Embed Size (px)
Citation preview

VOLKSWAGEN MKV GTI CARBON FIBERFENDER FLARE INSTALLATION
Proper service and repair procedures are vital to the safe, reliable operation of all motor vehicles as well as the personal safety of those performing the repairs. Standard safety procedures and precautions (including use of safety goggles and proper tools and equipment) should be followed at all times to eliminate the possibility of personal injury or improper service which could damage the vehicle or compromise its safety.
R
VOLKSWAGEN MKV GTI CARBON FIBER FENDER FLARE INSTALLATION
ECS TUNING 1000 SEVILLE RD. WADSWORTH, OH 44281 1.800.924.5172 WWW.ECSTUNING.COM 2
ES#2808526
ADVANCED SKILLS &EXPERIENCE REQUIRED
PROFESSIONAL SKILLS & SPECIALTY TOOLS REQUIRED
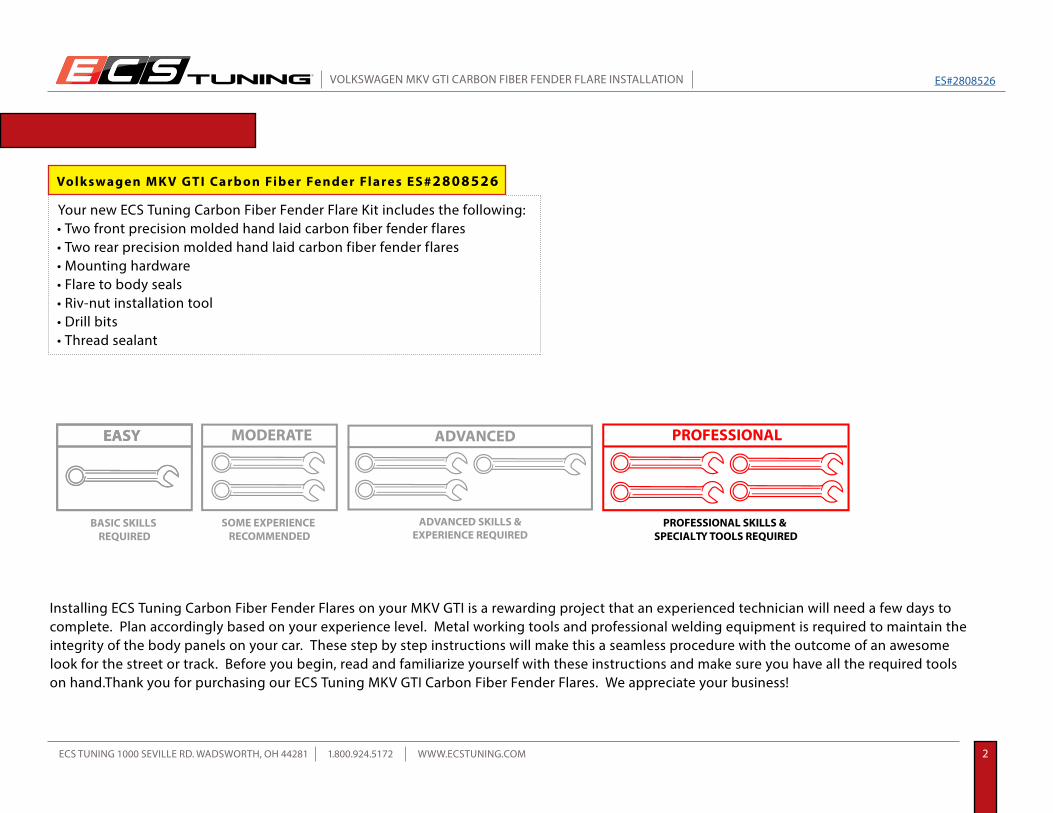
Installing ECS Tuning Carbon Fiber Fender Flares on your MKV GTI is a rewarding project that an experienced technician will need a few days to complete. Plan accordingly based on your experience level. Metal working tools and professional welding equipment is required to maintain the integrity of the body panels on your car. These step by step instructions will make this a seamless procedure with the outcome of an awesome look for the street or track. Before you begin, read and familiarize yourself with these instructions and make sure you have all the required tools on hand.Thank you for purchasing our ECS Tuning MKV GTI Carbon Fiber Fender Flares. We appreciate your business!
INTRODUCTION
Your new ECS Tuning Carbon Fiber Fender Flare Kit includes the following:• Two front precision molded hand laid carbon fiber fender flares• Two rear precision molded hand laid carbon fiber fender flares• Mounting hardware• Flare to body seals• Riv-nut installation tool• Drill bits• Thread sealant
Volkswagen MKV GTI Carb on Fib er Fender Flares ES#2808526
PROFESSIONAL SKILLS & SPECIALTY TOOLS REQUIRED
ADVANCED SKILLS &EXPERIENCE REQUIRED
SOME EXPERIENCE RECOMMENDED
BASIC SKILLS REQUIRED
BASIC SKILLS REQUIRED
SOME EXPERIENCE RECOMMENDED

R
VOLKSWAGEN MKV GTI CARBON FIBER FENDER FLARE INSTALLATION
ECS TUNING 1000 SEVILLE RD. WADSWORTH, OH 44281 1.800.924.5172 WWW.ECSTUNING.COM 3
ES#2808526R
TABLE OF CONTENTSKit Contents .....................................................................................................................pg.4
Required Tools and Equipment ................................................................................pg.5
Replacement Parts and Hardware ...........................................................................pg.5
Shop Supplies and Materials .....................................................................................pg.5
Installation Notes ..........................................................................................................pg.6
Preparation and Safety ................................................................................................pg.6
Checking the Fitment of the Flares .........................................................................pg.7
Mounting the Front Flares .........................................................................................pg.13
Riv-nut Tool Operation ................................................................................................pg.19
Mounting the Rear Flares ...........................................................................................pg.26
Wheel and Tire Information .......................................................................................pg.32
Trimming the Front Fenders ......................................................................................pg.33
Trimming the Rear Quarter Panels ..........................................................................pg.41
Final Installation of the Flares ...................................................................................pg.53
Carbon Fiber Cleaning and Care ..............................................................................pg.57
Torque Specifications ...................................................................................................pg.57

R
VOLKSWAGEN MKV GTI CARBON FIBER FENDER FLARE INSTALLATION
ECS TUNING 1000 SEVILLE RD. WADSWORTH, OH 44281 1.800.924.5172 WWW.ECSTUNING.COM 4
ES#2808526
CARBON FIBER FENDER FLARE KIT CONTENTS
Four Carbon Fiber Fender Flares
Thread Sealant Fender Flare To Body Seals
Mounting Screws (Qty.40)
Riv-nut Installation Tool Three Drill BitsRiv-nuts (Qty. 40)Nylon Washers (Qty. 40)M6 Nut
R
VOLKSWAGEN MKV GTI CARBON FIBER FENDER FLARE INSTALLATION
ECS TUNING 1000 SEVILLE RD. WADSWORTH, OH 44281 1.800.924.5172 WWW.ECSTUNING.COM 5
ES#2808526
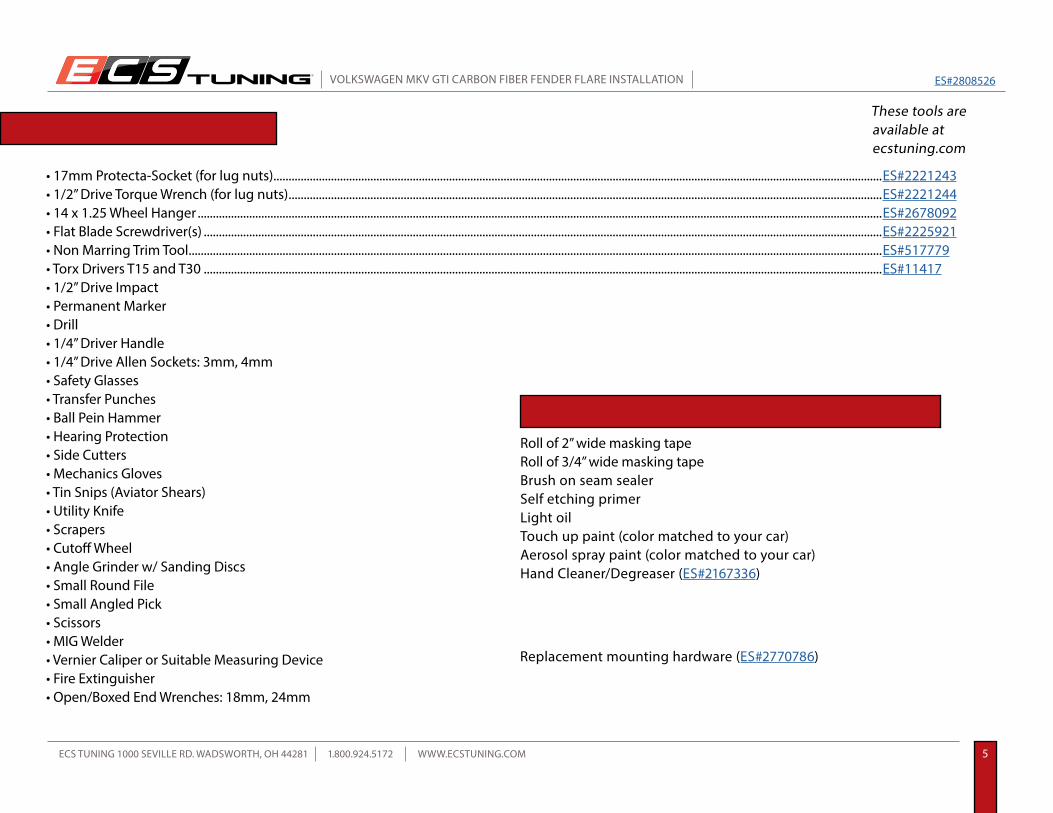
REQUIRED TOOLS• 17mm Protecta-Socket (for lug nuts) .........................................................................................................................................................................................................ES#2221243• 1/2” Drive Torque Wrench (for lug nuts) ....................................................................................................................................................................................................ES#2221244• 14 x 1.25 Wheel Hanger ..................................................................................................................................................................................................................................ES#2678092• Flat Blade Screwdriver(s) ................................................................................................................................................................................................................................ES#2225921• Non Marring Trim Tool .....................................................................................................................................................................................................................................ES#517779• Torx Drivers T15 and T30 ................................................................................................................................................................................................................................ES#11417• 1/2” Drive Impact• Permanent Marker• Drill• 1/4” Driver Handle• 1/4” Drive Allen Sockets: 3mm, 4mm• Safety Glasses• Transfer Punches• Ball Pein Hammer• Hearing Protection• Side Cutters• Mechanics Gloves• Tin Snips (Aviator Shears)• Utility Knife• Scrapers• Cutoff Wheel• Angle Grinder w/ Sanding Discs• Small Round File• Small Angled Pick• Scissors• MIG Welder• Vernier Caliper or Suitable Measuring Device• Fire Extinguisher• Open/Boxed End Wrenches: 18mm, 24mm
These tools are available at ecstuning.com
SHOP SUPPLIES AND MATERIALSRoll of 2” wide masking tapeRoll of 3/4” wide masking tapeBrush on seam sealerSelf etching primerLight oilTouch up paint (color matched to your car)Aerosol spray paint (color matched to your car)Hand Cleaner/Degreaser (ES#2167336)
Replacement mounting hardware (ES#2770786)

R
VOLKSWAGEN MKV GTI CARBON FIBER FENDER FLARE INSTALLATION
ECS TUNING 1000 SEVILLE RD. WADSWORTH, OH 44281 1.800.924.5172 WWW.ECSTUNING.COM 6
ES#2808526
INSTALLATION NOTES• RH refers to the passenger side of the vehicle.• LH refers to the driver side of the vehicle.• Always use the proper torque specifications.• If applicable to this installation, torque specifications will be listed throughout the document and at the end as well.• Please read all of these instructions and familiarize yourself with the complete process before you begin.
GENERAL PREPARATION AND SAFETY INFORMATION
• Park your car in a safe, well lit, level area.• Shut the engine off and remove the key from the ignition switch.• Make sure any remote start devices are properly disabled.• Always wear safety glasses.• Make sure the parking brake is applied until the vehicle is safely lifted and supported.• If using an automotive lift, be sure and utilize the factory specified lift points. Lifting a vehicle in an incorrect location can cause damage to the suspension/running gear.• When lifting a vehicle using a jack, always utilize the factory specified lift points. Lifting a vehicle in an incorrect location can cause damage to the suspension/running gear. Always support the vehicle with jack stands.• Always read and follow all safety information and warnings for the equipment you are using.
Never get underneath a vehicle that is supported only by a jack. Always make sure that the vehicle is securely supported on jack stands.!
ECS Tuning cares about your health and safety. Please read the following safety information. This information pertains to automotive service in general, and while it may not pertain to every job you do, please remember and share these important safety tips.
R
VOLKSWAGEN MKV GTI CARBON FIBER FENDER FLARE INSTALLATION
ECS TUNING 1000 SEVILLE RD. WADSWORTH, OH 44281 1.800.924.5172 WWW.ECSTUNING.COM 7
ES#2808526
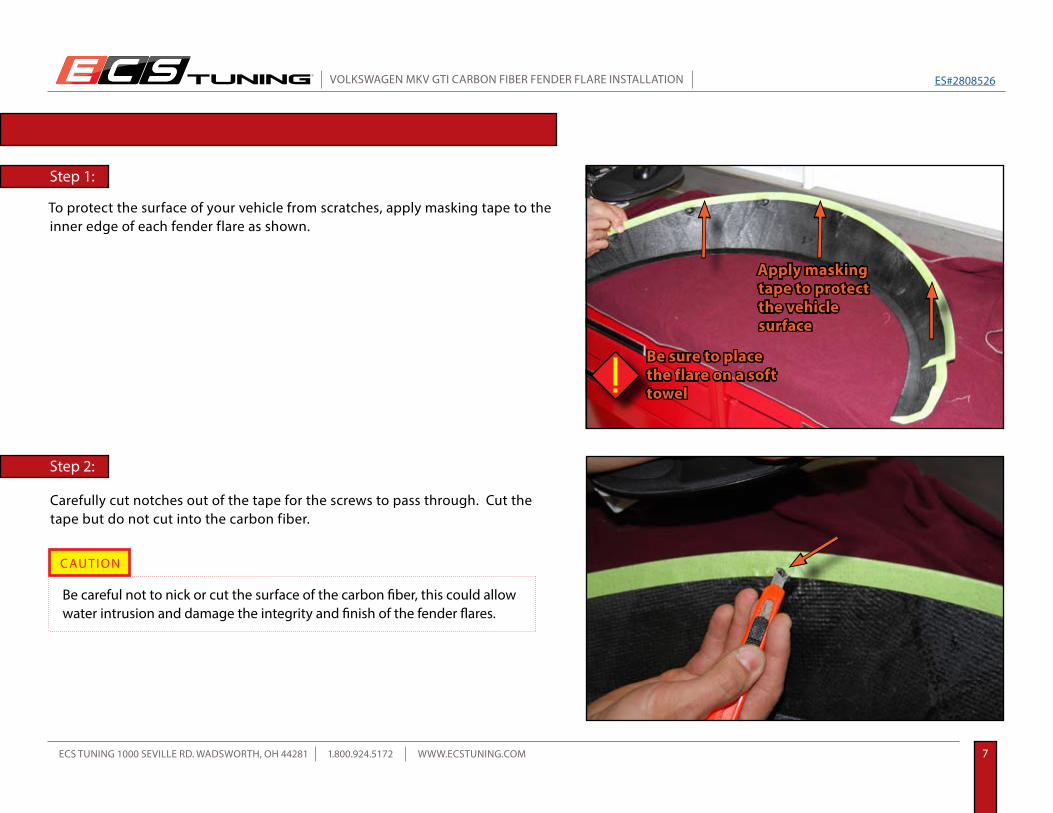
To protect the surface of your vehicle from scratches, apply masking tape to the inner edge of each fender flare as shown.
CHECKING THE FITMENT OF THE FLARES
Carefully cut notches out of the tape for the screws to pass through. Cut the tape but do not cut into the carbon fiber.
Step 1:
Step 2:
Be careful not to nick or cut the surface of the carbon fiber, this could allow water intrusion and damage the integrity and finish of the fender flares.
CAUTION
Apply masking tape to protect the vehicle surface
Be sure to place the flare on a soft towel
R
VOLKSWAGEN MKV GTI CARBON FIBER FENDER FLARE INSTALLATION
ECS TUNING 1000 SEVILLE RD. WADSWORTH, OH 44281 1.800.924.5172 WWW.ECSTUNING.COM 8
ES#2808526
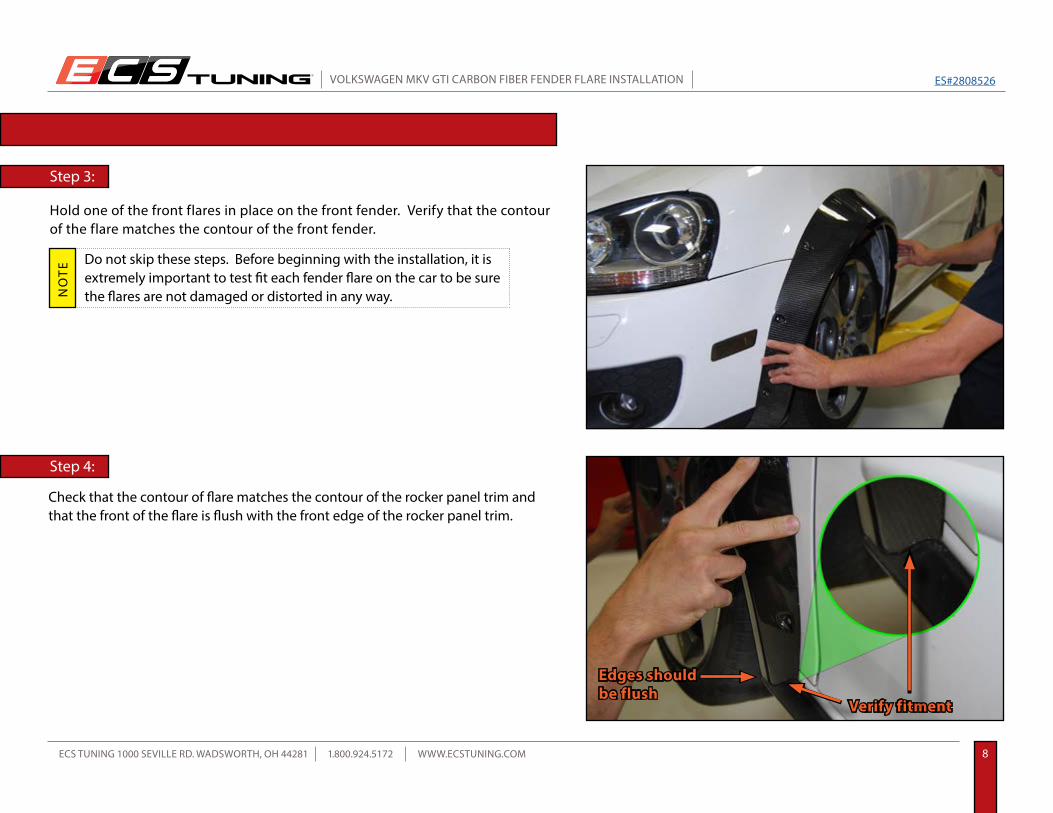
Hold one of the front flares in place on the front fender. Verify that the contour of the flare matches the contour of the front fender.
Step 3:
Step 4:
Do not skip these steps. Before beginning with the installation, it is extremely important to test fit each fender flare on the car to be sure the flares are not damaged or distorted in any way.N
OTE
Check that the contour of flare matches the contour of the rocker panel trim and that the front of the flare is flush with the front edge of the rocker panel trim.
CHECKING THE FITMENT OF THE FLARES
Verify fitment
Edges should be flush
R
VOLKSWAGEN MKV GTI CARBON FIBER FENDER FLARE INSTALLATION
ECS TUNING 1000 SEVILLE RD. WADSWORTH, OH 44281 1.800.924.5172 WWW.ECSTUNING.COM 9
ES#2808526
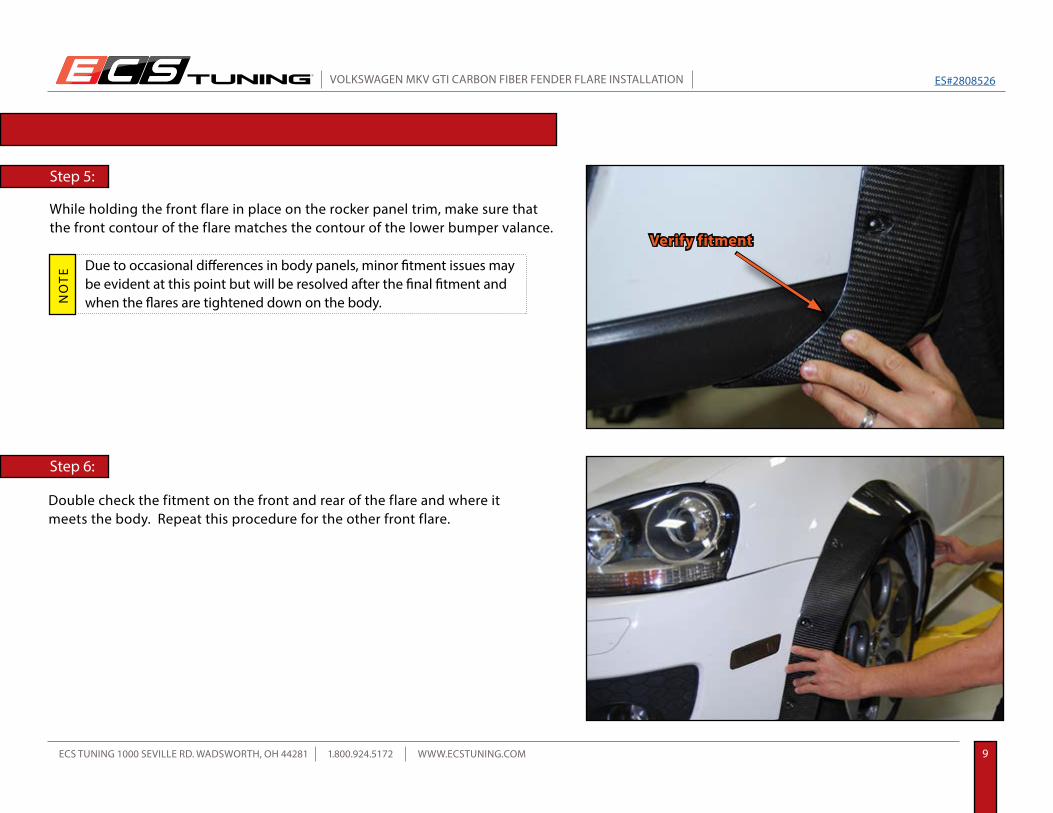
While holding the front flare in place on the rocker panel trim, make sure that the front contour of the flare matches the contour of the lower bumper valance.
Double check the fitment on the front and rear of the flare and where it meets the body. Repeat this procedure for the other front flare.
Step 5:
Step 6:
Due to occasional differences in body panels, minor fitment issues may be evident at this point but will be resolved after the final fitment and when the flares are tightened down on the body.N
OTE
CHECKING THE FITMENT OF THE FLARES
Verify fitment
R
VOLKSWAGEN MKV GTI CARBON FIBER FENDER FLARE INSTALLATION
ECS TUNING 1000 SEVILLE RD. WADSWORTH, OH 44281 1.800.924.5172 WWW.ECSTUNING.COM 10
ES#2808526
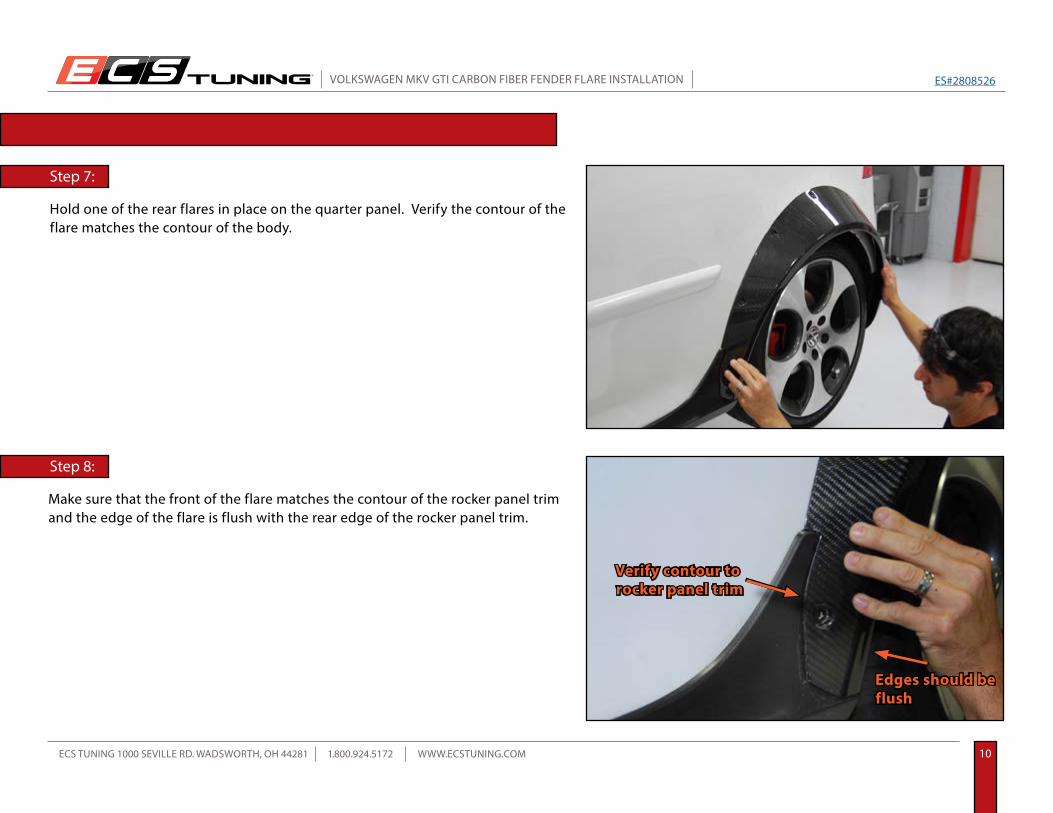
Hold one of the rear flares in place on the quarter panel. Verify the contour of the flare matches the contour of the body.
Make sure that the front of the flare matches the contour of the rocker panel trim and the edge of the flare is flush with the rear edge of the rocker panel trim.
Step 7:
Step 8:
CHECKING THE FITMENT OF THE FLARES
Verify contour to rocker panel trim
Edges should be flush
R
VOLKSWAGEN MKV GTI CARBON FIBER FENDER FLARE INSTALLATION
ECS TUNING 1000 SEVILLE RD. WADSWORTH, OH 44281 1.800.924.5172 WWW.ECSTUNING.COM 11
ES#2808526
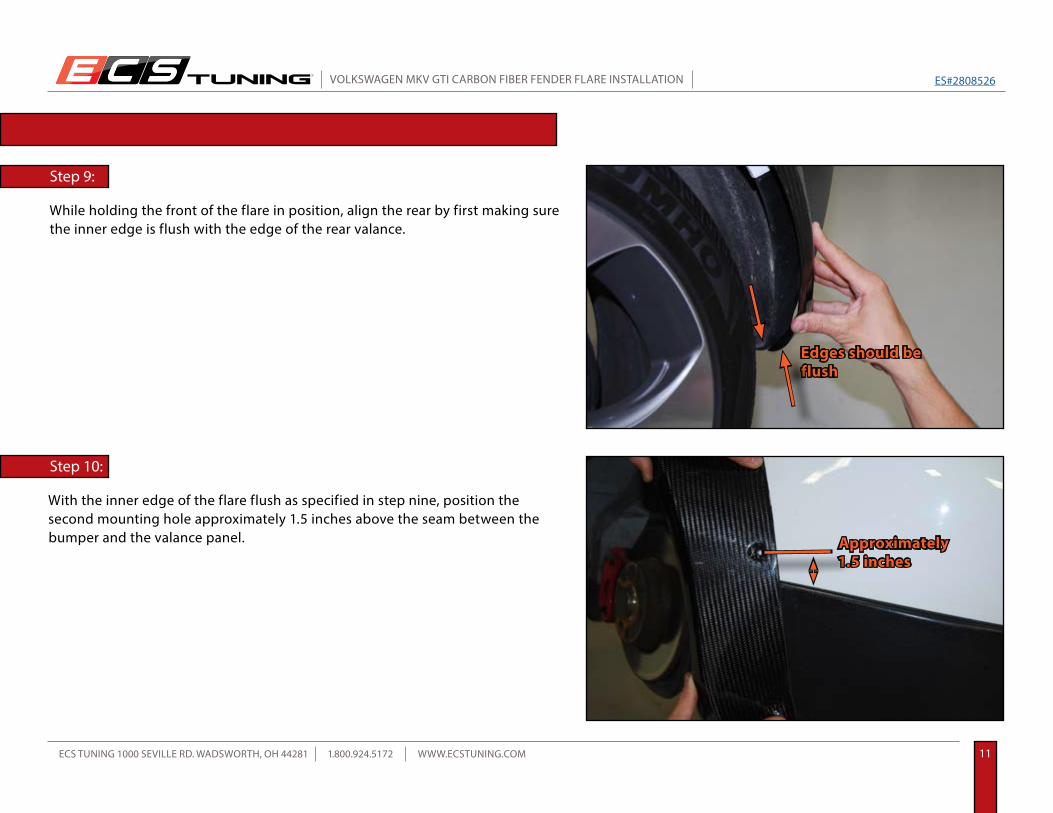
While holding the front of the flare in position, align the rear by first making sure the inner edge is flush with the edge of the rear valance.
With the inner edge of the flare flush as specified in step nine, position the second mounting hole approximately 1.5 inches above the seam between the bumper and the valance panel.
Step 9:
Step 10:
CHECKING THE FITMENT OF THE FLARES
Edges should be flush
Approximately 1.5 inches

R
VOLKSWAGEN MKV GTI CARBON FIBER FENDER FLARE INSTALLATION
ECS TUNING 1000 SEVILLE RD. WADSWORTH, OH 44281 1.800.924.5172 WWW.ECSTUNING.COM 12
ES#2808526
Verify the contour of the flare matches the contour of the rear bumper valance.
Double check the fitment at the front and rear of the flare and where it meets the body. Repeat this step for the other rear flare. You are now ready to begin mounting the flares.
Step 11:
Step 12:
CHECKING THE FITMENT OF THE FLARES
Due to occasional differences in body panels, minor fitment issues may be evident at this point but will be resolved after the final fitment and when the flares are tightened down on the body.N
OTE
R
VOLKSWAGEN MKV GTI CARBON FIBER FENDER FLARE INSTALLATION
ECS TUNING 1000 SEVILLE RD. WADSWORTH, OH 44281 1.800.924.5172 WWW.ECSTUNING.COM 13
ES#2808526
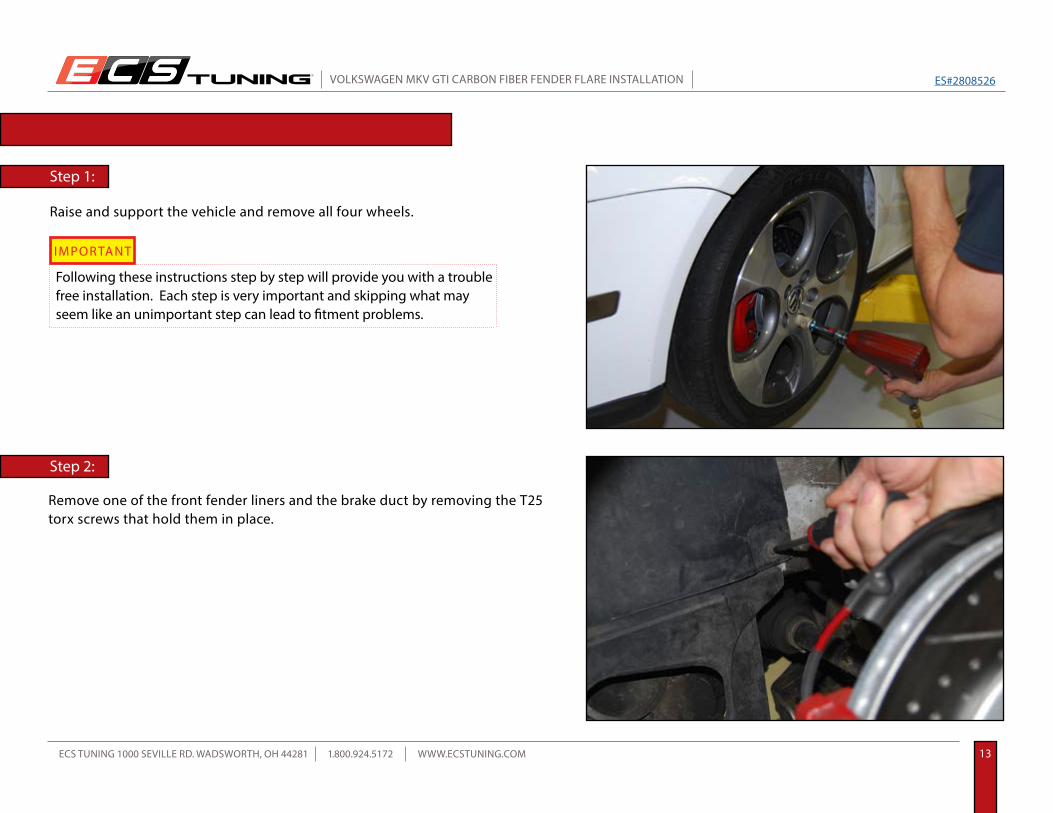
Raise and support the vehicle and remove all four wheels.
Remove one of the front fender liners and the brake duct by removing the T25 torx screws that hold them in place.
Step 1:
Step 2:
MOUNTING THE FRONT FLARES
Following these instructions step by step will provide you with a trouble free installation. Each step is very important and skipping what may seem like an unimportant step can lead to fitment problems.
IMPOR TANT
R
VOLKSWAGEN MKV GTI CARBON FIBER FENDER FLARE INSTALLATION
ECS TUNING 1000 SEVILLE RD. WADSWORTH, OH 44281 1.800.924.5172 WWW.ECSTUNING.COM 14
ES#2808526
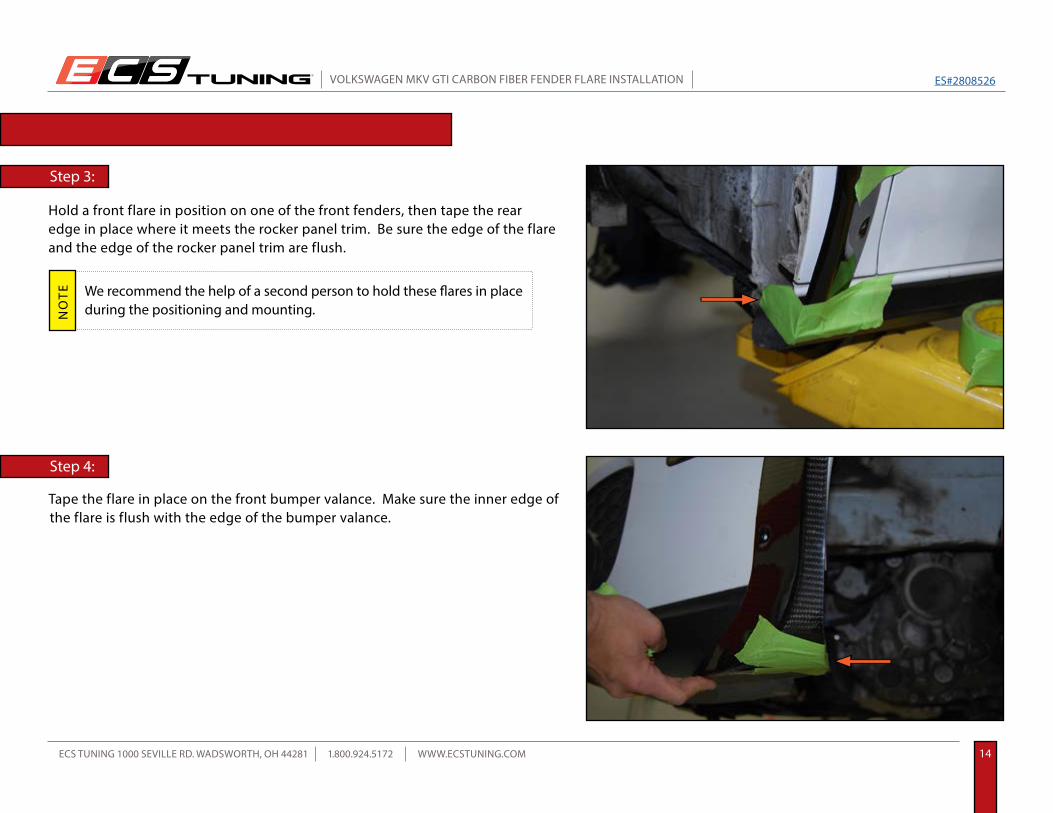
Tape the flare in place on the front bumper valance. Make sure the inner edge of the flare is flush with the edge of the bumper valance.
Hold a front flare in position on one of the front fenders, then tape the rear edge in place where it meets the rocker panel trim. Be sure the edge of the flare and the edge of the rocker panel trim are flush.
Step 3:
Step 4:
MOUNTING THE FRONT FLARES
We recommend the help of a second person to hold these flares in place during the positioning and mounting. N
OTE
R
VOLKSWAGEN MKV GTI CARBON FIBER FENDER FLARE INSTALLATION
ECS TUNING 1000 SEVILLE RD. WADSWORTH, OH 44281 1.800.924.5172 WWW.ECSTUNING.COM 15
ES#2808526
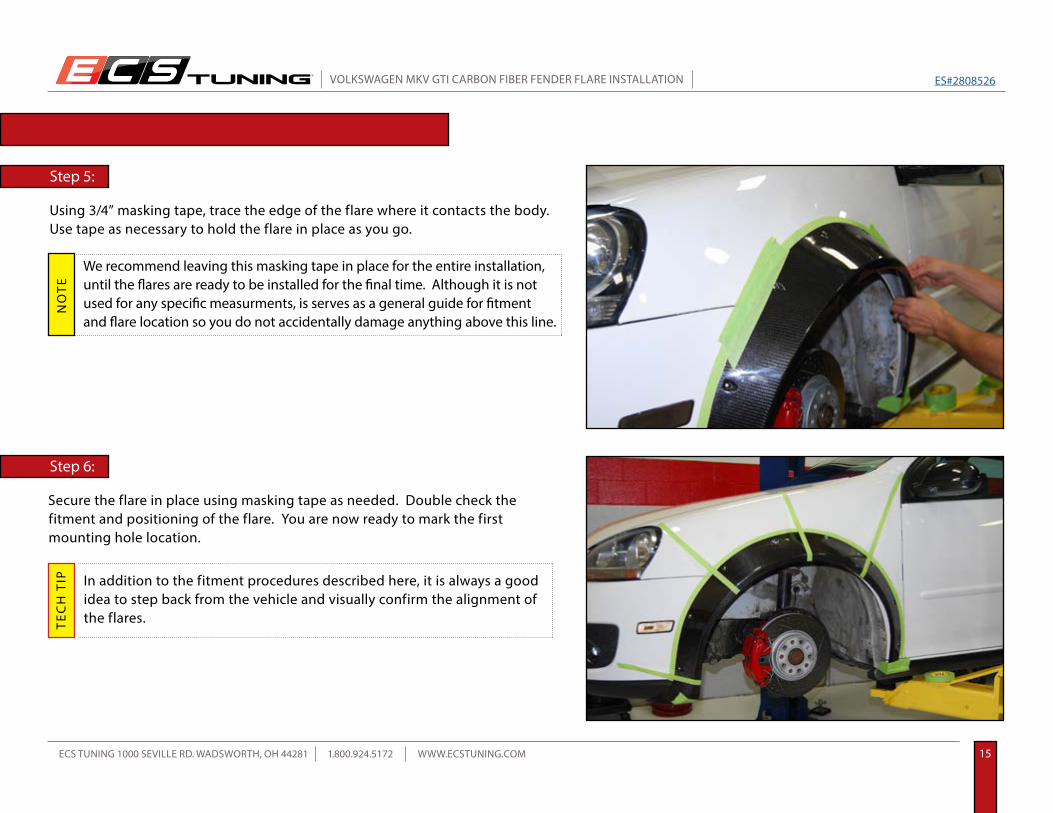
Using 3/4” masking tape, trace the edge of the flare where it contacts the body. Use tape as necessary to hold the flare in place as you go.
Secure the flare in place using masking tape as needed. Double check the fitment and positioning of the flare. You are now ready to mark the first mounting hole location.
Step 5:
Step 6:
MOUNTING THE FRONT FLARES
We recommend leaving this masking tape in place for the entire installation, until the flares are ready to be installed for the final time. Although it is not used for any specific measurments, is serves as a general guide for fitment and flare location so you do not accidentally damage anything above this line.
NO
TE
In addition to the fitment procedures described here, it is always a good idea to step back from the vehicle and visually confirm the alignment of the flares.TE
CH
TIP
R
VOLKSWAGEN MKV GTI CARBON FIBER FENDER FLARE INSTALLATION
ECS TUNING 1000 SEVILLE RD. WADSWORTH, OH 44281 1.800.924.5172 WWW.ECSTUNING.COM 16
ES#2808526
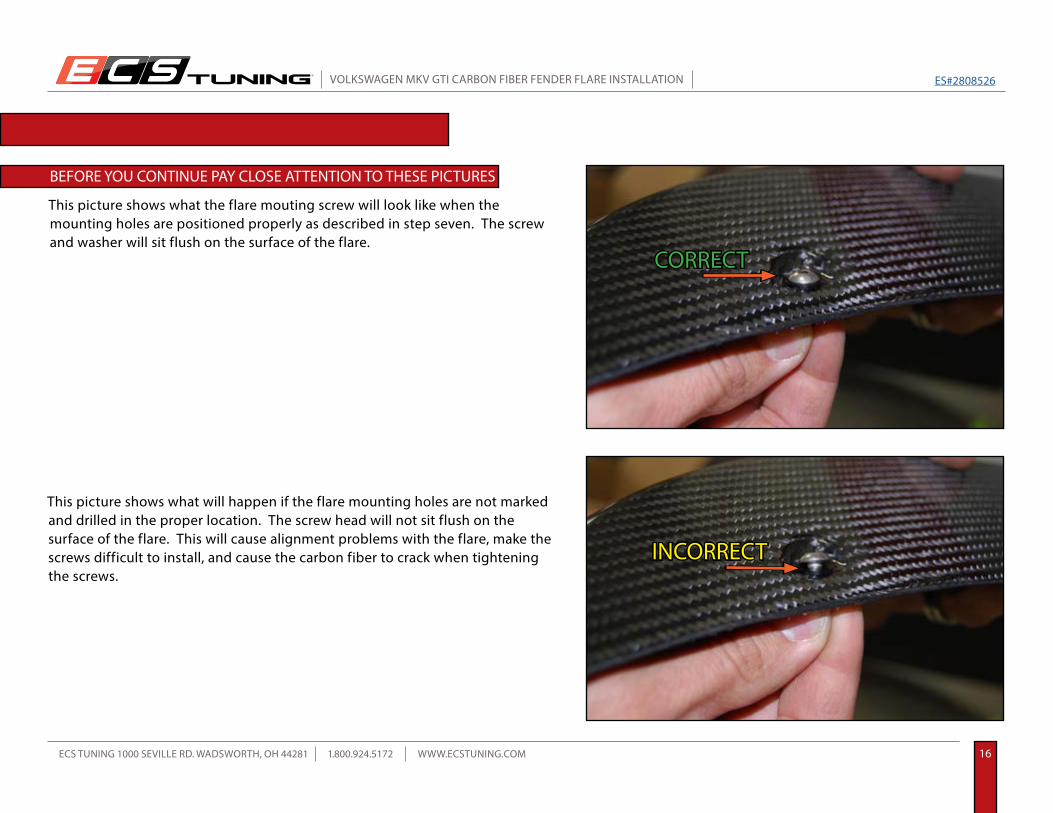
This picture shows what the flare mouting screw will look like when the mounting holes are positioned properly as described in step seven. The screw and washer will sit flush on the surface of the flare.
This picture shows what will happen if the flare mounting holes are not marked and drilled in the proper location. The screw head will not sit flush on the surface of the flare. This will cause alignment problems with the flare, make the screws difficult to install, and cause the carbon fiber to crack when tightening the screws.
BEFORE YOU CONTINUE PAY CLOSE ATTENTION TO THESE PICTURES
MOUNTING THE FRONT FLARES
CORRECT
INCORRECT
R
VOLKSWAGEN MKV GTI CARBON FIBER FENDER FLARE INSTALLATION
ECS TUNING 1000 SEVILLE RD. WADSWORTH, OH 44281 1.800.924.5172 WWW.ECSTUNING.COM 17
ES#2808526
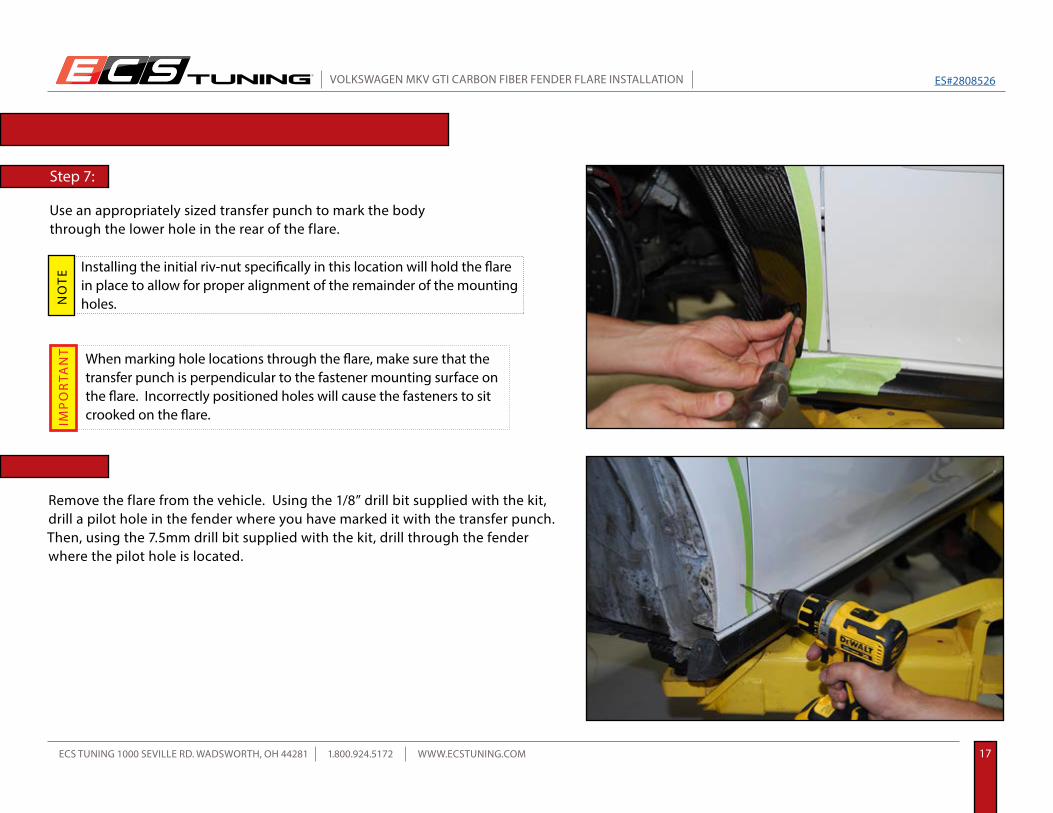
Use an appropriately sized transfer punch to mark the body through the lower hole in the rear of the flare.
Remove the flare from the vehicle. Using the 1/8” drill bit supplied with the kit, drill a pilot hole in the fender where you have marked it with the transfer punch. Then, using the 7.5mm drill bit supplied with the kit, drill through the fender where the pilot hole is located.
Step 7:
Step 8:
MOUNTING THE FRONT FLARES
Installing the initial riv-nut specifically in this location will hold the flare in place to allow for proper alignment of the remainder of the mounting holes.N
OTE
When marking hole locations through the flare, make sure that the transfer punch is perpendicular to the fastener mounting surface on the flare. Incorrectly positioned holes will cause the fasteners to sit crooked on the flare.IM
PO
RTA
NT
R
VOLKSWAGEN MKV GTI CARBON FIBER FENDER FLARE INSTALLATION
ECS TUNING 1000 SEVILLE RD. WADSWORTH, OH 44281 1.800.924.5172 WWW.ECSTUNING.COM 18
ES#2808526
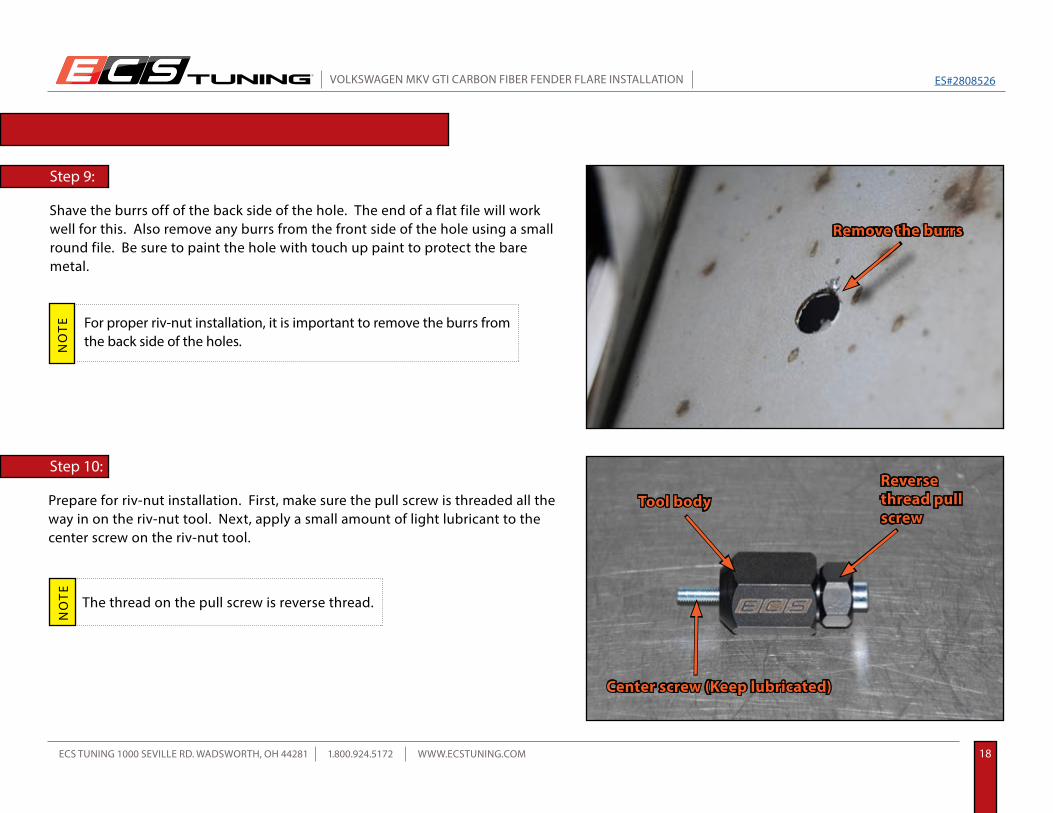
Shave the burrs off of the back side of the hole. The end of a flat file will work well for this. Also remove any burrs from the front side of the hole using a small round file. Be sure to paint the hole with touch up paint to protect the bare metal.
Prepare for riv-nut installation. First, make sure the pull screw is threaded all the way in on the riv-nut tool. Next, apply a small amount of light lubricant to the center screw on the riv-nut tool.
Step 9:
Step 10:
MOUNTING THE FRONT FLARES
The thread on the pull screw is reverse thread.
NO
TE
For proper riv-nut installation, it is important to remove the burrs from the back side of the holes.N
OTE
Remove the burrs
Tool bodyReverse thread pull screw
Center screw (Keep lubricated)

R
VOLKSWAGEN MKV GTI CARBON FIBER FENDER FLARE INSTALLATION
ECS TUNING 1000 SEVILLE RD. WADSWORTH, OH 44281 1.800.924.5172 WWW.ECSTUNING.COM 19
ES#2808526
Before you continue, familiarize yourself with the riv-nut tool operation.
A: Riv-nut inserted into hole.B: Riv-nut partially engaged.C: Riv-nut fully engaged and locked in place.
Below are the riv-nut installation steps, demonstrated here on a piece of sheet metal.
1: Insert the riv-nut into the hole.2: Keep pressure on the riv-nut tool so the riv-nut stays pressed flush against the mounting surface.3: Hold the riv-nut tool body with a 24mm wrench4: Turn the riv-nut pull screw with an 18mm wrench in a CLOCKWISE direction until riv-nut is fully engaged and locked in place.
A
RIV-NUT TOOL OPERATION
B C
You will feel even tension while rotating the pull screw. When the tension has noticeably increased, stop. Remove the tool and verify that the riv-nut is tightly locked in place. Be careful, overtightening the riv nut can damage the tool or the riv-nut. Overtightening can also pull the riv-nut through soft material such as the plastic on a bumper cover.
If you find the riv-nut is still loose,re-install the tool and tighten the riv-nut further.
R
VOLKSWAGEN MKV GTI CARBON FIBER FENDER FLARE INSTALLATION
ECS TUNING 1000 SEVILLE RD. WADSWORTH, OH 44281 1.800.924.5172 WWW.ECSTUNING.COM 20
ES#2808526
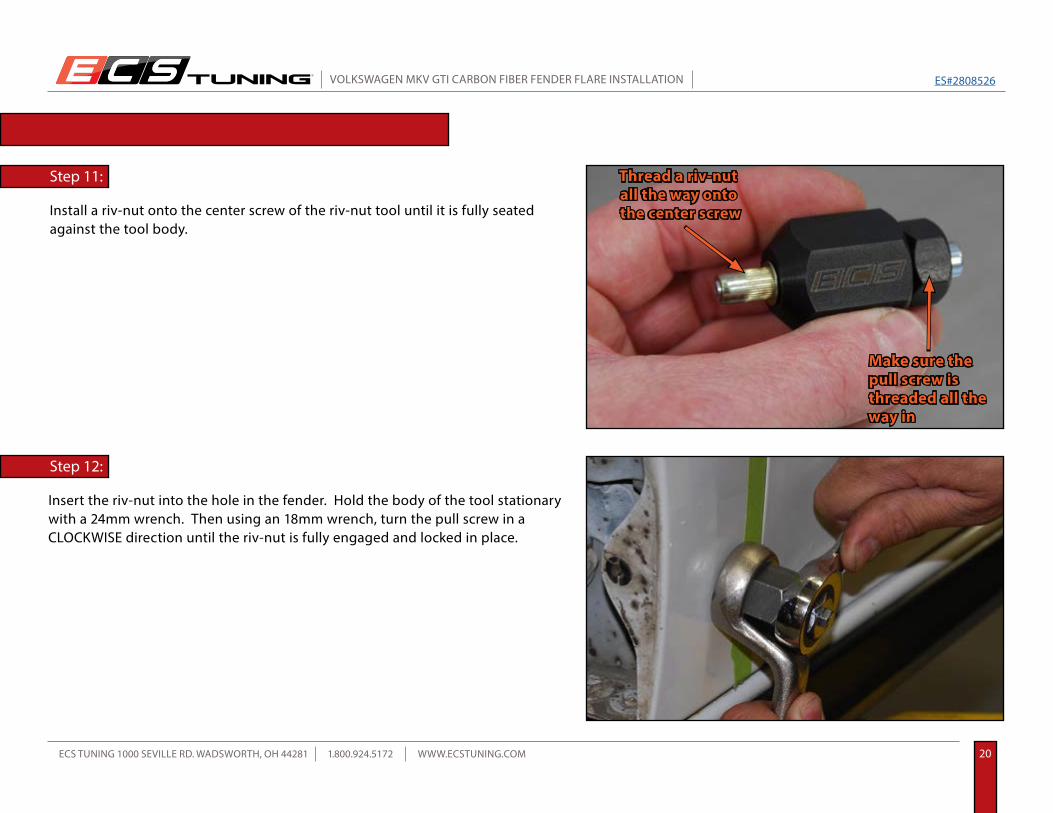
Install a riv-nut onto the center screw of the riv-nut tool until it is fully seated against the tool body.
Insert the riv-nut into the hole in the fender. Hold the body of the tool stationary with a 24mm wrench. Then using an 18mm wrench, turn the pull screw in a CLOCKWISE direction until the riv-nut is fully engaged and locked in place.
Step 11:
Step 12:
MOUNTING THE FRONT FLARESThread a riv-nut all the way onto the center screw
Make sure the pull screw is threaded all the way in
R
VOLKSWAGEN MKV GTI CARBON FIBER FENDER FLARE INSTALLATION
ECS TUNING 1000 SEVILLE RD. WADSWORTH, OH 44281 1.800.924.5172 WWW.ECSTUNING.COM 21
ES#2808526
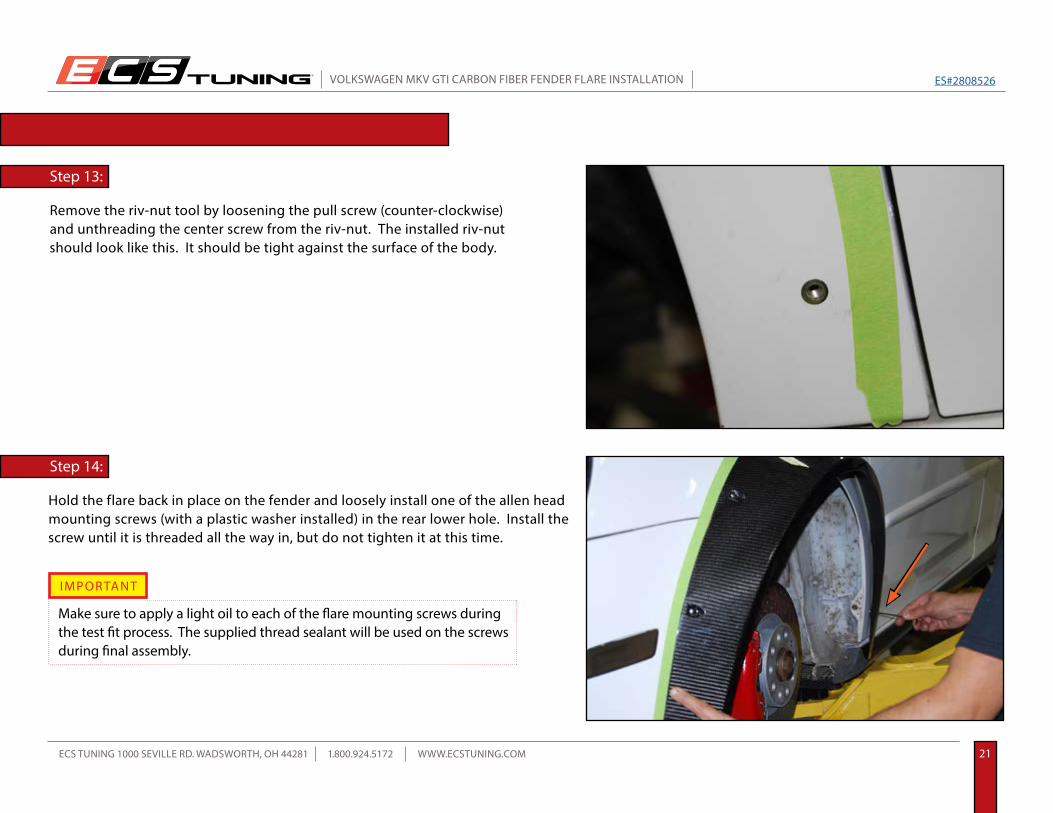
Remove the riv-nut tool by loosening the pull screw (counter-clockwise)and unthreading the center screw from the riv-nut. The installed riv-nut should look like this. It should be tight against the surface of the body.
Hold the flare back in place on the fender and loosely install one of the allen head mounting screws (with a plastic washer installed) in the rear lower hole. Install the screw until it is threaded all the way in, but do not tighten it at this time.
Step 13:
Step 14:
MOUNTING THE FRONT FLARES
Make sure to apply a light oil to each of the flare mounting screws during the test fit process. The supplied thread sealant will be used on the screws during final assembly.
IMPOR TANT
R
VOLKSWAGEN MKV GTI CARBON FIBER FENDER FLARE INSTALLATION
ECS TUNING 1000 SEVILLE RD. WADSWORTH, OH 44281 1.800.924.5172 WWW.ECSTUNING.COM 22
ES#2808526
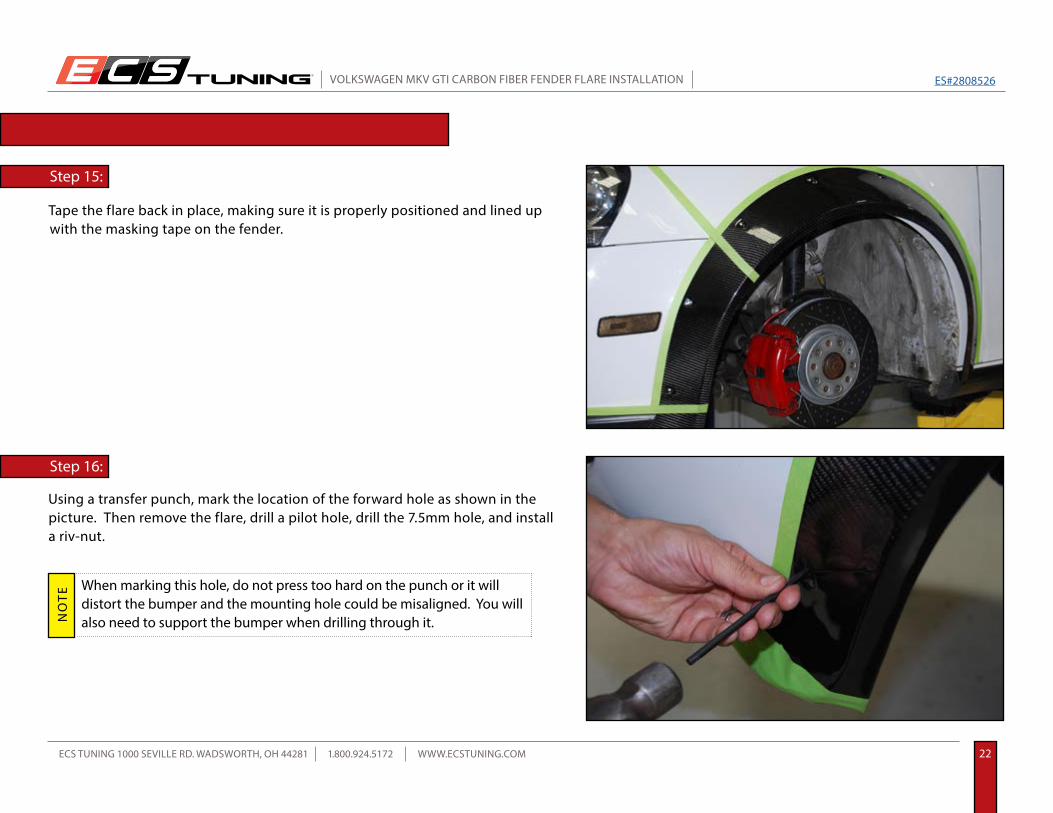
Tape the flare back in place, making sure it is properly positioned and lined up with the masking tape on the fender.
Using a transfer punch, mark the location of the forward hole as shown in the picture. Then remove the flare, drill a pilot hole, drill the 7.5mm hole, and install a riv-nut.
Step 15:
Step 16:
MOUNTING THE FRONT FLARES
When marking this hole, do not press too hard on the punch or it will distort the bumper and the mounting hole could be misaligned. You will also need to support the bumper when drilling through it.N
OTE

R
VOLKSWAGEN MKV GTI CARBON FIBER FENDER FLARE INSTALLATION
ECS TUNING 1000 SEVILLE RD. WADSWORTH, OH 44281 1.800.924.5172 WWW.ECSTUNING.COM 23
ES#2808526
Re install the flare using the front and rear screws. Thread them all the way in but do not tighten them at this time.
Squeeze the front of the flare at the bumper valance until the desired fitment is acheived. Mark both hole locations, remove the flare, drill the holes and install the riv-nuts.
Step 17:
Step 18:
MOUNTING THE FRONT FLARES
Remember, overtightnening the riv-nuts in the plastic bumper valance can result in the riv-nut being pulled through the hole.N
OTE
R
VOLKSWAGEN MKV GTI CARBON FIBER FENDER FLARE INSTALLATION
ECS TUNING 1000 SEVILLE RD. WADSWORTH, OH 44281 1.800.924.5172 WWW.ECSTUNING.COM 24
ES#2808526
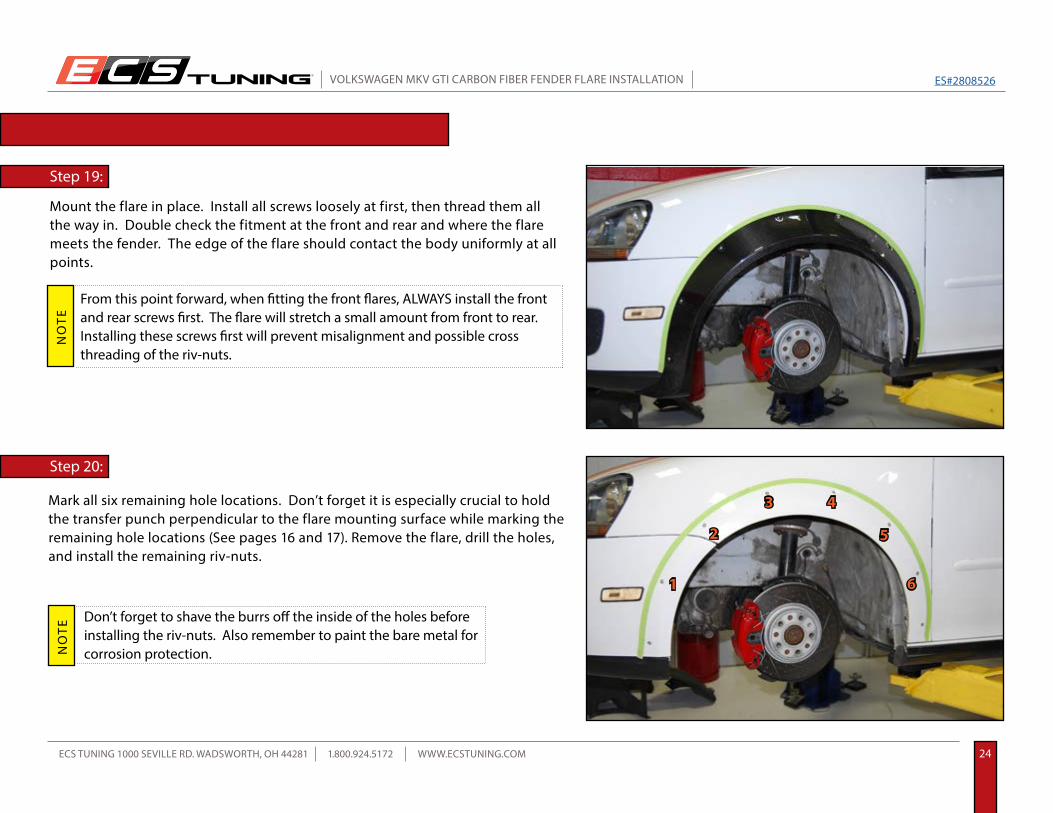
Mount the flare in place. Install all screws loosely at first, then thread them all the way in. Double check the fitment at the front and rear and where the flare meets the fender. The edge of the flare should contact the body uniformly at all points.
Mark all six remaining hole locations. Don’t forget it is especially crucial to hold the transfer punch perpendicular to the flare mounting surface while marking the remaining hole locations (See pages 16 and 17). Remove the flare, drill the holes, and install the remaining riv-nuts.
Step 19:
Step 20:
MOUNTING THE FRONT FLARES
Don’t forget to shave the burrs off the inside of the holes before installing the riv-nuts. Also remember to paint the bare metal for corrosion protection.N
OTE
From this point forward, when fitting the front flares, ALWAYS install the front and rear screws first. The flare will stretch a small amount from front to rear. Installing these screws first will prevent misalignment and possible cross threading of the riv-nuts.
NO
TE
1
2
3 4
5
6
R
VOLKSWAGEN MKV GTI CARBON FIBER FENDER FLARE INSTALLATION
ECS TUNING 1000 SEVILLE RD. WADSWORTH, OH 44281 1.800.924.5172 WWW.ECSTUNING.COM 25
ES#2808526
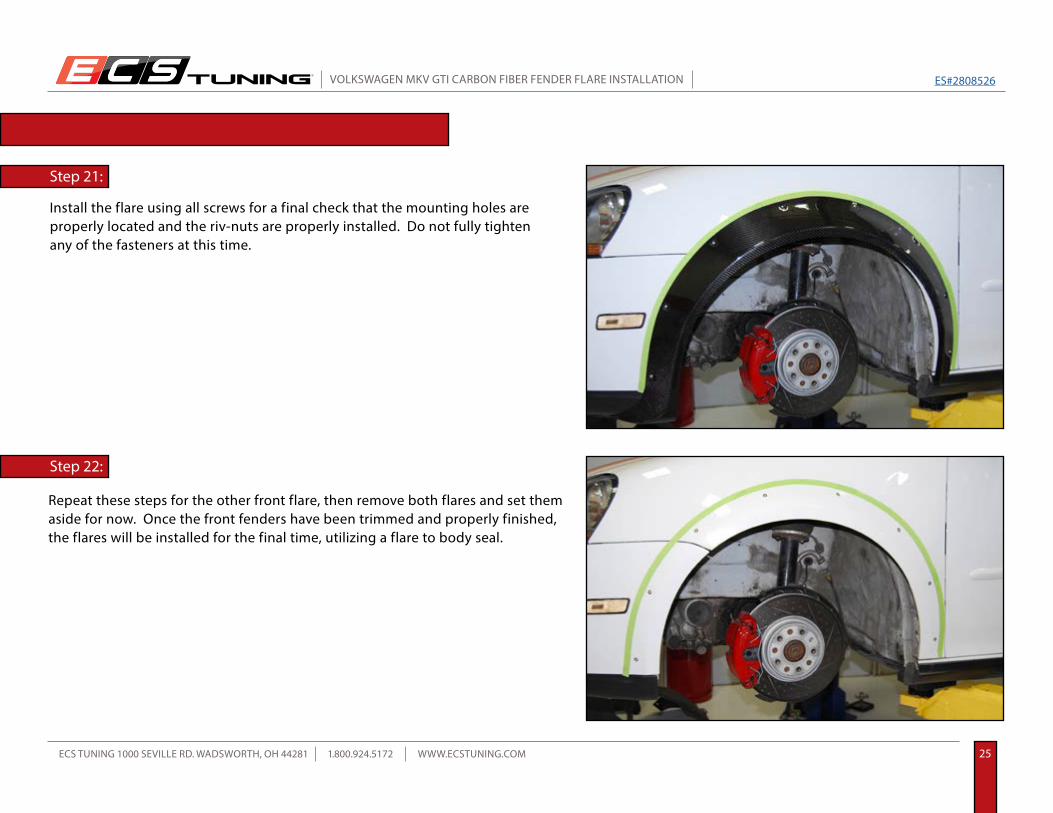
Install the flare using all screws for a final check that the mounting holes are properly located and the riv-nuts are properly installed. Do not fully tighten any of the fasteners at this time.
Repeat these steps for the other front flare, then remove both flares and set them aside for now. Once the front fenders have been trimmed and properly finished, the flares will be installed for the final time, utilizing a flare to body seal.
Step 21:
Step 22:
MOUNTING THE FRONT FLARES
R
VOLKSWAGEN MKV GTI CARBON FIBER FENDER FLARE INSTALLATION
ECS TUNING 1000 SEVILLE RD. WADSWORTH, OH 44281 1.800.924.5172 WWW.ECSTUNING.COM 26
ES#2808526
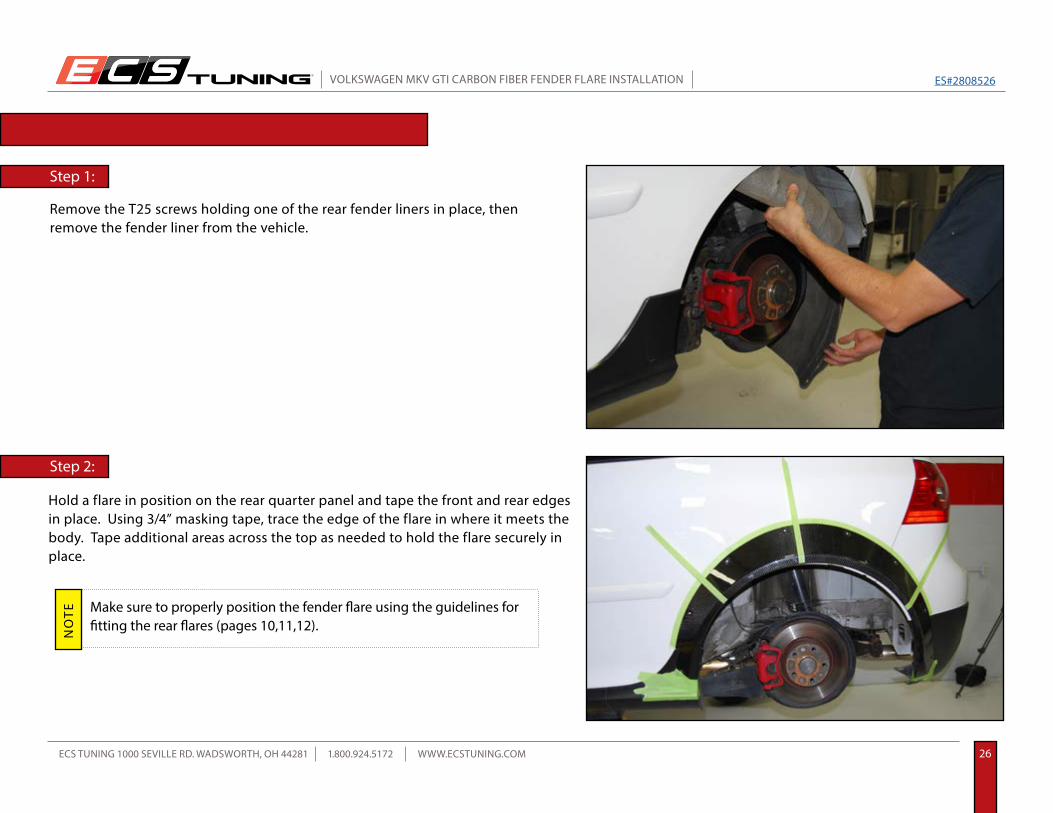
Remove the T25 screws holding one of the rear fender liners in place, then remove the fender liner from the vehicle.
Hold a flare in position on the rear quarter panel and tape the front and rear edges in place. Using 3/4” masking tape, trace the edge of the flare in where it meets the body. Tape additional areas across the top as needed to hold the flare securely in place.
Step 1:
Step 2:
MOUNTING THE REAR FLARES
Make sure to properly position the fender flare using the guidelines for fitting the rear flares (pages 10,11,12).
NO
TE
R
VOLKSWAGEN MKV GTI CARBON FIBER FENDER FLARE INSTALLATION
ECS TUNING 1000 SEVILLE RD. WADSWORTH, OH 44281 1.800.924.5172 WWW.ECSTUNING.COM 27
ES#2808526
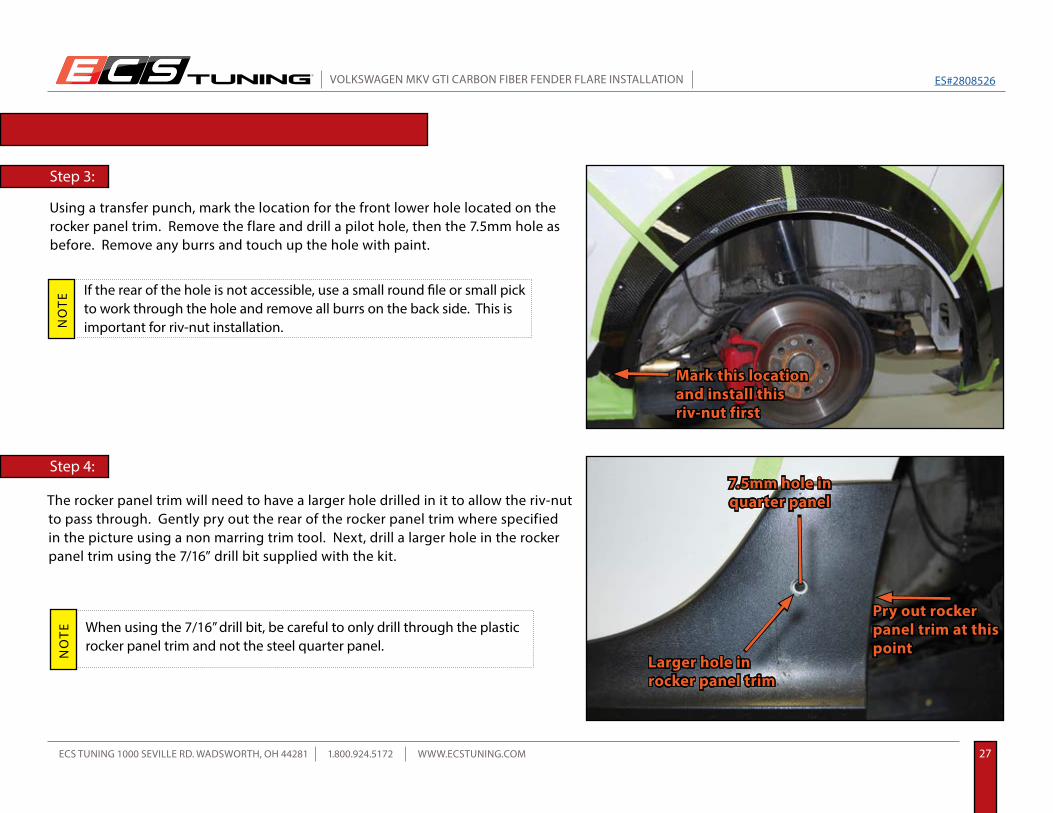
Using a transfer punch, mark the location for the front lower hole located on the rocker panel trim. Remove the flare and drill a pilot hole, then the 7.5mm hole as before. Remove any burrs and touch up the hole with paint.
The rocker panel trim will need to have a larger hole drilled in it to allow the riv-nut to pass through. Gently pry out the rear of the rocker panel trim where specified in the picture using a non marring trim tool. Next, drill a larger hole in the rocker panel trim using the 7/16” drill bit supplied with the kit.
Step 3:
Step 4:
MOUNTING THE REAR FLARES
When using the 7/16” drill bit, be careful to only drill through the plastic rocker panel trim and not the steel quarter panel.
NO
TE
If the rear of the hole is not accessible, use a small round file or small pick to work through the hole and remove all burrs on the back side. This is important for riv-nut installation.N
OTE
Mark this location and install this riv-nut first
7.5mm hole in quarter panel
Pry out rocker panel trim at this point
Larger hole in rocker panel trim
R
VOLKSWAGEN MKV GTI CARBON FIBER FENDER FLARE INSTALLATION
ECS TUNING 1000 SEVILLE RD. WADSWORTH, OH 44281 1.800.924.5172 WWW.ECSTUNING.COM 28
ES#2808526
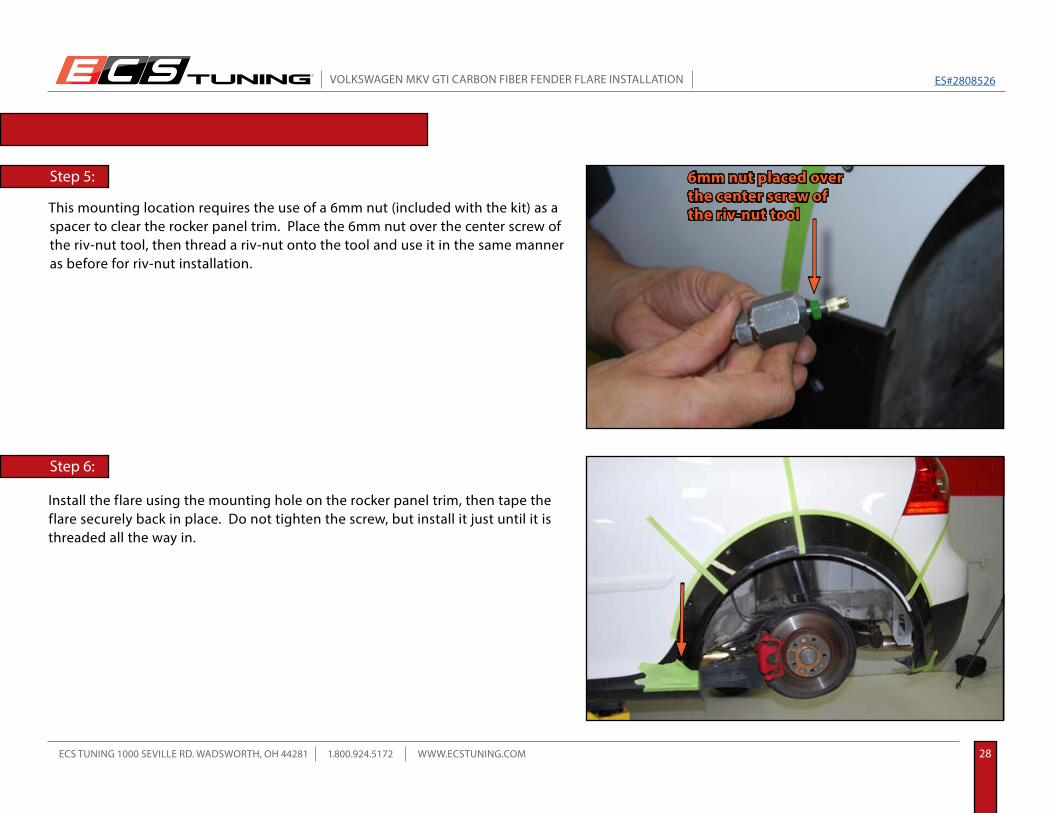
Install the flare using the mounting hole on the rocker panel trim, then tape the flare securely back in place. Do not tighten the screw, but install it just until it is threaded all the way in.
Step 5:
Step 6:
MOUNTING THE REAR FLARES
This mounting location requires the use of a 6mm nut (included with the kit) as a spacer to clear the rocker panel trim. Place the 6mm nut over the center screw of the riv-nut tool, then thread a riv-nut onto the tool and use it in the same manner as before for riv-nut installation.
6mm nut placed over the center screw of the riv-nut tool
R
VOLKSWAGEN MKV GTI CARBON FIBER FENDER FLARE INSTALLATION
ECS TUNING 1000 SEVILLE RD. WADSWORTH, OH 44281 1.800.924.5172 WWW.ECSTUNING.COM 29
ES#2808526
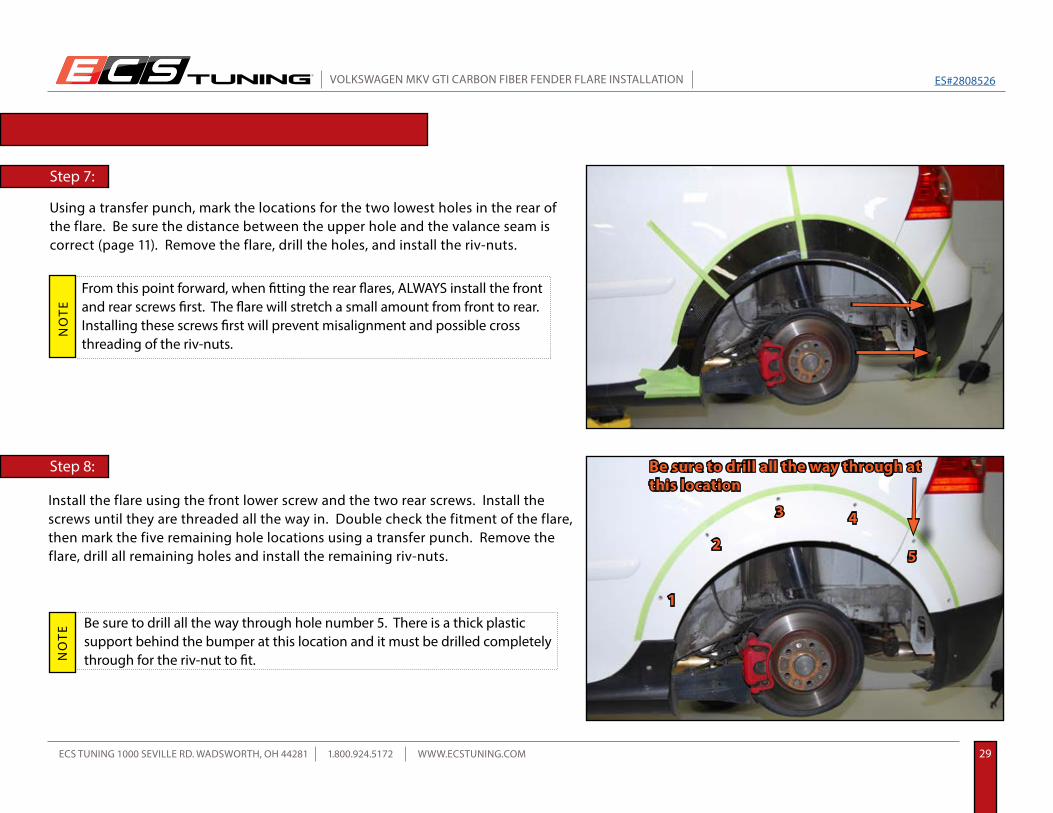
Using a transfer punch, mark the locations for the two lowest holes in the rear of the flare. Be sure the distance between the upper hole and the valance seam is correct (page 11). Remove the flare, drill the holes, and install the riv-nuts.
Step 7:
Step 8:
MOUNTING THE REAR FLARES
NO
TE
Install the flare using the front lower screw and the two rear screws. Install the screws until they are threaded all the way in. Double check the fitment of the flare, then mark the five remaining hole locations using a transfer punch. Remove the flare, drill all remaining holes and install the remaining riv-nuts.
Be sure to drill all the way through hole number 5. There is a thick plastic support behind the bumper at this location and it must be drilled completely through for the riv-nut to fit.N
OTE
Be sure to drill all the way through at this location
1
2
3 4
5
From this point forward, when fitting the rear flares, ALWAYS install the front and rear screws first. The flare will stretch a small amount from front to rear. Installing these screws first will prevent misalignment and possible cross threading of the riv-nuts.
R
VOLKSWAGEN MKV GTI CARBON FIBER FENDER FLARE INSTALLATION
ECS TUNING 1000 SEVILLE RD. WADSWORTH, OH 44281 1.800.924.5172 WWW.ECSTUNING.COM 30
ES#2808526
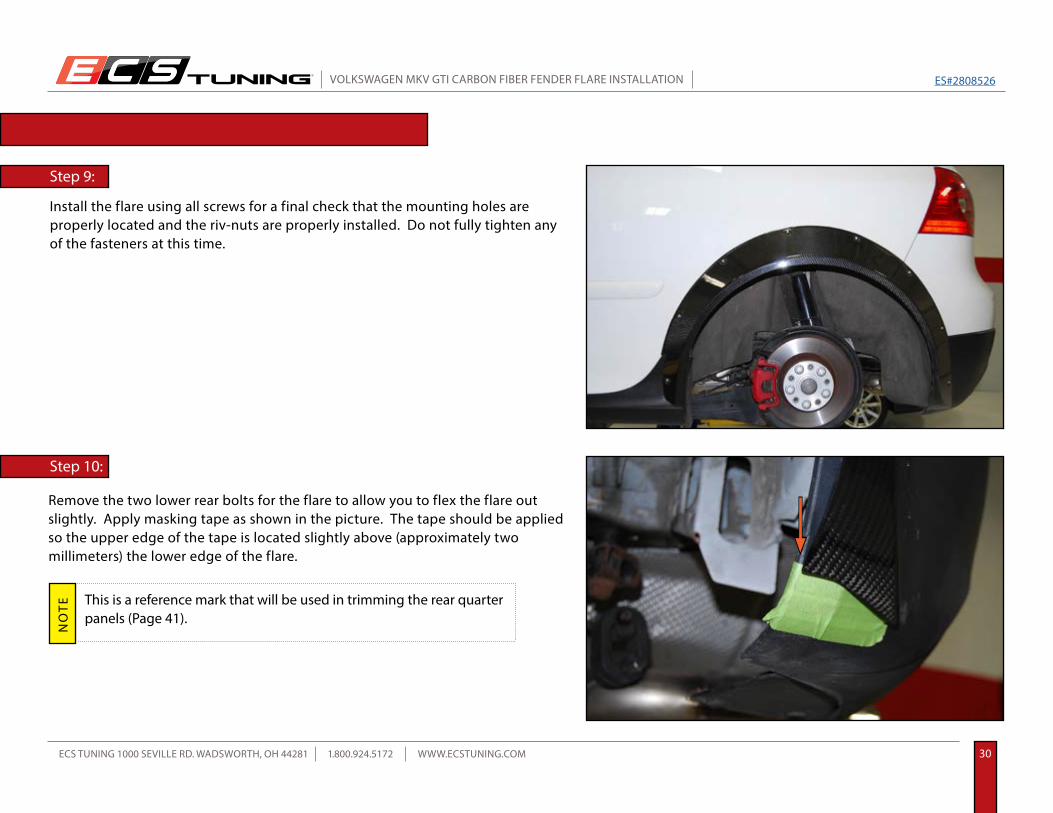
Install the flare using all screws for a final check that the mounting holes are properly located and the riv-nuts are properly installed. Do not fully tighten any of the fasteners at this time.
Remove the two lower rear bolts for the flare to allow you to flex the flare out slightly. Apply masking tape as shown in the picture. The tape should be applied so the upper edge of the tape is located slightly above (approximately two millimeters) the lower edge of the flare.
Step 9:
Step 10:
MOUNTING THE REAR FLARES
This is a reference mark that will be used in trimming the rear quarter panels (Page 41).
NO
TE
R
VOLKSWAGEN MKV GTI CARBON FIBER FENDER FLARE INSTALLATION
ECS TUNING 1000 SEVILLE RD. WADSWORTH, OH 44281 1.800.924.5172 WWW.ECSTUNING.COM 31
ES#2808526
Step 11:
MOUNTING THE REAR FLARES
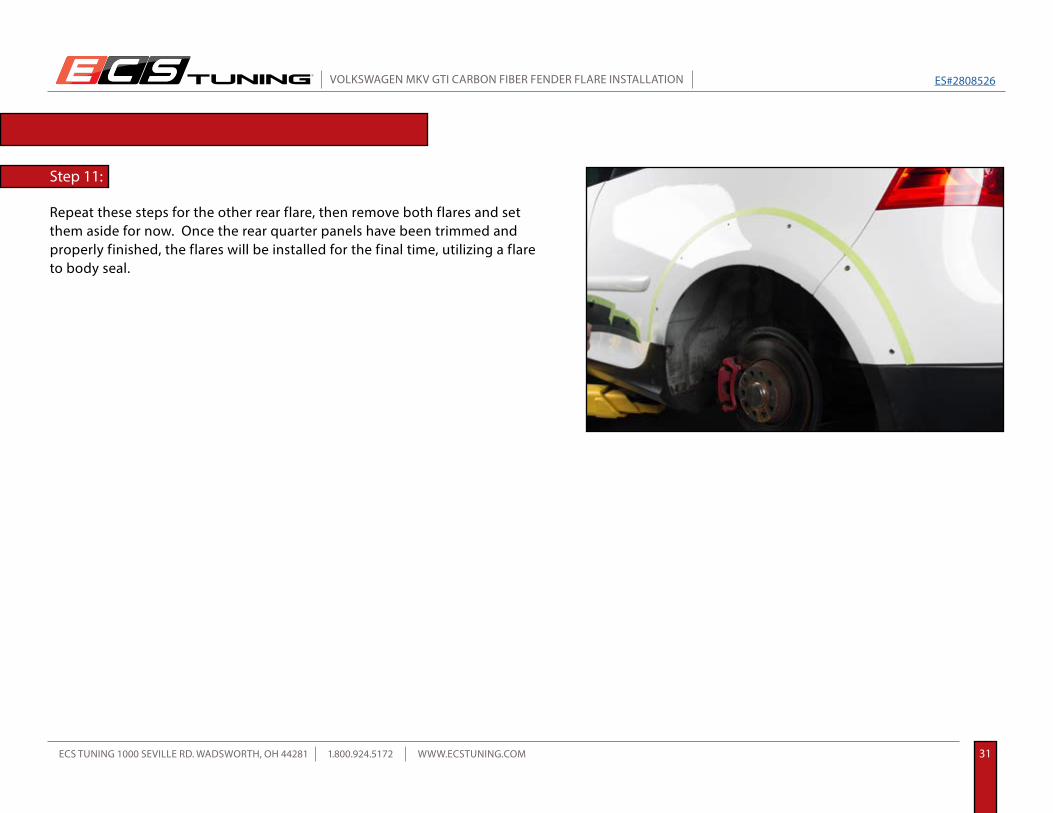
Repeat these steps for the other rear flare, then remove both flares and set them aside for now. Once the rear quarter panels have been trimmed and properly finished, the flares will be installed for the final time, utilizing a flare to body seal.
R
VOLKSWAGEN MKV GTI CARBON FIBER FENDER FLARE INSTALLATION
ECS TUNING 1000 SEVILLE RD. WADSWORTH, OH 44281 1.800.924.5172 WWW.ECSTUNING.COM 32
ES#2808526
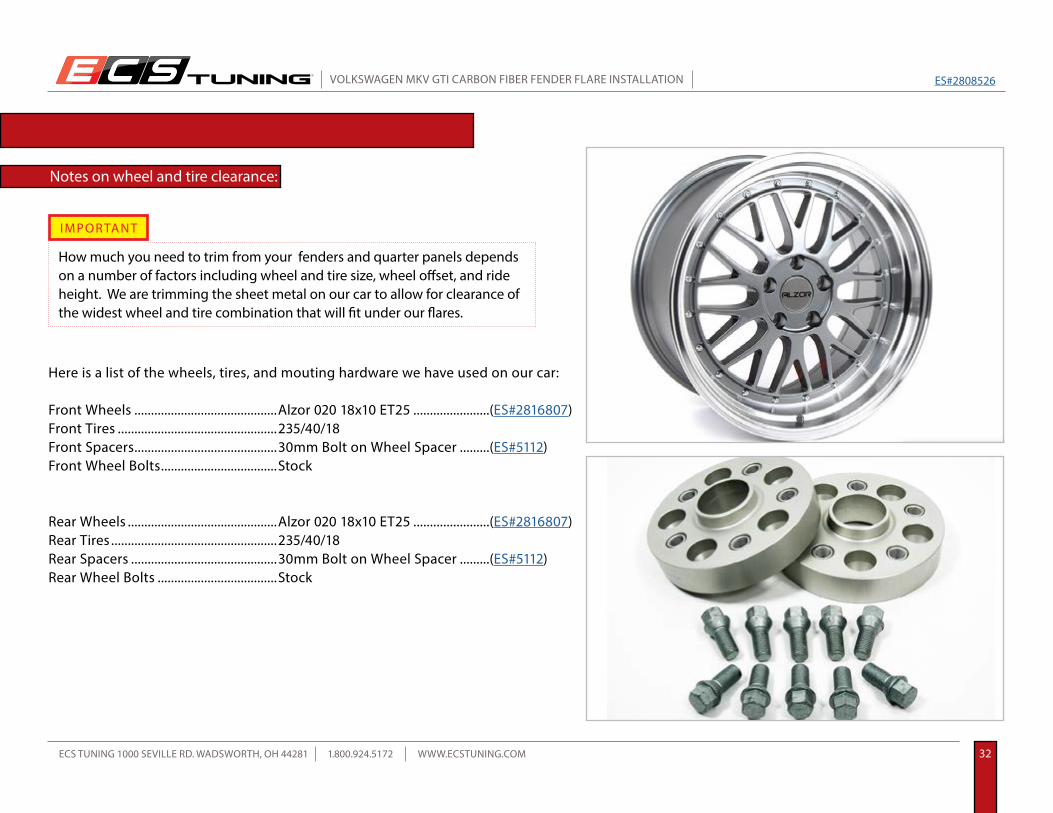
Here is a list of the wheels, tires, and mouting hardware we have used on our car:
Front Wheels ...........................................Alzor 020 18x10 ET25 .......................(ES#2816807)Front Tires ................................................235/40/18Front Spacers ...........................................30mm Bolt on Wheel Spacer .........(ES#5112)Front Wheel Bolts ...................................Stock
Rear Wheels .............................................Alzor 020 18x10 ET25 .......................(ES#2816807)Rear Tires ..................................................235/40/18Rear Spacers ............................................30mm Bolt on Wheel Spacer .........(ES#5112)Rear Wheel Bolts ....................................Stock
Notes on wheel and tire clearance:
WHEELS AND TIRE INFORMATION
How much you need to trim from your fenders and quarter panels depends on a number of factors including wheel and tire size, wheel offset, and ride height. We are trimming the sheet metal on our car to allow for clearance of the widest wheel and tire combination that will fit under our flares.
IMPOR TANT

R
VOLKSWAGEN MKV GTI CARBON FIBER FENDER FLARE INSTALLATION
ECS TUNING 1000 SEVILLE RD. WADSWORTH, OH 44281 1.800.924.5172 WWW.ECSTUNING.COM 33
ES#2808526
Mark the front fenders by first measuring .375 inches down (inset photo) from the bottom edge of riv-nuts 1, 2, 3, and 4, and make a mark at each location. Next, make reference marks along the character line of the front bumper cover as shown.
Each mark should be just a small dot with a permanent marker. We have exaggerated the marks here for clarity and descriptive purposes.
Step 1:
Step 2:
TRIMMING THE FRONT FENDERS
...
. .
. .
.
..........You will be able to follow the character line of the bumper cover without marking it, but we have chosen to show the marks here as well for clarity and descriptive purposes.
Inspect the measuring lines at the right. When measuring down from the riv-nuts for both the front and rear, measure and make your marks along an imaginary line that intersects both the riv-nut and the center of the wheel hub.
1 2
3
4
R
VOLKSWAGEN MKV GTI CARBON FIBER FENDER FLARE INSTALLATION
ECS TUNING 1000 SEVILLE RD. WADSWORTH, OH 44281 1.800.924.5172 WWW.ECSTUNING.COM 34
ES#2808526
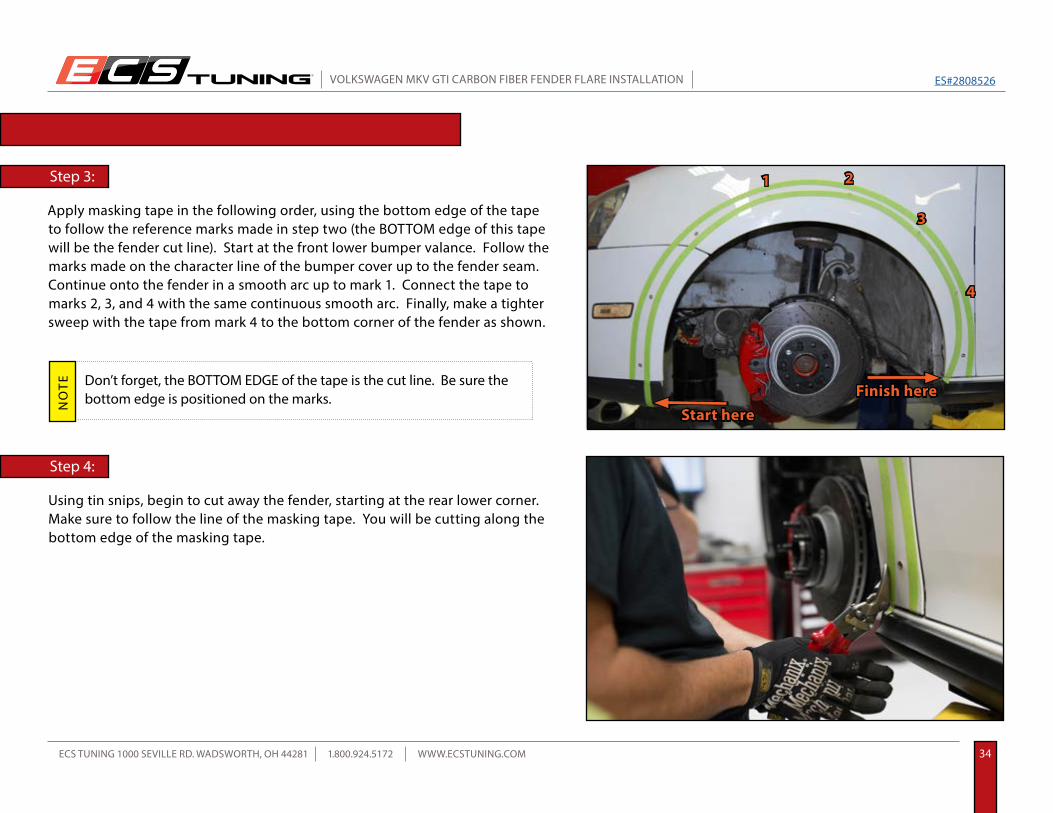
Using tin snips, begin to cut away the fender, starting at the rear lower corner. Make sure to follow the line of the masking tape. You will be cutting along the bottom edge of the masking tape.
Step 3:
Step 4:
TRIMMING THE FRONT FENDERS
Apply masking tape in the following order, using the bottom edge of the tape to follow the reference marks made in step two (the BOTTOM edge of this tape will be the fender cut line). Start at the front lower bumper valance. Follow the marks made on the character line of the bumper cover up to the fender seam. Continue onto the fender in a smooth arc up to mark 1. Connect the tape to marks 2, 3, and 4 with the same continuous smooth arc. Finally, make a tighter sweep with the tape from mark 4 to the bottom corner of the fender as shown.
Don’t forget, the BOTTOM EDGE of the tape is the cut line. Be sure the bottom edge is positioned on the marks.N
OTE
1 2
3
4
Start hereFinish here

R
VOLKSWAGEN MKV GTI CARBON FIBER FENDER FLARE INSTALLATION
ECS TUNING 1000 SEVILLE RD. WADSWORTH, OH 44281 1.800.924.5172 WWW.ECSTUNING.COM 35
ES#2808526
Continue to cut away the fender following the bottom edge of the masking tape. To make the cutting easier, make small cuts in the fender and cut away extra metal as you go.
Continue to cut the fender away until you have removed all the metal and reached the front bumper cover.
Step 5:
Step 6:
TRIMMING THE FRONT FENDERS
Make small cuts in the fender
R
VOLKSWAGEN MKV GTI CARBON FIBER FENDER FLARE INSTALLATION
ECS TUNING 1000 SEVILLE RD. WADSWORTH, OH 44281 1.800.924.5172 WWW.ECSTUNING.COM 36
ES#2808526
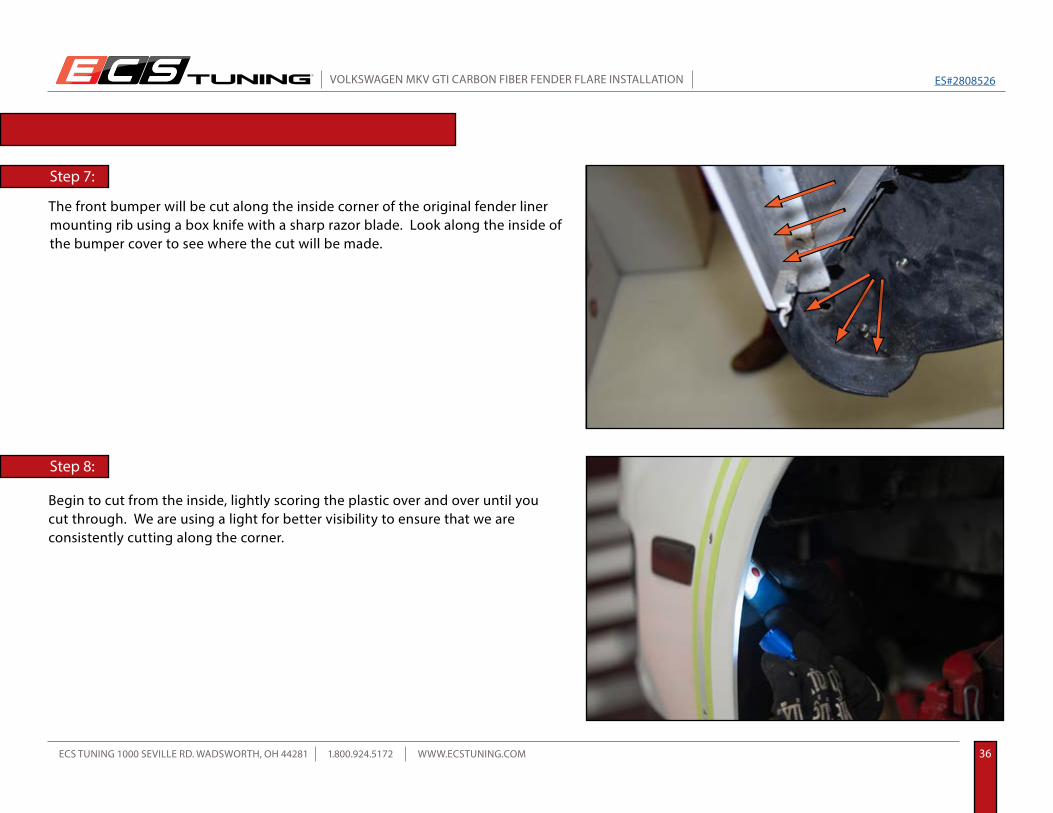
The front bumper will be cut along the inside corner of the original fender liner mounting rib using a box knife with a sharp razor blade. Look along the inside of the bumper cover to see where the cut will be made.
Begin to cut from the inside, lightly scoring the plastic over and over until you cut through. We are using a light for better visibility to ensure that we are consistently cutting along the corner.
Step 7:
Step 8:
TRIMMING THE FRONT FENDERS
R
VOLKSWAGEN MKV GTI CARBON FIBER FENDER FLARE INSTALLATION
ECS TUNING 1000 SEVILLE RD. WADSWORTH, OH 44281 1.800.924.5172 WWW.ECSTUNING.COM 37
ES#2808526
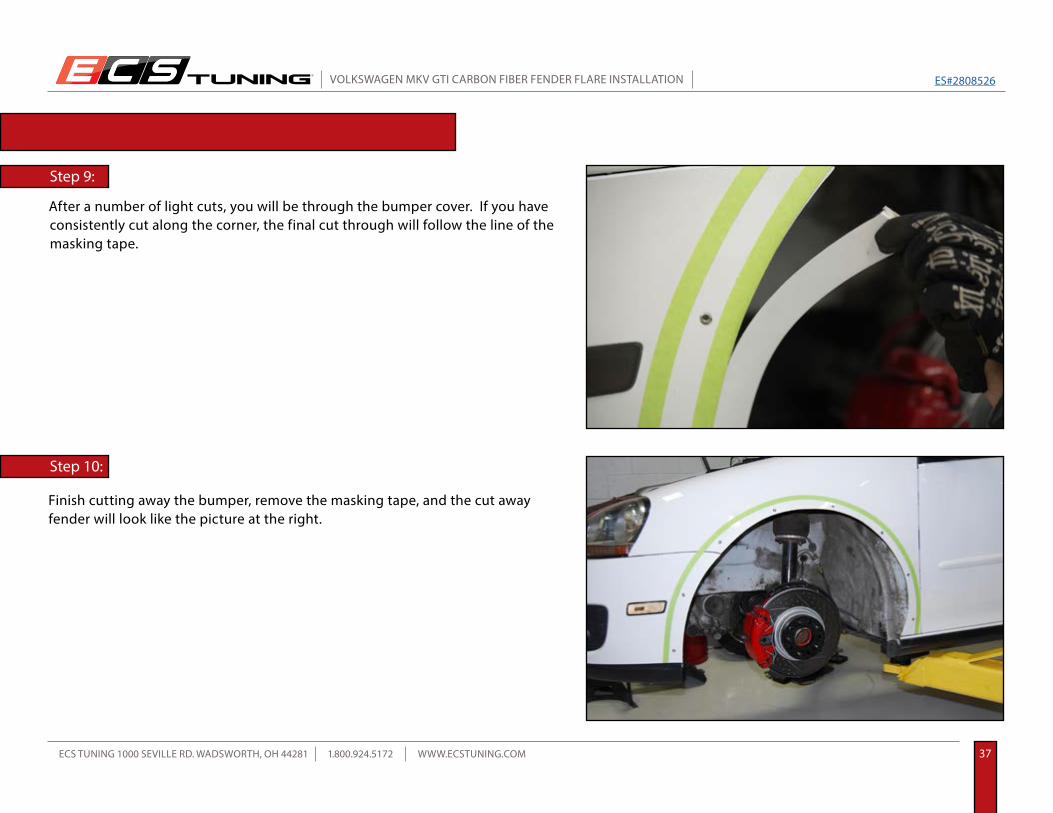
After a number of light cuts, you will be through the bumper cover. If you have consistently cut along the corner, the final cut through will follow the line of the masking tape.
Finish cutting away the bumper, remove the masking tape, and the cut away fender will look like the picture at the right.
Step 9:
Step 10:
TRIMMING THE FRONT FENDERS
R
VOLKSWAGEN MKV GTI CARBON FIBER FENDER FLARE INSTALLATION
ECS TUNING 1000 SEVILLE RD. WADSWORTH, OH 44281 1.800.924.5172 WWW.ECSTUNING.COM 38
ES#2808526
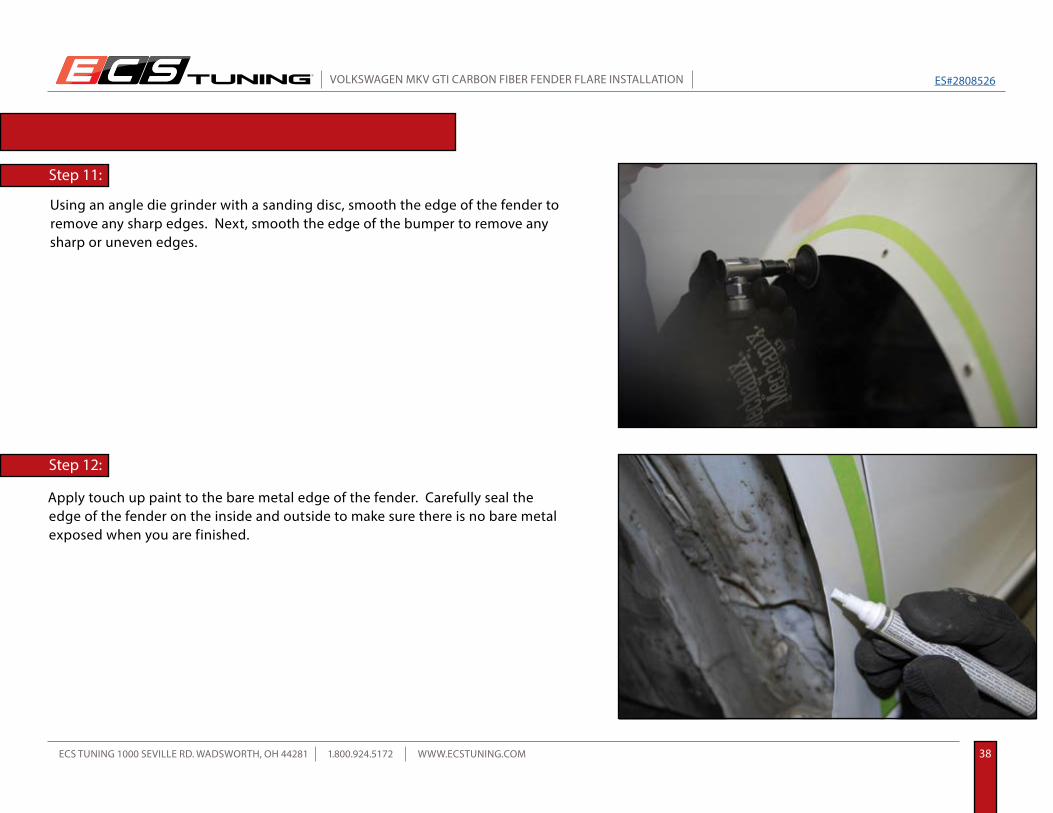
Using an angle die grinder with a sanding disc, smooth the edge of the fender to remove any sharp edges. Next, smooth the edge of the bumper to remove any sharp or uneven edges.
Apply touch up paint to the bare metal edge of the fender. Carefully seal the edge of the fender on the inside and outside to make sure there is no bare metal exposed when you are finished.
Step 11:
Step 12:
TRIMMING THE FRONT FENDERS
R
VOLKSWAGEN MKV GTI CARBON FIBER FENDER FLARE INSTALLATION
ECS TUNING 1000 SEVILLE RD. WADSWORTH, OH 44281 1.800.924.5172 WWW.ECSTUNING.COM 39
ES#2808526
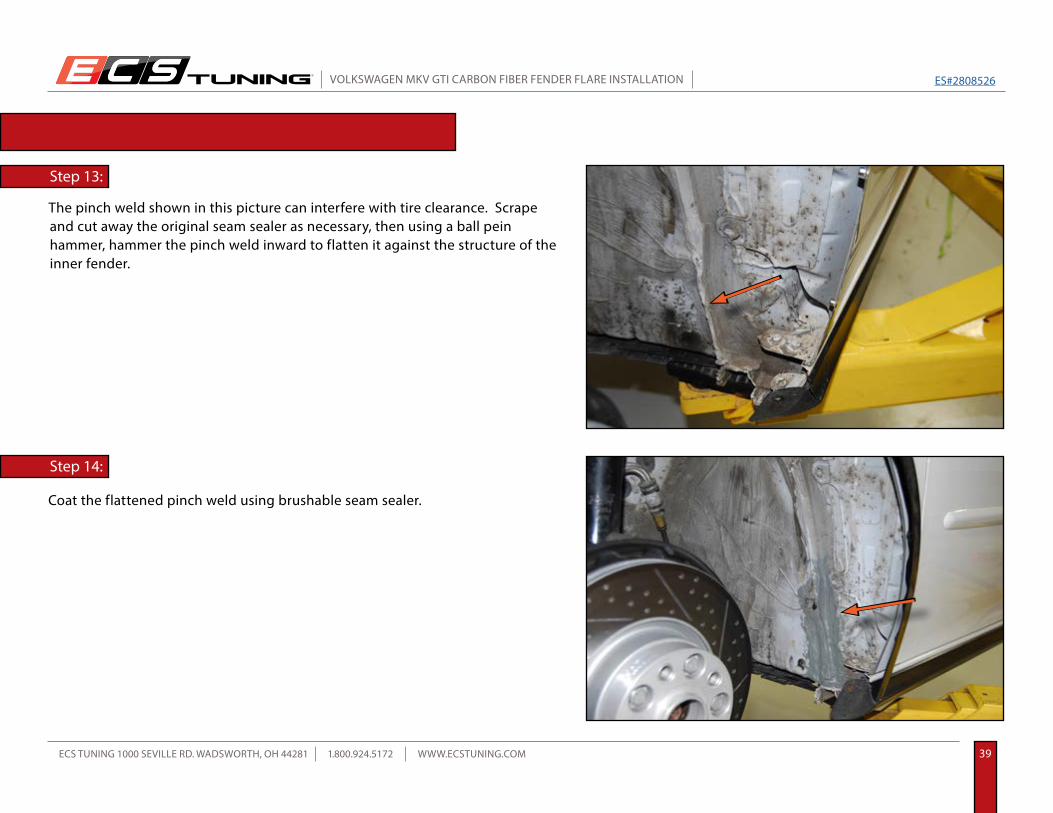
The pinch weld shown in this picture can interfere with tire clearance. Scrape and cut away the original seam sealer as necessary, then using a ball pein hammer, hammer the pinch weld inward to flatten it against the structure of the inner fender.
Coat the flattened pinch weld using brushable seam sealer.
Step 13:
Step 14:
TRIMMING THE FRONT FENDERS
R
VOLKSWAGEN MKV GTI CARBON FIBER FENDER FLARE INSTALLATION
ECS TUNING 1000 SEVILLE RD. WADSWORTH, OH 44281 1.800.924.5172 WWW.ECSTUNING.COM 40
ES#2808526
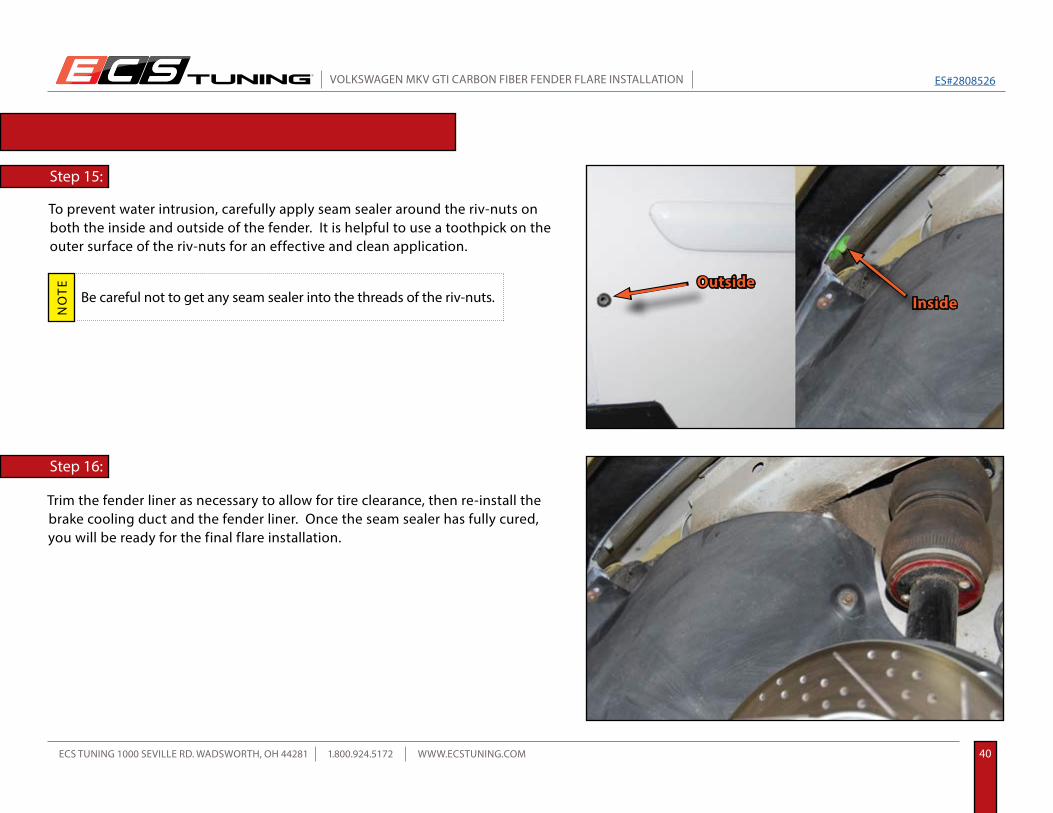
To prevent water intrusion, carefully apply seam sealer around the riv-nuts on both the inside and outside of the fender. It is helpful to use a toothpick on the outer surface of the riv-nuts for an effective and clean application.
Trim the fender liner as necessary to allow for tire clearance, then re-install the brake cooling duct and the fender liner. Once the seam sealer has fully cured, you will be ready for the final flare installation.
Step 15:
Step 16:
TRIMMING THE FRONT FENDERS
Be careful not to get any seam sealer into the threads of the riv-nuts.
NO
TE
InsideOutside

R
VOLKSWAGEN MKV GTI CARBON FIBER FENDER FLARE INSTALLATION
ECS TUNING 1000 SEVILLE RD. WADSWORTH, OH 44281 1.800.924.5172 WWW.ECSTUNING.COM 41
ES#2808526
Step 1:
Step 2:
TRIMMING THE REAR QUARTER PANELS
Mark the rear quarter panels by first measuring .750 inches down from the bottom edge of riv-nuts 1 and 2 and make a mark at each location. Next, measure down 1.250 inches from riv-nut 3 and make a mark at this location. Finally, make reference marks along the character line of the rear bumper cover as shown.
.
..
. . . . . ... .
Apply masking tape in the following order, using the bottom edge of the tape to follow the reference marks made in step one (the BOTTOM edge of this tape will be the fender cut line). Start in the front lower corner just above the rocker panel trim. Apply the tape in a smooth arc up to mark 1. Continue in a smooth arc across marks 2 and 3. From mark 3, curve the tape down smoothly to meet the corner of the character line on the bumper cover, then follow the character line down to the bumper valance.
Don’t forget, the BOTTOM EDGE of the tape is the cut line. Be sure the bottom edge is positioned on the marks.N
OTE
Use the same method of imaginary lines as on page 33 to measure and mark the rear quarter panels.
Each mark should be just a small dot with a permanent marker. We have exaggerated the marks here for clarity and descriptive purposes.
1
2 3
1
2 3
Start in this corner
R
VOLKSWAGEN MKV GTI CARBON FIBER FENDER FLARE INSTALLATION
ECS TUNING 1000 SEVILLE RD. WADSWORTH, OH 44281 1.800.924.5172 WWW.ECSTUNING.COM 42
ES#2808526
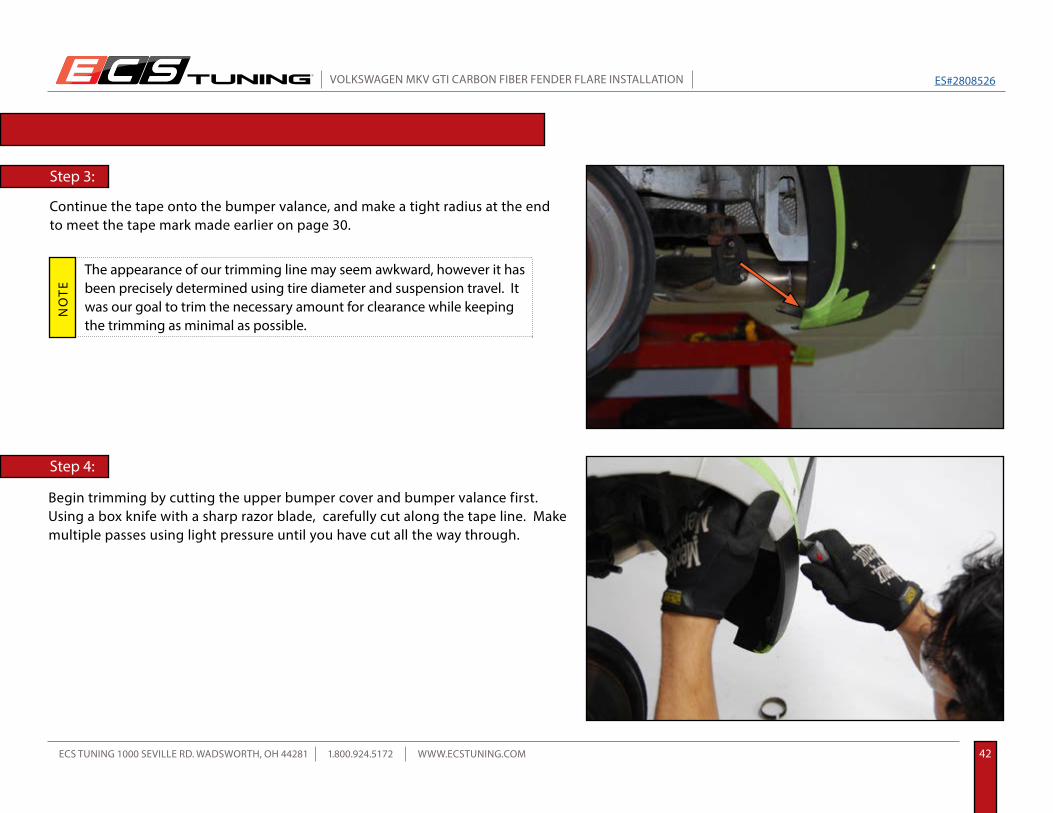
Continue the tape onto the bumper valance, and make a tight radius at the end to meet the tape mark made earlier on page 30.
Begin trimming by cutting the upper bumper cover and bumper valance first. Using a box knife with a sharp razor blade, carefully cut along the tape line. Make multiple passes using light pressure until you have cut all the way through.
Step 3:
Step 4:
TRIMMING THE REAR QUARTER PANELS
The appearance of our trimming line may seem awkward, however it has been precisely determined using tire diameter and suspension travel. It was our goal to trim the necessary amount for clearance while keeping the trimming as minimal as possible.
NO
TE
R
VOLKSWAGEN MKV GTI CARBON FIBER FENDER FLARE INSTALLATION
ECS TUNING 1000 SEVILLE RD. WADSWORTH, OH 44281 1.800.924.5172 WWW.ECSTUNING.COM 43
ES#2808526
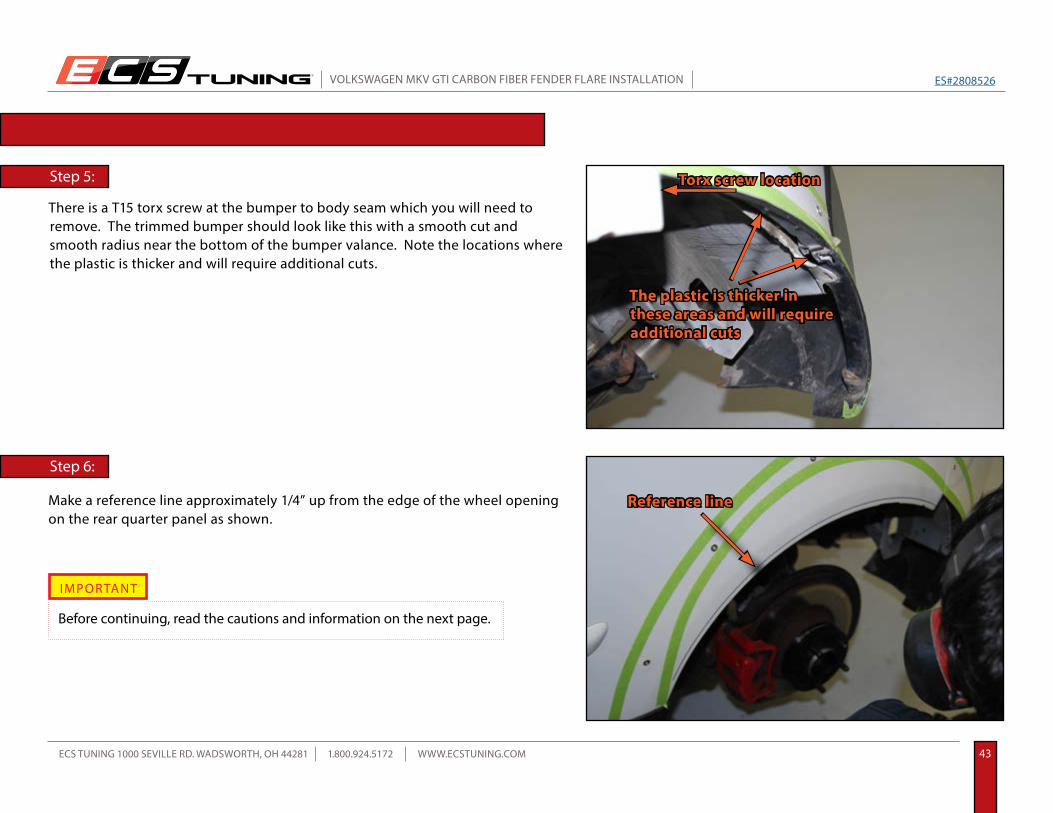
There is a T15 torx screw at the bumper to body seam which you will need to remove. The trimmed bumper should look like this with a smooth cut and smooth radius near the bottom of the bumper valance. Note the locations where the plastic is thicker and will require additional cuts.
Make a reference line approximately 1/4” up from the edge of the wheel opening on the rear quarter panel as shown.
Step 5:
Step 6:
TRIMMING THE REAR QUARTER PANELS
Before continuing, read the cautions and information on the next page.
IMPOR TANT
Torx screw location
Reference line
The plastic is thicker in these areas and will require additional cuts
R
VOLKSWAGEN MKV GTI CARBON FIBER FENDER FLARE INSTALLATION
ECS TUNING 1000 SEVILLE RD. WADSWORTH, OH 44281 1.800.924.5172 WWW.ECSTUNING.COM 44
ES#2808526
BEFORE CONTINUING WITH THIS PROCEDURE:
TRIMMING THE REAR QUARTER PANELS
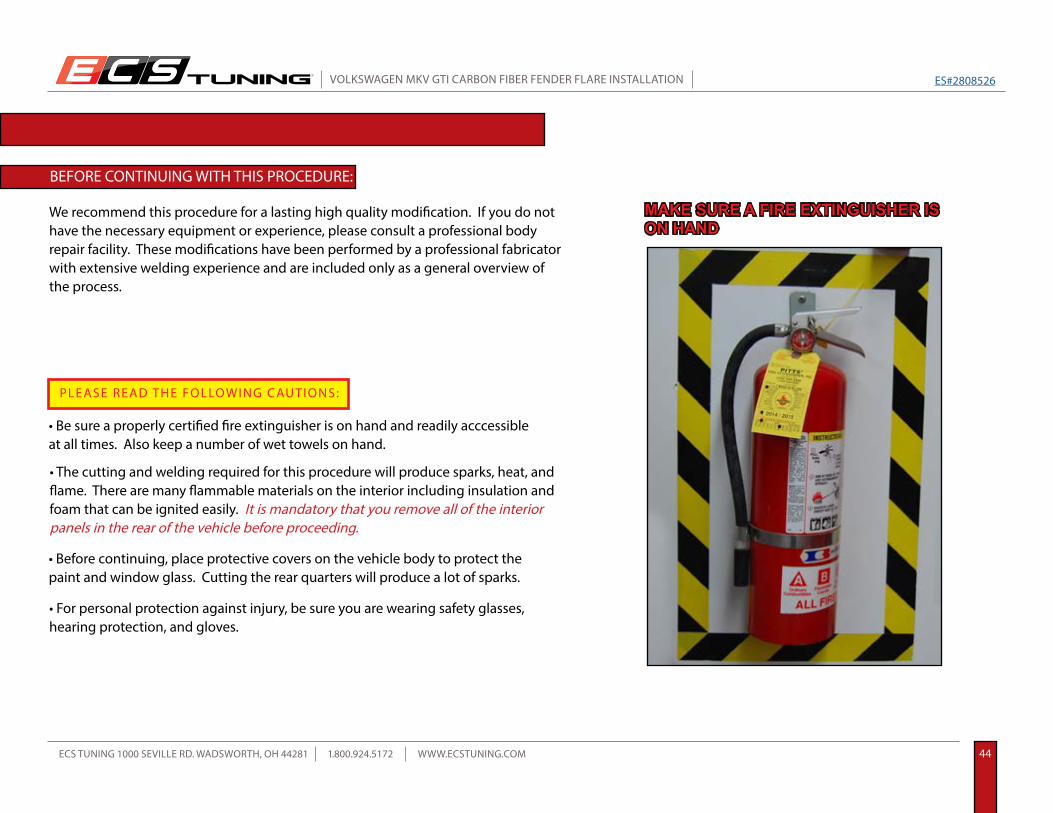
• Be sure a properly certified fire extinguisher is on hand and readily acccessible at all times. Also keep a number of wet towels on hand.
PLEASE READ THE FOLLOWING CAUTIONS:
MAKE SURE A FIRE EXTINGUISHER IS ON HAND
We recommend this procedure for a lasting high quality modification. If you do not have the necessary equipment or experience, please consult a professional body repair facility. These modifications have been performed by a professional fabricator with extensive welding experience and are included only as a general overview of the process.
• Before continuing, place protective covers on the vehicle body to protect the paint and window glass. Cutting the rear quarters will produce a lot of sparks.
• The cutting and welding required for this procedure will produce sparks, heat, and flame. There are many flammable materials on the interior including insulation and foam that can be ignited easily. It is mandatory that you remove all of the interior panels in the rear of the vehicle before proceeding.
• For personal protection against injury, be sure you are wearing safety glasses, hearing protection, and gloves.

R
VOLKSWAGEN MKV GTI CARBON FIBER FENDER FLARE INSTALLATION
ECS TUNING 1000 SEVILLE RD. WADSWORTH, OH 44281 1.800.924.5172 WWW.ECSTUNING.COM 45
ES#2808526
Remove all interior panels and insulation prior to cutting the quarter panel. Then, using a cutoff wheel, cut the quarter panel along the bottom edge of the lower tape line.
Using a cutoff wheel, cut the quarter panel at the reference line made in step six.
Step 7:
Step 8:
TRIMMING THE REAR QUARTER PANELS
Hold the cutoff wheel firmly with both hands and take your time. This will provide greater control for a smoother cut and will prevent the tool from jumping out of the groove and damaging the finish of the car.
TEC
H T
IP
R
VOLKSWAGEN MKV GTI CARBON FIBER FENDER FLARE INSTALLATION
ECS TUNING 1000 SEVILLE RD. WADSWORTH, OH 44281 1.800.924.5172 WWW.ECSTUNING.COM 46
ES#2808526
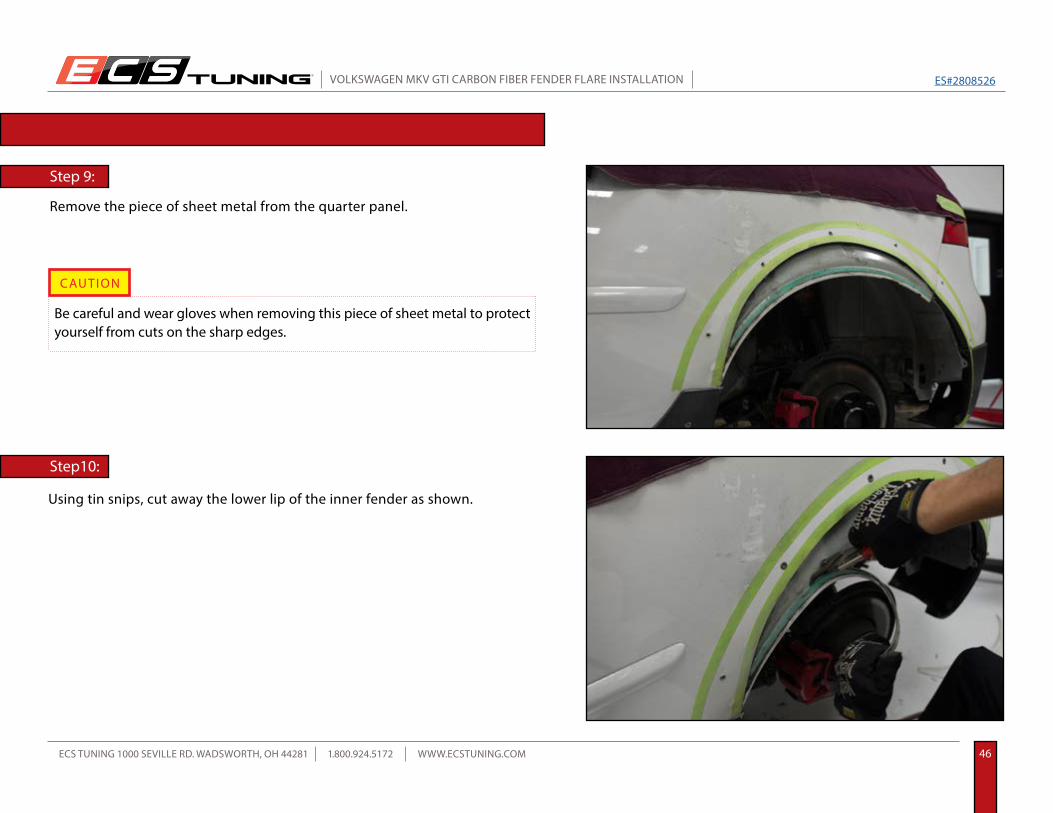
Remove the piece of sheet metal from the quarter panel.
Using tin snips, cut away the lower lip of the inner fender as shown.
Step 9:
Step10:
TRIMMING THE REAR QUARTER PANELS
Be careful and wear gloves when removing this piece of sheet metal to protect yourself from cuts on the sharp edges.
CAUTION
R
VOLKSWAGEN MKV GTI CARBON FIBER FENDER FLARE INSTALLATION
ECS TUNING 1000 SEVILLE RD. WADSWORTH, OH 44281 1.800.924.5172 WWW.ECSTUNING.COM 47
ES#2808526
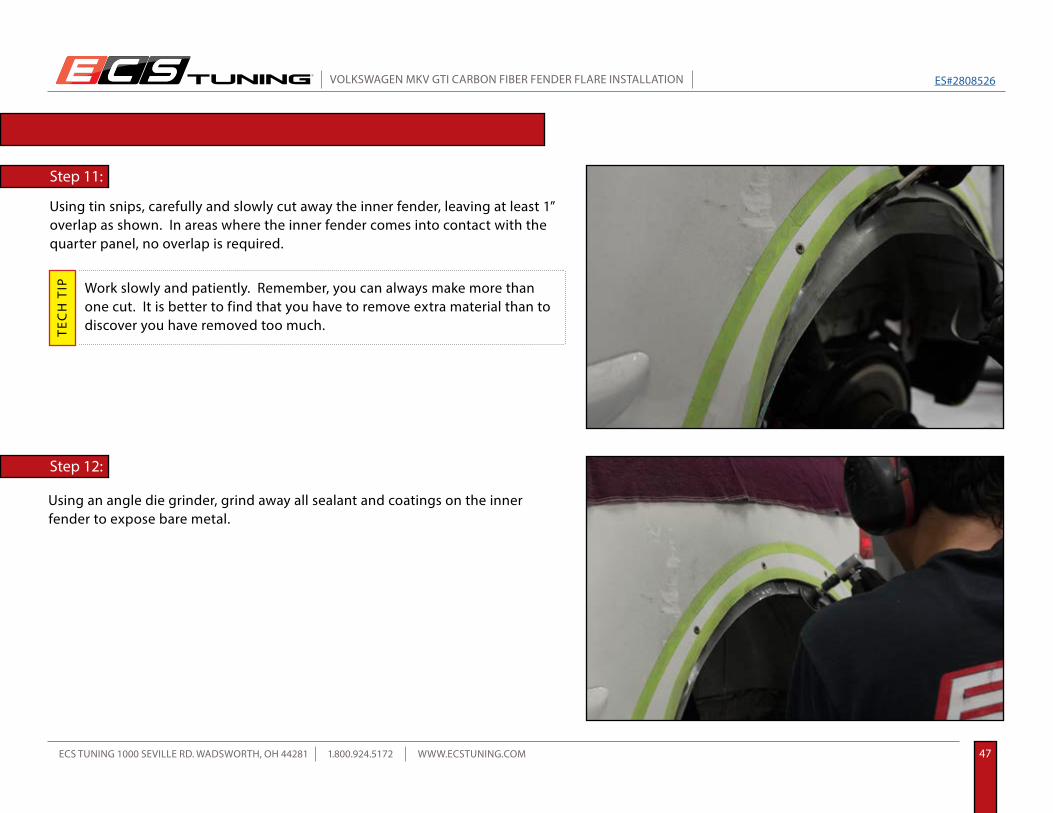
Using tin snips, carefully and slowly cut away the inner fender, leaving at least 1” overlap as shown. In areas where the inner fender comes into contact with the quarter panel, no overlap is required.
Using an angle die grinder, grind away all sealant and coatings on the inner fender to expose bare metal.
Step 11:
Step 12:
TRIMMING THE REAR QUARTER PANELS
Work slowly and patiently. Remember, you can always make more than one cut. It is better to find that you have to remove extra material than to discover you have removed too much.TE
CH
TIP
R
VOLKSWAGEN MKV GTI CARBON FIBER FENDER FLARE INSTALLATION
ECS TUNING 1000 SEVILLE RD. WADSWORTH, OH 44281 1.800.924.5172 WWW.ECSTUNING.COM 48
ES#2808526
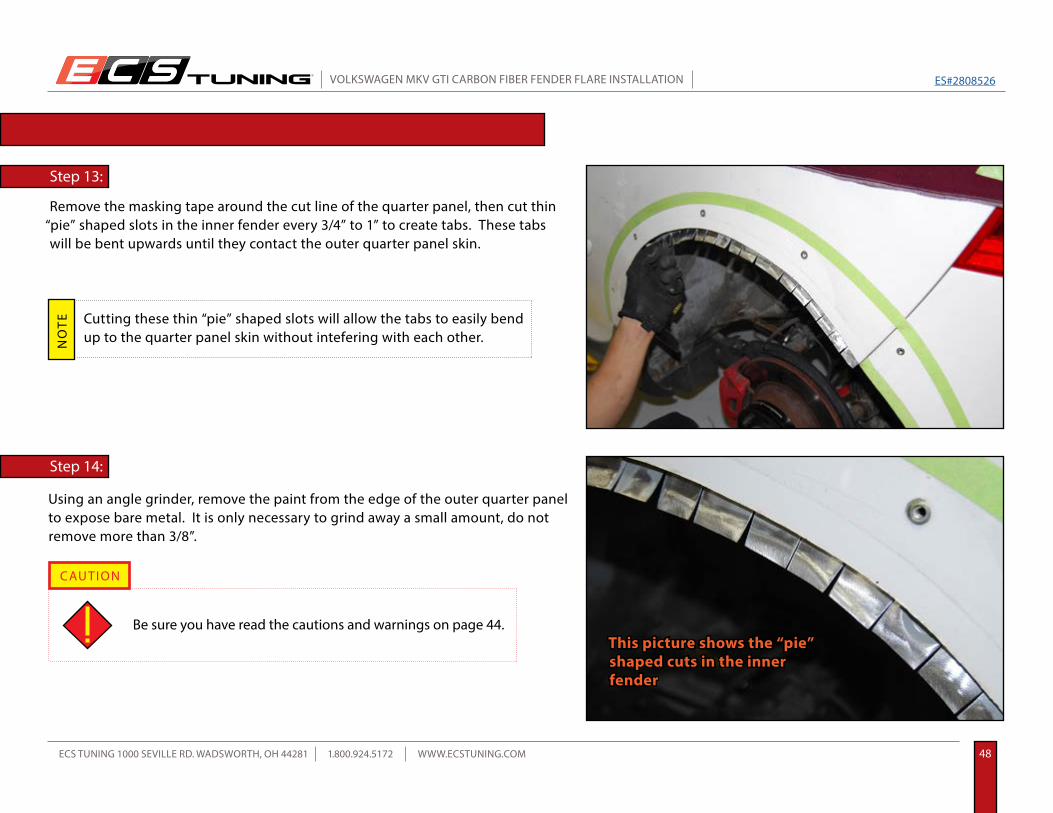
Remove the masking tape around the cut line of the quarter panel, then cut thin “pie” shaped slots in the inner fender every 3/4” to 1” to create tabs. These tabs will be bent upwards until they contact the outer quarter panel skin.
Using an angle grinder, remove the paint from the edge of the outer quarter panel to expose bare metal. It is only necessary to grind away a small amount, do not remove more than 3/8”.
Step 13:
Step 14:
TRIMMING THE REAR QUARTER PANELS
Be sure you have read the cautions and warnings on page 44.
CAUTION
Cutting these thin “pie” shaped slots will allow the tabs to easily bend up to the quarter panel skin without intefering with each other. N
OTE
This picture shows the “pie” shaped cuts in the inner fender
R
VOLKSWAGEN MKV GTI CARBON FIBER FENDER FLARE INSTALLATION
ECS TUNING 1000 SEVILLE RD. WADSWORTH, OH 44281 1.800.924.5172 WWW.ECSTUNING.COM 49
ES#2808526
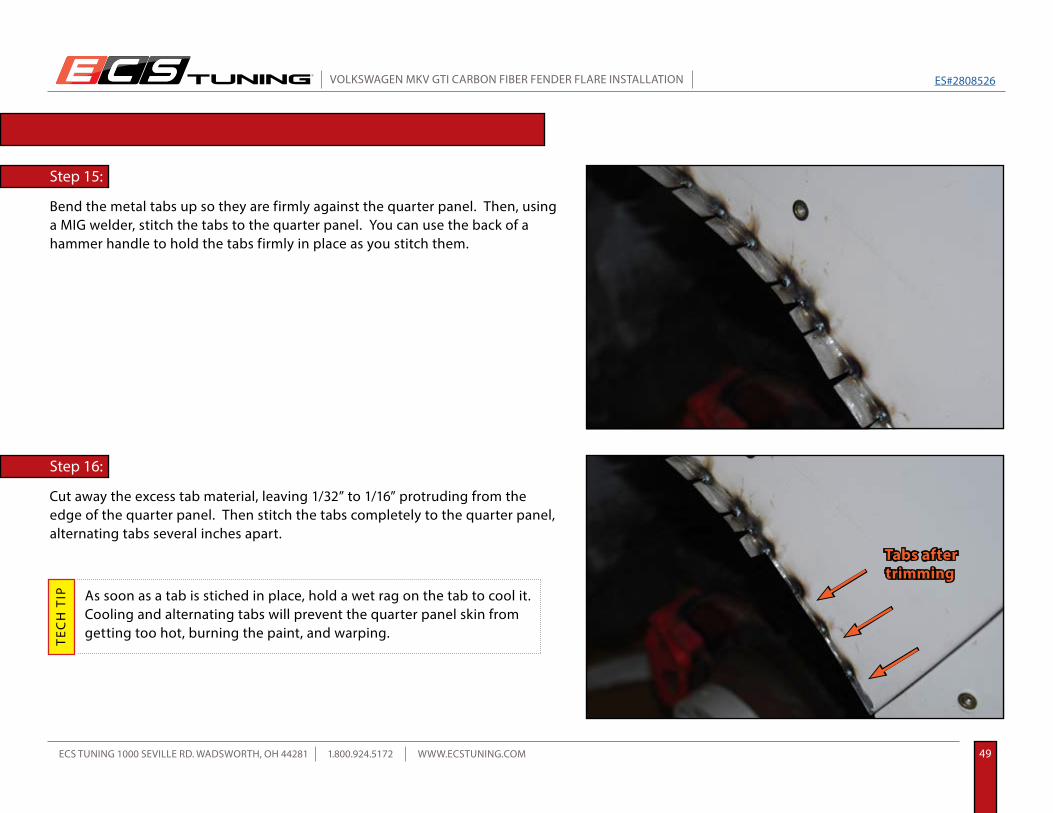
Bend the metal tabs up so they are firmly against the quarter panel. Then, using a MIG welder, stitch the tabs to the quarter panel. You can use the back of a hammer handle to hold the tabs firmly in place as you stitch them.
Step 15:
Step 16:
TRIMMING THE REAR QUARTER PANELS
Cut away the excess tab material, leaving 1/32” to 1/16” protruding from the edge of the quarter panel. Then stitch the tabs completely to the quarter panel, alternating tabs several inches apart.
As soon as a tab is stiched in place, hold a wet rag on the tab to cool it. Cooling and alternating tabs will prevent the quarter panel skin from getting too hot, burning the paint, and warping.
TEC
H T
IP
Tabs after trimming
R
VOLKSWAGEN MKV GTI CARBON FIBER FENDER FLARE INSTALLATION
ECS TUNING 1000 SEVILLE RD. WADSWORTH, OH 44281 1.800.924.5172 WWW.ECSTUNING.COM 50
ES#2808526
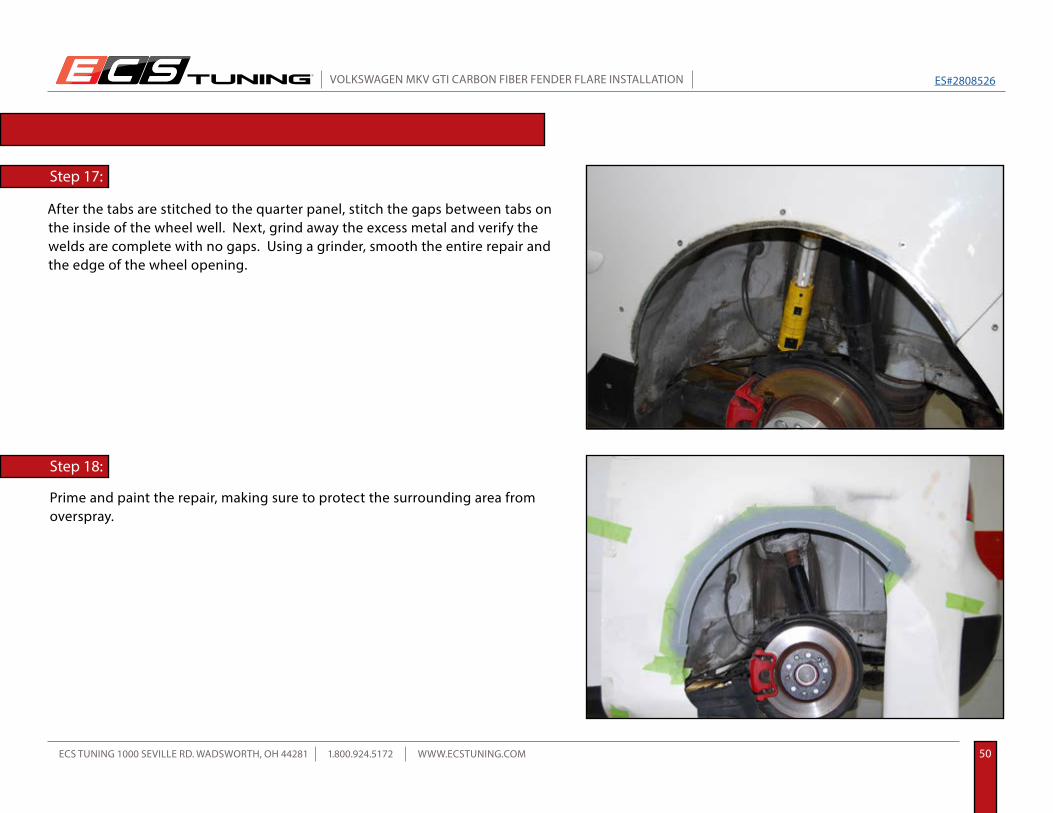
After the tabs are stitched to the quarter panel, stitch the gaps between tabs on the inside of the wheel well. Next, grind away the excess metal and verify the welds are complete with no gaps. Using a grinder, smooth the entire repair and the edge of the wheel opening.
Step 17:
Step 18:
TRIMMING THE REAR QUARTER PANELS
Prime and paint the repair, making sure to protect the surrounding area from overspray.

R
VOLKSWAGEN MKV GTI CARBON FIBER FENDER FLARE INSTALLATION
ECS TUNING 1000 SEVILLE RD. WADSWORTH, OH 44281 1.800.924.5172 WWW.ECSTUNING.COM 51
ES#2808526
Apply seam sealer to the outer edge of the riv-nuts where they contact the quarter panel. Allow the seam sealer to cure fully before the final flare installation.
Step 19:
Step 20:
TRIMMING THE REAR QUARTER PANELS
Install the fender liner in position and then mark and cut the fender liner as necessary for wheel clearance.
R
VOLKSWAGEN MKV GTI CARBON FIBER FENDER FLARE INSTALLATION
ECS TUNING 1000 SEVILLE RD. WADSWORTH, OH 44281 1.800.924.5172 WWW.ECSTUNING.COM 52
ES#2808526
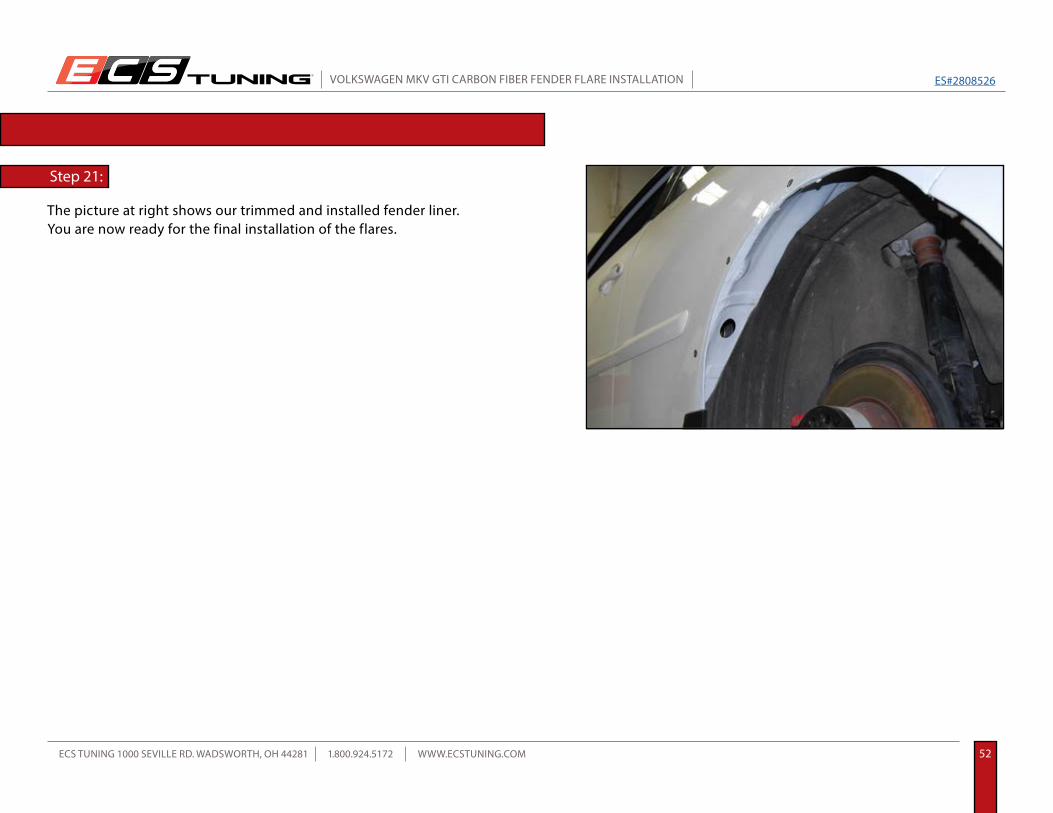
The picture at right shows our trimmed and installed fender liner.You are now ready for the final installation of the flares.
Step 21:
TRIMMING THE REAR QUARTER PANELS
R
VOLKSWAGEN MKV GTI CARBON FIBER FENDER FLARE INSTALLATION
ECS TUNING 1000 SEVILLE RD. WADSWORTH, OH 44281 1.800.924.5172 WWW.ECSTUNING.COM 53
ES#2808526
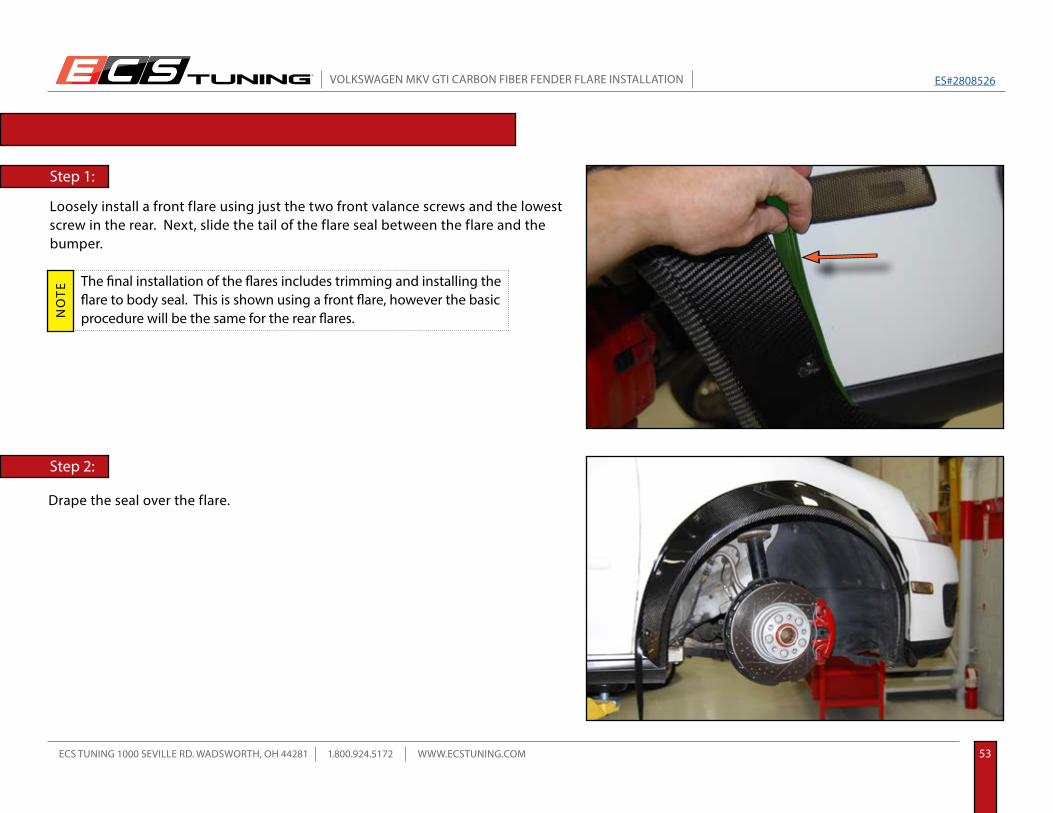
Loosely install a front flare using just the two front valance screws and the lowest screw in the rear. Next, slide the tail of the flare seal between the flare and the bumper.
Drape the seal over the flare.
Step 1:
Step 2:
FINAL INSTALLATION OF THE FLARES
The final installation of the flares includes trimming and installing the flare to body seal. This is shown using a front flare, however the basic procedure will be the same for the rear flares.N
OTE
R
VOLKSWAGEN MKV GTI CARBON FIBER FENDER FLARE INSTALLATION
ECS TUNING 1000 SEVILLE RD. WADSWORTH, OH 44281 1.800.924.5172 WWW.ECSTUNING.COM 54
ES#2808526
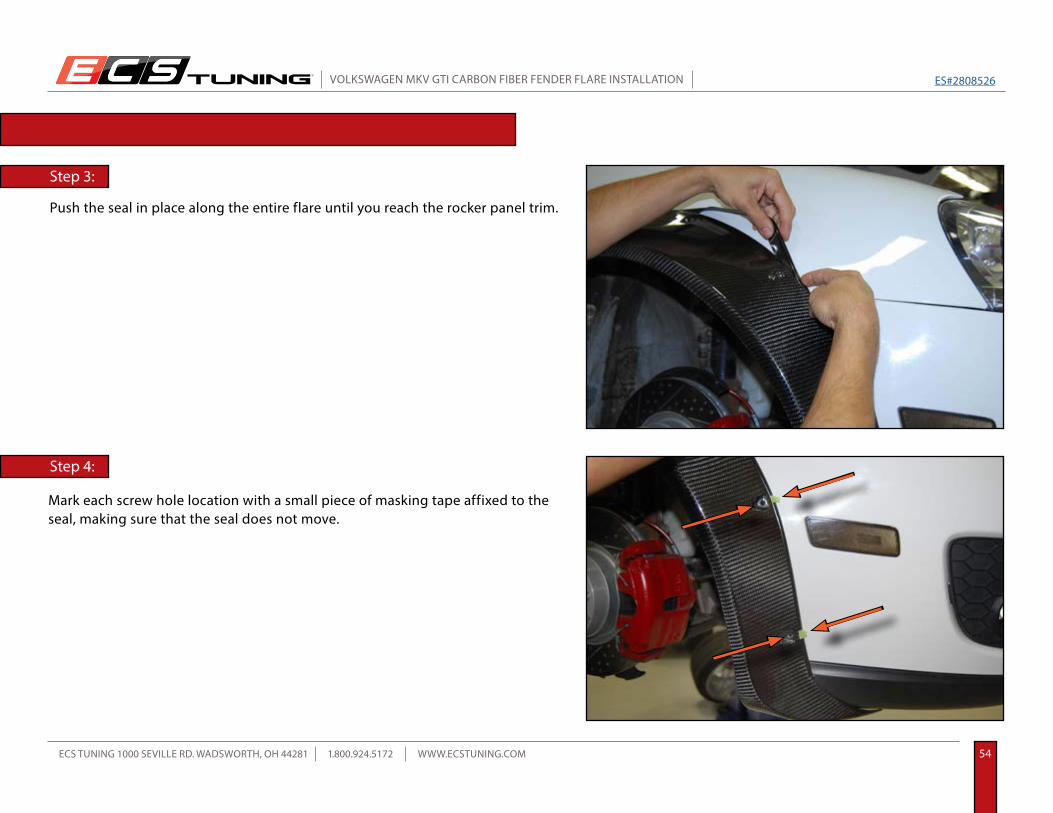
Push the seal in place along the entire flare until you reach the rocker panel trim.
Mark each screw hole location with a small piece of masking tape affixed to the seal, making sure that the seal does not move.
Step 3:
Step 4:
FINAL INSTALLATION OF THE FLARES
R
VOLKSWAGEN MKV GTI CARBON FIBER FENDER FLARE INSTALLATION
ECS TUNING 1000 SEVILLE RD. WADSWORTH, OH 44281 1.800.924.5172 WWW.ECSTUNING.COM 55
ES#2808526
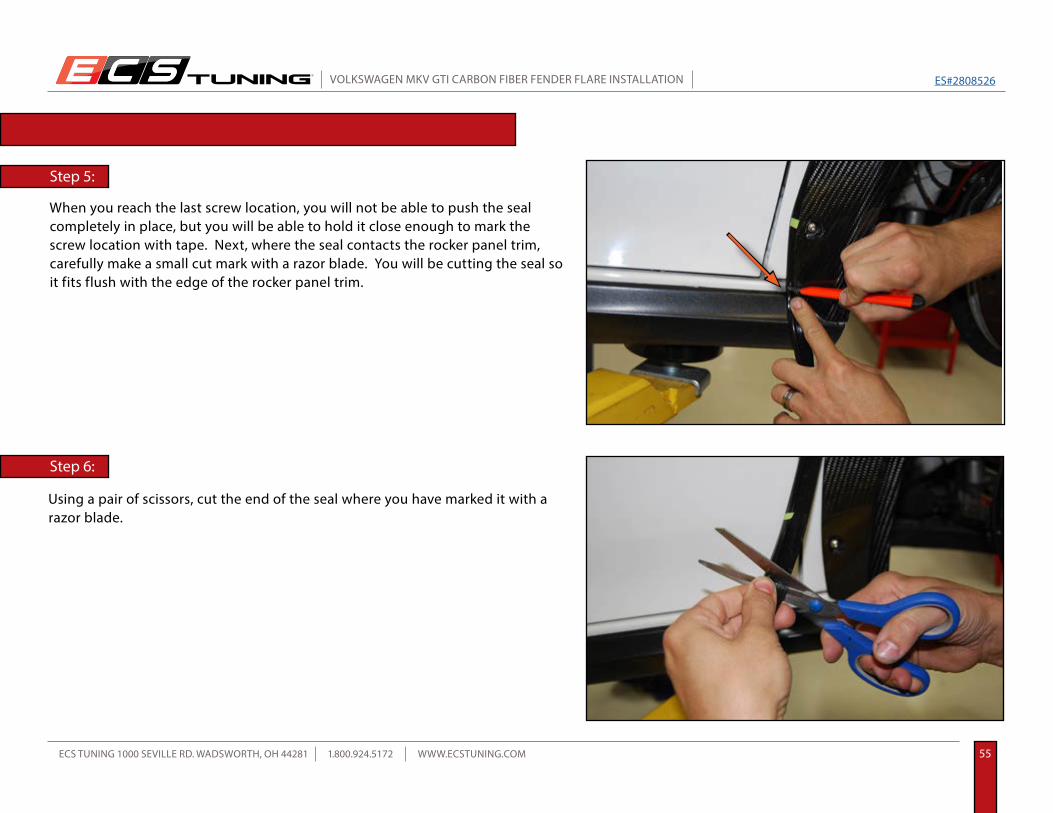
When you reach the last screw location, you will not be able to push the seal completely in place, but you will be able to hold it close enough to mark the screw location with tape. Next, where the seal contacts the rocker panel trim, carefully make a small cut mark with a razor blade. You will be cutting the seal so it fits flush with the edge of the rocker panel trim.
Using a pair of scissors, cut the end of the seal where you have marked it with a razor blade.
Step 5:
Step 6:
FINAL INSTALLATION OF THE FLARES

R
VOLKSWAGEN MKV GTI CARBON FIBER FENDER FLARE INSTALLATION
ECS TUNING 1000 SEVILLE RD. WADSWORTH, OH 44281 1.800.924.5172 WWW.ECSTUNING.COM 56
ES#2808526
Pull the seal back out from underneath the flare and cut a “V” notch in the tail of the seal at each tape location.
Reinstall the seal over the edge of the flare. For final assembly, apply the supplied thread sealer to each screw before installation. Install and tighten the flare screws until they are fully seated, then “snug” them by hand only. Using a 3mm allen socket on a nut driver handle will help prevent over tightening these screws. Do not use a ratchet and do not twist with your arm, only twist lightly with your wrist.
Step 7:
Step 8:
FINAL INSTALLATION OF THE FLARES
HAND TIGHTEN-DO NOT OVER TIGHTEN-THE SCREWS
Be careful not to over tighten the flare mounting screws. Over tightening the screws can crack the carbon fiber.
CAUTION
Repeat this procedure for the remaining flares.
R
VOLKSWAGEN MKV GTI CARBON FIBER FENDER FLARE INSTALLATION
ECS TUNING 1000 SEVILLE RD. WADSWORTH, OH 44281 1.800.924.5172 WWW.ECSTUNING.COM 57
ES#2808526
TORQUE SPECIFICATIONS
Wheels .....................................................................................................120 Nm (89 Ft-lbs)
CARE OF YOUR CARBON FIBER FLARESECS Tuning Carbon Fiber Flares are clear coated for excellent finish durability and UV resistance right out of the box.
If desired these flares can be painted for a color matched look with standard body shop prep work.
Carbon fiber can be washed with any gentle cleanser or soap. If it is safe for the paint on your car, it will be safe for the carbon fiber.
Be extra careful not to nick or deeply scratch the clear coat on the carbon fiber. This can lead to water intrusion into the carbon fiber which will damage the finish and the integrity of the flares.
If the clear coat does get nicked or deeply scratched to expose the carbon fiber, seal the damaged area thoroughly with a clear coat touch up or clear nail polish.
To retain UV resistance and protect the finish, we recommend regular waxing of these flares with a high quality caranuba wax.
Small surface scratches and light oxidation can be buffed out using the same methods and the same cautions you would use on the paint on your vehicle.

These instructions are provided as a courtesy by ECS Tuning.
Your MKV GTI Carbon Fiber Fender Flare installation is complete!
Proper service and repair procedures are vital to the safe, reliable operation of all motor vehicles as well as the personal safety of those performing the repairs. Standard safety procedures and precautions (including use of safety goggles and proper tools and equipment) should be followed at all times to eliminate the possibility of personal injury or improper service which could damage the vehicle or compromise its safety.
Although this material has been prepared with the intent to provide reliable information, no warranty (express or implied) is made as to its accuracy or completeness. Neither is any liability assumed for loss or damage resulting from reliance on this material. SPECIFICALLY, NO WARRANTY OF MERCHANTABILITY, FITNESS FOR A PARTICULAR PURPOSE OR ANY OTHER WARRANTY IS MADE OR TO BE IMPLIED WITH RESPECT TO THIS MATERIAL. In no event will ECS Tuning, Incorporated or its affiliates be liable for any damages, direct or indirect, consequential or compensatory, arising out of the use of this material.