Embed Size (px)
Citation preview
Feature Note
This document provides information around the native replication feature
of the HyperCore based Scale HC3 cluster. Check for additional information on this
topic in the support Knowledge base available at http://www.scalecomputing.com/support/login/.
Native HC3 Replication
2
Native HC3 Replication
You can find the most up-to-date technical documentation on the Scale Computing Portal at:http://www.scalecomputing.com/support/login/
The Scale Computing site also provides the latest product updates and information:http://www.scalecomputing.com/
Provide feedback on this document at:[email protected]
Contact support at:[email protected]://www.scalecomputing.com/support/login/US: +1-877-SCALE-59 (877-722-5359)Europe: 0808 234 0699
Document Version 1.4: 03/2017
Corporate Headquarters West Coast Office EMEA Office5225 Exploration Drive 360 Ritch Street Saunders HouseIndianapolis, IN 46241 Suite 300 52-53 The MallP. +1 877-722-5359 San Francisco, CA 94107 London W5 3TA United Kingdom
www.scalecomputing.com 1-877-SCALE-59 (877-722-5359)
3
About this Document 4
Introduction 5
Key Benefits of HC3 Replication 5
Requirements and Considerations for HC3 Replication 5 Requirements 5 Considerations 6
How Does HC3 Replication Work? 6 HC3 Snapshots 6 How Replication Utilizes HC3 Snapshots 8
Configuring HC3 Replication 10 Snapshot Scheduling and Replication 10 Configure a Remote Cluster Connection 10 Establish HC3 Replication 11 Initial Replication Image for a VM 11 Pause or Resume VM Replication 12 Cancel VM Replication 12
HC3 Replication Failover 13 Restore from a Replicated VM 13 Replicate Back to a Source Cluster 14
Network Planning and Recovery Point Objectives 16 HC3 Replication Network Timing 16 Disaster Recovery Point Objectives 17
Frequently Asked Questions 18 I/O Impact and Sizing 18 Supported HC3 Hardware Configurations 18
Resources 18
Provide Feedback or Contact Support 19
Disclaimer 19
Contents

4
Intended AudienceThis guide is intended for HC3 users to better understand the HyperCore Operating System (HCOS), the underlying SCRIBE architecture that is part of HCOS, and the specified feature. It is assumed that the user has a general understanding of virtualization and is looking to better operate and manage HC3.
Document Feedback
Scale Computing welcomes your suggestions for improving our documentation. If you have any comments or suggestions please send your feedback to [email protected].
Technical Support and Resources
There are many technical support resources available for use. Access this document, and many others, at http://www.scalecomputing.com/documentation.
Online Support You can submit support cases and view account information online through the Portal at http://www.scalecomputing.com/support/login/. You can also Live Chat with support through www.scalecomputing.com during standard hours Monday-Friday 8 AM to 6 PM ET.
Telephone Support Support is available for critical issues 24/7 by phone at 1-877-SCALE-59 (877-722-5359) in the US and at 0808 234 0699 in Europe. Telephone support is recommended for the fastest response on priority issues.
Professional Scale Computing offers many professional service options for both remote and Resources on-site assistance in getting your cluster up and running quickly and knowledgeably. Contact your Scale Computing sales representative today to discuss our service offerings. Find additional information at http://www.scalecomputing.com/products/support/.
About this DocumentAudience, feedback, and support
5
IntroductionThis feature note provides information on native HC3 replication made available in the version 6.4 General Availability release of the HyperCore (HCOS) software. This feature is built on the Scale Computing Reliable Independent Block Engine, known as SCRIBE, architecture and allows users to set up continuous replication on a VM by VM basis between two HC3 clusters.
HyperCore makes use of its space efficient snapshot technology made available by SCRIBE to replicate to a secondary site, tracking only the blocks unique to each snapshot and sending the changed blocks to the secondary site. This feature is integrated into HyperCore with no additional licensing! If you have two HC3 clusters, you have a remote disaster recovery plan.
Key Benefits of HC3 Replication• Built in Remote Disaster Recovery: Setup replication on a per VM basis for integrated remote Disaster Recovery that includes both automated snapshots and manual snapshots. Automated snapshots are taken as quickly as every 5 minutes, assuming the previous snapshot’s blocks have been fully replicated to the remote cluster.
• Continuous VM-level Replication: HyperCore makes use of its space efficient snapshot technology to replicate to a secondary site, tracking only the blocks unique to each snapshot and sending the change blocks.
• Built-in Compression: HyperCore utilizes compression on replication by default so that the job can complete as quickly as the network bandwidth and block changes allow.
• Low RPO/RTO: Simply “clone” a snapshot on the target cluster for the manual failover of a VM. Clones are immediately bootable.
• Simple Disaster Recovery Testing: Testing a DR infrastructure plan is now as simple as cloning a snapshot on the target cluster and starting a VM. No disruption to ongoing replication.
• Easy Failback after Disaster Recovery: After running a VM at the DR site, simply replicate the changed data back to the primary site and create a clone from the snapshot for simple failback.
• Security: Remote cluster connections are established using the target cluster’s UI credentials and authenticated with a key exchange between the two systems; this activates a secure tunnel between the HC3 clusters for the safe transfer of the replication data.
Requirements and Considerations for HC3 ReplicationWhen using HC3 replication, there are some requirements and considerations to keep in mind to make sure your replication configuration is fully supported, performance of your replication jobs is as quick as possible, and your replication implementation is successful.
Requirements• All clusters that will be replicating must be on the same firmware version. HCOS replication requires firmware 6.0 and above. The current firmware version of your cluster can be viewed in the upper right corner of the UI.
• At least two HC3 clusters; a local (Source) HyperCore cluster and a remote (Target) HyperCore cluster that are accessible to each other over the local and remote network
NOTE: If you wish to replicate between HC3 and a VMware or Hyper-V environment, please see the HC3 Availability Powered by DoubleTake product information. This product does require additional licensing.
6
connection.• If utilizing Tiered HC3 nodes (nodes with SSD drives) it is possible to replicate between a tiered and non-tiered cluster, but any VMs restored on a non-tiered cluster will not have access to their usual HEAT performance settings.
• The LAN IP for one of the nodes in the Target cluster.• The UI login credentials for the Target cluster.• Port 10022 open between the Source and Target clusters; this is the default replication port.• Port 443 open between the Source and Target clusters; this is used to create the UI session between the clusters that prompts for user authentication before allowing the remote cluster connection to be created.
Considerations• Network latency between the Source and Target clusters should be below 2000ms (2 seconds) for a sustainable and reliable replication tunnel.
• Tiered HC3 clusters (clusters utilizing SSD drives) will not pass their HEAT information along to cloned/restored VMs; any new VM restored on a Target cluster for disaster recovery purposes, even if the cluster contains Tiered HC3 nodes, will utilize the default Flash Priority and will need to be assessed for HEAT placement once more. See the HyperCore Enhanced Automated Tiering (HEAT) Feature Note under Resources for more information.
• It is possible to exclude VSDs (virtual hard drives) on a VM from the replication process, although this is a feature that is still in testing and must currently be done by engaging Support and discussing the options and considerations required. This is convenient for transient or temporary data that would otherwise generate large changes for the replication job, such as Windows pagefiles, SQL temporary databases, log data, print queues, etc. Contact Scale Support at [email protected] for assistance in excluding a VSD.
• Edge WAN optimization devices or virtual appliances can help to reduce the amount of data sent for ongoing changed blocks if there is limited network bandwidth.
• The initial snapshot of data sent to the Target cluster will be the entire allocated space of the VM and all of its disks unless it is a cloned VM. Due to this initial replication size, the first replication session for each VM may take days or possibly even weeks to complete depending on the distance, available bandwidth, and other factors between the Source and Target cluster.
• QoS policies could be leveraged to allow for policing or shaping of the replication traffic if the existing network architecture in your environment supports this.
• Only One-to-One replication is currently supported. This includes support for cross-replication between the two systems, meaning Source to Target and Target to Source. Please contact the Scale Computing Product team at [email protected] if you would like to discuss One-to-Many or Many-to-One replication for your use case.
How Does HC3 Replication Work?In order to understand how HC3 replication works, it is important to understand the basis of SCRIBE and HyperCore and why it is easier than ever to implement and use replication in the newest edition of the HC3 product running HyperCore. For more details on SCRIBE and HyperCore, please read the HC3, SCRIBE, and HyperCore Theory of Operations under Resources.
HC3 SnapshotsUnderstanding snapshots within HC3 provides a basis for understanding the theory behind HC3 replication. The combined power of SCRIBE and HyperCore in HC3 allows for VM level snapshots that

7
capture the entire VM disk contents and the VM’s configuration. This includes allocated memory and vCPUs, virtual disks, virtual NICs, etc. as they exist at an exact point in time in the VM. VM RAM state is not maintained as part of the snapshot, only the point-in-time virtual disk state. So VMs that are cloned from a local or remote snapshot and powered on will start as if that VM had rebooted, or, to think of it another way, as if the power plug were pulled from a physical machine. HC3 snapshots are always point-in-time consistent. Any in-flight I/O to the virtual disk is briefly quiesced at the precise moment the snapshot is taken and in such a way that there is no disruption to the VM.
In the most simplistic sense, HC3 replication determines the changed blocks referenced by the VM between these snapshots and delivers those changes to the Target cluster as an exact replica VM standing offline and ready for failover.
VM snapshots are created automatically by the replication process as quickly as every 5 minutes (as long as the previous snapshot’s change blocks have been fully replicated to the Target cluster). This allows for near real-time VM replication that can run almost continuously in the system background.
An example of the replication process utilizing VM snapshots is shown below. Snapshots are transmitted regularly after the initial replication image to the Target cluster.
Manual snapshots can also be taken by the user for a VM. Manual snapshots will be included in the replication job just like a normal automated replication snapshot. Past automated snapshots will be removed as new automated snapshots are taken; manual snapshots taken by the user will never be removed by the system automatically and can only be deleted by the user. In order to provide a history of point-in-time images, HC3 replication will keep roughly five to six automated snapshots on hand at any given time.
If you are interested in automating snapshots, whether for replication or on non-replicating VMs, at this time, please contact Scale Computing Support at [email protected] and they can assist you in manually configuring snapshot automation from the command line.
When using snapshots with replication, snapshots are tied to their parent VM. When the parent VM is deleted, any snapshots associated with that VM will be deleted as well, whether they are automated or manual. Any VMs or snapshots that have been replicated to a Target cluster will also be affected by the
VM snapshot
Virtual Disks
Configuration
Virtual Net Interfaces
Virtual Disks
Configuration
Virtual Net Interfaces
VM snapshot on target
VM Replication
8
parent VM on the Source cluster as the Target cluster “VM” is only an image of the parent VM on the Source cluster. An automated snapshot that is removed on a Source VM will also be removed on a Target VM. The same is true for a manual snapshot; if a manual snapshot is deleted by the user on the Source VM it will also be removed on the Target VM.
Any VMs that are restored (cloned) from a VM snapshot on either the Source or Target clusters are not affected by their parent VM. Once a VM has been restored from a snapshot image on either the Source or Target cluster it is its own entity separate from the initial VM and can maintain its own set of snapshots and/or be included in replication if needed.
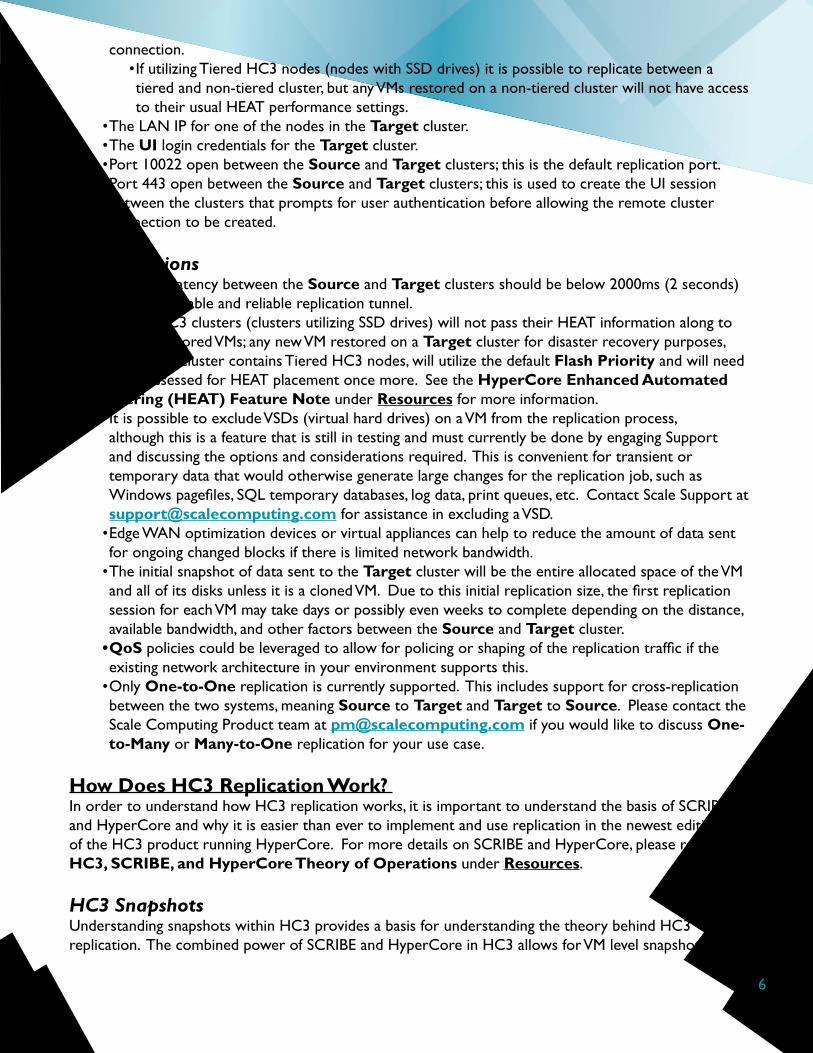
When a VM is active in HC3 replication, the HyperCore software can also determine the rough block change between two snapshot images based on the unique blocks that will need to be replicated. This size difference, as displayed in the image of the VM card below, is not the same as the size of each snapshot when it was first taken, or the amount of data that was transmitted to the Target HC3 system. As the VM continues to run and blocks are changed, and other snapshots are deleted automatically, more and more blocks will become unique to a particular snapshot, causing its reported size to grow over time as opposed to when it was initially taken.
When you request a VM snapshot, a copy is made of the virtual disk metadata at that exact point in time. Within the underlying SCRIBE technology, reference counts, which exist as a data structure for how many times blocks within a VM disk are referenced, are incremented on all blocks that are a part of that particular snapshot. Thus, for that snapshot, the reference counts for those blocks as they existed will be preserved and unchanged for the life of that snapshot. Beyond the small amount of VM metadata, which tracks the reference counts associated with the VM disks in a snapshot, taking a snapshot does not consume any additional storage capacity when it is taken.
As we will see later with VM replication, those newly written blocks also represent the new data that must be transmitted and applied on the Target cluster in order to make it current with the Source cluster. You can think of this newly allocated space as representing the “size” associated with maintaining that snapshot. If you were to delete the snapshot all of the blocks referenced only by that point in time can be “released” (their reference count will drop to zero) and returned to the capacity pool to be re-used by any VM that needs space. Therefore, deleting a snapshot may or may not actually impact available capacity on the cluster depending on the unique blocks of that snapshot and if those blocks are still referenced (their reference count did not reach 0 when the snapshot was released) by other virtual
9
instances.
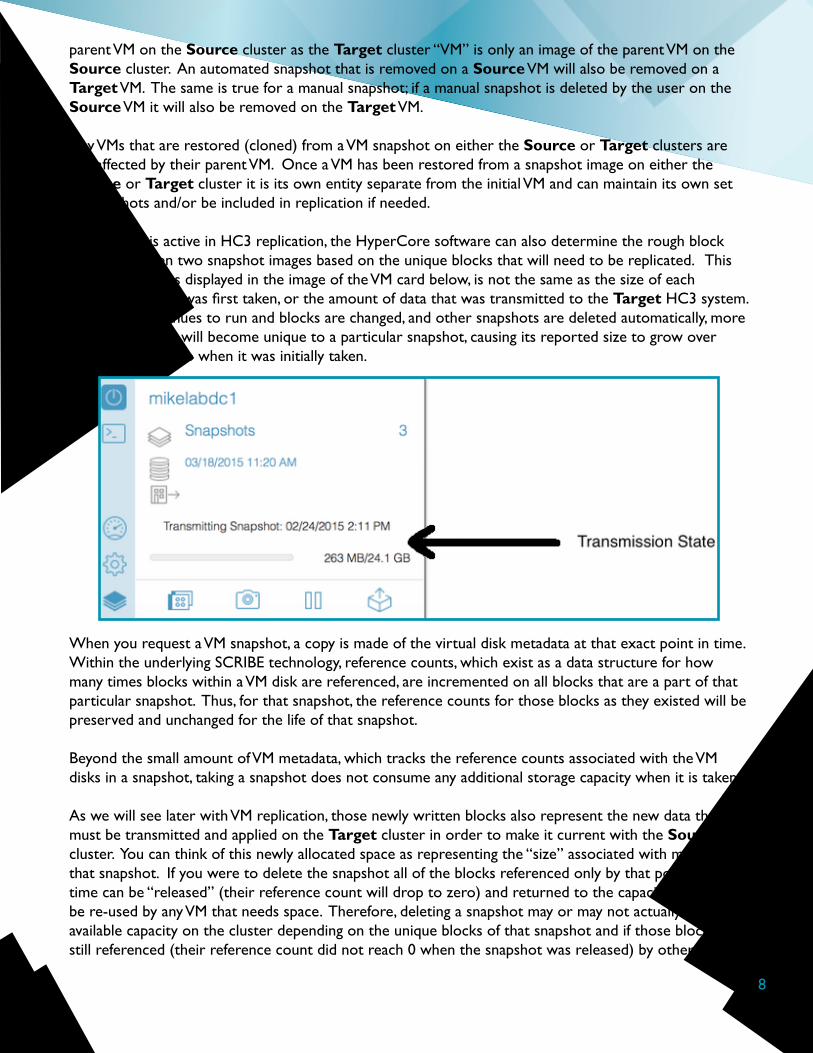
How Replication Utilizes HC3 SnapshotsBelow is an example of VMs replicated between a primary and DR site (a Source and Target cluster). We will follow these VMs--called A, B, and C on the Source cluster--through a Source cluster failure. In this scenario, VM B and VM C are critical VMs, and A is a minor VM.
These are the VMs as they stand in replication before the Source cluster failure. VM A, VM B, and VM C are all fully replicated on the Target cluster as VM A’, VM B’, and VM C’ respectively. Notice that VM B is a cloned VM of VM A and shares blocks (the red arrow on the Source cluster) with VM A. VM C is also cloned from VM B. All associated VMs and snapshots (VM A has two snapshots, VM B has three snapshots, and VM C has 1 snapshot) are fully replicated on the Target cluster.
Here, the Source cluster has failed in some way, preventing data access to the VMs. In order to enact the disaster recovery plan, VMs D and E have been cloned from the latest snapshots of VM image B’ and VM image C’ respectively. While the Source cluster is offline, VMs D and E on the Target cluster can pick up and continue production operations as normal until the Source cluster is available again.
Again, cloned VMs are their own entities separate from their parent VM, although they will still share some blocks of data (the red arrow on the Target cluster) between themselves and their parent VM to conserve cluster capacity and help with data redundancy.
primary site DR site
TIME
1
21
21
2
A
1
21
1
B
C
33
A’
B’
C’
primary site DR site
TIME
1
2
OFFLINE
1
21
2
A
1
21
1
1 1
B
C
33
A’
B’
C’D E
10
Configuring HC3 ReplicationHC3 replication is easier than ever to set up and initiate. Simply ensure your Source and Target clusters are able to communicate and it’s as easy as a few clicks. All of this information and more, including appendices of VM card states and images, can be found in the HyperCore User Guide v7 under Resources.
Snapshot Scheduling and ReplicationSnapshot schedules are utilized for VM replication in firmware version 6.5 and up. A VM that is set up for replication between Scale HC3 clusters will default to the Replication Default snapshot schedule if a custom snapshot schedule is not already assigned to the VM. The Replication Default schedule will take a snapshot every 15 minutes and keep 1 snapshot.
If a custom snapshot schedule is assigned to a VM after replication has already been running, the VM will continue forward with the custom snapshot settings and will no longer use the Replication Default schedule. With this in mind, the retention setting of a snapshot is created at the time that the snapshot is taken. If the snapshot schedule is changed on a particular VM, the system will not go back to prior snapshots and change their retention settings to match the new snapshot schedule. Only new snapshots will fall under the new snapshot schedule’s retention period. Existing snapshots will adhere to their original retention rule.
This same idea applies for any recurrence rule changes on an existing snapshot schedule. If a change is made to a snapshot schedule rule it will only apply to new snapshots taken for the VM; existing snapshots under the snapshot schedule will not be updated.
See the Snapshot Scheduling Feature Note under Resources for more information.
Configure a Remote Cluster ConnectionA Remote Cluster Connection must be set up with the Target cluster before you can initiate replication on the Source cluster VMs.
1. Open the Control Center Panel or the Snapshots and Replication screen on the VM card on what will be the Source cluster.
2. Click the Remote Clusters tab in the Control Center Panel or click Setup Replication next to the Replication icon in the Snapshots and Replication screen.
WARNING1. If a custom snapshot schedule is already assigned to a VM when
replication is initiated on the VM, the replication schedule will follow the custom snapshot schedule, NOT the default schedule.
2. Due to the relationship between snapshot scheduling and replication, when replication is paused, the snapshot schedule will be paused as well. No snapshots will be taken while replication is paused.
3. If a snapshot schedule is completely removed from an actively replicating VM, even if replication has not been paused on the VM, the VM will STOP replicating until a snapshot schedule is defined.
4. Always keep the assigned snapshot schedule in mind to ensure the VM is meeting your expected recovery point objectives when using HC3 VM replication.
11
3. Click + Add Cluster if you are working from the Remote Clusters tab.4. A popup dialog will appear.5. Enter the LAN IP of a node from the Target cluster in the Node field.6. Enter the Username and Password for the UI credentials to the Target cluster.7. Click Create to save the settings and initiate the replication connection.
Establish HC3 ReplicationOnce a Remote Cluster Connection has been established it only takes seconds to add a VM to HC3 replication.
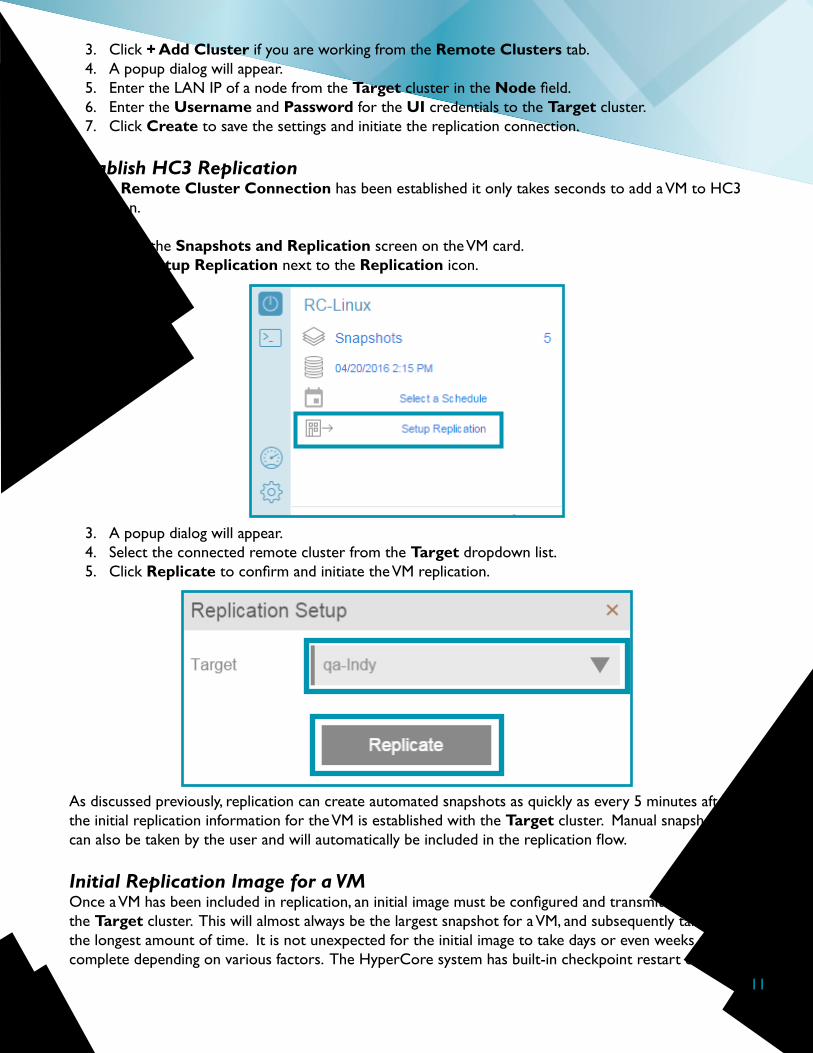
1. Open the Snapshots and Replication screen on the VM card.2. Click Setup Replication next to the Replication icon.
3. A popup dialog will appear.4. Select the connected remote cluster from the Target dropdown list.5. Click Replicate to confirm and initiate the VM replication.
As discussed previously, replication can create automated snapshots as quickly as every 5 minutes after the initial replication information for the VM is established with the Target cluster. Manual snapshots can also be taken by the user and will automatically be included in the replication flow.
Initial Replication Image for a VMOnce a VM has been included in replication, an initial image must be configured and transmitted to the Target cluster. This will almost always be the largest snapshot for a VM, and subsequently take the longest amount of time. It is not unexpected for the initial image to take days or even weeks to complete depending on various factors. The HyperCore system has built-in checkpoint restart capability

12
in the event of any disruptions during a prolonged replication job.
For example, let us assume a VM has a single 100 GiB disk (thin) provisioned, and of that 100 GiB disk, roughly 82 GB of actual data blocks have been written to that disk and therefore allocated.
When this VM is selected for replication, HC3 will automatically create a replication setup snapshot of the VM to allow it to be copied to the Target cluster the way it exists at that exact point in time. Replication will then begin copying and writing those 82 GB of allocated data blocks to the remote HC3 system. This is the first “full copy” of the VM snapshot. In this example, the first snapshot was 81.7GB as seen in the image below.
The length of time that the initial replication will take can depend on many factors but primarily comes down to the effective speed of the network available between the Source and Target clusters. The speed of the link between the clusters primarily drives the time to deliver the first replication setup snapshot. Other factors such as latency and congestion can be a factor if the link is a shared VPN link, for example. Additionally, in some cases disk I/O limits reading from the source cluster or writing to disk on the target cluster can impact the length of time to complete the replication setup snapshot. This is discussed in more detail in the Network Planning and Recovery Point Objectives section. Once the initial setup snapshot is transferred, the continuous VM replication process is under way and the system will begin taking automated snapshots. The time between automated snapshots will depend on the size of the block change from the previous snapshot and how long it took to send the previous changed blocks to the remote HC3 system.
Pause or Resume VM ReplicationIndividual VM replication can be paused indefinitely to be easily resumed at a later date as needed.
1. Open the Snapshots and Replication screen on the VM card on the Source cluster.Pause2. Click the Pause Replication icon.3. VM replication will pause.Resume2. Click the Resume Replication icon.3. VM replication will resume.
Cancel Virtual Machine ReplicationIndividual VM replication can be paused at any time to be easily resumed at a later date as needed. However, the VM must remain in the paused state indefinitely for replication.
If you wish only to free Target cluster capacity, it is possible to first pause VM replication and then delete the VM replication card on the Target cluster. This would require replication to retransmit from the current VM state when it is resumed, but would free any necessary capacity on the Target cluster.
If you wish to delete replication completely from a VM and do not plan to ever replicate the VM again, this is not currently possible due to the intended design of HC3 replication. There is a workaround if you do not wish to leave a VM replication paused that requires a small maintenance window to switch to
13
a clone VM of the VM being replicated.1. Open the Snapshots and Replication screen on the VM card on the Source cluster.2. Click the Pause Replication icon.3. VM replication will pause.4. While still on the Source cluster, create a clone of the VM with the paused replication. The
original VM with the paused replication will be known as the Parent VM. The cloned VM that does not have replication will be known as the Clone VM.
5. Shutdown the Parent VM.6. Power on the Clone VM. The Clone VM will be used as the primary VM going forward. The
time to transition from the Parent VM to the Clone VM will be the required downtime for this process.
7. The Clone VM is now the primary VM and has not been configured as part of the replication job.8. Delete the Parent VM once the Clone VM has been verified to be working correctly.
HC3 Replication FailoverThe process for recovering a replicated VM on a Target HC3 cluster leverages the same cloning capability as you would use to clone a VM or to roll back to a previous snapshot on a normal VM on an existing cluster. The only difference is that the VM that is “restored” from the snapshot will be cloned from a replicated VM snapshot.
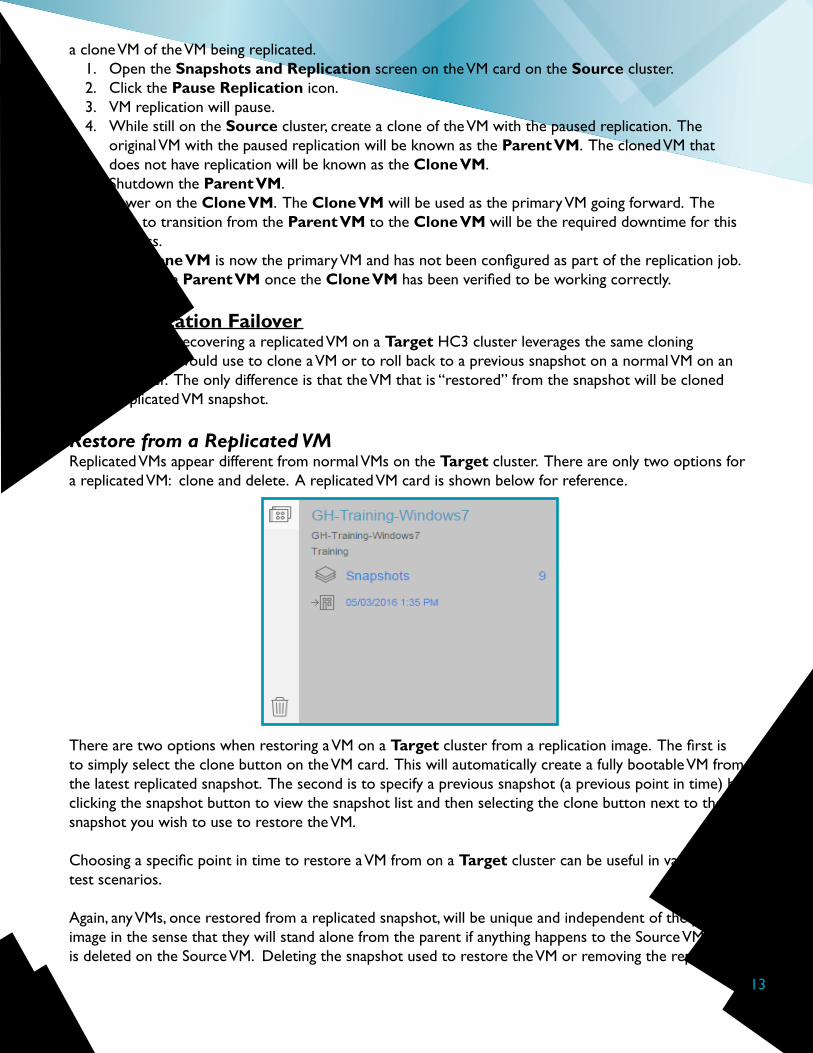
Restore from a Replicated VMReplicated VMs appear different from normal VMs on the Target cluster. There are only two options for a replicated VM: clone and delete. A replicated VM card is shown below for reference.
There are two options when restoring a VM on a Target cluster from a replication image. The first is to simply select the clone button on the VM card. This will automatically create a fully bootable VM from the latest replicated snapshot. The second is to specify a previous snapshot (a previous point in time) by clicking the snapshot button to view the snapshot list and then selecting the clone button next to the snapshot you wish to use to restore the VM.
Choosing a specific point in time to restore a VM from on a Target cluster can be useful in various DR test scenarios.
Again, any VMs, once restored from a replicated snapshot, will be unique and independent of the parent image in the sense that they will stand alone from the parent if anything happens to the Source VM or is deleted on the Source VM. Deleting the snapshot used to restore the VM or removing the replicated
14
VM will not impact any cloned VMs. More information on this is covered in the next section, Replicate Back to a Source Cluster.
In a true disaster recovery scenario, steps will generally be required to provision a VM with an IP on the new network local to the Target cluster site and redirect users to the VM running in the new location. An easy way to do this is to have a secondary NIC set up on the Source VM with the Target cluster IP network information. Keep this NIC disconnected while the Source VM is up and available. Then, in a DR scenario, disconnect the original NIC once a VM has been restored and connect the Target network NIC to make the VM quickly and easily accessible. By statically addressing these NICs, you can also plan in advance for user redirection in any failover scenarios.
Replicate Back to a Source ClusterIn the event of either a DR test or an actual outage at the production site, once the test is complete or the issue has been rectified failing back is a simple task. In short, we are reversing the process used to engage the DR procedures.
DR Assumptions:• The production VMs are running as clones from the replicated VMs.• Network connectivity is in place between the two clusters.• Appropriate measures are in place to avoid multiple IPs or IP conflict issues on the network.
If the remote connection for replication between the two clusters was disrupted, you will have been notified of the loss of connectivity via an alert, a UI message, and an action item in the UI. If necessary, re-establish the remote cluster connection using the steps in Configure a Remote Cluster Connection.
Once the clusters are communicating correctly you can initiate replication back to the Source cluster using the restored VMs from the Target cluster.
1. Open the Snapshots and Replication screen on the restored VM card on the Target cluster.2. Click Setup Replication next to the Replication icon.3. A popup dialog will appear.4. Select the connected remote cluster from the Target dropdown list.5. Click Replicate to confirm and initiate the VM replication back to the Source cluster.
NOTE: Cloning a VM, even from a replication image, will change the MAC address of its virtual NICs. If you have applications that depend on a fixed MAC address for licensing or other needs you can manually edit the assigned MAC address before booting the VM. An easy way to do this would be to put the required MAC address into the VM description so that it is handy for DR scenarios.
WARNINGNetwork adapters (VM NICs) are attached to restored VMs on the Target cluster and still have the existing guest configuration from the Source cluster. Take action to ensure that duplicate VM identities (based on IP address) are not going to cause problems to a production environment. Disconnecting NICs on restored VMs for a DR test is a sound way to avoid any potential conflicts.

15
Now that replication is underway back to the Source cluster, here are a few things to consider:1. If the data was not destroyed on the Source cluster and the original parent VM on the Source
cluster still exists, HyperCore will understand this.• The Target VM restored from the replication image for the DR test or scenario is a descendant of the parent VM on the Source cluster.
• As a descendant, the Target cluster VM shares many blocks from its parent VM.• Only data that has been changed from the time the Source cluster was offline and the restored VM on the target cluster was powered on, to the time it took to re-establish the replication job, will need to be sent back to the Source cluster.
2. If the data was destroyed on the Source cluster and the cluster is empty, all VMs will be replicated with the entire VM disk layout back to the Source cluster (based on allocated space as discussed in the HC3 Snapshots section).
• Automated replication snapshots will still take place as the data changes on the DR cluster.• Once the replication setup snapshot has transmitted, you can begin failing over on the Source cluster if desired (by cloning from the new replicated VM snapshots in the same way as on the DR cluster).
Below is a continuation of our example images from the How Replication Utilizes HC3 Snapshots section. As stated, the process is the same to bring restored VMs running on the Target cluster back to the Source cluster after a test or actual disaster scenario.
Here, replication has been established back to the Source cluster from the Target cluster VMs D and E that were handling production operations after the failover in the last section. Notice that as long as the original VMs are still operational on the Source cluster that they will identify the returning information (the gold arrows) in the same way cloned VMs can be identified by parent VMs and often share blocks of data. This makes the replication process back to the Source cluster as streamlined as possible.
Once VM images D’ and E’ have completed their initial replication image, VMs can again be cloned from them on the Source cluster and the production VM information can be brought back up on the original Source (primary site) cluster following the disaster scenario.
primary site DR site
TIME
1
21
21
2
A
22
1
21
1
1
2
1
2
B
C
33
A’
B’
C’D E
D’ E’
16
Network Planning and Recovery Point ObjectivesHyperCore replication does utilize block compression for network traffic by default for all replication jobs. However, the effective speed of transmitting data over a wide area network will still be the limiting factor as to how quickly data can be transmitted. This speed is also a key factor to HC3 replication performance and stability. The effective network speed also impacts the realistic Recovery Point Objectives (RPO) available on the HC3 clusters.
Beyond the speed of the link itself there may be other factors such as the overhead of the network protocols, other traffic that may be sharing the link, network latency, packet loss or retransmission, and any QoS bandwidth limits or priorities enforced by the network(s) between clusters. The performance and capabilities of the WAN routers may also be a factor and specialized “WAN Optimization” routers or virtual appliances can be considered for longer distance links where higher round-trip network latency may prevent standard network protocols from being able to effectively utilize the full network link.
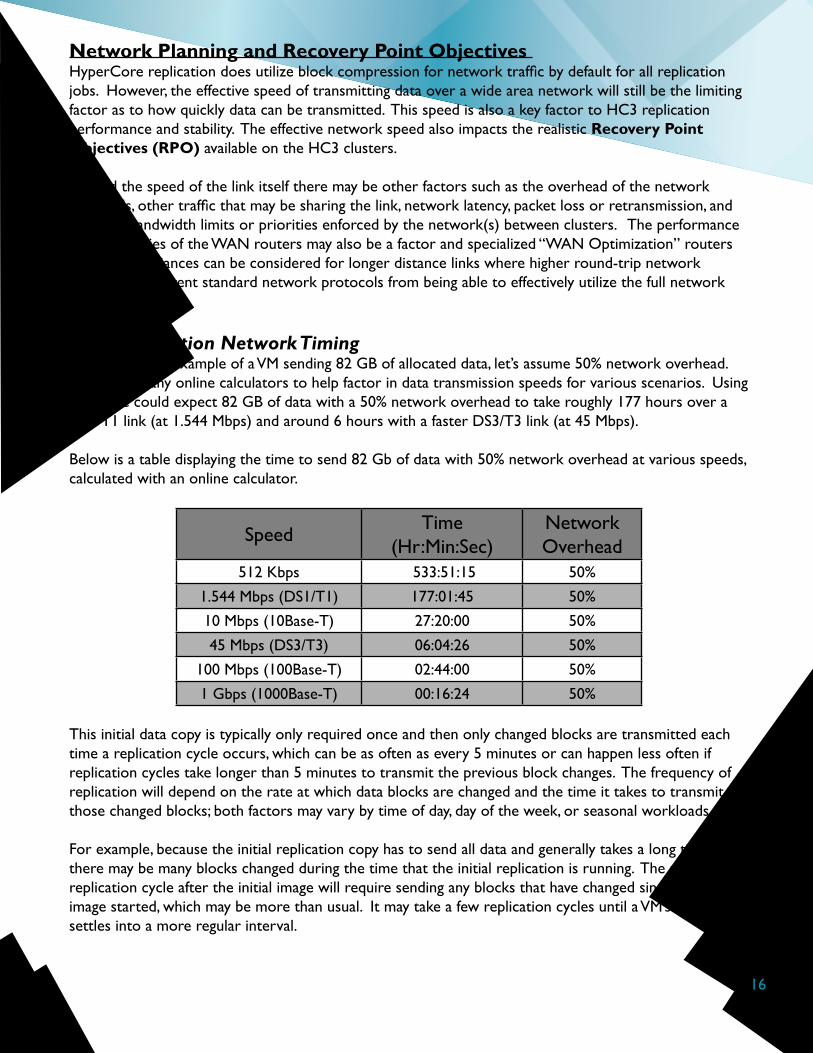
HC3 Replication Network TimingIn our previous example of a VM sending 82 GB of allocated data, let’s assume 50% network overhead. There are many online calculators to help factor in data transmission speeds for various scenarios. Using these, we could expect 82 GB of data with a 50% network overhead to take roughly 177 hours over a slow T1 link (at 1.544 Mbps) and around 6 hours with a faster DS3/T3 link (at 45 Mbps).
Below is a table displaying the time to send 82 Gb of data with 50% network overhead at various speeds, calculated with an online calculator.
Speed Time (Hr:Min:Sec)
Network Overhead
512 Kbps 533:51:15 50%
1.544 Mbps (DS1/T1) 177:01:45 50%
10 Mbps (10Base-T) 27:20:00 50%
45 Mbps (DS3/T3) 06:04:26 50%
100 Mbps (100Base-T) 02:44:00 50%
1 Gbps (1000Base-T) 00:16:24 50%
This initial data copy is typically only required once and then only changed blocks are transmitted each time a replication cycle occurs, which can be as often as every 5 minutes or can happen less often if replication cycles take longer than 5 minutes to transmit the previous block changes. The frequency of replication will depend on the rate at which data blocks are changed and the time it takes to transmit those changed blocks; both factors may vary by time of day, day of the week, or seasonal workloads.
For example, because the initial replication copy has to send all data and generally takes a long time, there may be many blocks changed during the time that the initial replication is running. The next replication cycle after the initial image will require sending any blocks that have changed since the first image started, which may be more than usual. It may take a few replication cycles until a VM’s replication settles into a more regular interval.
17
Some applications may have higher change rates when users are most active during the day or work week, or when background “batch” processes--usually scheduled for nights or weekends--are run. If the same data blocks change multiple times between replication snapshots (even hundreds), that block only needs to be transmitted once (containing the final change made during that replication cycle). Longer replication cycles result in less data having to be sent, which helps to get “caught up” in the replication process in a more timely fashion.
Wanos is a free third party WAN optimization software that has been seen to run in an HC3 VM on the cluster. This is a tool that could be useful in some network environments to help with network optimization for replication.
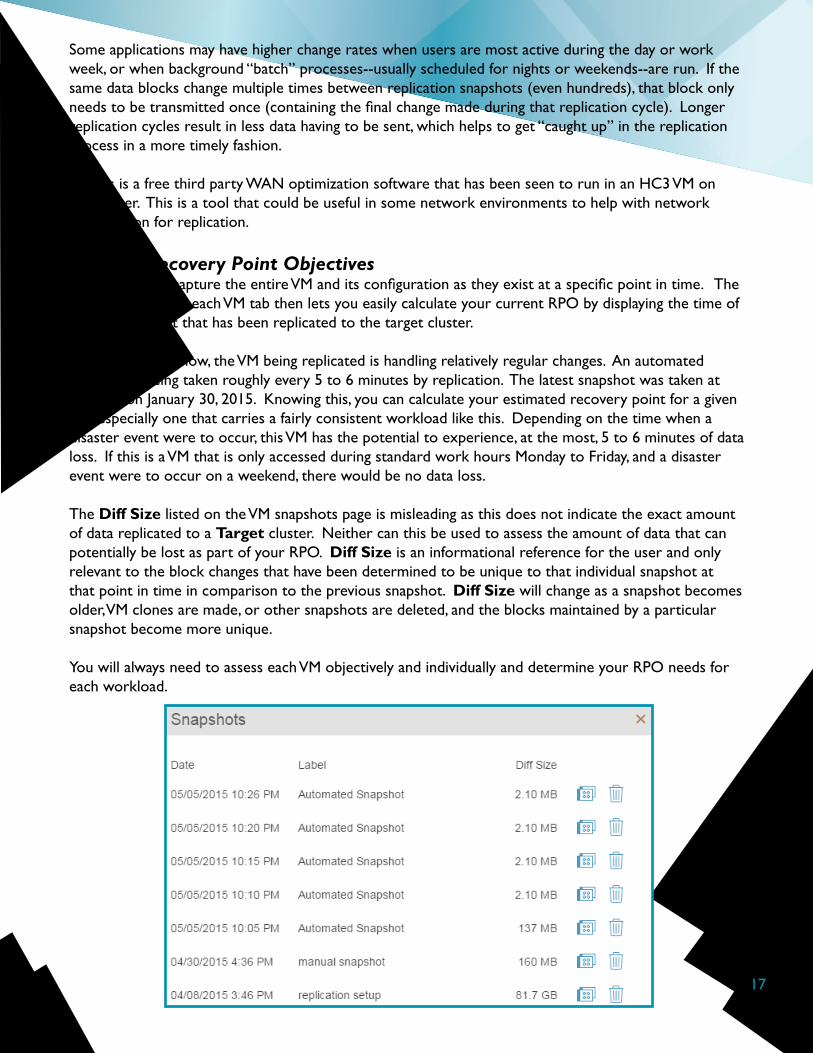
Disaster Recovery Point ObjectivesHC3 snapshots capture the entire VM and its configuration as they exist at a specific point in time. The snapshots page on each VM tab then lets you easily calculate your current RPO by displaying the time of the last snapshot that has been replicated to the target cluster.
In the example below, the VM being replicated is handling relatively regular changes. An automated snapshot is being taken roughly every 5 to 6 minutes by replication. The latest snapshot was taken at 3:48 PM on January 30, 2015. Knowing this, you can calculate your estimated recovery point for a given VM, especially one that carries a fairly consistent workload like this. Depending on the time when a disaster event were to occur, this VM has the potential to experience, at the most, 5 to 6 minutes of data loss. If this is a VM that is only accessed during standard work hours Monday to Friday, and a disaster event were to occur on a weekend, there would be no data loss.
The Diff Size listed on the VM snapshots page is misleading as this does not indicate the exact amount of data replicated to a Target cluster. Neither can this be used to assess the amount of data that can potentially be lost as part of your RPO. Diff Size is an informational reference for the user and only relevant to the block changes that have been determined to be unique to that individual snapshot at that point in time in comparison to the previous snapshot. Diff Size will change as a snapshot becomes older, VM clones are made, or other snapshots are deleted, and the blocks maintained by a particular snapshot become more unique.
You will always need to assess each VM objectively and individually and determine your RPO needs for each workload.
18
Frequently Asked QuestionsThis section contains questions frequently asked about HC3 replication. The questions have been split into relevant groups.
I/O Impact and SizingQ: Is there any I/O impact seen by turning on replication?A: Yes. Customers should expect an increase in cluster I/O related to replication. Essentially, any blocks that are changed or written will later have to be read when it’s time to transmit those changes to the remote cluster. This will cause additional read I/O. In addition, replication leverages multiple snapshots which are frequently created, mounted, dismounted and eventually deleted which will also cause additional I/O as replication updates that snapshot metadata and manages RSD block reference counts.
It is recommended that the HC3 system is not utilizing more than 50-75% of their cluster’s I/O capacity before enabling replication. It is never a good idea to run clusters with high I/O peaks (90% plus). If this is an existing HC3 system, please engage Scale Computing Support to determine the I/O usage as part of the sizing for a remote cluster.
Supported HC3 Hardware ConfigurationsQ: Can I use storage only nodes as a DR target?A: Yes. A DR target does not require compute nodes if a customer just requires getting the data off-site. For some customers it might make sense to only add a pair of compute nodes (or more) to the DR cluster in the event of a disaster. Adding the minimum amount of compute nodes will allow the VMs to actually be started on the DR cluster at that point. Q: Is a configuration of 2 compute nodes and 1 storage only node valid?A: Yes. The storage of the nodes would all need to match in terms of speed and capacity for the cluster to initialize. Keep in mind that the one of the HC3 node’s compute resources would effectively be idle when planning for failover. Keep in mind that this can also be used as a DR target cluster configuration. Q: Can I replicate between SSD and non-SSD clusters (Tiered HC3 nodes and standard HC3 nodes)?A: Yes. It is possible to replicate between Tiered and non-Tiered clusters. Any VMs utilized on the non-SSD nodes —non-Tiered HC3 nodes—will not have access to HEAT prioritization, however.
Q: Are there any documented limits of HyperCore?A: Yes. Follow the HyperCore Support Matrix for the most up-to-date information on HyperCore limits. The document can be found in the Technical section of the Resources page online: http://www.scalecomputing.com/resources/technical-resources/.
ResourcesAdditional informational and technical resources from Scale:
• Snapshot Scheduling Feature Note• HyperCore Enhanced Automated Tiering (HEAT) Feature Note• HC3, SCRIBE, and HyperCore Theory of Operations• HyperCore User Guide v7• Technical Documentation: http://www.scalecomputing.com/documents• Replication Video: https://www.youtube.com/watch?v=i79F8K218w8

19
Additional informational and technical resources from third parties:• Bandwidth Calculator: http://www.numion.com/calculators/Time.html• Wanos: http://wanos.co/wan-optimization/
Provide Feedback or Contact SupportIf you have comments or suggestions regarding this document or other Scale Computing documentation, you can send them to [email protected].
If you need help, call +1-877-SCALE-59 (877-722-5359), and someone from the Scale Computing Technical Support Team will be happy to help you. You can also email Scale Computing Technical Support at [email protected] or find them on the web at www.scalecomputing.com.
DisclaimerAny information listed here is supplement to the HC3 User Guide, product information, and Knowledge base. Scale Computing is not responsible for any issues or damages arising out of the use of this feature note or use of third party applications or products mentioned in this feature note.


![Mastering the Media Interview [HC3]](https://img.pdfslide.us/doc/110x75/577d35971a28ab3a6b90df4d/mastering-the-media-interview-hc3.jpg)
![Diversity Marketing Outreach: An Update [HC3]](https://img.pdfslide.us/doc/110x75/577d33f11a28ab3a6b8c2a66/diversity-marketing-outreach-an-update-hc3.jpg)


![Making Yourself Known in the Blogosphere [HC3]](https://img.pdfslide.us/doc/110x75/577d353e1a28ab3a6b8fe46d/making-yourself-known-in-the-blogosphere-hc3.jpg)


![Whither Twitter: Why, How and When to Tweet [HC3]](https://img.pdfslide.us/doc/110x75/577d2ac71a28ab4e1eaa118a/whither-twitter-why-how-and-when-to-tweet-hc3.jpg)

