Embed Size (px)
Citation preview

scco_mesh_intro_workbook_v160611.docx 1
Hands-on MESH Network Workshop Student Workbook
Santa Clara County RACES
Date: 18 June 2016
Version: 2.0

scco_mesh_intro_workbook_v160611.docx 2
TableofContents1. HANDS ON! Exercise #1: Looking at your Network Configuration ................................................................................ 3
1. HANDS ON! Exercise #2: Cable Inspection .................................................................................................................... 9
3. HANDS ON! Exercise #3: Checking out the Mesh Node configuration ....................................................................... 10
4. HANDS ON! Exercise #4: VoIP Phone configuration ................................................................................................... 17
5. HANDS ON! Exercise #5: iPhone, Android and media5‐fone (OPTIONAL) .................................................................. 24

scco_mesh_intro_workbook_v160611.docx 3
1. HANDS ON! Exercise #1: Looking at your Network Configuration
This exercise will help you answer 4 questions:
1. Who am I? (network speaking) 2. What’s my name? 3. Is my network working? 4. Who else is out there?
NOTE! Before beginning, make sure you are connected to the wireless network named
“Mesh_Workshop”
NOTE! For Apple users, differences in commands are listed with a in front of the line. Consult any
Apple users that are in the room.
Step 1 Run the Program: cmd
1. The cmd program brings up the Windows Command Line prompt.
2. To run cmd, go to Windows Start. Enter cmd in the run field or in the “Search programs or files” field.
3. Windows 10: Right‐click on the start icon (lower left in the tool bar), and then select the
Run menu option. Enter cmd in the field presented, and then press Enter to run the program.
4. Verify the Command Prompt window opens, and you are presented with a prompt (your
login followed by a “>”).
Go to a to Applications, and run Terminal

scco_mesh_intro_workbook_v160611.docx 4
Step 2 WHO AM I?... Running the Program: ipconfig
1. ipconfig displays the IP address, subnet mask, and default gateway for all network interfaces you have installed.
2. Run ipconfig from the cmd prompt. Try these command strings:
a. ipconfig ? (shows help for ipconfig)
b. ipconfig (displays your network Configuration)
(Example; partial listing shown here, your listing will be different)
Run ifconfig from the Terminal. This displays all your network interfaces.
(Example; partial listing shown here, your listing will be different)

scco_mesh_intro_workbook_v160611.docx 5
Step 3 1. After running ipconfig, Review the listing, and…
a. find your IP Address (IPv4 version) _____________________
find your IP Address (labeled “inet”) _____________________
Step 4 1. Run ipconfig from the cmd prompt. Try these command strings:
a. ipconfig /all (displays a lot of network info)
ifconfig (same listing as above)
2. From your listing,
a. Find your PC’s MAC address (listed as the Physical Address): Ethernet Adaptor _____________________ Wireless LAN Adaptor _____________________
Note: The MAC address for each network interface is labelled "ether".
Step 5 WHAT’S MY NAME?... Running the Program: hostname 1. This program displays the name of your computer. 2. Run hostname from the cmd prompt.
a. hostname (returns the computer name)
3. After running hostname, from your listing,
a. find you’re your computer name _____________________

scco_mesh_intro_workbook_v160611.docx 6
Step 6 IS MY NETWORK WORKING? Running the Program: ping 1. This program is used to test the “reachability” of a host on an IP network and to
measure the round‐trip time for messages sent from the originating host (you) to a destination computer.
2. Run ping from the cmd prompt, these 4 options.
a. ping (returns help for this command)
b. ping 127.0.0.1 (your loopback address)
c. ping localhost (another name for your local PC)
d. ping <computer name> (using your computer name)
3. What were the results of the 4 ping runs? 4. How were the results of the other 3 methods for pinging yourself?

scco_mesh_intro_workbook_v160611.docx 7
Step 7 WHO ELSE IS OUT THERE? ... Using the Program: Angry IP Scanner Angry IP scanner is a very fast IP address and port scanner. It can scan IP addresses in any range as well as any of their ports. The program pings each IP address to check if it’s alive, then optionally resolves its hostname, determines the MAC address, scans ports, etc.
NOTE: Before beginning, make sure you have installed this program and the associated
Java RTE if prompted.
Configure IP Scanner 1. Find and run the program. 2. Select additional data to be retrieved. From the program’s menu,
a. select Tools > Fetchers b. Under the right column labeled Available fetchers, highlight the entry
“MAC Address”, and then press the [ << ] button to add it to the Selected fetchers list on the left.
c. Next, select “MAC Vendor”, and then press the [ << ] button to add it as well. d. Verify the entries “MAC Address” and “MAC Vendor” are now listed in the left
column. e. Press [ OK ] when done.
3. Select the data to be displayed. From the program’s menu,
a. Select Tools > Preferences b. On the Scanning Tab, check the option:
i. Scan dead hosts, which do not reply to pings (see the notes under Step 8).
c. On the Display Tab, click on the option: i. Alive hosts, (responding to pings) only
d. Press [ OK ] when done.
scco_mesh_intro_workbook_v160611.docx 8
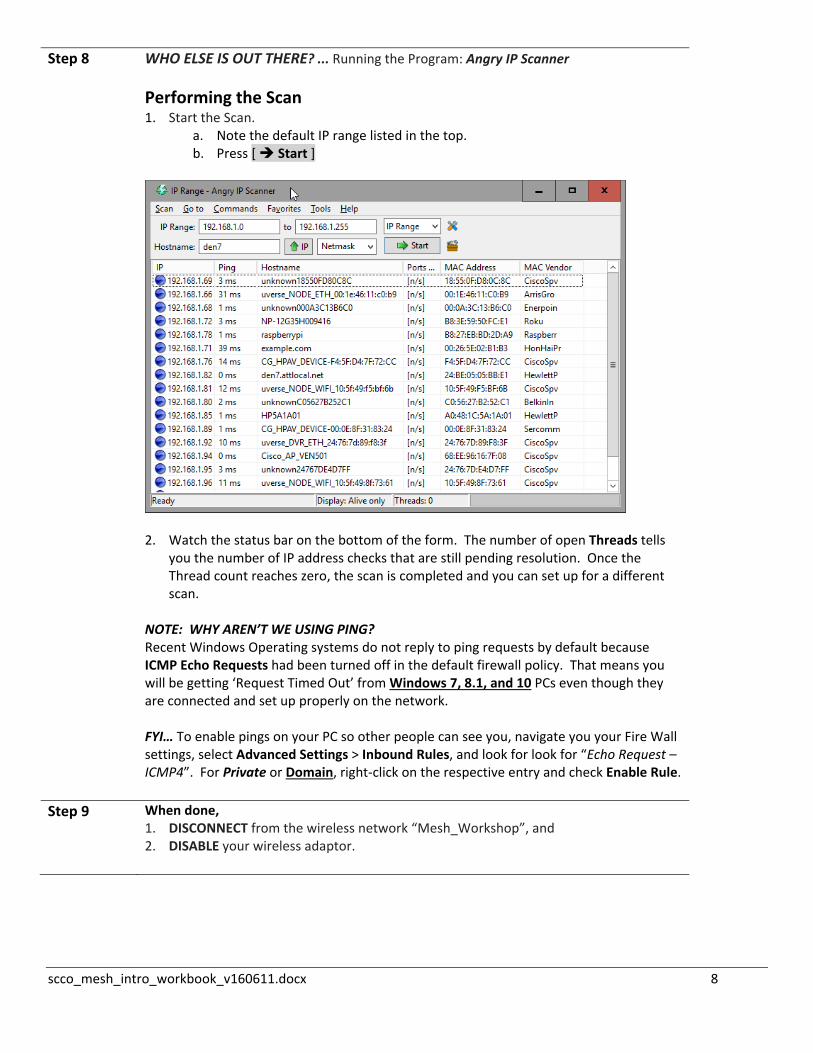
Step 8 WHO ELSE IS OUT THERE? ... Running the Program: Angry IP Scanner
Performing the Scan 1. Start the Scan.
a. Note the default IP range listed in the top. b. Press [ Start ]
2. Watch the status bar on the bottom of the form. The number of open Threads tells
you the number of IP address checks that are still pending resolution. Once the Thread count reaches zero, the scan is completed and you can set up for a different scan.
NOTE: WHY AREN’T WE USING PING? Recent Windows Operating systems do not reply to ping requests by default because ICMP Echo Requests had been turned off in the default firewall policy. That means you will be getting ‘Request Timed Out’ from Windows 7, 8.1, and 10 PCs even though they are connected and set up properly on the network. FYI… To enable pings on your PC so other people can see you, navigate you your Fire Wall settings, select Advanced Settings > Inbound Rules, and look for look for “Echo Request – ICMP4”. For Private or Domain, right‐click on the respective entry and check Enable Rule.
Step 9 When done, 1. DISCONNECT from the wireless network “Mesh_Workshop”, and 2. DISABLE your wireless adaptor.

scco_mesh_intro_workbook_v160611.docx 9
1. HANDS ON! Exercise #2: Cable Inspection
This exercise gives you a chance to get to know your Ethernet Cable.
Step 1
1. Most Category cables provide a variety of information printed right on the cable.
There is no standard way the information is presented, but you should see something printed on the cable that gives you a hint to some or all of the following. Take a look at your CAT cable. Record your observations here:
a. Category: ______________________________________________
b. Wire Gauge (a number followed by AWG): ____________________
c. Number of Pairs (#P or spelled out): ____________________
d. Connector Type: ________________________________________
Hint: Look for : TIA/EIA 568A TIA/EIA 568B.1 TIA/EIA 568B.2
e. Other Cable Marking: _________________________________
Step 2
2. On your cable connector, note the pin‐outs:
Pin Color Pin Color
1 1
2 2
3 3
4 4
5 5
6 6
7 7
8 8

scco_mesh_intro_workbook_v160611.docx 10
3. HANDS ON! Exercise #3: Checking out the Mesh Node configuration
This exercise walks you through an initial inspection of the mesh node using BBHN’s user Interface.
Step 1 Your Linksys Router
NOTE! All nodes in the workshop are assumed to be already loaded with the MESH firmware V3.0.0 or greater.
NOTE! DISABLE your wireless adaptor before proceeding. Wireless access to the Mesh Node from your PC is not supported.
1. Connect your PC/Laptop to the Linksys WRT54G Mesh Node with your Ethernet cable.
2. Apply Power to the Linksys Router. The boot process should take about 1 minute. Once the DMZ LED goes out, the node is ready for use.
3. On your PC, run the cmd Program. Then, run the ipconfig program to view your IP address. Record your IP address here.
a. Your IP Address ___________________________________________
4. VERIFY that an IP address has been assigned AND is in the range 10.###.###.###. If it is not, STOP! Do not proceed. Check your cable or Modem Power. Reboot your PC if necessary. Turn off your Wi‐Fi!
Step 2 Accessing the Linksys / Mesh configuration
1. Start up your browser.
2. Enter the following in the URL field: http://localnode:8080
3. The first thing you will see is a redirect page:
scco_mesh_intro_workbook_v160611.docx 11
Step 2 (continued)
Accessing the Linksys / Mesh configuration
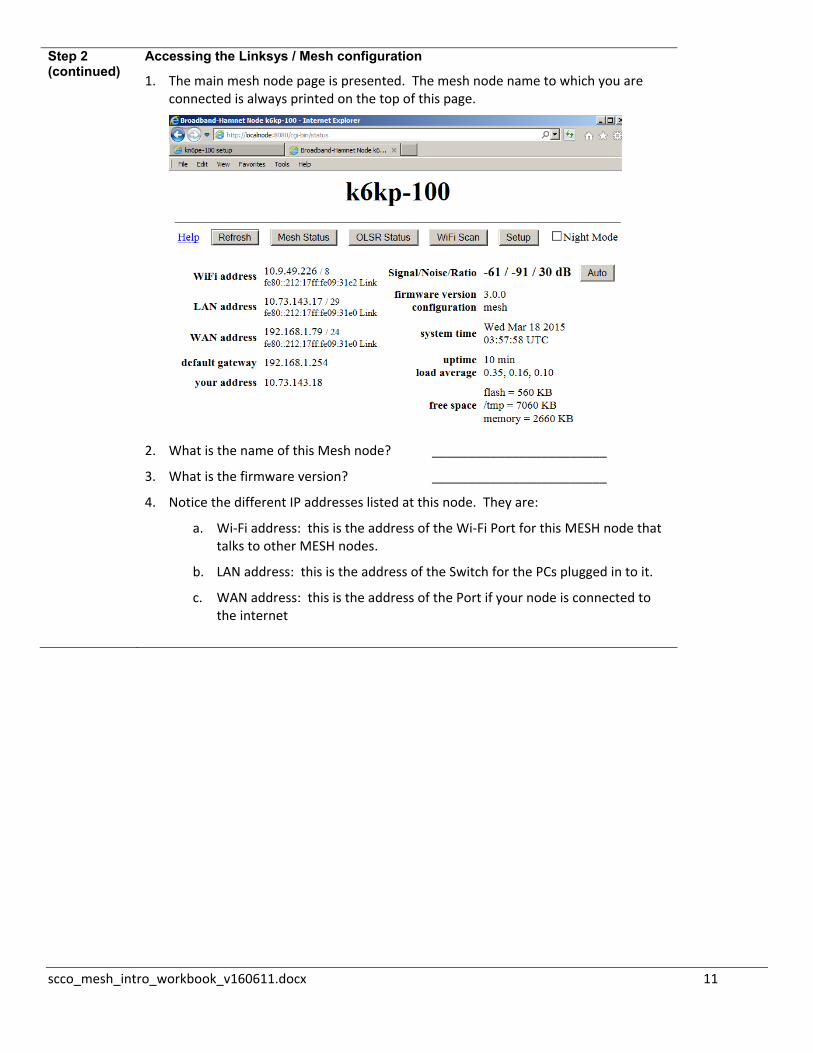
1. The main mesh node page is presented. The mesh node name to which you are connected is always printed on the top of this page.
2. What is the name of this Mesh node? ________________________
3. What is the firmware version? ________________________
4. Notice the different IP addresses listed at this node. They are:
a. Wi‐Fi address: this is the address of the Wi‐Fi Port for this MESH node that talks to other MESH nodes.
b. LAN address: this is the address of the Switch for the PCs plugged in to it.
c. WAN address: this is the address of the Port if your node is connected to the internet

scco_mesh_intro_workbook_v160611.docx 12
Step 3 Looking at the Mesh Status
1. Press the Mesh Status button. This form reports the local Host name (your Mesh Node name) and the list of Mesh Node neighbors that you can hear.
2. Other controls on this page are: a. Refresh: one‐time refresh of the results on this page. b. Auto: automatically refreshes the results of this page about every 10
seconds. c. Quit: Exits this page and returns to the main status page.
3. Note the list of neighbors and any services they offer. In the above example, you see the following:
a. Neighbor: kn6pe‐100. Alias: sccserver
b. Services: HTTP: This neighbor offers HTTP web services SIP: This neighbor offers SIP (PBX Phone ) services
4. List a few of your Current Neighbors and their services that you see: 1. Neighbor: ____________________, Services: _______________________ 2. Neighbor: ____________________, Services: _______________________ 3. Neighbor: ____________________, Services: _______________________
5. Click on any one of your Current Neighbors links. What happens? ____________________________________________________________
a. Note the Web address in your browser address line. ______________________________________________________
6. Press the Browser Back button to your own node (Hint: or re‐enter “http://localnode:8080” if you are not sure where you are).
7. When done, press Quit.

scco_mesh_intro_workbook_v160611.docx 13
STEP 4 Other Mesh Page tabs
1. From your node’s home page, a. Press WiFi Scan. This displays the list of all the Wi‐Fi nodes that are within
range of your node. Node the Signal Level in Column 1.
b. Notice all the entries that are standard Wi‐Fi routers that you might hear.
c. Note the entry with the SSID that says BroadbandHamnet‐20‐v3. These are other BBHN Mesh Nodes that you can hear.
d. What is the Channel Assignment for the BBHN nodes? _______________
e. If there is a “*” in the Enc column, this means that the channel is encrypted. Note that the Broadband Hamnet nodes are not encrypted per Part 97 rules.
f. Also, not the different MAC address representation: ######:######. This is the same MAX number but in a different format.

scco_mesh_intro_workbook_v160611.docx 14
Step 5 Setup/Basic Setup
1. To access the Setup menu, you need to enter the mesh node logon and password: a. Logon: root b. Password: mesh (or contact the node owner for the password)
NOTE: if you manage your own Mesh node, DO NOT FORGET your password. The method for resetting the password is non‐trivial .
2. After the logon form, the Basic Setup page shows the basic information for your node.
Confirm these settings: a. Node Type: Set to Mesh Node. b. LAN Mode: Set to 5 Host Direct. c. WAN Protocol: Set to DHCP.
3. Under the LAN column, note that DHCP Server is checked and the Starting and Ending DHCP Addresses. In the above example, the IP Address range is: 10.73.143.18 to 10.73.143.22; your listing will be different. Who on your node has these IP Addresses?
a. IP addr _________________ Owner: ________________________
b. IP addr _________________ Owner: ________________________
c. IP addr _________________ Owner: ________________________
d. IP addr _________________ Owner: ________________________
e. IP addr _________________ Owner: ________________________

scco_mesh_intro_workbook_v160611.docx 15
4. Change LAN Mode from 5 host Direct to another option like 13 Host Direct. What happens to the available IP address range? Change it back when done.
5. On your PC, run the Angry IP Scanner Program.
a. Note the IP Range: ______________________________________
b. Do you recognize any other devices connected to your local node?
STEP 6 Setup/Port Forwarding, DHCP, and Services
6. Click on the Port Forwarding, DHCP, and Services link.
7. This page shows the following:
a. DHCP Reservations. Sometimes, it is important that a device’s IP address does not change, such as a VoIP server (the phones need to know where it is all the time). This is the way to “lock in” an IP Address regardless of when and where it is plugged into this Mesh Node.
b. Current DHCP Leases. This shows what devices have been assigned an IP address by this node. Note the associated MAC address. Hover over the Add button; this creates a DHCP reservation for the associated device
c. Advertised Services. This lets you set up a device and have it advertise an available network service to the rest of the network.
d. Port Forwarding. If we are connected to the internet, this can add a port forwarding rule to the router portion of the node.
scco_mesh_intro_workbook_v160611.docx 16
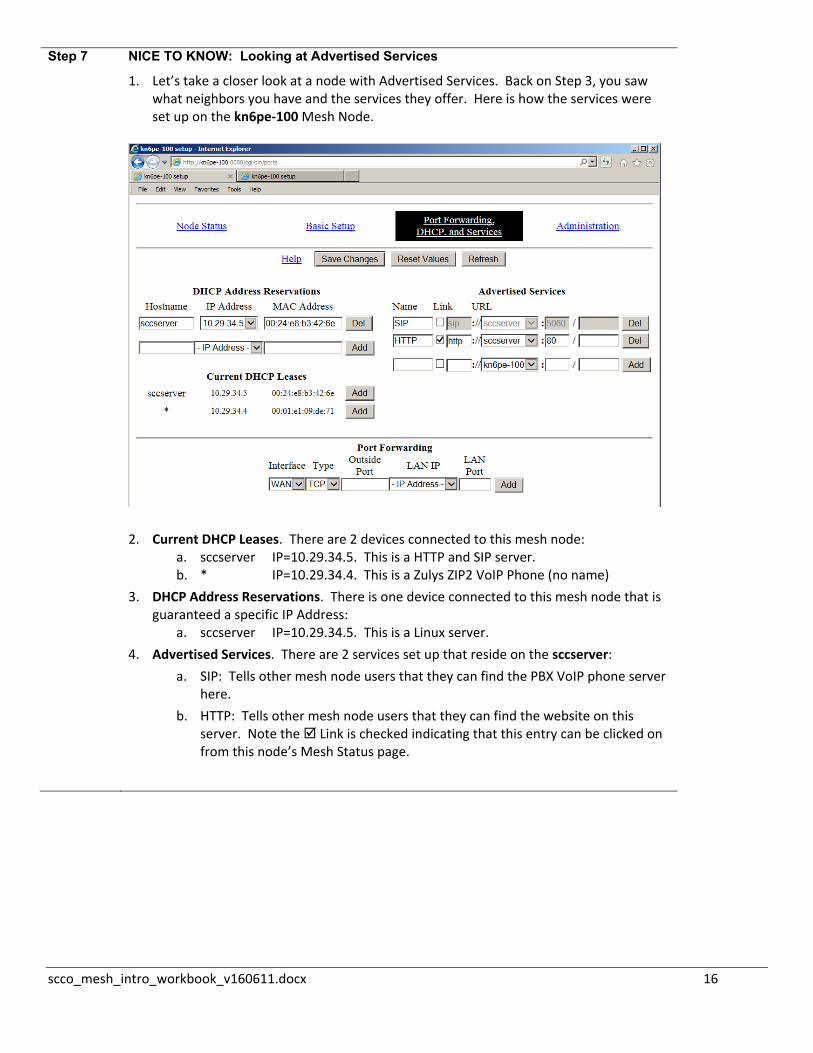
Step 7 NICE TO KNOW: Looking at Advertised Services
1. Let’s take a closer look at a node with Advertised Services. Back on Step 3, you saw what neighbors you have and the services they offer. Here is how the services were set up on the kn6pe‐100 Mesh Node.
2. Current DHCP Leases. There are 2 devices connected to this mesh node: a. sccserver IP=10.29.34.5. This is a HTTP and SIP server. b. * IP=10.29.34.4. This is a Zulys ZIP2 VoIP Phone (no name)
3. DHCP Address Reservations. There is one device connected to this mesh node that is guaranteed a specific IP Address:
a. sccserver IP=10.29.34.5. This is a Linux server.
4. Advertised Services. There are 2 services set up that reside on the sccserver:
a. SIP: Tells other mesh node users that they can find the PBX VoIP phone server here.
b. HTTP: Tells other mesh node users that they can find the website on this server. Note the Link is checked indicating that this entry can be clicked on from this node’s Mesh Status page.

scco_mesh_intro_workbook_v160611.docx 17
1. HANDS ON! Exercise #4: VoIP Phone configuration
This exercise walks you through the setup of your VoIP phone.
Step 1 Getting started
NOTE: These instructions assume a Zultys ZIP2 VoIP phone. If you have some version of the ZIP phone brand (such as ZIP2+ or ZIP2x2), or some other vendor all together, the forms and screens will look different.
NOTE: the phone must be set for DHCP before starting this installation.
1. Before plugging in the phone, turn it over and record the MAC Address. It will be a mix of HEX characters, 12 digits long. MAC Address : ___________________________________
Step 2 Reset to Factory Defaults
This step should be done whenever you are connecting your phone to a new network for the first time or if you are unsure of the phone settings last made. Check with the MESH network administrator for assistance.
1. Perform a Reset to Factory Defaults for your Zultys ZIP2 phone:
a. Remove power (if applied) from your ZIP2 phone (unplug the power adapter).
b. Pick up the handset.
c. While pressing the ‘1’ button, connect power to the phone. Do not release the ‘1’ button until both the red and yellow LEDs stop flashing; this usually takes about 10 seconds.
d. Disconnect power from the ZIP2 by removing the power adapter.
Step 3 Normal Phone Power up procedure
1. If a phone has been configured into the network, the following is the normal Phone power up procedure.
a. Connect the Phone to the Mesh router using an Ethernet cable.
b. Connect power to the ZIP2.
c. The phone quickly flashes the red LED above the keypad and the yellow LED below the keypad two times. Both LEDs turn off a few seconds after the power stabilizes.
2. Within a minute, check for a dial tone. If you hear one, this means:
a. the phone has power, and
b. the phone has been assigned an IP address by the Router.
3. If you did not hear a dial‐tone,
a. check the network cable between the phone and the router and power cycle the phone again.
b. Perform a Reset to Factory Defaults to ensure the phone is configured for DHCP.
NOTE: If you do not have a Dial Tone at this point, do not proceed!
scco_mesh_intro_workbook_v160611.docx 18
Step 4 Determine the Phone‘s IP Address
1. Before we can configure it, we need to find its IP Address.Open your browser and connect to your router http://localnode:8080
b. Select the Setup link. Enter the router’s logon and password.
c. Select the Port Forwarding, DHCP, and Services link.
d. Look under the Current DHCP Leases section.
e. Find the entry that matches the phones’ MAC address that you identified from Step 1 above. Zulty’s phones have an asterisk “*” in the first Current DHCP Leases column. Record the corresponding IP Address below.
2. Write down the IP Address for this phone: _____________________________________________

scco_mesh_intro_workbook_v160611.docx 19
Step 5 Accessing the Phone’s Interface
1. There are typically 2 ways to configure this phone: a. Download a configuration file from a central server b. Manually enter the configuration from the phone’s web interface.
2. We will be using the manual method since this is more likely to be the method used in the field.
3. Open your browser and enter the phone’s IP address in the URL address line. You are presented with the following form.
4. From the left menu, select LAN. Note the various network settings that the phone discovered. Note that “Dynamic IP Assignment” (DHCP) is set to YES.

scco_mesh_intro_workbook_v160611.docx 20
Step 6 Get your unique configuration
STOP! Go to the Mesh network administrator and request the following:
Server Address: ___________________________
Port Number: ___________________________
Domain Name: ___________________________
Phone Number: ___________________________
User Name: ___________________________
Password: ___________________________
Step 7 Configuring the Phone
Definition: VoIP, Voice Over Internet Protocol, a technology that delivers voice communication and multimedia sessions (such as video) over Internet Protocol (IP) networks.
Definition: SIP, Session Initiation Protocol, internet standard for real time voice and video communication. Asterisk is the application we use for all phone management.
Definition: PBX, Private Branch Exchange, a telephone system within an enterprise that switches calls between enterprise users on local lines while allowing all users to share a certain number of external phone lines. Most of the phone’s general settings can be defaulted. However, we do need to ensure this phone is unique to the SIP (PBX) server.
1. From the left menu, select SIP.

scco_mesh_intro_workbook_v160611.docx 21
2. The following needs to be confirmed or entered for the phone to work.
a. SIP Server Settings: This section identifies the location of the SIP server that manages all telephone call processing. The 3 three fields that MUST be filled in are:
i. Server Address _______________ (from Step 6)
ii. Port Number: 5060___________ (from Step 6)
iii. Domain Name: _______________ (from Step 6)
b. Gateway Settings. This section uniquely identifies the phone to the SIP Server. On boot up, the phone connects to the SIP Server (above) and registers using the phone’s user name and password that you will enter here. Once registered, you can then make and receive phone calls. The fields are:
i. Phone Number: _______________ (OK to leave blank)
ii. Caller ID Name: _______________ (OK to leave blank)
iii. Port: 5060 (from Step 6)
iv. AEC ON: [ON] (must be ON)
v. User Name: _______________ (from Step 6)
vi. Password: _______________ (from Step 6)
c. Press Save SIP Settings.
3. Reset the phone. All changed settings made to the phone do not take effect until you power cycle or reset the phone. Do either one of the following:
a. To power cycle the phone, remove power from the phone for a few seconds and then reapply power.
b. To reset the phone,
i. select Reset from the Left menu
ii. select the “Reset and execute Main Application” option, and then
iii. press the Reset button at the bottom of the phone.
4. The phone will restart as described in Step 3 of this exercise.

scco_mesh_intro_workbook_v160611.docx 22
Step 8 Test your telephone setup
1. Along with having several user phone numbers configured, this SIP server has a few additional numbers set up for testing your phone’s configuration.
a. Dial “100” This is a very basic phone‐to‐SIP Server test.
b. Dial “200” play backs your extension number.
c. Dial “5000” This is an echo test. Listen to the description and follow the prompts.
2. If you hear the messages, your setup is correct!
NOTE: While the ZOLTYs ZIP2 phone has a Speaker button, it does have an external
microphone. In short, this phone IS NOT a true speaker phone.
It works … Now what?
3. Set up your phone number with the on‐line Telephone Directory.
a. From your Browser, go to http://sccserver
b. On the web page, select the User Sign In menu option on the left:
i. If you already have an account, then sign in.
ii. If you do not have an account, then click the Sign Up link (you will be prompted for your call sign and a password).
c. Once signed in, select the My Account menu option on the left.
d. Under the Account Settings, find the Phone Book entry, and click on Add.
e. Enter the following:
i. your phone number as assigned: _________________
ii. Other Notes (optional; could be your ICS Position, Location, or “cell phone”):_______________
f. Press Add to Phone Book when done. Verify your phone number was correctly added to the phonebook.
4. If there is more than one user associated with this phone number, that user should also log in as well and set up the same number.
5. Once all users are entered in the phone book, make your first phone call. Call Extension 7020, and report the following:
a. Your first name, Call sign
b. Names and Call signs of people at this extension
c. Assigned Phone Number
scco_mesh_intro_workbook_v160611.docx 23
It doesn’t work … Now what?
6. If you hear a rapid busy signal, your phone did not register with the SIP Server. Try the following:
a. Check for a Dial Tone
b. Check the LAN connection between the Phone and Mesh Router
c. Check the power connection
d. Check your settings: confirm …
i. Server Name
ii. Port Number
iii. User Name
iv. Password
e. Power cycle or reset the phone
f. Go back to Step 7.1 above and try again

scco_mesh_intro_workbook_v160611.docx 24
2. HANDS ON! Exercise #5: iPhone, Android and media5-fone (OPTIONAL)
Yes, it is possible to connect a smartphone to the Mesh Network and make phone calls within the mesh network, PROVIDED
i. there is a Wireless Access Point (WAP) available (and, for this exercise, there is one), and
ii. there is a VoIP app running on your smartphone. Using the Media5‐fone app
Media5‐fone is a SIP Client that lets users to make and receive VoIP calls over Wi‐Fi, 3G, 4G, and LTE networks. It is interoperable with most IP‐PBX systems and transforms your smartphone into IP‐PBX phone extension. Do an internet search for “media5‐fone”
And, it works with our Mesh Network.
Step 1 Load your smartphone app
1. Before beginning, go you your smartphone’s app store, find, and download the free version of media5‐fone.
a. The paid version enables a few features that we won’t need for this exercise, but you may want to spend the a few bucks for this later on.
Step 2 Get your unique configuration
STOP! Go to the MESH network administrator and request the following:
Server Address: ___________________________
Port Number: ___________________________
Domain Name: ___________________________
Phone Number: ___________________________
User Name: ___________________________
Password: ___________________________

scco_mesh_intro_workbook_v160611.docx 25
Step 2 Configuring media5‐fone 1. From your smartphone’s Wi‐Fi selection, find and connect to the Wi‐Fi hot spot
named SCCMeshNode. Note: these instructions are specific for the iPhone. The Android app should be similar.
2. Run the program. Find the media5‐fone icon on your smartphone and double‐click on it. It will look something like the picture on the right.
3. On menu bar, click on the More button to open the More menu.
4. On the More menu, click on Settings.
5. On the Settings menu, click on Configure SIP Accounts.
6. On the Accounts menu, add a new account by clicking
the “+” on the page.
7. On the New Sip Accounts menu, click on Define Manually.
8. On the New Accounts menu, Enter the following:
a. Title: <Give it some name>
b. Username: _________________ (from Step 2)
c. Password: _________________ (from Step 2)
9. Press the Servers button. On the Servers page, enter the following:
d. Address: ________________ (from Step 2)
e. Port: ________________ (from Step 2)
10. When done, press Done, and then press the Dial Pad button on the menu bar.
Step 8 Test your telephone setup
1. Along with having several user phone numbers configured, this SIP server has a few additional numbers set up for testing your phone’s configuration.
a. Dial “100” This is a very basic phone‐to‐SIP Server test.
b. Dial “200” play backs your extension number.
c. Dial “5000” This is an echo test. Listen to the description and follow the prompts.
2. If you hear the messages, your setup is correct!

scco_mesh_intro_workbook_v160611.docx 26
It works … Now what?
3. Register your phone number with the on‐line Telephone Directory.
a. From your Browser, go to http://sccserver
b. Select the User Sign In menu option on the left: NOTE: FIRST TIME USERS OFTHIS SITE WILL HAVE TO CREATE AN ACCOUNT.
i. If you already have an account, then sign in.
ii. If you forgot your password, call Mesh Net Support for a password reset (see the phone book for the extension).
c. Once signed in, select the My Account menu option on the left.
d. Under the Account Settings, find the Phone Book entry, and click on Add.
e. Enter the following:
i. your phone number as assigned: _________________
ii. Other Notes: iPhone
f. Press Add to Phone Book when done. Verify your phone number was correctly entered in the phonebook.
4. Make your first phone call. Call Extension 7020, and report the following:
a. Your first name, Call sign
b. Identify this as a smartphone call
c. Assigned Phone Number
It doesn’t work … Now what?
5. If you hear a rapid busy signal, your phone did not register with the SIP Server. Try the following:
a. Check that your smartphone is connected to the Wi‐Fi hot spot named SCCMeshNode.
b. Check that your smartphone is registered with the server.
c. Check your settings: confirm …
i. Server Name
ii. Port Number
iii. User Name
iv. Password