Embed Size (px)
Citation preview
Expert Field Medical BadgeHands on
Training Workbook
Expert Field Medical BadgeTest Control Office
DEPARTMENT OF THE ARMYHeadquarters, U.S. Army Medical Department Center and School
Fort Sam Houston, Texas 78234-6100
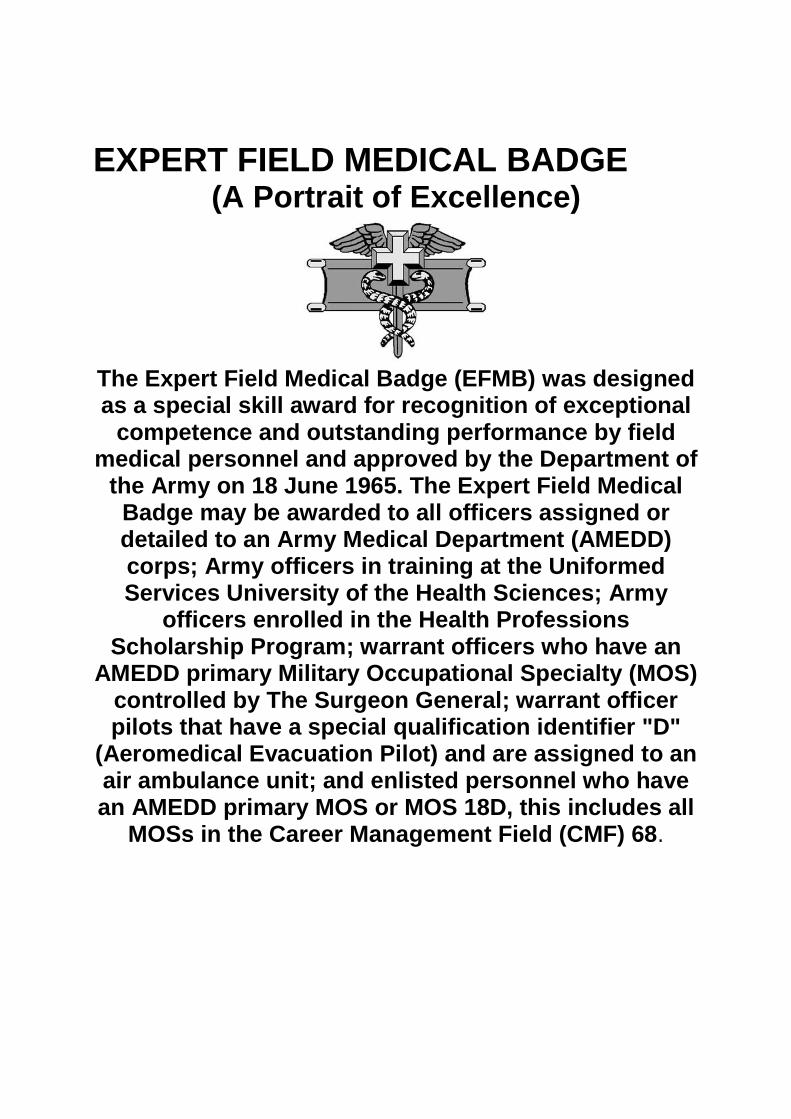
EXPERT FIELD MEDICAL BADGE(A Portrait of Excellence)
The Expert Field Medical Badge (EFMB) was designedas a special skill award for recognition of exceptional
competence and outstanding performance by fieldmedical personnel and approved by the Department of
the Army on 18 June 1965. The Expert Field MedicalBadge may be awarded to all officers assigned ordetailed to an Army Medical Department (AMEDD)corps; Army officers in training at the UniformedServices University of the Health Sciences; Army
officers enrolled in the Health ProfessionsScholarship Program; warrant officers who have an
AMEDD primary Military Occupational Specialty (MOS)controlled by The Surgeon General; warrant officerpilots that have a special qualification identifier "D"
(Aeromedical Evacuation Pilot) and are assigned to anair ambulance unit; and enlisted personnel who havean AMEDD primary MOS or MOS 18D, this includes all
MOSs in the Career Management Field (CMF) 68.
FORWARDThe Expert Field Medical Badge (EFMB) is the mark of a professional; one who cares andhas taken it upon themselves to demonstrate that they possess the skills required to beidentified as an expert. History has often validated that the course of the battle is influencedmore by the health of the Soldier than by strategy or tactics. The proud tradition of theEFMB is one of the major factors in conserving the fighting strength.
The intent of this training workbook is to assist commanders and candidates alike inpreparing for the EFMB. It is not intended to replace the actual references for EFMB, but beused to augment them for training purposes. Where the information presented hereinconflicts with that of the original publication, because of revision, omissions, mistakes, ormisspells, the original publication takes precedence.
The EFMB Test Control Offices’ website also provides links to the above stated referencesand has up to date information on the EFMB Program. It should be checked for updates andis located at: https://www.us.army.mil/suite/page/140048
The proponent of this publication is the U.S. Army Medical Department Center and School.Send comments and recommendations directly to: U.S. Army Medical Department Centerand School, Expert Field Medical Badge Test Control Office, ATTN: MCCS-OP (EFMB),3630 Stanley Road, Suite 336, Fort Sam Houston, TX 78234-6100.
Unless this publication states otherwise, masculine nouns and pronouns do not referexclusively to men.
The use of trade names or trademarks in this publication is for illustrative purposes only.Their use does not imply endorsement by the Department of Defense.
Also available on the EFMB Website are flashcards and bingo. The information included inthese training aids relates directly with the information provided within this workbook.
Candidates should check the EFMB Website for updates to EFMB Written Test Referencesand ensure there have been no updates to this publication. The EFMB TCO Website islocated on AKO at https://www.us.army.mil/suite/page/140048

THIS PAGE LEFT BLANK INTENTIONALLY
THE EXPERT FIELD MEDICAL BADGE (EFMB)HANDS ON TRAINING WORKBOOK
TABLE OF CONTENTS
PARA PAGE
CHAPTER 1. ADMINISTRATIVE REQUIREMENTSTHE EFMB......................................................................................... 1-1 1-1PROVISIONS AND AUTHORITIES................................................... 1-2 1-1FREQUENCY OF EFMB TEST ......................................................... 1-3 1-2EXPERT MEDICAL STREAMER....................................................... 1-4 1-2EXPERT FIELD MEDICAL BADGE COIN ......................................... 1-5 1-2AWARDING THE EFMB .................................................................... 1-6 1-3EFMB TCO CONTACT INFORMATION ............................................ 1-7 1-4
CHAPTER 2. EQUIPMENT REQUIREMENTSRECOMMENDED PACKING LIST .................................................... 2-1 2-1TABLE 2-1 Required Candidate Equipment for EFMB Testing............................... 2-1
CHAPTER 3. ELIGIBILITYELIGIBILITY....................................................................................... 3-1 3-1PREREQUISITES.............................................................................. 3-2 3-1UNIT COMMANDERS ....................................................................... 3-3 3-2FIGURE 3-1 COMMANDERS RECOMMENDATION MEMO ................................. 3-3
CHAPTER 4. CONDUCT EFMB TESTINGREQUIREMENTS.............................................................................. 4-1 4-1CLARIFICATION OF PERFORMANCE STEPS/MEASURES .......... 4-2 4-1TEST PERIOD .................................................................................. 4-3 4-1TRAINING.......................................................................................... 4-4 4-1CANDIDATE EQUIPMENT................................................................ 4-5 4-2BATTLEFIELD SCENARIO AND COMABT LANE CONCEPTS ....... 4-6 4-2PERFORMANCE STANDARDS........................................................ 4-7 4-3TABLE 4-1 REQUIREMENTS TO BE AWARDED EFMB....................................... 4-4SCORE SHEETS............................................................................... 4-8 4-4WRITTEN TEST ................................................................................ 4-9 4-4FOOT MARCH................................................................................... 4-10 4-4
CHAPTER 5. LAND NAVIGATIONLAND NAVIGATION TASKS ............................................................. 5-1 5-1EQUIPMENT ..................................................................................... 5-2 5-3REPRODUCIBLE SCORE SHEETS.................................................. 5-3 5-4
CHAPTER 6. TACTICAL COMBAT CASUALTY CARE
TACTICAL COMBAT CASUALTY CARE (TCCC) TASKS ................ 6-1 6-1COMMUNICATION............................................................................ 6-2 6-2EQUIPMENT ..................................................................................... 6-3 6-2REPRODUCIBLE SCORE SHEETS.................................................. 6-4 6-4TCCC-PERFORM A TCCC PATIENT ASSESSMENT ........................................... 6-4CONTROL BLEEDING USING A TOURNIQUET................................................. 6-11CONTROL BLEEDING USING A HEMOSTATIC DEVICE................................... 6-13TCCC-TRIAGE CASUALTIES .............................................................................. 6-14CONTROL BLEEDING USING DRESSINGS....................................................... 6-17TCCC-INITIATE A SALINE LOCK AND INTRAVENOUS INFUSION................... 6-19INITIATE TREATMENT FOR HYPOVOLEMIC SHOCK/HYPOTHERMIA............ 6-22TCCC-INSERT A NASOPHARYNGEAL AIRWAY................................................ 6-24TCCC-TREAT A PENETRATING CHEST WOUND ............................................. 6-25TCCC-PERFORM NEEDLE CHEST DECOMPRESSION.................................... 6-28TCCC-TREAT AN OPEN ABDOMINAL WOUND................................................. 6-29TCCC-TREAT AN OPEN HEAD INJURY............................................................. 6-30TCCC-IMMOBILIZE A SUSPECTED FRACTURE OF THE ARM ........................ 6-25TCCC-TREAT LACERATIONS, CONTUSTION, AND EXTRUSIONS OF THE ... 6-28ACRONYM WORKSHEET ................................................................................... 6-36
CHAPTER 7. MEDICAL AND CASUALTY EVACUATIONMEDICAL AND CASUALTY EVACUTAION TASKS.......................... 7-1 7-1ADDITIONAL INFORMATION ........................................................... 7-2 7-1EQUIPMENT ..................................................................................... 7-3 7-3REPRODUCIBLE SCORE SHEETS.................................................. 7-4 7-4ESTABLISH A HELICOPTER LANDING POINT .................................................... 7-5EVAC-LOAD CASUALTIES ONTO UH-60 HELICOPTER ..................................... 7-7EVAC-LOAD CASUALTIES ONTO HH-60L HELICOPTER .................................. 7-9EVAC-LOAD CASUALTIES ONTO M996, M997, or M113................................... 7-11EVAC-LOAD CASUALTIES ONTO STRYKER MEV............................................ 7-13LOAD CASUALTIES ONTO NONSTANDARD VEHICLES(5-TON, M-1085, M-1093, OR 2 ½ TON M-1081) ................................................ 7-15LOAD CASUALTIES ONTO NONSTANDARD VEHICLE(2 ½ TON, 6X6 OR 5-TON, CARGO TRUCK) ..................................................... 7-17LOAD CASUALTIES ONTO NONSTANDARD VEHICLE (1¼-TON, 4X4, M998) 7-18EVAC-EXTRICATE CASUALTIES FROM A VEHICLE ........................................ 7-20EVAC-EVACUATE A CASUALTY USING A SKED LITTER................................. 7-23EVACUATE CASUALTIES USING ONE-PERSON CARRIES OR DRAGS ......... 7-24EVACUATE CASUALTIES USING TWO-PERSON CARRIES OR DRAGS ........ 7-28EVACUATE CASUALTIES USING LITTER CARRIES......................................... 7-32
CHAPTER 8. COMMUNICATIONCOMMUNICATION TASKS ............................................................... 8-1 8-1EQUIPMENT ..................................................................................... 8-2 8-2TABLE 8-1. MEDICAL EVCUATION PRECEDENCE........................ 8-4 8-2REPRODUCIBLE SCORE SHEETS.................................................. 8-3 8-3
ASSEMBLE AND OPERATE A SINCGARS (ASIP) .............................................. 8-4ASSEMBLE AND OPERATE A SINCGARS........................................................... 8-5LOAD FH/COMSEC DATA AND CONDUCT RADIO CHECK USING SINCGARS(ASIP) .................................................................................................................... 8-6LOAD FH/COMSEC DATA AND CONDUCT RADIO CHECK USINGSINCGARS ............................................................................................................. 8-8PREPARE AND TRANSMIT A MEDEVAC REQUEST (USING SECURE MODERADIO) ................................................................................................................ 8-10SUBMIT NBC 1 REPORT..................................................................................... 8-12SUBMIT EXPLOSIVE HAZARD SPOT REPORT................................................. 8-14
CHAPTER 9. WARRIOR SKILLS.WARRIOR SKILLS TASKS................................................................ 9-1 9-1COMMUNICATION............................................................................ 9-2 9-2EQUIPMENT ..................................................................................... 9-3 9-3REPRODUCIBLE SCORE SHEETS.................................................. 9-4 9-5PROTECT YOURSELF USING ASSIGNED MASK WITH JLIST ........................... 9-5PROTECT YOURSELF USING ASSIGNED MASK................................................ 9-7DECONTAMINATE YOURSELF USING DECON KITS ......................................... 9-9PROTECT YOURSELF USING JLIST ENSEMBLE ............................................. 9-10PROTECT YOUSELF USING MOPP GEAR ........................................................ 9-12PERFORM SELF-AID FOR MILD NERVE AGENT POISONING......................... 9-13PROTECT YOUSELF WHEN REMOVING JLIST ................................................ 9-16PROTECT YOURSELF WHEN REMOVING MOPP GEAR ................................. 9-19STORE THE M40-SERIES PROTECTIVE MASK WITHOUT HOOD................... 9-21STORE THE M40-SERIES PROTECTIVE MASK WITH HOOD .......................... 9-22DISASSEMBLE, ASSEMBLE, AND PERFORM A FUNCTIONS CHECK M4 ...... 9-23DISASSEMBLE, ASSEMBLE, AND PERFORM A FUNCTIONS CHECK M16 .... 9-26DISASSEMBLE, ASSEMBLE, AND PERFORM A FUNCTIONS CHECK M9 ...... 9-29CORRECT MALFUNCTION ON AN M4 CARBINE OR M-16 SERIES RIFLE ..... 9-31MOVE UNDER DIRECT FIRE .............................................................................. 9-32REACT TO INDIRECT FIRE................................................................................. 9-33MOVE OVER, THROUGH, OR AROUND ABSTACLES ...................................... 9-35REACT TO AN UXO OR POSSIBLE IED............................................................. 9-37
APPENDIX A: EFMB TRAINING RECORDREQUIREMENTS TO BE AWARDED EFMB ..............................................................A-2EXPERT FIELD MEDICAL BADGE TRACKER ..........................................................A-3
APPENDIX B: GRAPHIC TRAINING AIDS ................................................................B-1GTA 08-01-004 (MEDEVAC REQUEST FORM) ....................................................B-2GTA 09-12-001 (UNEXPLODED ORDNANCE PROCEDURES) ...........................B-3GTA 03-06-008 (CBRN WARNING AND REPORTING SYSTEM).........................B-4

THIS PAGE LEFT BLANK INTENTIONALLY
1-1
CHAPTER 1
ADMINISTRATION REQUIREMENTS
1-1. THE EFMB.
a. The EFMB is a special skill badge authorized by AR 600-8-22. Made ofoxidized silver, the badge consists of a litter, placed horizontally, behind a caduceuswith the cross of the Geneva Convention at the junction of the wings.
b. The EFMB test measures the individual medical Soldier's physical fitness,mental toughness, and ability to perform to standards of excellence in a broad spectrumof critical medical and Soldier skills. The purpose of the EFMB is to-
(1) Recognize qualified AMEDD personnel who demonstrate a high degree ofprofessional skill, stamina, and proficiency.
(2) Recognize medical personnel who can expertly perform combat medical andSoldier tasks that support medical care in a simulated combat environment.
(3) Promote esprit-de-corps. It provides an incentive for greater effort byAMEDD personnel and a badge of excellence that is recognized worldwide by the totalArmy.
(4) Enhance individual training programs in units by providing a difficult, yetattainable, goal for every medical Soldier.
1-2. PROVISIONS AND AUTHORITIES.
a. The Surgeon General is the Army staff agent for the EFMB Program.
b. The Commander, AMEDDC&S, is the executive agent for the management of theEFMB Program.
c. Commanders of the following types of units, in the grade of lieutenant colonel orabove, are qualified to administer the EFMB test as a host unit:
(1) Active Army, US Army Reserve (USAR), and Army National Guard (ARNG)table of organization and equipment, and table of distribution and allowances medicalunits. USAR and ARNG units will conduct EFMB testing during their annual trainingperiods.
(2) Sustainment brigade commanders.
1-2
(3) Separate regiments and brigades having the resources and facilities toconduct all phases of the test as explained in this publication.
d. Units requesting to administer the EFMB test, while deployed, must meet furtherrequirements. Their request must be additionally approved by the senior missioncommander and senior medical commander in the deployed area.
1-3. FREQUENCY OF EFMB TEST. The EFMB test uses standardized performancesteps/measures to gauge a Soldier's ability to perform critical individual skills. Thus,every medical Soldier should have the opportunity to take it. There is no time limit thata Soldier must wait in between test sites, but a candidate may go through EFMB testingonly once during each unit testing cycle. Units may conduct EFMB testing as often asdesired.
1-4. EXPERT MEDICAL STREAMER.
a. A unit is awarded an Expert Medical Streamer IAW AR 600-8-22.
b. Requirements. When 65 percent or more of the assigned strength (during EFMBtesting period) of a medical unit authorized a color, distinguishing flag, or guidon, hasbeen awarded the Combat Medical Badge or the Expert Field Medical Badge, the unitwill be awarded an Expert Medical Streamer. This streamer may be displayed by theorganization for one year, at the expiration of which the unit must requalify under theabove rules.
c. Awarding authority. Commanding General, US Army Medical Command,installation commanders, commanders of combat divisions, separate brigades, separateregiments, and separate groups may award the Expert Medical Streamer to medicalunits within their command under the above criteria.
1-5. EXPERT FIELD MEDICAL BADGE COIN.
a. The EFMB coin is the Army Surgeon General's recognition of the Armed Forces'most technically and tactically competent expert field medics that successfully completethe requirements of EFMB testing. The EFMB coin will signify to all that the recipientsare among the best qualified field medics.
b. Composition. The EFMB coin is maroon and silver in color. The front and backof the coin displays a die cut of the EFMB symbol. The front displays the words"Awarded for Excellence." The back of the coin displays the AMEDD motto “ToConserve Fighting Strength.”
c. Award Criteria. The test board chairperson of the hosting unit will award EFMBcoins to candidates who earn the EFMB and meet the following criteria:
(1) The highest score on the EFMB WT.
1-3
(a) In the event of a tie, the most “GOs” in the hands-on testing phase willdetermine the recipient.
(b) If there still is a tie, the least time to complete the 12-mile foot march willdetermine the recipient.
(2) The most "GOs" in the hands-on testing phase.
(a) In the event of a tie, the highest score on the EFMB WT will determine therecipient.
(b) If there still is a tie, the least time to complete the 12-mile foot march willdetermine the recipient.
(3) The least time to complete the 12-mile foot march.
(a) In the event of a tie, the most “GOs” in the hands-on testing phase willdetermine the recipient.
(b) If there still is a tie, the highest score on the EFMB WT will determine therecipient.
d. Coin Distribution.
(1) The EFMB TCO will maintain an adequate quantity of EFMB coins forworldwide distribution to sponsoring units. The EFMB TCO is responsible for the coins’physical security, accountability, and distribution. The EFMB TCO will hand carry theEFMB coins to the test board chairperson. If the EFMB TCO will not be on site, they willbe sent via registered mail, with the sponsoring unit’s test materials. The basis ofallocation for coins is one per 50 candidates participating in the EFMB test, not toexceed a maximum of three coins per test.
(2) The test board chairperson will ensure that selection of EFMB coin awardeesfollows the criteria listed in paragraph 2-19c. Additionally, the test board chairpersonwill provide the standard name lines of the EFMB coin recipients to the EFMB TCOwithin five working days of the EFMB awards ceremony.
1-6. AWARDING THE EFMB.
a. The EFMB will be presented at an appropriate awards ceremony and worn IAWAR 670-1 (Wear and Appearance of Army Uniforms and Insignia).
b. Award of the EFMB will be announced in orders, citing AR 600-8-22 asauthorization. Copies will be forwarded to the military personnel officer for entry into the
1-4
awardees official records. Copies will be also forwarded to the EFMB TCO and theawardees.
c. A certificate of training may be awarded to candidates who completed all EFMBtest requirements, but failed to receive a passing score. The test board chairperson willdetermine the number of training hours to be awarded to these Soldiers.
1-7. EFMB TCO CONTACT INFORMATION.
a. The EFMB TCO mailing address is: U.S. Army Medical Department Center andSchool, Expert Field Medical Badge Test Control Office, ATTN: MCCS-OP (EFMB), 3630Stanley Road, Suite 336, Fort Sam Houston, TX 78234-6100.
b. The EFMB TCO website is located on the Medical Knowledge Network(MEDKN) portal of the Army Knowledge Online (AKO), which may be viewed by loggingon AKO first, then at: https://www.us.army.mil/suite/page/140048.
2-1
CHAPTER 2
EQUIPMENT REQUIREMENTS
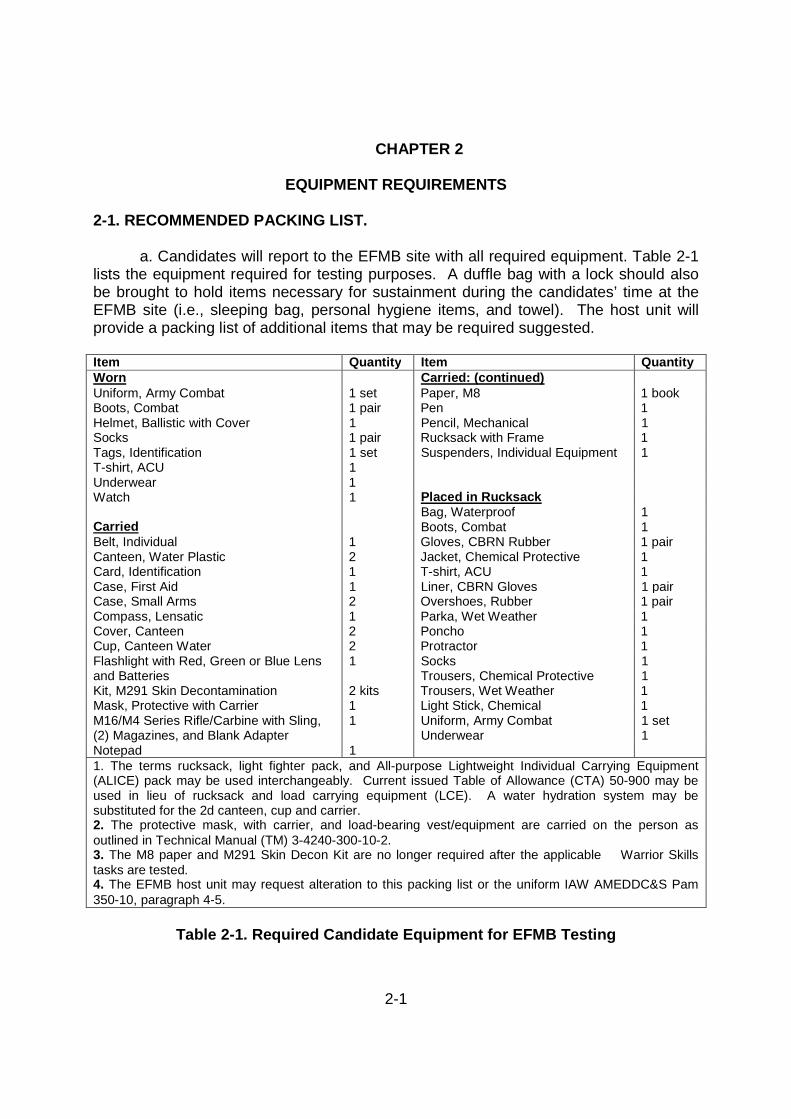
2-1. RECOMMENDED PACKING LIST.
a. Candidates will report to the EFMB site with all required equipment. Table 2-1lists the equipment required for testing purposes. A duffle bag with a lock should alsobe brought to hold items necessary for sustainment during the candidates’ time at theEFMB site (i.e., sleeping bag, personal hygiene items, and towel). The host unit willprovide a packing list of additional items that may be required suggested.
Item Quantity Item QuantityWorn Carried: (continued)Uniform, Army Combat 1 set Paper, M8 1 bookBoots, Combat 1 pair Pen 1Helmet, Ballistic with Cover 1 Pencil, Mechanical 1Socks 1 pair Rucksack with Frame 1Tags, IdentificationT-shirt, ACU
1 set1
Suspenders, Individual Equipment 1
Underwear 1Watch 1 Placed in Rucksack
Bag, Waterproof 1Carried Boots, Combat 1Belt, Individual 1 Gloves, CBRN Rubber 1 pairCanteen, Water Plastic 2 Jacket, Chemical Protective 1Card, Identification 1 T-shirt, ACU 1Case, First Aid 1 Liner, CBRN Gloves 1 pairCase, Small Arms 2 Overshoes, Rubber 1 pairCompass, Lensatic 1 Parka, Wet Weather 1Cover, Canteen 2 Poncho 1Cup, Canteen Water 2 Protractor 1Flashlight with Red, Green or Blue Lensand Batteries
1 SocksTrousers, Chemical Protective
11
Kit, M291 Skin Decontamination 2 kits Trousers, Wet Weather 1Mask, Protective with Carrier 1 Light Stick, Chemical 1M16/M4 Series Rifle/Carbine with Sling,(2) Magazines, and Blank Adapter
1 Uniform, Army CombatUnderwear
1 set1
Notepad 11. The terms rucksack, light fighter pack, and All-purpose Lightweight Individual Carrying Equipment(ALICE) pack may be used interchangeably. Current issued Table of Allowance (CTA) 50-900 may beused in lieu of rucksack and load carrying equipment (LCE). A water hydration system may besubstituted for the 2d canteen, cup and carrier.2. The protective mask, with carrier, and load-bearing vest/equipment are carried on the person asoutlined in Technical Manual (TM) 3-4240-300-10-2.3. The M8 paper and M291 Skin Decon Kit are no longer required after the applicable Warrior Skillstasks are tested.4. The EFMB host unit may request alteration to this packing list or the uniform IAW AMEDDC&S Pam350-10, paragraph 4-5.
Table 2-1. Required Candidate Equipment for EFMB Testing

2-1
THIS PAGE LEFT BLANK INTENTIONALLY

3-1
CHAPTER 3
ATTENDING EFMB
3-1. ELIGIBILITY.
a. The EFMB is awarded to DA personnel who meet the following requirementsand pass the EFMB test in accordance with (IAW) the standards in this publication.Other service and allied candidates must be either medical personnel or personnelserving in comparable medical positions.
(1) Enlisted personnel with an AMEDD primary MOS or MOS 18D, SpecialOperations Medical Sergeant. This includes all MOSs in the 68-career managementfield (CMF).
(2) Warrant officers with an AMEDD primary MOS. Warrant officer pilots with a“D” special qualification identifier, Aeromedical Evacuation Pilot, who are assigned to anair ambulance unit, are also eligible.
(3) All commissioned officers assigned or detailed to an AMEDD corps. Thisincludes Army officers in training at the Uniformed Services University of the HealthSciences and Army officers enrolled in the Health Professions Scholarship Program.
(4) Other service and allied candidates must be either medical personnel orserving in comparable medical positions.
(5) Individuals working in a medical facility or medical unit who do not meet thecriteria stated above are not eligible to be awarded the EFMB. They may go throughEFMB standardization and testing, but no orders may be issued awarding them theEFMB.
3-2. PREREQUISITES
a. To be eligible for the EFMB, candidates must meet prerequisites before the startdate of the EFMB test. Each candidate must:
(1) Volunteer for EFMB testing.
(2) Be recommended by their unit commander.
(3) Be physically and mentally prepared to cope with the rigorous demands ofthe EFMB test and trained in the prevention of heat related injuries. Soldiers withmedical profiles prohibiting the performance of any EFMB tested event are ineligible tocompete.
(4) Qualify as marksman or higher with their assigned weapon within one year of
3-2
the test-end date.
(5) Score a minimum of 180 points on the Army Physical Fitness Test (APFT),with a minimum of 60 points in each event, within 6 months of the test-end date.Alternate events are not authorized. Soldiers with medical profiles prohibitingparticipation in any of the three events are ineligible to compete, with the exception ofSoldiers who have been wounded during combat operations. These Soldiers areauthorized to take an alternate event in lieu of the 2-mile run and are eligible tocompete.
(6) Possess a current cardiopulmonary resuscitation (CPR) certification. Thecertification must be valid through the test-end date.
(7) Other service and allied candidates must meet the physical fitness andweapon qualification standards. The test board chairperson will determine whethercandidates have met a suitable standard prior to acceptance.
(8) Perform all tasks professionally and ethically IAW this publication and theArmy Values.
3-3. Unit Commanders.
(1) Recommend only those candidates who volunteer for EFMB testing andmeet the eligibility requirements in paragraph 3-1 and 3-2. Commanders shouldcarefully evaluate potential EFMB candidates before recommending them for EFMBtesting. They should remember that each candidate awarded the EFMB will representthe standards of the EFMB for the remainder of their military career.
(2) Arrange for the APFT, weapons qualification (WQ), and CPR certificationrequirements and provide a copy of the results to the test board chairperson.
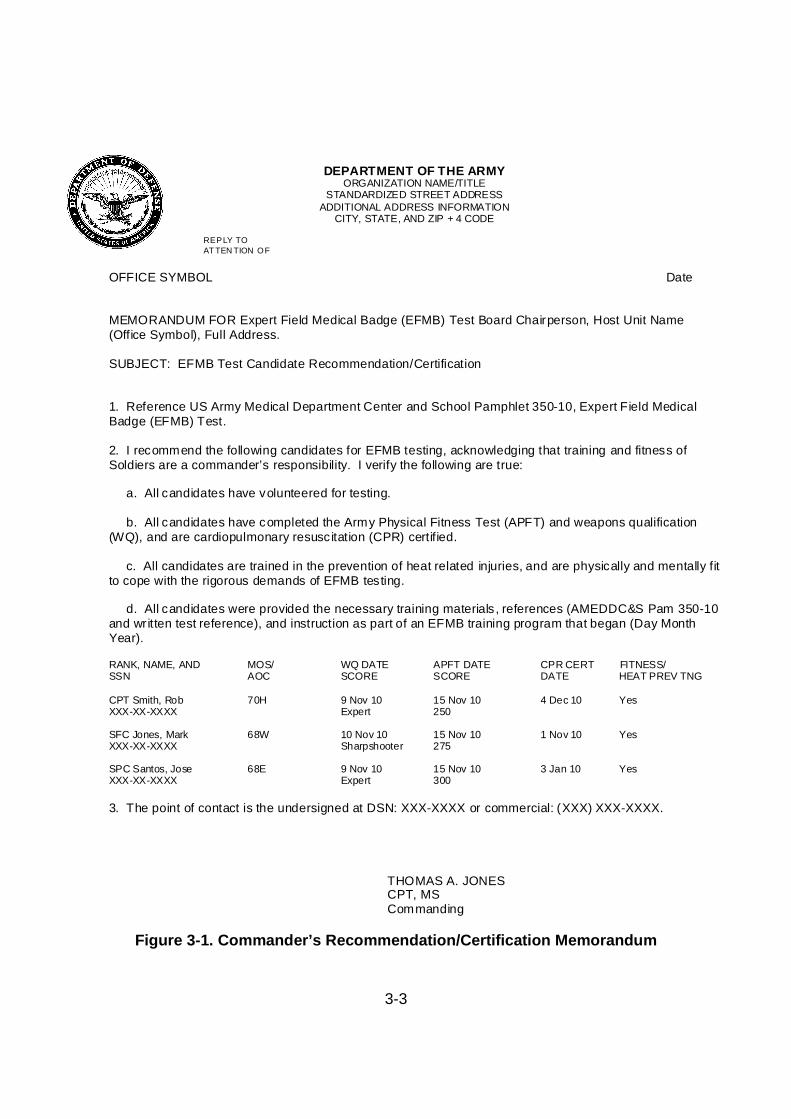
(3) Prepare a Commander’s Recommendation/Certification Memorandum fortheir candidates and submit to the test board chairperson (see figure 3-1).
(4) Conduct EFMB training and preparation in advance of EFMB testing.Standardization conducted at the EFMB testing site does not fulfill the requirement thatthe commander conduct EFMB training prior to testing to prepare their candidates.
(5) Ensure that candidates are physically and mentally prepared to cope withthe rigorous demands of EFMB testing, including the 12-mile foot march IAW FM 21-18(Foot Marches) and are trained in the prevention of heat-related injuries IAW the USArmy Center for Health Promotion and Preventive Medicine (http://chppm-www.apgea.army.mil/heat/).
3-3
Figure 3-1. Commander’s Recommendation/Certification Memorandum
DEPARTMENT OF THE ARMYORGANIZATION NAME/TITLE
STANDARDIZED STREET ADDRESSADDITIONAL ADDRESS INFORMATION
CITY, STATE, AND ZIP + 4 CODE
REPLY TOAT TEN TION OF
OFFICE SYMBOL Date
MEMORANDUM FOR Expert Field Medical Badge (EFMB) Test Board Chairperson, Host Unit Name(Office Symbol), Full Address.
SUBJECT: EFMB Test Candidate Recommendation/Certification
1. Reference US Army Medical Department Center and School Pamphlet 350-10, Expert Field MedicalBadge (EFMB) Test.
2. I recommend the following candidates for EFMB testing, acknowledging that training and fitness ofSoldiers are a commander’s responsibility. I verify the following are true:
a. All candidates have volunteered for testing.
b. All candidates have completed the Army Physical Fitness Test (APFT) and weapons qualification(WQ), and are cardiopulmonary resuscitation (CPR) certified.
c. All candidates are trained in the prevention of heat related injuries, and are physically and mentally fitto cope with the rigorous demands of EFMB testing.
d. All candidates were provided the necessary training materials , references (AMEDDC&S Pam 350-10and written test reference), and instruction as part of an EFMB training program that began (Day MonthYear).
RANK, NAME, AND MOS/ WQ DATE APFT DATE CPR CERT FITNESS/SSN AOC SCORE SCORE DATE HEAT PREV TNG
CPT Smith, Rob 70H 9 Nov 10 15 Nov 10 4 Dec 10 YesXXX-XX-XXXX Expert 250
SFC Jones, Mark 68W 10 Nov 10 15 Nov 10 1 Nov 10 YesXXX-XX-XXXX Sharpshooter 275
SPC Santos, Jose 68E 9 Nov 10 15 Nov 10 3 Jan 10 YesXXX-XX-XXXX Expert 300
3. The point of contact is the undersigned at DSN: XXX-XXXX or commercial: (XXX) XXX-XXXX.
THOMAS A. JONESCPT, MSCommanding

3-4
THIS PAGE LEFT BLANK INTENTIONALLY
4-1
CHAPTER 4
CONDUCT EFMB TESTING
4-1. REQUIREMENTS. To qualify for and be awarded the EFMB, candidates must beeligible IAW paragraph 3-2. In addition, they must successfully complete therequirements and/or required number of tasks associated with each of the seven criticalperformance areas in Appendix A.
4-2. CLARIFICATION OF PERFORMANCE STEPS/MEASURES.
NOTE: Some of the tasks in this publication were obtained from Soldier TrainingPublications (STP), Field Manuals (FM), and other publications and were revised forEFMB testing purposes. The performance conditions, standards, and steps/measuresin this publication are for EFMB TESTING PURPOSES ONLY.
a. Some tasks and performance steps/measures have time standards. These timestandards are for test administering purposes only.
b. Test board members, evaluators, and candidates must ensure that they areusing the most up to date EFMB references. The EFMB TCO will furnish changes totasks, conditions, standards, and performance steps/measures to the test boardchairperson prior to the conduct of EFMB testing. Changes will also be posted on theEFMB TCO website (see paragraph 2-21).
4-3. TEST PERIOD.
a. EFMB testing is designed to be both physically and mentally challenging. Thetesting, to include the written portion, is conducted in 120 hours on consecutive days.This may be conducted over six consecutive days as long as it is within the 120 hourtime constraint. Time begins from the beginning of the first event until the end of thefoot march. The foot march will be the last tested event. The WT will be the last testedevent prior to the foot march.
b. All testing will be conducted in a field type environment. However, the WT maybe administered in a garrison environment. Candidates will bivouac in tents or inhardstand buildings in a field environment area during the entire EFMB test period.
4-4. TRAINING.
a. Training prior to the standardization and test periods is the responsibility of thecandidate's chain of command.
b. Inconsistent or improper unit training prior to the test period is not grounds forrebuttal.
4-2
4-5. CANDIDATE EQUIPMENT.
a. Table 2-1 lists the equipment required for testing purposes for the candidates.Candidates are required to carry all of the equipment listed in table 2-2, including therucksack, to the start point of all lanes, but not during the testing of tasks. The ballistichelmet, LCE, and protective mask in carrier will be worn at all times. The M16/M4-series rifle/carbine will be carried at all times. The test board chairperson will determinewhich lanes he wishes to be negotiated with the rucksack worn, except as follows:
(1) The rucksack is not carried or worn on the land navigation course.
(2) The rucksack must be carried or worn on the 12-mile foot march.
b. During the WT, the candidates may wear the battle Army combat uniform (ACU)without the equipment. The field uniform is not required for this task.
c. The M16/M4-series rifle/carbine will be carried, worn, or within an arm’s reach(one meter from the candidate’s position) at all times. The candidate may receive anadministrative NO-GO on any task(s) in which the weapon is not within an arm’s reach.The EFMB test board will ensure that this is being evaluated the same on all lanes atthe EFMB site and is made clear to the candidates during standardization.
d. Rubber weapons will NOT be used by candidates in any portion of EFMBtesting.
4-6. BATTLEFIELD SCENARIO AND COMBAT LANE CONCEPTS.
a. Battlefield Scenarios.
(1) The creation of simulated combat conditions is critical to the evaluation ofperformance-oriented testing that is reaction based. Pyrotechnics, smoke, opposingforce activity, realistic moulage, anatomic simulators, and casualty simulators are usedextensively to enhance conditions for realism.
b. Combat Testing Lanes.
(1) Combat testing lanes will include mission-related tasks using reaction-basedtesting. Common task training (CTT), station, and round-robin style testing will not beused at any time.
(2) Tasks from the critical performance areas of TCCC, communications, warriorskills, and evacuation will be integrated in the CTLs. There is no predeterminedsequence of the tasks for each CTLs. The test board chairperson will determine thesequence of the tasks on all combat testing lanes.
(3) Candidates are given blank rounds to fill a minimum of one magazine before
4-3
the start of each lane that has opposing force activity.
(4) Candidates are given an overall written or verbal operation order (OPORD)at the beginning of the test cycle. Candidates will receive a fragmentary order (FRAGO)upon arriving at each CTL as a platoon. Candidates will receive a team or scenariobrief before the start of each lane. The use of FRAGOs throughout the lanes ismandatory to communicate the situation. They should all be relevant to the currentoperating environments and reflect realistic changes from the initial OPORD
(5) Evaluators will not give task, conditions, standards, etc. during testing.Testing is reaction based. After a candidate starts a lane, his interactions with theevaluator must be minimized other than FRAGOs. The score sheets in Appendix Bprovide “cues” for the evaluators to assist and standardize interaction during theperformance of tasks. The use of FRAGOs throughout the lanes is mandatory tocommunicate the situation.
(6) Upon arrival at the lane, all candidates will receive a FRAGO. Prior to thecandidate starting the lane the evaluator will provide them with a team briefing.
(9) All communication between the evaluator and the candidate during testing oftasks will be IAW the evaluator cues (“Evaluator States”) on the applicable scoresheets. The evaluator may add additional information to further clarify a cue or in actingas higher headquarters receiving a report or message. FRAGOs will be utilizedthroughout the lane to communicate the situation.
4-7. PERFORMANCE STANDARDS.
a. All performance steps/measures are provided for the tested tasks.
b. The test board chairperson will select the type of equipment which will be tested.This will be identified during standardization.
c. The score sheets ensure that every candidate is graded by the same standards.Candidates must successfully perform all performance steps/measures on the task toreceive a GO. Violation of a caution, warning, or note statement may be considered tocause further injury to the casualty, if applicable.
d. Candidates performing steps not listed in the score sheets will not be penalizedas long as they perform all required performance steps/measures in the allotted time, ifapplicable.
e. Candidates may receive an administrative NO-GO for test integrity violations orserious safety violations on any tested task, even though it is not stated as aperformance step/measure. Candidates may also receive an administrative NO-GO forweapons violations.
4-4
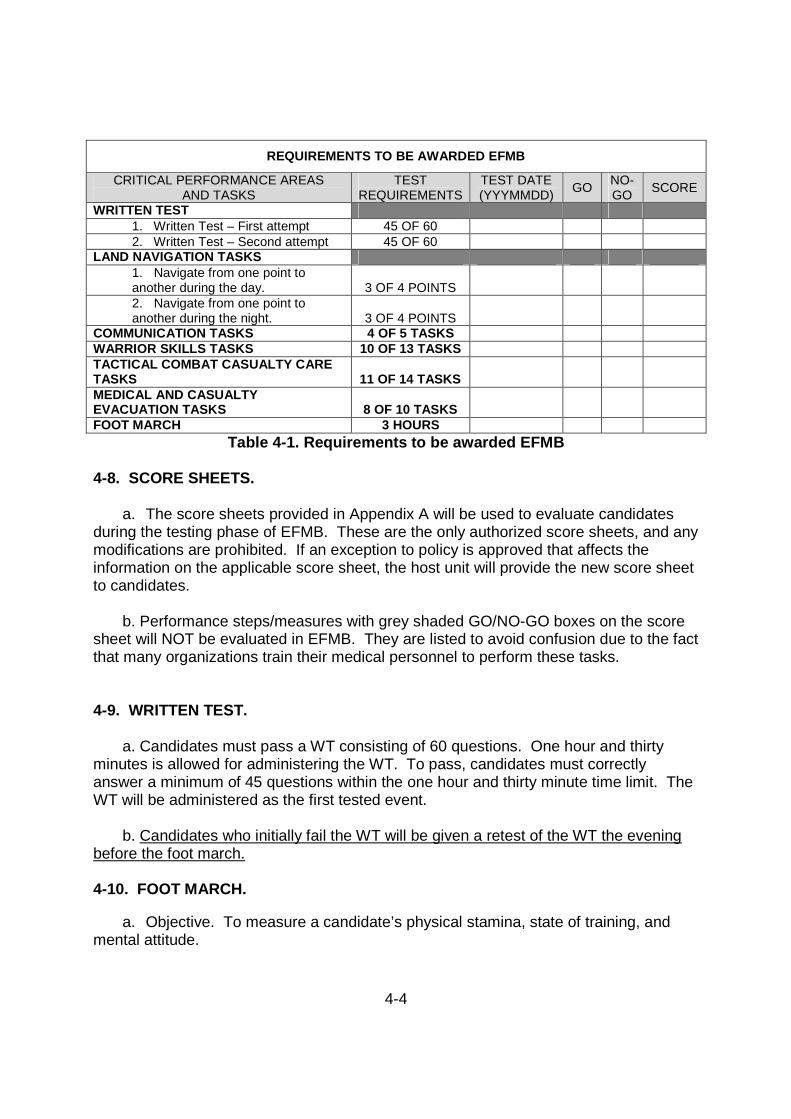
REQUIREMENTS TO BE AWARDED EFMB
CRITICAL PERFORMANCE AREASAND TASKS
TESTREQUIREMENTS
TEST DATE(YYYMMDD)
GONO-GO
SCORE
WRITTEN TEST1. Written Test – First attempt 45 OF 602. Written Test – Second attempt 45 OF 60
LAND NAVIGATION TASKS1. Navigate from one point toanother during the day. 3 OF 4 POINTS2. Navigate from one point toanother during the night. 3 OF 4 POINTS
COMMUNICATION TASKS 4 OF 5 TASKSWARRIOR SKILLS TASKS 10 OF 13 TASKSTACTICAL COMBAT CASUALTY CARETASKS 11 OF 14 TASKSMEDICAL AND CASUALTYEVACUATION TASKS 8 OF 10 TASKSFOOT MARCH 3 HOURS
Table 4-1. Requirements to be awarded EFMB
4-8. SCORE SHEETS.
a. The score sheets provided in Appendix A will be used to evaluate candidatesduring the testing phase of EFMB. These are the only authorized score sheets, and anymodifications are prohibited. If an exception to policy is approved that affects theinformation on the applicable score sheet, the host unit will provide the new score sheetto candidates.
b. Performance steps/measures with grey shaded GO/NO-GO boxes on the scoresheet will NOT be evaluated in EFMB. They are listed to avoid confusion due to the factthat many organizations train their medical personnel to perform these tasks.
4-9. WRITTEN TEST.
a. Candidates must pass a WT consisting of 60 questions. One hour and thirtyminutes is allowed for administering the WT. To pass, candidates must correctlyanswer a minimum of 45 questions within the one hour and thirty minute time limit. TheWT will be administered as the first tested event.
b. Candidates who initially fail the WT will be given a retest of the WT the eveningbefore the foot march.
4-10. FOOT MARCH.
a. Objective. To measure a candidate’s physical stamina, state of training, andmental attitude.
4-5
b. Requirements. Candidates must complete a 12-mile (19.3 kilometer) foot march,within 3 hours, completely crossing the finish line carrying their individual fieldequipment IAW table 2-2. This event is the last tested event during EFMB testing.
(1) Host units will exercise judgment to remove candidates who demonstrate theinability to achieve the standard at any time during the event. The Test BoardChairperson may appoint personnel at designated mile markers to remove candidatesexceeding a predetermined elapsed time. Personnel appointed by the Test BoardChairperson will remove candidates exceeding 2:00 and 2:15 at the six and nine milemarkers respectively. Radios will be utilized to communicate official time at eachlocation. Host units are not limited to the above stipulations.
(2) Risk reduction measures, such as unblousing the pants, are allowed. Thetest board chairperson may approve these measures as weather conditions necessitate.
(3) Proper hydration procedures must be enforced. On the day before themarch, candidates should consume several quarts (liters) of water. On the morning ofthe march, candidates should consume one or two quarts of water. They shouldconsume at least one quart (.9 liter) an hour during the march, preferably drinking someevery 15 to 30 minutes. Maximum consumption should not exceed 1.25 quarts (1.18liters) an hour or 12 quarts (11.35 liters) a day. Actual amounts required will vary withthe individual and weather conditions.
(4) The host unit test board chairperson will set the parameters on theparticipation of noncandidates and other personnel on the road march based on thehost sites’ support capabilities. All noncandidates that participate in the road march arenot allowed to enter the course until at least 300 meters after the start line and must beremoved from the course at least 100 meters before the finish line.
(5) Candidates must start and finish the course with the equipment in table 2-1.The host unit will conduct a uniform and equipment inspection prior to and at the end ofthe march.
(6) Candidates must carry their weapon “at the ready.” They will not strap theweapon to the rucksack, disassemble the weapon, or carry the weapon at sling arms.The weapon will not be slung in any manner to the candidate’s body orequipment.
(7) Candidates must carry the protective mask with carrier strapped aroundtheir waist or shoulder.
(8) Candidates will not be assisted during the march in any way. This includes,but is not limited to, adjusting their equipment for them and providing items such as drysocks, food, or drink. Candidates must secure their own water or refill their canteens atauthorized water stations. Candidates may carry additional items for their ownconsumption, such as sports drinks and energy bars. However, they must carry these
4-6
additional items and have them on their person prior to beginning the march.Candidates may not receive additional items after the march starts.
(9) A rest or sleep period must be afforded the candidates prior to the march.The duration of this rest or sleep period will be at least four to six continuous hours.
(10) The candidate will receive a NO-GO for any of the following:
(a) Not completing the road march within the 3-hour time limit.
(b) Not starting and finishing with the equipment listed in table 2-1.
(c) Receiving assistance along the route.
(d) Not carrying the weapon and/or mask as stated in paragraphs 4-10b(6).
5-1
CHAPTER 5
LAND NAVIGATION
TOTAL TASKS-2PASS REQUIREMENTS- 3 out of 4 (Day)
3 out of 4 (Night)
5-1. LAND NAVIGATION TASKS.
a. Objective. The objective of the land navigation courses is to measure thecandidate's ability to navigate from a start point, through intermediate points, to an endpoint during daylight and darkness.
b. Requirements. The candidate must successfully complete the performancemeasures for both the day and night courses to receive a GO.
(1) The host unit will NOT review the points with the candidates uponcompletion of both the day and night courses during standardization and test weeks.Candidates will receive a GO or NO-GO only. The host unit will not give moreinformation. However, the Land Navigation OIC/NCOIC may provide trainingRECOMMENDATIONS to the candidate.
(2) Candidates will carry a red-, green-, or blue-lens flashlight and a chemicallight stick during the night course. The use of white light or a chemical light stick willonly be used for emergencies.
(3) Prior to starting the land navigation course it is strongly recommended thatall candidates should verify the accuracy of their compass and reconfirm their knownpace count.
(4) No talking or interaction between candidates is permitted on the landnavigation courses at any time. Candidates should stay at least 10 feet away fromother candidates at all times.
(5) Artificial illumination (such as light sticks) may be used to mark the generalboundaries of the course, but not the individual points. Candidates may not useartificial illumination or red-, green-, or blue-lens flashlight to mark their direction.Candidates may illuminate map materials and check footing for safety whileSTATIONARY ONLY. Candidates who utilize any light source while “on the move” willreceive an NO-GO.
5-2. EQUIPMENT.
a. The equipment required for the day and night courses are specified in the landnavigation score sheets. NO OTHER EQUIPMENT IS AUTHORIZED.

5-2
b. For both the day and night courses, all candidates will be issued a paper (NOTlaminated) topographic map, score sheet, and the eight digit coordinates of the fivepoints to the candidates. The map and score sheet must be returned to the host unitupon completion of each course. Candidates may use a clipboard or other flat surfaceto plot their points.
c. If wearing body armor, the plates should be removed prior to negotiating the landnavigation course. Deviations in compass azimuth readings have been identified due tothe effects of the body armor plates.

5-3
REPRODUCIBLE SCORE SHEETS
5-3. GENERAL.
The various score sheets included within this appendix are designed for EFMB use onlyand prescribe the testing standards for use during EFMB. They may be reproduced locallyas needed.
5-4
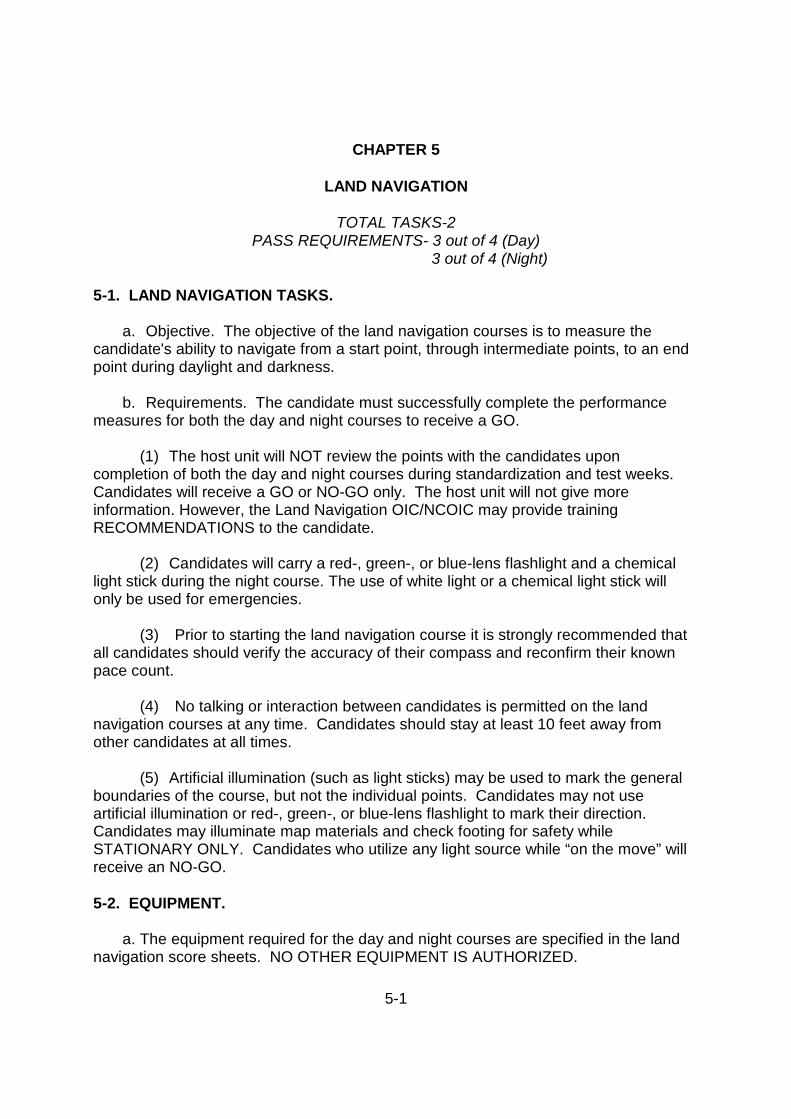
EFMB Test Score SheetLAND NAV — NAVIGATE FROM ONE POINT TO ANOTHER DURING THE DAY
(For use of this form, see AMEDDC&S Pam 350-10, the proponent is MCCS-OP-T)
CANDIDATE’S RANK AND NAME CANDIDATE #
TASK: NAVIGATE FROM ONE POINT TO ANOTHER DURING THE DAY.
CONDITIONS: Given a standard topographic map, scale 1:50,000; a lensatic compass; Graphic Training Aid (GTA)05-02-012 (coordinate scale and protractor); a pencil; a score sheet; and the eight-digit grid coordinates of the startpoint, three intermediate points, and end point.
STANDARDS: Plot the start point, intermediate points, and the end point on the map. Navigate from the start point,through each intermediate point, in order, to the end point, and correctly record at least three points within 3 hours.
NOTE: THIS TASK HAS BEEN MODIFIED FOR EFMB TESTING PURPOSES USE ONLY.
PERFORMANCE STEPS/MEASURES GO NO-GO
1. Plot points on the map.
2. Navigate from the start point, through the intermediate points, to the endpoint.
3. Correctly record the point number or letter of at least three points, excludingthe start point.
4. Complete all performance measures within 3 hours.
5. Return the map and score sheet.
DAY LAND NAVIGATION COURSE LANE # __________
START TIME: __________ END TIME: __________ TOTAL TIME : ____ Hours _____ Minutes
END POINT CADRE SIGNATURE: _________________________________
8 DIGIT GRID COORDINATESPOSITION STAKE
NUMBERGO NO-GO
START POINT
1st POINT
2d POINT
3rd POINT
END POINT
TOTAL CORRECT/ INCORRECT POINTS
REASON(S)FORFAILURE
DOES THE CANDIDATE WISH TO REBUT THIS TASK?(CANDIDATE INITIALS APPROPRIATE BOX)
YES NO
LANEOIC/NCOICINITIALS
EVALUATOR’S SIGNATURE DATE
Worksheet # 001 to construct AMEDDC&S Form 1232, 1 NOV 11
5-5
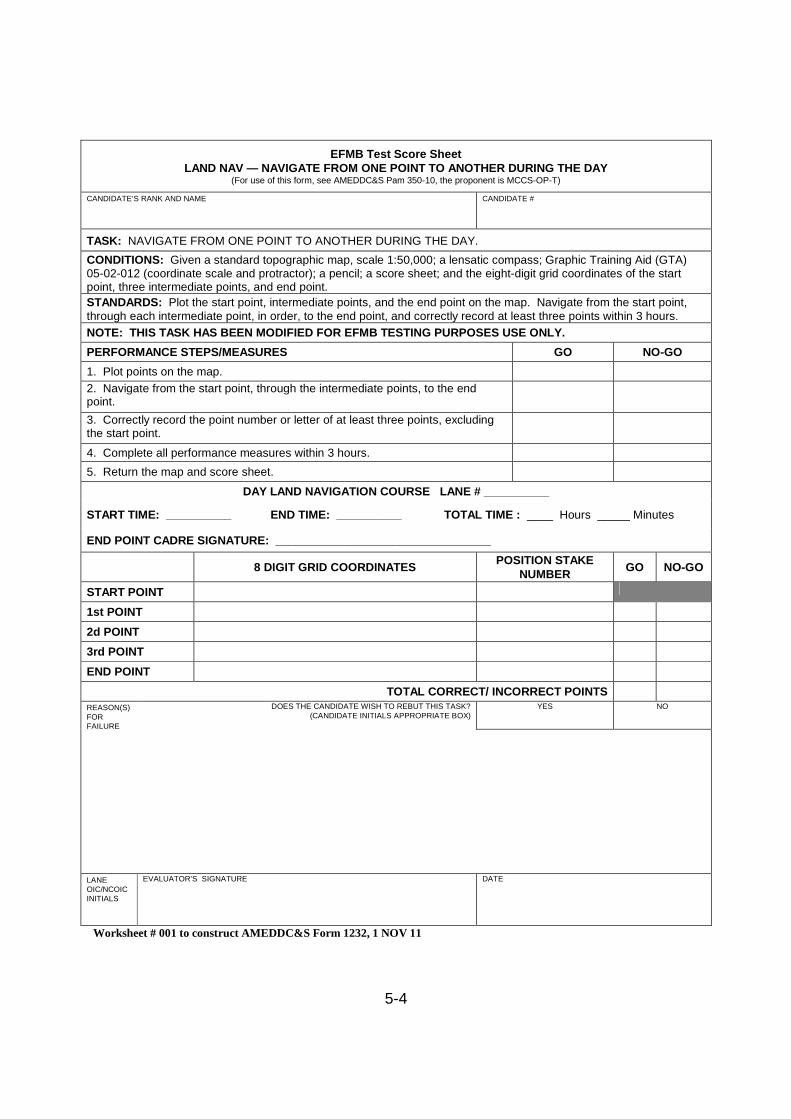
EFMB Test Score SheetLAND NAV — NAVIGATE FROM ONE POINT TO ANOTHER DURING THE NIGHT
(For use of this form, see AMEDDC&S Pam 350-10, the proponent is MCCS-OP-T)
CANDIDATE’S RANK AND NAME CANDIDATE #
TASK: NAVIGATE FROM ONE POINT TO ANOTHER DURING THE NIGHT.
CONDITIONS: Given a standard topographic map, scale 1:50,000; a lensatic compass; Graphic Training Aid (GTA)05-02-012 (coordinate scale and protractor); a pencil; a score sheet; a red-lens flashlight; a chemical light stick foremergency use; and the eight digit grid coordinates of the start point, three intermediate points, and end point.
STANDARDS: Plot the start point, intermediate points, and the end point on the map. Navigate from the start point,through each intermediate point, in order, to the end point, and correctly record at least three points within 4 hours.
NOTE: THIS TASK HAS BEEN MODIFIED FOR EFMB TESTING PURPOSES USE ONLY.
PERFORMANCE STEPS/MEASURES GO NO-GO
1. Plot points on the map.
2. Navigate from the start point, through the intermediate points, to the endpoint.
3. Did not mark the route of travel with the flashlight.
4. Correctly record the point number or letter of at least three points, excludingthe start point.
5. Complete all performance measures within 4 hours.
6. Return the map and score sheet.
NIGHT LAND NAVIGATION COURSE LANE # __________
START TIME: __________ END TIME: __________ TOTAL TIME : ____ Hours _____ Minutes
END POINT CADRE SIGNATURE: _________________________________
8 DIGIT GRID COORDINATESPOSITION STAKE
NUMBERGO NO-GO
START POINT
1st POINT
2d POINT
3rd POINT
END POINT
TOTAL CORRECT/INCORRECT POINTS
REASON(S)FOR FAILURE
DOES THE CANDIDATE WISH TO REBUT THIS TASK?(CANDIDATE INITIALS APPROPRIATE BOX)
YES NO
LANE OIC/NCOICINITIALS
EVALUATOR’S SIGNATURE DATE
Worksheet # 002 to construct AMEDDC&S Form 1232, 1 NOV 11

5-6
THIS PAGE LEFT BLANK INTENTIONALLY
6-1
CHAPTER 6
TACTICAL COMBAT CASUALTY CARE
TOTAL TASKS-14PASS REQUIREMENTS-11 OF 14
6-1. TACTICAL COMBAT CASUALTY CARE (TCCC) TASKS.
a. Objective. To measure the candidate's ability to prioritize casualties and applytactical combat casualty care and emergency medical treatment skills in acontemporary combat operating environment.
b. Requirements. The candidate is required to complete the 14 tasks (paragraph6-1-c) and pass 11 of the 14. The tasks are tested in a simulated battlefield scenariowith the required equipment. The candidates' aid bags will contain the items on apacking list provided by the EFMB test board. The candidate is placed in a scenariowith numerous simulated casualties incurred in the negotiation of the CTL.
c. Tasks. The following tasks are tested in a lane using reaction-style testing.
(1) Perform a tactical combat casualty care patient assessment.
(2) Control bleeding using a tourniquet.
(3) Control bleeding using a hemostatic device.
(4) Triage casualties.
(5) Control bleeding using dressings.
(6) Initiate a saline lock and intravenous infusion.
(7) Initiate treatment for hypovolemic shock and prevent hypothermia.
(8) Insert a nasopharyngeal airway.
(9) Treat a penetrating chest wound.
(10) Perform needle chest decompression.
(11) Treat an open abdominal wound.
(12) Treat an open head injury.
(13) Immobilize a suspected fracture of the arm.
6-2
(14) Treat lacerations, contusions, and extrusions of the eye.
d. TCCC tasks may be tested all on the same CTL or split up on various CTLs.
e. The EFMB test board chairperson may establish a time limit only for the portionsof lanes that TCCC tasks are tested to prevent unprepared candidates from hinderingthe efficiency of the lane. At the end of the time established by the test boardchairperson, the tasks that are not completed will be scored a NO-GO.
6-2. COMMUNICATION.
a. Any acronyms (i.e., DCAP-BTLS, TIC) that the candidate will use during thetesting of the TCCC tasks will be defined by the candidate to the evaluator following theteam brief. This portion of the lane will not be timed. If the candidate utilizes anacronym during the lane that was not previously defined, the evaluator will ask for itsdefinition. If the test board chairperson has established a time limit for the TCCCportion of a lane, the time required to define the acronym will be included in thecandidate’s completion time.
b. Substance Isolation (BSI). The majority of the TCCC tasks have a performancestep/measure to take BSI precautions. The EFMB host unit will standardize candidateson what actions they will take with the applicable tasks depending on its concept ofoperation.
6-3. EQUIPMENT.
a. The host unit will provide all equipment and supplies for TCCC tasks at thetested sites. Candidates are required to pack their own aid bags prior to the start of thelane. Improper packing of the aid bag by the candidate is not grounds for rebuttal.

6-3
REPRODUCIBLE SCORE SHEETS
6-4. GENERAL.
The various score sheets included within this appendix are designed for EFMB use onlyand prescribe the testing standards for use during EFMB. They may be reproduced locallyas needed.

6-4
EFMB Test Score SheetTCCC — PERFORM A TACTICAL COMBAT CASUALTY CARE PATIENT ASSESSMENT
(For use of this form, see AMEDDC&S Pam 350-10, the proponent is MCCS-OP-T)
CANDIDATE’S RANK AND NAME CANDIDATE #
TASK: PERFORM A TACTICAL COMBAT CASUALTY CARE PATIENT ASSESSMENT.
CONDITIONS: Given multiple trauma casualties in a simulated combat environment and necessary equipment toperform applicable performance steps and measures.
STANDARDS: Perform all steps and measures IAW the concepts and principles of Tactical Combat Casualty Careand the EFMB Program without causing further injury to the casualties.
NOTE: THIS TASK HAS BEEN MODIFIED FOR EFMB TESTING PURPOSES ONLY.
PERFORMANCE STEPS/MEASURES GO NO-GO
NOTE: Performance steps/measures that are evaluated in other EFMB TCCC tasks (i.e. Control Bleeding Using aTourniquet task) will not be marked as a NO-GO on this task as long as they were attempted at the appropriate phasein the CTL. Performance of a step/measure during the wrong phase (i.e., splinting a fracture in the care under firephase) or not performing at all will be marked as a NO-GO on this task.
1. Perform care under fire procedures.
a. Take cover. Return fire as directed or required before providing medical treatment.
b. Direct the casualties to return fire, if able.
c. Determine the scene safety/security.
NOTE: Despite fire superiority being gained during the care under fire phase of care, it does not mean that the enemythreat has been eliminated. You must exercise caution when maneuvering to casualties utilizing available cover,concealment, and suppressive fire. If the tactical situation permits have the casualties move to your position exercisingthe same caution.
NOTE: You must determine the relative threat of the tactical situation versus the risk to the casualty. Can you removethe casualty to a place of relative safety without becoming a casualty yourself? Is the casualty safer where he is? Ifpossible, seek assistance from your leader.
d. Determine the number and location of the injured and severity of their injuries (EvaluatedIAW Triage Casualties task).
e. Direct team members/combat life savers to assist, if available.
NOTE: For EFMB testing purposes, the candidate cannot direct other individuals or a casualty to perform tasks that heis being evaluated on. This is also applicable for other performance steps/measures within this task. For example, thecandidate cannot direct a team member to control bleeding using a tourniquet and only check that it was appliedcorrectly. The candidate must be evaluated on performing each of the TCCC tasks at least once.
f. Assess the casualties for life threatening extremity hemorrhage.
NOTE: Once fire superiority has been gained begin assessing and treating life threatening hemorrhage.
(1) If the casualty is unresponsive or unable to move and has severe extremity bleeding,administer life-saving hemorrhage control before moving the casualty.
(a) Use a tourniquet for hemorrhage that is anatomically amenable to tourniquetapplication (Evaluated IAW Control Bleeding with Tourniquet task).
(b) For hemorrhage that cannot be controlled with a tourniquet, apply a hemostaticdressing (Evaluated IAW Control Bleeding with Hemostatic Device task).
(2) Direct the casualty to control hemorrhage by self-aid if he is able.
g. Communicate the medical situation to the team leader, the evaluator for EFMB testingpurposes (Evaluated IAW Triage Casualties task).
h. Tactically transport the casualty, his weapon, and mission-essential equipment to cover,as required (Evaluated IAW Evacuate Casualties tasks).
NOTE: If the casualty has equipment that is essential to the mission, move the mission-essential equipment also. Donot try to move equipment that is not mission essential.
Worksheet # 003 to construct AMEDDC&S Form 1232, 1 NOV 11 Page 1 of 7
6-5
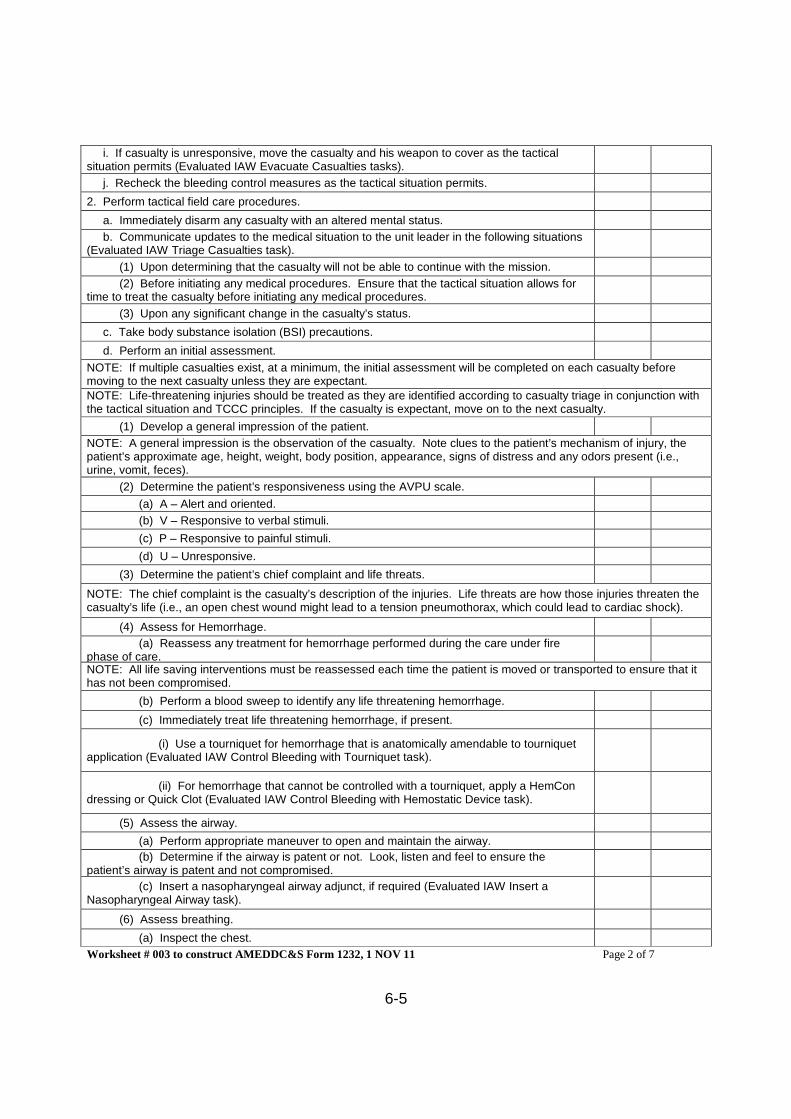
i. If casualty is unresponsive, move the casualty and his weapon to cover as the tacticalsituation permits (Evaluated IAW Evacuate Casualties tasks).
j. Recheck the bleeding control measures as the tactical situation permits.
2. Perform tactical field care procedures.
a. Immediately disarm any casualty with an altered mental status.
b. Communicate updates to the medical situation to the unit leader in the following situations(Evaluated IAW Triage Casualties task).
(1) Upon determining that the casualty will not be able to continue with the mission.
(2) Before initiating any medical procedures. Ensure that the tactical situation allows fortime to treat the casualty before initiating any medical procedures.
(3) Upon any significant change in the casualty’s status.
c. Take body substance isolation (BSI) precautions.
d. Perform an initial assessment.
NOTE: If multiple casualties exist, at a minimum, the initial assessment will be completed on each casualty beforemoving to the next casualty unless they are expectant.NOTE: Life-threatening injuries should be treated as they are identified according to casualty triage in conjunction withthe tactical situation and TCCC principles. If the casualty is expectant, move on to the next casualty.
(1) Develop a general impression of the patient.
NOTE: A general impression is the observation of the casualty. Note clues to the patient’s mechanism of injury, thepatient’s approximate age, height, weight, body position, appearance, signs of distress and any odors present (i.e.,urine, vomit, feces).
(2) Determine the patient’s responsiveness using the AVPU scale.
(a) A – Alert and oriented.
(b) V – Responsive to verbal stimuli.
(c) P – Responsive to painful stimuli.
(d) U – Unresponsive.
(3) Determine the patient’s chief complaint and life threats.
NOTE: The chief complaint is the casualty’s description of the injuries. Life threats are how those injuries threaten thecasualty’s life (i.e., an open chest wound might lead to a tension pneumothorax, which could lead to cardiac shock).
(4) Assess for Hemorrhage.
(a) Reassess any treatment for hemorrhage performed during the care under firephase of care.NOTE: All life saving interventions must be reassessed each time the patient is moved or transported to ensure that ithas not been compromised.
(b) Perform a blood sweep to identify any life threatening hemorrhage.
(c) Immediately treat life threatening hemorrhage, if present.
(i) Use a tourniquet for hemorrhage that is anatomically amendable to tourniquetapplication (Evaluated IAW Control Bleeding with Tourniquet task).
(ii) For hemorrhage that cannot be controlled with a tourniquet, apply a HemCondressing or Quick Clot (Evaluated IAW Control Bleeding with Hemostatic Device task).
(5) Assess the airway.
(a) Perform appropriate maneuver to open and maintain the airway.
(b) Determine if the airway is patent or not. Look, listen and feel to ensure thepatient’s airway is patent and not compromised.
(c) Insert a nasopharyngeal airway adjunct, if required (Evaluated IAW Insert aNasopharyngeal Airway task).
(6) Assess breathing.
(a) Inspect the chest.
Worksheet # 003 to construct AMEDDC&S Form 1232, 1 NOV 11 Page 2 of 7
6-6
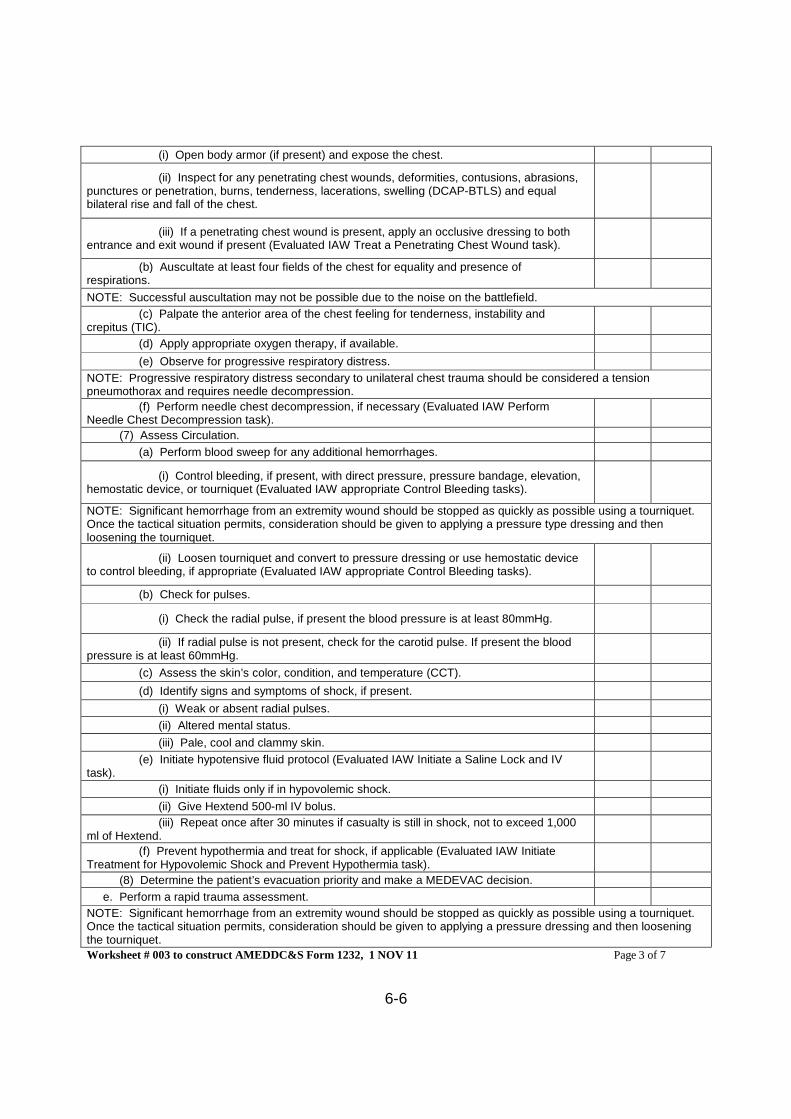
(i) Open body armor (if present) and expose the chest.
(ii) Inspect for any penetrating chest wounds, deformities, contusions, abrasions,punctures or penetration, burns, tenderness, lacerations, swelling (DCAP-BTLS) and equalbilateral rise and fall of the chest.
(iii) If a penetrating chest wound is present, apply an occlusive dressing to bothentrance and exit wound if present (Evaluated IAW Treat a Penetrating Chest Wound task).
(b) Auscultate at least four fields of the chest for equality and presence ofrespirations.
NOTE: Successful auscultation may not be possible due to the noise on the battlefield.
(c) Palpate the anterior area of the chest feeling for tenderness, instability andcrepitus (TIC).
(d) Apply appropriate oxygen therapy, if available.
(e) Observe for progressive respiratory distress.
NOTE: Progressive respiratory distress secondary to unilateral chest trauma should be considered a tensionpneumothorax and requires needle decompression.
(f) Perform needle chest decompression, if necessary (Evaluated IAW PerformNeedle Chest Decompression task).
(7) Assess Circulation.
(a) Perform blood sweep for any additional hemorrhages.
(i) Control bleeding, if present, with direct pressure, pressure bandage, elevation,hemostatic device, or tourniquet (Evaluated IAW appropriate Control Bleeding tasks).
NOTE: Significant hemorrhage from an extremity wound should be stopped as quickly as possible using a tourniquet.Once the tactical situation permits, consideration should be given to applying a pressure type dressing and thenloosening the tourniquet.
(ii) Loosen tourniquet and convert to pressure dressing or use hemostatic deviceto control bleeding, if appropriate (Evaluated IAW appropriate Control Bleeding tasks).
(b) Check for pulses.
(i) Check the radial pulse, if present the blood pressure is at least 80mmHg.
(ii) If radial pulse is not present, check for the carotid pulse. If present the bloodpressure is at least 60mmHg.
(c) Assess the skin’s color, condition, and temperature (CCT).
(d) Identify signs and symptoms of shock, if present.
(i) Weak or absent radial pulses.
(ii) Altered mental status.
(iii) Pale, cool and clammy skin.
(e) Initiate hypotensive fluid protocol (Evaluated IAW Initiate a Saline Lock and IVtask).
(i) Initiate fluids only if in hypovolemic shock.
(ii) Give Hextend 500-ml IV bolus.
(iii) Repeat once after 30 minutes if casualty is still in shock, not to exceed 1,000ml of Hextend.
(f) Prevent hypothermia and treat for shock, if applicable (Evaluated IAW InitiateTreatment for Hypovolemic Shock and Prevent Hypothermia task).
(8) Determine the patient’s evacuation priority and make a MEDEVAC decision.
e. Perform a rapid trauma assessment.
NOTE: Significant hemorrhage from an extremity wound should be stopped as quickly as possible using a tourniquet.Once the tactical situation permits, consideration should be given to applying a pressure dressing and then looseningthe tourniquet.
Worksheet # 003 to construct AMEDDC&S Form 1232, 1 NOV 11 Page 3 of 7
6-7
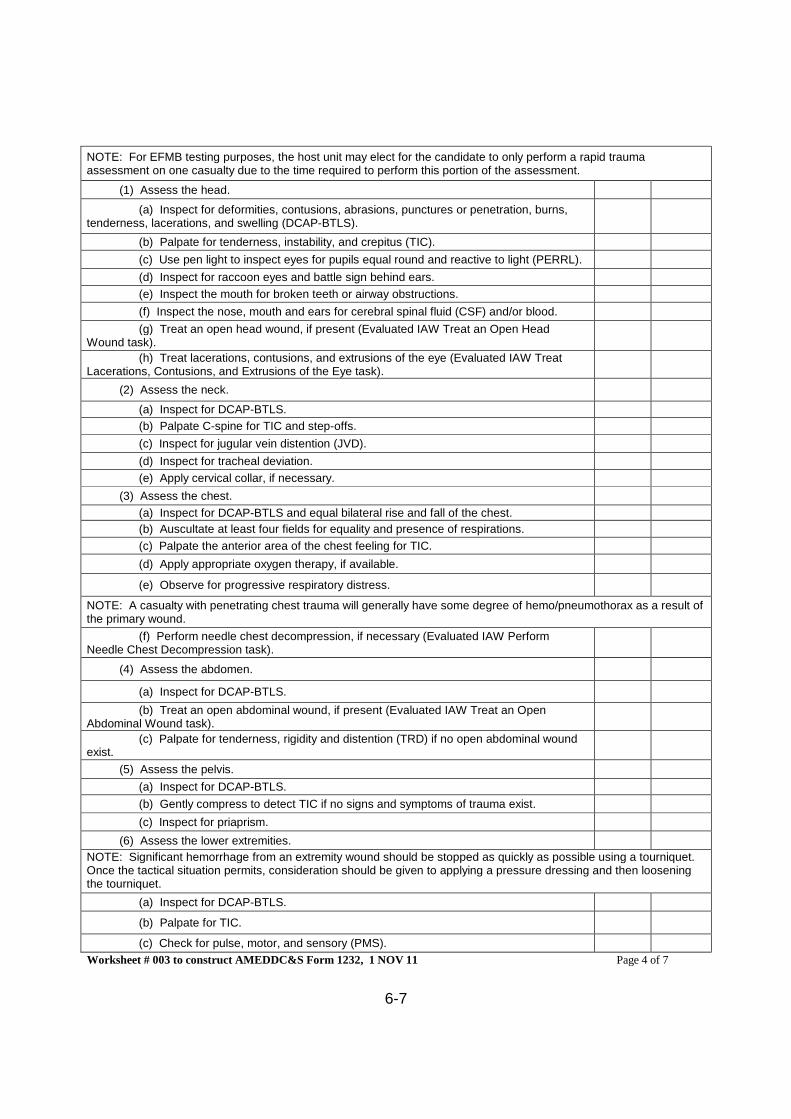
NOTE: For EFMB testing purposes, the host unit may elect for the candidate to only perform a rapid traumaassessment on one casualty due to the time required to perform this portion of the assessment.
(1) Assess the head.
(a) Inspect for deformities, contusions, abrasions, punctures or penetration, burns,tenderness, lacerations, and swelling (DCAP-BTLS).
(b) Palpate for tenderness, instability, and crepitus (TIC).
(c) Use pen light to inspect eyes for pupils equal round and reactive to light (PERRL).
(d) Inspect for raccoon eyes and battle sign behind ears.
(e) Inspect the mouth for broken teeth or airway obstructions.
(f) Inspect the nose, mouth and ears for cerebral spinal fluid (CSF) and/or blood.
(g) Treat an open head wound, if present (Evaluated IAW Treat an Open HeadWound task).
(h) Treat lacerations, contusions, and extrusions of the eye (Evaluated IAW TreatLacerations, Contusions, and Extrusions of the Eye task).
(2) Assess the neck.
(a) Inspect for DCAP-BTLS.
(b) Palpate C-spine for TIC and step-offs.
(c) Inspect for jugular vein distention (JVD).
(d) Inspect for tracheal deviation.
(e) Apply cervical collar, if necessary.
(3) Assess the chest.
(a) Inspect for DCAP-BTLS and equal bilateral rise and fall of the chest.
(b) Auscultate at least four fields for equality and presence of respirations.
(c) Palpate the anterior area of the chest feeling for TIC.
(d) Apply appropriate oxygen therapy, if available.
(e) Observe for progressive respiratory distress.
NOTE: A casualty with penetrating chest trauma will generally have some degree of hemo/pneumothorax as a result ofthe primary wound.
(f) Perform needle chest decompression, if necessary (Evaluated IAW PerformNeedle Chest Decompression task).
(4) Assess the abdomen.
(a) Inspect for DCAP-BTLS.
(b) Treat an open abdominal wound, if present (Evaluated IAW Treat an OpenAbdominal Wound task).
(c) Palpate for tenderness, rigidity and distention (TRD) if no open abdominal woundexist.
(5) Assess the pelvis.
(a) Inspect for DCAP-BTLS.
(b) Gently compress to detect TIC if no signs and symptoms of trauma exist.
(c) Inspect for priaprism.
(6) Assess the lower extremities.
NOTE: Significant hemorrhage from an extremity wound should be stopped as quickly as possible using a tourniquet.Once the tactical situation permits, consideration should be given to applying a pressure dressing and then looseningthe tourniquet.
(a) Inspect for DCAP-BTLS.
(b) Palpate for TIC.
(c) Check for pulse, motor, and sensory (PMS).
Worksheet # 003 to construct AMEDDC&S Form 1232, 1 NOV 11 Page 4 of 7
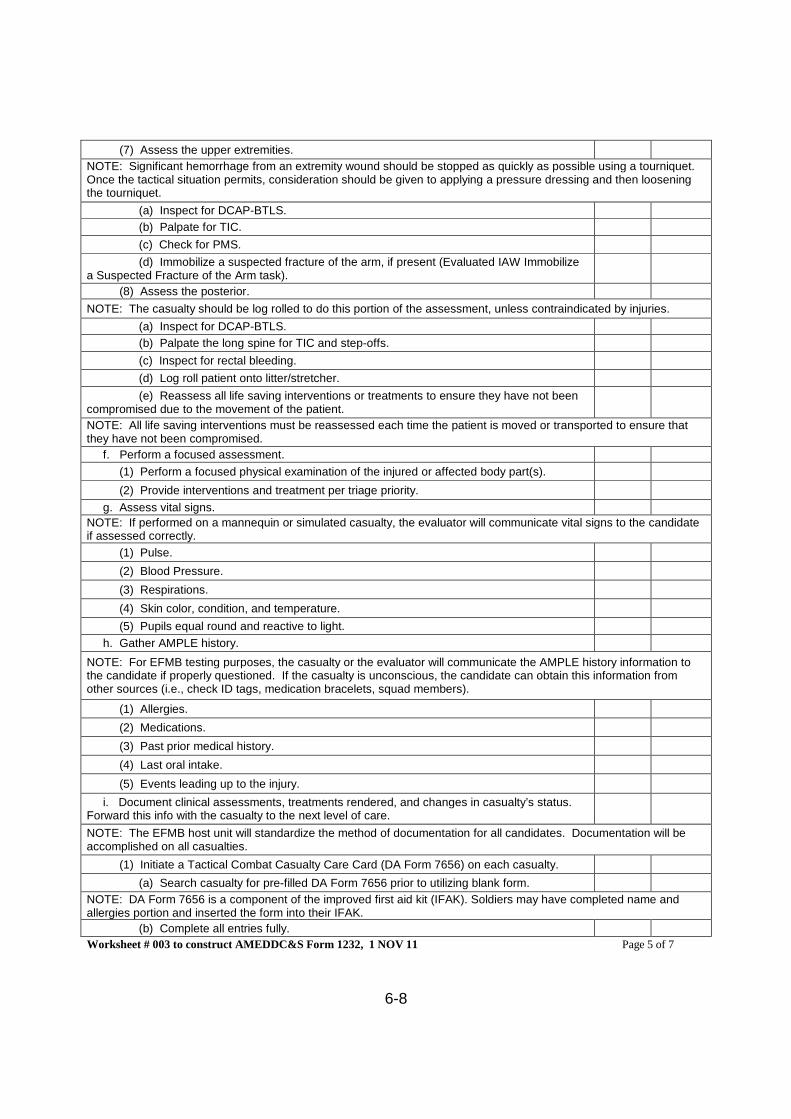
6-8
(7) Assess the upper extremities.
NOTE: Significant hemorrhage from an extremity wound should be stopped as quickly as possible using a tourniquet.Once the tactical situation permits, consideration should be given to applying a pressure dressing and then looseningthe tourniquet.
(a) Inspect for DCAP-BTLS.
(b) Palpate for TIC.
(c) Check for PMS.
(d) Immobilize a suspected fracture of the arm, if present (Evaluated IAW Immobilizea Suspected Fracture of the Arm task).
(8) Assess the posterior.
NOTE: The casualty should be log rolled to do this portion of the assessment, unless contraindicated by injuries.
(a) Inspect for DCAP-BTLS.
(b) Palpate the long spine for TIC and step-offs.
(c) Inspect for rectal bleeding.
(d) Log roll patient onto litter/stretcher.
(e) Reassess all life saving interventions or treatments to ensure they have not beencompromised due to the movement of the patient.
NOTE: All life saving interventions must be reassessed each time the patient is moved or transported to ensure thatthey have not been compromised.
f. Perform a focused assessment.
(1) Perform a focused physical examination of the injured or affected body part(s).
(2) Provide interventions and treatment per triage priority.
g. Assess vital signs.
NOTE: If performed on a mannequin or simulated casualty, the evaluator will communicate vital signs to the candidateif assessed correctly.
(1) Pulse.
(2) Blood Pressure.
(3) Respirations.
(4) Skin color, condition, and temperature.
(5) Pupils equal round and reactive to light.
h. Gather AMPLE history.
NOTE: For EFMB testing purposes, the casualty or the evaluator will communicate the AMPLE history information tothe candidate if properly questioned. If the casualty is unconscious, the candidate can obtain this information fromother sources (i.e., check ID tags, medication bracelets, squad members).
(1) Allergies.
(2) Medications.
(3) Past prior medical history.
(4) Last oral intake.
(5) Events leading up to the injury.
i. Document clinical assessments, treatments rendered, and changes in casualty’s status.Forward this info with the casualty to the next level of care.
NOTE: The EFMB host unit will standardize the method of documentation for all candidates. Documentation will beaccomplished on all casualties.
(1) Initiate a Tactical Combat Casualty Care Card (DA Form 7656) on each casualty.
(a) Search casualty for pre-filled DA Form 7656 prior to utilizing blank form.
NOTE: DA Form 7656 is a component of the improved first aid kit (IFAK). Soldiers may have completed name andallergies portion and inserted the form into their IFAK.
(b) Complete all entries fully.
Worksheet # 003 to construct AMEDDC&S Form 1232, 1 NOV 11 Page 5 of 7
6-9
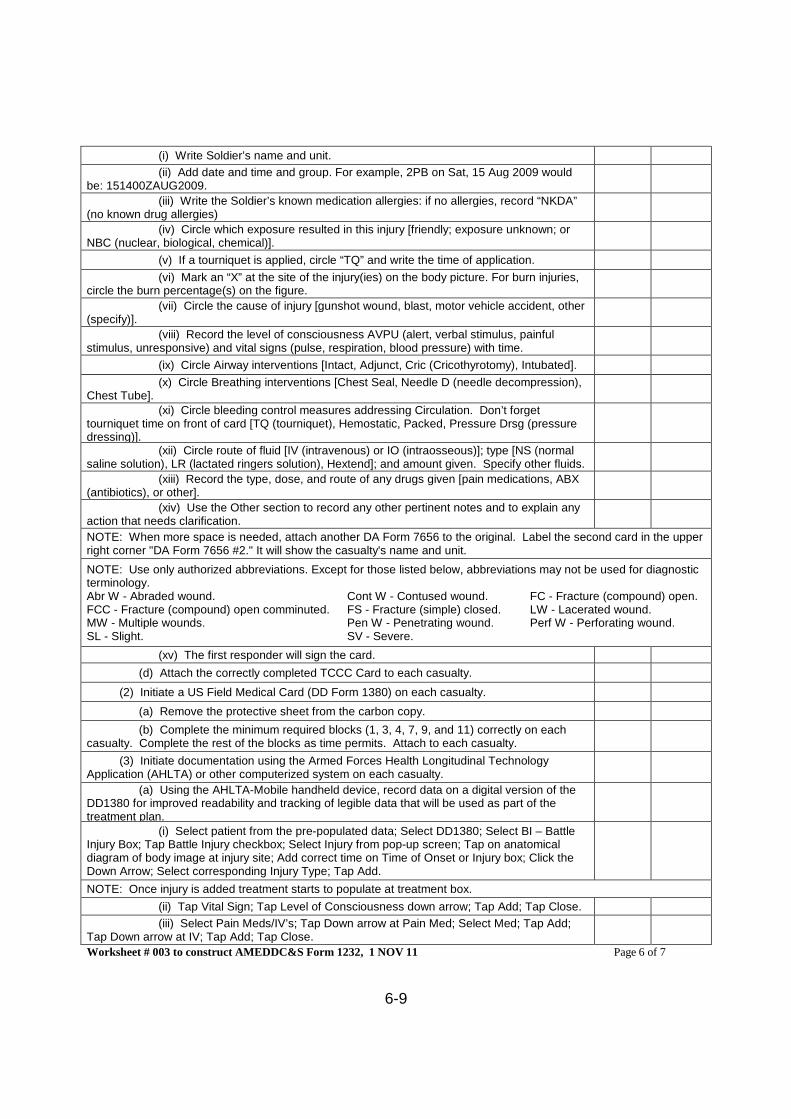
(i) Write Soldier’s name and unit.
(ii) Add date and time and group. For example, 2PB on Sat, 15 Aug 2009 wouldbe: 151400ZAUG2009.
(iii) Write the Soldier’s known medication allergies: if no allergies, record “NKDA”(no known drug allergies)
(iv) Circle which exposure resulted in this injury [friendly; exposure unknown; orNBC (nuclear, biological, chemical)].
(v) If a tourniquet is applied, circle “TQ” and write the time of application.
(vi) Mark an “X” at the site of the injury(ies) on the body picture. For burn injuries,circle the burn percentage(s) on the figure.
(vii) Circle the cause of injury [gunshot wound, blast, motor vehicle accident, other(specify)].
(viii) Record the level of consciousness AVPU (alert, verbal stimulus, painfulstimulus, unresponsive) and vital signs (pulse, respiration, blood pressure) with time.
(ix) Circle Airway interventions [Intact, Adjunct, Cric (Cricothyrotomy), Intubated].
(x) Circle Breathing interventions [Chest Seal, Needle D (needle decompression),Chest Tube].
(xi) Circle bleeding control measures addressing Circulation. Don’t forgettourniquet time on front of card [TQ (tourniquet), Hemostatic, Packed, Pressure Drsg (pressuredressing)].
(xii) Circle route of fluid [IV (intravenous) or IO (intraosseous)]; type [NS (normalsaline solution), LR (lactated ringers solution), Hextend]; and amount given. Specify other fluids.
(xiii) Record the type, dose, and route of any drugs given [pain medications, ABX(antibiotics), or other].
(xiv) Use the Other section to record any other pertinent notes and to explain anyaction that needs clarification.
NOTE: When more space is needed, attach another DA Form 7656 to the original. Label the second card in the upperright corner "DA Form 7656 #2." It will show the casualty's name and unit.
NOTE: Use only authorized abbreviations. Except for those listed below, abbreviations may not be used for diagnosticterminology.Abr W - Abraded wound. Cont W - Contused wound. FC - Fracture (compound) open.FCC - Fracture (compound) open comminuted. FS - Fracture (simple) closed. LW - Lacerated wound.MW - Multiple wounds. Pen W - Penetrating wound. Perf W - Perforating wound.SL - Slight. SV - Severe.
(xv) The first responder will sign the card.
(d) Attach the correctly completed TCCC Card to each casualty.
(2) Initiate a US Field Medical Card (DD Form 1380) on each casualty.
(a) Remove the protective sheet from the carbon copy.
(b) Complete the minimum required blocks (1, 3, 4, 7, 9, and 11) correctly on eachcasualty. Complete the rest of the blocks as time permits. Attach to each casualty.
(3) Initiate documentation using the Armed Forces Health Longitudinal TechnologyApplication (AHLTA) or other computerized system on each casualty.
(a) Using the AHLTA-Mobile handheld device, record data on a digital version of theDD1380 for improved readability and tracking of legible data that will be used as part of thetreatment plan.
(i) Select patient from the pre-populated data; Select DD1380; Select BI – BattleInjury Box; Tap Battle Injury checkbox; Select Injury from pop-up screen; Tap on anatomicaldiagram of body image at injury site; Add correct time on Time of Onset or Injury box; Click theDown Arrow; Select corresponding Injury Type; Tap Add.
NOTE: Once injury is added treatment starts to populate at treatment box.
(ii) Tap Vital Sign; Tap Level of Consciousness down arrow; Tap Add; Tap Close.
(iii) Select Pain Meds/IV’s; Tap Down arrow at Pain Med; Select Med; Tap Add;Tap Down arrow at IV; Tap Add; Tap Close.
Worksheet # 003 to construct AMEDDC&S Form 1232, 1 NOV 11 Page 6 of 7
6-10
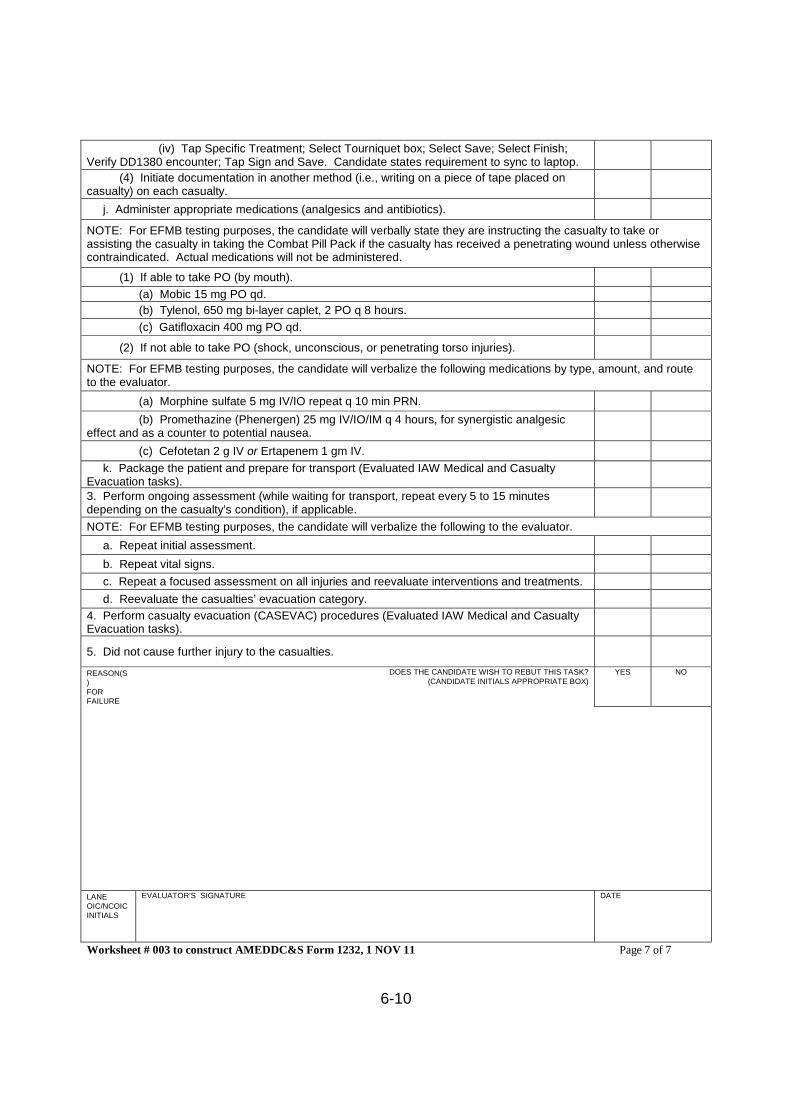
(iv) Tap Specific Treatment; Select Tourniquet box; Select Save; Select Finish;Verify DD1380 encounter; Tap Sign and Save. Candidate states requirement to sync to laptop.
(4) Initiate documentation in another method (i.e., writing on a piece of tape placed oncasualty) on each casualty.
j. Administer appropriate medications (analgesics and antibiotics).
NOTE: For EFMB testing purposes, the candidate will verbally state they are instructing the casualty to take orassisting the casualty in taking the Combat Pill Pack if the casualty has received a penetrating wound unless otherwisecontraindicated. Actual medications will not be administered.
(1) If able to take PO (by mouth).
(a) Mobic 15 mg PO qd.
(b) Tylenol, 650 mg bi-layer caplet, 2 PO q 8 hours.
(c) Gatifloxacin 400 mg PO qd.
(2) If not able to take PO (shock, unconscious, or penetrating torso injuries).
NOTE: For EFMB testing purposes, the candidate will verbalize the following medications by type, amount, and routeto the evaluator.
(a) Morphine sulfate 5 mg IV/IO repeat q 10 min PRN.
(b) Promethazine (Phenergen) 25 mg IV/IO/IM q 4 hours, for synergistic analgesiceffect and as a counter to potential nausea.
(c) Cefotetan 2 g IV or Ertapenem 1 gm IV.
k. Package the patient and prepare for transport (Evaluated IAW Medical and CasualtyEvacuation tasks).3. Perform ongoing assessment (while waiting for transport, repeat every 5 to 15 minutesdepending on the casualty’s condition), if applicable.
NOTE: For EFMB testing purposes, the candidate will verbalize the following to the evaluator.
a. Repeat initial assessment.
b. Repeat vital signs.
c. Repeat a focused assessment on all injuries and reevaluate interventions and treatments.
d. Reevaluate the casualties’ evacuation category.
4. Perform casualty evacuation (CASEVAC) procedures (Evaluated IAW Medical and CasualtyEvacuation tasks).
5. Did not cause further injury to the casualties.
REASON(S)FORFAILURE
DOES THE CANDIDATE WISH TO REBUT THIS TASK?(CANDIDATE INITIALS APPROPRIATE BOX)
YES NO
LANEOIC/NCOICINITIALS
EVALUATOR’S SIGNATURE DATE
Worksheet # 003 to construct AMEDDC&S Form 1232, 1 NOV 11 Page 7 of 7
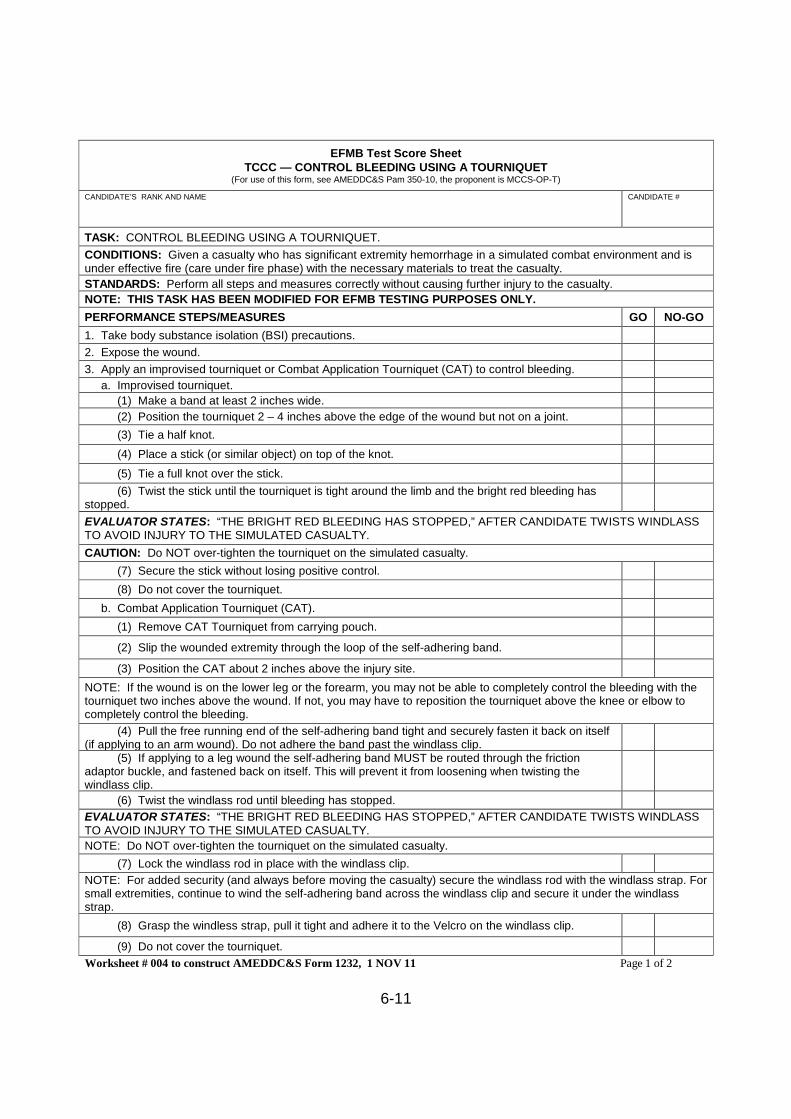
6-11
EFMB Test Score SheetTCCC — CONTROL BLEEDING USING A TOURNIQUET
(For use of this form, see AMEDDC&S Pam 350-10, the proponent is MCCS-OP-T)
CANDIDATE’S RANK AND NAME CANDIDATE #
TASK: CONTROL BLEEDING USING A TOURNIQUET.
CONDITIONS: Given a casualty who has significant extremity hemorrhage in a simulated combat environment and isunder effective fire (care under fire phase) with the necessary materials to treat the casualty.
STANDARDS: Perform all steps and measures correctly without causing further injury to the casualty.
NOTE: THIS TASK HAS BEEN MODIFIED FOR EFMB TESTING PURPOSES ONLY.
PERFORMANCE STEPS/MEASURES GO NO-GO
1. Take body substance isolation (BSI) precautions.
2. Expose the wound.
3. Apply an improvised tourniquet or Combat Application Tourniquet (CAT) to control bleeding.
a. Improvised tourniquet.
(1) Make a band at least 2 inches wide.
(2) Position the tourniquet 2 – 4 inches above the edge of the wound but not on a joint.
(3) Tie a half knot.
(4) Place a stick (or similar object) on top of the knot.
(5) Tie a full knot over the stick.
(6) Twist the stick until the tourniquet is tight around the limb and the bright red bleeding hasstopped.
EVALUATOR STATES: “THE BRIGHT RED BLEEDING HAS STOPPED,” AFTER CANDIDATE TWISTS WINDLASSTO AVOID INJURY TO THE SIMULATED CASUALTY.
CAUTION: Do NOT over-tighten the tourniquet on the simulated casualty.
(7) Secure the stick without losing positive control.
(8) Do not cover the tourniquet.
b. Combat Application Tourniquet (CAT).
(1) Remove CAT Tourniquet from carrying pouch.
(2) Slip the wounded extremity through the loop of the self-adhering band.
(3) Position the CAT about 2 inches above the injury site.
NOTE: If the wound is on the lower leg or the forearm, you may not be able to completely control the bleeding with thetourniquet two inches above the wound. If not, you may have to reposition the tourniquet above the knee or elbow tocompletely control the bleeding.
(4) Pull the free running end of the self-adhering band tight and securely fasten it back on itself(if applying to an arm wound). Do not adhere the band past the windlass clip.
(5) If applying to a leg wound the self-adhering band MUST be routed through the frictionadaptor buckle, and fastened back on itself. This will prevent it from loosening when twisting thewindlass clip.
(6) Twist the windlass rod until bleeding has stopped.
EVALUATOR STATES: “THE BRIGHT RED BLEEDING HAS STOPPED,” AFTER CANDIDATE TWISTS WINDLASSTO AVOID INJURY TO THE SIMULATED CASUALTY.
NOTE: Do NOT over-tighten the tourniquet on the simulated casualty.
(7) Lock the windlass rod in place with the windlass clip.
NOTE: For added security (and always before moving the casualty) secure the windlass rod with the windlass strap. Forsmall extremities, continue to wind the self-adhering band across the windlass clip and secure it under the windlassstrap.
(8) Grasp the windless strap, pull it tight and adhere it to the Velcro on the windlass clip.
(9) Do not cover the tourniquet.
Worksheet # 004 to construct AMEDDC&S Form 1232, 1 NOV 11 Page 1 of 2

6-12
4. Place a “T” on the casualty’s forehead and record the date and time the tourniquet was applied.
NOTE: The candidate will ensure that the time the tourniquet was applied is documented and forwarded with thecasualty. This will be done as standardized at the EFMB Test Site (i.e., on a DA 7656, tape applied on the casualty).
EVALUATOR WRITES: TIME TOURNIQUET WAS APPLIED:
5. If the tourniquet was applied on a casualty with an amputation, apply a dressing to cover the stump.
6. Did not cause further injury to the casualty.REASON(S)FOR FAILURE
DOES THE CANDIDATE WISH TO REBUT THIS TASK?(CANDIDATE INITIALS APPROPRIATE BOX)
YES NO
LANEOIC/NCOICINITIALS
EVALUATOR’S SIGNATURE DATE
Worksheet # 004 to construct AMEDDC&S Form 1232, 1 NOV 11 Page 2 of 2
6-13
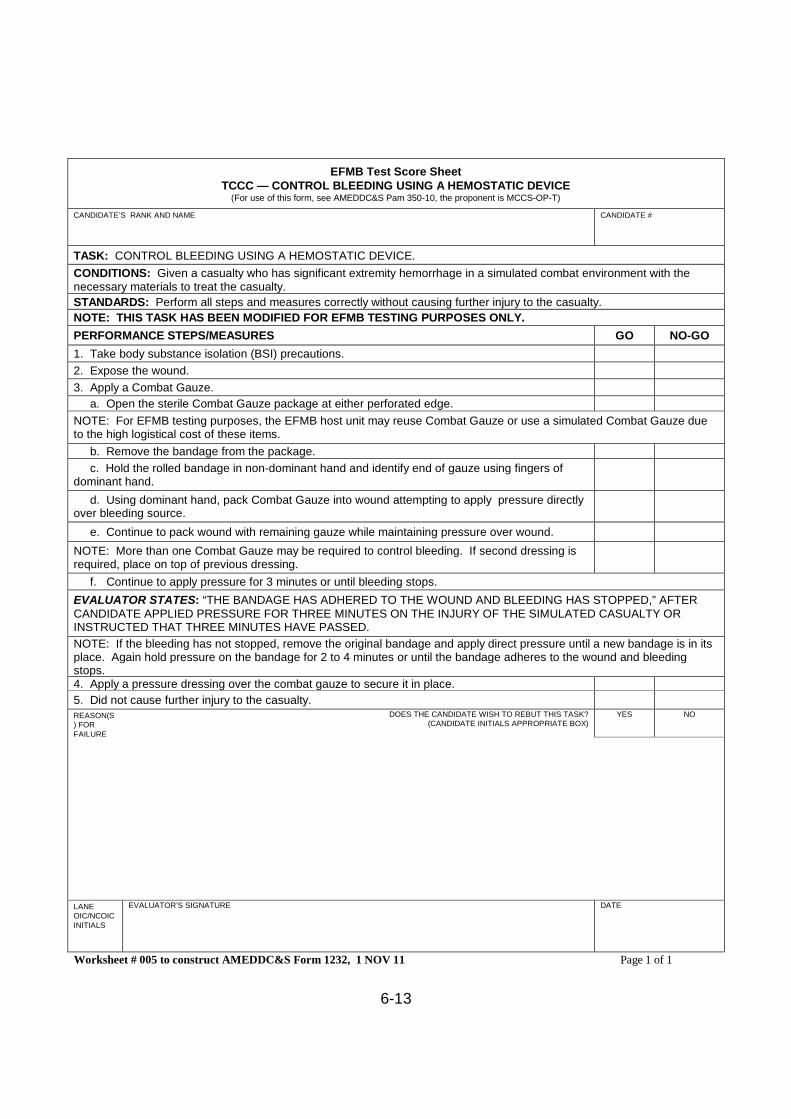
EFMB Test Score SheetTCCC — CONTROL BLEEDING USING A HEMOSTATIC DEVICE
(For use of this form, see AMEDDC&S Pam 350-10, the proponent is MCCS-OP-T)
CANDIDATE’S RANK AND NAME CANDIDATE #
TASK: CONTROL BLEEDING USING A HEMOSTATIC DEVICE.
CONDITIONS: Given a casualty who has significant extremity hemorrhage in a simulated combat environment with thenecessary materials to treat the casualty.
STANDARDS: Perform all steps and measures correctly without causing further injury to the casualty.
NOTE: THIS TASK HAS BEEN MODIFIED FOR EFMB TESTING PURPOSES ONLY.
PERFORMANCE STEPS/MEASURES GO NO-GO
1. Take body substance isolation (BSI) precautions.
2. Expose the wound.
3. Apply a Combat Gauze.
a. Open the sterile Combat Gauze package at either perforated edge.
NOTE: For EFMB testing purposes, the EFMB host unit may reuse Combat Gauze or use a simulated Combat Gauze dueto the high logistical cost of these items.
b. Remove the bandage from the package.
c. Hold the rolled bandage in non-dominant hand and identify end of gauze using fingers ofdominant hand.
d. Using dominant hand, pack Combat Gauze into wound attempting to apply pressure directlyover bleeding source.
e. Continue to pack wound with remaining gauze while maintaining pressure over wound.
NOTE: More than one Combat Gauze may be required to control bleeding. If second dressing isrequired, place on top of previous dressing.
f. Continue to apply pressure for 3 minutes or until bleeding stops.
EVALUATOR STATES: “THE BANDAGE HAS ADHERED TO THE WOUND AND BLEEDING HAS STOPPED,” AFTERCANDIDATE APPLIED PRESSURE FOR THREE MINUTES ON THE INJURY OF THE SIMULATED CASUALTY ORINSTRUCTED THAT THREE MINUTES HAVE PASSED.
NOTE: If the bleeding has not stopped, remove the original bandage and apply direct pressure until a new bandage is in itsplace. Again hold pressure on the bandage for 2 to 4 minutes or until the bandage adheres to the wound and bleedingstops.4. Apply a pressure dressing over the combat gauze to secure it in place.
5. Did not cause further injury to the casualty.REASON(S) FORFAILURE
DOES THE CANDIDATE WISH TO REBUT THIS TASK?(CANDIDATE INITIALS APPROPRIATE BOX)
YES NO
LANEOIC/NCOICINITIALS
EVALUATOR’S SIGNATURE DATE
Worksheet # 005 to construct AMEDDC&S Form 1232, 1 NOV 11 Page 1 of 1
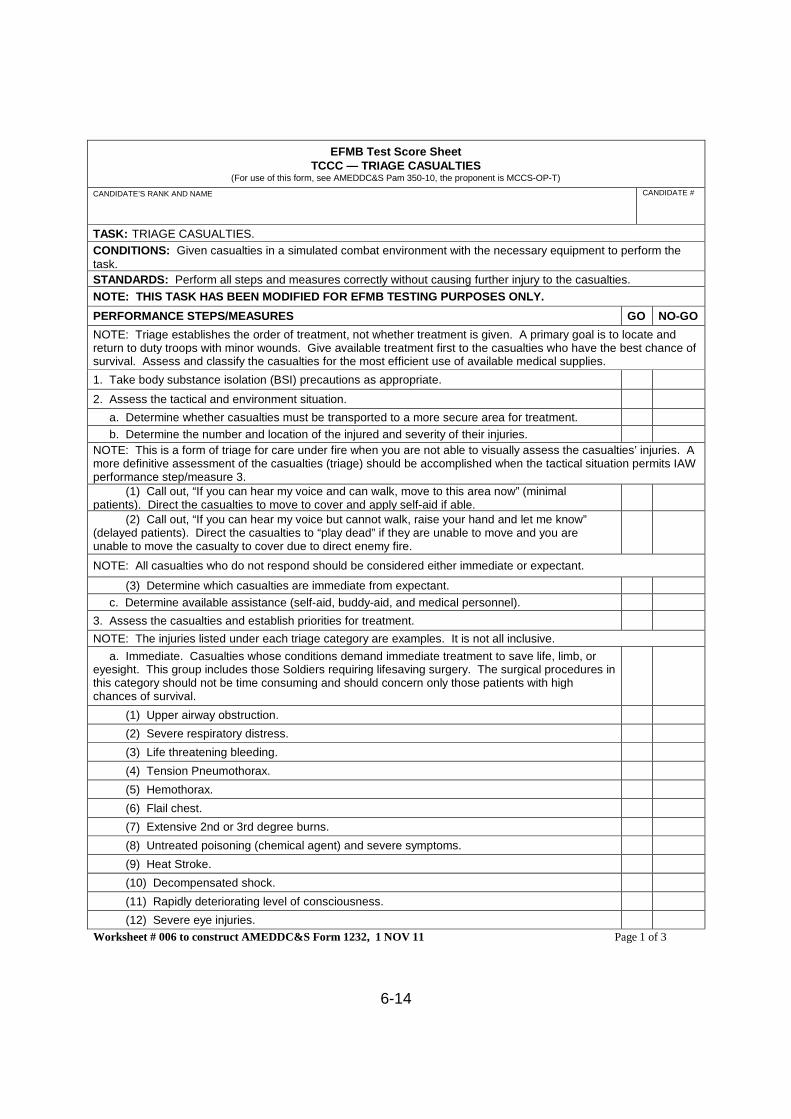
6-14
EFMB Test Score SheetTCCC — TRIAGE CASUALTIES
(For use of this form, see AMEDDC&S Pam 350-10, the proponent is MCCS-OP-T)
CANDIDATE’S RANK AND NAME CANDIDATE #
TASK: TRIAGE CASUALTIES.
CONDITIONS: Given casualties in a simulated combat environment with the necessary equipment to perform thetask.
STANDARDS: Perform all steps and measures correctly without causing further injury to the casualties.
NOTE: THIS TASK HAS BEEN MODIFIED FOR EFMB TESTING PURPOSES ONLY.
PERFORMANCE STEPS/MEASURES GO NO-GO
NOTE: Triage establishes the order of treatment, not whether treatment is given. A primary goal is to locate andreturn to duty troops with minor wounds. Give available treatment first to the casualties who have the best chance ofsurvival. Assess and classify the casualties for the most efficient use of available medical supplies.
1. Take body substance isolation (BSI) precautions as appropriate.
2. Assess the tactical and environment situation.
a. Determine whether casualties must be transported to a more secure area for treatment.
b. Determine the number and location of the injured and severity of their injuries.
NOTE: This is a form of triage for care under fire when you are not able to visually assess the casualties’ injuries. Amore definitive assessment of the casualties (triage) should be accomplished when the tactical situation permits IAWperformance step/measure 3.
(1) Call out, “If you can hear my voice and can walk, move to this area now” (minimalpatients). Direct the casualties to move to cover and apply self-aid if able.
(2) Call out, “If you can hear my voice but cannot walk, raise your hand and let me know”(delayed patients). Direct the casualties to “play dead” if they are unable to move and you areunable to move the casualty to cover due to direct enemy fire.
NOTE: All casualties who do not respond should be considered either immediate or expectant.
(3) Determine which casualties are immediate from expectant.
c. Determine available assistance (self-aid, buddy-aid, and medical personnel).
3. Assess the casualties and establish priorities for treatment.
NOTE: The injuries listed under each triage category are examples. It is not all inclusive.
a. Immediate. Casualties whose conditions demand immediate treatment to save life, limb, oreyesight. This group includes those Soldiers requiring lifesaving surgery. The surgical procedures inthis category should not be time consuming and should concern only those patients with highchances of survival.
(1) Upper airway obstruction.
(2) Severe respiratory distress.
(3) Life threatening bleeding.
(4) Tension Pneumothorax.
(5) Hemothorax.
(6) Flail chest.
(7) Extensive 2nd or 3rd degree burns.
(8) Untreated poisoning (chemical agent) and severe symptoms.
(9) Heat Stroke.
(10) Decompensated shock.
(11) Rapidly deteriorating level of consciousness.
(12) Severe eye injuries.
Worksheet # 006 to construct AMEDDC&S Form 1232, 1 NOV 11 Page 1 of 3
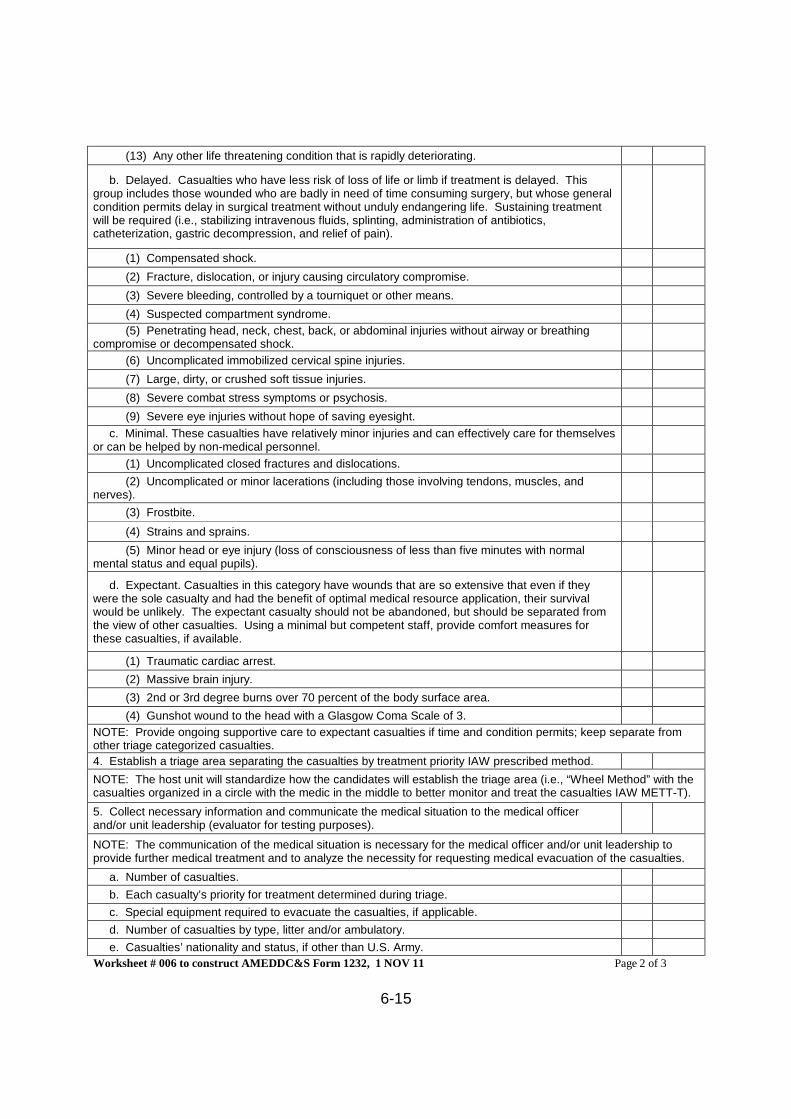
6-15
(13) Any other life threatening condition that is rapidly deteriorating.
b. Delayed. Casualties who have less risk of loss of life or limb if treatment is delayed. Thisgroup includes those wounded who are badly in need of time consuming surgery, but whose generalcondition permits delay in surgical treatment without unduly endangering life. Sustaining treatmentwill be required (i.e., stabilizing intravenous fluids, splinting, administration of antibiotics,catheterization, gastric decompression, and relief of pain).
(1) Compensated shock.
(2) Fracture, dislocation, or injury causing circulatory compromise.
(3) Severe bleeding, controlled by a tourniquet or other means.
(4) Suspected compartment syndrome.
(5) Penetrating head, neck, chest, back, or abdominal injuries without airway or breathingcompromise or decompensated shock.
(6) Uncomplicated immobilized cervical spine injuries.
(7) Large, dirty, or crushed soft tissue injuries.
(8) Severe combat stress symptoms or psychosis.
(9) Severe eye injuries without hope of saving eyesight.
c. Minimal. These casualties have relatively minor injuries and can effectively care for themselvesor can be helped by non-medical personnel.
(1) Uncomplicated closed fractures and dislocations.
(2) Uncomplicated or minor lacerations (including those involving tendons, muscles, andnerves).
(3) Frostbite.
(4) Strains and sprains.
(5) Minor head or eye injury (loss of consciousness of less than five minutes with normalmental status and equal pupils).
d. Expectant. Casualties in this category have wounds that are so extensive that even if theywere the sole casualty and had the benefit of optimal medical resource application, their survivalwould be unlikely. The expectant casualty should not be abandoned, but should be separated fromthe view of other casualties. Using a minimal but competent staff, provide comfort measures forthese casualties, if available.
(1) Traumatic cardiac arrest.
(2) Massive brain injury.
(3) 2nd or 3rd degree burns over 70 percent of the body surface area.
(4) Gunshot wound to the head with a Glasgow Coma Scale of 3.
NOTE: Provide ongoing supportive care to expectant casualties if time and condition permits; keep separate fromother triage categorized casualties.
4. Establish a triage area separating the casualties by treatment priority IAW prescribed method.
NOTE: The host unit will standardize how the candidates will establish the triage area (i.e., “Wheel Method” with thecasualties organized in a circle with the medic in the middle to better monitor and treat the casualties IAW METT-T).
5. Collect necessary information and communicate the medical situation to the medical officerand/or unit leadership (evaluator for testing purposes).
NOTE: The communication of the medical situation is necessary for the medical officer and/or unit leadership toprovide further medical treatment and to analyze the necessity for requesting medical evacuation of the casualties.
a. Number of casualties.
b. Each casualty’s priority for treatment determined during triage.
c. Special equipment required to evacuate the casualties, if applicable.
d. Number of casualties by type, litter and/or ambulatory.
e. Casualties’ nationality and status, if other than U.S. Army.
Worksheet # 006 to construct AMEDDC&S Form 1232, 1 NOV 11 Page 2 of 3
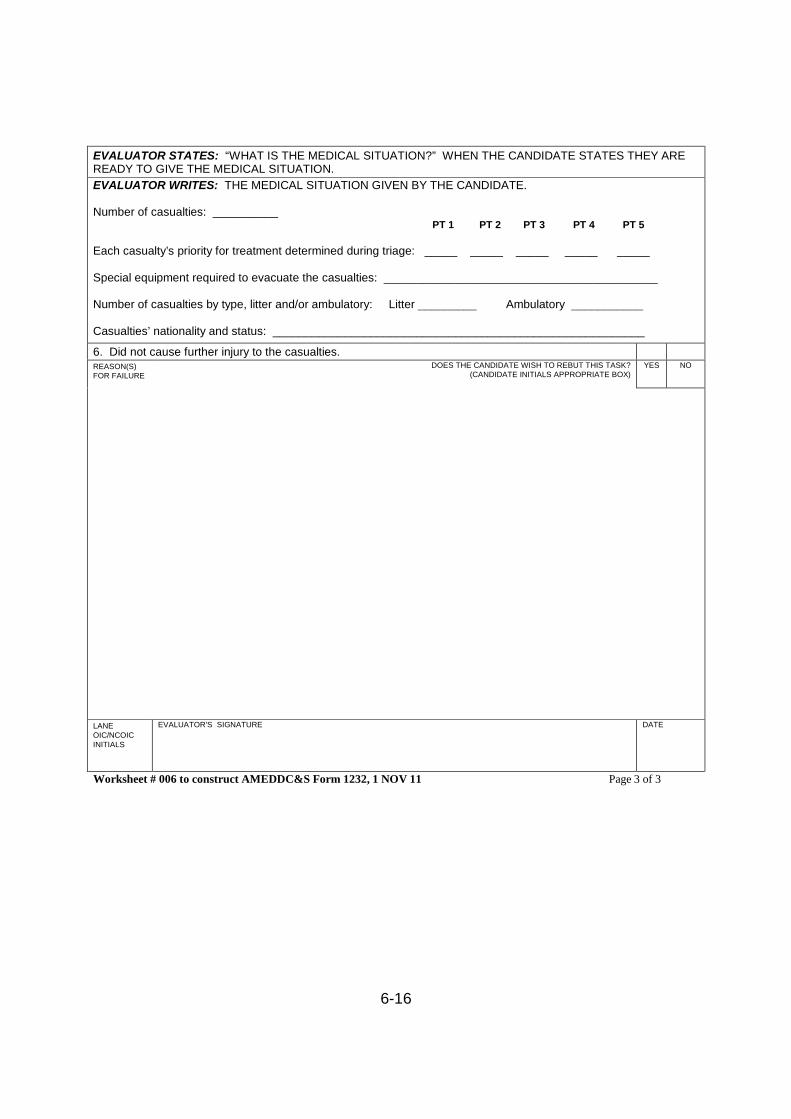
6-16
EVALUATOR STATES: “WHAT IS THE MEDICAL SITUATION?” WHEN THE CANDIDATE STATES THEY AREREADY TO GIVE THE MEDICAL SITUATION.
EVALUATOR WRITES: THE MEDICAL SITUATION GIVEN BY THE CANDIDATE.
Number of casualties: __________PT 1 PT 2 PT 3 PT 4 PT 5
Each casualty’s priority for treatment determined during triage: _____ _____ _____ _____ _____
Special equipment required to evacuate the casualties: __________________________________________
Number of casualties by type, litter and/or ambulatory: Litter _________ Ambulatory ___________
Casualties’ nationality and status: _________________________________________________________
6. Did not cause further injury to the casualties.REASON(S)FOR FAILURE
DOES THE CANDIDATE WISH TO REBUT THIS TASK?(CANDIDATE INITIALS APPROPRIATE BOX)
YES NO
LANEOIC/NCOICINITIALS
EVALUATOR’S SIGNATURE DATE
Worksheet # 006 to construct AMEDDC&S Form 1232, 1 NOV 11 Page 3 of 3

6-17
EFMB Test Score SheetTCCC — CONTROL BLEEDING USING DRESSINGS
(For use of this form, see AMEDDC&S Pam 350-10, the proponent is MCCS-OP-T)
CANDIDATE’S RANK AND NAME CANDIDATE #
TASK: CONTROL BLEEDING USING DRESSINGS.
CONDITIONS: Given a casualty who has a bleeding wound of the arm or leg in a simulated combat environment intactical field care conditions and the necessary materials to treat the casualty. The casualty has already been treated inthe “care under fire” phase, and an effective tourniquet is in place.
STANDARDS: Perform all steps and measures correctly without causing further injury to the casualty.
NOTE: THIS TASK HAS BEEN MODIFIED FOR EFMB TESTING PURPOSES ONLY.
PERFORMANCE STEPS/MEASURES GO
NO-GO
1. Take body substance isolation (BSI) precautions.
2. Expose the wound.
3. Loosen tourniquet slowly; if brisk bleeding returns, re-tighten tourniquet.
EVALUATOR STATES: “BRISK BLEEDING DOES NOT RETURN” AFTER CANDIDATE LOOSENS THETOURNIQUET.
NOTE: If using a CAT, do not remove the tourniquet, only loosen it. This allows the tourniquet to be re-applied if thehemorrhage cannot be controlled by other methods.
4. Apply a field/pressure dressing or emergency trauma dressing to the wound.
a. Field and pressure dressing.
(1) Apply the field dressing directly over the wound.
(2) Wrap the tails around the extremity.
(3) Tie a non-slip knot over the outer edge of the dressing, not over the wound.
(4) Check the tightness of the dressing.
(5) Check the distal pulse to make sure that the dressing has not been applied too tightly.
EVALUATOR STATES: “THERE IS A PULSE.”
(6) Tuck or cut excess tails from dressing.
EVALUATOR STATES: “WOUND CONTINUES TO BLEED.”
(7) Place a wad of padding directly over the wound.
(8) Apply a field dressing/cravat/elastic bandage on top of the padding to create a pressuredressing.
(9) Tie a non-slip knot directly over the wound or secure elastic bandage.
(10) Check the distal pulse to make sure that the dressing has not been applied too tightly.
EVALUATOR STATES: “THERE IS A PULSE AND THE BLEEDING HAS STOPPED.”
(11) Tuck or cut excess tails from dressing.
b. Emergency trauma dressing.
(1) Open the sterile package and apply the white portion of the bandage directly over thewound.
(2) Wrap the elastic portion of the bandage around the extremity.
(3) Insert the elastic wrap completely into the pressure bar.
(4) Pull the bandage tight and reverse it back over the top of the pressure bar forcing it downonto the pad.
(5) Continue to wrap the elastic bandage tightly over the pressure bar and wound pad. Ensurethat the edges of the wound pad are covered.
(6) Secure the hooking ends of the closure bar onto the last wrap of the bandage.
Worksheet # 007 to construct AMEDDC&S Form 1232, 1 NOV 11 Page 1 of 2
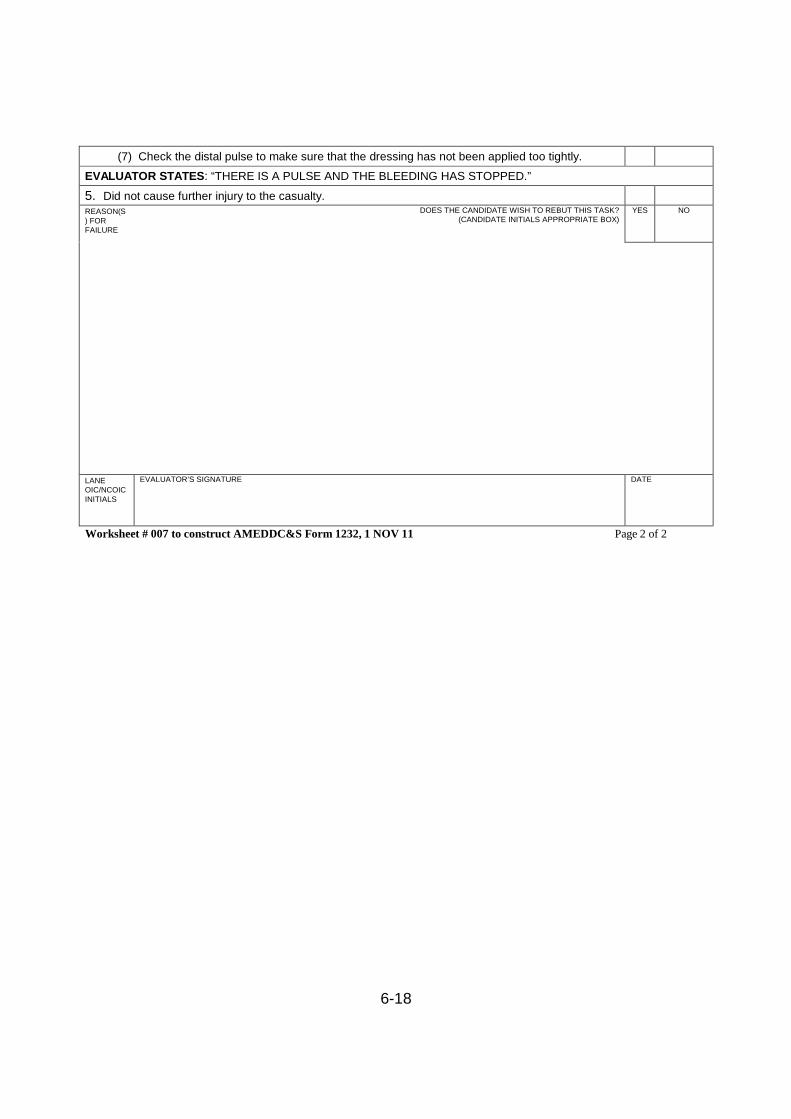
6-18
(7) Check the distal pulse to make sure that the dressing has not been applied too tightly.
EVALUATOR STATES: “THERE IS A PULSE AND THE BLEEDING HAS STOPPED.”
5. Did not cause further injury to the casualty.REASON(S) FORFAILURE
DOES THE CANDIDATE WISH TO REBUT THIS TASK?(CANDIDATE INITIALS APPROPRIATE BOX)
YES NO
LANEOIC/NCOICINITIALS
EVALUATOR’S SIGNATURE DATE
Worksheet # 007 to construct AMEDDC&S Form 1232, 1 NOV 11 Page 2 of 2
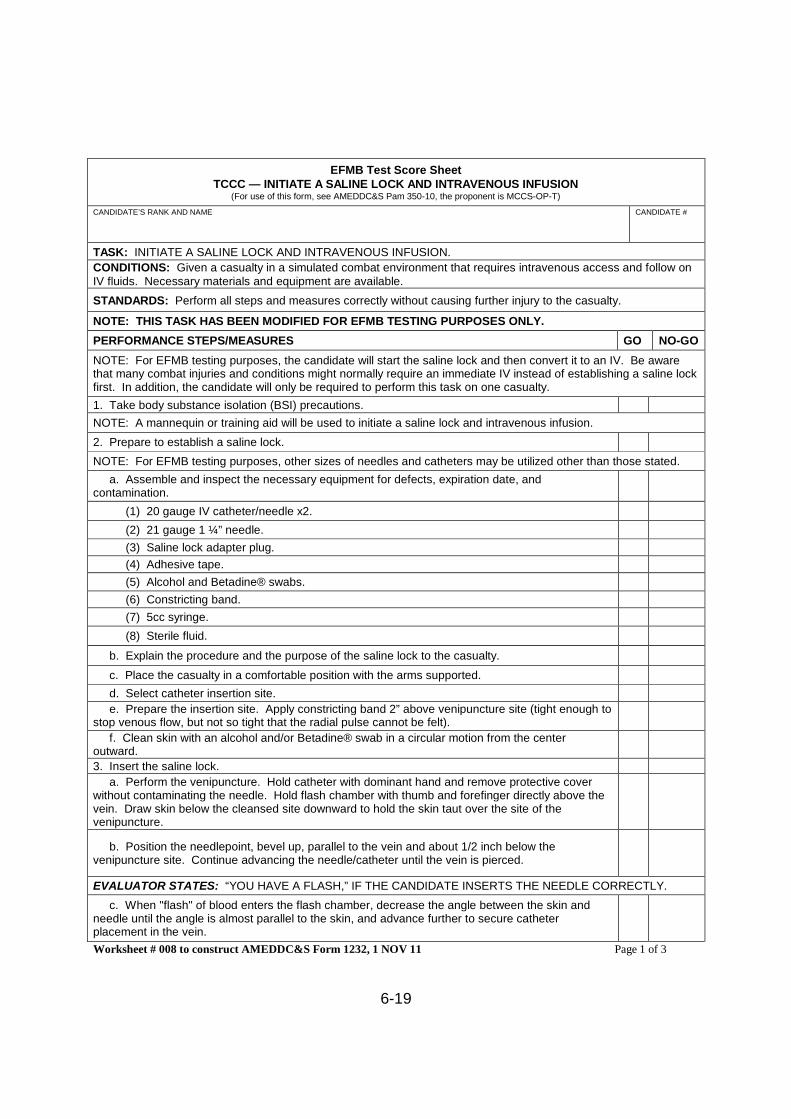
6-19
EFMB Test Score SheetTCCC — INITIATE A SALINE LOCK AND INTRAVENOUS INFUSION
(For use of this form, see AMEDDC&S Pam 350-10, the proponent is MCCS-OP-T)
CANDIDATE’S RANK AND NAME CANDIDATE #
TASK: INITIATE A SALINE LOCK AND INTRAVENOUS INFUSION.
CONDITIONS: Given a casualty in a simulated combat environment that requires intravenous access and follow onIV fluids. Necessary materials and equipment are available.
STANDARDS: Perform all steps and measures correctly without causing further injury to the casualty.
NOTE: THIS TASK HAS BEEN MODIFIED FOR EFMB TESTING PURPOSES ONLY.
PERFORMANCE STEPS/MEASURES GO NO-GO
NOTE: For EFMB testing purposes, the candidate will start the saline lock and then convert it to an IV. Be awarethat many combat injuries and conditions might normally require an immediate IV instead of establishing a saline lockfirst. In addition, the candidate will only be required to perform this task on one casualty.
1. Take body substance isolation (BSI) precautions.
NOTE: A mannequin or training aid will be used to initiate a saline lock and intravenous infusion.
2. Prepare to establish a saline lock.
NOTE: For EFMB testing purposes, other sizes of needles and catheters may be utilized other than those stated.
a. Assemble and inspect the necessary equipment for defects, expiration date, andcontamination.
(1) 20 gauge IV catheter/needle x2.
(2) 21 gauge 1 ¼” needle.
(3) Saline lock adapter plug.
(4) Adhesive tape.
(5) Alcohol and Betadine® swabs.
(6) Constricting band.
(7) 5cc syringe.
(8) Sterile fluid.
b. Explain the procedure and the purpose of the saline lock to the casualty.
c. Place the casualty in a comfortable position with the arms supported.
d. Select catheter insertion site.
e. Prepare the insertion site. Apply constricting band 2” above venipuncture site (tight enough tostop venous flow, but not so tight that the radial pulse cannot be felt).
f. Clean skin with an alcohol and/or Betadine® swab in a circular motion from the centeroutward.
3. Insert the saline lock.
a. Perform the venipuncture. Hold catheter with dominant hand and remove protective coverwithout contaminating the needle. Hold flash chamber with thumb and forefinger directly above thevein. Draw skin below the cleansed site downward to hold the skin taut over the site of thevenipuncture.
b. Position the needlepoint, bevel up, parallel to the vein and about 1/2 inch below thevenipuncture site. Continue advancing the needle/catheter until the vein is pierced.
EVALUATOR STATES: “YOU HAVE A FLASH,” IF THE CANDIDATE INSERTS THE NEEDLE CORRECTLY.
c. When "flash" of blood enters the flash chamber, decrease the angle between the skin andneedle until the angle is almost parallel to the skin, and advance further to secure catheterplacement in the vein.
Worksheet # 008 to construct AMEDDC&S Form 1232, 1 NOV 11 Page 1 of 3
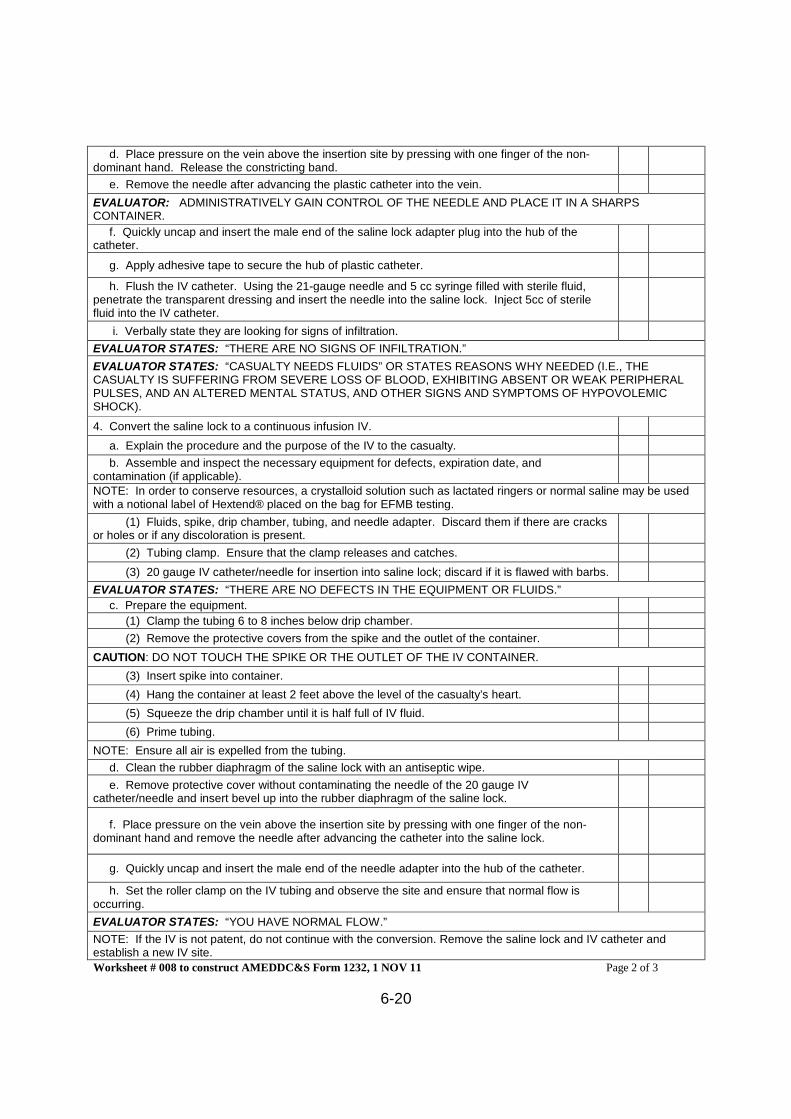
6-20
d. Place pressure on the vein above the insertion site by pressing with one finger of the non-dominant hand. Release the constricting band.
e. Remove the needle after advancing the plastic catheter into the vein.
EVALUATOR: ADMINISTRATIVELY GAIN CONTROL OF THE NEEDLE AND PLACE IT IN A SHARPSCONTAINER.
f. Quickly uncap and insert the male end of the saline lock adapter plug into the hub of thecatheter.
g. Apply adhesive tape to secure the hub of plastic catheter.
h. Flush the IV catheter. Using the 21-gauge needle and 5 cc syringe filled with sterile fluid,penetrate the transparent dressing and insert the needle into the saline lock. Inject 5cc of sterilefluid into the IV catheter.
i. Verbally state they are looking for signs of infiltration.
EVALUATOR STATES: “THERE ARE NO SIGNS OF INFILTRATION.”
EVALUATOR STATES: “CASUALTY NEEDS FLUIDS” OR STATES REASONS WHY NEEDED (I.E., THECASUALTY IS SUFFERING FROM SEVERE LOSS OF BLOOD, EXHIBITING ABSENT OR WEAK PERIPHERALPULSES, AND AN ALTERED MENTAL STATUS, AND OTHER SIGNS AND SYMPTOMS OF HYPOVOLEMICSHOCK).
4. Convert the saline lock to a continuous infusion IV.
a. Explain the procedure and the purpose of the IV to the casualty.
b. Assemble and inspect the necessary equipment for defects, expiration date, andcontamination (if applicable).NOTE: In order to conserve resources, a crystalloid solution such as lactated ringers or normal saline may be usedwith a notional label of Hextend® placed on the bag for EFMB testing.
(1) Fluids, spike, drip chamber, tubing, and needle adapter. Discard them if there are cracksor holes or if any discoloration is present.
(2) Tubing clamp. Ensure that the clamp releases and catches.
(3) 20 gauge IV catheter/needle for insertion into saline lock; discard if it is flawed with barbs.
EVALUATOR STATES: “THERE ARE NO DEFECTS IN THE EQUIPMENT OR FLUIDS.”
c. Prepare the equipment.
(1) Clamp the tubing 6 to 8 inches below drip chamber.
(2) Remove the protective covers from the spike and the outlet of the container.
CAUTION: DO NOT TOUCH THE SPIKE OR THE OUTLET OF THE IV CONTAINER.
(3) Insert spike into container.
(4) Hang the container at least 2 feet above the level of the casualty’s heart.
(5) Squeeze the drip chamber until it is half full of IV fluid.
(6) Prime tubing.
NOTE: Ensure all air is expelled from the tubing.
d. Clean the rubber diaphragm of the saline lock with an antiseptic wipe.
e. Remove protective cover without contaminating the needle of the 20 gauge IVcatheter/needle and insert bevel up into the rubber diaphragm of the saline lock.
f. Place pressure on the vein above the insertion site by pressing with one finger of the non-dominant hand and remove the needle after advancing the catheter into the saline lock.
g. Quickly uncap and insert the male end of the needle adapter into the hub of the catheter.
h. Set the roller clamp on the IV tubing and observe the site and ensure that normal flow isoccurring.
EVALUATOR STATES: “YOU HAVE NORMAL FLOW.”
NOTE: If the IV is not patent, do not continue with the conversion. Remove the saline lock and IV catheter andestablish a new IV site.
Worksheet # 008 to construct AMEDDC&S Form 1232, 1 NOV 11 Page 2 of 3
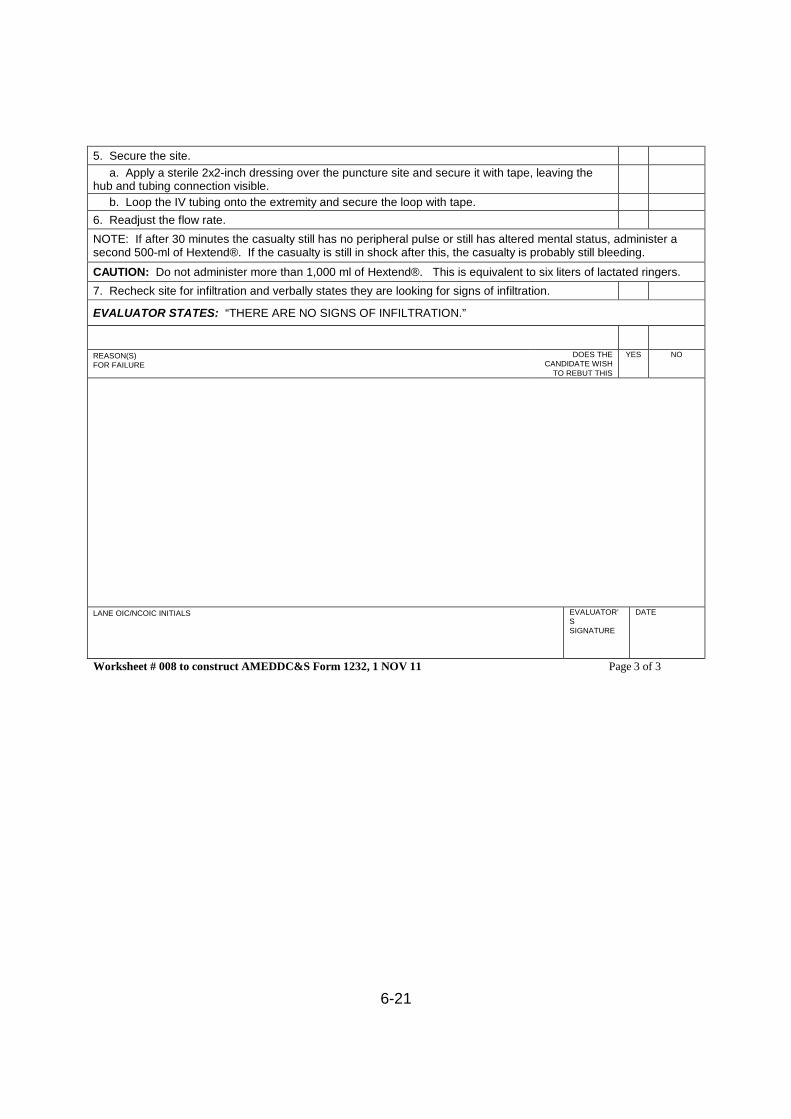
6-21
5. Secure the site.
a. Apply a sterile 2x2-inch dressing over the puncture site and secure it with tape, leaving thehub and tubing connection visible.
b. Loop the IV tubing onto the extremity and secure the loop with tape.
6. Readjust the flow rate.
NOTE: If after 30 minutes the casualty still has no peripheral pulse or still has altered mental status, administer asecond 500-ml of Hextend®. If the casualty is still in shock after this, the casualty is probably still bleeding.
CAUTION: Do not administer more than 1,000 ml of Hextend®. This is equivalent to six liters of lactated ringers.
7. Recheck site for infiltration and verbally states they are looking for signs of infiltration.
EVALUATOR STATES: “THERE ARE NO SIGNS OF INFILTRATION.”
REASON(S)FOR FAILURE
DOES THECANDIDATE WISH
TO REBUT THIS
YES NO
LANE OIC/NCOIC INITIALS EVALUATOR’SSIGNATURE
DATE
Worksheet # 008 to construct AMEDDC&S Form 1232, 1 NOV 11 Page 3 of 3
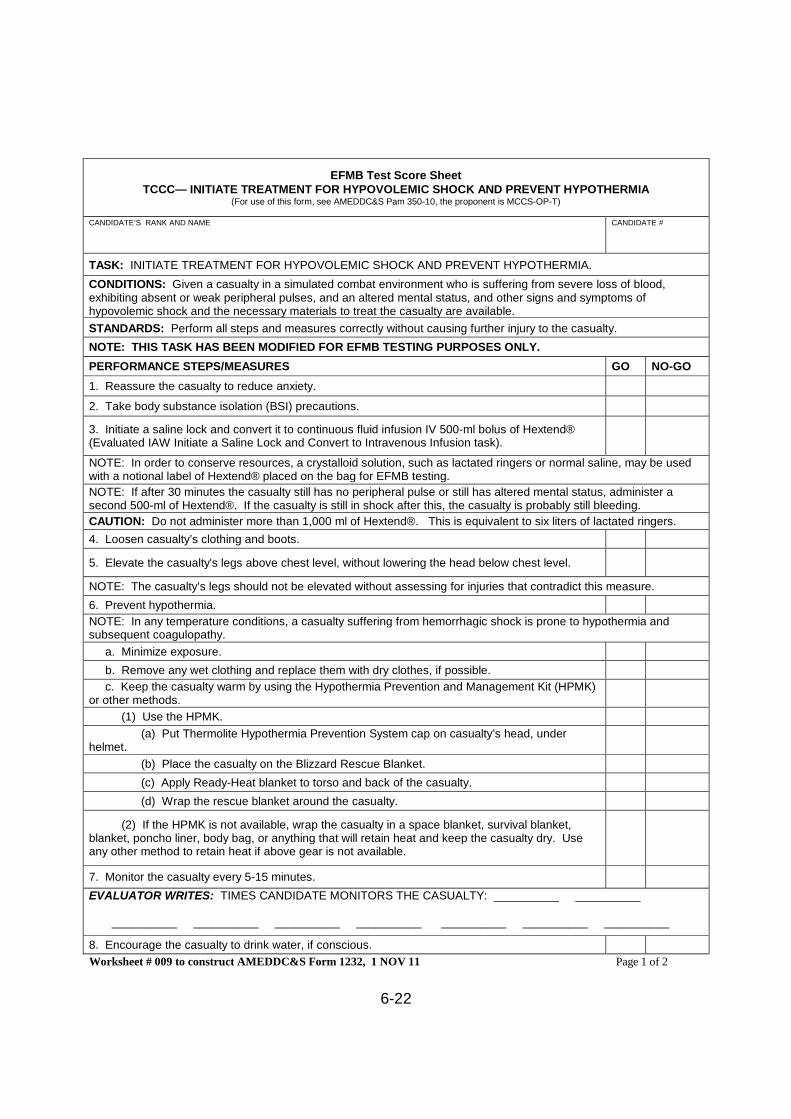
6-22
EFMB Test Score SheetTCCC— INITIATE TREATMENT FOR HYPOVOLEMIC SHOCK AND PREVENT HYPOTHERMIA
(For use of this form, see AMEDDC&S Pam 350-10, the proponent is MCCS-OP-T)
CANDIDATE’S RANK AND NAME CANDIDATE #
TASK: INITIATE TREATMENT FOR HYPOVOLEMIC SHOCK AND PREVENT HYPOTHERMIA.
CONDITIONS: Given a casualty in a simulated combat environment who is suffering from severe loss of blood,exhibiting absent or weak peripheral pulses, and an altered mental status, and other signs and symptoms ofhypovolemic shock and the necessary materials to treat the casualty are available.
STANDARDS: Perform all steps and measures correctly without causing further injury to the casualty.
NOTE: THIS TASK HAS BEEN MODIFIED FOR EFMB TESTING PURPOSES ONLY.
PERFORMANCE STEPS/MEASURES GO NO-GO
1. Reassure the casualty to reduce anxiety.
2. Take body substance isolation (BSI) precautions.
3. Initiate a saline lock and convert it to continuous fluid infusion IV 500-ml bolus of Hextend®(Evaluated IAW Initiate a Saline Lock and Convert to Intravenous Infusion task).
NOTE: In order to conserve resources, a crystalloid solution, such as lactated ringers or normal saline, may be usedwith a notional label of Hextend® placed on the bag for EFMB testing.
NOTE: If after 30 minutes the casualty still has no peripheral pulse or still has altered mental status, administer asecond 500-ml of Hextend®. If the casualty is still in shock after this, the casualty is probably still bleeding.
CAUTION: Do not administer more than 1,000 ml of Hextend®. This is equivalent to six liters of lactated ringers.
4. Loosen casualty’s clothing and boots.
5. Elevate the casualty's legs above chest level, without lowering the head below chest level.
NOTE: The casualty’s legs should not be elevated without assessing for injuries that contradict this measure.
6. Prevent hypothermia.
NOTE: In any temperature conditions, a casualty suffering from hemorrhagic shock is prone to hypothermia andsubsequent coagulopathy.
a. Minimize exposure.
b. Remove any wet clothing and replace them with dry clothes, if possible.
c. Keep the casualty warm by using the Hypothermia Prevention and Management Kit (HPMK)or other methods.
(1) Use the HPMK.
(a) Put Thermolite Hypothermia Prevention System cap on casualty’s head, underhelmet.
(b) Place the casualty on the Blizzard Rescue Blanket.
(c) Apply Ready-Heat blanket to torso and back of the casualty.
(d) Wrap the rescue blanket around the casualty.
(2) If the HPMK is not available, wrap the casualty in a space blanket, survival blanket,blanket, poncho liner, body bag, or anything that will retain heat and keep the casualty dry. Useany other method to retain heat if above gear is not available.
7. Monitor the casualty every 5-15 minutes.
EVALUATOR WRITES: TIMES CANDIDATE MONITORS THE CASUALTY: __________ __________
__________ __________ __________ __________ __________ __________ __________
8. Encourage the casualty to drink water, if conscious.
Worksheet # 009 to construct AMEDDC&S Form 1232, 1 NOV 11 Page 1 of 2
6-23
9. Did not cause further injury to the casualty.REASON(S)FORFAILURE
DOES THE CANDIDATE WISH TO REBUT THIS TASK?(CANDIDATE INITIALS APPROPRIATE BOX)
YES NO
LANEOIC/NCOICINITIALS
EVALUATOR’S SIGNATURE DATE
Worksheet # 009 to construct AMEDDC&S Form 1232, 1 NOV 11 Page 2 of 2
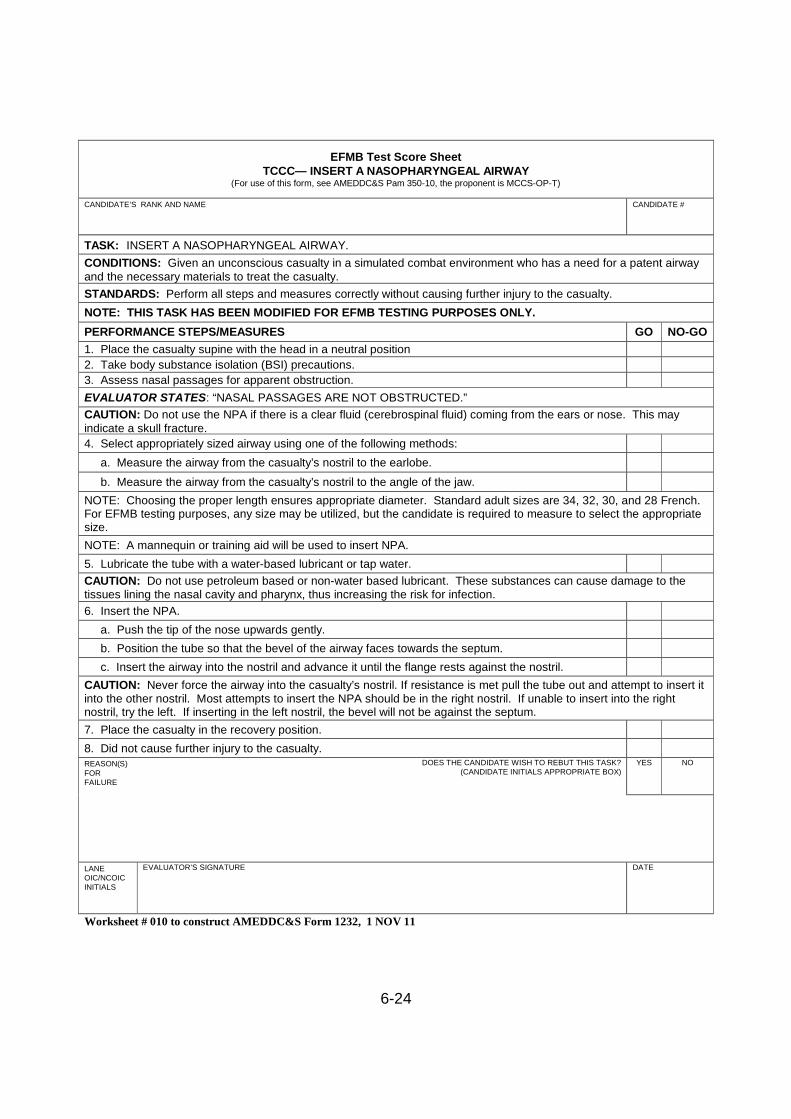
6-24
EFMB Test Score SheetTCCC— INSERT A NASOPHARYNGEAL AIRWAY
(For use of this form, see AMEDDC&S Pam 350-10, the proponent is MCCS-OP-T)
CANDIDATE’S RANK AND NAME CANDIDATE #
TASK: INSERT A NASOPHARYNGEAL AIRWAY.
CONDITIONS: Given an unconscious casualty in a simulated combat environment who has a need for a patent airwayand the necessary materials to treat the casualty.
STANDARDS: Perform all steps and measures correctly without causing further injury to the casualty.
NOTE: THIS TASK HAS BEEN MODIFIED FOR EFMB TESTING PURPOSES ONLY.
PERFORMANCE STEPS/MEASURES GO NO-GO
1. Place the casualty supine with the head in a neutral position
2. Take body substance isolation (BSI) precautions.
3. Assess nasal passages for apparent obstruction.
EVALUATOR STATES: “NASAL PASSAGES ARE NOT OBSTRUCTED.”
CAUTION: Do not use the NPA if there is a clear fluid (cerebrospinal fluid) coming from the ears or nose. This mayindicate a skull fracture.
4. Select appropriately sized airway using one of the following methods:
a. Measure the airway from the casualty’s nostril to the earlobe.
b. Measure the airway from the casualty’s nostril to the angle of the jaw.
NOTE: Choosing the proper length ensures appropriate diameter. Standard adult sizes are 34, 32, 30, and 28 French.For EFMB testing purposes, any size may be utilized, but the candidate is required to measure to select the appropriatesize.
NOTE: A mannequin or training aid will be used to insert NPA.
5. Lubricate the tube with a water-based lubricant or tap water.
CAUTION: Do not use petroleum based or non-water based lubricant. These substances can cause damage to thetissues lining the nasal cavity and pharynx, thus increasing the risk for infection.
6. Insert the NPA.
a. Push the tip of the nose upwards gently.
b. Position the tube so that the bevel of the airway faces towards the septum.
c. Insert the airway into the nostril and advance it until the flange rests against the nostril.
CAUTION: Never force the airway into the casualty’s nostril. If resistance is met pull the tube out and attempt to insert itinto the other nostril. Most attempts to insert the NPA should be in the right nostril. If unable to insert into the rightnostril, try the left. If inserting in the left nostril, the bevel will not be against the septum.
7. Place the casualty in the recovery position.
8. Did not cause further injury to the casualty.REASON(S)FORFAILURE
DOES THE CANDIDATE WISH TO REBUT THIS TASK?(CANDIDATE INITIALS APPROPRIATE BOX)
YES NO
LANEOIC/NCOICINITIALS
EVALUATOR’S SIGNATURE DATE
Worksheet # 010 to construct AMEDDC&S Form 1232, 1 NOV 11
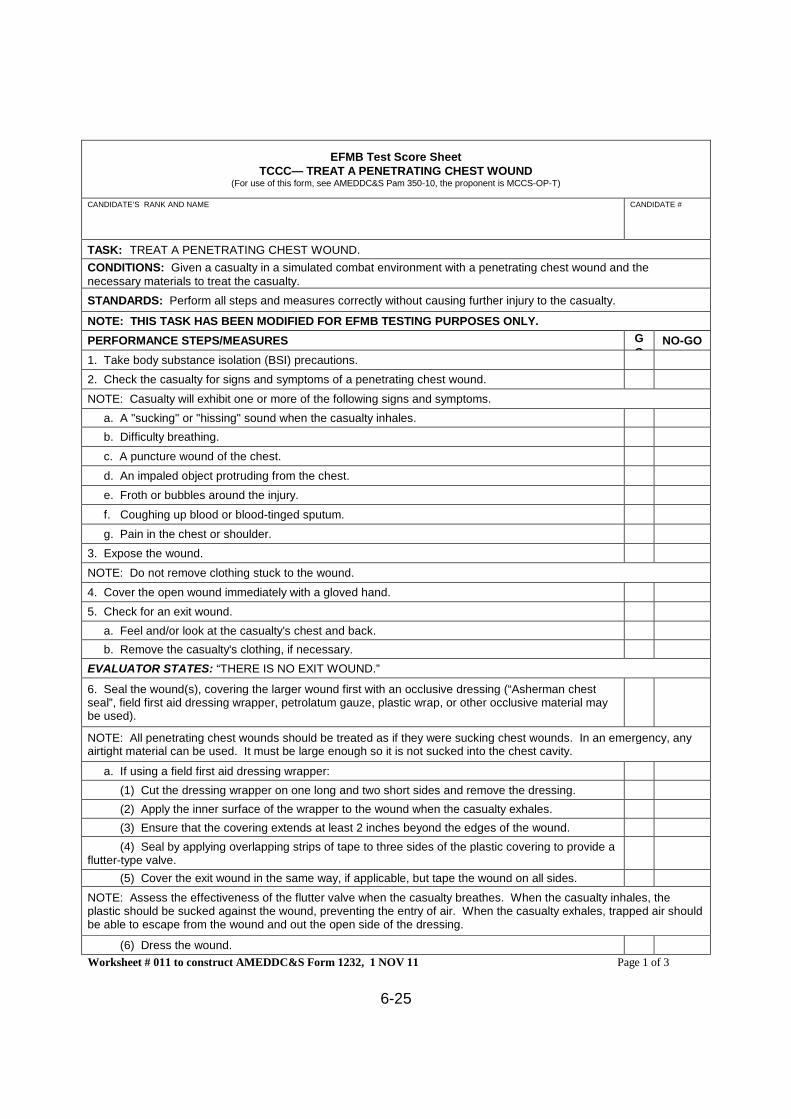
6-25
EFMB Test Score SheetTCCC— TREAT A PENETRATING CHEST WOUND
(For use of this form, see AMEDDC&S Pam 350-10, the proponent is MCCS-OP-T)
CANDIDATE’S RANK AND NAME CANDIDATE #
TASK: TREAT A PENETRATING CHEST WOUND.
CONDITIONS: Given a casualty in a simulated combat environment with a penetrating chest wound and thenecessary materials to treat the casualty.
STANDARDS: Perform all steps and measures correctly without causing further injury to the casualty.
NOTE: THIS TASK HAS BEEN MODIFIED FOR EFMB TESTING PURPOSES ONLY.
PERFORMANCE STEPS/MEASURES GO
NO-GO
1. Take body substance isolation (BSI) precautions.
2. Check the casualty for signs and symptoms of a penetrating chest wound.
NOTE: Casualty will exhibit one or more of the following signs and symptoms.
a. A "sucking" or "hissing" sound when the casualty inhales.
b. Difficulty breathing.
c. A puncture wound of the chest.
d. An impaled object protruding from the chest.
e. Froth or bubbles around the injury.
f. Coughing up blood or blood-tinged sputum.
g. Pain in the chest or shoulder.
3. Expose the wound.
NOTE: Do not remove clothing stuck to the wound.
4. Cover the open wound immediately with a gloved hand.
5. Check for an exit wound.
a. Feel and/or look at the casualty's chest and back.
b. Remove the casualty's clothing, if necessary.
EVALUATOR STATES: “THERE IS NO EXIT WOUND.”
6. Seal the wound(s), covering the larger wound first with an occlusive dressing (“Asherman chestseal”, field first aid dressing wrapper, petrolatum gauze, plastic wrap, or other occlusive material maybe used).
NOTE: All penetrating chest wounds should be treated as if they were sucking chest wounds. In an emergency, anyairtight material can be used. It must be large enough so it is not sucked into the chest cavity.
a. If using a field first aid dressing wrapper:
(1) Cut the dressing wrapper on one long and two short sides and remove the dressing.
(2) Apply the inner surface of the wrapper to the wound when the casualty exhales.
(3) Ensure that the covering extends at least 2 inches beyond the edges of the wound.
(4) Seal by applying overlapping strips of tape to three sides of the plastic covering to provide aflutter-type valve.
(5) Cover the exit wound in the same way, if applicable, but tape the wound on all sides.
NOTE: Assess the effectiveness of the flutter valve when the casualty breathes. When the casualty inhales, theplastic should be sucked against the wound, preventing the entry of air. When the casualty exhales, trapped air shouldbe able to escape from the wound and out the open side of the dressing.
(6) Dress the wound.
Worksheet # 011 to construct AMEDDC&S Form 1232, 1 NOV 11 Page 1 of 3
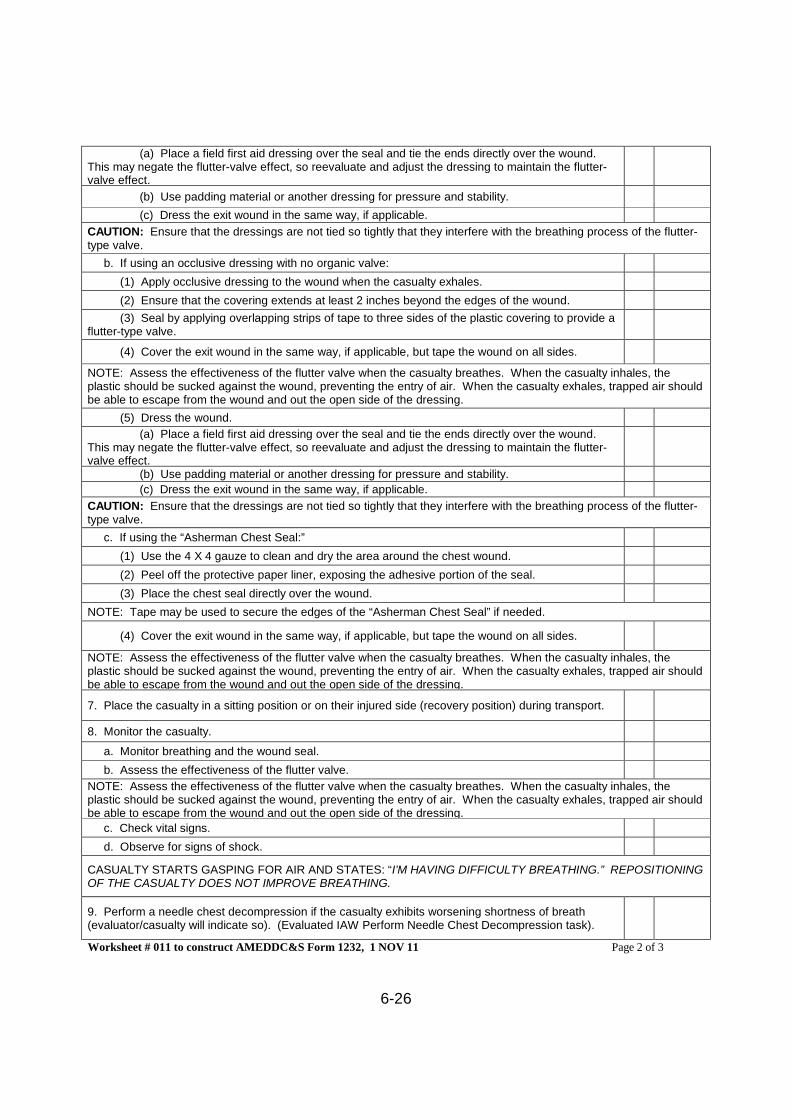
6-26
(a) Place a field first aid dressing over the seal and tie the ends directly over the wound.This may negate the flutter-valve effect, so reevaluate and adjust the dressing to maintain the flutter-valve effect.
(b) Use padding material or another dressing for pressure and stability.
(c) Dress the exit wound in the same way, if applicable.
CAUTION: Ensure that the dressings are not tied so tightly that they interfere with the breathing process of the flutter-type valve.
b. If using an occlusive dressing with no organic valve:
(1) Apply occlusive dressing to the wound when the casualty exhales.
(2) Ensure that the covering extends at least 2 inches beyond the edges of the wound.
(3) Seal by applying overlapping strips of tape to three sides of the plastic covering to provide aflutter-type valve.
(4) Cover the exit wound in the same way, if applicable, but tape the wound on all sides.
NOTE: Assess the effectiveness of the flutter valve when the casualty breathes. When the casualty inhales, theplastic should be sucked against the wound, preventing the entry of air. When the casualty exhales, trapped air shouldbe able to escape from the wound and out the open side of the dressing.
(5) Dress the wound.
(a) Place a field first aid dressing over the seal and tie the ends directly over the wound.This may negate the flutter-valve effect, so reevaluate and adjust the dressing to maintain the flutter-valve effect.
(b) Use padding material or another dressing for pressure and stability.
(c) Dress the exit wound in the same way, if applicable.
CAUTION: Ensure that the dressings are not tied so tightly that they interfere with the breathing process of the flutter-type valve.
c. If using the “Asherman Chest Seal:”
(1) Use the 4 X 4 gauze to clean and dry the area around the chest wound.
(2) Peel off the protective paper liner, exposing the adhesive portion of the seal.
(3) Place the chest seal directly over the wound.
NOTE: Tape may be used to secure the edges of the “Asherman Chest Seal” if needed.
(4) Cover the exit wound in the same way, if applicable, but tape the wound on all sides.
NOTE: Assess the effectiveness of the flutter valve when the casualty breathes. When the casualty inhales, theplastic should be sucked against the wound, preventing the entry of air. When the casualty exhales, trapped air shouldbe able to escape from the wound and out the open side of the dressing.
7. Place the casualty in a sitting position or on their injured side (recovery position) during transport.
8. Monitor the casualty.
a. Monitor breathing and the wound seal.
b. Assess the effectiveness of the flutter valve.
NOTE: Assess the effectiveness of the flutter valve when the casualty breathes. When the casualty inhales, theplastic should be sucked against the wound, preventing the entry of air. When the casualty exhales, trapped air shouldbe able to escape from the wound and out the open side of the dressing.
c. Check vital signs.
d. Observe for signs of shock.
CASUALTY STARTS GASPING FOR AIR AND STATES: “I’M HAVING DIFFICULTY BREATHING.” REPOSITIONINGOF THE CASUALTY DOES NOT IMPROVE BREATHING.
9. Perform a needle chest decompression if the casualty exhibits worsening shortness of breath(evaluator/casualty will indicate so). (Evaluated IAW Perform Needle Chest Decompression task).
Worksheet # 011 to construct AMEDDC&S Form 1232, 1 NOV 11 Page 2 of 3
6-27
10. Did not cause further injury to the casualty.
REASON(S) FORFAILURE
DOES THE CANDIDATE WISH TO REBUT THIS TASK?(CANDIDATE INITIALS APPROPRIATE BOX)
YES NO
LANE OIC/NCOICINITIALS
EVALUATOR’S SIGNATURE DATE
Worksheet # 011 to construct AMEDDC&S Form 1232, 1 NOV 11 Page 3 of 3
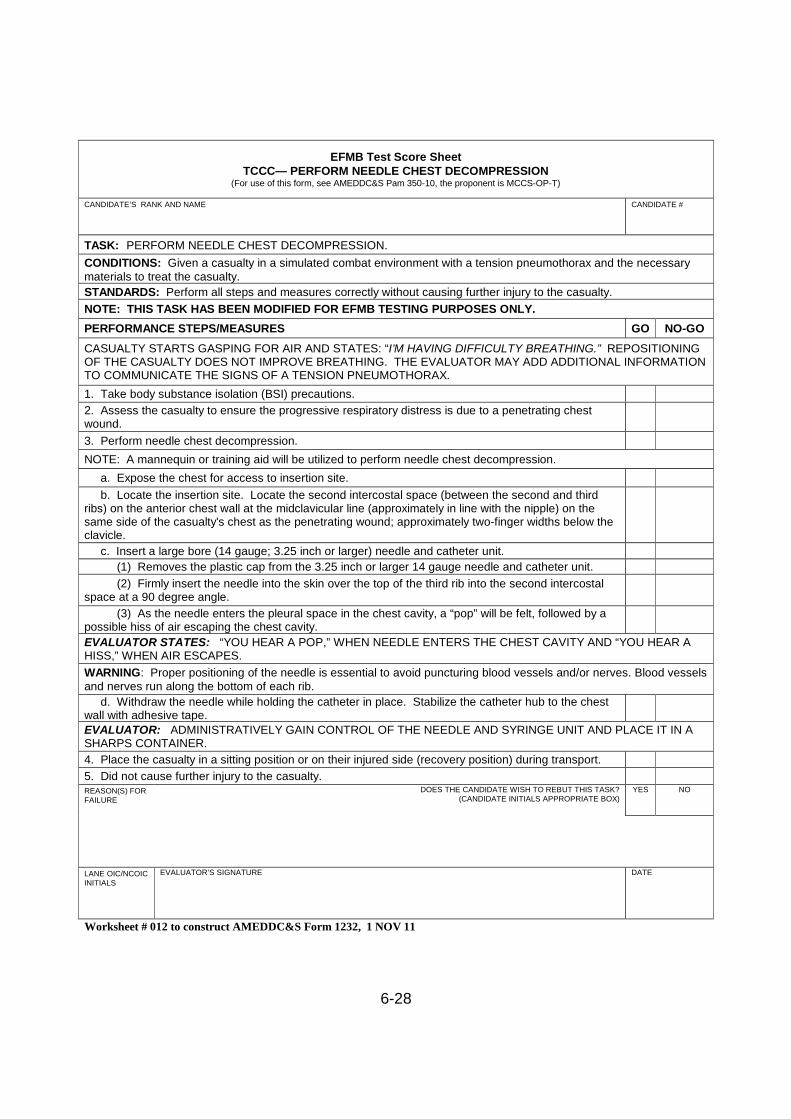
6-28
EFMB Test Score SheetTCCC— PERFORM NEEDLE CHEST DECOMPRESSION
(For use of this form, see AMEDDC&S Pam 350-10, the proponent is MCCS-OP-T)
CANDIDATE’S RANK AND NAME CANDIDATE #
TASK: PERFORM NEEDLE CHEST DECOMPRESSION.
CONDITIONS: Given a casualty in a simulated combat environment with a tension pneumothorax and the necessarymaterials to treat the casualty.
STANDARDS: Perform all steps and measures correctly without causing further injury to the casualty.
NOTE: THIS TASK HAS BEEN MODIFIED FOR EFMB TESTING PURPOSES ONLY.
PERFORMANCE STEPS/MEASURES GO NO-GO
CASUALTY STARTS GASPING FOR AIR AND STATES: “I’M HAVING DIFFICULTY BREATHING.” REPOSITIONINGOF THE CASUALTY DOES NOT IMPROVE BREATHING. THE EVALUATOR MAY ADD ADDITIONAL INFORMATIONTO COMMUNICATE THE SIGNS OF A TENSION PNEUMOTHORAX.
1. Take body substance isolation (BSI) precautions.
2. Assess the casualty to ensure the progressive respiratory distress is due to a penetrating chestwound.
3. Perform needle chest decompression.
NOTE: A mannequin or training aid will be utilized to perform needle chest decompression.
a. Expose the chest for access to insertion site.
b. Locate the insertion site. Locate the second intercostal space (between the second and thirdribs) on the anterior chest wall at the midclavicular line (approximately in line with the nipple) on thesame side of the casualty's chest as the penetrating wound; approximately two-finger widths below theclavicle.
c. Insert a large bore (14 gauge; 3.25 inch or larger) needle and catheter unit.
(1) Removes the plastic cap from the 3.25 inch or larger 14 gauge needle and catheter unit.
(2) Firmly insert the needle into the skin over the top of the third rib into the second intercostalspace at a 90 degree angle.
(3) As the needle enters the pleural space in the chest cavity, a “pop” will be felt, followed by apossible hiss of air escaping the chest cavity.
EVALUATOR STATES: “YOU HEAR A POP,” WHEN NEEDLE ENTERS THE CHEST CAVITY AND “YOU HEAR AHISS,” WHEN AIR ESCAPES.
WARNING: Proper positioning of the needle is essential to avoid puncturing blood vessels and/or nerves. Blood vesselsand nerves run along the bottom of each rib.
d. Withdraw the needle while holding the catheter in place. Stabilize the catheter hub to the chestwall with adhesive tape.
EVALUATOR: ADMINISTRATIVELY GAIN CONTROL OF THE NEEDLE AND SYRINGE UNIT AND PLACE IT IN ASHARPS CONTAINER.
4. Place the casualty in a sitting position or on their injured side (recovery position) during transport.
5. Did not cause further injury to the casualty.REASON(S) FORFAILURE
DOES THE CANDIDATE WISH TO REBUT THIS TASK?(CANDIDATE INITIALS APPROPRIATE BOX)
YES NO
LANE OIC/NCOICINITIALS
EVALUATOR’S SIGNATURE DATE
Worksheet # 012 to construct AMEDDC&S Form 1232, 1 NOV 11

6-29
EFMB Test Score SheetTCCC — TREAT AN OPEN ABDOMINAL WOUND
(For use of this form, see AMEDDC&S Pam 350-10, the proponent is MCCS-OP-T)
CANDIDATE’S RANK AND NAME CANDIDATE #
TASK: TREAT AN OPEN ABDOMINAL WOUND
CONDITIONS: Given a casualty in a simulated combat environment with an open abdominal wound without protrudinginternal organs and the necessary materials to treat the casualty.
STANDARDS: Perform all steps and measures correctly without causing further injury to the casualty.
NOTE: THIS TASK HAS BEEN MODIFIED FOR EFMB TESTING PURPOSES ONLY.
PERFORMANCE STEPS/MEASURES GO NO-GO
1. Take body substance isolation (BSI) precautions.
2. Position the casualty.
a. Place the casualty on his back (face up).
b. Flex the casualty's knees after the casualty assessment is completed.
c. Turn the casualty's head to the side and keep the airway clear if vomiting occurs.
3. Expose the wound.
4. Apply a sterile abdominal dressing.
a. Place the dressing directly on top of the wound.
b. Secure the dressing loosely.
NOTE: Dependent on the type of abdominal dressing being utilized, tie the dressing tails loosely in a non-slip knot at thecasualty's side if applicable.
CAUTION: DO NOT APPLY PRESSURE ON THE WOUND OR EXPOSE INTERNAL PARTS.
c. If two dressings are needed to cover a large wound, repeat steps 3a and 3b. Ensure that the tiesof additional dressings are not tied over each other.
d. If necessary, loosely cover the dressings with cravats. Tie them on the side of the casualty,opposite that of the dressing ties.
5. Did not cause further injury to the casualty.REASON(S)FORFAILURE
DOES THE CANDIDATE WISH TO REBUT THIS TASK?(CANDIDATE INITIALS APPROPRIATE BOX)
YES NO
LANEOIC/NCOICINITIALS
EVALUATOR’S SIGNATURE DATE
Worksheet # 013 to construct AMEDDC&S Form 1232, 1 NOV 11
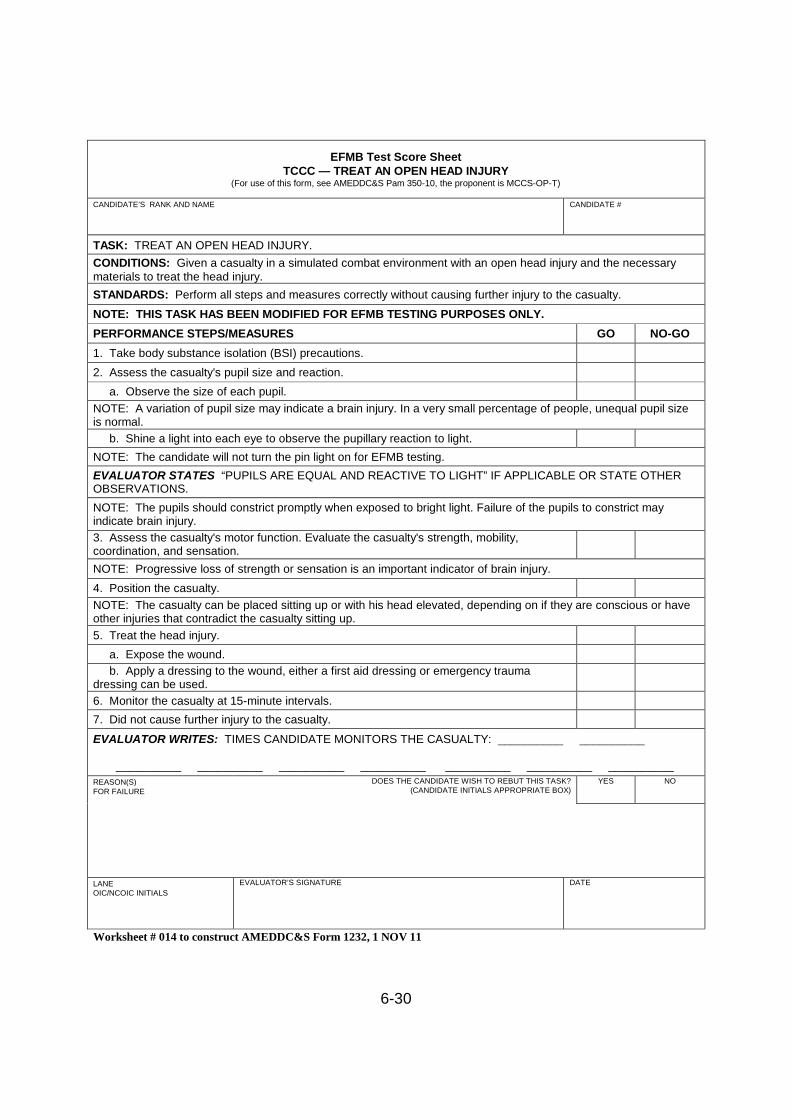
6-30
EFMB Test Score SheetTCCC — TREAT AN OPEN HEAD INJURY
(For use of this form, see AMEDDC&S Pam 350-10, the proponent is MCCS-OP-T)
CANDIDATE’S RANK AND NAME CANDIDATE #
TASK: TREAT AN OPEN HEAD INJURY.
CONDITIONS: Given a casualty in a simulated combat environment with an open head injury and the necessarymaterials to treat the head injury.
STANDARDS: Perform all steps and measures correctly without causing further injury to the casualty.
NOTE: THIS TASK HAS BEEN MODIFIED FOR EFMB TESTING PURPOSES ONLY.
PERFORMANCE STEPS/MEASURES GO NO-GO
1. Take body substance isolation (BSI) precautions.
2. Assess the casualty's pupil size and reaction.
a. Observe the size of each pupil.
NOTE: A variation of pupil size may indicate a brain injury. In a very small percentage of people, unequal pupil sizeis normal.
b. Shine a light into each eye to observe the pupillary reaction to light.
NOTE: The candidate will not turn the pin light on for EFMB testing.
EVALUATOR STATES “PUPILS ARE EQUAL AND REACTIVE TO LIGHT” IF APPLICABLE OR STATE OTHEROBSERVATIONS.
NOTE: The pupils should constrict promptly when exposed to bright light. Failure of the pupils to constrict mayindicate brain injury.
3. Assess the casualty's motor function. Evaluate the casualty's strength, mobility,coordination, and sensation..NOTE: Progressive loss of strength or sensation is an important indicator of brain injury.
4. Position the casualty.
NOTE: The casualty can be placed sitting up or with his head elevated, depending on if they are conscious or haveother injuries that contradict the casualty sitting up.
5. Treat the head injury.
a. Expose the wound.
b. Apply a dressing to the wound, either a first aid dressing or emergency traumadressing can be used.
6. Monitor the casualty at 15-minute intervals.
7. Did not cause further injury to the casualty.
EVALUATOR WRITES: TIMES CANDIDATE MONITORS THE CASUALTY: __________ __________
__________ __________ __________ __________ __________ __________ __________
REASON(S)FOR FAILURE
DOES THE CANDIDATE WISH TO REBUT THIS TASK?(CANDIDATE INITIALS APPROPRIATE BOX)
YES NO
LANEOIC/NCOIC INITIALS
EVALUATOR’S SIGNATURE DATE
Worksheet # 014 to construct AMEDDC&S Form 1232, 1 NOV 11
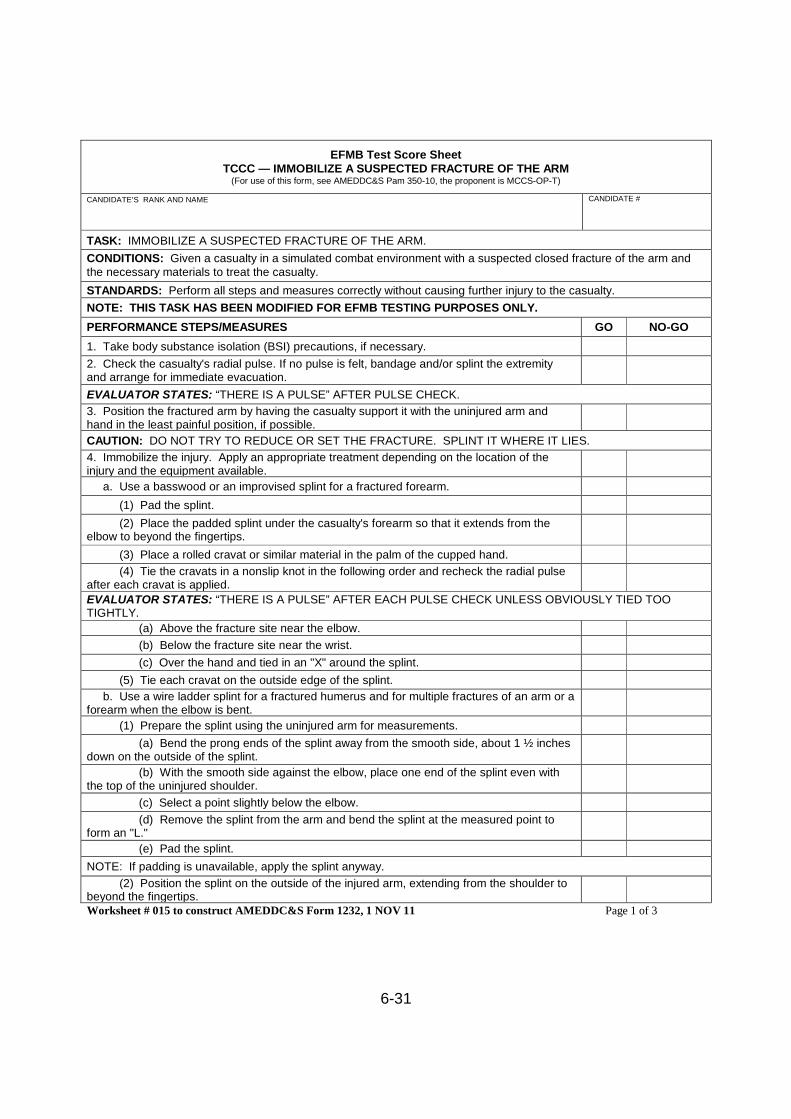
6-31
EFMB Test Score SheetTCCC — IMMOBILIZE A SUSPECTED FRACTURE OF THE ARM
(For use of this form, see AMEDDC&S Pam 350-10, the proponent is MCCS-OP-T)
CANDIDATE’S RANK AND NAME CANDIDATE #
TASK: IMMOBILIZE A SUSPECTED FRACTURE OF THE ARM.
CONDITIONS: Given a casualty in a simulated combat environment with a suspected closed fracture of the arm andthe necessary materials to treat the casualty.
STANDARDS: Perform all steps and measures correctly without causing further injury to the casualty.
NOTE: THIS TASK HAS BEEN MODIFIED FOR EFMB TESTING PURPOSES ONLY.
PERFORMANCE STEPS/MEASURES GO NO-GO
1. Take body substance isolation (BSI) precautions, if necessary.
2. Check the casualty's radial pulse. If no pulse is felt, bandage and/or splint the extremityand arrange for immediate evacuation.
EVALUATOR STATES: “THERE IS A PULSE” AFTER PULSE CHECK.
3. Position the fractured arm by having the casualty support it with the uninjured arm andhand in the least painful position, if possible.
CAUTION: DO NOT TRY TO REDUCE OR SET THE FRACTURE. SPLINT IT WHERE IT LIES.
4. Immobilize the injury. Apply an appropriate treatment depending on the location of theinjury and the equipment available.
a. Use a basswood or an improvised splint for a fractured forearm.
(1) Pad the splint.
(2) Place the padded splint under the casualty's forearm so that it extends from theelbow to beyond the fingertips.
(3) Place a rolled cravat or similar material in the palm of the cupped hand.
(4) Tie the cravats in a nonslip knot in the following order and recheck the radial pulseafter each cravat is applied.
EVALUATOR STATES: “THERE IS A PULSE” AFTER EACH PULSE CHECK UNLESS OBVIOUSLY TIED TOOTIGHTLY.
(a) Above the fracture site near the elbow.
(b) Below the fracture site near the wrist.
(c) Over the hand and tied in an "X" around the splint.
(5) Tie each cravat on the outside edge of the splint.
b. Use a wire ladder splint for a fractured humerus and for multiple fractures of an arm or aforearm when the elbow is bent.
(1) Prepare the splint using the uninjured arm for measurements.
(a) Bend the prong ends of the splint away from the smooth side, about 1 ½ inchesdown on the outside of the splint.
(b) With the smooth side against the elbow, place one end of the splint even withthe top of the uninjured shoulder.
(c) Select a point slightly below the elbow.
(d) Remove the splint from the arm and bend the splint at the measured point toform an "L."
(e) Pad the splint.
NOTE: If padding is unavailable, apply the splint anyway.
(2) Position the splint on the outside of the injured arm, extending from the shoulder tobeyond the fingertips.Worksheet # 015 to construct AMEDDC&S Form 1232, 1 NOV 11 Page 1 of 3
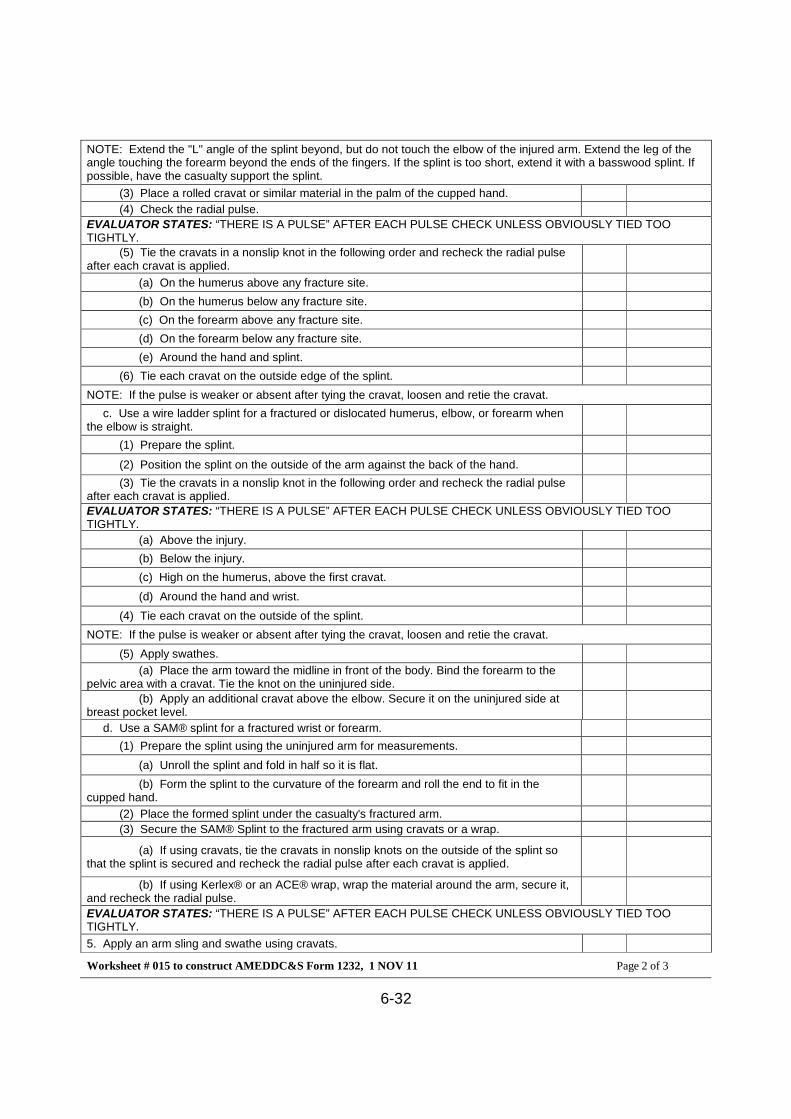
6-32
NOTE: Extend the "L" angle of the splint beyond, but do not touch the elbow of the injured arm. Extend the leg of theangle touching the forearm beyond the ends of the fingers. If the splint is too short, extend it with a basswood splint. Ifpossible, have the casualty support the splint.
(3) Place a rolled cravat or similar material in the palm of the cupped hand.
(4) Check the radial pulse.
EVALUATOR STATES: “THERE IS A PULSE” AFTER EACH PULSE CHECK UNLESS OBVIOUSLY TIED TOOTIGHTLY.
(5) Tie the cravats in a nonslip knot in the following order and recheck the radial pulseafter each cravat is applied.
(a) On the humerus above any fracture site.
(b) On the humerus below any fracture site.
(c) On the forearm above any fracture site.
(d) On the forearm below any fracture site.
(e) Around the hand and splint.
(6) Tie each cravat on the outside edge of the splint.
NOTE: If the pulse is weaker or absent after tying the cravat, loosen and retie the cravat.
c. Use a wire ladder splint for a fractured or dislocated humerus, elbow, or forearm whenthe elbow is straight.
(1) Prepare the splint.
(2) Position the splint on the outside of the arm against the back of the hand.
(3) Tie the cravats in a nonslip knot in the following order and recheck the radial pulseafter each cravat is applied.
EVALUATOR STATES: “THERE IS A PULSE” AFTER EACH PULSE CHECK UNLESS OBVIOUSLY TIED TOOTIGHTLY.
(a) Above the injury.
(b) Below the injury.
(c) High on the humerus, above the first cravat.
(d) Around the hand and wrist.
(4) Tie each cravat on the outside of the splint.
NOTE: If the pulse is weaker or absent after tying the cravat, loosen and retie the cravat.
(5) Apply swathes.
(a) Place the arm toward the midline in front of the body. Bind the forearm to thepelvic area with a cravat. Tie the knot on the uninjured side.
(b) Apply an additional cravat above the elbow. Secure it on the uninjured side atbreast pocket level.
d. Use a SAM® splint for a fractured wrist or forearm.
(1) Prepare the splint using the uninjured arm for measurements.
(a) Unroll the splint and fold in half so it is flat.
(b) Form the splint to the curvature of the forearm and roll the end to fit in thecupped hand.
(2) Place the formed splint under the casualty's fractured arm.
(3) Secure the SAM® Splint to the fractured arm using cravats or a wrap.
(a) If using cravats, tie the cravats in nonslip knots on the outside of the splint sothat the splint is secured and recheck the radial pulse after each cravat is applied.
(b) If using Kerlex® or an ACE® wrap, wrap the material around the arm, secure it,and recheck the radial pulse.
EVALUATOR STATES: “THERE IS A PULSE” AFTER EACH PULSE CHECK UNLESS OBVIOUSLY TIED TOOTIGHTLY.
5. Apply an arm sling and swathe using cravats.
Worksheet # 015 to construct AMEDDC&S Form 1232, 1 NOV 11 Page 2 of 3
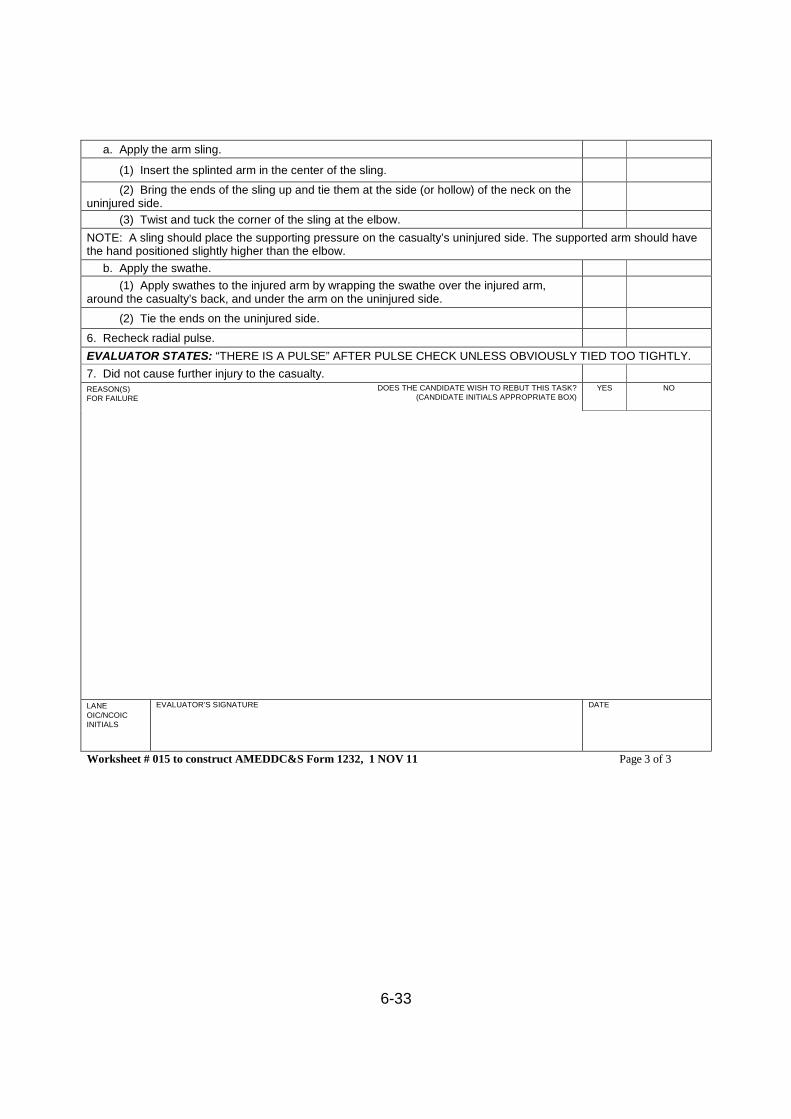
6-33
a. Apply the arm sling.
(1) Insert the splinted arm in the center of the sling.
(2) Bring the ends of the sling up and tie them at the side (or hollow) of the neck on theuninjured side.
(3) Twist and tuck the corner of the sling at the elbow.
NOTE: A sling should place the supporting pressure on the casualty’s uninjured side. The supported arm should havethe hand positioned slightly higher than the elbow.
b. Apply the swathe.
(1) Apply swathes to the injured arm by wrapping the swathe over the injured arm,around the casualty’s back, and under the arm on the uninjured side.
(2) Tie the ends on the uninjured side.
6. Recheck radial pulse.
EVALUATOR STATES: “THERE IS A PULSE” AFTER PULSE CHECK UNLESS OBVIOUSLY TIED TOO TIGHTLY.
7. Did not cause further injury to the casualty.REASON(S)FOR FAILURE
DOES THE CANDIDATE WISH TO REBUT THIS TASK?(CANDIDATE INITIALS APPROPRIATE BOX)
YES NO
LANEOIC/NCOICINITIALS
EVALUATOR’S SIGNATURE DATE
Worksheet # 015 to construct AMEDDC&S Form 1232, 1 NOV 11 Page 3 of 3
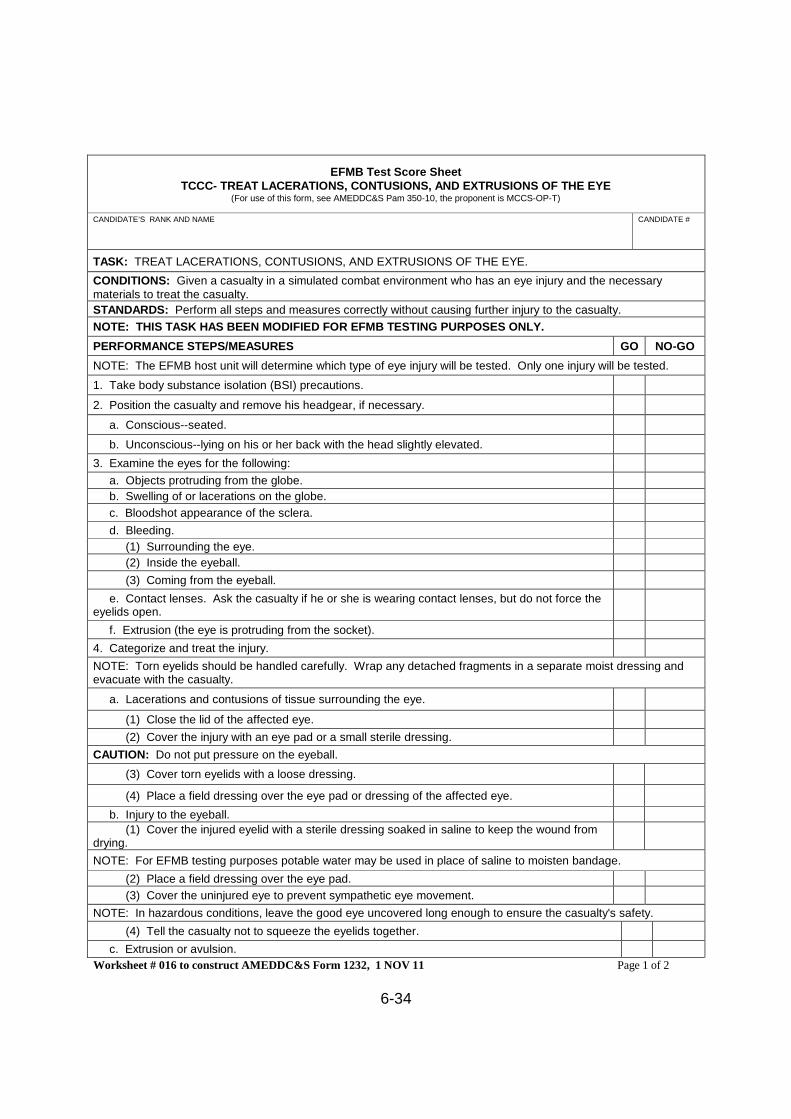
6-34
EFMB Test Score SheetTCCC- TREAT LACERATIONS, CONTUSIONS, AND EXTRUSIONS OF THE EYE
(For use of this form, see AMEDDC&S Pam 350-10, the proponent is MCCS-OP-T)
CANDIDATE’S RANK AND NAME CANDIDATE #
TASK: TREAT LACERATIONS, CONTUSIONS, AND EXTRUSIONS OF THE EYE.
CONDITIONS: Given a casualty in a simulated combat environment who has an eye injury and the necessarymaterials to treat the casualty.
STANDARDS: Perform all steps and measures correctly without causing further injury to the casualty.
NOTE: THIS TASK HAS BEEN MODIFIED FOR EFMB TESTING PURPOSES ONLY.
PERFORMANCE STEPS/MEASURES GO NO-GO
NOTE: The EFMB host unit will determine which type of eye injury will be tested. Only one injury will be tested.
1. Take body substance isolation (BSI) precautions.
2. Position the casualty and remove his headgear, if necessary.
a. Conscious--seated.
b. Unconscious--lying on his or her back with the head slightly elevated.
3. Examine the eyes for the following:
a. Objects protruding from the globe.
b. Swelling of or lacerations on the globe.
c. Bloodshot appearance of the sclera.
d. Bleeding.
(1) Surrounding the eye.
(2) Inside the eyeball.
(3) Coming from the eyeball.
e. Contact lenses. Ask the casualty if he or she is wearing contact lenses, but do not force theeyelids open.
f. Extrusion (the eye is protruding from the socket).
4. Categorize and treat the injury.
NOTE: Torn eyelids should be handled carefully. Wrap any detached fragments in a separate moist dressing andevacuate with the casualty.
a. Lacerations and contusions of tissue surrounding the eye.
(1) Close the lid of the affected eye.
(2) Cover the injury with an eye pad or a small sterile dressing.
CAUTION: Do not put pressure on the eyeball.
(3) Cover torn eyelids with a loose dressing.
(4) Place a field dressing over the eye pad or dressing of the affected eye.
b. Injury to the eyeball.
(1) Cover the injured eyelid with a sterile dressing soaked in saline to keep the wound fromdrying.
NOTE: For EFMB testing purposes potable water may be used in place of saline to moisten bandage.
(2) Place a field dressing over the eye pad.
(3) Cover the uninjured eye to prevent sympathetic eye movement.
NOTE: In hazardous conditions, leave the good eye uncovered long enough to ensure the casualty's safety.
(4) Tell the casualty not to squeeze the eyelids together.
c. Extrusion or avulsion.
Worksheet # 016 to construct AMEDDC&S Form 1232, 1 NOV 11 Page 1 of 2
6-35
CAUTION: Do not attempt to reposition the eyeball or replace it in the socket.
(1) Position the casualty face up.
(2) Cut a hole in several layers of dressing material, and then moisten it. Use sterile liquid, ifavailable.
(3) Place the dressing so the injured globe protrudes through the hole, but does not touch thedressing. The dressing should be built up higher than the globe.
NOTE: If available, place a paper cup or cone-shaped piece of cardboard over the eye. Do not apply pressure tothe injury site. Apply roller gauze to hold the cup in place.
(4) Cover the uninjured eye to prevent sympathetic eye movement.
NOTE: In hazardous conditions, leave the good eye uncovered long enough to ensure the casualty's safety.
5. Did not cause further injury to the casualty.
REASON(S)FOR FAILURE
DOES THE CANDIDATE WISH TO REBUT THIS TASK?(CANDIDATE INITIALS APPROPRIATE BOX)
YES NO
LANEOIC/NCOICINITIALS
EVALUATOR’S SIGNATURE DATE
Worksheet # 016 to construct AMEDDC&S Form 1232, 1 NOV 11 Page 2 of 2
6-36
ACRONYMS
Letter Meaning
Letter Meaning
Letter Meaning
7-1
CHAPTER 7
MEDICAL AND CASUALTY EVACUATION
TOTAL TASKS-10PASS REQUIREMENTS-8 OF 10
7-1. MEDICAL AND CASUALTY EVACUATION TASKS.
a. Objective. To measure the candidate’s ability to evacuate casualties usingmanual carries, medical devices, tactical vehicles, evacuation platforms, and aircraft ina battlefield scenario.
b. Requirements. The candidate is required to complete 10 performance taskslisted below and pass 8 of the 10. Test board chairperson determines which vehicle oraircraft that is tested. You will not know which ones will be tested until arrival at EFMBsite.
c. Tasks. The following tasks are tested using reaction-style testing.
(1) Establish a helicopter landing point.
(2) Load casualties onto two different medical evacuation platforms.(i.e., UH-60 helicopter, M997, M113, Stryker MEV, Hoist, etc.)
(3) Load casualties onto two different nonstandard vehicles.(i.e., 5-ton, 2 1/2-ton, 6x6, cargo truck, 4x4, M998, M1114, MRAP, etc.)
(4) Load casualties onto nonstandard vehicle (1¼-ton, 4x4, M998).
(5) Extricate casualties from a vehicle.
(6) Evacuate a casualty using a SKED litter.
(7) Evacuate casualties using one-person carries or drags.
(8) Evacuate casualties using two-person carries or drags.
(9) Evacuate casualties using litter carries.
7-2. ADDITIONAL INFORMATION.
a. The evacuation tasks or evacuation platforms will be distributed throughout thevarious combat testing lanes. Some of the tasks must be incorporated into the testingof the TCCC tasks.
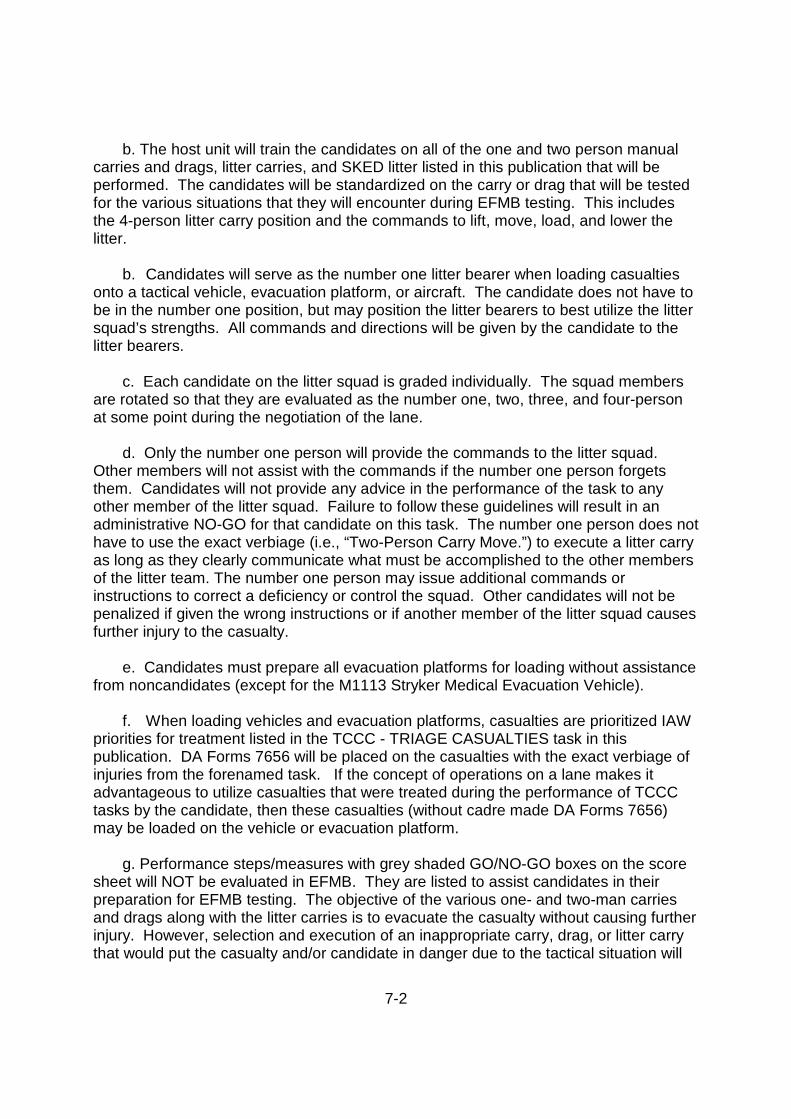
7-2
b. The host unit will train the candidates on all of the one and two person manualcarries and drags, litter carries, and SKED litter listed in this publication that will beperformed. The candidates will be standardized on the carry or drag that will be testedfor the various situations that they will encounter during EFMB testing. This includesthe 4-person litter carry position and the commands to lift, move, load, and lower thelitter.
b. Candidates will serve as the number one litter bearer when loading casualtiesonto a tactical vehicle, evacuation platform, or aircraft. The candidate does not have tobe in the number one position, but may position the litter bearers to best utilize the littersquad’s strengths. All commands and directions will be given by the candidate to thelitter bearers.
c. Each candidate on the litter squad is graded individually. The squad membersare rotated so that they are evaluated as the number one, two, three, and four-personat some point during the negotiation of the lane.
d. Only the number one person will provide the commands to the litter squad.Other members will not assist with the commands if the number one person forgetsthem. Candidates will not provide any advice in the performance of the task to anyother member of the litter squad. Failure to follow these guidelines will result in anadministrative NO-GO for that candidate on this task. The number one person does nothave to use the exact verbiage (i.e., “Two-Person Carry Move.”) to execute a litter carryas long as they clearly communicate what must be accomplished to the other membersof the litter team. The number one person may issue additional commands orinstructions to correct a deficiency or control the squad. Other candidates will not bepenalized if given the wrong instructions or if another member of the litter squad causesfurther injury to the casualty.
e. Candidates must prepare all evacuation platforms for loading without assistancefrom noncandidates (except for the M1113 Stryker Medical Evacuation Vehicle).
f. When loading vehicles and evacuation platforms, casualties are prioritized IAWpriorities for treatment listed in the TCCC - TRIAGE CASUALTIES task in thispublication. DA Forms 7656 will be placed on the casualties with the exact verbiage ofinjuries from the forenamed task. If the concept of operations on a lane makes itadvantageous to utilize casualties that were treated during the performance of TCCCtasks by the candidate, then these casualties (without cadre made DA Forms 7656)may be loaded on the vehicle or evacuation platform.
g. Performance steps/measures with grey shaded GO/NO-GO boxes on the scoresheet will NOT be evaluated in EFMB. They are listed to assist candidates in theirpreparation for EFMB testing. The objective of the various one- and two-man carriesand drags along with the litter carries is to evacuate the casualty without causing furtherinjury. However, selection and execution of an inappropriate carry, drag, or litter carrythat would put the casualty and/or candidate in danger due to the tactical situation will

7-3
receive a NO-GO, even if executed correctly.
7-3. EQUIPMENT.
a. The host unit will provide all equipment and supplies for tasks at the tested sites.Candidates are required to pack their own aid bags prior to the start of the lane.Improper packing of the aid bag by the candidate is not grounds for rebuttal.

7-4
REPRODUCIBLE SCORE SHEETS
7-4. GENERAL.
The various score sheets included within this appendix are designed for EFMB use onlyand prescribe the testing standards for use during EFMB. They may be reproduced locallyas needed.
7-5
EFMB Test Score SheetEVAC — ESTABLISH A HELICOPTER LANDING POINT
(For use of this form, see AMEDDC&S Pam 350-10, the proponent is MCCS-OP-T)
CANDIDATE’S RANK AND NAME CANDIDATE #
TASK: ESTABLISH A HELICOPTER LANDING POINT.
CONDITIONS: Given strobe lights, flashlights or vehicle lights, marker panels, and an area to be prepared forlanding site.
STANDARDS: Establish a landing site large enough for a helicopter to land and take off marking or identifying allobstacles that cannot be removed within 10 minutes.
NOTE: THIS TASK HAS BEEN MODIFIED FOR EFMB TESTING PURPOSES ONLY.
PERFORMANCE STEPS/MEASURES GO NO-GO
1. Select the landing site.
EVALUATOR STATES: “STATE THE FOUR FACTORS FOR SELECTING A LANDING SITE AND THECONSIDERATIONS FOR EACH.” CANDIDATE MUST ADDRESS ALL. EVALUATOR WILL ALSO STATE ALLOTHER NECESSARY INFORMATION (I.E., DISREGARD THE TELEPHONE POLES, TREELINE).
NOTE: Time starts after the evaluator states the above.
a. The size of the landing site.
(1) A helicopter requires a relatively level landing area 30 meters in diameter. This does notmean that a loaded helicopter can land and take off from an area of that size. Most helicopterscannot go straight up or down when fully loaded; therefore, a larger landing site and better approachand departure routes are required.
(2) When obstacles are in the approach or departure routes, 10 to 1 ratio must be used to layout the landing site. For example, during the approach and departure, if the helicopter must fly overtrees that are 15 meters high, the landing site must be at least 150 meters long (10x15=150 meters).
Landing Site Landing Ratio.
b. The ground slope of the landing site. When selecting the landing site, the ground slope mustbe no more than 15 degrees. Helicopters cannot safely land on a slope of more than 15 degrees.
(1) When the ground slope is less than 7 degrees, the helicopter should land upslope.
(2) When the ground slope is 7 to 15 degrees, the helicopter must land sideslope.
c. Surface conditions.
(1) The ground must be firm enough that the helicopter does not bog down during loading orunloading. If firm ground cannot be found, the pilot must be told. He may hover at the landing siteduring the loading or unloading.
(2) Rotor wash on dusty, sandy, or snow-covered surfaces may cause loss of visual contactwith the ground; therefore, these areas should be avoided.
(3) Loose debris that can be kicked up by the rotor wash must be removed from the landingsite. Loose debris can cause damage to the blades or engines.
d. Obstacles.Worksheet # 017 to construct AMEDDC&S Form 1232, 1 NOV 11 Page 1 of 2
7-6
(1) Landing sites should be free of tall trees, telephone lines, power lines or poles, and similarobstructions on the approach or departure ends of the landing site.
(2) Obstructions that cannot be removed (such as large rocks, stumps, or holes) must bemarked clearly within the landing site.
2. Remove all obstacles and debris at the landing site and mark obstructions that cannot beremoved. Ensure that the marker is properly secured to the obstacle or ground.
3. Mark the landing site and identify the touchdown point.
NOTE: For EFMB testing purposes, only step 3b will be tested, utilizing strobe lights, flashlights, or chemical lightsand will be tested during daylight hours.
a. When and how the landing site should be marked is based on the mission, capabilities, andsituation of the unit concerned. Normally, the only mark or signals required are smoke (colored) anda signalman. VS-17 marker panels may be used to mark the landing site, but MUST NOT be usedany closer than 50 feet to the touchdown point. In addition to identifying the landing site, smoke givesthe pilot information on the wind direction and speed.
b. An inverted “Y,” composed of four lights, marks the landing site and touchdown point at night.Strobe lights, flashlights, or vehicle lights may also be used to mark the landing site. The markingsystem used will be fully explained to the pilot when contact is made.
Inverted “Y” Landing Site.
EVALUATOR STATES: “WHAT MARKING SYSTEM DID YOU USE AND IDENTIFY THE TOUCHDOWN POINT?”AFTER THE CANDIDATE COMPLETES MARKING THE LANDING SITE.
4. Correctly perform all performance steps/measures within 10 minutes.
EVALUATOR WRITES: CANDIDATE’S TIME FOR THE TASK:
REASON(S)FOR FAILURE
DOES THE CANDIDATE WISH TO REBUT THIS TASK?(CANDIDATE INITIALS APPROPRIATE BOX)
YES NO
LANEOIC/NCOICINITIALS
EVALUATOR’S SIGNATURE DATE
Worksheet # 017 to construct AMEDDC&S Form 1232, 1 NOV 11 Page 2 of 2
7-7
EFMB Test Score SheetEVAC — LOAD CASUALTIES ONTO A UH-60 HELICOPTER
(For use of this form, see AMEDDC&S Pam 350-10, the proponent is MCCS-OP-T-T)
CANDIDATE’S RANK AND NAME CANDIDATE #
TASK: LOAD CASUALTIES ONTO A UH-60 HELICOPTER.
CONDITIONS: Given a UH-60 helicopter, three treated casualties secured on litters with straps. You and threenoncandidate Soldiers will form a litter squad, with you serving as the number 1 person to load the casualties. Theflight crew has configured the aircraft to receive the casualties.
STANDARDS: Prioritize, load, and secure three casualties onto a UH-60 helicopter within 15 minutes, in the propersequence, without causing further injury to the casualties.
NOTE: THIS TASK HAS BEEN MODIFIED FOR EFMB TESTING PURPOSES ONLY.
PERFORMANCE STEPS/MEASURES GO NO-GO
1. Survey and prioritize the casualties to determine loading sequence.
NOTE: Time starts when the candidate starts surveying the casualties or starts the steps to secure the casualtiesonto the litters.
NOTE: Casualties are prioritized IAW priorities for treatment listed in the TCCC - TRIAGE CASUALTIES task in thispublication. DA Form 7656 will be placed on the casualties with the exact verbage of injuries from forenamed task.
a. Position litter casualties in the helicopter according to the nature of their injuries or condition.
b. Load the most seriously injured casualties last on the bottom pans of the litter support unit.However, if in-flight emergency medical care may be required, such as cardiopulmonaryresuscitation, load the casualty onto either of the top pans to facilitate access.
c. Load casualties receiving IV fluids or oxygen on any litter pan, depending on their injuries orcondition (if applicable).
d. Load casualties in traction splints last on a bottom pan (if applicable).
2. Verify the security of the straps on the three casualties on litters.
3. Under the supervision of the flight personnel, serve as the number 1 position and with theassistance of the noncandidate Soldiers—
a. Move the litter to the aircraft.
NOTE: The UH-60 can be loaded on both sides. Load the casualty so that upon rotating the litter support, his or herhead will be forward in the cabin.
b. Do not approach aircraft until the flight crew directs you to do so.
c. Load litters onto litter pans.
(1) If loading from the aircraft’s left side with the carousel turned, the sequence is upper right,upper left, lower right, and then lower left.
(2) If loading from the aircraft’s right side with the carousel turned, the sequence is upper left,upper right, lower left, and then lower right.
(3) Direct the litter squad to move into the semioverhead carry, lifting the litter just highenough for the litter stirrups of one end to slide onto the litter pan.
(4) Direct the litter squad to slide the litter forward until the litter stirrups of both ends aresecured on the pan. The candidate raises the pan back to its upright position and secures it and thelitter.
d. The litter squad departs only when directed to do so by the flight crew.
NOTE: The litter team may assist the candidate in securing the pan and the litter, but it is still the candidate’sresponsibility to ensure that the pan and litter are secured properly.
WARNING: THE LITTER SQUAD DEPARTS ONLY WHEN DIRECTED TO DO SO BY THE FLIGHT CREW. ATNO TIME SHOULD ANY MEMBER OF THE LITTER SQUAD GO NEAR THE TAIL ROTOR SECTION OF THEAIRCRAFT.
Worksheet # 018 to construct AMEDDC&S Form 1232, 1 NOV 11 Page 1 of 2
7-8
4. Load the remaining casualties IAW steps 2b and 2c.
NOTE: Time ends when the litter squad departs the aircraft after loading and securing the last litter.
5. Did not cause further injury to the casualties.
6. Correctly perform all performance steps/measures within 15 minutes.
EVALUATOR WRITES: CANDIDATE’S TIME FOR THE TASK:
REASON(S)FOR FAILURE
DOES THE CANDIDATE WISH TO REBUT THIS TASK?(CANDIDATE INITIALS APPROPRIATE BOX)
YES NO
LANEOIC/NCOICINITIALS
EVALUATOR’S SIGNATURE DATE
Worksheet # 018 to construct AMEDDC&S Form 1232, 1 NOV 11 Page 2 of 2
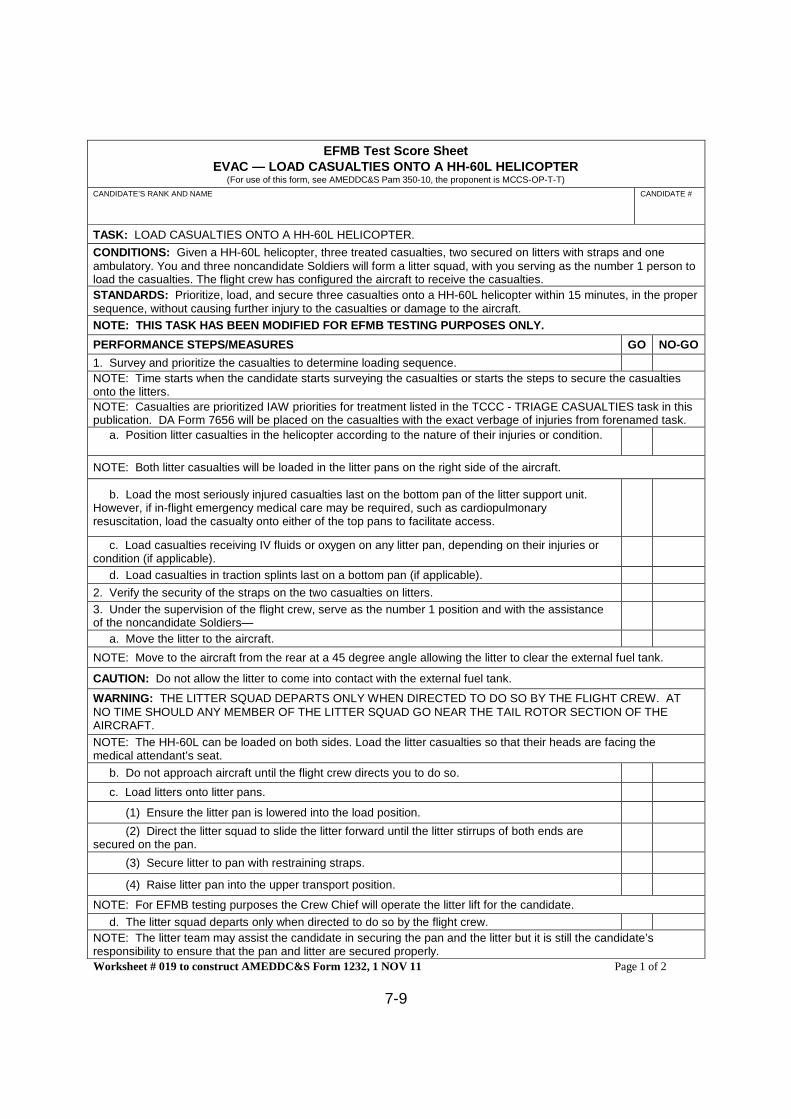
7-9
EFMB Test Score SheetEVAC — LOAD CASUALTIES ONTO A HH-60L HELICOPTER
(For use of this form, see AMEDDC&S Pam 350-10, the proponent is MCCS-OP-T-T)
CANDIDATE’S RANK AND NAME CANDIDATE #
TASK: LOAD CASUALTIES ONTO A HH-60L HELICOPTER.
CONDITIONS: Given a HH-60L helicopter, three treated casualties, two secured on litters with straps and oneambulatory. You and three noncandidate Soldiers will form a litter squad, with you serving as the number 1 person toload the casualties. The flight crew has configured the aircraft to receive the casualties.
STANDARDS: Prioritize, load, and secure three casualties onto a HH-60L helicopter within 15 minutes, in the propersequence, without causing further injury to the casualties or damage to the aircraft.
NOTE: THIS TASK HAS BEEN MODIFIED FOR EFMB TESTING PURPOSES ONLY.
PERFORMANCE STEPS/MEASURES GO NO-GO
1. Survey and prioritize the casualties to determine loading sequence.
NOTE: Time starts when the candidate starts surveying the casualties or starts the steps to secure the casualtiesonto the litters.
NOTE: Casualties are prioritized IAW priorities for treatment listed in the TCCC - TRIAGE CASUALTIES task in thispublication. DA Form 7656 will be placed on the casualties with the exact verbage of injuries from forenamed task.
a. Position litter casualties in the helicopter according to the nature of their injuries or condition.
NOTE: Both litter casualties will be loaded in the litter pans on the right side of the aircraft.
b. Load the most seriously injured casualties last on the bottom pan of the litter support unit.However, if in-flight emergency medical care may be required, such as cardiopulmonaryresuscitation, load the casualty onto either of the top pans to facilitate access.
c. Load casualties receiving IV fluids or oxygen on any litter pan, depending on their injuries orcondition (if applicable).
d. Load casualties in traction splints last on a bottom pan (if applicable).
2. Verify the security of the straps on the two casualties on litters.
3. Under the supervision of the flight crew, serve as the number 1 position and with the assistanceof the noncandidate Soldiers—
a. Move the litter to the aircraft.
NOTE: Move to the aircraft from the rear at a 45 degree angle allowing the litter to clear the external fuel tank.
CAUTION: Do not allow the litter to come into contact with the external fuel tank.
WARNING: THE LITTER SQUAD DEPARTS ONLY WHEN DIRECTED TO DO SO BY THE FLIGHT CREW. ATNO TIME SHOULD ANY MEMBER OF THE LITTER SQUAD GO NEAR THE TAIL ROTOR SECTION OF THEAIRCRAFT.
NOTE: The HH-60L can be loaded on both sides. Load the litter casualties so that their heads are facing themedical attendant’s seat.
b. Do not approach aircraft until the flight crew directs you to do so.
c. Load litters onto litter pans.
(1) Ensure the litter pan is lowered into the load position.
(2) Direct the litter squad to slide the litter forward until the litter stirrups of both ends aresecured on the pan.
(3) Secure litter to pan with restraining straps.
(4) Raise litter pan into the upper transport position.
NOTE: For EFMB testing purposes the Crew Chief will operate the litter lift for the candidate.
d. The litter squad departs only when directed to do so by the flight crew.
NOTE: The litter team may assist the candidate in securing the pan and the litter but it is still the candidate’sresponsibility to ensure that the pan and litter are secured properly.
Worksheet # 019 to construct AMEDDC&S Form 1232, 1 NOV 11 Page 1 of 2
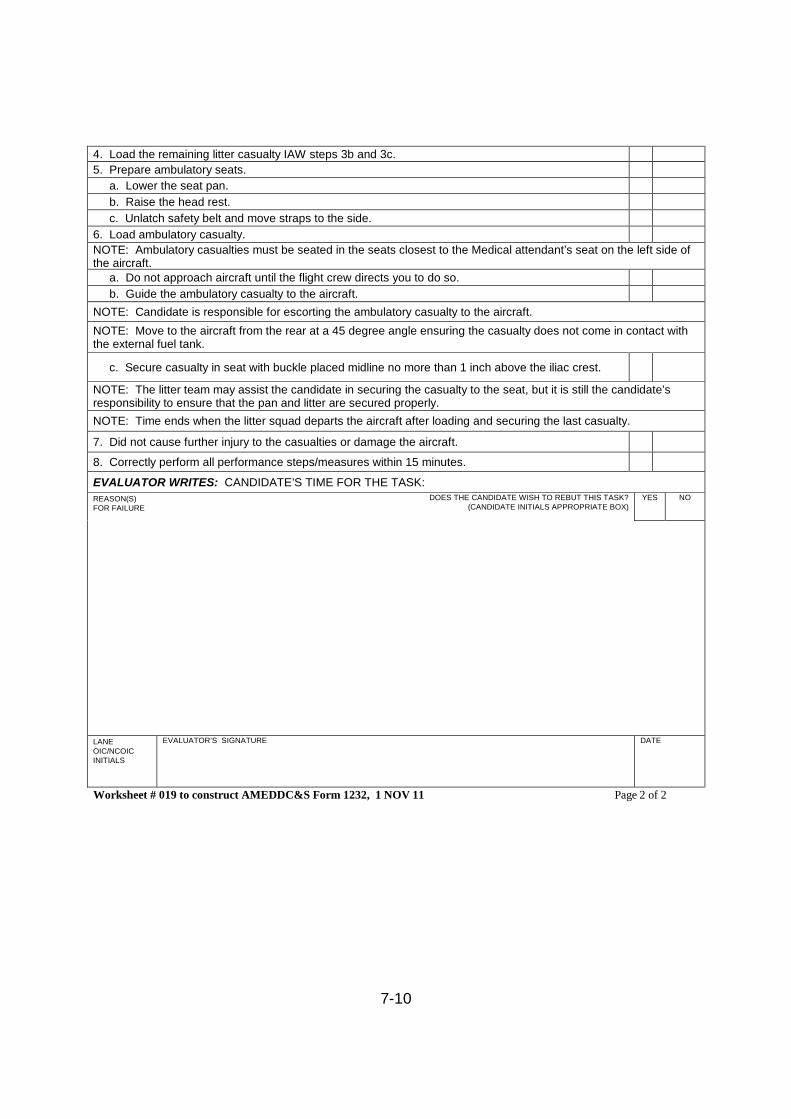
7-10
4. Load the remaining litter casualty IAW steps 3b and 3c.
5. Prepare ambulatory seats.
a. Lower the seat pan.
b. Raise the head rest.
c. Unlatch safety belt and move straps to the side.
6. Load ambulatory casualty.
NOTE: Ambulatory casualties must be seated in the seats closest to the Medical attendant’s seat on the left side ofthe aircraft.
a. Do not approach aircraft until the flight crew directs you to do so.
b. Guide the ambulatory casualty to the aircraft.
NOTE: Candidate is responsible for escorting the ambulatory casualty to the aircraft.
NOTE: Move to the aircraft from the rear at a 45 degree angle ensuring the casualty does not come in contact withthe external fuel tank.
c. Secure casualty in seat with buckle placed midline no more than 1 inch above the iliac crest.
NOTE: The litter team may assist the candidate in securing the casualty to the seat, but it is still the candidate’sresponsibility to ensure that the pan and litter are secured properly.
NOTE: Time ends when the litter squad departs the aircraft after loading and securing the last casualty.
7. Did not cause further injury to the casualties or damage the aircraft.
8. Correctly perform all performance steps/measures within 15 minutes.
EVALUATOR WRITES: CANDIDATE’S TIME FOR THE TASK:
REASON(S)FOR FAILURE
DOES THE CANDIDATE WISH TO REBUT THIS TASK?(CANDIDATE INITIALS APPROPRIATE BOX)
YES NO
LANEOIC/NCOICINITIALS
EVALUATOR’S SIGNATURE DATE
Worksheet # 019 to construct AMEDDC&S Form 1232, 1 NOV 11 Page 2 of 2
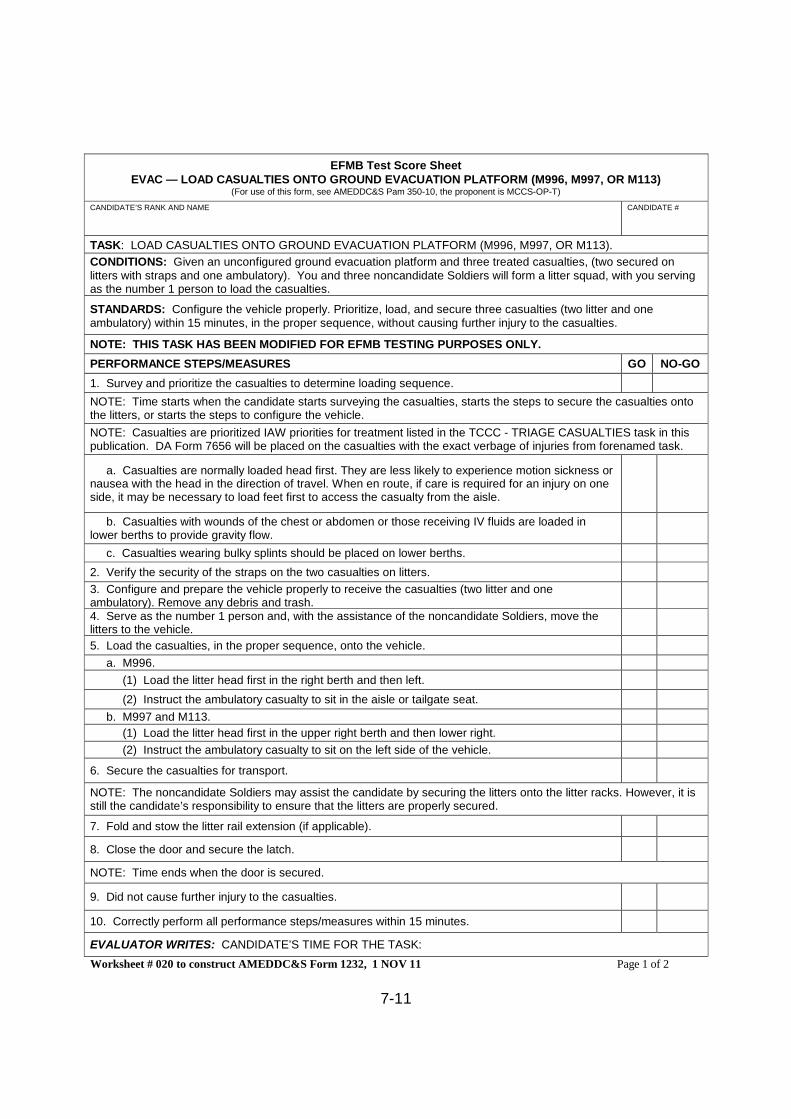
7-11
EFMB Test Score SheetEVAC — LOAD CASUALTIES ONTO GROUND EVACUATION PLATFORM (M996, M997, OR M113)
(For use of this form, see AMEDDC&S Pam 350-10, the proponent is MCCS-OP-T)
CANDIDATE’S RANK AND NAME CANDIDATE #
TASK: LOAD CASUALTIES ONTO GROUND EVACUATION PLATFORM (M996, M997, OR M113).
CONDITIONS: Given an unconfigured ground evacuation platform and three treated casualties, (two secured onlitters with straps and one ambulatory). You and three noncandidate Soldiers will form a litter squad, with you servingas the number 1 person to load the casualties.
STANDARDS: Configure the vehicle properly. Prioritize, load, and secure three casualties (two litter and oneambulatory) within 15 minutes, in the proper sequence, without causing further injury to the casualties.
NOTE: THIS TASK HAS BEEN MODIFIED FOR EFMB TESTING PURPOSES ONLY.
PERFORMANCE STEPS/MEASURES GO NO-GO
1. Survey and prioritize the casualties to determine loading sequence.
NOTE: Time starts when the candidate starts surveying the casualties, starts the steps to secure the casualties ontothe litters, or starts the steps to configure the vehicle.
NOTE: Casualties are prioritized IAW priorities for treatment listed in the TCCC - TRIAGE CASUALTIES task in thispublication. DA Form 7656 will be placed on the casualties with the exact verbage of injuries from forenamed task.
a. Casualties are normally loaded head first. They are less likely to experience motion sickness ornausea with the head in the direction of travel. When en route, if care is required for an injury on oneside, it may be necessary to load feet first to access the casualty from the aisle.
b. Casualties with wounds of the chest or abdomen or those receiving IV fluids are loaded inlower berths to provide gravity flow.
c. Casualties wearing bulky splints should be placed on lower berths.
2. Verify the security of the straps on the two casualties on litters.
3. Configure and prepare the vehicle properly to receive the casualties (two litter and oneambulatory). Remove any debris and trash.4. Serve as the number 1 person and, with the assistance of the noncandidate Soldiers, move thelitters to the vehicle.
5. Load the casualties, in the proper sequence, onto the vehicle.
a. M996.
(1) Load the litter head first in the right berth and then left.
(2) Instruct the ambulatory casualty to sit in the aisle or tailgate seat.
b. M997 and M113.
(1) Load the litter head first in the upper right berth and then lower right.
(2) Instruct the ambulatory casualty to sit on the left side of the vehicle.
6. Secure the casualties for transport.
NOTE: The noncandidate Soldiers may assist the candidate by securing the litters onto the litter racks. However, it isstill the candidate’s responsibility to ensure that the litters are properly secured.
7. Fold and stow the litter rail extension (if applicable).
8. Close the door and secure the latch.
NOTE: Time ends when the door is secured.
9. Did not cause further injury to the casualties.
10. Correctly perform all performance steps/measures within 15 minutes.
EVALUATOR WRITES: CANDIDATE’S TIME FOR THE TASK:
Worksheet # 020 to construct AMEDDC&S Form 1232, 1 NOV 11 Page 1 of 2
7-12
REASON(S)FOR FAILURE
DOES THE CANDIDATE WISH TO REBUT THIS TASK?(CANDIDATE INITIALS APPROPRIATE BOX)
YES NO
LANEOIC/NCOICINITIALS
EVALUATOR’S SIGNATURE DATE
Worksheet # 020 to construct AMEDDC&S Form 1232, 1 NOV 11 Page 2 of 2
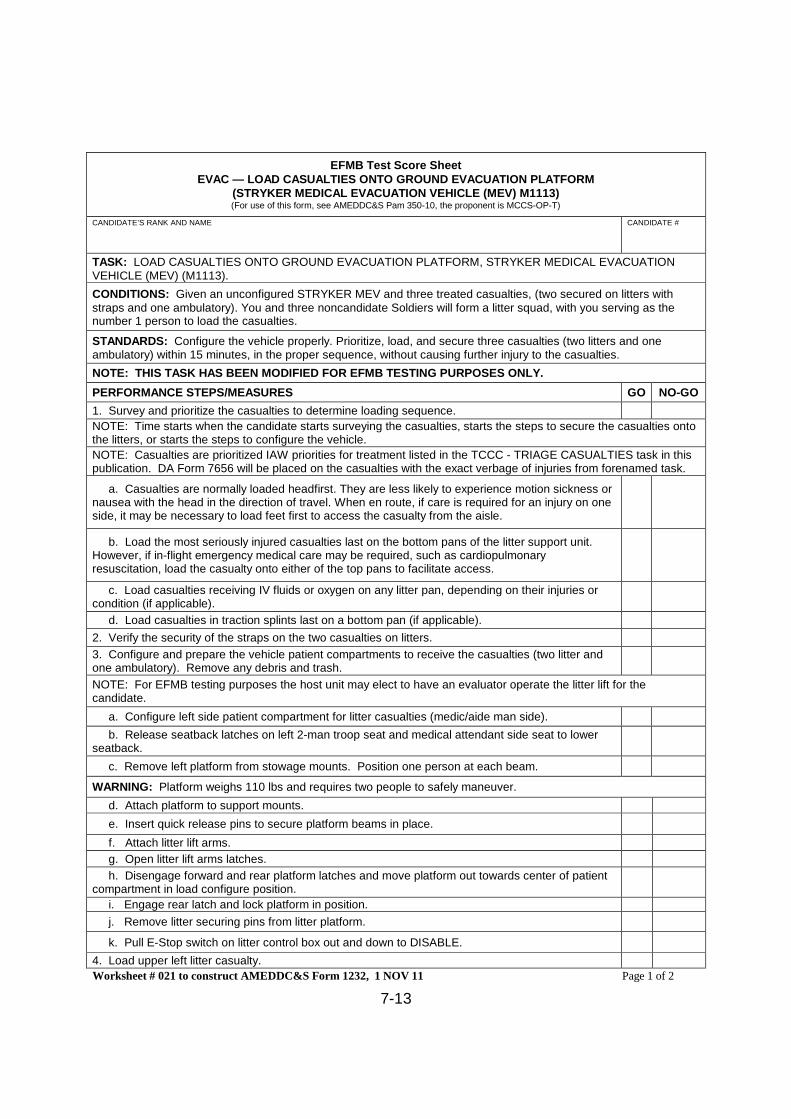
7-13
EFMB Test Score SheetEVAC — LOAD CASUALTIES ONTO GROUND EVACUATION PLATFORM
(STRYKER MEDICAL EVACUATION VEHICLE (MEV) M1113)(For use of this form, see AMEDDC&S Pam 350-10, the proponent is MCCS-OP-T)
CANDIDATE’S RANK AND NAME CANDIDATE #
TASK: LOAD CASUALTIES ONTO GROUND EVACUATION PLATFORM, STRYKER MEDICAL EVACUATIONVEHICLE (MEV) (M1113).
CONDITIONS: Given an unconfigured STRYKER MEV and three treated casualties, (two secured on litters withstraps and one ambulatory). You and three noncandidate Soldiers will form a litter squad, with you serving as thenumber 1 person to load the casualties.
STANDARDS: Configure the vehicle properly. Prioritize, load, and secure three casualties (two litters and oneambulatory) within 15 minutes, in the proper sequence, without causing further injury to the casualties.
NOTE: THIS TASK HAS BEEN MODIFIED FOR EFMB TESTING PURPOSES ONLY.
PERFORMANCE STEPS/MEASURES GO NO-GO
1. Survey and prioritize the casualties to determine loading sequence.
NOTE: Time starts when the candidate starts surveying the casualties, starts the steps to secure the casualties ontothe litters, or starts the steps to configure the vehicle.
NOTE: Casualties are prioritized IAW priorities for treatment listed in the TCCC - TRIAGE CASUALTIES task in thispublication. DA Form 7656 will be placed on the casualties with the exact verbage of injuries from forenamed task.
a. Casualties are normally loaded headfirst. They are less likely to experience motion sickness ornausea with the head in the direction of travel. When en route, if care is required for an injury on oneside, it may be necessary to load feet first to access the casualty from the aisle.
b. Load the most seriously injured casualties last on the bottom pans of the litter support unit.However, if in-flight emergency medical care may be required, such as cardiopulmonaryresuscitation, load the casualty onto either of the top pans to facilitate access.
c. Load casualties receiving IV fluids or oxygen on any litter pan, depending on their injuries orcondition (if applicable).
d. Load casualties in traction splints last on a bottom pan (if applicable).
2. Verify the security of the straps on the two casualties on litters.
3. Configure and prepare the vehicle patient compartments to receive the casualties (two litter andone ambulatory). Remove any debris and trash.
NOTE: For EFMB testing purposes the host unit may elect to have an evaluator operate the litter lift for thecandidate.
a. Configure left side patient compartment for litter casualties (medic/aide man side).
b. Release seatback latches on left 2-man troop seat and medical attendant side seat to lowerseatback.
c. Remove left platform from stowage mounts. Position one person at each beam.
WARNING: Platform weighs 110 lbs and requires two people to safely maneuver.
d. Attach platform to support mounts.
e. Insert quick release pins to secure platform beams in place.
f. Attach litter lift arms.
g. Open litter lift arms latches.
h. Disengage forward and rear platform latches and move platform out towards center of patientcompartment in load configure position.
i. Engage rear latch and lock platform in position.
j. Remove litter securing pins from litter platform.
k. Pull E-Stop switch on litter control box out and down to DISABLE.
4. Load upper left litter casualty.
Worksheet # 021 to construct AMEDDC&S Form 1232, 1 NOV 11 Page 1 of 2
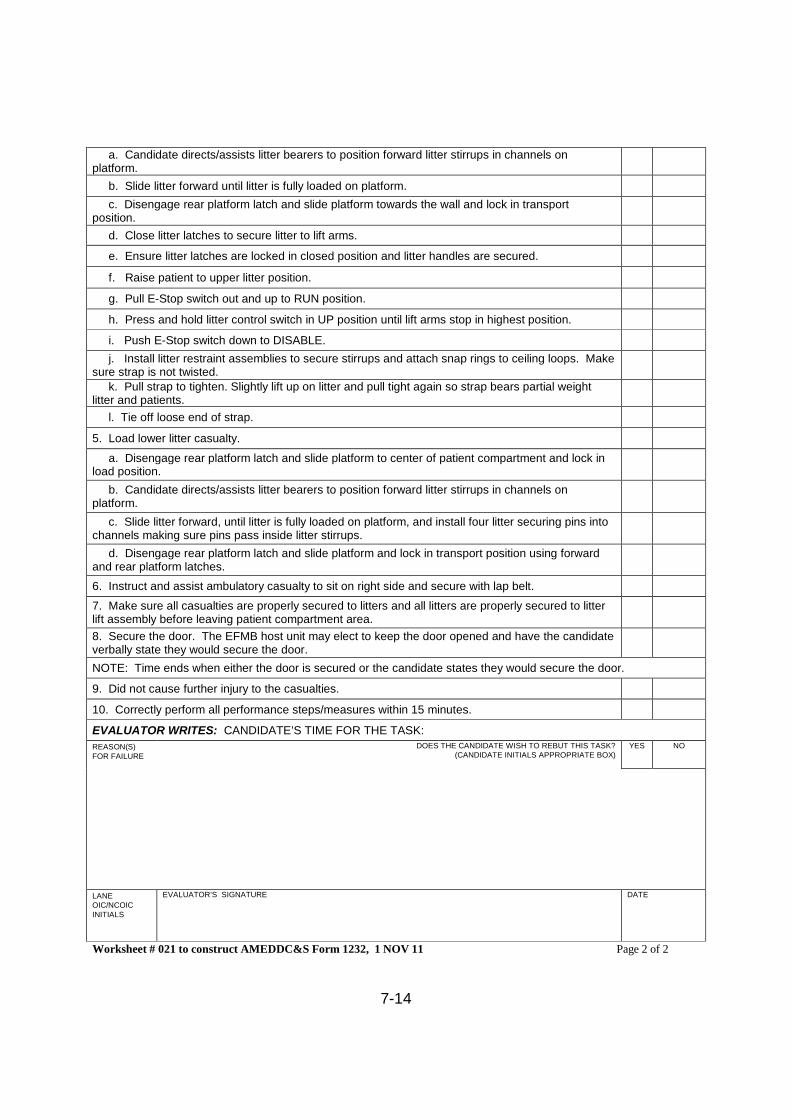
7-14
a. Candidate directs/assists litter bearers to position forward litter stirrups in channels onplatform.
b. Slide litter forward until litter is fully loaded on platform.
c. Disengage rear platform latch and slide platform towards the wall and lock in transportposition.
d. Close litter latches to secure litter to lift arms.
e. Ensure litter latches are locked in closed position and litter handles are secured.
f. Raise patient to upper litter position.
g. Pull E-Stop switch out and up to RUN position.
h. Press and hold litter control switch in UP position until lift arms stop in highest position.
i. Push E-Stop switch down to DISABLE.
j. Install litter restraint assemblies to secure stirrups and attach snap rings to ceiling loops. Makesure strap is not twisted.
k. Pull strap to tighten. Slightly lift up on litter and pull tight again so strap bears partial weightlitter and patients.
l. Tie off loose end of strap.
5. Load lower litter casualty.
a. Disengage rear platform latch and slide platform to center of patient compartment and lock inload position.
b. Candidate directs/assists litter bearers to position forward litter stirrups in channels onplatform.
c. Slide litter forward, until litter is fully loaded on platform, and install four litter securing pins intochannels making sure pins pass inside litter stirrups.
d. Disengage rear platform latch and slide platform and lock in transport position using forwardand rear platform latches.
6. Instruct and assist ambulatory casualty to sit on right side and secure with lap belt.
7. Make sure all casualties are properly secured to litters and all litters are properly secured to litterlift assembly before leaving patient compartment area.
8. Secure the door. The EFMB host unit may elect to keep the door opened and have the candidateverbally state they would secure the door.
NOTE: Time ends when either the door is secured or the candidate states they would secure the door.
9. Did not cause further injury to the casualties.
10. Correctly perform all performance steps/measures within 15 minutes.
EVALUATOR WRITES: CANDIDATE’S TIME FOR THE TASK:
REASON(S)FOR FAILURE
DOES THE CANDIDATE WISH TO REBUT THIS TASK?(CANDIDATE INITIALS APPROPRIATE BOX)
YES NO
LANEOIC/NCOICINITIALS
EVALUATOR’S SIGNATURE DATE
Worksheet # 021 to construct AMEDDC&S Form 1232, 1 NOV 11 Page 2 of 2
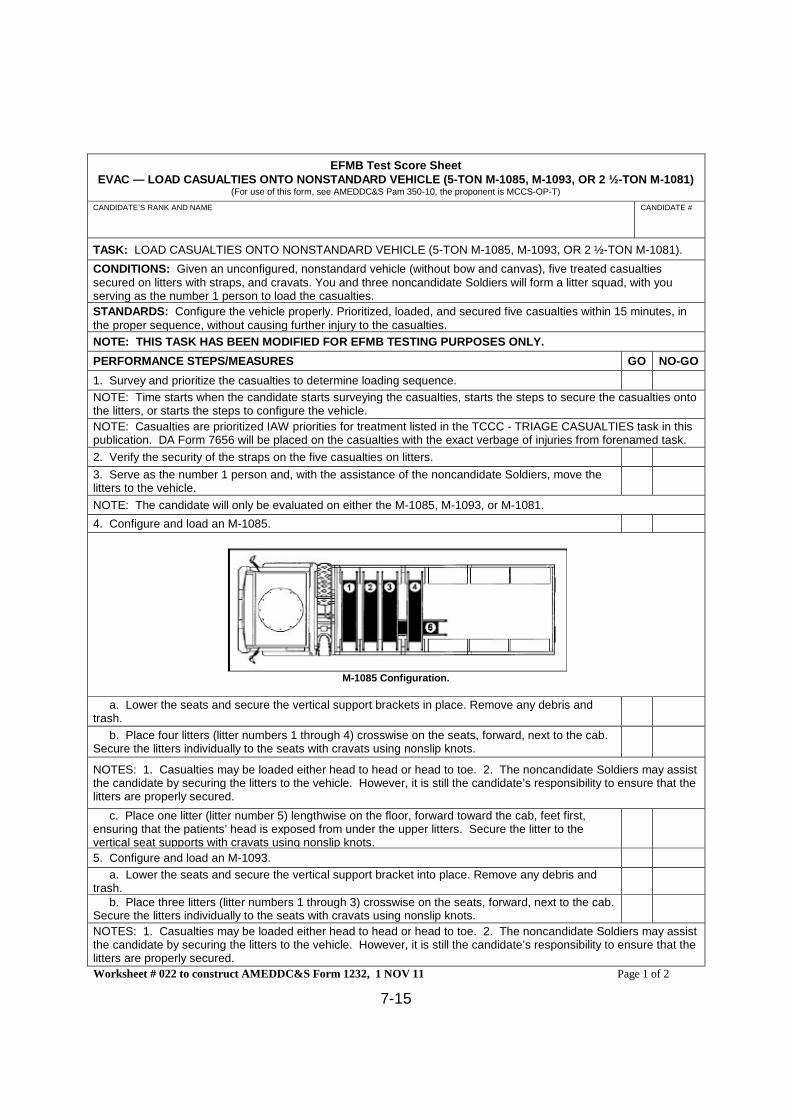
7-15
EFMB Test Score SheetEVAC — LOAD CASUALTIES ONTO NONSTANDARD VEHICLE (5-TON M-1085, M-1093, OR 2 ½-TON M-1081)
(For use of this form, see AMEDDC&S Pam 350-10, the proponent is MCCS-OP-T)
CANDIDATE’S RANK AND NAME CANDIDATE #
TASK: LOAD CASUALTIES ONTO NONSTANDARD VEHICLE (5-TON M-1085, M-1093, OR 2 ½-TON M-1081).
CONDITIONS: Given an unconfigured, nonstandard vehicle (without bow and canvas), five treated casualtiessecured on litters with straps, and cravats. You and three noncandidate Soldiers will form a litter squad, with youserving as the number 1 person to load the casualties.
STANDARDS: Configure the vehicle properly. Prioritized, loaded, and secured five casualties within 15 minutes, inthe proper sequence, without causing further injury to the casualties.
NOTE: THIS TASK HAS BEEN MODIFIED FOR EFMB TESTING PURPOSES ONLY.
PERFORMANCE STEPS/MEASURES GO NO-GO
1. Survey and prioritize the casualties to determine loading sequence.
NOTE: Time starts when the candidate starts surveying the casualties, starts the steps to secure the casualties ontothe litters, or starts the steps to configure the vehicle.
NOTE: Casualties are prioritized IAW priorities for treatment listed in the TCCC - TRIAGE CASUALTIES task in thispublication. DA Form 7656 will be placed on the casualties with the exact verbage of injuries from forenamed task.
2. Verify the security of the straps on the five casualties on litters.
3. Serve as the number 1 person and, with the assistance of the noncandidate Soldiers, move thelitters to the vehicle.
NOTE: The candidate will only be evaluated on either the M-1085, M-1093, or M-1081.
4. Configure and load an M-1085.
M-1085 Configuration.
a. Lower the seats and secure the vertical support brackets in place. Remove any debris andtrash.
b. Place four litters (litter numbers 1 through 4) crosswise on the seats, forward, next to the cab.Secure the litters individually to the seats with cravats using nonslip knots.
NOTES: 1. Casualties may be loaded either head to head or head to toe. 2. The noncandidate Soldiers may assistthe candidate by securing the litters to the vehicle. However, it is still the candidate’s responsibility to ensure that thelitters are properly secured.
c. Place one litter (litter number 5) lengthwise on the floor, forward toward the cab, feet first,ensuring that the patients’ head is exposed from under the upper litters. Secure the litter to thevertical seat supports with cravats using nonslip knots.
5. Configure and load an M-1093.
a. Lower the seats and secure the vertical support bracket into place. Remove any debris andtrash.
b. Place three litters (litter numbers 1 through 3) crosswise on the seats, forward, next to the cab.Secure the litters individually to the seats with cravats using nonslip knots.
NOTES: 1. Casualties may be loaded either head to head or head to toe. 2. The noncandidate Soldiers may assistthe candidate by securing the litters to the vehicle. However, it is still the candidate’s responsibility to ensure that thelitters are properly secured.
Worksheet # 022 to construct AMEDDC&S Form 1232, 1 NOV 11 Page 1 of 2
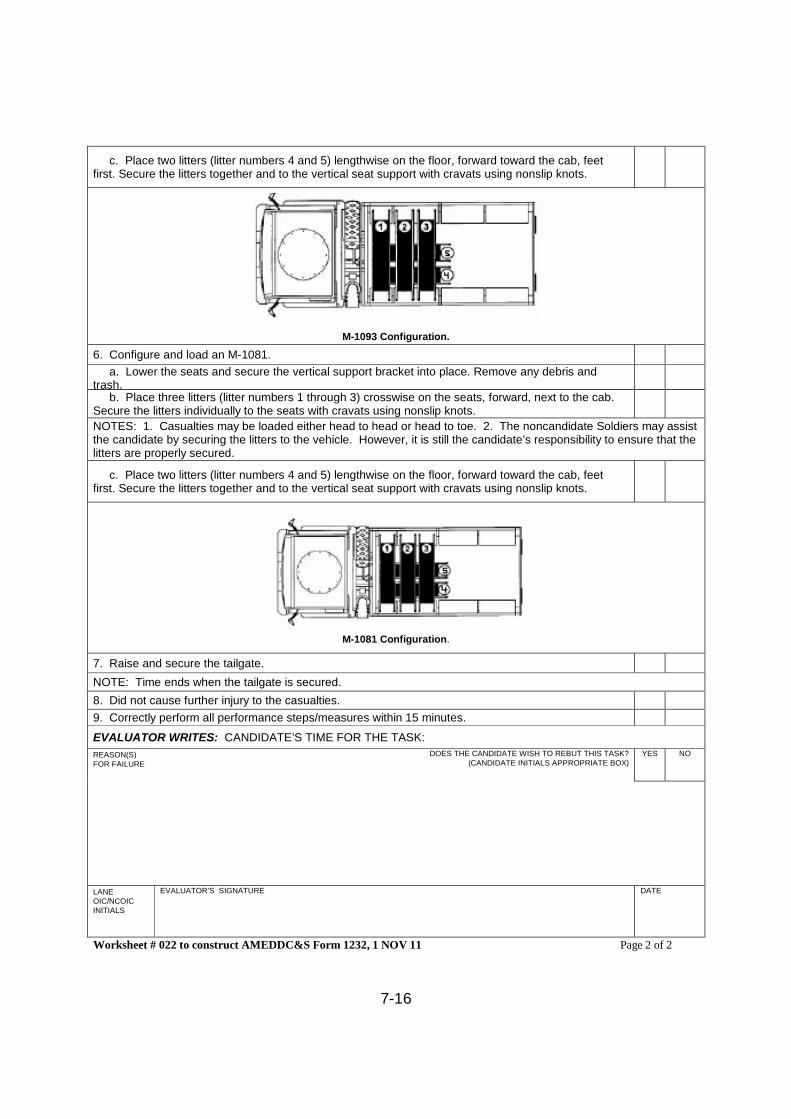
7-16
c. Place two litters (litter numbers 4 and 5) lengthwise on the floor, forward toward the cab, feetfirst. Secure the litters together and to the vertical seat support with cravats using nonslip knots.
M-1093 Configuration.
6. Configure and load an M-1081.
a. Lower the seats and secure the vertical support bracket into place. Remove any debris andtrash.
b. Place three litters (litter numbers 1 through 3) crosswise on the seats, forward, next to the cab.Secure the litters individually to the seats with cravats using nonslip knots.
NOTES: 1. Casualties may be loaded either head to head or head to toe. 2. The noncandidate Soldiers may assistthe candidate by securing the litters to the vehicle. However, it is still the candidate’s responsibility to ensure that thelitters are properly secured.
c. Place two litters (litter numbers 4 and 5) lengthwise on the floor, forward toward the cab, feetfirst. Secure the litters together and to the vertical seat support with cravats using nonslip knots.
M-1081 Configuration.
7. Raise and secure the tailgate.
NOTE: Time ends when the tailgate is secured.
8. Did not cause further injury to the casualties.
9. Correctly perform all performance steps/measures within 15 minutes.
EVALUATOR WRITES: CANDIDATE’S TIME FOR THE TASK:
REASON(S)FOR FAILURE
DOES THE CANDIDATE WISH TO REBUT THIS TASK?(CANDIDATE INITIALS APPROPRIATE BOX)
YES NO
LANEOIC/NCOICINITIALS
EVALUATOR’S SIGNATURE DATE
Worksheet # 022 to construct AMEDDC&S Form 1232, 1 NOV 11 Page 2 of 2
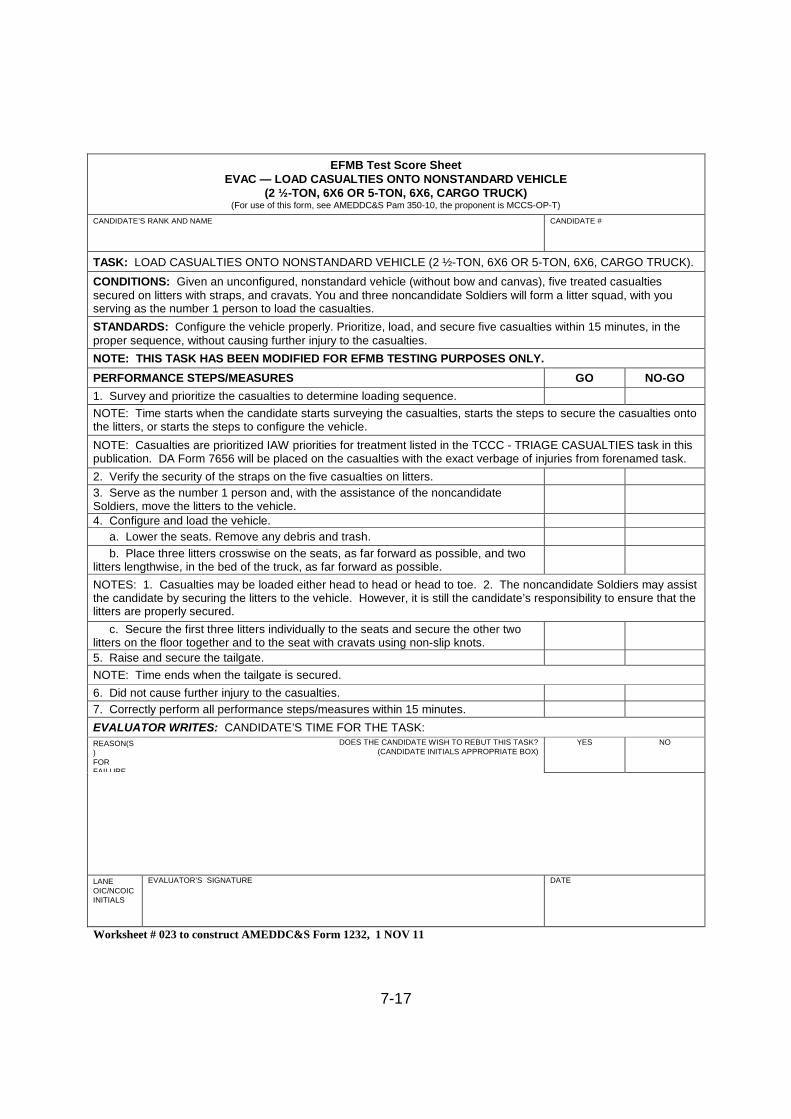
7-17
EFMB Test Score SheetEVAC — LOAD CASUALTIES ONTO NONSTANDARD VEHICLE
(2 ½-TON, 6X6 OR 5-TON, 6X6, CARGO TRUCK)(For use of this form, see AMEDDC&S Pam 350-10, the proponent is MCCS-OP-T)
CANDIDATE’S RANK AND NAME CANDIDATE #
TASK: LOAD CASUALTIES ONTO NONSTANDARD VEHICLE (2 ½-TON, 6X6 OR 5-TON, 6X6, CARGO TRUCK).
CONDITIONS: Given an unconfigured, nonstandard vehicle (without bow and canvas), five treated casualtiessecured on litters with straps, and cravats. You and three noncandidate Soldiers will form a litter squad, with youserving as the number 1 person to load the casualties.
STANDARDS: Configure the vehicle properly. Prioritize, load, and secure five casualties within 15 minutes, in theproper sequence, without causing further injury to the casualties.
NOTE: THIS TASK HAS BEEN MODIFIED FOR EFMB TESTING PURPOSES ONLY.
PERFORMANCE STEPS/MEASURES GO NO-GO
1. Survey and prioritize the casualties to determine loading sequence.
NOTE: Time starts when the candidate starts surveying the casualties, starts the steps to secure the casualties ontothe litters, or starts the steps to configure the vehicle.
NOTE: Casualties are prioritized IAW priorities for treatment listed in the TCCC - TRIAGE CASUALTIES task in thispublication. DA Form 7656 will be placed on the casualties with the exact verbage of injuries from forenamed task.
2. Verify the security of the straps on the five casualties on litters.
3. Serve as the number 1 person and, with the assistance of the noncandidateSoldiers, move the litters to the vehicle.4. Configure and load the vehicle.
a. Lower the seats. Remove any debris and trash.
b. Place three litters crosswise on the seats, as far forward as possible, and twolitters lengthwise, in the bed of the truck, as far forward as possible.
NOTES: 1. Casualties may be loaded either head to head or head to toe. 2. The noncandidate Soldiers may assistthe candidate by securing the litters to the vehicle. However, it is still the candidate’s responsibility to ensure that thelitters are properly secured.
c. Secure the first three litters individually to the seats and secure the other twolitters on the floor together and to the seat with cravats using non-slip knots.
5. Raise and secure the tailgate.
NOTE: Time ends when the tailgate is secured.
6. Did not cause further injury to the casualties.
7. Correctly perform all performance steps/measures within 15 minutes.
EVALUATOR WRITES: CANDIDATE’S TIME FOR THE TASK:
REASON(S)FORFAILURE
DOES THE CANDIDATE WISH TO REBUT THIS TASK?(CANDIDATE INITIALS APPROPRIATE BOX)
YES NO
LANEOIC/NCOICINITIALS
EVALUATOR’S SIGNATURE DATE
Worksheet # 023 to construct AMEDDC&S Form 1232, 1 NOV 11
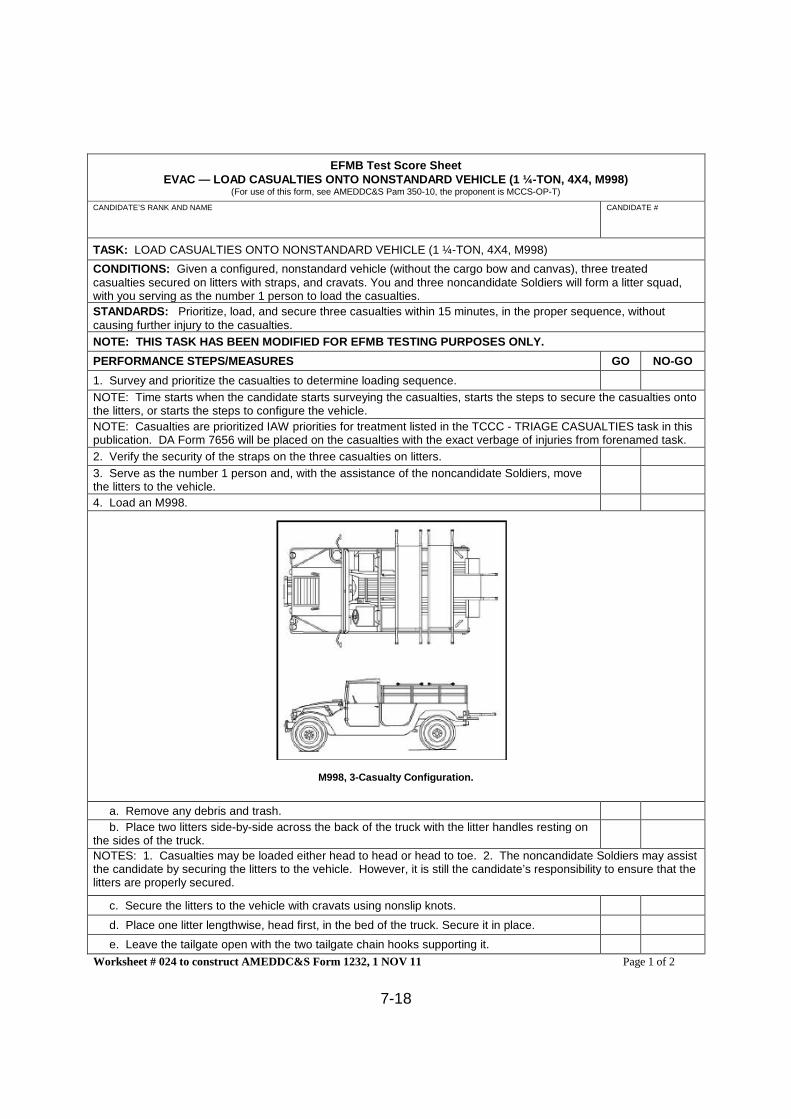
7-18
EFMB Test Score SheetEVAC — LOAD CASUALTIES ONTO NONSTANDARD VEHICLE (1 ¼-TON, 4X4, M998)
(For use of this form, see AMEDDC&S Pam 350-10, the proponent is MCCS-OP-T)
CANDIDATE’S RANK AND NAME CANDIDATE #
TASK: LOAD CASUALTIES ONTO NONSTANDARD VEHICLE (1 ¼-TON, 4X4, M998)
CONDITIONS: Given a configured, nonstandard vehicle (without the cargo bow and canvas), three treatedcasualties secured on litters with straps, and cravats. You and three noncandidate Soldiers will form a litter squad,with you serving as the number 1 person to load the casualties.
STANDARDS: Prioritize, load, and secure three casualties within 15 minutes, in the proper sequence, withoutcausing further injury to the casualties.
NOTE: THIS TASK HAS BEEN MODIFIED FOR EFMB TESTING PURPOSES ONLY.
PERFORMANCE STEPS/MEASURES GO NO-GO
1. Survey and prioritize the casualties to determine loading sequence.
NOTE: Time starts when the candidate starts surveying the casualties, starts the steps to secure the casualties ontothe litters, or starts the steps to configure the vehicle.
NOTE: Casualties are prioritized IAW priorities for treatment listed in the TCCC - TRIAGE CASUALTIES task in thispublication. DA Form 7656 will be placed on the casualties with the exact verbage of injuries from forenamed task.
2. Verify the security of the straps on the three casualties on litters.
3. Serve as the number 1 person and, with the assistance of the noncandidate Soldiers, movethe litters to the vehicle.
4. Load an M998.
M998, 3-Casualty Configuration.
a. Remove any debris and trash.
b. Place two litters side-by-side across the back of the truck with the litter handles resting onthe sides of the truck.
NOTES: 1. Casualties may be loaded either head to head or head to toe. 2. The noncandidate Soldiers may assistthe candidate by securing the litters to the vehicle. However, it is still the candidate’s responsibility to ensure that thelitters are properly secured.
c. Secure the litters to the vehicle with cravats using nonslip knots.
d. Place one litter lengthwise, head first, in the bed of the truck. Secure it in place.
e. Leave the tailgate open with the two tailgate chain hooks supporting it.
Worksheet # 024 to construct AMEDDC&S Form 1232, 1 NOV 11 Page 1 of 2
7-19
NOTE: Time ends when the last litter is secured and the tailgate is positioned as stated above.
5. Did not cause further injury to the casualties.
6. Correctly perform all performance steps/measures within 15 minutes.
EVALUATOR WRITES: CANDIDATE’S TIME FOR THE TASK:
REASON(S)FOR FAILURE
DOES THE CANDIDATE WISH TO REBUT THIS TASK?(CANDIDATE INITIALS APPROPRIATE BOX)
YES NO
LANEOIC/NCOICINITIALS
EVALUATOR’S SIGNATURE DATE
Worksheet # 024 to construct AMEDDC&S Form 1232, 1 NOV 11 Page 2 of 2
7-20
EFMB Test Score SheetEVAC — EXTRICATE CASUALTIES FROM A VEHICLE
(For use of this form, see AMEDDC&S Pam 350-10, the proponent is MCCS-OP-T)
CANDIDATE’S RANK AND NAME CANDIDATE #
TASK: EXTRICATE CASUALTIES FROM A VEHICLE.
CONDITIONS: Given a conscious casualty with a suspected neck or spinal injury that is in the driver’s seat of a vehicleand another casualty who does not have a suspected neck or spinal injury in the passenger seat of a vehicle after amotor vehicle accident or explosion. The tactical situation warrants extrication with a short spine board, KendrickExtrication Device (KED), or Oregon Spine Splint II (OSS II) which is available. A long spine board is also available, ifrequired. A noncandidate Soldier is available to assist.
STANDARDS: Secure and extricate casualties from the vehicle without causing further injury.
NOTE: THIS TASK HAS BEEN MODIFIED FOR EFMB TESTING PURPOSES ONLY.
PERFORMANCE STEPS/MEASURES GO NO-GO
NOTE: The EFMB host unit may elect to have the candidate perform this task on two to four casualties depending onthe lane concept. At least one casualty will be extricated from a vehicle using a KED, OSS II, or short spine board.However, they will all be tested on the same testing lane. Failure of the candidate to perform any portion of the task tostandard on any of the casualties will result in a NO-GO.
1. Consider extraction priority (i.e., vehicle on fire, under direct fire from the enemy) and mechanismof injury.
2. Gain access to the casualty.
3. Identify all injuries and either treat or delay treatment until after extrication based on the severityof the injuries and the tactical situation.
a. Prior to attempting to move the casualty, if the tactical situation permits, -
(1) Evaluate the type and extent of the casualty’s injuries.
(2) Ensure that dressings over wounds are adequately reinforced, if applicable.
(3) Ensure that fractured bones are properly immobilized and supported to prevent them fromcutting through muscle, blood vessels, and skin, if applicable.
b. Provide life threatening medical treatment at this time if warranted and if the tactical situationpermits.
4. Stabilize the spine by directing a noncandidate Soldier to immobilize the casualty's head and neckusing manual stabilization and apply a cervical collar, if necessary and the tactical situation permits.
a. Directs the noncandidate Soldier to do the following:
(1) Place the hands on both sides of the casualty's skull, with the palms over the ears.
(2) Support the jaw (mandible) with the fingers.
(3) Maintain manual stabilization until directed to release the stabilization.
b. Select, measure, and apply an effective, properly-fitting cervical collar, if available, orimprovise one.
5. Remove casualty from a vehicle.
a. Remove casualty from a vehicle, if the casualty does NOT have suspected neck or spinalinjury and/or the tactical situation does not warrant extraction using a KED, OSS II, or short spineboard (i.e., vehicle on fire, under direct fire from the enemy).
(1) Laterally.
(a) With the assistance of a non-candidate Soldier grasp the casualty’s arms and legs.
(b) While stabilizing the casualty’s head and neck as much as possible, lift the casualtyfree of the vehicle and move him to a safe place on the ground.
(2) Upward.
NOTE: You may have to remove a casualty upward from a vehicle, for example, from the passenger compartment of awheeled vehicle lying on its side or from the hatch of an armored vehicle sitting upright.
Worksheet # 025 to construct AMEDDC&S Form 1232, 1 NOV 11 Page 1 of 3
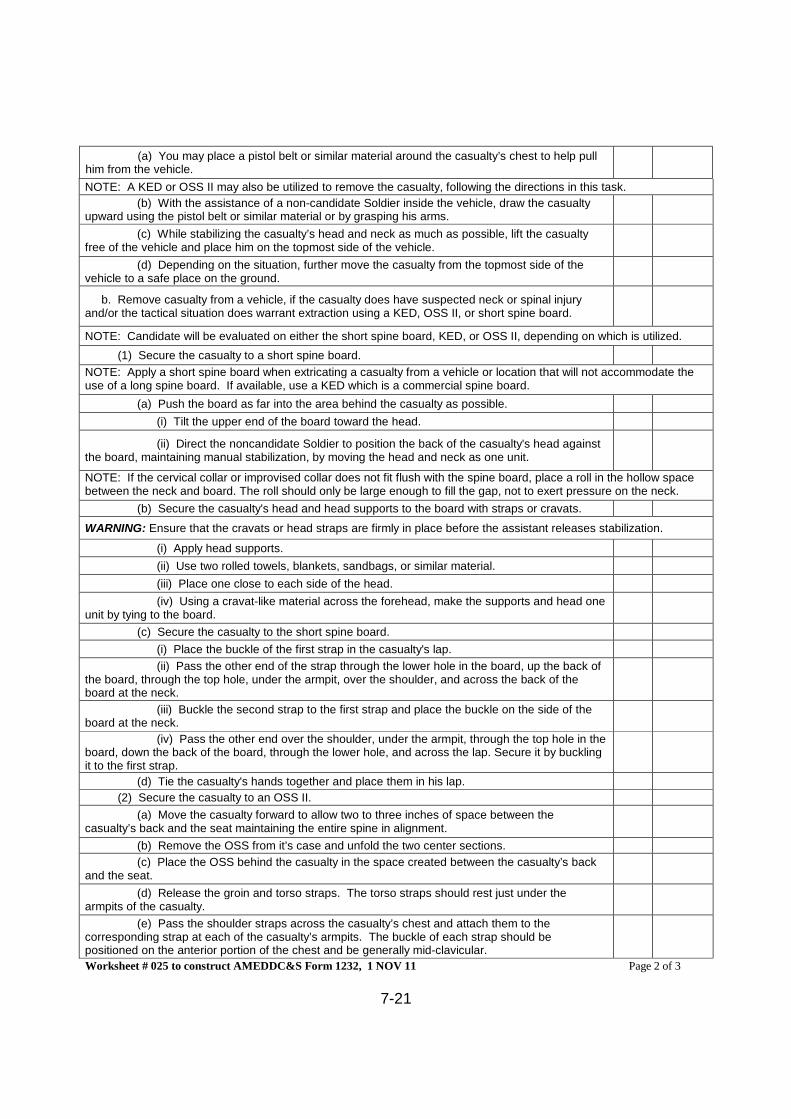
7-21
(a) You may place a pistol belt or similar material around the casualty’s chest to help pullhim from the vehicle.
NOTE: A KED or OSS II may also be utilized to remove the casualty, following the directions in this task.
(b) With the assistance of a non-candidate Soldier inside the vehicle, draw the casualtyupward using the pistol belt or similar material or by grasping his arms.
(c) While stabilizing the casualty’s head and neck as much as possible, lift the casualtyfree of the vehicle and place him on the topmost side of the vehicle.
(d) Depending on the situation, further move the casualty from the topmost side of thevehicle to a safe place on the ground.
b. Remove casualty from a vehicle, if the casualty does have suspected neck or spinal injuryand/or the tactical situation does warrant extraction using a KED, OSS II, or short spine board.
NOTE: Candidate will be evaluated on either the short spine board, KED, or OSS II, depending on which is utilized.
(1) Secure the casualty to a short spine board.
NOTE: Apply a short spine board when extricating a casualty from a vehicle or location that will not accommodate theuse of a long spine board. If available, use a KED which is a commercial spine board.
(a) Push the board as far into the area behind the casualty as possible.
(i) Tilt the upper end of the board toward the head.
(ii) Direct the noncandidate Soldier to position the back of the casualty's head againstthe board, maintaining manual stabilization, by moving the head and neck as one unit.
NOTE: If the cervical collar or improvised collar does not fit flush with the spine board, place a roll in the hollow spacebetween the neck and board. The roll should only be large enough to fill the gap, not to exert pressure on the neck.
(b) Secure the casualty's head and head supports to the board with straps or cravats.
WARNING: Ensure that the cravats or head straps are firmly in place before the assistant releases stabilization.
(i) Apply head supports.
(ii) Use two rolled towels, blankets, sandbags, or similar material.
(iii) Place one close to each side of the head.
(iv) Using a cravat-like material across the forehead, make the supports and head oneunit by tying to the board.
(c) Secure the casualty to the short spine board.
(i) Place the buckle of the first strap in the casualty's lap.
(ii) Pass the other end of the strap through the lower hole in the board, up the back ofthe board, through the top hole, under the armpit, over the shoulder, and across the back of theboard at the neck.
(iii) Buckle the second strap to the first strap and place the buckle on the side of theboard at the neck.
(iv) Pass the other end over the shoulder, under the armpit, through the top hole in theboard, down the back of the board, through the lower hole, and across the lap. Secure it by bucklingit to the first strap.
(d) Tie the casualty's hands together and place them in his lap.
(2) Secure the casualty to an OSS II.
(a) Move the casualty forward to allow two to three inches of space between thecasualty’s back and the seat maintaining the entire spine in alignment.
(b) Remove the OSS from it’s case and unfold the two center sections.
(c) Place the OSS behind the casualty in the space created between the casualty’s backand the seat.
(d) Release the groin and torso straps. The torso straps should rest just under thearmpits of the casualty.
(e) Pass the shoulder straps across the casualty’s chest and attach them to thecorresponding strap at each of the casualty’s armpits. The buckle of each strap should bepositioned on the anterior portion of the chest and be generally mid-clavicular.
Worksheet # 025 to construct AMEDDC&S Form 1232, 1 NOV 11 Page 2 of 3
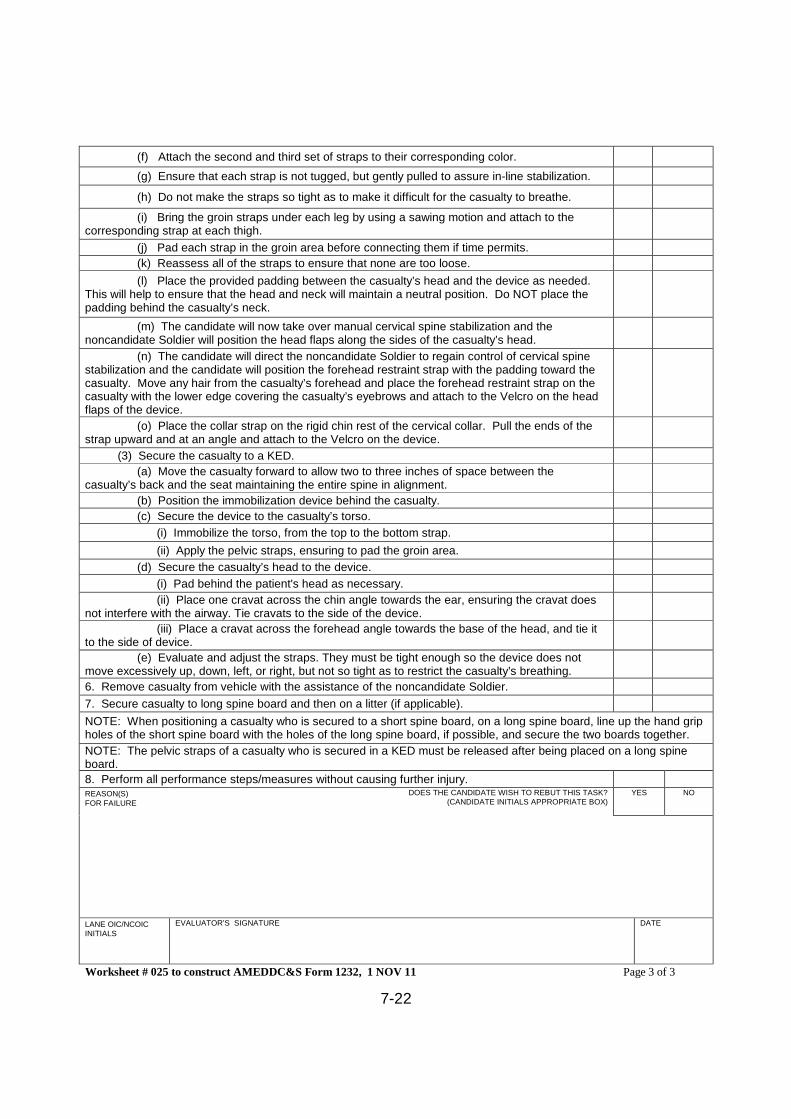
7-22
(f) Attach the second and third set of straps to their corresponding color.
(g) Ensure that each strap is not tugged, but gently pulled to assure in-line stabilization.
(h) Do not make the straps so tight as to make it difficult for the casualty to breathe.
(i) Bring the groin straps under each leg by using a sawing motion and attach to thecorresponding strap at each thigh.
(j) Pad each strap in the groin area before connecting them if time permits.
(k) Reassess all of the straps to ensure that none are too loose.
(l) Place the provided padding between the casualty’s head and the device as needed.This will help to ensure that the head and neck will maintain a neutral position. Do NOT place thepadding behind the casualty’s neck.
(m) The candidate will now take over manual cervical spine stabilization and thenoncandidate Soldier will position the head flaps along the sides of the casualty’s head.
(n) The candidate will direct the noncandidate Soldier to regain control of cervical spinestabilization and the candidate will position the forehead restraint strap with the padding toward thecasualty. Move any hair from the casualty’s forehead and place the forehead restraint strap on thecasualty with the lower edge covering the casualty’s eyebrows and attach to the Velcro on the headflaps of the device.
(o) Place the collar strap on the rigid chin rest of the cervical collar. Pull the ends of thestrap upward and at an angle and attach to the Velcro on the device.
(3) Secure the casualty to a KED.
(a) Move the casualty forward to allow two to three inches of space between thecasualty’s back and the seat maintaining the entire spine in alignment.
(b) Position the immobilization device behind the casualty.
(c) Secure the device to the casualty’s torso.
(i) Immobilize the torso, from the top to the bottom strap.
(ii) Apply the pelvic straps, ensuring to pad the groin area.
(d) Secure the casualty’s head to the device.
(i) Pad behind the patient's head as necessary.
(ii) Place one cravat across the chin angle towards the ear, ensuring the cravat doesnot interfere with the airway. Tie cravats to the side of the device.
(iii) Place a cravat across the forehead angle towards the base of the head, and tie itto the side of device.
(e) Evaluate and adjust the straps. They must be tight enough so the device does notmove excessively up, down, left, or right, but not so tight as to restrict the casualty’s breathing.
6. Remove casualty from vehicle with the assistance of the noncandidate Soldier.
7. Secure casualty to long spine board and then on a litter (if applicable).
NOTE: When positioning a casualty who is secured to a short spine board, on a long spine board, line up the hand gripholes of the short spine board with the holes of the long spine board, if possible, and secure the two boards together.
NOTE: The pelvic straps of a casualty who is secured in a KED must be released after being placed on a long spineboard.
8. Perform all performance steps/measures without causing further injury.REASON(S)FOR FAILURE
DOES THE CANDIDATE WISH TO REBUT THIS TASK?(CANDIDATE INITIALS APPROPRIATE BOX)
YES NO
LANE OIC/NCOICINITIALS
EVALUATOR’S SIGNATURE DATE
Worksheet # 025 to construct AMEDDC&S Form 1232, 1 NOV 11 Page 3 of 3
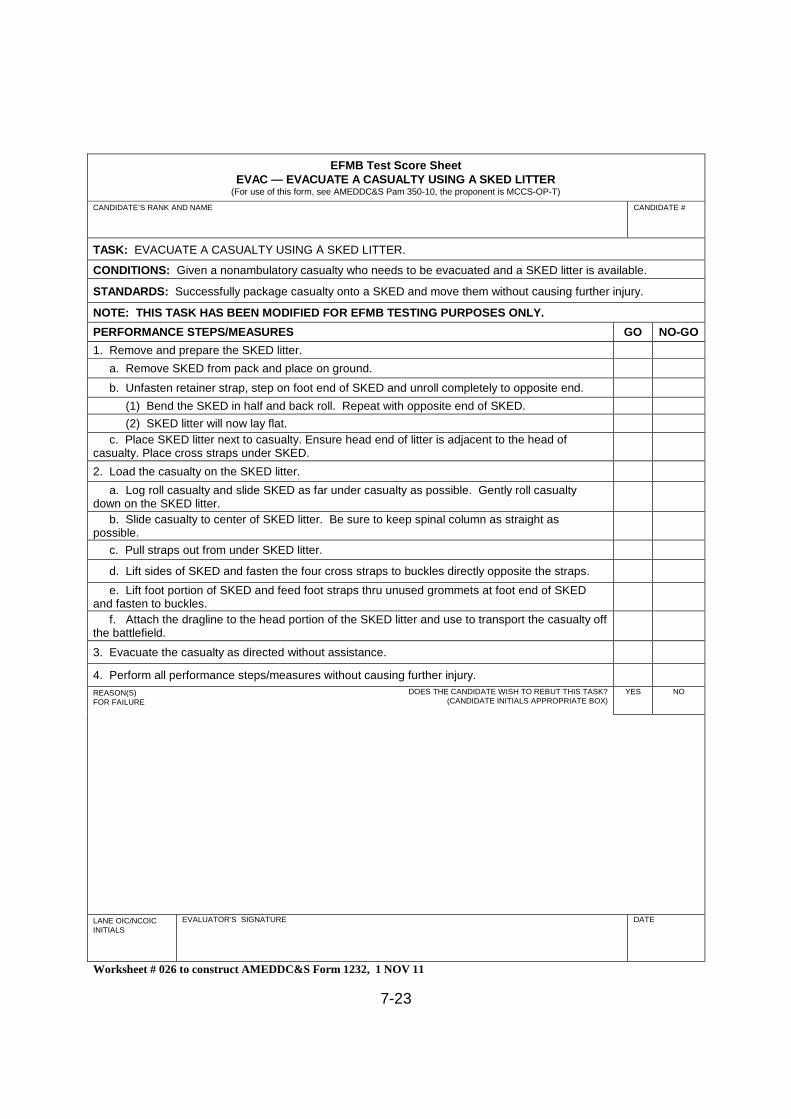
7-23
EFMB Test Score SheetEVAC — EVACUATE A CASUALTY USING A SKED LITTER
(For use of this form, see AMEDDC&S Pam 350-10, the proponent is MCCS-OP-T)
CANDIDATE’S RANK AND NAME CANDIDATE #
TASK: EVACUATE A CASUALTY USING A SKED LITTER.
CONDITIONS: Given a nonambulatory casualty who needs to be evacuated and a SKED litter is available.
STANDARDS: Successfully package casualty onto a SKED and move them without causing further injury.
NOTE: THIS TASK HAS BEEN MODIFIED FOR EFMB TESTING PURPOSES ONLY.
PERFORMANCE STEPS/MEASURES GO NO-GO
1. Remove and prepare the SKED litter.
a. Remove SKED from pack and place on ground.
b. Unfasten retainer strap, step on foot end of SKED and unroll completely to opposite end.
(1) Bend the SKED in half and back roll. Repeat with opposite end of SKED.
(2) SKED litter will now lay flat.
c. Place SKED litter next to casualty. Ensure head end of litter is adjacent to the head ofcasualty. Place cross straps under SKED.
2. Load the casualty on the SKED litter.
a. Log roll casualty and slide SKED as far under casualty as possible. Gently roll casualtydown on the SKED litter.
b. Slide casualty to center of SKED litter. Be sure to keep spinal column as straight aspossible.
c. Pull straps out from under SKED litter.
d. Lift sides of SKED and fasten the four cross straps to buckles directly opposite the straps.
e. Lift foot portion of SKED and feed foot straps thru unused grommets at foot end of SKEDand fasten to buckles.
f. Attach the dragline to the head portion of the SKED litter and use to transport the casualty offthe battlefield.
3. Evacuate the casualty as directed without assistance.
4. Perform all performance steps/measures without causing further injury.
REASON(S)FOR FAILURE
DOES THE CANDIDATE WISH TO REBUT THIS TASK?(CANDIDATE INITIALS APPROPRIATE BOX)
YES NO
LANE OIC/NCOICINITIALS
EVALUATOR’S SIGNATURE DATE
Worksheet # 026 to construct AMEDDC&S Form 1232, 1 NOV 11
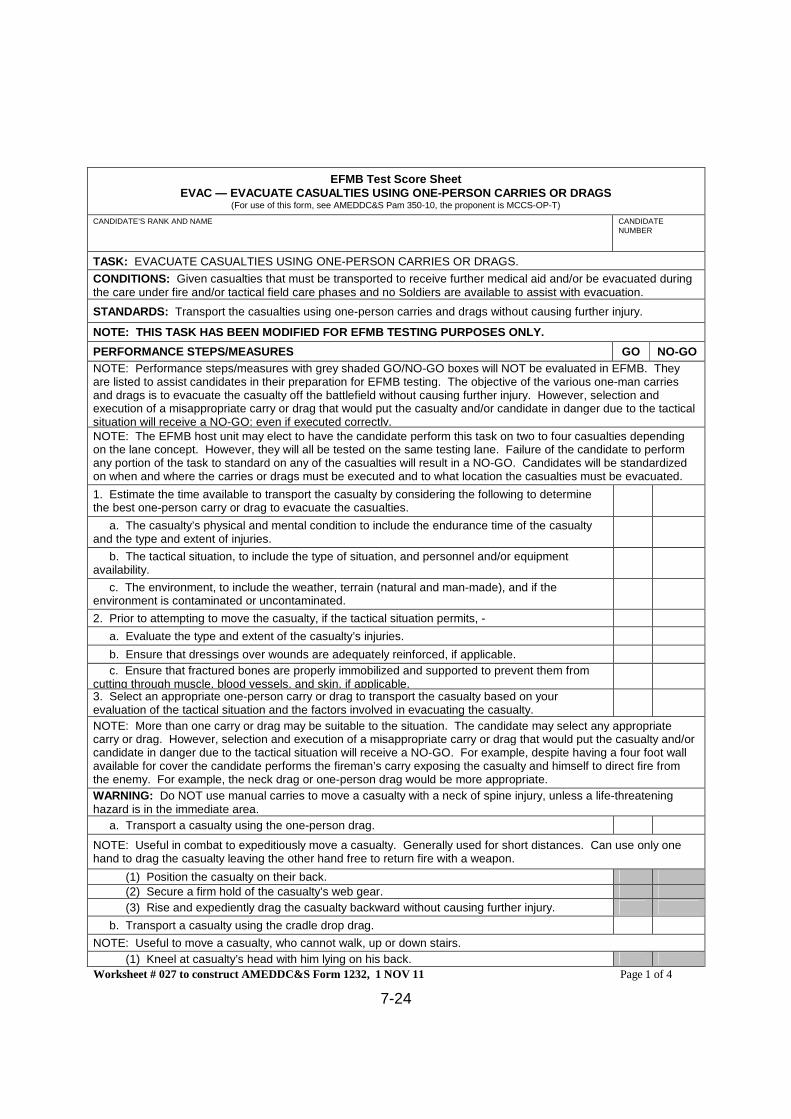
7-24
EFMB Test Score SheetEVAC — EVACUATE CASUALTIES USING ONE-PERSON CARRIES OR DRAGS
(For use of this form, see AMEDDC&S Pam 350-10, the proponent is MCCS-OP-T)
CANDIDATE’S RANK AND NAME CANDIDATENUMBER
TASK: EVACUATE CASUALTIES USING ONE-PERSON CARRIES OR DRAGS.
CONDITIONS: Given casualties that must be transported to receive further medical aid and/or be evacuated duringthe care under fire and/or tactical field care phases and no Soldiers are available to assist with evacuation.
STANDARDS: Transport the casualties using one-person carries and drags without causing further injury.
NOTE: THIS TASK HAS BEEN MODIFIED FOR EFMB TESTING PURPOSES ONLY.
PERFORMANCE STEPS/MEASURES GO NO-GO
NOTE: Performance steps/measures with grey shaded GO/NO-GO boxes will NOT be evaluated in EFMB. Theyare listed to assist candidates in their preparation for EFMB testing. The objective of the various one-man carriesand drags is to evacuate the casualty off the battlefield without causing further injury. However, selection andexecution of a misappropriate carry or drag that would put the casualty and/or candidate in danger due to the tacticalsituation will receive a NO-GO; even if executed correctly.NOTE: The EFMB host unit may elect to have the candidate perform this task on two to four casualties dependingon the lane concept. However, they will all be tested on the same testing lane. Failure of the candidate to performany portion of the task to standard on any of the casualties will result in a NO-GO. Candidates will be standardizedon when and where the carries or drags must be executed and to what location the casualties must be evacuated.
1. Estimate the time available to transport the casualty by considering the following to determinethe best one-person carry or drag to evacuate the casualties.
a. The casualty’s physical and mental condition to include the endurance time of the casualtyand the type and extent of injuries.
b. The tactical situation, to include the type of situation, and personnel and/or equipmentavailability.
c. The environment, to include the weather, terrain (natural and man-made), and if theenvironment is contaminated or uncontaminated.
2. Prior to attempting to move the casualty, if the tactical situation permits, -
a. Evaluate the type and extent of the casualty’s injuries.
b. Ensure that dressings over wounds are adequately reinforced, if applicable.
c. Ensure that fractured bones are properly immobilized and supported to prevent them fromcutting through muscle, blood vessels, and skin, if applicable.3. Select an appropriate one-person carry or drag to transport the casualty based on yourevaluation of the tactical situation and the factors involved in evacuating the casualty.
NOTE: More than one carry or drag may be suitable to the situation. The candidate may select any appropriatecarry or drag. However, selection and execution of a misappropriate carry or drag that would put the casualty and/orcandidate in danger due to the tactical situation will receive a NO-GO. For example, despite having a four foot wallavailable for cover the candidate performs the fireman’s carry exposing the casualty and himself to direct fire fromthe enemy. For example, the neck drag or one-person drag would be more appropriate.
WARNING: Do NOT use manual carries to move a casualty with a neck of spine injury, unless a life-threateninghazard is in the immediate area.
a. Transport a casualty using the one-person drag.
NOTE: Useful in combat to expeditiously move a casualty. Generally used for short distances. Can use only onehand to drag the casualty leaving the other hand free to return fire with a weapon.
(1) Position the casualty on their back.
(2) Secure a firm hold of the casualty’s web gear.
(3) Rise and expediently drag the casualty backward without causing further injury.
b. Transport a casualty using the cradle drop drag.
NOTE: Useful to move a casualty, who cannot walk, up or down stairs.
(1) Kneel at casualty’s head with him lying on his back.
Worksheet # 027 to construct AMEDDC&S Form 1232, 1 NOV 11 Page 1 of 4
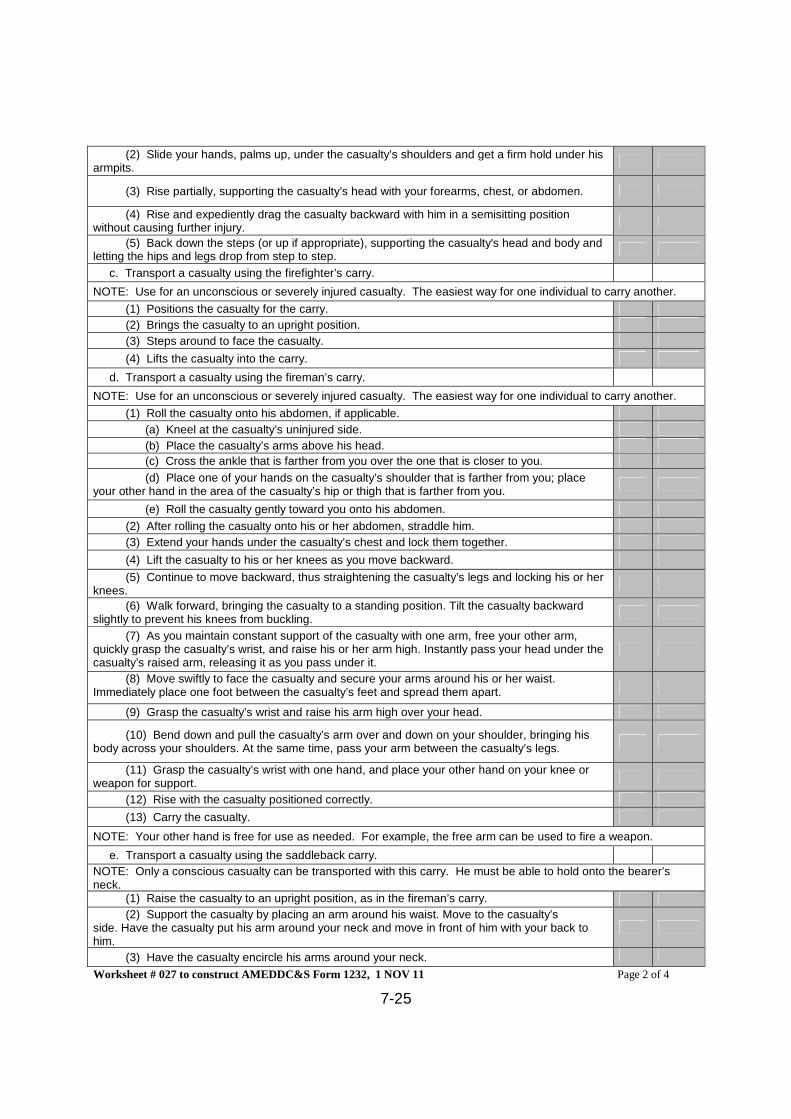
7-25
(2) Slide your hands, palms up, under the casualty’s shoulders and get a firm hold under hisarmpits.
(3) Rise partially, supporting the casualty’s head with your forearms, chest, or abdomen.
(4) Rise and expediently drag the casualty backward with him in a semisitting positionwithout causing further injury.
(5) Back down the steps (or up if appropriate), supporting the casualty's head and body andletting the hips and legs drop from step to step.
c. Transport a casualty using the firefighter’s carry.
NOTE: Use for an unconscious or severely injured casualty. The easiest way for one individual to carry another.
(1) Positions the casualty for the carry.
(2) Brings the casualty to an upright position.
(3) Steps around to face the casualty.
(4) Lifts the casualty into the carry.
d. Transport a casualty using the fireman’s carry.
NOTE: Use for an unconscious or severely injured casualty. The easiest way for one individual to carry another.
(1) Roll the casualty onto his abdomen, if applicable.
(a) Kneel at the casualty’s uninjured side.
(b) Place the casualty’s arms above his head.
(c) Cross the ankle that is farther from you over the one that is closer to you.
(d) Place one of your hands on the casualty’s shoulder that is farther from you; placeyour other hand in the area of the casualty’s hip or thigh that is farther from you.
(e) Roll the casualty gently toward you onto his abdomen.
(2) After rolling the casualty onto his or her abdomen, straddle him.
(3) Extend your hands under the casualty’s chest and lock them together.
(4) Lift the casualty to his or her knees as you move backward.
(5) Continue to move backward, thus straightening the casualty’s legs and locking his or herknees.
(6) Walk forward, bringing the casualty to a standing position. Tilt the casualty backwardslightly to prevent his knees from buckling.
(7) As you maintain constant support of the casualty with one arm, free your other arm,quickly grasp the casualty’s wrist, and raise his or her arm high. Instantly pass your head under thecasualty’s raised arm, releasing it as you pass under it.
(8) Move swiftly to face the casualty and secure your arms around his or her waist.Immediately place one foot between the casualty’s feet and spread them apart.
(9) Grasp the casualty’s wrist and raise his arm high over your head.
(10) Bend down and pull the casualty’s arm over and down on your shoulder, bringing hisbody across your shoulders. At the same time, pass your arm between the casualty’s legs.
(11) Grasp the casualty’s wrist with one hand, and place your other hand on your knee orweapon for support.
(12) Rise with the casualty positioned correctly.
(13) Carry the casualty.
NOTE: Your other hand is free for use as needed. For example, the free arm can be used to fire a weapon.
e. Transport a casualty using the saddleback carry.
NOTE: Only a conscious casualty can be transported with this carry. He must be able to hold onto the bearer’sneck.
(1) Raise the casualty to an upright position, as in the fireman’s carry.
(2) Support the casualty by placing an arm around his waist. Move to the casualty’sside. Have the casualty put his arm around your neck and move in front of him with your back tohim.
(3) Have the casualty encircle his arms around your neck.
Worksheet # 027 to construct AMEDDC&S Form 1232, 1 NOV 11 Page 2 of 4
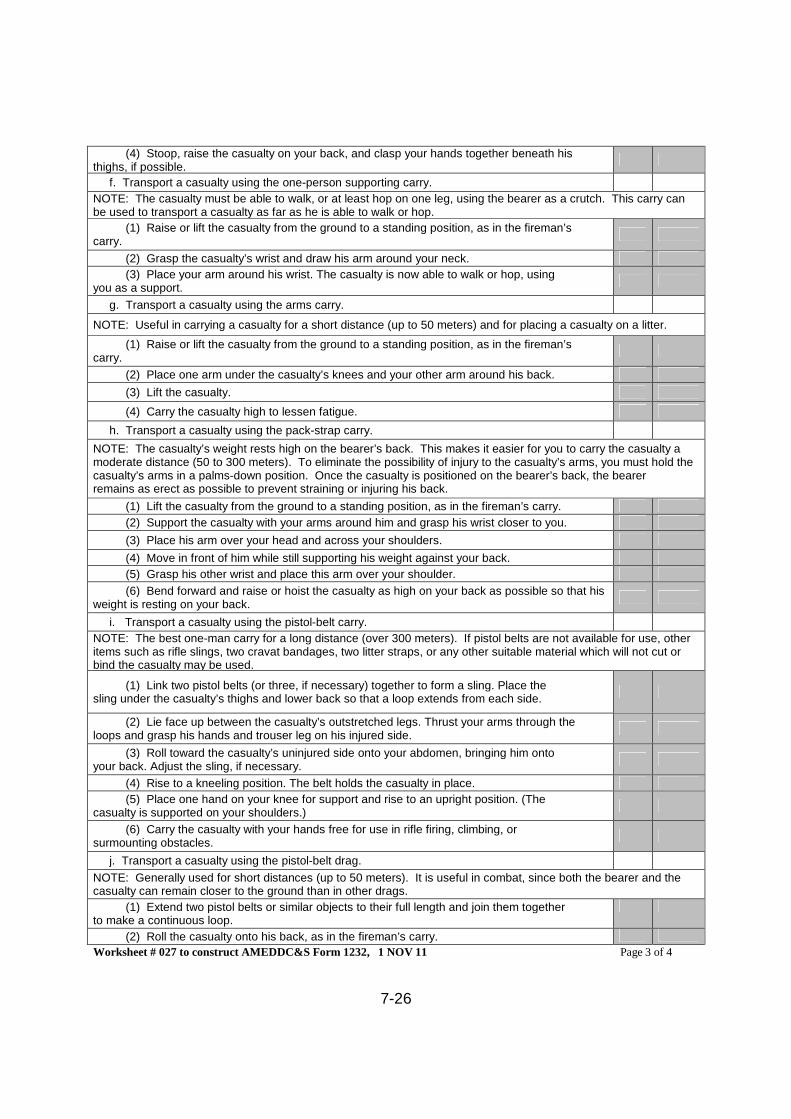
7-26
(4) Stoop, raise the casualty on your back, and clasp your hands together beneath histhighs, if possible.
f. Transport a casualty using the one-person supporting carry.
NOTE: The casualty must be able to walk, or at least hop on one leg, using the bearer as a crutch. This carry canbe used to transport a casualty as far as he is able to walk or hop.
(1) Raise or lift the casualty from the ground to a standing position, as in the fireman’scarry.
(2) Grasp the casualty’s wrist and draw his arm around your neck.
(3) Place your arm around his wrist. The casualty is now able to walk or hop, usingyou as a support.
g. Transport a casualty using the arms carry.
NOTE: Useful in carrying a casualty for a short distance (up to 50 meters) and for placing a casualty on a litter.
(1) Raise or lift the casualty from the ground to a standing position, as in the fireman’scarry.
(2) Place one arm under the casualty’s knees and your other arm around his back.
(3) Lift the casualty.
(4) Carry the casualty high to lessen fatigue.
h. Transport a casualty using the pack-strap carry.
NOTE: The casualty’s weight rests high on the bearer’s back. This makes it easier for you to carry the casualty amoderate distance (50 to 300 meters). To eliminate the possibility of injury to the casualty’s arms, you must hold thecasualty’s arms in a palms-down position. Once the casualty is positioned on the bearer’s back, the bearerremains as erect as possible to prevent straining or injuring his back.
(1) Lift the casualty from the ground to a standing position, as in the fireman’s carry.
(2) Support the casualty with your arms around him and grasp his wrist closer to you.
(3) Place his arm over your head and across your shoulders.
(4) Move in front of him while still supporting his weight against your back.
(5) Grasp his other wrist and place this arm over your shoulder.
(6) Bend forward and raise or hoist the casualty as high on your back as possible so that hisweight is resting on your back.
i. Transport a casualty using the pistol-belt carry.
NOTE: The best one-man carry for a long distance (over 300 meters). If pistol belts are not available for use, otheritems such as rifle slings, two cravat bandages, two litter straps, or any other suitable material which will not cut orbind the casualty may be used.
(1) Link two pistol belts (or three, if necessary) together to form a sling. Place thesling under the casualty’s thighs and lower back so that a loop extends from each side.
(2) Lie face up between the casualty’s outstretched legs. Thrust your arms through theloops and grasp his hands and trouser leg on his injured side.
(3) Roll toward the casualty’s uninjured side onto your abdomen, bringing him ontoyour back. Adjust the sling, if necessary.
(4) Rise to a kneeling position. The belt holds the casualty in place.
(5) Place one hand on your knee for support and rise to an upright position. (Thecasualty is supported on your shoulders.)
(6) Carry the casualty with your hands free for use in rifle firing, climbing, orsurmounting obstacles.
j. Transport a casualty using the pistol-belt drag.
NOTE: Generally used for short distances (up to 50 meters). It is useful in combat, since both the bearer and thecasualty can remain closer to the ground than in other drags.
(1) Extend two pistol belts or similar objects to their full length and join them togetherto make a continuous loop.
(2) Roll the casualty onto his back, as in the fireman’s carry.
Worksheet # 027 to construct AMEDDC&S Form 1232, 1 NOV 11 Page 3 of 4
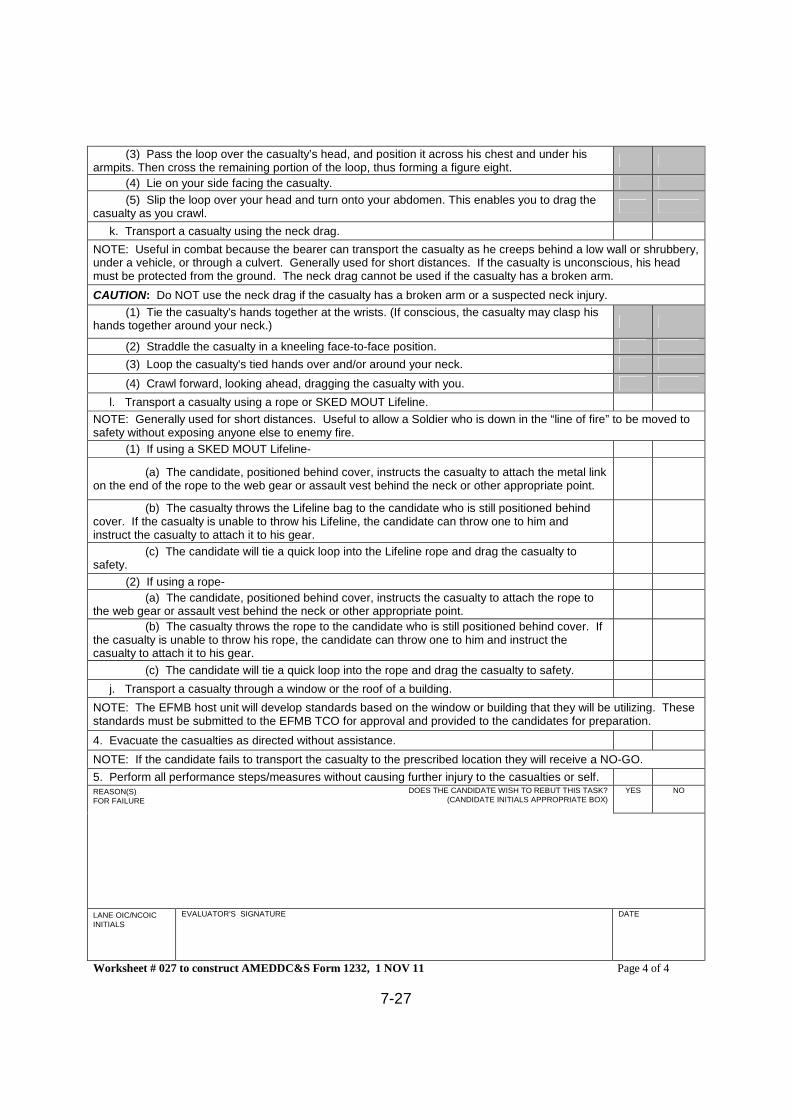
7-27
(3) Pass the loop over the casualty’s head, and position it across his chest and under hisarmpits. Then cross the remaining portion of the loop, thus forming a figure eight.
(4) Lie on your side facing the casualty.
(5) Slip the loop over your head and turn onto your abdomen. This enables you to drag thecasualty as you crawl.
k. Transport a casualty using the neck drag.
NOTE: Useful in combat because the bearer can transport the casualty as he creeps behind a low wall or shrubbery,under a vehicle, or through a culvert. Generally used for short distances. If the casualty is unconscious, his headmust be protected from the ground. The neck drag cannot be used if the casualty has a broken arm.
CAUTION: Do NOT use the neck drag if the casualty has a broken arm or a suspected neck injury.
(1) Tie the casualty's hands together at the wrists. (If conscious, the casualty may clasp hishands together around your neck.)
(2) Straddle the casualty in a kneeling face-to-face position.
(3) Loop the casualty's tied hands over and/or around your neck.
(4) Crawl forward, looking ahead, dragging the casualty with you.
l. Transport a casualty using a rope or SKED MOUT Lifeline.
NOTE: Generally used for short distances. Useful to allow a Soldier who is down in the “line of fire” to be moved tosafety without exposing anyone else to enemy fire.
(1) If using a SKED MOUT Lifeline-
(a) The candidate, positioned behind cover, instructs the casualty to attach the metal linkon the end of the rope to the web gear or assault vest behind the neck or other appropriate point.
(b) The casualty throws the Lifeline bag to the candidate who is still positioned behindcover. If the casualty is unable to throw his Lifeline, the candidate can throw one to him andinstruct the casualty to attach it to his gear.
(c) The candidate will tie a quick loop into the Lifeline rope and drag the casualty tosafety.
(2) If using a rope-
(a) The candidate, positioned behind cover, instructs the casualty to attach the rope tothe web gear or assault vest behind the neck or other appropriate point.
(b) The casualty throws the rope to the candidate who is still positioned behind cover. Ifthe casualty is unable to throw his rope, the candidate can throw one to him and instruct thecasualty to attach it to his gear.
(c) The candidate will tie a quick loop into the rope and drag the casualty to safety.
j. Transport a casualty through a window or the roof of a building.
NOTE: The EFMB host unit will develop standards based on the window or building that they will be utilizing. Thesestandards must be submitted to the EFMB TCO for approval and provided to the candidates for preparation.
4. Evacuate the casualties as directed without assistance.
NOTE: If the candidate fails to transport the casualty to the prescribed location they will receive a NO-GO.
5. Perform all performance steps/measures without causing further injury to the casualties or self.REASON(S)FOR FAILURE
DOES THE CANDIDATE WISH TO REBUT THIS TASK?(CANDIDATE INITIALS APPROPRIATE BOX)
YES NO
LANE OIC/NCOICINITIALS
EVALUATOR’S SIGNATURE DATE
Worksheet # 027 to construct AMEDDC&S Form 1232, 1 NOV 11 Page 4 of 4
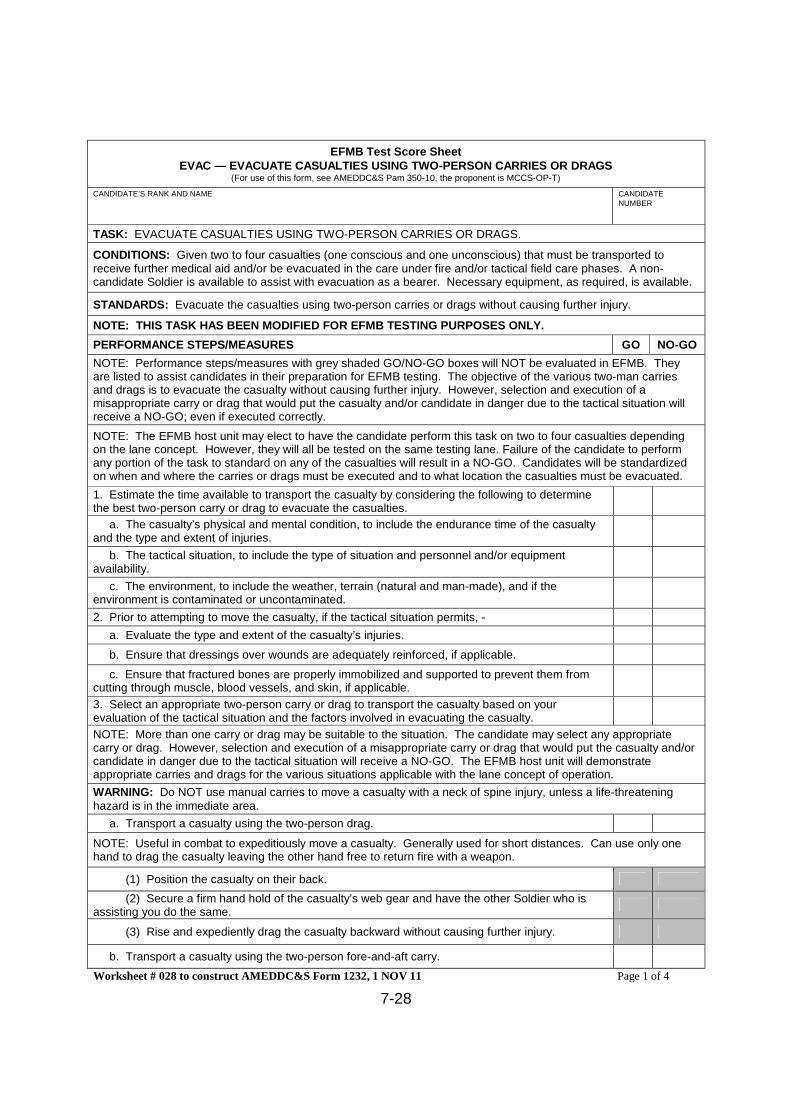
7-28
EFMB Test Score SheetEVAC — EVACUATE CASUALTIES USING TWO-PERSON CARRIES OR DRAGS
(For use of this form, see AMEDDC&S Pam 350-10, the proponent is MCCS-OP-T)
CANDIDATE’S RANK AND NAME CANDIDATENUMBER
TASK: EVACUATE CASUALTIES USING TWO-PERSON CARRIES OR DRAGS.
CONDITIONS: Given two to four casualties (one conscious and one unconscious) that must be transported toreceive further medical aid and/or be evacuated in the care under fire and/or tactical field care phases. A non-candidate Soldier is available to assist with evacuation as a bearer. Necessary equipment, as required, is available.
STANDARDS: Evacuate the casualties using two-person carries or drags without causing further injury.
NOTE: THIS TASK HAS BEEN MODIFIED FOR EFMB TESTING PURPOSES ONLY.
PERFORMANCE STEPS/MEASURES GO NO-GO
NOTE: Performance steps/measures with grey shaded GO/NO-GO boxes will NOT be evaluated in EFMB. Theyare listed to assist candidates in their preparation for EFMB testing. The objective of the various two-man carriesand drags is to evacuate the casualty without causing further injury. However, selection and execution of amisappropriate carry or drag that would put the casualty and/or candidate in danger due to the tactical situation willreceive a NO-GO; even if executed correctly.
NOTE: The EFMB host unit may elect to have the candidate perform this task on two to four casualties dependingon the lane concept. However, they will all be tested on the same testing lane. Failure of the candidate to performany portion of the task to standard on any of the casualties will result in a NO-GO. Candidates will be standardizedon when and where the carries or drags must be executed and to what location the casualties must be evacuated.
1. Estimate the time available to transport the casualty by considering the following to determinethe best two-person carry or drag to evacuate the casualties.
a. The casualty’s physical and mental condition, to include the endurance time of the casualtyand the type and extent of injuries.
b. The tactical situation, to include the type of situation and personnel and/or equipmentavailability.
c. The environment, to include the weather, terrain (natural and man-made), and if theenvironment is contaminated or uncontaminated.
2. Prior to attempting to move the casualty, if the tactical situation permits, -
a. Evaluate the type and extent of the casualty’s injuries.
b. Ensure that dressings over wounds are adequately reinforced, if applicable.
c. Ensure that fractured bones are properly immobilized and supported to prevent them fromcutting through muscle, blood vessels, and skin, if applicable.
3. Select an appropriate two-person carry or drag to transport the casualty based on yourevaluation of the tactical situation and the factors involved in evacuating the casualty.
NOTE: More than one carry or drag may be suitable to the situation. The candidate may select any appropriatecarry or drag. However, selection and execution of a misappropriate carry or drag that would put the casualty and/orcandidate in danger due to the tactical situation will receive a NO-GO. The EFMB host unit will demonstrateappropriate carries and drags for the various situations applicable with the lane concept of operation.
WARNING: Do NOT use manual carries to move a casualty with a neck of spine injury, unless a life-threateninghazard is in the immediate area.
a. Transport a casualty using the two-person drag.
NOTE: Useful in combat to expeditiously move a casualty. Generally used for short distances. Can use only onehand to drag the casualty leaving the other hand free to return fire with a weapon.
(1) Position the casualty on their back.
(2) Secure a firm hand hold of the casualty’s web gear and have the other Soldier who isassisting you do the same.
(3) Rise and expediently drag the casualty backward without causing further injury.
b. Transport a casualty using the two-person fore-and-aft carry.
Worksheet # 028 to construct AMEDDC&S Form 1232, 1 NOV 11 Page 1 of 4
7-29
NOTE: Useful two-person carry for transporting the casualty over a long distance (over 300 meters). The taller ofthe two bearers should be positioned at the casualty’s head. By altering this carry so that both bearers face thecasualty, it is useful for placing a casualty on a litter.
(1) One bearer spreads the casualty’s legs and kneels between them with his back to thecasualty. He positions his hands behind the casualty’s knees. The other bearer kneels at thecasualty’s head, slides his hands under the arms, across the chest, and locks his hands together.
(2) The two bearers rise together, lifting the casualty.
c. Transport a casualty using the two-person rifle carry.
NOTE: An improvised carry that may only be used in transporting a conscious casualty. Special care should betaken so the weapon is not damaged.
(1) Each bearer gains a firm grasp on opposite ends of the casualty’s rifle.
(2) Direct the casualty to place self on the middle of the held rifle and place his arms aroundthe bearer’s necks.
(3) The two bearers rise together, lifting the casualty.
d. Transport a casualty using the poncho drag.
NOTE: An improvised drag that may be used in transporting both conscious and unconscious casualties. Maycause damage to the poncho.
(1) Place the casualty on a poncho or other similar material.
(2) Each bearer grabs a firm grip of the poncho.
(3) Transport the casualty, paying attention that the casualty does not fall off the poncho.
e. Transport a casualty using the two-person supporting carry.
NOTE: Used in transporting both conscious and unconscious casualties. If the casualty is taller than the bearers, itmay be necessary for the bearers to lift the casualty’s legs and let them rest on their forearms.
(1) Help the casualty to his feet and support him with their arms around his waist.
(2) Grasp the casualty’s wrists and draw his arms around their necks.
f. Transport a casualty using the two-person arms carry.
NOTE: Useful in carrying a casualty for a moderate distance (50 to 300 meters) and placing him on a litter. Tolessen fatigue, the bearers should carry the casualty high and as close to their chests as possible. Safest method fortransporting a casualty with a back injury and there isn’t time to obtain a spine board.
(1) Kneel at one side of the casualty and place their arms beneath the casualty’s back,waist, hips, and knees.
(2) Lift the casualty while rising to their knees.
(3) Turn the casualty toward their chests, while rising to a standing position. Carry thecasualty high to lessen fatigue.
g. Transport a casualty using a stokes litter (basket).
NOTE: Affords maximum security for the patient when the litter is tilted.
(1) Place the casualty on the stokes litter (basket).
(2) Secure the casualty in the stokes litter (basket).
(3) One bearer is positioned at the head end of the casualty and the other at the casualty’sfeet.
(4) The two bearers rise together, lifting the casualty.
h. Transport a casualty using the four-hand seat carry.
NOTE: This carry is especially useful in transporting a casualty with a head or foot injury for a moderate distance (50to 300 meters). It is also useful in placing a casualty on a litter. Only a conscious casualty can be transported withthis carry.
(1) Bearers construct the handholds by grasping one of his wrists and one of the otherbearer’s wrists, thus forming a packsaddle.
(2) Direct the casualty to place self into the carry and place his arms around the bearer’snecks.
Worksheet # 028 to construct AMEDDC&S Form 1232, 1 NOV 11 Page 2 of 4
7-30
(3) The two bearers rise together, lifting the casualty.
i. Transport a casualty using the two-hand seat carry.
NOTE: Used when carrying a casualty for a short distance (up to 50 meters) and in placing a casualty on a litter.
(1) With the casualty lying on his back, a bearer kneels on each side of the casualty at hiships.
(2) Each bearer passes his arms under the casualty’s thighs and back, and grasps the otherbearer’s wrists.
(3) The two bearers rise together, lifting the casualty.
j. Transport a casualty using a rope or SKED MOUT Lifeline.
NOTE: Generally used for short distances. Useful to allow a Soldier who is down in the “line of fire” to be moved tosafety without exposing anyone else to enemy fire.
(1) If using a SKED MOUT Lifeline-
(a) The candidate, positioned behind cover, instructs the casualty to attach the metal linkon the end of the rope to the web gear or assault vest behind the neck or other appropriate point.
(b) The casualty throws the Lifeline bag to the candidate who is still positioned behindcover. If the casualty is unable to throw his Lifeline, the candidate can throw one to him andinstruct the casualty to attach it to his gear.
(c) The candidate will tie a quick loop into the Lifeline rope and with the assistance of anoncandidate Soldier drag the casualty to safety.
(2) If using a rope-
(a) The candidate, positioned behind cover, instructs the casualty to attach the rope tothe web gear or assault vest behind the neck or other appropriate point.
(b) The casualty throws the rope to the candidate who is still positioned behind cover. Ifthe casualty is unable to throw his rope, the candidate can throw one to him and instruct thecasualty to attach it to his gear.
(c) The candidate will tie a quick loop into the rope and with the assistance of anoncandidate Soldier drag the casualty to safety.
k. Transport a casualty through a window or from a roof of a building.
NOTE: The EFMB host unit will develop standards based on the window or building that they will be utilizing. Thesestandards must be submitted to the EFMB TCO for approval and provided to the candidates for preparation.
l. Transport a casualty using an improvised litter.
NOTE: The candidate will choose the type of improvised litter based on the available equipment to construct theimprovised litter (i.e., poncho, jackets, door).
(1) Use a poncho, poncho liner, or blanket and two poles or limbs.
(a) Open the poncho, poncho liner, or blanket and lay the two poles lengthwise acrossthe center, forming three equal sections.
(b) Reach in, pull the hood up toward you, and lay it flat on the poncho, if used.
(c) Fold one section of the poncho, poncho liner, or blanket over the first pole.
(d) Fold the remaining section of the poncho, poncho liner, or blanket over the secondpole to the first pole.
(2) Use shirts or jackets and two poles or limbs.
(a) Button two or three shirts or jackets and turn them inside out, leaving the sleevesinside.
(b) Lay the shirts or jackets on the ground and pass the poles through the sleeves.
(3) Use a door or any other material that may be used as an improvised litter.
(4) Place the casualty on the litter.
(5) The two bearers rise together, lifting the litter.
4. Evacuate the casualties as directed with the assistance of the other bearer.
NOTE: If the candidate fails to transport the casualty to the prescribed location they will receive a NO-GO.
Worksheet # 028 to construct AMEDDC&S Form 1232, 1 NOV 11 Page 3 of 4
7-31
5. Perform all performance steps/measures without causing further injury to the casualties.
REASON(S)FOR FAILURE
DOES THE CANDIDATE WISH TO REBUT THIS TASK?(CANDIDATE INITIALS APPROPRIATE BOX)
YES NO
LANE OIC/NCOICINITIALS
EVALUATOR’S SIGNATURE DATE
Worksheet # 028 to construct AMEDDC&S Form 1232, 1 NOV 11 Page 4 of 4
7-32
EFMB Test Score SheetEVAC — EVACUATE CASUALTIES USING LITTER CARRIES(For use of this form, see AMEDDC&S Pam 350-10, the proponent is MCCS-OP-T)
CANDIDATE’S RANK AND NAME CANDIDATENUMBER
TASK: EVACUATE CASUALTIES USING LITTER CARRIES.
CONDITIONS: Given one to four casualties in the tactical field care or CASEVAC phase that must be transported toreceive further medical aid and/or be evacuated. Standard Army litters, Talon litters, SKED litters, and/or Stokeslitter with litter straps and/or other necessary equipment is available as required. Three Soldiers are available toassist in transporting the casualties. Material to construct an improvised litter is available, as required.
STANDARDS: Evacuate the casualties using appropriate litter carries without causing further injury.
NOTE: THIS TASK HAS BEEN MODIFIED FOR EFMB TESTING PURPOSES ONLY.
PERFORMANCE STEPS/MEASURES GO NO-GO
NOTE: Performance steps/measures with grey shaded GO/NO-GO boxes will NOT be evaluated in EFMB. Theyare listed to assist candidates in their preparation for EFMB testing. The objective of the various litter carries is toevacuate the casualty over and through various obstacles and terrain without causing further injury. However,selection and execution of a misappropriate litter carry that would put the casualty and/or candidate in danger due tothe tactical situation will receive a NO-GO; even if executed correctly.
NOTE: The EFMB host unit may elect to have the candidate perform this task on one to four casualties dependingon the lane concept. However, they will all be tested on the same testing lane. Failure of the candidate to performany portion of the task to standard on any of the casualties will result in a NO-GO. Candidates will be standardizedon when and where the litter carries must be executed and to what location the casualties must be evacuated.
1. Remove casualty from a vehicle, if necessary, and consider extrication priority (i.e., vehicle on fire,under direct fire from the enemy).
NOTE: If the casualty has a suspected neck or spinal injury, remove the casualty from the vehicle with a KED, OSSII or short spine board if the tactical situation permits (Evaluated IAW Extricate Casualties from a Vehicle Task).
a. Laterally.
(1) With the assistance of a Soldier grasp the casualty’s arms and legs.
(2) While stabilizing the casualty’s head and neck as much as possible, lift the casualty free ofthe vehicle and move him to a safe place on the ground.
b. Upward.
NOTE: You may have to remove a casualty upward from a vehicle, for example, from the passenger compartment ofa wheeled vehicle lying on its side or from the hatch of an armored vehicle sitting upright.
(1) You may place a pistol belt or similar material around the casualty’s chest to help pull himfrom the vehicle.
(2) With the assistance of a Soldier inside the vehicle, draw the casualty upward using thepistol belt or similar material or by grasping his arms.
(3) While stabilizing the casualty’s head and neck as much as possible, lift the casualty free ofthe vehicle and place him on the topmost side of the vehicle.
(4) Depending on the situation, further move the casualty from the topmost side of the vehicleto a safe place on the ground.
2. Prior to attempting to move the casualty, if the tactical situation permits, -
a. Evaluate the type and extent of the casualty’s injuries.
b. Ensure that dressings over wounds are adequately reinforced, if applicable.
c. Ensure that fractured bones are properly immobilized and supported to prevent them fromcutting through muscle, blood vessels, and skin, if applicable.
3. Place casualty on litter and secure with litter straps or applicable securing devise.
4. Estimate the time available to transport the casualty by considering the following:
a. The casualty’s physical and mental condition to include the endurance time of the casualty andthe type and extent of injuries.
Worksheet # 029 to construct AMEDDC&S Form 1232, 1 NOV 11 Page 1 of 6
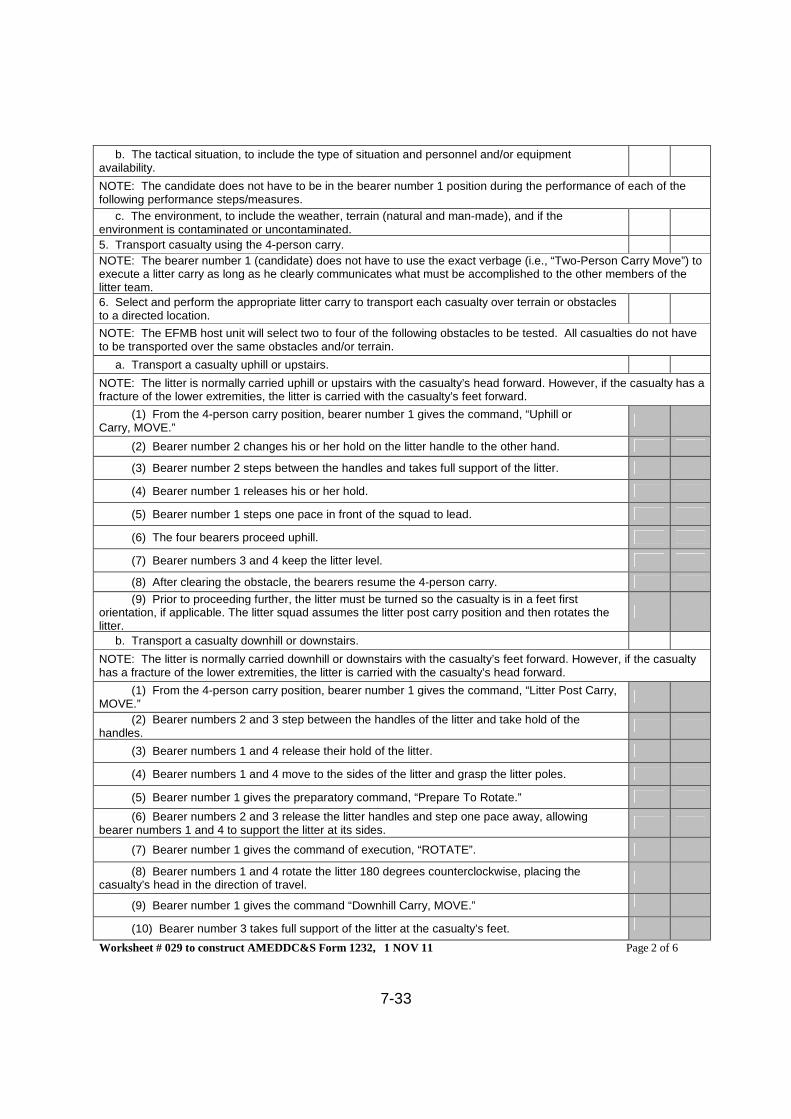
7-33
b. The tactical situation, to include the type of situation and personnel and/or equipmentavailability.
NOTE: The candidate does not have to be in the bearer number 1 position during the performance of each of thefollowing performance steps/measures.
c. The environment, to include the weather, terrain (natural and man-made), and if theenvironment is contaminated or uncontaminated.
5. Transport casualty using the 4-person carry.
NOTE: The bearer number 1 (candidate) does not have to use the exact verbage (i.e., “Two-Person Carry Move”) toexecute a litter carry as long as he clearly communicates what must be accomplished to the other members of thelitter team.
6. Select and perform the appropriate litter carry to transport each casualty over terrain or obstaclesto a directed location.
NOTE: The EFMB host unit will select two to four of the following obstacles to be tested. All casualties do not haveto be transported over the same obstacles and/or terrain.
a. Transport a casualty uphill or upstairs.
NOTE: The litter is normally carried uphill or upstairs with the casualty’s head forward. However, if the casualty has afracture of the lower extremities, the litter is carried with the casualty’s feet forward.
(1) From the 4-person carry position, bearer number 1 gives the command, “Uphill orCarry, MOVE.”
(2) Bearer number 2 changes his or her hold on the litter handle to the other hand.
(3) Bearer number 2 steps between the handles and takes full support of the litter.
(4) Bearer number 1 releases his or her hold.
(5) Bearer number 1 steps one pace in front of the squad to lead.
(6) The four bearers proceed uphill.
(7) Bearer numbers 3 and 4 keep the litter level.
(8) After clearing the obstacle, the bearers resume the 4-person carry.
(9) Prior to proceeding further, the litter must be turned so the casualty is in a feet firstorientation, if applicable. The litter squad assumes the litter post carry position and then rotates thelitter.
b. Transport a casualty downhill or downstairs.
NOTE: The litter is normally carried downhill or downstairs with the casualty’s feet forward. However, if the casualtyhas a fracture of the lower extremities, the litter is carried with the casualty’s head forward.
(1) From the 4-person carry position, bearer number 1 gives the command, “Litter Post Carry,MOVE.”
(2) Bearer numbers 2 and 3 step between the handles of the litter and take hold of thehandles.
(3) Bearer numbers 1 and 4 release their hold of the litter.
(4) Bearer numbers 1 and 4 move to the sides of the litter and grasp the litter poles.
(5) Bearer number 1 gives the preparatory command, “Prepare To Rotate.”
(6) Bearer numbers 2 and 3 release the litter handles and step one pace away, allowingbearer numbers 1 and 4 to support the litter at its sides.
(7) Bearer number 1 gives the command of execution, “ROTATE”.
(8) Bearer numbers 1 and 4 rotate the litter 180 degrees counterclockwise, placing thecasualty’s head in the direction of travel.
(9) Bearer number 1 gives the command “Downhill Carry, MOVE.”
(10) Bearer number 3 takes full support of the litter at the casualty’s feet.
Worksheet # 029 to construct AMEDDC&S Form 1232, 1 NOV 11 Page 2 of 6
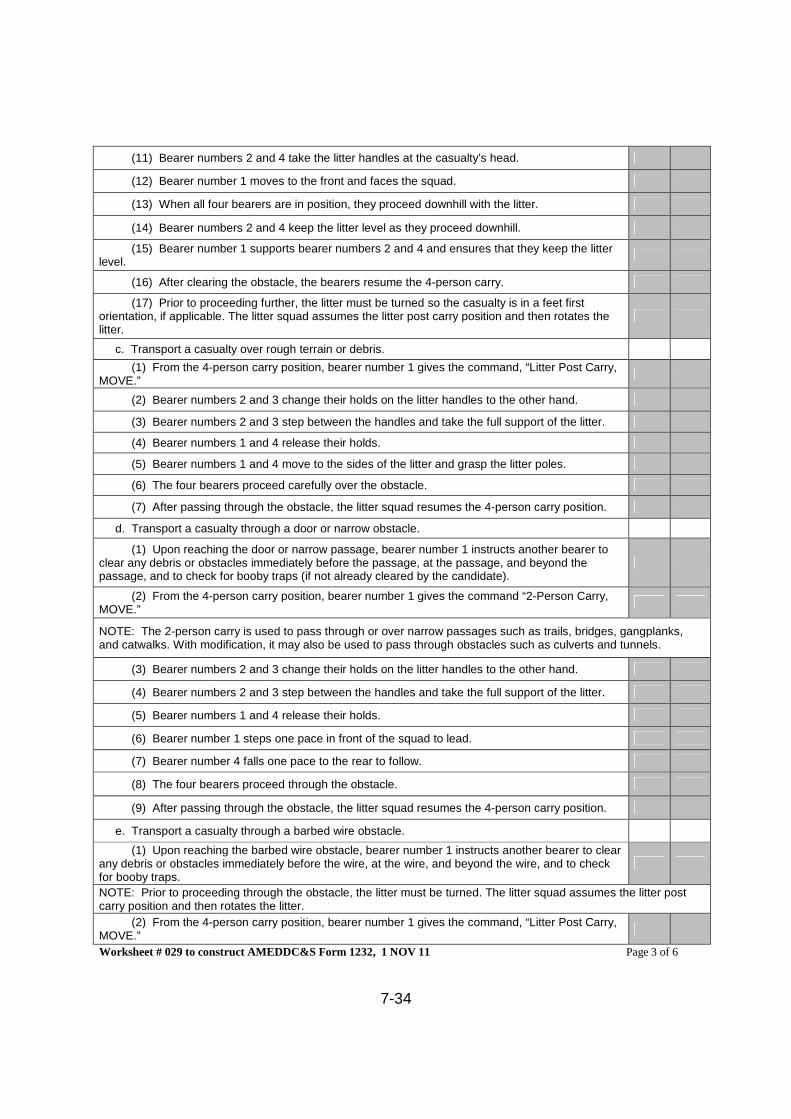
7-34
(11) Bearer numbers 2 and 4 take the litter handles at the casualty’s head.
(12) Bearer number 1 moves to the front and faces the squad.
(13) When all four bearers are in position, they proceed downhill with the litter.
(14) Bearer numbers 2 and 4 keep the litter level as they proceed downhill.
(15) Bearer number 1 supports bearer numbers 2 and 4 and ensures that they keep the litterlevel.
(16) After clearing the obstacle, the bearers resume the 4-person carry.
(17) Prior to proceeding further, the litter must be turned so the casualty is in a feet firstorientation, if applicable. The litter squad assumes the litter post carry position and then rotates thelitter.
c. Transport a casualty over rough terrain or debris.
(1) From the 4-person carry position, bearer number 1 gives the command, “Litter Post Carry,MOVE.”
(2) Bearer numbers 2 and 3 change their holds on the litter handles to the other hand.
(3) Bearer numbers 2 and 3 step between the handles and take the full support of the litter.
(4) Bearer numbers 1 and 4 release their holds.
(5) Bearer numbers 1 and 4 move to the sides of the litter and grasp the litter poles.
(6) The four bearers proceed carefully over the obstacle.
(7) After passing through the obstacle, the litter squad resumes the 4-person carry position.
d. Transport a casualty through a door or narrow obstacle.
(1) Upon reaching the door or narrow passage, bearer number 1 instructs another bearer toclear any debris or obstacles immediately before the passage, at the passage, and beyond thepassage, and to check for booby traps (if not already cleared by the candidate).
(2) From the 4-person carry position, bearer number 1 gives the command “2-Person Carry,MOVE.”
NOTE: The 2-person carry is used to pass through or over narrow passages such as trails, bridges, gangplanks,and catwalks. With modification, it may also be used to pass through obstacles such as culverts and tunnels.
(3) Bearer numbers 2 and 3 change their holds on the litter handles to the other hand.
(4) Bearer numbers 2 and 3 step between the handles and take the full support of the litter.
(5) Bearer numbers 1 and 4 release their holds.
(6) Bearer number 1 steps one pace in front of the squad to lead.
(7) Bearer number 4 falls one pace to the rear to follow.
(8) The four bearers proceed through the obstacle.
(9) After passing through the obstacle, the litter squad resumes the 4-person carry position.
e. Transport a casualty through a barbed wire obstacle.
(1) Upon reaching the barbed wire obstacle, bearer number 1 instructs another bearer to clearany debris or obstacles immediately before the wire, at the wire, and beyond the wire, and to checkfor booby traps.
NOTE: Prior to proceeding through the obstacle, the litter must be turned. The litter squad assumes the litter postcarry position and then rotates the litter.
(2) From the 4-person carry position, bearer number 1 gives the command, “Litter Post Carry,MOVE.”
Worksheet # 029 to construct AMEDDC&S Form 1232, 1 NOV 11 Page 3 of 6
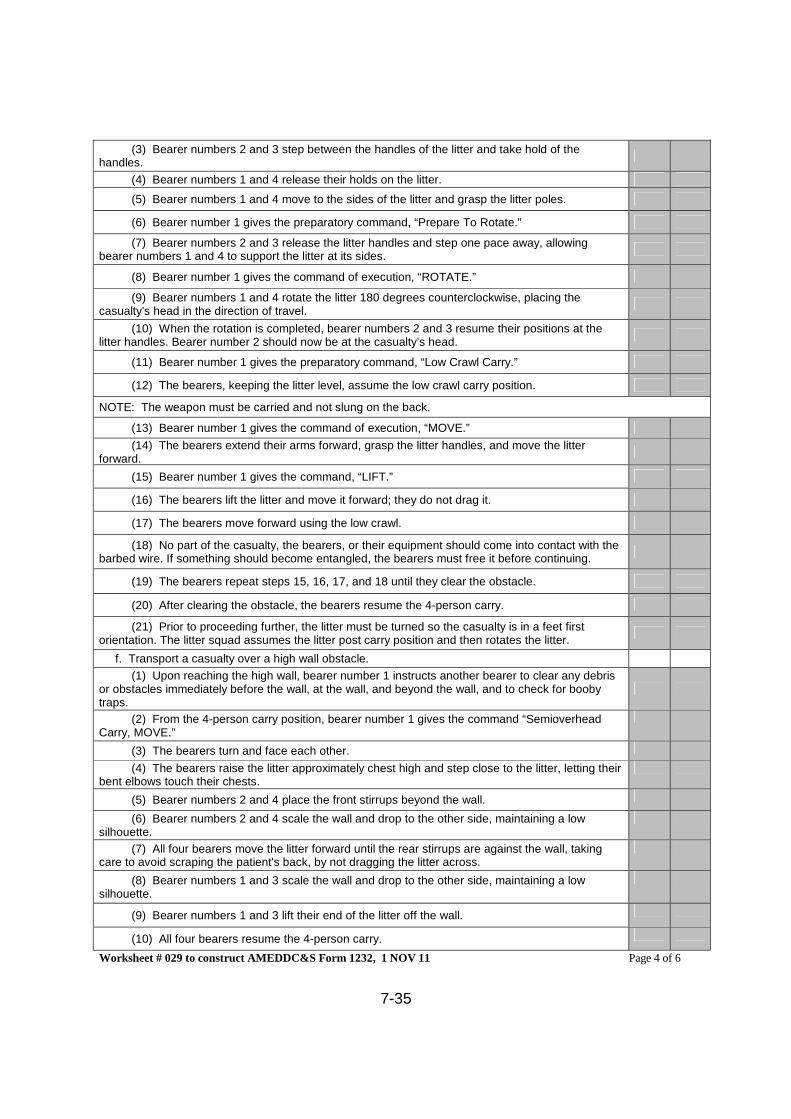
7-35
(3) Bearer numbers 2 and 3 step between the handles of the litter and take hold of thehandles.
(4) Bearer numbers 1 and 4 release their holds on the litter.
(5) Bearer numbers 1 and 4 move to the sides of the litter and grasp the litter poles.
(6) Bearer number 1 gives the preparatory command, “Prepare To Rotate.”
(7) Bearer numbers 2 and 3 release the litter handles and step one pace away, allowingbearer numbers 1 and 4 to support the litter at its sides.
(8) Bearer number 1 gives the command of execution, “ROTATE.”
(9) Bearer numbers 1 and 4 rotate the litter 180 degrees counterclockwise, placing thecasualty’s head in the direction of travel.
(10) When the rotation is completed, bearer numbers 2 and 3 resume their positions at thelitter handles. Bearer number 2 should now be at the casualty’s head.
(11) Bearer number 1 gives the preparatory command, “Low Crawl Carry.”
(12) The bearers, keeping the litter level, assume the low crawl carry position.
NOTE: The weapon must be carried and not slung on the back.
(13) Bearer number 1 gives the command of execution, “MOVE.”
(14) The bearers extend their arms forward, grasp the litter handles, and move the litterforward.
(15) Bearer number 1 gives the command, “LIFT.”
(16) The bearers lift the litter and move it forward; they do not drag it.
(17) The bearers move forward using the low crawl.
(18) No part of the casualty, the bearers, or their equipment should come into contact with thebarbed wire. If something should become entangled, the bearers must free it before continuing.
(19) The bearers repeat steps 15, 16, 17, and 18 until they clear the obstacle.
(20) After clearing the obstacle, the bearers resume the 4-person carry.
(21) Prior to proceeding further, the litter must be turned so the casualty is in a feet firstorientation. The litter squad assumes the litter post carry position and then rotates the litter.
f. Transport a casualty over a high wall obstacle.
(1) Upon reaching the high wall, bearer number 1 instructs another bearer to clear any debrisor obstacles immediately before the wall, at the wall, and beyond the wall, and to check for boobytraps.
(2) From the 4-person carry position, bearer number 1 gives the command “SemioverheadCarry, MOVE.”
(3) The bearers turn and face each other.
(4) The bearers raise the litter approximately chest high and step close to the litter, letting theirbent elbows touch their chests.
(5) Bearer numbers 2 and 4 place the front stirrups beyond the wall.
(6) Bearer numbers 2 and 4 scale the wall and drop to the other side, maintaining a lowsilhouette.
(7) All four bearers move the litter forward until the rear stirrups are against the wall, takingcare to avoid scraping the patient's back, by not dragging the litter across.
(8) Bearer numbers 1 and 3 scale the wall and drop to the other side, maintaining a lowsilhouette.
(9) Bearer numbers 1 and 3 lift their end of the litter off the wall.
(10) All four bearers resume the 4-person carry.
Worksheet # 029 to construct AMEDDC&S Form 1232, 1 NOV 11 Page 4 of 6
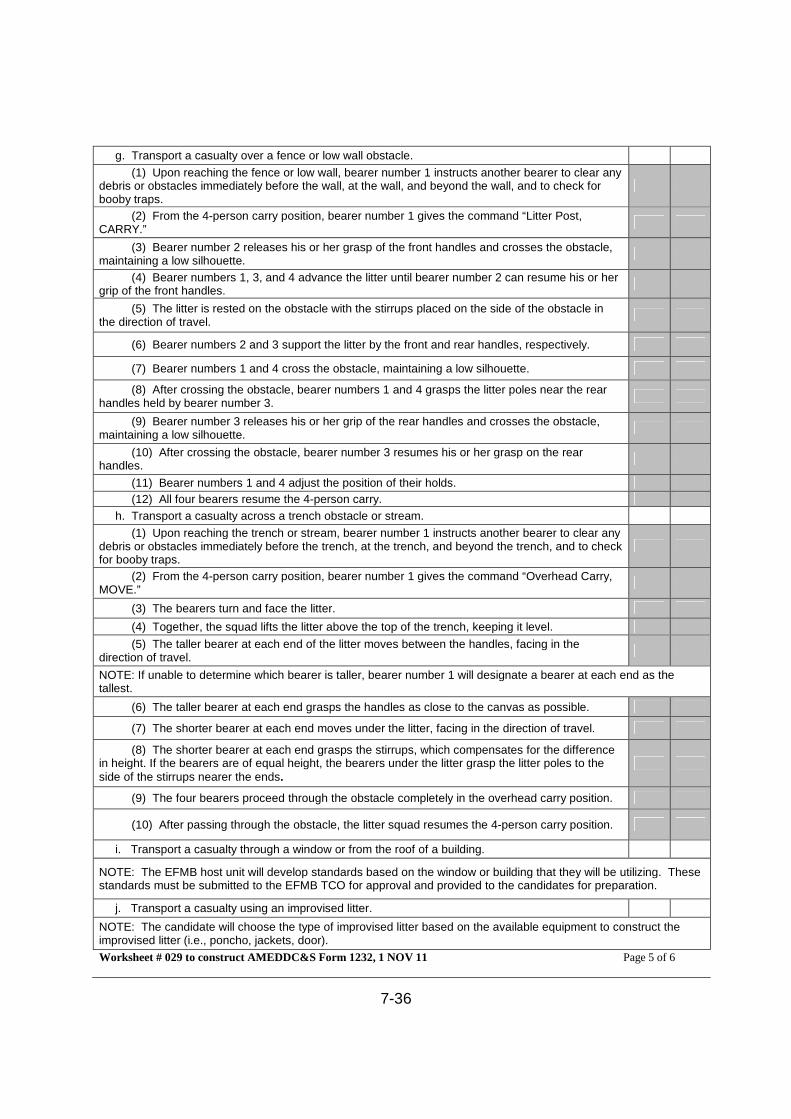
7-36
g. Transport a casualty over a fence or low wall obstacle.
(1) Upon reaching the fence or low wall, bearer number 1 instructs another bearer to clear anydebris or obstacles immediately before the wall, at the wall, and beyond the wall, and to check forbooby traps.
(2) From the 4-person carry position, bearer number 1 gives the command “Litter Post,CARRY.”
(3) Bearer number 2 releases his or her grasp of the front handles and crosses the obstacle,maintaining a low silhouette.
(4) Bearer numbers 1, 3, and 4 advance the litter until bearer number 2 can resume his or hergrip of the front handles.
(5) The litter is rested on the obstacle with the stirrups placed on the side of the obstacle inthe direction of travel.
(6) Bearer numbers 2 and 3 support the litter by the front and rear handles, respectively.
(7) Bearer numbers 1 and 4 cross the obstacle, maintaining a low silhouette.
(8) After crossing the obstacle, bearer numbers 1 and 4 grasps the litter poles near the rearhandles held by bearer number 3.
(9) Bearer number 3 releases his or her grip of the rear handles and crosses the obstacle,maintaining a low silhouette.
(10) After crossing the obstacle, bearer number 3 resumes his or her grasp on the rearhandles.
(11) Bearer numbers 1 and 4 adjust the position of their holds.
(12) All four bearers resume the 4-person carry.
h. Transport a casualty across a trench obstacle or stream.
(1) Upon reaching the trench or stream, bearer number 1 instructs another bearer to clear anydebris or obstacles immediately before the trench, at the trench, and beyond the trench, and to checkfor booby traps.
(2) From the 4-person carry position, bearer number 1 gives the command “Overhead Carry,MOVE.”
(3) The bearers turn and face the litter.
(4) Together, the squad lifts the litter above the top of the trench, keeping it level.
(5) The taller bearer at each end of the litter moves between the handles, facing in thedirection of travel.
NOTE: If unable to determine which bearer is taller, bearer number 1 will designate a bearer at each end as thetallest.
(6) The taller bearer at each end grasps the handles as close to the canvas as possible.
(7) The shorter bearer at each end moves under the litter, facing in the direction of travel.
(8) The shorter bearer at each end grasps the stirrups, which compensates for the differencein height. If the bearers are of equal height, the bearers under the litter grasp the litter poles to theside of the stirrups nearer the ends.
(9) The four bearers proceed through the obstacle completely in the overhead carry position.
(10) After passing through the obstacle, the litter squad resumes the 4-person carry position.
i. Transport a casualty through a window or from the roof of a building.
NOTE: The EFMB host unit will develop standards based on the window or building that they will be utilizing. Thesestandards must be submitted to the EFMB TCO for approval and provided to the candidates for preparation.
j. Transport a casualty using an improvised litter.
NOTE: The candidate will choose the type of improvised litter based on the available equipment to construct theimprovised litter (i.e., poncho, jackets, door).
Worksheet # 029 to construct AMEDDC&S Form 1232, 1 NOV 11 Page 5 of 6
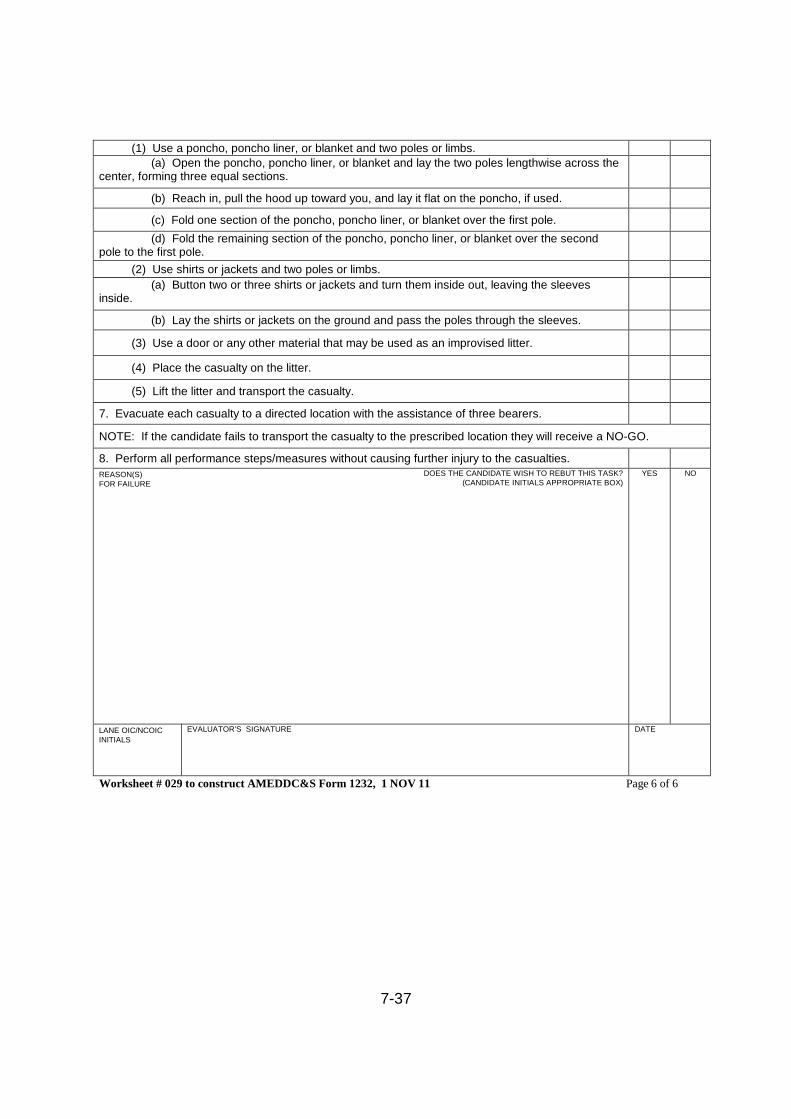
7-37
(1) Use a poncho, poncho liner, or blanket and two poles or limbs.
(a) Open the poncho, poncho liner, or blanket and lay the two poles lengthwise across thecenter, forming three equal sections.
(b) Reach in, pull the hood up toward you, and lay it flat on the poncho, if used.
(c) Fold one section of the poncho, poncho liner, or blanket over the first pole.
(d) Fold the remaining section of the poncho, poncho liner, or blanket over the secondpole to the first pole.
(2) Use shirts or jackets and two poles or limbs.
(a) Button two or three shirts or jackets and turn them inside out, leaving the sleevesinside.
(b) Lay the shirts or jackets on the ground and pass the poles through the sleeves.
(3) Use a door or any other material that may be used as an improvised litter.
(4) Place the casualty on the litter.
(5) Lift the litter and transport the casualty.
7. Evacuate each casualty to a directed location with the assistance of three bearers.
NOTE: If the candidate fails to transport the casualty to the prescribed location they will receive a NO-GO.
8. Perform all performance steps/measures without causing further injury to the casualties.
REASON(S)FOR FAILURE
DOES THE CANDIDATE WISH TO REBUT THIS TASK?(CANDIDATE INITIALS APPROPRIATE BOX)
YES NO
LANE OIC/NCOICINITIALS
EVALUATOR’S SIGNATURE DATE
Worksheet # 029 to construct AMEDDC&S Form 1232, 1 NOV 11 Page 6 of 6

7-38
THIS PAGE LEFT BLANK INTENTIONALLY
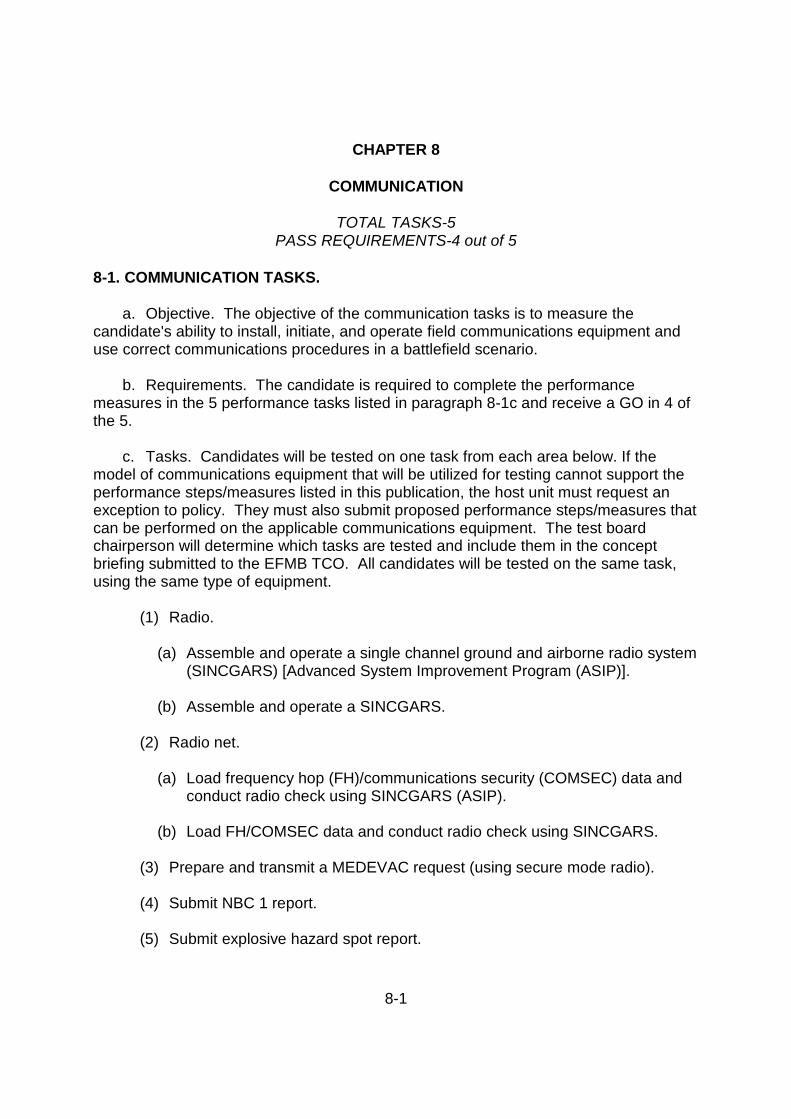
8-1
CHAPTER 8
COMMUNICATION
TOTAL TASKS-5PASS REQUIREMENTS-4 out of 5
8-1. COMMUNICATION TASKS.
a. Objective. The objective of the communication tasks is to measure thecandidate's ability to install, initiate, and operate field communications equipment anduse correct communications procedures in a battlefield scenario.
b. Requirements. The candidate is required to complete the performancemeasures in the 5 performance tasks listed in paragraph 8-1c and receive a GO in 4 ofthe 5.
c. Tasks. Candidates will be tested on one task from each area below. If themodel of communications equipment that will be utilized for testing cannot support theperformance steps/measures listed in this publication, the host unit must request anexception to policy. They must also submit proposed performance steps/measures thatcan be performed on the applicable communications equipment. The test boardchairperson will determine which tasks are tested and include them in the conceptbriefing submitted to the EFMB TCO. All candidates will be tested on the same task,using the same type of equipment.
(1) Radio.
(a) Assemble and operate a single channel ground and airborne radio system(SINCGARS) [Advanced System Improvement Program (ASIP)].
(b) Assemble and operate a SINCGARS.
(2) Radio net.
(a) Load frequency hop (FH)/communications security (COMSEC) data andconduct radio check using SINCGARS (ASIP).
(b) Load FH/COMSEC data and conduct radio check using SINCGARS.
(3) Prepare and transmit a MEDEVAC request (using secure mode radio).
(4) Submit NBC 1 report.
(5) Submit explosive hazard spot report.
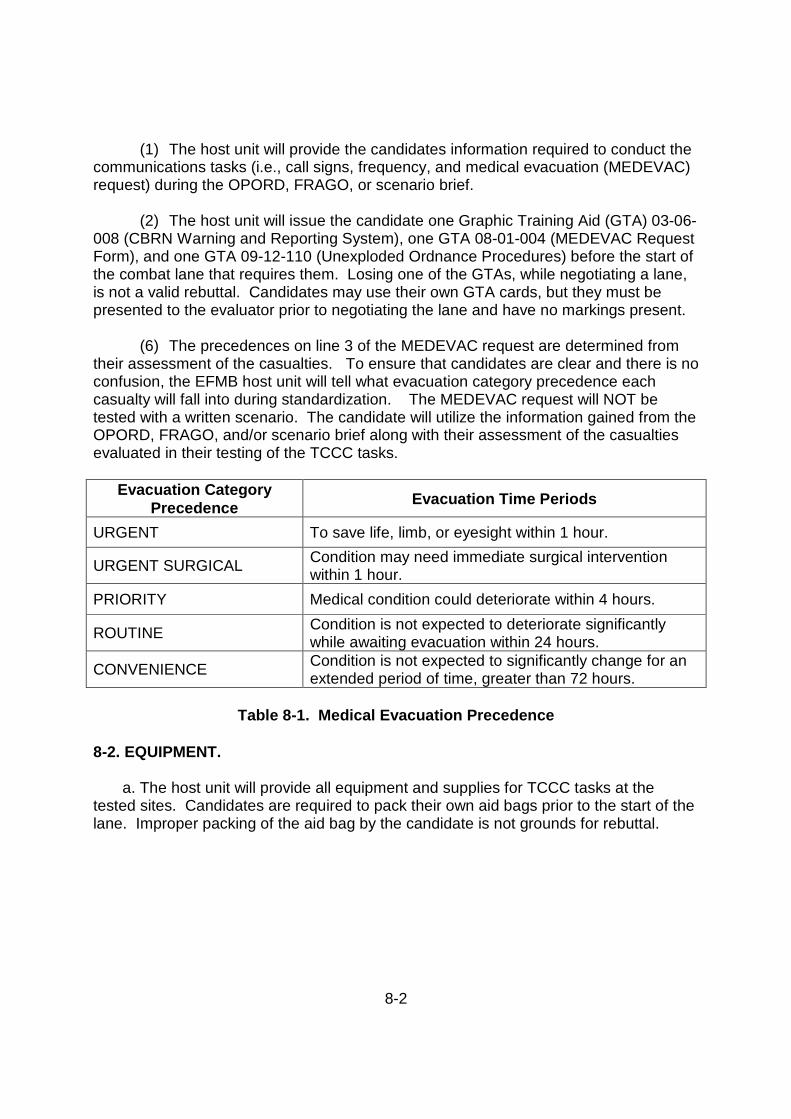
8-2
(1) The host unit will provide the candidates information required to conduct thecommunications tasks (i.e., call signs, frequency, and medical evacuation (MEDEVAC)request) during the OPORD, FRAGO, or scenario brief.
(2) The host unit will issue the candidate one Graphic Training Aid (GTA) 03-06-008 (CBRN Warning and Reporting System), one GTA 08-01-004 (MEDEVAC RequestForm), and one GTA 09-12-110 (Unexploded Ordnance Procedures) before the start ofthe combat lane that requires them. Losing one of the GTAs, while negotiating a lane,is not a valid rebuttal. Candidates may use their own GTA cards, but they must bepresented to the evaluator prior to negotiating the lane and have no markings present.
(6) The precedences on line 3 of the MEDEVAC request are determined fromtheir assessment of the casualties. To ensure that candidates are clear and there is noconfusion, the EFMB host unit will tell what evacuation category precedence eachcasualty will fall into during standardization. The MEDEVAC request will NOT betested with a written scenario. The candidate will utilize the information gained from theOPORD, FRAGO, and/or scenario brief along with their assessment of the casualtiesevaluated in their testing of the TCCC tasks.
Evacuation CategoryPrecedence
Evacuation Time Periods
URGENT To save life, limb, or eyesight within 1 hour.
URGENT SURGICALCondition may need immediate surgical interventionwithin 1 hour.
PRIORITY Medical condition could deteriorate within 4 hours.
ROUTINECondition is not expected to deteriorate significantlywhile awaiting evacuation within 24 hours.
CONVENIENCECondition is not expected to significantly change for anextended period of time, greater than 72 hours.
Table 8-1. Medical Evacuation Precedence
8-2. EQUIPMENT.
a. The host unit will provide all equipment and supplies for TCCC tasks at thetested sites. Candidates are required to pack their own aid bags prior to the start of thelane. Improper packing of the aid bag by the candidate is not grounds for rebuttal.

8-3
REPRODUCIBLE SCORE SHEETS
8-3. GENERAL.
The various score sheets included within this appendix are designed for EFMB use onlyand prescribe the testing standards for use during EFMB. They may be reproduced locallyas needed.
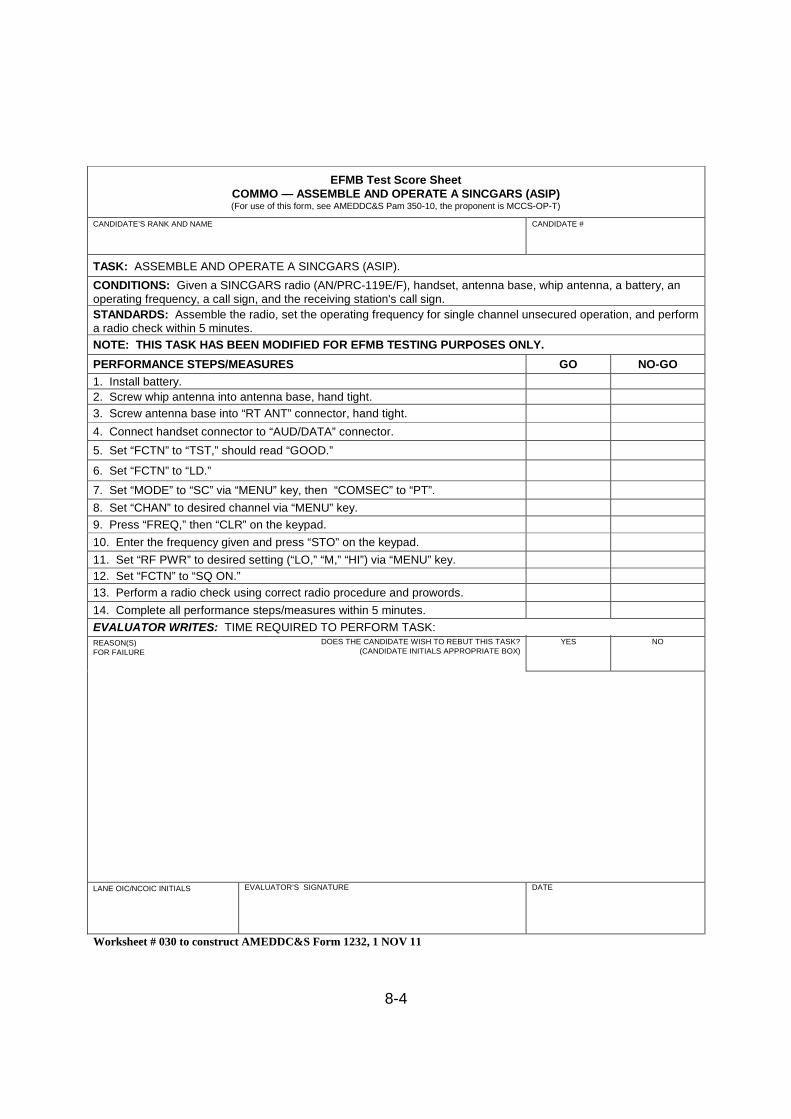
8-4
EFMB Test Score SheetCOMMO — ASSEMBLE AND OPERATE A SINCGARS (ASIP)(For use of this form, see AMEDDC&S Pam 350-10, the proponent is MCCS-OP-T)
CANDIDATE’S RANK AND NAME CANDIDATE #
TASK: ASSEMBLE AND OPERATE A SINCGARS (ASIP).
CONDITIONS: Given a SINCGARS radio (AN/PRC-119E/F), handset, antenna base, whip antenna, a battery, anoperating frequency, a call sign, and the receiving station's call sign.
STANDARDS: Assemble the radio, set the operating frequency for single channel unsecured operation, and performa radio check within 5 minutes.
NOTE: THIS TASK HAS BEEN MODIFIED FOR EFMB TESTING PURPOSES ONLY.
PERFORMANCE STEPS/MEASURES GO NO-GO
1. Install battery.
2. Screw whip antenna into antenna base, hand tight.
3. Screw antenna base into “RT ANT” connector, hand tight.
4. Connect handset connector to “AUD/DATA” connector.
5. Set “FCTN” to “TST,” should read “GOOD.”
6. Set “FCTN” to “LD.”
7. Set “MODE” to “SC” via “MENU” key, then “COMSEC” to “PT”.
8. Set “CHAN” to desired channel via “MENU” key.
9. Press “FREQ,” then “CLR” on the keypad.
10. Enter the frequency given and press “STO” on the keypad.
11. Set “RF PWR” to desired setting (“LO,” “M,” “HI”) via “MENU” key.
12. Set “FCTN” to “SQ ON.”
13. Perform a radio check using correct radio procedure and prowords.
14. Complete all performance steps/measures within 5 minutes.
EVALUATOR WRITES: TIME REQUIRED TO PERFORM TASK:REASON(S)FOR FAILURE
DOES THE CANDIDATE WISH TO REBUT THIS TASK?(CANDIDATE INITIALS APPROPRIATE BOX)
YES NO
LANE OIC/NCOIC INITIALS EVALUATOR’S SIGNATURE DATE
Worksheet # 030 to construct AMEDDC&S Form 1232, 1 NOV 11
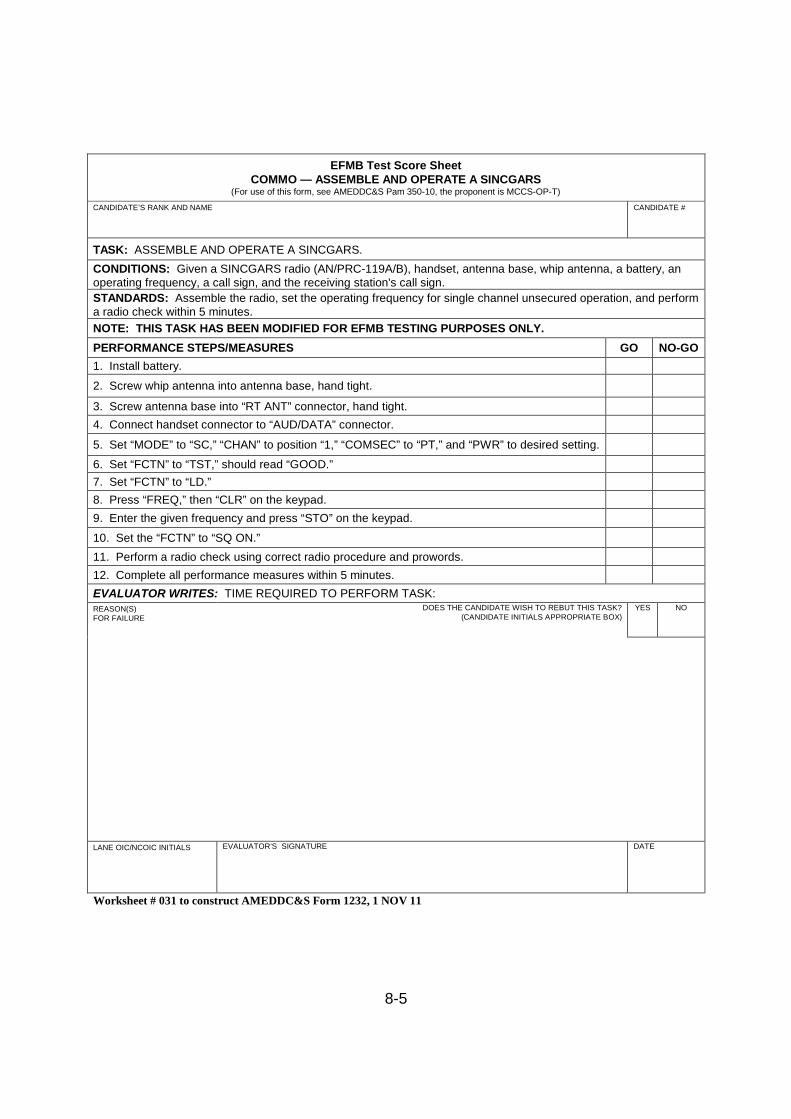
8-5
EFMB Test Score SheetCOMMO — ASSEMBLE AND OPERATE A SINCGARS
(For use of this form, see AMEDDC&S Pam 350-10, the proponent is MCCS-OP-T)
CANDIDATE’S RANK AND NAME CANDIDATE #
TASK: ASSEMBLE AND OPERATE A SINCGARS.
CONDITIONS: Given a SINCGARS radio (AN/PRC-119A/B), handset, antenna base, whip antenna, a battery, anoperating frequency, a call sign, and the receiving station's call sign.
STANDARDS: Assemble the radio, set the operating frequency for single channel unsecured operation, and performa radio check within 5 minutes.
NOTE: THIS TASK HAS BEEN MODIFIED FOR EFMB TESTING PURPOSES ONLY.
PERFORMANCE STEPS/MEASURES GO NO-GO
1. Install battery.
2. Screw whip antenna into antenna base, hand tight.
3. Screw antenna base into “RT ANT” connector, hand tight.
4. Connect handset connector to “AUD/DATA” connector.
5. Set “MODE” to “SC,” “CHAN” to position “1,” “COMSEC” to “PT,” and “PWR” to desired setting.
6. Set “FCTN” to “TST,” should read “GOOD.”
7. Set “FCTN” to “LD.”
8. Press “FREQ,” then “CLR” on the keypad.
9. Enter the given frequency and press “STO” on the keypad.
10. Set the “FCTN” to “SQ ON.”
11. Perform a radio check using correct radio procedure and prowords.
12. Complete all performance measures within 5 minutes.
EVALUATOR WRITES: TIME REQUIRED TO PERFORM TASK:REASON(S)FOR FAILURE
DOES THE CANDIDATE WISH TO REBUT THIS TASK?(CANDIDATE INITIALS APPROPRIATE BOX)
YES NO
LANE OIC/NCOIC INITIALS EVALUATOR’S SIGNATURE DATE
Worksheet # 031 to construct AMEDDC&S Form 1232, 1 NOV 11

8-6
EFMB Test Score SheetCOMMO — LOAD FH/COMSEC DATA AND CONDUCT RADIO CHECK USING SINCGARS (ASIP)
(For use of this form, see AMEDDC&S Pam 350-10, the proponent is MCCS-OP-T)
CANDIDATE’S RANK AND NAME CANDIDATE#
TASK: LOAD FH/COMSEC DATA AND CONDUCT RADIO CHECK USING SINCGARS (ASIP).
CONDITIONS: Given a SINCGARS radio (AN/PRC-119E/F) with components, a battery, an ANCD (AN/CYZ-10) orSKL loaded with signal operation instructions (SOI) and FH/COMSEC data and a W-4 cable, an operating frequency,a call sign, and the receiving station's call sign.
STANDARDS: Load radio for single channel secure operations and complete a radio check within 10 minutes.
NOTE: THIS TASK HAS BEEN MODIFIED FOR EFMB TESTING PURPOSES ONLY.
PERFORMANCE STEPS/MEASURES GO NO-GO
1. Set “FCTN” to “TST.” Wait for "GOOD" on display.
2. Set “FCTN” to “LD.”
NOTE: Steps 1 and 2 may be skipped if this task is performed after “Assemble and Operate a SINCGARS (ASIP)”task.
3. Set “COMSEC” to “CT” via “MENU” key.
4. Set “MODE” to “FH” via “MENU” key.
5. Press handset twice to clear audio alarm in handset to solid tone.
6. Load FH/COMSEC.
a. If using the ANCD:
(1) Turn the ANCD on and enter “RADIO” at the main menu.
(2) Press “Enter” for “Send-Radio-Icom” at next three screens.
(3) Follow guidance for next two steps by down arrow.
(4) Enter “Y” at the menu (time), then press “LOAD” on the “RT.”
b. If using the SKL:
(1) Turn the SKL on and double click “CoreLib.” Logon will appear.
(2) Type in User ID and password. Click “OK.”
NOTE: For EFMB testing purposes the evaluator will provide the User ID and password to the candidate.
(3) Select the “Launch Tab” at the top of the screen.
(4) Select “Launch UAS.” “SKL” will be highlighted. Click “OK.”
(5) Start up information will appear. Select “OK.”
(6) Select the “Plats” tab. Select “SINCGARS.” With “SINCGARS” highlighted, select“Load” icon at top right of screen.
(7) Select “ICOM Transfer.” Select “Include Time.” Select “OK.” “RT-1523” should appear.Select “Next.”
(8) Profiles page should appear. Check each task box as it is performed.
(9) Connect the SKL to the SINCGARS (ASIP) with the W4 Cable.
(10) Select “Send” on the SKL and press “LOAD” on the “RT.”
7. Set “CHAN” to desired channel via “MENU” key.
8. Press “FREQ,” then “CLR” on the keypad.
9. Enter the frequency given and press “STO” on the keypad.
10. Set “RF PWR” to desired setting (“LO”, “M”, or “HI”).
11. Set “FCTN” to “SQ ON.”
12. Conduct radio check using proper procedures and prowords.
13. Complete all required performance measures within 10 minutes.
Worksheet # 032 to construct AMEDDC&S Form 1232, 1 NOV 11 Page 1 of 2
8-7
EVALUATOR WRITES: TIME REQUIRED TO PERFORM TASK:REASON(S)FOR FAILURE
DOES THE CANDIDATE WISH TO REBUT THIS TASK?(CANDIDATE INITIALS APPROPRIATE BOX)
YES NO
LANE OIC/NCOIC INITIALS EVALUATOR’S SIGNATURE DATE
Worksheet # 032 to construct AMEDDC&S Form 1232, 1 NOV 11 Page 2 of 2

8-8
EFMB Test Score SheetCOMMO — LOAD FH/COMSEC DATA AND CONDUCT RADIO CHECK USING SINCGARS
(For use of this form, see AMEDDC&S Pam 350-10, the proponent is MCCS-OP-T)
CANDIDATE’S RANK AND NAME CANDIDATE #
TASK: LOAD FH/COMSEC DATA AND CONDUCT RADIO CHECK USING SINCGARS.
CONDITIONS: Given a SINCGARS radio (AN/PRC-119A/B) with components, a battery, an ANCD (AN/CYZ-10) orSKL loaded with SOI and FH/COMSEC data and a W-4 cable, an operating frequency, a call sign, and the receivingstation's call sign.
STANDARDS: Load radio for single channel secure operations and complete a radio check within 10 minutes.
NOTE: THIS TASK HAS BEEN MODIFIED FOR EFMB TESTING PURPOSES ONLY.
PERFORMANCE STEPS/MEASURES GO NO-GO
1. Set “FCTN” to “TST.” Wait for "GOOD" on display.
2. Set “FCTN” to “LD.”
NOTE: Steps 1 and 2 may be skipped if this task is performed after “Assemble and Operate a SINCGARS” task.
3. Set “COMSEC” to “CT.”
4. Set “MODE” to “FH.”
5. Press handset twice to clear audio alarm in handset to solid tone.
6. Load FH/COMSEC.
a. If using the ANCD:
(1) Turn the ANCD on and enter “RADIO” at the main menu.
(2) Press “Enter” for “Send-Radio-Icom” at next three screens.
(3) Follow guidance for next two steps by down arrow.
(4) Enter “Y” at the menu (time), then press “LOAD” on the “RT.”
b. If using the SKL:
(1) Turn the SKL on and double click “CoreLib.” Logon will appear.
(2) Type in User ID and password. Click “OK.”
NOTE: For EFMB testing purposes the evaluator will provide the User ID and password to the candidate.
(3) Select the “Launch Tab” at the top of the screen.
(4) Select “Launch UAS.” “SKL” will be highlighted. Click “OK.”
(5) Start up information will appear. Select “OK.”
(6) Select the “Plats” tab. Select “SINCGARS.” With “SINCGARS” highlighted, select“Load” icon at top right of screen.
(7) Select “ICOM Transfer.” Select “Include Time.” Select “OK.” “RT-1523” should appear.Select “Next.”
(8) Profiles page should appear. Check each task box as it is performed.
(9) Connect the SKL to the SINCGARS (ASIP) with the W4 Cable.
(10) Select “Send” on the SKL and press “LOAD” on the “RT.”
7. Set “CHAN” to desired position.
8. Press “FREQ,” then “CLR” on the keypad.
9. Enter the frequency given and press “STO” on the keypad.
10. Set “RF PWR” to desired setting (“LO”, “M”, or “HI”).
11. Set “FCTN” to “SQ ON.”
12. Conduct radio check using proper procedures and prowords.
13. Complete all required performance measures within 10 minutes.
Worksheet # 033 to construct AMEDDC&S Form 1232, 1 NOV 11 Page 1 of 2
8-9
EVALUATOR WRITES: TIME REQUIRED TO PERFORM TASK:REASON(S)FOR FAILURE
DOES THE CANDIDATE WISH TO REBUT THIS TASK?(CANDIDATE INITIALS APPROPRIATE BOX)
YES NO
LANE OIC/NCOIC INITIALS EVALUATOR’S SIGNATURE DATE
Worksheet # 033 to construct AMEDDC&S Form 1232, 1 NOV 11 Page 2 of 2
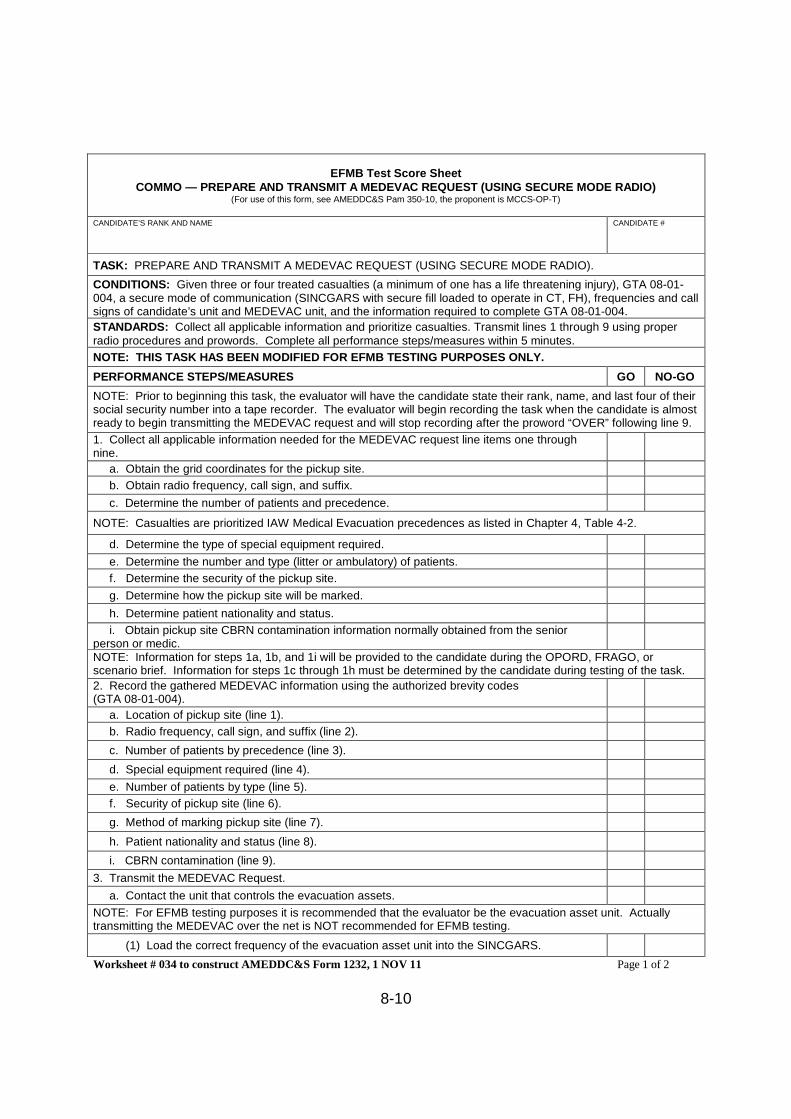
8-10
EFMB Test Score SheetCOMMO — PREPARE AND TRANSMIT A MEDEVAC REQUEST (USING SECURE MODE RADIO)
(For use of this form, see AMEDDC&S Pam 350-10, the proponent is MCCS-OP-T)
CANDIDATE’S RANK AND NAME CANDIDATE #
TASK: PREPARE AND TRANSMIT A MEDEVAC REQUEST (USING SECURE MODE RADIO).
CONDITIONS: Given three or four treated casualties (a minimum of one has a life threatening injury), GTA 08-01-004, a secure mode of communication (SINCGARS with secure fill loaded to operate in CT, FH), frequencies and callsigns of candidate’s unit and MEDEVAC unit, and the information required to complete GTA 08-01-004.
STANDARDS: Collect all applicable information and prioritize casualties. Transmit lines 1 through 9 using properradio procedures and prowords. Complete all performance steps/measures within 5 minutes.
NOTE: THIS TASK HAS BEEN MODIFIED FOR EFMB TESTING PURPOSES ONLY.
PERFORMANCE STEPS/MEASURES GO NO-GO
NOTE: Prior to beginning this task, the evaluator will have the candidate state their rank, name, and last four of theirsocial security number into a tape recorder. The evaluator will begin recording the task when the candidate is almostready to begin transmitting the MEDEVAC request and will stop recording after the proword “OVER” following line 9.
1. Collect all applicable information needed for the MEDEVAC request line items one throughnine.
a. Obtain the grid coordinates for the pickup site.
b. Obtain radio frequency, call sign, and suffix.
c. Determine the number of patients and precedence.
NOTE: Casualties are prioritized IAW Medical Evacuation precedences as listed in Chapter 4, Table 4-2.
d. Determine the type of special equipment required.
e. Determine the number and type (litter or ambulatory) of patients.
f. Determine the security of the pickup site.
g. Determine how the pickup site will be marked.
h. Determine patient nationality and status.
i. Obtain pickup site CBRN contamination information normally obtained from the seniorperson or medic.NOTE: Information for steps 1a, 1b, and 1i will be provided to the candidate during the OPORD, FRAGO, orscenario brief. Information for steps 1c through 1h must be determined by the candidate during testing of the task.
2. Record the gathered MEDEVAC information using the authorized brevity codes(GTA 08-01-004).
a. Location of pickup site (line 1).
b. Radio frequency, call sign, and suffix (line 2).
c. Number of patients by precedence (line 3).
d. Special equipment required (line 4).
e. Number of patients by type (line 5).
f. Security of pickup site (line 6).
g. Method of marking pickup site (line 7).
h. Patient nationality and status (line 8).
i. CBRN contamination (line 9).
3. Transmit the MEDEVAC Request.
a. Contact the unit that controls the evacuation assets.
NOTE: For EFMB testing purposes it is recommended that the evaluator be the evacuation asset unit. Actuallytransmitting the MEDEVAC over the net is NOT recommended for EFMB testing.
(1) Load the correct frequency of the evacuation asset unit into the SINCGARS.
Worksheet # 034 to construct AMEDDC&S Form 1232, 1 NOV 11 Page 1 of 2
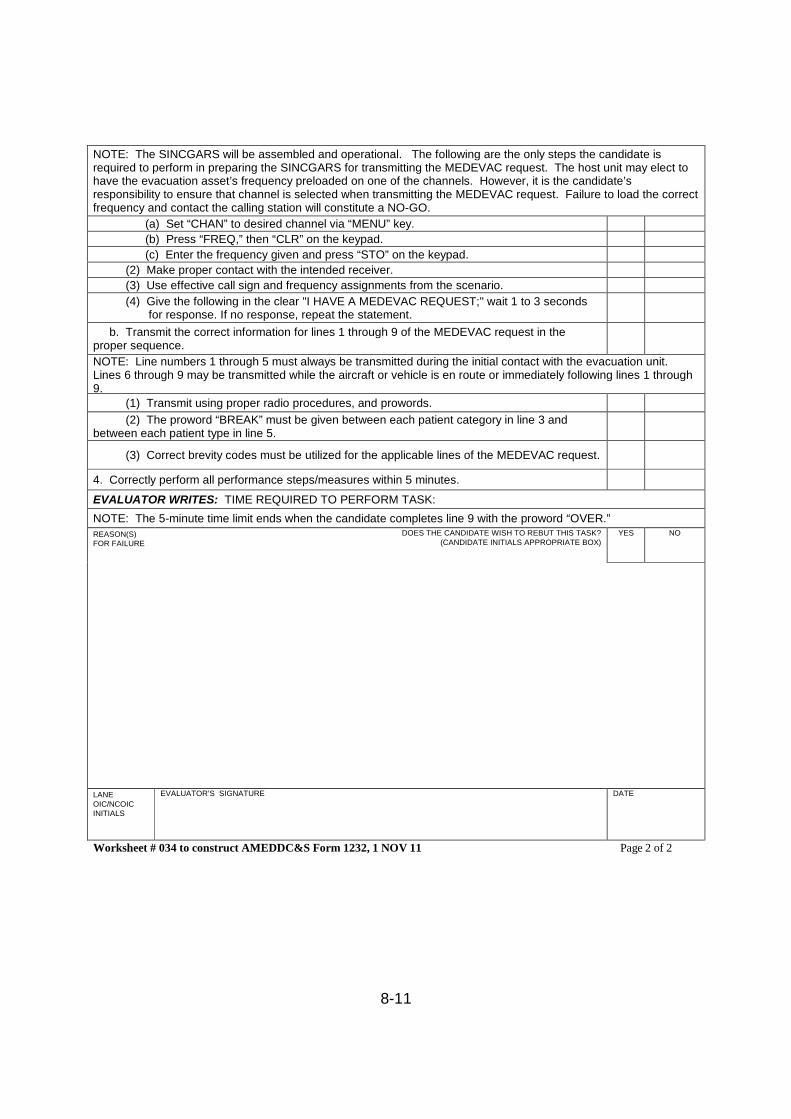
8-11
NOTE: The SINCGARS will be assembled and operational. The following are the only steps the candidate isrequired to perform in preparing the SINCGARS for transmitting the MEDEVAC request. The host unit may elect tohave the evacuation asset’s frequency preloaded on one of the channels. However, it is the candidate’sresponsibility to ensure that channel is selected when transmitting the MEDEVAC request. Failure to load the correctfrequency and contact the calling station will constitute a NO-GO.
(a) Set “CHAN” to desired channel via “MENU” key.
(b) Press “FREQ,” then “CLR” on the keypad.
(c) Enter the frequency given and press “STO” on the keypad.
(2) Make proper contact with the intended receiver.
(3) Use effective call sign and frequency assignments from the scenario.
(4) Give the following in the clear "I HAVE A MEDEVAC REQUEST;" wait 1 to 3 secondsfor response. If no response, repeat the statement.
b. Transmit the correct information for lines 1 through 9 of the MEDEVAC request in theproper sequence.
NOTE: Line numbers 1 through 5 must always be transmitted during the initial contact with the evacuation unit.Lines 6 through 9 may be transmitted while the aircraft or vehicle is en route or immediately following lines 1 through9.
(1) Transmit using proper radio procedures, and prowords.
(2) The proword “BREAK” must be given between each patient category in line 3 andbetween each patient type in line 5.
(3) Correct brevity codes must be utilized for the applicable lines of the MEDEVAC request.
4. Correctly perform all performance steps/measures within 5 minutes.
EVALUATOR WRITES: TIME REQUIRED TO PERFORM TASK:
NOTE: The 5-minute time limit ends when the candidate completes line 9 with the proword “OVER.”REASON(S)FOR FAILURE
DOES THE CANDIDATE WISH TO REBUT THIS TASK?(CANDIDATE INITIALS APPROPRIATE BOX)
YES NO
LANEOIC/NCOICINITIALS
EVALUATOR’S SIGNATURE DATE
Worksheet # 034 to construct AMEDDC&S Form 1232, 1 NOV 11 Page 2 of 2
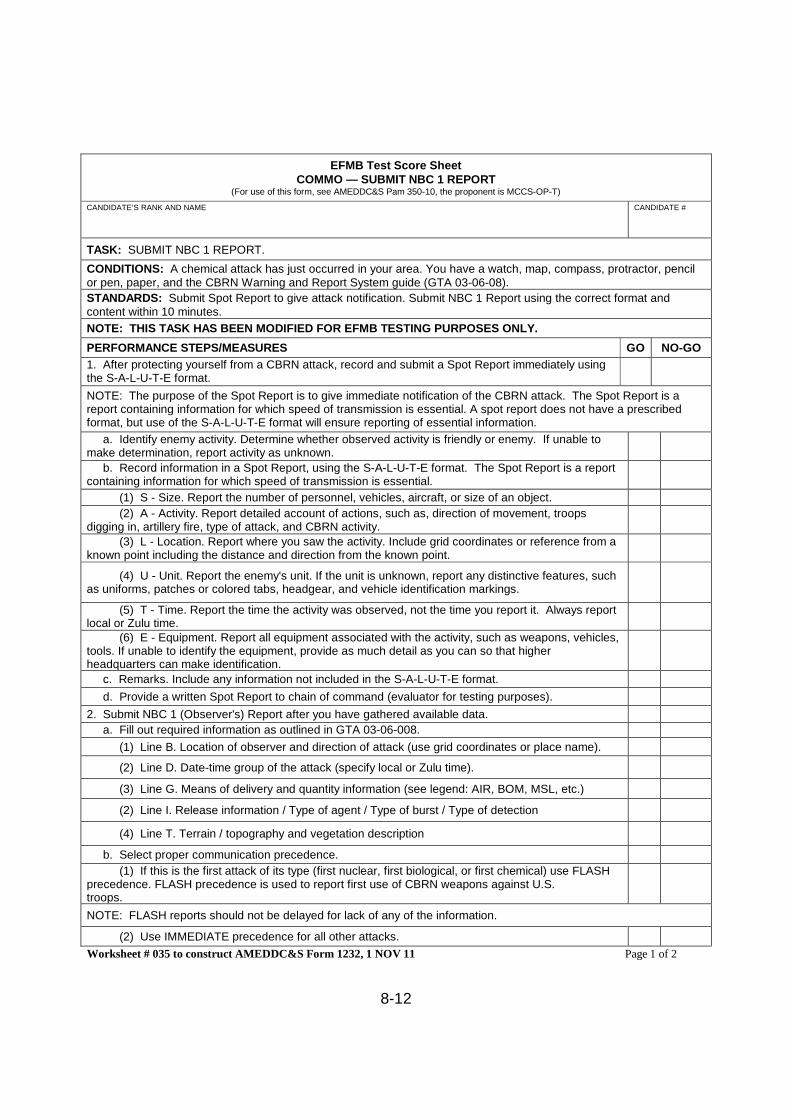
8-12
EFMB Test Score SheetCOMMO — SUBMIT NBC 1 REPORT
(For use of this form, see AMEDDC&S Pam 350-10, the proponent is MCCS-OP-T)
CANDIDATE’S RANK AND NAME CANDIDATE #
TASK: SUBMIT NBC 1 REPORT.
CONDITIONS: A chemical attack has just occurred in your area. You have a watch, map, compass, protractor, pencilor pen, paper, and the CBRN Warning and Report System guide (GTA 03-06-08).
STANDARDS: Submit Spot Report to give attack notification. Submit NBC 1 Report using the correct format andcontent within 10 minutes.
NOTE: THIS TASK HAS BEEN MODIFIED FOR EFMB TESTING PURPOSES ONLY.
PERFORMANCE STEPS/MEASURES GO NO-GO
1. After protecting yourself from a CBRN attack, record and submit a Spot Report immediately usingthe S-A-L-U-T-E format.
NOTE: The purpose of the Spot Report is to give immediate notification of the CBRN attack. The Spot Report is areport containing information for which speed of transmission is essential. A spot report does not have a prescribedformat, but use of the S-A-L-U-T-E format will ensure reporting of essential information.
a. Identify enemy activity. Determine whether observed activity is friendly or enemy. If unable tomake determination, report activity as unknown.
b. Record information in a Spot Report, using the S-A-L-U-T-E format. The Spot Report is a reportcontaining information for which speed of transmission is essential.
(1) S - Size. Report the number of personnel, vehicles, aircraft, or size of an object.
(2) A - Activity. Report detailed account of actions, such as, direction of movement, troopsdigging in, artillery fire, type of attack, and CBRN activity.
(3) L - Location. Report where you saw the activity. Include grid coordinates or reference from aknown point including the distance and direction from the known point.
(4) U - Unit. Report the enemy's unit. If the unit is unknown, report any distinctive features, suchas uniforms, patches or colored tabs, headgear, and vehicle identification markings.
(5) T - Time. Report the time the activity was observed, not the time you report it. Always reportlocal or Zulu time.
(6) E - Equipment. Report all equipment associated with the activity, such as weapons, vehicles,tools. If unable to identify the equipment, provide as much detail as you can so that higherheadquarters can make identification.
c. Remarks. Include any information not included in the S-A-L-U-T-E format.
d. Provide a written Spot Report to chain of command (evaluator for testing purposes).
2. Submit NBC 1 (Observer's) Report after you have gathered available data.
a. Fill out required information as outlined in GTA 03-06-008.
(1) Line B. Location of observer and direction of attack (use grid coordinates or place name).
(2) Line D. Date-time group of the attack (specify local or Zulu time).
(3) Line G. Means of delivery and quantity information (see legend: AIR, BOM, MSL, etc.)
(2) Line I. Release information / Type of agent / Type of burst / Type of detection
(4) Line T. Terrain / topography and vegetation description
b. Select proper communication precedence.
(1) If this is the first attack of its type (first nuclear, first biological, or first chemical) use FLASHprecedence. FLASH precedence is used to report first use of CBRN weapons against U.S.troops.
NOTE: FLASH reports should not be delayed for lack of any of the information.
(2) Use IMMEDIATE precedence for all other attacks.
Worksheet # 035 to construct AMEDDC&S Form 1232, 1 NOV 11 Page 1 of 2
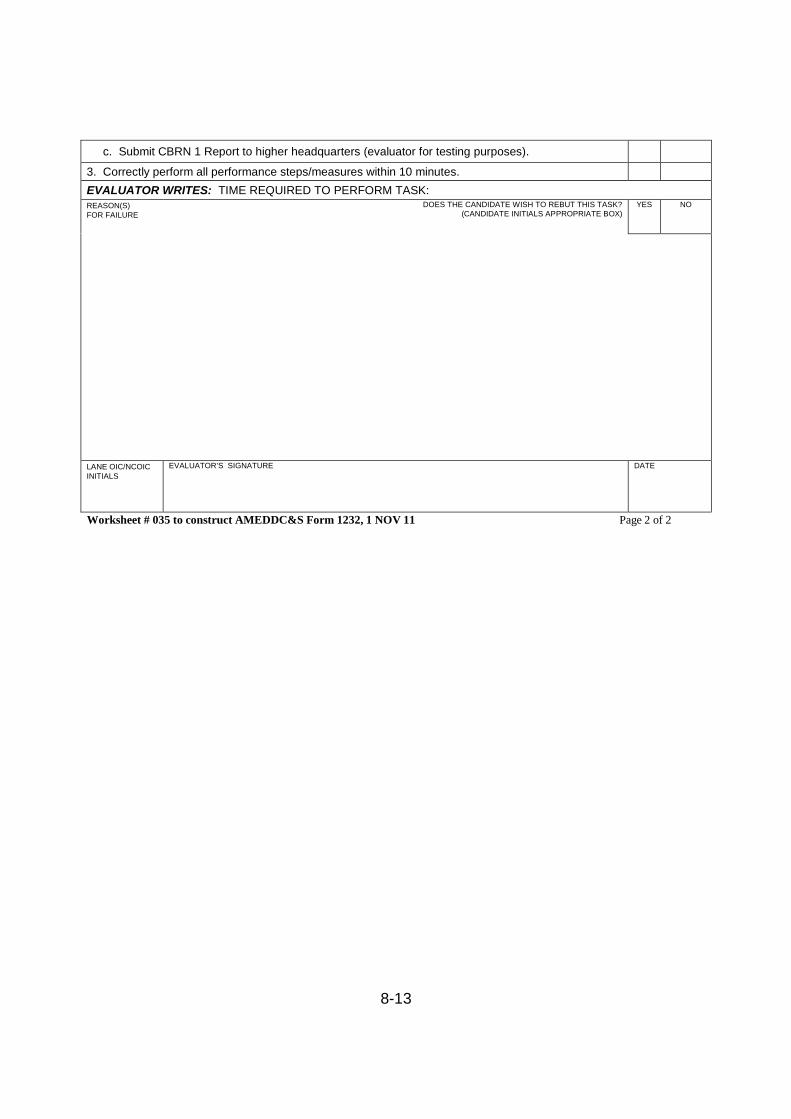
8-13
c. Submit CBRN 1 Report to higher headquarters (evaluator for testing purposes).
3. Correctly perform all performance steps/measures within 10 minutes.
EVALUATOR WRITES: TIME REQUIRED TO PERFORM TASK:REASON(S)FOR FAILURE
DOES THE CANDIDATE WISH TO REBUT THIS TASK?(CANDIDATE INITIALS APPROPRIATE BOX)
YES NO
LANE OIC/NCOICINITIALS
EVALUATOR’S SIGNATURE DATE
Worksheet # 035 to construct AMEDDC&S Form 1232, 1 NOV 11 Page 2 of 2
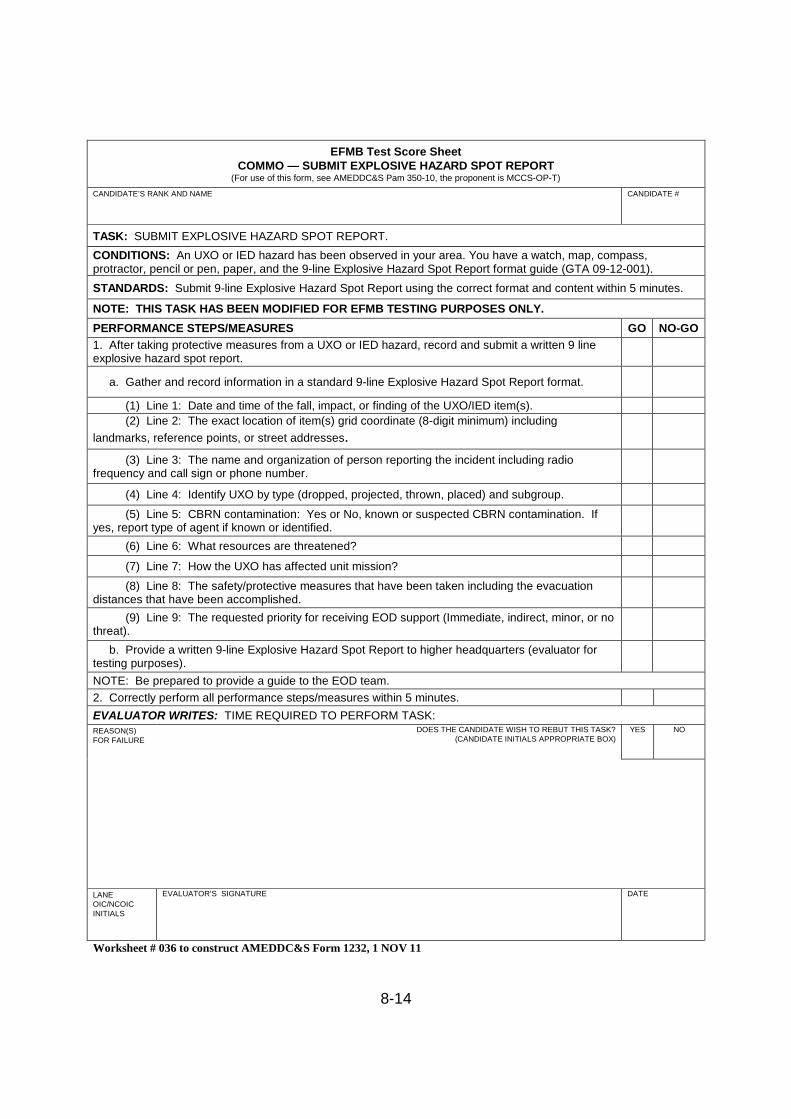
8-14
EFMB Test Score SheetCOMMO — SUBMIT EXPLOSIVE HAZARD SPOT REPORT
(For use of this form, see AMEDDC&S Pam 350-10, the proponent is MCCS-OP-T)
CANDIDATE’S RANK AND NAME CANDIDATE #
TASK: SUBMIT EXPLOSIVE HAZARD SPOT REPORT.
CONDITIONS: An UXO or IED hazard has been observed in your area. You have a watch, map, compass,protractor, pencil or pen, paper, and the 9-line Explosive Hazard Spot Report format guide (GTA 09-12-001).
STANDARDS: Submit 9-line Explosive Hazard Spot Report using the correct format and content within 5 minutes.
NOTE: THIS TASK HAS BEEN MODIFIED FOR EFMB TESTING PURPOSES ONLY.
PERFORMANCE STEPS/MEASURES GO NO-GO
1. After taking protective measures from a UXO or IED hazard, record and submit a written 9 lineexplosive hazard spot report.
a. Gather and record information in a standard 9-line Explosive Hazard Spot Report format.
(1) Line 1: Date and time of the fall, impact, or finding of the UXO/IED item(s).
(2) Line 2: The exact location of item(s) grid coordinate (8-digit minimum) including
landmarks, reference points, or street addresses.
(3) Line 3: The name and organization of person reporting the incident including radiofrequency and call sign or phone number.
(4) Line 4: Identify UXO by type (dropped, projected, thrown, placed) and subgroup.
(5) Line 5: CBRN contamination: Yes or No, known or suspected CBRN contamination. Ifyes, report type of agent if known or identified.
(6) Line 6: What resources are threatened?
(7) Line 7: How the UXO has affected unit mission?
(8) Line 8: The safety/protective measures that have been taken including the evacuationdistances that have been accomplished.
(9) Line 9: The requested priority for receiving EOD support (Immediate, indirect, minor, or nothreat).
b. Provide a written 9-line Explosive Hazard Spot Report to higher headquarters (evaluator fortesting purposes).
NOTE: Be prepared to provide a guide to the EOD team.
2. Correctly perform all performance steps/measures within 5 minutes.
EVALUATOR WRITES: TIME REQUIRED TO PERFORM TASK:REASON(S)FOR FAILURE
DOES THE CANDIDATE WISH TO REBUT THIS TASK?(CANDIDATE INITIALS APPROPRIATE BOX)
YES NO
LANEOIC/NCOICINITIALS
EVALUATOR’S SIGNATURE DATE
Worksheet # 036 to construct AMEDDC&S Form 1232, 1 NOV 11

9-1
CHAPTER 9
WARRIOR SKILLS
TOTAL TASKS-13PASS REQUIREMENTS-10 OF 13
9-1. WARRIOR SKILLS TASKS.
a. Objective. To measure the candidate's ability to apply warrior skills to protecthimself and the casualty in a battlefield scenario.
b. Requirements. The candidate is required to complete 13 tasks, as indicated inparagraph 9-1c, below, and pass 10 of the 13. These tasks are tested in a simulatedbattlefield scenario.
c. Tasks. The tasks listed in this paragraph are tested using reaction-style testing.
(1) Candidates will only test on one of the following tasks depending on whichtype of protective mask they were issued, with or without hood.
(a) Protect yourself from chemical/biological contamination using yourassigned protective mask with JSLIST mission oriented protective posture gear.
(b) Protect yourself from chemical/biological contamination using yourassigned protective mask.
(2) Decontaminate yourself using chemical decontaminating kits.
(3) Candidates will only test on one of the following tasks depending on whichtype of CBRN protective gear they were issued, MOPP or JSLIST.
(a) Protect yourself from CBRN injury/contamination with JSLIST chemicalprotective ensemble.
(b) Protect yourself from CBRN injury/contamination with MOPP gear.
(4) Perform self-aid for mild nerve agent poisoning.
(5) Candidates will only test on one of the following tasks depending on whichtype of CBRN protective gear they were issued, MOPP or JSLIST.
(a) Protect yourself from chemical or biological injury/contamination whenremoving mission oriented protective posture using JSLIST.
(b) Protect yourself from chemical or biological injury/contamination when
9-2
removing MOPP gear.
(6) Candidates will only test on one of the following tasks depending on whichtype of protective mask they were issued, with or without hood.
(a) Store the M40-series protective mask without hood.
(b) Store the M40-series protective mask with hood.
(7) Candidates will only test on one of the following tasks depending on whichthey were issued, either the M16-series rifle or M4/M4A1 carbine:
(a) Disassemble, assemble, and perform a function check on an M4 or M4A1carbine.
(b) Disassemble, assemble, and perform a function check on an M16-seriescarbine.
(8) Disassemble and assemble an M9 pistol and perform a function check.
(9) Correct malfunction of an M4-series carbine or M16-series rifle.
(10) Move under direct fire.
(11) React to indirect fire.
(12) Move over, through, or around obstacles.
(13) React to an unexploded ordinance (UXO) or possible improvised explosivedevice (IED).
9-2. COMMUNICATION.
a. Warrior Skills tasks will not be tested as a standalone lane. Tasks will beincorporated into the testing of the various CTLs.
b. Upon arrival at the lane where these tasks are evaluated, all candidates willreceive a FRAGO. Prior to the candidate starting the lane the evaluator will providethem with a team briefing.
c. All communication between the evaluator and the candidate during testing oftasks will be IAW the evaluator cues (“Evaluator States”) on the applicable scoresheets. The evaluator may add additional information to further clarify a cue. FRAGOswill be utilized throughout the lane to communicate the situation.
d. The test board chairperson will determine the placement and order of anyobstacles, the distance, and the grade of terrain between obstacles.

9-3
e. Changes. Changes are NOT authorized without approval of an exception topolicy.
9-3. EQUIPMENT.
a. Equipment. Candidates will be tested on the same type of equipment with theexception of their assigned protective mask, MOPP or JSLIST gear, and weapon.
b. The host unit will provide the following supplies/materials to the candidate:
(a) One set of nerve agent auto injector training aids prior to the start of thecombat lane.
(b) One M295 individual equipment decontamination kit (IEDK).
(c) One loaded magazine with a minimum of seven blank rounds and onedummy round prior to the start of the “Correct Malfunction of an M4 Carbine orM16-Series Rifle” task.
c. Candidates will have their unit-issued CBRN supplies (except M295 IEDK andnerve agent auto injector training aids) prior to the start of the combat lanes that requirethem.
d. Candidates are required to bring fully functional Mission Oriented ProtectivePosture (MOPP) or JSLIST gear. If their gear becomes unserviceable or hasdeficiencies, they are required to inform the evaluator prior to beginning testing on theapplicable testing lane.

9-4
REPRODUCIBLE SCORE SHEETS
9-4. GENERAL.
The various score sheets included within this appendix are designed for EFMB use onlyand prescribe the testing standards for use during EFMB. They may be reproduced locallyas needed.
9-5
EFMB Test Score SheetWARRIOR SKILLS — PROTECT YOURSELF FROM CHEMICAL/BIOLOGICAL CONTAMINATION USING YOUR
ASSIGNED PROTECTIVE MASK WITH JSLIST MOPP GEAR(For use of this form, see AMEDDC&S Pam 350-10, the proponent is MCCS-OP-T)
CANDIDATE’S RANK AND NAME CANDIDATE #
TASK: PROTECT YOURSELF FROM CHEMICAL/BIOLOGICAL CONTAMINATION USING YOUR ASSIGNEDPROTECTIVE MASK WITH JSLIST MOPP GEAR.
CONDITIONS: Given your assigned protective mask and carrier.
STANDARDS: Don, clear, and check your mask within 9 seconds.
NOTE: THIS TASK HAS BEEN MODIFIED FOR EFMB TESTING PURPOSES ONLY.
PERFORMANCE STEPS/MEASURES GO NO-GO
1. Don the mask as quickly as possible.
NOTE: Time begins when candidate begins any step/measure listed below.
a. Stop breathing and close your eyes.
b. Remove your helmet.
(1) If you have the M17-, M24-, M25-, M40-, M43-, or M45-series protective mask, put yourhelmet between your legs (above your knees) or hold your rifle between your legs and place yourhelmet on the muzzle. If you drop your helmet, continue to mask.
(2) If you have the M42-series protective mask, remove your helmet and place it in aconvenient location. Avoid placing it on a contaminated surface if possible.
WARNING: DO NOT WEAR CONTACT LENSES WITH THE PROTECTIVE MASK. REMOVE CONTACT LENSESWHEN THE USE OF CHEMICAL AGENTS IS IMMINENT.
c. Take off your glasses, if applicable.
d. Open the mask carrier with one hand.
e. Grasp the mask assembly with your other hand and remove it from the carrier.
f. Put your chin in the chin pocket and press the facepiece snugly against your face.
NOTE: The temple and forehead straps have already been adjusted during fitting.
g. Grasp the tab and pull the head harness over your head. Ensure that your ears are betweenthe temple straps and the cheek straps. Ensure that the head harness is pulled far enough over sothat the forehead straps are tight.
h. Use one hand to tighten the cheek straps, one at a time, while holding the head pad centeredon the back of your head with the other hand. Ensure that the straps lay flat against your head.
2. Clear the mask.
a. Seal the outlet valve by pushing in on the center of the outlet valve cover with one hand.
b. Blow out hard to ensure that any contaminated air is forced out around the edges of thefacepiece.
3. Check the mask.
a. Cover the inlet port of the filter canister (M40- and M45-series) or the inlet port of the armorquick disconnect (M42-series) with the palm of your hand and breathe in.
b. Ensure that the facepiece collapses against your face and remains so while you hold yourbreath (indicates that the mask is airtight).
c. Remove any hair, clothing, or other matter between your face and the mask if the facepiecedoes not collapse to your face.
4. Complete steps 1 through 3 within 9 seconds.
EVALUATOR WRITES: CANDIDATE’S TIME FOR DONNING THE MASK:
5. Resume breathing.
6. Close the mask carrier and continue your mission.
Worksheet # 037 to construct AMEDDC&S Form 1232, 1 NOV 11 Page 1 of 2
9-6
7. Correctly perform all applicable performance steps/measures in sequence without becoming acasualty.REASON(S)FOR FAILURE
DOES THE CANDIDATE WISH TO REBUT THIS TASK?(CANDIDATE INITIALS APPROPRIATE BOX)
YES NO
LANEOIC/NCOICINITIALS
EVALUATOR’S SIGNATURE DATE
Worksheet # 037 to construct AMEDDC&S Form 1232, 1 NOV 11 Page 2 of 2
9-7
EFMB Test Score SheetWARRIOR SKILLS — PROTECT YOURSELF FROM CHEMICAL/BIOLOGICAL CONTAMINATION USING YOUR
ASSIGNED PROTECTIVE MASK(For use of this form, see AMEDDC&S Pam 350-10, the proponent is MCCS-OP-T)
CANDIDATE’S RANK AND NAME CANDIDATE #
TASK: PROTECT YOURSELF FROM CHEMICAL/BIOLOGICAL CONTAMINATION USING YOUR ASSIGNEDPROTECTIVE MASK.
CONDITIONS: Given your assigned protective mask with hood and carrier.
STANDARDS: Don, clear, and check your mask within 9 seconds.
NOTE: THIS TASK HAS BEEN MODIFIED FOR EFMB TESTING PURPOSES ONLY.
PERFORMANCE STEPS/MEASURES GO NO-GO
1. Don the mask as quickly as possible.
NOTE: Time begins when candidate begins any step/measure listed below.
a. Stop breathing and close your eyes.
b. Remove your helmet.
(1) If you have the M17-, M24-, M25-, M40-, M43-, or M45-series protective mask, put yourhelmet between your legs (above your knees) or hold your rifle between your legs and place yourhelmet on the muzzle. If you drop your helmet, continue to mask.
(2) If you have the M42-series protective mask, remove your helmet and place it in aconvenient location. Avoid placing it on a contaminated surface if possible.WARNING: DO NOT WEAR CONTACT LENSES WITH THE PROTECTIVE MASK. REMOVE CONTACT LENSESWHEN THE USE OF CHEMICAL AGENTS IS IMMINENT.
c. Take off your glasses, if applicable.
d. Open the mask carrier with one hand.
e. Grasp the mask assembly with your other hand and remove it from the carrier.
f. Put your chin in the chin pocket and press the facepiece snugly against your face.
NOTE: The temple and forehead straps have already been adjusted during fitting.
g. Grasp the tab and pull the head harness over your head. Ensure that your ears are betweenthe temple straps and the cheek straps. Ensure that the head harness is pulled far enough over sothat the forehead straps are tight.
h. Use one hand to tighten the cheek straps, one at a time, while holding the head pad centeredon the back of your head with the other hand. Ensure that the straps lay flat against your head.
2. Clear the mask.
a. Seal the outlet valve by pushing in on the center of the outlet valve cover with one hand.
b. Blow out hard to ensure that any contaminated air is forced out around the edges of thefacepiece.
3. Check the mask.
a. Cover the inlet port of the filter canister (M40- and M45-series) or the inlet port of the armorquick disconnect (M42-series) with the palm of your hand and breathe in.
b. Ensure that the facepiece collapses against your face and remains so while you hold yourbreath (indicates that the mask is airtight).
c. Remove any hair, clothing, or other matter between your face and the mask if the facepiecedoes not collapse to your face.
4. Complete steps 1 through 3 within 9 seconds.
EVALUATOR WRITES: CANDIDATE’S TIME FOR DONNING THE MASK:
5. Resume breathing.
6. Secure the mask hood.
Worksheet # 038 to construct AMEDDC&S Form 1232, 1 NOV 11 Page 1 of 2
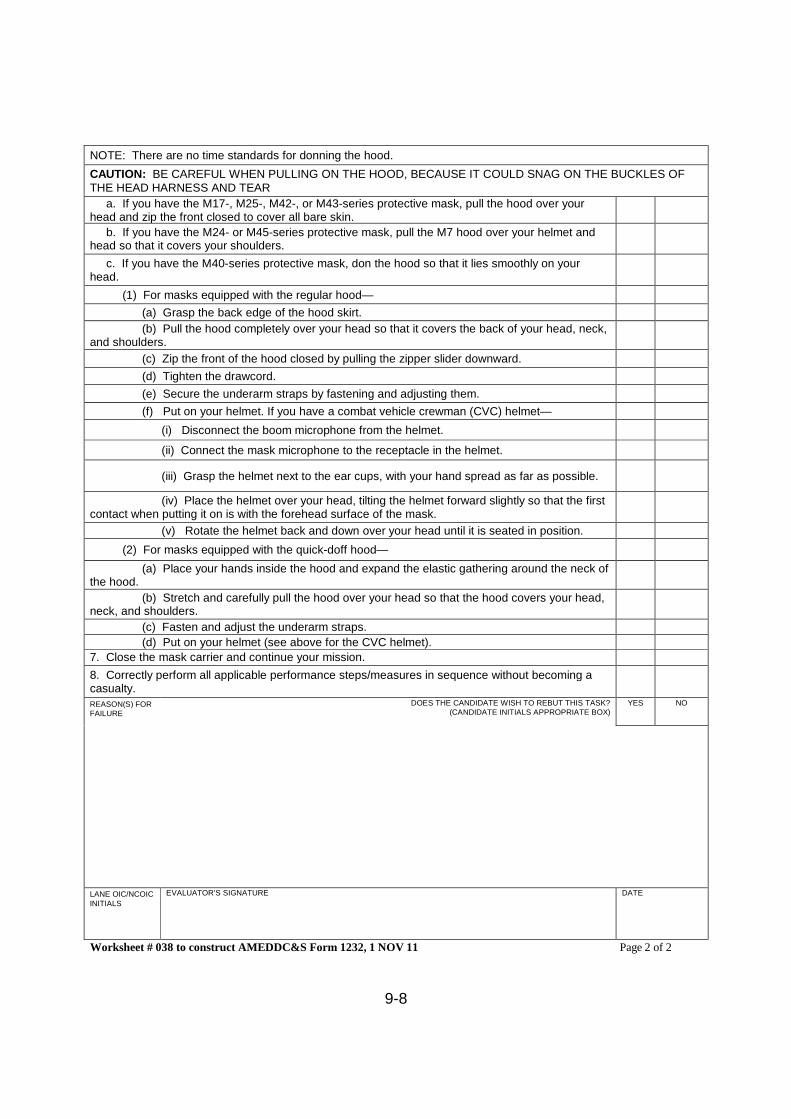
9-8
NOTE: There are no time standards for donning the hood.
CAUTION: BE CAREFUL WHEN PULLING ON THE HOOD, BECAUSE IT COULD SNAG ON THE BUCKLES OFTHE HEAD HARNESS AND TEAR
a. If you have the M17-, M25-, M42-, or M43-series protective mask, pull the hood over yourhead and zip the front closed to cover all bare skin.
b. If you have the M24- or M45-series protective mask, pull the M7 hood over your helmet andhead so that it covers your shoulders.
c. If you have the M40-series protective mask, don the hood so that it lies smoothly on yourhead.
(1) For masks equipped with the regular hood—
(a) Grasp the back edge of the hood skirt.
(b) Pull the hood completely over your head so that it covers the back of your head, neck,and shoulders.
(c) Zip the front of the hood closed by pulling the zipper slider downward.
(d) Tighten the drawcord.
(e) Secure the underarm straps by fastening and adjusting them.
(f) Put on your helmet. If you have a combat vehicle crewman (CVC) helmet—
(i) Disconnect the boom microphone from the helmet.
(ii) Connect the mask microphone to the receptacle in the helmet.
(iii) Grasp the helmet next to the ear cups, with your hand spread as far as possible.
(iv) Place the helmet over your head, tilting the helmet forward slightly so that the firstcontact when putting it on is with the forehead surface of the mask.
(v) Rotate the helmet back and down over your head until it is seated in position.
(2) For masks equipped with the quick-doff hood—
(a) Place your hands inside the hood and expand the elastic gathering around the neck ofthe hood.
(b) Stretch and carefully pull the hood over your head so that the hood covers your head,neck, and shoulders.
(c) Fasten and adjust the underarm straps.
(d) Put on your helmet (see above for the CVC helmet).
7. Close the mask carrier and continue your mission.
8. Correctly perform all applicable performance steps/measures in sequence without becoming acasualty.REASON(S) FORFAILURE
DOES THE CANDIDATE WISH TO REBUT THIS TASK?(CANDIDATE INITIALS APPROPRIATE BOX)
YES NO
LANE OIC/NCOICINITIALS
EVALUATOR’S SIGNATURE DATE
Worksheet # 038 to construct AMEDDC&S Form 1232, 1 NOV 11 Page 2 of 2
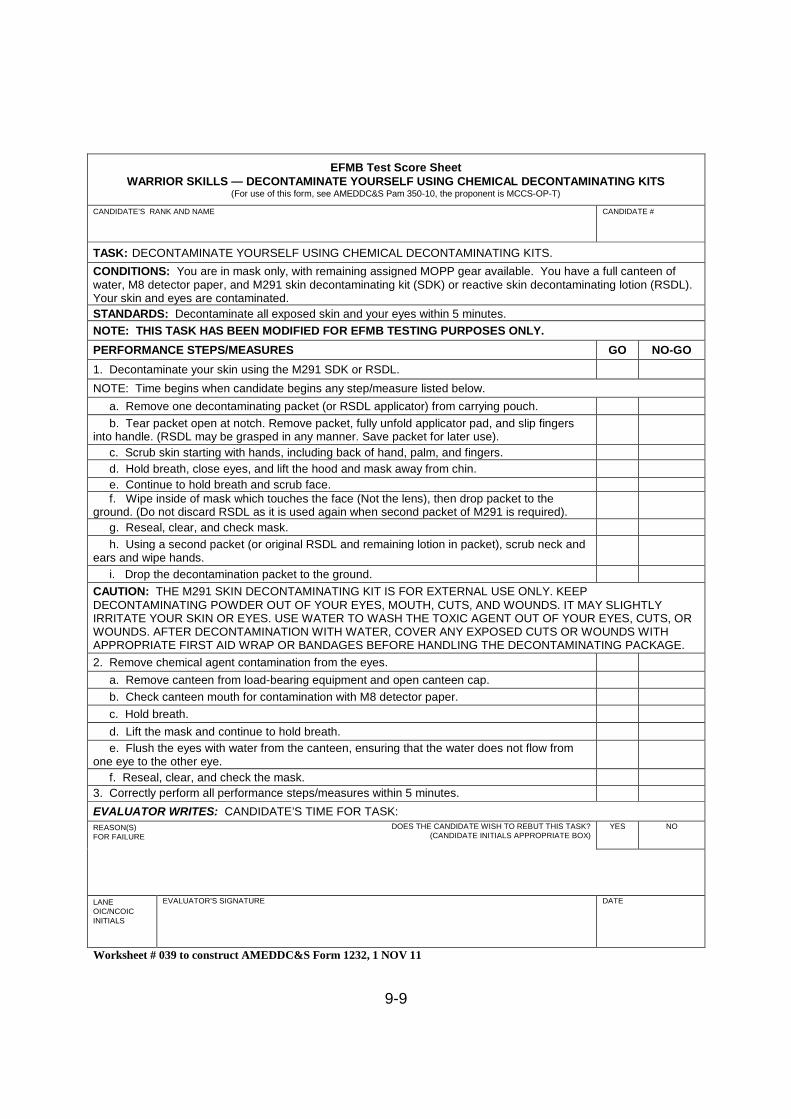
9-9
EFMB Test Score SheetWARRIOR SKILLS — DECONTAMINATE YOURSELF USING CHEMICAL DECONTAMINATING KITS
(For use of this form, see AMEDDC&S Pam 350-10, the proponent is MCCS-OP-T)
CANDIDATE’S RANK AND NAME CANDIDATE #
TASK: DECONTAMINATE YOURSELF USING CHEMICAL DECONTAMINATING KITS.
CONDITIONS: You are in mask only, with remaining assigned MOPP gear available. You have a full canteen ofwater, M8 detector paper, and M291 skin decontaminating kit (SDK) or reactive skin decontaminating lotion (RSDL).Your skin and eyes are contaminated.
STANDARDS: Decontaminate all exposed skin and your eyes within 5 minutes.
NOTE: THIS TASK HAS BEEN MODIFIED FOR EFMB TESTING PURPOSES ONLY.
PERFORMANCE STEPS/MEASURES GO NO-GO
1. Decontaminate your skin using the M291 SDK or RSDL.
NOTE: Time begins when candidate begins any step/measure listed below.
a. Remove one decontaminating packet (or RSDL applicator) from carrying pouch.
b. Tear packet open at notch. Remove packet, fully unfold applicator pad, and slip fingersinto handle. (RSDL may be grasped in any manner. Save packet for later use).
c. Scrub skin starting with hands, including back of hand, palm, and fingers.
d. Hold breath, close eyes, and lift the hood and mask away from chin.
e. Continue to hold breath and scrub face.f. Wipe inside of mask which touches the face (Not the lens), then drop packet to the
ground. (Do not discard RSDL as it is used again when second packet of M291 is required).
g. Reseal, clear, and check mask.
h. Using a second packet (or original RSDL and remaining lotion in packet), scrub neck andears and wipe hands.
i. Drop the decontamination packet to the ground.
CAUTION: THE M291 SKIN DECONTAMINATING KIT IS FOR EXTERNAL USE ONLY. KEEPDECONTAMINATING POWDER OUT OF YOUR EYES, MOUTH, CUTS, AND WOUNDS. IT MAY SLIGHTLYIRRITATE YOUR SKIN OR EYES. USE WATER TO WASH THE TOXIC AGENT OUT OF YOUR EYES, CUTS, ORWOUNDS. AFTER DECONTAMINATION WITH WATER, COVER ANY EXPOSED CUTS OR WOUNDS WITHAPPROPRIATE FIRST AID WRAP OR BANDAGES BEFORE HANDLING THE DECONTAMINATING PACKAGE.
2. Remove chemical agent contamination from the eyes.
a. Remove canteen from load-bearing equipment and open canteen cap.
b. Check canteen mouth for contamination with M8 detector paper.
c. Hold breath.
d. Lift the mask and continue to hold breath.
e. Flush the eyes with water from the canteen, ensuring that the water does not flow fromone eye to the other eye.
f. Reseal, clear, and check the mask.
3. Correctly perform all performance steps/measures within 5 minutes.
EVALUATOR WRITES: CANDIDATE’S TIME FOR TASK:
REASON(S)FOR FAILURE
DOES THE CANDIDATE WISH TO REBUT THIS TASK?(CANDIDATE INITIALS APPROPRIATE BOX)
YES NO
LANEOIC/NCOICINITIALS
EVALUATOR’S SIGNATURE DATE
Worksheet # 039 to construct AMEDDC&S Form 1232, 1 NOV 11
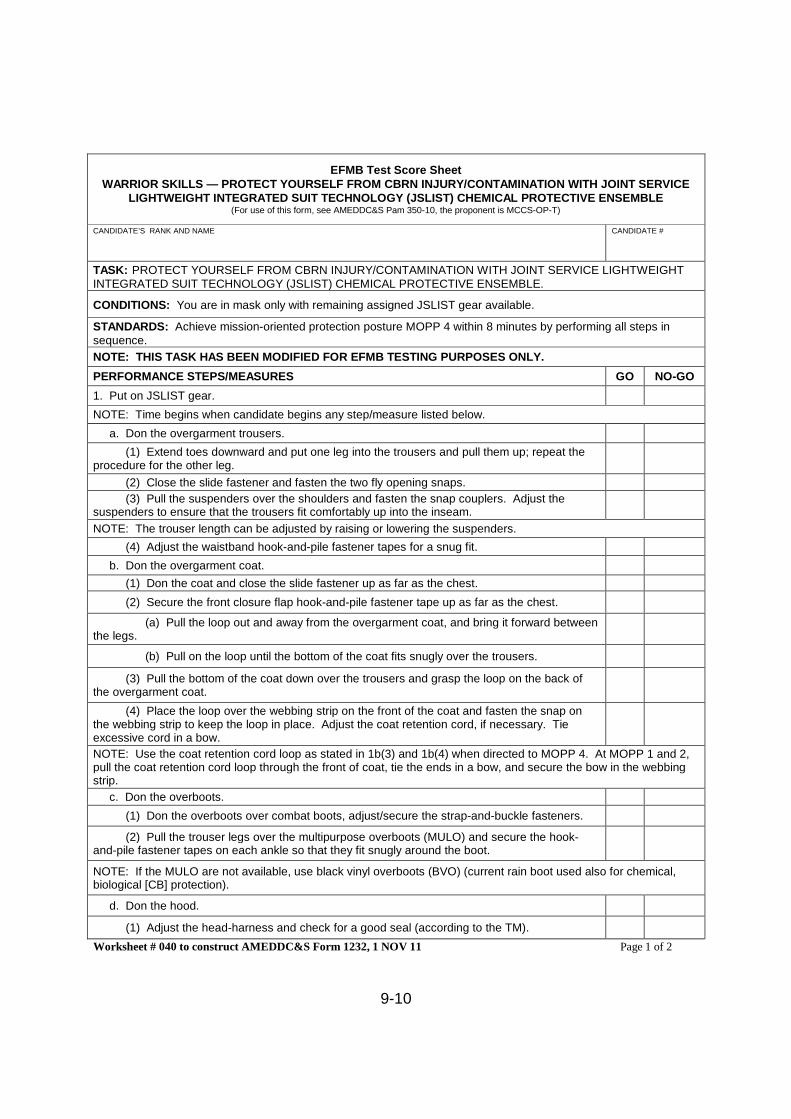
9-10
EFMB Test Score SheetWARRIOR SKILLS — PROTECT YOURSELF FROM CBRN INJURY/CONTAMINATION WITH JOINT SERVICE
LIGHTWEIGHT INTEGRATED SUIT TECHNOLOGY (JSLIST) CHEMICAL PROTECTIVE ENSEMBLE(For use of this form, see AMEDDC&S Pam 350-10, the proponent is MCCS-OP-T)
CANDIDATE’S RANK AND NAME CANDIDATE #
TASK: PROTECT YOURSELF FROM CBRN INJURY/CONTAMINATION WITH JOINT SERVICE LIGHTWEIGHTINTEGRATED SUIT TECHNOLOGY (JSLIST) CHEMICAL PROTECTIVE ENSEMBLE.
CONDITIONS: You are in mask only with remaining assigned JSLIST gear available.
STANDARDS: Achieve mission-oriented protection posture MOPP 4 within 8 minutes by performing all steps insequence.
NOTE: THIS TASK HAS BEEN MODIFIED FOR EFMB TESTING PURPOSES ONLY.
PERFORMANCE STEPS/MEASURES GO NO-GO
1. Put on JSLIST gear.
NOTE: Time begins when candidate begins any step/measure listed below.
a. Don the overgarment trousers.
(1) Extend toes downward and put one leg into the trousers and pull them up; repeat theprocedure for the other leg.
(2) Close the slide fastener and fasten the two fly opening snaps.
(3) Pull the suspenders over the shoulders and fasten the snap couplers. Adjust thesuspenders to ensure that the trousers fit comfortably up into the inseam.
NOTE: The trouser length can be adjusted by raising or lowering the suspenders.
(4) Adjust the waistband hook-and-pile fastener tapes for a snug fit.
b. Don the overgarment coat.
(1) Don the coat and close the slide fastener up as far as the chest.
(2) Secure the front closure flap hook-and-pile fastener tape up as far as the chest.
(a) Pull the loop out and away from the overgarment coat, and bring it forward betweenthe legs.
(b) Pull on the loop until the bottom of the coat fits snugly over the trousers.
(3) Pull the bottom of the coat down over the trousers and grasp the loop on the back ofthe overgarment coat.
(4) Place the loop over the webbing strip on the front of the coat and fasten the snap onthe webbing strip to keep the loop in place. Adjust the coat retention cord, if necessary. Tieexcessive cord in a bow.
NOTE: Use the coat retention cord loop as stated in 1b(3) and 1b(4) when directed to MOPP 4. At MOPP 1 and 2,pull the coat retention cord loop through the front of coat, tie the ends in a bow, and secure the bow in the webbingstrip.
c. Don the overboots.
(1) Don the overboots over combat boots, adjust/secure the strap-and-buckle fasteners.
(2) Pull the trouser legs over the multipurpose overboots (MULO) and secure the hook-and-pile fastener tapes on each ankle so that they fit snugly around the boot.
NOTE: If the MULO are not available, use black vinyl overboots (BVO) (current rain boot used also for chemical,biological [CB] protection).
d. Don the hood.
(1) Adjust the head-harness and check for a good seal (according to the TM).
Worksheet # 040 to construct AMEDDC&S Form 1232, 1 NOV 11 Page 1 of 2
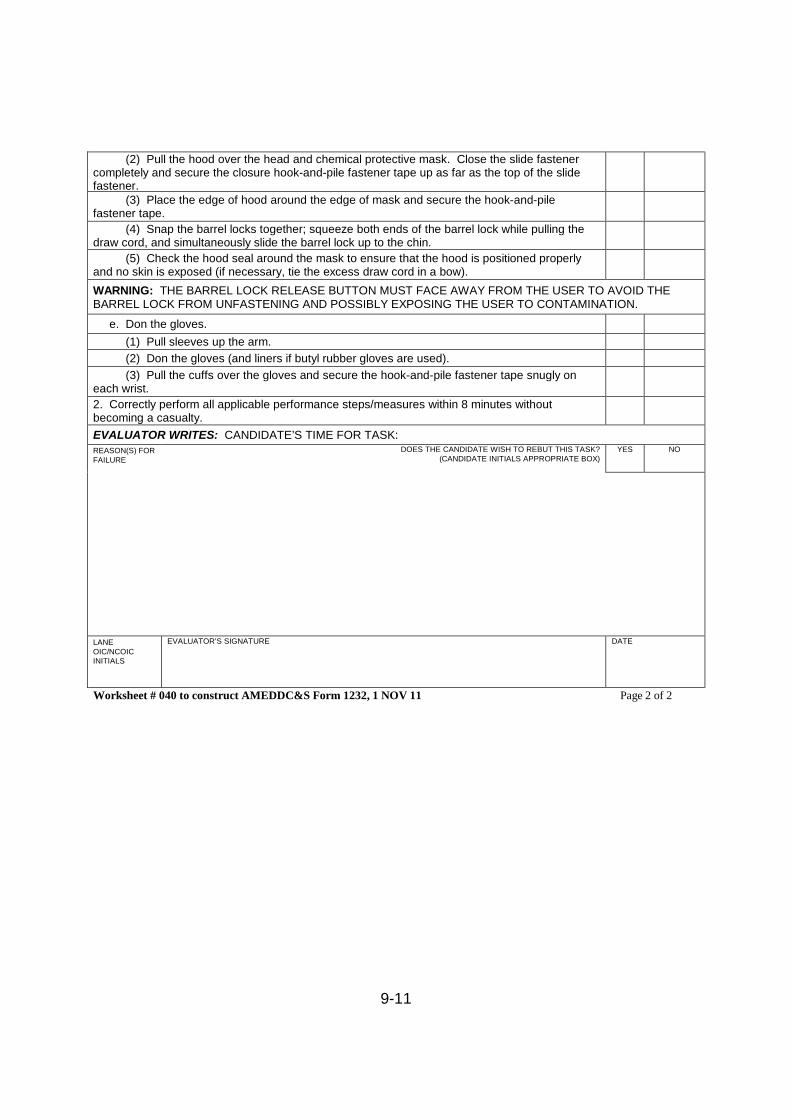
9-11
(2) Pull the hood over the head and chemical protective mask. Close the slide fastenercompletely and secure the closure hook-and-pile fastener tape up as far as the top of the slidefastener.
(3) Place the edge of hood around the edge of mask and secure the hook-and-pilefastener tape.
(4) Snap the barrel locks together; squeeze both ends of the barrel lock while pulling thedraw cord, and simultaneously slide the barrel lock up to the chin.
(5) Check the hood seal around the mask to ensure that the hood is positioned properlyand no skin is exposed (if necessary, tie the excess draw cord in a bow).
WARNING: THE BARREL LOCK RELEASE BUTTON MUST FACE AWAY FROM THE USER TO AVOID THEBARREL LOCK FROM UNFASTENING AND POSSIBLY EXPOSING THE USER TO CONTAMINATION.
e. Don the gloves.
(1) Pull sleeves up the arm.
(2) Don the gloves (and liners if butyl rubber gloves are used).
(3) Pull the cuffs over the gloves and secure the hook-and-pile fastener tape snugly oneach wrist.
2. Correctly perform all applicable performance steps/measures within 8 minutes withoutbecoming a casualty.
EVALUATOR WRITES: CANDIDATE’S TIME FOR TASK:REASON(S) FORFAILURE
DOES THE CANDIDATE WISH TO REBUT THIS TASK?(CANDIDATE INITIALS APPROPRIATE BOX)
YES NO
LANEOIC/NCOICINITIALS
EVALUATOR’S SIGNATURE DATE
Worksheet # 040 to construct AMEDDC&S Form 1232, 1 NOV 11 Page 2 of 2
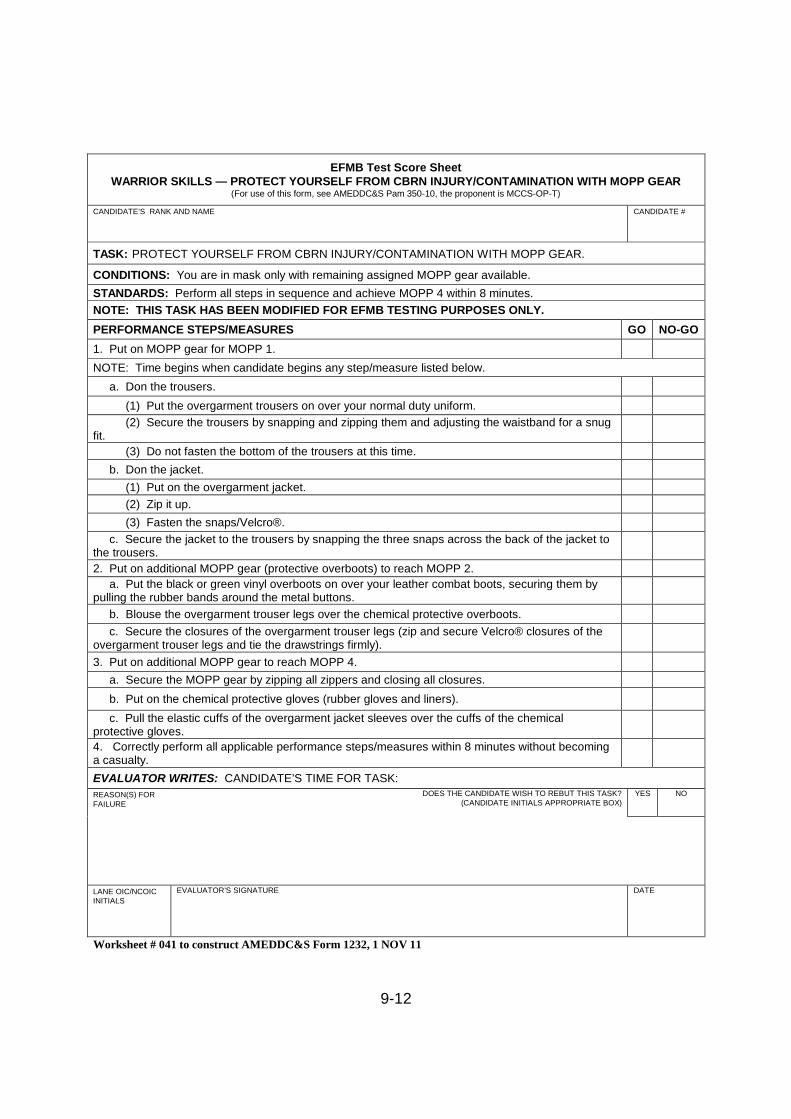
9-12
EFMB Test Score SheetWARRIOR SKILLS — PROTECT YOURSELF FROM CBRN INJURY/CONTAMINATION WITH MOPP GEAR
(For use of this form, see AMEDDC&S Pam 350-10, the proponent is MCCS-OP-T)
CANDIDATE’S RANK AND NAME CANDIDATE #
TASK: PROTECT YOURSELF FROM CBRN INJURY/CONTAMINATION WITH MOPP GEAR.
CONDITIONS: You are in mask only with remaining assigned MOPP gear available.
STANDARDS: Perform all steps in sequence and achieve MOPP 4 within 8 minutes.
NOTE: THIS TASK HAS BEEN MODIFIED FOR EFMB TESTING PURPOSES ONLY.
PERFORMANCE STEPS/MEASURES GO NO-GO
1. Put on MOPP gear for MOPP 1.
NOTE: Time begins when candidate begins any step/measure listed below.
a. Don the trousers.
(1) Put the overgarment trousers on over your normal duty uniform.
(2) Secure the trousers by snapping and zipping them and adjusting the waistband for a snugfit.
(3) Do not fasten the bottom of the trousers at this time.
b. Don the jacket.
(1) Put on the overgarment jacket.
(2) Zip it up.
(3) Fasten the snaps/Velcro®.
c. Secure the jacket to the trousers by snapping the three snaps across the back of the jacket tothe trousers.
2. Put on additional MOPP gear (protective overboots) to reach MOPP 2.
a. Put the black or green vinyl overboots on over your leather combat boots, securing them bypulling the rubber bands around the metal buttons.
b. Blouse the overgarment trouser legs over the chemical protective overboots.
c. Secure the closures of the overgarment trouser legs (zip and secure Velcro® closures of theovergarment trouser legs and tie the drawstrings firmly).
3. Put on additional MOPP gear to reach MOPP 4.
a. Secure the MOPP gear by zipping all zippers and closing all closures.
b. Put on the chemical protective gloves (rubber gloves and liners).
c. Pull the elastic cuffs of the overgarment jacket sleeves over the cuffs of the chemicalprotective gloves.
4. Correctly perform all applicable performance steps/measures within 8 minutes without becominga casualty.
EVALUATOR WRITES: CANDIDATE’S TIME FOR TASK:
REASON(S) FORFAILURE
DOES THE CANDIDATE WISH TO REBUT THIS TASK?(CANDIDATE INITIALS APPROPRIATE BOX)
YES NO
LANE OIC/NCOICINITIALS
EVALUATOR’S SIGNATURE DATE
Worksheet # 041 to construct AMEDDC&S Form 1232, 1 NOV 11
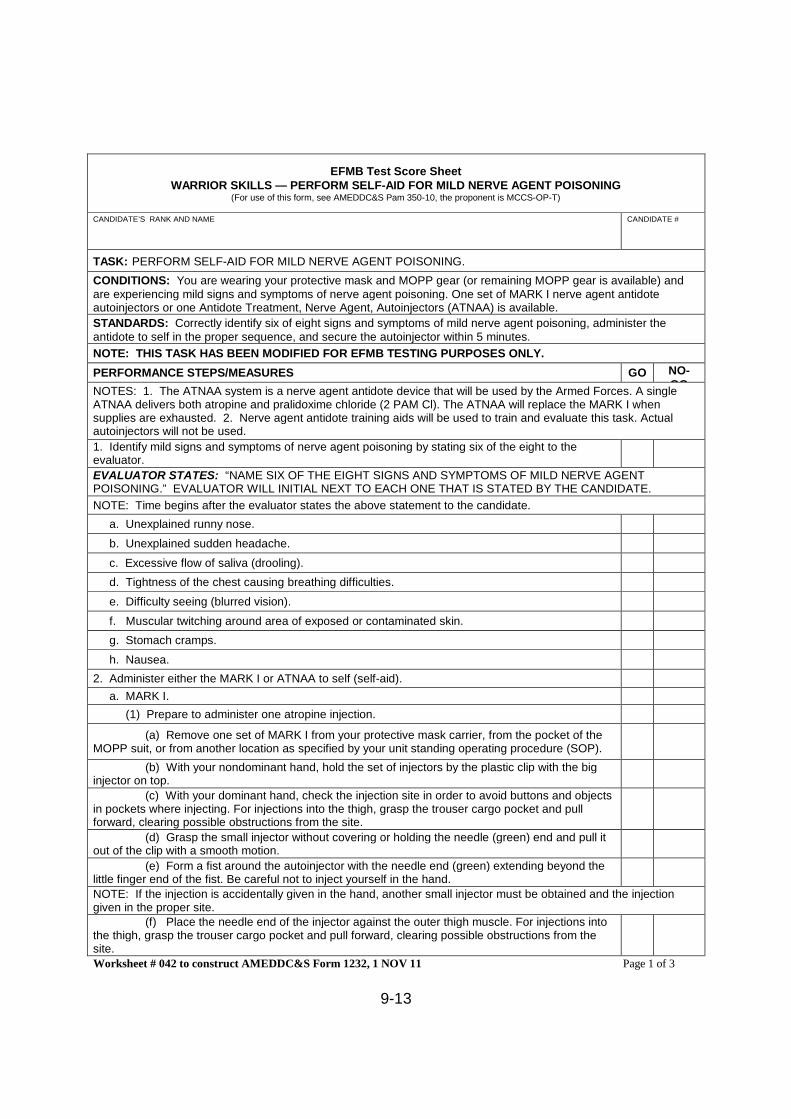
9-13
EFMB Test Score SheetWARRIOR SKILLS — PERFORM SELF-AID FOR MILD NERVE AGENT POISONING
(For use of this form, see AMEDDC&S Pam 350-10, the proponent is MCCS-OP-T)
CANDIDATE’S RANK AND NAME CANDIDATE #
TASK: PERFORM SELF-AID FOR MILD NERVE AGENT POISONING.
CONDITIONS: You are wearing your protective mask and MOPP gear (or remaining MOPP gear is available) andare experiencing mild signs and symptoms of nerve agent poisoning. One set of MARK I nerve agent antidoteautoinjectors or one Antidote Treatment, Nerve Agent, Autoinjectors (ATNAA) is available.
STANDARDS: Correctly identify six of eight signs and symptoms of mild nerve agent poisoning, administer theantidote to self in the proper sequence, and secure the autoinjector within 5 minutes.
NOTE: THIS TASK HAS BEEN MODIFIED FOR EFMB TESTING PURPOSES ONLY.
PERFORMANCE STEPS/MEASURES GO NO-GO
NOTES: 1. The ATNAA system is a nerve agent antidote device that will be used by the Armed Forces. A singleATNAA delivers both atropine and pralidoxime chloride (2 PAM Cl). The ATNAA will replace the MARK I whensupplies are exhausted. 2. Nerve agent antidote training aids will be used to train and evaluate this task. Actualautoinjectors will not be used.
1. Identify mild signs and symptoms of nerve agent poisoning by stating six of the eight to theevaluator.
EVALUATOR STATES: “NAME SIX OF THE EIGHT SIGNS AND SYMPTOMS OF MILD NERVE AGENTPOISONING.” EVALUATOR WILL INITIAL NEXT TO EACH ONE THAT IS STATED BY THE CANDIDATE.
NOTE: Time begins after the evaluator states the above statement to the candidate.
a. Unexplained runny nose.
b. Unexplained sudden headache.
c. Excessive flow of saliva (drooling).
d. Tightness of the chest causing breathing difficulties.
e. Difficulty seeing (blurred vision).
f. Muscular twitching around area of exposed or contaminated skin.
g. Stomach cramps.
h. Nausea.
2. Administer either the MARK I or ATNAA to self (self-aid).
a. MARK I.
(1) Prepare to administer one atropine injection.
(a) Remove one set of MARK I from your protective mask carrier, from the pocket of theMOPP suit, or from another location as specified by your unit standing operating procedure (SOP).
(b) With your nondominant hand, hold the set of injectors by the plastic clip with the biginjector on top.
(c) With your dominant hand, check the injection site in order to avoid buttons and objectsin pockets where injecting. For injections into the thigh, grasp the trouser cargo pocket and pullforward, clearing possible obstructions from the site.
(d) Grasp the small injector without covering or holding the needle (green) end and pull itout of the clip with a smooth motion.
(e) Form a fist around the autoinjector with the needle end (green) extending beyond thelittle finger end of the fist. Be careful not to inject yourself in the hand.
NOTE: If the injection is accidentally given in the hand, another small injector must be obtained and the injectiongiven in the proper site.
(f) Place the needle end of the injector against the outer thigh muscle. For injections intothe thigh, grasp the trouser cargo pocket and pull forward, clearing possible obstructions from thesite.
Worksheet # 042 to construct AMEDDC&S Form 1232, 1 NOV 11 Page 1 of 3
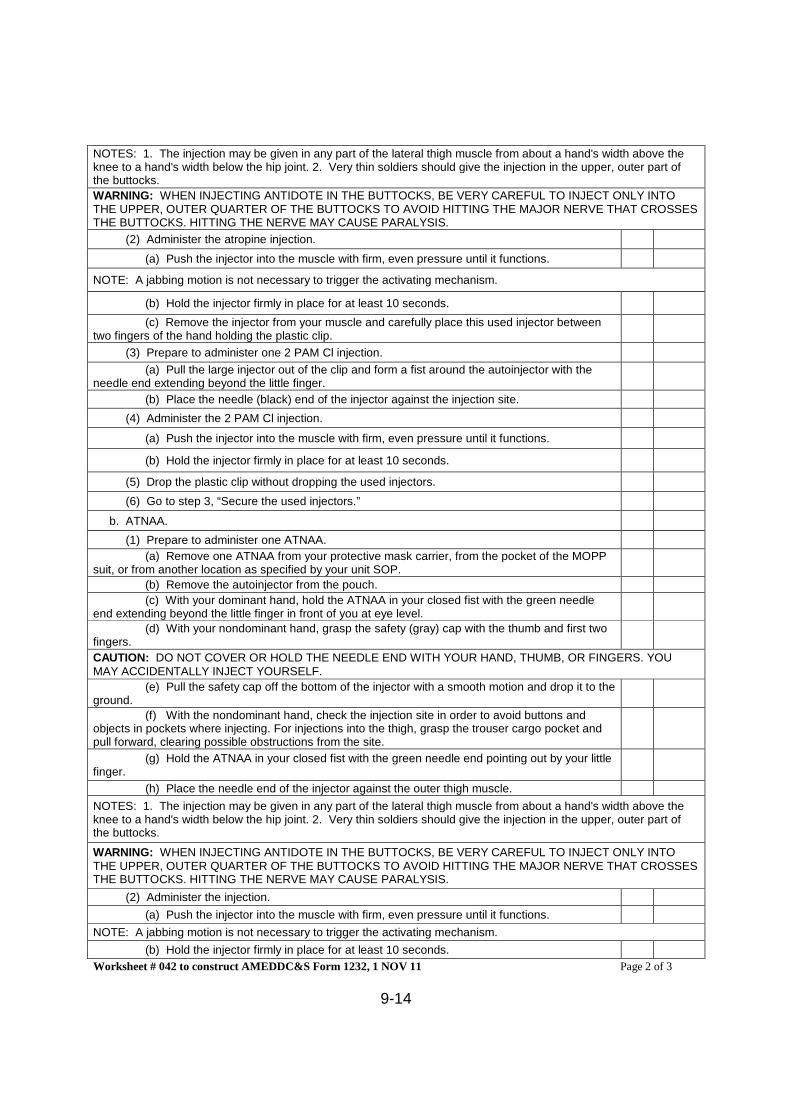
9-14
NOTES: 1. The injection may be given in any part of the lateral thigh muscle from about a hand's width above theknee to a hand's width below the hip joint. 2. Very thin soldiers should give the injection in the upper, outer part ofthe buttocks.
WARNING: WHEN INJECTING ANTIDOTE IN THE BUTTOCKS, BE VERY CAREFUL TO INJECT ONLY INTOTHE UPPER, OUTER QUARTER OF THE BUTTOCKS TO AVOID HITTING THE MAJOR NERVE THAT CROSSESTHE BUTTOCKS. HITTING THE NERVE MAY CAUSE PARALYSIS.
(2) Administer the atropine injection.
(a) Push the injector into the muscle with firm, even pressure until it functions.
NOTE: A jabbing motion is not necessary to trigger the activating mechanism.
(b) Hold the injector firmly in place for at least 10 seconds.
(c) Remove the injector from your muscle and carefully place this used injector betweentwo fingers of the hand holding the plastic clip.
(3) Prepare to administer one 2 PAM Cl injection.
(a) Pull the large injector out of the clip and form a fist around the autoinjector with theneedle end extending beyond the little finger.
(b) Place the needle (black) end of the injector against the injection site.
(4) Administer the 2 PAM Cl injection.
(a) Push the injector into the muscle with firm, even pressure until it functions.
(b) Hold the injector firmly in place for at least 10 seconds.
(5) Drop the plastic clip without dropping the used injectors.
(6) Go to step 3, “Secure the used injectors.”
b. ATNAA.
(1) Prepare to administer one ATNAA.
(a) Remove one ATNAA from your protective mask carrier, from the pocket of the MOPPsuit, or from another location as specified by your unit SOP.
(b) Remove the autoinjector from the pouch.
(c) With your dominant hand, hold the ATNAA in your closed fist with the green needleend extending beyond the little finger in front of you at eye level.
(d) With your nondominant hand, grasp the safety (gray) cap with the thumb and first twofingers.
CAUTION: DO NOT COVER OR HOLD THE NEEDLE END WITH YOUR HAND, THUMB, OR FINGERS. YOUMAY ACCIDENTALLY INJECT YOURSELF.
(e) Pull the safety cap off the bottom of the injector with a smooth motion and drop it to theground.
(f) With the nondominant hand, check the injection site in order to avoid buttons andobjects in pockets where injecting. For injections into the thigh, grasp the trouser cargo pocket andpull forward, clearing possible obstructions from the site.
(g) Hold the ATNAA in your closed fist with the green needle end pointing out by your littlefinger.
(h) Place the needle end of the injector against the outer thigh muscle.
NOTES: 1. The injection may be given in any part of the lateral thigh muscle from about a hand's width above theknee to a hand's width below the hip joint. 2. Very thin soldiers should give the injection in the upper, outer part ofthe buttocks.
WARNING: WHEN INJECTING ANTIDOTE IN THE BUTTOCKS, BE VERY CAREFUL TO INJECT ONLY INTOTHE UPPER, OUTER QUARTER OF THE BUTTOCKS TO AVOID HITTING THE MAJOR NERVE THAT CROSSESTHE BUTTOCKS. HITTING THE NERVE MAY CAUSE PARALYSIS.
(2) Administer the injection.
(a) Push the injector into the muscle with firm, even pressure until it functions.
NOTE: A jabbing motion is not necessary to trigger the activating mechanism.
(b) Hold the injector firmly in place for at least 10 seconds.
Worksheet # 042 to construct AMEDDC&S Form 1232, 1 NOV 11 Page 2 of 3
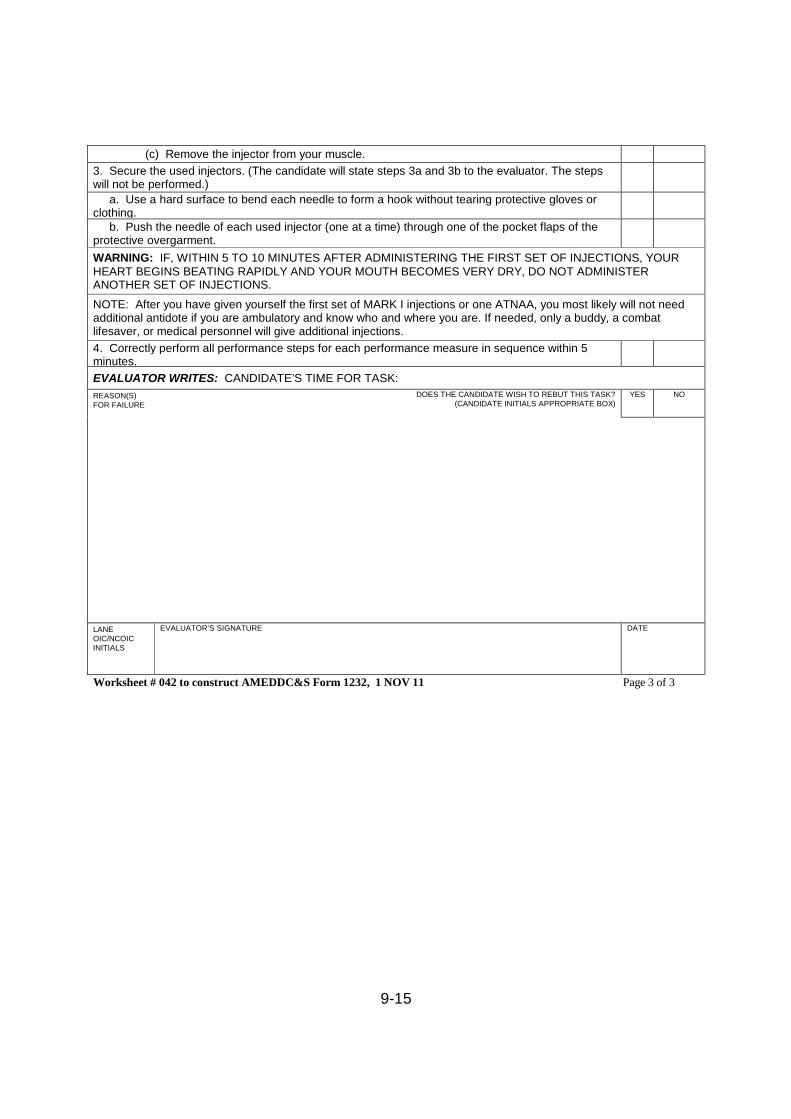
9-15
(c) Remove the injector from your muscle.
3. Secure the used injectors. (The candidate will state steps 3a and 3b to the evaluator. The stepswill not be performed.)
a. Use a hard surface to bend each needle to form a hook without tearing protective gloves orclothing.
b. Push the needle of each used injector (one at a time) through one of the pocket flaps of theprotective overgarment.
WARNING: IF, WITHIN 5 TO 10 MINUTES AFTER ADMINISTERING THE FIRST SET OF INJECTIONS, YOURHEART BEGINS BEATING RAPIDLY AND YOUR MOUTH BECOMES VERY DRY, DO NOT ADMINISTERANOTHER SET OF INJECTIONS.
NOTE: After you have given yourself the first set of MARK I injections or one ATNAA, you most likely will not needadditional antidote if you are ambulatory and know who and where you are. If needed, only a buddy, a combatlifesaver, or medical personnel will give additional injections.
4. Correctly perform all performance steps for each performance measure in sequence within 5minutes.
EVALUATOR WRITES: CANDIDATE’S TIME FOR TASK:
REASON(S)FOR FAILURE
DOES THE CANDIDATE WISH TO REBUT THIS TASK?(CANDIDATE INITIALS APPROPRIATE BOX)
YES NO
LANEOIC/NCOICINITIALS
EVALUATOR’S SIGNATURE DATE
Worksheet # 042 to construct AMEDDC&S Form 1232, 1 NOV 11 Page 3 of 3
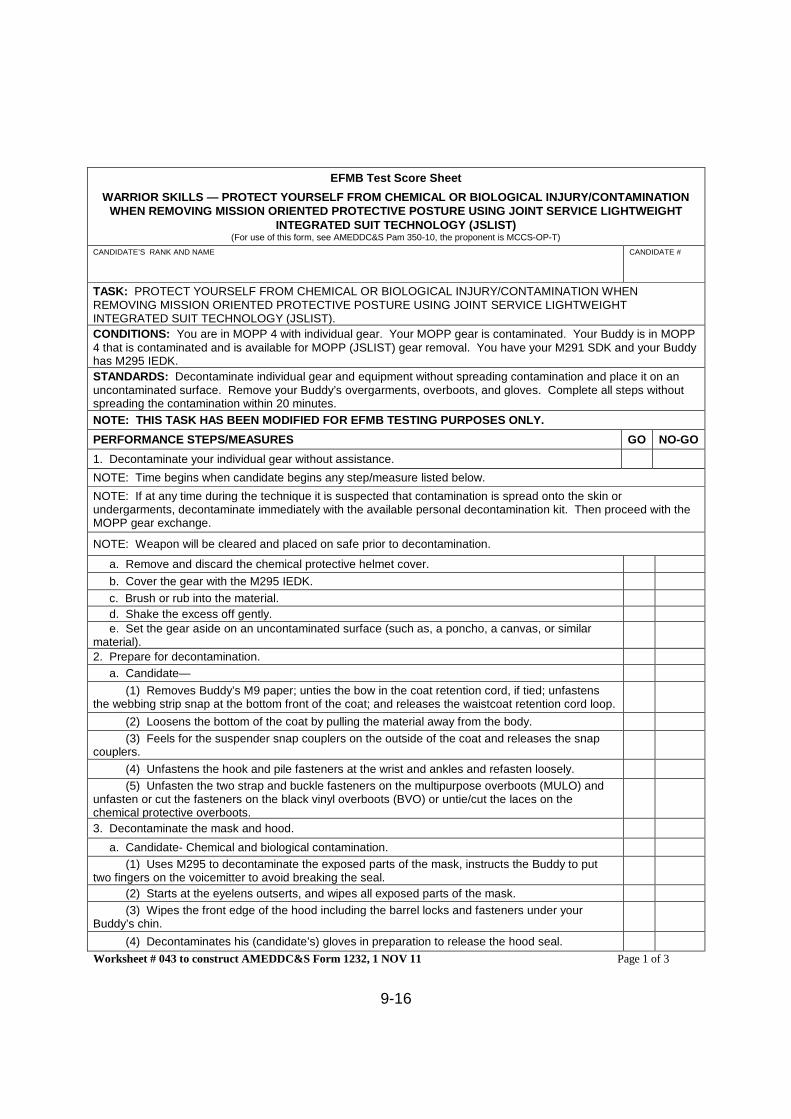
9-16
EFMB Test Score Sheet
WARRIOR SKILLS — PROTECT YOURSELF FROM CHEMICAL OR BIOLOGICAL INJURY/CONTAMINATIONWHEN REMOVING MISSION ORIENTED PROTECTIVE POSTURE USING JOINT SERVICE LIGHTWEIGHT
INTEGRATED SUIT TECHNOLOGY (JSLIST)(For use of this form, see AMEDDC&S Pam 350-10, the proponent is MCCS-OP-T)
CANDIDATE’S RANK AND NAME CANDIDATE #
TASK: PROTECT YOURSELF FROM CHEMICAL OR BIOLOGICAL INJURY/CONTAMINATION WHENREMOVING MISSION ORIENTED PROTECTIVE POSTURE USING JOINT SERVICE LIGHTWEIGHTINTEGRATED SUIT TECHNOLOGY (JSLIST).
CONDITIONS: You are in MOPP 4 with individual gear. Your MOPP gear is contaminated. Your Buddy is in MOPP4 that is contaminated and is available for MOPP (JSLIST) gear removal. You have your M291 SDK and your Buddyhas M295 IEDK.
STANDARDS: Decontaminate individual gear and equipment without spreading contamination and place it on anuncontaminated surface. Remove your Buddy’s overgarments, overboots, and gloves. Complete all steps withoutspreading the contamination within 20 minutes.
NOTE: THIS TASK HAS BEEN MODIFIED FOR EFMB TESTING PURPOSES ONLY.
PERFORMANCE STEPS/MEASURES GO NO-GO
1. Decontaminate your individual gear without assistance.
NOTE: Time begins when candidate begins any step/measure listed below.
NOTE: If at any time during the technique it is suspected that contamination is spread onto the skin orundergarments, decontaminate immediately with the available personal decontamination kit. Then proceed with theMOPP gear exchange.
NOTE: Weapon will be cleared and placed on safe prior to decontamination.
a. Remove and discard the chemical protective helmet cover.
b. Cover the gear with the M295 IEDK.
c. Brush or rub into the material.
d. Shake the excess off gently.e. Set the gear aside on an uncontaminated surface (such as, a poncho, a canvas, or similar
material).
2. Prepare for decontamination.
a. Candidate—
(1) Removes Buddy’s M9 paper; unties the bow in the coat retention cord, if tied; unfastensthe webbing strip snap at the bottom front of the coat; and releases the waistcoat retention cord loop.
(2) Loosens the bottom of the coat by pulling the material away from the body.
(3) Feels for the suspender snap couplers on the outside of the coat and releases the snapcouplers.
(4) Unfastens the hook and pile fasteners at the wrist and ankles and refasten loosely.
(5) Unfasten the two strap and buckle fasteners on the multipurpose overboots (MULO) andunfasten or cut the fasteners on the black vinyl overboots (BVO) or untie/cut the laces on thechemical protective overboots.
3. Decontaminate the mask and hood.
a. Candidate- Chemical and biological contamination.
(1) Uses M295 to decontaminate the exposed parts of the mask, instructs the Buddy to puttwo fingers on the voicemitter to avoid breaking the seal.
(2) Starts at the eyelens outserts, and wipes all exposed parts of the mask.
(3) Wipes the front edge of the hood including the barrel locks and fasteners under yourBuddy’s chin.
(4) Decontaminates his (candidate’s) gloves in preparation to release the hood seal.
Worksheet # 043 to construct AMEDDC&S Form 1232, 1 NOV 11 Page 1 of 3
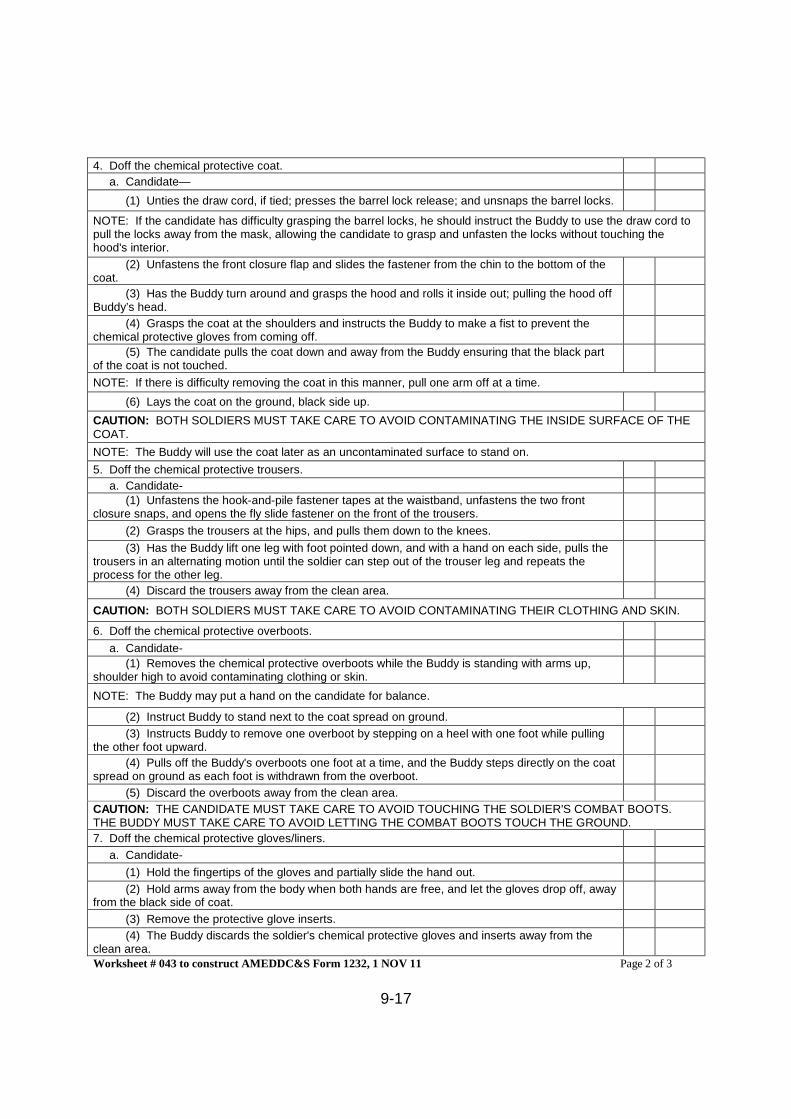
9-17
4. Doff the chemical protective coat.
a. Candidate—
(1) Unties the draw cord, if tied; presses the barrel lock release; and unsnaps the barrel locks.
NOTE: If the candidate has difficulty grasping the barrel locks, he should instruct the Buddy to use the draw cord topull the locks away from the mask, allowing the candidate to grasp and unfasten the locks without touching thehood's interior.
(2) Unfastens the front closure flap and slides the fastener from the chin to the bottom of thecoat.
(3) Has the Buddy turn around and grasps the hood and rolls it inside out; pulling the hood offBuddy’s head.
(4) Grasps the coat at the shoulders and instructs the Buddy to make a fist to prevent thechemical protective gloves from coming off.
(5) The candidate pulls the coat down and away from the Buddy ensuring that the black partof the coat is not touched.
NOTE: If there is difficulty removing the coat in this manner, pull one arm off at a time.
(6) Lays the coat on the ground, black side up.
CAUTION: BOTH SOLDIERS MUST TAKE CARE TO AVOID CONTAMINATING THE INSIDE SURFACE OF THECOAT.
NOTE: The Buddy will use the coat later as an uncontaminated surface to stand on.
5. Doff the chemical protective trousers.
a. Candidate-(1) Unfastens the hook-and-pile fastener tapes at the waistband, unfastens the two front
closure snaps, and opens the fly slide fastener on the front of the trousers.
(2) Grasps the trousers at the hips, and pulls them down to the knees.
(3) Has the Buddy lift one leg with foot pointed down, and with a hand on each side, pulls thetrousers in an alternating motion until the soldier can step out of the trouser leg and repeats theprocess for the other leg.
(4) Discard the trousers away from the clean area.
CAUTION: BOTH SOLDIERS MUST TAKE CARE TO AVOID CONTAMINATING THEIR CLOTHING AND SKIN.
6. Doff the chemical protective overboots.
a. Candidate-
(1) Removes the chemical protective overboots while the Buddy is standing with arms up,shoulder high to avoid contaminating clothing or skin.
NOTE: The Buddy may put a hand on the candidate for balance.
(2) Instruct Buddy to stand next to the coat spread on ground.
(3) Instructs Buddy to remove one overboot by stepping on a heel with one foot while pullingthe other foot upward.
(4) Pulls off the Buddy's overboots one foot at a time, and the Buddy steps directly on the coatspread on ground as each foot is withdrawn from the overboot.
(5) Discard the overboots away from the clean area.
CAUTION: THE CANDIDATE MUST TAKE CARE TO AVOID TOUCHING THE SOLDIER'S COMBAT BOOTS.THE BUDDY MUST TAKE CARE TO AVOID LETTING THE COMBAT BOOTS TOUCH THE GROUND.
7. Doff the chemical protective gloves/liners.
a. Candidate-
(1) Hold the fingertips of the gloves and partially slide the hand out.
(2) Hold arms away from the body when both hands are free, and let the gloves drop off, awayfrom the black side of coat.
(3) Remove the protective glove inserts.
(4) The Buddy discards the soldier's chemical protective gloves and inserts away from theclean area.Worksheet # 043 to construct AMEDDC&S Form 1232, 1 NOV 11 Page 2 of 3
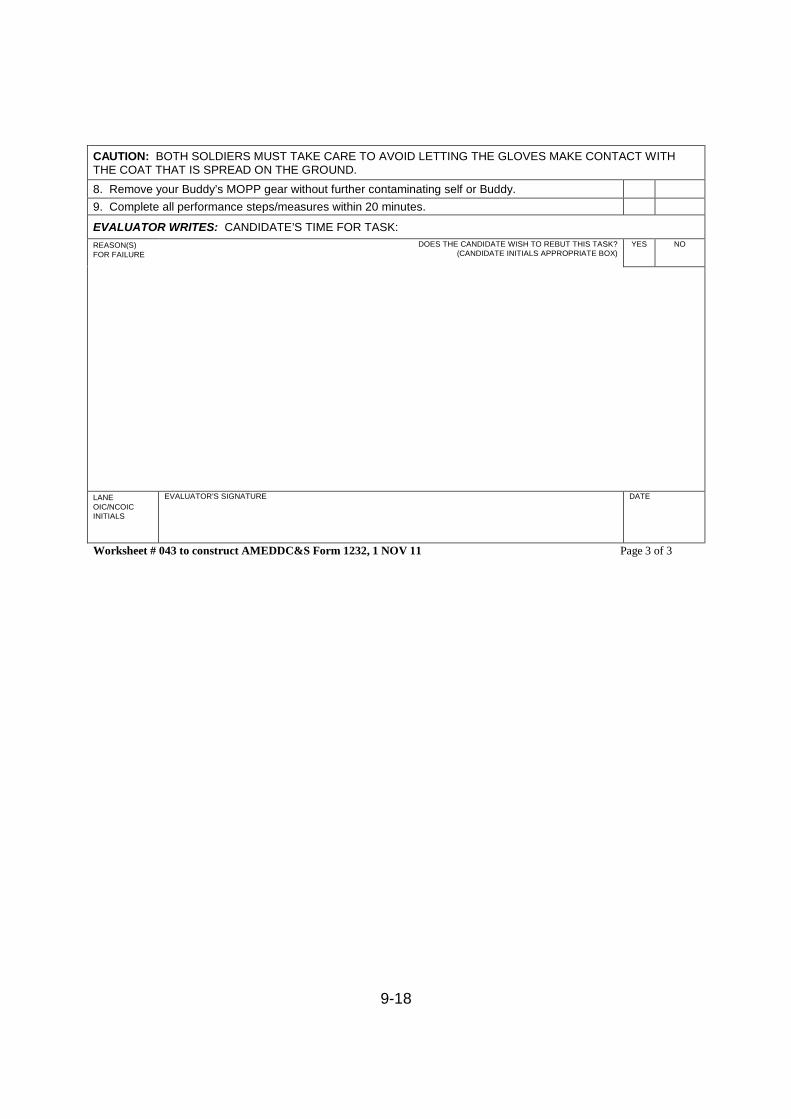
9-18
CAUTION: BOTH SOLDIERS MUST TAKE CARE TO AVOID LETTING THE GLOVES MAKE CONTACT WITHTHE COAT THAT IS SPREAD ON THE GROUND.
8. Remove your Buddy’s MOPP gear without further contaminating self or Buddy.
9. Complete all performance steps/measures within 20 minutes.
EVALUATOR WRITES: CANDIDATE’S TIME FOR TASK:
REASON(S)FOR FAILURE
DOES THE CANDIDATE WISH TO REBUT THIS TASK?(CANDIDATE INITIALS APPROPRIATE BOX)
YES NO
LANEOIC/NCOICINITIALS
EVALUATOR’S SIGNATURE DATE
Worksheet # 043 to construct AMEDDC&S Form 1232, 1 NOV 11 Page 3 of 3
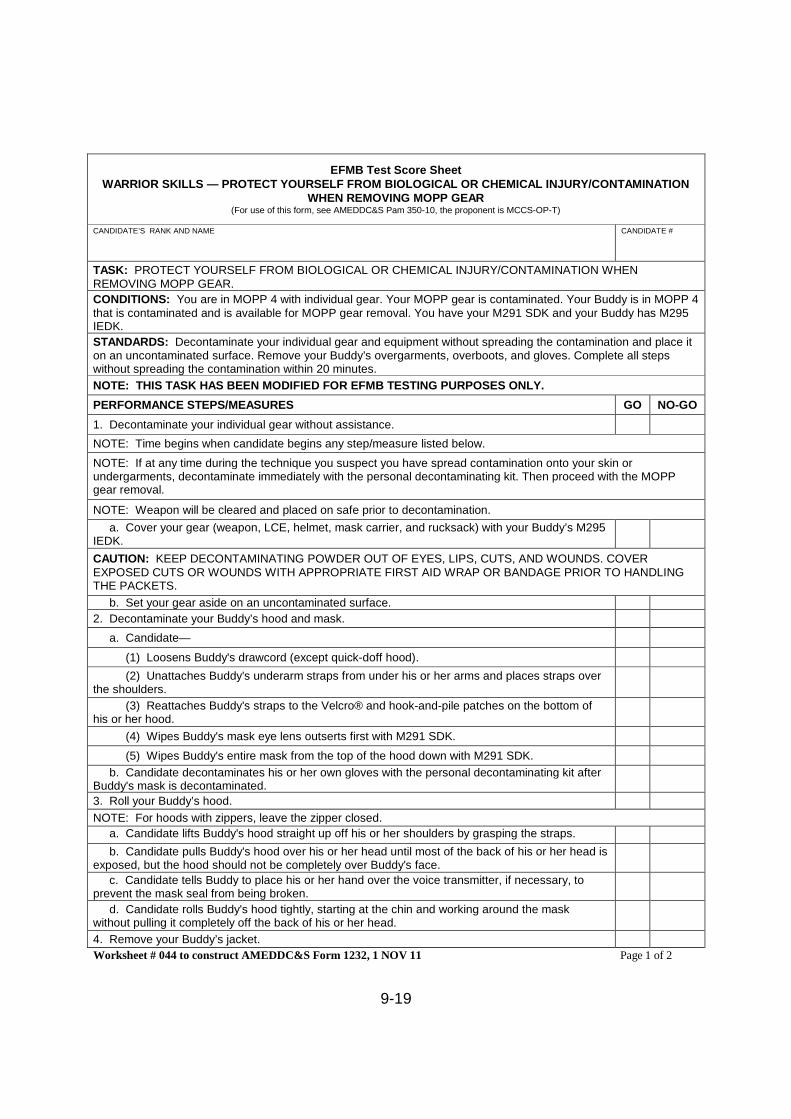
9-19
EFMB Test Score SheetWARRIOR SKILLS — PROTECT YOURSELF FROM BIOLOGICAL OR CHEMICAL INJURY/CONTAMINATION
WHEN REMOVING MOPP GEAR(For use of this form, see AMEDDC&S Pam 350-10, the proponent is MCCS-OP-T)
CANDIDATE’S RANK AND NAME CANDIDATE #
TASK: PROTECT YOURSELF FROM BIOLOGICAL OR CHEMICAL INJURY/CONTAMINATION WHENREMOVING MOPP GEAR.
CONDITIONS: You are in MOPP 4 with individual gear. Your MOPP gear is contaminated. Your Buddy is in MOPP 4that is contaminated and is available for MOPP gear removal. You have your M291 SDK and your Buddy has M295IEDK.
STANDARDS: Decontaminate your individual gear and equipment without spreading the contamination and place iton an uncontaminated surface. Remove your Buddy’s overgarments, overboots, and gloves. Complete all stepswithout spreading the contamination within 20 minutes.
NOTE: THIS TASK HAS BEEN MODIFIED FOR EFMB TESTING PURPOSES ONLY.
PERFORMANCE STEPS/MEASURES GO NO-GO
1. Decontaminate your individual gear without assistance.
NOTE: Time begins when candidate begins any step/measure listed below.
NOTE: If at any time during the technique you suspect you have spread contamination onto your skin orundergarments, decontaminate immediately with the personal decontaminating kit. Then proceed with the MOPPgear removal.
NOTE: Weapon will be cleared and placed on safe prior to decontamination.
a. Cover your gear (weapon, LCE, helmet, mask carrier, and rucksack) with your Buddy’s M295IEDK.
CAUTION: KEEP DECONTAMINATING POWDER OUT OF EYES, LIPS, CUTS, AND WOUNDS. COVEREXPOSED CUTS OR WOUNDS WITH APPROPRIATE FIRST AID WRAP OR BANDAGE PRIOR TO HANDLINGTHE PACKETS.
b. Set your gear aside on an uncontaminated surface.
2. Decontaminate your Buddy’s hood and mask.
a. Candidate—
(1) Loosens Buddy's drawcord (except quick-doff hood).
(2) Unattaches Buddy's underarm straps from under his or her arms and places straps overthe shoulders.
(3) Reattaches Buddy's straps to the Velcro® and hook-and-pile patches on the bottom ofhis or her hood.
(4) Wipes Buddy's mask eye lens outserts first with M291 SDK.
(5) Wipes Buddy's entire mask from the top of the hood down with M291 SDK.
b. Candidate decontaminates his or her own gloves with the personal decontaminating kit afterBuddy's mask is decontaminated.
3. Roll your Buddy’s hood.
NOTE: For hoods with zippers, leave the zipper closed.
a. Candidate lifts Buddy's hood straight up off his or her shoulders by grasping the straps.
b. Candidate pulls Buddy's hood over his or her head until most of the back of his or her head isexposed, but the hood should not be completely over Buddy's face.
c. Candidate tells Buddy to place his or her hand over the voice transmitter, if necessary, toprevent the mask seal from being broken.
d. Candidate rolls Buddy's hood tightly, starting at the chin and working around the maskwithout pulling it completely off the back of his or her head.
4. Remove your Buddy’s jacket.
Worksheet # 044 to construct AMEDDC&S Form 1232, 1 NOV 11 Page 1 of 2
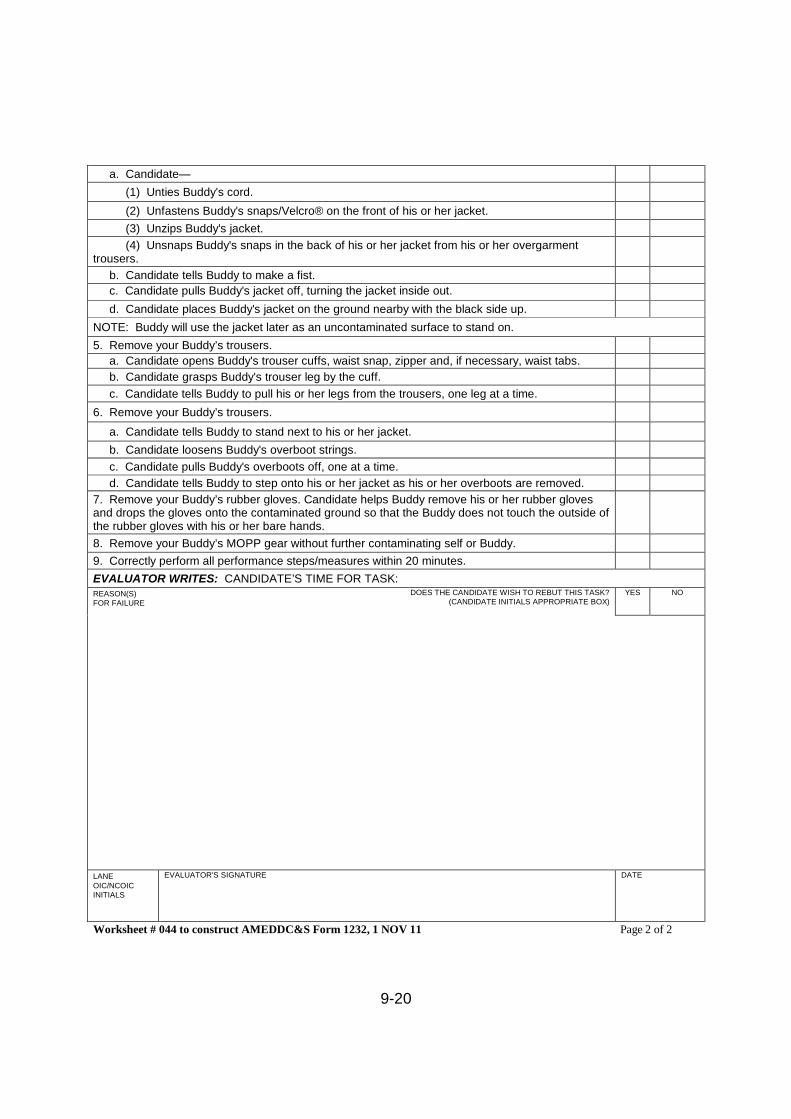
9-20
a. Candidate—
(1) Unties Buddy's cord.
(2) Unfastens Buddy's snaps/Velcro® on the front of his or her jacket.
(3) Unzips Buddy's jacket.
(4) Unsnaps Buddy's snaps in the back of his or her jacket from his or her overgarmenttrousers.
b. Candidate tells Buddy to make a fist.
c. Candidate pulls Buddy's jacket off, turning the jacket inside out.
d. Candidate places Buddy's jacket on the ground nearby with the black side up.
NOTE: Buddy will use the jacket later as an uncontaminated surface to stand on.
5. Remove your Buddy’s trousers.
a. Candidate opens Buddy's trouser cuffs, waist snap, zipper and, if necessary, waist tabs.
b. Candidate grasps Buddy's trouser leg by the cuff.
c. Candidate tells Buddy to pull his or her legs from the trousers, one leg at a time.
6. Remove your Buddy’s trousers.
a. Candidate tells Buddy to stand next to his or her jacket.
b. Candidate loosens Buddy's overboot strings.
c. Candidate pulls Buddy's overboots off, one at a time.
d. Candidate tells Buddy to step onto his or her jacket as his or her overboots are removed.
7. Remove your Buddy’s rubber gloves. Candidate helps Buddy remove his or her rubber glovesand drops the gloves onto the contaminated ground so that the Buddy does not touch the outside ofthe rubber gloves with his or her bare hands.
8. Remove your Buddy’s MOPP gear without further contaminating self or Buddy.
9. Correctly perform all performance steps/measures within 20 minutes.
EVALUATOR WRITES: CANDIDATE’S TIME FOR TASK:REASON(S)FOR FAILURE
DOES THE CANDIDATE WISH TO REBUT THIS TASK?(CANDIDATE INITIALS APPROPRIATE BOX)
YES NO
LANEOIC/NCOICINITIALS
EVALUATOR’S SIGNATURE DATE
Worksheet # 044 to construct AMEDDC&S Form 1232, 1 NOV 11 Page 2 of 2
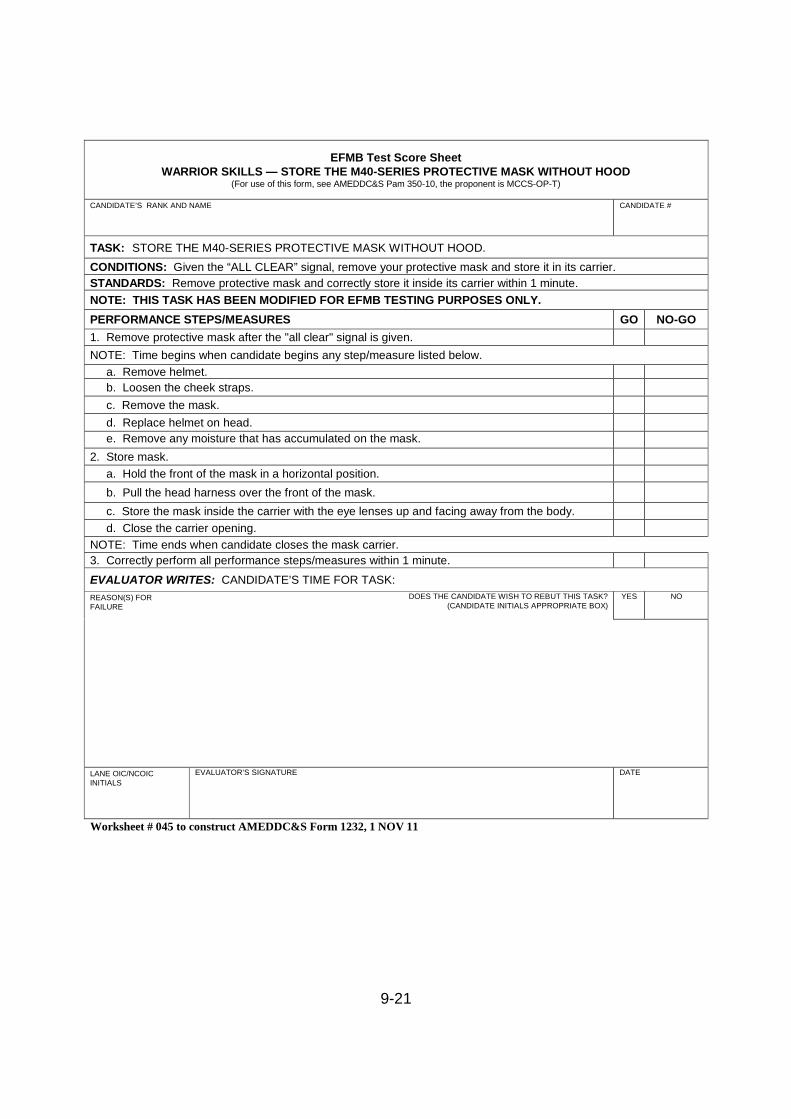
9-21
EFMB Test Score SheetWARRIOR SKILLS — STORE THE M40-SERIES PROTECTIVE MASK WITHOUT HOOD
(For use of this form, see AMEDDC&S Pam 350-10, the proponent is MCCS-OP-T)
CANDIDATE’S RANK AND NAME CANDIDATE #
TASK: STORE THE M40-SERIES PROTECTIVE MASK WITHOUT HOOD.
CONDITIONS: Given the “ALL CLEAR” signal, remove your protective mask and store it in its carrier.
STANDARDS: Remove protective mask and correctly store it inside its carrier within 1 minute.
NOTE: THIS TASK HAS BEEN MODIFIED FOR EFMB TESTING PURPOSES ONLY.
PERFORMANCE STEPS/MEASURES GO NO-GO
1. Remove protective mask after the "all clear" signal is given.
NOTE: Time begins when candidate begins any step/measure listed below.
a. Remove helmet.
b. Loosen the cheek straps.
c. Remove the mask.
d. Replace helmet on head.
e. Remove any moisture that has accumulated on the mask.
2. Store mask.
a. Hold the front of the mask in a horizontal position.
b. Pull the head harness over the front of the mask.
c. Store the mask inside the carrier with the eye lenses up and facing away from the body.
d. Close the carrier opening.
NOTE: Time ends when candidate closes the mask carrier.
3. Correctly perform all performance steps/measures within 1 minute.
EVALUATOR WRITES: CANDIDATE’S TIME FOR TASK:
REASON(S) FORFAILURE
DOES THE CANDIDATE WISH TO REBUT THIS TASK?(CANDIDATE INITIALS APPROPRIATE BOX)
YES NO
LANE OIC/NCOICINITIALS
EVALUATOR’S SIGNATURE DATE
Worksheet # 045 to construct AMEDDC&S Form 1232, 1 NOV 11
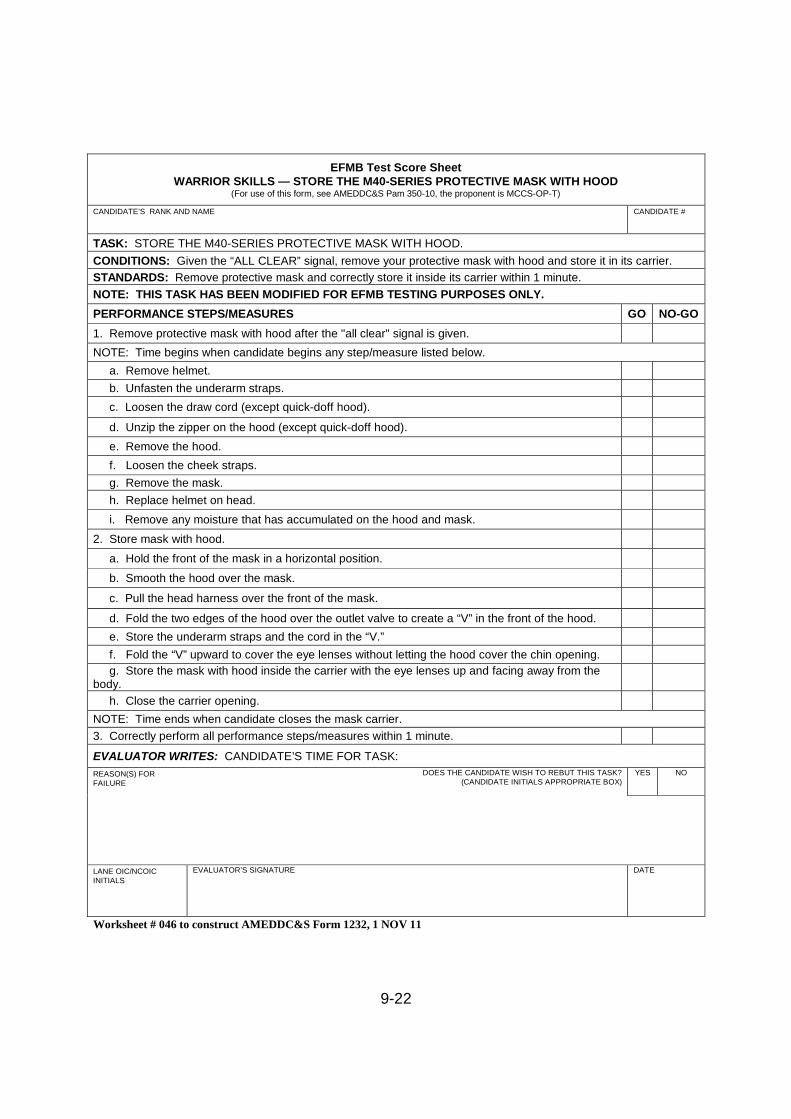
9-22
EFMB Test Score SheetWARRIOR SKILLS — STORE THE M40-SERIES PROTECTIVE MASK WITH HOOD
(For use of this form, see AMEDDC&S Pam 350-10, the proponent is MCCS-OP-T)
CANDIDATE’S RANK AND NAME CANDIDATE #
TASK: STORE THE M40-SERIES PROTECTIVE MASK WITH HOOD.
CONDITIONS: Given the “ALL CLEAR” signal, remove your protective mask with hood and store it in its carrier.
STANDARDS: Remove protective mask and correctly store it inside its carrier within 1 minute.
NOTE: THIS TASK HAS BEEN MODIFIED FOR EFMB TESTING PURPOSES ONLY.
PERFORMANCE STEPS/MEASURES GO NO-GO
1. Remove protective mask with hood after the "all clear" signal is given.
NOTE: Time begins when candidate begins any step/measure listed below.
a. Remove helmet.
b. Unfasten the underarm straps.
c. Loosen the draw cord (except quick-doff hood).
d. Unzip the zipper on the hood (except quick-doff hood).
e. Remove the hood.
f. Loosen the cheek straps.
g. Remove the mask.
h. Replace helmet on head.
i. Remove any moisture that has accumulated on the hood and mask.
2. Store mask with hood.
a. Hold the front of the mask in a horizontal position.
b. Smooth the hood over the mask.
c. Pull the head harness over the front of the mask.
d. Fold the two edges of the hood over the outlet valve to create a “V” in the front of the hood.
e. Store the underarm straps and the cord in the “V.”
f. Fold the “V” upward to cover the eye lenses without letting the hood cover the chin opening.
g. Store the mask with hood inside the carrier with the eye lenses up and facing away from thebody.
h. Close the carrier opening.
NOTE: Time ends when candidate closes the mask carrier.
3. Correctly perform all performance steps/measures within 1 minute.
EVALUATOR WRITES: CANDIDATE’S TIME FOR TASK:
REASON(S) FORFAILURE
DOES THE CANDIDATE WISH TO REBUT THIS TASK?(CANDIDATE INITIALS APPROPRIATE BOX)
YES NO
LANE OIC/NCOICINITIALS
EVALUATOR’S SIGNATURE DATE
Worksheet # 046 to construct AMEDDC&S Form 1232, 1 NOV 11
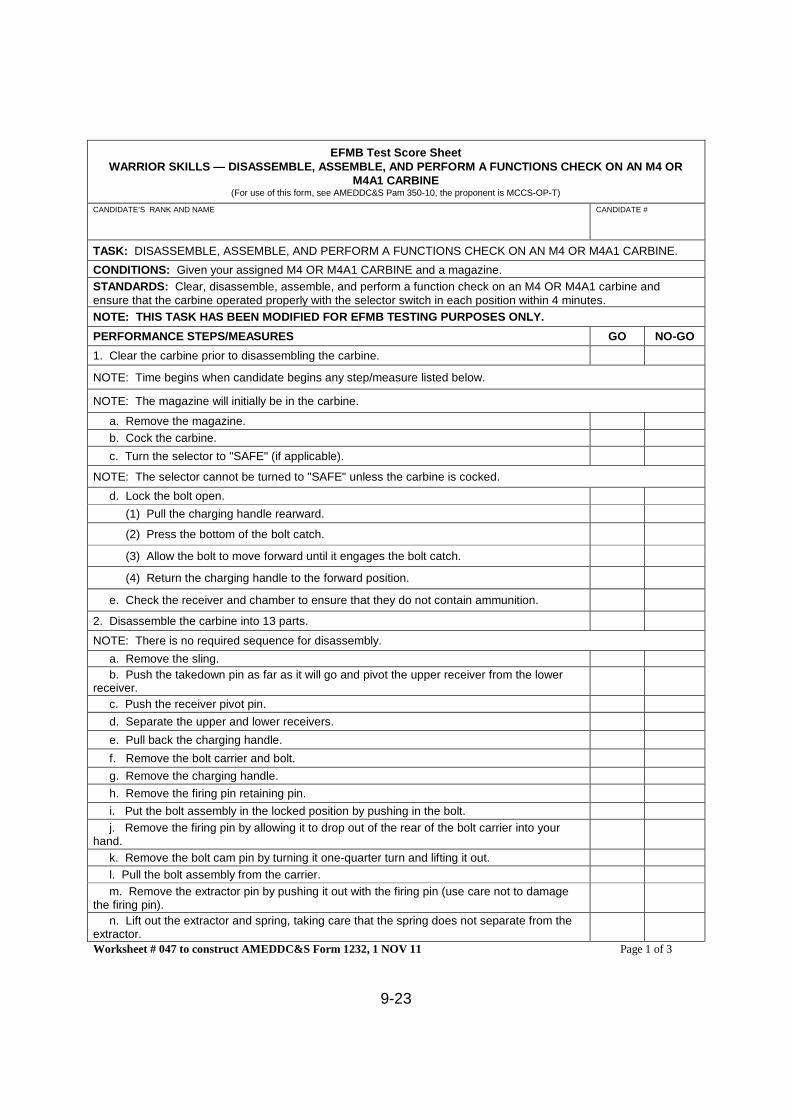
9-23
EFMB Test Score SheetWARRIOR SKILLS — DISASSEMBLE, ASSEMBLE, AND PERFORM A FUNCTIONS CHECK ON AN M4 OR
M4A1 CARBINE(For use of this form, see AMEDDC&S Pam 350-10, the proponent is MCCS-OP-T)
CANDIDATE’S RANK AND NAME CANDIDATE #
TASK: DISASSEMBLE, ASSEMBLE, AND PERFORM A FUNCTIONS CHECK ON AN M4 OR M4A1 CARBINE.
CONDITIONS: Given your assigned M4 OR M4A1 CARBINE and a magazine.
STANDARDS: Clear, disassemble, assemble, and perform a function check on an M4 OR M4A1 carbine andensure that the carbine operated properly with the selector switch in each position within 4 minutes.
NOTE: THIS TASK HAS BEEN MODIFIED FOR EFMB TESTING PURPOSES ONLY.
PERFORMANCE STEPS/MEASURES GO NO-GO
1. Clear the carbine prior to disassembling the carbine.
NOTE: Time begins when candidate begins any step/measure listed below.
NOTE: The magazine will initially be in the carbine.
a. Remove the magazine.
b. Cock the carbine.
c. Turn the selector to "SAFE" (if applicable).
NOTE: The selector cannot be turned to "SAFE" unless the carbine is cocked.
d. Lock the bolt open.
(1) Pull the charging handle rearward.
(2) Press the bottom of the bolt catch.
(3) Allow the bolt to move forward until it engages the bolt catch.
(4) Return the charging handle to the forward position.
e. Check the receiver and chamber to ensure that they do not contain ammunition.
2. Disassemble the carbine into 13 parts.
NOTE: There is no required sequence for disassembly.
a. Remove the sling.
b. Push the takedown pin as far as it will go and pivot the upper receiver from the lowerreceiver.
c. Push the receiver pivot pin.
d. Separate the upper and lower receivers.
e. Pull back the charging handle.
f. Remove the bolt carrier and bolt.
g. Remove the charging handle.
h. Remove the firing pin retaining pin.
i. Put the bolt assembly in the locked position by pushing in the bolt.
j. Remove the firing pin by allowing it to drop out of the rear of the bolt carrier into yourhand.
k. Remove the bolt cam pin by turning it one-quarter turn and lifting it out.
l. Pull the bolt assembly from the carrier.
m. Remove the extractor pin by pushing it out with the firing pin (use care not to damagethe firing pin).
n. Lift out the extractor and spring, taking care that the spring does not separate from theextractor.
Worksheet # 047 to construct AMEDDC&S Form 1232, 1 NOV 11 Page 1 of 3
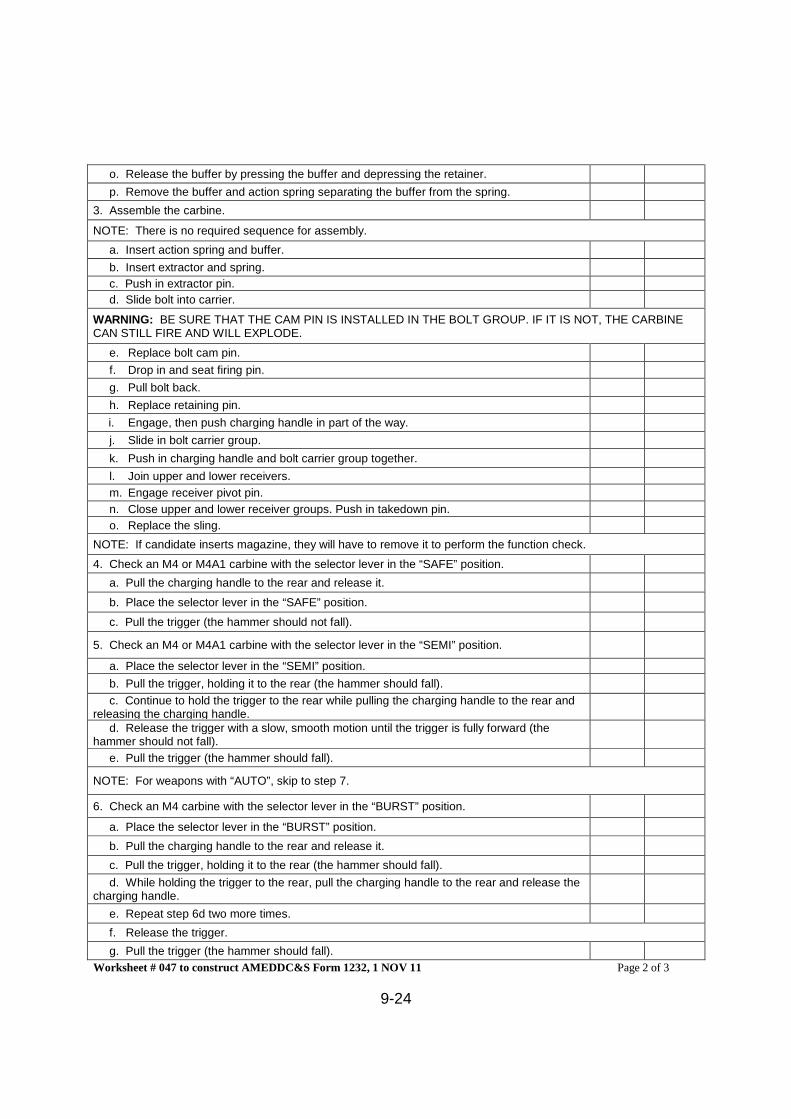
9-24
o. Release the buffer by pressing the buffer and depressing the retainer.
p. Remove the buffer and action spring separating the buffer from the spring.
3. Assemble the carbine.
NOTE: There is no required sequence for assembly.
a. Insert action spring and buffer.
b. Insert extractor and spring.
c. Push in extractor pin.
d. Slide bolt into carrier.
WARNING: BE SURE THAT THE CAM PIN IS INSTALLED IN THE BOLT GROUP. IF IT IS NOT, THE CARBINECAN STILL FIRE AND WILL EXPLODE.
e. Replace bolt cam pin.
f. Drop in and seat firing pin.
g. Pull bolt back.
h. Replace retaining pin.
i. Engage, then push charging handle in part of the way.
j. Slide in bolt carrier group.
k. Push in charging handle and bolt carrier group together.
l. Join upper and lower receivers.
m. Engage receiver pivot pin.
n. Close upper and lower receiver groups. Push in takedown pin.
o. Replace the sling.
NOTE: If candidate inserts magazine, they will have to remove it to perform the function check.
4. Check an M4 or M4A1 carbine with the selector lever in the “SAFE” position.
a. Pull the charging handle to the rear and release it.
b. Place the selector lever in the “SAFE” position.
c. Pull the trigger (the hammer should not fall).
5. Check an M4 or M4A1 carbine with the selector lever in the “SEMI” position.
a. Place the selector lever in the “SEMI” position.
b. Pull the trigger, holding it to the rear (the hammer should fall).
c. Continue to hold the trigger to the rear while pulling the charging handle to the rear andreleasing the charging handle.
d. Release the trigger with a slow, smooth motion until the trigger is fully forward (thehammer should not fall).
e. Pull the trigger (the hammer should fall).
NOTE: For weapons with “AUTO”, skip to step 7.
6. Check an M4 carbine with the selector lever in the “BURST” position.
a. Place the selector lever in the “BURST” position.
b. Pull the charging handle to the rear and release it.
c. Pull the trigger, holding it to the rear (the hammer should fall).
d. While holding the trigger to the rear, pull the charging handle to the rear and release thecharging handle.
e. Repeat step 6d two more times.
f. Release the trigger.
g. Pull the trigger (the hammer should fall).
Worksheet # 047 to construct AMEDDC&S Form 1232, 1 NOV 11 Page 2 of 3
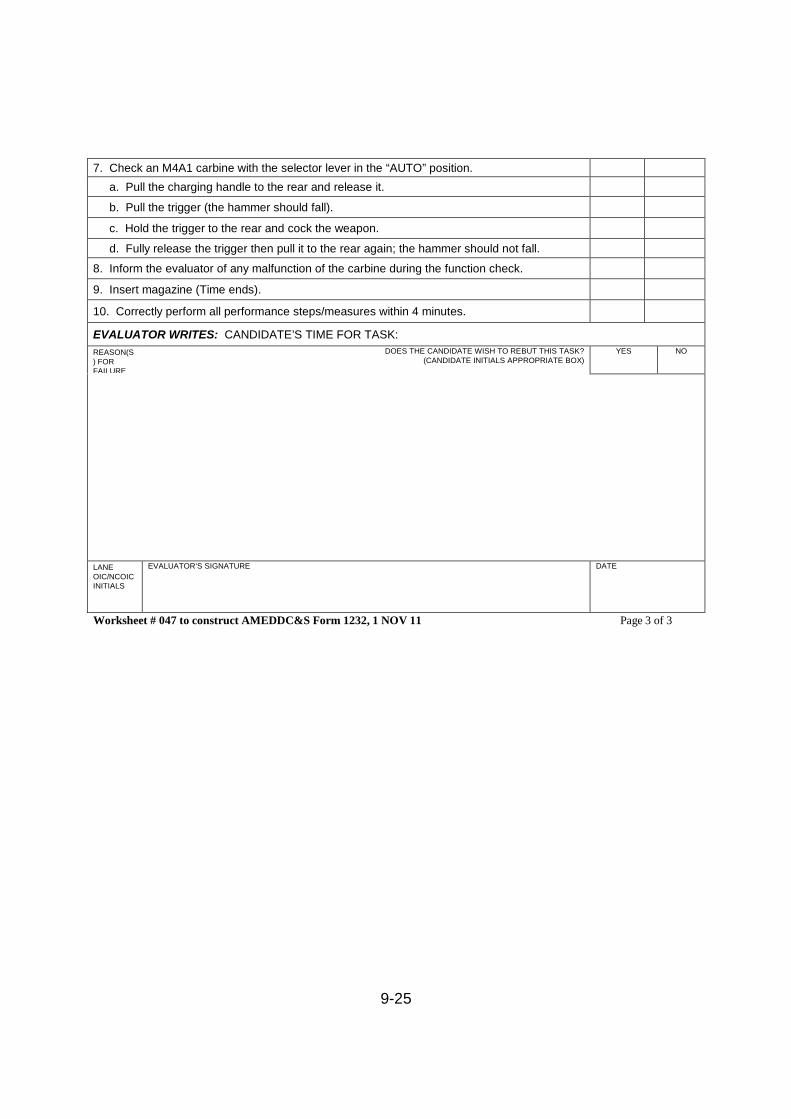
9-25
7. Check an M4A1 carbine with the selector lever in the “AUTO” position.
a. Pull the charging handle to the rear and release it.
b. Pull the trigger (the hammer should fall).
c. Hold the trigger to the rear and cock the weapon.
d. Fully release the trigger then pull it to the rear again; the hammer should not fall.
8. Inform the evaluator of any malfunction of the carbine during the function check.
9. Insert magazine (Time ends).
10. Correctly perform all performance steps/measures within 4 minutes.
EVALUATOR WRITES: CANDIDATE’S TIME FOR TASK:
REASON(S) FORFAILURE
DOES THE CANDIDATE WISH TO REBUT THIS TASK?(CANDIDATE INITIALS APPROPRIATE BOX)
YES NO
LANEOIC/NCOICINITIALS
EVALUATOR’S SIGNATURE DATE
Worksheet # 047 to construct AMEDDC&S Form 1232, 1 NOV 11 Page 3 of 3
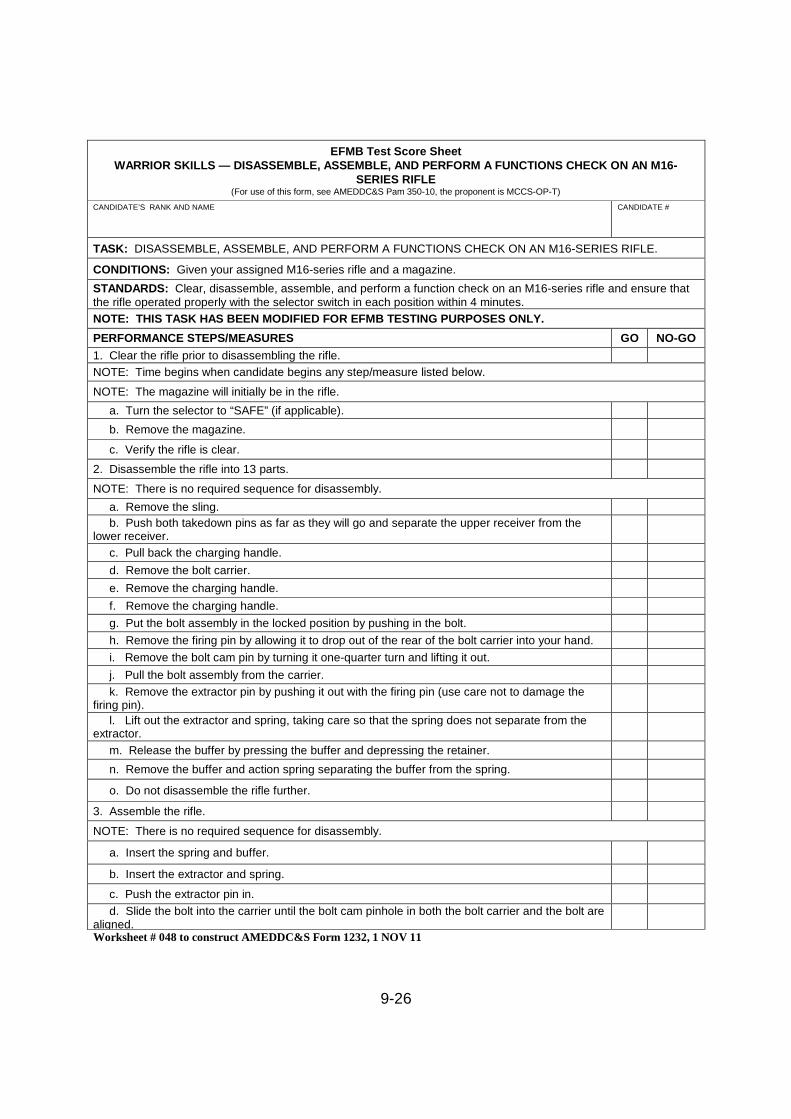
9-26
EFMB Test Score SheetWARRIOR SKILLS — DISASSEMBLE, ASSEMBLE, AND PERFORM A FUNCTIONS CHECK ON AN M16-
SERIES RIFLE(For use of this form, see AMEDDC&S Pam 350-10, the proponent is MCCS-OP-T)
CANDIDATE’S RANK AND NAME CANDIDATE #
TASK: DISASSEMBLE, ASSEMBLE, AND PERFORM A FUNCTIONS CHECK ON AN M16-SERIES RIFLE.
CONDITIONS: Given your assigned M16-series rifle and a magazine.
STANDARDS: Clear, disassemble, assemble, and perform a function check on an M16-series rifle and ensure thatthe rifle operated properly with the selector switch in each position within 4 minutes.
NOTE: THIS TASK HAS BEEN MODIFIED FOR EFMB TESTING PURPOSES ONLY.
PERFORMANCE STEPS/MEASURES GO NO-GO
1. Clear the rifle prior to disassembling the rifle.
NOTE: Time begins when candidate begins any step/measure listed below.
NOTE: The magazine will initially be in the rifle.
a. Turn the selector to “SAFE” (if applicable).
b. Remove the magazine.
c. Verify the rifle is clear.
2. Disassemble the rifle into 13 parts.
NOTE: There is no required sequence for disassembly.
a. Remove the sling.
b. Push both takedown pins as far as they will go and separate the upper receiver from thelower receiver.
c. Pull back the charging handle.
d. Remove the bolt carrier.
e. Remove the charging handle.
f. Remove the charging handle.
g. Put the bolt assembly in the locked position by pushing in the bolt.
h. Remove the firing pin by allowing it to drop out of the rear of the bolt carrier into your hand.
i. Remove the bolt cam pin by turning it one-quarter turn and lifting it out.
j. Pull the bolt assembly from the carrier.
k. Remove the extractor pin by pushing it out with the firing pin (use care not to damage thefiring pin).
l. Lift out the extractor and spring, taking care so that the spring does not separate from theextractor.
m. Release the buffer by pressing the buffer and depressing the retainer.
n. Remove the buffer and action spring separating the buffer from the spring.
o. Do not disassemble the rifle further.
3. Assemble the rifle.
NOTE: There is no required sequence for disassembly.
a. Insert the spring and buffer.
b. Insert the extractor and spring.
c. Push the extractor pin in.
d. Slide the bolt into the carrier until the bolt cam pinhole in both the bolt carrier and the bolt arealigned.Worksheet # 048 to construct AMEDDC&S Form 1232, 1 NOV 11
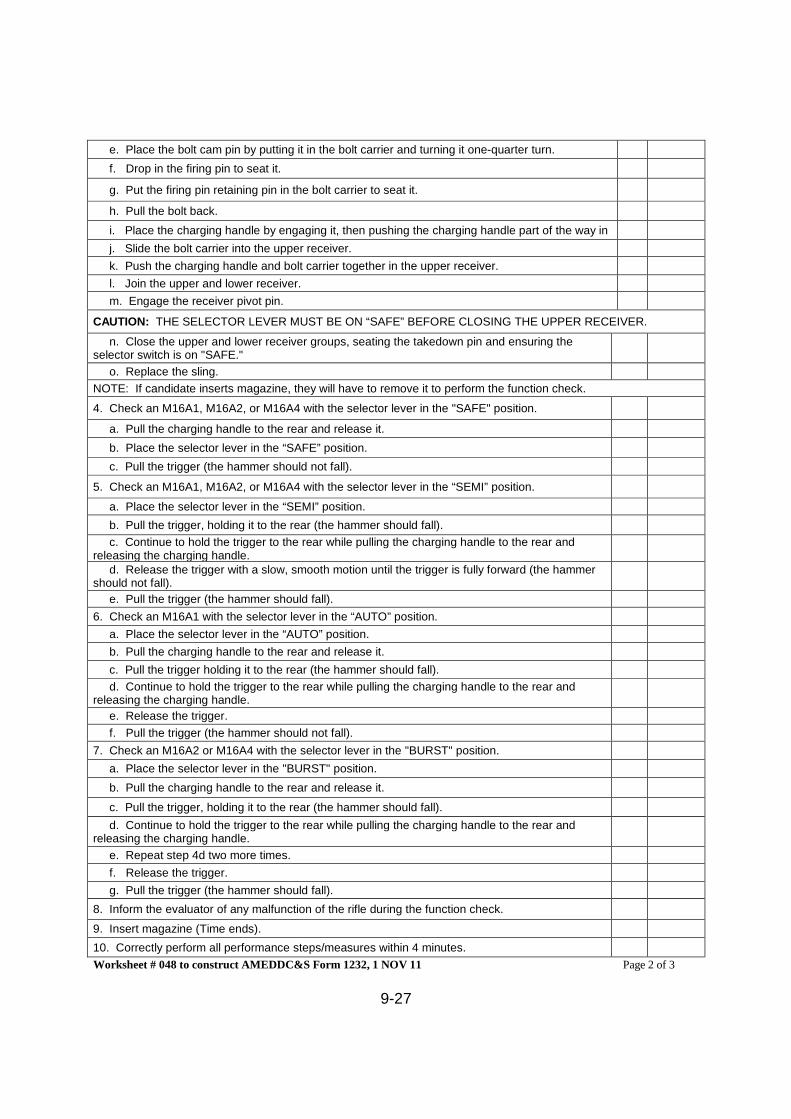
9-27
e. Place the bolt cam pin by putting it in the bolt carrier and turning it one-quarter turn.
f. Drop in the firing pin to seat it.
g. Put the firing pin retaining pin in the bolt carrier to seat it.
h. Pull the bolt back.
i. Place the charging handle by engaging it, then pushing the charging handle part of the way in
j. Slide the bolt carrier into the upper receiver.
k. Push the charging handle and bolt carrier together in the upper receiver.
l. Join the upper and lower receiver.
m. Engage the receiver pivot pin.
CAUTION: THE SELECTOR LEVER MUST BE ON “SAFE” BEFORE CLOSING THE UPPER RECEIVER.
n. Close the upper and lower receiver groups, seating the takedown pin and ensuring theselector switch is on "SAFE."
o. Replace the sling.
NOTE: If candidate inserts magazine, they will have to remove it to perform the function check.
4. Check an M16A1, M16A2, or M16A4 with the selector lever in the "SAFE" position.
a. Pull the charging handle to the rear and release it.
b. Place the selector lever in the “SAFE” position.
c. Pull the trigger (the hammer should not fall).
5. Check an M16A1, M16A2, or M16A4 with the selector lever in the “SEMI” position.
a. Place the selector lever in the “SEMI” position.
b. Pull the trigger, holding it to the rear (the hammer should fall).
c. Continue to hold the trigger to the rear while pulling the charging handle to the rear andreleasing the charging handle.
d. Release the trigger with a slow, smooth motion until the trigger is fully forward (the hammershould not fall).
e. Pull the trigger (the hammer should fall).
6. Check an M16A1 with the selector lever in the “AUTO” position.
a. Place the selector lever in the “AUTO” position.
b. Pull the charging handle to the rear and release it.
c. Pull the trigger holding it to the rear (the hammer should fall).
d. Continue to hold the trigger to the rear while pulling the charging handle to the rear andreleasing the charging handle.
e. Release the trigger.
f. Pull the trigger (the hammer should not fall).
7. Check an M16A2 or M16A4 with the selector lever in the "BURST" position.
a. Place the selector lever in the "BURST" position.
b. Pull the charging handle to the rear and release it.
c. Pull the trigger, holding it to the rear (the hammer should fall).
d. Continue to hold the trigger to the rear while pulling the charging handle to the rear andreleasing the charging handle.
e. Repeat step 4d two more times.
f. Release the trigger.
g. Pull the trigger (the hammer should fall).
8. Inform the evaluator of any malfunction of the rifle during the function check.
9. Insert magazine (Time ends).
10. Correctly perform all performance steps/measures within 4 minutes.
Worksheet # 048 to construct AMEDDC&S Form 1232, 1 NOV 11 Page 2 of 3
9-28
EVALUATOR WRITES: CANDIDATE’S TIME FOR TASK:
REASON(S) FORFAILURE
DOES THE CANDIDATE WISH TO REBUT THIS TASK?(CANDIDATE INITIALS APPROPRIATE BOX)
YES NO
LANE OIC/NCOICINITIALS
EVALUATOR’S SIGNATURE DATE
Worksheet # 048 to construct AMEDDC&S Form 1232, 1 NOV 11 Page 3 of 3

9-29
EFMB Test Score SheetWARRIOR SKILLS — DISASSEMBLE, ASSEMBLE, AND PERFORM A FUNCTIONS CHECK ON A M9 PISTOL
(For use of this form, see AMEDDC&S Pam 350-10, the proponent is MCCS-OP-T)
CANDIDATE’S RANK AND NAME CANDIDATE #
TASK: DISASSEMBLE, ASSEMBLE, AND PERFORM A FUNCTIONS CHECK E AN M9 PISTOL.
CONDITIONS: Given an M9 pistol and a magazine.
STANDARDS: Clear, disassemble, and assemble an M9 pistol and perform a function check within 3 minutes.
NOTE: THIS TASK HAS BEEN MODIFIED FOR EFMB TESTING PURPOSES ONLY.
PERFORMANCE STEPS/MEASURES GO NO-GO
1. Clear the pistol prior to disassembling the pistol.
NOTE: Time begins when candidate begins any step/measure listed below.
NOTE: The lever will initially be set in the “FIRE” position and an empty magazine will be in the pistol.
a. Place the safety lever in the “SAFE” position.
b. Depress the magazine release button; remove the magazine from the pistol.
c. Pull the slide to the rear.
d. Push the slide stop up, locking the slide to the rear.
e. Look into the chamber to ensure that it is empty.
2. Disassemble the pistol.
a. Depress the slide stop and let the slide go forward.
b. With your right hand, hold the pistol with the muzzle slightly raised.
c. With your forefinger, press the disassembly lever button.
d. Rotate the disassembly lever downward until it stops.
e. Pull the slide and barrel assembly forward and remove it from the receiver.
f. Slightly compress the recoil spring and spring guide. At the same time, lift them up and removethem, allowing the recoil spring to stretch slowly.
g. Separate the recoil spring from the spring guide.
h. Push in on the locking block plunger while pushing the barrel forward slightly. Lift and removethe locking block and barrel assembly from the slide.
3. Assemble the pistol.
a. Grasp the slide with the bottom facing up.
b. With the other hand, grasp the barrel assembly with the locking block facing up.
c. Insert the muzzle into the forward end of the slide. At the same time, lower the rear of thebarrel assembly by moving the barrel slightly downward with light thumb pressure. The barrel will fallinto place.
d. Insert the recoil spring guide into the recoil spring.
e. Insert the end of the recoil spring and the recoil spring guide into the recoil spring housing. Atthe same time, compress the recoil spring and lower the spring guide until it is fully seated on thelocking block cutaway.
CAUTION: BE SURE THAT THE HAMMER IS UNCOCKED AND FIRING PIN BLOCK LEVER IS IN THE DOWNPOSITION. IF THE HAMMER IS COCKED, CAREFULLY AND MANUALLY LOWER THE HAMMER. DO NOT PULLTHE TRIGGER WHILE PLACING THE SLIDE ONTO THE RECEIVER.
f. Push the firing pin block lever down. Grasp the slide and barrel assembly, with the sights upand align the slide on the receiver assembly guide rails.
Worksheet # 049 to construct AMEDDC&S Form 1232, 1 NOV 11 Page 1 of 2
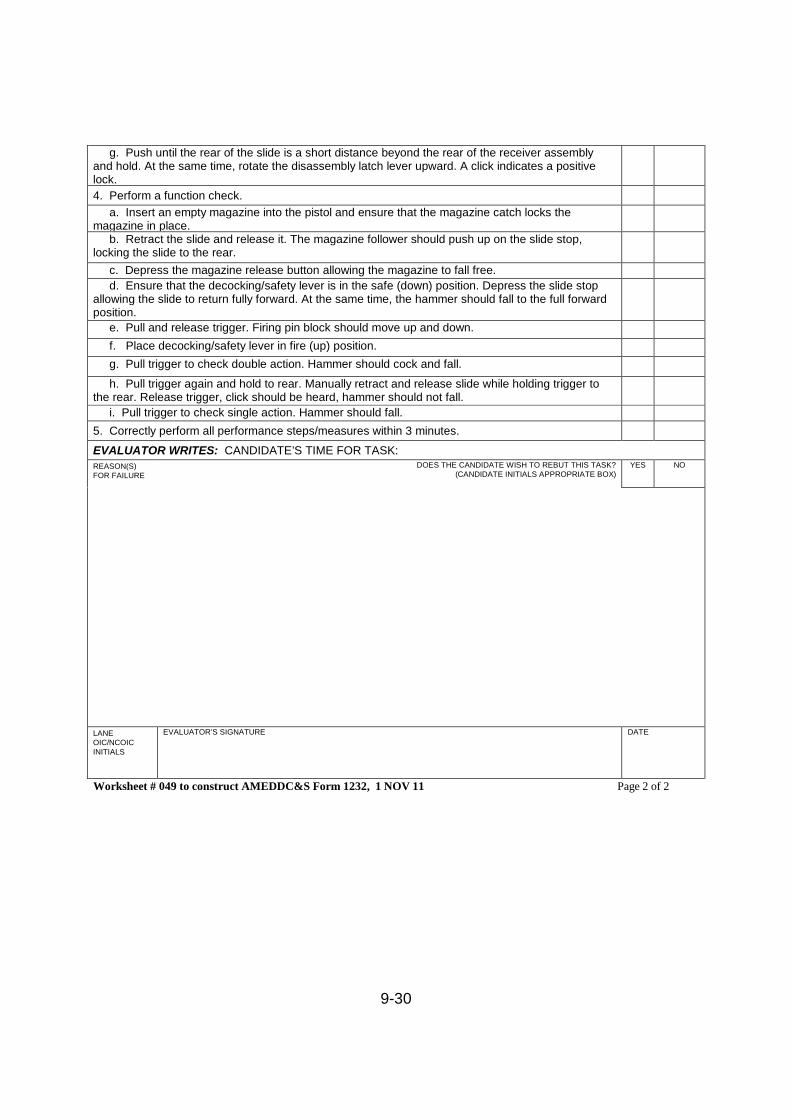
9-30
g. Push until the rear of the slide is a short distance beyond the rear of the receiver assemblyand hold. At the same time, rotate the disassembly latch lever upward. A click indicates a positivelock.
4. Perform a function check.
a. Insert an empty magazine into the pistol and ensure that the magazine catch locks themagazine in place.
b. Retract the slide and release it. The magazine follower should push up on the slide stop,locking the slide to the rear.
c. Depress the magazine release button allowing the magazine to fall free.
d. Ensure that the decocking/safety lever is in the safe (down) position. Depress the slide stopallowing the slide to return fully forward. At the same time, the hammer should fall to the full forwardposition.
e. Pull and release trigger. Firing pin block should move up and down.
f. Place decocking/safety lever in fire (up) position.
g. Pull trigger to check double action. Hammer should cock and fall.
h. Pull trigger again and hold to rear. Manually retract and release slide while holding trigger tothe rear. Release trigger, click should be heard, hammer should not fall.
i. Pull trigger to check single action. Hammer should fall.
5. Correctly perform all performance steps/measures within 3 minutes.
EVALUATOR WRITES: CANDIDATE’S TIME FOR TASK:REASON(S)FOR FAILURE
DOES THE CANDIDATE WISH TO REBUT THIS TASK?(CANDIDATE INITIALS APPROPRIATE BOX)
YES NO
LANEOIC/NCOICINITIALS
EVALUATOR’S SIGNATURE DATE
Worksheet # 049 to construct AMEDDC&S Form 1232, 1 NOV 11 Page 2 of 2
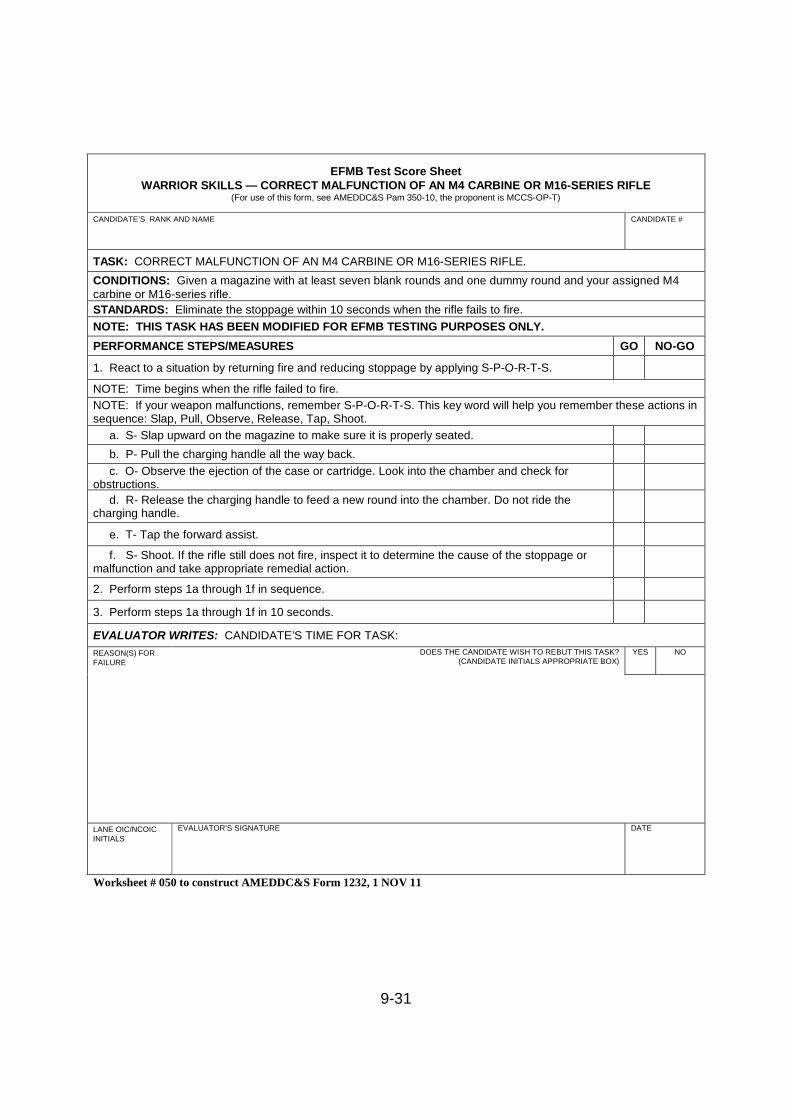
9-31
EFMB Test Score SheetWARRIOR SKILLS — CORRECT MALFUNCTION OF AN M4 CARBINE OR M16-SERIES RIFLE
(For use of this form, see AMEDDC&S Pam 350-10, the proponent is MCCS-OP-T)
CANDIDATE’S RANK AND NAME CANDIDATE #
TASK: CORRECT MALFUNCTION OF AN M4 CARBINE OR M16-SERIES RIFLE.
CONDITIONS: Given a magazine with at least seven blank rounds and one dummy round and your assigned M4carbine or M16-series rifle.
STANDARDS: Eliminate the stoppage within 10 seconds when the rifle fails to fire.
NOTE: THIS TASK HAS BEEN MODIFIED FOR EFMB TESTING PURPOSES ONLY.
PERFORMANCE STEPS/MEASURES GO NO-GO
1. React to a situation by returning fire and reducing stoppage by applying S-P-O-R-T-S.
NOTE: Time begins when the rifle failed to fire.
NOTE: If your weapon malfunctions, remember S-P-O-R-T-S. This key word will help you remember these actions insequence: Slap, Pull, Observe, Release, Tap, Shoot.
a. S- Slap upward on the magazine to make sure it is properly seated.
b. P- Pull the charging handle all the way back.
c. O- Observe the ejection of the case or cartridge. Look into the chamber and check forobstructions.
d. R- Release the charging handle to feed a new round into the chamber. Do not ride thecharging handle.
e. T- Tap the forward assist.
f. S- Shoot. If the rifle still does not fire, inspect it to determine the cause of the stoppage ormalfunction and take appropriate remedial action.
2. Perform steps 1a through 1f in sequence.
3. Perform steps 1a through 1f in 10 seconds.
EVALUATOR WRITES: CANDIDATE’S TIME FOR TASK:
REASON(S) FORFAILURE
DOES THE CANDIDATE WISH TO REBUT THIS TASK?(CANDIDATE INITIALS APPROPRIATE BOX)
YES NO
LANE OIC/NCOICINITIALS
EVALUATOR’S SIGNATURE DATE
Worksheet # 050 to construct AMEDDC&S Form 1232, 1 NOV 11
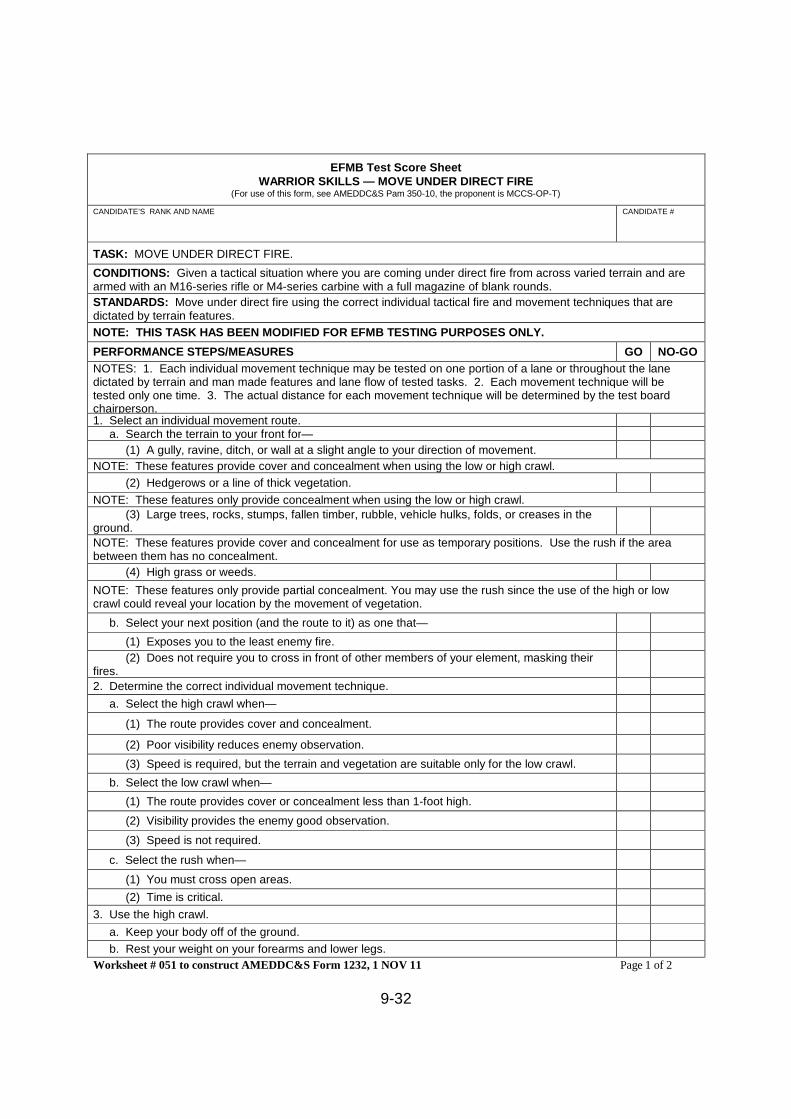
9-32
EFMB Test Score SheetWARRIOR SKILLS — MOVE UNDER DIRECT FIRE
(For use of this form, see AMEDDC&S Pam 350-10, the proponent is MCCS-OP-T)
CANDIDATE’S RANK AND NAME CANDIDATE #
TASK: MOVE UNDER DIRECT FIRE.
CONDITIONS: Given a tactical situation where you are coming under direct fire from across varied terrain and arearmed with an M16-series rifle or M4-series carbine with a full magazine of blank rounds.
STANDARDS: Move under direct fire using the correct individual tactical fire and movement techniques that aredictated by terrain features.
NOTE: THIS TASK HAS BEEN MODIFIED FOR EFMB TESTING PURPOSES ONLY.
PERFORMANCE STEPS/MEASURES GO NO-GO
NOTES: 1. Each individual movement technique may be tested on one portion of a lane or throughout the lanedictated by terrain and man made features and lane flow of tested tasks. 2. Each movement technique will betested only one time. 3. The actual distance for each movement technique will be determined by the test boardchairperson.1. Select an individual movement route.
a. Search the terrain to your front for—
(1) A gully, ravine, ditch, or wall at a slight angle to your direction of movement.
NOTE: These features provide cover and concealment when using the low or high crawl.
(2) Hedgerows or a line of thick vegetation.
NOTE: These features only provide concealment when using the low or high crawl.(3) Large trees, rocks, stumps, fallen timber, rubble, vehicle hulks, folds, or creases in the
ground.
NOTE: These features provide cover and concealment for use as temporary positions. Use the rush if the areabetween them has no concealment.
(4) High grass or weeds.
NOTE: These features only provide partial concealment. You may use the rush since the use of the high or lowcrawl could reveal your location by the movement of vegetation.
b. Select your next position (and the route to it) as one that—
(1) Exposes you to the least enemy fire.
(2) Does not require you to cross in front of other members of your element, masking theirfires.
2. Determine the correct individual movement technique.
a. Select the high crawl when—
(1) The route provides cover and concealment.
(2) Poor visibility reduces enemy observation.
(3) Speed is required, but the terrain and vegetation are suitable only for the low crawl.
b. Select the low crawl when—
(1) The route provides cover or concealment less than 1-foot high.
(2) Visibility provides the enemy good observation.
(3) Speed is not required.
c. Select the rush when—
(1) You must cross open areas.
(2) Time is critical.
3. Use the high crawl.
a. Keep your body off of the ground.
b. Rest your weight on your forearms and lower legs.
Worksheet # 051 to construct AMEDDC&S Form 1232, 1 NOV 11 Page 1 of 2
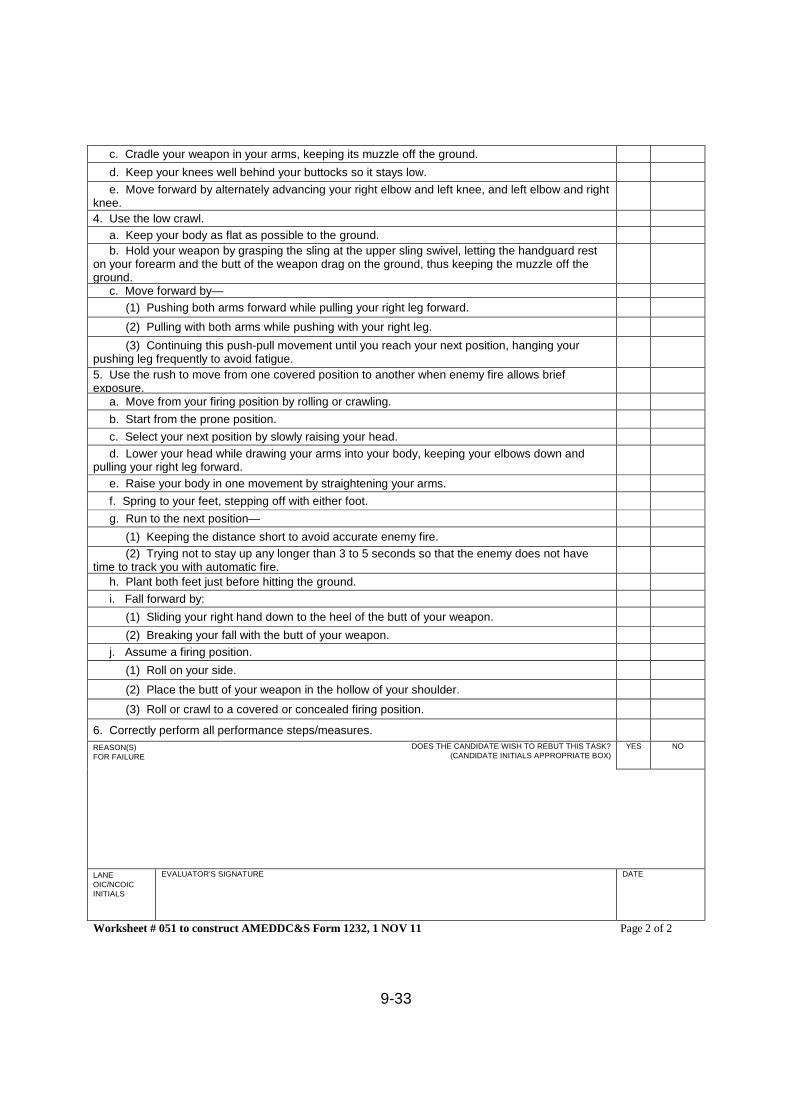
9-33
c. Cradle your weapon in your arms, keeping its muzzle off the ground.
d. Keep your knees well behind your buttocks so it stays low.
e. Move forward by alternately advancing your right elbow and left knee, and left elbow and rightknee.
4. Use the low crawl.
a. Keep your body as flat as possible to the ground.
b. Hold your weapon by grasping the sling at the upper sling swivel, letting the handguard reston your forearm and the butt of the weapon drag on the ground, thus keeping the muzzle off theground.
c. Move forward by—
(1) Pushing both arms forward while pulling your right leg forward.
(2) Pulling with both arms while pushing with your right leg.
(3) Continuing this push-pull movement until you reach your next position, hanging yourpushing leg frequently to avoid fatigue.
5. Use the rush to move from one covered position to another when enemy fire allows briefexposure.
a. Move from your firing position by rolling or crawling.
b. Start from the prone position.
c. Select your next position by slowly raising your head.
d. Lower your head while drawing your arms into your body, keeping your elbows down andpulling your right leg forward.
e. Raise your body in one movement by straightening your arms.
f. Spring to your feet, stepping off with either foot.
g. Run to the next position—
(1) Keeping the distance short to avoid accurate enemy fire.
(2) Trying not to stay up any longer than 3 to 5 seconds so that the enemy does not havetime to track you with automatic fire.
h. Plant both feet just before hitting the ground.
i. Fall forward by:
(1) Sliding your right hand down to the heel of the butt of your weapon.
(2) Breaking your fall with the butt of your weapon.
j. Assume a firing position.
(1) Roll on your side.
(2) Place the butt of your weapon in the hollow of your shoulder.
(3) Roll or crawl to a covered or concealed firing position.
6. Correctly perform all performance steps/measures.
REASON(S)FOR FAILURE
DOES THE CANDIDATE WISH TO REBUT THIS TASK?(CANDIDATE INITIALS APPROPRIATE BOX)
YES NO
LANEOIC/NCOICINITIALS
EVALUATOR’S SIGNATURE DATE
Worksheet # 051 to construct AMEDDC&S Form 1232, 1 NOV 11 Page 2 of 2
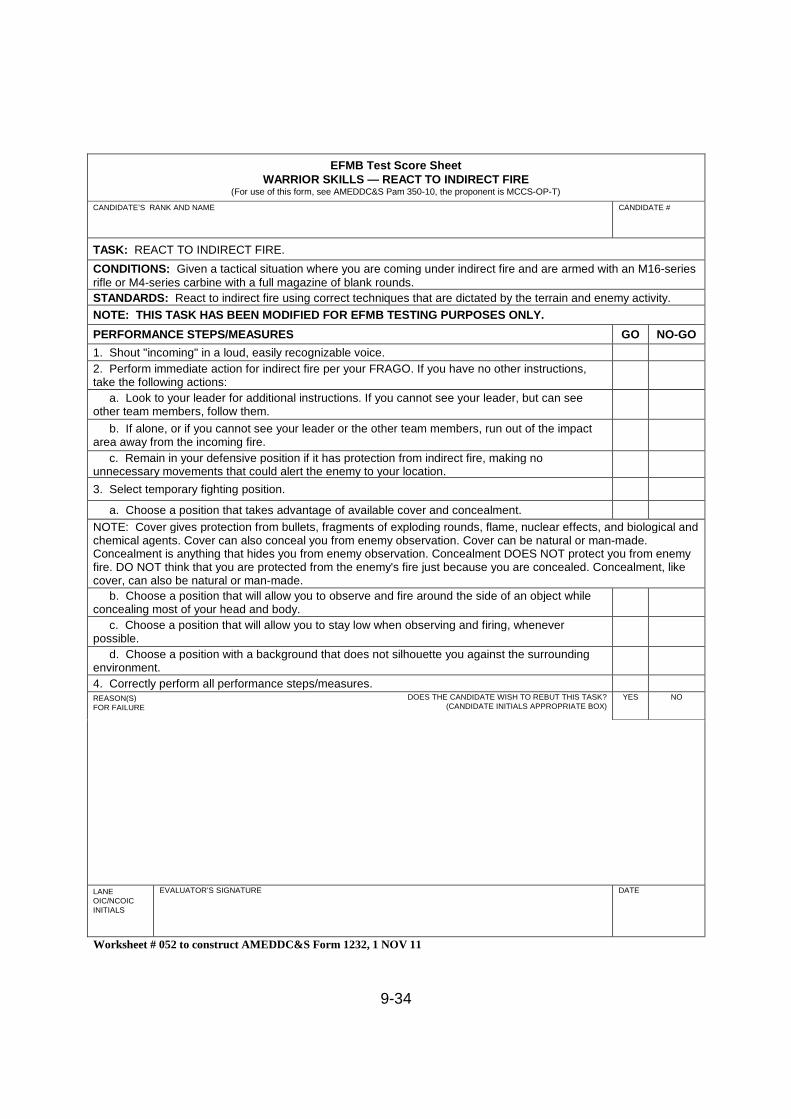
9-34
EFMB Test Score SheetWARRIOR SKILLS — REACT TO INDIRECT FIRE
(For use of this form, see AMEDDC&S Pam 350-10, the proponent is MCCS-OP-T)
CANDIDATE’S RANK AND NAME CANDIDATE #
TASK: REACT TO INDIRECT FIRE.
CONDITIONS: Given a tactical situation where you are coming under indirect fire and are armed with an M16-seriesrifle or M4-series carbine with a full magazine of blank rounds.
STANDARDS: React to indirect fire using correct techniques that are dictated by the terrain and enemy activity.
NOTE: THIS TASK HAS BEEN MODIFIED FOR EFMB TESTING PURPOSES ONLY.
PERFORMANCE STEPS/MEASURES GO NO-GO
1. Shout "incoming" in a loud, easily recognizable voice.
2. Perform immediate action for indirect fire per your FRAGO. If you have no other instructions,take the following actions:
a. Look to your leader for additional instructions. If you cannot see your leader, but can seeother team members, follow them.
b. If alone, or if you cannot see your leader or the other team members, run out of the impactarea away from the incoming fire.
c. Remain in your defensive position if it has protection from indirect fire, making nounnecessary movements that could alert the enemy to your location.
3. Select temporary fighting position.
a. Choose a position that takes advantage of available cover and concealment.
NOTE: Cover gives protection from bullets, fragments of exploding rounds, flame, nuclear effects, and biological andchemical agents. Cover can also conceal you from enemy observation. Cover can be natural or man-made.Concealment is anything that hides you from enemy observation. Concealment DOES NOT protect you from enemyfire. DO NOT think that you are protected from the enemy's fire just because you are concealed. Concealment, likecover, can also be natural or man-made.
b. Choose a position that will allow you to observe and fire around the side of an object whileconcealing most of your head and body.
c. Choose a position that will allow you to stay low when observing and firing, wheneverpossible.
d. Choose a position with a background that does not silhouette you against the surroundingenvironment.
4. Correctly perform all performance steps/measures.REASON(S)FOR FAILURE
DOES THE CANDIDATE WISH TO REBUT THIS TASK?(CANDIDATE INITIALS APPROPRIATE BOX)
YES NO
LANEOIC/NCOICINITIALS
EVALUATOR’S SIGNATURE DATE
Worksheet # 052 to construct AMEDDC&S Form 1232, 1 NOV 11
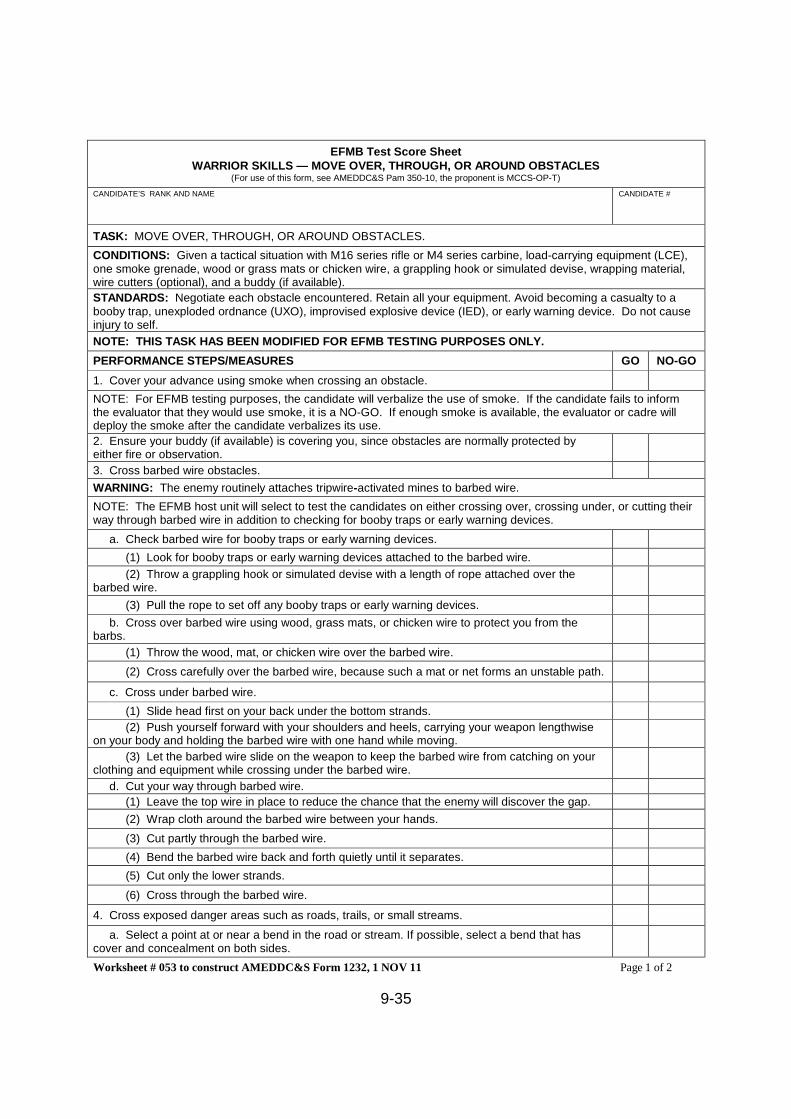
9-35
EFMB Test Score SheetWARRIOR SKILLS — MOVE OVER, THROUGH, OR AROUND OBSTACLES
(For use of this form, see AMEDDC&S Pam 350-10, the proponent is MCCS-OP-T)
CANDIDATE’S RANK AND NAME CANDIDATE #
TASK: MOVE OVER, THROUGH, OR AROUND OBSTACLES.
CONDITIONS: Given a tactical situation with M16 series rifle or M4 series carbine, load-carrying equipment (LCE),one smoke grenade, wood or grass mats or chicken wire, a grappling hook or simulated devise, wrapping material,wire cutters (optional), and a buddy (if available).
STANDARDS: Negotiate each obstacle encountered. Retain all your equipment. Avoid becoming a casualty to abooby trap, unexploded ordnance (UXO), improvised explosive device (IED), or early warning device. Do not causeinjury to self.
NOTE: THIS TASK HAS BEEN MODIFIED FOR EFMB TESTING PURPOSES ONLY.
PERFORMANCE STEPS/MEASURES GO NO-GO
1. Cover your advance using smoke when crossing an obstacle.
NOTE: For EFMB testing purposes, the candidate will verbalize the use of smoke. If the candidate fails to informthe evaluator that they would use smoke, it is a NO-GO. If enough smoke is available, the evaluator or cadre willdeploy the smoke after the candidate verbalizes its use.
2. Ensure your buddy (if available) is covering you, since obstacles are normally protected byeither fire or observation.
3. Cross barbed wire obstacles.
WARNING: The enemy routinely attaches tripwire-activated mines to barbed wire.
NOTE: The EFMB host unit will select to test the candidates on either crossing over, crossing under, or cutting theirway through barbed wire in addition to checking for booby traps or early warning devices.
a. Check barbed wire for booby traps or early warning devices.
(1) Look for booby traps or early warning devices attached to the barbed wire.
(2) Throw a grappling hook or simulated devise with a length of rope attached over thebarbed wire.
(3) Pull the rope to set off any booby traps or early warning devices.
b. Cross over barbed wire using wood, grass mats, or chicken wire to protect you from thebarbs.
(1) Throw the wood, mat, or chicken wire over the barbed wire.
(2) Cross carefully over the barbed wire, because such a mat or net forms an unstable path.
c. Cross under barbed wire.
(1) Slide head first on your back under the bottom strands.
(2) Push yourself forward with your shoulders and heels, carrying your weapon lengthwiseon your body and holding the barbed wire with one hand while moving.
(3) Let the barbed wire slide on the weapon to keep the barbed wire from catching on yourclothing and equipment while crossing under the barbed wire.
d. Cut your way through barbed wire.
(1) Leave the top wire in place to reduce the chance that the enemy will discover the gap.
(2) Wrap cloth around the barbed wire between your hands.
(3) Cut partly through the barbed wire.
(4) Bend the barbed wire back and forth quietly until it separates.
(5) Cut only the lower strands.
(6) Cross through the barbed wire.
4. Cross exposed danger areas such as roads, trails, or small streams.
a. Select a point at or near a bend in the road or stream. If possible, select a bend that hascover and concealment on both sides.
Worksheet # 053 to construct AMEDDC&S Form 1232, 1 NOV 11 Page 1 of 2
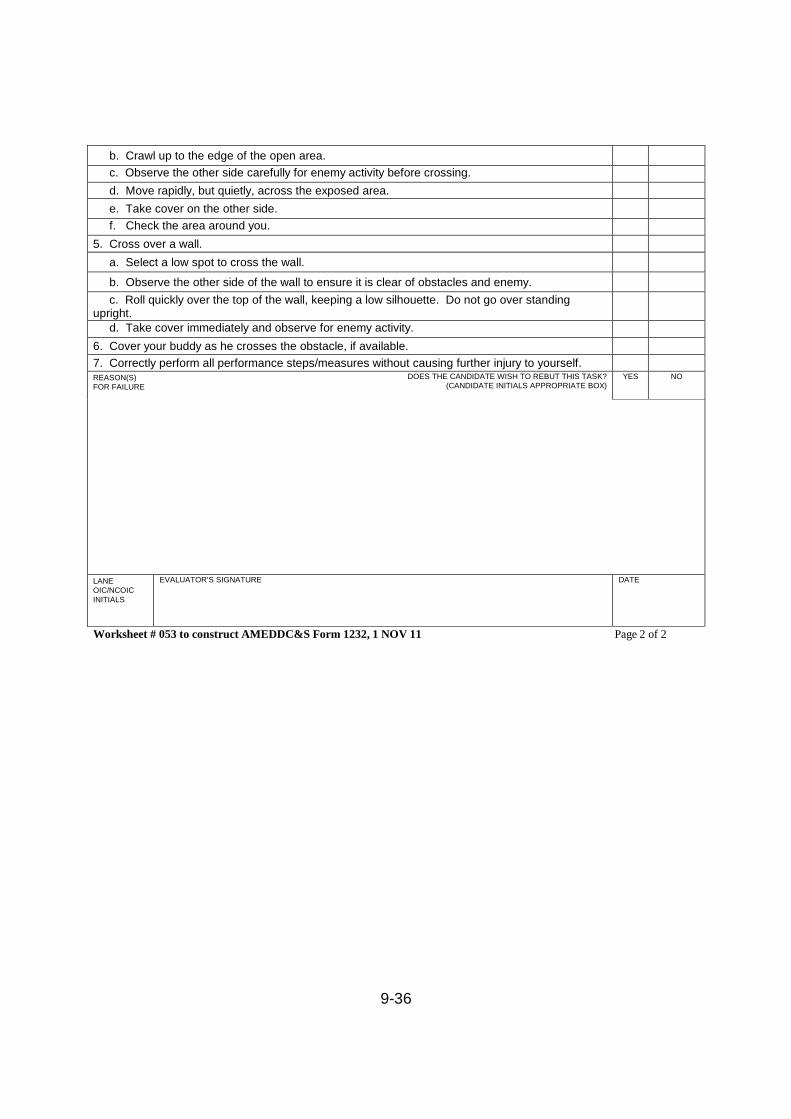
9-36
b. Crawl up to the edge of the open area.
c. Observe the other side carefully for enemy activity before crossing.
d. Move rapidly, but quietly, across the exposed area.
e. Take cover on the other side.
f. Check the area around you.
5. Cross over a wall.
a. Select a low spot to cross the wall.
b. Observe the other side of the wall to ensure it is clear of obstacles and enemy.
c. Roll quickly over the top of the wall, keeping a low silhouette. Do not go over standingupright.
d. Take cover immediately and observe for enemy activity.
6. Cover your buddy as he crosses the obstacle, if available.
7. Correctly perform all performance steps/measures without causing further injury to yourself.REASON(S)FOR FAILURE
DOES THE CANDIDATE WISH TO REBUT THIS TASK?(CANDIDATE INITIALS APPROPRIATE BOX)
YES NO
LANEOIC/NCOICINITIALS
EVALUATOR’S SIGNATURE DATE
Worksheet # 053 to construct AMEDDC&S Form 1232, 1 NOV 11 Page 2 of 2
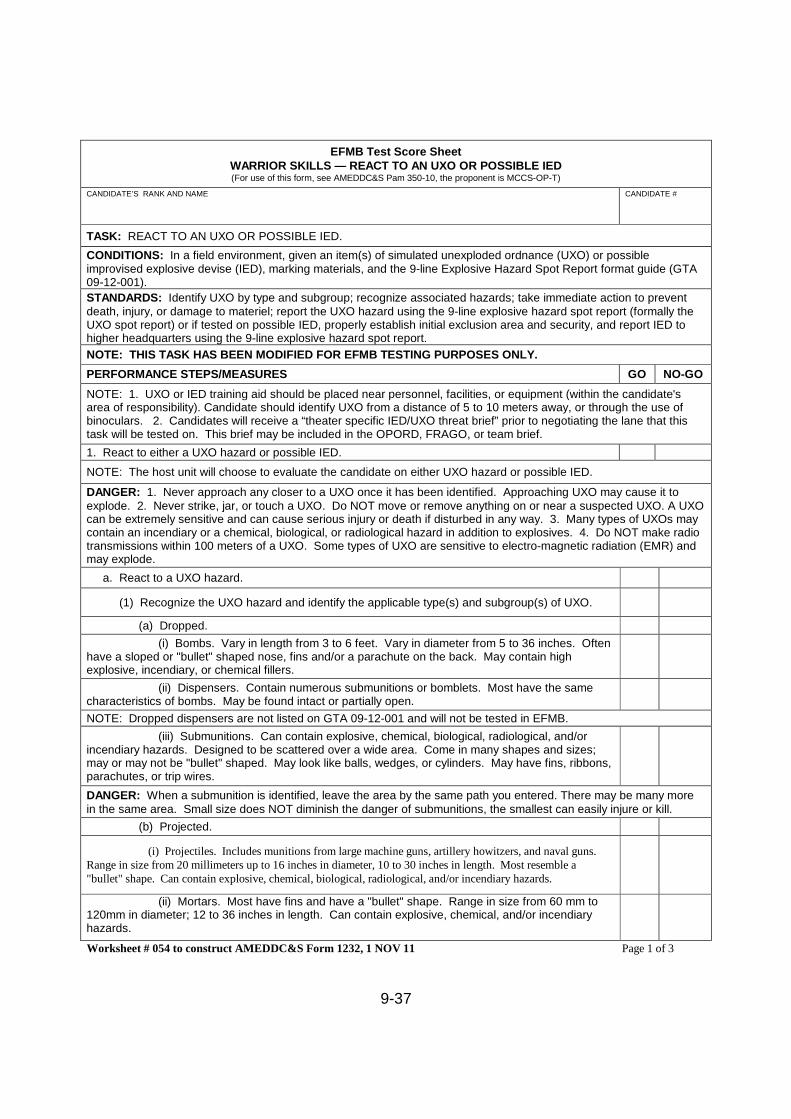
9-37
EFMB Test Score SheetWARRIOR SKILLS — REACT TO AN UXO OR POSSIBLE IED(For use of this form, see AMEDDC&S Pam 350-10, the proponent is MCCS-OP-T)
CANDIDATE’S RANK AND NAME CANDIDATE #
TASK: REACT TO AN UXO OR POSSIBLE IED.
CONDITIONS: In a field environment, given an item(s) of simulated unexploded ordnance (UXO) or possibleimprovised explosive devise (IED), marking materials, and the 9-line Explosive Hazard Spot Report format guide (GTA09-12-001).
STANDARDS: Identify UXO by type and subgroup; recognize associated hazards; take immediate action to preventdeath, injury, or damage to materiel; report the UXO hazard using the 9-line explosive hazard spot report (formally theUXO spot report) or if tested on possible IED, properly establish initial exclusion area and security, and report IED tohigher headquarters using the 9-line explosive hazard spot report.
NOTE: THIS TASK HAS BEEN MODIFIED FOR EFMB TESTING PURPOSES ONLY.
PERFORMANCE STEPS/MEASURES GO NO-GO
NOTE: 1. UXO or IED training aid should be placed near personnel, facilities, or equipment (within the candidate'sarea of responsibility). Candidate should identify UXO from a distance of 5 to 10 meters away, or through the use ofbinoculars. 2. Candidates will receive a “theater specific IED/UXO threat brief” prior to negotiating the lane that thistask will be tested on. This brief may be included in the OPORD, FRAGO, or team brief.
1. React to either a UXO hazard or possible IED.
NOTE: The host unit will choose to evaluate the candidate on either UXO hazard or possible IED.
DANGER: 1. Never approach any closer to a UXO once it has been identified. Approaching UXO may cause it toexplode. 2. Never strike, jar, or touch a UXO. Do NOT move or remove anything on or near a suspected UXO. A UXOcan be extremely sensitive and can cause serious injury or death if disturbed in any way. 3. Many types of UXOs maycontain an incendiary or a chemical, biological, or radiological hazard in addition to explosives. 4. Do NOT make radiotransmissions within 100 meters of a UXO. Some types of UXO are sensitive to electro-magnetic radiation (EMR) andmay explode.
a. React to a UXO hazard.
(1) Recognize the UXO hazard and identify the applicable type(s) and subgroup(s) of UXO.
(a) Dropped.
(i) Bombs. Vary in length from 3 to 6 feet. Vary in diameter from 5 to 36 inches. Oftenhave a sloped or "bullet" shaped nose, fins and/or a parachute on the back. May contain highexplosive, incendiary, or chemical fillers.
(ii) Dispensers. Contain numerous submunitions or bomblets. Most have the samecharacteristics of bombs. May be found intact or partially open.
NOTE: Dropped dispensers are not listed on GTA 09-12-001 and will not be tested in EFMB.
(iii) Submunitions. Can contain explosive, chemical, biological, radiological, and/orincendiary hazards. Designed to be scattered over a wide area. Come in many shapes and sizes;may or may not be "bullet" shaped. May look like balls, wedges, or cylinders. May have fins, ribbons,parachutes, or trip wires.
DANGER: When a submunition is identified, leave the area by the same path you entered. There may be many morein the same area. Small size does NOT diminish the danger of submunitions, the smallest can easily injure or kill.
(b) Projected.
(i) Projectiles. Includes munitions from large machine guns, artillery howitzers, and naval guns.Range in size from 20 millimeters up to 16 inches in diameter, 10 to 30 inches in length. Most resemble a"bullet" shape. Can contain explosive, chemical, biological, radiological, and/or incendiary hazards.
(ii) Mortars. Most have fins and have a "bullet" shape. Range in size from 60 mm to120mm in diameter; 12 to 36 inches in length. Can contain explosive, chemical, and/or incendiaryhazards.
Worksheet # 054 to construct AMEDDC&S Form 1232, 1 NOV 11 Page 1 of 3
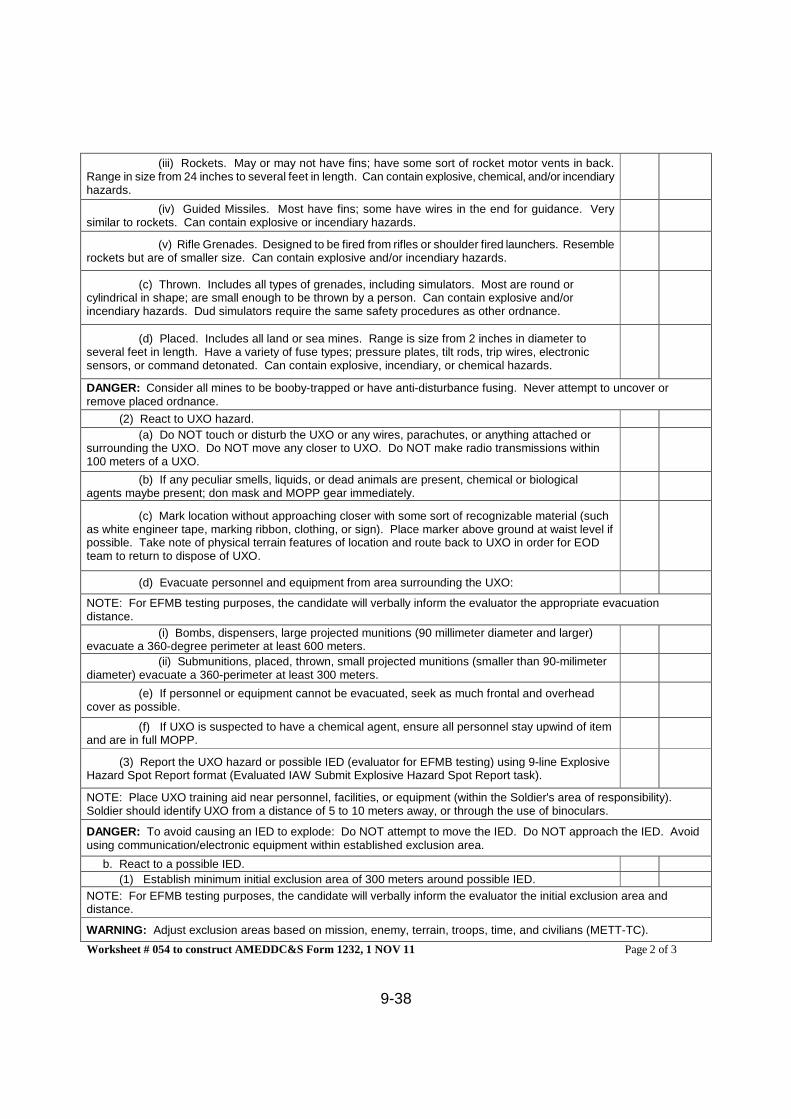
9-38
(iii) Rockets. May or may not have fins; have some sort of rocket motor vents in back.Range in size from 24 inches to several feet in length. Can contain explosive, chemical, and/or incendiaryhazards.
(iv) Guided Missiles. Most have fins; some have wires in the end for guidance. Verysimilar to rockets. Can contain explosive or incendiary hazards.
(v) Rifle Grenades. Designed to be fired from rifles or shoulder fired launchers. Resemblerockets but are of smaller size. Can contain explosive and/or incendiary hazards.
(c) Thrown. Includes all types of grenades, including simulators. Most are round orcylindrical in shape; are small enough to be thrown by a person. Can contain explosive and/orincendiary hazards. Dud simulators require the same safety procedures as other ordnance.
(d) Placed. Includes all land or sea mines. Range is size from 2 inches in diameter toseveral feet in length. Have a variety of fuse types; pressure plates, tilt rods, trip wires, electronicsensors, or command detonated. Can contain explosive, incendiary, or chemical hazards.
DANGER: Consider all mines to be booby-trapped or have anti-disturbance fusing. Never attempt to uncover orremove placed ordnance.
(2) React to UXO hazard.
(a) Do NOT touch or disturb the UXO or any wires, parachutes, or anything attached orsurrounding the UXO. Do NOT move any closer to UXO. Do NOT make radio transmissions within100 meters of a UXO.
(b) If any peculiar smells, liquids, or dead animals are present, chemical or biologicalagents maybe present; don mask and MOPP gear immediately.
(c) Mark location without approaching closer with some sort of recognizable material (suchas white engineer tape, marking ribbon, clothing, or sign). Place marker above ground at waist level ifpossible. Take note of physical terrain features of location and route back to UXO in order for EODteam to return to dispose of UXO.
(d) Evacuate personnel and equipment from area surrounding the UXO:
NOTE: For EFMB testing purposes, the candidate will verbally inform the evaluator the appropriate evacuationdistance.
(i) Bombs, dispensers, large projected munitions (90 millimeter diameter and larger)evacuate a 360-degree perimeter at least 600 meters.
(ii) Submunitions, placed, thrown, small projected munitions (smaller than 90-milimeterdiameter) evacuate a 360-perimeter at least 300 meters.
(e) If personnel or equipment cannot be evacuated, seek as much frontal and overheadcover as possible.
(f) If UXO is suspected to have a chemical agent, ensure all personnel stay upwind of itemand are in full MOPP.
(3) Report the UXO hazard or possible IED (evaluator for EFMB testing) using 9-line ExplosiveHazard Spot Report format (Evaluated IAW Submit Explosive Hazard Spot Report task).
NOTE: Place UXO training aid near personnel, facilities, or equipment (within the Soldier's area of responsibility).Soldier should identify UXO from a distance of 5 to 10 meters away, or through the use of binoculars.
DANGER: To avoid causing an IED to explode: Do NOT attempt to move the IED. Do NOT approach the IED. Avoidusing communication/electronic equipment within established exclusion area.
b. React to a possible IED.
(1) Establish minimum initial exclusion area of 300 meters around possible IED.
NOTE: For EFMB testing purposes, the candidate will verbally inform the evaluator the initial exclusion area anddistance.
WARNING: Adjust exclusion areas based on mission, enemy, terrain, troops, time, and civilians (METT-TC).
Worksheet # 054 to construct AMEDDC&S Form 1232, 1 NOV 11 Page 2 of 3
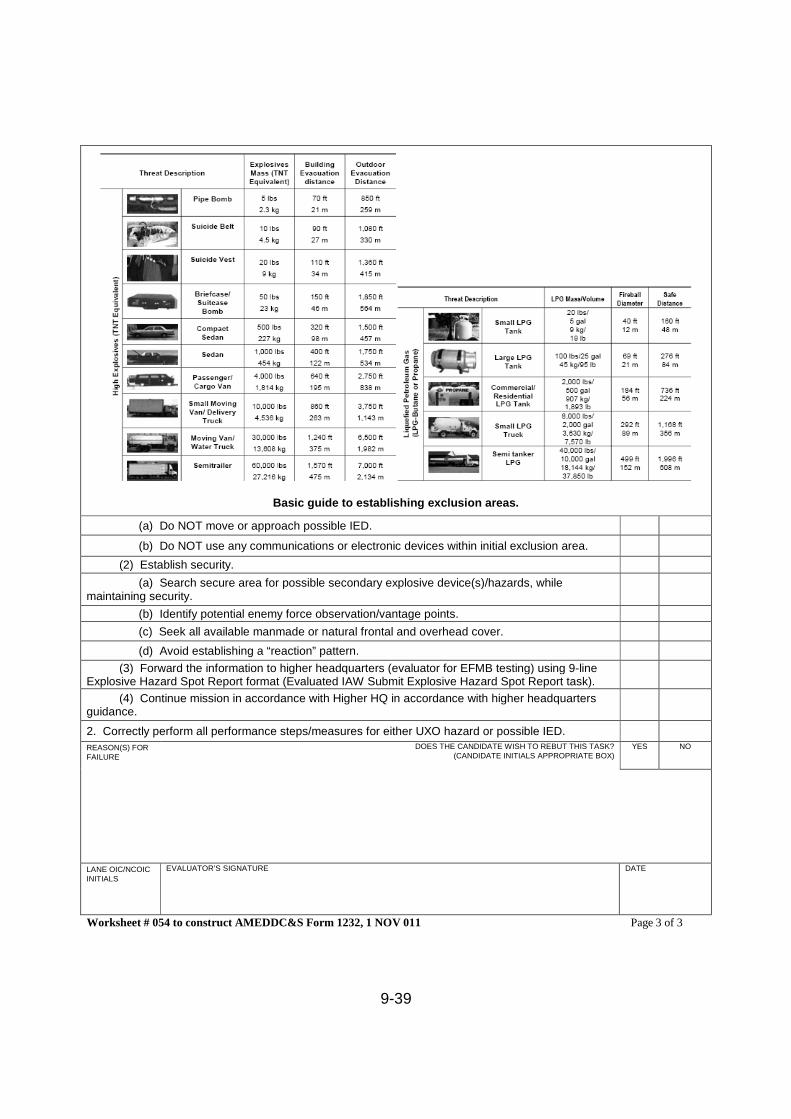
9-39
Basic guide to establishing exclusion areas.
(a) Do NOT move or approach possible IED.
(b) Do NOT use any communications or electronic devices within initial exclusion area.
(2) Establish security.
(a) Search secure area for possible secondary explosive device(s)/hazards, whilemaintaining security.
(b) Identify potential enemy force observation/vantage points.
(c) Seek all available manmade or natural frontal and overhead cover.
(d) Avoid establishing a “reaction” pattern.
(3) Forward the information to higher headquarters (evaluator for EFMB testing) using 9-lineExplosive Hazard Spot Report format (Evaluated IAW Submit Explosive Hazard Spot Report task).
(4) Continue mission in accordance with Higher HQ in accordance with higher headquartersguidance.
2. Correctly perform all performance steps/measures for either UXO hazard or possible IED.
REASON(S) FORFAILURE
DOES THE CANDIDATE WISH TO REBUT THIS TASK?(CANDIDATE INITIALS APPROPRIATE BOX)
YES NO
LANE OIC/NCOICINITIALS
EVALUATOR’S SIGNATURE DATE
Worksheet # 054 to construct AMEDDC&S Form 1232, 1 NOV 011 Page 3 of 3

9-40
THIS PAGE LEFT BLANK INTENTIONALLY
A-1
APPENDIX A
REPRODUCIBLE TRAINING RECORD
A-1. GENERAL.
The training record included within this appendix is designed for EFMB use only and prescribe thetesting standards for use during EFMB. They may be reproduced locally as needed.
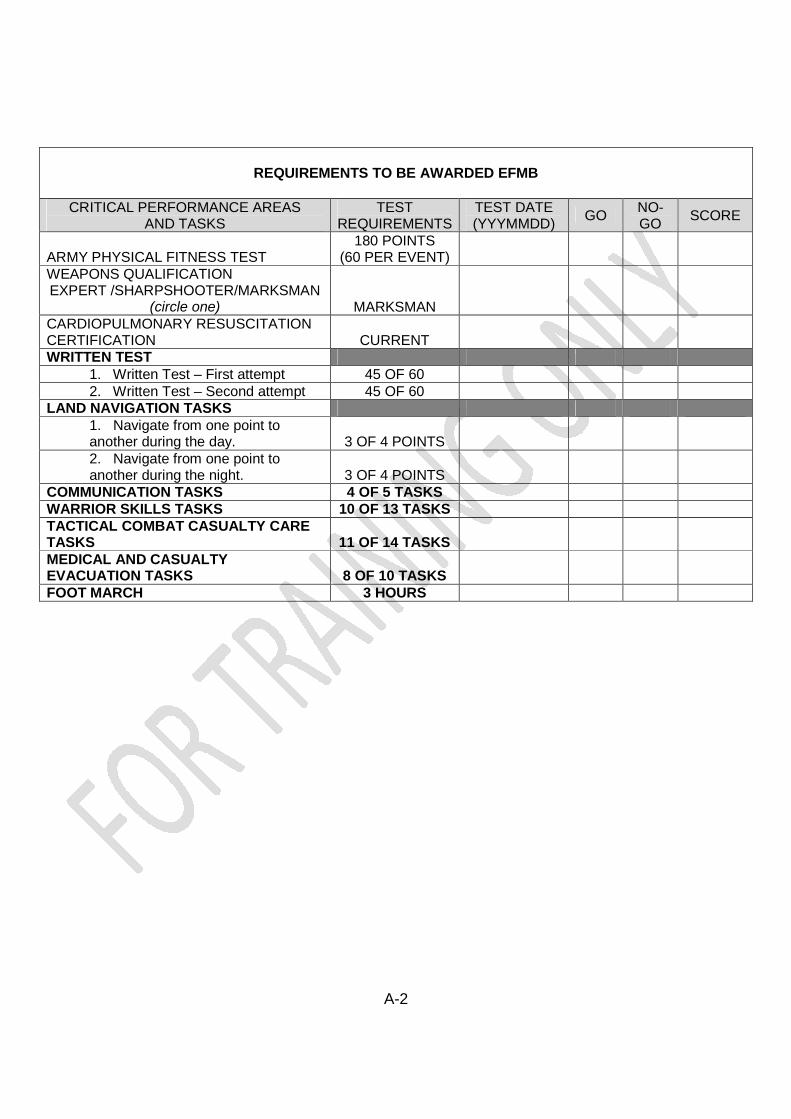
A-2
REQUIREMENTS TO BE AWARDED EFMB
CRITICAL PERFORMANCE AREASAND TASKS
TESTREQUIREMENTS
TEST DATE(YYYMMDD)
GONO-GO
SCORE
ARMY PHYSICAL FITNESS TEST180 POINTS
(60 PER EVENT)WEAPONS QUALIFICATIONEXPERT /SHARPSHOOTER/MARKSMAN
(circle one) MARKSMANCARDIOPULMONARY RESUSCITATIONCERTIFICATION CURRENTWRITTEN TEST
1. Written Test – First attempt 45 OF 602. Written Test – Second attempt 45 OF 60
LAND NAVIGATION TASKS1. Navigate from one point toanother during the day. 3 OF 4 POINTS2. Navigate from one point toanother during the night. 3 OF 4 POINTS
COMMUNICATION TASKS 4 OF 5 TASKSWARRIOR SKILLS TASKS 10 OF 13 TASKSTACTICAL COMBAT CASUALTY CARETASKS 11 OF 14 TASKSMEDICAL AND CASUALTYEVACUATION TASKS 8 OF 10 TASKSFOOT MARCH 3 HOURS
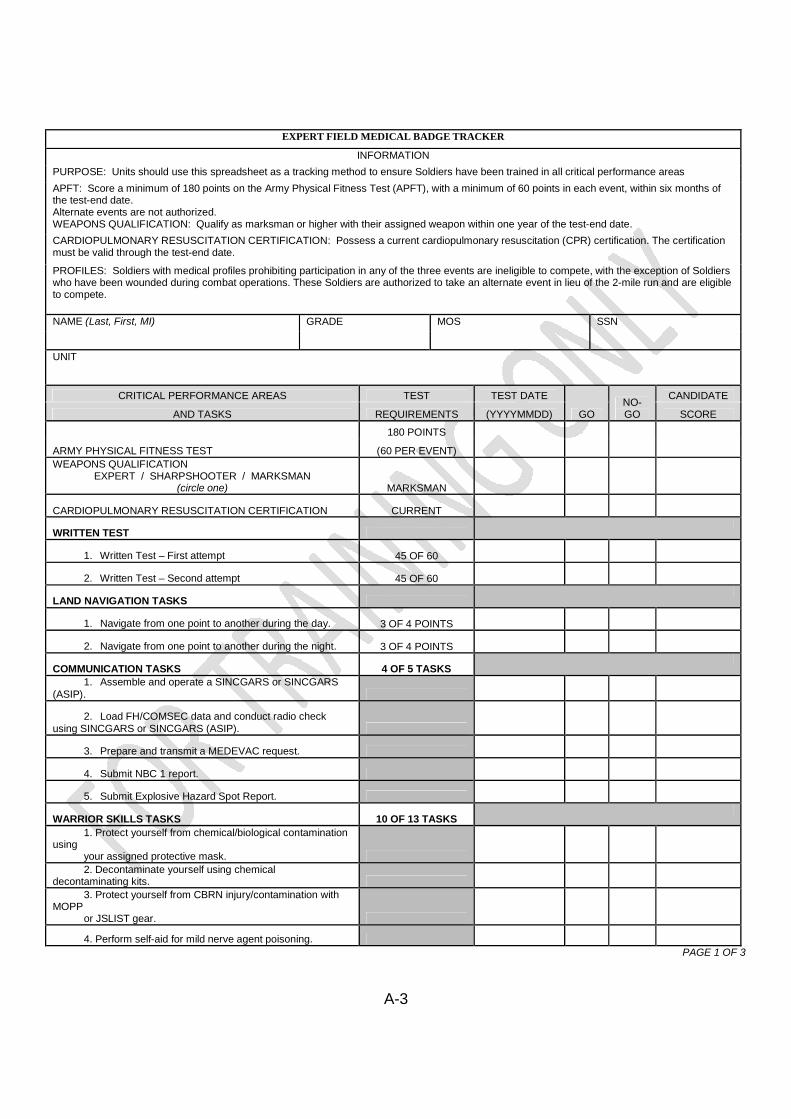
A-3
EXPERT FIELD MEDICAL BADGE TRACKER
INFORMATION
PURPOSE: Units should use this spreadsheet as a tracking method to ensure Soldiers have been trained in all critical performance areas
APFT: Score a minimum of 180 points on the Army Physical Fitness Test (APFT), with a minimum of 60 points in each event, within six months ofthe test-end date.Alternate events are not authorized.WEAPONS QUALIFICATION: Qualify as marksman or higher with their assigned weapon within one year of the test-end date.
CARDIOPULMONARY RESUSCITATION CERTIFICATION: Possess a current cardiopulmonary resuscitation (CPR) certification. The certificationmust be valid through the test-end date.
PROFILES: Soldiers with medical profiles prohibiting participation in any of the three events are ineligible to compete, with the exception of Soldierswho have been wounded during combat operations. These Soldiers are authorized to take an alternate event in lieu of the 2-mile run and are eligibleto compete.
NAME (Last, First, MI) GRADE MOS SSN
UNIT
CRITICAL PERFORMANCE AREAS TEST TEST DATE
GONO-GO
CANDIDATE
AND TASKS REQUIREMENTS (YYYYMMDD) SCORE
ARMY PHYSICAL FITNESS TEST
180 POINTS
(60 PER EVENT)
WEAPONS QUALIFICATIONEXPERT / SHARPSHOOTER / MARKSMAN
(circle one) MARKSMAN
CARDIOPULMONARY RESUSCITATION CERTIFICATION CURRENT
WRITTEN TEST
1. Written Test – First attempt 45 OF 60
2. Written Test – Second attempt 45 OF 60
LAND NAVIGATION TASKS
1. Navigate from one point to another during the day. 3 OF 4 POINTS
2. Navigate from one point to another during the night. 3 OF 4 POINTS
COMMUNICATION TASKS 4 OF 5 TASKS
1. Assemble and operate a SINCGARS or SINCGARS(ASIP).
2. Load FH/COMSEC data and conduct radio checkusing SINCGARS or SINCGARS (ASIP).
3. Prepare and transmit a MEDEVAC request.
4. Submit NBC 1 report.
5. Submit Explosive Hazard Spot Report.
WARRIOR SKILLS TASKS 10 OF 13 TASKS
1. Protect yourself from chemical/biological contaminationusing
your assigned protective mask.
2. Decontaminate yourself using chemicaldecontaminating kits.
3. Protect yourself from CBRN injury/contamination withMOPP
or JSLIST gear.
4. Perform self-aid for mild nerve agent poisoning.
PAGE 1 OF 3
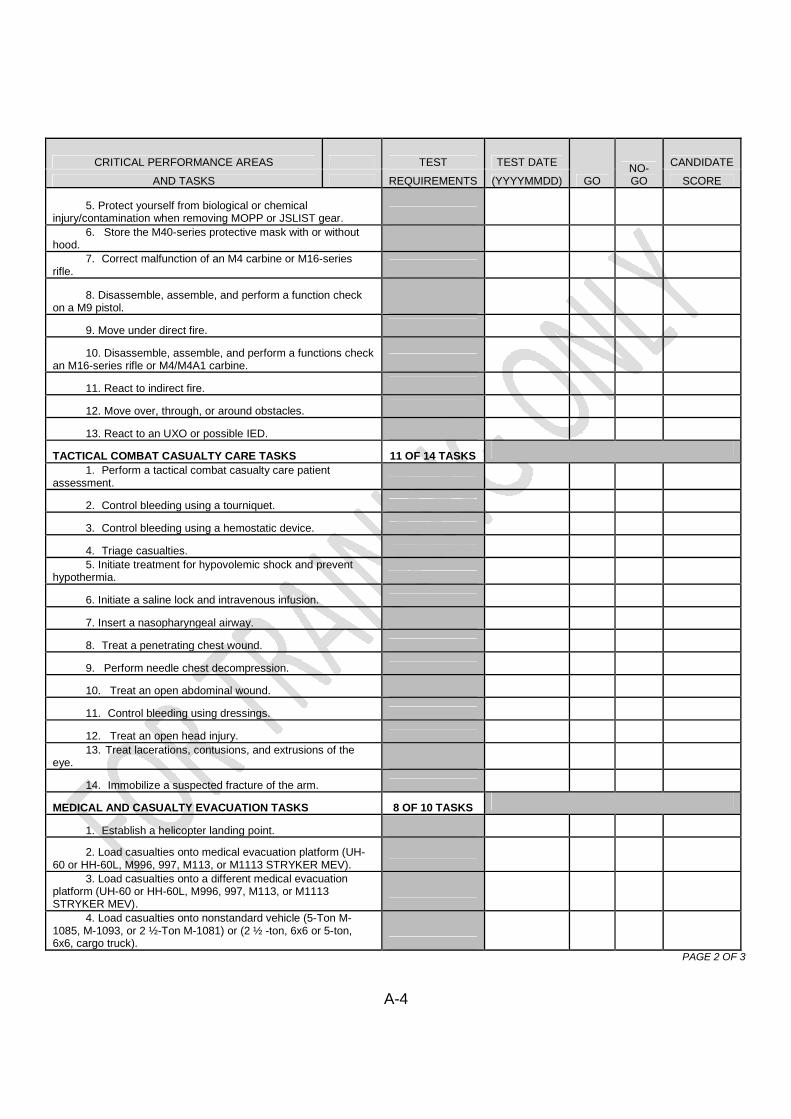
A-4
CRITICAL PERFORMANCE AREAS TEST TEST DATE
GONO-GO
CANDIDATE
AND TASKS REQUIREMENTS (YYYYMMDD) SCORE
5. Protect yourself from biological or chemicalinjury/contamination when removing MOPP or JSLIST gear.
6. Store the M40-series protective mask with or withouthood.
7. Correct malfunction of an M4 carbine or M16-seriesrifle.
8. Disassemble, assemble, and perform a function checkon a M9 pistol.
9. Move under direct fire.
10. Disassemble, assemble, and perform a functions checkan M16-series rifle or M4/M4A1 carbine.
11. React to indirect fire.
12. Move over, through, or around obstacles.
13. React to an UXO or possible IED.
TACTICAL COMBAT CASUALTY CARE TASKS 11 OF 14 TASKS
1. Perform a tactical combat casualty care patientassessment.
2. Control bleeding using a tourniquet.
3. Control bleeding using a hemostatic device.
4. Triage casualties.
5. Initiate treatment for hypovolemic shock and preventhypothermia.
6. Initiate a saline lock and intravenous infusion.
7. Insert a nasopharyngeal airway.
8. Treat a penetrating chest wound.
9. Perform needle chest decompression.
10. Treat an open abdominal wound.
11. Control bleeding using dressings.
12. Treat an open head injury.
13. Treat lacerations, contusions, and extrusions of theeye.
14. Immobilize a suspected fracture of the arm.
MEDICAL AND CASUALTY EVACUATION TASKS 8 OF 10 TASKS
1. Establish a helicopter landing point.
2. Load casualties onto medical evacuation platform (UH-60 or HH-60L, M996, 997, M113, or M1113 STRYKER MEV).
3. Load casualties onto a different medical evacuationplatform (UH-60 or HH-60L, M996, 997, M113, or M1113STRYKER MEV).
4. Load casualties onto nonstandard vehicle (5-Ton M-1085, M-1093, or 2 ½-Ton M-1081) or (2 ½ -ton, 6x6 or 5-ton,6x6, cargo truck).
PAGE 2 OF 3
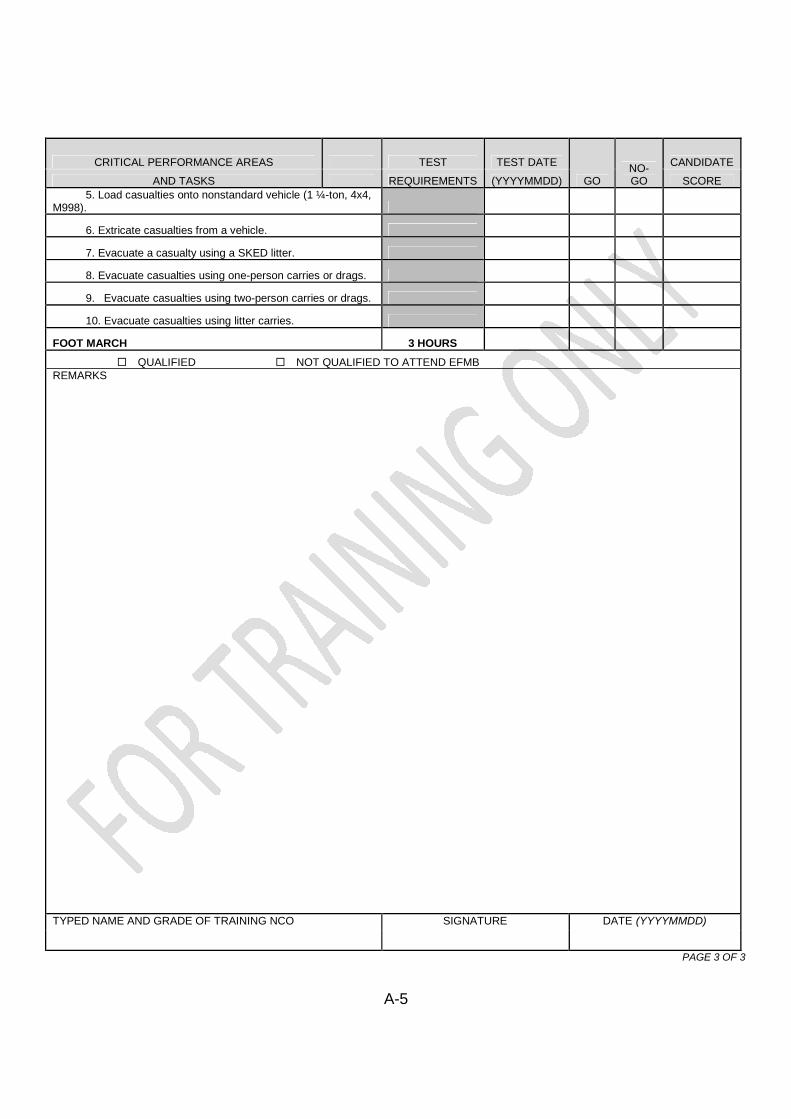
A-5
CRITICAL PERFORMANCE AREAS TEST TEST DATE
GONO-GO
CANDIDATE
AND TASKS REQUIREMENTS (YYYYMMDD) SCORE
5. Load casualties onto nonstandard vehicle (1 ¼-ton, 4x4,M998).
6. Extricate casualties from a vehicle.
7. Evacuate a casualty using a SKED litter.
8. Evacuate casualties using one-person carries or drags.
9. Evacuate casualties using two-person carries or drags.
10. Evacuate casualties using litter carries.
FOOT MARCH 3 HOURS
QUALIFIED NOT QUALIFIED TO ATTEND EFMBREMARKS
TYPED NAME AND GRADE OF TRAINING NCO SIGNATURE DATE (YYYYMMDD)
PAGE 3 OF 3
A-6
THIS PAGE LEFT BLANK INTENTIONALLY

B-1
APPENDIX B
GRAPHIC TRAINING AIDS
The various graphic training aids (GTAs) contained within this appendix are alsoavailable at local TASCs and on the AKO General Reimer’s Library.
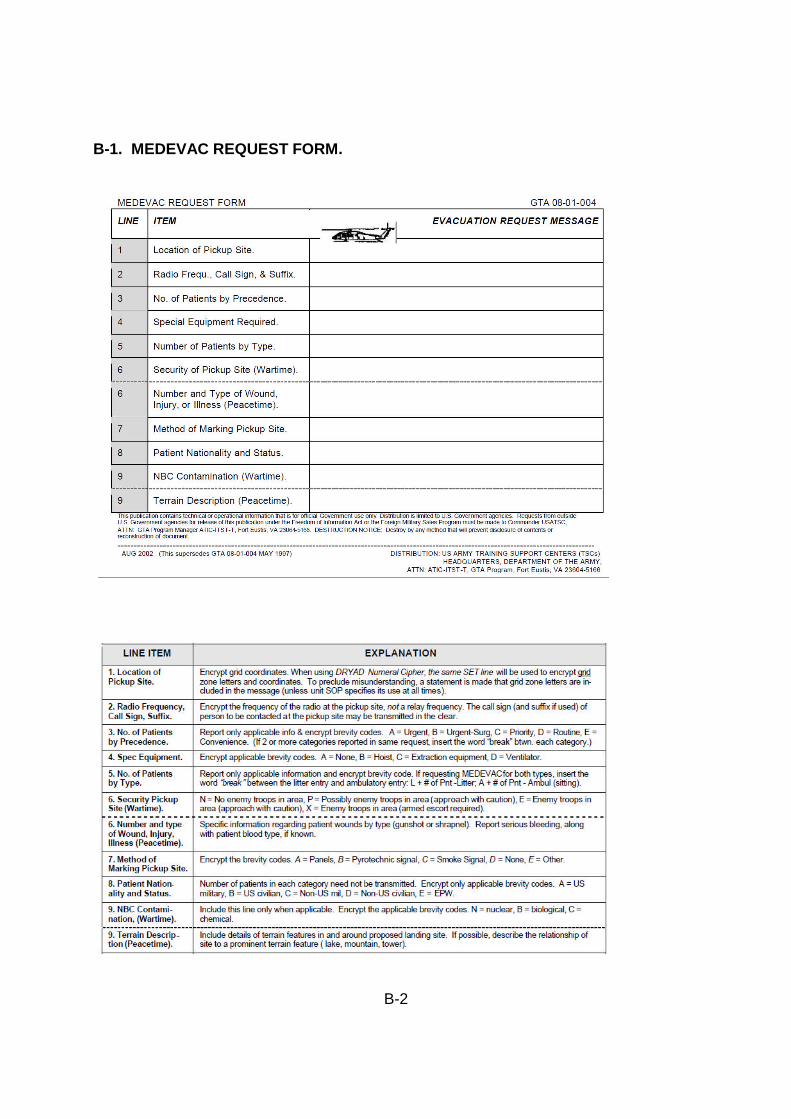
B-2
B-1. MEDEVAC REQUEST FORM.
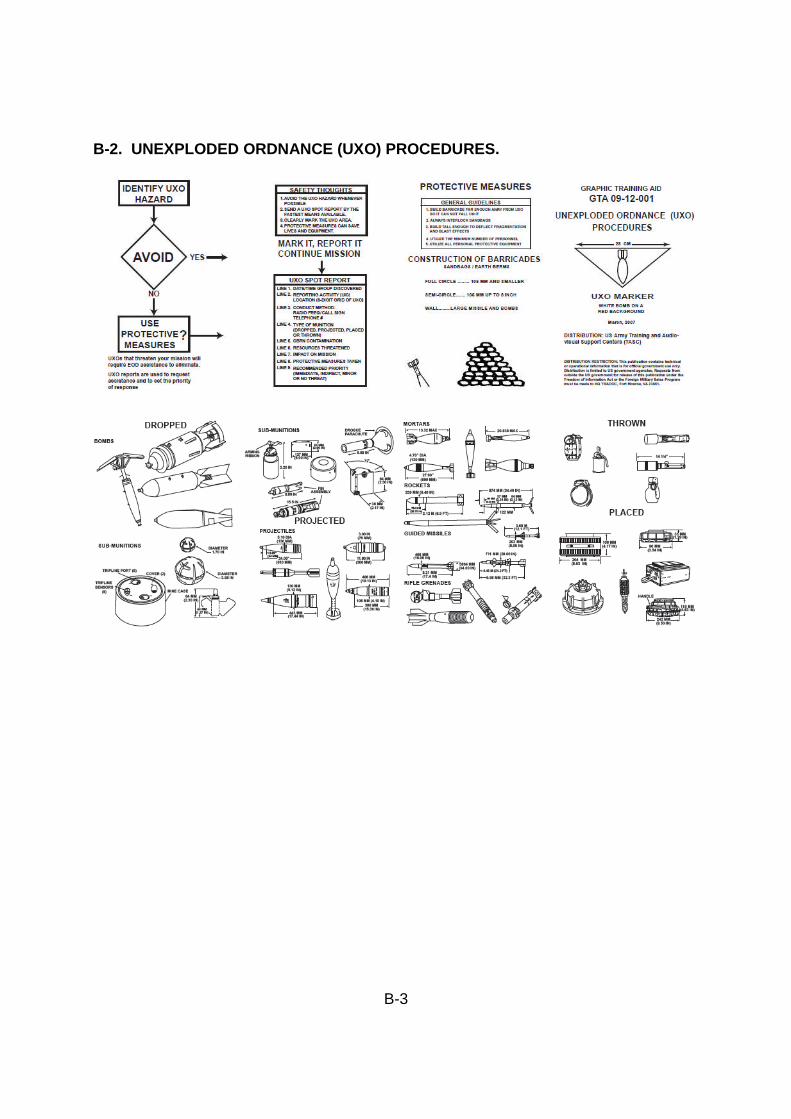
B-3
B-2. UNEXPLODED ORDNANCE (UXO) PROCEDURES.
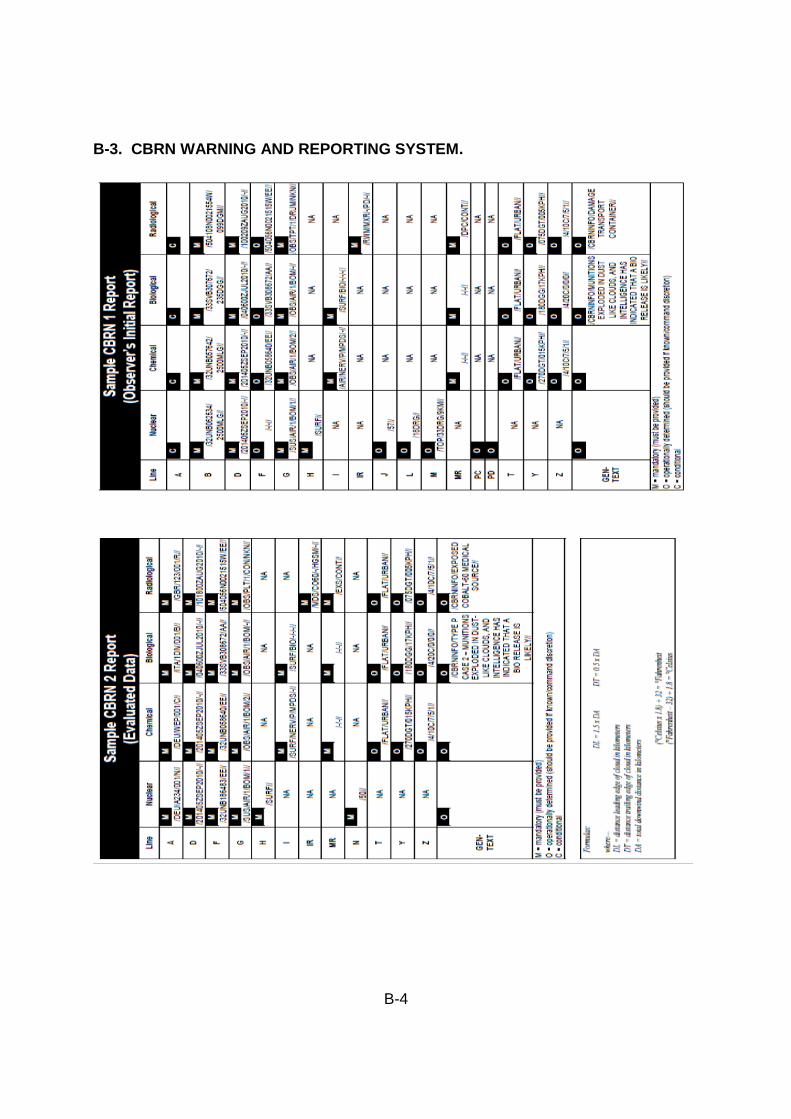
B-4
B-3. CBRN WARNING AND REPORTING SYSTEM.
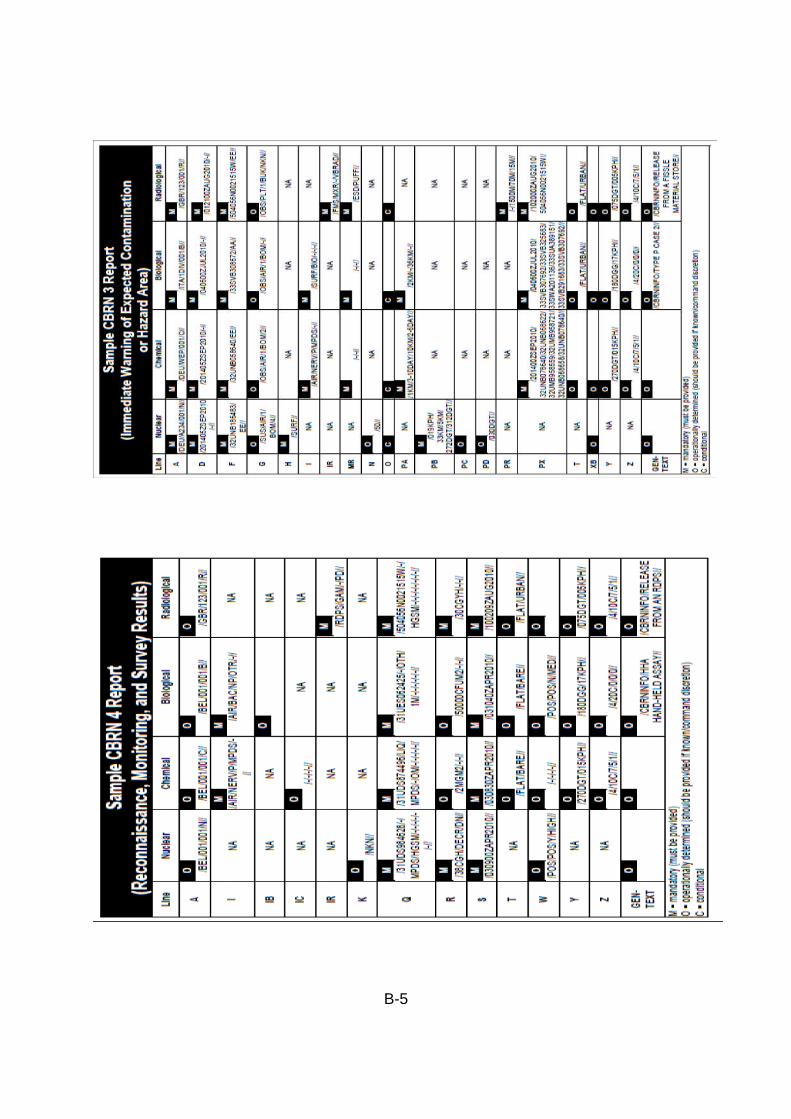
B-5
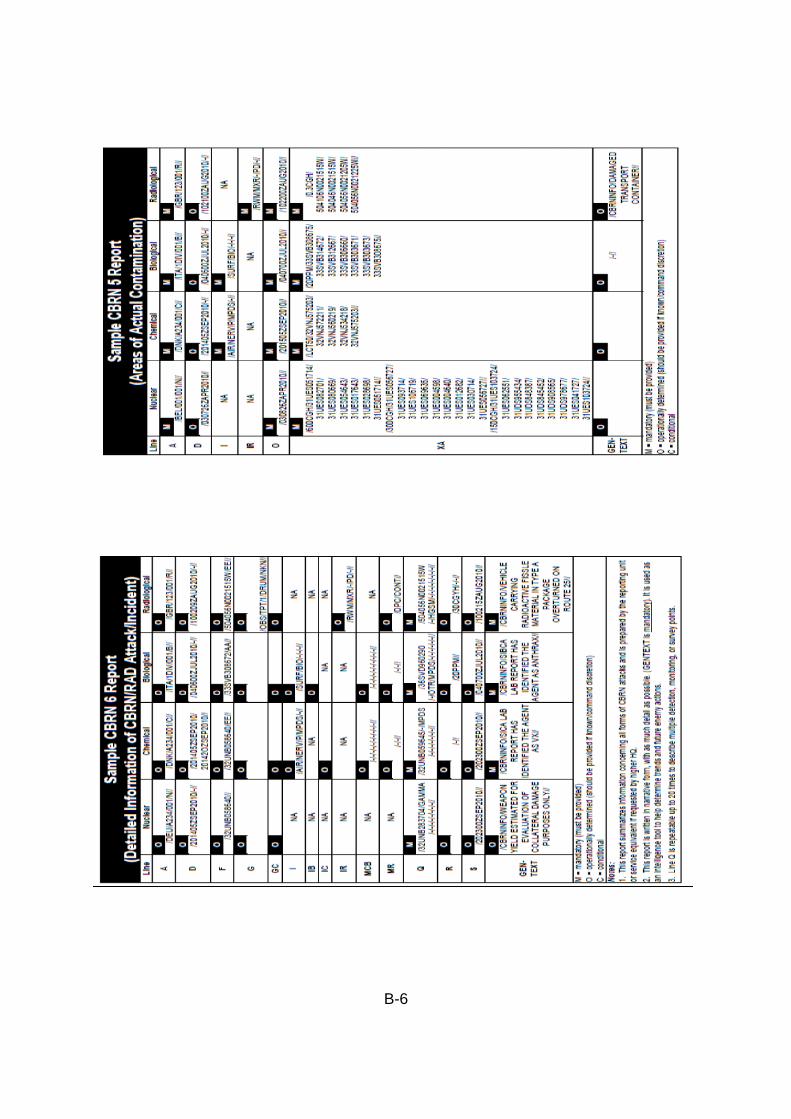
B-6
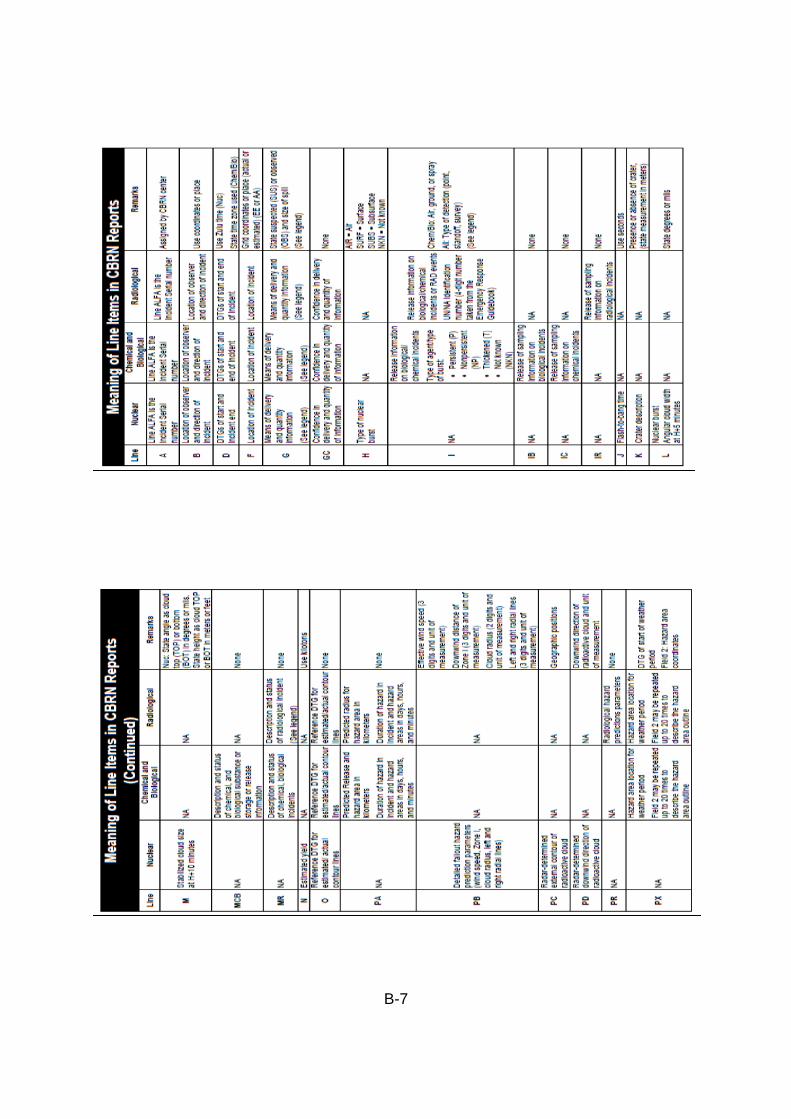
B-7
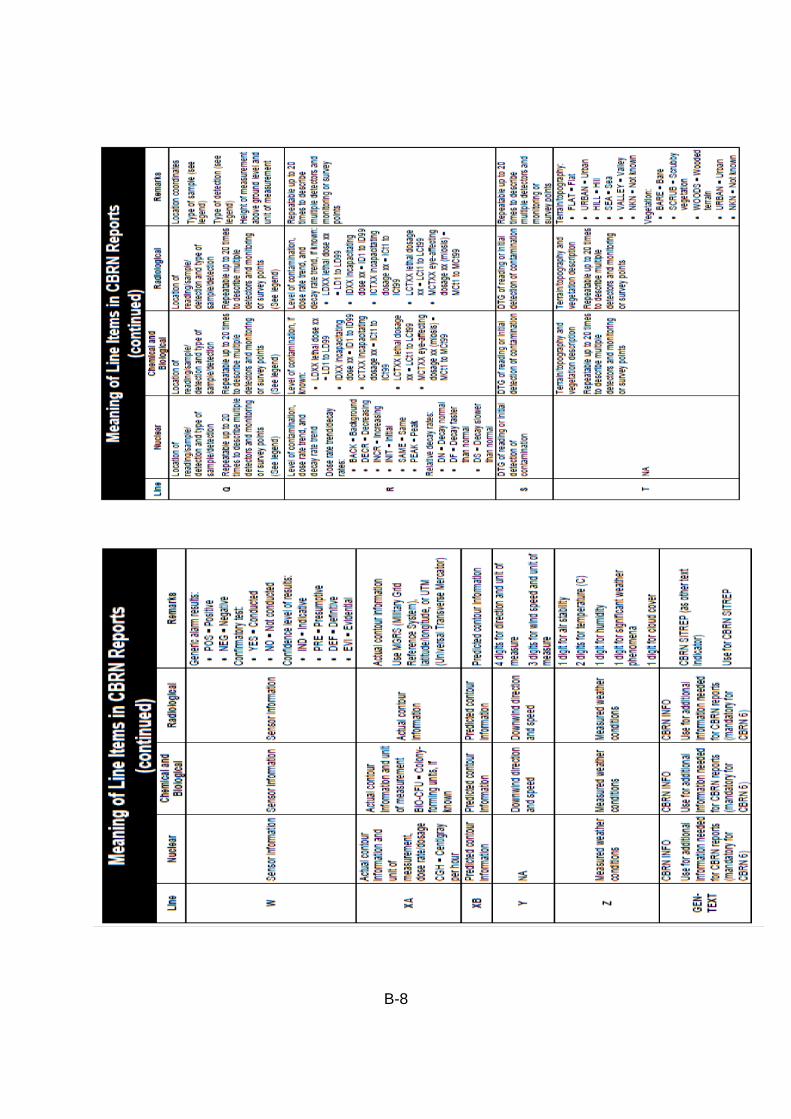
B-8
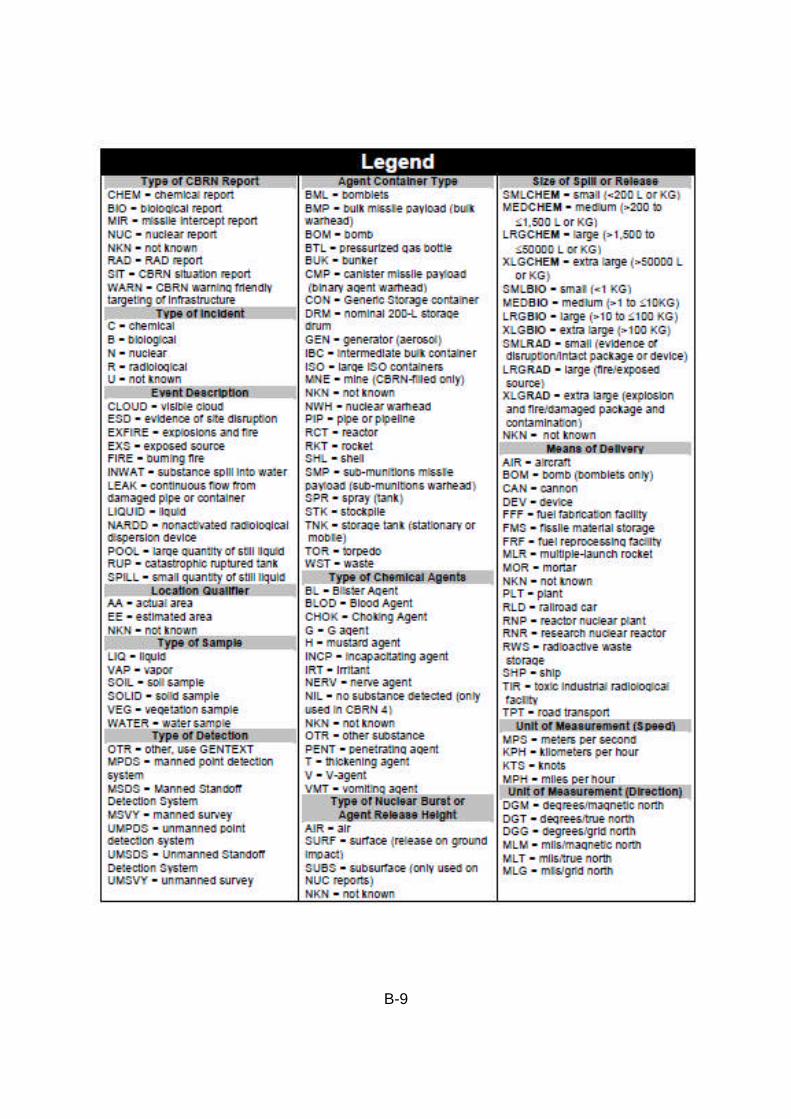
B-9

B-10
THIS PAGE LEFT BLANK INTENTIONALLY
The EFMB Test Control Offices’ website also provides links to the references and has up todate information on the EFMB Program. It should be checked for updates and is located at:https://www.us.army.mil/suite/page/140048
The proponent of this publication is the U.S. Army Medical Department Center and School.Send comments and recommendations directly to: U.S. Army Medical Department Centerand School, ATTN: MCCS-OP-T (EFMB), 3630 Stanley Road, Suite 336, Fort SamHouston, TX 78234-6122.
Any comments, concerns or recommendations can be given directly to the Test Board atany EFMB location by filling out the following form. Comments, concerns orrecommendations can be email directly to the Test Control Office representatives. TCOcontact information is located at https://www.us.army.mil/suite/page/140048.
NAME (LAST, FIRST, MI) RANK PHONE
EMAIL ADDRESS
UNIT
1. Issue, comment or concern:
Recommendation:
PAGE_______ CHAPTER TITLE______________________________1. Issue, comment or concern:
Recommendation:
PAGE_______ CHAPTER TITLE______________________________
EFMB Test Control Office contact information is located athttps://www.us.army.mil/suite/page/140048.