Embed Size (px)
Citation preview

1
Handbook for
Pervious Concrete Certification
in Greater Kansas City (Updated June 2017 to mirror the Updated Specifiers Guide
to Pervious Concrete in Kansas City v.1.4.17)
This support material is part of the CPG Pervious Concrete Certification Program

2
Table of Contents
Preface: The CPG Pervious Certification Program
1. Pervious Concrete: What’s it all about? (Overview)
2. Brief History of Pervious Concrete
3. Design Elements for Pervious Concrete
Hydrology, Drainage, Layout, Subgrade Soil, Subbase, Thickness, Jointing
4. Basic Mix Design Information for Pervious Concrete
Cement & SCM’s, Aggregates, Water, Admixtures, Proportioning, Tips for the
Ready Mix Producer
5. Testing Pervious Concrete/QC & QA
6. Pervious Pavement Construction
Equipment and Tools
Test Panel Placement and Approval
Pre‐Construction Meeting
Excavation, Filter Fabric, Subgrade, Base, Jointing, Curing,
Hot & Cold Weather Practices
7. Maintenance
8. Green Building Credits/LEED®
9. Decorative Pervious
10. Specifiers Guide for Pervious Concrete for Stormwater Mitigation in Greater
Kansas City & Pervious Construction Checklist, Pre‐Construction Checklist
11. Websites & Resources

3
Preface
CPG Pervious Certification Program
4 Levels CPG Pervious Concrete Certification
Level 1: CPG Pervious Concrete Technician (Required for Contractors & Ready Mix Producers, optional and recommended for inspectors, designers, stormwater engineers, architects, civil engineers) Requirements:
A) Pass the CPG Pervious Concrete Written Exam with a score of 80% or higher B) Complete the Performance Evaluation usually done the same day as the written exam, demonstrating
subgrade prep, form placement, the proper use of tools, placement procedure, proper jointing, proper curing, etc.
C) Pass an individual Performance Evaluation on the individual’s 1st job or test site, set up by the individual. D) Valid for 5 years after receiving the certification. E) Re-certification is required within 90 days after the expiration date listed on the wallet card/certification
certificate. F) Starting January 1, 2012 re-certification applications require 2 hours of continuing education credits on
pervious concrete. These hours can be local, regional or national seminars, demo’s or workshops on pervious concrete. It is up to the individual to keep records of these continuing education hours to turn in with the re-certification application.
Level 2: CPG Pervious Concrete Installer (Upgrade option for Contractors) Requirements:
A) Have a current ACI Flatwork Finisher Technician Certificate. B) Have a current CPG Level 1 Pervious Concrete Technician Certificate. C) Project Experience with successful pervious construction in a minimum of 3 projects, with a total area
exceeding 10,000 sq. ft.
Level 3 CPG Pervious Concrete Craftsman (Upgrade option for Contractors) Requirements:
A) Have a current ACI Flatwork Finisher Technician Certificate B) Have a current CPG Level 1 Pervious Concrete Technician Certificate C) Have a CPG Level 2 Concrete Installer Certification. D) Document work experience constructing pervious pavements exceeding 1,500 hours (not including the 10,000
sq. ft. needed to qualify for the Installer)
Level 4 CPG Advanced Pervious Concrete Team Certification (Optional for Contractor and Ready Mix Team)
Well above and beyond traditional concrete, successful pervious concrete placements require a dedicated team with an excellent relationship between the Ready Mixed Concrete Producer and the Concrete Contractor. The Concrete Promotional Group has assembled an advanced mixture design and construction review for contractor/producer teams looking to advance their pervious concrete construction knowledge. Certification will encompass one producer, one contractor, one pervious concrete mixture, and one placement technique. Upon completion of the process the producer will be provided with a performance and testing certification for the final mixture design. The contractor will be provided with certification of the in-place mixture properties and

4
performance. By completing the certification process a pervious concrete team will have documentation showing the unit weight, strength, and infiltration that will be achieved. Requirements: A) Have a current ACI Flatwork Finisher Technician Certificate B) Have a current CPG Level 1 Pervious Concrete Technician Certificate C) Complete the Team Review Process outlined below:
Outline of the Review Process:
The certification process involves an interactive ½ day series of two test placements (at a location of the team’s selection).
A. Starting mixture provided by producer. The mix is proprietary so it is kept confidential. Only the ready mix producer and Dr. John Kevern will discuss these details.
B. Contractor will place a 4 cy sample panel. Concrete will be held 45 minutes after batching to simulate field conditions. Inverse slump, ASTM C1688 unit weight, and timed discharge values will be recorded.
C. The contractor, producer, and CPG representative will discuss consistency, workability, finishability, and discharge capacity. The mixture will then be modified to better meet the desired criteria.
D. The contractor will then place a second 4 cy sample panel using the modified mixture. Inverse slump, ASTM C1688 unit weight, predicted unit weight, and timed discharge will be measured on the fresh concrete. Cylinders will be created for the compaction density curves for reporting voids, unit weight, permeability, 7 day compressive strength, and 28 day compressive strength for the selected mixture.
E. The contractor and/or producer is responsible for obtaining at least (3) 4” diameter cores for hardened unit weight and permeability testing at UMKC.
F. Field infiltration will be performed according to ASTM C1701 on at least five (5) locations. G. The performance and testing data will be used to create mixture certification documentation and individual field
evaluation documentation.
Deliverables:
Deliverables will include a description and summary of the certification process including all testing data for reproduction and transmittal to any interested party.
All certified individuals and companies can be found listed on the CPG Website at www.concretepromotion.com.
All certified contractors are encouraged to work with certified ready mix producers and vice-versa.

5
Chapter 1
Pervious Concrete: What’s it all about?
What is Pervious Concrete?
Pervious Concrete is a specialty concrete used to allow water to intentionally pass through the surface of a pavement and
allow stormwater to eventually absorb back into the surrounding soils or evaporate. This keeps runoff water from
downstream urban flooding and erosion. It also breaks the cycle of water treatment plants needing to treat stormwater
where municipalities have combined sewer and stormwater systems. Pervious concrete pavements are “best management
practices” (BMP’s) to collect, clean and cool stormwater. This usually eliminates the need for detention/retention ponds, thus
reducing construction expenses, safety issues, and maintenance costs.
Why are we worried about Stormwater? The EPA NPDES Phase II requirements now mandate municipalities to implement
stormwater mitigation policies. New developments, both residential and commercial, must show how stormwater leaving the
property will not exceed predevelopment conditions. That includes both quantity and quality of stormwater. There are many
types of stormwater mitigation techniques. Pervious concrete is one of many options available.
Why choose Pervious Concrete over other BMP Methods? Pervious Concrete not only collects stormwater but it also filters
and cools it economically with local materials. Low Impact Developments (LIDs) are encouraged to save space, save natural
resources and promote sustainable communities. What does this mean? Developments are encouraged to build up rather
than out. With a pervious concrete parking lot or pavement the detention pond could be eliminated completely, thus
conserving green space.
Figure 1.1
Pre Development Post Development Low Impact Development
What about freeze/thaw concerns and clay soils in Kansas City Metro Area? Pervious Concrete is usually more freeze/thaw
durable than “conventional” concrete. Pervious concrete pavements have not been lost to freeze/thaw conditions. The voids
in the pervious concrete allow for water (which expands 9% when it turns into ice) to expand and contract within the voids
which keep it from breaking up the pavement. Pervious concrete in clay soil markets becomes a “system” (see figure 1.2
below). It is designed with a rock base under the pervious layer to temporarily hold stormwater since the clay soils prevent
fast recharging of the subsoil. Pervious concrete pavements typically lose ¾ of an inch to an inch of water a day to
evaporation. A three inch rain would be gone in 4 days just to evaporation. The clay soils usually allow a slow exfiltration rate
of .5 to .05 in the market.

6
Figure 1.2
How does Pervious Concrete fit in with Sustainability & Green Building Ideas?
Pervious Concrete Pavements:
Maximize Open Space The temporary detention area is under the pavement rather than beside it, taking the system vertical rather than horizontal.
Stormwater Quantity Control Pervious concrete takea in huge amounts of stormwater.
Stormwater Design‐Quality Control Pervious pavements filter the stormwater and cleans it.
Heat Island Effect (reduction) Non‐roof Pervious concrete improves solar reflective index (SRI) by reflecting the suns’ light rather than absorb it like dark or black pavements.
Construction Waste Management Pervious concrete is ordered as needed and can be recycled.
Recycled Content Pervious Concrete has pre‐consumer recycled content in the concrete mix.
Regional Materials Pervious concrete is delivered with local materials from a local company, typically within 20 miles of the jobsite.
Water Efficient Landscaping Pervious Concrete eliminates using surface or subsurface water for irrigation, instead capturing rainwater or brown water for landscaping. Pervious pavements can catch and contain rainwater and recycled for landscaping use.
Water Use Reduction The intent here is to lessen the burden on municipalities for water supply and wastewater. Pervious pavements can capture stormwater divert the water to cisterns, for brown water use, in flushing toilets and watering landscaping.
More detailed information on Pervious Concrete’s role in qualifying for Leadership in Energy and Environmental Design (LEED)
for Sustainable Building and Communities can be found in Chapter 8 of the Handbook for Pervious Concrete in Kansas City.
What maintenance is needed? An occasional vacuuming or wet/vac is usually sufficient, as dirt, leaves, or fines typically sit in
the top inch under the surface. More maintenance information can also be found in Chapter 7 of the Handbook for Pervious
Concrete in Kansas City, and in the National Ready Mixed Concrete Association’s Pervious Maintenance Operations Guide.
The Pervious Concrete System
for Stormwater Mitigation,
A Multi‐Purpose System
Stormwater Control
A Pavement
Erosion Control
Acts as a Filter
Slip Resistant
Fights the Urban Heat
Island Effect

7
Chapter 2
Brief History of Pervious Concrete
Pervious Concrete has been around for hundreds of years. The Europeans recognized the insulating properties in structural
pervious concrete for their buildings. Europeans have also used pervious concrete for paving including on the Autobahn. Stories
passed down through the years tell us that our soldiers didn’t mind walking on pervious roads during World War II because it meant
their feet would be dry!
Pervious was brought to the United States after World War II. It first showed up in Florida and other southern coastal states.
Slowly it has migrated to the other states where it has met different successes. As with any new product, it has had to prove itself.
Many well intended ready mix producers have produced the product and many well intended contractors have placed the product.
Some did well, others did not. As it is true with any material and construction technique, there is a science to it and a best way to
conduct the construction. Education and experience are the key to success. The coastal states have experienced pervious concrete
for over 20 years. The hesitation to move into the Midwest and Northern States was mainly due to freeze/thaw concerns. Now that
those concerns are no longer considered a problem, the product has moved quickly across the United States.
In the 1990’s the U.S. Environmental Protection Administration (EPA) came out with the Clean Water Act (CWA), that later led to
other phases of implementation to preserve the waterways from stormwater borne pollutants. EPA identifies “stormwater runoff is
generated when precipitation from rain and snowmelt events flow over land or impervious surfaces and does not percolate into the
ground. As the runoff flows over the land or impervious surfaces (paved streets, parking lots, and building rooftops), it accumulates
debris, chemicals, sediment or other pollutants that could adversely affect water quality if the runoff is discharged untreated. The
primary method to control stormwater discharges is the use of best management practices (BMPs).” (EPA.gov). Pervious concrete is
one of many BMP’s recognized by the EPA as well as our local American Public Works Association (APWA) and the Mid America
Regional Council (MARC). The local APWA/MARC Best Management Practices for Stormwater Mitigation Manual can be found at:
http://www.marc.org/Environment/Water/bmp_manual.htm . Basically, it requires the developer/owner to keep as much
stormwater on property as possible. If stormwater leaves the property it must leave cleaner and cooler than before. Pervious
concrete allows for the filtering/cleaning and detainment of stormwater.
Since municipalities have been required to enforce stormwater mitigation with the implementation of EPA NPDES Phase II, many
BMP’s have been placed and tested to find out which one is going to work for their area. Balancing BMP’s becomes an art of
balancing placement costs, maintenance costs, aesthetics and functionality. Budgets are tight and skepticism is high, because the
BMP’s are relatively new concepts and some are unproven.
The first pervious placement in the Kansas City Metro Area was in Sugar Creek, MO in November 2005. Since that time about 60+
pavements have been placed and many lessons learned about what makes pervious concrete “good”. Herein, are the current
guidelines that have been learned and adjusted. There are some basics we know about placing a successful pervious pavement:
1) The design of the pervious pavement has a hand in its success.
2) The mix design delivered by the ready mix producer has a hand in its success.
3) The contractor placing the pervious concrete has a hand in its success.
4) The owner has a responsibility for proper maintenance to keep the system functional.

8
Chapter 3
Design Elements for Pervious Concrete
Hydrology
The reason pervious concrete is being considered in the first place is because of water. Stormwater runoff is a negative issue
affecting the quality of our urban and suburban areas, chasing pollutants down into the typically combined stormwater/sewer
systems. This ends up doing three things:
1. sending rainwater to the water treatment plants for cleaning then back out to public as fresh cleaned water.
2. sending rainwater into the streams, creeks and waterways creating urban flooding.
3. sending polluted rainwater into the waterways altering the balance of nature hurting native plants and wildlife.
In Kansas City we’ve seen the latter two points in Indian Creek, Brush Creek, Tomahawk Creek and the Little Blue River. In the U.S.
we are spending millions of dollars nationally cleaning rainwater in our water treatments plants, which is unnecessary.
Most municipalities identify a typical rain event they require to be mitigated on developments. Nationally the most common rain
event required to be mitigated is a 25 year storm event in 24 hours. The numbers vary by geographic area depending on the kind of
rain events that frequent that area and the type of soils in the area. Obviously sandy soils let water percolate back into the
surrounding soils faster than fat clay soils will. In the Greater Kansas City Area’s APWA/MARC Stormwater Best Management
Practices Manual, the 100 year rain event in 24 hours is required to be mitigated. Depending on which part of town you are in, the
number is somewhere between 8 or 9 inches of rain in 24 hours. Our local area has a majority of clay soils/expansive clay soils. Rain
water will not percolate through the clay quickly, it seeps slowly. Regulations allow some water to run off site, but that water must
be cleaner and cooler than when it hit the site. In other words, it needs to be filtered or cleaned. The Greater Kansas City Area’s
American Public Works Association and Mid‐American Regional Council (APWA/MARC) BMP Manual requires a minimum of a 12”
clean rock base beneath the porous pavement whether it be porous asphalt, porous pavers or pervious concrete. Sidewalks are not
held to the same standards and there is no minimum listed for sidewalk applications.
The hydrological calculations that need to be established are:
1. How much water needs to be mitigated? ‐ check municipal requirements.
2. How much water will 12” of clean rock base hold (typically 40% voids)?
3. Is more base rock needed or will the 12” hold it satisfactorily?
4. Adjust as needed.
Do not calculate the pervious concrete to hold any of the stormwater. That way you will not have water standing on the surface,
thus protecting it even more from freeze/thaw expansion. Extra base may be needed if roof top guttering runs into the pavement or
adjacent areas drain into the pervious area. Are overflow piping or additional water storage containers needed? If your water
calculations are correct you likely will not need additional means. However, depending on the amount of water you are mitigating
you may want to allow for an overflow. (See figure 3.1 below, for an example.) Overflow pipe may be placed at the top of the clean
rock base. This pipe can be routed to another BMP such as a bioswale or to the storm/sewer system with a delayed and controlled
release. Some sustainable projects have used a sump pump to reuse this brownwater indoor to flush toilets and outdoors for
watering landscaping.

9
Figure 3.1
NOTE ‐ approximately ¾” to an 1” of water will evaporate in a day. This has been proven on a national level and on a local level at
I’Lan Park, in Leawood, KS. So even in the worst clay soils possible, the water does eventually go somewhere. After a two inch rain,
the rainwater can be expected to be gone in about 2‐3 days.
Why would a designer or owner choose pervious concrete pavements instead of other acceptable BMP’s? First off what are the
other types of acceptable BMP’s and what are their limitations?
Rain Gardens used for smaller areas, more residential, needs a lot of maintenance such as pulling weeds, etc.)
Figure 3.2
Rain garden Bioswale
Bio‐Swales used for larger areas can look like weeds‐gone‐wild until the public is educated on the application.
Detention Ponds are the most commonly used BMP. They need land and have standing water where mosquitoes breed.
They are a safety hazard for children, they need maintenance and they are costly to place in the first place.
Figure 3.3 Fenced wet detention pond Lake Lenexa, dam and spillway
Ponds or small lakes turned into recreational areas as in Lake Lenexa in Lenexa, KS.
Many different types of proprietary systems which can include special tree/plant wells at street side, cisterns or piping
below the surface are costly to construct and purchase.
Pervious Concrete
Clean Rock Base
Overflow Pipe

10
Figure 3.4 Proprietary plant wells system Porous asphalt
Porous Asphalt is an oil‐petroleum based material. Do you really want your water running through this picking up hydro‐
carbons and depositing them back into the ground sources?
Porous Pavers are typically a 6 to 8 step installation process, building the base with rock, sand, etc. Maintenance is much
higher on this type of paving material and more labor intensive.
Figure 3.5
Various systems Porous pavers Grasscrete
Grasscrete proprietary systems combine structures below the surface to hold aggregates and soil mediums for hearty
grasses or plants. These systems take a while for the plants to establish and are multi‐step construction processes to place.
Pervious Concrete (see below)
Figure 3.6
Grounds Park parking lot expansion Thermo Fisher Scientific parking lot expansion
Blue Springs, MO Lenexa, KS
So why choose pervious concrete parking lots to solve your stormwater mitigation issue?
Pervious pavements helps in achieving “Low Impact Developments” (LIDS), in other words building UP, instead of OUT. By
placing pervious concrete the temporary detention basin (the clean rock base) is UNDER the parking lot surface. It
eliminates the need for additional land to place a detention pond next to the building or parking lot. The pervious parking
lot becomes both the detention pond and the parking surface in one. Build up not out. The owners save on land cost too,
as they don’t need additional land for the detention pond.
Pervious concrete is green or sustainable. Pervious concrete is placed with regionally available materials (anything within
100 miles of a jobsite to cut down on energy for transportation costs).
Pervious concrete is recyclable. If for some reason, it needs to be replaced someday in the future, it can be used for base
rock or possibly for aggregate in concrete.

11
Pervious can have recycled pre‐consumer materials in it. Fly ash found in the KC market is often in the concrete mix. By
using beneficial supplementary cementitious materials in concrete, they help keep them out of landfills.
Pervious concrete is low maintenance. An occasional vacuuming or wet/vac will pull dirt, sand and debris from the surface.
Pervious concrete like regular concrete is light reflective and cooler. This helps fight the Urban Heat Island Effect. Cooler
pavements mean cooler environments near buildings and homes, and this means lower air conditioning bills in the summer.
Research shows that by building with light reflective and heat reflective materials for roofs and pavements, and increasing
green space (trees and plants) the ambient temperatures in urban areas can be reduced 5°F or save up to 18% on air
conditioning bills.
Figure 3.7 Asphalt pavement at night, Concrete pavement at night,
very little light reflectance much more light reflective
The water collected within the pervious pavement system can be collected and rerouted (sump pump or other means) to
use for irrigating landscaping or for flushing toilets in nearby buildings. This lessens the burden on municipal water supply
and lowers the need for wastewater systems.
Figure 3.8
Finley Stadium, Chattanooga, TN, built in 1997, partial pervious pavement, collects stormwater,
recycles the water to water landscaping around the stadium and the football field
Impervious pavements near or next to trees and bushes drain water away from trees. Everyone has seen concrete
sidewalks “tenting”. Tree roots drive upward to find air and water for nourishment. Pervious concrete allows water and air
get to the tree roots. No more sidewalk tenting.

12
Design & Layout
Lessons learned in design and layout to maximize pervious success regarding permeability and durability:
1. The bottom of the clean rock base should be as flat as possible. Gravity will feed water to the lowest point. If the
pavement is on a slight grade make up the difference from bottom to the grade on the surface, with the clean rock base as
it is less costly than the pervious concrete.
Figure 3.9
2. Use trenches or check dams or other means in stabilizing downhill water flow when building on a grade.
Figure 3.10
3. Best management practice uses dual concrete design for maximum durability. Pave the drive lanes in regular concrete,
where there are more turning movements, and pave the parking stalls in pervious concrete. Place the base clean rock
under all of it. Make sure both the regular concrete and the pervious pavement are the same thickness for construction
ease. This way the base under the entire parking lot is used efficiently for temporary storage, while utilizing regular
concrete where the most traffic and stress occurs on the surface.
Figure 3.11
Dual concrete design with pervious and conventional concrete

13
4. Pay special attention to the outer edge of the pavement where pervious meets landscaping or grass. Also in the middle of
the parking area where trees and landscaping islands are within the pervious surface. This is where the maximum exposure
to soils occurs. Rains will wash soils, landscaping mulch, etc. into the pervious pavement. Make sure plans are in place to
immediately mitigate the surrounding soils with sod (or equal) to keep dirt and mulch in place and out of the pervious
pavement. The pictures in Figure 3.12 show soils and mulch carried into pervious pavements after rains. The exposed soils
and mulch were not satisfactorily secured. Landscaping islands should be slightly depressed behind the curb. Erosion
control needs to be in place until grass or landscaping plants are mature. This is also the reason why pervious is used for
parking lots more often than sidewalks/paths. Sidewalks have so much more linear exposure to the dirt/grass. Parking
areas can limit the exposure to soils to the outer perimeter.
Figure 3.12
5. When using green practices in design it is customary to place trees and shrubs within the parking lot matrix to provide
shade and evapotranspiration. However, for pervious parking lots, it is best to limit the trees to the outer perimeter of the
parking area, where they are more easily maintained, and the dirt/mulch doesn’t contaminate the pervious surface within
the parking area as in the picture in figure 3.12.
Subgrade
The existing subgrade under the stormwater detention area shall not be compacted or subject to excessive construction
equipment traffic prior to coarse aggregate bed placement. The subgrade may be scarified to improve infiltration rates.
Cuts necessary to establish proper subgrade level shall not be compacted or subject to excessive construction equipment
traffic prior to coarse aggregate bed placement and may be scarified to improve infiltration rates.
When fill is needed to meet proper subgrade level, some compaction may be necessary. Compaction to approximately 92%
proctor is more than sufficient.
Base
Filter fabric a 4 oz non‐woven geotextile shall be placed on the subgrade/soil prior to placing the base material.
The filter fabric will continue up the sides to the surface to keep fines from migrating into the storage layer.
It is advisable to continue the filter fabric up and over the surrounding soils approximately 2 to 3 feet. This will “hold” the
soils under the fabric acting as erosion control until the project is complete and landscaping is ready to secure the soils next
to the pervious pavement. This is an optional solution to erosion control.

14
Figure 3.13
The coarse aggregate for the base or “storage” layer shall be a minimum of 12” in the Greater Kansas City Area.
(APWA/MARC Stormwater BMP Manual) This has been established to mitigate the 100 year rain event in 24 hours. A true
stormwater evaluation may be required for the specific site by a qualified stormwater engineer to meet municipal
requirements. The base thickness for a parking lot can vary depending on the hydrological calculations, discussed in the
beginning of Chapter 3.
Sidewalks are not held to the same standard. Sidewalks tend to have 4 to 6” of clean rock base.
The material for the base shall conform to ASTM C33 standards and be capable of having minimum voids of 38% by weight
measured in accordance with ASTM C29. It shall be clean washed rock. The rock shall be a maximum top size of 1 ½”.
The material shall be placed in 6 inch lifts and lightly compacted with equipment. Keep movement over the storage bed as
minimal as possible. Install to the required grades.
Place hay bales or equivalent at the top of slopes to prevent sediment from washing into beds during site development.
The base shall be moist at the time of pervious concrete placement to ensure no water from the pervious is drawn down
into the base layer. A water source should be at the job site to spray the base immediately prior to pervious placement.
The base may have a component installed to allow for moving the collected rainwater to be used for irrigation or for
brownwater use in nearby buildings.
The base material for pervious pavement is a function of the stormwater detention, not structural performance. In some
areas of the country no base material is needed as the soil conditions allow water to migrate through in a timely manner.
In the Kansas City market we’ve already established the minimum standards require at least 12” of clean rock for
stormwater temporary detention.
Pervious Thickness
Experience has been the driving force in making decisions determining the thickness for pervious pavements. 6‐8 inches is
common for parking areas for automobile traffic and an occasional truck. Refer to ACI 330R Guide for the Design and
Construction of Concrete Parking Lots for suggestions when designing concrete parking areas. Keep in mind pervious is not
meant for heavy 18‐wheeler truck traffic at this time. Sidewalks tend to be a traditional 4‐5 inches thick.
The thickness of the pervious layer is somewhat determined by the equipment used to place the concrete. The roller
screed tends to be the most commonly used screed in the Kansas City area. Consolidation by this equipment doesn’t reach
further than 6 to 8 inches down into the concrete.
Design Warning
When placing pervious concrete up against asphalt pavement a regular concrete strip or divider (12 inches wide minimum)
must start at the surface and continue all the way down past the rock subbase to the soil. Asphalt does not hold up well
with water migrating from below. However, no divider is needed to separate pervious concrete from regular concrete.

15
Figure 3.14 Side view of pervious concrete thickness No longeran acceptable method Joint free pervious concrete
Jointing
Jointing pervious concrete is not recommended.
If jointing pervious concrete is done then it should be treated much like conventional concrete. Use the same rules of
thumb, for guidance as to what these standards are refer to ACI 330 Design and Construction of Concrete Parking Lots.
o Traditional concrete saws adequately cut the pavement. The trick here is they need to be sawn at just the right
moment, which is more art than science. Cut 24 hours after placement OR the earliest possible time without
raveling the joint and before the pavement cracks at the premarked locations. Carefully cut the plastic sheeting,
pull back then cut to ¼ to 1/3 the pavement thickness. Slurry or dust should be vacuumed out, then sprayed with
the soybean oil curing compound. Reseal the plastic cover over the joint and tape shut for the balance of the 7‐day
curing time.
o Take the thickness of the pavement multiply it by 2 to reach the maximum spacing in feet.
Ex. 6” thick X 2 = 12’ spacing. For pavements thicker than 7 inches, the maximum joint spacing is 15’.
o Isolation joints shall be used when abutting fixed structural structures such as columns, manholes, signposts, light
poles, buildings etc.
o Construction joints may be needed at the end of the day’s paving, or when there is a prolonged delay in the next
concrete truck delivery.
o Early entry saws are out of the question completely, as the pavement has been put to “sleep” with the hydration
stabilizer. Early entry saws pull aggregates out of the pavement surface making a mess.
o Fill the joint with a joint sealant per the manufacturer recommendation after the 7‐day curing period.

16
Chapter 4
Basic Mix Design Information for Pervious Concrete
Cement & Cementitious Materials
Portland Cement Type I, II or I/II is readily available in the Kansas City market and used for pervious concrete production
(ASTM C150) .
Fly Ash Type C and Type F are both available in the market and used in pervious concrete production (ASTM C618).
Fly ash and other supplementary cementitious materials (SCM) often used to replace the amount of cement. SCMs are
industrial byproducts. Using SCM’s in concrete keeps them out of landfills helping to green our environment. They offer
good benefits to concrete and they offer strength gain, this means they add durability in the long run. They require longer
curing times for the concrete to initially set and gain strength.
The current thinking is to lower the paste value than what has traditionally been used in the Greater Kansas City Area prior
to 2013. The cementitious material target for pervious mix designs is approximately 500 pcy.
Aggregates
Aggregates can have a direct influence in the permeability, surface texture and the appearance of the pervious slab.
A uniform large aggregate size is preferable for maximum permeability. This is opposite of the optimized gradation usually
wanted in a regular concrete mix.
Aggregates large and small shall conform to ASTM D448 and comply with ASTM C33.
The size of the large aggregate will influence aesthetics and the top size of the “holes” in the surface.
¼” to 3/8” large aggregates are preferred. The specific gravity shall be >2.5 and the absorption shall be <2.5 to aid in
durability and performance.
Both rounded aggregates like pea gravel and angular aggregates like granite, quartzite and limestone have been used in the
market. Experience tells us that the rounded aggregates can pack tight in the placement process, limiting some of the
permeability. Angular aggregates are the preferred aggregate for pervious.
For the most part, sand is excluded in many parts of the U.S. However, in markets like Kansas City with severe freeze/thaw
cycles, research has shown up to 6‐7% fines in the mix can provide added durability without losing porosity.
The hardness and durability of the aggregate can also have an effect on the durability of the pervious pavement. Use sound
freeze/thaw durable aggregates.
The aggregates should be good quality clean aggregates. Dust and debris can add to clogging the wet pervious matrix.
The owner/contractor/designer ordering the pervious concrete may be limited to the aggregates available in the
marketplace. That usually means using aggregates already available for conventional concrete.
Aggregate Saturated Surface Dry or SSD is critical in the batching/mixing pervious mix. How wet or dry the large aggregates
are can make a huge difference in the consistency and slump of the concrete. This has been one of the biggest impacts on
the pervious mix affecting the plastic pervious properties.
Internal Curing options include using Pre‐Wetted Lightweight Fine Aggregate (or a Super Absorbent Polymer) in pervious
mix designs. These are optional materials that fortify the curing process. Using these for internal curing protect the
pavement with extra curing from the inside out. Using the pre‐wetted lightweight aggregates will domino changes in the
mix design such as:
o 170 pcy to 210 pcy depending on absorption
o 7 lbs extra water per 100 lbs of cementitious material
o Can decrease admixtures 1/3 to ½

17
Water
Water used for the pervious concrete mix shall be potable, drinkable water and conform to ASTM C1602.
Using hot water in winter (used by ready mix producers for conventional concrete for Cold Weather practices) should be
avoided at all costs! The hot water “flash cooks” the admixtures leaving them ineffective. Only extremely experienced
pervious concrete contractors with experienced inspectors should attempt using the hot water in winter months. If
pervious must be placed in cold weather, use water diverted from the “hot water” system that is measured accurately.
Otherwise, wait until the ambient temperatures have warmed up.
Figure 4.1
Keeping aggregates wet and cool in the hot summer
Admixtures
Air Entraining Admixtures shall conform to ASTM C260. Dose as per the manufacturer recommendation for conventional
concrete in severe freeze/thaw conditions. Dosages usually start at 2 oz/cwt. Dose to achieve approximately 6% air.
Should the mix design contain silica fume, the air dosage rate should be increased by 50%.
o NOTE – there is not an ASTM test method for testing air in pervious concrete. The conventional test for concrete
would not be able to differentiate between the voids in the matrix or the air entrainment.
Polycarboxylate Water Reducing Admixtures shall conform to ASTM C494, type A, B D or F, mid‐range or high‐range
versions. For broad application products, dose for high‐range water reduction.
Hydration Stabilizers, also known as extended control admixtures, shall conform to ASTM C494, type B or D. This admixture
is critical to the success of the mix.
o Examples of hydration stabilizers are BASF/Delvo® or Grace/Recover®; all pervious mix design shall have these
products or another equal product.
o Hydration stabilizers and/or water reducers shall be available on the jobsite for re‐dosing as needed. Placing
pervious in hot temperatures often requires more hydration stabilizers, which include the ability to re‐dose on the
jobsite.

18
Viscosity Modifying Admixtures (VMA’s) have been used successfully in other markets. They have met limited success in
the Kansas City area.
Super Absorbent Polymers are new admixtures that absorb many times their weight in water. When added to the pervious
mix at the concrete plant they hold water over time and slowly release it back into the concrete itself to slow cure and
hydrate the cement particles. When using this polymer in the pervious mix design:
o Increase the water/cement ratio an additional 0.054
o Decrease the paste
o Decrease the admixtures 1/3 to 1/2.
New Admixtures for pervious are appearing every day. Recently admixture companies have bundled together water
reducers, hydration stabilizers and viscosity modifying admixtures in one product or “pervious cocktail” to market for
pervious mixes. Usually additional water reducers are needed beyond the water reducer in the new cocktail version. Be
aware and open to trying new products as the technology and education changes for pervious.
It is a best management practice to use fibers in pervious concrete.
Note: Fiber benefits include preventing excess raveling, preventing too dry of a mix and preventing over compaction from a
wet mix and holding cracks together when they do happen.
o Polypropylene or cellulose < 1.5 in. fibrillated or micro fiber type. Fibers have been included in all locally placed
pervious projects. Other markets have used macro fibers in pervious concrete also. Fiber dosage shall be a
minimum 1.5 lbs/yd for micro fibers, and to the manufacturer’s recommendations for macro fibers.
o Mono‐filament micro fibers shall be polypropylene, cellulose, nylon or polyvinyl alcohol and dosed between 1.0
and 2.0 pcy.
o Fibrillated fibers shall be polypropylene and dosed between 1.5 and 3.0 pcy.
o Macro fibers shall be polypropylene or nylon and dosed between 3.0 and 5.0 pcy.
o Micro and fibrillated fibers are generally used to improve surface durability, raveling resistance, and to prevent
over compaction while macro fibers are generally used to control random cracking. A combination of the two is
allowable and appropriate to achieve both aims.
o Micro and fibrillate fibers should be removed from bags and distributed in 2‐3 gallons of water before addition to
the mix to prevent balling materials and promoting even distribution.

19
Proportioning Pervious Concrete Mixes
The mix design shall be submitted to the designer/owner for review and approval. Proportions shall follow ASTM C1688.
Trial mixtures must be tested to establish proper proportions and determine expected behavior.
Concrete ready mix producers may have mixture proportions optimized for performance with local materials.
The pervious concrete mixture void content should range between 20 to 25%. ASTM C1754 measures voids in the hardened
state to see what is in place.
The water/cement ratio shall be between .30 and .35 with a target range of .32 ‐ .33 w/c.
Supplementary cementitious materials (SCM’s), fly ash (potentially silica fume) shall not constitute more than 25% of the
cement replacement individually. If used in ternary blended cement, the SCM’s shall not exceed 50% of the mass of the
Portland cement.
Yield, Density and Permeability
In conventional concrete yield is closely related to the volume of concrete placed, as established in ASTM C94. Pervious
concrete is different; the volume of concrete placed can vary depending on the level of compaction during placement.
Also note that the density (unit weight) for pervious concrete varies from the density measured in accordance with ASTM
C1688 density in the plastic state and the ASTM C1754 density of the hardened pervious concrete. The contractor ordering
the pervious concrete will need to order with care as pervious will vary more than conventional concrete.
Density of the installed pervious concrete affects the voids in the hardened state, thus affecting the permeability of the
final in‐place product.
Density is also affected by the properties of the materials in the pervious mix design (aggregates, cement, water,
admixtures etc.).
Infiltration of water through the voids in the hardened pervious pavement can be field tested by using ASTM C1701.
Helpful Information for the Ready Mix Producer
The target truck load of pervious concrete is 6 yards. Pervious is much harder to get out of the truck as it ages in the truck
because the admixtures have been used up and lost their effectiveness. It is recommended that dry batch plants limit loads
to 6 yards. For central mix plants 6 ‐ 8 yards loads are acceptable. It is much easier to dose at the plant than it is to try and
guess how much concrete is in the truck half way through unloading the truck. Plus, it means stopping discharge and
stopping the crew while the “fix” is being conducted on site. Experience has taught us shorter loads at 6 yards saves
everyone time and money in the long run, than a 8 yard load.
The ready mix truck must have good quality “paving fins” to discharge from the truck properly. Older trucks with the fins
worn down or trucks with no paving fins can jeopardize getting the concrete out of the truck. These trucks have slowed
down jobs significantly, turning a 15‐minute discharge into a one hour discharge! We’ve established that pervious is very
perishable. Taking a long time to get the mix out of the truck jeopardizes the entire load.
Every delivery of pervious should have the water reducer and/or the hydration stabilizer available at the jobsite for re‐
dosing as needed. Review the Admixture section above for more details about the admixtures.
The truck drivers need to be educated about pervious, what is it, how it looks, etc. Truck drivers should be trained on the
restrictions pertaining to addition of water at the jobsite for pervious and re‐dosing admixtures in the field.
Ambient temperatures affect pervious concrete even more that conventional concrete (because it is at a lower water
cement ratio).
When using the Super Absorbent Polymer, add it with the aggregates in the batching sequence.
Be sure to take fibers out of “bags” and breakup in a 5‐gallon bucket of 2‐3 gallons of water before introducing into the
batching process.

20
Polycarboxylate water reducers are required mid‐range or high‐range products. Dose to the high‐range.
Angular rock outperforms rounded aggregates in hardened pervious concrete.
Aggregate stock piles need to be kept at the target SSD. Moisture in aggregates has a HUGE effect on the mix design. It is
more noticeable in pervious concrete than with conventional concrete. Moisture readings may need to be set to zero
manually to get the appropriate water in the mix. This depends on the quality control at the plant, moisture probe
calibrations, etc.
Spacing the trucks to the jobsite can be tricky until the crew establishes a jobsite rhythm (usually after the 2nd truck). Send
the first truck, wait 30 minutes, and then send the rest every 15 ‐20 minutes depending on the feedback from the field.
Avoid stacking the trucks at the jobsite, as pervious is more perishable than conventional concrete.
It is possible to unload two trucks at a time into a conveyor belt hopper, if the contractor can adequately keep up with the
placement at the other end.
The mix design should be submitted for approval to the contractor and designer.
It is advisable to place many trial batches and test panels to adjust the plant mix design for pervious.
Ready mix quality control technicians and sales personnel should all be versed in ASTM C1688, ASTM C1701, the Inverted
Slump Test, ASTM C1754 and ASTM C1747 tests for hardened pervious density and voids and any new ASTM tests that are
published for pervious concrete.

21
Chapter 5
Testing Pervious Concrete
There are currently 4 ASTM tests designated specifically for pervious concrete:
o ASTM C1688, Standard Test Method for Density and Void Content of Freshly Mixed Pervious Concrete
o ASTM C1701, Standard Test Method for Infiltration Rate of In Place Pervious Concrete
o ASTM C1754, Standard Test Method for Density and Void Content of Hardened Pervious Concrete
o ASTM C1747, Standard Test Method for Determining the Potential Surface Durability of Pervious Concrete
ASTM and ACI are working in tandem to develop standardized tests for other pervious concrete attributes, such as flexural
and compressive strengths, etc. Pervious is still relatively new so it will take some time for the standards to be developed
and published.
NOTE – The ASTM Standards for conventional concrete that we are accustomed to using for flexural and compressive
strengths DO NOT apply to pervious concrete.
ASTM C1688, Standard Test Method for Density and Void Content of Freshly Mixed Pervious Concrete
Figure 5.1
ASTM C1688 Equipment & materials needed A proctor hammer First lift compacted
Second lift compacted Striking off the surface Weighing & final calculations
Use ASTM 1688 and the Inverted Slump Concrete Test for jobsite remediation and/or acceptance.
The workability and consistency of pervious concrete may be determined for each ready mixed truck to ensure quality
construction. Typically, workability is adjusted on‐site for the first load and then readjusted during batching for all
subsequent loads.
a) Check Batch Ticket: Upon arrival at the jobsite. Check for the correct mixture and appropriate delivery and mixing
time.
b) Check Workability:
a. Look at it, touch it, perform an inverse slump check, perform an ASTM C1688 test.
b. If workability remediation is required first add 0.5 gallon of water per cubic yard, 30 rev’s
c. Evaluate again
d. If additional workability remediation is required, add up to 50% of the original dosage of water reducer or 50% of
the hydration stabilizer plus .5 gallon of water, 30 rev’s
c) Adjust subsequent loads: Radio back to the batch personnel and relay water and/or admixture adjustments.
d) Determine Consistency with ASTM C1688 unit weight and compare against required values. Unit weight values greater
than 3 pcf different from the desired values may indicate that an incorrect mixture may have been delivered. If the

22
mixture was correctly batched, but the unit weight is high, hold the truck while slowly mixing for 15 minutes. If the unit
weight is light, adjust workability. In most situations, poor flow through the inverse slump cone will indicate potential
for low unit weight values. Adjusting for workability will improve unit weight.
e) Discharge
ASTM C1701, Standard Test Method for Infiltration Rate of In Place Pervious Concrete
Figure 5.2
ASTM C1701 Equipment & Materials Needed Calibrated markings in the rim Secure the rim with putty
1 gallon of water into apparatus (Step 2 if needed) 5 gallons into apparatus Final calculations
The Inverted Slump Cone Test
Inverted Slump Test (Not an ASTM test)
Picture credit: Kevern, Schaefer, Wang
Figure 5.3
Filling the inverted slump cone Checking workability Workable mix Over‐worked mix
ASTM C1754, Standard Test Method for Density and Void Content of Hardened Pervious Concrete
Figure 5.4 ASTM C1754

23
Using testing for final acceptance
ASTM C1754 testing voids in hardened concrete on the test panel and comparing it to the final product could be one
method for acceptance, +3 pcf. Assuming the test had been performed on the test panel and established as a goal for the
project. The parameters should be +3 lbs. of the unit weight from the accepted test slab.
ASTM C 1747 ASTM C1747, Standard Test Method for Determining the Potential Surface Durability of Pervious Concrete
o This is not a pass/fail test. Look for loss percentages < 40% for indicators of acceptable material loss.
Figure 5.5 ASTM C1747
Quality Control/Quality Assurance Plan
Hold Pre‐Bid Meeting
o Emphasize everything should be performed in accordance to the specification. Have a copy of the spec at the
meeting and someone who understands and knows the content present.
Qualify Bidders
o Ready Mix Certified? Past experience? Projects?
o Contractor Certified? Past experience? Projects?
o Field Testing Personnel Certified? Know and understand the ASTM tests for Pervious Concrete?
Hold Pre‐Construction Conference
o Use the Pre‐Con Checklist as a starting place
Build Mock up in accordance with the specification
o Same mix design and same contractor team placing as on placement day
o Test for Density‐Unit Weight, ASTM C1688
o Test for Hardened Density, 3 cores, ASTM C1754
o Test for Infiltration, ASTM C1701
o Does the data meet expectations? How does the slab look?
Placement Day
o Test every truck for density‐unit weight, ASTM C 1688. Within the parameters +3 lbs of the unit weight from
accepted test slab?
Curing
o Spray cure within 5‐10 minutes of the screed, then cover with poly immediately
o When using an internal curing choice an alternate curing compound conforming to ASTM C309 by be used instead
of soy bean oil.
Post Curing Period
o ASTM C1754, 3 cores for every 5, 000 sf (hardened density must be within +5% of the accepted hardened density
from the mock up)
o ASTM C1701, 3 infiltration tests for every 5,000 sf. This is not a pass/fail test. It’s a subjective test, but history has
shown us in KC to look for somewhere between 250 to 750 in/hr.
ASTM Tests Specifically for Pervious Concrete (as of June 2017):
o ASTM C1688 Standard Test Method for Density & Void Content of Freshly Mixed Pervious Concrete
o ASTM C 1701 Standard Test Method for Infiltration Rate of In Place Pervious Concrete
o ASTM C 1754 Standard Test Method for Density & Void Content of Hardened Pervious Concrete
o ASTM C 1747 Standard Test Method for Determining the Potential Surface Durability of Pervious Concrete
o Note there is NO test method for flexural or compressive strength
24
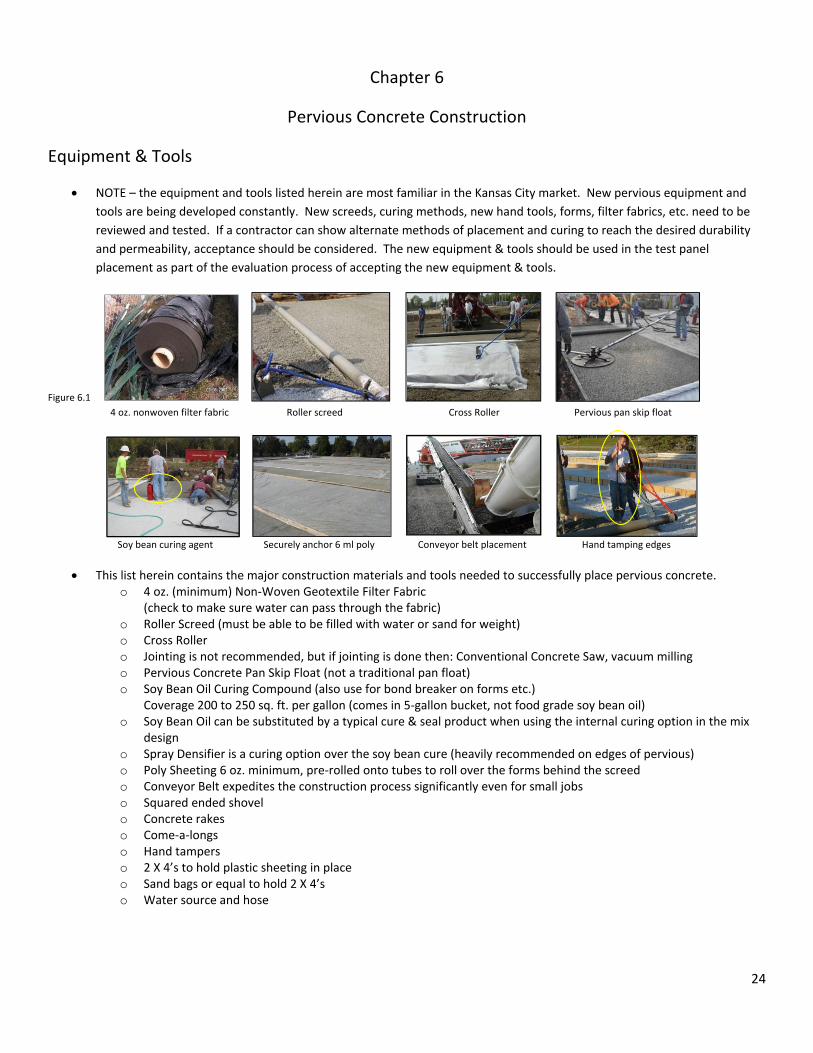
Chapter 6
Pervious Concrete Construction
Equipment & Tools
NOTE – the equipment and tools listed herein are most familiar in the Kansas City market. New pervious equipment and
tools are being developed constantly. New screeds, curing methods, new hand tools, forms, filter fabrics, etc. need to be
reviewed and tested. If a contractor can show alternate methods of placement and curing to reach the desired durability
and permeability, acceptance should be considered. The new equipment & tools should be used in the test panel
placement as part of the evaluation process of accepting the new equipment & tools.
Figure 6.1
4 oz. nonwoven filter fabric Roller screed Cross Roller Pervious pan skip float
Soy bean curing agent Securely anchor 6 ml poly Conveyor belt placement Hand tamping edges
This list herein contains the major construction materials and tools needed to successfully place pervious concrete. o 4 oz. (minimum) Non‐Woven Geotextile Filter Fabric
(check to make sure water can pass through the fabric) o Roller Screed (must be able to be filled with water or sand for weight) o Cross Roller o Jointing is not recommended, but if jointing is done then: Conventional Concrete Saw, vacuum milling o Pervious Concrete Pan Skip Float (not a traditional pan float) o Soy Bean Oil Curing Compound (also use for bond breaker on forms etc.)
Coverage 200 to 250 sq. ft. per gallon (comes in 5‐gallon bucket, not food grade soy bean oil) o Soy Bean Oil can be substituted by a typical cure & seal product when using the internal curing option in the mix
design o Spray Densifier is a curing option over the soy bean cure (heavily recommended on edges of pervious) o Poly Sheeting 6 oz. minimum, pre‐rolled onto tubes to roll over the forms behind the screed o Conveyor Belt expedites the construction process significantly even for small jobs o Squared ended shovel o Concrete rakes o Come‐a‐longs o Hand tampers o 2 X 4’s to hold plastic sheeting in place o Sand bags or equal to hold 2 X 4’s o Water source and hose

25
Other types of screeds used in other markets have been tested and used; some successfully and others not. Slipform pavers, power roller screeds, grout boxes, laser screeds, are just to name a few. These screeds and other equipment can be proven and used in the test panel placement as part of the acceptance process with the engineer/designer approval.
Test Panel Placement & Approval
Test panel placement and approval approximately one month prior to pervious construction.
See the Specifier’s Guide for Pervious Concrete in Kansas City for dimensions and details.
The contractor must use the equipment, tools and 40% crew that will be used in the actual placement.
NOTE – The slab will need to cure for 7 days. Then the owner/designer, contractor and testing company will meet to review
the slab, conduct tests and approve the slab. IF it is not acceptable, it will need to be repeated until approved. This will
take another 7 days, etc. Timing of the test slab can affect the overall start date for the construction schedule.
Overall acceptance should be on surface appearance, joint details, thickness, porosity and curing procedures.
Was the mix provided by the ready mix producer workable and acceptable? If not, was it adjusted or modified until
acceptable during the test?
Was the contractor ready and using proper tools? Was the placement team size appropriate? Curing practices in line?
ASTM C1688 established that will be used on actual paving day
ASTM C1754 conducted after 7 day curing to establish the hardened density (unit weight) and void content (make cylinders
at test placement)
ASTM C1701 to establish the permeability of the hardened pervious, is it acceptable?
The test panel should remain intact as a point of reference until the entire job is complete.
Pre‐Construction Meeting
Refer to the Pre‐Construction Checklist in the back of the Specifiers Guide for Pervious Concrete in Kansas City.
Has the Test Panel Placement & Approval be completed and approved? The mix approved?
Conduct the meeting at least one week prior to placement.
GC, pervious contractor, ready mix supplier, excavation contractor, landscape contractor, architect, engineers, etc. in
attendance.
Review the plans, specifications with all parties.
Discuss testing being conducted, test methods, samples, frequency of tests, testing company familiar with ASTM standards
for pervious concrete? etc.
Discuss weather, as it has a HUGE effect on pervious. Hot or cold weather practices? Wind? Curing? Authority to cancel
and reschedule if necessary? Over 90° for the next 7 days or under 40° for the next 7 days?
Discuss access to the site for ready mix trucks and conveyor belt for placement.
Review subgrade, filter fabric, base aggregate, base thickness, wetting the base prior to pervious placement, pervious
thickness, jointing, curing, crew size, etc.
Is there a water source on site (for wetting the base rock immediately prior to pervious placement)?
Discuss the width of the screed, paving in strips, constructability issues.
Is everyone aware that the poly sheeting stays in place for 7‐day cure period, without any traffic on it?
Has erosion control been discussed to keep soils out of the pavement once the poly is removed?
Is the landscaper aware that they cannot use the pervious pavement for their staging area for mulch, plants, etc.?

26
Weather
Figure 6.2
Securing poly after 45 mph winds Prevent billowing in the poly sheeting from the wind
Prepare for wind. Severe winds in the 20 to 45+ mph range can wreak havoc on pervious placement.
The Contractor shall not place pervious concrete pavement when the ambient temperature is predicted by the National
Weather Service Point Forecast for the jobsite to rise above 90°F (32.2ºC) during the seven days following placement,
unless otherwise permitted in writing by the Architect/Engineer. These hot days can be detrimental to getting pervious out
of the truck, exposed on conveyor belts, etc. There is an increased probability of raveling on the pervious surface in its
completed state and possible durability issues. Consider alternative placement times, i.e., 3 am to 6 am, or late night
placements during cooler hours of the day/night. The owner/designer and contractor may need to delay placement in hot
weather.
ACI 305 Hot Weather Concrete can provide some very helpful information. But remember pervious is more sensitive to
heat that conventional concrete. No placement when ambient temps are > 90 degrees F for the next 7 days.
Admixtures need higher dosage rates in hot weather to work properly. The ready mix producer and contractor need to be
prepared to re‐dose at the jobsite. Staff will need to be on site during placement.
Hot weather shortens the time from batching the concrete to when it must be placed on site.
The Contractor shall not place pervious concrete pavement when the ambient temperature is predicted by the National
Weather Service Point Forecast for the jobsite to be 40°F (4.4ºC) or lower during the seven days following placement,
unless otherwise permitted in writing by the Architect/Engineer. ACI 306 Cold Weather Concrete can also provide some
very helpful information, but pervious has some additional needs in cold weather. 40°F is usually the mark where ready
mix producers’ start using hot water. Pervious concrete should be avoided when the ready mix producer has moved to
using hot water for cold weather conventional practices. The hot water “flash cooks” the admixtures, disabling them from
working properly.
Pervious concrete cannot be placed in rain or snow or on a frozen subgrade or base.
Winter months tend to have dry or very low humidity. These conditions will “dry” the pervious out, so curing is extra
important, and needed to be conducted very conservatively.
Never use hot water at the plant to make pervious concrete in winter months.
Site Preparation
Verify that the site conditions match the plans.
Review the specifications.
Verify grade stakes
Remove organic materials and trash.
Verify locations for drains, piping, underground cisterns, (if applicable) etc.
Cuts necessary to establish proper subgrade level shall not be compacted or subject to excessive construction equipment
traffic prior to coarse aggregate bed placement and may be scarified to improve infiltration rates.
When fill is needed to meet proper subgrade level, some compaction may be necessary. Compaction to approximately 92%
proctor is sufficient.

27
Filter Fabric Installation
Figure 6.3
Filter fabric overlaps 18 inches Filter Fabric up sides and over edges
Refer to Chapter 3, Design Elements for Pervious Concrete, for specifics on the filter fabric and design details.
Filter fabric shall be a minimum 4 oz. non‐woven geotextile. This keeps the fines from coming up from the subgrade below
and clogging the base area. It also allows for water to move through the fabric and continue into the subgrade for
movement into the surrounding soils.
NOTE – Product technology is changing to adapt to pervious pavement needs. Keep abreast of new products that may work
to help water exfiltration into the surrounding soils, even in clay soils.
Run the filter fabric up the sides of the pervious pavement.
Overlap the filter fabric to the manufacturer’s recommendations (usually 18 inches).
Base Construction
Figure 6.4
Placing clean aggregate base Placing a perforated pipe underdrain Placing clean rock base over filter fabric
Refer to Chapter 3, Design Elements for Pervious Concrete, for specifics on the base materials and design details.
It is critical that the base aggregate be clean washed aggregates that allow the water to move freely in the base section.
Optional drainage systems may be required by the designer, which may or may not tie into the pervious system. Review
the plans and specifications closely. This could be constructed with check dams, piping etc. See figure 3.3.
The material shall be placed in 6 inch lifts and lightly compacted with equipment. Keep movement over the storage bed as
minimal as possible. Install to the required grades.
It is a best management practice to spray the base layer at the surface with water immediately prior to pervious concrete
placement. This keeps the base from pulling water out of the pervious mix when it is placed. This will protect the plastic
pervious concrete from being jeopardized; it’s curing the pervious from the “bottom up”.

28
Setting Forms
Figure 6.5
Forms set ready to pave Forms set Concrete strips placed in advance for forms for pervious
Forms must be study enough to stand up to the heavy roller screed and placement operations. Typically, wood, steel or
aluminum forms are used.
Make sure stakes are 1/2” lower than the top of the forms. This will allow the roller screed to not get hung‐up on a stake as
placement progresses.
The embedded stakes must be anchored well. stakes must hold up to the stress of the equipment and crew. They may not
allow deflection during placement.
Size of the Crew
Figure 6.6
Crew size – 8 approx. Crew size – 14 approx. Crew size – 12 approx. Crew size – 12 approx.
A typical crew size for pervious concrete placement with a roller screed is 6 to 14 crewmen, depending on the job specifics:
o One person conducting oversight, managing the arrival of new trucks, coordinating with inspectors and ready mix. o One in front, keeping the base rock surface wetted down with water immediately in front of the screed. o One on the end of the conveyor belt. o Two to four, with squared shovels, concrete rakes or come‐a‐longs to move the pervious in front of the screed,
these people fill in holes, consolidate the edges and keep a head of concrete in front of the screed. o Two, one on each end of the roller screed. o Two, one on each side of the pavement, they cure with both the soybean oil and roll the poly over the surface and
secure the plastic tight.
Every team member has a job, knows what it is, and knows who is behind him and in front of him in the construction
process.
Concrete Arrives for Placement
Be ready BEFORE the concrete truck arrives. This product is very perishable. There is no time to add water to the roller
screed to weigh it down, or place forms after the concrete truck arrives.
Is the conveyor belt in place and ready?
If placing the pervious on small jobs directly from the concrete truck, think about the placement direction ahead of time. If
the chute from the concrete truck is running uphill, you are going to be there a very long time getting the pervious out of
the truck! Pervious is placed with one chute down. Two and three chutes will delay the time and ability to move the
pervious.

29
The concrete truck will need easy accessibility to the site for truck placement to work.
Using buggies to place pervious has been done before, however, be prepared as you will lose some of your permeability.
The pervious consolidates in the buggy getting to the actual site and then is consolidated again with the roller screed. It
also physically takes twice as long and it becomes harder to work with quickly. This is not the best method in the high heat
of summer months! Buggies may be the only method to get pervious in tight spots, where trucks and conveyors can’t
reach.
The conveyor belt method works the best and is needed for the smallest of jobs.
Be sure the pre‐approved mix has been ordered and is delivered. Check the batch ticket.
Conduct an inverted slump test, to assess the workability of the pervious, adjust, if necessary, notify plant of changes made
in the field.
Conduct ASTM 1688 to calculate the unit weight on each truck. Does it fall within the +3 from the test panel established
mix design weight?
Remember pervious concrete is not the typical 140‐145 pcf as in conventional concrete.
Finishing Pervious Concrete
The Basic Steps to finishing pervious concrete:
o Spreading the plastic pervious concrete
o Consolidating/compacting/striking off the concrete
o Curing
o Cross Rolling
o Extra effort to secure plastic
o Wait minimum 7 days
o Remove plastic and forms
Spreading or Placing Pervious Concrete
Figure 6. 7
Filling the screed with water for weight Placing pervious concrete Conveyor placement/Prerolled poly ready
Place pervious as close to the final resting spots as possible.
The less pervious is worked/touched the better it is!
Use squared shovels, concrete rakes and come‐a‐longs to move it from below the chute or below the conveyor placement
in front of the screed.
Pervious is not pumpable. A conveyor belt is the best placement method.
Use a roller screed that has been weighted down with either water or sand in the roller tube. If the roller is not weighted
down it will float on the top of the pervious. It must be weighted down to properly consolidate the concrete. Do not skip
this step.
If approved by the owner/designer the contractor may use an alternate screed. The test panel would need to be conducted
with this screed. Technology is constantly changing as well as the availability of new screeds. Slip form pavers have been
adapted for pervious placement. Truss screeds do not consolidate pervious effectively. Some other states have used truss
screeds with shims on the first pass, then taking the shims off for the second pass. This process still has some consolidation

30
issues and leaves the surface exposed too long. It inhibits the proper cure methods to get the pervious covered before it
dries out.
Extra consolidation is needed at the header and along the sides where the pervious meets the forms. Hand tampers, new
specially designed edge rollers to consolidate near the form edge.
As placement proceeds away from the forms, crew will want to AVOID walking on the pervious concrete. Walking in it will
reduce the permeability in its final state.
Keeping a consistent height (head) of concrete ahead of the screed for proper consolidation and uniform surface.
Placing pervious ahead of the screed should not be too far ahead of the strike off crew. This will keep the crew from
walking in the fresh pervious.
A starting guideline to set for pervious truck spacing for a new job: The first truck 30 minutes ahead of the second truck.
Then spacing them 15 to 20 minutes apart thereafter. Set up constant feedback between the crew lead and the ready mix
company to adjust the spacing as needed. Two trucks can discharge into the hopper of the conveyor belt truck IF the crew
can place it at the other end at the same rate. Discharge rates will vary with the equipment, ambient temperature, mix
design flow and the experience of the crew.
Compaction from the roller screed is important. Too much compaction will tighten the matrix making it less permeable.
Not enough compaction leaves the matrix too loose and not even. This makes for a less durable pavement and more likely
to surface delaminate. A balance must be achieved. Practice and familiarity with specific mix designs improves the
contractor’s ability to produce a viable pervious pavement.
The desirable finish is smooth with no roller marks and no major voids with an even texture. It allows for good water
permeability and providing a durable surface for car traffic.
Pervious concrete is usually placed in a skip pave alternating system. Every other row paved at one time then 7 days later
come back and pave the other lanes.
An alternative to skip paving, is to place a regular concrete strip approximately 24+ inches wide (refer to Figure 6.5 last
picture in the series of 3 pictures). Use the concrete edging for the form edge for pervious concrete. The reason the regular
concrete strip is 24 inches wide allows the crew to walk on the strip and leaves room for the screed too, without having to
step in fresh pervious concrete.
Jointing
Figure 6.8
Cutting in a joint in during construction Using a “pizza cutter” to roll in a joint Continuous pervious pavement, no joints
Joints are not recommended for pervious concrete.
If for some reason joints are being required, follow conventional jointing guidelines (as in ACI 330). Joints are typically
spaced twice the thickness of the pavement in feet. In other words, a six inch pavement wouldn’t have joints spaced
further out than 12 feet (6” X 2 = 12’). Joints should never be further than 15’ apart.
Isolation joints are needed at manholes, sign posts, columns, buildings, etc. Anywhere the pavement meets up with
something fixed that will tend to expand and contract at a different level than the pervious pavement.
If joints are used, then they must be pre‐marked where the joints will be made before paving starts.
Those cut in with the “pizza cutter” or flanged roller, tend to delaminate at the joint, this type is no longer recommended.
Saws have been mentioned before in Chapter 3, Design Elements for Pervious Concrete. Joints are also the most common
place for raveling.

31
o Regular concrete saws adequately cut the pavement. The trick here is they need to be sawn at just the right
moment, which is more art than science. Usually cut 24 hours after placement OR the earliest possible time
without raveling the joint and before the pavement cracks. Saw cuts are ¼ to 1/3 the pavement thickness. Slurry
or dust to be vacuumed out. IF conditions are such that poly sheeting has been placed on the pavement, the poly
must be split to pull the edges back to make the saw cuts, then secured and taped back shut when completed.
Return to fill the joints with joint sealant after the initial 7 day curing period. Fill the joint with a joint sealant per the
manufacturer recommendation.
Edging
Edging has been considered optional in the Kansas City market.
If proper consolidation has been conducted against forms it may or may not be necessary.
Edging cleans up the edge by the form or abutting curb or abutting pavement.
It can also leave a small space where vehicles roll over putting tension on the edge, potentially causing delamination at that
dead space. Some feel it is important to make sure the surface is tighter at the edge to not leave any small dead space to
eliminate the “edge break off”.
Curing
Figure 6.9
Spraying water on base prior to paving Spraying soy bean cure Tape poly overlap 2x4’s anchor sides of poly down
“If it dries, it dies.” Most concrete industry personnel have heard this quote once or twice. Never was it truer than when
working with pervious concrete.
Curing cannot be emphasized enough.
If pervious concrete is not cured it will fail, 100% guarantee!
Curing must be executed within 5 to 10 minutes behind the screed.
Pervious concrete is placed with a water/cement ratio of .30 to .35. That means low or no slump concrete. It has just
enough water in it to hydrate the cement particles and aid in mixing the materials. Curing is done to allow the water in the
mix to properly hydrate the cement, before the water has a chance to evaporate. If the pavement is not covered up
completely, it will be exposed to the weather elements such as wind and heat.
Pervious concrete is cured in several different ways.
Spray the surface within 5 to 10 minutes behind the screed with soy bean oil or densifier, then immediately roll poly
sheeting over the top and tightly secure with 2 x 4’s etc.
The poly sheeting can leave a mottled aesthetic look on the surface if the plastic is not pulled taught. The bunching up of
the plastic can cause these stripes to be left on the surface when the plastic is removed. Since the plastic has been pre‐
rolled on tubes prior to placement, it helps to eliminate some of the mottling left with wrinkles in the plastic.
Mottling marks left by the plastic in the curing stage are NOT structural blemishes. They are acceptable and scars of good
practices been being used. The contractor can help himself in eliminating as many of these scars by communicating with his
crew to keep the plastic sheeting pulled tight to keep the wrinkles out as placement is occurring.
Spray a layer of water OVER the poly. This does several things, helps hold the plastic down, cools on a hot day, leaves a
humidifying layer over the pervious and helps the cross roller move over the plastic without sticking.

32
Foggers (optional) have been implemented successfully to increase the humidity directly above the pervious pavement. Be
careful, spraying water from a hose over the pervious is not recommended, as it will wash the mortar off the top aggregate
or jeopardize the water/cement ratio at the surface. Not all contractors have fogging equipment.
2 X 4’s placed end to end over the poly sheeting on the formwork is best to hold down the plastic. Then place sand bags
every 5’ to 6’ over the 2 X 4’s to hold them in place. An occasion mud clump or brick here or there is not sufficient to hold
the plastic in the potential winds and curious on lookers.
Alternative internal curing options include Pre‐Wetted Lightweight Sand or a Super Absorbent Polymer.
The pervious concrete shall be cured for a minimum of 7 days. All traffic will be kept off the plastic during the 7 days.
Technology is changing curing methods for pervious concrete. Be aware of new products entering the market to better
cure the pervious pavements. Be open to these products, research them, and use them in test pours and experiments to
prove to yourself and others that they do work or not.
Using a densifier typically used in polished concrete applications has proven to be a wonderful tool when placing pervious
concrete. It can be used as a curing agent; it can be used instead of soy bean or after soy bean for additional surface
protection. If a pervious concrete pavement starts to ravel after being in use, a densifier sprayed on the surface can help it
from further deterioration.
Cross Rolling
Figure 6.10
Cross rolling over poly Cross roll perpendicular to screed Spray water over poly prior to cross rolling
Cross rolling is done to work out the bumps and lines left in the plastic pervious concrete after the roller screed has passed
over it.
Spray water over the poly sheeting then cross roll. The water holds the plastic down and makes it easier to roll.
Cross rolling is done over the poly sheeting. This ensures the pervious is covered up and cured quickly and properly.
Cross rolling is done in the direction perpendicular to the direction the roller screed. If the roller screed is moving in a
north/south direction, the cross rolling is done in the east/west direction.
It also gives the surface its last consolidation.
The cross roller is not meant to close the surface. If this happens, stop. Re‐evaluate why the surface is sealing. Deal with it
immediately.
Re‐evaluate the poly sheeting
Is the poly sheeting securely anchored?
Will wind, over the next 7 days, potentially billow under the plastic?
Fix problem sheeting spots before leaving.
Have a representative check the poly everyday over the 7 days and fix any problems that might arise.
Wait 7 days
Remove plastic sheeting and forms

33
Chapter 7
Maintenance
Cleaning Debris Out
Figure 7.1
There are all kinds of vacuums on the markets, walk behinds, drive behinds, some with water and some without.
Figure 7.2
Pervious surface prior to vacuuming Pervious surface after vacuuming
Vacuuming is the most successful way of cleaning pervious concrete. The fines that accumulate usually stay within the top
1 inch or so of the surface. So, pulling them out the top is easier than pushing them further into the pavement.
Wet/Vac is a combination of wetting the surface to loosen the debris and vacuuming at the same time and has been very
successful.
Power washing can be helpful to loosen packed in clay and massive debris. A high psi is NOT recommended at it can loosen
the aggregate on the surface. A low psi will dislodge the packed in material. A thorough vacuuming will need to follow.
Preventive Maintenance
Preventing clogging in the first place is better than dealing with it once it has occurred!
Collect leaves/pinecones etc. after they have fallen. This keeps them from decomposing into the surface.
Vacuuming the pavement once or twice a year will prevent build up below the surface that is not visible.
Manage the immediate landscaping before, during and after pervious paving to prevent soils and mulch from
contaminating the pervious pavement after a rain storm.
Make sure the landscaping contractor knows to NOT use the pervious pavement as a staging area for their mulch, dirt,
plants etc.
Designers need to be aware of adjacent areas to the pavement. Direct future rainwater from carrying dirt and debris into
the pavement. Create berms, bioswales etc. to protect the pavement.
Surface Raveling Maintenance
Applying a densifier, typically used for polished concrete, to the surface or where loose debris has been swept away and
prepared for treatment. Densifiers chemically react with the surface making it more durable. This will not correct the issue,
it is a temporary fix to keep it from getting worse or slowing the issue down.

34
Snow Removal
Figure 7.3
No refreezing of melted snow on surface Snow disappears below the surface Less than 3 inches of snow, no plowing needed
Make sure the company or person conducting the snow plowing knows that the surface is pervious concrete
Do not back drag a plow blade on the pervious surface.
Use the protective sleeve on the blade if possible when plowing.
Snow less than 3 inches disappear quickly once they have been walked on or driven on. The snow and melt goes below the
surface and out of sight.
There is no reason to use deicers since there is no standing water on the surface. (But people will do it anyway.)
There is no refreezing of melted snow at night since the water has moved down below into the base.
The base layer is usually 8 to 10 degrees warmer than the surface in winter. The air voids are great insulators.

35
Chapter 8
Green Building Credits/LEED®
Pervious Concrete can contribute to Green Building Credits or LEED® in several ways:
Site Development –Maximize Open Space
It is possible, for example, for a pervious concrete parking lot to help eliminate the need for a detention pond and
allowing that real estate to be part of the “vegetated open space area adjacent to the building” or parking lot.
Stormwater Design‐Quantity Control
Option #1 Sites with Existing Imperviousness 50% or less
Option #2 Sites with Existing Imperviousness Greater than 50%
Pervious Concrete can help both conditions collect, clean and cool stormwater and in many cases eliminate post
development runoff and certainly reduce predevelopment runoff by more than 25% (2 year‐ 24 hr design storm).
Stormwater Design‐Quality Control
Pervious Concrete is one of many commonly acceptable Best Management Practices (BMP’s) used to collect, clean
and cool stormwater. Capable of removing 80% of the average annual post development total suspended solids
(TSS). Pervious concrete is listed and recognized by KC Metro MARC/APWA Section 5600 for stormwater Mitigation.
Heat Island Effect‐Nonroof
Reduce heat island effect.
Option #1: 50% of the site hardscape will consist of paving materials with a solar reflective Index (SRI) of at least 29.
While regular new concrete does meet the LEED SRI minimum requirement of SRI 29, pervious concrete pavements
may or may not. Pervious pavements can be designed to meet the SRI 29 requirements. Pervious concrete
pavements must be tested for SRI to list testing data in the LEED template for reporting. See LEED default chart for
SRI info below:
Material Emissivity Reflectance SRI
New Gray Concrete 0.9 0.35 38‐52
Weathered Gray Concrete 0.9 0.20 19‐32
Typical White Concrete 0.9 0.7 86‐100
New Asphalt 0.9 0.05 0
Weathered Asphalt 0.9 0.10 6
Pervious Concrete Needs to be tested Needs to be tested Test results here
(Test in accordance with ASTM E 903, ASTM E 1918 or ASTM C 1549)
Construction Waste Management
It is not possible for pervious concrete to singlehandedly fulfill this category. Since concrete is batched for each
specific job there is very little waste or overage (which is in itself green). It is possible that “left over” pervious
concrete could potentially be recycled back at the ready mix concrete plant with 100% of the water and aggregate
for reuse in concrete, thus keeping it from the landfills. This is something we will see more of in the future. The
calculations for the entire job site’s waste management for all construction materials figure into this number.
Recycled Content
It is not likely pervious concrete will fulfill this category by itself. However, pervious concrete can help attain this
point(s). Points are awarded for 10% (1 pt) or 20% (2 pts) of recycled content based on cost of the total value of the
materials in the project. Pervious concrete will likely have fly ash or slag in the makeup of the mix design. Both fly
ash and slag are preconsumer recycled materials. The ready mix producer will provide a letter with the appropriate
information about the recycled material in the concrete mix to the LEED AP or project coordinator.
Regional Materials
“Building materials or products that have been extracted, harvested or recovered, as well as manufactured within

36
500 miles of the project site for a minimum of 10% or 20% based on cost, of the total materials value” will earn 1 pt
or 2 pts respectively. In the Kansas City metro area, it is likely that the cement, large aggregates, sand, water, fly ash
and even recycled aggregates are all within 500 miles of our local job sites. The ready mix producer will provide a
letter with the appropriate information to the LEED AP or project coordinator.
Innovation in Design
This leaves the door open to innovation and creativity. It is possible for technology or sustainable ideas to be applied
here to reach new levels. These must be submitted for consideration and approval.
LEED Accredited Professional
“At least one principal participant of the project team shall be a LEED AP.” While it is not likely the pervious
contractor or pervious ready mix supplier will be a “principal participant” on the project team; it is likely if the project
is a LEED project there will be a LEED AP already on the project team. There are concrete industry personnel that are
LEED AP and they are usually available for consultation.
Regional Priority
“To provide an incentive for the achievement of credits that address geographically‐specific environmental
priorities.” This is up to the decision makers in each region. Go to www.usgbc.org to find a list of regional priority
credits.
As the LEED system updates and changes these categories and points will reflect those changes. For up to date
information on LEED® go to www.usgbc.org . The U.S. Green Building Council (USGBC) is a 501(c)(3) non‐profit that
developed the LEED (Leadership in Energy and Environmental Design) Green Building Rating System.

37
Chapter 9
Decorative Pervious
All decorative processes need to be tested in a pre‐placement situation for approval.
Figure 9‐1
Trailhead with decorative pervious Colored pervious courtyard Stamped and colored pervious concrete
Integral Colored Pervious concrete can be attained by adding powdered color or liquid color to the mix in the batching process in the ready
mix truck or central mix unit. Keep in mind this process needs to be tested and adjusted for each individual job. The
water/cement ratio is very low in pervious concrete. When adding powdered color to the mix, it will use up more of the
water in the mix. More water may be needed in the decorative pervious mix than in pervious without color.
Surface Color
Color can be applied to pervious concrete with a surface application. There are coloring agents that can be applied to the
surface. Color can be sprayed on the surface in the curing stage along with the soy bean oil and reapplied as needed for
color intensity or maintenance. Or done as a stain/dye process. Keep in mind pervious is usually being done to achieve
green building practices, so applying a stain that requires rinsing may not be the greenest practice. Be sure coloring agents
are UV stable.
Stamping
Stamping pervious concrete has been done and can be done. It is not as simple as with conventional concrete. The
pervious concrete has low to no slump, which means it is very stiff. The older metal stamps tend to be used instead of the
softer neoprene/rubber mats to create an impression. This is a specialty type of pervious concrete placed with great
difficulty.
Keep in mind that stamping takes time, which leaves the pervious exposed to the wind and sun. It would be difficult to cure
pervious in the required 3 to 5 minutes behind the screed when stamping.
An experienced crew would need to work very quickly to stamp the surface and get it covered (cured).

38
Chapter 10
Specifiers Guide to Pervious Concrete Pavements in the Greater Kansas City Area
v1.4.17
Go to www.concretepromotion.com to find the current guide.
It is available on the front page of the website and/or under the “pervious” tab.
“The Pervious Construction Checklist” is found in the back of the Specifiers Guide
“The Pre‐Construction Conference Checklist” is also found in the back of the Specifiers Guide

39
Chapter 11
Websites and Resources
Websites:
CPG website www.concretepromotion.com
National Ready Mixed Concrete Association’s (NRMCA) website www.nrmca.org
NRMCA’s Pervious website www.perviouspavement.org
Portland Cement Association (PCA) website www.cement.org
Concrete Thinking for a Sustainable World website www.concretethinker.com
NRMCA’s Pervious Concrete Contractor Certification Program http://nrmca.org/Education/Certifications/Pervious_Contractor.htm
American Society for Testing Materials (ASTM) www.astm.org
American Concrete Institute (ACI) www.concrete.org
National Pervious Concrete Pavement Association (NPCPA) www.npcpa.org
Resources:
Storm Water Phase II Final Rule: An Overview, EPA 833‐F‐00‐001, Fact Sheet 1.0, US Environmental Protection Agency, Office of Water, January 2000, 4 pages
Freeze/Thaw Resistance of Pervious Concrete, NRMCA, May 2004, Silver Spring, Maryland, 17 pages
Mix Design Development for Pervious Concrete in Cold Weather Concrete, Iowa State University, National Concrete Pavement Technology Center, February 2006
Pervious Concrete: When it Rains it Drains, NRMCA
CIP #38 Pervious Concrete, NRMCA, Concrete in Practice Series
Storm Water Technology Fact Sheet: Porous Pavement, United States Environmental Protection Agency, EPA 832‐F‐99‐023 September 1999. www.epa.gov/npdes
Pervious Concrete Promo Flip Book, NRMCA, #2PPCPB1
Pervious Concrete Pavements, PCA, Tennis, P. D., Leming, M. L., and Akers, D. J., Skokie, Illinois & NRMCA, Silver Spring, Maryland, EB302, 25 pgs
Pervious Hydrological Software Resource CD‐ROM, NRMCA, CD063.02
Construction and Maintenance Assessment of Pervious Concrete Pavements, RMC Foundation, January 2007, www.rmc‐foundation.org
Hydraulic Performance Assessment of Pervious Concrete Pavements for Stormwater Management Credit, RMC Foundation, January 2007, www.rmc‐foundation.org
Portland Cement Pervious Concrete Pavement: Field Performance Investigation on Parking Lot and Roadway Pavements, RMC‐Foundation, December 2007, www.rmc‐foundation.org
Pervious Concrete Research Compilation: Past, Present and Future, RMC‐Foundation,Updated June 2008 & November 2008, www.rmc‐foundation.org
Mix Design Development for Portland Cement Pervious Concrete in Cold Weather Climates, Kevern, John T., Master’s Thesis, Iowa State University, Ames, Iowa, 2006, 155 pages
The Effect of Coarse Aggregate on the Freeze‐Thaw Durability of Pervious Concrete, Kevern, John T.; Wang, Kejin, and Schaefer, Vernon R., SN3063, Portland Cement Association, Skokie, Illinois, USA, 2008, 29 pages
ASTM C 1688, Standard Test Method for Density and Void Content of Freshly Mixed Pervious Concrete http://www.astm.org/Standards/C1688.htm
ASTM C 1701, Standard Test Method for Infiltration Rate of In Place Pervious Concrete http://www.astm.org/Standards/C1701.htm
ASTM C 1747, Standard Test Method for Determining Potential Resistance to Degradation of Pervious Concrete by Impact and Abrasion, https://www.astm.org/Standards/C1747.htm
ACI 522.1‐13 Specification for Pervious Concrete Pavement, ACI 2008, Farmington Hills, MI
ACI 522R‐10 Report on Pervious Concrete, ACI 2010, Farmington Hills, MI