Embed Size (px)
Citation preview
(Revision 2 / October 2013)
Head to Foot Orthotics Page 1
Head to Foot Orthotics GUIDELINES TO WEARING:
THE HALO-THORACIC SPINAL ORTHOSIS
Your ORTHOTIST is: ..........................................
EMERGENCY PHONE NUMBERS:
Head to Foot Orthotics: 9870 2284 Business Hours: 8.30am – 5.00pm, Monday - Friday
Outside of Normal Business Hours:
On Call Service: 9870 2284
Head to Foot Orthotics would like to acknowledge the Orthotics Department at
The Alfred Hospital for providing the information for this brochure.
(Revision 2 / October 2013)
Head to Foot Orthotics Page 2
CONTENTS
WHEN TO CONTACT HEAD TO FOOT ORTHOTICS ................................... 3
THINGS TO AVOID ......................................................................................... 3
INTRODUCTION TO THE HALO-THORACIC ORTHOSIS ............................ 4
FITTING OF THE HALO-THORACIC ORTHOSIS .......................................... 5
INITIAL CARE AFTER FITTING: .................................................................... 6
CARE OF THE PIN SITES .............................................................................. 7
THE JACKET .................................................................................................. 8
HYGIENE ........................................................................................................ 9
SITTING IN BED ........................................................................................... 11
GETTING OUT OF BED ................................................................................ 12
SOCIAL ISSUES ........................................................................................... 13
FOOD AND DIET .......................................................................................... 13
SLEEPING OR LYING .................................................................................. 14
TRAVEL ........................................................................................................ 15
CLOTHING .................................................................................................... 16
REMOVAL OF THE HALO ........................................................................... 17
HELPFUL HOME HINTS ............................................................................... 18
EMERGENCY REMOVAL OF THE HALO ................................................... 19

(Revision 2 / October 2013)
Head to Foot Orthotics Page 3
WHEN TO CONTACT YOUR ORTHOTIST.
If at any time, whilst wearing the halo, any of the following occur please contact the emergency numbers on the front of this booklet: Sensation in your toes or fingers becomes worse or is altered, (ie.
pins and needles, tingling or numbness) A pin site becomes red and sore, or starts clicking. Any part of the jacket becomes loose or broken. A skin irritation or pressure area develops under the jacket.
EMERGENCY PHONE NUMBERS:
Head to Foot Orthotics: 9870 2284 Business Hours : 8.30am – 5.00pm, Monday - Friday
Also an On Call Service available: 9870 2284
THINGS TO AVOID DON’T DRIVE A CAR OR RIDE ANY BIKE!!!
DON’T Sit straight up in bed. (Refer to page 11)
DON’T Loosen or tighten the jacket. If it feels too loose or tight and you feel it needs adjusting, notify your orthotist.
DON’T Lift anything heavier than a telephone book (e.g. A-K section).
DON’T Allow anyone to pull on the superstructure of the halo. This can alter alignment of the neck and also put a lot of pressure on the pins.
DON’T Jump or run. Careless behaviour, falling or bumping heavily into an object could cause irreversible damage.
DON’T Remove the allen key from the front of the jacket.
DON’T Attempt to shower or change the liners.
DON’T Consume alcohol or participate in activities which are dangerous or in which your balance may be affected.
(Revision 2 / October 2013)
Head to Foot Orthotics Page 4
INTRODUCTION TO THE HALO-THORACIC ORTHOSIS
The Halo-Thoracic Orthosis is fitted to patients to provide maximum stability after a cervical spine injury. It is commonly fitted for a fracture, dislocation or severe soft tissue injury. Occasionally it is used in conjunction with surgery. The Halo is usually worn for a twelve week period, however, this is only an approximate time frame. You will be reviewed frequently by your Orthopaedic Surgeon / Neurosurgeon and your Orthotist. The Halo stabilises your cervical spine as your injury heals, and allows you to return to activities of daily living. Previously, people with unstable cervical injuries had to lie on their back in bed for a twelve week period, often with traction devices in place. With this in mind the advantages of the halo are: Early mobilisation (if appropriate) Decreased hospital stay Better pulmonary (chest) care Ability to carry out basic activities of daily living Allows special magnetic scans (MRI) to be carried out, also good lateral
(side view) x-rays can be taken without compromising neck stability.
This booklet provides general information for patients wearing the Halo-
Thoracic Spinal Orthosis. Any instructions given directly to you by Orthopaedic Surgeon / Neurosurgeon or your Orthotist, should be
adhered to over and above anything written in this booklet.
When discharged from hospital many patients will cope well with some assistance from family members at home. If any queries, problems or information is needed during your time in the Halo-Thoracic Spinal Orthosis, please don’t hesitate to call Head to Foot Orthotics.
(Revision 2 / October 2013)
Head to Foot Orthotics Page 5
FITTING THE HALO-THORACIC ORTHOSIS: Before application of the Halo, you may be pre-measured by an orthotist to ensure a good fit. The Halo may be fitted in theatre or on the ward. During the fitting patients are usually awake during the procedure. You will be given local anaesthetic and antiseptic before the pins are positioned. The anaesthetic may sting when it is administered, however the region goes numb a short time later. During the fitting the doctor or orthotist will explain to you particular steps of the procedure. When the pins are sited you will feel some discomfort. Pressure on the skull is a common sensation as the pins are tensioned. This pressure will ease but sometimes takes a few days to settle. You should notify the doctor and orthotist if you experience any of the following during the fitting of the halo: Sharp pain at the pin site when the pins are being inserted Any tingling, numbness, pins and needles or changes in sensation in your
fingers or toes. The pins will be re-tensioned 24-48 hours after initial fitting. This ensures the correct pressure is applied and a secure fixation is achieved. If the pins ever become very sore, or start clicking or grinding, contact the Emergency numbers on the front of this booklet, or call an Ambulance.
(Revision 2 / October 2013)
Head to Foot Orthotics Page 6
INITIALLY AFTER FITTING: After having the Halo-Thoracic Orthosis fitted; you may initially notice: Some dizziness when you first sit or stand. This is usually due to lying
down for a long period of time and will fade as stamina increases. Your physiotherapist will assist you with getting mobile again.
Headaches are often experienced. It is normal to feel pressure on the
skull, this is due to having the pins sited. Headaches will usually fade throughout the day. Analgesic relief may be administered by nursing staff to help with the pain.
The weight of the brace feels considerable. It may take some time to
adjust to the weight. It weighs around 3 kg. It may be hard to sleep, advise your doctor if this occurs. However, as
discomfort settles, sleeping times usually increase. Refer to ‘Sleeping or Lying - Finding a Comfortable Position’ (page 14).
Patients occasionally experience a clicking sensation in their neck. This is
usually only soft tissue becoming tight. If clicking persists advise your doctor.
(Revision 2 / October 2013)
Head to Foot Orthotics Page 7
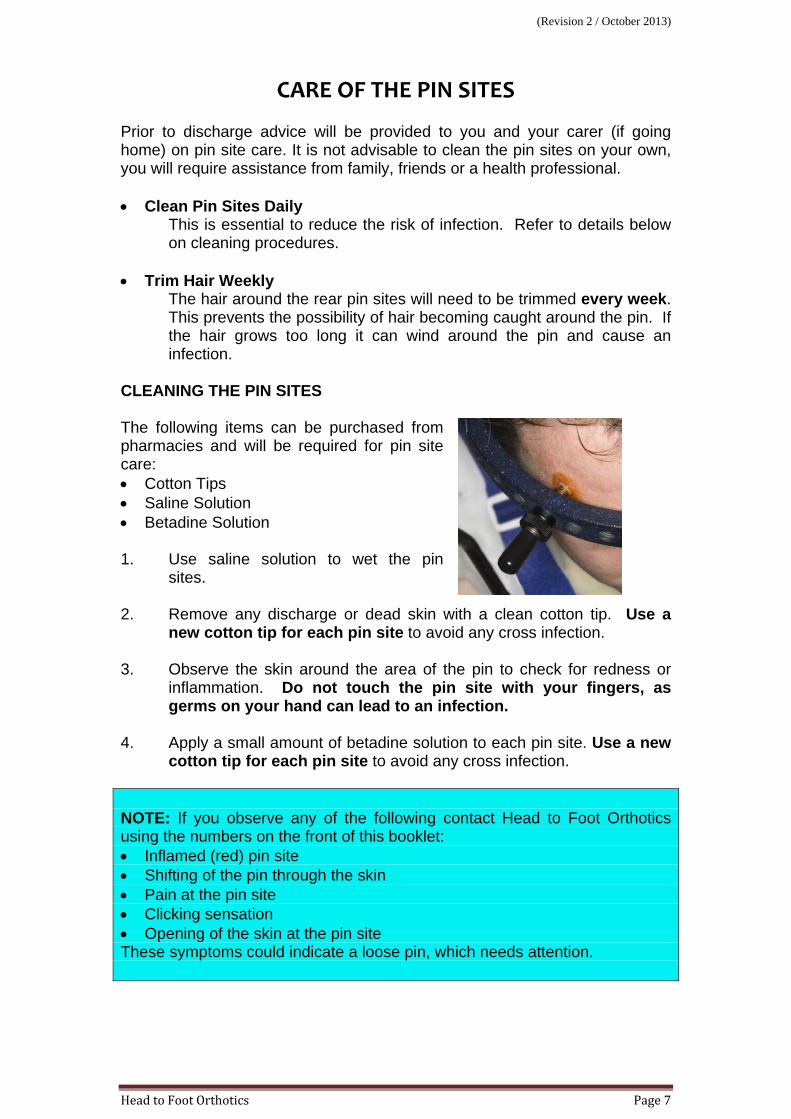
CARE OF THE PIN SITES Prior to discharge advice will be provided to you and your carer (if going home) on pin site care. It is not advisable to clean the pin sites on your own, you will require assistance from family, friends or a health professional. Clean Pin Sites Daily
This is essential to reduce the risk of infection. Refer to details below on cleaning procedures.
Trim Hair Weekly
The hair around the rear pin sites will need to be trimmed every week. This prevents the possibility of hair becoming caught around the pin. If the hair grows too long it can wind around the pin and cause an infection.
CLEANING THE PIN SITES The following items can be purchased from pharmacies and will be required for pin site care: Cotton Tips Saline Solution Betadine Solution 1. Use saline solution to wet the pin
sites.
2. Remove any discharge or dead skin with a clean cotton tip. Use a new cotton tip for each pin site to avoid any cross infection.
3. Observe the skin around the area of the pin to check for redness or
inflammation. Do not touch the pin site with your fingers, as germs on your hand can lead to an infection.
4. Apply a small amount of betadine solution to each pin site. Use a new
cotton tip for each pin site to avoid any cross infection. NOTE: If you observe any of the following contact Head to Foot Orthotics using the numbers on the front of this booklet: Inflamed (red) pin site Shifting of the pin through the skin Pain at the pin site Clicking sensation Opening of the skin at the pin site These symptoms could indicate a loose pin, which needs attention.
(Revision 2 / October 2013)
Head to Foot Orthotics Page 8
THE JACKET The jacket/vest is made from a copolymer plastic and the superstructure is a titanium material. Once fitted the vest is very rigid. The orthosis should not be altered by anyone other than your orthotist or doctor as the stabilisation of the neck will be compromised. If any part of the jacket is “digging in” or irritating you, contact your orthotist. DO NOT ALTER THE JACKET YOURSELF!! Do not pull on the jacket, this can alter the alignment of your neck or cause loosening of the superstructure. Never apply articles of clothing or padding between the jacket and your body, this can cause increased pressure on your skin and change the fit of the orthosis. Occasionally gapping will occur between your body and the jacket. This can be due to weight loss. When all straps and bolts are firm the neck will be held securely. Contact your orthotist if:
The jacket is causing you pain You suspect the jacket may be causing any damage to your skin Any component of the orthosis becomes loose You experience any breakages or near breakages of the orthosis You have concerns regarding the fit of the orthosis
DO NOT remove the allen key from the front of the jacket. This is needed to loosen the jacket and allow access to the your chest in the event of an emergency.
(Revision 2 / October 2013)
Head to Foot Orthotics Page 9
HYGIENE Liner changes may be available where necessary, however changes are typically discouraged as slight movement of the fracture segments may occur. Do NOT attempt to change the liners at home. A lightweight cotton singlet (or boob-tube) top can be worn underneath if needed. Ask your orthotist to demonstrate how this is fitted. When to Contact your Orthotist: If heavy soiling occurs to the liner an earlier appointment may be
possible. If the liners are wet. The orthosis must be kept dry. If the liners are wet
by accident, use a hair drier to dry the liners out as much as possible, then phone the orthotist to arrange a liner change.
If you notice any skin irritation or pressure area developing under the
jacket
(Revision 2 / October 2013)
Head to Foot Orthotics Page 10
BATHING AT HOME When washing at home, DO NOT GET THE LINERS WET! Option 1: Sponge bath, this is the easiest and quickest way to wash. Option 2: Bath in a shallow bathtub (ie. water level below the level of the jacket), and wash the upper body with a damp face-washer. To assist in keeping the liners dry, plastic can be tucked into the bottom of the jacket. Ensure the base of the bath is non-slip and use extreme caution when climbing in and out of the bath. It is essential to have an assistant when entering and exiting the bath, as well as using a hand rail if one is installed.
Showering should NOT be attempted
as it is impossible to keep the liners dry.
HAIR WASHING In some circumstances it is possible to wash your hair at home. Please request instruction from your orthotist for appropriate procedures. If hair becomes dirty or oily in between washes, dry shampoo’s can be used and are available from most pharmacies. Occasionally patients may experience cradle cap, consult your pharmacist for appropriate treatments, eg. Ego Cappil.
Do not use hair dyes, bleaches or other chemicals
whilst wearing the halo.
(Revision 2 / October 2013)
Head to Foot Orthotics Page 11
SITTING IN BED
When fitted with the Halo-Thoracic Orthosis you may initially find it is hard to move around. In the first couple of days you may require assistance to sit up in bed. You will require authorisation from the doctors before staff can assist you to sit up in bed. Please carefully read the following instructions regarding sitting up in bed. Failure to comply may result in serious consequences including: Pin loosening leading to severe pain Movement of fracture segments Spinal Cord Damage
How to Assist a Patient to Sit up in Bed:
Ensure hips are positioned at “break” of bed.
Raise bed to a maximum height of 45 using automatic raise.
Raise legs to prevent patient slipping.
Please DO NOT:
Don’t manually lift a patient.
Don’t pull on frame.
Patient should not slump in bed.
(Revision 2 / October 2013)
Head to Foot Orthotics Page 12
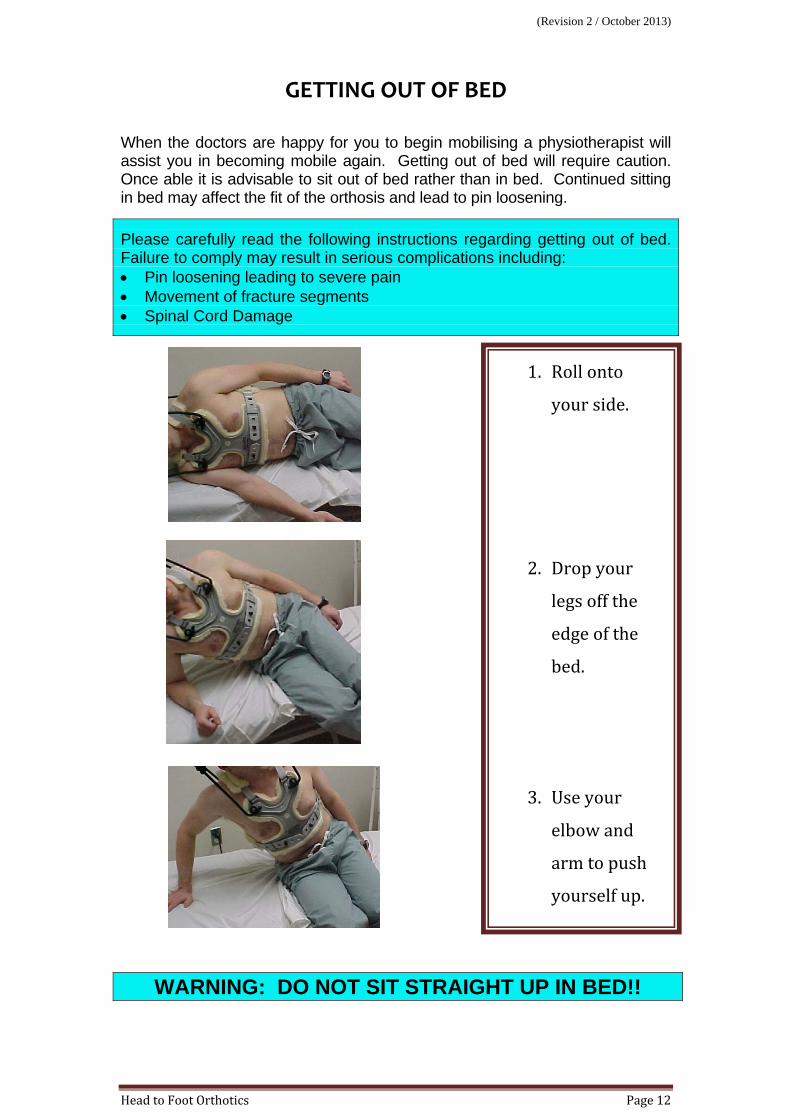
GETTING OUT OF BED
When the doctors are happy for you to begin mobilising a physiotherapist will assist you in becoming mobile again. Getting out of bed will require caution. Once able it is advisable to sit out of bed rather than in bed. Continued sitting in bed may affect the fit of the orthosis and lead to pin loosening.
Please carefully read the following instructions regarding getting out of bed. Failure to comply may result in serious complications including: Pin loosening leading to severe pain Movement of fracture segments Spinal Cord Damage
WARNING: DO NOT SIT STRAIGHT UP IN BED!!
1. Roll onto your side. 2. Drop your legs off the edge of the bed. 3. Use your elbow and arm to push yourself up.
(Revision 2 / October 2013)
Head to Foot Orthotics Page 13
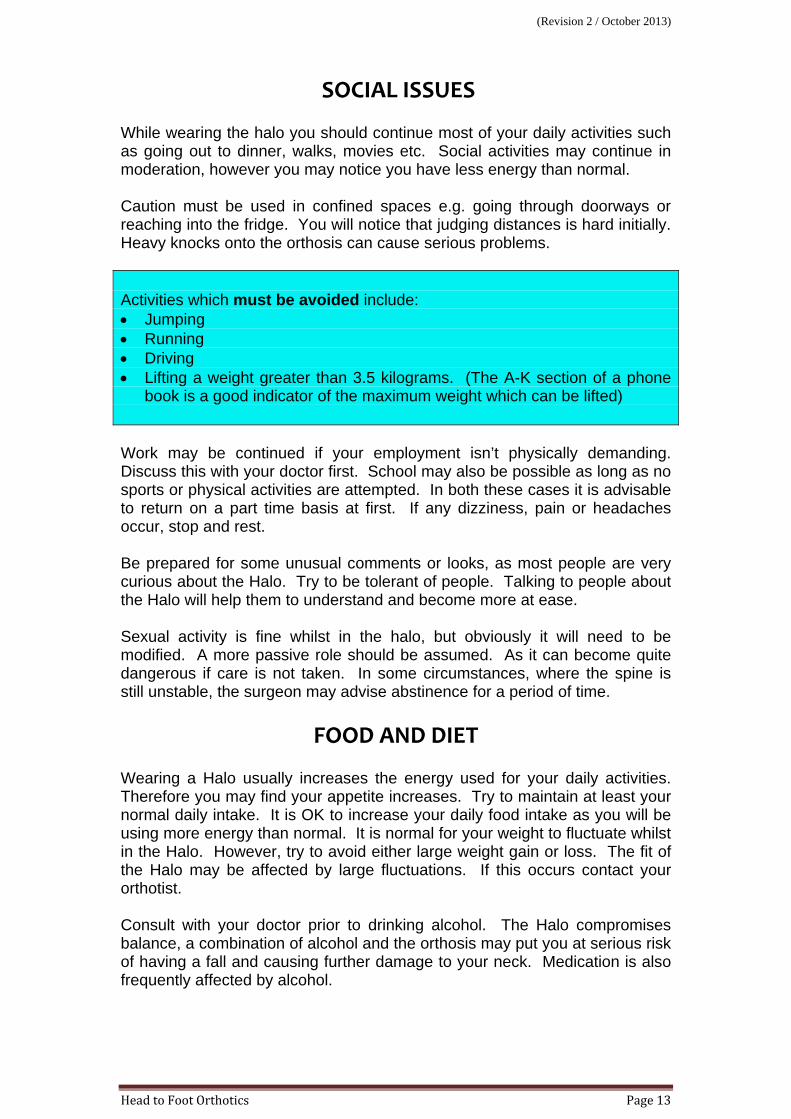
SOCIAL ISSUES While wearing the halo you should continue most of your daily activities such as going out to dinner, walks, movies etc. Social activities may continue in moderation, however you may notice you have less energy than normal. Caution must be used in confined spaces e.g. going through doorways or reaching into the fridge. You will notice that judging distances is hard initially. Heavy knocks onto the orthosis can cause serious problems. Activities which must be avoided include: Jumping Running Driving Lifting a weight greater than 3.5 kilograms. (The A-K section of a phone
book is a good indicator of the maximum weight which can be lifted) Work may be continued if your employment isn’t physically demanding. Discuss this with your doctor first. School may also be possible as long as no sports or physical activities are attempted. In both these cases it is advisable to return on a part time basis at first. If any dizziness, pain or headaches occur, stop and rest. Be prepared for some unusual comments or looks, as most people are very curious about the Halo. Try to be tolerant of people. Talking to people about the Halo will help them to understand and become more at ease. Sexual activity is fine whilst in the halo, but obviously it will need to be modified. A more passive role should be assumed. As it can become quite dangerous if care is not taken. In some circumstances, where the spine is still unstable, the surgeon may advise abstinence for a period of time.
FOOD AND DIET Wearing a Halo usually increases the energy used for your daily activities. Therefore you may find your appetite increases. Try to maintain at least your normal daily intake. It is OK to increase your daily food intake as you will be using more energy than normal. It is normal for your weight to fluctuate whilst in the Halo. However, try to avoid either large weight gain or loss. The fit of the Halo may be affected by large fluctuations. If this occurs contact your orthotist. Consult with your doctor prior to drinking alcohol. The Halo compromises balance, a combination of alcohol and the orthosis may put you at serious risk of having a fall and causing further damage to your neck. Medication is also frequently affected by alcohol.
(Revision 2 / October 2013)
Head to Foot Orthotics Page 14
SLEEPING OR LYING FINDING A COMFORTABLE POSITION As your body adjusts to the Halo you may find your sleeping pattern is disrupted. Finding a comfortable position in which to sit or lie may also be difficult at first. Gradually, with time, sleeping periods will increase as you adjust to the Halo. You may feel lethargic in the early stages because your body is using more energy than normal and getting less sleep. Naps during the day may be needed until you are sleeping well at night. Any position can be assumed when lying (e.g. back, side or stomach), as long as you are comfortable and no pain is being experienced. The Halo is fitted so that, when lying, your head will not be in contact with the bed. This is often a strange or uncomfortable feeling for patients. Use of a pillow is discouraged as this elevates the head, therefore it may change the alignment of the spine. However, if this hurts or feels very strange a very soft or low pillow can be placed under your head. Ensure the pillow does not place any pressure onto the back of your neck. When lying on your back or stomach you should avoid any direct pressure on the pins. This can alter the tension of the pin and may facilitate pin loosening. When side lying you may find it more comfortable to position a pillow behind your back to support you on your side.

(Revision 2 / October 2013)
Head to Foot Orthotics Page 15
CAR TRAVEL DO NOT DRIVE!!!! – Driving whilst in a Halo Thoracic Orthosis is incredibly dangerous and it is also against the law! Normal car travel as a passenger should be well within limits. Non-essential travel over long distances should be limited. It is advisable to take a break after every hour of travel. More frequent breaks may be required if discomfort is experienced. To enter the car it is easiest to have the front seat pushed as far back as possible. Use the door as a stabiliser, and reverse into the seat with your body bent forward. When your bottom is on the seat then swing your legs into the car. To get out, reverse this process.
ALTERNATIVE FORMS OF TRANSPORT
Transport in a car is the safest option whilst in a Halo. DO NOT use bicycles or motorbikes or any other two or three wheeled forms of transport. Balance is quite impaired and the risk of falling is far too high. Flying is usually OK, however, you will need to confirm this with your doctor. Whilst in mid-flight you may need to have a short stand or walk. Be very careful as balance may be affected. Public transport should be avoided wherever possible. Never travel during peak periods. In off-peak times wearers may travel on buses if absolutely essential. It is advisable to be accompanied by an assistant and to ensure the driver is aware that you must be seated. All other forms of public transport are discouraged. Be aware that public transport often vibrates and brakes quickly, which can affect balance and cause headaches.
(Revision 2 / October 2013)
Head to Foot Orthotics Page 16
CLOTHING Due to the superstructure of the Halo, wearing normal clothes above the waist is quite difficult. The easiest alternative is for the patient to wear a slightly larger than usual button-up shirt. This can be worn without alterations and is easily put on and taken off. Tops which have a zipper are also a good alternative. The sheepskin liners should help you to keep warm, therefore usually only light clothes are needed. However, in the winter a windcheater or jumper may need to be altered. ALTERATIONS TO CLOTHES: As wearing time in a Halo is quite substantial many people elect to customise their clothes to achieve a better fit. FOOTWEAR: Flat soled shoes with good grip are essential e.g. runners. Balance is already compromised in a Halo, therefore poor footwear will increase your risk of falls. High heels or ‘slip-on’ shoes put you at high risk of falling.

(Revision 2 / October 2013)
Head to Foot Orthotics Page 17
REMOVAL OF THE HALO The Halo will be removed when your Orthopaedic Surgeon / Neurosurgeon determines that adequate healing is achieved. X-rays are usually taken before removal of the halo to ensure the fracture or injury is stable. Often a cervical (neck) collar will be required for several weeks after halo removal e.g. Philadelphia, Miami J or Soft Collar. This decision will be made by your doctor at the time of halo removal. Usually no special rehabilitation is required on the neck after removal of the Halo. It has been found that the neck muscles cope very well and don’t require additional exercises. Your doctor will advise if any rehabilitation is required. PIN SITE CARE AFTER HALO REMOVAL Cleaning Pin sites will be cleaned after Halo removal. Try not to get your pin sites wet for the first day. After 24 hours you may get pin sites wet. Continue to wash pin sites in the shower. Pin sites do NOT require a dressing. Monitor pin sites for any sign of infection. If you notice an infection visit your GP. Massaging Allow 2 days after Halo removal for the skin to seal over then begin gentle massaging of the two front pin sites. You may wish to use a cream such as Sorbolene. Continue this three times per day until the skin is free to move over the bone (approx. 2 weeks). Massaging breaks any adhesions, which form between the skin and the bone while wearing the Halo and also prevents any new adhesions from forming. Dimples will form at the pin sites if skin remains adhered to the bone. Massaging may cause some pain as adhesions are broken. Rear pins do not need to be massaged as they are usually covered by hair. Scarring at the pin sites does occur occasionally. Failure to massage the front pin sites will result in a scar which resembles a large dimple.
(Revision 2 / October 2013)
Head to Foot Orthotics Page 18
HELPFUL HOME HINTS 1. FLEXIBLE STRAWS May make drinking easier. Can be obtained from
supermarkets or convenience stores. 2. ELASTIC SHOELACES To make putting shoes on easier. 3. LONG HANDLED SHOE HORN Helps to get your foot into the shoe.
Available from chemists or discuss with your Orthotist. 4. SOCK DONNER This assists in putting on socks. 5. ANGLED BOOK HOLDER Tilts the book to allow easier reading. May
be of assistance if returning to work or school. 6. SHELF ARRANGEMENTS Encourage people you live with, to leave
items in shoulder and waist height cupboards.
IF ANY QUESTIONS OR QUERIES HAVE NOT BEEN ANSWERED IN THIS BOOKLET, PLEASE DON’T HESITATE TO CONTACT YOUR ORTHOTIST.
(Refer to Emergency Numbers on the front cover)
(Revision 2 / October 2013)
Head to Foot Orthotics Page 19
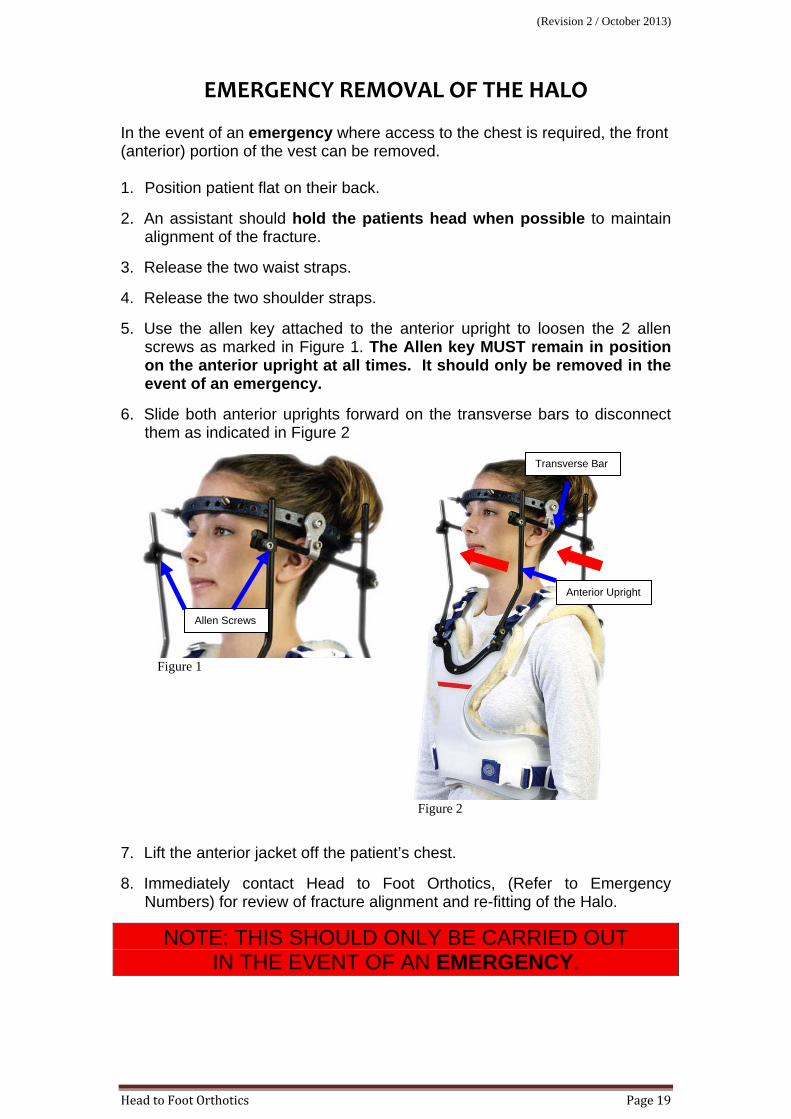
EMERGENCY REMOVAL OF THE HALO In the event of an emergency where access to the chest is required, the front (anterior) portion of the vest can be removed. 1. Position patient flat on their back.
2. An assistant should hold the patients head when possible to maintain alignment of the fracture.
3. Release the two waist straps.
4. Release the two shoulder straps.
5. Use the allen key attached to the anterior upright to loosen the 2 allen screws as marked in Figure 1. The Allen key MUST remain in position on the anterior upright at all times. It should only be removed in the event of an emergency.
6. Slide both anterior uprights forward on the transverse bars to disconnect them as indicated in Figure 2
Figure 1
Figure 2
7. Lift the anterior jacket off the patient’s chest.
8. Immediately contact Head to Foot Orthotics, (Refer to Emergency Numbers) for review of fracture alignment and re-fitting of the Halo.
NOTE: THIS SHOULD ONLY BE CARRIED OUT IN THE EVENT OF AN EMERGENCY.
Transverse Bar
Anterior Upright
Allen Screws

(Revision 2 / October 2013)
Head to Foot Orthotics Page 20
Notes

(Revision 2 / October 2013)
Head to Foot Orthotics Page 21
Notes