Embed Size (px)
Citation preview
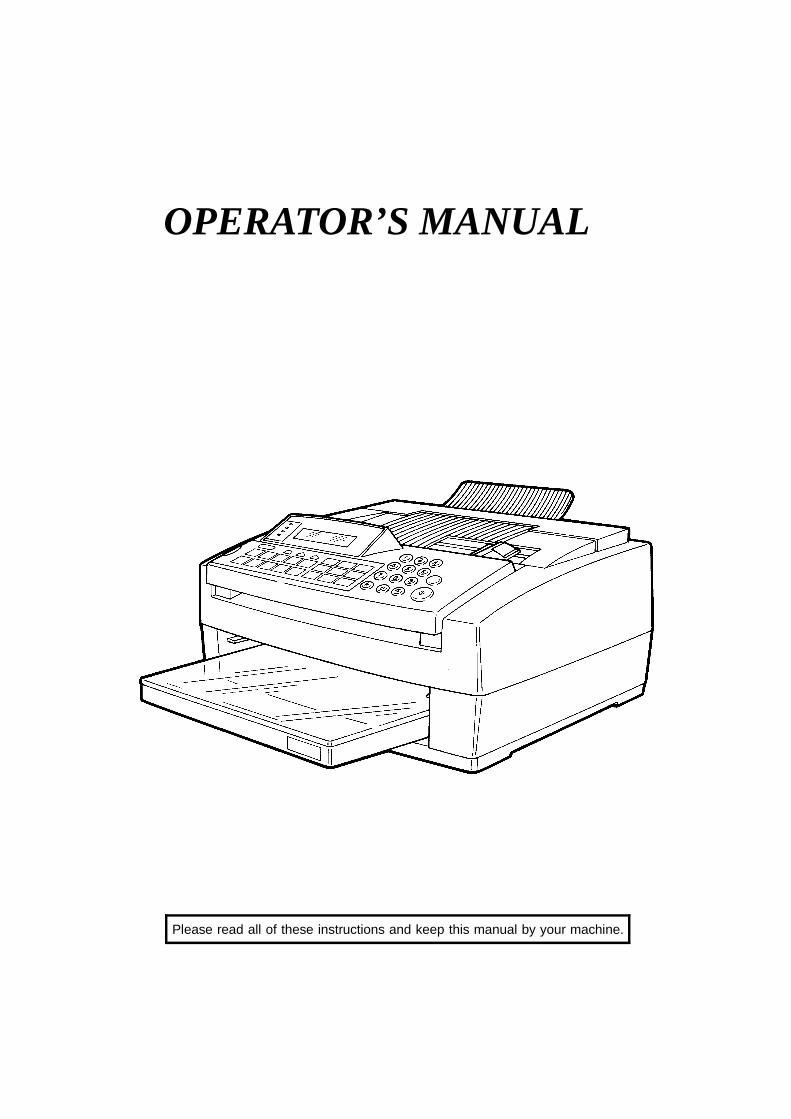
OPERATOR’S MANUAL
Please read all of these instructions and keep this manual by your machine.
Notice about the Telephone Consumer Protection Act (Valid in the USA only)
Attention please!
The Telephone Consumer Protection Act of 1991 among other things makes it unlawful for anyperson to send any message via a telephone fax machine unless such message clearly contains ina margin at the top or bottom of each transmitted page or on the first page of the transmission, thedate and time it is sent and an identification of the business or other entity, or other individualsending the message and the telephone number of the sending machine or such business, otherentity, or individual. This information is transmitted with your document by the TTI feature.
In order for you to meet the requirement, your machine must be programmed by following theinstructions in the accompanying Operation Manual. In particular, please refer to the "GettingStarted" and/or "Programming" sections. Also refer to the TTI (Transmit Terminal Identification)programming procedure to enter the business identification and telephone number of the terminal orbusiness. Do not forget to set the date and time.
Thank you
USA: This equipment has been tested and found to comply with the limits for a Class B digital device, pursu-
ant to Part 15 of the FCC Rules. These limits are designed to provide reasonable protection against harmful in-
terference in a residential installation. This equipment generates, uses, and can radiate radio frequency energy
and, if not installed and used in accordance with the instructions, may cause harmful interference to radio com-
munications. However, there is no guarantee that interference will not occur in a particular installation. If this
equipment does cause harmful interference to radio or television reception, which can be determined by turn-
ing the equipment off and on, the user is encouraged to try to correct the interference by one or more of the
following measures:
❐ Reorient or relocate the receiving antenna.
❐ Increase the separation between the equipment and receiver.
❐ Connect the equipment into an outlet on a circuit different from that to which the receiver is connected.
❐ Consult the dealer or an experienced radio/TV technician for help.
CANADA
This digital apparatus does not exceed the Class B limits for radio noise emissions from digital apparatus as set
out in the interference-causing equipment standard entitled "Digital Apparatus", ICES-003 of the Department
of Communications.
Cet appartil numérique respecte les limites de bruits radioélectriques applicables aux appareils numériques de
Classe B prescrites dans la norme sur le matériel brouilleur : "Appareils Numériques", NMB-003 édictée par le
ministre des Communications.
Trademark Notices
IBM and IBM PC are trademarks of International Business Machines Corporation
Centronics is a trademark of Centronics Data Computer Corporation
IMPORTANT SAFETY INSTRUCTIONS
1. Read all of these instructions.
2. Save these instructions for later use.
3. Follow all warnings and instructions marked on the product.
4. Unplug this product from the wall outlet before cleaning. Do not use liquid cleaners or aerosol cleaners. Use a damp cloth for cleaning.
5. Do not use this product near water.
6. Do not place this product on an unstable cart, stand, or table. The product may fall, causing serious damage to the product or injuring
the user.
7. Slots and openings in the cabinet and the back or bottom are provided for ventilation; to ensure reliable operation of the product and
to protect it from overheating, these openings must not be blocked or covered. The openings should never be blocked by placing the
product on a bed, sofa, rug, or other similar surface. This product should not be placed in a built-in installation unless proper ventila-
tion is provided.
8. This product should be operated from the type of power source indicated on the marking label. If you are not sure of the type of power
available, consult an authorized sales person or your local power company.
9. This product is equipped with a 3-wire grounding type plug, a plug having a third (grounding) pin. This plug will only fit into a ground-
ing-type power outlet. This is a safety feature. If you are unable to insert the plug into the outlet, contact your electrician to replace
your obsolete outlet. Do not defeat the purpose of the grounding type plug. (This does not apply in the countries in which the 2-wire,
non-grounded type of plug is used.)
10. Do not allow anything to rest on the power cord. Do not locate this product where persons will walk on the cord.
11. If an extension cord is used with this product, make sure that the total of the ampere ratings on the products plugged into the extension
cord do not exceed the extension cord ampere rating. Also, make sure that the total of all products plugged into the wall outlet does
not exceed 15 amperes (USA and Taiwan models).
12. Never push objects of any kind into this product through cabinet slots as they may touch dangerous voltage points or short out parts
that could result in a risk of fire or electric shock. Never spill liquid of any kind on the product.
13. Do not attempt to service this product yourself, as opening or removing covers may expose you to dangerous voltage points or other
risks. Refer all servicing to qualified service personnel.
14. Unplug this product from the wall outlet and refer servicing to qualified service personnel under the following conditions:
A. When the power cord or plug is damaged or frayed.
B. If liquid has been spilled into the product.
C. If the product has been exposed to rain or water.
D. If the product does not operate normally when the operating instructions are followed. Adjust only those controls that are covered
by the operating instructions since improper adjustment of other controls may result in damage and will often required extensive
work by a qualified technician to restore the product to normal operation.
E. If the product has been dropped or the cabinet has been damaged.
F. If the product exhibits a distinct change in performance, indicating a need for service.
NOTICE TO USERS (New Zealand)
Immediately disconnect the equipment should it become physically damaged, and arrange for its disposal or repair.
Disconnect the Telecom connection before disconnecting the power connection prior to relocating the equipment, and reconnect the power
first.
This equipment may not necessarily provide for the effective hand-over of a call to or from a telephone connected to the same line.
The operation of this equipment on the same line as telephones or other equipment with audible warning devices or automatic ring detec-
tors will give rise to bell tinkle or noise and may cause false tripping of the ring detector. Should such problems occur, the user is not to
contact Telecom Faults Service.
Not all standard telephones will respond to incoming ringing when connected to the extension socket.
Thank you for purchasing this product. This small compact machine is ideal for small busi-nesses or first-time users who wish to have an economically priced plain paper fax machinewith a selection of useful features.
WHAT DOES A FAX MACHINE DO?When you write a letter, you normally seal it in an envelope, attach a stamp, and post it in the nearest letter
box. Then in a few days, depending on the postal service, the letter will arrive at its destination. However, you
may not be aware of its arrival until you get a return letter.
A fax machine speeds this process up. After you have written your letter, place it in your fax machine�s docu-
ment feeder, dial the destination�s fax number, then press the Start key on your fax machine�s operation panel.
The fax machine scans your letter, and converts it into a series of black and white dots (the number of dots
there are across the page and down the page depends on the resolution that you selected; refer to the specifica-
tions section of this manual for details). This series of dots is transformed into an electrical signal and sent
out over the telephone line to the fax machine at the destination.
The fax machine at the destination reconstructs your letter from the received signal, and prints it. The quality
of the printed message is not as good as the original, but it is good enough for most purposes.
If you are worried about whether the message arrived at the destination, you can check the report known as the
TCR (Transaction Confirmation Report), also called the Journal in some areas. When you print this report,
you will see the results of the most recent fax communications made by your machine.
You can use your fax machine to send and receive any type of document, even photographs.
BAD TELEPHONE LINES AFFECT FAX COMMUNICATIONQuick and accurate transmission of fax messages depends on the condition of the telephone line, If the line
condition is very good, this machine will transmit an A4 or letter-size page in about 10 seconds. However, if the
line is noisy, the speed may be reduced significantly, and the data may be damaged.
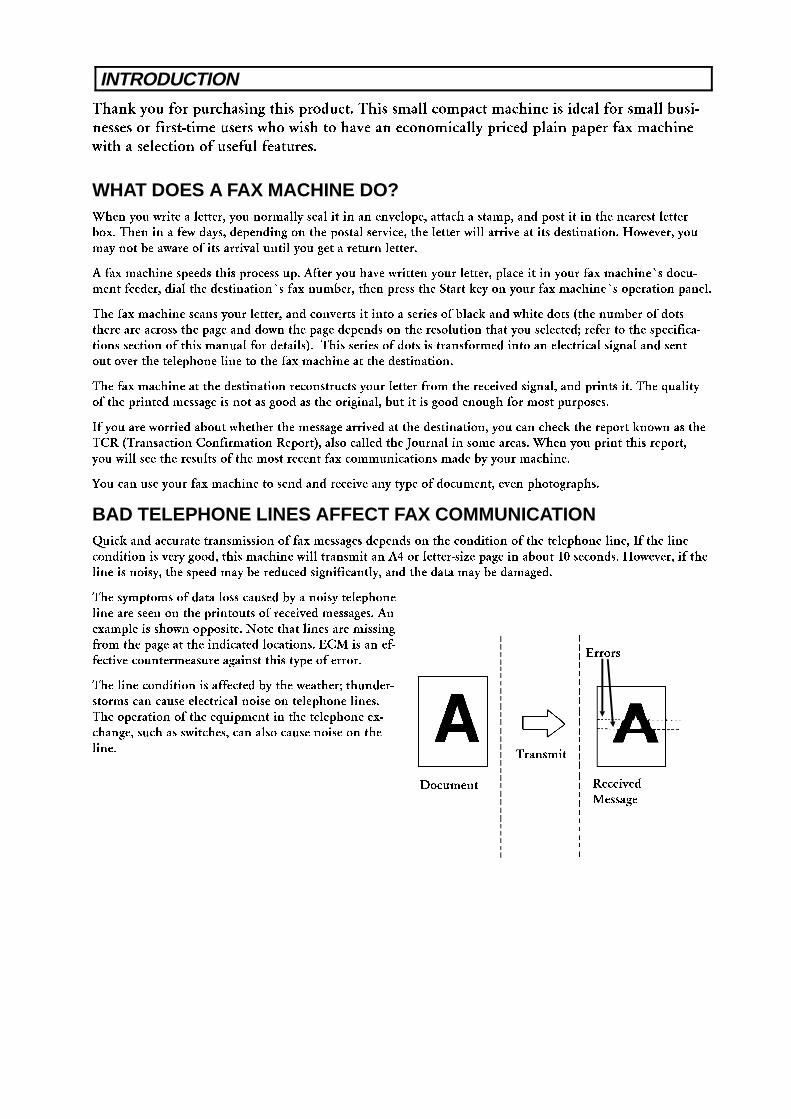
The symptoms of data loss caused by a noisy telephone
line are seen on the printouts of received messages. An
example is shown opposite. Note that lines are missing
from the page at the indicated locations. ECM is an ef-
fective countermeasure against this type of error.
The line condition is affected by the weather; thunder-
storms can cause electrical noise on telephone lines.
The operation of the equipment in the telephone ex-
change, such as switches, can also cause noise on the
line.
INTRODUCTION
Document Received
Message
Transmit
Errors
This manual contains instructions on how to operate and take care of your machine. Please
keep it near the machine at all times.
CAUTION: This machine can only be used in the country where it was purchased.
CONVENTIONS
The following conventions were used when writing this manual.
Key Names
There are two types of notation in this manual.
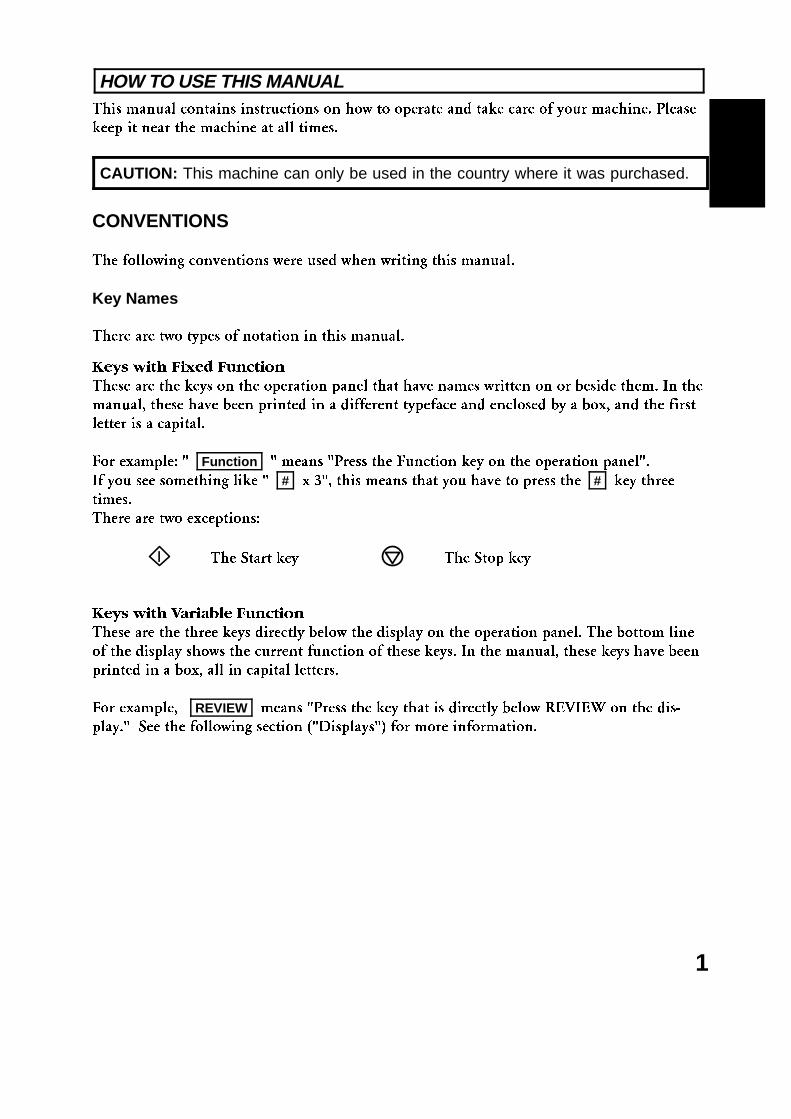
Keys with Fixed Function
These are the keys on the operation panel that have names written on or beside them. In the
manual, these have been printed in a different typeface and enclosed by a box, and the first
letter is a capital.
For example: " Function " means "Press the Function key on the operation panel".
If you see something like " # x 3", this means that you have to press the # key three
times.
There are two exceptions:
Keys with Variable Function
These are the three keys directly below the display on the operation panel. The bottom line
of the display shows the current function of these keys. In the manual, these keys have been
printed in a box, all in capital letters.
For example, REVIEW means "Press the key that is directly below REVIEW on the dis-
play." See the following section ("Displays") for more information.
HOW TO USE THIS MANUAL
The Start key The Stop key
1
Displays
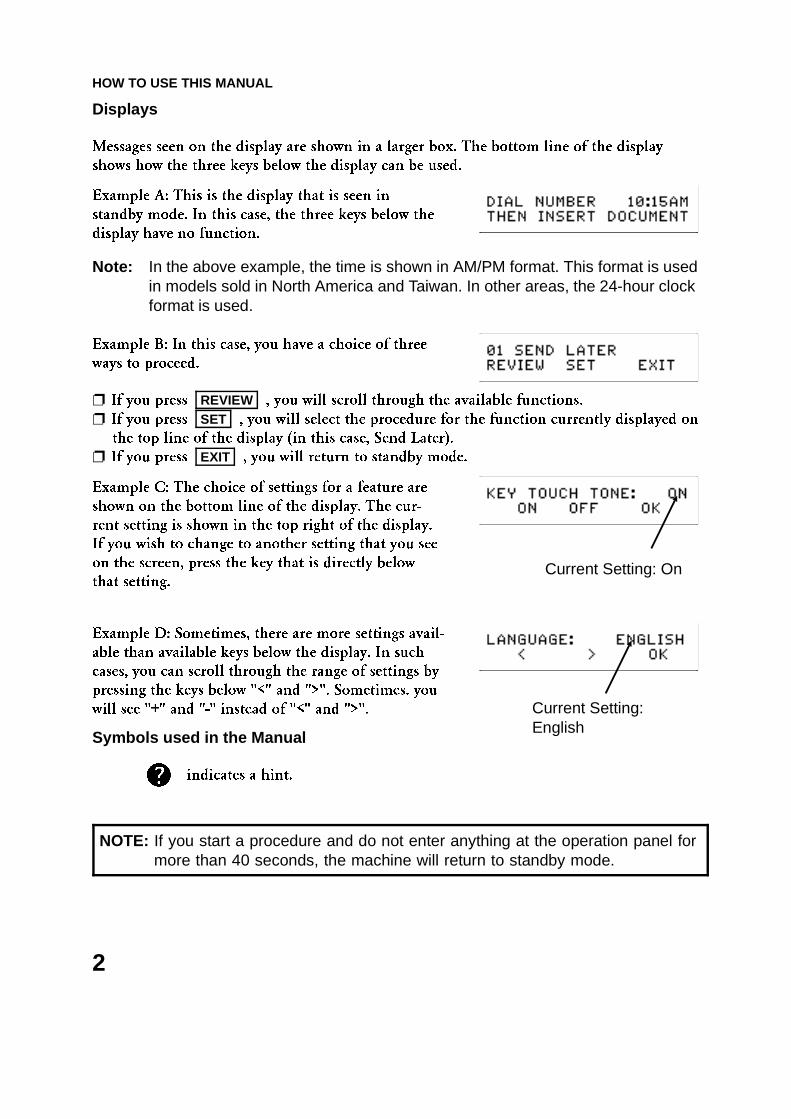
Messages seen on the display are shown in a larger box. The bottom line of the display
shows how the three keys below the display can be used.
Example A: This is the display that is seen in
standby mode. In this case, the three keys below the
display have no function.
Note: In the above example, the time is shown in AM/PM format. This format is usedin models sold in North America and Taiwan. In other areas, the 24-hour clockformat is used.
Example B: In this case, you have a choice of three
ways to proceed.
❐ If you press REVIEW , you will scroll through the available functions.
❐ If you press SET , you will select the procedure for the function currently displayed on
the top line of the display (in this case, Send Later).
❐ If you press EXIT , you will return to standby mode.
Example C: The choice of settings for a feature are
shown on the bottom line of the display. The cur-
rent setting is shown in the top right of the display.
If you wish to change to another setting that you see
on the screen, press the key that is directly below
that setting.
Example D: Sometimes, there are more settings avail-
able than available keys below the display. In such
cases, you can scroll through the range of settings by
pressing the keys below "<" and ">". Sometimes. you
will see "+" and "-" instead of "<" and ">".
Symbols used in the Manual
indicates a hint.
NOTE: If you start a procedure and do not enter anything at the operation panel formore than 40 seconds, the machine will return to standby mode.
Current Setting: On
Current Setting:English
HOW TO USE THIS MANUAL
2
STORING TELEPHONE NUMBERS
To dial a telephone number or store it as a Quick Dial or Speed Dial, type it into the ma-
chine at the ten-key pad on the operation panel.
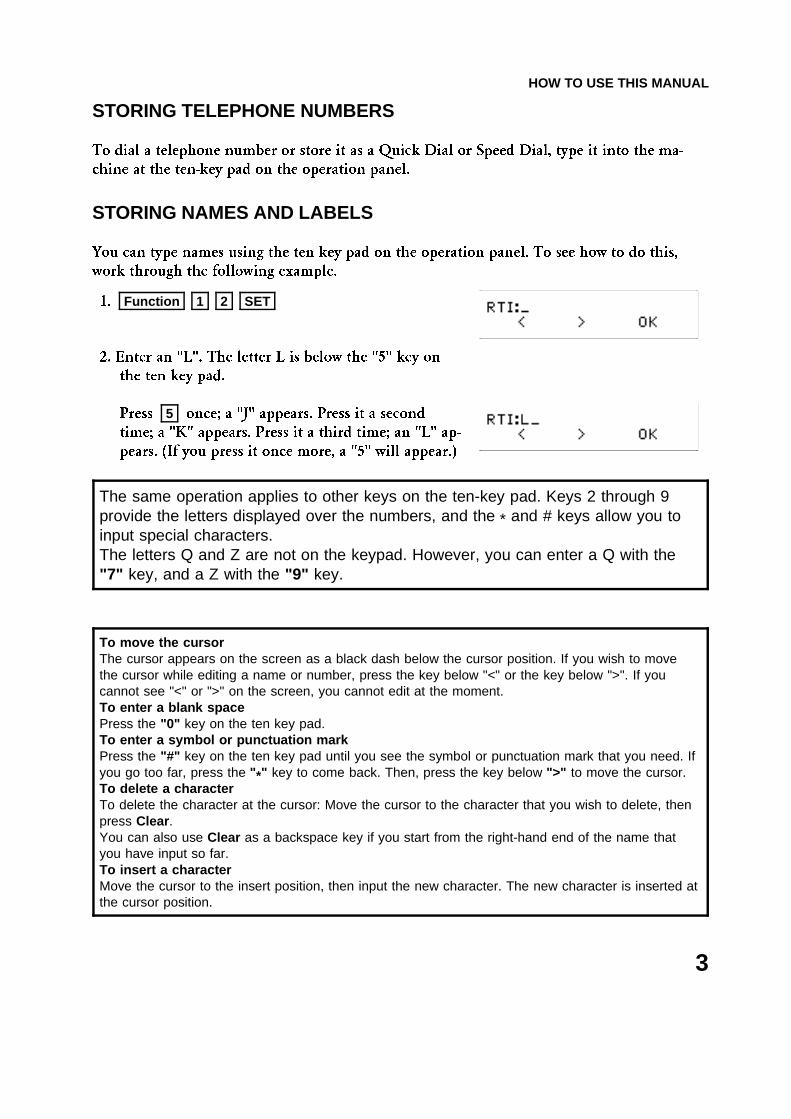
STORING NAMES AND LABELS
You can type names using the ten key pad on the operation panel. To see how to do this,
work through the following example.
1. Function 1 2 SET
2. Enter an "L". The letter L is below the "5" key on
the ten key pad.
Press 5 once; a "J" appears. Press it a second
time; a "K" appears. Press it a third time; an "L" ap-
pears. (If you press it once more, a "5" will appear.)
The same operation applies to other keys on the ten-key pad. Keys 2 through 9provide the letters displayed over the numbers, and the * and # keys allow you toinput special characters.The letters Q and Z are not on the keypad. However, you can enter a Q with the"7" key, and a Z with the "9" key.
To move the cursor The cursor appears on the screen as a black dash below the cursor position. If you wish to movethe cursor while editing a name or number, press the key below "<" or the key below ">". If youcannot see "<" or ">" on the screen, you cannot edit at the moment.To enter a blank spacePress the "0" key on the ten key pad.To enter a symbol or punctuation markPress the "#" key on the ten key pad until you see the symbol or punctuation mark that you need. Ifyou go too far, press the " *" key to come back. Then, press the key below ">" to move the cursor.To delete a characterTo delete the character at the cursor: Move the cursor to the character that you wish to delete, thenpress Clear .You can also use Clear as a backspace key if you start from the right-hand end of the name thatyou have input so far.To insert a characterMove the cursor to the insert position, then input the new character. The new character is inserted atthe cursor position.
HOW TO USE THIS MANUAL
3
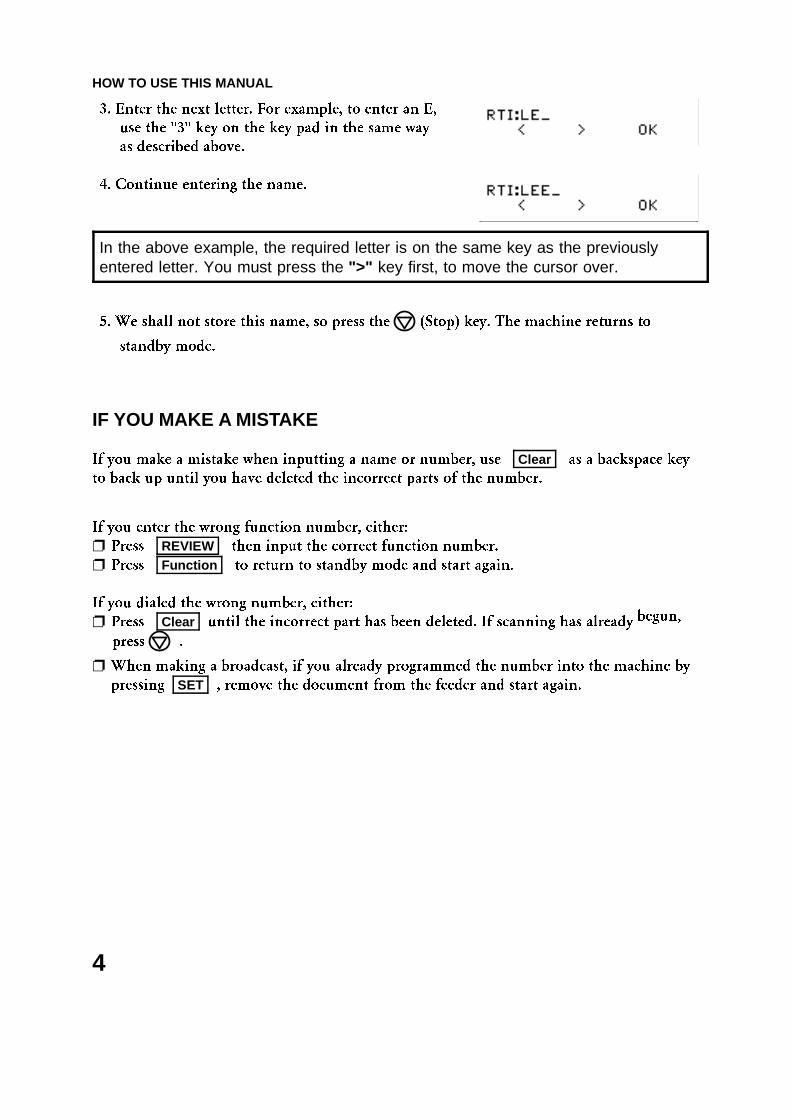
3. Enter the next letter. For example, to enter an E,
use the "3" key on the key pad in the same way
as described above.
4. Continue entering the name.
In the above example, the required letter is on the same key as the previouslyentered letter. You must press the ">" key first, to move the cursor over.
5. We shall not store this name, so press the (Stop) key. The machine returns to
standby mode.
IF YOU MAKE A MISTAKE
If you make a mistake when inputting a name or number, use Clear as a backspace key
to back up until you have deleted the incorrect parts of the number.
If you enter the wrong function number, either:
❐ Press REVIEW then input the correct function number.
❐ Press Function to return to standby mode and start again.
If you dialed the wrong number, either:
❐ Press Clear until the incorrect part has been deleted. If scanning has already begun,
press .
❐ When making a broadcast, if you already programmed the number into the machine by
pressing SET , remove the document from the feeder and start again.
HOW TO USE THIS MANUAL
4
LIMITATIONS ON VARIOUS FEATURES
The following tables show the limitations that the various features of your fax machine have.
1. Communication Features
Feature Item
Broadcasting from memory Maximum number of destinations: 9
Maximum number of documents that can be stored in
the memory: 1
Polling reception Maximum number of addresses that can be polled in
one operation: 1
2. Programming
Feature Item
Quick Dial Keys Number of Quick Dial keys: 10 (A to J)
Maximum length of a name: 10 characters
Maximum length of a telephone or fax number: 40
digits
Speed Dial Codes Number of Speed Dial codes: 40 (01 to 40)
Maximum length of a name: 10 characters
Maximum length of a telephone or fax number: 40
digits
Groups Number of Groups: 5 (A to E)
Maximum length of a name: 10 characters
Maximum number of addresses in a Group: 9
3. Others
❐ Memory Capacity
Transmission: 128 kbytes [9 pages] maximum
Reception: 416 kbytes [29 pages] maximum (288 kbytes [20 pages] if there is a document
for transmission stored in the memory)
Measured using a CCITT #1 chart (Slerexe letter) at standard resolution
❐ RTI: Up to 20 characters
❐ TTI: Up to 32 characters
❐ CSI: Up to 20 digits
❐ Authorized Reception
Maximum number of terminals that can be authorized: 50
❐ Redialling
Maximum number of redials: 100
Maximum interval: 9 minutes
HOW TO USE THIS MANUAL
5
POWER AND GROUNDING
Pay attention to the following.
Power Supply
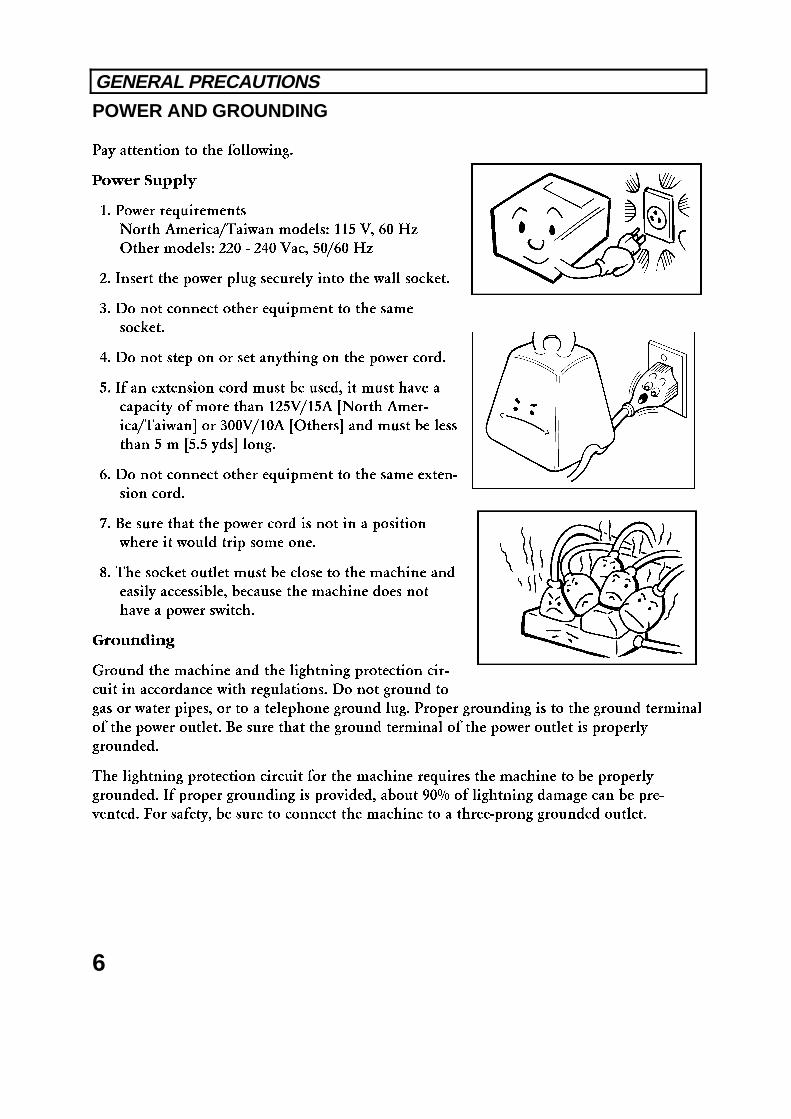
1. Power requirements
North America/Taiwan models: 115 V, 60 Hz
Other models: 220 - 240 Vac, 50/60 Hz
2. Insert the power plug securely into the wall socket.
3. Do not connect other equipment to the same
socket.
4. Do not step on or set anything on the power cord.
5. If an extension cord must be used, it must have a
capacity of more than 125V/15A [North Amer-
ica/Taiwan] or 300V/10A [Others] and must be less
than 5 m [5.5 yds] long.
6. Do not connect other equipment to the same exten-
sion cord.
7. Be sure that the power cord is not in a position
where it would trip some one.
8. The socket outlet must be close to the machine and
easily accessible, because the machine does not
have a power switch.
Grounding
Ground the machine and the lightning protection cir-
cuit in accordance with regulations. Do not ground to
gas or water pipes, or to a telephone ground lug. Proper grounding is to the ground terminal
of the power outlet. Be sure that the ground terminal of the power outlet is properly
grounded.
The lightning protection circuit for the machine requires the machine to be properly
grounded. If proper grounding is provided, about 90% of lightning damage can be pre-
vented. For safety, be sure to connect the machine to a three-prong grounded outlet.
GENERAL PRECAUTIONS
6
COLD WEATHER POWER-UP
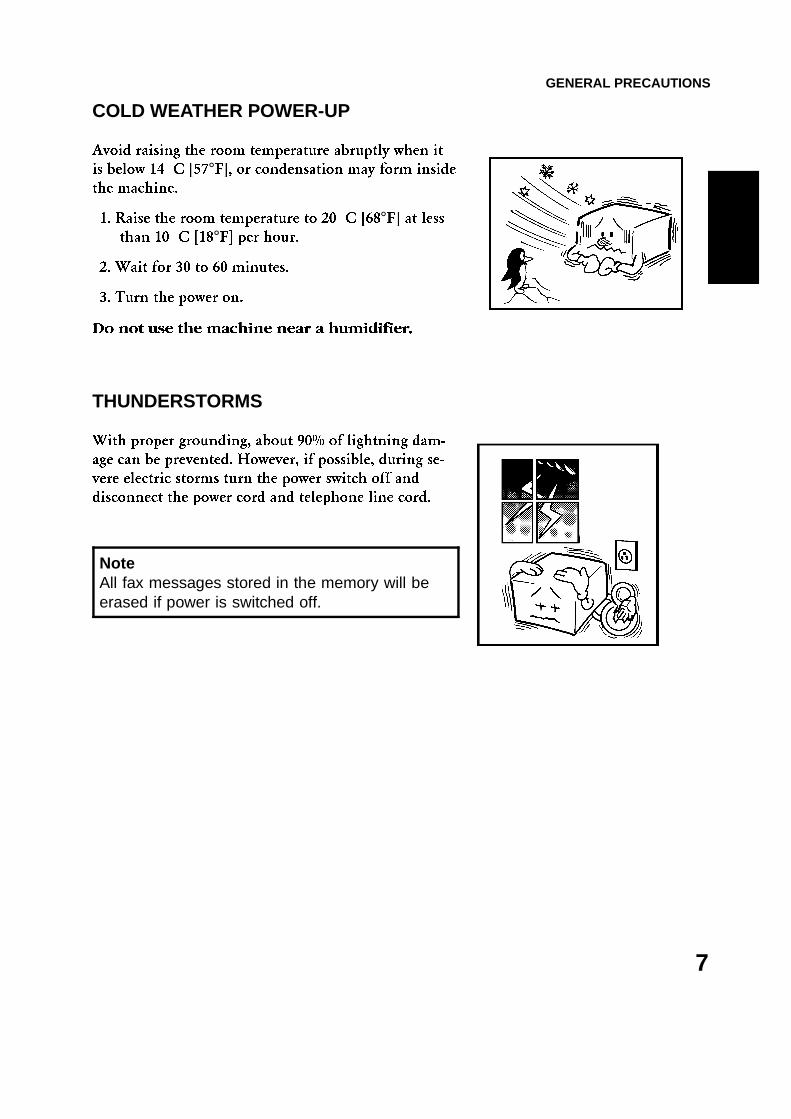
Avoid raising the room temperature abruptly when it
is below 14 °C [57°F], or condensation may form inside
the machine.
1. Raise the room temperature to 20 °C [68°F] at less
than 10 °C [18°F] per hour.
2. Wait for 30 to 60 minutes.
3. Turn the power on.
Do not use the machine near a humidifier.
THUNDERSTORMS
With proper grounding, about 90% of lightning dam-
age can be prevented. However, if possible, during se-
vere electric storms turn the power switch off and
disconnect the power cord and telephone line cord.
NoteAll fax messages stored in the memory will beerased if power is switched off.
GENERAL PRECAUTIONS
7
RECOMMENDED PAPER TYPES (SCANNING AND PRINTING)❐ 45-90 g/m
2 [15-20 lb.] copy paper is recommended: A4, letter, or legal sizes are the most
commonly used
❐ Do not use damp paper, or copies will be defective.
❐ Keep in a vinyl bag if it will not be used for a long time.
❐ Store in a dry, cool, dark place.
❐ Store flat. Do not stand upright.
INK CARTRIDGES
CAUTION: The supplier shall not be responsible for any damage or expense thatmay result from the use of parts other than recommended ink cartridges.
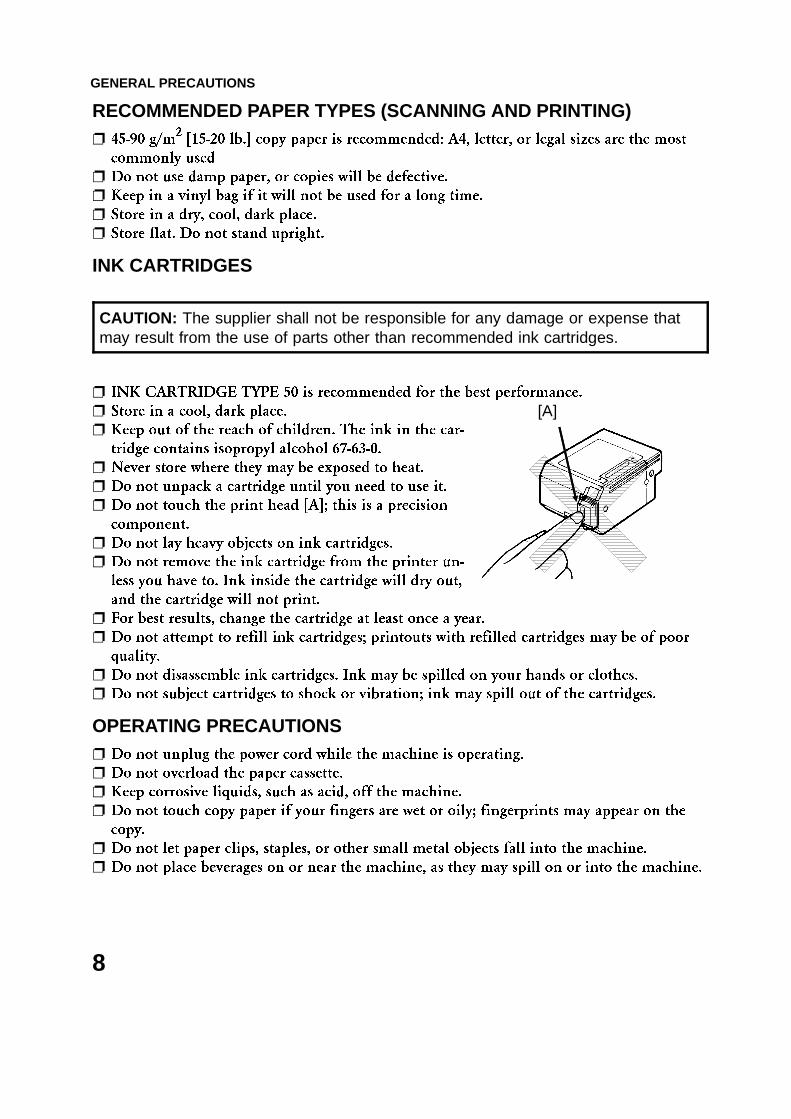
❐ INK CARTRIDGE TYPE 50 is recommended for the best performance.
❐ Store in a cool, dark place.
❐ Keep out of the reach of children. The ink in the car-
tridge contains isopropyl alcohol 67-63-0.
❐ Never store where they may be exposed to heat.
❐ Do not unpack a cartridge until you need to use it.
❐ Do not touch the print head [A]; this is a precision
component.
❐ Do not lay heavy objects on ink cartridges.
❐ Do not remove the ink cartridge from the printer un-
less you have to. Ink inside the cartridge will dry out,
and the cartridge will not print.
❐ For best results, change the cartridge at least once a year.
❐ Do not attempt to refill ink cartridges; printouts with refilled cartridges may be of poor
quality.
❐ Do not disassemble ink cartridges. Ink may be spilled on your hands or clothes.
❐ Do not subject cartridges to shock or vibration; ink may spill out of the cartridges.
OPERATING PRECAUTIONS❐ Do not unplug the power cord while the machine is operating.
❐ Do not overload the paper cassette.
❐ Keep corrosive liquids, such as acid, off the machine.
❐ Do not touch copy paper if your fingers are wet or oily; fingerprints may appear on the
copy.
❐ Do not let paper clips, staples, or other small metal objects fall into the machine.
❐ Do not place beverages on or near the machine, as they may spill on or into the machine.
[A]
GENERAL PRECAUTIONS
8
GENERAL❐ Since some parts of the machine are supplied with high voltage, make sure that you do
not attempt any repairs or attempt to access any part of the machine except those de-
scribed in this manual.
❐ Do not modify or replace parts other than those mentioned in this manual.
❐ After unplugging the power cord, always wait for more than three seconds before plug-
ging it back in.
❐ A lithium battery has been used in this machine to ensure the maximum storage life for
your programmed data (such as Quick Dial Keys and Speed Dial Codes). Your data will
be saved for 5 years if you keep the machine�s power on at all times.
LOCATION
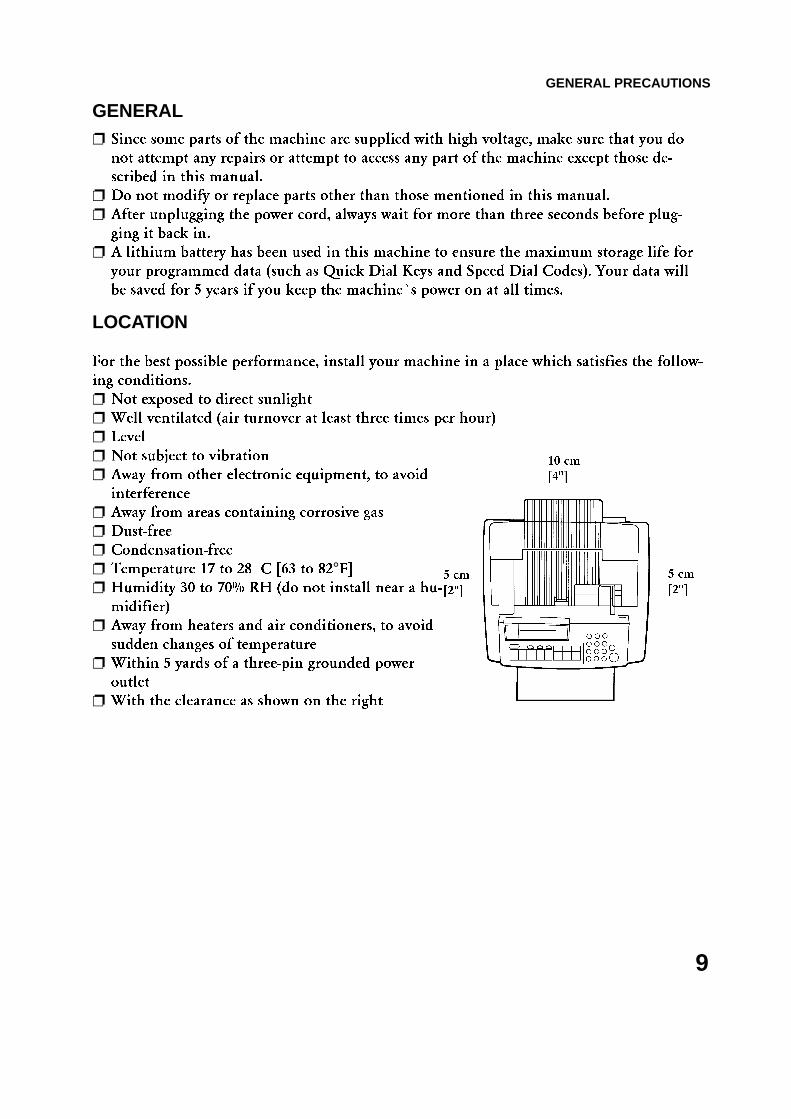
For the best possible performance, install your machine in a place which satisfies the follow-
ing conditions.
❐ Not exposed to direct sunlight
❐ Well ventilated (air turnover at least three times per hour)
❐ Level
❐ Not subject to vibration
❐ Away from other electronic equipment, to avoid
interference
❐ Away from areas containing corrosive gas
❐ Dust-free
❐ Condensation-free
❐ Temperature 17 to 28 °C [63 to 82°F]
❐ Humidity 30 to 70% RH (do not install near a hu-
midifier)
❐ Away from heaters and air conditioners, to avoid
sudden changes of temperature
❐ Within 5 yards of a three-pin grounded power
outlet
❐ With the clearance as shown on the right
5 cm
[2"]
5 cm
[2"]
10 cm
[4"]
GENERAL PRECAUTIONS
9
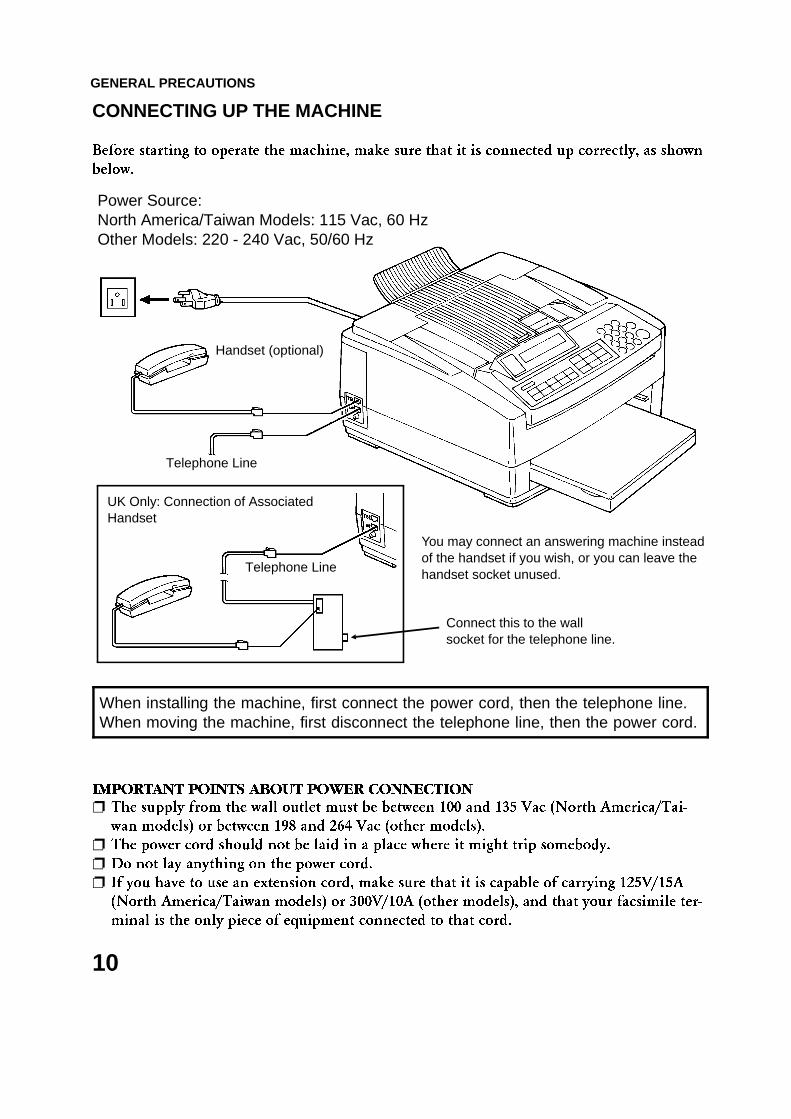
CONNECTING UP THE MACHINE
Before starting to operate the machine, make sure that it is connected up correctly, as shown
below.
When installing the machine, first connect the power cord, then the telephone line.When moving the machine, first disconnect the telephone line, then the power cord.
IMPORTANT POINTS ABOUT POWER CONNECTION
❐ The supply from the wall outlet must be between 100 and 135 Vac (North America/Tai-
wan models) or between 198 and 264 Vac (other models).
❐ The power cord should not be laid in a place where it might trip somebody.
❐ Do not lay anything on the power cord.
❐ If you have to use an extension cord, make sure that it is capable of carrying 125V/15A
(North America/Taiwan models) or 300V/10A (other models), and that your facsimile ter-
minal is the only piece of equipment connected to that cord.
Handset (optional)
Telephone Line
Power Source:North America/Taiwan Models: 115 Vac, 60 HzOther Models: 220 - 240 Vac, 50/60 Hz
You may connect an answering machine insteadof the handset if you wish, or you can leave thehandset socket unused.
UK Only: Connection of AssociatedHandset
Telephone Line
Connect this to the wallsocket for the telephone line.
GENERAL PRECAUTIONS
10
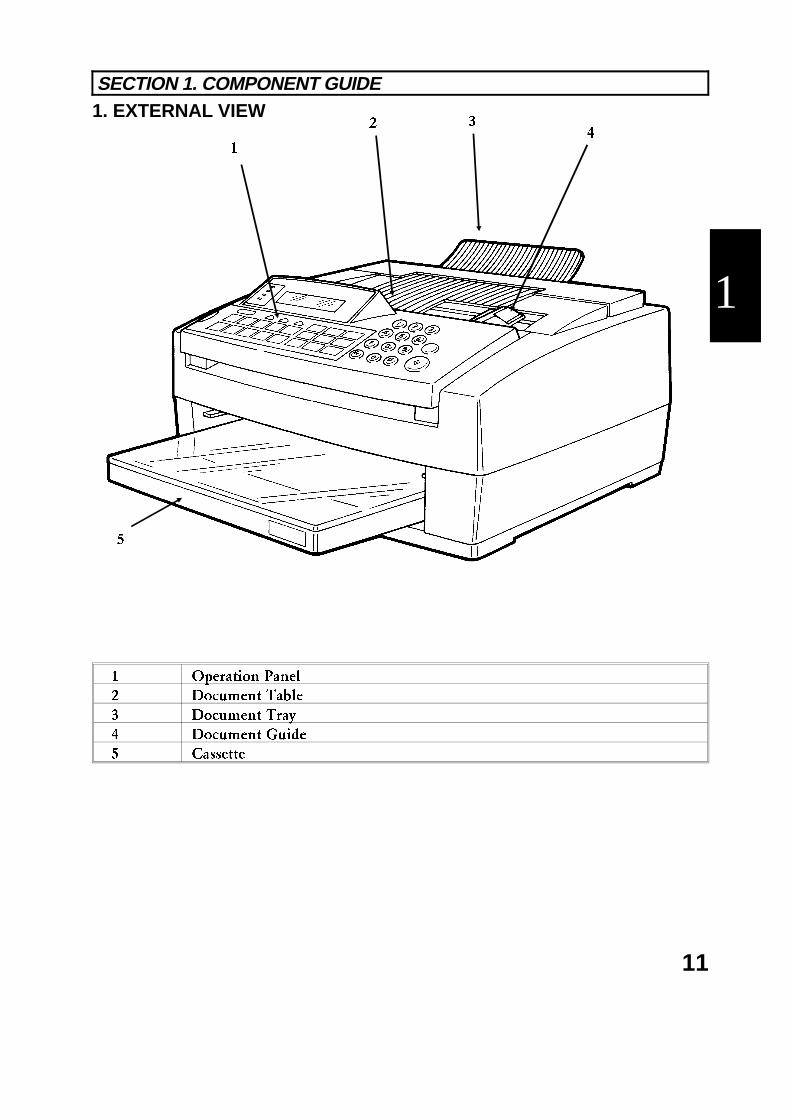
1. EXTERNAL VIEW
1 Operation Panel
2 Document Table
3 Document Tray
4 Document Guide
5 Cassette
SECTION 1. COMPONENT GUIDE
2 34
1
5
1
11
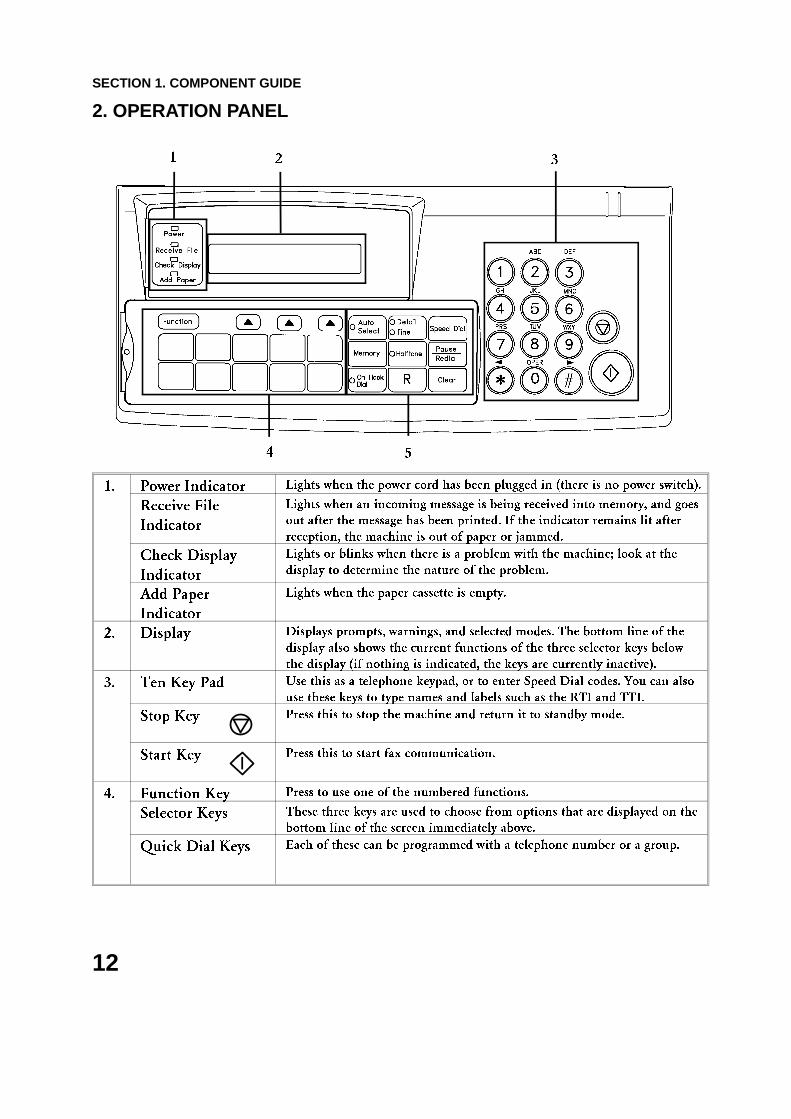
2. OPERATION PANEL
1. Power Indicator Lights when the power cord has been plugged in (there is no power switch).
Receive File
Indicator
Lights when an incoming message is being received into memory, and goes
out after the message has been printed. If the indicator remains lit after
reception, the machine is out of paper or jammed.
Check Display
Indicator
Lights or blinks when there is a problem with the machine; look at the
display to determine the nature of the problem.
Add Paper
Indicator
Lights when the paper cassette is empty.
2. Display Displays prompts, warnings, and selected modes. The bottom line of the
display also shows the current functions of the three selector keys below
the display (if nothing is indicated, the keys are currently inactive).
3. Ten Key Pad Use this as a telephone keypad, or to enter Speed Dial codes. You can also
use these keys to type names and labels such as the RTI and TTI.
Stop Key Press this to stop the machine and return it to standby mode.
Start Key Press this to start fax communication.
4. Function Key Press to use one of the numbered functions.
Selector Keys These three keys are used to choose from options that are displayed on the
bottom line of the screen immediately above.
Quick Dial Keys Each of these can be programmed with a telephone number or a group.
1 3
54
2
SECTION 1. COMPONENT GUIDE
12
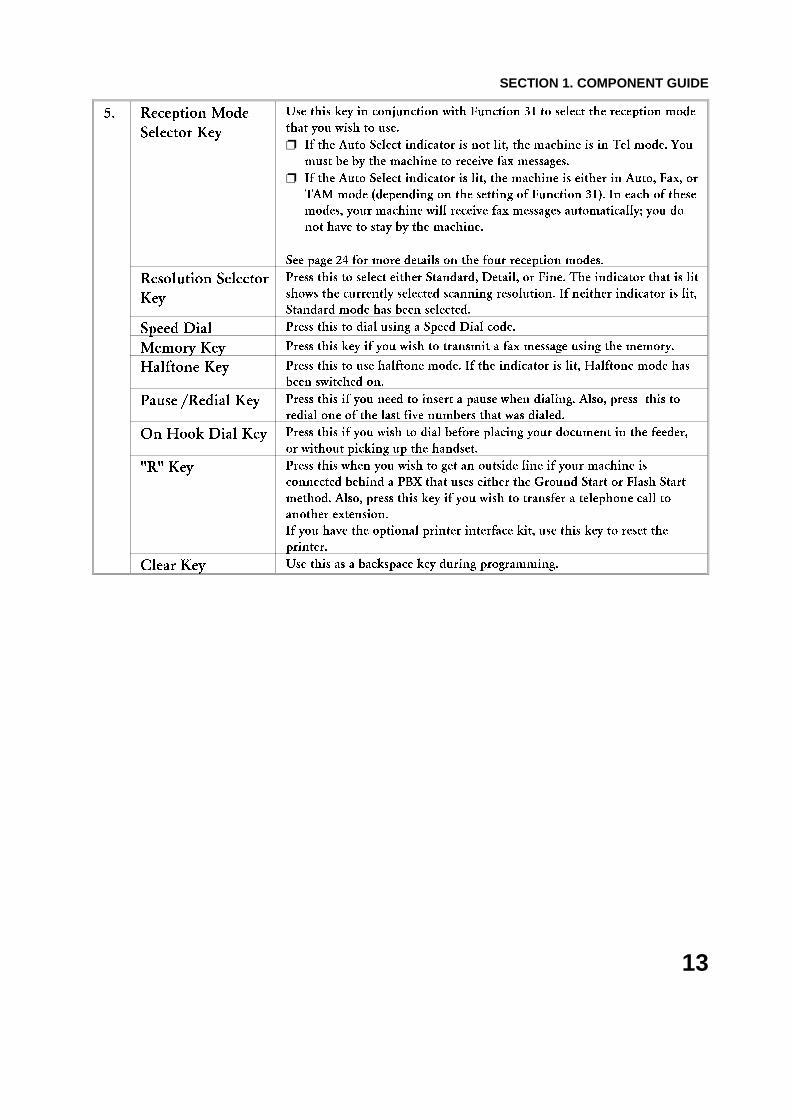
5. Reception Mode
Selector Key
Use this key in conjunction with Function 31 to select the reception mode
that you wish to use.
❐ If the Auto Select indicator is not lit, the machine is in Tel mode. You
must be by the machine to receive fax messages.
❐ If the Auto Select indicator is lit, the machine is either in Auto, Fax, or
TAM mode (depending on the setting of Function 31). In each of these
modes, your machine will receive fax messages automatically; you do
not have to stay by the machine.
See page 24 for more details on the four reception modes.
Resolution Selector
Key
Press this to select either Standard, Detail, or Fine. The indicator that is lit
shows the currently selected scanning resolution. If neither indicator is lit,
Standard mode has been selected.
Speed Dial Press this to dial using a Speed Dial code.
Memory Key Press this key if you wish to transmit a fax message using the memory.
Halftone Key Press this to use halftone mode. If the indicator is lit, Halftone mode has
been switched on.
Pause /Redial Key Press this if you need to insert a pause when dialing. Also, press this to
redial one of the last five numbers that was dialed.
On Hook Dial Key Press this if you wish to dial before placing your document in the feeder,
or without picking up the handset.
"R" Key Press this when you wish to get an outside line if your machine is
connected behind a PBX that uses either the Ground Start or Flash Start
method. Also, press this key if you wish to transfer a telephone call to
another extension.
If you have the optional printer interface kit, use this key to reset the
printer.
Clear Key Use this as a backspace key during programming.
SECTION 1. COMPONENT GUIDE
13
This section contains information on the features that you will probably use the most often.
In particular, the procedure on page 16 shows you how to send a fax message in the simplest
and quickest way.
1. SENDING A FAX MESSAGE
1-1. Recommended Types of Document
Before you send your document, make sure that it meets the following requirements.
CAUTION: Documents that do not meet these requirements can cause yourmachine to jam or may cause some components of the machine to becomedamaged or dirty.
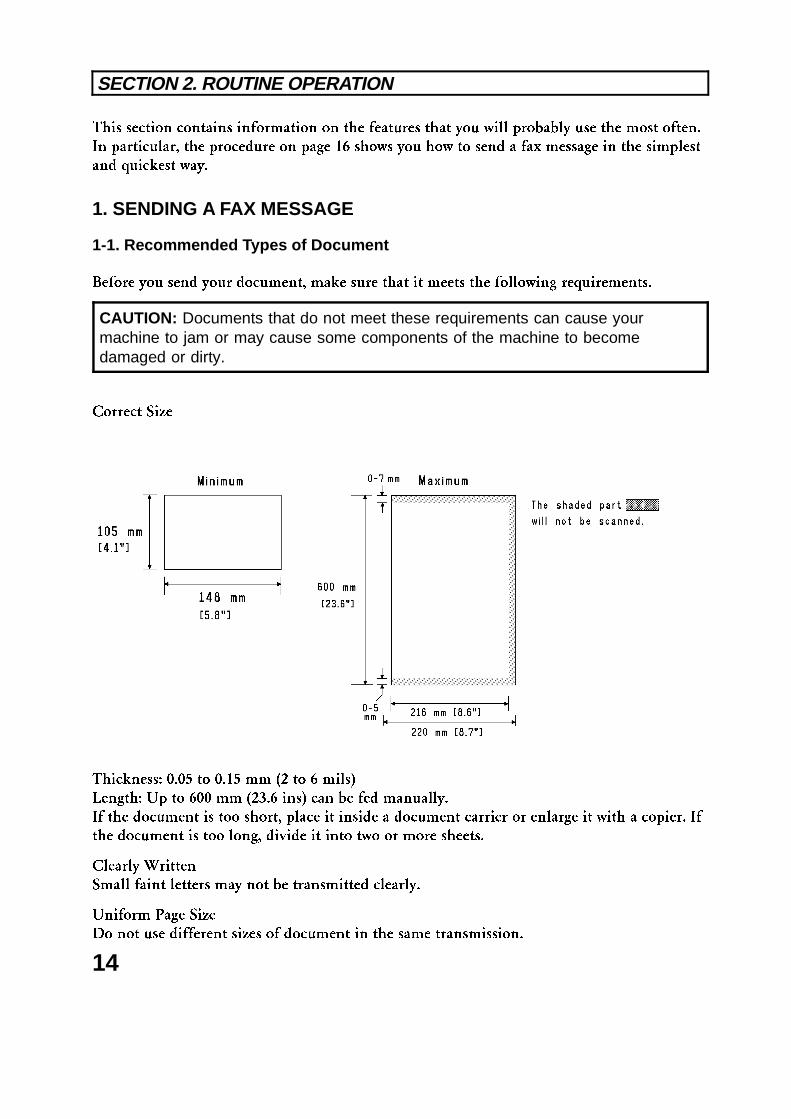
Correct Size
Thickness: 0.05 to 0.15 mm (2 to 6 mils)
Length: Up to 600 mm (23.6 ins) can be fed manually.
If the document is too short, place it inside a document carrier or enlarge it with a copier. If
the document is too long, divide it into two or more sheets.
Clearly Written
Small faint letters may not be transmitted clearly.
Uniform Page Size
Do not use different sizes of document in the same transmission.
SECTION 2. ROUTINE OPERATION
14
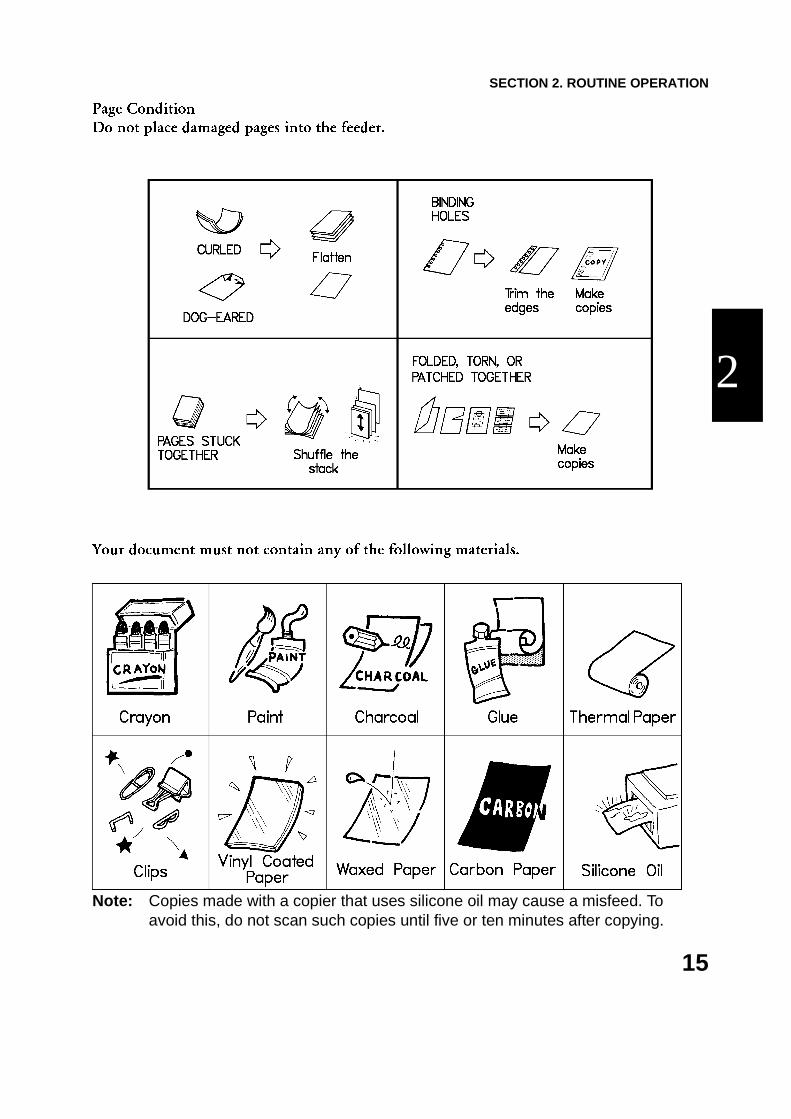
Page Condition
Do not place damaged pages into the feeder.
Your document must not contain any of the following materials.
Note: Copies made with a copier that uses silicone oil may cause a misfeed. Toavoid this, do not scan such copies until five or ten minutes after copying.
2
SECTION 2. ROUTINE OPERATION
15
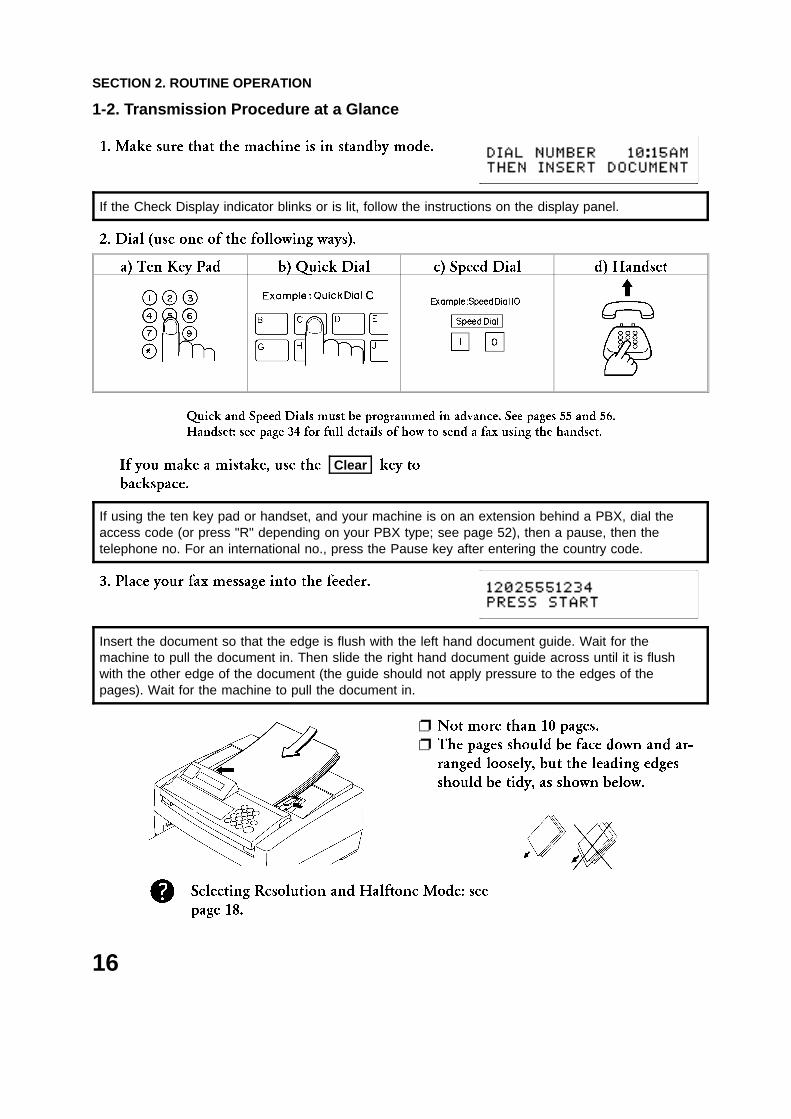
1-2. Transmission Procedure at a Glance
1. Make sure that the machine is in standby mode.
If the Check Display indicator blinks or is lit, follow the instructions on the display panel.
2. Dial (use one of the following ways).
a) Ten Key Pad b) Quick Dial c) Speed Dial d) Handset
Quick and Speed Dials must be programmed in advance. See pages 55 and 56.
Handset: see page 34 for full details of how to send a fax using the handset.
If you make a mistake, use the Clear key to
backspace.
If using the ten key pad or handset, and your machine is on an extension behind a PBX, dial theaccess code (or press "R" depending on your PBX type; see page 52), then a pause, then thetelephone no. For an international no., press the Pause key after entering the country code.
3. Place your fax message into the feeder.
Insert the document so that the edge is flush with the left hand document guide. Wait for themachine to pull the document in. Then slide the right hand document guide across until it is flushwith the other edge of the document (the guide should not apply pressure to the edges of thepages). Wait for the machine to pull the document in.
❐ Not more than 10 pages.
❐ The pages should be face down and ar-
ranged loosely, but the leading edges
should be tidy, as shown below.
Selecting Resolution and Halftone Mode: see
page 18.
SECTION 2. ROUTINE OPERATION
16
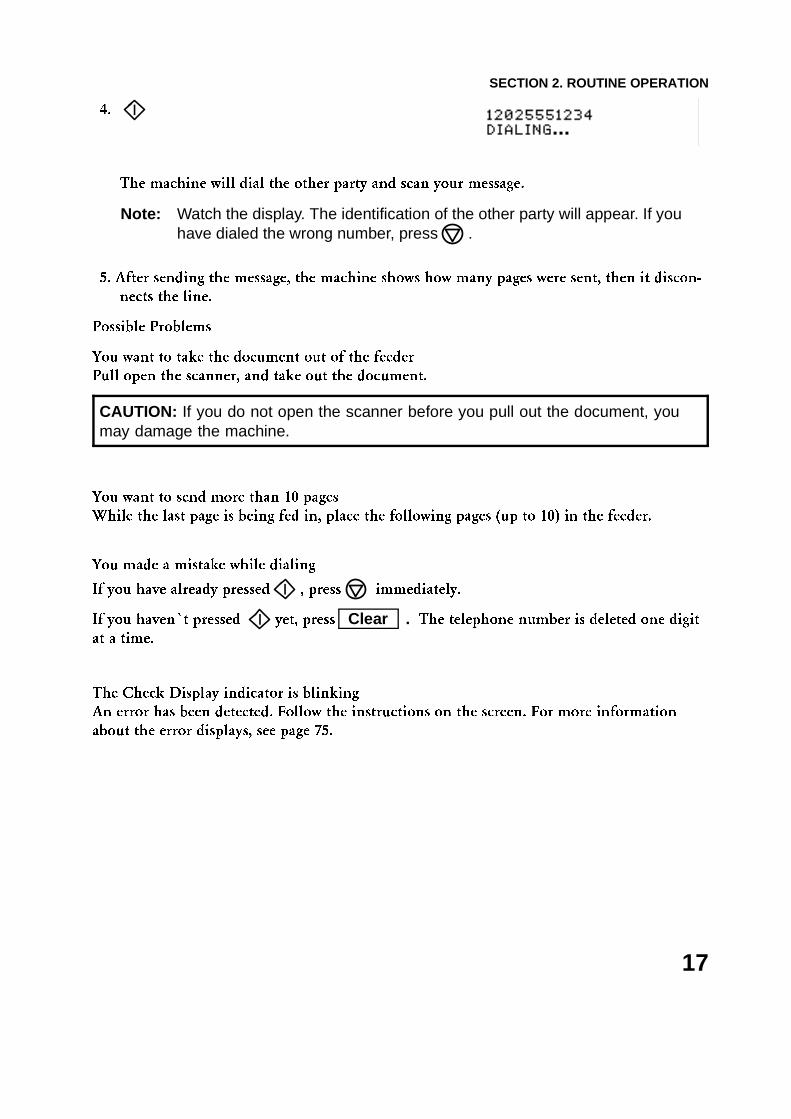
4.
The machine will dial the other party and scan your message.
Note: Watch the display. The identification of the other party will appear. If youhave dialed the wrong number, press .
5. After sending the message, the machine shows how many pages were sent, then it discon-
nects the line.
Possible Problems
You want to take the document out of the feeder
Pull open the scanner, and take out the document.
CAUTION: If you do not open the scanner before you pull out the document, youmay damage the machine.
You want to send more than 10 pages
While the last page is being fed in, place the following pages (up to 10) in the feeder.
You made a mistake while dialing
If you have already pressed , press immediately.
If you haven�t pressed yet, press Clear . The telephone number is deleted one digit
at a time.
The Check Display indicator is blinking
An error has been detected. Follow the instructions on the screen. For more information
about the error displays, see page 75.
SECTION 2. ROUTINE OPERATION
17
1-3. Resolution and Halftone Modes
You may wish to send many different types of fax message. Some of these may be difficult to
reproduce at the other end, for example if they contain small characters or are written on
colored paper. However, your machine has two settings that you can adjust to help you trans-
mit your document with the best possible image quality.
If you are not sure whether your settings are suitable, make a copy of the document using thesesettings. The printout shows how the fax message will look when it is printed at the other end.
- Resolution -
There are three resolution settings to choose from.
❐ Standard: Suitable for most typewritten documents
❐ Detail: Use this for documents with small print or fine details
❐ Fine: Use this for the best quality reproduction
To change the resolution, press Detail/Fine until the indicator next to the required setting
is lit. If neither of the Detail or Fine indicators is lit, the machine is in Standard resolution
mode.
You can change the resolution for each page. The machine checks the resolution setting just beforeit scans each page. If you wish to change the resolution between pages, wait till the current page ispulled into the machine, then choose the resolution setting that is needed for the next page.
Note: If the receiving terminal is not equipped to receive at high resolution, it will printyour document at the highest resolution that it can.
- Halftone -
If your document contains a photograph, or diagrams with complex shading patterns or
grays, switch Halftone mode on to achieve optimum image quality.
To select Halftone mode, press Halftone until the Halftone indicator is lit. If the indicator
is not lit, Halftone is not selected.
Halftone mode slows down the transmission speed, and may increase your communication costs.Higher resolutions also do this. This is because these settings create larger files that contain moreinformation.
Note: For speedy transmission, use Standard resolution, and keep Halftone off.
CAUTION: If you use Halftone with Memory Transmission, the document may notbe scanned completely because there may be too much data to fit into memory.Do not use Memory Transmission if you intend to use Halftone mode.
SECTION 2. ROUTINE OPERATION
18
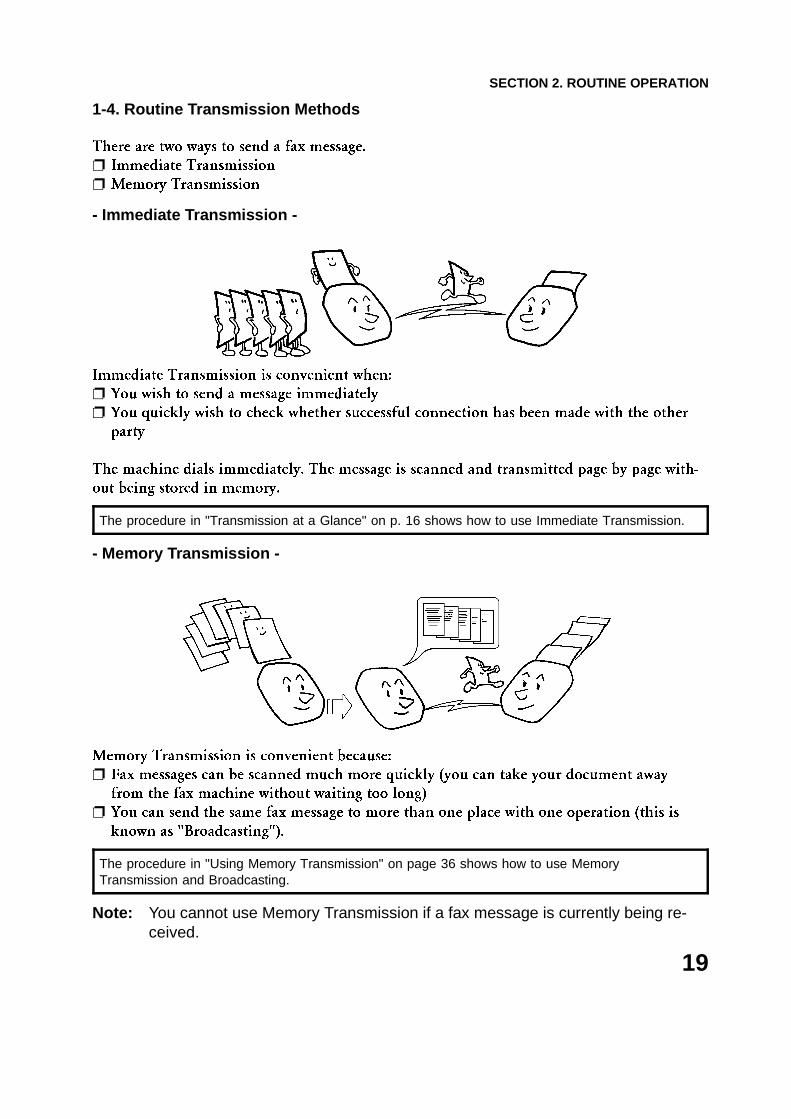
1-4. Routine Transmission Methods
There are two ways to send a fax message.
❐ Immediate Transmission
❐ Memory Transmission
- Immediate Transmission -
Immediate Transmission is convenient when:
❐ You wish to send a message immediately
❐ You quickly wish to check whether successful connection has been made with the other
party
The machine dials immediately. The message is scanned and transmitted page by page with-
out being stored in memory.
The procedure in "Transmission at a Glance" on p. 16 shows how to use Immediate Transmission.
- Memory Transmission -
Memory Transmission is convenient because:
❐ Fax messages can be scanned much more quickly (you can take your document away
from the fax machine without waiting too long)
❐ You can send the same fax message to more than one place with one operation (this is
known as "Broadcasting").
The procedure in "Using Memory Transmission" on page 36 shows how to use MemoryTransmission and Broadcasting.
Note: You cannot use Memory Transmission if a fax message is currently being re-ceived.
SECTION 2. ROUTINE OPERATION
19
1-5. Convenient Dialing Methods
In addition to dialing the full number on
the fax machine�s keypad, the machine has
the following dialing methods:
❐ Quick Dial
❐ Speed Dial
❐ Groups
These features allow you to store telephone numbers in your machine�s memory. A stored
number will remain in the memory, and you can use it as many times as you wish without
having to reprogram it. When you need to dial a number, just call it up (for example, by
pressing the required Quick Dial Key).
- Quick Dial and Speed Dial -
Quick Dial and Speed Dial are very convenient for dialing numbers that you often call, espe-
cially if these numbers are very long (like international numbers).
After programming your Quick Dials and Speed Dials, you can dial a telephone number
with very few keystrokes.
❐ To use Quick Dial: Put your document in the feeder, press a Quick Dial Key then
press .
❐ To use Speed Dial: Put your document in the feeder, press Speed Dial , enter a two-
digit Speed Dial Code, then press .
You can program 10 Quick Dial Keys and 40 Speed Dial Codes in your machine.
- Groups -
If you will frequently send the same message to more than one place (using the Broadcasting
feature), program these telephone numbers into a group. Then you can send the messages to
all the addresses in that group with just a few keystrokes.
❐ To use a Group, put your document in the feeder, and press Memory . Then
press Speed Dial then the Quick Dial Key (from A to E) that corresponds to the Group
that you need. Then press .
You can store 5 Groups in your machine.
You can also program a name for that group (for example, "Chess Club"), which will be dis-
played before you start the transmission. This helps you to check whether you selected the
correct group.
Using Quick and Speed Dial: see pages 16 and 36.
Programming Quick and Speed Dial numbers: see pages 55 and 56.
Using a Group: see page 36.
Programming a Group: see page 58.
SECTION 2. ROUTINE OPERATION
20

1-6. Using Send Later
Using this feature, you can instruct the machine to delay transmission of your fax message
until a later time. This allows you to take advantage of off-peak telephone line charges with-
out having to be by the machine at the time.
1. Place your document in the feeder.
2. Function 0 1
3. SET
4. Set the hour.
❐ Adjust the displayed hour with + and - .
❐ When the hour is correct: OK
5. Set the minute.
❐ Adjust the displayed minute with + and - .
❐ When the minute is correct: OK
6. Dial
7.
If you wish to cancel the operation.
Press twice. The machine feeds out the document.
Your fax message remains on standby in the
feeder, and will be sent at the displayed time.
Press + or - once, or hold it down until the
required hour is displayed.
See page 16 for how to dial.
Do not use the handset.
SECTION 2. ROUTINE OPERATION
21
1-7. Redialing
If a message was not transmitted successfully, that does not mean that you have to enter the
telephone number again. In many cases, the machine will redial the destination automat-
ically at two-minute intervals. Or, with the Redial key, you can redial with just a few key-
strokes.
- Automatic Redialing -
The machine will automatically redial the other party if any of the following conditions oc-
curred.
❐ The other party�s machine was busy
❐ There was no reply from the other party
❐ The message was rejected by the machine at the other end because of excessive errors (in
this case, redialing will only take place if Memory Transmission was used)
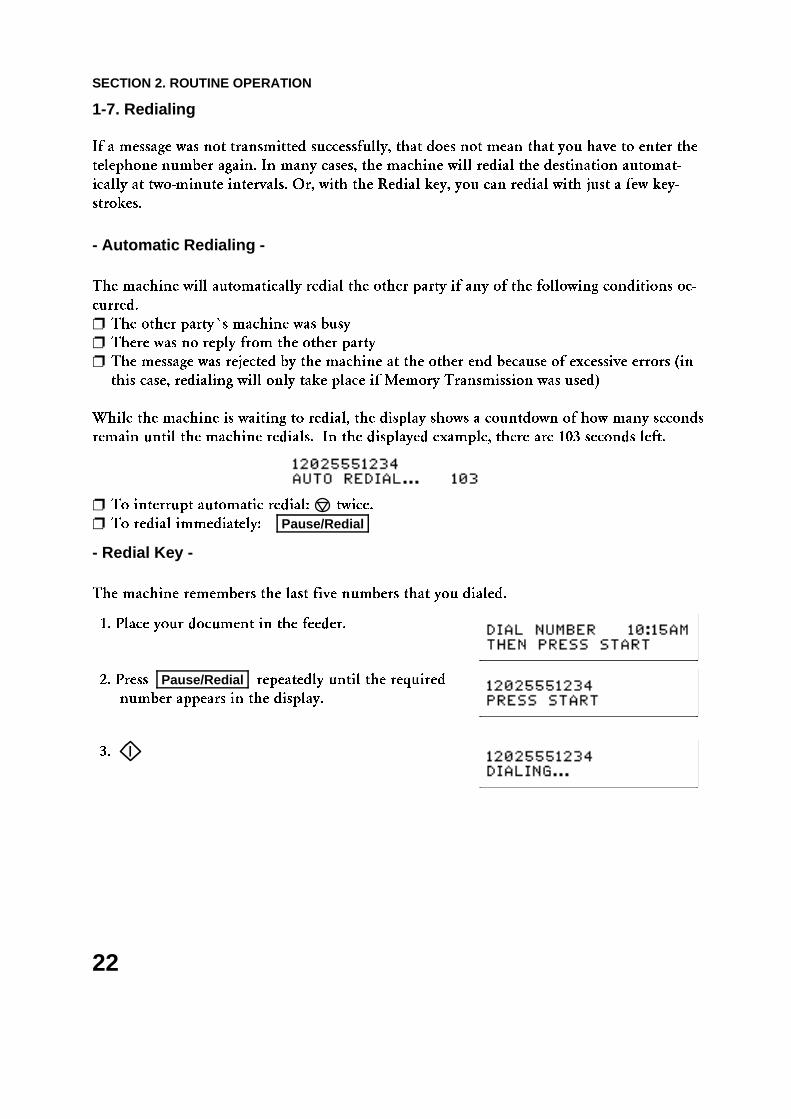
While the machine is waiting to redial, the display shows a countdown of how many seconds
remain until the machine redials. In the displayed example, there are 103 seconds left.
❐ To interrupt automatic redial: twice.
❐ To redial immediately: Pause/Redial
- Redial Key -
The machine remembers the last five numbers that you dialed.
1. Place your document in the feeder.
2. Press Pause/Redial repeatedly until the required
number appears in the display.
3.
SECTION 2. ROUTINE OPERATION
22
2. RECEIVING FAX MESSAGES
2-1. Overview of the Four Reception Modes
There are four ways to set up your machine to receive fax messages. In three of these modes
(Auto, TAM, and Fax modes) the machine will receive incoming fax messages automatically,
without anybody being present.
- Auto Mode -
The machine answers all incoming calls automatically.
❐ If your machine detects that the call is coming from another fax machine, the incoming
fax will be accepted automatically. You do not need to intervene.
❐ If your machine detects that the other party is a telephone caller, it will start ringing to al-
low you to answer the call. If you do not answer within a certain time, the machine will
connect the caller to the fax machine.
- TAM (Telephone Answering Machine) Mode -
This mode is useful if you have a telephone answering machine connected to the "TEL" jack
on your machine.
❐ TAM mode ensures that your answering machine has the chance to respond to incoming
telephone calls,. If the call happens to be a fax message, the message will be given to the
fax machine automatically.
For information on how to set up your answering machine to take advantage of thisfeature, see page 35.
- Fax Mode -
Your machine will treat each incoming call as if it comes from a fax machine.
❐ You do not have to be by the machine, as long as you have kept the power on. Use this
setting if you have connected the machine to a special line used only for fax messages.
- Tel (Telephone) Mode -
Your machine will not answer incoming calls automatically.
❐ You must answer every incoming call yourself and decide whether the incoming call is
from a fax machine or from a telephone caller.
SECTION 2. ROUTINE OPERATION
23
2-2. Selecting and Setting Up a Reception Mode
- Auto Mode -
When you select Auto Mode, there are two settings that you can adjust.
❐ Auto Ring Time: When the machine detects an incoming call, it will ring to attract your
attention. While the machine is ringing, you have a chance to answer the call; after ring-
ing stops, the fax machine will grab the line, and you are no longer able to answer the
call yourself. The Auto Ring Time is the amount of time that the machine will ring for.
❐ Voice Prompt (On/Off, Languages): During the Auto Ring Time, the machine can send
either a ringing signal or recorded voice messages to the other party. You can select either
of these choices. You can also select two languages for the recorded messages. Each mes-
sage will be transmitted in both of the selected languages.
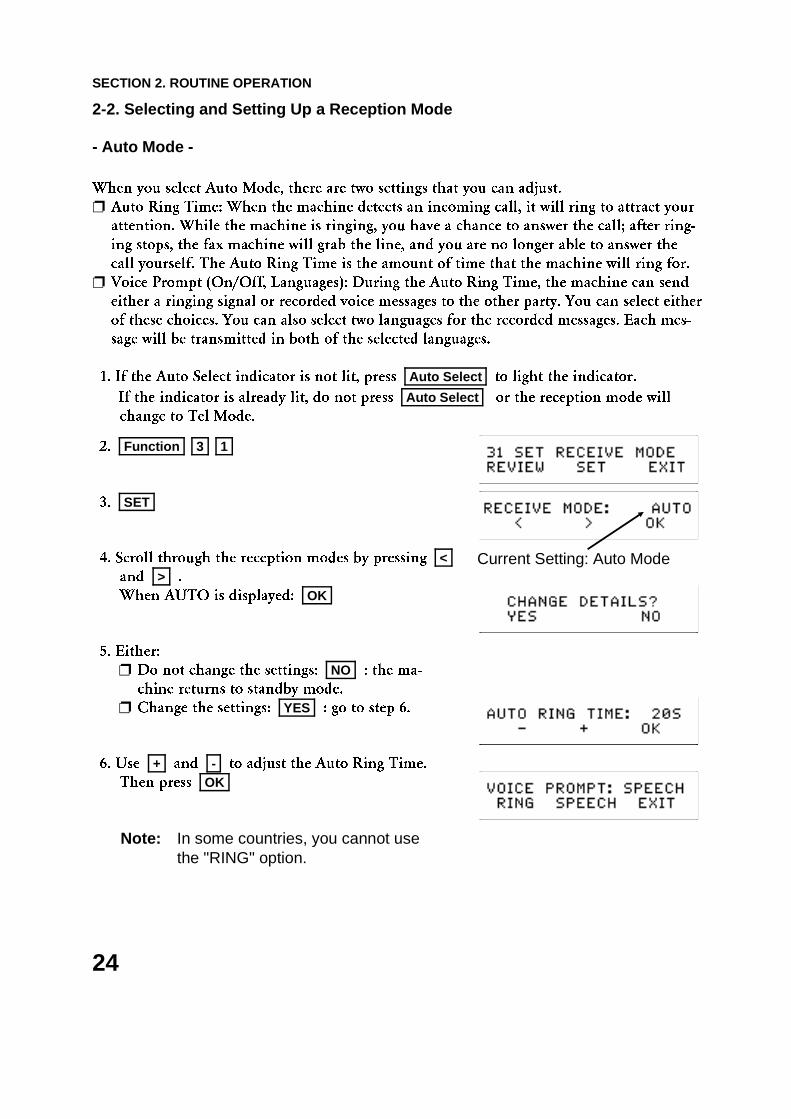
1. If the Auto Select indicator is not lit, press Auto Select to light the indicator.
If the indicator is already lit, do not press Auto Select or the reception mode will
change to Tel Mode.
2. Function 3 1
3. SET
4. Scroll through the reception modes by pressing < and > .
When AUTO is displayed: OK
5. Either:
❐ Do not change the settings: NO : the ma-
chine returns to standby mode.
❐ Change the settings: YES : go to step 6.
6. Use + and - to adjust the Auto Ring Time.
Then press OK
Note: In some countries, you cannot usethe "RING" option.
Current Setting: Auto Mode
SECTION 2. ROUTINE OPERATION
24
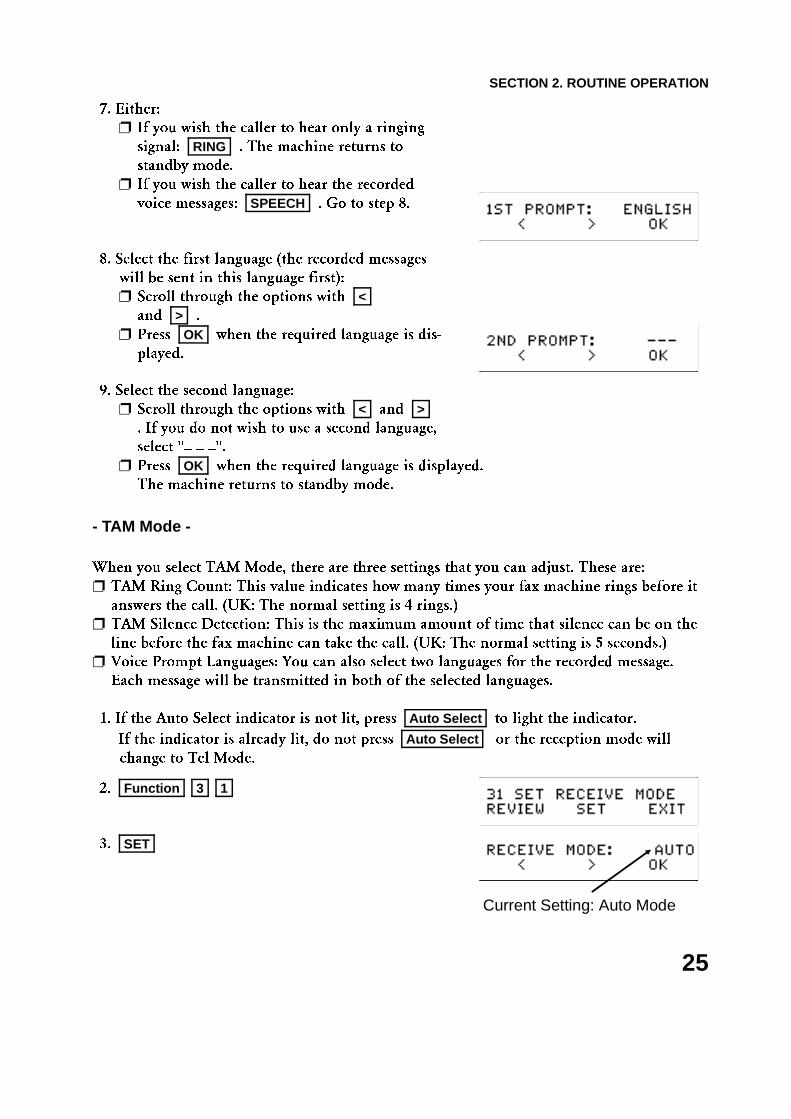
7. Either:
❐ If you wish the caller to hear only a ringing
signal: RING . The machine returns to
standby mode.
❐ If you wish the caller to hear the recorded
voice messages: SPEECH . Go to step 8.
8. Select the first language (the recorded messages
will be sent in this language first):
❐ Scroll through the options with < and > .
❐ Press OK when the required language is dis-
played.
9. Select the second language:
❐ Scroll through the options with < and > . If you do not wish to use a second language,
select "_ _ _".
❐ Press OK when the required language is displayed.
The machine returns to standby mode.
- TAM Mode -
When you select TAM Mode, there are three settings that you can adjust. These are:
❐ TAM Ring Count: This value indicates how many times your fax machine rings before it
answers the call. (UK: The normal setting is 4 rings.)
❐ TAM Silence Detection: This is the maximum amount of time that silence can be on the
line before the fax machine can take the call. (UK: The normal setting is 5 seconds.)
❐ Voice Prompt Languages: You can also select two languages for the recorded message.
Each message will be transmitted in both of the selected languages.
1. If the Auto Select indicator is not lit, press Auto Select to light the indicator.
If the indicator is already lit, do not press Auto Select or the reception mode will
change to Tel Mode.
2. Function 3 1
3. SET
Current Setting: Auto Mode
SECTION 2. ROUTINE OPERATION
25
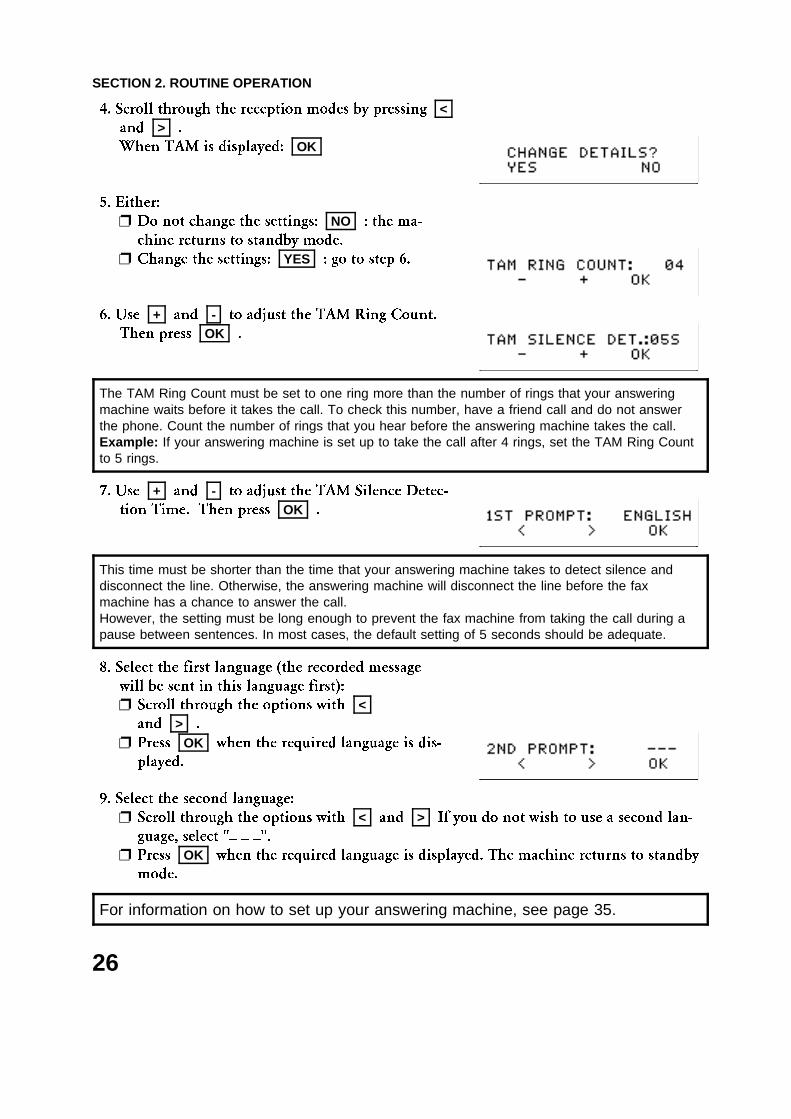
4. Scroll through the reception modes by pressing < and > .
When TAM is displayed: OK
5. Either:
❐ Do not change the settings: NO : the ma-
chine returns to standby mode.
❐ Change the settings: YES : go to step 6.
6. Use + and - to adjust the TAM Ring Count.
Then press OK .
The TAM Ring Count must be set to one ring more than the number of rings that your answeringmachine waits before it takes the call. To check this number, have a friend call and do not answerthe phone. Count the number of rings that you hear before the answering machine takes the call.Example: If your answering machine is set up to take the call after 4 rings, set the TAM Ring Countto 5 rings.
7. Use + and - to adjust the TAM Silence Detec-
tion Time. Then press OK .
This time must be shorter than the time that your answering machine takes to detect silence anddisconnect the line. Otherwise, the answering machine will disconnect the line before the faxmachine has a chance to answer the call.However, the setting must be long enough to prevent the fax machine from taking the call during apause between sentences. In most cases, the default setting of 5 seconds should be adequate.
8. Select the first language (the recorded message
will be sent in this language first):
❐ Scroll through the options with < and > .
❐ Press OK when the required language is dis-
played.
9. Select the second language:
❐ Scroll through the options with < and > If you do not wish to use a second lan-
guage, select "_ _ _".
❐ Press OK when the required language is displayed. The machine returns to standby
mode.
For information on how to set up your answering machine, see page 35.
SECTION 2. ROUTINE OPERATION
26
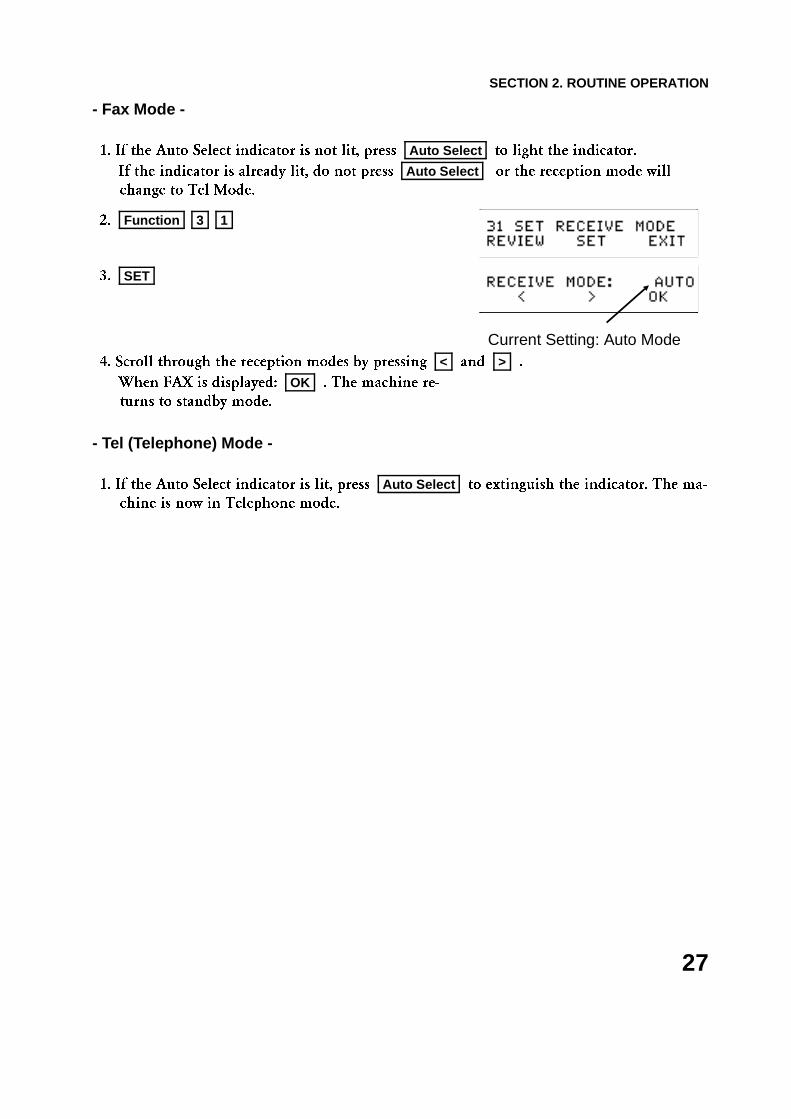
- Fax Mode -
1. If the Auto Select indicator is not lit, press Auto Select to light the indicator.
If the indicator is already lit, do not press Auto Select or the reception mode will
change to Tel Mode.
2. Function 3 1
3. SET
4. Scroll through the reception modes by pressing < and > .
When FAX is displayed: OK . The machine re-
turns to standby mode.
- Tel (Telephone) Mode -
1. If the Auto Select indicator is lit, press Auto Select to extinguish the indicator. The ma-
chine is now in Telephone mode.
Current Setting: Auto Mode
SECTION 2. ROUTINE OPERATION
27
2-3. Receiving
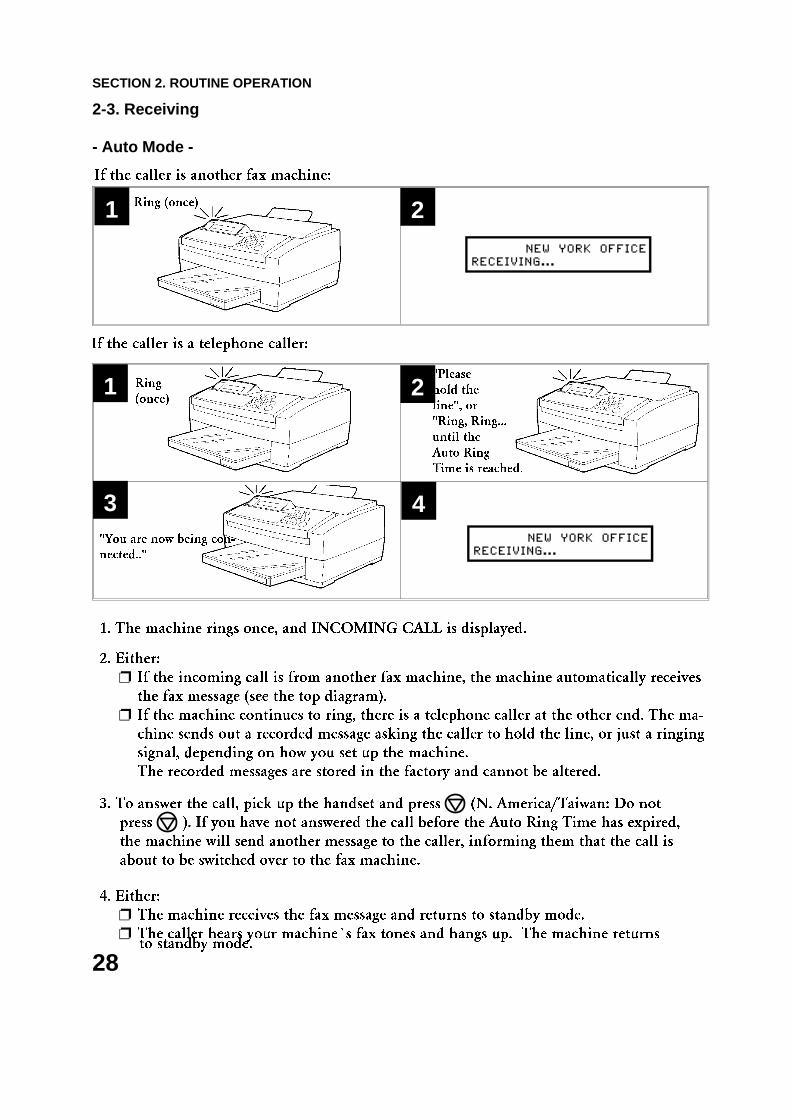
- Auto Mode -
1. The machine rings once, and INCOMING CALL is displayed.
2. Either:
❐ If the incoming call is from another fax machine, the machine automatically receives
the fax message (see the top diagram).
❐ If the machine continues to ring, there is a telephone caller at the other end. The ma-
chine sends out a recorded message asking the caller to hold the line, or just a ringing
signal, depending on how you set up the machine.
The recorded messages are stored in the factory and cannot be altered.
3. To answer the call, pick up the handset and press (N. America/Taiwan: Do not
press ). If you have not answered the call before the Auto Ring Time has expired,
the machine will send another message to the caller, informing them that the call is
about to be switched over to the fax machine.
4. Either:
❐ The machine receives the fax message and returns to standby mode.
❐ The caller hears your machine�s fax tones and hangs up. The machine returns
If the caller is a telephone caller:
If the caller is another fax machine:
to standby mode.
Ring (once)1
Ring
(once)1
"Please
hold the
line", or
"Ring, Ring...
until the
Auto Ring
Time is reached.
2
43"You are now being con-
nected.."
2
SECTION 2. ROUTINE OPERATION
28
- TAM Mode -
If the caller is another fax machine:
If the caller is a telephone caller:
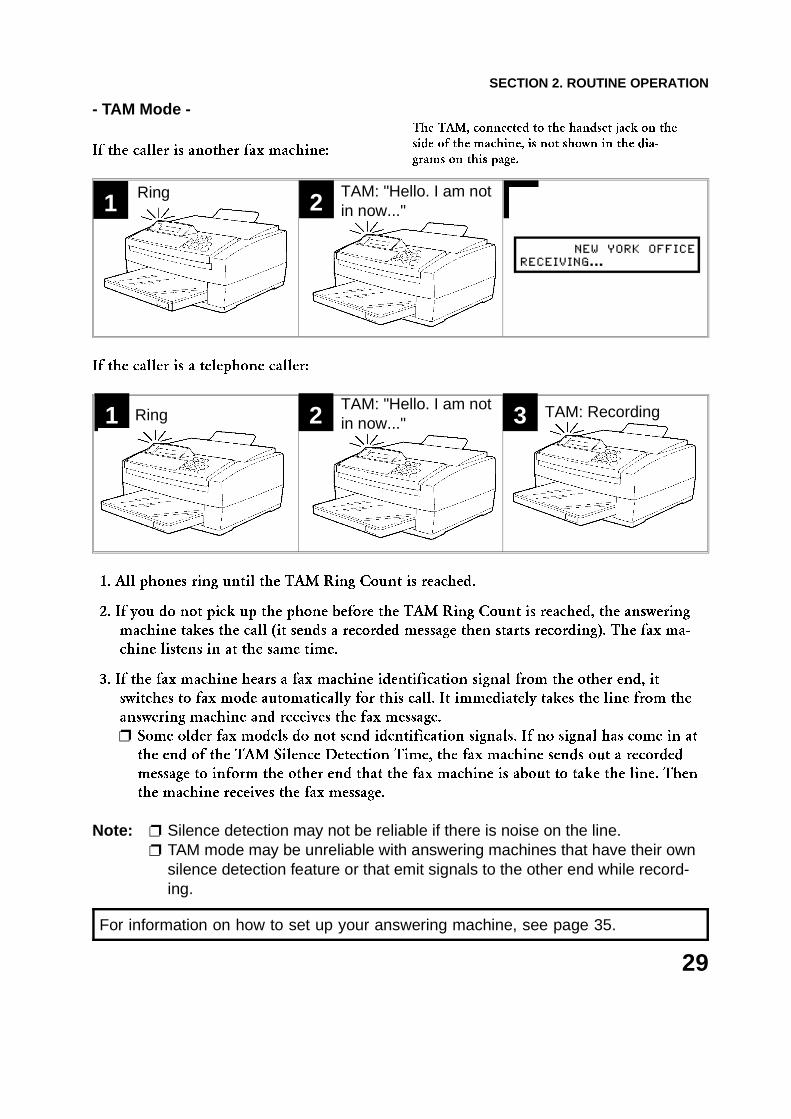
1. All phones ring until the TAM Ring Count is reached.
2. If you do not pick up the phone before the TAM Ring Count is reached, the answering
machine takes the call (it sends a recorded message then starts recording). The fax ma-
chine listens in at the same time.
3. If the fax machine hears a fax machine identification signal from the other end, it
switches to fax mode automatically for this call. It immediately takes the line from the
answering machine and receives the fax message.
❐ Some older fax models do not send identification signals. If no signal has come in at
the end of the TAM Silence Detection Time, the fax machine sends out a recorded
message to inform the other end that the fax machine is about to take the line. Then
the machine receives the fax message.
Note: ❐ Silence detection may not be reliable if there is noise on the line.❐ TAM mode may be unreliable with answering machines that have their own
silence detection feature or that emit signals to the other end while record-ing.
For information on how to set up your answering machine, see page 35.
TAM: "Hello. I am notin now..."
TAM: Recording
1 2 3
1 3
Ring
2Ring
TAM: "Hello. I am notin now..."
The TAM, connected to the handset jack on the
side of the machine, is not shown in the dia-
grams on this page.
SECTION 2. ROUTINE OPERATION
29

- Fax Mode -
1. The telephone rings once.
See page 54 if you need to change the ringer�s volume.
2. The machine automatically starts to receive the message.
- Tel (Telephone) Mode -
1. The machine rings continuously until you answer the call. Pick up the handset.
2. Either:
❐ If you hear a voice from the other end, speak in reply.
❐ If you hear a tone every few seconds, the other end is a fax terminal (also, if you
don�t hear anything, the other end may be an older machine that doesn�t send identi-
fication signals).
Remove any documents that are in the feeder, then press .
3. If the person at the other end wishes to send you a fax message,
press to receive the message. Then hang up the handset.
4. The machine starts to receive the message.
1 2Ring
1 2 3 4Ring
SECTION 2. ROUTINE OPERATION
30
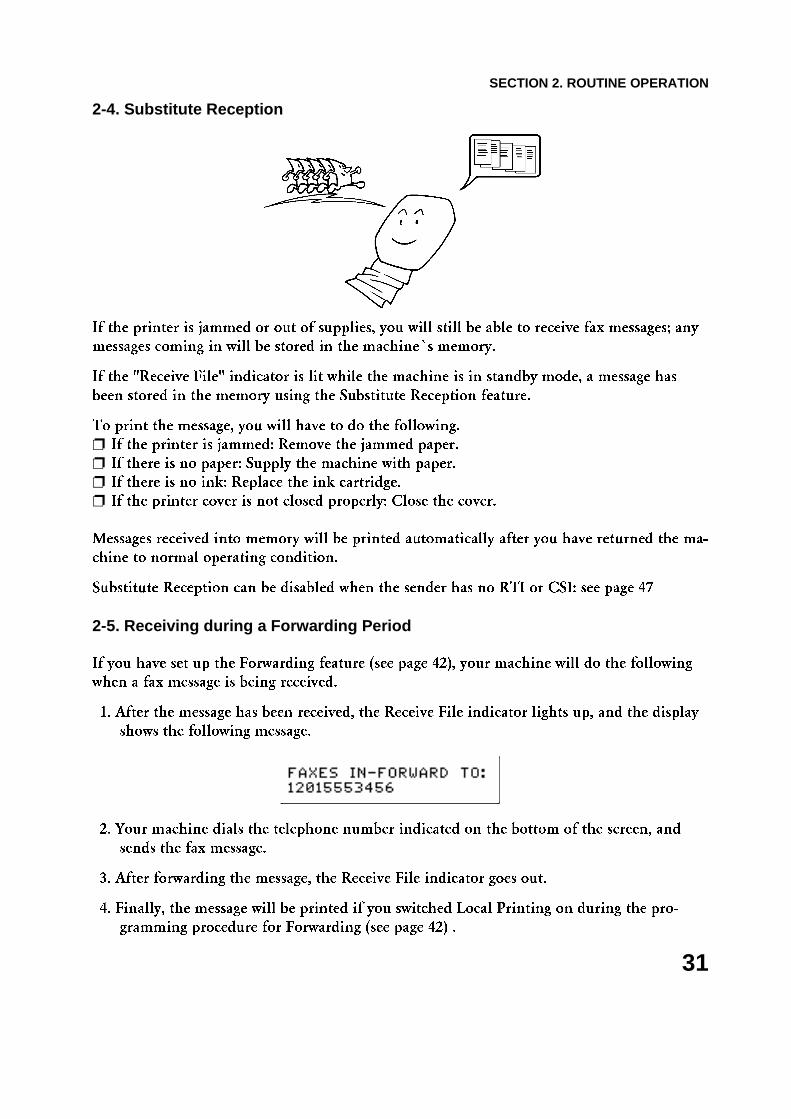
2-4. Substitute Reception
If the printer is jammed or out of supplies, you will still be able to receive fax messages; any
messages coming in will be stored in the machine�s memory.
If the "Receive File" indicator is lit while the machine is in standby mode, a message has
been stored in the memory using the Substitute Reception feature.
To print the message, you will have to do the following.
❐ If the printer is jammed: Remove the jammed paper.
❐ If there is no paper: Supply the machine with paper.
❐ If there is no ink: Replace the ink cartridge.
❐ If the printer cover is not closed properly: Close the cover.
Messages received into memory will be printed automatically after you have returned the ma-
chine to normal operating condition.
Substitute Reception can be disabled when the sender has no RTI or CSI: see page 47
2-5. Receiving during a Forwarding Period
If you have set up the Forwarding feature (see page 42), your machine will do the following
when a fax message is being received.
1. After the message has been received, the Receive File indicator lights up, and the display
shows the following message.
2. Your machine dials the telephone number indicated on the bottom of the screen, and
sends the fax message.
3. After forwarding the message, the Receive File indicator goes out.
4. Finally, the message will be printed if you switched Local Printing on during the pro-
gramming procedure for Forwarding (see page 42) .
SECTION 2. ROUTINE OPERATION
31
3. MAKING TELEPHONE CALLS
Fax machines have several features that allow you to use them conveniently as telephones.
These features are also useful when calling fax machines that are usually kept in Manual Re-
ceive Mode. The most notable are the following:
❐ You can dial using Quick Dial Keys or Speed Dial Codes.
❐ Using On Hook Dial, you do not have to pick up the handset before dialing.
❐ You can send a fax message after finishing the conversation, without having to make a
new call.
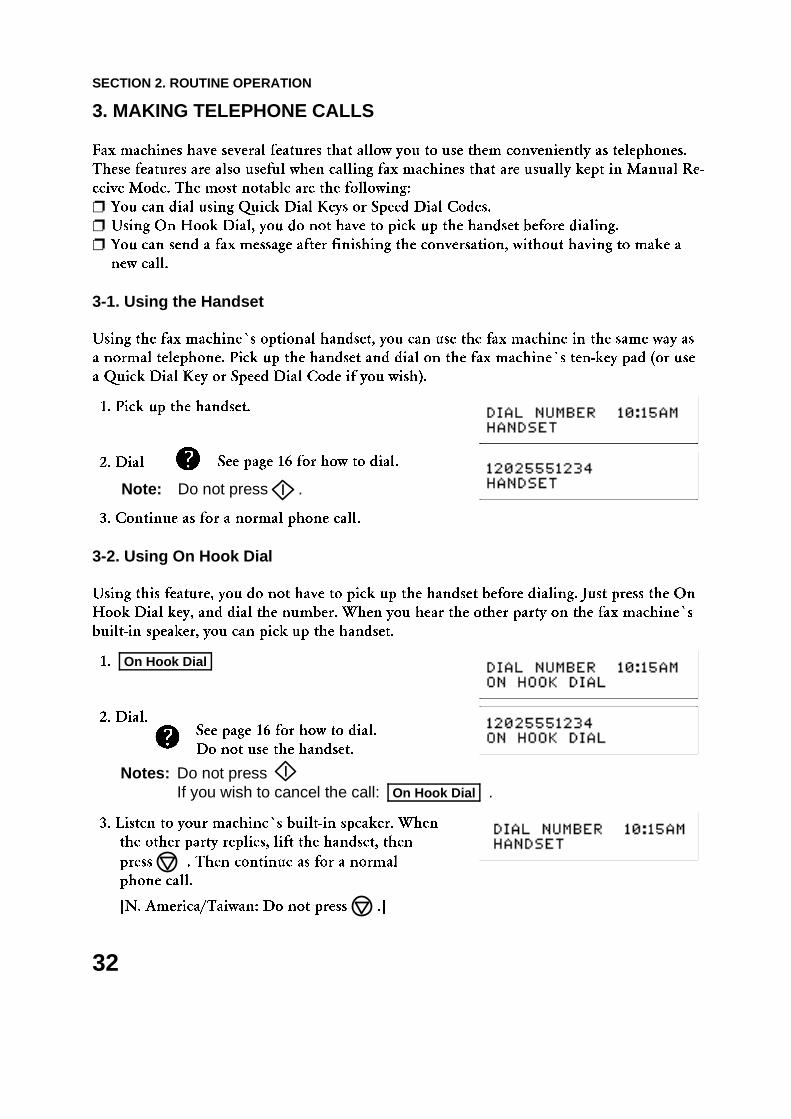
3-1. Using the Handset
Using the fax machine�s optional handset, you can use the fax machine in the same way as
a normal telephone. Pick up the handset and dial on the fax machine�s ten-key pad (or use
a Quick Dial Key or Speed Dial Code if you wish).
1. Pick up the handset.
2. Dial
3. Continue as for a normal phone call.
3-2. Using On Hook Dial
Using this feature, you do not have to pick up the handset before dialing. Just press the On
Hook Dial key, and dial the number. When you hear the other party on the fax machine�s
built-in speaker, you can pick up the handset.
1. On Hook Dial
2. Dial.
Notes: Do not pressIf you wish to cancel the call: On Hook Dial .
3. Listen to your machine�s built-in speaker. When
the other party replies, lift the handset, then
press . Then continue as for a normal
phone call.
[N. America/Taiwan: Do not press .]
Note: Do not press .
See page 16 for how to dial.
See page 16 for how to dial.
Do not use the handset.
SECTION 2. ROUTINE OPERATION
32
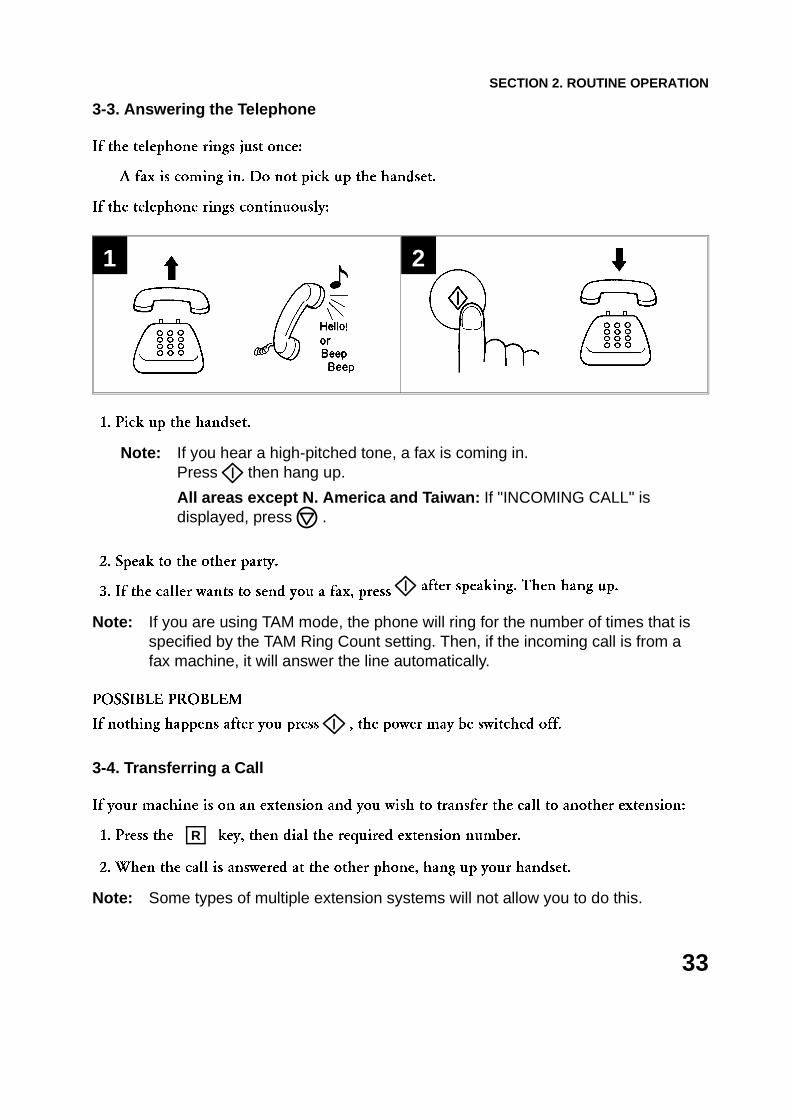
3-3. Answering the Telephone
If the telephone rings just once:
A fax is coming in. Do not pick up the handset.
If the telephone rings continuously:
1. Pick up the handset.
Note: If you hear a high-pitched tone, a fax is coming in. Press then hang up.
All areas except N. America and Taiwan: If "INCOMING CALL" is displayed, press .
2. Speak to the other party.
3. If the caller wants to send you a fax, press after speaking. Then hang up.
Note: If you are using TAM mode, the phone will ring for the number of times that isspecified by the TAM Ring Count setting. Then, if the incoming call is from afax machine, it will answer the line automatically.
POSSIBLE PROBLEM
If nothing happens after you press , the power may be switched off.
3-4. Transferring a Call
If your machine is on an extension and you wish to transfer the call to another extension:
1. Press the R key, then dial the required extension number.
2. When the call is answered at the other phone, hang up your handset.
Note: Some types of multiple extension systems will not allow you to do this.
2 1
SECTION 2. ROUTINE OPERATION
33
3-5. Phoning and Faxing on the Same Call
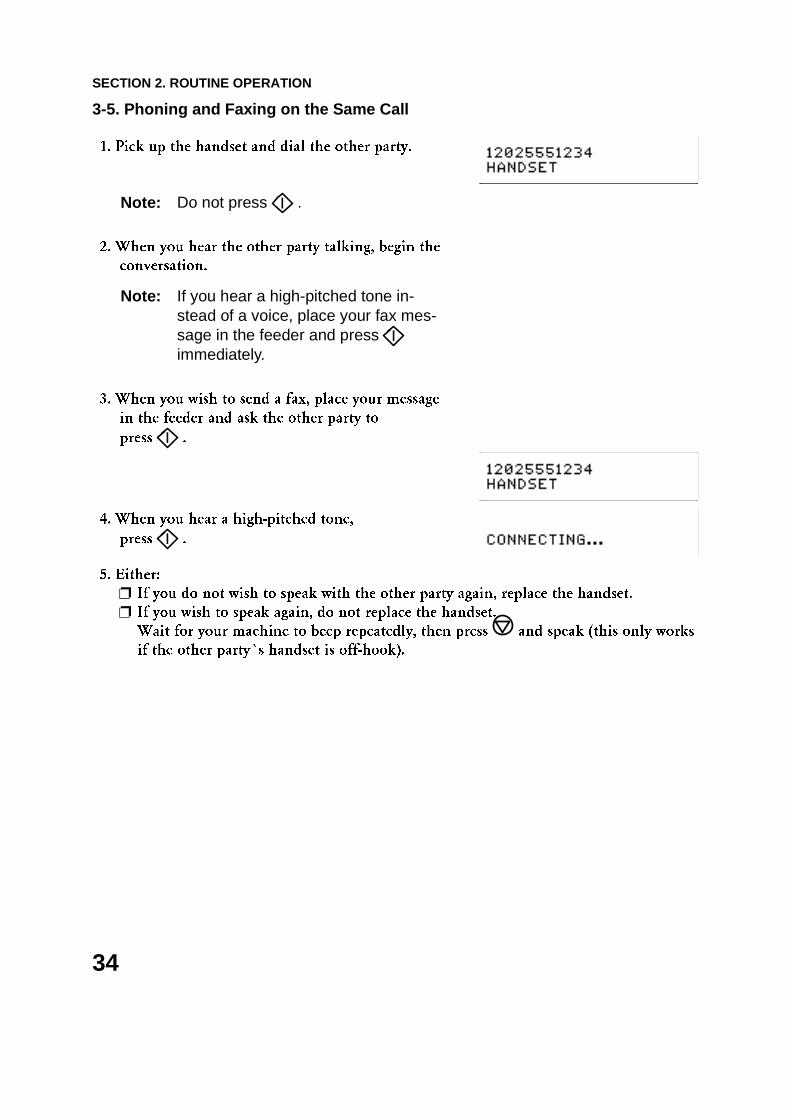
1. Pick up the handset and dial the other party.
Note: Do not press .
2. When you hear the other party talking, begin the
conversation.
Note: If you hear a high-pitched tone in-stead of a voice, place your fax mes-sage in the feeder and pressimmediately.
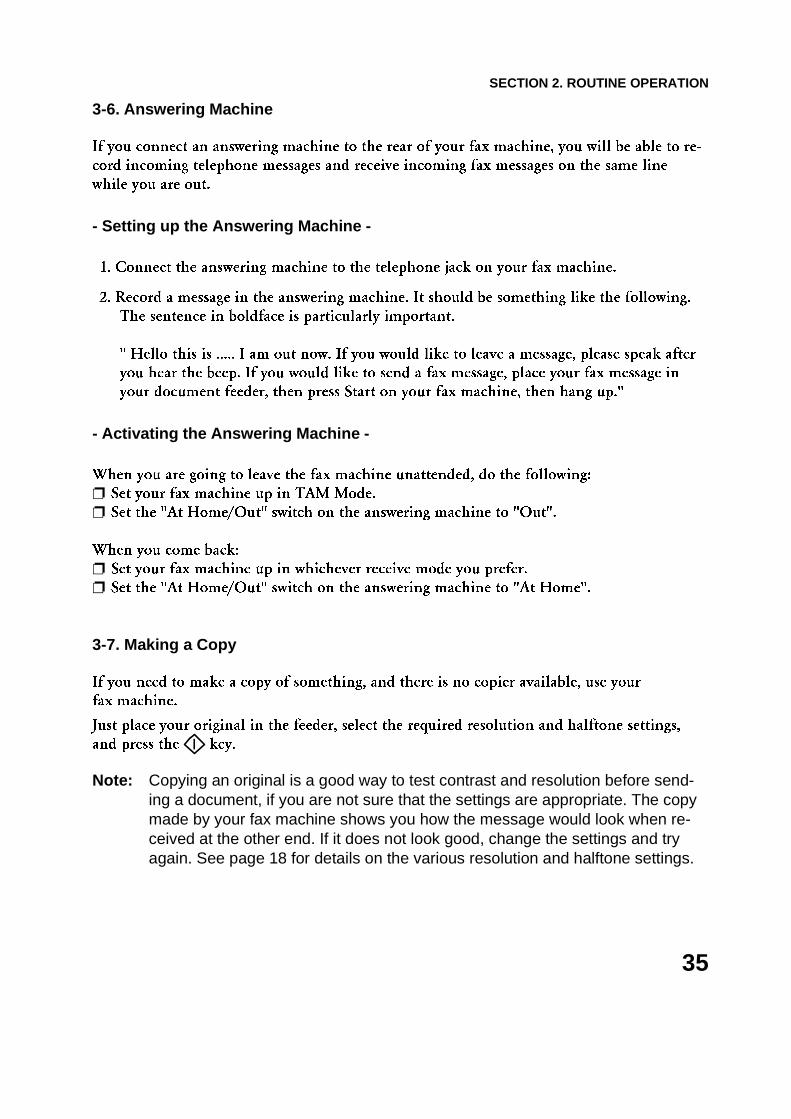
3. When you wish to send a fax, place your message
in the feeder and ask the other party to
press .
4. When you hear a high-pitched tone,
press .
5. Either:
❐ If you do not wish to speak with the other party again, replace the handset.
❐ If you wish to speak again, do not replace the handset.
Wait for your machine to beep repeatedly, then press and speak (this only works
if the other party�s handset is off-hook).
SECTION 2. ROUTINE OPERATION
34
3-6. Answering Machine
If you connect an answering machine to the rear of your fax machine, you will be able to re-
cord incoming telephone messages and receive incoming fax messages on the same line
while you are out.
- Setting up the Answering Machine -
1. Connect the answering machine to the telephone jack on your fax machine.
2. Record a message in the answering machine. It should be something like the following.
The sentence in boldface is particularly important.
" Hello this is ..... I am out now. If you would like to leave a message, please speak after
you hear the beep. If you would like to send a fax message, place your fax message in
your document feeder, then press Start on your fax machine, then hang up."
- Activating the Answering Machine -
When you are going to leave the fax machine unattended, do the following:
❐ Set your fax machine up in TAM Mode.
❐ Set the "At Home/Out" switch on the answering machine to "Out".
When you come back:
❐ Set your fax machine up in whichever receive mode you prefer.
❐ Set the "At Home/Out" switch on the answering machine to "At Home".
3-7. Making a Copy
If you need to make a copy of something, and there is no copier available, use your
fax machine.
Just place your original in the feeder, select the required resolution and halftone settings,
and press the key.
Note: Copying an original is a good way to test contrast and resolution before send-ing a document, if you are not sure that the settings are appropriate. The copymade by your fax machine shows you how the message would look when re-ceived at the other end. If it does not look good, change the settings and tryagain. See page 18 for details on the various resolution and halftone settings.
SECTION 2. ROUTINE OPERATION
35
The features described in this section will allow you to use the full capability of the machine.
1. Using Memory Transmission and Broadcasting
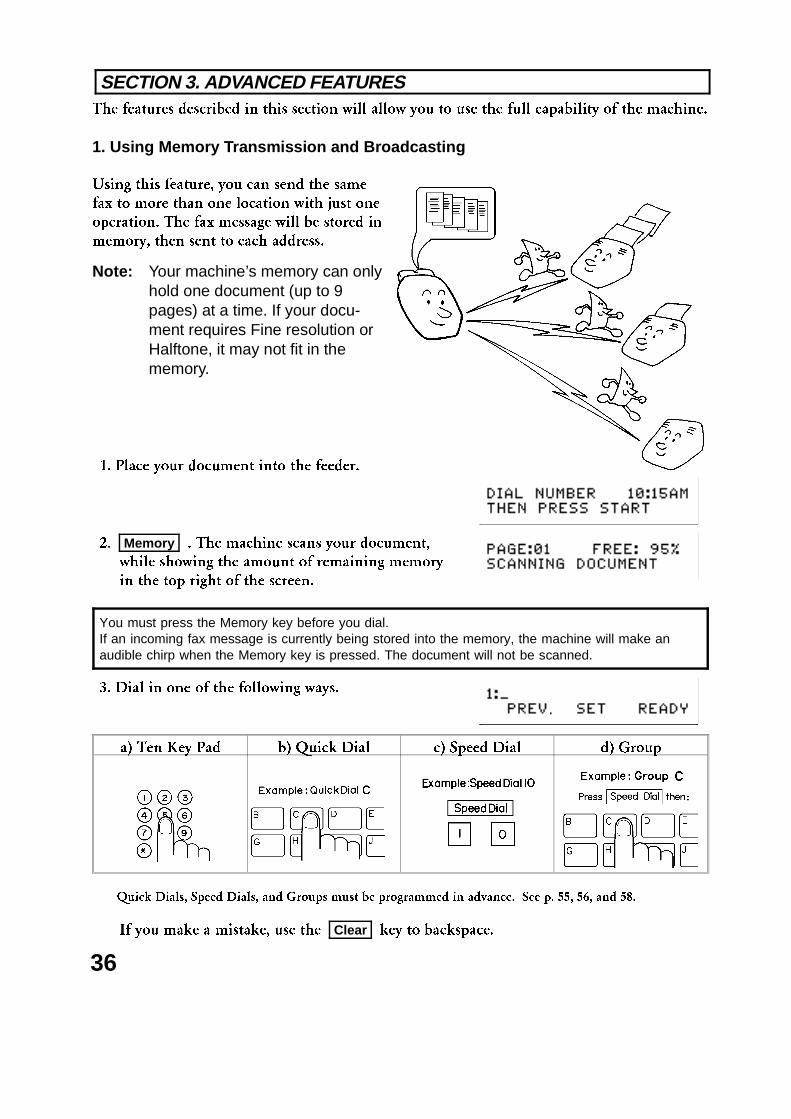
Using this feature, you can send the same
fax to more than one location with just one
operation. The fax message will be stored in
memory, then sent to each address.
Note: Your machine’s memory can onlyhold one document (up to 9pages) at a time. If your docu-ment requires Fine resolution orHalftone, it may not fit in thememory.
1. Place your document into the feeder.
2. Memory . The machine scans your document,
while showing the amount of remaining memory
in the top right of the screen.
You must press the Memory key before you dial.If an incoming fax message is currently being stored into the memory, the machine will make anaudible chirp when the Memory key is pressed. The document will not be scanned.
3. Dial in one of the following ways.
a) Ten Key Pad b) Quick Dial c) Speed Dial d) Group
Quick Dials, Speed Dials, and Groups must be programmed in advance. See p. 55, 56, and 58.
If you make a mistake, use the Clear key to backspace.
.
SECTION 3. ADVANCED FEATURES
36
If using the ten key pad and your machine is on an extension behind a PBX, dial the access code(or press "R" depending on your PBX type; see page 52), then a pause, then the telephone no. Foran international phone number, press the Pause key after entering the country code.
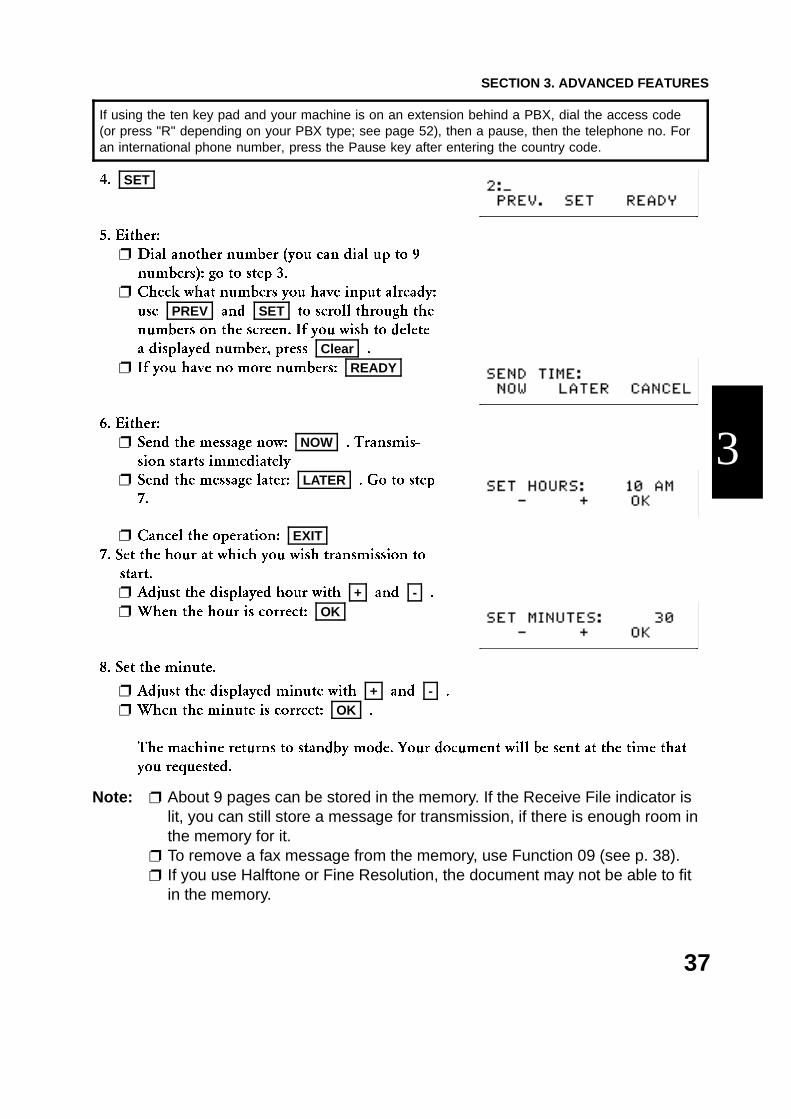
4. SET
5. Either:
❐ Dial another number (you can dial up to 9
numbers): go to step 3.
❐ Check what numbers you have input already:
use PREV and SET to scroll through the
numbers on the screen. If you wish to delete
a displayed number, press Clear .
❐ If you have no more numbers: READY
6. Either:
❐ Send the message now: NOW . Transmis-
sion starts immediately
❐ Send the message later: LATER . Go to step
7.
❐ Cancel the operation: EXIT 7. Set the hour at which you wish transmission to
start.
❐ Adjust the displayed hour with + and - .
❐ When the hour is correct: OK
8. Set the minute.
❐ Adjust the displayed minute with + and - .
❐ When the minute is correct: OK .
The machine returns to standby mode. Your document will be sent at the time that
you requested.
Note: ❐ About 9 pages can be stored in the memory. If the Receive File indicator islit, you can still store a message for transmission, if there is enough room inthe memory for it.
❐ To remove a fax message from the memory, use Function 09 (see p. 38).❐ If you use Halftone or Fine Resolution, the document may not be able to fit
in the memory.
3
SECTION 3. ADVANCED FEATURES
37
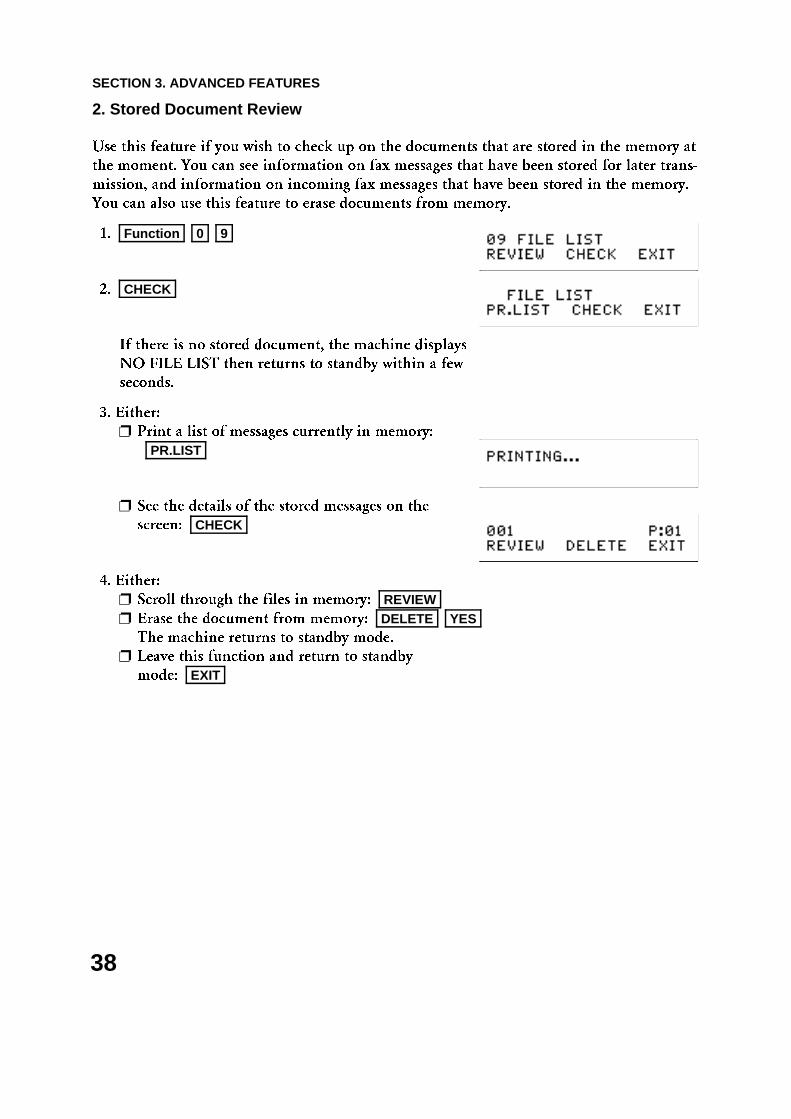
2. Stored Document Review
Use this feature if you wish to check up on the documents that are stored in the memory at
the moment. You can see information on fax messages that have been stored for later trans-
mission, and information on incoming fax messages that have been stored in the memory.
You can also use this feature to erase documents from memory.
1. Function 0 9
2. CHECK
If there is no stored document, the machine displays
NO FILE LIST then returns to standby within a few
seconds.
3. Either:
❐ Print a list of messages currently in memory:
PR.LIST
❐ See the details of the stored messages on the
screen: CHECK
4. Either:
❐ Scroll through the files in memory: REVIEW ❐ Erase the document from memory: DELETE YES
The machine returns to standby mode.
❐ Leave this function and return to standby
mode: EXIT
SECTION 3. ADVANCED FEATURES
38
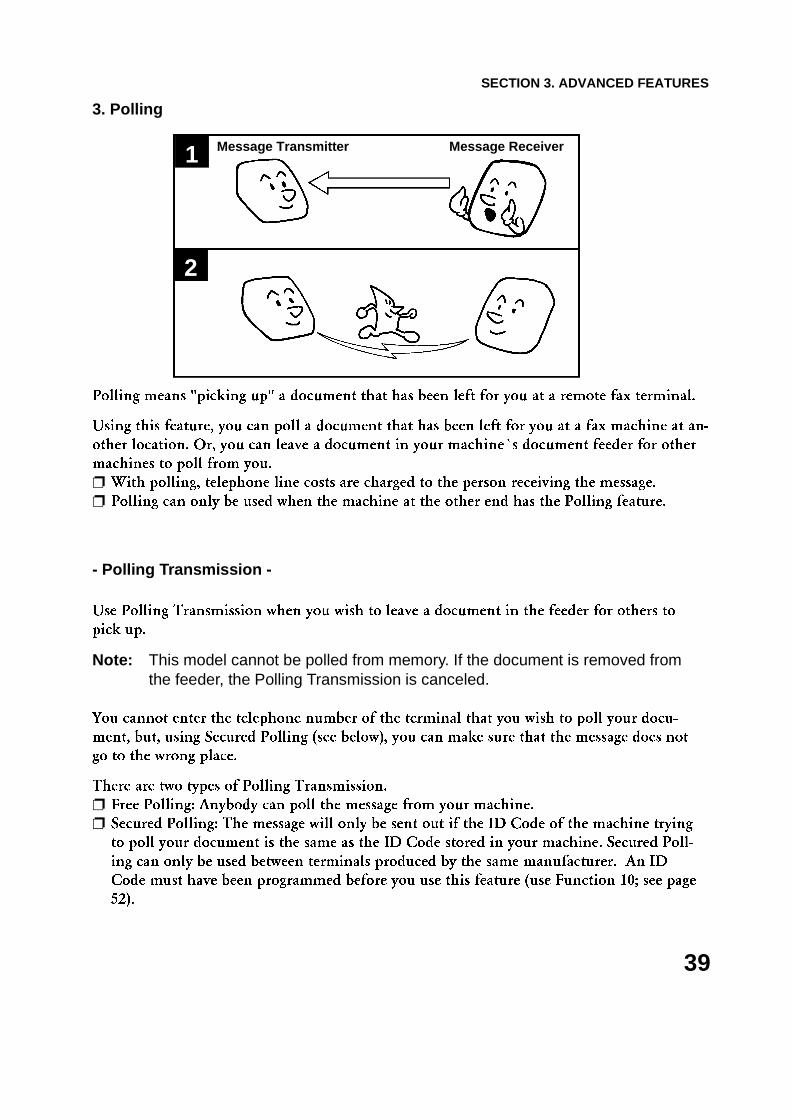
3. Polling
Polling means "picking up" a document that has been left for you at a remote fax terminal.
Using this feature, you can poll a document that has been left for you at a fax machine at an-
other location. Or, you can leave a document in your machine�s document feeder for other
machines to poll from you.
❐ With polling, telephone line costs are charged to the person receiving the message.
❐ Polling can only be used when the machine at the other end has the Polling feature.
- Polling Transmission -
Use Polling Transmission when you wish to leave a document in the feeder for others to
pick up.
Note: This model cannot be polled from memory. If the document is removed fromthe feeder, the Polling Transmission is canceled.
You cannot enter the telephone number of the terminal that you wish to poll your docu-
ment, but, using Secured Polling (see below), you can make sure that the message does not
go to the wrong place.
There are two types of Polling Transmission.
❐ Free Polling: Anybody can poll the message from your machine.
❐ Secured Polling: The message will only be sent out if the ID Code of the machine trying
to poll your document is the same as the ID Code stored in your machine. Secured Poll-
ing can only be used between terminals produced by the same manufacturer. An ID
Code must have been programmed before you use this feature (use Function 10; see page
52).
Message Transmitter Message Receiver
2
1
SECTION 3. ADVANCED FEATURES
39
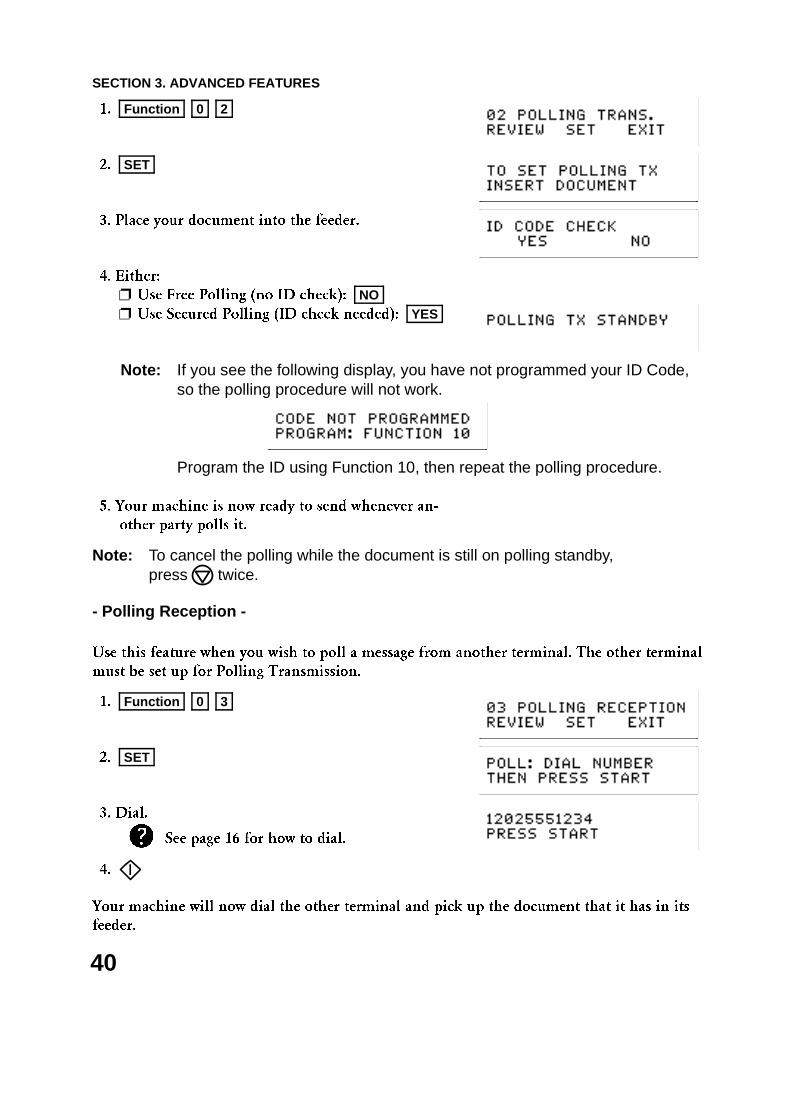
1. Function 0 2
2. SET
3. Place your document into the feeder.
4. Either:
❐ Use Free Polling (no ID check): NO ❐ Use Secured Polling (ID check needed): YES
Note: If you see the following display, you have not programmed your ID Code,so the polling procedure will not work.
Program the ID using Function 10, then repeat the polling procedure.
5. Your machine is now ready to send whenever an-
other party polls it.
Note: To cancel the polling while the document is still on polling standby, press twice.
- Polling Reception -
Use this feature when you wish to poll a message from another terminal. The other terminal
must be set up for Polling Transmission.
1. Function 0 3
2. SET
3. Dial.
4.
Your machine will now dial the other terminal and pick up the document that it has in its
feeder.
See page 16 for how to dial.
SECTION 3. ADVANCED FEATURES
40

4. Authorized Reception
If you only wish to receive messages from certain people, switch Authorized Reception on.
People will not be able to send you a message unless you have programmed their number as
a Quick Dial or as a Speed Dial. This helps to prevent junk fax mail.
You will not be able to receive messages from a particular location, unless you have alreadyprogrammed it as a Quick or Speed Dial, and sent a fax to it at some time. While faxing, yourmachine stores the other party’s identification signal (RTI or CSI). Your machine will recognize thissignal when that machine calls later to send you a fax message.If one of the authorized terminals changes their RTI/CSI, you will not be able to accept messagesfrom that sender any more, unless you send them a fax message first so that your machine canmemorize the new identification.
1. Function 1 4
2. SET
3. Either:
❐ Switch Authorized Reception on: ON OK ❐ Switch Authorized Reception off: OFF OK
Note: ❐ If you see the following display, you have not yet sent a fax to any of thenumbers stores as Quick or Speed Dials. Therefore, you cannot switchAuthorized Reception on yet.
❐ The machine at the other end must have an RTI or CSI programmed into it.
SECTION 3. ADVANCED FEATURES
41
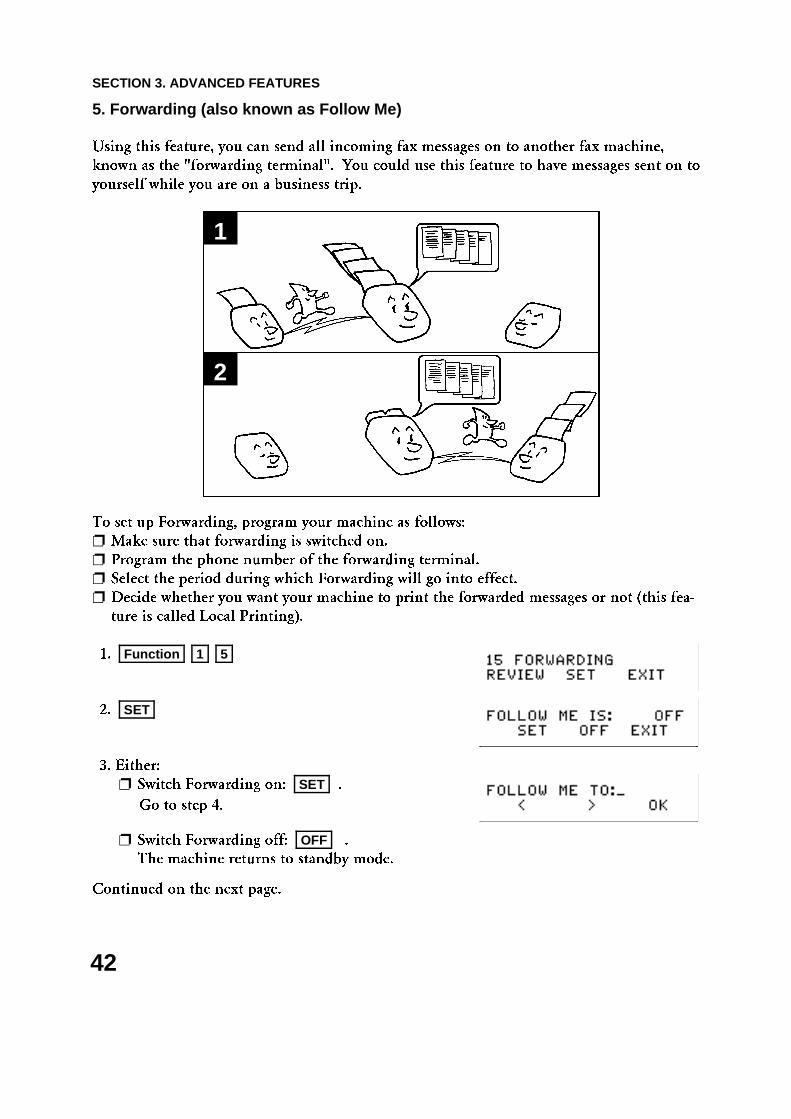
5. Forwarding (also known as Follow Me)
Using this feature, you can send all incoming fax messages on to another fax machine,
known as the "forwarding terminal". You could use this feature to have messages sent on to
yourself while you are on a business trip.
To set up Forwarding, program your machine as follows:
❐ Make sure that forwarding is switched on.
❐ Program the phone number of the forwarding terminal.
❐ Select the period during which Forwarding will go into effect.
❐ Decide whether you want your machine to print the forwarded messages or not (this fea-
ture is called Local Printing).
1. Function 1 5
2. SET
3. Either:
❐ Switch Forwarding on: SET .
Go to step 4.
❐ Switch Forwarding off: OFF .
The machine returns to standby mode.
Continued on the next page.
2
1
SECTION 3. ADVANCED FEATURES
42
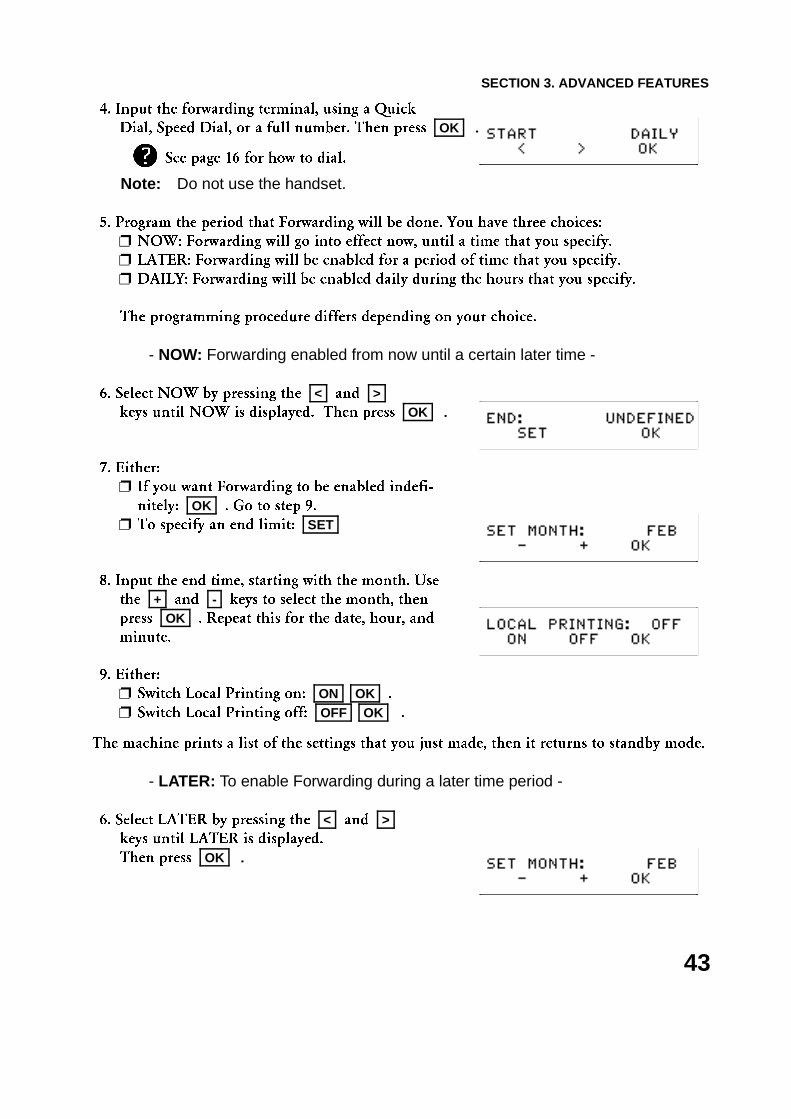
4. Input the forwarding terminal, using a Quick
Dial, Speed Dial, or a full number. Then press OK .
Note: Do not use the handset.
5. Program the period that Forwarding will be done. You have three choices:
❐ NOW: Forwarding will go into effect now, until a time that you specify.
❐ LATER: Forwarding will be enabled for a period of time that you specify.
❐ DAILY: Forwarding will be enabled daily during the hours that you specify.
The programming procedure differs depending on your choice.
- NOW: Forwarding enabled from now until a certain later time -
6. Select NOW by pressing the < and > keys until NOW is displayed. Then press OK .
7. Either:
❐ If you want Forwarding to be enabled indefi-
nitely: OK . Go to step 9.
❐ To specify an end limit: SET
8. Input the end time, starting with the month. Use
the + and - keys to select the month, then
press OK . Repeat this for the date, hour, and
minute.
9. Either:
❐ Switch Local Printing on: ON OK .
❐ Switch Local Printing off: OFF OK .
The machine prints a list of the settings that you just made, then it returns to standby mode.
- LATER: To enable Forwarding during a later time period -
6. Select LATER by pressing the < and > keys until LATER is displayed.
Then press OK .
See page 16 for how to dial.
SECTION 3. ADVANCED FEATURES
43
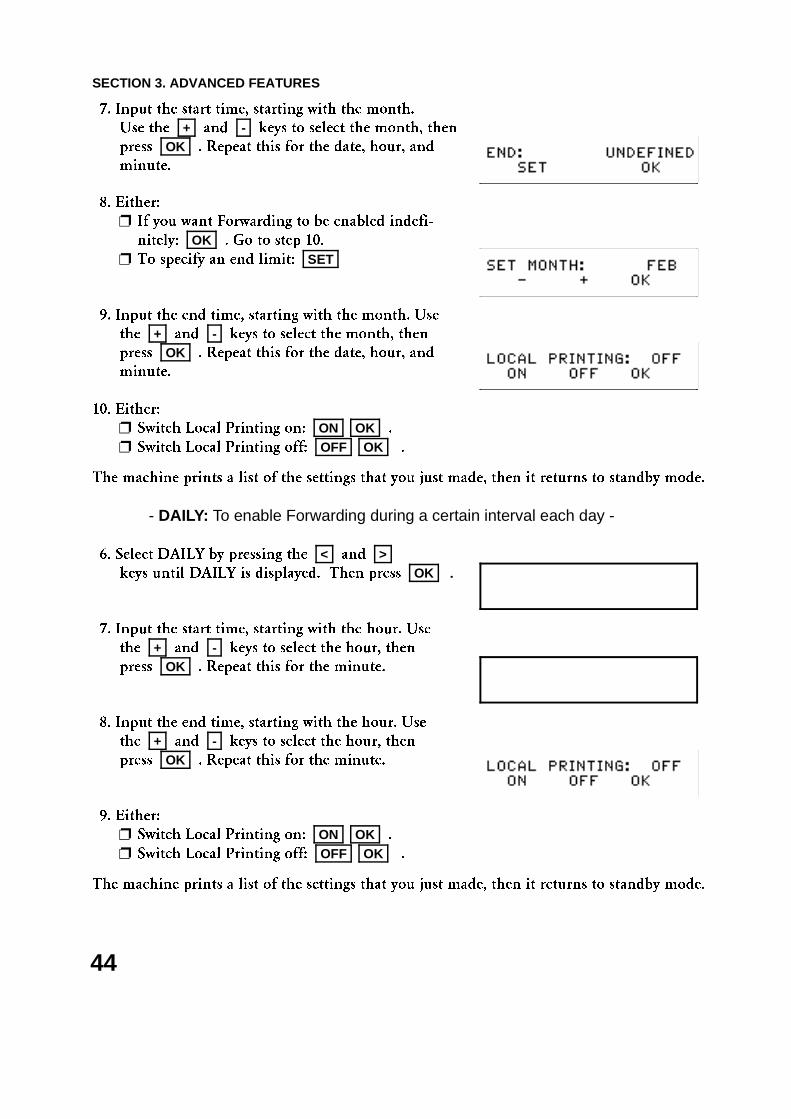
7. Input the start time, starting with the month.
Use the + and - keys to select the month, then
press OK . Repeat this for the date, hour, and
minute.
8. Either:
❐ If you want Forwarding to be enabled indefi-
nitely: OK . Go to step 10.
❐ To specify an end limit: SET
9. Input the end time, starting with the month. Use
the + and - keys to select the month, then
press OK . Repeat this for the date, hour, and
minute.
10. Either:
❐ Switch Local Printing on: ON OK .
❐ Switch Local Printing off: OFF OK .
The machine prints a list of the settings that you just made, then it returns to standby mode.
- DAILY: To enable Forwarding during a certain interval each day -
6. Select DAILY by pressing the < and > keys until DAILY is displayed. Then press OK .
7. Input the start time, starting with the hour. Use
the + and - keys to select the hour, then
press OK . Repeat this for the minute.
8. Input the end time, starting with the hour. Use
the + and - keys to select the hour, then
press OK . Repeat this for the minute.
9. Either:
❐ Switch Local Printing on: ON OK .
❐ Switch Local Printing off: OFF OK .
The machine prints a list of the settings that you just made, then it returns to standby mode.
SECTION 3. ADVANCED FEATURES
44
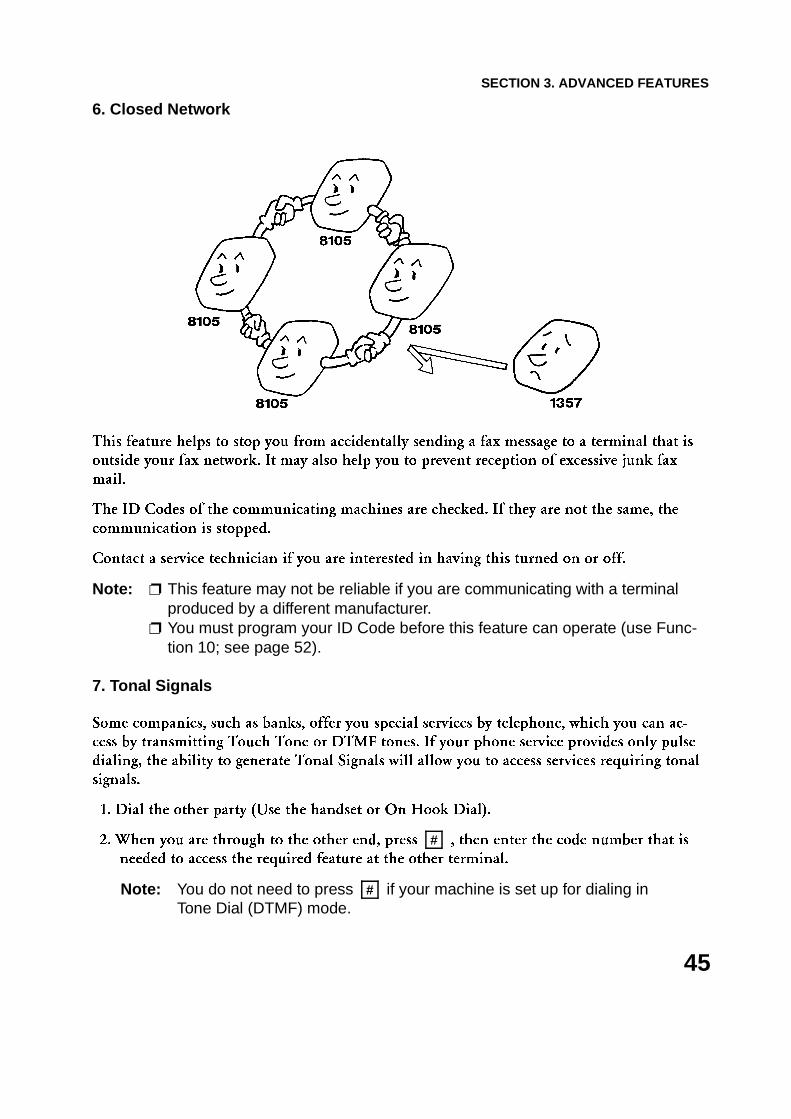
6. Closed Network
This feature helps to stop you from accidentally sending a fax message to a terminal that is
outside your fax network. It may also help you to prevent reception of excessive junk fax
mail.
The ID Codes of the communicating machines are checked. If they are not the same, the
communication is stopped.
Contact a service technician if you are interested in having this turned on or off.
Note: ❐ This feature may not be reliable if you are communicating with a terminalproduced by a different manufacturer.
❐ You must program your ID Code before this feature can operate (use Func-tion 10; see page 52).
7. Tonal Signals
Some companies, such as banks, offer you special services by telephone, which you can ac-
cess by transmitting Touch Tone or DTMF tones. If your phone service provides only pulse
dialing, the ability to generate Tonal Signals will allow you to access services requiring tonal
signals.
1. Dial the other party (Use the handset or On Hook Dial).
2. When you are through to the other end, press # , then enter the code number that is
needed to access the required feature at the other terminal.
Note: You do not need to press # if your machine is set up for dialing inTone Dial (DTMF) mode.
SECTION 3. ADVANCED FEATURES
45
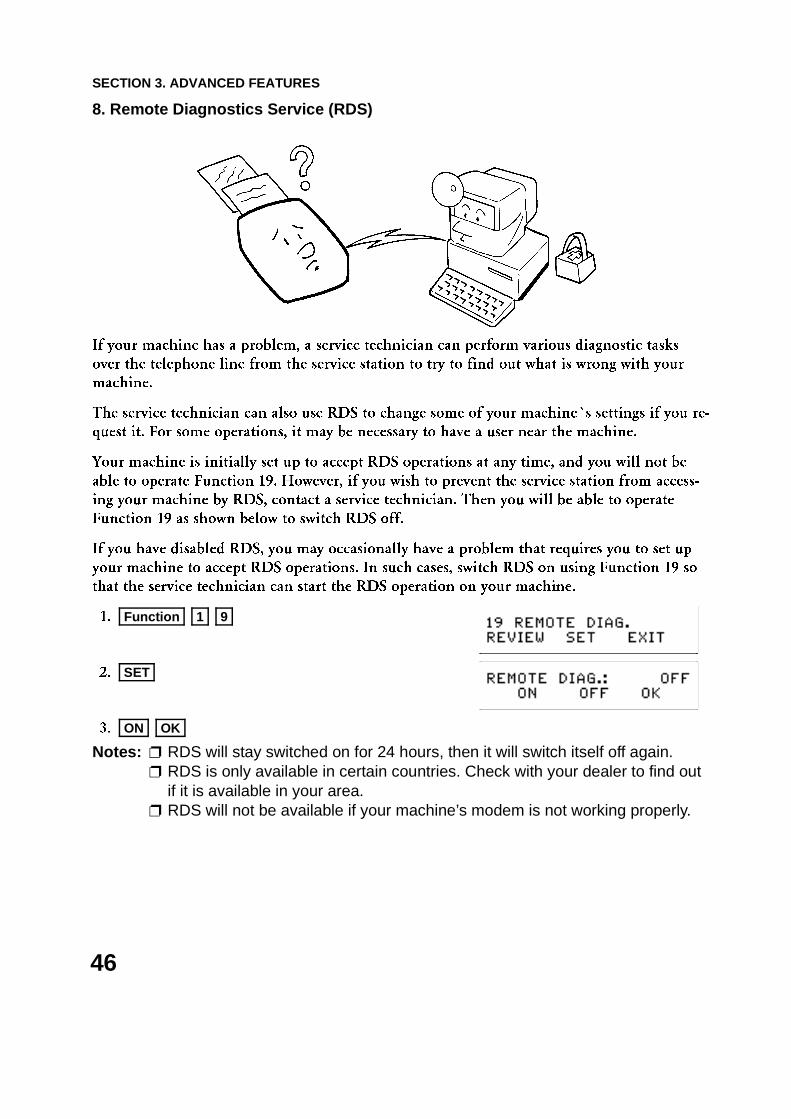
8. Remote Diagnostics Service (RDS)
If your machine has a problem, a service technician can perform various diagnostic tasks
over the telephone line from the service station to try to find out what is wrong with your
machine.
The service technician can also use RDS to change some of your machine�s settings if you re-
quest it. For some operations, it may be necessary to have a user near the machine.
Your machine is initially set up to accept RDS operations at any time, and you will not be
able to operate Function 19. However, if you wish to prevent the service station from access-
ing your machine by RDS, contact a service technician. Then you will be able to operate
Function 19 as shown below to switch RDS off.
If you have disabled RDS, you may occasionally have a problem that requires you to set up
your machine to accept RDS operations. In such cases, switch RDS on using Function 19 so
that the service technician can start the RDS operation on your machine.
1. Function 1 9
2. SET
3. ON OK
Notes: ❐ RDS will stay switched on for 24 hours, then it will switch itself off again.❐ RDS is only available in certain countries. Check with your dealer to find out
if it is available in your area.❐ RDS will not be available if your machine’s modem is not working properly.
SECTION 3. ADVANCED FEATURES
46
9. Disabling Substitute Reception for Unknown Senders
If your printer is jammed or out of paper, you can receive a few pages in the memory using
Substitute Reception, as described on page 31.
If you wish to reject messages from senders that do not have their identifying labels ( RTI or
CSI) programmed, do the following procedure.
1. Function 2 3
2. SET
There are four digits in the top right of the display. Each can be 1 or 0.If the second digit from the left is 0: Substitute Reception will not be disabled.If the second digit from the left is 1: Substitute Reception will be disabled if thesender has no RTI or CSI.
3. Either:
❐ If you wish to change the setting of this
feature: 2 OK ❐ Otherwise: OK
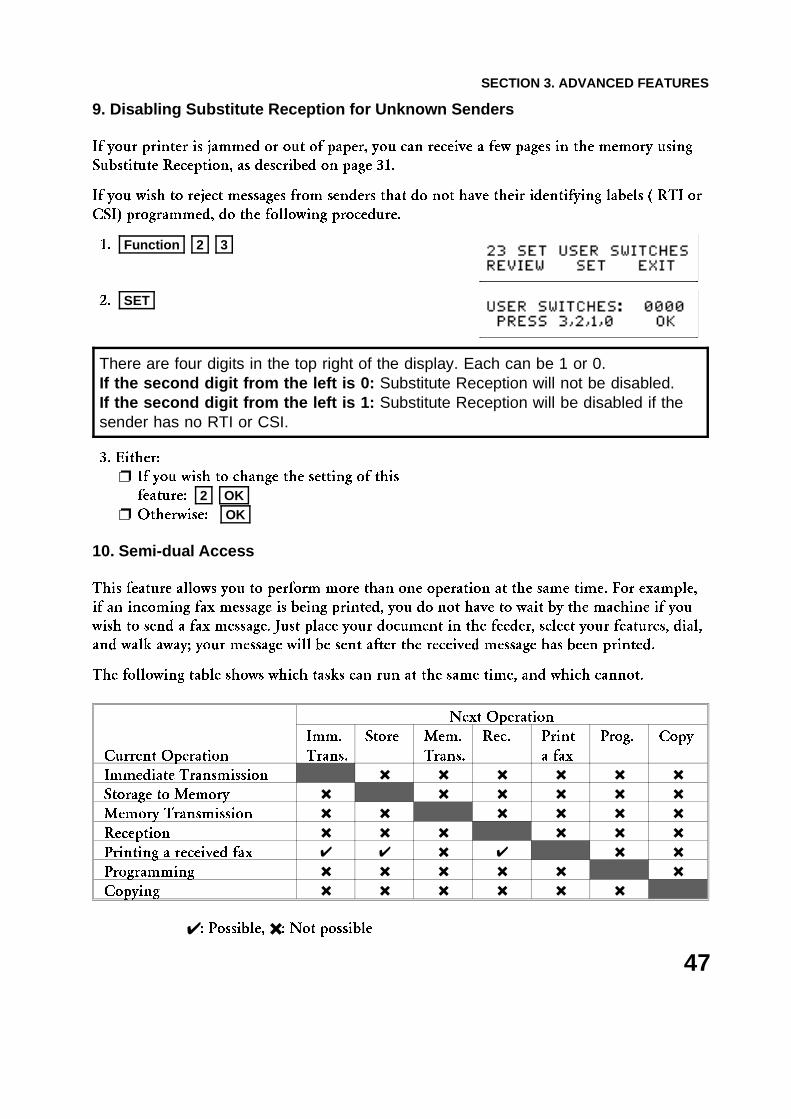
10. Semi-dual Access
This feature allows you to perform more than one operation at the same time. For example,
if an incoming fax message is being printed, you do not have to wait by the machine if you
wish to send a fax message. Just place your document in the feeder, select your features, dial,
and walk away; your message will be sent after the received message has been printed.
The following table shows which tasks can run at the same time, and which cannot.
Next Operation
Current Operation
Imm.
Trans.
Store Mem.
Trans.
Rec. Print
a fax
Prog. Copy
Immediate Transmission ✖ ✖ ✖ ✖ ✖ ✖
Storage to Memory ✖ ✖ ✖ ✖ ✖ ✖
Memory Transmission ✖ ✖ ✖ ✖ ✖ ✖
Reception ✖ ✖ ✖ ✖ ✖ ✖
Printing a received fax ✔ ✔ ✖ ✔ ✖ ✖
Programming ✖ ✖ ✖ ✖ ✖ ✖
Copying ✖ ✖ ✖ ✖ ✖ ✖
✔: Possible, ✖: Not possible
SECTION 3. ADVANCED FEATURES
47
Your machine has a variety of features that you need to program if you wish the machine�s
full range of features.
1. PROGRAMMING AT INSTALLATION
1-1. Display and Report Language
If the display on the operation panel is not in your own language, try using this feature. The
machine�s software contains displays for several different languages.
1. Function 3 5
2. SET
3. Scroll through the choice of languages with the < and > keys until the correct one is displayed.
4. OK
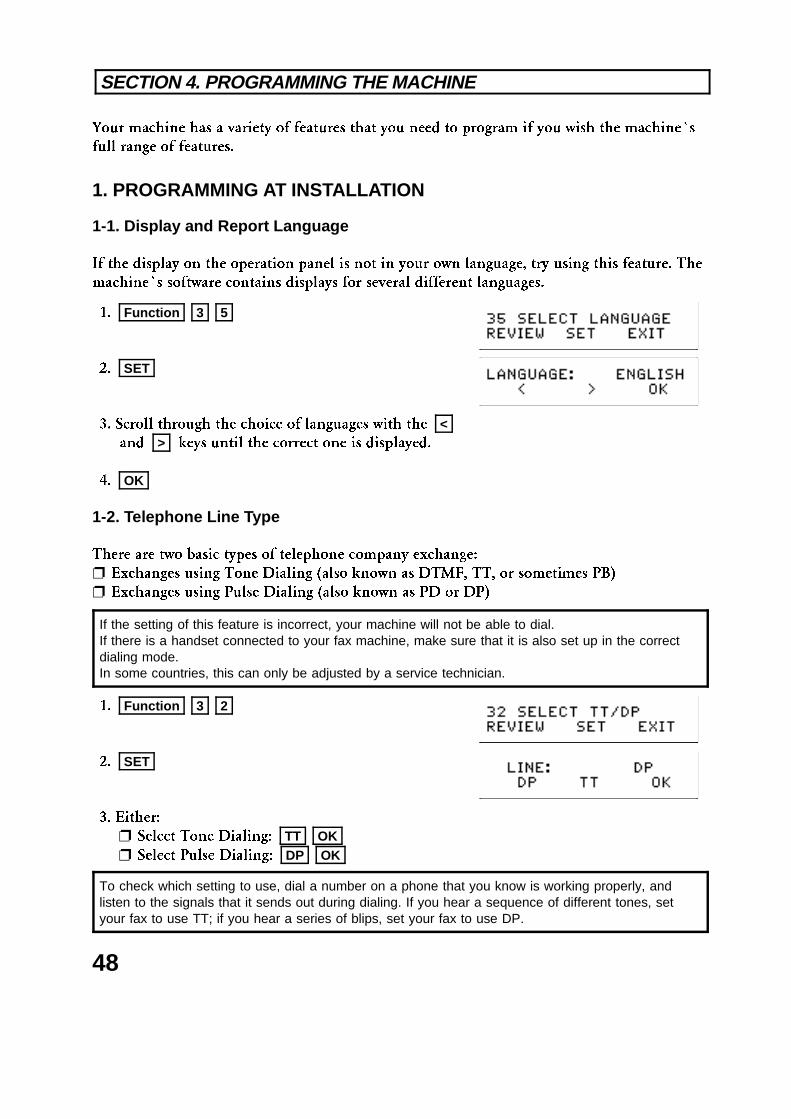
1-2. Telephone Line Type
There are two basic types of telephone company exchange:
❐ Exchanges using Tone Dialing (also known as DTMF, TT, or sometimes PB)
❐ Exchanges using Pulse Dialing (also known as PD or DP)
If the setting of this feature is incorrect, your machine will not be able to dial. If there is a handset connected to your fax machine, make sure that it is also set up in the correctdialing mode.In some countries, this can only be adjusted by a service technician.
1. Function 3 2
2. SET
3. Either:
❐ Select Tone Dialing: TT OK ❐ Select Pulse Dialing: DP OK
To check which setting to use, dial a number on a phone that you know is working properly, andlisten to the signals that it sends out during dialing. If you hear a sequence of different tones, setyour fax to use TT; if you hear a series of blips, set your fax to use DP.
SECTION 4. PROGRAMMING THE MACHINE
48
1-3. Date and Time
Your fax machine has an internal clock. It controls the following features.
❐ The time display on the operation panel while the machine is idle
❐ Operation of time-delay features like Send Later.
❐ The date and time that is printed out at the other end on pages received from your ma-
chine
Program the correct date and time when you install the machine, and wheneverlocal custom requires advancing the clock or setting the clock back.
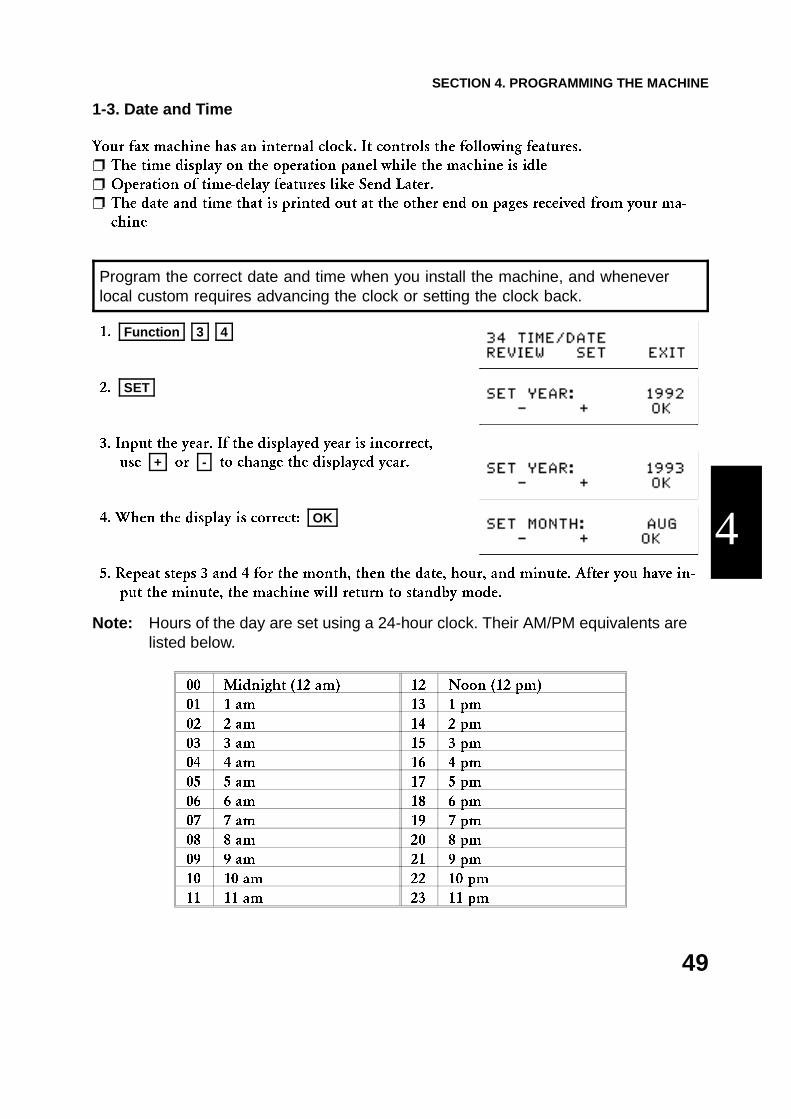
1. Function 3 4
2. SET
3. Input the year. If the displayed year is incorrect,
use + or - to change the displayed year.
4. When the display is correct: OK
5. Repeat steps 3 and 4 for the month, then the date, hour, and minute. After you have in-
put the minute, the machine will return to standby mode.
Note: Hours of the day are set using a 24-hour clock. Their AM/PM equivalents arelisted below.
00 Midnight (12 am) 12 Noon (12 pm)
01 1 am 13 1 pm
02 2 am 14 2 pm
03 3 am 15 3 pm
04 4 am 16 4 pm
05 5 am 17 5 pm
06 6 am 18 6 pm
07 7 am 19 7 pm
08 8 am 20 8 pm
09 9 am 21 9 pm
10 10 am 22 10 pm
11 11 am 23 11 pm
4
SECTION 4. PROGRAMMING THE MACHINE
49

1-4. RTI, TTI, and CSI
These three are labels which identify yourself to the operator at the other end.
❐ RTI or CSI: These appear at the other end in the display on the operation panel during
communication, and on reports after communication.
❐ TTI: This is printed at the other end at the top of each page sent from your machine.
Similarly, you can see the RTI, TTI, and CSI of the other party during communication.
Some machines may reject your transmitted fax messages if you have not stored the RTI, TTI, orCSI in advance.
- Programming the RTI (Identification Display) -
The RTI (Remote Terminal Identification) can have up to 20 characters (numbers and let-
ters can be used, along with some punctuation marks).
❐ Program something easy to recognize, such as your name.
1. Function 1 2
2. SET
3. Use the ten key pad to enter your RTI.
4. When you have finished: OK .
The machine returns to standby mode.
RTI or CSI
TTI
Inputting names: see page 3.
SECTION 4. PROGRAMMING THE MACHINE
50
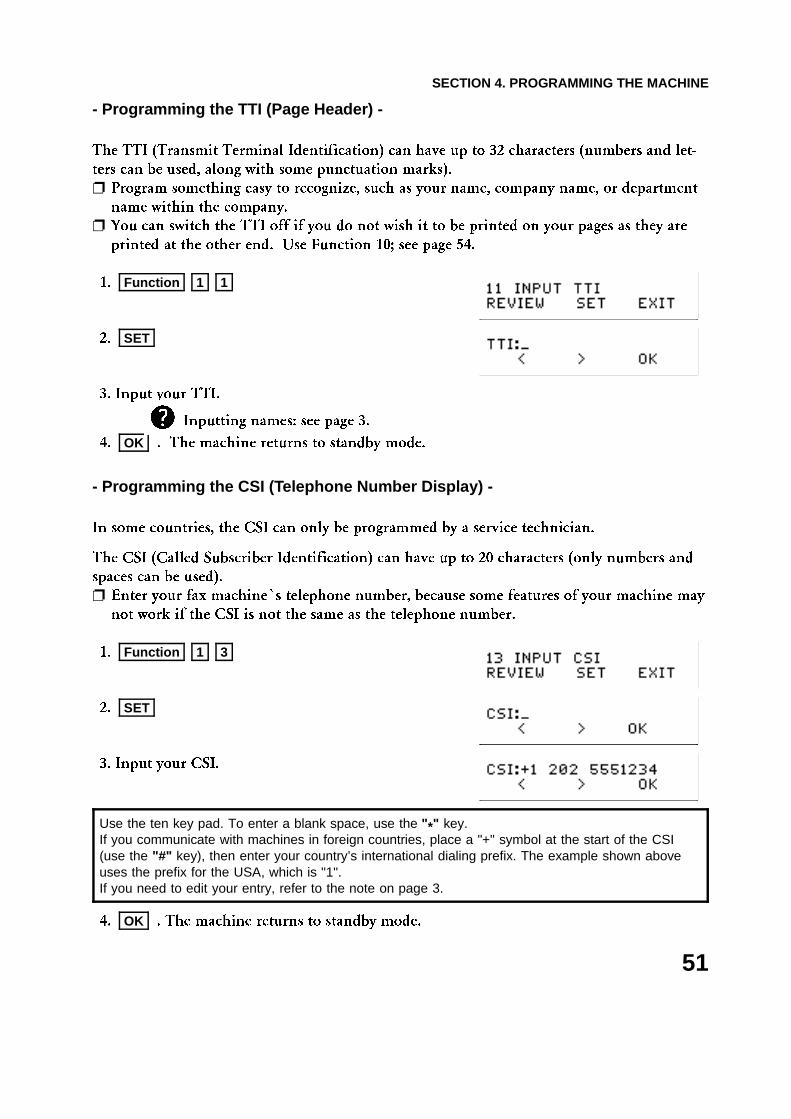
- Programming the TTI (Page Header) -
The TTI (Transmit Terminal Identification) can have up to 32 characters (numbers and let-
ters can be used, along with some punctuation marks).
❐ Program something easy to recognize, such as your name, company name, or department
name within the company.
❐ You can switch the TTI off if you do not wish it to be printed on your pages as they are
printed at the other end. Use Function 10; see page 54.
1. Function 1 1
2. SET
3. Input your TTI.
4. OK . The machine returns to standby mode.
- Programming the CSI (Telephone Number Display) -
In some countries, the CSI can only be programmed by a service technician.
The CSI (Called Subscriber Identification) can have up to 20 characters (only numbers and
spaces can be used).
❐ Enter your fax machine�s telephone number, because some features of your machine may
not work if the CSI is not the same as the telephone number.
1. Function 1 3
2. SET
3. Input your CSI.
Use the ten key pad. To enter a blank space, use the " *" key. If you communicate with machines in foreign countries, place a "+" symbol at the start of the CSI(use the "#" key), then enter your country’s international dialing prefix. The example shown aboveuses the prefix for the USA, which is "1". If you need to edit your entry, refer to the note on page 3.
4. OK . The machine returns to standby mode.
Inputting names: see page 3.
SECTION 4. PROGRAMMING THE MACHINE
51
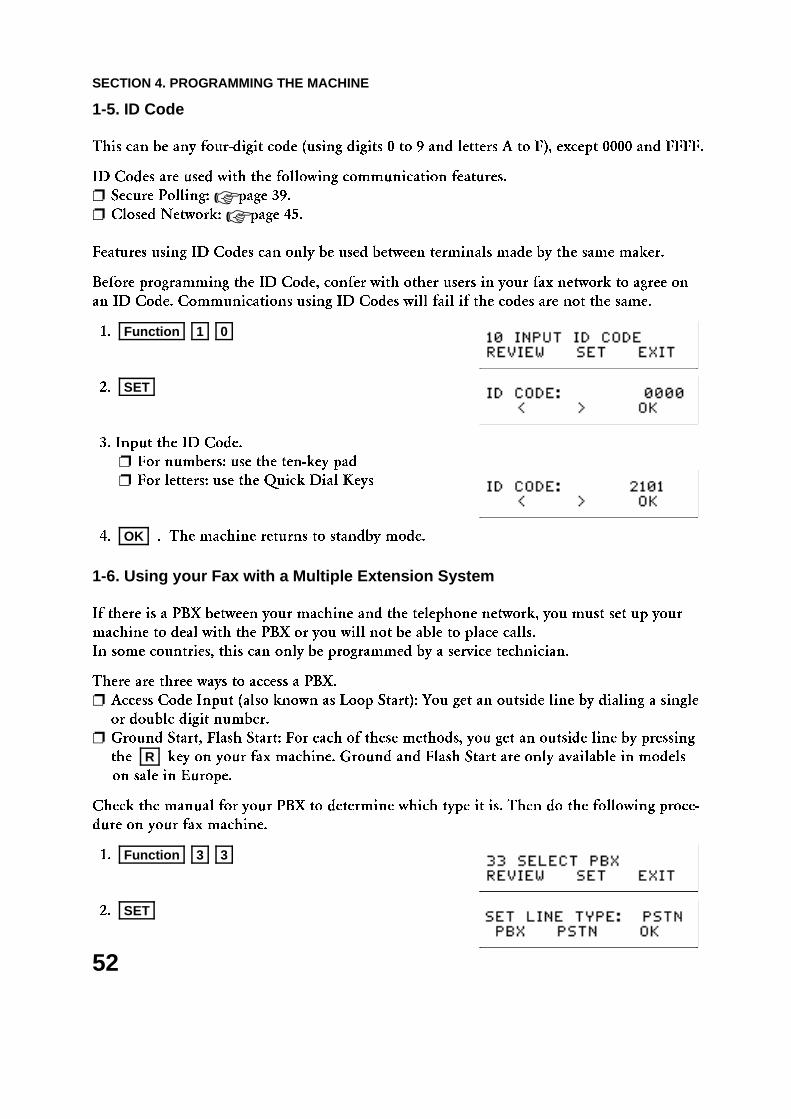
1-5. ID Code
This can be any four-digit code (using digits 0 to 9 and letters A to F), except 0000 and FFFF.
ID Codes are used with the following communication features.
❐ Secure Polling: ☞ page 39.
❐ Closed Network: ☞ page 45.
Features using ID Codes can only be used between terminals made by the same maker.
Before programming the ID Code, confer with other users in your fax network to agree on
an ID Code. Communications using ID Codes will fail if the codes are not the same.
1. Function 1 0
2. SET
3. Input the ID Code.
❐ For numbers: use the ten-key pad
❐ For letters: use the Quick Dial Keys
4. OK . The machine returns to standby mode.
1-6. Using your Fax with a Multiple Extension System
If there is a PBX between your machine and the telephone network, you must set up your
machine to deal with the PBX or you will not be able to place calls.
In some countries, this can only be programmed by a service technician.
There are three ways to access a PBX.
❐ Access Code Input (also known as Loop Start): You get an outside line by dialing a single
or double digit number.
❐ Ground Start, Flash Start: For each of these methods, you get an outside line by pressing
the R key on your fax machine. Ground and Flash Start are only available in models
on sale in Europe.
Check the manual for your PBX to determine which type it is. Then do the following proce-
dure on your fax machine.
1. Function 3 3
2. SET
SECTION 4. PROGRAMMING THE MACHINE
52
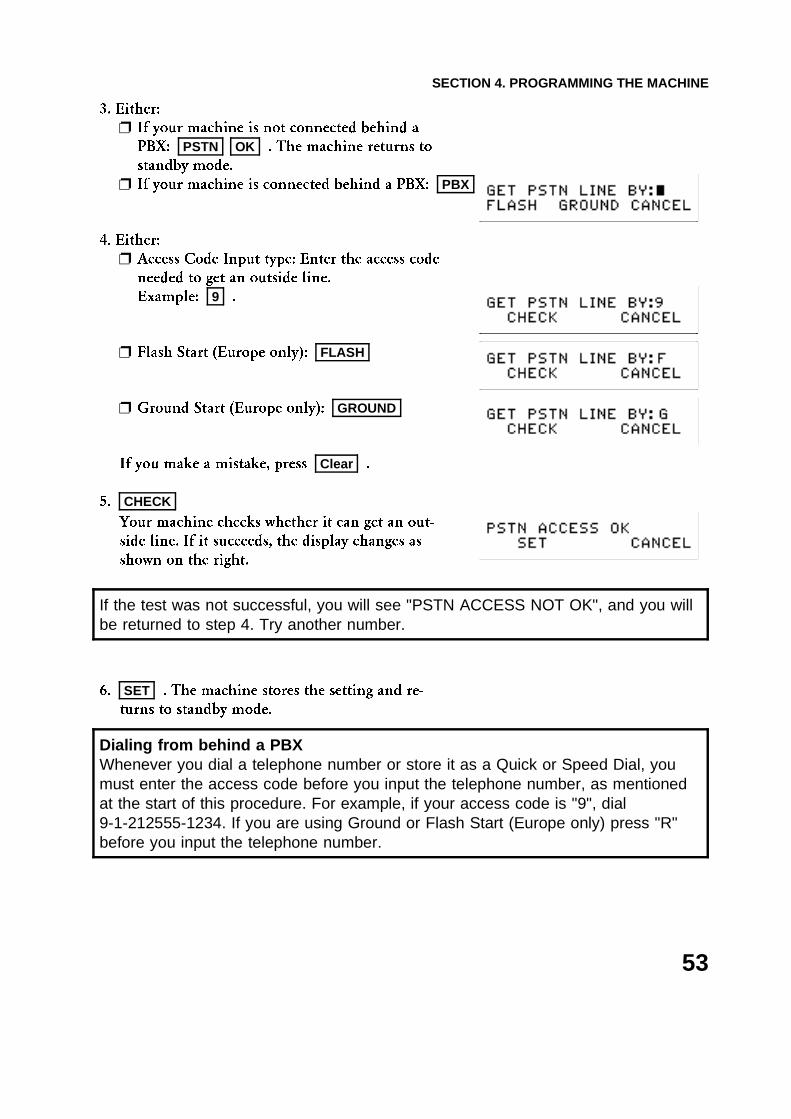
3. Either:
❐ If your machine is not connected behind a
PBX: PSTN OK . The machine returns to
standby mode.
❐ If your machine is connected behind a PBX: PBX OK
4. Either:
❐ Access Code Input type: Enter the access code
needed to get an outside line.
Example: 9 .
❐ Flash Start (Europe only): FLASH
❐ Ground Start (Europe only): GROUND
If you make a mistake, press Clear .
5. CHECK
Your machine checks whether it can get an out-
side line. If it succeeds, the display changes as
shown on the right.
If the test was not successful, you will see "PSTN ACCESS NOT OK", and you willbe returned to step 4. Try another number.
6. SET . The machine stores the setting and re-
turns to standby mode.
Dialing from behind a PBXWhenever you dial a telephone number or store it as a Quick or Speed Dial, youmust enter the access code before you input the telephone number, as mentionedat the start of this procedure. For example, if your access code is "9", dial9-1-212555-1234. If you are using Ground or Flash Start (Europe only) press "R"before you input the telephone number.
SECTION 4. PROGRAMMING THE MACHINE
53
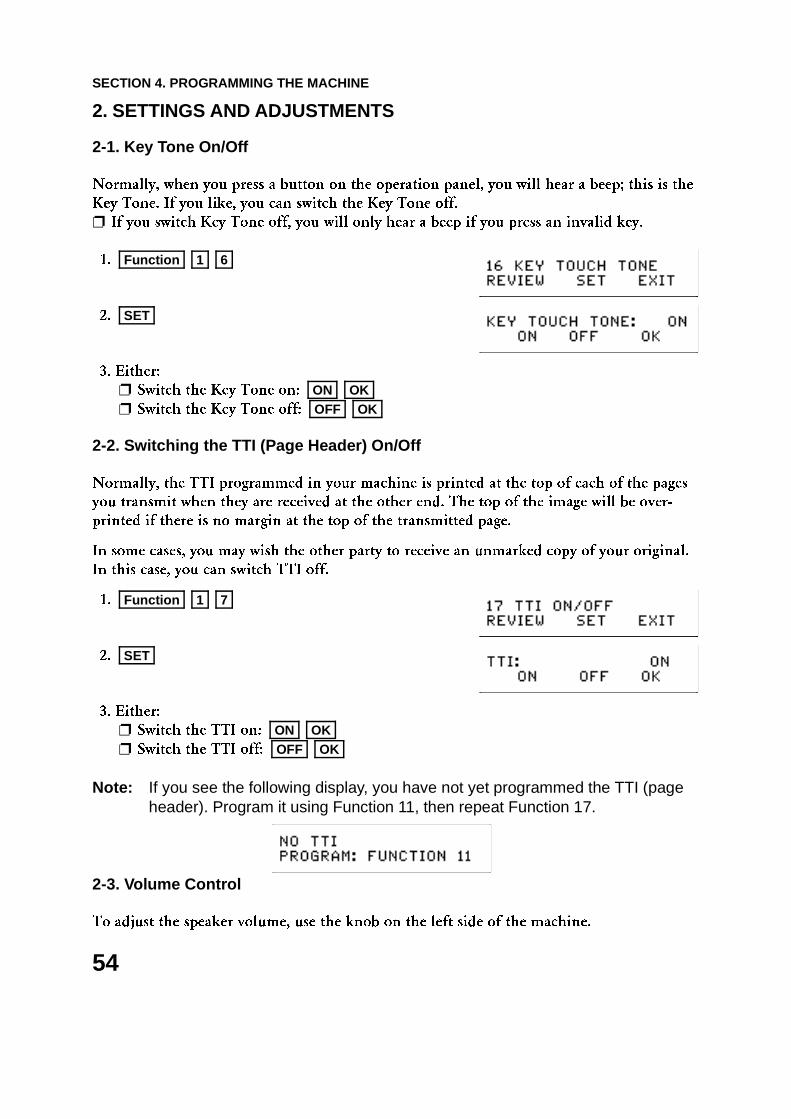
2. SETTINGS AND ADJUSTMENTS
2-1. Key Tone On/Off
Normally, when you press a button on the operation panel, you will hear a beep; this is the
Key Tone. If you like, you can switch the Key Tone off.
❐ If you switch Key Tone off, you will only hear a beep if you press an invalid key.
1. Function 1 6
2. SET
3. Either:
❐ Switch the Key Tone on: ON OK ❐ Switch the Key Tone off: OFF OK
2-2. Switching the TTI (Page Header) On/Off
Normally, the TTI programmed in your machine is printed at the top of each of the pages
you transmit when they are received at the other end. The top of the image will be over-
printed if there is no margin at the top of the transmitted page.
In some cases, you may wish the other party to receive an unmarked copy of your original.
In this case, you can switch TTI off.
1. Function 1 7
2. SET
3. Either:
❐ Switch the TTI on: ON OK ❐ Switch the TTI off: OFF OK
Note: If you see the following display, you have not yet programmed the TTI (pageheader). Program it using Function 11, then repeat Function 17.
2-3. Volume Control
To adjust the speaker volume, use the knob on the left side of the machine.
SECTION 4. PROGRAMMING THE MACHINE
54
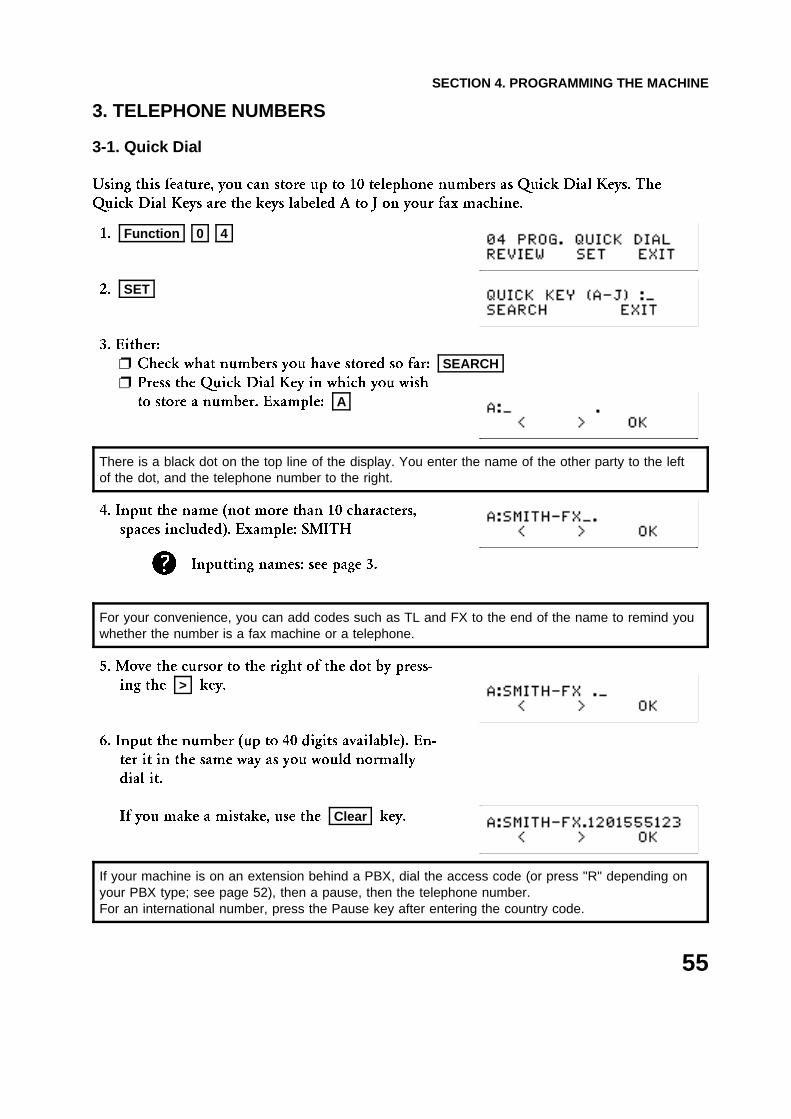
3. TELEPHONE NUMBERS
3-1. Quick Dial
Using this feature, you can store up to 10 telephone numbers as Quick Dial Keys. The
Quick Dial Keys are the keys labeled A to J on your fax machine.
1. Function 0 4
2. SET
3. Either:
❐ Check what numbers you have stored so far: SEARCH ❐ Press the Quick Dial Key in which you wish
to store a number. Example: A
There is a black dot on the top line of the display. You enter the name of the other party to the leftof the dot, and the telephone number to the right.
4. Input the name (not more than 10 characters,
spaces included). Example: SMITH
For your convenience, you can add codes such as TL and FX to the end of the name to remind youwhether the number is a fax machine or a telephone.
5. Move the cursor to the right of the dot by press-
ing the > key.
6. Input the number (up to 40 digits available). En-
ter it in the same way as you would normally
dial it.
If you make a mistake, use the Clear key.
If your machine is on an extension behind a PBX, dial the access code (or press "R" depending onyour PBX type; see page 52), then a pause, then the telephone number.For an international number, press the Pause key after entering the country code.
Inputting names: see page 3.
SECTION 4. PROGRAMMING THE MACHINE
55
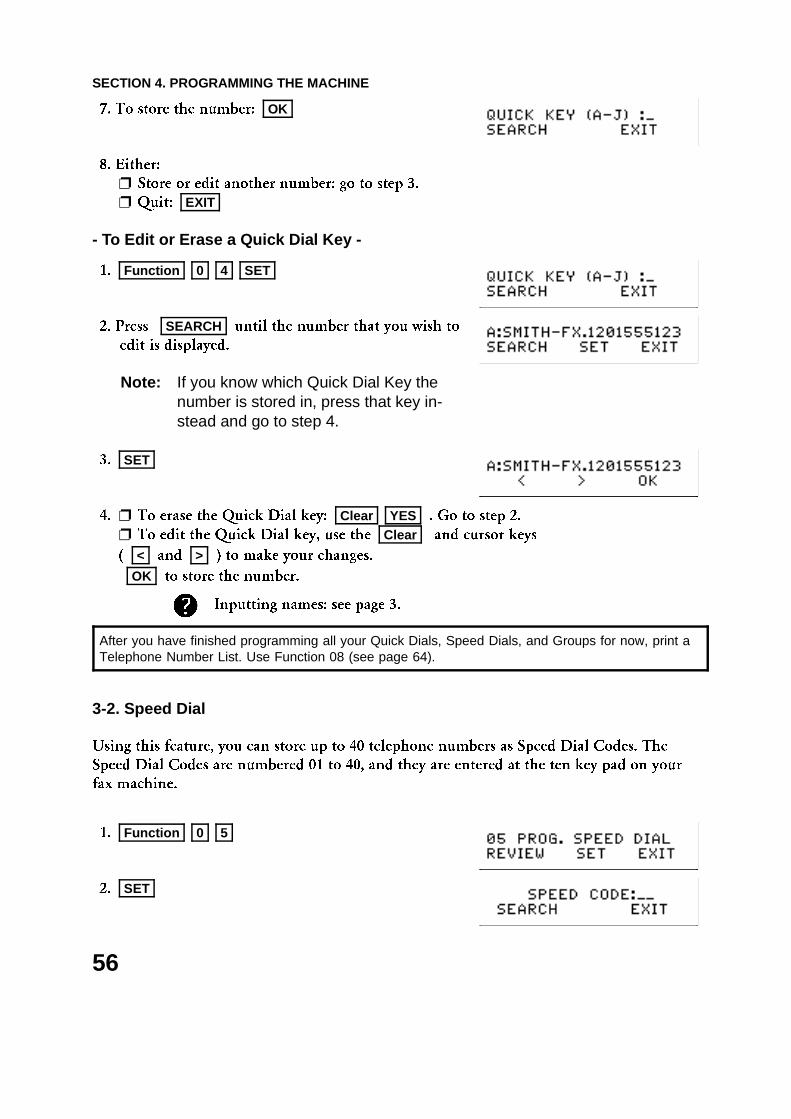
7. To store the number: OK
8. Either:
❐ Store or edit another number: go to step 3.
❐ Quit: EXIT
- To Edit or Erase a Quick Dial Key -
1. Function 0 4 SET
2. Press SEARCH until the number that you wish to
edit is displayed.
Note: If you know which Quick Dial Key thenumber is stored in, press that key in-stead and go to step 4.
3. SET
4. ❐ To erase the Quick Dial key: Clear YES . Go to step 2.
❐ To edit the Quick Dial key, use the Clear and cursor keys
( < and > ) to make your changes.
OK to store the number.
After you have finished programming all your Quick Dials, Speed Dials, and Groups for now, print aTelephone Number List. Use Function 08 (see page 64).
3-2. Speed Dial
Using this feature, you can store up to 40 telephone numbers as Speed Dial Codes. The
Speed Dial Codes are numbered 01 to 40, and they are entered at the ten key pad on your
fax machine.
1. Function 0 5
2. SET
Inputting names: see page 3.
SECTION 4. PROGRAMMING THE MACHINE
56
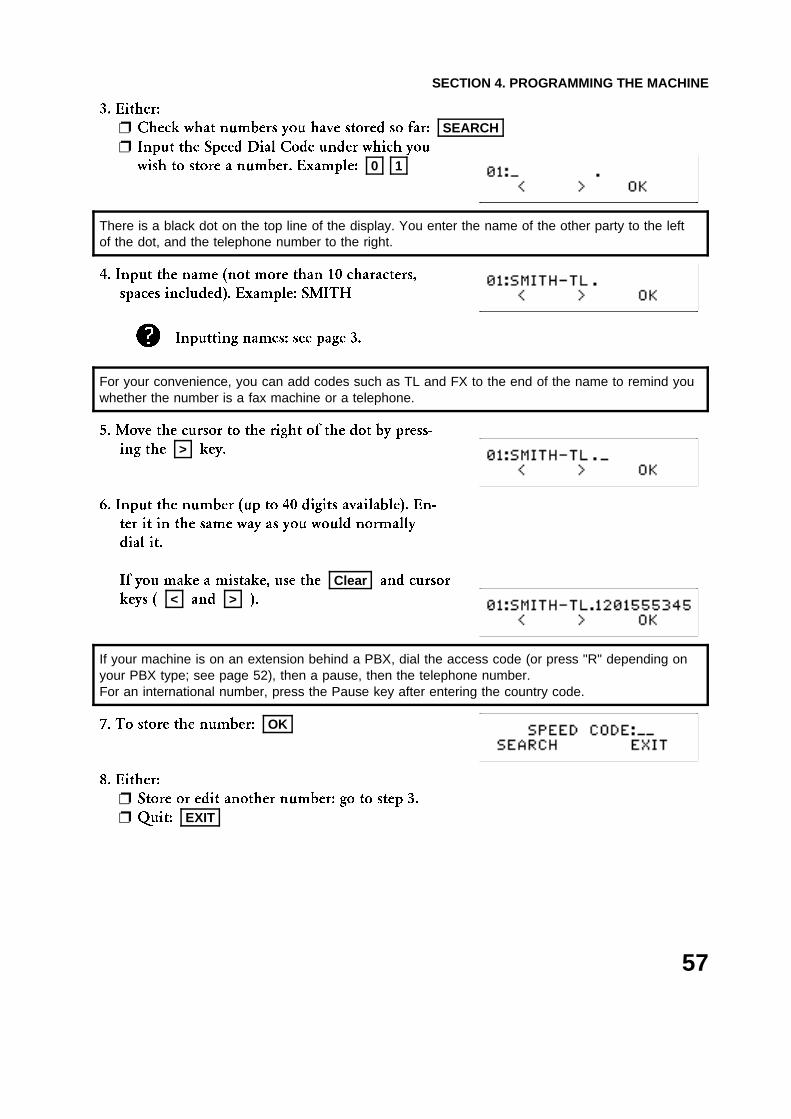
3. Either:
❐ Check what numbers you have stored so far: SEARCH ❐ Input the Speed Dial Code under which you
wish to store a number. Example: 0 1
There is a black dot on the top line of the display. You enter the name of the other party to the leftof the dot, and the telephone number to the right.
4. Input the name (not more than 10 characters,
spaces included). Example: SMITH
For your convenience, you can add codes such as TL and FX to the end of the name to remind youwhether the number is a fax machine or a telephone.
5. Move the cursor to the right of the dot by press-
ing the > key.
6. Input the number (up to 40 digits available). En-
ter it in the same way as you would normally
dial it.
If you make a mistake, use the Clear and cursor
keys ( < and > ).
If your machine is on an extension behind a PBX, dial the access code (or press "R" depending onyour PBX type; see page 52), then a pause, then the telephone number. For an international number, press the Pause key after entering the country code.
7. To store the number: OK
8. Either:
❐ Store or edit another number: go to step 3.
❐ Quit: EXIT
Inputting names: see page 3.
SECTION 4. PROGRAMMING THE MACHINE
57
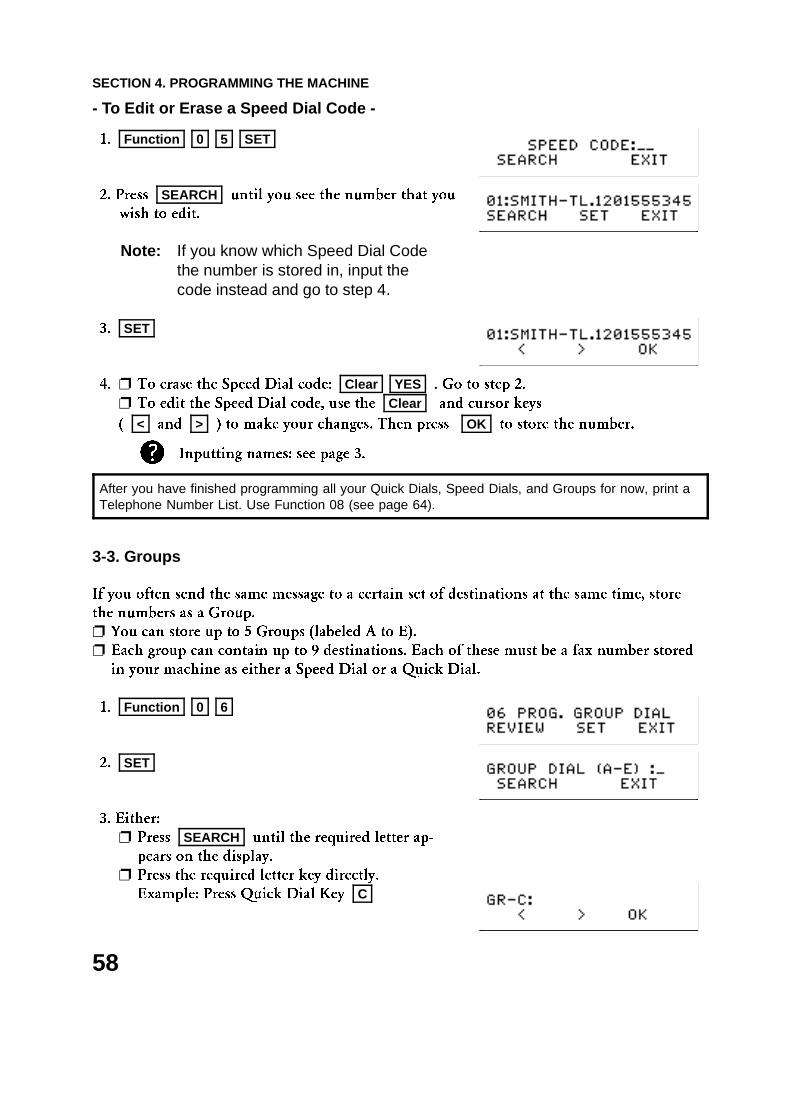
- To Edit or Erase a Speed Dial Code -
1. Function 0 5 SET
2. Press SEARCH until you see the number that you
wish to edit.
Note: If you know which Speed Dial Codethe number is stored in, input thecode instead and go to step 4.
3. SET
4. ❐ To erase the Speed Dial code: Clear YES . Go to step 2.
❐ To edit the Speed Dial code, use the Clear and cursor keys
( < and > ) to make your changes. Then press OK to store the number.
After you have finished programming all your Quick Dials, Speed Dials, and Groups for now, print aTelephone Number List. Use Function 08 (see page 64).
3-3. Groups
If you often send the same message to a certain set of destinations at the same time, store
the numbers as a Group.
❐ You can store up to 5 Groups (labeled A to E).
❐ Each group can contain up to 9 destinations. Each of these must be a fax number stored
in your machine as either a Speed Dial or a Quick Dial.
1. Function 0 6
2. SET
3. Either:
❐ Press SEARCH until the required letter ap-
pears on the display.
❐ Press the required letter key directly.
Example: Press Quick Dial Key C
Inputting names: see page 3.
SECTION 4. PROGRAMMING THE MACHINE
58
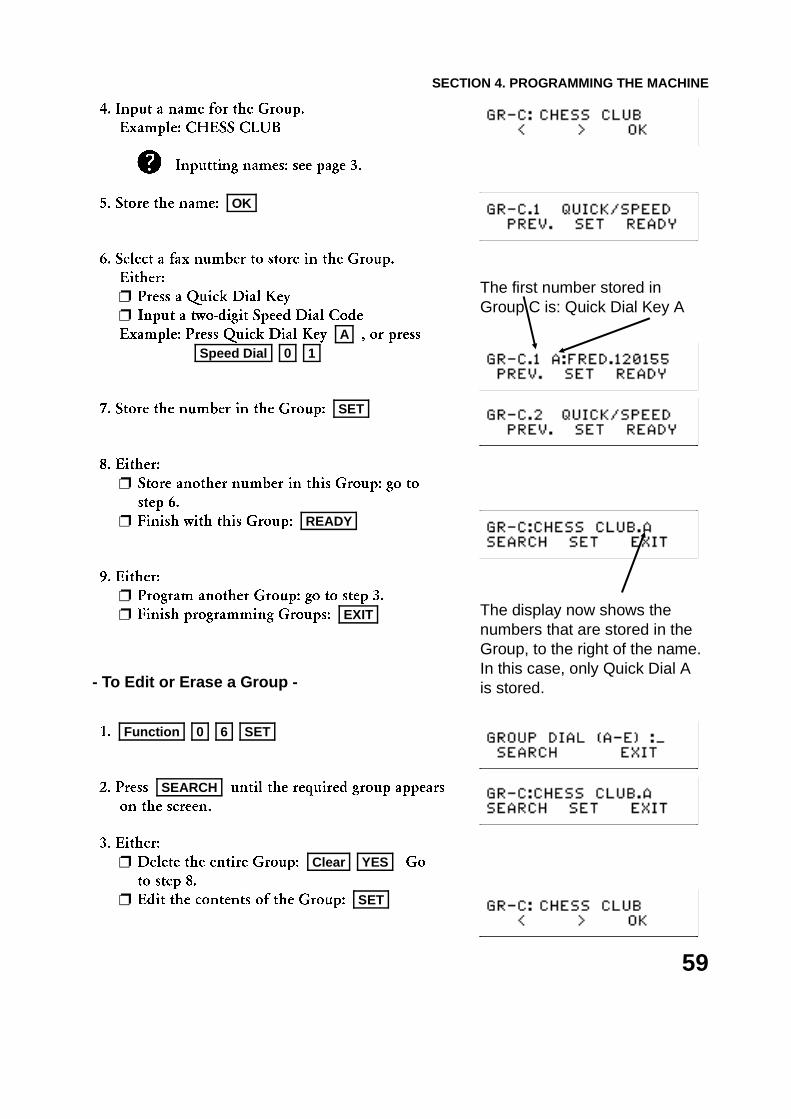
4. Input a name for the Group.
Example: CHESS CLUB
5. Store the name: OK
6. Select a fax number to store in the Group.
Either:
❐ Press a Quick Dial Key
❐ Input a two-digit Speed Dial Code
Example: Press Quick Dial Key A , or press
Speed Dial 0 1
7. Store the number in the Group: SET
8. Either:
❐ Store another number in this Group: go to
step 6.
❐ Finish with this Group: READY
9. Either:
❐ Program another Group: go to step 3.
❐ Finish programming Groups: EXIT
- To Edit or Erase a Group -
1. Function 0 6 SET
2. Press SEARCH until the required group appears
on the screen.
3. Either:
❐ Delete the entire Group: Clear YES Go
to step 8.
❐ Edit the contents of the Group: SET
The first number stored inGroup C is: Quick Dial Key A
The display now shows thenumbers that are stored in theGroup, to the right of the name.In this case, only Quick Dial Ais stored.
Inputting names: see page 3.
SECTION 4. PROGRAMMING THE MACHINE
59
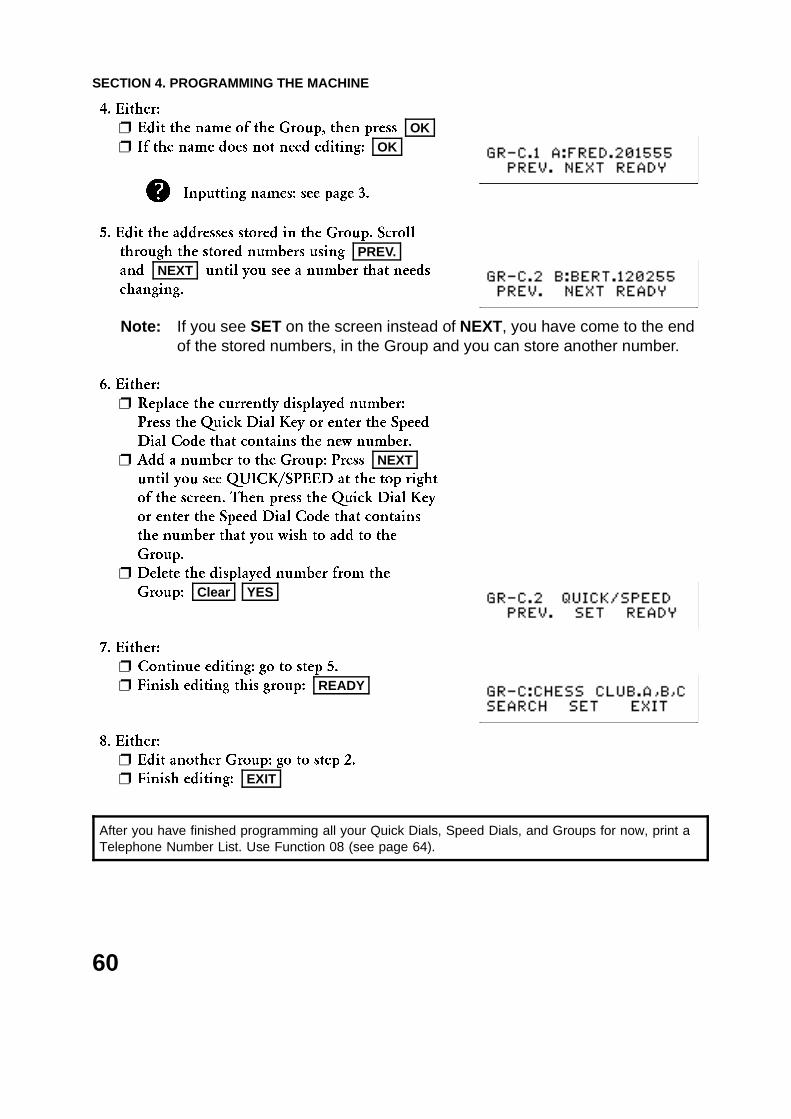
4. Either:
❐ Edit the name of the Group, then press OK ❐ If the name does not need editing: OK
5. Edit the addresses stored in the Group. Scroll
through the stored numbers using PREV. and NEXT until you see a number that needs
changing.
Note: If you see SET on the screen instead of NEXT, you have come to the endof the stored numbers, in the Group and you can store another number.
6. Either:
❐ Replace the currently displayed number:
Press the Quick Dial Key or enter the Speed
Dial Code that contains the new number.
❐ Add a number to the Group: Press NEXT until you see QUICK/SPEED at the top right
of the screen. Then press the Quick Dial Key
or enter the Speed Dial Code that contains
the number that you wish to add to the
Group.
❐ Delete the displayed number from the
Group: Clear YES
7. Either:
❐ Continue editing: go to step 5.
❐ Finish editing this group: READY
8. Either:
❐ Edit another Group: go to step 2.
❐ Finish editing: EXIT
After you have finished programming all your Quick Dials, Speed Dials, and Groups for now, print aTelephone Number List. Use Function 08 (see page 64).
Inputting names: see page 3.
SECTION 4. PROGRAMMING THE MACHINE
60
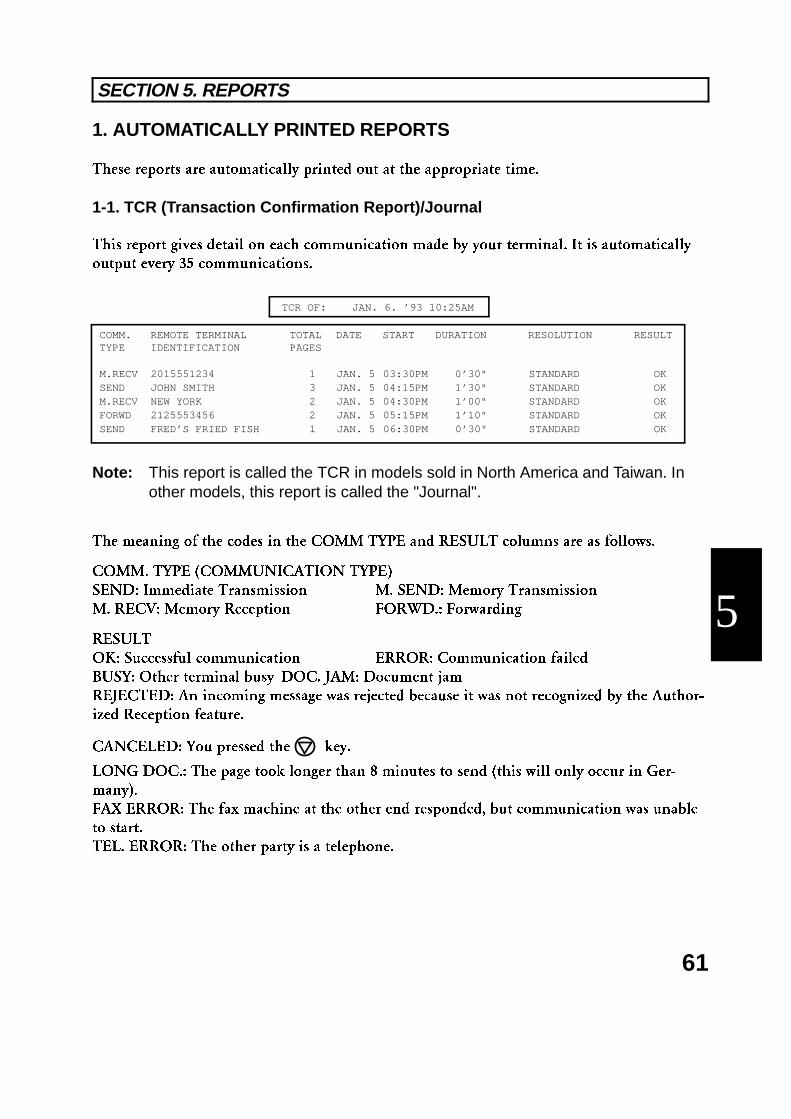
1. AUTOMATICALLY PRINTED REPORTS
These reports are automatically printed out at the appropriate time.
1-1. TCR (Transaction Confirmation Report)/Journal
This report gives detail on each communication made by your terminal. It is automatically
output every 35 communications.
Note: This report is called the TCR in models sold in North America and Taiwan. Inother models, this report is called the "Journal".
The meaning of the codes in the COMM TYPE and RESULT columns are as follows.
COMM. TYPE (COMMUNICATION TYPE)
SEND: Immediate Transmission M. SEND: Memory Transmission
M. RECV: Memory Reception FORWD.: Forwarding
RESULT
OK: Successful communication ERROR: Communication failed
BUSY: Other terminal busy DOC. JAM: Document jam
REJECTED: An incoming message was rejected because it was not recognized by the Author-
ized Reception feature.
CANCELED: You pressed the key.
LONG DOC.: The page took longer than 8 minutes to send (this will only occur in Ger-
many).
FAX ERROR: The fax machine at the other end responded, but communication was unable
to start.
TEL. ERROR: The other party is a telephone.
SECTION 5. REPORTS
TCR OF: JAN. 6. ’93 10:25AM
COMM. TYPE
REMOTE TERMINALIDENTIFICATION
TOTALPAGES
DATE START DURATION RESOLUTION RESULT
M.RECV 2015551234 1 JAN. 5 03:30PM 0’30" STANDARD OK SEND JOHN SMITH 3 JAN. 5 04:15PM 1’30" STANDARD OK M.RECV NEW YORK 2 JAN. 5 04:30PM 1’00" STANDARD OK FORWD 2125553456 2 JAN. 5 05:15PM 1’10" STANDARD OK SEND FRED’S FRIED FISH 1 JAN. 5 06:30PM 0’30" STANDARD OK
5
61
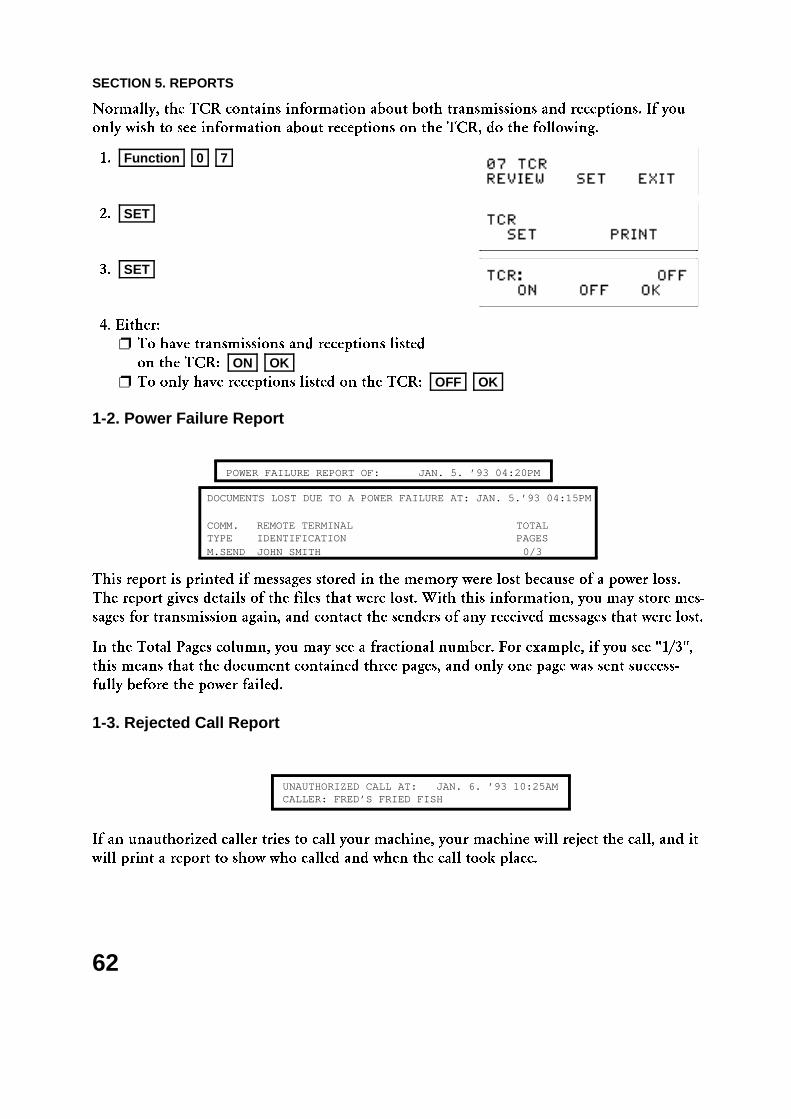
Normally, the TCR contains information about both transmissions and receptions. If you
only wish to see information about receptions on the TCR, do the following.
1. Function 0 7
2. SET
3. SET
4. Either:
❐ To have transmissions and receptions listed
on the TCR: ON OK ❐ To only have receptions listed on the TCR: OFF OK
1-2. Power Failure Report
This report is printed if messages stored in the memory were lost because of a power loss.
The report gives details of the files that were lost. With this information, you may store mes-
sages for transmission again, and contact the senders of any received messages that were lost.
In the Total Pages column, you may see a fractional number. For example, if you see "1/3",
this means that the document contained three pages, and only one page was sent success-
fully before the power failed.
1-3. Rejected Call Report
If an unauthorized caller tries to call your machine, your machine will reject the call, and it
will print a report to show who called and when the call took place.
POWER FAILURE REPORT OF: JAN. 5. ’93 04:20PM
DOCUMENTS LOST DUE TO A POWER FAILURE AT: JAN. 5.’93 04:15PM
COMM.TYPE
REMOTE TERMINALIDENTIFICATION
TOTALPAGES
M.SEND JOHN SMITH 0/3
UNAUTHORIZED CALL AT: JAN. 6. ’93 10:25AMCALLER: FRED’S FRIED FISH
SECTION 5. REPORTS
62
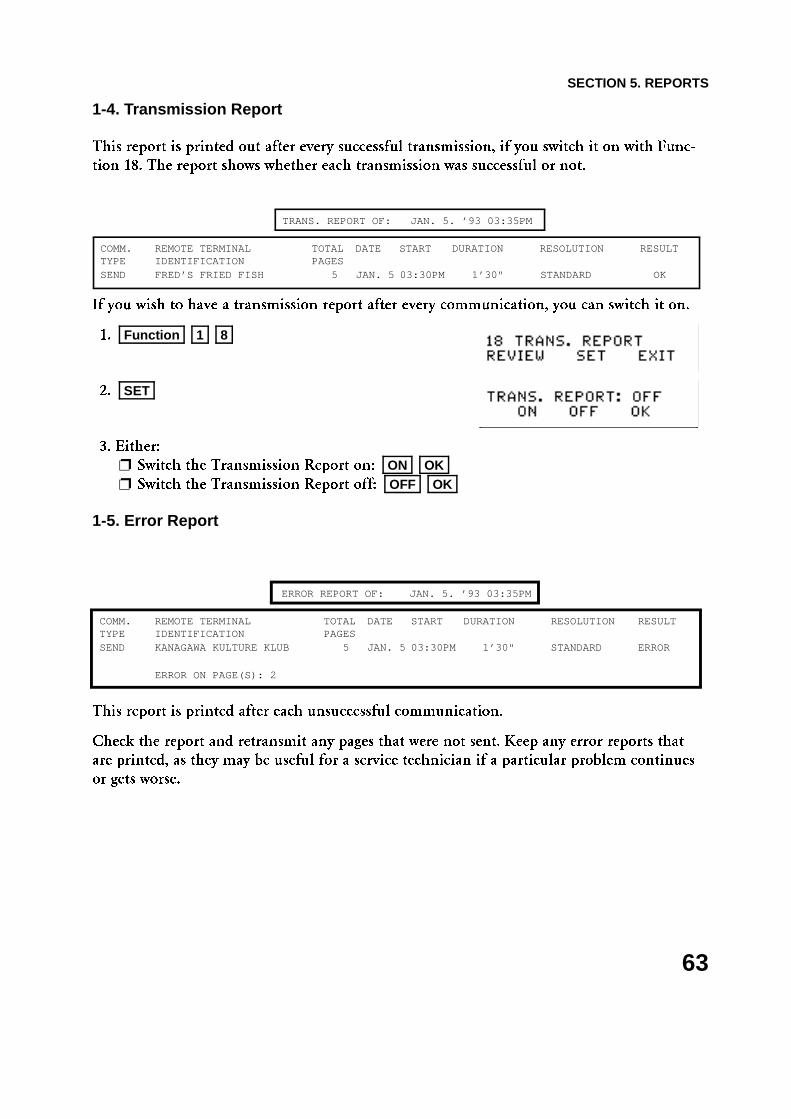
1-4. Transmission Report
This report is printed out after every successful transmission, if you switch it on with Func-
tion 18. The report shows whether each transmission was successful or not.
If you wish to have a transmission report after every communication, you can switch it on.
1. Function 1 8
2. SET
3. Either:
❐ Switch the Transmission Report on: ON OK ❐ Switch the Transmission Report off: OFF OK
1-5. Error Report
This report is printed after each unsuccessful communication.
Check the report and retransmit any pages that were not sent. Keep any error reports that
are printed, as they may be useful for a service technician if a particular problem continues
or gets worse.
TRANS. REPORT OF: JAN. 5. ’93 03:35PM
COMM. TYPE
REMOTE TERMINALIDENTIFICATION
TOTALPAGES
DATE START DURATION RESOLUTION RESULT
SEND FRED’S FRIED FISH 5 JAN. 5 03:30PM 1’30" STANDARD OK
ERROR REPORT OF: JAN. 5. ’93 03:35PM
COMM. TYPE
REMOTE TERMINALIDENTIFICATION
TOTALPAGES
DATE START DURATION RESOLUTION RESULT
SEND KANAGAWA KULTURE KLUB 5 JAN. 5 03:30PM 1’30" STANDARD ERROR
ERROR ON PAGE(S): 2
SECTION 5. REPORTS
63
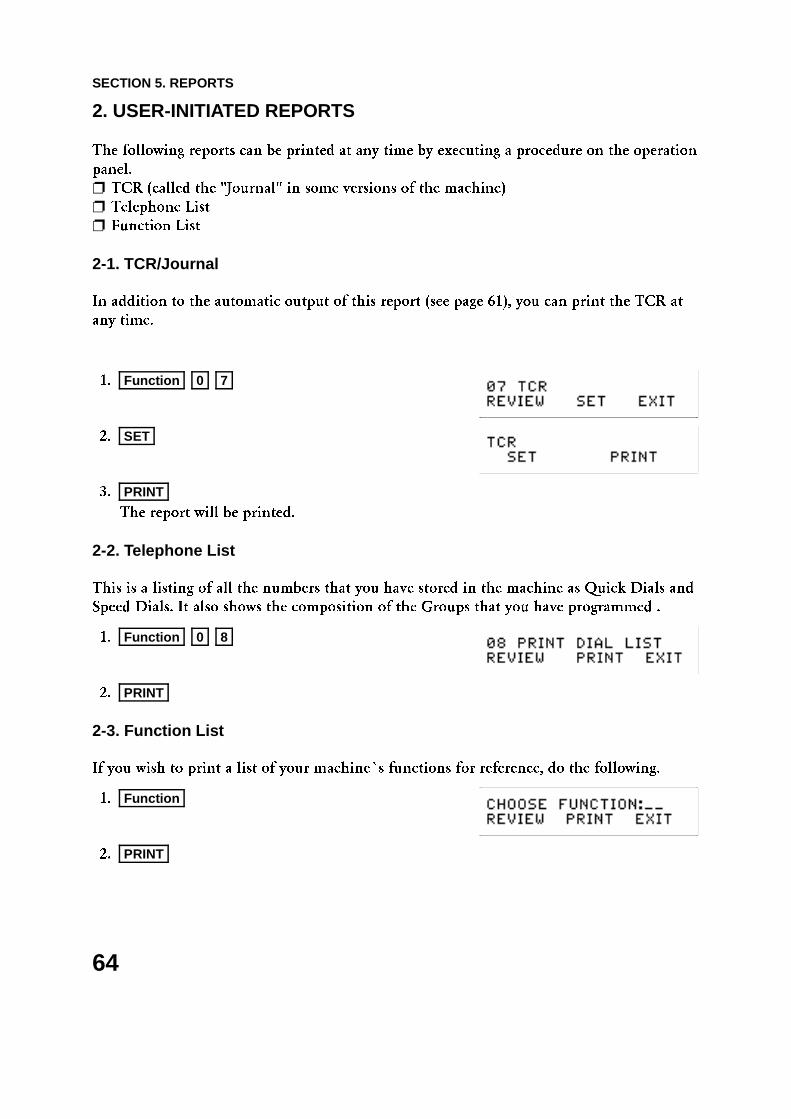
2. USER-INITIATED REPORTS
The following reports can be printed at any time by executing a procedure on the operation
panel.
❐ TCR (called the "Journal" in some versions of the machine)
❐ Telephone List
❐ Function List
2-1. TCR/Journal
In addition to the automatic output of this report (see page 61), you can print the TCR at
any time.
1. Function 0 7
2. SET
3. PRINT
The report will be printed.
2-2. Telephone List
This is a listing of all the numbers that you have stored in the machine as Quick Dials and
Speed Dials. It also shows the composition of the Groups that you have programmed .
1. Function 0 8
2. PRINT
2-3. Function List
If you wish to print a list of your machine�s functions for reference, do the following.
1. Function
2. PRINT
SECTION 5. REPORTS
64

There are a few features that you can use to adjust your printer.
1. Changing the Cassette Size (North American models only)
While the standard cassette holds only letter size paper, an optional extra cassette is avail-
able for Legal-size paper. Consult your dealer if you would like to have one of these cas-
settes. Then, if you wish to use Legal size paper, install the Legal-size cassette. After having
done that, register the new paper size with the machine using the following procedure.
1. Function 3 6 SET
2. Press the > key until LEGAL is displayed.
3. OK
Whenever you change the paper size, you must always work through Function 36after installing the new paper cassette.
2. Magnification Ratios
To alter the appearance of the printer�s output, you can change the horizontal and vertical
magnification ratios.
❐ To change the vertical ratio, use Function 2 1 ❐ To change the horizontal ratio, use Function 2 2 Example: Changing the vertical ratio
1. Function 2 1
2. SET
3. Use the < and > keys to change the ratio.
4. When the ratio is correct: OK
❐ These magnification ratios are used whether Auto Reduction is on or off.
❐ If the horizontal ratio is 100%, the left and right edges of printouts may be missing.
❐ If the vertical ratio is 100%, incoming pages may be printed on more than one sheet of pa-
per if Auto Reduction is switched off.
SECTION 6. ADJUSTING THE PRINTER
6
65
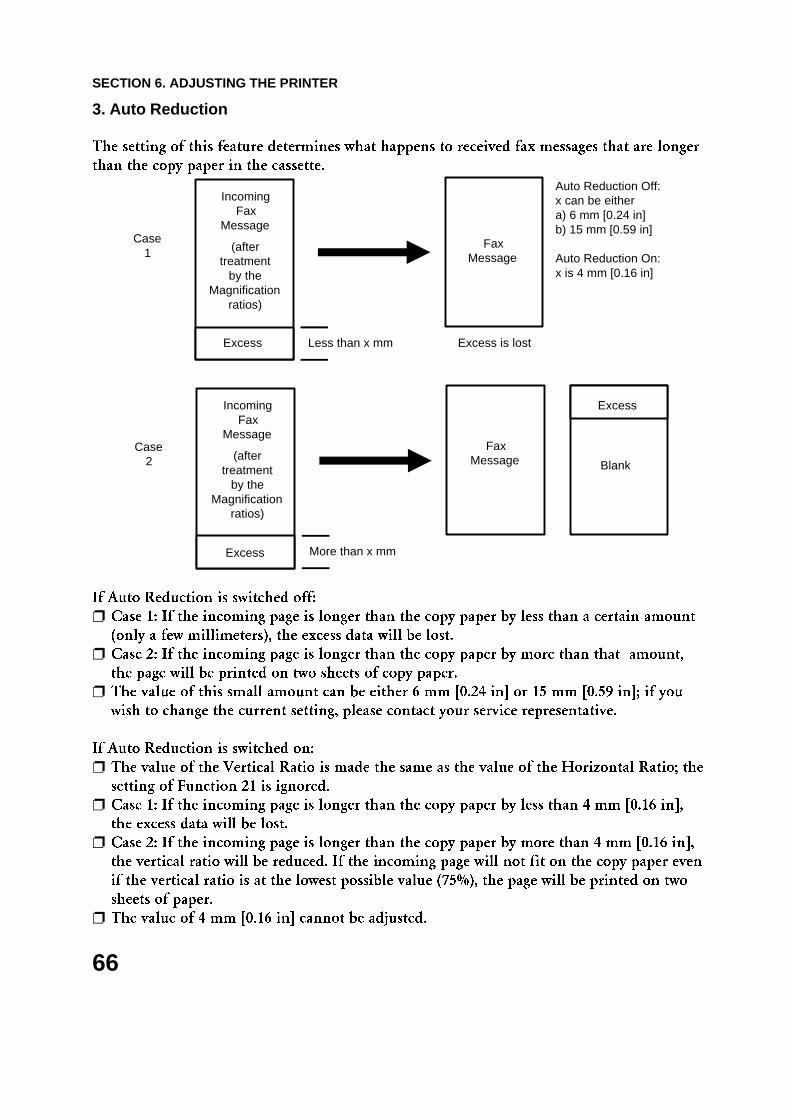
3. Auto Reduction
The setting of this feature determines what happens to received fax messages that are longer
than the copy paper in the cassette.
If Auto Reduction is switched off:
❐ Case 1: If the incoming page is longer than the copy paper by less than a certain amount
(only a few millimeters), the excess data will be lost.
❐ Case 2: If the incoming page is longer than the copy paper by more than that amount,
the page will be printed on two sheets of copy paper.
❐ The value of this small amount can be either 6 mm [0.24 in] or 15 mm [0.59 in]; if you
wish to change the current setting, please contact your service representative.
If Auto Reduction is switched on:
❐ The value of the Vertical Ratio is made the same as the value of the Horizontal Ratio; the
setting of Function 21 is ignored.
❐ Case 1: If the incoming page is longer than the copy paper by less than 4 mm [0.16 in],
the excess data will be lost.
❐ Case 2: If the incoming page is longer than the copy paper by more than 4 mm [0.16 in],
the vertical ratio will be reduced. If the incoming page will not fit on the copy paper even
if the vertical ratio is at the lowest possible value (75%), the page will be printed on two
sheets of paper.
❐ The value of 4 mm [0.16 in] cannot be adjusted.
Case1
Less than x mm
Case2
More than x mm
Excess
Excess
Excess
Excess is lost
FaxMessage
FaxMessage Blank
Auto Reduction Off:x can be eithera) 6 mm [0.24 in]b) 15 mm [0.59 in]
Auto Reduction On:x is 4 mm [0.16 in]
IncomingFax
Message
(aftertreatment
by theMagnification
ratios)
IncomingFax
Message
(aftertreatment
by theMagnification
ratios)
SECTION 6. ADJUSTING THE PRINTER
66

To switch Auto Reduction on or off, do the following.
1. Function 2 0
2. SET
3. Either:
❐ Switch Auto Reduction on: ON OK ❐ Switch Auto Reduction off: OFF OK
Note: ❐ If an incoming message is too big to fit in the remaining memory, AutoReduction is disabled for this fax message.
❐ For Copy mode, the image is always treated in the same way as ifAuto Reduction is off.
4. Ink End Detection
Normally, the machine prints a small black mark at the bottom right of each page. A sensor
inside the machine monitors the intensity of the blackness; if the mark is too pale, the ma-
chine determines that a new ink cartridge must be added.
If you do not wish this mark to appear on your printouts, you can switch it off by doing the
following. If you switch this feature off, you will have to judge visually whether the ink is
running out or not.
1. Function 2 3
2. SET
There are four digits in the top right of the display. Each one of these can be either0 or 1. If the second digit from the right is at 0: The ink sensor mark is currentlyswitched on. If the second digit from the right is at 1: The ink sensor mark is currentlyswitched off.
3. Either:
❐ If you wish to change the setting of the ink
sensor mark digit: 1 OK ❐ Otherwise: OK
SECTION 6. ADJUSTING THE PRINTER
67
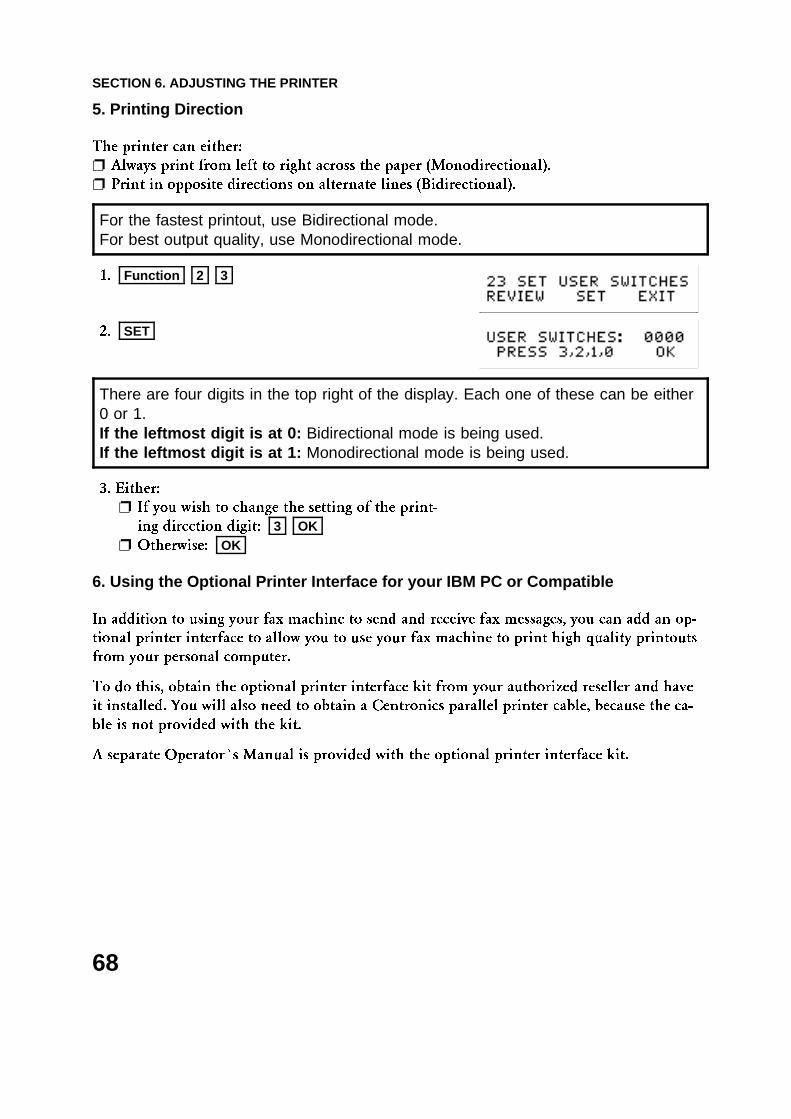
5. Printing Direction
The printer can either:
❐ Always print from left to right across the paper (Monodirectional).
❐ Print in opposite directions on alternate lines (Bidirectional).
For the fastest printout, use Bidirectional mode.For best output quality, use Monodirectional mode.
1. Function 2 3
2. SET
There are four digits in the top right of the display. Each one of these can be either0 or 1. If the leftmost digit is at 0: Bidirectional mode is being used. If the leftmost digit is at 1: Monodirectional mode is being used.
3. Either:
❐ If you wish to change the setting of the print-
ing direction digit: 3 OK ❐ Otherwise: OK
6. Using the Optional Printer Interface for your IBM PC or Compatible
In addition to using your fax machine to send and receive fax messages, you can add an op-
tional printer interface to allow you to use your fax machine to print high quality printouts
from your personal computer.
To do this, obtain the optional printer interface kit from your authorized reseller and have
it installed. You will also need to obtain a Centronics parallel printer cable, because the ca-
ble is not provided with the kit.
A separate Operator�s Manual is provided with the optional printer interface kit.
SECTION 6. ADJUSTING THE PRINTER
68
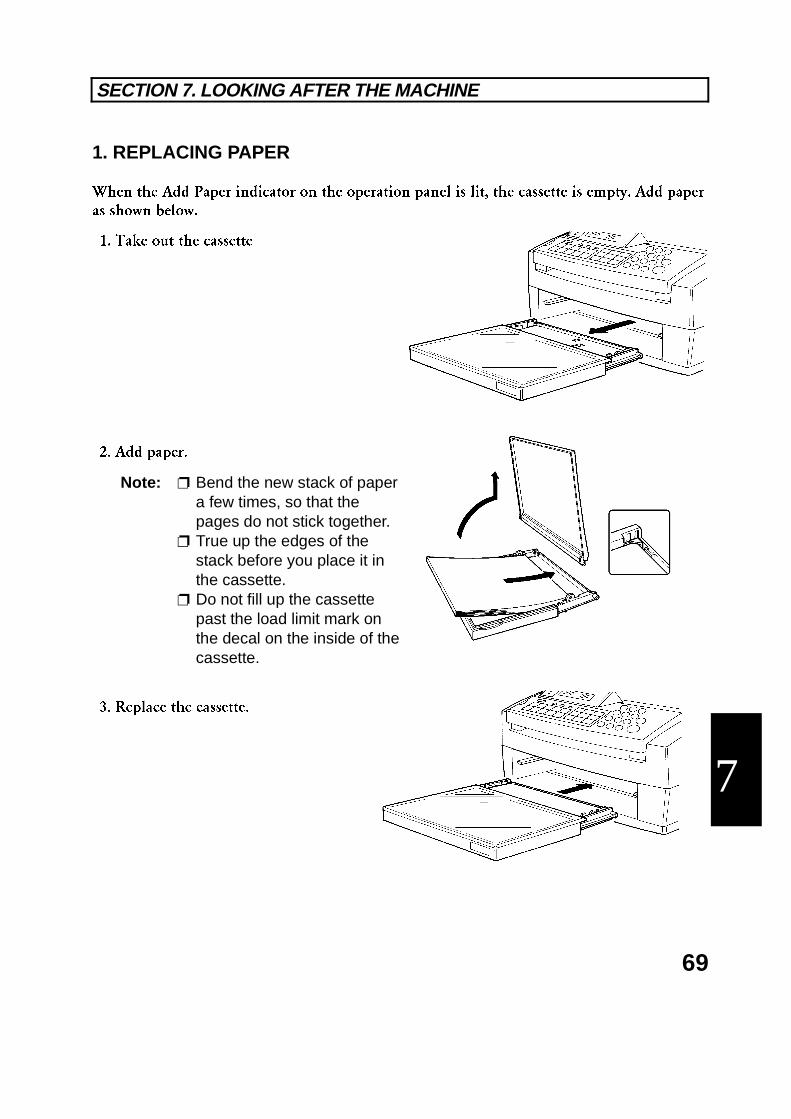
1. REPLACING PAPER
When the Add Paper indicator on the operation panel is lit, the cassette is empty. Add paper
as shown below.
1. Take out the cassette
2. Add paper.
Note: ❐ Bend the new stack of papera few times, so that thepages do not stick together.
❐ True up the edges of thestack before you place it inthe cassette.
❐ Do not fill up the cassettepast the load limit mark onthe decal on the inside of thecassette.
3. Replace the cassette.
SECTION 7. LOOKING AFTER THE MACHINE
7
69
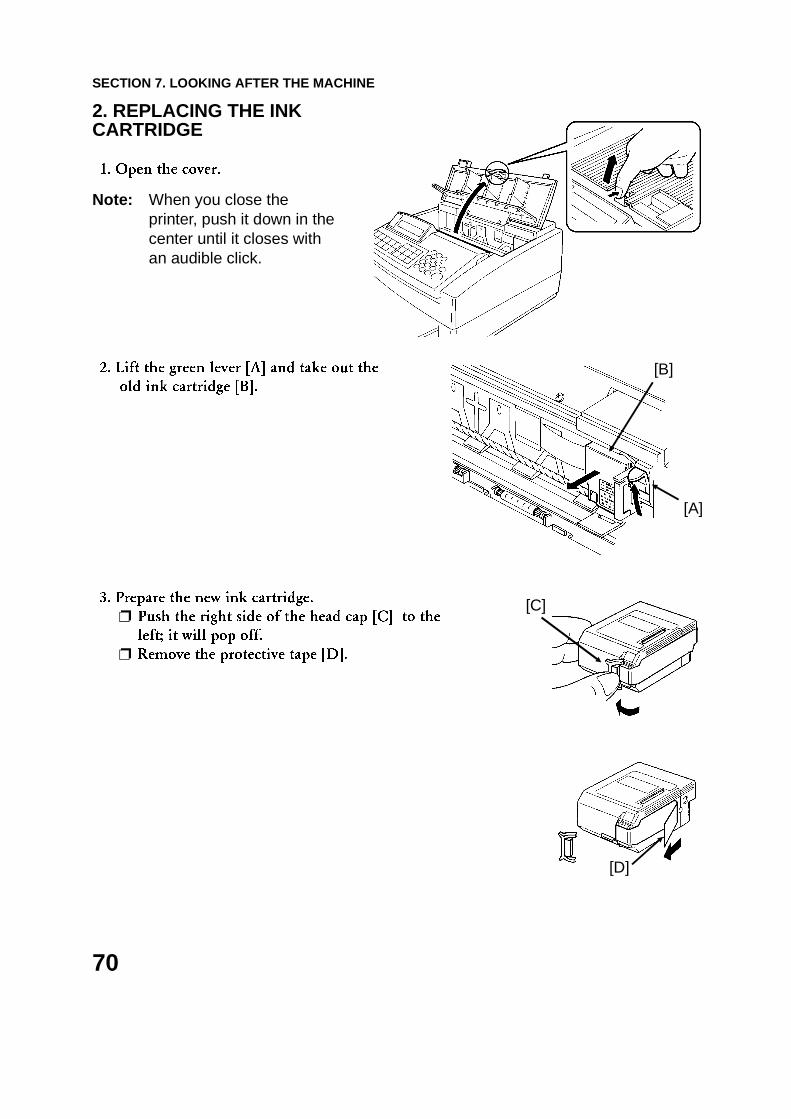
2. REPLACING THE INKCARTRIDGE
1. Open the cover.
Note: When you close theprinter, push it down in thecenter until it closes withan audible click.
2. Lift the green lever [A] and take out the
old ink cartridge [B].
3. Prepare the new ink cartridge.
❐ Push the right side of the head cap [C] to the
left; it will pop off.
❐ Remove the protective tape [D].
[B]
[A]
[D]
[C]
SECTION 7. LOOKING AFTER THE MACHINE
70
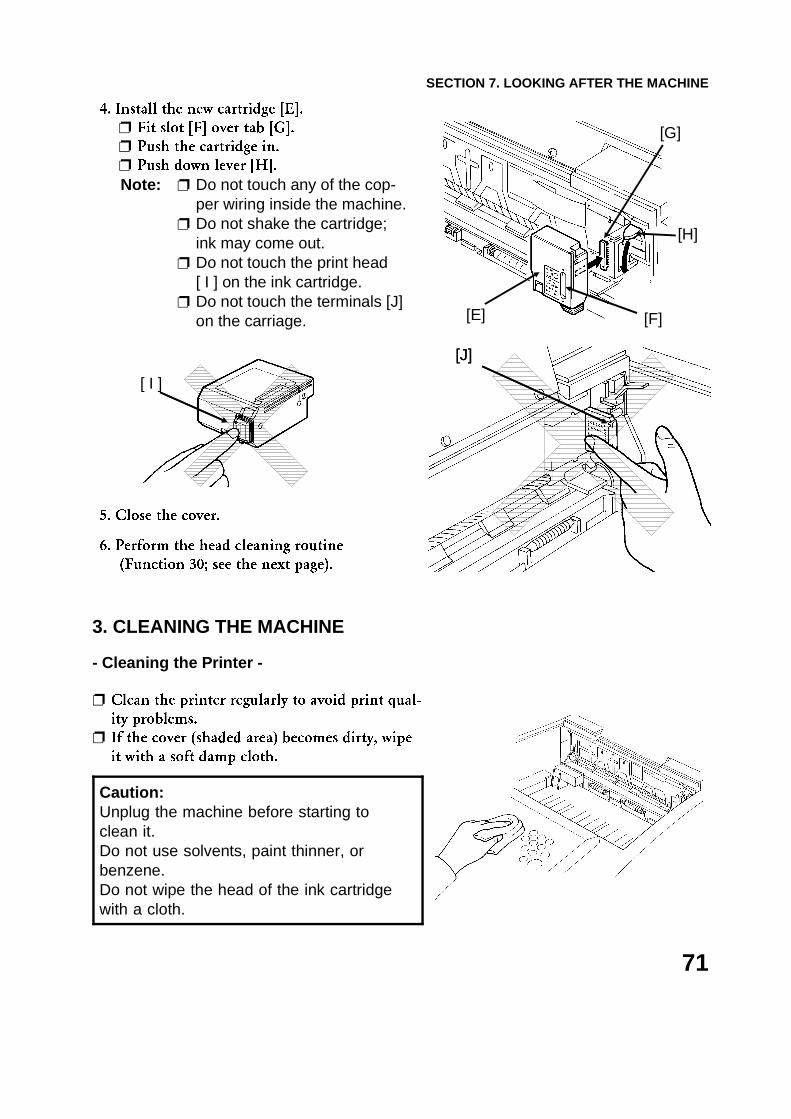
4. Install the new cartridge [E].
❐ Fit slot [F] over tab [G].
❐ Push the cartridge in.
❐ Push down lever [H].
Note: ❐ Do not touch any of the cop-per wiring inside the machine.
❐ Do not shake the cartridge;ink may come out.
❐ Do not touch the print head [ I ] on the ink cartridge.
❐ Do not touch the terminals [J]on the carriage.
5. Close the cover.
6. Perform the head cleaning routine
(Function 30; see the next page).
3. CLEANING THE MACHINE
- Cleaning the Printer -
❐ Clean the printer regularly to avoid print qual-
ity problems.
❐ If the cover (shaded area) becomes dirty, wipe
it with a soft damp cloth.
Caution:Unplug the machine before starting toclean it.Do not use solvents, paint thinner, orbenzene.Do not wipe the head of the ink cartridgewith a cloth.
[H]
[E] [F]
[G]
[ I ]
[J][J]
SECTION 7. LOOKING AFTER THE MACHINE
71
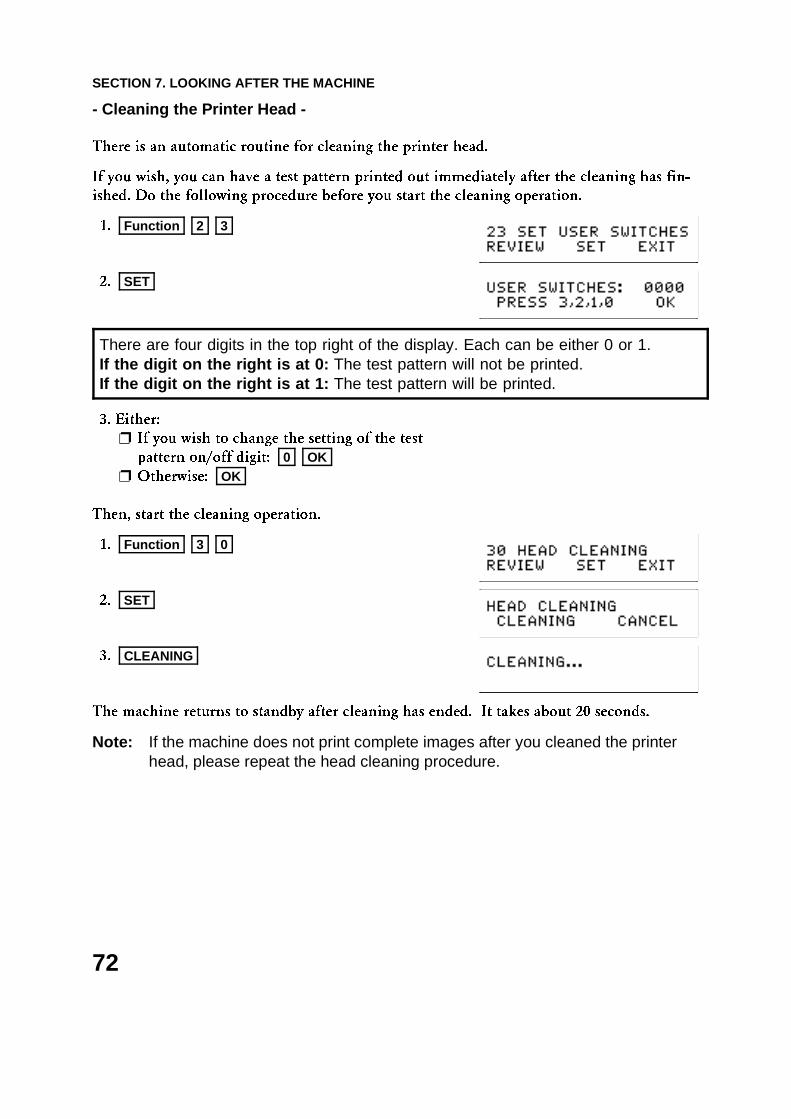
- Cleaning the Printer Head -
There is an automatic routine for cleaning the printer head.
If you wish, you can have a test pattern printed out immediately after the cleaning has fin-
ished. Do the following procedure before you start the cleaning operation.
1. Function 2 3
2. SET
There are four digits in the top right of the display. Each can be either 0 or 1. If the digit on the right is at 0: The test pattern will not be printed. If the digit on the right is at 1: The test pattern will be printed.
3. Either:
❐ If you wish to change the setting of the test
pattern on/off digit: 0 OK ❐ Otherwise: OK
Then, start the cleaning operation.
1. Function 3 0
2. SET
3. CLEANING
The machine returns to standby after cleaning has ended. It takes about 20 seconds.
Note: If the machine does not print complete images after you cleaned the printerhead, please repeat the head cleaning procedure.
SECTION 7. LOOKING AFTER THE MACHINE
72
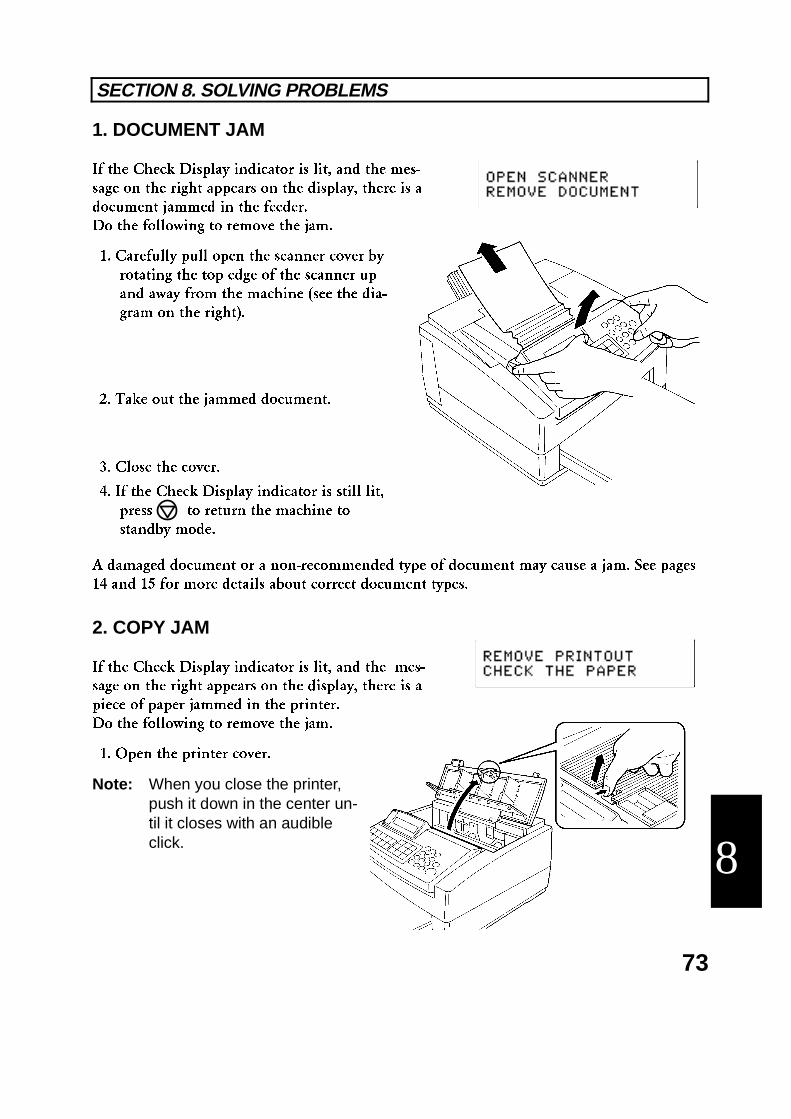
1. DOCUMENT JAM
If the Check Display indicator is lit, and the mes-
sage on the right appears on the display, there is a
document jammed in the feeder.
Do the following to remove the jam.
1. Carefully pull open the scanner cover by
rotating the top edge of the scanner up
and away from the machine (see the dia-
gram on the right).
2. Take out the jammed document.
3. Close the cover.
4. If the Check Display indicator is still lit,
press to return the machine to
standby mode.
A damaged document or a non-recommended type of document may cause a jam. See pages
14 and 15 for more details about correct document types.
2. COPY JAM
If the Check Display indicator is lit, and the mes-
sage on the right appears on the display, there is a
piece of paper jammed in the printer.
Do the following to remove the jam.
1. Open the printer cover.
Note: When you close the printer,push it down in the center un-til it closes with an audibleclick.
SECTION 8. SOLVING PROBLEMS
8
73
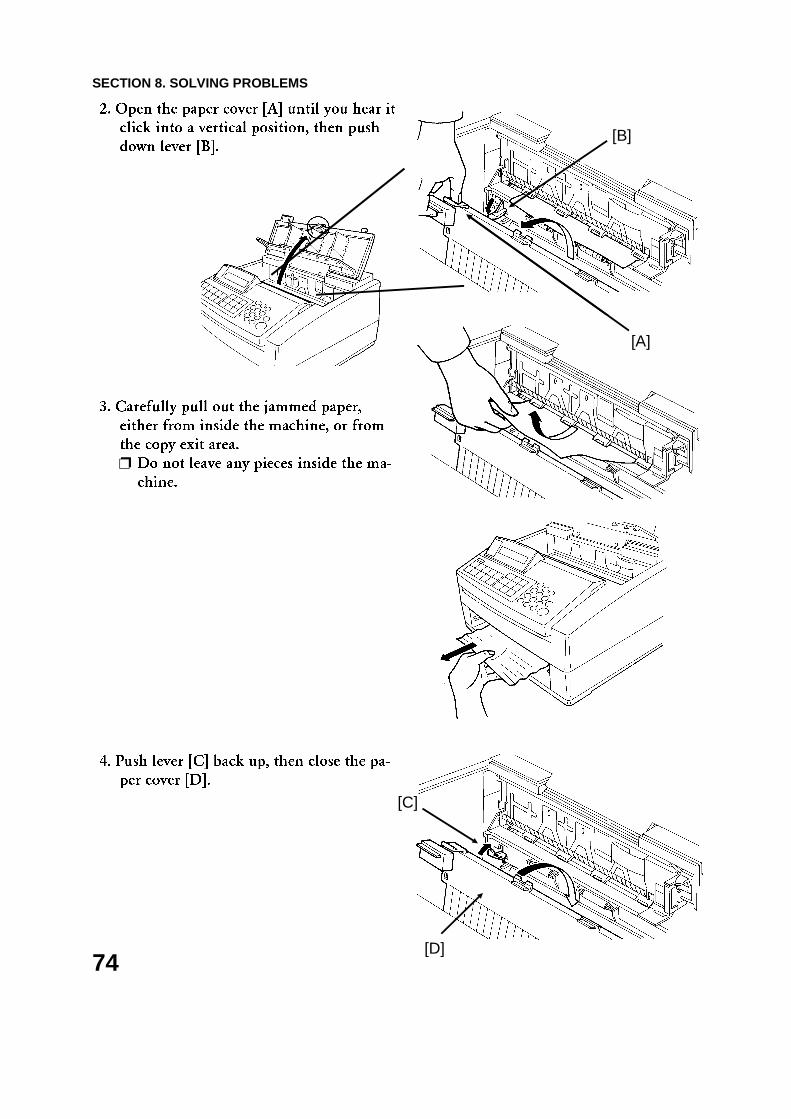
2. Open the paper cover [A] until you hear it
click into a vertical position, then push
down lever [B].
3. Carefully pull out the jammed paper,
either from inside the machine, or from
the copy exit area.
❐ Do not leave any pieces inside the ma-
chine.
4. Push lever [C] back up, then close the pa-
per cover [D].
[B]
[A]
[C]
[D]
SECTION 8. SOLVING PROBLEMS
74
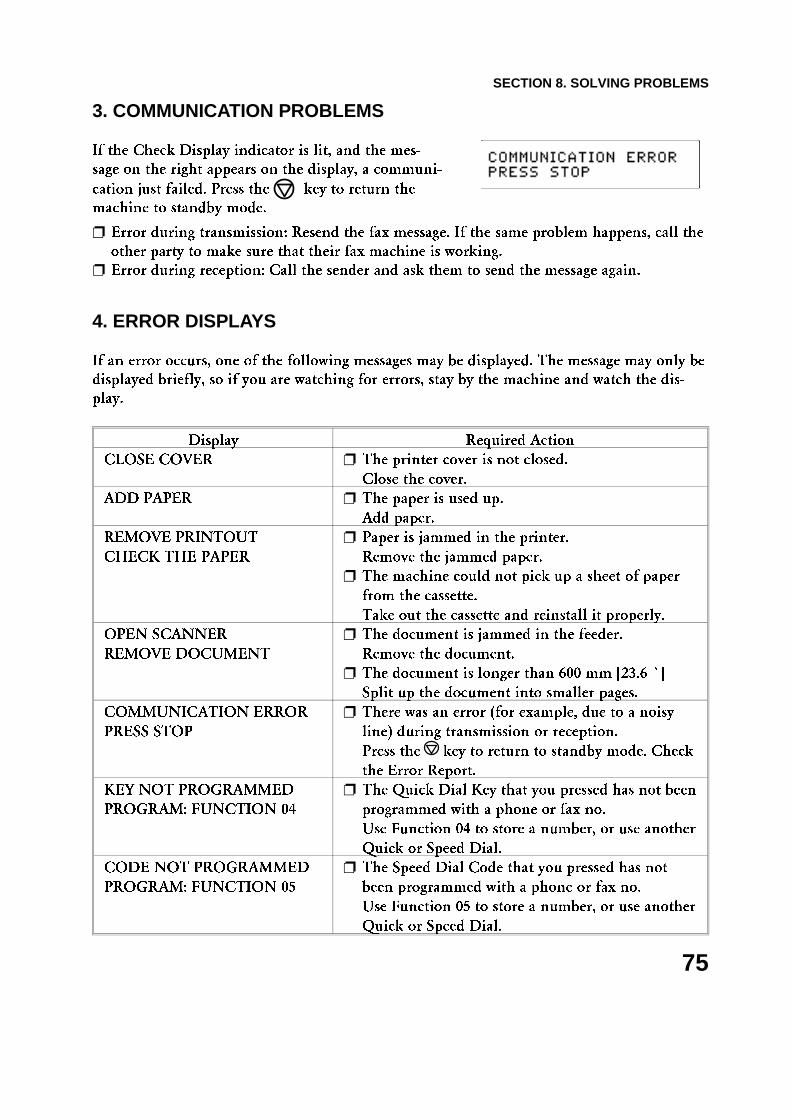
3. COMMUNICATION PROBLEMS
If the Check Display indicator is lit, and the mes-
sage on the right appears on the display, a communi-
cation just failed. Press the key to return the
machine to standby mode.
❐ Error during transmission: Resend the fax message. If the same problem happens, call the
other party to make sure that their fax machine is working.
❐ Error during reception: Call the sender and ask them to send the message again.
4. ERROR DISPLAYS
If an error occurs, one of the following messages may be displayed. The message may only be
displayed briefly, so if you are watching for errors, stay by the machine and watch the dis-
play.
Display Required Action
CLOSE COVER ❐ The printer cover is not closed.
Close the cover.
ADD PAPER ❐ The paper is used up.
Add paper.
REMOVE PRINTOUT
CHECK THE PAPER
❐ Paper is jammed in the printer.
Remove the jammed paper.
❐ The machine could not pick up a sheet of paper
from the cassette.
Take out the cassette and reinstall it properly.
OPEN SCANNER
REMOVE DOCUMENT
❐ The document is jammed in the feeder.
Remove the document.
❐ The document is longer than 600 mm [23.6 �]
Split up the document into smaller pages.
COMMUNICATION ERROR
PRESS STOP
❐ There was an error (for example, due to a noisy
line) during transmission or reception.
Press the key to return to standby mode. Check
the Error Report.
KEY NOT PROGRAMMED
PROGRAM: FUNCTION 04
❐ The Quick Dial Key that you pressed has not been
programmed with a phone or fax no.
Use Function 04 to store a number, or use another
Quick or Speed Dial.
CODE NOT PROGRAMMED
PROGRAM: FUNCTION 05
❐ The Speed Dial Code that you pressed has not
been programmed with a phone or fax no.
Use Function 05 to store a number, or use another
Quick or Speed Dial.
SECTION 8. SOLVING PROBLEMS
75
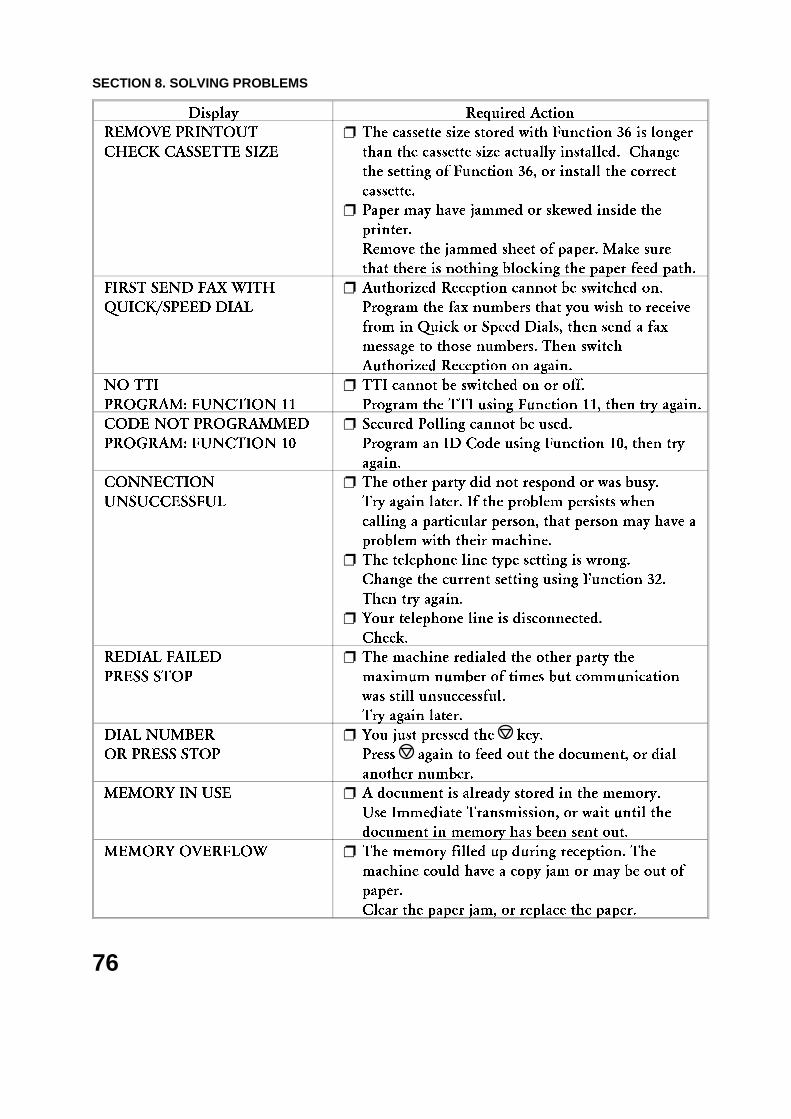
Display Required Action
REMOVE PRINTOUT
CHECK CASSETTE SIZE
❐ The cassette size stored with Function 36 is longer
than the cassette size actually installed. Change
the setting of Function 36, or install the correct
cassette.
❐ Paper may have jammed or skewed inside the
printer.
Remove the jammed sheet of paper. Make sure
that there is nothing blocking the paper feed path.
FIRST SEND FAX WITH
QUICK/SPEED DIAL
❐ Authorized Reception cannot be switched on.
Program the fax numbers that you wish to receive
from in Quick or Speed Dials, then send a fax
message to those numbers. Then switch
Authorized Reception on again.
NO TTI
PROGRAM: FUNCTION 11
❐ TTI cannot be switched on or off.
Program the TTI using Function 11, then try again.
CODE NOT PROGRAMMED
PROGRAM: FUNCTION 10
❐ Secured Polling cannot be used.
Program an ID Code using Function 10, then try
again.
CONNECTION
UNSUCCESSFUL
❐ The other party did not respond or was busy.
Try again later. If the problem persists when
calling a particular person, that person may have a
problem with their machine.
❐ The telephone line type setting is wrong.
Change the current setting using Function 32.
Then try again.
❐ Your telephone line is disconnected.
Check.
REDIAL FAILED
PRESS STOP
❐ The machine redialed the other party the
maximum number of times but communication
was still unsuccessful.
Try again later.
DIAL NUMBER
OR PRESS STOP
❐ You just pressed the key.
Press again to feed out the document, or dial
another number.
MEMORY IN USE ❐ A document is already stored in the memory.
Use Immediate Transmission, or wait until the
document in memory has been sent out.
MEMORY OVERFLOW ❐ The memory filled up during reception. The
machine could have a copy jam or may be out of
paper.
Clear the paper jam, or replace the paper.
SECTION 8. SOLVING PROBLEMS
76
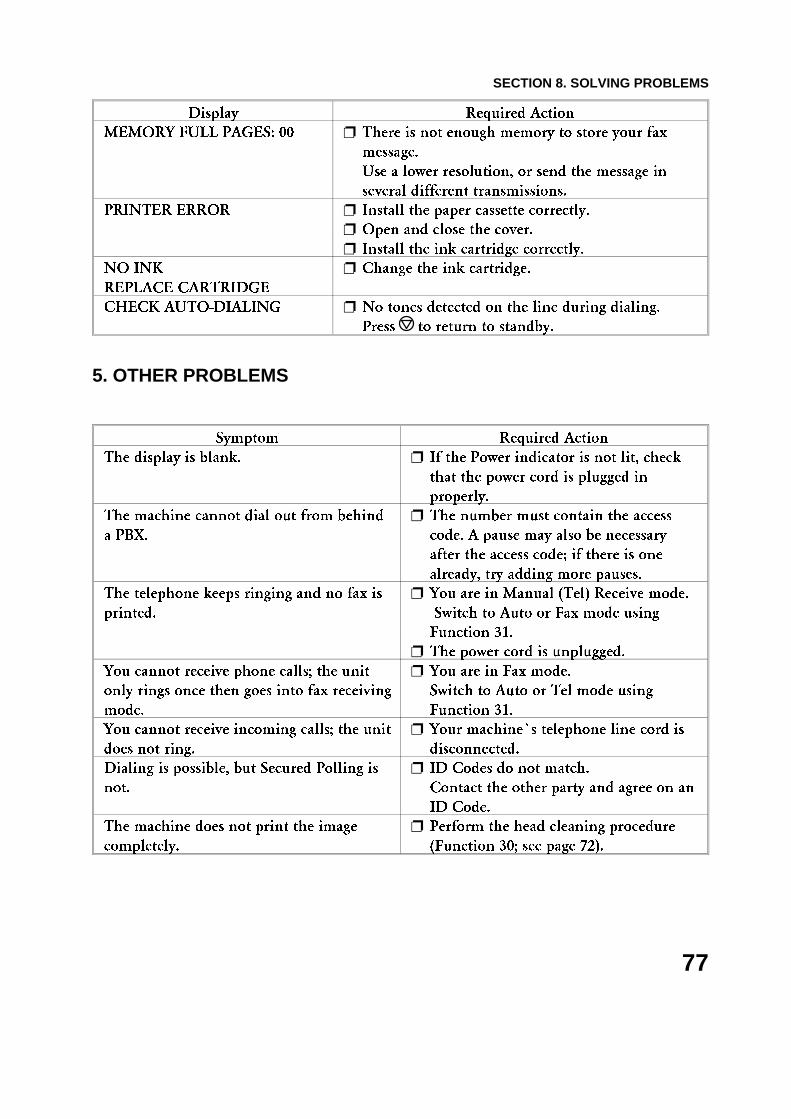
Display Required Action
MEMORY FULL PAGES: 00 ❐ There is not enough memory to store your fax
message.
Use a lower resolution, or send the message in
several different transmissions.
PRINTER ERROR ❐ Install the paper cassette correctly.
❐ Open and close the cover.
❐ Install the ink cartridge correctly.
NO INK
REPLACE CARTRIDGE
❐ Change the ink cartridge.
CHECK AUTO-DIALING ❐ No tones detected on the line during dialing.
Press to return to standby.
5. OTHER PROBLEMS
Symptom Required Action
The display is blank. ❐ If the Power indicator is not lit, check
that the power cord is plugged in
properly.
The machine cannot dial out from behind
a PBX.
❐ The number must contain the access
code. A pause may also be necessary
after the access code; if there is one
already, try adding more pauses.
The telephone keeps ringing and no fax is
printed.
❐ You are in Manual (Tel) Receive mode.
Switch to Auto or Fax mode using
Function 31.
❐ The power cord is unplugged.
You cannot receive phone calls; the unit
only rings once then goes into fax receiving
mode.
❐ You are in Fax mode.
Switch to Auto or Tel mode using
Function 31.
You cannot receive incoming calls; the unit
does not ring.
❐ Your machine�s telephone line cord is
disconnected.
Dialing is possible, but Secured Polling is
not.
❐ ID Codes do not match.
Contact the other party and agree on an
ID Code.
The machine does not print the image
completely.
❐ Perform the head cleaning procedure
(Function 30; see page 72).
SECTION 8. SOLVING PROBLEMS
77
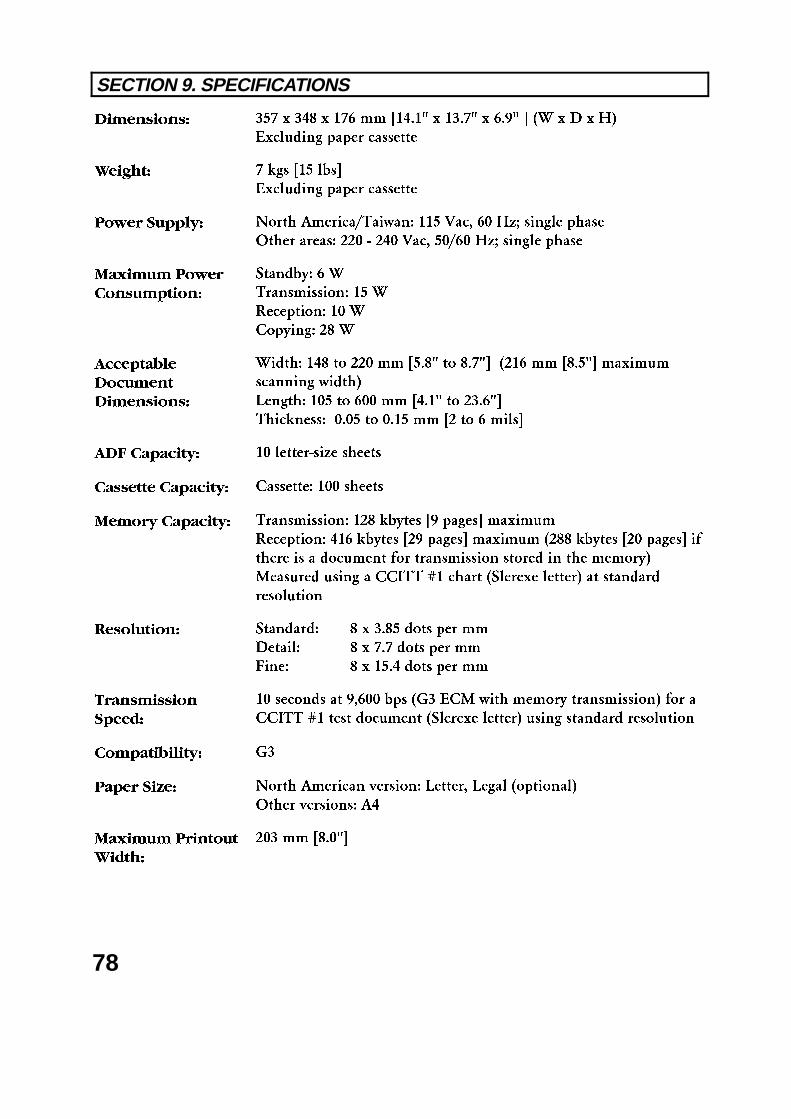
Dimensions: 357 x 348 x 176 mm [14.1" x 13.7" x 6.9" ] (W x D x H)
Excluding paper cassette
Weight: 7 kgs [15 lbs]
Excluding paper cassette
Power Supply: North America/Taiwan: 115 Vac, 60 Hz; single phase
Other areas: 220 - 240 Vac, 50/60 Hz; single phase
Maximum Power
Consumption:
Standby: 6 W
Transmission: 15 W
Reception: 10 W
Copying: 28 W
Acceptable
Document
Dimensions:
Width: 148 to 220 mm [5.8" to 8.7"] (216 mm [8.5"] maximum
scanning width)
Length: 105 to 600 mm [4.1" to 23.6"]
Thickness: 0.05 to 0.15 mm [2 to 6 mils]
ADF Capacity: 10 letter-size sheets
Cassette Capacity: Cassette: 100 sheets
Memory Capacity: Transmission: 128 kbytes [9 pages] maximum
Reception: 416 kbytes [29 pages] maximum (288 kbytes [20 pages] if
there is a document for transmission stored in the memory)
Measured using a CCITT #1 chart (Slerexe letter) at standard
resolution
Resolution: Standard: 8 x 3.85 dots per mm
Detail: 8 x 7.7 dots per mm
Fine: 8 x 15.4 dots per mm
Transmission
Speed:
10 seconds at 9,600 bps (G3 ECM with memory transmission) for a
CCITT #1 test document (Slerexe letter) using standard resolution
Compatibility: G3
Paper Size: North American version: Letter, Legal (optional)
Other versions: A4
Maximum Printout
Width:
203 mm [8.0"]
SECTION 9. SPECIFICATIONS
78
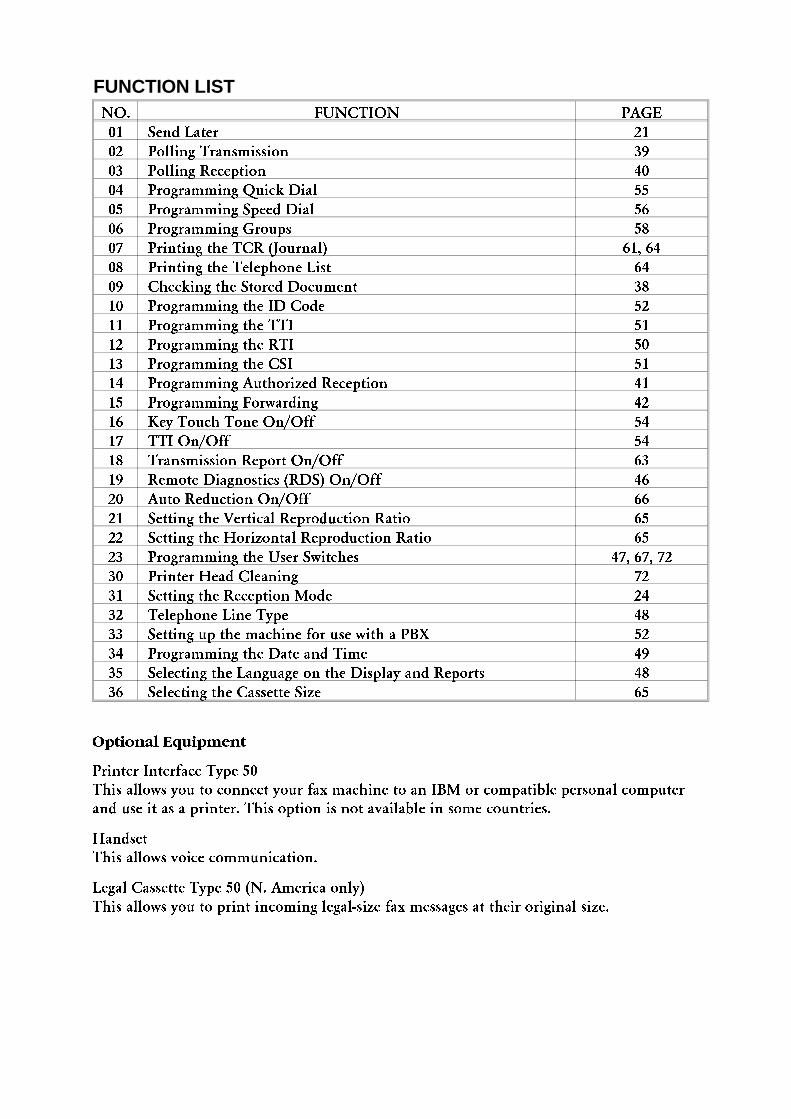
NO. FUNCTION PAGE
01 Send Later 21
02 Polling Transmission 39
03 Polling Reception 40
04 Programming Quick Dial 55
05 Programming Speed Dial 56
06 Programming Groups 58
07 Printing the TCR (Journal) 61, 64
08 Printing the Telephone List 64
09 Checking the Stored Document 38
10 Programming the ID Code 52
11 Programming the TTI 51
12 Programming the RTI 50
13 Programming the CSI 51
14 Programming Authorized Reception 41
15 Programming Forwarding 42
16 Key Touch Tone On/Off 54
17 TTI On/Off 54
18 Transmission Report On/Off 63
19 Remote Diagnostics (RDS) On/Off 46
20 Auto Reduction On/Off 66
21 Setting the Vertical Reproduction Ratio 65
22 Setting the Horizontal Reproduction Ratio 65
23 Programming the User Switches 47, 67, 72
30 Printer Head Cleaning 72
31 Setting the Reception Mode 24
32 Telephone Line Type 48
33 Setting up the machine for use with a PBX 52
34 Programming the Date and Time 49
35 Selecting the Language on the Display and Reports 48
36 Selecting the Cassette Size 65
Optional Equipment
Printer Interface Type 50
This allows you to connect your fax machine to an IBM or compatible personal computer
and use it as a printer. This option is not available in some countries.
Handset
This allows voice communication.
Legal Cassette Type 50 (N. America only)
This allows you to print incoming legal-size fax messages at their original size.
FUNCTION LIST
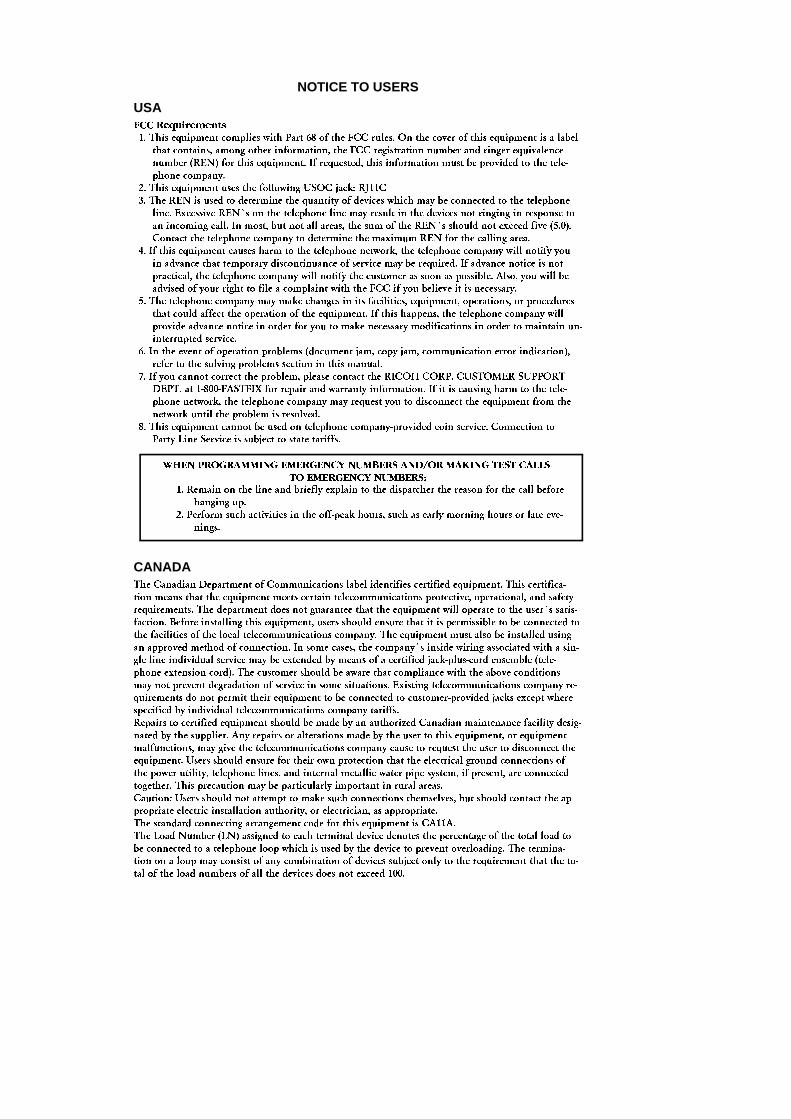
USAFCC Requirements
1. This equipment complies with Part 68 of the FCC rules. On the cover of this equipment is a label
that contains, among other information, the FCC registration number and ringer equivalence
number (REN) for this equipment. If requested, this information must be provided to the tele-
phone company.
2. This equipment uses the following USOC jack: RJ11C
3. The REN is used to determine the quantity of devices which may be connected to the telephone
line. Excessive REN�s on the telephone line may result in the devices not ringing in response to
an incoming call. In most, but not all areas, the sum of the REN�s should not exceed five (5.0).
Contact the telephone company to determine the maximum REN for the calling area.
4. If this equipment causes harm to the telephone network, the telephone company will notify you
in advance that temporary discontinuance of service may be required. If advance notice is not
practical, the telephone company will notify the customer as soon as possible. Also, you will be
advised of your right to file a complaint with the FCC if you believe it is necessary.
5. The telephone company may make changes in its facilities, equipment, operations, or procedures
that could affect the operation of the equipment. If this happens, the telephone company will
provide advance notice in order for you to make necessary modifications in order to maintain un-
interrupted service.
6. In the event of operation problems (document jam, copy jam, communication error indication),
refer to the solving problems section in this manual.
7. If you cannot correct the problem, please contact the RICOH CORP. CUSTOMER SUPPORT
DEPT. at 1-800-FASTFIX for repair and warranty information. If it is causing harm to the tele-
phone network, the telephone company may request you to disconnect the equipment from the
network until the problem is resolved.
8. This equipment cannot be used on telephone company-provided coin service. Connection to
Party Line Service is subject to state tariffs.
WHEN PROGRAMMING EMERGENCY NUMBERS AND/OR MAKING TEST CALLS
TO EMERGENCY NUMBERS:
1. Remain on the line and briefly explain to the dispatcher the reason for the call before
hanging up.
2. Perform such activities in the off-peak hours, such as early morning hours or late eve-
nings.
CANADAThe Canadian Department of Communications label identifies certified equipment. This certifica-
tion means that the equipment meets certain telecommunications protective, operational, and safety
requirements. The department does not guarantee that the equipment will operate to the user�s satis-
faction. Before installing this equipment, users should ensure that it is permissible to be connected to
the facilities of the local telecommunications company. The equipment must also be installed using
an approved method of connection. In some cases, the company�s inside wiring associated with a sin-
gle line individual service may be extended by means of a certified jack-plus-cord ensemble (tele-
phone extension cord). The customer should be aware that compliance with the above conditions
may not prevent degradation of service in some situations. Existing telecommunications company re-
quirements do not permit their equipment to be connected to customer-provided jacks except where
specified by individual telecommunications company tariffs.
Repairs to certified equipment should be made by an authorized Canadian maintenance facility desig-
nated by the supplier. Any repairs or alterations made by the user to this equipment, or equipment
malfunctions, may give the telecommunications company cause to request the user to disconnect the
equipment. Users should ensure for their own protection that the electrical ground connections of
the power utility, telephone lines, and internal metallic water pipe system, if present, are connected
together. This precaution may be particularly important in rural areas.
Caution: Users should not attempt to make such connections themselves, but should contact the ap-
propriate electric installation authority, or electrician, as appropriate.
The standard connecting arrangement code for this equipment is CA11A.
The Load Number (LN) assigned to each terminal device denotes the percentage of the total load to
be connected to a telephone loop which is used by the device to prevent overloading. The termina-
tion on a loop may consist of any combination of devices subject only to the requirement that the to-
tal of the load numbers of all the devices does not exceed 100.
NOTICE TO USERS
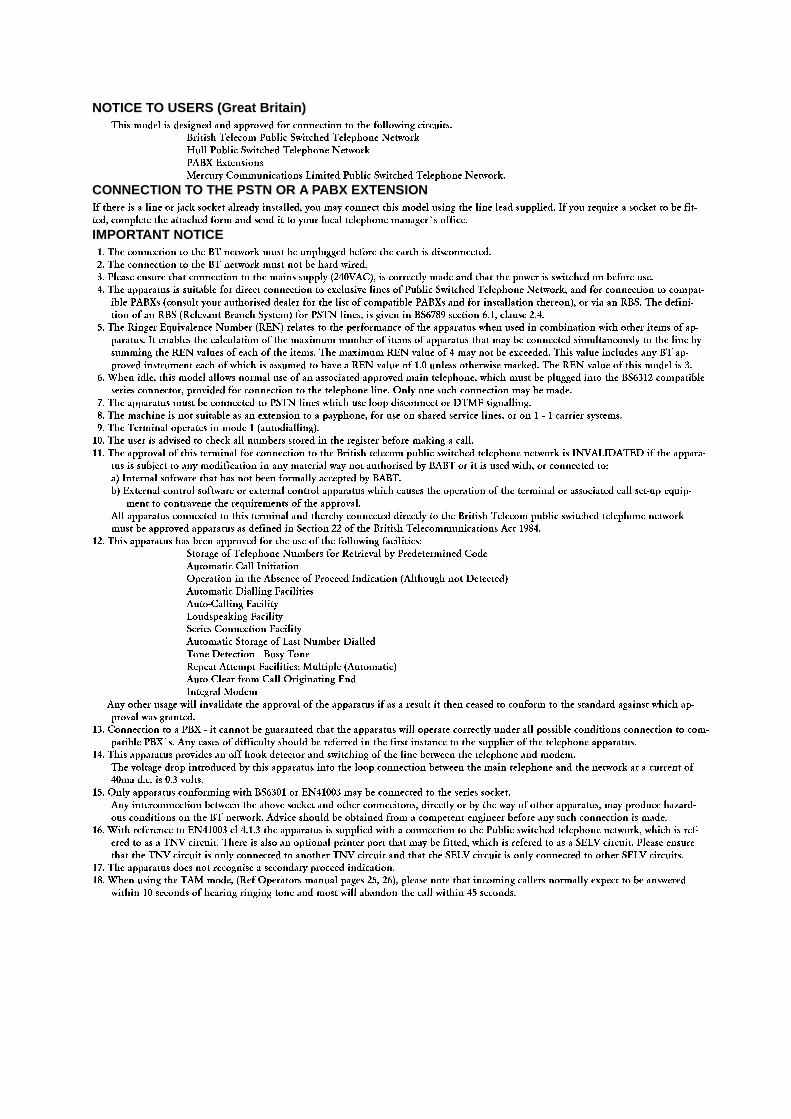
NOTICE TO USERS (Great Britain)This model is designed and approved for connection to the following circuits.
British Telecom Public Switched Telephone Network
Hull Public Switched Telephone Network
PABX Extensions
Mercury Communications Limited Public Switched Telephone Network.
CONNECTION TO THE PSTN OR A PABX EXTENSIONIf there is a line or jack socket already installed, you may connect this model using the line lead supplied. If you require a socket to be fit-
ted, complete the attached form and send it to your local telephone manager�s office.
IMPORTANT NOTICE 1. The connection to the BT network must be unplugged before the earth is disconnected.
2. The connection to the BT network must not be hard wired.
3. Please ensure that connection to the mains supply (240VAC), is correctly made and that the power is switched on before use.
4. The apparatus is suitable for direct connection to exclusive lines of Public Switched Telephone Network, and for connection to compat-
ible PABXs (consult your authorised dealer for the list of compatible PABXs and for installation thereon), or via an RBS. The defini-
tion of an RBS (Relevant Branch System) for PSTN lines, is given in BS6789 section 6.1, clause 2.4.
5. The Ringer Equivalence Number (REN) relates to the performance of the apparatus when used in combination with other items of ap-
paratus. It enables the calculation of the maximum number of items of apparatus that may be connected simultaneously to the line by
summing the REN values of each of the items. The maximum REN value of 4 may not be exceeded. This value includes any BT ap-
proved instrument each of which is assumed to have a REN value of 1.0 unless otherwise marked. The REN value of this model is 3.
6. When idle, this model allows normal use of an associated approved main telephone, which must be plugged into the BS6312 compatible
series connector, provided for connection to the telephone line. Only one such connection may be made.
7. The apparatus must be connected to PSTN lines which use loop disconnect or DTMF signalling.
8. The machine is not suitable as an extension to a payphone, for use on shared service lines, or on 1 - 1 carrier systems.
9. The Terminal operates in mode 1 (autodialling).
10. The user is advised to check all numbers stored in the register before making a call.
11. The approval of this terminal for connection to the British telecom public switched telephone network is INVALIDATED if the appara-
tus is subject to any modification in any material way not authorised by BABT or it is used with, or connected to:
a) Internal software that has not been formally accepted by BABT.
b) External control software or external control apparatus which causes the operation of the terminal or associated call set-up equip-
ment to contravene the requirements of the approval.
All apparatus connected to this terminal and thereby connected directly to the British Telecom public switched telephone network
must be approved apparatus as defined in Section 22 of the British Telecommunications Act 1984.
12. This apparatus has been approved for the use of the following facilities:
Storage of Telephone Numbers for Retrieval by Predetermined Code
Automatic Call Initiation
Operation in the Absence of Proceed Indication (Although not Detected)
Automatic Dialling Facilities
Auto-Calling Facility
Loudspeaking Facility
Series Connection Facility
Automatic Storage of Last Number Dialled
Tone Detection - Busy Tone
Repeat Attempt Facilities: Multiple (Automatic)
Auto Clear from Call Originating End
Integral Modem
Any other usage will invalidate the approval of the apparatus if as a result it then ceased to conform to the standard against which ap-
proval was granted.
13. Connection to a PBX - it cannot be guaranteed that the apparatus will operate correctly under all possible conditions connection to com-
patible PBX�s. Any cases of difficulty should be referred in the first instance to the supplier of the telephone apparatus.
14. This apparatus provides an off hook detector and switching of the line between the telephone and modem.
The voltage drop introduced by this apparatus into the loop connection between the main telephone and the network at a current of
40ma d.c. is 0.3 volts.
15. Only apparatus conforming with BS6301 or EN41003 may be connected to the series socket.
Any interconnection between the above socket and other connecitons, directly or by the way of other apparatus, may produce hazard-
ous conditions on the BT network. Advice should be obtained from a competent engineer before any such connection is made.
16. With reference to EN41003 cl 4.1.3 the apparatus is supplied with a connection to the Public switched telephone network, which is ref-
ered to as a TNV circuit. There is also an optional printer port that may be fitted, which is refered to as a SELV circuit. Please ensure
that the TNV circuit is only connected to another TNV circuit and that the SELV circuit is only connected to other SELV circuits.
17. The apparatus does not recognise a secondary proceed indication.
18. When using the TAM mode, (Ref Operators manual pages 25, 26), please note that incoming callers normally expect to be answered
within 10 seconds of hearing ringing tone and most will abandon the call within 45 seconds.
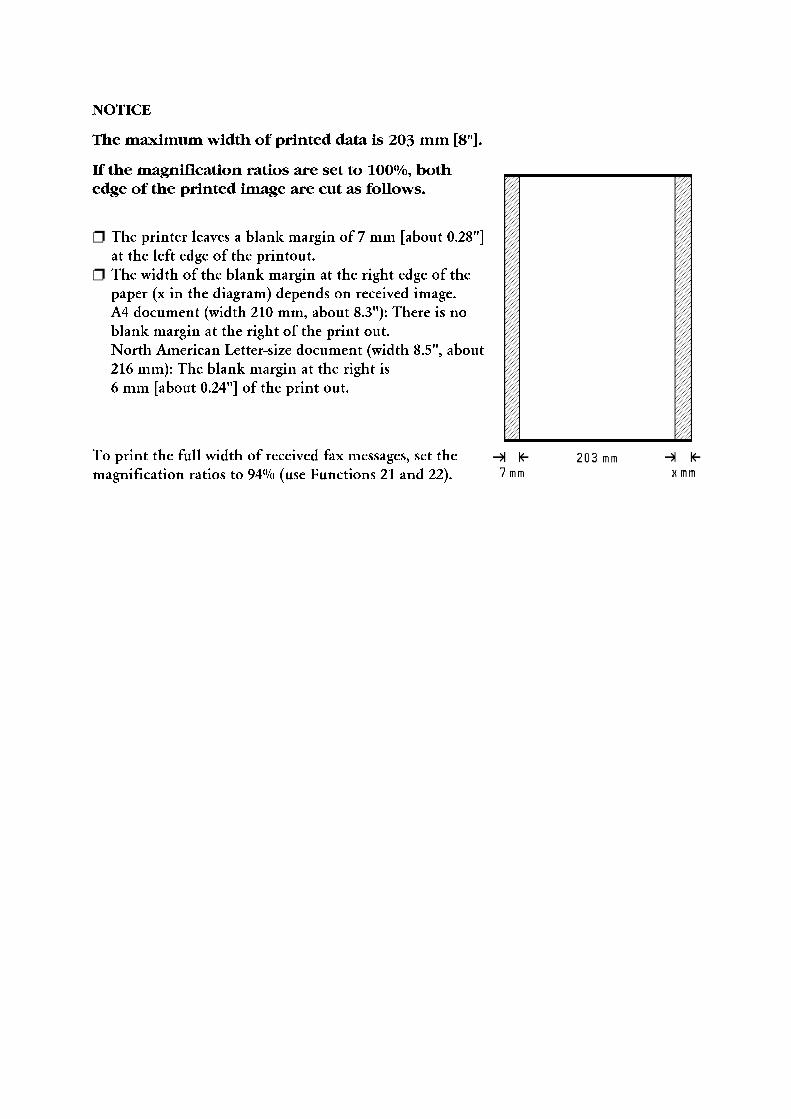
NOTICE
The maximum width of printed data is 203 mm [8"].
If the magnification ratios are set to 100%, both
edge of the printed image are cut as follows.
❐ The printer leaves a blank margin of 7 mm [about 0.28"]
at the left edge of the printout.
❐ The width of the blank margin at the right edge of the
paper (x in the diagram) depends on received image.
A4 document (width 210 mm, about 8.3"): There is no
blank margin at the right of the print out.
North American Letter-size document (width 8.5", about
216 mm): The blank margin at the right is
6 mm [about 0.24"] of the print out.
To print the full width of received fax messages, set the
magnification ratios to 94% (use Functions 21 and 22).
PRINTER INTERFACE TYPE 50
OPERATOR’S MANUALBEDIENUNGSANLEITUNGMANUALE OPERATIVOMANUAL DE INSTRUCCIONESMANUEL OPERATEURBRUNKSANVISNING
This printer interface can only be installed in models of the H504 series. Before installation, pleasemake sure that the rating plate on the rear of the machine contains "H504".
Diese Druckerschnittstelle kann nur in Faxmodellen der Serie H504 verwendet werden. Vor derInstallation überprüfen Sie bitte, ob an der Rückseite des Geräts auf dem Typenschild "H504" steht.
Questa interfaccia per stampante può venire installata solo nei modelli della serie H504. Primadell’installazione, accertarsi che la targhetta dei dati, situata nella parte posteriore della macchina,contenga la sigla "H504".
Este interface sólo puede instalarse en los modelos de la serie H504. Antes de proceder a suinstalación, por favor asegúrese de que la chapa metálica de identificación en la parte trasera de sumáquina tiene escrito el código "H504".
Cette interface ne peut être installée que sur les modèles de la série H504. Avant l’installation,soyez bien certain que la plaque d’identité à l’arrière de l’appareil porte bien "H504".
Detta skrivar-interface kan endast installeras på modeller i H504-serien. Före installation, kontrolleraatt plattan bak på maskinen innehåller "H504".

Epson® LQ -510IBM® Proprinter X24ECanon® BJ®-10exMicrosoft® Windows
Trademark Notice:Canon and BJ are registered trademarks of Canon Inc.Centronics is a trademark of Centronics Data Computer Corporation.Epson is a registered trademark and LQ is a trademark of Seiko Epson Corporation.IBM is a registered trademark and Proprinter is a trademark of International Business Machines Corp.Microsoft is a registered trademark and Windows is a trademark of Microsoft Corporation.
Warenzeichen-Hinweis:Canon und BJ sind eingetragene Warenzeichen der Canon, Inc.Centronics ist ein Warenzeichen der Centronics Data Computer Corporation.Epson ist ein eingetragenes Warenzeichen und LQ ein Warenzeichen der Seiko Epson Corp.IBM ist ein eingetragenes Warenzeichen und Proprinter ein Warenzeichen der International Business Ma-chines Corporation.Microsoft ist ein eingetragenes Warenzeichen und Windows ein Warenzeichen der Microsoft Corporation.
Der Hersteller behält sich das Recht vor, den Inhalt des vorliegenden Dokuments zu ändern oder zuüberarbeiten. Trotz sorgfältiger Ausarbeitung kann dieses Handbuch Fehler oder Unvollständigkeiten en-thalten. Es wird keine Haftung für Fehler oder Folgeschäden übernommen. Technische Änderungen vorbehalten.
Marchi registrati:Canon e BJ sono marchi registrati della Canon, IncCentronics è un marchio di Centronics Data Computer Corporation.Epson è un marchio registrato e LQ è un marchio della Seiko Epson Corporation.IBM è un marchio registrato e Proprinter è un marchio dell’International Business Machines Corporation.Microsoft è un marchio registrato e Windows è un marchio della Microsoft Corporation.
Aviso de Marca Registrada:Canon y BJ son marcas registradas de Canon, IncCentronics es una marca propiedad de Centronics Data Computer Corporation.Epson es una marca registrada y LQ es una marca propiedad de Seiko Epson Corporation.IBM es una marca registrada y Proprinter es una marca propiedad de International Business MachinesCorporation.Microsoft es una marca registrada y Windows es una marca propiedad de Microsoft Corporation.
Marques déposées:Canon et BJ sont des marques déposées de Canon, Inc.Centronics est une marque déposée de Centronics Data Computer Corporation.Epson est une marque déposée et LQ est une marque de fabrique de Seiko Epson Corp.IBM est une marque déposée et Proprinter est une marque de fabrique d’International Business Ma-chines Corporation.Microsoft est une marque déposée et Windows est une marque de fabrique de Microsoft Corporation.
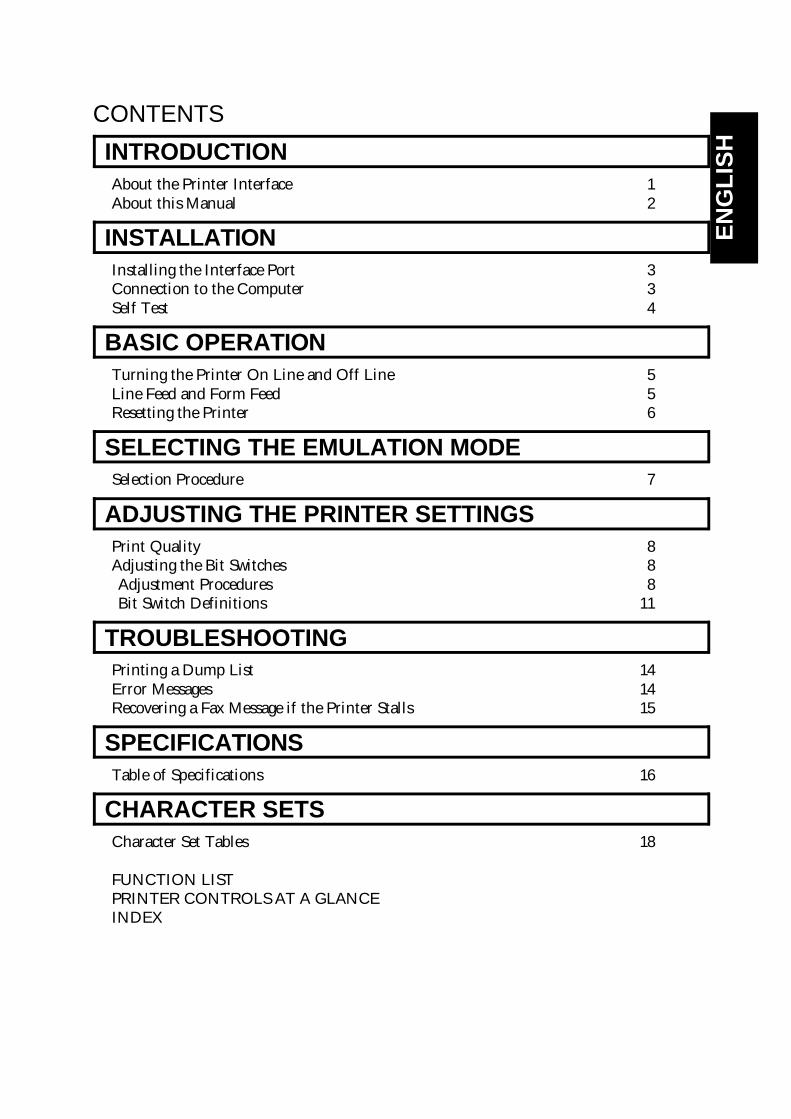
CONTENTS
INTRODUCTIONAbout the Printer Interface 1About this Manual 2
INSTALLATIONInstalling the Interface Port 3Connection to the Computer 3Self Test 4
BASIC OPERATIONTurning the Printer On Line and Off Line 5Line Feed and Form Feed 5Resetting the Printer 6
SELECTING THE EMULATION MODESelection Procedure 7
ADJUSTING THE PRINTER SETTINGSPrint Quality 8Adjusting the Bit Switches 8Adjustment Procedures 8Bit Switch Definitions 11
TROUBLESHOOTINGPrinting a Dump List 14Error Messages 14Recovering a Fax Message if the Printer Stalls 15
SPECIFICATIONSTable of Specifications 16
CHARACTER SETSCharacter Set Tables 18
FUNCTION LISTPRINTER CONTROLS AT A GLANCEINDEX
EN
GL
ISH
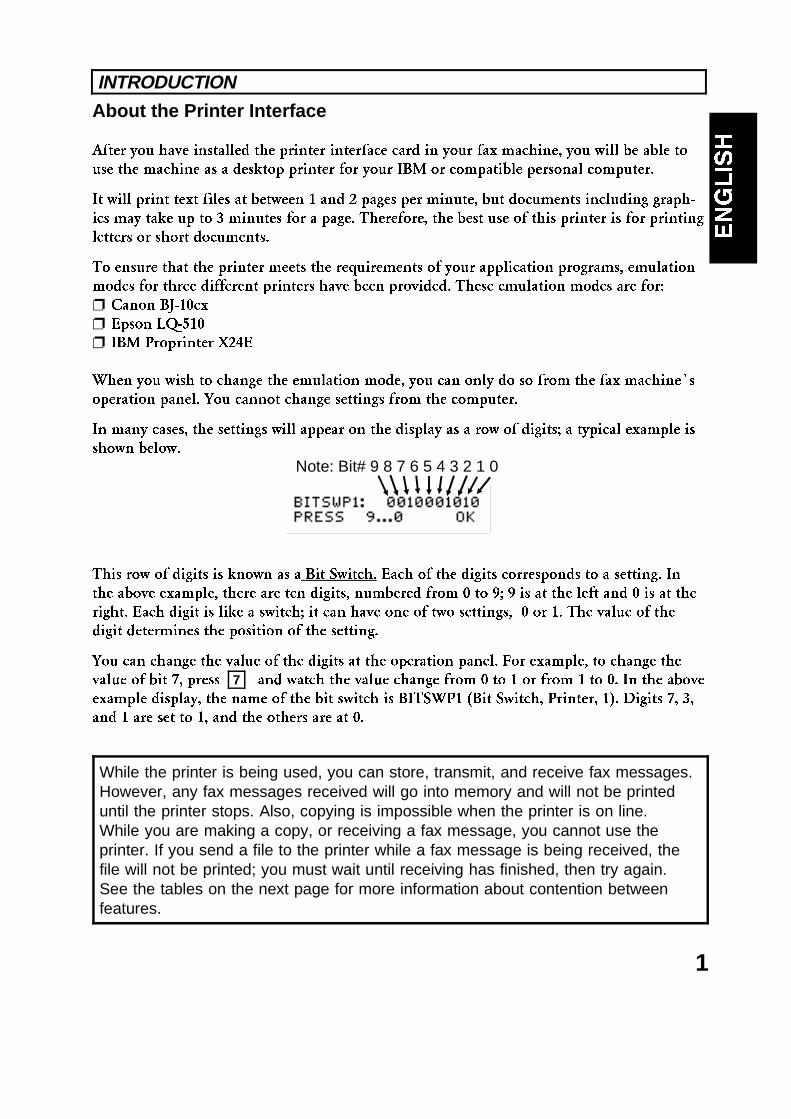
About the Printer Interface
After you have installed the printer interface card in your fax machine, you will be able to
use the machine as a desktop printer for your IBM or compatible personal computer.
It will print text files at between 1 and 2 pages per minute, but documents including graph-
ics may take up to 3 minutes for a page. Therefore, the best use of this printer is for printing
letters or short documents.
To ensure that the printer meets the requirements of your application programs, emulation
modes for three different printers have been provided. These emulation modes are for:
❐ Canon BJ-10ex
❐ Epson LQ-510
❐ IBM Proprinter X24E
When you wish to change the emulation mode, you can only do so from the fax machine�s
operation panel. You cannot change settings from the computer.
In many cases, the settings will appear on the display as a row of digits; a typical example is
shown below.
This row of digits is known as a Bit Switch. Each of the digits corresponds to a setting. In
the above example, there are ten digits, numbered from 0 to 9; 9 is at the left and 0 is at the
right. Each digit is like a switch; it can have one of two settings, 0 or 1. The value of the
digit determines the position of the setting.
You can change the value of the digits at the operation panel. For example, to change the
value of bit 7, press 7 and watch the value change from 0 to 1 or from 1 to 0. In the above
example display, the name of the bit switch is BITSWP1 (Bit Switch, Printer, 1). Digits 7, 3,
and 1 are set to 1, and the others are at 0.
While the printer is being used, you can store, transmit, and receive fax messages.However, any fax messages received will go into memory and will not be printeduntil the printer stops. Also, copying is impossible when the printer is on line.While you are making a copy, or receiving a fax message, you cannot use theprinter. If you send a file to the printer while a fax message is being received, thefile will not be printed; you must wait until receiving has finished, then try again.See the tables on the next page for more information about contention betweenfeatures.
INTRODUCTION
Note: Bit# 9 8 7 6 5 4 3 2 1 0
1
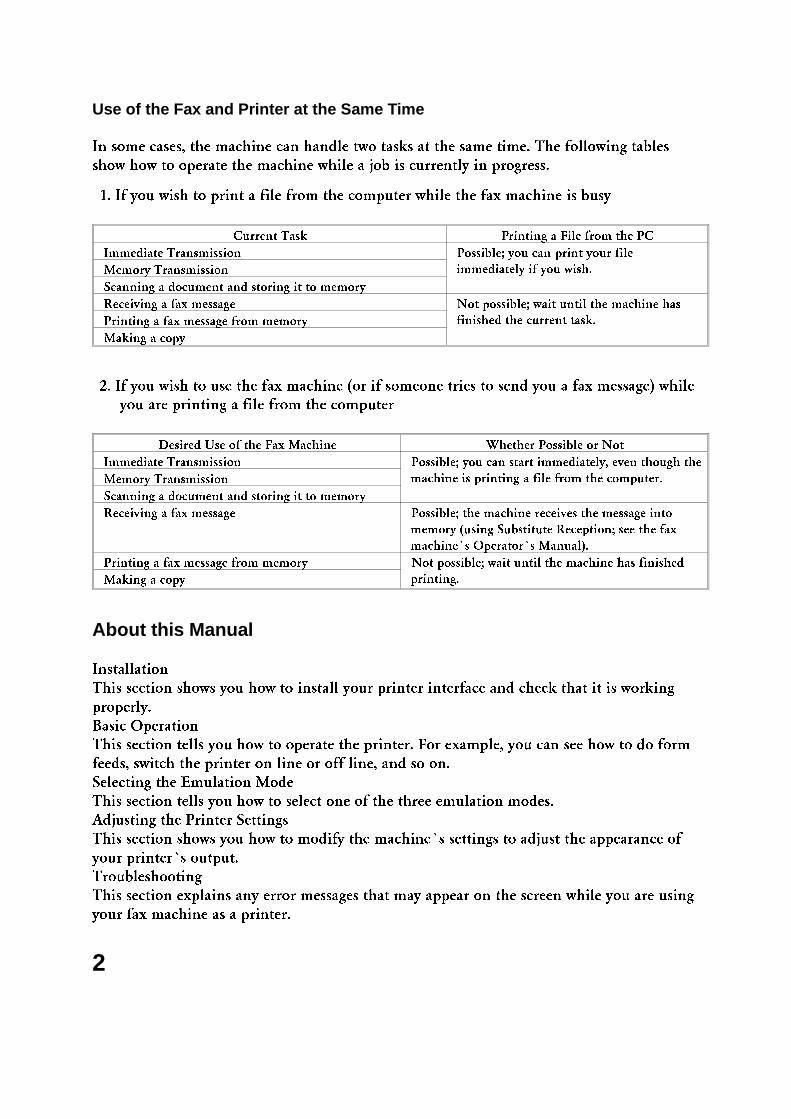
Use of the Fax and Printer at the Same Time
In some cases, the machine can handle two tasks at the same time. The following tables
show how to operate the machine while a job is currently in progress.
1. If you wish to print a file from the computer while the fax machine is busy
Current Task Printing a File from the PC
Immediate Transmission Possible; you can print your file
immediately if you wish.Memory Transmission
Scanning a document and storing it to memory
Receiving a fax message Not possible; wait until the machine has
finished the current task.Printing a fax message from memory
Making a copy
2. If you wish to use the fax machine (or if someone tries to send you a fax message) while
you are printing a file from the computer
Desired Use of the Fax Machine Whether Possible or Not
Immediate Transmission Possible; you can start immediately, even though the
machine is printing a file from the computer.Memory Transmission
Scanning a document and storing it to memory
Receiving a fax message Possible; the machine receives the message into
memory (using Substitute Reception; see the fax
machine�s Operator�s Manual).
Printing a fax message from memory Not possible; wait until the machine has finished
printing.Making a copy
About this Manual
Installation
This section shows you how to install your printer interface and check that it is working
properly.
Basic Operation
This section tells you how to operate the printer. For example, you can see how to do form
feeds, switch the printer on line or off line, and so on.
Selecting the Emulation Mode
This section tells you how to select one of the three emulation modes.
Adjusting the Printer Settings
This section shows you how to modify the machine�s settings to adjust the appearance of
your printer�s output.
Troubleshooting
This section explains any error messages that may appear on the screen while you are using
your fax machine as a printer.
2

Installing the Interface Port
Make sure that the machine is unplugged before you install the interface port.
Caution: Check the Receive File indicator before unplugging. If the indicator is lit,a received fax message is in the memory. This message will be erasedif you unplug the machine.
Connection to the Computer
There is no cable provided with the printer interface kit. To connect the printer to your computer, youwill need a cable for a parallel interface, also known as a Centronics cable.
Make sure that the computer and the printer are both switched off and unplugged before
connecting or disconnecting the cable or the interface port.
INSTALLATION
3
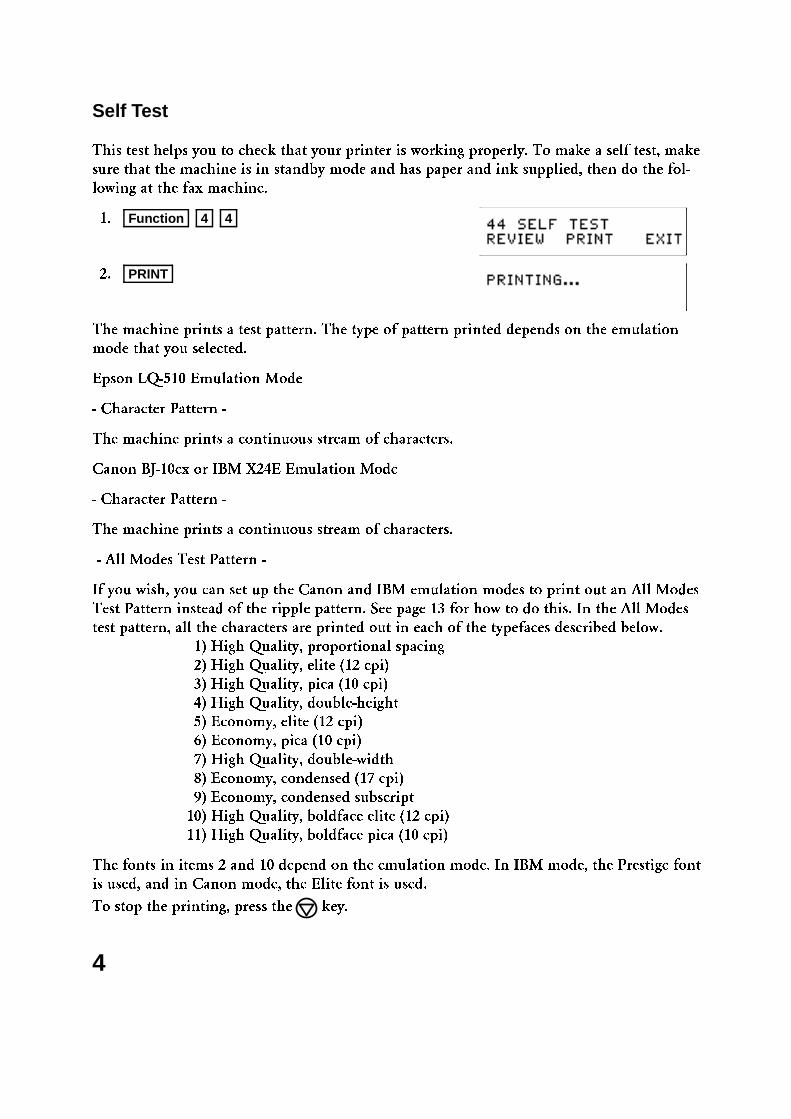
Self Test
This test helps you to check that your printer is working properly. To make a self test, make
sure that the machine is in standby mode and has paper and ink supplied, then do the fol-
lowing at the fax machine.
1. Function 4 4
2. PRINT
The machine prints a test pattern. The type of pattern printed depends on the emulation
mode that you selected.
Epson LQ-510 Emulation Mode
- Character Pattern -
The machine prints a continuous stream of characters.
Canon BJ-10ex or IBM X24E Emulation Mode
- Character Pattern -
The machine prints a continuous stream of characters.
- All Modes Test Pattern -
If you wish, you can set up the Canon and IBM emulation modes to print out an All Modes
Test Pattern instead of the ripple pattern. See page 13 for how to do this. In the All Modes
test pattern, all the characters are printed out in each of the typefaces described below.
1) High Quality, proportional spacing
2) High Quality, elite (12 cpi)
3) High Quality, pica (10 cpi)
4) High Quality, double-height
5) Economy, elite (12 cpi)
6) Economy, pica (10 cpi)
7) High Quality, double-width
8) Economy, condensed (17 cpi)
9) Economy, condensed subscript
10) High Quality, boldface elite (12 cpi)
11) High Quality, boldface pica (10 cpi)
The fonts in items 2 and 10 depend on the emulation mode. In IBM mode, the Prestige font
is used, and in Canon mode, the Elite font is used.
To stop the printing, press the key.
4
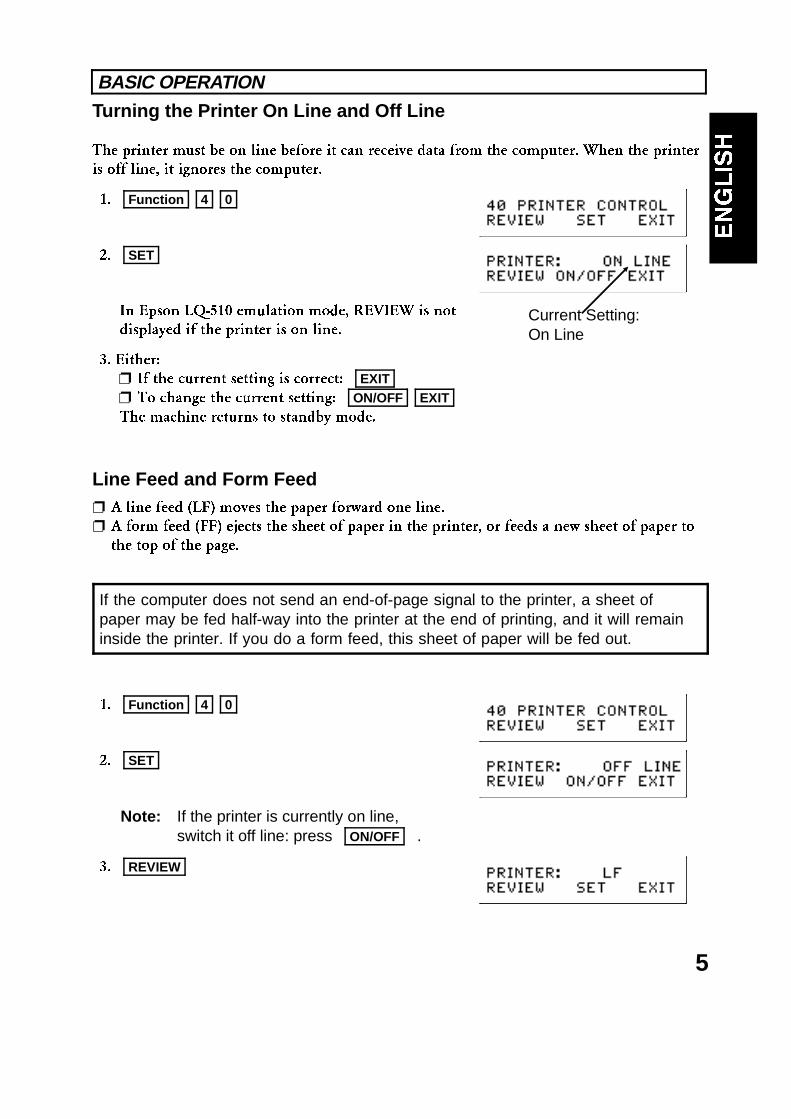
Turning the Printer On Line and Off Line
The printer must be on line before it can receive data from the computer. When the printer
is off line, it ignores the computer.
1. Function 4 0
2. SET
In Epson LQ-510 emulation mode, REVIEW is not
displayed if the printer is on line.
3. Either:
❐ If the current setting is correct: EXIT ❐ To change the current setting: ON/OFF EXIT The machine returns to standby mode.
Line Feed and Form Feed❐ A line feed (LF) moves the paper forward one line.
❐ A form feed (FF) ejects the sheet of paper in the printer, or feeds a new sheet of paper to
the top of the page.
If the computer does not send an end-of-page signal to the printer, a sheet ofpaper may be fed half-way into the printer at the end of printing, and it will remaininside the printer. If you do a form feed, this sheet of paper will be fed out.
1. Function 4 0
2. SET
Note: If the printer is currently on line,switch it off line: press ON/OFF .
3. REVIEW
Current Setting:On Line
BASIC OPERATION
5
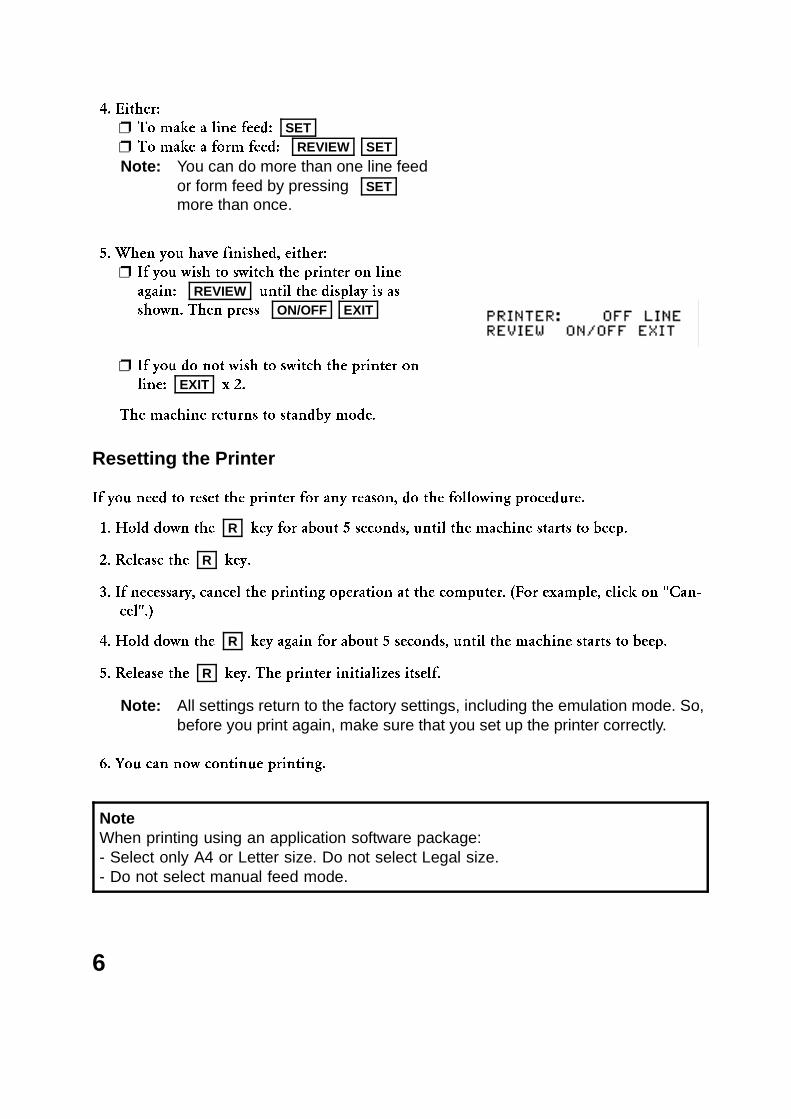
4. Either:
❐ To make a line feed: SET ❐ To make a form feed: REVIEW SET
Note: You can do more than one line feedor form feed by pressing SET more than once.
5. When you have finished, either:
❐ If you wish to switch the printer on line
again: REVIEW until the display is as
shown. Then press ON/OFF EXIT
❐ If you do not wish to switch the printer on
line: EXIT x 2.
The machine returns to standby mode.
Resetting the Printer
If you need to reset the printer for any reason, do the following procedure.
1. Hold down the R key for about 5 seconds, until the machine starts to beep.
2. Release the R key.
3. If necessary, cancel the printing operation at the computer. (For example, click on "Can-
cel".)
4. Hold down the R key again for about 5 seconds, until the machine starts to beep.
5. Release the R key. The printer initializes itself.
Note: All settings return to the factory settings, including the emulation mode. So,before you print again, make sure that you set up the printer correctly.
6. You can now continue printing.
NoteWhen printing using an application software package:- Select only A4 or Letter size. Do not select Legal size.- Do not select manual feed mode.
6
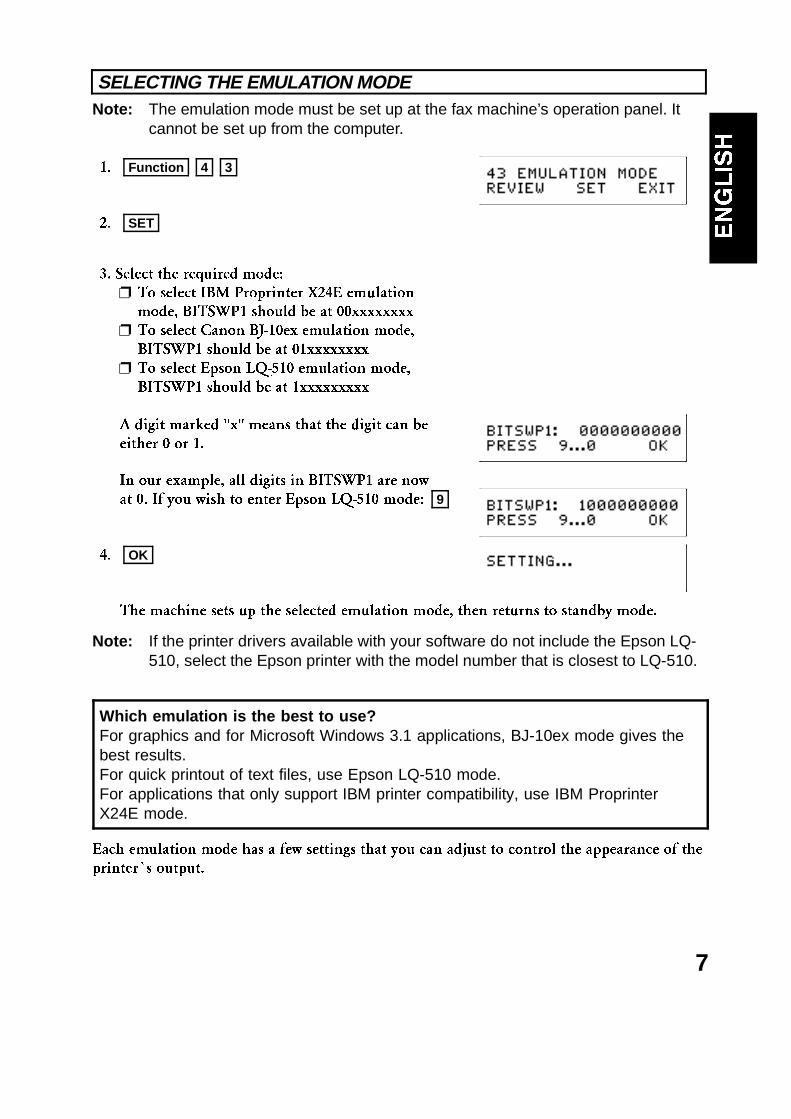
Note: The emulation mode must be set up at the fax machine’s operation panel. Itcannot be set up from the computer.
1. Function 4 3
2. SET
3. Select the required mode:
❐ To select IBM Proprinter X24E emulation
mode, BITSWP1 should be at 00xxxxxxxx
❐ To select Canon BJ-10ex emulation mode,
BITSWP1 should be at 01xxxxxxxx
❐ To select Epson LQ-510 emulation mode,
BITSWP1 should be at 1xxxxxxxxx
A digit marked "x" means that the digit can be
either 0 or 1.
In our example, all digits in BITSWP1 are now
at 0. If you wish to enter Epson LQ-510 mode: 9
4. OK
The machine sets up the selected emulation mode, then returns to standby mode.
Note: If the printer drivers available with your software do not include the Epson LQ-510, select the Epson printer with the model number that is closest to LQ-510.
Which emulation is the best to use?For graphics and for Microsoft Windows 3.1 applications, BJ-10ex mode gives thebest results.For quick printout of text files, use Epson LQ-510 mode.For applications that only support IBM printer compatibility, use IBM ProprinterX24E mode.
Each emulation mode has a few settings that you can adjust to control the appearance of the
printer�s output.
SELECTING THE EMULATION MODE
7
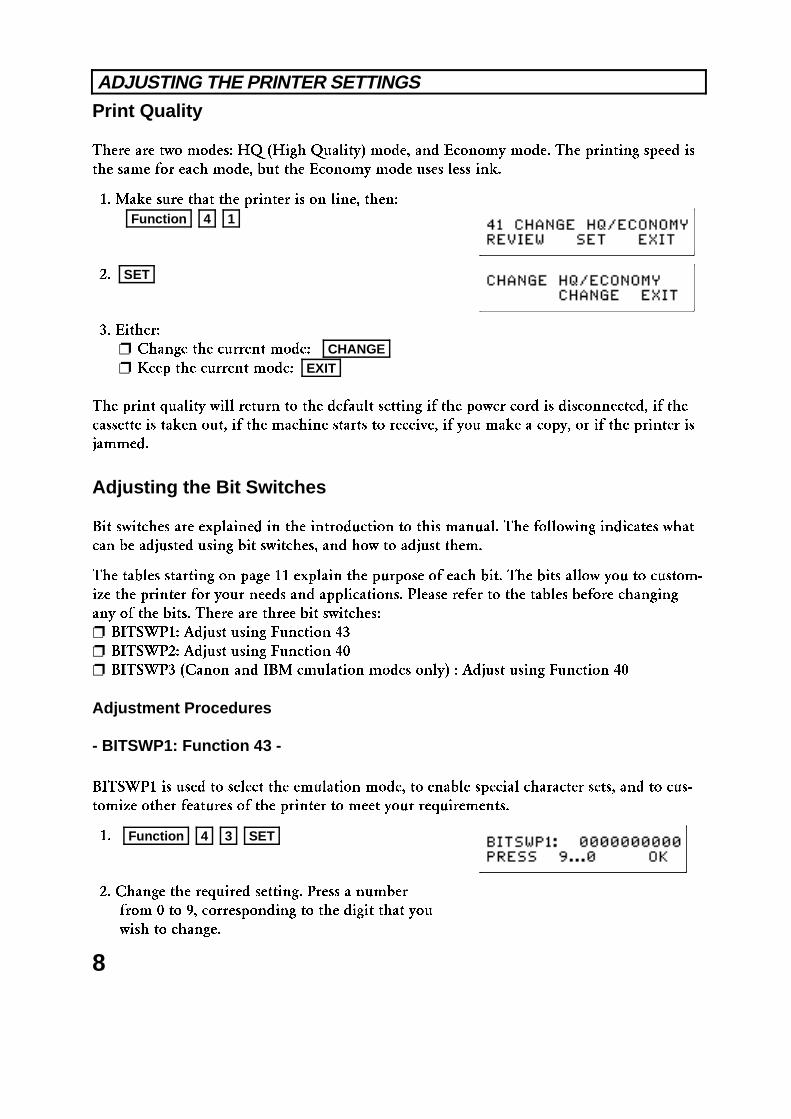
Print Quality
There are two modes: HQ (High Quality) mode, and Economy mode. The printing speed is
the same for each mode, but the Economy mode uses less ink.
1. Make sure that the printer is on line, then:
Function 4 1
2. SET
3. Either:
❐ Change the current mode: CHANGE ❐ Keep the current mode: EXIT
The print quality will return to the default setting if the power cord is disconnected, if the
cassette is taken out, if the machine starts to receive, if you make a copy, or if the printer is
jammed.
Adjusting the Bit Switches
Bit switches are explained in the introduction to this manual. The following indicates what
can be adjusted using bit switches, and how to adjust them.
The tables starting on page 11 explain the purpose of each bit. The bits allow you to custom-
ize the printer for your needs and applications. Please refer to the tables before changing
any of the bits. There are three bit switches:
❐ BITSWP1: Adjust using Function 43
❐ BITSWP2: Adjust using Function 40
❐ BITSWP3 (Canon and IBM emulation modes only) : Adjust using Function 40
Adjustment Procedures
- BITSWP1: Function 43 -
BITSWP1 is used to select the emulation mode, to enable special character sets, and to cus-
tomize other features of the printer to meet your requirements.
1. Function 4 3 SET
2. Change the required setting. Press a number
from 0 to 9, corresponding to the digit that you
wish to change.
ADJUSTING THE PRINTER SETTINGS
8
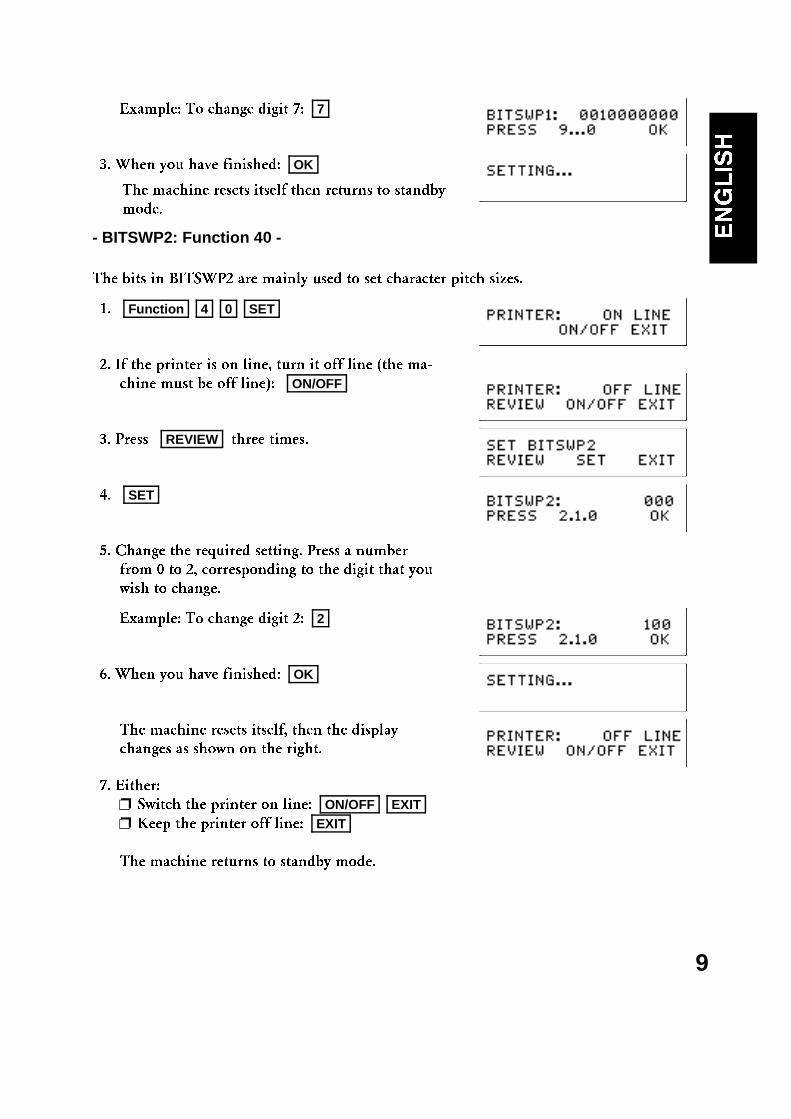
Example: To change digit 7: 7
3. When you have finished: OK
- BITSWP2: Function 40 -
The bits in BITSWP2 are mainly used to set character pitch sizes.
1. Function 4 0 SET
2. If the printer is on line, turn it off line (the ma-
chine must be off line): ON/OFF
3. Press REVIEW three times.
4. SET
5. Change the required setting. Press a number
from 0 to 2, corresponding to the digit that you
wish to change.
Example: To change digit 2: 2
6. When you have finished: OK
The machine resets itself, then the display
changes as shown on the right.
7. Either:
❐ Switch the printer on line: ON/OFF EXIT ❐ Keep the printer off line: EXIT
The machine returns to standby mode.
The machine resets itself then returns to standby
mode.
9

- BITSWP3: Function 40 -
The bits in BITSWP3 are used to set special width and height modes, and a few other fea-
tures.
BITSWP3 is available for Canon BJ-10ex and IBM X24E emulation modes only.
1. Function 4 0 SET
2. If the printer is off line, turn it on line (the ma-
chine must be on line): ON/OFF
3. REVIEW
4. SET
5. Change the required setting. Press a number
from 0 to 3, corresponding to the digit that you
wish to change.
Example: To change digit 2: 2
6. When you have finished: OK
The machine resets itself, then the display
changes as shown on the right.
7. Either:
❐ Switch the printer off line: ON/OFF EXIT ❐ Keep the printer on line: EXIT
The machine returns to standby mode.
Note: Do not adjust BITSWP2 and BITSWP3 during printing. Otherwise, the printerwill stop then reset.
10
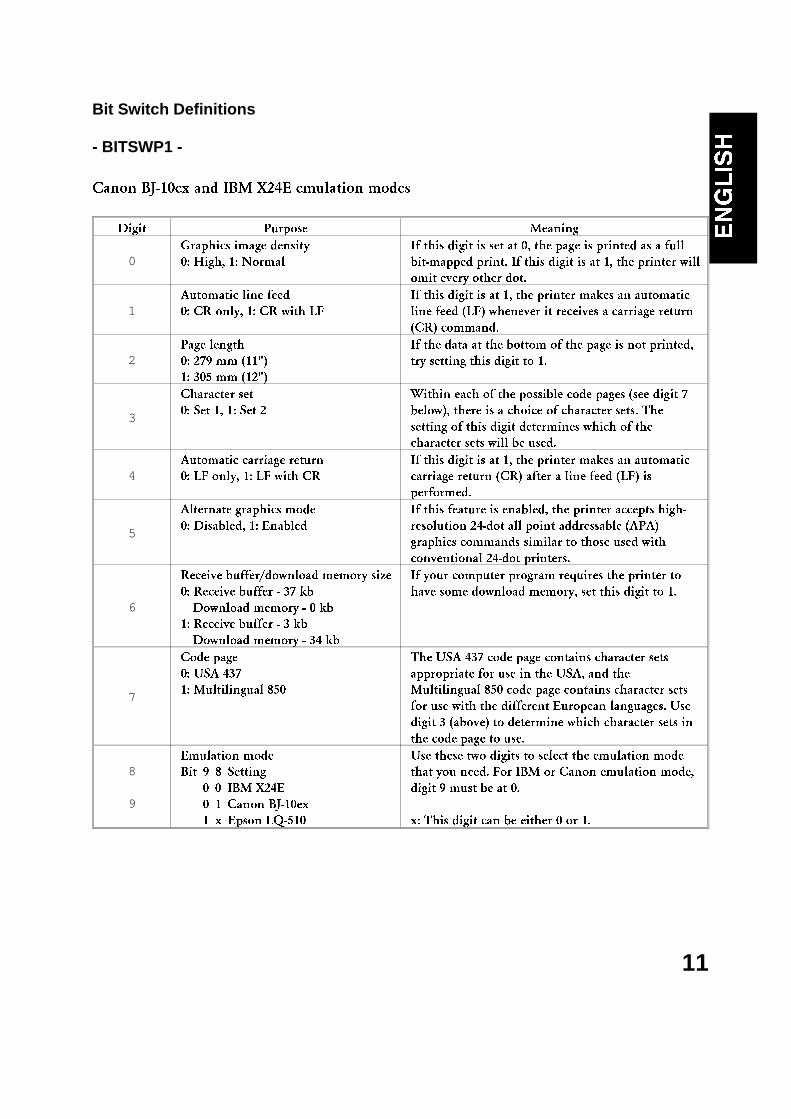
Bit Switch Definitions
- BITSWP1 -
Canon BJ-10ex and IBM X24E emulation modes
Digit Purpose Meaning
0Graphics image density
0: High, 1: Normal
If this digit is set at 0, the page is printed as a full
bit-mapped print. If this digit is at 1, the printer will
omit every other dot.
1Automatic line feed
0: CR only, 1: CR with LF
If this digit is at 1, the printer makes an automatic
line feed (LF) whenever it receives a carriage return
(CR) command.
2Page length
0: 279 mm (11")
1: 305 mm (12")
If the data at the bottom of the page is not printed,
try setting this digit to 1.
3
Character set
0: Set 1, 1: Set 2
Within each of the possible code pages (see digit 7
below), there is a choice of character sets. The
setting of this digit determines which of the
character sets will be used.
4Automatic carriage return
0: LF only, 1: LF with CR
If this digit is at 1, the printer makes an automatic
carriage return (CR) after a line feed (LF) is
performed.
5
Alternate graphics mode
0: Disabled, 1: Enabled
If this feature is enabled, the printer accepts high-
resolution 24-dot all point addressable (APA)
graphics commands similar to those used with
conventional 24-dot printers.
6
Receive buffer/download memory size
0: Receive buffer - 37 kb
Download memory - 0 kb
1: Receive buffer - 3 kb
Download memory - 34 kb
If your computer program requires the printer to
have some download memory, set this digit to 1.
7
Code page
0: USA 437
1: Multilingual 850
The USA 437 code page contains character sets
appropriate for use in the USA, and the
Multilingual 850 code page contains character sets
for use with the different European languages. Use
digit 3 (above) to determine which character sets in
the code page to use.
8
9
Emulation mode
Bit 9 8 Setting
0 0 IBM X24E
0 1 Canon BJ-10ex
1 x Epson LQ-510
Use these two digits to select the emulation mode
that you need. For IBM or Canon emulation mode,
digit 9 must be at 0.
x: This digit can be either 0 or 1.
11
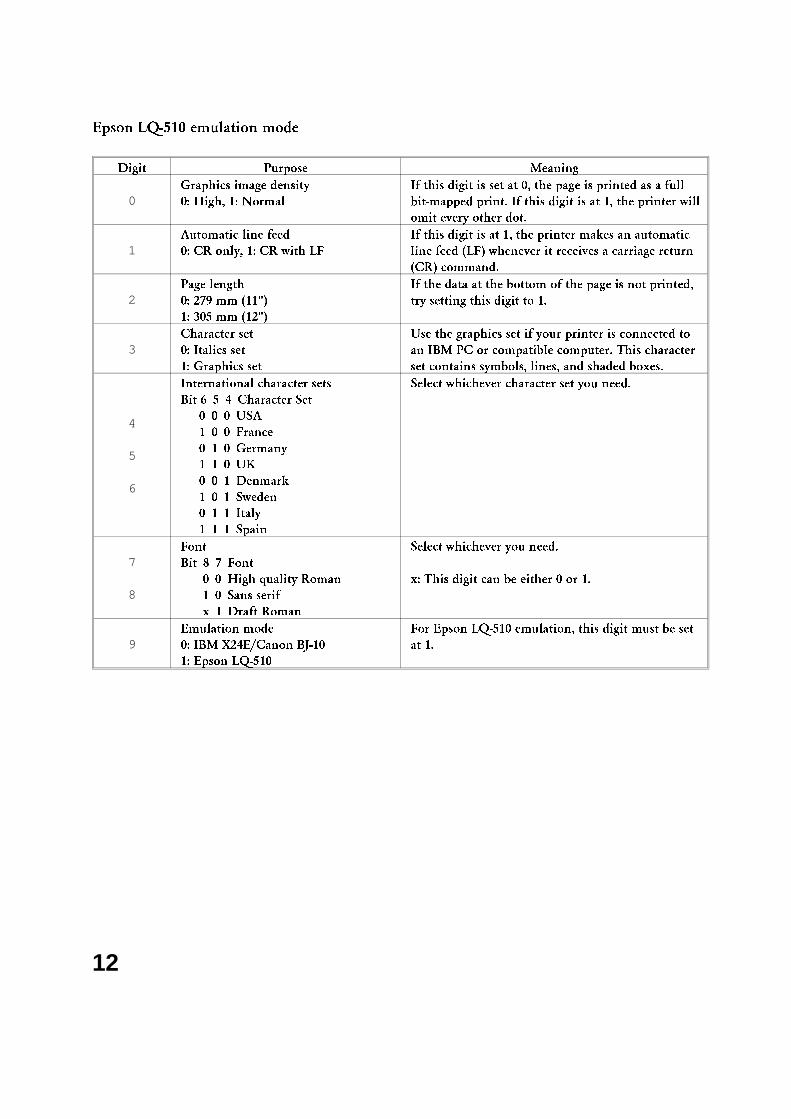
Epson LQ-510 emulation mode
Digit Purpose Meaning
0Graphics image density
0: High, 1: Normal
If this digit is set at 0, the page is printed as a full
bit-mapped print. If this digit is at 1, the printer will
omit every other dot.
1Automatic line feed
0: CR only, 1: CR with LF
If this digit is at 1, the printer makes an automatic
line feed (LF) whenever it receives a carriage return
(CR) command.
2Page length
0: 279 mm (11")
1: 305 mm (12")
If the data at the bottom of the page is not printed,
try setting this digit to 1.
3Character set
0: Italics set
1: Graphics set
Use the graphics set if your printer is connected to
an IBM PC or compatible computer. This character
set contains symbols, lines, and shaded boxes.
4
5
6
International character sets
Bit 6 5 4 Character Set
0 0 0 USA
1 0 0 France
0 1 0 Germany
1 1 0 UK
0 0 1 Denmark
1 0 1 Sweden
0 1 1 Italy
1 1 1 Spain
Select whichever character set you need.
7
8
Font
Bit 8 7 Font
0 0 High quality Roman
1 0 Sans serif
x 1 Draft Roman
Select whichever you need.
x: This digit can be either 0 or 1.
9Emulation mode
0: IBM X24E/Canon BJ-10
1: Epson LQ-510
For Epson LQ-510 emulation, this digit must be set
at 1.
12
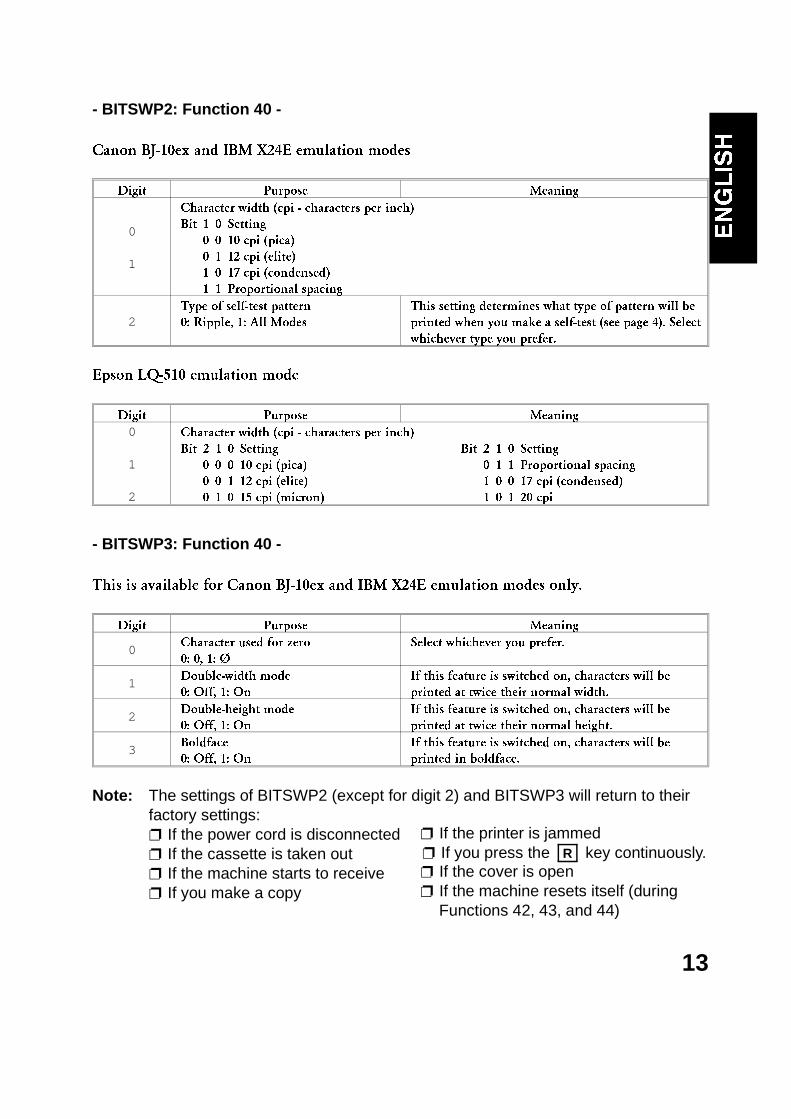
- BITSWP2: Function 40 -
Canon BJ-10ex and IBM X24E emulation modes
Digit Purpose Meaning
0
1
Character width (cpi - characters per inch)
Bit 1 0 Setting
0 0 10 cpi (pica)
0 1 12 cpi (elite)
1 0 17 cpi (condensed)
1 1 Proportional spacing
2Type of self-test pattern
0: Ripple, 1: All Modes
This setting determines what type of pattern will be
printed when you make a self-test (see page 4). Select
whichever type you prefer.
Epson LQ-510 emulation mode
Digit Purpose Meaning
0
1
2
Character width (cpi - characters per inch)
Bit 2 1 0 Setting Bit 2 1 0 Setting
0 0 0 10 cpi (pica) 0 1 1 Proportional spacing
0 0 1 12 cpi (elite) 1 0 0 17 cpi (condensed)
0 1 0 15 cpi (micron) 1 0 1 20 cpi
- BITSWP3: Function 40 -
This is available for Canon BJ-10ex and IBM X24E emulation modes only.
Digit Purpose Meaning
0Character used for zero
0: 0, 1: Ø
Select whichever you prefer.
1Double-width mode
0: Off, 1: On
If this feature is switched on, characters will be
printed at twice their normal width.
2Double-height mode
0: Off, 1: On
If this feature is switched on, characters will be
printed at twice their normal height.
3Boldface
0: Off, 1: On
If this feature is switched on, characters will be
printed in boldface.
Note: The settings of BITSWP2 (except for digit 2) and BITSWP3 will return to theirfactory settings:❐ If the power cord is disconnected❐ If the cassette is taken out❐ If the machine starts to receive❐ If you make a copy
❐ If the printer is jammed❐ If you press the R key continuously.❐ If the cover is open❐ If the machine resets itself (during
Functions 42, 43, and 44)
13
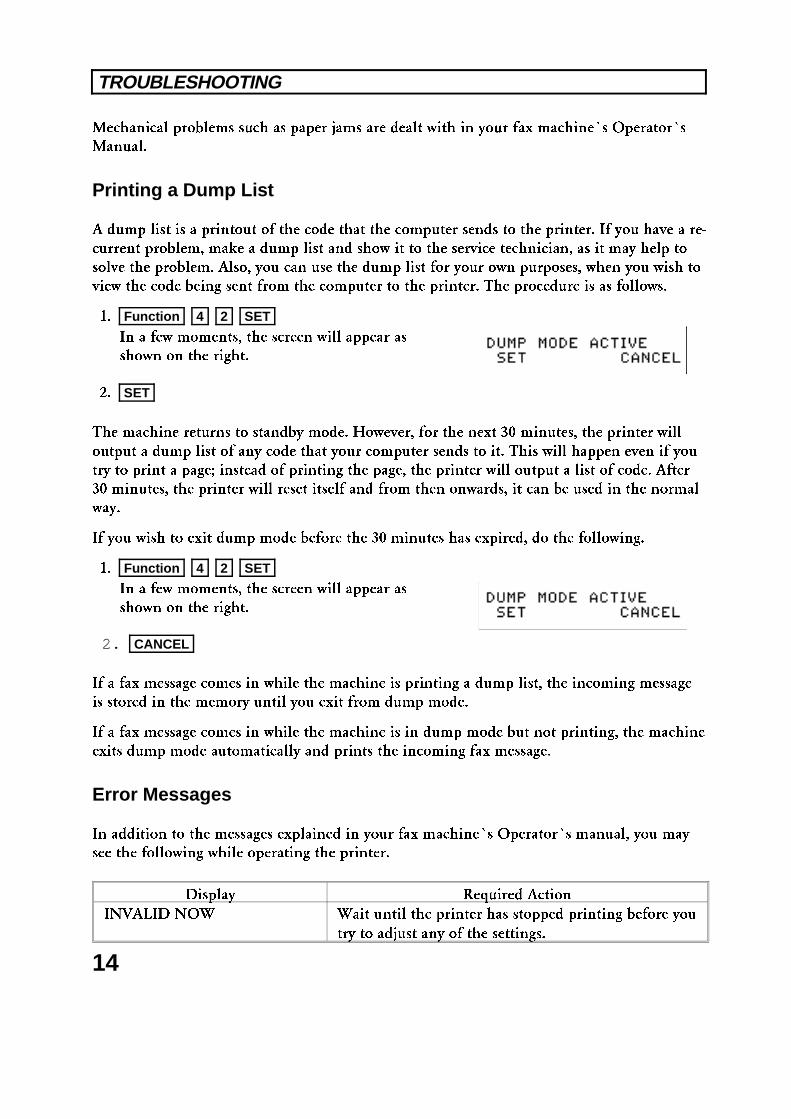
Mechanical problems such as paper jams are dealt with in your fax machine�s Operator�s
Manual.
Printing a Dump List
A dump list is a printout of the code that the computer sends to the printer. If you have a re-
current problem, make a dump list and show it to the service technician, as it may help to
solve the problem. Also, you can use the dump list for your own purposes, when you wish to
view the code being sent from the computer to the printer. The procedure is as follows.
1. Function 4 2 SET
In a few moments, the screen will appear as
shown on the right.
2. SET
The machine returns to standby mode. However, for the next 30 minutes, the printer will
output a dump list of any code that your computer sends to it. This will happen even if you
try to print a page; instead of printing the page, the printer will output a list of code. After
30 minutes, the printer will reset itself and from then onwards, it can be used in the normal
way.
If you wish to exit dump mode before the 30 minutes has expired, do the following.
1. Function 4 2 SET
In a few moments, the screen will appear as
shown on the right.
2. CANCEL
If a fax message comes in while the machine is printing a dump list, the incoming message
is stored in the memory until you exit from dump mode.
If a fax message comes in while the machine is in dump mode but not printing, the machine
exits dump mode automatically and prints the incoming fax message.
Error Messages
In addition to the messages explained in your fax machine�s Operator�s manual, you may
see the following while operating the printer.
Display Required Action
INVALID NOW Wait until the printer has stopped printing before you
try to adjust any of the settings.
TROUBLESHOOTING
14
Recovering a Fax Message if the Printer Stalls
Occasionally, the computer and printer may lock up during printing. In this case, you may
have to switch off both the printer and the computer to reset the system. However, you may
have a received fax message stored in the printer�s memory, and if you disconnect the power
cord, that fax message will be lost.
So, before pulling out the power cord, recover the fax message with either of the following
procedures.
❐ Open and shut the printer cover.
❐ Press R . Printing starts after 15 seconds.
15
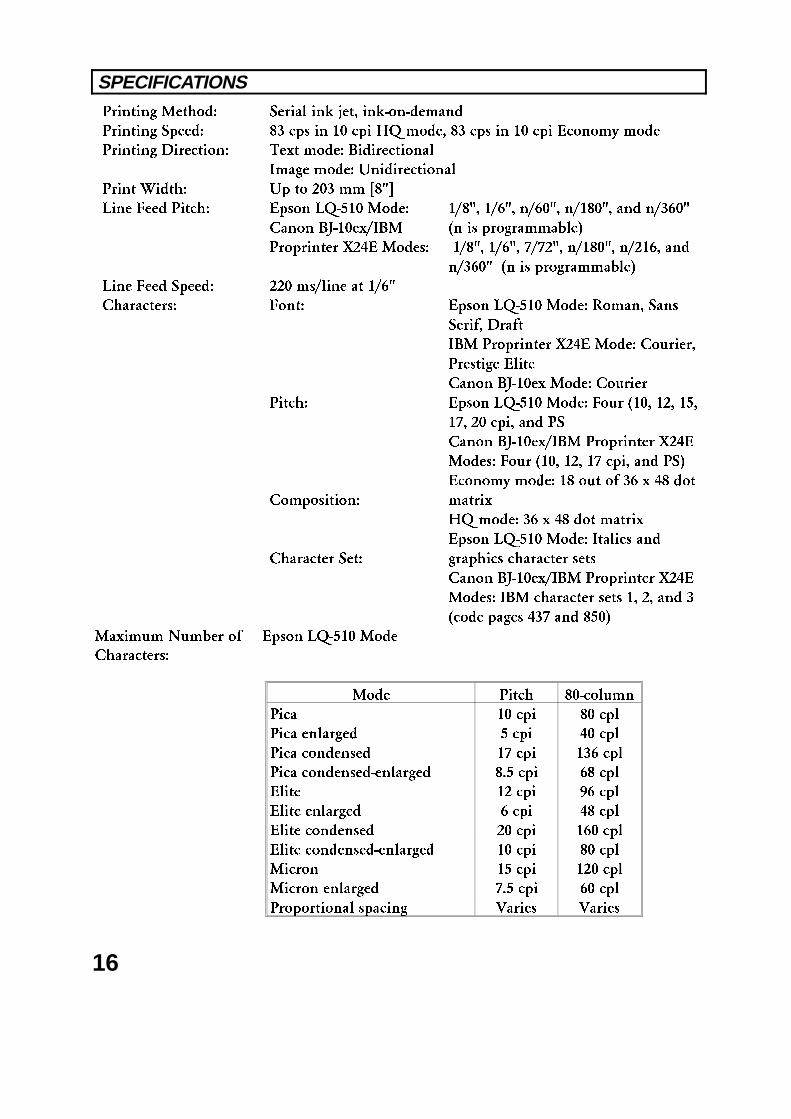
Printing Method: Serial ink jet, ink-on-demand
Printing Speed: 83 cps in 10 cpi HQ mode, 83 cps in 10 cpi Economy mode
Printing Direction: Text mode: Bidirectional
Image mode: Unidirectional
Print Width: Up to 203 mm [8"]
Line Feed Pitch: Epson LQ-510 Mode:
Canon BJ-10ex/IBM
Proprinter X24E Modes:
1/8", 1/6", n/60", n/180", and n/360"
(n is programmable)
1/8", 1/6", 7/72", n/180", n/216, and
n/360" (n is programmable)
Line Feed Speed: 220 ms/line at 1/6"
Characters: Font:
Pitch:
Composition:
Character Set:
Epson LQ-510 Mode: Roman, Sans
Serif, Draft
IBM Proprinter X24E Mode: Courier,
Prestige Elite
Canon BJ-10ex Mode: Courier
Epson LQ-510 Mode: Four (10, 12, 15,
17, 20 cpi, and PS
Canon BJ-10ex/IBM Proprinter X24E
Modes: Four (10, 12, 17 cpi, and PS)
Economy mode: 18 out of 36 x 48 dot
matrix
HQ mode: 36 x 48 dot matrix
Epson LQ-510 Mode: Italics and
graphics character sets
Canon BJ-10ex/IBM Proprinter X24E
Modes: IBM character sets 1, 2, and 3
(code pages 437 and 850)
Maximum Number of
Characters:
Epson LQ-510 Mode
Mode Pitch 80-column
Pica 10 cpi 80 cpl
Pica enlarged 5 cpi 40 cpl
Pica condensed 17 cpi 136 cpl
Pica condensed-enlarged 8.5 cpi 68 cpl
Elite 12 cpi 96 cpl
Elite enlarged 6 cpi 48 cpl
Elite condensed 20 cpi 160 cpl
Elite condensed-enlarged 10 cpi 80 cpl
Micron 15 cpi 120 cpl
Micron enlarged 7.5 cpi 60 cpl
Proportional spacing Varies Varies
SPECIFICATIONS
16
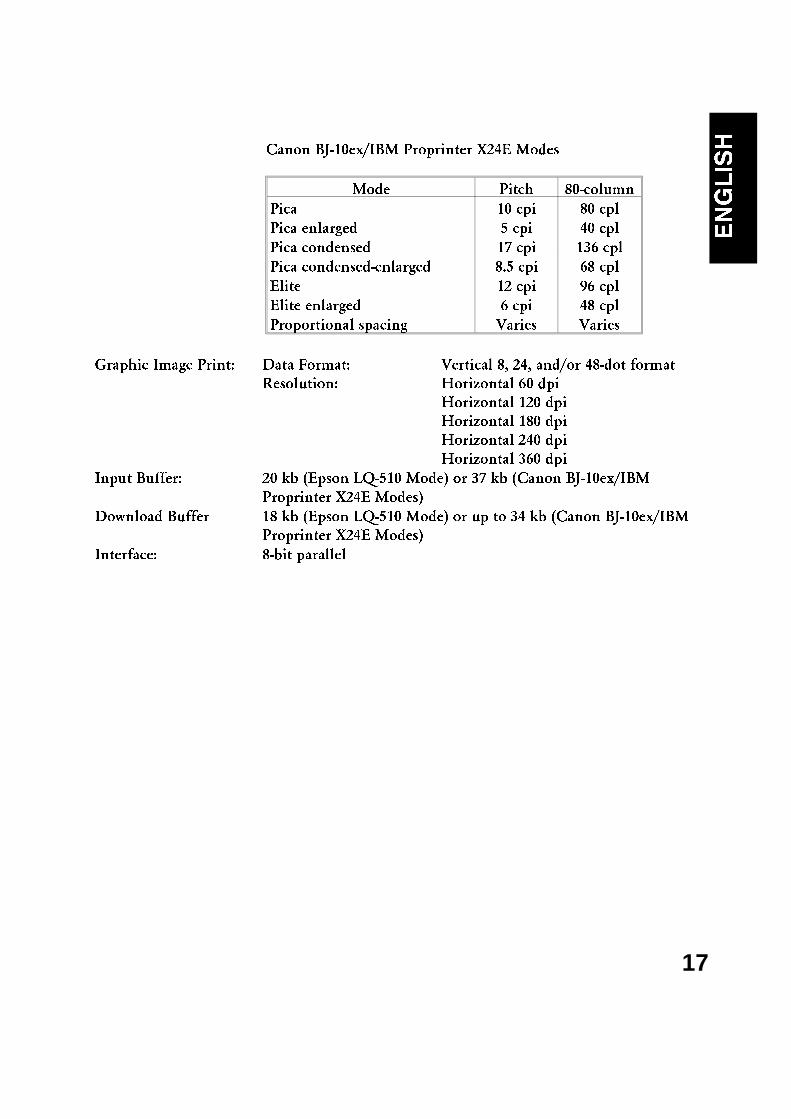
Canon BJ-10ex/IBM Proprinter X24E Modes
Mode Pitch 80-column
Pica 10 cpi 80 cpl
Pica enlarged 5 cpi 40 cpl
Pica condensed 17 cpi 136 cpl
Pica condensed-enlarged 8.5 cpi 68 cpl
Elite 12 cpi 96 cpl
Elite enlarged 6 cpi 48 cpl
Proportional spacing Varies Varies
Graphic Image Print: Data Format:
Resolution:
Vertical 8, 24, and/or 48-dot format
Horizontal 60 dpi
Horizontal 120 dpi
Horizontal 180 dpi
Horizontal 240 dpi
Horizontal 360 dpi
Input Buffer: 20 kb (Epson LQ-510 Mode) or 37 kb (Canon BJ-10ex/IBM
Proprinter X24E Modes)
Download Buffer 18 kb (Epson LQ-510 Mode) or up to 34 kb (Canon BJ-10ex/IBM
Proprinter X24E Modes)
Interface: 8-bit parallel
17
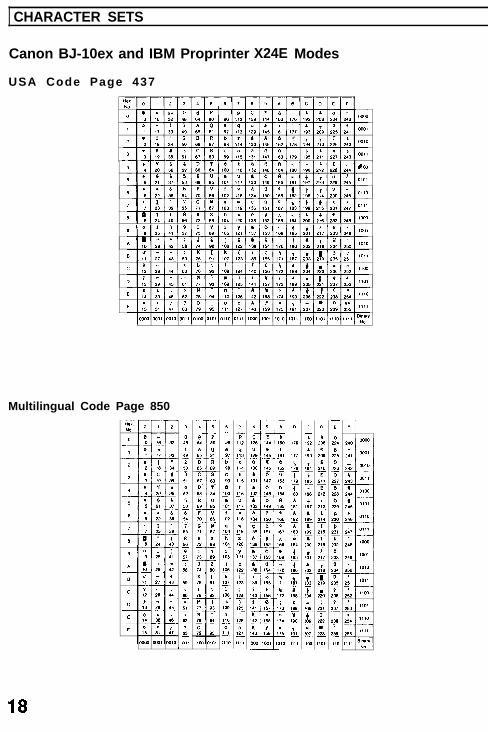
CHARACTER SETS 1
Canon BJ-10ex and IBM Proprinter
USA Code Page 437
X24E Modes
Multilingual Code Page 850

Epson LQ-510 Mode
Italics Character Set
Graphics Character Set
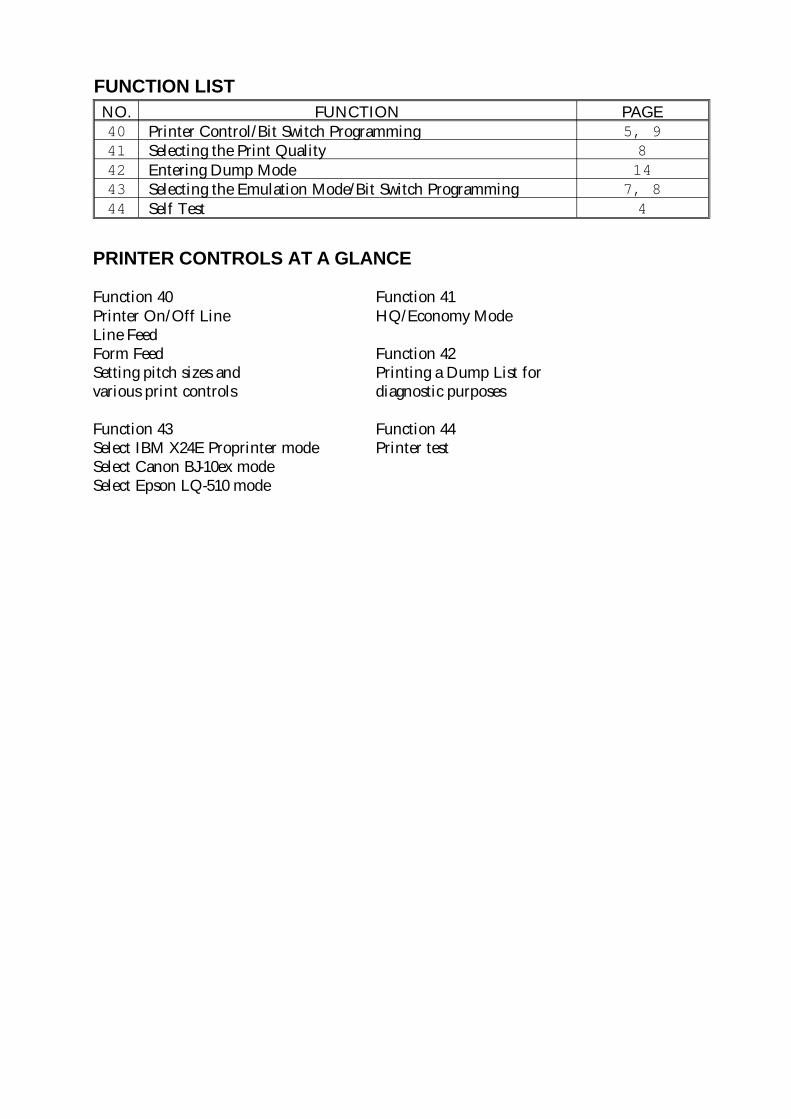
NO. FUNCTION PAGE40 Printer Control/Bit Switch Programming 5, 941 Selecting the Print Quality 842 Entering Dump Mode 1443 Selecting the Emulation Mode/Bit Switch Programming 7, 844 Self Test 4
PRINTER CONTROLS AT A GLANCE
Function 40 Function 41Printer On/Off Line HQ/Economy ModeLine FeedForm Feed Function 42Setting pitch sizes and Printing a Dump List forvarious print controls diagnostic purposes
Function 43 Function 44Select IBM X24E Proprinter mode Printer testSelect Canon BJ-10ex modeSelect Epson LQ-510 mode
FUNCTION LIST

INDEX
BBit Switches 1
Adjustment Procedure 8 - 10Definitions 11 - 13
CCharacter sets 18 - 19
DDump List Printout 14
EEconomy mode 8Emulation Mode
Available modes 1Selection 7
Emulation Mode AdjustmentCanon BJ-10ex mode 11, 13Epson LQ-510 mode 12 - 13IBM X24E mode 11, 13
Emulation Mode Control: Canon BJ-10ex/IBM X24E
All boldface mode 13Alternate graphics mode 11Automatic carriage return 11Automatic line feed 11Character set 11Character width 13Code page 11Double-height mode 13Double-width mode 13Graphics image density 11Page length 11Receive buffer/download memory size control 11Test pattern type 13Zero character type 13
Emulation Mode Control: Epson LQ-510Automatic line feed 12Character set 12Character width 13Font type selection 12Graphics image density 12International character sets 12Page length 12
FFax Messages
Transmission & reception 1Form Feed 5
HHQ (High Quality) mode 8
IInstallation 3 - 4
LLine Feed 5
MMechanical problems 14
OOn Line/Off Line Switch 5
PPaper jams 14Print Quality Selection 8Printer Controls
Bit Switch Adjustment 8 - 10Emulation Mode Selection 7Form Feed 5Line Feed 5On Line/Off Line Switch 5Print Quality Selection 8Resetting the printer 6
Printer Speed 1
RResetting the Printer 6
SSelf Test 4
TTesting the printer 4
EN
GLI
SH