Embed Size (px)
Citation preview

For Warranty and RMA information, please visit www.grandstream.com
GXV 3501IP VIDEO SERVER
QuickStart Guide
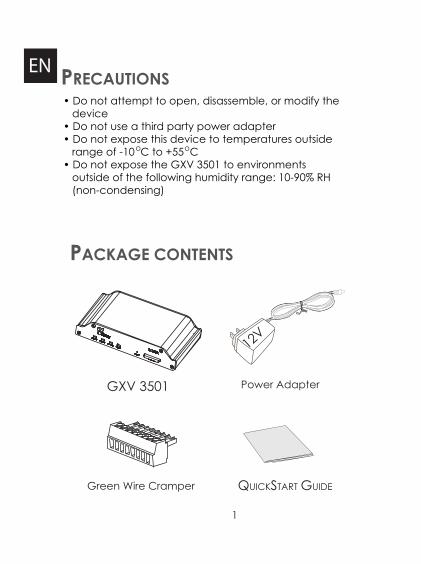
PRECAUTIONS
PACKAGE CONTENTS
Power Adapter
QUICKSTART GUIDE
GXV 3501
12V
• Do not attempt to open, disassemble, or modify the device• Do not use a third party power adapter • Do not expose this device to temperatures outside range of -10 C to +55 C• Do not expose the GXV 3501 to environments outside of the following humidity range: 10-90% RH (non-condensing)
EN
Green Wire Cramper
1
o o
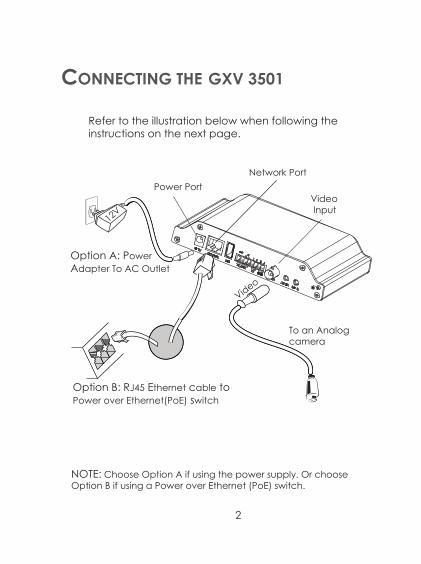
CONNECTING THE GXV 3501
Refer to the illustration below when following theinstructions on the next page.
12V
Video
Option A: Power Adapter To AC Outlet
Option B: RJ45 Ethernet cable to Power over Ethernet(PoE) switch
To an Analog camera
NOTE: Choose Option A if using the power supply. Or choose Option B if using a Power over Ethernet (PoE) switch.
Power PortNetwork Port
Video Input
2

Option A
Step 1: Insert the power adapter into the 12V DC port on the GXV 3501. Plug the other end of the adapter into an AC power outlet.
Step 2: Plug an RJ45 Ethernet cable into the network port. Plug the other into a hub, switch or router.
Step 3: Connect the video-out BNC cable of an analog camera to the video port on the GXV 3501.
Option B
Step 1: Plug an RJ45 Ethernet cable into the network port. Plug the other end into a Power over Ethernet (PoE) switch.
Step 2: Connect the video-out BNC cable of your camera to the video input port of the GXV 3501.
If the GXV 3501 is properly connected, the POWER, READY and NETWORK indicator lights will flash green.
3
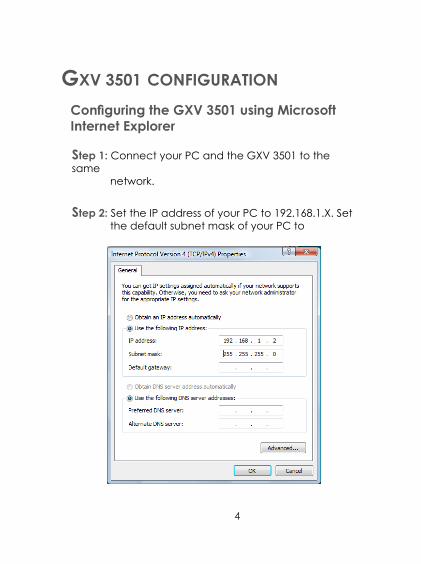
GXV 3501 CONFIGURATION
Step 1: Connect your PC and the GXV 3501 to the same network.
Step 2: Set the IP address of your PC to 192.168.1.X. Set the default subnet mask of your PC to
Configuring the GXV 3501 using Microsoft Internet Explorer
4

Step 3: Open Microsoft Internet Explorer on your PC. Type 192.168.1.168 in the address bar.
Step 4: A pop-up window will appear with prompts for a user name and password. The default administrator user name and password are both set to “admin” at the default factory configuration.
5 6

Step 5: Once you log into the GXV 3501’s web inter-face Internet Explorer will indicate that “This website wants to install to following add-on: ‘GSViewer. cab’ from Grandstream Networks, Inc.”. Install this add-on by following the instructions.
Step 6: Once the installation of GSViewX.cab completes you will see the web page shown in the screen- shot on the next page. Click the play button to view the video feed.
5 6

Please download the user manual and FAQ for more detailed configuration instructions:http://www.grandstream.com/support/gxv_series_sur-veillance/gxv350x/documents/gxv350x_usermanual_english.pdf
Step 7: Click through the menu on the left hand side of the web UI for more advanced configuration parameters.
7 8
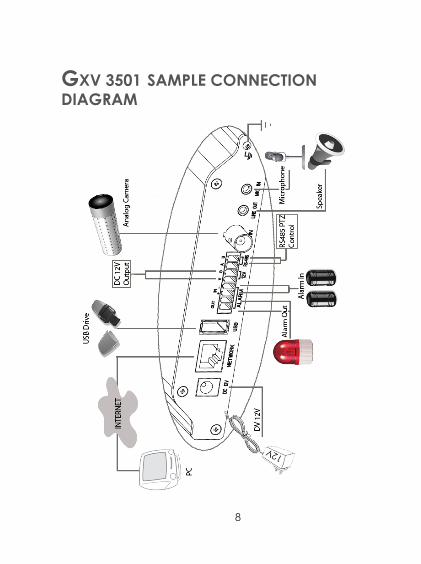
GXV 3501 SAMPLE CONNECTION DIAGRAM
8
7 8

Precauciones
Contenido
Adaptador de corriente
Guía de Instalación Rápida
GXV 3501
12V
• No intente abrir, desarmar o modificar la unidad• No use un adaptador de corriente de otra marca • No exponga esta unidad a temperaturas fuera de este rango: -10 C a +55 C• No exponga esta unidad a condiciones húmedas fuera del rango de 10 a 90 % RH (no condensadas)
Conector verde del cable
ES
9 10
o o

Guía de Instalación Rápida
Conexión del GXV 3501
Observe la ilustración de abajo cuando siga las instrucciones en la pagina siguiente
12V
VideoOpción A: Adaptador de corriente hacia toma de corriente
Opción B: Cable de Red RJ45 hacia switch PoE
Hacia Cámara Analógica
Nota: Utilice solo una opción A o B
Puerto de corriente
Puerto de Red
Entrada de Video
• No intente abrir, desarmar o modificar la unidad• No use un adaptador de corriente de otra marca • No exponga esta unidad a temperaturas fuera de este rango: -10 C a +55 C• No exponga esta unidad a condiciones húmedas fuera del rango de 10 a 90 % RH (no condensadas)
9 10

Si el usuario elije opción A,
Paso 1: Conecte el conector pequeño y redondo del adaptador de corriente en el puerto de corriente. Co-necte el otro extremo en la toma de corriente.
Paso 2: Conecte el cable de red RJ45 en el Puerto de red. Conecte el otro extreme en el hub/switch/router.
Paso 3: Conecte el cable BNC de la cámara en el puerto de entrada de video. Si la cámara tiene salida de audio, conecte el cable BNC de audio en el puerto de entrada de audio.
Si el usuario elije opción B:
Paso 1: Conecte el cable de red RJ45 en el puerto de red. Conecte le otro extremo en el switch de PoE
Paso 2: Conecte el cable BNC de la cámara en el puerto de entrada de video
Si la conexión es incorrecta, el indicador de POWER y READY se encenderán y el indicador de NETWORK parpadeara.
11 12

Configuración del GXV 3501
Paso 1: Conecte su PC y el GXV 3501 a la misma red.
Paso 2: Coloque la IP de su PC en 192.168.1.X. Coloque la mascara de red en 255.255.255.0.
Configure el GXV 3501 usando el Explorador Internet de Microsoft
11 12
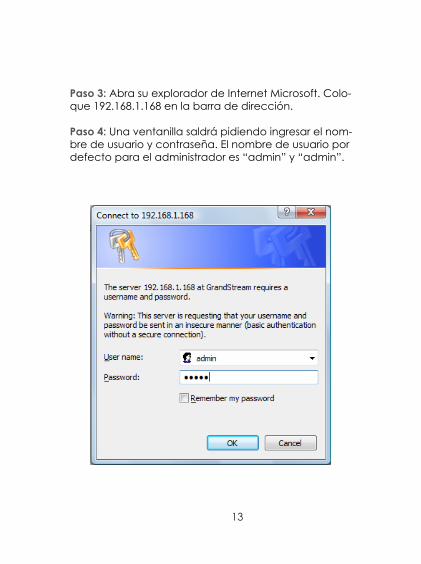
Paso 3: Abra su explorador de Internet Microsoft. Colo-que 192.168.1.168 en la barra de dirección.
Paso 4: Una ventanilla saldrá pidiendo ingresar el nom-bre de usuario y contraseña. El nombre de usuario por defecto para el administrador es “admin” y “admin”.
13 14

Paso 5: Luego de ingresar a la pagina web, su explo-rador le indicara que “ Esta pagina quiere instalar el siguiente add-on: GSViewerX.cab desde “Grandstream Networks Inc.”. Instale el add-on siguiendo las instruc-ciones.
Paso 6: Luego de instalar el GSViewX.cab con éxito, el usuario podrá ver la pagina principal mostrando las siguientes figuras. Haga click en el botón de PLAY para ver el video.
13 14

Por favor baje el manual de usuario y FAQ para mas instrucciones de configuracion:http://www.grandstream.com/support/gxv_series_surveil-lance/gxv350x/documents/gxv350x_usermanual_english.pdf
Paso 7: Para mas configuraciones vaya al menú principal a la izquierda.
15 16
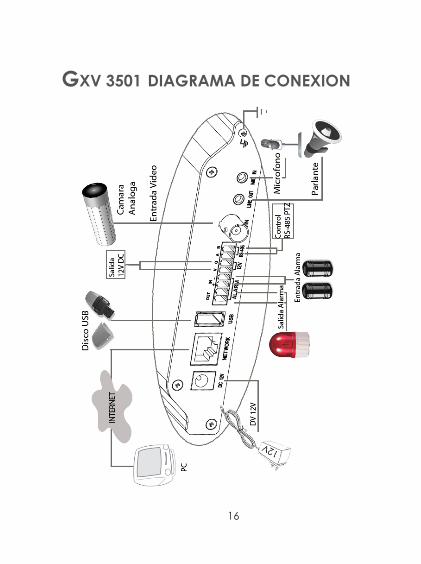
GXV 3501 DIAGRAMA DE CONEXION
16
15 16

PRECAUTIONS
CONTENU DU PACK
Boitier d’alimentation
Guide d’installation express
GXV 3501
12V
• Ne pas tenter d’ouvrir, de désassembler ou de modifier le dispositif• Ne pas utiliser un boitier d’alimentation tiers• Ne pas exposer cet appareil à des températures hors de la gamme de -10 °C à +55 C• Ne pas exposer cet appareil à un environnement avec l’humidité hors de la gamme de 10-90% RH (sans condensation)
Connecteur de câbles vert
FR
17 18
o

Guide d’installation express
CONNEXION DU GXV 3501
Reportez-vous à l’illustration ci-dessous en suivant les instructions sur la page suivante.
12V
VidéoOption A : Boitier d’alimentation à la prise électrique
Option B : Câble Ethernet RJ45 au port Ethernet pré-alimenté (PoE) du Switch
Au camera analogique
NOTE : Pour l’alimentation, choisissez l’option A ou B
Port d’alimentation
Port Réseau
Entrée Vidéo
17 18
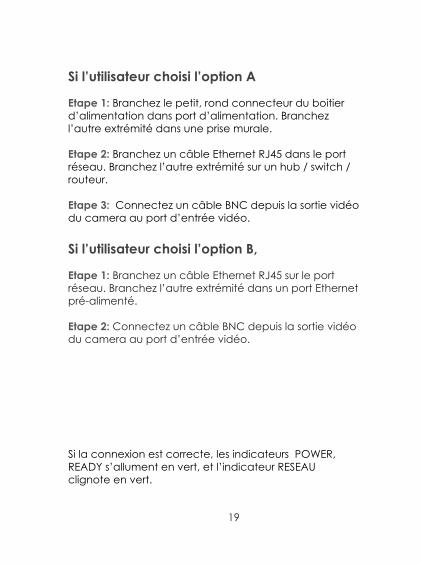
Si l’utilisateur choisi l’option A
Etape 1: Branchez le petit, rond connecteur du boitier d’alimentation dans port d’alimentation. Branchez l’autre extrémité dans une prise murale.
Etape 2: Branchez un câble Ethernet RJ45 dans le port réseau. Branchez l’autre extrémité sur un hub / switch / routeur.
Etape 3: Connectez un câble BNC depuis la sortie vidéo du camera au port d’entrée vidéo.
Si l’utilisateur choisi l’option B,
Etape 1: Branchez un câble Ethernet RJ45 sur le port réseau. Branchez l’autre extrémité dans un port Ethernet pré-alimenté.
Etape 2: Connectez un câble BNC depuis la sortie vidéo du camera au port d’entrée vidéo.
Si la connexion est correcte, les indicateurs POWER, READY s’allument en vert, et l’indicateur RESEAU clignote en vert.
19 20

La Configuration du GXV 3501
Etape 1: Connectez votre PC et le GXV 3501 dans le même réseau.
Etape 2: Fixez l’adresse IP de votre PC à 192.168.1.X et le masque sous réseau à 255.255.255.0.
Configurez le GXV 3501 en utilisant le navi-gateur Microsoft Internet Explorer
19 20
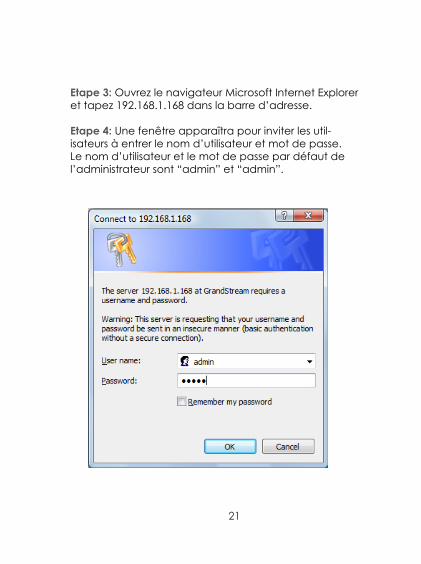
Etape 3: Ouvrez le navigateur Microsoft Internet Explorer et tapez 192.168.1.168 dans la barre d’adresse.
Etape 4: Une fenêtre apparaîtra pour inviter les util-isateurs à entrer le nom d’utilisateur et mot de passe. Le nom d’utilisateur et le mot de passe par défaut de l’administrateur sont “admin” et “admin”.
21 22
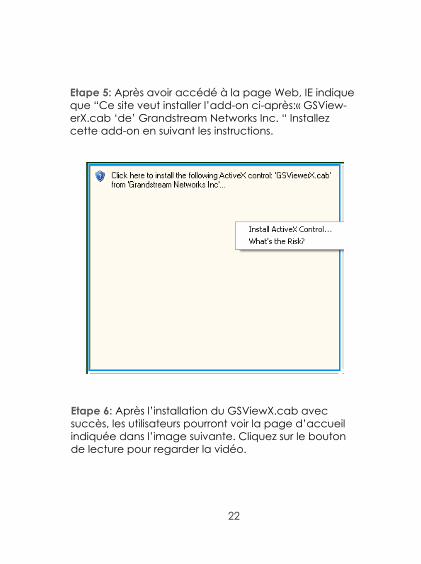
Etape 5: Après avoir accédé à la page Web, IE indique que “Ce site veut installer l’add-on ci-après:« GSView-erX.cab ‘de’ Grandstream Networks Inc. “ Installez cette add-on en suivant les instructions.
Etape 6: Après l’installation du GSViewX.cab avec succès, les utilisateurs pourront voir la page d’accueil indiquée dans l’image suivante. Cliquez sur le bouton de lecture pour regarder la vidéo.
21 22

Pour les instructions de configuration détaillées, veuillez télécharger le manuel d’utilisation et l’aide.http://www.grandstream.com/support/gxv_series_surveil-lance/gxv350x/documents/gxv350x_usermanual_english.pdf
Etape 7: Pour plus de paramètres, Veuillez aller sur le menu principal sur le côté gauche.
23 24
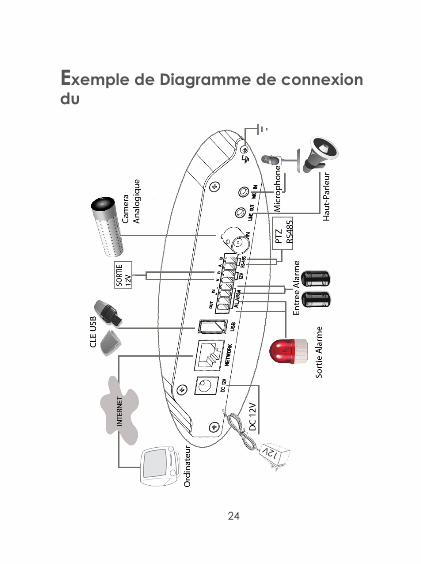
Exemple de Diagramme de connexion du
24
23 24