Embed Size (px)
Citation preview
7/29/2019 GV-Recording Server User Manual RSV11-A-En
http://slidepdf.com/reader/full/gv-recording-server-user-manual-rsv11-a-en 1/103
User's Manual V1.1
GV-Recording Server
RSV11-A-EN
7/29/2019 GV-Recording Server User Manual RSV11-A-En
http://slidepdf.com/reader/full/gv-recording-server-user-manual-rsv11-a-en 2/103
© 2012 GeoVision, Inc. All rights reserved.Under the copyright laws, this manual may not be copied, in whole or in part,without the written consent of GeoVision.
Every effort has been made to ensure that the information in this manual isaccurate. GeoVision, Inc. makes no expressed or implied warranty of any kind
and assumes no responsibility for errors or omissions. No liability is assumedfor incidental or consequential damages arising from the use of the informationor products contained herein. Features and specifications are subject tochange without notice.
GeoVision, Inc.9F, No. 246, Sec. 1, Neihu Rd.,Neihu District, Taipei, Taiwan
Tel: +886-2-8797-8377Fax: +886-2-8797-8335http://www.geovision.com.tw
Trademarks used in this manual: GeoVision , the GeoVision logo and GVseries products are trademarks of GeoVision, Inc. Windows and Windows XP are registered trademarks of Microsoft Corporation.
January 2012
7/29/2019 GV-Recording Server User Manual RSV11-A-En
http://slidepdf.com/reader/full/gv-recording-server-user-manual-rsv11-a-en 3/103
i
Preface
Welcome to the GV-Recording Server User’s Manual .
This Manual is designed for the following version:
Product Version
GV-Recording Server V1.1.0.0
7/29/2019 GV-Recording Server User Manual RSV11-A-En
http://slidepdf.com/reader/full/gv-recording-server-user-manual-rsv11-a-en 4/103
ii
ContentsNaming and Definition .. ................................................ v
Chapter 1 Introduction.. ............................................... 1
1.1 System Requirements.. .............................................................................................. 4
1.1.1 Minimum System Requirements.. .................................................................... 4
1.1.2 Optimal System Requirements .. ...................................................................... 5
1.1.3 Recommended Hard Disk Requirements .. ...................................................... 7
1.1.4 Network Requirements .. .................................................................................. 8
1.1.5 GV-USB Dongle.. ............................................................................................. 9
1.1.6 Compatible Versions of GeoVision Applications.. ............................................ 9
Chapter 2 Installation... .............................................. 10
2.1 Installing the GV-Recording Server... ....................................................................... 10
2.2 Starting the GV-Recording Server ... ........................................................................ 11
Chapter 3 Getting Started ... ...................................... 13
Chapter 4 Active and Passive Mode ... ..................... 17
4.1 Active Connection ... ................................................................................................. 18
4.2 Passive Connection ... .............................................................................................. 18
Chapter 5 Administrator Mode ... .............................. 21
5.1 Information ... ............................................................................................................ 23
5.1.1 Camera Connection Information... ................................................................. 23
5.1.2 Storage Information ... .................................................................................... 25 5.1.3 Client Connection Information ... .................................................................... 26
5.1.4 Server Information ... ...................................................................................... 27
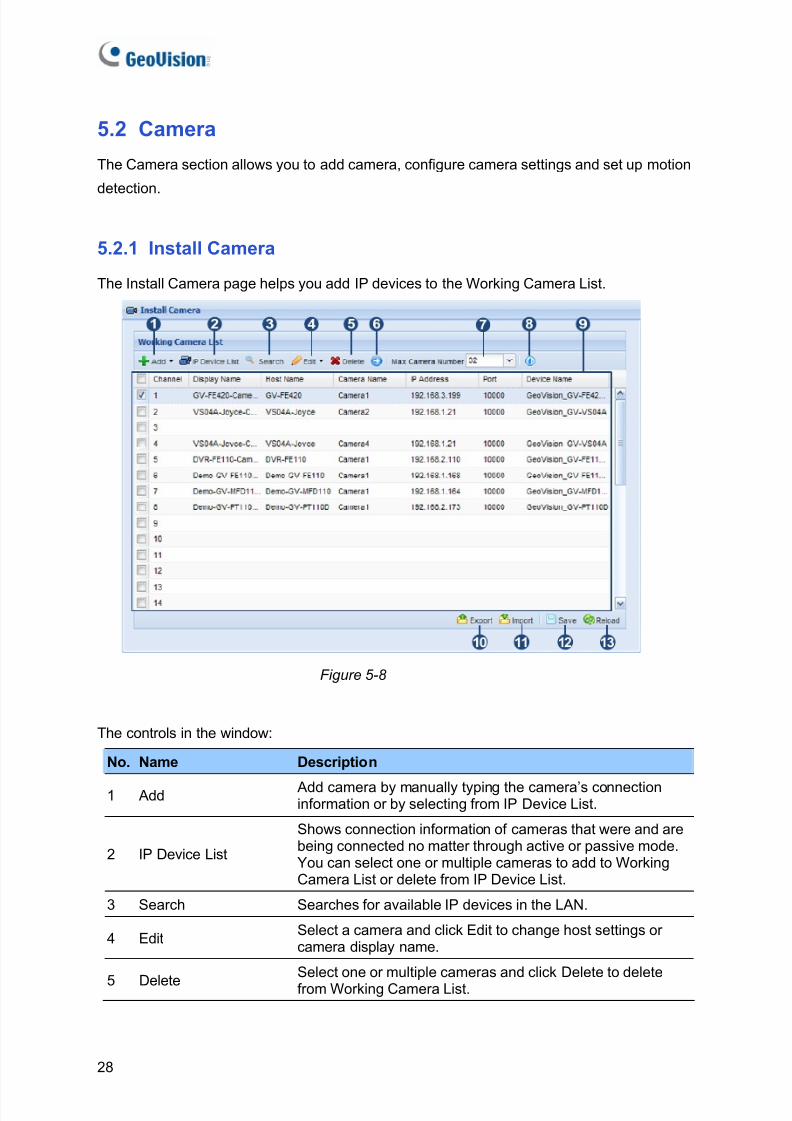
5.2 Camera ... ................................................................................................................. 28
5.2.1 Install Camera... ............................................................................................. 28
5.2.2 Camera Setting... ........................................................................................... 32
5.2.3 Motion Detection... ......................................................................................... 38
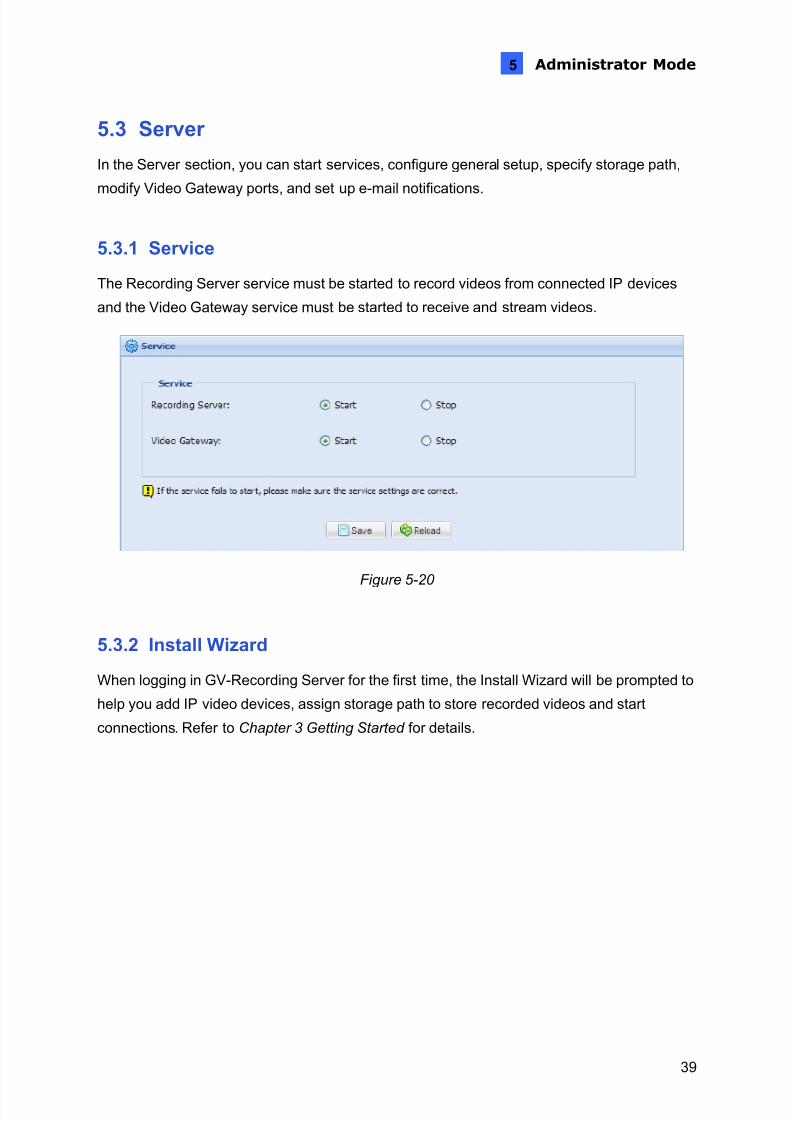
5.3 Server... .................................................................................................................... 39
5.3.1 Service... ........................................................................................................ 39 5.3.2 Install Wizard ... .............................................................................................. 39
7/29/2019 GV-Recording Server User Manual RSV11-A-En
http://slidepdf.com/reader/full/gv-recording-server-user-manual-rsv11-a-en 5/103
iii
5.3.3 General Setup... ............................................................................................. 40
5.3.4 Storage Path... ............................................................................................... 41
5.3.5 Video Gateway ... ........................................................................................... 41
5.3.6 Notification... .................................................................................................. 43
5.4 Network... ................................................................................................................. 44
5.4.1 Network... ....................................................................................................... 44
5.4.2 Port Setting... ................................................................................................. 46
5.4.3 Mail Service ... ................................................................................................ 47
5.4.4 Remote ViewLog ... ........................................................................................ 49
5.5 Advanced Management ... ........................................................................................ 50
5.5.1 E-map ... ......................................................................................................... 50
5.5.2 GIS... .............................................................................................................. 54 5.5.3 User Account ... .............................................................................................. 56
5.5.4 Advanced Query ... ......................................................................................... 58
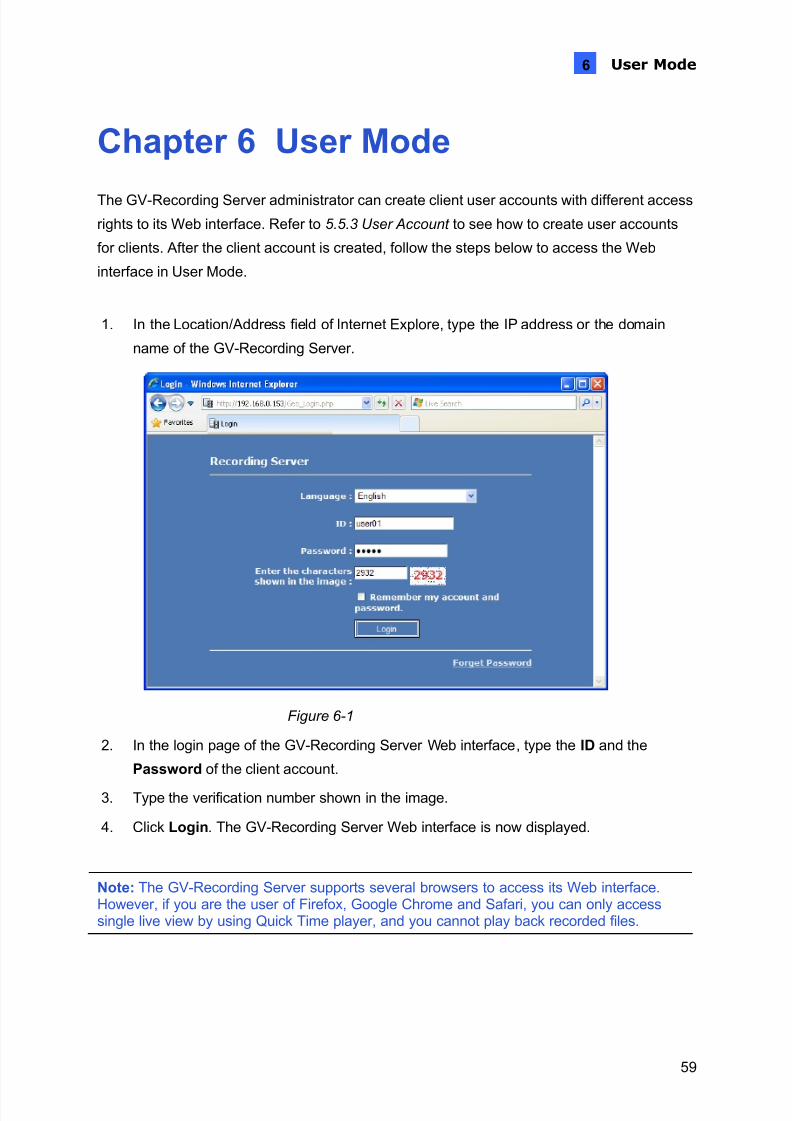
Chapter 6 User Mode ... .............................................. 59
6.1 Single Live View... .................................................................................................... 60
6.1.1 Control Panel... ............................................................................................... 61
6.1.2 Snapshot of a Live Video... ............................................................................ 62
6.1.3 Video Recording ... ......................................................................................... 62
6.1.4 Picture-in-Picture and Picture-and-Picture View... ......................................... 62
6.1.5 Video and Audio Configuration... ................................................................... 65
6.1.6 PTZ Control ... ................................................................................................ 65
6.1.7 Visual PTZ ... .................................................................................................. 66
6.1.8 Camera Name Display... ................................................................................ 67
6.1.9 Image Enhancement... ................................................................................... 67
6.1.10 GPS Tracking ... ........................................................................................... 68
6.2 Multi-Channel Live View... ........................................................................................ 70
6.3 Emap Query ... .......................................................................................................... 71
6.4 Remote Playback... .................................................................................................. 72
6.5 Composite Information Query ... ............................................................................... 73
6.6 System Event List Query... ....................................................................................... 75
6.7 Behavior Log Event Query ... .................................................................................... 76
6.8 Login / Logout Query... ............................................................................................. 77
6.9 Chart Analysis... ....................................................................................................... 78
7/29/2019 GV-Recording Server User Manual RSV11-A-En
http://slidepdf.com/reader/full/gv-recording-server-user-manual-rsv11-a-en 6/103
iv
Chapter 7 Connections with Clients ... ..................... 80
7.1 Connecting with GV-System ... ................................................................................. 80
7.2 Connecting with Multi View ... ................................................................................... 83 7.3 Connecting with Multicast ... ..................................................................................... 85
7.4 Connecting with Remote ViewLog ... ........................................................................ 86
7.5 Connecting with the GV-Control Center... ................................................................ 88
Specifications... ........................................................... 89
Appendix... ................................................................... 90
A. Settings for Internet Explore 8 ... ................................................................................. 90
B. RTSP Protocol Support ... ........................................................................................... 91
C. Supported Third-Party IP Devices ... ........................................................................... 92
7/29/2019 GV-Recording Server User Manual RSV11-A-En
http://slidepdf.com/reader/full/gv-recording-server-user-manual-rsv11-a-en 7/103
v
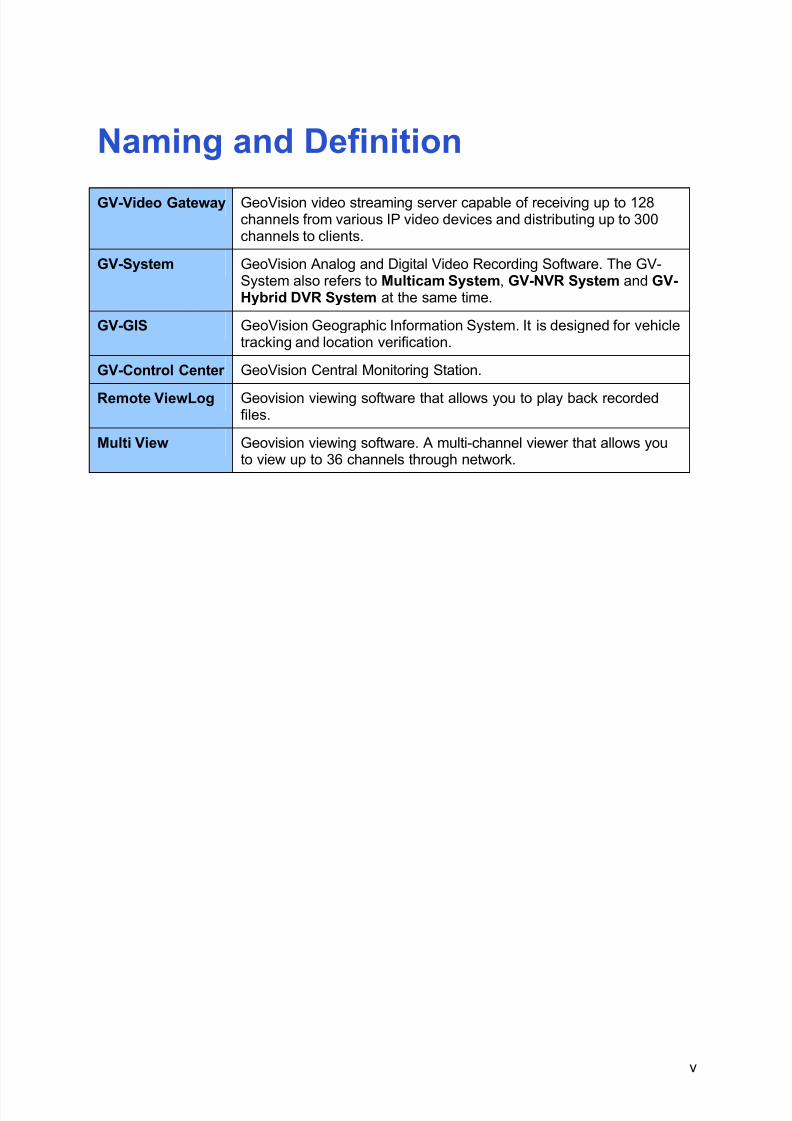
Naming and Definition
GV-Video Gateway GeoVision video streaming server capable of receiving up to 128channels from various IP video devices and distributing up to 300channels to clients.
GV-System GeoVision Analog and Digital Video Recording Software. The GV-System also refers to Multicam System , GV-NVR System and GV-Hybrid DVR System at the same time.
GV-GIS GeoVision Geographic Information System. It is designed for vehicletracking and location verification.
GV-Control Center GeoVision Central Monitoring Station.
Remote ViewLog Geovision viewing software that allows you to play back recordedfiles.
Multi View Geovision viewing software. A multi-channel viewer that allows youto view up to 36 channels through network.

7/29/2019 GV-Recording Server User Manual RSV11-A-En
http://slidepdf.com/reader/full/gv-recording-server-user-manual-rsv11-a-en 8/103
7/29/2019 GV-Recording Server User Manual RSV11-A-En
http://slidepdf.com/reader/full/gv-recording-server-user-manual-rsv11-a-en 9/103
Introduction
1
1
Chapter 1 Introduction
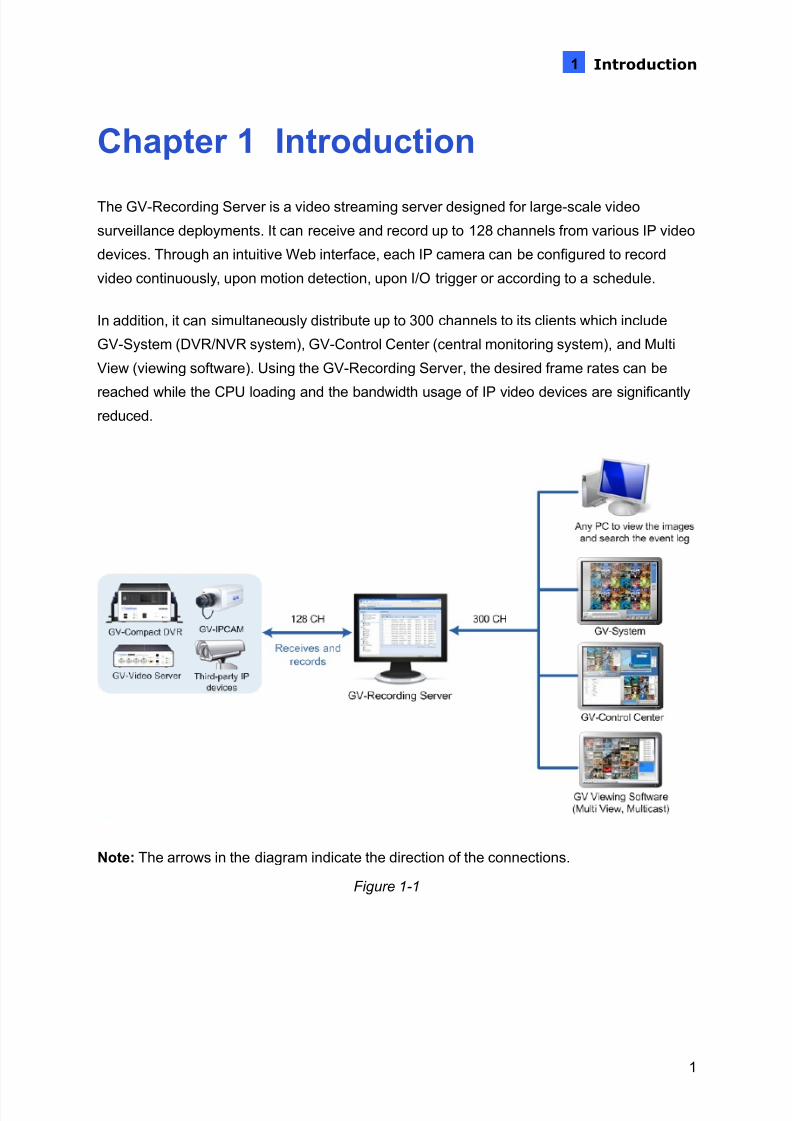
The GV-Recording Server is a video streaming server designed for large-scale video
surveillance deployments. It can receive and record up to 128 channels from various IP video
devices. Through an intuitive Web interface, each IP camera can be configured to record
video continuously, upon motion detection, upon I/O trigger or according to a schedule.
In addition, it can simultaneously distribute up to 300 channels to its clients which include
GV-System (DVR/NVR system), GV-Control Center (central monitoring system), and Multi
View (viewing software). Using the GV-Recording Server, the desired frame rates can be
reached while the CPU loading and the bandwidth usage of IP video devices are significantlyreduced.
Note: The arrows in the diagram indicate the direction of the connections.
Figure 1-1
7/29/2019 GV-Recording Server User Manual RSV11-A-En
http://slidepdf.com/reader/full/gv-recording-server-user-manual-rsv11-a-en 10/103
2
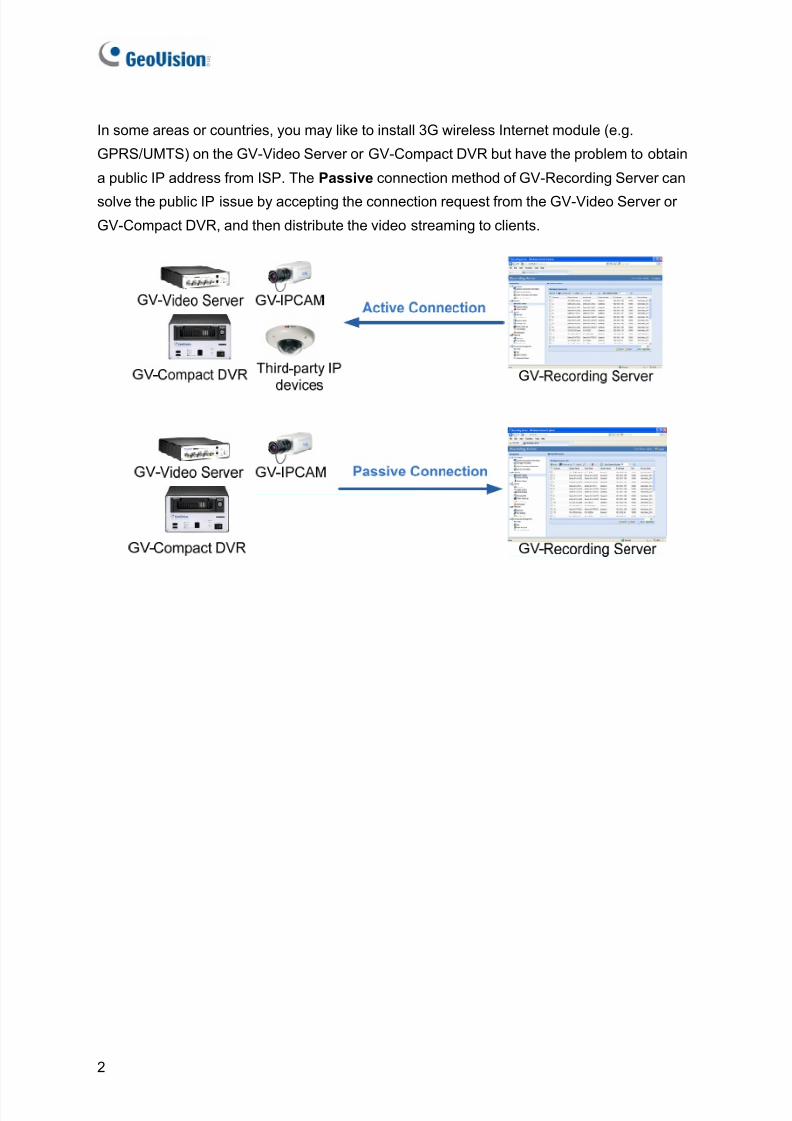
In some areas or countries, you may like to install 3G wireless Internet module (e.g.
GPRS/UMTS) on the GV-Video Server or GV-Compact DVR but have the problem to obtain
a public IP address from ISP. The Passive connection method of GV-Recording Server can
solve the public IP issue by accepting the connection request from the GV-Video Server or
GV-Compact DVR, and then distribute the video streaming to clients.
7/29/2019 GV-Recording Server User Manual RSV11-A-En
http://slidepdf.com/reader/full/gv-recording-server-user-manual-rsv11-a-en 11/103
Introduction
3
1
Features
z Video gateway between IP devices and receiving clients (GV-System, GV-Control
Center, and Multi View)
z Maximum video distribution for large IP channel counts (up to 128 IP channels) andreceiving clients (up to 300 IP channels)
z Simultaneous recording up to 128 IP channels
z Different recording policies to set each channel to record continuously, upon motion
detection, upon I/O trigger or by schedule (recording upon motion detection and I/O
trigger are only for GV-IP devices)
z Video playback using Remote ViewLog
z Web interface to remotely configure and monitor GV-Recording Server using Internet
Explorer, Firefox, Google Chrome and Safari
z Support for third-party IP video devices (Sony, Axis, VIVOTEK, Panasonic, HikVision,
Arecont Vision)
z Support for ONVIF, PSIA and RTSP protocols
z Passive and active connection methods with IP video devices (Passive connection only
supported by GV-IP devices)
z Solution for Mobile DVR (GV-Video Server, GV-Compact DVR) to obtain a public IP
address
z Bandwidth monitoring
z Two-way audio communication (only for GV-IP devices through active connection)
For the supported third-party IP video devices, see Appendix C. Supported Third-Party IP
Devices .
7/29/2019 GV-Recording Server User Manual RSV11-A-En
http://slidepdf.com/reader/full/gv-recording-server-user-manual-rsv11-a-en 12/103
4
1.1 System Requirements
The following is system requirements to run the GV-Recording Server.
1.1.1 Minimum System Requirements
Servers meeting the following minimum system requirements have the capacity to receive up
to 128 channels and transmit up to 300 channels with the image settings of 1280 x 1024
resolution, 30 fps and H.264 / MPEG4 codec for each channel.
OS 64-bit Windows 7 / Server 2008
CPU Core i5 750, 2.67 GHzMemory 4 GB Dual Channels (without recording)
6 GB Dual Channels (with recording)
Hard Disk 1 GB (for installation)
Browser • Internet Explorer 8.0.7600.16385• Internet Explorer 9.00.7930.16406• Firefox 3.6.13• Google Chrome 9.0.597.94•
Safari 5.33.19.4LAN Gigabit Ethernet X 1
Software .Net Framework 3.5
Hardware • GV-Video Gateway: Internal or external GV-USB Dongle• GV-Recording Server: Internal GV-USB Dongle
Note:1. Memory required varies depending on the number of channels and resolution of
videos received.2. The 1 GB hard disk requirement is for installation of GV-Recording Server only. To see
hard disk requirements for recording, please see 1.1.3 Recommended Hard Disk Requirements for more detail.
3. In order to receive 128 channels and transmit up to 300 channels with the imagesettings of 1280 x 1024 resolution, 30 fps and JPEG codec for each channel, GigabitEthernet x 6 is required.
4. For users of Firefox, Google Chrome and Safari, you can only access single live viewby using Quick Time player, and you cannot play back recorded files.
5. To see how to install the internal GV-USB Dongle, refer to Appendix D. Install theInternal USB Dongle .
7/29/2019 GV-Recording Server User Manual RSV11-A-En
http://slidepdf.com/reader/full/gv-recording-server-user-manual-rsv11-a-en 13/103
Introduction
5
1
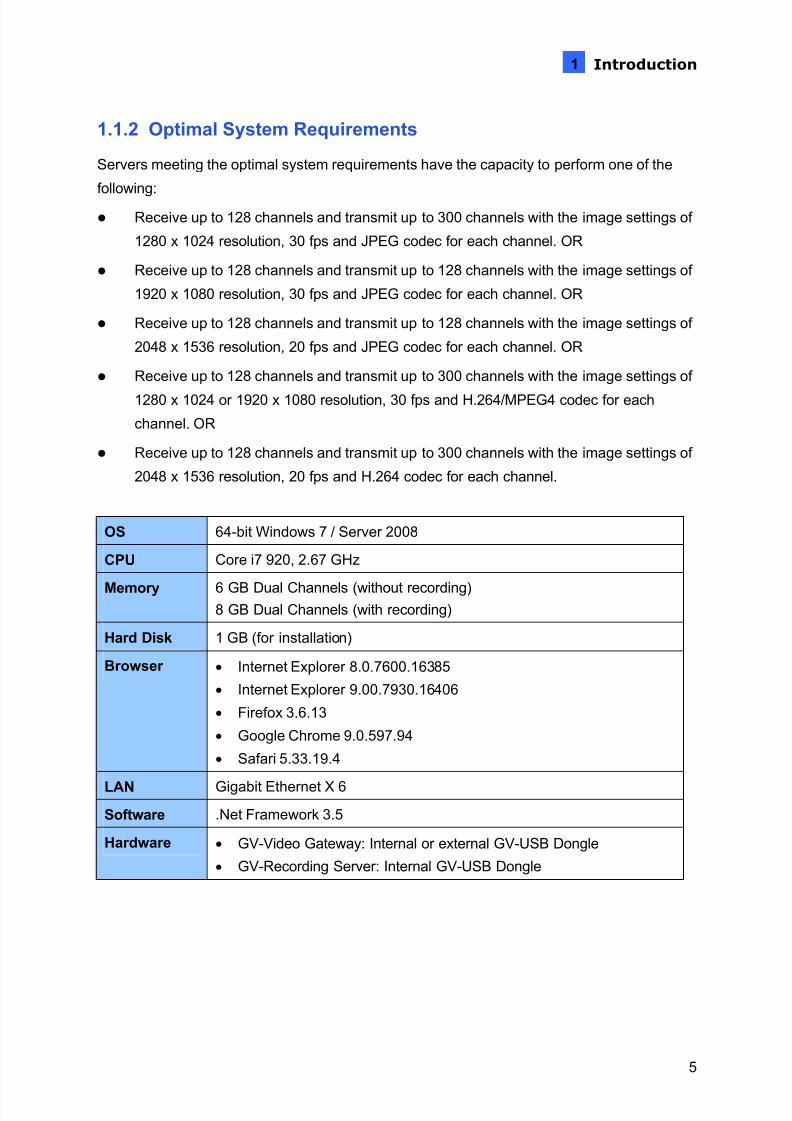
1.1.2 Optimal System Requirements
Servers meeting the optimal system requirements have the capacity to perform one of the
following:
z Receive up to 128 channels and transmit up to 300 channels with the image settings of
1280 x 1024 resolution, 30 fps and JPEG codec for each channel. OR
z Receive up to 128 channels and transmit up to 128 channels with the image settings of
1920 x 1080 resolution, 30 fps and JPEG codec for each channel. OR
z Receive up to 128 channels and transmit up to 128 channels with the image settings of
2048 x 1536 resolution, 20 fps and JPEG codec for each channel. OR
z Receive up to 128 channels and transmit up to 300 channels with the image settings of
1280 x 1024 or 1920 x 1080 resolution, 30 fps and H.264/MPEG4 codec for each
channel. OR
z Receive up to 128 channels and transmit up to 300 channels with the image settings of
2048 x 1536 resolution, 20 fps and H.264 codec for each channel.
OS 64-bit Windows 7 / Server 2008
CPU Core i7 920, 2.67 GHz
Memory 6 GB Dual Channels (without recording)8 GB Dual Channels (with recording)
Hard Disk 1 GB (for installation)
Browser • Internet Explorer 8.0.7600.16385• Internet Explorer 9.00.7930.16406• Firefox 3.6.13• Google Chrome 9.0.597.94• Safari 5.33.19.4
LAN Gigabit Ethernet X 6
Software .Net Framework 3.5
Hardware • GV-Video Gateway: Internal or external GV-USB Dongle• GV-Recording Server: Internal GV-USB Dongle
7/29/2019 GV-Recording Server User Manual RSV11-A-En
http://slidepdf.com/reader/full/gv-recording-server-user-manual-rsv11-a-en 14/103
6
Note:1. Memory required varies depending on the number of channels and resolution of
videos received.2. The 1 GB hard disk requirement is for installation of GV-Recording Server only. To see
hard disk requirements for recording, please see 1.1.3 Recommended Hard Disk Requirements for more details.
3. For users of Firefox, Google Chrome and Safari, you can only access single live viewby using Quick Time player, and you cannot play back recorded files.
4. To see how to install the internal GV-USB Dongle, refer to Appendix D. Install theInternal USB Dongle .
7/29/2019 GV-Recording Server User Manual RSV11-A-En
http://slidepdf.com/reader/full/gv-recording-server-user-manual-rsv11-a-en 15/103
Introduction
7
1
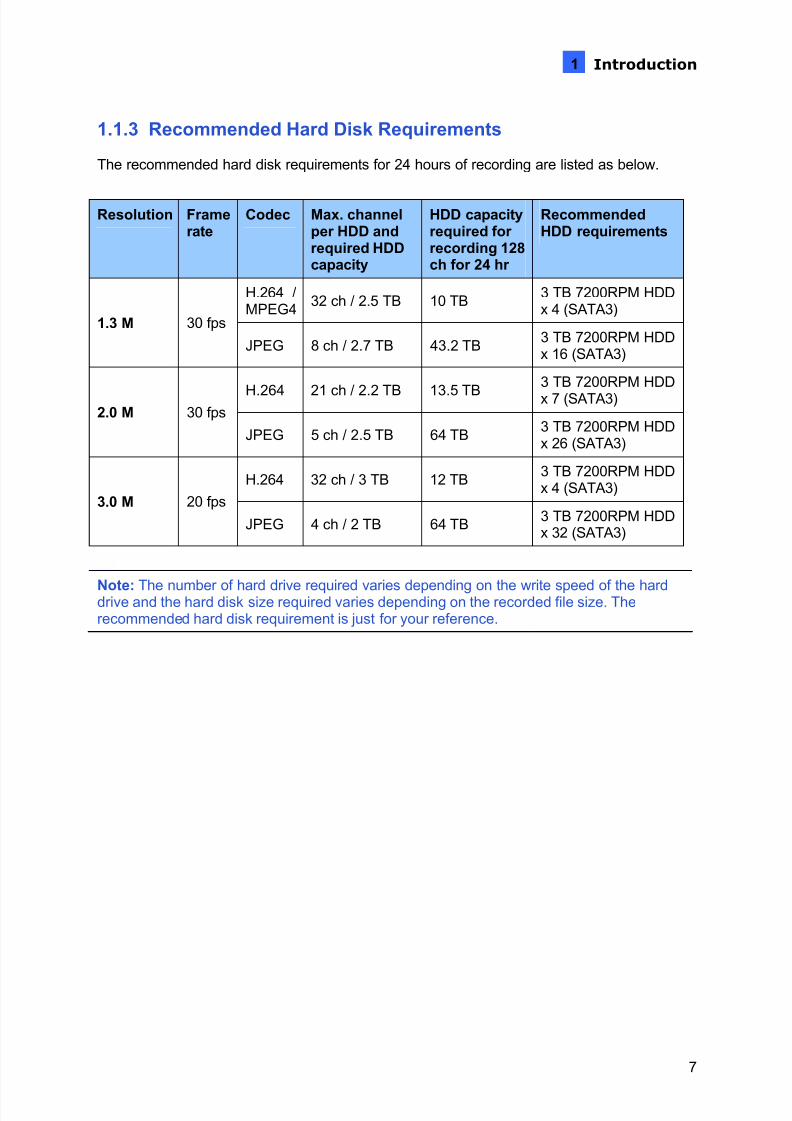
1.1.3 Recommended Hard Disk Requirements
The recommended hard disk requirements for 24 hours of recording are listed as below.
Resolution Framerate
Codec Max. channelper HDD andrequired HDDcapacity
HDD capacityrequired for recording 128ch for 24 hr
RecommendedHDD requirements
H.264 /MPEG4 32 ch / 2.5 TB 10 TB 3 TB 7200RPM HDD
x 4 (SATA3)1.3 M 30 fps
JPEG 8 ch / 2.7 TB 43.2 TB 3 TB 7200RPM HDDx 16 (SATA3)
H.264 21 ch / 2.2 TB 13.5 TB3 TB 7200RPM HDDx 7 (SATA3)
2.0 M 30 fps
JPEG 5 ch / 2.5 TB 64 TB 3 TB 7200RPM HDDx 26 (SATA3)
H.264 32 ch / 3 TB 12 TB 3 TB 7200RPM HDDx 4 (SATA3)
3.0 M 20 fps
JPEG 4 ch / 2 TB 64 TB 3 TB 7200RPM HDDx 32 (SATA3)
Note: The number of hard drive required varies depending on the write speed of the harddrive and the hard disk size required varies depending on the recorded file size. Therecommended hard disk requirement is just for your reference.
7/29/2019 GV-Recording Server User Manual RSV11-A-En
http://slidepdf.com/reader/full/gv-recording-server-user-manual-rsv11-a-en 16/103
8
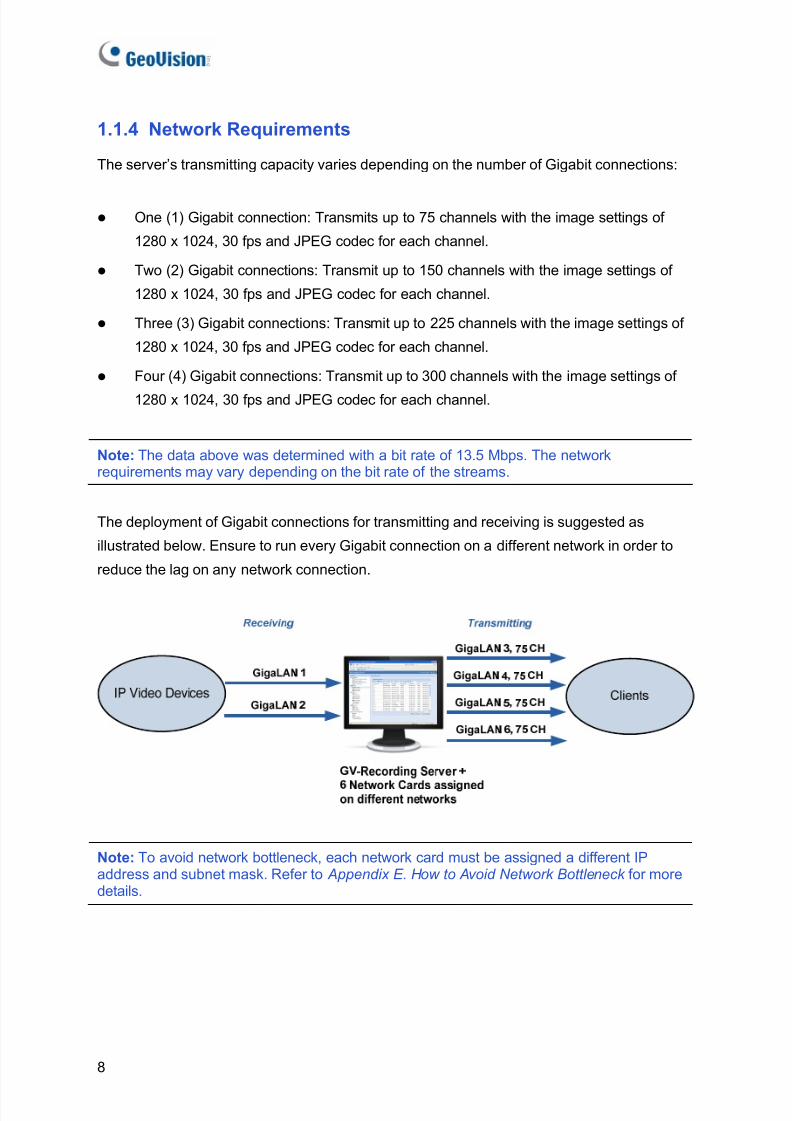
1.1.4 Network Requirements
The server’s transmitting capacity varies depending on the number of Gigabit connections:
z One (1) Gigabit connection: Transmits up to 75 channels with the image settings of
1280 x 1024, 30 fps and JPEG codec for each channel.
z Two (2) Gigabit connections: Transmit up to 150 channels with the image settings of
1280 x 1024, 30 fps and JPEG codec for each channel.
z Three (3) Gigabit connections: Transmit up to 225 channels with the image settings of
1280 x 1024, 30 fps and JPEG codec for each channel.
z Four (4) Gigabit connections: Transmit up to 300 channels with the image settings of
1280 x 1024, 30 fps and JPEG codec for each channel.
Note: The data above was determined with a bit rate of 13.5 Mbps. The networkrequirements may vary depending on the bit rate of the streams.
The deployment of Gigabit connections for transmitting and receiving is suggested as
illustrated below. Ensure to run every Gigabit connection on a different network in order to
reduce the lag on any network connection.
Note: To avoid network bottleneck, each network card must be assigned a different IPaddress and subnet mask. Refer to Appendix E. How to Avoid Network Bottleneck for moredetails.
7/29/2019 GV-Recording Server User Manual RSV11-A-En
http://slidepdf.com/reader/full/gv-recording-server-user-manual-rsv11-a-en 17/103
Introduction
9
1
1.1.5 GV-USB Dongle
It is required to insert the GV-USB Dongle to the server, so that the GV-Recording Server
software can be enabled. The GV-USB Dongle supports connection with up to 128 IPchannels. You can select a dongle with GV-Video Gateway functions only or a GV-Recording
Server dongle to access all functions.
GV-Video Gateway dongle supports both third-party IP devices and GV-IP devices, and
comes in two types, internal and external dongles. For GV-Recording Server, you can select
an internal dongle to enable GV-IP video devices only or a dongle to include both third-party
IP devices and GV-IP devices.
GV-Video Gateway Only (without recording functions): Internal or external USB dongle
z Third-party IP devices (Includes GV-IP video devices): 128 IP channels.
GV-Recording Server (full functions available): Internal USB dongle
z GV-IP video devices only: 32, 36, 40, 44, 48, 52, 56, 60, 64, 68, 72, 76, 80, 84, 88, 92,
96, 100, 104, 108, 112, 116, 120, 124, 128 IP channels.
z Third-party IP devices (Includes GV-IP video devices): 32, 36, 40, 44, 48, 52, 56, 60,
64, 68, 72, 76, 80, 84, 88, 92, 96, 100, 104, 108, 112, 116, 120, 124, 128 IP channels.
Note: The internal type of USB dongle can provide the Hardware Watchdog function to theGV-Recording Server by restarting the computer when Windows crashes. To see how toinstall the internal GV-USB Dongle, refer to Appendix D. Install the Internal USB Dongle .
1.1.6 Compatible Versions of GeoVision Applications
The GV-Recording Server is only compatible with the following version:
z GV-System, GV-Control Center, Multi View, Multicast: version 8.4 or later. GV-
System V8.4 only supports single streaming from the GV-Recording Server, and GV-
System V8.5 supports dual streaming from the GV-Recording Server.
z GV-GIS: version 3.0 or later.
7/29/2019 GV-Recording Server User Manual RSV11-A-En
http://slidepdf.com/reader/full/gv-recording-server-user-manual-rsv11-a-en 18/103
10
Chapter 2 Installation
2.1 Installing the GV-Recording Server
It is recommended to install the GV-Recording Server on a dedicated computer or server.
Before installing the GV-Recording Server, you need to plug the GV-USB Dongle to the
computer, and then install the dongle driver . Follow the steps below to install the driver and
the GV-Recording Server.
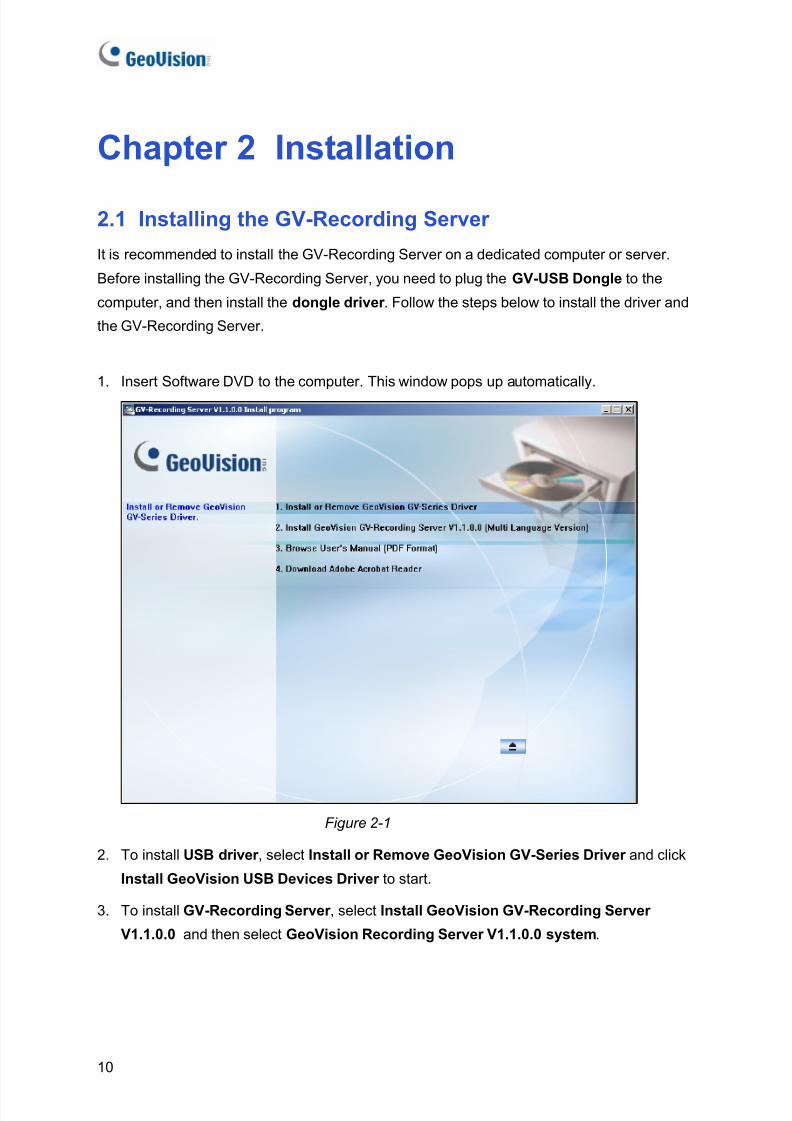
1. Insert Software DVD to the computer. This window pops up automatically.
Figure 2-1
2. To install USB driver , select Install or Remove GeoVision GV-Series Driver and click
Install GeoVision USB Devices Driver to start.
3. To install GV-Recording Server , select Install GeoVision GV-Recording Server
V1.1.0.0 and then select GeoVision Recording Server V1.1.0.0 system .

7/29/2019 GV-Recording Server User Manual RSV11-A-En
http://slidepdf.com/reader/full/gv-recording-server-user-manual-rsv11-a-en 19/103
Installation
11
2
2.2 Starting the GV-Recording Server
After installing GV-Recording Server, the GV-Recording Server icon
will appear in the system tray. Follow the steps below to access the Web interface of GV-
Recording Server.
1. The default HTTP port is 80 and the command port is 20000. To customize the port
number, right-click the GV-Recording Server icon and select Configure . This dialog box
appears.
Figure 2-2
2. Customize the port number and click OK .
3. Right-click the GV-Recording Server icon and select Start Service .
4. After the GV-Recording Server icon turns green, right-click the icon again and select
Access Web Interface . You can also access the Web interface from a remote computer
by typing the IP address of GV-Recording Server in the Internet browser. The Web
interface login page appears.
Figure 2-3
7/29/2019 GV-Recording Server User Manual RSV11-A-En
http://slidepdf.com/reader/full/gv-recording-server-user-manual-rsv11-a-en 20/103
12
5. Type the ID and Password . The default login name and password for the Administrator
are admin .
6. Type the verification number shown in the image.
7. Click Login . The GV-Recording Server Web interface is now displayed.
To access the Web interface from a remote computer, start the Internet browser and type the
IP address or the domain name of the GV-Recording Server in the Location/Address field. If
the default HTTP port has been changed, type a colon and the port number after the IP
address, for example, Http://192.168.3.199:81/ . After the login page appears, follow steps 5
to 7 to log in the Web interface.
Note:1. To enable the updating of images in Microsoft Internet Explorer, you must set your
browser to allow ActiveX Controls and perform a one-time installation of GeoVision’sActiveX component onto your computer.
2. If the GV-Recording Server is installed behind a firewall or router, you may need toopen these default ports: HTTP port 80, server connection port (Active connection port)11000 and Passive connection port 50000, remote playback (Remote ViewLog) port5552.
3. The Command port is used for running the recording server. By default, 9 ports arereserved, ranging from 20000 to 20009, for the program use. If other program is usingthe default ports, you may need to change the Command port value.
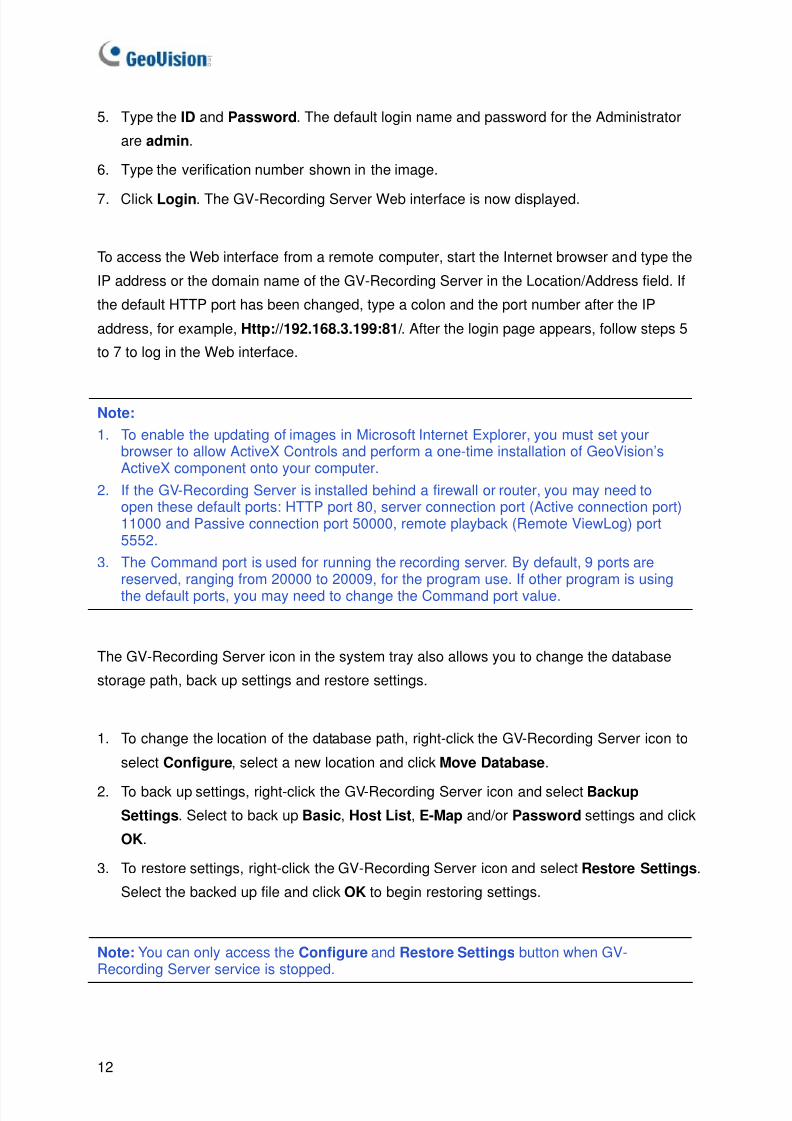
The GV-Recording Server icon in the system tray also allows you to change the database
storage path, back up settings and restore settings.
1. To change the location of the database path, right-click the GV-Recording Server icon to
select Configure , select a new location and click Move Database .
2. To back up settings, right-click the GV-Recording Server icon and select Backup
Settings . Select to back up Basic , Host List , E-Map and/or Password settings and click
OK .
3. To restore settings, right-click the GV-Recording Server icon and select Restore Settings .
Select the backed up file and click OK to begin restoring settings.
Note: You can only access the Configure and Restore Settings button when GV-Recording Server service is stopped.
7/29/2019 GV-Recording Server User Manual RSV11-A-En
http://slidepdf.com/reader/full/gv-recording-server-user-manual-rsv11-a-en 21/103
Getting Started
13
3
Chapter 3 Getting StartedWhen logging in the GV-Recording Server for the first time, the Install Wizard will be
prompted to help you add IP video devices, assign storage path to store recorded files and
start connections.
Note: To start the Install Wizard manually, click Install Wizard under the Server section inthe left menu.
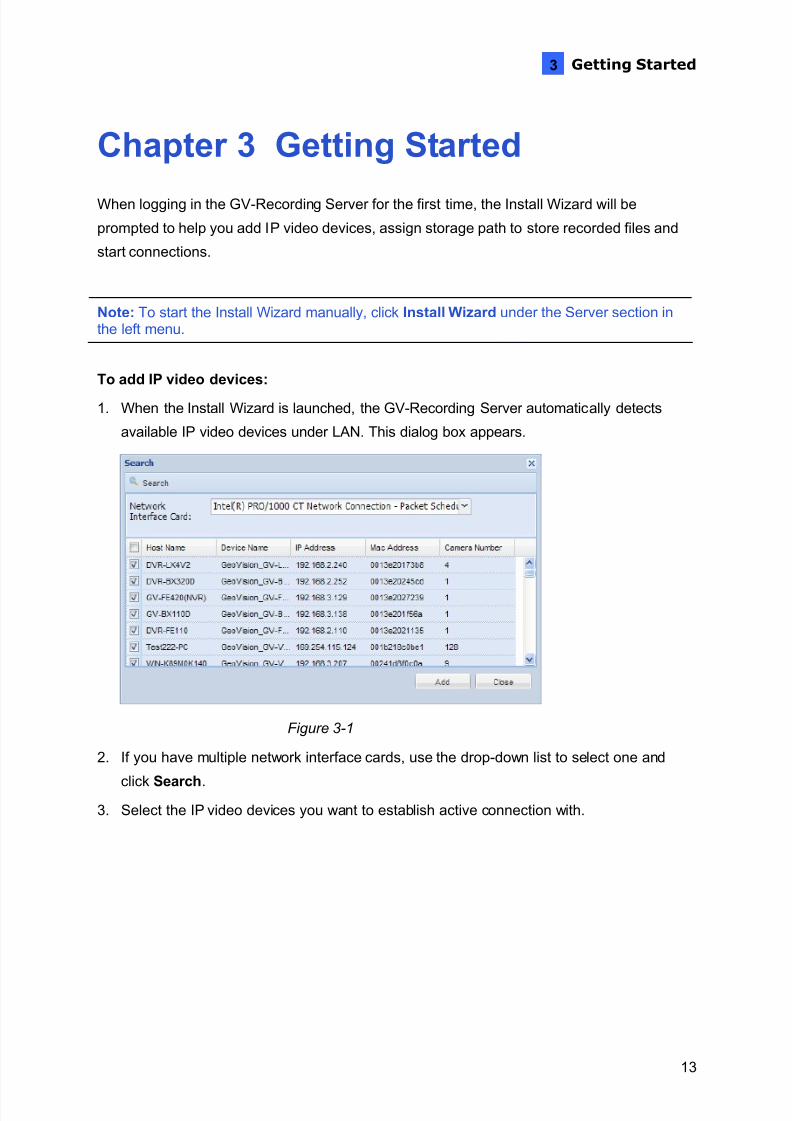
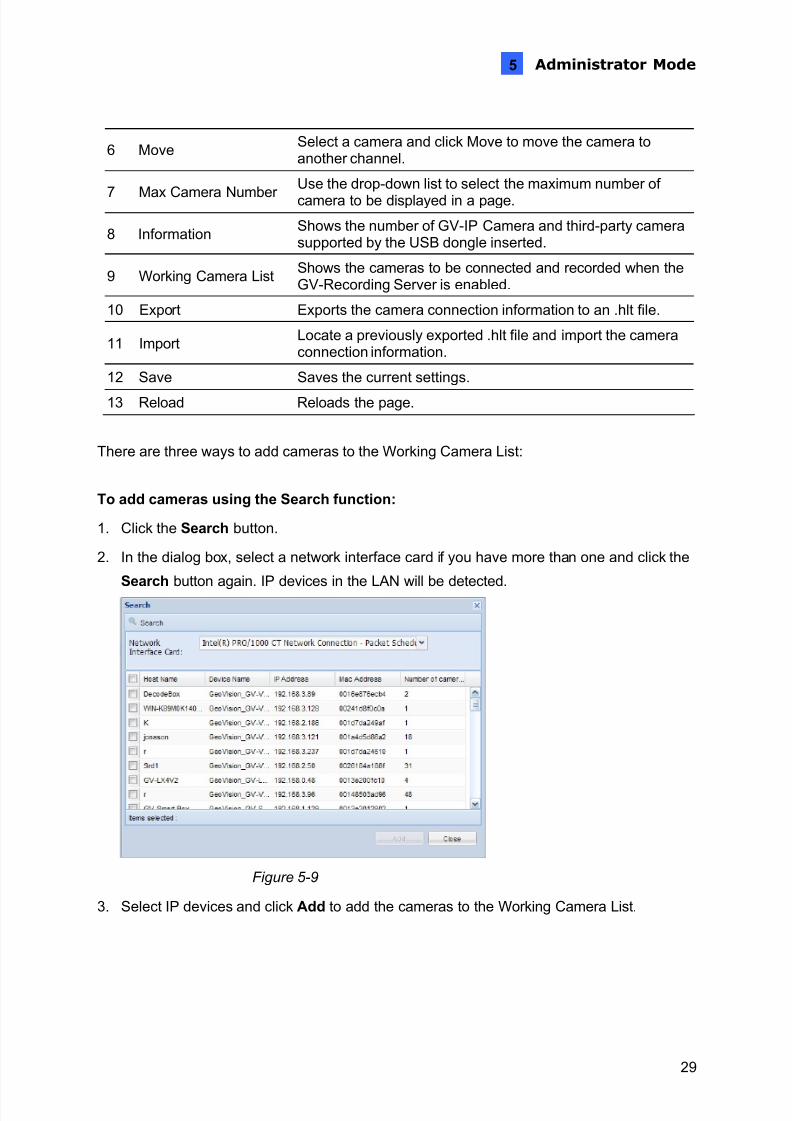
To add IP video devices:
1. When the Install Wizard is launched, the GV-Recording Server automatically detects
available IP video devices under LAN. This dialog box appears.
Figure 3-1
2. If you have multiple network interface cards, use the drop-down list to select one and
click Search .3. Select the IP video devices you want to establish active connection with.
7/29/2019 GV-Recording Server User Manual RSV11-A-En
http://slidepdf.com/reader/full/gv-recording-server-user-manual-rsv11-a-en 22/103
14
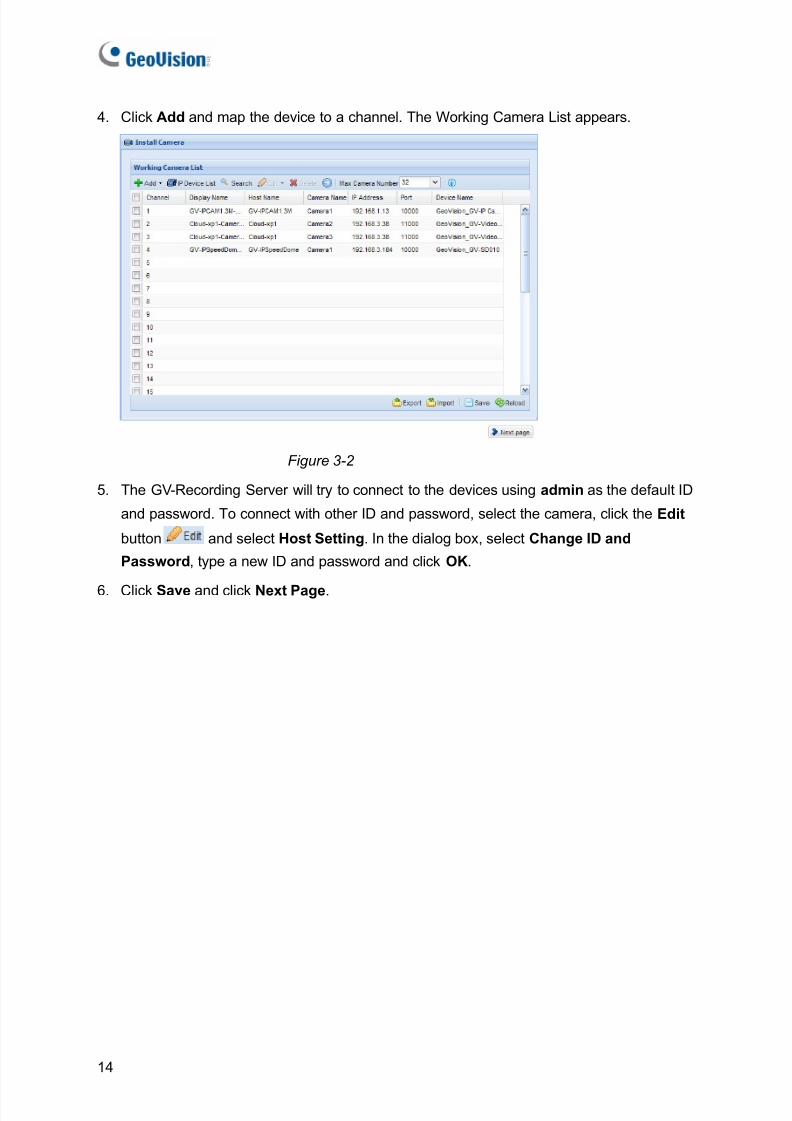
4. Click Add and map the device to a channel. The Working Camera List appears.
Figure 3-2
5. The GV-Recording Server will try to connect to the devices using admin as the default ID
and password. To connect with other ID and password, select the camera, click the Edit
button and select Host Setting . In the dialog box, select Change ID and
Password , type a new ID and password and click OK .
6. Click Save and click Next Page .
7/29/2019 GV-Recording Server User Manual RSV11-A-En
http://slidepdf.com/reader/full/gv-recording-server-user-manual-rsv11-a-en 23/103
Getting Started
15
3
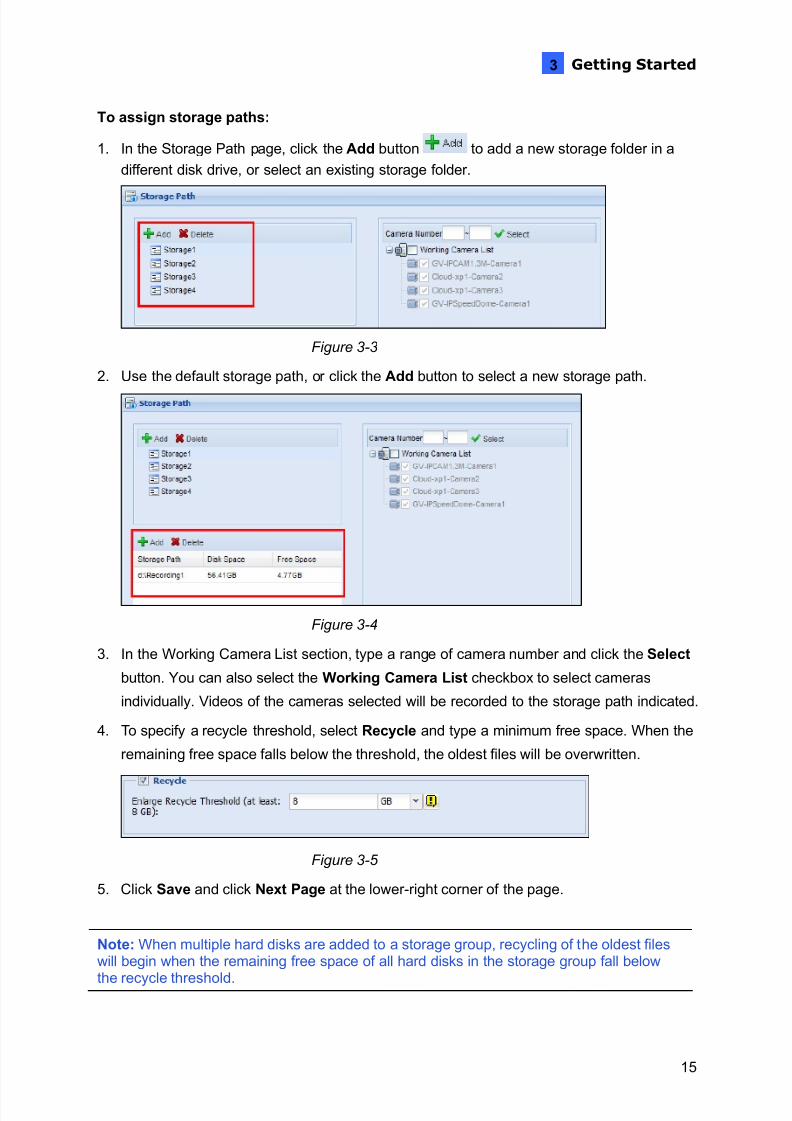
To assign storage paths:
1. In the Storage Path page, click the Add button to add a new storage folder in adifferent disk drive, or select an existing storage folder.
Figure 3-3
2. Use the default storage path, or click the Add button to select a new storage path.
Figure 3-4
3. In the Working Camera List section, type a range of camera number and click the Select
button. You can also select the Working Camera List checkbox to select cameras
individually. Videos of the cameras selected will be recorded to the storage path indicated.
4. To specify a recycle threshold, select Recycle and type a minimum free space. When the
remaining free space falls below the threshold, the oldest files will be overwritten.
Figure 3-5
5. Click Save and click Next Page at the lower-right corner of the page.
Note: When multiple hard disks are added to a storage group, recycling of the oldest fileswill begin when the remaining free space of all hard disks in the storage group fall below
the recycle threshold.
7/29/2019 GV-Recording Server User Manual RSV11-A-En
http://slidepdf.com/reader/full/gv-recording-server-user-manual-rsv11-a-en 24/103
16
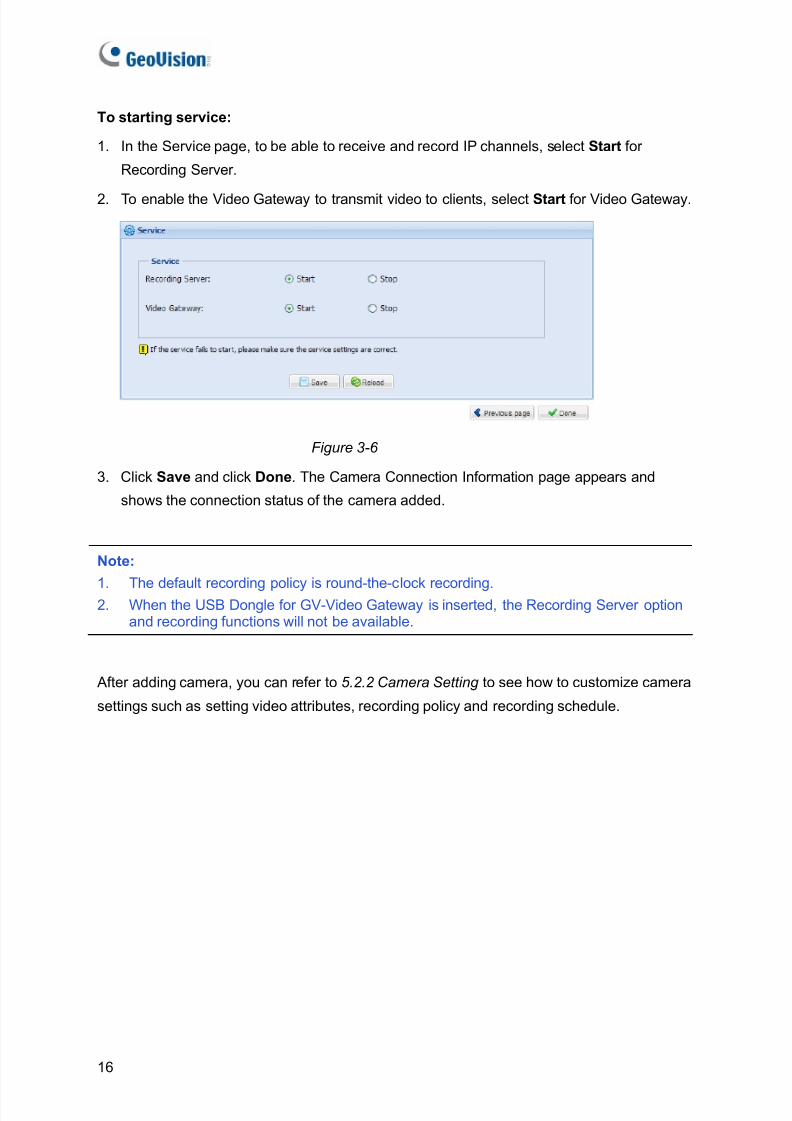
To starting service:
1. In the Service page, to be able to receive and record IP channels, select Start for
Recording Server.
2. To enable the Video Gateway to transmit video to clients, select Start for Video Gateway.
Figure 3-6
3. Click Save and click Done . The Camera Connection Information page appears and
shows the connection status of the camera added.
Note:
1. The default recording policy is round-the-clock recording.2. When the USB Dongle for GV-Video Gateway is inserted, the Recording Server option
and recording functions will not be available.
After adding camera, you can refer to 5.2.2 Camera Setting to see how to customize camera
settings such as setting video attributes, recording policy and recording schedule.
7/29/2019 GV-Recording Server User Manual RSV11-A-En
http://slidepdf.com/reader/full/gv-recording-server-user-manual-rsv11-a-en 25/103
Active and Passive Mode
17
4
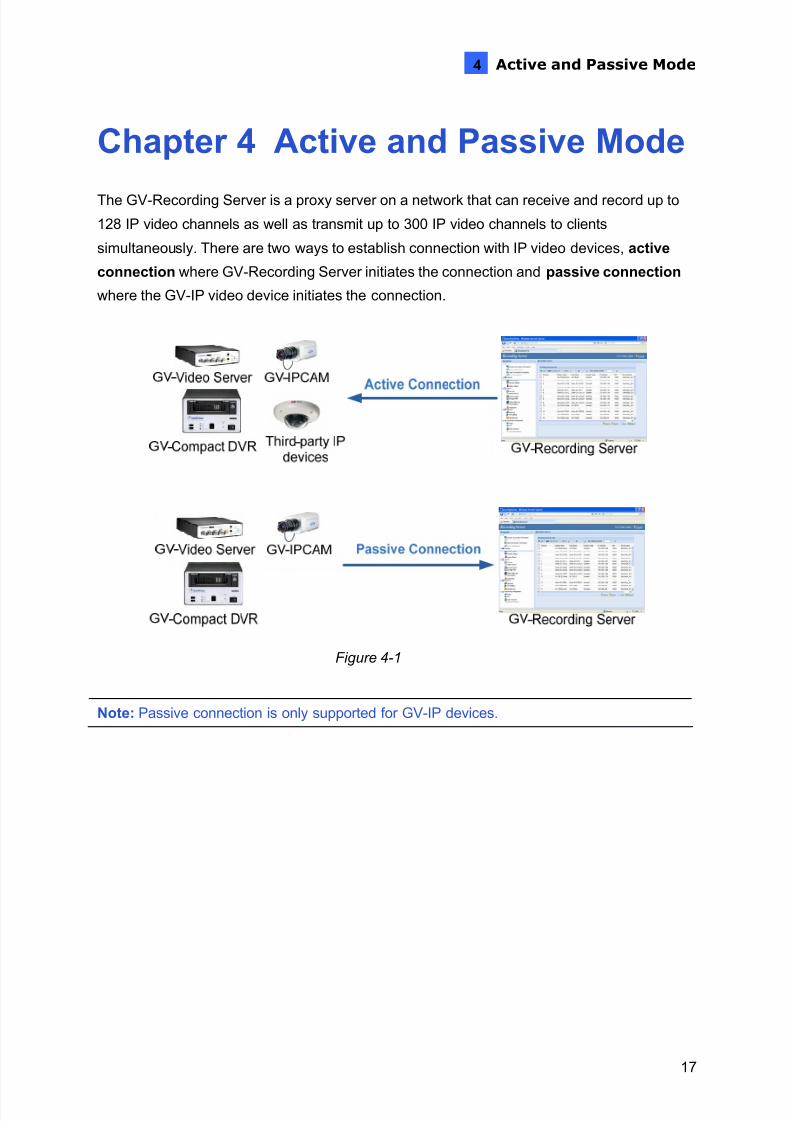
Chapter 4 Active and Passive Mode
The GV-Recording Server is a proxy server on a network that can receive and record up to128 IP video channels as well as transmit up to 300 IP video channels to clients
simultaneously. There are two ways to establish connection with IP video devices, active
connection where GV-Recording Server initiates the connection and passive connection
where the GV-IP video device initiates the connection.
Figure 4-1
Note: Passive connection is only supported for GV-IP devices.
7/29/2019 GV-Recording Server User Manual RSV11-A-En
http://slidepdf.com/reader/full/gv-recording-server-user-manual-rsv11-a-en 26/103
18
4.1 Active Connection
There are multiple ways to actively connect to IP video devices from GV-Recording Server.
You can refer to Chapter 3 Getting Started and simply follow the steps in Installation Wizard
to actively add IP video devices. For other ways to actively add IP video devices or to
customize camera settings, refer to 5.2.1 Install Camera and 5.2.2 Camera Setting .
4.2 Passive Connection
To create passive connection, the GV-Recording Server must be configured to allow
connections from GV-IP video devices. Passive connection to GV-Recording Server is only
supported for GV-IP devices.
To allow passive connection on GV-Recording Server:
1. In left menu, select General Setup .
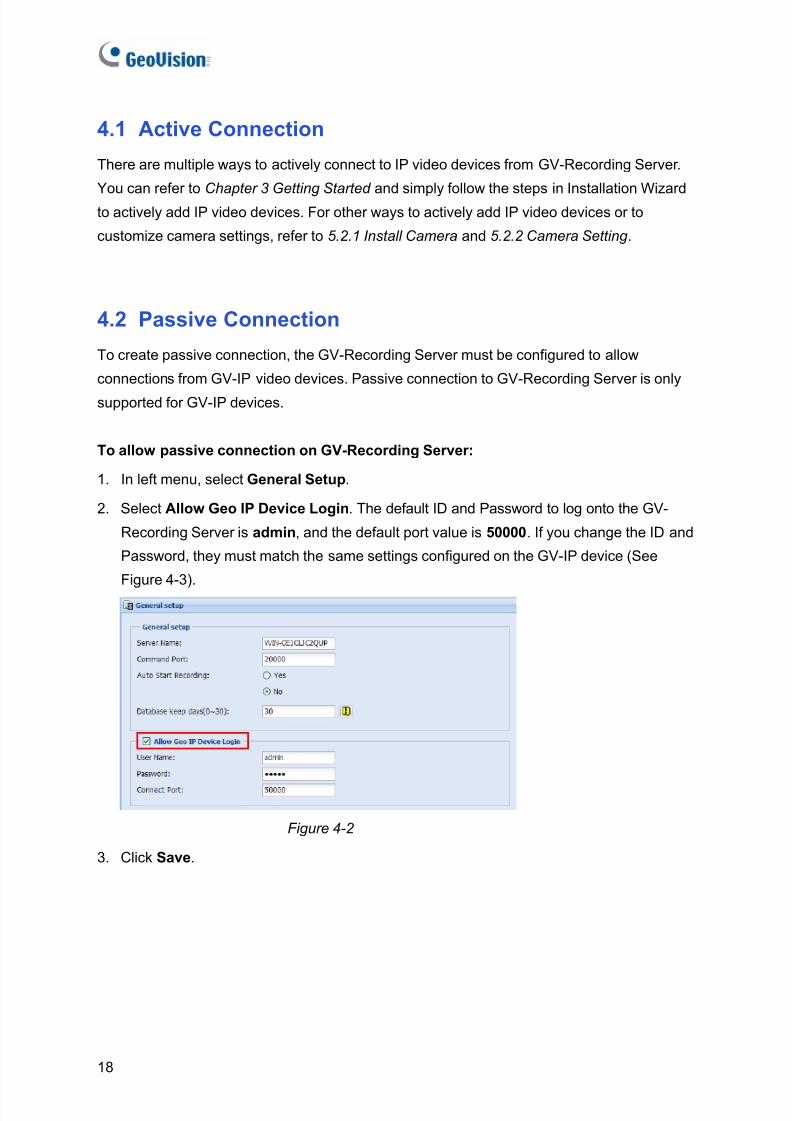
2. Select Allow Geo IP Device Login . The default ID and Password to log onto the GV-
Recording Server is admin , and the default port value is 50000 . If you change the ID and
Password, they must match the same settings configured on the GV-IP device (See
Figure 4-3).
Figure 4-2
3. Click Save .
7/29/2019 GV-Recording Server User Manual RSV11-A-En
http://slidepdf.com/reader/full/gv-recording-server-user-manual-rsv11-a-en 27/103
Active and Passive Mode
19
4
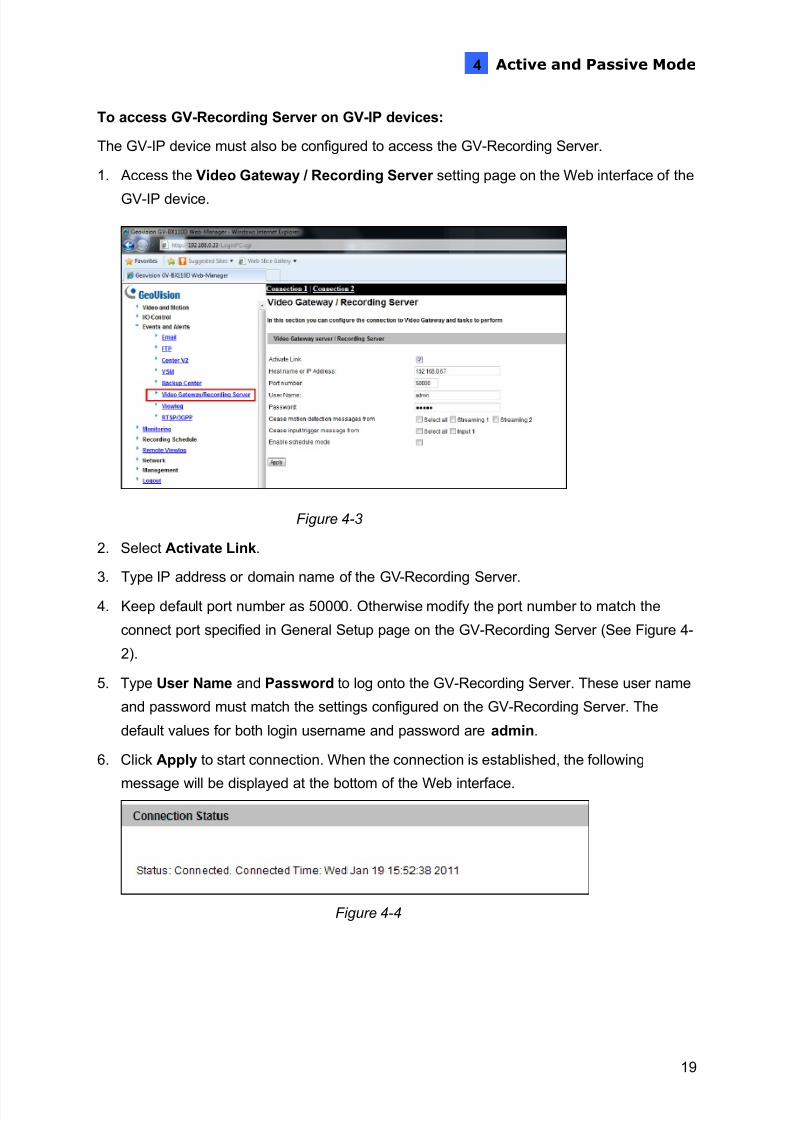
To access GV-Recording Server on GV-IP devices:
The GV-IP device must also be configured to access the GV-Recording Server.
1. Access the Video Gateway / Recording Server setting page on the Web interface of the
GV-IP device.
Figure 4-3
2. Select Activate Link .
3. Type IP address or domain name of the GV-Recording Server.
4. Keep default port number as 50000. Otherwise modify the port number to match the
connect port specified in General Setup page on the GV-Recording Server (See Figure 4-
2).
5. Type User Name and Password to log onto the GV-Recording Server. These user name
and password must match the settings configured on the GV-Recording Server. The
default values for both login username and password are admin .
6. Click Apply to start connection. When the connection is established, the following
message will be displayed at the bottom of the Web interface.
Figure 4-4
7/29/2019 GV-Recording Server User Manual RSV11-A-En
http://slidepdf.com/reader/full/gv-recording-server-user-manual-rsv11-a-en 28/103
20
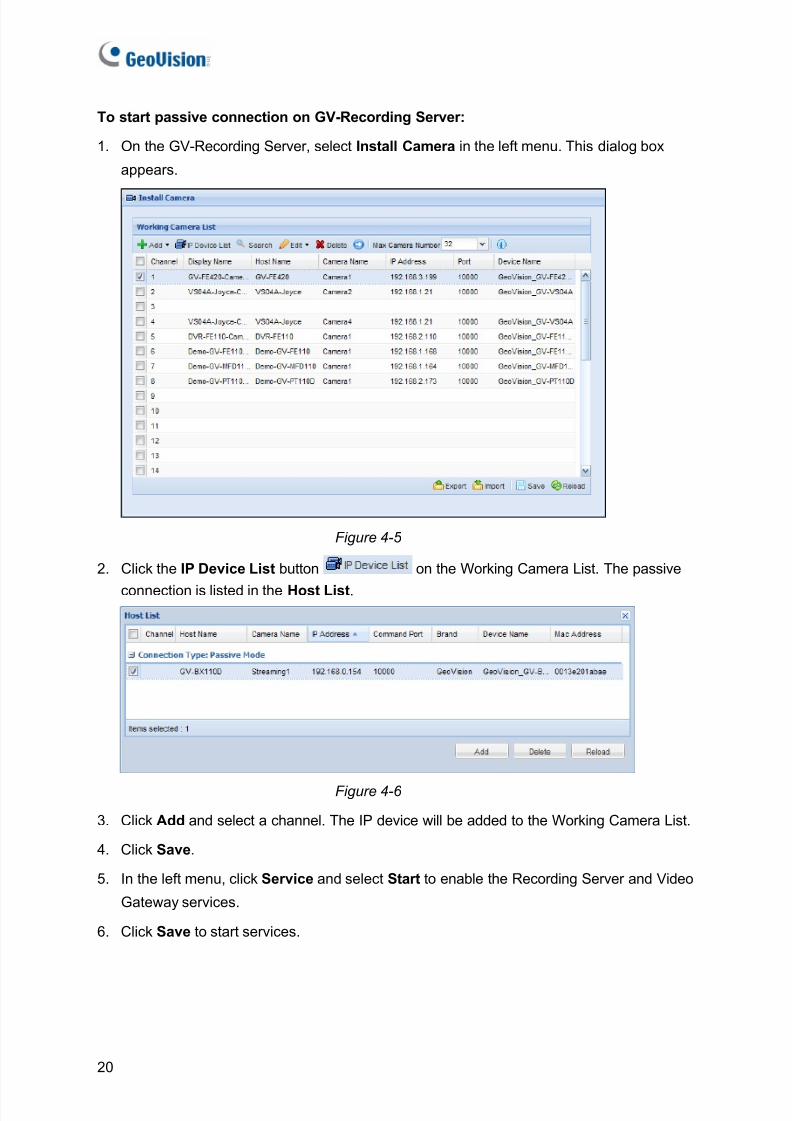
To start passive connection on GV-Recording Server:
1. On the GV-Recording Server, select Install Camera in the left menu. This dialog box
appears.
Figure 4-5
2. Click the IP Device List button on the Working Camera List. The passive
connection is listed in the Host List .
Figure 4-6
3. Click Add and select a channel. The IP device will be added to the Working Camera List.
4. Click Save .
5. In the left menu, click Service and select Start to enable the Recording Server and Video
Gateway services.
6. Click Save to start services.
7/29/2019 GV-Recording Server User Manual RSV11-A-En
http://slidepdf.com/reader/full/gv-recording-server-user-manual-rsv11-a-en 29/103
Administrator Mode
21
5
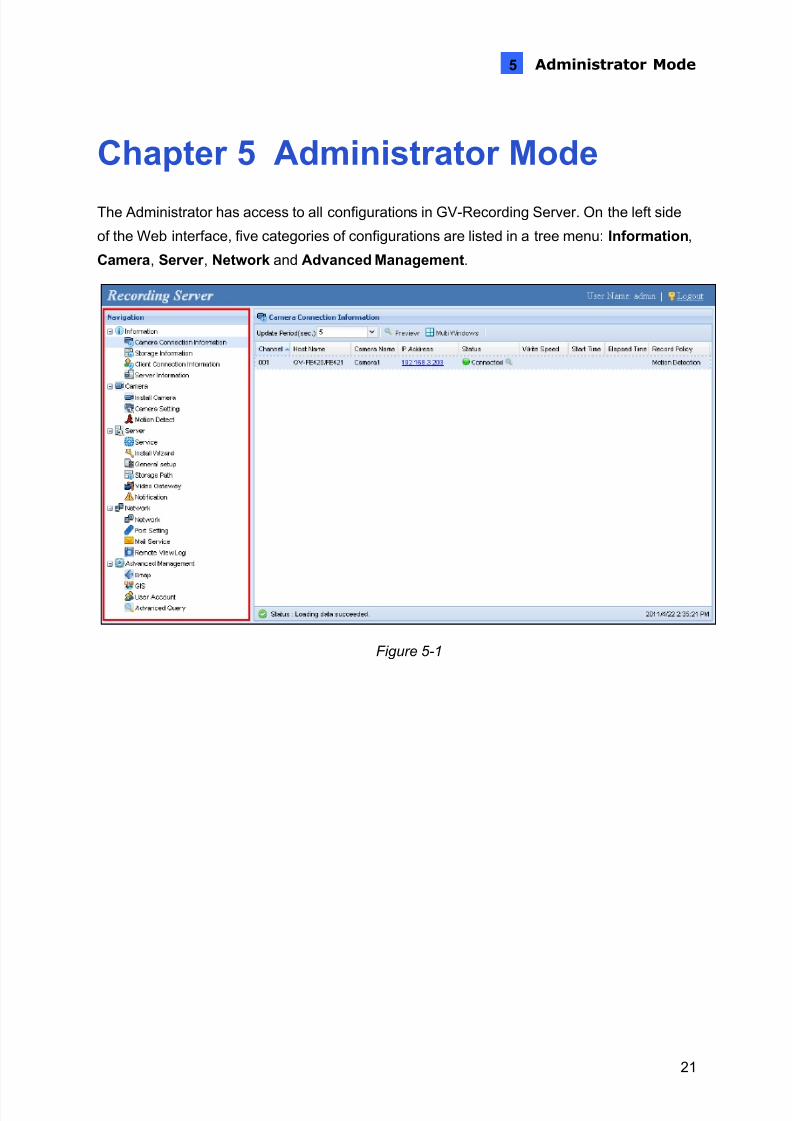
Chapter 5 Administrator ModeThe Administrator has access to all configurations in GV-Recording Server. On the left side
of the Web interface, five categories of configurations are listed in a tree menu: Information ,
Camera , Server , Network and Advanced Management .
Figure 5-1

7/29/2019 GV-Recording Server User Manual RSV11-A-En
http://slidepdf.com/reader/full/gv-recording-server-user-manual-rsv11-a-en 30/103
22
List of Menu Options
Find the topic of interest by referring to the sections below.
5.1 Information
5.1.1 Camera Connection Information
5.1.2 Storage Information5.1.3 Client Connection Information5.1.4 Server Information
5.2 Camera5.2.1 Install Camera5.2.2 Camera Setting5.2.3 Motion Detect
5.3 Server
5.3.1 Service5.3.2 Install Wizard5.3.3 General Setup
5.3.4 Storage Path5.3.5 Video Gateway5.3.6 Notification
5.4 Network5.4.1 Network5.4.2 Port Setting5.4.3 Mail Service
5.5 Advanced Management
5.5.1 Emap5.5.2 GIS5.5.3 User Account
5.5.4 Advanced Query
7/29/2019 GV-Recording Server User Manual RSV11-A-En
http://slidepdf.com/reader/full/gv-recording-server-user-manual-rsv11-a-en 31/103
Administrator Mode
23
5
5.1 Information
This section introduces how to look up camera connection information, storage information,
client connection information and server information.
5.1.1 Camera Connection Information
The Camera Connection Information page shows the connection status of all the IP cameras
added to the Working Camera List and allows you to watch the live video of the connected
camera.
Figure 5-2
The controls in the window:
No. Name Description
1 Upload Period Shows the refresh frequency of the page. Use the drop-down list tocustomize.
2 Preview Shows the live view of the selected camera.
3 Multi Windows Shows the live view of multiple cameras in the list.
4 IP Address Click to access the Web interface of the camera.
5 Status
: The camera is recording. Click to access the live view.: The camera is connected. Click to access the live view.: Connecting to the camera.
: Unable to connect to the camera.: Service has been stopped.: Unable to obtain video from the device.
: Incorrect ID or password.: Unable to record video.
7/29/2019 GV-Recording Server User Manual RSV11-A-En
http://slidepdf.com/reader/full/gv-recording-server-user-manual-rsv11-a-en 32/103
24
To watch the live view:
1. To watch the live view of an individual camera, select a connected camera and click the
Preview button or the icon. The live view, video codec, resolution and the frame rate
of the camera are displayed.
Figure 5-3
2. To watch the live view of multiple cameras, click the Multi Windows button. This window
appears.
Figure 5-4
3. To specify the number of camera live view per page, click the 2x2 , 4x4 or 6x6 button.
4. Use the left and right arrows to see other pages.
7/29/2019 GV-Recording Server User Manual RSV11-A-En
http://slidepdf.com/reader/full/gv-recording-server-user-manual-rsv11-a-en 33/103
Administrator Mode
25
5
5.1.2 Storage Information
The Storage Information page shows the storage paths designated to store recorded videos.
For each storage path, you can see the disk’s used size, free space, write speed and the
time when the disk became full.
Figure 5-5
7/29/2019 GV-Recording Server User Manual RSV11-A-En
http://slidepdf.com/reader/full/gv-recording-server-user-manual-rsv11-a-en 34/103
26
5.1.3 Client Connection Information
The Client Connection Information page shows the clients currently logged into the GV-
Recording Server. The bandwidth occupied, FPS, IP address, login time and camera number
of each client are listed.
Figure 5-6
7/29/2019 GV-Recording Server User Manual RSV11-A-En
http://slidepdf.com/reader/full/gv-recording-server-user-manual-rsv11-a-en 35/103
Administrator Mode
27
5
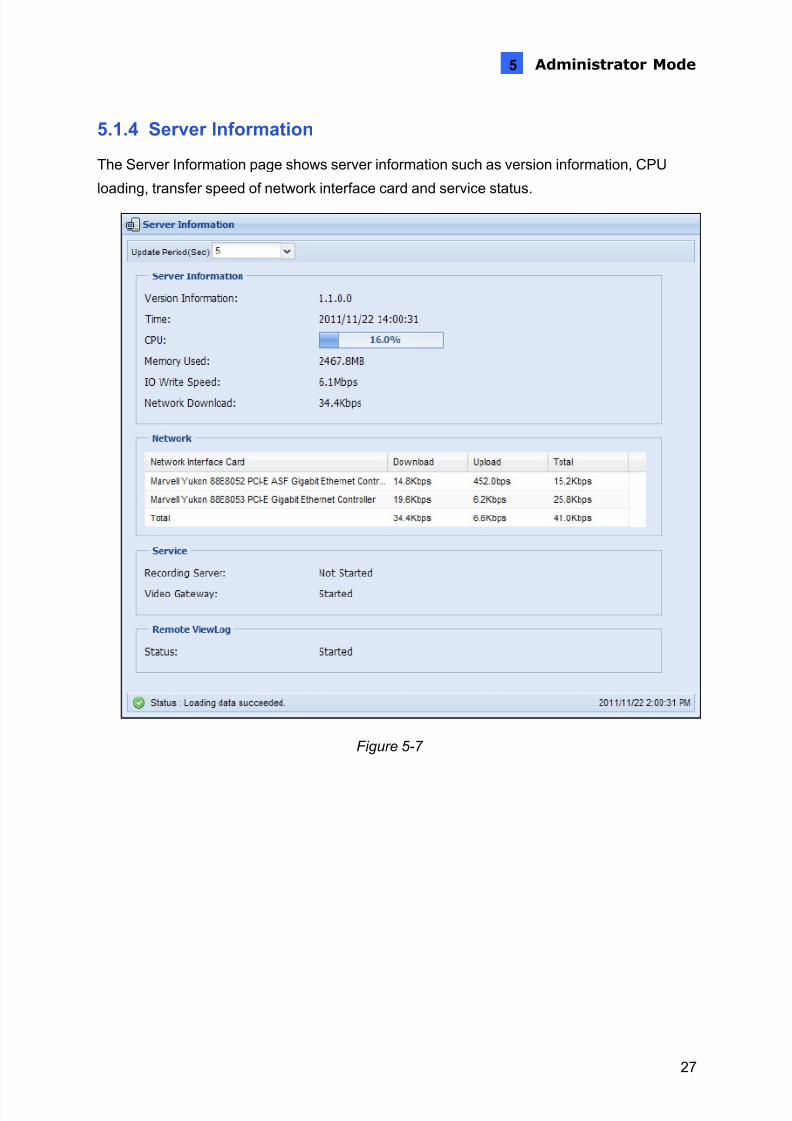
5.1.4 Server Information
The Server Information page shows server information such as version information, CPU
loading, transfer speed of network interface card and service status.
Figure 5-7
7/29/2019 GV-Recording Server User Manual RSV11-A-En
http://slidepdf.com/reader/full/gv-recording-server-user-manual-rsv11-a-en 36/103
7/29/2019 GV-Recording Server User Manual RSV11-A-En
http://slidepdf.com/reader/full/gv-recording-server-user-manual-rsv11-a-en 37/103
7/29/2019 GV-Recording Server User Manual RSV11-A-En
http://slidepdf.com/reader/full/gv-recording-server-user-manual-rsv11-a-en 38/103
30
To add cameras using the IP Device List:
1. Click the IP Device List . The cameras that were and are being connected are all listed.
2. Select one or multiple cameras.
3. Click Add .
To add cameras by manually typing the camera’s information:
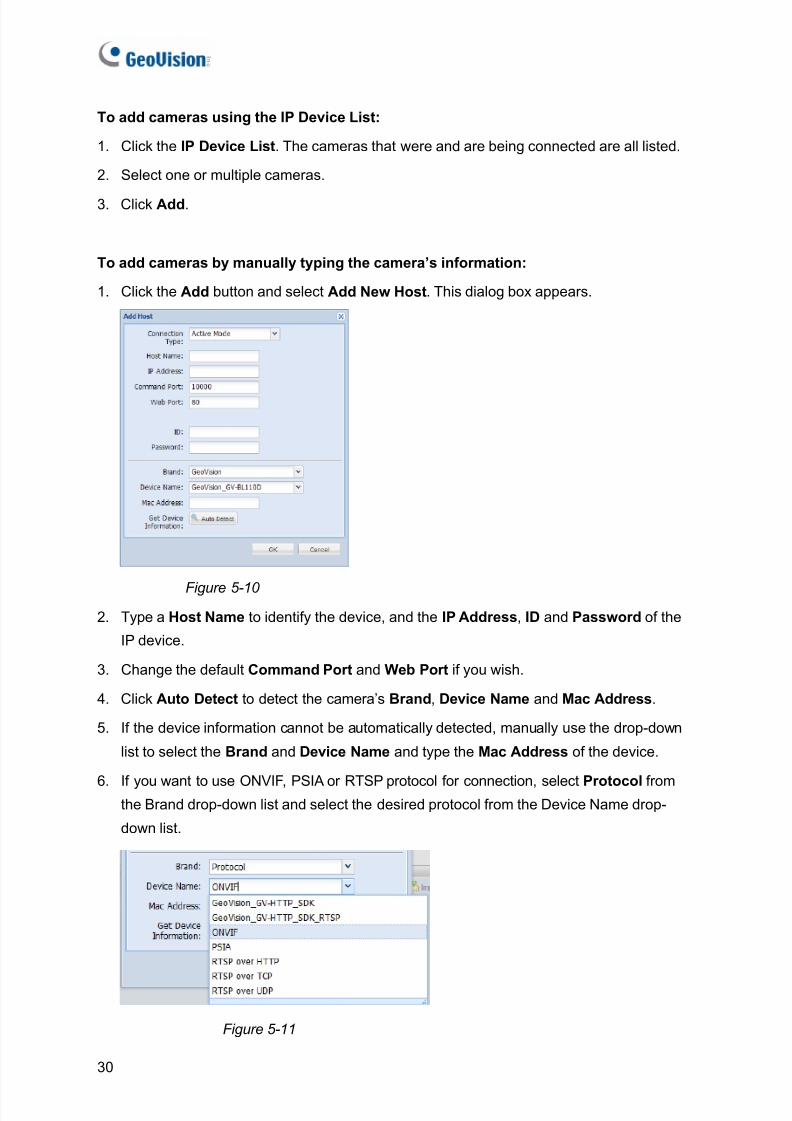
1. Click the Add button and select Add New Host . This dialog box appears.
Figure 5-10 2. Type a Host Name to identify the device, and the IP Address , ID and Password of the
IP device.
3. Change the default Command Port and Web Port if you wish.
4. Click Auto Detect to detect the camera’s Brand , Device Name and Mac Address .
5. If the device information cannot be automatically detected, manually use the drop-down
list to select the Brand and Device Name and type the Mac Address of the device.
6. If you want to use ONVIF, PSIA or RTSP protocol for connection, select Protocol fromthe Brand drop-down list and select the desired protocol from the Device Name drop-
down list.
Figure 5-11
7/29/2019 GV-Recording Server User Manual RSV11-A-En
http://slidepdf.com/reader/full/gv-recording-server-user-manual-rsv11-a-en 39/103
Administrator Mode
31
5
7. Click OK .
After adding the cameras through one of the methods above, a dialog box appears. Type a
number and the cameras will be mapped to that channel and the channels after it. If thechannels are already occupied, a message appears to ask if you want to replace existing
cameras. Click NO to map the cameras to the next available channels instead.
Hint: When adding devices through the Search function, the ID and Password of thedevice will be set to admin by default. To change the ID and Password, select the cameraand click the Edit button. Select Host Setting and select Change ID and Password . Typethe correct ID and Password and click OK .
7/29/2019 GV-Recording Server User Manual RSV11-A-En
http://slidepdf.com/reader/full/gv-recording-server-user-manual-rsv11-a-en 40/103
32
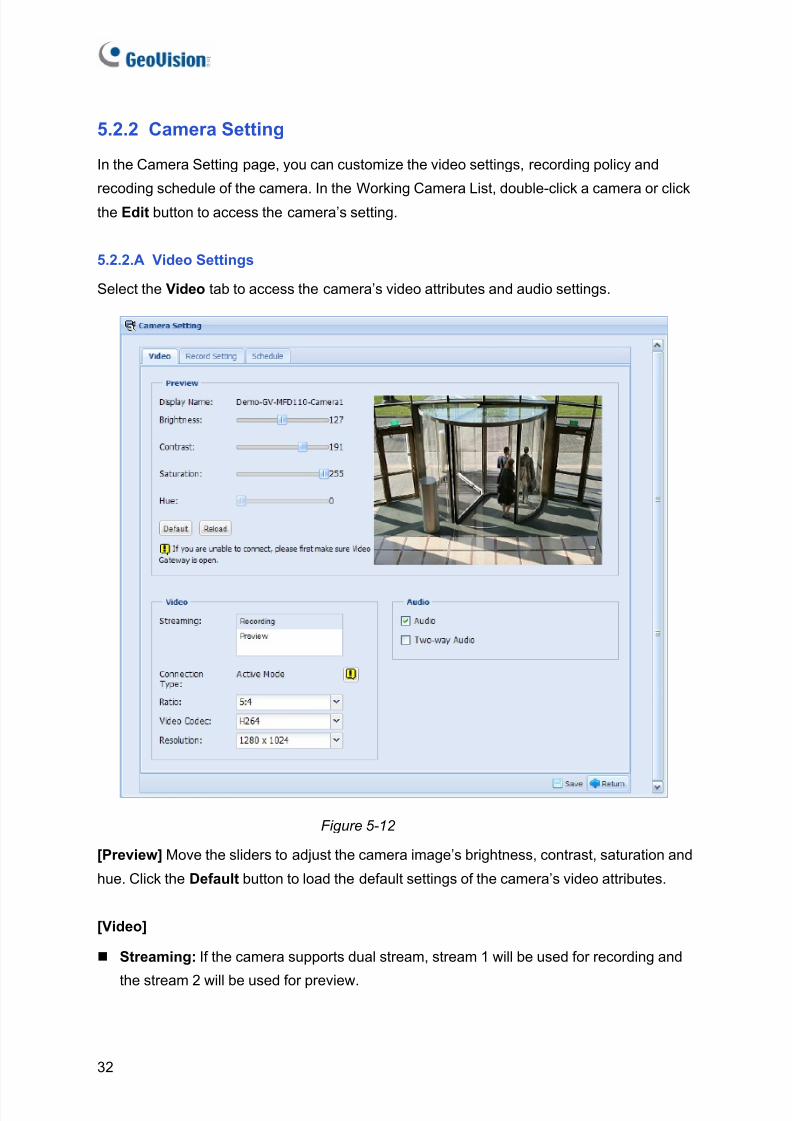
5.2.2 Camera Setting
In the Camera Setting page, you can customize the video settings, recording policy and
recoding schedule of the camera. In the Working Camera List, double-click a camera or click
the Edit button to access the camera’s setting.
5.2.2.A Video Settings
Select the Video tab to access the camera’s video attributes and audio settings.
Figure 5-12
[Preview] Move the sliders to adjust the camera image’s brightness, contrast, saturation and
hue. Click the Default button to load the default settings of the camera’s video attributes.
[Video]
Streaming: If the camera supports dual stream, stream 1 will be used for recording and
the stream 2 will be used for preview.
7/29/2019 GV-Recording Server User Manual RSV11-A-En
http://slidepdf.com/reader/full/gv-recording-server-user-manual-rsv11-a-en 41/103
Administrator Mode
33
5
Connection Type: Shows whether the camera is connected through active mode or
passive mode.
Ratio: Select a display ratio for the camera.
Video Codec: Select a type of video compression method.
Resolution: Select a resolution for live view and recorded video.
[Audio]
Audio: Enables audio of live view.
Two-Way Audio: Enables two-way audio for the camera.
Note:1. Two-way audio is only supported for GV-IP devices connected through active mode.2. The adjustment of video attributes may not be available for some IP video devices.
7/29/2019 GV-Recording Server User Manual RSV11-A-En
http://slidepdf.com/reader/full/gv-recording-server-user-manual-rsv11-a-en 42/103
34
5.2.2.B Record Setting
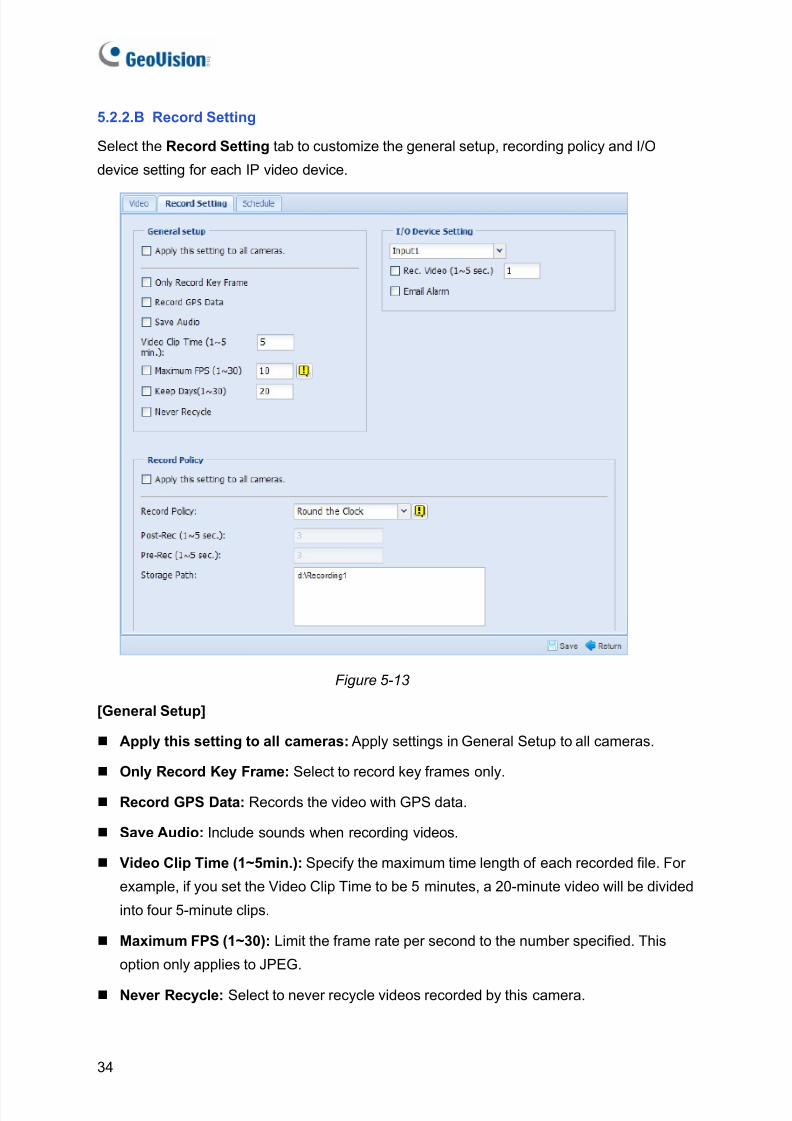
Select the Record Setting tab to customize the general setup, recording policy and I/O
device setting for each IP video device.
Figure 5-13
[General Setup]
Apply this setting to all cameras: Apply settings in General Setup to all cameras.
Only Record Key Frame: Select to record key frames only.
Record GPS Data: Records the video with GPS data.
Save Audio: Include sounds when recording videos.
Video Clip Time (1~5min.): Specify the maximum time length of each recorded file. For
example, if you set the Video Clip Time to be 5 minutes, a 20-minute video will be divided
into four 5-minute clips.
Maximum FPS (1~30): Limit the frame rate per second to the number specified. This
option only applies to JPEG.
Never Recycle: Select to never recycle videos recorded by this camera.
7/29/2019 GV-Recording Server User Manual RSV11-A-En
http://slidepdf.com/reader/full/gv-recording-server-user-manual-rsv11-a-en 43/103
Administrator Mode
35
5
[Recording Policy] In the Record Policy section, use the Record Policy drop-down list to
select one of the following record policies.
Round-the-Clock: Records continuously.
Motion Detect: Starts recording upon motion detection.
I/O Trigger: Starts recording upon input device triggered.
Schedule: Records according to the schedule specified.
Note: 1. Recording upon motion detection and I/O trigger are only supported on GV-IP devices.2. After a camera is added to the Working Camera List, the default recording policy is
Round-the-Clock.
To customize the recording policy:
1. The Post-Rec and Pre-Rec options are available when Motion Detect, I/O Trigger or
Schedule is selected.
If Motion Detect or I/O Trigger is selected, type a time period between 1 and 5 seconds
in the Post-Rec field to continue recording for the number of seconds specified after the
motion detection or I/O trigger event. Use the Pre-Rec field to specify the number of
seconds to start recording before motion is detected or before I/O device is triggered.
2. If Schedule is selected, refer to 5.2.2.C Schedule to see how to set up a recording
schedule.
3. If I/O Trigger is selected, also set up the related settings in the I/O Device Setting below.
4. To apply the settings to all cameras in the Working Camera List, select Apply this
setting to all cameras .
5. Click Save .
[I/O Device Setting] Use the drop-down list to select an input device. When the selected
input device is triggered, the recording will start.
Rec. Video (1~5 sec): Specify the time length for the recording upon input trigger
between 1 and 5 seconds.
E-mail Alarm: The administrator can receive an e-mail alert after input trigger. To use
this function, you must also set up the mail server. See 5.4.3 Mail Service .
7/29/2019 GV-Recording Server User Manual RSV11-A-En
http://slidepdf.com/reader/full/gv-recording-server-user-manual-rsv11-a-en 44/103
36
5.2.2.C Schedule
In the Schedule tab, you can create a recording schedule by setting different recording
policies during different time periods. First create a daily recording schedule and then assign
the daily schedule to a date or a day of the week in the calendar.
Figure 5-14
1. In the Plans section, click the Add button and type a name for the schedule plan.The schedule plan appears in the Plans list.
2. Double-click the schedule plan. This dialog box appears.
Figure 5-15
7/29/2019 GV-Recording Server User Manual RSV11-A-En
http://slidepdf.com/reader/full/gv-recording-server-user-manual-rsv11-a-en 45/103
Administrator Mode
37
5
3. Use the Type drop-down list to select whether to record video round-the-clock, upon
motion detection or upon I/O trigger.
Note: Recording upon I/O trigger and motion detection is not supported for passive
connection.
4. Select a Start Time and an End Time to apply the recording policy specified above.
5. Click the Add button.
6. Repeat steps 3 to 5 to set different recording policies during other time periods. Click OK .
7. Under Calendar, click Add Schedule . This dialog box appears.
Figure 5-16
8. To apply the schedule plan created above to a particular day of the week continuously,
select Weekly Schedule . In the dialog box that appears, select a schedule plan and
select a day of the week to apply.
Figure 5-17
9. To apply the schedule plan to a particular day only, select Special Day Schedule . In the
dialog box that appears, select a schedule plan and select a date to apply.
Figure 5-18
10. Click Save .
7/29/2019 GV-Recording Server User Manual RSV11-A-En
http://slidepdf.com/reader/full/gv-recording-server-user-manual-rsv11-a-en 46/103
38
5.2.3 Motion Detection
Set up motion detection to generate a notification or to begin recording whenever movement
occurs in the video image. You can set up to 8 areas with different sensitivity values for
motion detection.
Note:1. Motion detection is only available for GV-IP devices.2. Motion detection is not supported when codec is set to MJPEG on GV-IP devices.
Figure 5-19
1. In the Working Camera List, select a camera.
2. The default sensitivity value is 2 for the entire area. To define a different sensitivity value,
click Reset .3. Select the sensitivity by moving the slider. There are three values. The higher the value,
the more sensitive the camera is to motion.
4. Drag an area on the image. Click Add when you are prompted to confirm the setting.
5. To create several areas with different sensitivity values, repeat steps 3 and 4.
6. Click Save .
You can now set up e-mail notifications to be sent or to start recording upon motion detection.Refer to 5.3.6 Notification and 5.2.2 Camera Setting to see how to set up notifications and
record policy.
7/29/2019 GV-Recording Server User Manual RSV11-A-En
http://slidepdf.com/reader/full/gv-recording-server-user-manual-rsv11-a-en 47/103
Administrator Mode
39
5
5.3 Server
In the Server section, you can start services, configure general setup, specify storage path,
modify Video Gateway ports, and set up e-mail notifications.
5.3.1 Service
The Recording Server service must be started to record videos from connected IP devices
and the Video Gateway service must be started to receive and stream videos.
Figure 5-20
5.3.2 Install Wizard
When logging in GV-Recording Server for the first time, the Install Wizard will be prompted to
help you add IP video devices, assign storage path to store recorded videos and start
connections. Refer to Chapter 3 Getting Started for details.
7/29/2019 GV-Recording Server User Manual RSV11-A-En
http://slidepdf.com/reader/full/gv-recording-server-user-manual-rsv11-a-en 48/103
40
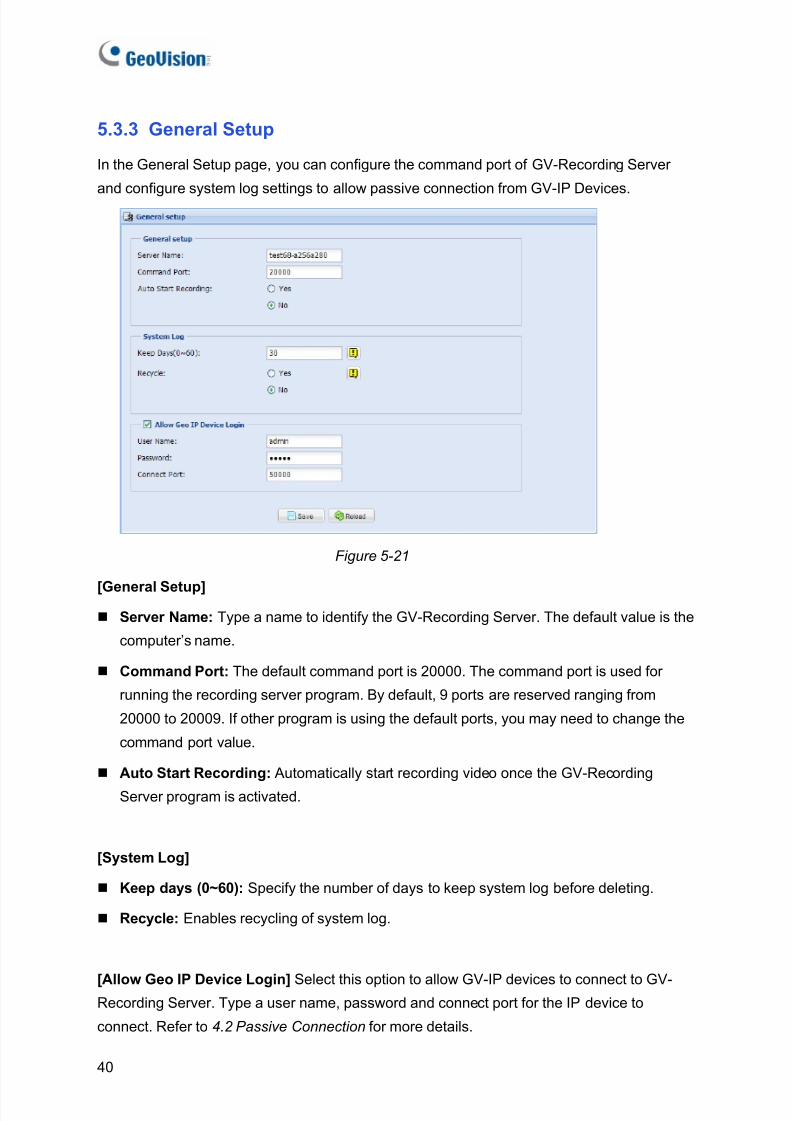
5.3.3 General Setup
In the General Setup page, you can configure the command port of GV-Recording Server
and configure system log settings to allow passive connection from GV-IP Devices.
Figure 5-21
[General Setup] Server Name: Type a name to identify the GV-Recording Server. The default value is the
computer’s name.
Command Port: The default command port is 20000. The command port is used for
running the recording server program. By default, 9 ports are reserved ranging from
20000 to 20009. If other program is using the default ports, you may need to change the
command port value.
Auto Start Recording: Automatically start recording video once the GV-Recording
Server program is activated.
[System Log]
Keep days (0~60): Specify the number of days to keep system log before deleting.
Recycle: Enables recycling of system log.
[Allow Geo IP Device Login] Select this option to allow GV-IP devices to connect to GV-Recording Server. Type a user name, password and connect port for the IP device to
connect. Refer to 4.2 Passive Connection for more details.
7/29/2019 GV-Recording Server User Manual RSV11-A-En
http://slidepdf.com/reader/full/gv-recording-server-user-manual-rsv11-a-en 49/103
Administrator Mode
41
5
5.3.4 Storage Path
In the Storage Path page, you can set a storage path for each camera to store recorded
videos and specify the file size threshold for recycling recorded video. Refer to the Setting
Storage Path section in Chapter 3 Getting Started for details.
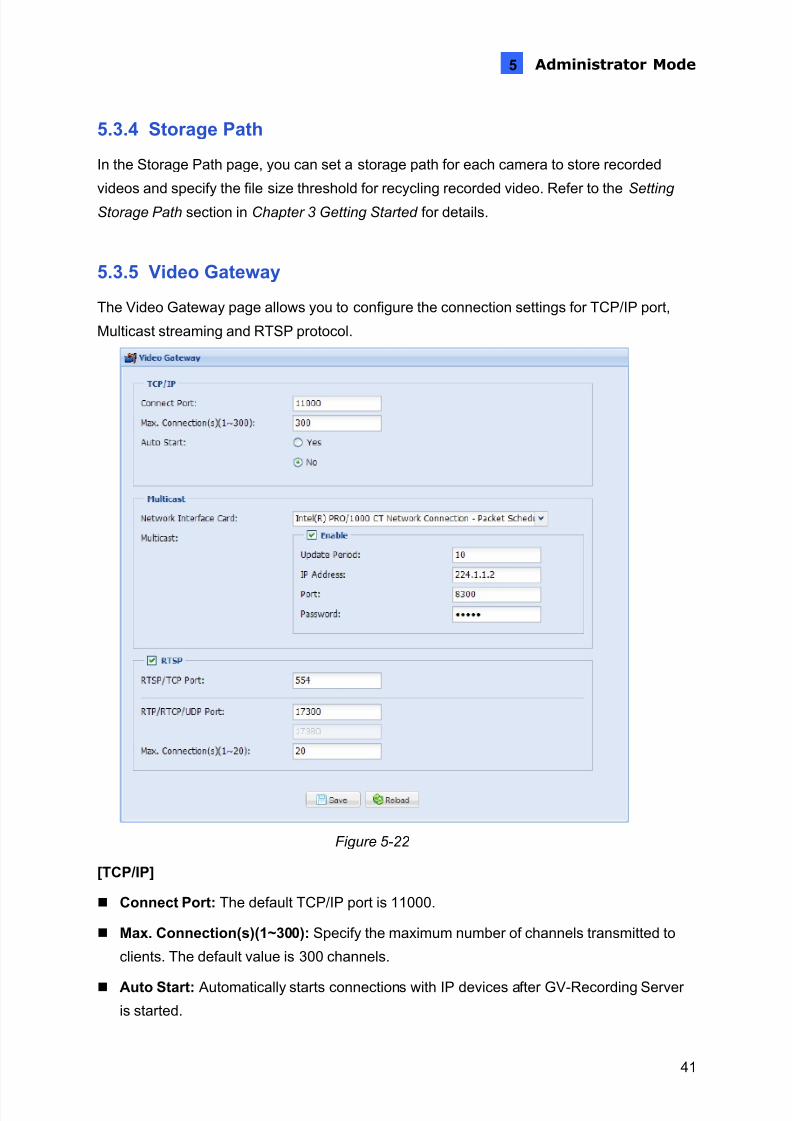
5.3.5 Video Gateway
The Video Gateway page allows you to configure the connection settings for TCP/IP port,
Multicast streaming and RTSP protocol.
Figure 5-22
[TCP/IP]
Connect Port: The default TCP/IP port is 11000.
Max. Connection(s)(1~300): Specify the maximum number of channels transmitted to
clients. The default value is 300 channels.
Auto Start: Automatically starts connections with IP devices after GV-Recording Server
is started.
7/29/2019 GV-Recording Server User Manual RSV11-A-En
http://slidepdf.com/reader/full/gv-recording-server-user-manual-rsv11-a-en 50/103
42
[Multicast] The multicast provides a mechanism for sending a single video and audio stream
to a group of hosts.
Network Interface Card: Select a Network Card to run multicast on a different network.
Since the multicast can take a lot of bandwidth when enabled, separating it from the mainnetwork is advised whenever possible.
Multicast: Select this option to enable the multicast settings and send video and audio
streams to the multicast group.
• Update Period: Specify the time length in second between each update of multicast
streams.
• IP Address: Type the IP address used for multicasting. Only the hosts with the
same multicast IP can receive the multicast streams. The default IP address is
224.1.1.2.
• Port: Type the port number used for multicasting. The default port number is 8300.
• Password: Select this option and type a password to secure multicast streams. The
hosts in the multicast group will need to enter the password before accessing video
and audio streams.
To see how to connect to GV-Recording Server using Multicast, see 7.3 Connecting with
Multicast .
[RTSP] You can connect to IP devices through RTSP protocol if the protocol is supported by
the IP device.
RTSP/TCP Port: The default port number is 554.
RTP/RTCP/UDP Port: The default port range is 17300 to 17380.
Max. Connection(s)(1~20): Specify the maximum number of RTSP connections. The
default value is 20 channels.
Note: Only VLC media player and QuickTime Player are supported for streaming H.264video via RTSP protocol.
For more details on how to connect to IP devices through RTSP, see Appendix B. RTSP
Protocol Support .
7/29/2019 GV-Recording Server User Manual RSV11-A-En
http://slidepdf.com/reader/full/gv-recording-server-user-manual-rsv11-a-en 51/103
Administrator Mode
43
5
5.3.6 Notification
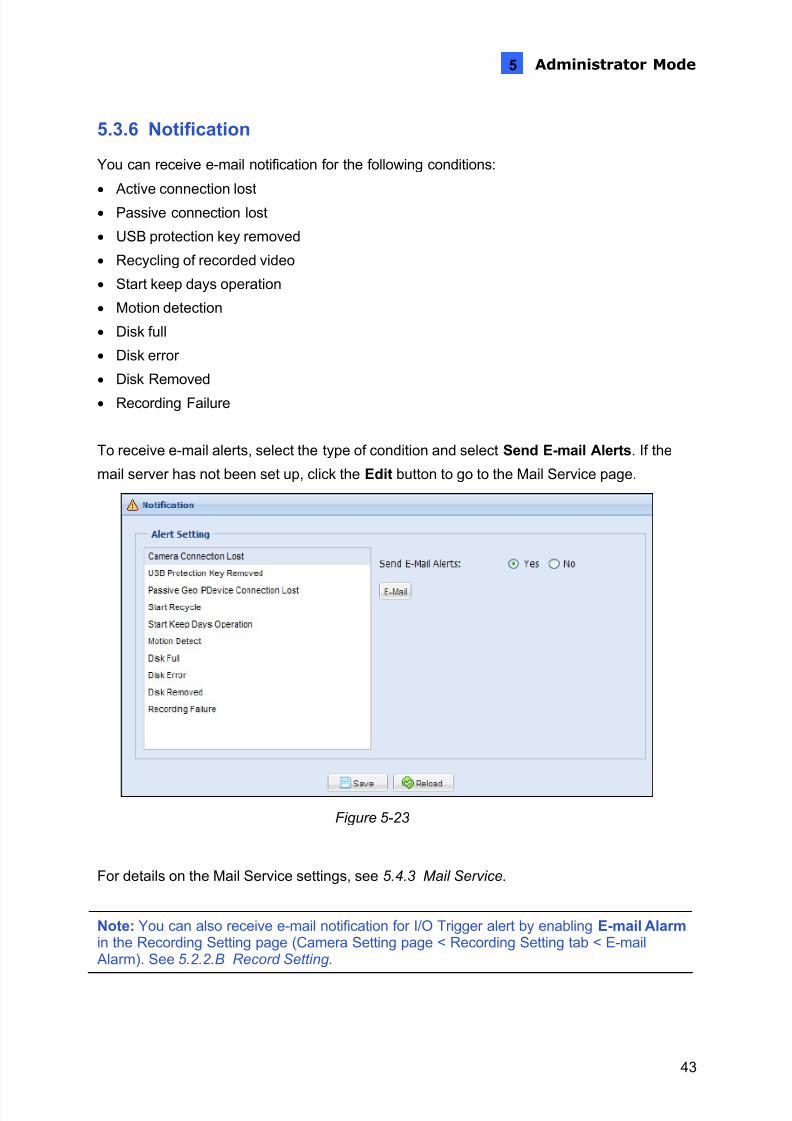
You can receive e-mail notification for the following conditions:•
Active connection lost• Passive connection lost• USB protection key removed• Recycling of recorded video• Start keep days operation• Motion detection• Disk full• Disk error • Disk Removed• Recording Failure
To receive e-mail alerts, select the type of condition and select Send E-mail Alerts . If the
mail server has not been set up, click the Edit button to go to the Mail Service page.
Figure 5-23
For details on the Mail Service settings, see 5.4.3 Mail Service .
Note: You can also receive e-mail notification for I/O Trigger alert by enabling E-mail Alarmin the Recording Setting page (Camera Setting page < Recording Setting tab < E-mail
Alarm). See 5.2.2.B Record Setting.
7/29/2019 GV-Recording Server User Manual RSV11-A-En
http://slidepdf.com/reader/full/gv-recording-server-user-manual-rsv11-a-en 52/103
44
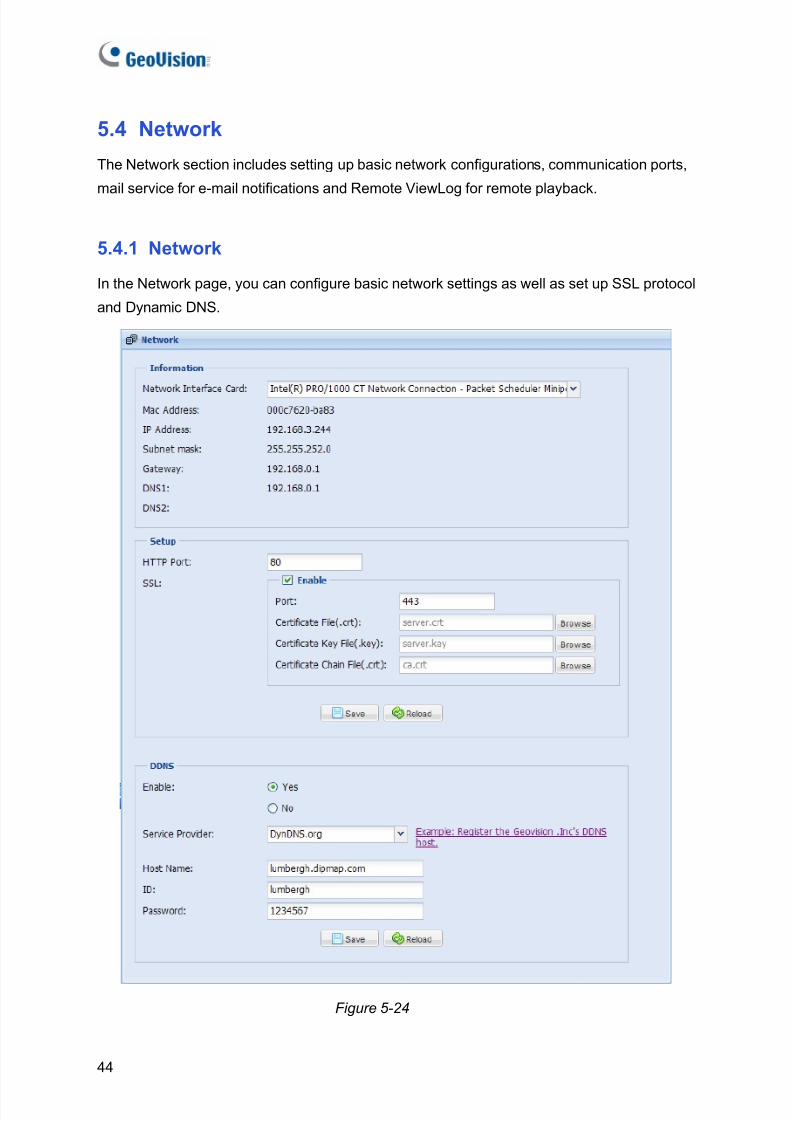
5.4 Network
The Network section includes setting up basic network configurations, communication ports,
mail service for e-mail notifications and Remote ViewLog for remote playback.
5.4.1 Network
In the Network page, you can configure basic network settings as well as set up SSL protocol
and Dynamic DNS.
Figure 5-24
7/29/2019 GV-Recording Server User Manual RSV11-A-En
http://slidepdf.com/reader/full/gv-recording-server-user-manual-rsv11-a-en 53/103
Administrator Mode
45
5
[Information]
Network Interface Card: Select a Network Interface Card to connect to the Internet.
[Setup]
HTTP Port: The default HTTP port is 80.
SSL: Enable the Secure Sockets Layer (SSL) protocol for a more secure Internet
connection. To use your own Certificate File, Certificate Key File and Certificate Chain
File, click the Browse buttons and select the files stored at your computer. The
encryption strength depends on your SSL certificate.
[DDNS] Dynamic DNS allows you to register a domain name to easily access your GV-Recording Server when using a dynamic IP address.
Enable: Select to enable DDNS.
Service Provider: Select a DDNS service provider. If you select GeoVision DDNS
Server, click the link on the right for service registration.
Host Name: Type the host name used to connect to the GV-Recording Server. The host
name registered on GeoVision DDNS Server is created by adding “.dipmap.com” to the
username.
ID: Type the username used to enable the service from the DDNS.
Password: Type the password used to enable the service from the DDNS.
7/29/2019 GV-Recording Server User Manual RSV11-A-En
http://slidepdf.com/reader/full/gv-recording-server-user-manual-rsv11-a-en 54/103
46
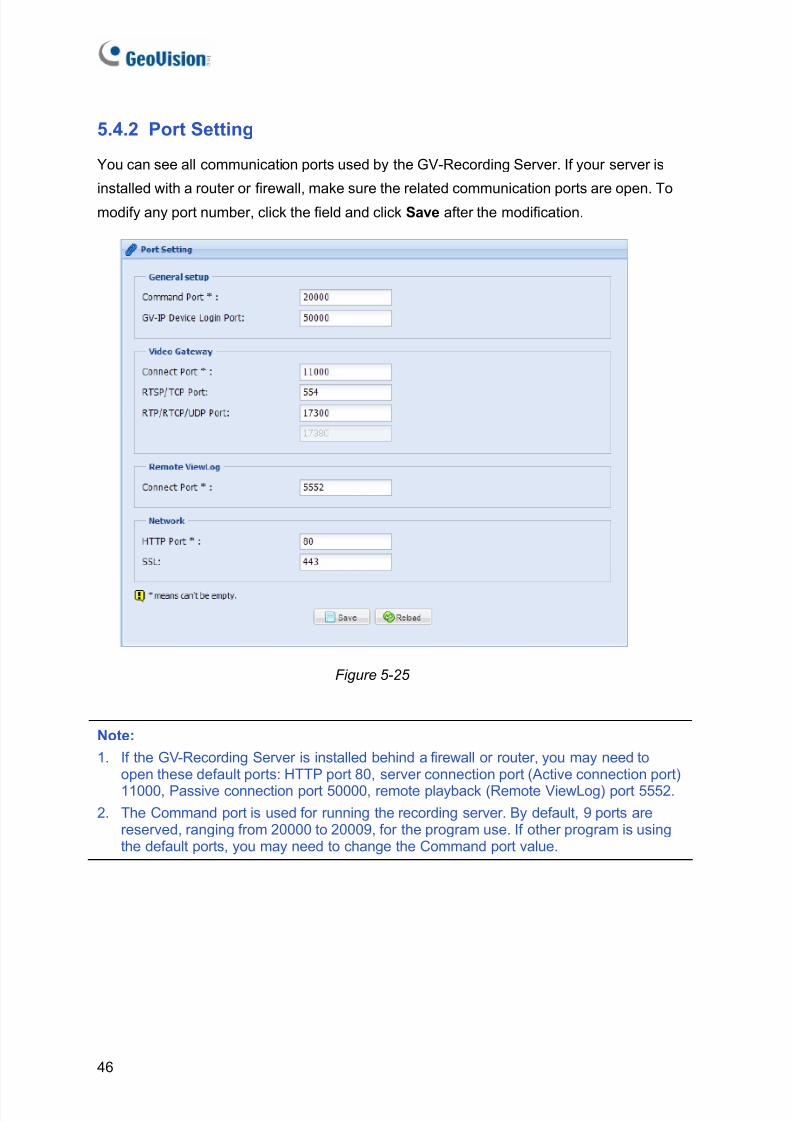
5.4.2 Port Setting
You can see all communication ports used by the GV-Recording Server. If your server is
installed with a router or firewall, make sure the related communication ports are open. To
modify any port number, click the field and click Save after the modification.
Figure 5-25
Note:1. If the GV-Recording Server is installed behind a firewall or router, you may need to
open these default ports: HTTP port 80, server connection port (Active connection port)11000, Passive connection port 50000, remote playback (Remote ViewLog) port 5552.
2. The Command port is used for running the recording server. By default, 9 ports arereserved, ranging from 20000 to 20009, for the program use. If other program is usingthe default ports, you may need to change the Command port value.
7/29/2019 GV-Recording Server User Manual RSV11-A-En
http://slidepdf.com/reader/full/gv-recording-server-user-manual-rsv11-a-en 55/103
Administrator Mode
47
5
5.4.3 Mail Service
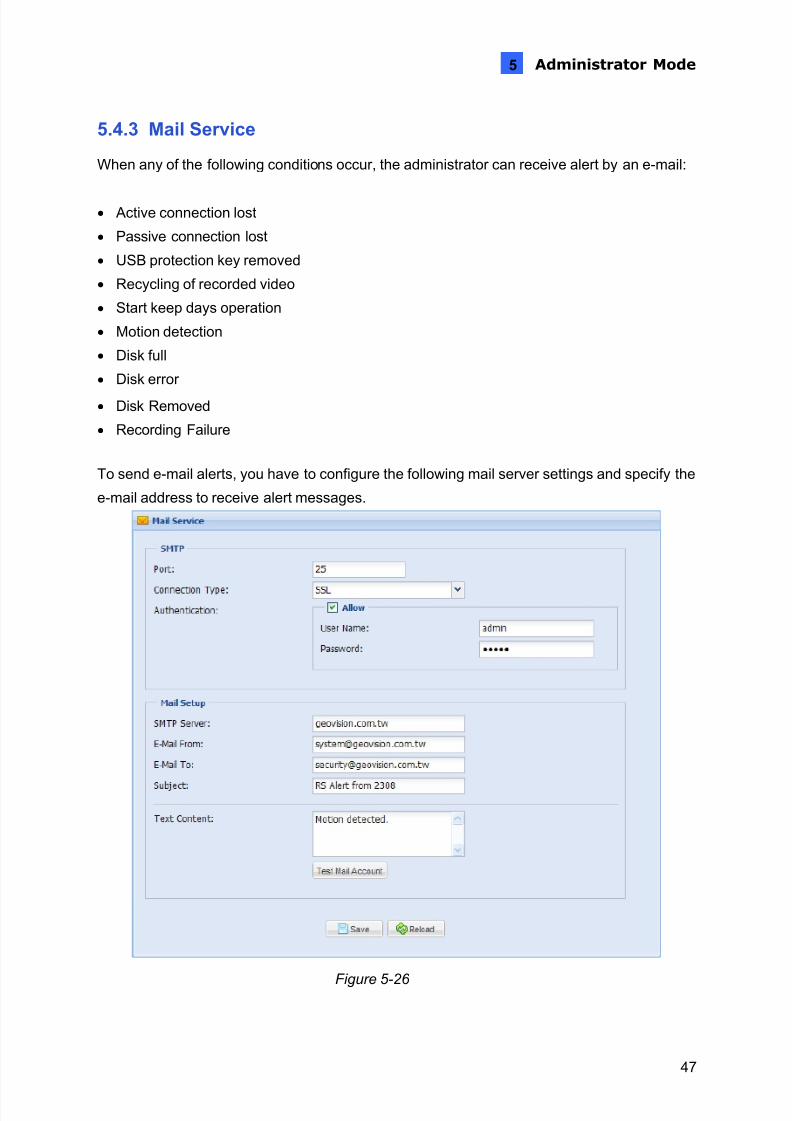
When any of the following conditions occur, the administrator can receive alert by an e-mail:
• Active connection lost• Passive connection lost• USB protection key removed• Recycling of recorded video• Start keep days operation• Motion detection• Disk full• Disk error
• Disk Removed• Recording Failure
To send e-mail alerts, you have to configure the following mail server settings and specify the
e-mail address to receive alert messages.
Figure 5-26
7/29/2019 GV-Recording Server User Manual RSV11-A-En
http://slidepdf.com/reader/full/gv-recording-server-user-manual-rsv11-a-en 56/103
48
[SMTP Setting]
Port: The default port for most SMTP servers is 25. However webmail Yahoo and
Hotmail generally use different SMTP port. In this case, check your e-mail provider for
the SMTP port number. Connection Type: For a more secure connection, use the drop-down list to select SSL
or TLS/STARTTLS .
Authentication: If your mail server needs login authentication, select Allow and type
your login account name and password.
[Mail Setup]
SMTP Server: Type your mail server’s URL address or IP address. E-Mail From: Type the sender’s e-mail address.
E-Mail To: Type the recipient’s e-mail address. For multiple recipients, add a semicolon
between each e-mail address.
Subject: Type a subject that comes with the alert message.
Text Content: Type the content of the alert message.
Test Mail Account: Click this button to send a test e-mail to the assigned account.
7/29/2019 GV-Recording Server User Manual RSV11-A-En
http://slidepdf.com/reader/full/gv-recording-server-user-manual-rsv11-a-en 57/103
Administrator Mode
49
5
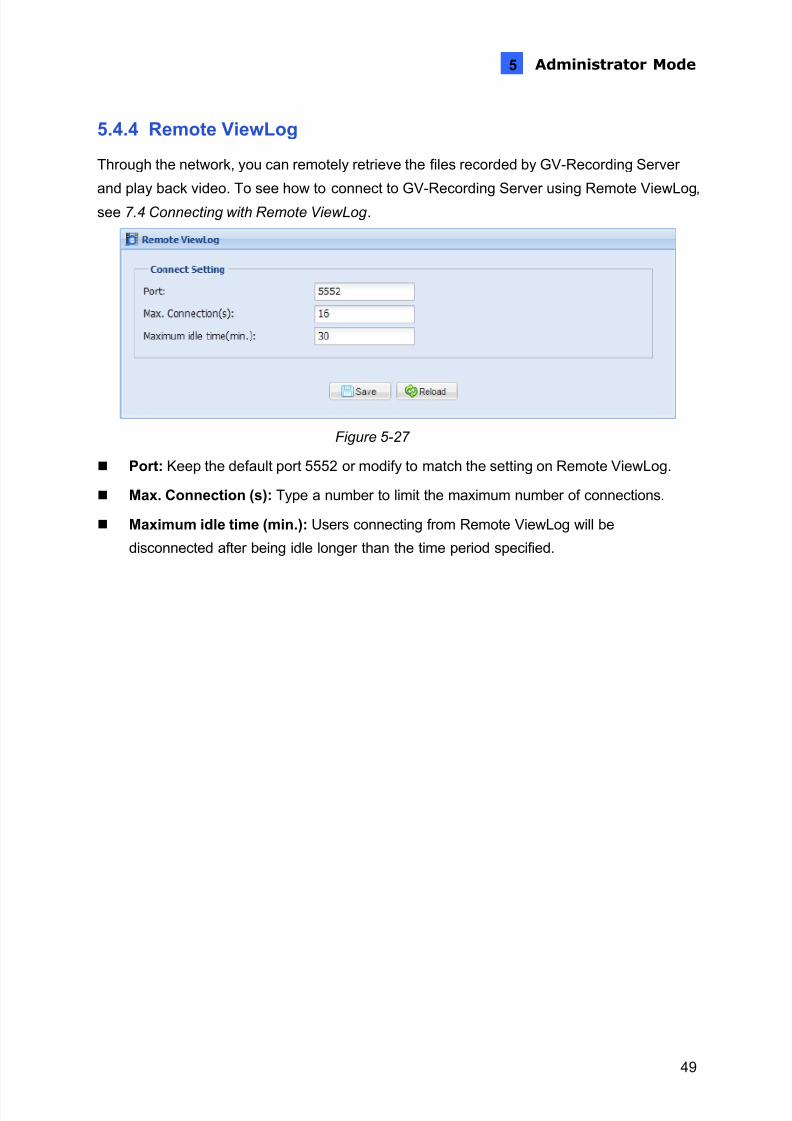
5.4.4 Remote ViewLog
Through the network, you can remotely retrieve the files recorded by GV-Recording Server
and play back video. To see how to connect to GV-Recording Server using Remote ViewLog,
see 7.4 Connecting with Remote ViewLog .
Figure 5-27
Port: Keep the default port 5552 or modify to match the setting on Remote ViewLog.
Max. Connection (s): Type a number to limit the maximum number of connections.
Maximum idle time (min.): Users connecting from Remote ViewLog will be
disconnected after being idle longer than the time period specified.
7/29/2019 GV-Recording Server User Manual RSV11-A-En
http://slidepdf.com/reader/full/gv-recording-server-user-manual-rsv11-a-en 58/103
50
5.5 Advanced Management
The Advanced Management section allows you to set up E-map, connection to GV-GIS, user
accounts and advanced query.
5.5.1 E-map
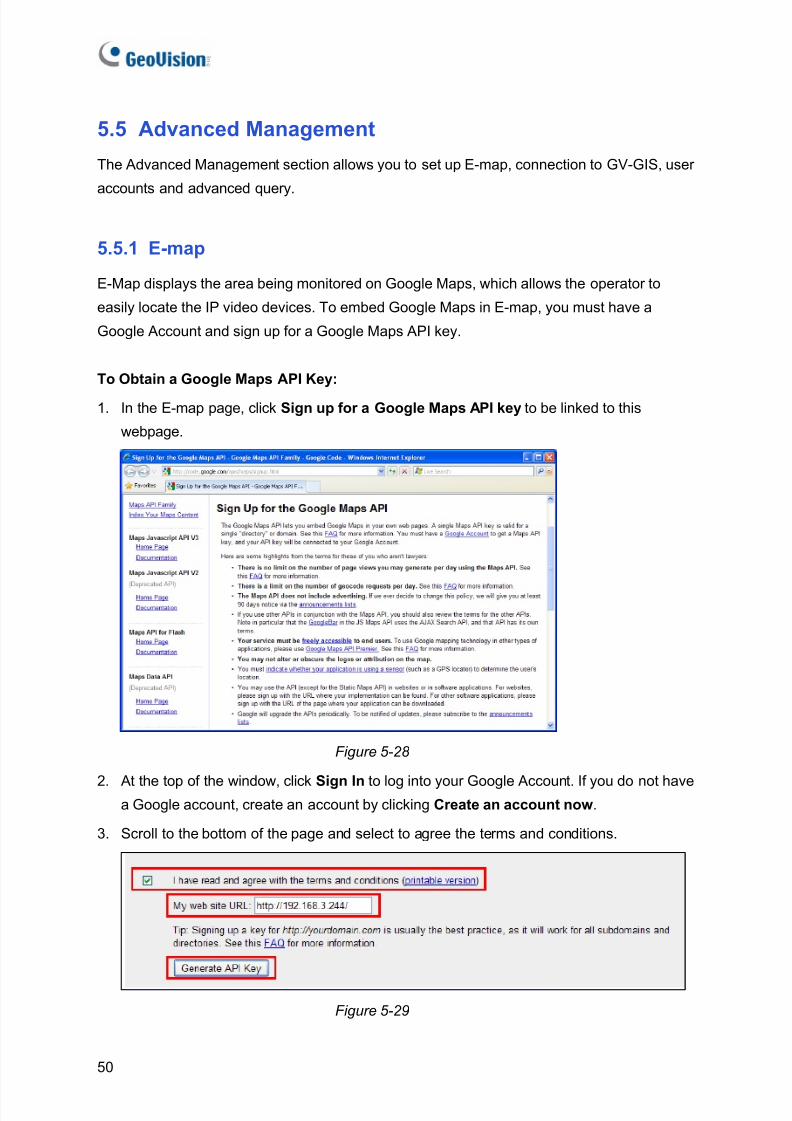
E-Map displays the area being monitored on Google Maps, which allows the operator to
easily locate the IP video devices. To embed Google Maps in E-map, you must have a
Google Account and sign up for a Google Maps API key.
To Obtain a Google Maps API Key:
1. In the E-map page, click Sign up for a Google Maps API key to be linked to this
webpage.
Figure 5-28
2. At the top of the window, click Sign In to log into your Google Account. If you do not havea Google account, create an account by clicking Create an account now .
3. Scroll to the bottom of the page and select to agree the terms and conditions.
Figure 5-29
7/29/2019 GV-Recording Server User Manual RSV11-A-En
http://slidepdf.com/reader/full/gv-recording-server-user-manual-rsv11-a-en 59/103
Administrator Mode
51
5
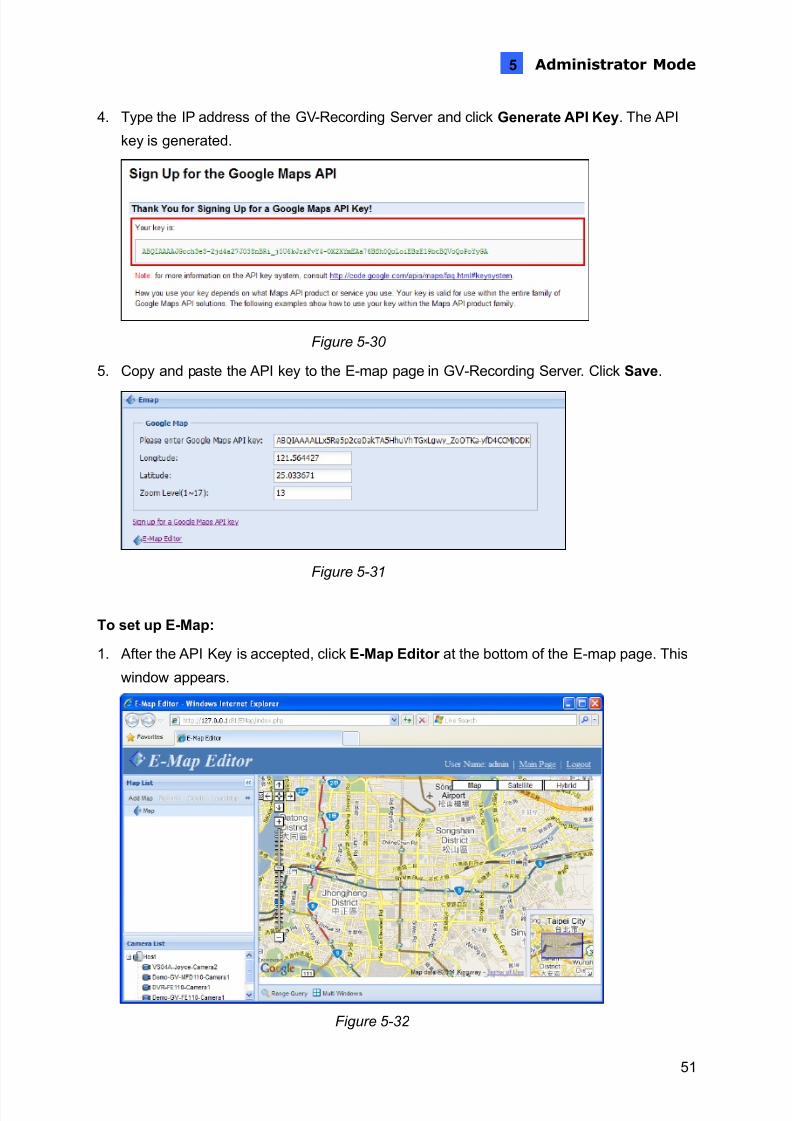
4. Type the IP address of the GV-Recording Server and click Generate API Key . The API
key is generated.
Figure 5-30
5. Copy and paste the API key to the E-map page in GV-Recording Server. Click Save .
Figure 5-31
To set up E-Map:
1. After the API Key is accepted, click E-Map Editor at the bottom of the E-map page. This
window appears.
Figure 5-32
7/29/2019 GV-Recording Server User Manual RSV11-A-En
http://slidepdf.com/reader/full/gv-recording-server-user-manual-rsv11-a-en 60/103
52
2. Drag the camera from the Camera List and drop in the Google map to indicate the
location of the camera.
3. Right-click the camera icon and click Live View to see the live view of the camera.
Figure 5-33
4. Right-click the camera icon and click Street View to see the Google street view of the
camera location.
Figure 5-34
5. To change the direction of the camera icon, right-click the icon and select a direction.
6. At the bottom of the page, you can click Range Query and a circular area will be
highlighted on the map. You can adjust the location and size of the circle and click Multi
Windows to see the live view of all cameras included in the circle.
7/29/2019 GV-Recording Server User Manual RSV11-A-En
http://slidepdf.com/reader/full/gv-recording-server-user-manual-rsv11-a-en 61/103
Administrator Mode
53
5
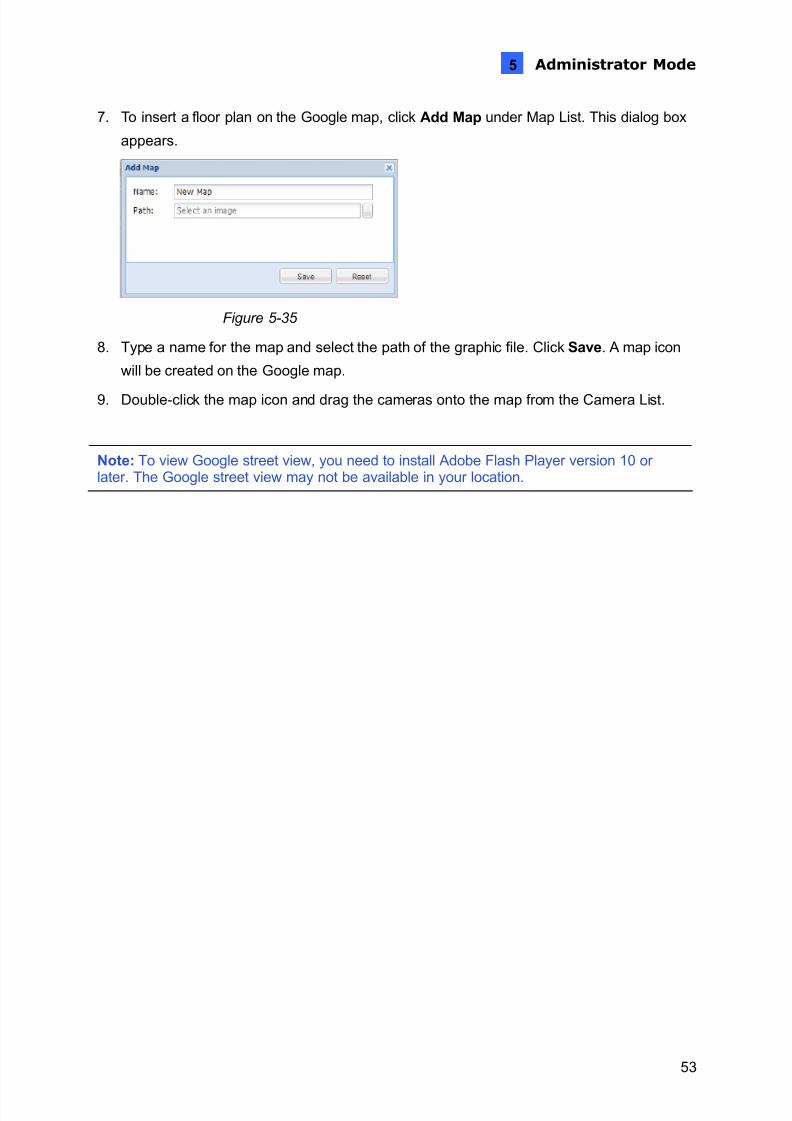
7. To insert a floor plan on the Google map, click Add Map under Map List. This dialog box
appears.
Figure 5-35
8. Type a name for the map and select the path of the graphic file. Click Save . A map icon
will be created on the Google map.
9. Double-click the map icon and drag the cameras onto the map from the Camera List.
Note: To view Google street view, you need to install Adobe Flash Player version 10 or later. The Google street view may not be available in your location.
7/29/2019 GV-Recording Server User Manual RSV11-A-En
http://slidepdf.com/reader/full/gv-recording-server-user-manual-rsv11-a-en 62/103
54
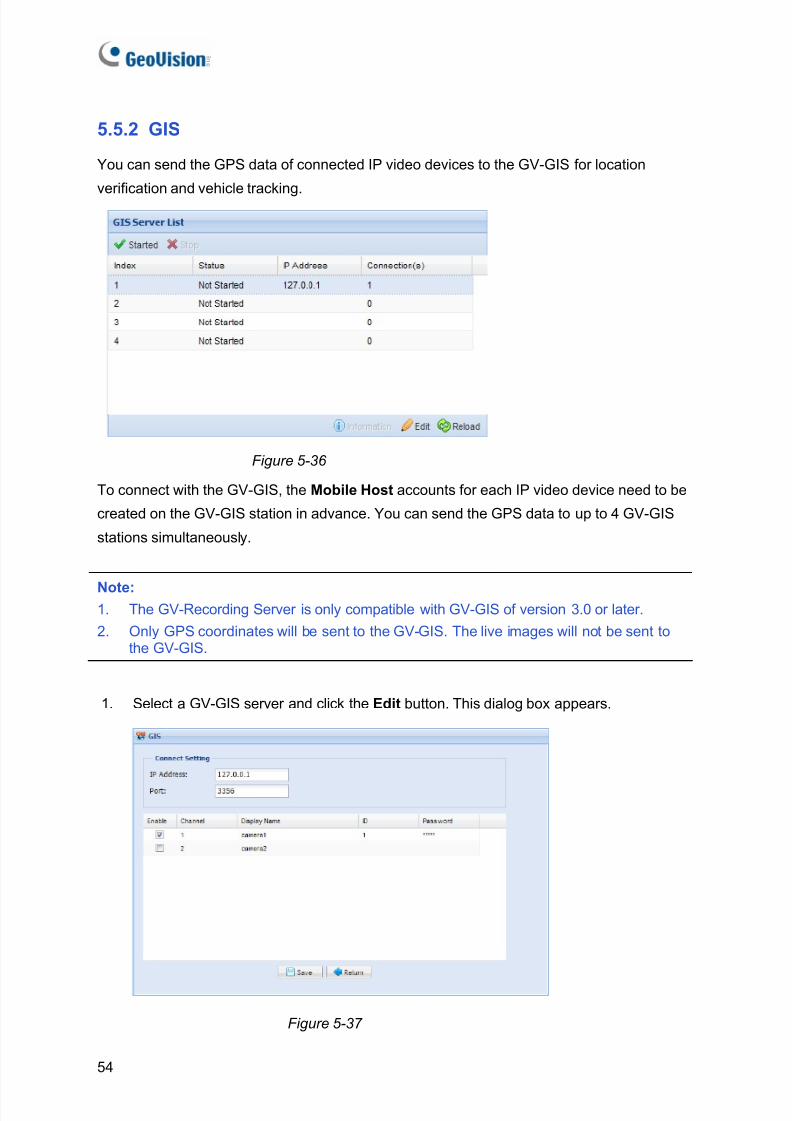
5.5.2 GIS
You can send the GPS data of connected IP video devices to the GV-GIS for location
verification and vehicle tracking.
Figure 5-36
To connect with the GV-GIS, the Mobile Host accounts for each IP video device need to be
created on the GV-GIS station in advance. You can send the GPS data to up to 4 GV-GIS
stations simultaneously.
Note:1. The GV-Recording Server is only compatible with GV-GIS of version 3.0 or later.2. Only GPS coordinates will be sent to the GV-GIS. The live images will not be sent to
the GV-GIS.
1. Select a GV-GIS server and click the Edit button. This dialog box appears.
Figure 5-37
7/29/2019 GV-Recording Server User Manual RSV11-A-En
http://slidepdf.com/reader/full/gv-recording-server-user-manual-rsv11-a-en 63/103
Administrator Mode
55
5
2. Type the IP Address of the GV-GIS. Keep the default port 3356 or modify to match the
settings on GV-GIS.
3. Select the cameras.
4. Click on the fields under ID and Password to type the individual ID and Passwordcreated in GV-GIS for cameras.
5. Click Save and return to GIS Server List. The total number of to-be-connected IP
cameras is displayed in the Connection (s) column in the GIS Server List.
6. Click the GV-GIS server and click the Start button.
7. After the GV-GIS server is started, you can click the Information button to see the
connection status of the GV-GIS server.
7/29/2019 GV-Recording Server User Manual RSV11-A-En
http://slidepdf.com/reader/full/gv-recording-server-user-manual-rsv11-a-en 64/103
56
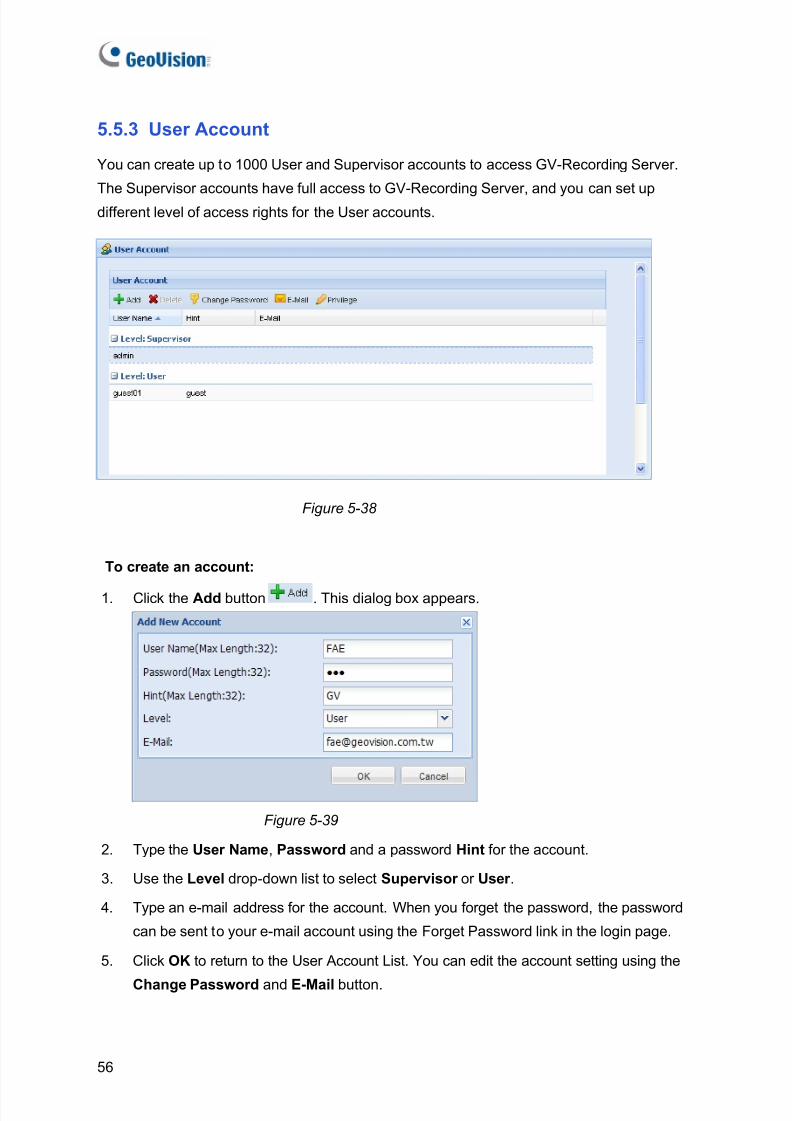
5.5.3 User Account
You can create up to 1000 User and Supervisor accounts to access GV-Recording Server.
The Supervisor accounts have full access to GV-Recording Server, and you can set up
different level of access rights for the User accounts.
Figure 5-38
To create an account:
1. Click the Add button . This dialog box appears.
Figure 5-39
2. Type the User Name , Password and a password Hint for the account.
3. Use the Level drop-down list to select Supervisor or User .
4. Type an e-mail address for the account. When you forget the password, the password
can be sent to your e-mail account using the Forget Password link in the login page.
5. Click OK to return to the User Account List. You can edit the account setting using the
Change Password and E-Mail button.
7/29/2019 GV-Recording Server User Manual RSV11-A-En
http://slidepdf.com/reader/full/gv-recording-server-user-manual-rsv11-a-en 65/103
Administrator Mode
57
5
To set access rights:
1. Select a user account and click the Privilege button . This dialog box appears.
Figure 5-40
2. The cameras listed in the IP Device List are displayed. Select to allow the user to
access the Live View , Remote Playback and Event Query of the camera.
3. You can Select All cameras or Clear All selected cameras for each function by using
the drop-down list above the camera list.
Figure 5-41
4. Click Save .
7/29/2019 GV-Recording Server User Manual RSV11-A-En
http://slidepdf.com/reader/full/gv-recording-server-user-manual-rsv11-a-en 66/103
58
5.5.4 Advanced Query
Using Advanced Query, you can see the live view of the cameras in Working Camera List, as
well as search for events to remotely play back recorded videos. In addition, you can query
GV-Recording Server system logs and look up graphical charts of event analysis.
The Advanced Query interface is the same as the Web interface when logging in GV-
Recording Server through client user account. For more details on Advanced Query, refer to
Chapter 6 User Mode.
7/29/2019 GV-Recording Server User Manual RSV11-A-En
http://slidepdf.com/reader/full/gv-recording-server-user-manual-rsv11-a-en 67/103
User Mode
59
6
Chapter 6 User Mode
The GV-Recording Server administrator can create client user accounts with different accessrights to its Web interface. Refer to 5.5.3 User Account to see how to create user accounts
for clients. After the client account is created, follow the steps below to access the Web
interface in User Mode.
1. In the Location/Address field of Internet Explore, type the IP address or the domain
name of the GV-Recording Server.
Figure 6-1
2. In the login page of the GV-Recording Server Web interface, type the ID and the
Password of the client account.
3. Type the verification number shown in the image.
4. Click Login . The GV-Recording Server Web interface is now displayed.
Note: The GV-Recording Server supports several browsers to access its Web interface.However, if you are the user of Firefox, Google Chrome and Safari, you can only accesssingle live view by using Quick Time player, and you cannot play back recorded files.
7/29/2019 GV-Recording Server User Manual RSV11-A-En
http://slidepdf.com/reader/full/gv-recording-server-user-manual-rsv11-a-en 68/103
60
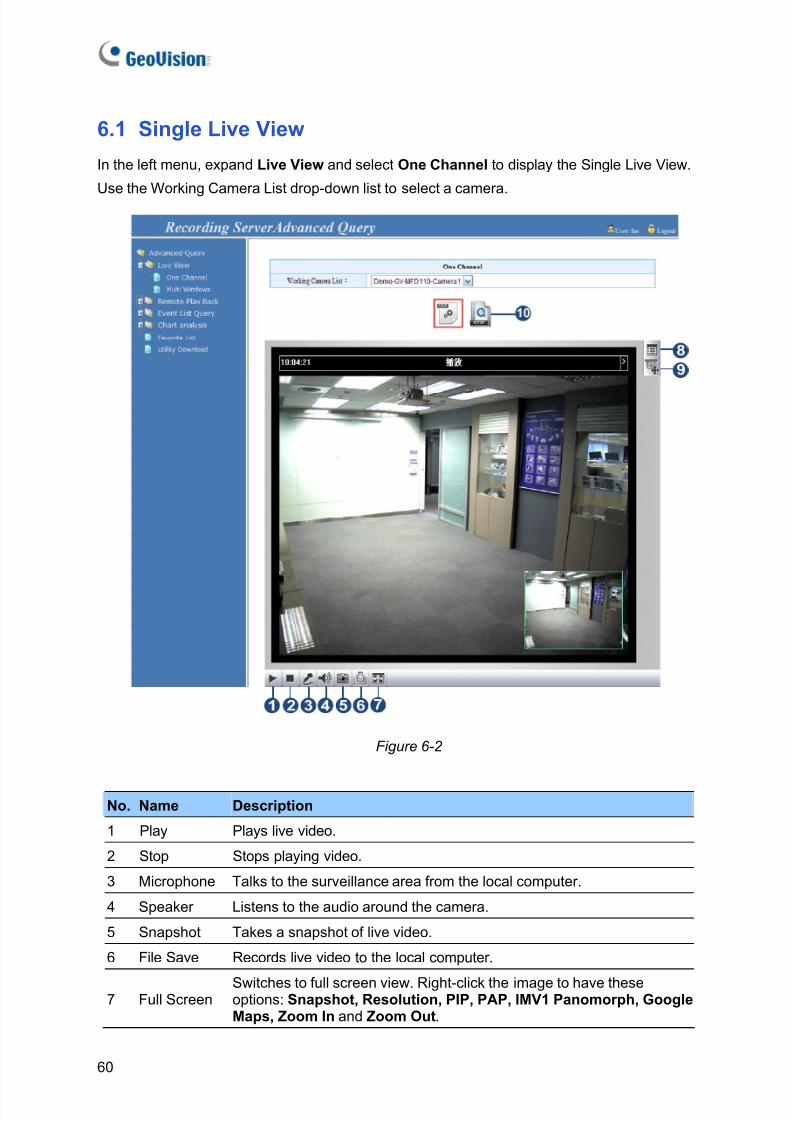
6.1 Single Live View
In the left menu, expand Live View and select One Channel to display the Single Live View.
Use the Working Camera List drop-down list to select a camera.
Figure 6-2
No. Name Description
1 Play Plays live video.
2 Stop Stops playing video.
3 Microphone Talks to the surveillance area from the local computer.
4 Speaker Listens to the audio around the camera.
5 Snapshot Takes a snapshot of live video.
6 File Save Records live video to the local computer.
7 Full ScreenSwitches to full screen view. Right-click the image to have theseoptions: Snapshot, Resolution, PIP, PAP, IMV1 Panomorph, GoogleMaps, Zoom In and Zoom Out .
7/29/2019 GV-Recording Server User Manual RSV11-A-En
http://slidepdf.com/reader/full/gv-recording-server-user-manual-rsv11-a-en 69/103
User Mode
61
6
8 OptionSelect Show Camera Name to show camera name on image andselect Image Enhance to access the De-interlace , De-block andDirectDraw functions.
9 PTZ Control Starts the PTZ control Panel and the Virtual PTZ.
10 RTSPSelect RTSP to access live view using browsers other than InternetExplorer. You will need to install Quick Time first. Note that only singlelive view in H.264 codec is supported in this mode.
Note: Only Quick Time player is supported for single live view through Firefox, GoogleChrome and Safari.
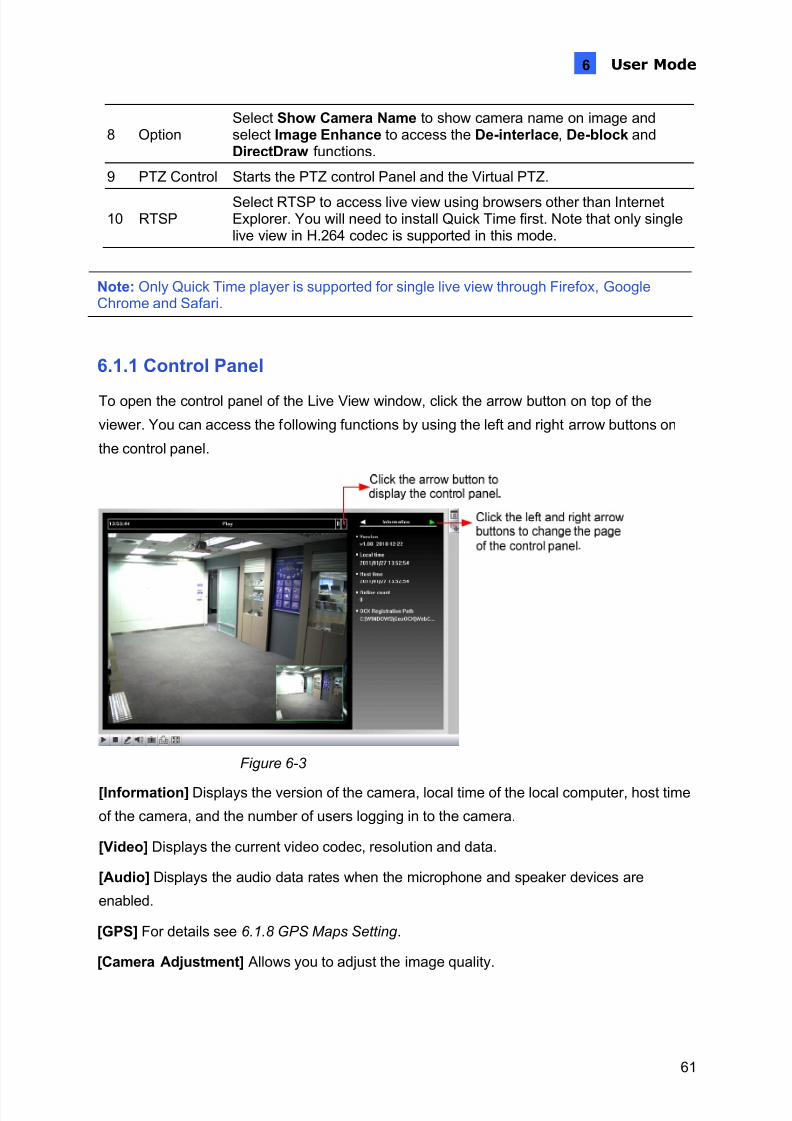
6.1.1 Control Panel
To open the control panel of the Live View window, click the arrow button on top of the
viewer. You can access the following functions by using the left and right arrow buttons on
the control panel.
Figure 6-3
[Information] Displays the version of the camera, local time of the local computer, host time
of the camera, and the number of users logging in to the camera.
[Video] Displays the current video codec, resolution and data.
[Audio] Displays the audio data rates when the microphone and speaker devices are
enabled.
[GPS] For details see 6.1.8 GPS Maps Setting .
[Camera Adjustment] Allows you to adjust the image quality.
7/29/2019 GV-Recording Server User Manual RSV11-A-En
http://slidepdf.com/reader/full/gv-recording-server-user-manual-rsv11-a-en 70/103
62
6.1.2 Snapshot of a Live Video
To take a snapshot of live video, follow these steps:
1. Click the Snapshot button (No. 5, Figure 6-2). The Save As dialog box appears.
2. Specify Save in , type the File name , and select JPEG or BMP as Save as Type . You
may also choose whether to display the name and date stamps on the image.
3. Click the Save button to save the image in the local computer.
6.1.3 Video Recording
You can record live images for a certain period of time to your local computer.
1. Click the File Save button (No. 6, Figure 6-2). The Save As dialog box appears.
2. Specify Save in , type the File name , and move the Time Period scroll bar to specify the
time length of the video clip from 1 to 5 minutes.
3. Click the Save button to start recording.
4. To stop recording, click the Stop button (No. 2, Figure 6-2).
6.1.4 Picture-in-Picture and Picture-and-Picture View
The full screen mode provides two types of close-up views: Picture-in-Picture (PIP) and
Picture-and Picture (PAP) . The two views are useful in providing clear and detailed images
of the surveillance area.
To access this feature:
• Click the Full Screen button (No. 7, Figure 6-2). Right-click the full screen to select PIP
or PAP .
• Right-click the live view to select PIP or PAP .
7/29/2019 GV-Recording Server User Manual RSV11-A-En
http://slidepdf.com/reader/full/gv-recording-server-user-manual-rsv11-a-en 71/103
User Mode
63
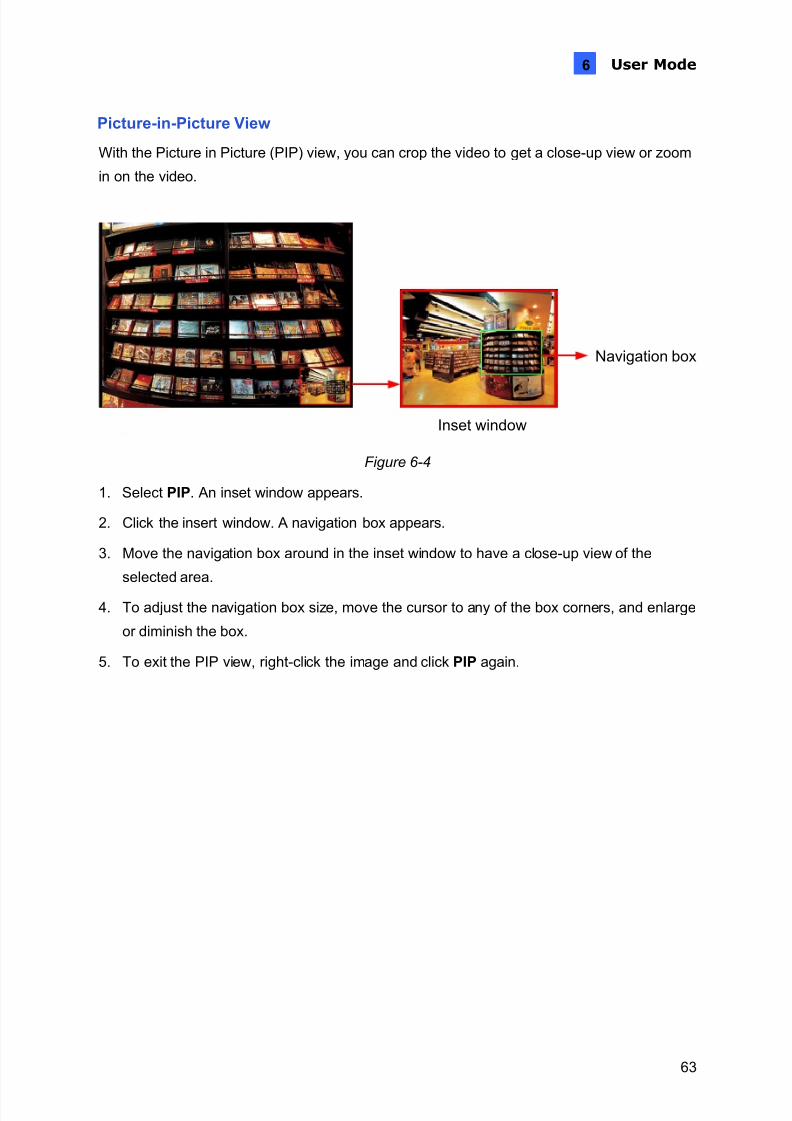
6
Picture-in-Picture View
With the Picture in Picture (PIP) view, you can crop the video to get a close-up view or zoom
in on the video.
Inset window
Navigation box
Figure 6-4
1. Select PIP . An inset window appears.
2. Click the insert window. A navigation box appears.
3. Move the navigation box around in the inset window to have a close-up view of the
selected area.
4. To adjust the navigation box size, move the cursor to any of the box corners, and enlarge
or diminish the box.
5. To exit the PIP view, right-click the image and click PIP again.
7/29/2019 GV-Recording Server User Manual RSV11-A-En
http://slidepdf.com/reader/full/gv-recording-server-user-manual-rsv11-a-en 72/103
64
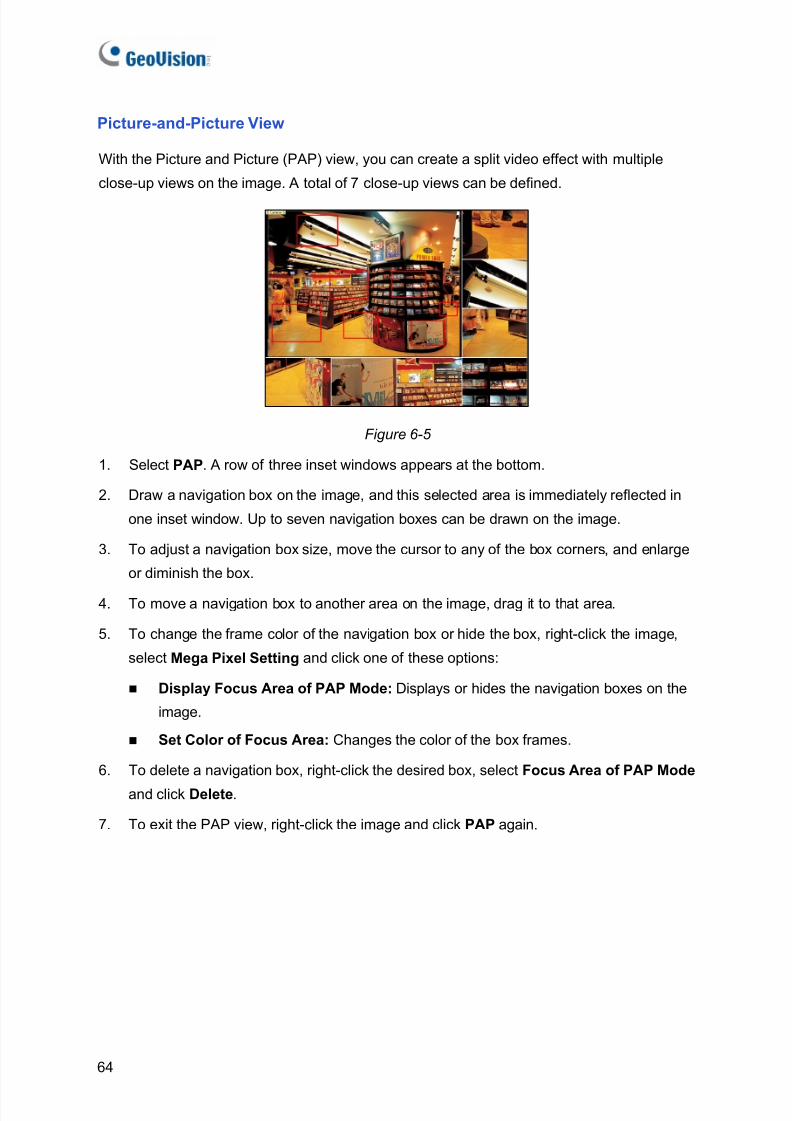
Picture-and-Picture View
With the Picture and Picture (PAP) view, you can create a split video effect with multiple
close-up views on the image. A total of 7 close-up views can be defined.
Figure 6-5
1. Select PAP . A row of three inset windows appears at the bottom.
2. Draw a navigation box on the image, and this selected area is immediately reflected in
one inset window. Up to seven navigation boxes can be drawn on the image.
3. To adjust a navigation box size, move the cursor to any of the box corners, and enlarge
or diminish the box.
4. To move a navigation box to another area on the image, drag it to that area.
5. To change the frame color of the navigation box or hide the box, right-click the image,
select Mega Pixel Setting and click one of these options:
Display Focus Area of PAP Mode: Displays or hides the navigation boxes on the
image.
Set Color of Focus Area: Changes the color of the box frames.
6. To delete a navigation box, right-click the desired box, select Focus Area of PAP Mode
and click Delete .
7. To exit the PAP view, right-click the image and click PAP again.
7/29/2019 GV-Recording Server User Manual RSV11-A-En
http://slidepdf.com/reader/full/gv-recording-server-user-manual-rsv11-a-en 73/103
User Mode
65
6
6.1.5 Video and Audio Configuration
You can enable the microphone and speaker for two-way audio communication, and adjust
the audio volume. To access this feature, click the Microphone button (No. 3, Figure 6-2) or the Speaker button (No. 4, Figure 6-2).
Note:1. To listen to the audio, the Audio function (Figure 5-11) must be enabled on the GV-
Recording Server in advance. 2. The two-way audio communication only works for GV-IP device connected through
active mode.
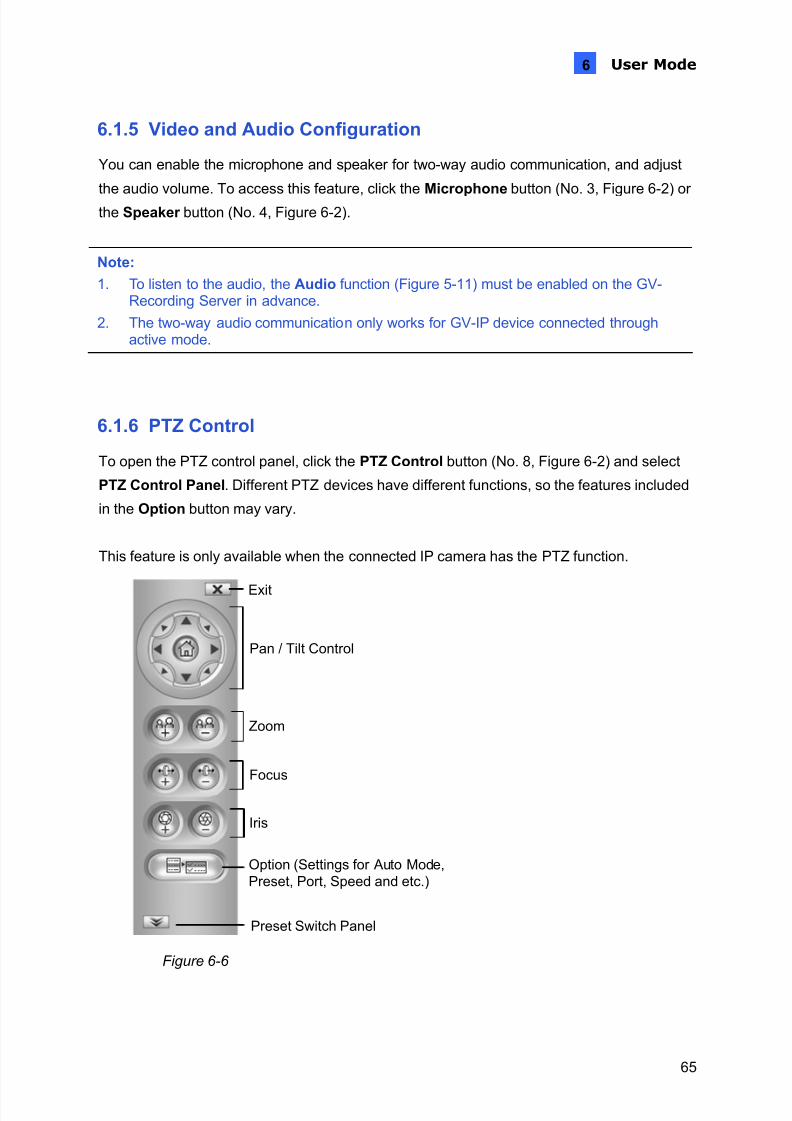
6.1.6 PTZ Control
To open the PTZ control panel, click the PTZ Control button (No. 8, Figure 6-2) and select
PTZ Control Panel . Different PTZ devices have different functions, so the features included
in the Option button may vary.
This feature is only available when the connected IP camera has the PTZ function.
Pan / Tilt Control
Zoom
Focus
Exit
Option (Settings for Auto Mode,Preset, Port, Speed and etc.)
Preset Switch Panel
Iris
Figure 6-6

7/29/2019 GV-Recording Server User Manual RSV11-A-En
http://slidepdf.com/reader/full/gv-recording-server-user-manual-rsv11-a-en 74/103
66
6.1.7 Visual PTZ
In additional to the PTZ control panel, you can display a visual PTZ control panel on the
image. This feature is only available when the connected IP camera has the PTZ function.
Figure 6-7
¾ To access this feature, click the PTZ Control button (No. 8, Figure 6-2) and select
Visual PTZ .
¾ To change the panel settings, click the green PTZ button on the top left corner. You will
have these options:
[PTZ Control Type]
Type 1: In this mode when you place the mouse arrow on the four directions, i.e.
north, south, east, west, the speed indicator of five levels will appear. Click and
hold on the required level of movement and the camera will move as per the
specific speed.
Type 2: In this mode with the mouse click, the PTZ control panel will appear. The
movement of the camera will depend on the speed of the mouse movement.
[Configure]
Set Color: Changes the color of the panel. Three kinds of colors are available: Red ,
Green and Blue .
Transparent Degree: Adjusts the transparency level of the panel. Ten levels range
from 10% (fully transparent) to 100% (fully opaque).
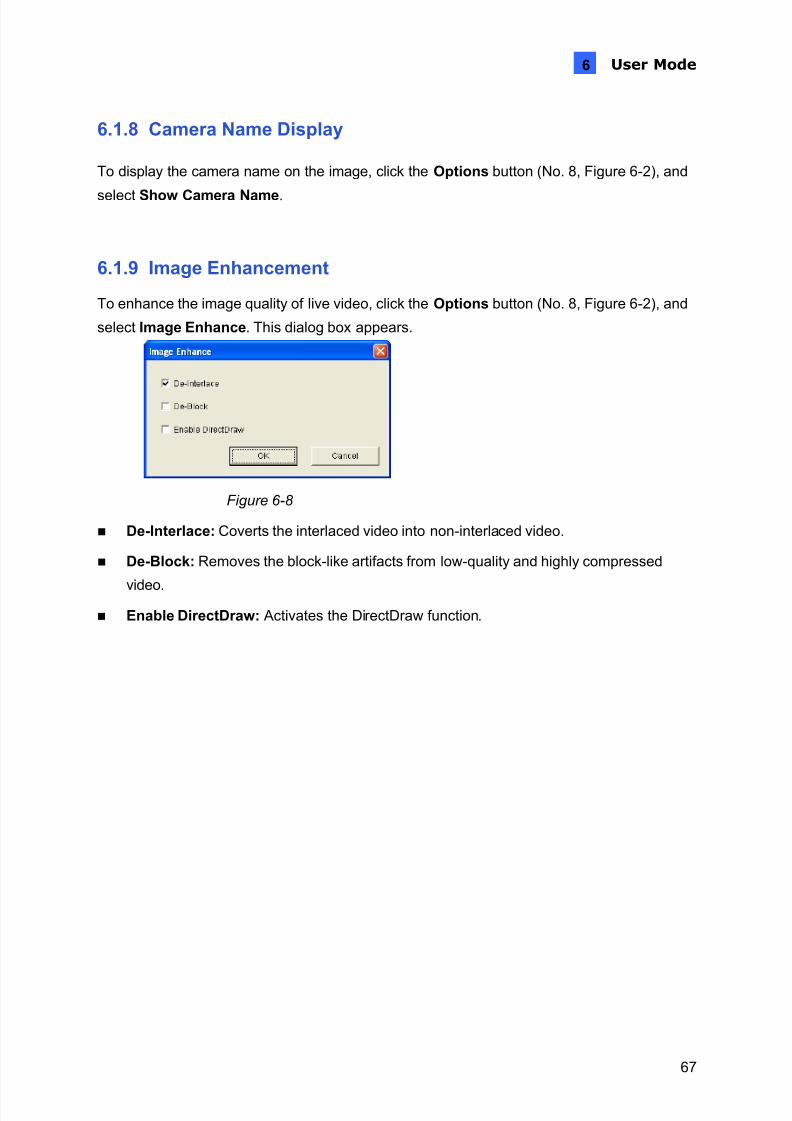
7/29/2019 GV-Recording Server User Manual RSV11-A-En
http://slidepdf.com/reader/full/gv-recording-server-user-manual-rsv11-a-en 75/103
User Mode
67
6
6.1.8 Camera Name Display
To display the camera name on the image, click the Options button (No. 8, Figure 6-2), and
select Show Camera Name .
6.1.9 Image Enhancement
To enhance the image quality of live video, click the Options button (No. 8, Figure 6-2), and
select Image Enhance . This dialog box appears.
Figure 6-8
De-Interlace: Coverts the interlaced video into non-interlaced video.
De-Block: Removes the block-like artifacts from low-quality and highly compressed
video. Enable DirectDraw: Activates the DirectDraw function.
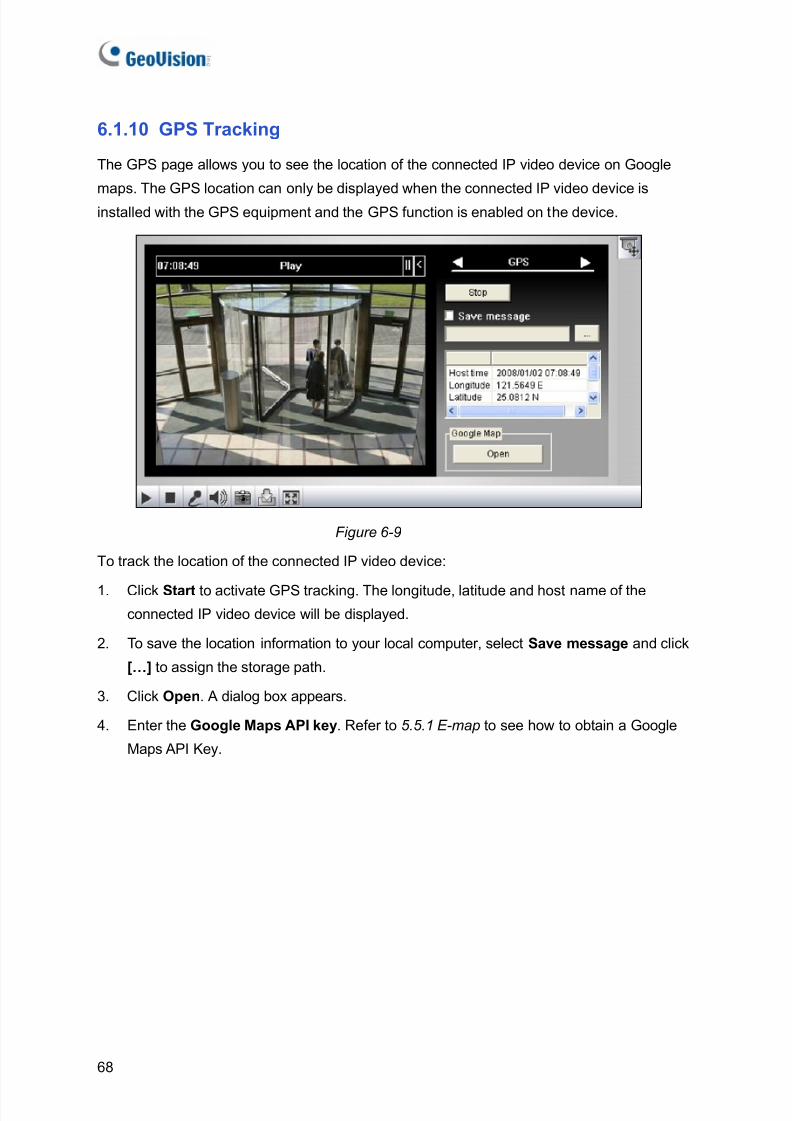
7/29/2019 GV-Recording Server User Manual RSV11-A-En
http://slidepdf.com/reader/full/gv-recording-server-user-manual-rsv11-a-en 76/103
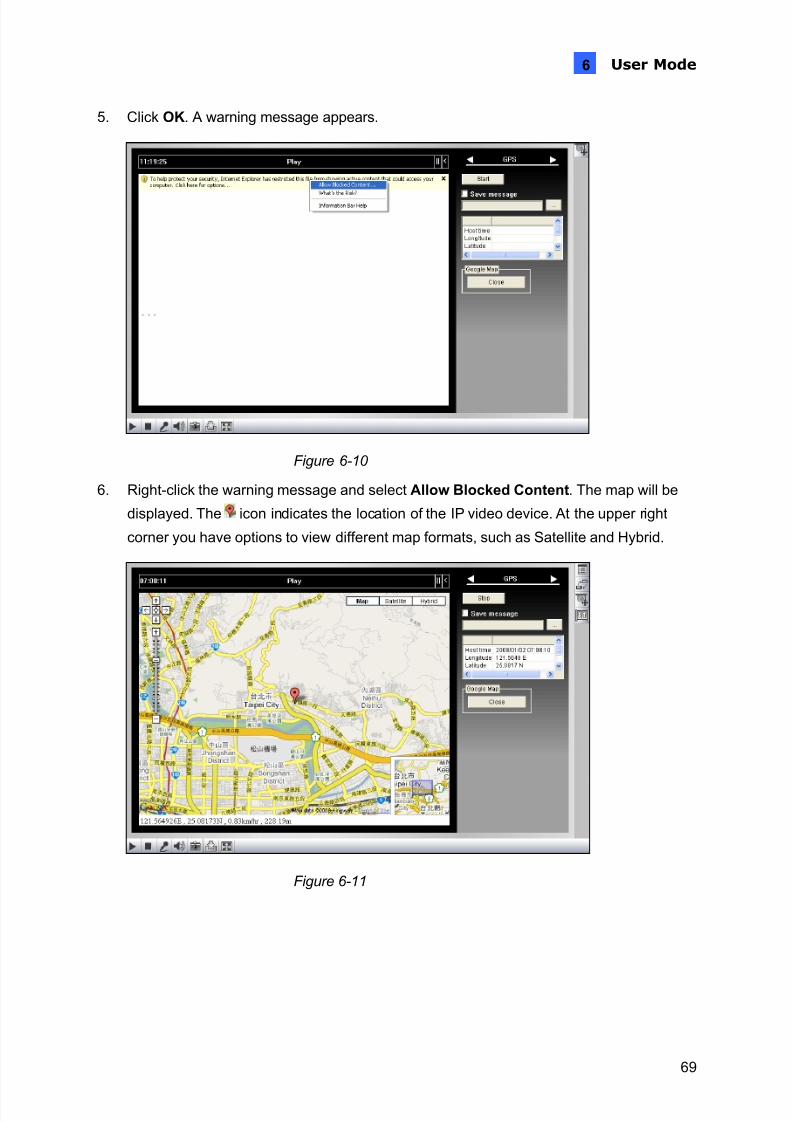
7/29/2019 GV-Recording Server User Manual RSV11-A-En
http://slidepdf.com/reader/full/gv-recording-server-user-manual-rsv11-a-en 77/103
User Mode
69
6
5. Click OK . A warning message appears.
Figure 6-10
6. Right-click the warning message and select Allow Blocked Content . The map will be
displayed. The icon indicates the location of the IP video device. At the upper right
corner you have options to view different map formats, such as Satellite and Hybrid.
Figure 6-11
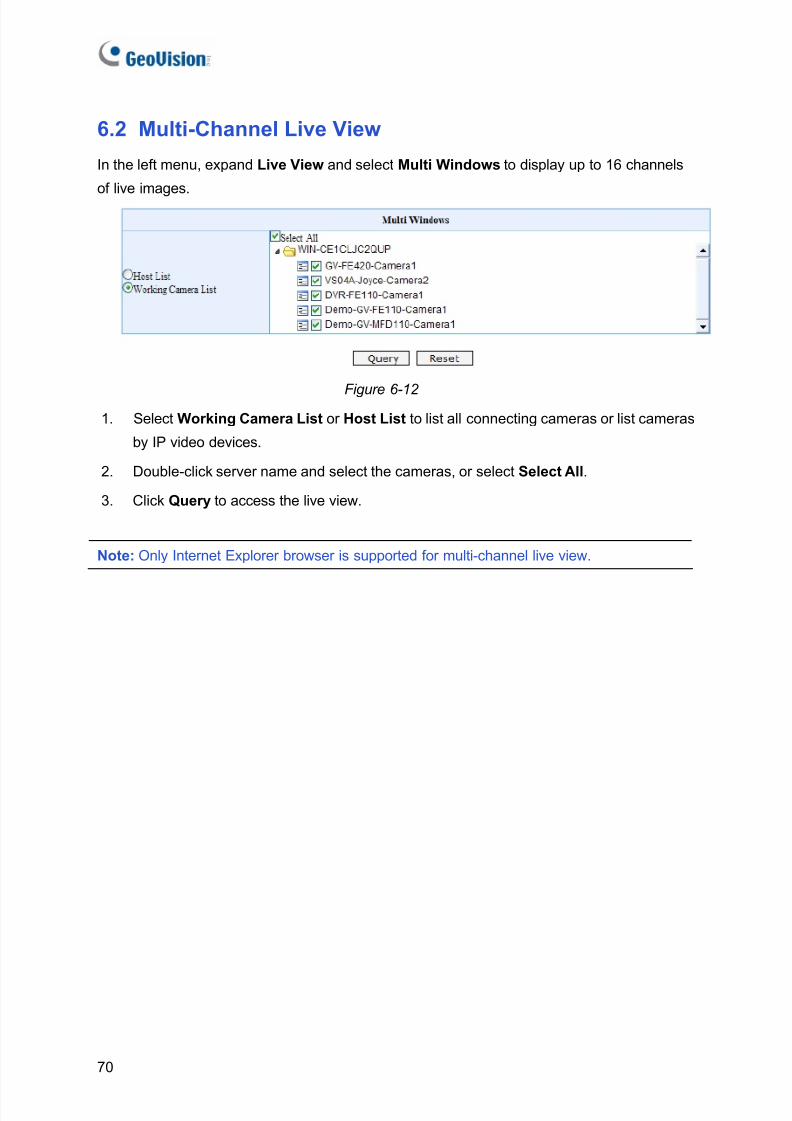
7/29/2019 GV-Recording Server User Manual RSV11-A-En
http://slidepdf.com/reader/full/gv-recording-server-user-manual-rsv11-a-en 78/103
70
6.2 Multi-Channel Live View
In the left menu, expand Live View and select Multi Windows to display up to 16 channels
of live images.
Figure 6-12 1. Select Working Camera List or Host List to list all connecting cameras or list cameras
by IP video devices.
2. Double-click server name and select the cameras, or select Select All .
3. Click Query to access the live view.
Note: Only Internet Explorer browser is supported for multi-channel live view.
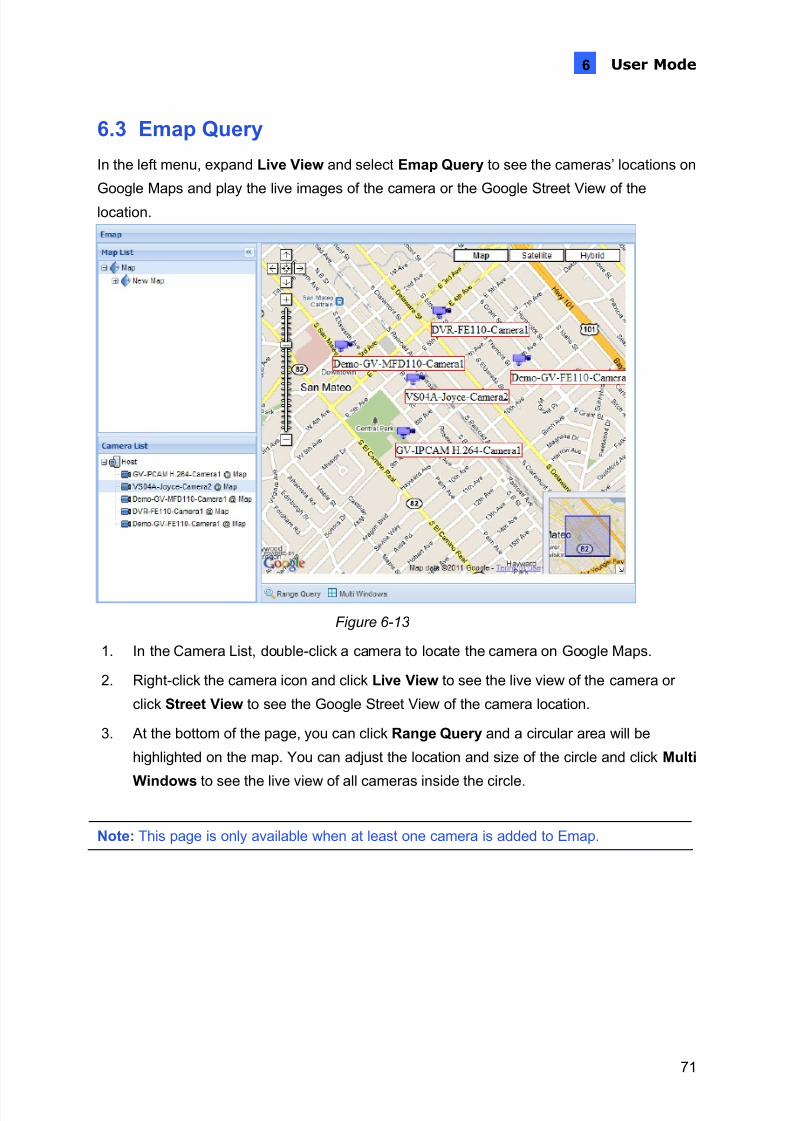
7/29/2019 GV-Recording Server User Manual RSV11-A-En
http://slidepdf.com/reader/full/gv-recording-server-user-manual-rsv11-a-en 79/103
User Mode
71
6
6.3 Emap Query
In the left menu, expand Live View and select Emap Query to see the cameras’ locations on
Google Maps and play the live images of the camera or the Google Street View of the
location.
Figure 6-13
1. In the Camera List, double-click a camera to locate the camera on Google Maps.
2. Right-click the camera icon and click Live View to see the live view of the camera or
click Street View to see the Google Street View of the camera location.
3. At the bottom of the page, you can click Range Query and a circular area will be
highlighted on the map. You can adjust the location and size of the circle and click Multi
Windows to see the live view of all cameras inside the circle.
Note: This page is only available when at least one camera is added to Emap.
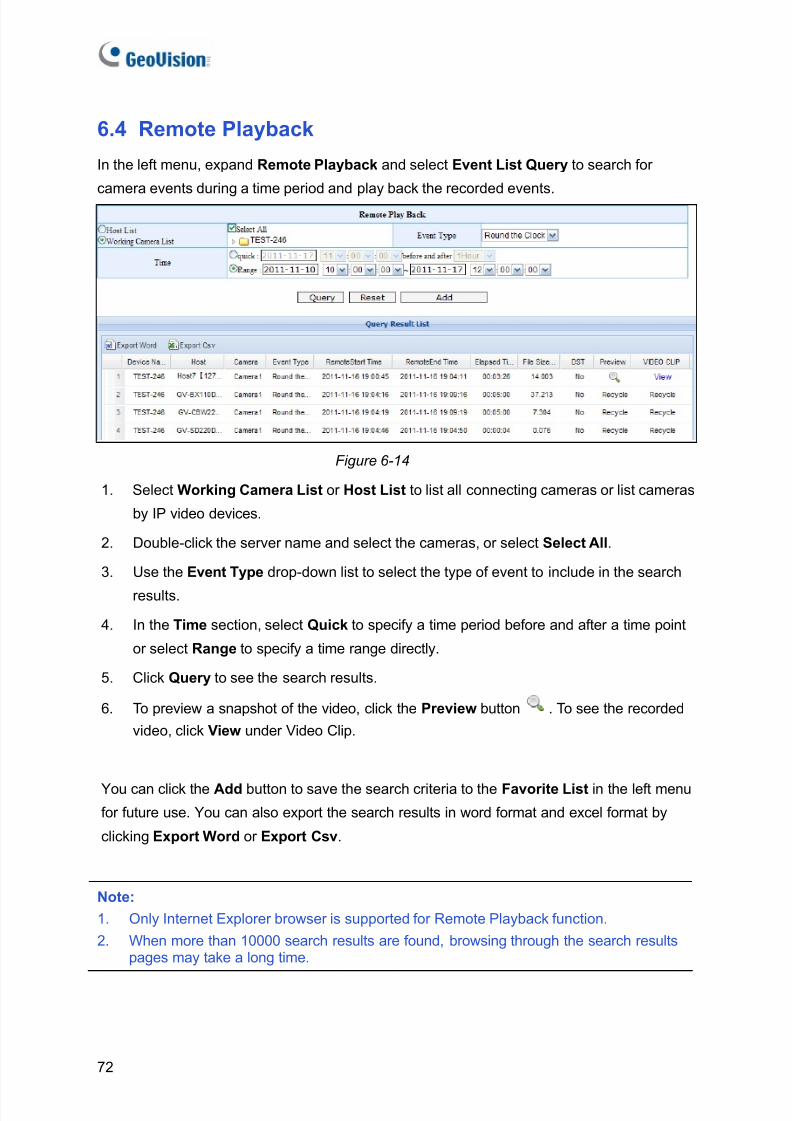
7/29/2019 GV-Recording Server User Manual RSV11-A-En
http://slidepdf.com/reader/full/gv-recording-server-user-manual-rsv11-a-en 80/103
72
6.4 Remote Playback
In the left menu, expand Remote Playback and select Event List Query to search for
camera events during a time period and play back the recorded events.
Figure 6-14
1. Select Working Camera List or Host List to list all connecting cameras or list cameras
by IP video devices.
2. Double-click the server name and select the cameras, or select Select All .
3. Use the Event Type drop-down list to select the type of event to include in the search
results.
4. In the Time section, select Quick to specify a time period before and after a time point
or select Range to specify a time range directly.
5. Click Query to see the search results.
6. To preview a snapshot of the video, click the Preview button . To see the recorded
video, click View under Video Clip.
You can click the Add button to save the search criteria to the Favorite List in the left menufor future use. You can also export the search results in word format and excel format by
clicking Export Word or Export Csv .
Note:1. Only Internet Explorer browser is supported for Remote Playback function.2. When more than 10000 search results are found, browsing through the search results
pages may take a long time.
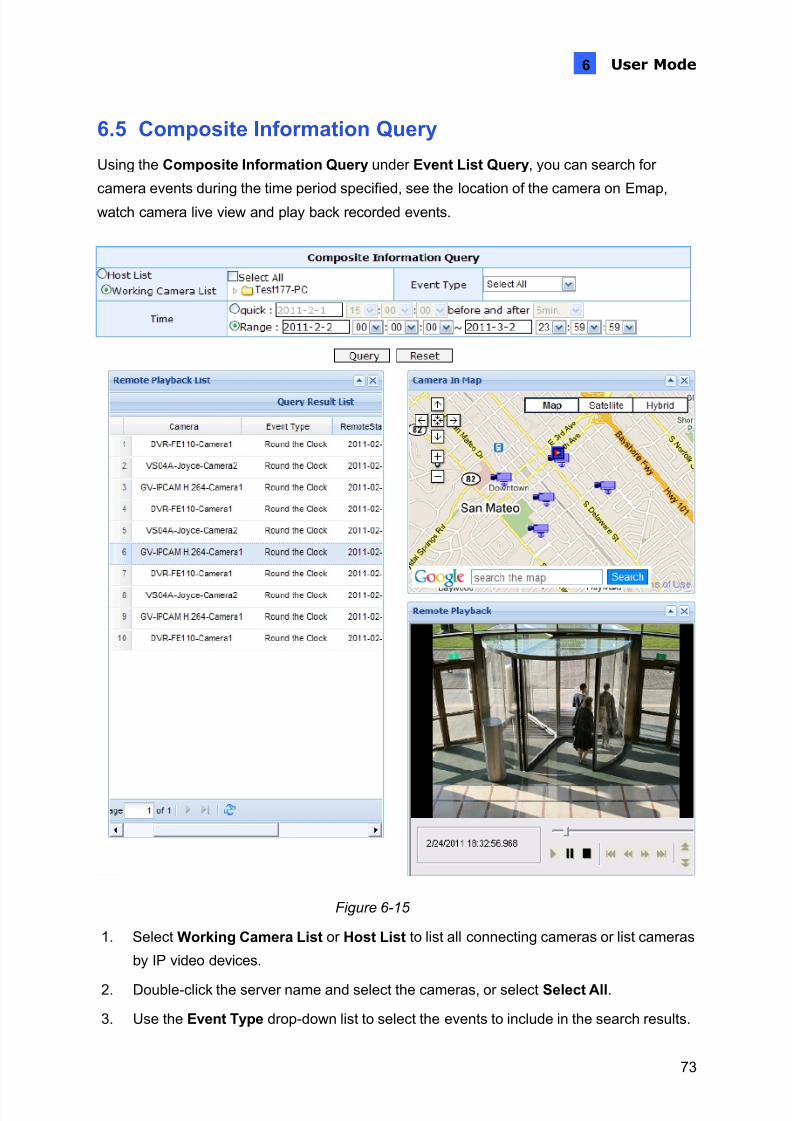
7/29/2019 GV-Recording Server User Manual RSV11-A-En
http://slidepdf.com/reader/full/gv-recording-server-user-manual-rsv11-a-en 81/103
User Mode
73
6
6.5 Composite Information Query
Using the Composite Information Query under Event List Query , you can search for
camera events during the time period specified, see the location of the camera on Emap,
watch camera live view and play back recorded events.
Figure 6-15
1. Select Working Camera List or Host List to list all connecting cameras or list cameras
by IP video devices.
2. Double-click the server name and select the cameras, or select Select All .
3. Use the Event Type drop-down list to select the events to include in the search results.

7/29/2019 GV-Recording Server User Manual RSV11-A-En
http://slidepdf.com/reader/full/gv-recording-server-user-manual-rsv11-a-en 82/103
74
4. In the Time section, select Quick to specify a time period before and after a time point
or select Range to specify a time range directly.
5. Click Query to see the search results. To see the live view of a camera, select the
camera and click the play button in the map.
Note:1. This page is only available when at least one camera is added to Emap.2. When more than 10000 search results are found, browsing through the search results
pages may take a long time.
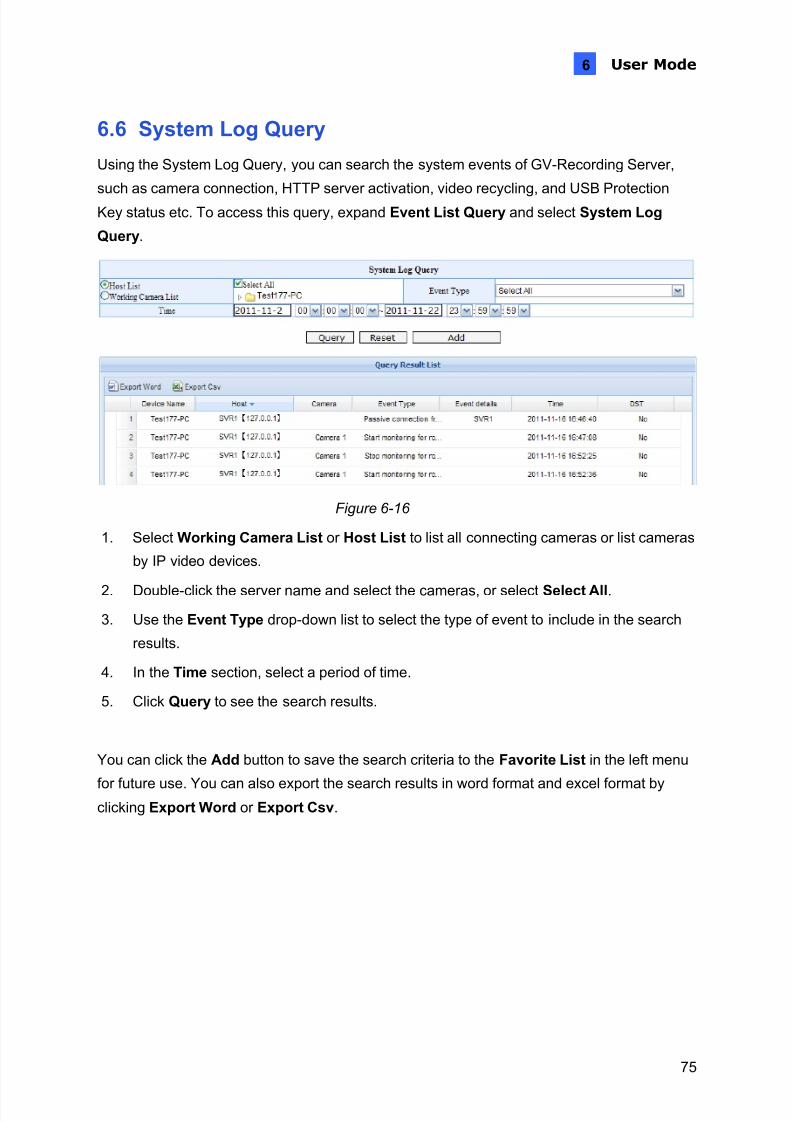
7/29/2019 GV-Recording Server User Manual RSV11-A-En
http://slidepdf.com/reader/full/gv-recording-server-user-manual-rsv11-a-en 83/103
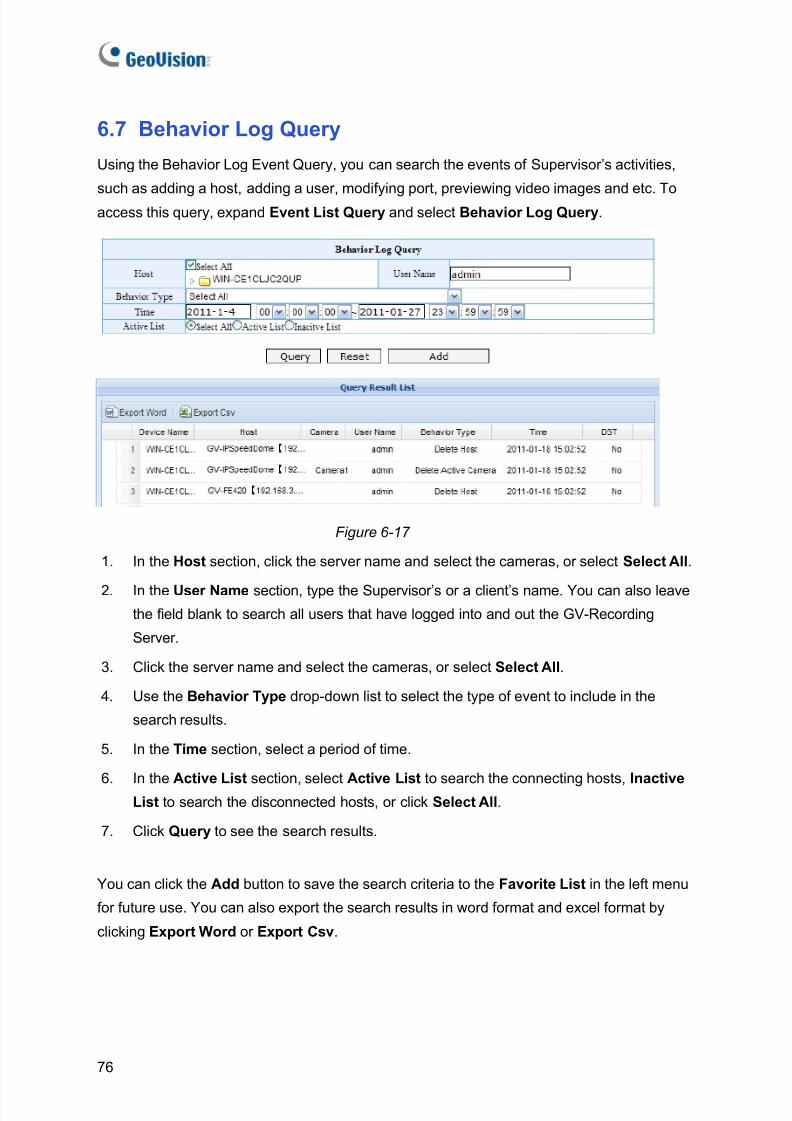
7/29/2019 GV-Recording Server User Manual RSV11-A-En
http://slidepdf.com/reader/full/gv-recording-server-user-manual-rsv11-a-en 84/103
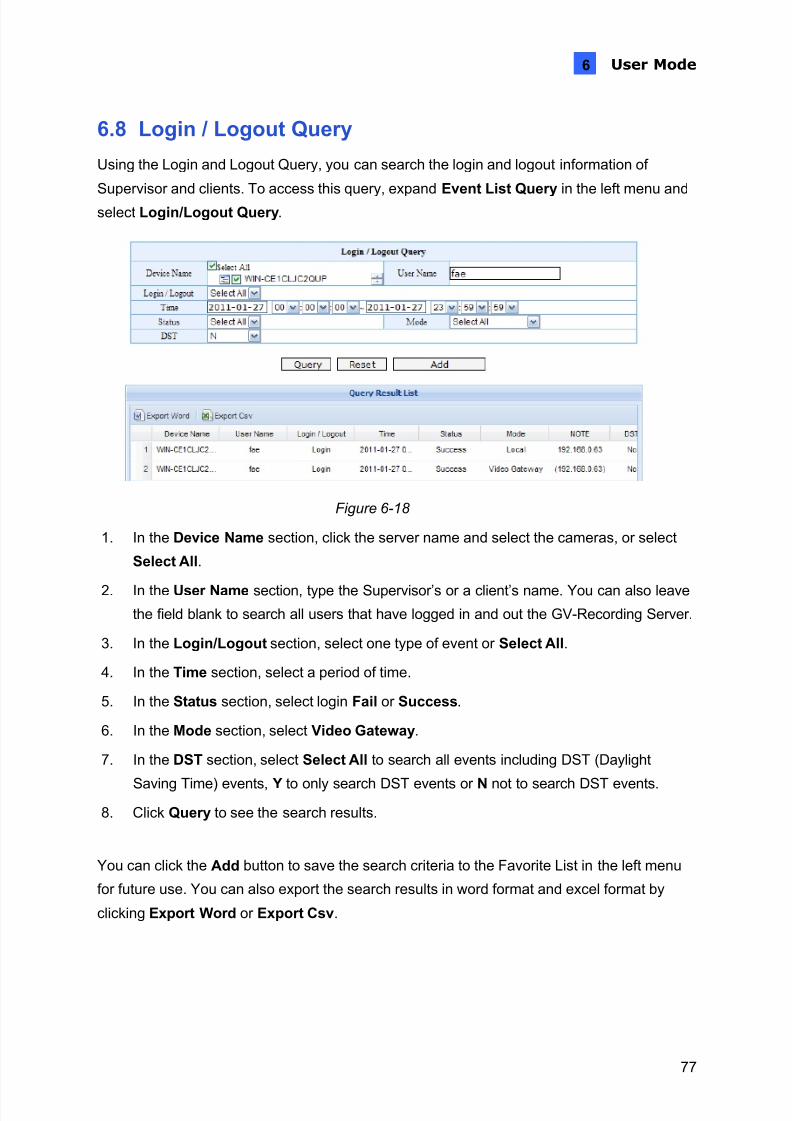
7/29/2019 GV-Recording Server User Manual RSV11-A-En
http://slidepdf.com/reader/full/gv-recording-server-user-manual-rsv11-a-en 85/103
User Mode
77
6
6.8 Login / Logout Query
Using the Login and Logout Query, you can search the login and logout information of
Supervisor and clients. To access this query, expand Event List Query in the left menu andselect Login/Logout Query .
Figure 6-18
1. In the Device Name section, click the server name and select the cameras, or select
Select All .
2. In the User Name section, type the Supervisor’s or a client’s name. You can also leavethe field blank to search all users that have logged in and out the GV-Recording Server.
3. In the Login/Logout section, select one type of event or Select All .
4. In the Time section, select a period of time.
5. In the Status section, select login Fail or Success .
6. In the Mode section, select Video Gateway .
7. In the DST section, select Select All to search all events including DST (Daylight
Saving Time) events, Y to only search DST events or N not to search DST events.8. Click Query to see the search results.
You can click the Add button to save the search criteria to the Favorite List in the left menu
for future use. You can also export the search results in word format and excel format by
clicking Export Word or Export Csv .
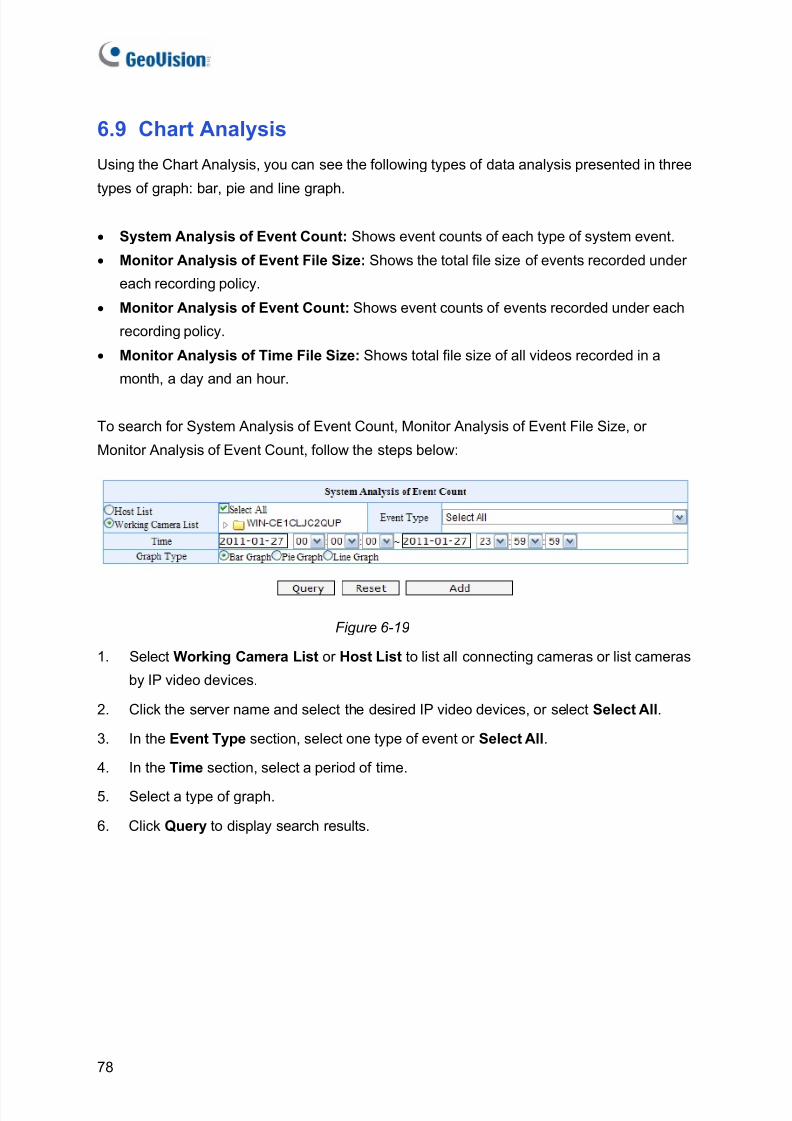
7/29/2019 GV-Recording Server User Manual RSV11-A-En
http://slidepdf.com/reader/full/gv-recording-server-user-manual-rsv11-a-en 86/103
78
6.9 Chart Analysis
Using the Chart Analysis, you can see the following types of data analysis presented in three
types of graph: bar, pie and line graph.
• System Analysis of Event Count: Shows event counts of each type of system event. • Monitor Analysis of Event File Size: Shows the total file size of events recorded under
each recording policy. • Monitor Analysis of Event Count: Shows event counts of events recorded under each
recording policy. • Monitor Analysis of Time File Size: Shows total file size of all videos recorded in a
month, a day and an hour.
To search for System Analysis of Event Count, Monitor Analysis of Event File Size, or
Monitor Analysis of Event Count, follow the steps below:
Figure 6-19
1. Select Working Camera List or Host List to list all connecting cameras or list cameras
by IP video devices.
2. Click the server name and select the desired IP video devices, or select Select All .
3. In the Event Type section, select one type of event or Select All .
4. In the Time section, select a period of time.
5. Select a type of graph.
6. Click Query to display search results.
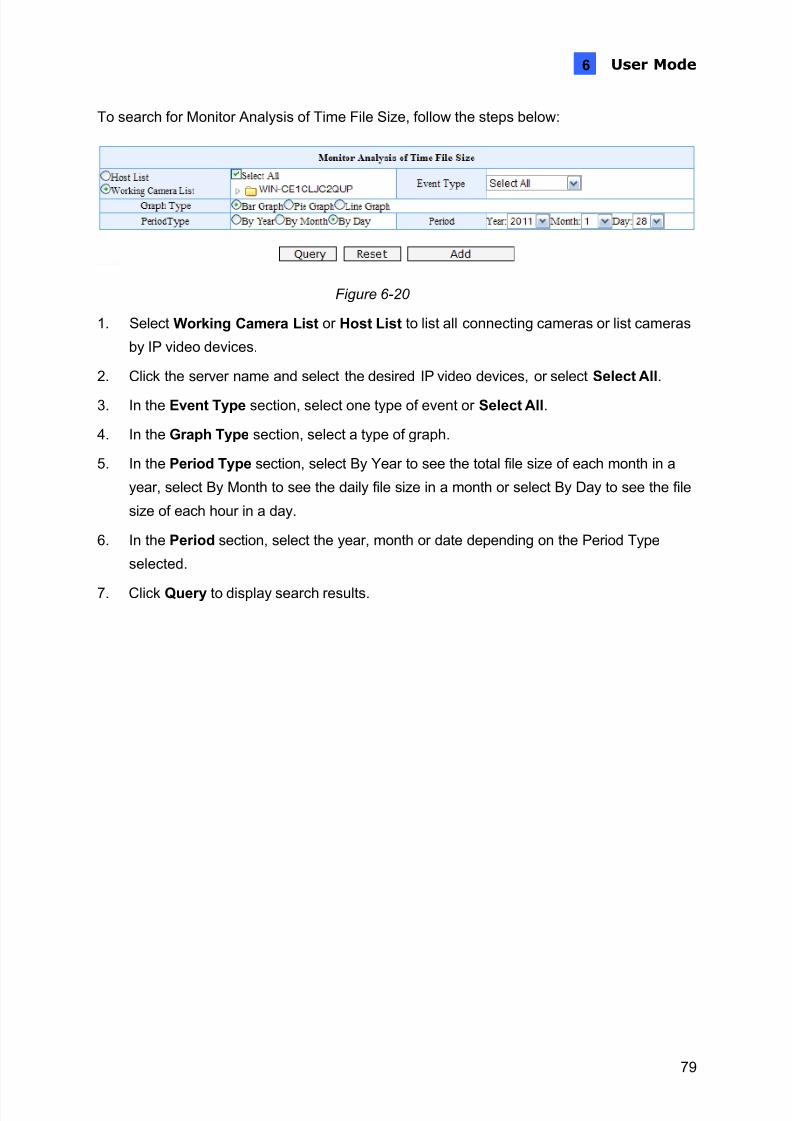
7/29/2019 GV-Recording Server User Manual RSV11-A-En
http://slidepdf.com/reader/full/gv-recording-server-user-manual-rsv11-a-en 87/103
User Mode
79
6
To search for Monitor Analysis of Time File Size, follow the steps below:
Figure 6-20
1. Select Working Camera List or Host List to list all connecting cameras or list cameras
by IP video devices.
2. Click the server name and select the desired IP video devices, or select Select All .
3. In the Event Type section, select one type of event or Select All .
4. In the Graph Type section, select a type of graph.
5. In the Period Type section, select By Year to see the total file size of each month in a
year, select By Month to see the daily file size in a month or select By Day to see the file
size of each hour in a day.
6. In the Period section, select the year, month or date depending on the Period Type
selected.
7. Click Query to display search results.
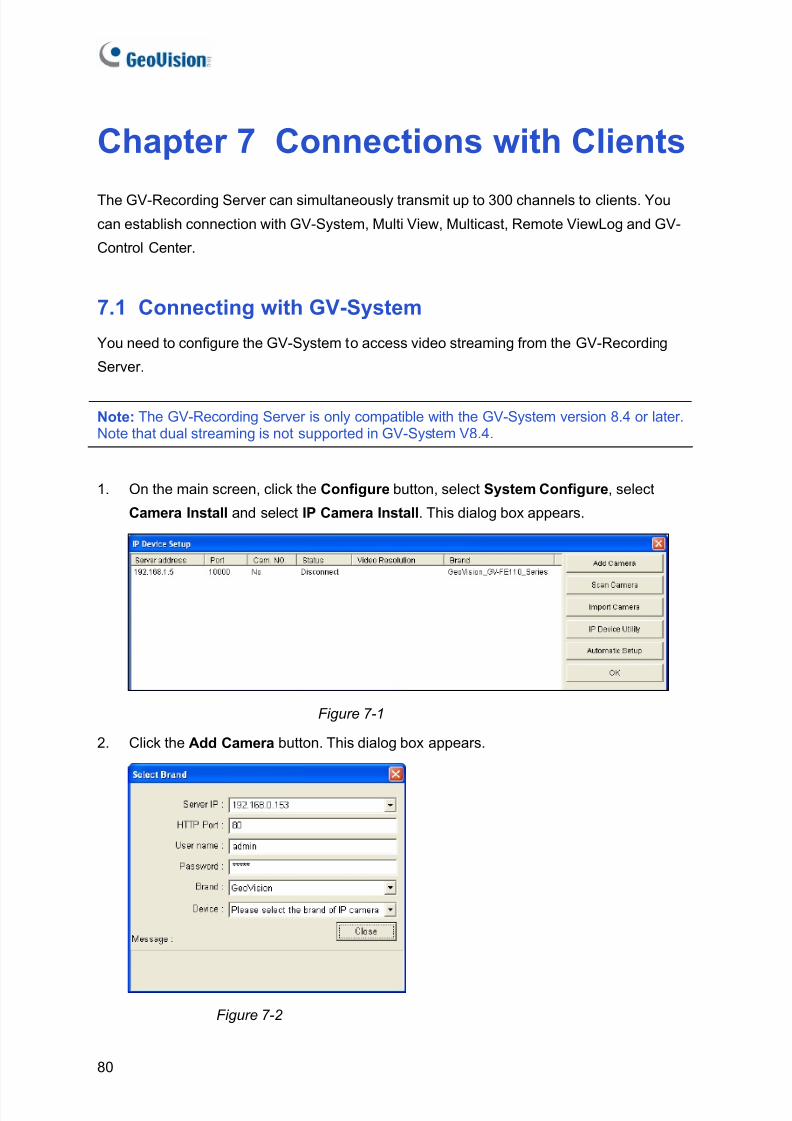
7/29/2019 GV-Recording Server User Manual RSV11-A-En
http://slidepdf.com/reader/full/gv-recording-server-user-manual-rsv11-a-en 88/103
80
Chapter 7 Connections with Clients
The GV-Recording Server can simultaneously transmit up to 300 channels to clients. Youcan establish connection with GV-System, Multi View, Multicast, Remote ViewLog and GV-
Control Center.
7.1 Connecting with GV-System
You need to configure the GV-System to access video streaming from the GV-Recording
Server.
Note: The GV-Recording Server is only compatible with the GV-System version 8.4 or later.Note that dual streaming is not supported in GV-System V8.4.
1. On the main screen, click the Configure button, select System Configure , select
Camera Install and select IP Camera Install . This dialog box appears.
Figure 7-1
2. Click the Add Camera button. This dialog box appears.
Figure 7-2
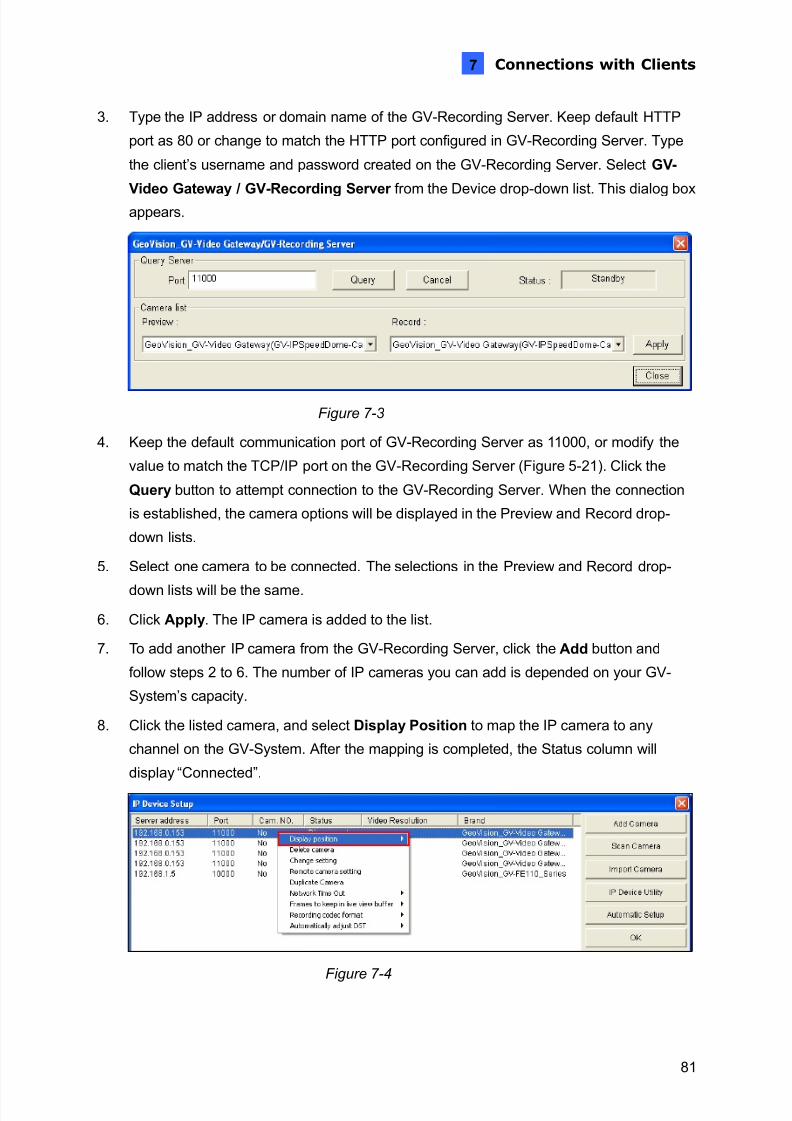
7/29/2019 GV-Recording Server User Manual RSV11-A-En
http://slidepdf.com/reader/full/gv-recording-server-user-manual-rsv11-a-en 89/103
Connections with Clients
81
7
3. Type the IP address or domain name of the GV-Recording Server. Keep default HTTP
port as 80 or change to match the HTTP port configured in GV-Recording Server. Type
the client’s username and password created on the GV-Recording Server. Select GV-
Video Gateway / GV-Recording Server from the Device drop-down list. This dialog boxappears.
Figure 7-3
4. Keep the default communication port of GV-Recording Server as 11000, or modify the
value to match the TCP/IP port on the GV-Recording Server (Figure 5-21). Click the
Query button to attempt connection to the GV-Recording Server. When the connection
is established, the camera options will be displayed in the Preview and Record drop-
down lists.
5. Select one camera to be connected. The selections in the Preview and Record drop-
down lists will be the same.
6. Click Apply . The IP camera is added to the list.
7. To add another IP camera from the GV-Recording Server, click the Add button and
follow steps 2 to 6. The number of IP cameras you can add is depended on your GV-
System’s capacity.
8. Click the listed camera, and select Display Position to map the IP camera to any
channel on the GV-System. After the mapping is completed, the Status column will
display “Connected”.
Figure 7-4
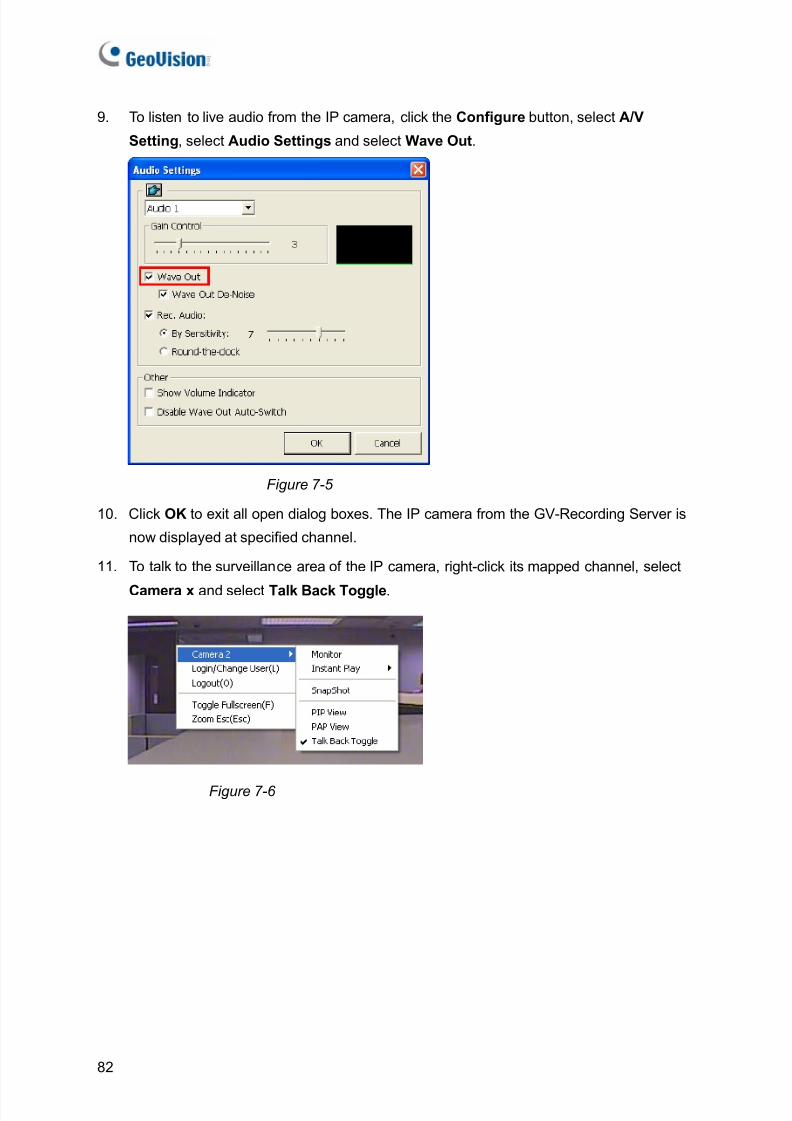
7/29/2019 GV-Recording Server User Manual RSV11-A-En
http://slidepdf.com/reader/full/gv-recording-server-user-manual-rsv11-a-en 90/103
82
9. To listen to live audio from the IP camera, click the Configure button, select A/V
Setting , select Audio Settings and select Wave Out .
Figure 7-5
10. Click OK to exit all open dialog boxes. The IP camera from the GV-Recording Server is
now displayed at specified channel.
11. To talk to the surveillance area of the IP camera, right-click its mapped channel, select
Camera x and select Talk Back Toggle .
Figure 7-6
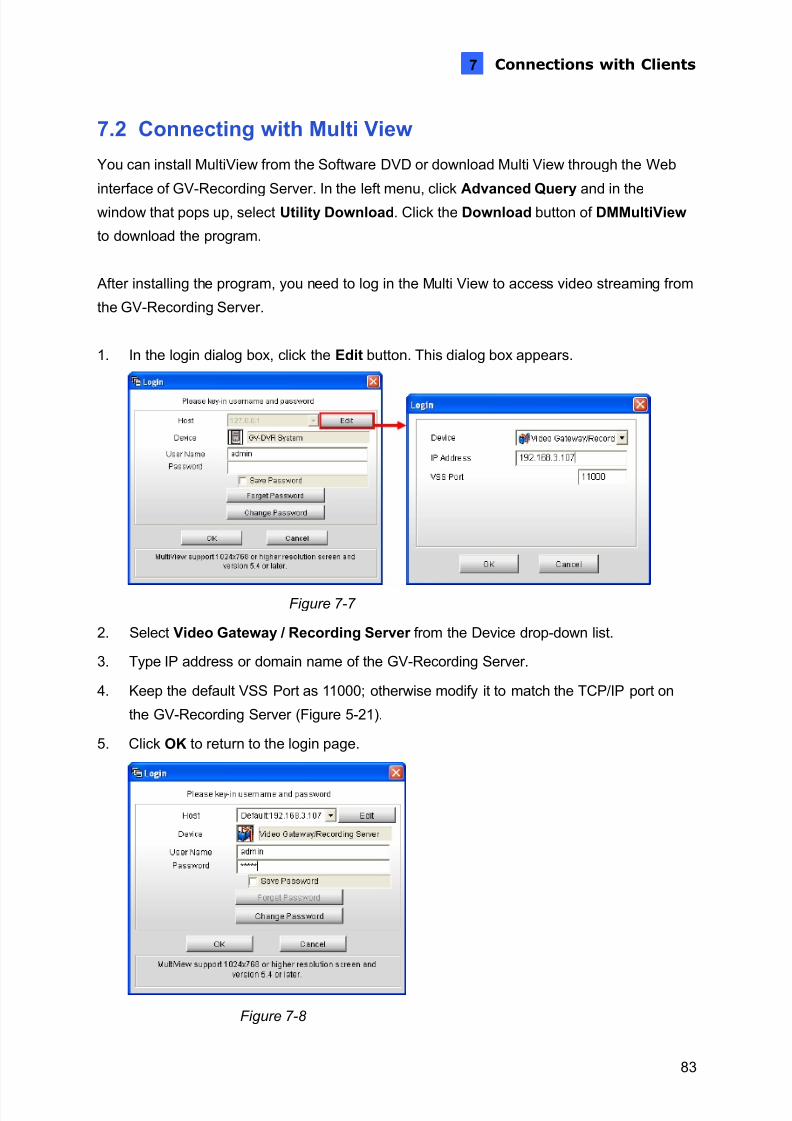
7/29/2019 GV-Recording Server User Manual RSV11-A-En
http://slidepdf.com/reader/full/gv-recording-server-user-manual-rsv11-a-en 91/103
Connections with Clients
83
7
7.2 Connecting with Multi View
You can install MultiView from the Software DVD or download Multi View through the Web
interface of GV-Recording Server. In the left menu, click Advanced Query and in thewindow that pops up, select Utility Download . Click the Download button of DMMultiView
to download the program.
After installing the program, you need to log in the Multi View to access video streaming from
the GV-Recording Server.
1. In the login dialog box, click the Edit button. This dialog box appears.
Figure 7-7
2. Select Video Gateway / Recording Server from the Device drop-down list.
3. Type IP address or domain name of the GV-Recording Server.
4. Keep the default VSS Port as 11000; otherwise modify it to match the TCP/IP port on
the GV-Recording Server (Figure 5-21).
5. Click OK to return to the login page.
Figure 7-8
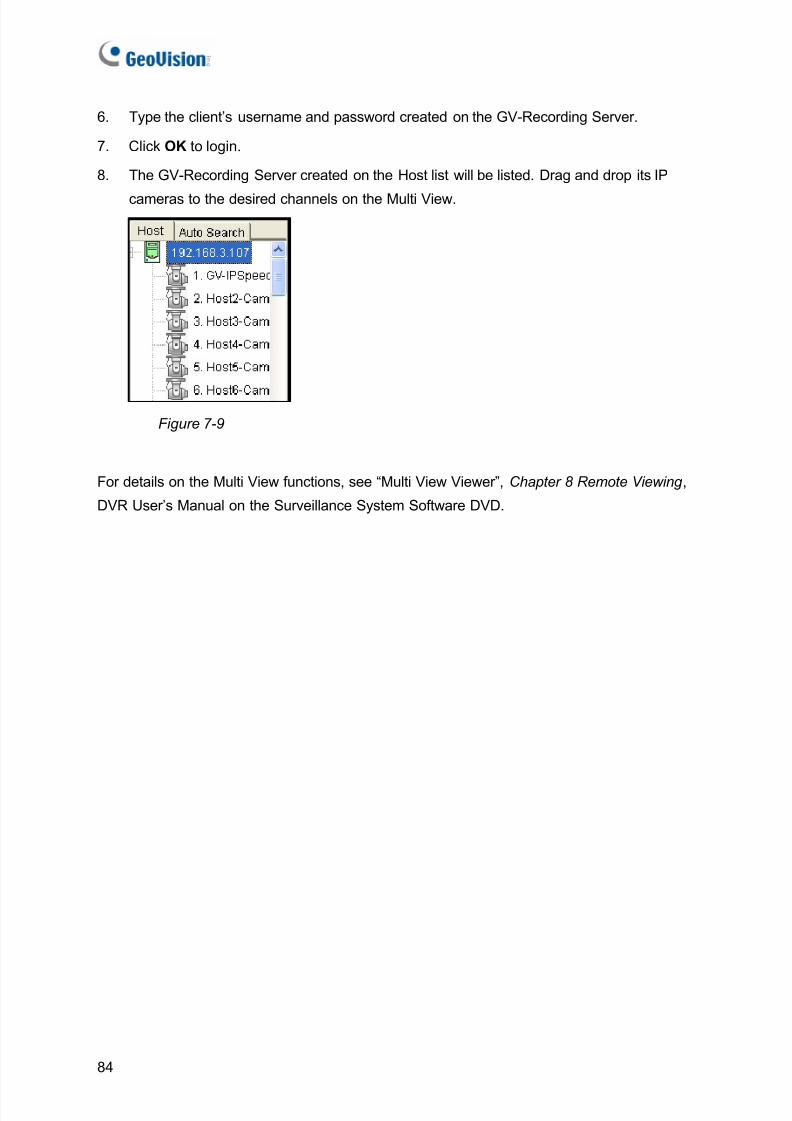
7/29/2019 GV-Recording Server User Manual RSV11-A-En
http://slidepdf.com/reader/full/gv-recording-server-user-manual-rsv11-a-en 92/103
84
6. Type the client’s username and password created on the GV-Recording Server.
7. Click OK to login.
8. The GV-Recording Server created on the Host list will be listed. Drag and drop its IP
cameras to the desired channels on the Multi View.
Figure 7-9
For details on the Multi View functions, see “Multi View Viewer”, Chapter 8 Remote Viewing ,
DVR User’s Manual on the Surveillance System Software DVD.
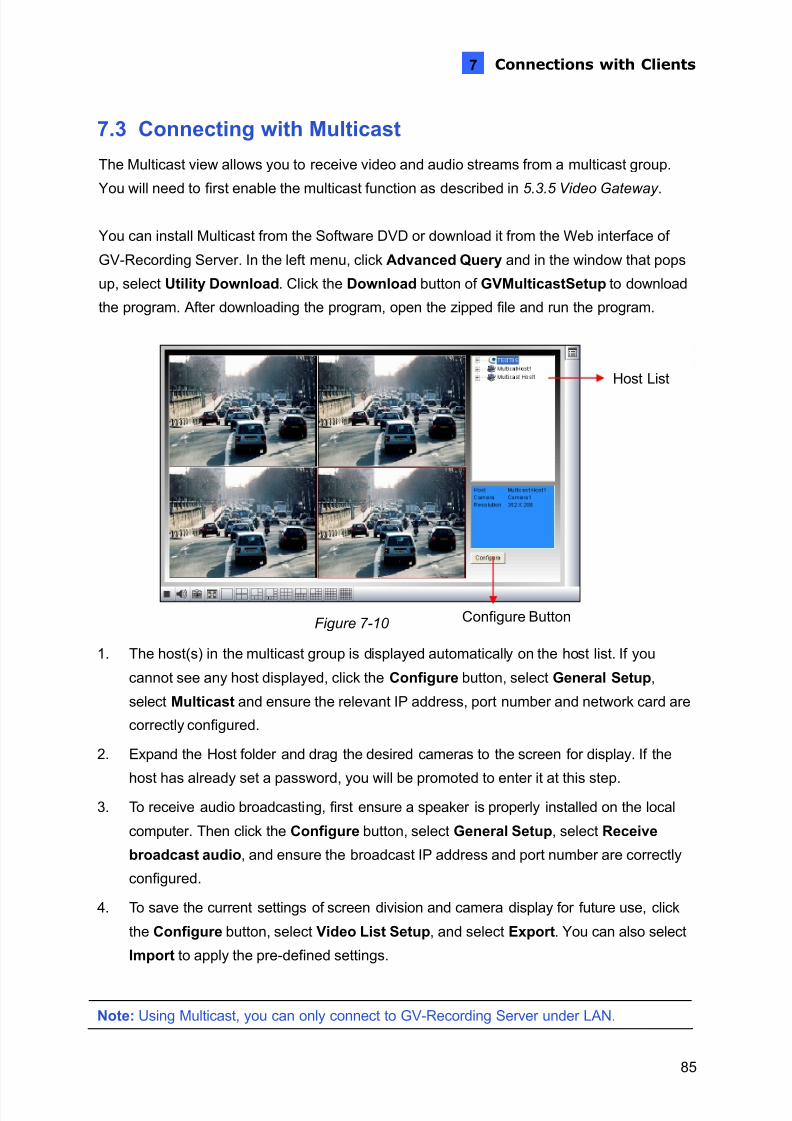
7/29/2019 GV-Recording Server User Manual RSV11-A-En
http://slidepdf.com/reader/full/gv-recording-server-user-manual-rsv11-a-en 93/103
Connections with Clients
85
7
7.3 Connecting with Multicast
The Multicast view allows you to receive video and audio streams from a multicast group.
You will need to first enable the multicast function as described in 5.3.5 Video Gateway .
You can install Multicast from the Software DVD or download it from the Web interface of
GV-Recording Server. In the left menu, click Advanced Query and in the window that pops
up, select Utility Download . Click the Download button of GVMulticastSetup to download
the program. After downloading the program, open the zipped file and run the program.
Figure 7-10
1. The host(s) in the multicast group is displayed automatically on the host list. If you
cannot see any host displayed, click the Configure button, select General Setup ,
select Multicast and ensure the relevant IP address, port number and network card are
correctly configured.
2. Expand the Host folder and drag the desired cameras to the screen for display. If the
host has already set a password, you will be promoted to enter it at this step.3. To receive audio broadcasting, first ensure a speaker is properly installed on the local
computer. Then click the Configure button, select General Setup , select Receive
broadcast audio , and ensure the broadcast IP address and port number are correctly
configured.
4. To save the current settings of screen division and camera display for future use, click
the Configure button, select Video List Setup , and select Export . You can also select
Import to apply the pre-defined settings.
Note: Using Multicast, you can only connect to GV-Recording Server under LAN.
Configure Button
Host List
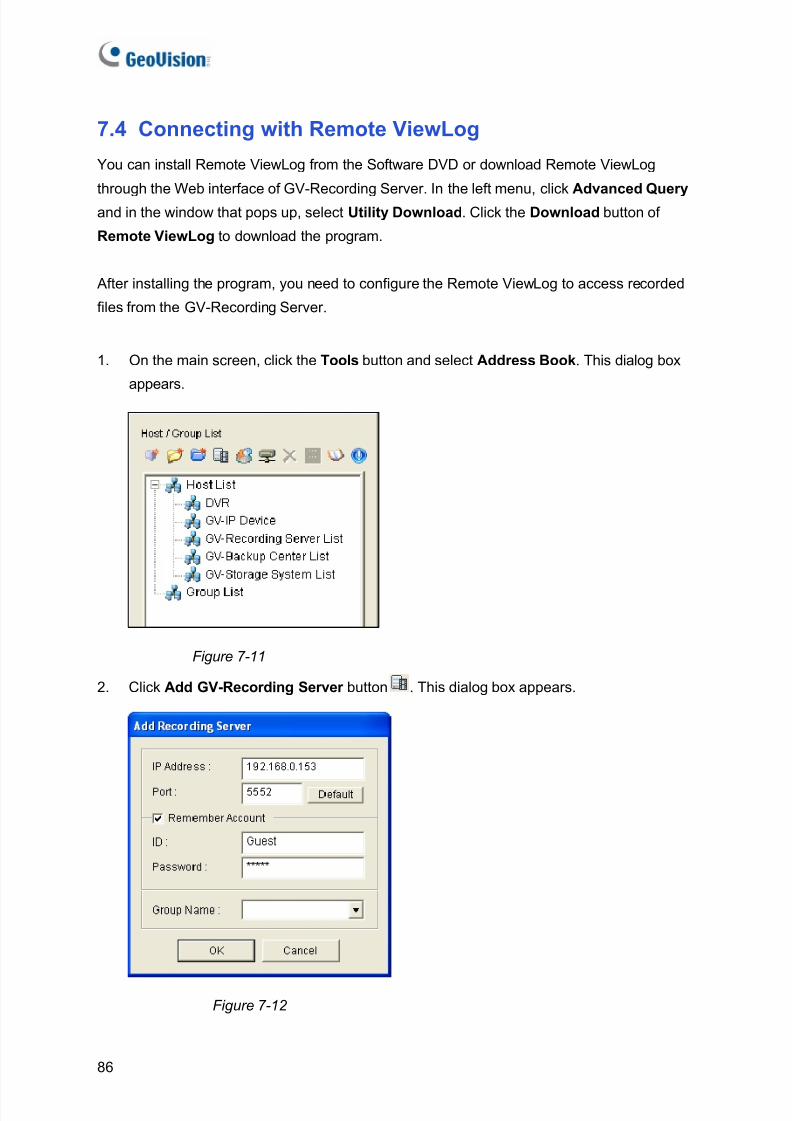
7/29/2019 GV-Recording Server User Manual RSV11-A-En
http://slidepdf.com/reader/full/gv-recording-server-user-manual-rsv11-a-en 94/103
86
7.4 Connecting with Remote ViewLog
You can install Remote ViewLog from the Software DVD or download Remote ViewLog
through the Web interface of GV-Recording Server. In the left menu, click Advanced Queryand in the window that pops up, select Utility Download . Click the Download button of
Remote ViewLog to download the program.
After installing the program, you need to configure the Remote ViewLog to access recorded
files from the GV-Recording Server.
1. On the main screen, click the Tools button and select Address Book . This dialog box
appears.
Figure 7-11
2. Click Add GV-Recording Server button . This dialog box appears.
Figure 7-12
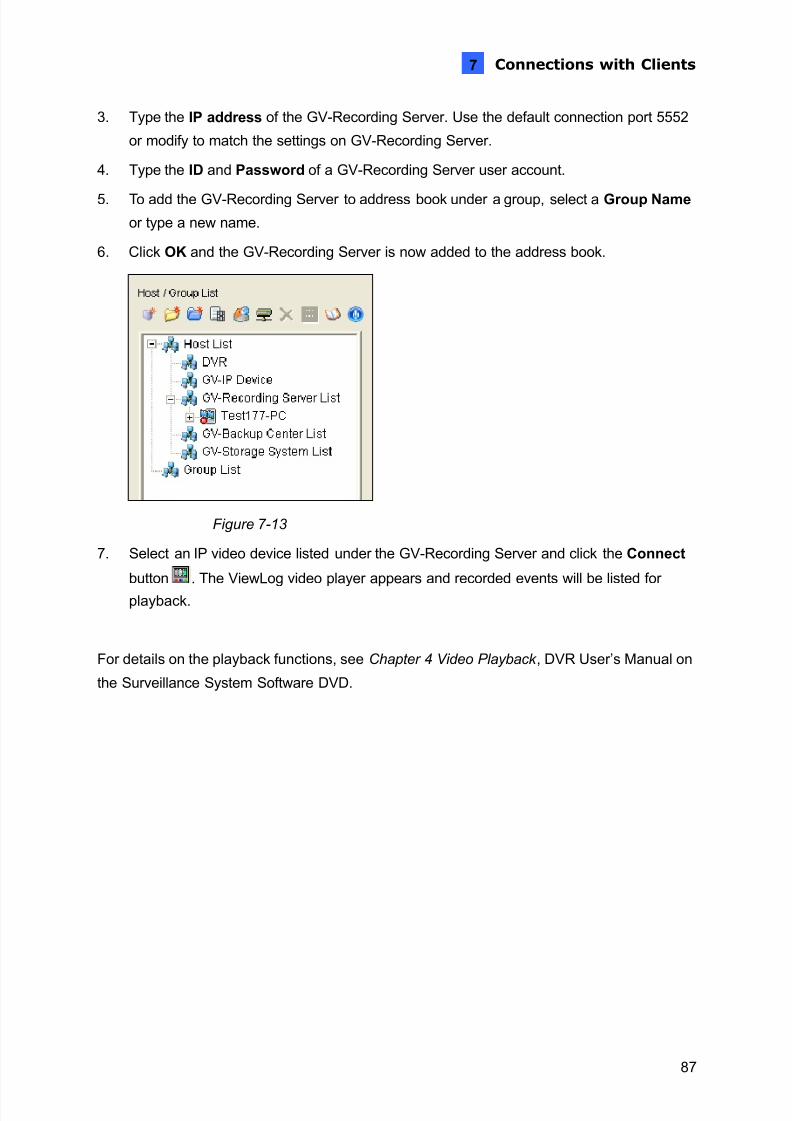
7/29/2019 GV-Recording Server User Manual RSV11-A-En
http://slidepdf.com/reader/full/gv-recording-server-user-manual-rsv11-a-en 95/103
Connections with Clients
87
7
3. Type the IP address of the GV-Recording Server. Use the default connection port 5552
or modify to match the settings on GV-Recording Server.
4. Type the ID and Password of a GV-Recording Server user account.
5. To add the GV-Recording Server to address book under a group, select a Group Name or type a new name.
6. Click OK and the GV-Recording Server is now added to the address book.
Figure 7-13
7. Select an IP video device listed under the GV-Recording Server and click the Connect
button . The ViewLog video player appears and recorded events will be listed for
playback.
For details on the playback functions, see Chapter 4 Video Playback , DVR User’s Manual on
the Surveillance System Software DVD.
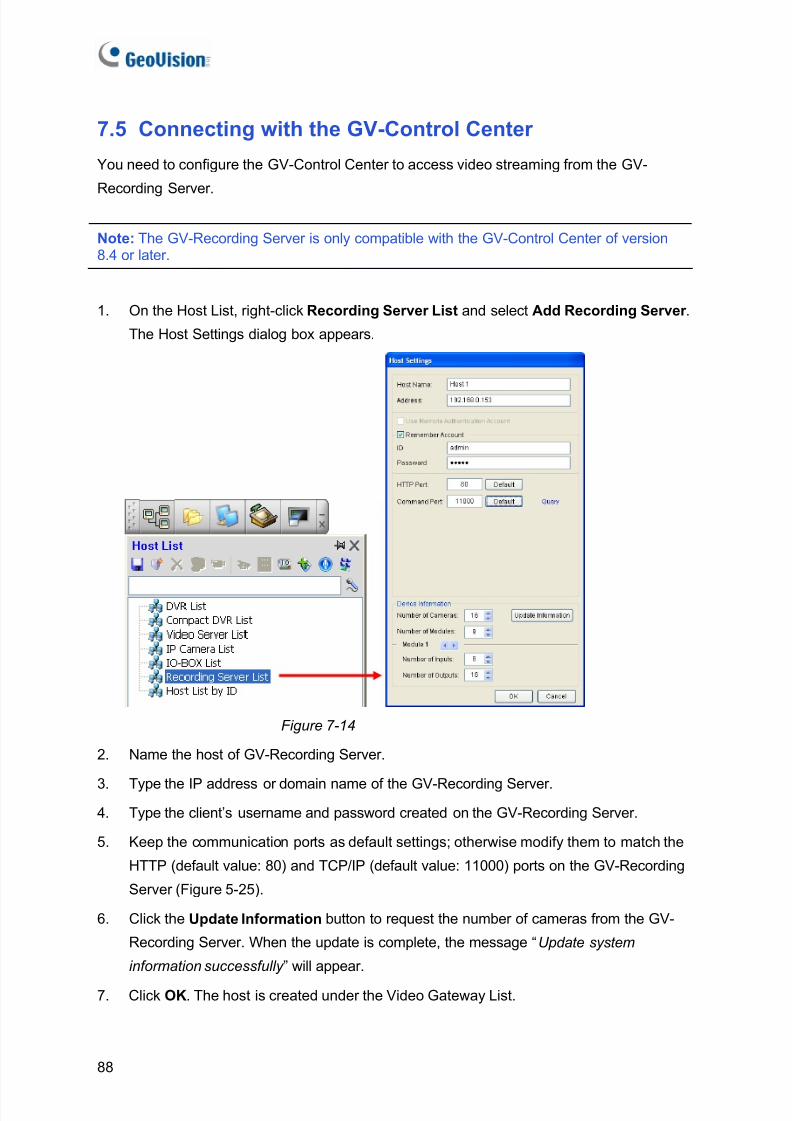
7/29/2019 GV-Recording Server User Manual RSV11-A-En
http://slidepdf.com/reader/full/gv-recording-server-user-manual-rsv11-a-en 96/103
88
7.5 Connecting with the GV-Control Center
You need to configure the GV-Control Center to access video streaming from the GV-
Recording Server.
Note: The GV-Recording Server is only compatible with the GV-Control Center of version8.4 or later.
1. On the Host List, right-click Recording Server List and select Add Recording Server .
The Host Settings dialog box appears.
Figure 7-14
2. Name the host of GV-Recording Server.
3. Type the IP address or domain name of the GV-Recording Server.4. Type the client’s username and password created on the GV-Recording Server.
5. Keep the communication ports as default settings; otherwise modify them to match the
HTTP (default value: 80) and TCP/IP (default value: 11000) ports on the GV-Recording
Server (Figure 5-25).
6. Click the Update Information button to request the number of cameras from the GV-
Recording Server. When the update is complete, the message “ Update system
information successfully ” will appear.
7. Click OK . The host is created under the Video Gateway List.
7/29/2019 GV-Recording Server User Manual RSV11-A-En
http://slidepdf.com/reader/full/gv-recording-server-user-manual-rsv11-a-en 97/103
A p p e n d i x
89
Specifications
Number of IP Video Device Connections 128 channels
Number of Remote Client Connections 300 channels
Active Connections Yes
Passive Connections Yes (only for GV-IP devices)
3 rd Party IP Cameras Support Yes
Live Viewing Single live view, multi-channel live view
Recording Yes (up to 128 channels)
Protocol HTTP, HTTPS, TCP, UDP, SMTP, UPnP,DynDNS, RTSP, PSIA, ONVIF
E-mail Notification Yes (for Active connection lost, passiveconnection lost, USB protection key removed,recycling of recorded video, start keep daysoperation, motion detection, disk full, diskerror, I/O trigger, disk removed, recordingfailure)
SMS Notification No
2-Way Audio Yes (only for GV-IP devices through activeconnection)
GPS support Yes (only for GV-IP cameras)
Number of Accounts Up to 1000 accounts
Mobile Phone Support No
Bandwidth Control No
IE Live View Yes (up to 36 channels)
IE Event Query Yes
IE I/O Control No
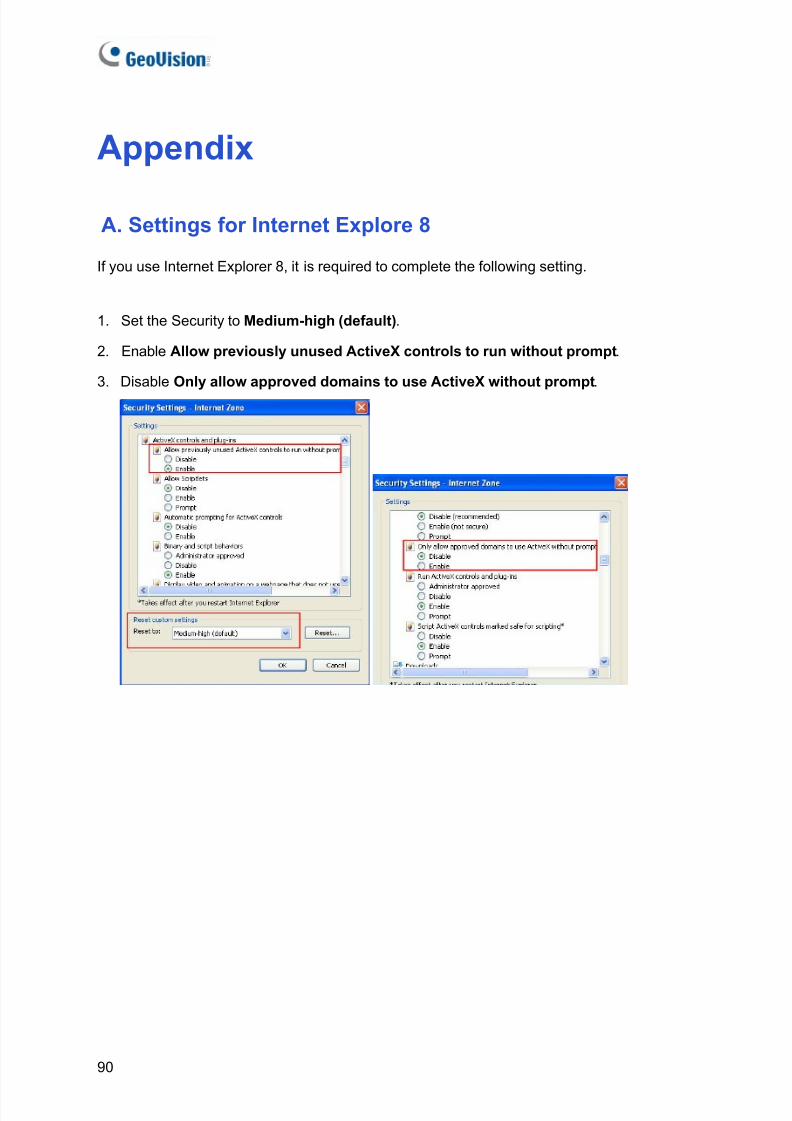
7/29/2019 GV-Recording Server User Manual RSV11-A-En
http://slidepdf.com/reader/full/gv-recording-server-user-manual-rsv11-a-en 98/103
90
Appendix
A. Settings for Internet Explore 8
If you use Internet Explorer 8, it is required to complete the following setting.
1. Set the Security to Medium-high (default) .
2. Enable Allow previously unused ActiveX controls to run without prompt .
3. Disable Only allow approved domains to use ActiveX without prompt .
7/29/2019 GV-Recording Server User Manual RSV11-A-En
http://slidepdf.com/reader/full/gv-recording-server-user-manual-rsv11-a-en 99/103
Appendix
91
B. RTSP Protocol Support
The GV-Recording Server can support RTSP protocol for video streaming.
To connect using TCP port, use the following RTSP command. The default port is 554.
rtsp://<Recording Server IP>/<camNo.>_<streamNo.>
For example, rtsp:// 192.168.3.111 /cam1 _ stream1
To connect using UDP port, use the following RTSP command. The default port range is
17300 to 17380.
rtsp://<Recording Server IP>:<port>/<camNo.>_<streamNo.>
For example, rtsp:// 192.168.3.111 :17300 /cam1 _ stream1
Note:1. The RTSP server must be enabled on the Web interface. See Figure 5-21.2. H.264 is the only codec supported by RTSP streaming.3. Only VLC media player and QuickTime Player are supported for streaming H.264
video via RTSP protocol.
7/29/2019 GV-Recording Server User Manual RSV11-A-En
http://slidepdf.com/reader/full/gv-recording-server-user-manual-rsv11-a-en 100/103
92
C. Supported IP Devices
The GV-Recording Server is compatible with GeoVision IP devices and the following third-
party IP device brands. To see the supported models for each brand, refer to the SupportedIP Camera List on GeoVision’s website by clicking the links below.
• Arecont Vision:
http://www.geovision.com.tw/english/product/SupportIPCAM_Arecont.htm
• AXIS: http://www.geovision.com.tw/english/product/SupportIPCAM_AXIS.htm
• HikVis ion: http://www.geovision.com.tw/english/product/SupportIPCAM_hikvi sion.htm
•
GeoVision: http://www.geovision.com.tw/english/product/SupportIPCAM_Geovision.a sp • Panasonic: http://www.geovision.com.tw/english/product/SupportIPCAM_Panasonic.htm
• Sony: http://www.geovision.com.tw/english/product/SupportIPCAM_SONY.htm
• VIVOTEK: http://www.geovision.com.tw/english/product/SupportIPCAM_VIVOTEK.htm
Note: GV-Recording Server V1.1 only supports IP devices with V8.5 or earlier versionslisted under the GV S/W column in the support list.
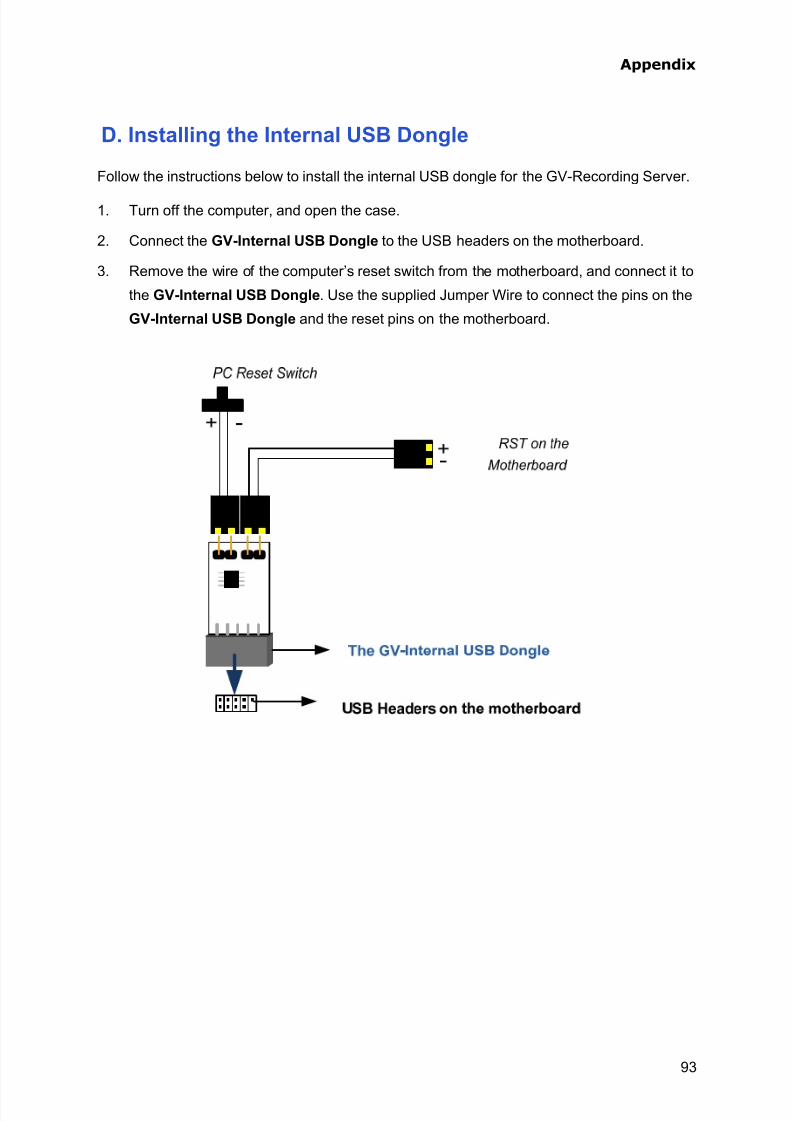
7/29/2019 GV-Recording Server User Manual RSV11-A-En
http://slidepdf.com/reader/full/gv-recording-server-user-manual-rsv11-a-en 101/103
Appendix
93
D. Installing the Internal USB Dongle
Follow the instructions below to install the internal USB dongle for the GV-Recording Server.
1. Turn off the computer, and open the case.
2. Connect the GV-Internal USB Dongle to the USB headers on the motherboard.
3. Remove the wire of the computer’s reset switch from the motherboard, and connect it to
the GV-Internal USB Dongle . Use the supplied Jumper Wire to connect the pins on the
GV-Internal USB Dongle and the reset pins on the motherboard.
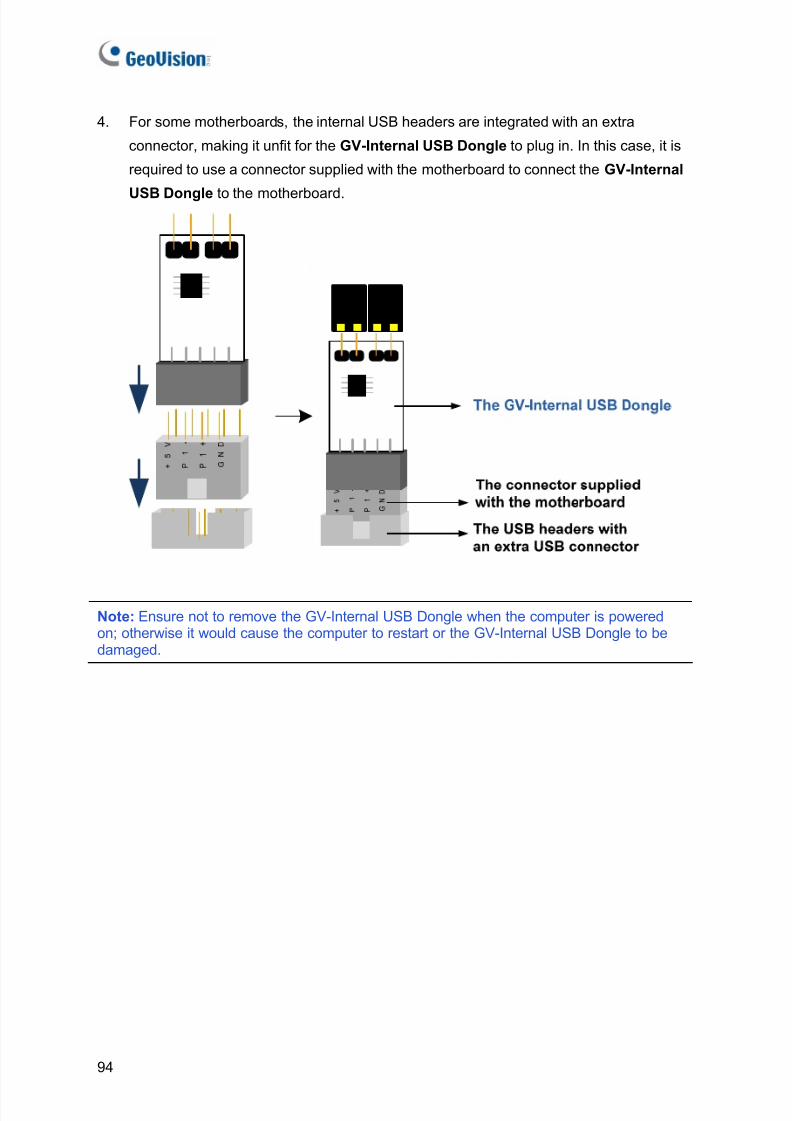
7/29/2019 GV-Recording Server User Manual RSV11-A-En
http://slidepdf.com/reader/full/gv-recording-server-user-manual-rsv11-a-en 102/103
94
4. For some motherboards, the internal USB headers are integrated with an extra
connector, making it unfit for the GV-Internal USB Dongle to plug in. In this case, it is
required to use a connector supplied with the motherboard to connect the GV-Internal
USB Dongle to the motherboard.
Note: Ensure not to remove the GV-Internal USB Dongle when the computer is poweredon; otherwise it would cause the computer to restart or the GV-Internal USB Dongle to bedamaged.
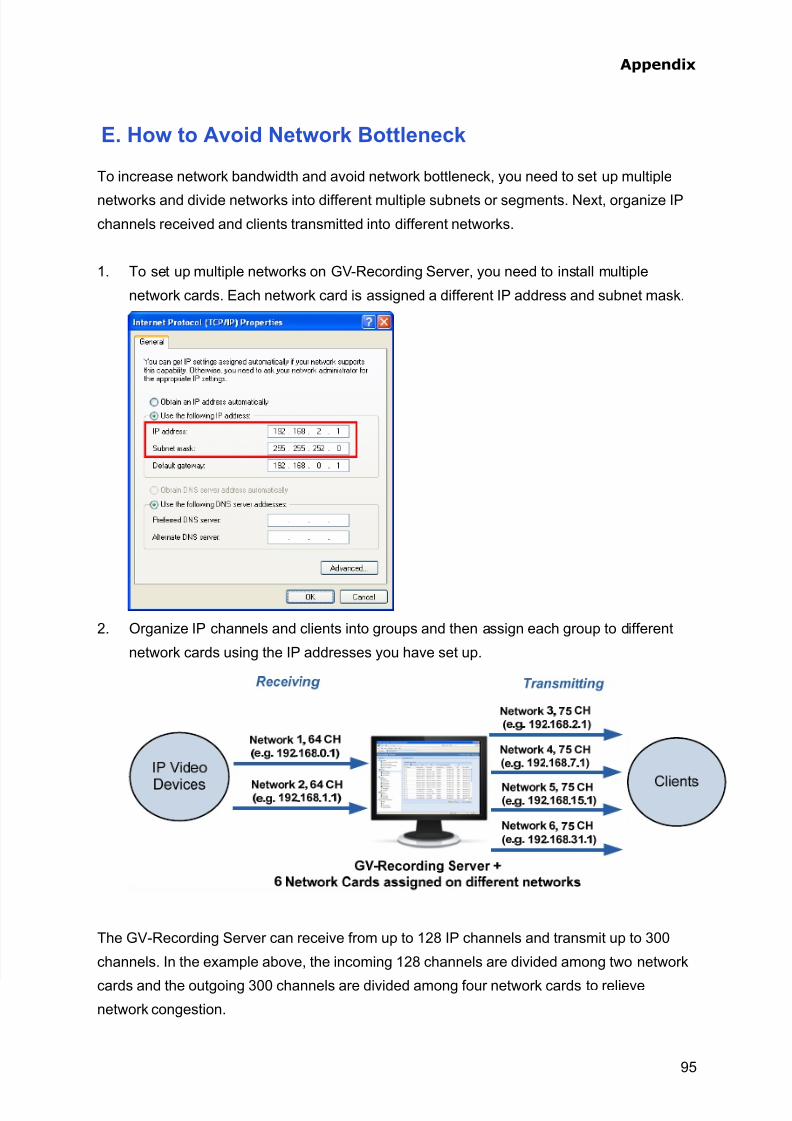
7/29/2019 GV-Recording Server User Manual RSV11-A-En
http://slidepdf.com/reader/full/gv-recording-server-user-manual-rsv11-a-en 103/103
Appendix
E. How to Avoid Network Bottleneck
To increase network bandwidth and avoid network bottleneck, you need to set up multiple
networks and divide networks into different multiple subnets or segments. Next, organize IPchannels received and clients transmitted into different networks.
1. To set up multiple networks on GV-Recording Server, you need to install multiple
network cards. Each network card is assigned a different IP address and subnet mask.
2. Organize IP channels and clients into groups and then assign each group to different
network cards using the IP addresses you have set up.