Embed Size (px)
Citation preview
GV-Face 1 Date: 5/23/2018
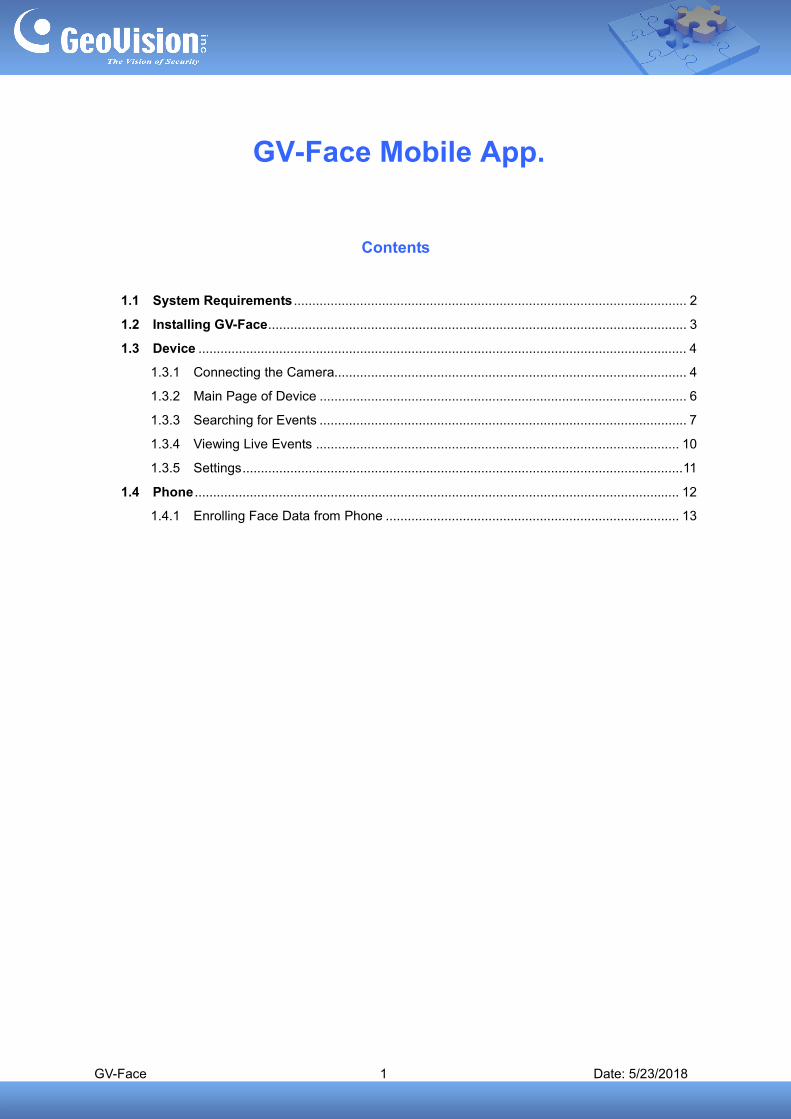
GV-Face Mobile App.
Contents
1.1 System Requirements ........................................................................................................... 2
1.2 Installing GV-Face.................................................................................................................. 3
1.3 Device ..................................................................................................................................... 4
1.3.1 Connecting the Camera................................................................................................ 4
1.3.2 Main Page of Device .................................................................................................... 6
1.3.3 Searching for Events .................................................................................................... 7
1.3.4 Viewing Live Events ................................................................................................... 10
1.3.5 Settings........................................................................................................................11
1.4 Phone .................................................................................................................................... 12
1.4.1 Enrolling Face Data from Phone ................................................................................ 13
GV-Face 2 Date: 5/23/2018
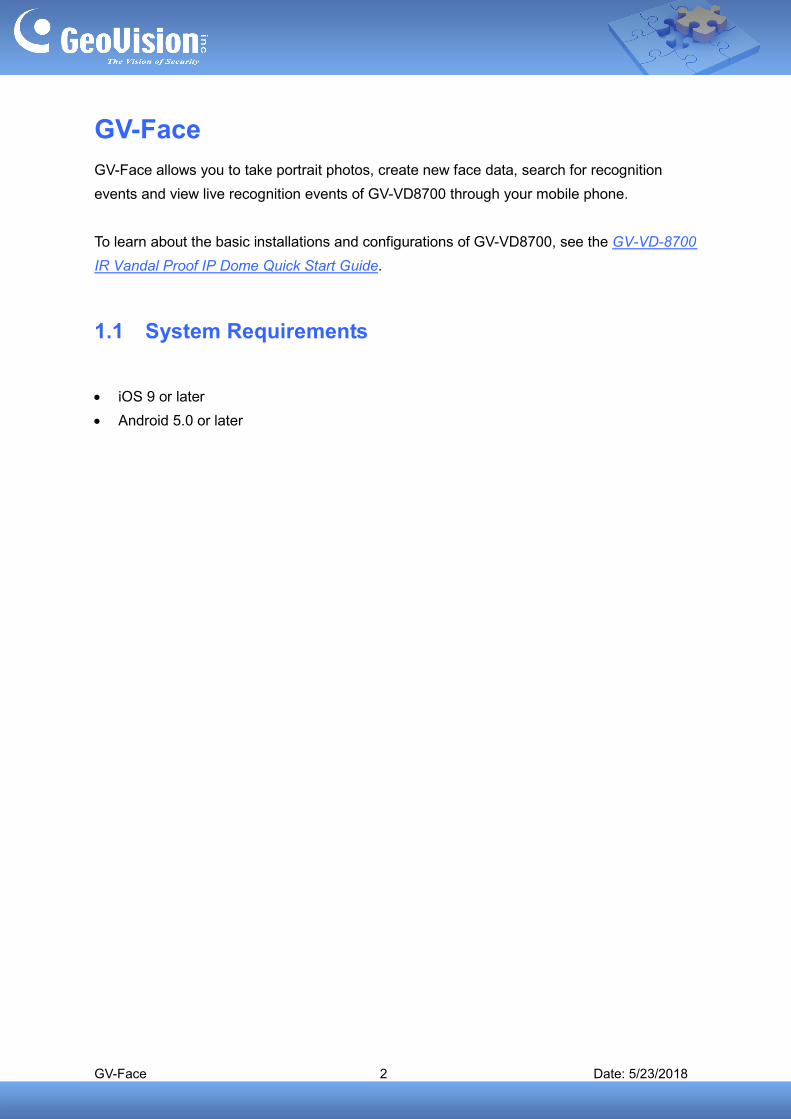
GV-Face GV-Face allows you to take portrait photos, create new face data, search for recognition
events and view live recognition events of GV-VD8700 through your mobile phone.
To learn about the basic installations and configurations of GV-VD8700, see the GV-VD-8700
IR Vandal Proof IP Dome Quick Start Guide.
1.1 System Requirements
iOS 9 or later
Android 5.0 or later
GV-Face 3 Date: 5/23/2018
1.2 Installing GV-Face
You can download GV-Face from the App Store or Google Play and install the application.
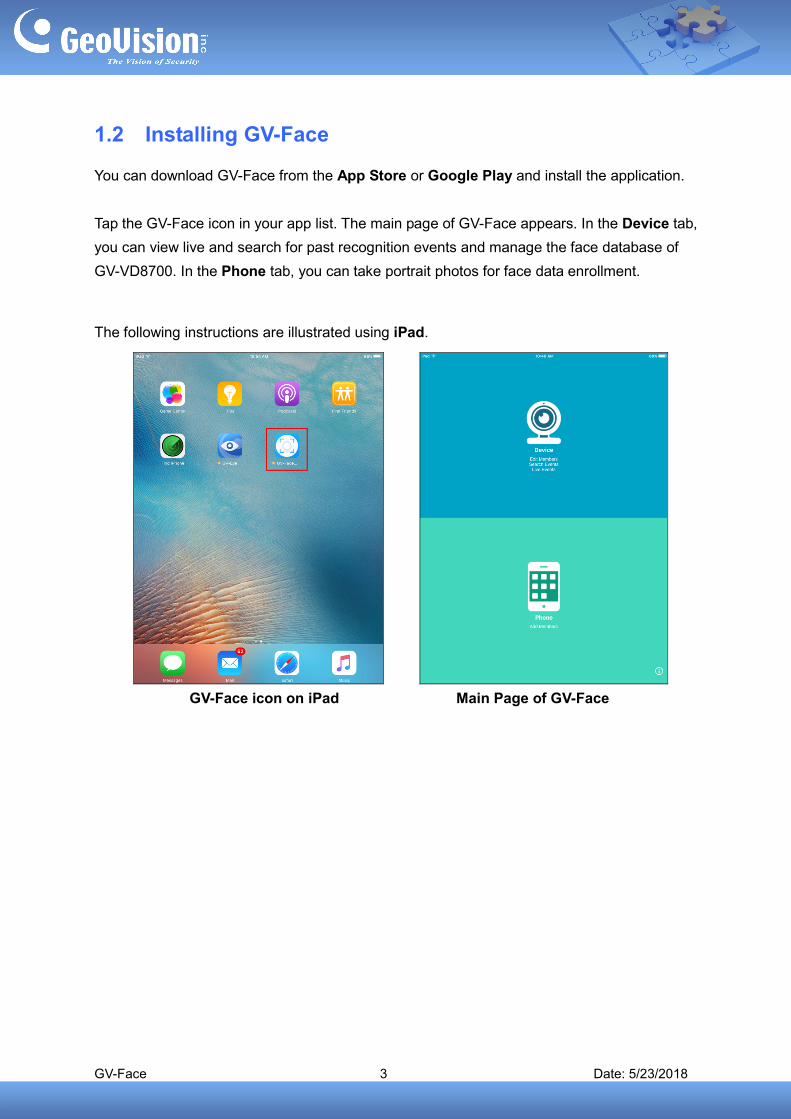
Tap the GV-Face icon in your app list. The main page of GV-Face appears. In the Device tab,
you can view live and search for past recognition events and manage the face database of
GV-VD8700. In the Phone tab, you can take portrait photos for face data enrollment.
The following instructions are illustrated using iPad.
GV-Face icon on iPad Main Page of GV-Face
GV-Face 4 Date: 5/23/2018
1.3 Device
In the Device tab, you can connect to the GV-VD8700 of your choice. Once you log in, you
can manage the face data, recognition events, and device settings of the camera.
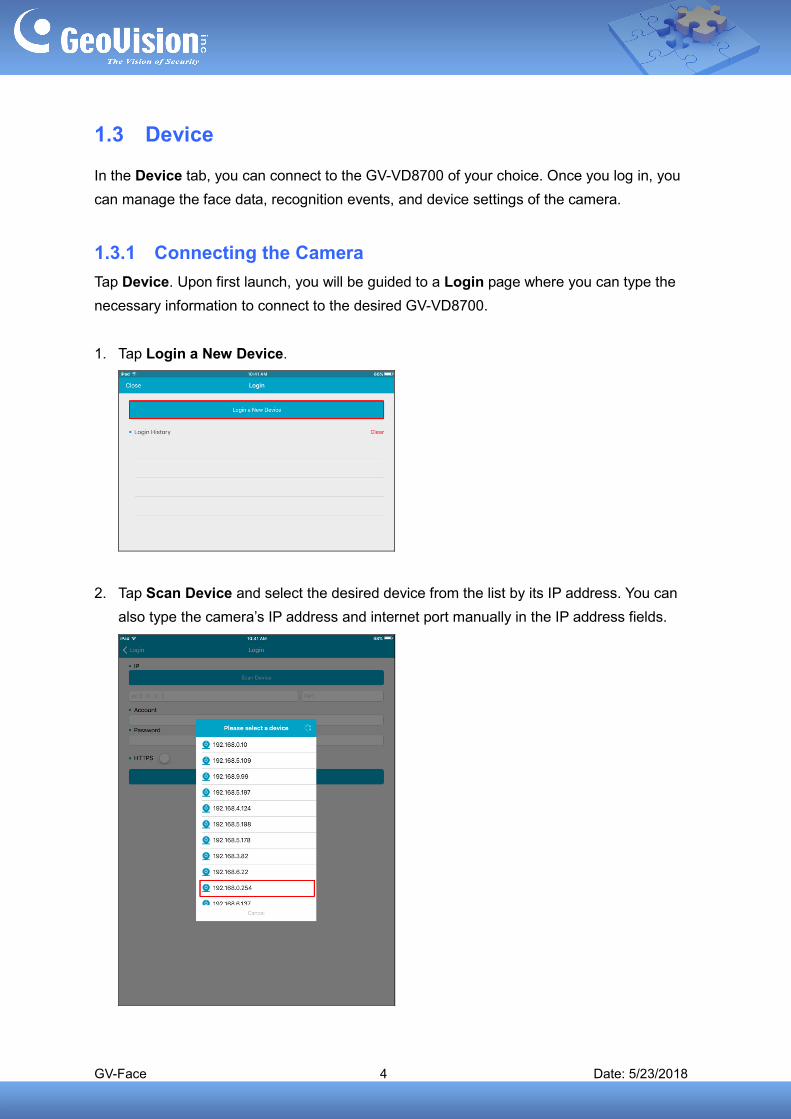
1.3.1 Connecting the Camera Tap Device. Upon first launch, you will be guided to a Login page where you can type the
necessary information to connect to the desired GV-VD8700.
1. Tap Login a New Device.
2. Tap Scan Device and select the desired device from the list by its IP address. You can
also type the camera’s IP address and internet port manually in the IP address fields.
GV-Face 5 Date: 5/23/2018
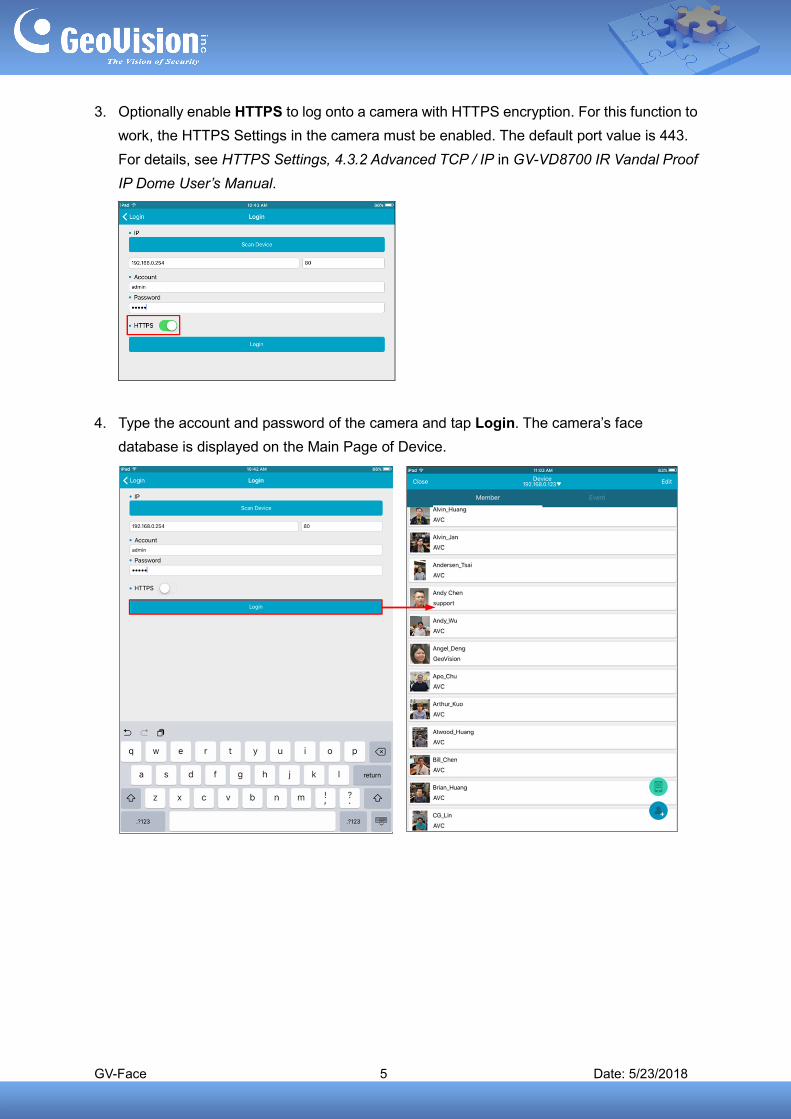
3. Optionally enable HTTPS to log onto a camera with HTTPS encryption. For this function to
work, the HTTPS Settings in the camera must be enabled. The default port value is 443.
For details, see HTTPS Settings, 4.3.2 Advanced TCP / IP in GV-VD8700 IR Vandal Proof
IP Dome User’s Manual.
4. Type the account and password of the camera and tap Login. The camera’s face
database is displayed on the Main Page of Device.
GV-Face 6 Date: 5/23/2018
1.3.2 Main Page of Device
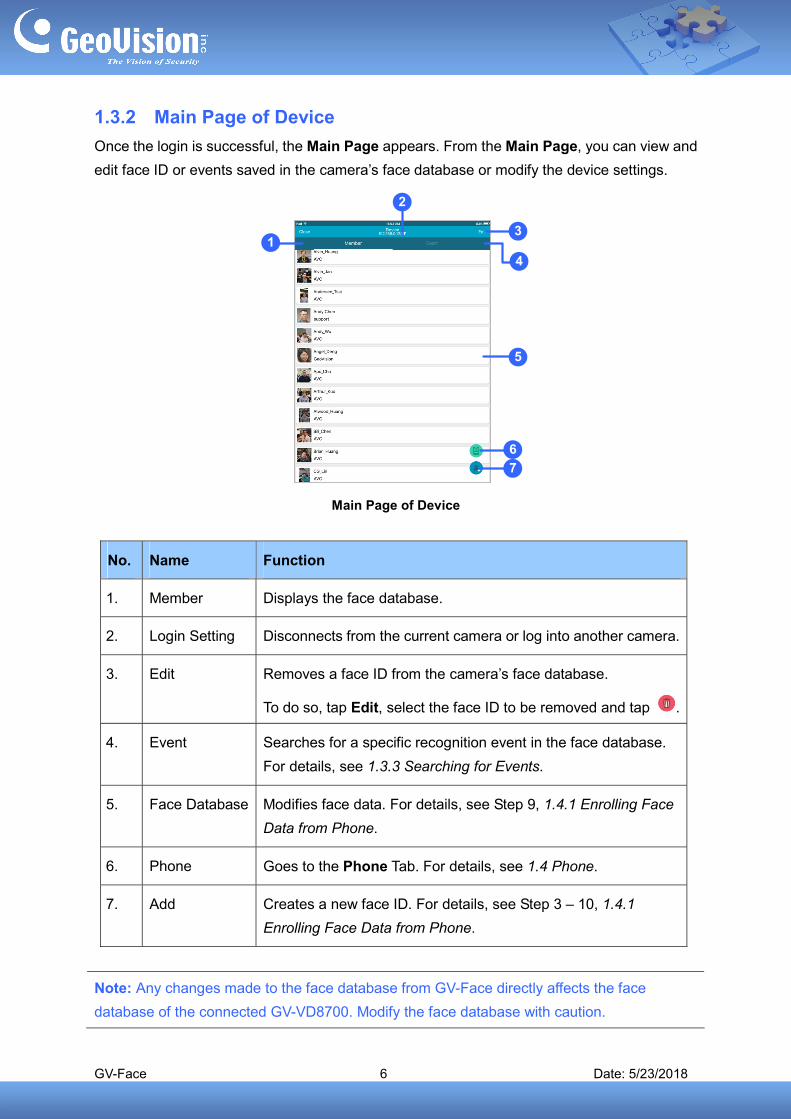
Once the login is successful, the Main Page appears. From the Main Page, you can view and
edit face ID or events saved in the camera’s face database or modify the device settings.
2
13
4
5
6
7
Main Page of Device
No. Name Function
1. Member Displays the face database.
2. Login Setting Disconnects from the current camera or log into another camera.
3. Edit Removes a face ID from the camera’s face database.
To do so, tap Edit, select the face ID to be removed and tap .
4. Event Searches for a specific recognition event in the face database.
For details, see 1.3.3 Searching for Events.
5. Face Database Modifies face data. For details, see Step 9, 1.4.1 Enrolling Face
Data from Phone.
6. Phone Goes to the Phone Tab. For details, see 1.4 Phone.
7. Add Creates a new face ID. For details, see Step 3 – 10, 1.4.1
Enrolling Face Data from Phone.
Note: Any changes made to the face database from GV-Face directly affects the face
database of the connected GV-VD8700. Modify the face database with caution.
GV-Face 7 Date: 5/23/2018
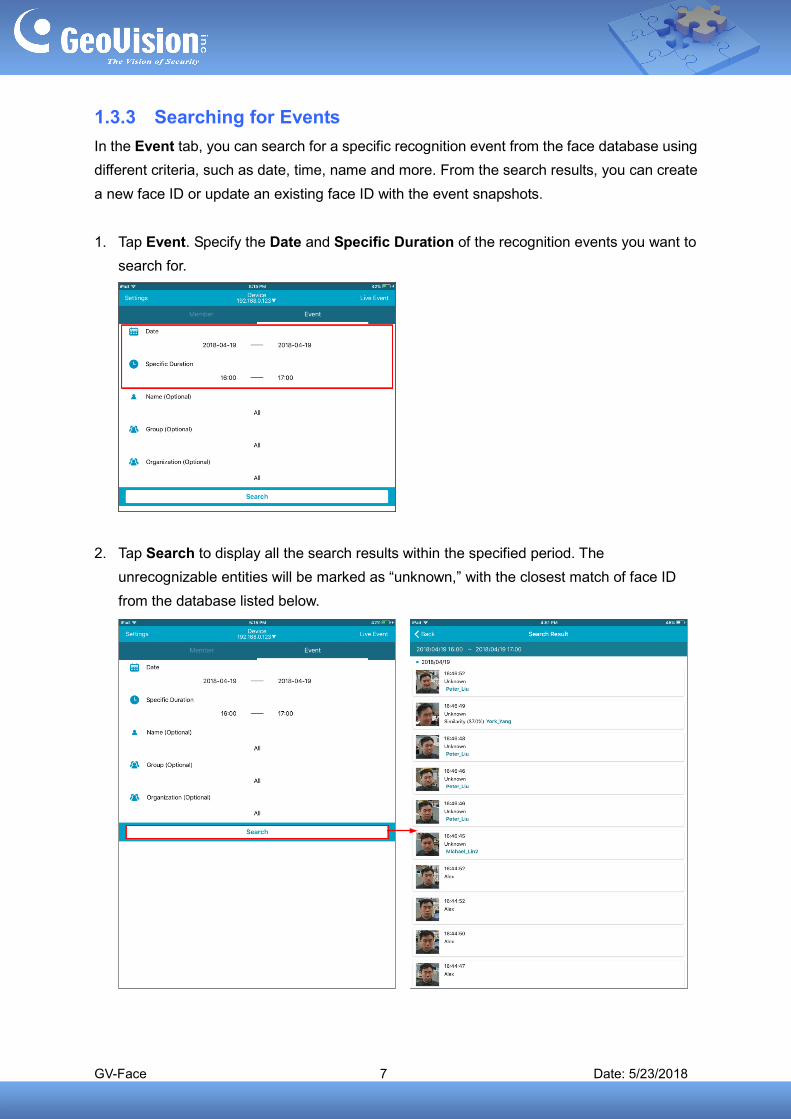
1.3.3 Searching for Events
In the Event tab, you can search for a specific recognition event from the face database using
different criteria, such as date, time, name and more. From the search results, you can create
a new face ID or update an existing face ID with the event snapshots.
1. Tap Event. Specify the Date and Specific Duration of the recognition events you want to
search for.
2. Tap Search to display all the search results within the specified period. The
unrecognizable entities will be marked as “unknown,” with the closest match of face ID
from the database listed below.
GV-Face 8 Date: 5/23/2018
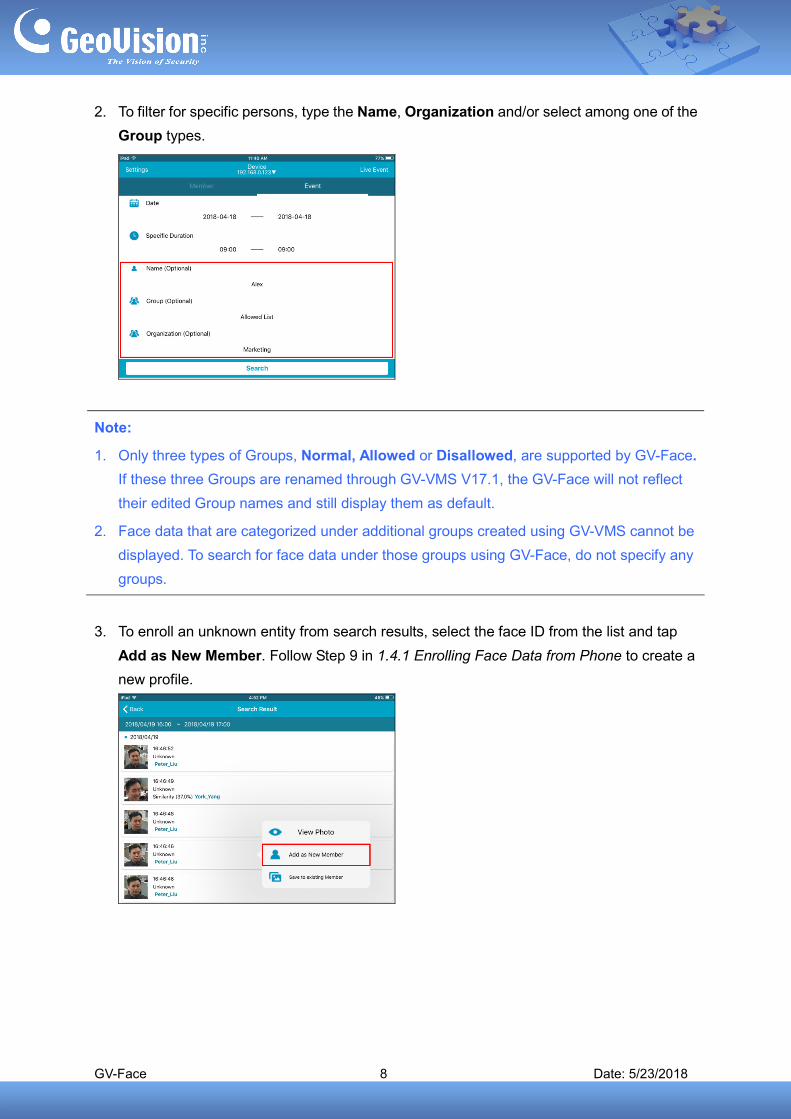
2. To filter for specific persons, type the Name, Organization and/or select among one of the
Group types.
Note:
1. Only three types of Groups, Normal, Allowed or Disallowed, are supported by GV-Face.
If these three Groups are renamed through GV-VMS V17.1, the GV-Face will not reflect
their edited Group names and still display them as default.
2. Face data that are categorized under additional groups created using GV-VMS cannot be
displayed. To search for face data under those groups using GV-Face, do not specify any
groups.
3. To enroll an unknown entity from search results, select the face ID from the list and tap
Add as New Member. Follow Step 9 in 1.4.1 Enrolling Face Data from Phone to create a
new profile.
GV-Face 9 Date: 5/23/2018
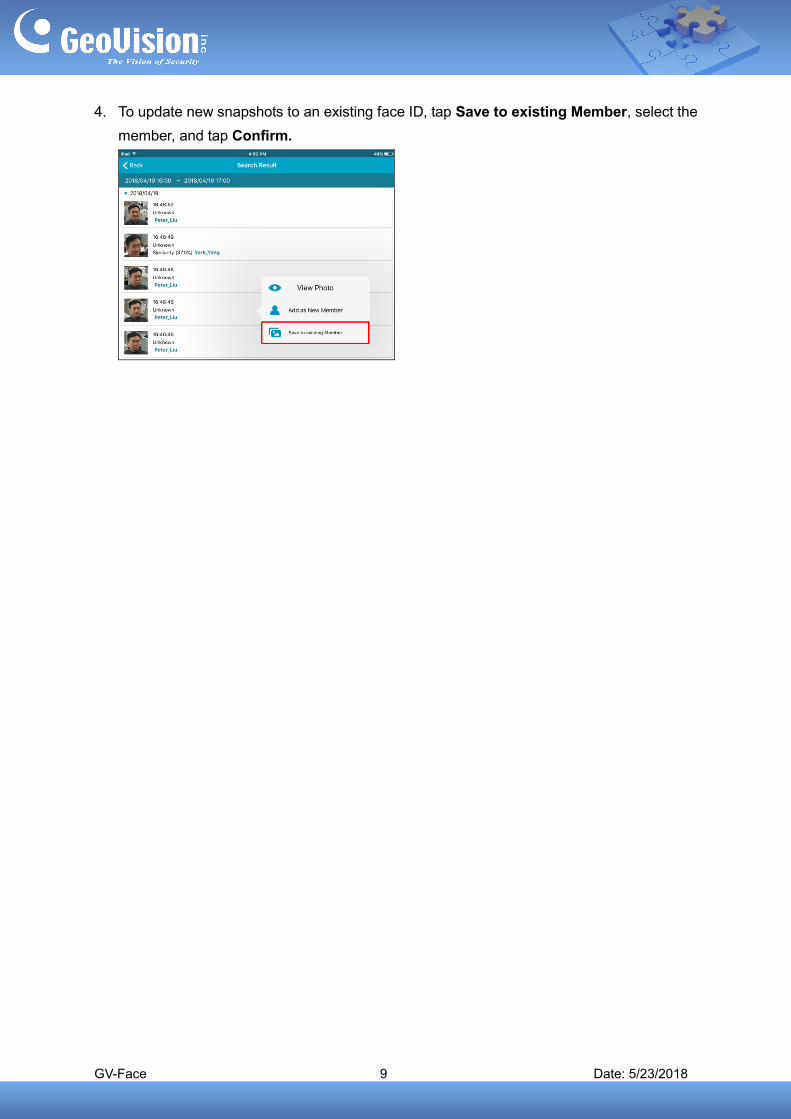
4. To update new snapshots to an existing face ID, tap Save to existing Member, select the
member, and tap Confirm.
GV-Face 10 Date: 5/23/2018
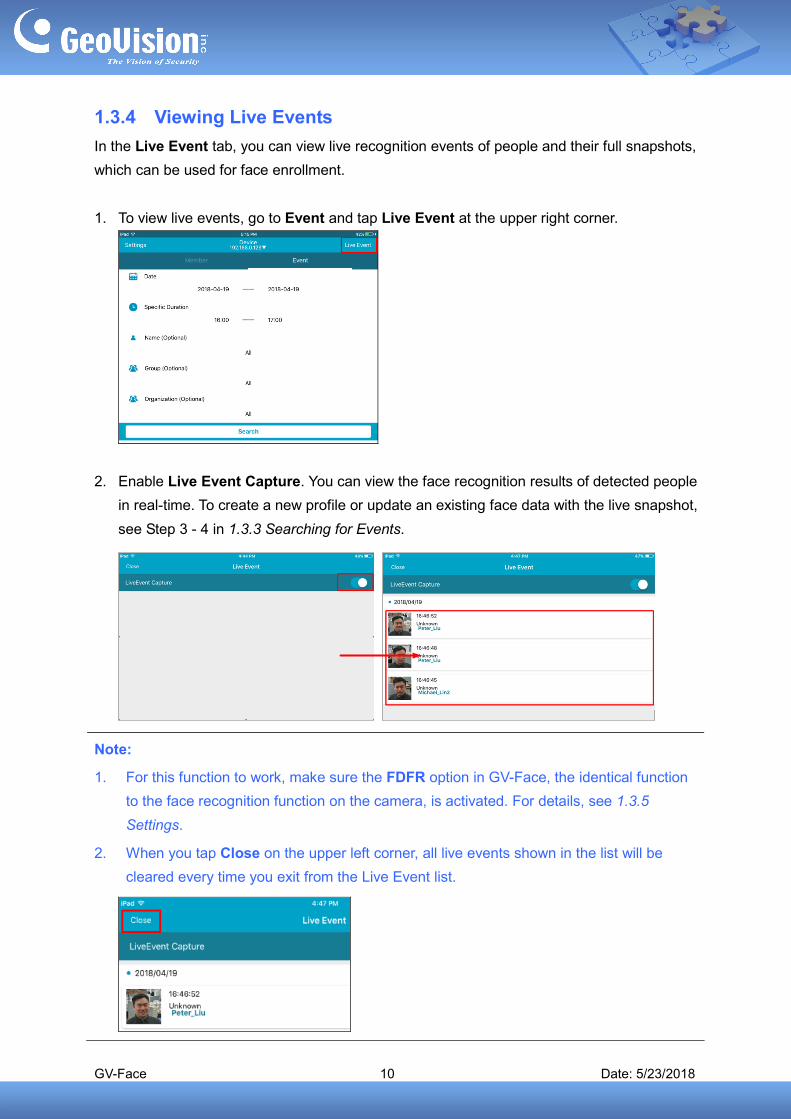
1.3.4 Viewing Live Events
In the Live Event tab, you can view live recognition events of people and their full snapshots,
which can be used for face enrollment.
1. To view live events, go to Event and tap Live Event at the upper right corner.
2. Enable Live Event Capture. You can view the face recognition results of detected people
in real-time. To create a new profile or update an existing face data with the live snapshot,
see Step 3 - 4 in 1.3.3 Searching for Events.
Note:
1. For this function to work, make sure the FDFR option in GV-Face, the identical function
to the face recognition function on the camera, is activated. For details, see 1.3.5
Settings.
2. When you tap Close on the upper left corner, all live events shown in the list will be
cleared every time you exit from the Live Event list.
GV-Face 11 Date: 5/23/2018
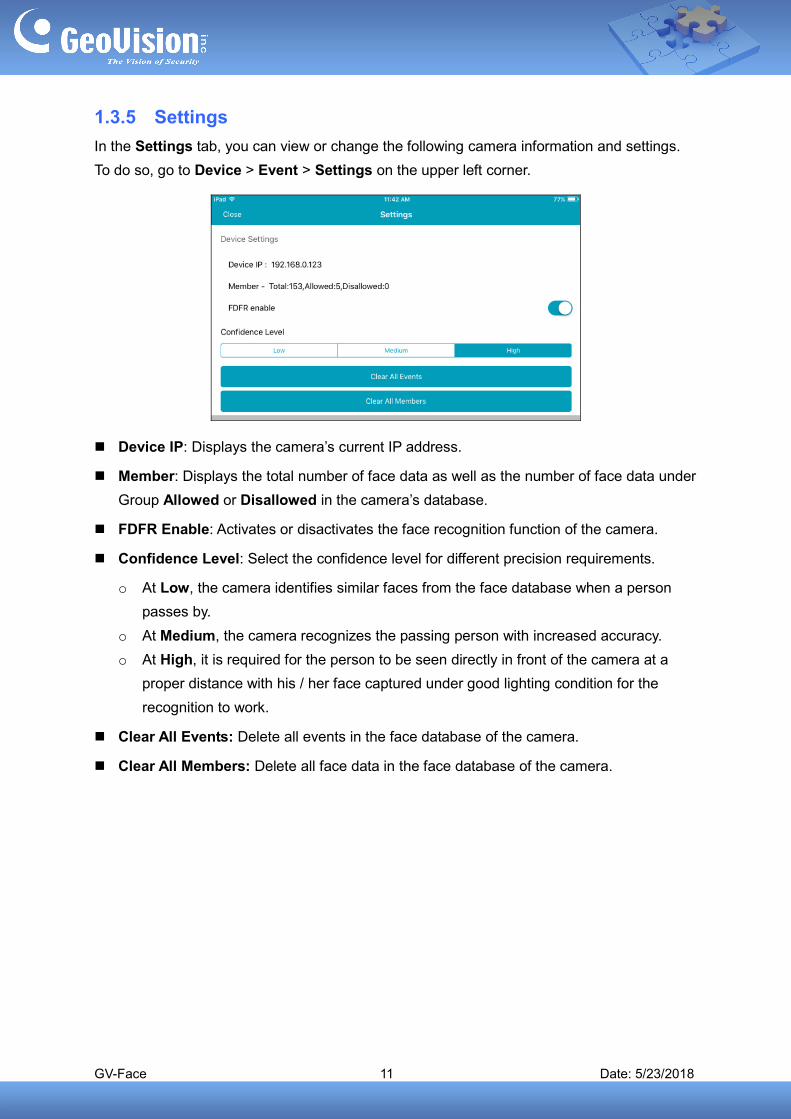
1.3.5 Settings
In the Settings tab, you can view or change the following camera information and settings.
To do so, go to Device > Event > Settings on the upper left corner.
Device IP: Displays the camera’s current IP address.
Member: Displays the total number of face data as well as the number of face data under
Group Allowed or Disallowed in the camera’s database.
FDFR Enable: Activates or disactivates the face recognition function of the camera.
Confidence Level: Select the confidence level for different precision requirements.
o At Low, the camera identifies similar faces from the face database when a person
passes by.
o At Medium, the camera recognizes the passing person with increased accuracy.
o At High, it is required for the person to be seen directly in front of the camera at a
proper distance with his / her face captured under good lighting condition for the
recognition to work.
Clear All Events: Delete all events in the face database of the camera.
Clear All Members: Delete all face data in the face database of the camera.
GV-Face 12 Date: 5/23/2018
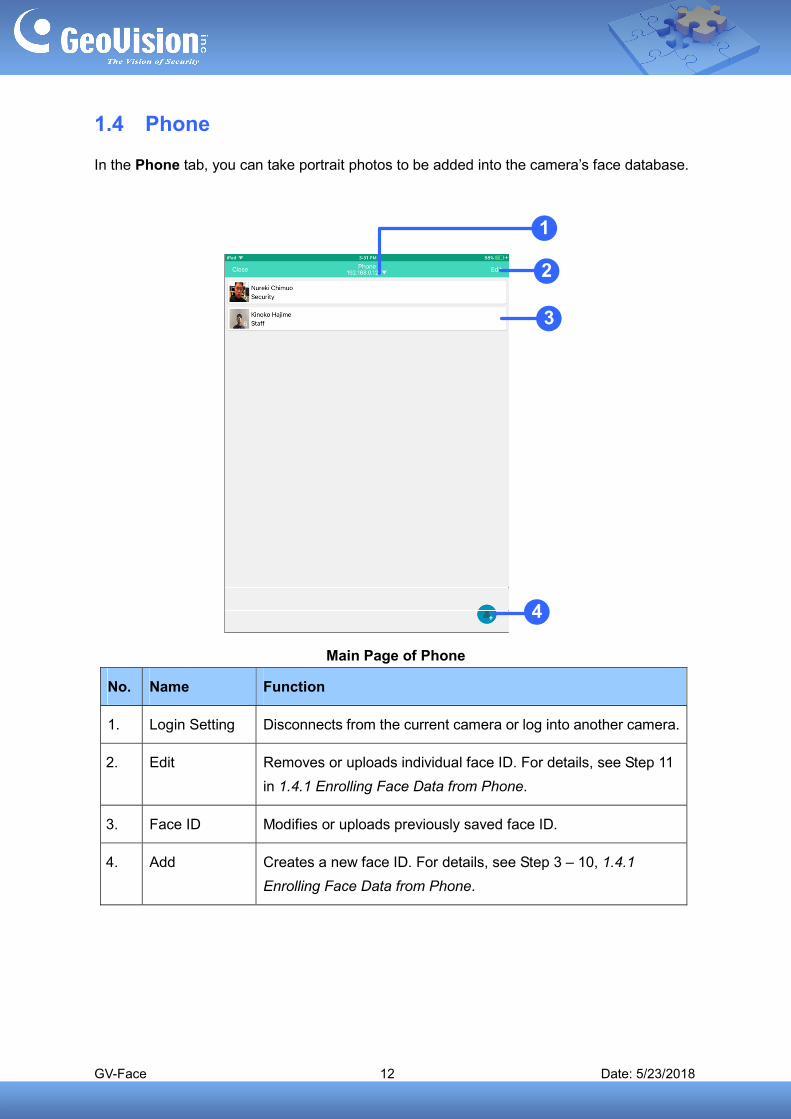
1.4 Phone
In the Phone tab, you can take portrait photos to be added into the camera’s face database.
1
2
3
4
Main Page of Phone
No. Name Function
1. Login Setting Disconnects from the current camera or log into another camera.
2. Edit Removes or uploads individual face ID. For details, see Step 11
in 1.4.1 Enrolling Face Data from Phone.
3. Face ID Modifies or uploads previously saved face ID.
4. Add Creates a new face ID. For details, see Step 3 – 10, 1.4.1
Enrolling Face Data from Phone.
GV-Face 13 Date: 5/23/2018
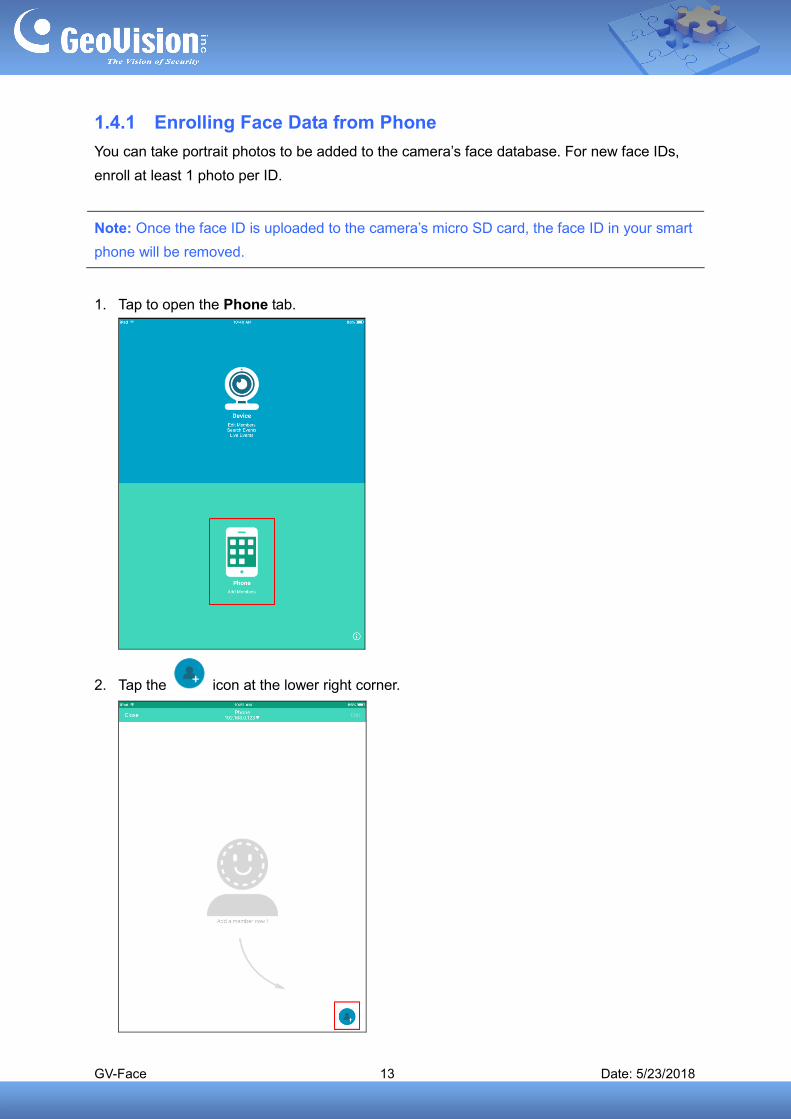
1.4.1 Enrolling Face Data from Phone You can take portrait photos to be added to the camera’s face database. For new face IDs,
enroll at least 1 photo per ID.
Note: Once the face ID is uploaded to the camera’s micro SD card, the face ID in your smart
phone will be removed.
1. Tap to open the Phone tab.
2. Tap the icon at the lower right corner.
GV-Face 14 Date: 5/23/2018
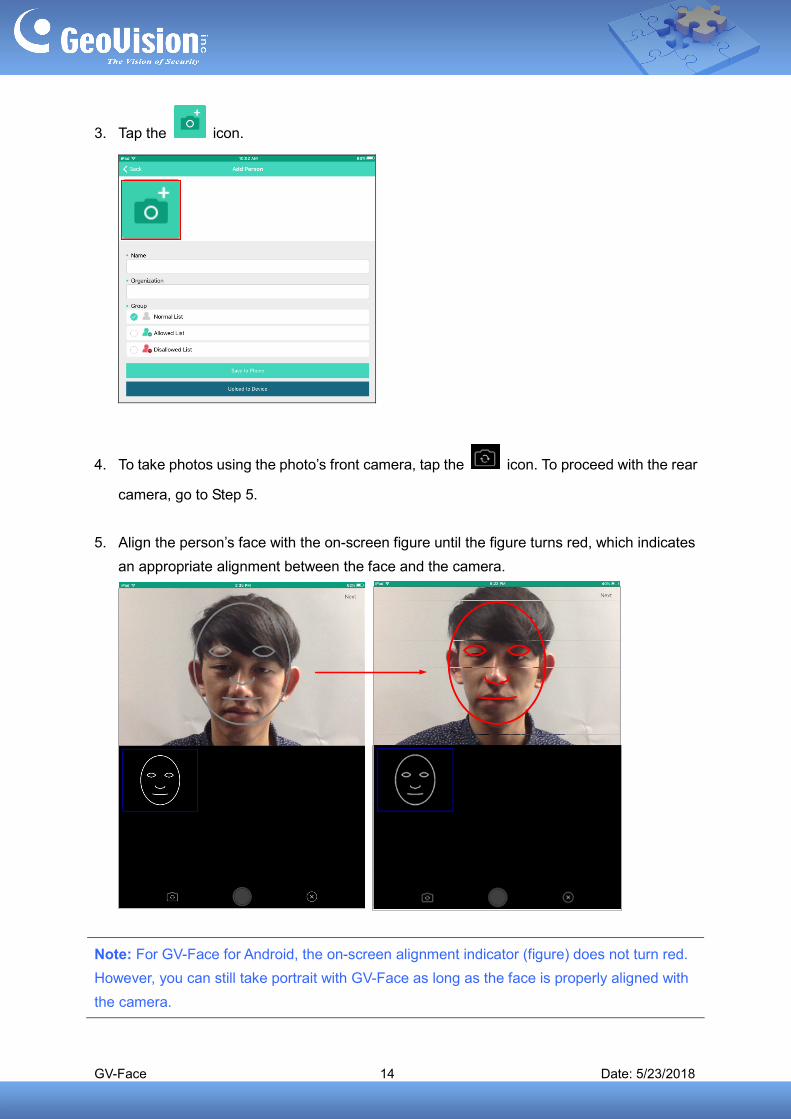
3. Tap the icon.
4. To take photos using the photo’s front camera, tap the icon. To proceed with the rear
camera, go to Step 5.
5. Align the person’s face with the on-screen figure until the figure turns red, which indicates
an appropriate alignment between the face and the camera.
Note: For GV-Face for Android, the on-screen alignment indicator (figure) does not turn red.
However, you can still take portrait with GV-Face as long as the face is properly aligned with
the camera.
GV-Face 15 Date: 5/23/2018
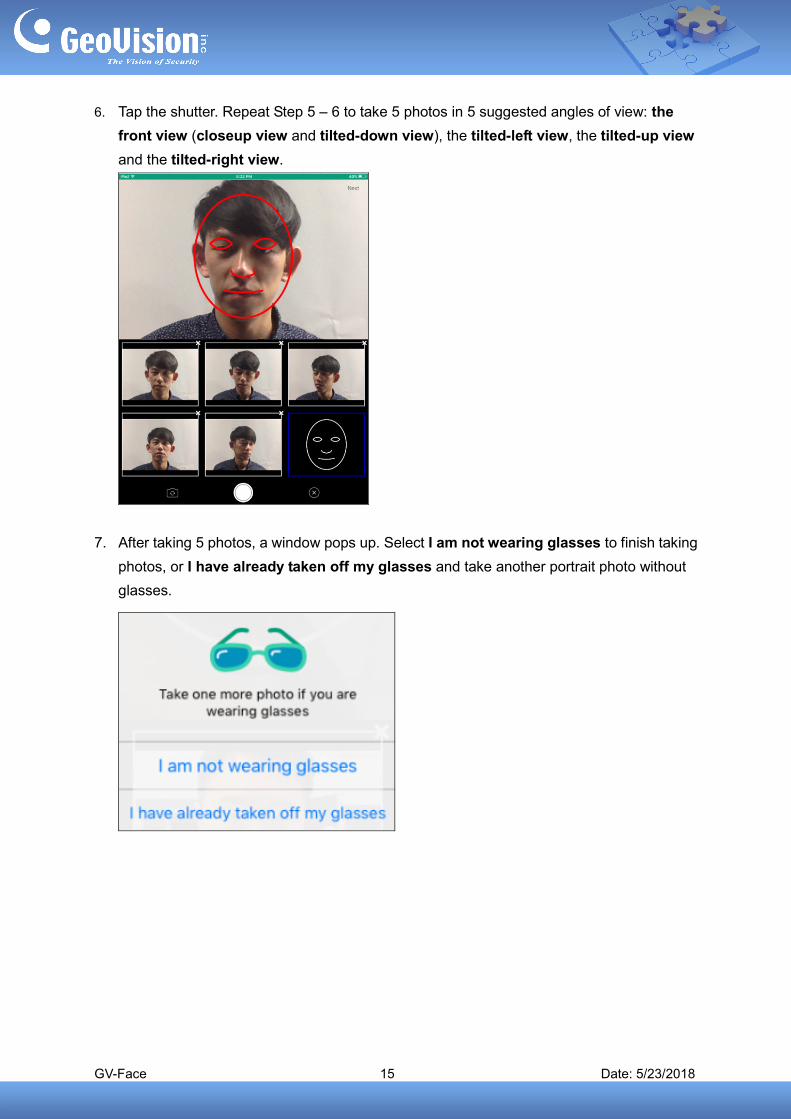
6. Tap the shutter. Repeat Step 5 – 6 to take 5 photos in 5 suggested angles of view: the
front view (closeup view and tilted-down view), the tilted-left view, the tilted-up view
and the tilted-right view.
7. After taking 5 photos, a window pops up. Select I am not wearing glasses to finish taking
photos, or I have already taken off my glasses and take another portrait photo without
glasses.

GV-Face 16 Date: 5/23/2018
8. Tap Next on the upper right corner.
9. Type the desired Name and Organization for the person and select a Group, from
Normal List, Allowed List or Disallowed List, under which the person shall be
categorized.
10. Tap Upload to Device. Or, optionally tap Save to Phone to save the face ID at the Phone
tab temporarily. To upload previously created face ID, tap Edit on the upper right corner,
select the face ID from the list and tap .