Embed Size (px)
Citation preview
313
Chapter 7: Historical and manual data entry Historical data is comprised of transactions that are dated before the first transaction downloaded for a bank account. You can only enter historical data for prior periods after the bank account has been attached to the client file.
Manual data is entered into manual bank accounts which you create to hold transactions for accounts that are not available as yet on the BankLink service. Transactions can be added for any date, and if the account becomes available for download the manual data can be combined with delivered transactions to allow full account history.
When you enter historical and manual data, you use windows similar to the Code Entries Screen. To make data entry faster, you have the option of adding ranges of blank cheques and functions allowing you to repeat information, or for historical data only, importing it from a .csv file.
Once you have entered historical or manual data, it forms part of the BankLink Practice client file and can be viewed in the Code Entries Screen as though it had been electronically downloaded.
An H appears on the status bar whenever an historic transaction is selected; an L denotes a manual transaction.
The toolbar buttons and right-click menus function in the same way as the Code Entries Screen, except for cheques (see Adding cheque ranges).
Only use Historical Data Entry to enter data from printed bank statements. Do not account for unpresented items or non-bank transactions using this function.
Once you have added the data, you can add unpresented items in the usual way.
BankLink Practice Guide for Australia
314
This Chapter covers:
Adding historical data
Importing historical data
Saving historical data
Deleting and editing historical data
Adding manual data
Saving manual data
Deleting and editing manual data
Adding cheque ranges
Checking the bank balance
Configuring columns for historical and manual data entry
Chapter 7: Historical and manual data entry
315
Adding historical data
To access the Historical Data Entry window:
1 Open the file to which you want to add historical data
2 Click Data Entry, Historical Entries
3 If the client file has more than one bank account BankLink Practice displays the Select Account to add Historical Transactions to window - select the required account and click OK
BankLink Practice displays the Add Historical Entries window
To enter an opening balance for the account:
1 Double click in the Opening Balance From Statement field and enter the opening balance from the bank statement on the date you will start to enter transactions
2 Click in the IF/OD field and select IF for In Funds or OD for Overdrawn
BankLink Practice prompts you to enter transactions up to, but excluding, the day the first transactions were electronically downloaded. You cannot enter transactions dated after this date in order to eliminate the possibility of duplicate entries.
To enter transactions:
1 Click in the Date field to commence entering transactions
2 Press the Enter key to move across the screen to edit each column
You can enter information in all columns or select specific columns to edit and view - see Configure columns in Chapter 3: Start coding.
To insert a line, press Shift+Insert or right click and select Insert a new line from the menu.
As each transaction is entered, the Calculated Closing Balance field is updated automatically. Once you have entered an initial opening balance the amount in the Calculated Closing Balance field can be compared with the bank statement to ensure that you are entering correct amounts.
This balance acts only as a control total to ensure the data has been keyed correctly. It does not affect the balance stored in the client file for the account.
BankLink Practice Guide for Australia
316
Adding Historical Entries columns
Date
The effective date of the transaction.
Reference
The cheque number if the transaction is a cheque.
Account
Accounts code allocated to this transaction. You can manually enter an account code or use BankLink Practice’s look up options to code the transaction. Click the Chart button (F2) to look up the chart of accounts. You can choose to leave this field blank and code the transaction once the entries have been transferred to the Code Entries window.
Amount
Enter the monetary amount of the transaction as processed by the bank. Enter a minus sign (-) to show the correct sign on deposits.
Narration
Enter the narration from the statement or enter the information you want to see for the transaction - if you code by payee (see below) the payee name replaces the narration
Payee
Enter the payee number or press F3 to select from the payee list.
Payees with Superfund details should not be used with Manual (or Historic) Data Entry as Superfund details cannot be added into these windows. The payees can be used to code transactions once they have been saved, and are displayed, in the Code Entries Screen.
GST
GST ID associated with the account code. BankLink Practice automatically enters the default GST class assigned to the account code when you code a transaction. You can choose to override the GST ID. Press the F7 key to look up the GST classes.
GST Amount
GST value of the coded transaction, calculated using the rate defined by the GST class, which is attached to each account code.
Quantity
The number of units related to this transaction. The quantity has the same sign as the transaction amount. BankLink Practice anticipates this and enters a minus sign (-) for you if the transaction amount is a credit. This may be used to enter livestock quantities.

Chapter 7: Historical and manual data entry
317
Entry Type
BankLink Practice assigns an entry type of Deposit, Withdrawal or Cheque depending on the contents of the Reference field and the sign on the amount.
Importing Transactions
You can also import transactions from a .csv file - see Importing historical data for more information.

BankLink Practice Guide for Australia
318
Importing historical data
When you sign a client up to the BankLink Service part-way through the year, there may be quite a number of earlier transactions to add to their account. Rather than entering them manually, you can import .csv files.
Typically these files are downloaded by your client from an internet banking service - how much data is available varies depending on the bank. When downloading, your client needs to select the .csv format.
You import the .csv files via the Add Historical Entries window, so there is an opportunity to review the transactions before posting them to the Code Entries Screen.
Historical data can be added to a client file only once the first download of data has been received, and only up until the day before the first transaction supplied through The BankLink Service. This means it can be added to the correct bank account, and there will be no overlapping transaction dates.
To import historical entries:
1 Open the file to which you want to import historical data
2 Click Data Entry, Historical Entries
3 If the client file has more than one bank account BankLink Practice displays the Select Account to add Historical Transactions to window - select the required account and click OK
BankLink Practice displays the Add Historical Entries window
4 Click Import Transactions
BankLink Practice displays the Import Historical Transactions into Bank Account window
5 Click the Browse button next to the Import File field to locate the file you want to import
BankLink Practice displays the Open window
6 Click to select the file
Chapter 7: Historical and manual data entry
319
7 Click Open
BankLink Practice carries out the following actions:
displays the file name in the Import File field
previews the transactions in the top half of the window
scans for a header line
if the file contains other lines before the header line with account number, name, date etc., skips those lines
places a tick in the Next line is header line checkbox when it has set the number of lines to skip
8 If necessary, you can change the number of lines to skip - use the arrows or enter a number in the Skip lines field
9 If the transactions are not correctly displayed you can choose a different Delimiter from the drop-down list - a comma, a semi-colon or a tab
In the bottom half of the window BankLink Practice displays the following tabs - Date, Amount, Reference, Narration - these correspond to the fields that will be imported
10 Click each of the tabs in turn to confirm that the columns BankLink Practice has assigned to the fields are correct, and choose columns for any that have not been assigned
BankLink Practice Guide for Australia
320
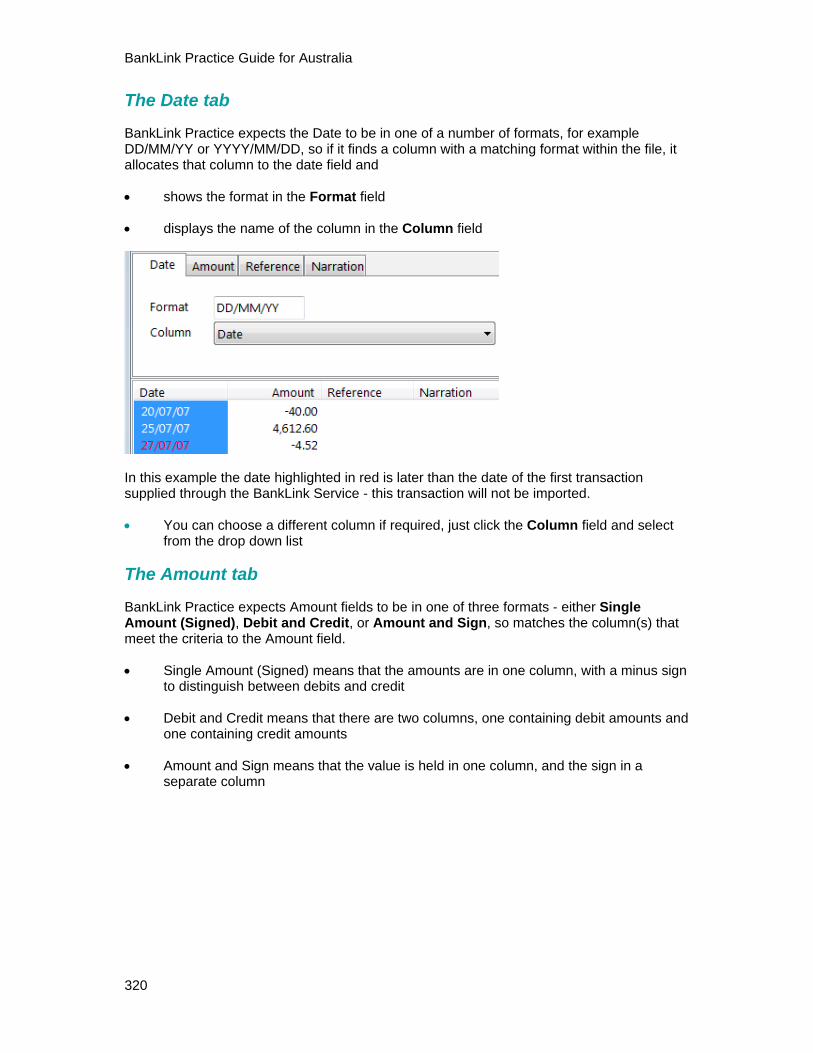
The Date tab
BankLink Practice expects the Date to be in one of a number of formats, for example DD/MM/YY or YYYY/MM/DD, so if it finds a column with a matching format within the file, it allocates that column to the date field and
shows the format in the Format field
displays the name of the column in the Column field
In this example the date highlighted in red is later than the date of the first transaction supplied through the BankLink Service - this transaction will not be imported.
You can choose a different column if required, just click the Column field and select from the drop down list
The Amount tab
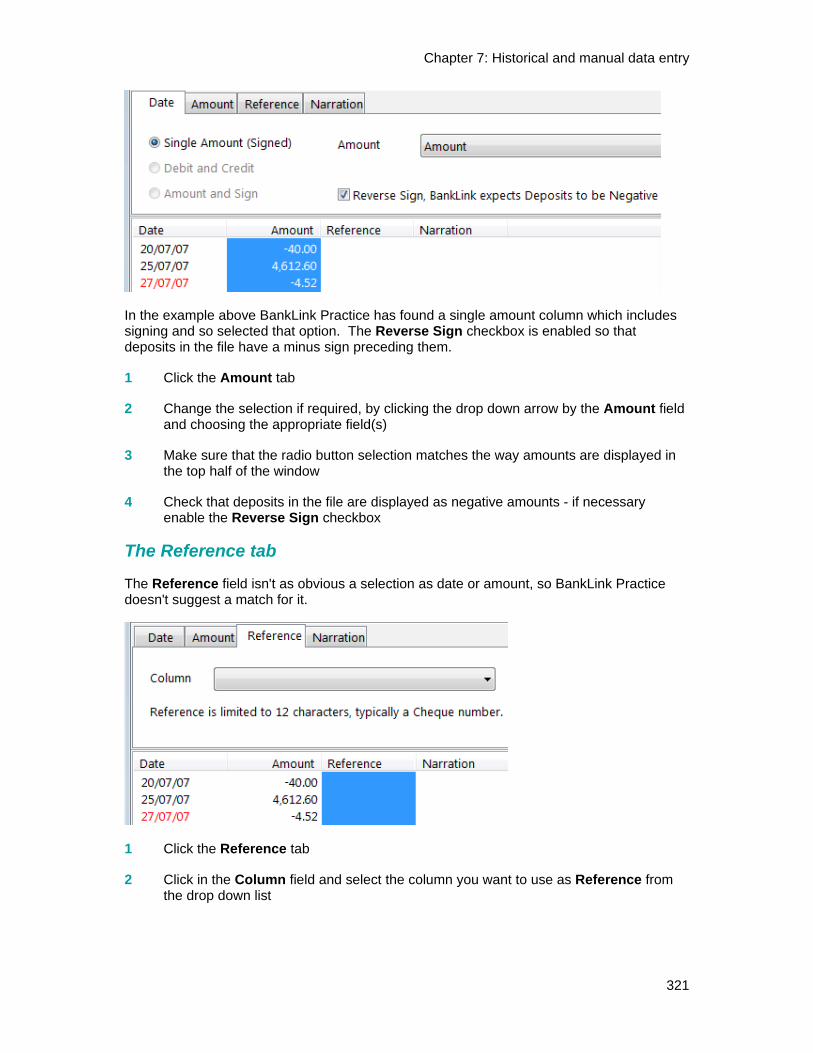
BankLink Practice expects Amount fields to be in one of three formats - either Single Amount (Signed), Debit and Credit, or Amount and Sign, so matches the column(s) that meet the criteria to the Amount field.
Single Amount (Signed) means that the amounts are in one column, with a minus sign to distinguish between debits and credit
Debit and Credit means that there are two columns, one containing debit amounts and one containing credit amounts
Amount and Sign means that the value is held in one column, and the sign in a separate column
Chapter 7: Historical and manual data entry
321
In the example above BankLink Practice has found a single amount column which includes signing and so selected that option. The Reverse Sign checkbox is enabled so that deposits in the file have a minus sign preceding them.
1 Click the Amount tab
2 Change the selection if required, by clicking the drop down arrow by the Amount field and choosing the appropriate field(s)
3 Make sure that the radio button selection matches the way amounts are displayed in the top half of the window
4 Check that deposits in the file are displayed as negative amounts - if necessary enable the Reverse Sign checkbox
The Reference tab
The Reference field isn't as obvious a selection as date or amount, so BankLink Practice doesn't suggest a match for it.
1 Click the Reference tab
2 Click in the Column field and select the column you want to use as Reference from the drop down list
BankLink Practice Guide for Australia
322
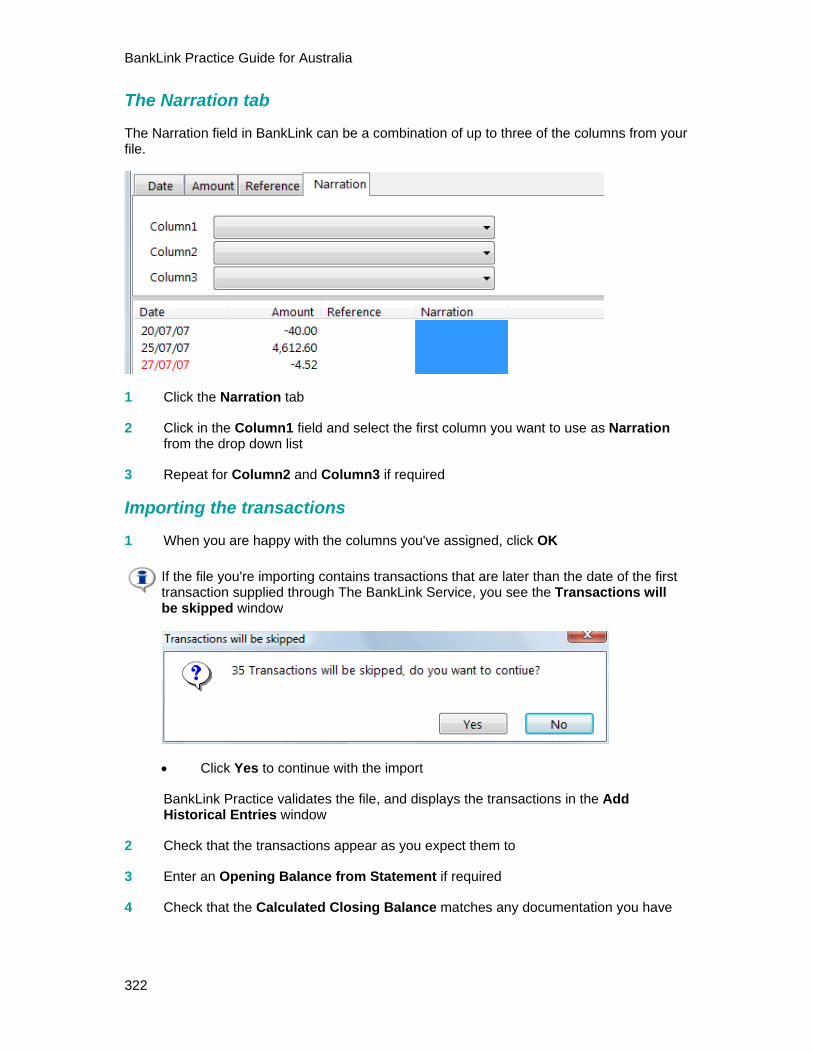
The Narration tab
The Narration field in BankLink can be a combination of up to three of the columns from your file.
1 Click the Narration tab
2 Click in the Column1 field and select the first column you want to use as Narration from the drop down list
3 Repeat for Column2 and Column3 if required
Importing the transactions
1 When you are happy with the columns you've assigned, click OK
If the file you're importing contains transactions that are later than the date of the first transaction supplied through The BankLink Service, you see the Transactions will be skipped window
Click Yes to continue with the import
BankLink Practice validates the file, and displays the transactions in the Add Historical Entries window
2 Check that the transactions appear as you expect them to
3 Enter an Opening Balance from Statement if required
4 Check that the Calculated Closing Balance matches any documentation you have

Chapter 7: Historical and manual data entry
323
5 Click Post
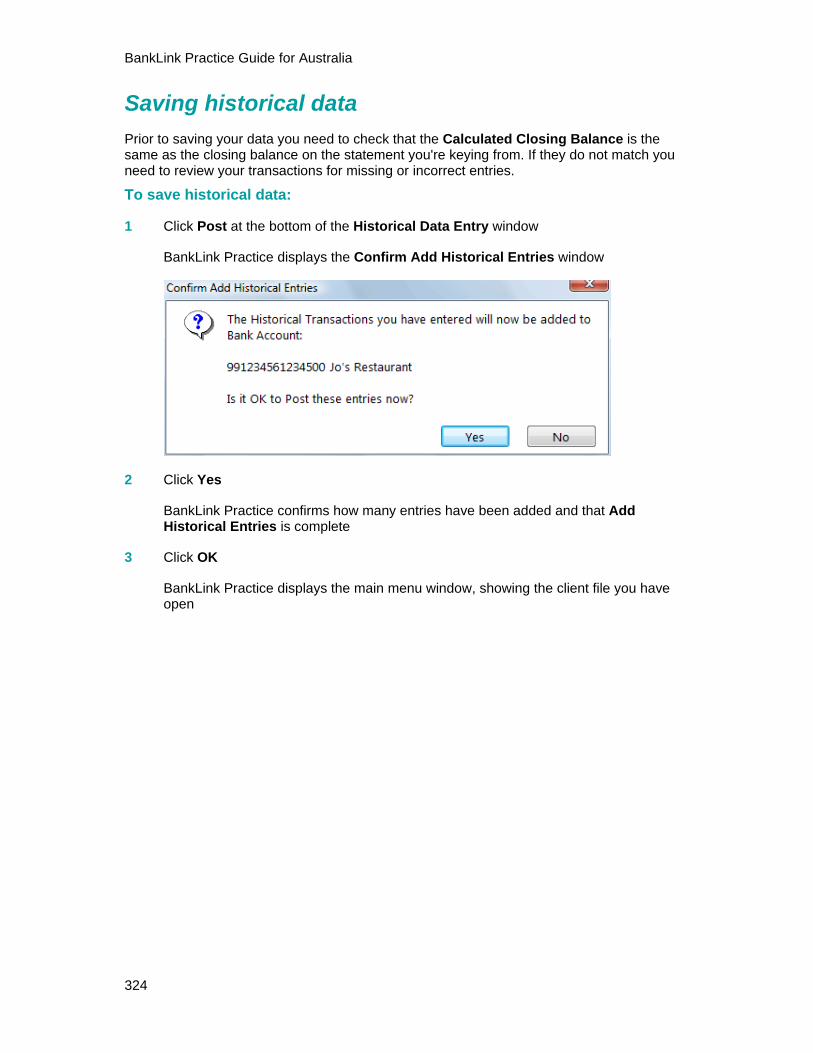
BankLink Practice displays the Confirm Add Historical Entries window
6 Click Yes
BankLink Practice displays an Information window, telling you how many entries have been added
7 Click OK
BankLink Practice Guide for Australia
324
Saving historical data
Prior to saving your data you need to check that the Calculated Closing Balance is the same as the closing balance on the statement you're keying from. If they do not match you need to review your transactions for missing or incorrect entries.
To save historical data:
1 Click Post at the bottom of the Historical Data Entry window
BankLink Practice displays the Confirm Add Historical Entries window
2 Click Yes
BankLink Practice confirms how many entries have been added and that Add Historical Entries is complete
3 Click OK
BankLink Practice displays the main menu window, showing the client file you have open
Chapter 7: Historical and manual data entry
325
4 Click File, Save
BankLink Practice automatically prompts you to save after 100 historical entries are added:
1 Click OK
2 Exit the Historical Data Entry window using the above steps
3 Click File, Save to save the client file
BankLink Practice also saves the data automatically via the auto-save feature. On installation, the auto-save period is set to 5 minutes, but an Administrator can change this.
Only use Historical Data Entry to enter data from printed bank statements. Do not account for unpresented items or non-bank transactions using this function.
If the bank account balance differs when all transactions are correctly entered you may need to edit the account balance - see Chapter 2: Clients, charts of accounts, and bank accounts, Editing bank account details for information on how to do this.
Once historical data has been added to the bank account you can then account for any unpresented items in the Code Entries Screen using the same methods used for downloaded transactions.

BankLink Practice Guide for Australia
326
Deleting and editing historical data
Once you have saved historical data, BankLink Practice displays it in the Code Entries Screen. Unlike downloaded transactions, you are able to delete or edit the amount of an historical entry. Historical entries are identified by an H in the Code Entries Screen status bar when you select them.
To delete historical entries:
1 In the Code Entries Screen, click on the transaction you want to delete (it must have an H indicator on the status bar)
2 Press the control and delete keys together (Ctrl+Delete)
BankLink Practice displays the Delete Entry? window
3 Click Yes to delete the entry
To edit the date of historical entries:
1 In the Code Entries Screen, click in the Date field of the transaction you want to edit the date for (it must have an H indicator on the status bar)
2 Ensure that you are in All Editable Columns mode - see Edit all columns facility for more information
If you cannot edit the date of an historical entry, you may need to configure the Code Entries Screen so that the Effective Date column is editable - see Configure columns for more information.
3 Change the date as required
Chapter 7: Historical and manual data entry
327
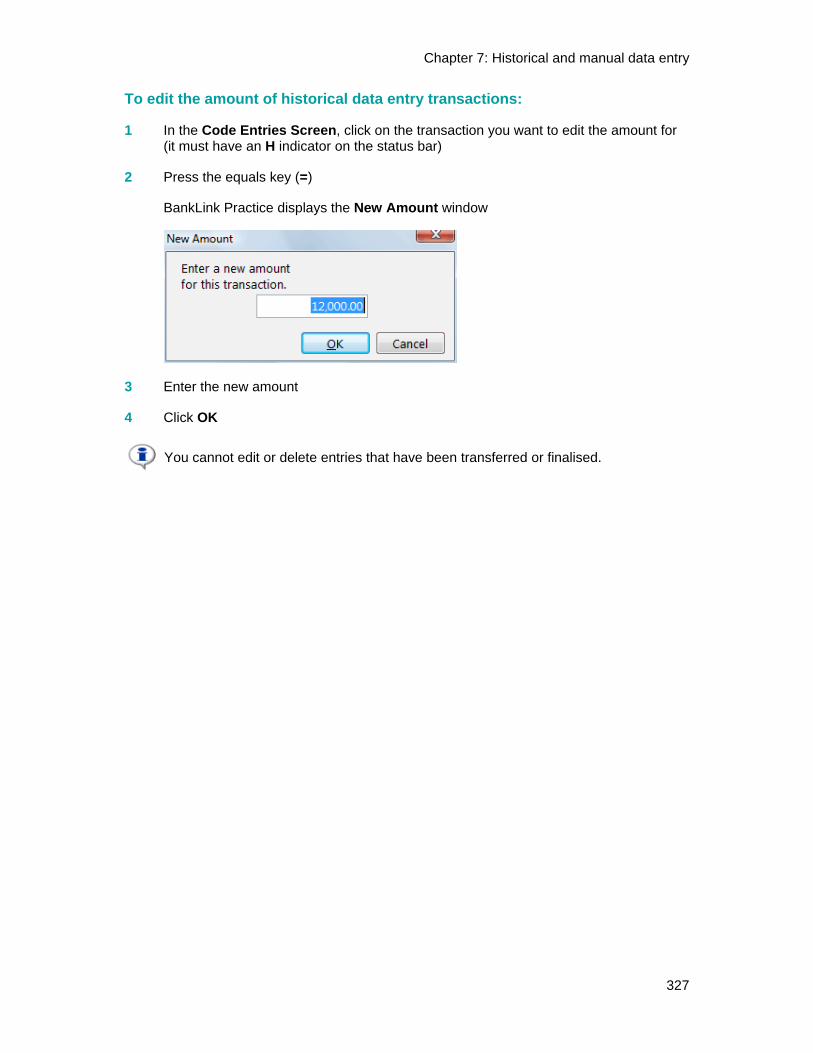
To edit the amount of historical data entry transactions:
1 In the Code Entries Screen, click on the transaction you want to edit the amount for (it must have an H indicator on the status bar)
2 Press the equals key (=)
BankLink Practice displays the New Amount window
3 Enter the new amount
4 Click OK
You cannot edit or delete entries that have been transferred or finalised.
BankLink Practice Guide for Australia
328
Adding manual data
To access the Add Manual Entries window:
1 Open the file to which you want to add historical data
2 Click Data Entry, Manual Entries
3 If the client file has more than one manual bank account BankLink Practice displays the Select Account to add Manual Transactions to window - select the required account
BankLink Practice displays the Add Manual Entries window
To enter an opening balance for the account:
1 Double click in the Opening Balance from Statement field and enter the opening balance from the bank statement on the date you will start to enter transactions
2 Click in the IF/OD field and select IF for In Funds or OD for Overdrawn
To enter transactions:
1 Click in the Date field to commence entering transactions
2 Press the Enter key to move across the screen to edit each column
You can enter information in all columns or select specific columns to edit and view - see Configuring Columns for historical and manual data entry.
To insert a line, press Shift+Insert or right click and select Insert a new line from the menu.
As each transaction is entered, the Calculated Closing Balance for MDE field is updated automatically. Once you have entered an initial opening balance the amount in the Calculated Closing Balance for MDE field can be compared with the bank statement to ensure that you are entering correct amounts.
This balance acts only as a control total to ensure the data has been keyed correctly. It does not affect the balance stored in the client file for the account.
Chapter 7: Historical and manual data entry
329
Adding Manual Entries columns:
Date The effective date of the transaction
Reference The cheque number if the transaction is a cheque
Account Accounts code allocated to this transaction. You can manually enter an account code or use BankLink Practice’s look up options to code the transaction. Click the Chart button (F2) to look up the chart of accounts. You can choose to leave this field blank and code the transaction once the entries have been transferred to the Code Entries Screen
Amount Enter the monetary amount of the transaction as processed by the bank. Enter a minus sign (-) to show the correct sign on deposits
Narration Enter the narration from the statement or enter the information you want to see for the transaction - if you code by payee (see below) the payee name replaces the narration
Payee Enter the payee number or press F3 to select from the payee list
Payees with Superfund details should not be used with Manual (or Historic) Data Entry as Superfund details cannot be added into these windows. The payees can be used to code transactions once they have been saved, and are displayed, in the Code Entries Screen.
GST GST ID associated with the account code. BankLink Practice automatically enters the default GST class assigned to the account code when you code a transaction. You can choose to override the GST ID. Press the F7 key to look up the GST classes
GST Amount
GST value of the coded transaction, calculated using the rate defined by the GST class, which is attached to each account code
Quantity The number of units related to this transaction. The quantity has the same sign as the transaction amount. BankLink Practice anticipates this and enters a minus sign (-) for you if the transaction amount is a credit. This may be used to enter livestock quantities
Entry Type
BankLink Practice assigns an entry type of Deposit, Withdrawal or Cheque depending on the contents of the Reference field and the sign on the amount
BankLink Practice Guide for Australia
330
Saving manual data
Prior to saving your data you can check that the Calculated Closing Balance is the same as the closing balance on the statement you're keying from. If they do not match you need to review your transactions for missing or incorrect entries.
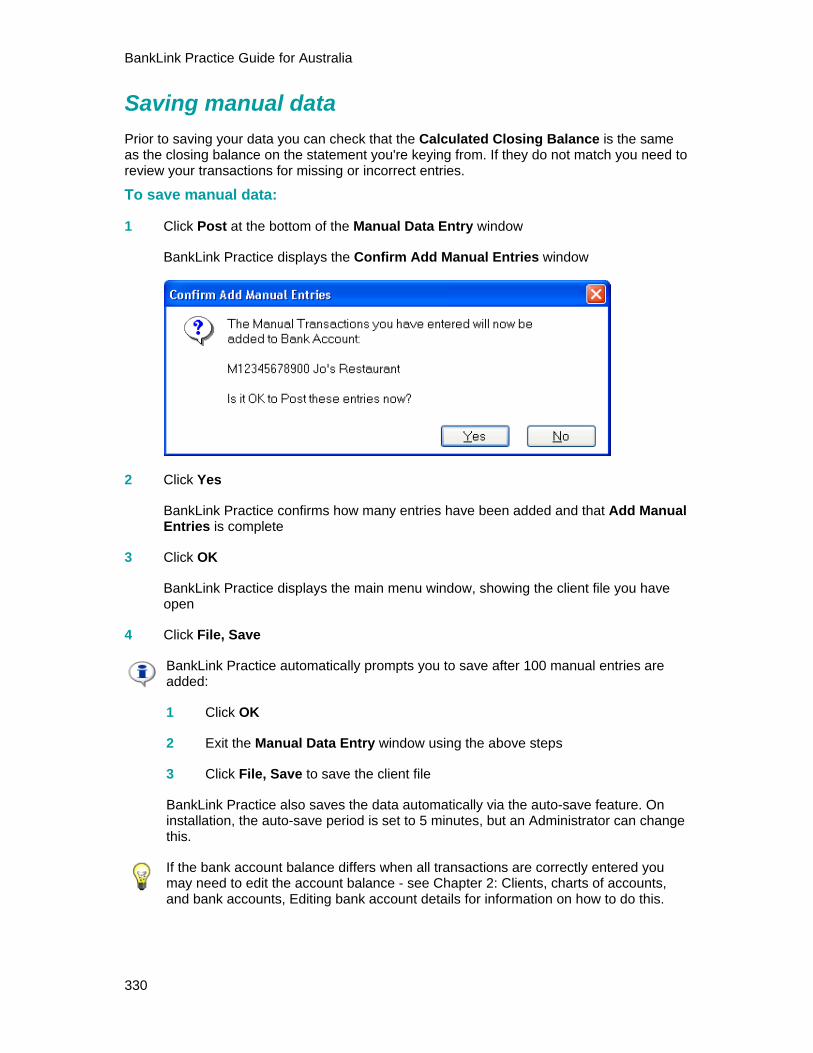
To save manual data:
1 Click Post at the bottom of the Manual Data Entry window
BankLink Practice displays the Confirm Add Manual Entries window
2 Click Yes
BankLink Practice confirms how many entries have been added and that Add Manual Entries is complete
3 Click OK
BankLink Practice displays the main menu window, showing the client file you have open
4 Click File, Save
BankLink Practice automatically prompts you to save after 100 manual entries are added:
1 Click OK
2 Exit the Manual Data Entry window using the above steps
3 Click File, Save to save the client file
BankLink Practice also saves the data automatically via the auto-save feature. On installation, the auto-save period is set to 5 minutes, but an Administrator can change this.
If the bank account balance differs when all transactions are correctly entered you may need to edit the account balance - see Chapter 2: Clients, charts of accounts, and bank accounts, Editing bank account details for information on how to do this.
Chapter 7: Historical and manual data entry
331
Deleting and editing manual data
Once you have saved manual data, it forms part of the Code Entries Screen. Unlike downloaded transactions, you are able to delete or edit the amount of a manual entry. Manual entries are identified by an L in the Code Entries Screen status bar when you select them.
To delete manual data entry transactions:
1 In the Code Entries Screen, click on the transaction you want to delete (it must have an L indicator on the status bar)
2 Press the control and delete keys together (Ctrl+Delete)
BankLink Practice displays the Delete Entry? window
3 Click Yes to delete the entry
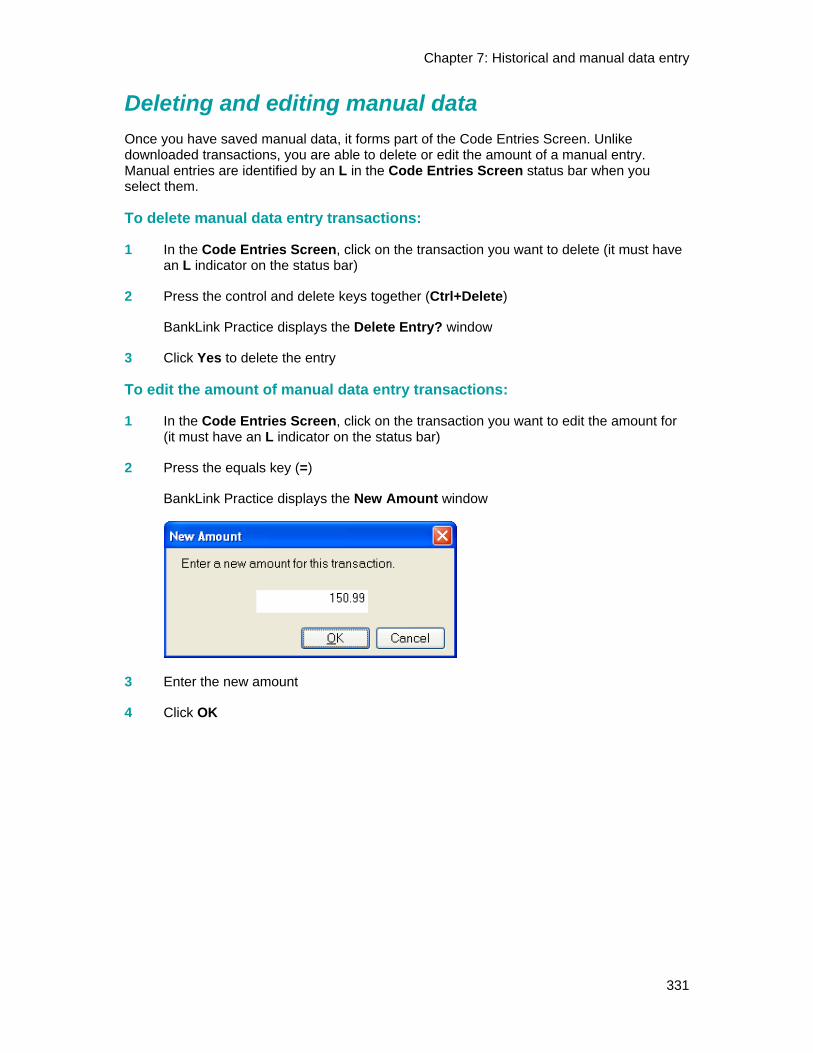
To edit the amount of manual data entry transactions:
1 In the Code Entries Screen, click on the transaction you want to edit the amount for (it must have an L indicator on the status bar)
2 Press the equals key (=)
BankLink Practice displays the New Amount window
3 Enter the new amount
4 Click OK

BankLink Practice Guide for Australia
332
To edit manual data entry transactions:
1 In the Code Entries Screen, click on the transaction you want to edit the amount for (it must have an L indicator on the status bar)
2 Make sure that you can edit all columns - see Chapter 3 - Start coding for more information
3 Change the information as required
BankLink Practice saves the data when you exit the client file
You cannot edit or delete entries that have been transferred or finalised.
Chapter 7: Historical and manual data entry
333
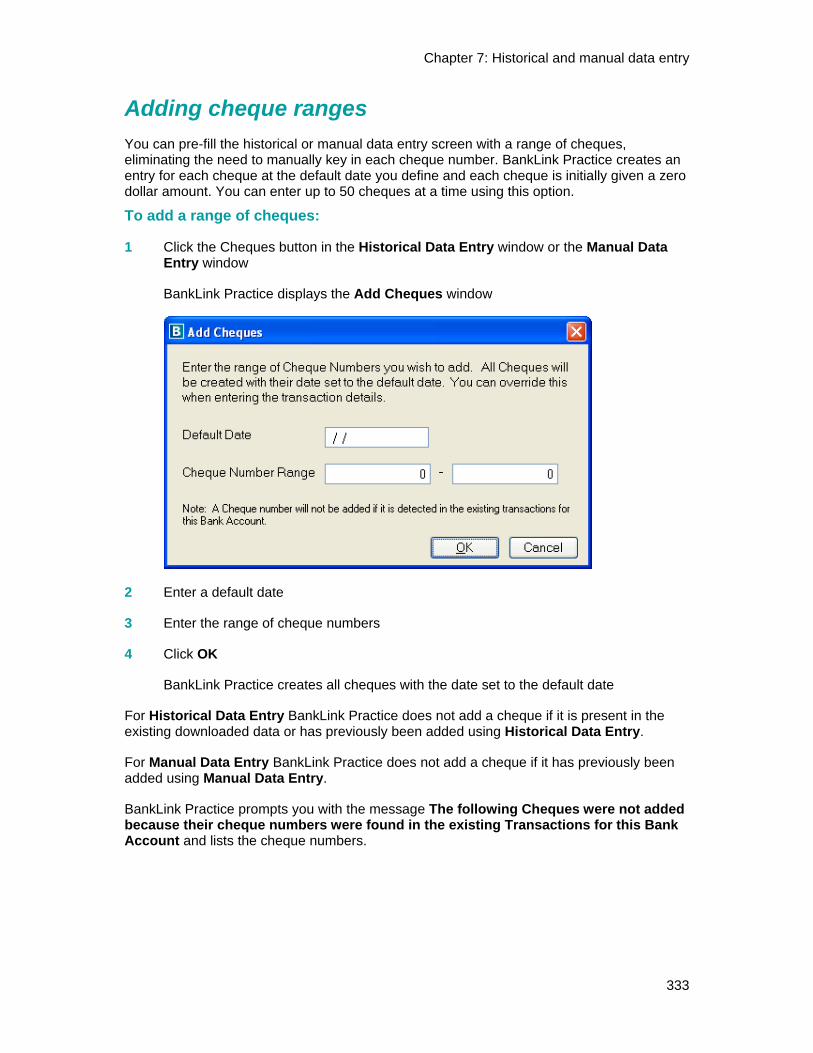
Adding cheque ranges
You can pre-fill the historical or manual data entry screen with a range of cheques, eliminating the need to manually key in each cheque number. BankLink Practice creates an entry for each cheque at the default date you define and each cheque is initially given a zero dollar amount. You can enter up to 50 cheques at a time using this option.
To add a range of cheques:
1 Click the Cheques button in the Historical Data Entry window or the Manual Data Entry window
BankLink Practice displays the Add Cheques window
2 Enter a default date
3 Enter the range of cheque numbers
4 Click OK
BankLink Practice creates all cheques with the date set to the default date
For Historical Data Entry BankLink Practice does not add a cheque if it is present in the existing downloaded data or has previously been added using Historical Data Entry.
For Manual Data Entry BankLink Practice does not add a cheque if it has previously been added using Manual Data Entry.
BankLink Practice prompts you with the message The following Cheques were not added because their cheque numbers were found in the existing Transactions for this Bank Account and lists the cheque numbers.
BankLink Practice Guide for Australia
334
Checking the bank balance
Once you have added historical or manual transactions, you can ensure that the bank balance in BankLink Practice matches the bank balance on the printed bank statement.
To check the bank balance:
1 Select Reports, Bank Reconciliation, Summarised
2 Enter From and To dates that include all data
3 If the bank balance on the report does not match the balance on the printed copy of the bank statement, you need to review your historical or manual transactions for missing or incorrect entries
If the balance differs when all transactions are correctly entered you may need to edit the account balance - see Chapter 2: Clients, charts of accounts, and bank accounts, Editing bank account details for information on how to do this.
Chapter 7: Historical and manual data entry
335
Configuring columns for historical and manual data entry
You can configure the columns for historical and manual data entry, changing the order or hiding those you don't want to enter data into, and BankLink remembers each of the settings for the next time you enter data. You can also restore the defaults if required.
To configure columns in the Add Historical Entries and Add Manual Entries windows:
1 Right click in the data entry area and select Configure Columns
BankLink Practice displays the Configure Columns window
2 Click on the Configure tab if not already displayed
E next to a column description means that it is possible to edit this column
V next to a column means that it is possible to view this column
3 When an E or V is greyed out it cannot be altered
4 Click on the E next to a column description and the E disappears - this means that this column cannot be edited
5 Click on the V next to a column description to remove it - this means that this column is no longer visible
6 Click on a column description to highlight it and click the Move Up button to move that column further to the left or the Move Down button to move that column further to the right in the data entry window
You can also drag the columns up or down with the mouse:
Click the column with the mouse and drag it to the desired position, then release the mouse
BankLink Practice shows an outline where the column will be shifted to
7 Click OK
BankLink Practice Guide for Australia
336
To restore column defaults:
1 Right click in the data entry area and select Configure Columns
2 Click the Restore Defaults tab
3 To restore the default order, click the Default Order button
4 To restore the default widths to all columns, click the Default Widths button
5 To restore the default editing settings to all columns, click the Default Editing button
The E reappears next to all the relevant columns
6 To restore the default visibility settings to all columns, click the Default Visibility button
The V reappears next to all the relevant columns
7 To restore all default settings:
Click the Restore All button and click OK
or:
Right click in the data entry area and select Restore column defaults