Embed Size (px)
Citation preview

GREENSMOWERClassic Cut
�����������
Hudson Sales & Engineering, Inc., Crawfordsville, IN 47933
Read and follow allSafety Rules and Instructions
before operating this equipment
�����������
Safety/Owner’s ResponsibilitiesPreparation For UseOperation/AdjustmentsMaintenanceCleanup/Off-season StorageResharpeningTroubleshootingWarrantyService & PartsMowing Pattern
Hudson-Star Greensmower Classic Cut
page 2 Copyright © 2008 Hudson Sales & Engineering, Inc.
Congratulations on your purchase of the new Hudson-Star Classic Cut
GreensMower. This quality machine is designed to give you years of trouble-free
service and let you focus on improving your game.
To ensure safe and efficient service from your mower, please take a few moments
to read the following material. Just like the mower itself, we’ve kept the manual as
simple and easy to follow as possible.
Keep in mind that this mower is designed to do close trimming
of the green and other golfing areas, not to cut tall grass.
Follow Safety Instructionsto prevent injury anddamage to mower!
Hudson-Star Greensmower
Classic Cut
Owner’s Manual
TABLE OF CONTENTS
SECTION I, SAFETY / OWNER’S RESPONSIBILITIES ...........................4
SECTION II, PREPARATION FOR USE ...................................................5
SECTION III, OPERATION / ADJUSTMENTS ..........................................6
SECTION IV, MAINTENANCE ..................................................................7
SECTION V, CLEANUP AFTER USE / OFF-SEASON STORAGE ...........7
SECTION VI, RESHARPENING ................................................................8
SECTION VII, TROUBLESHOOTING .....................................................10
SECTION VIII, WARRANTY ....................................................................10
SECTION IX, SERVICE / PARTS ............................................................11
Mowing Pattern .......................................................................Addendum
Hudson-Star Greensmower Classic Cut
page 4 Copyright © 2008 Hudson Sales & Engineering, Inc.
SECTION I, SAFETY / OWNER’S RESPONSIBILITIES
We have provided you with a mower that is as reliable and safe to use as possible. Please take the
time to read, understand and follow all the instructions and safety warnings found on the following
pages. Failure to do so may result in bodily injury and damage to the mower.
It is your responsibility toproperly maintain and operate this equipment.
FOR YOUR SAFETY, Keep clothing, fingers and feet clear of the cutting blades and any other exposed moving parts.
FOR YOUR SAFETY, Use both hands and proper posture when operating the mower.
FOR YOUR SAFETY, If it is necessary to life the mower, use two people. The mower weighs approximately 82 pounds. Trying to lift it by yourself may result in back injury! TO PREVENT DAMAGE TO THE MOWER:
Watch for foreign objects in the mowing path, such as rocks, sticks, golf balls and tees, etc.
Don’t drop, rock, bounce, or otherwise abuse the mower. Don’t attempt to mow an area other than a
putting green, fringe area, or other close-cut golfing area. Don’t try to cut tall grass.
Use the rear roller method to move the mower from one area to another when not actually mowing.
See Section III, Figure 3 for details.
OWNER’S MANUAL
Copyright © 2008 page 5 Hudson Sales & Engineering, Inc.
4. Grass Catcher
Height AdjustmentBar
CatcherHooks
Slots inFrame
CatcherHooks
1. Mower Unit
Figure 1
3. Upper Handle
7. Allen Wrench
5. Blade Sharpening Handle
8. Shoulder Bolts (2 included)
Note: Items notshown at full scale.
9. Grass Catcher Hardware
6. Handle Hardware (bolt, washer, & nut) (4 - Included )
9. Catcher Hardware (bolt, plate, & nut) (Plate - 2 Included) (bolt & nut - 6 Included)
2. Lower Handle
6. HandleHardware
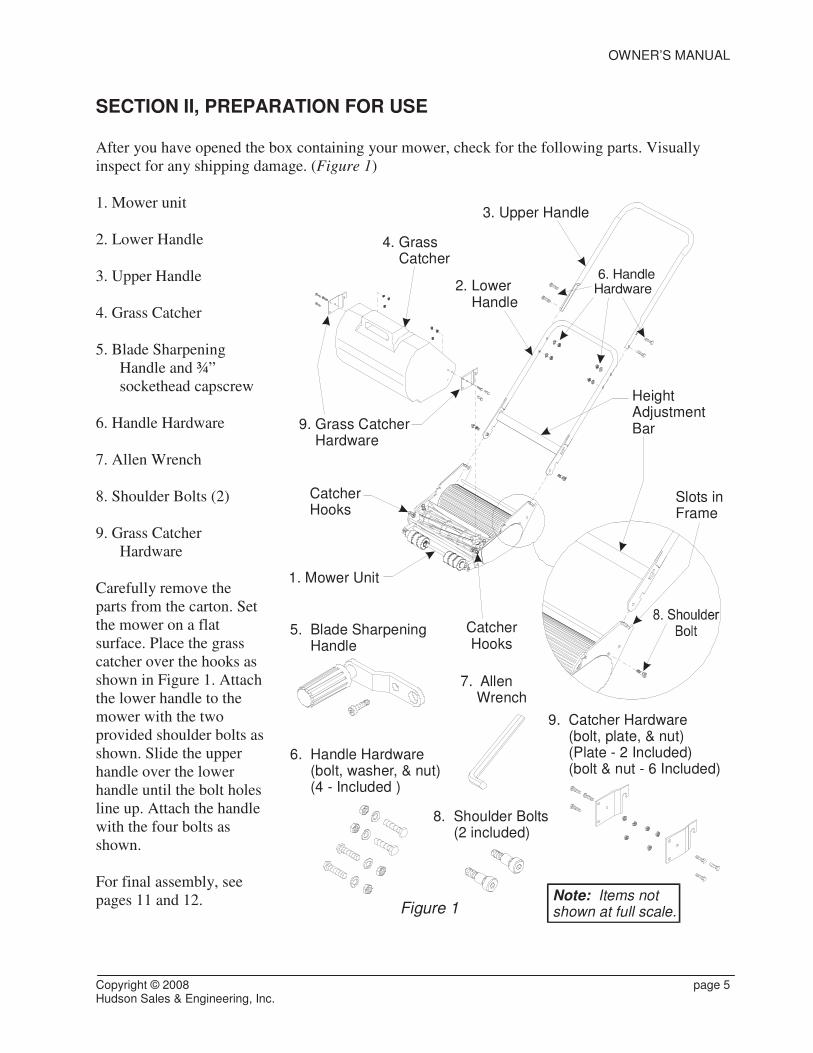
SECTION II, PREPARATION FOR USE After you have opened the box containing your mower, check for the following parts. Visually
inspect for any shipping damage. (Figure 1)
1. Mower unit
2. Lower Handle
3. Upper Handle
4. Grass Catcher
5. Blade Sharpening
Handle and ¾”
sockethead capscrew
6. Handle Hardware
7. Allen Wrench
8. Shoulder Bolts (2)
9. Grass Catcher
Hardware
Carefully remove the
parts from the carton. Set
the mower on a flat
surface. Place the grass
catcher over the hooks as
shown in Figure 1. Attach
the lower handle to the
mower with the two
provided shoulder bolts as
shown. Slide the upper
handle over the lower
handle until the bolt holes
line up. Attach the handle
with the four bolts as
shown.
For final assembly, see
pages 11 and 12.
Hudson-Star Greensmower Classic Cut
page 6 Copyright © 2008 Hudson Sales & Engineering, Inc.
SECTION III, OPERATION / ADJUSTMENTS
This section covers:
• How to adjust the handle height
for mowing
• How to properly move the
mower when not mowing
• How to use and what not to do
• How to set the cutting height
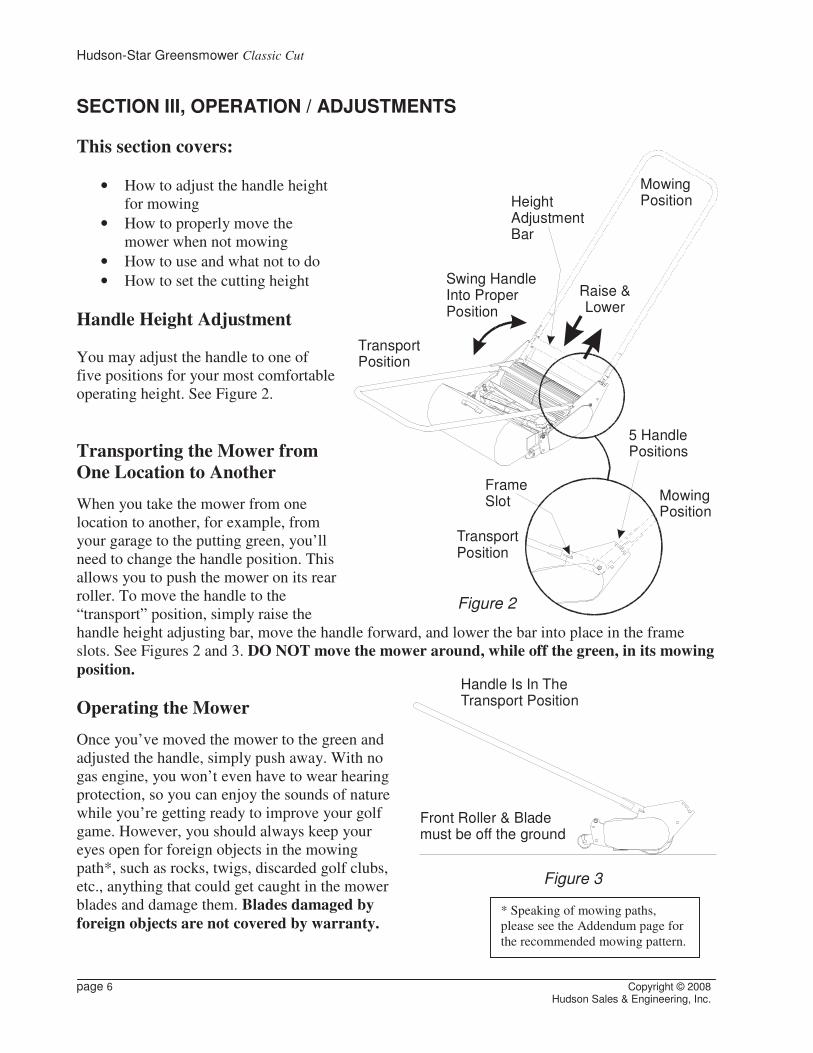
Handle Height Adjustment
You may adjust the handle to one of
five positions for your most comfortable
operating height. See Figure 2.
Transporting the Mower from
One Location to Another
When you take the mower from one
location to another, for example, from
your garage to the putting green, you’ll
need to change the handle position. This
allows you to push the mower on its rear
roller. To move the handle to the
“transport” position, simply raise the
handle height adjusting bar, move the handle forward, and lower the bar into place in the frame
slots. See Figures 2 and 3. DO NOT move the mower around, while off the green, in its mowing
position.
Operating the Mower
Once you’ve moved the mower to the green and
adjusted the handle, simply push away. With no
gas engine, you won’t even have to wear hearing
protection, so you can enjoy the sounds of nature
while you’re getting ready to improve your golf
game. However, you should always keep your
eyes open for foreign objects in the mowing
path*, such as rocks, twigs, discarded golf clubs,
etc., anything that could get caught in the mower
blades and damage them. Blades damaged by
foreign objects are not covered by warranty.
* Speaking of mowing paths,
please see the Addendum page for
the recommended mowing pattern.
TransportPosition
MowingPosition
5 HandlePositions
FrameSlot
MowingPosition
TransportPosition
Height AdjustmentBar
Swing HandleInto ProperPosition
Figure 2
Raise &Lower
Figure 3
Handle Is In TheTransport Position
Front Roller & Blademust be off the ground
OWNER’S MANUAL
Copyright © 2008 page 7 Hudson Sales & Engineering, Inc.
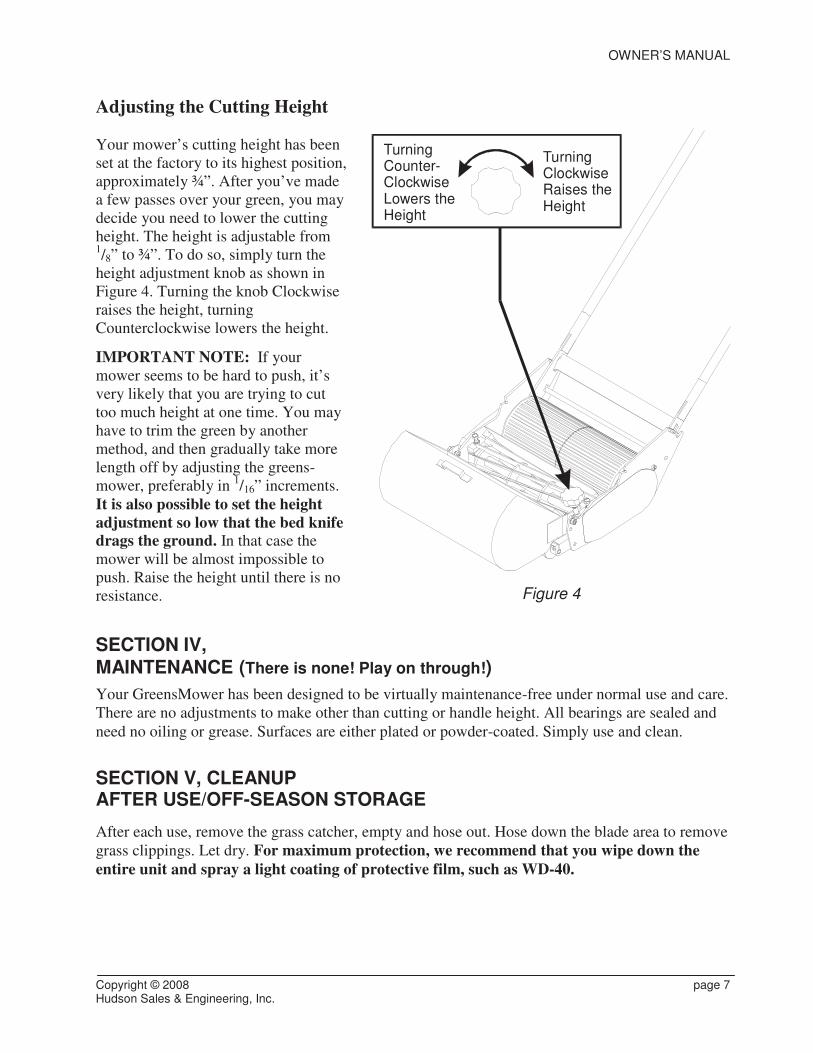
Adjusting the Cutting Height Your mower’s cutting height has been
set at the factory to its highest position,
approximately ¾”. After you’ve made
a few passes over your green, you may
decide you need to lower the cutting
height. The height is adjustable from 1/8” to ¾”. To do so, simply turn the
height adjustment knob as shown in
Figure 4. Turning the knob Clockwise
raises the height, turning
Counterclockwise lowers the height.
IMPORTANT NOTE: If your
mower seems to be hard to push, it’s
very likely that you are trying to cut
too much height at one time. You may
have to trim the green by another
method, and then gradually take more
length off by adjusting the greens-
mower, preferably in 1/16” increments.
It is also possible to set the height
adjustment so low that the bed knife drags the ground. In that case the
mower will be almost impossible to
push. Raise the height until there is no
resistance.
SECTION IV,
MAINTENANCE (There is none! Play on through!)
Your GreensMower has been designed to be virtually maintenance-free under normal use and care.
There are no adjustments to make other than cutting or handle height. All bearings are sealed and
need no oiling or grease. Surfaces are either plated or powder-coated. Simply use and clean.
SECTION V, CLEANUP AFTER USE/OFF-SEASON STORAGE
After each use, remove the grass catcher, empty and hose out. Hose down the blade area to remove
grass clippings. Let dry. For maximum protection, we recommend that you wipe down the
entire unit and spray a light coating of protective film, such as WD-40.
Figure 4
TurningCounter-ClockwiseLowers theHeight
TurningClockwiseRaises theHeight
Hudson-Star Greensmower Classic Cut
page 8 Copyright © 2008 Hudson Sales & Engineering, Inc.
Extended Storage
After cleaning and drying the mower, spray the cutting blades with a light preservative oil such as
WD-40. Hanging the mower up off the floor is recommended and will help keep moisture
accumulation to a minimum.
SECTION VI, RESHARPENING
Under normal conditions and frequency of use, your GreensMower cutting blades should not need
to be sharpened more than every year. Keep in mind that your local conditions or the frequency of
top dressing may affect the need for resharpening.
When resharpening does become necessary, we strongly recommend you contact a golf course or
mowing equipment dealer in your area who offers resharpening/lapping services.
However, if you are a die-hard do-it-yourselfer, this section of the manual gives you instructions
you may follow to do your own resharpening (the technical term is “backlapping”). If you choose to
sharpen the blades yourself, be sure to follow the step-by-step procedures and diagrams in this sec-
tion. We are not responsible for your results.
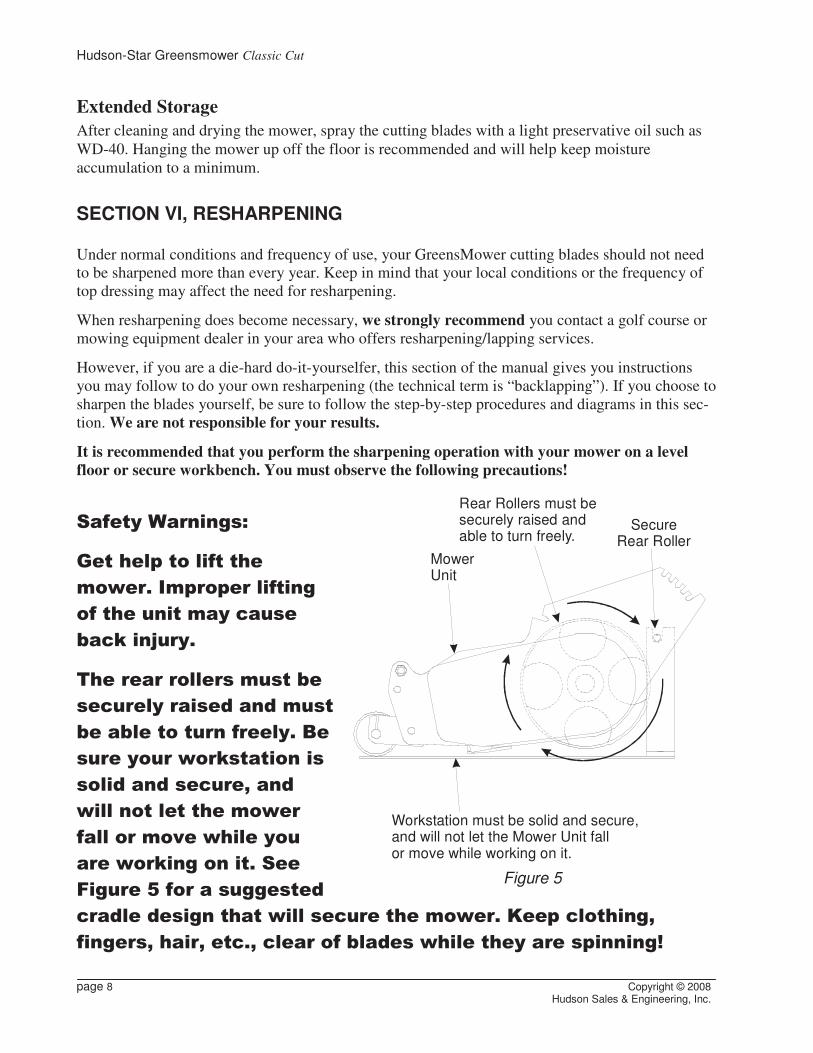
It is recommended that you perform the sharpening operation with your mower on a level
floor or secure workbench. You must observe the following precautions!
��� ������������
�� ������ ����� � ���
������������������� ����
��� ������ ���������
�!���"�����
������������������� � ��
�������������#��#���� �
�� ��� �� ������������$��
�������������!� �������
����#��#�������%��#�
������� ��� � ���������
���������&������������
������!�������� ������
�������'������������ �#�
��#���#������ � ������������� ����������(������� ����%�
�������%����%�� ��%��������� �#��������� ���������������)��
Figure 5
Secure Rear Roller
Rear Rollers must besecurely raised andable to turn freely.
Workstation must be solid and secure, and will not let the Mower Unit fall or move while working on it.
MowerUnit
OWNER’S MANUAL
Copyright © 2008 page 9 Hudson Sales & Engineering, Inc.
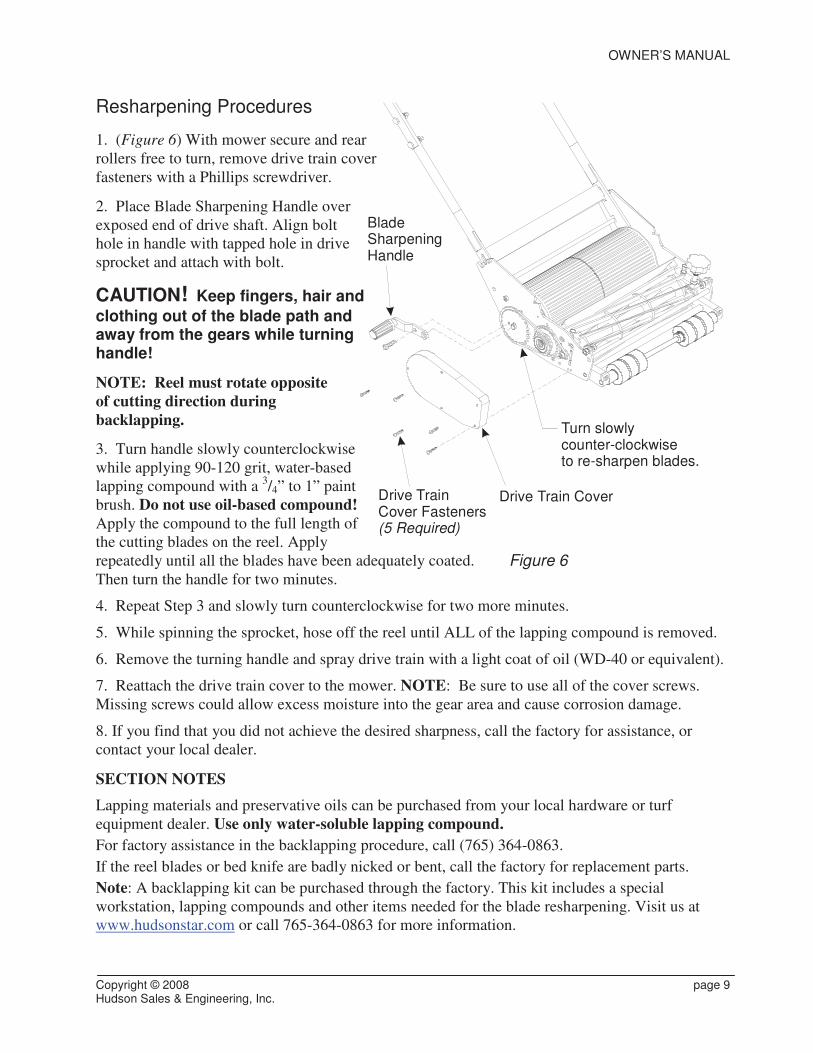
Figure 6
Drive TrainCover Fasteners(5 Required)
Drive Train Cover
BladeSharpeningHandle
Turn slowlycounter-clockwiseto re-sharpen blades.
Resharpening Procedures
1. (Figure 6) With mower secure and rear
rollers free to turn, remove drive train cover
fasteners with a Phillips screwdriver.
2. Place Blade Sharpening Handle over
exposed end of drive shaft. Align bolt
hole in handle with tapped hole in drive
sprocket and attach with bolt.
CAUTION! Keep fingers, hair and
clothing out of the blade path and away from the gears while turning handle!
NOTE: Reel must rotate opposite
of cutting direction during
backlapping.
3. Turn handle slowly counterclockwise
while applying 90-120 grit, water-based
lapping compound with a 3/4” to 1” paint
brush. Do not use oil-based compound!
Apply the compound to the full length of
the cutting blades on the reel. Apply
repeatedly until all the blades have been adequately coated.
Then turn the handle for two minutes.
4. Repeat Step 3 and slowly turn counterclockwise for two more minutes.
5. While spinning the sprocket, hose off the reel until ALL of the lapping compound is removed.
6. Remove the turning handle and spray drive train with a light coat of oil (WD-40 or equivalent).
7. Reattach the drive train cover to the mower. NOTE: Be sure to use all of the cover screws.
Missing screws could allow excess moisture into the gear area and cause corrosion damage.
8. If you find that you did not achieve the desired sharpness, call the factory for assistance, or
contact your local dealer.
SECTION NOTES
Lapping materials and preservative oils can be purchased from your local hardware or turf
equipment dealer. Use only water-soluble lapping compound.
For factory assistance in the backlapping procedure, call (765) 364-0863.
If the reel blades or bed knife are badly nicked or bent, call the factory for replacement parts.
Note: A backlapping kit can be purchased through the factory. This kit includes a special
workstation, lapping compounds and other items needed for the blade resharpening. Visit us at
www.hudsonstar.com or call 765-364-0863 for more information.
Hudson-Star Greensmower Classic Cut
page 10 Copyright © 2008 Hudson Sales & Engineering, Inc.
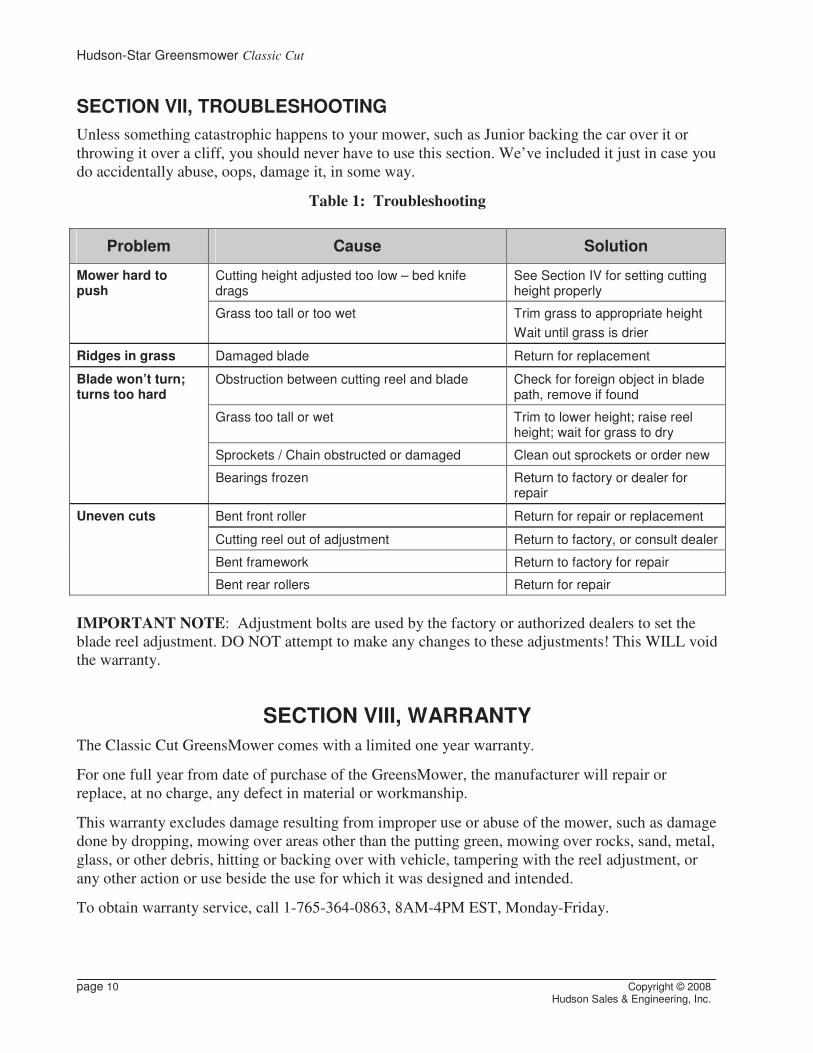
SECTION VII, TROUBLESHOOTING
Unless something catastrophic happens to your mower, such as Junior backing the car over it or
throwing it over a cliff, you should never have to use this section. We’ve included it just in case you
do accidentally abuse, oops, damage it, in some way.
Table 1: Troubleshooting
Problem Cause Solution
Cutting height adjusted too low – bed knife drags
See Section IV for setting cutting height properly
Mower hard to push
Grass too tall or too wet Trim grass to appropriate height
Wait until grass is drier
Ridges in grass Damaged blade Return for replacement
Obstruction between cutting reel and blade Check for foreign object in blade path, remove if found
Grass too tall or wet Trim to lower height; raise reel height; wait for grass to dry
Sprockets / Chain obstructed or damaged Clean out sprockets or order new
Blade won’t turn; turns too hard
Bearings frozen Return to factory or dealer for repair
Bent front roller Return for repair or replacement
Cutting reel out of adjustment Return to factory, or consult dealer
Bent framework Return to factory for repair
Uneven cuts
Bent rear rollers Return for repair
IMPORTANT NOTE: Adjustment bolts are used by the factory or authorized dealers to set the
blade reel adjustment. DO NOT attempt to make any changes to these adjustments! This WILL void
the warranty.
SECTION VIII, WARRANTY The Classic Cut GreensMower comes with a limited one year warranty.
For one full year from date of purchase of the GreensMower, the manufacturer will repair or
replace, at no charge, any defect in material or workmanship.
This warranty excludes damage resulting from improper use or abuse of the mower, such as damage
done by dropping, mowing over areas other than the putting green, mowing over rocks, sand, metal,
glass, or other debris, hitting or backing over with vehicle, tampering with the reel adjustment, or
any other action or use beside the use for which it was designed and intended.
To obtain warranty service, call 1-765-364-0863, 8AM-4PM EST, Monday-Friday.
OWNER’S MANUAL
Copyright © 2008 page 11 Hudson Sales & Engineering, Inc.
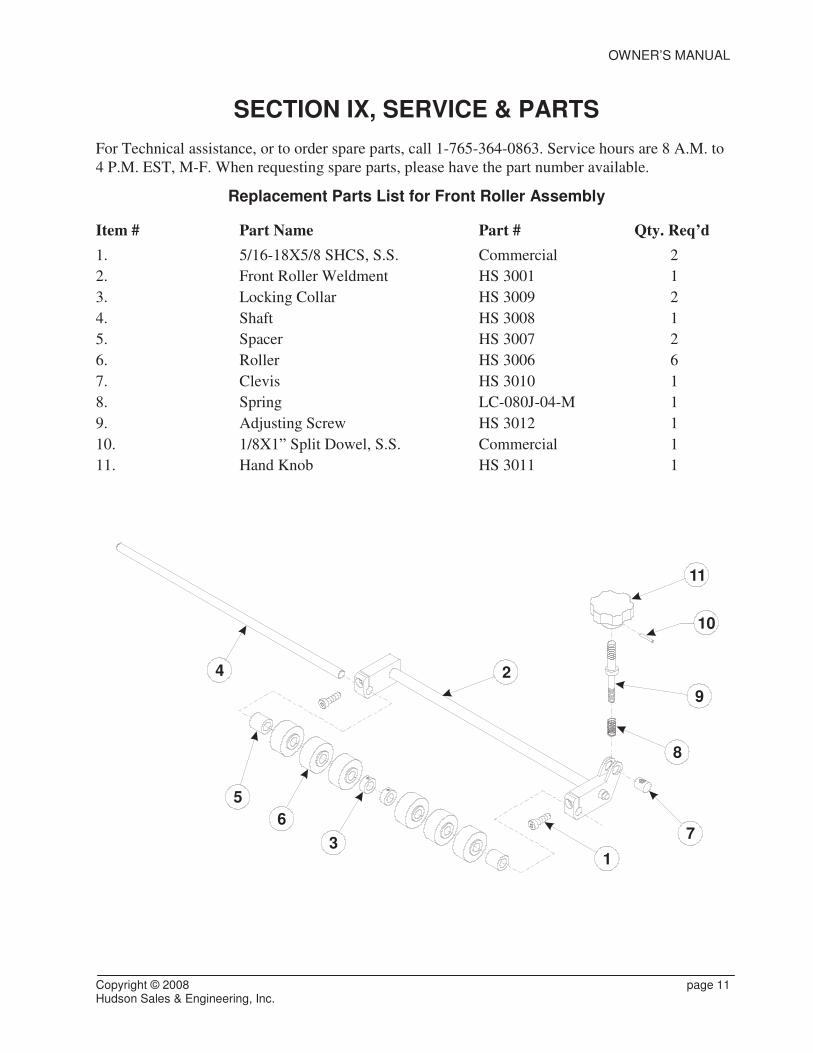
SECTION IX, SERVICE & PARTS
For Technical assistance, or to order spare parts, call 1-765-364-0863. Service hours are 8 A.M. to
4 P.M. EST, M-F. When requesting spare parts, please have the part number available.
Replacement Parts List for Front Roller Assembly
Item # Part Name Part # Qty. Req’d
1. 5/16-18X5/8 SHCS, S.S. Commercial 2
2. Front Roller Weldment HS 3001 1
3. Locking Collar HS 3009 2
4. Shaft HS 3008 1
5. Spacer HS 3007 2
6. Roller HS 3006 6
7. Clevis HS 3010 1
8. Spring LC-080J-04-M 1
9. Adjusting Screw HS 3012 1
10. 1/8X1” Split Dowel, S.S. Commercial 1
11. Hand Knob HS 3011 1
8
11
10
9
1
2
3
4
5
76
Hudson-Star Greensmower Classic Cut
page 12 Copyright © 2008 Hudson Sales & Engineering, Inc.
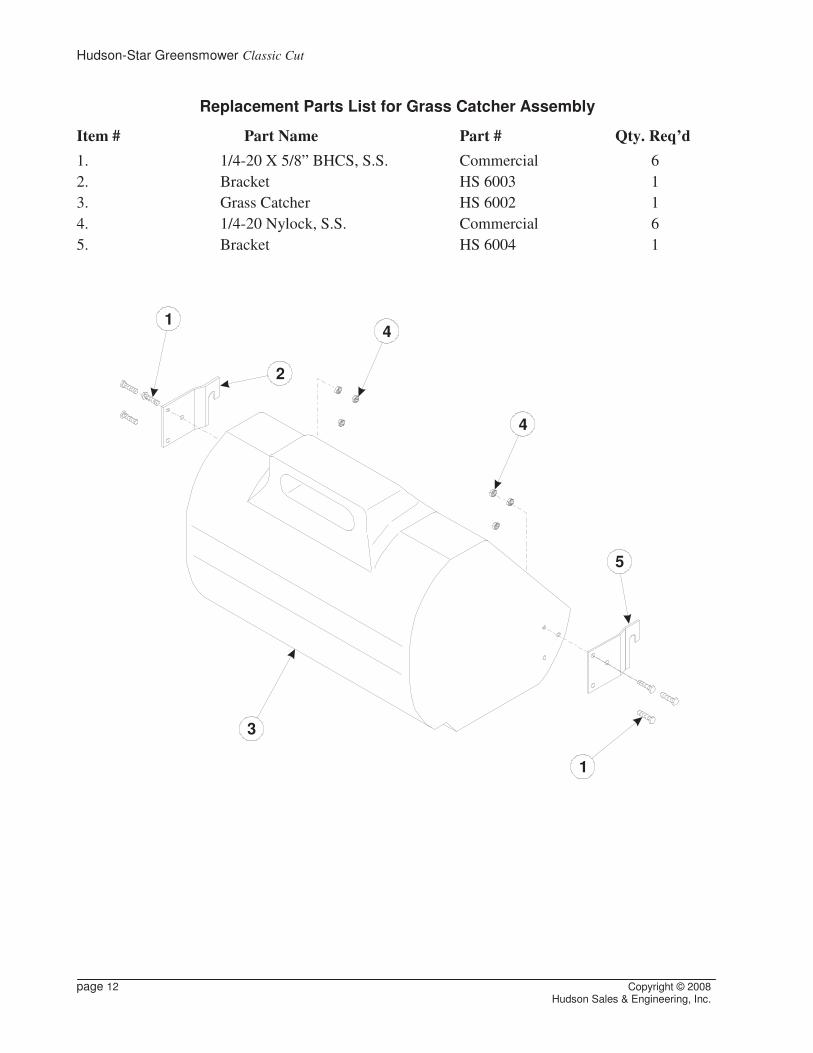
Replacement Parts List for Grass Catcher Assembly
Item # Part Name Part # Qty. Req’d
1. 1/4-20 X 5/8” BHCS, S.S. Commercial 6
2. Bracket HS 6003 1
3. Grass Catcher HS 6002 1
4. 1/4-20 Nylock, S.S. Commercial 6
5. Bracket HS 6004 1
1
2
3
4
5
1
4

OWNER’S MANUAL
Copyright © 2008 page 13 Hudson Sales & Engineering, Inc.
Replacement Parts List for Handle Assembly
Item # Part Name Part # Qty. Req’d
1. Lower Handle HS 5002 1
2. Upper Handle HS 5003 1
3. 3/8 X ¼ Shoulder Bolt Commercial 2
4. Height Adjusting Bar HS 5006 1
5. ¼-20X1 ½” SS Screw Commercial 4
6. ¼-20 Nylock SS Commercial 4
7. ¼-20 SS Flat Washer Commercial 4
1
3
4
2
56
7

Hudson-Star Greensmower Classic Cut
page 14 Copyright © 2008 Hudson Sales & Engineering, Inc.
Replacement Parts List for Drive Train and Covers
Item # Part Name Part # Qty. Req’d
1. 10-24 X 1-1/4 PHMS, S.S. Commercial 5
2. Drive Train Cover HS 2020 1
3. Sprocket HS 2011 1
4. 1/4-20 X 1/4 Setscrew, S.S. Commercial 2
5. 3/16” X 1/2” Key, S.S. Commercial 1
6. Sprocket HS 2009 1
7. Sprocket HS 2010-4 1
8. Sideplate HS 2021 1
9. 10-24 X 1/4 BHCS, S.S. Commercial 5
10. 3/16 X 3/4 Roll pin, S.S. Commercial 1
11. Bearing 6202LLB 2
12. Teflon Washer 4009-1 1
13. #35 Roller Chain Commercial 2
8
9
1
23
45
76
12
13
10
11

OWNER’S MANUAL
Copyright © 2008 page 15 Hudson Sales & Engineering, Inc.
Replacement Parts List for Rear Roller Assembly
Item # Part Name Part # Qty. Req’d
1. 1/4-20 X 3/4 FHCS, S.S. Commercial 4
2. Bearing Assembly 40MSTZPA6 & SB202-10 2
3. 1/4-20 Nylock, S.S. Commercial 4
4. 1/4-20 X ½” SHCS, S.S. Commercial 12
5. 1/4” Lock washer, S.S. Commercial 12
6. Roller HS 4002 2
7. Bearing Housing HS 4008 4
8. Bearing RCB 101416 4
9. Drive Shaft HS 4007 1
10. Spacer HS 4009-3 1
11. Spacer HS 4009-2 2
8
10
9
1
23
45
7
6
2
Parts Located In Two Places Per Roller
4
5
5
8
Parts Located In Two Places Per Roller
5
3
16
4
4
7
11
11

Hudson-Star Greensmower Classic Cut
page 16 Copyright © 2008 Hudson Sales & Engineering, Inc.
Replacement Parts List for Mower Assembly
Item # Part Name Part # Qty. Req’d
1. 3/8-24 X 1-1/4” HHCS, S.S. Commercial 2
2. 3/8-24 Hex Nut, S.S. Commercial 2
3. 3/8-16 Nylock, S.S. Commercial 2
4. 1/4-20 X 1/2” BHCS, S.S. Commercial 4
5. 1/2 X 3/8” Shoulder Bolt, S.S. Commercial 2
6. 1/4-20 X 1/2” FHCS, S.S. Commercial 15
7. L.H. Side Plate HS 2005 1
8. R.H. Side Plate HS 2006 1
9. Spacer Bar HS 2013 2
10. Grass Deflector HS 2019 1
11. Bed Knife HS 2003 1
12. 1/4-20 X 3/8 FHCS, S.S. Commercial 9
13. Reel Bearing Blocks HS 2008 2
14. Spring LC-092H-03-M 2
15. Bearing 6202LLB 2
16. Reel HS 2002 1
17. Front Roller Assembly HS 3001 1
18. Drive Roller Assembly HS 4001 1
19. Bed Knife Holder HS 2004 1
20. 5/16-18 X 5/8 SHCS, S.S. Commercial 4
8
13
12
11
10
9
1
2
3
4
5
7
6
1
2
3
4
5 4
14
15
9
4
13
14
15
16
17
18
19
20

OWNER’S MANUAL
Copyright © 2008 page 17 Hudson Sales & Engineering, Inc.
ADDENDUM
RECOMMENDED MOWING PATTERN
For the best results on your green, mow two times around the edge of the green, then mow up and down the
rest of the green. After you’ve done that, you can mow across the green for even smoother, finer results.
Mowing around the edges gives you a place to turn the mower around without leaving unsightly mowing
marks on your green.
Other considerations to keep in mind: Don’t mow when grass is very wet or frozen.
We recommend a two inch overlap on each cut to avoid missed areas.
As you become more familiar with your Greensmower, you’ll get better results with less wasted time.
Practice makes perfect.
First cut
Optional second cut