Embed Size (px)
Citation preview
GREENPRINTSA HANDBOOK ON SOME NEW
METHODS FOR NON-TOXICINTAGLIO ETCHING AND METAL
PLATE PRINTMAKING
Cedric Green FRSA
2
Copyright © Cedric Green 1998 - 2013seventeenth edition February 2013
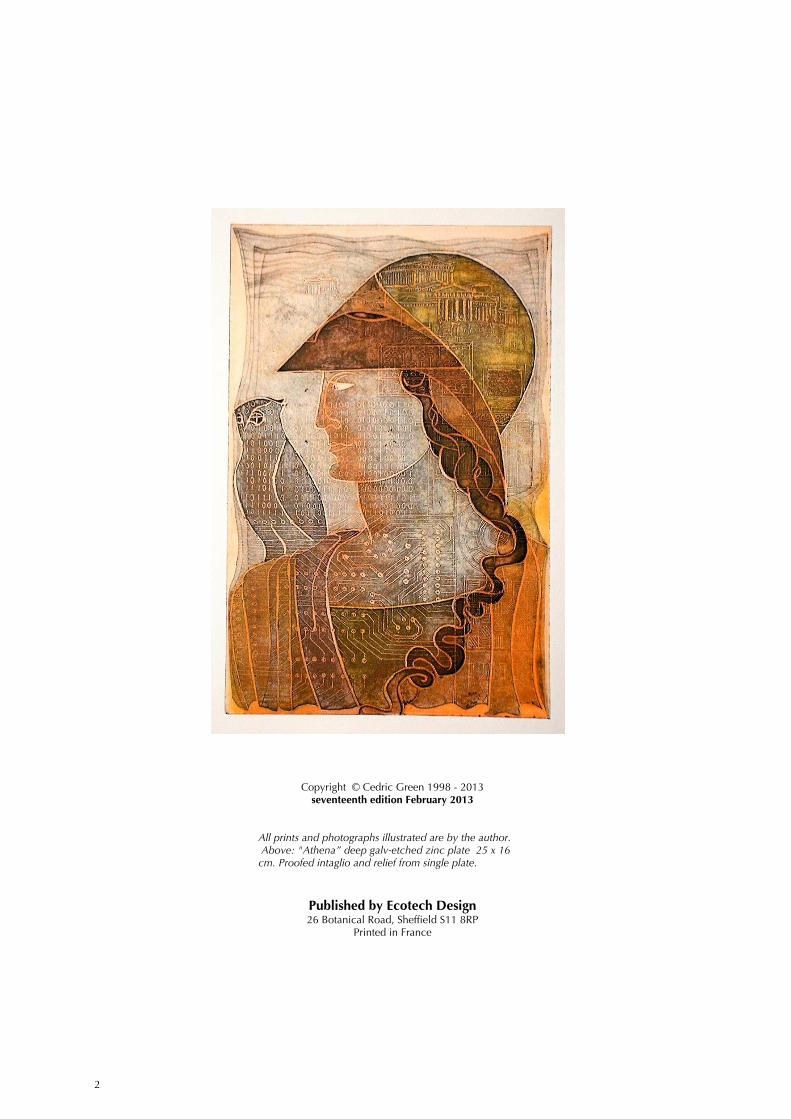
All prints and photographs illustrated are by the author. Above: "Athena” deep galv-etched zinc plate 25 x 16cm. Proofed intaglio and relief from single plate.
Published by Ecotech Design26 Botanical Road, Sheffield S11 8RP
Printed in France
3
ACKNOWLEDGMENTSThis booklet is intended primarily for printmakers with some experience ofproducing prints from metal plates - copper, zinc or steel. It assumes a readerwith a basic knowledge of the traditional processes of etching, and like me,with a feeling of dissatisfaction with the toxicity and general unpleasantnessof many of the processes involved, in particular the use of acid mordants,strong solvents and resin aquatint.
It was written to amplify articles I wrote for Printmaking Today published inSpring 1998, 1999 and 2002 (1). I am grateful to the editors, RosemarySimmons and Anne Desmet, for encouraging me to write about my personalexperience and search for safer integrated methods for producing etchings,and the revival of 19th century electrolytic methods. The discipline of havingto put it into writing stimulated a certain rigour in recording what I wasdoing, and led to finding new and interesting expressive possibilities. Theresponse I received to the first article put me in touch with many printmakerswho shared my concerns.
At the same time I was persuaded by Geffrey Green to make the results of myresearches freely and widely available by putting them on the Internet, and Iam very grateful for his work in creating the original website (whose addressis given below). I want to thank Tim Healey for the time he spent answeringmy questions about the chemistry of Bordeaux etch, and his advice on thedangers of etching zinc plates in ferric chloride.
Ad Stijnman kindly supplied me with background information and samplesof vegetable cleaning agent (VCA). Thanks too for encouragement andcomments from Nik Semenoff, who first published an article onelectroetching in 1991 (18) and researched a new mordant for aluminiumand zinc similar to Bordeaux Etch, which was published at the same time asmy first article (16). Keith Howard has tried the techniques with his studentsand I am grateful for his appreciative and helpful comments. I acknowledgewith thanks the information supplied by Prior and Co. in Sheffield about theirequipment for industrial electrolytic etched marking. Lastly I'd like to thankthose printmakers who freely supplied me with information on their methods.
In the course of many workshops at home and abroad, I have beenstimulated by questions from the participants, to try new methods and torefine and improve the ones covered in this book. I have found that aninterest in electrolytic etching methods extends a long way beyondprintmakers, and I have been contacted by craftsmen and women in manydifferent fields like emamelling (champlevé), jewellery, etc. I am verygrateful also to Fabien Maison, Jean-Claude Pronier et Jean-Marc Couffin fortheir translation of the web pages and the booklet in French which isavailable free as a download.
Cedric Green, February 2013
Brantôme, Francetelephone: +33 (0)5 53 13 41 07email: [email protected]: www.greenart.info
"Brantôme - Abbey" a 4 colour print from 4galv-etched and fractinted plates - 33 x 33 cms
4
CONTENTS
ACKNOWLEDGMENTS 3
CONTENTS 4
BACKGROUND 7
COMPARATIVE TABLE 8
ETCHING WITHOUT ACID 9
A brief history of electrolytic methods 9
WHAT IS GALV-ETCH ? 11
the electrolytic process 12electrical units and ohms law 12advantages of galv-etch over acids 14
EQUIPMENT AND MATERIALS 15
Power supplies 16chemicals and materials 19preparation of the electrolyte 19plate contacts 20backplate contacts 20cathode grid 20flat tray for galv-etching line or tint 20vertical tank 20supporting a plate in a vertical tank 21
PROCEDURE IN GALV-ETCH 22
using a standard tray and grid system 22open bite or galvanoplasty in a flat tray 22etching a plate in a vertical tank 22deep etch and open bite 23
5
GALV-ON SEMI DRY METHOD 24
needled lines or tint with galv-on 24
TIMES AND TESTS 26
calculating the time to etch 26the effect of voltage and amperage 26galv-etching very large plates 27special effects 29galvanoplasty or galv-plating 29cold casting copper 31
BORDEAUX ETCH 33
etching safely with copper sulphate 34the chemistry of Bordeaux etch 34PASSIVE GALV-ON 35Galv-etching without electricity 35the passive galv-on procedure 35
GROUNDING WITHOUT WAX 37
Relief printing ink ground 37Ink hard ground 37soft ground 38
TINTING WITHOUT ROSIN 39
fractint, salt tint, and sugar lift tint 39salt tint 40sugar lift tint 41galv-etching fractint 41special effects of fractint 42variations and refinements 42proofing galv-etched plates 42
CLEANING WITHOUT SOLVENTS 44
cleaning with cooking oil 44vegetable cleaning agent 44
CONCLUSIONS 45
NOTES AND REFERENCES 46
6
related internet web sites 47
APPENDIX A : ELECTRO-ETCHING (1855) 49
APPENDIX B - FIRST PATENT 1840 51
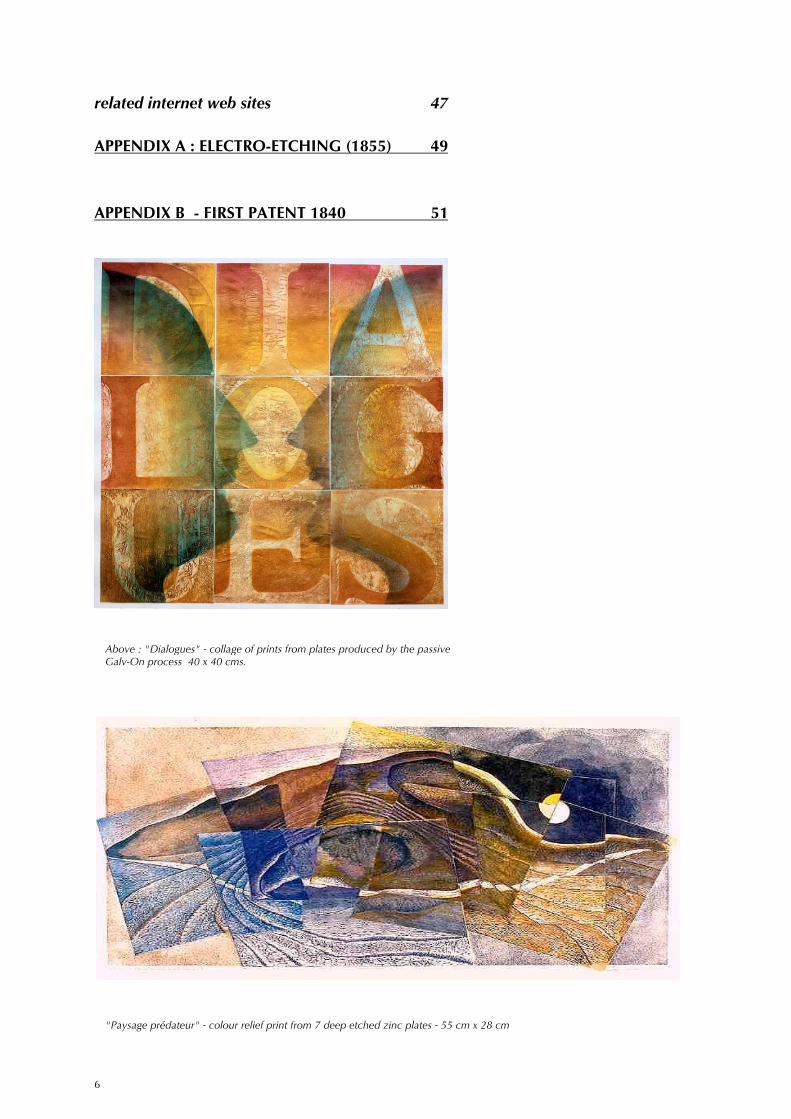
Above : "Dialogues" - collage of prints from plates produced by the passiveGalv-On process 40 x 40 cms.
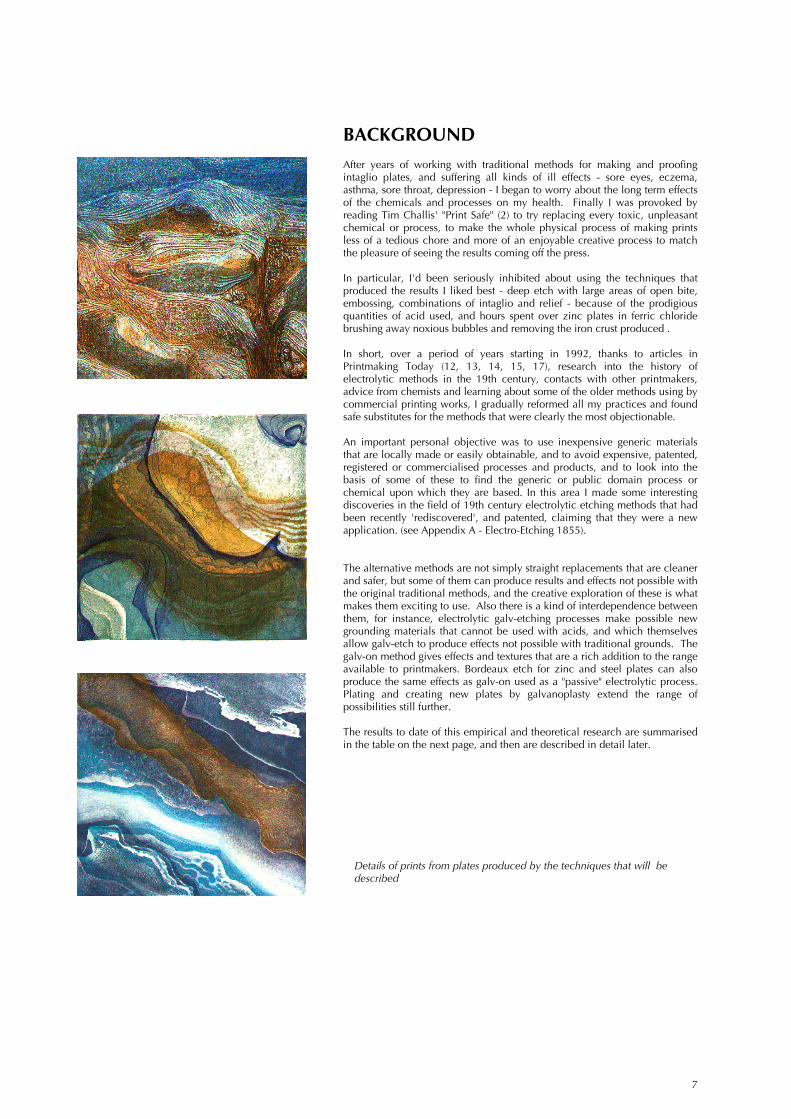
"Paysage prédateur" - colour relief print from 7 deep etched zinc plates - 55 cm x 28 cm
7
BACKGROUNDAfter years of working with traditional methods for making and proofingintaglio plates, and suffering all kinds of ill effects - sore eyes, eczema,asthma, sore throat, depression - I began to worry about the long term effectsof the chemicals and processes on my health. Finally I was provoked byreading Tim Challis' "Print Safe" (2) to try replacing every toxic, unpleasantchemical or process, to make the whole physical process of making printsless of a tedious chore and more of an enjoyable creative process to matchthe pleasure of seeing the results coming off the press.
In particular, I'd been seriously inhibited about using the techniques thatproduced the results I liked best - deep etch with large areas of open bite,embossing, combinations of intaglio and relief - because of the prodigiousquantities of acid used, and hours spent over zinc plates in ferric chloridebrushing away noxious bubbles and removing the iron crust produced .
In short, over a period of years starting in 1992, thanks to articles inPrintmaking Today (12, 13, 14, 15, 17), research into the history ofelectrolytic methods in the 19th century, contacts with other printmakers,advice from chemists and learning about some of the older methods using bycommercial printing works, I gradually reformed all my practices and foundsafe substitutes for the methods that were clearly the most objectionable.
An important personal objective was to use inexpensive generic materialsthat are locally made or easily obtainable, and to avoid expensive, patented,registered or commercialised processes and products, and to look into thebasis of some of these to find the generic or public domain process orchemical upon which they are based. In this area I made some interestingdiscoveries in the field of 19th century electrolytic etching methods that hadbeen recently 'rediscovered', and patented, claiming that they were a newapplication. (see Appendix A - Electro-Etching 1855).
The alternative methods are not simply straight replacements that are cleanerand safer, but some of them can produce results and effects not possible withthe original traditional methods, and the creative exploration of these is whatmakes them exciting to use. Also there is a kind of interdependence betweenthem, for instance, electrolytic galv-etching processes make possible newgrounding materials that cannot be used with acids, and which themselvesallow galv-etch to produce effects not possible with traditional grounds. Thegalv-on method gives effects and textures that are a rich addition to the rangeavailable to printmakers. Bordeaux etch for zinc and steel plates can alsoproduce the same effects as galv-on used as a "passive" electrolytic process.Plating and creating new plates by galvanoplasty extend the range ofpossibilities still further.
The results to date of this empirical and theoretical research are summarisedin the table on the next page, and then are described in detail later.
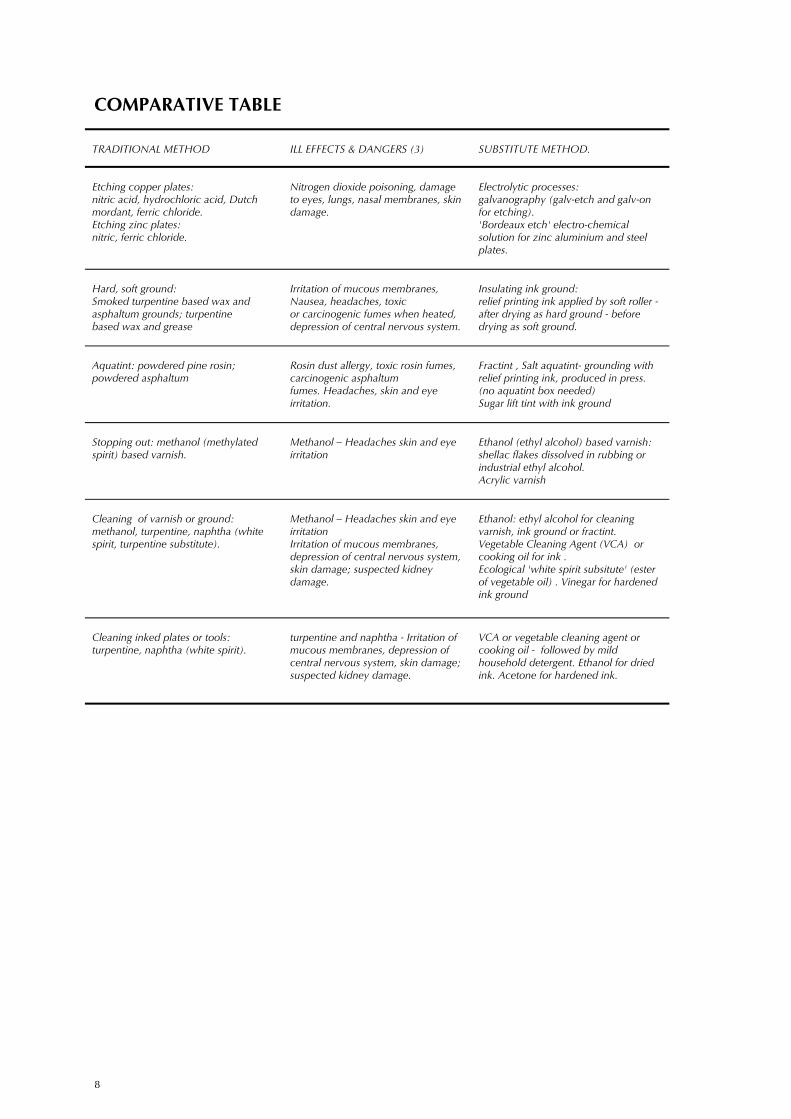
Details of prints from plates produced by the techniques that will bedescribed
8
COMPARATIVE TABLE
TRADITIONAL METHOD ILL EFFECTS & DANGERS (3) SUBSTITUTE METHOD.
Etching copper plates:nitric acid, hydrochloric acid, Dutchmordant, ferric chloride.Etching zinc plates:nitric, ferric chloride.
Nitrogen dioxide poisoning, damageto eyes, lungs, nasal membranes, skindamage.
Electrolytic processes:galvanography (galv-etch and galv-onfor etching).'Bordeaux etch' electro-chemicalsolution for zinc aluminium and steelplates.
Hard, soft ground:Smoked turpentine based wax andasphaltum grounds; turpentinebased wax and grease
Irritation of mucous membranes,Nausea, headaches, toxicor carcinogenic fumes when heated,depression of central nervous system.
Insulating ink ground:relief printing ink applied by soft roller -after drying as hard ground - beforedrying as soft ground.
Aquatint: powdered pine rosin;powdered asphaltum
Rosin dust allergy, toxic rosin fumes,carcinogenic asphaltumfumes. Headaches, skin and eyeirritation.
Fractint , Salt aquatint- grounding withrelief printing ink, produced in press.(no aquatint box needed)Sugar lift tint with ink ground
Stopping out: methanol (methylatedspirit) based varnish.
Methanol – Headaches skin and eyeirritation
Ethanol (ethyl alcohol) based varnish:shellac flakes dissolved in rubbing orindustrial ethyl alcohol.Acrylic varnish
Cleaning of varnish or ground:methanol, turpentine, naphtha (whitespirit, turpentine substitute).
Methanol – Headaches skin and eyeirritationIrritation of mucous membranes,depression of central nervous system,skin damage; suspected kidneydamage.
Ethanol: ethyl alcohol for cleaningvarnish, ink ground or fractint.Vegetable Cleaning Agent (VCA) orcooking oil for ink .Ecological 'white spirit subsitute' (esterof vegetable oil) . Vinegar for hardenedink ground
Cleaning inked plates or tools:turpentine, naphtha (white spirit).
turpentine and naphtha - Irritation ofmucous membranes, depression ofcentral nervous system, skin damage;suspected kidney damage.
VCA or vegetable cleaning agent orcooking oil - followed by mildhousehold detergent. Ethanol for driedink. Acetone for hardened ink.
9
ETCHING WITHOUT ACIDA brief history of electrolytic methods
This chapter is a condensed version of “Electricity, Light and the PrintedImage” Published by the University of Barcelona Press 2004
Galvanism, or chemically produced electricity, was accidentally discoveredby Luigi Galvani in 1789 who was doing experiments on frog's legs andfound that muscles twitched when touched by two different metals incontact, a phenomenon he attributed to a fluid in organic tissue. Soon afterthat Alexandre Volta showed that it was due to a direct electric current, andbuilt a 'galvanic battery' formed by alternating zinc and copper platesseparated by fabric soaked in an acidic solution (5). In 1834 Michael Faradaypostulated his Laws of Electrolysis and established the scientific basis of theranking of different metals according to their 'electrode potential' (6). Smeeand Daniell invented improved versions of galvanic cells, using a copperplate suspended in copper sulphate and a zinc plate in salt or sulphuric acidwith a permeable plaster of paris partition between them. Thomas Spencerfound that copper was deposited on the cathode or ‘negative metal’ and thezinc pole was etched. He and John Wilson were granted a patent in 1840 for"Engraving Metals by Voltaic Electricity" (see Appendix B for text of patent).These discoveries were immediately utilized to make printing plates,reproduce seals and plate small objects by the process that became known as‘Electrotyping’.
It was soon found that applying a direct current from a galvanic cell to aseparate ‘cell’ containing a couple of parallel metal plates in a metallic saltsolution (the electrolyte) dissolved metal from the anode (+ve) and depositedmetal on the cathode (-ve). This is explained by the fact that an electrolyte,consisting of positive and negative ‘ions’ will conduct a direct electricalcurrent, which carries the ions to the plate of the opposite polarity. In acopper sulphate solution the positive copper ions collect on the negativecopper plate, and negative sulphate ions react with the bare metal of thecopper anode - etch it in fact - and create new copper sulphate. Thus theelectrolyte stays at the same concentration, creating the illusion that copperparticles are transferred from one plate to the other - a common fallacy.
The process of electrotyping become very widely used for creating printingplates, plating metal objects, decorating silverware and marking cutlery. In1852 Charles V Walker documented and described all the processes thatwere currently known in his book Electrotype Manipulation, which wentthrough 29 editions by 1859 and was also published in the USA (7). Part IIincluded detailed descriptions of a patented process called 'Electro-Etching',and another called 'Electro-tint' (see Appendix A for excerpts). The word'Galvanography’ was synonymous with 'Electrotyping', basically meaning aplate made by depositing metal over a mould, a process which is called'galvanoplasty'', but other processes of etching or plating, which used thesame electrolytic principles and equipment were included in the originalmeaning. The term 'Galvanography’ was used to distinguish the graphic useof the Electrotyping process from the industrial use or the production of texttype plates. The French name for the Electrotype process is 'galvanotypie'and a plate made by the process was called a 'galvano'.
Illustration by Thomas Spencer of his apparatus forcreating the printing plate from which this illustrationwas printed in 1841 (20).
10
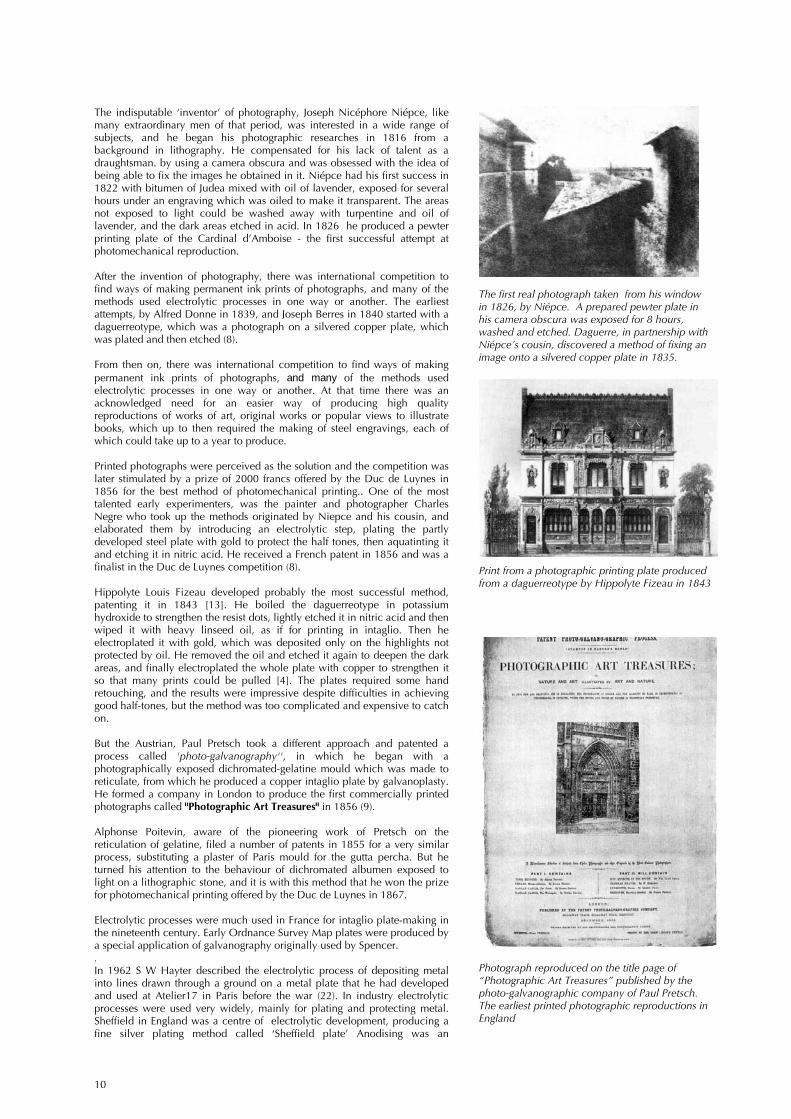
The indisputable ‘inventor’ of photography, Joseph Nicéphore Niépce, likemany extraordinary men of that period, was interested in a wide range ofsubjects, and he began his photographic researches in 1816 from abackground in lithography. He compensated for his lack of talent as adraughtsman. by using a camera obscura and was obsessed with the idea ofbeing able to fix the images he obtained in it. Niépce had his first success in1822 with bitumen of Judea mixed with oil of lavender, exposed for severalhours under an engraving which was oiled to make it transparent. The areasnot exposed to light could be washed away with turpentine and oil oflavender, and the dark areas etched in acid. In 1826 he produced a pewterprinting plate of the Cardinal d’Amboise - the first successful attempt atphotomechanical reproduction.
After the invention of photography, there was international competition tofind ways of making permanent ink prints of photographs, and many of themethods used electrolytic processes in one way or another. The earliestattempts, by Alfred Donne in 1839, and Joseph Berres in 1840 started with adaguerreotype, which was a photograph on a silvered copper plate, whichwas plated and then etched (8).
From then on, there was international competition to find ways of makingpermanent ink prints of photographs, and many of the methods usedelectrolytic processes in one way or another. At that time there was anacknowledged need for an easier way of producing high qualityreproductions of works of art, original works or popular views to illustratebooks, which up to then required the making of steel engravings, each ofwhich could take up to a year to produce.
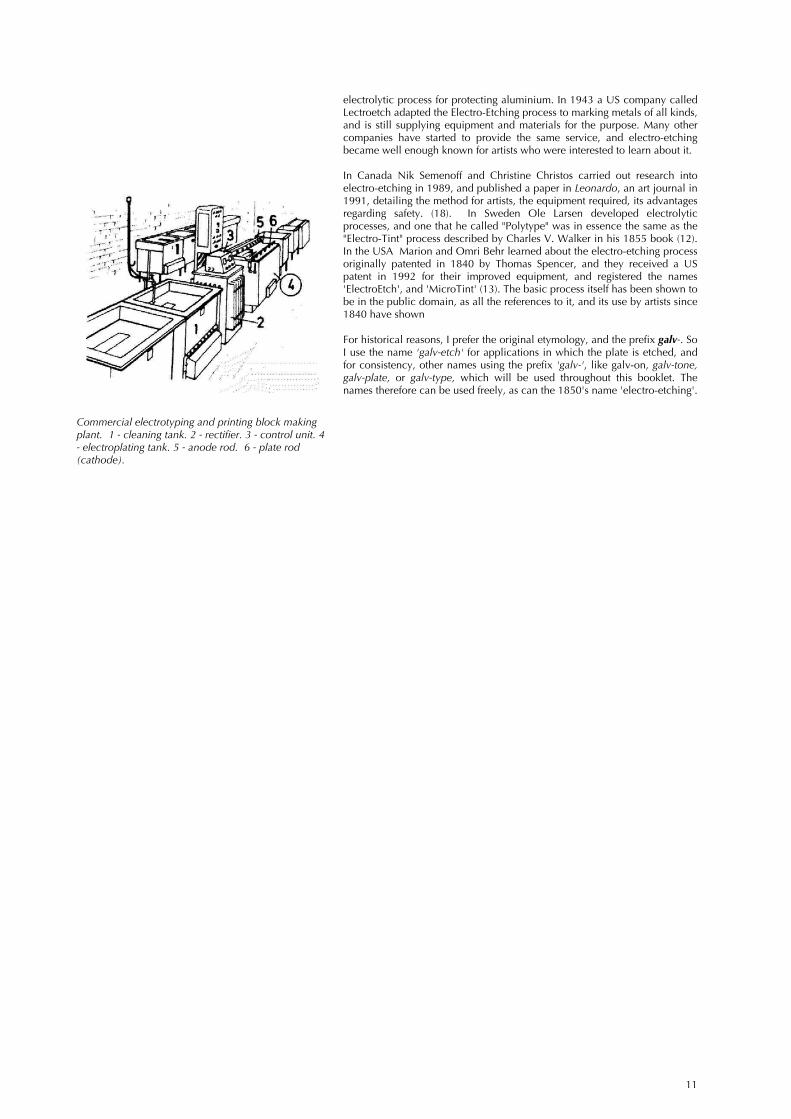
Printed photographs were perceived as the solution and the competition waslater stimulated by a prize of 2000 francs offered by the Duc de Luynes in1856 for the best method of photomechanical printing.. One of the mosttalented early experimenters, was the painter and photographer CharlesNegre who took up the methods originated by Niepce and his cousin, andelaborated them by introducing an electrolytic step, plating the partlydeveloped steel plate with gold to protect the half tones, then aquatinting itand etching it in nitric acid. He received a French patent in 1856 and was afinalist in the Duc de Luynes competition (8).
Hippolyte Louis Fizeau developed probably the most successful method,patenting it in 1843 [13]. He boiled the daguerreotype in potassiumhydroxide to strengthen the resist dots, lightly etched it in nitric acid and thenwiped it with heavy linseed oil, as if for printing in intaglio. Then heelectroplated it with gold, which was deposited only on the highlights notprotected by oil. He removed the oil and etched it again to deepen the darkareas, and finally electroplated the whole plate with copper to strengthen itso that many prints could be pulled [4]. The plates required some handretouching, and the results were impressive despite difficulties in achievinggood half-tones, but the method was too complicated and expensive to catchon.
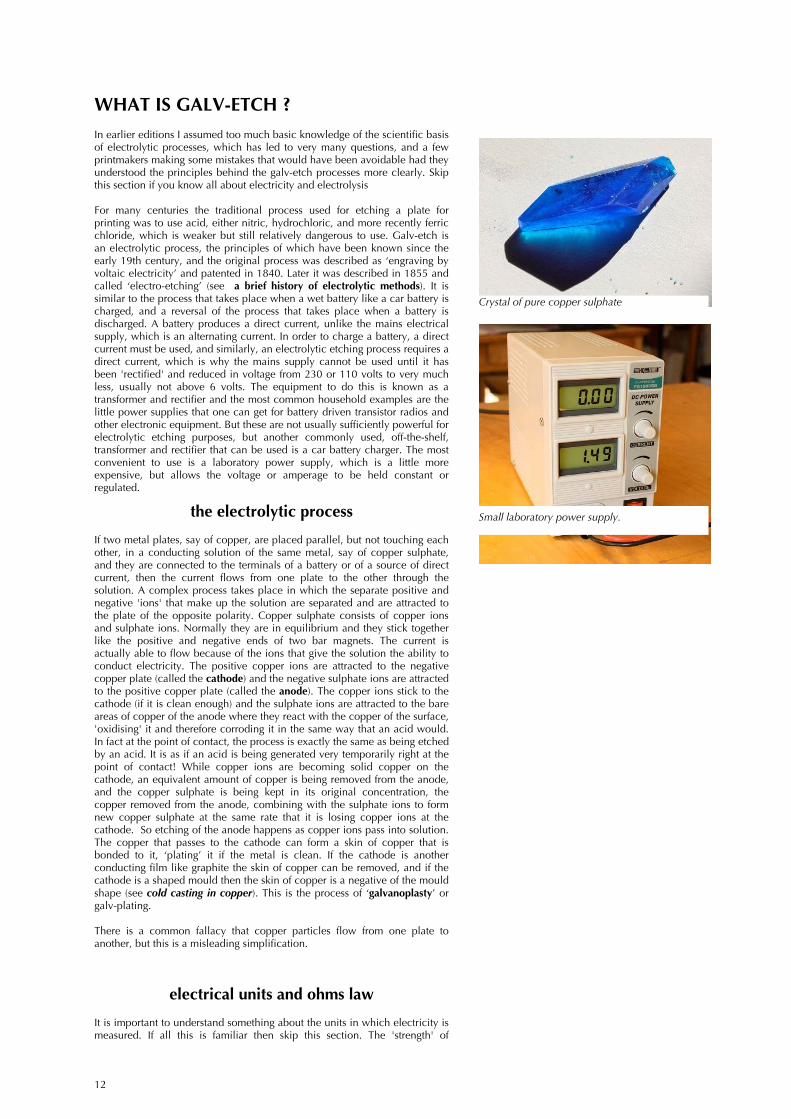
But the Austrian, Paul Pretsch took a different approach and patented aprocess called 'photo-galvanography'', in which he began with aphotographically exposed dichromated-gelatine mould which was made toreticulate, from which he produced a copper intaglio plate by galvanoplasty.He formed a company in London to produce the first commercially printedphotographs called "Photographic Art Treasures" in 1856 (9).
Alphonse Poitevin, aware of the pioneering work of Pretsch on thereticulation of gelatine, filed a number of patents in 1855 for a very similarprocess, substituting a plaster of Paris mould for the gutta percha. But heturned his attention to the behaviour of dichromated albumen exposed tolight on a lithographic stone, and it is with this method that he won the prizefor photomechanical printing offered by the Duc de Luynes in 1867.
Electrolytic processes were much used in France for intaglio plate-making inthe nineteenth century. Early Ordnance Survey Map plates were produced bya special application of galvanography originally used by Spencer..In 1962 S W Hayter described the electrolytic process of depositing metalinto lines drawn through a ground on a metal plate that he had developedand used at Atelier17 in Paris before the war (22). In industry electrolyticprocesses were used very widely, mainly for plating and protecting metal.Sheffield in England was a centre of electrolytic development, producing afine silver plating method called ‘Sheffield plate’ Anodising was an
The first real photograph taken from his windowin 1826, by Niépce. A prepared pewter plate inhis camera obscura was exposed for 8 hours,washed and etched. Daguerre, in partnership withNiépce’s cousin, discovered a method of fixing animage onto a silvered copper plate in 1835.
Photograph reproduced on the title page of“Photographic Art Treasures” published by thephoto-galvanographic company of Paul Pretsch.The earliest printed photographic reproductions inEngland
Print from a photographic printing plate producedfrom a daguerreotype by Hippolyte Fizeau in 1843
11
electrolytic process for protecting aluminium. In 1943 a US company calledLectroetch adapted the Electro-Etching process to marking metals of all kinds,and is still supplying equipment and materials for the purpose. Many othercompanies have started to provide the same service, and electro-etchingbecame well enough known for artists who were interested to learn about it.
In Canada Nik Semenoff and Christine Christos carried out research intoelectro-etching in 1989, and published a paper in Leonardo, an art journal in1991, detailing the method for artists, the equipment required, its advantagesregarding safety. (18). In Sweden Ole Larsen developed electrolyticprocesses, and one that he called "Polytype" was in essence the same as the"Electro-Tint" process described by Charles V. Walker in his 1855 book (12).In the USA Marion and Omri Behr learned about the electro-etching processoriginally patented in 1840 by Thomas Spencer, and they received a USpatent in 1992 for their improved equipment, and registered the names'ElectroEtch', and 'MicroTint' (13). The basic process itself has been shown tobe in the public domain, as all the references to it, and its use by artists since1840 have shown
For historical reasons, I prefer the original etymology, and the prefix galv-. SoI use the name 'galv-etch' for applications in which the plate is etched, andfor consistency, other names using the prefix 'galv-', like galv-on, galv-tone,galv-plate, or galv-type, which will be used throughout this booklet. Thenames therefore can be used freely, as can the 1850's name 'electro-etching'.
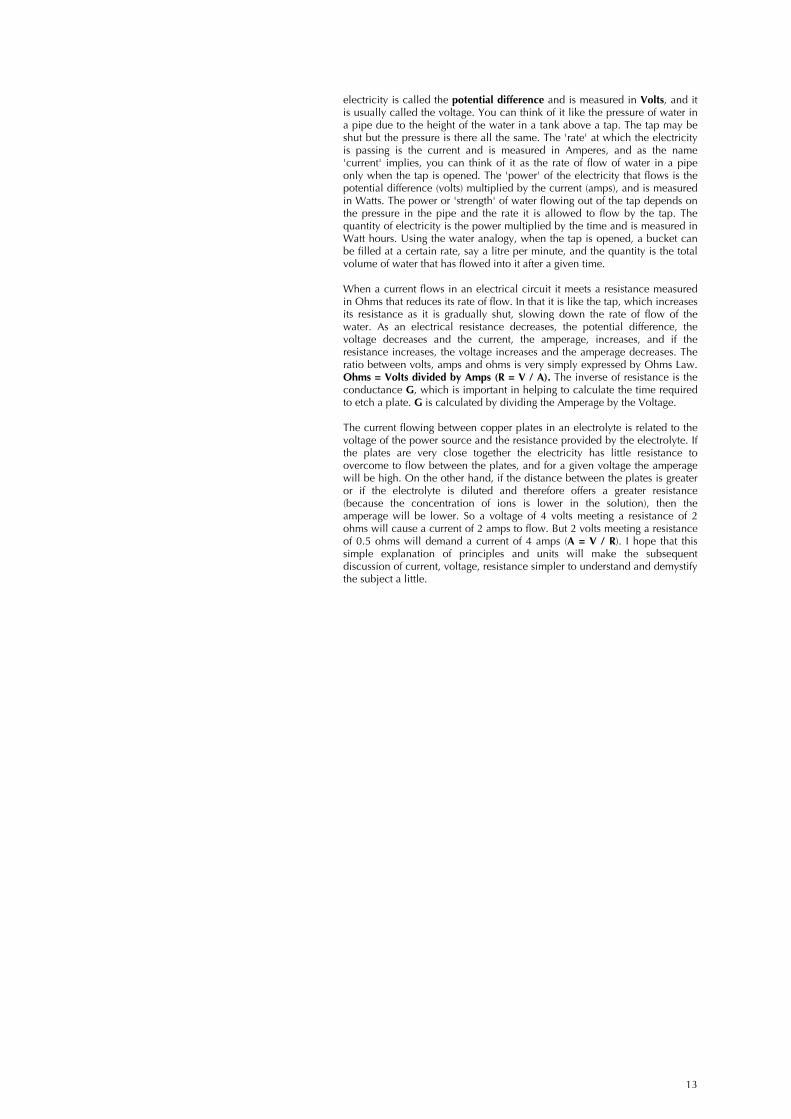
Commercial electrotyping and printing block makingplant. 1 - cleaning tank. 2 - rectifier. 3 - control unit. 4- electroplating tank. 5 - anode rod. 6 - plate rod(cathode).
12
WHAT IS GALV-ETCH ?In earlier editions I assumed too much basic knowledge of the scientific basisof electrolytic processes, which has led to very many questions, and a fewprintmakers making some mistakes that would have been avoidable had theyunderstood the principles behind the galv-etch processes more clearly. Skipthis section if you know all about electricity and electrolysis
For many centuries the traditional process used for etching a plate forprinting was to use acid, either nitric, hydrochloric, and more recently ferricchloride, which is weaker but still relatively dangerous to use. Galv-etch isan electrolytic process, the principles of which have been known since theearly 19th century, and the original process was described as ‘engraving byvoltaic electricity’ and patented in 1840. Later it was described in 1855 andcalled ‘electro-etching’ (see a brief history of electrolytic methods). It issimilar to the process that takes place when a wet battery like a car battery ischarged, and a reversal of the process that takes place when a battery isdischarged. A battery produces a direct current, unlike the mains electricalsupply, which is an alternating current. In order to charge a battery, a directcurrent must be used, and similarly, an electrolytic etching process requires adirect current, which is why the mains supply cannot be used until it hasbeen 'rectified' and reduced in voltage from 230 or 110 volts to very muchless, usually not above 6 volts. The equipment to do this is known as atransformer and rectifier and the most common household examples are thelittle power supplies that one can get for battery driven transistor radios andother electronic equipment. But these are not usually sufficiently powerful forelectrolytic etching purposes, but another commonly used, off-the-shelf,transformer and rectifier that can be used is a car battery charger. The mostconvenient to use is a laboratory power supply, which is a little moreexpensive, but allows the voltage or amperage to be held constant orregulated.
the electrolytic process
If two metal plates, say of copper, are placed parallel, but not touching eachother, in a conducting solution of the same metal, say of copper sulphate,and they are connected to the terminals of a battery or of a source of directcurrent, then the current flows from one plate to the other through thesolution. A complex process takes place in which the separate positive andnegative 'ions' that make up the solution are separated and are attracted tothe plate of the opposite polarity. Copper sulphate consists of copper ionsand sulphate ions. Normally they are in equilibrium and they stick togetherlike the positive and negative ends of two bar magnets. The current isactually able to flow because of the ions that give the solution the ability toconduct electricity. The positive copper ions are attracted to the negativecopper plate (called the cathode) and the negative sulphate ions are attractedto the positive copper plate (called the anode). The copper ions stick to thecathode (if it is clean enough) and the sulphate ions are attracted to the bareareas of copper of the anode where they react with the copper of the surface,'oxidising' it and therefore corroding it in the same way that an acid would.In fact at the point of contact, the process is exactly the same as being etchedby an acid. It is as if an acid is being generated very temporarily right at thepoint of contact! While copper ions are becoming solid copper on thecathode, an equivalent amount of copper is being removed from the anode,and the copper sulphate is being kept in its original concentration, thecopper removed from the anode, combining with the sulphate ions to formnew copper sulphate at the same rate that it is losing copper ions at thecathode. So etching of the anode happens as copper ions pass into solution.The copper that passes to the cathode can form a skin of copper that isbonded to it, ‘plating’ it if the metal is clean. If the cathode is anotherconducting film like graphite the skin of copper can be removed, and if thecathode is a shaped mould then the skin of copper is a negative of the mouldshape (see cold casting in copper). This is the process of ‘galvanoplasty’ orgalv-plating.
There is a common fallacy that copper particles flow from one plate toanother, but this is a misleading simplification.
electrical units and ohms law
It is important to understand something about the units in which electricity ismeasured. If all this is familiar then skip this section. The 'strength' of
Crystal of pure copper sulphate
Small laboratory power supply.
13
electricity is called the potential difference and is measured in Volts, and itis usually called the voltage. You can think of it like the pressure of water ina pipe due to the height of the water in a tank above a tap. The tap may beshut but the pressure is there all the same. The 'rate' at which the electricityis passing is the current and is measured in Amperes, and as the name'current' implies, you can think of it as the rate of flow of water in a pipeonly when the tap is opened. The 'power' of the electricity that flows is thepotential difference (volts) multiplied by the current (amps), and is measuredin Watts. The power or 'strength' of water flowing out of the tap depends onthe pressure in the pipe and the rate it is allowed to flow by the tap. Thequantity of electricity is the power multiplied by the time and is measured inWatt hours. Using the water analogy, when the tap is opened, a bucket canbe filled at a certain rate, say a litre per minute, and the quantity is the totalvolume of water that has flowed into it after a given time.
When a current flows in an electrical circuit it meets a resistance measuredin Ohms that reduces its rate of flow. In that it is like the tap, which increasesits resistance as it is gradually shut, slowing down the rate of flow of thewater. As an electrical resistance decreases, the potential difference, thevoltage decreases and the current, the amperage, increases, and if theresistance increases, the voltage increases and the amperage decreases. Theratio between volts, amps and ohms is very simply expressed by Ohms Law.Ohms = Volts divided by Amps (R = V / A). The inverse of resistance is theconductance G, which is important in helping to calculate the time requiredto etch a plate. G is calculated by dividing the Amperage by the Voltage.
The current flowing between copper plates in an electrolyte is related to thevoltage of the power source and the resistance provided by the electrolyte. Ifthe plates are very close together the electricity has little resistance toovercome to flow between the plates, and for a given voltage the amperagewill be high. On the other hand, if the distance between the plates is greateror if the electrolyte is diluted and therefore offers a greater resistance(because the concentration of ions is lower in the solution), then theamperage will be lower. So a voltage of 4 volts meeting a resistance of 2ohms will cause a current of 2 amps to flow. But 2 volts meeting a resistanceof 0.5 ohms will demand a current of 4 amps (A = V / R). I hope that thissimple explanation of principles and units will make the subsequentdiscussion of current, voltage, resistance simpler to understand and demystifythe subject a little.
14
advantages of galv-etch over acids
1 The greatest advantage is that with the same equipment, plates can beeither bitten down or built up to give a much richer variety of results, andthat qualities of tone and texture can be produced that are not possible withother methods of etching and tinting. In addition, new plates can be createdby 'electrotyping' from wax or other moulds or from relief created on silveredcopper plates -- the original meaning of the word galvanography.
2 Working with copper plates the chemical - copper sulphate - is absolutelysafe to use, but gloves should be worn to protect the skin from drying anddiscolouring. With zinc plates the electrolyte - zinc sulphate - is much saferthan acids, but must be used with care, avoiding contact with skin or eyes,and storing it safely out of reach of children.
3 For steel plates galv-etch is the safest method, although Bordeaux Etch)can be used as a mordant (see section on Bordeaux Etch later). Theelectrolytes for steel - ferrous sulphate or ammonium ferrous sulphate - areclassified as safe chemicals, but I find it prudent to wear gloves where thereis any danger of skin contact.
4 The solutions are not weakened by use, in fact, the same solutions can beused for years and eventually pose no serious disposal problems (see sectionon safety precautions and Bordeaux Etch for method of disposal).
5 No gases or fumes are generated nor is there any precipitate or depositformed in the bite, although a fine sludge from impurities can build up in thebottom of a tank, which needs occasionally to be filtered out.
6 The length of time taken for a given depth of bite on the same size andtype of plate, under the same conditions of voltage and current, is always thesame, and the biting can be controlled by time-switch, leaving one free to geton with other things.
7 Another advantage is that the backs of plates do not need protecting - thestrength of the electrolytic action is proportional to the distance between theelectrodes, so that only the edges and perhaps a narrow strip around theedge at the back need be varnished. The Galv-on semi-dry method leaves thebacks of plates completely untouched.
8 The long-term cost is much lower as no very special expensive equipmentis needed, especially with the galv-on semi-dry method, and the amount ofelectricity used is negligible - about as much as a light bulb. There is nodanger from electric shock, because both voltage and current are low ( 0.5 to8 volts at 0.5 to 10 amps). The electrolyte solution will last indefinitely, if itis not used for different metals.
9 The electrolytic action is not like the corrosive action produced by anacid, and so the range of varnishes, resists and grounds that are effective ismuch greater, because they must be simply electrically insulating and notacid resistant. Some heat-sensitive grounds require a low current and coolelectrolyte, because galv-etch generates a little heat at the point where theetch acts.
10 The electrolytic action between the plate (anode) and the cathode isdirectional at right angles to the face, and so the edge of a resist is notsignificantly eroded or undercut.
11 The galv-on semi-dry method of etching simplifies the equipmentrequired and allows one to work on only a portion of a large plate at a time,and can produce a great variety of textures, tones and images quickly withrelative ease.
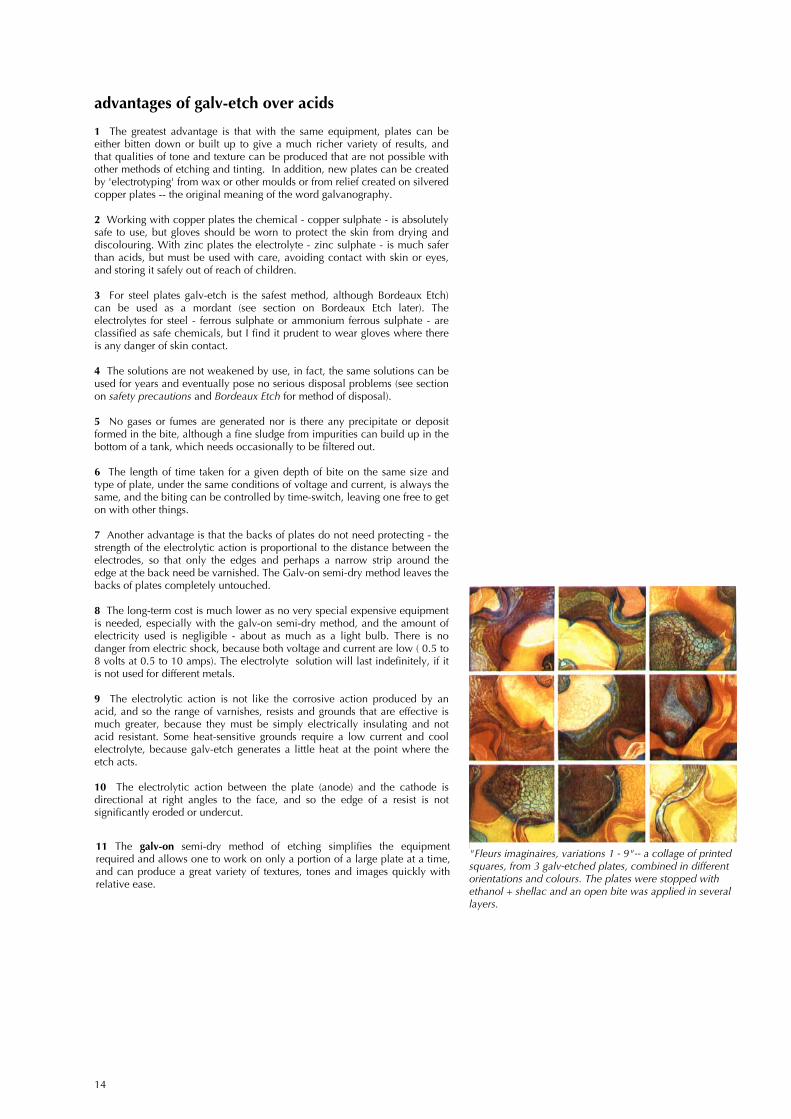
"Fleurs imaginaires, variations 1 - 9"-- a collage of printedsquares, from 3 galv-etched plates, combined in differentorientations and colours. The plates were stopped withethanol + shellac and an open bite was applied in severallayers.

15
EQUIPMENT AND MATERIALSThis guide assumes that someone using galv-etch for the first time will bemaking medium size prints - from plates up to about 50 cms on the longestside, and will be wanting to etch grounded needled, or tinted plates (seefractint later) or etch areas of open bite. Larger plates can obviously be madebut to start off you may not want to invest a lot of money, and can make useof existing equipment like acid etching trays or photographic developingtrays. In particular the galv-on semi-dry process (described later) can bedone with the simplest equipment of all. Some readers may not beprintmakers at all and will want to etch other objects like badges, nameplates, dials, knife blades etc. I hope these pages will be helpful to them too,and I would only warn that if very small areas are to be etched, the currentand voltage required must be low or the resists required must be very robust.Nearly all the equipment needed can be bought from DIY stores, electricaland electronic suppliers, motor spares suppliers or hardware shops.
Expanded diagram of standard all- purposeequipment for galv-etch - Key below. (reliefprint from galv-etched and fractinted zincplate )
[1] Deep plastic tray with appropriate electrolyte.
[2] "Backplate contact" - flat metal plate with metal strap soldered to back,varnished except face for contact with back of plate.
[3] Plate prepared for galv-etching, with area on back unvarnished to allowelectrical contact on backplate contact.
[4] Grid to form cathode; heavy metal strips silver-soldered or mechanicallyfixed to frame, bent to allow grid to touch surface of electrolyte.
[5] Power supply - direct current, switched voltages, ammeter, overload cutout,and short circuit protection.
[6] Control box to use with any power supply without voltage switchable below6 volts and without voltage output meter. Details of control box on page 24.
[7] Mains switched socket with time switch.

16
Power supplies
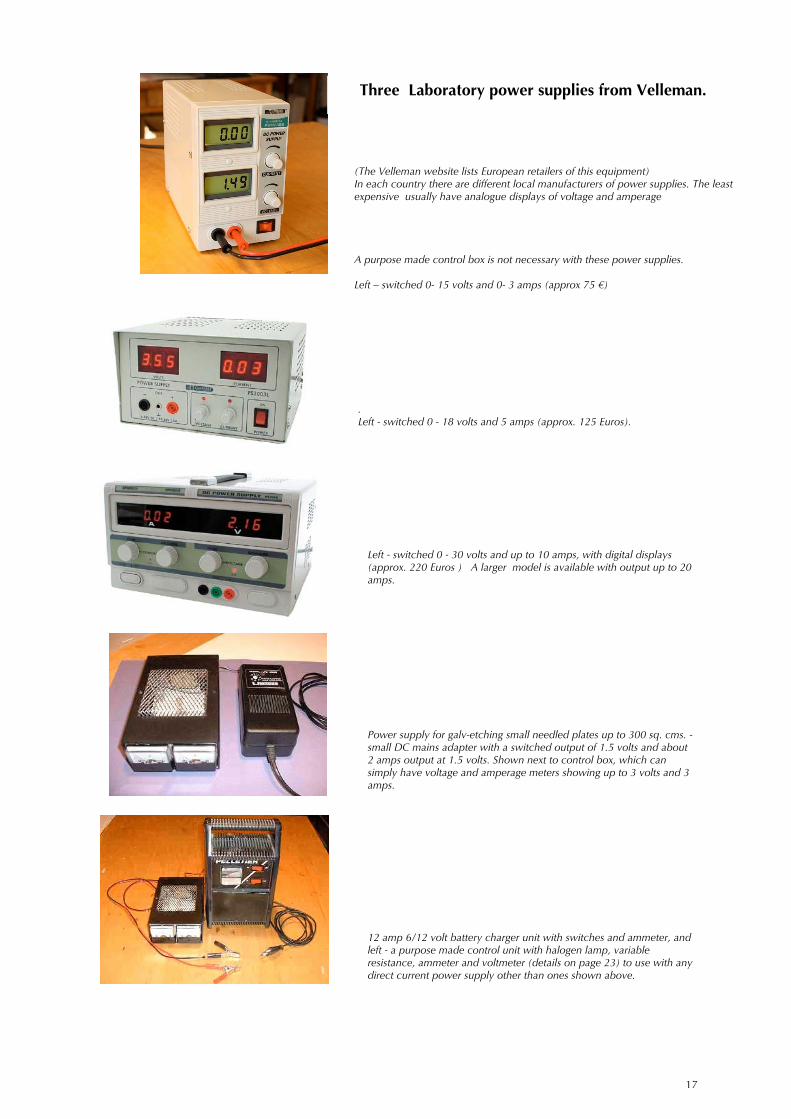
The most important piece of equipment is a direct current power supply unitwith switched voltage outputs and voltage and amperage displays. The mostsatisfactory and versatile type is a DC regulated laboratory power supply. InEurope, Velleman Instruments (website address: www.velleman.be) aredistributors of a range of power supplies of this type. There are models whichcan be switched from 0 volts upward and with maximum outputs of 5, 10and 20 amps costing from about 75 - 300 Euros. To begin without spending alot of money, you can use a 6 volt car and motorcycle battery charger, withbuilt-in ammeter, and fused short circuit and overload protection. With abattery charger it is necessary to have a control box as shown and describedbelow, which can be made up by an electrician. The use of 6 volt batteries inmotor cycles is becoming rare, but heavy duty 6/12/24 volt chargers can stillbe found capable of up to 20 amps. but voltages higher than 6 volts shouldnever be used. For etching very small areas at low voltage, you can use adirect current mains adapter which can be switched down to 1.5 volts.Similarly, for small plates I have successfully used a small array ofphotovoltaic solar cells producing between 4 and 0.5 volts in bright sun.The control box for the last two options only needs a sensitive voltage andamperage display. There are other sources of direct current that can be used,like rechargeable batteries, but never use more than 6 volts, and then onlywith a control box to adjust and display the voltage by introducing a fixedand/or variable resistance. An accurate display of amperage is very usefulalso, which is used for calibrating the system to calculate the time required toetch (see times and tests).
Typical tray based galv-etch equipment
[1] plastic tray
[2] copper backplate contact or plate to be etchedwith copper strip taped to back
[4] copper grid
[5] laboratory 10 amp power supply with regulatedvariable voltage and amperage, digital displays,overload and short circuit protection
[7] Electronic mains supply timeswitch and controlwith display.
17
Power supply for galv-etching small needled plates up to 300 sq. cms. -small DC mains adapter with a switched output of 1.5 volts and about2 amps output at 1.5 volts. Shown next to control box, which cansimply have voltage and amperage meters showing up to 3 volts and 3amps.
.Left - switched 0 - 18 volts and 5 amps (approx. 125 Euros).
Left - switched 0 - 30 volts and up to 10 amps, with digital displays(approx. 220 Euros ) A larger model is available with output up to 20amps.
(The Velleman website lists European retailers of this equipment)In each country there are different local manufacturers of power supplies. The leastexpensive usually have analogue displays of voltage and amperage
A purpose made control box is not necessary with these power supplies.
Left – switched 0- 15 volts and 0- 3 amps (approx 75 €)
12 amp 6/12 volt battery charger unit with switches and ammeter, andleft - a purpose made control unit with halogen lamp, variableresistance, ammeter and voltmeter (details on page 23) to use with anydirect current power supply other than ones shown above.
Three Laboratory power supplies from Velleman.
18
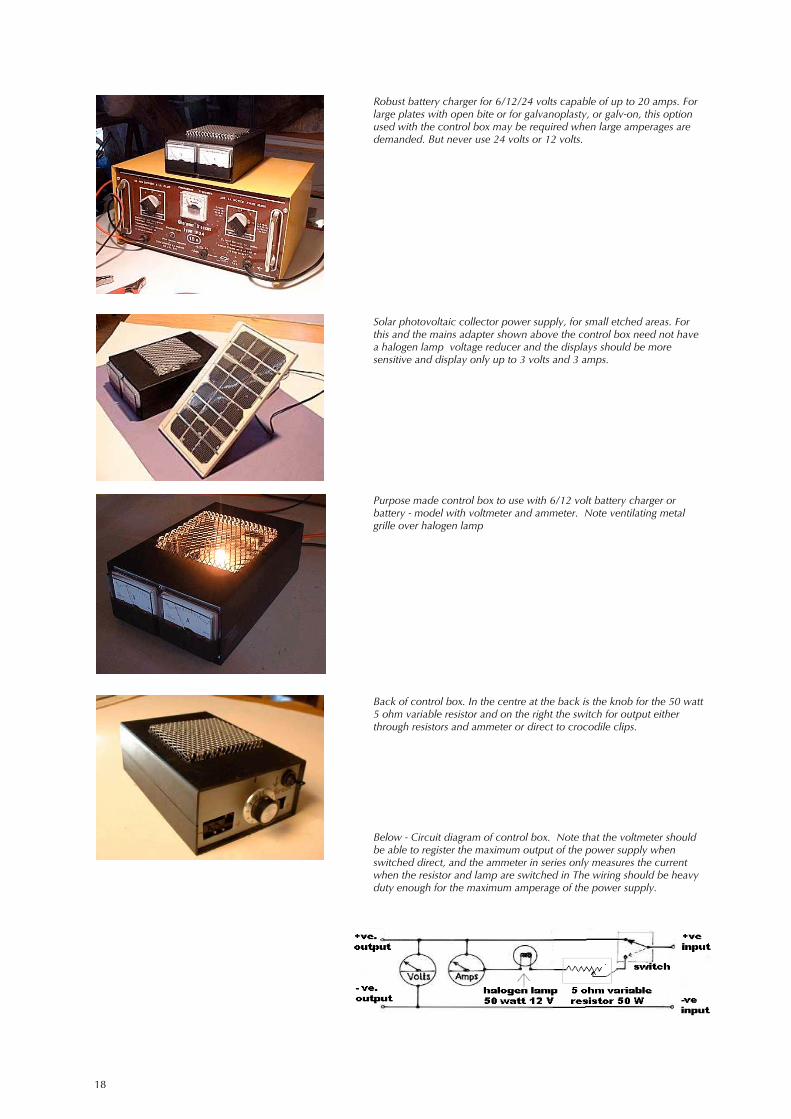
Below - Circuit diagram of control box. Note that the voltmeter shouldbe able to register the maximum output of the power supply whenswitched direct, and the ammeter in series only measures the currentwhen the resistor and lamp are switched in The wiring should be heavyduty enough for the maximum amperage of the power supply.
Purpose made control box to use with 6/12 volt battery charger orbattery - model with voltmeter and ammeter. Note ventilating metalgrille over halogen lamp
Back of control box. In the centre at the back is the knob for the 50 watt5 ohm variable resistor and on the right the switch for output eitherthrough resistors and ammeter or direct to crocodile clips.
Solar photovoltaic collector power supply, for small etched areas. Forthis and the mains adapter shown above the control box need not havea halogen lamp voltage reducer and the displays should be moresensitive and display only up to 3 volts and 3 amps.
Robust battery charger for 6/12/24 volts capable of up to 20 amps. Forlarge plates with open bite or for galvanoplasty, or galv-on, this optionused with the control box may be required when large amperages aredemanded. But never use 24 volts or 12 volts.
19
chemicals and materials
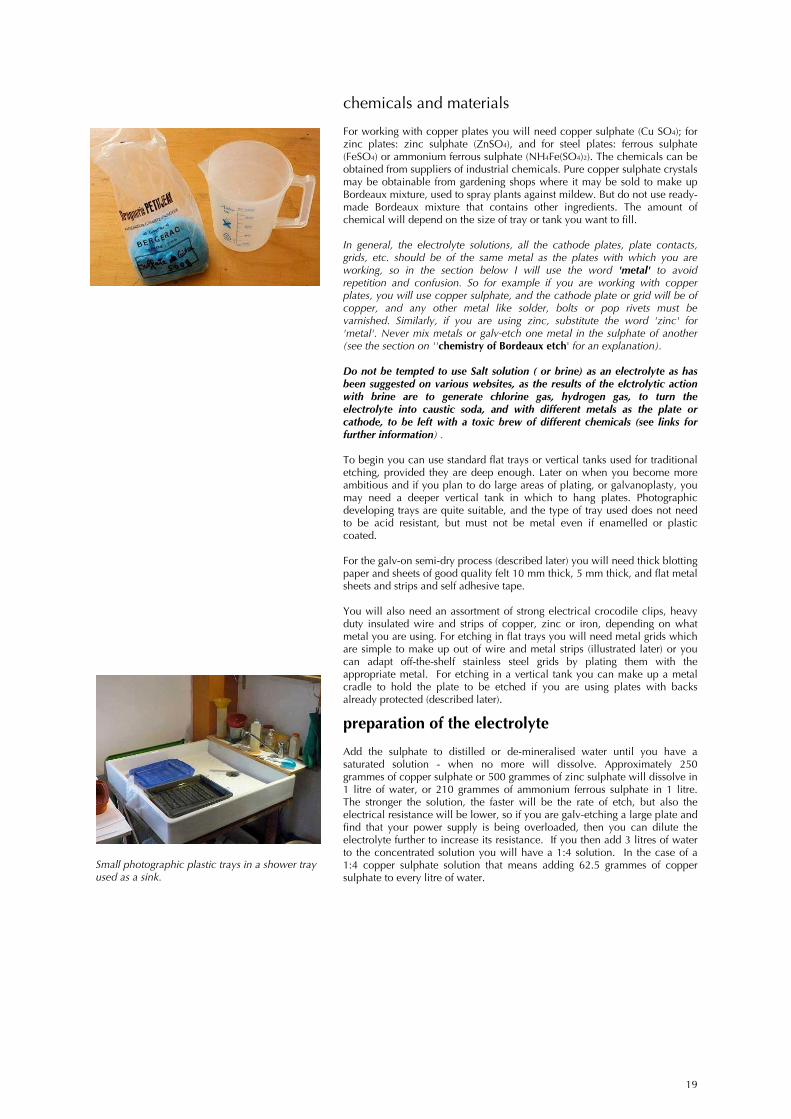
For working with copper plates you will need copper sulphate (Cu SO4); forzinc plates: zinc sulphate (ZnSO4), and for steel plates: ferrous sulphate(FeSO4) or ammonium ferrous sulphate (NH4Fe(SO4)2). The chemicals can beobtained from suppliers of industrial chemicals. Pure copper sulphate crystalsmay be obtainable from gardening shops where it may be sold to make upBordeaux mixture, used to spray plants against mildew. But do not use ready-made Bordeaux mixture that contains other ingredients. The amount ofchemical will depend on the size of tray or tank you want to fill.
In general, the electrolyte solutions, all the cathode plates, plate contacts,grids, etc. should be of the same metal as the plates with which you areworking, so in the section below I will use the word 'metal' to avoidrepetition and confusion. So for example if you are working with copperplates, you will use copper sulphate, and the cathode plate or grid will be ofcopper, and any other metal like solder, bolts or pop rivets must bevarnished. Similarly, if you are using zinc, substitute the word 'zinc' for'metal'. Never mix metals or galv-etch one metal in the sulphate of another(see the section on ''chemistry of Bordeaux etch' for an explanation).
Do not be tempted to use Salt solution ( or brine) as an electrolyte as hasbeen suggested on various websites, as the results of the elctrolytic actionwith brine are to generate chlorine gas, hydrogen gas, to turn theelectrolyte into caustic soda, and with different metals as the plate orcathode, to be left with a toxic brew of different chemicals (see links forfurther information) .
To begin you can use standard flat trays or vertical tanks used for traditionaletching, provided they are deep enough. Later on when you become moreambitious and if you plan to do large areas of plating, or galvanoplasty, youmay need a deeper vertical tank in which to hang plates. Photographicdeveloping trays are quite suitable, and the type of tray used does not needto be acid resistant, but must not be metal even if enamelled or plasticcoated.
For the galv-on semi-dry process (described later) you will need thick blottingpaper and sheets of good quality felt 10 mm thick, 5 mm thick, and flat metalsheets and strips and self adhesive tape.
You will also need an assortment of strong electrical crocodile clips, heavyduty insulated wire and strips of copper, zinc or iron, depending on whatmetal you are using. For etching in flat trays you will need metal grids whichare simple to make up out of wire and metal strips (illustrated later) or youcan adapt off-the-shelf stainless steel grids by plating them with theappropriate metal. For etching in a vertical tank you can make up a metalcradle to hold the plate to be etched if you are using plates with backsalready protected (described later).
preparation of the electrolyte
Add the sulphate to distilled or de-mineralised water until you have asaturated solution - when no more will dissolve. Approximately 250grammes of copper sulphate or 500 grammes of zinc sulphate will dissolve in1 litre of water, or 210 grammes of ammonium ferrous sulphate in 1 litre.The stronger the solution, the faster will be the rate of etch, but also theelectrical resistance will be lower, so if you are galv-etching a large plate andfind that your power supply is being overloaded, then you can dilute theelectrolyte further to increase its resistance. If you then add 3 litres of waterto the concentrated solution you will have a 1:4 solution. In the case of a1:4 copper sulphate solution that means adding 62.5 grammes of coppersulphate to every litre of water.
Small photographic plastic trays in a shower trayused as a sink.

20
plate contacts
The simplest way of making a contact for a plate to be etched, is to tape oneor two thin flat metal strips to the back of the plate to be etched. Cut a pieceof self-adhesive plastic sheet the size of the plate and put the flat strip againstthe back of the plate and then stick the plastic sheet over it. This way theback of the plate can be protected against being lightly etched. The flat stripcan be bent up to sit clear of the electrolyte and the crocodile clip fixed to it.The strip also helps you lift the plate out of the solution and carry it around
backplate contacts
Another method you can use for making a contact with a plate to be galv-etched in a flat deep tray is to solder or tape a flat metal strip to a small flatplate of the same metal to lie on the bottom of the tray, which makes acontact with a bare area in the middle of the back of the plate. I will call thisa backplate contact from now on. The back of the backplate contact and itsstrap should be varnished or covered with plastic.
The back of the plate you are galv-etching need not be varnished, as theelectrolytic etching action is strongest on the face directly opposite thecathode. Only the edges and perhaps a strip around the edges need to beprotected. If you use plates with backs ready protected, in a flat tray, thenyou will have to use a cradle making contact with the bare edges of the plateas described later.
cathode grid
The method that I recommend for a flat deep tray is to use a grid for thecathode (-ve), made from wires or strips of metal soldered or mechanicallyfixed to a frame. The frame of the grid should be bent so that the wires of thegrid are just immersed in the surface of the electrolyte. The spacing of thewires should be slightly less than the distance from the grid to the plate. Astainless steel off-the-shelf grid can be used for galv-etching, as it will besoon plated with the metal. But it must be completely degreased and thecurrent turned on the moment it is immersed in the electrolyte or else it willbegin to be etched by copper sulphate (see Bordeaux Etch).
If you use the equipment for plating or galvanoplasty (creating a newnegative plate against a mould), or for depositing a dark tone onto an area,you will be removing a significant amount of metal from the grid (anode inthat case), then you will need a plate suspended to touch the electrolyte. Youcan use the standard grid with a plate the right size fixed below it with plasticself adhesive tape.
flat tray for galv-etching line or tint
To start with, if you are galv-etching plates that have been grounded andneedled, or fractinted, you can use a conventional flat etching tray. The trayneeds to be quite deep, at least 6 cms. If you have not got a tray deepenough, you can use the kind of plastic food storage trays sold insupermarkets, because the galv-etch solutions are not corrosive, and don'tneed the special materials required for acids. Don't use metal trays though,even if enameled, in case of electrical short circuits.
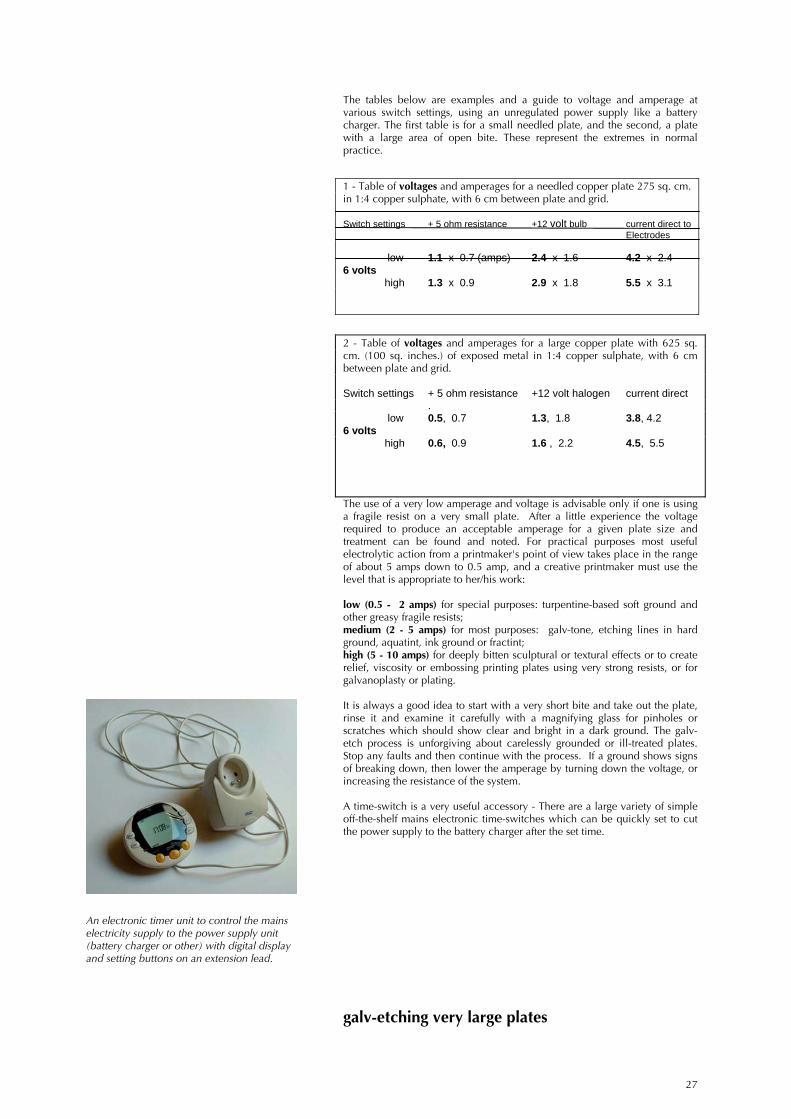
In order to calculate the time required to galv-etch you will need to"calibrate" the setup you are using - a process which is more fully describedin the section on 'times and tests'. For this you need a test plate with exactly100 square centimeters of exposed metal.
Copper cathode grid in plastic etching tray - 48x 36 cm. 6 cm. deep,
Above - self adhesive plastic tape laid overback of plate to fix copper contact strips.
Below - strip bent up to project out ofelectrolyte.
Copper backplate contact with copper stripbent up to project out of electrolyte - stripprotected by strong varnish.
21
vertical tank
The alternative to a deep tray is a tank in which plates can be hung verticallyfrom a bar or over the edge of the tank.. Vertical tanks are increasingly usedfor etching and most of them can be adapted for galv-etch if they havesufficient depth to hang the plate and the cathode opposite and parallel withabout 5 cm between them. Vertical tanks can be made for galv-etching fromlarge polypropylene or other plastic 'jerry cans' or water storage containerswith built -in taps as shown below. It is a good idea to have a tank with a tapa few centimeters above the bottom, in order occasionally to empty itwithout stirring up the deposit that eventually accumulates on the bottom.Using a vertical tank with sufficient depth is a much better way of doinggalvanoplasty or plating, but can be used for all purposes if it will take yourlargest plate.
supporting a plate in a vertical tank
If you wish to use a larger tank with the plate vertical, one way to suspend aplate and to provide a contact and protect the back is to cut a sheet of self-adhesive plastic sheet to the size of the plate and fix two thin strips of metalagainst the back of the plate. The strips can be bent over to hang over theedge of a vertical sided tank or to hang from a metal bar across the tank.Contact from the power supply can be made to the metal strips or to the endof the metal bar. If you are using plates with backs ready protected the platecan be held on a metal cradle hooked over the edge of the tank, made from abroad strip of the correct metal with the edge turned up on which to rest theplate with a bare area to make contact with an unvarnished area on the edgeor back of the plate.. All the metal bars, straps, clips, rivets etc. must be wellvarnished against being etched, just leaving the points of electrical contactwith the plate bare.
For the vertical tank make a cathode plate of the correct metal by solderingor taping thin metal straps to each end, to hang over the edge of the etchingbath. Alternatively a square plate with a long single strap can be used,which can be lowered into the tank to control the resistance. The cathodestrip or square should be able to hang opposite the centre of the plate and beparallel to it. If it is not, the galv-etch may not be even in depth. To stop thembeing etched and prolong their life, seal all the metal crocodile clips, backsof plates, bars, straps etc. with ethanol varnish, or a strong stop-out varnish,leaving bare only those areas to be in direct contact with the plate. A gridcathode can be used in a vertical tank as well, unless you are using it forplating or galvanoplasty.
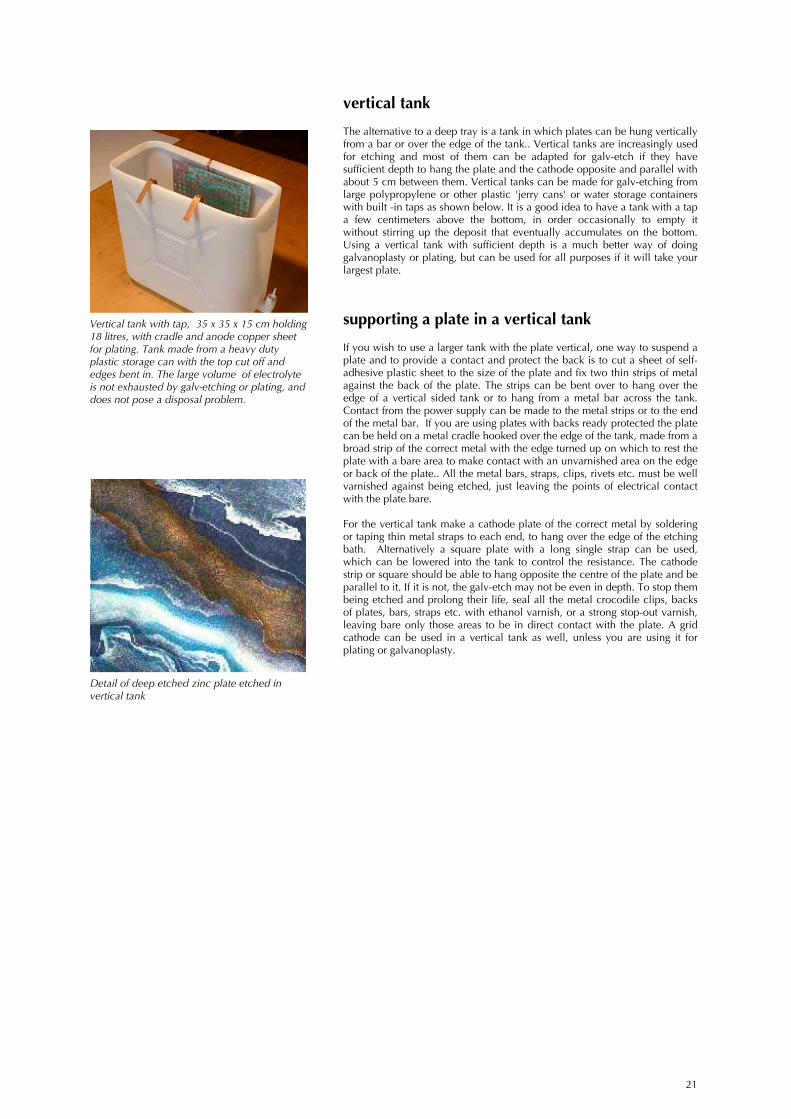
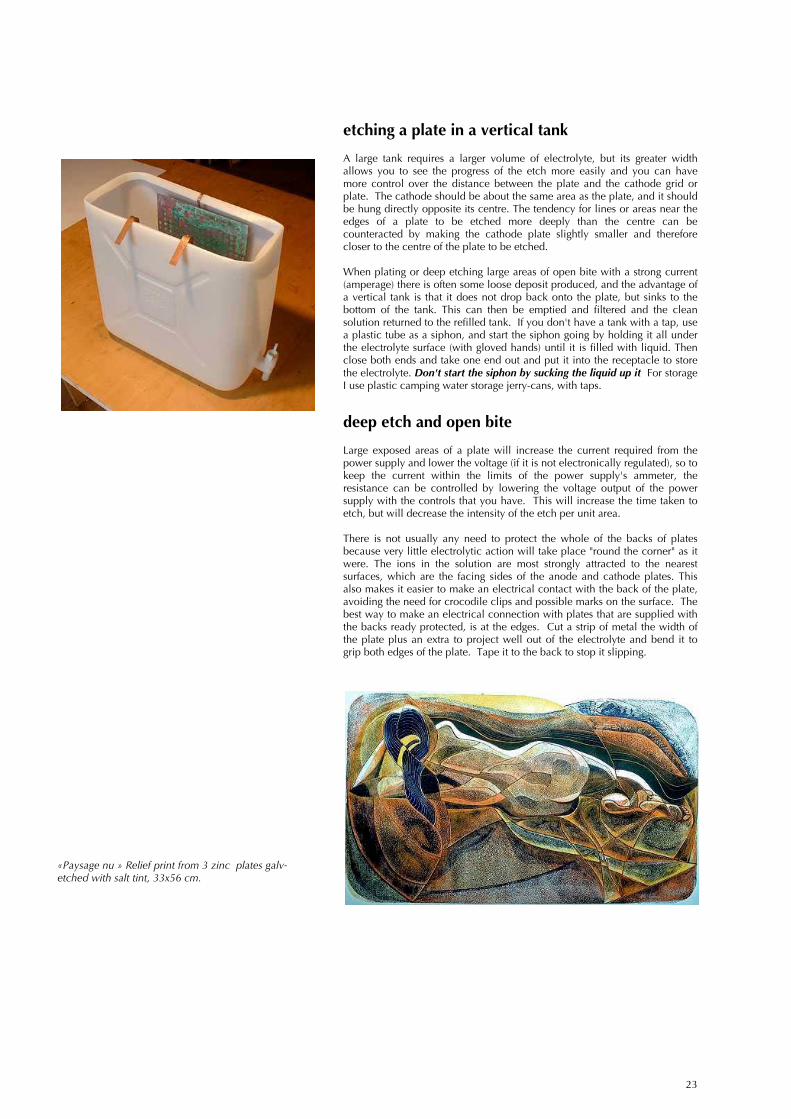
Vertical tank with tap, 35 x 35 x 15 cm holding18 litres, with cradle and anode copper sheetfor plating. Tank made from a heavy dutyplastic storage can with the top cut off andedges bent in. The large volume of electrolyteis not exhausted by galv-etching or plating, anddoes not pose a disposal problem.
Detail of deep etched zinc plate etched invertical tank
22
PROCEDURE IN GALV-ETCHusing a standard tray and grid system
Fill the tray with electrolyte to the height of the bottom of the grid and thenremove the grid. Lower the plate to be etched into the electrolyte by its stripcontacts. If you are using a backplate contact, put it into the tray with thestrip bent up at the right position for the edge of the plate, then lower theplate into the solution onto the centre of the backplate contact. Place the gridonto the tray, with its wires just immersed in the electrolyte. At this stagemake sure that the battery charger is switched off, either at the mains, or by aswitch or timeswitch on its output.
Attach the positive (red) terminal of the battery charger to the plate contactstrip or the backplate contact, and the negative (black) terminal to the grid orcathode. Check that you don't have any short circuits - leads, straps orcrocodile clips touching. Then switch on for a moment, and watch theammeter and voltmeter to check that the current and voltage are OK andnote the readings. If the needle goes off the scale, or the digital display showsabove 10 amps or 5 volts, switch off quickly, lower the voltage setting andtry again.
At this stage you may be calibrating your system with a test calibration plate,in which case follow the procedure detailed in the section on times andtests. If you are etching a prepared plate, calculate the time you need fromthe voltmeter readings (see section on times and tests). Then set the timeswitch, if you have one, leave it to etch for the required time. It is a good aidea to keep a record of what you have done on every plate.
If the ammeter reading is very high because the exposed area of your plate islarge, then the voltage should be lowered by switching it a lower setting, orthe resistance increased by switching in the control box described earlier, orby the other means described later (galv-etching very large plates).
An uneven bite can be caused by the cathode grid or plate not being parallelto the plate and opposite its centre. There is a slight tendency for edges tobite more deeply than the centre, which can be counteracted by having thecathode grid slightly smaller than the plate if you notice a problem. Narrowopen bite areas tend to bite more deeply than broad ones, something thatcan only be avoided by biting in short steps and stopping them out sooner.Similarly, isolated lines bite slightly more deeply than closely spacedhatching.
open bite or galvanoplasty in a flat tray
A flat tray can be used for plating or open bite provided that you have somemeans of controlling the surge of current caused by the very low resistance ofa plate with large areas of bare metal in the electrolyte. The control boxshown in the diagram earlier can be inexpensively made up from off-the-shelf components. Note that adding a resistance like this in series, has theeffect of reducing the voltage over the anode and cathode (see section ontimes and tests). For plating, a grid (which becomes the anode) is not ideal asit is etched away and a solid plate can be attached to the underside of thegrid.
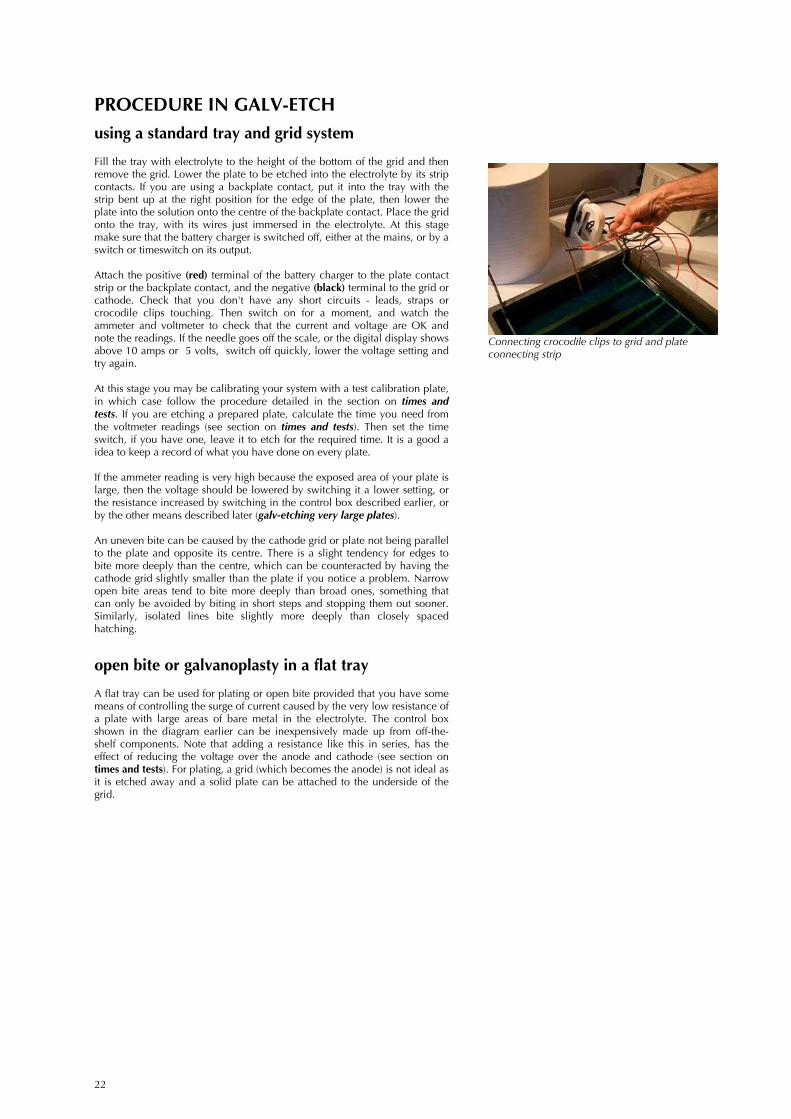
Connecting crocodile clips to grid and plateconnecting strip
23
etching a plate in a vertical tank
A large tank requires a larger volume of electrolyte, but its greater widthallows you to see the progress of the etch more easily and you can havemore control over the distance between the plate and the cathode grid orplate. The cathode should be about the same area as the plate, and it shouldbe hung directly opposite its centre. The tendency for lines or areas near theedges of a plate to be etched more deeply than the centre can becounteracted by making the cathode plate slightly smaller and thereforecloser to the centre of the plate to be etched.
When plating or deep etching large areas of open bite with a strong current(amperage) there is often some loose deposit produced, and the advantage ofa vertical tank is that it does not drop back onto the plate, but sinks to thebottom of the tank. This can then be emptied and filtered and the cleansolution returned to the refilled tank. If you don't have a tank with a tap, usea plastic tube as a siphon, and start the siphon going by holding it all underthe electrolyte surface (with gloved hands) until it is filled with liquid. Thenclose both ends and take one end out and put it into the receptacle to storethe electrolyte. Don't start the siphon by sucking the liquid up it For storageI use plastic camping water storage jerry-cans, with taps.
deep etch and open bite
Large exposed areas of a plate will increase the current required from thepower supply and lower the voltage (if it is not electronically regulated), so tokeep the current within the limits of the power supply's ammeter, theresistance can be controlled by lowering the voltage output of the powersupply with the controls that you have. This will increase the time taken toetch, but will decrease the intensity of the etch per unit area.
There is not usually any need to protect the whole of the backs of platesbecause very little electrolytic action will take place "round the corner" as itwere. The ions in the solution are most strongly attracted to the nearestsurfaces, which are the facing sides of the anode and cathode plates. Thisalso makes it easier to make an electrical contact with the back of the plate,avoiding the need for crocodile clips and possible marks on the surface. Thebest way to make an electrical connection with plates that are supplied withthe backs ready protected, is at the edges. Cut a strip of metal the width ofthe plate plus an extra to project well out of the electrolyte and bend it togrip both edges of the plate. Tape it to the back to stop it slipping.
«Paysage nu » Relief print from 3 zinc plates galv-etched with salt tint, 33x56 cm.
24
GALV-ON SEMI DRY METHODFor certain purposes - for etching a small portion of a large plate; forapplying a particular texture over an area without using fractint (see later) oraquatint or other alternatives - I have adapted a method that does not requireimmersion of the plate in the electrolyte, and therefore does not need a tray,grid, or vertical tank with cradles etc. The method is best suited as analternative to open bite, but it can be used to etch needled lines or tint, andis proving to be rich in new possibilities. I have called the new method“galv-on” as it expresses the way that it is done flat on a surface by forming asandwich of felt and other absorbent materials soaked in electrolyte on top ofthe plate to be etched, backed by a cathode plate.
For zinc, aluminium, or steel plates, I have developed a similar methodwhich does not require a power supply, because it uses Bordeaux etch(copper sulphate), without salt solution. If the sandwich is of zinc + coppersulphate + copper plate, it becomes a primitive battery and generates its owncurrent, and I have called this method Passive Galv-On (described in greaterdetail in Bordeaux Etch later).
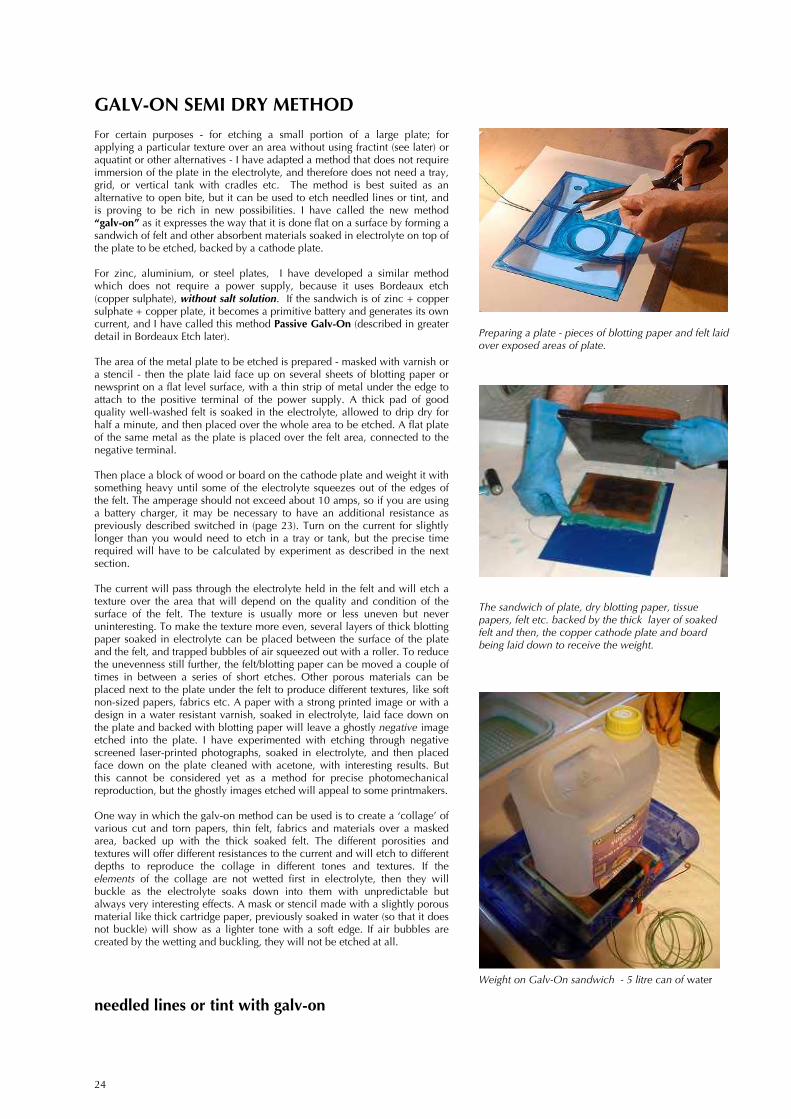
The area of the metal plate to be etched is prepared - masked with varnish ora stencil - then the plate laid face up on several sheets of blotting paper ornewsprint on a flat level surface, with a thin strip of metal under the edge toattach to the positive terminal of the power supply. A thick pad of goodquality well-washed felt is soaked in the electrolyte, allowed to drip dry forhalf a minute, and then placed over the whole area to be etched. A flat plateof the same metal as the plate is placed over the felt area, connected to thenegative terminal.
Then place a block of wood or board on the cathode plate and weight it withsomething heavy until some of the electrolyte squeezes out of the edges ofthe felt. The amperage should not exceed about 10 amps, so if you are usinga battery charger, it may be necessary to have an additional resistance aspreviously described switched in (page 23). Turn on the current for slightlylonger than you would need to etch in a tray or tank, but the precise timerequired will have to be calculated by experiment as described in the nextsection.
The current will pass through the electrolyte held in the felt and will etch atexture over the area that will depend on the quality and condition of thesurface of the felt. The texture is usually more or less uneven but neveruninteresting. To make the texture more even, several layers of thick blottingpaper soaked in electrolyte can be placed between the surface of the plateand the felt, and trapped bubbles of air squeezed out with a roller. To reducethe unevenness still further, the felt/blotting paper can be moved a couple oftimes in between a series of short etches. Other porous materials can beplaced next to the plate under the felt to produce different textures, like softnon-sized papers, fabrics etc. A paper with a strong printed image or with adesign in a water resistant varnish, soaked in electrolyte, laid face down onthe plate and backed with blotting paper will leave a ghostly negative imageetched into the plate. I have experimented with etching through negativescreened laser-printed photographs, soaked in electrolyte, and then placedface down on the plate cleaned with acetone, with interesting results. Butthis cannot be considered yet as a method for precise photomechanicalreproduction, but the ghostly images etched will appeal to some printmakers.
One way in which the galv-on method can be used is to create a ‘collage’ ofvarious cut and torn papers, thin felt, fabrics and materials over a maskedarea, backed up with the thick soaked felt. The different porosities andtextures will offer different resistances to the current and will etch to differentdepths to reproduce the collage in different tones and textures. If theelements of the collage are not wetted first in electrolyte, then they willbuckle as the electrolyte soaks down into them with unpredictable butalways very interesting effects. A mask or stencil made with a slightly porousmaterial like thick cartridge paper, previously soaked in water (so that it doesnot buckle) will show as a lighter tone with a soft edge. If air bubbles arecreated by the wetting and buckling, they will not be etched at all.
needled lines or tint with galv-on
Preparing a plate - pieces of blotting paper and felt laidover exposed areas of plate.
The sandwich of plate, dry blotting paper, tissuepapers, felt etc. backed by the thick layer of soakedfelt and then, the copper cathode plate and boardbeing laid down to receive the weight.
Weight on Galv-On sandwich - 5 litre can of water
25
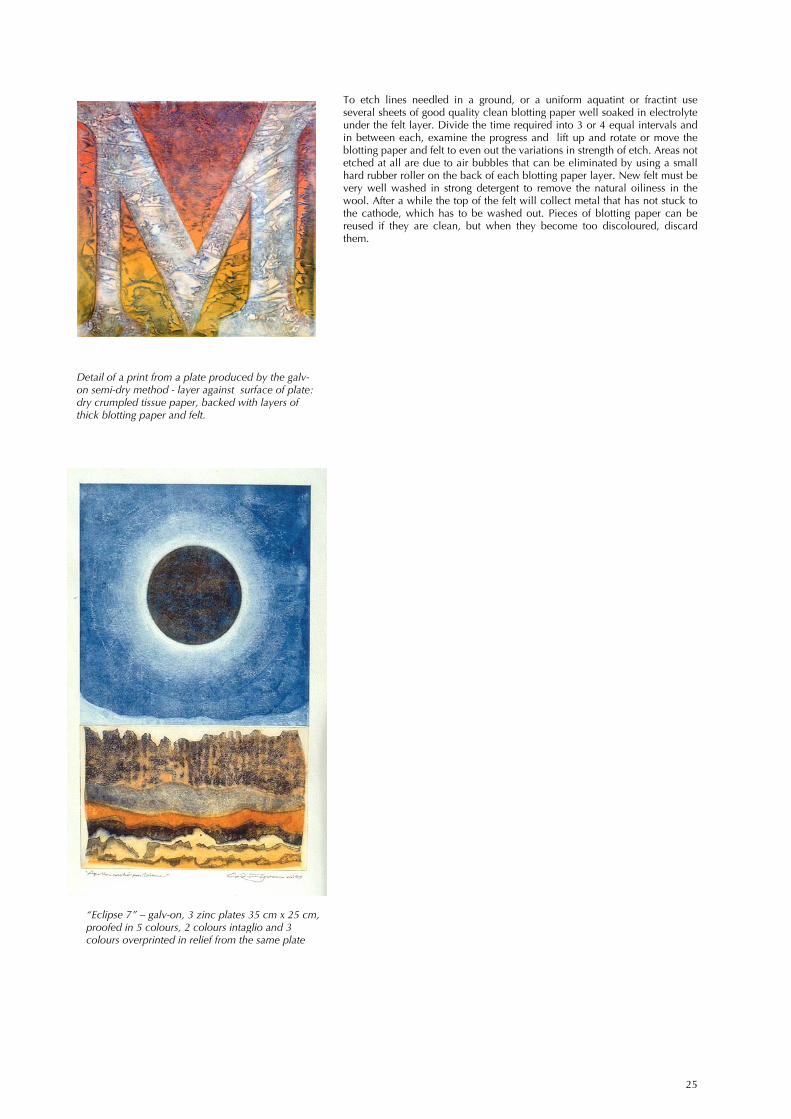
To etch lines needled in a ground, or a uniform aquatint or fractint useseveral sheets of good quality clean blotting paper well soaked in electrolyteunder the felt layer. Divide the time required into 3 or 4 equal intervals andin between each, examine the progress and lift up and rotate or move theblotting paper and felt to even out the variations in strength of etch. Areas notetched at all are due to air bubbles that can be eliminated by using a smallhard rubber roller on the back of each blotting paper layer. New felt must bevery well washed in strong detergent to remove the natural oiliness in thewool. After a while the top of the felt will collect metal that has not stuck tothe cathode, which has to be washed out. Pieces of blotting paper can bereused if they are clean, but when they become too discoloured, discardthem.
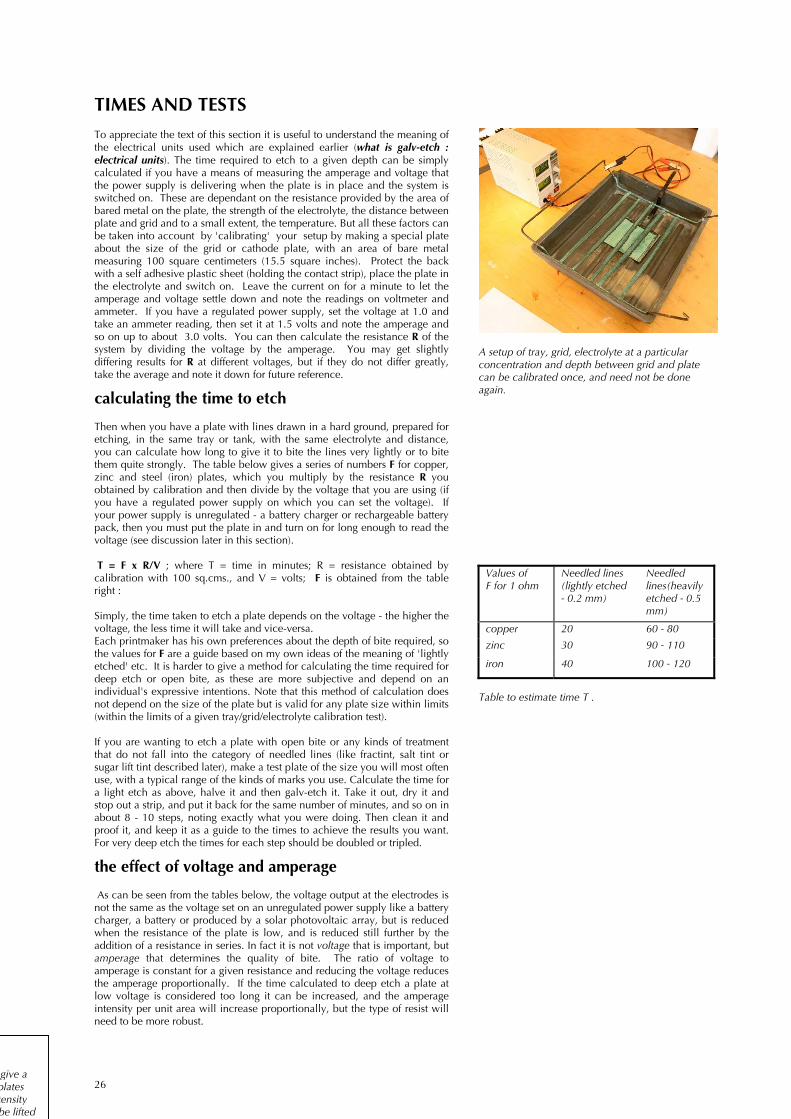
“Eclipse 7” – galv-on, 3 zinc plates 35 cm x 25 cm,proofed in 5 colours, 2 colours intaglio and 3colours overprinted in relief from the same plate
Detail of a print from a plate produced by the galv-on semi-dry method - layer against surface of plate:dry crumpled tissue paper, backed with layers ofthick blotting paper and felt.
26
TIMES AND TESTSTo appreciate the text of this section it is useful to understand the meaning ofthe electrical units used which are explained earlier (what is galv-etch :electrical units). The time required to etch to a given depth can be simplycalculated if you have a means of measuring the amperage and voltage thatthe power supply is delivering when the plate is in place and the system isswitched on. These are dependant on the resistance provided by the area ofbared metal on the plate, the strength of the electrolyte, the distance betweenplate and grid and to a small extent, the temperature. But all these factors canbe taken into account by 'calibrating' your setup by making a special plateabout the size of the grid or cathode plate, with an area of bare metalmeasuring 100 square centimeters (15.5 square inches). Protect the backwith a self adhesive plastic sheet (holding the contact strip), place the plate inthe electrolyte and switch on. Leave the current on for a minute to let theamperage and voltage settle down and note the readings on voltmeter andammeter. If you have a regulated power supply, set the voltage at 1.0 andtake an ammeter reading, then set it at 1.5 volts and note the amperage andso on up to about 3.0 volts. You can then calculate the resistance R of thesystem by dividing the voltage by the amperage. You may get slightlydiffering results for R at different voltages, but if they do not differ greatly,take the average and note it down for future reference.
calculating the time to etch
Then when you have a plate with lines drawn in a hard ground, prepared foretching, in the same tray or tank, with the same electrolyte and distance,you can calculate how long to give it to bite the lines very lightly or to bitethem quite strongly. The table below gives a series of numbers F for copper,zinc and steel (iron) plates, which you multiply by the resistance R youobtained by calibration and then divide by the voltage that you are using (ifyou have a regulated power supply on which you can set the voltage). Ifyour power supply is unregulated - a battery charger or rechargeable batterypack, then you must put the plate in and turn on for long enough to read thevoltage (see discussion later in this section).
T = F x R/V ; where T = time in minutes; R = resistance obtained bycalibration with 100 sq.cms., and V = volts; F is obtained from the tableright :
Simply, the time taken to etch a plate depends on the voltage - the higher thevoltage, the less time it will take and vice-versa.Each printmaker has his own preferences about the depth of bite required, sothe values for F are a guide based on my own ideas of the meaning of 'lightlyetched' etc. It is harder to give a method for calculating the time required fordeep etch or open bite, as these are more subjective and depend on anindividual's expressive intentions. Note that this method of calculation doesnot depend on the size of the plate but is valid for any plate size within limits(within the limits of a given tray/grid/electrolyte calibration test).
If you are wanting to etch a plate with open bite or any kinds of treatmentthat do not fall into the category of needled lines (like fractint, salt tint orsugar lift tint described later), make a test plate of the size you will most oftenuse, with a typical range of the kinds of marks you use. Calculate the time fora light etch as above, halve it and then galv-etch it. Take it out, dry it andstop out a strip, and put it back for the same number of minutes, and so on inabout 8 - 10 steps, noting exactly what you were doing. Then clean it andproof it, and keep it as a guide to the times to achieve the results you want.For very deep etch the times for each step should be doubled or tripled.
the effect of voltage and amperage
As can be seen from the tables below, the voltage output at the electrodes isnot the same as the voltage set on an unregulated power supply like a batterycharger, a battery or produced by a solar photovoltaic array, but is reducedwhen the resistance of the plate is low, and is reduced still further by theaddition of a resistance in series. In fact it is not voltage that is important, butamperage that determines the quality of bite. The ratio of voltage toamperage is constant for a given resistance and reducing the voltage reducesthe amperage proportionally. If the time calculated to deep etch a plate atlow voltage is considered too long it can be increased, and the amperageintensity per unit area will increase proportionally, but the type of resist willneed to be more robust.
Values ofF for 1 ohm
Needled lines(lightly etched- 0.2 mm)
Needledlines(heavilyetched - 0.5mm)
copper 20 60 - 80
zinc 30 90 - 110
iron 40 100 - 120
give aplatestensitybe lifted
A setup of tray, grid, electrolyte at a particularconcentration and depth between grid and platecan be calibrated once, and need not be doneagain.
Table to estimate time T .
27
The tables below are examples and a guide to voltage and amperage atvarious switch settings, using an unregulated power supply like a batterycharger. The first table is for a small needled plate, and the second, a platewith a large area of open bite. These represent the extremes in normalpractice.
The use of a very low amperage and voltage is advisable only if one is usinga fragile resist on a very small plate. After a little experience the voltagerequired to produce an acceptable amperage for a given plate size andtreatment can be found and noted. For practical purposes most usefulelectrolytic action from a printmaker's point of view takes place in the rangeof about 5 amps down to 0.5 amp, and a creative printmaker must use thelevel that is appropriate to her/his work:
low (0.5 - 2 amps) for special purposes: turpentine-based soft ground andother greasy fragile resists;medium (2 - 5 amps) for most purposes: galv-tone, etching lines in hardground, aquatint, ink ground or fractint;high (5 - 10 amps) for deeply bitten sculptural or textural effects or to createrelief, viscosity or embossing printing plates using very strong resists, or forgalvanoplasty or plating.
It is always a good idea to start with a very short bite and take out the plate,rinse it and examine it carefully with a magnifying glass for pinholes orscratches which should show clear and bright in a dark ground. The galv-etch process is unforgiving about carelessly grounded or ill-treated plates.Stop any faults and then continue with the process. If a ground shows signsof breaking down, then lower the amperage by turning down the voltage, orincreasing the resistance of the system.
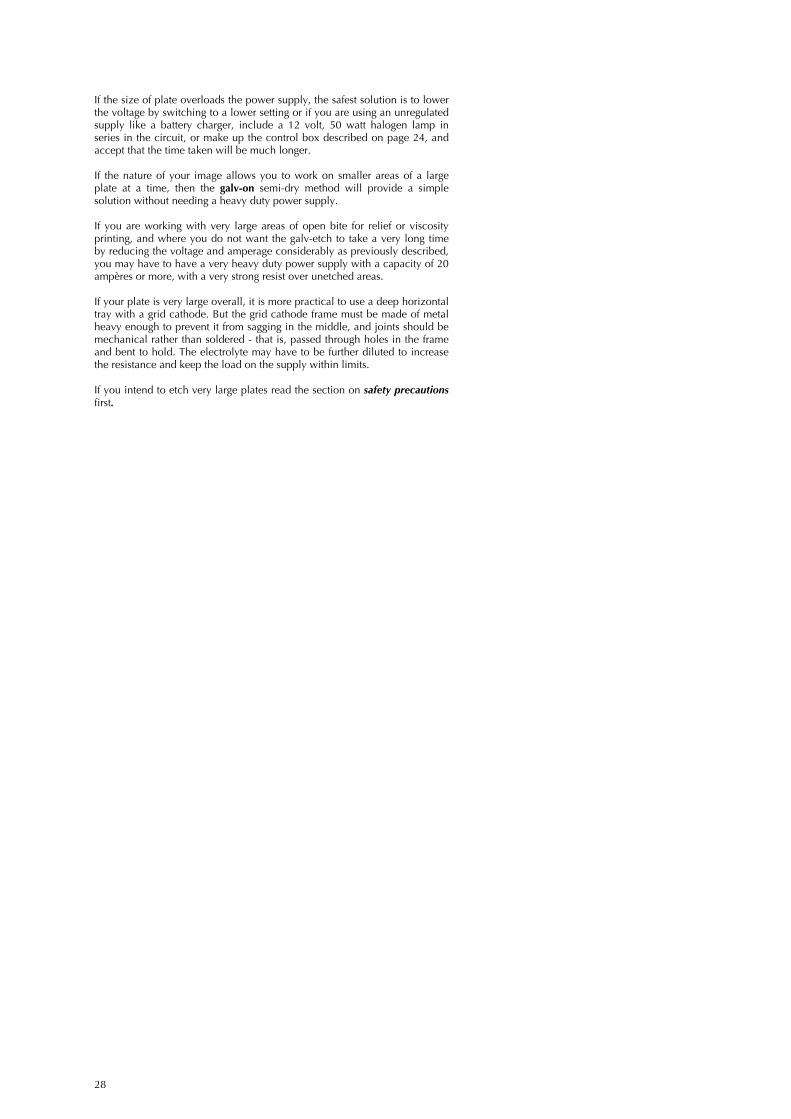
A time-switch is a very useful accessory - There are a large variety of simpleoff-the-shelf mains electronic time-switches which can be quickly set to cutthe power supply to the battery charger after the set time.
galv-etching very large plates
1 - Table of voltages and amperages for a needled copper plate 275 sq. cm.in 1:4 copper sulphate, with 6 cm between plate and grid.
Switch settings + 5 ohm resistance +12 volt bulb current direct toElectrodes
low 1.1 x 0.7 (amps) 2.4 x 1.6 4.2 x 2.46 volts
high 1.3 x 0.9 2.9 x 1.8 5.5 x 3.1
2 - Table of voltages and amperages for a large copper plate with 625 sq.cm. (100 sq. inches.) of exposed metal in 1:4 copper sulphate, with 6 cmbetween plate and grid.
Switch settings + 5 ohm resistance +12 volt halogen current direct . low 0.5, 0.7 1.3, 1.8 3.8, 4.26 volts
high 0.6, 0.9 1.6 , 2.2 4.5, 5.5
An electronic timer unit to control the mainselectricity supply to the power supply unit(battery charger or other) with digital displayand setting buttons on an extension lead.
28
If the size of plate overloads the power supply, the safest solution is to lowerthe voltage by switching to a lower setting or if you are using an unregulatedsupply like a battery charger, include a 12 volt, 50 watt halogen lamp inseries in the circuit, or make up the control box described on page 24, andaccept that the time taken will be much longer.
If the nature of your image allows you to work on smaller areas of a largeplate at a time, then the galv-on semi-dry method will provide a simplesolution without needing a heavy duty power supply.
If you are working with very large areas of open bite for relief or viscosityprinting, and where you do not want the galv-etch to take a very long timeby reducing the voltage and amperage considerably as previously described,you may have to have a very heavy duty power supply with a capacity of 20ampères or more, with a very strong resist over unetched areas.
If your plate is very large overall, it is more practical to use a deep horizontaltray with a grid cathode. But the grid cathode frame must be made of metalheavy enough to prevent it from sagging in the middle, and joints should bemechanical rather than soldered - that is, passed through holes in the frameand bent to hold. The electrolyte may have to be further diluted to increasethe resistance and keep the load on the supply within limits.
If you intend to etch very large plates read the section on safety precautionsfirst.
29
special effects
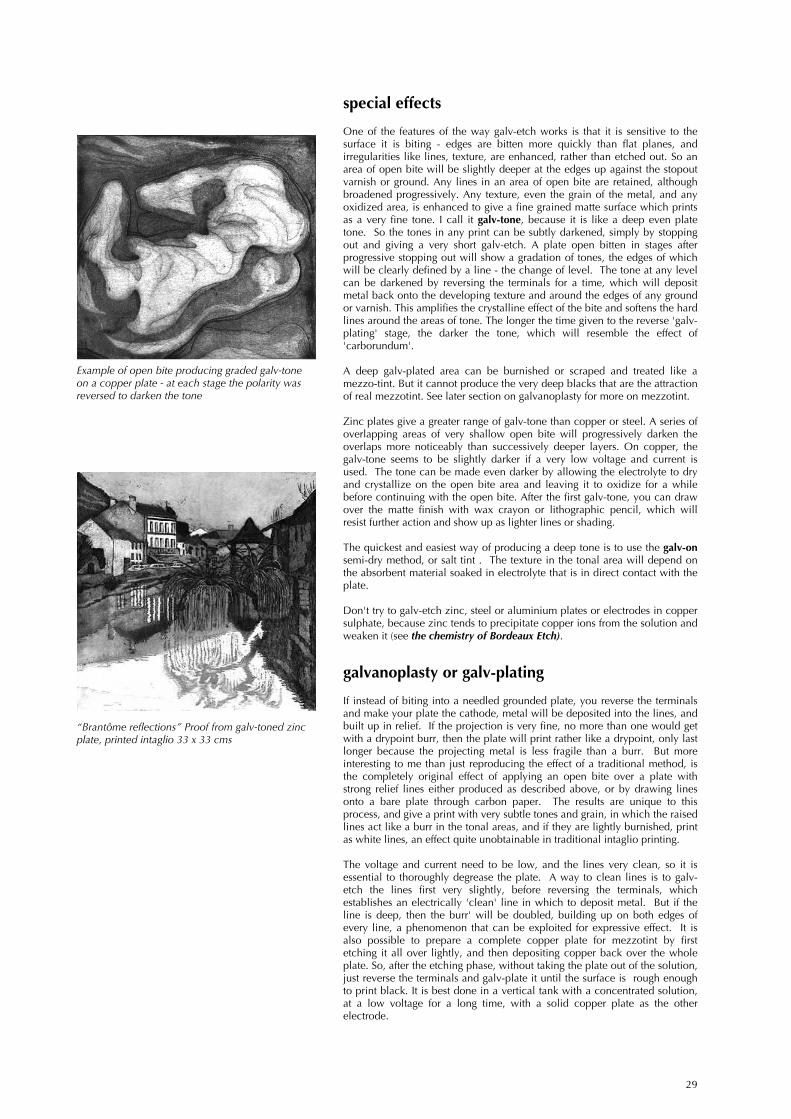
One of the features of the way galv-etch works is that it is sensitive to thesurface it is biting - edges are bitten more quickly than flat planes, andirregularities like lines, texture, are enhanced, rather than etched out. So anarea of open bite will be slightly deeper at the edges up against the stopoutvarnish or ground. Any lines in an area of open bite are retained, althoughbroadened progressively. Any texture, even the grain of the metal, and anyoxidized area, is enhanced to give a fine grained matte surface which printsas a very fine tone. I call it galv-tone, because it is like a deep even platetone. So the tones in any print can be subtly darkened, simply by stoppingout and giving a very short galv-etch. A plate open bitten in stages afterprogressive stopping out will show a gradation of tones, the edges of whichwill be clearly defined by a line - the change of level. The tone at any levelcan be darkened by reversing the terminals for a time, which will depositmetal back onto the developing texture and around the edges of any groundor varnish. This amplifies the crystalline effect of the bite and softens the hardlines around the areas of tone. The longer the time given to the reverse 'galv-plating' stage, the darker the tone, which will resemble the effect of'carborundum'.
A deep galv-plated area can be burnished or scraped and treated like amezzo-tint. But it cannot produce the very deep blacks that are the attractionof real mezzotint. See later section on galvanoplasty for more on mezzotint.
Zinc plates give a greater range of galv-tone than copper or steel. A series ofoverlapping areas of very shallow open bite will progressively darken theoverlaps more noticeably than successively deeper layers. On copper, thegalv-tone seems to be slightly darker if a very low voltage and current isused. The tone can be made even darker by allowing the electrolyte to dryand crystallize on the open bite area and leaving it to oxidize for a whilebefore continuing with the open bite. After the first galv-tone, you can drawover the matte finish with wax crayon or lithographic pencil, which willresist further action and show up as lighter lines or shading.
The quickest and easiest way of producing a deep tone is to use the galv-onsemi-dry method, or salt tint . The texture in the tonal area will depend onthe absorbent material soaked in electrolyte that is in direct contact with theplate.
Don't try to galv-etch zinc, steel or aluminium plates or electrodes in coppersulphate, because zinc tends to precipitate copper ions from the solution andweaken it (see the chemistry of Bordeaux Etch).
galvanoplasty or galv-plating
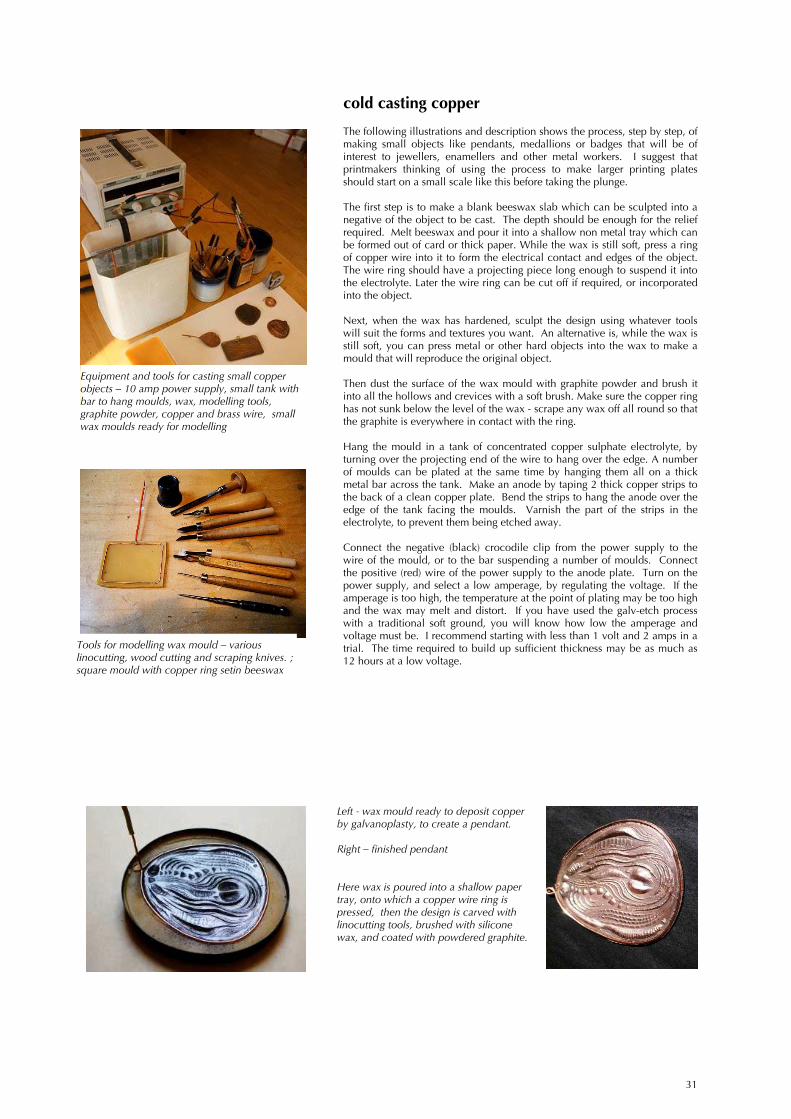
If instead of biting into a needled grounded plate, you reverse the terminalsand make your plate the cathode, metal will be deposited into the lines, andbuilt up in relief. If the projection is very fine, no more than one would getwith a drypoint burr, then the plate will print rather like a drypoint, only lastlonger because the projecting metal is less fragile than a burr. But moreinteresting to me than just reproducing the effect of a traditional method, isthe completely original effect of applying an open bite over a plate withstrong relief lines either produced as described above, or by drawing linesonto a bare plate through carbon paper. The results are unique to thisprocess, and give a print with very subtle tones and grain, in which the raisedlines act like a burr in the tonal areas, and if they are lightly burnished, printas white lines, an effect quite unobtainable in traditional intaglio printing.
The voltage and current need to be low, and the lines very clean, so it isessential to thoroughly degrease the plate. A way to clean lines is to galv-etch the lines first very slightly, before reversing the terminals, whichestablishes an electrically 'clean' line in which to deposit metal. But if theline is deep, then the burr' will be doubled, building up on both edges ofevery line, a phenomenon that can be exploited for expressive effect. It isalso possible to prepare a complete copper plate for mezzotint by firstetching it all over lightly, and then depositing copper back over the wholeplate. So, after the etching phase, without taking the plate out of the solution,just reverse the terminals and galv-plate it until the surface is rough enoughto print black. It is best done in a vertical tank with a concentrated solution,at a low voltage for a long time, with a solid copper plate as the otherelectrode.
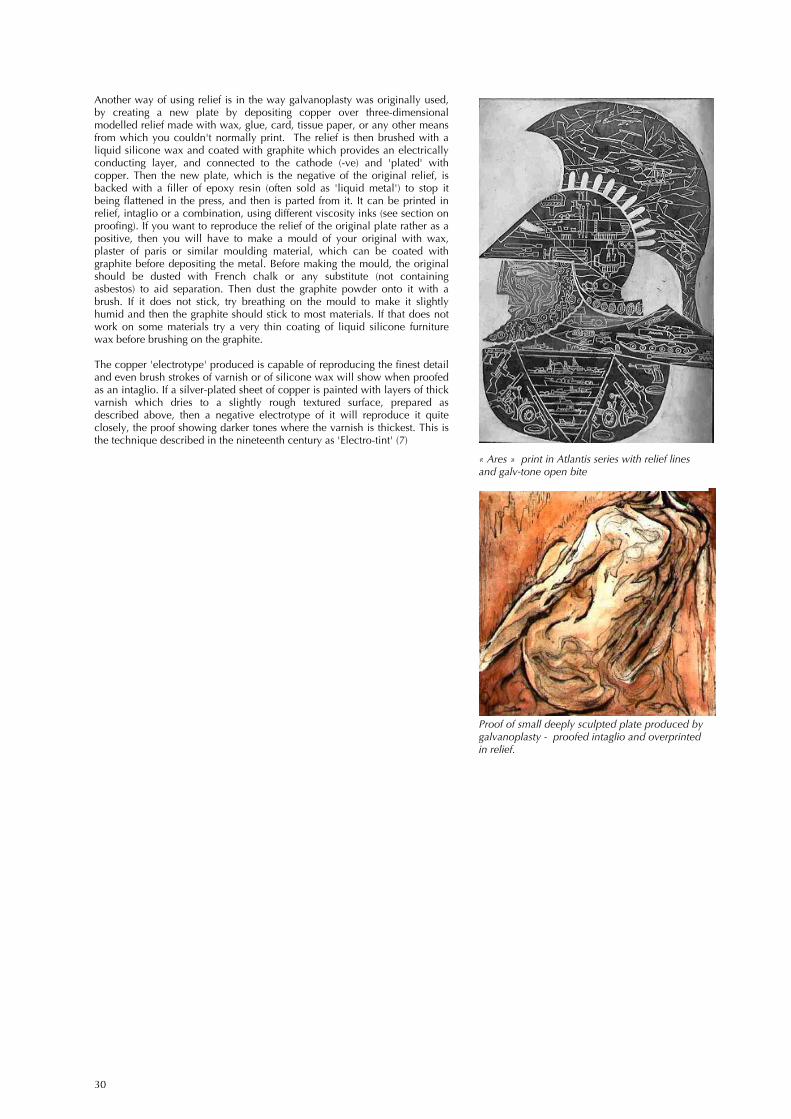
“Brantôme reflections” Proof from galv-toned zincplate, printed intaglio 33 x 33 cms
Example of open bite producing graded galv-toneon a copper plate - at each stage the polarity wasreversed to darken the tone
30
Another way of using relief is in the way galvanoplasty was originally used,by creating a new plate by depositing copper over three-dimensionalmodelled relief made with wax, glue, card, tissue paper, or any other meansfrom which you couldn't normally print. The relief is then brushed with aliquid silicone wax and coated with graphite which provides an electricallyconducting layer, and connected to the cathode (-ve) and 'plated' withcopper. Then the new plate, which is the negative of the original relief, isbacked with a filler of epoxy resin (often sold as 'liquid metal') to stop itbeing flattened in the press, and then is parted from it. It can be printed inrelief, intaglio or a combination, using different viscosity inks (see section onproofing). If you want to reproduce the relief of the original plate rather as apositive, then you will have to make a mould of your original with wax,plaster of paris or similar moulding material, which can be coated withgraphite before depositing the metal. Before making the mould, the originalshould be dusted with French chalk or any substitute (not containingasbestos) to aid separation. Then dust the graphite powder onto it with abrush. If it does not stick, try breathing on the mould to make it slightlyhumid and then the graphite should stick to most materials. If that does notwork on some materials try a very thin coating of liquid silicone furniturewax before brushing on the graphite.
The copper 'electrotype' produced is capable of reproducing the finest detailand even brush strokes of varnish or of silicone wax will show when proofedas an intaglio. If a silver-plated sheet of copper is painted with layers of thickvarnish which dries to a slightly rough textured surface, prepared asdescribed above, then a negative electrotype of it will reproduce it quiteclosely, the proof showing darker tones where the varnish is thickest. This isthe technique described in the nineteenth century as 'Electro-tint' (7)
Proof of small deeply sculpted plate produced bygalvanoplasty - proofed intaglio and overprintedin relief.
« Ares » print in Atlantis series with relief linesand galv-tone open bite
31
cold casting copper
The following illustrations and description shows the process, step by step, ofmaking small objects like pendants, medallions or badges that will be ofinterest to jewellers, enamellers and other metal workers. I suggest thatprintmakers thinking of using the process to make larger printing platesshould start on a small scale like this before taking the plunge.
The first step is to make a blank beeswax slab which can be sculpted into anegative of the object to be cast. The depth should be enough for the reliefrequired. Melt beeswax and pour it into a shallow non metal tray which canbe formed out of card or thick paper. While the wax is still soft, press a ringof copper wire into it to form the electrical contact and edges of the object.The wire ring should have a projecting piece long enough to suspend it intothe electrolyte. Later the wire ring can be cut off if required, or incorporatedinto the object.
Next, when the wax has hardened, sculpt the design using whatever toolswill suit the forms and textures you want. An alternative is, while the wax isstill soft, you can press metal or other hard objects into the wax to make amould that will reproduce the original object.
Then dust the surface of the wax mould with graphite powder and brush itinto all the hollows and crevices with a soft brush. Make sure the copper ringhas not sunk below the level of the wax - scrape any wax off all round so thatthe graphite is everywhere in contact with the ring.
Hang the mould in a tank of concentrated copper sulphate electrolyte, byturning over the projecting end of the wire to hang over the edge. A numberof moulds can be plated at the same time by hanging them all on a thickmetal bar across the tank. Make an anode by taping 2 thick copper strips tothe back of a clean copper plate. Bend the strips to hang the anode over theedge of the tank facing the moulds. Varnish the part of the strips in theelectrolyte, to prevent them being etched away.
Connect the negative (black) crocodile clip from the power supply to thewire of the mould, or to the bar suspending a number of moulds. Connectthe positive (red) wire of the power supply to the anode plate. Turn on thepower supply, and select a low amperage, by regulating the voltage. If theamperage is too high, the temperature at the point of plating may be too highand the wax may melt and distort. If you have used the galv-etch processwith a traditional soft ground, you will know how low the amperage andvoltage must be. I recommend starting with less than 1 volt and 2 amps in atrial. The time required to build up sufficient thickness may be as much as12 hours at a low voltage.
Equipment and tools for casting small copperobjects – 10 amp power supply, small tank withbar to hang moulds, wax, modelling tools,graphite powder, copper and brass wire, smallwax moulds ready for modelling
Tools for modelling wax mould – variouslinocutting, wood cutting and scraping knives. ;square mould with copper ring setin beeswax
Left - wax mould ready to deposit copperby galvanoplasty, to create a pendant.
Right – finished pendant
Here wax is poured into a shallow papertray, onto which a copper wire ring ispressed, then the design is carved withlinocutting tools, brushed with siliconewax, and coated with powdered graphite.
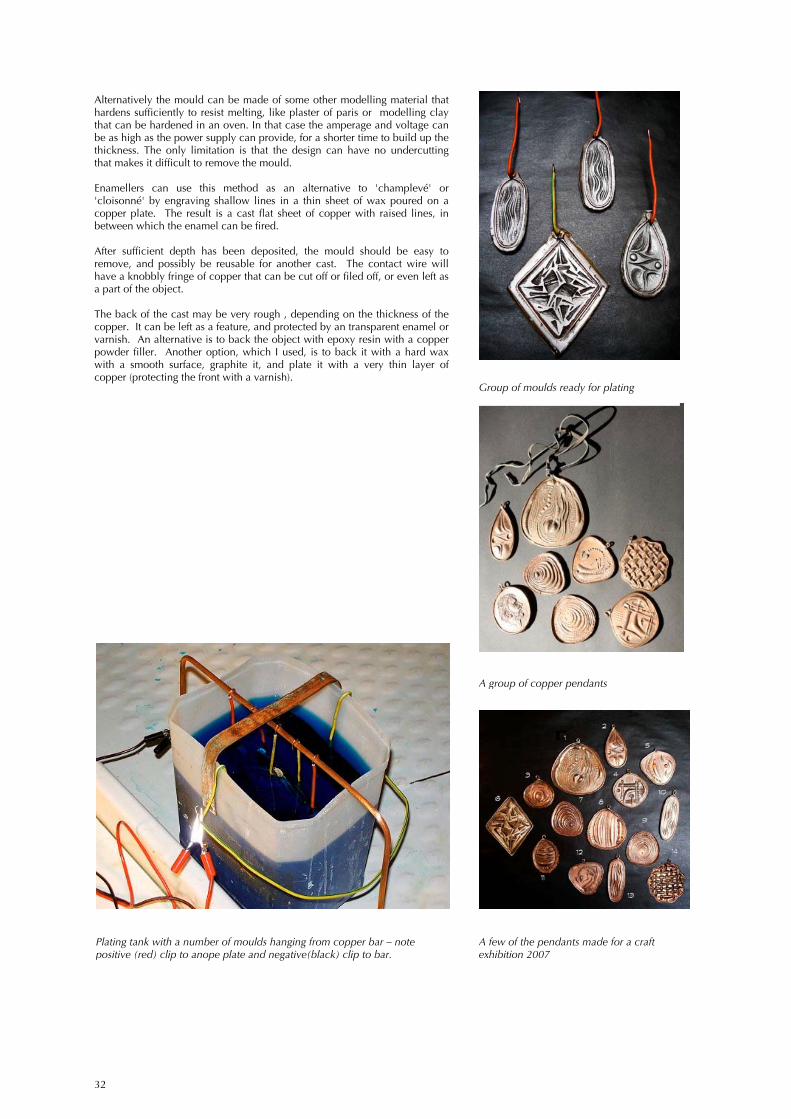
32
Alternatively the mould can be made of some other modelling material thathardens sufficiently to resist melting, like plaster of paris or modelling claythat can be hardened in an oven. In that case the amperage and voltage canbe as high as the power supply can provide, for a shorter time to build up thethickness. The only limitation is that the design can have no undercuttingthat makes it difficult to remove the mould.
Enamellers can use this method as an alternative to 'champlevé' or'cloisonné' by engraving shallow lines in a thin sheet of wax poured on acopper plate. The result is a cast flat sheet of copper with raised lines, inbetween which the enamel can be fired.
After sufficient depth has been deposited, the mould should be easy toremove, and possibly be reusable for another cast. The contact wire willhave a knobbly fringe of copper that can be cut off or filed off, or even left asa part of the object.
The back of the cast may be very rough , depending on the thickness of thecopper. It can be left as a feature, and protected by an transparent enamel orvarnish. An alternative is to back the object with epoxy resin with a copperpowder filler. Another option, which I used, is to back it with a hard waxwith a smooth surface, graphite it, and plate it with a very thin layer ofcopper (protecting the front with a varnish).
Group of moulds ready for plating
A group of copper pendants
Plating tank with a number of moulds hanging from copper bar – notepositive (red) clip to anope plate and negative(black) clip to bar.
A few of the pendants made for a craftexhibition 2007
33
The area where you do galv-etch should be free of solventfumes of any kind (as the whole working space shouldbe). Make sure all your electrical connections from powersupply to the mains are correctly made and that the wholesystem is protected by a mains switch which is easilyaccessible. If you are using a time switch on the mainsinput, it should be switched on the input.
On the low voltage direct current output from the powersupply (battery charger) you will usually find a pair oflarge crocodile clips, the positive on a red wire, negativeon a black wire. While the system is not in use clip theseboth to an insulating strip of plastic or card so that theycannot touch accidentally.
When you are preparing to start a galv-etch, put the plateon its back plate contact or cradle, and place the grid orplate/strip cathode into the electrolyte and make all theconnections before switching on. Do not make or unclipany connection while the current is flowing or you maycreate a spark - if you have to stop the etch quickly, turnoff at the mains switch or switch from the battery.
Take great care using a flat tray with a grid cathode, anddo not try to control the current by lowering the grid intothe electrolyte. If you are using a vertical tank andlowering the cathode into the electrolyte to control theresistance, start off with it just touching the surface andclipped to the side, switch on and then unclip it, loweringit slowly while watching the ammeter, and re-clip it whenthe right level is reached. To avoid an uneven depth ofetch, check that the immersed part of the cathode isopposite the centre of the plate.
If the power supply is overloaded, switch off quickly andfirst check that you don't have a short circuit somewhere -a plate bar strap touching a grid support for instance. Ifnot, use a diluted electrolyte, a different power supply likea rechargeable battery or solar cell array, or include aresistance like a 12 volt lamp in series in the circuit, or acontrol box as shown in Equipment. Note that adding aresistance reduces the voltage and produces a more gentlegalv-etch that takes much longer.
If you use a lead acid rechargeable battery (6 volt motorcycle battery) you must have very heavy duty connectingwires - I recommend car jump leads to be on the safe side.Wire a mains switch into the positive (red) lead.Galvanoplasty or galv-plating puts a much heavier load onthe power supply, partly because the cathode - this timethe plate on which you will be depositing metal (-ve) - willprobably have a large conducting surface, and if so, theanode (+ve) must be a plate and not a grid.
If the rate of etch seems too fast or vigorous, include aresistance like a 12 volt halogen lamp in series in thecircuit, or make up and use the control box (shown inEquipment) with a 12 volt 50 watt lamp, and a 50 watt, 5ohm variable resistance, a 2-way switch, and voltmeterand ammeter, which can be used to regulate theamperage and voltage output from the battery or otherunregulated power supply. Note that when this controlbox is used it reduces the voltage and the amperage, andin consequence a longer time is required for the galv-etch,which may be necessary if you are using traditional softground or producing textures by pressing oily materialsonto a bare plate.
At any time that your hands might be in contact with theelectrolyte, wear thin waterproof gloves because thesulphate solutions are slightly acidic, and in particular withzinc sulphate, take care to avoid any contact with skin oreyes, and keep all the solutions out of the reach ofchildren Store it in a safe place, well labelled to avoidanyone having an accident or drinking it, as it is a clearliquid. No special precautions are required for coppersulphate, except perhaps wearing gloves to protect theskin from drying out and staining blue.
Before lifting a grid cathode or the etched plate out of thegalv-etch tray, make sure the current is off - cut by thetimeswitch or off at the mains. If using a battery chargeror mains rectified power supply, when you have finishedwork, switch off the mains supply to the unit. If you areusing a battery, remove the leads from the terminals ofthe battery.
precautions in using galv-etch
A special warning is added here about using salt solution (brine) as an electrolyte because a number of books and recentwebsites have suggested using salt or adding salt to electrolytes. Using brine as an electrolyte generates chlorine gas,hydrogen gas, and produces caustic soda. Different toxic chemicals are produced when etching metals like zinc,aluminium, and steel. Free copper deposit produced by etching zinc plates in saline sulphate etch forms a 'zinc coppercouple' which generates a current and produces chlorine, hydrogen and caustic soda. Free chlorine and hydrogen gas in aconfined space like a covered etching tray can form an explosive mixture. If the chlorine gas is not channelled andcollected, but mixes freely with the caustic soda, then sodium chlorate is produced . Sodium chlorate is a very toxicchemical banned since 2008 in the European Union where it was used as a powerful weed killer. (see the links page forthe websites giving further information about the processes of electrolysis of brine) .
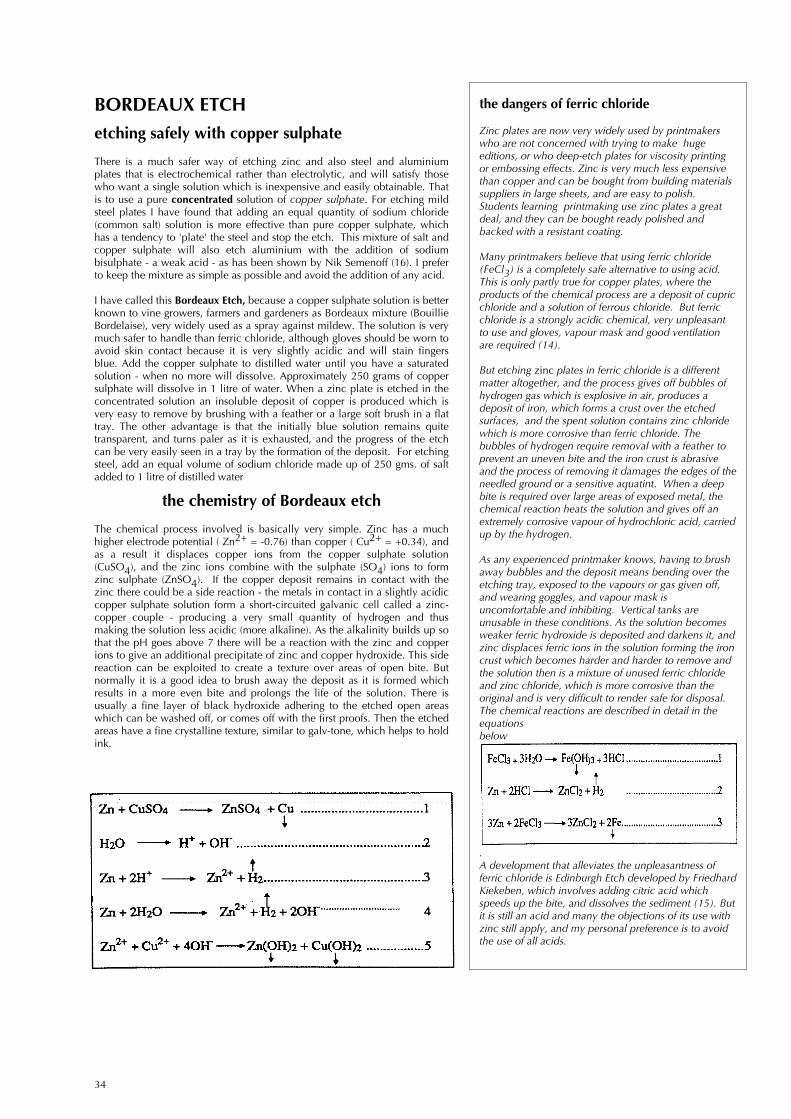
34
BORDEAUX ETCHetching safely with copper sulphate
There is a much safer way of etching zinc and also steel and aluminiumplates that is electrochemical rather than electrolytic, and will satisfy thosewho want a single solution which is inexpensive and easily obtainable. Thatis to use a pure concentrated solution of copper sulphate. For etching mildsteel plates I have found that adding an equal quantity of sodium chloride(common salt) solution is more effective than pure copper sulphate, whichhas a tendency to 'plate' the steel and stop the etch. This mixture of salt andcopper sulphate will also etch aluminium with the addition of sodiumbisulphate - a weak acid - as has been shown by Nik Semenoff (16). I preferto keep the mixture as simple as possible and avoid the addition of any acid.
I have called this Bordeaux Etch, because a copper sulphate solution is betterknown to vine growers, farmers and gardeners as Bordeaux mixture (BouillieBordelaise), very widely used as a spray against mildew. The solution is verymuch safer to handle than ferric chloride, although gloves should be worn toavoid skin contact because it is very slightly acidic and will stain fingersblue. Add the copper sulphate to distilled water until you have a saturatedsolution - when no more will dissolve. Approximately 250 grams of coppersulphate will dissolve in 1 litre of water. When a zinc plate is etched in theconcentrated solution an insoluble deposit of copper is produced which isvery easy to remove by brushing with a feather or a large soft brush in a flattray. The other advantage is that the initially blue solution remains quitetransparent, and turns paler as it is exhausted, and the progress of the etchcan be very easily seen in a tray by the formation of the deposit. For etchingsteel, add an equal volume of sodium chloride made up of 250 gms. of saltadded to 1 litre of distilled water
the chemistry of Bordeaux etch
The chemical process involved is basically very simple. Zinc has a muchhigher electrode potential ( Zn2+ = -0.76) than copper ( Cu2+ = +0.34), andas a result it displaces copper ions from the copper sulphate solution(CuSO4), and the zinc ions combine with the sulphate (SO4) ions to formzinc sulphate (ZnSO4). If the copper deposit remains in contact with thezinc there could be a side reaction - the metals in contact in a slightly acidiccopper sulphate solution form a short-circuited galvanic cell called a zinc-copper couple - producing a very small quantity of hydrogen and thusmaking the solution less acidic (more alkaline). As the alkalinity builds up sothat the pH goes above 7 there will be a reaction with the zinc and copperions to give an additional precipitate of zinc and copper hydroxide. This sidereaction can be exploited to create a texture over areas of open bite. Butnormally it is a good idea to brush away the deposit as it is formed whichresults in a more even bite and prolongs the life of the solution. There isusually a fine layer of black hydroxide adhering to the etched open areaswhich can be washed off, or comes off with the first proofs. Then the etchedareas have a fine crystalline texture, similar to galv-tone, which helps to holdink.
the dangers of ferric chloride
Zinc plates are now very widely used by printmakerswho are not concerned with trying to make hugeeditions, or who deep-etch plates for viscosity printingor embossing effects. Zinc is very much less expensivethan copper and can be bought from building materialssuppliers in large sheets, and are easy to polish.Students learning printmaking use zinc plates a greatdeal, and they can be bought ready polished andbacked with a resistant coating.
Many printmakers believe that using ferric chloride(FeCl3) is a completely safe alternative to using acid.This is only partly true for copper plates, where theproducts of the chemical process are a deposit of cupricchloride and a solution of ferrous chloride. But ferricchloride is a strongly acidic chemical, very unpleasantto use and gloves, vapour mask and good ventilationare required (14).
But etching zinc plates in ferric chloride is a differentmatter altogether, and the process gives off bubbles ofhydrogen gas which is explosive in air, produces adeposit of iron, which forms a crust over the etchedsurfaces, and the spent solution contains zinc chloridewhich is more corrosive than ferric chloride. Thebubbles of hydrogen require removal with a feather toprevent an uneven bite and the iron crust is abrasiveand the process of removing it damages the edges of theneedled ground or a sensitive aquatint. When a deepbite is required over large areas of exposed metal, thechemical reaction heats the solution and gives off anextremely corrosive vapour of hydrochloric acid, carriedup by the hydrogen.
As any experienced printmaker knows, having to brushaway bubbles and the deposit means bending over theetching tray, exposed to the vapours or gas given off,and wearing goggles, and vapour mask isuncomfortable and inhibiting. Vertical tanks areunusable in these conditions. As the solution becomesweaker ferric hydroxide is deposited and darkens it, andzinc displaces ferric ions in the solution forming the ironcrust which becomes harder and harder to remove andthe solution then is a mixture of unused ferric chlorideand zinc chloride, which is more corrosive than theoriginal and is very difficult to render safe for disposal.The chemical reactions are described in detail in theequationsbelow
.A development that alleviates the unpleasantness offerric chloride is Edinburgh Etch developed by FriedhardKiekeben, which involves adding citric acid whichspeeds up the bite, and dissolves the sediment (15). Butit is still an acid and many the objections of its use withzinc still apply, and my personal preference is to avoidthe use of all acids.
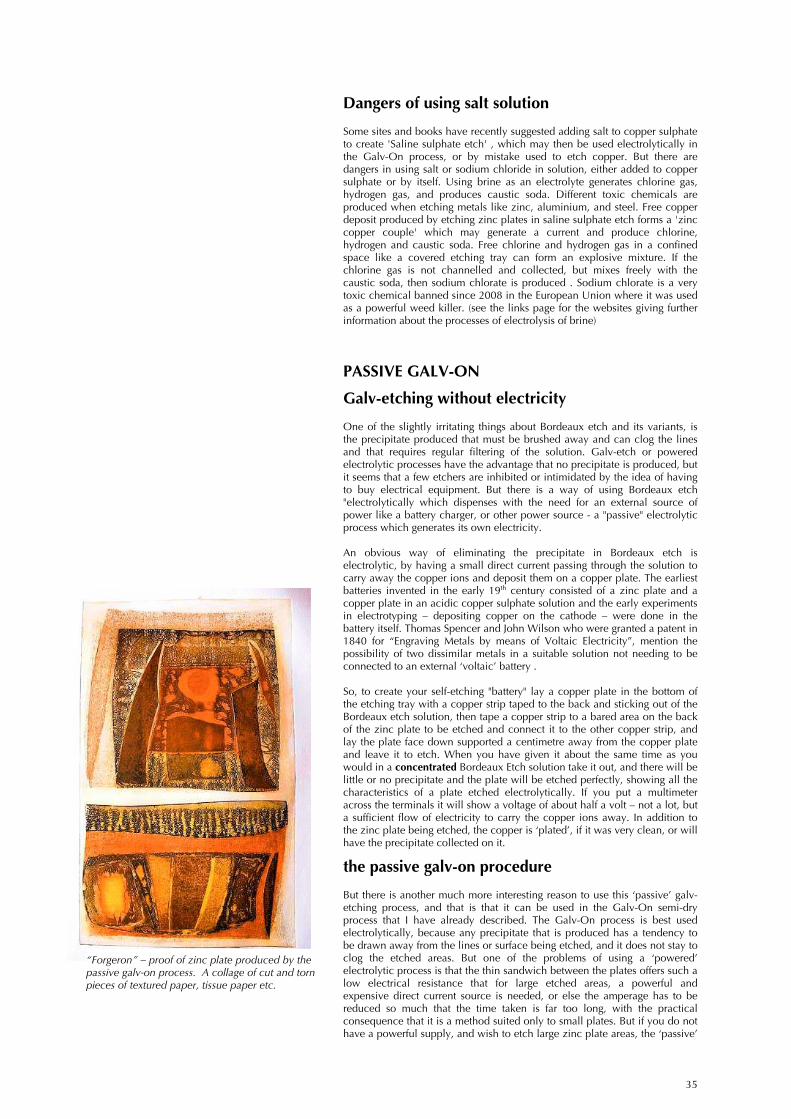
35
Dangers of using salt solution
Some sites and books have recently suggested adding salt to copper sulphateto create 'Saline sulphate etch' , which may then be used electrolytically inthe Galv-On process, or by mistake used to etch copper. But there aredangers in using salt or sodium chloride in solution, either added to coppersulphate or by itself. Using brine as an electrolyte generates chlorine gas,hydrogen gas, and produces caustic soda. Different toxic chemicals areproduced when etching metals like zinc, aluminium, and steel. Free copperdeposit produced by etching zinc plates in saline sulphate etch forms a 'zinccopper couple' which may generate a current and produce chlorine,hydrogen and caustic soda. Free chlorine and hydrogen gas in a confinedspace like a covered etching tray can form an explosive mixture. If thechlorine gas is not channelled and collected, but mixes freely with thecaustic soda, then sodium chlorate is produced . Sodium chlorate is a verytoxic chemical banned since 2008 in the European Union where it was usedas a powerful weed killer. (see the links page for the websites giving furtherinformation about the processes of electrolysis of brine)
PASSIVE GALV-ON
Galv-etching without electricity
One of the slightly irritating things about Bordeaux etch and its variants, isthe precipitate produced that must be brushed away and can clog the linesand that requires regular filtering of the solution. Galv-etch or poweredelectrolytic processes have the advantage that no precipitate is produced, butit seems that a few etchers are inhibited or intimidated by the idea of havingto buy electrical equipment. But there is a way of using Bordeaux etch"electrolytically which dispenses with the need for an external source ofpower like a battery charger, or other power source - a "passive" electrolyticprocess which generates its own electricity.
An obvious way of eliminating the precipitate in Bordeaux etch iselectrolytic, by having a small direct current passing through the solution tocarry away the copper ions and deposit them on a copper plate. The earliestbatteries invented in the early 19th century consisted of a zinc plate and acopper plate in an acidic copper sulphate solution and the early experimentsin electrotyping – depositing copper on the cathode – were done in thebattery itself. Thomas Spencer and John Wilson who were granted a patent in1840 for “Engraving Metals by means of Voltaic Electricity”, mention thepossibility of two dissimilar metals in a suitable solution not needing to beconnected to an external ‘voltaic’ battery .
So, to create your self-etching "battery" lay a copper plate in the bottom ofthe etching tray with a copper strip taped to the back and sticking out of theBordeaux etch solution, then tape a copper strip to a bared area on the backof the zinc plate to be etched and connect it to the other copper strip, andlay the plate face down supported a centimetre away from the copper plateand leave it to etch. When you have given it about the same time as youwould in a concentrated Bordeaux Etch solution take it out, and there will belittle or no precipitate and the plate will be etched perfectly, showing all thecharacteristics of a plate etched electrolytically. If you put a multimeteracross the terminals it will show a voltage of about half a volt – not a lot, buta sufficient flow of electricity to carry the copper ions away. In addition tothe zinc plate being etched, the copper is ‘plated’, if it was very clean, or willhave the precipitate collected on it.
the passive galv-on procedure
But there is another much more interesting reason to use this ‘passive’ galv-etching process, and that is that it can be used in the Galv-On semi-dryprocess that I have already described. The Galv-On process is best usedelectrolytically, because any precipitate that is produced has a tendency tobe drawn away from the lines or surface being etched, and it does not stay toclog the etched areas. But one of the problems of using a ‘powered’electrolytic process is that the thin sandwich between the plates offers such alow electrical resistance that for large etched areas, a powerful andexpensive direct current source is needed, or else the amperage has to bereduced so much that the time taken is far too long, with the practicalconsequence that it is a method suited only to small plates. But if you do nothave a powerful supply, and wish to etch large zinc plate areas, the ‘passive’
“Forgeron” – proof of zinc plate produced by thepassive galv-on process. A collage of cut and tornpieces of textured paper, tissue paper etc.
36
procedure is the solution.
The initial procedure is as already described for Galv-On. The zinc plate isprepared, and the layers forming the design are backed with felt soakedsoaked in strong Bordeaux etch (copper sulphate). The sandwich is finishedwith a flat copper plate connected by a copper strip to the zinc plate. Thesmall distance between the plates is a positive advantage and a current isgenerated, carrying away all the precipitate. All the effects possible with the‘powered’ galv-on process are possible and there is no limit to the size ofplate that can be etched. The time taken does not increase with larger plates,as it does with the ‘powered’ process, as the current automatically increaseswith the size of the plates.
The electricity generated results from the difference in what is called the‘electrode potential’ between zinc and copper, and closing the circuitbetween the plates allows a current to flow, ‘pushed’ by the flow ofpositively charged copper ions up towards the copper or negative cathode,displaced from the solution by the zinc. The felt can be squeezed out, theBordeaux etch filtered and used again. The disadvantage is that it becomesexhausted as its copper is gradually replaced by zinc, and it must bedisposed of safely (see above).
For those willing to tangle with a powered electrolytic process the advantageis that the electrolyte can be used for years, and one is not limited to etchingzinc, steel or aluminium.
For existing users of Bordeaux etch or its variants like ‘saline sulphate etch’, Iexpect it will be good news to be able to eliminate annoying precipitates andto be able to use the galv-on semi-dry method, without having to invest inelectrical equipment, special etching tanks, and grapple with the mysteries ofvoltage, amperage and calculations of the time required based on plate area.For many courses and studios that have to provide facilities for numbers ofstudents at a time, the passive galv-etch and galv-on processes should be awelcome development.
disposal of used Bordeaux etch
As the spent Bordeaux etch solution becomestoo weak to use, it is a mixture of unusedcopper sulphate and zinc sulphate. Aspreviously mentioned, zinc sulphate is slightlyless safe to handle than copper sulphate, soavoid direct contact with the skin and eyes,and keep out of the reach of children.
Disposal can be done in two ways dependingon whether you have added salt to thesolution. If you have not, it will be possible tofilter and save the spent solution to use as theelectrolyte for galv-etching zinc plates. Therewill always be a little copper sulphate in thesolution and the bare plate will be blackenedinstantly on putting it into the solution, whichdoes not happen with pure zinc sulphate. Ifyou have too large a quantity of spentBordeaux etch solution, then it must not beput down the drain because of the zincsulphate and the residual copper sulphate leftin it.
To make it safe for disposal, you can addsodium carbonate (washing soda) or sodiumhydroxide to it to neutralize it, until the pHvalue goes up to between 7.0 and 8.0, testingit with indicator paper. Copper and zinchydroxide will be deposited as a sludge.Allow the sludge to settle, pour off the liquid,further dilute it and then it can be poureddown the drain. Collect the sludge in plasticbags and dispose of it as required by yourlocal authority. When neutralizing it, becareful not to allow it to become too alkalinebecause the hydroxides will be re-dissolved. Ifyou do not have much solution to get rid of,it can be placed to evaporate in a flat tray.Collect the crystals, bag them and dispose ofthem safely.
If you are galv-etching copper plates as wellas using Bordeaux etch, then keep the dilutecopper sulphate used for that completelyseparate from the concentrated Bordeauxetch solution, in well marked containers. It isnot dangerous to use the wrong one, but adiluted galv-etch copper sulphate will notetch zinc satisfactorily, and a partly spentBordeaux etch solution, used electrolytically,will deposit zinc on your cathode.
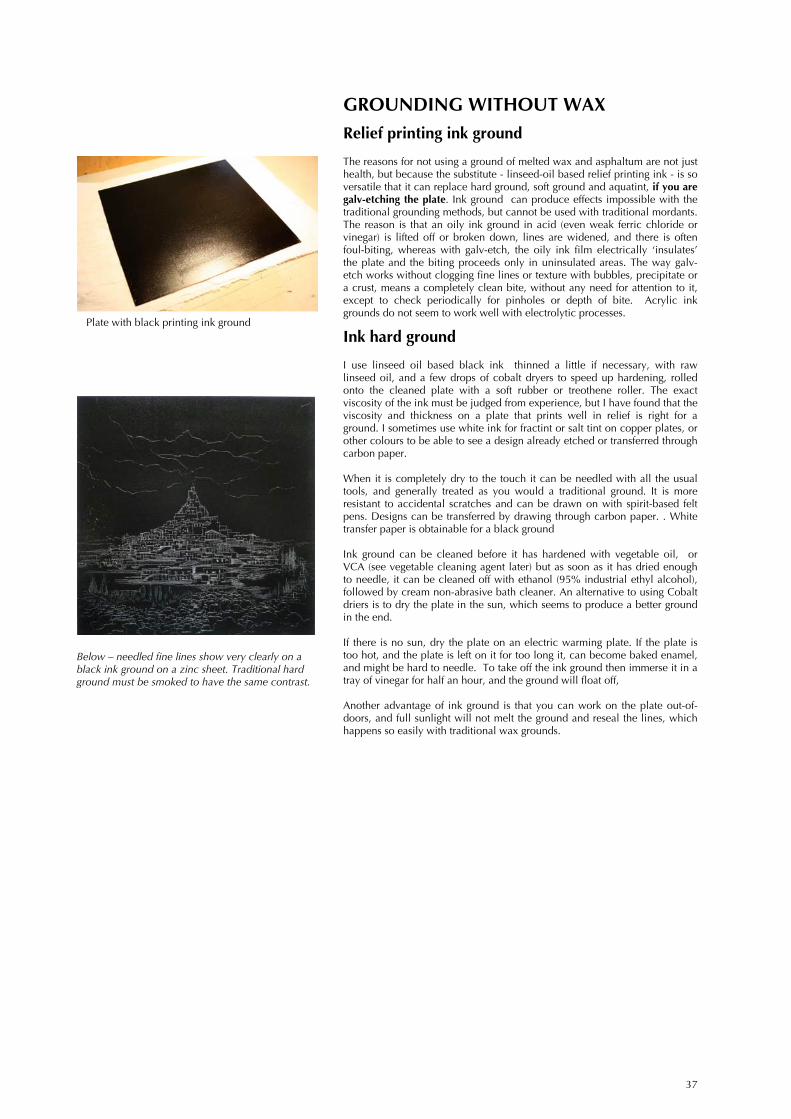
37
GROUNDING WITHOUT WAXRelief printing ink ground
The reasons for not using a ground of melted wax and asphaltum are not justhealth, but because the substitute - linseed-oil based relief printing ink - is soversatile that it can replace hard ground, soft ground and aquatint, if you aregalv-etching the plate. Ink ground can produce effects impossible with thetraditional grounding methods, but cannot be used with traditional mordants.The reason is that an oily ink ground in acid (even weak ferric chloride orvinegar) is lifted off or broken down, lines are widened, and there is oftenfoul-biting, whereas with galv-etch, the oily ink film electrically ‘insulates’the plate and the biting proceeds only in uninsulated areas. The way galv-etch works without clogging fine lines or texture with bubbles, precipitate ora crust, means a completely clean bite, without any need for attention to it,except to check periodically for pinholes or depth of bite. Acrylic inkgrounds do not seem to work well with electrolytic processes.
Ink hard ground
I use linseed oil based black ink thinned a little if necessary, with rawlinseed oil, and a few drops of cobalt dryers to speed up hardening, rolledonto the cleaned plate with a soft rubber or treothene roller. The exactviscosity of the ink must be judged from experience, but I have found that theviscosity and thickness on a plate that prints well in relief is right for aground. I sometimes use white ink for fractint or salt tint on copper plates, orother colours to be able to see a design already etched or transferred throughcarbon paper.
When it is completely dry to the touch it can be needled with all the usualtools, and generally treated as you would a traditional ground. It is moreresistant to accidental scratches and can be drawn on with spirit-based feltpens. Designs can be transferred by drawing through carbon paper. . Whitetransfer paper is obtainable for a black ground
Ink ground can be cleaned before it has hardened with vegetable oil, orVCA (see vegetable cleaning agent later) but as soon as it has dried enoughto needle, it can be cleaned off with ethanol (95% industrial ethyl alcohol),followed by cream non-abrasive bath cleaner. An alternative to using Cobaltdriers is to dry the plate in the sun, which seems to produce a better groundin the end.
If there is no sun, dry the plate on an electric warming plate. If the plate istoo hot, and the plate is left on it for too long it, can become baked enamel,and might be hard to needle. To take off the ink ground then immerse it in atray of vinegar for half an hour, and the ground will float off,
Another advantage of ink ground is that you can work on the plate out-of-doors, and full sunlight will not melt the ground and reseal the lines, whichhappens so easily with traditional wax grounds.
Below – needled fine lines show very clearly on ablack ink ground on a zinc sheet. Traditional hardground must be smoked to have the same contrast.
Plate with black printing ink ground
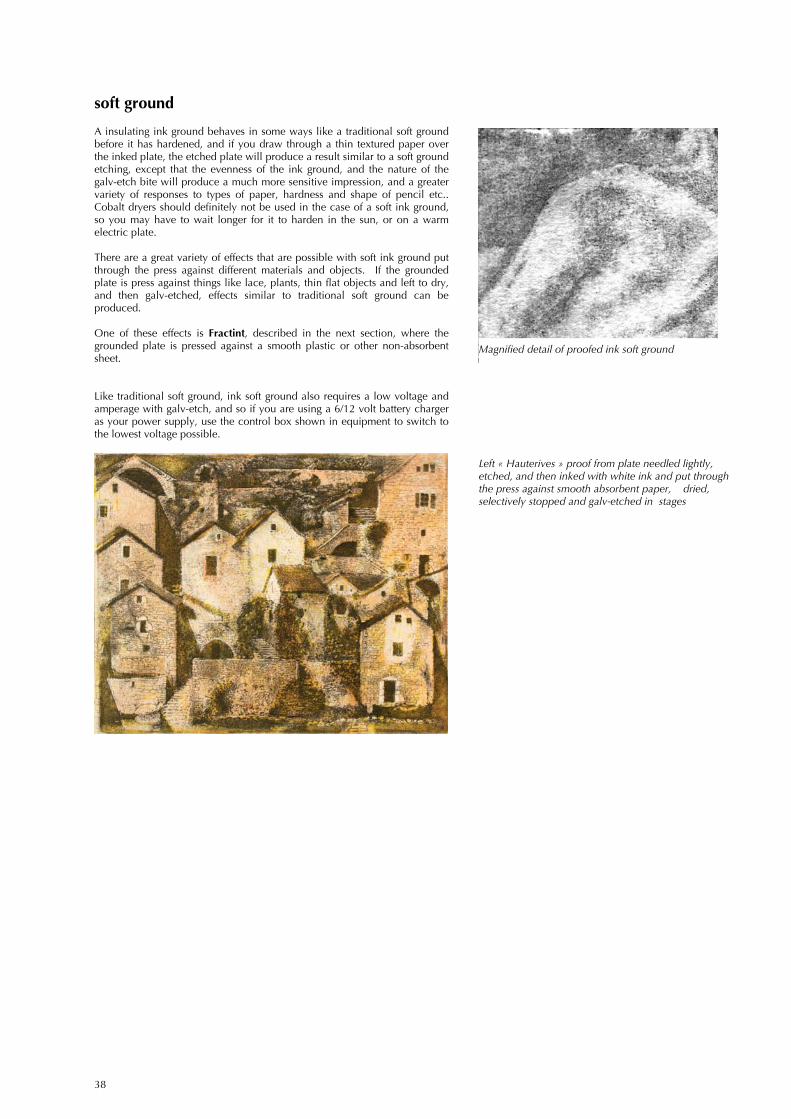
38
soft ground
A insulating ink ground behaves in some ways like a traditional soft groundbefore it has hardened, and if you draw through a thin textured paper overthe inked plate, the etched plate will produce a result similar to a soft groundetching, except that the evenness of the ink ground, and the nature of thegalv-etch bite will produce a much more sensitive impression, and a greatervariety of responses to types of paper, hardness and shape of pencil etc..Cobalt dryers should definitely not be used in the case of a soft ink ground,so you may have to wait longer for it to harden in the sun, or on a warmelectric plate.
There are a great variety of effects that are possible with soft ink ground putthrough the press against different materials and objects. If the groundedplate is press against things like lace, plants, thin flat objects and left to dry,and then galv-etched, effects similar to traditional soft ground can beproduced.
One of these effects is Fractint, described in the next section, where thegrounded plate is pressed against a smooth plastic or other non-absorbentsheet.
Like traditional soft ground, ink soft ground also requires a low voltage andamperage with galv-etch, and so if you are using a 6/12 volt battery chargeras your power supply, use the control box shown in equipment to switch tothe lowest voltage possible.
Magnified detail of proofed ink soft ground
Left « Hauterives » proof from plate needled lightly,etched, and then inked with white ink and put throughthe press against smooth absorbent paper, dried,selectively stopped and galv-etched in stages
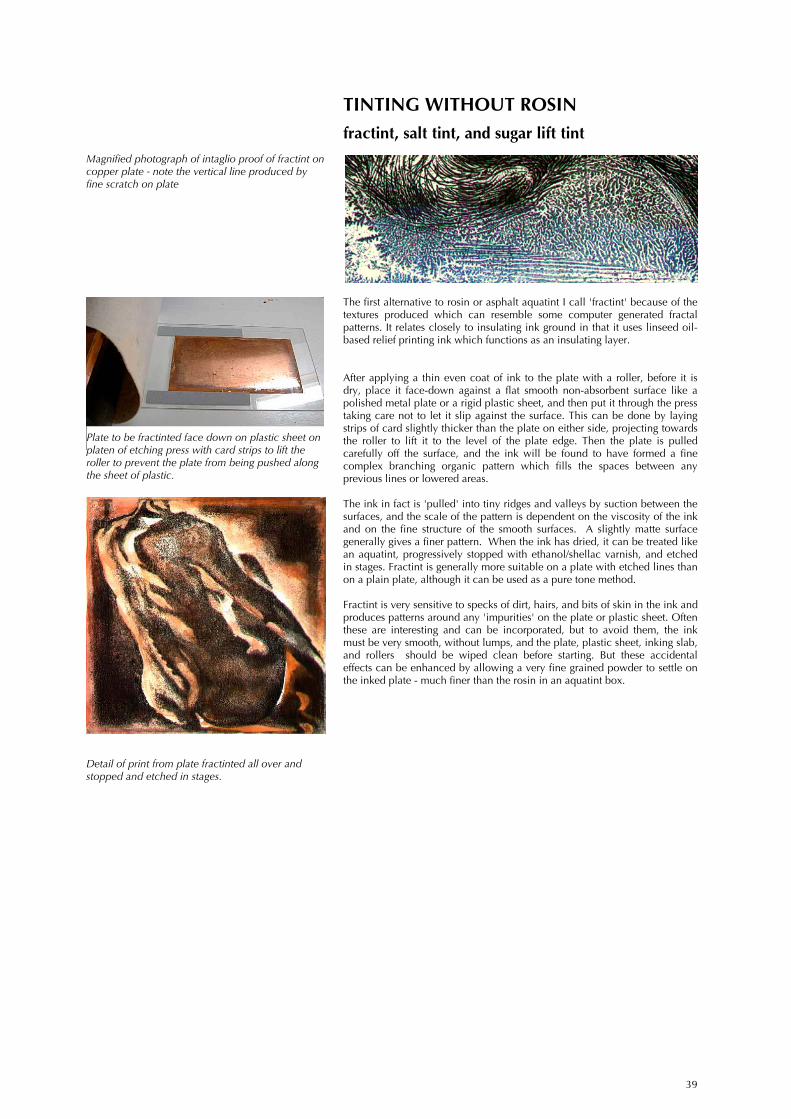
39
TINTING WITHOUT ROSINfractint, salt tint, and sugar lift tint
The first alternative to rosin or asphalt aquatint I call 'fractint' because of thetextures produced which can resemble some computer generated fractalpatterns. It relates closely to insulating ink ground in that it uses linseed oil-based relief printing ink which functions as an insulating layer.
After applying a thin even coat of ink to the plate with a roller, before it isdry, place it face-down against a flat smooth non-absorbent surface like apolished metal plate or a rigid plastic sheet, and then put it through the presstaking care not to let it slip against the surface. This can be done by layingstrips of card slightly thicker than the plate on either side, projecting towardsthe roller to lift it to the level of the plate edge. Then the plate is pulledcarefully off the surface, and the ink will be found to have formed a finecomplex branching organic pattern which fills the spaces between anyprevious lines or lowered areas.
The ink in fact is 'pulled' into tiny ridges and valleys by suction between thesurfaces, and the scale of the pattern is dependent on the viscosity of the inkand on the fine structure of the smooth surfaces. A slightly matte surfacegenerally gives a finer pattern. When the ink has dried, it can be treated likean aquatint, progressively stopped with ethanol/shellac varnish, and etchedin stages. Fractint is generally more suitable on a plate with etched lines thanon a plain plate, although it can be used as a pure tone method.
Fractint is very sensitive to specks of dirt, hairs, and bits of skin in the ink andproduces patterns around any 'impurities' on the plate or plastic sheet. Oftenthese are interesting and can be incorporated, but to avoid them, the inkmust be very smooth, without lumps, and the plate, plastic sheet, inking slab,and rollers should be wiped clean before starting. But these accidentaleffects can be enhanced by allowing a very fine grained powder to settle onthe inked plate - much finer than the rosin in an aquatint box.
Plate to be fractinted face down on plastic sheet onplaten of etching press with card strips to lift theroller to prevent the plate from being pushed alongthe sheet of plastic.
Magnified photograph of intaglio proof of fractint oncopper plate - note the vertical line produced byfine scratch on plate
Detail of print from plate fractinted all over andstopped and etched in stages.
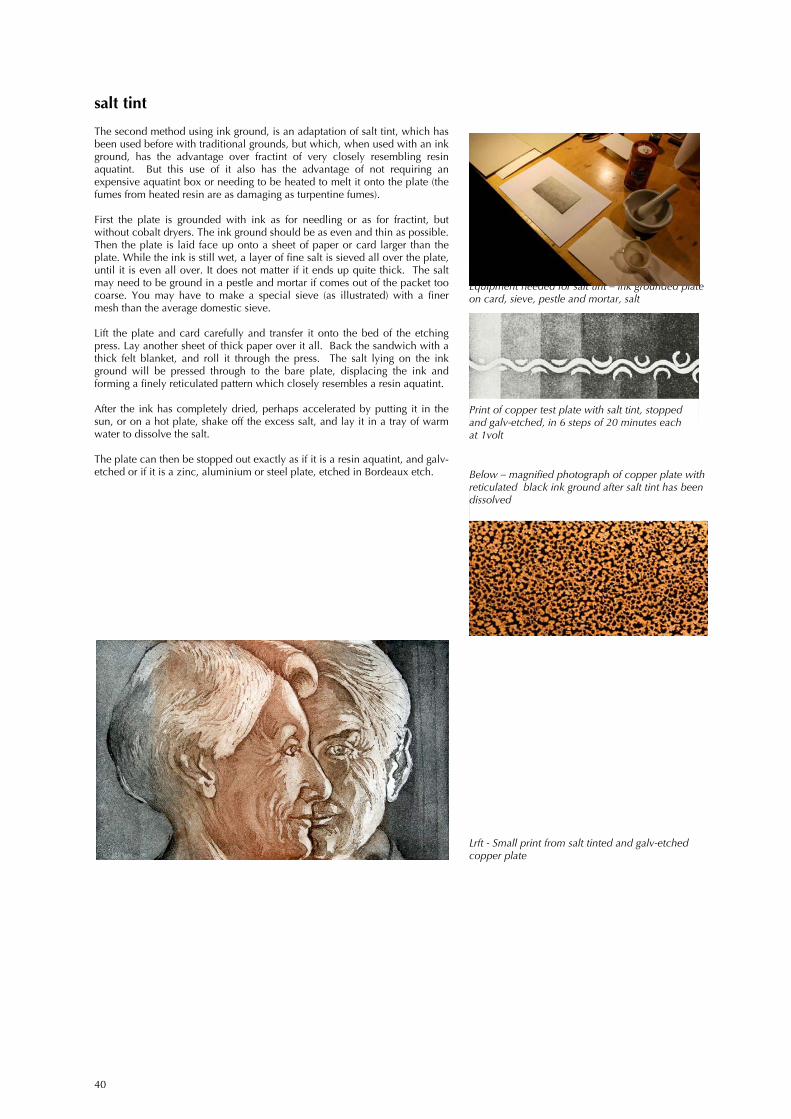
40
salt tint
The second method using ink ground, is an adaptation of salt tint, which hasbeen used before with traditional grounds, but which, when used with an inkground, has the advantage over fractint of very closely resembling resinaquatint. But this use of it also has the advantage of not requiring anexpensive aquatint box or needing to be heated to melt it onto the plate (thefumes from heated resin are as damaging as turpentine fumes).
First the plate is grounded with ink as for needling or as for fractint, butwithout cobalt dryers. The ink ground should be as even and thin as possible.Then the plate is laid face up onto a sheet of paper or card larger than theplate. While the ink is still wet, a layer of fine salt is sieved all over the plate,until it is even all over. It does not matter if it ends up quite thick. The saltmay need to be ground in a pestle and mortar if comes out of the packet toocoarse. You may have to make a special sieve (as illustrated) with a finermesh than the average domestic sieve.
Lift the plate and card carefully and transfer it onto the bed of the etchingpress. Lay another sheet of thick paper over it all. Back the sandwich with athick felt blanket, and roll it through the press. The salt lying on the inkground will be pressed through to the bare plate, displacing the ink andforming a finely reticulated pattern which closely resembles a resin aquatint.
After the ink has completely dried, perhaps accelerated by putting it in thesun, or on a hot plate, shake off the excess salt, and lay it in a tray of warmwater to dissolve the salt.
The plate can then be stopped out exactly as if it is a resin aquatint, and galv-etched or if it is a zinc, aluminium or steel plate, etched in Bordeaux etch.
Equipment needed for salt tint – ink grounded plateon card, sieve, pestle and mortar, salt
Print of copper test plate with salt tint, stoppedand galv-etched, in 6 steps of 20 minutes eachat 1volt
Lrft - Small print from salt tinted and galv-etchedcopper plate
Below – magnified photograph of copper plate withreticulated black ink ground after salt tint has beendissolved
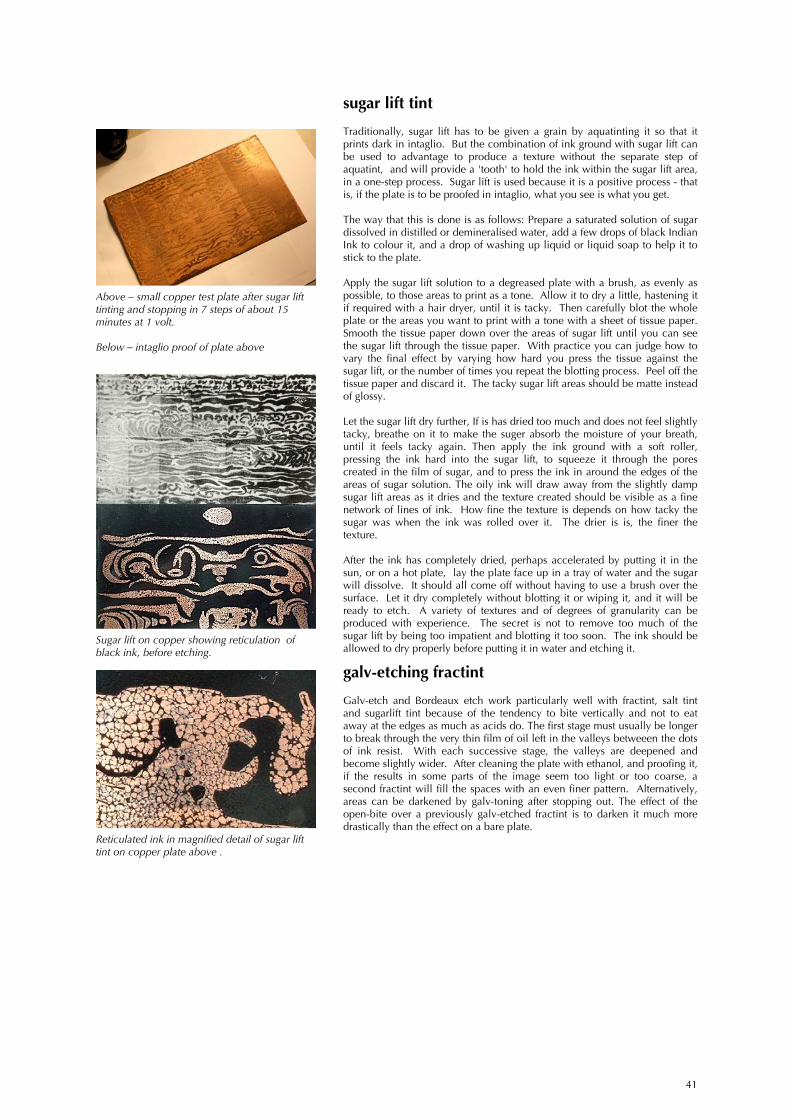
41
sugar lift tint
Traditionally, sugar lift has to be given a grain by aquatinting it so that itprints dark in intaglio. But the combination of ink ground with sugar lift canbe used to advantage to produce a texture without the separate step ofaquatint, and will provide a 'tooth' to hold the ink within the sugar lift area,in a one-step process. Sugar lift is used because it is a positive process - thatis, if the plate is to be proofed in intaglio, what you see is what you get.
The way that this is done is as follows: Prepare a saturated solution of sugardissolved in distilled or demineralised water, add a few drops of black IndianInk to colour it, and a drop of washing up liquid or liquid soap to help it tostick to the plate.
Apply the sugar lift solution to a degreased plate with a brush, as evenly aspossible, to those areas to print as a tone. Allow it to dry a little, hastening itif required with a hair dryer, until it is tacky. Then carefully blot the wholeplate or the areas you want to print with a tone with a sheet of tissue paper.Smooth the tissue paper down over the areas of sugar lift until you can seethe sugar lift through the tissue paper. With practice you can judge how tovary the final effect by varying how hard you press the tissue against thesugar lift, or the number of times you repeat the blotting process. Peel off thetissue paper and discard it. The tacky sugar lift areas should be matte insteadof glossy.
Let the sugar lift dry further, If is has dried too much and does not feel slightlytacky, breathe on it to make the suger absorb the moisture of your breath,until it feels tacky again. Then apply the ink ground with a soft roller,pressing the ink hard into the sugar lift, to squeeze it through the porescreated in the film of sugar, and to press the ink in around the edges of theareas of sugar solution. The oily ink will draw away from the slightly dampsugar lift areas as it dries and the texture created should be visible as a finenetwork of lines of ink. How fine the texture is depends on how tacky thesugar was when the ink was rolled over it. The drier is is, the finer thetexture.
After the ink has completely dried, perhaps accelerated by putting it in thesun, or on a hot plate, lay the plate face up in a tray of water and the sugarwill dissolve. It should all come off without having to use a brush over thesurface. Let it dry completely without blotting it or wiping it, and it will beready to etch. A variety of textures and of degrees of granularity can beproduced with experience. The secret is not to remove too much of thesugar lift by being too impatient and blotting it too soon. The ink should beallowed to dry properly before putting it in water and etching it.
galv-etching fractint
Galv-etch and Bordeaux etch work particularly well with fractint, salt tintand sugarlift tint because of the tendency to bite vertically and not to eataway at the edges as much as acids do. The first stage must usually be longerto break through the very thin film of oil left in the valleys betweeen the dotsof ink resist. With each successive stage, the valleys are deepened andbecome slightly wider. After cleaning the plate with ethanol, and proofing it,if the results in some parts of the image seem too light or too coarse, asecond fractint will fill the spaces with an even finer pattern. Alternatively,areas can be darkened by galv-toning after stopping out. The effect of theopen-bite over a previously galv-etched fractint is to darken it much moredrastically than the effect on a bare plate.
Above – small copper test plate after sugar lifttinting and stopping in 7 steps of about 15minutes at 1 volt.
Below – intaglio proof of plate above
Reticulated ink in magnified detail of sugar lifttint on copper plate above .
Sugar lift on copper showing reticulation ofblack ink, before etching.
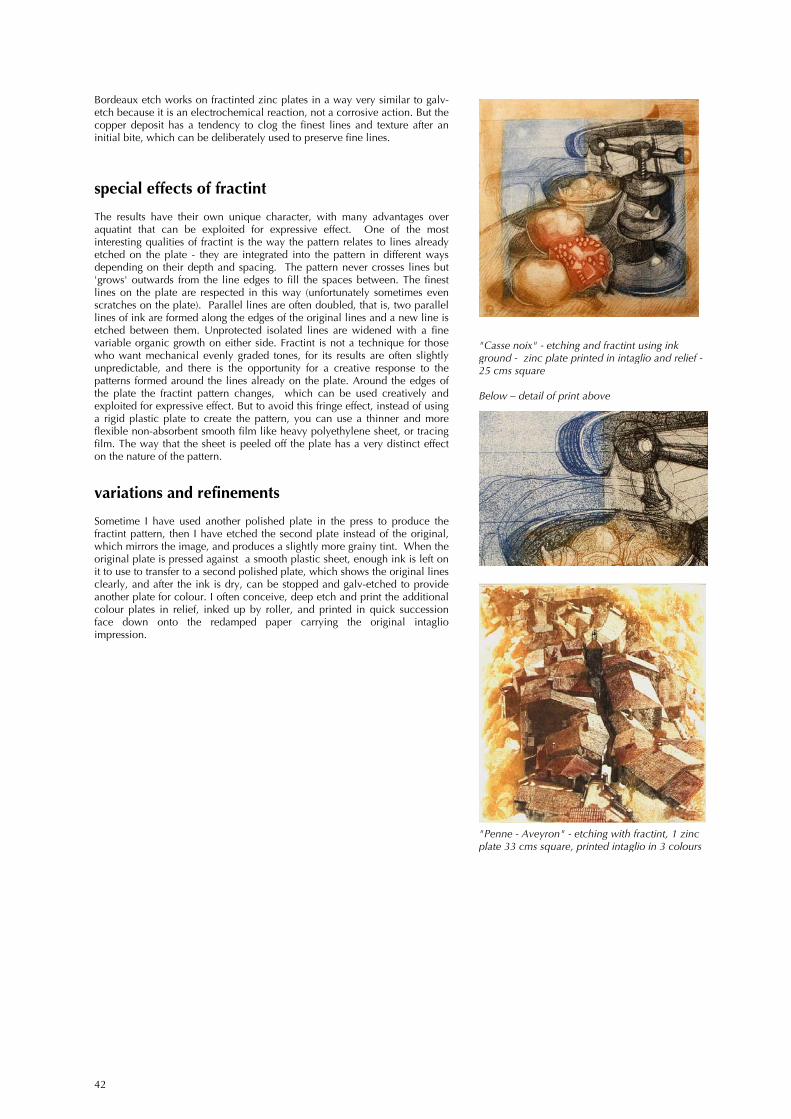
42
Bordeaux etch works on fractinted zinc plates in a way very similar to galv-etch because it is an electrochemical reaction, not a corrosive action. But thecopper deposit has a tendency to clog the finest lines and texture after aninitial bite, which can be deliberately used to preserve fine lines.
special effects of fractint
The results have their own unique character, with many advantages overaquatint that can be exploited for expressive effect. One of the mostinteresting qualities of fractint is the way the pattern relates to lines alreadyetched on the plate - they are integrated into the pattern in different waysdepending on their depth and spacing. The pattern never crosses lines but'grows' outwards from the line edges to fill the spaces between. The finestlines on the plate are respected in this way (unfortunately sometimes evenscratches on the plate). Parallel lines are often doubled, that is, two parallellines of ink are formed along the edges of the original lines and a new line isetched between them. Unprotected isolated lines are widened with a finevariable organic growth on either side. Fractint is not a technique for thosewho want mechanical evenly graded tones, for its results are often slightlyunpredictable, and there is the opportunity for a creative response to thepatterns formed around the lines already on the plate. Around the edges ofthe plate the fractint pattern changes, which can be used creatively andexploited for expressive effect. But to avoid this fringe effect, instead of usinga rigid plastic plate to create the pattern, you can use a thinner and moreflexible non-absorbent smooth film like heavy polyethylene sheet, or tracingfilm. The way that the sheet is peeled off the plate has a very distinct effecton the nature of the pattern.
variations and refinements
Sometime I have used another polished plate in the press to produce thefractint pattern, then I have etched the second plate instead of the original,which mirrors the image, and produces a slightly more grainy tint. When theoriginal plate is pressed against a smooth plastic sheet, enough ink is left onit to use to transfer to a second polished plate, which shows the original linesclearly, and after the ink is dry, can be stopped and galv-etched to provideanother plate for colour. I often conceive, deep etch and print the additionalcolour plates in relief, inked up by roller, and printed in quick successionface down onto the redamped paper carrying the original intaglioimpression.
"Casse noix" - etching and fractint using inkground - zinc plate printed in intaglio and relief -25 cms square
Below – detail of print above
"Penne - Aveyron" - etching with fractint, 1 zincplate 33 cms square, printed intaglio in 3 colours
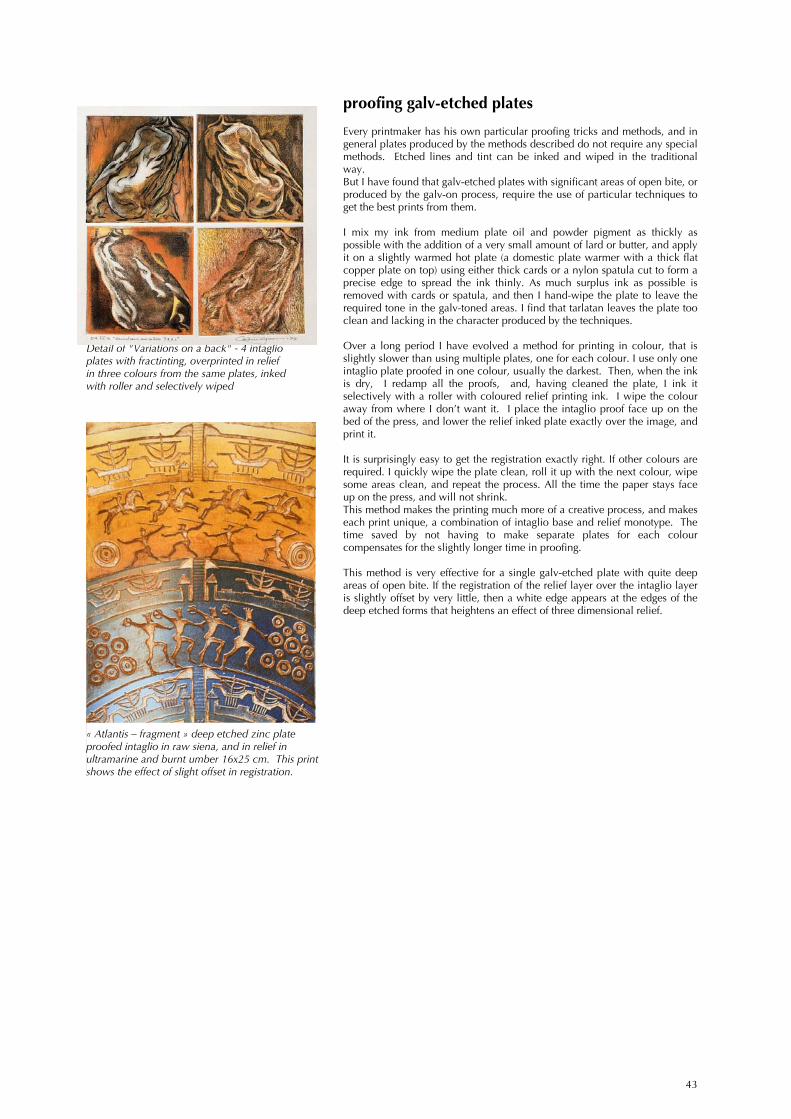
43
proofing galv-etched plates
Every printmaker has his own particular proofing tricks and methods, and ingeneral plates produced by the methods described do not require any specialmethods. Etched lines and tint can be inked and wiped in the traditionalway.But I have found that galv-etched plates with significant areas of open bite, orproduced by the galv-on process, require the use of particular techniques toget the best prints from them.
I mix my ink from medium plate oil and powder pigment as thickly aspossible with the addition of a very small amount of lard or butter, and applyit on a slightly warmed hot plate (a domestic plate warmer with a thick flatcopper plate on top) using either thick cards or a nylon spatula cut to form aprecise edge to spread the ink thinly. As much surplus ink as possible isremoved with cards or spatula, and then I hand-wipe the plate to leave therequired tone in the galv-toned areas. I find that tarlatan leaves the plate tooclean and lacking in the character produced by the techniques.
Over a long period I have evolved a method for printing in colour, that isslightly slower than using multiple plates, one for each colour. I use only oneintaglio plate proofed in one colour, usually the darkest. Then, when the inkis dry, I redamp all the proofs, and, having cleaned the plate, I ink itselectively with a roller with coloured relief printing ink. I wipe the colouraway from where I don’t want it. I place the intaglio proof face up on thebed of the press, and lower the relief inked plate exactly over the image, andprint it.
It is surprisingly easy to get the registration exactly right. If other colours arerequired. I quickly wipe the plate clean, roll it up with the next colour, wipesome areas clean, and repeat the process. All the time the paper stays faceup on the press, and will not shrink.This method makes the printing much more of a creative process, and makeseach print unique, a combination of intaglio base and relief monotype. Thetime saved by not having to make separate plates for each colourcompensates for the slightly longer time in proofing.
This method is very effective for a single galv-etched plate with quite deepareas of open bite. If the registration of the relief layer over the intaglio layeris slightly offset by very little, then a white edge appears at the edges of thedeep etched forms that heightens an effect of three dimensional relief.
Detail of "Variations on a back" - 4 intaglioplates with fractinting, overprinted in reliefin three colours from the same plates, inkedwith roller and selectively wiped
« Atlantis – fragment » deep etched zinc plateproofed intaglio in raw siena, and in relief inultramarine and burnt umber 16x25 cm. This printshows the effect of slight offset in registration.
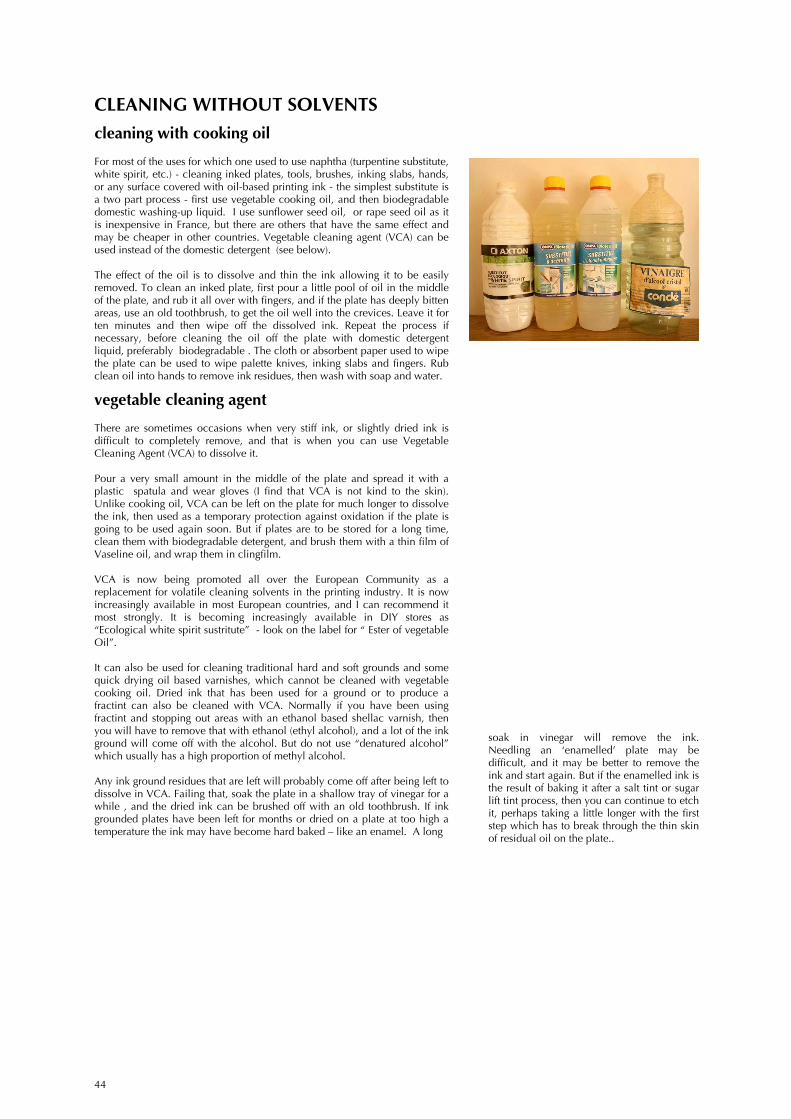
44
CLEANING WITHOUT SOLVENTScleaning with cooking oil
For most of the uses for which one used to use naphtha (turpentine substitute,white spirit, etc.) - cleaning inked plates, tools, brushes, inking slabs, hands,or any surface covered with oil-based printing ink - the simplest substitute isa two part process - first use vegetable cooking oil, and then biodegradabledomestic washing-up liquid. I use sunflower seed oil, or rape seed oil as itis inexpensive in France, but there are others that have the same effect andmay be cheaper in other countries. Vegetable cleaning agent (VCA) can beused instead of the domestic detergent (see below).
The effect of the oil is to dissolve and thin the ink allowing it to be easilyremoved. To clean an inked plate, first pour a little pool of oil in the middleof the plate, and rub it all over with fingers, and if the plate has deeply bittenareas, use an old toothbrush, to get the oil well into the crevices. Leave it forten minutes and then wipe off the dissolved ink. Repeat the process ifnecessary, before cleaning the oil off the plate with domestic detergentliquid, preferably biodegradable . The cloth or absorbent paper used to wipethe plate can be used to wipe palette knives, inking slabs and fingers. Rubclean oil into hands to remove ink residues, then wash with soap and water.
vegetable cleaning agent
There are sometimes occasions when very stiff ink, or slightly dried ink isdifficult to completely remove, and that is when you can use VegetableCleaning Agent (VCA) to dissolve it.
Pour a very small amount in the middle of the plate and spread it with aplastic spatula and wear gloves (I find that VCA is not kind to the skin).Unlike cooking oil, VCA can be left on the plate for much longer to dissolvethe ink, then used as a temporary protection against oxidation if the plate isgoing to be used again soon. But if plates are to be stored for a long time,clean them with biodegradable detergent, and brush them with a thin film ofVaseline oil, and wrap them in clingfilm.
VCA is now being promoted all over the European Community as areplacement for volatile cleaning solvents in the printing industry. It is nowincreasingly available in most European countries, and I can recommend itmost strongly. It is becoming increasingly available in DIY stores as“Ecological white spirit sustritute” - look on the label for “ Ester of vegetableOil”.
It can also be used for cleaning traditional hard and soft grounds and somequick drying oil based varnishes, which cannot be cleaned with vegetablecooking oil. Dried ink that has been used for a ground or to produce afractint can also be cleaned with VCA. Normally if you have been usingfractint and stopping out areas with an ethanol based shellac varnish, thenyou will have to remove that with ethanol (ethyl alcohol), and a lot of the inkground will come off with the alcohol. But do not use “denatured alcohol”which usually has a high proportion of methyl alcohol.
Any ink ground residues that are left will probably come off after being left todissolve in VCA. Failing that, soak the plate in a shallow tray of vinegar for awhile , and the dried ink can be brushed off with an old toothbrush. If inkgrounded plates have been left for months or dried on a plate at too high atemperature the ink may have become hard baked – like an enamel. A long
soak in vinegar will remove the ink.Needling an ‘enamelled’ plate may bedifficult, and it may be better to remove theink and start again. But if the enamelled ink isthe result of baking it after a salt tint or sugarlift tint process, then you can continue to etchit, perhaps taking a little longer with the firststep which has to break through the thin skinof residual oil on the plate..
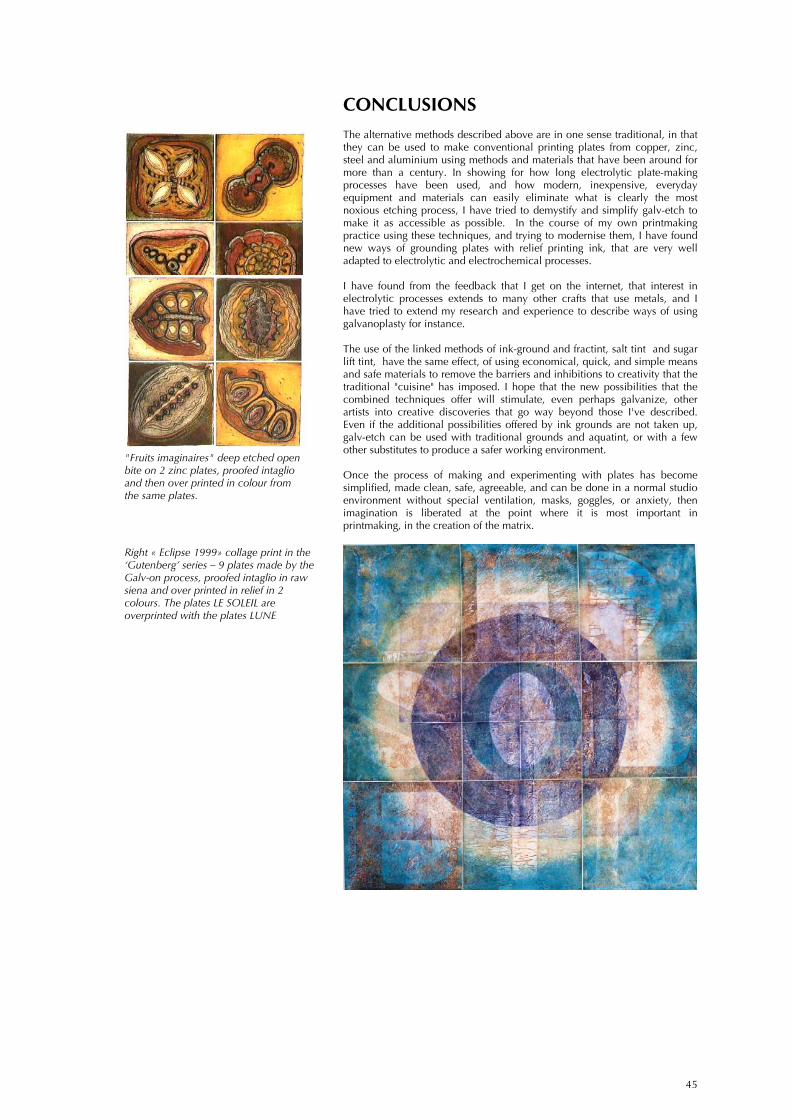
45
CONCLUSIONSThe alternative methods described above are in one sense traditional, in thatthey can be used to make conventional printing plates from copper, zinc,steel and aluminium using methods and materials that have been around formore than a century. In showing for how long electrolytic plate-makingprocesses have been used, and how modern, inexpensive, everydayequipment and materials can easily eliminate what is clearly the mostnoxious etching process, I have tried to demystify and simplify galv-etch tomake it as accessible as possible. In the course of my own printmakingpractice using these techniques, and trying to modernise them, I have foundnew ways of grounding plates with relief printing ink, that are very welladapted to electrolytic and electrochemical processes.
I have found from the feedback that I get on the internet, that interest inelectrolytic processes extends to many other crafts that use metals, and Ihave tried to extend my research and experience to describe ways of usinggalvanoplasty for instance.
The use of the linked methods of ink-ground and fractint, salt tint and sugarlift tint, have the same effect, of using economical, quick, and simple meansand safe materials to remove the barriers and inhibitions to creativity that thetraditional "cuisine" has imposed. I hope that the new possibilities that thecombined techniques offer will stimulate, even perhaps galvanize, otherartists into creative discoveries that go way beyond those I've described.Even if the additional possibilities offered by ink grounds are not taken up,galv-etch can be used with traditional grounds and aquatint, or with a fewother substitutes to produce a safer working environment.
Once the process of making and experimenting with plates has becomesimplified, made clean, safe, agreeable, and can be done in a normal studioenvironment without special ventilation, masks, goggles, or anxiety, thenimagination is liberated at the point where it is most important inprintmaking, in the creation of the matrix.
"Fruits imaginaires" deep etched openbite on 2 zinc plates, proofed intaglioand then over printed in colour fromthe same plates.
Right « Eclipse 1999» collage print in the‘Gutenberg’ series – 9 plates made by theGalv-on process, proofed intaglio in rawsiena and over printed in relief in 2colours. The plates LE SOLEIL areoverprinted with the plates LUNE

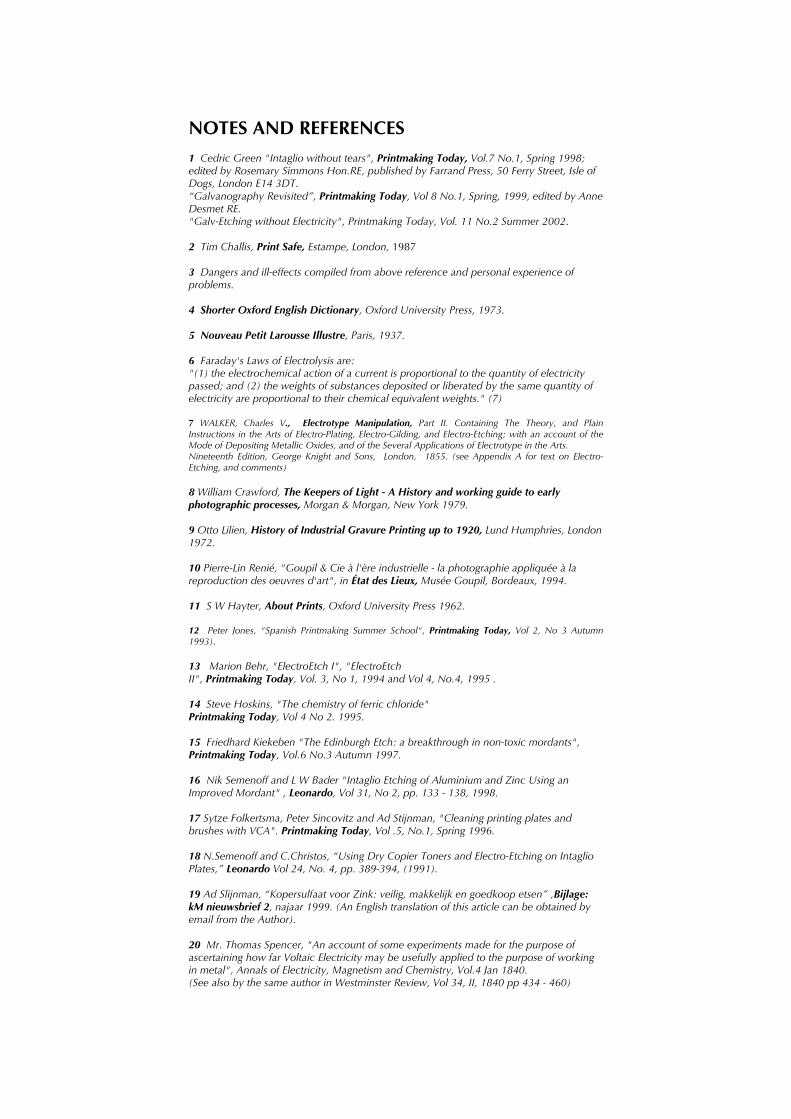
NOTES AND REFERENCES1 Cedric Green "Intaglio without tears", Printmaking Today, Vol.7 No.1, Spring 1998;edited by Rosemary Simmons Hon.RE, published by Farrand Press, 50 Ferry Street, Isle ofDogs, London E14 3DT.“Galvanography Revisited”, Printmaking Today, Vol 8 No.1, Spring, 1999, edited by AnneDesmet RE."Galv-Etching without Electricity", Printmaking Today, Vol. 11 No.2 Summer 2002.
2 Tim Challis, Print Safe, Estampe, London, 1987
3 Dangers and ill-effects compiled from above reference and personal experience ofproblems.
4 Shorter Oxford English Dictionary, Oxford University Press, 1973.
5 Nouveau Petit Larousse Illustre, Paris, 1937.
6 Faraday's Laws of Electrolysis are:"(1) the electrochemical action of a current is proportional to the quantity of electricitypassed; and (2) the weights of substances deposited or liberated by the same quantity ofelectricity are proportional to their chemical equivalent weights." (7)
7 WALKER, Charles V., Electrotype Manipulation, Part II. Containing The Theory, and PlainInstructions in the Arts of Electro-Plating, Electro-Gilding, and Electro-Etching; with an account of theMode of Depositing Metallic Oxides, and of the Several Applications of Electrotype in the Arts.Nineteenth Edition, George Knight and Sons, London, 1855. (see Appendix A for text on Electro-Etching, and comments)
8 William Crawford, The Keepers of Light - A History and working guide to earlyphotographic processes, Morgan & Morgan, New York 1979.
9 Otto Lilien, History of Industrial Gravure Printing up to 1920, Lund Humphries, London1972.
10 Pierre-Lin Renié, "Goupil & Cie à l'ère industrielle - la photographie appliquée à lareproduction des oeuvres d'art", in État des Lieux, Musée Goupil, Bordeaux, 1994.
11 S W Hayter, About Prints, Oxford University Press 1962.
12 Peter Jones, "Spanish Printmaking Summer School", Printmaking Today, Vol 2, No 3 Autumn1993).
13 Marion Behr, "ElectroEtch I", "ElectroEtchII", Printmaking Today, Vol. 3, No 1, 1994 and Vol 4, No.4, 1995 .
14 Steve Hoskins, "The chemistry of ferric chloride"Printmaking Today, Vol 4 No 2. 1995.
15 Friedhard Kiekeben "The Edinburgh Etch: a breakthrough in non-toxic mordants",Printmaking Today, Vol.6 No.3 Autumn 1997.
16 Nik Semenoff and L W Bader "Intaglio Etching of Aluminium and Zinc Using anImproved Mordant" , Leonardo, Vol 31, No 2, pp. 133 - 138, 1998.
17 Sytze Folkertsma, Peter Sincovitz and Ad Stijnman, "Cleaning printing plates andbrushes with VCA". Printmaking Today, Vol .5, No.1, Spring 1996.
18 N.Semenoff and C.Christos, “Using Dry Copier Toners and Electro-Etching on IntaglioPlates,” Leonardo Vol 24, No. 4, pp. 389-394, (1991).
19 Ad Slijnman, “Kopersulfaat voor Zink: veilig, makkelijk en goedkoop etsen” ,Bijlage:kM nieuwsbrief 2, najaar 1999. (An English translation of this article can be obtained byemail from the Author).
20 Mr. Thomas Spencer, "An account of some experiments made for the purpose ofascertaining how far Voltaic Electricity may be usefully applied to the purpose of workingin metal", Annals of Electricity, Magnetism and Chemistry, Vol.4 Jan 1840.(See also by the same author in Westminster Review, Vol 34, II, 1840 pp 434 - 460)
2
related internet web sites
Using brine as an electrolyte - the toxic effects of using a salt solution as an electrolyte ingalv-etch or any type of electroetching.A list below of websites showing the processes of the electrolysis of Sodium Chloride, saltsolution or brine, and others showing toxicity of the chlorine gas generated, of the causticsoda solution that is left, and the different toxic chemicals that are produced when etchingmetals like copper, zinc, aluminium, steel, brass. Some of these reactions can be foundwhen adding salt to copper sulphate to create 'Saline sulphate etch' , which may then beused electrolytically in the Galv-On process. Free copper deposit produced by etchingzinc plates in saline sulphate etch forms a 'zinc copper couple' generating a current andproducing chlorine and caustic soda. Free chlorine and hydrogen gas in a confined spacelike a covered etching tray can form an explosive mixture. If the chlorine gas is notchannelled and collected, but mixes freely with the caustic soda, then sodium chlorate isproduced . Sodium chlorate is a very toxic chemical banned since 2008 in the EuropeanUnion where it was used as a powerful weed killer.
Electrolysis of Brine
http://chemed.chem.wisc.edu/chempaths/GenChem-Textbook/Electrolysis-of-Brine-991.html
http://nj.gov/health/eoh/rtkweb/documents/fs/1706.pdf
http://www.ncbi.nlm.nih.gov/pmc/articles/PMC2908650/
http://electrochem.cwru.edu/encycl/art-b01-brine.htm
http://nj.gov/health/eoh/rtkweb/documents/fs/0057.pdf
http://en.wikipedia.org/wiki/Sodium_chlorate
The following sites are those that deal specifically with safe and ecologically soundprintmaking:
Printmaking TodayThe quarterly international Journal created by Rosemary Simmons and edited by AnneDesmet, which covers all aspects of printmaking including non-toxic methodshttp://www.artnet.co.uk
PrintmakerA comprehensive listing of websites and pages dealing with printmaking and art, createdby Chris of Printmaker, a studio offering printmaking editioning services and otherresources to printmakers, especially those interested in screenprinting. Data and links tonon-toxic printmaking sites and woodcut artists and techniques.http://www.printmaker.co.uk/links.html
Keith Howard's Non-Toxic Printmaking PageA few extracts from “Non-Toxic Intaglio Printmaking”, describing non-toxic photographicintaglio printmaking methods; Intaglio-Type method using ImagOn film; new groundingmethods. Regularly updated with links and new material..http://www.mtsu.edu/~art/printmaking/non_toxic.html
Edinburgh Printmakers Workshopis an artists' studio and gallery dedicated to contemporary fine-art printmaking. Studiofacilities are provided at reasonable cost for any artist who wishes to work in etching,lithography, screenprinting or relief printing. They have developed and use non-toxicmethods: Edinburgh Etch, Acrylic Resist Etching; Water-based screenprinting; Lithographyusing non-toxic chemicals. An extremely well designed and attractive site..http://www.edinburgh-printmakers.co.uk
The Printmakers CouncilFounded in 1965 to promote the art of printmaking and the work of contemporaryprintmakers. It continues to pursue this aim by organising a program of exhibitions inLondon, throughout the U.K. and worldwide. These exhibitions show both traditionalskills and innovatory printmaking techniques..http://www.printmaker.co.uk/pmc/index.html
Nik Semenoff - new lithographic techniquesPages describing new techniques he has developed for waterless lithography; techniquesusing dry copier toner; electro-etching; a new mordant for aluminium plates. New
3
Directions Art Gallery showing example prints.http://duke.usask.ca/~semenoff/Home.html
Printmaking Methods - A 'Print Australia' ListingA comprehensive resource of information concerning methods of printmaking and general'how-to' information, giving preference to sites promoting the use of non-toxicmethodologies. A site filled with links to sites under different headings:http://www.acay.com.au/~severn/methods.htm
GreenArt - an Eco-Art directoryA selective list of websites and pages of artists and designers concerned with ecological,environmental and social issues in their work, under a number of headings: Printmaking(non-toxic, woodcuts), Architecture & Design (solar, energy conservation), Tapestry andFibre-art, Sculpture & Painting (recycled materials and ecological themes), Travel,Organisations.http://www.greenart.info/guide
Printworks MagazineA web magazine with content that regularly changes, often drawn from articles inPrintmaking Today, originally created by Mark Millmore. Individual artists featured;articles on technical subjects, and techniques described.http://people.whitman.edu/~goodmal/print/works.htm
Printmaking LinksMiddle Tennesee State University's site with a facility to search the site for information onall aspects of printmaking, including non-toxic techniqueshttp:///www.mtsu.edu/~art/printmaking/print_links.html
PolymetaalManufacturer of printmaking equipment; Etching presses, litho presses, hot plates, reliefpresses, intaglio presses, acid trays etc. Also on this website you can find printmaking linksas well as free exhibit space for printmaking artists.http://www.polymetaal.nl
The Printmakers' Experimentarium - was established in Copenhagen by Henrik Boegh in1997. with the following aims: Testing and evaluating new printmaking techniques andmaterials based on acrylics and polymers; Imparting experience with such techniques andmaterials to the art schools and creative artists; Arranging workshops and demonstrationsof Non-Toxic Printmaking; Advising schools and printmaking workshops on establishingand equipping a Non-Toxic Printmaking Studio..http://www.artbag.dk/ge/uk/index.html
Printmaking Links - Middle Tennesee State University's site with a facility to search thesite for information on all aspects of printmaking. A site very rich in information and linksto other printmaking sites...http://www.mtsu.edu/~art/printmaking/print_links.html
ElectroEtchA commercial site with very little information about methods, promoting the expensivepatented equipment sold by ElectroEtch Enterprises, developed and patented by Omri andMarion Behr.http://www.electroetch.com
LectroEtch - an American company supplying materials and equipment for industrialmarking by electrolytic etching since 1943 (no connection with the Behrs).http://www.lectroetch.com
How a Wood Engraving is MadeA well illustrated and described process of the process of making a wood engraving, byAndy English. http://freespace.virgin.net/a.english/how.htm
Wood EngravingWood engraving is a refinement of the technique of woodcut, the carving of a design intoa block of wood by cutting away all parts of the wood which are not part of the design. Asite showing this and other techniqueshttp://www.cbbag.ca/WoodEngraving.html
and a reminder of my website addresses:http://www.greenart.info
4
APPENDIX A : ELECTRO-ETCHING (1855)Extract from: WALKER, Charles V., Electrotype Manipulation : Part II. Containing TheTheory, and Plain Instructions in the Arts of Electro-Plating, Electro-Gilding, and Electro-Etching; with an account of the Mode of Depositing Metallic Oxides, and of the SeveralApplications of Electrotype in the Arts.Nineteenth Edition, London, Published by George Knight and Sons, Manufacturers ofChemical Apparatus and Philosophical Instruments, Foster Lane, Cheapside. 1855.
Page 44. Para.149 "ELECTRO-ETCHING.- The results hither to treated on, have been (....)all obtained at the negative metal : but there is a class of results of no inconsiderableimportance to be obtained at the other terminal. The plates of copper, in thedecomposition cell, in connection with the copper of the battery, have been described ascombining gradually with the oxygen released there, and being eventually consumed;so likewise the plates of silver or gold, which occupy the same relative position, are in asimilar manner consumed. But as the varnish placed on moulds, effectively shields theparts protected by it, from the effects of electrolytic action, so also may the copperplates, or the plates of any metal connected with the positive end of the battery, beprotected, and the destructive action localised at pleasure.
150. If, for instance, plates of copper be covered on any part of their surface with astratum of varnish, that part will be excluded from the line of action, while all else isbeing consumed. Advantage has been taken of this, by coating plates with propercomposition and then tracing through it any design, of which an etching is required.The plate in this condition is submitted to the action of the nascent oxygen, and thesurface is readily and effectively etched. There is some superiority too possessed by thismethod, over the ordinary etching by the use of nitric acid; for the operation can beconducted with considerable regularity; it can be rendered a slow or a speedy process;and the result can be taken out from time to time, to be examined, and can beresubmitted in a moment, In fact, of so much importance has this mode of etching beendeemed, that it is already one amongst the many applications of this principle for whicha patent has been obtained.
151. Process of electro-etching.- Take a burnished copper plate, and solder to it a stoutwire; heat the plate, and rub its surface with etching ground, wrapped in silk : be carefulto obtain an even coating; then smoke the covered surface over the flame of a candle.Varnish the back of the plate as well as the wire with shellac. Trace the design throughthe etching ground with a fine point. This done, place it in a decomposition cell, andconnect it with the copper of a Daniell's or other cell, placing opposite to it a plate ofsomewhat similar size; after the lapse of ten minutes, remove it, and "stop out" the fineparts with Brunswick black; return it to the decomposition cell for a second ten minutes;and again stop the half tints; again submit it to action for ten minutes, and the operationis complete. Remove the etching ground by means of heat, and a perfect engraving willbe found on the plate. The exact duration of the several operations, as well as theirnumber, must be regulated according to circumstances. Electro-etching is an interestingexperiment for the lecture table. At the commencement of a lecture, I have submitted aplate to electric action, and before the hour has expired, have distributed proofimpressions..."
Comments on text: In introductory part of the text, Walker describes a 'decomposition cell'as a vessel in which the electrolytic action upon the plates takes place, connected to aGalvanic cell or a battery. A Daniell's cell is a source of Galvanic or Voltaic Electricity, andconsists of a copper and a zinc plate in a vessel containing an acidic solution, and devicesfor maintaining the concentration and acidity of the solution. The etching time of a total of30 minutes, indicated in para. 151, assuming he is talking about a small demonstrationplate, would indicate a voltage of about 1 volt, the output of a single Daniell's cell. The'copper' of the battery is the side which produces the 'positive' current. The words"rendered a slow or a speedy process" indicate that the voltage could be low or high,regulated by a different number of cells in series. In another part of the text, a very lowvoltage is recommended for certain purposes, and the time required for electrotyping, of aweek or more, also indicates the use of a low voltage and amperage.
Later in the text there is a section on "Electro-tint or Galvanography", (para 173) which isdescribed as a "another form of deposite" produced by painting on 'white metal' withthick etching ground or varnish to create a textured relief, then the whole is''plumbagoed', that is, covered with graphite, and then a tonal plate is created by theelectrotyping or galvanoplastic process.
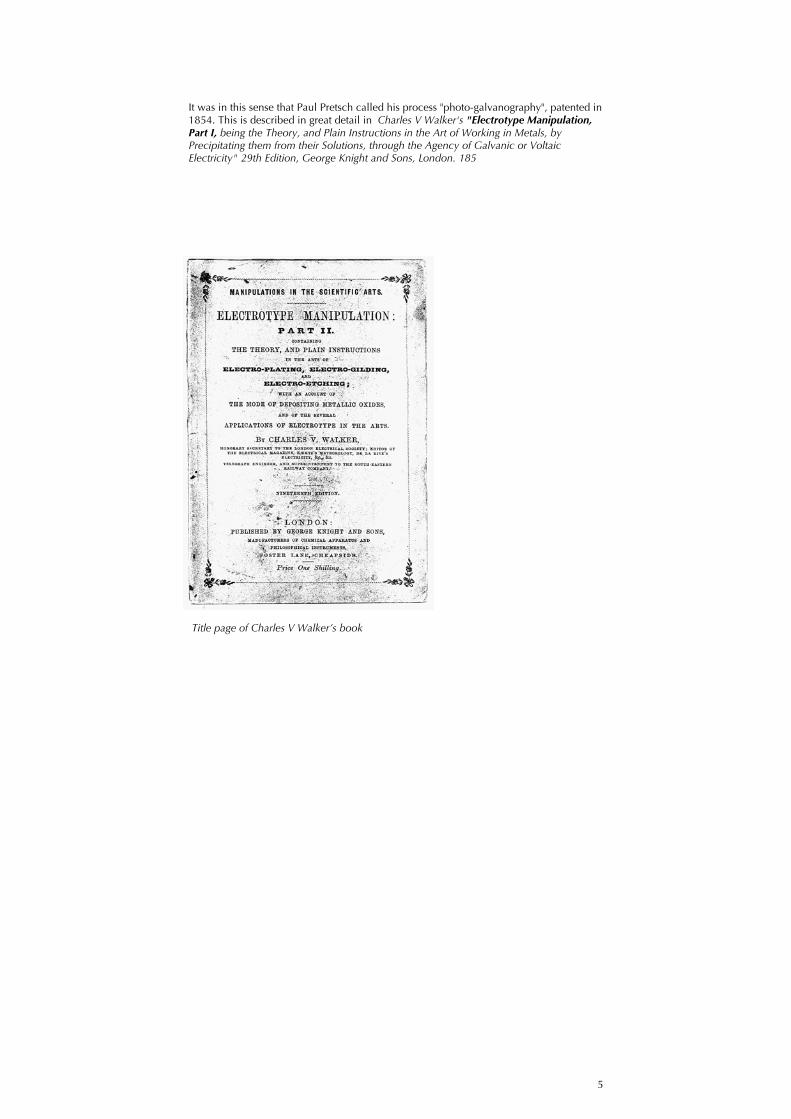
5
It was in this sense that Paul Pretsch called his process "photo-galvanography", patented in1854. This is described in great detail in Charles V Walker's "Electrotype Manipulation,Part I, being the Theory, and Plain Instructions in the Art of Working in Metals, byPrecipitating them from their Solutions, through the Agency of Galvanic or VoltaicElectricity" 29th Edition, George Knight and Sons, London. 185
Title page of Charles V Walker’s book
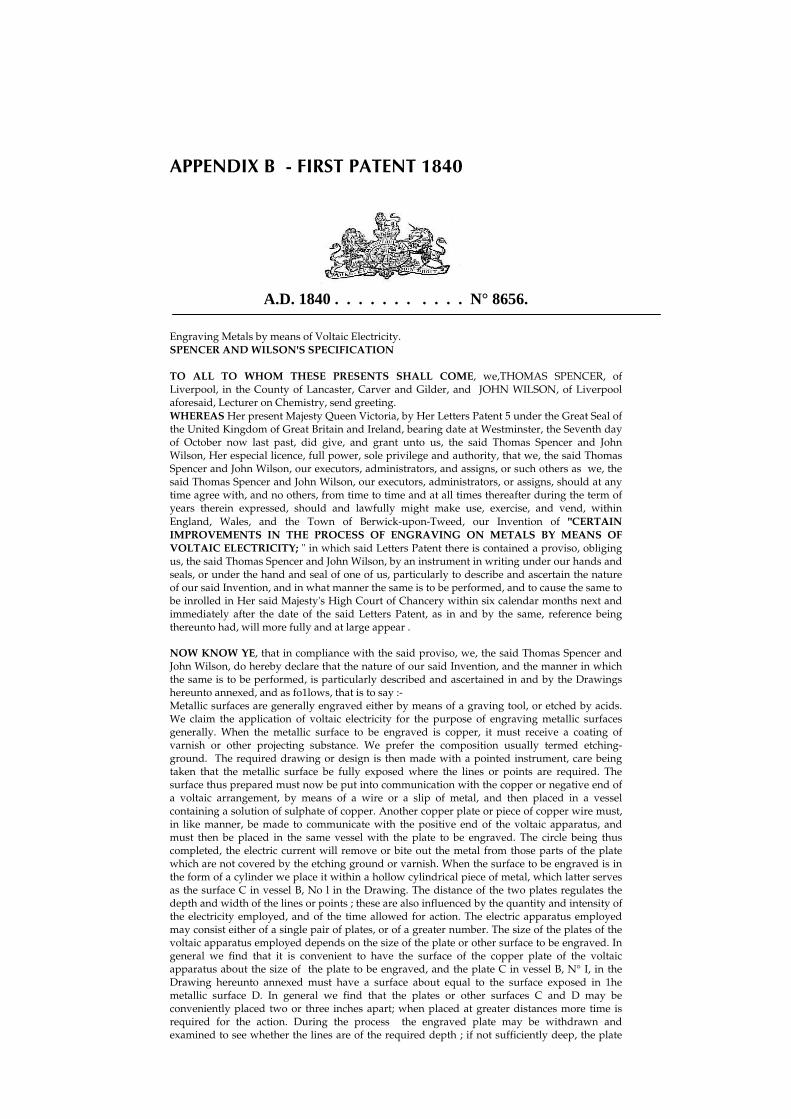
APPENDIX B - FIRST PATENT 1840
A.D. 1840 . . . . . . . . . . . N° 8656.
Engraving Metals by means of Voltaic Electricity.SPENCER AND WILSON'S SPECIFICATION
TO ALL TO WHOM THESE PRESENTS SHALL COME, we,THOMAS SPENCER, ofLiverpool, in the County of Lancaster, Carver and Gilder, and JOHN WILSON, of Liverpoolaforesaid, Lecturer on Chemistry, send greeting.WHEREAS Her present Majesty Queen Victoria, by Her Letters Patent 5 under the Great Seal ofthe United Kingdom of Great Britain and Ireland, bearing date at Westminster, the Seventh dayof October now last past, did give, and grant unto us, the said Thomas Spencer and JohnWilson, Her especial licence, full power, sole privilege and authority, that we, the said ThomasSpencer and John Wilson, our executors, administrators, and assigns, or such others as we, thesaid Thomas Spencer and John Wilson, our executors, administrators, or assigns, should at anytime agree with, and no others, from time to time and at all times thereafter during the term ofyears therein expressed, should and lawfully might make use, exercise, and vend, withinEngland, Wales, and the Town of Berwick-upon-Tweed, our Invention of "CERTAINIMPROVEMENTS IN THE PROCESS OF ENGRAVING ON METALS BY MEANS OFVOLTAIC ELECTRICITY; " in which said Letters Patent there is contained a proviso, obligingus, the said Thomas Spencer and John Wilson, by an instrument in writing under our hands andseals, or under the hand and seal of one of us, particularly to describe and ascertain the natureof our said Invention, and in what manner the same is to be performed, and to cause the same tobe inrolled in Her said Majesty's High Court of Chancery within six calendar months next andimmediately after the date of the said Letters Patent, as in and by the same, reference beingthereunto had, will more fully and at large appear .
NOW KNOW YE, that in compliance with the said proviso, we, the said Thomas Spencer andJohn Wilson, do hereby declare that the nature of our said Invention, and the manner in whichthe same is to be performed, is particularly described and ascertained in and by the Drawingshereunto annexed, and as fo1lows, that is to say :-Metallic surfaces are generally engraved either by means of a graving tool, or etched by acids.We claim the application of voltaic electricity for the purpose of engraving metallic surfacesgenerally. When the metallic surface to be engraved is copper, it must receive a coating ofvarnish or other projecting substance. We prefer the composition usually termed etching-ground. The required drawing or design is then made with a pointed instrument, care beingtaken that the metallic surface be fully exposed where the lines or points are required. Thesurface thus prepared must now be put into communication with the copper or negative end ofa voltaic arrangement, by means of a wire or a slip of metal, and then placed in a vesselcontaining a solution of sulphate of copper. Another copper plate or piece of copper wire must,in like manner, be made to communicate with the positive end of the voltaic apparatus, andmust then be placed in the same vessel with the plate to be engraved. The circle being thuscompleted, the electric current will remove or bite out the metal from those parts of the platewhich are not covered by the etching ground or varnish. When the surface to be engraved is inthe form of a cylinder we place it within a hollow cylindrical piece of metal, which latter servesas the surface C in vessel B, No l in the Drawing. The distance of the two plates regulates thedepth and width of the lines or points ; these are also influenced by the quantity and intensity ofthe electricity employed, and of the time allowed for action. The electric apparatus employedmay consist either of a single pair of plates, or of a greater number. The size of the plates of thevoltaic apparatus employed depends on the size of the plate or other surface to be engraved. Ingeneral we find that it is convenient to have the surface of the copper plate of the voltaicapparatus about the size of the plate to be engraved, and the plate C in vessel B, N° I, in theDrawing hereunto annexed must have a surface about equal to the surface exposed in 1hemetallic surface D. In general we find that the plates or other surfaces C and D may beconveniently placed two or three inches apart; when placed at greater distances more time isrequired for the action. During the process the engraved plate may be withdrawn andexamined to see whether the lines are of the required depth ; if not sufficiently deep, the plate
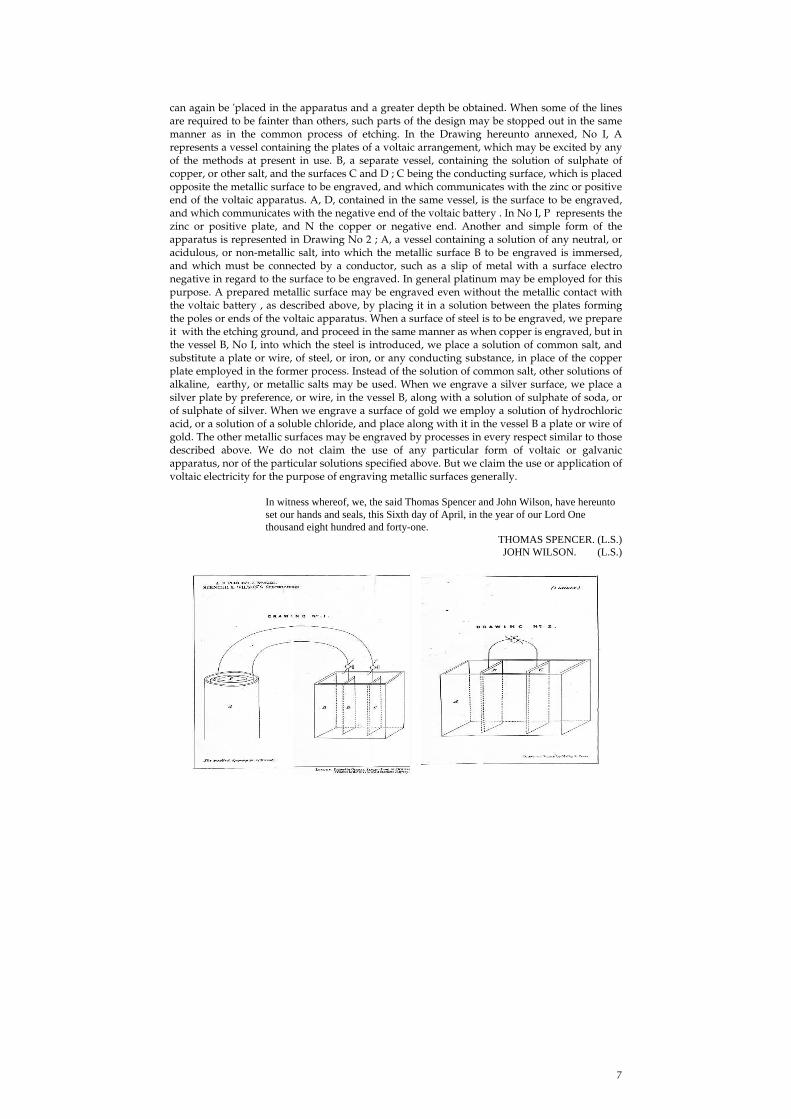
7
can again be 'placed in the apparatus and a greater depth be obtained. When some of the linesare required to be fainter than others, such parts of the design may be stopped out in the samemanner as in the common process of etching. In the Drawing hereunto annexed, No I, Arepresents a vessel containing the plates of a voltaic arrangement, which may be excited by anyof the methods at present in use. B, a separate vessel, containing the solution of sulphate ofcopper, or other salt, and the surfaces C and D ; C being the conducting surface, which is placedopposite the metallic surface to be engraved, and which communicates with the zinc or positiveend of the voltaic apparatus. A, D, contained in the same vessel, is the surface to be engraved,and which communicates with the negative end of the voltaic battery . In No I, P represents thezinc or positive plate, and N the copper or negative end. Another and simple form of theapparatus is represented in Drawing No 2 ; A, a vessel containing a solution of any neutral, oracidulous, or non-metallic salt, into which the metallic surface B to be engraved is immersed,and which must be connected by a conductor, such as a slip of metal with a surface electronegative in regard to the surface to be engraved. In general platinum may be employed for thispurpose. A prepared metallic surface may be engraved even without the metallic contact withthe voltaic battery , as described above, by placing it in a solution between the plates formingthe poles or ends of the voltaic apparatus. When a surface of steel is to be engraved, we prepareit with the etching ground, and proceed in the same manner as when copper is engraved, but inthe vessel B, No I, into which the steel is introduced, we place a solution of common salt, andsubstitute a plate or wire, of steel, or iron, or any conducting substance, in place of the copperplate employed in the former process. Instead of the solution of common salt, other solutions ofalkaline, earthy, or metallic salts may be used. When we engrave a silver surface, we place asilver plate by preference, or wire, in the vessel B, along with a solution of sulphate of soda, orof sulphate of silver. When we engrave a surface of gold we employ a solution of hydrochloricacid, or a solution of a soluble chloride, and place along with it in the vessel B a plate or wire ofgold. The other metallic surfaces may be engraved by processes in every respect similar to thosedescribed above. We do not claim the use of any particular form of voltaic or galvanicapparatus, nor of the particular solutions specified above. But we claim the use or application ofvoltaic electricity for the purpose of engraving metallic surfaces generally.
In witness whereof, we, the said Thomas Spencer and John Wilson, have hereuntoset our hands and seals, this Sixth day of April, in the year of our Lord Onethousand eight hundred and forty-one.
THOMAS SPENCER. (L.S.)JOHN WILSON. (L.S.)
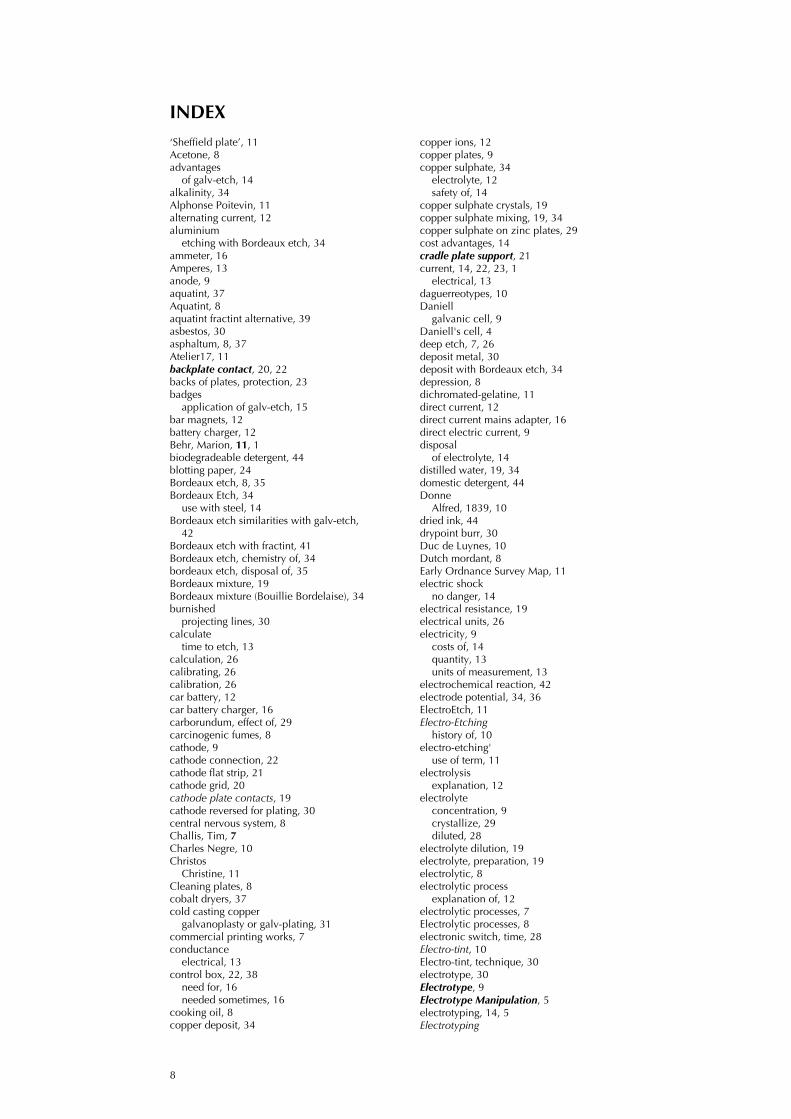
8
INDEX‘Sheffield plate’, 11Acetone, 8advantages
of galv-etch, 14alkalinity, 34Alphonse Poitevin, 11alternating current, 12aluminium
etching with Bordeaux etch, 34ammeter, 16Amperes, 13anode, 9aquatint, 37Aquatint, 8aquatint fractint alternative, 39asbestos, 30asphaltum, 8, 37Atelier17, 11backplate contact, 20, 22backs of plates, protection, 23badges
application of galv-etch, 15bar magnets, 12battery charger, 12Behr, Marion, 11, 1biodegradeable detergent, 44blotting paper, 24Bordeaux etch, 8, 35Bordeaux Etch, 34
use with steel, 14Bordeaux etch similarities with galv-etch,
42Bordeaux etch with fractint, 41Bordeaux etch, chemistry of, 34bordeaux etch, disposal of, 35Bordeaux mixture, 19Bordeaux mixture (Bouillie Bordelaise), 34burnished
projecting lines, 30calculate
time to etch, 13calculation, 26calibrating, 26calibration, 26car battery, 12car battery charger, 16carborundum, effect of, 29carcinogenic fumes, 8cathode, 9cathode connection, 22cathode flat strip, 21cathode grid, 20cathode plate contacts, 19cathode reversed for plating, 30central nervous system, 8Challis, Tim, 7Charles Negre, 10Christos
Christine, 11Cleaning plates, 8cobalt dryers, 37cold casting copper
galvanoplasty or galv-plating, 31commercial printing works, 7conductance
electrical, 13control box, 22, 38
need for, 16needed sometimes, 16
cooking oil, 8copper deposit, 34
copper ions, 12copper plates, 9copper sulphate, 34
electrolyte, 12safety of, 14
copper sulphate crystals, 19copper sulphate mixing, 19, 34copper sulphate on zinc plates, 29cost advantages, 14cradle plate support, 21current, 14, 22, 23, 1
electrical, 13daguerreotypes, 10Daniell
galvanic cell, 9Daniell's cell, 4deep etch, 7, 26deposit metal, 30deposit with Bordeaux etch, 34depression, 8dichromated-gelatine, 11direct current, 12direct current mains adapter, 16direct electric current, 9disposal
of electrolyte, 14distilled water, 19, 34domestic detergent, 44Donne
Alfred, 1839, 10dried ink, 44drypoint burr, 30Duc de Luynes, 10Dutch mordant, 8Early Ordnance Survey Map, 11electric shock
no danger, 14electrical resistance, 19electrical units, 26electricity, 9
costs of, 14quantity, 13units of measurement, 13
electrochemical reaction, 42electrode potential, 34, 36ElectroEtch, 11Electro-Etching
history of, 10electro-etching'
use of term, 11electrolysis
explanation, 12electrolyte
concentration, 9crystallize, 29diluted, 28
electrolyte dilution, 19electrolyte, preparation, 19electrolytic, 8electrolytic process
explanation of, 12electrolytic processes, 7Electrolytic processes, 8electronic switch, time, 28Electro-tint, 10Electro-tint, technique, 30electrotype, 30Electrotype, 9Electrotype Manipulation, 5electrotyping, 14, 5Electrotyping
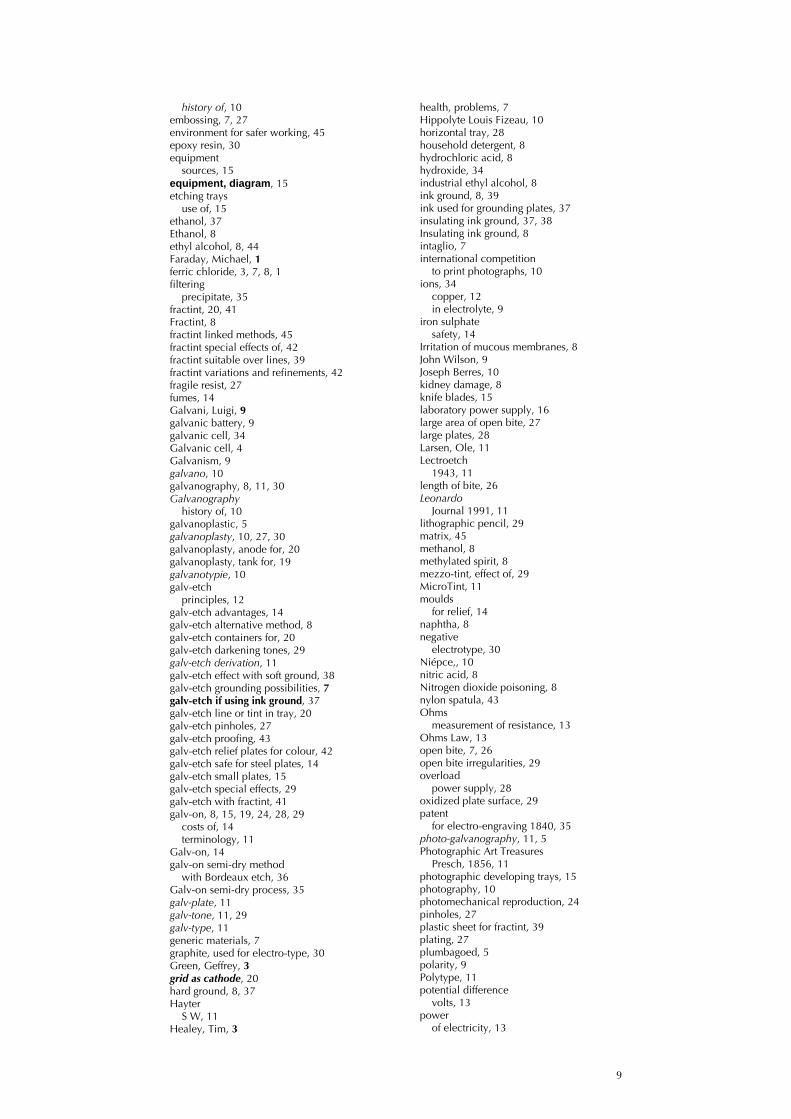
9
history of, 10embossing, 7, 27environment for safer working, 45epoxy resin, 30equipment
sources, 15equipment, diagram, 15etching trays
use of, 15ethanol, 37Ethanol, 8ethyl alcohol, 8, 44Faraday, Michael, 1ferric chloride, 3, 7, 8, 1filtering
precipitate, 35fractint, 20, 41Fractint, 8fractint linked methods, 45fractint special effects of, 42fractint suitable over lines, 39fractint variations and refinements, 42fragile resist, 27fumes, 14Galvani, Luigi, 9galvanic battery, 9galvanic cell, 34Galvanic cell, 4Galvanism, 9galvano, 10galvanography, 8, 11, 30Galvanography
history of, 10galvanoplastic, 5galvanoplasty, 10, 27, 30galvanoplasty, anode for, 20galvanoplasty, tank for, 19galvanotypie, 10galv-etch
principles, 12galv-etch advantages, 14galv-etch alternative method, 8galv-etch containers for, 20galv-etch darkening tones, 29galv-etch derivation, 11galv-etch effect with soft ground, 38galv-etch grounding possibilities, 7galv-etch if using ink ground, 37galv-etch line or tint in tray, 20galv-etch pinholes, 27galv-etch proofing, 43galv-etch relief plates for colour, 42galv-etch safe for steel plates, 14galv-etch small plates, 15galv-etch special effects, 29galv-etch with fractint, 41galv-on, 8, 15, 19, 24, 28, 29
costs of, 14terminology, 11
Galv-on, 14galv-on semi-dry method
with Bordeaux etch, 36Galv-on semi-dry process, 35galv-plate, 11galv-tone, 11, 29galv-type, 11generic materials, 7graphite, used for electro-type, 30Green, Geffrey, 3grid as cathode, 20hard ground, 8, 37Hayter
S W, 11Healey, Tim, 3
health, problems, 7Hippolyte Louis Fizeau, 10horizontal tray, 28household detergent, 8hydrochloric acid, 8hydroxide, 34industrial ethyl alcohol, 8ink ground, 8, 39ink used for grounding plates, 37insulating ink ground, 37, 38Insulating ink ground, 8intaglio, 7international competition
to print photographs, 10ions, 34
copper, 12in electrolyte, 9
iron sulphatesafety, 14
Irritation of mucous membranes, 8John Wilson, 9Joseph Berres, 10kidney damage, 8knife blades, 15laboratory power supply, 16large area of open bite, 27large plates, 28Larsen, Ole, 11Lectroetch
1943, 11length of bite, 26Leonardo
Journal 1991, 11lithographic pencil, 29matrix, 45methanol, 8methylated spirit, 8mezzo-tint, effect of, 29MicroTint, 11moulds
for relief, 14naphtha, 8negative
electrotype, 30Niépce,, 10nitric acid, 8Nitrogen dioxide poisoning, 8nylon spatula, 43Ohms
measurement of resistance, 13Ohms Law, 13open bite, 7, 26open bite irregularities, 29overload
power supply, 28oxidized plate surface, 29patent
for electro-engraving 1840, 35photo-galvanography, 11, 5Photographic Art Treasures
Presch, 1856, 11photographic developing trays, 15photography, 10photomechanical reproduction, 24pinholes, 27plastic sheet for fractint, 39plating, 27plumbagoed, 5polarity, 9Polytype, 11potential difference
volts, 13power
of electricity, 13
10
power supply unit, 16precipitate, 35Pretsch, Paul, 11Printmaking Today, 3, 7producing a deep tone, 29progressive stopping out, 29protecting backs of plates, 14quality of bite, 27rectifier, 12relief fine lines, 30relief printing ink, 8, 37, 39resistance
electrical, 13reversing the terminals, 29rosin, 8ROSIN, 39Rosin dust allergy, 8rubbing alcohol, 8salt, 34sandwich
in galv-on process, 35Semenoff
Nik, 11Semenoff, Nik, 3, 34semi-dry galv-etch process, 15semi-dry method, 24shellac flakes, 8silicone wax, 30silicone wax, preparation, 30silver-plated sheet, 30Simmons, Rosemary, 3skin and eye irritation, 8skin damage, 8small needled plate, 27sodium bisulphate, 34sodium chloride
added to Bordeaux etch, 14added to copper sulphate, 34
soft ground, 8, 37, 38solar cells, 16solar photovoltaic array, 27stainless steel, grid for cathode, 20steel
etching with Bordeaux etch, 34steel plates, 8, 14sulphate ions, 12Sunflower oil, 8suppliers, 19table, 26
tables, 27test plate, procedure, 26tests, 26texture with Bordeaux Etch, 34Thomas Spencer, 9, 11, 35, 2, 6, 7three-dimensional modelled relief, 30time
required to etch, 16time required to etch, 26time-switch, 14, 28tone
open bite, 14toxic fumes, 8transformer, 12tray plastic food storage, 20turpentine, 8undercutting of grounds, 14unregulated power supply, 27variable resistance, 16varnish, 8vaseline oil, 44VCA, 44Vegetable Cleaning Agent, 44Velleman Instruments, 16vertical tank, 21vertical tank for deep etch, 21very small plate, 27viscosity printing, 27, 28Volta, Alexandre, 9voltage, 13voltage constant, 14voltage for plating, 30voltages
avoidance of high, 16voltaic battery, 35Walker, Charles V, 9, 5WALKER, Charles V, 4Watts
electrical power, 13wax, 30wax crayon, 29white spirit, 8zinc plates, 7, 9, 14zinc sulphate, 34
precautions, 14zinc sulphate mixing, 19zinc-copper couple, 34