Embed Size (px)
Citation preview

1
Grand Island Central School District
Instructional Technology Department
Information Packet
For Mac Users
2009 - 2010

2
Table of Contents
Topic Page (s)
IT Department Contacts 3
TIFs and Technology Coordinators 3
Mac OSX Topics
Logging on & off an OSX machine 4
The Dock 5
The Finder 6
USB Flash Drives 6
Home Folders 7
iNotes Topics
iNotes Access & Welcome Page 8-9
Changing you password in iNotes 10
iNotes Quick Reference Guide 11-14
Resource Reservations 15
Tech Dept & Custodial Dept Work Orders 16-17
FileMaker Pro Topics
Accessing FileMaker Pro (Curriculum Maps, Literacy Profile etc.) 18
Infinite Campus Topics
Taking Attendance 19-20
3
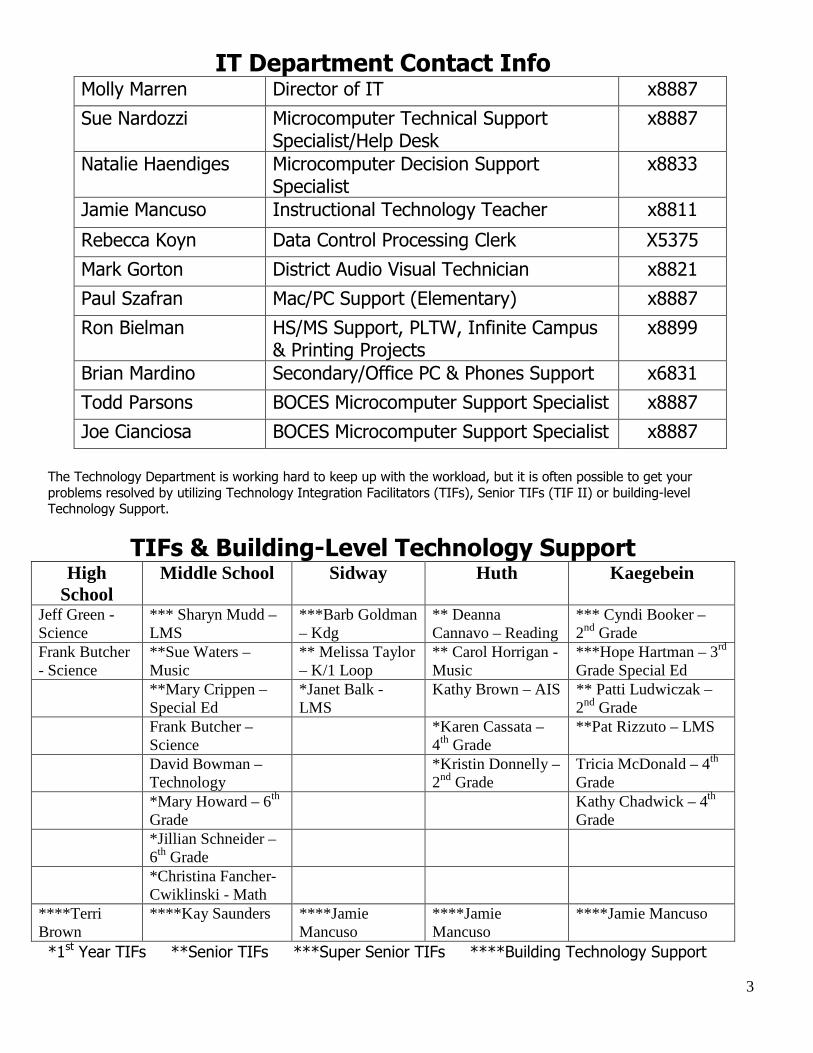
IT Department Contact Info Molly Marren Director of IT x8887
Sue Nardozzi Microcomputer Technical Support Specialist/Help Desk
x8887
Natalie Haendiges Microcomputer Decision Support Specialist
x8833
Jamie Mancuso Instructional Technology Teacher x8811
Rebecca Koyn Data Control Processing Clerk X5375
Mark Gorton District Audio Visual Technician x8821
Paul Szafran Mac/PC Support (Elementary) x8887
Ron Bielman HS/MS Support, PLTW, Infinite Campus & Printing Projects
x8899
Brian Mardino Secondary/Office PC & Phones Support x6831
Todd Parsons BOCES Microcomputer Support Specialist x8887
Joe Cianciosa BOCES Microcomputer Support Specialist x8887
The Technology Department is working hard to keep up with the workload, but it is often possible to get your
problems resolved by utilizing Technology Integration Facilitators (TIFs), Senior TIFs (TIF II) or building-level Technology Support.
TIFs & Building-Level Technology Support High
School Middle School Sidway Huth Kaegebein
Jeff Green - Science
*** Sharyn Mudd – LMS
***Barb Goldman – Kdg
** Deanna Cannavo – Reading
*** Cyndi Booker – 2nd Grade
Frank Butcher - Science
**Sue Waters – Music
** Melissa Taylor – K/1 Loop
** Carol Horrigan - Music
***Hope Hartman – 3rd Grade Special Ed
**Mary Crippen – Special Ed
*Janet Balk - LMS
Kathy Brown – AIS ** Patti Ludwiczak – 2nd Grade
Frank Butcher – Science
*Karen Cassata – 4th Grade
**Pat Rizzuto – LMS
David Bowman – Technology
*Kristin Donnelly – 2nd Grade
Tricia McDonald – 4th Grade
*Mary Howard – 6th Grade
Kathy Chadwick – 4th Grade
*Jillian Schneider – 6th Grade
*Christina Fancher-Cwiklinski - Math
****Terri Brown
****Kay Saunders ****Jamie Mancuso
****Jamie Mancuso
****Jamie Mancuso
*1st Year TIFs **Senior TIFs ***Super Senior TIFs ****Building Technology Support

4
Logging in and out of an OSX Machine
When you turn on your computer, you will see the following dialog box.
1. Enter your network/home folder username. The username is a maximum of 8 characters long and in general the standard is first initial and the last name. For example, John Doe’s network username would be jdoe.
2. Enter your network/home folder password.
3. Click Log In Note: Before entering your password, ensure that the caps lock function on your keyboard is disabled. Passwords are case-sensitive, so caps-lock should not be on when entering a password.
If you have questions regarding your username or password,
please call the IT Office at ext. 8887. When you are finished working at a computer, you must log off of the computer. It is not possible for someone else to log onto the computer until the log off procedure has been completed. Note: if you walk away from a computer and you are still logged on, the next person will have access to all of your files. To Log out: 1. Click on the Blue Apple in the top left hand of your screen and select Log Out…
2. A window will open asking you to confirm log out, click Log Out. This will end your network session and ensure the computer is ready for the next user.
5
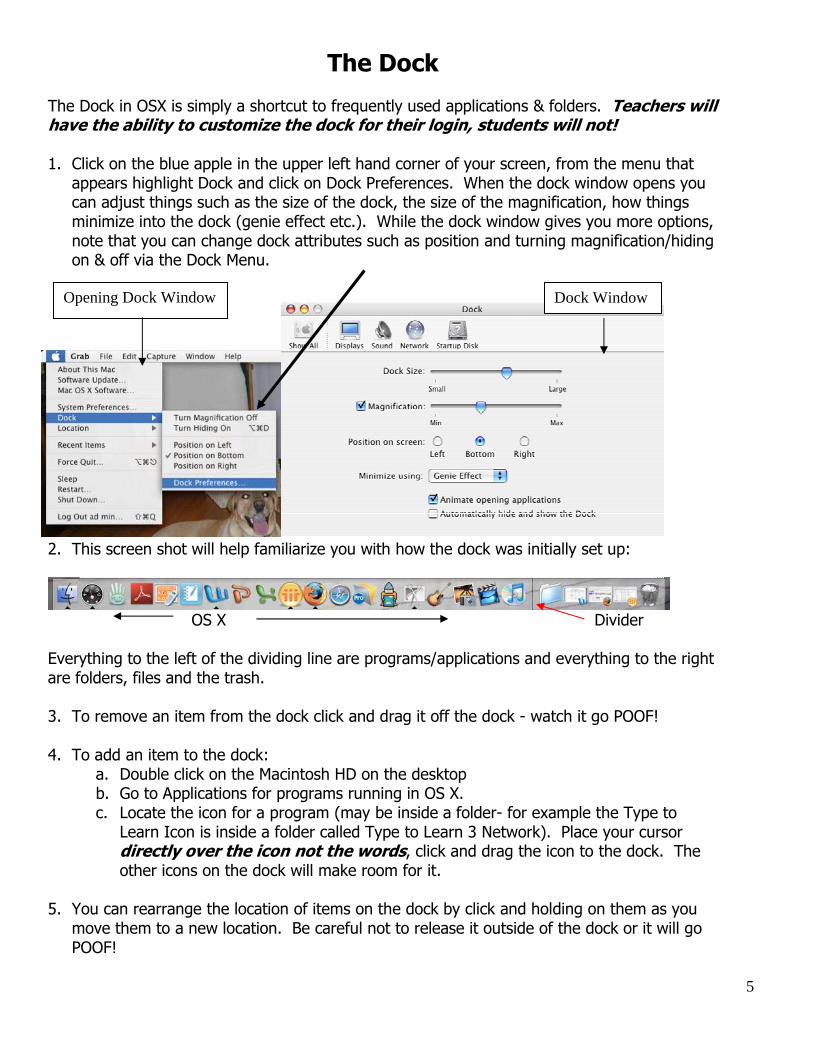
The Dock The Dock in OSX is simply a shortcut to frequently used applications & folders. Teachers will have the ability to customize the dock for their login, students will not! 1. Click on the blue apple in the upper left hand corner of your screen, from the menu that appears highlight Dock and click on Dock Preferences. When the dock window opens you can adjust things such as the size of the dock, the size of the magnification, how things minimize into the dock (genie effect etc.). While the dock window gives you more options, note that you can change dock attributes such as position and turning magnification/hiding on & off via the Dock Menu.
2. This screen shot will help familiarize you with how the dock was initially set up:
OS X Divider
Everything to the left of the dividing line are programs/applications and everything to the right are folders, files and the trash. 3. To remove an item from the dock click and drag it off the dock - watch it go POOF! 4. To add an item to the dock:
a. Double click on the Macintosh HD on the desktop b. Go to Applications for programs running in OS X. c. Locate the icon for a program (may be inside a folder- for example the Type to Learn Icon is inside a folder called Type to Learn 3 Network). Place your cursor directly over the icon not the words, click and drag the icon to the dock. The other icons on the dock will make room for it.
5. You can rearrange the location of items on the dock by click and holding on them as you move them to a new location. Be careful not to release it outside of the dock or it will go POOF!
Opening Dock Window Dock Window
6
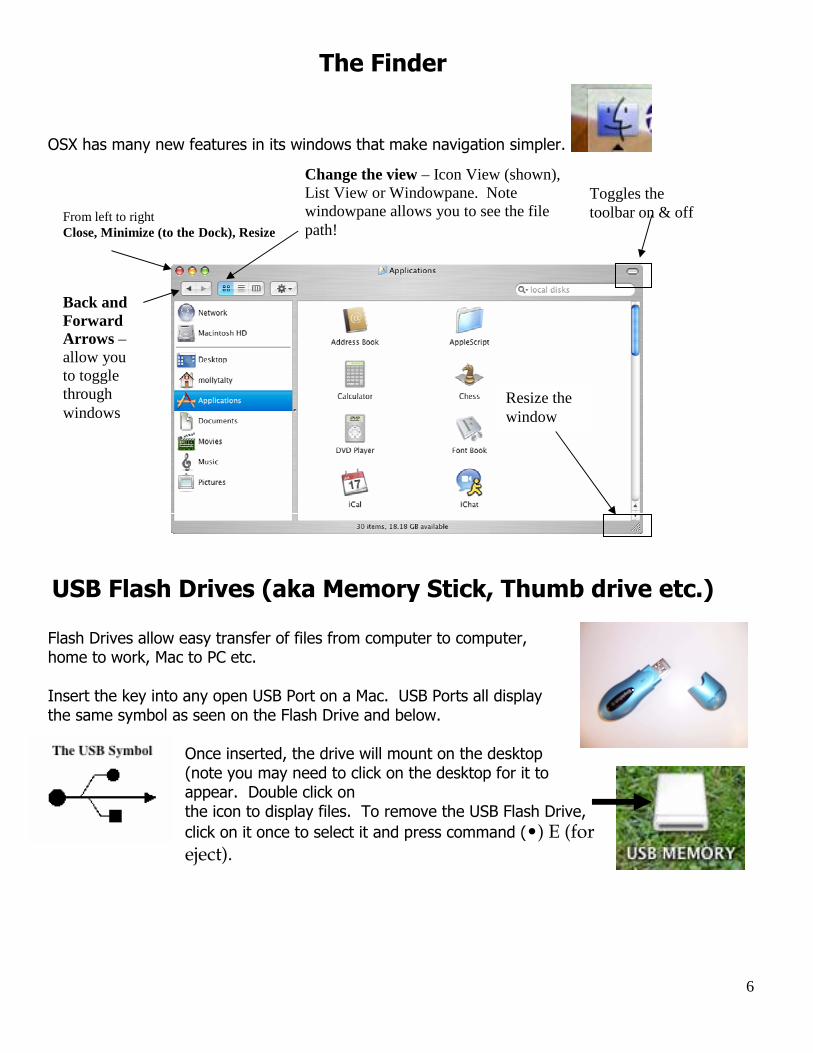
The Finder
OSX has many new features in its windows that make navigation simpler.
USB Flash Drives (aka Memory Stick, Thumb drive etc.) Flash Drives allow easy transfer of files from computer to computer, home to work, Mac to PC etc. Insert the key into any open USB Port on a Mac. USB Ports all display the same symbol as seen on the Flash Drive and below.
Once inserted, the drive will mount on the desktop (note you may need to click on the desktop for it to appear. Double click on the icon to display files. To remove the USB Flash Drive,
click on it once to select it and press command (•) E (for eject).
From left to right Close, Minimize (to the Dock), Resize
Back and Forward Arrows – allow you to toggle through windows
Toggles the toolbar on & off
Resize the window
Change the view – Icon View (shown), List View or Windowpane. Note windowpane allows you to see the file path!
7
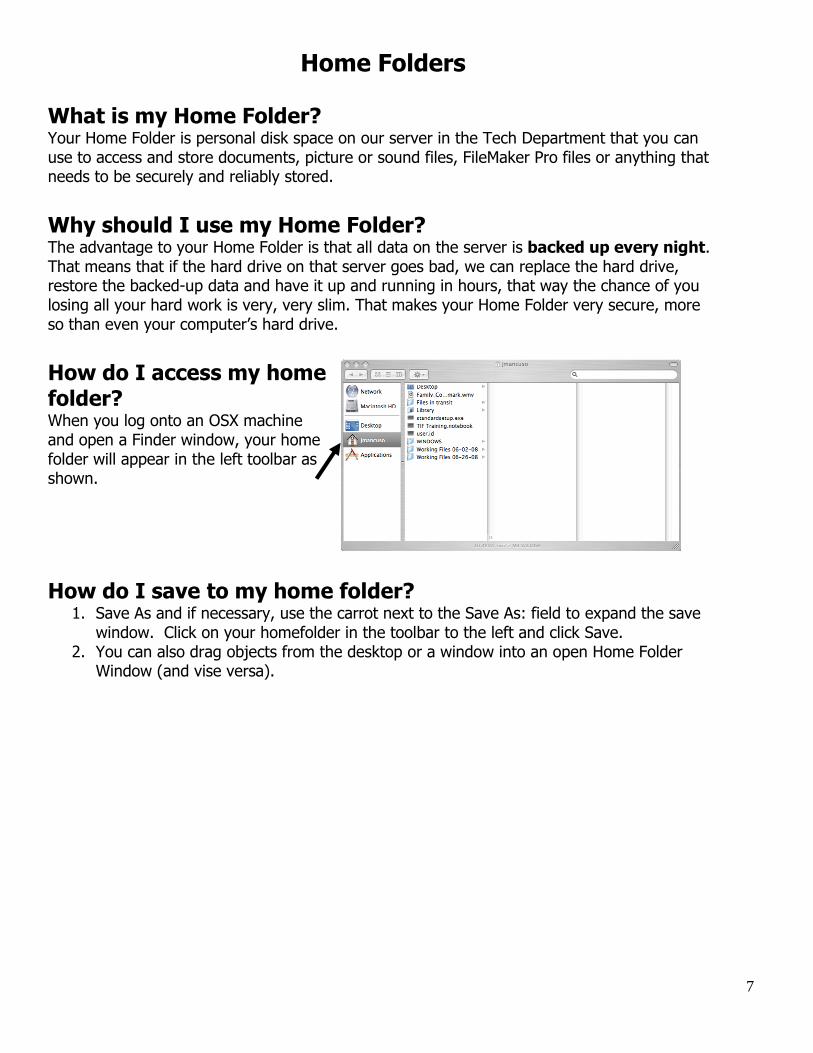
Home Folders What is my Home Folder? Your Home Folder is personal disk space on our server in the Tech Department that you can use to access and store documents, picture or sound files, FileMaker Pro files or anything that needs to be securely and reliably stored.
Why should I use my Home Folder? The advantage to your Home Folder is that all data on the server is backed up every night. That means that if the hard drive on that server goes bad, we can replace the hard drive, restore the backed-up data and have it up and running in hours, that way the chance of you losing all your hard work is very, very slim. That makes your Home Folder very secure, more so than even your computer’s hard drive.
How do I access my home folder? When you log onto an OSX machine and open a Finder window, your home folder will appear in the left toolbar as shown.
How do I save to my home folder? 1. Save As and if necessary, use the carrot next to the Save As: field to expand the save window. Click on your homefolder in the toolbar to the left and click Save.
2. You can also drag objects from the desktop or a window into an open Home Folder Window (and vise versa).
8
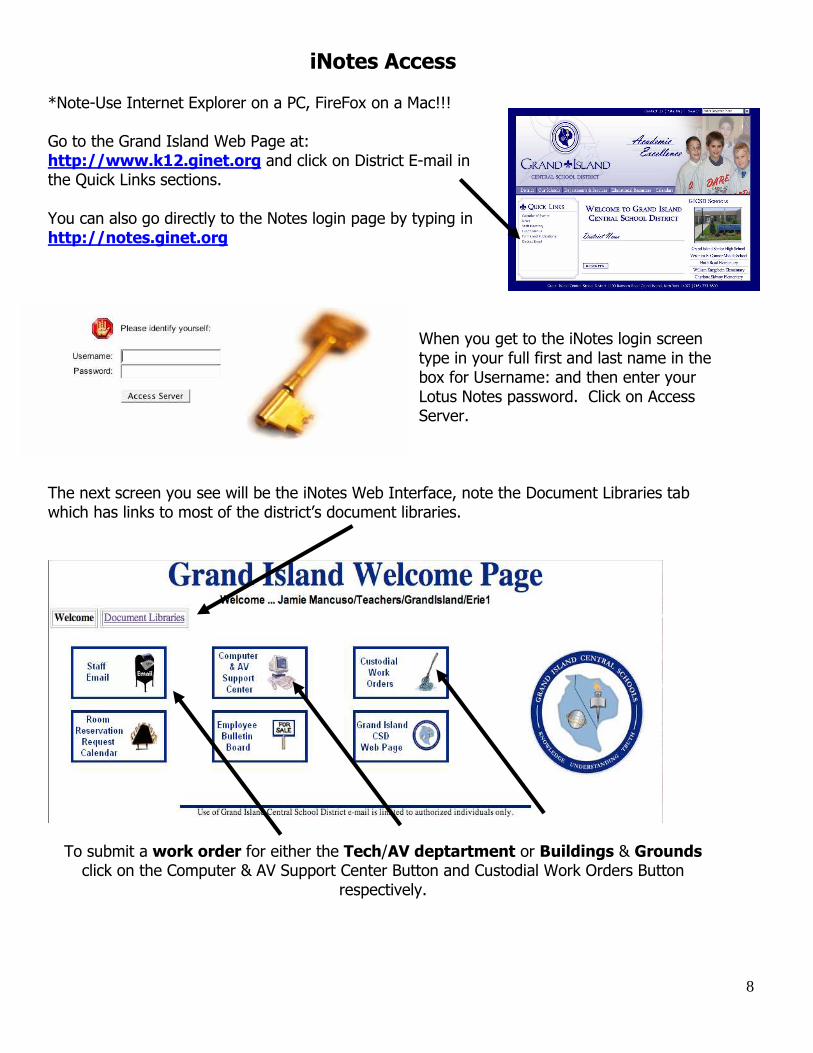
iNotes Access *Note-Use Internet Explorer on a PC, FireFox on a Mac!!! Go to the Grand Island Web Page at: http://www.k12.ginet.org and click on District E-mail in the Quick Links sections. You can also go directly to the Notes login page by typing in http://notes.ginet.org
When you get to the iNotes login screen type in your full first and last name in the box for Username: and then enter your Lotus Notes password. Click on Access Server.
The next screen you see will be the iNotes Web Interface, note the Document Libraries tab which has links to most of the district’s document libraries.
To submit a work order for either the Tech/AV deptartment or Buildings & Grounds click on the Computer & AV Support Center Button and Custodial Work Orders Button
respectively.

9
iNotes – Access Continued To access your E-mail, click on Staff E-mail, you will be redirected and a new window will open. When the new windows open you may or may not receive an error message like this one:
Place a check in the box that says “Remember this decision” and click Allow. You may have to repeat this step a few times (either throughout your session or again when you login next time). Always say Allow and check the box and at some point you won’t be prompted to do this anymore. Another error message that appears randomly while using iNotes via Firefox is:
Click OK anytime this message appears and continue working.
10
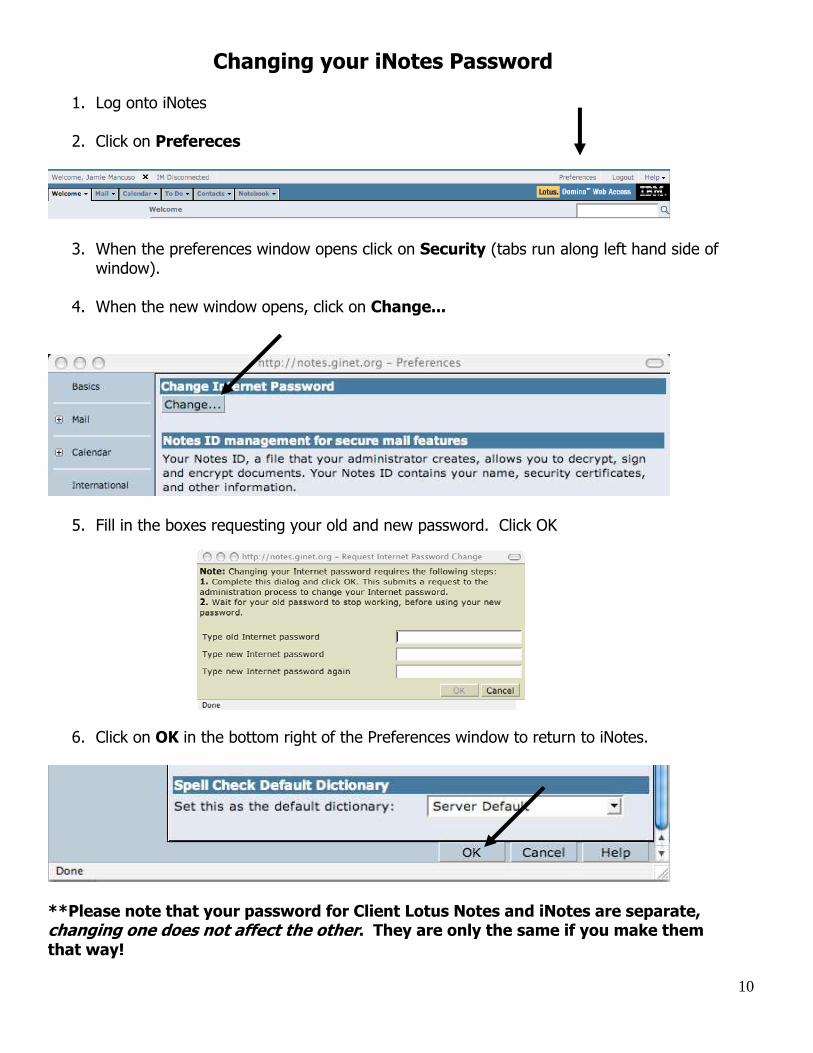
Changing your iNotes Password 1. Log onto iNotes
2. Click on Prefereces
3. When the preferences window opens click on Security (tabs run along left hand side of window).
4. When the new window opens, click on Change...
5. Fill in the boxes requesting your old and new password. Click OK
6. Click on OK in the bottom right of the Preferences window to return to iNotes.
**Please note that your password for Client Lotus Notes and iNotes are separate, changing one does not affect the other. They are only the same if you make them that way!

11
iNotes – Quick Reference Guide Getting Started IMPORTANT INFO FOR MAC USERS – iNotes works best on a PC. If you have a Mac at home (or wherever you are trying to access your e-mail from) you should use the Internet Browser Firefox. Mac Users utilize the client version of Lotus Notes in the schools, any preferences, and folders etc. that you set up will carry over to iNotes. The only changes that don’t carry over are contacts and password changes. If you change your iNotes password – your password for the client DOES NOT CHANGE! Access iNotes via http://notes.ginet.org or by clicking on the District E-mail link in the Quick Links section of www.k12.ginet.org
Navigation Tab- Contains shortcuts for logging out, setting preferences, and getting help. Shortcut Bar – Contains shortcuts to the Welcome, Mail, Calendar, To Do List, Contacts and Notebook features of iNotes Web Access. Action Bar – Contains tools for use in each of the six sections of iNotes Web Access. Customizing the Welcome Page 1. When viewing the Welcome Page, click the Edit Layout button on the Action Bar. 2. Select the numbers of panels you want displayed on your page. 3. For each panel, select the type of content you want the panel to contain. 4. Make changes to the corresponding titles, if desired. 5. Select display options from the Options field, when applicable. 6. Click the Save & Close button when done. Setting Preferences Set up Lotus iNotes to best meet your needs. Click the Preferences button located on the Navigation Tab. You can set mail and calendar options, as well as access privileges, archive options, and date and time format.
Navigation Tab
Shortcut Bar
Action Bar
12
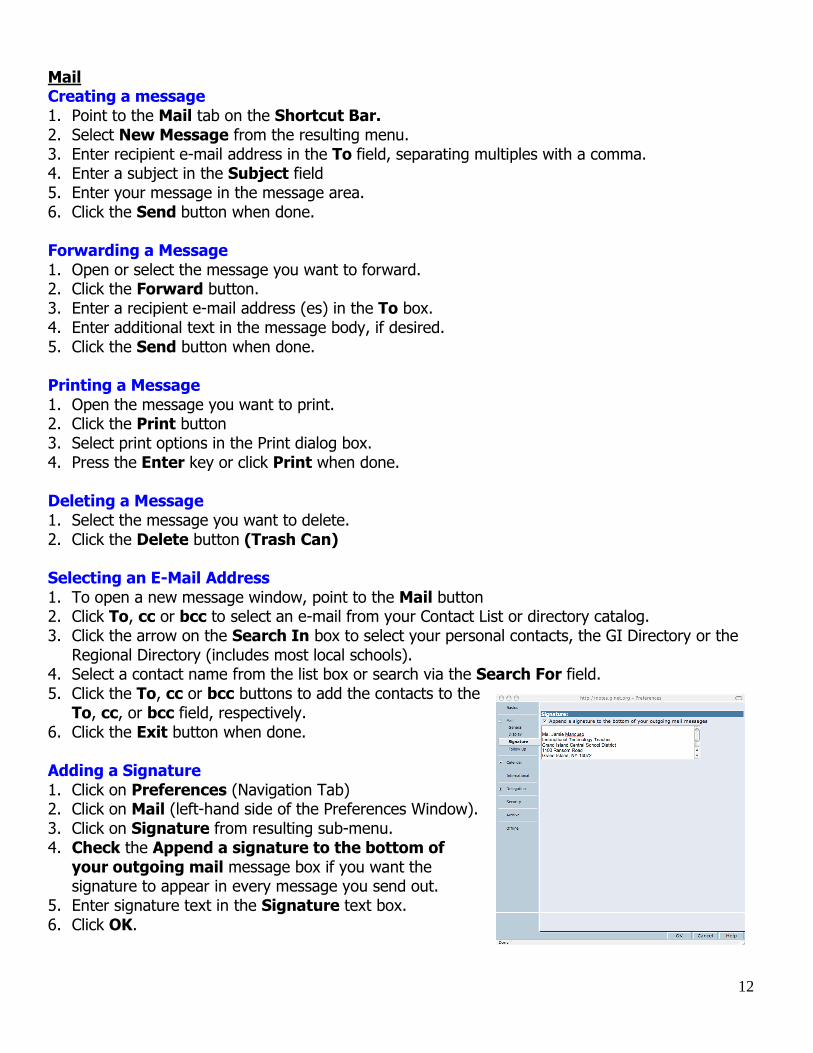
Mail Creating a message 1. Point to the Mail tab on the Shortcut Bar. 2. Select New Message from the resulting menu. 3. Enter recipient e-mail address in the To field, separating multiples with a comma. 4. Enter a subject in the Subject field 5. Enter your message in the message area. 6. Click the Send button when done. Forwarding a Message 1. Open or select the message you want to forward. 2. Click the Forward button. 3. Enter a recipient e-mail address (es) in the To box. 4. Enter additional text in the message body, if desired. 5. Click the Send button when done. Printing a Message 1. Open the message you want to print. 2. Click the Print button 3. Select print options in the Print dialog box. 4. Press the Enter key or click Print when done. Deleting a Message 1. Select the message you want to delete. 2. Click the Delete button (Trash Can) Selecting an E-Mail Address 1. To open a new message window, point to the Mail button 2. Click To, cc or bcc to select an e-mail from your Contact List or directory catalog. 3. Click the arrow on the Search In box to select your personal contacts, the GI Directory or the Regional Directory (includes most local schools).
4. Select a contact name from the list box or search via the Search For field. 5. Click the To, cc or bcc buttons to add the contacts to the
To, cc, or bcc field, respectively. 6. Click the Exit button when done. Adding a Signature 1. Click on Preferences (Navigation Tab) 2. Click on Mail (left-hand side of the Preferences Window). 3. Click on Signature from resulting sub-menu. 4. Check the Append a signature to the bottom of
your outgoing mail message box if you want the signature to appear in every message you send out.
5. Enter signature text in the Signature text box. 6. Click OK.
13
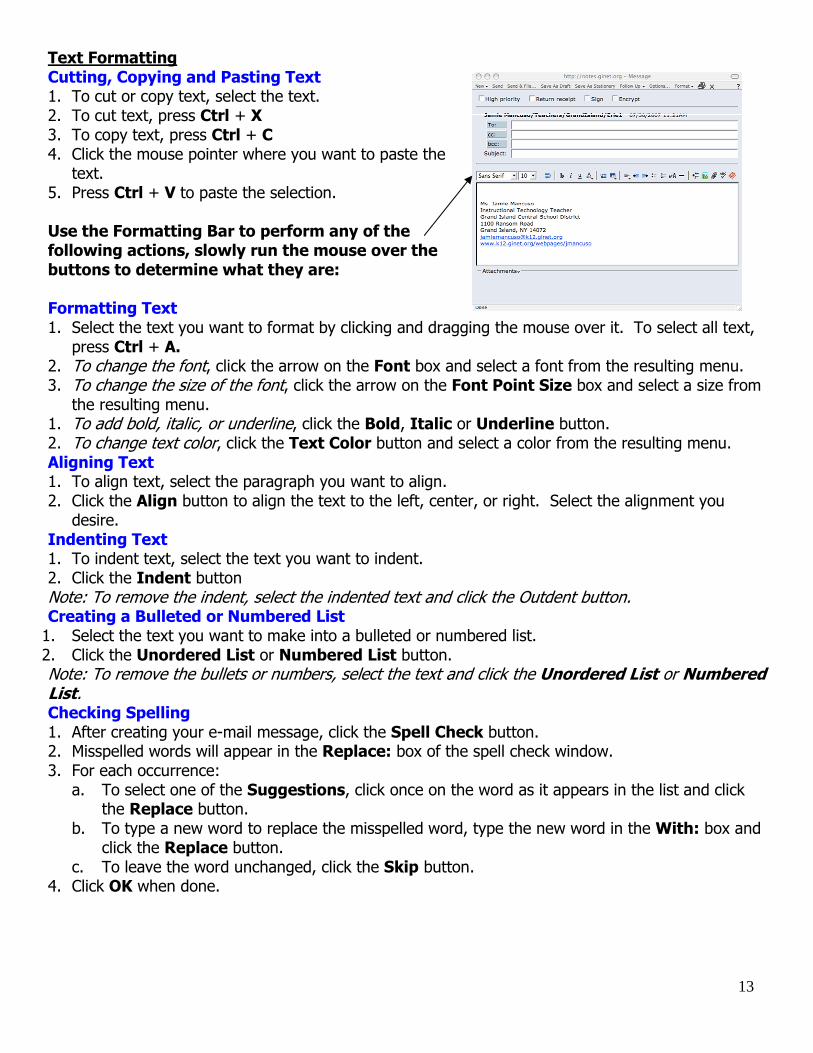
Text Formatting Cutting, Copying and Pasting Text 1. To cut or copy text, select the text. 2. To cut text, press Ctrl + X 3. To copy text, press Ctrl + C 4. Click the mouse pointer where you want to paste the text.
5. Press Ctrl + V to paste the selection. Use the Formatting Bar to perform any of the following actions, slowly run the mouse over the buttons to determine what they are: Formatting Text 1. Select the text you want to format by clicking and dragging the mouse over it. To select all text, press Ctrl + A.
2. To change the font, click the arrow on the Font box and select a font from the resulting menu. 3. To change the size of the font, click the arrow on the Font Point Size box and select a size from the resulting menu.
1. To add bold, italic, or underline, click the Bold, Italic or Underline button. 2. To change text color, click the Text Color button and select a color from the resulting menu. Aligning Text 1. To align text, select the paragraph you want to align. 2. Click the Align button to align the text to the left, center, or right. Select the alignment you desire.
Indenting Text 1. To indent text, select the text you want to indent. 2. Click the Indent button Note: To remove the indent, select the indented text and click the Outdent button. Creating a Bulleted or Numbered List 1. Select the text you want to make into a bulleted or numbered list. 2. Click the Unordered List or Numbered List button. Note: To remove the bullets or numbers, select the text and click the Unordered List or Numbered List. Checking Spelling 1. After creating your e-mail message, click the Spell Check button. 2. Misspelled words will appear in the Replace: box of the spell check window. 3. For each occurrence: a. To select one of the Suggestions, click once on the word as it appears in the list and click
the Replace button. b. To type a new word to replace the misspelled word, type the new word in the With: box and
click the Replace button. c. To leave the word unchanged, click the Skip button.
4. Click OK when done.
14
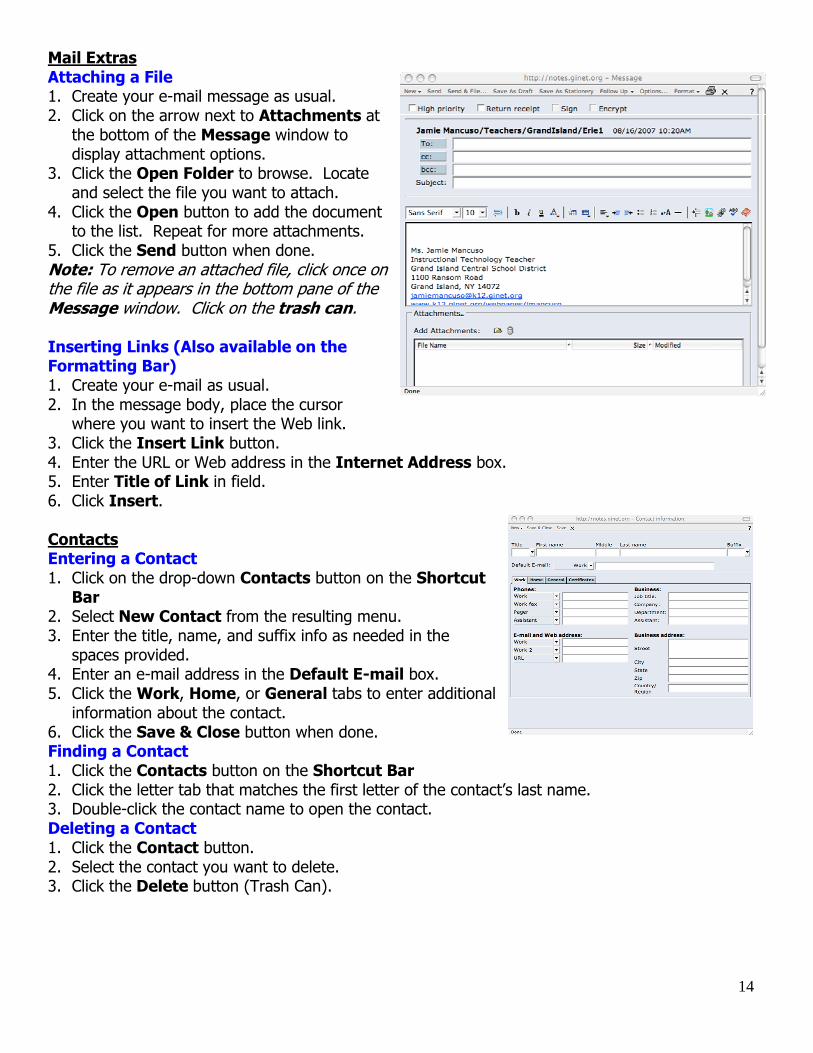
Mail Extras Attaching a File 1. Create your e-mail message as usual. 2. Click on the arrow next to Attachments at the bottom of the Message window to display attachment options.
3. Click the Open Folder to browse. Locate and select the file you want to attach.
4. Click the Open button to add the document to the list. Repeat for more attachments.
5. Click the Send button when done. Note: To remove an attached file, click once on the file as it appears in the bottom pane of the Message window. Click on the trash can. Inserting Links (Also available on the Formatting Bar) 1. Create your e-mail as usual. 2. In the message body, place the cursor where you want to insert the Web link.
3. Click the Insert Link button. 4. Enter the URL or Web address in the Internet Address box. 5. Enter Title of Link in field. 6. Click Insert. Contacts Entering a Contact 1. Click on the drop-down Contacts button on the Shortcut
Bar 2. Select New Contact from the resulting menu. 3. Enter the title, name, and suffix info as needed in the spaces provided.
4. Enter an e-mail address in the Default E-mail box. 5. Click the Work, Home, or General tabs to enter additional information about the contact.
6. Click the Save & Close button when done. Finding a Contact 1. Click the Contacts button on the Shortcut Bar 2. Click the letter tab that matches the first letter of the contact’s last name. 3. Double-click the contact name to open the contact. Deleting a Contact 1. Click the Contact button. 2. Select the contact you want to delete. 3. Click the Delete button (Trash Can).
15
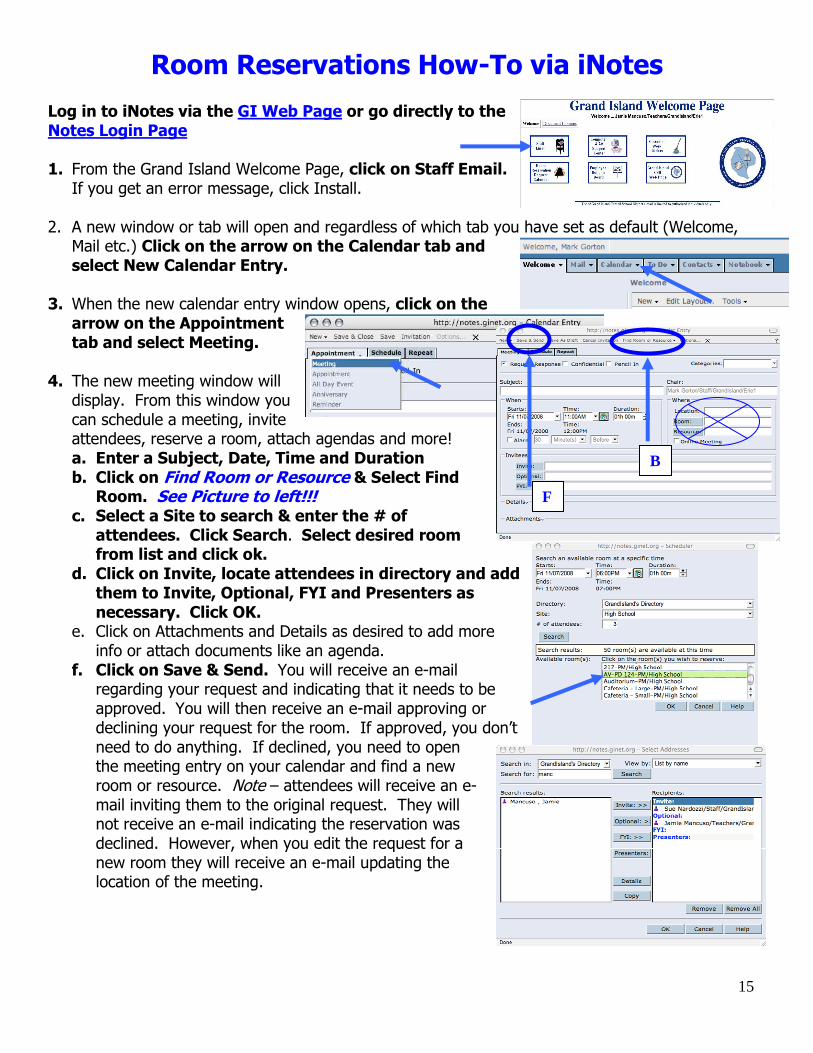
Room Reservations How-To via iNotes Log in to iNotes via the GI Web Page or go directly to the Notes Login Page 1. From the Grand Island Welcome Page, click on Staff Email. If you get an error message, click Install.
2. A new window or tab will open and regardless of which tab you have set as default (Welcome, Mail etc.) Click on the arrow on the Calendar tab and select New Calendar Entry.
3. When the new calendar entry window opens, click on the
arrow on the Appointment tab and select Meeting.
4. The new meeting window will display. From this window you can schedule a meeting, invite attendees, reserve a room, attach agendas and more! a. Enter a Subject, Date, Time and Duration b. Click on Find Room or Resource & Select Find
Room. See Picture to left!!! c. Select a Site to search & enter the # of
attendees. Click Search. Select desired room from list and click ok.
d. Click on Invite, locate attendees in directory and add them to Invite, Optional, FYI and Presenters as necessary. Click OK.
e. Click on Attachments and Details as desired to add more info or attach documents like an agenda.
f. Click on Save & Send. You will receive an e-mail regarding your request and indicating that it needs to be approved. You will then receive an e-mail approving or declining your request for the room. If approved, you don’t need to do anything. If declined, you need to open the meeting entry on your calendar and find a new room or resource. Note – attendees will receive an e-mail inviting them to the original request. They will not receive an e-mail indicating the reservation was declined. However, when you edit the request for a new room they will receive an e-mail updating the location of the meeting.
B
F
16
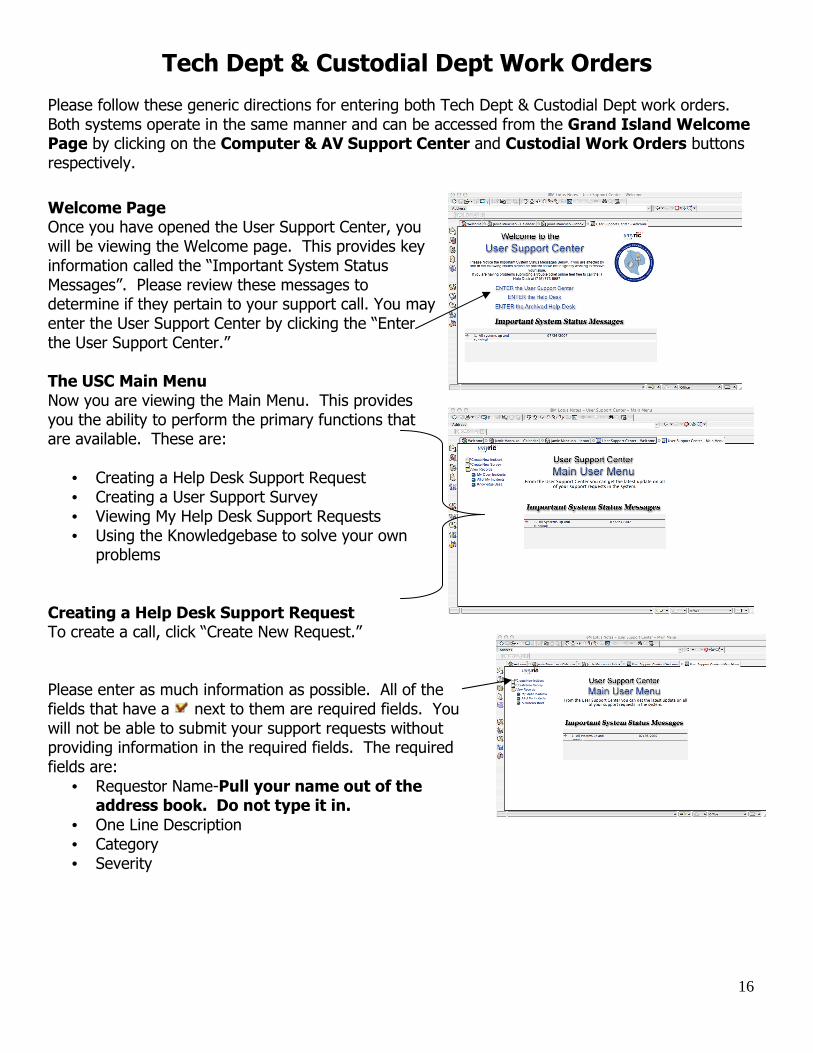
Tech Dept & Custodial Dept Work Orders Please follow these generic directions for entering both Tech Dept & Custodial Dept work orders. Both systems operate in the same manner and can be accessed from the Grand Island Welcome Page by clicking on the Computer & AV Support Center and Custodial Work Orders buttons respectively.
Welcome Page Once you have opened the User Support Center, you will be viewing the Welcome page. This provides key information called the “Important System Status Messages”. Please review these messages to determine if they pertain to your support call. You may enter the User Support Center by clicking the “Enter the User Support Center.” The USC Main Menu Now you are viewing the Main Menu. This provides you the ability to perform the primary functions that are available. These are:
• Creating a Help Desk Support Request • Creating a User Support Survey • Viewing My Help Desk Support Requests • Using the Knowledgebase to solve your own problems
Creating a Help Desk Support Request To create a call, click “Create New Request.” Please enter as much information as possible. All of the fields that have a next to them are required fields. You will not be able to submit your support requests without providing information in the required fields. The required fields are:
• Requestor Name-Pull your name out of the address book. Do not type it in.
• One Line Description • Category • Severity
17
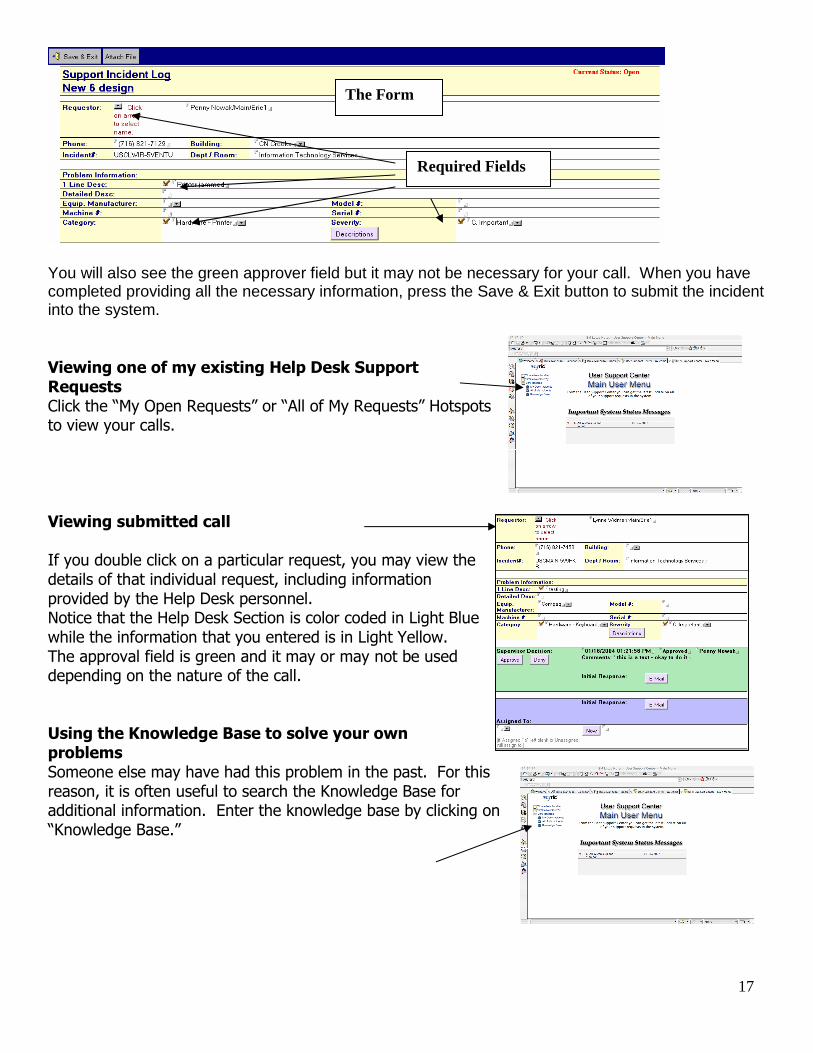
You will also see the green approver field but it may not be necessary for your call. When you have completed providing all the necessary information, press the Save & Exit button to submit the incident into the system. Viewing one of my existing Help Desk Support Requests Click the “My Open Requests” or “All of My Requests” Hotspots to view your calls. Viewing submitted call If you double click on a particular request, you may view the details of that individual request, including information provided by the Help Desk personnel. Notice that the Help Desk Section is color coded in Light Blue while the information that you entered is in Light Yellow. The approval field is green and it may or may not be used depending on the nature of the call. Using the Knowledge Base to solve your own problems Someone else may have had this problem in the past. For this reason, it is often useful to search the Knowledge Base for additional information. Enter the knowledge base by clicking on “Knowledge Base.”
The Form
Required Fields