Embed Size (px)
Citation preview
GOALKEEPING RESOURCE

2

Contents
Introduction - page 5 Specific Rules for Goalkeepers - page 6 Goalkeeper Equipment - page 7 Warming Up - page 8 Skills/Techniques - page 9 Drills - page 25 Small Games - page 33
Text & Drawings by Nicola Connell Images courtesy of OBO (www.obo.co.nz) and Hockey New Zealand
3
4
5
Introduction This booklet is designed for beginner goalkeepers as well as coaches who want help with specific
training for their goalkeeper. It will also be useful for more experienced goalkeepers who want drills
and games to improve their techniques.
In this resource are specific rules that all goalkeepers should know including a rule change
regarding using your hands and arms. Also included is information about goalkeeping equipment;
equipment you should have, and what to keep in your gear bag in case of emergencies. It is also
important that goalkeepers know how to warm up properly; there is a page dedicated to specific
goalkeeping warm up techniques.
The techniques explained in this resource include: basic kicking, aerial saves, how to slide and
dive, and information on defending penalty corners and saving penalty strokes.
We have also included 16 basic drills ranging from accuracy and power, to speed and agility. At the
back are 10 small games for goalkeepers which are useful for younger keepers to teach them
game sense and tactical awareness. These are taken from the Hockey New Zealand Small Games
CD.
We hope you enjoy using this resource and that you find the information and techniques useful.
- Hockey New Zealand Coaching & Development Team
Gillian Gemming
Kelly Hudson
Nicola Connell
Kirsty Yeoman
6
Specific Rules for Goalkeepers Definition of a goalkeeper One of the participants of each team on the field who wears protective equipment comprised of at least headgear and who thereby has the privileges of a goalkeeper. Hockey Rules Conduct of play: 10.1 A goalkeeper who: a) Wears protective equipment of at least, headgear, leg guards and kickers must not take part in the match outside the 23 metres area they are defending, except when taking a penalty stroke b) Wears only protective headgear must not take part in the match outside the 23 metres area they are defending when wearing the headgear but may remove the headgear and take part in the match anywhere on the field The protective headgear must be worn when defending a penalty corner or penalty stroke. 10.2 When the ball is inside the circle they are defending and they have their stick in their hand, goalkeepers are permitted to: a) Use their stick, protective equipment or any part of their body to push the ball away, deflect the ball (in any direction including over the back-line) or stop the ball
This permits a goalkeeper to use their hands, arms or any other part of their body to move the ball away but only as part of a goal saving action and not to propel the ball forcefully so that it travels a long distance. (NEW)
b) Use their stick, feet, kickers, legs or leg guards to propel the ball forcefully. 10.3 Goalkeepers must not lie on the ball. 10.4 When the ball is outside the circle they are defending, goalkeepers are only permitted to play the ball with their stick. Penalty Corners 12.3e) a penalty corner is awarded when the ball becomes lodged in a player’s clothing or equipment while in the circle they are defending. Defending a Penalty Stroke 13.5e) the player defending the stroke must stand with both feet on the goal-line and must not leave the goal-line or move either foot until the ball has been played f) If the player defending the stroke is a goalkeeper, they must wear protective headgear; if the player defending the stroke is otherwise taking part in the game as a field player, they may wear only a face mask as protective equipment. Tournament Rules Goalkeepers need to wear a different coloured shirt to either team, and that shirt needs to be numbered both front and back. Front is important as this is usually the most visible to umpires, coaches, players and selectors. Goalkeeper’s buckles need to be covered/taped to prevent injuries
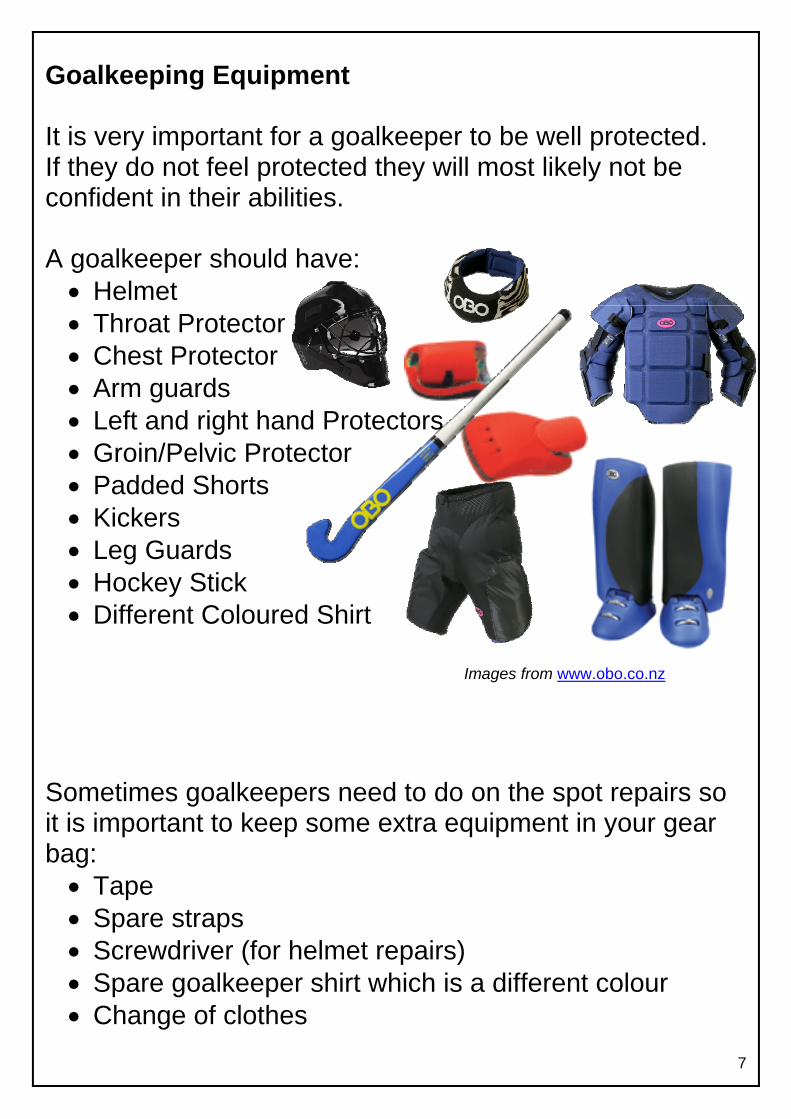
Goalkeeping Equipment It is very important for a goalkeeper to be well protected. If they do not feel protected they will most likely not be confident in their abilities. A goalkeeper should have: • Helmet
7
• Throat Protector • Chest Protector • Arm guards • Left and right hand Protectors • Groin/Pelvic Protector • Padded Shorts • Kickers • Leg Guards • Hockey Stick • Different Coloured Shirt
Sometimes goalkeepers need to do on the spot repairs so it is important to keep some extra equipment in your gear bag: • Tape • Spare straps • Screwdriver (for helmet repairs) • Spare goalkeeper shirt which is a different colour • Change of clothes
Images from www.obo.co.nz
8
Warming Up for Goalies For goalkeepers the warm up is just as important as it is for field players. They need to do some warm up activities both before and after padding up. Allow approximately half an hour before practice/games to warm up and put your gear on.
• Jogging 1-2 laps of turf • Side steps – low and fast • Butt kicks • High Knees
Stretching
• Quads • Calves • Hamstrings • Groin • Hip Flexors • Gluts • Shoulders/Arms • Trunk
Pad Up / Get your gear on – this should take no more than 10mins! Stretching with gear on
• Hip flexors • Hamstrings • Groin
For more information on stretching and preventing injury check out the new ACC Sport Smart Tips for hockey goalkeepers by going to the Hockey New Zealand website, Coaching and Development section and clicking on the Smart Tips Link. http://www.hockeynz.co.nz/about_coachdev.php
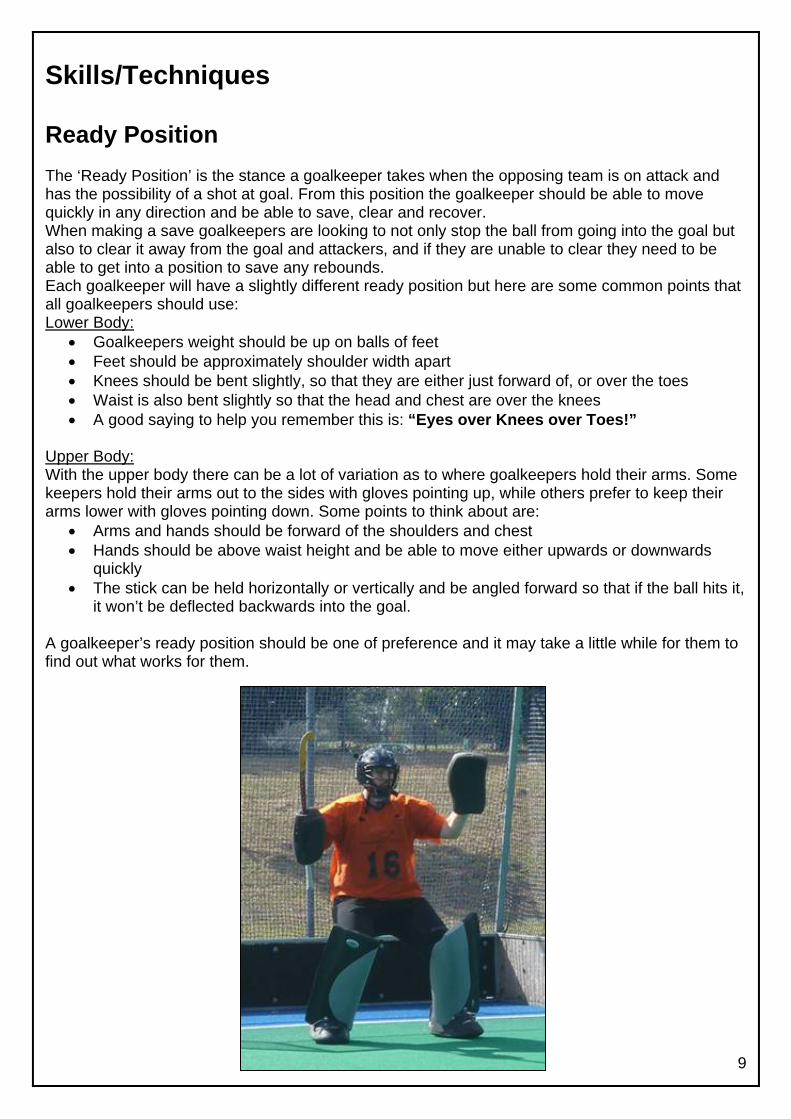
Skills/Techniques Ready Position The ‘Ready Position’ is the stance a goalkeeper takes when the opposing team is on attack and has the possibility of a shot at goal. From this position the goalkeeper should be able to move quickly in any direction and be able to save, clear and recover. When making a save goalkeepers are looking to not only stop the ball from going into the goal but also to clear it away from the goal and attackers, and if they are unable to clear they need to be able to get into a position to save any rebounds. Each goalkeeper will have a slightly different ready position but here are some common points that all goalkeepers should use: Lower Body:
• Goalkeepers weight should be up on balls of feet • Feet should be approximately shoulder width apart • Knees should be bent slightly, so that they are either just forward of, or over the toes • Waist is also bent slightly so that the head and chest are over the knees • A good saying to help you remember this is: “Eyes over Knees over Toes!”
Upper Body: With the upper body there can be a lot of variation as to where goalkeepers hold their arms. Some keepers hold their arms out to the sides with gloves pointing up, while others prefer to keep their arms lower with gloves pointing down. Some points to think about are:
• Arms and hands should be forward of the shoulders and chest • Hands should be above waist height and be able to move either upwards or downwards
quickly • The stick can be held horizontally or vertically and be angled forward so that if the ball hits it,
it won’t be deflected backwards into the goal. A goalkeeper’s ready position should be one of preference and it may take a little while for them to find out what works for them.
9

Knowing your angles Knowing your angles is a very important part of goalkeeping. Goalkeepers need to develop an understanding of where to stand in relation to where the attacker is shooting from. The aim of the goalkeeper is to give the attacker the smallest view of the goal. The movement of the goalkeeper to position and cover these shots is known as covering the angles. Goalkeepers need to get behind the line of the ball. They should be able to draw an imaginary line from the ball through the goalkeeper to the centre of the goal line. When moving short distances to cut down the angle, goalkeepers should use quick shuffle steps to get into a new ready position. When a player passes the ball from one side of the circle to the other the goalkeeper will need to realign themselves with the ball by dropping back to the centre of the goal and then moving to cut down the angle.
10

Depth Another aspect of covering angles is depth. The further out from the goal you are, the more area you can cover – however you have less time to react to a shot. How far out a goalkeeper plays will depend on their reaction skills and also their height. For example a shorter goalkeeper may need to play further out from the goal to cover the same area as a taller goalkeeper.
Here the goalkeeper is on the left post as the ball is out wide. She is in a good ready position, set to move across the goal or save a shot if needed.
11
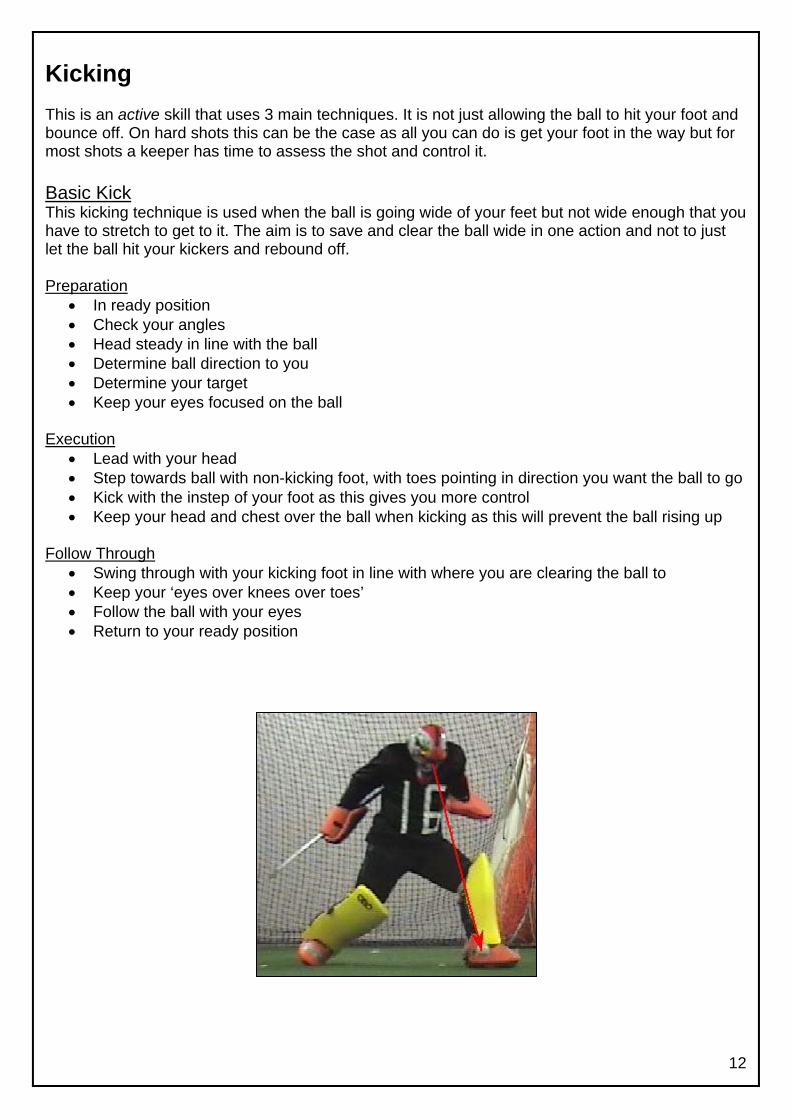
Kicking This is an active skill that uses 3 main techniques. It is not just allowing the ball to hit your foot and bounce off. On hard shots this can be the case as all you can do is get your foot in the way but for most shots a keeper has time to assess the shot and control it. Basic Kick This kicking technique is used when the ball is going wide of your feet but not wide enough that you have to stretch to get to it. The aim is to save and clear the ball wide in one action and not to just let the ball hit your kickers and rebound off. Preparation
• In ready position • Check your angles • Head steady in line with the ball • Determine ball direction to you • Determine your target • Keep your eyes focused on the ball
Execution
• Lead with your head • Step towards ball with non-kicking foot, with toes pointing in direction you want the ball to go • Kick with the instep of your foot as this gives you more control • Keep your head and chest over the ball when kicking as this will prevent the ball rising up
Follow Through
• Swing through with your kicking foot in line with where you are clearing the ball to • Keep your ‘eyes over knees over toes’ • Follow the ball with your eyes • Return to your ready position
12
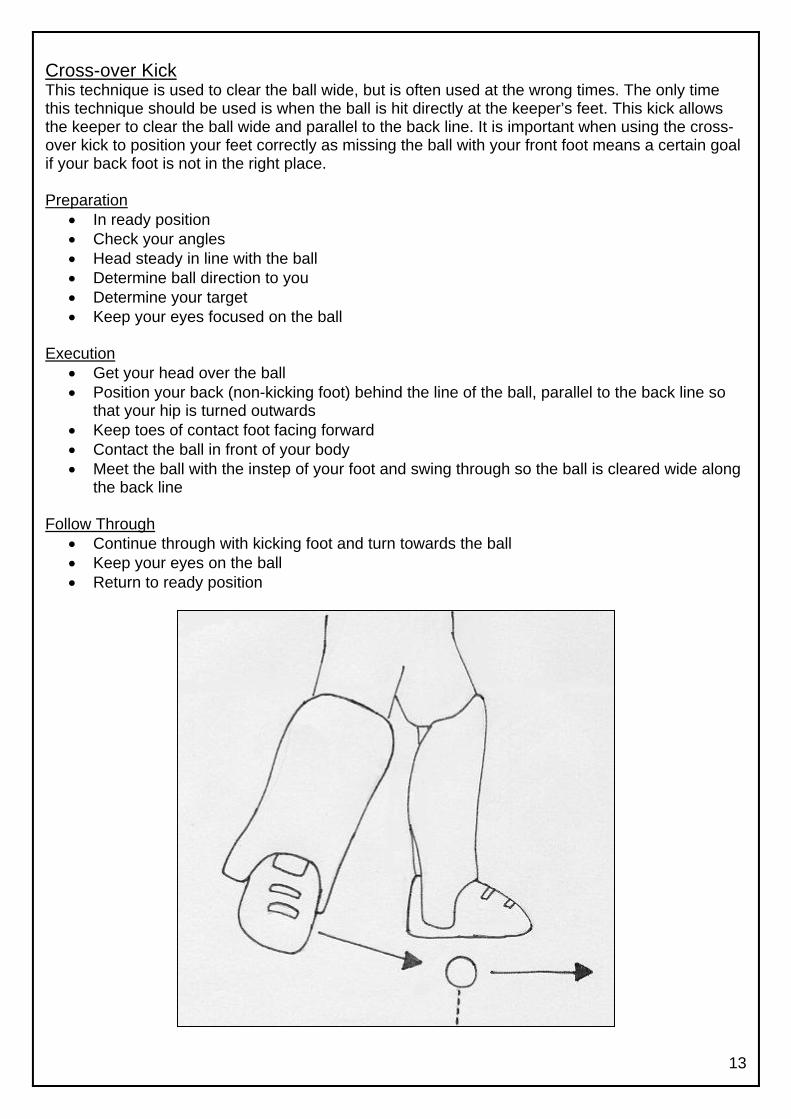
Cross-over Kick This technique is used to clear the ball wide, but is often used at the wrong times. The only time this technique should be used is when the ball is hit directly at the keeper’s feet. This kick allows the keeper to clear the ball wide and parallel to the back line. It is important when using the cross-over kick to position your feet correctly as missing the ball with your front foot means a certain goal if your back foot is not in the right place. Preparation
• In ready position • Check your angles • Head steady in line with the ball • Determine ball direction to you • Determine your target • Keep your eyes focused on the ball
Execution
• Get your head over the ball • Position your back (non-kicking foot) behind the line of the ball, parallel to the back line so
that your hip is turned outwards • Keep toes of contact foot facing forward • Contact the ball in front of your body • Meet the ball with the instep of your foot and swing through so the ball is cleared wide along
the back line Follow Through
• Continue through with kicking foot and turn towards the ball • Keep your eyes on the ball • Return to ready position
13
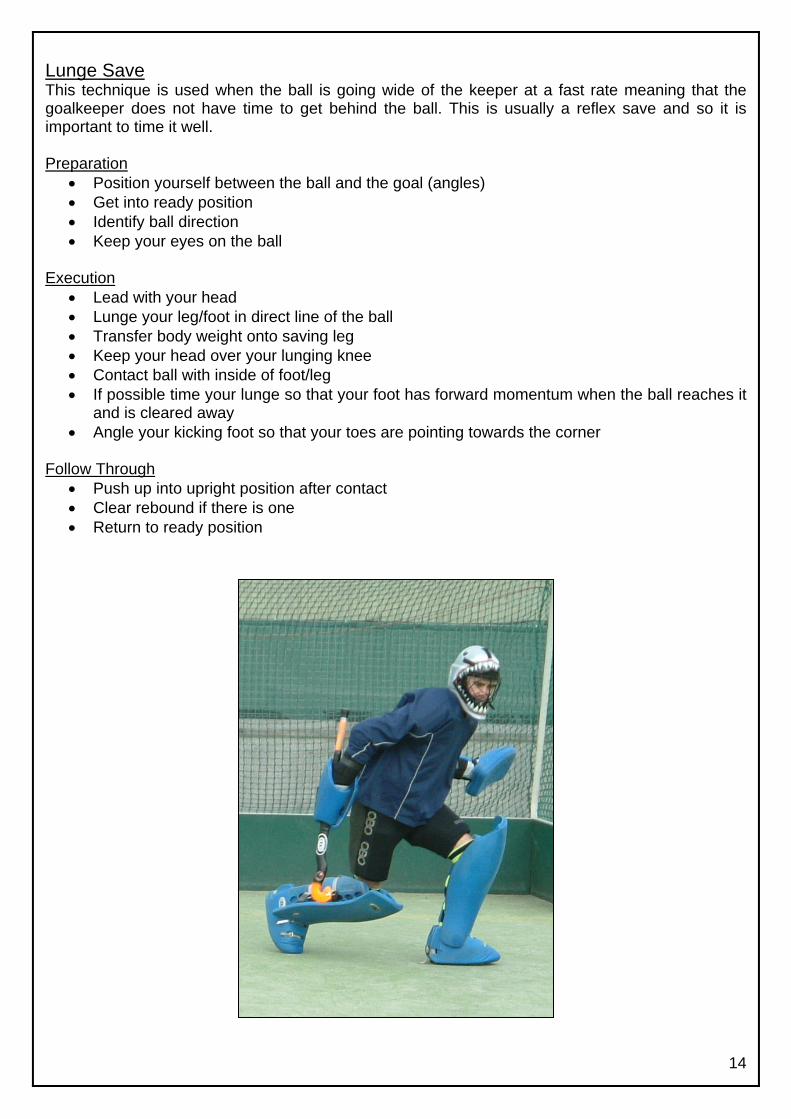
Lunge Save This technique is used when the ball is going wide of the keeper at a fast rate meaning that the goalkeeper does not have time to get behind the ball. This is usually a reflex save and so it is important to time it well. Preparation
• Position yourself between the ball and the goal (angles) • Get into ready position • Identify ball direction • Keep your eyes on the ball
Execution
• Lead with your head • Lunge your leg/foot in direct line of the ball • Transfer body weight onto saving leg • Keep your head over your lunging knee • Contact ball with inside of foot/leg • If possible time your lunge so that your foot has forward momentum when the ball reaches it
and is cleared away • Angle your kicking foot so that your toes are pointing towards the corner
Follow Through
• Push up into upright position after contact • Clear rebound if there is one • Return to ready position
14

Aerial Saves Glove Saves Generally glove saves (i.e. left hand protector) are made when the ball is above waist height or you are unable to get to it with your legs/feet. The left hand glove is mainly used for the whole of your left side, in front of your body, and up to your elbow on your right hand side. You can also bring it across to assist your right glove with high balls on the right but this is personal preference. With the new rule, goalkeepers can now push their hand towards the ball to save, instead of having to wait for the ball to meet the glove. However this does not mean a goalkeeper can punch the ball clear with their glove like a soccer goalkeeper does. It just means they are allowed to push the ball away as long as it doesn’t endanger anyone (see rule 10.2a in Goalkeeping rules on page 3). To clear most aerial shots it is best to either deflect the ball wide or over the back line or to tip it over the cross bar. With a soft flick it may be best to push the ball wide of the goal, or if you have time deflect it downwards so that you are able to kick the ball clear. Preparation
• Align yourself so that you are covering the angles • Get into ready position • Focus on ball • Determine direction, height and speed of the ball
Execution
• For balls above elbow height, fingers should be facing up, and for below elbow height fingers should point down
• For balls on the left step towards the ball • Bring your hand behind the line of the ball • Push the ball away with your glove as wide as possible • For hard shots angle your glove so that the ball is
deflected wide and down, or up and over the goal • Avoid trying to swat the ball or swinging the glove at the ball
Follow Through
• Maintain body balance • Keep eyes on ball if possible • Return to ready position
15
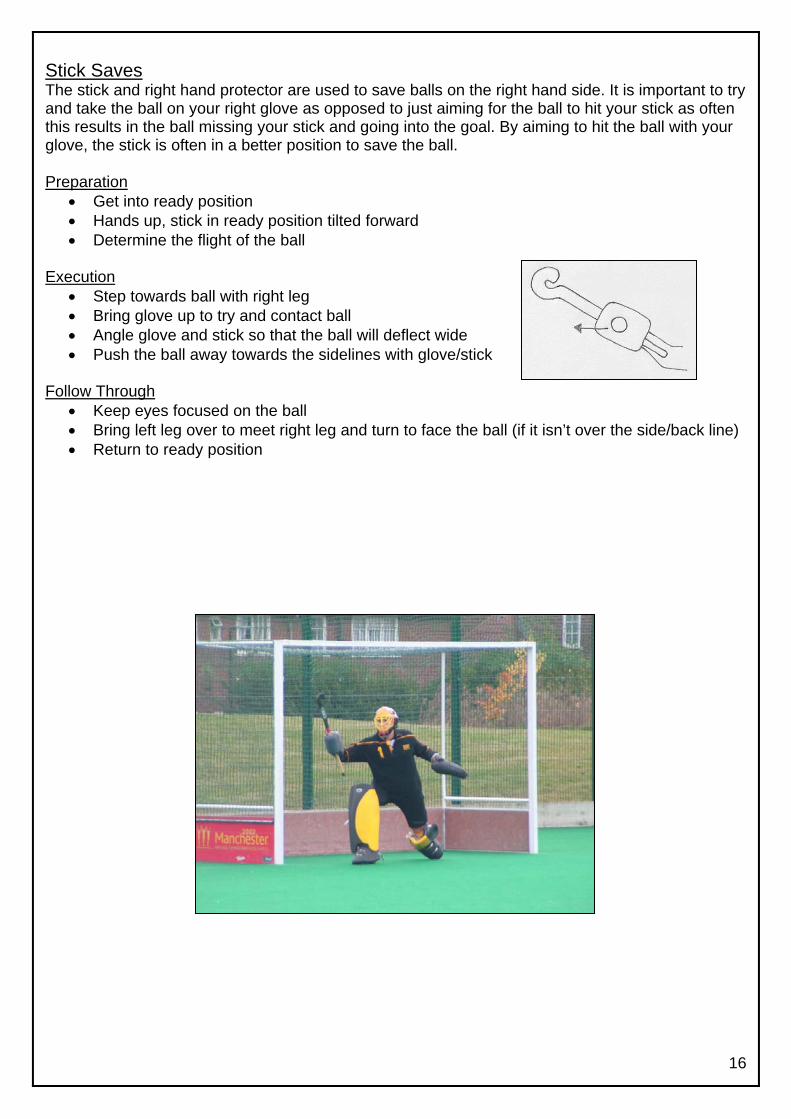
Stick Saves The stick and right hand protector are used to save balls on the right hand side. It is important to try and take the ball on your right glove as opposed to just aiming for the ball to hit your stick as often this results in the ball missing your stick and going into the goal. By aiming to hit the ball with your glove, the stick is often in a better position to save the ball. Preparation
• Get into ready position • Hands up, stick in ready position tilted forward • Determine the flight of the ball
Execution
• Step towards ball with right leg • Bring glove up to try and contact ball • Angle glove and stick so that the ball will deflect wide • Push the ball away towards the sidelines with glove/stick
Follow Through
• Keep eyes focused on the ball • Bring left leg over to meet right leg and turn to face the ball (if it isn’t over the side/back line) • Return to ready position
16
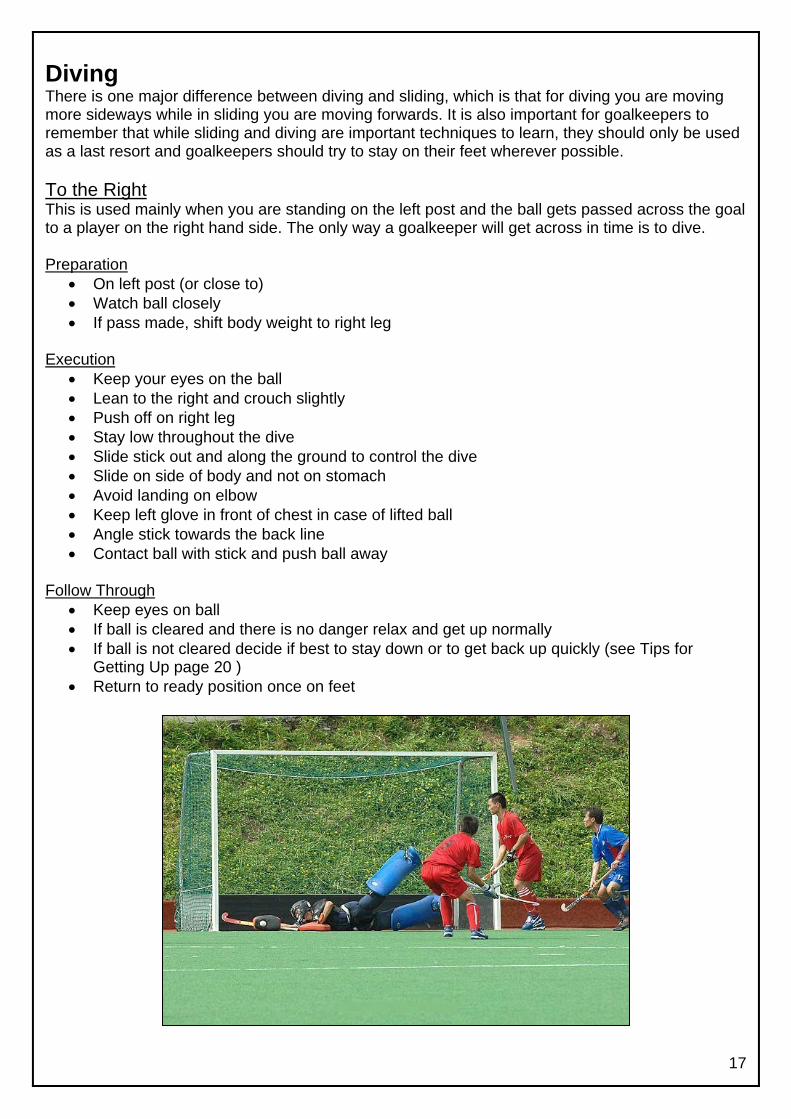
Diving There is one major difference between diving and sliding, which is that for diving you are moving more sideways while in sliding you are moving forwards. It is also important for goalkeepers to remember that while sliding and diving are important techniques to learn, they should only be used as a last resort and goalkeepers should try to stay on their feet wherever possible. To the Right This is used mainly when you are standing on the left post and the ball gets passed across the goal to a player on the right hand side. The only way a goalkeeper will get across in time is to dive. Preparation
• On left post (or close to) • Watch ball closely • If pass made, shift body weight to right leg
Execution
• Keep your eyes on the ball • Lean to the right and crouch slightly • Push off on right leg • Stay low throughout the dive • Slide stick out and along the ground to control the dive • Slide on side of body and not on stomach • Avoid landing on elbow • Keep left glove in front of chest in case of lifted ball • Angle stick towards the back line • Contact ball with stick and push ball away
Follow Through
• Keep eyes on ball • If ball is cleared and there is no danger relax and get up normally • If ball is not cleared decide if best to stay down or to get back up quickly (see Tips for
Getting Up page 20 ) • Return to ready position once on feet
17
18
To the Left Usually goalkeepers do not need to dive to the left much, the more common technique used is the Double Leg Block which is explained below. The only time a goalkeeper may need to use this is to save a drag flick or flick to the left on a Penalty Corner or to save a shot to the left which is just off the ground about knee height. Preparation
• Get into ready position • Shift weight onto left leg • Keep eyes on the ball
Execution
• Keep your eyes on the ball throughout the dive • Push off on left leg • Stay low throughout the dive • Bring your right arm and stick across in front of body (ensure stick is reversed) • Aim to contact ball with your left glove and deflect it away • Land on left forearm (not elbow)
Follow Through
• Keep eyes on ball • If ball is cleared and there is no danger relax and get up normally • If ball is not cleared decide if best to stay down or to get back up quickly (see below) • Return to ready position once on feet
Double Leg Block This technique is used when you are on the left post and the ball is passed across the circle to the right post. Instead of diving to the left, a Double Leg Block is used. This is similar to a softball/baseball player sliding into a base except the goalkeeper is sliding on their side. Preparation
• Get into ready position • When pass is made turn so you are facing out into the field • Keep your eyes focused on the ball
Execution
• Take one sidestep left then bring right leg across and slightly behind your left leg • Push both legs out to the left and drop • With your right glove push yourself towards the left post to slide your body that way • Bring your legs out straight and swing them slightly forward to propel the ball away • Keep your left hand up in front of your chest ready for any lifted ball
Follow Through
• Once ball is cleared get up normally • Return to ready position
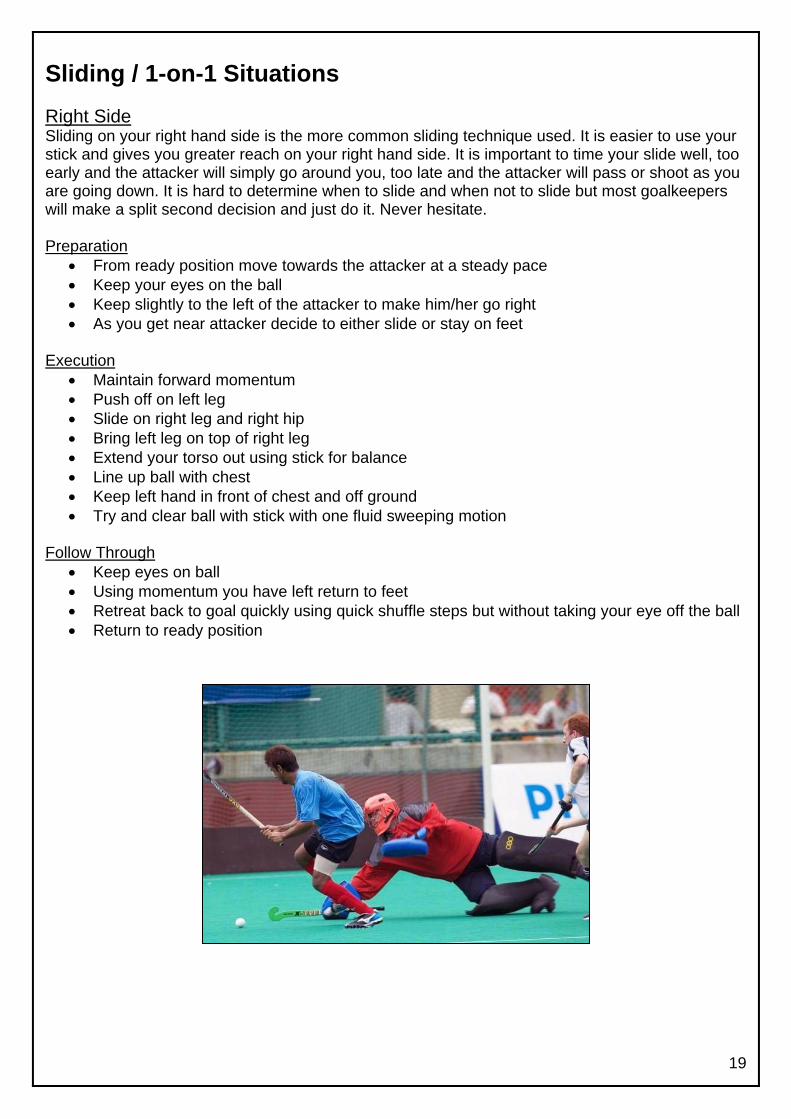
Sliding / 1-on-1 Situations Right Side Sliding on your right hand side is the more common sliding technique used. It is easier to use your stick and gives you greater reach on your right hand side. It is important to time your slide well, too early and the attacker will simply go around you, too late and the attacker will pass or shoot as you are going down. It is hard to determine when to slide and when not to slide but most goalkeepers will make a split second decision and just do it. Never hesitate. Preparation
• From ready position move towards the attacker at a steady pace • Keep your eyes on the ball • Keep slightly to the left of the attacker to make him/her go right • As you get near attacker decide to either slide or stay on feet
Execution
• Maintain forward momentum • Push off on left leg • Slide on right leg and right hip • Bring left leg on top of right leg • Extend your torso out using stick for balance • Line up ball with chest • Keep left hand in front of chest and off ground • Try and clear ball with stick with one fluid sweeping motion
Follow Through
• Keep eyes on ball • Using momentum you have left return to feet • Retreat back to goal quickly using quick shuffle steps but without taking your eye off the ball • Return to ready position
19
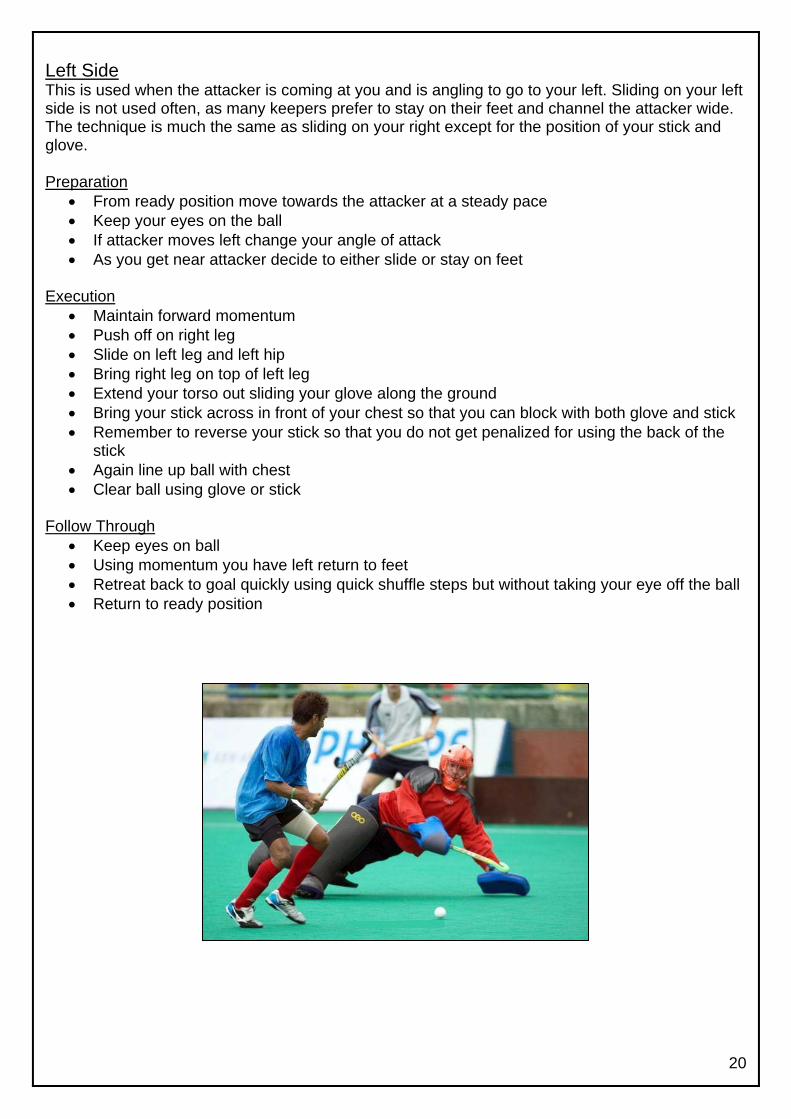
Left Side This is used when the attacker is coming at you and is angling to go to your left. Sliding on your left side is not used often, as many keepers prefer to stay on their feet and channel the attacker wide. The technique is much the same as sliding on your right except for the position of your stick and glove. Preparation
• From ready position move towards the attacker at a steady pace • Keep your eyes on the ball • If attacker moves left change your angle of attack • As you get near attacker decide to either slide or stay on feet
Execution
• Maintain forward momentum • Push off on right leg • Slide on left leg and left hip • Bring right leg on top of left leg • Extend your torso out sliding your glove along the ground • Bring your stick across in front of your chest so that you can block with both glove and stick • Remember to reverse your stick so that you do not get penalized for using the back of the
stick • Again line up ball with chest • Clear ball using glove or stick
Follow Through
• Keep eyes on ball • Using momentum you have left return to feet • Retreat back to goal quickly using quick shuffle steps but without taking your eye off the ball • Return to ready position
20
21
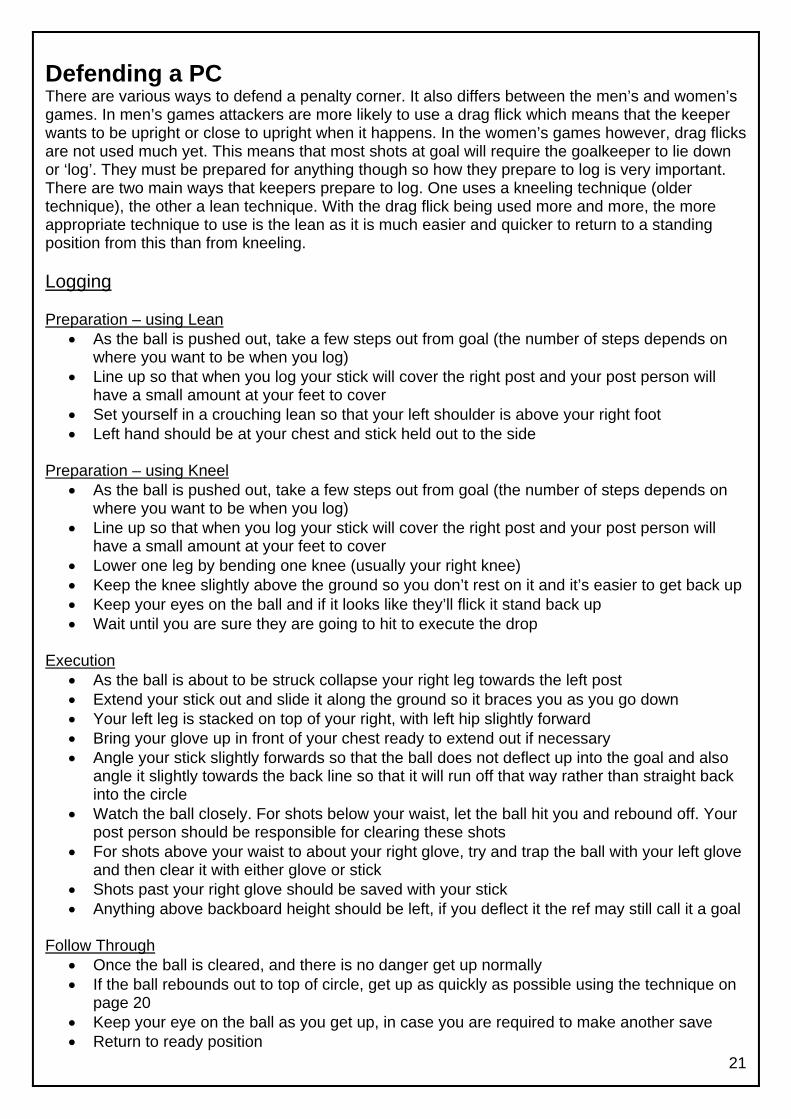
Defending a PC There are various ways to defend a penalty corner. It also differs between the men’s and women’s games. In men’s games attackers are more likely to use a drag flick which means that the keeper wants to be upright or close to upright when it happens. In the women’s games however, drag flicks are not used much yet. This means that most shots at goal will require the goalkeeper to lie down or ‘log’. They must be prepared for anything though so how they prepare to log is very important. There are two main ways that keepers prepare to log. One uses a kneeling technique (older technique), the other a lean technique. With the drag flick being used more and more, the more appropriate technique to use is the lean as it is much easier and quicker to return to a standing position from this than from kneeling. Logging Preparation – using Lean
• As the ball is pushed out, take a few steps out from goal (the number of steps depends on where you want to be when you log)
• Line up so that when you log your stick will cover the right post and your post person will have a small amount at your feet to cover
• Set yourself in a crouching lean so that your left shoulder is above your right foot • Left hand should be at your chest and stick held out to the side
Preparation – using Kneel
• As the ball is pushed out, take a few steps out from goal (the number of steps depends on where you want to be when you log)
• Line up so that when you log your stick will cover the right post and your post person will have a small amount at your feet to cover
• Lower one leg by bending one knee (usually your right knee) • Keep the knee slightly above the ground so you don’t rest on it and it’s easier to get back up • Keep your eyes on the ball and if it looks like they’ll flick it stand back up • Wait until you are sure they are going to hit to execute the drop
Execution
• As the ball is about to be struck collapse your right leg towards the left post • Extend your stick out and slide it along the ground so it braces you as you go down • Your left leg is stacked on top of your right, with left hip slightly forward • Bring your glove up in front of your chest ready to extend out if necessary • Angle your stick slightly forwards so that the ball does not deflect up into the goal and also
angle it slightly towards the back line so that it will run off that way rather than straight back into the circle
• Watch the ball closely. For shots below your waist, let the ball hit you and rebound off. Your post person should be responsible for clearing these shots
• For shots above your waist to about your right glove, try and trap the ball with your left glove and then clear it with either glove or stick
• Shots past your right glove should be saved with your stick • Anything above backboard height should be left, if you deflect it the ref may still call it a goal
Follow Through
• Once the ball is cleared, and there is no danger get up normally • If the ball rebounds out to top of circle, get up as quickly as possible using the technique on
page 20 • Keep your eye on the ball as you get up, in case you are required to make another save • Return to ready position
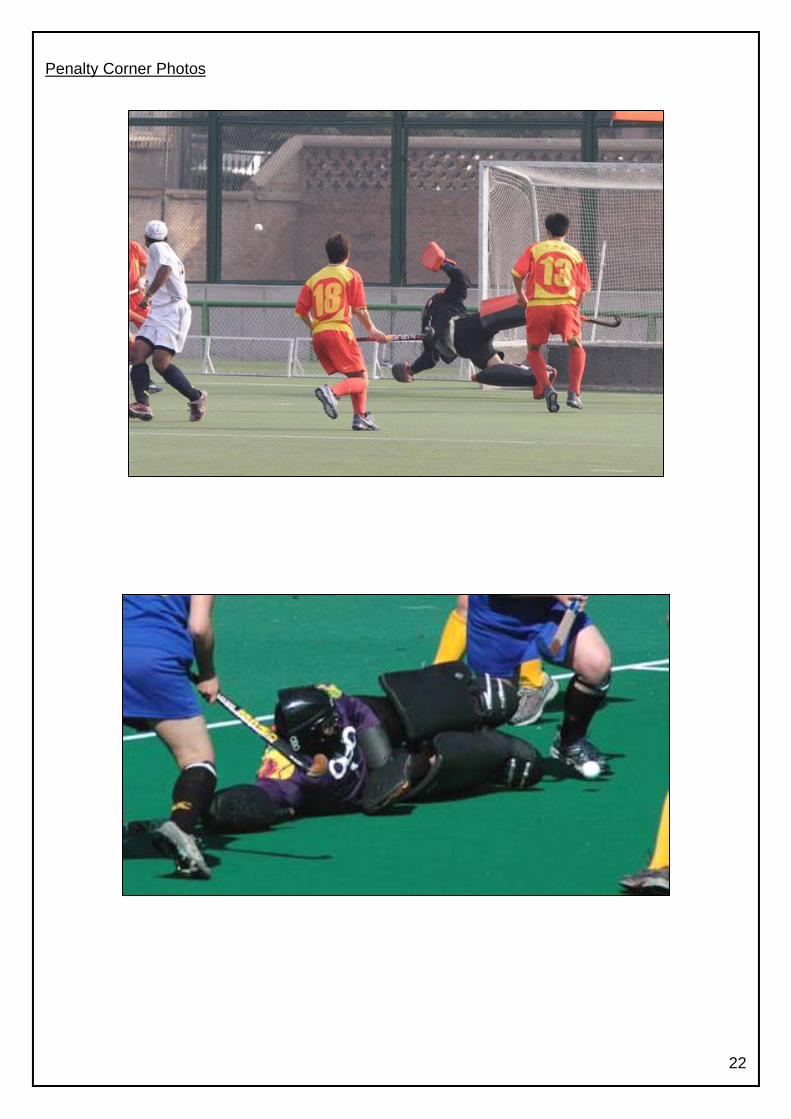
Penalty Corner Photos
22
23
Getting Back Up This is a very important technique that many young goalkeepers have no idea how to do. They
learn how to dive and slide, but they often don’t get taught the best way to get back up again. This
technique is probably the easiest and best way to get back up. Although it is hard to practice, once
you get it right it should come naturally in a game situation. One of the most important things about
getting back on your feet is when to do it. If the ball is still right in front of you and an attacker is
right there, it is best to stay down rather than risk them putting the ball underneath you as you get
up. While on the ground, stay mobile, raise yourself onto your right forearm, and have your left
glove out and ready for a flick. It may be good to practice getting back up while someone is flicking
balls at you.
Preparation
• From a lying position e.g. just logged on a PC
• Bring your left leg in front of your right leg, planting the left foot firmly on the ground
• Raise yourself up onto your right glove, ready to push off
• Left glove should be on ground in front of chest
Execution
• Keep your eyes on the ball
• Push yourself up using your arms in one powerful motion
• At the same time bring your right leg underneath your left one
• Kneel on your right leg quickly then stand up (as you get better at this you may not need to
kneel but get to your feet in one motion)
• Keep your left glove out in case of a shot
Follow Through
• Return to ready position
Defending a Penalty Stroke This is one of the most difficult things for a goalkeeper to do. For a penalty stroke to be awarded there must have been a serious foul. It is important to remember that the stroke is designed to give the attacking team a very good chance to score. A well taken penalty stroke should go in. However as goalkeepers it is our job to try and make sure that does not happen. Knowledge of penalty strokes and how they work is important for a goalkeeper to learn. Here is the standard procedure for a penalty stroke.
1. All other players must stand outside the 23 metre line 2. The ball is placed on the penalty spot 3. The player taking the stroke must stand behind and within playing distance before beginning
the stroke 4. The goalkeeper must stand with both feet on or over the goal line and must not leave the
goal line or move either foot until the ball has been played 5. The whistle is blown when the player taking the stroke and the player defending it are in
position 6. The player taking the stroke must not take it until the whistle has been blown 7. Both players can not delay the taking of the stroke 8. The player taking the stroke can not feint at playing the ball 9. The player taking the stroke must push, flick or scoop the ball and is permitted to raise it to
any height. A drag flick action is not allowed. 10. The player taking the stroke must play the ball only once and must not subsequently
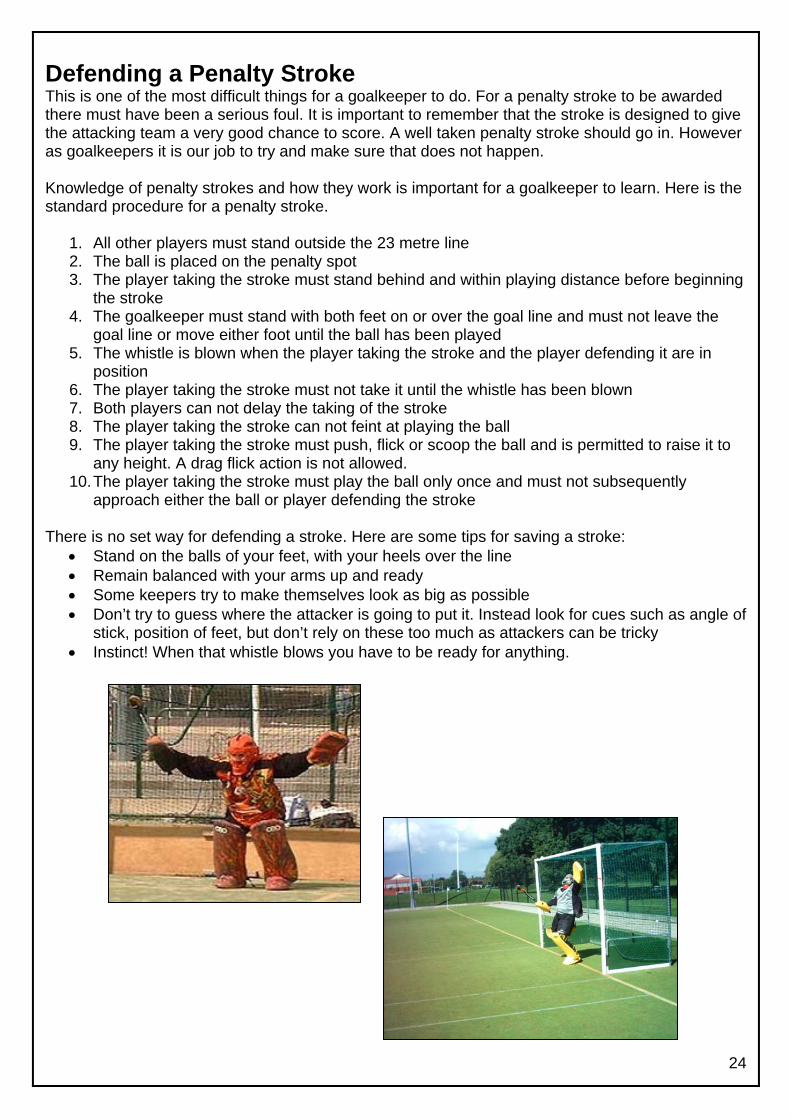
approach either the ball or player defending the stroke There is no set way for defending a stroke. Here are some tips for saving a stroke:
• Stand on the balls of your feet, with your heels over the line • Remain balanced with your arms up and ready • Some keepers try to make themselves look as big as possible • Don’t try to guess where the attacker is going to put it. Instead look for cues such as angle of
stick, position of feet, but don’t rely on these too much as attackers can be tricky • Instinct! When that whistle blows you have to be ready for anything.
24
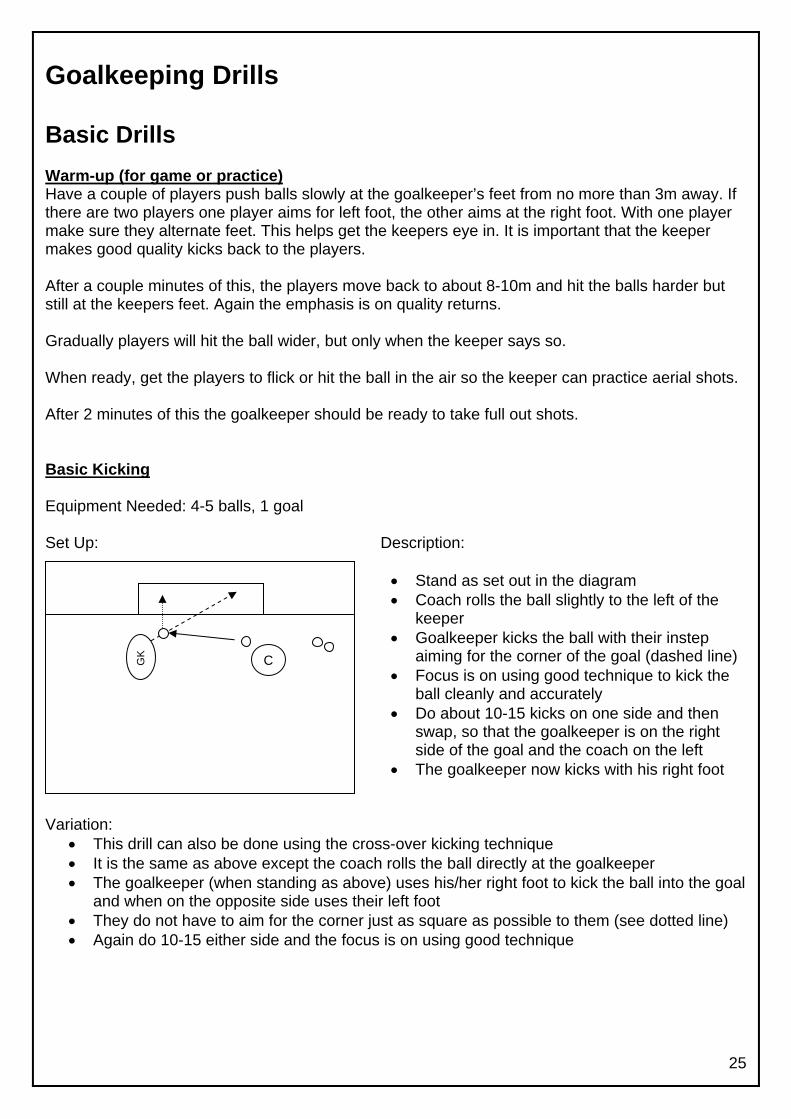
Goalkeeping Drills Basic Drills Warm-up (for game or practice) Have a couple of players push balls slowly at the goalkeeper’s feet from no more than 3m away. If there are two players one player aims for left foot, the other aims at the right foot. With one player make sure they alternate feet. This helps get the keepers eye in. It is important that the keeper makes good quality kicks back to the players. After a couple minutes of this, the players move back to about 8-10m and hit the balls harder but still at the keepers feet. Again the emphasis is on quality returns. Gradually players will hit the ball wider, but only when the keeper says so. When ready, get the players to flick or hit the ball in the air so the keeper can practice aerial shots. After 2 minutes of this the goalkeeper should be ready to take full out shots. Basic Kicking Equipment Needed: 4-5 balls, 1 goal Set Up: Description:
• Stand as set out in the diagram • Coach rolls the ball slightly to the left of the
keeper • Goalkeeper kicks the ball with their instep
aiming for the corner of the goal (dashed line) • Focus is on using good technique to kick the
ball cleanly and accurately • Do about 10-15 kicks on one side and then
swap, so that the goalkeeper is on the right side of the goal and the coach on the left
• The goalkeeper now kicks with his right foot
Variation:
• This drill can also be done using the cross-over kicking technique • It is the same as above except the coach rolls the ball directly at the goalkeeper • The goalkeeper (when standing as above) uses his/her right foot to kick the ball into the goal
and when on the opposite side uses their left foot • They do not have to aim for the corner just as square as possible to them (see dotted line) • Again do 10-15 either side and the focus is on using good technique
25
GK
C
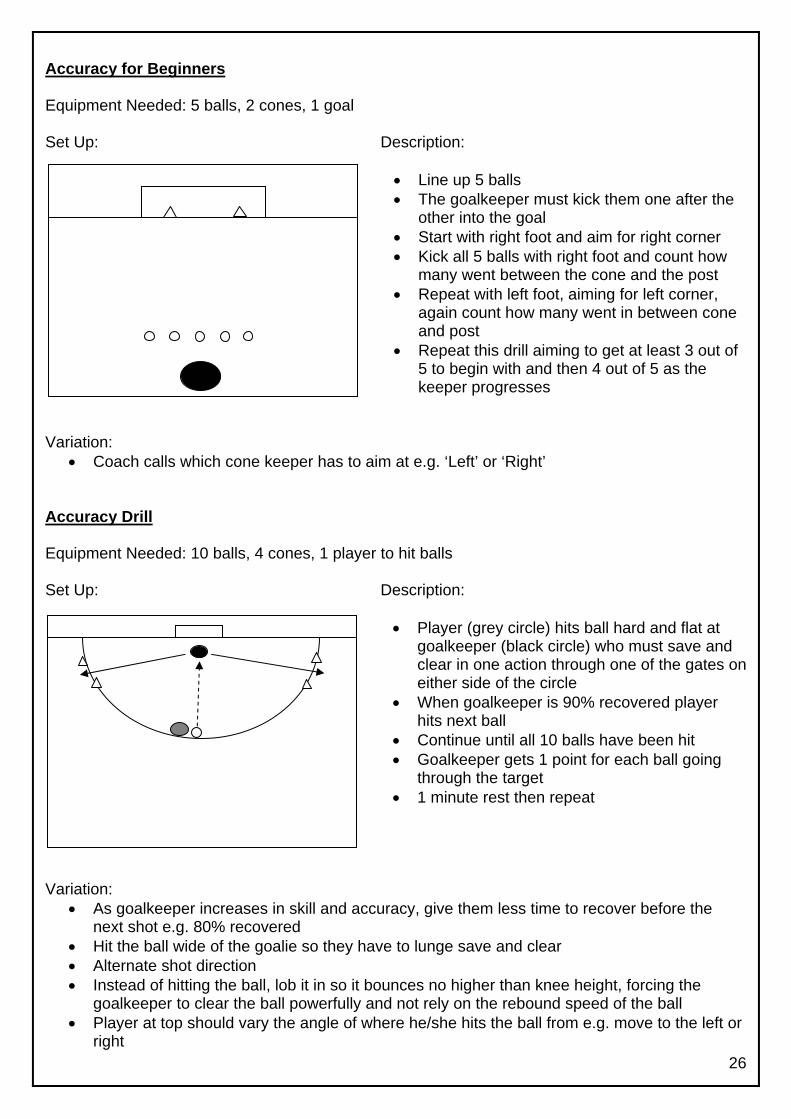
Accuracy for Beginners Equipment Needed: 5 balls, 2 cones, 1 goal Set Up: Description:
• Line up 5 balls • The goalkeeper must kick them one after the
other into the goal • Start with right foot and aim for right corner • Kick all 5 balls with right foot and count how
many went between the cone and the post • Repeat with left foot, aiming for left corner,
again count how many went in between cone and post
• Repeat this drill aiming to get at least 3 out of 5 to begin with and then 4 out of 5 as the keeper progresses
Variation:
• Coach calls which cone keeper has to aim at e.g. ‘Left’ or ‘Right’ Accuracy Drill Equipment Needed: 10 balls, 4 cones, 1 player to hit balls Set Up: Description:
• Player (grey circle) hits ball hard and flat at
goalkeeper (black circle) who must save and clear in one action through one of the gates on either side of the circle
• When goalkeeper is 90% recovered player hits next ball
• Continue until all 10 balls have been hit • Goalkeeper gets 1 point for each ball going
through the target • 1 minute rest then repeat
Variation:
• As goalkeeper increases in skill and accuracy, give them less time to recover before the next shot e.g. 80% recovered
• Hit the ball wide of the goalie so they have to lunge save and clear • Alternate shot direction • Instead of hitting the ball, lob it in so it bounces no higher than knee height, forcing the
goalkeeper to clear the ball powerfully and not rely on the rebound speed of the ball • Player at top should vary the angle of where he/she hits the ball from e.g. move to the left or
right 26
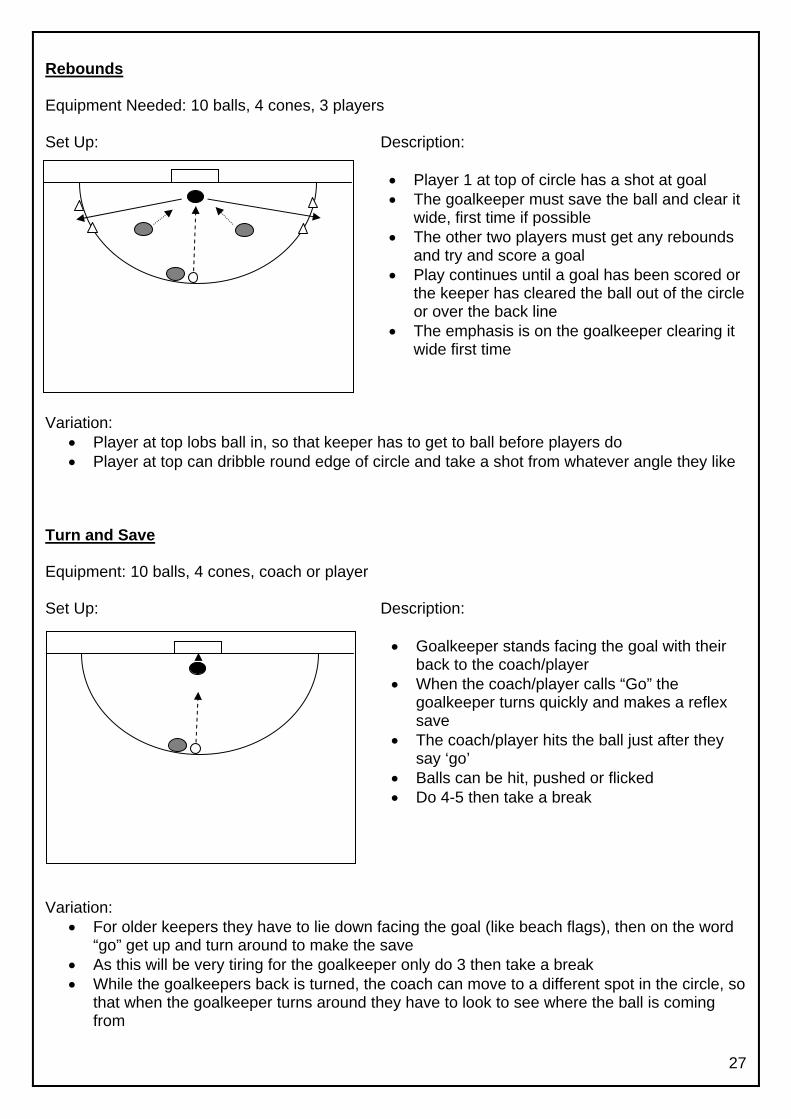
Rebounds Equipment Needed: 10 balls, 4 cones, 3 players Set Up: Description:
• Player 1 at top of circle has a shot at goal • The goalkeeper must save the ball and clear it
wide, first time if possible • The other two players must get any rebounds
and try and score a goal • Play continues until a goal has been scored or
the keeper has cleared the ball out of the circle or over the back line
• The emphasis is on the goalkeeper clearing it wide first time
Variation:
• Player at top lobs ball in, so that keeper has to get to ball before players do • Player at top can dribble round edge of circle and take a shot from whatever angle they like
Turn and Save Equipment: 10 balls, 4 cones, coach or player Set Up: Description:
• Goalkeeper stands facing the goal with their
back to the coach/player • When the coach/player calls “Go” the
goalkeeper turns quickly and makes a reflex save
• The coach/player hits the ball just after they say ‘go’
• Balls can be hit, pushed or flicked • Do 4-5 then take a break
Variation:
• For older keepers they have to lie down facing the goal (like beach flags), then on the word “go” get up and turn around to make the save
• As this will be very tiring for the goalkeeper only do 3 then take a break • While the goalkeepers back is turned, the coach can move to a different spot in the circle, so
that when the goalkeeper turns around they have to look to see where the ball is coming from
27
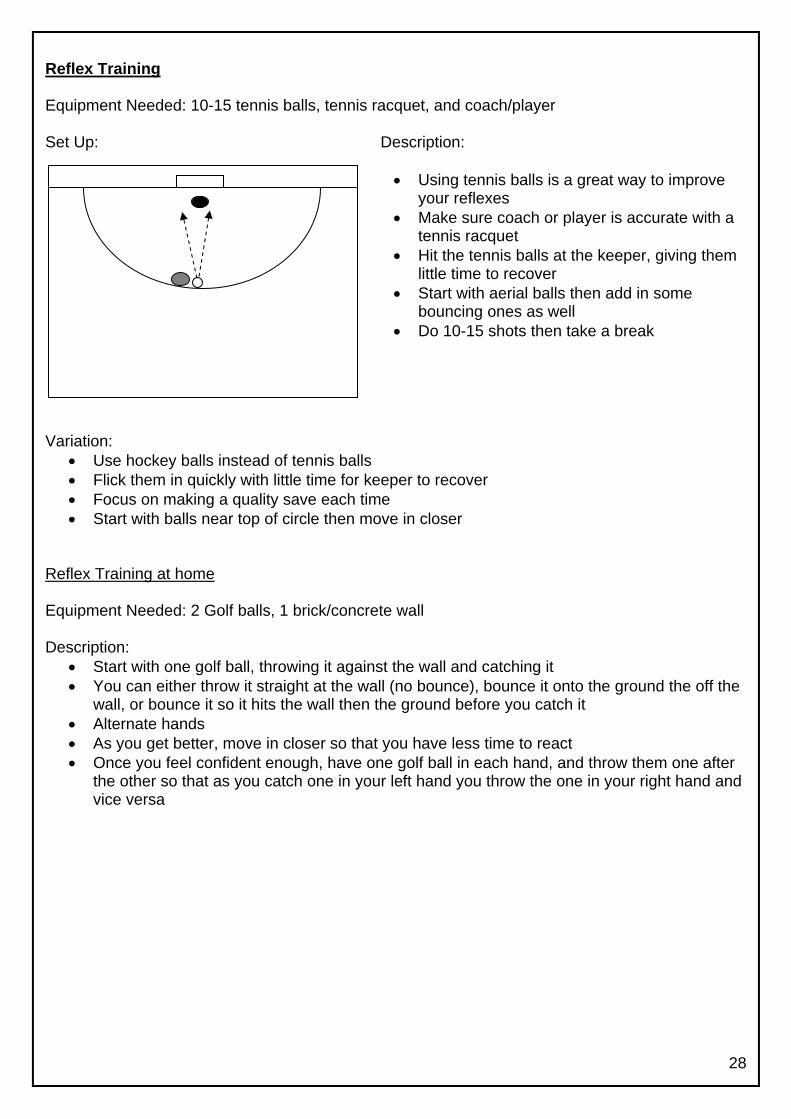
Reflex Training Equipment Needed: 10-15 tennis balls, tennis racquet, and coach/player Set Up: Description:
• Using tennis balls is a great way to improve
your reflexes • Make sure coach or player is accurate with a
tennis racquet • Hit the tennis balls at the keeper, giving them
little time to recover • Start with aerial balls then add in some
bouncing ones as well • Do 10-15 shots then take a break
Variation:
• Use hockey balls instead of tennis balls • Flick them in quickly with little time for keeper to recover • Focus on making a quality save each time • Start with balls near top of circle then move in closer
Reflex Training at home Equipment Needed: 2 Golf balls, 1 brick/concrete wall Description:
• Start with one golf ball, throwing it against the wall and catching it • You can either throw it straight at the wall (no bounce), bounce it onto the ground the off the
wall, or bounce it so it hits the wall then the ground before you catch it • Alternate hands • As you get better, move in closer so that you have less time to react • Once you feel confident enough, have one golf ball in each hand, and throw them one after
the other so that as you catch one in your left hand you throw the one in your right hand and vice versa
28
Quick Movement Equipment Needed: 5 balls, 1 cone, 1 player Set Up: Description:
• Goalkeeper stands on cone facing towards the
player • Player calls “Go” and goalkeeper leaves cone
and sprints across the goal, sets and makes the save
• Player hits the ball when goalkeeper is 90% ready
• Goalkeeper walks back to cone • Do 5 then recover for 1 minute then repeat
from opposite side
Variation:
• Don’t give goalkeeper time to get ready so that they are still on the move when the ball is hit • Tell the goalkeeper to save the ball in any way possible e.g. by diving, sliding, etc. • Start with goalkeeper facing opposite way so they have to turn and get back
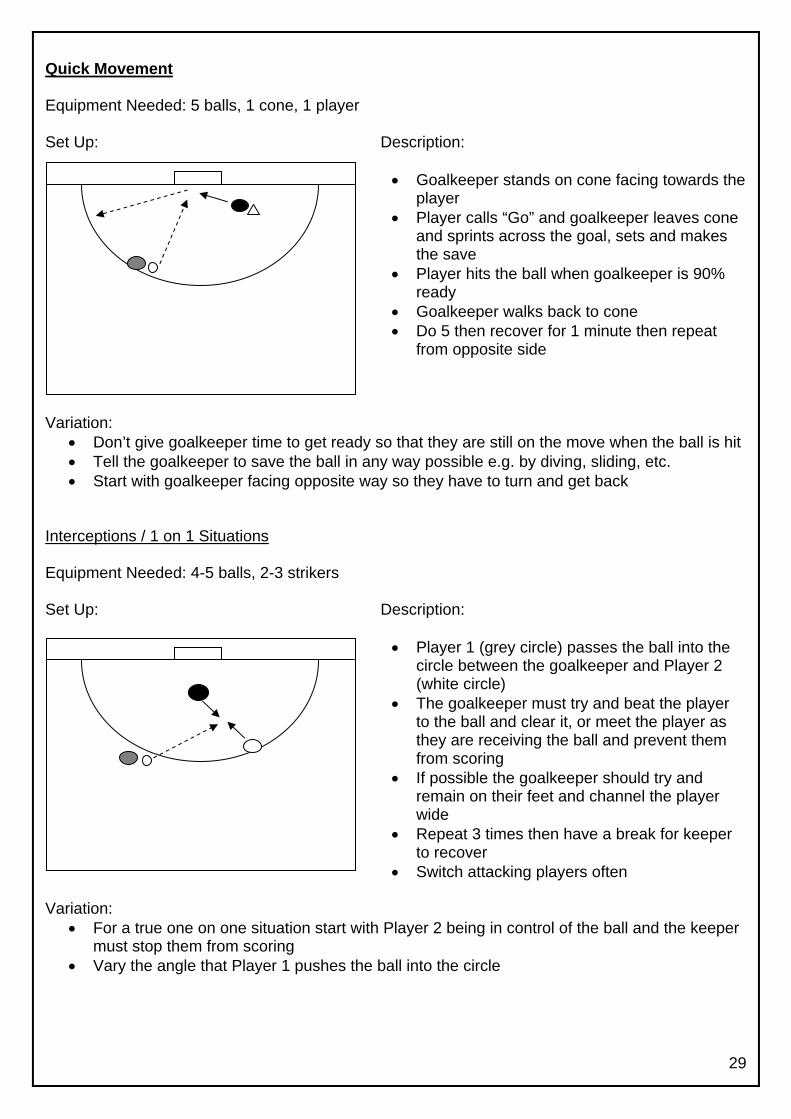
Interceptions / 1 on 1 Situations Equipment Needed: 4-5 balls, 2-3 strikers Set Up: Description:
• Player 1 (grey circle) passes the ball into the circle between the goalkeeper and Player 2 (white circle)
• The goalkeeper must try and beat the player to the ball and clear it, or meet the player as they are receiving the ball and prevent them from scoring
• If possible the goalkeeper should try and remain on their feet and channel the player wide
• Repeat 3 times then have a break for keeper to recover
• Switch attacking players often Variation:
• For a true one on one situation start with Player 2 being in control of the ball and the keeper must stop them from scoring
• Vary the angle that Player 1 pushes the ball into the circle 29
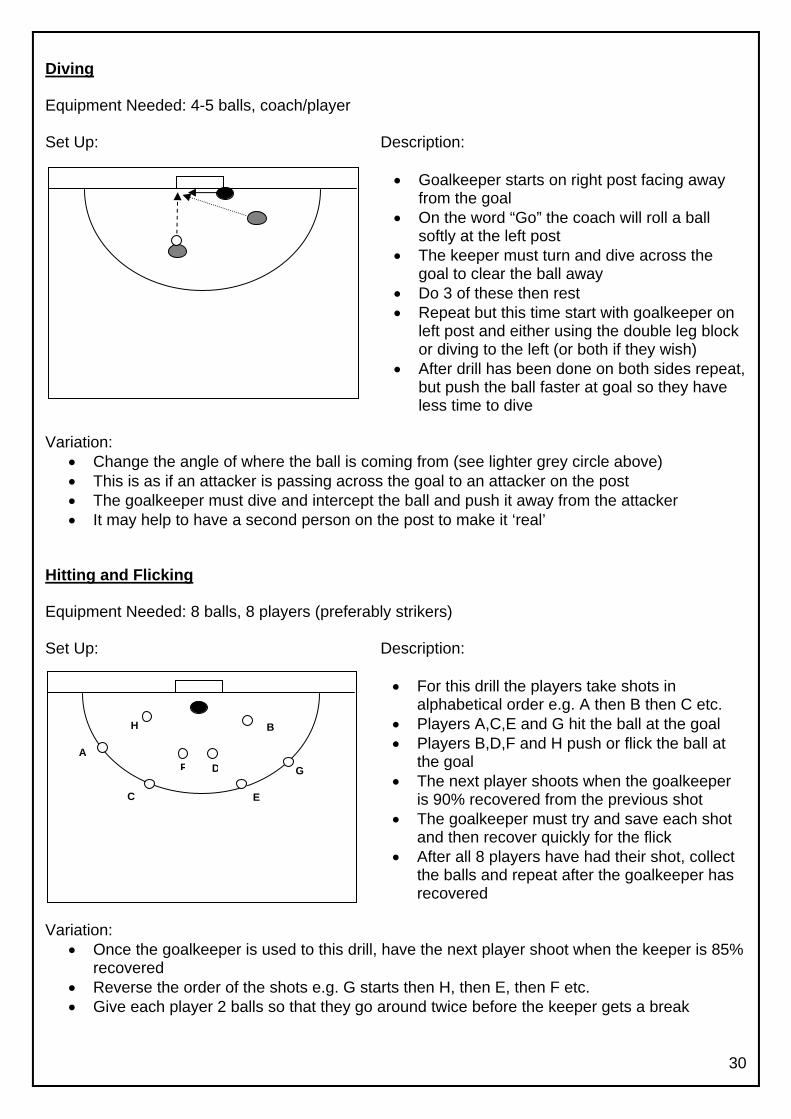
Diving Equipment Needed: 4-5 balls, coach/player Set Up: Description:
• Goalkeeper starts on right post facing away
from the goal • On the word “Go” the coach will roll a ball
softly at the left post • The keeper must turn and dive across the
goal to clear the ball away • Do 3 of these then rest • Repeat but this time start with goalkeeper on
left post and either using the double leg block or diving to the left (or both if they wish)
• After drill has been done on both sides repeat, but push the ball faster at goal so they have less time to dive
Variation:
• Change the angle of where the ball is coming from (see lighter grey circle above) • This is as if an attacker is passing across the goal to an attacker on the post • The goalkeeper must dive and intercept the ball and push it away from the attacker • It may help to have a second person on the post to make it ‘real’
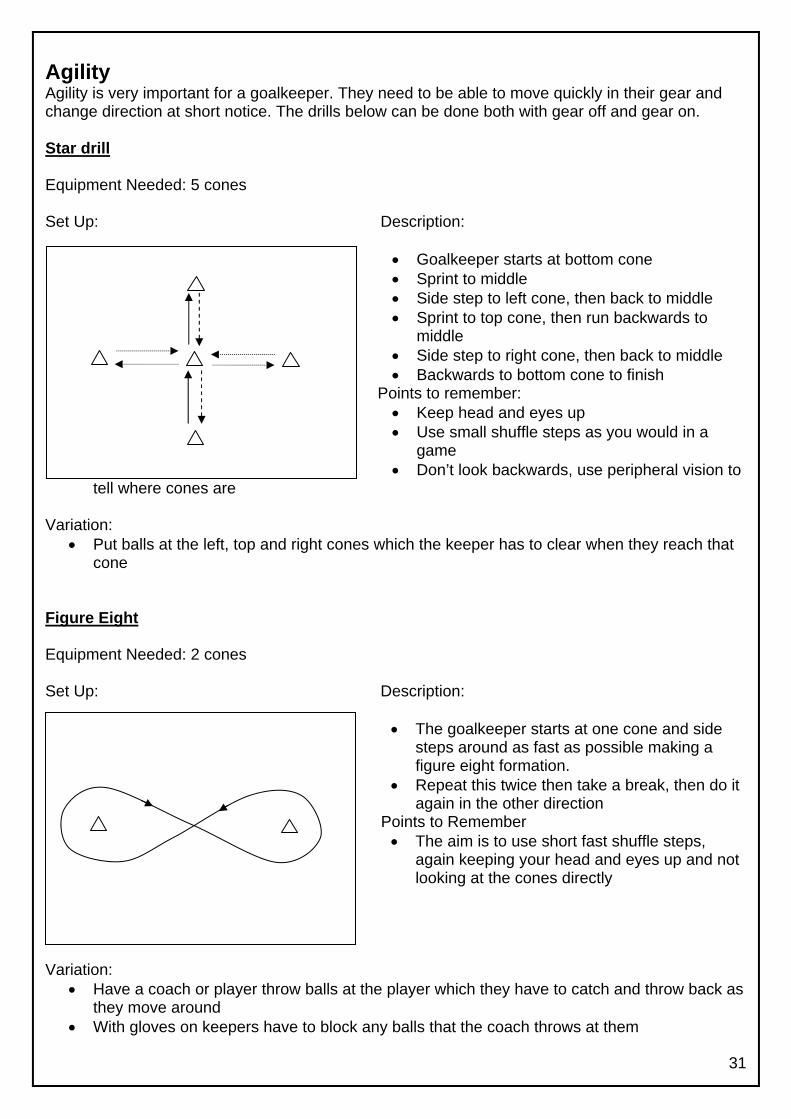
Hitting and Flicking Equipment Needed: 8 balls, 8 players (preferably strikers) Set Up: Description:
• For this drill the players take shots in
alphabetical order e.g. A then B then C etc. • Players A,C,E and G hit the ball at the goal
30
• Players B,D,F and H push or flick the ball at the goal
• The next player shoots when the goalkeeper is 90% recovered from the previous shot
• The goalkeeper must try and save each shot and then recover quickly for the flick
• After all 8 players have had their shot, collect the balls and repeat after the goalkeeper has recovered
Variation:
• Once the goalkeeper is used to this drill, have the next player shoot when the keeper is 85% recovered
• Reverse the order of the shots e.g. G starts then H, then E, then F etc. • Give each player 2 balls so that they go around twice before the keeper gets a break
B
DA
C
F
E
G
H
Agility Agility is very important for a goalkeeper. They need to be able to move quickly in their gear and change direction at short notice. The drills below can be done both with gear off and gear on. Star drill Equipment Needed: 5 cones Set Up: Description:
• Goalkeeper starts at bottom cone • Sprint to middle • Side step to left cone, then back to middle • Sprint to top cone, then run backwards to
middle • Side step to right cone, then back to middle • Backwards to bottom cone to finish
Points to remember: • Keep head and eyes up • Use small shuffle steps as you would in a
game • Don’t look backwards, use peripheral vision to
tell where cones are Variation:
• Put balls at the left, top and right cones which the keeper has to clear when they reach that cone
Figure Eight Equipment Needed: 2 cones Set Up: Description:
• The goalkeeper starts at one cone and side
steps around as fast as possible making a figure eight formation.
• Repeat this twice then take a break, then do it again in the other direction
Points to Remember • The aim is to use short fast shuffle steps,
again keeping your head and eyes up and not looking at the cones directly
Variation: • Have a coach or player throw balls at the player which they have to catch and throw back as
they move around • With gloves on keepers have to block any balls that the coach throws at them
31

Copy Cat Equipment Needed: 2 cones Set Up: Description:
• This can be done with either 2 goalkeepers, or
a coach and goalkeeper • The aim is for one player to mirror or copy the
other player e.g. if coach goes left, then keeper goes left, coach goes right, keeper goes right
• The aim for the coach or other goalkeeper is to lose the player copying them, by stopping and switching directions quickly
• This goes for 20-30 seconds then stop as this fatigues the goalkeeper very quickly
• After 1 minute break, switch so that the keeper has a turn at losing the coach (or other keeper)
Variation:
• Add a ball into the drill, by having the coach throw the ball at the player while still copying the coach’s movements
Audible Reactions Equipment Needed: 6 cones Set Up: Description:
• The goalkeeper starts at cone number 1, then
side steps to cone 2 then to cone 3 then back to middle
• This continues until the coach shouts either A, B or C
• On hearing the cue the goalkeeper must immediately sprint to the cone called e.g. A and then jog backwards to cone 1 again
• Do this 3 times and then take a break • The coach can shout the letter whenever they
want but don’t make the goalkeeper wait too long for the cue
Variation:
• Place a ball at the cones A, B, C • When reaching the cone, the keeper must kick the ball away before returning to cone 1 • Again repeat three times then rest
32
5m
GK
Coach
1 2 3
A B C
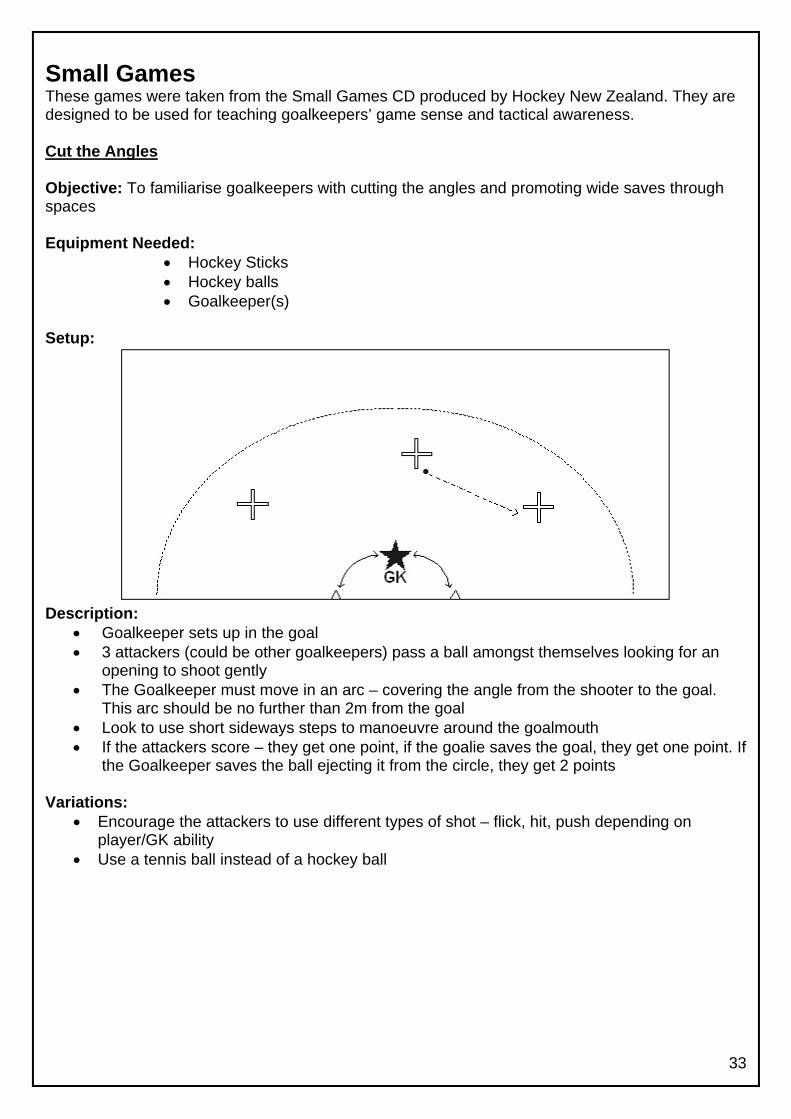
Small Games These games were taken from the Small Games CD produced by Hockey New Zealand. They are designed to be used for teaching goalkeepers’ game sense and tactical awareness. Cut the Angles Objective: To familiarise goalkeepers with cutting the angles and promoting wide saves through spaces Equipment Needed:
• Hockey Sticks • Hockey balls • Goalkeeper(s)
Setup:
Description: eper sets up in the goal
keepers) pass a ball amongst themselves looking for an
• ve in an arc – covering the angle from the shooter to the goal.
• nd the goalmouth hey get one point. If
ariations:
rage the attackers to use different types of shot – flick, hit, push depending on
• nstead of a hockey ball
• Goalke• 3 attackers (could be other goal
opening to shoot gently The Goalkeeper must moThis arc should be no further than 2m from the goal Look to use short sideways steps to manoeuvre arou
• If the attackers score – they get one point, if the goalie saves the goal, tthe Goalkeeper saves the ball ejecting it from the circle, they get 2 points
V• Encou
player/GK ability Use a tennis ball i
33
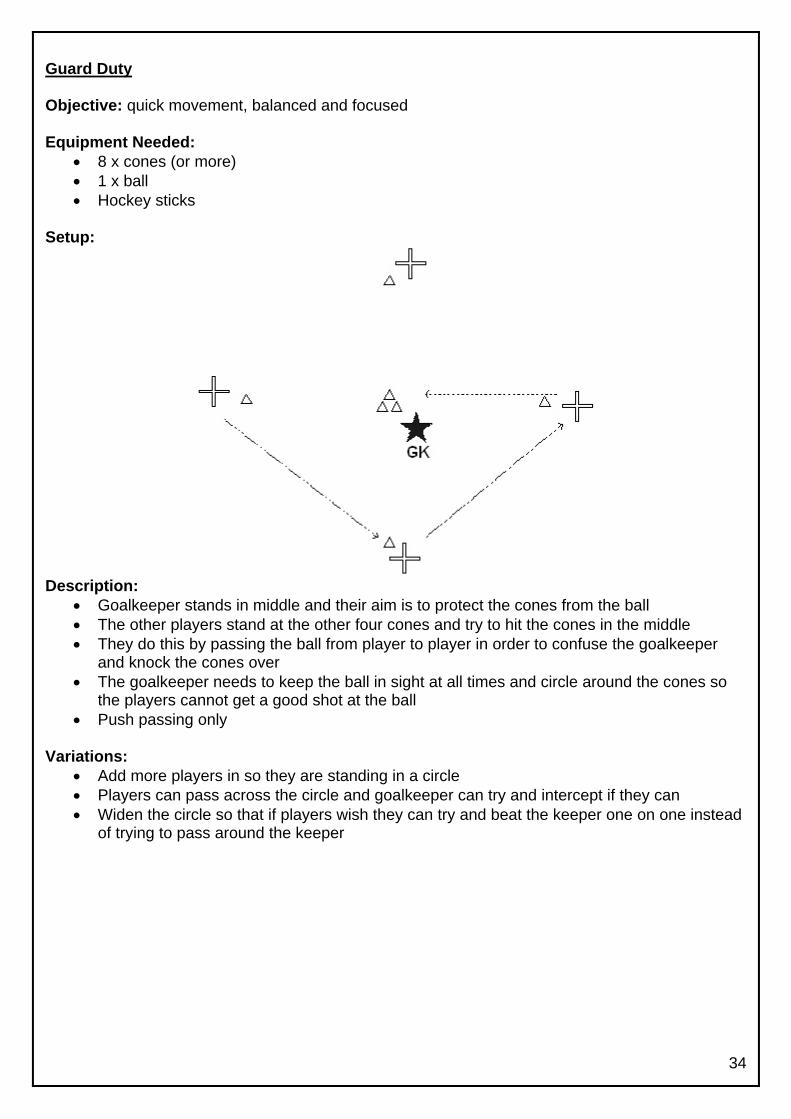
Guard Duty
34
bjective: quick movement, balanced and focused
quipment Needed: ore)
sticks
etup:
escription: eper stands in middle and their aim is to protect the cones from the ball
iddle er
• eep the ball in sight at all times and circle around the cones so
•
ariations: ore players in so they are standing in a circle
n try and intercept if they can instead
O E
• 8 x cones (or m• 1 x ball • Hockey
S D
• Goalke• The other players stand at the other four cones and try to hit the cones in the m• They do this by passing the ball from player to player in order to confuse the goalkeep
and knock the cones over The goalkeeper needs to kthe players cannot get a good shot at the ball Push passing only
V• Add m• Players can pass across the circle and goalkeeper ca• Widen the circle so that if players wish they can try and beat the keeper one on one
of trying to pass around the keeper
35
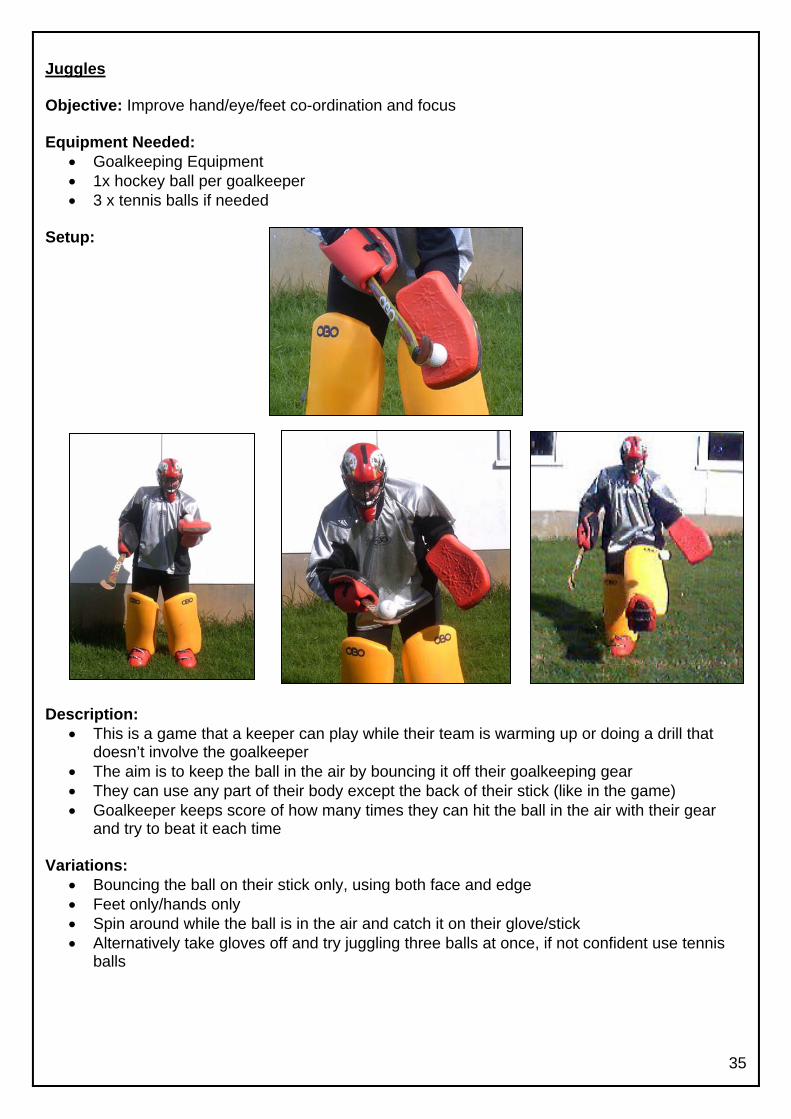
ugglesJ
bjective: Improve hand/eye/feet co-ordination and focus
quipment Needed: uipment
eper
etup:
escription: game that a keeper can play while their team is warming up or doing a drill that
• air by bouncing it off their goalkeeping gear ame)
gear
ariations:
ing the ball on their stick only, using both face and edge
ball is in the air and catch it on their glove/stick onfident use tennis
O E
• Goalkeeping Eq• 1x hockey ball per goalke• 3 x tennis balls if needed
S
D
• This is adoesn’t involve the goalkeeper The aim is to keep the ball in the
• They can use any part of their body except the back of their stick (like in the g• Goalkeeper keeps score of how many times they can hit the ball in the air with their
and try to beat it each time
V• Bounc• Feet only/hands only • Spin around while the• Alternatively take gloves off and try juggling three balls at once, if not c
balls
36
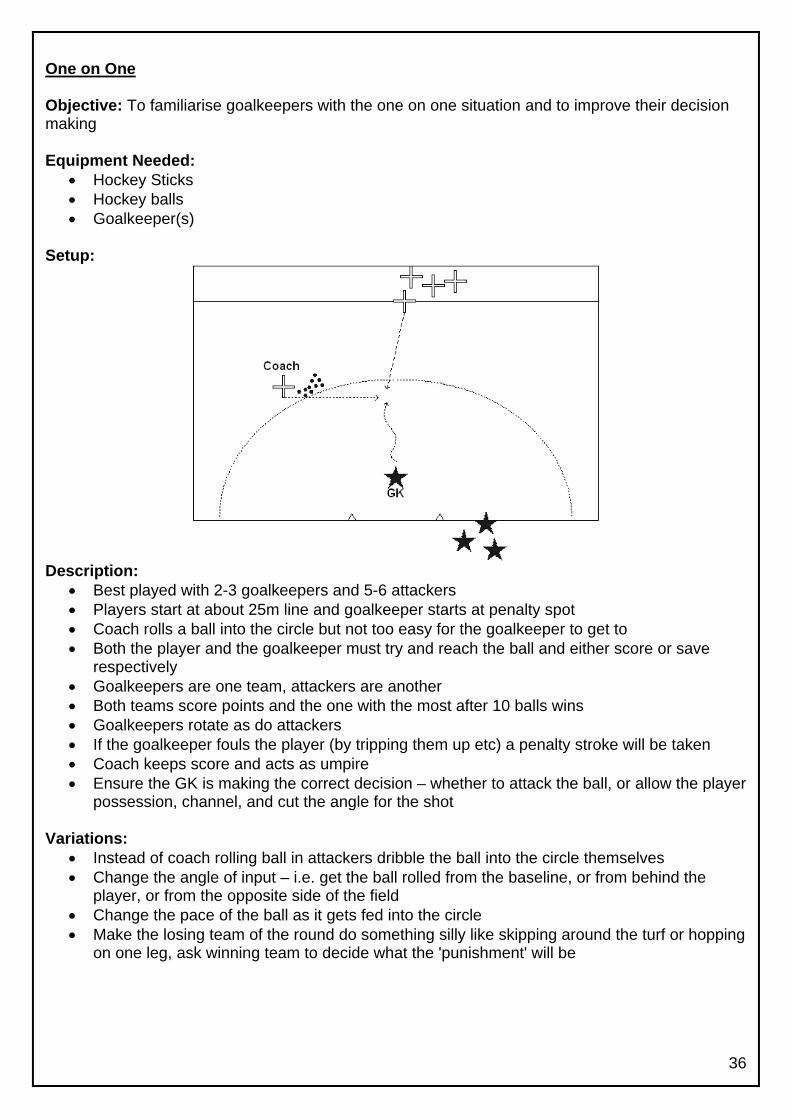
ne on One O
bjective: To familiarise goalkeepers with the one on one situation and to improve their decision
quipment Needed:
etup:
Omaking E
• Hockey Sticks • Hockey balls • Goalkeeper(s)
S
Description:
yed with 2-3 goalkeepers and 5-6 attackers at penalty spot
get to re or save
• are one team, attackers are another after 10 balls wins
tripping them up etc) a penalty stroke will be taken
ision – whether to attack the ball, or allow the player
ariations:
d of coach rolling ball in attackers dribble the ball into the circle themselves d the
• the circle
• Best pla• Players start at about 25m line and goalkeeper starts• Coach rolls a ball into the circle but not too easy for the goalkeeper to• Both the player and the goalkeeper must try and reach the ball and either sco
respectively Goalkeepers
• Both teams score points and the one with the most• Goalkeepers rotate as do attackers • If the goalkeeper fouls the player (by• Coach keeps score and acts as umpire • Ensure the GK is making the correct dec
possession, channel, and cut the angle for the shot
V• Instea• Change the angle of input – i.e. get the ball rolled from the baseline, or from behin
player, or from the opposite side of the field Change the pace of the ball as it gets fed into
• Make the losing team of the round do something silly like skipping around the turf or hopping on one leg, ask winning team to decide what the 'punishment' will be
37
eflex SavesR
mprove reactions and glove work
• 15-20 x tennis balls
Set
Objective: To i Equipment Needed:
• tennis racquet • hockey stick • 4 x cones
up:
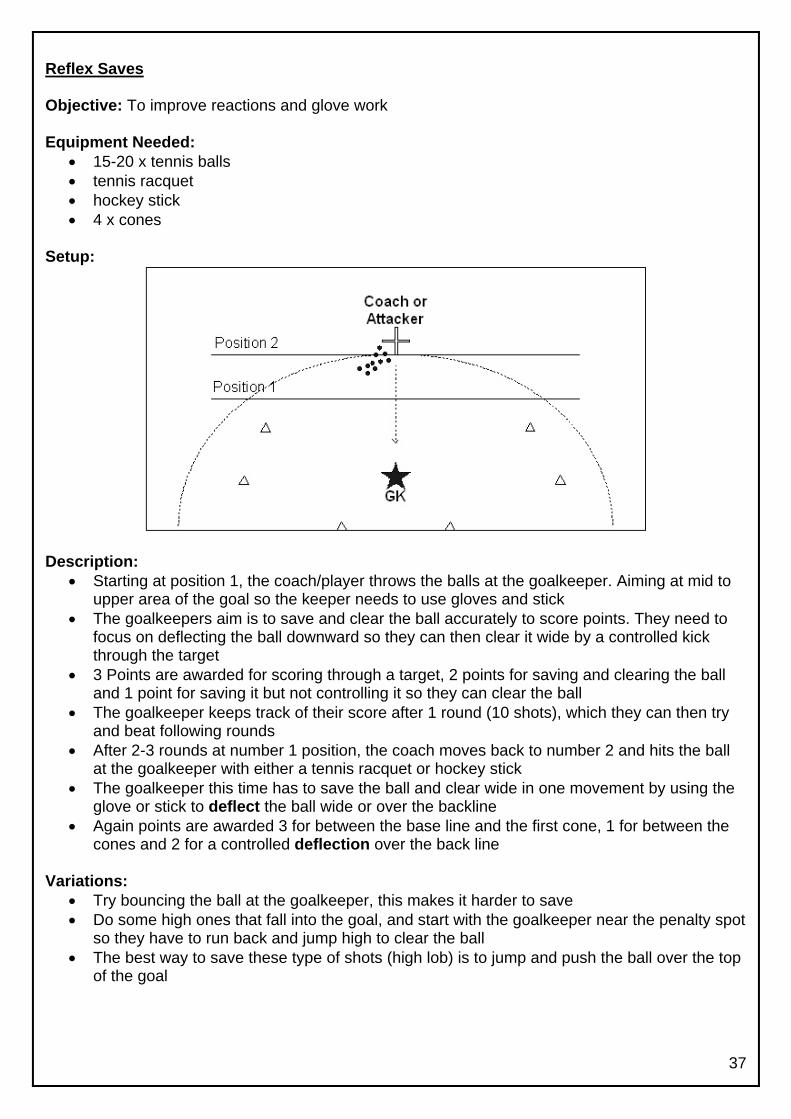
Description:
• Starting at position 1, the coach/player throws the balls at the goalkeeper. Aiming at mid to rea of the goal so the keeper needs to use gloves and stick
by a controlled kick
• ll ng it but not controlling it so they can clear the ball
r a tennis racquet or hockey stick
Variat
• Try bouncing the ball at the goalkeeper, this makes it harder to save me high ones that fall into the goal, and start with the goalkeeper near the penalty spot
upper a• The goalkeepers aim is to save and clear the ball accurately to score points. They need to
focus on deflecting the ball downward so they can then clear it wide through the target 3 Points are awarded for scoring through a target, 2 points for saving and clearing the baand 1 point for savi
• The goalkeeper keeps track of their score after 1 round (10 shots), which they can then try and beat following rounds
• After 2-3 rounds at number 1 position, the coach moves back to number 2 and hits the ball at the goalkeeper with eithe
• The goalkeeper this time has to save the ball and clear wide in one movement by using the glove or stick to deflect the ball wide or over the backline
• Again points are awarded 3 for between the base line and the first cone, 1 for between the cones and 2 for a controlled deflection over the back line
ions:
• Do soso they have to run back and jump high to clear the ball
• The best way to save these type of shots (high lob) is to jump and push the ball over the top of the goal
38
hoot - SaveS
lkeeper balance, fitness and agility, also striker fitness and agility
• 2 x cones
Set
Objective: Goa Equipment Needed:
• 6 x hockey balls
up:
Description:
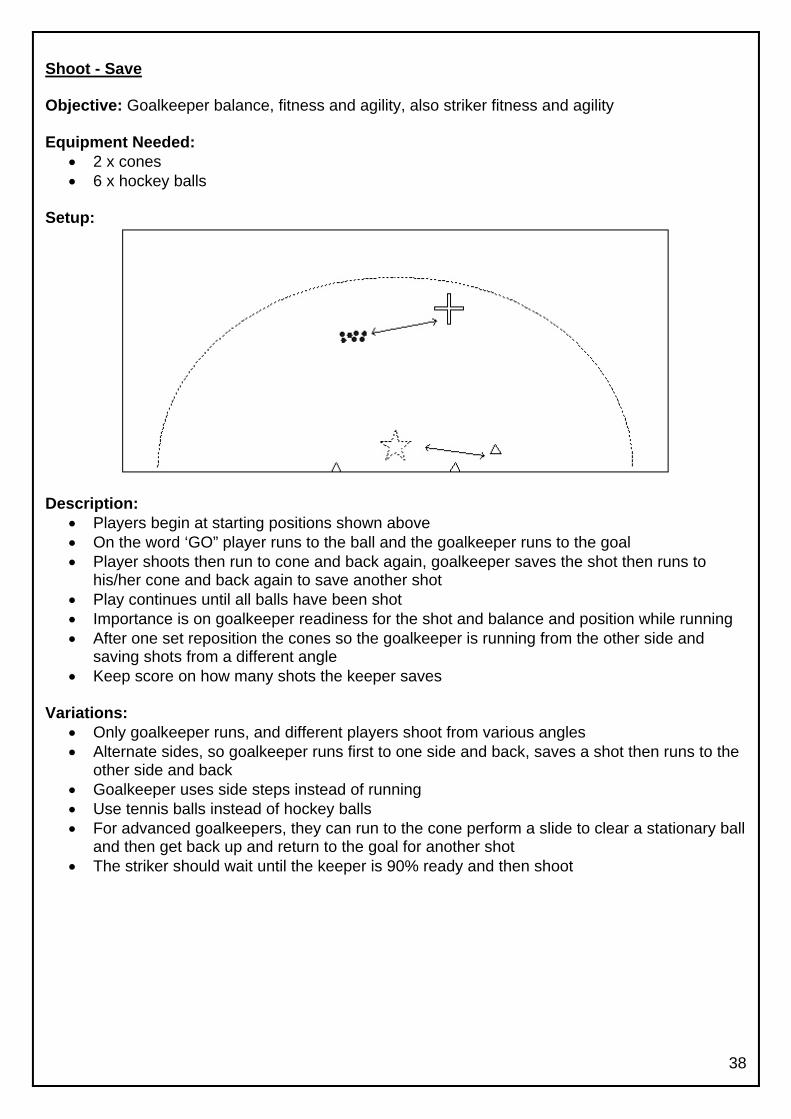
• Players begin at starting positions shown above word ‘GO” player runs to the ball and the goalkeeper runs to the goal
oalkeeper saves the shot then runs to
• and balance and position while running lkeeper is running from the other side and
Var t
• Only goalkeeper runs, and different players shoot from various angles ate sides, so goalkeeper runs first to one side and back, saves a shot then runs to the
• ad of hockey balls one perform a slide to clear a stationary ball
al for another shot
• On the • Player shoots then run to cone and back again, g
his/her cone and back again to save another shot • Play continues until all balls have been shot
Importance is on goalkeeper readiness for the shot• After one set reposition the cones so the goa
saving shots from a different angle • Keep score on how many shots the keeper saves
ia ions:
• Alternother side and back
• Goalkeeper uses side steps instead of running Use tennis balls inste
• For advanced goalkeepers, they can run to the cand then get back up and return to the go
• The striker should wait until the keeper is 90% ready and then shoot
39
imon Says (for Goalies)S
lkeepers with different types of movements they will need to make and heck they are using the correct technique for each movement
• GK Gear
Set
Objective: to familiarise goac Equipment Needed:
• Balls • 4 Cones
up:
Description:
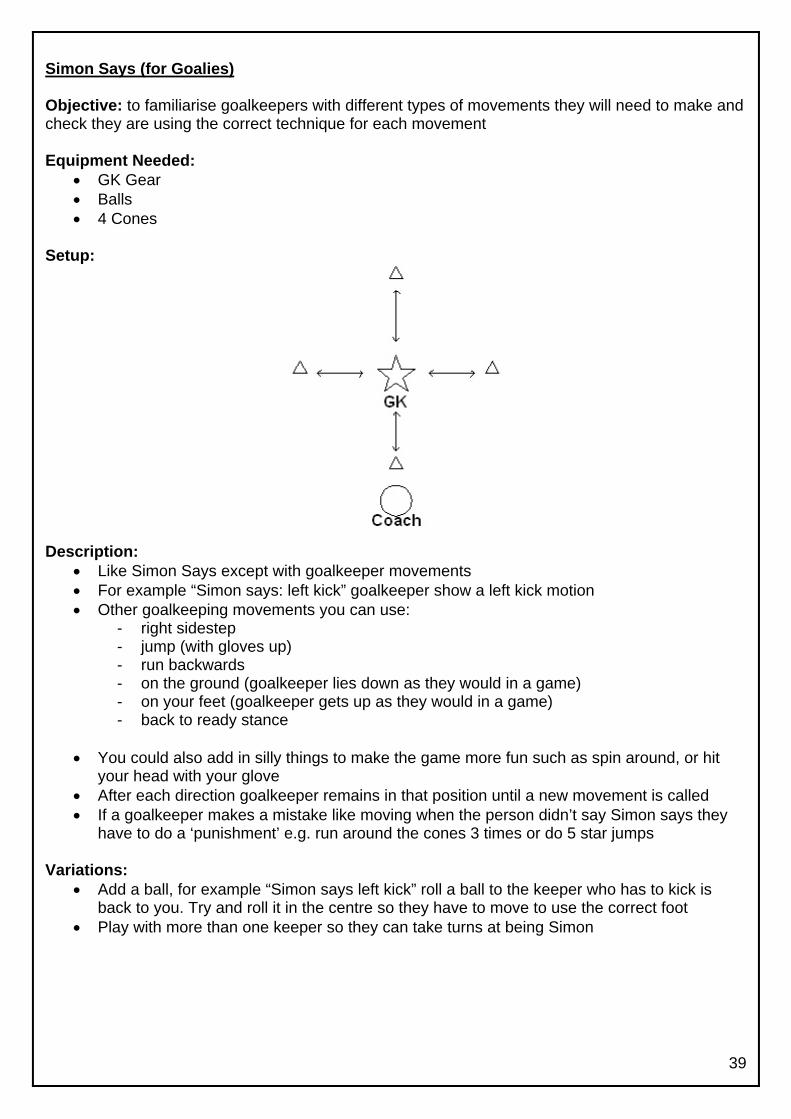
• Like Simon Says except with goalkeeper movements mple “Simon says: left kick” goalkeeper show a left kick motion
per lies down as they would in a game) alkeeper gets up as they would in a game)
• You could also add in silly things to make the game more fun such as spin around, or hit
your head with your glove
• stake like moving when the person didn’t say Simon says they
Variati
• Add a ball, for example “Simon says left kick” roll a ball to the keeper who has to kick is to you. Try and roll it in the centre so they have to move to use the correct foot
• For exa• Other goalkeeping movements you can use:
- right sidestep - jump (with gloves up) - run backwards - on the ground (goalkee- on your feet (go- back to ready stance
• After each direction goalkeeper remains in that position until a new movement is called If a goalkeeper makes a mihave to do a ‘punishment’ e.g. run around the cones 3 times or do 5 star jumps
ons:
back • Play with more than one keeper so they can take turns at being Simon
40
arget PracticeT
ctice clearing the ball wide
• GK gear targets
Set
Objective: To pra Equipment Needed:
• 12 x cones for • 10+ balls
up:
Description:
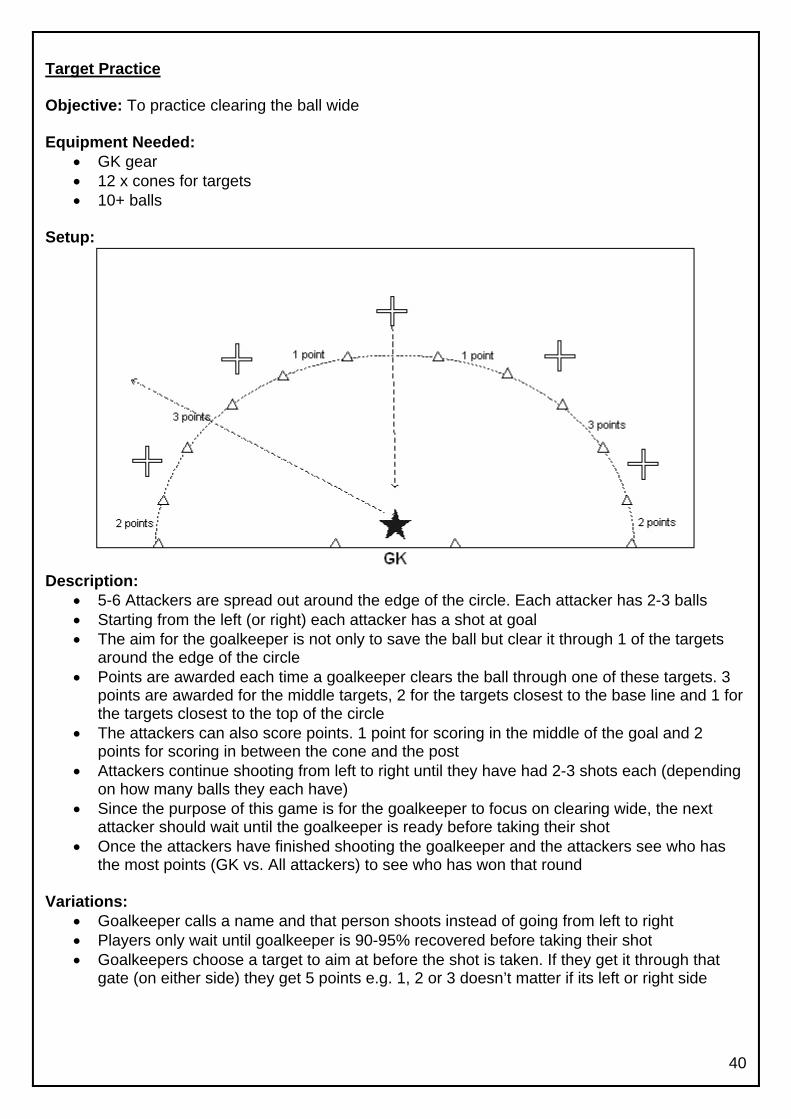
• 5-6 Attackers are spread out around the edge of the circle. Each attacker has 2-3 balls from the left (or right) each attacker has a shot at goal
s
dle targets, 2 for the targets closest to the base line and 1 for
• the post
ding
per is ready before taking their shot
Variati
• Goalkeeper calls a name and that person shoots instead of going from left to right rs only wait until goalkeeper is 90-95% recovered before taking their shot
h that ht side
• Starting• The aim for the goalkeeper is not only to save the ball but clear it through 1 of the target
around the edge of the circle • Points are awarded each time a goalkeeper clears the ball through one of these targets. 3
points are awarded for the midthe targets closest to the top of the circle The attackers can also score points. 1 point for scoring in the middle of the goal and 2 points for scoring in between the cone and
• Attackers continue shooting from left to right until they have had 2-3 shots each (depenon how many balls they each have)
• Since the purpose of this game is for the goalkeeper to focus on clearing wide, the next attacker should wait until the goalkee
• Once the attackers have finished shooting the goalkeeper and the attackers see who hasthe most points (GK vs. All attackers) to see who has won that round
ons:
• Playe• Goalkeepers choose a target to aim at before the shot is taken. If they get it throug
gate (on either side) they get 5 points e.g. 1, 2 or 3 doesn’t matter if its left or rig
41
ennis HockeyT
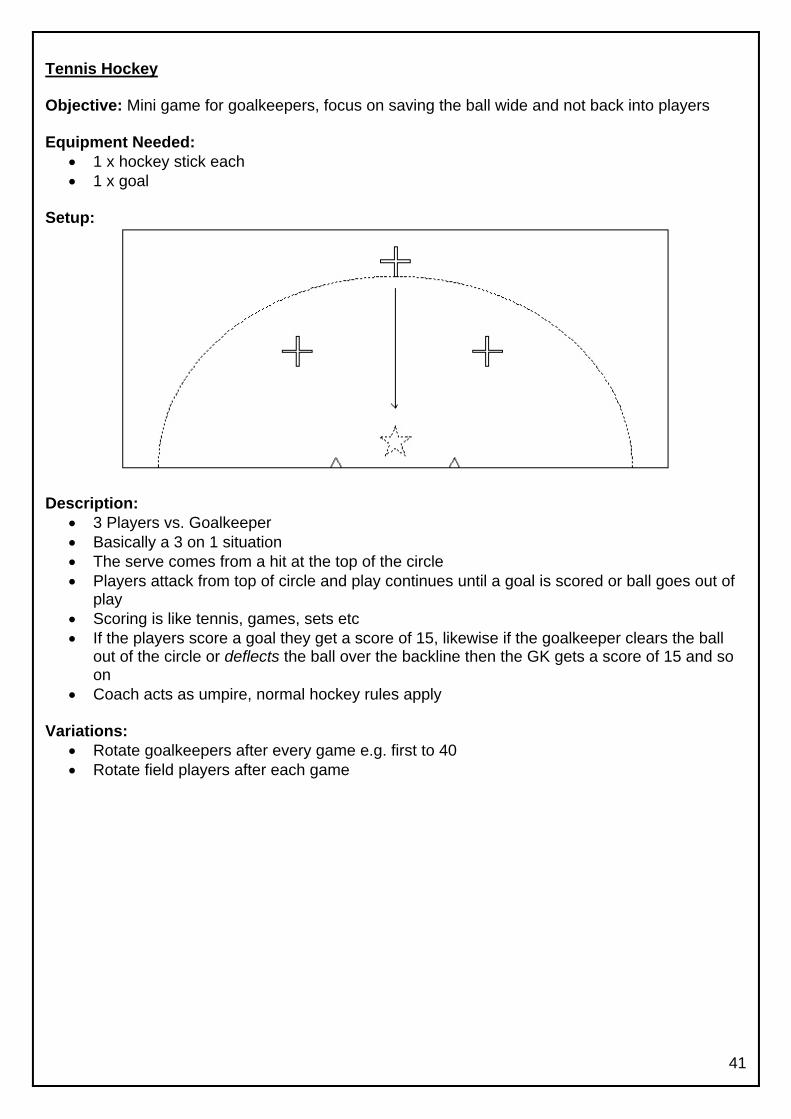
ame for goalkeepers, focus on saving the ball wide and not back into players
• 1 x hockey stick each
Set
Objective: Mini g Equipment Needed:
• 1 x goal
up:
Description:
• 3 Players vs. Goalkeeper y a 3 on 1 situation
it at the top of the circle rcle and play continues until a goal is scored or ball goes out of
• players score a goal they get a score of 15, likewise if the goalkeeper clears the ball the backline then the GK gets a score of 15 and so
• Var t
• Rotate goalkeepers after every game e.g. first to 40 field players after each game
• Basicall• The serve comes from a h• Players attack from top of ci
play • Scoring is like tennis, games, sets etc
If the out of the circle or deflects the ball overon Coach acts as umpire, normal hockey rules apply
ia ions:
• Rotate
42
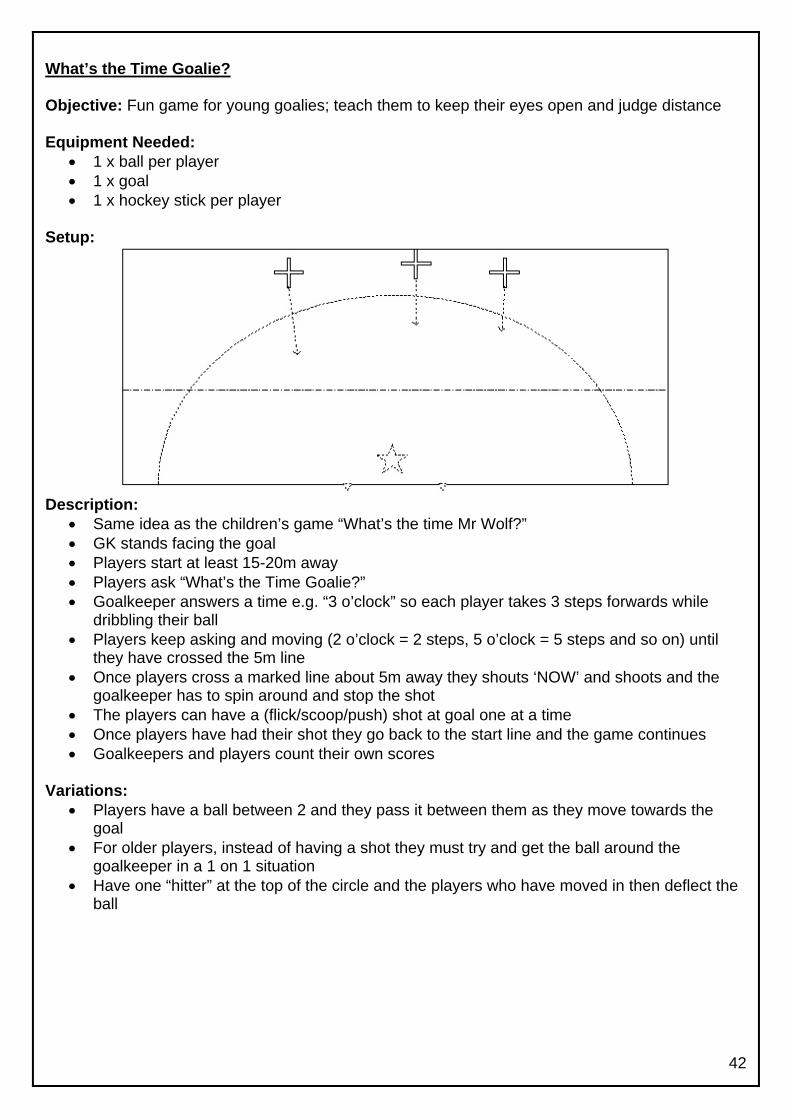
hat’s the Time Goalie?W
bjective: Fun game for young goalies; teach them to keep their eyes open and judge distance
quipment Needed: er
y stick per player
etup:
O E
• 1 x ball per play• 1 x goal • 1 x hocke
S
Description:
ea as the children’s game “What’s the time Mr Wolf?”
m away ?”
ck” so each player takes 3 steps forwards while
• g and moving (2 o’clock = 2 steps, 5 o’clock = 5 steps and so on) until
• ne about 5m away they shouts ‘NOW’ and shoots and the
• goal one at a time e game continues
ariations:
s have a ball between 2 and they pass it between them as they move towards the
• lder players, instead of having a shot they must try and get the ball around the
• circle and the players who have moved in then deflect the
• Same id• GK stands facing the goal • Players start at least 15-20• Players ask “What’s the Time Goalie• Goalkeeper answers a time e.g. “3 o’clo
dribbling their ball Players keep askinthey have crossed the 5m line Once players cross a marked ligoalkeeper has to spin around and stop the shot The players can have a (flick/scoop/push) shot at
• Once players have had their shot they go back to the start line and th• Goalkeepers and players count their own scores
V• Player
goal For ogoalkeeper in a 1 on 1 situation Have one “hitter” at the top of theball