Embed Size (px)
Citation preview

Page 1 of 10 ©2021 AccuQuilt PQ12025
GO! Rice Bag

Page 2 of 10 ©2021 AccuQuilt PQ12025
Dies Needed: GO! Square-8-1/2” (8” Finished) (55058) GO! Qube Mix & Match 8” Block (55776)
• GO! Square-4 1/2" (4" Finished) (55708) (Shape 1) • GO! Square-2 1/2" (2" Finished) (55709) (shape 2) • GO! Half Square Triangle-4" Finished Square (55710) (Shape 3) • GO! Quarter Square Triangle-4" Finished Square (55711) (Shape 4) • GO! Half Square Triangle-2" Finished Square (55712) (Shape 5) • GO! Rectangle-2 1/2" x 4 1/2" (2" x 4" Finished) (55715) (shape 8)
Additional Dies (optional)
• GO! Strip Cutter-2-1/2” (2” Finished) (55017 or 55014) Fabric Requirements:
Fabric Color Total Yardage
Lining and Bottom of Bag
1/2 yard
Body of bag and loops
Scraps or about 3 Fat Quarters
Orange (straps) 1/8 yard Batting 1/2 yard or scraps

Page 3 of 10 ©2021 AccuQuilt PQ12025
Cutting Directions:
Fabric Color Die Number of Shapes to Cut
Bottom and Lining Pieces
GO! Square-8-1/2” (8” Finished) (55058)
Cut 6—8-1/2” Squares.
Loops
GO! Rectangle-2-1/2” x 4-1/2” (2” x 4” Finished) (Shape 5)
Cut 8—2-1/2” x 4-1/2” rectangles for the loops of the bag
Orange (straps)
GO! Strip Cutter-2-1/2” (2” Finished) (55017 or 55014)
Cut 2—2-1/2” x WOF strips
Assorted Fat Quarters
GO! Half Square Triangle-4" Finished Square (55710) (Shape 3)
Cut 8—4-1/2” Half Square Triangles (HST). For Block #1.
Assorted Fat Quarters
GO! Square-4 1/2" (4" Finished) (55708) (Shape 1)
Cut 1—4-1/2” Squares. For Block #2.
Assorted Fat Quarters
GO! Rectangle-2 1/2" x 4 1/2" (2" x 4" Finished) (55715) (shape 8)
Cut 4—2-1/2” x 4-1/2” Rectangles. For Block #2.
Assorted Fat Quarters
GO! Rectangle-2-1/2” x 4-1/2” (2” x 4” Finished) (Shape 5)
Cut 8—2-1/2” Half Square Triangles (HST). For Block #2.
Page 4 of 10 ©2021 AccuQuilt PQ12025
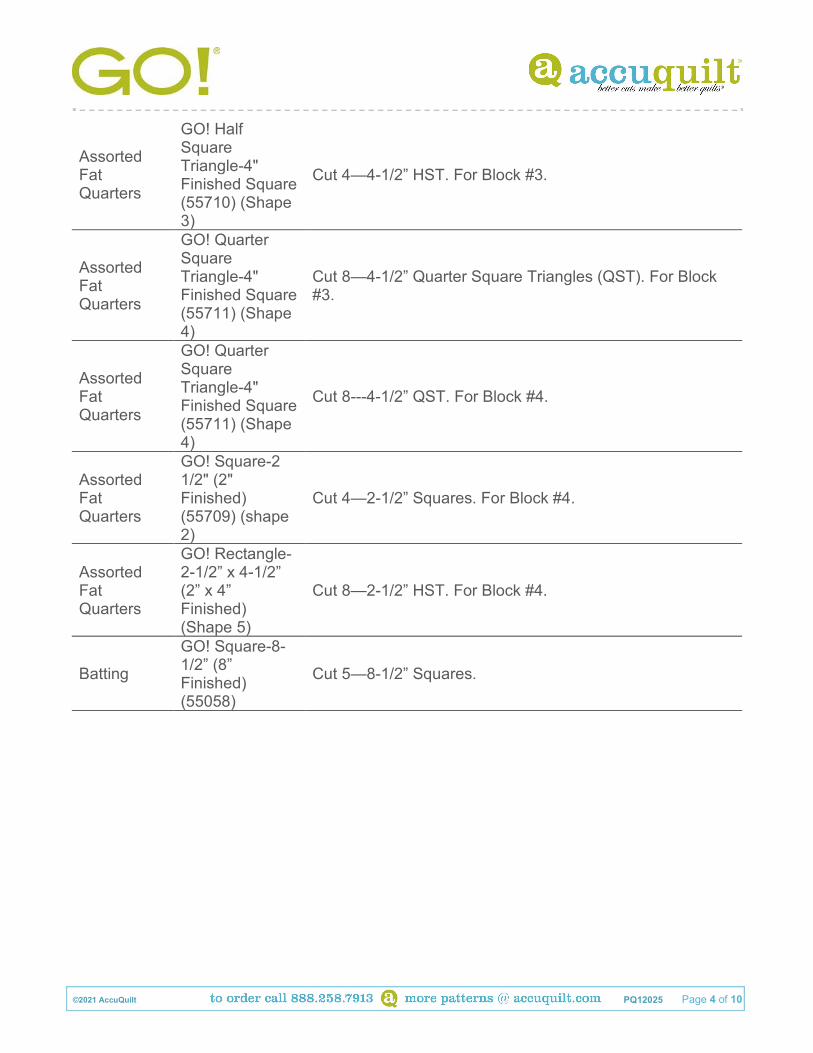
Assorted Fat Quarters
GO! Half Square Triangle-4" Finished Square (55710) (Shape 3)
Cut 4—4-1/2” HST. For Block #3.
Assorted Fat Quarters
GO! Quarter Square Triangle-4" Finished Square (55711) (Shape 4)
Cut 8—4-1/2” Quarter Square Triangles (QST). For Block #3.
Assorted Fat Quarters
GO! Quarter Square Triangle-4" Finished Square (55711) (Shape 4)
Cut 8---4-1/2” QST. For Block #4.
Assorted Fat Quarters
GO! Square-2 1/2" (2" Finished) (55709) (shape 2)
Cut 4—2-1/2” Squares. For Block #4.
Assorted Fat Quarters
GO! Rectangle-2-1/2” x 4-1/2” (2” x 4” Finished) (Shape 5)
Cut 8—2-1/2” HST. For Block #4.
Batting
GO! Square-8-1/2” (8” Finished) (55058)
Cut 5—8-1/2” Squares.
Page 5 of 10 ©2021 AccuQuilt PQ12025
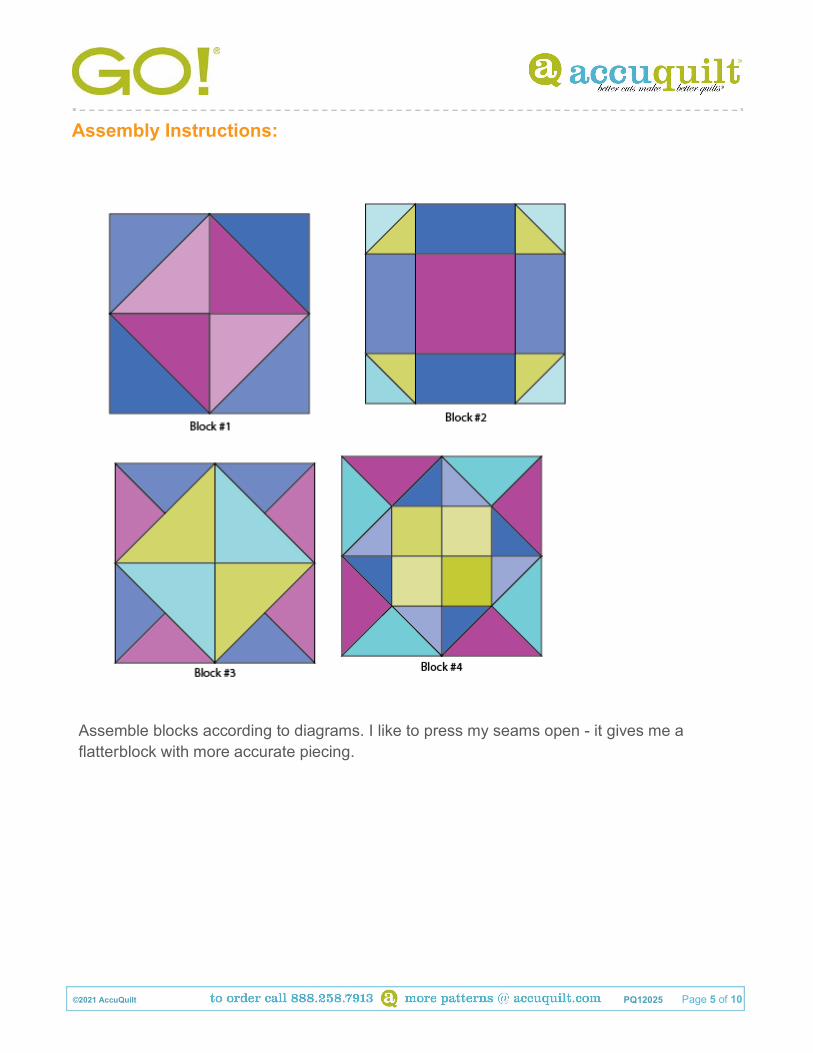
Assembly Instructions:
Assemble blocks according to diagrams. I like to press my seams open - it gives me a flatter block with more accurate piecing.

Page 6 of 10 ©2021 AccuQuilt PQ12025
Layer each pieced block and the bottom square with an 8-1/2” square of batting. Quilt as desired. I used my walking foot to stitch in the ditch of my blocks. This is also the perfect time to practice some hand quilting - little projects are fun to quilt by hand.
On the batting side of the bottom square, mark a dot ¼ away from each corner. This will mark your stop and start points for stitching the pieces of your bag together.
Line up block #1 and the bottom of your bag, right sides together. Stitching with the bottom piece up, stitch from one marked point to the next, reversing for a couple of stitches to secure the seam.
Repeat for all 4 sides, until you have a shape like this.

Page 7 of 10 ©2021 AccuQuilt PQ12025
Now, fold two sides of your bag together, right sides together. Stitch from the top of your bag, all the way down to the bottom.
Repeat for all 4 sides.
Turn your bag right side out, carefully pressing out the corners.
Repeat this process with your five lining squares, leaving an opening of several inches along one bottom seam line. This is where you will turn your bag right side out. Leave bag lining inside out.

Page 8 of 10 ©2021 AccuQuilt PQ12025
Set lining and bag body aside.
Fold a loop piece right sides together, along the long side. Stitch a ¼” seam along the long side.
Rotate seam until it is in the middle of the loop, press open.
Turn the loop inside out, so the seam is hidden. Press again.
Top stitch ⅛” away from the edge to secure the loop.
Fold in half along the short side, press. Create
8 loops.
Pin your loops to the quilted portion of your bag. The loops should be hanging down, along the
outside of the bag. I like to position mine about 1” away from the corner, with two loops per side. Pin them in place, keeping the raw edges of the bag and the loop together.
Place your quilted bag inside of the lining, with right sides together. Be sure to match up the corners, so your bag will finish nice and square.
Pin the corners, matching up your seam lines. I like to put in a few more pins along the edge, just to prevent any bunching as I stitch.
Using a generous ¼” seam allowance, stitch along the entire upper edge of your bag.

Page 9 of 10 ©2021 AccuQuilt PQ12025
Using the opening you left in the lining, gently pull the finished bag through the gap, being careful not to tear the lining.
Close the gap you left in the lining. Pull the seam taut, pin it shut, and stitch a close to the folded edges to secure it.
Tuck the lining into your bag.
Press the top edge of your bag, pulling the loops up and nudging the lining down. Top stitch along the top edge of your bag, a little less than ¼” away from the edge to secure the loops and give a nice, finished look to your bag.
Page 10 of 10 ©2021 AccuQuilt PQ12025
Prepare your straps:
Turn the short raw edges of your straps under, to the wrong side, and give them a press.
Fold your strips in half lengthwise, and press, creating a center seam the length of your fabric.
Now, fold the raw edges in towards the center, as if you are preparing a double fold of bias tape. Press.
Fold in half and press again, to make a narrow strap.
Top stitch along the folded edges, securing your strap in together. Repeat with your second long strap.
Thread your straps through the loops on your finished bag, knotting the ends. One set of straps should be knotted in between the two loops on the left side of your bag, and the other should be knotted in between the two loops on the right side of your bag.