Embed Size (px)
Citation preview

Plenty of Pockets Duffel BagBy: Cheryl Bush of www.sewcando.com
A bag that's amazing for organizing on the go. Two rows of pockets on the outside, another full row of pockets on the inside, with a drawstring closure and adjustable straps to wear as a backpack. Great for the beach, traveling and back-to-school!
Fabric Requirements:
5/8 yard Timeless Treasures Stripe (daisy-c2940-robinegg)
¾ yard Timeless Treasures Tossed Hedgehogs (fun-c9468-white)
¾ yard Timeless Treasures Woodland Picnic (fun-C9466-blue)
¾ yard Timeless Treasures Soho Solids - Red
Materials Needed:
1 ¾ yards Fusible Fleece Stabilizer
Four 1 ½ inch wide metal D-rings
One double cord stop 1/8 inch size
One package of double fold bias tape
One extra long shoelace or 1/8 inch wide cording, 38-40 inches long
Coordinating thread
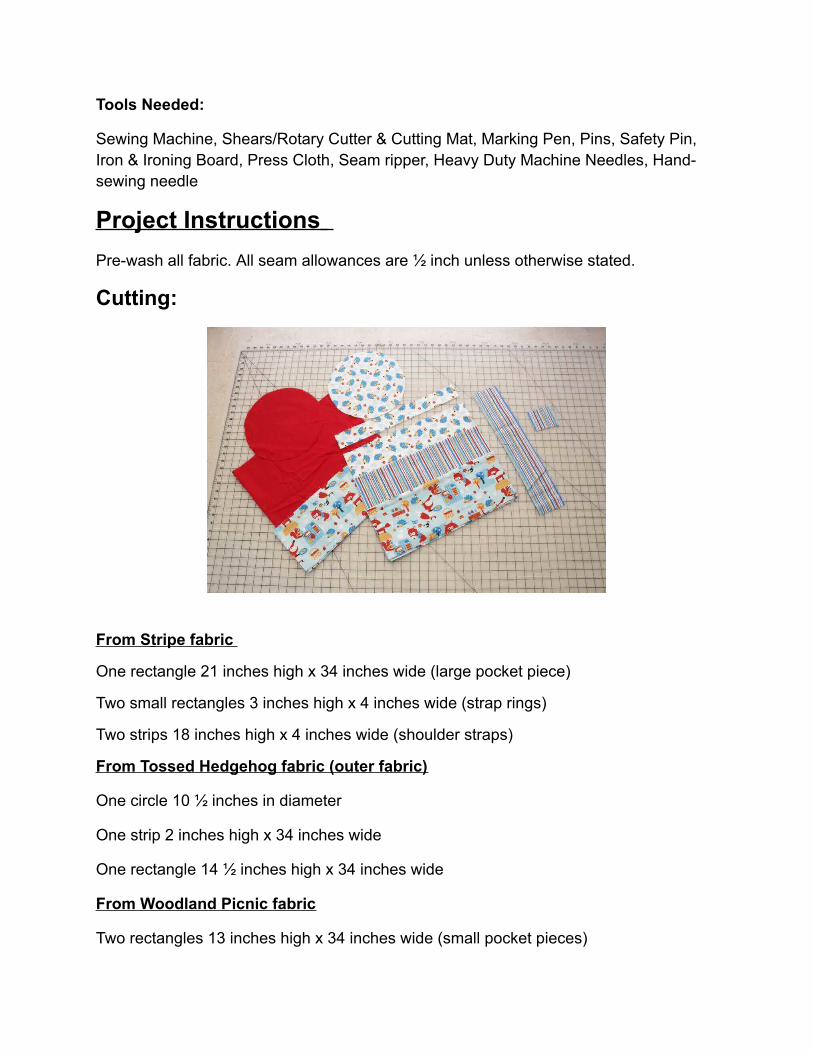
Tools Needed:
Sewing Machine, Shears/Rotary Cutter & Cutting Mat, Marking Pen, Pins, Safety Pin, Iron & Ironing Board, Press Cloth, Seam ripper, Heavy Duty Machine Needles, Hand-sewing needle
Project Instructions
Pre-wash all fabric. All seam allowances are ½ inch unless otherwise stated.
Cutting:
From S tripe fabric
One rectangle 21 inches high x 34 inches wide (large pocket piece)
Two small rectangles 3 inches high x 4 inches wide (strap rings)
Two strips 18 inches high x 4 inches wide (shoulder straps)
From Tossed Hedgehog fabric (outer fabric)
One circle 10 ½ inches in diameter
One strip 2 inches high x 34 inches wide
One rectangle 14 ½ inches high x 34 inches wide
From Woodland Picnic fabric
Two rectangles 13 inches high x 34 inches wide (small pocket pieces)
From Red Soho Solid fabric (lining)
One circle 10 ½ inches in diameter
One rectangle 16 inches high x 34 inches wide
From Fusible Fleece
Two circles 10 inches in diameter
Two rectangles 6 ½ inches high x 34 inches wide (small pocket pieces)
One rectangle 10 ½ inches high x 34 inches wide (large pocket piece)
One rectangle 15 ½ inches high by 34 inchs wide
One rectangle 14 inches high x 34 inches wide
Two small rectangles 2 inches high x 4 inches wide (strap rings)
One strip 2 inches high x 34 inches wide
Two strips 18 inches high x 4 inches wide (shoulder straps)
Assembly
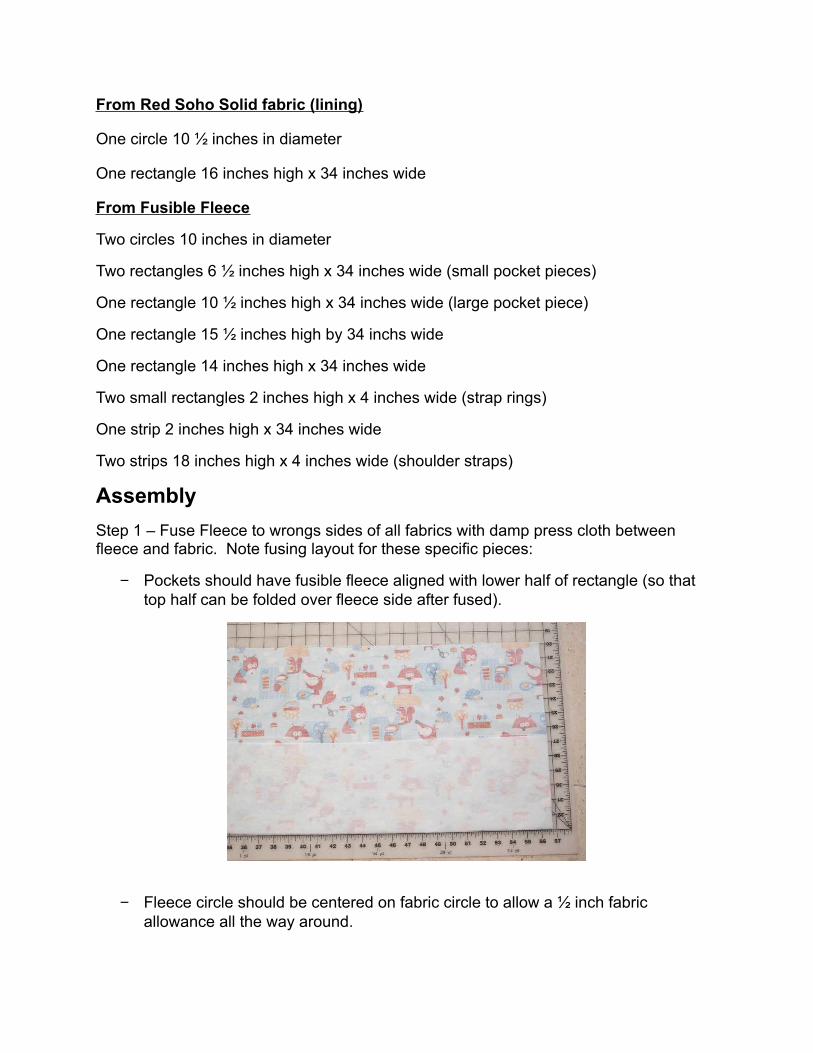
Step 1 – Fuse Fleece to wrongs sides of all fabrics with damp press cloth between fleece and fabric. Note fusing layout for these specific pieces:
− Pockets should have fusible fleece aligned with lower half of rectangle (so that top half can be folded over fleece side after fused).
− Fleece circle should be centered on fabric circle to allow a ½ inch fabric allowance all the way around.
− Fleece for small rectangles (strap rings) should allow a ½ inch fabric allowance at top and bottom.
These allowances will make it easier to sew through the bulk of the layers later.
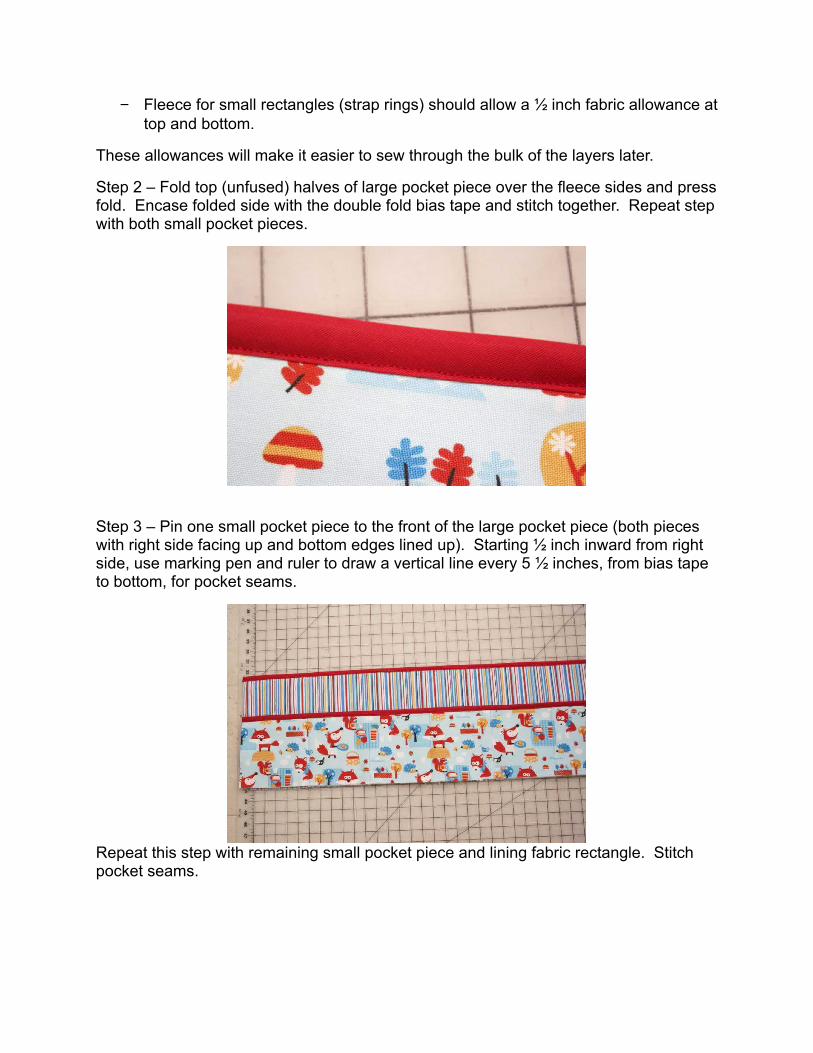
Step 2 – Fold top (unfused) halves of large pocket piece over the fleece sides and press fold. Encase folded side with the double fold bias tape and stitch together. Repeat step with both small pocket pieces.
Step 3 – Pin one small pocket piece to the front of the large pocket piece (both pieces with right side facing up and bottom edges lined up). Starting ½ inch inward from right side, use marking pen and ruler to draw a vertical line every 5 ½ inches, from bias tape to bottom, for pocket seams.
Repeat this step with remaining small pocket piece and lining fabric rectangle. Stitch pocket seams.
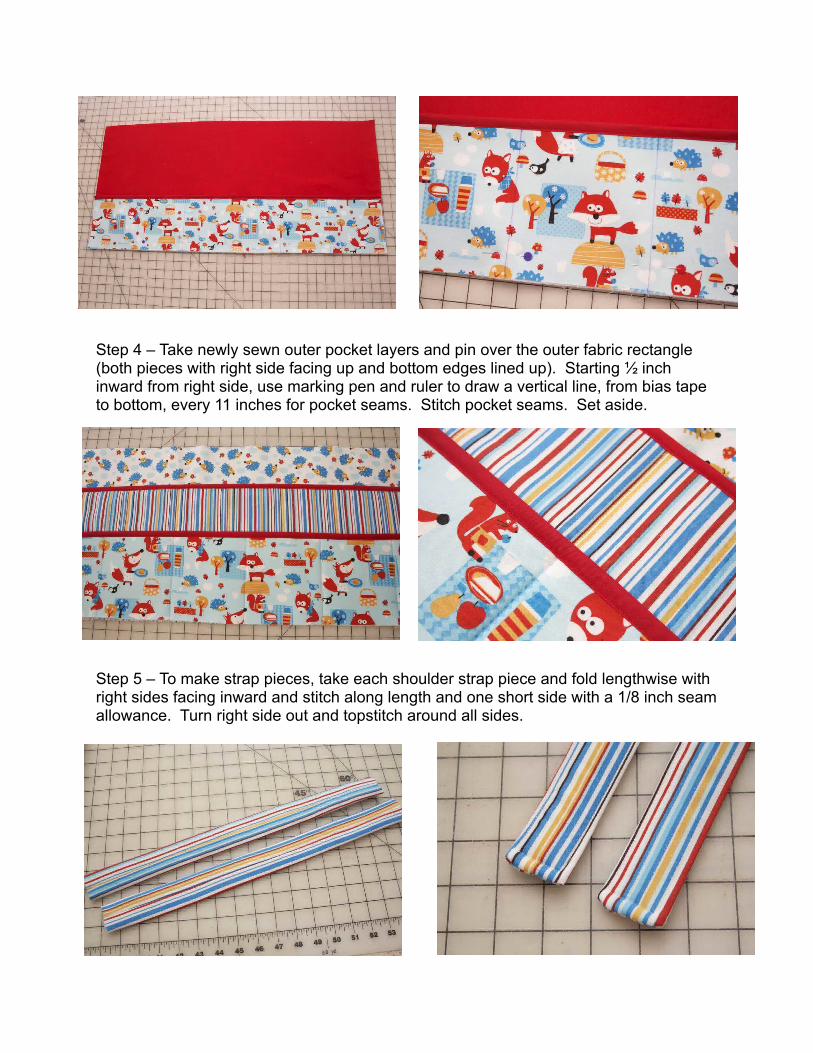
Step 4 – Take newly sewn outer pocket layers and pin over the outer fabric rectangle (both pieces with right side facing up and bottom edges lined up). Starting ½ inch inward from right side, use marking pen and ruler to draw a vertical line, from bias tape to bottom, every 11 inches for pocket seams. Stitch pocket seams. Set aside.
Step 5 – To make strap pieces, take each shoulder strap piece and fold lengthwise with right sides facing inward and stitch along length and one short side with a 1/8 inch seam allowance. Turn right side out and topstitch around all sides.
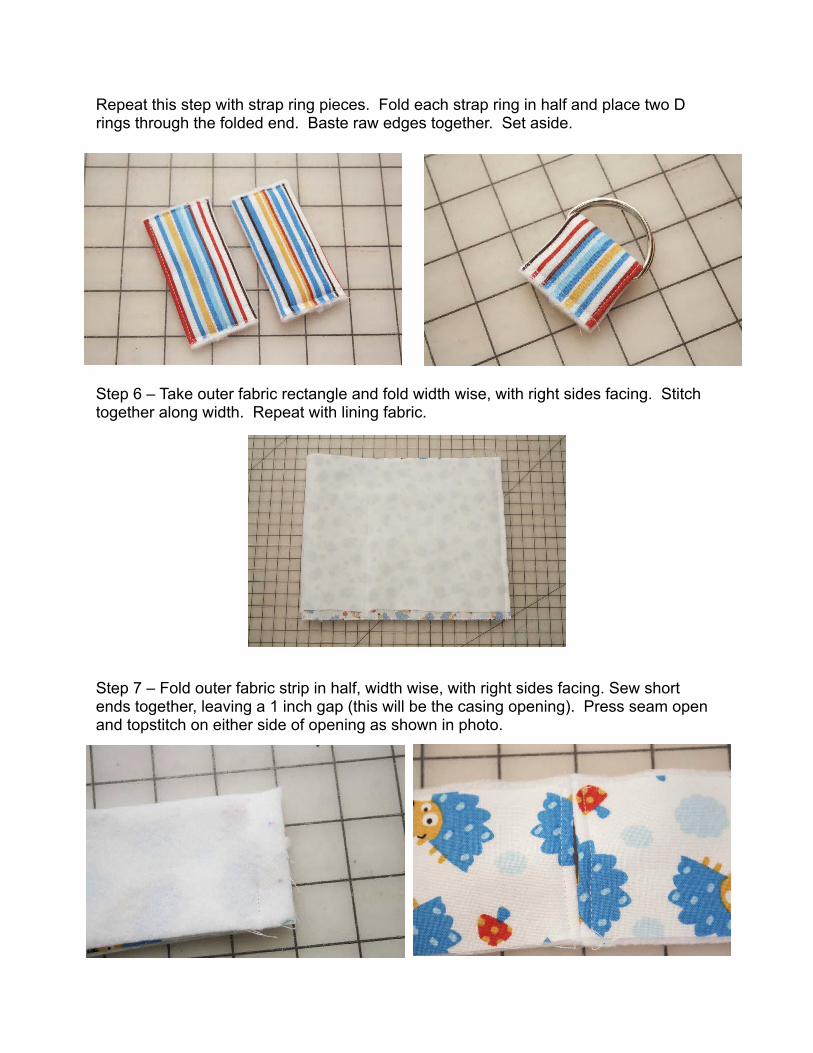
Repeat this step with strap ring pieces. Fold each strap ring in half and place two D rings through the folded end. Baste raw edges together. Set aside.
Step 6 – Take outer fabric rectangle and fold width wise, with right sides facing. Stitch together along width. Repeat with lining fabric.
Step 7 – Fold outer fabric strip in half, width wise, with right sides facing. Sew short ends together, leaving a 1 inch gap (this will be the casing opening). Press seam open and topstitch on either side of opening as shown in photo.

Step 8 – Take outer fabric of bag and turn right side out. Line up the outer fabric strip piece with the top of the bag so that right sides are facing and raw edges are lined up. The casing opening of the strip should be at the front center of the bag. Take raw edges of shoulder straps and sandwich on either side of back seam of bag (each being 1 inch from seam). Pin all the way around, then sew edges together. Trim seam allowance and flip strip portion upward.
Step 9 – Place raw edges strap rings over bottom edge of the back of the bag. Align each strap to be 3 inches from back seam. Baste layers together.
Step 10 – Pin circular outer piece to bottom of outer bag, with right sides facing each other and then stitch. Trim seam allowance and clip around entire circle. Repeat with lining fabric, but leave a 3 inch opening for turning.
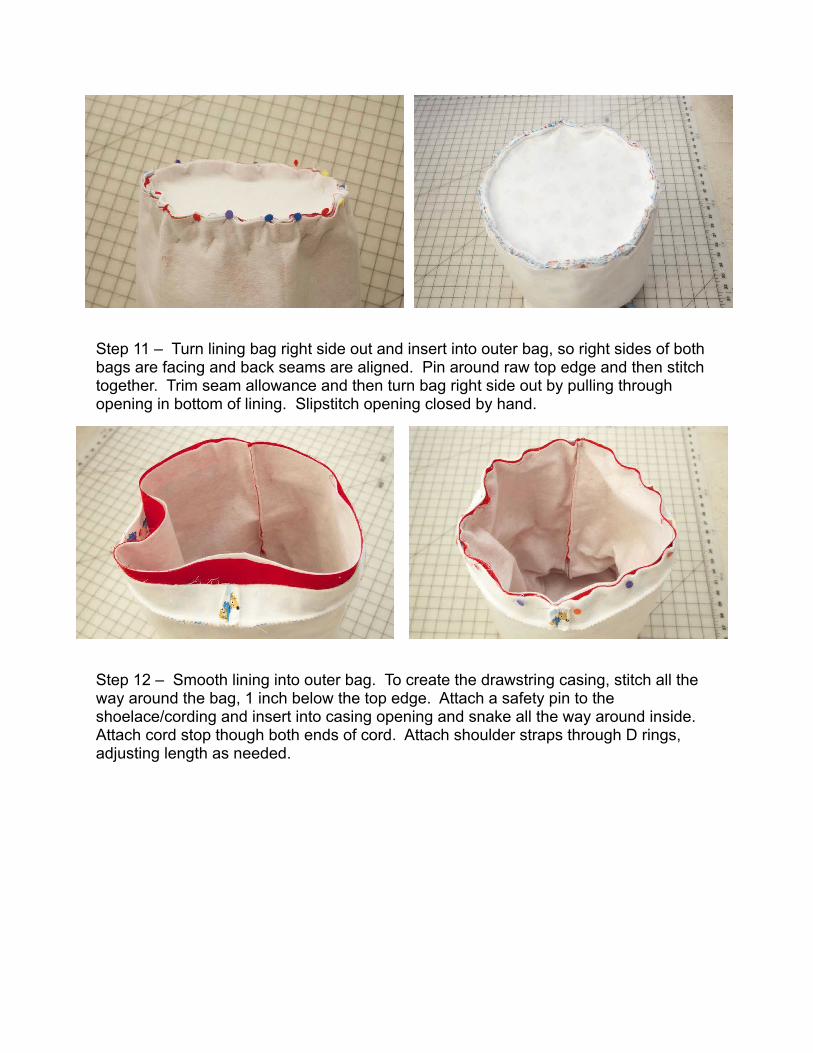
Step 11 – Turn lining bag right side out and insert into outer bag, so right sides of both bags are facing and back seams are aligned. Pin around raw top edge and then stitch together. Trim seam allowance and then turn bag right side out by pulling through opening in bottom of lining. Slipstitch opening closed by hand.
Step 12 – Smooth lining into outer bag. To create the drawstring casing, stitch all the way around the bag, 1 inch below the top edge. Attach a safety pin to the shoelace/cording and insert into casing opening and snake all the way around inside. Attach cord stop though both ends of cord. Attach shoulder straps through D rings, adjusting length as needed.
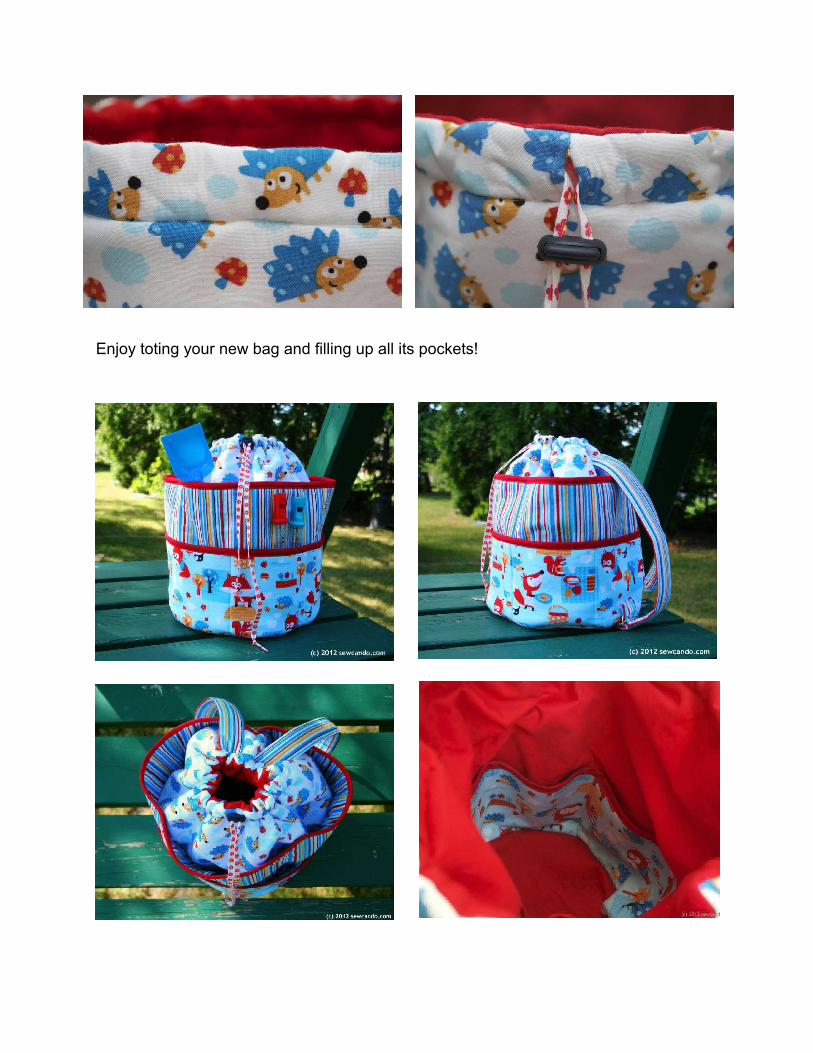
Enjoy toting your new bag and filling up all its pockets!


![2006 - TRG Grouptrggroup.net/pageimages/file/Extranet - Victorinox...hanging garment bag 40" carry-on garment bag 20"wx23"hx8"d [unfolds to 40"h] cabin duffel cargo bag ... wt toiletry](https://img.pdfslide.us/doc/110x75/603137002533db2afc4e5818/2006-trg-victorinox-hanging-garment-bag-40-carry-on-garment-bag-20wx23hx8d.jpg)