Embed Size (px)
Citation preview
1
Glaciers and Glaciation A unit designed for use with 5th grade science students
Jann Clouse
The Big Sky Science Partnership Target Range Elementary School
Missoula, Montana Unit Overview This unit focuses on glaciers and the process of glaciation. Students will build their understanding of how some of Earth’s features are created through a variety of lessons in which they construct representations of glaciers and study their movement, assemble models of glacially created landforms and explain how they were made, and look for evidence of glaciation in local landscapes. Students will read an east side and west side (of Glacier National Park) glacial story from a local tribal. Unit Objectives (Montana Science Standards align with those for end of grade 8): Content Knowledge (Montana Science Standard 4.4)
Key Words: glaciation, erosion, snowline, Ice Age, glacial ice, headwall, moraine, cirque Describe how ice can affect landform building and destruction Explain why glaciers advance, retreat, or remain stationary Give examples of how glaciers erode, transport, and deposit sediment Understand how glaciers modify a landscape
Skills (Benchmarks for Science Content Standard 1.1, 1.4, 1.6) Formulate a testable hypothesis Plan and predict the outcome of an investigation Safely conduct a scientific investigation Make observations Compare and analyze data Create a model to illustrate a scientific concept Compare how observations of nature form an essential base of knowledge among Montana American
Indians Dispositions
Engage in and contribute to discourse among classmates about scientific ideas Accept and share responsibility for their own learning Practice self-assessment Display respect for the diverse ideas, skills, and experiences of all students Expect collaboration among members of their work groups Emphasize the skills, attitudes, and values of scientific inquiry
Time required to teach unit is five to six regular 45-55 minute class periods. Materials
• Copies of Salish story “Bluejay Brings the Chinook Wind” and Blackfeet story “Napi Punishes a Rock” • Large pieces of poster board or drawing paper • Pencils and colored markers
2
• CD of kids’ movie Ice Age • DVD player, TV • Glass bottles with tightly fitting lids and trays for each group • A large KWL chart • Package of modeling clay for each group definition cards for landscape features you want to introduce (I
used moraine, cirque, headwall, till, and U-shaped valley.) • Resource materials on glaciated landscape features • Pictures of glaciated landscapes • Computer, projector, screen • Large plastic cups • 4-5 shallow boxes with about 4-5 inches of damp sand in the bottom • Liter container of small rock and gravel • Access to computer lab for final lesson • List of coordinate points students will investigate using Google Earth
3
Lesson One: Native Stories about Glaciers Summary Students listen to “Bluejay Brings the Chinook Wind,” a glacial story told by Montana tribes on the east side of the Continental Divide the, and “Napi Punishes a Rock,” a glacial story told by Montana tribes from east of the Continental Divide. Students practice active listening by drawing story maps of the main events. Approximate time required Estimated amount of time is one 45-minute period. Lesson Objectives – Major Concepts
1. Students will appreciate that Native peoples are keen, accurate observers of natural phenomena (Montana Science Standard 1.6).
2. Students will understand that oral tradition is an effective means of transferring information from one generation to the next (Montana Science Standard 1.6).
Lesson Objectives – Dispositions 1. Accept and share responsibility for their own learning. 2. Display respect for the diverse ideas, skills, and experiences of all peoples. 3. Expect collaboration among members of their work groups.
Lesson Objectives- Skills
1. Practice active listening. 2. Identify the main ideas in a story, including problem, rising action, and climax. 3. Identify the moral lesson taught in a story.
Benchmarks Addressed
1. Make observations. 2. Create a model to illustrate a scientific concept. 3. Compare how observations of nature form an essential base of knowledge among Montana American
Indians. Resources/Materials
1. Copies of Salish story “Bluejay Brings the Chinook Wind” and Blackfeet story “Napi Punishes a Rock” 2. Large pieces of poster board or drawing paper 3. Pencils and colored markers
Teacher Preparation
1. Familiarize oneself with the two stories, noting where to pause and what parts you may wish to emphasize. If possible, tell the stories, rather than reading them. Ideally, tribal elders or tribal members are the best people to tell the stories of the their tribes. Consider inviting a tribal elder or member to the class to tell the story.
2. Read some of the background information at websites cited below:
4
Background Information- Cultural information 1. http://www.nytimes.com/books/first/m/manning-river.html Link to the first chapter of Richard
Manning’s book contains information about the Salish history in western Montana 2. http://www.cskt.org/hc/index.htm Link to Confederated Salish and Kootenai tribes history and culture
page 3. http://www.bigorrin.org/blackfoot_kids.htm Link to Blackfeet Indian fact sheet 4. http://www.galileo.org/schools/gibson/land/gibson-idx.shtml Link to Blackfeet stories whose
significance is explained by children SUGGESTIONS FOR CULTURALLY CONGRUENT USE OF STORIES IN INSTRUCTION Stories are a wonderful culturally competent element to include in units. The information and suggestions below come from a discussion with Michael Munson, who was a former BSSP teacher and an American Indian Education Specialist at Montana OPI. What should I call these… stories, legends, myths? The preferred term is stories. The terms legend or myth may imply that the story is false. Even if the resource that you find uses a term like “legend” or “myth,” try to use the term “story” when you talk with your students. Can I tell students that American Indians come up with stories to explain phenomena in our world? Saying that American Indians “come up” with stories is potentially culturally insensitive. Avoid suggesting that the stories are “made up.” Michael suggests explaining that Oral Tradition has passed these stories, with no or very little change, through generations for thousands of years. Rather than saying that the stories are made up, you can explain to students that we all have different beliefs and that with American Indian stories, a good way to think about them is to listen and try to understand the perspective and view point without judging one way or another. These stories represent a different perspective than Western ideas. Can students write stories after we listen to an American Indian story? Having students write stories, drawing on their creativity, is a great strategy. However, avoid asking students to write “American Indian” or “Native American” stories. Because these stories are passed down over generations, they are not something that students will be able to write. Instead, just ask students to write their own stories about the topic. Michael added, “Don’t even suggest the students write fictional stories – any implication that stories are fictional will imply that they are not true and therefore not valued.” Can I have students compare/contrast ideas in American Indian stories and ideas in Western science? This is a tough question. It may be ok to compare and contrast ideas as long as this does not turn into judging the American Indian ideas with respect to Western science, or vice versa. Another approach might be to try to avoid making comparisons and instead focus on something slightly different. For example, MT Science Content Standard 1, Benchmark 6 addresses the idea that, “observations of nature form an essential base of knowledge among the Montana American Indians.” Asking students to read or listen to stories and then identify observations of nature and science evident in the stories would be a useful and respectful practice that avoids direct comparisons with Western science and meets a MT Science Benchmark. How do I know which cultural stories and materials are appropriate to use? This is a tough question too. If you are unsure, it is best to check with a cultural consultant from the BSSP, with a member of the tribe the materials represent who is knowledgeable about culture, or with someone from OPI’s Office of Indian Education. Although not as preferred as talking with a knowledgeable person, you can also make use of the OPI resource, “A Guide for Evaluating Indian Education Services, Products, and Materials” available online at: http://www.opi.mt.gov/PDF/IndianEd/EvaluatingIndianEd06.pdf Note that just because information is published in a book or on the web does not mean that it includes information that is culturally sensitive or information that the tribe would like to share with the public. It is best
5
to err on the side of being careful. The OPI website is a useful source for finding materials that are Montana specific and that have been vetted by tribal representatives. One other issue to consider is that whenever possible, you should use stories and materials from a specific Montana Indian tribe. Avoid using stories about unspecified American Indians or materials that include many different tribes. These “Pan Indian” materials do not emphasize the diversity of cultures and beliefs across different American Indian tribes. Procedure
1. Let students know that in this lesson, they will listen to a Salish story that takes place in Western Montana.
2. Show the students a Montana map and locate the places mentioned in the Bluejay story; the Bitterroot Valley, Sleeping Child Hot Springs, the Mission Range, the Mission Valley. Ask students to share what they know about these areas of the state.
3. Discuss the term Chinook Wind with students, eliciting sharing of experiences they’ve had with this phenomenon.
4. Tell the students that as they listen to a story about the places they’ve just located, they’ll create a simple map that shows the movement of the story’s plot in geographical terms.
5. Tell students they can draw their own story maps at their desks, work together in cooperative pairs, or contribute ideas as an entire class to help you draw one large map on the whiteboard. Let the class decide how they want to create the story maps.
6. Tell the “Bluejay Brings the Chinook Wind” story. (Even better, invite a tribal elder or other member of the Salish tribe to come to your class to tell the story.) After listening to the story, encourage students to discuss and share their representations of the plot events.
7. Invite the kids to create another story map as you tell the story “Napi Punishes a Rock.” (Again, if possible, it would be preferable to invite a tribal elder or member to come and tell the story to the class.)
8. Again, encourage students to discuss and share their representations of the plot events. 9. Ask the students what natural features are represented in this story. 10. Show the students slides (or photographs) of the hanging valleys and cirques in Glacier National Park.
Discuss the unique features of these landforms. Tell the students they are going to work with partners to create a story about how a cirque or hanging valley came to be part of this landscape. Make copies of some photos so students may reference them as they write. Give the students the rest of the class period to work on their how stories.
Assessment Students can exchange their how stories and read another pair’s effort.
• They could then provide verbal feedback about how they thought the writing explained cirques and hanging valleys.
• They could create a story map of the other group’s story. • They could identify the type of landform the group was describing. • They could illustrate each other’s stories and bind them into a “how story” book. • They could create cartoons that depict highlights of their stories.
6
Bluejay Brings the Chinook Wind (A West Side Glacial Story)
http://home.nps.gov/glac/forteachers/bluejay-brings-the-chinook-wind.htm In the very earliest times, Amotken, The Creative High Mystery, gave part of the North Crow Creek Canyon of the Mission Range to Thunderbird. Coyote was forbidden to enter the area and so Thunderbird was free to raise her young in peace. It was in the canyon that she gave birth to her three daughters: Bluejay, Crow, and Magpie. Thunderbird was happy to let her friends from the Bitterroot Valley hunt and gather in the canyon. If bad weather was approaching from the East Pass, Thunderbird would make deep growling noises to warn her friends away. After many, many years of this friendly arrangement, a careless hunter neglected to put out his campfire and a huge fire destroyed all life in Thunderbird’s beautiful canyon. With no trees and vegetation to hold the water, even the little creek dried up. Thunderbird was understandably extremely upset about this careless act, and she was determined to punish the Salish people. She invited the cold Northeast Wind to drive the people back to the Bitterroot. The Northeast Wind set up permanent camp in the East Pass. He blew his frosty breath into the Salish country for many endless winters. The great lake of the Salish people froze to the bottom and all the animals were driven with the people to the Bitterroot Valley where they shivered with the cold. Even Thunderbird’s daughters: Bluejay, Crow, and Magpie followed the people to the south. Alas, the plants were unable to move on their own and they withered away and died. Finally, after many, many winters the heart of Thunderbird was softened. She grew lonely; she missed her daughters, the other animals, and even the people. Thunderbird went to the Northeast Wind and asked him to leave. Thunderbird said, “The People have suffered enough now. Perhaps if you leave my daughters will come back to visit me.” Reluctantly, the Northeast Wind left the East Pass and returned to his home. A wandering scout was startled by the sudden stillness to the north and rushed to tell the chief of the Salish who was huddled with his people around the Sleeping Child Hot Springs. “Northeast Wind no longer blows and from the north one can hear a gentle rumbling as if Thunderbird were weeping.” The chief was very pleased and told his people to prepare to move to the north again. He asked Coyote if he knew of a way to please Thunderbird so that she might hasten the warming of the old country. Coyote was still upset that Amotken had forbidden him to enter North Crow Creek Canyon, and refused to help. Bluejay had always loved the Salish people, and longing to see her mother, offered to help. She flew to the west and asked her friend Chinook Wind to help her friends return to their old hunting grounds. Chinook Wind, always warm and kind, readily agreed to go and warm the valley. “Show me the way my little friend,” he whispered and away they flew. When they finally reached the little canyon beneath the Mission Range, Chinook Wind settled in for a long steady blow. His warm moist breath melted the thick ice and, as it receded, beautiful flowers and long grasses sprouted up along its margins. Soon there were trees once again in the Mission Valley. Thunderbird was pleased and asked Bluejay what she could give to her to show her gratitude. “In the future, Dear Mother,” Bluejay said, “Do not get so angry. It is not right that the considerate people should suffer for the offenses of the careless.”

7
Though the Northeast Wind returns to the East Pass each winter to remind us to live a thoughtful life, he always returns to his home when the Chinook Wind comes back to stay in the spring. For that we can thank Bluejay and a mother’s love.
8
Napi Punishes a Rock (An East Side Glacial Story)
http://www.nps.gov/glac/forteachers/napi-punishes-a-rock.htm
One beautiful Indian Summer day in the long ago times, Napi was walking with his friend Fox in the mountains above Cut Bank Creek. Although it was beyond the Moon of the Falling Leaves, the day was unusually warm. Napi, who always carried his buffalo robe, grew hot as they walked along. He and Fox stopped by a large black rock to rest and look at the scenery. “Ah, Old Rock, you poor thing,” said Napi, “You have to spend the long cold winter up here all by yourself with nothing to keep you warm. Here, take my robe.” With that, Napi gently placed his robe over the rock and the two friends continued on their way. Soon, however, as often happens in Indian Summer, there was a sudden change in the weather. Steel gray clouds began to roll in from the northwest. The wind howled and stinging flakes began to pelt the two hikers. “Fox, old friend,” asked Napi, “would you mind running back to get my robe?” The kind Fox ran back but soon returned with the message that the rock was not willing to part with the robe and that he was quite angry that Napi would have the nerve to take back a gift. Just then they felt the earth shake and heard loud rumble. Napi looked over his shoulder and saw the boulder rolling down upon them along the path. “Oh, oh.” Yelled Fox, “We had better hightail it out of here. I think he is really angry!” The two fugitives ran out of the mountains and out onto the prairie, but they could not out-distance the rock. Just as they felt they could run no farther, Napi spotted his friends the Nighthawks. “Quickly”, he shouted, “stop that rock before it squashes us.” The fast-flying Nighthawks dove at the rock again and again. Each time they pecked at it, another large piece of rock broke off. Soon there was nothing left but a widely scattered trail of smaller rocks. The two friends collapsed upon the ground and thanked the Nighthawks between gasps. “In commemoration of this great deed you will always wear bright slashes of honor across your wings.” It is because of this memorable chase that you still see these strange rocks from the mountains scattered far out onto the plains.
9
Lesson Two: The Power of Ice Summary Students will watch a short clip from the movie “Ice Age,” and then they’ll explain what they think a glacier is. Students will freeze a tightly capped glass bottle filled with water and predict what they think will happen to it. They will observe what happens to the bottle as the ice melts. Students will make a model mountain and add glacially carved features to their model. Approximate time required One 55-minute class period. Lesson Objectives – Main Concepts
1. Students will recognize that as water freezes, it expands, and produces force (Montana Science Standard 2.4).
2. Students will describe how glacial ice can crack rocks (Montana Science Standard 4.1). 3. Students will define glacial terms and recognize some glacial features in a landscape (Montana Science
Standard 4.1). Lesson Objectives- Skills
1. Students will observe how freezing and thawing of water affects a glass container (Montana Science Standard 2.4).
2. Students will state what they know about glaciers and discuss what they’d like to know about them. 3. Students will predict the outcome of an investigation (Montana Science Standard 1.1). 4. Students will create a model of specific terms referring to a glacier (Montana Science Standard 1.4).
Lesson Objectives-Dispositions
1. Engage in and contribute to discourse among classmates about scientific ideas. 2. Expect collaboration among members of their work groups. 3. Accept and share responsibility for their own learning.
Resources/Materials
1. CD of kids’ movie “Ice Age” 2. DVD player, TV 3. Glass bottles with tightly fitting lids and trays for each group 4. A large KWL (Know, Want to Know, Learned) chart 5. Access to a freezer 6. Package of modeling clay for each group 7. Definition cards for landscape features you want to introduce (I used moraine, cirque, headwall, till, and
U-shaped valley) 8. Resource materials on glaciated landscape features 9. Large index cards containing definitions and illustrations of selected glacial features
Teacher Preparation
1. Prepare television and DVD player with cued “Ice Age” video. 2. Prepare the outline of a KWL chart. 3. Fill the glass jars full to the top with water and close them tightly. Put them into the freezer the night
before this lesson. 4. Create definition cards with example pictures showing the features you’re going to introduce (I used
moraine, cirque, kettle lake, horn, and U-shaped valley).
10
Background information The National Snow & Ice Data Center hosts a website with helpful background information about glaciers at http://nsidc.org/glaciers/questions/what.html Procedure
1. Ask each group to observe the frozen jars of water taken from the freezer. They should describe the bulging lids and cracked glass. Is this what they thought would happen when we put them in the freezer? Ask students to hypothesize what the jars will look like after the ice melts. Put the jars aside until the end of the class period.
2. Watch a short clip from the video “Ice Age.” Discuss what the students know about glaciers. Is this video indicative of their background knowledge?
3. Complete a KWL chart, filling in what the students KNOW about glaciers, and what they WANT to learn about glaciers.
4. Give each group a ball of clay. Ask them to create a mountainous landscape. 5. Hand out definition cards to each group. Ask students to find the glacial feature on their landscape, or to
remold their clay mountain to include that feature. Have resource materials available should the group need further information or photographs to remodel their landscape.
6. Ask groups to share both the landform’s definition and their representation of that feature. Ask, “How have glaciers affected the topography?”
7. Discuss the dynamics of mountainous environments. 8. Display their models in the classroom. 9. Near the end of the class, revisit the jars on the trays. The students will find melted ice and a collapsed
pile of glass. Ask them to explain what has happened. If ice is this powerful, what do they imagine a huge amount of glacial ice could do to rock?
Formative Assessment
1. Ask students to write an exit card on a post-it sheet. It should include one new term, or one new fact students learned from today’s lesson. This will be posted on the LEARN section of the KWL chart.
2. Assignment: Write a riddle using one of the terms studied today. It must include at least three clues. Extra points will be awarded if the lines rhyme.
11
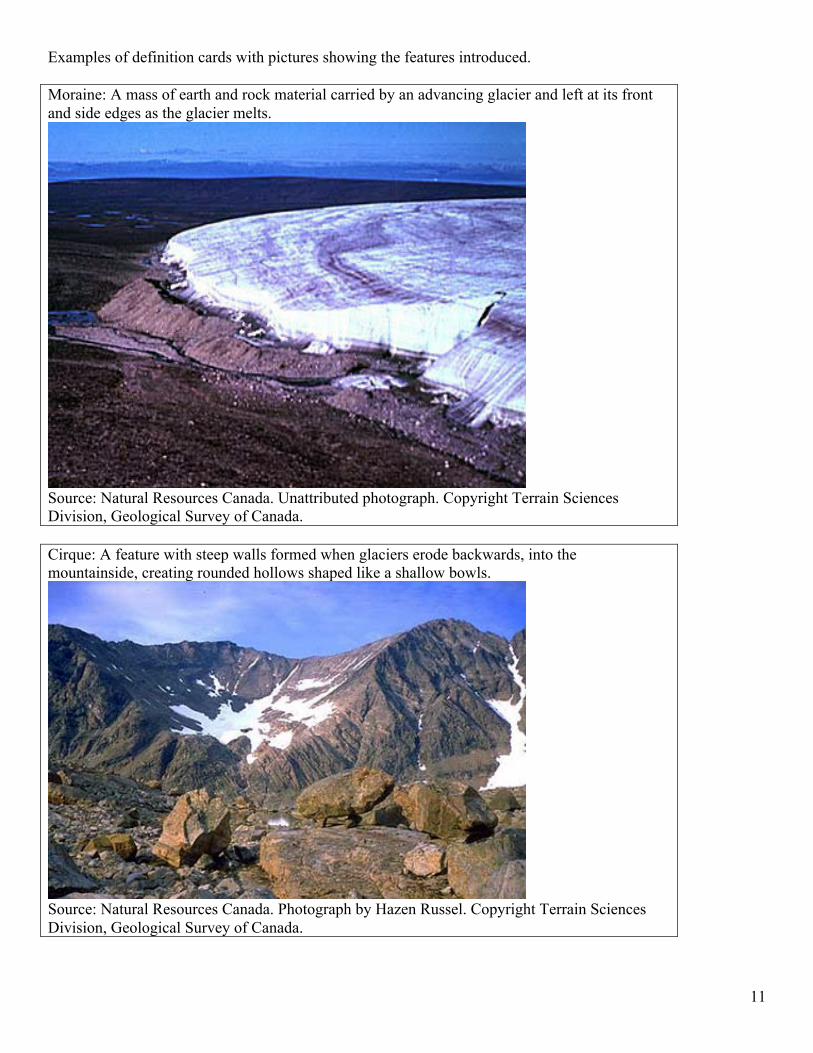
Examples of definition cards with pictures showing the features introduced. Moraine: A mass of earth and rock material carried by an advancing glacier and left at its front and side edges as the glacier melts.
Source: Natural Resources Canada. Unattributed photograph. Copyright Terrain Sciences Division, Geological Survey of Canada. Cirque: A feature with steep walls formed when glaciers erode backwards, into the mountainside, creating rounded hollows shaped like a shallow bowls.
Source: Natural Resources Canada. Photograph by Hazen Russel. Copyright Terrain Sciences Division, Geological Survey of Canada.
12
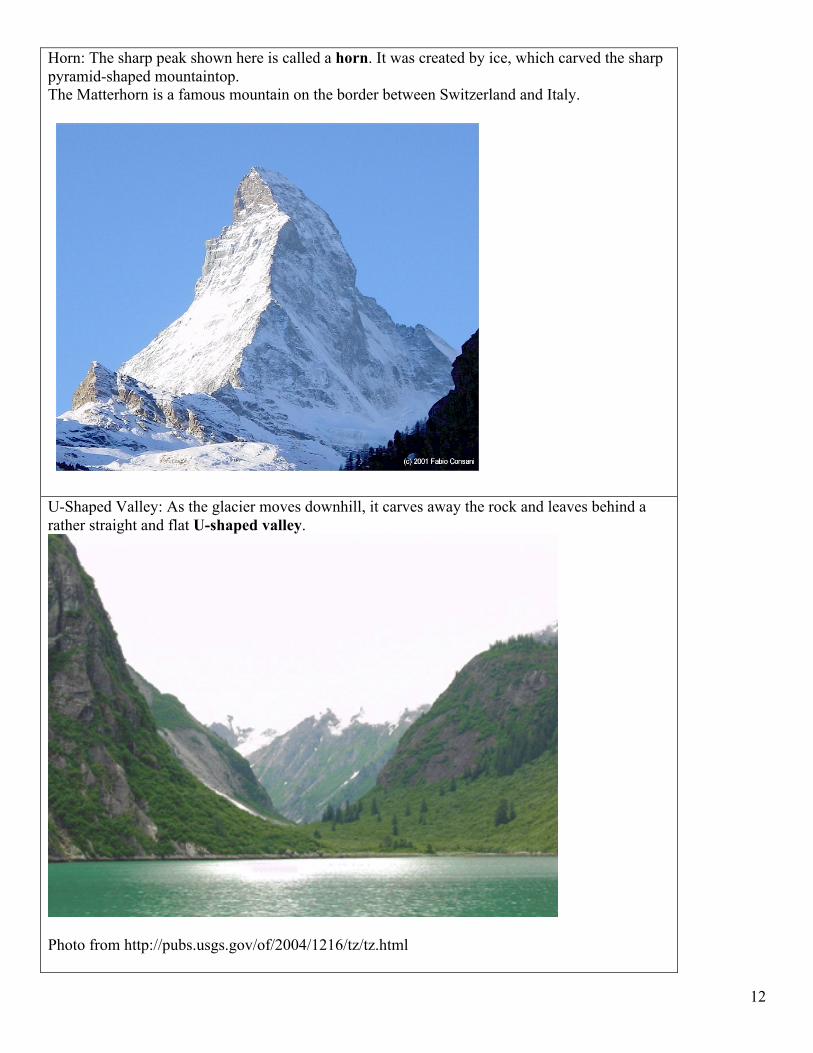
Horn: The sharp peak shown here is called a horn. It was created by ice, which carved the sharp pyramid-shaped mountaintop. The Matterhorn is a famous mountain on the border between Switzerland and Italy.
U-Shaped Valley: As the glacier moves downhill, it carves away the rock and leaves behind a rather straight and flat U-shaped valley.
Photo from http://pubs.usgs.gov/of/2004/1216/tz/tz.html

13
Kettle lakes form when a piece of glacier ice breaks off and becomes buried by glacial till or moraine deposits. Over time the ice melts, leaving a small depression in the land, filled with water.
Image from: http://www.geo.sunysb.edu/esp/Science_Walks/carmans/index.htm
14
Lesson Three: How Glaciers Affect a Landscape Summary Students will watch a slide show about glacial evidence in landscapes. Students will discuss and practice looking for evidence of a glaciated landscape in photographs. Given sandboxes, students will attempt to model how glaciers formed certain landscapes. Approximate time required One or two 45-minute class periods. Lesson Objectives – Main Concepts
1. Students will be able to explain how and where glaciers form (Montana Science Standard 4.1 ). 2. Students will be able to explain how glaciers change landscapes (Montana Science Standard 4.1). 3. Students will be able to identify some characteristics of glaciated landscapes (Montana Science Standard
5.2). Lesson Objectives –Skills
1. Identify characteristics of a glaciated landscape (Montana Science Standard: 4.1). 2. Make observations of evidence of glaciations (Montana Science Standard: 1.1). 3. Model the action of a glacier bulldozing a path down a valley, and name some of the land formations it
creates (Montana Science Standard:1.4). Lesson Objectives-Dispositions
1. Engage in and contribute to discourse among classmates about scientific ideas. 2. Accept and share responsibility for their learning. 3. Display respect for the diverse ideas, skills, and experiences of their classmates.
Resources/Materials
1. Pictures of glaciated landscapes 2. Computer, projector, screen 3. Access to a freezer 4. Large plastic cups 5. Shallow boxes with about 4-5 inches of damp sand in the bottom (one for each group) 6. KWL chart begun in lesson two 7. 1 Liter (or half gallon) container of small rock and gravel
Teacher Preparation
1. Prepare enough photos for each pair of students to have one to work with 2. The night before this lesson, fill 4-5 plastic cups with water and small rocks and gravel. Put them in the
freezer. 3. Get 4-5 cardboard boxes and line them with black plastic garbage sacks before filling each with about 4
inches of damp sand.

15
Background information The National Snow & Ice Data Center (NSIDC) website also has a page describing glaciers’ effects on landscapes and types of landforms formed by glaciers at http://nsidc.org/cryosphere/glaciers/questions/land.html To prepare for this lesson, it is suggested that the teacher read about glacial erosion, glaciated valleys, cirques, arêtes, horns, glacial till, moraines, kettle lakes, kames, and glacial erratic boulders. The teacher can also find pictures of each of these features; many photos are available on the NSIDC website. The teacher can create a PowerPoint showing different glacial features using photos from the NSIDC website or other online sites. Procedure
1. Ask the students to imagine how a large glacier would move. Most slide only a few centimeters in a year, however some Alaskan glaciers travel as fast as 150 feet in a day.
2. Give each group a sandbox and a large chunk of ice to act as their glacier. Ask groups to attempt to create a glacial landscape using their ice. Allow them time to investigate the challenge. When they share their results, they should show how they tried to mimic glacial movement, and they should describe the changes in their landscape.
3. Ask the students to recontour the sand and place their ice blocks at the head of the valley. Tell them to slowly gouge out a path along the river basin. What is happening to the land as they plow along? When they reach the end of the basin, what has happened to the sand? If they have bulldozed deep into the sand, can they see the “bedrock” below the sand? What has happened along the sides of their glacier’s path?
4. When they are done, ask students to leave their glaciers against the headwall (top of the valley). You can look at them later to find the debris left in the cirque when the ice block melts.
5. Give each student, or group of students a photo(s) of a glacier or glaciated landscape. Tell them they are going to watch a slide show about glaciers, and they should be checking the slides carefully to see if they can identify what part of our topic their photo(s) is showing. Photos should show such things as glacial till, moraines, hanging valleys, U-shaped valleys, and cirques.
6. When the slide show is finished, ask each group to discuss their pictures and prepare a short class presentation. They will need to show the class their picture(s), tell what they think the landform is or where it might be found, and how they think it was formed.*
7. Allow the groups 5-10 minutes to prepare their photos and presentations. 8. Monitor their discussion to make sure they’re not too far off in their photo interpretations. 9. Allow each group 3-5 minutes to share their photos and their ideas/observations. 10. Near the end of the period, ask students to retrieve their sandboxes and observe what’s happened with
their glaciers. Ask them to describe any changes in their landscapes. *If you want to give your students more time to work on this activity, break here and go directly to lesson plan step 10. Formative Assessment • Ask each group to prepare one well-worded statement for the LEARNED section of the KWL chart. • Ask them to use good scientific language. • Ask them to use context clues to help define any new terms. • They should be prepared to answer any questions about their ideas, and provide evidence from their photos
or sandboxes to support their conclusions.
16
Lesson Four: Looking At Landscapes Summary Students will learn to recognize the landscapes formed by glaciers. Students will use Google Earth to travel to selected sites and examine them for evidence of glaciation. They will have to look carefully for scientific evidence of glacial erosion or deposition. Students will share the evidence of glaciated landscape with the class. Approximate time required One 45-55 minute class period. Lesson Objectives – Main Concepts
1. Students will be able to define or identify examples of terminal and lateral moraines, a headwall, a cirque, and a hanging valley (MT Science Standard 4.1).
2. Students will recognize places in the modern landscape that show evidence of glaciation (MT Science Standard 5.2).
Lesson Objectives –Skills
1. Identify characteristics of a glaciated landscape (MT Science Standard 4.1). 2. Make observations of evidence of glaciations (MT Science Standard 5.2).
Lesson Objectives-Dispositions
4. Engage in and contribute to discourse among classmates about scientific ideas. 5. Accept and share responsibility for their learning. 6. Display respect for the diverse ideas, skills, and experiences of their classmates. 7. Use computer lab equipment appropriately.
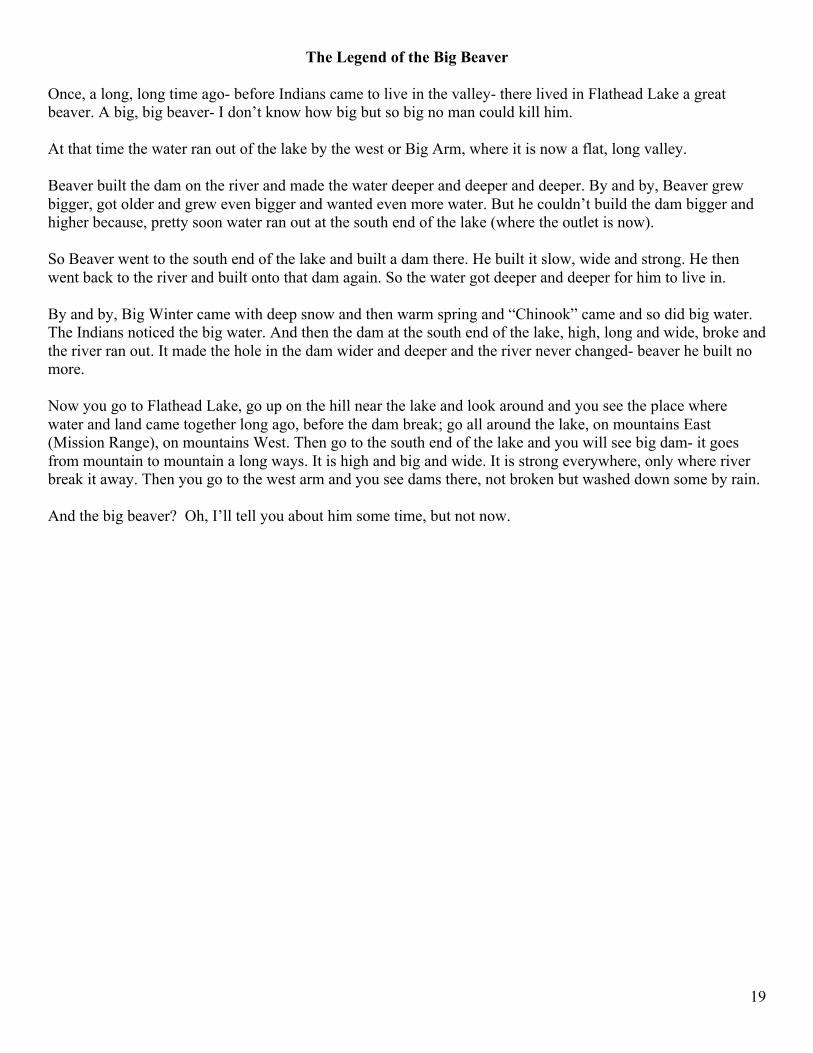
Resources/Materials Access to computer lab with projector and screen Access to computer program Google Earth Student copies of picture dictionary pages Copy of Salish story Tahwah’s Geology or The Legend of the Big Beaver, September 7, 1900, Manuscript 3777, National Anthropological Archives, Smithsonian Institution. Teacher preparation Create, in Google Earth, a set of 8-12 points marking glaciated landscape features in western Montana. Schedule one full class period in the computer lab. Demonstrate to students who have not used it, how to move around in program Google Earth. Make copies of picture dictionary pages for each student Background information http://www.montanahistoricalsociety.org/pub/press/nativeamerican.asp#Blackfeet Possible books to use to teach about Montana Indian stories http://www.galileo.org/schools/gibson/land/gibson-idx.shtml Website for Blackfeet stories about their homeland. See, in particular, information about Okotoks.
17
Procedure 1. When students arrive at the computer lab, have this site up and ready:
http://www.galileo.org/schools/gibson/land/land-blackfoot.html. Scroll across the picture allowing students to discuss the comments made about “Big Rock” and the Blackfeet connection to the land.
2. Show students the Google Earth program by bringing up Polson and the terminal moraine just south of it. Ask how the moraine was formed.
3. Share the Salish story of how Big Beaver created the dam. Discuss this evidence that native peoples are keen, accurate observers of natural phenomenon.
4. Show students how to access Google Earth. Tell them their challenge is to be keen, accurate observers of the modern landscape too.
5. Show the students how to type in Polson, Montana, to create a view of the landscape. 6. Ask them to watch as you share a Google Earth flyover of locations containing a kettle lake, glaciated
valley, and moraines. 7. Show them how to add a pushpin to mark a particular point. 8. After allowing some time for exploration, tell the students to type in Glacier National Park. Tell them
their task is to locate some areas that they think show evidence of glaciation in and around the park. Ask them to mark their selected spots with a pushpin and a name.
9. When you feel they’ve had ample time to explore, ask for student volunteers to come to the teacher’s computer and share one place they found in Glacier NP with the group. They should explain what evidence of glaciation they’ve discovered.
Formative Assessment The teacher can assess the quality of points marked for understanding of evidence of glaciation on the identified landscape. Summative Assessment Portfolio Assessment: Students will keep a portfolio containing at least three items of their choice that show what they learned from this unit. They will conference with the teacher and share each item, explaining its significance to their learning. Picture Dictionary Pages: Students will choose three terms they learned in this unit, and create a picture dictionary page for each. Their dictionary entries should include:
• a definition of the term • a sample sentence using the word with good context clues to show they understand its meaning • a sketch of a landscape that depicts the term graphically
18
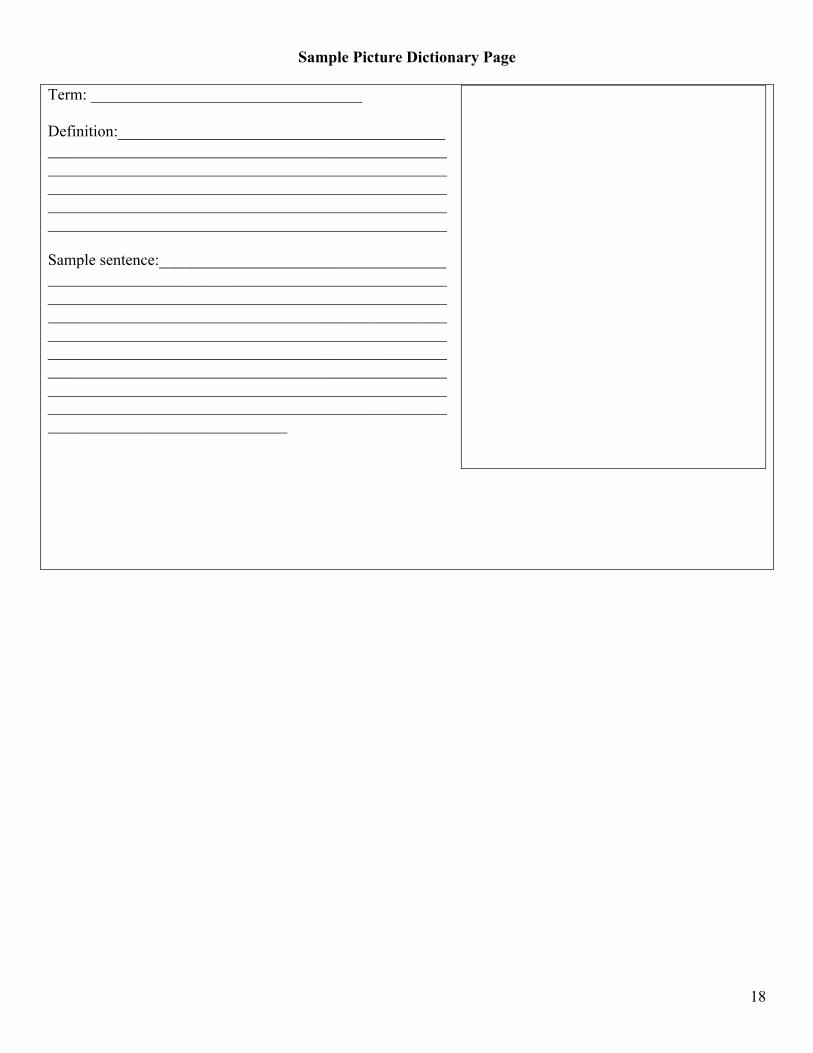
Sample Picture Dictionary Page
Term: __________________________________ Definition:___________________________________________________________________________________________ ____________________________________________________________________________________________________ ____________________________________________________________________________________________________ Sample sentence:____________________________________ ____________________________________________________________________________________________________ ____________________________________________________________________________________________________ ______________________________________________________________________________________________________________________________________________________________________________________________________________________________________
19
The Legend of the Big Beaver Once, a long, long time ago- before Indians came to live in the valley- there lived in Flathead Lake a great beaver. A big, big beaver- I don’t know how big but so big no man could kill him. At that time the water ran out of the lake by the west or Big Arm, where it is now a flat, long valley. Beaver built the dam on the river and made the water deeper and deeper and deeper. By and by, Beaver grew bigger, got older and grew even bigger and wanted even more water. But he couldn’t build the dam bigger and higher because, pretty soon water ran out at the south end of the lake (where the outlet is now). So Beaver went to the south end of the lake and built a dam there. He built it slow, wide and strong. He then went back to the river and built onto that dam again. So the water got deeper and deeper for him to live in. By and by, Big Winter came with deep snow and then warm spring and “Chinook” came and so did big water. The Indians noticed the big water. And then the dam at the south end of the lake, high, long and wide, broke and the river ran out. It made the hole in the dam wider and deeper and the river never changed- beaver he built no more. Now you go to Flathead Lake, go up on the hill near the lake and look around and you see the place where water and land came together long ago, before the dam break; go all around the lake, on mountains East (Mission Range), on mountains West. Then go to the south end of the lake and you will see big dam- it goes from mountain to mountain a long ways. It is high and big and wide. It is strong everywhere, only where river break it away. Then you go to the west arm and you see dams there, not broken but washed down some by rain. And the big beaver? Oh, I’ll tell you about him some time, but not now.
20
Supporting Assessments Formative Exit Slips Ask students to turn in a short 1-2 sentence exit slip explaining the most important thing(s) they gleaned from the day’s lesson. Class Observations Create a checklist of expected attitudes, behaviors, and skills the students will be expected to display as they work on class projects. Performance Assessment Students will be evaluated on their presentation of their glacier model and their explanation of what features it depicts.
Summarizing Write a riddle using one of the terms we studied. It must include at least three clues. Use these riddles to review terminology by allowing students to quiz the class with their clues. Summative Portfolio Assessment Students will keep a portfolio containing at least three items of their choice that show what they learned from this unit. They will conference with the teacher and share each item, explaining its significance to their learning. Mini-Dictionary Pages Students will choose three terms they learned in this unit, and create a picture dictionary page for each. Their dictionary entry should include:
• a definition of the term • a sample sentence using the word with good context clues to show they understand its meaning • a sketch of a landscape that depicts the term graphically