Embed Size (px)
Citation preview
1
Digital images: GIMP - further techniques
IT Learning Programme
TIMNFGIMP
2
Contents 2
How to use this user guide 3
Introduction 5
Setting up GIMP 7
* Image navigation 8
* Overflow exercise 9
Evaluate your image 10
Rotate, correct perspective and crop 11
Reduce noise and repair blemishes 14
Capture Sharpening 19
Tonal range adjustment - Brightness/Contrast 21
Tonal range adjustment - Levels 22
Colour balance 25
Selective correction - Feathering a selection 28
Selective correction - Using a feathered selection 30
* Introduction to Layers 32
* Introduction to Text 35
* Saving image files - JPEG 37
Appendix 38
Contents
* Supplementary or optional exercises
3IT Learning Programme
TIMNFGIMP
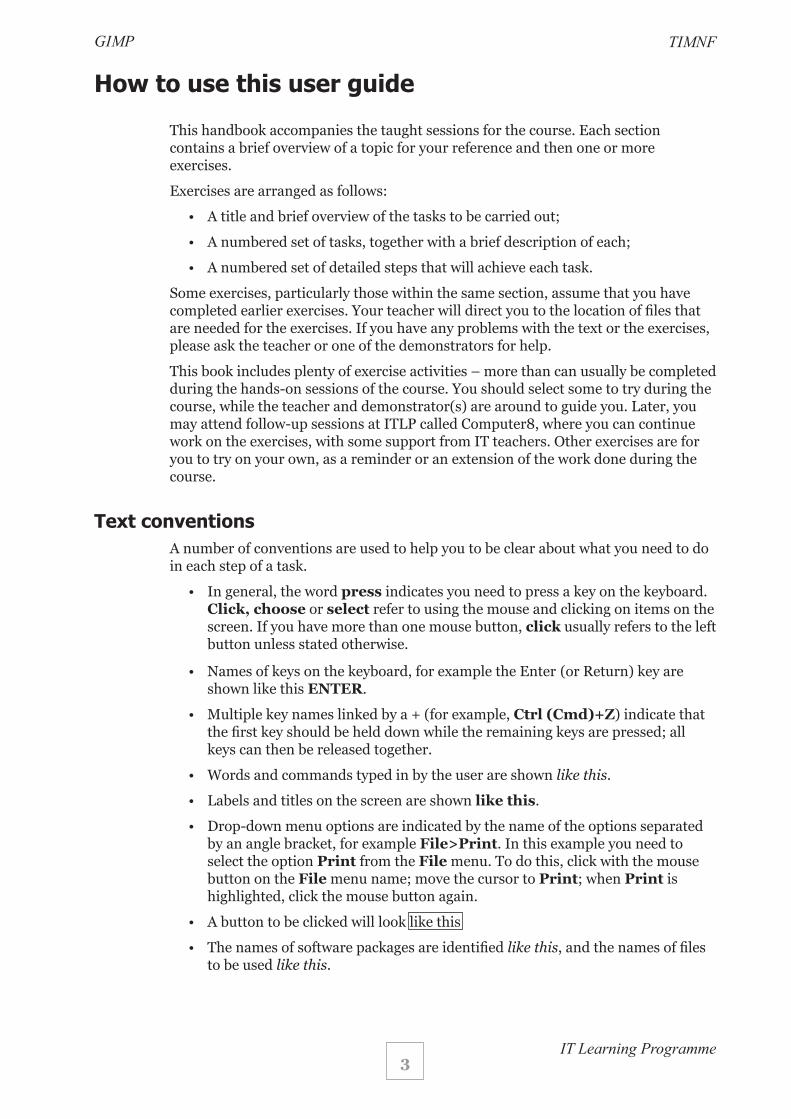
How to use this user guide
This handbook accompanies the taught sessions for the course. Each section contains a brief overview of a topic for your reference and then one or more exercises.
Exercises are arranged as follows:
• A title and brief overview of the tasks to be carried out;
• A numbered set of tasks, together with a brief description of each;
• A numbered set of detailed steps that will achieve each task.
Some exercises, particularly those within the same section, assume that you have completed earlier exercises. Your teacher will direct you to the location of files that are needed for the exercises. If you have any problems with the text or the exercises, please ask the teacher or one of the demonstrators for help.
This book includes plenty of exercise activities – more than can usually be completed during the hands-on sessions of the course. You should select some to try during the course, while the teacher and demonstrator(s) are around to guide you. Later, you may attend follow-up sessions at ITLP called Computer8, where you can continue work on the exercises, with some support from IT teachers. Other exercises are for you to try on your own, as a reminder or an extension of the work done during the course.
Text conventionsA number of conventions are used to help you to be clear about what you need to do in each step of a task.
• In general, the word press indicates you need to press a key on the keyboard. Click, choose or select refer to using the mouse and clicking on items on the screen. If you have more than one mouse button, click usually refers to the left button unless stated otherwise.
• Names of keys on the keyboard, for example the Enter (or Return) key are shown like this ENTER.
• Multiple key names linked by a + (for example, Ctrl (Cmd)+Z) indicate that the first key should be held down while the remaining keys are pressed; all keys can then be released together.
• Words and commands typed in by the user are shown like this.
• Labels and titles on the screen are shown like this.
• Drop-down menu options are indicated by the name of the options separated by an angle bracket, for example File>Print. In this example you need to select the option Print from the File menu. To do this, click with the mouse button on the File menu name; move the cursor to Print; when Print is highlighted, click the mouse button again.
• A button to be clicked will look like this
• The names of software packages are identified like this, and the names of files to be used like this.
4IT Learning Programme
TIMNFGIMP
Software usedGIMP 2.8.14Windows XP or Mac OSX
Files usedCourse files folder containing images
Revision informationVersion Date Author Changes made1.0 May 2011 Carl Wenczek Updates for version 2.6.11
2.0 January 2013 Carl Wenczek General tidying up of notes, feedback taken into account, additional exercises added, some exercises removed
2.1 April 2013 Carl Wenczek Correction of errors and typos. Addition of keyboard shortcuts and correction of image outlines
2.2 June 2013 Carl Wenczek Updated for version 2.8.4. Correction of errors and typos. Notes sections added. Bibliography turned into Appendix and synchronised with other course notes
2.3 September 2014
Carl Wenczek Checked for errors
2.4 May 2015 Carl Wenczek Re-ordering of introductory pages
AcknowledgementsPhotographs are used with the permission of Carl Wenczek and Born Digital Ltd. and planetary images are Courtesy NASA/JPL-Caltech.
CopyrightCarl Wenczek makes this document and the accompanying PowerPoint presentation available under a Creative Commons licence: Attribution, Non Commercial, No Derivatives. Individual resources are subject to their own licencing conditions as listed.
Screenshots in this document are copyright of Adobe Systems Incorporated.
The Oxford University logo and crest is copyright of Oxford University and may only be used by Oxford University members in accordance with the University’s branding guidelines.
IT Learning Programme
TIMNFGIMP
5
IntroductionThe GNU Image Manipulation Program, or GIMP, is a raster graphics editor used to process digital graphics and photographs. Typical uses include creating graphics and logos, resizing and cropping photos, altering colours, combining multiple images, removing unwanted image features, and converting between different image formats. GIMP can also be used to create basic animated images in GIF format.
It is often used as a free software replacement for Adobe Photoshop, the most widely used bitmap editor in the printing and graphics industries; however, it is not designed to be a Photoshop clone.
The project’s mascot is named Wilber.
GIMP is expandable and extensible. It is designed to be augmented with plug-ins and extensions to do just about anything. The advanced scripting interface allows everything from the simplest task to the most complex image manipulation procedures to be easily scripted.
One of The GIMP’s strengths is its free availability from many sources for many operating systems. Most GNU/Linux distributions include The GIMP as a standard application. The GIMP is also available for other operating systems such as Microsoft Windows™ or Apple’s Mac OS. The GIMP is a Free Software application covered by the General Public License ( GPL license). The GPL provides users with the freedom to access and alter the source code that makes up computer programs.
GNU (pronounced /gnu) is a computer operating system composed entirely of free software. Its name is a recursive acronym for GNU’s Not Unix; it was chosen because its design is Unix-like, but differs from Unix by being free software and by not containing any Unix code.
Text courtesy of Wikipedia and www.gimp.org
IT Learning Programme
TIMNFGIMP
6
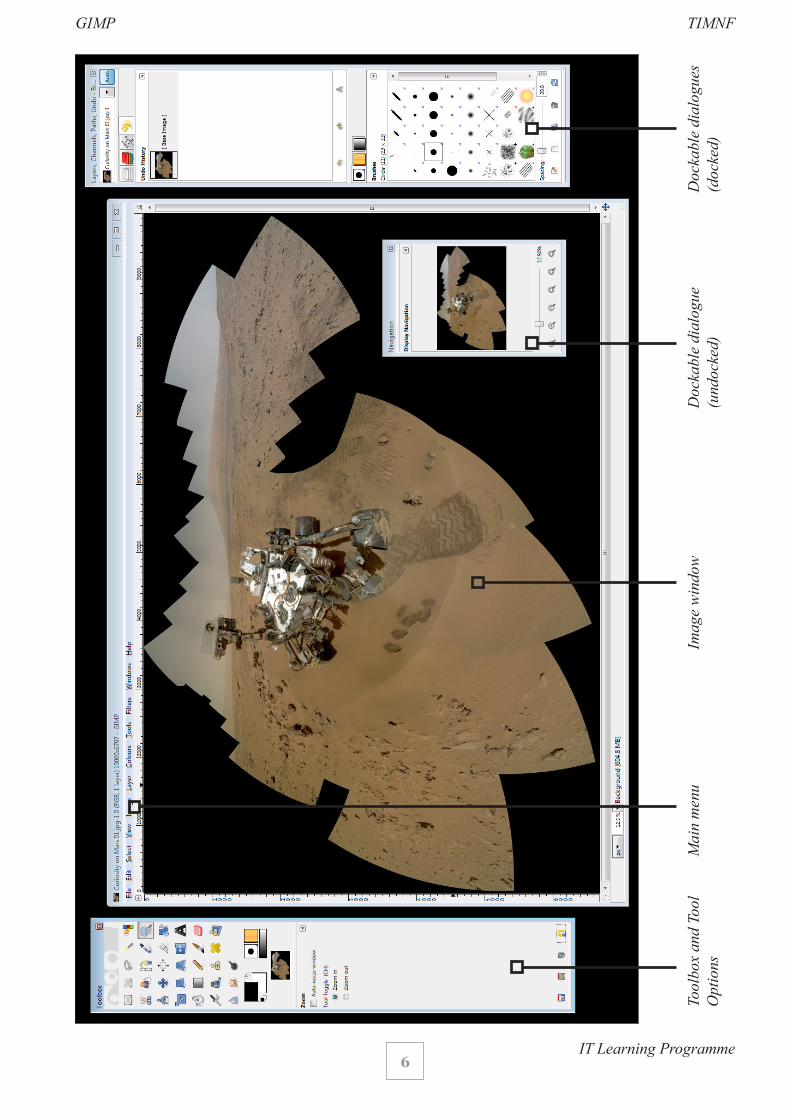
Tool
box
and
Tool
O
ptio
nsM
ain
men
uIm
age
win
dow
Doc
kabl
e di
alog
ue
(und
ocke
d)D
ocka
ble
dial
ogue
s (d
ocke
d)
IT Learning Programme
TIMNFGIMP
7
Setting up GIMP
Exercise - Setting up GIMP
The preferences dialogue can be accessed from the main menu along the top of the image window. It lets you customize many aspects of the way GIMP works.
Open GIMP and set preferences
Steps
1. Open GIMP.
2. Choose Edit>Preferences. This will launch the Preferences dialogue box.
3. Select Default Grid. The right hand side of the Preferences dialogue box will change to show the options for the Default Image Grid.
4. Set the Spacing Width and Height to 100 pixels.
5. Ensure the Line style under Appearance is set to Solid.
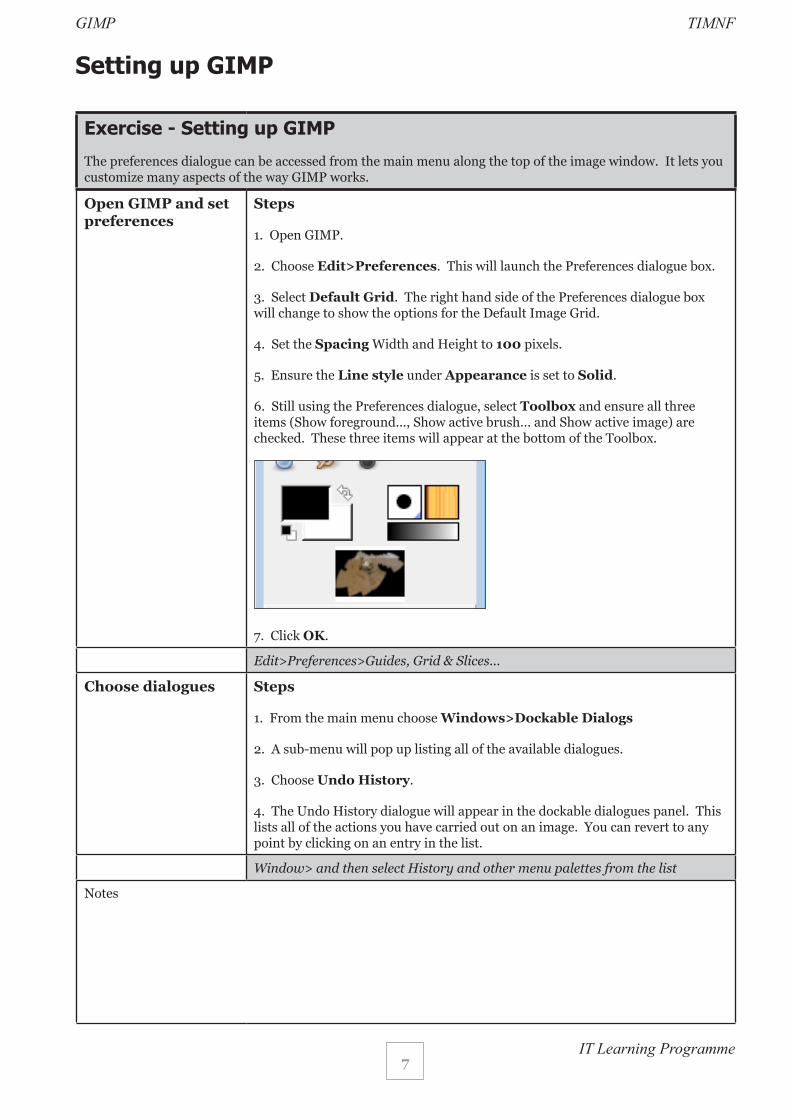
6. Still using the Preferences dialogue, select Toolbox and ensure all three items (Show foreground..., Show active brush... and Show active image) are checked. These three items will appear at the bottom of the Toolbox.
7. Click OK.
Edit>Preferences>Guides, Grid & Slices...
Choose dialogues Steps
1. From the main menu choose Windows>Dockable Dialogs
2. A sub-menu will pop up listing all of the available dialogues.
3. Choose Undo History.
4. The Undo History dialogue will appear in the dockable dialogues panel. This lists all of the actions you have carried out on an image. You can revert to any point by clicking on an entry in the list.
Window> and then select History and other menu palettes from the list
Notes
IT Learning Programme
TIMNFGIMP
8
* Image navigation
Exercise - Using the Zoom Tool and the Navigation dialogue
The Navigation dialogue is designed to allow more control over the magnification of your image and offer easy movement around the active image if the zoom is set higher than the image window can display.
Open an image Steps
1. Choose File>Open... This will launch the Open Image dialogue box.
2. You will notice that there are options along the top of the dialogue box as well as the usual list of folders and drives down the left hand side to help you navigate and locate a file or folder.
3. Locate the image called Curiosity on Mars 01.jpg.
4. Click Open. The image opens into the image window.
File>Open...
Use the Zoom Tool Steps
1. From the Toolbox select the Zoom Tool (Z)
2. Move your mouse cursor over the image. You will notice the cursor shows a magnifying glass symbol with a small + (plus) sign above it.
3. Click with the mouse in the image to zoom in.
4. Hold down the Ctrl (Cmd) key. The symbol above the magnifying glass should change to a - (minus) sign.
5. While holding down Ctrl (Cmd) click with the mouse in the image to zoom out.
Select the Zoom Tool from the Toolbox. Hold down Alt to zoom out.
Use the Navigation dialogue
Steps
1. From the main menu choose Windows>Dockable Dialogs
2. A sub-menu will pop up listing all of the available dialogues.
3. Choose Navigation. The Navigation dialogue will appear.
4. Use the slider or zoom buttons to zoom in or out of the image. If you hover your mouse over the buttons a tool tip will popup indicating the function of the button.
5. If the zoom is set higher than the image window can display a rectangular outline appears in the Navigation dialogues thumbnail of the image showing the location of the current view area in respect to the image. This rectangular outline can be dragged to change the viewing region.
Window>Navigator
Notes
IT Learning Programme
TIMNFGIMP
9
* Overflow exerciseUse the the techniques you will learn during this course to repair and enhance an old photograph
Steps
1. Open the image called great grandparents 01.jpg.
2. Use the the techniques you will learn during this course to repair and enhance this photograph.
IT Learning Programme
TIMNFGIMP
10
Evaluate your image
Exercise - Open an image and evaluate
When you first open an image in GIMP it is important to spend several minutes looking at the image with all the menus and toolbars switched off.
Before going through the process of enhancing an image, you want to be sure that the work is going to be worthwhile and that your initial decision to use the image is correct. In addition, you need a plan of action to work to and it is useful to make some notes about what needs to be done to the image.
Open an image Steps
1. Open the image called Crop Rotate Perspective 01.jpg.
File>Open...
Hide the Toolbox and other windows/dialogues
Steps
1. Select the image window by clicking at the top of the window where the name of the image is displayed.
2. Press the Tab key. The Toolbox and other dialogues will temporarily disappear.
3. You can now evaluate your image free from distraction.
4. Press the Tab key again to bring them back.
Note: to temporarily hide images you are not currently working on you can minimize and maximize their windows using the standard minimize, maximize and close buttons at the top left of each window.
The minimized windows are in the taskbar at the bottom of your screen and can be restored by clicking on them.
Press the Tab key to temporarily hide/reveal the Toolbox and menu palettes
Notes
IT Learning Programme
TIMNFGIMP
11
Rotate, correct perspective and crop
Exercise - Rotate, correct perspective and crop an image
When photographing landscapes or architecture it can be difficult to ensure the image is straight without using a tripod. You may find the horizon is aslant even though it looked straight through the viewfinder.
When using wide angle lenses the vertical lines of a building can seem to converge.
Often you may want to crop an image to lose unwanted elements at the edge of a frame or to help with the composition.
All of these issues can be rectified using tools in GIMP
Display a grid to help you judge how straight your image is
Steps
1. You will have noticed that the image window has a menu along the top.
2. From this menu choose View>Show Grid.
3. A grid will appear over your image. The settings for the grid are based on those you set in the earlier Preferences exercise.
4. You can override these grid settings for this image by choosing Image>Configure Grid...
View>Show>Grid
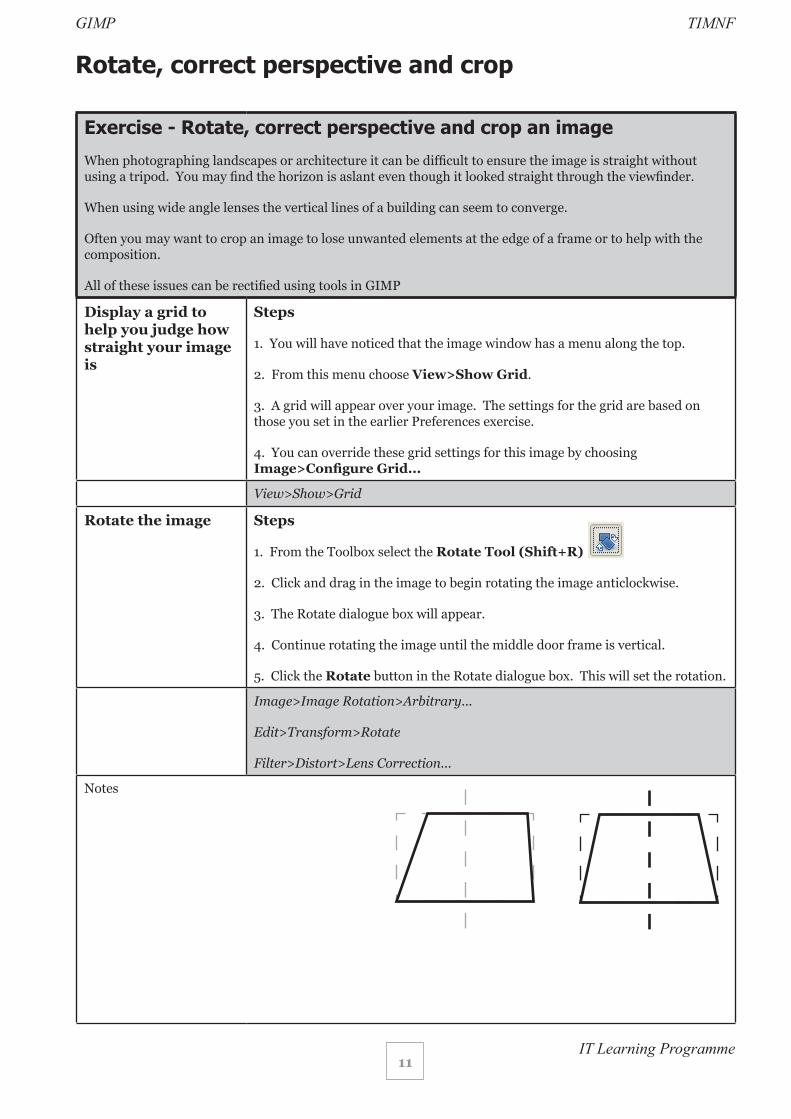
Rotate the image Steps
1. From the Toolbox select the Rotate Tool (Shift+R)
2. Click and drag in the image to begin rotating the image anticlockwise.
3. The Rotate dialogue box will appear.
4. Continue rotating the image until the middle door frame is vertical.
5. Click the Rotate button in the Rotate dialogue box. This will set the rotation.
Image>Image Rotation>Arbitrary...
Edit>Transform>Rotate
Filter>Distort>Lens Correction...
Notes
IT Learning Programme
TIMNFGIMP
12
Correct the perspective
Steps
1. From the Toolbox select the Perspective Tool (Shift+P)
2. Click and drag in the image to begin adjusting the perspective.
3. The Perspective dialogue box will appear.
4. Continue clicking and dragging the top left and top right corner handles until all of the vertical lines in the image are parallel. It does not matter that the image will appear skewed over to the left, we can adjust this in the next task. The important thing is to ensure the vertical lines are parallel.
5. Click Transform in the Perspective dialogue box to set the perspective correction.
Edit>Transform>Perspective
Filter>Distort>Lens Correction...
Optional
Skewing the image
Steps
You may need to further straighten the image:
1. From the Toolbox select the Shear Tool (Shift+S)
2. Click and drag to the left or to the right in the image to begin straightening up the vertical lines.
3. The Shear dialogue box will appear.
4. Continue clicking and dragging until all of the vertical lines in the image are vertical.
5. Click Shear in the Shear dialogue box to set the correction.
Edit>Transform>Skew
Filter>Distort>Lens Correction...
Move the image Steps
1. From the Toolbox select the Move Tool (M)
2. Click and drag in the image to move the image.
3. Areas of the image that had disappeared from the image window will appear.
4. Continue to click and drag until you are happy with the composition.
Select the Move Tool from the Toolbox
Notes
IT Learning Programme
TIMNFGIMP
13
Crop the image Steps
1. From the Toolbox select the Crop Tool (Shift+C)
2. Click and drag in the image to define the initial crop area.
3. To refine the crop area move your mouse cursor near the corners or the edges of the crop area and then click and drag to reposition.
4. When you are finished press the Enter key on your keyboard to complete the crop.
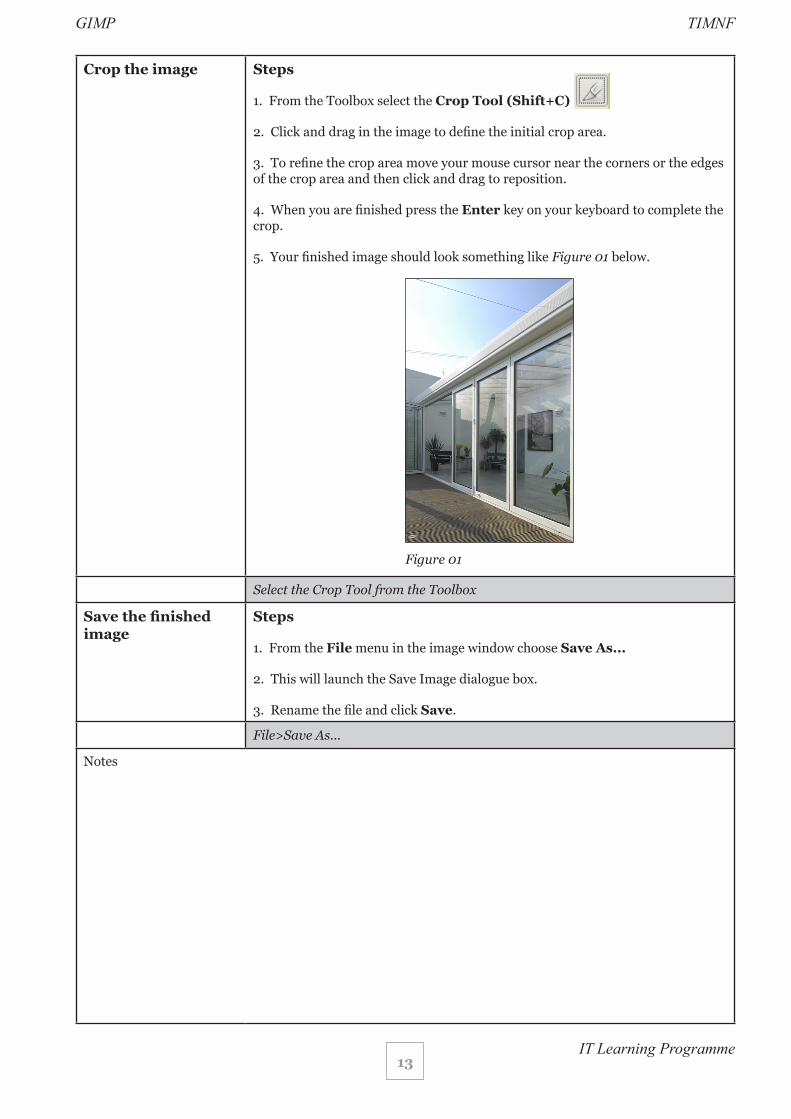
5. Your finished image should look something like Figure 01 below.
Select the Crop Tool from the Toolbox
Save the finished image
Steps
1. From the File menu in the image window choose Save As...
2. This will launch the Save Image dialogue box.
3. Rename the file and click Save.
File>Save As...
Notes
Figure 01
IT Learning Programme
TIMNFGIMP
14
Reduce noise and repair blemishes
Exercise - Use the Despeckle filter to remove small defects due to dust or scratches.
Several tools and filters in GIMP can be used to remove dust, scratches and other blemishes from images. In the next set of exercises we will examine the Despeckle filter, the Clone Tool and the Healing Tool.
Open an image Steps
1. Open the image called family 01.jpg.
File>Open...
Apply the Despeckle filter
Steps
The Despeckle filter replaces each pixel with the median value of the pixels within the specified radius.
1. From the image window menu choose Filters>Enhance>Despeckle...
2. This will launch the Despeckle dialogue box.
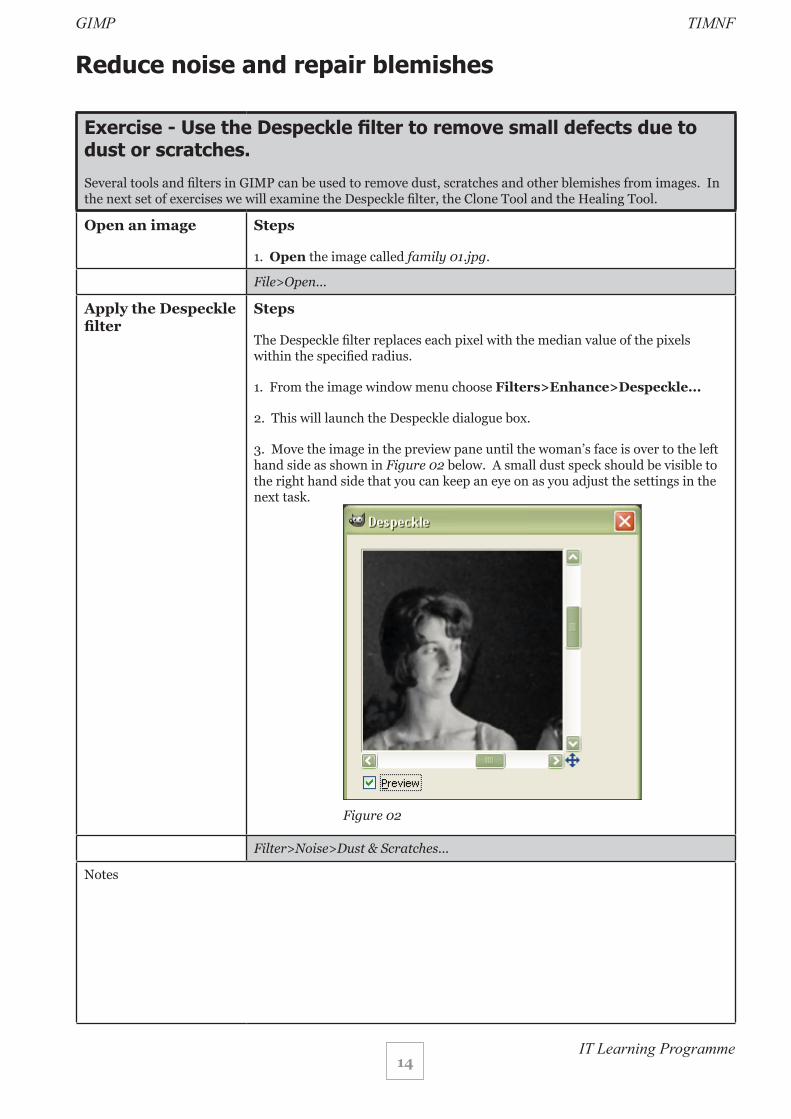
3. Move the image in the preview pane until the woman’s face is over to the left hand side as shown in Figure 02 below. A small dust speck should be visible to the right hand side that you can keep an eye on as you adjust the settings in the next task.
Filter>Noise>Dust & Scratches...
Notes
Figure 02
IT Learning Programme
TIMNFGIMP
15
Adjust the Despeckle filter options until the dust specks disappear
Steps
1. The Despeckle filter options are described below:
Adaptive:
Adapts the Radius to the image or the selection content by analyzing the histogram of the region around the target pixel. The adapted Radius will always be equal to or smaller than the specified Radius. It renders a result smoother than with radius alone.
Recursive: Repeats filter action which gets stronger.
Radius: Sets size of action window from 1 (3x3 pixels) to 20 (41x41). This window moves over the image, and the colour in it is smoothed, so imperfections are removed.
Black level: Removes pixels darker than set value (0-255).
White level: Removes pixels whiter than set value (0-255).
2. Leave Adaptive checked.
3. Try setting the Radius to 1, the Black level to 0 and the White level to 12.
4. Look in the preview pane. With the settings suggested above, the white speck to the right of the woman’s face should disappear.
5. Click OK. The filter will now be applied to the whole image and you can see if the settings were successful. If not, use the Undo History dialogue to go back in your Undo History and try again.
Notes
IT Learning Programme
TIMNFGIMP
16
Exercise - Use the Clone Tool to repair an image.Open an image Steps
1. Open the image called walton 01.jpg.
File>Open...
Select the Clone Tool and adjust the brush size
Steps
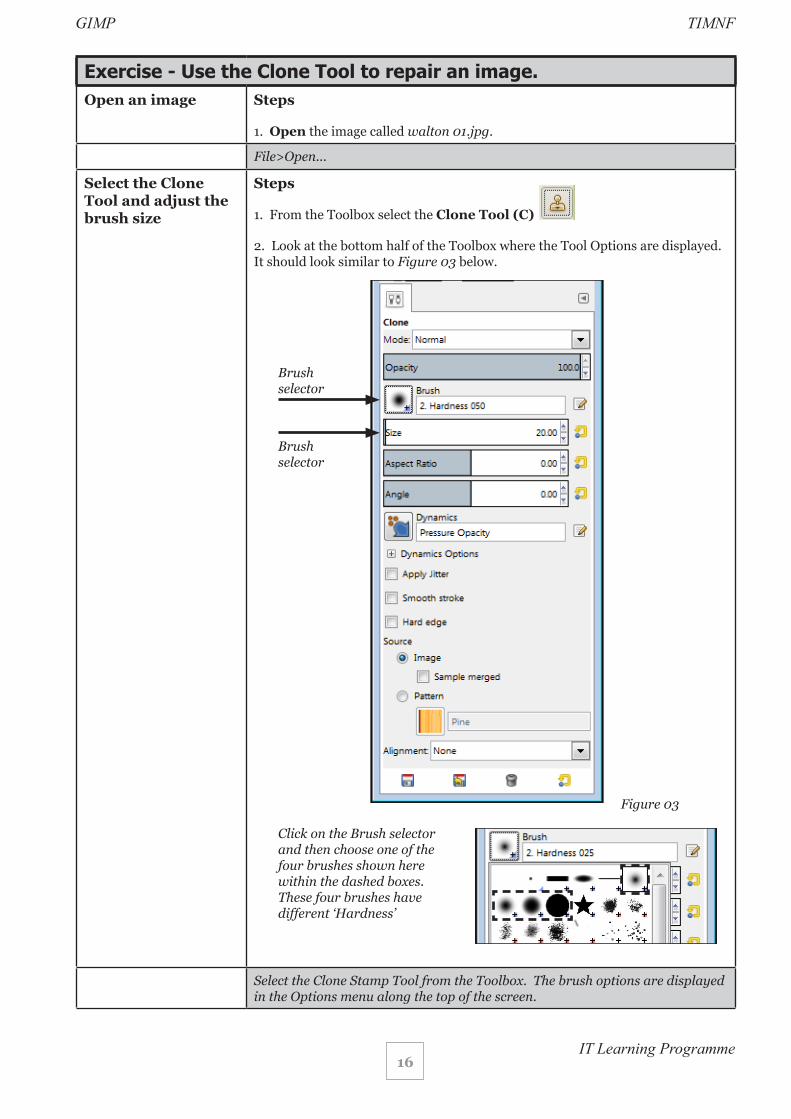
1. From the Toolbox select the Clone Tool (C)
2. Look at the bottom half of the Toolbox where the Tool Options are displayed. It should look similar to Figure 03 below.
Select the Clone Stamp Tool from the Toolbox. The brush options are displayed in the Options menu along the top of the screen.
Figure 03
Brush selector
Click on the Brush selector and then choose one of the four brushes shown here within the dashed boxes. These four brushes have different ‘Hardness’
Brush selector
IT Learning Programme
TIMNFGIMP
17
Adjust the brush size
Steps
1. Click on the brush selector in the Tool Options (see Figure 03).
2. Choose one of the four brushes shown indicated by the dashed rectangles in Figure 03.
3. The size of the brush can be adjusted using the Brush Size area below the brush selector.
The brush options are displayed in the Options menu along the top of the screen.
Use the Clone Tool to copy or clone areas of an image
Steps
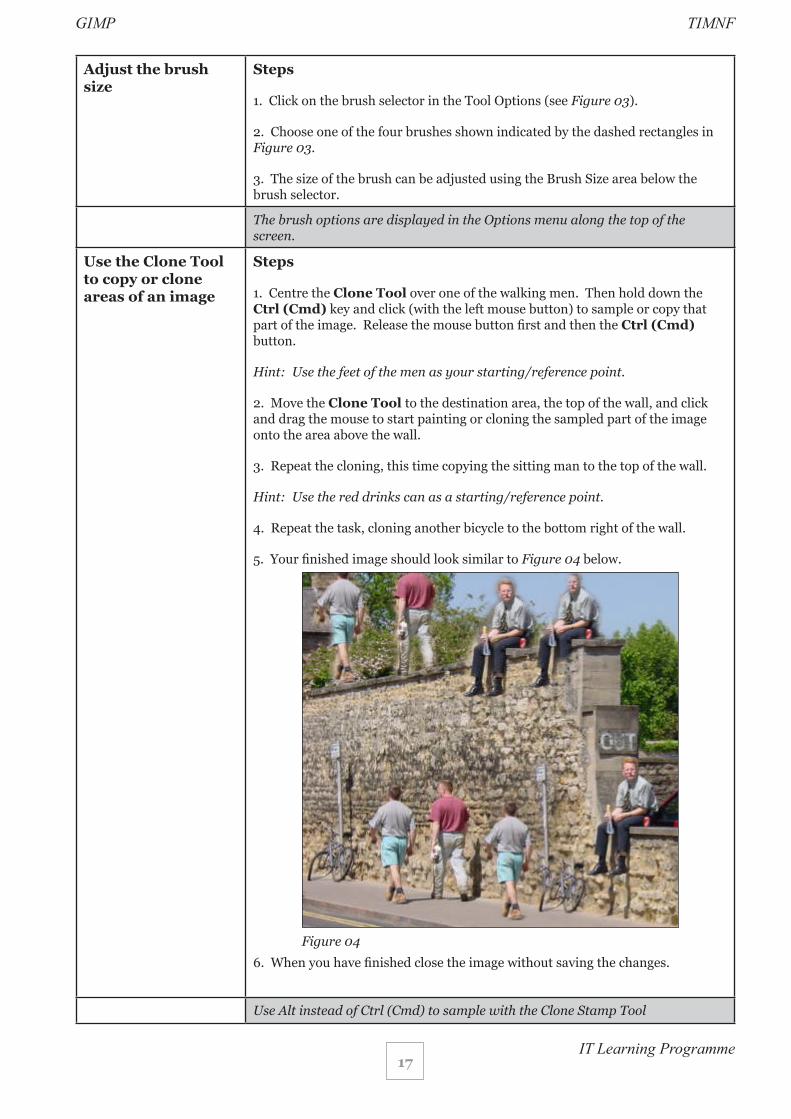
1. Centre the Clone Tool over one of the walking men. Then hold down the Ctrl (Cmd) key and click (with the left mouse button) to sample or copy that part of the image. Release the mouse button first and then the Ctrl (Cmd) button.
Hint: Use the feet of the men as your starting/reference point.
2. Move the Clone Tool to the destination area, the top of the wall, and click and drag the mouse to start painting or cloning the sampled part of the image onto the area above the wall.
3. Repeat the cloning, this time copying the sitting man to the top of the wall.
Hint: Use the red drinks can as a starting/reference point.
4. Repeat the task, cloning another bicycle to the bottom right of the wall.
5. Your finished image should look similar to Figure 04 below.
6. When you have finished close the image without saving the changes.
Use Alt instead of Ctrl (Cmd) to sample with the Clone Stamp Tool
Figure 04
IT Learning Programme
TIMNFGIMP
18
Exercise - Use the Healing Tool to repair an image.
The Healing Tool is similar to the Clone Tool. However, when using the Healing Tool pixels are not simply copied from source to destination, but the area around the destination is taken into account before cloning is applied.
The aim of this exercise is to remove the cables from the sky using the Healing Tool.
Open an image Steps
1. Open the image called shark 01.jpg.
File>Open...
Select the Healing Tool and adjust the brush size
Steps
1. From the Toolbox select the Healing Tool (H)
2. Click on the brush selector in the Tool Options.
3. Choose one of the four brushes shown indicated by the dashed rectangles in Figure 03 (Clone Tool exercise).
4. The size of the brush can be adjusted using the Brush Size area below the brush selector.
Select the Healing Brush Tool from the Toolbox. The brush options are displayed in the Options menu along the top of the screen.
Use the Healing Tool to repair areas of an image
1. Centre the Healing Tool over part of the sky. Then hold down Ctrl (Cmd) and click (with the left mouse button) to sample or copy that part of the image. Release the mouse button first and then the Ctrl (Cmd) button.
2. Move the Healing Tool to the destination area, part of the sky crossed by cables, and click and drag the mouse to start painting or cloning the sampled part of the image onto the appropriate area of sky.
3. Repeat the cloning to resample another part of the sky to paint over another area with cables.
4. Continue working until you have removed all of the cables from the sky.
5. When you have finished close the image without saving.
Use Alt instead of Ctrl (Cmd) to sample with the Healing Brush Tool
Notes
IT Learning Programme
TIMNFGIMP
19
Capture Sharpening
Exercise - Sharpen an image
Sharpening works by enhancing the definition of edges in an image. Most images, whether from a digital camera or a scanner, can benefit from sharpening. The degree of sharpening needed will vary depending on the quality of the digital camera or scanner. Bear in mind that sharpening will not correct a severely blurred image.
The Sharpen filter appears to focus or sharpen blurred images by increasing the contrast of adjacent pixels.
At this stage we are just offsetting the effect of the capture process and doing this with a mild sharpening routine.
Open an image Steps
1. Open the image called baby 01.jpg.
File>Open...
Select the Sharpen filter
Steps
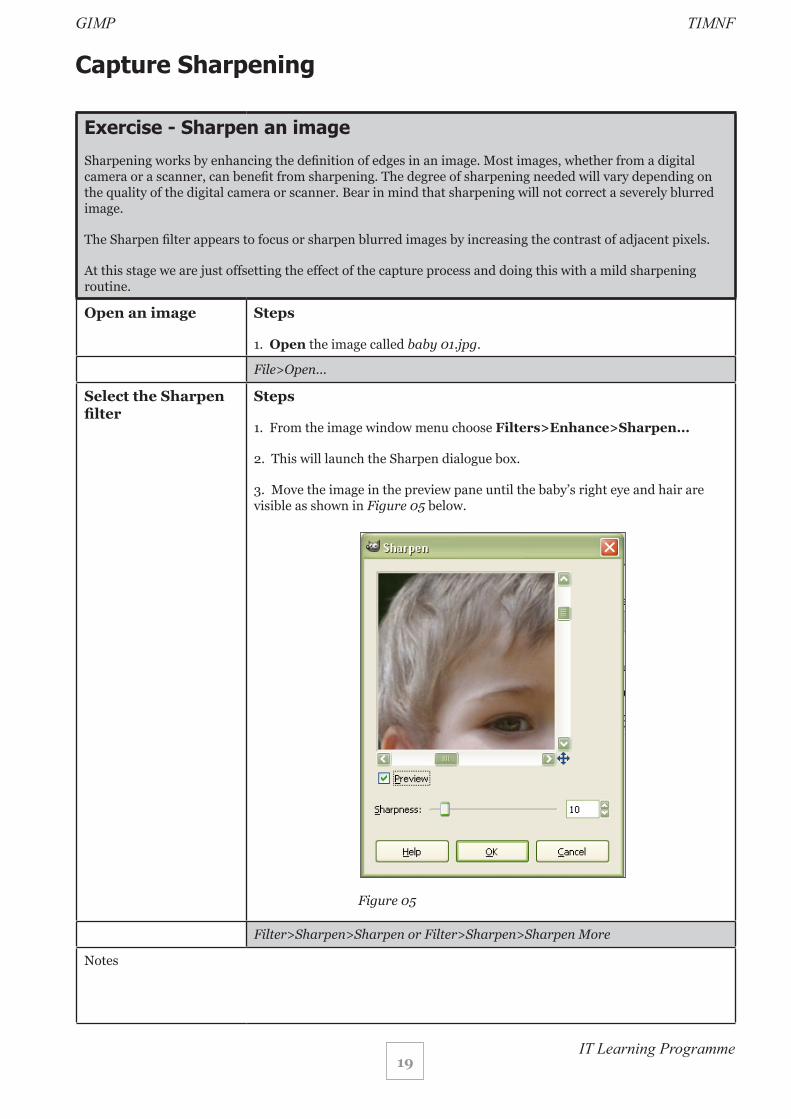
1. From the image window menu choose Filters>Enhance>Sharpen...
2. This will launch the Sharpen dialogue box.
3. Move the image in the preview pane until the baby’s right eye and hair are visible as shown in Figure 05 below.
Filter>Sharpen>Sharpen or Filter>Sharpen>Sharpen More
Notes
Figure 05
IT Learning Programme
TIMNFGIMP
20
Apply the Sharpen filter
Steps
1. Drag the Sharpness slider.
2. Keep an eye on the preview pane to see the effect of the Sharpness slider setting.
Hint: Check and uncheck the Preview box to turn the preview in the preview pane on and off. This helps give you a clearer impression of the before and after effect of the sharpening.
3. Remember, at this stage we are only applying a small amount of sharpening to simply offset the digital capture process. Try a Sharpness setting of about 50.
4. Click OK.
Compare the sharpened image with the original
Steps
1. Use your Undo History dialogue to toggle back and forth between the base image and the sharpened version.
2. When you have finished, undo your changes to revert back to the base image.
Window> History to select the History menu palette and then toggle back and forth between the original image and the sharpened version.
Apply the Unsharp Mask filter.
This filter is best used as the final stage of sharpening.
Steps
1. From the image window menu choose Filters>Enhance>Unsharp Mask...
2. This will launch the Unsharp Mask dialogue box.
3. Move the image in the preview pane until the baby’s right eye and hair are visible.
4. Adjust the sliders. Try the following settings: Radius: 1.0, Amount: 0.7 and Threshold: 10
Please refer to the explanations of the sliders below:
Radius: slider and input box (0.1-120) allow you to set how many pixels on either side of an edge will be affected by sharpening. High resolution images allow higher radius. It is better to always sharpen an image at its final resolution.
Amount: slider and input boxes (0.00-5.00) allow you to set strength of sharpening.
Threshold: slider and input boxes (0-255) allow you to set the minimum difference in pixel values that indicates an edge where sharpen must be applied. So you can protect areas of smooth tonal transition from sharpening, and avoid creation of blemishes in face, sky or water surface.
5. When you are satisfied with the results click OK.
6. Close your image without saving the changes.
Filter>Sharpen>Unsharp Mask...
IT Learning Programme
TIMNFGIMP
21
Tonal range adjustment - Brightness/Contrast
Exercise - Improve an image using the Brightness/Contrast Tool
The aim of this task is to improve an image using the Brightness/Contrast Tool.
The Brightness/Contrast Tool lets you make simple adjustments to the tonal range of an image. Unlike Levels (next exercise), which applies proportionate (nonlinear) adjustments to the pixels in an image, Brightness/Contrast makes the same amount of adjustment to every pixel (a linear adjustment). The Brightness/Contrast command is not recommended for high-end output because it can result in a loss of image detail.
Open an image Steps
1. Open the image called totem 01.jpg.
File>Open...
Select and apply the Brightness/Contrast Tool
Steps
1. From the image window menu choose Tools>Color Tools>Brightness-Contrast...
2. This will launch the Brightness-Contrast dialogue box.
3. Click and drag the Brightness and Contrast sliders until you are happy with the result.
Hint: Check and uncheck the Preview box to turn the preview in the preview pane on and off. This helps give you a clearer impression of the before and after effect of the brightness and contrast adjustments.
4. Click OK.
5. When you have finished use the Undo History dialogue to undo the brightness and contrast adjustment so that you are ready for the next task.
Image>Adjustments>Brightness/Contrast...
Notes
IT Learning Programme
TIMNFGIMP
22
Tonal range adjustment - Levels
Exercise - Improve an image using the Levels Tool
The aim of this task is to improve an image using the Levels Tool.
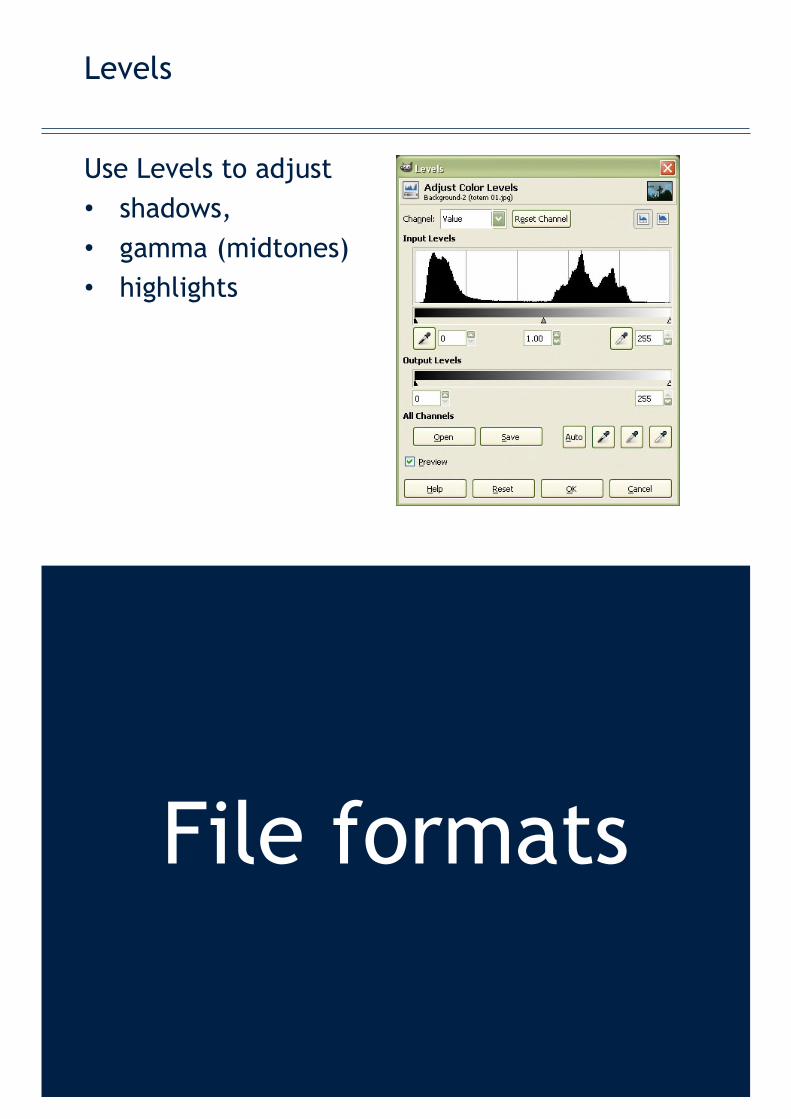
The Levels command lets you correct the tonal range and color balance of an image by adjusting intensity levels of image shadows, midtones, and highlights.
Check the image is ready
Steps
1. Ensure that you have undone any changes you made to the totem image in the previous exercise.
2. Use the Undo History dialogue to revert the image to its original or base state.
File>Open...
Open the Histogram dialogue
Steps
1. From the Toolbox menu choose Windows>Dockable Dialogs>Histogram
2. This will launch the Histogram dialogue.
The Histogram dialogue shows you information about the statistical distribution of colour values in the image. This information is useful when you are trying to colour balance an image. However, the Histogram dialogue is purely informational: nothing you do with it will cause any change to the image. If you want to perform a histogram-based colour correction, use the Levels tool.
Choose Image>Histogram... (Window>Histogram for later versions of Photoshop).
Select the Levels Tool
Steps
1. From the image window menu choose Tools>Color Tools>Levels...
2. This will launch the Levels dialogue.
Image>Adjustments>Levels...
Notes
IT Learning Programme
TIMNFGIMP
23
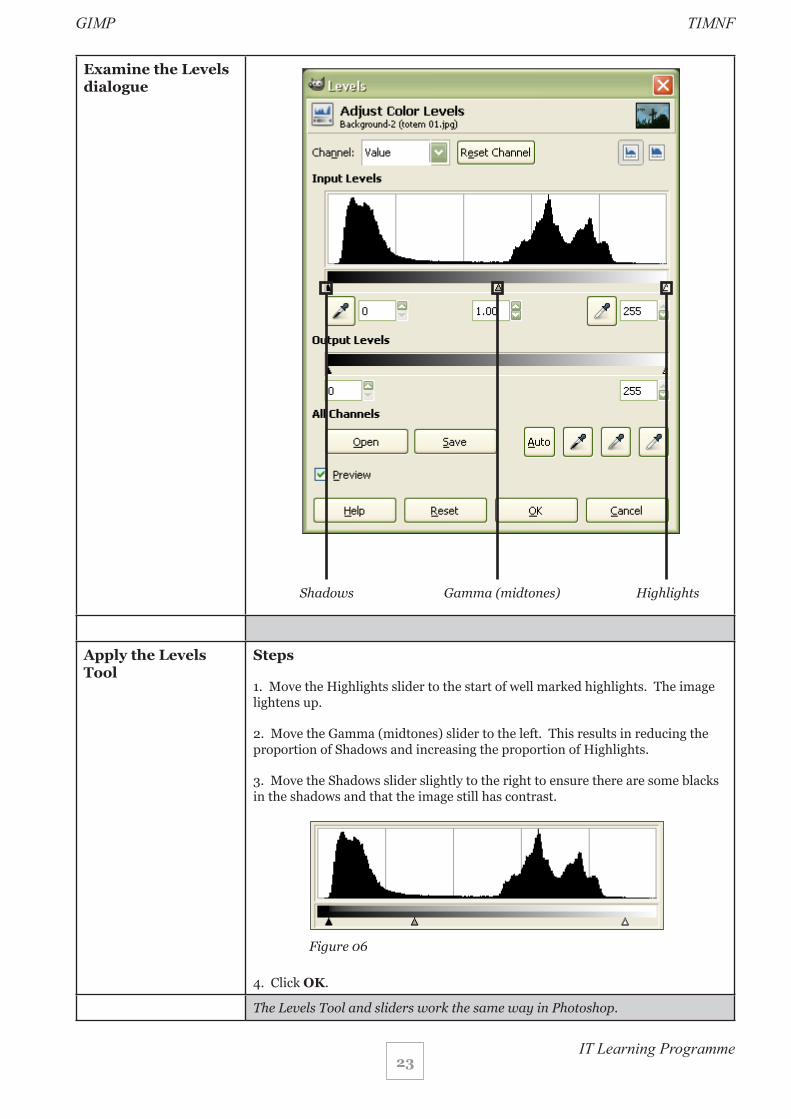
Examine the Levels dialogue
Apply the Levels Tool
Steps
1. Move the Highlights slider to the start of well marked highlights. The image lightens up.
2. Move the Gamma (midtones) slider to the left. This results in reducing the proportion of Shadows and increasing the proportion of Highlights.
3. Move the Shadows slider slightly to the right to ensure there are some blacks in the shadows and that the image still has contrast.
4. Click OK.
The Levels Tool and sliders work the same way in Photoshop.
Shadows Gamma (midtones) Highlights
Figure 06
IT Learning Programme
TIMNFGIMP
24
Examine the Histogram dialogue
Steps
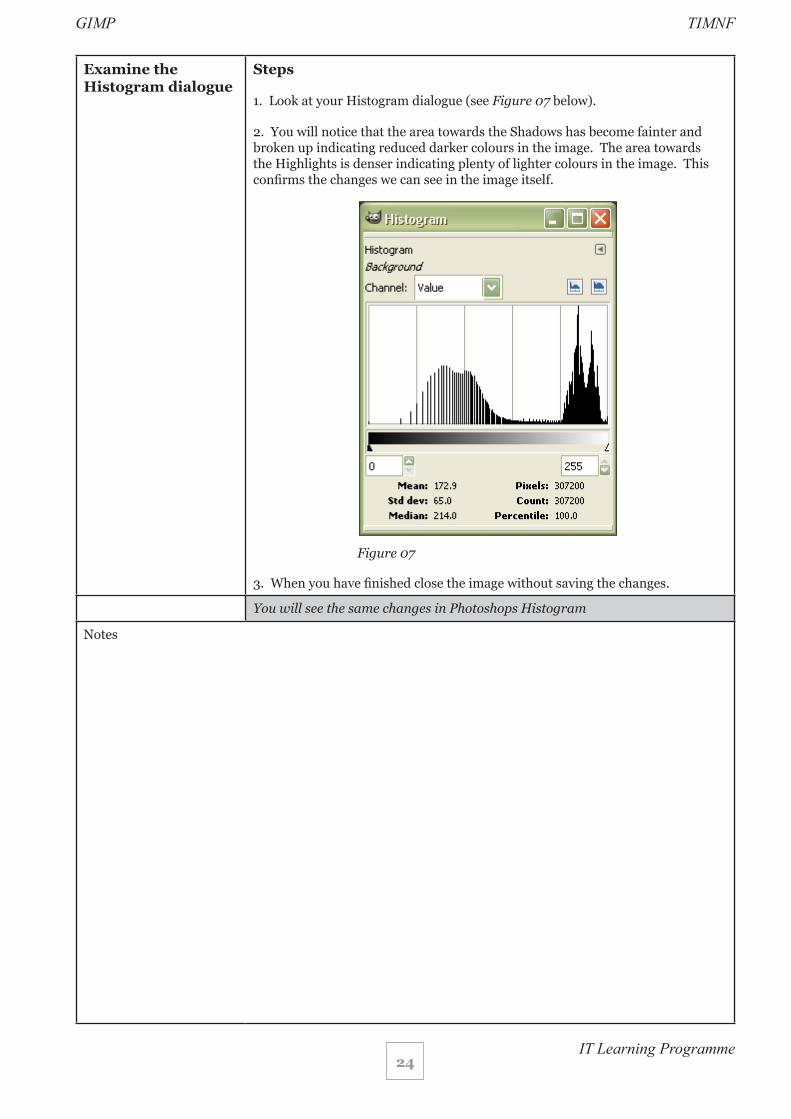
1. Look at your Histogram dialogue (see Figure 07 below).
2. You will notice that the area towards the Shadows has become fainter and broken up indicating reduced darker colours in the image. The area towards the Highlights is denser indicating plenty of lighter colours in the image. This confirms the changes we can see in the image itself.
3. When you have finished close the image without saving the changes.
You will see the same changes in Photoshops Histogram
Notes
Figure 07
IT Learning Programme
TIMNFGIMP
25
Colour balance
Exercise - Colour correct an image using the Color Balance Tool
One of the standard tasks in GIMP is colour correcting images or photographs. This is particularly important if a photograph was not taken in a professional photographic studio or if a digital camera’s white balance system did not accurately compensate for the lighting conditions. Photographic images may suffer from a shift in colours due to variations in lighting conditions. Daylight, for instance, brings out different colour frequencies than neon light, and you may have to correct those colour differences in GIMP.
GIMP offeres several commands aimed at colour correction. The following tasks will focus on two: Hue-Saturation and Color Balance.
This first task will examine the Color Balance command used to change the overall mixture of colors in an image for generalized color correction.
Open an image Steps
1. Open the image called student union 01.tga.
File>Open...
Select and apply the Color Balance Tool
Steps
1. Choose Tools>Color Tools>Color Balance... This opens the Color Balance dialogue.
2. Notice how you can specify to adjust either the Shadows, Midtones, or Highlights. For the purposes of this exercise you will focus on the Midtones.
3. Ensure Midtones is selected.
4. Adjust the Color Levels. Try the following settings:
• Cyan--Red -10
• Magenta--Green +5
• Yellow--Blue +15
5. Try checking and unchecking the Preserve Luminosity box.
Hint: Check and uncheck the Preview box to give you a clearer impression of the before and after effect of the adjusted colour levels.
6. Click OK.
7. Close the image without saving the changes.
Choose Image>Adjustments>Color Balance...
Notes
IT Learning Programme
TIMNFGIMP
26
Exercise - Colour correct an image using the Hue-Saturation ToolOpen an image Steps
1. Open the image called mercedes 01.tga.
File>Open...
Select the Hue-Saturation Tool
Steps
1. Choose Tools>Color Tools>Hue-Saturation... This opens the Hue-Saturation dialogue.
Choose Image>Adjustments>Hue/Saturation...
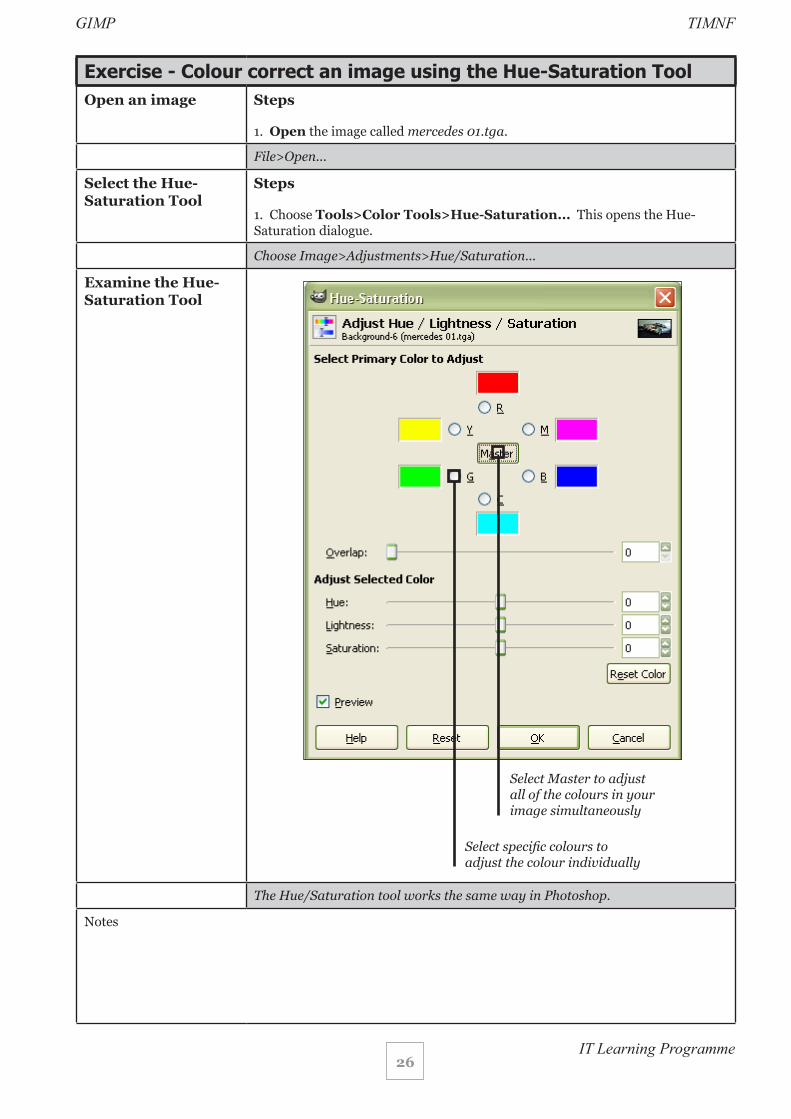
Examine the Hue-Saturation Tool
The Hue/Saturation tool works the same way in Photoshop.
Notes
Select Master to adjust all of the colours in your image simultaneously
Select specific colours to adjust the colour individually
IT Learning Programme
TIMNFGIMP
27
Apply the Hue-Saturation Tool
Steps
1. Choose Red.
2. Adjust the Saturation value to +20 either dragging the Saturation slider.
3. Choose Yellow.
4. Drag the Saturation slider as far to the left as it will go. It’s value should be -100. All the yellow tones in the image will turn to gray shades.
5. Repeat step 4 for the rest of the colours (i.e. Green, Cyan, Blue and Magenta).
6. This process will result in an image where the only colour is red and the rest of the image is black-and-white.
7. Click OK.
8. Close the image without saving the changes.
Use the Hue/Saturation command to change the colour saturation of an image.
Steps
1. Open the file Saturation 01.jpg.
2. Choose Tools>Color Tools>Hue-Saturation...
3. Adjust the Saturation slider. Dragging it to the right will saturate all of the colours in the image. Dragging it to the left will desaturate all of the colours in the image.
4. Click OK.
5. Close the image without saving the changes.
Choose Image>Adjustments>Hue/Saturation... The Hue/Saturation tool works the same way in Photoshop.
Notes
IT Learning Programme
TIMNFGIMP
28
Selective correction - Feathering a selection
Exercise - Examine the effects of Feathering a selection
Feathering blurs the edges of a selection by building a transition boundary between the selection and its surrounding pixels. This blurring can cause some loss of detail at the edge of the selection.
You can add feathering to an existing selection. Feathering effects become apparent when you move, cut, copy, or fill the selection.
Create a new, blank canvas
Steps
1. Choose File>New... This will launch the Create a New Image dialogue box.
2. Make both the Height and the Width 400 pixels. Click OK.
File>New...
Create the first rectangular selection
Steps
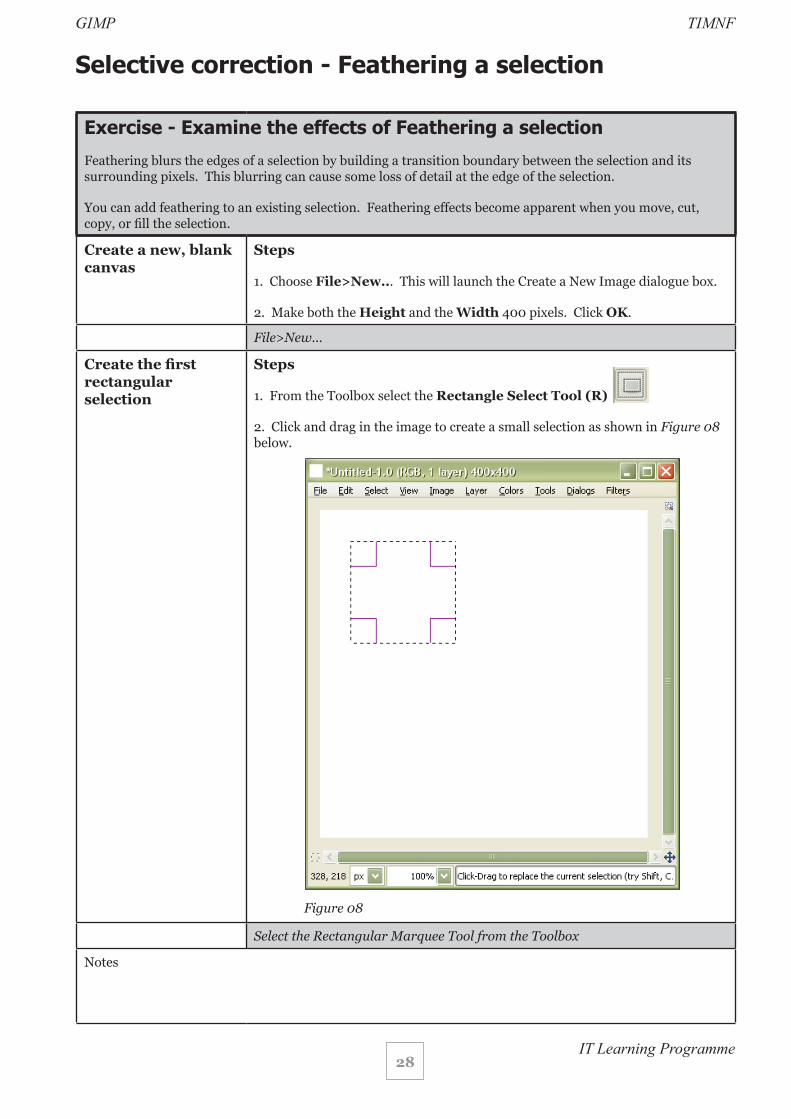
1. From the Toolbox select the Rectangle Select Tool (R)
2. Click and drag in the image to create a small selection as shown in Figure 08 below.
Select the Rectangular Marquee Tool from the Toolbox
Notes
Figure 08
IT Learning Programme
TIMNFGIMP
29
Fill the selection with black
Steps
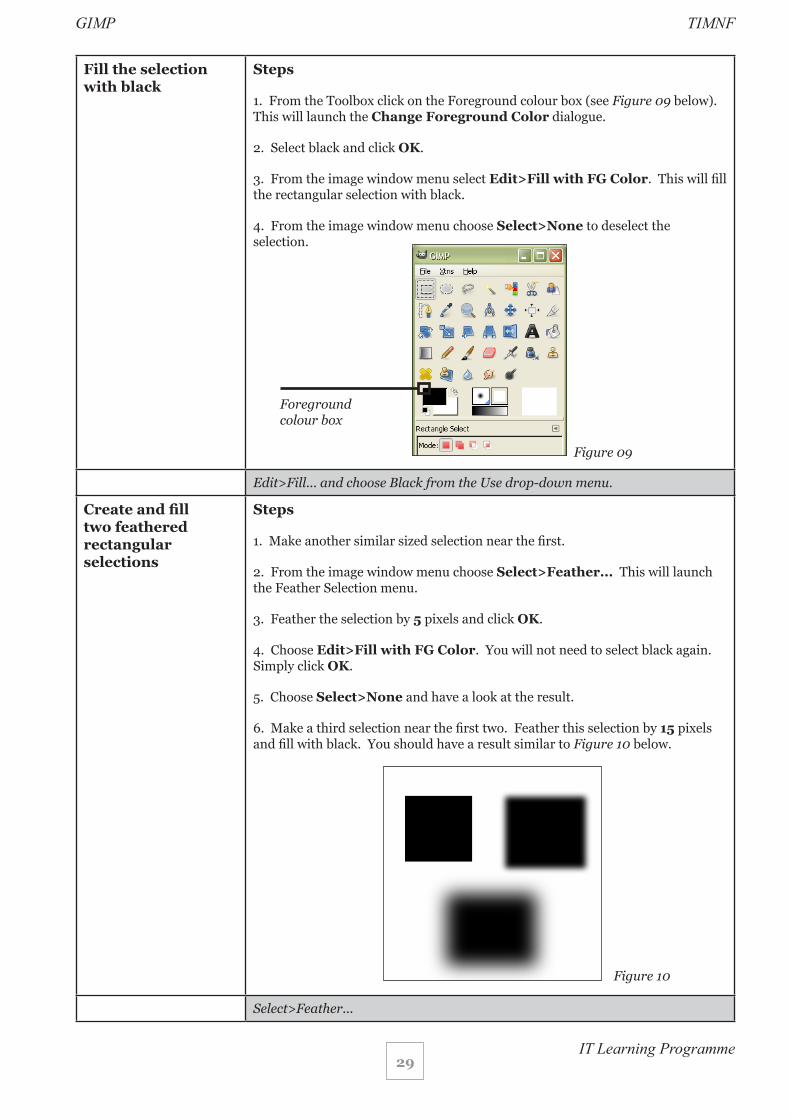
1. From the Toolbox click on the Foreground colour box (see Figure 09 below). This will launch the Change Foreground Color dialogue.
2. Select black and click OK.
3. From the image window menu select Edit>Fill with FG Color. This will fill the rectangular selection with black.
4. From the image window menu choose Select>None to deselect the selection.
Edit>Fill... and choose Black from the Use drop-down menu.
Create and fill two feathered rectangular selections
Steps
1. Make another similar sized selection near the first.
2. From the image window menu choose Select>Feather... This will launch the Feather Selection menu.
3. Feather the selection by 5 pixels and click OK.
4. Choose Edit>Fill with FG Color. You will not need to select black again. Simply click OK.
5. Choose Select>None and have a look at the result.
6. Make a third selection near the first two. Feather this selection by 15 pixels and fill with black. You should have a result similar to Figure 10 below.
Select>Feather...
Figure 09
Foreground colour box
Figure 10
IT Learning Programme
TIMNFGIMP
30
Selective correction - Using a feathered selection
Exercise - Apply a Levels correction to a portion of an image using a feathered selection.
In the previous exercise you examined how feathering a selection blurs the edges of a selection. This technique can be used to fade the appearance of a correction into the surrounding image allowing you to selectively correct areas of an image.
Open an image Steps
1. Open the file Selective Correction 01.jpg.
File>New...
Create an elliptical selection
Steps
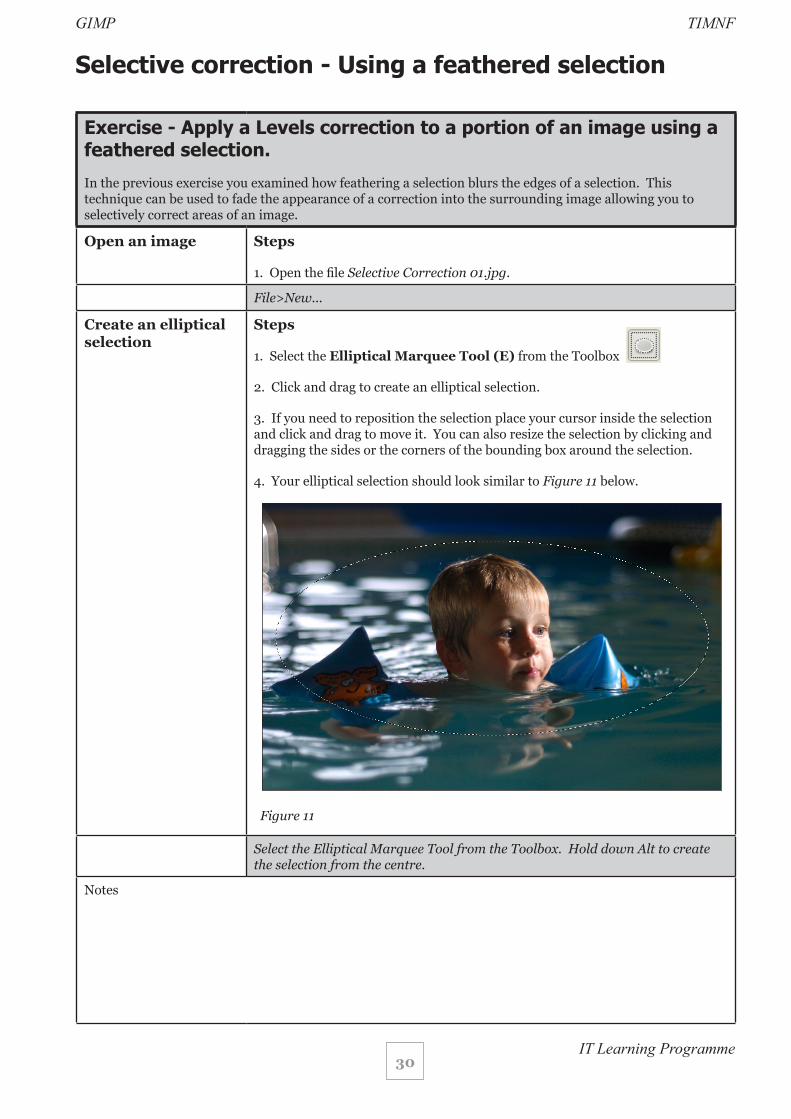
1. Select the Elliptical Marquee Tool (E) from the Toolbox
2. Click and drag to create an elliptical selection.
3. If you need to reposition the selection place your cursor inside the selection and click and drag to move it. You can also resize the selection by clicking and dragging the sides or the corners of the bounding box around the selection.
4. Your elliptical selection should look similar to Figure 11 below.
Select the Elliptical Marquee Tool from the Toolbox. Hold down Alt to create the selection from the centre.
Notes
Figure 11
IT Learning Programme
TIMNFGIMP
31
Feather the selection
Steps
1. From the image window menu choose Select>Feather... This will launch the Feather Selection menu.
2. Feather the selection by 100 pixels and click OK.
Select>Feather...
Adjust the Levels Steps
1. From the image window menu choose Tools>Color Tools>Levels...
2. Adjust the Levels.
3. When you are satisfied with the result choose Select>None.
4. Close your image without saving the changes.
Image>Adjustments>Levels...
Notes
IT Learning Programme
TIMNFGIMP
32
* Introduction to Layers
Exercise - Combine two images using layers
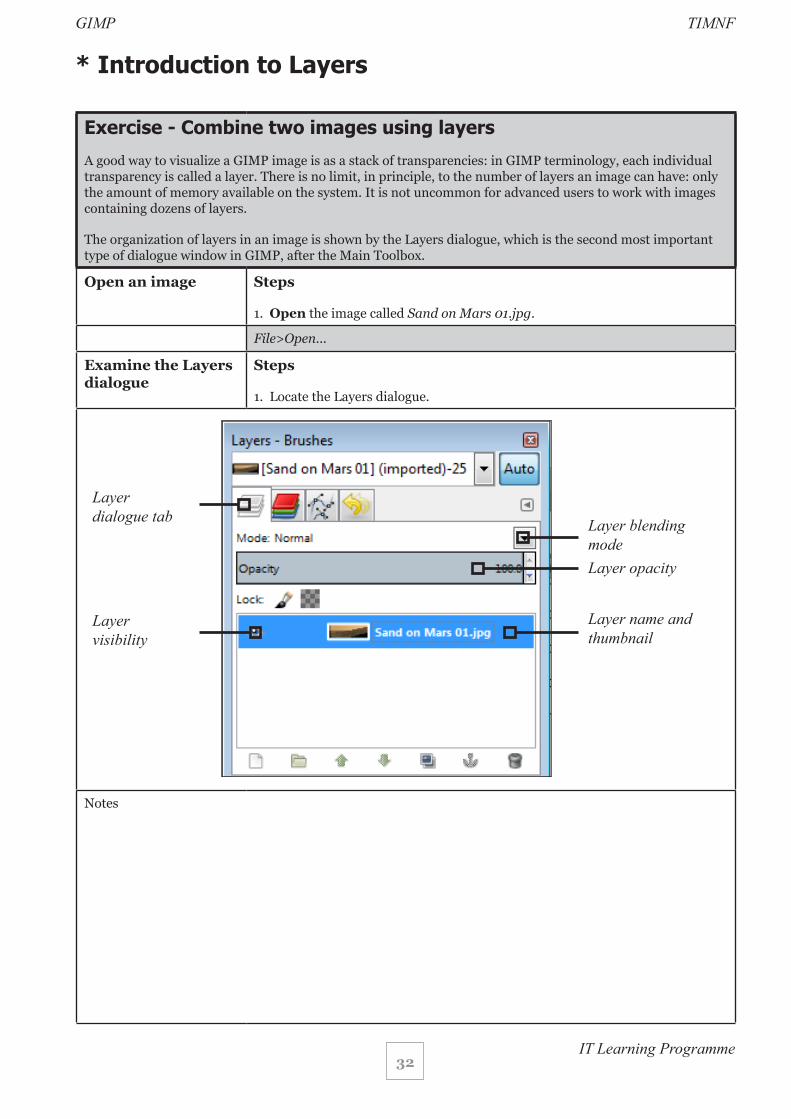
A good way to visualize a GIMP image is as a stack of transparencies: in GIMP terminology, each individual transparency is called a layer. There is no limit, in principle, to the number of layers an image can have: only the amount of memory available on the system. It is not uncommon for advanced users to work with images containing dozens of layers.
The organization of layers in an image is shown by the Layers dialogue, which is the second most important type of dialogue window in GIMP, after the Main Toolbox.
Open an image Steps
1. Open the image called Sand on Mars 01.jpg.
File>Open...
Examine the Layers dialogue
Steps
1. Locate the Layers dialogue.
Notes
Layer blending modeLayer opacity
Layer name and thumbnail
Layer dialogue tab
Layer visibility
IT Learning Programme
TIMNFGIMP
33
Open a second image
Steps
1. Open the image called saturn 03.jpg.
File>Open...
Copy and paste the Saturn image into the Mars image
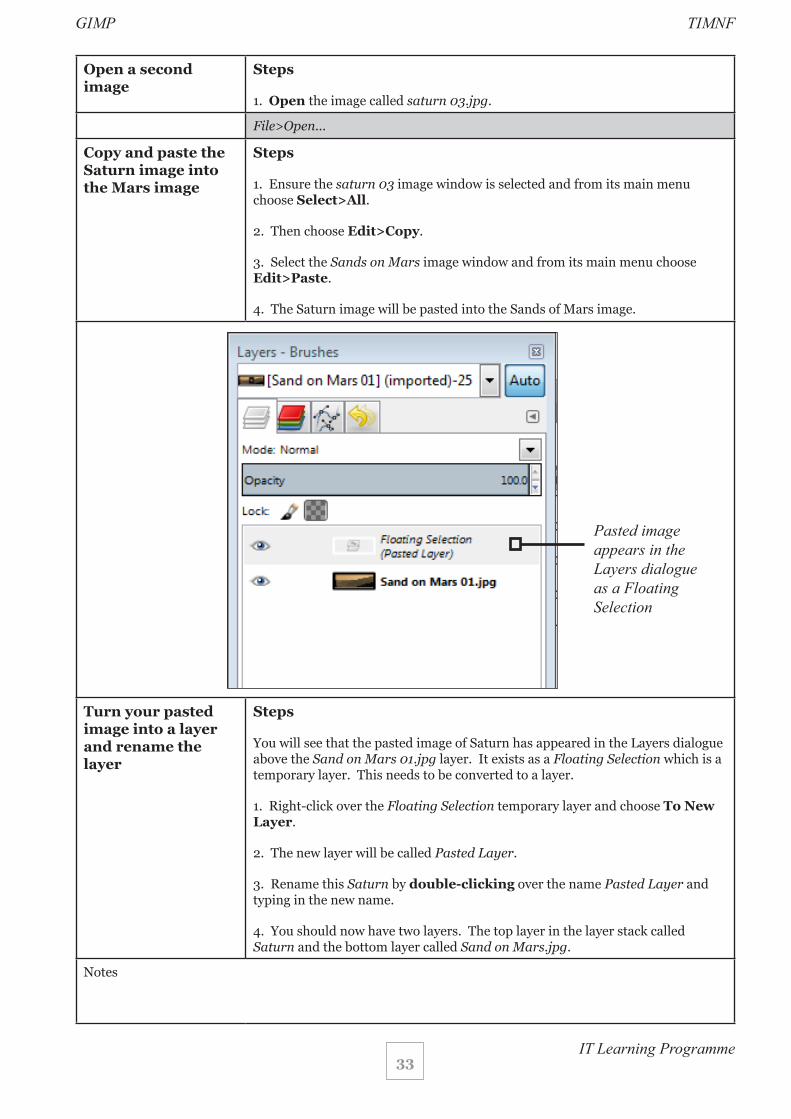
Steps
1. Ensure the saturn 03 image window is selected and from its main menu choose Select>All.
2. Then choose Edit>Copy.
3. Select the Sands on Mars image window and from its main menu choose Edit>Paste.
4. The Saturn image will be pasted into the Sands of Mars image.
Turn your pasted image into a layer and rename the layer
Steps
You will see that the pasted image of Saturn has appeared in the Layers dialogue above the Sand on Mars 01.jpg layer. It exists as a Floating Selection which is a temporary layer. This needs to be converted to a layer.
1. Right-click over the Floating Selection temporary layer and choose To New Layer.
2. The new layer will be called Pasted Layer.
3. Rename this Saturn by double-clicking over the name Pasted Layer and typing in the new name.
4. You should now have two layers. The top layer in the layer stack called Saturn and the bottom layer called Sand on Mars.jpg.
Notes
Pasted image appears in the Layers dialogue as a Floating Selection
IT Learning Programme
TIMNFGIMP
34
Change the blending mode of the Saturn layer
Steps
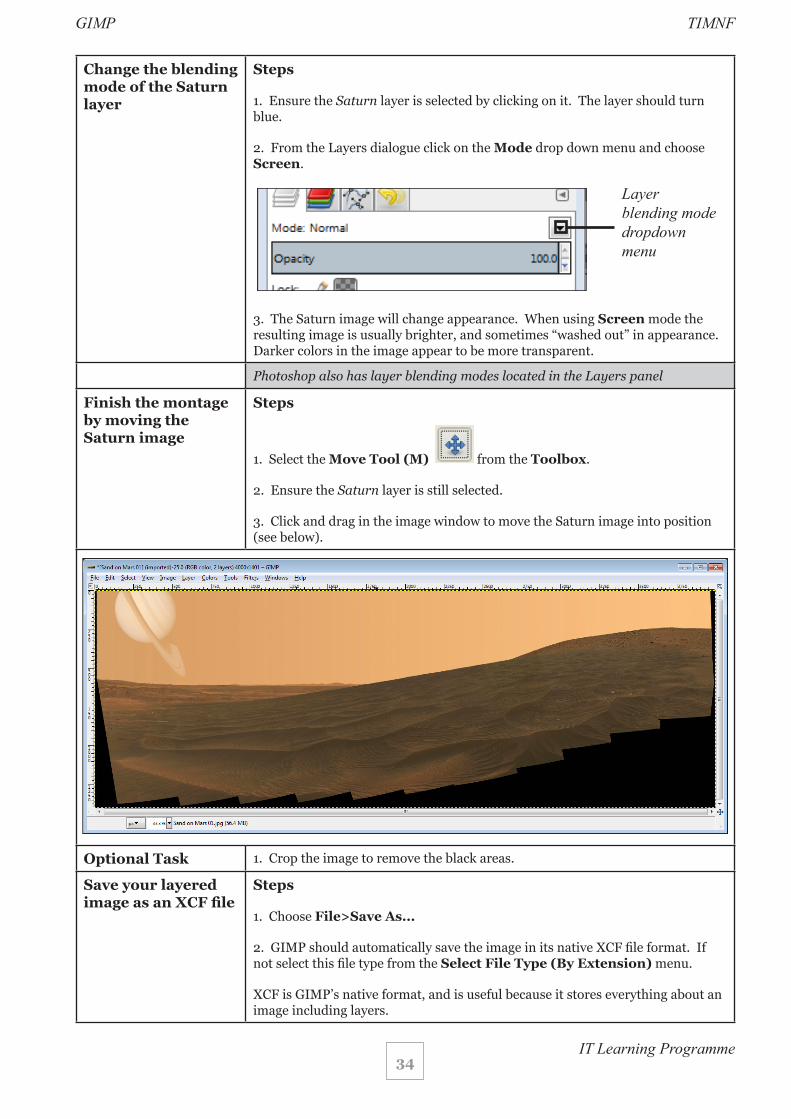
1. Ensure the Saturn layer is selected by clicking on it. The layer should turn blue.
2. From the Layers dialogue click on the Mode drop down menu and choose Screen.
3. The Saturn image will change appearance. When using Screen mode the resulting image is usually brighter, and sometimes “washed out” in appearance. Darker colors in the image appear to be more transparent.
Photoshop also has layer blending modes located in the Layers panel
Finish the montage by moving the Saturn image
Steps
1. Select the Move Tool (M) from the Toolbox.
2. Ensure the Saturn layer is still selected.
3. Click and drag in the image window to move the Saturn image into position (see below).
Optional Task 1. Crop the image to remove the black areas.
Save your layered image as an XCF file
Steps
1. Choose File>Save As...
2. GIMP should automatically save the image in its native XCF file format. If not select this file type from the Select File Type (By Extension) menu.
XCF is GIMP’s native format, and is useful because it stores everything about an image including layers.
Layer blending mode dropdown menu
IT Learning Programme
TIMNFGIMP
35
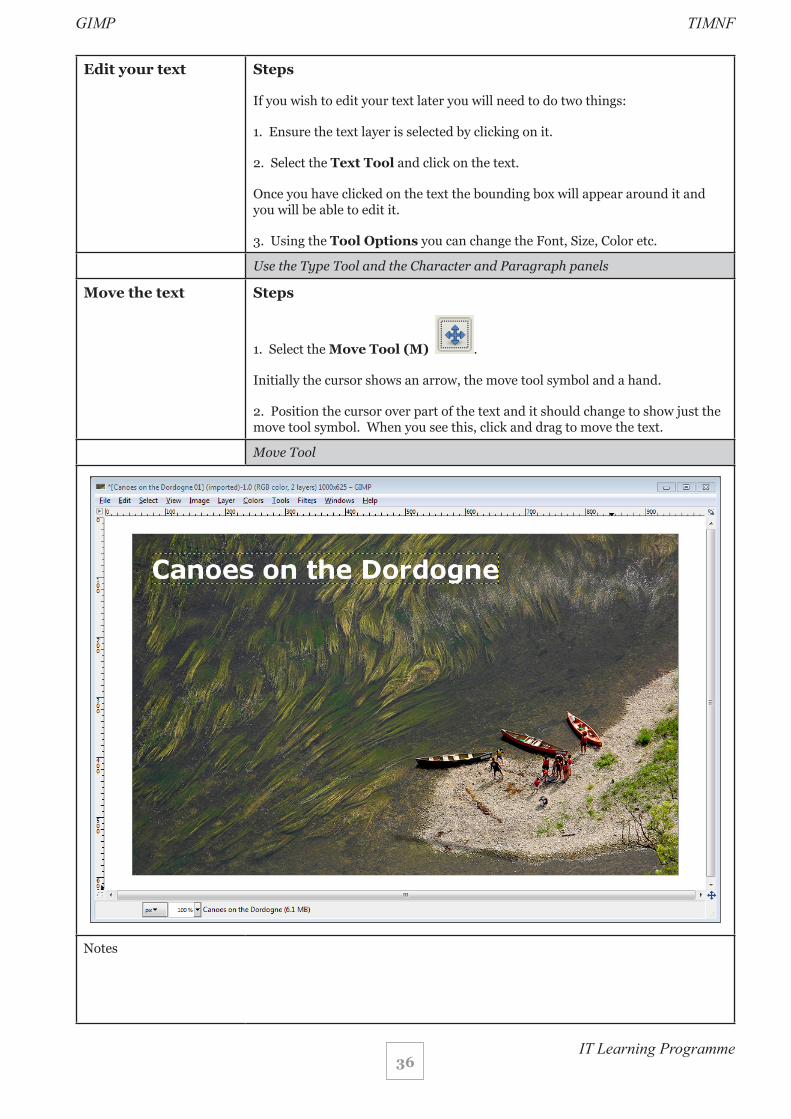
* Introduction to Text
Exercise - Create a title over an image
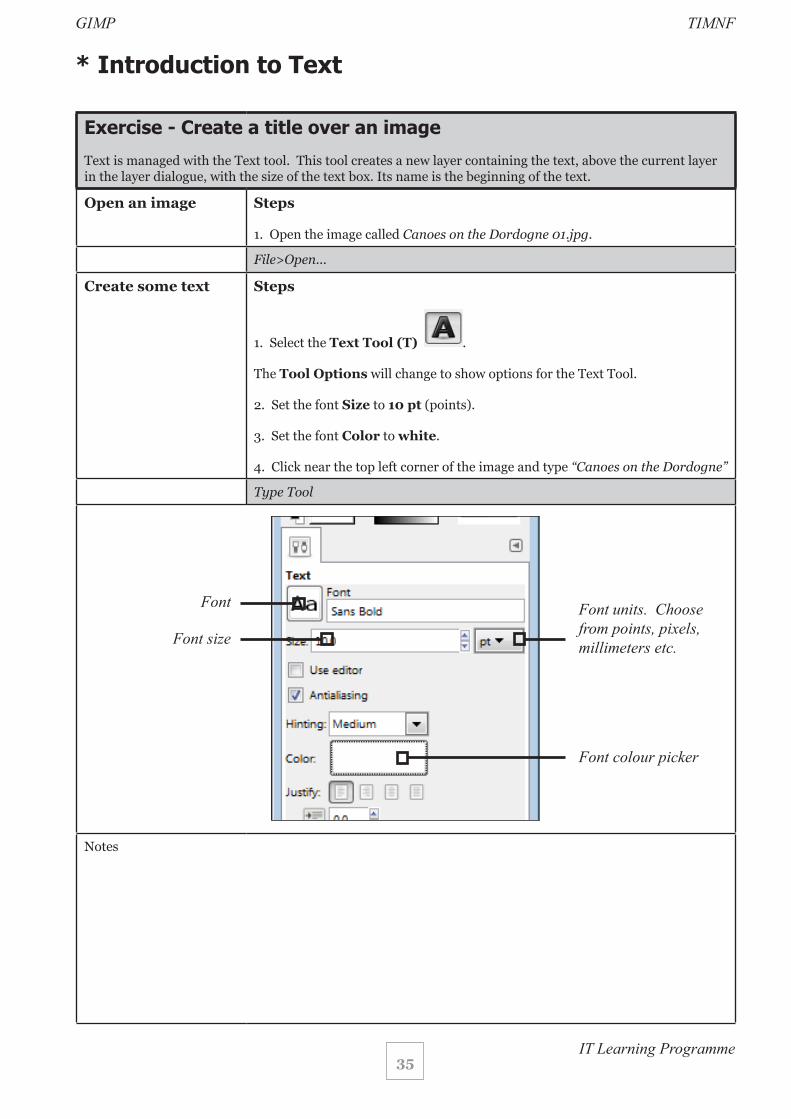
Text is managed with the Text tool. This tool creates a new layer containing the text, above the current layer in the layer dialogue, with the size of the text box. Its name is the beginning of the text.
Open an image Steps
1. Open the image called Canoes on the Dordogne 01.jpg.
File>Open...
Create some text Steps
1. Select the Text Tool (T) .
The Tool Options will change to show options for the Text Tool.
2. Set the font Size to 10 pt (points).
3. Set the font Color to white.
4. Click near the top left corner of the image and type “Canoes on the Dordogne”
Type Tool
Notes
Font units. Choose from points, pixels, millimeters etc.
Font colour picker
Font
Font size
IT Learning Programme
TIMNFGIMP
36
Edit your text Steps
If you wish to edit your text later you will need to do two things:
1. Ensure the text layer is selected by clicking on it.
2. Select the Text Tool and click on the text.
Once you have clicked on the text the bounding box will appear around it and you will be able to edit it.
3. Using the Tool Options you can change the Font, Size, Color etc.
Use the Type Tool and the Character and Paragraph panels
Move the text Steps
1. Select the Move Tool (M) .
Initially the cursor shows an arrow, the move tool symbol and a hand.
2. Position the cursor over part of the text and it should change to show just the move tool symbol. When you see this, click and drag to move the text.
Move Tool
Notes
IT Learning Programme
TIMNFGIMP
37
* Saving image files - JPEG
Exercise - Save a layered image as a JPEG
From the GIMP manual:
“When you are finished working with an image, you will want to save the results. (In fact, it is often a good idea to save at intermediate stages too: GIMP is a pretty robust program, but we have heard rumors, possibly apocryphal, that it may have been known on rare and mysterious occasions to crash.) Most of the file formats that GIMP can open, can also be used for saving. There is one file format that is special, though: XCF is GIMP’s native format, and is useful because it stores everything about an image (well, almost everything; it does not store “undo” information). Thus, the XCF format is especially suitable for saving intermediate results, and for saving images to be re-opened later in GIMP. XCF files are not readable by most other programs that display images, so once you have finished, you will probably also want to export the image in a more widely used format, such as JPEG, PNG, TIFF, etc.”
Open an image Steps
1. Open the image called Martian Landscape 01.jpg.
File>Open...
Save as a JPEG Steps
1. Choose File>Export... This launches the Export Image dialogue.
2. Expand the menu in the bottom left corner of the dialogue called Select File Type (By Extension).
3. From this menu choose JPEG image and click on the Export button.
This will launch the Export Image as JPEG dialogue.
4. Ensure Show preview in image window is checked.
You may need to move the various dialogues out of the way to see the preview in the window.
5. Experiment with various Quality settings by sliding the quality slider left and right. Look to see the effect this has on both the visual quality of the image and the file size.
6. When you have found a good balance between visual quality and file size click the Export button to save your image as a JPEG.
File>Save for Web...
Notes
38IT Learning Programme
TIMNFGIMP
AppendixBibliography
• http://www.gimp.org/ and http://docs.gimp.org/en/index.html
• http://en.wikipedia.org/wiki/Main_Page
Recommended reading
• http://www.gimp.org/books/
Tutorial images used in this course
• Course resources are available via Portfolio.
39IT Learning Programme
TIMNFGIMP
Macintosh keyboard equivalents
This documentation uses the terms of the PC keyboard, and so speaks of the “Control” (Ctrl) key and the “Alt” key, but these have different meanings in the Macintosh world.
The Mac usually has (moving from the leftmost bottom corner of the keyboard inwards toward the space bar) a “Control” key in the same position as the PC control key. Then there is an “Option” key, which has a funny symbol and “Alt” written on it, in the position where a “Windows” key often appears on PC keyboards. Then, next to the space bar, there is a “Command” key, with an Apple logo and a sort of quadrifoil symbol, which occupies the space in which you usually find the Alt key on a PC.
The problem is that, although the PC and the Mac have a key marked “Control” in the same position on the keyboard, they use this key differently. Whereas PC users use, for example, Control-C to copy and Control-S to save, Mac users are accustomed to Command-C and Command-S.
Use the Command (or Apple) key as the Control key. Thus Command-S will save the file. Since you cannot use the Option key (which is marked “Alt”), because it is used to enter symbols, this leaves the key marked “Ctrl” to serve as the “Alt” key. If you are a regular Mac user, this is probably the easiest way -- just remember that when the documentation refers to the “Ctrl” key, do not use the key with that label, but use the Apple key, and when the documentation refers to the “Alt” key, use the key marked “Ctrl”.

IT Learning Programme
Digital Images:GIMP correcting and improvingimages
Carl Wenczek
Your safety is important
Where is the fire exit?
Beware of hazards:
Tripping over bags and coats
Please report any equipment faults to us
Let us know if you have any other concerns
Your comfort is important
The toilets are along the corridor outside thelecture rooms
The rest area is where you registered;it has vending machines and a water cooler
The seats at the computers are adjustable
You can adjust the monitors for height, tilt andbrightness
Programme
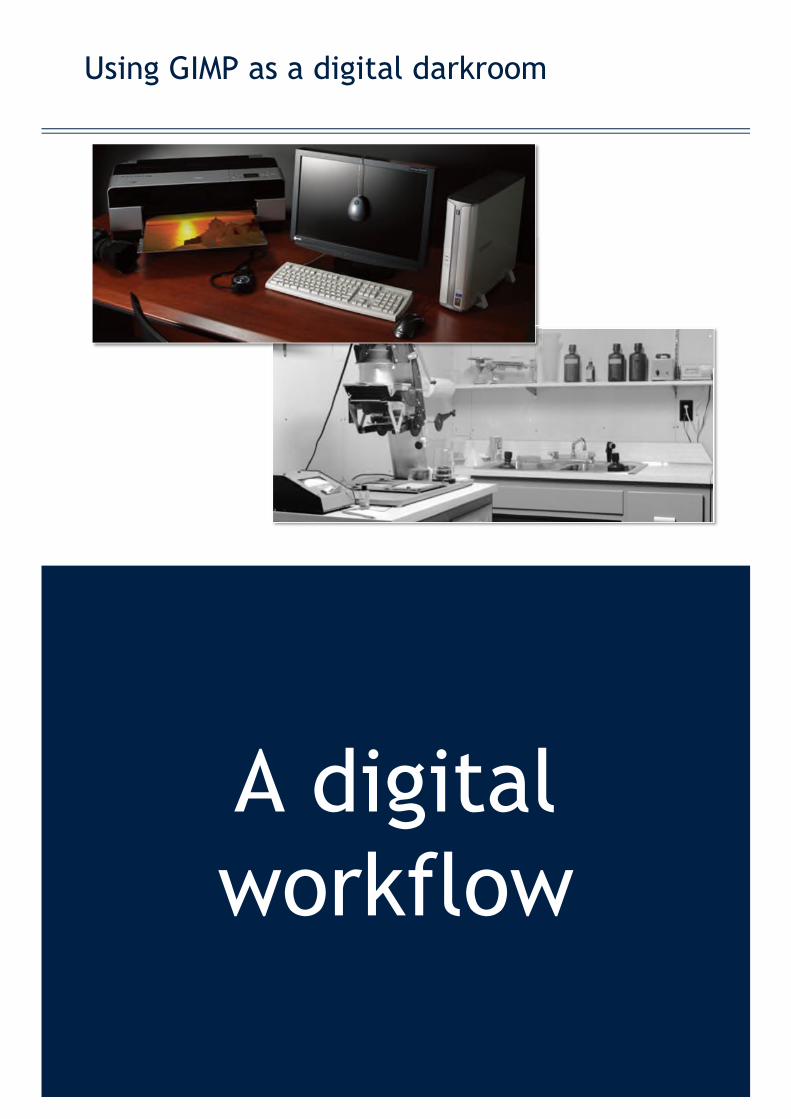
Using GIMP as a Digital DarkroomUsing GIMP as a digital darkroom
A digitalworkflow
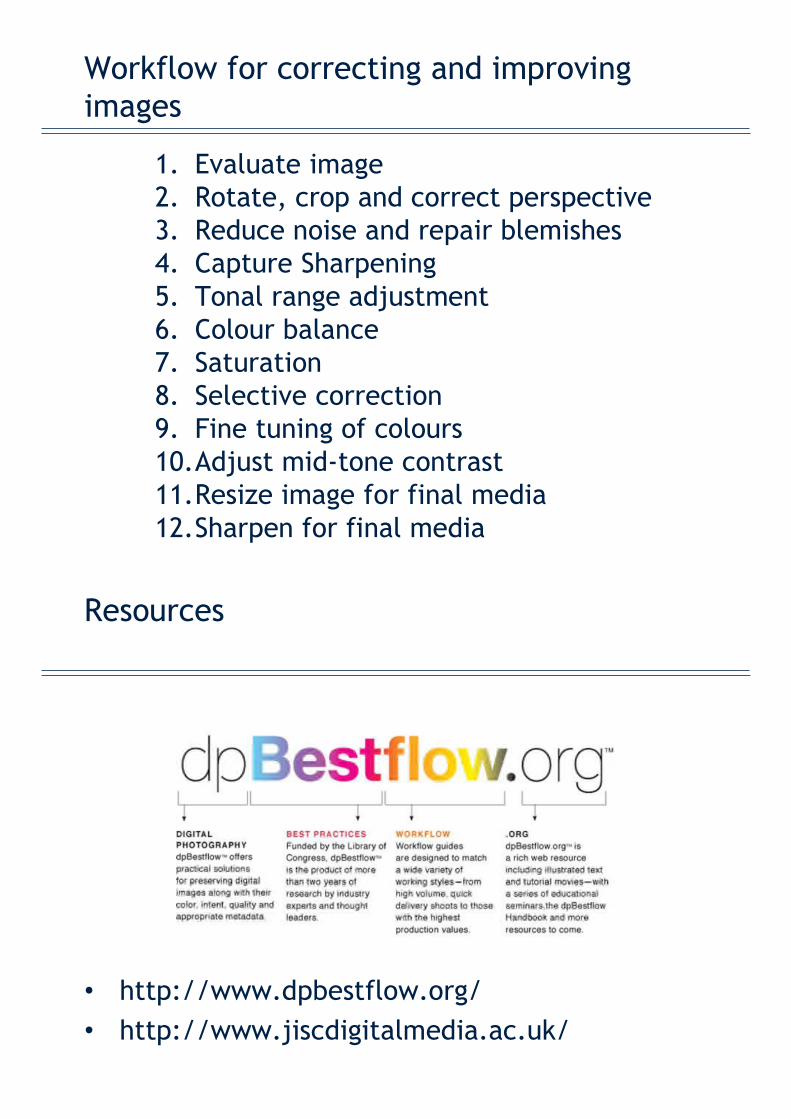
Workflow for correcting and improvingimages
1. Evaluate image2. Rotate, crop and correct perspective3. Reduce noise and repair blemishes4. Capture Sharpening5. Tonal range adjustment6. Colour balance7. Saturation8. Selective correction9. Fine tuning of colours10.Adjust mid-tone contrast11.Resize image for final media12.Sharpen for final media
Resources
http://www.dpbestflow.org/
http://www.jiscdigitalmedia.ac.uk/

The workingenvironment
Average screen resolution and connectionspeed
The latest State of the Internet report from ContentDelivery Network (CDN) operator Akamai - globalaverage connections speed in the first quarter of thisyear was 2.6 Mbps (2012)
Own Google analytics average screen resolution1024x768
http://www.w3schools.com/default.asp
http://media.ofcom.org.uk/facts/
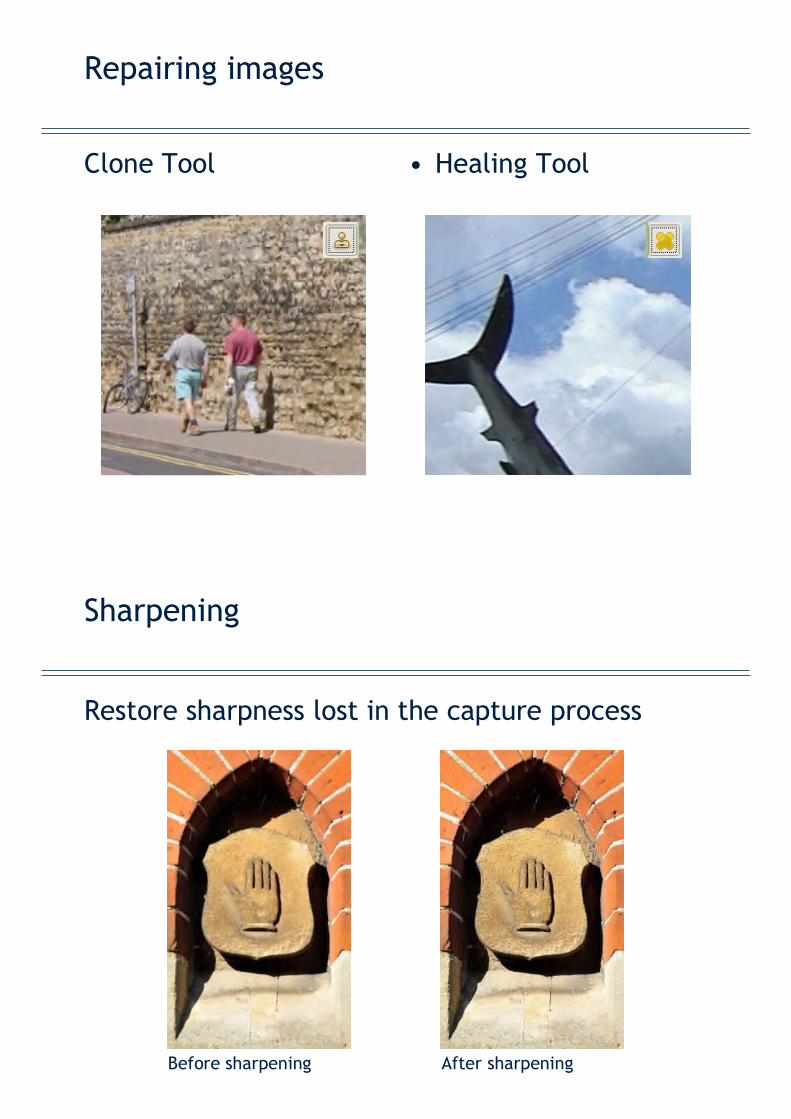
Repairing images
Clone Tool Healing Tool
Sharpening
Restore sharpness lost in the capture process
Before sharpening After sharpening
Levels
Use Levels to adjust
shadows,
gamma (midtones)
highlights
File formats
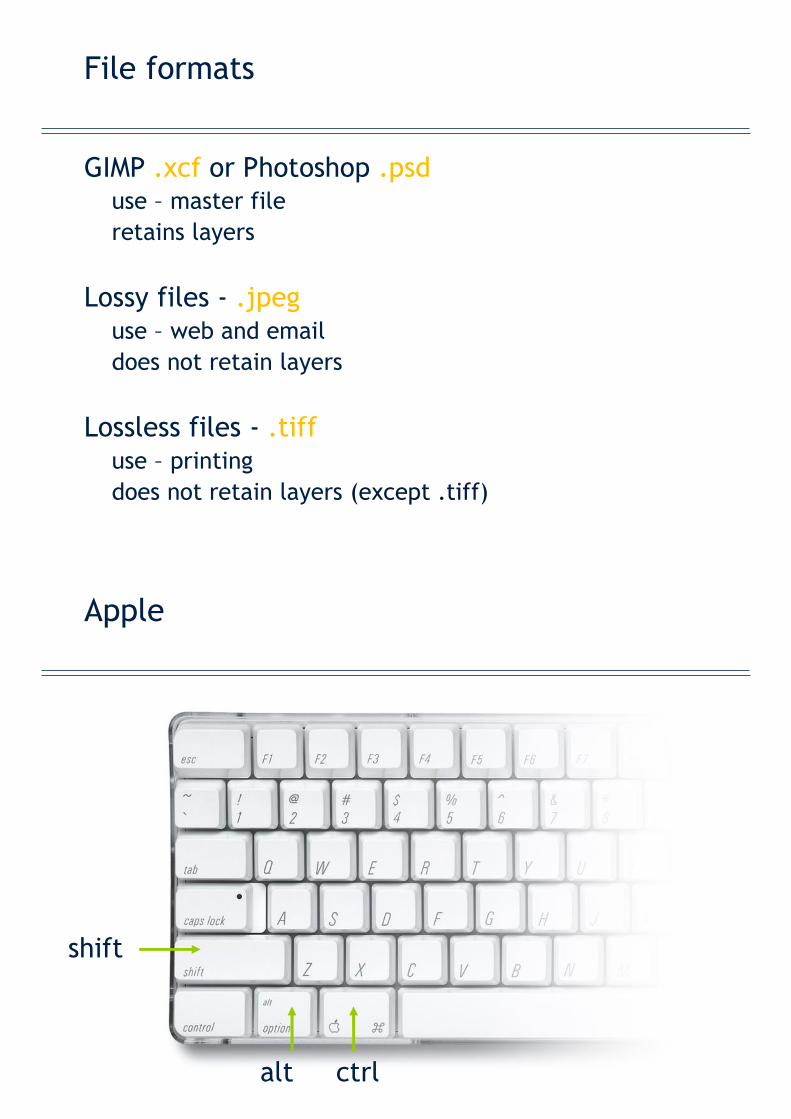
File formats
GIMP .xcf or Photoshop .psduse master file
retains layers
Lossy files - .jpeguse web and email
does not retain layers
Lossless files - .tiffuse printing
does not retain layers (except .tiff)
Apple
shift
alt ctrl

This presentation is made available by Carl Wenczekunder a Creative Commons licence:
Attribution-NonCommercial-NoDerivsCC BY-NC-ND