Embed Size (px)
DESCRIPTION
GIMP Beginners Guide
Citation preview
TD TEMPLATES [GIMP BEGINNER’S TUTORIAL]
1
GIMP can be downloaded for free @ http://www.gimp.org/downloads/
The following tutorial uses GIMP Version 2.6.10
***
Contents
1. Importing from SL
2. Creating a new image in GIMP
3. Opening in GIMP
4. Exporting from GIMP
5. GIMP Tools
6. Working with Layers
7. Alpha Channel Basics
8. Adding Designs/ Logo’s
9. Coloring
10. From Texture to Clothing
11. Packaging Tips
TD TEMPLATES [GIMP BEGINNER’S TUTORIAL]
2
Introduction - What is a template?
A template is a stencil, pattern or overlay used in graphic arts (drawing, painting, etc) and sewing to
replicate letters, shapes or design. In the case of using templates in SL, it is your basic design that
you can work from.
There are two ways to create clothes in SL. You can either make your own template from scratch or
you can use a pre-made template.
1. Importing Clothing Textures from SL
Ready to wear templates are just that, you can put them straight onto your avatar by clicking your
avatar and right click, go to appearance, select which item of clothing you are making, click on the
Fabric window and add your template from your inventory. You can also drag the template onto the
fabric window. Your avatar will now be wearing the item. Click save as, name your item, click ok.
If you want to be a bit more adventurous and make some changes to the template you can export it
to GIMP. Follow these steps.
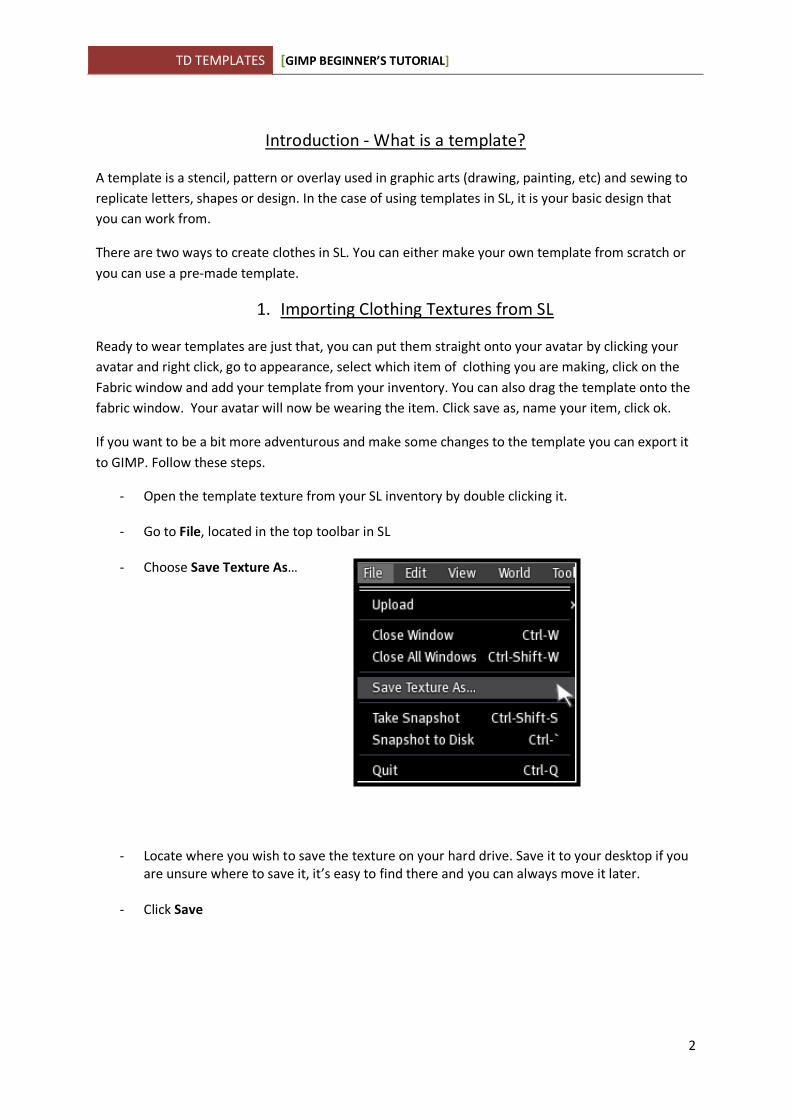
- Open the template texture from your SL inventory by double clicking it.
- Go to File, located in the top toolbar in SL
- Choose Save Texture As…
- Locate where you wish to save the texture on your hard drive. Save it to your desktop if you
are unsure where to save it, it’s easy to find there and you can always move it later.
- Click Save

TD TEMPLATES [GIMP BEGINNER’S TUTORIAL]
3
2. Creating a New Image
When creating a new project in GIMP, we first have to set the attributes the image will have
such as its size, resolution, color type and what type of background we will start off with.
- From the top menu toolbar click File, New. This dialog will be displayed:
- Click the + icon next to Advanced options to expand the dialog for more options.
- When creating a new image for SL, the image sizes commonly used are 512 x 512 and 1024 x
1024.
- Use the default resolution of 72. Also, the colour space should be RGB to allow color for your
image.
- Select Transparency next to fill with. This will give you a transparent background to work
with, click OK.
- You will see a grey and white chequered screen on your canvas indicating a transparent
background.
TD TEMPLATES [GIMP BEGINNER’S TUTORIAL]
4
3. Opening in GIMP
The following section will explore how to open files in your GIMP program.
IMPORTANT NOTE: PSD files are photoshop based documents. They do open in GIMP, however
some groups and special effects may not be visible since they require photoshop. In order for them
to open in GIMP these special layers must be formatted in a certain way. Before purchasing these
templates it is best to check whether they are compatible with GIMP.
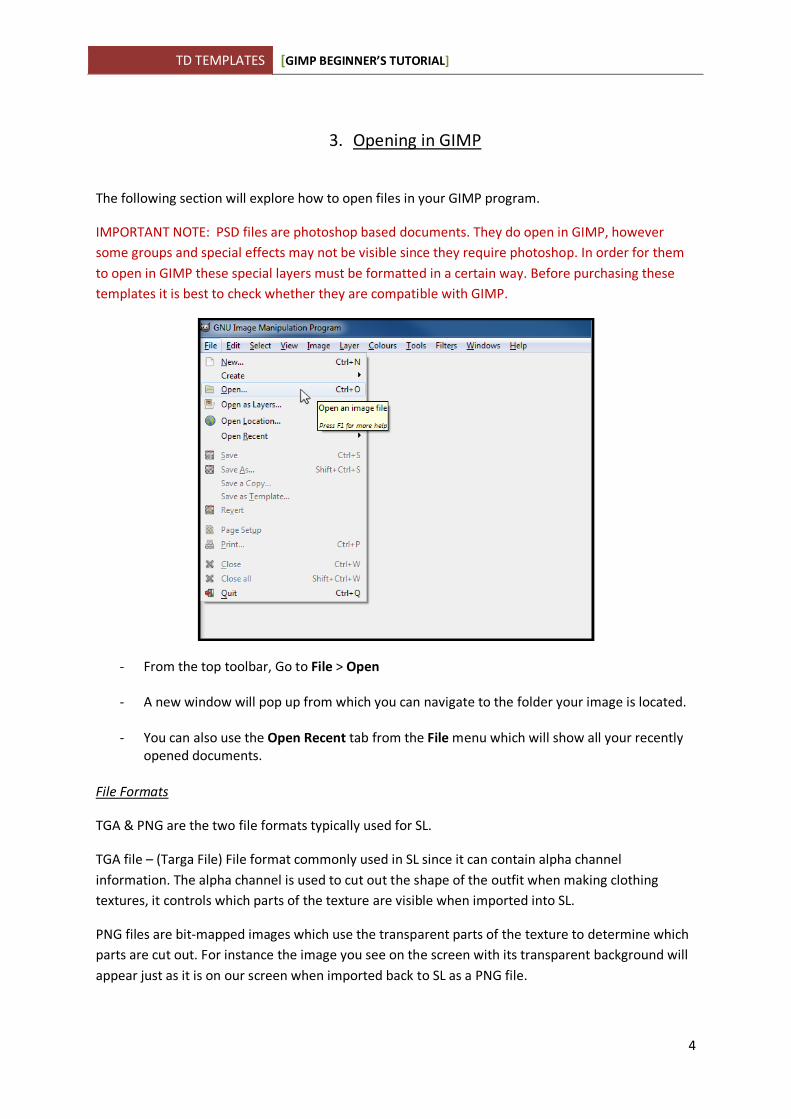
- From the top toolbar, Go to File > Open
- A new window will pop up from which you can navigate to the folder your image is located.
- You can also use the Open Recent tab from the File menu which will show all your recently
opened documents.
File Formats
TGA & PNG are the two file formats typically used for SL.
TGA file – (Targa File) File format commonly used in SL since it can contain alpha channel
information. The alpha channel is used to cut out the shape of the outfit when making clothing
textures, it controls which parts of the texture are visible when imported into SL.
PNG files are bit-mapped images which use the transparent parts of the texture to determine which
parts are cut out. For instance the image you see on the screen with its transparent background will
appear just as it is on our screen when imported back to SL as a PNG file.
TD TEMPLATES [GIMP BEGINNER’S TUTORIAL]
5
Both methods are used in SL. Some people believe PNG files are easier to use. In essence, it depends
on the complexity of the template. PNG files need to be extremely careful and precise when creating
your image as what you have on your image is exactly how it will appear on your avatar when
exported.
4. Exporting from GIMP to SL
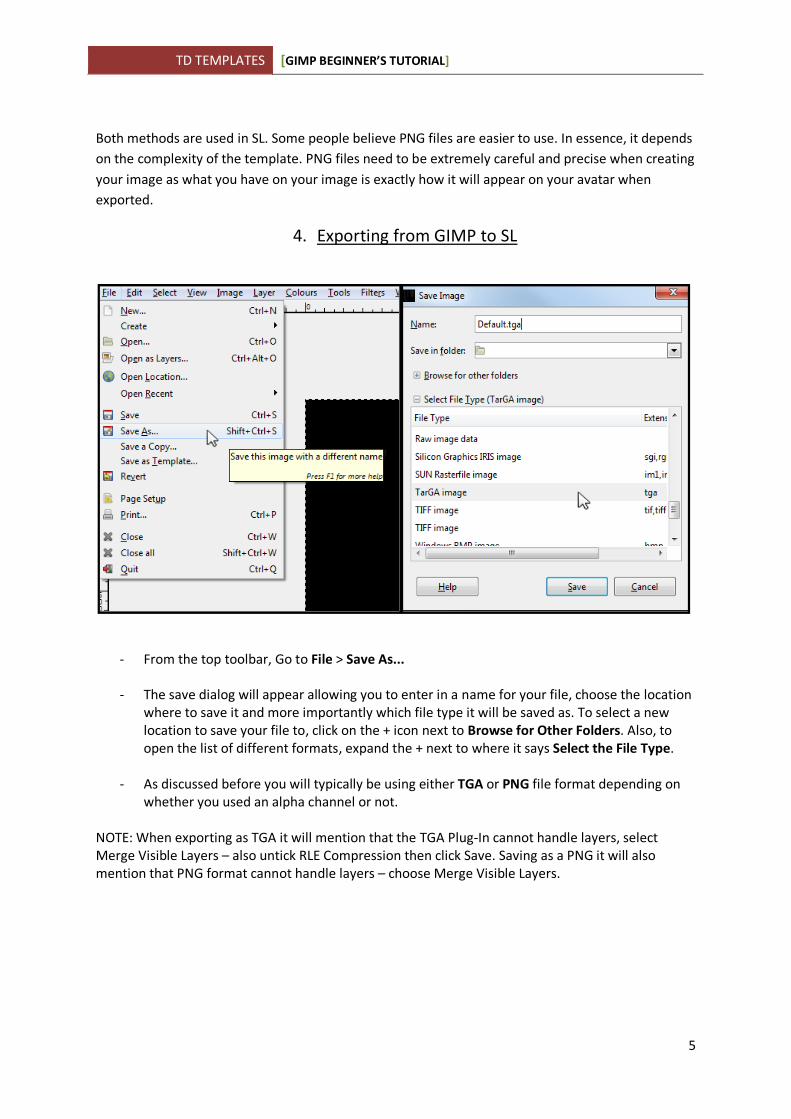
- From the top toolbar, Go to File > Save As...
- The save dialog will appear allowing you to enter in a name for your file, choose the location
where to save it and more importantly which file type it will be saved as. To select a new
location to save your file to, click on the + icon next to Browse for Other Folders. Also, to
open the list of different formats, expand the + next to where it says Select the File Type.
- As discussed before you will typically be using either TGA or PNG file format depending on
whether you used an alpha channel or not.
NOTE: When exporting as TGA it will mention that the TGA Plug-In cannot handle layers, select
Merge Visible Layers – also untick RLE Compression then click Save. Saving as a PNG it will also
mention that PNG format cannot handle layers – choose Merge Visible Layers.
TD TEMPLATES [GIMP BEGINNER’S TUTORIAL]
6
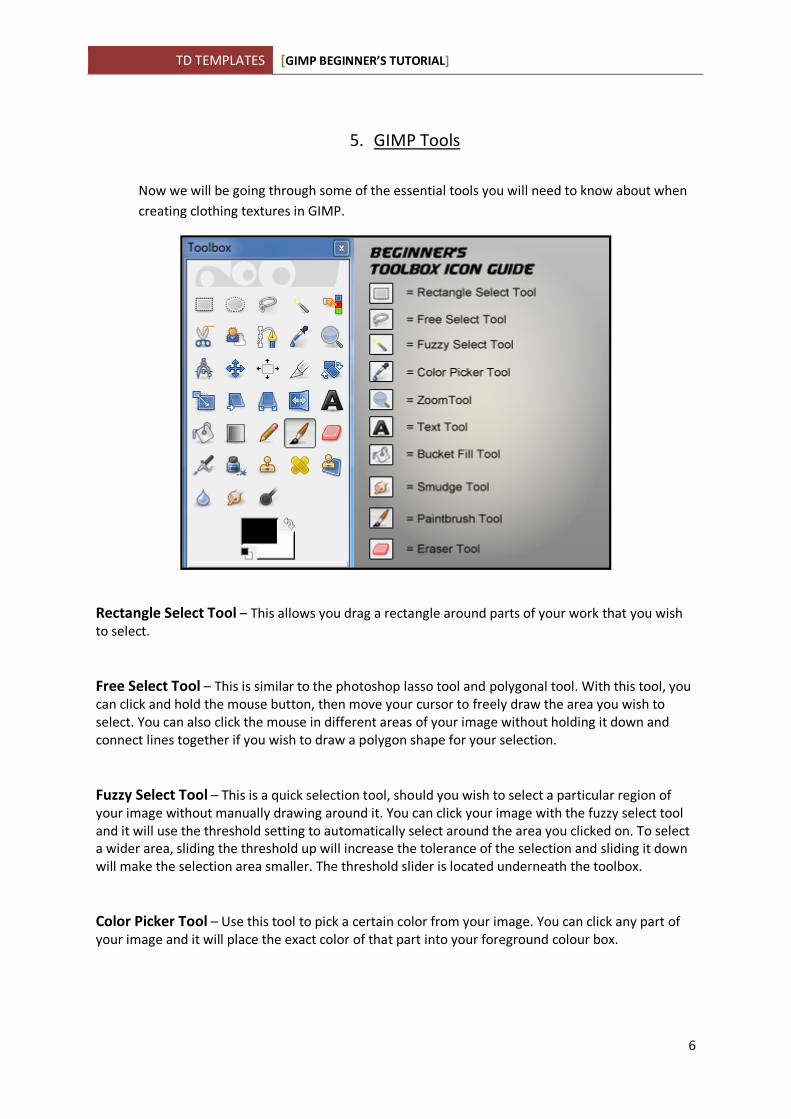
5. GIMP Tools
Now we will be going through some of the essential tools you will need to know about when
creating clothing textures in GIMP.
Rectangle Select Tool – This allows you drag a rectangle around parts of your work that you wish
to select.
Free Select Tool – This is similar to the photoshop lasso tool and polygonal tool. With this tool, you
can click and hold the mouse button, then move your cursor to freely draw the area you wish to
select. You can also click the mouse in different areas of your image without holding it down and
connect lines together if you wish to draw a polygon shape for your selection.
Fuzzy Select Tool – This is a quick selection tool, should you wish to select a particular region of
your image without manually drawing around it. You can click your image with the fuzzy select tool
and it will use the threshold setting to automatically select around the area you clicked on. To select
a wider area, sliding the threshold up will increase the tolerance of the selection and sliding it down
will make the selection area smaller. The threshold slider is located underneath the toolbox.
Color Picker Tool – Use this tool to pick a certain color from your image. You can click any part of
your image and it will place the exact color of that part into your foreground colour box.
TD TEMPLATES [GIMP BEGINNER’S TUTORIAL]
7
Zoom Tool – Simply zooms in and out of your image.
Text Tool – Inserts text into your document. Click this tool then select which part of your image to
have the text placed on. You can then change font size type/ size etc from the text palette on the
left side of the screen.
Useful Hint: When you create a new text layer, it will not be editable like your other layers – for
instance you won’t be able to erase parts of it with your eraser tool. This is because it contains text
information only for use for the text tool. You’ll need to right click the layer then select Discard Text
Information, when you do this it won’t be able to reverse back to a text layer like before.
Bucket Fill Tool – Fills your whole image or selection with your foreground color.
Smudge Tool – A slightly more advanced tool which allows you to make subtle touches to your
image by holding the mouse down and sliding across to smudge that area. You can make the area
bigger/ smaller by adjusting the smudge brush size on the left side of the screen under the toolbox.
However, smudging is not always recommend since it can distort the image and take away from the
texturing making it look unclear and blurred.
Paintbrush Tool – Clicking on the paintbrush tool will bring up a set of option on the left on your
screen which you can use to change the brush options like size/ shape etc. Using the brush tool is
just like using a brush on a canvas you can freely use it to make swirls and draw on your image.
Eraser Tool – If you make a mistake you can erase parts of your image using the eraser tool. You
can change the size of the eraser brush in the options underneath the toolbox.
History – Next to your Layers and Channels tab on the upper right side of GIMP is the History tab,
indicated by this icon The history tab allows you to go back one or more steps if you make a
mistake. You can also click Edit > Undo from the top menu toolbar or press Ctrl Z to undo your last
action.
Foreground / Background Colors – Underneath the toolbox are two squares, these represent
your currently selected foreground and background colors. The foreground color will be the main
color used by your brush and the paint bucket tools.
TD TEMPLATES [GIMP BEGINNER’S TUTORIAL]
8
6. Working with Layers
Layers make it easier to separate different elements of the image you are working on. For example
you can have the shadows on one layer and the colouring on another allowing you to modify one
layer at a time without disturbing the other layers.
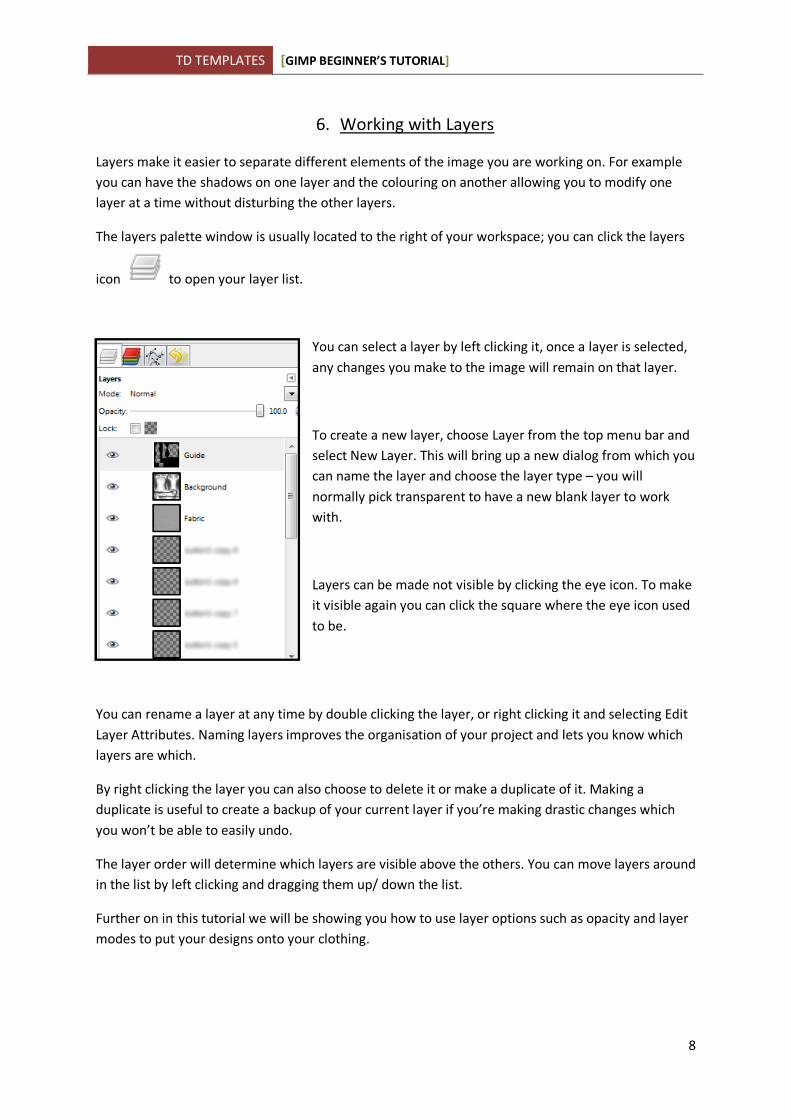
The layers palette window is usually located to the right of your workspace; you can click the layers
icon to open your layer list.
You can select a layer by left clicking it, once a layer is selected,
any changes you make to the image will remain on that layer.
To create a new layer, choose Layer from the top menu bar and
select New Layer. This will bring up a new dialog from which you
can name the layer and choose the layer type – you will
normally pick transparent to have a new blank layer to work
with.
Layers can be made not visible by clicking the eye icon. To make
it visible again you can click the square where the eye icon used
to be.
You can rename a layer at any time by double clicking the layer, or right clicking it and selecting Edit
Layer Attributes. Naming layers improves the organisation of your project and lets you know which
layers are which.
By right clicking the layer you can also choose to delete it or make a duplicate of it. Making a
duplicate is useful to create a backup of your current layer if you’re making drastic changes which
you won’t be able to easily undo.
The layer order will determine which layers are visible above the others. You can move layers around
in the list by left clicking and dragging them up/ down the list.
Further on in this tutorial we will be showing you how to use layer options such as opacity and layer
modes to put your designs onto your clothing.
TD TEMPLATES [GIMP BEGINNER’S TUTORIAL]
9
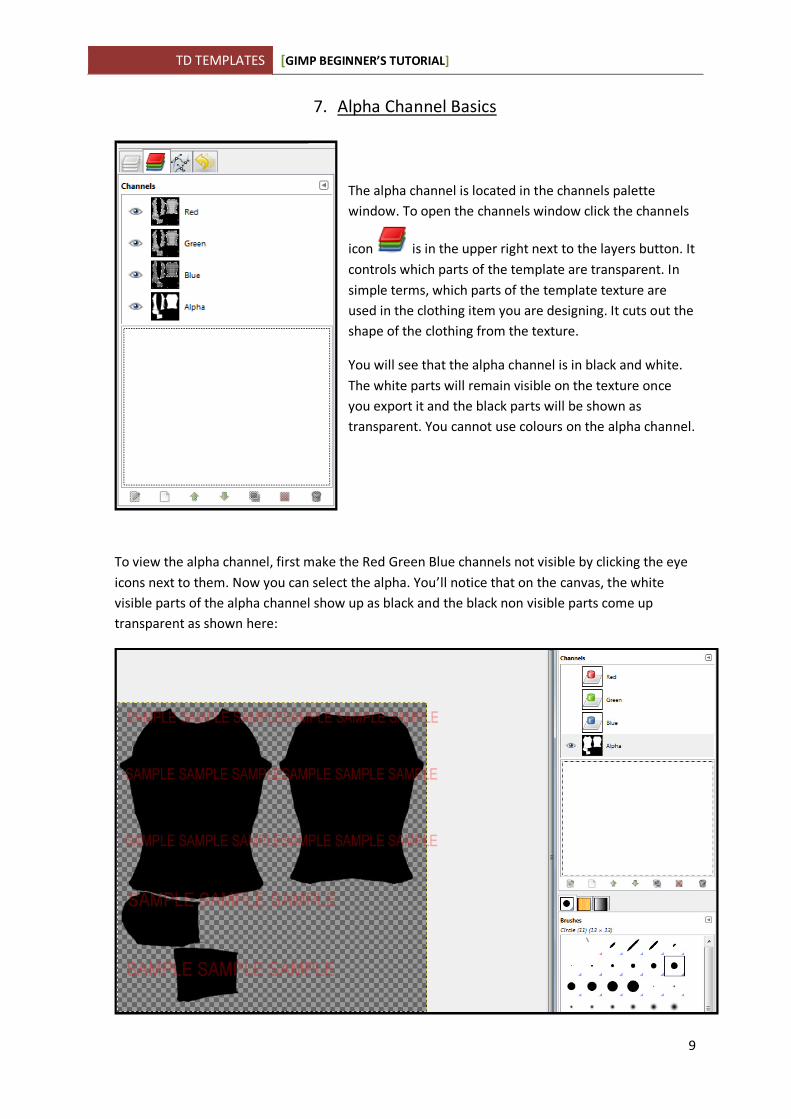
7. Alpha Channel Basics
The alpha channel is located in the channels palette
window. To open the channels window click the channels
icon is in the upper right next to the layers button. It
controls which parts of the template are transparent. In
simple terms, which parts of the template texture are
used in the clothing item you are designing. It cuts out the
shape of the clothing from the texture.
You will see that the alpha channel is in black and white.
The white parts will remain visible on the texture once
you export it and the black parts will be shown as
transparent. You cannot use colours on the alpha channel.
To view the alpha channel, first make the Red Green Blue channels not visible by clicking the eye
icons next to them. Now you can select the alpha. You’ll notice that on the canvas, the white
visible parts of the alpha channel show up as black and the black non visible parts come up
transparent as shown here:
TD TEMPLATES [GIMP BEGINNER’S TUTORIAL]
10
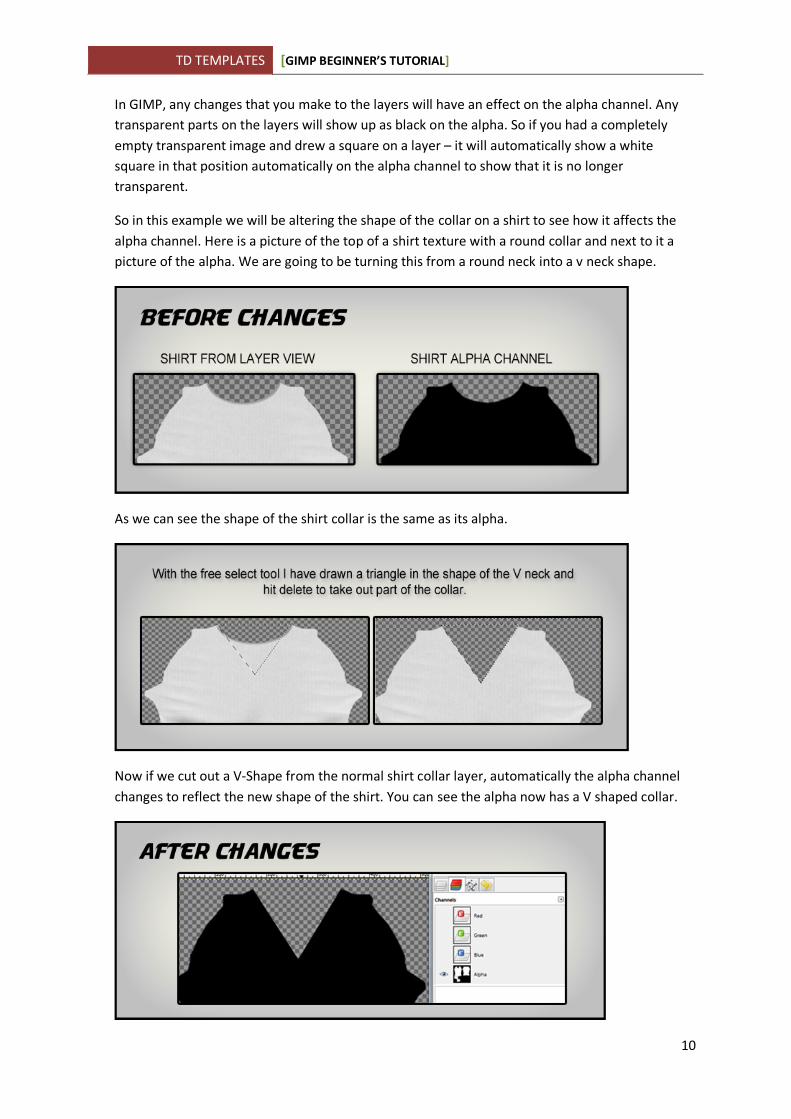
In GIMP, any changes that you make to the layers will have an effect on the alpha channel. Any
transparent parts on the layers will show up as black on the alpha. So if you had a completely
empty transparent image and drew a square on a layer – it will automatically show a white
square in that position automatically on the alpha channel to show that it is no longer
transparent.
So in this example we will be altering the shape of the collar on a shirt to see how it affects the
alpha channel. Here is a picture of the top of a shirt texture with a round collar and next to it a
picture of the alpha. We are going to be turning this from a round neck into a v neck shape.
As we can see the shape of the shirt collar is the same as its alpha.
Now if we cut out a V-Shape from the normal shirt collar layer, automatically the alpha channel
changes to reflect the new shape of the shirt. You can see the alpha now has a V shaped collar.
TD TEMPLATES [GIMP BEGINNER’S TUTORIAL]
11
8. Adding Designs / Logo’s
Anyone can place a logo on top of a clothing template, however its making the logo look
realistically part of the clothing itself which takes more skill. Here are some tips and tricks to
place your logo or design on the template.
- Paste your logo or design on a new layer (Layer > New Layer).
- Position your logo/design where you would like it.
NOTE: Be careful when choosing where to place
your design since the avatar can tend to distort it
on certain areas of the body. Most noticeably
around the female breast area, the sides of the
body and other parts likely to be contoured.
Useful Hint: Go to this web page:
http://secondlife.com/community/templates.php
And download the avatar UV Templates which
map out the avatar body contours.
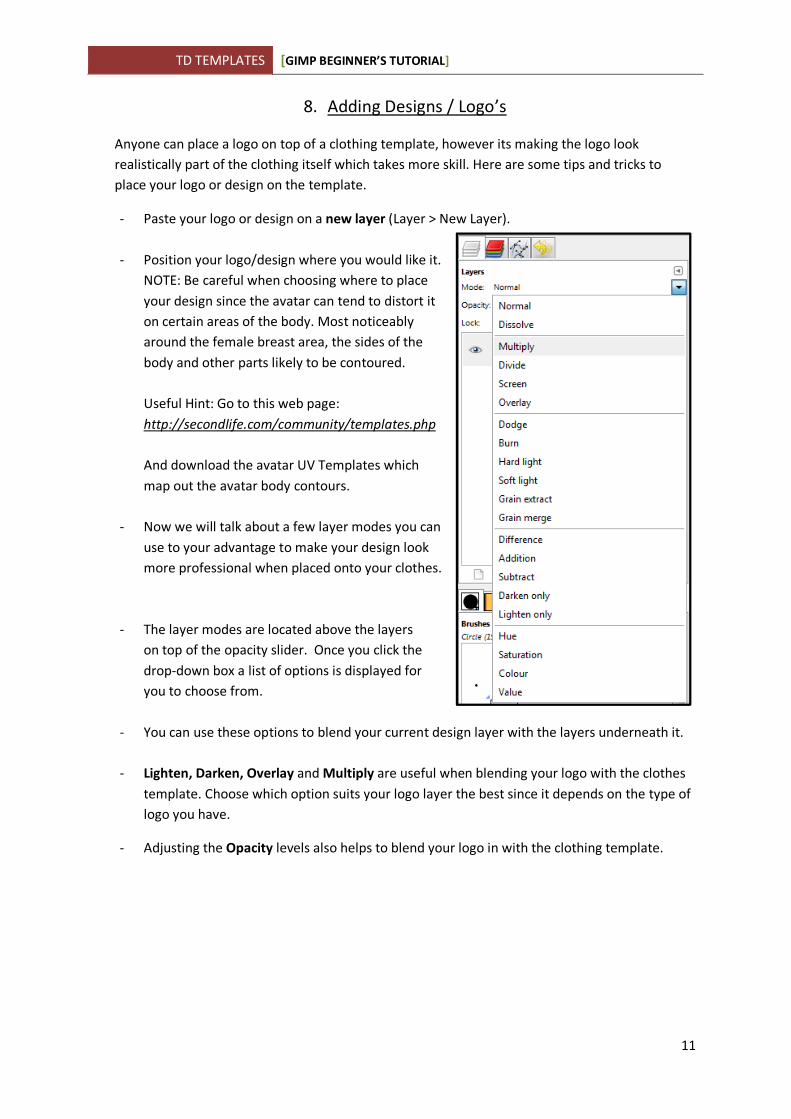
- Now we will talk about a few layer modes you can
use to your advantage to make your design look
more professional when placed onto your clothes.
- The layer modes are located above the layers
on top of the opacity slider. Once you click the
drop-down box a list of options is displayed for
you to choose from.
- You can use these options to blend your current design layer with the layers underneath it.
- Lighten, Darken, Overlay and Multiply are useful when blending your logo with the clothes
template. Choose which option suits your logo layer the best since it depends on the type of
logo you have.
- Adjusting the Opacity levels also helps to blend your logo in with the clothing template.
TD TEMPLATES [GIMP BEGINNER’S TUTORIAL]
12
9. Coloring
Coloring is another essential skill to learn when designing clothing to wear in SL. We will now
walk through how to alter the color of your outfit.
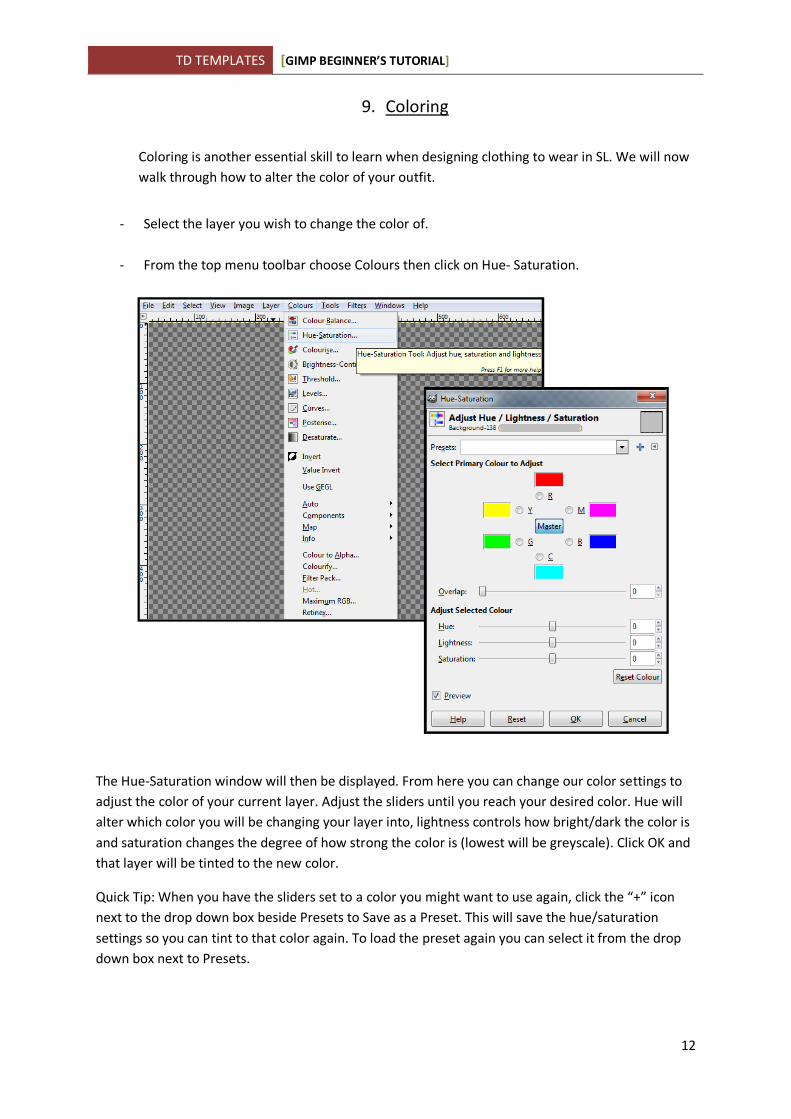
- Select the layer you wish to change the color of.
- From the top menu toolbar choose Colours then click on Hue- Saturation.
The Hue-Saturation window will then be displayed. From here you can change our color settings to
adjust the color of your current layer. Adjust the sliders until you reach your desired color. Hue will
alter which color you will be changing your layer into, lightness controls how bright/dark the color is
and saturation changes the degree of how strong the color is (lowest will be greyscale). Click OK and
that layer will be tinted to the new color.
Quick Tip: When you have the sliders set to a color you might want to use again, click the “+” icon
next to the drop down box beside Presets to Save as a Preset. This will save the hue/saturation
settings so you can tint to that color again. To load the preset again you can select it from the drop
down box next to Presets.
TD TEMPLATES [GIMP BEGINNER’S TUTORIAL]
13
10. From Texture to Clothing
Once you have your finished texture(s) and uploaded them into SL, you can then begin to transform
them into your finished product.
Let’s start with making a simple shirt.
- Go into appearance mode by right clicking your avatar and selecting Appearance. (Make
sure you have taken off any shirts/jackets you’re wearing)
- Select the Jacket tab.
- Create New Jacket.
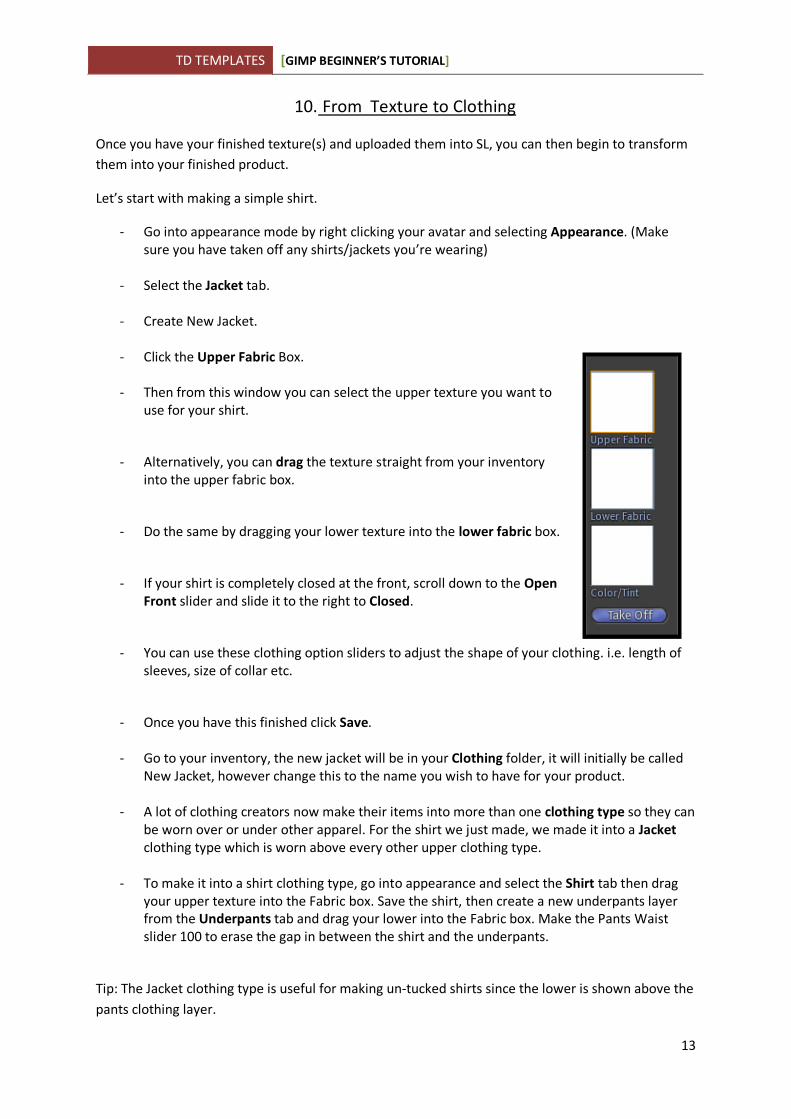
- Click the Upper Fabric Box.
- Then from this window you can select the upper texture you want to
use for your shirt.
- Alternatively, you can drag the texture straight from your inventory
into the upper fabric box.
- Do the same by dragging your lower texture into the lower fabric box.
- If your shirt is completely closed at the front, scroll down to the Open
Front slider and slide it to the right to Closed.
- You can use these clothing option sliders to adjust the shape of your clothing. i.e. length of
sleeves, size of collar etc.
- Once you have this finished click Save.
- Go to your inventory, the new jacket will be in your Clothing folder, it will initially be called
New Jacket, however change this to the name you wish to have for your product.
- A lot of clothing creators now make their items into more than one clothing type so they can
be worn over or under other apparel. For the shirt we just made, we made it into a Jacket
clothing type which is worn above every other upper clothing type.
- To make it into a shirt clothing type, go into appearance and select the Shirt tab then drag
your upper texture into the Fabric box. Save the shirt, then create a new underpants layer
from the Underpants tab and drag your lower into the Fabric box. Make the Pants Waist
slider 100 to erase the gap in between the shirt and the underpants.
Tip: The Jacket clothing type is useful for making un-tucked shirts since the lower is shown above the
pants clothing layer.
TD TEMPLATES [GIMP BEGINNER’S TUTORIAL]
14
11. Packaging Tips
Setting Permissions [Perms] for your product
Right click your clothing item from your inventory and choose properties. Below where it says Next
Owner Can: is where the permissions are. These options are what the buyer can do with your
product once they have purchased it.
Transfer: They can give it someone else.
Copy: They can make copies of it in their inventory.
Mod: They can modify the clothing item in appearance (useful for when editing sleeve length/collar
size is necessary).
The two most common permission options are:
Copy/Mod – This means they can copy and modify the item in their own inventory for themselves
but cannot give it to anyone else.
Trans (Transfer) – This means they can transfer the item to anyone else but they cannot replicate it
or modify it in appearance. (This is useful for making clothes which people can gift people as
presents).
Now it’s ready to put into your box or display for purchase.
Tip: Put your store landmark into the packaging and if necessary a note card about how to use the
product.
**
Thank You for using one of our tutorials.