Embed Size (px)
Citation preview

Gibson Dark FireGibson Dark Fire
Owner's ManualOwner's Manual
Gibson Dark Fire 4.0 manual, page 1
Important Safety Instructions
We value you as a customer—and want our products to give you an inspiring, and gratifying, experience. So, to insure your safety and protect your investment in the Gibson Dark Fire guitar, please read and follow all safety warnings and operating instructions before using this product, and keep all documentation for future reference.
Environmental Factors
Heat and moisture can harm your Gibson Dark Fire. Please do not install or operate this guitar near sources of moisture, such as sinks, damp basements, leaky roofs, etc. and never store it near heat sources, such as heaters or radiators. Both you and your Dark Fire will be much happier if you store and operate this product under safe conditions.
Power Sources
Use only the power source included in the Dark Fire package. Make sure any power supply cords are not located where they are likely to be safety hazards, such as on the floor where people might walk, or in locations where they may receive pressure from items placed upon or against them. Also, be very careful with any power source connections, such as where the AC adapter connects to the wall outlet. If these are jostled loose, the Robot Guitar II Breakout Box or RIP audio interface may experience extreme power differentials, which can potentially harm you and the product.
Service
Please do not attempt to service Dark Fire or any of its accessories yourself. Opening the case may expose you to high voltages (besides, there are no user-serviceable parts), so let our expert technicians handle any repairs for you.
Speaking of experts, always send the RIP to an authorized service technician if any of the following occurs (contact numbers for service centers are at the end of this section):
Any foreign object (especially liquid) has gotten inside Dark Fire or its accessories Dark Fire or its accessories have been exposed to water, dropped, or otherwise damaged A marked change in Dark Fire’s performance You hear anything rattling around inside if you shake the Dark Fire gently
Gibson Dark Fire 4.0 manual, page 2

Warranty Protection
It is extremely important to us that you are satisfied with Dark Fire. Register it and activate your warranty protection by mailing the warranty card included with Dark Fire to Gibson USA, Department W, P.O. Box 100087, Nashville, TN 37210-0087. If you encounter any kind of problem, contact us as soon as possible so we can make things right.
Once you your warranty protection is active, Dark Fire's electronic components are warranted to be free from defects in materials and workmanship for a period of one (1) year from the date of original purchase. Your warranty covers the cost of both labor and materials on any repair deemed necessary by our Customer Service Representative for the warranty period, subject to the limitations below. Please note that our warranty belongs to the original retail purchaser only, and may not be transferred or assigned to subsequent owners.
If Dark Fire malfunctions as a result of faulty materials or workmanship, Gibson will determine whether repair or replacement is more appropriate. In case the original materials are no longer available for repair, Gibson reserves the right to use materials regularly utilized at the time of repair.
If we determine that replacing Dark Fire best serves your interests, or in the unlikely event that it is destroyed, lost, or damaged beyond repair while in our possession for repairs, we will replace the product. If it is no longer available, it will be replaced with the most similar product whose value does not exceed your original product’s purchase price.
Remember—as a necessary condition to the warranty coverage described in this section, you must activate your warranty by mailing the warranty card included with Dark Fire to Gibson USA, Department W, P.O. Box 100087, Nashville, TN 37210-0087.
Warranty Limitations
Unfortunately, it is not possible for your product warranty to cover any of the following:
Any product that has been altered or modified in any way, or upon which any serial or registration number has been tampered with or altered in any way.
Any product whose warranty card has been altered or contains false information. Any product that has been damaged due to misuse, negligence, accident or improper
operation or storage. Any product damaged during shipment. Inspect the package immediately upon receipt, and
notify the carrier immediately if there is damage. Any product damaged as a result of extreme temperature, humidity, or the use of an improper
power source. Any product not purchased through an authorized dealer, or any product that has had repairs,
modifications or alterations made by an unauthorized service technician. Wear and tear based on normal usage. Factory installed electronics after more than one year following the original date of purchase.
Gibson makes no other express warranty of any kind. All implied warranties, including warranties of merchantability and fitness for a particular purpose that exceed the specific provisions of the warranty, are expressly and specifically disclaimed and excluded from the
Gibson Dark Fire 4.0 manual, page 3

warranty. Note, however, that some states and/or countries do not allow the exclusion or limitation of implied warranties, so this paragraph may not apply to you. In particular, if you purchased your product outside of the United States, contact your local distributor for the handling and resolution of all warranty issues, as the warranty described here is not always applicable.
And of course, Gibson shall not be liable for any special, indirect, consequential, incidental or other similar damages to you or to any third party, including, without limitation, damages for loss of profits or business, or damages resulting from use or performance of the product, whether in contract or tort, even if Gibson or its authorized representative has been advised of the possibility of such damages, and Gibson shall not be liable for any expenses, claims or suits arising from or relating to any of the foregoing.
To obtain warranty service, contact the service center nearest you:
US (Toll Free) 1-800-4GIBSONUS (Local) 1-615-871-4500Email - [email protected]
Europe 00800-4GIBSON1Email - [email protected]
Japan 03-3434-5670Email - [email protected]
China 800-820-8841 (in China only)Email - [email protected]
Please do not send a unit in for repair before contacting your customer service center. They will advise you of the proper procedure for a quick and efficient repair, as well as provide information on where and how to send your Dark Fire.
Gibson® is a trademark of t .he Gibson Guitar Corp
Gibson Dark Fire 4.0 manual, page 4

Introduction: Welcome to Dark Fire Dark Fire is the world's most technologically-advanced guitar. Its features include:
Second-generation Robot Tuning TechnologyTM for automatic, accurate tuning Instantly selectable choice of tunings (standard and 18 alternate tunings) Chameleon Tone TechnologyTM delivers iconic guitar sounds without digital modeling Dark Fire is equally at home in live performance or recording environments The Master Control Knob (MCK) includes a sophisticated display to help you select different
tunings, sounds, and functions The Dark Fire package includes the Robot Guitar II Breakout Box/Charger (referred to from
now as simply the Breakout Box) that splits the magnetic pickup and Piezo pickup signals into separate channels (useful for both recording and live performance), and can also charge Dark Fire's internal battery
Dark Fire also comes with the Robot Interface Pack (RIP), a custom-designed, cross-platform FireWire box that interfaces Dark Fire to a computer for computer-based recording; it can also charge Dark Fire's internal battery
Multiple outputs available for recording: Magnetic pickups, Piezo pickup, individual string outputs
The pickup switch toggle is also a knob (“Piezo blend”) that sets the blend of magnetic and Piezo pickup sounds
Set up with Plek technology for exceptional playability Bundled with Native Instruments' Guitar Rig 3 (full version) and Ableton Live Lite 7 Gibson
Studio Edition User-updatable for additional functionality User-replaceable, internal high-performance battery
Most importantly, Dark Fire is an inspiring guitar that plays, looks, and feels both familiar and comfortable.
Dark Fire offers so much you'll need time to learn its features. This manual, written by Dark Fire owners for Dark Fire owners, will help make that process as simple as possible.
All of us at Gibson hope that you get the same joy out of playing Dark Fire that we've had in creating and updating it. We appreciate your confidence in Gibson. Should you encounter problems, our support staff is always ready to help you resolve any issues.
Welcome to the Gibson family, and to the ground-breaking world of Dark Fire.
Gibson Dark Fire 4.0 manual, page 5

Chapter 1: Dark Fire Essentials
Dark Fire's Power Source
Dark Fire contains an internal, user-replaceable, rechargeable battery that must be charged to use the Piezo pickup, Chameleon Tone Technology, or Robot Tuning Technology. Using only the magnetic pickups does not require power. Please charge the battery fully when you first receive Dark Fire. Chapter 4 tells how to use and charge the battery, as well as optimize battery life. The Power Supply included with Dark Fire is an international type (100-240V, 50/60Hz).
The Master Control Knob
The Master Control Knob (MCK), a sophisticated “push-pull” knob with an illuminated interactive display, shows Dark Fire's status and lets you select tunings, sounds, and more. The MCK has two main modes:
When pushed in (closest to the guitar body), the MCK works like a regular tone knob. Pulling the MCK out (furthest from the guitar body) activates it and applies power to Dark Fire.
You can rotate the MCK to make various selections, and “enter” your choices in two ways: Some functions require short, momentary presses on the MCK's Display Matrix, while others require a sustained press of greater than 2 seconds (but don't press too hard, as this will push the MCK all the way in to the off position).
The MCK has several distinct elements:
Gibson Dark Fire 4.0 manual, page 6

Position/String LEDs. These 10 LEDs surround the MCK's edge. After pulling the MCK out, rotating the knob to a particular LED chooses a specific sound or function.
b# symbol. Rotate the MCK fully counter-clockwise to access this position, then access the preset tuning banks.
Rotating arrow symbol. Activates String Up, String Down, and other modes desribed later. Guitar symbol. Shows the status of the Piezo pickup, e.g., whether it's available to be blended
in with the magnetic pickup and whether its companion onboard EQ is on or off. Pickup symbol. This indicates the status of Dark Fire's magnetic pickups—whether they're
operating as standard pickups, using coil switching to obtain different sounds, and whether the onboard EQ section is on or off.
Variable color Display Matrix. This provides feedback on several aspects of Dark Fire: For example, it changes color to indicate which bank of alternate tunings is selected, spells out the name of the selected Chameleon tone, shows the battery charge, and much more.
Peg symbol. Activates tuning functions. | symbol. Changes Piezo and pickup status. Chameleon Tone symbol. Enters the mode for selecting Chameleon Tones.
Dark Fire Connections
Dark Fire has traditional magnetic pickups, a Piezo pickup in the bridge, and individual outputs for each string (hex pickup), all of which feed a tip-ring-sleeve (stereo) 1/4” output jack. There are several ways to use these outputs.
As you familiarize yourself with the Dark Fire guitar, we suggest using either the “Traditional Electric Guitar” or “Blended Electric/Piezo Sound” connections described next. The companion RIP Computer Interface manual covers computer-based application in detail.
Traditional Electric Guitar
The magnetic pickups' output appears on the jack's tip. If you plug a standard mono guitar cable into Dark Fire and plug the other end into an amp, Dark Fire (even when not powered-on) acts just like a traditional electric guitar. When powered-on, you can use the Robot Tuning and Chameleon Tone Technology, as well as mix in the Piezo pickup sound.
Blended Electric/Piezo Sound
1. Use a standard guitar cord to connect Dark Fire to your amplifier.2. Pull the MCK out, then turn it to the | position.3. Press momentarily on the center of the Display Matrix (don't press hard enough to push the
MCK knob back in). Each press changes the color of the Guitar symbol, which indicates the status of the Piezo output. Choose the blue Guitar symbol for now.
4. Dark Fire's output carries a mix of the magnetic and Piezo pickup signals, with the balance determined by the blend control (pickup switch toggle). Turn the toggle clockwise for more Piezo sound, or counter-clockwise for more magnetic sound.
Gibson Dark Fire 4.0 manual, page 7
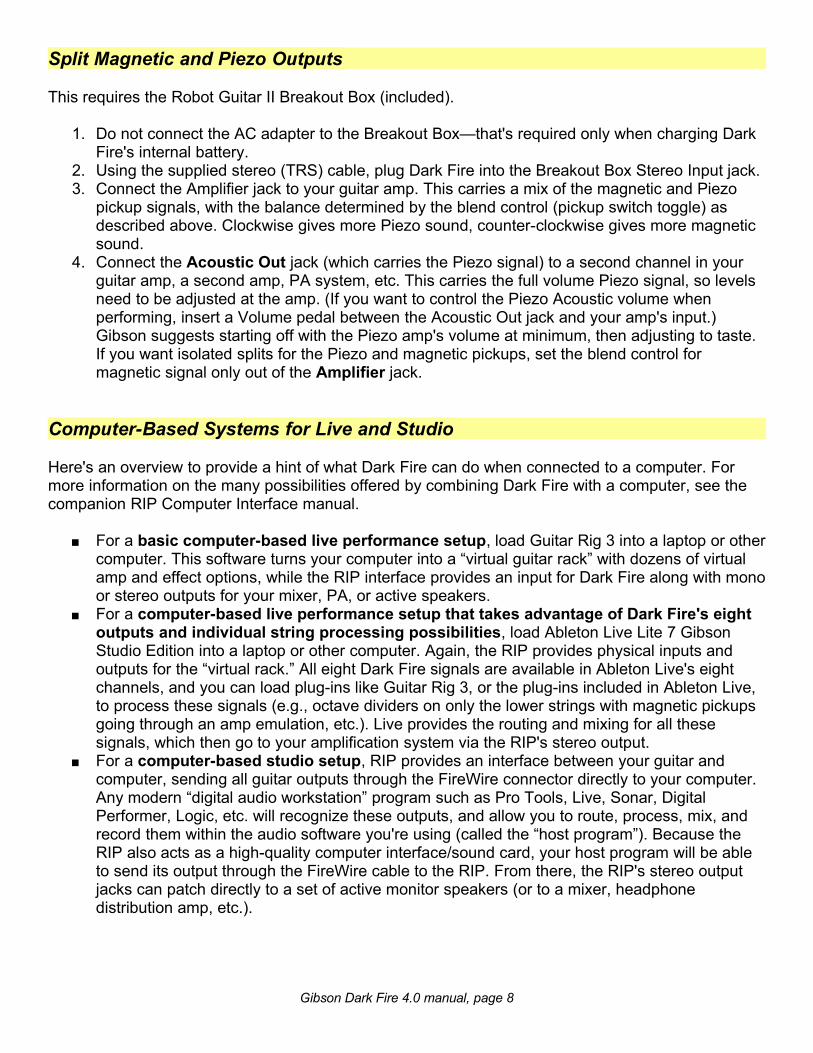
Split Magnetic and Piezo Outputs
This requires the Robot Guitar II Breakout Box (included).
1. Do not connect the AC adapter to the Breakout Box—that's required only when charging Dark Fire's internal battery.
2. Using the supplied stereo (TRS) cable, plug Dark Fire into the Breakout Box Stereo Input jack.3. Connect the Amplifier jack to your guitar amp. This carries a mix of the magnetic and Piezo
pickup signals, with the balance determined by the blend control (pickup switch toggle) as described above. Clockwise gives more Piezo sound, counter-clockwise gives more magnetic sound.
4. Connect the Acoustic Out jack (which carries the Piezo signal) to a second channel in your guitar amp, a second amp, PA system, etc. This carries the full volume Piezo signal, so levels need to be adjusted at the amp. (If you want to control the Piezo Acoustic volume when performing, insert a Volume pedal between the Acoustic Out jack and your amp's input.) Gibson suggests starting off with the Piezo amp's volume at minimum, then adjusting to taste. If you want isolated splits for the Piezo and magnetic pickups, set the blend control for magnetic signal only out of the Amplifier jack.
Computer-Based Systems for Live and Studio
Here's an overview to provide a hint of what Dark Fire can do when connected to a computer. For more information on the many possibilities offered by combining Dark Fire with a computer, see the companion RIP Computer Interface manual.
For a basic computer-based live performance setup, load Guitar Rig 3 into a laptop or other computer. This software turns your computer into a “virtual guitar rack” with dozens of virtual amp and effect options, while the RIP interface provides an input for Dark Fire along with mono or stereo outputs for your mixer, PA, or active speakers.
For a computer-based live performance setup that takes advantage of Dark Fire's eight outputs and individual string processing possibilities, load Ableton Live Lite 7 Gibson Studio Edition into a laptop or other computer. Again, the RIP provides physical inputs and outputs for the “virtual rack.” All eight Dark Fire signals are available in Ableton Live's eight channels, and you can load plug-ins like Guitar Rig 3, or the plug-ins included in Ableton Live, to process these signals (e.g., octave dividers on only the lower strings with magnetic pickups going through an amp emulation, etc.). Live provides the routing and mixing for all these signals, which then go to your amplification system via the RIP's stereo output.
For a computer-based studio setup, RIP provides an interface between your guitar and computer, sending all guitar outputs through the FireWire connector directly to your computer. Any modern “digital audio workstation” program such as Pro Tools, Live, Sonar, Digital Performer, Logic, etc. will recognize these outputs, and allow you to route, process, mix, and record them within the audio software you're using (called the “host program”). Because the RIP also acts as a high-quality computer interface/sound card, your host program will be able to send its output through the FireWire cable to the RIP. From there, the RIP's stereo output jacks can patch directly to a set of active monitor speakers (or to a mixer, headphone distribution amp, etc.).
Gibson Dark Fire 4.0 manual, page 8

Chapter 2: Dark Fire Robot II Tuning Functions
To start playing, pull the MCK out. Dark Fire defaults to being ready to tune to standard tuning. The selected Chameleon Tone is Gibson Classic; to indicate this, the MCK Display Matrix alternates between the letters “S” (Standard Tuning) and “G” (Gibson Classic).
Instantly Activated Tuning
Once Dark Fire is in default mode from pulling the MCK out, here's how to tune to standard tuning (A=440Hz).
1. Strum all six strings normally at the neck pickup position—not too hard or soft. Do not fret any strings, or touch the neck, while tuning.
2. The Powerheads will turn robotically, and the MCK's String LEDs will shine various colors to indicate tuning status. Here's what the colors mean:
Red (solid): String not in tune, or not yet tuned Red (flashing): Measuring string frequency Blue (solid): Signal is clipping (the strum was too hard; please strum more softly) Yellow flashing: Powerheads turning to tune string. If the corresponding Powerhead is
not turning when its LED flashes yellow, there is a physical or electrical problem. Purple solid: String frequency at extreme end of range Green: Individual string in tune All LEDs off, except one LED solid blue, green, or red: Tuning is complete White (blinking): Short circuit detected. Check if a string touches the tail piece, the
bridge, a fret, or another string; make sure that strings are cut close to the posts, and that all strings are in the bridge saddle's center.
White (solid): Tuning for this string is temporarily on hold; tuning will be completed after the other strings are tuned, or after the next strum.
3. When the guitar is in tune, all LEDs will turn off except for the currently selected LED position (either E, A, D, G, B, or e). This will shine solid blue, green, or red, depending on the selected tuning bank.
4. If all the LEDs don't turn off as described in step 3, strum all six strings again. This may be necessary if the guitar is considerably out of tune. It should take only one or two strums for Dark Fire to tune itself; pause briefly (2-3 seconds) between strums.
5. Push the MCK back in (unless you also want to use the Chameleon Tone select mode), and you're ready to play.
Note: You can change your desired Instantly Activated Tuning (for example, to an alternate tuning), and even the Calibration if you want “A” to be something other than 440Hz, as described in Chapter 7. You can also change the default Chameleon Tone; see Chapter 3.
Gibson Dark Fire 4.0 manual, page 9

Manual Powerhead Tuning
You can tune Dark Fire’s Powerheads by hand as well as use Robot tuning technology.
Caution: Never use a manual or mechanical string winding tool, as this can damage the Powerheads. Also, never attempt to tune the Powerheads manually while they are operating robotically as this can also damage the Powerheads permanently.
Unlike conventional tuning keys, Powerheads all turn in the same direction. The Powerhead tuner posts have locking nuts to secure the end of each string during tuning operations.
Robot technology includes special options for changing strings (see Chapter 5), as this is much faster than changing strings manually.
Alternate Tuning Function Basics
Dark Fire has three banks (each with six presets) of alternate tunings. Dark Fire comes with 18 factory presets loaded in these banks, but you can replace any of these with custom presets.
The three banks are indicated by the colors of the dots in the center of the Display Matrix:
Blue (the default bank when you first pull the MCK out) Green (additional alternate tunings) Red (special low tunings that are optimized for use with different strings than the standard
guitar set)
The Blue Bank is intended to be your main, “go-to” bank for alternate tuning presets. Therefore, it is the easiest to access. However, accessing the other banks requires only slightly more steps.
Standard Tuning Shortcut for All Banks
While in any Bank, you can go instantly to the Robot standard tuning function (low string to high, E, A, D, G, B, e).
1. Turn the MCK fully clockwise to the Peg symbol. It will show the color of the currently selected Bank.
Gibson Dark Fire 4.0 manual, page 10

2. Momentarily press the center of the MCK's Display Matrix.3. Dark Fire is now in the standard Robot tuning mode. Proceed as normal—strum the strings,
and observe the LEDs to know when Dark Fire is tuned.
Selecting a Preset from the Blue Bank
To choose a particular tuning preset from the Blue Bank (“Robot Classic” bank as used in the original Gibson Robot Guitar):
1. Pull the MCK out. The Blue Bank appears by default. 2. Turn the MCK to the string LED that represents the tuning you want (refer to the following
chart), then press momentarily on the center of the Display Matrix (but not hard enough to push the MCK back in) to enter your choice.
3. Strum the strings, and the Powerheads will tune Dark Fire to the pitches required for the selected alternate tuning.
4. The string colors indicate the tuning status. 5. When Dark Fire is tuned, the String LED you selected will shine solid blue and the other String
LEDs will turn off.6. Push the MCK back in—you're ready to play.
Blue Bank Presets Reference
String LED Name Tuning (low string to high)
E E Major E B E G# B e
A DADAGAD D A D G A D
D Dropped D D A D G B e
G Delta Blues D G D G B D
B E Flat Eb Ab Db Gb Bb eb
e Double Dropped D D A D G B D
Selecting a Preset from the Green or Red (Low Tunings) Bank
To use Presets in other banks, use the Bank Selection function. You'll also need to use Bank Selection if you're in any Bank and want to go to any other Bank. Caution: When using extremely low tunings, such as the Red Bank “C” or “B” tunings, use heavier gauge strings (e.g., .013” to .062”) for best results. However, do not use the Green and Blue Bank presets with heavy gauge strings, as the extreme tension may damage Dark Fire.
Gibson Dark Fire 4.0 manual, page 11

1. Pull the MCK out and turn it fully counter-clockwise. The Display Matrix and the b# symbol will shine blue, because Dark Fire’s default Bank is the Blue Bank.
2. Press the center of the MCK's Display Matrix momentarily (don't press hard enough to push the MCK knob back in). Each press cycles through the Banks in the following order: Green, Red, Blue, Green, Red, Blue, etc.
3. When the Display Matrix shows the color for the desired Bank, turn the MCK to the string LED that represents the tuning you want (please refer to the following charts).
4. Press the center of the MCK's Display Matrix once more to enter your choice.5. Strum the strings, and the Powerheads will tune Dark Fire to the pitches required for the
selected alternate tuning.6. The string colors indicate the tuning status. 7. When Dark Fire is tuned, the String LED you selected will shine the same color as the current
Bank, and the other String LEDs will turn off. Push the MCK in—you're ready to play.8. To return to Standard Tuning, rotate the MCK to the Peg symbol and press momentarily on the
Display Matrix. Strum the strings, and Dark Fire will return to the default tuning.
Green Bank Presets Reference
String LED Name Tuning (low string to high)
E Delta Blues (G) D G D G B D
A Delta Blues (Ab) Eb Ab Eb Ab C eb
D Delta Blues (A) E A E A C# e
G E Major E B E G# B e
B E Flat Major Eb Bb Eb G Bb eb
e Open D D A D F# A D
Red Bank Presets Reference
String LED Name Tuning (low string to high)
E Eb Eb Ab Db Gb Bb eb
A D D G C F A D
D C# C# F# B E G# C#
G C C F Bb Eb G C
B B B E A D F# B
e Dropped Db Db Ab Db Gb Bb eB
Gibson Dark Fire 4.0 manual, page 12

Chapter 3: Dark Fire Chameleon Tone Technology
About Chameleon Tone Technology
Dark Fire uses pickup coil switching techniques (and onboard EQ) to create eight iconic guitar sounds from the onboard magnetic pickups. Because Dark Fire doesn't use digital modeling, the signal path is all-analog. Furthermore, the piezo pickup output can supplement the magnetic pickups for an acoustic type of sound.
Note: The classic Chameleon sounds require that the pickup toggle switch be in the middle (both pickups) position, with no Piezo sound blended in, and the tone controls full up. Of course, one of Dark Fire's advantages is that you can make variations on these classic sounds.
After choosing a Chameleon sound, you then exit Chameleon mode. Two things happen upon exiting:
Dark Fire links the sound you chose with the current tuning, then stores the combination as the default so it's available next time you turn on Dark Fire.
The guitar electronics enter a power-saving state to extend the battery's charge.
You can activate Chameleon Tone technology and select sounds while in any tuning Bank (blue, green, or red). The default Chameleon Tone setup is Gibson Classic with standard EADGBe tuning, but Dark Fire will always retain the the most recently-stored Chameleon magnetic pickup coil configuration, even with no power. This is because Dark Fire's Chameleon Tone technology uses special latching relays that “remember” their most recent state.
Choosing Chameleon Tones
1. Pull the MCK out, choose a tuning Preset, and tune the guitar as described in Chapter 2. The Chameleon Tone will be applied to whichever tuning you’ve selected. To indicate the default Chameleon mode, the MCK’s Display Matrix alternates between the letters S (Standard Tuning) and G (Gibson Classic).
2. After tuning Dark Fire, rotate the MCK to the letter C and press down momentarily on the MCK's Display Matrix to enter Chameleon Tone selection mode. Three things happen:
The C shines white. As long as the C LED is shining white, Dark Fire is in Chameleon Tone selection mode.
The Display Matrix spells the current Chameleon Tone setting as a scrolling marquee, with one letter following another.
The MCK displays the current magnetic pickup coil configuration.
3. To choose a different Chameleon Tone setting, rotate the MCK to a different String LED, the Rotating Arrow, or the b# symbol. Keep the MCK in that position for several seconds so that the sound goes into Dark Fire's temporary memory (you'll store the sound when you exit Chameleon Tone mode, as described later). Each LED represents a different tone with different coil switching:
Gibson Dark Fire 4.0 manual, page 13

String LED Tone Burstbucker P90H Phase with both on
E Gibson Classic both coils north coil in phase
A Blues both coils north coil in phase
D Funky both coils* north coil in phase
G Twang both coils** north coil in phase
B Acoustic south coil north coil out of phase
e L5 both coils north coil in phase
Rotating arrow Hard Rock south coil both coils out of phase
b# Metal both coils both coils in phase* out of phase ** in parallel
MCK Coil Switching Symbols
When you rotate the MCK to the C position to enter Chameleon mode, the MCK shows how the coils are set for the currently-selected sound.
The Burstbucker pickup symbols appear at the bottom of the MCK (i.e., closest to the Guitar and Pickup symbols), while the P90H symbols appear toward the top of the MCK. Each pickup is represented by two lines (one for each coil). The north coil is the upper line, and the south coil is the lower line.
A line's color indicates the status of the associated coil:
Green = switched on Red = switched off White = out of phase Blue = parallel
Note that just because different Chameleon tones have the same coil wirings doesn't mean they sound the same. For example, although Gibson Classic, Blues, and L5 have the same coil wirings, the EQ settings for for the magnetic pickups (blue Pickup symbol turned on) are different and shade the tones differently. Sometimes these differences are more obvious when you set the pickup toggle switch to the P90H or Burstbucker position, and of course, turning the Piezo pickup output all the way down makes it easier to hear any differences in the magnetic pickup sounds.
Changing Piezo and Pickup Functions
1. Before or after choosing a Chameleon Tone, or when Dark Fire is not in Chameleon Tone select mode (but before storing the Tone or exiting Chameleon mode), you can choose different magnetic and Piezo pickup options. Note: If you make these changes after choosing a Chameleon Tone, when you rotate the MCK to select the Peg or | LED, rotate rapidly past the String LEDs—if you pause on a String LED, the associated sound will load into memory.
Gibson Dark Fire 4.0 manual, page 14

2. To change magnetic pickup options, rotate the MCK to the Peg LED. Press momentarily on the MCK's Display Matrix to toggle between two states:
Magnetic pickup parametric EQ active. The Pickup symbol is blue, Peg flashes blue.
Magnetic pickup parametric EQ off. The Pickup symbol will be unlit if the Gibson Classic tone is selected (I.e., no coil switching is used), or green to show that coil switching is in play.
To change the Piezo pickup settings, rotate the MCK to the | LED. Pressing momentarily on the top of the MCK toggles between three states, as shown by the MCK's guitar symbol.
If Dark Fire connects to the Robot Guitar II Breakout Box (or is in traditional electric guitar mode):
Green: Piezo pickup output blend is on, Piezo EQ is off. The Acoustic output from the Piezo pickup is constant. The Amplifier out (magnetic pickups) level depends on the blend control in the pickup toggle: Turn clockwise to reduce the level, counter-clockwise to increase.
Blue: Piezo pickup output blend is on, and Piezo EQ is on. The Acoustic output from the Piezo pickup is constant. The Amplifier out (magnetic pickups) level depends on the blend control in the pickup toggle: Turn clockwise to reduce the level, counter-clockwise to increase.
Unlit: Piezo pickup output blend is off (magnetic pickups only)
If Dark Fire connects to the RIP computer interface:
Green: Piezo pickup output blend is on, Piezo EQ is off (“Live” mode). Blue: Piezo pickup output blend is on and Piezo EQ is on (“Live” mode). Light blue (cyan): Hex outputs are enabled (“Recording” mode). You must enable Hex
Output Mode for RIP to see the hexaphonic string inputs.
Storing the Tone and Exiting Chameleon Tone Mode
1. While still in Chamelon Tone mode (C string LED lit white), press on the MCK Display Matrix for more than 2 seconds to store the selected sound with the current tuning preset, or press momentarily on the MCK to load the sound (you can store it later if you want). Either action takes you out of Chameleon Tone mode.
2. After exiting Chameleon Tone select mode, push down on the MCK until it's all the way in. Dark Fire is now in Play mode, and several things happen:
The sound settings (main Chameleon Tone, Piezo settings, EQ settings) are linked to the current tuning preset, and stored in Dark Fire’s onboard memory. The Display Matrix will spell “S-T-O-R-E-D” in green letters during the storing process.
The selected tuning preset, with the associated sound, becomes the default preset. When you activate the system later on, Dark Fire pre-loads this sound—just strum the strings and play.
Gibson Dark Fire 4.0 manual, page 15

All LEDs (except for the Pickup and Guitar symbols) switch off, and all unneeded hardware powers down to save energy.
The MCK reverts to being a standard tone control. The RIP (if used) will communicate with Dark Fire, if Dark Fire is not tuning itself.
Additional Display Matrix Indications
After you've auditioned a tone In Chameleon Tone mode, Dark Fire no longer takes the time to spell out the full name if you select it again before exiting Chameleon Tone mode. Instead, the Display Matrix shows a single white character in the display:
White Character Tone Setting
G Gibson Classic
B Blues
F Funky
T Twang
A Acoustic
L L5
R Rock
M Metal
If a blue, red, or green character alternates with the white character, the character indicates the selected tuning preset (E, A, D, G, B, e; S is the standard EADGBe tuning), while the color indicates the tuning bank.
Example: Creating a “Hendrix”-Type Sound
Let’s create the kind of sound often associated with Jimi Hendrix. We’ll tune to the E Flat Major tuning that Hendrix often used, enable the magnetic pickups with EQ, enable the Piezo without EQ, and choose the “Twang” sound.
1. Pull the MCK out, rotate it to the B position (the blue tuning bank), press down momentarily on the MCK, and strum the strings. Dark Fire is now tuned to E Flat Major (assuming you haven't overwritten the factory presets). Also, you have now selected (and tuned) the preset to which the Chameleon Tone will be applied.
2. Rotate the MCK to the C position and press down momentarily on the MCK to enter Chameleon Tone selection mode.
3. Rotate the MCK to the Peg position, then press down momentarily on the MCK (repeatedly if necessary) until the Pickup symbol shines blue. This shows that the EQ is processing the magnetic pickup signal (when using the Beakout Box, the Amp jack carries this signal).
4. Rotate the MCK to the I position, then press down momentarily on the MCK (repeatedly if necessary) until the Guitar symbol shines green. This indicates that the Piezo signal is
Gibson Dark Fire 4.0 manual, page 16

switched on and its EQ is switched off. If you’re using the Breakout Box, the Acoustic jack carries this signal.
5. Rotate the MCK to the G position to select the “Twang” tone. The Display Matrix alternates between showing a white T (for “Twang”) and a blue B (for the blue tuning bank, preset B).
6. Push down fully on the MCK to store the sound and start playing.
About Les Paul Mode
In addition to the Chameleon Tone possibilities, there is also a mode that causes Dark Fire's pickups to work like a Les Paul: The Burstbucker's coils are wired in series and humbucking, while the P90H uses the north coil only.
As this is such a common mode that guitarists may want to access at any time, it can be selected while you're in any Bank and is not part of the Chameleon Tone selection process.
1. Pull the MCK out.2. Rotate the MCK to the Rotating Arrow symbol.3. Press momentarily on the MCK's Display Matrix.4. The display will spell out L-E-S-P-A-U-L.5. Press the MCK in to resume playing, or choose other MCK functions.
Note: One of the Chameleon Tones is called Gibson Classic, but this isn't quite the same as the Les Paul mode. With Gibson Classic, the P90H neck pickup is wired as a single coil pickup but EQ is enabled for both the magnetic pickups and the Piezo. With Les Paul mode, although the P90H neck pickup is also wired as a single coil pickup, the EQ and Piezo default to being off.
About the Wiring in Les Paul Controls
The volume controls in a classic Les Paul interact with each other when the pickup toggle is in the middle position (i.e., selecting both pickups). Due to this interaction, if either the neck or bridge volume control is at “0” (all the way down), the signal is grounded and you will not hear any output—regardless of the other control's setting.
If you want to change the mix of the magnetic pickups with the pickup toggle in the middle position, start with both magnetic pickup volume controls on “5” (up halfway), then adjust to taste.
Other Factors Affecting Chameleon Tone
There are very significant differences in each Dark Fire Chameleon Tone setting. The tones were worked on for some time in studio settings to match vintage guitars.
However, note that a guitar's tone results from a combination of factors. For example, putting a single coil in a guitar does not necessarily make it sound like the classic guitars that use single coil pickups. The four main factors influencing tone are:
Gibson Dark Fire 4.0 manual, page 17

The position of the transducer (pickup) between the nut and bridge The pickup characteristics (coil windings, wire, magnets, etc.) Guitar construction details, including wood type Post-processing of the guitar (e.g., the amp you use, or adding effects in the studio)
The guitar construction imparts a characteristic tone by altering the vibrating string's frequency response. It's possible to re-create this characteristic frequency curve by using very precise equalizer circuits; Dark Fire does this primarily by using two 4-band parametric equalizers to mold the frequency response. (The reason for using analog technology is that digital processing requires converting analog signals into digital streams, and then converting back to analog. This introduces a delay that players often find disconcerting.)
The placement of the pick up coils and their construction allows Dark Fire to reproduce phase and other tone modifying affects.
Finally, remember that the classic Chameleon sounds require that the pickup toggle switch be in the middle (both pickups) position, with no Piezo sound blended in, and the tone controls up full. But with so many options available to change tone in addition to the Chameleon Tones, it's possible to stray from the original, classic sounds. This makes it easy to create useful variations on these classic sounds for even more tonal possibilities, but if Dark Fire doesn't sound quite like the guitar you're trying to emulate, make sure you have the pickup switch, Piezo blend, and tone controls set properly. Also, remember that any post processing you use (i.e., anything the modifies the tone after the signal leaves the guitar, like your amplifier) impacts the sound. Some “classic” guitar sounds result from combining the guitar sound with a particular amplifier—for example, a Les Paul going through a British stack will sound very different compared to going through an American combo amp.
The bottom line is that each Chameleon Tone setting is very different, and factors other than the guitar itself can change these sounds even further.
Gibson Dark Fire 4.0 manual, page 18

Chapter 4: Battery and Power Management
Dark Fire’s power source is an on-board, rechargeable, Lithium Ion (Li-Ion) 7.4V battery. Dark Fire can tune itself up to 500 times on a single charge, and recharges in about 70 minutes. Caution: Because this battery is a precision device, please follow these instructions carefully on charging, storage, and optimizing performance.
Charging Dark Fire’s Battery
To charge Dark Fire’s battery:
1. Connect the Dark Fire AC adapter to the Robot Guitar II Breakout Box's Power jack. 2. Using Dark Fire’s stereo cable, connect Dark Fire’s output jack to the Breakout Box’s Stereo
Input jack.3. When charging begins, the Breakout Box’s blue LED shines brightly.
You may play Dark Fire while it charges; patch a standard guitar cable from the Breakout Box’s Amplifier output to your guitar amp or monitoring system. Note: The Piezo pickup out and hex outputs are not available while charging—only the magnetic pickups. However, Gibson recommends shutting down the system (see later in this chapter) while charging to decrease the charging time and increase battery life.
After the Battery is charged fully, the charging circuit switches to trickle charge mode to prevent damage to the battery. The blue light remains on while trickle charging.
You can also charge Dark Fire with the RIP Computer Interface. Refer to its manual for details.
Monitoring the Charging Process
To monitor the charging process while in any Bank with the charger connected:
1. If the MCK isn’t already pulled out, pull it out and turn it to the C LED (to help remember this, think “Charging”).
2. Press on the MCK’s Display Matrix for more than 2 seconds.3. Observe the Display Matrix. If the red / yellow / green bars are scrolling up (moving), charging
is occurring. If they only stay lit at a low level, Dark Fire is not charging. In this case, disconnect Dark Fire's stereo cable and reconnect. You will see one of the following:
Scrolling two red bars = continue charging because the charge is still low Scrolling two red / two yellow bars = continue charging, charge is mid to low level Scrolling red-yellow-one green bar = continued charging optional, level is high to full
already Scrolling red-yellow-two green bars = fully charged, disconnect and switch off Dark Fire All red-yellow-green bars stay lit = fully charged, disconnect and switch off Dark Fire.
Gibson Dark Fire 4.0 manual, page 19

Charge Strength Display
Disconnect power from the charger. To check the battery charge while in any Bank:
1. If the MCK isn’t already pulled out, pull it out and turn it to the C LED.2. Press on the MCK’s Display Matrix for more than 2 seconds. The Display Matrix shows the battery level:
1 or 2 red bars = low charge 2 red bars plus 1 or 2 yellow bars = medium charge. Charging is not essential, but will
improve performance because all six Powerheads will be activated only if the charge is 50% or above. With charges below 50%, the Powerheads will take longer to tune because all six can't be active at once.
2 red bars, 2 yellow bars, one or 2 green bars = high charge (recommended for best performance)
Low Battery Warning Indicator
The MCK Pickup symbol (next to the Guitar symbol):
Shines orange when the battery has about 30 minutes of charge left Turns red when the charge level is too low for Dark Fire to operate properly. In this state Dark
Fire switches off the Piezo out and onboard EQ, and Powertune switches into hibernation mode. If the red charge level symbol appears, begin charging Dark Fire immediately.
If you turn on Dark Fire and the Display Matrix shows nothing but yellow dots (or if this appears during the course of playing), then the battery is fully discharged. At this point you must recharge the battery. If Dark Fire was charged when you put it away but the yellow dots appear the next time go to play it, then it was not shut down properly—please read the following section carefully.
System Shutdown
Proper shutdown prevents draining the battery pack. The shutdown procedure depends on the current status.
MCK pulled out: Turn it to any position other than the Peg symbol LED, then push the MCK all the way in.
Chameleon Mode active: Exit by pressing briefly on the Display Matrix, then push the MCK all the way in.
MCK pushed down, and any symbol lit: Pull out the MCK. Turn it to any position other than the Peg symbol LED, then push the MCK all the way in.
MCK pushed down, and no symbol lit: Dark Fire is already shut down.
Gibson Dark Fire 4.0 manual, page 20

Optimizing Battery Life
Proper care extends the battery’s life, keeps it operating at optimum efficiency, and preserves the highest possible storage capacity. Please observe the following.
Charge the battery fully before using Dark Fire. Even if Dark Fire seems charged upon arrival, that was done for testing at the factory. Initially charge Dark Fire for at least an hour.
Caution: Do not use any charger other than the one supplied with Dark Fire. Li-Ion batteries require specific charge rates..
Avoid full discharges that drain the battery completely. Li-Ion batteries like to be discharged somewhat, then recharged back to full capacity. Dark Fire provides a good environment for Li-Ion batteries, as you’ll typically discharge it about halfway during the length of a concert. Charging the battery back to full charge after playing provides optimum battery life.
Avoid elevated temperatures. You don’t want to expose any guitar to high temperatures, but this also shortens battery life dramatically.
Store the battery properly. If you won’t be playing Dark Fire for several weeks or more), discharge the battery partway (about 40-50% of its full charge), remove the battery, and store it in a cool, but not cold, place. Do not store the battery either fully charged or fully discharged. Either one can shorten battery life considerably.
After taking a battery out of storage, charge it fully before playing Dark Fire. This promotes longer battery life.
Once the battery is fully charged, disconnect the charger. Li-Ion batteries are “smart” and you can’t really overcharge them. However, leaving them connected to a charger when fully charged uses power unnecessarily.
These tips don’t necessarily apply to laptop computers. Even if a laptop uses an Li-Ion battery, there are computer-specific considerations. Follow the computer manufacturer’s instructions for proper laptop battery care.
Tech Tip: About Charge/Discharge Cycles
An Li-Ion battery is typically rated for 300-500 charge/discharge cycles. In other words, you can discharge the battery at least 300 times and charge it back up again before its useful life is over.
If you play Dark Fire and discharge it 50% during a concert, then charge it to full capacity, that is only half of a charge/discharge cycle. If you play Dark Fire every day and discharge it to 75% of capacity then charge it back to 100%, it would take four days before the battery would experience a full charge/discharge cycle.
However, a battery has a finite life regardless of whether you’ve used up the full number of charge/discharge cycles—after about 2-3 years its internal resistance rises to the point where it can no longer deliver its rated voltage.
It’s important to remember that Li-Ion batteries like “exercise.” Leaving a battery on a charger all the time will lead to lower performance than doing some degree of charging and discharging.
Gibson Dark Fire 4.0 manual, page 21

Chapter 5: String Changing with Robot II Technology
Because each key turns extremely slowly when tuned by hand, Dark Fire includes three modes to speed up, and automate, the string-changing process. Reminder: Do not use manual or mechanically-powered “string winder” tools. There are three primary functions to help you change strings:
String Up Mode (for changing all strings at once) Single String Up Mode (for replacing individual strings) String Down Mode (for removing all strings at the same time)
Note: You may want to “break in” your strings by tugging gently on them, and also perform multiple tunings until they've stabilized—as when changing strings on a conventional guitar. Also, use strings with ends that fit completely within the bridge end holes and do not short out to the bridge.
Installing Strings: General Guidelines
1. Manually rotate each tuner until the hole in the string binding post provides a straight path for threading each new string.
2. Guide each string through your tailpiece, over the center of each saddle (where contact is essential), through the nut slot, then straight through the post hole.
3. Pull the string slightly to take up any slack, then tighten down the locking nut on the post hole. 4. Cut the extra length off each string close to the post; if one string contacts another, the system
may function improperly. Also, do not use any strings which have frayed wraps at the ball end (Dark Fire will not function if any part of the string touches beyond its insulated holder), and don't let steel bottleneck slides contact the strings during tuning operations.
5. Manually turn each tuning peg to tighten the string tension—just enough for the Piezo bridge to accurately "read" the string pitch.
All Strings Up Mode
To change all strings at the same time:
1. After installing all strings as described previously, pull out the MCK and turn it counter-clockwise until the b# symbol lights blue. The Display Matrix will also shine blue (Dark Fire is in the Blue Bank).
2. Press the Display Matrix momentarily. The Display Matrix will shine green (Dark Fire is in the Green Bank).
3. Turn the MCK to the Rotating Arrow position.4. Now press the MCK's Display Matrix and hold until all the String LEDs shine red. Gently tap
the strings against their Piezo saddles, and their corresponding Powerheads will start to turn and place tension on the strings.
5. Once there is enough tension on the strings for them to approach pitch, gently strum the strings. Pause briefly between strums to allow the Powerheads to turn. The strings' LEDs will change colors to indicate status until they turn green, indicating the strings have reached pitch.
Gibson Dark Fire 4.0 manual, page 22

In this mode, Dark Fire automatically repeats the tuning process because new strings are being tuned. Note: A string LED may shine solid white in this mode due to signal anomalies. This is not a problem; proceed normally.
Single String Up Mode
This mode is for replacing only one or two strings (e.g., replacing a broken string).
Caution: Unlike String Up Mode, Single String Up Mode does not target any pitch but simply puts tension on the string. Do not press the MCK too many times in Step (5) below, or the string could snap from over-tightening. Three presses should put enough tension on the new string for it to tune with standard tuning operations. Also, remember that no tuning functions work if any portion of the string shorts to the bridge base or adjacent strings.
1. After installing a string as described previously, pull out the MCK and turn it counter-clockwise until the b# symbol lights blue. The Display Matrix will also shine blue (Dark Fire is in the Blue Bank).
2. Turn the MCK to the Rotating Arrow position, and press the Display Matrix until a green “arrow up” symbol shows in the center of the Display Matrix.
3. Stop pressing on the display; the Rotating Arrow LED will shine blue and all string LEDs will shine green.
4. Turn the MCK to the string LED that corresponds to the string you are replacing. The LED you select will shine red.
5. Press the MCK's Display Matrix momentarily, a few times in succession, and the corresponding Powerhead will start to turn and place tension on that string.
6. Once there is enough tension on the string for it to have a pitch, rotate the MCK fully clockwise and press the Display Matrix momentarily twice. Strum the strings as usual to tune.
All Strings Down Mode
When changing an entire set of strings, String Down Mode causes all Powerheads to de-tension all strings at the same time so that you can remove them all.
1. Pull out the MCK and turn it counter-clockwise until the b# symbol lights blue. The Display Matrix will also shine blue (Dark Fire is in the Blue Bank).
2. Press the MCK momentarily twice; the Display Matrix shines red. Dark Fire is in the Red Bank.3. Turn the MCK to the Rotating Arrow position.4. Press on the MCK's Display Matrix, and hold it in until the string LEDs start to flash and the
Powerheads start to unwind. All 6 Powerheads will unwind their strings.5. When the Powerheads stop turning, release the locking nuts on the tuner posts and you can
easily remove all strings.
Gibson Dark Fire 4.0 manual, page 23

Chapter 6: Advanced Tuning Options
You can create your own custom alternate tuning presets, and store them in one of the three preset tuning banks. Although this overwrites the factory preset in that location, you can always revert to the factory defaults, as described in Chapter 7 section. Furthermore, you can choose a reference pitch other than A=440.
Creating Custom Alternate Tuning Presets
To create a custom alternate tuning preset:
1. With the MCK pushed in, tune Dark Fire manually to the pitches you want (remember: all Powerheads turn in the same direction). Caution: Make sure the guitar is in tune—if you happen to save this as the default “Instantly Activated Tuning,” then the default guitar tuning will be out of tune. If this happens, refer to the Setup section for information on restoring the factory presets.
2. Pull the MCK out and turn it clockwise to the Peg LED symbol.3. Press on the MCK's Display Matrix and hold it in the pressed state until the Peg LED shines
cyan (I.e., greenish-blue). Symbols E, A, D, G, B and e will shine red.4. Strum each string individually, one by one (don’t strum too hard!); when each string’s
frequency has been measured and registered, its LED will turn green. If necessary, re-pluck any strings that remain red until they are measured and turn green.
5. When all string LEDs have turned green, they will turn off and the Peg LED will start flashing. This indicates your Custom Altered Tuning is ready to store.
6. To store a preset in the Blue Bank: As Dark Fire is currently in the Blue Bank, storing to the Blue Bank is easy. Select a string LED position, then press the Display Matrix momentarily and the string LEDs will flash red 4 times, indicating your custom alternate tuning is now stored in that position.
7. To store a preset in the Green or Red Bank: As Dark Fire is currently in the Blue Bank, rotate the MCK until the b# symbol shines blue. Press momentarily on the Display Matrix to select the Green Bank, then press again to select the Red Bank. After selecting the desired bank, select a string LED position, then press the Display Matrix momentarily. The string LEDs will flash red 4 times, indicating your custom alternate tuning is now stored in that position.
Tuning to Pitch References other than A=440Hz
Although the most common tuning reference is A=440Hz, it's not the only one (e.g., some orchestras tune to A=442Hz). Or a piano may be in tune with itself, but not tuned exactly to A=440Hz. For these situations, Dark Fire can tune to any arbitrary reference.
1. Pull the MCK out, and tune to standard pitch.2. Select the desired Bank and Preset to hold the custom tuning.3. Tune the open “A” string manually to the new reference pitch for A (e.g., slightly sharp, like
A=442Hz).
Gibson Dark Fire 4.0 manual, page 24

4. Turn the MCK counter-clockwise until the b# symbol shines blue. The Display Matrix dots will also shine blue, because Dark Fire is in the Blue Bank.
5. Press the MCK's Display Matrix momentarily and the Display Matrix dot's will shine green. Now Dark Fire is in the Green Bank.
6. Turn the MCK to the Peg position.7. Press the MCK's Display Matrix, and hold it in the pressed state until the LED symbols E, A, D,
G, B and e shine red. The Peg LED will shine magenta.8. Pluck the open A string until its LED turns green. This confirms the reference frequency has
been measured and registered.9. Now strum all strings, and the remaining LED symbols will behave as during a normal tuning
operation. Dark Fire will tune to the selected tuning with respect to your new reference pitch.10.When tuning is complete, the string LEDs will turn off.
You can store your changed reference tuning as a custom alternate tuning preset. Push the MCK all the way in, and perform the procedure described in the previous section (“Creating Custom Alternate Tuning Presets”), including the procedure for storing the tuning in a preset position.
Note: An alternative method to use a reference other than A=440Hz is to change Dark Fire's calibration, as described in Chapter 7.
Intonation Mode
Dark Fire's built-in Intonation Mode allows setting or checking string intonation. Note: You will need a small screwdriver to adjust the bridge's saddle adjustment screws. Gibson recommends first doing a standard tuning to A = 440Hz, then pushing the MCK in, before adjusting the intonation.
Note: You can easily change a fretted string's pitch by up to 10 cents by applying different forces, and the position where you press down on the string affects pitch. Please use a consistent force and position. Also, during intonation the tuning precision is set to maximum automatically—you may notice that it takes a little bit longer to detect the pitch.
1. Pull the MCK out, and turn it counter-clockwise until the b# symbol shines blue. The Display Matrix center will also shine blue (Dark Fire is in the Blue Bank).
2. Press the MCK momentarily 2 times, and the Display Matrix center will shine red. Dark Fire is now in the Red Bank.
3. Turn the MCK to the Peg LED position. Press the Display Matrix and hold it in until the Peg LED shines orange. All the String LEDs will now shine red.
4. Strum the lower E string gently. When the E String LED shines orange, fret the lower E string at the 12th fret then gently strum it again.
5. If the Piezo saddle position needs changing, the MCK will display the number of half-turns to apply to the intonation screw. Turn the screw 1/2 turn clockwise for each LED shining red, or 1/2 turn counter-clockwise for each LED shining green.
6. After making an adjustment, strum the open string again until its LED turns orange, then re-check by fretting the 12th fret again and strumming gently. Once a string's intonation is correct, its LED will shine solid blue—proceed to the next string.
7. When all strings are properly intonated, they will all shine blue for a moment, then turn off. Intonation is now complete.
Gibson Dark Fire 4.0 manual, page 25

Alternate Tuning Tricks
You may fret single strings while tuning, and here are some examples of how to use this technique. Note: It's important to fret the strings very accurately, and strum gently and precisely—especially when frequencies are being measured.
Tuning Down Individual Strings
Suppose you want to tune to Dropped D tuning instantly.
1. Activate Dark Fire's standard EADGBe tuning (turn the MCK clockwise, then press on the Display Matrix momentarily.
2. Fret the low E on the 2nd fret and strum the strings.3. Dark Fire will tune to Dropped D tuning.
You may use this technique for all tunings / strings that are at lower pitch than the tuning you are using.
Tuning Down Multiple Strings
If you want to tune more than one string down to a certain pitch, you may fret and strum string-by-string. Let´s do an Eb (Hendrix tuning) with this technique.
1. Activate Dark Fire, and it will be in Standard EADGBe tuning.2. Fret the low E at the 1st fret and pluck only that string. Dark Fire will tune the low E string to
Eb.3. Fret the A string at the 1st fret and pluck only that string. Dark Fire will tune the A string to Ab. 4. Fret the D string at the 1st fret and pluck only that string. Dark Fire will tune the D string to Db.5. Continue fretting strings at the 1st fret and plucking individual strings. When complete, you
may store your tuning as a Custom Altered Tuning.
Tuning Up Individual Strings
Let's do an E minor open chord tuning.
1. Tune to standard pitch (blue bank).2. Rotate the MCK to the Peg LED and press the Display Matrix for more than 2 seconds. Dark
Fire is now in Custom Alternate Tuning Mode.3. Pluck the low E string gently. The E LED will turn green, indicating the frequency has been
measured and stored.4. Fret the A string at the 2nd fret and pluck the A string gently until the A LED turns green.5. Fret the D string at the 2nd fret and pluck the D string gently until the D LED turns green.6. Pluck the G, B and high e individually until their string LEDs all turn green.7. Store your Custom Alternate Tuning where desired (see “Creating Custom Alternate Tuning
Presets” on page 21).
Gibson Dark Fire 4.0 manual, page 26

Chapter 7: Setup Mode
Dark Fire defaults to settings that are well-suited to the vast majority of players. However, it is possible to change many of these defaults via Setup Mode. The general procedure is to enter Setup Mode, choose a function, then choose the desired default setting value for that function.
The list of numbered functions appears after setup mode instructions.
Entering Setup Mode
1. Pull the MCK out, and turn it counter-clockwise to the b# symbol (in any Bank).2. Press on the Display Matrix for at least two seconds until it shows a pink "Enter" symbol
(which looks like an arrow), then release the MCK..3. Press on the Display Matrix again for at least two seconds until it shows a cyan "Enter"
symbol.4. Dark Fire is now in Setup Mode. In addition to the cyan “Enter” symbol, the b LED will shine
yellow as confirmation. You are now ready to select a function.
Selecting a Function
Once Dark Fire is in setup mode, rotating the MCK will let you select a number from 0-9. We'll use an example to show how this process works; the procedure is similar for any setup function.
Let's assume you know Dark Fire so well you no longer need to have it spell out which Chameleon Sound is selected, and you want to turn off the name scrolling. Referring to the list of functions below, this is done with function 13. It defaults to value 1, where the name is spelled out. Value 0 prevents the name from being spelled out. So, we want to choose 13 as the function, and 0 as the value. Here's what to do after entering setup mode.
1. Rotate the MCK until the Display Matrix shows the function's first digit, which is 1.2. Press momentarily on the MCK. 1 will flash red to confirm it has been entered.3. Rotate the MCK until the Display Matrix shows the function's second digit, which is 3.4. Press momentarily on the MCK. 3 will flash red to confirm it has been entered.5. After entering the function number, rotate the MCK fully counter-clockwise and press the
Display Matrix momentarily. The “Enter” symbol flashes red then returns to cyan. To confirm, the selected Function Number will scroll across the Display Matrix in yellow. The MCK's # LED will shine magenta, indicating that you may now enter a value for the function.
6. Value numbers are entered the same way as for function numbers. In this case, rotate the MCK until the Display Matrix shows the desired value's first digit, which is 0.
7. Press momentarily on the MCK. 0 will flash red to confirm it has been entered.8. As no more digits need to be entered, rotate the MCK fully counter-clockwise and press the
Display Matrix momentarily. The LEDs around the MCK's perimeter flash green 3 times, and the selected value scrolls across the Display Matrix in yellow.
9. Note that the b symbol shines yellow again (as in Step 4 under “Entering Setup Mode”), indicating you can access another Setup Mode Function. If you want to do this, repeat steps 1-9. Otherwise, proceed to the next step.
Gibson Dark Fire 4.0 manual, page 27

10.To exit Setup Mode, push the MCK back in. The new value you selected for the function will remain as set until you change it again by selecting it individually in Setup Mode, or restore the Factory Defaults in Setup Mode.
The following set of tables shows the various user-editable Functions available in Setup Mode, but please note the following important points.
Note 1: The function's “clickstream” shown in each chart abbreviates the MCK operations needed to edit the function. To save space and text, the § symbol means “rotate the MCK fully counter-clockwise then press the Display Matrix momentarily.” Example: 1 § 0 § means “Enter the digit 1, rotate the MCK fully counter-clockwise then press the Display Matrix momentarily, enter the digit 0, rotate the MCK fully counter-clockwise then press the Display Matrix momentarily.” After entering the desired value for a function, remember to turn the MCK fully counter-clockwise and press the Display Matrix momentarily.
Note 2: Some functions are “on/off” types (value of 0 or 1), while some have a range of values. For example, Function 7 has 10 options, from 0-9.
Note 3: “Reset” functions have a safety feature where you must press a red “Y” on the display. This is similar to when a PC asks “Are You Sure?”
Available Functions and Values
Function 1 Instant activated function: Controls startup behavior Default = 0
Value Result Clickstream
0 Starts up with instant activated tuning 1 § 0 §
1 Starts up in Chameleon mode 1 § 1 §
2 Starts up with main menu (no instant activated tuning, no Chameleon mode) 1 § 2 §
Function 2 Instant activated tuning: Select startup tuning (if function 1 = 0) Default = 0
Value Result Clickstream
0 Startup tuning is standard EADGBe 2 § 0 §
1 Startup tuning is the particular tuning selected with Function 14 2 § 1 §
2 Startup tuning is the last completed tuning 2 § 2 §
Note: With value = 2, if you tuned to E major for example and turned off Dark Fire, it will start up with E major tuning
Function 3 Piezo out status: Sets up Piezo signal status Default = 1
Value Result Clickstream
0 Piezo signal never switches on automatically; must be switched manually (| LED) 3 § 0 §
1 Switches on Pizeo signal automatically whenever possible 3 § 1 §
Note: The Piezo is always switched off during tuning. With value = 1, it's turned on again after the tuning process is done
Gibson Dark Fire 4.0 manual, page 28

Function 4 Parametric EQ status: Sets up PEQ status Default = 1
Value Result Clickstream
0 PEQ never switches on automatically and must be switched on manually 4 § 0 §
1 On startup, switches on PEQ automatically 4 § 1 §
Note: When set to 0, you have to turn on PEQ manually by clicking on the Peg LED in Chameleon mode
Function 5 Coil switching status: Sets up your coil switching behavior Default = 1
Value Result Clickstream
0 On startup, switches coils to Gibson Classic mode regardless of any previous settings 5 § 0 §
1 On startup, switches coils to your last selected Chameleon mode sound 5 § 1 §
Function 6 Coil preset: Sets up coil switching behavior when you select a tuning preset Default = 1
Value Result Clickstream
0 Coil setting will not be changed when you select a tuning preset 6 § 0 §
1 Switches coils to the sound that was stored with the selected preset 6 § 1 §
Function 7 Tuning precision: Sets up tuning precision and performance Default = 5
Value Result Clickstream
0 to 9 Trades off tuning speed for accuracy. 0 = least accurate, 9 = most accurate 7 § 0-9 §
Note: 0 gives fastest tuning with 2.5 cent accuracy, 9 gives slowest tuning with 0.2 cent accuracy
Function 9 E-Function correction: Compensates for different strum levels when tuning Default = 1
Value Result Clickstream
0 Switches off compensation to give an extremely slight speed increase when tuning 9 § 0 §
1 Switches compensation on to allow a wider variation in strum levels 9 § 1 §
Note: When set to 0, you need to strum the strings gently during tuning
Function 10 Calibration: Sets global calibration for all presets Default = 440.0
Value Result Clickstream
4440 Sets A = 440.0 Hz as calibration standard 13 § 4§4§0§0 §
xxxx “xxxx” can be a value from 4300 (430Hz) to 4499 (449.9Hz) 13 § x§x§x§x §
Note: Resolution is 0.1Hz so you need to enter four numbers
Function 13 Tutorial mode: Shows a sound's name in Chameleon Mode Default = 1
Value Result Clickstream
0 No sound name spelled out when selected in Chameleon mode 13 § 0 §
1 Shows a sound's name when selected in Chameleon mode 13 § 1 §
Note: When you select a Chameleon sound preset, Dark Fire normally spells it out but you can turn this behavior off.
Gibson Dark Fire 4.0 manual, page 29

Function 14 Default tuning: Select default tuning on startup Default = 0
Value Result Clickstream
0 Standard EADGBe 14 § 0 §
18 Red Bank e 14 § 18 §
Note: If Function 2 is set to 1, load your favorite tuning into Red Bank e and use function 14 to select this.
Function 16 Tune count: Have tuning process happen once, or repeat Default = 1
Value Result Clickstream
1 Tunes once 16 § 1 §
2 Tuning process restarts one more time after first tuning is complete (all LEDs green) 16 § 2 §
Note: This function is intended for very low tunings where two tunings might be necessary to reach proper pitch.
Function 17 Piezo out mono on tip: Set up Piezo out signal Default = 1
Value Result Clickstream
0 No Piezo out signal on tip when Piezo pickup is switched on 17 § 0 §
1 Piezo out signal routed to tip when Piezo pickup is switched on 17 § 1 §
Note: This relates only to Piezo Out Mono where all six strings are mixed. Piezo Out Hex is never routed to the tip.
Function 18 Piezo out mono on ring: Set up Piezo out signal Default = 1
Value Result Clickstream
0 No Piezo out signal on ring when Piezo pickup is switched on 18 § 0 §
1 Piezo out signal routed to ring when Piezo pickup is switched on 18 § 1 §
Note: This relates only to Piezo Out Mono where all six strings are mixed. Piezo Out Hex is never routed to the tip.
Function 20 Sound setup: Combine a tuning preset with a coil configuration Default = 1
Value Result Clickstream
0 Chooses Gibson Classic for all tuning presets 20 § 0 §
Preset 1-18, coil config 1-8
Associates a particular tuning preset with a particular coil configuration 20 § preset number § coil configuration number §
Example: To combine the Delta Blues tuning preset (Green Bank, E) with the Blues coil configuration, enter 20 § 7 § 2. This is equivalent to selecting Preset E from the Green Bank, activating Chameleon mode, rotating the MCK to LED A, and storing the sound with a long press on the Display Matrix. The preset numbers correspond to the LED numbers in different banks: Blue Bank E=1, A=2, D=3, G=4, B=5, e=6; Green Bank E=7, A=8, D=9, G=10, B=11, e=12; Red Bank E=13, A=14, D=15, G=16, B=17, e=18.
Function 99 Display software version: Shows Dark Fire's current software
Result Clickstream
Show current Dark Fire software version 99 §
Note: There is no default as this is a read-only parameter
Gibson Dark Fire 4.0 manual, page 30
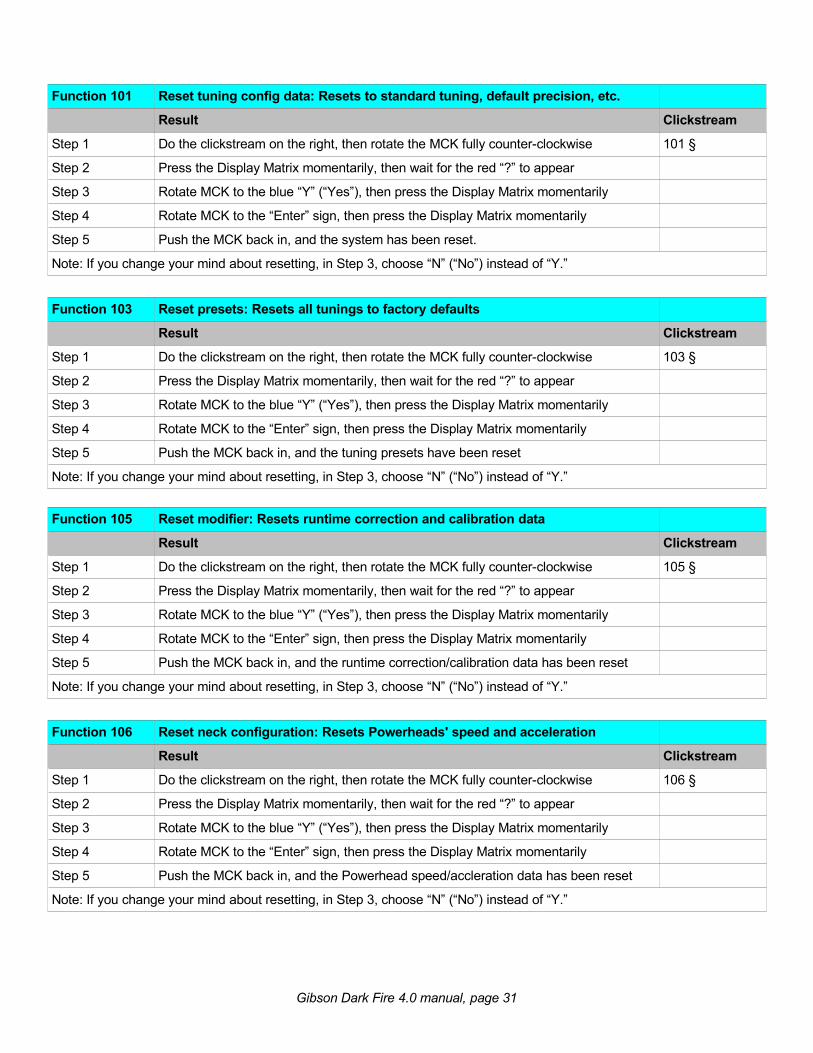
Function 101 Reset tuning config data: Resets to standard tuning, default precision, etc.
Result Clickstream
Step 1 Do the clickstream on the right, then rotate the MCK fully counter-clockwise 101 §
Step 2 Press the Display Matrix momentarily, then wait for the red “?” to appear
Step 3 Rotate MCK to the blue “Y” (“Yes”), then press the Display Matrix momentarily
Step 4 Rotate MCK to the “Enter” sign, then press the Display Matrix momentarily
Step 5 Push the MCK back in, and the system has been reset.
Note: If you change your mind about resetting, in Step 3, choose “N” (“No”) instead of “Y.”
Function 103 Reset presets: Resets all tunings to factory defaults
Result Clickstream
Step 1 Do the clickstream on the right, then rotate the MCK fully counter-clockwise 103 §
Step 2 Press the Display Matrix momentarily, then wait for the red “?” to appear
Step 3 Rotate MCK to the blue “Y” (“Yes”), then press the Display Matrix momentarily
Step 4 Rotate MCK to the “Enter” sign, then press the Display Matrix momentarily
Step 5 Push the MCK back in, and the tuning presets have been reset
Note: If you change your mind about resetting, in Step 3, choose “N” (“No”) instead of “Y.”
Function 105 Reset modifier: Resets runtime correction and calibration data
Result Clickstream
Step 1 Do the clickstream on the right, then rotate the MCK fully counter-clockwise 105 §
Step 2 Press the Display Matrix momentarily, then wait for the red “?” to appear
Step 3 Rotate MCK to the blue “Y” (“Yes”), then press the Display Matrix momentarily
Step 4 Rotate MCK to the “Enter” sign, then press the Display Matrix momentarily
Step 5 Push the MCK back in, and the runtime correction/calibration data has been reset
Note: If you change your mind about resetting, in Step 3, choose “N” (“No”) instead of “Y.”
Function 106 Reset neck configuration: Resets Powerheads' speed and acceleration
Result Clickstream
Step 1 Do the clickstream on the right, then rotate the MCK fully counter-clockwise 106 §
Step 2 Press the Display Matrix momentarily, then wait for the red “?” to appear
Step 3 Rotate MCK to the blue “Y” (“Yes”), then press the Display Matrix momentarily
Step 4 Rotate MCK to the “Enter” sign, then press the Display Matrix momentarily
Step 5 Push the MCK back in, and the Powerhead speed/accleration data has been reset
Note: If you change your mind about resetting, in Step 3, choose “N” (“No”) instead of “Y.”
Gibson Dark Fire 4.0 manual, page 31
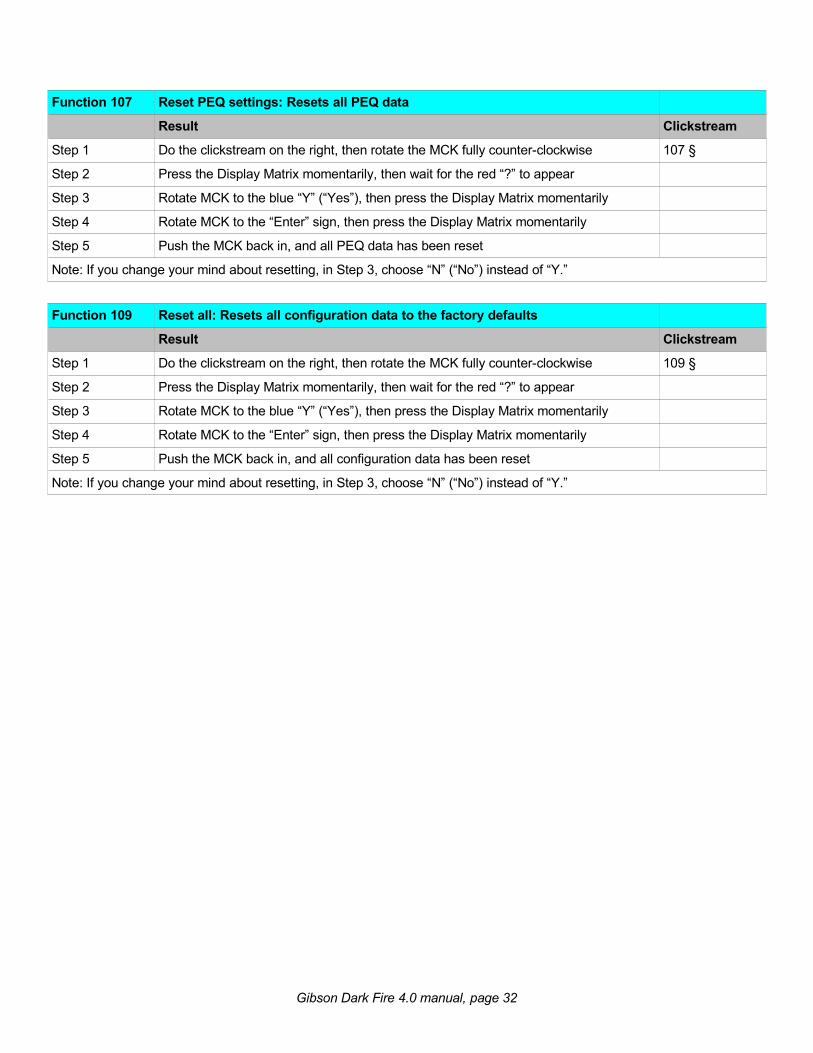
Function 107 Reset PEQ settings: Resets all PEQ data
Result Clickstream
Step 1 Do the clickstream on the right, then rotate the MCK fully counter-clockwise 107 §
Step 2 Press the Display Matrix momentarily, then wait for the red “?” to appear
Step 3 Rotate MCK to the blue “Y” (“Yes”), then press the Display Matrix momentarily
Step 4 Rotate MCK to the “Enter” sign, then press the Display Matrix momentarily
Step 5 Push the MCK back in, and all PEQ data has been reset
Note: If you change your mind about resetting, in Step 3, choose “N” (“No”) instead of “Y.”
Function 109 Reset all: Resets all configuration data to the factory defaults
Result Clickstream
Step 1 Do the clickstream on the right, then rotate the MCK fully counter-clockwise 109 §
Step 2 Press the Display Matrix momentarily, then wait for the red “?” to appear
Step 3 Rotate MCK to the blue “Y” (“Yes”), then press the Display Matrix momentarily
Step 4 Rotate MCK to the “Enter” sign, then press the Display Matrix momentarily
Step 5 Push the MCK back in, and all configuration data has been reset
Note: If you change your mind about resetting, in Step 3, choose “N” (“No”) instead of “Y.”
Gibson Dark Fire 4.0 manual, page 32

Appendix A: Setup Mode Service Procedures There are additional setup mode functions for servicing that follow the same procedure as the setup functions described in Chapter 7.
Caution: The following setup functions are servicing procedures, and are included for completeness. Do not perform any of the following functions unless you are being instructed on what to do by a Gibson service technician or Gibson tech support.
Functions 21-24 require the Dark Fire Configuration Tool. If needed, Gibson technical support will provide you with additional information on obtaining and using this tool.
Function 8 Runtime correction: Set up Powerhead runtime correction Default = 1
Value Result Clickstream
0 Turns off runtime correction (not recommended) 8 § 0 §
1 Monitoring Powerheads generates correction data for different string gauges 8 § 1 §
Note: It takes up to 10 tunings to match the Powerhead movement to a specific string gauge
Function 21 Magnetic PU (left channel) PEQ settings: Configure 4-band EQ Default depends on sound
Result Clickstream
Configure a band of the magnetic pickup PEQ 21 § coil configuration number § band number § config data
Example: To configure the left channel, PEQ Band1 for the Gibson Classic sound, use the clickstream 21 § 0 § 1 § 16. You need the Dark Fire Configuration Tool to calculate the correct config data.
Function 22 Magnetic PU (left channel) PEQ settings: Configure EQ gain Default depends on sound
Result Clickstream
Configure gain for the magnetic pickups' 4-band PEQ 22 § coil configuration number § band number § gain data
Example: To configure the left channel, PEQ Band1 gain for the Gibson Classic sound, use the clickstream 22 § 0 § 1 § 0. You need the Dark Fire Configuration Tool to calculate the correct gain data.
Function 23 Piezo PU (right channel) PEQ settings: Configure 4-band EQ Default depends on sound
Result Clickstream
Configure a band of the magnetic pickup PEQ 23 § coil configuration number § band number § config data
Example: To configure the right channel, PEQ Band1 for the Gibson Classic sound, use the clickstream 23 § 0 § 1 § 16. You need the Dark Fire Configuration Tool to calculate the correct config data.“3. To Change the Piezo pickup settings…..by the MCKs guitar symbol.
Gibson Dark Fire 4.0 manual, page 33

Function 24 Piezo PU (right channel) PEQ settings: Configure EQ gain Default depends on sound
Result Clickstream
Configure gain for the magnetic pickups' 4-band PEQ 24 § coil configuration number § band number § gain data
Example: To configure the left channel, PEQ Band1 gain for the Gibson Classic sound, use the clickstream 24 § 0 § 1 § 0. You need the Dark Fire Configuration Tool to calculate the correct gain data.
Function 30 Set stepper speed: Determine maximum speed for individual Powerheads Default = 5
Value Result Clickstream
0-9 Set seach Powerhead's maximum speed (0 = slowest, 9 = fastest) 30 § 1 § 5 §
Note: The second clickstream number is the associated Powerhead number, the third clickstream number is the speed
Function 31 Max concurrent steppers: Max number of Powerheads running simultaneously Default = 6
Value Result Clickstream
1-6 Set number of Powerheads that can tune at the same time 30 § 1-6 §
Note: The third clickstream number can range from 1 to 6
Function 32 Stepper acceleration: Set acceleration for each Powerhead individually Default = 5
Value Result Clickstream
0-9 Sets Powerhead acceleration 32 § 1 § 0-9 §
Note: The second clickstream number is the associated Powerhead number, the third number is the acceleration
Function 37 Set maximum speed for all Powerheads: Adjusts all Powerheads at once Default = 5
Value Result Clickstream
0-9 Sets maximum speed for all Powerheads, not just individual ones 37 § 0-9 §
Note: 0 is the slowest speed, 9 is the fastest speed
Function 38 Set acceleration for all Powerheads: Adjusts all Powerheads at once Default = 5
Value Result Clickstream
0-9 Sets acceleration for all Powerheads, not just individual ones 38 § 0-9 §
Note: 0 is the slowest acceleration, 9 is the fastest acceleration
Gibson Dark Fire 4.0 manual, page 34

Appendix B: Dark Fire Electronics Block Diagram
This diagram indicates signal flow within Dark Fire's electronics. Note that the magnetic pickups and Piezo pickup have their own equalizers, and that the Piezo blend circuit is post-equalizer.
In Hex Mode, the RIP Computer Interface does sophisticated analog signal multiplexing in order to have the Piezo pickup and the individual hex pickups available on a single conductor (i.e., the stereo cable's ring connection).
Gibson Dark Fire 4.0 manual, page 35

Appendix C: TroubleshootingIf you encounter problems with Dark Fire, Gibson recommends that you take it to an authorized service center. Although there are some procedures you can try yourself, be careful—if you have any doubt about your ability to do any of these fixes, please consult Gibson tech support.
One or more strings don't seem to tune correctly, but the rest do.
There can be several possible reasons for this problem:
The nut slot too high and there's too much friction The lock nut on the string post is not tight enough The string was strummed too hard, causing it to go sharp A sticky string bar in the saddle causes pitch detection to fail The accuracy setting needs to be higher accuracy setting too low (refer to Function 7 table in
Chapter 7) E-Function Correction is enabled (refer to Function 9 table in Chapter 7) The tailpiece is set too low, so the string touches the bridge base and shorts out to it.
Observe what happens when you try to tune the problematic string. Here's what should happen:
You strum, the respective string LED should start flashing red to indicate that pitch detection is active.
After 1 second, the LED should start flashing yellow (information is being sent to the neck CPU, and the Powerhead starts to move).
After tuning the string, the string's LED turns green to indicate the string is in tune. When the guitar is in tune, all strings flash blue.
If not, try these fixes:
Remove the problematic string and make sure the string bar is not inclined in the saddle, and that you can move the string bar up and down a little bit; it must not be sticky in its saddle. Sometimes just “unsticking” the string bar is enough to solve the problem.
Restring the string and tap the string bar gently. Check that the string bar is not inclined and that the lock nut on the tuner post is set tight.
Reset the tuning system (refer to Function 101 table in Chapter 7), afterward disable E-Function correction (this must be done manually; refer to Function 9 table in Chapter 7).
If you are still having problems at this point, change accuracy settings to a higher level (refer to Function 7 table in Chapter 7).
If all else fails, tune the problematic string to your liking, and save as Custom Altered Tuning preset.
The battery doesn't seem to charge properly
While this is extremely rare, the battery may need to be reset. To do this (work slowly and carefully—take care that you don't damage any of the components!):
Gibson Dark Fire 4.0 manual, page 36

1. On the back of the guitar, take off the back plate nearest the output jack.
The battery is on the left in this picture.
2. Locate the battery and disconnect the red wire.3. Wait one minute and reconnect the wire.4. Make sure the battery is in its proper position, then close the backplate.5. Charge the guitar using the included TRS (stereo) cable. IF you suspect the cable is defective,
use a different TRS cable instead. 6. After 90 minutes of charging, pull the MCK, turn to C, then press on the Display Matrix and
hold it for at least two seconds. The Display Matrix should indicate that it is charged (two red, two yellow and two green bars; see Chapter 4 for more details).
My headstock hit against the wall, and now one of the Powertune heads doesn't work.
If you hear a winding noise but the Powerhead doesn't move, it might be a connection issue from the powerhead to the neck circuitry. Inspect the tuning peg that doesn't work. If its case is rotated, rotate the Powerhead back to its original position (level with the back plate with the lit up G); this should fix the problem. Then, tighten the nut to make sure the Powerhead stays in this position. Avoid overtightening—do not exceed 1 ft/pound torque maximum.
For a “tighter” rhythm guitar part when recording, I wanted to remove the A, G, and (high) e strings because I kept hitting them accidentally, but then the tuning system didn't work. Why?
The strings carry low voltages and data, as well as provide grounding. The E, D, and B strings are ground. The A, G, and high e strings carry a positive voltage and data. By removing those three strings, there was no way for the tuning system to provide data on how to tune the strings.
Gibson Dark Fire 4.0 manual, page 37

The string LEDs are flashing white, and tuning doesn't work at all.
A white flashing string LED indicates a short circuit. The strings carry power and data to the neck, so even if only one string is touching a hardware part (bridge, tailpiece, even a fret bar) or another string, the tuning system won't work. Also note that if the Gibson "G" on the neck electronic cover does not start flashing once you activate the system, it is most likely that there is also a white LED on the MCK flashing to indicate there's a short circuit, and therefore, no power going to the neck electronics. Please check the following:
The string ball ends must not touch the tailpiece at all. The strings must be in the middle position of each string bar. Look at the tuner posts; the strings must not touch each other, so cut all string ends very close
to its post. Check the tailpiece and bridge height, then adjust if needed.
I want to shut down Powertune so I can use the MCK as a standard tone control, but when I push down on the MCK, it won't shut down.
When you push the MCK down, this should activate the tone capacitor and shut down the Powertune system. But there is one exception: Powertune remains active when the PEQ or the Piezo signal is present and you rotate the MCK to the LED Peg symbol. When you push the MCK down at this position, the PEQ and Piezo signal remain active. The tone knob feels like a regular knob (without clicks) and the tone capacitor is activated again. To summarize:
If you want to shut down Powertune, turn the MCK to any position other than the LED Peg symbol and push the MCK down.
If you want to play with active electronics (PEQ and/or Piezo) rotate the MCK to the LED Peg symbol and push the MCK down.
When I tune the Powerheads manually, the process seems extremely slow.
The gear ratio in the Powerheads is 24:1, so you need to turn the tuning peg 24 times to get one complete rotation of the string post. This is one reason why Gibson recommends using the Robot tuning options, especially when re-stringing. Please see Chapter 5 for more information.
I can't use the Piezo pickup when charging, either with the Breakout Box or the RIP.
This is because the ring lead carries the Piezo output but also carries the power needed to charge Dark Fire's battery. So, you can't have both happening at the same time. However, you may enable the "Piezo Blend" function, which blends the Piezo pickup with the magnetic pickups, and routes this signal to the Breakout Box's "Amplifier" jack.
Gibson Dark Fire 4.0 manual, page 38

Appendix D: Dark Fire Cheat Sheet
Chameleon Tone OptionsString LED Tone String LED Tone
E Gibson B Acoustic
A Texas Blues E L5
D Funky arrow Hard Rock
G Twang b# Metal
MCK Primary FunctionsDifferent functions are available from the MCK, depending on whether you do a momentary press, or a long press (2 seconds or more), on the MCK's display matrix. Functions also depend on the current Bank, as shown in the following chart.
short press long press (>2 seconds)
bank blue green red blue green red
peg LED standard tuning custom tunings
reference tunings
intonation
peg LED (Chameleon
mode)
magnetic pickup output toggle – press for on (green), press again for on+EQ (blue), press
again for off (unlit)
| LED piezo output toggle - press for on (green), press again for on+EQ (blue)
| LED (Chameleon
mode)
piezo output toggle – press for on (green), press again for on+eq (blue), and press again
for off (unlit)
C LED enter Chameleon Tone select mode (then choose the desired tone by rotating the MCK
to the E, A, D, G, B, E, Arrow, or B# LEDs)
display charge level (two red bars, two yellow bars, and two green bars indicate full charge)
E LED tuning 1 tuning 7 tuning 13
A LED tuning 2 tuning 8 tuning 14
D LED tuning 3 tuning 9 tuning 15
G LED tuning 4 tuning 10 tuning 16
B LED tuning 5 tuning 11 tuning 17
E LED tuning 6 tuning 12 tuning 18
Arrow LED single string up
all strings up all strings down
B# LED each press steps through the banks – blue, green, red, blue, green, red, etc.
enter setup mode
Gibson Dark Fire 4.0 manual, page 39