Embed Size (px)
Citation preview
Gibson Dark FireGibson Dark Fire
ApplicationsApplications
Quick StartQuick Start
Using the RIP Console, Native Instruments Guitar Rig 3, and Ableton Live Lite 7 Gibson Studio Edition
Owner’s Manual Version 1.0.2
1
Important Safety Instructions
We value you as a customer—and want our products to give you an inspiring, and gratifying, experience. So, to insure your safety and protect your investment in the Gibson RIP, please read and follow all safety warnings and operating instructions before using this product, and keep all documentation for future reference.
Environmental Factors
Heat and moisture can harm your Gibson RIP. Please do not install or operate this product near sources of moisture, such as sinks, damp basements, leaky roofs, etc. and never store it near heat sources, such as heaters or radiators. Both you and your RIP will be much happier if you store and operate this product under safe conditions.
Power Sources
Use only the power sources recommended in this manual. Make sure any power supply cords are not located where they are likely to be safety hazards, such as on the floor where people might walk, or in locations where they may receive pressure from items placed upon or against them. Also, be very careful with any power source connections, such as where the AC adapter connects to the wall outlet and where it plugs into RIP. If these are jostled loose, RIP may experience extreme power differentials, which can potentially harm you and the product.
Service
Please do not attempt to service RIP yourself. Opening the case may expose you to high voltages (besides, there are no user-serviceable parts), so let our expert technicians handle any repairs for you.
Speaking of experts, always send the RIP to an authorized service technician if any of the following occurs (contact numbers for service centers are at the end of this section):
Any foreign object (especially liquid) has gotten into the case RIP has been exposed to water, dropped, or otherwise damaged A marked changed in RIP’s performance You hear anything rattling around inside if you shake the RIP gently
2
Warranty Protection
It is very important to us that you are satisfied with your Gibson product. Register it and activate your warranty protection by mailing the warranty card included with Dark Fire to Gibson USA, Department W, P.O. Box 100087, Nashville, TN 37210-0087. If you encounter any kind of problem, contact us as soon as possible so we can make things right.
Once you your warranty protection is active, RIP’s electronic components are warranted to be free from defects in materials and workmanship for a period of one (1) year from the date of original purchase. Your warranty covers the cost of both labor and materials on any repair deemed necessary by our Customer Service Representative for the warranty period, subject to the limitations below. Please note that our warranty belongs to the original retail purchaser only, and may not be transferred or assigned to subsequent owners.
If RIP malfunctions as a result of faulty materials or workmanship, Gibson will determine whether repair or replacement is more appropriate. In case the original materials are no longer available for repair, Gibson reserves the right to use materials regularly utilized at the time of repair.
If we determine that replacing RIP best serves your interests, or in the unlikely event that it is destroyed, lost, or damaged beyond repair while in our possession for repairs, we will replace the product. If it is no longer available, it will be replaced with the most similar product whose value does not exceed your original product’s purchase price.
Remember—as a necessary condition to the warranty coverage described in this section, you must activate your warranty by mailing the warranty card included with Dark Fire to Gibson USA, Department W, P.O. Box 100087, Nashville, TN 37210-0087.
Warranty Limitations
Unfortunately, it is not possible for your product warranty to cover any of the following:
Any product that has been altered or modified in any way, or upon which any serial or registration number has been tampered with or altered in any way.
Any product whose warranty card has been altered or contains false information. Any product that has been damaged due to misuse, negligence, accident or improper
operation or storage. Any product damaged during shipment. Inspect the package immediately upon receipt,
and notify the carrier immediately if there is damage. Any product damaged as a result of extreme temperature, humidity, or the use of an
improper power source. Any product not purchased through an authorized dealer, or any product that has had
repairs, modifications or alterations made by an unauthorized service technician. Wear and tear based on normal usage. Factory installed electronics after more than one year following the original date of
purchase.
3
Gibson makes no other express warranty of any kind. All implied warranties, including warranties of merchantability and fitness for a particular purpose that exceed the specific provisions of the warranty, are expressly and specifically disclaimed and excluded from the warranty. Note, however, that some states and/or countries do not allow the exclusion or limitation of implied warranties, so this paragraph may not apply to you. In particular, if you purchased your product outside of the United States, contact your local distributor for the handling and resolution of all warranty issues, as the warranty described here is not always applicable.
And of course, Gibson shall not be liable for any special, indirect, consequential, incidental or other similar damages to you or to any third party, including, without limitation, damages for loss of profits or business, or damages resulting from use or performance of the product, whether in contract or tort, even if Gibson or its authorized representative has been advised of the possibility of such damages, and Gibson shall not be liable for any expenses, claims or suits arising from or relating to any of the foregoing.
To obtain warranty service, contact the service center nearest you:
US (Toll Free) 1-800-4GIBSONUS (Local) 1-615-871-4500Email - [email protected]
Europe 00800-4GIBSON1Email - [email protected]
Japan 03-3434-5670Email - [email protected]
China 800-820-8841 (in China only)Email - [email protected]
Please do not send a unit in for repair before contacting your customer service center. They will advise you of the proper procedure for a quick and efficient repair, as well as provide information on where and how to send the product.
Gibson® is a trademarkof t .heGibsonGuitarCorpFireWire® , .is a trademarkof Apple Computer IncWindows® andWindowsXP® , .are registeredtrademarksof Microsoft Inc
4
Chapter 1: Introduction
Gibson's Dark Fire is not just an extraordinary guitar, but part of an advanced system that is equally at home on stage or in today's computer-based studio. This Quick Start manual focuses on using the Dark Fire system in the studio.
There are three main components to this system:
RIP interface and Console. This hardware/software combination provides a way to feed Dark Fire's multiple outputs (magnetic pickups, piezo pickup, individual hex outputs) into various software programs for Mac or Windows (XP/Vista), as well as play back the results through speakers, headphones, or a mixer.
Native Instruments Guitar Rig 3. This software program models a wide range of amplifiers and effects, and also provides various tools (e.g., tuner, metronome, recorder). It can run in stand-alone mode, where it essentially turns your laptop or other computer into a complete rack guitar system, or as a plug-in with host programs like Ableton Live, Cakewalk Sonar, Apple Logic Studio, MOTU Digital Performer, etc. When used as a plug-in, it can insert in any track to process the track's signal. While intended for guitar, Guitar Rig 3 is also useful with other instruments including bass, drums, and even voice.
Ableton Live Lite 7 Gibson Studio Edition. Live is a sophisticated recording and editing program that is ideal for guitar, and particularly, Dark Fire. In the studio, you can use it to record your playing as well as other instruments. You can also build backing tracks using loops of drum parts, bass lines, etc. When playing live, Ableton Live can serve as a “host” for Guitar Rig 3, even letting you insert a separate instance of Guitar Rig 3 for each string.
Any updates to this documentation are available for download from http://www.gibson.com/darkfire .
Mac/Windows Differences
All Dark Fire software is compatible with both Mac OS X and Windows XP/Vista computers, and all software works virtually identically with both types of machines. Most screen shots show the Windows versions, but any differences will be pointed out when needed.
IMPORTANT!
The RIP has a feature where if you don't play for a while, it shuts down and starts charging the Dark Fire battery. If during the following examples you don't hear any output from the RIP, strum the Dark Fire strings. This “wakes up” the RIP.
5
Chapter 2: Playing Dark Fire with RIP and Your Computer
In this application, we'll use only the RIP for practicing guitar. This will also familiarize you with how to use the RIP with subsequent applications, which is important—the RIP is the connection between Dark Fire and your computer. If you need more information on RIP, such as how to install its drivers or understand the difference among different FireWire connectors, please refer to the full RIP owner's manual.
Hardware Setup
1. With your computer off, connect the RIP's FireWire connector to an available FireWire connector on your computer.
2. Connect the RIP to its AC adapter. If the adapter is plugged into a barrier strip, make sure the barrier strip is turned on.
3. Turn on your computer, and allow it to boot completely.4. Open the Console. The easiest way is to double-click on the Gibson RIP Console
shortcut (called an “alias” on the Mac) that was placed on your desktop during installation. Otherwise, for Windows, use the Start menu to go Start > Program > Gibson RIP > Gibson RIP Console. For the Mac, from the Finder click on Go, open Applications, and double-click on Gibson RIP Console.
5. The Console opens. If the console does not open, refer to the RIP owner's manual for information on troubleshooting. Likely problems are:
The FireWire cable might be bad or not inserted fully. The drivers might not be installed correctly. The RIP's AC adapter might not be plugged in—the AC adapter is required for
the RIP to work.6. Plug Dark Fire into the RIP guitar input using the included stereo (TRS) cable. Turn the
Console analog out faders all the way down, as shown in the following screen shot, so that you can bring the volume up gradually and avoid any possible damage to your hearing. For monitoring through headphones, plug a set of headphones into the 1/8” front panel Phones jack, and turn the volume control about halfway up. If you prefer to monitor through a mixer or powered speakers, with your speakers turned off, plug the RIP Line Outputs into your mixer or speaker inputs (output 1 is the left channel, output 2 is the right channel).
6
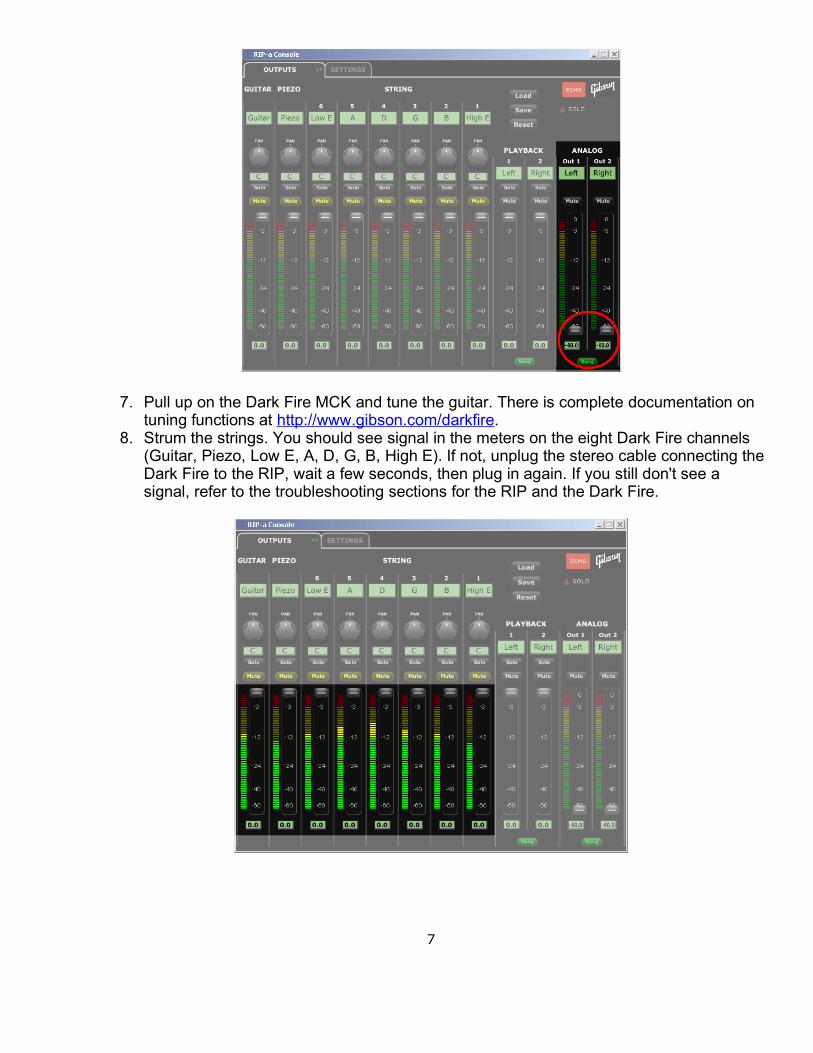
7. Pull up on the Dark Fire MCK and tune the guitar. There is complete documentation on tuning functions at http://www.gibson.com/darkfire.
8. Strum the strings. You should see signal in the meters on the eight Dark Fire channels (Guitar, Piezo, Low E, A, D, G, B, High E). If not, unplug the stereo cable connecting the Dark Fire to the RIP, wait a few seconds, then plug in again. If you still don't see a signal, refer to the troubleshooting sections for the RIP and the Dark Fire.
7

Listen to the Magnetic Pickups
We'll now listen to only the magnetic pickups. This is an excellent way to hear how the Chameleon Tone Technology options affects the magnetic pickup sound as you try out different Chameleon Tone settings.
1. Unmute the Guitar channel (Mute switch label goes from yellow to white).2. Make sure Gang is lit green on the Analog Out 1 and Out 2 channels.3. Turn up the Analog Out 1 and 2 faders to a comfortable listening level. Note: For the
best signal-to-noise ratio and dynamic range, Gibson highly recommends adjusting levels at your monitoring system, and leaving the Analog Out 1 and Out 2 faders all the way up.
4. To check out the Chameleon Tone Technology options, rotate the MCK until the “C” lights up, then press momentarily on the MCK knob to enter Chameleon mode.
5. Rotate the MCK counter-clockwise to E (Gibson), and check out the sound. Then try the other positions and play for a little bit (A = Blues, D = Funky, G= Twang, B = Acoustic, e = L5, rotating arrow = Rock, b symbol = Metal). Have fun!
8
Blend in the Piezo Pickup
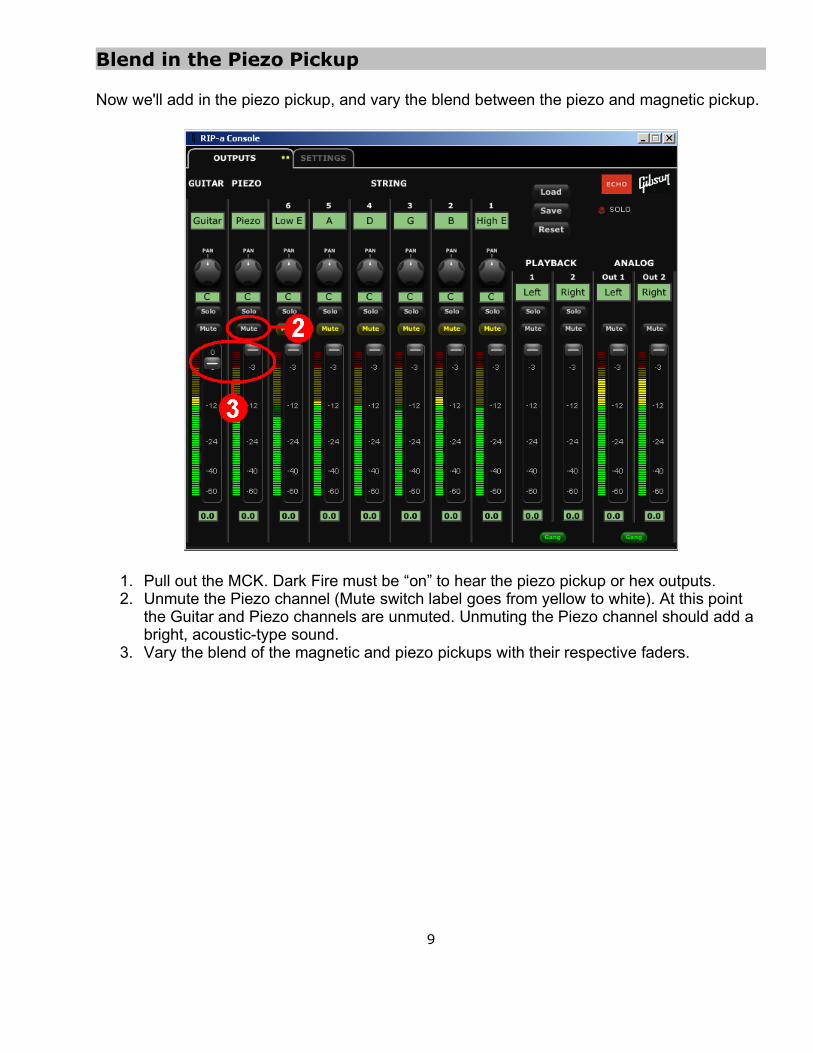
Now we'll add in the piezo pickup, and vary the blend between the piezo and magnetic pickup.
1. Pull out the MCK. Dark Fire must be “on” to hear the piezo pickup or hex outputs.2. Unmute the Piezo channel (Mute switch label goes from yellow to white). At this point
the Guitar and Piezo channels are unmuted. Unmuting the Piezo channel should add a bright, acoustic-type sound.
3. Vary the blend of the magnetic and piezo pickups with their respective faders.
9
Use the Individual String (Hex) Outputs for Stereo Spread
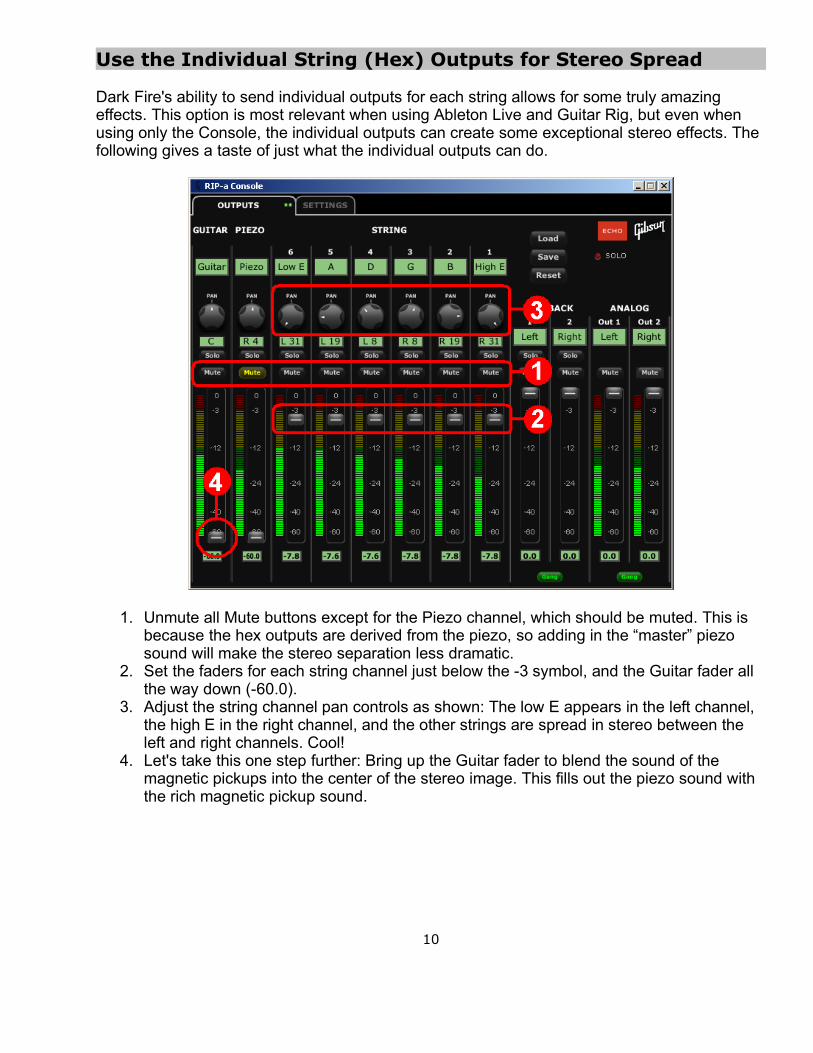
Dark Fire's ability to send individual outputs for each string allows for some truly amazing effects. This option is most relevant when using Ableton Live and Guitar Rig, but even when using only the Console, the individual outputs can create some exceptional stereo effects. The following gives a taste of just what the individual outputs can do.
1. Unmute all Mute buttons except for the Piezo channel, which should be muted. This is because the hex outputs are derived from the piezo, so adding in the “master” piezo sound will make the stereo separation less dramatic.
2. Set the faders for each string channel just below the -3 symbol, and the Guitar fader all the way down (-60.0).
3. Adjust the string channel pan controls as shown: The low E appears in the left channel, the high E in the right channel, and the other strings are spread in stereo between the left and right channels. Cool!
4. Let's take this one step further: Bring up the Guitar fader to blend the sound of the magnetic pickups into the center of the stereo image. This fills out the piezo sound with the rich magnetic pickup sound.
10
Chapter 3: Guitar Rig 3 Stand-Alone Mode
We'll now process the guitar through Native Instruments' Guitar Rig 3 in stand-alone mode. In this case, Guitar Rig 3 replaces a complete guitar setup, including pedals, studio processors, amp, cabinets, and even miking options.
This Quick Start will get you up and running with Guitar Rig 3, but the program is deep and flexible. Although you can enjoy using Guitar Rig 3 at a basic level, Gibson recommends going over the program's documentation so you can become familiar with its many features.
The first time you open Guitar Rig 3 in stand-alone mode, you'll need to make some audio and MIDI settings. You need only do this once, unless your system changes.
Open Guitar Rig 3. The easiest way is to double-click on the Guitar Rig 3 shortcut (called an “alias” on the Mac) that was placed on your desktop during installation. Otherwise, do the following.
Windows: From the Start menu, go Start > Programs > Native Instruments > Guitar Rig 3 > Guitar Rig 3. You can also access the documentation within the Guitar Rig 3 folder.Mac: From the Finder click on Go, open Applications, and open the Guitar Rig 3 folder, From there, double-click on Guitar Rig 3. As with Windows, the documentation is within the Guitar Rig 3 folder.
Upon opening Guitar Rig 3 in stand-alone mode, the Audio and MIDI Settings window appears. If this window does not appear, or if you need to change these settings later, do the following.
Windows: With Guitar Rig 3 open, go File > Audio and MIDI Settings.Mac: From the Guitar Rig 3 menu item, select Preferences.
11
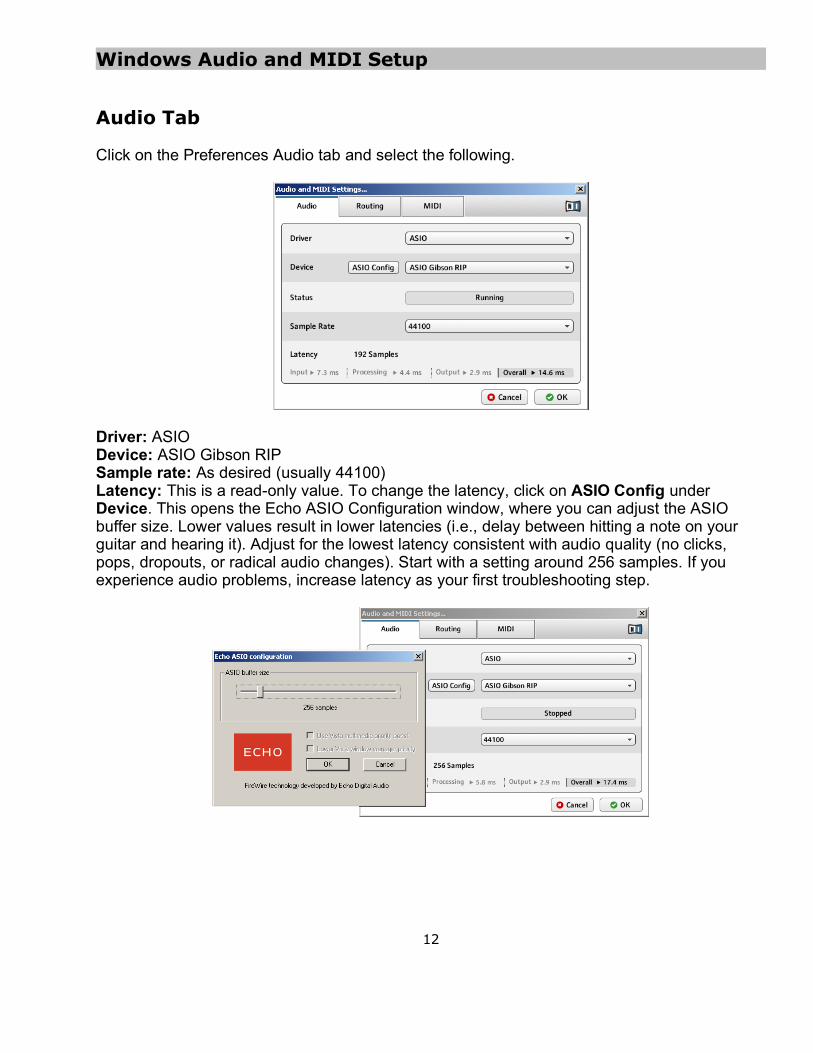
Windows Audio and MIDI Setup
Audio Tab
Click on the Preferences Audio tab and select the following.
Driver: ASIODevice: ASIO Gibson RIPSample rate: As desired (usually 44100)Latency: This is a read-only value. To change the latency, click on ASIO Config under Device. This opens the Echo ASIO Configuration window, where you can adjust the ASIO buffer size. Lower values result in lower latencies (i.e., delay between hitting a note on your guitar and hearing it). Adjust for the lowest latency consistent with audio quality (no clicks, pops, dropouts, or radical audio changes). Start with a setting around 256 samples. If you experience audio problems, increase latency as your first troubleshooting step.
12
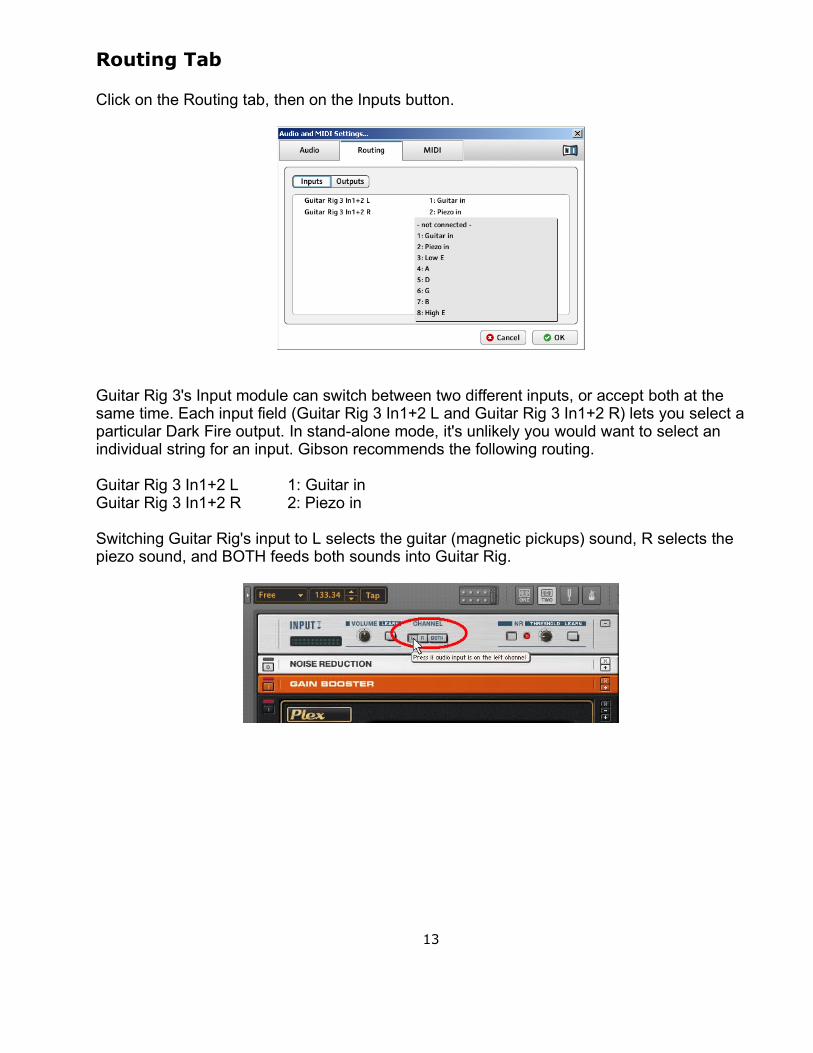
Routing Tab
Click on the Routing tab, then on the Inputs button.
Guitar Rig 3's Input module can switch between two different inputs, or accept both at the same time. Each input field (Guitar Rig 3 In1+2 L and Guitar Rig 3 In1+2 R) lets you select a particular Dark Fire output. In stand-alone mode, it's unlikely you would want to select an individual string for an input. Gibson recommends the following routing.
Guitar Rig 3 In1+2 L 1: Guitar inGuitar Rig 3 In1+2 R 2: Piezo in
Switching Guitar Rig's input to L selects the guitar (magnetic pickups) sound, R selects the piezo sound, and BOTH feeds both sounds into Guitar Rig.
13
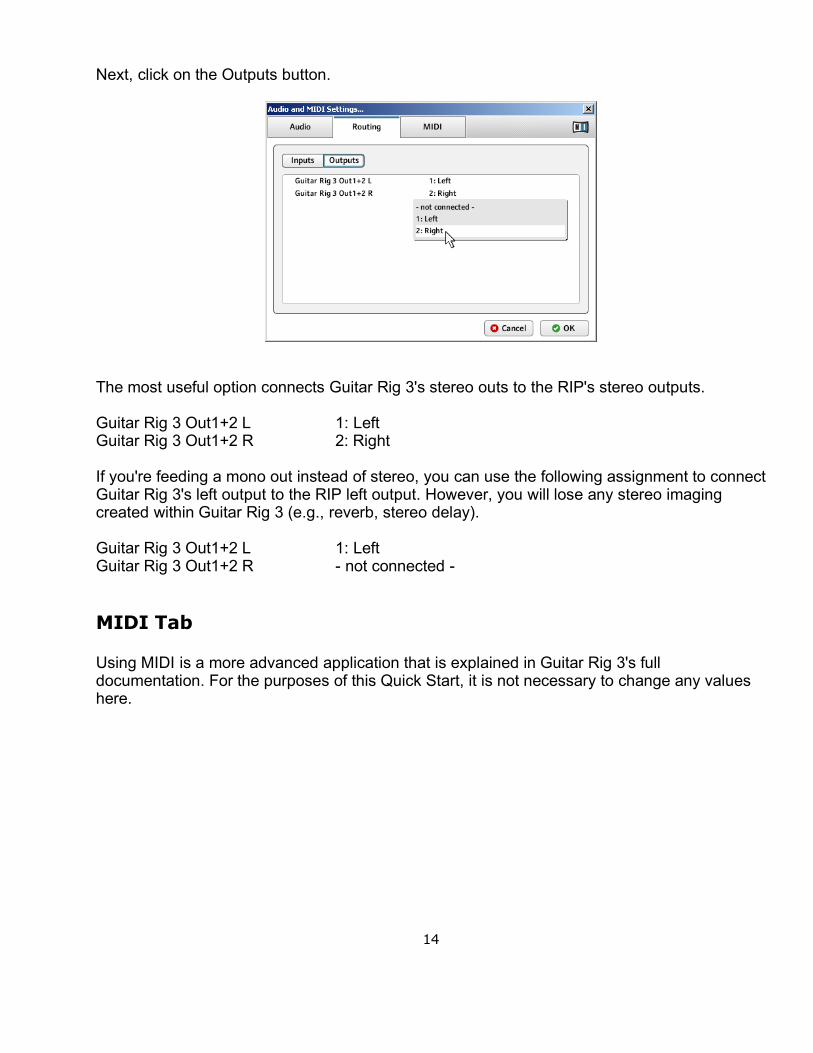
Next, click on the Outputs button.
The most useful option connects Guitar Rig 3's stereo outs to the RIP's stereo outputs.
Guitar Rig 3 Out1+2 L 1: LeftGuitar Rig 3 Out1+2 R 2: Right
If you're feeding a mono out instead of stereo, you can use the following assignment to connect Guitar Rig 3's left output to the RIP left output. However, you will lose any stereo imaging created within Guitar Rig 3 (e.g., reverb, stereo delay).
Guitar Rig 3 Out1+2 L 1: LeftGuitar Rig 3 Out1+2 R - not connected - MIDI Tab
Using MIDI is a more advanced application that is explained in Guitar Rig 3's full documentation. For the purposes of this Quick Start, it is not necessary to change any values here.
14
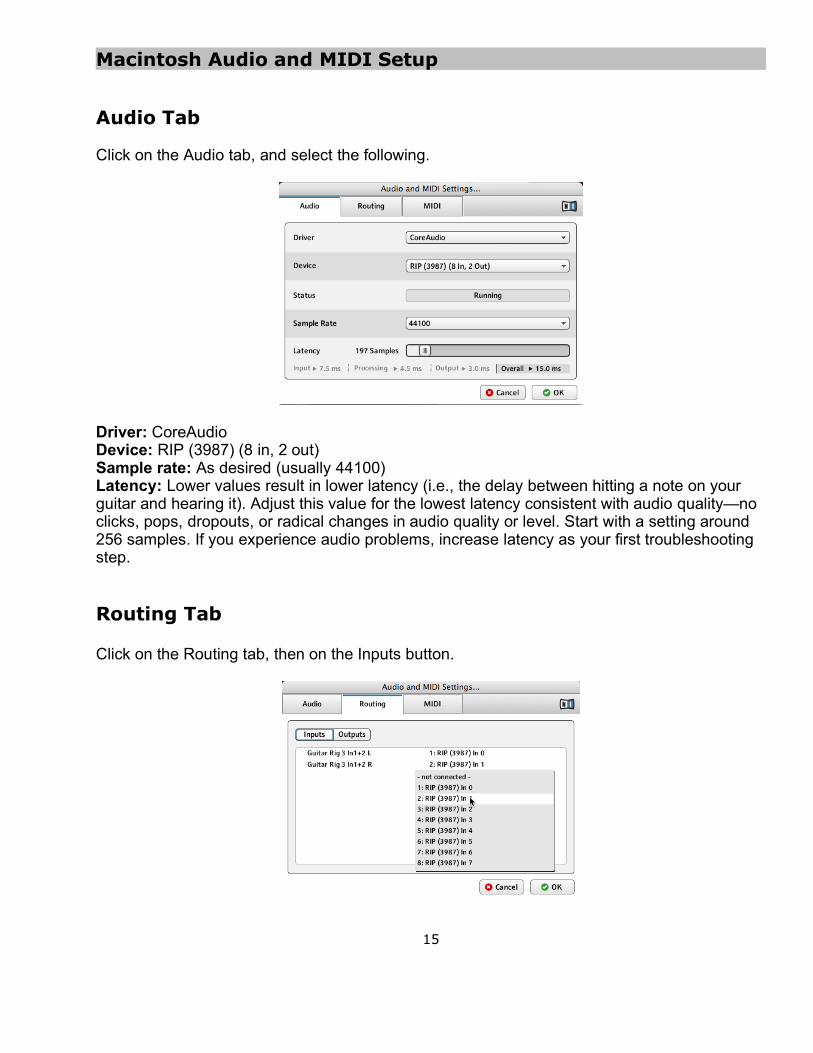
Macintosh Audio and MIDI Setup
Audio Tab
Click on the Audio tab, and select the following.
Driver: CoreAudioDevice: RIP (3987) (8 in, 2 out)Sample rate: As desired (usually 44100)Latency: Lower values result in lower latency (i.e., the delay between hitting a note on your guitar and hearing it). Adjust this value for the lowest latency consistent with audio quality—no clicks, pops, dropouts, or radical changes in audio quality or level. Start with a setting around 256 samples. If you experience audio problems, increase latency as your first troubleshooting step.
Routing Tab
Click on the Routing tab, then on the Inputs button.
15
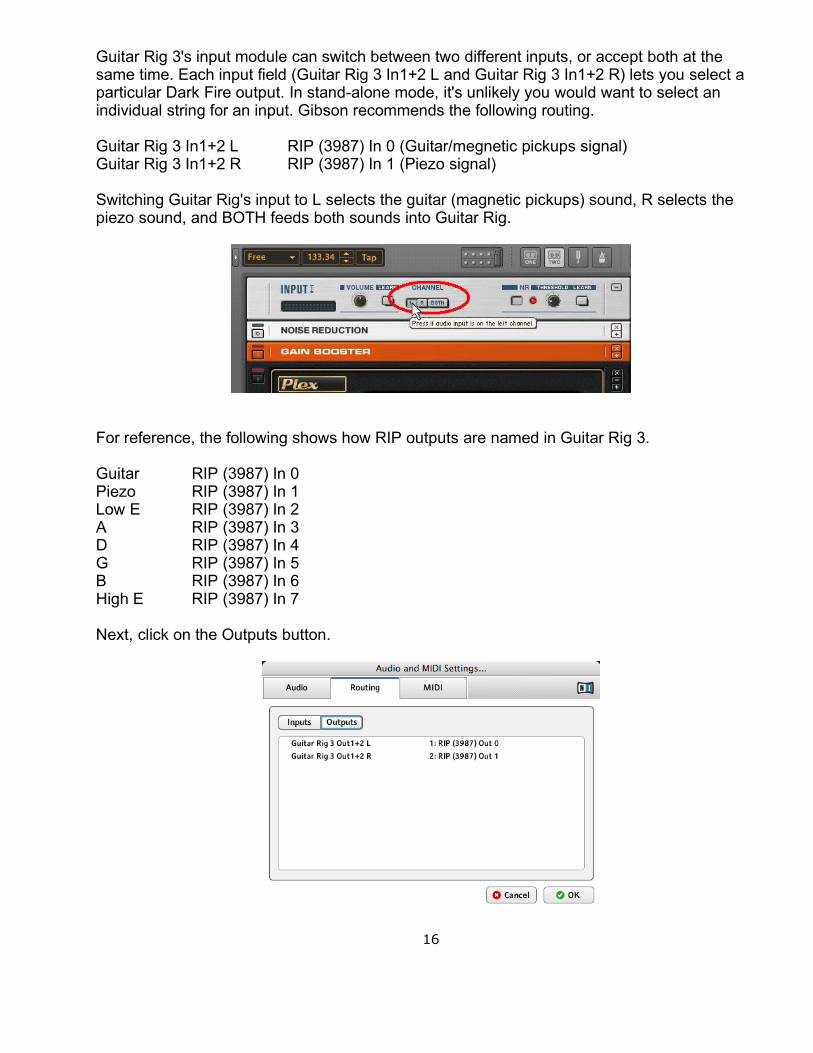
Guitar Rig 3's input module can switch between two different inputs, or accept both at the same time. Each input field (Guitar Rig 3 In1+2 L and Guitar Rig 3 In1+2 R) lets you select a particular Dark Fire output. In stand-alone mode, it's unlikely you would want to select an individual string for an input. Gibson recommends the following routing.
Guitar Rig 3 In1+2 L RIP (3987) In 0 (Guitar/megnetic pickups signal)Guitar Rig 3 In1+2 R RIP (3987) In 1 (Piezo signal)
Switching Guitar Rig's input to L selects the guitar (magnetic pickups) sound, R selects the piezo sound, and BOTH feeds both sounds into Guitar Rig.
For reference, the following shows how RIP outputs are named in Guitar Rig 3.
Guitar RIP (3987) In 0Piezo RIP (3987) In 1Low E RIP (3987) In 2A RIP (3987) In 3D RIP (3987) In 4G RIP (3987) In 5B RIP (3987) In 6High E RIP (3987) In 7
Next, click on the Outputs button.
16
The most useful option connects Guitar Rig 3's stereo outs to the RIP's stereo outputs:
Guitar Rig 3 Out1+2 L RIP (3987) Out 0Guitar Rig 3 Out1+2 R RIP (3987) Out 1
If you're feeding a mono out instead of stereo, you can use the following assignment to connect Guitar Rig 3's left output to the RIP left output. However, you will lose any stereo imaging created within Guitar Rig 3 (e.g., reverb, stereo delay).
Guitar Rig 3 Out1+2 L RIP (3987) Out 0Guitar Rig 3 Out1+2 R - not connected - MIDI Tab
Using MIDI is a more advanced application that is explained in Guitar Rig 3's full documentation. For the purposes of this Quick Start, it is not necessary to change any values here.
17
Selecting Programs and Playing through Guitar Rig 3
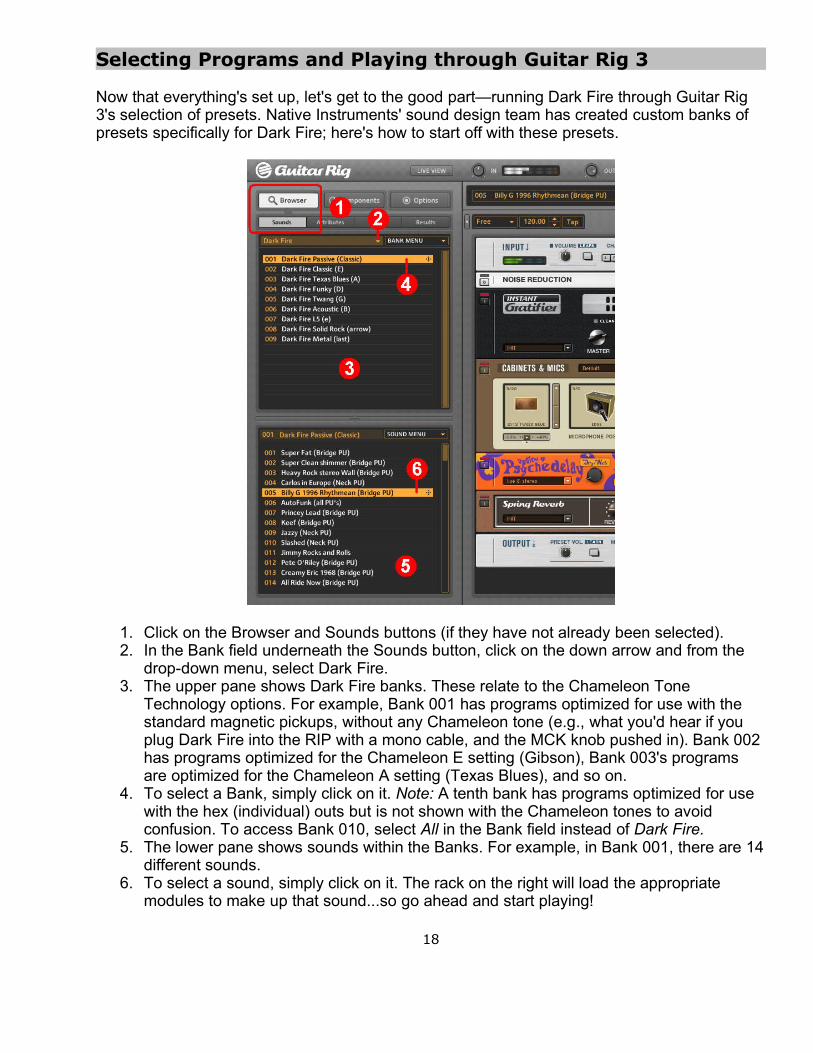
Now that everything's set up, let's get to the good part—running Dark Fire through Guitar Rig 3's selection of presets. Native Instruments' sound design team has created custom banks of presets specifically for Dark Fire; here's how to start off with these presets.
1. Click on the Browser and Sounds buttons (if they have not already been selected).2. In the Bank field underneath the Sounds button, click on the down arrow and from the
drop-down menu, select Dark Fire.3. The upper pane shows Dark Fire banks. These relate to the Chameleon Tone
Technology options. For example, Bank 001 has programs optimized for use with the standard magnetic pickups, without any Chameleon tone (e.g., what you'd hear if you plug Dark Fire into the RIP with a mono cable, and the MCK knob pushed in). Bank 002 has programs optimized for the Chameleon E setting (Gibson), Bank 003's programs are optimized for the Chameleon A setting (Texas Blues), and so on.
4. To select a Bank, simply click on it. Note: A tenth bank has programs optimized for use with the hex (individual) outs but is not shown with the Chameleon tones to avoid confusion. To access Bank 010, select All in the Bank field instead of Dark Fire.
5. The lower pane shows sounds within the Banks. For example, in Bank 001, there are 14 different sounds.
6. To select a sound, simply click on it. The rack on the right will load the appropriate modules to make up that sound...so go ahead and start playing!
18
Guitar Rig 3 Quick Tips
As mentioned, GR3 is very flexible; to get the most out of the program, please read the documentation included in the Guitar Rig 3 folder. However, while you're getting started, the following tips will introduce you to some of the main features, and help you climb the learning curve a little faster.
Learning Levels
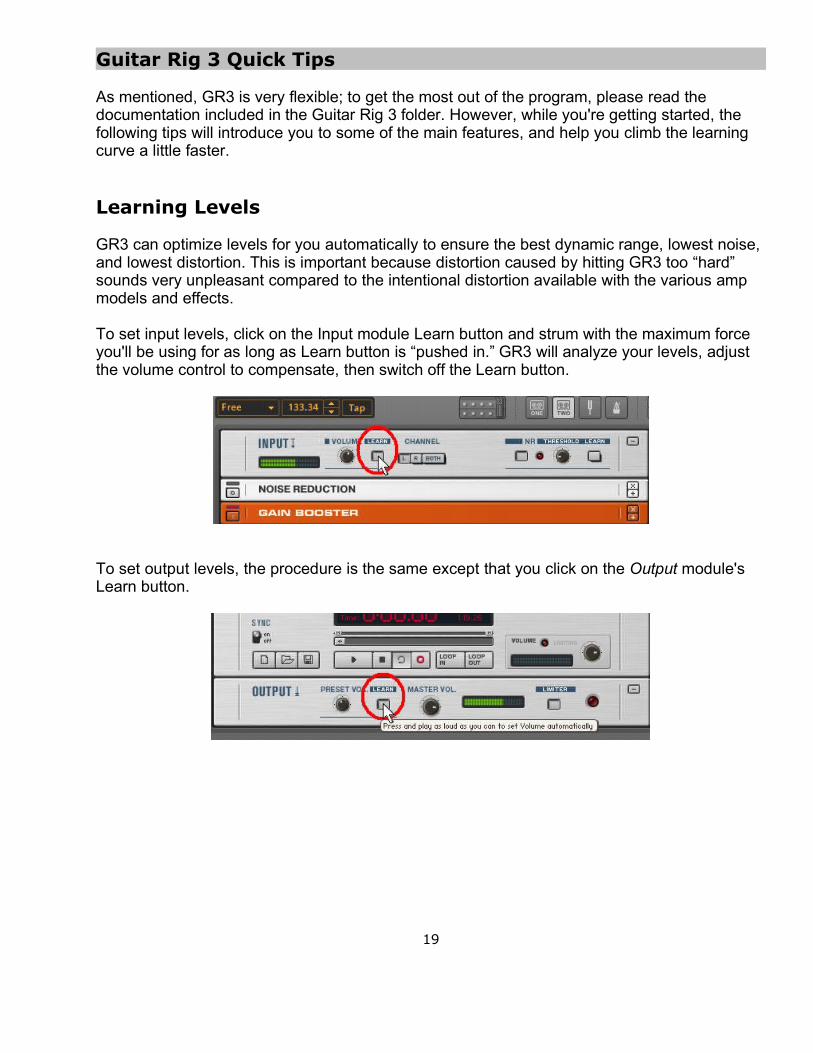
GR3 can optimize levels for you automatically to ensure the best dynamic range, lowest noise, and lowest distortion. This is important because distortion caused by hitting GR3 too “hard” sounds very unpleasant compared to the intentional distortion available with the various amp models and effects.
To set input levels, click on the Input module Learn button and strum with the maximum force you'll be using for as long as Learn button is “pushed in.” GR3 will analyze your levels, adjust the volume control to compensate, then switch off the Learn button.
To set output levels, the procedure is the same except that you click on the Output module's Learn button.
19
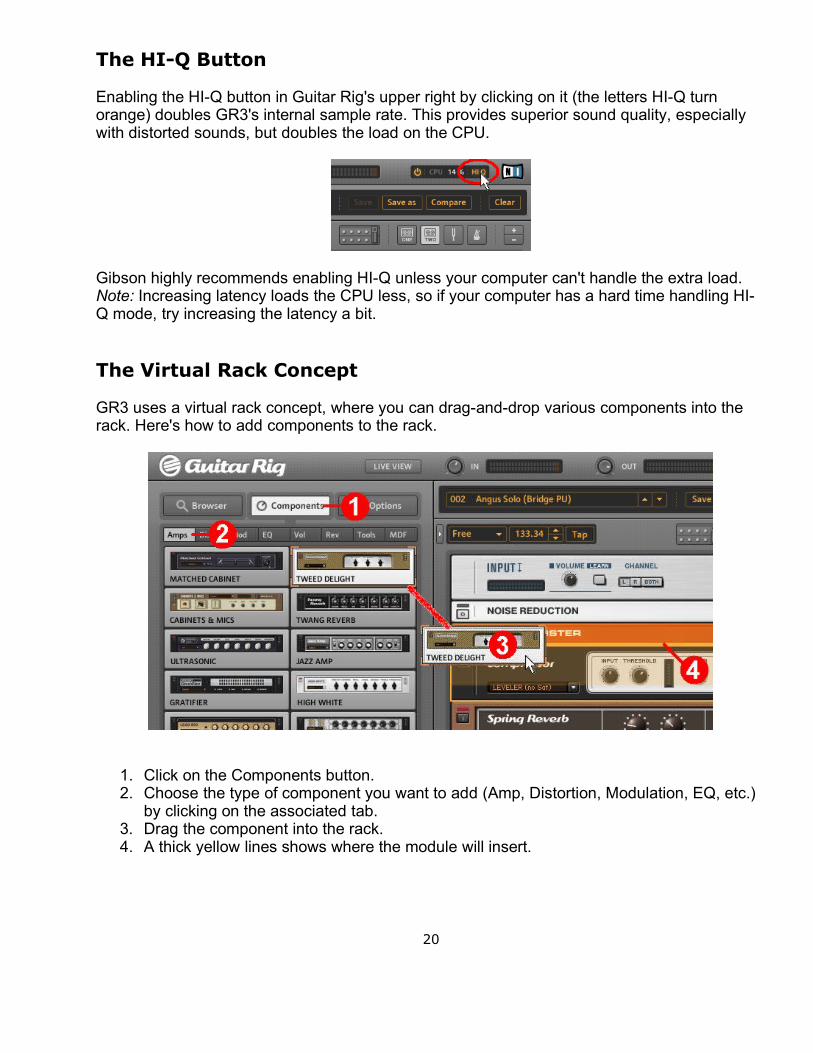
The HI-Q Button
Enabling the HI-Q button in Guitar Rig's upper right by clicking on it (the letters HI-Q turn orange) doubles GR3's internal sample rate. This provides superior sound quality, especially with distorted sounds, but doubles the load on the CPU.
Gibson highly recommends enabling HI-Q unless your computer can't handle the extra load. Note: Increasing latency loads the CPU less, so if your computer has a hard time handling HI-Q mode, try increasing the latency a bit.
The Virtual Rack Concept
GR3 uses a virtual rack concept, where you can drag-and-drop various components into the rack. Here's how to add components to the rack.
1. Click on the Components button.2. Choose the type of component you want to add (Amp, Distortion, Modulation, EQ, etc.)
by clicking on the associated tab.3. Drag the component into the rack.4. A thick yellow lines shows where the module will insert.
20
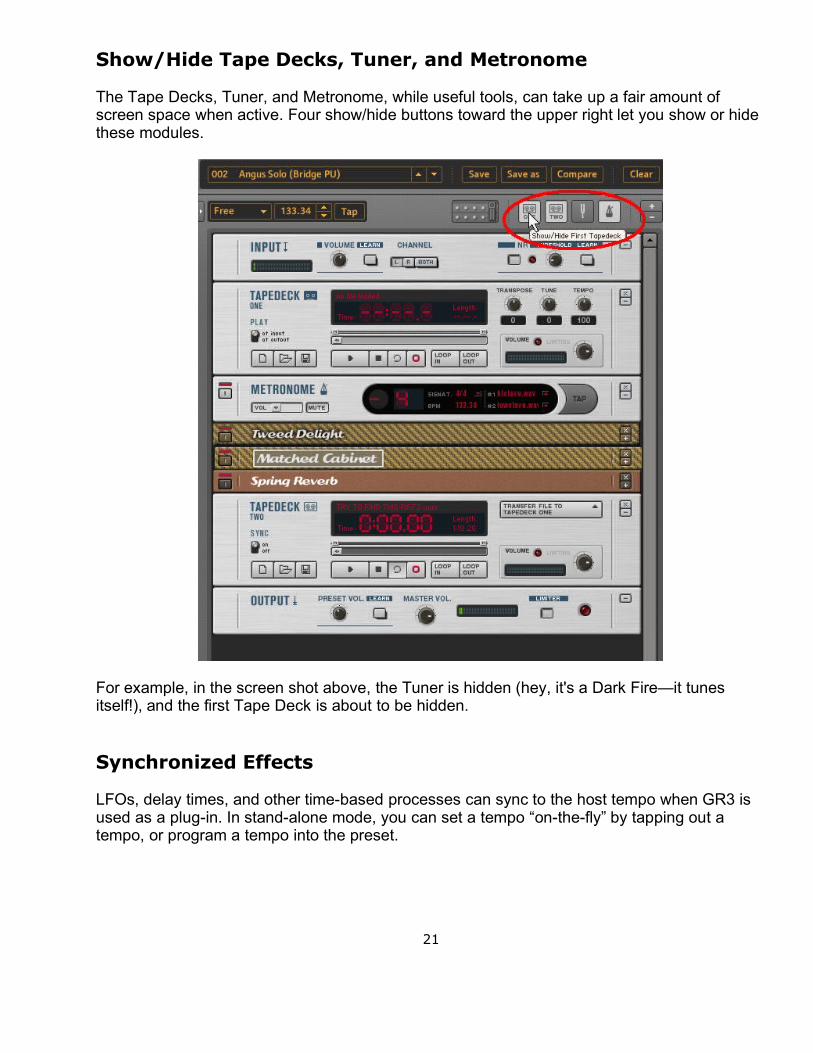
Show/Hide Tape Decks, Tuner, and Metronome
The Tape Decks, Tuner, and Metronome, while useful tools, can take up a fair amount of screen space when active. Four show/hide buttons toward the upper right let you show or hide these modules.
For example, in the screen shot above, the Tuner is hidden (hey, it's a Dark Fire—it tunes itself!), and the first Tape Deck is about to be hidden.
Synchronized Effects
LFOs, delay times, and other time-based processes can sync to the host tempo when GR3 is used as a plug-in. In stand-alone mode, you can set a tempo “on-the-fly” by tapping out a tempo, or program a tempo into the preset.
21
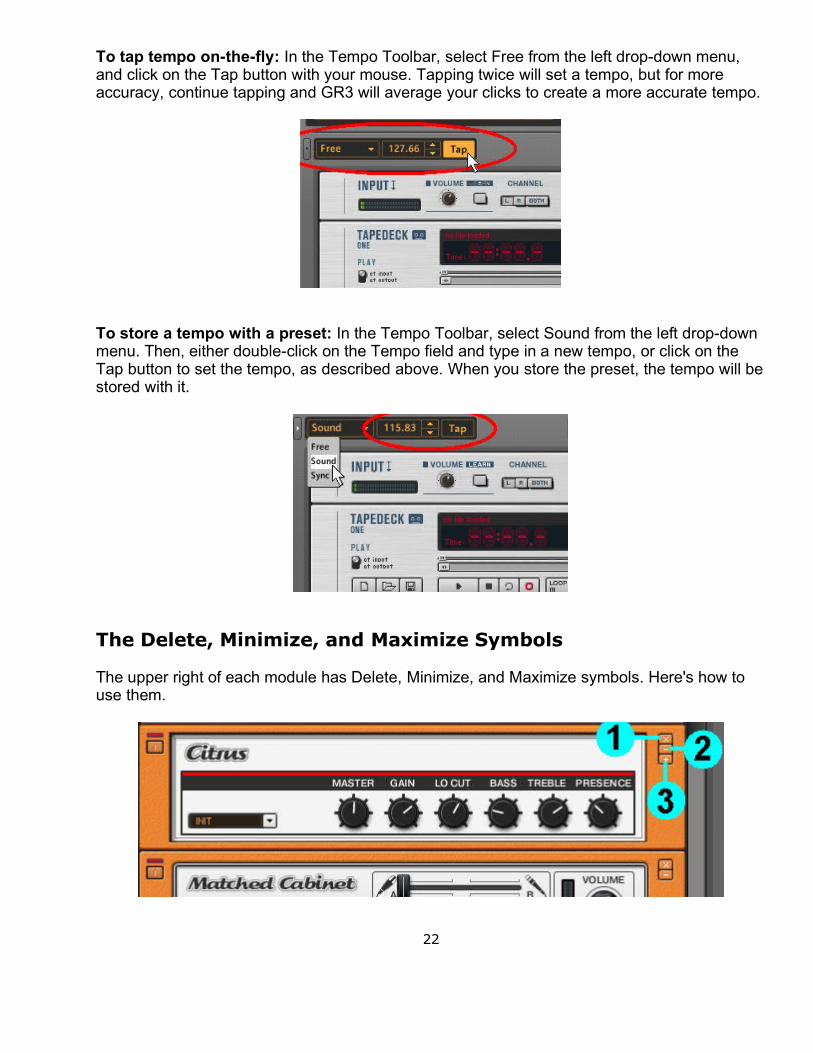
To tap tempo on-the-fly: In the Tempo Toolbar, select Free from the left drop-down menu, and click on the Tap button with your mouse. Tapping twice will set a tempo, but for more accuracy, continue tapping and GR3 will average your clicks to create a more accurate tempo.
To store a tempo with a preset: In the Tempo Toolbar, select Sound from the left drop-down menu. Then, either double-click on the Tempo field and type in a new tempo, or click on the Tap button to set the tempo, as described above. When you store the preset, the tempo will be stored with it.
The Delete, Minimize, and Maximize Symbols
The upper right of each module has Delete, Minimize, and Maximize symbols. Here's how to use them.
22
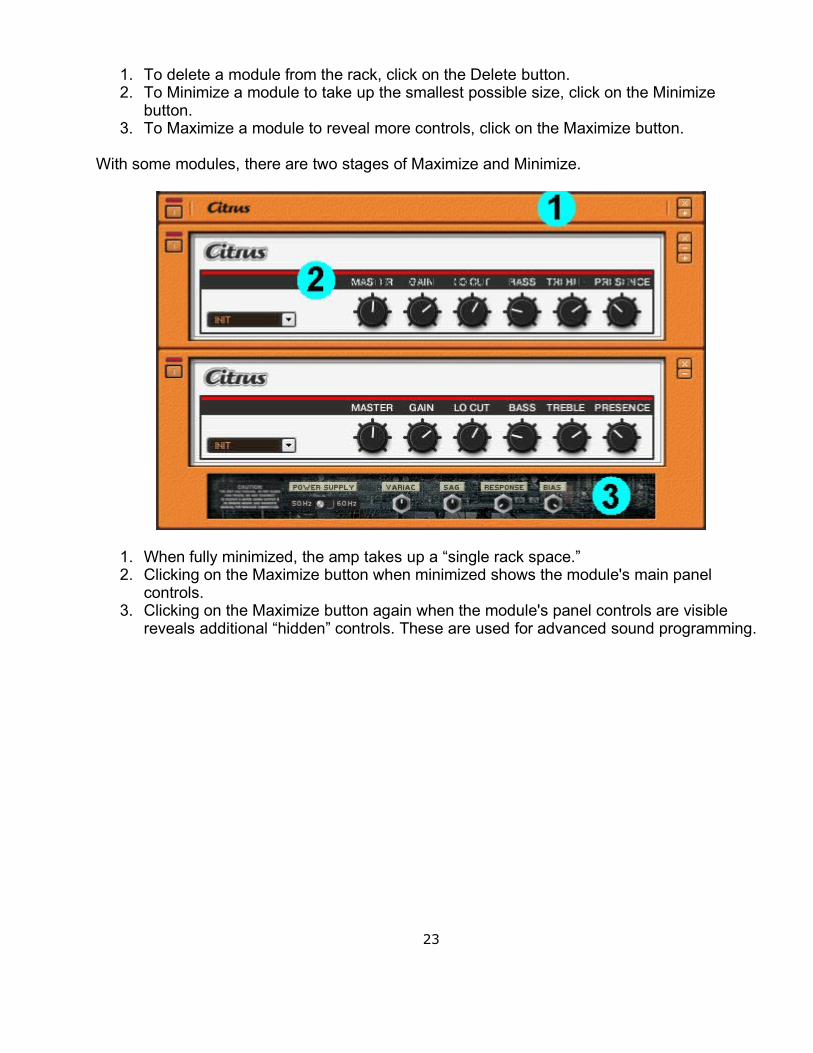
1. To delete a module from the rack, click on the Delete button.2. To Minimize a module to take up the smallest possible size, click on the Minimize
button.3. To Maximize a module to reveal more controls, click on the Maximize button.
With some modules, there are two stages of Maximize and Minimize.
1. When fully minimized, the amp takes up a “single rack space.”2. Clicking on the Maximize button when minimized shows the module's main panel
controls.3. Clicking on the Maximize button again when the module's panel controls are visible
reveals additional “hidden” controls. These are used for advanced sound programming.
23
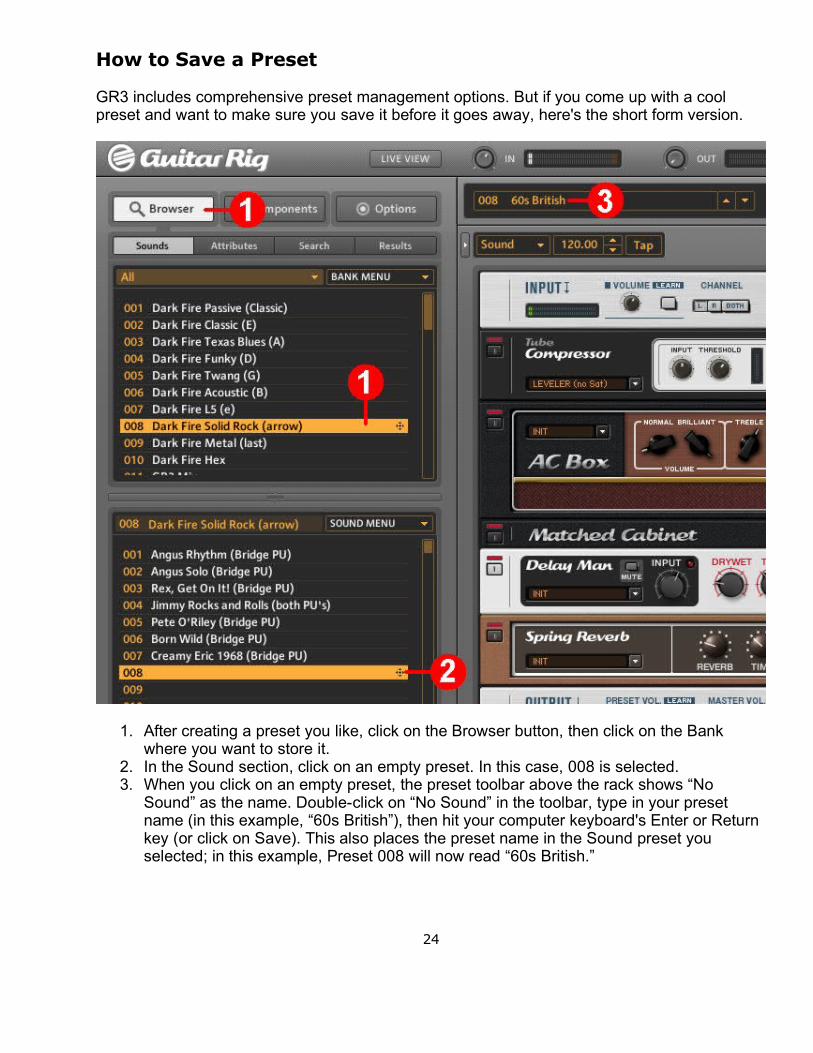
How to Save a Preset
GR3 includes comprehensive preset management options. But if you come up with a cool preset and want to make sure you save it before it goes away, here's the short form version.
1. After creating a preset you like, click on the Browser button, then click on the Bank where you want to store it.
2. In the Sound section, click on an empty preset. In this case, 008 is selected.3. When you click on an empty preset, the preset toolbar above the rack shows “No
Sound” as the name. Double-click on “No Sound” in the toolbar, type in your preset name (in this example, “60s British”), then hit your computer keyboard's Enter or Return key (or click on Save). This also places the preset name in the Sound preset you selected; in this example, Preset 008 will now read “60s British.”
24
Chapter 4: Recording with Ableton Live Lite 7 Gibson Studio Edition
Ableton Live Lite 7 Gibson Studio Edition (“Live” for short), is an advanced DAW (digital audio workstation) that offers multiple ways of working.
You can treat it like a tape recorder with built-in mixer, and simply record tracks into Live's Arrangement view. This option uses familiar transport, record enable, and mixing controls. Live can record and play back audio and MIDI data.
Live also has a Session view that is unique to the program. Session view is oriented toward what guitarists call “riffs” and DJs call “loops.” This view makes it easy to write songs and backing tracks using drum loops, bass lines, and other riffs. Live comes with a library of loops and riffs so you can get started “right out of the box.”
You can combine the two approaches—create a backing track in Session view, then switch over to Arrangement view and add guitar solos, vocals, etc. Even while you're working in one view, the other view remains active.
Live can serve as a plug-in host for live performance. Suppose you want to use Dark Fire live, and take advantage of the hex pickup outputs to create huge sounds. You can create six channels in Live, insert an instance of Guitar Rig 3 in each channel, and process each string individually for monster sounds. (Note: Live Lite 7 Gibson Studio Edition allows a maximum of six external plug-in effects, so you can't insert Guitar Rig 3 for the six outs as well as the magnetic and piezo pickups. However, Live comes with a suite of over 20 built-in plug-in effects, up to four of which can also be included in a project.)
Live is a creative, deep program with exceptional potential. This Quick Start will give just the smallest taste of what Live can do; here's how to find the complete documentation.
Windows: Go Start > Programs > Ableton > Live 7.0.13 > Manual and then click on the manual in the appropriate language.Mac: From the Finder, select Go > Applications > Live 7.0.13 OS X > Docs and double-click on the manual in the appropriate language.
Also check Live's help menu for additional documentation and lessons.
The first time you open Live, it's a good idea to check the Preferences and make sure that Live is working properly with the RIP, and also, that it knows where to find the Guitar Rig 3 plug-in. You need set the preferences only once, unless your system changes.
25
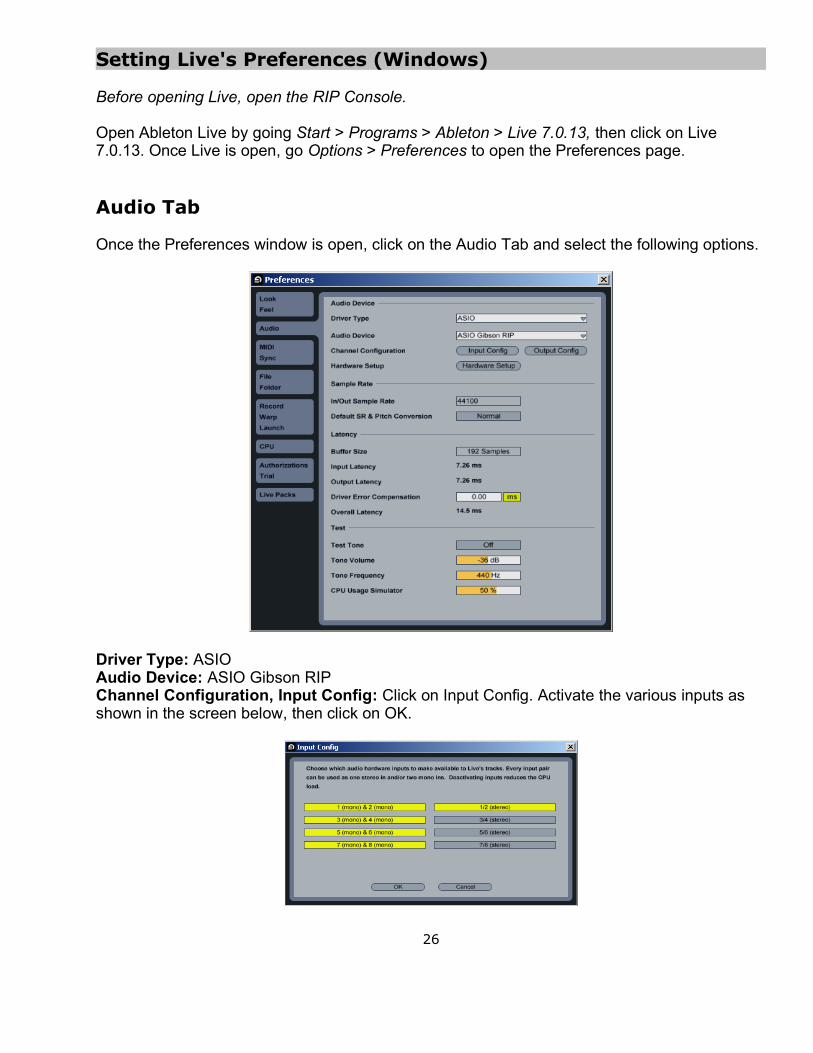
Setting Live's Preferences (Windows)
Before opening Live, open the RIP Console.
Open Ableton Live by going Start > Programs > Ableton > Live 7.0.13, then click on Live 7.0.13. Once Live is open, go Options > Preferences to open the Preferences page.
Audio Tab
Once the Preferences window is open, click on the Audio Tab and select the following options.
Driver Type: ASIOAudio Device: ASIO Gibson RIPChannel Configuration, Input Config: Click on Input Config. Activate the various inputs as shown in the screen below, then click on OK.
26
Here's how the RIP outputs correspond to Live's inputs.
Guitar 1Piezo 2Low E 3A 4D 5G 6B 7High E 8
So, by activating “1 (mono) & 2 (mono),” the RIP Guitar output (1) can be treated as a mono signal, as can the RIP Piezo output (2). However, by also activating “1/2 (stereo),” you have the option of treating the Guitar and Piezo outs as separate channels of a stereo pair.
Practically speaking, this means a Live channel could carry only the Guitar if the channel is set to listen to input 1, only the Piezo if set to input 2, and both if set to 1+2.
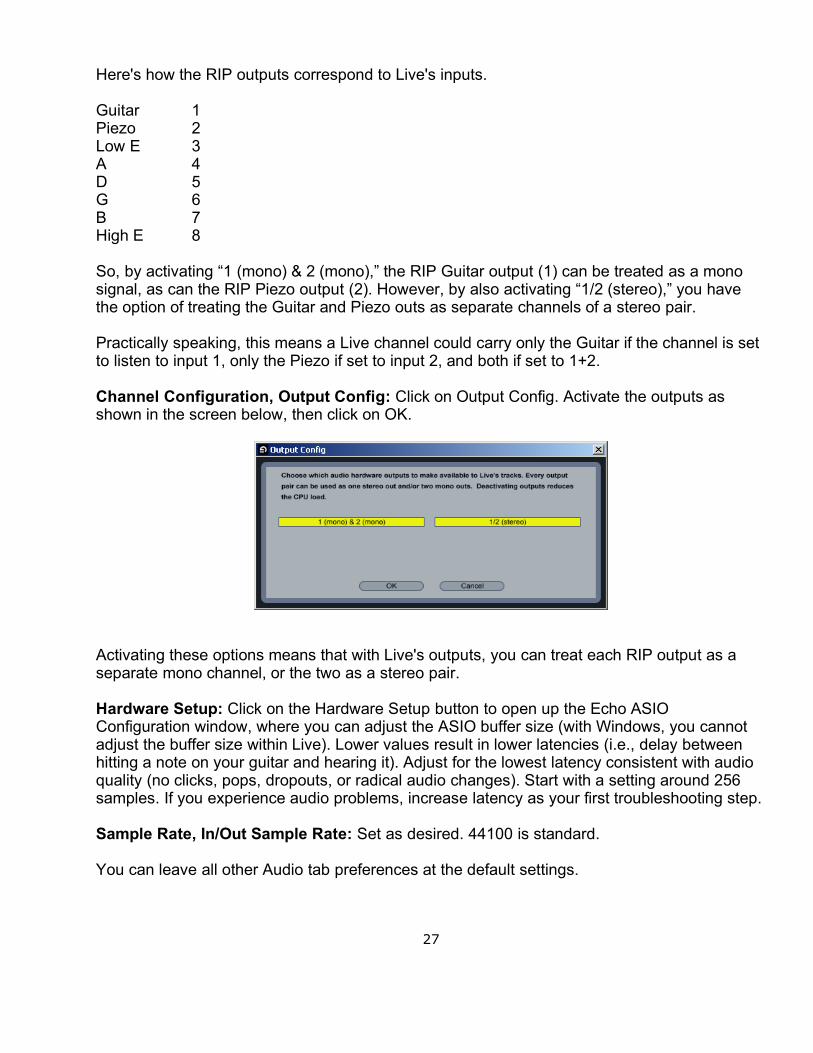
Channel Configuration, Output Config: Click on Output Config. Activate the outputs as shown in the screen below, then click on OK.
Activating these options means that with Live's outputs, you can treat each RIP output as a separate mono channel, or the two as a stereo pair.
Hardware Setup: Click on the Hardware Setup button to open up the Echo ASIO Configuration window, where you can adjust the ASIO buffer size (with Windows, you cannot adjust the buffer size within Live). Lower values result in lower latencies (i.e., delay between hitting a note on your guitar and hearing it). Adjust for the lowest latency consistent with audio quality (no clicks, pops, dropouts, or radical audio changes). Start with a setting around 256 samples. If you experience audio problems, increase latency as your first troubleshooting step.
Sample Rate, In/Out Sample Rate: Set as desired. 44100 is standard.
You can leave all other Audio tab preferences at the default settings.
27
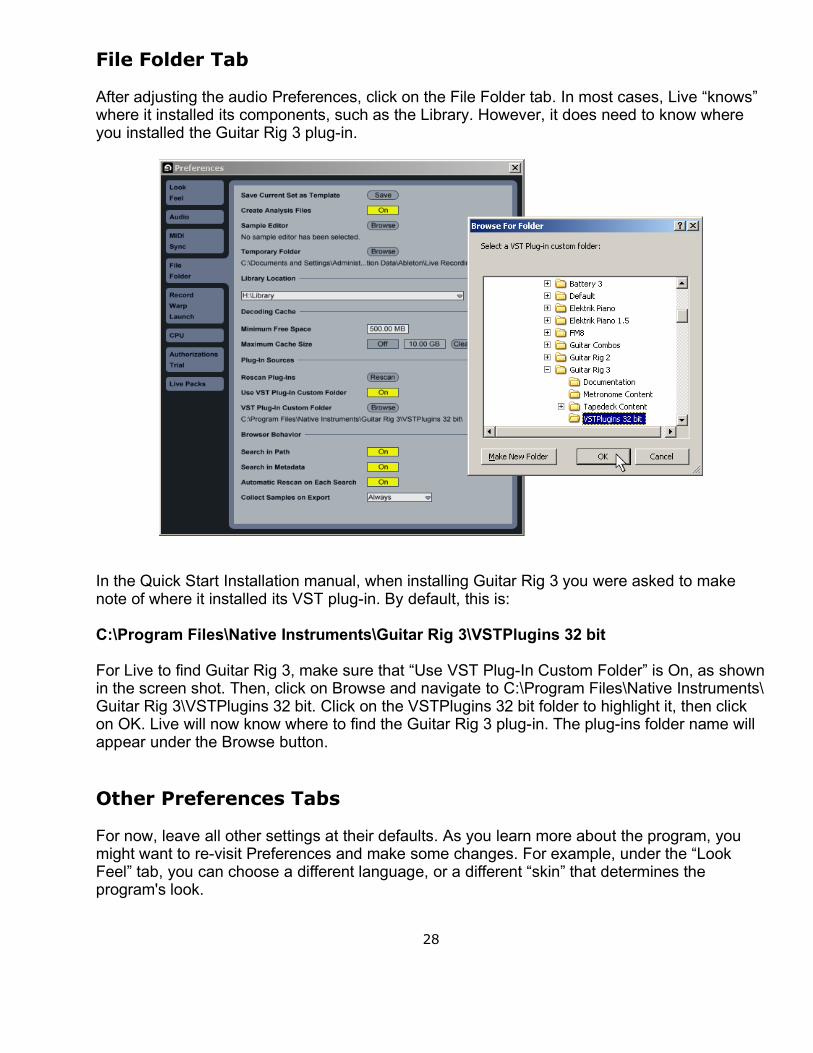
File Folder Tab
After adjusting the audio Preferences, click on the File Folder tab. In most cases, Live “knows” where it installed its components, such as the Library. However, it does need to know where you installed the Guitar Rig 3 plug-in.
In the Quick Start Installation manual, when installing Guitar Rig 3 you were asked to make note of where it installed its VST plug-in. By default, this is:
C:\Program Files\Native Instruments\Guitar Rig 3\VSTPlugins 32 bit
For Live to find Guitar Rig 3, make sure that “Use VST Plug-In Custom Folder” is On, as shown in the screen shot. Then, click on Browse and navigate to C:\Program Files\Native Instruments\Guitar Rig 3\VSTPlugins 32 bit. Click on the VSTPlugins 32 bit folder to highlight it, then click on OK. Live will now know where to find the Guitar Rig 3 plug-in. The plug-ins folder name will appear under the Browse button.
Other Preferences Tabs
For now, leave all other settings at their defaults. As you learn more about the program, you might want to re-visit Preferences and make some changes. For example, under the “Look Feel” tab, you can choose a different language, or a different “skin” that determines the program's look.
28
Setting Live's Preferences (Macintosh)
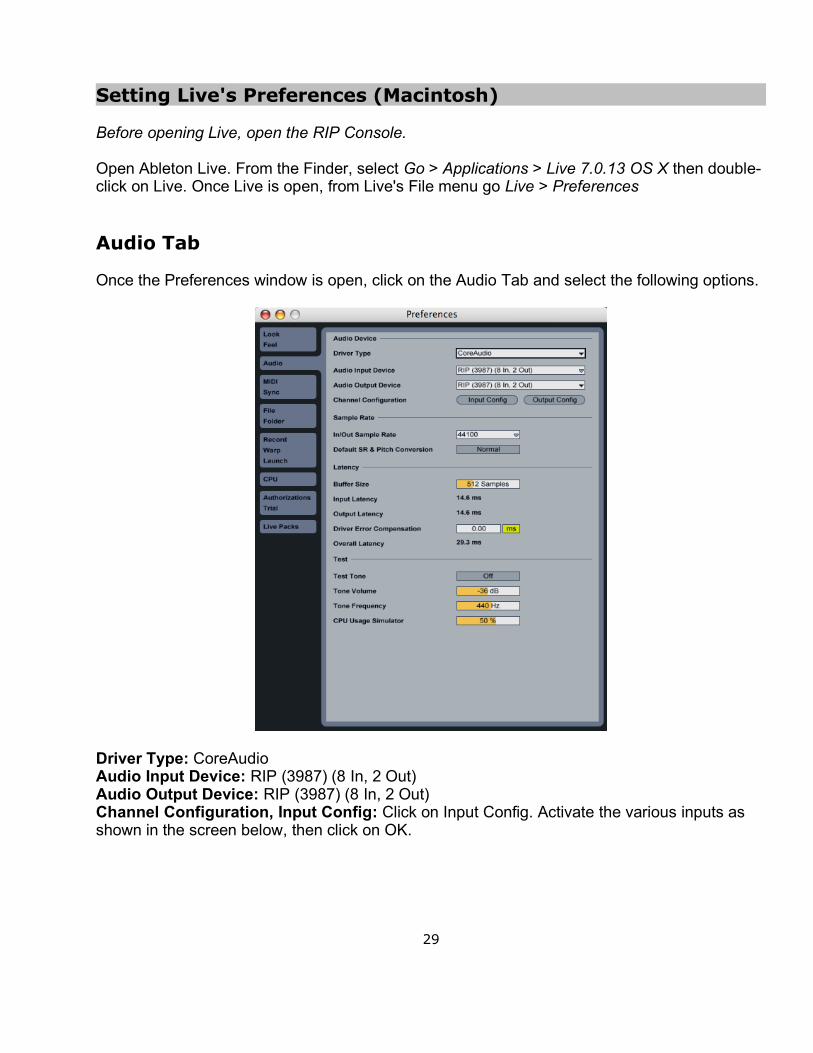
Before opening Live, open the RIP Console.
Open Ableton Live. From the Finder, select Go > Applications > Live 7.0.13 OS X then double-click on Live. Once Live is open, from Live's File menu go Live > Preferences
Audio Tab
Once the Preferences window is open, click on the Audio Tab and select the following options.
Driver Type: CoreAudioAudio Input Device: RIP (3987) (8 In, 2 Out)Audio Output Device: RIP (3987) (8 In, 2 Out)Channel Configuration, Input Config: Click on Input Config. Activate the various inputs as shown in the screen below, then click on OK.
29
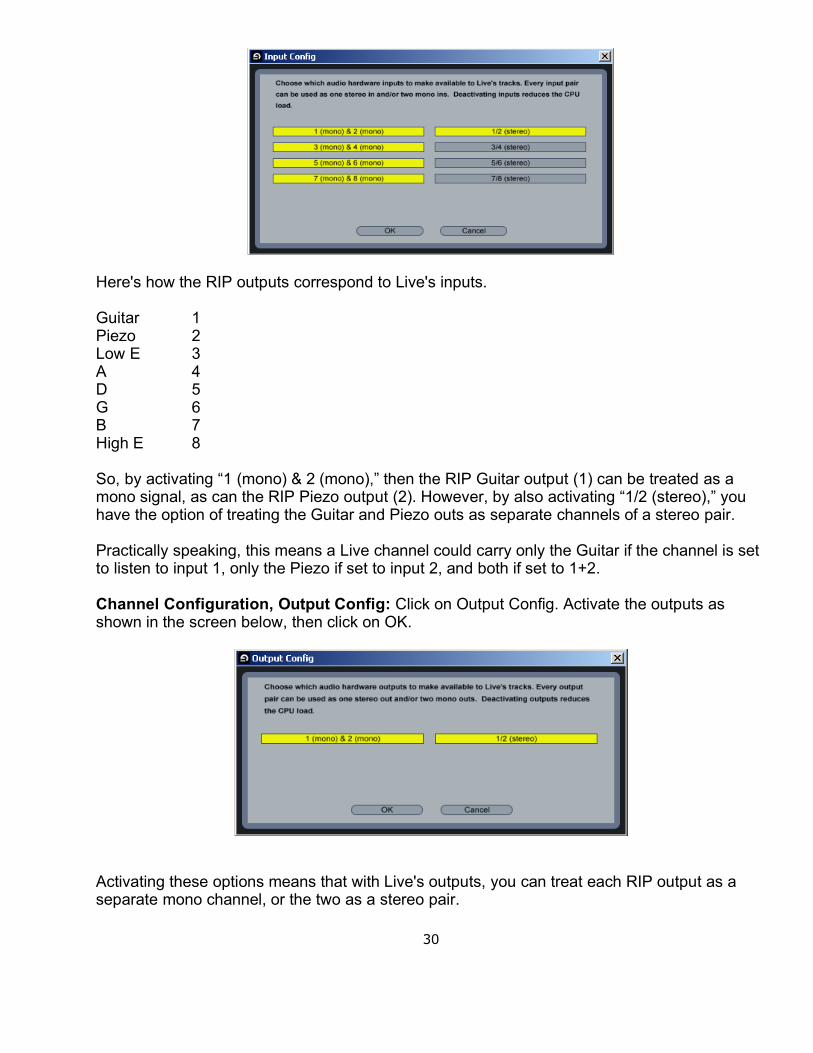
Here's how the RIP outputs correspond to Live's inputs.
Guitar 1Piezo 2Low E 3A 4D 5G 6B 7High E 8
So, by activating “1 (mono) & 2 (mono),” then the RIP Guitar output (1) can be treated as a mono signal, as can the RIP Piezo output (2). However, by also activating “1/2 (stereo),” you have the option of treating the Guitar and Piezo outs as separate channels of a stereo pair.
Practically speaking, this means a Live channel could carry only the Guitar if the channel is set to listen to input 1, only the Piezo if set to input 2, and both if set to 1+2.
Channel Configuration, Output Config: Click on Output Config. Activate the outputs as shown in the screen below, then click on OK.
Activating these options means that with Live's outputs, you can treat each RIP output as a separate mono channel, or the two as a stereo pair.
30
Sample Rate, In/Out Sample Rate: Set as desired. 44100 is standard.
Buffer Size: Click within the Buffer Size field and drag down to lower the BufferSize, and up to increase it. Lower values result in lower latencies (i.e., delay between hitting a note on your guitar and hearing it). Adjust for the lowest latency consistent with audio quality (no clicks, pops, dropouts, or radical audio changes). Start with a setting around 256 samples. If you experience audio problems, increase latency as your first troubleshooting step.
You can leave all other Audio tab preferences to the default settings.
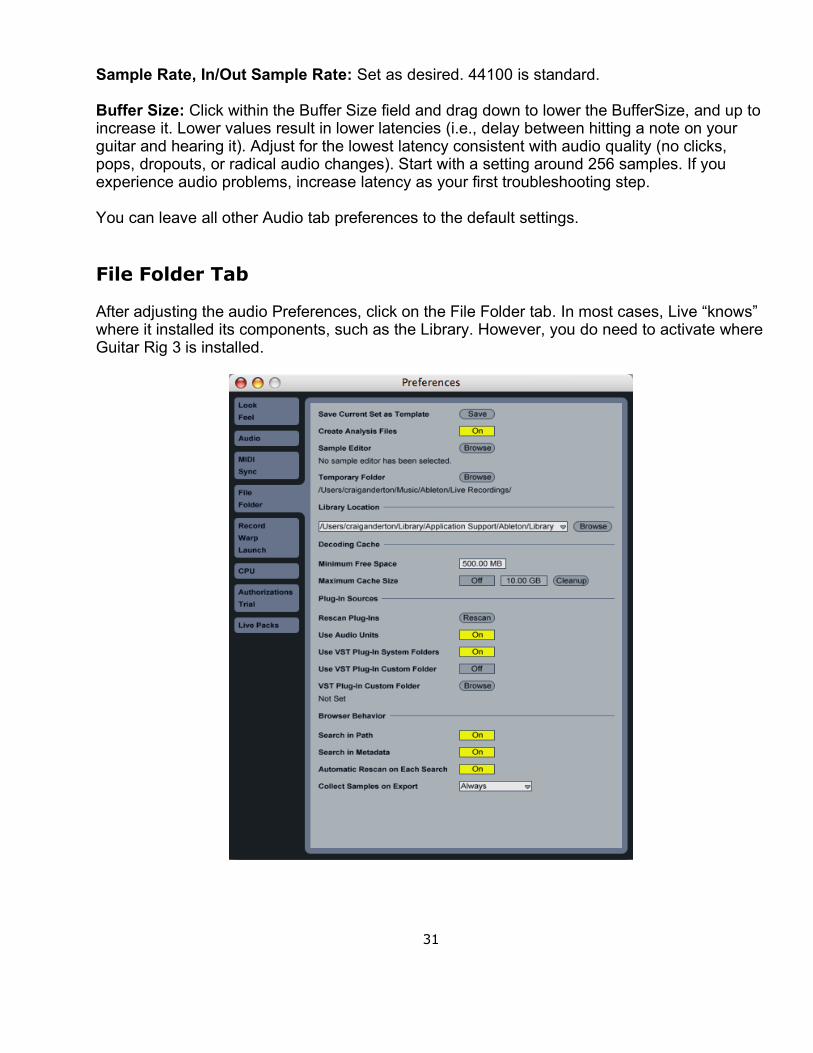
File Folder Tab
After adjusting the audio Preferences, click on the File Folder tab. In most cases, Live “knows” where it installed its components, such as the Library. However, you do need to activate where Guitar Rig 3 is installed.
31
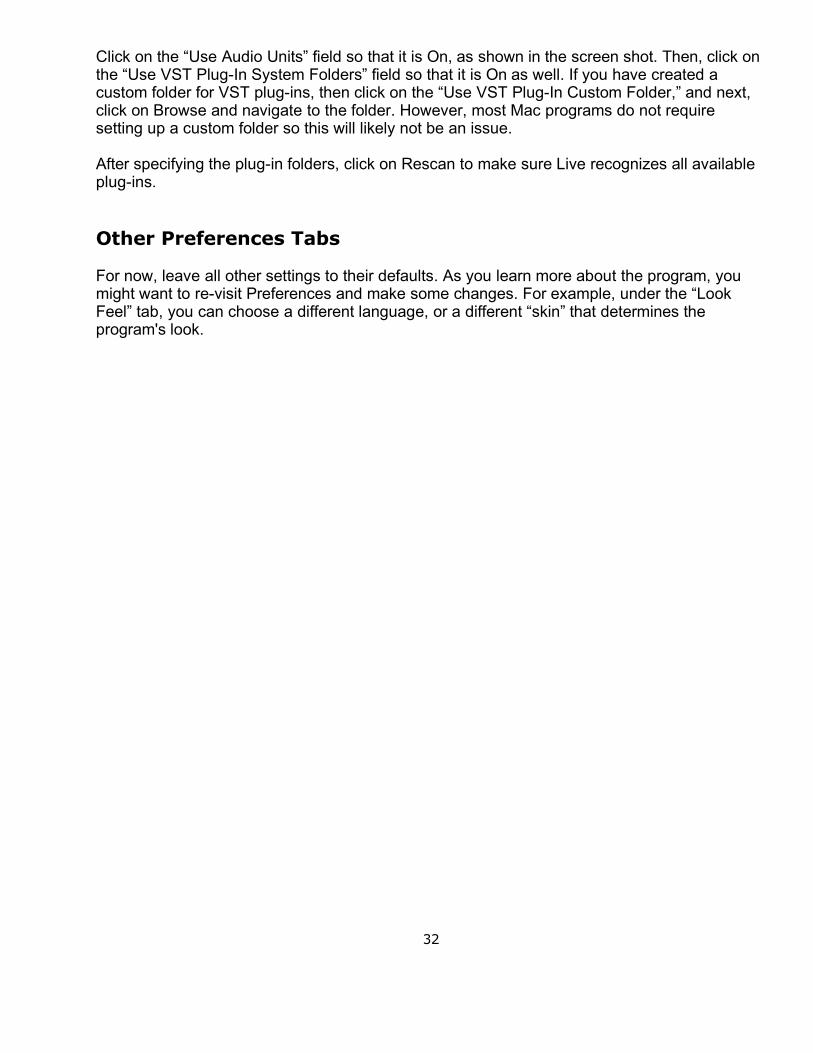
Click on the “Use Audio Units” field so that it is On, as shown in the screen shot. Then, click on the “Use VST Plug-In System Folders” field so that it is On as well. If you have created a custom folder for VST plug-ins, then click on the “Use VST Plug-In Custom Folder,” and next, click on Browse and navigate to the folder. However, most Mac programs do not require setting up a custom folder so this will likely not be an issue.
After specifying the plug-in folders, click on Rescan to make sure Live recognizes all available plug-ins.
Other Preferences Tabs
For now, leave all other settings to their defaults. As you learn more about the program, you might want to re-visit Preferences and make some changes. For example, under the “Look Feel” tab, you can choose a different language, or a different “skin” that determines the program's look.
32
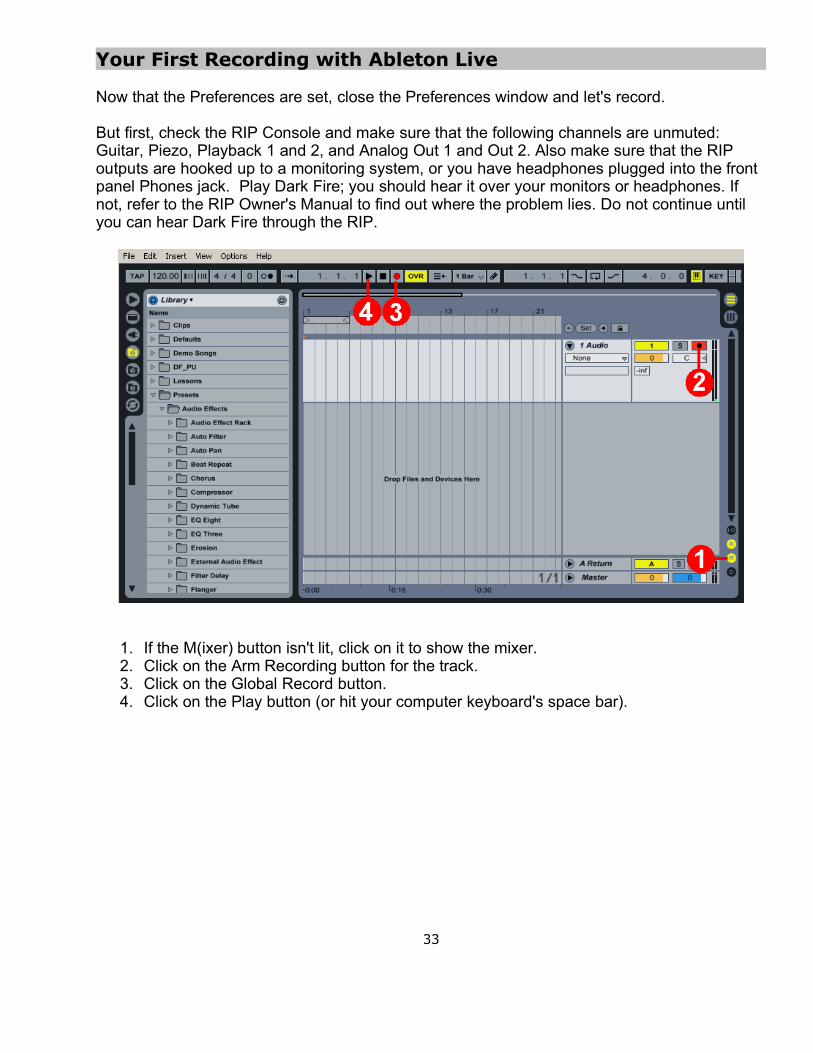
Your First Recording with Ableton Live
Now that the Preferences are set, close the Preferences window and let's record.
But first, check the RIP Console and make sure that the following channels are unmuted: Guitar, Piezo, Playback 1 and 2, and Analog Out 1 and Out 2. Also make sure that the RIP outputs are hooked up to a monitoring system, or you have headphones plugged into the front panel Phones jack. Play Dark Fire; you should hear it over your monitors or headphones. If not, refer to the RIP Owner's Manual to find out where the problem lies. Do not continue until you can hear Dark Fire through the RIP.
1. If the M(ixer) button isn't lit, click on it to show the mixer.2. Click on the Arm Recording button for the track.3. Click on the Global Record button.4. Click on the Play button (or hit your computer keyboard's space bar).
33
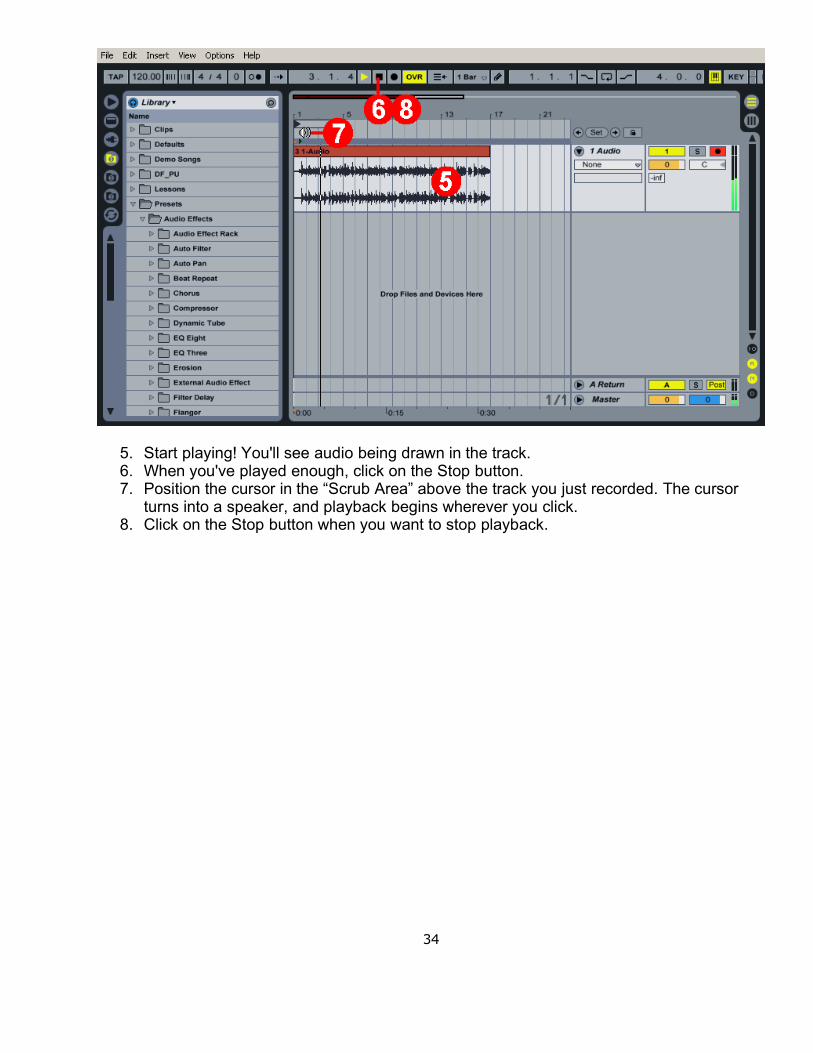
5. Start playing! You'll see audio being drawn in the track.6. When you've played enough, click on the Stop button.7. Position the cursor in the “Scrub Area” above the track you just recorded. The cursor
turns into a speaker, and playback begins wherever you click.8. Click on the Stop button when you want to stop playback.
34
Processing Your Recording with Guitar Rig 3
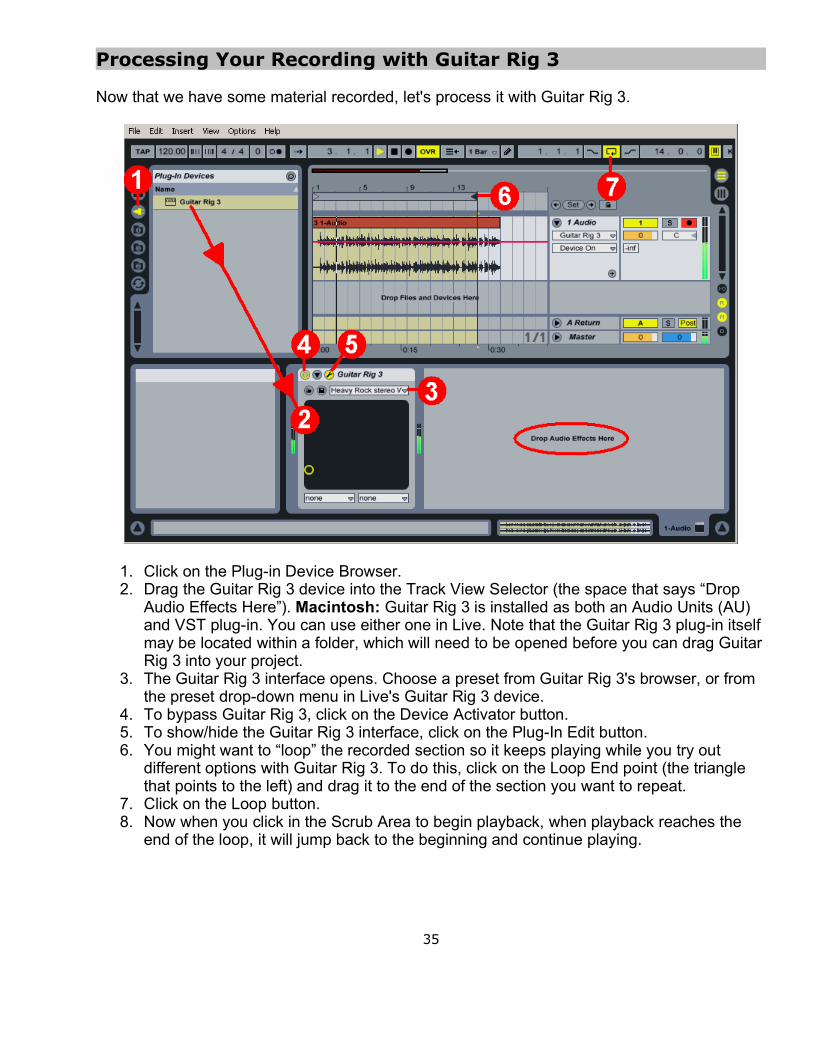
Now that we have some material recorded, let's process it with Guitar Rig 3.
1. Click on the Plug-in Device Browser.2. Drag the Guitar Rig 3 device into the Track View Selector (the space that says “Drop
Audio Effects Here”). Macintosh: Guitar Rig 3 is installed as both an Audio Units (AU) and VST plug-in. You can use either one in Live. Note that the Guitar Rig 3 plug-in itself may be located within a folder, which will need to be opened before you can drag Guitar Rig 3 into your project.
3. The Guitar Rig 3 interface opens. Choose a preset from Guitar Rig 3's browser, or from the preset drop-down menu in Live's Guitar Rig 3 device.
4. To bypass Guitar Rig 3, click on the Device Activator button.5. To show/hide the Guitar Rig 3 interface, click on the Plug-In Edit button.6. You might want to “loop” the recorded section so it keeps playing while you try out
different options with Guitar Rig 3. To do this, click on the Loop End point (the triangle that points to the left) and drag it to the end of the section you want to repeat.
7. Click on the Loop button.8. Now when you click in the Scrub Area to begin playback, when playback reaches the
end of the loop, it will jump back to the beginning and continue playing.
35
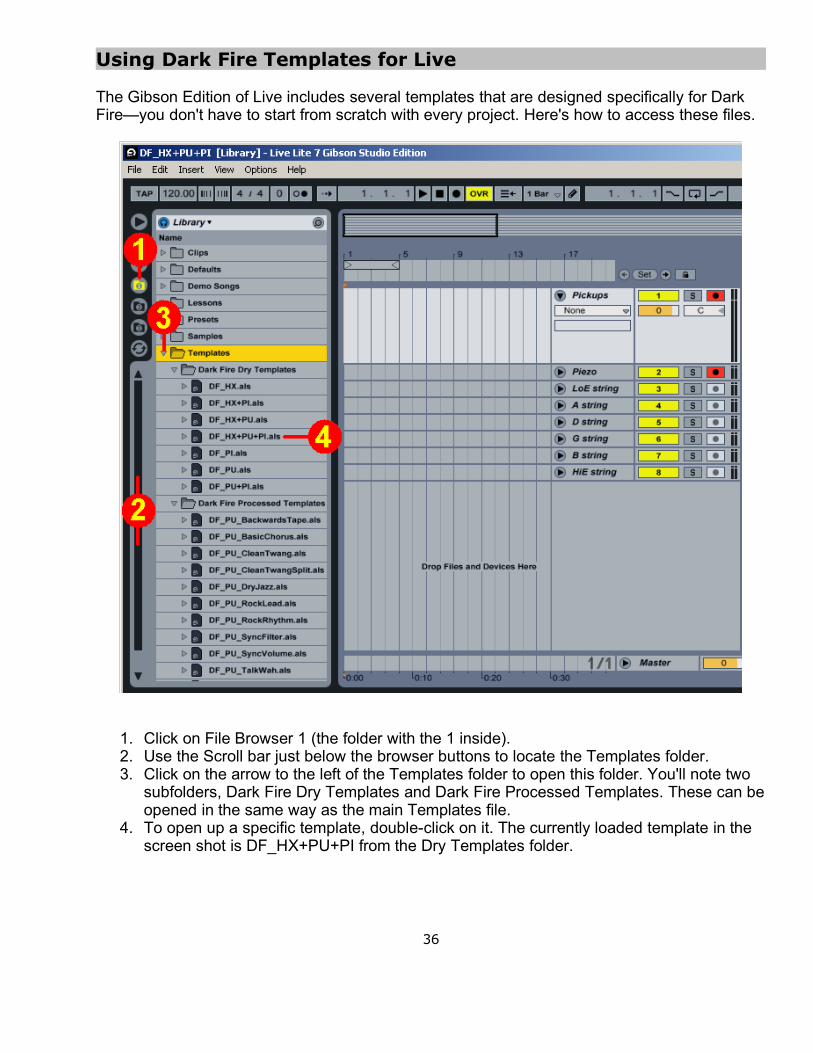
Using Dark Fire Templates for Live
The Gibson Edition of Live includes several templates that are designed specifically for Dark Fire—you don't have to start from scratch with every project. Here's how to access these files.
1. Click on File Browser 1 (the folder with the 1 inside).2. Use the Scroll bar just below the browser buttons to locate the Templates folder.3. Click on the arrow to the left of the Templates folder to open this folder. You'll note two
subfolders, Dark Fire Dry Templates and Dark Fire Processed Templates. These can be opened in the same way as the main Templates file.
4. To open up a specific template, double-click on it. The currently loaded template in the screen shot is DF_HX+PU+PI from the Dry Templates folder.
36
About the Dark Fire Templates
The Dry templates route various RIP outputs to Live tracks. Here's what the abbreviations mean:
HX The individual string hex outputs are assigned to six individual tracks.PU The magnetic pickup output is assigned to a track.PI The piezo pickup output is assigned to a track..als Indicates the file is intended for Live.
For example, the template DF_HX+PI.als has seven tracks: Six for the hex outputs, plus one for the piezo pickup.
The Processed templates are designed for the magnetic pickups. These templates include an instance of Guitar Rig 3 set for a particular type of sound, e.g., Rock Lead or Dry Jazz. These are not only useful sounds in their own right, but can serve as a point of departure for your own tweaking.
Learn More About Live
Live not only includes a comprehensive electronic manual, but lessons that cover everything from setting up your hardware to advanced applications. All of these are available from the Help section in the menu bar, as well as links to Ableton, their forums, and Ableton Support. Live is a wonderful program, and time spent learning it will be time well spent.
37


![Port-Gibson herald (Port Gibson, Miss.), 1843-11-30, [p ]](https://img.pdfslide.us/doc/110x75/6215d71f2af3ae3ba7015db1/port-gibson-herald-port-gibson-miss-1843-11-30-p-.jpg)