Embed Size (px)
Citation preview

100% referenceable customers
©2009 CSS Corporation Version 0.2 Page 2 of 59
GHRMS – USER MANUAL

Table of Content
1. Introduction ................................................................................................... 7
1.1 Purpose................................................................................................... 7
2. Overall Description.......................................................................................... 7
2.1 Description of the project .......................................................................... 7
2.2 Application Structure................................................................................. 7
1 Home Page .................................................................................................... 8
1.1 My Tasks and Updates............................................................................... 8
1.1.1 My Tasks ......................................................................................... 8
1.1.2 My Updates...................................................................................... 8
1.1.3 My Greetings.................................................................................... 8
1.2 My Views ................................................................................................. 8
1.2.1 Birthdays ......................................................................................... 8
1.2.2 Service Anniversary .......................................................................... 9
1.2.3 Wedding Anniversary ........................................................................ 9
1.2.4 My Team ......................................................................................... 9
1.2.5 My Details........................................................................................ 9
1.3 My Organizers .......................................................................................... 9
1.3.1 Do you know? .................................................................................. 9
1.3.2 Reminders ......................................................................................10
2 Search..........................................................................................................10
2.1 My Team Search......................................................................................10
2.1.1 New Joinee Edit ...............................................................................11
2.2 People Search .........................................................................................11
2.3 Organization Chart Search ........................................................................12
2.4 Event Search ..........................................................................................12
2.5 My Transaction Search .............................................................................13
3 Organization Chart .........................................................................................13
3.1 Organization Chart...................................................................................13
3.1.1 My Tree ..........................................................................................13
4 System Controls ............................................................................................13
4.1 Grade Designation Role ............................................................................13
4.2 Employment terms ..................................................................................14
4.3 System...................................................................................................14
4.4 Personal .................................................................................................15
4.5 Geography..............................................................................................15
4.6 Bank and Payment...................................................................................16
4.7 Academics ..............................................................................................16
4.8 Organization Structure .............................................................................17
4.9 RMG module ...........................................................................................17

4.10 LAMS .................................................................................................17
5 Transactions..................................................................................................18 New
Joinee Registration.....................................................................................18
5.1.1 New Joinee .....................................................................................18
5.1.2 New Joinee Login .............................................................................19
5.2 Transfer .................................................................................................19
5.2.1 Appraiser Change ............................................................................19
5.2.2 Office Change..................................................................................20
5.2.3 All other transfer .............................................................................21
5.3 Initiate change in.....................................................................................22
5.3.1 Designation.....................................................................................22
5.3.2 Designation Compensation................................................................23
5.3.3 Grade Designation Compensation ......................................................24
5.3.4 Grade Compensation........................................................................25
5.3.5 Compensation .................................................................................25
5.3.6 Update Compensation ......................................................................27
5.3.7 Upload Compensation.......................................................................27
5.3.8 Group Termination...........................................................................28
5.3.9 Employee Dynamic Status ................................................................28
5.3.10 Bulk Client team Transfer .................................................................29
5.3.11 Group L1 L4 transfer ......................................................................30
6 Leave & Attendance .......................................................................................31
6.1 View Attendance......................................................................................31
6.2 My Team Attendance................................................................................32
6.3 Leave History ..........................................................................................32
6.4 View Leave balance..................................................................................33
6.5 Leave Cr/Dr History .................................................................................33
6.6 Apply for Leave .......................................................................................34
6.7 Adhoc Leave ...........................................................................................35
6.8 View Roster ............................................................................................36
6.9 Upload Roster .........................................................................................36
6.10 Modify Roster ......................................................................................37
6.11 View Holidays......................................................................................37
6.12 Modify Attendance ...............................................................................38
6.13 Upload Attendance...............................................................................39
6.14 Mark LOP/LOP Reversal ........................................................................39
6.15 Mark Compoff ....................................................................................40
6.16 Attendance Case Creation .....................................................................40
6.17 AB to LOP Conversion...........................................................................41
6.18 Upload LOP/LOP Reversal .....................................................................41
7 Payroll..........................................................................................................42
7.1 Uploads ..................................................................................................42
7.1.1 Upload Deductions ...........................................................................42
7.1.2 Upload Allowance.............................................................................43
7.1.3 Mark F & F ......................................................................................43

7.1.4 Internal Hold...................................................................................43
7.1.5 Release Internal Hold .......................................................................44
7.1.6 Restart Salary .................................................................................44
7.1.7 Normal Run/Rerun..........................................................................45
7.1.8 Supplementary Run .........................................................................46
7.1.9 Special Run.....................................................................................46
7.1.10 Upload IT........................................................................................46
7.1.11 Loan Entry ......................................................................................47
7.1.12 Loan View .......................................................................................47
7.1.13 Upload Perks ...................................................................................47
7.1.14 Upload Bank Account Number ...........................................................48
7.1.15 Upload ESI/PF/PAN ..........................................................................48
7.2 Process ..................................................................................................48
7.2.1 Medical bills approval .......................................................................48
7.2.2 Payroll Process ................................................................................48
7.2.3 Freeze ............................................................................................49
7.2.4 Miscellaneous Adjustments ...............................................................50
7.2.5 Rerun............................................................................................50
7.2.6 Tax Approval...................................................................................50
7.2.7 Lock Pay Period ...............................................................................51
7.2.8 Run Cancellation..............................................................................51
7.2.9 UnMark Hold ..................................................................................51
7.2.10 TD Before Remittance ......................................................................51
7.3 View ......................................................................................................52
7.3.1 Employee Info .................................................................................52
7.3.2 Medical Bill submission .....................................................................52
7.3.3 Tax Declaration ...............................................................................52
7.4 Adjustments ...........................................................................................53
7.4.1 PF Challan Details ............................................................................53
7.4.2 TDS Challan ....................................................................................53
8 Reports & Dashboards ....................................................................................54
8.1 My Reports & Dashboards .........................................................................54
8.1.1 My Reports .....................................................................................54
8.1.2 My Dashboards................................................................................54
8.2 Payroll Reports ........................................................................................54
9 Mgmt View....................................................................................................55
10 Quick LinksMy Other Transactions ............................................................55
10.1.1 Check In/Out ..................................................................................55
10.1.2 Payroll............................................................................................55
10.1.3 EResignation..................................................................................55
11 Quick LinksHelp......................................................................................55
11.1.1 Glossary .........................................................................................55
11.1.2 FAQ ...............................................................................................55
11.1.3 HR Helpdesk ...................................................................................55
12 EIB ........................................................................................................55

12.1.1 Employee Search .............................................................................55
12.1.2 Appraiser Change ............................................................................56
12.1.3 Request for Separation .....................................................................56
12.2 EIB Approval Process ...........................................................................57
12.2.1 Edit EIBPersonal Details. ................................................................57
12.2.2 Edit EIBContact Details...................................................................57
12.2.3 Edit EIBEducation Details................................................................57
12.2.4 Edit EIBFamily Details. ...................................................................57
12.2.5 Edit EIBPassport and Visa Details. ...................................................58
12.2.6 Edit EIBPrevious Employment. ........................................................58
12.2.7 Edit EIBDependent Nomination........................................................58

1. Introduction
1.1 Purpose
The purpose of this user manual is to make the user understand and use the functions of the GHRMS
application with ease.
2. Overall Description
2.1 Description of the project
GHRMS is a CSS Global HR Management system which was developed internally by the
GHRMS team that caters to all the administrative aspects of the HR team. The GHRMS
application covers a very wide area of the HR functions which will be covered in this user
manual. To mention few salient features of this application, all users of CSS has to enter
their timein and timeout on all the working days and this time log is taken for salary
computation. Leave management is integrated into the system, hence leave, holidays, On
duty, Offs, Comp offs and all the features of a Leave management system are well covered
in the GHRMS application. The performance management system is also planned to be
integrated into the GHRMS which aids in monitoring the performance of the employees and
to award compensation based on the PMS. All HR activities from joining an employee to the
relieving of an employee upon resignation are taken care of by the GHRMS application.
Recruitment module is in the development stage.
2.2 Application Structure
The GHRMS application contains 7 sections to it. They are Home, Search, Organization chart,
Transactions, Leave & Attendance, Reports & Dashboards, Payroll. Apart from these
sections, the GHRMS application has quick links on the right pane of the application. They
are Payroll & eresignation.

1 Home Page
1.1 My Tasks and Updates
1.1.1 My Tasks This tab will provide list of transactions you need to act upon. The number
displayed next to “My Tasks” is number of transactions you need to act upon. Upon “click”
on the transaction number will take you to actions.
1.1.2 My Updates
Any transactions in GHRMS related to you or your subordinates will be kept informed
here. You need not necessarily act on this information, its an information sharing area.
1.1.3 My Greetings
Wishes or greetings posted to you can be viewed. “Reply to greetings” functionality is
planned as part of future releases of HRMS application.
1.2 My Views
1.2.1 Birthdays
This tab will provide birthday details of employees' until 3 levels below in your reporting
structure, all employees' above in your organization tree and the peers reporting to your
Appraiser.

1.2.2 Service Anniversary
This tab will provide service anniversary completion of employees' until 3 levels
below in your reporting structure , all employees' above in your organization tree and the
peers reporting to your Appraiser.
1.2.3 Wedding Anniversary This tab will provide wedding anniversary completion of
employees' until 3 levels below in your reporting structure, all employees' above in your
organization tree and the peers reporting to your Appraiser.
1.2.4 My Team
a) Team Organization Structure This link will take you to view your team structure until 3
levels below in your reporting structure and all members above your organization tree.
b) Team Details
This link will take you to My Team report. Access to this report is applicable only if you
are an Appraiser.
1.2.5 My Details
• My Details link will take you to view your profile.
1.3 My Organizers
1.3.1 Do you know?
This tab will help the employees to read general important notice(s) posted in the system.
Ex : Reply to Greeting feature in GHRMS

1.3.2 Reminders
This tab will help the employees to read general reminders posted in the system. Ex: Last
date for tax declaration is April 15th
.
2 Search
2.1 My Team Search
My Team search is a function to search for the employee. Any one or multiple fields can
be chosen and queried.
None of the fields in this search are Mandatory fields.
Based on the L1 selection, the attributes of L2 dynamically changes and based on the
L2 selection, the attributes of L3 dynamically changes.
For Example a user may search for all the TLs name for a support project called
Vonage. In that case, he will choose the field drop downs as in the above picture.
Depending on the search criteria, the user will be able to narrow down the search
result.
One can even get the list of all the active employees in the organization using the My
team search.
2.1.1 New Joinee Edit This feature is available only for those who have specific roles like EHRA/HRA/EOT.
The New joinee edit found in the ‘My Team search’ window is to add or edit employee
details like the personal details, contact details, Educational details as found in the ‘Edit
Module’ drop down.

2.2 People Search
People search is a simple search to find an employee in the organization.
By entering, the first name, the user will be able to choose the required name from the
dynamically generated list.
The search would bring the employee name and the employee id.
Upon selecting the name and then by clicking the Fetch button, the complete official
detail of the employee will be displayed.
Details which are not entered in the GHRMS database will not appear in the search
result.

2.3
Organization Chart Search
The organization chart search is done for any employee by entering the name of the employee.
Choosing the employee name from the dynamically generated names and click the Fetch button.
Upon clicking the Fetch button, the program will bring the Organization hierarchy of that
particular person. It displays the hierarchy above and hierarchy below of that person upto 3
levels.
2.4 Event Search
There are 3 types of events Viz Birthdays, Wedding anniversaries and Service
anniversaries.
The user can select one of the 3 events and search for employees celebrating events
within the date range given.

The user can also search by selecting ‘all’ and then search for employees celebrating
any of these 3 events within the specified date range.
The search result will bring the name of the employee, emp.id, Project/Client name,
Date of the event and the nature of the event.

2.5 My Transaction Search
This feature is available only for employees who have a set of employees reporting to them.
My transaction search will search for the transactions that the user had made within the
selected time period.
The user has two options to narrow down his search Viz. Search by attributes and
search by action. Search by attribute
3 Organization Chart
3.1 Organization Chart
3.1.1 My Tree
This link will take you to view your team structure until 3 levels below in your reporting
structure and all members above your organization tree.
4 System Controls
4.1 Grade Designation Role
Grade Designation Role is a master table to create Grades (For Ex. A1, B2, C3 etc), Designation
(For Ex. Program Manager, system admin, Assistant systems analyst etc) and Roles (within the
GHRMS application viz HRM, Entity HRA, Superuser etc).
Access to the systems control would be available only to the superuser.
The superuser would be able to add new grade, designation and role by clicking on the
add button on the top.
The superuser would be able to choose the status by double clicking on the status field.
The code is autogenerated upon saving the data.
After entering the relevant data, the superuser would save the entered data.
Grade/designation/role cannot be removed after saving the data.
In case, if the superuser wants to remove a saved data, he will have to only change the
status to inactive.

4.2 Employment terms
The ‘Employment terms’ master contain HR related tables like Employment type, Employment
Status, Joining Check list, Exit Reason, Exit Type, Agreement & Asset.
While creating a Master table, the user would enter the data, select the status from the
drop down.
The code for the entered data would be auto generated.
The user
would view the
next page data
by clicking on
the arrow
button.
4.3 System
The ‘system’
master
contain
super admin
related
masters like
Privilege,
Role based
module,
Employee
Role Link,
module,
Supporting L2, Supporting Grade, Control Parameter, L2L4 Mapping, Organizer Message.

Privilege is the privileges given to the different roles.
Add a Privilege name and a privilege description and then click ‘save’
The role based module is to give access to the different modules of the program and to
remove access.
Employee role link is to assign roles to an user.
Supporting L2 is to map users to the respective Entity & L2 only in which they would be
able to view and do transactions.
The Supporting grade is to choose a role and then associate the eligible grades to that
role.
A defined control Parameter name is given a respective control parameter value and a
control parameter description by the super user.
The L1L4 mapping is to map the L1L2 to the respective L3L4 and then assign a HR
owner to that mapped group.
Messages that are displayed in My Organizer and Reminders are categorized as
message types. Create a message, Assign a message type and set status.
4.4
Personal
The above displayed tables are created in the Personal Master. The created tables will have an
autogenerated code number and the status has to be set to ‘Active’.
4.5 Geography

The above displayed tables are created in the Geography Master.
In Country table, create code, Country & Nationality.
Add/create a state name to an already defined country and turn the status to ‘Active’.
Any saved record cannot be removed.
Add/Create a city and map a state and country from the drop down.
Add/Create an office by mapping Entity Branch Name and the respective City from the
drop downs.
Before creating an Entity, Create an Entity branch for that Entity. Create Entity name
by mapping the new entity to a country and add the address in the address column.
Add/ Create entity branch name by mapping the entity name, country, Time Zone &
Default in time and Default Out time from the drop downs.
Add/ Create Currency name, its symbol and the currency notation to click ‘Save’.
Add currency by choosing the country, the country’s currency and then add the
currency to the right.
Add/Create time zone by entering a time zone and a Time zone value.
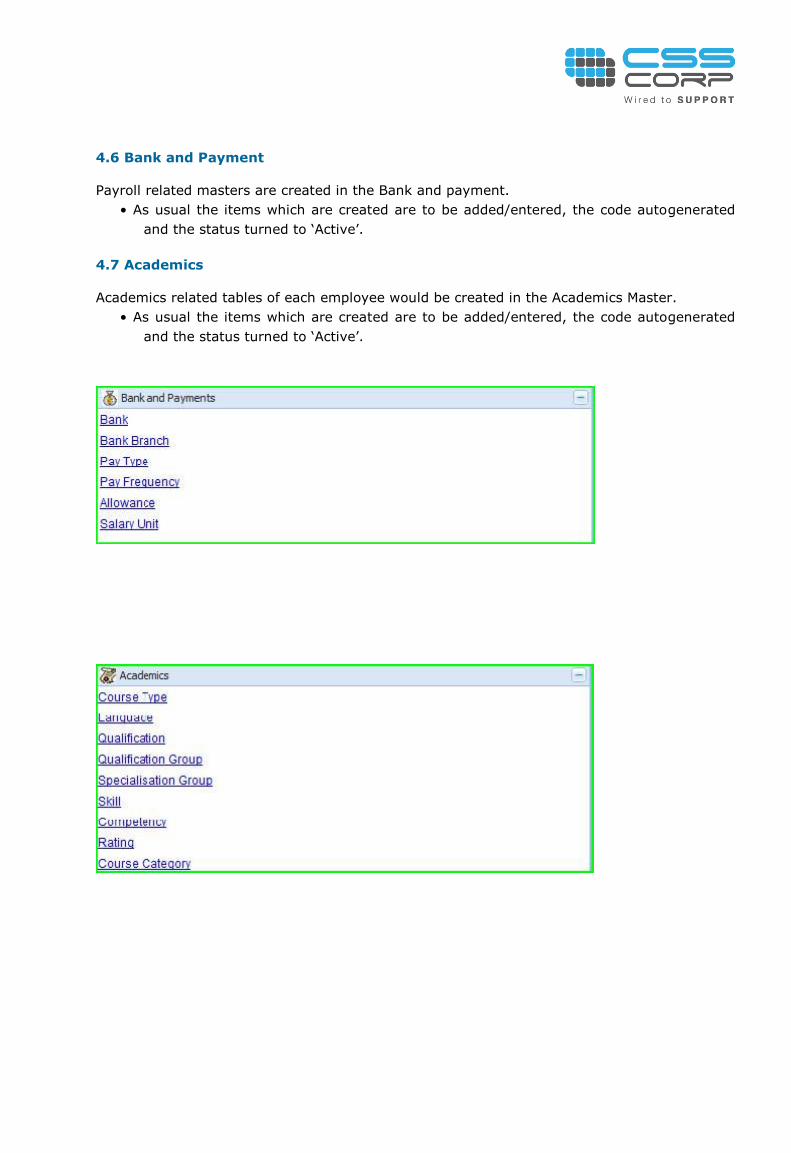
4.6 Bank and Payment
Payroll related masters are created in the Bank and payment.
• As usual the items which are created are to be added/entered, the code autogenerated
and the status turned to ‘Active’.
4.7 Academics
Academics related tables of each employee would be created in the Academics Master.
• As usual the items which are created are to be added/entered, the code autogenerated
and the status turned to ‘Active’.

4.8
Organization Structure
The L1, L2,
L3 & L4 of
the
organization structure is created and defined in the Org. Structure Masters.
4.9 RMG
module
The RMG
module masters add or creates the different SBUs, and the sales regions the client and the
clientteam relationship and the billing type. The creation is no different from the other master
creation.
4.10 LAMS
Masters that are related to Leave & Attendance are created in the LAMS.
The ClientTeam AMS maps the AMS admin to a clientTeam for a particular period of
time.
A Holiday is created in LAMS by entering the name of the Holiday & the most likely
date.
Holiday entity attributes Holidays to the different Entity branches. For Ex. If it is a
holiday for Holi to only Bangalore office, then Holi will be mapped only to the Bangalore

entitybranch.
The different kinds of leave are created here. Each leave is mapped to a show data.
The different event of marking attendance to an employee is created here. The
different events are Holiday working, off & On duty.
Reports that are to be available to the different users are mapped here in the Report-
RoleLink

5 Transactions New Joinee Registration
5.1.1 New Joinee
As soon as the employee joins the organization, the EOT/HRA/EHRA would collect the details of
the employee and would enter these details in the New Joinee detail. This data will get reflected
in the My details of the employee in the GHRMS application. The red asterix indicate mandatory
fields. On Completion of all the details, employee number and temporary password would be
generated.

5.1.2 New Joinee Login
The employee number and password generated by the system is to access the GHRMS
application. This is used by the employee to complete the registration process. Once this is
done, the username would be firstname.lastname and the password is created by the LDAP
process using the name of the employee. The employee can change the password later. This
function would be accessible to HRA, EHRA & EOT.
5.2 Transfer
5.2.1 Appraiser Change
Appraiser change can be done by the EHRA/HRA/appraiser for all employees when there is an
appraiser change.
The details of the employee are fetched by choosing to select any of the following viz.
emp.id, emp. Name, appraiser name, appraiser id, L2 wise or by team/client wise.
The HRA/appraiser/EHRA will select the fetched employee by clicking the checkbox on
the left hand side of the employee name.
The HRA/appraiser/EHRA will checkmark the employee, enter the proposed appraiser
from the drop down, the effective date and remarks if any.
Clicking apply will autopopulate all the entered fields to the selected employee. Click
Save to record it to the EIB.
In the case of appraiser change for 2 or more employees, the HR will enter the
employee ids of the employees in the CSV search to fetch the details of the employees.
If the ‘Appraiser Change’ is going to be same for all the fetched employees, then all the
fetched employees can be checkmarked, specify appraiser, input effective date and
click apply, and then click Save to save it to the EIB.
Now click ‘Apply’ to autopopulate the changes to the selected users and then click Save
to save the changes to the EIB.
If the ‘Appraiser Change’ is going to be different for different employees, then each
employee should be checkmarked separately, enter the changes and then click ‘Apply’
individually for each employee before saving.

5.2.2 Office Change
Office Change for an employee is done by the EHRA/HRA/appraiser if the work place of the
employee is going to be changed. This will happen in the event of team change, infrastructure
change, Onsite, L2 change, transfers and the like.
The EHRA/HRA/appraiser will fetch the employee detail by choosing to select any of the
following viz. emp.id, emp. Name, L2 wise or by team/client wise.
The EHRA/HRA/appraiser will select the fetched employee by clicking the checkbox on
the left hand side of the employee name.
The EHRA/HRA/appraiser will checkmark the employee, enter the proposed office
country, the effective date and remarks if any.
The application will autopopulate the office locations as the case may be for the HR to
choose.
Clicking apply will autopopulate all the entered fields to the selected employee. Click
Save to record it to the EIB.
In the case of office change for 2 or more employees, the EHRA/HRA/appraiser will
enter the employee ids of the employees in the CSV search to fetch the details of the
employees. We can bulk office/appraiser change by choosing multiple employees,
client/team wise.
If the ‘Office Change’ is going to be same for all the fetched employees, then all the
fetched employees can be checkmarked, specify Office location, input effective date
and click apply, and then click Save to save it to the EIB.
Now click ‘Apply’ to autopopulate the changes to the selected users and then click Save
to save the changes to the EIB.
If the ‘Office Change’ is going to be different for different employees, then each
employee should be checkmarked separately, enter the changes and then click ‘Apply’
individually for each employee before saving.

5.2.3 All other transfer
This function is accessible to HRA, EHRA, PM. ‘All other transfer’ is only for employees for
whom all or majority of all attributes are to be changed. There are 3 drop downs that could be
selected in ‘All other transfer’ viz. Release to RP, All other transfer and Inter entity transfer.
• Release to RP is releasing an employee from a project to the resource pool or bench.
• The employee to be released to the resource pool is chosen, with the release date.
• Click release to release the employee to the respective resource pool and to the
resource pool manager.
• The EHRA/HRA/appraiser would choose one of the attributes for transfer, choose an
employee, an effective date and then click ‘Fetch’.
• The screen dynamically changes based on the attributes chosen.
• For Interentity transfer, the HR had to select the employee, enter the effective date of
transfer and choose and proposed entity. Click ‘Initiate’ to initiate the transfer process.
• All other transfer would fetch all the employees in the select employee field.
• The HR/appraiser would choose the name of the person to be transferred.
• The HR/appraiser would choose the proposed recipient, the L1, Proposed appraiser if
any then initiate the transfer.
• In this function, the transferred employee name and the proposed recipient are
significant in carrying out this activity.
• The appraiser who is C3 & above only can do this transaction.
• Client – team if not needed, then it can be closed by using the option ‘Close Client’.


5.3 Initiate change in
5.3.1 Designation

Designation change is done by the respective HR for all the employees.
• This feature is available to appraisers who are C3 and above. • The HR/appraiser searches for the employee either by emp name, emp id or by the respective L2. • After fetching the employee the HR checkmarks the employee and chooses the proposed designation from the field drop down and the effective date. • Upon clicking ‘Apply’ the proposed designation and date would be populated in the respective columns for the said employee. • In case of group designation change, the HR would enter the employee ids of all employees who are due for a designation change in the CSV search. Each employee id would be separated by a comma. • Checkmark an employee and select the proposed designation and date. Click Apply. • Uncheck this employee before working on the other employee. • In case of identical designation change and date for 2 or more employees, the HR can fetch the employees, checkmark all the employees and then select the proposed designation and date. Click ‘Apply’ to populate the designation and date for all the employees. • Now click ‘Initiate’ to save the changes to the EIB.
5.3.2 Designation Compensation
Designation Compensation is a function enabled only for the HR & PM to change employee
designation and compensation for an employee or a group of employees at one go.
• As usual, the HR/PM searches for the employee by employee name, id or by L2.
• After fetching the employee name, the HR/PM checkmarks the employee and selects
the proposed designation and the effective date.
• To change the salary, the HR/PM would enter the percentage of increase in the
‘INC%AMT’.
• The increase % would be equally distributed to the existing attributes of the gross
salary and the variable salary (if any) according to the existing ratio.
• In case if the HR/PM want to view the breakup in salary, then the HR would doubleclick
on the name of the employee to get a popup of the salary breakup.
• In the case of edit salary attributes the HR had to go to ‘Update compensation’ which is
a separate function by itself.
• The same applies to a group of employees, where the HR/PM would search them using
the CSV search, fetch the names, checkmark them individually to work on the designation
change and the compensation change before clicking ‘Apply’.
• On initiation by the EHRA/HRA/PM, it will send an actionable alert to the respective
HRMs for action. On approval, it would save the changes to the EIB.
• HRM can approve or reject the same.
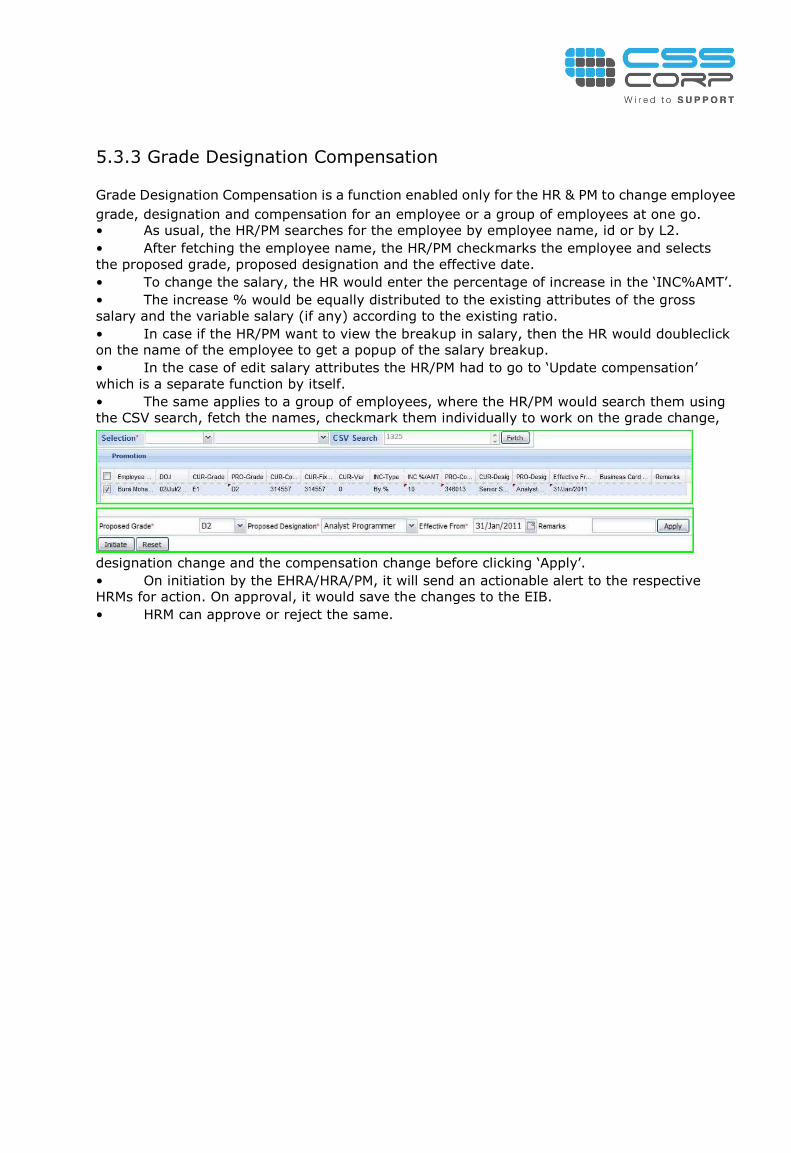
5.3.3 Grade Designation Compensation
Grade Designation Compensation is a function enabled only for the HR & PM to change employee
grade, designation and compensation for an employee or a group of employees at one go.
• As usual, the HR/PM searches for the employee by employee name, id or by L2.
• After fetching the employee name, the HR/PM checkmarks the employee and selects
the proposed grade, proposed designation and the effective date.
• To change the salary, the HR would enter the percentage of increase in the ‘INC%AMT’.
• The increase % would be equally distributed to the existing attributes of the gross
salary and the variable salary (if any) according to the existing ratio.
• In case if the HR/PM want to view the breakup in salary, then the HR would doubleclick
on the name of the employee to get a popup of the salary breakup.
• In the case of edit salary attributes the HR/PM had to go to ‘Update compensation’
which is a separate function by itself.
• The same applies to a group of employees, where the HR/PM would search them using
the CSV search, fetch the names, checkmark them individually to work on the grade change,
designation change and the compensation change before clicking ‘Apply’.
• On initiation by the EHRA/HRA/PM, it will send an actionable alert to the respective
HRMs for action. On approval, it would save the changes to the EIB.
• HRM can approve or reject the same.

5.3.4 Grade Compensation
Grade Compensation is a function enabled only for the HR & PM to change employee designation
and compensation for an employee or a group of employees at one go.
• As usual, the HR/PM searches for the employee by employee name, id or by L2.
• After fetching the employee name, the HR/PM checkmarks the employee and selects
the proposed grade and the effective date.
• To change the salary, the HR/PM would enter the percentage of increase in the
‘INC%AMT’.
• The increase % would be equally distributed to the attributes of the gross salary and
the variable salary (if any) according to the existing ratio.
• In case if the HR/PM want to view the breakup in salary, then the HR would doubleclick
on the name of the employee to get a popup of the salary breakup.
• In the case of edit salary attributes the HR/PM had to go to ‘Update compensation’
which is a separate function by itself.
• The same applies to a group of employees, where the HR/PM would search them using
the CSV search, fetch the names, checkmark them individually to work on the grade change
and the compensation change before clicking ‘Apply’.
• After working on all the employees, the HR would finally click ‘Initiate’ to save the
changes to the EIB.
• On initiation by the EHRA/HRA/PM, it will send an actionable alert to the respective
HRMs for action. On approval, it would save the changes to the EIB.
• HRM can approve or reject the same.
5.3.5 Compensation
Compensation function is used by the HR or by the PM in case there is no grade change or
designation change but there a change in the compensation.

• As usual, the HR/PM searches for the employee by employee name, id or by L2.
• After fetching the employee name, the HR/PM checkmarks the employee and selects
the effective date.
• For salary change, the HR/PM would enter the percentage of increase in the
‘INC%AMT’.
• The increase % would be equally distributed to the attributes of the gross salary and
the variable salary (if any) according to the existing ratio.
• In case if the HR/PM want to view the breakup in salary, then the HR/PM would double-
click on the name of the employee to get a popup of the salary breakup.
• In the case of edit salary attributes the HR/PM had to go to ‘Update compensation’
which is explained below.
• The same applies to a group of employees, where the HR would search them using the
CSV search, fetch the names, checkmark them individually to work on the compensation
change before clicking ‘Apply’.
• After working on all the employees, the HR/PM would finally click ‘Initiate’ to save the
changes to the EIB.
• On initiation by the EHRA/HRA/PM, it will send an actionable alert to the respective
HRMs for action. On approval, it would save the changes to the EIB.
• HRM can approve or reject the same.

5.3.6 Update Compensation
Update compensation is a function to rectify wrongly entered employee’s compensation. This
function is available to the EHRA only.
• Fetch the employee by entering the employee id or the employee name.
• The current compensation of that employee would appear.
• The HR may edit any of the fields to calculate and bring out the compensation of a
particular employee.
• The mandatory fields that the HR had to enter are the TAGR+ VP and the effective
date.
5.3.7 Upload Compensation
This is a function available to the EHRA/HRA Payroll to upload the compensation of new joinee
or existing employee.

• The HR will choose the upload type before uploading the compensation
• The HR Payroll has a specific excel file in a specified format. Usually all fields will be
formatted to text.
• By uploading changes to an employee or a group of employee, the application will
accept the changes to the compensation of the employee(s) if the formatting is proper else will
throw an error.
• If the upload is successful, then the application will throw an alert that the upload is
successful else throw an error specifying the line numbers.
5.3.8 Group Termination
Termination function in the GHRMS is available to the HR to remove an employee from the roles
in the event of forced termination or in the event of employee resignation.
• The HR will fetch the employee detail by choosing to select any of the following viz.
emp.id, emp. Name, L2 wise.
• The HR will select the fetched employee by clicking the checkbox on the left hand side
of the employee name.
• The HR can checkmark the employee and enter the resignation/termination date and
the reason for resignation and then click ‘apply’ to autopopulate the entered date and reason
for resignation/termination.
• For bulk, termination, the HR would enter the employee ids of all the employees to be
termination in the CSV search separated by commas to fetch the list of names.
• Checkmark each name to enter the resignation date and reason. Click apply to auto-
populate the date and the reason. Uncheck the check mark before working on the other
employees in the list.
• Click Save to save termination to the EIB.
5.3.9 Employee Dynamic Status

The Employee Dynamic Status is available only to the HR to change the employee Dynamic
Status from ‘Long Leave’, ‘absent’ to ‘Active’ based on the status of the employee.
• The HR will fetch the employee detail by choosing to select any of the following viz.
emp.id, emp. Name, L2 or client and teamwise.
• The HR will select the fetched employee by clicking the checkbox on the left hand side
of the employee name.
• After checkmarking the employee, the HR can change the ‘Dynamic Status of the
Employee’, the ‘Effective date’ and the ‘Billing type’ and the ‘Billing from’
• The HR will click ‘Apply’ to autopopulate the selected fields to the employee. Clicking
‘Save’ will save the changes to the EIB.
• In case of status change for 2 or more employees, the HR will enter the employee ids
of the employees in the CSV search to fetch the details of the employees.
• If the ‘Status Change’ is going to be same for all the fetched employees, then all the
fetched employees can be checkmarked, Status changed, input effective date, billing type and
billing from.
• Now click ‘Apply’ to autopopulate the changes to the selected users and then click Save
to save the changes to the EIB.
• If the ‘Status Change’ is going to be different for different employees, then each
employee should be checkmarked separately, enter the changes and then click ‘Apply’
individually for each employee before saving.
• It is not possible for the HR to change the dynamic status from ‘Active’ to ‘long leave,
‘notice period’, ‘maternity leave’, as it is linked to attendance & eresignation.
5.3.10 Bulk Client team Transfer
In case of team transfers within the L2s, the HR will use this function to transfer an individual
or a group of employees from one team to another. This function falls within the transaction tab
and this tab would be available only for the HR logins.
• The HR will fetch the employee detail by choosing to select any of the following viz.
emp.id, emp. Name, L2 or client and teamwise.
• The HR will select the employee by clicking the checkbox on the left hand side of the
employee name.
• After checkmarking the employee, the HR will choose the proposed Client, team &
Billing type to which the employee is to be transferred. The date of transfer is also taken into
account.
• The HR will click ‘Apply’ to autopopulate the selected client and billing type. Clicking
‘Save’ will save the changes to the EIB.
• In case of 2 or more employee transfers, the HR will enter the employee ids of the
employees in the CSV search to fetch the details of the employees.
• If the fetched employees are to be transferred to the same project or client then, the
HR will select all the employees by clicking the checkboxes and then choose the proposed
Client, Team, Billing type & date.
• Clicking ‘Apply’ will bring the selected client, team, billing type and date in the
appropriate columns besides the selected employee names. Clicking Save, will save the
changes in the EIB.
• In case, the fetched employees are to be transferred to different teams or clients, then
each employee should be check marked separately, assign Teams, Clients, Billing type
separately, then click ‘Apply’ and remove the check mark before working on the next
employee.

• The Clients, Teams & Billing Type will be applied to all the checkmarked employees
upon clicking ‘Apply’.
• After working on all the employees, the HR will finally click ‘Save’ to record the
transfers in the EIB.
• Client – team if not needed, then it can be closed by using the option “close client”.

5.3.11 Group L1 L4 transfer
The group transfer is a function to facilitate HR to initiate transfer of an employee or a group of
employee within the organization. This function falls within the transaction tab and this tab would
be available only for the HR logins.
• The HR will fetch the employee detail by choosing to select any of the following viz. emp.id,
emp. Name, L2 or client and teamwise.
• After fetching the employee, the HR will choose the proposed L1, L2, L3 & L4 to which the
employee is to be transferred.
• The HR will select the employee by clicking the checkbox on the left hand side of the
employee name and them would click apply.
• The HR will click save to save the transfer initiated.
• In case of 2 or more employee transfers, the HR will enter the employee ids of the
employees in the CSV search to fetch the details of the employees.
• If the fetched employees are to be transferred to the same L3 and L4 then, the HR will
select all the employees by clicking the checkboxes and then choose the proposed L1, L2,
L3 & L4 and then click ‘Apply’ and then click ‘Save’.
• In case, the fetched employees are to be transferred to different projects, then each
employee should be check marked separately, assign L1, L2, L3 & L4, then click ‘Apply’ and
remove the check mark before working on the next employee.
• The L1, L2, L3 & L4 will be applied to all the checkmarked employees upon clicking ‘Apply’.
• After working on all the employees, the HR will finally click ‘Save’ to record the transfers in
the EIB.
• Client – team if not needed, then it can be closed by using the option “close client”.

6 Leave & Attendance
6.1 View Attendance
The view attendance function would be available for all users. Any user can view his own
attendance details.
• The default attendance view would be for the current month’s view.
• In the utilization section, the user would view his Actual Duration against the Roster
duration and the percentage of actual duration.
• This calculation is available inclusive of Leave and exclusive of leave.
• In the View Attendance section, the user will have a readonly view of the actual Check-
in, Checkout time against Roster time.
• The user can view both utilization and the Attendance view for any previous months by
selecting the month from the drop down provided above.

6.2 My Team Attendance
My Team Attendance function would be available only for roles who have employees reporting
directly to them. This function would be available for the AMS admin and the AMS central admin.
• The user can choose to view his team attendance by selecting his team from the client
and team wise option and then his team.
• The user can also opt to choose to view the attendance of an individual in his team by
selecting the employee either by emp.id or emp.name.
• The user can also choose to view a group of employees in his team by entering the
employee ids of the group separated by commas in the CSV search.
• After fetching the name(s) of the employee or a group of employees, the user can right
click on the employee name to view the actions that are available for the user to
perform for that employee.
• The actions that could be performed by the user are View attendance, View Roster,
View Leave balance, View Leave history, Apply Leave for employee and Leave
Credit/debit history.
• The user will be able to view only one action per employee at any point of time.
6.3 Leave History
Leave history function will be available for all the employees to view their past leave transactions
yearwise.
• The default history view would be for the current year.
• The user can view their past leave history by choosing the year that they wish to view.
• The screen will automatically refresh to bring a readonly view of the leave transactions
upon choosing the year.

6.4 View Leave balance
Leave Balance function is available to all the employees to view their leave balance.
• The system will show the leave balance as on the current date.
• Leave will be split into General leave and Hospitalization leave and the balance shown
respectively.
• The leave displayed is always for the current year.
• Compoff details are shown as a separate section. If there is a compoff Balance, the
compoff expiry date would also be mentioned.
• The compoff would go waste if it is not availed within the expiry date.
• Instead of availing the compoff, the user can also opt for a sixth day pay with the
approval of the reporting authority.
6.5 Leave Cr/Dr History
The Leave Cr/Dr History function is available to all the employees to view their leave credits and
debits for a particular month of the year.
• The default display would be for the current year and the current month of the General
leave type.
• The user can select the leave type and the year to view the calendar of availed leave
and leave credits.
• The user can further expand the month tree to view the credits and debits daywise.

6.6 Apply for Leave
Apply for leave will be available for all users in CSS to apply for leave and compoffs.
• The dashboard in the ‘Apply for leave’ would display General leave and Hospitalization
leave respectively.
• The dashboard would display the number of leave at the opening of the year,
Entitlement, availed and Leave balance.
• General leave would be credited twice a month.
• The compoff details would also be displayed in the dashboard.
• The user can apply for leave by selecting the ‘Leave type’, the ‘from date’ and the ‘to
date’ which are mandatory fields.
• If it is a halfaday leave then the user would specify it by checkmarking in ‘Half Day?’
• Upon checkmarking the halfday, there will be another checkbox appearing named
‘from’.
• The user would choose whether he is applying leave for first session or second session.
• The user can enter the reason for leave and then click ‘Initiate’.
• The initiated request goes for approval to the reporting authority. The reporting
authority can either approve or reject based on work situations.
• Usually, rejected requests will carry a reason for reject in the remarks column which
will be available for the user to view.
• If the user don’t have any leave and if he applies for a leave, that will be counted as an
LOP. Yet, the approving authority has the right to approve against future credit.
Maximum of 6 days can be approved against future credit.
• An employee can also apply for leave by clicking the AB alert as found in the dashboard
after taking an unplanned leave.
• The employee would have to rightclick on the absent detail to apply for the unplanned
leave.

6.7 Adhoc Leave
The Adhoc leave function would be available only for the AMS central admin and the super admin
to debit or credit leave for an employee or a group of employees on an adhoc basis. This would
usually be done with the approval of the employee’s reporting authority.
• The admin would fetch the employee details either through the selection drop down or
through the CSV search.
• After fetching the employee, the admin will checkmark the employee before working on
the leave credits or debits.
• The admin will select the leave type from the dropdown, the number of days to be
credited or debited, Type of action and the effective date.
• After choosing all the fields the admin will click apply to populate all the details to the
employee selected.
• The admin can checkmark all employee at one go if the leave credit or debit detail is
same for all the selected employees.
• Finally, the admin clicks ‘Save’ to leave changes.

6.8
View
Roster
The view roster function is available to all the users. The user will be able to view the roster time
as set by his reporting authority.
• The default view would be the current month’s roster.
• The user can view the previous roster’s of the year, the current month and the next
month if the roster is defined. The roster can be view by selecting the month from the
dropdown.
6.9 Upload Roster
Upload roster function is available to users who have employees reporting to them, super user,
AMS central admin and AMS admin.
• Users who upload roster for their employees are for their team would have to get the
upload excel template by clicking the link ‘Prescribed File Format’
• The template could be got from the AMS team.
• The application only identifies and employee by the employee id.
• All the cells in the template would be in text format.
• The user who uploads the roster should be well versed with abbreviations like ‘O’ for
off, ‘H’ for Holiday, ‘OD’ for on duty, ‘W’ for working. These abbreviations could be got
from the AMS team.

• A sample template is pasted above for reference.

6.10 Modify Roster
The modify roster function would be available to user who have employees reporting to them,
super user, AMS central admin and AMS admin. The user can modify the roster for an employee
reporting to them or to even the whole team.
• The admin would fetch the employee roster either through the selection drop down or
through the CSV search.
• The user has to mention the dates for which the roster had to be modified before
fetching the employee’s original roster.
• After fetching the employee, the admin will checkmark the employee before working on
the modify roster.
• The user will select the event, whether Working, Holiday, OFF or OD for the employee
to whom the roster is being modified.
• The user will choose the shift duration of the employee which would usually be 9 hrs.
• The New roster in time is selected from the drop down and then clicks ‘Apply’.
• After working on all the employees, the user would click save, to modify the roster.
• Roster modification should happen within 3 days from the date to be modified.
6.11 View Holidays
View holidays function is available to all the users of CSS to view the holidays of their respective
regions.
• The user has to select the entity, whether CSS Corp or CSS US, or CSS Europe.
• The user upon choosing the entity, the branch would dynamically populate.
• The user would choose the year for which he wishes to view the holidays.
• Holidays of the current year is displayed as default.
• Usually, the user would be able to view the previous year’s holidays and the next year’s
holidays could be viewed.

6.12 Modify Attendance
The modify attendance function would be available to appraisers, AMS admin and the AMS
central admin to ratify attendance based on requests. Self ratification of attendance is available
to all grades except E grade. These attendance defaulters will not get the modify attendance
link in their left panel instead the application will warrant their action in ‘My tasks and actions’
in the dashboard as attendance deviation. For ‘E’ grades, it is available till 10th
of next month and
the appraisers have time till 20th
of the next month to ratify & approve the previous month’s
attendance. For the rest of the grades, self ratification time is available till 20th
of the next month.
Attendance for A & B grades is not mandatory.
• Users other than AMS admin and AMS central admin would be able to modify only their
attendance only if there is a deviation.
• These users will click on the attendance deviation link, checkmark the row; enter the
checkout date, checkout time and the Day’s work.
• Repeat the same for other rows if any and then finally click save.
• The AMS admin and AMS central admin would fetch the names either by selection or by
CSV search.
• After fetching the employee detail, admin would checkmark each employee and enter
the details at the bottom of the screen and click ‘apply’ to update.
• In the same way, the admin would enter the details for all the fetched employees and
finally saved the entered data.

6.13 Upload Attendance
The upload attendance function is available only to the AMS admin and the AMS central admin
to upload attendance of the employee who had not marked their attendance for various reasons.
• The admin can download the prescribed file format in which they have to upload by
clicking the format link.
• The format would be in text format.
• The admin would enter the employee id name and other details of the attendance like
date, checkin time, checkout time, checkout date, working hours and then would
upload the file.
• If the upload is successful, then ‘successful file upload’ would appear.
• If there are errors in the file, then the application will throw alerts on the errors by
highlighting the line items so that the admin could work on the specific line items and
then reupload.
• AMS admin associated with the client – team can modify the roster for those teams.
• If client team is not associated with any particular AMS admin, the appraisers can
upload the roster.
6.14 Mark LOP/LOP Reversal
The function is to mark LOP/LOP reversal which has happened in the payroll. This function is
available only to AMS central admin.

6.15 Mark Compoff
The function is available only with AMS central admin. This is to mark all the expired comp offs
which are paid in the payroll.
6.16 Attendance Case Creation
The attendance case creation function is available to all employees of CSS to raise attendance
related cases to their respective appraisers to approve.
• In case, if there is a ratification to be made in any one of the event listed in the picture,
then the employee can raise the attendance case creation for that particular day.
• The employee had to checkmark on the date, select the event for which ratification has
to be made, enter the ratified date to the respective field and then click save.
• The change as made by the employee to the above event would go for approval to the
respective appraise.
• Upon approval from the appraised, the change as made by the employee would be
ratified.

6.17 AB to LOP Conversion
The AB to LOP conversion is a bookmark or a status mark made against the employee in the
GHRMS application for employees who are marked absent within the selected time period that
their status as AB had been changed to LOP. This usually happens to employees who have not
ratified their attendance or applied leave as the case may be.
• This status change is made by the AMS central admin.
• The status change is done with a remark/reason for marking the AB to LOP.
• This LOP details are taken for payroll.
6.18 Upload LOP/LOP Reversal
The Upload LOP/LOP reversal is a function available only for the AMS central admin. This function
will have a direct impact on the payroll transactions.
• The prescribed format to upload could be downloaded from the blue link found near the
submit button.

7 Payroll
Payroll is an exclusive section for which access is given only to the Payroll team. Access to these
functions is restricted even to the super users. The Payroll has 4 sections to it viz., Uploads,
Process, payroll and statutory reports.
7.1 Uploads
All inputs to be given to the system to run the payroll process are uploaded in the upload section.
7.1.1 Upload Deductions
Deductions for the employees which are unknown to the application are uploaded with this
option.
• The above deductions can be deducted from the salary upon request from HR or admin.
• The HRPayroll would upload the emp. Id and the amount to be deducted against the
respective deductions.
• The system will then deduct the amount from the salary for the specified month.

7.1.2 Upload
Allowance
Allowances will be credited to the employee upon uploading here in the upload allowance based
on the eligibility. System validates the data against the compensation for the entitlement.
• The HR Payroll will enter the employee id and the amount to be credited against the
respective allowance.
• The system will input all the entered allowance against the employee id and would
process it in the first run where the employee comes for that pay period.
7.1.3 Mark F & F
Employees who are to be included for the full and final settlement are marked here.
• The system will process the full and final settlement for those employees who are marked
F&F. This can be done in normal run or in F&F run.
7.1.4 Internal Hold

Internal hold given to a particular employee id will hold the salary of that employee.
• Internal hold option is given to hold the salary processed from the month specified till
change in the status quo.
• In the internal hold if the date is given for an employee, then the processing of salary
for that month would be stopped. This is called as stop process. When salary process is
stopped, it would default go for internal hold.
• The salary for subsequent months would be stopped until restart salary is given.
7.1.5 Release Internal Hold
Internal hold can be released only for a month fully, not partially. It can be released from the
beginning of the hold.
• For Ex. If salary is held for January, February, March then February alone cannot be
released.
• Release should be from January, it alone can be released or in combination with
February and March.
7.1.6 Restart Salary

Restart salary would enable the HR Payroll to start processing the salary for the specified
employees who are uploaded in the list. Salary process will start from the date that is mentioned
in the upload list.
• If the date is not mentioned then it will restart the salary from the date it is stopped.
• If the date is mentioned, it will go check for flags and then restart the salary.
7.1.7 Normal Run/Rerun The system will process payroll for all employees in the
selected entity except: (a) who
joined and exited within 3 days for the pay period. (b) Who exited prior to the pay period (C)
who joined after the cutoff date.
• This will consider all the active / inactive employees in the system minus any new
joiners for whom the HRA / EHRA / Payroll dissuade the pay process.
• For a year, month, Normal Run can be executed only once. If the user tries to execute
more than once, system will throw an error message.
• If the previous pay period is not locked then, while processing for the current pay
period, system will throw error message.
• ReRun Whenever the user feels that there is a change in any component / any arrears
which needs to be effected in the current month salary, the user chooses to rerun the
payroll for set of employees.
• To process a rerun for an employee / set of employees, the employee should be already
in a run.
• The user will choose entity and CSV / upload to rerun the process.
• If the CSV / upload has both valid and invalid employee numbers, then, the system will
popup an error message whether to proceed with the valid employee numbers.
• Whenever the user gives the employee number in CSV / upload, these employees are
considered for “Compensation Arrears”.
• If the user presses “Yes”, then the system will rerun the valid employee(s).
• If the user presses “No”, the system will not process further.
• Rerun will run the compensation change of the employee(s) number given in the CSV /
upload
• Auto Sense: Any changes identified by the system after the draft run.
• If the user presses the process button in the rerun screen without giving employee
number in CSV / upload, the system will rerun for those employee(s) who has been
identified using Auto Sense for LWD, PAN change, Upload deduction, Upload Allowance,
Hold employee, Stop salary process.
• If no employees are identified in the auto sense, the system will popup saying,” There
are no employees to process”.
• If there is any other change like office change / LOP / LOP reversal – system should not
consider those changes for the rerun / Auto Sense.

7.1.8 Supplementary Run Supplementary run is a provision requested by the HR
Payroll to run new joinee salary and it is an exceptional pay run for employees who has an LOP
or compensation revision
or for people who has an IT declaration to do at the last minute, people who want to enter
their PAN details.
• The supplementary run would be activated as an excel upload or as a CSV.
• In Excel upload, if Consider compensation is Yes, the system will consider all pay and
deduction and the compensation as well.
• If the run is through CSV, then system will not consider compensation.
• For any supplementary run, the normal run should have to be over and freezed for that
pay period.
• The supplementary run will deduct PF, ESI, PTAX, IT, LWF and company deductions if
any.
• In case of no earnings in the supplementary pay, then it will deduct only IT and that
too only if there is a difference between that run and the previous normal run and it will
not deduct PF, ESI, PTAX, LWF & Company Deductions.
• For F & F employees, the system will not run supplementary run.
7.1.9 Special Run
Special run is done for those employees who need to be given variable pay separately. Fixed
components cannot be processed in this run.
• Payroll would upload the list of employee ids that are to be given a special run.
• For a special run to happen, the previous month’s run should be closed and freezed.
• Special run can be used only before normal run.
7.1.10Upload IT
Upload IT is the IT declaration or submission made on behalf of the employee by the HR Payroll.
This
would usually happen to onsite employees or employees who work at a client place where they
would not have access to our GHRMS application or to the internet.
• The HR Payroll would select the Declaration if it is for the employee declaration and
would choose approval, if it for submission of proofs.
• Declaration or approval beyond the last date for declaration and submission, the
system will not allow the user to submit the claims.

7.1.11Loan Entry
The Loan Entry is to enter the loan details who have availed loan from CSS Corp.
• All the particulars are entered by the HR Payroll for the employee who had availed loan.
• The particular EMI would be deducted from the employee’s salary each month till the
principal is paid back to the company.
•
7.1.12 Loan View
The HR Payroll will be able to view the loan details of any employee who had availed loan from
the company.
• An employee can request the HR Payroll to defer a month’s EMI.
• The HR Payroll upon right click would bring the Loan entry window where they will be
able to defer the loan date or do any other edits.
7.1.13Upload Perks
Perks like accommodation perks, furniture perks and other perks can be credited to an
employee’s account on need based scenarios.

• The HR payroll would enter the emp id and the amount entered against the respective
perk and uploaded.
7.1.14Upload Bank Account Number
New joinees Bank account number, Bank Name and branch would be uploaded once in the
system for the system to process and credit salary to the uploaded Bank account.
7.1.15Upload ESI/PF/PAN
ESI number/PF number/PAN numbers of the employee are uploaded here into the system. This
number would reflect in various parts of the program under the
7.2
Process
7.2.1
Medical bills
approval
Medical bills submitted online by the employee will come here for approval The HR payroll will
check employeewise and approve the pending list. The approved amount will be credited in the
next pay run.


7.2.2 Payroll Process
There are 4 types of run in the payroll process. They
are Normal run, special run, supplementary run and
full and final settlement run. To process a run, the
previous month’s runs should be locked. After locking
the previous month’s run, the HR Payroll can run one
normal run for an employee and any number of special
runs and only 1 supplementary run. FFS run will
happen to employees who are marked FFS.
• Normal run is processed for the regular salary.
• Special runs are processed for incentives, perks and other special income which are
credited separately not along with the salary.
• Supplementary run can happen for those who are missed out in the normal run or for
those whose salary needs to be reworked.
• FFS is processed exclusively for FFS marked employees.
7.2.3 Freeze
All previous month’s runs of employees should be freezed and locked to facilitate process of
current month’s runs. The
runs will be processed in
this section.
• The freeze selection would contain the year, month, number of runs and Type of run.
• There could be only one Normal run, any number of special runs and few FFS.
• Supplementary run can happen after freezing but before locking the previous month’s
run.
• Upon choosing a run, the HR payroll will click freeze to freeze the previous runs.

7.2.4 Miscellaneous Adjustments
Miscellaneous Allowance or deductions are adjusted for an employee in case of adjustments later
after the pay run.
• The HR Payroll will fetch the employee and the respective run for which the adjustment
has to be made.
• HR could add an adjustment by specifying the name of the adjustment and the amount
to be adjusted.
• The HR can specify any number of adjustments or remove any added adjustments.
7.2.5 Rerun
Rerun is to redo the run again in case if the HR payroll had to add or remove something to the
salary of a particular person or a group of people. The rerun will be done for specific employees
for which the run had to be carried out by
choosing the entity to which the employee
or employees belong to.
7.2.6 Tax Approval

The tax as submitted by the employee would be fetched by the HR Payroll. The submitted tax
form would be checked by the HR and would be approved. In case of discrepancies the HR
payroll would contact the employee offline.
7.2.7 Lock Pay Period
The previous pay period has to be locked to facilitate
new runs for the next pay period. The locking of the
previous pay is done here.
7.2.8 Run Cancellation
This section cancels the run that is in
progress.
7.2.9 UnMark Hold
UnMark hold will release the hold made earlier and salary would be process for the employee
for whom the
hold was
made. Salary
would be
processed for
the employee
from the date
when the Un-
mark hold is activiated.
7.2.10TD Before Remittance

The TDS remittance is exclusive for the HR Payroll as this sheet that is uploaded would have the
tax details of all the employees for a particular month. The total tax amount of all the employees
would be sent to the IT department as a single cheque.
7.3 View
7.3.1
Employee Info
HR payroll would be able to view the employee info or the employee salary structure with the
CTC.
• The HR payroll would select the emp. Name or the emp.id, then choose the name and
emp.id from the
drop down and then
choose to view
either the emp info
or the CTC.
7.3.2 Medical Bill submission
The HR payroll will
be able to view the pending medical bill, approve pending bills and print pending list.
7.3.3 Tax Declaration
The HR Payroll will be able to view his tax declaration form in this section. He will be able to
view and edit his tax declaration. The edit buttons will be available only during the declaration
and submission period.

7.4 Adjustments
7.4.1 PF Challan Details
The section saves the PF Challan details that was paid to the PF department into the system.
• Upon clicking add, a window will popup asking the details of the cheque, the bank,
Remittance details and Damage and accumulation details.
• Upon entering the details, the HR Payroll will save the details month on month in to the
system.
7.4.2 TDS Challan

The HR Payroll stores the TDS challan details in this section. Tax for the quarter, cheque details
and the tax amount are stored in the system.
8 Reports & Dashboards
8.1 My Reports & Dashboards
8.1.1 My Reports
8.1.2 My Dashboards
8.2 Payroll Reports
The Payroll department generates several payroll related reports for processing payroll and
analysis. They can generate the reports by querying the predefined queries in the

Report name drop down. After selecting a Report name, the user can choose the filters for
month, year, Run Number, Entity & branch to generate their required report.
Upon clicking the BIRT, the report will be generated in the BIRT format.
9 Mgmt View
10 Quick LinksMy Other Transactions
10.1.1 Check In/Out All users of CSS Mark their attendance here. The system will
capture the current time yet the users have option to change the time to an expired time. The
users will not be able to change to a future time.
10.1.2 Payroll
Your payroll information can accessed here. Employee can submit their IT Declaration, PAN
and Reimbursement claims. Also pay slip, Form 16, and Form 12 BA can be viewed.
10.1.3 EResignation You can use EResignation if you have decided to resign your job.
11 Quick LinksHelp
11.1.1 Glossary
Glossary provides brief description of Acronyms , Abbreviations, and popular nouns used in
the application.
11.1.2 FAQ
Answers to frequently asked questions are packaged in the document for easy application
navigations.
11.1.3 HR Helpdesk The link takes you to HR Helpdesk application.
12 EIB
12.1.1 Employee Search Fine Grain Access Control allows an employee to search the
members details within his /her reporting structure. L2 is dependent on L1, L3 is
dependent on L2 and L4 is dependent on L3. Employee can click Reset to reenter required
conditions for search.
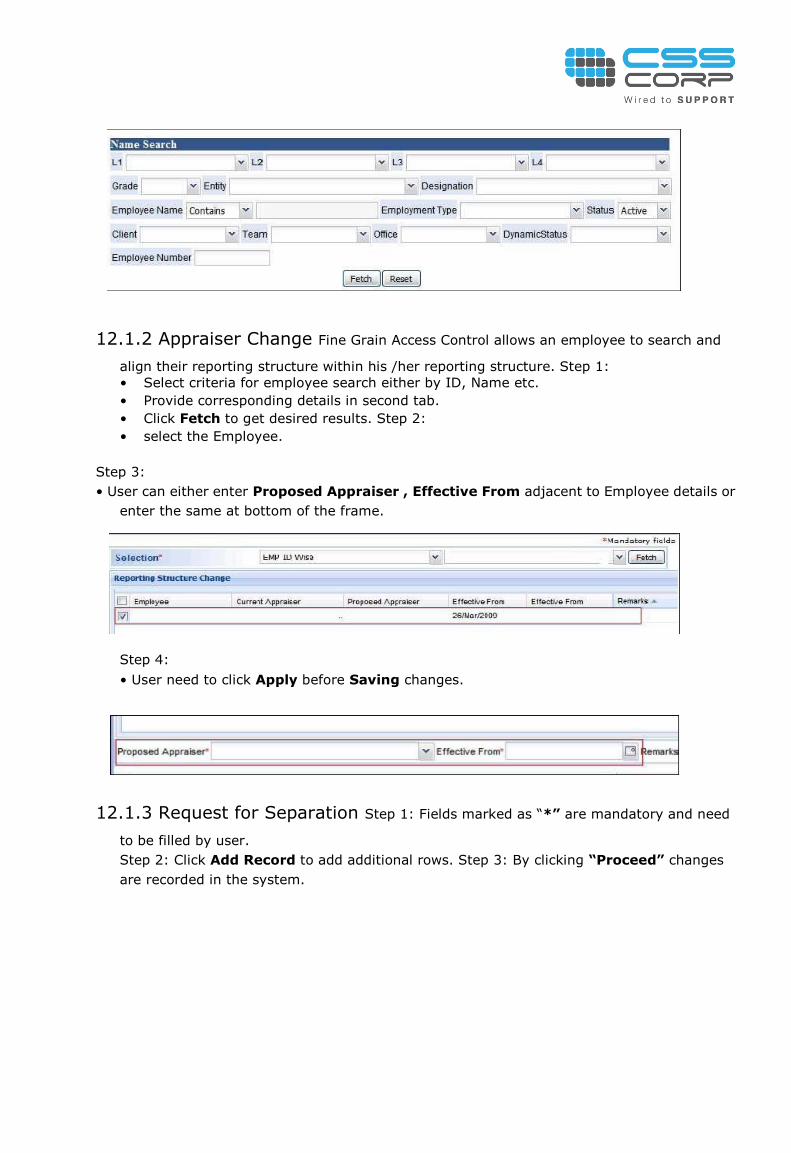
12.1.2 Appraiser Change Fine Grain Access Control allows an employee to search and
align their reporting structure within his /her reporting structure. Step 1:
• Select criteria for employee search either by ID, Name etc.
• Provide corresponding details in second tab.
• Click Fetch to get desired results. Step 2:
• select the Employee.
Step 3:
• User can either enter Proposed Appraiser , Effective From adjacent to Employee details or
enter the same at bottom of the frame.
Step 4:
• User need to click Apply before Saving changes.
12.1.3 Request for Separation Step 1: Fields marked as “*” are mandatory and need
to be filled by user.
Step 2: Click Add Record to add additional rows. Step 3: By clicking “Proceed” changes
are recorded in the system.

Once you have submitted the request for separation your Appraiser will be intimated for
either Approving or Rejecting request.
12.2 EIB Approval Process
Any changes to following details in EDIT EIB by you will be intimated to HR for approval.
Only changes Approved by HR will be reflected in HRMS.
• Contact details
• Qualifications
• Certification
• Passport
• Visa
• Membership
• Previous Employment
• Dependent Nomination
12.2.1 Edit EIBPersonal Details.
Step 1: Fields marked as “*” are mandatory and need to be filled by user. Step 2: Click
Save to save the changes.
12.2.2 Edit EIBContact Details.
Step 1: Fields marked as “*” are mandatory and need to be filled by user.
Step 2: Check “Check if Present Address is same as Permanent Address” if Present
Address is same as Permanent Address.
Step 3: Click Save to save the changes.
12.2.3 Edit EIBEducation Details.
Step 1: Fields marked as “*” are mandatory and need to be filled by user. Step 2: Click
Save to save the changes.
12.2.4 Edit EIBFamily Details.
Step 1: Fields marked as “*” are mandatory and need to be filled by user.

Step 2: Click Save to save the changes.
12.2.5 Edit EIBPassport and Visa Details.
1. Steps to Edit EIBPassport and Visa Details.
Step 1: Fields marked as “*” are mandatory
and need to be filled by user.
Step 2: Click Add Record to add additional rows.
Step 3: Click Save to save the changes.
2. Sections in Edit EIBPassport and Visa Details. Passport and Visa Details also has
following sections within them,
• Medical Information
• Passport Information
• Visa Information
• Achievements
• Extra Curricular Activity
• Membership details.
12.2.6 Edit EIBPrevious Employment.
Step 1: Fields marked as “*” are mandatory and need to be filled by user. Step 2: Click
Add More to add additional rows.
Step 3: By clicking “Save” changes are recorded in the system.
12.2.7 Edit EIBDependent Nomination
Step 1: Fields marked as “*” are mandatory and need to be filled by user. Step 2: Click Add
More to add additional rows.

Step 3: By clicking “Save,” changes are recorded in the system. Step 4: User can either
delete individual records or delete list of records entered by clicking “Delete.”