Embed Size (px)
Citation preview
iMIV Owners ManualVersion: 1.0
1 | P a g eVersion Date: Oct. 24, 07 © Sensolutions Inc. 2007
Table of Contents1. Getting Started....................................................................................................................................4
1.1 Supported iPod Models...............................................................................................................4
1.2 Known Issues...............................................................................................................................5
2. iPod Operation....................................................................................................................................6
2.1 First Contact.................................................................................................................................6
2.2 Simple Mode................................................................................................................................6
2.3 Advanced Mode...........................................................................................................................6
2.3.1 How to operate in Advanced Mode.....................................................................................7
2.4 Switch from Advanced Mode to Simple.................................................................................... 11
2.5 Ignition on/off............................................................................................................................11
2.6 Special Operations.....................................................................................................................11
2.6.1 External 10 CD Changer (CDC)...........................................................................................12
2.6.2 External MD Changer (MDC)..............................................................................................12
2.6.3 External Satellite Receiver (SAT)........................................................................................13
2.7 AUX Input...................................................................................................................................14
2.8 RTI And Video Signal..................................................................................................................14
2.8.1 iPod Video (5th Generation)................................................................................................15
2.8.2 Video While In Motion.......................................................................................................16
2.8.3 Possible Issues And How To Resolve Them........................................................................17
3. All About Firmware............................................................................................................................18
3.1 Identify iMIV Revision................................................................................................................18
3.2 Firmware Update.......................................................................................................................18
3.2.1 Get the right firmware.......................................................................................................18
3.2.2 Update Process Over iPod – Nonemergency.....................................................................19
3.2.3 Update Process – Emergency Update................................................................................21
3.2.4 Possible Issues And How To Resolve Them........................................................................22
4. Warranty, Disclaimer And Liability....................................................................................................23
4.1 Warranty....................................................................................................................................23
4.2 Disclaimer and Liability..............................................................................................................23
2 | P a g eVersion Date: Oct. 24, 07 © Sensolutions Inc. 2007

4.3 Trademarks................................................................................................................................24
3 | P a g eVersion Date: Oct. 24, 07 © Sensolutions Inc. 2007
1. Getting StartedThank you for purchasing the iMIV-Volvo adapter!
By reading this manual and using the adapter you will soon find that this adapter has the most feature rich and multipurpose functionality of any available adapter. The iMIV takes full advantage of the extendible Volvo audio system and was designed to seamlessly integrate into the factory audio and video components without any of the limitations found in similar products.
These are the adapter’s main features:
- Seamless integration into the OEM Volvo audio system.- Works with RTI (navigation), the external 10 CD Changer (CDC), MD Changer (MDC), Satellite
(SAT) and Television (TV) channel.- All HU-xxx models supported (S40(classic), V40, S60, V/XC70, S80).- User selectable HU-channel configuration. The iPod can be controlled via CDC, MDC or SAT and
VIDEO/AUDIO integration through the TV channel.- ALL described iPod features controlled via HU.- Steering wheel controls can be used to select tracks and playlists.- Integration of VIDEO and AUDIO utilized via the HU TV-channel
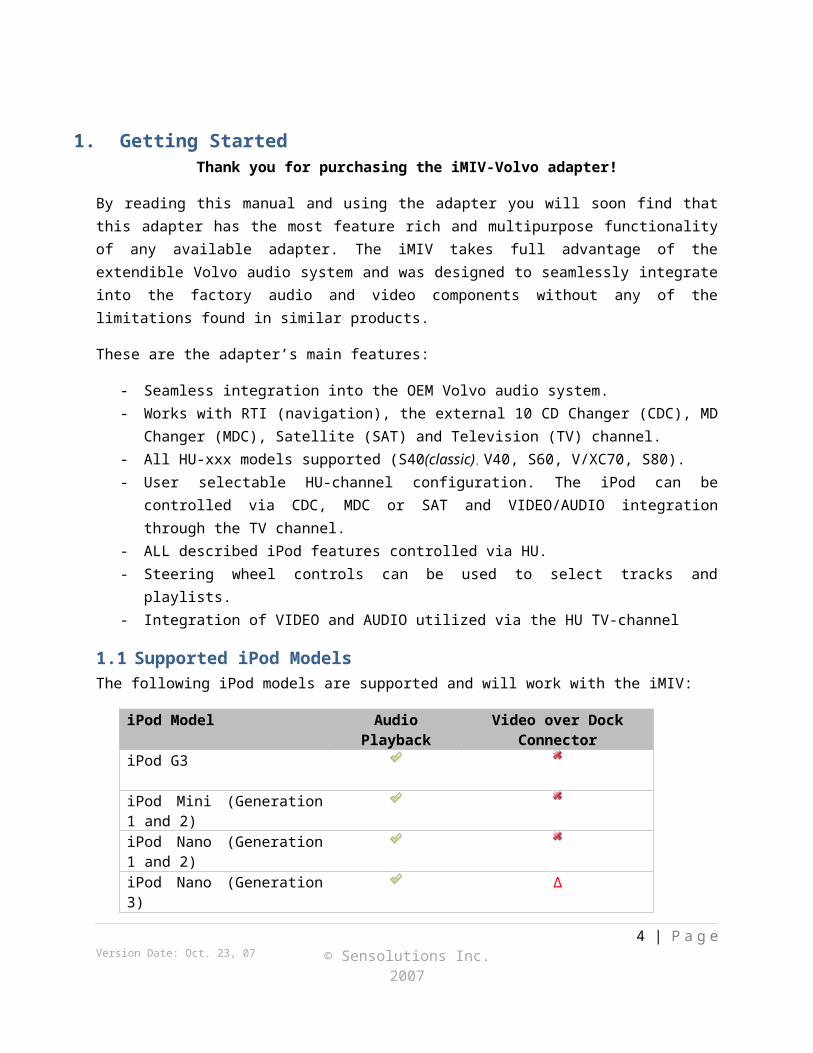
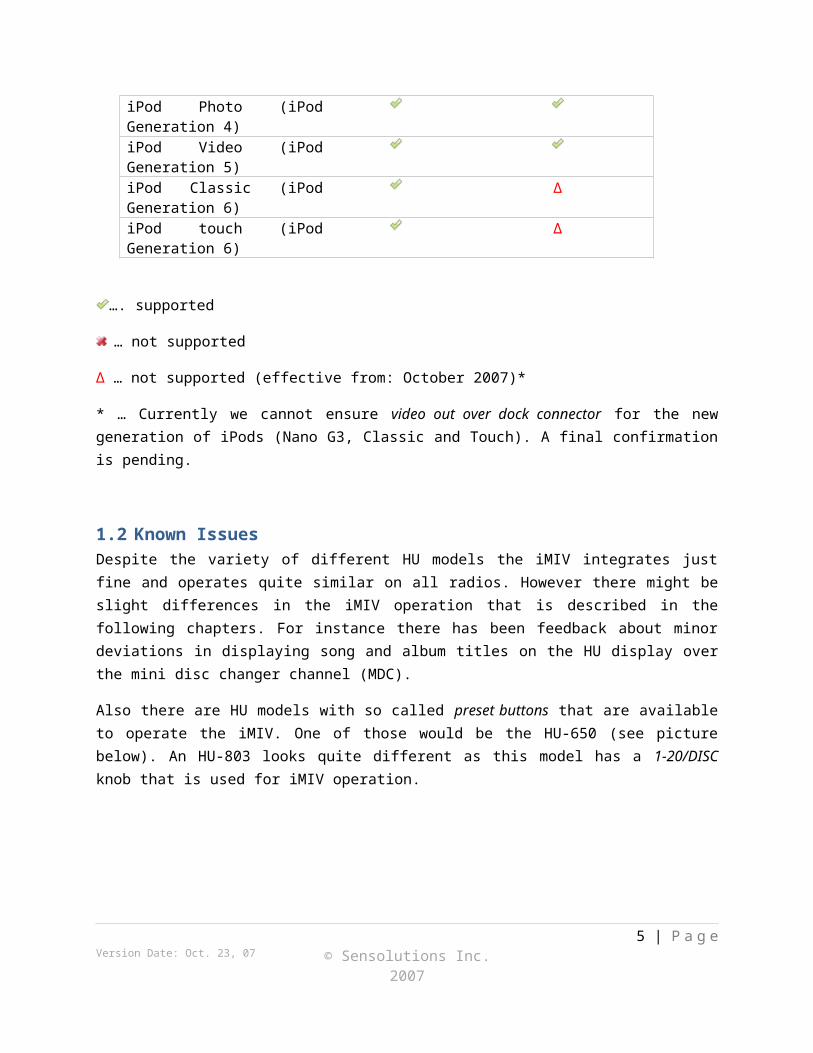
1.1 Supported iPod ModelsThe following iPod models are supported and will work with the iMIV:
iPod Model Audio Playback Video over Dock ConnectoriPod G3iPod Mini (Generation 1 and 2)iPod Nano (Generation 1 and 2)iPod Nano (Generation 3) ∆iPod Photo (iPod Generation 4)iPod Video (iPod Generation 5)iPod Classic (iPod Generation 6) ∆iPod touch (iPod Generation 6) ∆
…. supported
… not supported
∆ … not supported (effective from: October 2007)*
* … Currently we cannot ensure video out over dock connector for the new generation of iPods (Nano G3, Classic and Touch). A final confirmation is pending.
4 | P a g eVersion Date: Oct. 24, 07 © Sensolutions Inc. 2007
1.2 Known IssuesDespite the variety of different HU models the iMIV integrates just fine and operates quite similar on all radios. However there might be slight differences in the iMIV operation that is described in the following chapters. For instance there has been feedback about minor deviations in displaying song and album titles on the HU display over the mini disc changer channel (MDC).
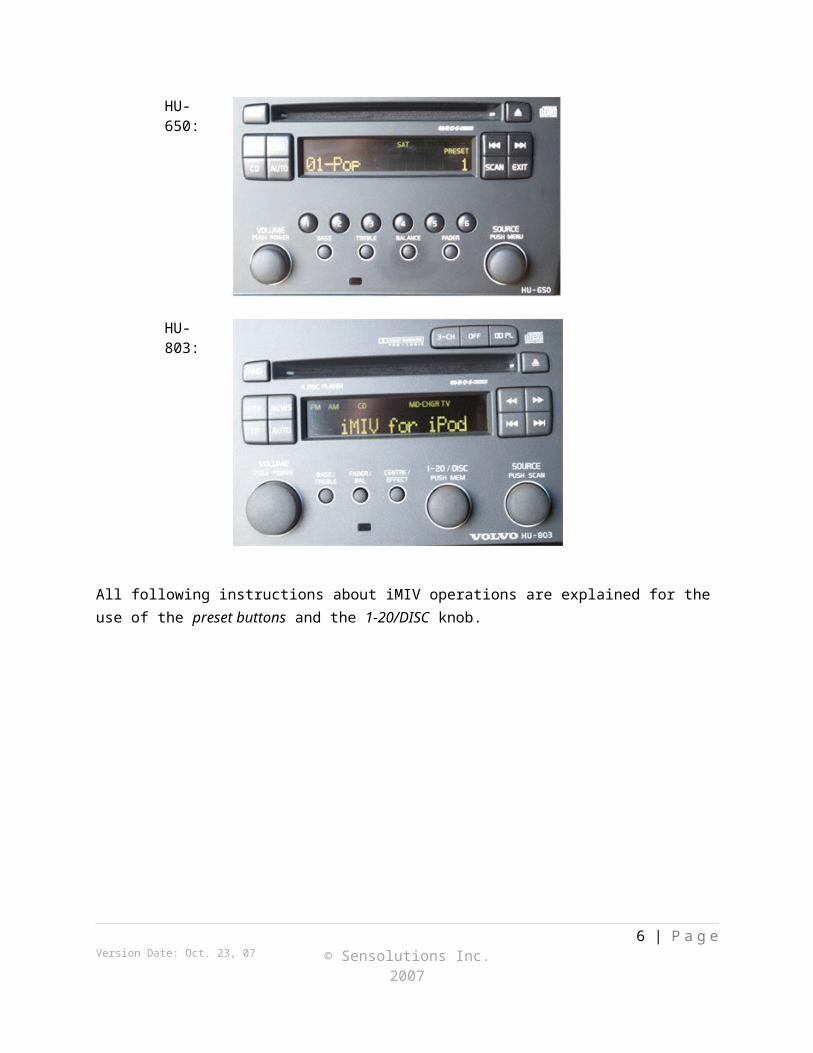
Also there are HU models with so called preset buttons that are available to operate the iMIV. One of those would be the HU-650 (see picture below). An HU-803 looks quite different as this model has a 1-20/DISC knob that is used for iMIV operation.
HU-650:
HU-803:
All following instructions about iMIV operations are explained for the use of the preset buttons and the 1-20/DISC knob.
5 | P a g eVersion Date: Oct. 24, 07 © Sensolutions Inc. 2007
2. iPod Operation
2.1 First ContactThe iMIV works in the way that it emulates free channels on the MELBUS for the radio. Depending on the firmware that is installed on the iMIV there should be 2 new channels available when rotating the source knob. With the pre-installed CDC-TV firmware for-instance the 10 CD Changer and Television channel are added to the radios sources.
With that you are now able to use the iMIV and its different modes:
2.2 Simple ModeIn Simple Mode the iPod can be controlled manually as you would normally do. As soon as the iPod channel is selected on the HU (using the source knob) the iPod starts playing and then pauses when the channel is deselected. The iPod will also pause if the HU is interrupted, e.g. by a telephone call (if you have telephone mute or the integrated car phone/hands free kit installed) or by a traffic announcement via the radio (if TP has been enabled). Once the interruption is finished the iPod resumes playing.
Always connect the iPod to the adapter when the iPod is paused. The adapter expects this and will otherwise reverse the Play/Pause operation.
Besides operating the iPod with its controls directly the iPod can be controlled by the HU as well as the audio controls on the steering wheel.
Button HU Button Steering Wheel Button iPod OperationSkip to next trackSkip to previous trackFast forward in current trackFast reverse in current track
2.3 Advanced ModeIn the Advanced Mode the iPod is locked and displays the iMIV-Volvo logo. The iPod cannot be manually operated. All iPod control is accomplished by using the HU buttons and all relevant information is shown on the HU display.
The Advanced Mode of the iMIV adapter is used to access the playlists on your iPod. Up to 99 are supported by the adapter.
6 | P a g eVersion Date: Oct. 24, 07 © Sensolutions Inc. 2007
iPod in Advanced Mode
2.3.1 How to operate in Advanced ModeWhile the iPod is connected to the dock connector press the following button to get from Simple Mode into Advanced Mode:
With the 1-20/DISC knob:
Description Button Rotate 1 click clockwise to switch from Simple to Advanced Mode.
With the preset buttons:
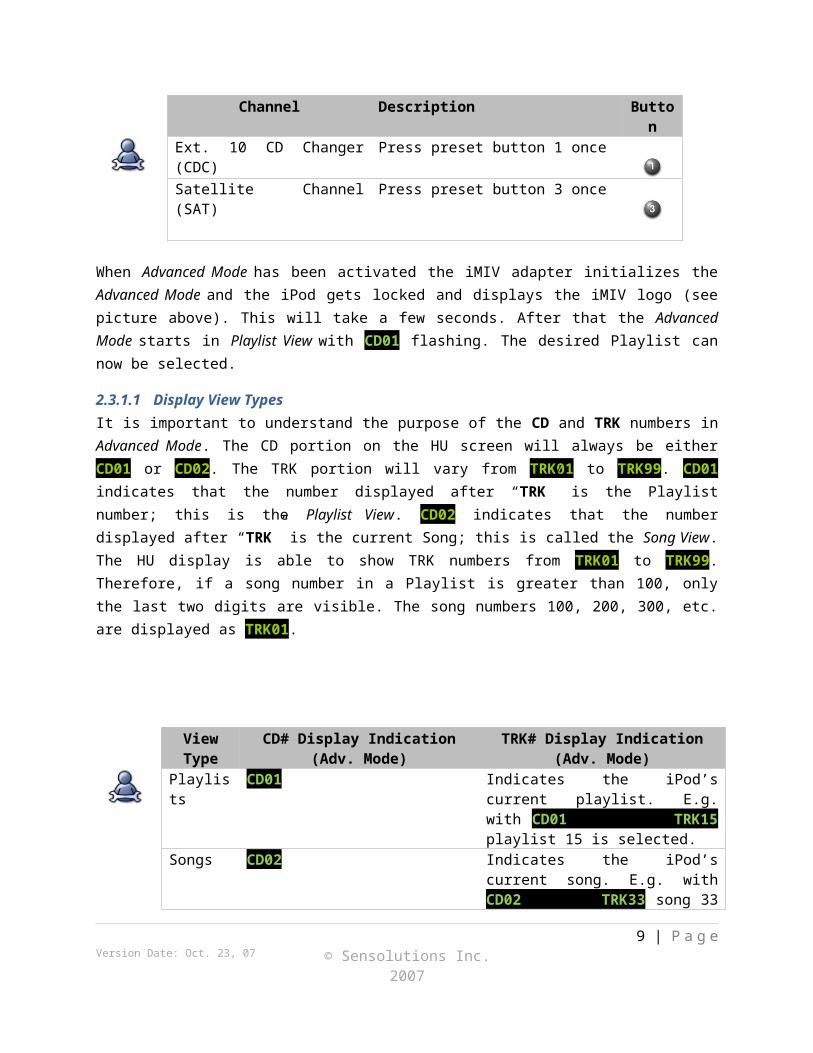
Channel Description ButtonExt. 10 CD Changer (CDC) Press preset button 1 once
Satellite Channel (SAT) Press preset button 3 once
When Advanced Mode has been activated the iMIV adapter initializes the Advanced Mode and the iPod gets locked and displays the iMIV logo (see picture above). This will take a few seconds. After that the Advanced Mode starts in Playlist View with CD01 flashing. The desired Playlist can now be selected.
2.3.1.1 Display View TypesIt is important to understand the purpose of the CD and TRK numbers in Advanced Mode. The CD portion on the HU screen will always be either CD01 or CD02. The TRK portion will vary from TRK01 to TRK99. CD01 indicates that the number displayed after “TRK” is the Playlist number; this is the Playlist View. CD02 indicates that the number displayed after “TRK” is the current Song; this is called the Song View. The HU display is able to show TRK numbers from TRK01 to TRK99. Therefore, if a song number in a Playlist is greater than 100, only the last two digits are visible. The song numbers 100, 200, 300, etc. are displayed as TRK01.
7 | P a g eVersion Date: Oct. 24, 07 © Sensolutions Inc. 2007
View Type CD# Display Indication (Adv. Mode) TRK# Display Indication (Adv. Mode)Playlists CD01 Indicates the iPod’s current playlist.
E.g. with CD01 TRK15 playlist 15 is selected.
Songs CD02 Indicates the iPod’s current song. E.g. with CD02 TRK33 song 33 is curr-ently playing.
2.3.1.2 PlaylistsPlaylists names have to be set in a certain way that is called Indexed Enumeration Mode.
When the playlist enumeration starts, the iMIV adapter always checks the name of the first playlist. If the first two characters of this playlist name are numbers the playlist is not assigned to index number 1 but to the index number that is formed by the first two numbers in the name. This index will show on the HU as Playlist number.
For example, if your first playlist is named “28 – Pop classics” then it is displayed on the HU as: CD01 TRK28. If the first two characters of the playlist name had not been numbers, it would have displayed as: CD01 TRK01).
A few rules apply to use this type of enumeration:
1. You have to make sure that the first playlist in the list begins with two numbers. This means index number one has to be typed as “01”, not “1”. Change the names of your playlists accordingly if this is not the case.
2. Number “00” as first characters in the Playlist name cannot be used for indexed enumeration, because this can be confused with “Simple Mode” operation.
3. The enumeration will stop as soon as a playlist name is found where one or both of the first two characters are not numeric. It is important to understand that when the first playlist begins with two numbers, all successive playlists that do not begin with two numbers will not be enumerated and then cannot be accessed.
Do not use Playlist names that exceed 50 characters in length. The iMIV-Volvo adapter may not function correctly in this case.
Playlist example:
- Imagine your playlists would look like this:o “10 - Miscellaneous pop music”o “11 - Number one hits from the 90’s”o “12 - Pop Classics”o “20 - Modern classical”
8 | P a g eVersion Date: Oct. 24, 07 © Sensolutions Inc. 2007
o “21 - Mozart’s symphonies”o “30 - Greatest hits of Jazz”o “31 - North Sea Jazz Festival 2000”o “32 - The best of Miles Davis”o “40 - Birthday songs for kids”o “41 - Sing along songs”o “On-The-Go 1”o “On-The-Go 2”o “On-The-Go 3”o “On-The-Go 4”
- Scrolling through the playlists on the HU will show:
CD01 TRK10 → CD01 TRK11 → CD01 TRK12 → CD01 TRK20 → CD01 TRK21 → CD01 TRK30 → CD01 TRK31 → CD01 TRK32 → CD01 TRK40 → CD01 TRK41
Note that the On-The-Go playlists are not enumerated, because their name does not begin with two numbers. The enumeration stopped at “On-The-Go 1”.
2.3.1.3 Using Playlists and Songs in Advanced ModeDuring normal operation, when the iPod plays songs, the Song View is active and the HU display represents the current playing Song no.
For example, CD02 TRK13 shows that Song no. 13 of the selected Playlist is playing currently. As soon as the next Song starts playing, the HU display will update the Song number accordingly.
Selecting songsYou can search through the songs using the HU buttons, when the Song View is active. The HU display will immediately update the song number to the one you have selected.
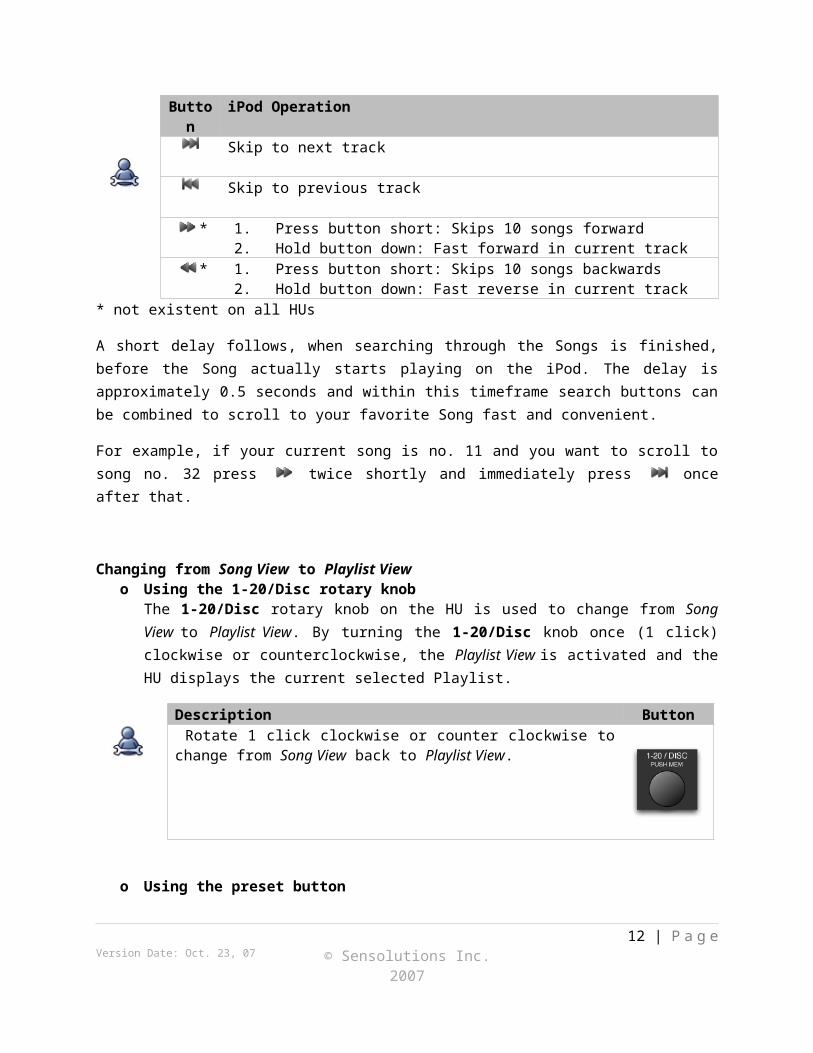
Button iPod OperationSkip to next trackSkip to previous track
* 1. Press button short: Skips 10 songs forward2. Hold button down: Fast forward in current track
* 1. Press button short: Skips 10 songs backwards2. Hold button down: Fast reverse in current track
* not existent on all HUs
A short delay follows, when searching through the Songs is finished, before the Song actually starts playing on the iPod. The delay is approximately 0.5 seconds and within this timeframe search buttons can be combined to scroll to your favorite Song fast and convenient.
For example, if your current song is no. 11 and you want to scroll to song no. 32 press twice shortly and immediately press once after that.
9 | P a g eVersion Date: Oct. 24, 07 © Sensolutions Inc. 2007
Changing from Song View to Playlist Viewo Using the 1-20/Disc rotary knob
The 1-20/Disc rotary knob on the HU is used to change from Song View to Playlist View. By turning the 1-20/Disc knob once (1 click) clockwise or counterclockwise, the Playlist View is activated and the HU displays the current selected Playlist.
Description Button Rotate 1 click clockwise or counter clockwise to change from Song View back to Playlist View.
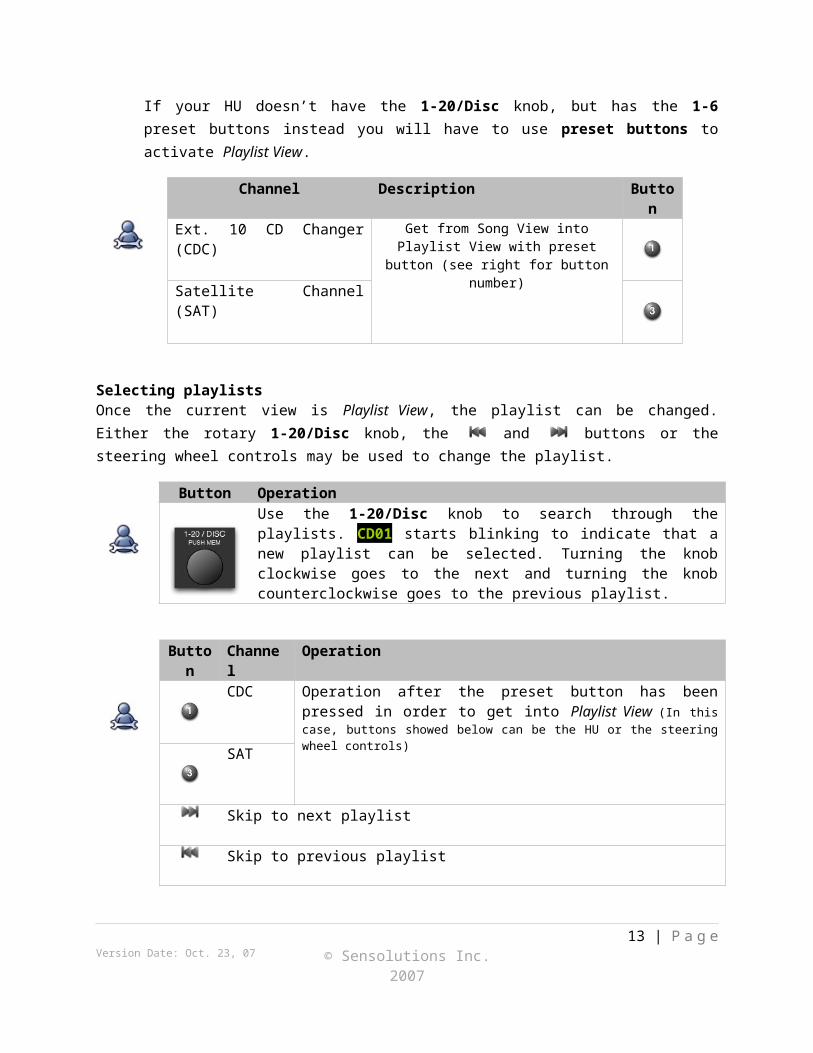
o Using the preset buttonIf your HU doesn’t have the 1-20/Disc knob, but has the 1-6 preset buttons instead you will have to use preset buttons to activate Playlist View.
Channel Description ButtonExt. 10 CD Changer (CDC) Get from Song View into Playlist View with
preset button (see right for button number)Satellite Channel (SAT)
Selecting playlistsOnce the current view is Playlist View, the playlist can be changed. Either the rotary 1-20/Disc knob, the
and buttons or the steering wheel controls may be used to change the playlist.
Button OperationUse the 1-20/Disc knob to search through the playlists. CD01 starts blinking to indicate that a new playlist can be selected. Turning the knob clockwise goes to the next and turning the knob counterclockwise goes to the previous playlist.
Button Channel OperationCDC Operation after the preset button has been pressed in order to get
into Playlist View (In this case, buttons showed below can be the HU or the steering wheel controls)SAT
Skip to next playlistSkip to previous playlist
10 | P a g eVersion Date: Oct. 24, 07 © Sensolutions Inc. 2007
You can search through the available playlists by using any of the buttons above as long as CD01 blinks.CD01 will continue to blink for a few seconds after you stopped scrolling. Once the blinking stops the playlist you selected becomes the active playlist and after a short delay the iPod starts playing the first song of the new playlist.
Automatic playlist turnoverThe iMIV adapter will turn over automatically to the next indexed playlist if the current playlist has reached the end. The adapter switches to Simple Mode if it is through the last indexed and the iPod starts playing the first song of all available music.
Tip!If you want the playlist to turn over to the first song of that playlist after you played the last song set the “Repeat” option on your iPod to “All”.
2.4 Switch from Advanced Mode to SimpleThe Simple Mode is seen as an extra playlist in the Advanced Mode, which is indexed between the first and the last playlist.
For example (using the CDC firmware): Simply just switch to Display View Types, select playlist CD01 TRK99 and wait until the iPod screen unlocks and the iMIV logo disappears. While doing that the iPod will pause for a few seconds and after that continues to play the current song.
2.5 Ignition on/offThe adapter is powered on and the indication LED lights up green when ignition is switched on. The adapter charges the iPod immediately once it is connected.
When ignition is switched off the adapter remains powered for approximately 15-20 seconds, before it shuts down completely and switches off the indication LED. Your cars battery is never drained because the adapter does not use any power when the ignition is off.
In case the iPod was playing it pauses as soon as the ignition is switched off. The adapter will continue to charge the iPod for about 6 seconds and then the adapter switches off and stops charging the iPod.
In Advanced Mode the adapter unlocks the iPod display at the same time the power is switched off to the iPod (so after approximately 6 seconds). By doing so, the iPod can always be operated when it is disconnected - regardless of the mode that had been active before and regardless of the adapter being powered or not.
2.6 Special OperationsSome firmware versions for different channels use different button controls for the same functions. The following lists below show the basic controls ordered by the possible primary HU channels.
11 | P a g eVersion Date: Oct. 24, 07 © Sensolutions Inc. 2007
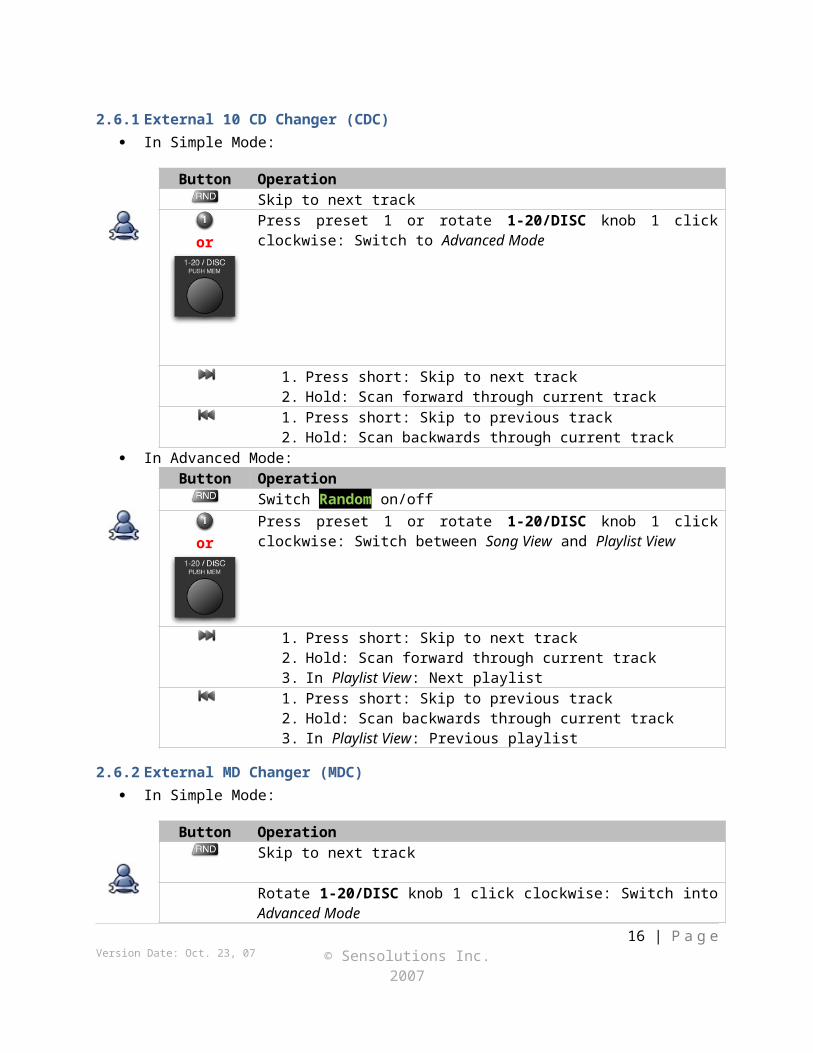
2.6.1 External 10 CD Changer (CDC) In Simple Mode:
Button OperationSkip to next track
orPress preset 1 or rotate 1-20/DISC knob 1 click clockwise: Switch to Advanced Mode
1. Press short: Skip to next track2. Hold: Scan forward through current track1. Press short: Skip to previous track2. Hold: Scan backwards through current track
In Advanced Mode:Button Operation
Switch Random on/off
orPress preset 1 or rotate 1-20/DISC knob 1 click clockwise: Switch between Song View and Playlist View
1. Press short: Skip to next track2. Hold: Scan forward through current track3. In Playlist View: Next playlist1. Press short: Skip to previous track2. Hold: Scan backwards through current track3. In Playlist View: Previous playlist
2.6.2 External MD Changer (MDC) In Simple Mode:
Button OperationSkip to next trackRotate 1-20/DISC knob 1 click clockwise: Switch into Advanced Mode
1. Press short: Skip to next track2. Hold: Scan forward through current track1. Press short: Skip to previous track2. Hold: Scan backwards through current track
12 | P a g eVersion Date: Oct. 24, 07 © Sensolutions Inc. 2007
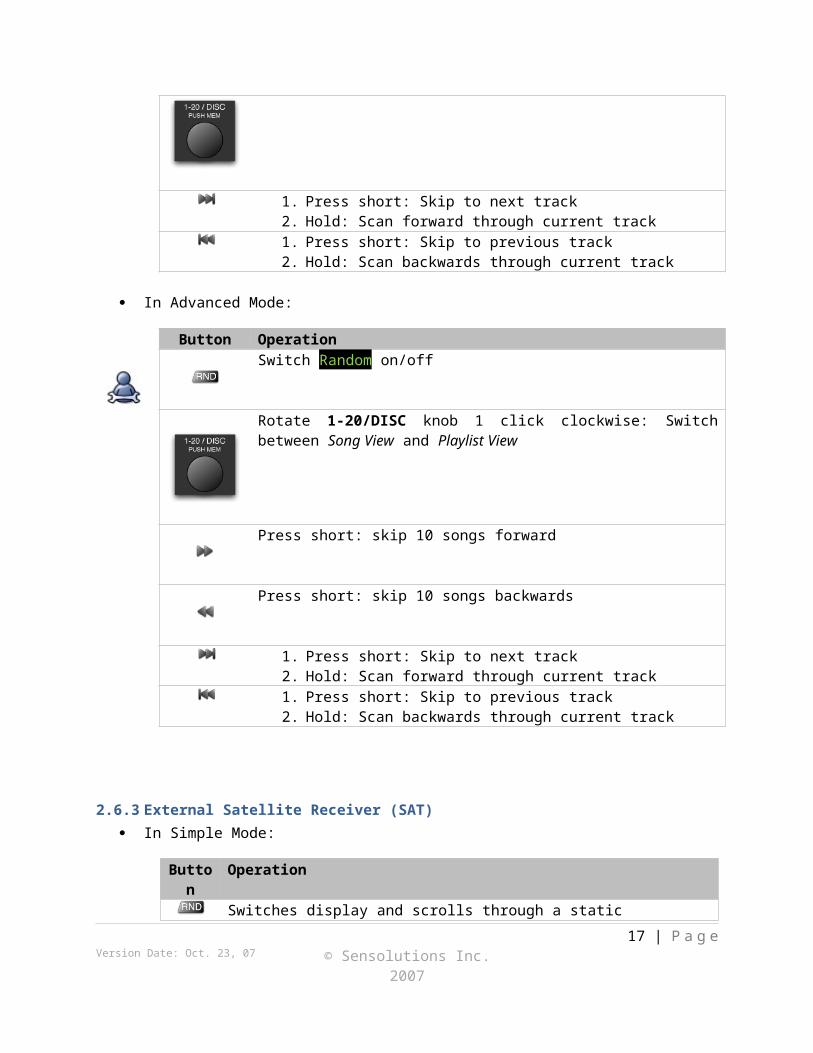
In Advanced Mode:
Button OperationSwitch Random on/offRotate 1-20/DISC knob 1 click clockwise: Switch between Song View and Playlist View
Press short: skip 10 songs forwardPress short: skip 10 songs backwards
1. Press short: Skip to next track2. Hold: Scan forward through current track1. Press short: Skip to previous track2. Hold: Scan backwards through current track
2.6.3 External Satellite Receiver (SAT) In Simple Mode:
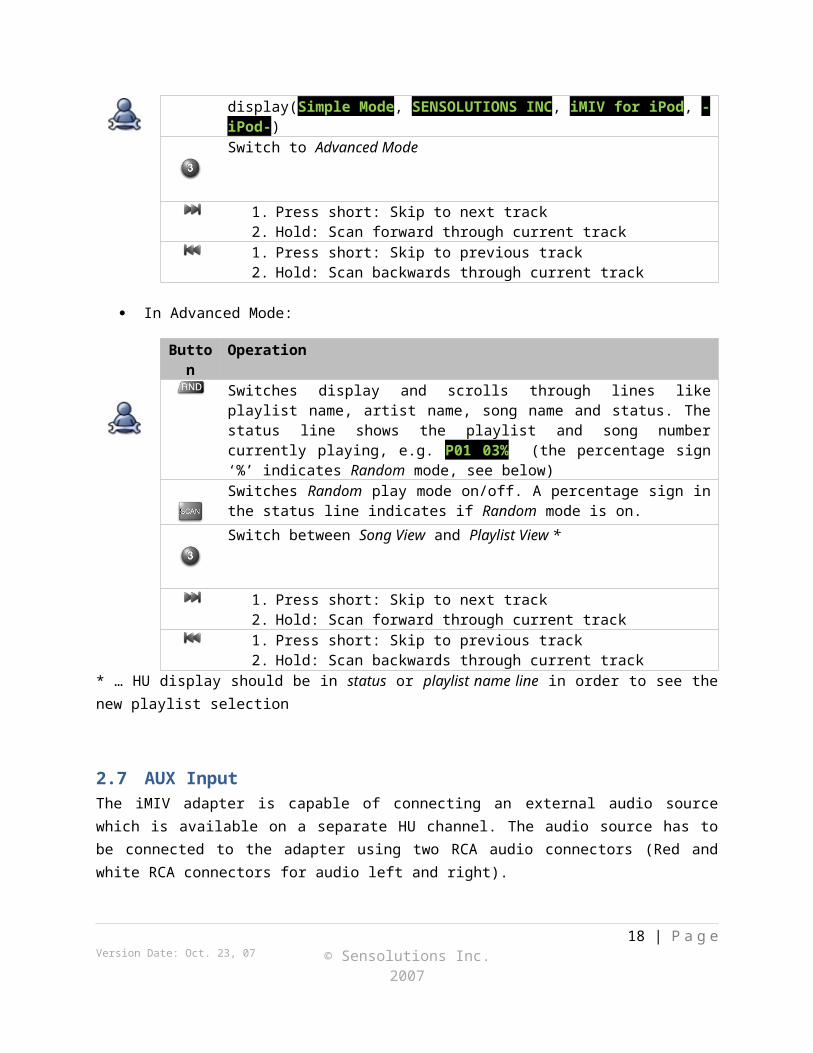
Button OperationSwitches display and scrolls through a static display(Simple Mode, SENSOLUTIONS INC, iMIV for iPod, -iPod-)Switch to Advanced Mode
1. Press short: Skip to next track2. Hold: Scan forward through current track1. Press short: Skip to previous track2. Hold: Scan backwards through current track
In Advanced Mode:
Button OperationSwitches display and scrolls through lines like playlist name, artist name, song name and status. The status line shows the playlist and song number currently playing, e.g. P01 03% (the percentage sign ‘%’ indicates Random mode, see below)Switches Random play mode on/off. A percentage sign in the status line indicates if Random mode is on.Switch between Song View and Playlist View *
1. Press short: Skip to next track2. Hold: Scan forward through current track1. Press short: Skip to previous track2. Hold: Scan backwards through current track
* … HU display should be in status or playlist name line in order to see the new playlist selection
13 | P a g eVersion Date: Oct. 24, 07 © Sensolutions Inc. 2007
2.7 AUX InputThe iMIV adapter is capable of connecting an external audio source which is available on a separate HU channel. The audio source has to be connected to the adapter using two RCA audio connectors (Red and white RCA connectors for audio left and right).
Your adapter comes pre-installed with firmware where the AUX input is available on the TV channel of the HU. Since this default firmware also supports the iPod Video (5 th generation) two aux/video inputs are available, utilized via TV 1 and TV 2.
TV 1 selects the iPod as audio/video input and TV 2 selects the external audio/video source (RCA connectors). The user can switch between TV 1 and TV 2 by using , or the steering wheel controls.
The AUX channel is available on two other channels besides TV which are CD-CHGR or MD-CHGR. The user can customize that by downloading another firmware version into the adapter. The AUX channel is always different from the iPod channel. See our list of downloadable firmware files on our website for possible combinations of channel configurations on your HU.
If the AUX input is configured as the CD-CHGR channel, the HU will display CD01 TRK01 constantly. Pressing buttons on the HU will not affect the display.
If the AUX input is configured as the MD-CHGR channel, the HU will display MD01 TRK01 constantly. Pressing buttons on the HU will not affect the display.
If the AUX input is configured as the TV channel (using a firmware for non-video-iPods), the HU displays TV 1 or TV 0 (Some HU models display ‘TV 0’ while other models display ‘TV’ without the ‘0’ indication). Pressing the buttons on the HU will toggle between TV 0 and TV 1. TV 1 connects the video output to the RTI and TV 0 disconnects the video output from the RTI (no video signal on RTI screen). In both cases the RCA audio connectors on the adapter are selected as audio source.
2.8 RTI And Video SignalIf you have RTI in your car and want to connect the iMIV adapter to your built-in navigation screen, first you need to purchase a special video cable (also available in a video-and-power-cable combination). This cable connects the video output of the adapter to the RTI unit.
This cable is available for DVD-based RTI units and plugs into the RTI with a special green connector. This connector can only be inserted in the correct receptacle at the back of the RTI unit in the trunk, so installation is straightforward and easy.
Since the RTI unit is mainly designed for navigation, the unit itself determines the precedence of the navigation screen and the connected video signal. Navigation always has priority over the video signal as explained in the following paragraph.
14 | P a g eVersion Date: Oct. 24, 07 © Sensolutions Inc. 2007
Suppose that you have a video source connected to the adapter and have installed the video cable to the RTI.
Selecting the TV channelSelect the TV channel on the HU and set the source to TV 1 or TV 2. With the navigation system switched on, the screen switches from navigation to video automatically, if the car is not moving. The screen switches from video to navigation automatically, if the car starts moving with a higher speed than 5mph.
With the navigation system switched off, the screen raises and shows the video, if the car is not moving. The screen turns black for your safety, if the car starts moving with a higher speed than 5mph.
Deselecting the TV channelDeselect the TV channel on the HU and switch to another channel.
With the navigation system switched on, the screen switches from video to navigation automatically. With the navigation system switched off, the screen lowers and turns black.
Temporarily turning off the video signalSelecting TV 0 by using either buttons or steering wheel controls disconnects the video signal from the RTI unit.
With the navigation system switched on, the screen no longer switches to video automatically, if the car stops, but navigation remains visible as if you had not selected the TV channel. This feature is for your convenience when e.g. you drive in a (unknown) city and need the navigation all the time, but do not want to deselect the TV channel.
2.8.1 iPod Video (5th Generation)A special firmware has been created to fully support iPods with a video output (iPod Photo and especially iPod Video-G5). The iMIV adapter has been designed so that the audio and video capabilities of your iPod can be leveraged into the factory audio system without the need for extra cables or additional hardware.
The adapter’s iPod Video firmware enables a second video input on the TV channel and provides high quality audio and video signals from the iPod. Besides video your iPod can still be used as a music player via the CDCHGR or MD-CHGR channel as described in previous sections without disconnecting it.
All features of AUX and Video as described above in previous sections remain unchanged.
Switching between the A/V inputsThe TV channel is the only available channel for the external AUDIO/VIDEO input on the adapter, with the iPod Video firmware version. The TV channel can switch between the two AUDIO/VIDEO inputs, using TV 1 and TV 2. TV 1 switches the iPod AUDIO/VIDEO input and TV 2 switches the external AUDIO/VIDEO RCA connectors on the adapter as input to connect e.g. a DVD player, rearview camera, gaming console, etc.
15 | P a g eVersion Date: Oct. 24, 07 © Sensolutions Inc. 2007
Temporarily turning off the video signalBesides TV 1 and TV 2, TV 0 is available as well to disconnect the video signal from the RTI and temporarily turn off the video signal.
The knob can be used to switch from TV 1 to TV 0. The knob can be used to switch from TV 2 to TV 0.
iPod video settingsTo use the iPod as video source its video settings need to be set up correctly.
Scroll to the “Videos → Video Settings” menu on your iPod Video. Now set the “TV Out” option to “On” and set the “TV Signal” option to “PAL”, if the RTI screen is used for video.
If an external TFT is used to display video, either PAL or NTSC can be used for the “TV Signal” setting, depending on whether the video input signal setting of the TFT panel supports it.
2.8.2 Video While In Motion
2.8.2.1 Important InformationThe iMIV fully integrates your digital entertainment source(s) with the OEM car radio and RTI (Road Traffic Information) in-dash LCD screen. While some video source configurations will allow will allow (for) a video signal on the RTI screen while the car is in motion, it has not been the specifically designed by Sensolutions to permit watching video images while driving on the RTI screen. Therefore the video connection between the RTI and the iMIV is only to be used for transmitting motion picture frames while the vehicle is stationary. Specifically, the iMIV video output is incorporated for rear seat entertainment or still picture display on your RTI screen. Any other use is strongly discouraged for traffic safety reasons.
If you must watch the screen, do so briefly: remain attentive while driving. In some jurisdictions/countries it is unlawful for the driver to watch video while driving: OBEY LOCAL TRAFFIC LAWS. Operating any device while driving, including the iMIV and/or any of its connected peripherals (radio, MP3 player), poses a risk. This risk includes accidental property damage, personal injury or even death. If you must OPERATE THE iMIV or its peripherals, do so ONLY WHEN the car is AT A COMPLETE STOP.
Remember, you drive a VOLVO™: SAFETY FIRST!
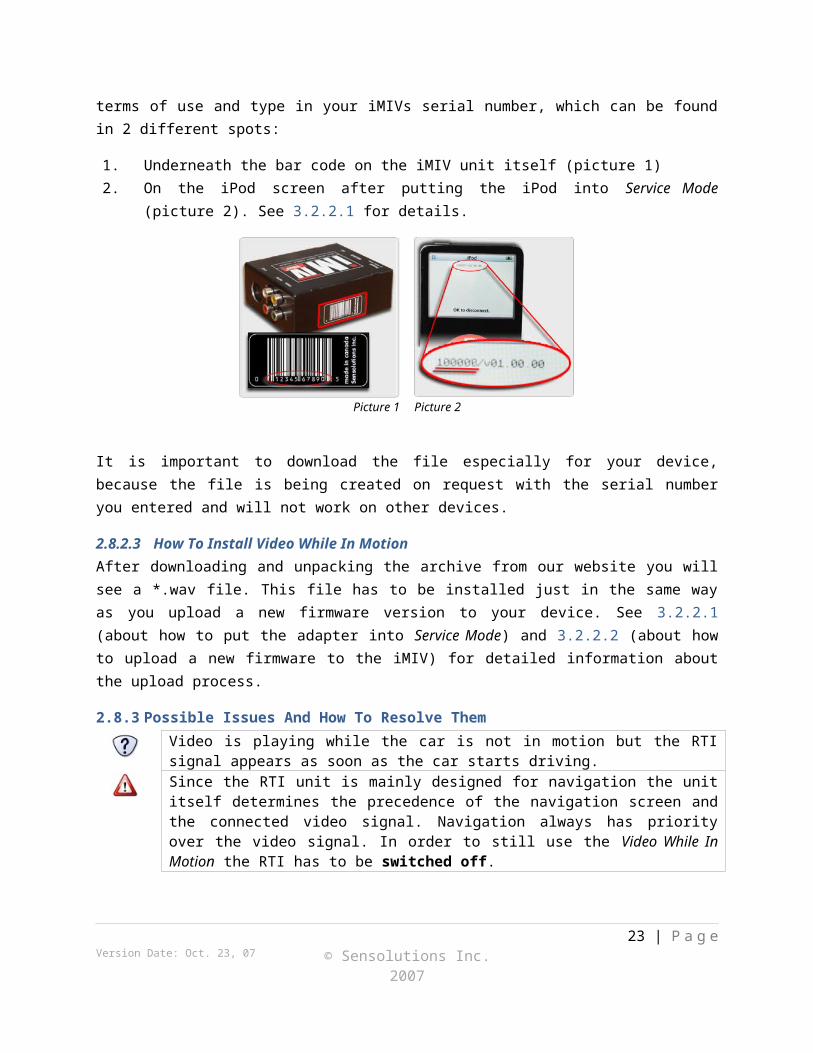
2.8.2.2 Where To Get The Video While In Motion FeatureA special file has to be downloaded from www.imiv.ca (log-in necessary). In order to download that file you have to agree to the terms of use and type in your iMIVs serial number, which can be found in 2 different spots:
1. Underneath the bar code on the iMIV unit itself (picture 1)
16 | P a g eVersion Date: Oct. 24, 07 © Sensolutions Inc. 2007
2. On the iPod screen after putting the iPod into Service Mode (picture 2). See 3.2.2.1 for details.
Picture 1 Picture 2
It is important to download the file especially for your device, because the file is being created on request with the serial number you entered and will not work on other devices.
2.8.2.3 How To Install Video While In MotionAfter downloading and unpacking the archive from our website you will see a *.wav file. This file has to be installed just in the same way as you upload a new firmware version to your device. See 3.2.2.1 (about how to put the adapter into Service Mode) and 3.2.2.2 (about how to upload a new firmware to the iMIV) for detailed information about the upload process.
2.8.3 Possible Issues And How To Resolve ThemVideo is playing while the car is not in motion but the RTI signal appears as soon as the car starts driving.Since the RTI unit is mainly designed for navigation the unit itself determines the precedence of the navigation screen and the connected video signal. Navigation always has priority over the video signal. In order to still use the Video While In Motion the RTI has to be switched off.
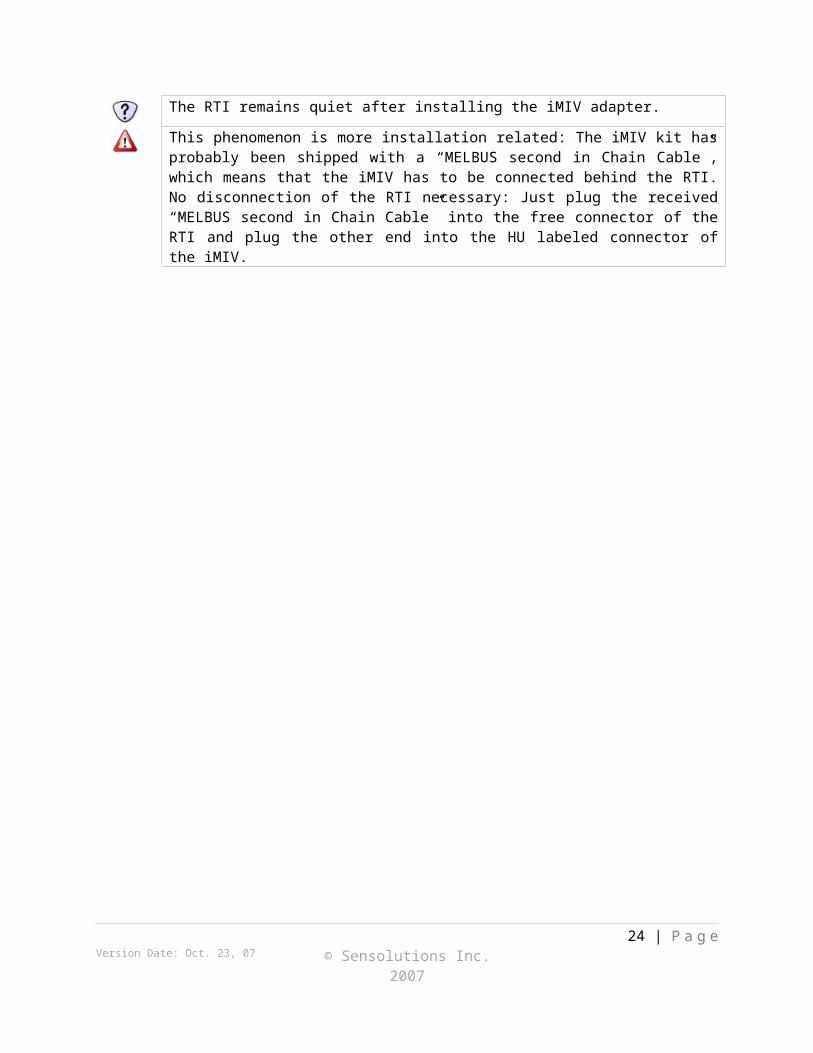
The RTI remains quiet after installing the iMIV adapter.
This phenomenon is more installation related: The iMIV kit has probably been shipped with a “MELBUS second in Chain Cable”, which means that the iMIV has to be connected behind the RTI. No disconnection of the RTI necessary: Just plug the received “MELBUS second in Chain Cable” into the free connector of the RTI and plug the other end into the HU labeled connector of the iMIV.
17 | P a g eVersion Date: Oct. 24, 07 © Sensolutions Inc. 2007
3. All About Firmware
3.1 Identify iMIV RevisionAs of today there are 2 different iMIV versions: Hardware revision 1 and 2. Two different ways can be used in order to identify the version of an iMIV:
1. Purchase date: If the iMIV has been purchased and received before May 2007 it is hardware revision 1.
Any later receipt of the device will be revision 2.2. Look at the iMIV
Revision 1 iMIVs have a “jumper” on the side in order to perform an emergency firmware upload if needed.
Revision 2 iMIVs have a “dip switch” on the same spot that can be used for an emergency firmware upload if needed.
iMIV Revision 1 (Jumper) iMIV Revision 2 (Switch)
3.2 Firmware Update
3.2.1 Get the right firmwareFirst of all you have to choose the correct firmware file. For that the iMIV has to be identified (see 3.1). After that you have to decide which channels you would like to run the iMIV on. Possible combinations are:
CDC-TV CDC-MDC MDC-TV MDC-CDC SAT-TV SAT-CDC
18 | P a g eVersion Date: Oct. 24, 07 © Sensolutions Inc. 2007
The first name always stands for the channel you run your iPod on in Simple Mode and Advanced Mode. The second one is for video over iPod (if a 5th generation iPod Video is used) and the AUX input (Audio and Video).
You might find more than one file for a certain channel configuration in our firmware file download list. That is because of other additional features. There can be files with and/or without the following features for the same 2 channels:
“Rear View Camera” o RTI screen switches automatically to a connected rear view camera, when changing into
rear gearo Firmware files usually include a “rc” in their name, when the feature is included
“iPod-Video-Support”o Supports videos on the RTI screen from a supported iPod model with video out (see 1.1)o Firmware files without that feature usually include a “xi” in their name
“Display Song Titles”o Artist, Song and Playlist names can be displayed on the radio displayo Works mostly with MD changer and SAT channels
“DVD based RTI only”o Those files mostly affect video playback via RTI navigation screens which is only possible,
if the RTI is a DVD based system
Another important point is to select the right iPod model in your profile on our website. Some iPod models (for instance the iPod Nano 2Gen) requires a special version in order to successfully update the iMIV. So using a wrong iPod-firmware combination makes is impossible to load the file onto the iMIV adapter.
3.2.2 Update Process Over iPod – NonemergencyThe iMIV adapter features a sophisticated method to upload new firmware into the adapter’s flash memory by simply playing a sound file on the iPod.
Other firmware is needed when you would like to change the channel configuration on the HU or assign different channels to the iPod or AUX input. It is highly recommended to upgrade the firmware when a new firmware release becomes available.
Before firmware uploading can be commenced, the firmware sound file needs to be uploaded to your iPod. Please check www.imiv.ca (log in necessary) for available firmware releases. After selecting and downloading the appropriate firmware file it has to be transferred to the iPod using iTunes.
It is recommended to place the firmware sound file(s) in a unique Music library location in iTunes, so the file is isolated from the rest of your music collection and can be easily found and selected. For example create a new Genre named as “_vol_iMIV” and place the firmware sound file(s) in there. When the iPod is synced with iTunes the firmware file(s) can be located easily.
19 | P a g eVersion Date: Oct. 24, 07 © Sensolutions Inc. 2007
3.2.2.1 Put the iMIV into Service Mode/Firmware ModeFirst of all you have to select the primary channel of your current firmware (which would be the external 10 CD Changer for the pre-installed version). Have it in Simple Mode and pause the iPod in case it’s playing. It might even be a good idea to navigate to the firmware. Then switch into Service Mode:
Get into Service Mode using the 1-20/DISC knob:
Button Operation
+
Rotate the 1-20/DISC knob 10 clicks counter clockwise and press in order to put the iMIV into firmware mode (iMIV adapter is waiting for a new firmware file)
+
Rotate the 1-20/DISC knob 10 clicks counter clockwise and press in order to see the firmware revision number and iMIV serial number on the iPod display (see 2.8.2.2 for details)
Get into Service Mode using the Preset Buttons – CDC Channel
Button Operation
+
Press the preset 2 button 10 times and press in order to put the iMIV into firmware mode (iMIV adapter is waiting for a new firmware file)
+
Press the preset 2 button 10 times and press in order to see the firmware revision number and iMIV serial number on the iPod display (see 2.8.2.2 for details)
Get into Service Mode using the Preset Buttons – SAT Channel
Button Operation
+
Press the preset 5 button 10 times and press in order to put the iMIV into firmware mode (iMIV adapter is waiting for a new firmware file)
+
Press the preset 5 button 10 times and press in order to see the firmware revision number and iMIV serial number on the iPod display (see 2.8.2.2 for details)
What you will see then is, depending on the channel you are using, a CD ERROR, MD ERROR or SAT ERROR. Also the LED on the side of the iMIV starts flashing red and green and you iPod stops charging.
20 | P a g eVersion Date: Oct. 24, 07 © Sensolutions Inc. 2007
3.2.2.2 Upload The New Firmware File1. Start playing the firmware sound file on your iPod. The adapter expects the firmware sound file
to be started within approximately 30 seconds. The indication LED remains blinking red/green during this time to indicate that a firmware file can be started. If the adapter does not recognize a valid firmware file or the file has not been started during the blinking of the indication LED it breaks off the procedure without uploading firmware and returns to normal operation. The indication LED will light green and the iPod gets charged again.
2. When uploading has started (user started playing the firmware file within the 30 seconds) the indication LED lights red constantly with a short green flash every 2 seconds. This process will take a few minutes to finish. A beeping/ crackling noise is heard on the audio system. You can select another channel or turn down the volume completely. It is very important NOT to pause the iPod during uploading. This would result in corrupted firmware and causes the adapter to fail! Once the sound file played all the way through, the indication LED flashes green 4 times shortly to indicate a successful upload. The adapter returns to normal operation with a green indication LED and the HU reflects the changes after a few seconds.
3. After that turn the ignition off and wait for at least 30 seconds or until the indication LED has switched off. Turn the ignition back on and check if everything works as expected. If the expected HU channels do not show up at all, something went wrong with the upload and the adapter fails to operate normally. In that case you can use the emergency update procedure to restore a correct firmware onto the adapter.
The adapter stops charging the iPod once the firmware uploading is enabled. Therefore it is critical that the iPod is charged sufficiently since firmware uploading takes a few minutes to finish. If the iPod stops in the middle of firmware uploading for any reason, the firmware of the adapter is corrupted and the adapter will not operate normally anymore. Only the emergency procedure can be used in this case to upload new firmware and have the adapter operational again.
3.2.3 Update Process – Emergency UpdateIn rare occasions, uploading firmware may have been unsuccessful for any reason, causing corrupted firmware of the adapter and failure of its operation. The most likely reason is that the transfer of the sound file has been interrupted, e.g. because the iPod was paused accidentally or the iPod lacked enough power to play for a few minutes or the cables introduced some kind of unacceptable electrical noise.
1. Turn off the ignition and wait for at least 30 seconds or until the indication LED is switched off.2. Set the jumper (iMIV revision 1) or the switch (iMIV revision 2) on the side of the adapter marked
as “prg” to position “1”.3. Connect your iPod, pause the iPod and navigate to the firmware sound file on your iPod but do
not start playing it yet.4. Turn on the ignition. The indication LED on the adapter lights red.5. Wait approximately 2 seconds. The adapter starts up in firmware upload mode just as if normal
firmware uploading had been activated via the HU and is ready to receive new firmware. The
21 | P a g eVersion Date: Oct. 24, 07 © Sensolutions Inc. 2007
iPod is not being charged. The indication LED starts blinking red/green after approximately 2 seconds. The adapter will not communicate with the HU which results in an error being displayed on the HU (depending on the current firmware version CD ERROR, MD ERROR or SAT ERROR). This is normal behavior.
6. Start playing the firmware sound file on your iPod. The adapter expects the firmware sound file to be started within approximately 30 seconds. The indication LED remains flashing red/green during this time to indicate that a firmware file can be started. If the adapter does not recognize a valid firmware file or the file has not been started within 30 seconds it stops the procedure without uploading firmware and returns to normal operation.
7. If uploading has started the LED lights constantly red with a short green flash every 2 seconds. The uploading will take a few minutes to finish. It is very important NOT to pause the iPod during uploading, which could result in corrupted firmware and causes the adapter to fail! Once the sound file has finished playing, the indication LED flashes green 4 times shortly to indicate a successful upload. The adapter returns to normal operation with a green indication LED and the HU reflects the changes after a few seconds.
8. Turn off the ignition and wait for at least 30 seconds or until the indication LED is switched off. Reset the jumper/switch from position “1” back to position “2”.
9. Turn on the ignition and check if everything works as expected. If the additional HU channels do not show up, something went wrong with the upload and the adapter fails to operate normally. Re-engage the emergency procedure to restore correct firmware to the adapter.
3.2.4 Possible Issues And How To Resolve ThemThe iMIV adapter is in Service Mode but the LED is solid green just a few seconds after the firmware file has been started.The reason for that problem is a version conflict. That means that either the firmware file is not compatible with the hardware revision of your iMIV or the firmware does not match the iPod model.Solutions:
1. Check, that you downloaded the right revision number for your iMIV hardware revision (see 3.1 for details and use the filter function on our download page)
2. Select the right iPod model in your profile. Firmware files are being pre-filtered by your profile settings so if you want to perform a successful firmware upgrade with an iPod Nano (2nd generation) you have to select exactly this model in your profile.
22 | P a g eVersion Date: Oct. 24, 07 © Sensolutions Inc. 2007
4. Warranty, Disclaimer And Liability
4.1 WarrantyPlease retain the receipt as proof of purchase and write down the information below in case you need to obtain support information
- Sensolutions Product- Date of Purchase- Serial Number- Invoice Number and/or Dealer:
The Sensolutions iMIV carries a one year limited warranty that protects you from defects in material and workmanship. We do not warrant any installation. Should a product fail to perform as described above within the warranted period, it will be repaired or replaced with the same functionally equivalent product by Sensolutions, at its discretion, free of charge provided you:
1. Return the failed product to a Sensolutions designated repair facility with shipping charges pre-paid, and
2. Provide Sensolutions with proof of the original date of purchase
Repaired or replacement products will be returned to you with shipping charges prepaid. If Sensolutions is unable to repair or replace the defective product, it will issue a refund at a fair market value. Warranty does not cover normal tear and wear, damages due to negligence, improper installation or operation. Warranty is void if opened. The maximum liability of Sensolutions under this warranty is limited to the purchase price of the product covered by the warranty. Prior to returning any defective product, you must obtain a Returns Materials Authorization (RMA) number from Sensolutions. All defective products should be returned to Sensolutions with shipping charges prepaid. Sensolutions will not accept collect shipments.
4.2 Disclaimer and LiabilityThe iMIV adapter’s design and specifications are subject to change without notice.
Future firmware updates for your iPod may affect the features and functions described in this manual.
In general, the iPod has not been designed to withstand temperature extremes in automobiles. Consult the iPod’s Owner Manual regarding acceptable operation and storage temperatures.
Sensolutions is not liable for any incidental, consequential or indirect damages. Nor can we be held liable for warranties that are voided because of the use of this adapter.
In case of erratic behavior of your car’s electrical system please disconnect your iMIV first and have it checked by your installer. Sensolutions assumes no liability for any diagnostic fees.
23 | P a g eVersion Date: Oct. 24, 07 © Sensolutions Inc. 2007
The maximum liability of Sensolutions under its warranty is limited to the purchase price of the product covered by the warranty.
4.3 Trademarks- iPod, iPod mini, iPod Photo, iPod Nano, iPod Video, iPod Classic, iPod Touch and iTunes are
registered trademarks of Apple Computer, Inc.- Volvo is a registered trademark of Volvo Trademark Holding AB and/ or Volvo Cars- Sensolutions is not affiliated with AB Volvo, Volvo Car Corporation, Volvo Cars or any other
Volvo companies
24 | P a g eVersion Date: Oct. 24, 07 © Sensolutions Inc. 2007


![VAGUE to VISION. [Your Name]’s Life Vision Playlist: (enter the names of the song(s) that fit your current life vision and that inspire you)](https://img.pdfslide.us/doc/110x75/56649e795503460f94b79512/vague-to-vision-your-names-life-vision-playlist-enter-the-names-of.jpg)