Embed Size (px)
Citation preview

Working with Photoshop CS 5 A University of Michigan Library Instructional Technology Workshop
Need help? Visit the Faculty Exploratory or Knowledge Navigation Center on the 2nd floor of the Graduate Library.
[email protected] | http://guides.lib.umich.edu | [email protected]
rev: 5/9/11
1 of 27
Table of Contents
Introduction: Tools and Palettes .................................................................................. 3
Palettes ............................................................................................................................................................ 3
Getting Help with Photoshop ..................................................................................................................... 3
Resolution and Image Size ........................................................................................... 4
Changing the Image Size .............................................................................................................................. 4
Tips for Changing Image Size ..................................................................................................................... 4
Cropping, Straightening or Rotating an Image .......................................................... 5
Rotating with the Crop Tool ....................................................................................................................... 5
Transforming the Selection .......................................................................................................................... 5
Working with Layers ...................................................................................................... 6
A Few Layer Tips .......................................................................................................................................... 6
Creating a New Layer ................................................................................................................................... 7
Adding Layer Styles/Effects ........................................................................................................................ 7
Linking and Aligning Layers ........................................................................................................................ 8
Transforming Layers Exercise ..................................................................................................................... 8
Working with Text .......................................................................................................... 9
Adjusting Canvas Size ................................................................................................ 10
Manually Adjusting the Canvas Size ......................................................................................................... 10
Automatically Adjusting the Canvas Size with Photomerge ................................................................. 11
Photomerge Exercise .................................................................................................................................. 11
Saving Your Images .................................................................................................... 11
The Difference Between Save, Save As, and Save for Web ................................................................. 11
Working with Selecting Tools ...................................................................................... 12
Selection Tool Tips ..................................................................................................................................... 12
Marquee Tool and Feathering Exercise ................................................................................................... 13
Magic Wand Tool Exercise ........................................................................................................................ 14
Magnetic Lasso Tool Exercise................................................................................................................... 15
Quick Selection Tool Exercise .................................................................................................................. 15
Working With Color ..................................................................................................... 16
Correcting Colors in Your Image ............................................................................................................. 16
Setting Black and White Points ................................................................................................................. 17
Using the Foreground/Background Tool ............................................................................................... 17
Creating a Color Gradient Exercise .......................................................................................................... 18
Replacing Colors in an Image .................................................................................................................... 19
Working with Photoshop CS 5 A University of Michigan Library Instructional Technology Workshop
Need help? Visit the Faculty Exploratory or Knowledge Navigation Center on the 2nd floor of the Graduate Library.
[email protected] | http://guides.lib.umich.edu | [email protected]
rev: 5/9/11
2 of 27
Adding Shapes ............................................................................................................ 20
Using the Shape Tool ................................................................................................................................. 20
Using the Marquee to Make a Circle ........................................................................................................ 21
Using Other Selection Tools and the Move Tool .................................................................................. 21
Working with Filters ...................................................................................................... 22
Applying Filters ........................................................................................................................................... 22
Smart Filters ................................................................................................................................................. 22
Correcting Parts of Your Images ................................................................................ 23
Using the Spot Healing Brush and the Healing Brush .......................................................................... 23
The Clone Stamp Tool ............................................................................................................................... 24
The Eraser Tool .......................................................................................................................................... 24
Using Masks to Hide and Reveal Parts of Your Image............................................. 25
Adding a Layer Mask Exercise .................................................................................................................. 25
Using Quick Mask Mode and Applying Filters Exercise ...................................................................... 26
Hiding Selections with Masks .................................................................................................................... 27

Working with Photoshop CS 5 A University of Michigan Library Instructional Technology Workshop
Need help? Visit the Faculty Exploratory or Knowledge Navigation Center on the 2nd floor of the Graduate Library.
[email protected] | http://guides.lib.umich.edu | [email protected]
rev: 5/9/11
3 of 27
By having pieces on separate layers, you can manipulate only one portion at a time to achieve the desired effect.
The Options Palette (below the main menu) displays the choices for the tool.
INTRODUCTION: TOOLS AND PALETTES
Photoshop is a powerful graphic editing program that allows you to create and manipulate images for print, the web, and other media. This handout introduces the basics; many of the tools need to be explored to see all of their capabilities. To find out the name of a particular tool, hold your mouse over the tool in the Toolbox (shown at left) until the yellow tip pops up. If a tool has a small arrow in the lower right corner, it has more than one option. Click and hold on the tool, slide over to the option you wish to use, and release the mouse.
PALETTES Palettes are groups of tools used to edit and manipulate your image and can be shown or hidden from the Window menu or using its icon in the right-side dock. The most commonly used palettes are the Layers, History, Adjustments and Options Palettes. Each tool in the Toolbox has an Options Palette (displayed at the top of the screen) that shows the choices for the tool’s painting, editing and other effects.
THE HISTORY PALETTE – SAVING A SNAPSHOT
By default, the History Palette contains the last 20 changes to your image. Each time you change the image, a new state is added to the History Palette. To jump to a particular state, click on that state name in the History Palette. As shown at lower right, the other states below turn gray and italicized. If you change your image while at a previous state, you will start from this state and lose all of your other changes.
The Snapshot command lets you take a snapshot of any state in the History Palette of your image. The new snapshot is added to a list of snapshots located at the top of History Palette. To create a snapshot:
1. Select the state that you want to capture.
2. Click the New Snapshot icon ( ) at the bottom of History Palette.
Note: When you close the image file, the snapshots and states in the History Palette are not saved.
GETTING HELP WITH PHOTOSHOP
In addition to this handout, Photoshop’s Help menu is a great resource or you can try finding an answer online. The possibilities in Photoshop are endless, and there are typically a number of ways to accomplish what you are trying to do with your pictures. If you get stuck or would like an appointment, email us at [email protected], or drop in with your question.

Working with Photoshop CS 5 A University of Michigan Library Instructional Technology Workshop
Need help? Visit the Faculty Exploratory or Knowledge Navigation Center on the 2nd floor of the Graduate Library.
[email protected] | http://guides.lib.umich.edu | [email protected]
rev: 5/9/11
4 of 27
RESOLUTION AND IMAGE SIZE
Photoshop works with raster (or bitmap) images, which are stored as a grid of density of small squares known as pixels, and variations in the colors of the pixels produce areas of color on the picture. Resolution refers to the pixels that make up an image and establish its detail. Resolution is commonly measured in “dots per inch” or “dpi”. An image’s resolution is measured by how many of those tiny dots are crammed into a certain amount of space. For example, if an image’s resolution is 300dpi, then for every physical inch of the image, there are 300 tiny little dots, both vertically and horizontally.
Generally, the higher the resolution, the more smooth the image appears, and the less likely the human eye will notice individual dots, because there are more dots per inch. After all, if you cram 300 dots into one inch, those dots are a lot smaller than the dots would be if you were only cramming 72 dots into one inch!
CHANGING THE IMAGE SIZE 1. To resize the image, go to the Image menu and select Image Size.
2. Make sure the Resample Image: box is checked. This will change the pixel size of your image as well as the print size.
3. Make sure the Constrain Proportions box is checked.
4. In the Pixel Dimensions: section or the Document Size: section, change the width or height; notice the other dimension changes automatically (if the Constrain Proportions box is checked).
5. Click OK.
If you don’t like your change, undo it via the Edit menu or History Palette, and then follow these steps again.
TIPS FOR CHANGING IMAGE SIZE
Changing the image size is a basic Photoshop skill that you will use in many different situations. You can change the Pixel Dimensions, Document Size, or the Resolution. Generally speaking, you can always go down in size or resolution without loosing any clarity, but you cannot often go larger/higher.
You may want to scan your images at a higher resolution than you may need, because you can always discard image information, but you cannot add it.
Adjust the Pixel Dimensions if the image is going to be displayed only on the screen (web page, PowerPoint presentation, etc.) You can change either by pixel size or percentage.
Adjust the Document Size if the image is primarily for printing.
The Constrain Proportions option changes the height automatically if you adjust the width (and vice versa).
To lock in the pixel size, but change the print size, uncheck the Resample Image option, and change the resolution.

Working with Photoshop CS 5 A University of Michigan Library Instructional Technology Workshop
Need help? Visit the Faculty Exploratory or Knowledge Navigation Center on the 2nd floor of the Graduate Library.
[email protected] | http://guides.lib.umich.edu | [email protected]
rev: 5/9/11
5 of 27
CROPPING, STRAIGHTENING OR ROTATING AN IMAGE
It’s sometimes hard to get a perfectly straight result when scanning in an image. Photoshop offers a quick automated solution called Crop and Straighten Photos (located in the File menu under Automate). This tool works well, but is not always perfect – a copy is made, so if you don’t like it, you can just close and not save the copy.
In addition to the below methods, you can rotate the entire canvas by going to the Image menu, then Rotate Canvas, and then select one of the options (rotate clockwise or counterclockwise, flip horizontal or vertical, or choose a specific angle of rotation).
ROTATING WITH THE CROP TOOL
The Crop Tool allows you to remove unwanted parts of an image by drawing a rectangle around the part you want to keep and then rotating it if needed. Outside of the selection is deleted.
1. Select the Crop Tool ( ) from the Toolbox and draw a marquee around the part of the image you wish to keep. Resize the marquee by moving the small squares (or “handles”) that appear in each corner and at the middle of each side. The unwanted part of the image will be dimmed out.
2. If your image isn’t straight, rotate the marquee by moving your cursor outside a corner handle until you see a two-headed curved arrow (see above middle picture). Click and hold to rotate the crop area in the direction you wish to move.
3. To crop the image, push Return/Enter on your keyboard, or click on the checkmark in the Options Palette. You can also crop by going to the Image menu and choosing Crop (after you’ve drawn the marquee around your selection).
TRANSFORMING THE SELECTION 1. Select part of the image with a selection tool or go to the Select menu and choose All.
2. Next go to the Edit menu, then Transform, and then Rotate.
3. A transform box will appear around the image or selection – to rotate the selection, move your cursor outside a corner handle until you see a two-headed curved arrow (see the left of penguin picture). Click and hold to rotate the area in the direction you wish to move.
a. In the middle of the transform box is a rotation point crosshair – if you click and drag that, it will move the rotation point, not rotate the selection.
b. Notice that if you don’t have the entire image selected, there will be a gap where the selection originally was (see the white area in the penguin picture).
4. To apply the transformation, push Return/Enter on your keyboard, or click on the checkmark in the Options Palette.

Working with Photoshop CS 5 A University of Michigan Library Instructional Technology Workshop
Need help? Visit the Faculty Exploratory or Knowledge Navigation Center on the 2nd floor of the Graduate Library.
[email protected] | http://guides.lib.umich.edu | [email protected]
rev: 5/9/11
6 of 27
WORKING WITH LAYERS
Layers are one of Photoshop’s most powerful features – think of a cartoonist who draws each bit of a character on a different cell so he/she can move them around, but when you view the final product, it looks like one image. That’s a bit what layers are like; you can draw, edit, paste, and reposition elements on one layer without disturbing the others. Where there is no image on a layer, you can see through to the layers below.
Behind all of the layers is the background. The Background is a protected layer, and many filters and effects cannot be applied to background layers. To unprotect the background, double-click on it in the Layers Palette, rename it, and then apply your effect.
The Layers Palette lists all layers in an image, and a thumbnail of layer contents appears to the left of the layer name. You use the Layers Palette to create, hide, display, copy, merge, and delete layers. (Additional commands appear in the Layers Palette and the Layers menu.) Changes to an image affect only the highlighted or active layer(s). Click once on the layer in the Layers Palette to select it and make it active.
There are many types of layers: some layers are pieces of a final image that you are putting together, some are shape or text layers (created automatically), and some are fill or adjustment layers. Fill or adjustment layers allow you to play with different colors or effects without changing your main image. If you change your mind, you can delete or alter the fill or adjustment layer, and your original image layer is still intact.
A FEW LAYER TIPS
Layers give you power, but they can also cause confusion. Here are a few tips to help you along.
Shortcuts to items in the Layer menu are
available by clicking on the little arrow at the right side.
You can change the opacity of a layer to make it partially transparent.
You can hide or show each layer by clicking on the “Eye” next to the appropriate layer or layer effect.
Changes to an image affect only the highlighted or active layer (click on it once in the Layers Palette to make it the active layer).
Layers can be deleted by dragging them into the little trashcan.
You can link layers together so they move together or so you can align them.
Working with Photoshop CS 5 A University of Michigan Library Instructional Technology Workshop
Need help? Visit the Faculty Exploratory or Knowledge Navigation Center on the 2nd floor of the Graduate Library.
[email protected] | http://guides.lib.umich.edu | [email protected]
rev: 5/9/11
7 of 27
CREATING A NEW LAYER
There are a few different ways to create a new layer:
Go to the Layer menu, select New, New Fill Layer…, or New Adjustment Layer… .
With something on the clipboard (from either cutting or copying), you can go to the Edit menu and select Paste. A new layer is automatically created.
If you have a portion of your image selected, you can go to the Edit menu and select Paste Into. This not only creates a new layer, but adds a layer mask so the pasted item only displays in the selected area (you may need to transform and/or move this layer to get it all to display in your selection, depending on the size of your selection).
Sometimes layers are created automatically, such as when you use the Text Tool, the Shape Tool, or add a layer mask.
Drag a selection or layer from one image to another.
ADDING LAYER STYLES/EFFECTS
Layer styles (or effects) can be added to any layer (including text layers) and are applied to the whole layer. Make sure you’re on the correct layer in the Layers Palette before you start, or on the thumbnail of the image if you are on a layer with a mask.
Blending Modes determine how the pixels in a layer or set of layers are blended with underlying pixels in the image, such as “screen”, so you see the layer below as if through a light version of the upper layer. Layer Styles include drop shadows and bevel effects.
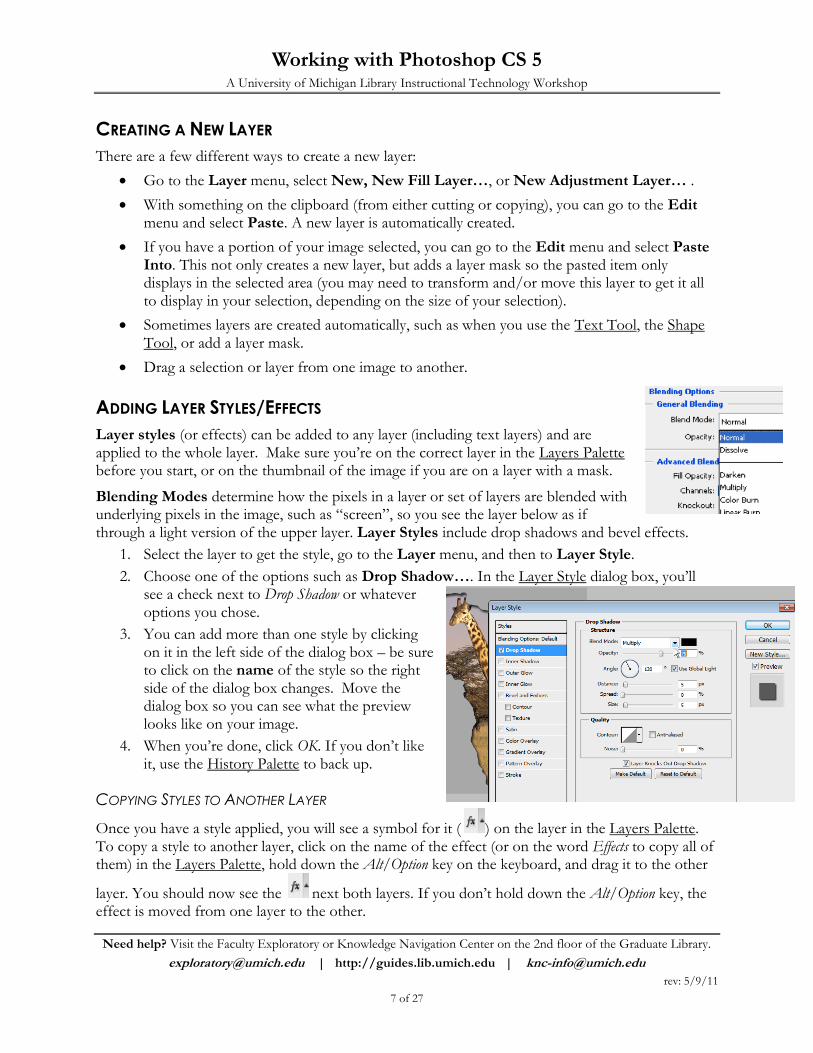
1. Select the layer to get the style, go to the Layer menu, and then to Layer Style.
2. Choose one of the options such as Drop Shadow…. In the Layer Style dialog box, you’ll see a check next to Drop Shadow or whatever options you chose.
3. You can add more than one style by clicking on it in the left side of the dialog box – be sure to click on the name of the style so the right side of the dialog box changes. Move the dialog box so you can see what the preview looks like on your image.
4. When you’re done, click OK. If you don’t like it, use the History Palette to back up.
COPYING STYLES TO ANOTHER LAYER
Once you have a style applied, you will see a symbol for it ( ) on the layer in the Layers Palette. To copy a style to another layer, click on the name of the effect (or on the word Effects to copy all of them) in the Layers Palette, hold down the Alt/Option key on the keyboard, and drag it to the other
layer. You should now see the next both layers. If you don’t hold down the Alt/Option key, the effect is moved from one layer to the other.

Working with Photoshop CS 5 A University of Michigan Library Instructional Technology Workshop
Need help? Visit the Faculty Exploratory or Knowledge Navigation Center on the 2nd floor of the Graduate Library.
[email protected] | http://guides.lib.umich.edu | [email protected]
rev: 5/9/11
8 of 27
LINKING AND ALIGNING LAYERS
Often times you want your layers lined up – all your text aligned in the center, for example, or two layers evenly aligned horizontally. To align your layers:
1. Select the layers you want to align in the Layers Palette by clicking on one, then holding down the Shift key (if the layers are contiguous) or the Control key (if they are not contiguous) while you click on the other layers.
2. Choose the Move Tool from the Toolbox, and then select one of the alignment options in the Options Palette at the top of the screen.
3. If you want both vertical and horizontal alignment, you need to do one, then the other (you can’t apply both at the same time).
If you no longer need the layers to be linked, just click on one of the individual layers and then only that one will be active.
If you want to link your layers so that they move or resize together, select them then go to the Layer menu and choose Link Layers or click on the Link icon at the bottom of the Layers Palette.
TRANSFORMING LAYERS EXERCISE
Once you have more than one layer, there are times when you need to resize or transform just that layer, not the whole image (similar example: http://www.youtube.com/watch?v=SpoKUDJjeGw).
1. Open logo; use the Move tool to to drag onto milkbottle.
2. Go to the Edit menu, then Transform and Scale; – in the Option Palette at the top, click the link symbol between height and width and type in 25%.
a. Drag from a corner on the logo to resize further, but keep the label a little larger than the bottle (you want to make sure there is enough overhang for both warping and cropping). Press Enter/Return on the keyboard when finished.
3. Go to the Edit menu, then Transform, and then Warp (you may want to zoom in).
a. Drag the markers at the corners in and along the sides of the label in, making sure the label still overhangs the bottle slightly.
b. Click the top center of the label and drag down to match the curve of the bottle and repeat for bottom center.
c. Press Enter/Return on the keyboard when you are satisfied (it’s ok if it still hangs over a little).
4. Zoom back out to 100%, if you had zoomed in.
5. On the bottle layer, select everything but the bottle using the Magic Wand with the tolerance set at 5.
6. With the label layer selected, click big Delete key (or go to Edit then Clear) to delete the overhanging part of the label. Now, the label looks like a perfect fit.

Working with Photoshop CS 5 A University of Michigan Library Instructional Technology Workshop
Need help? Visit the Faculty Exploratory or Knowledge Navigation Center on the 2nd floor of the Graduate Library.
[email protected] | http://guides.lib.umich.edu | [email protected]
rev: 5/9/11
9 of 27
WORKING WITH TEXT
When you add text, a new layer will automatically be created. Because text layers work just like other layers, you can apply styles as described on page 7.
The Options Palette (shown below) is key for formatting the text you create with the Text Tool – here you’ll change fonts, size, color etc., but you’ll also use it to access the Character/Paragraph
Palette icon ( ) to add small caps, subscript, superscript, and other formatting options. How to give shape to your text is described later on this page.
1. Choose the Type Tool ( ) from the Toolbox, then click on the image and start typing (note we recommend against drawing a box with the Type Tool and then typing, as it changes the way resizing your text works).
2. Highlight your text and change the font, size and color in the Options Palette – by default the font color will be what is selected in the foreground of the Foreground/Background Tool.
a. While the text is still active (before you’ve clicked the checkmark at the right end of the Options Palette), you can move the text by moving your cursor slightly below the text until you see the Move Tool icon and then moving it.
b. Once you’ve created the text layer, you can move it like any layer by selecting the Move Tool from the Toolbox.
3. Click on the checkmark at the right end of the Options Palette to accept the changes, and a new text layer is automatically created in the Layers Palette.
4. To change the text, double-click on the “T” in the Layers Palette. The Type Tool becomes active, with your text highlighted. Make your changes, and click on the check mark at the right end of the Options Palette.
WARPING TEXT
You can add some special shapes for your text by using the Wrap Text icon in the Options Palette.
1. Select your text layer, or add one as described above.
2. Select the Create Warped Text icon ( ) from the Options Palette and choose a style from the Style: pulldown.
3. Modify the various options if you desire and click OK.

Working with Photoshop CS 5 A University of Michigan Library Instructional Technology Workshop
Need help? Visit the Faculty Exploratory or Knowledge Navigation Center on the 2nd floor of the Graduate Library.
[email protected] | http://guides.lib.umich.edu | [email protected]
rev: 5/9/11
10 of 27
ADJUSTING CANVAS SIZE
Sometimes when you combine images, you need to change the “canvas size” or work area to make it wider or taller to accommodate the new pieces.
MANUALLY ADJUSTING THE CANVAS SIZE
In this exercise we’ll look at two different parts of South America, which were scanned separately, and we will combine them into one image.
1. Open “maptop.psd” and “mapbottom.psd.”
2. Before we merge these into one image, we need to know how big they both are, so we know how big the final canvas needs to be. Go to the Image menu, then Image Size for both images and add the heights and/or widths together.
3. Change the canvas size of the one that you will be using as the base by going to the Image menu and selecting Canvas Size…. Select an anchor point to designate where the new space should go by clicking in the appropriate box in the Anchor section. In this example, we need all the extra height added above the existing image, so we would click in the bottom center.
4. Type in the correct new height/width (you can use either inches or pixels by changing the pulldown). When it’s all set, click OK.
5. In maptop.psd, select the Move Tool from the Toolbox, then click and drag the map top on to the map bottom, and you will notice that a new layer appears in the Layers Palette.
6. Once the top is in the bottom image, again use the Move Tool to correctly position it. Use the Zoom Tool to focus in on a particular area and then use the arrow keys on the keyboard to nudge the layer into place.

Working with Photoshop CS 5 A University of Michigan Library Instructional Technology Workshop
Need help? Visit the Faculty Exploratory or Knowledge Navigation Center on the 2nd floor of the Graduate Library.
[email protected] | http://guides.lib.umich.edu | [email protected]
rev: 5/9/11
11 of 27
AUTOMATICALLY ADJUSTING THE CANVAS SIZE WITH PHOTOMERGE
If you have pictures that form a panoramic view, or two parts of the same (such as our maps above), you can also try using the Photomerge command. This command tries to merge the selected images; if Photoshop can’t do it automatically, a dialog box will appear allowing you to arrange the images yourself (though Photoshop will automatically resize and crop), or cancel the operation. This function creates a new merged image, and leaves your two (or more) originals intact.
PHOTOMERGE EXERCISE 1. Go to the File menu, then Automate, then
Photomerge.
2. Click on the browse button to navigate to the images you would like to merge.
3. Check the box for Geometric Distortion Correction. Leave the Layout as Auto, and select OK.
4. There will be a delay as Photoshop merges the images. When it’s finished, go to the Layer menu and select Merge Layers.
5. Use the Crop Tool to crop the image as desired.
6. In the Make sure that the box next to Contiguous is not checked. Select the transparent area around the edges of the image using the Magic Wand.
7. Go to the Edit menu, then Fill. Under the Use drop down menu, choose Content-Aware and hit OK.
SAVING YOUR IMAGES We recommend always saving a version of your file as a Photoshop document (.psd) even if you’re going to Save for the Web & Devices because it is the only format that keeps the layers.
When you save, only the layers showing will display in your image. So, for example, if you have three layers in your image, but only two are displaying when you save as JPEG, only those two will show in the JPEG image.
THE DIFFERENCE BETWEEN SAVE, SAVE AS, AND SAVE FOR WEB
Save: This option saves the changes that you have made to the original image.
Save As: When you use Save As, you will save a copy of your original work and begin working on the new copy. Your original image remains as it was when you first opened it.
Save for Web & Devices: You can optimize pictures for viewing on the web by previewing your images in “web” form and making adjustments specifically for different file types. Choose this if you want to save your GIF with a transparent background.

Working with Photoshop CS 5 A University of Michigan Library Instructional Technology Workshop
Need help? Visit the Faculty Exploratory or Knowledge Navigation Center on the 2nd floor of the Graduate Library.
[email protected] | http://guides.lib.umich.edu | [email protected]
rev: 5/9/11
12 of 27
WORKING WITH SELECTING TOOLS
To modify a portion of your image you need to select it first – everything outside the selected area is then protected from change. The selected area is then outlined with a dotted line, what we refer to as “dancing ants.” The Selection Tools allow you to select portions of the image either by location or by pixel color, and thus apply Photoshop’s editing power in specific areas. All selection tools can be combined to create exact selections using the Shift key or Alt key (Option key on the Mac), to add or subtract respectively (see below for more tips).
In addition, there is a Refine Edge button in each selection tool Options Palette (see the Marquee Tool and Feathering Exercise for a picture of this dialog box). You can adjust the edges of your selection – sharpen or blur, smooth the transition, etc. – and then preview what it would look like against different backgrounds.
Marquee Tools: The Marquee Tool ( ) allows you to make a selection using a rectangle or ellipse. Select one of the Marquee Tools by clicking and holding on the tool, then sliding over and down to the correct selection.
Lasso Tools: The Lasso ( ) and Polygon Lasso let you draw both freehand and straight-edged segments of a selection border. The Magnetic Lasso snaps to the edges of a color in the image and is especially useful for quickly selecting objects with complex edges set against high-contrast backgrounds. You can select one of the Lasso Tools by clicking and holding on the Lasso Tool, sliding over and selecting the correct option.
The Quick Selection Tool: The Quick Selection Tool ( ) allows you to paint over the area that you would like to select by using an adjustable brush tip. As you drag over the area, the selection expands and follows defined edges within the image.
Magic Wand Tool: The Magic Wand ( ) selects pixels based on color value, not on their placement in the image, and so lets you select an area with similar colors without having to trace its outline. The Magic Wand is now found under the Quick Selection Tool.
SELECTION TOOL TIPS
To add to your selection, hold down the Shift key and click to select the additional areas, (you’ll see a plus sign (+) by the crosshair).
To subtract from your selection, hold down the Alt key (Windows) or Option key (Mac) and draw the additional shape (you’ll see a minus sign (-) by the crosshair). For example, if you have a circle selected and drag another smaller circle inside it while pressing the Alt key (Windows) or Option key (Mac), the selected shape is then a donut.
To make a circle or a square with the Marquee Tool, hold down the Shift key as you drag.
To drag a marquee from its center, hold down the Alt key (Windows) or Option key (Mac) as you begin dragging.
To reposition a marquee, click inside the selection, then drag it to the desired location.

Working with Photoshop CS 5 A University of Michigan Library Instructional Technology Workshop
Need help? Visit the Faculty Exploratory or Knowledge Navigation Center on the 2nd floor of the Graduate Library.
[email protected] | http://guides.lib.umich.edu | [email protected]
rev: 5/9/11
13 of 27
MARQUEE TOOL AND FEATHERING EXERCISE
In this exercise, we will draw an ellipse around a bird in a picture, and fade the background to white,
using the Elliptical Marquee Tool ( ) and the Feather Effect.
1. Go to the File menu, select Open and choose your file.
2. Click and hold on the Marquee Tool and choose the Elliptical Marquee Tool.
3. Click and drag an ellipse on the image. While you can move your selection (by clicking in the middle of the selection, then holding and dragging it or using the arrow keys on the keyboard), you can’t resize the selection. If the selection isn’t how you want it, go to the Select menu, choose Deselect, then try again.
4. You can add a feathered effect, so the marquee fades to white (versus a hard line of white around the marquee). If you don’t want the feathered effect, skip this part. In the Options Palette, click on the Refine Edge… button.
5. In the Feather: box, box type in between 5 and 10 – the higher the number, the larger the gradient – then click OK.
6. Go to the Select menu and choose Inverse. Now your selection is not the ellipse, but the entire area outside the ellipse.
7. Fill this area with any color you like. Go to the Edit menu and choose Fill. In the Use: pulldown of the Contents area, select White, Black, Foreground Color, or Background Color. For more information on choosing the foreground or background color, see the Working With Color section on page 16.
8. Click OK.
9. Go to the Select menu and choose Deselect.

Working with Photoshop CS 5 A University of Michigan Library Instructional Technology Workshop
Need help? Visit the Faculty Exploratory or Knowledge Navigation Center on the 2nd floor of the Graduate Library.
[email protected] | http://guides.lib.umich.edu | [email protected]
rev: 5/9/11
14 of 27
MAGIC WAND TOOL EXERCISE
In this exercise, we will select a specific color using the Magic Wand Tool, and change it to a different color.
1. Go to the File menu, select Open and choose the file “africa.psd.”
2. Choose the Magic Wand Tool from the Toolbox (click and hold on the Quick Selection Tool).
3. Click once with your Magic Wand in the gray area around the continent. This will select that color anywhere it touches the spot you selected.
4. Go to the Edit menu and choose Fill. In the Use: pulldown of the Contents area, select White, Black, Foreground Color, or Background Color.
5. Click OK to close the dialog box.
6. Click once with your Magic Wand on one of the countries.
7. Go to the Select menu and choose Similar. Now all of the countries of that color are selected.
a. If you get more of a selection than what you expected, it’s possible that the Tolerance of the Magic Wand is set too high – change the number and then try the selection again. The tolerance defines how similar in color a pixel must be to be selected by the Magic Wand Tool. Lower values select colors that are very similar; higher numbers select a broader range of colors. The default is 32, and the range is between 0 and 255.
b. An alternate way to select everything in the image that is the same color is to uncheck the Contiguous checkbox in the Option Palette. That way, any occurrence of that color will be selected throughout the image.
8. Go to the Edit menu and choose Fill. In the Use: pulldown of the Contents area, select White, Black, Foreground Color, or Background Color.
9. Click OK to close the dialog box.

Working with Photoshop CS 5 A University of Michigan Library Instructional Technology Workshop
Need help? Visit the Faculty Exploratory or Knowledge Navigation Center on the 2nd floor of the Graduate Library.
[email protected] | http://guides.lib.umich.edu | [email protected]
rev: 5/9/11
15 of 27
MAGNETIC LASSO TOOL EXERCISE
1. In this exercise, we will select a specific shape using the Magnetic Lasso Tool ( ).
2. Go to the File menu, select Open and choose the file “ducky.tif”.
3. Click and hold on the Lasso Tool ( ) and choose the Magnetic Lasso Tool ( ).
4. Click the Magnetic Lasso on the edge of the duck and move the cursor around the edges (you don’t have to hold your mouse button down while doing this).
a. Notice that “anchor points” are dropped along the way. If part of the selection is not what you want, press the Delete key and this will undo the last anchor point on the selection.
b. You can click your mouse at any time to manually set an anchor point. If you press the esc key on the keyboard, your whole selection will disappear.
5. To finish the selection, return to the point where you began your selection, and click when you see the little circle next to your Magnetic Lasso. You should now see “dancing ants” around your selection.
6. Now that you have a selection, you can copy it, apply a filter, etc.
QUICK SELECTION TOOL EXERCISE
The new Quick Selection Tool is sort of a combination of the Magic Wand and the Magnetic Lasso – it selects pixels based on color (like the Magic Wand), but also “senses” the edge of the color (like the Magnetic Lasso).
1. Go to the File menu, select Open and choose the file “Dune.tif”.
2. Choose the Quick Selection Tool from the Toolbox, and drag your cursor over the sky area.
Notice that this tool picks up all the colors of the sky – with the Magic Wand, this would have been more difficult because of the various colors in the sky.
To change the brush size, adjust the pressure or angle, click on the black arrow next to the Brush: section of th Options Palette.
To subtract from your selection, choose the icon with the minus sign in the Options Palette.

Working with Photoshop CS 5 A University of Michigan Library Instructional Technology Workshop
Need help? Visit the Faculty Exploratory or Knowledge Navigation Center on the 2nd floor of the Graduate Library.
[email protected] | http://guides.lib.umich.edu | [email protected]
rev: 5/9/11
16 of 27
WORKING WITH COLOR
There are many different ways to work with color, including using a variety of tools (some of which are discussed below) and applying fill layers (which use a different layer for the fill effect, so it is easier to alter if you change your mind). Remember as you’re working with color that Hue is color, saturation is the purity of the color, and lightness is how much white or black is in the image.
CORRECTING COLORS IN YOUR IMAGE
With Photoshop, you change the mixture of colors in a color image in a variety of ways, depending on what you are trying to do. You can change color characteristics of the entire image, or make a selection and apply the change to just that small area. These are just a few of the tools you might want to use.
In the Adjustments Palette, you can choose presets, or click on an icon to make your own choices – explore!
Levels: allows precise adjustments using three variables (highlights, shadows, and midtones). You can change it manually, or let Photoshop do it by choosing Auto Levels.
Curves: replicates high-end color correction systems and lets you isolate 16 ranges of pixel values between pure highlight and pure shadow.
Color Balance: lets you change the mixture of colors in a color image. Like the Brightness/Contrast command, this tool provides generalized color correction. For precise control over individual color components, use Levels, Curves, or one of the specialized color correction tools: Hue/Saturation, Replace Color, or Selective Color.
Brightness/Contrast: applies the same adjustment to every pixel in the selection or image (i.e., if you increase the brightness value by 30, 30 is added to the brightness value of every pixel). You can change it manually, or let Photoshop do it by choosing Auto Contrast.
Desaturate: removes all color from an image. It’s useful to remove the yellowing of old black and white pictures.
In addition to these adjustments, you can also add a fill layer to overlay solid colors, gradients or patterns all at varying opacities or an adjustment layer to overlay the adjustments described above, but on a separate layer. Fill or adjustment layers allow you to play with different colors or effects without changing your main image. If you change your mind, you can delete or alter the fill or adjustment layer, and your original image layer is still intact.

Working with Photoshop CS 5 A University of Michigan Library Instructional Technology Workshop
Need help? Visit the Faculty Exploratory or Knowledge Navigation Center on the 2nd floor of the Graduate Library.
[email protected] | http://guides.lib.umich.edu | [email protected]
rev: 5/9/11
17 of 27
SETTING BLACK AND WHITE POINTS
Sometimes when you scan in an image the whites aren’t white enough – for example, a line drawing in a book that should be black lines on a white background. By using curves, you can set the white point, black point or gray point. For more information, go to the Help menu.
1. Go to the Image menu, Adjustments, and then Curves….
2. Click once on the appropriate eyedropper (Set Black Point, Gray Point, or White Point) then click on the appropriate spot in your image.
3. Click OK when you are finished.
USING THE FOREGROUND/BACKGROUND TOOL
The Foreground/Background Tool ( ) allows you to designate two colors (one for the foreground color chip, and one for the background color chip). The colors in this tool are used in a variety of instances: the foreground color is the default color for the text tool, the background color is the default for the eraser tool, both can be used from the Edit then Fill… command or to create a gradient, and so on.
The Color Picker dialog box is describe below in relation to the Foreground/Background Tool, but is used in the same manner by many of the different tools.
1. Choose a foreground color from the Foreground/Background Tool ( ) in the Toolbox by clicking once on the top box.
2. In the dialog box, use the slider on the color bar to select the hue, and then choose a specific color in the large color box.
– To pick up a color in your image, move the cursor out of the Color Picker dialog box and onto your picture and the cursor will turn into an eyedropper. Click on a color in your image, and that color will be selected. You may need to move around to get exactly the color you are after.
3. Once you have the color you want, click OK.
USING THE EYEDROPPER TOOL TO SELECT YOUR COLOR
As mentioned above, if you move the cursor out of the Color Picker dialog box and onto your picture, the cursor turns into an eyedropper, and allows you to select the color that was clicked.
However, you can also use the Eyedropper Tool ( ) at anytime by selecting it from the Toolbox. Click anywhere on your image, and that color will appear as the foreground color chip.

Working with Photoshop CS 5 A University of Michigan Library Instructional Technology Workshop
Need help? Visit the Faculty Exploratory or Knowledge Navigation Center on the 2nd floor of the Graduate Library.
[email protected] | http://guides.lib.umich.edu | [email protected]
rev: 5/9/11
18 of 27
CREATING A COLOR GRADIENT EXERCISE
The Gradient Tools create a gradual blend between multiple colors. There are a variety of Gradient Tool options – line, radial, etc. and each will give you a different effect. By default, the Gradient Tool will use the colors displayed in the Foreground/Background Tool, but you can choose other options in the Options Palette.
If you want to change your gradient, you do not need to undo it, but rather you can just draw a new line to apply a new gradient, because it will cover everything up. For an added effect, use a selection tool, such as the Marquee Tool, and your gradient will only apply to that selection. If you do that, however, you will need to undo your gradient to get rid of it.
In addition, you can apply a filter after you’ve added a gradient, if you want to give your image a texture, etc. Careful, though – if you apply the filter first, then the gradient, the gradient will overwrite the filter!
1. Create a new file by going to the File menu and selecting New… or use a selection tool to select just a portion of an existing image.
2. Select the Gradient Tool ( ) from the Toolbox. To select other types of gradients, choose that style from the Gradient Tool Options Palette.
3. Using the Foreground/Background Tool, choose a foreground color and a background color that you would like the gradient to appear between. If you go to the Gradient Tool Options Palette, you can choose other predefined gradients, such as rainbow, tri-color, etc.
4. Click and hold on your image, and draw a line. The length of the line will determine the length of the gradient. The first place you click is where the foreground color will start and the place where you release is where the background color will start. (If you have foreground to background selected in the Gradient Tool Options Palette). Release your mouse button.

Working with Photoshop CS 5 A University of Michigan Library Instructional Technology Workshop
Need help? Visit the Faculty Exploratory or Knowledge Navigation Center on the 2nd floor of the Graduate Library.
[email protected] | http://guides.lib.umich.edu | [email protected]
rev: 5/9/11
19 of 27
REPLACING COLORS IN AN IMAGE
With the Replace Color command, you can create temporary masks based on specific colors and then replace these colors. Masks let you isolate an area of an image, so that changes affect just the selected area and not the rest of the image (for more about masks, see the Using Masks to Hide and Reveal Parts of Your Image section on page 25). Options in the Replace Color command’s dialog box allow you to adjust the hue, saturation, and lightness components of the selection.
The advantage of using the Replace Color command instead of filling the selection is that this command replaces the color range, so you keep the various shades.
1. Select the Rectangle Marquee Tool, and drag a selection around the area that has the colors you want to change (make sure you’re on the right layer!). Don’t worry about making a perfect selection, but be sure to include all of the area you wish to change.
2. Go to the Image menu, choose Adjustments, and then choose Replace Color. By default, the Selection area of the Replace Color dialog box displays a black rectangle, representing the current selection.
3. Use the Eyedropper Tools within the Replace Color dialog box to select the area of color that will be masked and replaced with a new color.
a. The first Eyedropper Tool selects a single color, the Eyedropper-Plus Tool is used to add colors to a selection, and the Eyedropper-Minus Tool is used to subtract colors from a selection. Use these various eyedroppers to make your selection, which will appear as white in the preview box.
b. If you seem to be selecting too many or too few colors, adjust the tolerance level of the mask by moving the Fuzziness slider. Fuzziness controls the degree to which related colors are included – the higher the number the broader the color range.
4. Once you have made your selection, you need to choose a new color. You can do this in one of two ways – either move the Hue, Saturation, and Lightness sliders to the color you would like, or click in the Result color square and choose a color from the Color Picker. As noted above, once the Color Picker is open you can use the Eyedropper Tool to choose a color from your image. You may need to move the dialog box to preview your changes.
5. As in the picture above, you may find that you need to add more to your selection (or take more away). Continue until your whole selection area is white, and you see the results you want in the preview.
6. Click OK to apply the changes.
7. Color dialog box displays a black rectangle, representing the current selection.

Working with Photoshop CS 5 A University of Michigan Library Instructional Technology Workshop
Need help? Visit the Faculty Exploratory or Knowledge Navigation Center on the 2nd floor of the Graduate Library.
[email protected] | http://guides.lib.umich.edu | [email protected]
rev: 5/9/11
20 of 27
ADDING SHAPES
There may be occasions to add shapes to your images – arrows, circles, lines, etc. You can use either the Shape Tool or one of the selection tools to create the shape. The Shape Tool has some advantages, in that it automatically creates a shape layer (and therefore allows you to move it, change the color, and add effects to it), and has several options, including, but not limited to lines (which can have arrow heads) and custom shapes.
USING THE SHAPE TOOL
As mentioned above, the Shape Tool automatically creates a layer that has a “mask” linked to it. A mask isolates a specific area, and protects the rest of the image from the effect (color changes, filters, etc.) that you are applying. In the case of the Shape Tool, the shape defines the boundary of the mask, and then the fill color only appears within the shape. In addition, you can add multiple shapes to the same layer by changing the options in the Shape Tool Option Palette. For more information on how to do this, look up “Using the Shape Tools” in Photoshop help.
Since the Shape Tool uses the foreground as its color, choose a foreground color that you would like and that will stand out against the other colors in the image. For more information on choosing a foreground color, see the Using the Foreground/Background Tool section on page 17.
1. Open “map.psd” or any image you would like.
2. Click and hold on the Shape Tool, and select the Line Tool.
3. In the Options Palette, be sure that the Shape Layer ( ) option is selected.
4. Use the Shape pulldown arrow to add an arrowhead to your line by checking Start, End or both and change the Weight: (thickness of the arrow) if you would like.
5. Click and hold on the image to begin your line, and release the mouse button where you want it to end. Holding down the Shift key on the keyboard will keep the line straight as you drag it out. You can add other lines or shapes as well by using the icons in the Options Palette.
6. A new layer will appear in the Layers Palette with a shape mask. Since the Shape Tool creates its own layer each time you use it, you can use the Move Tool to adjust the positioning of the line if you wish. You can also double-click on the color square in that layer to change the color of the shape.
If you want a hollow circle, square, etc., draw your shape as above, then double-click on the shape mask, and go to the Blending Options. In the Advanced Blending section, change the Fill Opacity: to 0% and make sure to go to the Stroke option to give your shape an outline.

Working with Photoshop CS 5 A University of Michigan Library Instructional Technology Workshop
Need help? Visit the Faculty Exploratory or Knowledge Navigation Center on the 2nd floor of the Graduate Library.
[email protected] | http://guides.lib.umich.edu | [email protected]
rev: 5/9/11
21 of 27
USING THE MARQUEE TO MAKE A CIRCLE
You can use any of the selection tools to make a selection and either add a fill color (inside the shape) or a “stroke” color (outline of the shape). The most common selection tool used is the Marquee Tool to add a circle or square.
1. Choose the Elliptical Marquee Tool (if it’s not displayed, click and hold on the Marquee Tool and select it), or any of the selection tools, if you want to do something different. Holding down the Shift key on the keyboard as you draw creates a perfect circle.
2. Once you’ve got your circle (or other shape), to be able to move it later, you must first create a new layer for it by going to the Layer menu, choosing New, then Layer….
3. Be sure that you are on the new layer (which you should be by default), then go to the Edit menu and choose Stroke…. In the Stroke dialog box, you can change the Width: (the thickness of the line) and Color: if you choose. Click OK.
4. From the Select menu, choose Deselect to get rid of the “dancing ants”.
USING OTHER SELECTION TOOLS AND THE MOVE TOOL
Sometimes you want a specific shape or outline to add to your picture; at the right is an example of using the outline of Africa to lay over the giraffe picture to give a different kind of effect for the image.
You can copy and paste the portion of the image you want, but you can also use
the Move Tool ( ) to drag one image onto another.
1. Open the “africa.psd” and “giraffe.psd” files. Make sure the picture of Africa is the active image.
2. We want to put the outline of Africa on top of the picture of the giraffe but first we must
select the outline. Choose the Magic Wand Tool ( ) from the Toolbox and then click on the gray area around the continent to select it.
3. Choose the Move Tool from the Toolbox. Make sure that you can see part of the giraffe.psd window as well as the africa.psd window, moving the windows if necessary.
4. Click in africa.psd and drag the selection onto any part of giraffe.psd. Notice that the outline of Africa is sitting on top of the giraffe image, and a new layer now appears in the Layers Palette. Still using the Move Tool, position the continent where you want it.
5. To rename the layer something easier to remember, double-click on the layer name in the Layers Palette and give it a new name. Push Enter (or Return) on the keyboard to accept your change.
Remember, since the continent is its own layer, you can select the gray again and choose a new color with the Foreground/Background Tool, change the opacity of the layer (in the Layers Palette) so some of the giraffe’s natural habitat shows through (e.g. the picture above), or add a layer style such as a bevel or drop shadow.

Working with Photoshop CS 5 A University of Michigan Library Instructional Technology Workshop
Need help? Visit the Faculty Exploratory or Knowledge Navigation Center on the 2nd floor of the Graduate Library.
[email protected] | http://guides.lib.umich.edu | [email protected]
rev: 5/9/11
22 of 27
WORKING WITH FILTERS
Many of the filters are artistic in nature, but there are others that are more commonly used. Filters are applied to the active layer or selection, and cannot be applied to Bitmap-mode or indexed-color images, such as GIFs. You can make a selection (with the Marquee Tool, Magic Wand, etc.) and apply the filter only to that selection. The Photoshop Help offers more explanations and examples. Some of the most commonly used are:
Blur: softens a selection or an image and creates smooth transitions by averaging the pixels next to the hard edges of defined lines and shaded areas in an image.
Noise: adds or removes “noise”, or pixels with randomly distributed color levels, blending a selection into the surrounding pixels. Choosing Noise and then the Despeckle option detects edges in an image (areas where significant color changes occur) and blurs all of the selection except those edges. This blurring removes noise while preserving detail. Choosing Noise and then Dust & Scratches reduces the noise by changing pixels that are dissimilar.
Sharpen: focuses blurry images by increasing the contrast of adjacent pixels. They include the Sharpen Edges and Unsharp Mask filters, which find and sharpen areas where significant color changes occur (such as at the edges). The Unsharp Mask filter is commonly used for high-end color correction.
Texture: gives the appearance of depth or substance; options include Grain or Canvas.
APPLYING FILTERS
Before adding a filter, make sure that you are on the correct layer and make a selection with one of the selection tools you’ve learned if you choose. In the Filter menu, choose a filter category then choose any of the specific filters. Photoshop gives you a preview of the various filters within each category, so you can move around in the dialog box until you find exactly what you are looking for. Click OK when you are finished to close the dialog box.
Play around with multiple filters, trying out any of the filters in the Filter menu. Remember, regular filters build on each other, so if you don’t like it, you should remove it. To remove a filter, go to the Edit menu and choose Undo, or use the History Palette to go back.
SMART FILTERS
Smart Filters allow you to hide, show, and adjust the filters you apply to a layer.
1. Go to the Filter menu and choose Convert for Smart Filters.
2. Apply your filters as you normally would (go to the Filters menu and choose your filter).
Notice that you now have an Eye next to each filter, so you can hide or show it, and an adjustment icon to the right of the filter name. Double-click on the adjustment icon, and you can change the settings for the filter.

Working with Photoshop CS 5 A University of Michigan Library Instructional Technology Workshop
Need help? Visit the Faculty Exploratory or Knowledge Navigation Center on the 2nd floor of the Graduate Library.
[email protected] | http://guides.lib.umich.edu | [email protected]
rev: 5/9/11
23 of 27
CORRECTING PARTS OF YOUR IMAGES
Often times when you scan an image, there will be parts of the image that you will not want in the final image, or that don’t look exactly how you’d like. Cropping is an effective tool for eliminating parts of the image that are at the edges of your image, but more often you need to eliminate a selection in the middle of the image that you can’t just crop away. In addition, there are times when you need to correct something in the image – the lighting, a smudge or tear, etc.
There are a number of tools in Photoshop that can be used fix problems – depending on what you are trying to accomplish, you may need a different type of tool:
Healing Tools (Spot Healing Brush, Healing Brush, Patch, Color Replacement): take your selection and its replacement, and blend it with the surrounding area.
Cloning Tools (Clone Stamp, Pattern Stamp): take your selection and exactly copy it to the new location (no blending).
Erasing Tools (Eraser, Background Eraser, Magic Eraser): erase unwanted parts of an image to the layer below or to transparency.
Lightening/Darkening Tools (Dodge, Burn, Sponge): lighten or darken an image or selection; the Sponge changes the saturation.
Focusing Tools (Blur, Sharpen, Smudge): soften or harden the edges of the selection or image.
Other ways to adjust your image can be found in the Filter menu (see the Working with Filters section on page 20).
USING THE SPOT HEALING BRUSH AND THE HEALING BRUSH
The Spot Healing Brush Tool ( ) automatically replaces an area with a blend of its surrounding texture, brightness, and even color. There is no need to sample with the spot healing brush. Generally you’ll want to have the hardness of your brush high with the Healing Brush (some books recommend 75%), since the tool itself will soften the edges to blend to the surroundings. In
addition, you may want to change the shape of your brush to more of an oval (angle at 60, for example) so you have more of an irregular edge to help the blending process.
1. Open “oldphoto.psd” and then select the Spot Healing Brush Tool from the Toolbox.
2. Drag the Spot Healing Brush Tool over the unwanted portions of the image. Remember to take short strokes, so undoing doesn’t loose lots of work. You can change the brush size to fit the area you wish to heal by going to the Options Palette, and picking a different paintbrush or changing the brush’s diameter.
3. When you release the mouse button, the Spot Healing Brush Tool will modify the image by automatically replacing and blending the desired area with its surroundings.

Working with Photoshop CS 5 A University of Michigan Library Instructional Technology Workshop
Need help? Visit the Faculty Exploratory or Knowledge Navigation Center on the 2nd floor of the Graduate Library.
[email protected] | http://guides.lib.umich.edu | [email protected]
rev: 5/9/11
24 of 27
The Healing Brush Tool( ) copies a sampled area, inserts it into a new location, and then proceeds to blend. Each stroke of the tool paints on more of the sampled image. Cross hairs mark the original sampling point.
The Aligned option in the Options Palette toggles from where the tool will sample on the succeeding uses. If Aligned is checked, the sampling point will be in the same relative position to the cursor. If you deselect Aligned, the brush will always draw from the initial point of sampling each time you begin again.
1. Center the Healing Brush Tool over an area you wish to copy and then hold down Alt (Windows) or Option (Mac) key, and click to sample/copy that part of the image. Make sure that the area you sample blends well with the area around the object you are removing. The cross hair that follows the cursor as you paint indicates the point from which the Healing Brush is taking its sample. Remember you can change the brush size.
2. Drag the Healing Brush Tool over the unwanted portions of the image. Remember to take short strokes, so undoing doesn’t loose lots of work.
3. Resample as needed (holding down the down Alt (Windows) or Option (Mac) key).
THE CLONE STAMP TOOL
Similar to the Healing Brush Tool, the Clone Stamp Tool takes a sample of the image, which can then be applied over another image or part of the same image. For the background of this old photo, for example, we don’t want to blend in the odd colored spots, but rather want to replace with the correct looking area.
1. Select the Clone Stamp Tool in the Toolbox (remember to deselect the Aligned option if you prefer).
2. Center the Clone Stamp Tool over an area you wish to copy and then hold down Alt (Windows) or Option (Mac) key, and click to sample/copy that part of the image. Make sure that the area you sample blends well with the area around the object you are removing. Remember you can change the brush size by going to the Options Palette, and picking a different paintbrush.
3. Drag the Clone Stamp Tool over the unwanted object to paint over it with a copy of the area you just sampled to duplicate the sample so it repeats. Just like with the Healing Brush, the cross hair that follows the cursor as you paint indicates the point from which the Clone Stamp is taking its sample. Remember, it’s best to use short strokes, because if you need to undo a step, you don’t want to lose everything you’ve done.
THE ERASER TOOL
You can also use the Eraser Tool to get rid of unwanted spots or defects in your image. With the Eraser Tool, you can choose to work with a brush or a block, which is sometimes handy to make straight edges. The Eraser Tool can erase to the background color chip, to the layer below, or with the Magic Eraser, you can change all similar pixels at once.

Working with Photoshop CS 5 A University of Michigan Library Instructional Technology Workshop
Need help? Visit the Faculty Exploratory or Knowledge Navigation Center on the 2nd floor of the Graduate Library.
[email protected] | http://guides.lib.umich.edu | [email protected]
rev: 5/9/11
25 of 27
USING MASKS TO HIDE AND REVEAL PARTS OF YOUR IMAGE
Photoshop also offers the flexibility to “hide” or mask a certain part of an image. A mask lets you isolate and protect areas of an image as you apply color changes, filters, or other effects to the rest of the image. When you select part of an image, the area that is not selected is “masked” or protected from editing.
Making careful selections in an image can be tricky sometimes, but editing in Quick Mask Mode allows you to carefully include or exclude certain pieces of the image from your selection by using a temporary mask for the image.
ADDING A LAYER MASK EXERCISE
In this exercise, we’ll use the Move Tool to merge two images like we did before, but this time we’ll use a Layer Mask to hide part of one image so the one behind it shows through.
1. Open the files called “dolphin.psd” and “lighthouse.psd.” Use the Move Tool to move the dolphin into the lighthouse picture. Select the Move Tool, click on the dolphin and then drag the dolphin into the opened lighthouse picture.
2. Resize the dolphin layer by going to the Edit menu and choosing Free Transform.
a. There will be a box around the dolphin that allows you to resize it. To keep the body proportionate, click on the chain
link ( ) in the Options Palette to lock height and width together while you drag a corner to resize.
b. You can also rotate the image by moving your cursor away from a handle until you see the two-headed curved arrow, and then clicking and dragging the cursor.
c. Once you are satisfied, click on the check mark in the Options Palette or push Enter/Return on the keyboard.
To create the illusion that the dolphin is coming out of the water, we’ll add a Layer Mask.
3. Go to the Layers Palette and click on the Add Mask icon at the bottom of the Layers Palette (the second button from the left.) Notice there is now a new symbol for the mask on the dolphin layer in the Layers Palette.
4. Also notice that the Foreground/Background Tool automatically switches to black and white. Make sure the foreground color is set to black to hide what you brush over in order for the ocean to shine through. If you change to white, what you paint over will show, not
hide. Use the two-headed arrow ( ) by the Foreground/Background Tool to switch between black and white.
5. Click on the Paintbrush Tool ( ) and select the type of brush you would like to use from the Options Palette, changing brushes as needed, to brush away at the dolphin’s tail so it looks as if it is jumping out of the water. When using the paintbrush, short strokes are recommended so if you need to undo a step, you won’t lose many changes.

Working with Photoshop CS 5 A University of Michigan Library Instructional Technology Workshop
Need help? Visit the Faculty Exploratory or Knowledge Navigation Center on the 2nd floor of the Graduate Library.
[email protected] | http://guides.lib.umich.edu | [email protected]
rev: 5/9/11
26 of 27
USING QUICK MASK MODE AND APPLYING FILTERS EXERCISE
To change the sky to a more cloudy look, we can apply a filter to just that area. First we’ll select the sky, use Quick Mask Mode to finalize our selection, and then apply a filter.
Still using the lighthouse.psd image, click the Magic Wand Tool ( ) and then click on the sky (be sure you are on the background layer).
Note: To add to the sky selection, you could hold down the Shift key while clicking on the rest of the sky or you can enter Quick Mask Mode, which enables you to quickly and accurately select the desired portions of the image.
1. Click on the Quick Mask Mode button ( ) in the Toolbox below the Foreground /Background Color Tool. The NON-selected portion appears in red. Notice that your foreground/background colors are automatically changed to black and white, as they did when we manually applied a mask.
2. Click on the Paintbrush Tool ( ), go to the Options Palette, and pick a paintbrush.
– To add to your selection, make sure that white is the foreground color.
– To subtract from your selection, make sure that black is the foreground color.
3. Use the paintbrush to add or subtract until you are satisfied with your selection. It’s best to use short strokes, because if you need to undo a step, you don’t want to lose everything you’ve done. You may need to switch paintbrushes as you go.
4. When you are satisfied with your selection, exit the Quick Mask Mode by clicking on the left button below the Foreground/Background Tool. Your selection will now appear with the “dancing ants” around it.
5. Go to the Filter menu, choose Render and choose Clouds. Note that the Cloud filter uses your foreground and background colors, so you may need to adjust that first. Notice that the last filter used is always at the top of the Filter menu, so you can just choose that rather than go to the specific filter grouping. This may be selected as many times as you like to change the effect of the clouds.
6. To adjust the darkness of the clouds, go to the Image menu, select Adjust, then Levels. Now adjust the Midtone slider to the left for lighter tones or to the right for darker tones. Notice it is only applying the levels to your selection. When you are satisfied with your adjustments, click OK.
7. Go to the Select menu, choose Deselect.
8. To add one last effect to the image, go to the Filter menu, select Render, and choose either Lighting Effects… or Lens Flare…. Adjust as you see fit, then click OK.

Working with Photoshop CS 5 A University of Michigan Library Instructional Technology Workshop
Need help? Visit the Faculty Exploratory or Knowledge Navigation Center on the 2nd floor of the Graduate Library.
[email protected] | http://guides.lib.umich.edu | [email protected]
rev: 5/9/11
27 of 27
HIDING SELECTIONS WITH MASKS 1. Open the “lighthouse2.psd” and “sunset.psd” files. Make sure sunset.psd is the active image.
2. We want to put the sunset behind the lighthouse and reveal it in the sky area using a mask. To do this, choose the Move Tool from the Toolbox. Make sure that you can see part of the lighthouse2.psd window as well as the sunset.psd window, moving the windows if necessary. Click and drag the sunset.psd onto any part of lighthouse2.psd. Notice that the sunset is sitting on top of the lighthouse image, and a new layer now appears in the Layers Palette.
3. To rename the layer something easier to remember, double-click on the layer name in the Layers Palette. Rename it, and then push Enter/Return on the keyboard.
4. We want to put the sunset behind the picture of the lighthouse, but if we try to drag the sunset layer down behind the background, Photoshop won’t let us, because the background layer is a special layer.
a. To make the background a layer we can alter, double-click on the Background layer in the Layers Palette to bring up the Layer Options dialog box.
b. In the Layer Properties dialog box, name the layer “lighthouse”. Click OK.
5. In the Layers Palette, click and drag the sunset layer below the lighthouse layer. It is now hidden by the lighthouse layer.
6. To show the sunset in the sky area, first select the sky area as we did in the previous exercise using the Magic Wand Tool and if necessary, Quick Mask Mode. Once you have made your selection, go to the Layers menu, Add Layer Mask, and choose Hide Selection. Notice the new symbol on the lighthouse layer in the Layers Palette, indicating use of a Layer Mask.
7. Make sure that you are on the sunset layer in the Layers Palette and select the Move Tool. Move the sunset so you can see the sun itself over the horizon of the waves (not too high, though, or you’ll start to see the trees!).
– Note: Use the arrow keys on the keyboard to move the selected layer by one pixel per keystroke.
8. If you want, change the blending mode of the lighthouse (Screen, for example), or add some other layer style. Remember, when working with a layer that has a mask, click on the thumbnail of the image (not the mask) before you apply your style or change the blending.