Embed Size (px)
Citation preview
Amazon RedshiftGetting Started Guide
API Version 2012-12-01
Amazon Web Services
Amazon Redshift Getting Started Guide
Amazon Redshift: Getting Started GuideAmazon Web ServicesCopyright © 2013 Amazon Web Services, Inc. and/or its affiliates. All rights reserved.
The following are trademarks of Amazon Web Services, Inc.: Amazon, Amazon Web Services Design, AWS,Amazon CloudFront, Cloudfront, Amazon DevPay, DynamoDB, ElastiCache, Amazon EC2, Amazon ElasticCompute Cloud, Amazon Glacier, Kindle, Kindle Fire, AWS Marketplace Design, Mechanical Turk, AmazonRedshift, Amazon Route 53, Amazon S3, Amazon VPC. In addition, Amazon.com graphics, logos, pageheaders, button icons, scripts, and service names are trademarks, or trade dress of Amazon in the U.S.and/or other countries. Amazon's trademarks and trade dress may not be used in connection with anyproduct or service that is not Amazon's, in any manner that is likely to cause confusion among customers,or in any manner that disparages or discredits Amazon.
All other trademarks not owned by Amazon are the property of their respective owners, who may or maynot be affiliated with, connected to, or sponsored by Amazon.
Amazon Redshift Getting Started Guide
Welcome ................................................................................................................................................. 1Getting Started ....................................................................................................................................... 3Step 1: Before You Begin ........................................................................................................................ 3Step 2: Launch a Cluster ........................................................................................................................ 4Step 3: Authorize Access ...................................................................................................................... 10Step 4: Connect to Your Cluster ............................................................................................................ 13Step 5: Create Tables, Upload Data, and Try Example Queries .......................................................... 15Step 6: Delete Your Sample Cluster ...................................................................................................... 19Step 7: Where Do I Go from Here? ....................................................................................................... 20Document History ................................................................................................................................. 21
API Version 2012-12-014
Amazon Redshift Getting Started Guide
Welcome
Welcome to the Amazon Redshift Getting Started Guide. Amazon Redshift is a fast and powerful, fullymanaged, petabyte-scale data warehouse service in the cloud.
In order to begin using Amazon Redshift, you will first launch an Amazon Redshift cluster. A cluster is afully managed data warehouse that consists of set of compute nodes.You can use the Amazon RedshiftManagement console, API, or CLI to create and manage clusters.
By default, Amazon Redshift creates one database when you create a new cluster.You can createadditional databases as needed. After your cluster has been provisioned, you can upload your datasetand then perform data analysis queries by using the SQL-based tools and business intelligence applicationsthat you are already familiar with.
This guide walks you through the process of creating a cluster, creating database tables, uploading data,and testing queries.
Are You a First-Time Amazon Redshift User?If you are a first-time user of Amazon Redshift, we recommend that you begin by reading the followingsections:
• Service Highlights and Pricing – The product detail page provides the Amazon Redshift valueproposition, service highlights and pricing.
• Getting Started (this document) – This document walks you through the process of creating a cluster,creating database tables, uploading data, and testing queries.
After you complete the Getting Started guide, you can follow either one of the following guides:
• Amazon Redshift Cluster Management Guide – The Management Guide shows you how to createand manage Amazon Redshift clusters.
If you are an application developer, you can use the Amazon Redshift Query API to manage clustersprogrammatically. Additionally, the AWS SDKs for Java, .NET and other languages provide classlibraries that wrap the underlying Amazon Redshift API to simplify your programming tasks. If you prefera more interactive way of managing clusters, you can use the Amazon Redshift console and the AWScommand line interface (AWS CLI). For information about the API and CLI, go to the following manuals:
• API Reference
API Version 2012-12-011
Amazon Redshift Getting Started GuideAre You a First-Time Amazon Redshift User?
• CLI Reference
• Amazon Redshift Database Developer Guide – If you are a database developer, the Amazon RedshiftDatabase Developer Guide explains how to design, build, query, and maintain the databases that makeup your data warehouse.
API Version 2012-12-012
Amazon Redshift Getting Started GuideAre You a First-Time Amazon Redshift User?
Getting Started with AmazonRedshift
Topics
• Step 1: Before You Begin (p. 3)
• Step 2: Launch a Cluster (p. 4)
• Step 3: Authorize Inbound Traffic for Cluster Access (p. 10)
• Step 4: Connect to Your Cluster (p. 13)
• Step 5: Create Tables, Upload Data, and Try Example Queries (p. 15)
• Step 6: Delete Your Sample Cluster (p. 19)
• Step 7: Where Do I Go from Here? (p. 20)
Your first step in using the Amazon Redshift data warehouse service is to launch an Amazon Redshiftcluster, which consists of set of compute nodes. By default, Amazon Redshift creates one database withyour cluster.You can create additional databases, as needed. After your cluster has been provisioned,you can upload your dataset and then perform data analysis queries by using the SQL-based tools andbusiness intelligence applications that you are already familiar with.
This section walks you through the process of creating a cluster, creating database tables, uploadingdata, and testing queries.You will use the Amazon Redshift console to provision a cluster and to authorizenecessary access permissions.You will then use the SQL Workbench client to connect to the cluster andcreate sample tables, upload sample data, and execute test queries.
Step 1: Before You BeginTopics
• Step 1.1: Sign Up (p. 4)
• Step 1.2: Download the Client Tools and the Drivers (p. 4)
If you don't already have an AWS account, you must sign up for one. Then you'll need to download clienttools and drivers in order to connect to the Amazon Redshift cluster.
API Version 2012-12-013
Amazon Redshift Getting Started GuideStep 1: Before You Begin
Step 1.1: Sign UpIf you already have an AWS account, go ahead and skip to Step 1.2: Download the Client Tools and theDrivers (p. 4).
To sign up for an AWS account
1. Go to http://aws.amazon.com, and then click Sign Up.
2. Follow the on-screen instructions.
Part of the sign-up procedure involves receiving a phone call and entering a PIN using the phonekeypad.
Step 1.2: Download the Client Tools and theDriversAfter you create an Amazon Redshift cluster, you can use any SQL client tools to connect to the clusterwith PostgreSQL JDBC or ODBC drivers. In this tutorial, we show how to connect using SQL Workbench/J,a free, DBMS-independent, cross-platform SQL query tool. If you plan to use SQL Workbench/J tocomplete this tutorial, follow the steps below to get set up. For more complete instructions for installingSQL Workbench/J, go to Setting Up the SQL Workbench/J Client. If you use an Amazon EC2 instanceas your client computer, you will need to install SQL Workbench and the required drivers on the instance.
NoteYou must install any third-party database tools that you want to use with your clusters; AmazonRedshift does not provide or install any third-party tools or libraries.
To set up SQL Workbench/J
1. Go to the SQL Workbench/J website and download the appropriate package for your operatingsystem.
2. Go to the Installing and starting SQL Workbench/J page and install SQL Workbench/J.
ImportantNote the Java runtime version prerequisites for SQL Workbench/J and ensure you are usingthat version, otherwise, this client application will not run.
3. Download a driver that will enable SQL Workbench/J to connect to your cluster.
Currently, Amazon Redshift supports the following version 8 JDBC and ODBC drivers.
• JDBC http://jdbc.postgresql.org/download/postgresql-8.4-703.jdbc4.jar
• ODBC http://ftp.postgresql.org/pub/odbc/versions/msi/psqlodbc_08_04_0200.zip
• For 64-bit machines, use this driver:http://ftp.postgresql.org/pub/odbc/versions/msi/psqlodbc_09_00_0101-x64.zip
Step 2: Launch a ClusterNow you're ready to launch a cluster by using the AWS Management Console.
API Version 2012-12-014
Amazon Redshift Getting Started GuideStep 1.1: Sign Up
ImportantThe cluster that you're about to launch will be live (and not running in a sandbox).You will incurthe standard Amazon Redshift usage fees for the cluster until you terminate it. If you completethe exercise described here in one sitting and terminate your cluster when you are finished, thetotal charges will be minimal.
To launch a cluster
1. Sign into the AWS Management Console using either your AWS account or IAM account credentials,and open the Amazon Redshift console at https://console.aws.amazon.com/redshift.
ImportantIf you use IAM user credentials, ensure that the user has the necessary permissions toperform the cluster operations. For more information, go to Controlling Access to IAM Usersin the Amazon Redshift Management Guide.
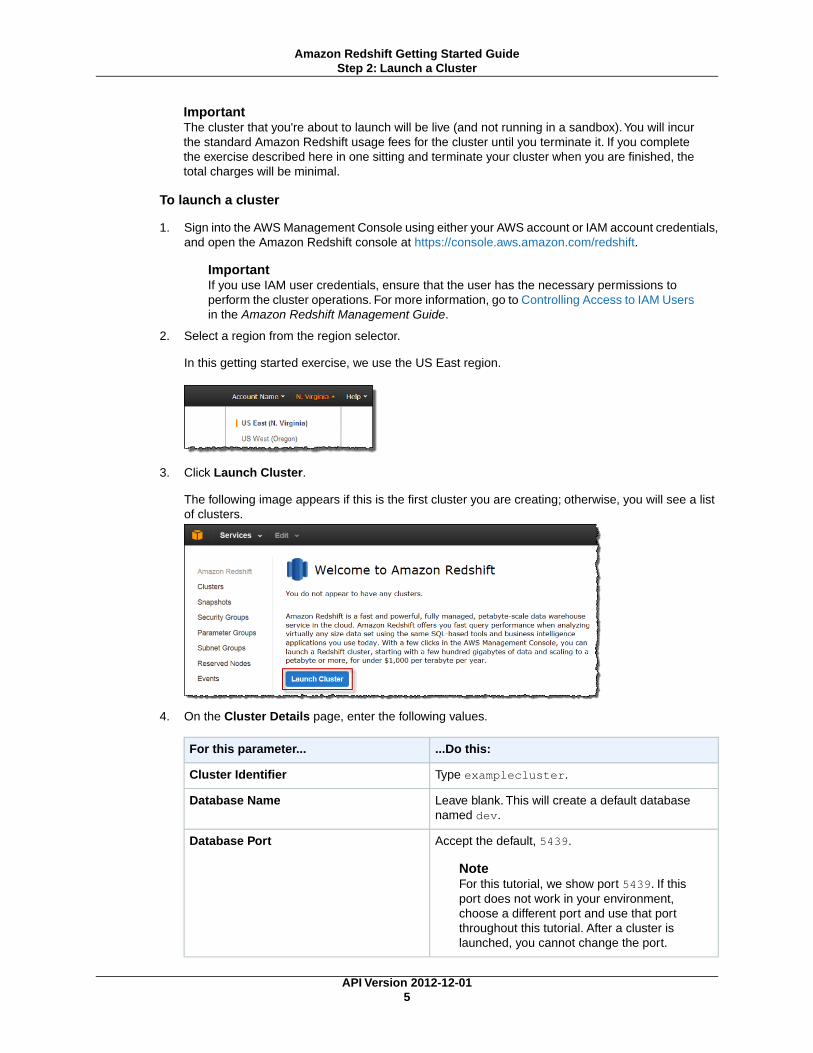
2. Select a region from the region selector.
In this getting started exercise, we use the US East region.
3. Click Launch Cluster.
The following image appears if this is the first cluster you are creating; otherwise, you will see a listof clusters.
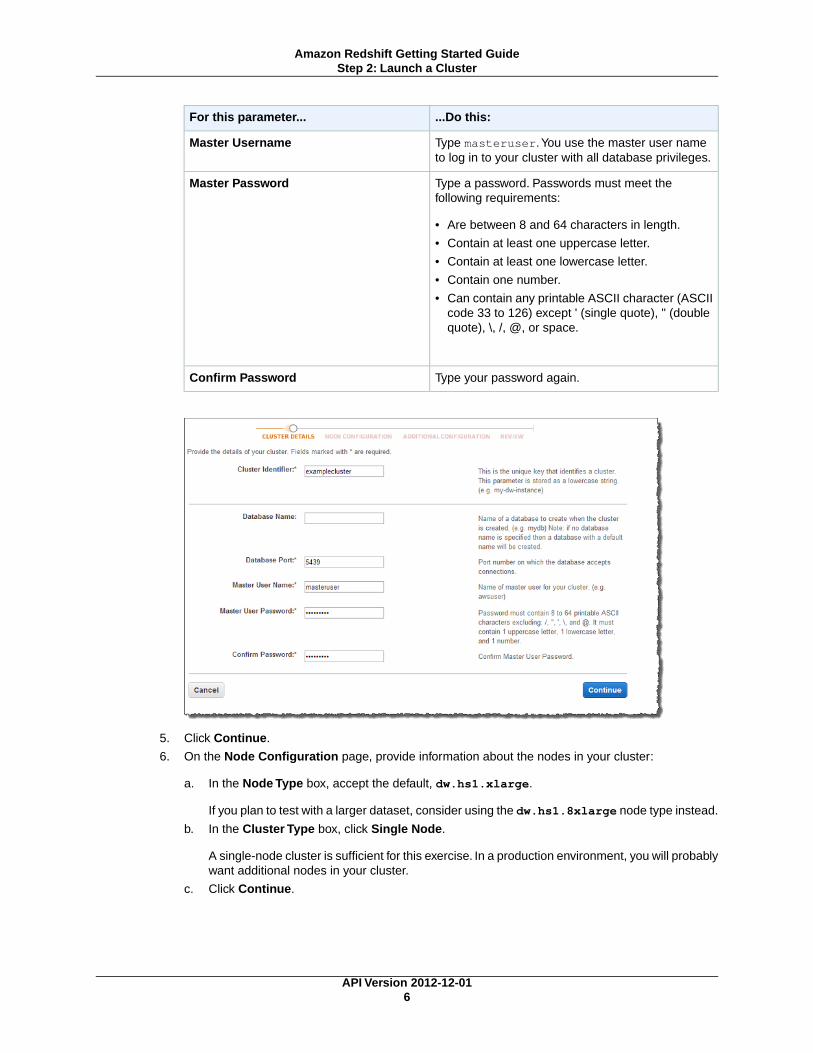
4. On the Cluster Details page, enter the following values.
...Do this:For this parameter...
Type examplecluster.Cluster Identifier
Leave blank. This will create a default databasenamed dev.
Database Name
Accept the default, 5439.
NoteFor this tutorial, we show port 5439. If thisport does not work in your environment,choose a different port and use that portthroughout this tutorial. After a cluster islaunched, you cannot change the port.
Database Port
API Version 2012-12-015
Amazon Redshift Getting Started GuideStep 2: Launch a Cluster
...Do this:For this parameter...
Type masteruser.You use the master user nameto log in to your cluster with all database privileges.
Master Username
Type a password. Passwords must meet thefollowing requirements:
• Are between 8 and 64 characters in length.
• Contain at least one uppercase letter.
• Contain at least one lowercase letter.
• Contain one number.
• Can contain any printable ASCII character (ASCIIcode 33 to 126) except ' (single quote), " (doublequote), \, /, @, or space.
Master Password
Type your password again.Confirm Password
5. Click Continue.
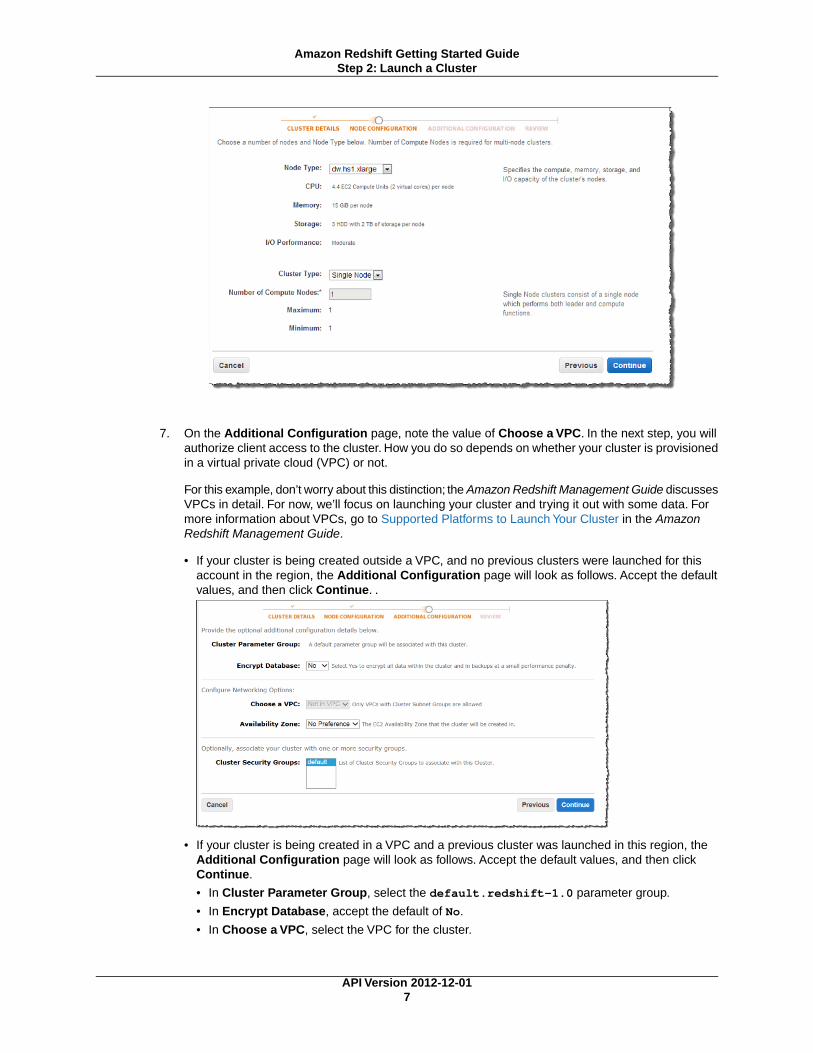
6. On the Node Configuration page, provide information about the nodes in your cluster:
a. In the Node Type box, accept the default, dw.hs1.xlarge.
If you plan to test with a larger dataset, consider using the dw.hs1.8xlarge node type instead.
b. In the Cluster Type box, click Single Node.
A single-node cluster is sufficient for this exercise. In a production environment, you will probablywant additional nodes in your cluster.
c. Click Continue.
API Version 2012-12-016
Amazon Redshift Getting Started GuideStep 2: Launch a Cluster
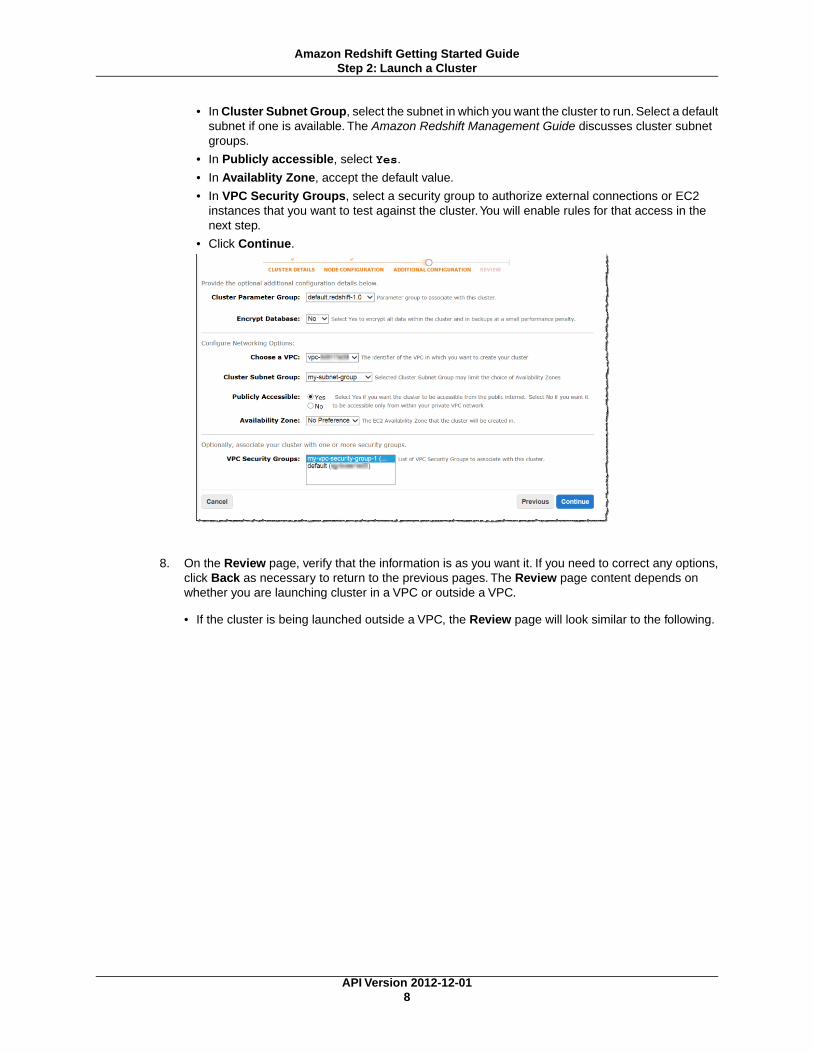
7. On the Additional Configuration page, note the value of Choose a VPC. In the next step, you willauthorize client access to the cluster. How you do so depends on whether your cluster is provisionedin a virtual private cloud (VPC) or not.
For this example, don’t worry about this distinction; the Amazon Redshift Management Guide discussesVPCs in detail. For now, we’ll focus on launching your cluster and trying it out with some data. Formore information about VPCs, go to Supported Platforms to Launch Your Cluster in the AmazonRedshift Management Guide.
• If your cluster is being created outside a VPC, and no previous clusters were launched for thisaccount in the region, the Additional Configuration page will look as follows. Accept the defaultvalues, and then click Continue. .
• If your cluster is being created in a VPC and a previous cluster was launched in this region, theAdditional Configuration page will look as follows. Accept the default values, and then clickContinue.
• In Cluster Parameter Group, select the default.redshift-1.0 parameter group.
• In Encrypt Database, accept the default of No.
• In Choose a VPC, select the VPC for the cluster.
API Version 2012-12-017
Amazon Redshift Getting Started GuideStep 2: Launch a Cluster
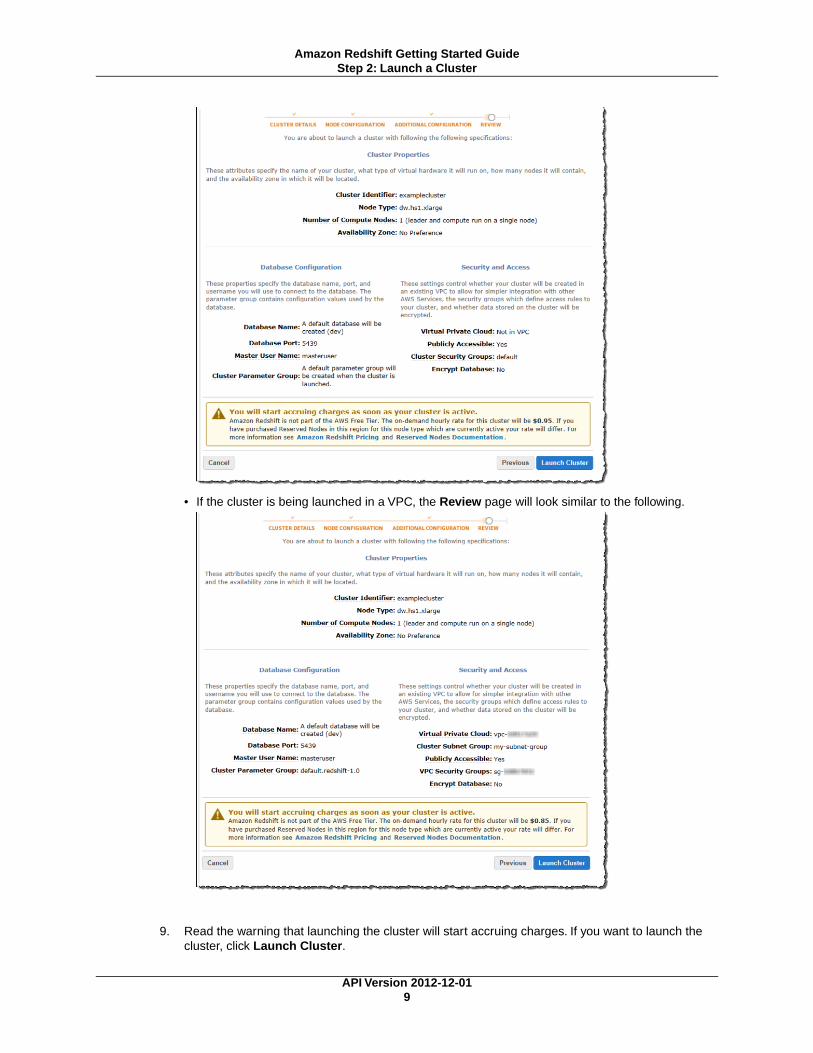
• In Cluster Subnet Group, select the subnet in which you want the cluster to run. Select a defaultsubnet if one is available. The Amazon Redshift Management Guide discusses cluster subnetgroups.
• In Publicly accessible, select Yes.
• In Availablity Zone, accept the default value.
• In VPC Security Groups, select a security group to authorize external connections or EC2instances that you want to test against the cluster.You will enable rules for that access in thenext step.
• Click Continue.
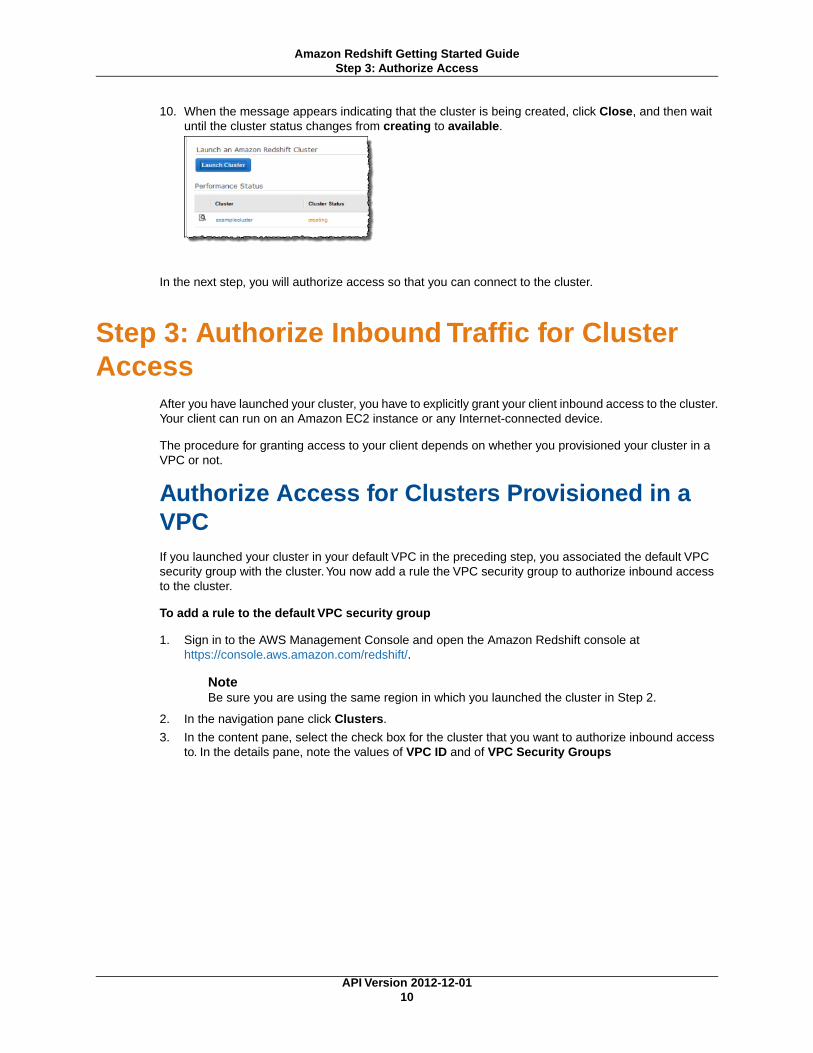
8. On the Review page, verify that the information is as you want it. If you need to correct any options,click Back as necessary to return to the previous pages. The Review page content depends onwhether you are launching cluster in a VPC or outside a VPC.
• If the cluster is being launched outside a VPC, the Review page will look similar to the following.
API Version 2012-12-018
Amazon Redshift Getting Started GuideStep 2: Launch a Cluster
• If the cluster is being launched in a VPC, the Review page will look similar to the following.
9. Read the warning that launching the cluster will start accruing charges. If you want to launch thecluster, click Launch Cluster.
API Version 2012-12-019
Amazon Redshift Getting Started GuideStep 2: Launch a Cluster
10. When the message appears indicating that the cluster is being created, click Close, and then waituntil the cluster status changes from creating to available.
In the next step, you will authorize access so that you can connect to the cluster.
Step 3: Authorize Inbound Traffic for ClusterAccess
After you have launched your cluster, you have to explicitly grant your client inbound access to the cluster.Your client can run on an Amazon EC2 instance or any Internet-connected device.
The procedure for granting access to your client depends on whether you provisioned your cluster in aVPC or not.
Authorize Access for Clusters Provisioned in aVPCIf you launched your cluster in your default VPC in the preceding step, you associated the default VPCsecurity group with the cluster.You now add a rule the VPC security group to authorize inbound accessto the cluster.
To add a rule to the default VPC security group
1. Sign in to the AWS Management Console and open the Amazon Redshift console athttps://console.aws.amazon.com/redshift/.
NoteBe sure you are using the same region in which you launched the cluster in Step 2.
2. In the navigation pane click Clusters.
3. In the content pane, select the check box for the cluster that you want to authorize inbound accessto. In the details pane, note the values of VPC ID and of VPC Security Groups
API Version 2012-12-0110
Amazon Redshift Getting Started GuideStep 3: Authorize Access
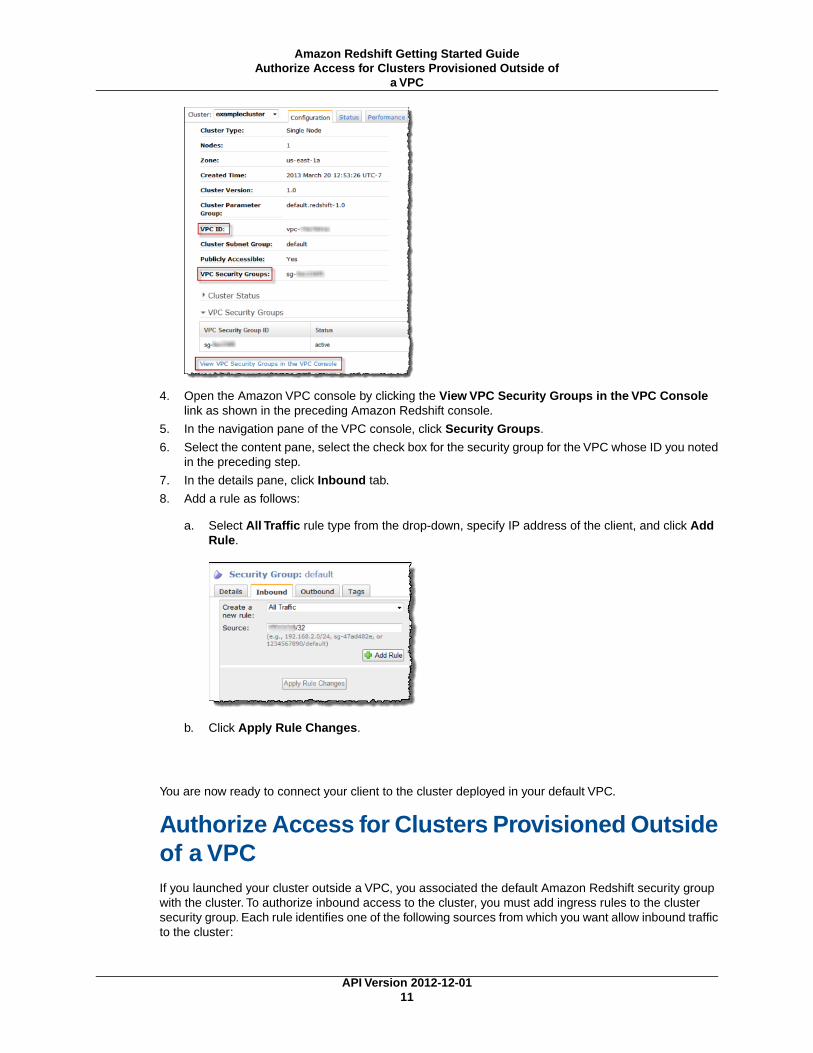
4. Open the Amazon VPC console by clicking the View VPC Security Groups in the VPC Consolelink as shown in the preceding Amazon Redshift console.
5. In the navigation pane of the VPC console, click Security Groups.
6. Select the content pane, select the check box for the security group for the VPC whose ID you notedin the preceding step.
7. In the details pane, click Inbound tab.
8. Add a rule as follows:
a. Select All Traffic rule type from the drop-down, specify IP address of the client, and click AddRule.
b. Click Apply Rule Changes.
You are now ready to connect your client to the cluster deployed in your default VPC.
Authorize Access for Clusters Provisioned Outsideof a VPCIf you launched your cluster outside a VPC, you associated the default Amazon Redshift security groupwith the cluster. To authorize inbound access to the cluster, you must add ingress rules to the clustersecurity group. Each rule identifies one of the following sources from which you want allow inbound trafficto the cluster:
API Version 2012-12-0111
Amazon Redshift Getting Started GuideAuthorize Access for Clusters Provisioned Outside of
a VPC
• Classless Inter-Domain Routing IP (CIDR/IP) address range – Use a CIDR/IP address range when theclient application is running on the Internet.
• Amazon EC2 security group – Use an Amazon EC2 security group when the client application is runningon one or more EC2 instances.
To add a rule to the default cluster security group
1. Sign in to the AWS Management Console and open the Amazon Redshift console athttps://console.aws.amazon.com/redshift/.
2. In the navigation pane click Security Groups.
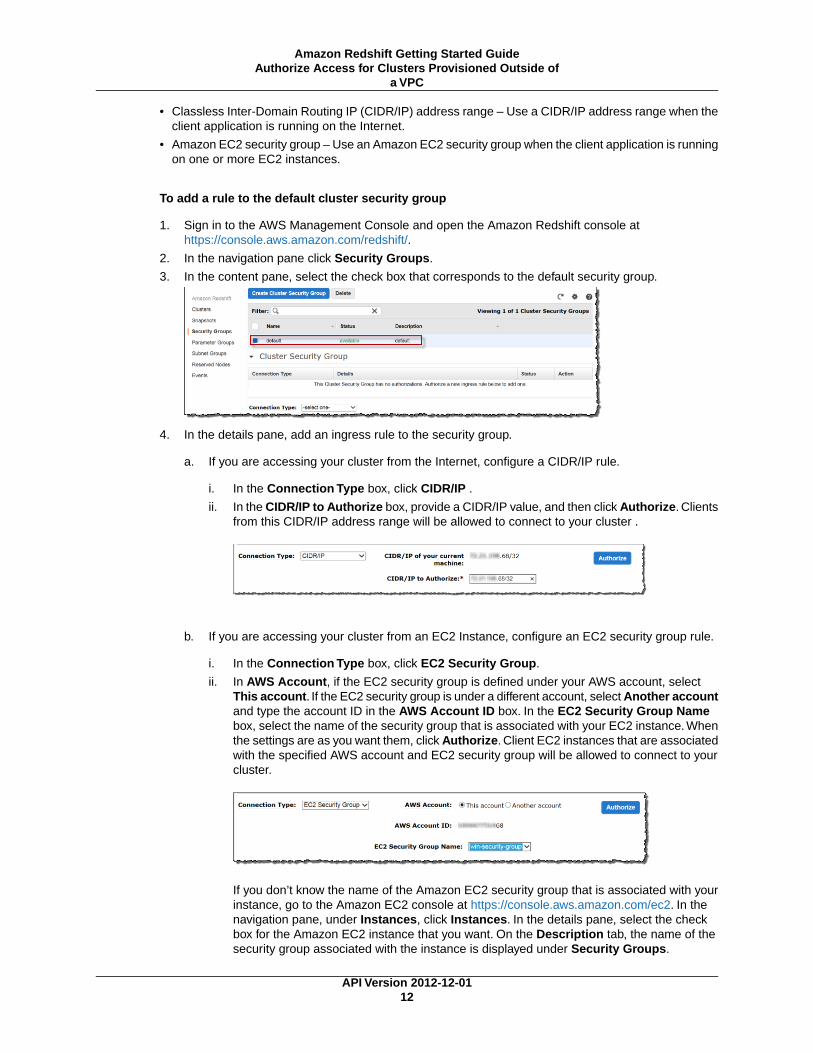
3. In the content pane, select the check box that corresponds to the default security group.
4. In the details pane, add an ingress rule to the security group.
a. If you are accessing your cluster from the Internet, configure a CIDR/IP rule.
i. In the Connection Type box, click CIDR/IP .
ii. In the CIDR/IP to Authorize box, provide a CIDR/IP value, and then click Authorize. Clientsfrom this CIDR/IP address range will be allowed to connect to your cluster .
b. If you are accessing your cluster from an EC2 Instance, configure an EC2 security group rule.
i. In the Connection Type box, click EC2 Security Group.
ii. In AWS Account, if the EC2 security group is defined under your AWS account, selectThis account. If the EC2 security group is under a different account, select Another accountand type the account ID in the AWS Account ID box. In the EC2 Security Group Namebox, select the name of the security group that is associated with your EC2 instance. Whenthe settings are as you want them, click Authorize. Client EC2 instances that are associatedwith the specified AWS account and EC2 security group will be allowed to connect to yourcluster.
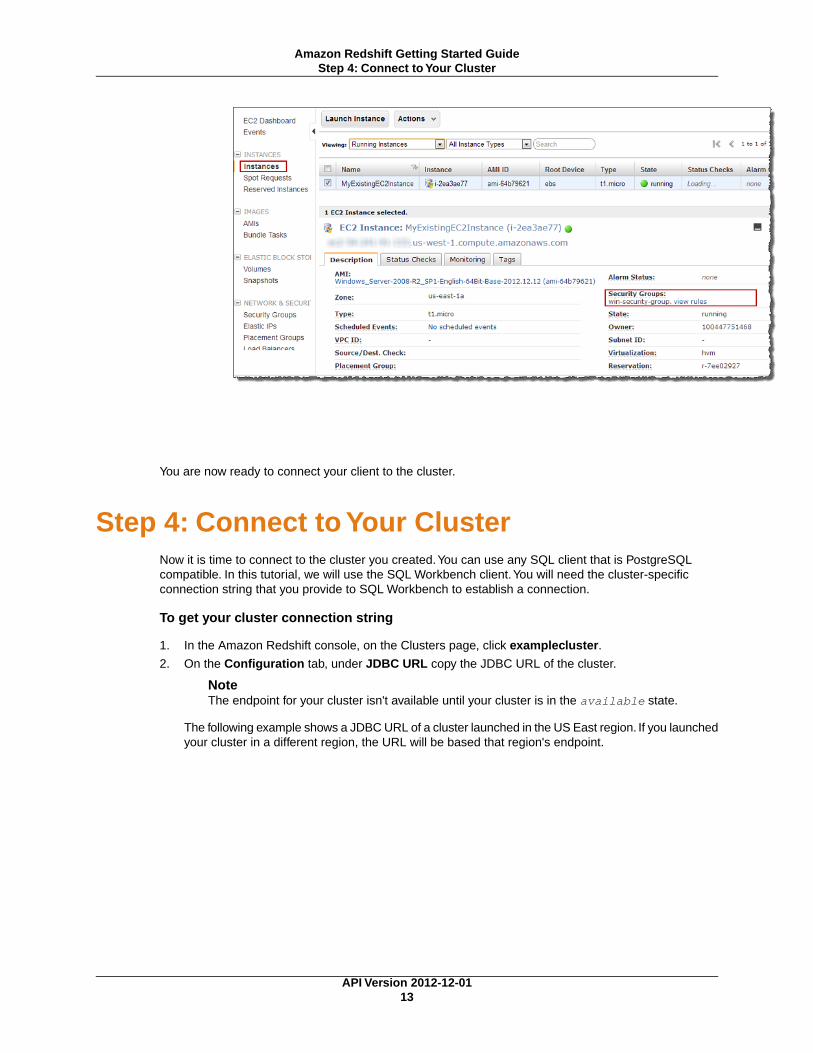
If you don’t know the name of the Amazon EC2 security group that is associated with yourinstance, go to the Amazon EC2 console at https://console.aws.amazon.com/ec2. In thenavigation pane, under Instances, click Instances. In the details pane, select the checkbox for the Amazon EC2 instance that you want. On the Description tab, the name of thesecurity group associated with the instance is displayed under Security Groups.
API Version 2012-12-0112
Amazon Redshift Getting Started GuideAuthorize Access for Clusters Provisioned Outside of
a VPC
You are now ready to connect your client to the cluster.
Step 4: Connect to Your ClusterNow it is time to connect to the cluster you created.You can use any SQL client that is PostgreSQLcompatible. In this tutorial, we will use the SQL Workbench client.You will need the cluster-specificconnection string that you provide to SQL Workbench to establish a connection.
To get your cluster connection string
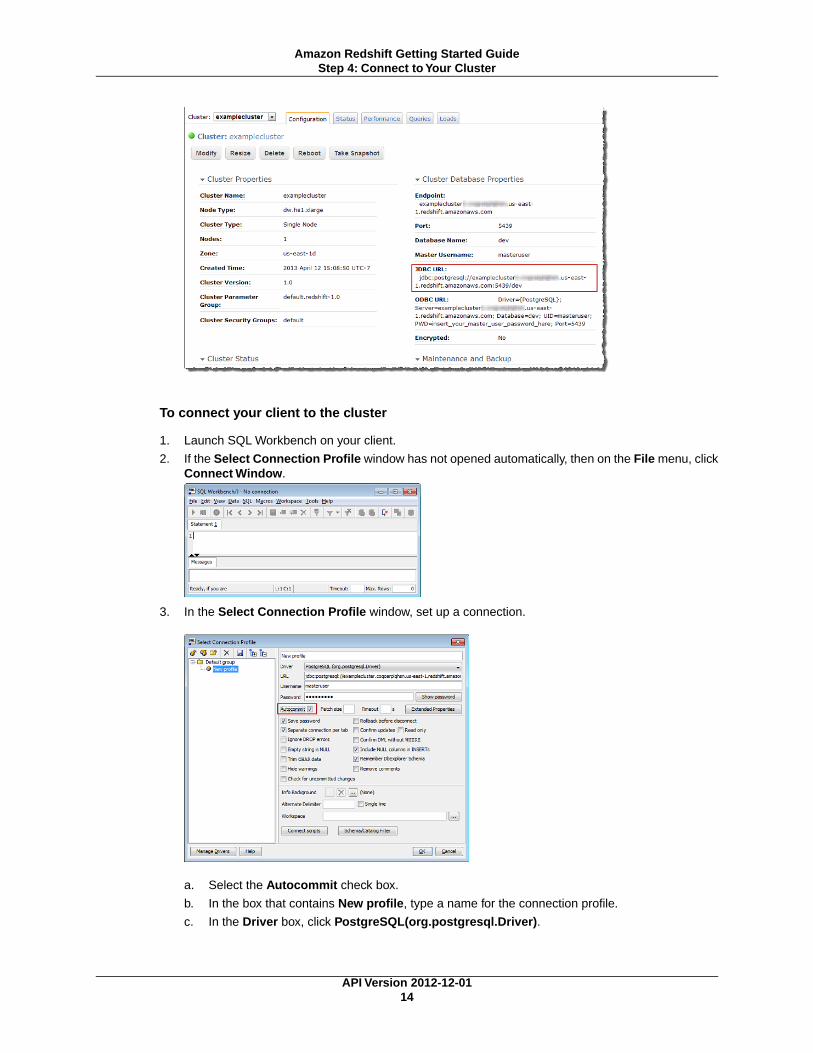
1. In the Amazon Redshift console, on the Clusters page, click examplecluster.
2. On the Configuration tab, under JDBC URL copy the JDBC URL of the cluster.
NoteThe endpoint for your cluster isn't available until your cluster is in the available state.
The following example shows a JDBC URL of a cluster launched in the US East region. If you launchedyour cluster in a different region, the URL will be based that region's endpoint.
API Version 2012-12-0113
Amazon Redshift Getting Started GuideStep 4: Connect to Your Cluster
To connect your client to the cluster
1. Launch SQL Workbench on your client.
2. If the Select Connection Profile window has not opened automatically, then on the File menu, clickConnect Window.
3. In the Select Connection Profile window, set up a connection.
a. Select the Autocommit check box.
b. In the box that contains New profile, type a name for the connection profile.
c. In the Driver box, click PostgreSQL(org.postgresql.Driver).
API Version 2012-12-0114
Amazon Redshift Getting Started GuideStep 4: Connect to Your Cluster
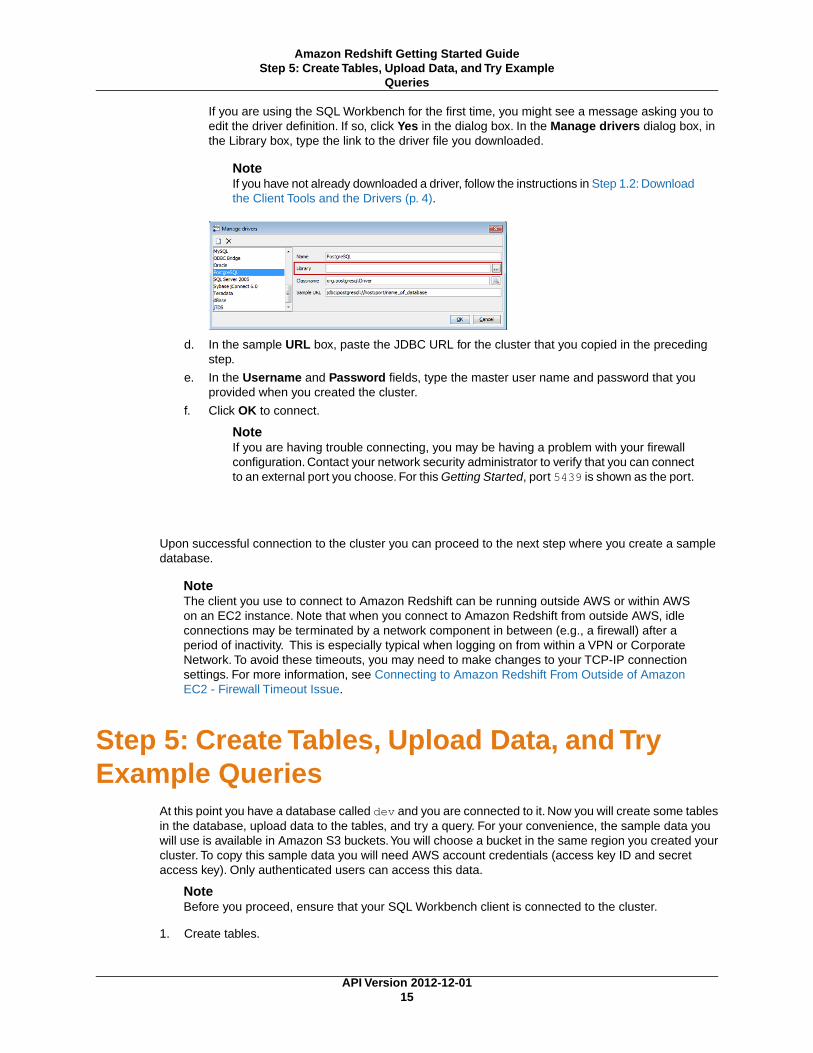
If you are using the SQL Workbench for the first time, you might see a message asking you toedit the driver definition. If so, click Yes in the dialog box. In the Manage drivers dialog box, inthe Library box, type the link to the driver file you downloaded.
NoteIf you have not already downloaded a driver, follow the instructions in Step 1.2: Downloadthe Client Tools and the Drivers (p. 4).
d. In the sample URL box, paste the JDBC URL for the cluster that you copied in the precedingstep.
e. In the Username and Password fields, type the master user name and password that youprovided when you created the cluster.
f. Click OK to connect.
NoteIf you are having trouble connecting, you may be having a problem with your firewallconfiguration. Contact your network security administrator to verify that you can connectto an external port you choose. For this Getting Started, port 5439 is shown as the port.
Upon successful connection to the cluster you can proceed to the next step where you create a sampledatabase.
NoteThe client you use to connect to Amazon Redshift can be running outside AWS or within AWSon an EC2 instance. Note that when you connect to Amazon Redshift from outside AWS, idleconnections may be terminated by a network component in between (e.g., a firewall) after aperiod of inactivity. This is especially typical when logging on from within a VPN or CorporateNetwork. To avoid these timeouts, you may need to make changes to your TCP-IP connectionsettings. For more information, see Connecting to Amazon Redshift From Outside of AmazonEC2 - Firewall Timeout Issue.
Step 5: Create Tables, Upload Data, and TryExample Queries
At this point you have a database called dev and you are connected to it. Now you will create some tablesin the database, upload data to the tables, and try a query. For your convenience, the sample data youwill use is available in Amazon S3 buckets.You will choose a bucket in the same region you created yourcluster. To copy this sample data you will need AWS account credentials (access key ID and secretaccess key). Only authenticated users can access this data.
NoteBefore you proceed, ensure that your SQL Workbench client is connected to the cluster.
1. Create tables.
API Version 2012-12-0115
Amazon Redshift Getting Started GuideStep 5: Create Tables, Upload Data, and Try Example
Queries
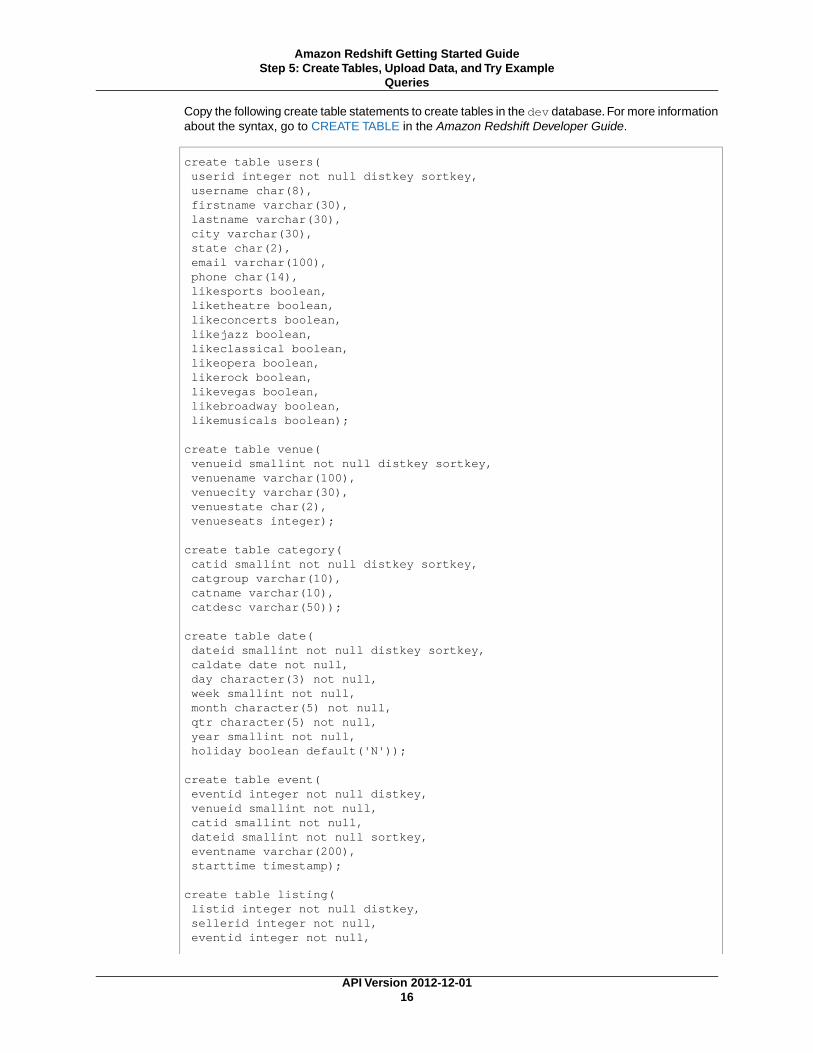
Copy the following create table statements to create tables in the dev database. For more informationabout the syntax, go to CREATE TABLE in the Amazon Redshift Developer Guide.
create table users( userid integer not null distkey sortkey, username char(8), firstname varchar(30), lastname varchar(30), city varchar(30), state char(2), email varchar(100), phone char(14), likesports boolean, liketheatre boolean, likeconcerts boolean, likejazz boolean, likeclassical boolean, likeopera boolean, likerock boolean, likevegas boolean, likebroadway boolean, likemusicals boolean);
create table venue( venueid smallint not null distkey sortkey, venuename varchar(100), venuecity varchar(30), venuestate char(2), venueseats integer);
create table category( catid smallint not null distkey sortkey, catgroup varchar(10), catname varchar(10), catdesc varchar(50));
create table date( dateid smallint not null distkey sortkey, caldate date not null, day character(3) not null, week smallint not null, month character(5) not null, qtr character(5) not null, year smallint not null, holiday boolean default('N'));
create table event( eventid integer not null distkey, venueid smallint not null, catid smallint not null, dateid smallint not null sortkey, eventname varchar(200), starttime timestamp);
create table listing( listid integer not null distkey, sellerid integer not null, eventid integer not null,
API Version 2012-12-0116
Amazon Redshift Getting Started GuideStep 5: Create Tables, Upload Data, and Try Example
Queries
dateid smallint not null sortkey, numtickets smallint not null, priceperticket decimal(8,2), totalprice decimal(8,2), listtime timestamp);
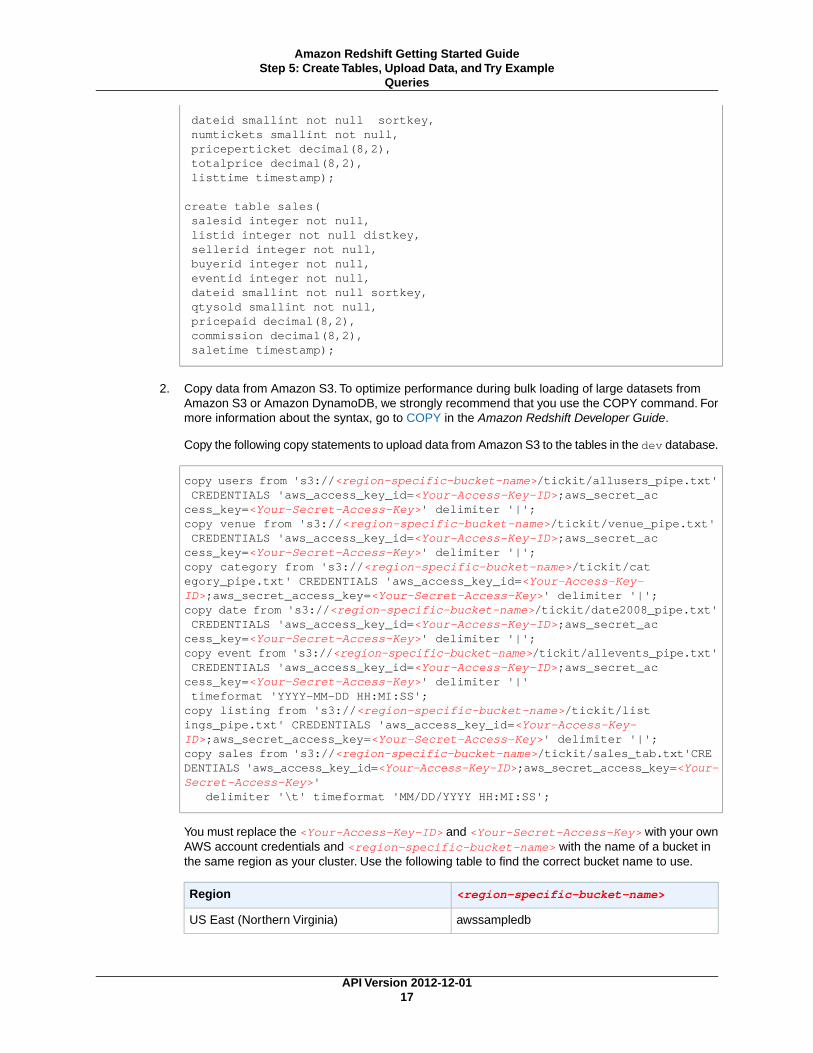
create table sales( salesid integer not null, listid integer not null distkey, sellerid integer not null, buyerid integer not null, eventid integer not null, dateid smallint not null sortkey, qtysold smallint not null, pricepaid decimal(8,2), commission decimal(8,2), saletime timestamp);
2. Copy data from Amazon S3. To optimize performance during bulk loading of large datasets fromAmazon S3 or Amazon DynamoDB, we strongly recommend that you use the COPY command. Formore information about the syntax, go to COPY in the Amazon Redshift Developer Guide.
Copy the following copy statements to upload data from Amazon S3 to the tables in the dev database.
copy users from 's3://<region-specific-bucket-name>/tickit/allusers_pipe.txt' CREDENTIALS 'aws_access_key_id=<Your-Access-Key-ID>;aws_secret_ac cess_key=<Your-Secret-Access-Key>' delimiter '|';copy venue from 's3://<region-specific-bucket-name>/tickit/venue_pipe.txt' CREDENTIALS 'aws_access_key_id=<Your-Access-Key-ID>;aws_secret_ac cess_key=<Your-Secret-Access-Key>' delimiter '|';copy category from 's3://<region-specific-bucket-name>/tickit/cat egory_pipe.txt' CREDENTIALS 'aws_access_key_id=<Your-Access-Key-ID>;aws_secret_access_key=<Your-Secret-Access-Key>' delimiter '|';copy date from 's3://<region-specific-bucket-name>/tickit/date2008_pipe.txt' CREDENTIALS 'aws_access_key_id=<Your-Access-Key-ID>;aws_secret_ac cess_key=<Your-Secret-Access-Key>' delimiter '|';copy event from 's3://<region-specific-bucket-name>/tickit/allevents_pipe.txt' CREDENTIALS 'aws_access_key_id=<Your-Access-Key-ID>;aws_secret_ac cess_key=<Your-Secret-Access-Key>' delimiter '|' timeformat 'YYYY-MM-DD HH:MI:SS';copy listing from 's3://<region-specific-bucket-name>/tickit/list ings_pipe.txt' CREDENTIALS 'aws_access_key_id=<Your-Access-Key-ID>;aws_secret_access_key=<Your-Secret-Access-Key>' delimiter '|';copy sales from 's3://<region-specific-bucket-name>/tickit/sales_tab.txt'CRE DENTIALS 'aws_access_key_id=<Your-Access-Key-ID>;aws_secret_access_key=<Your-Secret-Access-Key>' delimiter '\t' timeformat 'MM/DD/YYYY HH:MI:SS';
You must replace the <Your-Access-Key-ID> and <Your-Secret-Access-Key> with your ownAWS account credentials and <region-specific-bucket-name> with the name of a bucket inthe same region as your cluster. Use the following table to find the correct bucket name to use.
<region-specific-bucket-name>Region
awssampledbUS East (Northern Virginia)
API Version 2012-12-0117
Amazon Redshift Getting Started GuideStep 5: Create Tables, Upload Data, and Try Example
Queries
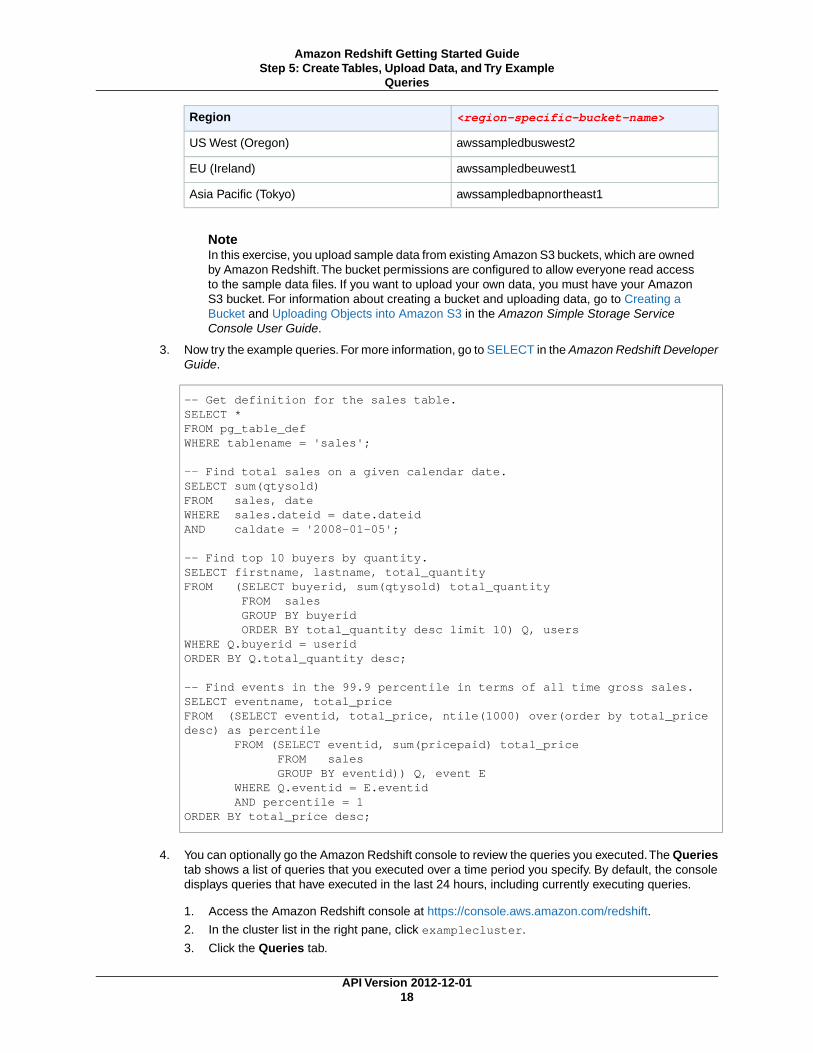
<region-specific-bucket-name>Region
awssampledbuswest2US West (Oregon)
awssampledbeuwest1EU (Ireland)
awssampledbapnortheast1Asia Pacific (Tokyo)
NoteIn this exercise, you upload sample data from existing Amazon S3 buckets, which are ownedby Amazon Redshift.The bucket permissions are configured to allow everyone read accessto the sample data files. If you want to upload your own data, you must have your AmazonS3 bucket. For information about creating a bucket and uploading data, go to Creating aBucket and Uploading Objects into Amazon S3 in the Amazon Simple Storage ServiceConsole User Guide.
3. Now try the example queries. For more information, go to SELECT in the Amazon Redshift DeveloperGuide.
-- Get definition for the sales table.SELECT * FROM pg_table_def WHERE tablename = 'sales';
-- Find total sales on a given calendar date.SELECT sum(qtysold) FROM sales, date WHERE sales.dateid = date.dateid AND caldate = '2008-01-05';
-- Find top 10 buyers by quantity.SELECT firstname, lastname, total_quantity FROM (SELECT buyerid, sum(qtysold) total_quantity FROM sales GROUP BY buyerid ORDER BY total_quantity desc limit 10) Q, usersWHERE Q.buyerid = useridORDER BY Q.total_quantity desc;
-- Find events in the 99.9 percentile in terms of all time gross sales.SELECT eventname, total_price FROM (SELECT eventid, total_price, ntile(1000) over(order by total_price desc) as percentile FROM (SELECT eventid, sum(pricepaid) total_price FROM sales GROUP BY eventid)) Q, event E WHERE Q.eventid = E.eventid AND percentile = 1ORDER BY total_price desc;
4. You can optionally go the Amazon Redshift console to review the queries you executed.The Queriestab shows a list of queries that you executed over a time period you specify. By default, the consoledisplays queries that have executed in the last 24 hours, including currently executing queries.
1. Access the Amazon Redshift console at https://console.aws.amazon.com/redshift.
2. In the cluster list in the right pane, click examplecluster.
3. Click the Queries tab.
API Version 2012-12-0118
Amazon Redshift Getting Started GuideStep 5: Create Tables, Upload Data, and Try Example
Queries
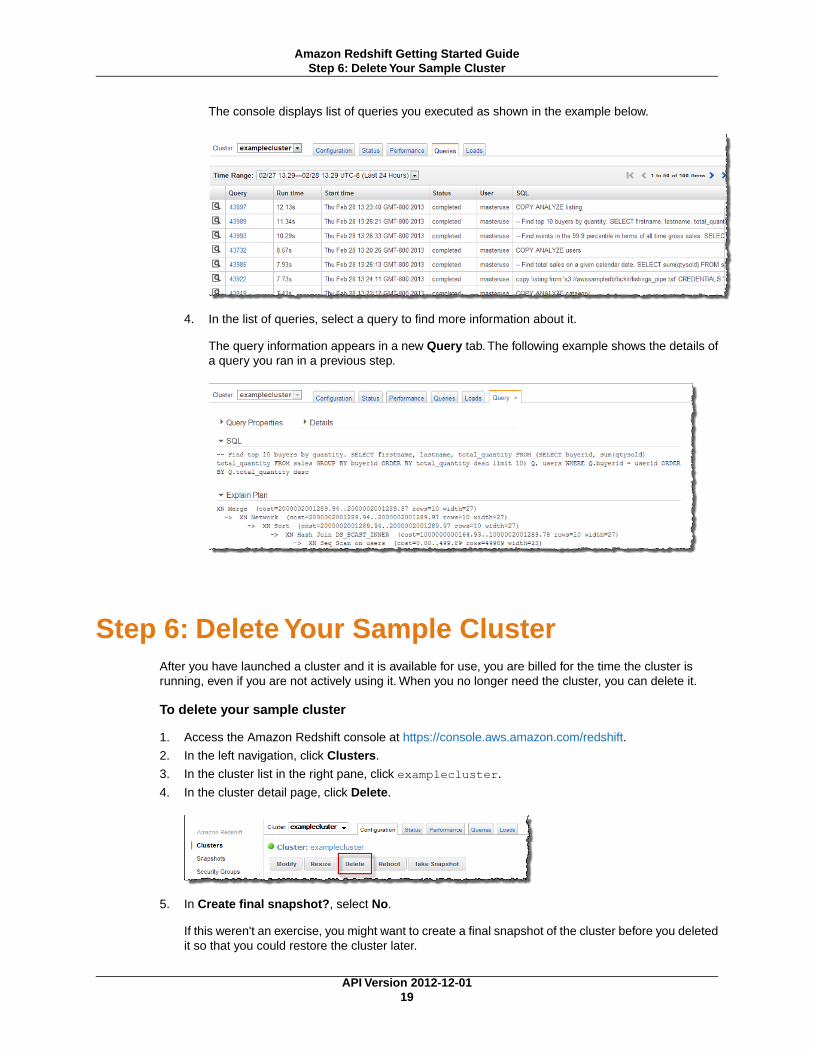
The console displays list of queries you executed as shown in the example below.
4. In the list of queries, select a query to find more information about it.
The query information appears in a new Query tab. The following example shows the details ofa query you ran in a previous step.
Step 6: Delete Your Sample ClusterAfter you have launched a cluster and it is available for use, you are billed for the time the cluster isrunning, even if you are not actively using it. When you no longer need the cluster, you can delete it.
To delete your sample cluster
1. Access the Amazon Redshift console at https://console.aws.amazon.com/redshift.
2. In the left navigation, click Clusters.
3. In the cluster list in the right pane, click examplecluster.
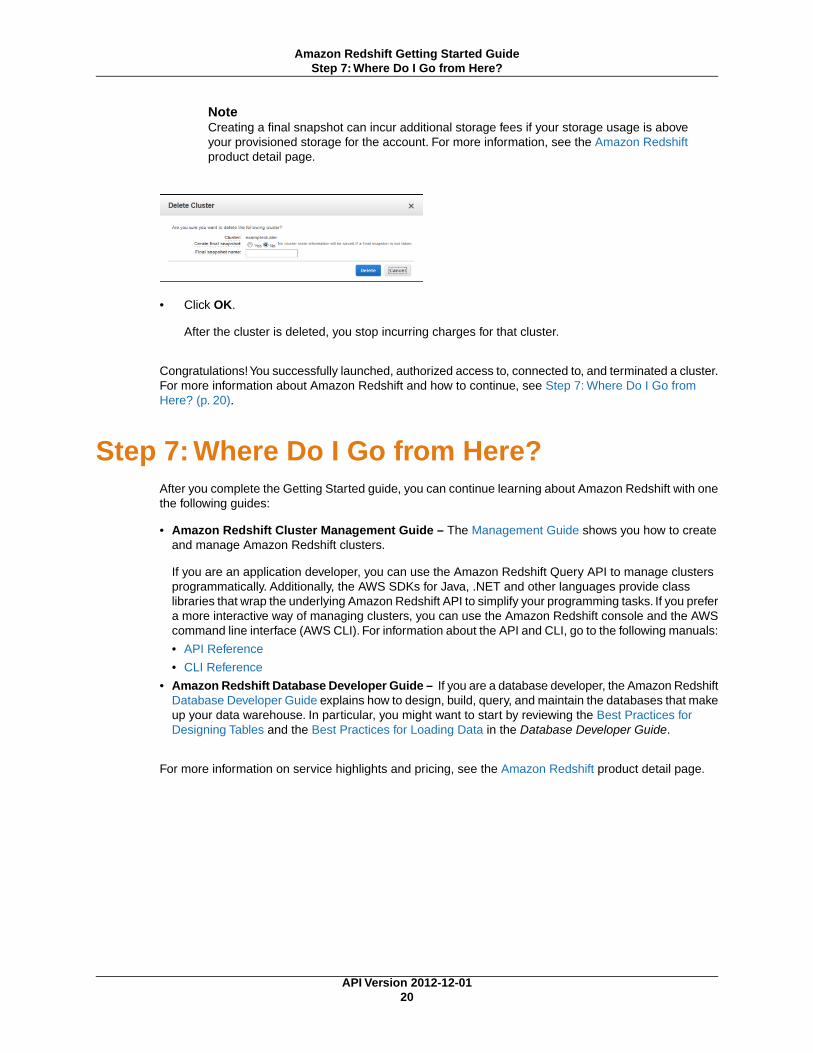
4. In the cluster detail page, click Delete.
5. In Create final snapshot?, select No.
If this weren't an exercise, you might want to create a final snapshot of the cluster before you deletedit so that you could restore the cluster later.
API Version 2012-12-0119
Amazon Redshift Getting Started GuideStep 6: Delete Your Sample Cluster
NoteCreating a final snapshot can incur additional storage fees if your storage usage is aboveyour provisioned storage for the account. For more information, see the Amazon Redshiftproduct detail page.
• Click OK.
After the cluster is deleted, you stop incurring charges for that cluster.
Congratulations! You successfully launched, authorized access to, connected to, and terminated a cluster.For more information about Amazon Redshift and how to continue, see Step 7: Where Do I Go fromHere? (p. 20).
Step 7: Where Do I Go from Here?After you complete the Getting Started guide, you can continue learning about Amazon Redshift with onethe following guides:
• Amazon Redshift Cluster Management Guide – The Management Guide shows you how to createand manage Amazon Redshift clusters.
If you are an application developer, you can use the Amazon Redshift Query API to manage clustersprogrammatically. Additionally, the AWS SDKs for Java, .NET and other languages provide classlibraries that wrap the underlying Amazon Redshift API to simplify your programming tasks. If you prefera more interactive way of managing clusters, you can use the Amazon Redshift console and the AWScommand line interface (AWS CLI). For information about the API and CLI, go to the following manuals:
• API Reference
• CLI Reference
• Amazon Redshift Database Developer Guide – If you are a database developer, the Amazon RedshiftDatabase Developer Guide explains how to design, build, query, and maintain the databases that makeup your data warehouse. In particular, you might want to start by reviewing the Best Practices forDesigning Tables and the Best Practices for Loading Data in the Database Developer Guide.
For more information on service highlights and pricing, see the Amazon Redshift product detail page.
API Version 2012-12-0120
Amazon Redshift Getting Started GuideStep 7: Where Do I Go from Here?
Document History
The following table describes the important changes since the last release of the Amazon Redshift GettingStarted Guide.
Latest documentation update: April 22, 2013
Release DateDescriptionChange
14 February 2013This is the first release of the Amazon Redshift GettingStarted Guide.
New Guide
API Version 2012-12-0121
Amazon Redshift Getting Started Guide