Embed Size (px)
Citation preview

30 GEARS December 2008
Getting a Better Look at the Toyota A761E Valve Body
Very few have seen or worked on one, but believe me they’re out there and they’re coming!
Introduced in 2004 in the Lexus LS430, the A761E has been around four years. Now these cars are getting traded in and are getting a lot of miles on them. And for those of you that step up to the call, you will be standing tall!
The main thing you’ll want to keep a close eye on is the valve body. That’s where this information will come in very handy. You may have already noticed Toyota won’t print any infor-mation on valve body breakdown and checkball locations. Solenoid identi-fication (figure 1) is a problem of its own.
In the chart, you’ll see that the solenoids have two names: One that
STREET SMART
by Mike Brown
Getting aGetting a Better Look Better Look at the at the Toyota A761EToyota A761E Valve BodyValve Body
Repair Manual Solenoid Name
Parts Catalog Description
S1 Shift Solenoid A
S2 Shift Solenoid B
S3 Shift Solenoid C
S4 Shift Solenoid D
SR Shift Solenoid E
SL1 Pressure Control Solenoid A
SL2 Pressure Control Solenoid B
SLT Pressure Control Solenoid D
SLUTorque Converter Clutch Pressure Control Solenoid
Figure 1 Chart 1
Figure 2
30mikeB1208.indd 3030mikeB1208.indd 30 11/14/08 2:39:18 PM11/14/08 2:39:18 PM
GEARS December 2008 31
you’ll get from the scan tool and repair manual, and the second one, which is the one you’ll need to use at the parts counter. (Chart 1)
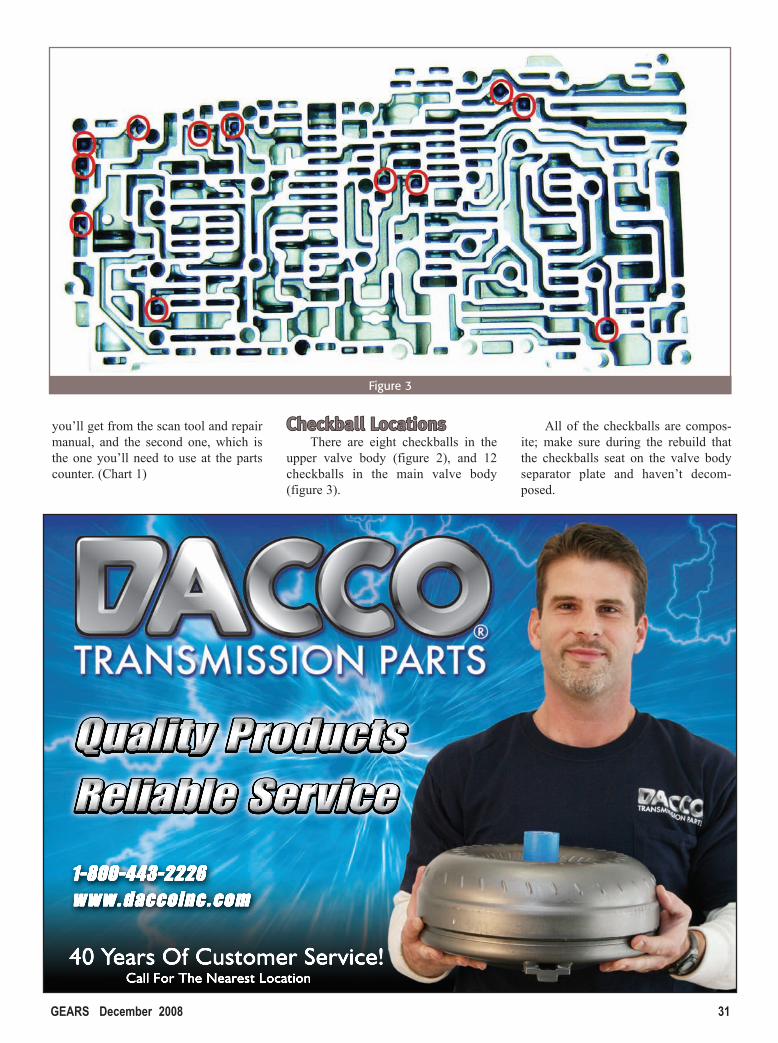
Checkball LocationsCheckball LocationsThere are eight checkballs in the
upper valve body (figure 2), and 12 checkballs in the main valve body (figure 3).
All of the checkballs are compos-ite; make sure during the rebuild that the checkballs seat on the valve body separator plate and haven’t decom-posed.
Figure 3
30mikeB1208.indd 3130mikeB1208.indd 31 11/14/08 2:39:44 PM11/14/08 2:39:44 PM

32 GEARS December 2008
Getting a Better Look at the Toyota A761E Valve Body
Figure 4
Valve Body DisassemblyValve Body DisassemblyAs with any valve body, there are
a few common practices you should always keep in mind:
• Always inspect the valves and springs thoroughly dur-ing disassembly.
• Check the valves for scoring and make sure the valve bore is clean of debris.
• Pay close attention to the valve layout, and make sure
CoreCompetencyCoreCompetencyWith over 150,000 engine, transmission andinternal part cores on the shelf, we havethe cores you need – ready to ship today!
Las Vegas, NV Chicago, IL
aamidwestcores.com®
A Division of
800.426.8771 800.826.7403702.649.7776 773.624.6111702.649.6777 FAX 773.624.6660 FAX
Figure 5
Mar
k th
e se
tting
be
fore
you
di
ssas
sem
ble
• Nationwide Inter-shop Warranty
• ATRA Online's Tech Center
• Technical Seminars• Testing & Certifi cation• GEARS Magazine• Customer Referral
Services• Bankcard Services• Check Verifi cation
Services
• Consumer Financing Services
• Point of Sale Support• Consumer Complaint
Arbitration• Health Insurance Services• Garage Liability Services• Shipping / Freight
Services• Web page Design /
Hosting• Industry EXPO• Technical BookStore
www.atraonline.com(866) GO-4-ATRA
ATRA is much morethan just
a HelpLine...
30mikeB1208.indd 3230mikeB1208.indd 32 11/14/08 2:40:36 PM11/14/08 2:40:36 PM

GEARS December 2008 33
you put them back together the way they came out.
Start with the lower #2 valve body (figure 4).
CAUTION: Mark the setting before you remove the accumu-lator control valve. There are no factory settings for this valve; it’s model-dependent, and will vary from vehicle to vehicle.
Upper #2 valve body (figure 5).
Lower #1 valve body (figure 6).
Figure 6
Lower #1 Lower #1 valve bodyvalve body
Trany CoatTrany CoatAvailable in Aluminum or Cast Iron Finish
“Refinish your rebuilt transmissions! “Refinish your rebuilt transmissions! “Refinish your rebuilt transmissions! Don’t just paint them!”Don’t just paint them!”Don’t just paint them!”
Make your rebuilds look new using G-TEC’s environmentally-formulated coatings that apply like spray paint, but won’t trap heat in the transmission or torque converter like enamel and epoxy paints do. This allows positive heat transfer, prolonging the life of the rebuild. Trany Coat covers blemishes, and won’t smudge or dissolve on contact with ATF. Refinish your transmission cases, transfer cases, and torque converters. Trany Coat is VOC compliant and available in 16 oz. aerosol cans.
®
AluminumAluminum Cast IronCast Iron
www.g-tec.com [email protected]
800.725.6499 417.725.6400
30mikeB1208.indd 3330mikeB1208.indd 33 11/14/08 2:41:22 PM11/14/08 2:41:22 PM

34 GEARS December 2008
Getting a Better Look at the Toyota A761E Valve Body
Upper #1 valve body left side (figure 7) and the right side of the valve body (figure 8).
Be careful not to overlook the B1 accumulator in figure 9.
Now that we’ve covered all the solenoids, control valves and checkballs in the valve body, use the appropriate charts to identify the bolts and install them in the right locations (figure 10), using the proper torque (figure 11).
Figure 7
Figure 8
Be careful not to Be careful not to overlook the B1 overlook the B1 accumulator in accumulator in
figure 9. figure 9.
30mikeB1208.indd 3430mikeB1208.indd 34 11/14/08 2:41:55 PM11/14/08 2:41:55 PM

GEARS December 2008 35
Valve Body Bolt Length and PositionValve Body Bolt Length and PositionA: 20mm Qty 1 B: 25mm Qty 10 C: 32mm Qty 4D: 36mm Qty 13E: 40mm Qty 7F: 45mm Qty 2
G: 50mm Qty 5H: 60mm Qty 1J: 64mm Qty 7K: 76mm Qty 1
Figure 9
Transmission Specialties offers a Builder Program designed to fit your business requirements. If you’re building high performance converters, let us supply you quality converter parts and offer a package with our high performance transmissions to your existing converter customers. If you’re building transmissions, we can provide virtually every hard part at a competitive price
and you can offer our “spragless” converter line to your customer. We will spec and build the converter for you and
will handle any questions or stall adjustments from the customer.
Our goal is to work with you and help you expand your business. Call or email us and
we’ll tailor a no risk program for you.
30mikeB1208.indd 3530mikeB1208.indd 35 11/14/08 2:42:18 PM11/14/08 2:42:18 PM

36 GEARS December 2008
Getting a Better Look at the Toyota A761E Valve Body
Torque SpecificationsTorque SpecificationsValve body-to-case bolts ................................ 11 Nm (8 ft-lbs)Upper valve body-to-lower valve body ......6.4 Nm (57 in-lbs)Solenoid bolts .............................................6.4 Nm (57 in-lbs)Solenoid bolts ................................................ 10 Nm (7 ft-lbs)Oil filter bolts ................................................. 10 Nm (7 ft-lbs)
Figure 10
Figure 10
When you have the right information, reassembling the valve body is a snap. And that’s why having the right information isn’t just smart… it’s street smart!
30mikeB1208.indd 3630mikeB1208.indd 36 11/14/08 2:42:39 PM11/14/08 2:42:39 PM

C M Y CM MY CY CMY K