Embed Size (px)
Citation preview
QuickStart
GuideQuick
StartGuide
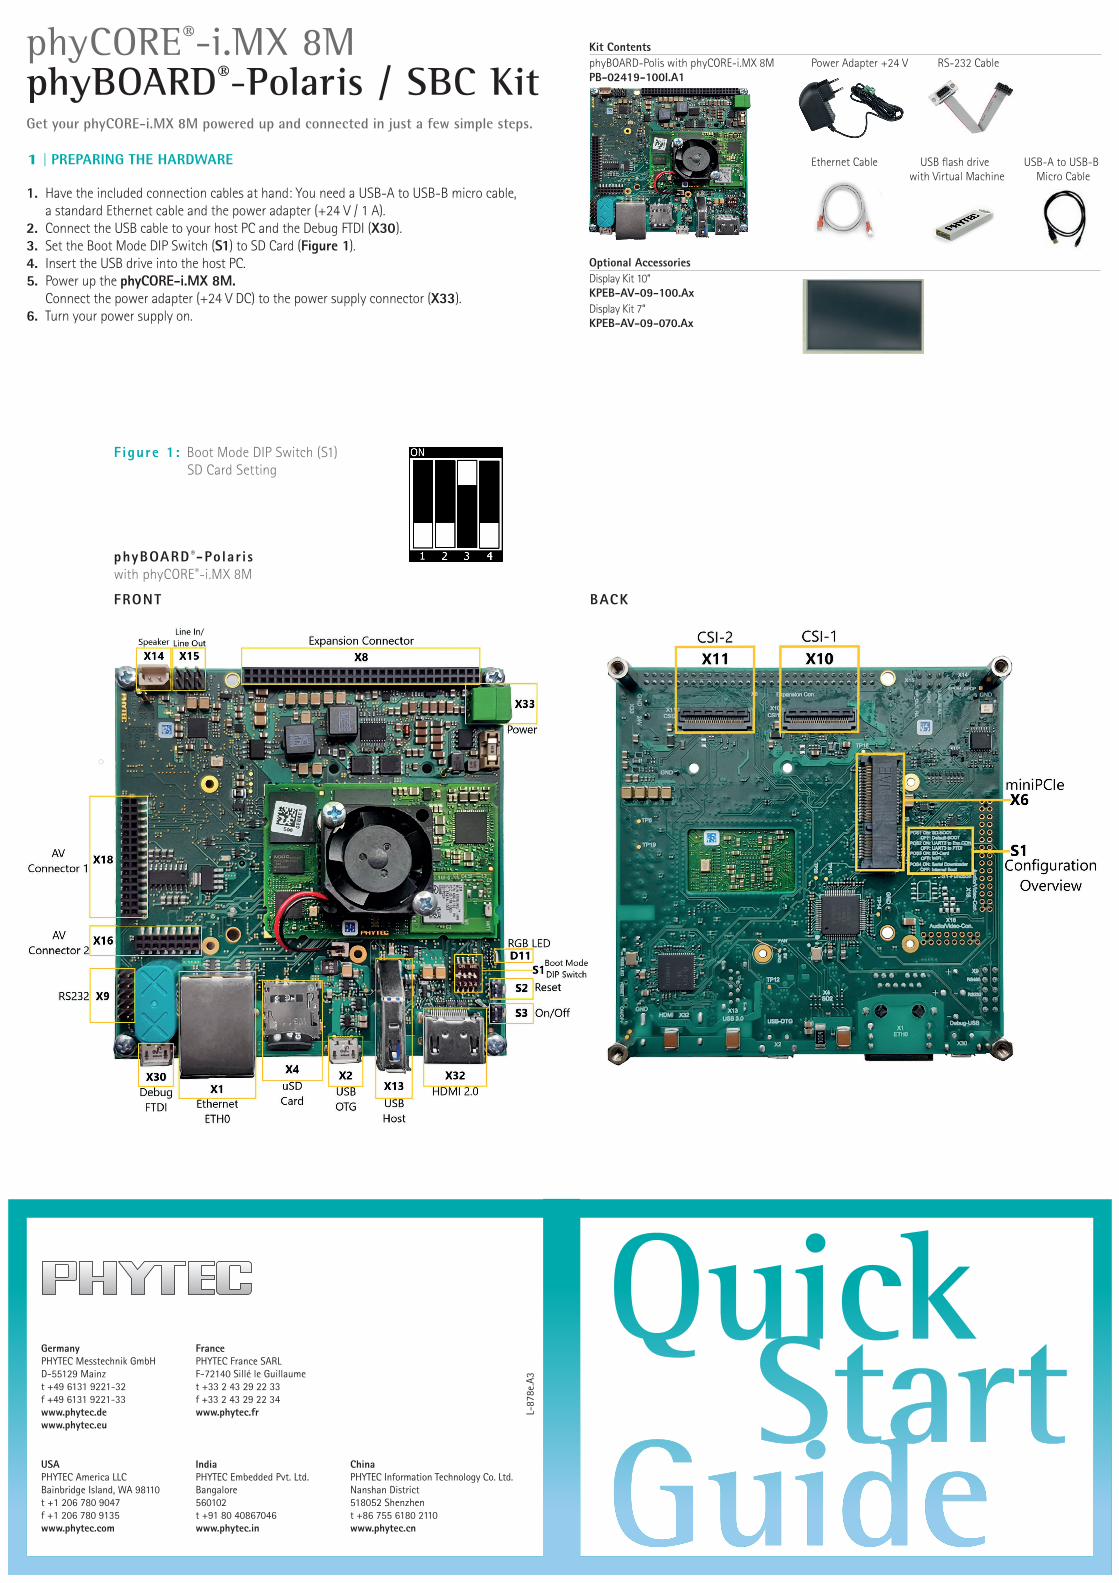
Kit Contents phyBOARD-Polis with phyCORE-i.MX 8M Power Adapter +24 V RS-232 Cable PB-02419-100I.A1
Ethernet Cable USB flash drive USB-A to USB-B with Virtual Machine Micro Cable
Optional AccessoriesDisplay Kit 10“ KPEB-AV-09-100.AxDisplay Kit 7“ KPEB-AV-09-070.Ax
phyCORE®-i.MX 8MphyBOARD®-Polaris / SBC KitGet your phyCORE-i.MX 8M powered up and connected in just a few simple steps.
1 | PREPARING THE HARDWARE
1. Have the included connection cables at hand: You need a USB-A to USB-B micro cable, a standard Ethernet cable and the power adapter (+24 V / 1 A). 2. Connect the USB cable to your host PC and the Debug FTDI (X30). 3. Set the Boot Mode DIP Switch (S1) to SD Card (Figure 1). 4. Insert the USB drive into the host PC. 5. Power up the phyCORE-i.MX 8M. Connect the power adapter (+24 V DC) to the power supply connector (X33).6. Turn your power supply on.
phyBOARD ®-Polar is with phyCORE®-i.MX 8M
FRONT BACK
Figure 1: Boot Mode DIP Switch (S1) SD Card Setting
L-87
8e.A
3
Germany PHYTEC Messtechnik GmbHD-55129 Mainzt +49 6131 9221-32f +49 6131 9221-33www.phytec.dewww.phytec.eu
USA PHYTEC America LLCBainbridge Island, WA 98110t +1 206 780 9047f +1 206 780 9135www.phytec.com
France PHYTEC France SARLF-72140 Sillé le Guillaumet +33 2 43 29 22 33f +33 2 43 29 22 34www.phytec.fr
India PHYTEC Embedded Pvt. Ltd.Bangalore560102t +91 80 40867046www.phytec.in
China PHYTEC Information Technology Co. Ltd.Nanshan District518052 Shenzhent +86 755 6180 2110www.phytec.cn
2 | PREPARING AND STARTING THE VIRTUAL MACHINE
To follow this QuickStart and the descriptions in the Development Environment Guide you need our compressed phyCORE-i.MX 8M virtual machine hard disc image (SO-548.zip). The hard disk image includes all software installations and configurations (e.g. Toolchain, Eclipse, Qt Creator) necessary for a successful start-up of the phyCORE-i.MX 8M. The virtual machine hard disk image (.vmdk) is suitable for most virtualization software and can be mounted to an appropriate virtual machine (tested with VMware Player and Virtualbox).1. If no USB flash drive is included, please refer to the download section under https://www.phytec.de/p/som/phycore-imx-8m/#downloads/ and download the virtualmachine hard disk image. Otherwise plugin the USB flash drive which includes the required file.2. Unpack the compressed file with an appropriate tool to your local hard drive to get the included .vmdk file.3. Follow the instructions of your virtualization software to create a new virtual machine. Pay regard to the following settings required to obtain a correctly working virtual machine: • Choose Linux-Ubuntu 64-bit version as operating system. • Use the unpacked file SO-552v1.vmdk as existing hard disk. • An Ethernet adapter, as well as a serial interface, or the USB controller must be available to connect to the phyCORE-i.MX 8M.
We recommend to have two network adapters available on the host pc. One for a peer-to-peer connection to the target and one with access to the internet, otherwise be advised that you will need to swap Ethernet connections multiple times in order to access documentation and sources.
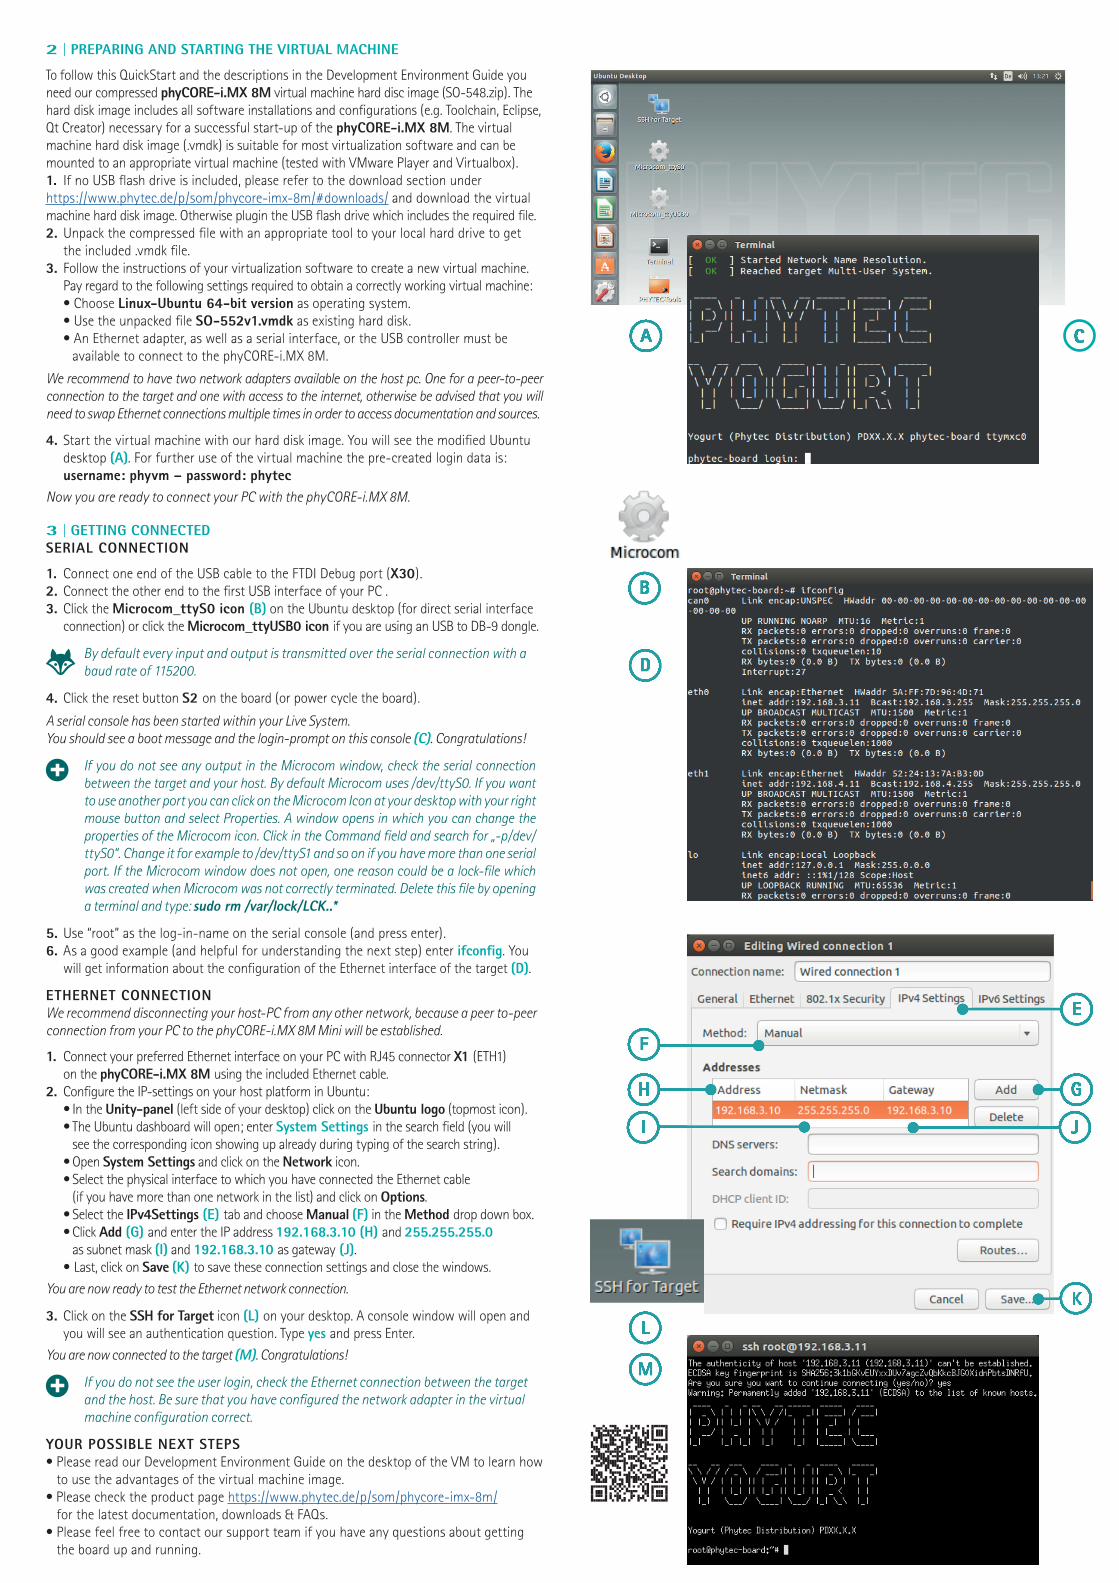
4. Start the virtual machine with our hard disk image. You will see the modified Ubuntu desktop (A). For further use of the virtual machine the pre-created login data is: username: phyvm – password: phytecNow you are ready to connect your PC with the phyCORE-i.MX 8M.
3 | GETTING CONNECTED SERIAL CONNECTION
1. Connect one end of the USB cable to the FTDI Debug port (X30). 2. Connect the other end to the first USB interface of your PC .3. Click the Microcom_ttyS0 icon (B) on the Ubuntu desktop (for direct serial interface connection) or click the Microcom_ttyUSB0 icon if you are using an USB to DB-9 dongle.
By default every input and output is transmitted over the serial connection with a baud rate of 115200.
4. Click the reset button S2 on the board (or power cycle the board).
A serial console has been started within your Live System.You should see a boot message and the login-prompt on this console (C). Congratulations!
If you do not see any output in the Microcom window, check the serial connection between the target and your host. By default Microcom uses /dev/ttyS0. If you want to use another port you can click on the Microcom Icon at your desktop with your right mouse button and select Properties. A window opens in which you can change the properties of the Microcom icon. Click in the Command field and search for „-p/dev/ttyS0“. Change it for example to /dev/ttyS1 and so on if you have more than one serial port. If the Microcom window does not open, one reason could be a lock-file which was created when Microcom was not correctly terminated. Delete this file by opening a terminal and type: sudo rm /var/lock/LCK..*
5. Use “root” as the log-in-name on the serial console (and press enter).6. As a good example (and helpful for understanding the next step) enter ifconfig. You will get information about the configuration of the Ethernet interface of the target (D).
ETHERNET CONNECTIONWe recommend disconnecting your host-PC from any other network, because a peer to-peer connection from your PC to the phyCORE-i.MX 8M Mini will be established.
1. Connect your preferred Ethernet interface on your PC with RJ45 connector X1 (ETH1) on the phyCORE-i.MX 8M using the included Ethernet cable.2. Configure the IP-settings on your host platform in Ubuntu: • In the Unity-panel (left side of your desktop) click on the Ubuntu logo (topmost icon). • The Ubuntu dashboard will open; enter System Settings in the search field (you will see the corresponding icon showing up already during typing of the search string). • Open System Settings and click on the Network icon. • Select the physical interface to which you have connected the Ethernet cable (if you have more than one network in the list) and click on Options. • Select the IPv4Settings (E) tab and choose Manual (F) in the Method drop down box. • Click Add (G) and enter the IP address 192.168.3.10 (H) and 255.255.255.0 as subnet mask (I) and 192.168.3.10 as gateway (J). • Last, click on Save (K) to save these connection settings and close the windows.
You are now ready to test the Ethernet network connection.
3. Click on the SSH for Target icon (L) on your desktop. A console window will open and you will see an authentication question. Type yes and press Enter.
You are now connected to the target (M). Congratulations!
If you do not see the user login, check the Ethernet connection between the targetand the host. Be sure that you have configured the network adapter in the virtualmachine configuration correct.
YOUR POSSIBLE NEXT STEPS• Please read our Development Environment Guide on the desktop of the VM to learn how to use the advantages of the virtual machine image.• Please check the product page https://www.phytec.de/p/som/phycore-imx-8m/ for the latest documentation, downloads & FAQs.• Please feel free to contact our support team if you have any questions about getting the board up and running.