Embed Size (px)
Citation preview

Geocoding Using QGIS
The following is a rough guide of how to do geocoding in QGIS. Geocoding was done in QGIS version 2.0.1-Dufour. When you open up QGIS, you’ll see the version number at the top left of the window.
1) To download the discarded syringe file we’ll be using for geocoding, please click here. 2) To geocode, you’ll have to install the mmqgis plugin. In QGIS, click on Plugins > Manage and
Install Plug-ins. Scroll down and click on mmqgis and click on install.
3) Once installed, you should see the “MMQGIS” in the menu bar. 4) Import the discarded syringe file through the MMQGIS plugin. 5) Click on MMQGIS (which will be located on the menu at the top) > Geocode > Geocode CSV with
Google/OpenStreetMap. a. In your CSV, you’ll need separate fields for each piece of geographic information:
i. Address: 2210 Bank Street ii. City: Ottawa
iii. Province: Ontario iv. Country: Canada

6) In the dialog box, match up the corresponding fields to geocoding (ie. State Field = Province). Select Google Maps or OpenStreetMap as the WebService. Google Maps can do only 2,500 records per day (per ID Address) while OpenStreetMap has no limits.
7) Click OK 8) Once completed, the geocoded points will appear on the map. (NOTE: QGIS can be
unpredictable. So if the process stalls, or seems to be taking too long, try it again.) 9) Open the csv file’s attribute to view the records that weren’t geocoded and attempt to fix the
addresses. 10) You’ll notice that the attribute table does not contain the longitude and latitude coordinates,
even though QGIS is using them to map the locations. 11) To obtain columns with the longitude and latitudes, we’ll have to use Qgis’s field calculator.

12) Stay in the attribute table, and select the icon to the far right of the menu.

13) Let’s add a latitude column. To do this, type “X” into the “Output field name”.

14) Change the “Output field type” to “Decimal number (real)”. And the “Precision”, 5.
15) “Output field width” at 10 16) In the Expression field, type “$x”.
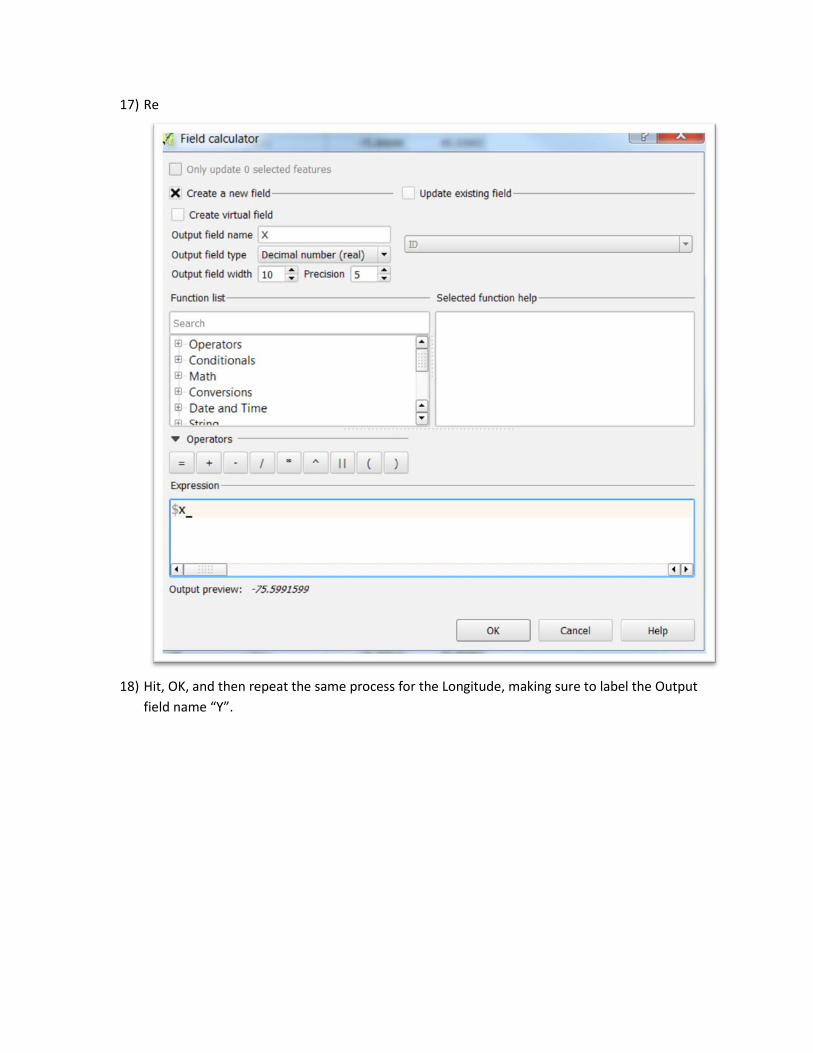
17) Re
18) Hit, OK, and then repeat the same process for the Longitude, making sure to label the Output
field name “Y”.

19) Your table attribute table should look have these two fields added.
20) The new columns will allow you to map these locations using ArcGIS, Fusion Tables, or Tableau,
once you ‘ve exported the layer as a csv file. 21) The coordinates will also allow you to perform the kinds of spatial joins in Qgis that we learned
in first Qgis tutorial.