Embed Size (px)
Citation preview

702063 GCAS HT Plates.book Page -i Thursday, June 15, 2006 8:33 AM
GeneChip® Expression Analysis Technical Manual
For HT Array Plates Using the GeneChip® Array Station
P/N 702063 Rev. 2

702063 GCAS HT Plates.book Page 0 Thursday, June 15, 2006 8:33 AM
For research use only. Not for use in diagnostic procedures.
Trademarks
Affymetrix®, GeneChip®, , GenFlex®, HuSNP®, Flying Objective™, NetAffx™, CustomExpress®, CustomSeq®, Tools to Take You As Far As Your Vision®, The Way Ahead™, Powered by Affymetrix™, GeneChip-compatible™, and Command Console™ are trademarks of Affymetrix, Inc.
Caliper®, and Twister® are trademarks of Caliper Life Sciences, Inc.
All other trademarks are the property of their respective owners.
Limited License
Subject to the Affymetrix terms and conditions that govern your use of Affymetrix products, Affymetrix grants you a non-exclusive, non-transferable, non-sublicensable license to use this Affymetrix product only in accordance with the manual and written instructions provided by Affymetrix. You understand and agree that except as expressly set forth in the Affymetrix terms and conditions, that no right or license to any patent or other intellectual property owned or licensable by Affymetrix is conveyed or implied by this Affymetrix product. In particular, no right or license is conveyed or implied to use this Affymetrix product in combination with a product not provided, licensed or specifically recommended by Affymetrix for such use.
Patents
Arrays: Products may be covered by one or more of the following patents and/or sold under license from Oxford Gene Technology: U.S. Patent Nos. 5,445,934; 5,700,637; 5,744,305; 5,874,219; 5,945,334; 6,054,270; 6,140,044; 6,261,776; 6,291,183; 6,346,413; 6,399,365; 6,420,169; 6,551,817; 6,610,482; 6,733,977; and EP 619 321; 373 203 and other U.S. or foreign patents.
Use of the GeneChip® HT One-Cycle cDNA Synthesis Kit in accordance with the instructions provided is accompanied by a limited license to U.S. Patent Nos. 5,716,785; 5,891,636; 6,291,170; and 5,545,522. Users who do not purchase this Kit may be required to obtain a license under these patents or to purchase another licensed kit.
Copyright
©2005-2006 Affymetrix Inc. All rights reserved.

i
702063 GCAS HT Plates.book Page i Thursday, June 15, 2006 8:33 AM
Contents
CHAPTER 1 Overview 1
INTRODUCTION 3Summary of the Array Station Run 5
ARRAY STATION SUBSYSTEMS 6Typical Core System 6
USER DOCUMENTATION AND QUICK REFERENCE CARDS 8
REGULATORY COMPLIANCE 9
CHAPTER 2 RNA Preparation 11
TOTAL RNA ISOLATION FOR ONE-CYCLE EUKARYOTIC TARGET LABELING ASSAY 13
Materials List 13Isolation of RNA from Yeast 13Isolation of RNA from Arabidopsis 14Isolation of RNA from Mammalian Cells or Tissues 14Precipitation of RNA 14Precipitation Procedure 15Quantitation of RNA 16Preparation of Poly-A RNA Controls for One-Cycle cDNA Synthesis (Spike-in Controls) 17Preparation of Total RNA Plates for Processing on the Array Station 19
CHAPTER 3 Reagent Preparation 21
INTRODUCTION 23
REAGENTS AND MATERIALS REQUIRED 24Reagents and Equipment 24

GeneChip® Expression Analysis Technical Manualii For HT Array Plates Using the GeneChip® Array Station
702063 GCAS HT Plates.book Page ii Thursday, June 15, 2006 8:33 AM
BEFORE YOU BEGIN 26
PROCEDURE 1: T7 PRIMER MASTER MIX 27
PROCEDURE 2: FIRST-STRAND cDNA SYNTHESIS MASTER MIX 28
PROCEDURE 3: SECOND-STRAND cDNA SYNTHESIS MASTER MIX 29
PROCEDURE 4: T4 DNA POLYMERASE MASTER MIX 31
PROCEDURE 5: IVT MASTER MIX 33
PROCEDURE 6: FRAGMENTATION BUFFER 35
PROCEDURE 7: HYBRIDIZATION MASTER MIX 36Reagent Preparation 36
ADDITIONAL REAGENT PREPARATION STEPS REQUIRED 41Setup 75% EtOH Reservoir 41Setup H2O Reservoir 41cDNA and cRNA Purification Preparation 42
CHAPTER 4 Array Station Setup and Target Preparation 43
INTRODUCTION 45
AUTOMATED TARGET PREPARATION SCHEMATIC 45
CHECK LIST BEFORE A RUN 53Clean the Bio-Rad 96-Well Hard-Shell PCR Plate Lids 59
BEGINNING A RUN — FIRST LAYOUT 60Procedure 60Running Affymetrix® Gene Expression Target Preparation (TP) Protocol on the GeneChip® Array Station 65
SECOND LAYOUT (USER INTERVENTION) 76Procedure 76cRNA Quantitation and Normalization 78

contents iii
702063 GCAS HT Plates.book Page iii Thursday, June 15, 2006 8:33 AM
cRNA First Quantitation 79Normalization 81Second Quantitation 83Fragmentation and Hybridization Cocktail 86Target Preparation Final Reports 87
GENECHIP® ARRAY STATION CLEAN UP 89
CHAPTER 5 Hybridization Setup Protocol and Hybridization 91
INTRODUCTION 93Automated Hybridization Setup Schematic 93
REAGENTS AND MATERIALS REQUIRED 94Reagents and Materials 94Reagent Preparation 94Clean the Bio-Rad Plate Lids with DNAZap™ and RNaseZap® 96
BEGINNING A RUN – HYBRIDIZATION SETUP DECK LAYOUT 97Procedure 97
RUNNING AFFYMETRIX® GENE EXPRESSION HYBRIDIZATION SETUP PROTOCOL ON THE GENECHIP® ARRAY STATION 99
HYBRIDIZATION 110Overnight Hybridization 110
CHAPTER 6 Wash and Stain 111
INTRODUCTION 113
AUTOMATED WASH AND STAIN SCHEMATIC 113
REAGENTS AND MATERIALS REQUIRED 116

GeneChip® Expression Analysis Technical Manualiv For HT Array Plates Using the GeneChip® Array Station
702063 GCAS HT Plates.book Page iv Thursday, June 15, 2006 8:33 AM
REAGENT PREPARATION 117Stock Buffers 117Stain 1 and Stain 3 118Stain 2 119Low Stringency Buffer 120High Stringency Buffer 121MES Holding Buffer 122Clean the Bio-Rad Plate Lids with DNAZap™ and RNaseZap® 122
BEGINNING A RUN – WASH AND STAIN DECK LAYOUT 123Procedure 123
RUNNING AFFYMETRIX® GENE EXPRESSION WASH AND STAIN PROTOCOL ON THE GENECHIP® ARRAY STATION 127
Running the Protocol 127
APPENDIX A Master Mix Spreadsheet 137
MASTER MIX VOLUME SPREADSHEETS 139
APPENDIX B Automated Sample Transfer 145
LOADING SAMPLE PLATE AND INITIAL DECK LAYOUT FOR AUTOMATED SAMPLE TRANSFER 147
APPENDIX C Array Station Customized Applications and Deck Layouts 155
DECK LAYOUTS FOR THE ARRAY STATION TARGET PREPARATION OPTIONS 157

contents v
702063 GCAS HT Plates.book Page v Thursday, June 15, 2006 8:33 AM
APPENDIX D Sciclone Workstation Software User Information 179
USER LEVEL CONFIGURATION 181
APPENDIX E Formats of Summary Reports from the GeneChip® Array Station 185
FORMATS OF SUMMARY REPORTS FROM THE GENECHIP® ARRAY STATION 187
Introduction 187File Names 187File Contents 188File Location 191
APPENDIX F Reagents, Equipment, and Supplier Contact Information 193
MASTER LIST - CONSUMABLES, REAGENTS,AND EQUIPMENT 195
Instruments 195Consumables – Target Preparation 196Consumables – Hybridization Setup 197Consumables – Wash and Stain 198Reagents – Total RNA Isolation 199Reagents – Target Preparation 200Reagents – Hybridization Setup 201Reagents – Wash and Stain 202
SUPPLIER CONTACT INFORMATION 203

GeneChip® Expression Analysis Technical Manualvi For HT Array Plates Using the GeneChip® Array Station
702063 GCAS HT Plates.book Page vi Thursday, June 15, 2006 8:33 AM
APPENDIX G Affymetrix Contact Information 205
WHEN TO CONTACT TECHNICAL SUPPORT 207

702063 GCAS HT Plates.book Page 1 Thursday, June 15, 2006 8:33 AM
Chapter 1
Overview
702063 GCAS HT Plates.book Page 2 Thursday, June 15, 2006 8:33 AM
Chapter 1

3
702063 GCAS HT Plates.book Page 3 Thursday, June 15, 2006 8:33 AM
Introduction
Welcome to the Affymetrix® GeneChip® Array Station. This system uses robotic technology to automate many of the labor intensive tasks required when preparing a eukaryotic mRNA sample for gene expression analysis. The Array Station also automates the hybridization of a target to a GeneChip HT Array Plate, as well as the washing and staining of the HT Array Plate prior to scanning.
This manual describes the assay procedures recommended for eukaryotic target labeling for expression analysis and subsequent HT Array Plate hybridization and processing using the GeneChip® Array Station. By following the protocols and using high-quality starting materials, a sufficient amount of biotin-labeled complementary RNA (cRNA) target can be obtained for hybridization to a HT Array Plate. The reagents and protocols have been developed and optimized specifically for use with the GeneChip Array Station.
The GeneChip One-Cycle Target Labeling Assay experimental outline is represented in Figure 1.1. Total RNA (1 μg to 2 μg) is first reverse transcribed using a T7-Oligo(dT) Promoter Primer in the first-strand cDNA synthesis reaction. Following RNase H-mediated second-strand cDNA synthesis, the double-stranded cDNA is purified and serves as a template in the subsequent in vitro transcription (IVT) reaction. The IVT reaction is carried out in the presence of T7 RNA Polymerase and a biotinylated nucleotide analog/ribonucleotide mix for cRNA amplification and biotin labeling. The biotinylated cRNA targets are then cleaned up, fragmented, and hybridized to GeneChip® HT Array Plates.

GeneChip® Expression Analysis Technical Manual4 For HT Array Plates Using the GeneChip® Array Station
702063 GCAS HT Plates.book Page 4 Thursday, June 15, 2006 8:33 AM
Figure 1.1GeneChip® Eukaryotic Labeling Assays for Expression Analysis Using GeneChip® Array Station

chapter 1 | Overview 5
702063 GCAS HT Plates.book Page 5 Thursday, June 15, 2006 8:33 AM
SUMMARY OF THE ARRAY STATION RUN
Target preparation on the Array Station takes approximately 18.5 hours and requires three human interventions: initial sample preparation, change of deck layout, and cRNA quantitation. At the end of target preparation, the sample is ready to be denatured and hybridized onto a HT Array Plate. Hybridization takes 16 hours. Washing and staining on the Array Station takes 1.5 hours. Additional time is required for scanning and is dependent on the number of samples processed and the array type. The typical workflow and chapter references are provided below.
1. Isolate high quality total RNA (refer to Chapter 2).
2. Prepare reagents required for target preparation (refer to Chapter 3).
3. Perform Array Station system check (refer to Chapter 4).
4. Set-up first deck layout required for cDNA synthesis reaction through purification of cRNA (refer to Chapter 4).
5. Set-up second deck layout required for the quantitation and normalization steps and preparation of the hybridization- ready sample (refer to Chapter 4).
6. Denature sample and hybridize overnight onto GeneChip® HT Array Plates (refer to Chapter 5).
7. Wash and stain HT Array Plates using the Array Station (refer to Chapter 6).
8. Scan HT Array Plates using the HT Scanner (refer Affymetrix GeneChip® HT Scanner User’s Guide, P/N 701978).

GeneChip® Expression Analysis Technical Manual6 For HT Array Plates Using the GeneChip® Array Station
702063 GCAS HT Plates.book Page 6 Thursday, June 15, 2006 8:33 AM
Array Station SubsystemsThe array station is composed of both mechanical and software subsystems. Refer to the GeneChip® Array Station User’s Guide (P/N 701859) for more information.
TYPICAL CORE SYSTEM
Figure 1.2 illustrates the core mechanical subsystems of the Array Station including the Caliper Sciclone workstation, Bio-Rad DNA Engine® Thermal Cycler, and Twister® II microplate handler. For detailed information on the various mechanical components of the system, please refer to the GeneChip® Array Station User’s Guide (P/N 701859).
Figure 1.2The GeneChip® Array Station
DI Water
Caliper
Sciclone
Workstation
Caliper Sciclone Head
Twister II
Plate Stacker
Waste
LiquidComputer
Terminal
The Bio-Rad DNA
Engine Thermal
Cycler is located
behind the Twister
unit. The thermal
cycler controller and
spectrophotometer
are located below
the Array Station.
Twister II
Robot Arm
Caliper Sciclone
Workstation Deck
EMERGENCY STOP
BUTTON
DI Water
®

chapter 1 | Overview 7
702063 GCAS HT Plates.book Page 7 Thursday, June 15, 2006 8:33 AM
The Sciclone 4.0 control software provides a graphical user interface (GUI) to run and track the various mechanical components that comprise the application. The Sciclone 4.0 software has integrated all instrument control programs (ICP’s) into one GUI, thus enhancing software ease of use. See Figure 1.3 for a schematic of the software product configuration for the Array Station.
Figure 1.3Sciclone 4.0 Software
Caliper® Sciclone ICP
Twister® II Robot ICP
Bio-Rad® ICP
Sciclone 4.0Single User Interface
GeneChip® Expression Analysis Technical Manual8 For HT Array Plates Using the GeneChip® Array Station
702063 GCAS HT Plates.book Page 8 Thursday, June 15, 2006 8:33 AM
User Documentation and Quick Reference CardsThe operation of the Array Station requires familiarity with the following user documentation.
The manuals that are relevant will depend on your system configuration. For the Array Station configuration, the following list presents the relevant guides:
1. GeneChip® Array Station Site Preparation Guide (P/N 702020)
2. GeneChip® Array Station User’s Guide (P/N 701859)
3. GeneChip® Array Station Deck Layout Quick Reference Card (P/N 702013)
4. GeneChip® Array Station Reagent Preparation Quick Reference Card (P/N 702032)
5. Affymetrix GeneChip® Operating Software User’s Guide (P/N 701439): if you are using Affymetrix GeneChip® analysis software, you should be familiar with Affymetrix’ GeneChip® Operating System in order to interpret the assay results.
6. Caliper Sciclone User’s Manual (from Caliper Life Sciences).
7. Bio-Rad MJ Thermal Cycler ICP Guide (from Bio-Rad/MJ Research).

chapter 1 | Overview 9
702063 GCAS HT Plates.book Page 9 Thursday, June 15, 2006 8:33 AM
Regulatory CompliancePlease refer to the GeneChip® Array Station User’s Guide (P/N 701859) for regulatory compliance and safety information for the Array Station.

GeneChip® Expression Analysis Technical Manual10 For HT Array Plates Using the GeneChip® Array Station
702063 GCAS HT Plates.book Page 10 Thursday, June 15, 2006 8:33 AM

702063 GCAS HT Plates.book Page 11 Thursday, June 15, 2006 8:33 AM
Chapter 2
RNA Preparation
702063 GCAS HT Plates.book Page 12 Thursday, June 15, 2006 8:33 AM
Chapter 2

13
702063 GCAS HT Plates.book Page 13 Thursday, June 15, 2006 8:33 AM
Total RNA Isolation for One-Cycle Eukaryotic Target Labeling Assay
This chapter describes the general requirements for RNA isolation methods and poly-A control preparation for spiking into your RNA sample.
When using a commercial kit, follow the manufacturer’s instructions for RNA isolation.
MATERIALS LIST
Total RNA Isolation Reagents
• TRIzol® Reagent: Invitrogen Life Technologies, P/N 15596-018, or QIAzol™ Lysis Reagent: QIAGEN, P/N 79306
• RNeasy® Mini Kit: QIAGEN, P/N 74104
Miscellaneous Reagents
• 80% ethanol (stored at –20°C)
• Pellet Paint®: Novagen, P/N 69049-3 (optional)
• Glycogen: Ambion, P/N 9510 (optional)
• 3M Sodium Acetate (NaOAc): Sigma-Aldrich, P/N S7899
ISOLATION OF RNA FROM YEAST
Total RNA
Quality total RNA has been isolated successfully from yeast cells using a hot phenol protocol described by Schmitt, et al. Nucl Acids Res 18:3091-3092 (1990).
The quality of the RNA is essential to the overall success of theanalysis. Since the most appropriate protocol for the isolation ofRNA can be source dependent, we recommend using a protocolthat has been established for the tissues or cells being used. In theabsence of an established protocol, using one of the commerciallyavailable kits designed for RNA isolation is suggested.
GeneChip® Expression Analysis Technical Manual14 For HT Array Plates Using the GeneChip® Array Station
702063 GCAS HT Plates.book Page 14 Thursday, June 15, 2006 8:33 AM
ISOLATION OF RNA FROM ARABIDOPSIS
Total RNA
TRIzol® Reagent from Invitrogen Life Technologies has been used to isolate total RNA from Arabidopsis. Follow the instructions provided by the supplier and, when necessary, use the steps outlined specifically for samples with high starch and/or high lipid content. QIAzol™ Lysis Reagent from QIAGEN can also be used.
ISOLATION OF RNA FROM MAMMALIAN CELLS OR TISSUES
Total RNA
High-quality total RNA has been successfully isolated from mammalian cells (such as cultured cells and lymphocytes) using the RNeasy® Mini Kit from QIAGEN.
If mammalian tissue is used as the source of RNA, it is recommended to isolate total RNA with a commercial reagent, such as TRIzol® or QIAzol™ reagent.
PRECIPITATION OF RNA
Total RNA
It is not necessary to precipitate total RNA following isolation or cleanup with the RNeasy Mini Kit. Adjust elution volumes from the RNeasy column to prepare for cDNA synthesis based upon expected RNA yields from your experiment. Ethanol precipitation is required
If going directly from TRIzol- or QIAzol™-isolated total RNA tocDNA synthesis, it may be beneficial to perform a second cleanupon the total RNA before starting. After the ethanol precipitationstep in the Lysis Reagent extraction procedure, perform a cleanupusing the QIAGEN RNeasy Mini Kit. Much better yields of labeledcRNA are obtained from the in vitro transcription-labeling reactionwhen this second cleanup is performed.

chapter 2 | RNA Preparation 15
702063 GCAS HT Plates.book Page 15 Thursday, June 15, 2006 8:33 AM
following TRIzol or QIAzol reagent isolation and hot phenol extraction methods; see methods on page 15 for details.
PRECIPITATION PROCEDURE
1. Add 1/10 volume 3M NaOAc, pH 5.2, and 2.5 volumes ethanol.*
2. Mix and incubate at –20°C for at least 1 hour.
3. Centrifuge at ≥ 12,000 x g in a microcentrifuge for 20 minutes at 4°C.
4. Wash pellet twice with 80% ethanol.
5. Air dry pellet. Check for dryness before proceeding.
6. Resuspend pellet in DEPC-treated H2O. The appropriate volume for resuspension depends on the expected yield and the amount of RNA required for the cDNA synthesis. Please read ahead to the cDNA synthesis protocol in order to determine the appropriate resuspension volume at this step.
*Addition of Carrier to Ethanol Precipitations
Adding carrier material has been shown to improve the RNA yield of precipitation reactions.
• Pellet Paint®
Addition of 0.5 μL of Pellet Paint per tube to nucleic acid precipitations makes the nucleic acid pellet easier to visualize and helps reduce the chance of losing the pellet during washing steps. The pellet paint does not appear to affect the outcome of subsequent steps in this protocol; however, it can contribute to the absorbance at 260 nm when quantifying the total RNA.
• GlycogenAddition of 0.5 to 1 μL of glycogen (5 mg/mL) to nucleic acid precipitations aids in visualization of the pellet and may increase recovery. The glycogen does not appear to affect the outcome of subsequent steps in this protocol.

GeneChip® Expression Analysis Technical Manual16 For HT Array Plates Using the GeneChip® Array Station
702063 GCAS HT Plates.book Page 16 Thursday, June 15, 2006 8:33 AM
QUANTITATION OF RNA
Quantify RNA yield by spectrophotometric analysis using the convention that 1 absorbance unit at 260 nm equals 40 μg/mL RNA.
• The absorbance should be checked at 260 and 280 nm for determination of sample concentration and purity.
• The A260/A280 ratio should be close to 2.0 for pure RNA (ratios between 1.9 and 2.1 are acceptable).
• Integrity of total RNA samples can also be assessed qualitatively on an Agilent 2100 Bioanalyzer. Refer to Figure 2.1 for an example of good-quality total RNA sample.
Figure 2.1Electropherogram (from the Agilent 2100 Bioanalyzer) for HeLa Total RNA. For a high-quality total RNA sample, two well-defined peaks corresponding to the 18S and 28S ribosomal RNAs should be observed, similar to a denaturing agarose gel, with ratios approaching 2:1 for the 28S to 18S bands.

chapter 2 | RNA Preparation 17
702063 GCAS HT Plates.book Page 17 Thursday, June 15, 2006 8:33 AM
PREPARATION OF POLY-A RNA CONTROLS FOR ONE-CYCLE cDNA SYNTHESIS (SPIKE-IN CONTROLS)
Reagents and Equipment
• GeneChip® Eukaryotic Poly-A RNA Control Kit: Affymetrix, P/N 900433
Designed specifically to provide exogenous positive controls to monitor the entire eukaryotic target labeling process, a set of poly-A RNA controls is supplied in the GeneChip Eukaryotic Poly-A RNA Control Kit.
Each eukaryotic GeneChip probe array contains probe sets for several B. subtilis genes that are absent in eukaryotic samples (lys, phe, thr, and dap). These poly-A RNA controls are in vitro synthesized, and the polyadenylated transcripts for the B. subtilis genes are pre-mixed at staggered concentrations. The concentrated Poly-A Control Stock can be diluted with the Poly-A Control Dil Buffer and spiked directly into RNA samples to achieve the final dilutions (relative to estimated copy number of total mRNA population) summarized in Table 2.1.
The controls are then amplified and labeled together with the samples. Examining the hybridization intensities of these controls on GeneChip arrays helps to monitor the labeling process independently from the quality of the starting RNA samples. Anticipated relative signal strength follows the order of lys < phe < thr < dap.
Table 2.1Final Dilutions of Poly-A RNA Controls in Samples
Poly-A RNA Spike Final Dilution (estimated ratio of copy number)
lys 1:100,000
phe 1:50,000
thr 1:25,000
dap 1:6,667

GeneChip® Expression Analysis Technical Manual18 For HT Array Plates Using the GeneChip® Array Station
702063 GCAS HT Plates.book Page 18 Thursday, June 15, 2006 8:33 AM
The Poly-A RNA Control Stock and Poly-A Control Dil Buffer are provided with the kit to prepare the appropriate serial dilutions based on Table 2.2. This is a guideline when 1 or 2 μg of total RNA is used as starting material.
For example, to prepare the Poly-A RNA dilutions for 1 μg of total RNA:
1. Add 2 μL of the Poly-A Control Stock to 38 μL of Poly-A Control Dil Buffer for the First Dilution (1:20).
2. Mix thoroughly and spin down to collect the liquid at the bottom of the tube.
3. Add 2 μL of the First Dilution to 98 μL of Poly-A Control Dil Buffer to prepare the Second Dilution (1:50).
4. Mix thoroughly and spin down to collect the liquid at the bottom of the tube.
5. Add 2 μL of the Second Dilution to 98 μL of Poly-A Control Dil Buffer to prepare the Third Dilution (1:50).
Use non-stick RNase-free microfuge tubes to prepare all of thedilutions.
Table 2.2Serial Dilutions of Poly-A RNA Control Stock
Starting Amount Serial Dilutions Spike-in Volume
Total RNA mRNA First Second Third
1 µg 1:20 1:50 1:50 2 µL
2 µg 1:20 1:50 1:25 2 µL
Avoid pipetting solutions less than 2 μL in volume to maintainprecision and consistency when preparing the dilutions.

chapter 2 | RNA Preparation 19
702063 GCAS HT Plates.book Page 19 Thursday, June 15, 2006 8:33 AM
6. Mix thoroughly and spin down to collect the liquid at the bottom of the tube.
7. Add 2 μL of this Third Dilution to 1 μg of sample to total RNA directly. The final volume of the total RNA with the diluted poly-A controls should not exceed 5 μL.
PREPARATION OF TOTAL RNA PLATES FOR PROCESSING ON THE ARRAY STATION
The Array Station Target Preparation protocol starts with 5 μL of material in a Bio-Rad 96-Well Hard-Shell PCR Plate. This plate can either be prepared offline (manually) or on the Array Station, as described below.
User-Prepared Plate Preparation
Preparing Samples with PolyA Controls
Pipet 3 μL of the total RNA sample (1 to 2 μg) and 2 μL of the appropriate PolyA spike control solution into the 96-well plate. Samples should be placed into the plate in a column-wise fashion starting from the left side of the plate. For example, if preparing 24 samples, pipet the samples into the sample wells for columns 1, 2, and 3.
Optional – Running without PolyA Controls
Affymetrix highly recommends that you utilize PolyA controls as described above. However, if you choose not to utilize these controls, the total RNA sample in the Bio-Rad 96-Well Hard-Shell PCR Plate must be adjusted to a final volume of 5 μL.
Once the Bio-Rad 96-Well Hard-Shell PCR Plate has been prepared with 5 μL of the material as described above, select the Manual
The first dilution of the Poly-A RNA controls can be stored up to sixweeks in a frost-free freezer at –20°C and freeze-thawed up to eighttimes.

GeneChip® Expression Analysis Technical Manual20 For HT Array Plates Using the GeneChip® Array Station
702063 GCAS HT Plates.book Page 20 Thursday, June 15, 2006 8:33 AM
Sample Transfer option when starting on the Array Station. Please refer to Chapter 4 for detailed information.
Automated Plate Preparation
If there is at least 20 μL of purified total RNA (0.2 to 0.4 μg/μL) in a Greiner-U-Bottom plate, the Array Station may be used to transfer 5 μL of this material to the Bio-Rad 96-Well Hard-Shell PCR Plate. Please refer to the instructions in Appendix B for an explanation of how to have the Array Station transfer 5 μL of sample to the starting plate at the beginning of a run.

702063 GCAS HT Plates.book Page 21 Thursday, June 15, 2006 8:33 AM
Chapter 3
Reagent Preparation
702063 GCAS HT Plates.book Page 22 Thursday, June 15, 2006 8:33 AM
Chapter 3
23
702063 GCAS HT Plates.book Page 23 Thursday, June 15, 2006 8:33 AM
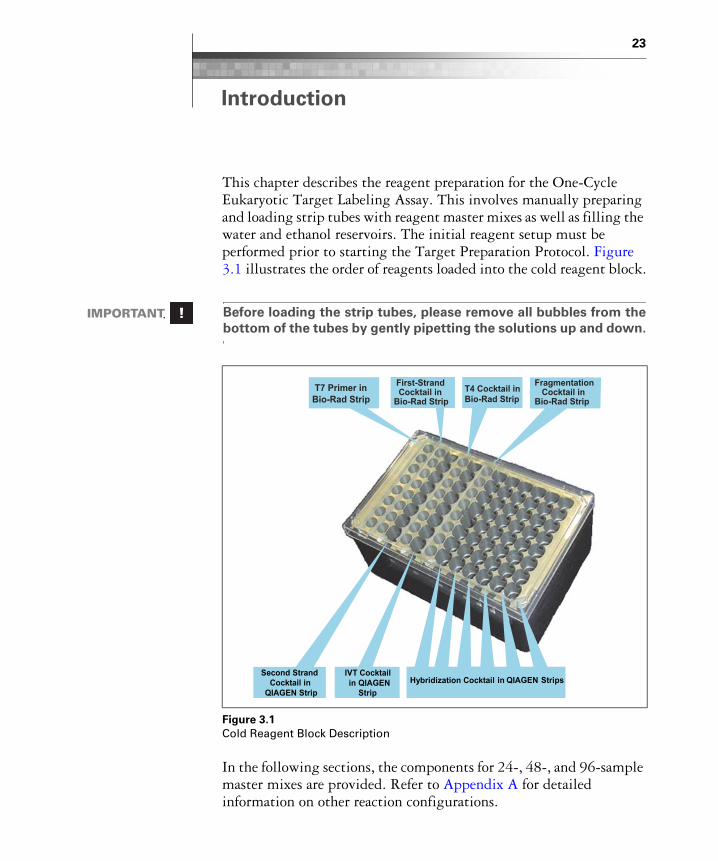
Introduction
This chapter describes the reagent preparation for the One-Cycle Eukaryotic Target Labeling Assay. This involves manually preparing and loading strip tubes with reagent master mixes as well as filling the water and ethanol reservoirs. The initial reagent setup must be performed prior to starting the Target Preparation Protocol. Figure 3.1 illustrates the order of reagents loaded into the cold reagent block.
In the following sections, the components for 24-, 48-, and 96-sample master mixes are provided. Refer to Appendix A for detailed information on other reaction configurations.
Before loading the strip tubes, please remove all bubbles from thebottom of the tubes by gently pipetting the solutions up and down.
Figure 3.1Cold Reagent Block Description

GeneChip® Expression Analysis Technical Manual24 For HT Array Plates Using the GeneChip® Array Station
702063 GCAS HT Plates.book Page 24 Thursday, June 15, 2006 8:33 AM
Reagents and Materials RequiredThe following reagents and materials have been tested and evaluated by Affymetrix. Information and part numbers listed are based on U.S. catalog information. For supplier information, please refer to the Supplier Reference List in Appendix F of this manual.
REAGENTS AND EQUIPMENT
• GeneChip® HT One-Cycle cDNA Synthesis Kit: Affymetrix, P/N 9006871
• GeneChip® HT IVT Labeling Kit; Affymetrix: P/N 900688
• GeneChip® Eukaryotic Hybridization Control Kit: Affymetrix, P/N 900454 (30 reactions) or P/N 900457 (150 reactions), contains Control cRNA and Control Oligo B2
• Control Oligo B2 (3 nM): Affymetrix, P/N 900301 (can be ordered separately)
• Bovine Serum Albumin (BSA) solution (50 mg/mL): Invitrogen Life Technologies, P/N 15561-020
• EDTA Disodium Salt, 0.5M solution (100 mL): Sigma-Aldrich, P/N E7889
• Herring Sperm DNA: Promega Corporation, P/N D1811
• MES Hydrate SigmaUltra: Sigma-Aldrich, P/N M5287
• MES Sodium Salt: Sigma-Aldrich, P/N M5057
• 5M NaCl, RNase-free, DNase-free: Ambion, P/N 9760G
• Surfact-Amps 20 (Tween-20), 10%: Pierce Chemical, P/N 28320
• TMAC (5M), Sigma-Aldrich: P/N T3411
• Ethanol, 100%: Various Suppliers
Do not store enzymes in a frost-free freezer.
1 Users who do not purchase this Kit may be required to obtain a license under U.S. Patent Nos. 5,716,785,5,891,636, 6,291,170, and 5,545,522 or to purchase another licensed kit.

chapter 3 | Reagent Preparation 25
702063 GCAS HT Plates.book Page 25 Thursday, June 15, 2006 8:33 AM
• RNAClean™, Agencourt: P/N 000494
• Nuclease-free Water: Ambion, P/N 9932
• BD Falcon™ Test Tube, 5 mL: VWR International, P/N 60819-728
• BD Falcon™ Test Tube, 14 mL: VWR International, P/N 60819-761
• Elution Strip Tubes, 0.85 mL: QIAGEN, P/N 19588
• Low-Profile 0.2 mL PCR 8-Tube Strips: Bio-Rad, P/N TLS-0801
• Polypropylene Centrifuge Tubes with Caps, 50 mL: VWR International, P/N 20171-028
• RNase-Free 1.5 mL microfuge tube: Ambion, P/N 12400

GeneChip® Expression Analysis Technical Manual26 For HT Array Plates Using the GeneChip® Array Station
702063 GCAS HT Plates.book Page 26 Thursday, June 15, 2006 8:33 AM
Before You Begin
Determine the number of reactions to run for target preparationand then prepare the reagents according to the number of reactionsindicated in the tables provided in the following steps.
The tables in this guide are suited for RNA samples loaded in thetotal RNA plate columnwise.
The volume per strip tube for each reagent is adjusted tosufficiently accommodate the requirements of the GeneChip® ArrayStation.
Assemble the cold reagent block to the Peltier on the GeneChipArray Station deck before preparing the reagent master mixes(refer to Figure 4.22 and Figure 4.23). Ensure that the cold reagentblock is chilled to 4°C prior to loading the reagent strip tubescontaining the reagent master mixes.
Reagent master mixes should not be vortexed. Gently pipet thesolution to ensure reagents are uniformly mixed.
The amount added to the wells of the strip tubes is slightly lessthan the total volume of prepared reagent. This is needed tocompensate for technical differences that may result from pipetteand operator variation, and the properties of the reagents (i.e.,viscosity).

chapter 3 | Reagent Preparation 27
702063 GCAS HT Plates.book Page 27 Thursday, June 15, 2006 8:33 AM
Procedure 1: T7 Primer Master Mix
1. Obtain a RNase-free 1.5 mL microfuge tube and label as “T7 Primer.”
2. Obtain a Bio-Rad Low-Profile PCR Tube Strip and label as “T7.”
3. Add the components listed in Table 3.1 to the microfuge tube and mix well.
4. Aliquot the appropriate volumes of the master mix as indicated in “Volume per Strip Tube Well” into each well of the PCR strip tube.
5. Avoid air bubbles at the bottom of the strip tubes. If necessary, remove air bubbles by briefly pipetting the reaction mix out of the strip well and slowly pipetting it back.
6. Load the strip tube to column 1 of the cold reagent block.
Refer to Table 3.1 for the T7 Primer Master Mix composition.
Table 3.1T7 Primer Master Mix for Cold Reagent Block
Volume per Rxn
Adjusted Volumes:
24 Rxns 48 Rxns 96 Rxns
T7-Oligo(dT) Primer, 50 µM 1.0 µL 32.0 µL 57.0 µL 114.0 µL
Nuclease-free Water 4.0 µL 127.9 µL 228.0 µL 456.0 µL
Total Volume 5.0 µL 159.9 µL 285.0 µL 570.0 µL
Volume per Strip Tube Well 18.5 µL 34.0 µL 69.3 µL

GeneChip® Expression Analysis Technical Manual28 For HT Array Plates Using the GeneChip® Array Station
702063 GCAS HT Plates.book Page 28 Thursday, June 15, 2006 8:33 AM
Procedure 2: First-Strand cDNA Synthesis Master Mix
1. Obtain a RNase-free 1.5 mL microfuge tube and label as “1st Strand.”
2. Obtain a Bio-Rad Low-Profile PCR Tube Strip and label as “1st.”
3. Add the components listed in Table 3.2 to the microfuge tube and mix well.
4. Aliquot the appropriate volumes of the master mix as indicated in “Volume per Strip Tube Well” into each well of the PCR strip tube.
5. Avoid air bubbles at the bottom of the strip tubes. If necessary, remove air bubbles by briefly pipetting the reaction mix out of the strip well and slowly pipetting it back.
6. Load the strip tube to column 2 of the cold reagent block.
Refer to Table 3.2 for the First-Strand cDNA Synthesis Cocktailcomposition.
Table 3.2First-Strand cDNA Synthesis Cocktail for Cold Reagent Block
Volume per Rxn
Adjusted Volumes:
24 Rxns 48 Rxns 96 Rxns
5X 1st Strand Reaction Mix 4.0 µL 114.0 µL 228.0 µL 456.0 µL
DTT, 0.1 M 2.0 µL 57.0 µL 114.0 µL 228.0 µL
dNTP Mix, 10 mM 1.0 µL 28.5 µL 57.0 µL 114.0 µL
SuperScript™ II 1.0 µL 28.5 µL 57.0 µL 114.0 µL
Nuclease-free Water 2.0 µL 57.0 µL 114.0 µL 228.0 µL
Total Volume 10.0 µL 285.0 µL 570.0 µL 1,140.0 µL
Volume per Strip Tube Well 33.5 µL 69.3 µL 140.5 µL

chapter 3 | Reagent Preparation 29
702063 GCAS HT Plates.book Page 29 Thursday, June 15, 2006 8:33 AM
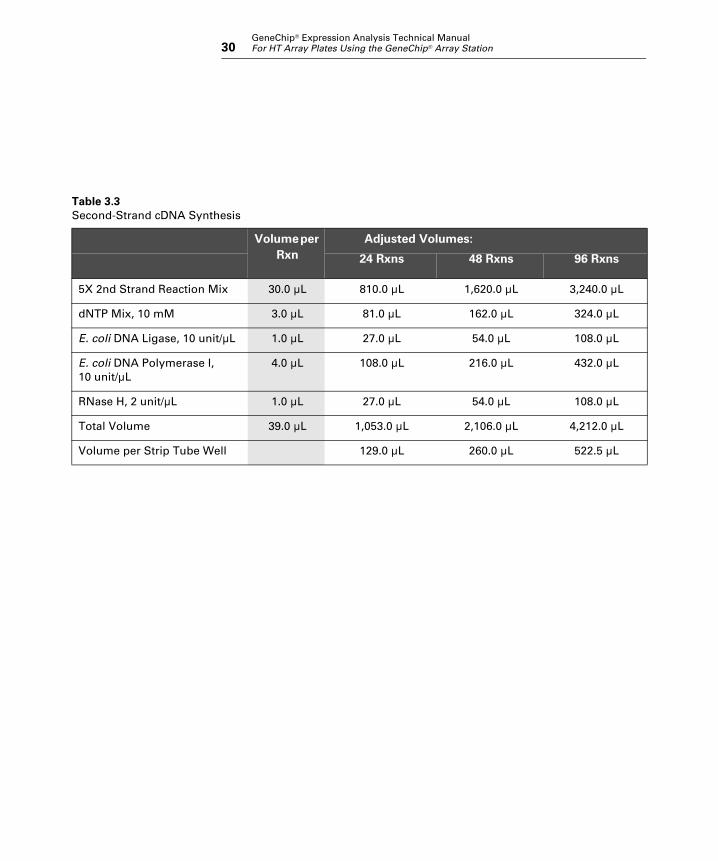
Procedure 3: Second-Strand cDNA Synthesis Master Mix
1. Obtain a 5 mL BD Falcon Test Tube with a clip-on cap for large volumes or a 1.5 mL microfuge tube for smaller volumes (for 32 reactions or less) and label as “2nd Strand.”
2. Obtain an 0.85 mL QIAGEN Elution Strip Tube and label as “2nd.”
3. Add the components listed in Table 3.3 to the BD Falcon Test Tube or the microfuge tube and mix well.
4. Aliquot the appropriate volumes of the master mix as indicated in “Volume per Strip Tube Well” into each well of the QIAGEN Elution Strip Tube.
5. Avoid air bubbles at the bottom of the strip tubes. If necessary, remove air bubbles by briefly pipetting the reaction mix out of the strip well and slowly pipetting it back.
6. Load the strip tube to column 3 of the cold reagent block.
Refer to Table 3.3 for the Second-Strand cDNA Synthesiscomposition.
GeneChip® Expression Analysis Technical Manual30 For HT Array Plates Using the GeneChip® Array Station
702063 GCAS HT Plates.book Page 30 Thursday, June 15, 2006 8:33 AM
Table 3.3Second-Strand cDNA Synthesis
Volume per Rxn
Adjusted Volumes:
24 Rxns 48 Rxns 96 Rxns
5X 2nd Strand Reaction Mix 30.0 µL 810.0 µL 1,620.0 µL 3,240.0 µL
dNTP Mix, 10 mM 3.0 µL 81.0 µL 162.0 µL 324.0 µL
E. coli DNA Ligase, 10 unit/µL 1.0 µL 27.0 µL 54.0 µL 108.0 µL
E. coli DNA Polymerase I, 10 unit/µL
4.0 µL 108.0 µL 216.0 µL 432.0 µL
RNase H, 2 unit/µL 1.0 µL 27.0 µL 54.0 µL 108.0 µL
Total Volume 39.0 µL 1,053.0 µL 2,106.0 µL 4,212.0 µL
Volume per Strip Tube Well 129.0 µL 260.0 µL 522.5 µL

chapter 3 | Reagent Preparation 31
702063 GCAS HT Plates.book Page 31 Thursday, June 15, 2006 8:33 AM
Procedure 4: T4 DNA Polymerase Master Mix
1. Dilute the 5X T4 DNA Polymerase Buffer to a 1X concentration with RNase-free water.
2. Obtain an RNase-free 1.5 mL microfuge tube and label as “T4 DNA Pol.”
3. Obtain a Bio-Rad Low-Profile PCR Tube Strip and label as “T4.”
4. Add the components listed in Table 3.4 to the microfuge tube and mix well.
5. Aliquot the appropriate volumes of the master mix as indicated in “Volume per Strip Tube Well” into each well of the PCR strip tube.
6. Avoid air bubbles at the bottom of the strip tubes. If necessary, remove air bubbles by briefly pipetting the reaction mix out of the strip well and slowly pipetting it back.
7. Load the strip tube to column 4 of the cold reagent block.
Refer to Table 3.4 for the T4 DNA Polymerase Cocktail composition.
The T4 DNA polymerase buffer supplied in the GeneChip® HT One-Cycle cDNA Synthesis Kit is 5X. First dilute 5X T4 DNA PolymeraseBuffer to 1X buffer.

GeneChip® Expression Analysis Technical Manual32 For HT Array Plates Using the GeneChip® Array Station
702063 GCAS HT Plates.book Page 32 Thursday, June 15, 2006 8:33 AM
Table 3.4T4 DNA Polymerase Cocktail for Cold Reagent Block
Volume per Rxn
Adjusted Volumes:
24 Rxns 48 Rxns 96 Rxns
T4 DNA Polymerase 2.0 µL 69.3 µL 118.0 µL 236.0 µL
1X T4 DNA Polymerase Buffer 2.0 µL 69.3 µL 118.0 µL 236.0 µL
Total Volume 4.0 µL 138.6 µL 236.0 µL 472.0 µL
Volume per Strip Tube Well 16.0 µL 27.8 µL 57.0 µL

chapter 3 | Reagent Preparation 33
702063 GCAS HT Plates.book Page 33 Thursday, June 15, 2006 8:33 AM
Procedure 5: IVT Master Mix
1. Obtain a 5 mL BD Falcon Test Tube with a clip-on cap for large volumes or a 1.5 mL microfuge tube for smaller volumes (for 32 reactions or less) and label as “IVT.”
2. Obtain a 0.85 mL QIAGEN Elution Strip Tube and label as “IVT.”
3. Add the components listed in Table 3.5 to the BD Falcon Test Tube or the microfuge tube and mix well.
4. Aliquot the appropriate volumes of the master mix as indicated in “Volume per Strip Tube Well” into each well of the QIAGEN Elution Strip Tube.
5. Avoid air bubbles at the bottom of the strip tubes. If necessary, remove air bubbles by briefly pipetting the reaction mix out of the strip well and slowly pipetting it back.
6. Load the strip tube to column 5 of the cold reagent block.
Refer to Table 3.5 for the IVT Cocktail Master Mix composition.

GeneChip® Expression Analysis Technical Manual34 For HT Array Plates Using the GeneChip® Array Station
702063 GCAS HT Plates.book Page 34 Thursday, June 15, 2006 8:33 AM
Table 3.5IVT Cocktail Master Mix for Cold Reagent Block
Volume per Rxn
Adjusted Volumes:
24 Rxns 48 Rxns 96 Rxns
10X IVT Buffer 6.0 µL 168.0 µL 336.0 µL 672.0 µL
IVT Labeling NTP Mix 18.0 µL 504.0 µL 1,008.0 µL 2,016.0 µL
IVT Labeling Enzyme Mix 6.0 µL 168.0 µL 336.0 µL 672.0 µL
T7 RNA Polymerase 1.0 µL 28.0 µL 56.0 µL 112.0 µL
Nuclease-free Water 7.0 µL 196.0 µL 392.0 µL 784.0 µL
Total Volume 38.0 µL 1,064.0 µL 2,128.0 µL 4,256.0 µL
Volume per Strip Tube Well 131.0 µL 264.0 µL 529.0 µL
chapter 3 | Reagent Preparation 35
702063 GCAS HT Plates.book Page 35 Thursday, June 15, 2006 8:33 AM
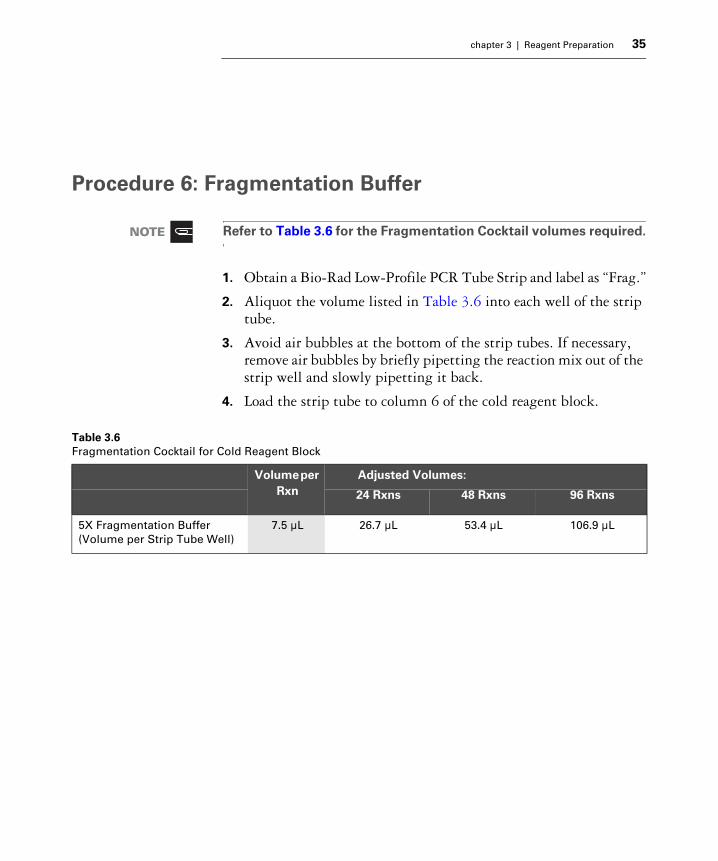
Procedure 6: Fragmentation Buffer
1. Obtain a Bio-Rad Low-Profile PCR Tube Strip and label as “Frag.”
2. Aliquot the volume listed in Table 3.6 into each well of the strip tube.
3. Avoid air bubbles at the bottom of the strip tubes. If necessary, remove air bubbles by briefly pipetting the reaction mix out of the strip well and slowly pipetting it back.
4. Load the strip tube to column 6 of the cold reagent block.
Refer to Table 3.6 for the Fragmentation Cocktail volumes required.
Table 3.6Fragmentation Cocktail for Cold Reagent Block
Volume per Rxn
Adjusted Volumes:
24 Rxns 48 Rxns 96 Rxns
5X Fragmentation Buffer (Volume per Strip Tube Well)
7.5 µL 26.7 µL 53.4 µL 106.9 µL

GeneChip® Expression Analysis Technical Manual36 For HT Array Plates Using the GeneChip® Array Station
702063 GCAS HT Plates.book Page 36 Thursday, June 15, 2006 8:33 AM
Procedure 7: Hybridization Master MixThe Array Station allows the choice of two different volumes of Hybridization Cocktails to be prepared for the HT Array Plates, 100 μL or 200 μL. The 100 μL Hybridization Cocktail is prepared when the samples are to be analyzed on one HT Array Plate. The 200 μL Hybridization Cocktail is prepared when samples are to be analyzed on two HT Array Plates.
REAGENT PREPARATION
12X MES Stock Buffer
(1.22M MES, 0.89M [Na+])
For 1,000 mL:64.61 g of MES Hydrate193.3 g of MES Sodium Salt800 mL of Nuclease-free WaterMix and adjust volume to 1,000 mL.The pH should be between 6.5 and 6.7. Filter through a 0.2 μm filter.
The Hybridization Cocktail for the HT Array Plates is a TMAC basedbuffer. It differs from the Hybridization Cocktail prepared forcartridge expression arrays.
Do not autoclave. Store at 2°C to 8°C, and shield from light.
Discard solution if yellow.

chapter 3 | Reagent Preparation 37
702063 GCAS HT Plates.book Page 37 Thursday, June 15, 2006 8:33 AM
1.23X Hybridization Buffer
(Final 1.0X concentration is 100 mM MES, 2.5M TMAC, 20 mM EDTA, 0.01% Tween-20)
For 50 mL:5.04 mL of 12X MES Stock Buffer30.73 mL of 5M TMAC2.46 mL of 0.5M EDTA 0.06 mL of 10% Tween-2011.71 mL of Nuclease-free WaterFilter through a 0.2 μm filter Store at 2°C to 8°C, and shield from light
Do not autoclave. Store at 2°C to 8°C, and shield from light.
Discard solution if yellow.

GeneChip® Expression Analysis Technical Manual38 For HT Array Plates Using the GeneChip® Array Station
702063 GCAS HT Plates.book Page 38 Thursday, June 15, 2006 8:33 AM
PROCEDURE
1. Obtain a 14 mL BD Falcon Test Tube, or a 50 mL centrifuge tube for larger volumes, and label as “Hyb Mix.”
2. Obtain one to six 0.85 mL QIAGEN Elution Strip Tubes and label as “Hyb.”
3. For hybridizing to one HT Array Plate, follow Step 3A below. For hybridizing to two HT Array Plates, follow Step 3B below.
A. Referring to Table 3.7 for 100 μL Hybridization Cocktail Master Mix composition, combine the components as indicated in a 14 mL BD Falcon test tube. Go to Step 4 below.
B. Referring to Table 3.8 for 200 μL Hybridization Cocktail Master Mix composition, combine the components as indicated in a 14 mL BD Falcon test tube, or a 50 mL centrifuge tube, depending on the total volume.
4. Aliquot the appropriate volumes of the master mix as indicated in Table 3.7 (or Table 3.8) into each well of the QIAGEN Elution Strip Tube(s).
5. Avoid air bubbles at the bottom of the strip tubes. If necessary, remove air bubbles by briefly pipetting the reaction mix out of the strip well and slowly pipetting it back.
The recipes in Table 3.7 and Table 3.8 take into account that it isnecessary to make extra hybridization cocktail due to a small lossof volume (10 to 20 μL) during each hybridization.
Refer to Table 3.7 for 100 μL Hybridization Cocktail Master Mixcomposition. The 100 μL volume is for Hybridization Cocktails thatwill be hybridized to one HT Array Plate.
Refer to Table 3.8 for 200 μL Hybridization Cocktail Master Mixcomposition. The 200 μL volume is for Hybridization Cocktails thatwill be hybridized to two HT Array Plates.

chapter 3 | Reagent Preparation 39
702063 GCAS HT Plates.book Page 39 Thursday, June 15, 2006 8:33 AM
6. Load the strip tubes to columns 7-12 of the cold reagent block. The number of strip tubes will vary depending on the number of reactions.
It is imperative that frozen stocks of 20X GeneChip® EukaryoticHybridization Controls are heated to 65°C for 5 minutes tocompletely resuspend the cRNA before aliquotting.
Table 3.7100 µL Hybridization Cocktail Master Mix for Cold Reagent Block - 1 HT Array Plate
Volume per Rxn
Adjusted Volumes:
24 Rxns 48 Rxns 96 Rxns
20X Hybridization Control Stock 5.0 µL 139.1 µL 272.5 µL 545.0 µL
3 nM B2 Oligo 1.65 µL 45.9 µL 89.9 µL 179.9 µL
HS DNA (10 mg/mL) 1.0 µL 27.8 µL 54.5 µL 109.0 µL
Acetylated BSA (50 mg/mL) 1.0 µL 27.8 µL 54.5 µL 109.0 µL
1.23X Hybridization Buffer 81.35 µL 2,263.0 µL 4,433.6 µL 8,867.2 µL
Total Volume 90 µL 2,503.6 µL 4,905.0 µL 9,810.1 µL
# of QIAGEN Strips Used 1 2 3
Volume per Well in 1st Strip 306.0 µL 408.0 µL 408.0 µL
Volume per Well in 2nd Strip 204.0 µL 408.0 µL
Volume per Well in 3rd Strip 408.0 µL

GeneChip® Expression Analysis Technical Manual40 For HT Array Plates Using the GeneChip® Array Station
702063 GCAS HT Plates.book Page 40 Thursday, June 15, 2006 8:33 AM
It is imperative that frozen stocks of 20X GeneChip® EukaryoticHybridization Controls are heated to 65°C for 5 minutes tocompletely resuspend the cRNA before aliquotting.
Table 3.8200 µL Hybridization Cocktail Master Mix for Cold Reagent Block - 2 HT Array Plates
Volume per Rxn
Adjusted Volumes:
24 Rxns 48 Rxns 96 Rxns
20X Hybridization Control Stock 10.0 µL 272.5 µL 545.0 µL 1,090.0 µL
3 nM B2 Oligo 3.3 µL 89.9 µL 179.9 µL 359.7 µL
HS DNA (10 mg/mL) 2.0 µL 54.5 µL 109.0 µL 218.0 µL
Acetylated BSA (50 mg/mL) 2.0 µL 54.5 µL 109.0 µL 218.0 µL
1.23X Hybridization Buffer 162.7 µL 4,433.6 µL 8,867.2 µL 17,734.3 µL
Total Volume 180.0 µL 4,905.0 µL 9,810.1 µL 19,620.0 µL
# of QIAGEN Strips Used 2 3 6
Volume per Well in 1st Strip 408.0 µL 408.0 µL 408.0 µL
Volume per Well in 2nd Strip 204.0 µL 408.0 µL 408.0 µL
Volume per Well in 3rd Strip 408.0 µL 408.0 µL
Volume per Well in 4th Strip 408.0 µL
Volume per Well in 5th Strip 408.0 µL
Volume per Well in 6th Strip 408.0 µL

chapter 3 | Reagent Preparation 41
702063 GCAS HT Plates.book Page 41 Thursday, June 15, 2006 8:33 AM
Additional Reagent Preparation Steps Required
SETUP 75% EtOH RESERVOIR
Materials Needed
• Ethanol, 100%
• Nuclease-free Water
• E&K Scientific 96 Well Reservoir, High Profile 300 mL
• Phenix Universal Lid for 96-well plates
Procedure
1. Prepare 250 mL 75% EtOH and pour into reagent reservoir.
2. Cover the reservoir with a lid.
SETUP H2O RESERVOIR
Materials Needed
• E&K Scientific 96 Well Reservoir, High Profile 300 mL
• Phenix Universal Lid for 96-well plates
• Nuclease-free Water
Procedure
1. Pour 250 mL Nuclease-free water into the reagent reservoir.
2. Cover the reservoir with a lid.

GeneChip® Expression Analysis Technical Manual42 For HT Array Plates Using the GeneChip® Array Station
702063 GCAS HT Plates.book Page 42 Thursday, June 15, 2006 8:33 AM
cDNA AND cRNA PURIFICATION PREPARATION
Materials Needed
• Agencourt RNAClean™
• ABGene 1.2 mL Square Well Storage Plate, Low Profile
• Phenix Universal Lid for 96-well plates
Procedure
1. Inspect the bottle of RNAClean solution to verify that it is a brownish slurry in color and that it has been refrigerated.
2. Thoroughly shake the bottle of RNAClean solution before aliquoting 450 μL into each well of a 1.2 mL low profile reservoir.
3. Cover the reservoir with a lid.

702063 GCAS HT Plates.book Page 43 Thursday, June 15, 2006 8:33 AM
Chapter 4
Array Station Setup and Target Preparation
702063 GCAS HT Plates.book Page 44 Thursday, June 15, 2006 8:33 AM
Chapter 4

45
702063 GCAS HT Plates.book Page 45 Thursday, June 15, 2006 8:33 AM
Introduction
This chapter describes a typical Array Station run for GeneChip® HT Array Plates. A schematic of the automated target preparation protocol is provided at the beginning to outline the steps in the procedure (Figure 4.1 to Figure 4.13).
This chapter also describes the procedures for using the GeneChip® Array Station Software, setting up the Array Station deck, and performing quantitation and normalization of cRNA.
Automated Target Preparation SchematicThe following outlines a complete sample preparation protocol.
Figure 4.1Step 1 & 2: Primer Anneal

GeneChip® Expression Analysis Technical Manual46 For HT Array Plates Using the GeneChip® Array Station
702063 GCAS HT Plates.book Page 46 Thursday, June 15, 2006 8:33 AM
Figure 4.2Step 3 & 4: First Strand cDNA Synthesis
Figure 4.3Steps 5, 6, and 7: Second Strand cDNA Synthesis

chapter 4 | Array Station Setup and Target Preparation 47
702063 GCAS HT Plates.book Page 47 Thursday, June 15, 2006 8:33 AM
Figure 4.4Step 8 & 9: T4 Polymerase Reaction
Figure 4.5Steps 10 to 18: cDNA Capture

GeneChip® Expression Analysis Technical Manual48 For HT Array Plates Using the GeneChip® Array Station
702063 GCAS HT Plates.book Page 48 Thursday, June 15, 2006 8:33 AM
Figure 4.6Step 19 & 20: cDNA Wash
Figure 4.7Steps 21 to 25: cDNA Elution and IVT Setup

chapter 4 | Array Station Setup and Target Preparation 49
702063 GCAS HT Plates.book Page 49 Thursday, June 15, 2006 8:33 AM
Figure 4.8Steps 26 to 32: IVT Capture and Wash

GeneChip® Expression Analysis Technical Manual50 For HT Array Plates Using the GeneChip® Array Station
702063 GCAS HT Plates.book Page 50 Thursday, June 15, 2006 8:33 AM
Figure 4.9Steps 33 to 36: IVT Elution
Figure 4.10Steps 37 to 40: First Quantitation

chapter 4 | Array Station Setup and Target Preparation 51
702063 GCAS HT Plates.book Page 51 Thursday, June 15, 2006 8:33 AM
Figure 4.11Steps 41 & 42 & 43: Normalization and Second Quantitation (Refer to Figure 4.11 for details of Step 43)
Figure 4.12Steps 44 & 45 & 46: Fragmentation

GeneChip® Expression Analysis Technical Manual52 For HT Array Plates Using the GeneChip® Array Station
702063 GCAS HT Plates.book Page 52 Thursday, June 15, 2006 8:33 AM
Figure 4.13Steps 47 & 48: Hyb-sample Mix Transfer

chapter 4 | Array Station Setup and Target Preparation 53
702063 GCAS HT Plates.book Page 53 Thursday, June 15, 2006 8:33 AM
Check List Before a RunBefore beginning a sample preparation run, you must make the following checks of the system.
1. Ensure that the water supply connections and waste water drainage are properly installed. In addition, the bottles (illustrated in Figure 4.14) must be filled with distilled or de-ionized water and the liquid waste container (illustrated in Figure 4.15) must be empty.
Figure 4.14Tubing lines for water supply

GeneChip® Expression Analysis Technical Manual54 For HT Array Plates Using the GeneChip® Array Station
702063 GCAS HT Plates.book Page 54 Thursday, June 15, 2006 8:33 AM
Figure 4.15Liquid waste drainage
Waste

chapter 4 | Array Station Setup and Target Preparation 55
702063 GCAS HT Plates.book Page 55 Thursday, June 15, 2006 8:33 AM
2. Ensure that all the pipette tip boxes are oriented correctly, fit snugly into the holders, and the holders fit into the Twister II Rack.Figure 4.16 to Figure 4.20 illustrate how to load the pipette tips into the Twister II Rack.
3. Controlling static electrical interference: Static attraction can cause pipette tips to cling to the heads and to each other. To control static attraction, use non-sterile, RNase/DNase-free tips and use a static gun to remove static discharge. See Figure 4.16 and Figure 4.17.
4. Another method used to control static electricity is the use of metal spacers. Spacers should be placed in between each and on top of the last RNase/DNase-free tip rack after the use of the static gun. See Figure 4.18.
Tip Loading Requirement — The number of tip boxes needed foreach run may vary depending on the deck layout used and thenumber of samples processed. Refer to Table 4.1 to determine thenumber of tip boxes to load.
Clean out empty tip boxes in Twister II® Rack 2.
Do not remove tip boxes while run is in progress.
Tip boxes should not extend above the top of the Rack.
Table 4.1Pipette Tip Usage
Number of Rxns 8 16 24 32 40 48 56 64 72 80 88 96
Number of Tip Boxes Needed
2 4 6 7 9 11 13 14 16 18 20 21

GeneChip® Expression Analysis Technical Manual56 For HT Array Plates Using the GeneChip® Array Station
702063 GCAS HT Plates.book Page 56 Thursday, June 15, 2006 8:33 AM
Figure 4.16Removing static discharge from tip boxes with a static gun
Figure 4.17Removing static discharge from tips with a static gun

chapter 4 | Array Station Setup and Target Preparation 57
702063 GCAS HT Plates.book Page 57 Thursday, June 15, 2006 8:33 AM
Figure 4.18Tips with anti-static metal spacers

GeneChip® Expression Analysis Technical Manual58 For HT Array Plates Using the GeneChip® Array Station
702063 GCAS HT Plates.book Page 58 Thursday, June 15, 2006 8:33 AM
Figure 4.19Loading the pipette tips into the holder and into the Rack
Figure 4.20Loading the pipette boxes into the Rack

chapter 4 | Array Station Setup and Target Preparation 59
702063 GCAS HT Plates.book Page 59 Thursday, June 15, 2006 8:33 AM
CLEAN THE BIO-RAD 96-WELL HARD-SHELL PCR PLATE LIDS
Material required
• Ambion DNAZap™
• Ambion RNaseZap® Wipes
Procedure
1. Rinse the pad with DI water.
2. Wipe the pad with RNaseZap.
3. Rinse the pad with DI water.
4. Wipe the pad with DNAZap.
5. Thoroughly rinse the pad with DI water.
6. Dry the pad with pressurized clean air or nitrogen.
The disposable pad under the arched lids should be cleaned beforeevery run.
The disposable pad under the arched lids should be replaced every15 runs. Refer to the GeneChip® Array Station User’s Guide (P/N701859) for further details.

GeneChip® Expression Analysis Technical Manual60 For HT Array Plates Using the GeneChip® Array Station
702063 GCAS HT Plates.book Page 60 Thursday, June 15, 2006 8:33 AM
Beginning a Run — First LayoutThis section shows you how to set up the deck and use the software to begin a sample preparation run for the first deck layout. The first layout protocol completes the following steps.
1. Primer anneal
2. First strand cDNA synthesis
3. Second strand cDNA synthesis
4. T4 polymerase synthesis
5. cDNA purification, wash and cDNA elution
6. IVT reaction
7. cRNA Cleanup and Elution
8. Pause for deck change to the second deck layout
PROCEDURE
1. Set up the deck with the appropriate consumables. Refer to Figure 4.21.
2. Assemble the Peltier adaptor and prechilled cold reagent block. Ensure that the unit is securely tightened. Refer to Figure 4.22 and Figure 4.23.
The deck layout shown in Figure 4.21 is for runs starting at thebeginning of the target prep process. Custom target prep runs canalso be started at various other places in the protocol. Please referto layouts in Appendix C for runs starting at other steps in theprocess.

chapter 4 | Array Station Setup and Target Preparation 61
702063 GCAS HT Plates.book Page 61 Thursday, June 15, 2006 8:33 AM
3. Turn on the Watlow Temperature Controller to 4°C. Refer Figure 4.24.
4. Load the reagent strip tubes onto the assembled cold reagent block and adaptor. Refer to Figure 4.25.
5. Ensure that the tabs on the strip tubes are correctly seated in order to place the lid on the cold reagent block.
The prechilled cold reagent block and Peltier adaptor are assembledprior to the addition of the reagent strip tubes. It is important thatthe adaptor be at room temperature when joining with the coldreagent block as it is difficult to fit the cold reagent block flushagainst the adaptor if the adaptor is cold. Once the chilled coldreagent block is assembled into the adapter securely, adjust thecontrol unit to 4°C for the remainder of the run.

GeneChip® Expression Analysis Technical Manual62 For HT Array Plates Using the GeneChip® Array Station
702063 GCAS HT Plates.book Page 62 Thursday, June 15, 2006 8:33 AM
Figure 4.21First Deck LayoutRefer to Table 4.1 on page 55 to determine the number of tip boxes to load.
Red Tip Rack
Tip Rack
Tip Rack
Tip Rack
EMPTY
Tbe used for Twister access
EMPTY
Lubrication Block
Nuclease free H2O in lidded reservoir
Bio-Rad Plate with lid.Label as "un-frag cRNA"
Bio-Rad Plate with lidManual prep: contains 5µLtotal RNA in each well.Label as "Total RNA"
D3D2
Liquid Waste Drain
D4 D5
B3B2B1 B4 B5
C4
Bio-Rad Plate with lidLabel as "Purified cDNA"
C3C2C1 C5
Base for stackable tip rack
Waste Chute
75% EtOH in lidded reservoir
A4
RNAClean™ in low profilelidded reservoir plate
A3 A5
Lidded Cold Block for Reagents
A1 A2
D1
Corning Polystyrene 3795 U-bottom plate. Label as "cRNA Cleanup"
Corning Polystyrene 3795 U bottom plate onMag Separator. Label as "cDNA Cleanup"
EMPTY

chapter 4 | Array Station Setup and Target Preparation 63
702063 GCAS HT Plates.book Page 63 Thursday, June 15, 2006 8:33 AM
Figure 4.22Loading the cold reagent block on to the deck fixture
Figure 4.23Securing the cold reagent block. Do not fully tighten.

GeneChip® Expression Analysis Technical Manual64 For HT Array Plates Using the GeneChip® Array Station
702063 GCAS HT Plates.book Page 64 Thursday, June 15, 2006 8:33 AM
Figure 4.24Setting the Watlow Temperature Controller for the Peltier at 4°C
Figure 4.25Loading the strips into the cold reagent block

chapter 4 | Array Station Setup and Target Preparation 65
702063 GCAS HT Plates.book Page 65 Thursday, June 15, 2006 8:33 AM
RUNNING AFFYMETRIX® GENE EXPRESSION TARGET PREPARATION (TP) PROTOCOL ON THE GENECHIP® ARRAY STATION
1. Check to confirm that the deck and racks are correctly populated with well plates, tips, etc. and that the cold reagent block is loaded with the correct reagents.
2. Open the GeneChip Array Station Software by double-clicking the desktop icon, or click Start → Programs → Caliper Life Sciences → Instruments → Sciclone→ Sciclone Workstation Software.
3. A Login window appears (Figure 4.26). Enter your User Name and Password and click OK. All runs should be performed in Operator Mode. See Appendix D, User Level Configuration for a description of operational modes.
4. Once you have logged in, the main Operator window appears, as shown in Figure 4.27. This window is referred to as the Runtime Window.
Figure 4.26Sciclone Workstation Software Login Window

GeneChip® Expression Analysis Technical Manual66 For HT Array Plates Using the GeneChip® Array Station
702063 GCAS HT Plates.book Page 66 Thursday, June 15, 2006 8:33 AM
5. To load the Affymetrix Target Preparation protocol, select File → Open and you will see the dialog box shown in Figure 4.28.
Figure 4.27Runtime window

chapter 4 | Array Station Setup and Target Preparation 67
702063 GCAS HT Plates.book Page 67 Thursday, June 15, 2006 8:33 AM
6. Select the protocol TP_0001 and click Open. When the Target Preparation Protocol has completed loading, the window will appear as shown in Figure 4.29.
Figure 4.28Open Sciclone Application window

GeneChip® Expression Analysis Technical Manual68 For HT Array Plates Using the GeneChip® Array Station
702063 GCAS HT Plates.book Page 68 Thursday, June 15, 2006 8:33 AM
Figure 4.29Target Preparation Protocol Loaded

chapter 4 | Array Station Setup and Target Preparation 69
702063 GCAS HT Plates.book Page 69 Thursday, June 15, 2006 8:33 AM
7. To begin a run, click the green arrow button in the Application Control console of the Runtime window. Prior to the start of the run, you will be prompted to select various options. The windows and selections you will see are shown in the series of figures that follow.
8. For the Target Preparation Setup window you will need to select the following options:
A. User name: Select the appropriate user name from the drop down menu. Please contact Affymetrix support personnel for assistance with customizing this window.
Figure 4.30Target Preparation Setup window

GeneChip® Expression Analysis Technical Manual70 For HT Array Plates Using the GeneChip® Array Station
702063 GCAS HT Plates.book Page 70 Thursday, June 15, 2006 8:33 AM
B. Number of samples: Select either 24 or 96. Be sure your samples are laid out in the plate in column wise fashion starting column 1.
C. Incubation time: Select 8 hours from the drop down menu.
D. Target for: Select the desired final volume of hyb-ready sample needed for further processing on HT Array plates. 100 μL will provide sufficient material for hybridization to one HT Array plate. 200 μL is required if running samples on two HT Array plates.
E. Tracking identifier: This is an optional field that can be utilized for your individual runs. You can fill in up to 40 characters of text here. The information you enter will be recorded in the Target Preparation Summary Report for your run (see Figure 4.44 on page 88).
F. Read barcodes: Check this box if you want the system to automatically read and track the barcodes of various plates used during the run. You must supply the barcodes (code 128c format) and affix them to any or all of the following plates for tracking total RNA, unfragmented cRNA, normalized cRNA, fragmented cRNA, and hyb-ready sample. Barcodes should be affixed to the right side of the plate (see Figure 4.31). Barcodes recorded during the run will be reported in the Target Preparation Summary Report for your run (see Figure 4.44 on page 88).
Affymetrix Target Prep currently is only validated for an 8 hour IVT.If you choose an incubation time other than 8 hours, ensure youhave consulted Affymetrix support.

chapter 4 | Array Station Setup and Target Preparation 71
702063 GCAS HT Plates.book Page 71 Thursday, June 15, 2006 8:33 AM
G. Perform automatic sample transfer: Check this box to have the Array Station transfer 5 μL of starting total RNA into the Bio-Rad 96 Well Hard Shell PCR plate. To use automated sample transfer, a minimum of 20 μL of your sample (0.2 to 0.4 μg/μL) must be in a Greiner U-bottom plate. If you select Automated Sample Transfer, you will be prompted when to place and remove plates as needed. Please refer to Appendix B and Chapter 2 for more information on using the automated sample transfer option.
H. Hold in incubator at 4°C after IVT: If you select this option, the plate will be held in the incubator at 4°C after the IVT step until you prompt the Array Station to resume the process. Once prompted, the process will proceed to the IVT cleanup steps.
I. Twister II tip rack spacer plates are in use: Select this option if you are using the tip rack spacer plates to help control static. Affymetrix strongly suggests you utilize the tip rack spacer plates. A spacer plate should be placed between each rack of tips as well as on the top rack of tips before loading tips into the Twister II Rack 1.
Figure 4.31Barcode Positioning on Plate
If you select the automatic sample transfer option you must use theinitial deck layout shown in Figure B.1 of Appendix B. Do not usethe layout shown in Figure 4.21.
Front Front
Rig
ht
Rig
ht

GeneChip® Expression Analysis Technical Manual72 For HT Array Plates Using the GeneChip® Array Station
702063 GCAS HT Plates.book Page 72 Thursday, June 15, 2006 8:33 AM
J. Notification Settings: Select each of the steps at which you would like to receive a notification. Notification can be received via email or pager. Ensure that the email address or pager information in the selection is correct and active. Please contact Affymetrix personnel for assistance with configuring email or pager notification.
K. Run compressed method (FOR TESTING ONLY): Do not select this option unless you are performing a blank test run.
9. When you have completed the options on this setup window, click Next.
Please see Appendix C for a description of how to use the“Customize Run” option.

chapter 4 | Array Station Setup and Target Preparation 73
702063 GCAS HT Plates.book Page 73 Thursday, June 15, 2006 8:33 AM
10. The Target Preparation Reagents window graphically displays the correct setup for the Reagent Block according to your selections. In the example shown, the user has selected 96 samples and a final hybridization volume of 100 μL. The boxes labeled cDNA kit and IVT kit provide an optional way to track lot numbers of your reagent kits. If you place the lot numbers in the boxes at this time, they will be captured in the Target Preparation Summary Report at the end of the run (see Figure 4.44 on page 88 for an example of this report). After verifying you have correctly set up the Reagent Block, click Next.
Figure 4.32Target Preparation Reagents window
GeneChip® Expression Analysis Technical Manual74 For HT Array Plates Using the GeneChip® Array Station
702063 GCAS HT Plates.book Page 74 Thursday, June 15, 2006 8:33 AM
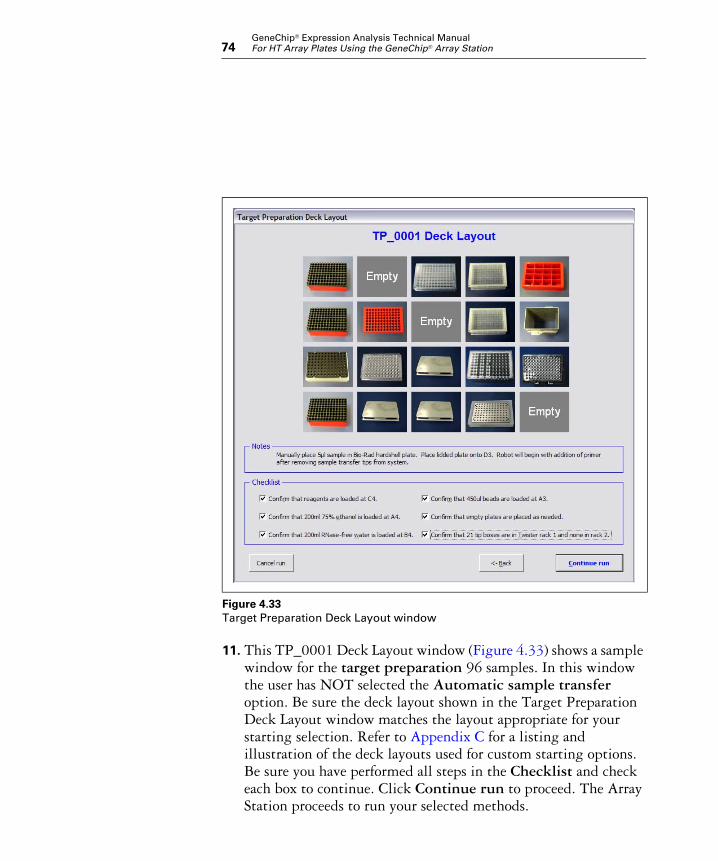
11. This TP_0001 Deck Layout window (Figure 4.33) shows a sample window for the target preparation 96 samples. In this window the user has NOT selected the Automatic sample transfer option. Be sure the deck layout shown in the Target Preparation Deck Layout window matches the layout appropriate for your starting selection. Refer to Appendix C for a listing and illustration of the deck layouts used for custom starting options. Be sure you have performed all steps in the Checklist and check each box to continue. Click Continue run to proceed. The Array Station proceeds to run your selected methods.
Figure 4.33Target Preparation Deck Layout window

chapter 4 | Array Station Setup and Target Preparation 75
702063 GCAS HT Plates.book Page 75 Thursday, June 15, 2006 8:33 AM
12. If you have selected the option to Hold in the incubator at 4°C after IVT, you will see the following message after completion of the IVT method:
13. To proceed to the cRNA cleanup, you must click OK. Do not make any changes to the deck. The Array Station will continue with the cRNA cleanup method.
Figure 4.34User Message window if holding at 4°C after IVT.

GeneChip® Expression Analysis Technical Manual76 For HT Array Plates Using the GeneChip® Array Station
702063 GCAS HT Plates.book Page 76 Thursday, June 15, 2006 8:33 AM
Second Layout (User Intervention)This section shows you how to begin a sample preparation run for the second deck layout.
The second layout protocol completes the following steps:
1. First quantitation
2. Normalization
3. Second quantitation
4. Fragmentation
5. Preparation of hybridization-ready sample.
PROCEDURE
1. Change the deck layout as shown in Figure 4.36.
Do not click OK, as illustrated in the User Message in Figure 4.35,until the deck layout is changed. See Figure 4.36 for an illustrationof the deck layout.
Figure 4.35User Message window indicating a deck layout change for First quantitation.
Your samples are being held at 4°C in the incubator. Do not disturbthem. The robot will bring them back on the deck after you havecompleted the deck layout change.

chapter 4 | Array Station Setup and Target Preparation 77
702063 GCAS HT Plates.book Page 77 Thursday, June 15, 2006 8:33 AM
2. Follow the prompts on the workstation to complete this section of the protocol.
Figure 4.36Second layout. This requires user intervention to set up.
After the completion of this section, the samples are ready forhybridization to the cartridge arrays.
Tip RackIf tips are present, leave them there.
EMPTY
Tbe used for Twister access
EMPTY
Lubrication BlockGreiner Polystyrene UV transparent optical plate
Nuclease free H2O in lidded reservoir
Bio-Rad Plate with lid Label as "frag cRNA"
DD2
Liquid Waste Drain
D4 D5
B3B2B1 B4 B5
C4C3C2C1 C5
Base for stackable tip rack
Waste Chute
A4A3 A5
Lidded Cold Block for Reagents
A1 A2
D1
Plate Array Release Clamp
Tip RackIf tips are present, leave them there.
Tip RackIf tips are present, leave them there.
Greiner PolypropyleneU-bottom plate. Label as "normalized cRNA"
Greiner PolypropyleneU-bottom plate for HybLabel as "Hyb-ready sample"
EMPTY
Twback here
EMPTY
Two Plastic Lids Stacked
Red Tip Rack
GeneChip® Expression Analysis Technical Manual78 For HT Array Plates Using the GeneChip® Array Station
702063 GCAS HT Plates.book Page 78 Thursday, June 15, 2006 8:33 AM
cRNA QUANTITATION AND NORMALIZATION
This section of the protocol details the user intervention steps necessary for calculating the yield of cRNA generated from the in vitro transcription reaction. The accurate calculation of the yield is necessary so that the correct amount of cRNA is added to the fragmentation reaction. Too much or too little cRNA added to the fragmentation reaction can result in incomplete or over fragmented cRNA and cause hybridization effects. This cRNA yield can be used as a check point to ensure that all the proceeding steps have been successfully completed and sufficient cRNA yield has been generated.
The GeneChip Array Station uses spectrophotometric analysis to determine the cRNA yield. The convention that 1 absorbance unit at 260 nm equals 40 μg/mL RNA is used.
• The absorbance at 260 nm and 280 nm is checked to determine sample concentration and purity.
• The A260/A280 ratio is maintained close to 2.0 for pure RNA (ratios between 1.9 and 2.1 are acceptable).
The following method assumes the use of the recommendedspectrophotometer as part of the Array Station system. If a differentspectrophotometer is used, refer to instructions in that user guide.

chapter 4 | Array Station Setup and Target Preparation 79
702063 GCAS HT Plates.book Page 79 Thursday, June 15, 2006 8:33 AM
cRNA FIRST QUANTITATION
1. Turn on the spectrophotometer. Before proceeding, ensure that the LCD screen on the spectrophotometer indicates that the UV lamp has warmed up successfully. Confirm that you have selected the proper wavelengths (260 and 280).
2. Start the SoftMax® Pro software. Either click the SoftMax Pro icon on the desktop or click Start → All Programs → SoftMax Pro → SoftMax Pro.
3. Remove the optical plate from position C2 on the deck and place the plate on the spectrophotometer tray.
4. Press the Read button in the SoftMax Pro software and make sure that the Replace option is selected.The spectrophotometer will read the plate as a blank.
5. Using the SoftMax Pro software, export the readings as a file called “Blank.txt” to the folder c:\Affymetrix\Reader Data. Also save the blank reading on floppy disc as a backup.
The robot will remove the reaction plate from the thermal cyclerand put 198 μL of water into the optical plate.
When the User Message appears, as illustrated in Figure 4.37, donot click “OK” until Step 7.
Figure 4.37User Message window indicating to read Blank plate.

GeneChip® Expression Analysis Technical Manual80 For HT Array Plates Using the GeneChip® Array Station
702063 GCAS HT Plates.book Page 80 Thursday, June 15, 2006 8:33 AM
.
6. Go to c:\Affymetrix\Reader Data to check that the software has updated “Blank.txt” with the correct date and time.
7. Return the plate on the deck to position C2 and click OK.
8. Remove the optical plate and place in the spectrophotometer.
9. Open the SoftMax Pro software.
10. Press the Read button in the SoftMax Pro software and ensure that you have selected the Replace option.The spectrophotometer will now read the plate.
Use the export function to save the file in text format. If you areusing other software, export or save data as a text file and ensurethat the file is reformatted to the appropriate format.
The Array Station will now add 2 μL to the 198 μL of the water inthe optical plate and will mix the sample with pipette mixes.
When the User Message appears, as illustrated in Figure 4.38, donot click “OK” until Step 2 of Normalization on page 81.
Figure 4.38User Message window indicating reading optical plate and placing a clean optical plate.

chapter 4 | Array Station Setup and Target Preparation 81
702063 GCAS HT Plates.book Page 81 Thursday, June 15, 2006 8:33 AM
11. When the spectrophotometer completes the optical read, export the data as “sample.txt” to the folder c:\Affymetrix\Reader Data. Save the sample data on a floppy disc as a backup.
12. Go to c:\Affymetrix\Reader Data to check that the software has updated “Sample.txt” with the correct date and time.
13. Discard optical plate.
NORMALIZATION
1. Place a clean optical plate on the Array Station deck at position C2.
2. Click OK in the window shown in Figure 4.38.The Array Station will calculate the concentrations and yields of your samples. A graphical output will be produced to show you the yields. The Figure 4.39 shows an example.If any wells fail to generate an amount of sample that can be correctly normalized, a red “X” will mark that well.
Figure 4.39Graphic displaying cRNA yields (in µg)

GeneChip® Expression Analysis Technical Manual82 For HT Array Plates Using the GeneChip® Array Station
702063 GCAS HT Plates.book Page 82 Thursday, June 15, 2006 8:33 AM
3. Click Resume Run and the robot will add the correct amount of water to each well to make the dilution of cRNA ready for fragmentation. This process takes approximately 30 minutes to complete for a full 96 sample plate.
Following normalization, the Array Station will prepare a blank plate so that the normalized samples can be read to verify normalization. The blank plate will contain 198 μL of water in each well.
Samples which are outside the range of normalization (25 to 250 μg)will be carried through the remainder of the procedure but will notbe properly normalized. Hybridization results from improperlynormalized samples may not be valid.
The blank.txt and sample.txt files you saved for the FirstQuantitation above, will be renamed with the followingconvention:
Sample_TP_0001_Pre-Norm_3_28_2006_5_44_59_PM.txt
Where Sample = sample or blankTP_0001 = method usedPre-Norm or Post-Norm (dependent on when it is used)3_28_2006 = date stamp of when the TP_0001 starts
5_44_59_PM = time stamp of when the TP_0001 starts
These renamed files can still be found in the folderc:\Affymetrix\Reader Data after the run. In addition, all processedOD readings will be automatically saved to a Data Report at the endof the run.
When the User Message appears, as illustrated in Figure 4.40, donot click “OK” until Step 6 of Second Quantitation on page 83.

chapter 4 | Array Station Setup and Target Preparation 83
702063 GCAS HT Plates.book Page 83 Thursday, June 15, 2006 8:33 AM
SECOND QUANTITATION
1. Remove the optical plate from position C2 and place the optical plate on the spectrophotometer tray.
2. Start the SoftMax Pro software. Either click the Softmax Pro icon on the desktop or click Start → All Programs → SoftMax Pro → SoftMax Pro.
3. Press the Read button in the SoftMax Pro software and ensure that you have selected the Replace option.The spectrophotometer will now read the plate.
4. When the spectrophotometer completes the optical read, export the data in the appropriate format as “Blank.txt” to the folder c:\Affymetrix\Reader Data. Save the blank reading on a floppy disc as a backup.
5. Go to c:\Affymetrix\Reader Data, to ensure the “Blank.txt” file is updated with the correct date and time.
6. Replace the optical plate back on the deck in position C2 and click OK.
Figure 4.40User Message window indicating read Blank plate.
The Array Station will now add 2 μL to the 198 μL of the water andwill mix the sample with pipette mixes.
When the User Message appears, as illustrated in Figure 4.41, donot click “OK” until Step 12.

GeneChip® Expression Analysis Technical Manual84 For HT Array Plates Using the GeneChip® Array Station
702063 GCAS HT Plates.book Page 84 Thursday, June 15, 2006 8:33 AM
7. Remove the optical plate from position C2 on the Array Station and place in the spectrophotometer.
8. Press the Read button in the SoftMax Pro software make sure that the Replace option is selected. The spectrophotometer will now read the plate.
9. When the spectrophotometer completes the optical read, export the file in the appropriate format as “Sample.txt” to the folder c:\Affymetrix\Reader Data. Save the data on a floppy disc as a backup.
10. Go to c:\Affymetrix\Reader Data, ensure the software has updated “Sample.txt” with the correct date and time.
11. Exit the SoftMax Pro program.
12. Discard the optical plate and click OK.The Array Station calculates the concentrations and yields of your samples. A graphical output is produced to show you the yields. Figure 4.42 shows an example.
Figure 4.41User Message window indicating the transfer of Blank.txt and Sample.txt.

chapter 4 | Array Station Setup and Target Preparation 85
702063 GCAS HT Plates.book Page 85 Thursday, June 15, 2006 8:33 AM
13. Click Resume Run and the sample preparation method continues with the fragmentation step. After the second quantitation, the samples should be at a concentration of 0.625 μg/μL. If the dilution of the sample is below 0.625 μg/μL, the sample will not be normalized, but will continue through the method.
Figure 4.42Graphic displaying cRNA yields (in µg)

GeneChip® Expression Analysis Technical Manual86 For HT Array Plates Using the GeneChip® Array Station
702063 GCAS HT Plates.book Page 86 Thursday, June 15, 2006 8:33 AM
FRAGMENTATION AND HYBRIDIZATION COCKTAIL
After the second quantitation and cRNA yield calculation, the Array Station will continue to the fragmentation step and make the hybridization-ready sample without user intervention. These two processes take approximately two hours for a full 96 sample plate. After the run has completed, a message appears as illustrated in Figure 4.43.
The hybridization-ready samples can now be hybridized to a HT Array Plate or stored.
For short-term storage:
1. Cover the hybridization-ready sample plate with an adhesive plate sealer.
2. Store the sealed plate at –20°C.
For long-term storage:
1. Cover the hybridization-ready sample plate with an adhesive plate sealer.
2. Store the sealed plate at –80°C.
Figure 4.43User Message indicating the completion of target preparation.

chapter 4 | Array Station Setup and Target Preparation 87
702063 GCAS HT Plates.book Page 87 Thursday, June 15, 2006 8:33 AM
TARGET PREPARATION FINAL REPORTS
After completion of the target preparation, three report files are saved automatically.
1. Main Summary Report: This report is found in the folder c:\Affymetrix\Reports\Summary. This is a user readable report that captures user information, start and stop times, set up information, lot numbers (if input), barcodes (if used), wells flagged as outside the pre-normalization range limits, and reports of all errors encountered during run. An example of a Summary Report is shown in Figure 4.44. The summary report will be named with the following convention (example): SummaryReport_TP_0001_3_21_2006_6_14_52_PM.rtfSummaryReport: type of reportTP_0001: type of run3_21_2006: date of run6_14_52_PM: time run started
2. Yield Data Summary: The Yield Data Summary is found in the folder c:\Affymetrix\Reports\Data. This report captures the background subtracted A260 and A280 readings, A260/A280 ratio, concentrations, yields, and volumes for both the Pre and Post Normalization process.The naming convention for the Data Summary report is (example):ODs_TP_0001_3_21_2006_6_14_52_PM.txtODs: indicates yield data reportTP_0001: type of run3_21_2006: date run started6_14_52_PM: time run started
3. Data Summary: The Data Summary report is found in the folder c:\Affymetrix\Reports\Data. It contains the same information as the Main Summary report. However, this report is in a tab delimited text file useful for data upload to many LIMS systems.The naming convention for the Data Summary report is (example):SummaryReport_TP_0001_3_21_2006_6_14_52_PM.txtSummaryReport: type of report

GeneChip® Expression Analysis Technical Manual88 For HT Array Plates Using the GeneChip® Array Station
702063 GCAS HT Plates.book Page 88 Thursday, June 15, 2006 8:33 AM
TP_0001: type of run3_21_2006: date run started6_14_52_PM: time run started
Figure 4.44Example of Final Summary Report for a Target Preparation Run

chapter 4 | Array Station Setup and Target Preparation 89
702063 GCAS HT Plates.book Page 89 Thursday, June 15, 2006 8:33 AM
GeneChip® Array Station Clean UpAfter completion of the target preparation, follow the steps below to cleanup the Array Station.
1. Cover the unfragmented, normalized, and fragmented RNA with an adhesive plate sealer. Use the plate roller to securely cover the sealer on the plate to prevent evaporation.
2. Store the sealed plates at –20°C.
3. Dispose of the EtOH, water, pipette tips, and waste water appropriately.
4. Wipe up any spills that may have occurred.
5. Close the GeneChip Array Station Software.
6. Check and refill Z8 water reservoir level.

GeneChip® Expression Analysis Technical Manual90 For HT Array Plates Using the GeneChip® Array Station
702063 GCAS HT Plates.book Page 90 Thursday, June 15, 2006 8:33 AM

702063 GCAS HT Plates.book Page 91 Thursday, June 15, 2006 8:33 AM
Chapter 5
Hybridization Setup Protocol and Hybridization
702063 GCAS HT Plates.book Page 92 Thursday, June 15, 2006 8:33 AM
Chapter 5

93
702063 GCAS HT Plates.book Page 93 Thursday, June 15, 2006 8:33 AM
Introduction
This chapter describes the Array Station Hybridization Setup protocol for HT Array Plates. A schematic of the automated Hybridization Setup run is provided to outline the steps in the procedure (Figure 5.1).
This chapter also provides details on how to prepare reagents, how to set up the Array Station Deck, and how to use the GeneChip Array Station Software to pre-hybridize a HT Array Plate. Information on how to hybridize a HT Array Plate is also provided.
AUTOMATED HYBRIDIZATION SETUP SCHEMATIC
This section summarizes the Hybridization Setup protocol steps.
Figure 5.1Steps 49 to 54: Hybridization Setup and Hybridization

GeneChip® Expression Analysis Technical Manual94 For HT Array Plates Using the GeneChip® Array Station
702063 GCAS HT Plates.book Page 94 Thursday, June 15, 2006 8:33 AM
Reagents and Materials RequiredThe reagents and materials required in the Hybridization Setup protocol have been tested and evaluated by Affymetrix. Information and part numbers listed are based on U.S. catalog information. For supplier information, please refer to the Supplier Reference List in Appendix F of this manual.
REAGENTS AND MATERIALS
• Bovine Serum Albumin (BSA) solution (50 mg/mL): Invitrogen Life Technologies, P/N 15561-020
• Herring Sperm DNA (HS DNA) solution (10 mg/mL): Promega Corporation, P/N D1811
• Nuclease-free Water: Ambion, P/N 9932
• Distilled Water: Invitrogen Life Technologies, P/N 15230-147
• EDTA Disodium Salt, 0.5M solution (100 mL): Sigma-Aldrich, P/N E7889
• Surfact-Amps® 20 (Tween-20), 10%: Pierce Chemical, P/N 28320
• Tetramethyl ammonium chloride (TMAC), 5M solution (500 mL): Sigma-Aldrich, P/N T-3411
• 12X MES – see recipe Chapter 3, page 36
REAGENT PREPARATION
The Hybridization Setup protocol requires reagent preparation. This involves manually preparing reagents and filling the appropriate consumable. The reagent setup must be performed prior to starting the Hybridization Setup protocol.

chapter 5 | Hybridization Setup Protocol and Hybridization 95
702063 GCAS HT Plates.book Page 95 Thursday, June 15, 2006 8:33 AM
Pre-Hybridization Buffer for HT Array Plates
If using a Greiner Polypropylene U-bottom Plate at position B3:
1. Prepare the Pre-Hybridization Buffer for 24 or 96 wells as shown in Table 5.1.
2. Aliquot 100 μL of this buffer into each well of the Greiner Polypropylene U-bottom Plate.
If using a VWR Omnitray at position B3:
1. Prepare the Pre-Hybridization Buffer for the Omnitray as shown in Table 5.1.
2. Pour 20 mL into the VWR Omnitray.
A Greiner Polypropylene U-bottom Plate or a VWR Omnitray can beused in position B3 to hold the Pre-Hybridization Buffer.
Use good lab practices when handling TMAC-containing solutions.Wear gloves, safety glasses, and lab coats when preparing thepre-hybridization buffers. Please consult the appropriate MSDS forreagent storage and handling requirements.
Table 5.1Pre-Hybridization Buffer Recipe
1 Well Volume
24 Wells Volume
96 Wells Volume
Omnitray Volume
HS DNA (10 mg/mL) 1.00 µL 27 µL 108 µL 200.0 µL
BSA (50 mg/mL) 1.00 µL 27 µL 108 µL 200.0 µL
1.23X Hybridization Buffer*
*The 1.23X hybridization buffer is TMAC containing buffer. See Table 5.2 for recipe.
81.4 µL 2,197.8 µL 8,791.0 µL 16,280.0 µL
Nuclease-free Water 16.6 µL 448.2 µL 1,793.0 µL 3,320.0 µL
Total Volume 100 µL 2,700 µL 10,800.0 µL 20,000.0 µL

GeneChip® Expression Analysis Technical Manual96 For HT Array Plates Using the GeneChip® Array Station
702063 GCAS HT Plates.book Page 96 Thursday, June 15, 2006 8:33 AM
CLEAN THE BIO-RAD PLATE LIDS WITH DNAZap™ AND RNaseZap®
The disposable pad under the lids should be cleaned before the run.
1. Rinse the pad with DI Water.
2. Wipe the pad with RNaseZap.
3. Rinse the pad with DI Water.
4. Wipe the pad with DNAZap.
5. Thoroughly rinse the pad with DI Water.
6. Dry the pad with pressurized clean air or nitrogen.
Table 5.21.23X Hybridization Buffer recipe.
50 mL 1 L Final 1X Concentration
12X MES 5.04 mL 100.8 mL 100 mM
5M TMAC 30.73 mL 614.6 mL 2.5M
0.5M EDTA 2.46 mL 49.2 mL 20 mM
10% Tween-20 0.06 mL 1.2 mL 0.01%
Nuclease-free Water 11.71 mL 234.2 mL
Total Volume 50 mL 1 L

chapter 5 | Hybridization Setup Protocol and Hybridization 97
702063 GCAS HT Plates.book Page 97 Thursday, June 15, 2006 8:33 AM
Beginning a Run – Hybridization Setup Deck LayoutThis section describes how to assemble the deck and use the GeneChip Array Station Software to begin a Hybridization Setup run. The Hybridization Setup protocol will perform the following methods:
• Pre-hybridize the HT Array Plates
• Denature the sample for hybridization
• Assemble the HT Array Plate and the Hybridization Tray containing the hybridization-ready sample
PROCEDURE
1. Setup the deck with the appropriate consumables. Refer to Figure 5.2.
2. Load at least four tip boxes into Rack 1.
3. Remove the cold reagent block.
4. Place the hybridization-ready samples on the deck at location C2.
If using a HT 24-Array Plate, it is NOT necessary to re-array thesamples into columns 5, 7 and 9. Samples should be in columns 1,2, and 3 of the Greiner plate. The Array Station will transfer samplesto columns 5, 7, and 9 during the protocol.

GeneChip® Expression Analysis Technical Manual98 For HT Array Plates Using the GeneChip® Array Station
702063 GCAS HT Plates.book Page 98 Thursday, June 15, 2006 8:33 AM
Figure 5.2The deck layout for the Hybridization Setup protocol.Load four tip boxes into Rack 1.Empty Rack 2, leaving the tip rack base there.
If you are using recovered samples and your samples are already inthe Bio-Rad 96-Well plate, you will need to leave position C2 empty.Your samples will be in the Bio-Rad plate placed at A3.
EMPTY
EMPTY
Lubrication Block
D3D2
Liquid Waste Drain
D4 D5
B2B1 B4
C4C3C2C1
Base for stackable tip rack
Waste Chute
A4A3 A5A1 A2
D1
Plate Array Clamp Release
Tip Rack
EMPTY
Tip Rack
Tip Rack
HT Stain Trayused for prehyb
HT Array Plate on Blue Spacer Tray
Clamping LocatorEmpty
Lidded Bio-Rad PCR plate with sample if starting with denature
Greiner Polypropylene U-bottom Plate or VWR Omnitray w/pre-hyb Buffer
B3
HT Hybridization Tray
EMPTY
EMPTY
Sample in Greiner PolypropyleneU-bottom plate

chapter 5 | Hybridization Setup Protocol and Hybridization 99
702063 GCAS HT Plates.book Page 99 Thursday, June 15, 2006 8:33 AM
Running Affymetrix® Gene Expression Hybridization Setup Protocol on the GeneChip® Array Station
1. Check to confirm that the deck and racks are correctly populated with well plates, tips, etc.
2. Open the software by double clicking the GeneChip Array Station desktop icon, or click Start → Programs → Caliper Life Sciences → Instruments → Sciclone → Sciclone Workstation Software. The login window appears (Figure 5.3).
3. Enter your User Name and Password and click OK. The Operator Runtime interface window appears (Figure 5.4).
Figure 5.3Sciclone Workstation Software Login window

GeneChip® Expression Analysis Technical Manual100 For HT Array Plates Using the GeneChip® Array Station
702063 GCAS HT Plates.book Page 100 Thursday, June 15, 2006 8:33 AM
4. Select File → Open to access the load application window (Figure 5.5).
Figure 5.4Sciclone Workstation Software Operator window

chapter 5 | Hybridization Setup Protocol and Hybridization 101
702063 GCAS HT Plates.book Page 101 Thursday, June 15, 2006 8:33 AM
5. Select HYB_0001 and click Open. The hybridization setup application is loaded into Sciclone Workstation Software.
Figure 5.5Open Sciclone Application window

GeneChip® Expression Analysis Technical Manual102 For HT Array Plates Using the GeneChip® Array Station
702063 GCAS HT Plates.book Page 102 Thursday, June 15, 2006 8:33 AM
6. Click the green Start arrow to begin the application.The application will prompt you to select several options through the interactive window shown in Figure 5.7.
Figure 5.6Hybridization Setup Protocol Loaded

chapter 5 | Hybridization Setup Protocol and Hybridization 103
702063 GCAS HT Plates.book Page 103 Thursday, June 15, 2006 8:33 AM
7. Select the protocol parameters.
A. Select your User name from the drop down menu.
B. Select either 24 or 96 well HT array plate. It is important that you select the proper plate type to ensure samples are transferred to the correct wells.
C. If you wish the protocol to read and store the sample plate barcode and the HT array plate barcode, check the Read barcodes option. Barcodes will be reported in the user summary at the end of the run.
Figure 5.7Hybridization Setup window

GeneChip® Expression Analysis Technical Manual104 For HT Array Plates Using the GeneChip® Array Station
702063 GCAS HT Plates.book Page 104 Thursday, June 15, 2006 8:33 AM
D. Select Run prehybridization method.
E. Selection of the Run hybridization mix transfer method depends on if your samples are in the Greiner plate or are recovered samples in the Bio-Rad plate.
1) If Run hybridization mix transfer method is selected, the Array Station will transfer the hyb-ready sample from a Greiner U-bottom Plate at C2 to a Bio-Rad Plate at A3. If you are running a HT 24-Array Plate, your samples should be in columns 1, 2, and 3 of the Greiner plate. The Array Station will automatically transfer these samples to columns 5,7, and 9 of the hybridization tray to match the HT 24-Array Plate.
2) If Run hybridization mix transfer method is NOT selected, it is required that 100 μL of Hyb-Ready sample is placed in a Bio-Rad Plate at position A3. If you are running a HT 24-Array Plate, your samples should be in columns 1, 2, and 3 of the Bio-Rad plate. The Array Station will automatically transfer these samples to columns 5, 7, and 9 of the hybridization tray to match the HT 24-Array Plate.
F. If you are using spacer plates for tip static control (recommended), check the box Twister tip rack spacer plates are in use. If this box is checked, ensure you have placed spacer plates between each nested tip rack and on the top rack.
G. Enter a Tracking identifier (limited to 40 characters) if desired. The Tracking identifier will be recorded in the Hybridization Setup Summary Report at the end of the run (refer to Figure 5.11 on page 108 for a description of the Summary Report).
In most cases you will select and run the hybridization mix transfermethod. However, if you are re-hybridizing samples recovered froma previous hybridization, your samples will already be in a Bio-RadPlate. You should select NOT to run the hybridization mix transferif your samples are in the Bio-Rad Plate.

chapter 5 | Hybridization Setup Protocol and Hybridization 105
702063 GCAS HT Plates.book Page 105 Thursday, June 15, 2006 8:33 AM
H. Select the desired notification settings. Be sure the email address or pager information is properly configured.
8. After selecting the settings parameters, click Next. You will see one of the following windows, depending on whether you have selected Run hybridization mix transfer method.
Figure 5.8Hybridization Deck Layout when Run hybridization mix transfer method is selected

GeneChip® Expression Analysis Technical Manual106 For HT Array Plates Using the GeneChip® Array Station
702063 GCAS HT Plates.book Page 106 Thursday, June 15, 2006 8:33 AM
9. Verify that you have configured the deck properly and that you have completed and checked the items on the checklist. Click Continue and the Hybridization Setup protocol continues until the HT Array Plate/Hybridization Tray Sandwich is assembled.
Figure 5.9Hybridization Deck Layout when Run hybridization mix transfer method is NOT selected

chapter 5 | Hybridization Setup Protocol and Hybridization 107
702063 GCAS HT Plates.book Page 107 Thursday, June 15, 2006 8:33 AM
10. At the end of the protocol, The End message appears (Figure 5.10). Click OK.
You must place the HT Array Plate hybridization sandwich in an incubator equilibrated to 48°C. Please refer to page 110.
11. At the conclusion of each run, two summary reports are automatically saved by the program.
A. A user readable summary of the run is saved to the folder C:\Affymetrix\Reports\Summary. This file has the following naming convention:SummaryReport_HYB_0001_3_23_2006_10_03_36_AM.rtf
HYB_0001 = method used3_23_2006 = date stamp of when the HYB_0001 starts10_03_36_AM = time stamp of when the HYB_0001 starts Figure 5.11 shows an example of a Hybridization Setup Summary Report.
Figure 5.10Run Complete message

GeneChip® Expression Analysis Technical Manual108 For HT Array Plates Using the GeneChip® Array Station
702063 GCAS HT Plates.book Page 108 Thursday, June 15, 2006 8:33 AM
12. A tab-delimited text report useful for transferring data to many LIMS systems is also saved. This report is saved in the folder C:\Affymetrix\Reports\Data. An example if this report is shown in Figure 5.12.
Figure 5.11Hybridization Setup Summary Report Example

chapter 5 | Hybridization Setup Protocol and Hybridization 109
702063 GCAS HT Plates.book Page 109 Thursday, June 15, 2006 8:33 AM
13. The HT Array Plate/Hybridization Tray Sandwich is ready to be placed into a 48°C incubator for 16 hours.
Figure 5.12LIMS Summary Report Example
Take care in transferring the Hyb Sandwich to the hybridizationoven. The sandwich should remain close to level to prevent samplecontamination.

GeneChip® Expression Analysis Technical Manual110 For HT Array Plates Using the GeneChip® Array Station
702063 GCAS HT Plates.book Page 110 Thursday, June 15, 2006 8:33 AM
HybridizationThis section describes how to incubate a HT Array Plate/Hybridization Tray Sandwich for hybridization.
OVERNIGHT HYBRIDIZATION
1. Remove the HT Array Plate/Hybridization Tray Sandwich from the Array Station, taking care to keep the sandwich level, and place in the hybridization oven.
2. Incubate the HT Array Plate/Hybridization Tray Sandwich for 16 hours at 48°C.
The hybridization oven should be monitored with a digitalthermometer (such as VWR, P/N 23226-656) to ensure that thetemperature is stabilized at 48°C.
The HT Array Plate/Hybridization Tray Sandwich must remain levelduring hybridization. A bubble level can be placed on top of thesandwich to ensure that all four corners are level.
702063 GCAS HT Plates.book Page 111 Thursday, June 15, 2006 8:33 AM
Chapter 6
Wash and Stain
702063 GCAS HT Plates.book Page 112 Thursday, June 15, 2006 8:33 AM
Chapter 6

113
702063 GCAS HT Plates.book Page 113 Thursday, June 15, 2006 8:33 AM
Introduction
This chapter describes the Array Station Wash and Stain protocol for HT Array Plates. A schematic of the automated Wash and Stain is provided at the beginning of this chapter to outline the steps of the procedure (Figure 6.1 to Figure 6.6).
This chapter also provides detail on how to prepare reagents, how to set up the Array Station deck, and how to use the Sciclone 4.0 Software to perform a Wash and Stain protocol.
Automated Wash and Stain SchematicThis section summarizes the Wash and Stain protocol steps.
Figure 6.1Step 1: Fill HT Wash Trays with Low Stringency Wash (LSW) Buffer

GeneChip® Expression Analysis Technical Manual114 For HT Array Plates Using the GeneChip® Array Station
702063 GCAS HT Plates.book Page 114 Thursday, June 15, 2006 8:33 AM
Figure 6.2Step 2: Low Stringency Wash (LSW)
Figure 6.3Step 3: High Stringency Wash (HSW); Transfer of Hybridization Cocktail; Drain/Refill HT Wash Trays
Figure 6.4Step 4: First Stain (Phycoerythrin); Low Stringency Wash; Drain/Refill HT Wash Trays

chapter 6 | Wash and Stain 115
702063 GCAS HT Plates.book Page 115 Thursday, June 15, 2006 8:33 AM
Figure 6.5Step 5: Second Stain (Ab); Low Stringency Wash; Drain/Refill HT Wash Tray
Figure 6.6Step 6: Third Stain (Streptavidin-Phycoerythrin); Low Stringency Wash
Figure 6.7Step 7: Filling HT Scan Tray with Holding Buffer and Insertion of the HT Array Plate

GeneChip® Expression Analysis Technical Manual116 For HT Array Plates Using the GeneChip® Array Station
702063 GCAS HT Plates.book Page 116 Thursday, June 15, 2006 8:33 AM
Reagents and Materials RequiredThe following reagents and materials required in the Wash and Stain protocol have been tested and evaluated by Affymetrix. Information and part numbers listed below are based on U.S. catalog information. For supplier information, please refer to the Supplier Reference List in Appendix F of this manual.
REAGENTS AND MATERIALS
• Nuclease-free Water: Ambion, P/N 9932
• 20X SSPE (3M NaCl, 0.2M NaH2PO4, 0.02M EDTA): Cambrex, P/N 51214
• 5M NaCl, RNase-free, DNase-free: Ambion, P/N 9760G
• Anti-streptavidin antibody (goat), biotinylated: Vector Laboratories, P/N BA-0500
• Bovine Serum Albumin (BSA) solution (50 mg/mL): Invitrogen Life Technologies, P/N 15561-020
• Distilled Water: Invitrogen Life Technologies, P/N 15230-147
• Goat IgG, Reagent Grade: Sigma-Aldrich, P/N I 5256
• PBS, pH 7.2: Invitrogen Life Technologies, P/N 20012-027
• R-Phycoerythrin Streptavidin: Molecular Probes, P/N S-866
• Surfact-Amps® 20 (Tween-20), 10%: Pierce Chemical, P/N 28320

chapter 6 | Wash and Stain 117
702063 GCAS HT Plates.book Page 117 Thursday, June 15, 2006 8:33 AM
Reagent Preparation The Wash and Stain protocol requires reagent preparation. This involves manually preparing and filling the appropriate consumable. The reagent setup must be performed prior to starting the Wash and Stain protocol.
STOCK BUFFERS
12X MES Stock Buffer Recipe
(1.22M MES, 0.89M [Na+])
For 1,000 mL:64.61 g of MES Hydrate193.3 g of MES Sodium Salt800 mL of Nuclease-free WaterMix and adjust volume to 1,000 mL.The pH should be between 6.5 and 6.7. Filter through a 0.2 μm filter.
2X MES Stain Buffer Recipe
(100 mM MES, 1.0M Na+, 0.05% Tween-20)
41.7 mL 12X MES Buffer92.5 mL 5M NaCl2.5 mL 10% Tween-20113.3 mL Distilled Water
Do not autoclave. Store at 2°C to 8°C, and shield from light.
Discard solution if yellow.

GeneChip® Expression Analysis Technical Manual118 For HT Array Plates Using the GeneChip® Array Station
702063 GCAS HT Plates.book Page 118 Thursday, June 15, 2006 8:33 AM
STAIN 1 AND STAIN 3
1. In a 50 mL conical tube, add the components listed in the Stain 1 + Stain 3 column of Table 6.1, and mix well.
2. Obtain two HT Stain trays and label one “Stain 1” and the other “Stain 3.”
3. Aliquot 80 μL of the Stain1 + Stain 3 mixture into the appropriate wells of both labeled HT Stain Trays.
If using a HT 24-Array Plate, the stain mixture should be aliquotedinto columns 5, 7, and 9 of the HT Stain Trays.
Table 6.1Stain 1 and Stain 3 Recipe
Stain 1 + Stain 3
1 Well 24 Wells 96 Wells
Nuclease-free Water 36.0 µL 1,944.0 µL 7,776.0 µL
2X MES Stain Buffer 40.0 µL 2,160 µL 8,640.0 µL
BSA (50 mg/mL) 3.2 µL 172.8 µL 691.2 µL
SAPE 0.8 µL 43.2 µL 172.8 µL
Total Volume 80.0 µL 4,320.0 µL 17,280.0 µL

chapter 6 | Wash and Stain 119
702063 GCAS HT Plates.book Page 119 Thursday, June 15, 2006 8:33 AM
STAIN 2
1. In a 14 mL conical tube, add the components listed in the 24 wells or 96 wells column of Table 6.2 as appropriate, and mix well.
2. Obtain one HT Stain tray and label it “Stain 2.”
3. Aliquot 80 μL of the Stain 2 mixture into the appropriate wells of the labeled HT Stain Tray.
If using a HT 24-Array Plate, the stain mixture should be aliquottedinto columns 5, 7, and 9 of the HT Stain Trays.
Table 6.2Stain 2 Synthesis
1 Well 24 Wells 96 Wells
Nuclease-free Water 35.52 µL 959.0 µL 3,836.16 µL
2X MES Stain Buffer 40.0 µL 1,080.0 µL 4,320.0 µL
BSA (50 mg/mL) 3.2 µL 86.4 µL 345.6 µL
10 mg/mL Goat IgG Stock*
*Goat IgG Stock should be made by resuspending 50 mg in 5 mL of 150 mM NaCl. Store at 4°C. Note: If alarger volume of the 10 mg/mL IgG stock is prepared, aliquot and store at –20°C until use. After the solutionhas been thawed it should be stored at 4°C. Avoid additional freezing and thawing.
0.8 µL 21.6 µL 86.4 µL
0.5 mg/mL Biotinylated Antibody†
†Stock solution of the biotinylated antibody should be made by resuspending 0.5 mg in 1 mL of nuclease-free water.
0.48 µL 13 µL 51.84 µL
Total Volume 80.0 µL 2,160.0 µL 8,640.0 µL

GeneChip® Expression Analysis Technical Manual120 For HT Array Plates Using the GeneChip® Array Station
702063 GCAS HT Plates.book Page 120 Thursday, June 15, 2006 8:33 AM
LOW STRINGENCY BUFFER
1. Prepare 2,000 mL of Low Stringency Wash Buffer.
2. Connect Bulk Dispenser Buffer Line to container containing Low Stringency Wash Buffer.
Low Stringency Wash Buffer Recipe
(6X SSPE, 0.01% Tween-20)
For 2,000 mL:600.0 mL 20X SSPE2.0 mL 10% Tween-201,398.0 mL Distilled WaterAdjust pH to 7.4.Filter through a 0.2 μm filter. Store at 2°C to 8°C and shield from light.
The Low Stringency Wash Buffer can be made in large volumes andplaced in a 20 L carboy.

chapter 6 | Wash and Stain 121
702063 GCAS HT Plates.book Page 121 Thursday, June 15, 2006 8:33 AM
HIGH STRINGENCY BUFFER
1. Prepare 1 L of High Stringency Wash Buffer.
2. Pour 94 mL into one HT Wash Tray.
High Stringency Buffer Recipe
(100 mM MES, 100 mM NaCl, 0.01% Tween-20)
For 1,000.0 mL:83.3 mL 12X MES5.2 mL 5M NaCl1.0 mL 10% Tween-20910.5 mL Distilled WaterFilter through a 0.2 μm filter. Store at 2°C to 8°C and shield from light.

GeneChip® Expression Analysis Technical Manual122 For HT Array Plates Using the GeneChip® Array Station
702063 GCAS HT Plates.book Page 122 Thursday, June 15, 2006 8:33 AM
MES HOLDING BUFFER
1. Prepare 1 L of MES Holding Buffer.
2. Pour 20 mL into a VWR Omnitray.
MES Holding Buffer Recipe
(100 mM MES, 1M [Na+], 0.01% Tween-20)
For 1,000 mL:83.3 mL 12X MES185.2 mL 5M NaCl1.0 mL 10% Tween-20731.8 mL Distilled WaterFilter through a 0.2 μm filter. Store at 2°C to 8°C and shield from light.
CLEAN THE BIO-RAD PLATE LIDS WITH DNAZap™ AND RNaseZap®
The disposable pad under the lids should be cleaned before the run.
1. Rinse the pad with DI Water.
2. Wipe the pad with RNaseZap.
3. Rinse the pad with DI Water.
4. Wipe the pad with DNAZap.
5. Thoroughly rinse the pad with DI Water.
6. Dry the pad with pressurized clean air or nitrogen.

chapter 6 | Wash and Stain 123
702063 GCAS HT Plates.book Page 123 Thursday, June 15, 2006 8:33 AM
Beginning a Run – Wash and Stain Deck LayoutThis section describes how to assemble the deck and use the Sciclone Workstation Software to begin a Wash and Stain run. The Wash and Stain protocol will perform the following methods on the GeneChip Array Station:
• Wash the hybridized HT Array Plate in Low Stringency and High Stringency Buffer
• Stain the hybridized HT Array Plate
• Assemble the hybridized HT Array Plate for scanning
PROCEDURE
1. Set up deck with appropriate consumables. Refer to Figure 6.8.
2. Load at least three tip boxes in Rack 1.
3. Assemble the Peltier adaptor and Hybridization Block Fixture. Refer to Figure 6.9 and Figure 6.10.
4. Set the temperature of the Watlow Temperature Controller to 48°C. Refer to Figure 6.11.
The HT Stain Trays containing Stain 1, Stain 2, and Stain 3 arestacked and covered with a flat lid. The three trays should bestacked in ascending order, with Stain 1 on top, and Stain 3 onbottom. Stain 1 is covered with the flat lid.
The High Stringency Buffer must be between 41°C and 42°C for theWash and Stain protocol. During the Wash and Stain deck setup,the High Stringency Buffer is placed in a HT Wash Tray and placedon the Peltier adaptor to reach a temperature between 41°C and42°C. The temperature adjustment between 41°C and 42°C takes along time. To decrease this time requirement, place 100 mL of theHigh Stringency Buffer in a 37°C incubator the night before so it isprewarmed.
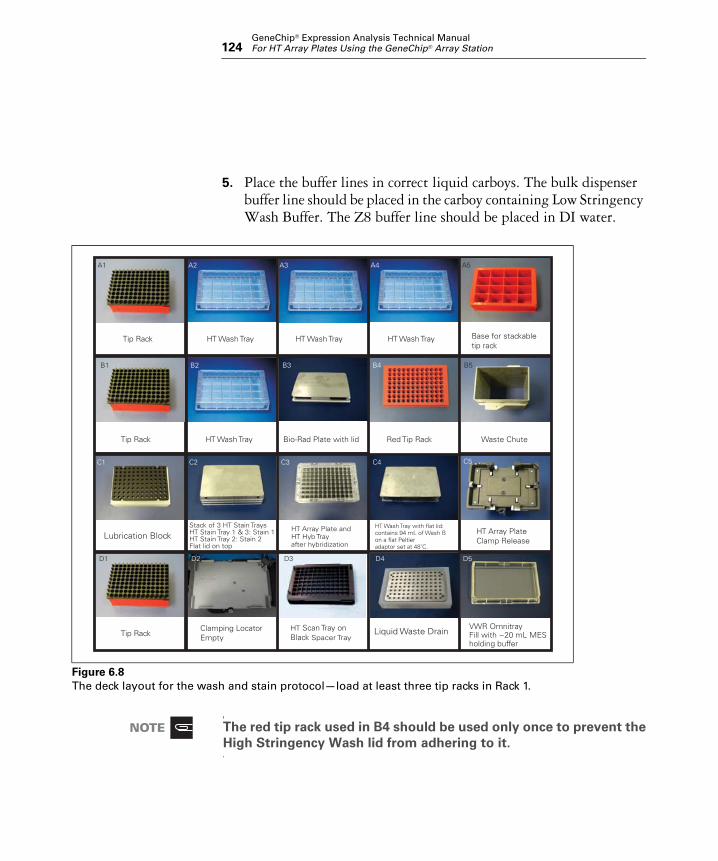
GeneChip® Expression Analysis Technical Manual124 For HT Array Plates Using the GeneChip® Array Station
702063 GCAS HT Plates.book Page 124 Thursday, June 15, 2006 8:33 AM
5. Place the buffer lines in correct liquid carboys. The bulk dispenser buffer line should be placed in the carboy containing Low Stringency Wash Buffer. The Z8 buffer line should be placed in DI water.
Figure 6.8The deck layout for the wash and stain protocol—load at least three tip racks in Rack 1.
The red tip rack used in B4 should be used only once to prevent theHigh Stringency Wash lid from adhering to it.
Lubrication Block
D3D2
Liquid Waste Drain
D4 D5
B2B1 B4 B5
C4C3C2C1 C5
Base for stackable tip rack
A4A3 A5A1 A2
D1
HT Array Plate Clamp Release
Tip Rack
Tip Rack
Tip Rack
HT Wash Tray
Clamping LocatorEmpty
B3
Stack of 3 HT Stain TraysHT Stain Tray 1 & 3: Stain 1HT Stain Tray 2: Stain 2Flat lid on top
HT Scan Tray on Black Spacer Tray
HT Array Plate and HT Hyb Tray after hybridization
Bio-Rad Plate with lid Red Tip Rack
HT Wash Tray with flat lid:contains 94 mL of Wash Bon a flat Peltieradaptor set at 48˚C.
VWR OmnitrayFill with ~20 mL MES holding buffer
HT Wash Tray HT Wash Tray
HT Wash Tray Waste Chute

chapter 6 | Wash and Stain 125
702063 GCAS HT Plates.book Page 125 Thursday, June 15, 2006 8:33 AM
Figure 6.9Installing the hybridization block fixture
Figure 6.10Securing the hybridization block fixture

GeneChip® Expression Analysis Technical Manual126 For HT Array Plates Using the GeneChip® Array Station
702063 GCAS HT Plates.book Page 126 Thursday, June 15, 2006 8:33 AM
Figure 6.11Setting the 48°C temperature on the Watlow Temperature Controller

chapter 6 | Wash and Stain 127
702063 GCAS HT Plates.book Page 127 Thursday, June 15, 2006 8:33 AM
Running Affymetrix® Gene Expression Wash and Stain Protocol on the GeneChip® Array Station
RUNNING THE PROTOCOL
1. Check to confirm that the deck and racks are correctly populated with well plates, tips, etc.
2. Remove the HT Array Plate/Hybridization Tray Sandwich from the incubator and place on the deck at location C3.
3. Open the software by double-clicking the GeneChip Array Station desktop icon, or click Start → Programs → Caliper Life Sciences → Instruments → Sciclone → Sciclone Workstation Software. The login window appears (Figure 6.12).
4. Enter your User name and Password and click OK. The Operator Runtime interface appears (Figure 6.13).
Figure 6.12Sciclone Workstation Software Login window

GeneChip® Expression Analysis Technical Manual128 For HT Array Plates Using the GeneChip® Array Station
702063 GCAS HT Plates.book Page 128 Thursday, June 15, 2006 8:33 AM
5. Select File → Open to access the load application window (Figure 6.14).
Figure 6.13Sciclone Workstation Software Operator window

chapter 6 | Wash and Stain 129
702063 GCAS HT Plates.book Page 129 Thursday, June 15, 2006 8:33 AM
6. Select WS_0001 and click Open. The Affymetrix Wash Stain Protocol is loaded into Sciclone Workstation software (Figure 6.15).
Figure 6.14Open Sciclone Application window

GeneChip® Expression Analysis Technical Manual130 For HT Array Plates Using the GeneChip® Array Station
702063 GCAS HT Plates.book Page 130 Thursday, June 15, 2006 8:33 AM
7. Click the green Start arrow to begin the application.
8. The Application will prompt you to select several options through the interactive window shown in Figure 6.16.
Figure 6.15Wash and Stain Protocol Loaded

chapter 6 | Wash and Stain 131
702063 GCAS HT Plates.book Page 131 Thursday, June 15, 2006 8:33 AM
9. Select the protocol parameters:
A. Select your User name from the drop down menu.
B. Select either a HT 24- or 96-Array Plate. It is important that you select the proper plate type to ensure samples are transferred to the correct wells.
C. If you wish the protocol to read and store the HT array plate barcode and the recovered sample plate barcode, check the Read barcodes option. Barcodes will be reported in the Wash/ Stain Summary Report at the end of the run.
Figure 6.16Wash and Stain Setup window

GeneChip® Expression Analysis Technical Manual132 For HT Array Plates Using the GeneChip® Array Station
702063 GCAS HT Plates.book Page 132 Thursday, June 15, 2006 8:33 AM
D. If you are using spacer plates for tip static control (recommended), check the box Twister tip rack spacer plates are in use. If this box is checked, ensure you have placed spacer plates between each nested tip rack and on the top tip rack.
E. Enter a Tracking identifier (limited to 40 characters) if desired. The Tracking identifier will be recorded in the Summary report at the end of the run.
F. Select the desired notification settings. Be sure the email address or pager information is properly configured.
10. After selecting the settings parameters, click Next. The Wash Stain Deck Layout window appears (Figure 6.17).
Figure 6.17Wash/Stain Deck Layout Setup window

chapter 6 | Wash and Stain 133
702063 GCAS HT Plates.book Page 133 Thursday, June 15, 2006 8:33 AM
11. Verify that you have set the deck up properly and that you have completed all items in the Notes section. Verify and check the boxes that you have completed all items in the Checklist section.
12. Click Continue run and the Array Station will perform the Wash/Stain protocol.The Wash/Stain protocol continues until the HT Array Plate is stained and ready to be scanned. When the protocol has completed, the following message appears (Figure 6.18).
13. Remove the stained HT Array Plate for scanning. Take care not to disturb or disrupt the array from the scan tray. Refer to the HT Scanner User’s Guide (P/N 701978) for instructions on scanning the HT Array Plate.
14. Remove the sample recovery plate. Recovered hyb sample can be sealed and stored at –80°C for further use.
15. Change the Bulk Dispenser tubing back to the water bottle, Click OK. The Array Station will proceed to drain the wash trays and clean up the deck.
16. At the end of the protocol, The End message appears (Figure 6.19). Click OK.
Figure 6.18Ready to Scan window

GeneChip® Expression Analysis Technical Manual134 For HT Array Plates Using the GeneChip® Array Station
702063 GCAS HT Plates.book Page 134 Thursday, June 15, 2006 8:33 AM
17. At the conclusion of each run, two summary reports are automatically saved by the program:
A. A user readable summary of the run is saved to the folder C:\Affymetrix\Reports\Summary. This file has the following naming convention: SummaryReport_WS_0001_4_4_2006_9_56_08_AM.rtf
WS_0001 = method used4_4_2006 = date stamp of when the HYB_0001 starts9_56_08_AM = time stamp of when the HYB_0001 startsFigure 6.20 shows an example of a Summary Report.
Figure 6.19Run Complete window
Figure 6.20Wash/Stain Summary Report Example

chapter 6 | Wash and Stain 135
702063 GCAS HT Plates.book Page 135 Thursday, June 15, 2006 8:33 AM
B. A report useful for transferring data to many LIMS systems is also saved. This report is saved in the folder C:\Affymetrix\Reports\Data. An example if this report is shown in Figure 6.21.
Figure 6.21LIMS-friendly Report Example

GeneChip® Expression Analysis Technical Manual136 For HT Array Plates Using the GeneChip® Array Station
702063 GCAS HT Plates.book Page 136 Thursday, June 15, 2006 8:33 AM

702063 GCAS HT Plates.book Page 137 Thursday, June 15, 2006 8:33 AM
Appendix A
Master Mix Spreadsheet
702063 GCAS HT Plates.book Page 138 Thursday, June 15, 2006 8:33 AM
Appendix
A
139
702063 GCAS HT Plates.book Page 139 Thursday, June 15, 2006 8:33 AM
Master Mix Volume Spreadsheets
This appendix contains master mix formulation tables for all of the reagents placed in the cold reagent block for the Target Preparation protocol. These master mix formulation tables are calculated for use on the GeneChip® Array Station.
The GeneChip Array Station is designed to facilitate higher-throughput target preparation for the GeneChip Expression Assay. Reagent volumes provided in the GeneChip® HT One-Cycle cDNA Synthesis Kit (P/N 900687) and the GeneChip® HT IVT Labeling Kit (P/N 900688) are sufficient for four 24-sample master mixes, with overage to accommodate for pipetting error. Occasionally, smaller sample master mixes may be useful. Please note in the tables that the “Volume per Strip Tube Well” values for each reagent is adjusted to sufficiently accommodate the requirements of the GeneChip Array Station.

GeneChip® Expression Analysis Technical Manual140 For HT Array Plates Using the GeneChip® Array Station
702063 GCAS HT Plates.book Page 140 Thursday, June 15, 2006 8:33 AM
Tab
le A.1
T7 P
rimer C
ocktail M
aster Mix fo
r Co
ld R
eagen
t Blo
ck
Vo
lum
e p
er R
xn
Ad
justed
Vo
lum
es (μL):
8 R
xns
16 R
xns
24 R
xns
32 R
xns
40 R
xns
48 R
xns
56 R
xns
64 R
xns
72 R
xns
80 R
xns
88 R
xns
96 R
xns
T7-O
ligo
(dT
) Prim
er, 50 µ
M1.0
12.023.2
32.038.0
47.557.0
66.576.0
85.595.0
104.5114.0
Nu
clease-free Water
4.048.0
92.8127.9
152.0190.0
228.0266.0
304.0342.0
380.0418.0
456.0
To
tal Vo
lum
e5.0
60.0116.0
159.9190.0
237.5285.0
332.5380.0
427.5475.0
522.5570.0
Vo
l per S
trip T
ub
e Well
7.013.5
18.522.0
28.034.0
40.045.5
51.457.4
63.369.3
Tab
le A.2
First-Stran
d cD
NA
Syn
thesis C
ocktail M
aster Mix fo
r Co
ld R
eagen
t Blo
ck
Vo
lum
e p
er R
xn
Ad
justed
Vo
lum
es (μL):
8 R
xns
16 R
xns
24 R
xns
32 R
xns
40 R
xns
48 R
xns
56 R
xns
64 R
xns
72 R
xns
80 R
xns
88 R
xns
96 R
xns
5X 1st S
trand
Rxn
Mix
4.046.4
82.8114.0
152.0190.0
228.0266.0
304.0342.0
380.0418.0
456.0
DT
T, 0.1 M
2.0
23.241.4
57.076.0
95.0114.0
133.0152.0
171.0190.0
209.0228.0
dN
TP
Mix, 10 m
M
1.011.6
20.728.5
38.047.5
57.066.5
76.085.5
95.0104.5
114.0
Su
perS
cript™
II1.0
11.620.7
28.538.0
47.557.0
66.576.0
85.595.0
104.5114.0
Nu
clease-free Water
2.023.2
41.457.0
76.095.0
114.0133.0
152.0171.0
190.0209.0
228.0
To
tal Vo
lum
e10.0
116.0207.0
285.0380.0
475.0570.0
665.0760.0
855.0950.0
1,045.01,140.0
Vo
l per S
trip T
ub
e Well
14.024.0
33.545.5
57.469.3
81.193.0
104.9116.8
128.6140.5

appendix A | Master Mix Spreadsheet 141
702063 GCAS HT Plates.book Page 141 Thursday, June 15, 2006 8:33 AM
Tab
le A
.3S
eco
nd
-Str
and
cD
NA
Syn
thes
is C
ock
tail
Mas
ter
Mix
fo
r C
old
Rea
gen
t B
lock
Vo
lum
e p
er
Rxn
Ad
just
ed V
olu
mes
(μ
L):
8 R
xns
16
Rxn
s24
R
xns
32
Rxn
s40
R
xns
48
Rxn
s56
R
xns
64
Rxn
s72
R
xns
80
Rxn
s88
R
xns
96
Rxn
s
5X 2
nd
Str
and
Rxn
Mix
30.0
270.
054
0.0
810.
01,
080.
01,
350.
01,
620.
01,
890.
02,
160.
02,
430.
02,
700.
02,
970.
03,
240.
0
dN
TP
Mix
, 10
mM
3.
027
.054
.081
.010
8.0
135.
016
2.0
189.
021
6.0
243.
027
0.0
297.
032
4.0
DN
A L
igas
e, 1
0 u
nit
/µL
1.0
9.0
18.0
27.0
36.0
45.0
54.0
63.0
72.0
81.0
90.0
99.0
108.
0
DN
A P
oly
mer
ase
I, 10
un
it/µ
L 4.
036
.072
.010
8.0
144.
018
0.0
216.
025
2.0
288.
032
4.0
360.
039
6.0
432.
0
RN
ase
H, 2
un
it/µ
L 1.
09.
018
.027
.036
.045
.054
.063
.072
.081
.090
.099
.010
8.0
To
tal V
olu
me
39.0
351.
070
2.0
1,05
3.0
1,40
4.0
1,75
5.0
2,10
6.0
2,45
7.0
2,80
8.0
3159
.03,
510.
03,
861.
04,
212.
0
Vo
l per
Str
ip T
ub
e W
ell
41.0
85.0
129.
017
2.0
216.
026
0.0
303.
034
7.0
391.
043
5.0
479.
052
2.5
Tab
le A
.4T
4 D
NA
Po
lym
eras
e C
ock
tail
Mas
ter
Mix
fo
r C
old
Rea
gen
t B
lock
Vo
lum
e p
er
Rxn
Ad
just
ed V
olu
mes
(μ
L):
8 R
xns
16
Rxn
s24
R
xns
32
Rxn
s40
R
xns
48
Rxn
s56
R
xns
64
Rxn
s72
R
xns
80
Rxn
s88
R
xns
96
Rxn
s
T4
DN
A P
oly
mer
ase
2.0
30.7
49.7
69.3
81.1
98.3
118.
013
7.7
157.
317
7.0
196.
721
6.3
236.
0
1X T
4 D
NA
Po
lym
eras
e B
uff
er
2.0
30.7
49.7
69.3
81.1
98.3
118.
013
7.7
157.
317
7.0
196.
721
6.3
236.
0
To
tal V
olu
me
4.0
61.4
99.4
138.
616
2.2
196.
623
6.0
275.
431
4.6
354.
039
3.4
432.
647
2.0
Vo
l per
Str
ip T
ub
e W
ell
7.0
11.0
16.0
18.5
23.0
27.8
33.0
38.0
42.3
47.3
52.1
57.0

GeneChip® Expression Analysis Technical Manual142 For HT Array Plates Using the GeneChip® Array Station
702063 GCAS HT Plates.book Page 142 Thursday, June 15, 2006 8:33 AM
Tab
le A.5
IVT
Co
cktail for C
old
Reag
ent B
lock
Vo
lum
e p
er R
xn
Ad
justed
Vo
lum
es (μL):
8 R
xns
16 R
xns
24 R
xns
32 R
xns
40 R
xns
48 R
xns
56 R
xns
64 R
xns
72 R
xns
80 R
xns
88 R
xns
96 R
xns
10X IV
T B
uffer
6.056.0
112.0168.0
224.0280.0
336.0392.0
448.0504.0
560.0616.0
672.0
IVT
Labelin
g N
TP
Mix
18.0168.0
336.0504.0
672.0840.0
1,008.01,176.0
1,344.01,512.0
1,680.01,848.0
2,016.0
IVT
Labelin
g E
nzym
e Mix
6.056.0
112.0168.0
224.0280.0
336.0392.0
448.0504.0
560.0616.0
672.0
T7 R
NA
Po
lymerase
1.09.3
18.728.0
37.346.7
56.065.3
74.784.0
93.3102.7
112.0
Nu
clease-free Water
7.065.3
130.7196.0
261.3326.7
392.0457.3
522.7588.0
653.3718.7
784.0
To
tal Vo
lum
e38.0
354.6709.4
1,064.01,418.6
1,773.42,128.0
2,482.62,837.4
3,192.03,546.6
3,901.44,256.0
Vo
l per S
trip T
ub
e Well
43.087.0
131.0174.0
219.0264.0
308.0352.0
396.0440.0
484.0529.0
Tab
le A.6
Fragm
entatio
n C
ocktail fo
r Co
ld R
eagen
t Blo
ck
Vo
lum
e p
er R
xn
Ad
justed
Vo
lum
es (μL):
8 R
xns
16 R
xns
24 R
xns
32 R
xns
40 R
xns
48 R
xns
56 R
xns
64 R
xns
72 R
xns
80 R
xns
88 R
xns
96 R
xns
5X Frag
men
tation
Bu
ffer (V
ol p
er Strip
Tu
be W
ell)7.5
11.417.8
26.735.6
44.553.4
62.371.3
80.289.1
98.0106.9

appendix A | Master Mix Spreadsheet 143
702063 GCAS HT Plates.book Page 143 Thursday, June 15, 2006 8:33 AM
Tab
le A
.71
HT
Arr
ay P
late
100
µL
TM
AC
Hyb
rid
izat
ion
Co
ckta
il M
aste
r M
ix f
or
Co
ld R
eag
ent
Blo
ck
Vo
lum
e p
er
Rxn
Ad
just
ed V
olu
mes
(μ
L):
8 R
xns
16
Rxn
s24
R
xns
32
Rxn
s40
R
xns
48
Rxn
s56
R
xns
64
Rxn
s72
R
xns
80
Rxn
s88
R
xns
96
Rxn
s
20X
Hyb
rid
izat
ion
Co
ntr
ol
Sto
ck5.
051
.193
.713
9.1
184.
523
2.8
272.
531
7.9
363.
340
8.8
454.
249
9.6
545.
0
3nM
B2
Olig
o1.
6516
.930
.945
.960
.976
.889
.910
4.9
119.
913
4.9
149.
916
4.9
179.
9
HS
DN
A (
10 m
g/m
L)1.
010
.218
.727
.836
.946
.654
.563
.672
.781
.890
.899
.910
9.0
Ace
tyla
ted
BS
A (5
0 m
g/m
L)1.
010
.218
.727
.836
.946
.654
.563
.672
.781
.890
.899
.910
9.0
1.23
x H
ybri
diz
atio
n B
uff
er81
.35
831.
31,
524.
02,
263.
03,
001.
93,
787.
04,
433.
65,
172.
55,
911.
46,
650.
47,
389.
38,
128.
28,
867.
2
To
tal
90.0
919.
71,
686.
02,
503.
63,
321.
14,
189.
84,
905.
05,
722.
56,
540.
07,
357.
78,
175.
08,
992.
59,
810.
1
# o
f Q
IAG
EN
Str
ips
Use
d1
11
12
22
23
33
3
Vo
lum
e p
er W
ell 1
st S
trip
114.
020
4.0
306.
040
0.0
400.
040
0.0
400.
040
0.0
400.
040
0.0
400.
040
0.0
Vo
lum
e p
er W
ell 2
nd
Str
ip11
4.0
204.
030
6.0
400.
040
0.0
400.
040
0.0
400.
0
Vo
lum
e p
er W
ell 3
rd S
trip
114.
020
4.0
306.
040
0.0

GeneChip® Expression Analysis Technical Manual144 For HT Array Plates Using the GeneChip® Array Station
702063 GCAS HT Plates.book Page 144 Thursday, June 15, 2006 8:33 AM
Tab
le A.8
2 HT
Array P
lates200 µ
L TM
AC
Hyb
ridizatio
n C
ocktail M
aster Mix fo
r Co
ld R
eagen
t Blo
ck
Vo
lum
e p
er R
xn
Ad
justed
Vo
lum
es (μL):
8 R
xns
16 R
xns
24 R
xns
32 R
xns
40 R
xns
48 R
xns
56 R
xns
64 R
xns
72 R
xns
80 R
xns
88 R
xns
96 R
xns
20X H
ybrid
ization
Co
ntro
l S
tock
10.090.8
181.7272.5
363.3454.2
545.0635.8
726.7817.5
908.3999.2
1,090.0
3nM
B2 O
ligo
3.330.0
60.089.9
119.9149.9
179.9209.8
239.8269.8
299.8329.7
359.7
HS
DN
A (10 m
g/m
L)2.0
18.236.3
54.572.7
90.8109.0
127.2145.3
163.5181.7
199.8218.0
Acetylated
BS
A (50 m
g/m
L)2.0
18.236.3
54.572.7
90.8109.0
127.2145.3
163.5181.7
199.8218.0
1.23x Hyb
ridizatio
n B
uffer
162.71,477.9
2,955.74,433.6
5,911.47,389.3
8,867.210,345.0
11,822.913,300.7
14,778.616,256.4
17,734.3
To
tal180.0
1,635.13,270.0
4,905.06,540.0
8,175.09,810.1
11,445.013,080.0
14,715.016,350.1
17,984.919,620.0
# of Q
IAG
EN
Strip
s Used
11
22
33
44
55
66
Vo
lum
e per W
ell 1st Strip
204.0408.0
408.0408.0
408.0408.0
408.0408.0
408.0408.0
408.0408.0
Vo
lum
e per W
ell 2nd
Strip
204.0408.0
408.0408.0
408.0408.0
408.0408.0
408.0408.0
Vo
lum
e per W
ell 3rd S
trip204.0
408.0408.0
408.0408.0
408.0408.0
408.0
Vo
lum
e per W
ell 4th S
trip204.0
408.0408.0
408.0408.0
408.0
Vo
lum
e per W
ell 5th S
trip204.0
408.0408.0
408.0
Vo
lum
e per W
ell 6th S
trip204.0
408.0

702063 GCAS HT Plates.book Page 145 Thursday, June 15, 2006 8:33 AM
Appendix B
Automated Sample Transfer
702063 GCAS HT Plates.book Page 146 Thursday, June 15, 2006 8:33 AM
Appendix
B
147
702063 GCAS HT Plates.book Page 147 Thursday, June 15, 2006 8:33 AM
Loading Sample Plate and Initial Deck Layout for Automated Sample Transfer
The Automated Sample Transfer function uses the Array Station to transfer 5 μL of total RNA from a Greiner U-bottom plate to a lidded Bio-Rad 96-Well Hard-Shell PCR Plate. To use this option, you must have at least 20 μL of your sample at a concentration of 0.2 to 0.4 μg/μL in a Greiner U-bottom plate. The samples should be placed in the wells in a column wise fashion in the same wells to be utilized for the Array Station Target Preparation run.
PROCEDURE
1. Set up the deck with the appropriate consumables, as illustrated in Figure B.1.

GeneChip® Expression Analysis Technical Manual148 For HT Array Plates Using the GeneChip® Array Station
702063 GCAS HT Plates.book Page 148 Thursday, June 15, 2006 8:33 AM
2. Start the software and load the TP_0001 application. Start the run by clicking the green arrow on the Application Control Console. The first window you see is shown in Figure B.2.
Figure B.1Auto Starting Deck Layout
Red Tip Rack
Tip Rack
Tip Rack
Tip Rack
EMPTY
Tbe used for Twister access
EMPTY
Lubrication Block
Nuclease free H2O in lidded reservoir
Bio-Rad Plate with lidLabel as "Total RNA"
D3D2
Liquid Waste Drain
D4 D5
B3B2B1 B4 B5
C4
Bio-Rad Plate with lidLabel as "Purified cDNA"
C3C2C1 C5
Base for stackable tip rack
Waste Chute
75% EtOH in lidded reservoir
A4
RNAClean™ in low profilelidded reservoir plate
A3 A5
Lidded Cold Block for Reagents
A1 A2
D1
Corning Polystyrene 3795 U-bottom plate. Label as "cRNA Cleanup"
Corning Polystyrene 3795 U-bottom plate onMag Separator. Label as "cDNA Cleanup"
EMPTY
Greiner PolypropyleneU-bottom plate for Hyb Label as "Starting Sample" at least 20 µL.

appendix B | Automated Sample Transfer 149
702063 GCAS HT Plates.book Page 149 Thursday, June 15, 2006 8:33 AM
A. From the drop-down option boxes, select User Name, Number of Samples by 8’s (by column starting with position A1), IVT Incubation Time, and either 100 μL one HT Array plate, or 200 μL - two HT Array plates.
B. In the Tracking Identifier box, you may put barcodes or other unique identification codes.
C. There are five options at the bottom of the Run Settings section in the TP-0001 Setup window:
1) If using barcodes, select the barcode option. Please refer to
Figure B.2Target Preparation Setup window

GeneChip® Expression Analysis Technical Manual150 For HT Array Plates Using the GeneChip® Array Station
702063 GCAS HT Plates.book Page 150 Thursday, June 15, 2006 8:33 AM
Chapter 4, page 70, substep F for a description on how to use barcoded plates.
2) Select the Perform automatic sample transfer option.
3) Select the option, Hold in incubator at 4°C after IVT if you want the plate to be held at 4°C before proceeding to the cRNA cleanup steps. User intervention is required after IVT if you select this option. See Figure 4.34 on page 75.
4) Select the option, Twister II tip rack spacer plates are in use when using the spacer plates if there is a static electricity concern.
5) The last option, Run compressed method (FOR TESTING ONLY) is for testing purposes only and should not be selected.
D. Notification Settings: During unattended operation, if problems arise the user notification feature allows an operator to be notified remotely by sending an email or dialing a phone number for pager/text purposes.
3. When the appropriate options are selected, click the Next button.
To cancel before continuing the run follow these steps:
1. Click the “Cancel Run” button.
2. Two windows appear in succession.
3. Click “Yes” and “OK” sequentially to cancel the run.

appendix B | Automated Sample Transfer 151
702063 GCAS HT Plates.book Page 151 Thursday, June 15, 2006 8:33 AM
4. Use the TP_0001 Reagents window to ensure all reagents are loaded. There are two user entry fields found in this window, one for the cDNA Kit and one for the IVT Kit. Lot numbers of the kits are tracked by typing them into the appropriate field.
5. After you have verified that your reagents are loaded and have typed in the lot numbers of the kits, click Next.
Figure B.3TP_0001 Reagents window

GeneChip® Expression Analysis Technical Manual152 For HT Array Plates Using the GeneChip® Array Station
702063 GCAS HT Plates.book Page 152 Thursday, June 15, 2006 8:33 AM
6. Use the six-option Checklist of this window to ensure all consumables are loaded. After selecting each option (all six boxes should be checked as in Figure B.4) the Continue Run button becomes enabled.
7. Click Continue Run.
Figure B.4TP_0001 Deck Layout Checklist window
To cancel before continuing the run follow these steps:
1. Click the “Cancel Run” button.
2. Two windows appear in succession.
3. Click “Yes” and “OK” sequentially to cancel the run.

appendix B | Automated Sample Transfer 153
702063 GCAS HT Plates.book Page 153 Thursday, June 15, 2006 8:33 AM
8. After transfer is complete, Figure B.5 appears.
9. Remove the Greiner plate from the D2 position and replace it with the “unfrag cRNA” plate (Bio-Rad 96-well Hard Shell PCR Plate). Close the doors to the Array Station and select OK to proceed.
10. Please Refer to Chapter 4, Array Station Setup and Target Preparation instructions for the remaining steps of the process.
Figure B.5User message to replace sample plate with lidded PCR plate.

GeneChip® Expression Analysis Technical Manual154 For HT Array Plates Using the GeneChip® Array Station
702063 GCAS HT Plates.book Page 154 Thursday, June 15, 2006 8:33 AM

702063 GCAS HT Plates.book Page 155 Thursday, June 15, 2006 8:33 AM
Appendix C
Array Station Customized Applications and Deck Layouts
702063 GCAS HT Plates.book Page 156 Thursday, June 15, 2006 8:33 AM
Appendix
C
157
702063 GCAS HT Plates.book Page 157 Thursday, June 15, 2006 8:33 AM
Deck layouts for the Array Station Target Preparation Options
The Array Station Automated Target Preparation Application offers options for running all or portions of the One Cycle Eukaryotic Labeling Process.
You will need to configure the Deck Layout properly depending upon where in the process you elect to start. Deck layouts for all possible starting options are presented in this Appendix.
1. In order to run customized applications click the Customize run button as shown in Figure C.1.
Figure C.1Target Preparation Setup window

GeneChip® Expression Analysis Technical Manual158 For HT Array Plates Using the GeneChip® Array Station
702063 GCAS HT Plates.book Page 158 Thursday, June 15, 2006 8:33 AM
You are prompted for information on the Run Type as shown in Figure C.2.
2. For the Run Type window, you will need to select one of the following options:
A. Full target preparation: When this option is selected, the protocol will run all methods associated with target preparation from Primer Anneal through Hybridization Mix preparation. Notice that when you select this option, all methods from Primer annealing [2] to Hybridization mix [15] will be
Figure C.2Customized Run Setup window

appendix C | Array Station Customized Applications and Deck Layouts 159
702063 GCAS HT Plates.book Page 159 Thursday, June 15, 2006 8:33 AM
selected for you in the Run Steps. In addition, if you want the Array Station to transfer your sample from a Greiner U-bottom to the Bio-Rad 96 Well plate, you must select the checkbox Automatic Sample Transfer [1]. If 5 μL of your sample is already in the Bio-Rad plate, leave this box unchecked. When running the Full target preparation selection, you will be prompted to change the deck, read plates and transfer plate reader data to the Array Station at indicated times.
B. First half of target preparation: When this option is selected, only the methods from Primer anneal through IVT elution will execute. Notice that when you select this option, all methods from Primer annealing [2] to IVT elution [10] will be selected for you in the Run Steps. In addition, if you want the Array Station to transfer your sample from a Greiner U-bottom to the Bio-Rad 96 Well plate, you will need to select the checkbox Automatic Sample Transfer [1]. If 5 μL of your sample is already in the Bio-Rad plate, leave this box unchecked. At the end of this process, the cRNA will be cleaned and placed in the incubator at 4°C. This RNA should be removed and stored at –80°C until ready for further processing.
C. Second half of target preparation: When this option is selected, only the methods First quantitation through Hybridization mix will execute. Notice that when you select this option, methods from First Quantitation [11] to Hybridization mix [15] will be selected for you in the Run Steps. This selection assumes you are starting with the purified cRNA obtained from the First half of target preparation. When running the Second half of target preparation selection, you will be prompted to read plates and transfer plate reader data to the Array Station at indicated times.
D. Fragmentation: When this option is selected, only the last two methods, Fragmentation and Hybridization mix will execute. Notice that when you select this option, the methods Fragmentation [14] and Hybridization mix [15] are selected for you in the Run Steps.
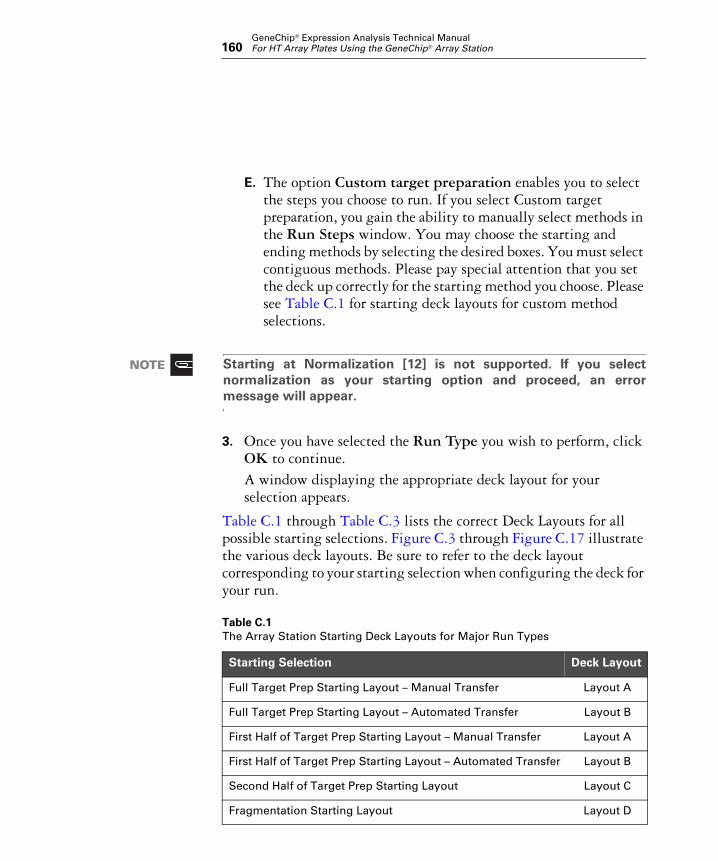
GeneChip® Expression Analysis Technical Manual160 For HT Array Plates Using the GeneChip® Array Station
702063 GCAS HT Plates.book Page 160 Thursday, June 15, 2006 8:33 AM
E. The option Custom target preparation enables you to select the steps you choose to run. If you select Custom target preparation, you gain the ability to manually select methods in the Run Steps window. You may choose the starting and ending methods by selecting the desired boxes. You must select contiguous methods. Please pay special attention that you set the deck up correctly for the starting method you choose. Please see Table C.1 for starting deck layouts for custom method selections.
3. Once you have selected the Run Type you wish to perform, click OK to continue. A window displaying the appropriate deck layout for your selection appears.
Table C.1 through Table C.3 lists the correct Deck Layouts for all possible starting selections. Figure C.3 through Figure C.17 illustrate the various deck layouts. Be sure to refer to the deck layout corresponding to your starting selection when configuring the deck for your run.
Starting at Normalization [12] is not supported. If you selectnormalization as your starting option and proceed, an errormessage will appear.
Table C.1The Array Station Starting Deck Layouts for Major Run Types
Starting Selection Deck Layout
Full Target Prep Starting Layout – Manual Transfer Layout A
Full Target Prep Starting Layout – Automated Transfer Layout B
First Half of Target Prep Starting Layout – Manual Transfer Layout A
First Half of Target Prep Starting Layout – Automated Transfer Layout B
Second Half of Target Prep Starting Layout Layout C
Fragmentation Starting Layout Layout D

appendix C | Array Station Customized Applications and Deck Layouts 161
702063 GCAS HT Plates.book Page 161 Thursday, June 15, 2006 8:33 AM
Table C.2The Array Station Starting Deck Layouts for Custom Selection of Run Steps
Starting Selection Deck Layout
Primer Annealing Layout A
First Method Layout E
Second Method Layout F
T4 Polymerase Layout G
cDNA Capture Layout H
cDNA Wash Layout I
cDNA Elution and IVT Setup Layout J
IVT Capture and Wash Layout K
IVT Elution Layout L
First Quantitation Layout C
Normalization Not Supported
Second Quantitation Layout M
Fragmentation Layout D
Hybridization Mix Layout N
Table C.3Deck Layout for User Intervention
Starting Selection Deck Layout
Full Target Prep User Intervention Layout Layout O

GeneChip® Expression Analysis Technical Manual162 For HT Array Plates Using the GeneChip® Array Station
702063 GCAS HT Plates.book Page 162 Thursday, June 15, 2006 8:33 AM
Please be sure to place all plates on deck as indicated in layouts.Even if the process for which that plate is used is complete, therobot expects the plate to be in that position. Serious errors canoccur if plates are missing.
When starting at any selection (except Full Target Prep UserIntervention) tip boxes on the Deck at A1, B1 and D1 should beempty of any tips.

appendix C | Array Station Customized Applications and Deck Layouts 163
702063 GCAS HT Plates.book Page 163 Thursday, June 15, 2006 8:33 AM
Figure C.3Array Station Deck Layout Configuration A
Red Tip Rack
Tip Rack
Tip Rack
Tip Rack
EMPTY
Tbe used for Twister access
EMPTY
Lubrication Block
Nuclease free H2O in lidded reservoir
Bio-Rad Plate with lid.Label as "un-frag cRNA"
Bio-Rad Plate with lidManual prep: contains 5µLtotal RNA in each well.Label as "Total RNA"
D3D2
Liquid Waste Drain
D4 D5
B3B2B1 B4 B5
C4
Bio-Rad Plate with lidLabel as "Purified cDNA"
C3C2C1 C5
Base for stackable tip rack
Waste Chute
75% EtOH in lidded reservoir
A4
RNAClean™ in low profilelidded reservoir plate
A3 A5
Lidded Cold Block for Reagents
A1 A2
D1
Corning Polystyrene 3795 U-bottom plate. Label as "cRNA Cleanup"
Corning Polystyrene 3795 U bottom plate onMag Separator. Label as "cDNA Cleanup"
EMPTY

GeneChip® Expression Analysis Technical Manual164 For HT Array Plates Using the GeneChip® Array Station
702063 GCAS HT Plates.book Page 164 Thursday, June 15, 2006 8:33 AM
Figure C.4Array Station Deck Layout Configuration B
Red Tip Rack
Tip Rack
Tip Rack
Tip Rack
EMPTY
Tbe used for Twister access
EMPTY
Lubrication Block
Nuclease free H2O in lidded reservoir
Bio-Rad Plate with lidLabel as "Total RNA"
D3D2
Liquid Waste Drain
D4 D5
B3B2B1 B4 B5
C4
Bio-Rad Plate with lidLabel as "Purified cDNA"
C3C2C1 C5
Base for stackable tip rack
Waste Chute
75% EtOH in lidded reservoir
A4
RNAClean™ in low profilelidded reservoir plate
A3 A5
Lidded Cold Block for Reagents
A1 A2
D1
Corning Polystyrene 3795 U-bottom plate. Label as "cRNA Cleanup"
Corning Polystyrene 3795 U-bottom plate onMag Separator. Label as "cDNA Cleanup"
EMPTY
Greiner PolypropyleneU-bottom plate for Hyb Label as "Starting Sample" at least 20 µL.

appendix C | Array Station Customized Applications and Deck Layouts 165
702063 GCAS HT Plates.book Page 165 Thursday, June 15, 2006 8:33 AM
Figure C.5Array Station Deck Layout Configuration C
Red Tip Rack
EMPTY
HT Array PlateRelease ClampStation
Greiner Polystyrene UV transparent optical plate
Bio-Rad Plate with lid.Label as "frag cRNA"
EMPTY
Tip Rack
Tip Rack
Tip RackTbe used for Twister access
EMPTY
Lubrication Block
Nuclease free H2O in lidded reservoir
Bio-Rad Plate with lid.Label as "un-frag cRNA." Wells contain 40 µL clean cRNA
Two Plastic Lids - stacked
D3D2
Liquid Waste Drain
D4 D5
B3B2B1 B4 B5
C4C3C2C1 C5
Base for stackable tip rack
Waste Chute
A4A3 A5
Lidded Cold Block for Reagents
A1 A2
D1
Greiner PolypropyleneU-bottom plate. Label as "normalized cRNA"
Greiner PolypropyleneU-bottom plate for HybLabel as "Hyb-ready sample"

GeneChip® Expression Analysis Technical Manual166 For HT Array Plates Using the GeneChip® Array Station
702063 GCAS HT Plates.book Page 166 Thursday, June 15, 2006 8:33 AM
Figure C.6Array Station Deck Layout Configuration D
EMPTY
Red Tip Rack
EMPTY
EMPTY
HT Array PlateRelease ClampStation
Bio-Rad Plate with lid. Label as "frag cRNA." Wells contain normalized cRNA at 0.625 µg/µL
EMPTY
Tip Rack
Tip Rack
Tip RackTbe used for Twister access
EMPTY
Lubrication Block
Bio-Rad Plate with lid.Label as "un-frag cRNA"
Two Plastic Lids - stacked
D3D2
Liquid Waste Drain
D4 D5
B3B2B1 B4 B5
C4C3C2C1 C5
Base for stackable tip rack
Waste Chute
A4A3 A5
Lidded Cold Block for Reagents
A1 A2
D1
Greiner PolypropyleneU-bottom plate. Label as "normalized cRNA"
Greiner PolypropyleneU-bottom plate for HybLabel as "Hyb-ready sample"

appendix C | Array Station Customized Applications and Deck Layouts 167
702063 GCAS HT Plates.book Page 167 Thursday, June 15, 2006 8:33 AM
Figure C.7Array Station Deck Layout Configuration E
Red Tip Rack
Tip Rack
Tip Rack
Tip Rack
EMPTY
Tbe used for Twister access
EMPTY
Lubrication Block
Nuclease free H2O in lidded reservoir
Bio-Rad Plate with lid.Label as "un-frag cRNA"
Bio-Rad Plate with lidManual prep: contains 10µLannealed total RNA in wells.Label as "Total RNA"
D3D2
Liquid Waste Drain
D4 D5
B3B2B1 B4 B5
C4
Bio-Rad Plate with lidLabel as "Purified cDNA"
C3C2C1 C5
Base for stackable tip rack
Waste Chute
75% EtOH in lidded reservoir
A4
RNAClean™ in low profilelidded reservoir plate
A3 A5
Lidded Cold Block for Reagents
A1 A2
D1
Corning Polystyrene 3795 U-bottom plate. Label as "cRNA Cleanup"
Corning Polystyrene 3795 U-bottom plate onMag Separator. Label as "cDNA Cleanup"
EMPTY

GeneChip® Expression Analysis Technical Manual168 For HT Array Plates Using the GeneChip® Array Station
702063 GCAS HT Plates.book Page 168 Thursday, June 15, 2006 8:33 AM
Figure C.8Array Station Deck Layout Configuration F
Red Tip Rack
Tip Rack
Tip Rack
Tip Rack
EMPTY
Tbe used for Twister access
EMPTY
Lubrication Block
Nuclease free H2O in lidded reservoir
Bio-Rad Plate with lid.Label as "un-frag cRNA"
Bio-Rad Plate with lid.Contains 20 µL completed first strand reaction in wells..Label as "Total RNA"
D3D2
Liquid Waste Drain
D4 D5
B3B2B1 B4 B5
C4
Bio-Rad Plate with lidLabel as "Purified cDNA"
C3C2C1 C5
Base for stackable tip rack
Waste Chute
75% EtOH in lidded reservoir
A4
RNAClean™ in low profilelidded reservoir plate
A3 A5
Lidded Cold Block for Reagents
A1 A2
D1
Corning Polystyrene 3795 U-bottom plate. Label as "cRNA Cleanup"
Corning Polystyrene 3795 U-bottom plate onMag Separator. Label as "cDNA Cleanup"
EMPTY

appendix C | Array Station Customized Applications and Deck Layouts 169
702063 GCAS HT Plates.book Page 169 Thursday, June 15, 2006 8:33 AM
Figure C.9Array Station Deck Layout Configuration G
Red Tip Rack
Tip Rack
Tip Rack
Tip Rack
EMPTY
Tbe used for Twister access
EMPTY
Lubrication Block
Nuclease free H2O in lidded reservoir
Bio-Rad Plate with lid.Label as "un-frag cRNA"
Bio-Rad Plate with lid. Contains 170 µL of completed second strand reaction in wells.Label as "Total RNA"
D3D2
Liquid Waste Drain
D4 D5
B3B2B1 B4 B5
C4
Bio-Rad Plate with lidLabel as "Purified cDNA"
C3C2C1 C5
Base for stackable tip rack
Waste Chute
75% EtOH in lidded reservoir
A4
RNAClean™ in low profilelidded reservoir plate
A3 A5
Lidded Cold Block for Reagents
A1 A2
D1
Corning Polystyrene 3795 U-bottom plate. Label as "cRNA Cleanup"
Corning Polystyrene 3795 U-bottom plate onMag Separator. Label as "cDNA Cleanup"
EMPTY

GeneChip® Expression Analysis Technical Manual170 For HT Array Plates Using the GeneChip® Array Station
702063 GCAS HT Plates.book Page 170 Thursday, June 15, 2006 8:33 AM
Figure C.10Array Station Deck Layout Configuration H
Red Tip Rack
Tip Rack
Tip Rack
Tip Rack
EMPTY
Tbe used for Twister access
EMPTY
Lubrication Block
Nuclease free H2O in lidded reservoir
Bio-Rad Plate with lid.Label as "un-frag cRNA"
Bio-Rad Plate with lid. Wells contain 174 µL of completed cDNA synthesis reaction. Label as "Total RNA"
D3D2
Liquid Waste Drain
D4 D5
B3B2B1 B4 B5
C4
Bio-Rad Plate with lidLabel as "Purified cDNA"
C3C2C1 C5
Base for stackable tip rack
Waste Chute
75% EtOH in lidded reservoir
A4
RNAClean™ in low profilelidded reservoir plate
A3 A5
Lidded Cold Block for Reagents
A1 A2
D1
Corning Polystyrene 3795 U-bottom plate. Label as "cRNA Cleanup"
Corning Polystyrene 3795 U-bottom plate onMag Separator. Label as "cDNA Cleanup"
EMPTY
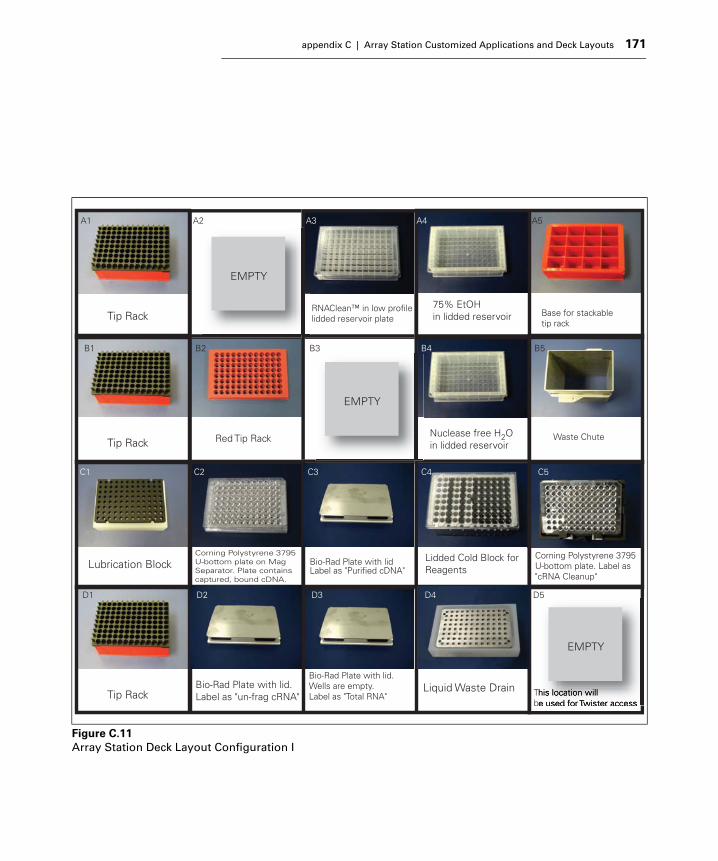
appendix C | Array Station Customized Applications and Deck Layouts 171
702063 GCAS HT Plates.book Page 171 Thursday, June 15, 2006 8:33 AM
Figure C.11Array Station Deck Layout Configuration I
Red Tip Rack
Tip Rack
Tip Rack
Tip Rack
EMPTY
Tbe used for Twister access
EMPTY
Lubrication Block
Nuclease free H2O in lidded reservoir
Bio-Rad Plate with lid.Label as "un-frag cRNA"
Bio-Rad Plate with lid.Wells are empty.Label as "Total RNA"
D3D2
Liquid Waste Drain
D4 D5
B3B2B1 B4 B5
C4
Bio-Rad Plate with lidLabel as "Purified cDNA"
C3C2C1 C5
Base for stackable tip rack
Waste Chute
75% EtOH in lidded reservoir
A4
RNAClean™ in low profilelidded reservoir plate
A3 A5
Lidded Cold Block for Reagents
A1 A2
D1
Corning Polystyrene 3795 U-bottom plate. Label as "cRNA Cleanup"
Corning Polystyrene 3795 U-bottom plate on Mag Separator. Plate contains captured, bound cDNA.
EMPTY

GeneChip® Expression Analysis Technical Manual172 For HT Array Plates Using the GeneChip® Array Station
702063 GCAS HT Plates.book Page 172 Thursday, June 15, 2006 8:33 AM
Figure C.12Array Station Deck Layout Configuration J
Red Tip Rack
Tip Rack
Tip Rack
Tip Rack
EMPTY
Tbe used for Twister access
EMPTY
Lubrication Block
Nuclease free H2O in lidded reservoir
Bio-Rad Plate with lid.Label as "un-frag cRNA"
Bio-Rad Plate with lidWells are empty.Label as "Total RNA"
D3D2
Liquid Waste Drain
D4 D5
B3B2B1 B4 B5
C4
Bio-Rad Plate with lidLabel as "Purified cDNA"
C3C2C1 C5
Base for stackable tip rack
Waste Chute
75% EtOH in lidded reservoir
A4
RNAClean™ in low profilelidded reservoir plate
A3 A5
Lidded Cold Block for Reagents
A1 A2
D1
Corning Polystyrene 3795 U-bottom plate. Label as "cRNA Cleanup"
Mag Separator
Corning Polystyrene 3795 U-bottom plate. Label as "cDNA Cleanup" Wells contain washed, bound cDNA

appendix C | Array Station Customized Applications and Deck Layouts 173
702063 GCAS HT Plates.book Page 173 Thursday, June 15, 2006 8:33 AM
Figure C.13Array Station Deck Layout Configuration K
Red Tip Rack
Tip Rack
Tip Rack
Tip Rack
EMPTY
Tbe used for Twister access
EMPTY
Lubrication Block
Nuclease free H2O in lidded reservoir
Bio-Rad Plate with lid.Label as "un-frag cRNA"
Bio-Rad Plate with lid.Label as "total RNA"
Bio-Rad Plate with lid. Wells contain 60 µL of completed IVT reaction. Label as "Purified cDNA"
D3D2
Liquid Waste Drain
D4 D5
B3B2B1 B4 B5
C4C3C2C1 C5
Base for stackable tip rack
Waste Chute
75% EtOH in lidded reservoir
A4
RNAClean™ in low profilelidded reservoir plate
A3 A5
Lidded Cold Block for Reagents
A1 A2
D1
Corning Polystyrene 3795 U-bottom plate. Label as "cRNA Cleanup"
Mag SeparatorCorning Polystyrene 3795 U-bottom plate. Label as "cDNA Cleanup"

GeneChip® Expression Analysis Technical Manual174 For HT Array Plates Using the GeneChip® Array Station
702063 GCAS HT Plates.book Page 174 Thursday, June 15, 2006 8:33 AM
Figure C.14Array Station Deck Layout Configuration L
Tip Rack
Tip Rack
Tip Rack
EMPTY
Tbe used for Twister access
EMPTY
Lubrication Block
Nuclease free H2O in lidded reservoir
Bio-Rad Plate with lid.Label as "un-frag cRNA"
Bio-Rad Plate with lid.Label as "Total RNA"
Bio-Rad Plate with lidLabel as "Purified cDNA"
D3D2
Liquid Waste Drain
D4 D5
B3B2B1 B4 B5
C4C3C2C1 C5
Base for stackable tip rack
Waste Chute
75% EtOH in lidded reservoir
A4
RNAClean™ in low profilelidded reservoir plate
A3 A5
Lidded Cold Block for Reagents
A1 A2
D1
Corning Polystyrene 3795 U-bottom plate. Label as "cRNA Cleanup" Plate contains bound, washed cRNA
Mag SeparatorCorning Polystyrene 3795 U-bottom plate. Label as "cDNA Cleanup"
Red Tip Rack

appendix C | Array Station Customized Applications and Deck Layouts 175
702063 GCAS HT Plates.book Page 175 Thursday, June 15, 2006 8:33 AM
Figure C.15Array Station Deck Layout Configuration M
Red Tip Rack
EMPTY
HT Array PlateRelease ClampStation
Greiner Polystyrene UV transparent optical plate
Bio-Rad Plate with lid.Label as "frag cRNA"
EMPTY
Tip Rack
Tip Rack
Tip RackTbe used for Twister access
EMPTY
Lubrication Block
Nuclease free H2O in lidded reservoir
Bio-Rad Plate with lid. Wells contain 38 µL of clean cRNA. Label as "un-frag cRNA"
Two Plastic Lids - stacked
D3D2
Liquid Waste Drain
D4 D5
B3B2B1 B4 B5
C4C3C2C1 C5
Base for stackable tip rack
Waste Chute
A4A3 A5
Lidded Cold Block for Reagents
A1 A2
D1
Greiner PolypropyleneU-bottom plate. Label as "normalized cRNA"
Greiner PolypropyleneU-bottom plate for HybLabel as "Hyb-ready sample"
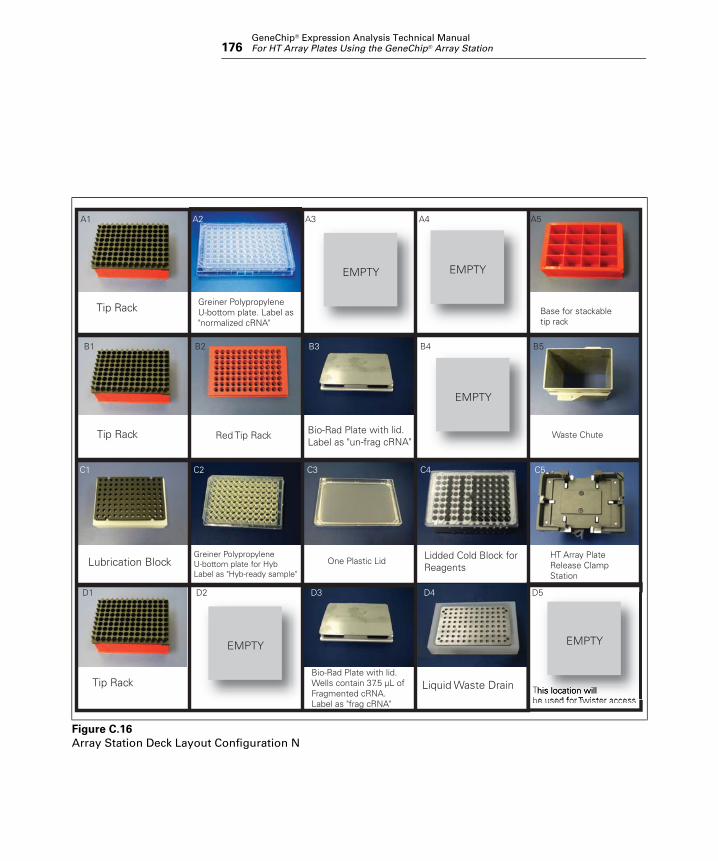
GeneChip® Expression Analysis Technical Manual176 For HT Array Plates Using the GeneChip® Array Station
702063 GCAS HT Plates.book Page 176 Thursday, June 15, 2006 8:33 AM
Figure C.16Array Station Deck Layout Configuration N
One Plastic Lid
Red Tip Rack
EMPTY
EMPTY
HT Array PlateRelease ClampStation
Bio-Rad Plate with lid. Wells contain 37.5 µL of Fragmented cRNA.Label as "frag cRNA"
EMPTY
Tip Rack
Tip Rack
Tip RackTbe used for Twister access
EMPTY
Lubrication Block
Bio-Rad Plate with lid.Label as "un-frag cRNA"
D3D2
Liquid Waste Drain
D4 D5
B3B2B1 B4 B5
C4C3C2C1 C5
Base for stackable tip rack
Waste Chute
A4A3 A5
Lidded Cold Block for Reagents
A1 A2
D1
Greiner PolypropyleneU-bottom plate. Label as "normalized cRNA"
Greiner PolypropyleneU-bottom plate for HybLabel as "Hyb-ready sample"
EMPTY

appendix C | Array Station Customized Applications and Deck Layouts 177
702063 GCAS HT Plates.book Page 177 Thursday, June 15, 2006 8:33 AM
Figure C.17Array Station Deck Layout Configuration O
Tip RackIf tips are present, leave them there.
EMPTY
Tbe used for Twister access
EMPTY
Lubrication BlockGreiner Polystyrene UV transparent optical plate
Nuclease free H2O in lidded reservoir
Bio-Rad Plate with lid Label as "frag cRNA"
DD2
Liquid Waste Drain
D4 D5
B3B2B1 B4 B5
C4C3C2C1 C5
Base for stackable tip rack
Waste Chute
A4A3 A5
Lidded Cold Block for Reagents
A1 A2
D1
Plate Array Release Clamp
Tip RackIf tips are present, leave them there.
Tip RackIf tips are present, leave them there.
Greiner PolypropyleneU-bottom plate. Label as "normalized cRNA"
Greiner PolypropyleneU-bottom plate for HybLabel as "Hyb-ready sample"
EMPTY
Twback here
EMPTY
Two Plastic Lids Stacked
Red Tip Rack

GeneChip® Expression Analysis Technical Manual178 For HT Array Plates Using the GeneChip® Array Station
702063 GCAS HT Plates.book Page 178 Thursday, June 15, 2006 8:33 AM

702063 GCAS HT Plates.book Page 179 Thursday, June 15, 2006 8:33 AM
Appendix D
Sciclone Workstation Software User Information
702063 GCAS HT Plates.book Page 180 Thursday, June 15, 2006 8:33 AM
Appendix
D
181
702063 GCAS HT Plates.book Page 181 Thursday, June 15, 2006 8:33 AM
User Level Configuration
Sciclone Workstation Software has three user groups with different permissions. These groups are Operators, Developers and Administrators.
The level of access is determined at User Login. A User Name and Password is required at login (see Figure D.1). The level of access for each authorized user will be set up during installation of your Sciclone Workstation Software by Affymetrix personnel.
Table D.1Permissions for Sciclone Workstation Software
User Group Permissions
Sciclone Operators Access Runtime Window, Run Methods, Access Direct Control Window, Error Recovery
Sciclone Method Developers All Operator Privileges, Access Method Editor Window, Create, Edit, Save and Delete Methods, Layouts and Liquid Classes, Import and Export Applications and Methods
Sciclone Administrators Access all Sciclone systems
Figure D.1Sciclone Workstation Software Login window

GeneChip® Expression Analysis Technical Manual182 For HT Array Plates Using the GeneChip® Array Station
702063 GCAS HT Plates.book Page 182 Thursday, June 15, 2006 8:33 AM
If the User logged into the system is in the Operator User Group, he will have access to the Runtime window (Figure D.2).
Figure D.2Sciclone Workstation Software Operator window

appendix D | Sciclone Workstation Software User Information 183
702063 GCAS HT Plates.book Page 183 Thursday, June 15, 2006 8:33 AM
If the User logged into the system is in the Developer or Administrator User Group, he will have access to the Method Editor window (Figure D.3).
Figure D.3Sciclone Workstation Software Developer window
When running the Affymetrix applications you should login as anOperator and run the applications from the Operator window.

GeneChip® Expression Analysis Technical Manual184 For HT Array Plates Using the GeneChip® Array Station
702063 GCAS HT Plates.book Page 184 Thursday, June 15, 2006 8:33 AM
More information on the User groups can be found in the Sciclone Users Manual.

702063 GCAS HT Plates.book Page 185 Thursday, June 15, 2006 8:33 AM
Appendix E
Formats of Summary Reports from the GeneChip® Array Station
702063 GCAS HT Plates.book Page 186 Thursday, June 15, 2006 8:33 AM
Appendix
E
187
702063 GCAS HT Plates.book Page 187 Thursday, June 15, 2006 8:33 AM
Formats of Summary Reports from the GeneChip® Array Station
INTRODUCTION
Each of the applications being written for the GeneChip® Array Station produces a summary report suitable for importing into a Laboratory Information Management System (LIMS). The report will tell how the operator chose to set up the run; what the plate barcodes were (if the operator turned barcode reading on); what errors occurred during the run; and, where applicable, which wells in the plate being processed are outside an acceptance criteria. To make importation uncomplicated, the report is a text file in a standard format easily parsed by LIMS software. Because some of the items in the report are expected to contain commas, using commas as delimiters would be undesirable, so the tab-delimited text-file format will be utilized over the comma-separated-variables format. In that format the text is divided into lines, and fields within a line are separated from each other by tab characters.
FILE NAMES
The summary-report files are given names that identify the application that generates them as well as the particular run of that application being summarized. Accordingly, the file names are constructed by appending the application name to “SummaryReport_”, following that with a date-and-time stamp constructed out of the starting time of the run, and appending “.txt” as the file extension. For example, the name of a report file generated by a run of application TP_0001 on April 3, 2006, at 4:30:31pm would be “SummaryReport_TP_0001_4_3_06_4_30_31_PM.txt” on a workstation set up to use the North American date-and-time format. Note that the underscore character is used in place of other punctuation to ensure that the file name conforms to operating-system rules.

GeneChip® Expression Analysis Technical Manual188 For HT Array Plates Using the GeneChip® Array Station
702063 GCAS HT Plates.book Page 188 Thursday, June 15, 2006 8:33 AM
FILE CONTENTS
Thus far three applications have been written, all for gene expression: Target Preparation 0001, Hybridization Setup 0001, and Wash Stain 0001. The contents of the report files from all three applications are found in the following Tables.
Table E.1Contents of Summary Report File for Target Preparation 0001
Line Number
Contents Possible Values or Example
1 Application name TP_0001
2 Name of Array Station user Doe, John
3 Run start time 4:30:31 PM
4 Run start date Monday, April 03, 2006
5 Run end time 8:53:41 PM
6 Run duration 4:23:10
7 Tracking ID User-entered string*
8 Tip-spacers-used flag YES or NO
9 Number of samples 8, 16, 24, …, 96
10 In-vitro transcription time 4, 8, or 16
11 Target destination One HT array plate
12 First run step Primer annealing [ 2 ]†
13 Last run step Hybridization mix [ 15 ]†
14 Initial sample transfer Manual or Automatic
15 Hold-after-IVT flag YES or NO
16 cDNA kit lot number User-entered value‡
17 IVT kit lot number User-entered value‡
18 Barcode-reader-enabled flag YES or NO

appendix E | Formats of Summary Reports from the GeneChip® Array Station 189
702063 GCAS HT Plates.book Page 189 Thursday, June 15, 2006 8:33 AM
19 Total RNA barcode Value read during run**
20 Unfragmented cRNA barcode Value read during run**
21 Normalized cRNA barcode Value read during run**
22 Fragmented cRNA barcode Value read during run**
23 Hybridization-ready barcode Value read during run**
24 Limits for pre-normalization yields
25<tab>250
25 Wells outside pre-normalization limits
A01<tab>C12<tab>E05
26 Robot errors Tab-delimited set of numbers
*The Tracking ID is a string entered by the user when the run is being set up. It may have up to forty char-acters and may also be blank.
†The names of the run steps are followed by their step numbers enclosed in square brackets.‡Kit lot numbers will typically be in barcodes read from the kits with a hand-held barcode reader attachedto the workstation.
**These barcodes will be read from the indicated items during the run by a barcode reader on the deck ofthe robot provided that the barcode-reader-enabled flag is set to YES. If the flag is set to NO or if the attemptto read the barcode failed, a phrase to that effect will replace the barcode on the corresponding line of thereport.
Table E.1 (Continued)Contents of Summary Report File for Target Preparation 0001
Line Number
Contents Possible Values or Example
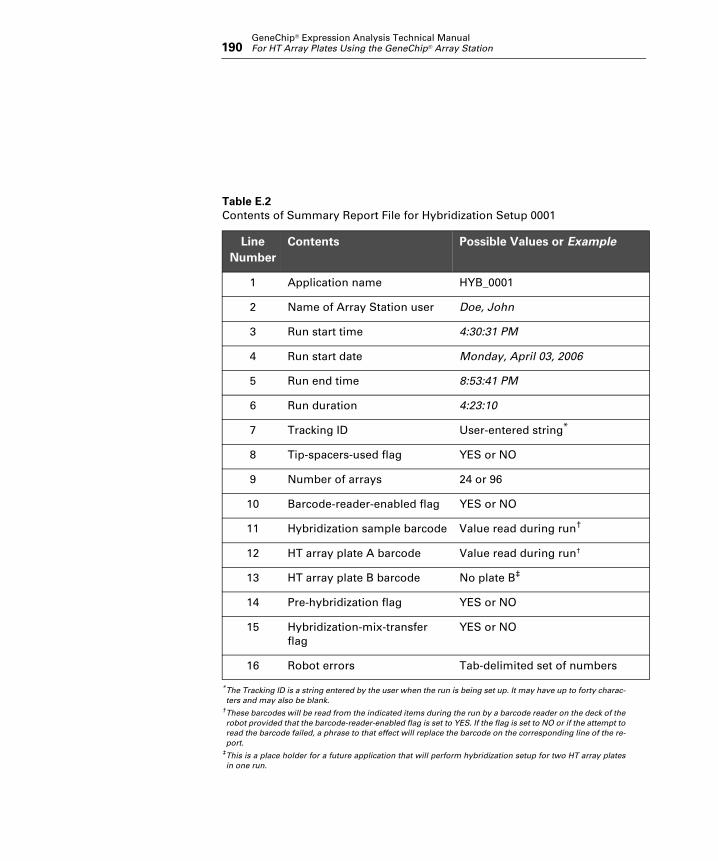
GeneChip® Expression Analysis Technical Manual190 For HT Array Plates Using the GeneChip® Array Station
702063 GCAS HT Plates.book Page 190 Thursday, June 15, 2006 8:33 AM
Table E.2Contents of Summary Report File for Hybridization Setup 0001
Line Number
Contents Possible Values or Example
1 Application name HYB_0001
2 Name of Array Station user Doe, John
3 Run start time 4:30:31 PM
4 Run start date Monday, April 03, 2006
5 Run end time 8:53:41 PM
6 Run duration 4:23:10
7 Tracking ID User-entered string*
*The Tracking ID is a string entered by the user when the run is being set up. It may have up to forty charac-ters and may also be blank.
8 Tip-spacers-used flag YES or NO
9 Number of arrays 24 or 96
10 Barcode-reader-enabled flag YES or NO
11 Hybridization sample barcode Value read during run†
†These barcodes will be read from the indicated items during the run by a barcode reader on the deck of therobot provided that the barcode-reader-enabled flag is set to YES. If the flag is set to NO or if the attempt toread the barcode failed, a phrase to that effect will replace the barcode on the corresponding line of the re-port.
12 HT array plate A barcode Value read during run†
13 HT array plate B barcode No plate B‡
‡This is a place holder for a future application that will perform hybridization setup for two HT array platesin one run.
14 Pre-hybridization flag YES or NO
15 Hybridization-mix-transfer flag
YES or NO
16 Robot errors Tab-delimited set of numbers

appendix E | Formats of Summary Reports from the GeneChip® Array Station 191
702063 GCAS HT Plates.book Page 191 Thursday, June 15, 2006 8:33 AM
FILE LOCATION
By convention, the applications will write the summary files into C:\Affymetrix\Reports\Data.
Table E.3Contents of Summary Report File for Wash Stain 0001
Line Number
Contents Possible Values or Example
1 Application name WS_0001
2 Name of Array Station user Doe, John
3 Run start time 4:30:31 PM
4 Run start date Monday, April 03, 2006
5 Run end time 8:53:41 PM
6 Run duration 4:23:10
7 Tracking ID User-entered string*
*The Tracking ID is a string entered by the user when the run is being set up. It may have up to forty char-acters and may also be blank.
8 Tip-spacers-used flag YES or NO
9 Number of arrays 24 or 96
10 Barcode-reader-enabled flag YES or NO
11 HT array plate barcode Value read during run†
†These barcodes will be read from the indicated items during the run by a barcode reader on the deck of therobot provided that the barcode-reader-enabled flag is set to YES. If the flag is set to NO or if the attemptto read the barcode failed, a phrase to that effect will replace the barcode on the corresponding line of thereport.
12 Recovered sample plate barcode
Value read during run†
13 Robot errors Tab-delimited set of numbers

GeneChip® Expression Analysis Technical Manual192 For HT Array Plates Using the GeneChip® Array Station
702063 GCAS HT Plates.book Page 192 Thursday, June 15, 2006 8:33 AM

702063 GCAS HT Plates.book Page 193 Thursday, June 15, 2006 8:33 AM
Appendix F
Reagents, Equipment, and Supplier Contact Information
702063 GCAS HT Plates.book Page 194 Thursday, June 15, 2006 8:33 AM
Appendix
F
195
702063 GCAS HT Plates.book Page 195 Thursday, June 15, 2006 8:33 AM
Master List - Consumables, Reagents,and Equipment
You will need the following reagents and supplies to complete the target preparation on the Array Station system. The reagent quantities listed are for one plate of 96 well reactions.
INSTRUMENTS
All labware, including pipettes, must be RNase/DNase-free.
Table F.1Instruments
Instruments Supplier P/N Quantity / Run
GeneChip® Array Station Affymetrix 00-0162 (110V) or 00-0235 (220v)
1
GeneChip® HT Scanner Affymetrix 00-0172 1
Allen wrench (2.5mm) Multiple 1
Dual Channel Thermocouple VWR International 61220-605 1
12-multichannel 20 µL Pipetman Rainin L12-20 1
12-multichannel 200 µL Pipetman Rainin L12-200 1
8-multichannel 20 µL Pipetman Rainin L8-20 1
8-multichannel 200 µL Pipetman Rainin L8-200 1
Auto-sealing microplate lid, arched, wide tab Bio-Rad MSL 2032 4
Gripper Pads Caliper LifeSciences 52071 8
Heatblock Multiple
Microseal P pads ADHESIVE Bio-Rad MSP-1001 1 (10 seals)
Multidispensing pipette - 1,000 µL Rainin E3-1000
Multidispensing pipette - 200 µL Rainin E3-200
Sealing Roller Bio-Rad MSR-0001
Zerostat Anti-Static Gun Audioadvisor.com Zerostat

GeneChip® Expression Analysis Technical Manual196 For HT Array Plates Using the GeneChip® Array Station
702063 GCAS HT Plates.book Page 196 Thursday, June 15, 2006 8:33 AM
CONSUMABLES – TARGET PREPARATION
Table F.2Consumables List for Target Preparation
Item Source P/N Quantity / Run
1.2 mL Square Well Storage Plate, Low Profile ABGene/Marsh AB-1127 1
96 Wells High Profile 300 mL Reservoir E&K Scientific Products EK-2035 2
96-Well Hard-Shell PCR Plate Bio-Rad HSP-9601 4
Aluminum Foil Lids* Beckman 538619 1 pack
BD Falcon™ Test Tube, 14 mL VWR International 60819-761 2
BD Falcon™ Test Tube, 5 mL* VWR International 60819-728 2
Corning Polystyrene Round Bottom Plates Fisher Scientific CLS3795 2
DNAZap™ Ambion 9890 1 (2 bottles)
Elution Strip Tubes, 0.85 mL QIAGEN 19588 6 strips
Greiner round bottom clear polypropylene plate
E&K Scientific Products 20261 2
Greiner UV transparent Optical Plates E&K Scientific Products AB-1127 2
KimWipes® VWR International 34256
Low-Profile 0.2 mL PCR 8-Tube Strips Bio-Rad TLS-0801 4 strips
Microseal ‘F’ Adhesive Foil Bio-Rad MSF-1001
Microtiter plate lids Phenix ML-5009 5
Polypropylene Centrifuge Tubes with Caps, Sterile 50 mL
VWR International 20171-028 2
RNase-Free 1.5 mL Microfuge tube*
*or equivalent
Ambion 12400 6
RNaseZap® wipes Ambion 9786 1 (100 wipes)
Stacker tips 200 µL non-sterile Caliper LifeSciences 78641 1 box

appendix F | Reagents, Equipment, and Supplier Contact Information 197
702063 GCAS HT Plates.book Page 197 Thursday, June 15, 2006 8:33 AM
CONSUMABLES – HYBRIDIZATION SETUP
Table F.3Consumables List for Hybridization Setup
Item Source P/N Quantity / Run
HT Hybridization Tray*
*Stain and Hybridization Tray are packaged with the HT Array Plates.
Affymetrix 202111 1
HT Stain Tray* Affymetrix 900745 1
96-Well Hard-Shell PCR Plate Bio-Rad HSP-9601 1
OmnitrayorGreiner Round Bottom Clear Polypropylene Plate
VWR
E&K Scientific Products
4660-638
20261
1
1
Stacker Tips 200 µL non-sterile Caliper LifeSciences 78642 3

GeneChip® Expression Analysis Technical Manual198 For HT Array Plates Using the GeneChip® Array Station
702063 GCAS HT Plates.book Page 198 Thursday, June 15, 2006 8:33 AM
CONSUMABLES – WASH AND STAIN
Table F.4Consumables List for Wash and Stain of HT Array Plate
Item Source P/N Quantity / Run
HT Scan Tray*
*HT Stain, Wash, and Scan Trays are packaged with the HT Array Plates.
Affymetrix 900746 1
HT Stain Tray* Affymetrix 900745 3
HT Wash Tray* Affymetrix 900752 5
Aluminum Foil Lids Beckman 538619 1 pack
BD Falcon™ Test Tube, 14 mL VWR International 60819-761 2
BD Falcon™ Test Tube, 5 mL†
†or equivalent
VWR International 60819-728 1
Polypropylene Centrifuge Tubes with Caps, Sterile 50 mL
VWR International 20171-028 2
RNase-Free 1.5 mL Microfuge tube† Ambion 12400 1
Round Bottom Clear Polypropylene Plate E&K Scientific Products 20261 1
Stacker Tips 200 µL non-sterile Caliper LifeSciences 78641 1 Box
96-Well Hard-Shell PCR Plate Bio-Rad HSP-9601 1
Omnitray VWR International 4660-638 2

appendix F | Reagents, Equipment, and Supplier Contact Information 199
702063 GCAS HT Plates.book Page 199 Thursday, June 15, 2006 8:33 AM
REAGENTS – TOTAL RNA ISOLATION
Table F.5Reagent List for Total RNA Isolation
Material Source P/N
TRIzol® Reagent Invitrogen Life Technologies
15596-018
Ethanol, 80% (stored at –20°C) Multiple
Glycogen (optional) Ambion 9510
Pellet Paint® (optional) Novagen 69049-3
QIAzol™ Lysis Reagent QIAGEN 79306
RNeasy® Mini Kit QIAGEN 74104
Sodium Acetate (NaOAc), 3M Sigma-Aldrich S7899

GeneChip® Expression Analysis Technical Manual200 For HT Array Plates Using the GeneChip® Array Station
702063 GCAS HT Plates.book Page 200 Thursday, June 15, 2006 8:33 AM
REAGENTS – TARGET PREPARATION
Table F.6Reagent List for Target Preparation
Material Source P/N
GeneChip® HT One-Cycle Target Labeling and Controls Kit(96 samples)
containing:• GeneChip® HT One-Cycle cDNA Synthesis Kit
96-Reactions, P/N 900687• GeneChip® HT IVT Labeling Kit
96-Reactions, P/N 900688• GeneChip® Eukaryotic Poly-A RNA Control Kit
100-Reactions, P/N 900433• GeneChip® Eukaryotic Hybridization Control Kit
150-Reactions, P/N 900457
Affymetrix 900686
GeneChip® Eukaryotic Poly-A RNA Control Kitcontaining:• Poly-A Control Stock (16 µL)• Poly-A Control Dil Buffer (3.8 mL)
Affymetrix 900433
GeneChip® HT One-Cycle cDNA Synthesis Kitcontaining:• T7-Oligo(dT) Primer, 50 µM (130 µL)• 5X 1st Strand Reaction Mix (460 µL)• DTT, 0.1M (230 µL)• dNTP, 10 mM (460 µL)• SuperScript™ II (120 µL)• 5X 2nd Strand Reaction Mix (3,300 µL)• E. coli DNA Polymerase I (440 µL)• E. coli DNA Ligase (110 µL)• RNase H (110 µL)• T4 DNA Polymerase (280 µL)• 5X T4 DNA Polymerase Buffer (60 µL)
Affymetrix 900687
GeneChip® HT IVT Labeling Kitcontaining:• 10X IVT Labeling Buffer, 1 tube (675 µL)• IVT Labeling Enzyme Mix, 1 tube (675 µL)• IVT Labeling NTP Mix, 2 tubes (1,010 µL)• 3’-Labeling Control (0.5 µg/µL), 1 tube (10 µL)• T7 RNA Polymerase, 1 tube (115 µL)• 5X Fragmentation Buffer, 1 tube (855 µL)
Affymetrix 900688

appendix F | Reagents, Equipment, and Supplier Contact Information 201
702063 GCAS HT Plates.book Page 201 Thursday, June 15, 2006 8:33 AM
REAGENTS – HYBRIDIZATION SETUP
Nuclease-free Water Ambion 9932
RNAClean 60 mL Agencourt 000494
Table F.7Reagent List for Hybridization Setup
Material Source P/N
Bovine Serum Albumin (BSA) solution (50 mg/mL) Invitrogen Life Technologies
15561-020
EDTA Disodium Salt, 0.5M solution (100 mL) Sigma-Aldrich E7889
Herring Sperm DNA Promega Corporation D1811
MES hydrate SigmaUltra Sigma-Aldrich M5287
MES Sodium Salt Sigma-Aldrich M5057
Nuclease-free Water, 1 L Ambion 9932
Surfact-Amps® 20 (Tween-20), 10% Pierce Chemical 28320
TMAC (5M) Sigma-Aldrich T3411
Table F.6 (Continued)Reagent List for Target Preparation
Material Source P/N

GeneChip® Expression Analysis Technical Manual202 For HT Array Plates Using the GeneChip® Array Station
702063 GCAS HT Plates.book Page 202 Thursday, June 15, 2006 8:33 AM
REAGENTS – WASH AND STAIN
Table F.8Reagent List for Wash and Stain
Material Source P/N
Nuclease-free Water Ambion 9932
20X SSPE (3M NaCl, 0.2M NaH2PO4, 0.02M EDTA) Cambrex 51214
5M NaCl, RNase-free, DNase-free Ambion 9760G
Anti-Streptavidin Antibody (Goat), Biotinylated Vector Laboratories BA-0500
Bovine Serum Albumin (BSA) solution (50 mg/mL) Invitrogen Life Technologies
15561-020
Distilled Water Invitrogen Life Technologies
15230-147
Goat IgG, Reagent Grade Sigma-Aldrich I 5256
PBS, pH 7.2 Invitrogen Life Technologies
20012-027
R-Phycoerythrin Streptavidin Molecular Probes S-866
Surfact-Amps® 20 (Tween-20), 10% Pierce Chemical 28320
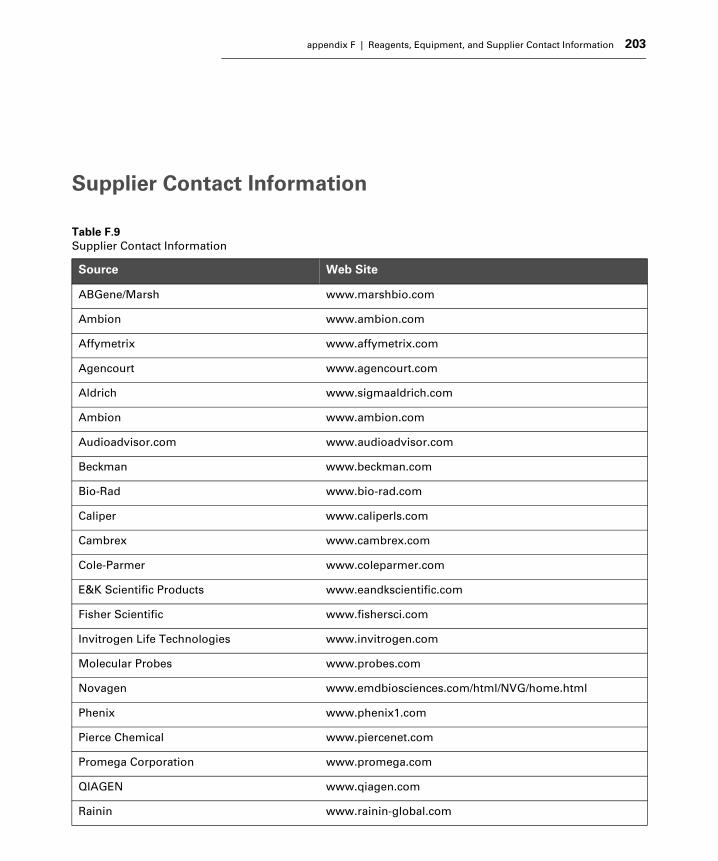
appendix F | Reagents, Equipment, and Supplier Contact Information 203
702063 GCAS HT Plates.book Page 203 Thursday, June 15, 2006 8:33 AM
Supplier Contact Information
Table F.9Supplier Contact Information
Source Web Site
ABGene/Marsh www.marshbio.com
Ambion www.ambion.com
Affymetrix www.affymetrix.com
Agencourt www.agencourt.com
Aldrich www.sigmaaldrich.com
Ambion www.ambion.com
Audioadvisor.com www.audioadvisor.com
Beckman www.beckman.com
Bio-Rad www.bio-rad.com
Caliper www.caliperls.com
Cambrex www.cambrex.com
Cole-Parmer www.coleparmer.com
E&K Scientific Products www.eandkscientific.com
Fisher Scientific www.fishersci.com
Invitrogen Life Technologies www.invitrogen.com
Molecular Probes www.probes.com
Novagen www.emdbiosciences.com/html/NVG/home.html
Phenix www.phenix1.com
Pierce Chemical www.piercenet.com
Promega Corporation www.promega.com
QIAGEN www.qiagen.com
Rainin www.rainin-global.com

GeneChip® Expression Analysis Technical Manual204 For HT Array Plates Using the GeneChip® Array Station
702063 GCAS HT Plates.book Page 204 Thursday, June 15, 2006 8:33 AM
Sigma-Aldrich www.sigma-aldrich.com
USA Scientific www.usascientific.com
Vector Laboratories www.vectorlabs.com
VWR International www.vwr.com
Table F.9 (Continued)Supplier Contact Information
Source Web Site

702063 GCAS HT Plates.book Page 205 Thursday, June 15, 2006 8:33 AM
Appendix G
Affymetrix Contact Information
702063 GCAS HT Plates.book Page 206 Thursday, June 15, 2006 8:33 AM
Appendix
G
207
702063 GCAS HT Plates.book Page 207 Thursday, June 15, 2006 8:33 AM
When to Contact Technical Support
Under any of the following conditions, unplug the instrument from the power source and contact Affymetrix Technical Support:
• when the power cord is damaged or frayed;
• if any liquid has penetrated the instrument;
If the instrument must be returned for repair, call Affymetrix Technical Support.
Make sure you have the model and serial number.
Affymetrix, Inc.3420 Central ExpresswaySanta Clara, CA 95051USA
E-mail: [email protected]: 1-888-362-2447 (1-888-DNA-CHIP)Fax: 1-408-731-5441
Affymetrix UK LtdVoyager, Mercury Park,Wycombe Lane, Wooburn Green,High Wycombe HP10 0HHUnited Kingdom
E-mail: [email protected] and Others Tel: +44 (0) 1628 552550France Tel: 0800919505Germany Tel: 01803001334Fax: +44 (0) 1628 552585

GeneChip® Expression Analysis Technical Manual208 For HT Array Plates Using the GeneChip® Array Station
702063 GCAS HT Plates.book Page 208 Thursday, June 15, 2006 8:33 AM
Affymetrix Japan, K. K.Mita NN Bldg16 Floor, 4-1-23 Shiba,Minato-ku, Tokyo 108-0014Japan
Tel: (03) 5730-8200Fax: (03) 5730-8201