Embed Size (px)
Citation preview

ORNL/TM-2009/285_1B
Gen IV Materials Handbook Functionalities and Operation (1B) – Handbook Version 1.1 –
March 8, 2010 Prepared by Weiju Ren
DOCUMENT AVAILABILITY Reports produced after January 1, 1996, are generally available free via the U.S. Department of Energy (DOE) Information Bridge. Web site http://www.osti.gov/bridge Reports produced before January 1, 1996, may be purchased by members of the public from the following source. National Technical Information Service 5285 Port Royal Road Springfield, VA 22161 Telephone 703-605-6000 (1-800-553-6847) TDD 703-487-4639 Fax 703-605-6900 E-mail [email protected] Web site http://www.ntis.gov/support/ordernowabout.htm Reports are available to DOE employees, DOE contractors, Energy Technology Data Exchange (ETDE) representatives, and International Nuclear Information System (INIS) representatives from the following source. Office of Scientific and Technical Information P.O. Box 62 Oak Ridge, TN 37831 Telephone 865-576-8401 Fax 865-576-5728 E-mail [email protected] Web site http://www.osti.gov/contact.html
This report was prepared as an account of work sponsored by an agency of the United States Government. Neither the United States Government nor any agency thereof, nor any of their employees, makes any warranty, express or implied, or assumes any legal liability or responsibility for the accuracy, completeness, or usefulness of any information, apparatus, product, or process disclosed, or represents that its use would not infringe privately owned rights. Reference herein to any specific commercial product, process, or service by trade name, trademark, manufacturer, or otherwise, does not necessarily constitute or imply its endorsement, recommendation, or favoring by the United States Government or any agency thereof. The views and opinions of authors expressed herein do not necessarily state or reflect those of the United States Government or any agency thereof.

i
ORNL/TM-2009/285_1B
Generation IV Nuclear Energy Systems Program
Gen IV Materials Handbook Functionalities and Operation (1B)
Weiju Ren
Date Published: March 8, 2010
Prepared by OAK RIDGE NATIONAL LABORATORY
Oak Ridge, Tennessee 37831-6283 managed by
UT-BATTELLE, LLC for the
U.S. DEPARTMENT OF ENERGY under contract DE-AC05-00OR22725

ii

iii
PREFACE
The Gen IV Materials Handbook, a web-based, interactive, and digitized materials database initially developed for the US Gen IV Nuclear Energy Systems Program, was unanimously accepted as the shared international database by the Generation IV International Forum (GIF) Very High Temperature Reactor (VHTR) Provisional Management Board in April, 2007. To help the prospective international users learn and evaluate its structure and functionalities, a demonstration version dubbed “Gen IV Materials Handbook GIF Demo” was released with a companion user guide in March 2008 [1]. Based on the user evaluation feedback, revisions were made as the Handbook Project continued to prepare the system for business operation. In September 2009, all participating VHTR signatories completed signing the collaboration documents, and the Provisional Management Board officially became the GIF VHTR Materials Project Management Board (PMB). An immediate request made by the PMB upon its inauguration was to initiate Handbook business operation and upload a batch of Gen IV nuclear reactor program technical reports from the member countries.
This instruction manual for Handbook functionalities and operation has been prepared in response to the PMB request to release Gen IV Materials Handbook V1.0, the first business version of the Handbook. Duration the past few years while the international collaboration was being evolved, decisive planning and steady progress of the Project have developed the Handbook into a sophisticated materials information management system with highly secured access control, powerful data processing tools, and optimal framework for flexible enhancement and effective expansion, which allows its future development to be largely directed by users to ensure satisfaction of the research needs and requirements for their Gen IV nuclear reactor programs. This document is intended to provide a user-friendly guide for navigating the Handbook structure, using Handbook functionalities, and conducting data and file uploading operations. Meanwhile, it is also attempted to help users understand the Handbook history, development strategies, current status, future plans, and important design and construction considerations so that users can feel knowledgeable and confident to participate in future Handbook development.
Because an online help menu is also provided to cover the most basic functionalities of the Handbook, this document only focuses on typical operations that users will need when using the Handbook to conduct Gen IV program activities. If you have any questions, problems, needs, requirements, and suggestions, please feel free to contact the Handbook management. Your input will provide the highly desired guidance for future development to satisfy your specific needs. I truly believe that working together through effective communication, we can make the Handbook an increasingly satisfactory resource to facilitate the global development of the Gen IV Nuclear Reactor Systems.
Sincerely yours, Weiju Ren, Ph. D. Manager of Operations Gen IV Materials Handbook Project Oak Ridge National Laboratory Oak Ridge, Tennessee 37831-6155 United States of America Email: [email protected] Phone: 1-865-576-6402

iv

v
REVISION HISTORY
To provide updated information and satisfy emerging user requirements as the development of the Gen IV Materials Handbook continues, this document will be periodically revised as needed.
The version of the Handbook is represented by a serial number followed by a decimal point and
its revision number. For example: V1.2 means Handbook version 1 revision 2. The version of this manual is represented by an integer corresponding to the Handbook version
followed by an upper case letter starting from A to represent the manual revision. For example: 1C means revision C of the manual for Handbook version 1. Manual Version Release Date Comments
1A December 2, 2009 Created for official business operation of Gen IV Materials Handbook V1.0
1B March 8, 2010
Editorial revisions; addition of the indirect Handbook Record creation procedure; removal of the browse functional button from the homepage tool bar; and revision of operation examples to reflect changes resulting from functionality upgrade. All revisions are marked in green color.

vi

vii
TABLE OF CONTENTS
PREFACE .............................................................................................................................................iii REVISION HISTORY ........................................................................................................................... v TABLE OF CONTENTS .....................................................................................................................vii ABSTRACT ..........................................................................................................................................xi ACRONYMS ......................................................................................................................................xiii 1. INTRODUCTION..................................................................................................................... 1
1.1 DEVELOPMENT BACKGROUND AND RATIONALE.................................................. 1 1.2 DEVELOPMENT HISTORY AND STRATEGY............................................................... 2
2. HANDBOOK ARCHITECTURE AND CONSTRUCTION STATUS .................................... 2 2.1 HANDBOOK DATA MANAGEMENT SCHEMA OVERVIEW....................................... 2 2.2 COLOR CODES AND COUNTRY NAME ACRONYMS ................................................ 6 2.3 UNIT SYSTEMS.................................................................................................................. 6
3. ACCESS CONTROL OF THE HANDBOOK .......................................................................... 7 4. BROWSING THE HANDBOOK .............................................................................................. 8
4.1 DEFINITIONS ..................................................................................................................... 8 4.2 GETTING STARTED........................................................................................................ 11 4.3 GETTING AROUND IN THE HANDBOOK .................................................................... 11 4.3.1 Basic browse operations ................................................................................. 12 4.3.2 Using the “search” icon .................................................................................. 16 4.3.3 Using the “report” icon ................................................................................... 18 4.3.4 Using other icons and buttons......................................................................... 22 4.3.5 Access external Material Data Network ......................................................... 22
5. REPORT AND DATA FILE UPLOADING .......................................................................... 23 5.1 HANDBOOK INFORMATION CATEGORIZATION ..................................................... 23 5.2 HANDBOOK RECORD NUMBER AND HANDBOOK RECORD ID ............................. 24 5.3 OPERATIONAL PROCEDURE FOR UPLOADING REPORTS.................................... 24 5.4 OPERATIONAL PROCEDURE FOR UPLOADING DATA FILES............................... 31
6. REFERENCES........................................................................................................................ 33 APPENDIX A PROCEDURES FOR ESTABLISHING ACCESS TO GEN IV MATERIALS
HANDBOOK........................................................................................................ 34 APPENDIX B GEN IV MATERIALS HANDBOOK RECORD PART AND DIVISION
SYMBOLS .......................................................................................................... 53 APPENDIX C GEN IV MATERIALS HANDBOOK RECORD NUMBER RULES.................... 55 APPENDIX D GEN IV MATERIALS HANDBOOK RECORD NAME RULES ......................... 58 DISTRIBUTION LIST ............................................................................................................61

viii

ix
ACKNOWLEDGMENTS
The author is grateful to Rob Versluis of US DOE for providing programmatic direction and support, to Bill Corwin of ORNL for leadership in international collaboration development and administrative support, to Shelly Ren, Claire Luttrell, Philip Rittenhouse, Robert Swindeman, Roger Stoller, Andrew Miller, Stephen Grantham, John Sutcliffe, and Will Marsden for much technical advice and help, to fellow members of the Materials Data Management Consortium and the support team of Granta Design Ltd. for numerous constructive discussions, and to Dennis Depp, Dave Hill, and particularly Tim Jerome, for database maintenance and technical assistance in Handbook development and operation during the past few years.
This work is sponsored by the U.S. Department of Energy, Office of Nuclear Energy Science and Technology with Oak Ridge National Laboratory.

x

xi
ABSTRACT
This document is prepared for navigation and operation of the Gen IV Materials Handbook, with architecture description and new user access initiation instructions.
Development rationale and history of the Handbook is summarized. The major development aspects, architecture, and design principles of the Handbook are briefly introduced to provide an overview of its past evolution and future prospects. Detailed instructions are given with examples for navigating the constructed Handbook components and using the main functionalities. Procedures are provided in a step-by-step fashion for Data Upload Managers to upload reports and data files, as well as for new users to initiate Handbook access.

xii

xiii
ACRONYMS
ANL Argonne National Laboratory ASME American Society of Mechanical Engineers ASTM American Society for Testing and Materials DOE Department of Energy GA General Atomic GE General Electric GIF Generation IV International Forum ID Identification INL Idaho National Laboratory MDMC Material Data Management Consortium MI Materials Intelligence MIT Massachusetts Institute of Technology NDA Non-Disclosure Agreement NRC Nuclear Regulatory Commission OP Optical Microscopy or Optical Microscope ORNL Oak Ridge National Laboratory PA Project Agreement PBMR Pebble Bed Modular Reactor (Pty) Limited PDF Portable Document Format PMB Project Management Board QA Quality Assurance R&D Research and Development RSA Rivest-Shamir-Adleman (initials of the SecurID System algorithm authors) SEM Scanning Electron Microscopy or Scanning Electron Microscope TEM Transmission Electron Microscopy or Transmission Electron Microscope US United States

1
1. INTRODUCTION
1.1 Development Background and Rationale
Development of the Gen IV Nuclear Reactor Systems requires different types of materials such as metals, graphites, ceramics, composites; and involves various activities including materials selection, component design, stress analysis, code development, to name a few. To ensure success of the development, a significant amount of information from diverse sources must be efficiently managed and used with great accuracy and consistency; communications among all developers must be conducted on a mutually understood base; and unnecessary research and development (R&D) redundancies must be readily identified and eliminated to achieve cost and time efficiency. It is apparent that the immensity and diversity of information involved in the Gen IV systems development poses a great challenge to these objectives.
To evaluate the situation and seek adequate solutions for the challenge, a workshop was held on July 28-29, 2004 in La Jolla, California. Attendees included senior materials managers and experts from General Atomic (GA), General Electric (GE), Westinghouse, Areva-Framatome, and Pebble Bed Modular Reactor (Pty) Limited (PBMR); representatives from relevant American Society of Mechanical Engineers (ASME) and American Society for Testing and Materials (ASTM) committees; section head of the United States (US) Nuclear Regulatory Commission (NRC) Office of Nuclear Regulatory Research; US Department of Energy (DOE) Gen IV Program managers; US Gen IV System Integration Managers; materials experts and managers from Idaho National Laboratory (INL), Oak Ridge National Laboratory (ORNL), and Argonne National Laboratory (ANL). The workshop concluded with unanimous support to the development of a dedicated Gen IV Materials Handbook to provide an authoritative, single, durable data source that would ensure the consistency of property values used by all stakeholders. It was expected that the Handbook would manage internally consistent, validated, and highly qualified data, complement applicable codes and standards, and establish a platform for sharing data and R&D information among participating Gen IV Nuclear Reactor Systems developers.
The conclusion and expectations of the workshop were corroborated by the success of the Nuclear System Materials Handbook (NSMH) developed for the previous US nuclear reactor programs. The NSMH was developed during the 1970s and 1980s under the leadership of ORNL and supported by the US DOE. All the NSMH data were contained in multiple volume binders that could pile up to approximately 1,270 mm high. The NSMH provided significant materials information covering liquid and metal breeder, gas-cooled, and fusion reactor systems under previous US nuclear reactor programs. With the NSMH, overlapping requirements and data needs of various participants of the nuclear reactor development programs were efficiently met by a single, authoritative data source; various R&D reports and documents were substantially reduced to a sole reference; and deficiencies in materials data were readily identified and corrected.
Based on the unanimous support of the workshop as well as the successful experience of the NSMH, a task was quickly defined under the US Gen IV Nuclear Reactor Materials Program to develop the Gen IV Materials Handbook. The task leadership evaluated the situation and decided not merely to repeat the NSMH success, but further to take full advantages of the modern information technologies to develop the Handbook as an interactive, web-accessible, and digital materials property database with specific software tools and functionalities that would substantially facilitate materials selection, component design, and information management.
2
1.2 Development History and Strategy
Immediately after the establishment of the Handbook task, preparations were actively started in data collection and development planning. In March 2005, the “Gen IV Materials Handbook Implementation Plan” was completed to provide guidelines and directions for the development [2]. A “Gen IV Materials Handbook Advisory Committee Charter” was then drafted in April 2005 for organizing expertise and support from candidate Handbook users. Meanwhile, initial data collection was summarized in a report “Assessment of Existing Alloy 617 Data for Gen IV Materials Handbook” in June 2005 [3]. Advancement was also quickly made in Handbook software and hardware preparation, and the progress was summarized in the report “Initial Development of the Gen IV Materials Handbook” in September 2005 [4]. In October 2005, hardware and software were acquired and assembled for evaluation. In the same month, the Handbook task officially joined the Material Data Management Consortium (MDMC), an organization with more than ten US and international corporate members that share the common interest in materials data management and software developing for constructing databases. Also, the “Gen IV Materials Handbook Advisory Committee Charter” was revised [5], and by the end of February 2006 the first Handbook Advisory Committee Meeting was convened. At the same time, a report “Gen IV Materials Handbook Architecture and System Design” was completed [6]. The document has since been serving as a blueprint for the Handbook construction. In September 2006, the “Gen IV Materials Handbook Beta Version” was released and successfully passed evaluation by a group of US experts and managers. After revisions based on the evaluation feedback and further development according to the plans, the Handbook was released as the “Gen IV Materials Handbook GIF Demo” in March 2008 for international evaluation.
To ensure steady development, a “piecewise construction strategy” was stipulated in the “Gen IV Materials Handbook Implementation Plan” [2], by which the Handbook will be developed piece by piece over time. Technically, it is much easier to debug and fix problems in a relatively small piece of a large database than to find problems and try to fix them when the entire system has already been built up, which usually proves very difficult, if not impossible, or leads to a disastrous collapse of the whole system. Financially, the piecewise strategy may better fit into the profile of program funding. With the available funds of a given fiscal year, development may cover certain contents, structures, and functionalities based on user demands and priorities.
2. HANDBOOK ARCHITECTURE AND CONSTRUCTION STATUS
2.1 Handbook Data Management Schema Overview
The initial architecture design of the Handbook was completed in February of 2006 [6]. A revision was made in 2009 during the preparation for international data and file uploading operations. As shown in Figure 1, the Handbook is planned to be composed of 11 Parts from A through K. These Parts can be internally connected to each other through hypertext links. User can hop from a page in, for example, Part A, directly to another related page in Part B by a simple click on a link. These interconnections are represented in Figure 1 by the black solid lines. The black dash lines indicate the data processing workflow.
The basic principle for this Handbook architecture design is different from those for most other databases. The design emphases are given to:
• Accurately recording as much detailed information as users consider necessary;
• Enabling high traceability of histories of and relations between the stored data;

3
• Storing data in formats that maximize efficiency in traceability and detail recording;
• Developing customized software tools for effective generation of various desired data presentations, as well as efficient data processing and analysis.
Part CTest & Data
Management
Part DStatisticalTest Data
Part FDesign Data
Part BPedigree
Part GApplications
Part IReports
Part EMicrostructures
Part JReference
Part AMaterials
Part HComments& Analyses
Part KNew Data Port
HDBKSchema090114Y08M10D10ORNL / W. Ren
Figure 1: Overview of Gen IV Materials Handbook database architecture
The basic functions of each Part shown in Figure 1 are described as follows:
Part A - Materials:
Part A is designed for containing generic information. It functions as general introductions for given material types or grades. Each Record in Part A contains general information on a specific material type or grade, e.g., the standard chemistry specification, general physical properties etc. of Material X. It is noted that Part A is not intended to contain the design data.
Part B - Pedigree:
Part B is designed for containing detailed batch (or heat, lot, billet etc.) specific materials information. Each Record in Part B contains pedigree information on a specific material batch (or heat, lot, billet etc.), e.g., the chemistry, processing history, and physical properties of Batch Y of Material X. All batch Records of Material X are connected to its generic information Record in Part A through hypertext links so user on a batch Record can conveniently trace back to its generic information Record, or vice versa. Part B is further split into two Divisions, each containing several Chapters:
1. Division B1 for base materials containing several Chapters each for pedigrees of a specific material type, e.g., Chapter B1-Pedigree/Metal for pedigrees of metallic materials, Chapter B1-Pedigree/Graphite for pedigrees of graphite materials, etc.
2. Division B2 for joints, including joints from welding, brazing and any other joining processes that will be employed in Gen IV Nuclear Reactor Systems construction.
The hierarchy in Parts A and B is designed to reduce unnecessary redundant recording of detailed generic, batch (or heat, lot, billet etc.) information in Part C Records for raw test data. Information consistency and flexibility to conduct comparisons between grades, batch (or heat, lot, billet etc.) are also improved by such a structure as a natural corollary.
4
Part C - Test and Data Management:
Part C is designed for containing raw test data and information on the history of the raw test data generation. Like Part B, it is further split into four Divisions, each containing one or several Chapters:
1. Division C1 for raw test data, which include data downloaded from the testing machine without extensive processing, such as the test result curves and testing parameters; and also include some primary testing results extracted from the testing curve, such as Young’s Modulus etc. Each Record of Division C1 only stores data from one test. The Handbook provides software tools for user to extract data from Part C1 Records and generate test result tables and spreadsheets in various formats and data combinations for reporting and analysis purposes. Division C1 contains several Chapters, each for raw test data from a specific testing type, e.g., Chapter C1-Test Data/Creep for creep test data, Chapter C1-Test Data/LCF for low cycle fatigue test data, etc.;
2. Division C2 for testing definition, which is planned to contain the nominal testing conditions and parameters of the test data in Division C1;
3. Division C3 for test information, which currently contains two Chapters, one for testing specimens and the other for equipment that generated the data in Division C1. Depending on user needs and quality assurance (QA) requirements, Chapters for calibration Records of testing devices and machines, or any other important information regarding traceability of the data generation process, can be added;
4. Division C4 is planned for test requirements specifying the data needs and requirements from the Handbook users. Future functionality development is expected to enable the Handbook to suggest testing matrices for filling data gaps by comparing information contained in Division C2 and Division C4.
To comply with the QA requirement for traceability, hypertext links can be provided as needed to connect the pages in Part C for test data to any relevant pages in other locations of the Handbook. For example, a page containing the results of a given creep test can be linked to the pedigree of its test specimen material, or to the design and conditioning information of its test specimen. It is the objective in designing Part C that data generation history of each test can be accurately and conveniently tracked to the original details whenever the information is desired and available for input into the Handbook, and thus to satisfy the strict traceability QA requirement for nuclear reactor development.
Part D - Statistical Data:
Part D is planned for summaries of the raw test data contained in Division C1. Compared to the Records in Division C1 each for one individual test, a Record in Part D will stores summary data resulting from multiple tests, e.g., average Young’s Modulus value from a given group of tests, which can be all test results from a given batch of Material X, or all test results of Materials X generated by a give organization etc.
Part E - Microstructure:
Part E is designed for containing detailed microstructural information including descriptive texts as well as micrographs from various microstructural characterization techniques such as optical microscopy (OP), scanning electron microscopy (SEM), transmission electron microscopy (TEM), etc. Each Record will be connected to the Record for the specific material on which the microstructural analysis was conducted and the micrographs were taken. User can conveniently

5
navigate between micrographs and their materials or testing conditions Records using the hypertext links provided.
Part F - Design Data:
Part F is planned for containing data derived from Division C1 and Part D to be discussed and considered for design use. The objective of Part F is to provide a platform that would facilitate discussions for development of codes and standards governing the design and construction of the Gen IV Nuclear Reactor Systems. Once the information becomes mature enough for design use and is accepted into codes and standards, access to the information will be restricted for reviewing codes and standards development history only. This practice will be conducted to comply with the stipulation in “Gen IV Materials Handbook Implementation Plan” that “the Handbook is not intended to serve as a substitute for ASME/ASTM Codes and Standards but is to provide an out-in-front source of materials data that will contain more extensive data and information than is provided in these Codes and Standards [2].”
Part G - Application:
Part G is planned for containing cartoons and schematics of the Gen IV Nuclear Reactor components under design considerations. It is intended to provide graphic concepts for users with different technical backgrounds, thus ensure a common understanding of material applications. It may also be employed by users to store images and mesh models for discussions about finite element analysis on particular reactor components.
Part H - Comments and Analyses:
Part H is planned for containing comments from Handbook users to share their thoughts and analyses on data and information contained in the other Parts. The objective of this Part is to provide a knowledge and wisdom reservoir for Handbook users. Expert analyses and comments may be stored and linked directly to the analyzed and commented data. It is hoped that this will help not only avoid “reinventing the wheel” in data analysis, but also stimulate user interactions and maximize the benefit of sharing information and thoughts. An alternative plan is to construct a comment area in every Record in other Parts and allow users to make comments and have online discussions.
Part I - Reports:
Part I is constructed for storage of R&D reports in PDF generated under the Gen IV Programs so they can be shared among GIF partners based on mutual agreement, and also will not be lost in decades to come. A Report Uploading Folder is constructed in Part I and access control is set such that only authorized Data Upload Managers of each Signatory can see and operate the Folder. After the uploaded reports are checked and considered operational error free by Handbook Manager of Operations, they will be relocated to adequate Handbook sections for release.
Part J - References:
Part J is planned for containing literature that are germane to the information contained in the other Parts of the Handbook. Whenever further detailed information is desired, user can follow the links or reference indices to access the original literature if stored in the Handbook. This is also a means of satisfying the traceability requirements for nuclear application QA.

6
Part K - New Data Ports:
Part K is designed for uploading files of numerical and text data to be used for creating Handbook Records in various Parts. It contains Folders each for a GIF member country to upload their data files. Data Upload Managers of each Signatory can find multiple virtual cabinets in their own Data Uploading Folder and upload their files into its cabinets. The uploaded files will be further processed by the Handbook Manager of Operations to create Records in adequate Handbook Parts.
It should be noted that many Parts, Divisions, and Chapters are still to be developed, therefore are not included in the present version of the Handbook. Furthermore, the present design and plan of the Parts, Divisions, and Chapters described above are not final. As the Handbook is further developed, comments and suggestions from users will be seriously considered and adopted, if adequate, for new version construction.
2.2 Color Codes and Country Name Acronyms
To facilitate information management, an acronym and color code system has been developed to visualize the data contributions to the Handbook from different participating signatories. Every Handbook Record will be marked with the designated acronym, color code, or both, of its contributing country. For consistency and standardization, the acronyms specified in ISO 3166 Country Codes have been adopted as Signatory acronyms [7], with the EU and MB fabricated for the European Union and VHTR PMB, respectively. The acronyms and color codes for the current participating members are presented in Table 1 and Table 2, respectively.
Table 1: Country name acronyms developed in the Gen IV Materials Handbook Country Acronym Country Acronym Country Acronym Canada CA Japan JP Switzerland CH
European Union EU Korea KR United States US France FR South Africa ZA VHTR PMB MB
Table 2: Signatory color codes for Folders and Records in the Gen IV Materials Handbook Signatory Color Folder Signatory Color Folder Signatory Color Folder
Canada Yellow
Japan White
Switzerland Silver
European Union Blue
Korea Aqua
United States Navy
France Fuchsia
South Africa Green
VHTR PMB Lime
2.3 Unit Systems
To facilitate data processing and analysis, five unit systems are provided for measurements that may appear in Handbook Records:
Automatic Unit System:
The Automatic Unit System is set as default when user logs into the Handbook for the first time.

7
User may choose to change to other unit system and the change will be saved as a cookie to be remembered by the Handbook for future logins. When the Automatic Unit System is active, it looks up the global geographical region setting on the user’s PC and automatically allocates the appropriate unit system for the user, i.e., the US Imperial Unit System will be used for a US PC setting; and the Metric Unit System will be used for a European PC setting.
Database Unit System:
In the Database Unit System, no particular unit conversion is applied. The units displayed to the users are those that are stored in the database, so this can lead to mixed units being displayed.
Metric Unit System:
The Metric Unit System displays all the measurements in basic metric units and their derivative complex units. Selection of a particular unit is customary and not consistent. For example, the unit of length may be either meter or centimeter, depending on the magnitude of the measurement.
US Imperial Unit System:
The US Imperial Unit System, also called US Customary Unit System, displays all the measurements in the conventional British basic units and their derivative complex units. Selection of a particular unit is customary and not consistent, e.g., the unit of length may be either foot or inch, depending on the magnitude of the measurement.
SI Unit System:
The SI Unit Systems displays all the measurements in the basic SI units and their derivative complex units. The SI Unit System in the Handbook is particularly developed to ensure that selection of a particular unit is strictly consistent regardless of the magnitude of the measurement. This feature is intended to facilitate using the Handbook data for finite element analysis. In most finite element analysis software, data are usually processed in a dimensionless fashion during calculation. Therefore, all data must be input with consistent units to ensure calculations are correctly conducted. For example, if the unit of meter is used for length as in the measurement of thickness, meter must also be consistently used in all derivative complex units that contain length, as in the measurement of density, despite its non-conventional awkwardness. If centimeter is used in the derivative complex unit for density such as g/cm3 in the conventional fashion without conversion when data are exported for finite element analysis, most finite element analysis software would likely process the values of thickness and density in the same fashion during calculation regardless their different units, inevitably leading to erroneous results.
3. ACCESS CONTROL OF THE HANDBOOK
Because the Handbook will contain voluminous information that may be considered proprietary and/or sensitive concerning the interest of participating GIF member countries, significant efforts have been made to ensure that its global internet access is highly secured. The present access control scheme includes two security layers:
1. The RSA SecureID for two-factor user authentication;
2. The MI Access Controls for user privileges inside the Handbook.

8
The RSA SecureID employs a public-key encryption technology developed based on the algorithm published in 1977 by Ron Rivest, Adi Shamir, and Leonard Adleman at the Massachusetts Institute of Technology (MIT). The letters RSA are the initials of their last names. The RSA algorithm is derivative from the fact that there is no efficient way to factor very large numbers. Deducing an RSA key, therefore, requires an impractically extraordinary amount of computer processing power and time. The RSA SecureID employed as the first layer of the Handbook access control enforces the two-factor authentication principle of “something you have and something you know” before user can see the Handbook cover page. User must have a RSA token that displays a code changing every 60 seconds, and must know a Personal Identification Number (PIN) to bring the Handbook cover page onto the computer screen for Handbook login operation.
After user reaches the Handbook cover page, a User identification code (User ID) and a Handbook password are required for login. The Handbook MI Access Control System identifies the user based on the User ID and password, and grant the user his/her authorized Handbook privileges. The user can only see or access the portion of the Handbook that he/she is authorized to. The unauthorized portion will be either completely invisible or inaccessible. The privileges of a particular user are determined by a combination of the Database Access privilege that defines what the user can see, and the Application Access privilege that defines what the user can do. Detailed description of the Handbook MI Access Control System is described in the “Gen IV Materials Handbook Architecture and System Design” [6]. With different access privileges, two users may see completely different appearances and contents of the Handbook on the screens, and have different operational capabilities in the Handbook.
Most users are granted the READ privileges and can utilize all the functionalities in the Read Mode to browse almost all Parts of the Handbook but can not make any changes to the Handbook contents. Those serving as Data Upload Managers are granted the WRITE privileges, who, in addition to the READ privileges, can access the Report Uploading Folder in Part I and the New Data Ports Folder in Part K, respectively, for their own Signatory.
To managerially secure the Handbook access control, the responsibilities to grant, approve, and set up user access privileges are separated among Handbook management personnel. Personnel who grants or approves user access privileges can not execute the settings of the user access privileges, and vice versa. Further, the Handbook software technically restricts the creation of user groups for different access privileges to the Windows System Administrator, who must be computer support personnel with control of the Windows domain where the Handbook servers are installed, and at ORNL the Windows System Administrator is computer support personnel independent of the Gen IV Nuclear Energy Systems Program. All the granted access must be documented and periodically audited. Participating GIF countries have the right to request a copy of the granted access records at any time.
To protect proprietary and sensitive data, a legal document, i.e., the Non-Disclosure Agreement (NDA), is provided to stipulate user responsibilities. Each user must sign the NDA and be held legally responsible for protecting the Handbook data. Abuse of the access privileges and misuse of the Handbook information will be prosecuted as a violation of the agreement.
4. BROWSING THE HANDBOOK
4.1 Definitions
To browse the Handbook, the data containers listed below should first be reviewed and understood. These containers are described in their hierarchical order in the Handbook.

9
Understanding of these concepts also helps you adequately make requirements for viable Handbook developments to satisfy your data management needs.
Volume - Handbook symbol:
A Volume contains all the data in a version of the Handbook, for example: Gen IV Materials Handbook V1.1. In the current release, only the Gen IV Materials Handbook V1.1 is presented. Each future release will issue a new Volume, and the older Volumes will become invisible for users but will still be archived on the server machine. Depending on user requirements, the immediate previous Volume may also be kept visible for a given period of time after a new version release. Part - Handbook symbol: capital letter from A to K prefixed to Chapter name
As introduced in Section 2.1 and Figure 1, Part is the largest unit in the Handbook. There is no graphic symbol for Part. Each Part is represented by a capital letter, for example: B means pedigree data, and D means statistical data, as shown in Figure 1.
Division - Handbook symbol: affix Arabic number starting from 1 in Chapter name
Division is the next lower level unit in a Part. Divisions only exist when a Part contains significantly distinguishable contents potentially large in size. There is no graphic symbol for Division in the Handbook. A Division is represented by an affix Arabic number in the Chapter name as introduced in Section 2.1, for example: C1 means raw test data, and C3 means test information data.
Chapter - Handbook symbol:
As implied by its symbol, Chapter is also often referred to as Table when browsing the Handbook because Chapters are designed and constructed in one of the most important structural unit called Table in the base software. Each Chapter contains information of same nature and has its own data storage characteristics specifically designed and constructed to satisfy the data management needs and requirements for that particular Chapter. A Chapter symbol is always labeled with its Chapter name prefixed with corresponding Part symbol letter and Division number, if any, for example: all raw test data for creep are contained in Chapter C1-Test Data/Creep.
Subset - Handbook symbol:
Subset is the next lower level of unit within a Chapter. Subsets separate Records with subtle layout differences and/or data management needs within a Chapter, for example: US Creep Test Data Subset. Subset layouts are specifically designed and constructed to best reflect the features of the data it contains as well as to maximize the benefit and efficiency of the data management functionalities of the Handbook software tools. Folder - Handbook symbol:
A Folder is used to group Records with similar characteristics within a Subset, for example: Records of austenitic alloys are all contained in Folder Austenitic Alloys. The exclamation mark indicates some access control settings are set on the Folder. A Folder normally does not have data directly associated with it, but contains other Folders at lower hierarchical levels and/or data pages called Records.

10
Record - Handbook symbol:
A Record contains the actual data in the Chapter, for example: Air649C289.58MPa_C1-C2-N06617-0086. The type of information contained in a Record will vary from Chapter to Chapter.
Attribute - Handbook symbol: text in bold font followed by a field for Attribute value
Each Record contains Attributes which specify what data the Record can hold. There is one Attribute for each data type existing in the database, for example: the Attribute “Creep Rupture Time” for time data; and the Attribute “Tensile Stress” for stress data, etc.
Tree - Handbook symbol: dotted lines connecting various Handbook data containers
Tree, also called the Materials Tree, refers to the hierarchical structure in which all the data containers are organized. As shown in Figure 2, Chapters with their names prefixed with their Part letter and Divisions number form the trunk of the Tree. Below this are branches made up of Folders and Records as leaves located in the Folders. Within the Records are Attributes as cells of the leaves.
Link - Handbook symbol: underlined blue text
Links connect related information in different locations of the Handbook. Links are represented by underlined blue hypertext names. User can click on a link to hop directly to the location it is connected to.
Figure 2: Schematic of Gen IV Materials Handbook Materials Tree
Gen IV Materials Handbook V1.1
A- Materials/Metal
Metal Materials Subset
Austenitic Alloys
Nickel Alloys
800 H
Inconel 617
Refractory & Others
B1-Pedigree/Ceramic
B1-Pedigree/Composite
B2-Pedigree/Welding
C1-Test Data/Creep
C1-Test Data/Crack Growth
C1-Test Data/Fatigue
D-Statistical Data/Creep
D-Statistical Data/Fatigue
D-Statistical Data/Tensile

11
4.2 Getting Started
The website address for accessing the Handbook is: https://gen4www.ornl.gov. You need your RSA User ID, PIN and RSA token to reach the Handbook cover page. Then, you need your User ID and Handbook password to enter the Handbook. If you are a first-time user, you must follow the “Procedures for Establishing Access to Gen IV Materials Handbook” in Appendix A to initiate your identity in the Handbook access management system. Please review the requirements in Appendix A and follow the instructions.
After you have completed the procedures in Appendix A, the following steps should be followed to access the Handbook:
1. Enter the Handbook website address in the internet browser address field. The RSA SecureID login page will show up after pressing the Enter/Return key on your keyboard.
2. To reach the Handbook cover page, type in your RSA User ID and you PIN plus the current pass code displayed on your token, then click at the Log In button. The Handbook cover page will show up. Note you must click before time runs out and the current pass code displayed in your RSA token changes.
3. To enter the Handbook, click at the bottom of the cover page where it says Click here to enter as you did for the initial login. If your screen is small, you may need to scroll down to see the Click here to enter line.
4. After the click, a pop-up logon screen will appear that requires a User ID and Handbook password.
5. Type in extranet\ immediately followed by your User ID and Handbook password to log into the Handbook. For example, if your User ID is xyz, you type in extranet\xyz in the User name box.
It should be noted that even after you have entered the Handbook, the RSA SecurityID is still active and functions to guard the Handbook contents. It may periodically shield the Handbook and requires you to use your RSA User ID, PIN and token to remove the shield before your Handbook operations can be resumed.
4.3 Getting Around in the Handbook
After login, the Handbook should be displayed as shown in Figure 3. Before starting the navigation, change the Handbook settings by following the steps below.
1. Click on the options button on the right side of the database top toolbar. Make sure you see “Gen IV Materials Handbook V1.1” in the “Database Options” field. If not, select “Gen IV Materials Handbook V1.1” using the “Database” dropdown menu and click on Change Database.
2. In “Unit system” dropdown menu of the “Application Options” field, select “-Database-” or the unit system of your preference. If you choose the SI, you may also want to have the “Use absolute temperatures” box checked. (When the “Use absolute temperatures” box is checked, the Handbook displays Kelvin instead of Celsius in the SI and Metric Unit Systems, and Rankin instead of Fahrenheit in the US Imperial Unit System.) Then click on Save Options.
There are also two icon buttons that will be constantly used when browsing the Handbook.
12
1. The home button resets the left and right window panes to the internal homepage. In case you need to initiate a new browsing task or get lost in the labyrinth of data during browsing, a click on home immediately brings you back to the starting point.
2. The back arrow button in the Explorer tool bar brings you to previous pages you just reviewed. However, if you have browsed into the present page through a hypertext link, a double click is required to get back to the previous page.
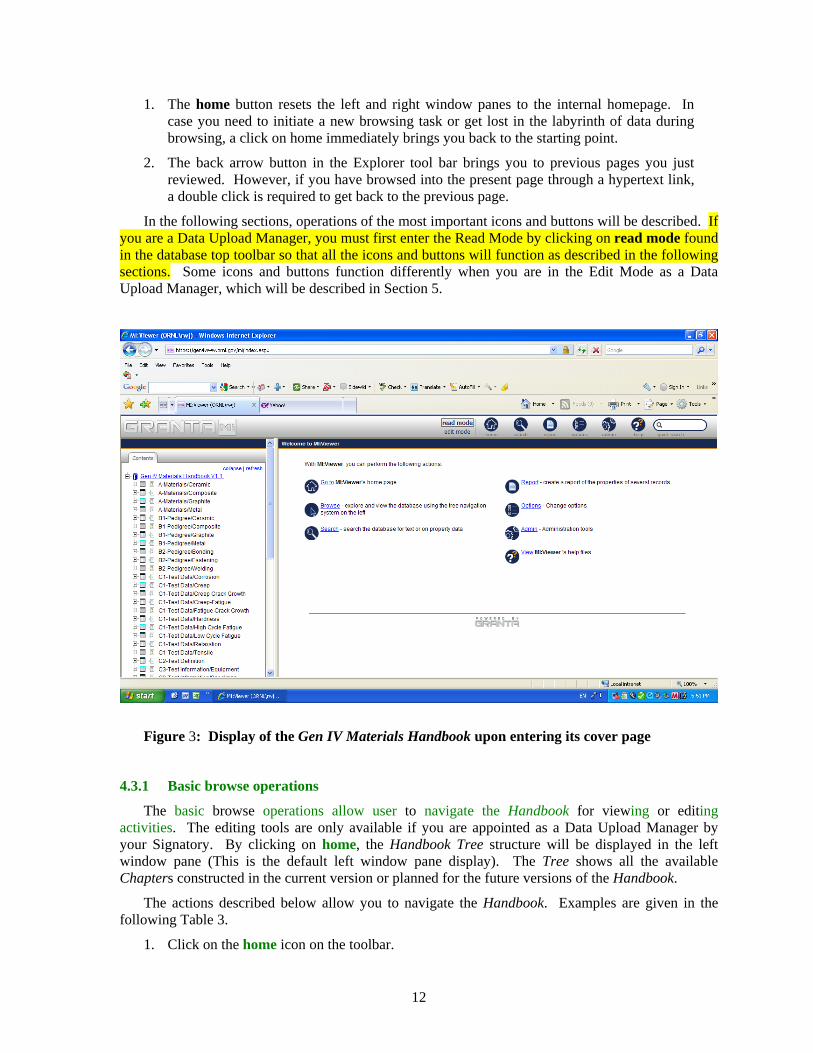
In the following sections, operations of the most important icons and buttons will be described. If you are a Data Upload Manager, you must first enter the Read Mode by clicking on read mode found in the database top toolbar so that all the icons and buttons will function as described in the following sections. Some icons and buttons function differently when you are in the Edit Mode as a Data Upload Manager, which will be described in Section 5.
Figure 3: Display of the Gen IV Materials Handbook upon entering its cover page
4.3.1 Basic browse operations
The basic browse operations allow user to navigate the Handbook for viewing or editing activities. The editing tools are only available if you are appointed as a Data Upload Manager by your Signatory. By clicking on home, the Handbook Tree structure will be displayed in the left window pane (This is the default left window pane display). The Tree shows all the available Chapters constructed in the current version or planned for the future versions of the Handbook.
The actions described below allow you to navigate the Handbook. Examples are given in the following Table 3.
1. Click on the home icon on the toolbar.

13
2. Chapters are represented by the icons followed by the Chapter name. Expand a Chapter by clicking on the + icon beside the Chapter name.
3. Records contributed from a Signatory are grouped in the Subset for the Signatory (except the Records in Part I – Reports). In default, the Subset that contains Records from all Signatories is displayed. To display Records from a specific Signatory, click on the (change) link following the Subset name, e.g., All Metal Materials Subset (change), and select the Subset for the Signatory of interest.
4. Expand the levels of the Materials Tree by clicking the + icon beside a Folder in the Tree.
5. Click on a Record name to display the data contained in the Record in the right window pane.
6. When a Record is displayed, the right window pane can either display only the Attributes that contain data, or all Attributes including empty ones. To toggle between these options, go to View in the top blue bar of the right window pane and click Show Empty Attributes or Hide Empty Attributes (depending on which is currently displayed).
7. A Record can be displayed with or without plots when functional data are stored. To toggle between these options, go to View in the top of the right window pane and click Full Datasheet or Summary Datasheet (depending on which is currently displayed).
8. Inside a Record, Attributes are grouped under headings such as “General Information”, “Chemical Composition,” etc. except in the “No Subset” mode. Depending on whether the – or the + icon is present on the left of a heading row, clicking on the heading hides or displays the Attributes under that heading.
9. Links can be used to navigate between Chapters directly from the Record. In the present Handbook version, these links are all found at the bottom of the Record under “Further Information.”
Table 3: Examples for basic browse operations
Example
1
To find generic material information on Inconel 617 and review its thermal expansion coefficient data and all the constructed Attributes, and close the chemical composition Attributes.
1. Open Chapter “A-Materials/Metal” by clicking on the + icon beside the Chapter name.
2. Click the + icon beside the Austenitic Alloys Folder.
3. The generic material information Records are named by their materials trade name. Click on Inconel 617 to view the Record for Alloy 617 (do not click on the
icon). You may go to View in the top blue bar of the right window pane and click Show Empty Attributes or Hide Empty Attributes (depending on which is currently displayed).
4. Under the “Thermal Properties” heading, find Attribute “Thermal Expansion Coefficient with Temperature” and click on the icon. The plot of Thermal Expansion Coefficient versus Temperature curve appears.
5. Click on the plot, the table of Thermal Expansion Coefficient versus Temperature

14
data appears.
6. Click on the Save To Excel (CSV) at the bottom of the table, you can save the table in Excel file for further processing. (CSV stands for comma-separated values. It is a file format that stores tabular data. You may want to further convert it to Microsoft Office Excel Workbook by saving it again with the file extension .xls for data processing.)
7. Use the back arrow button in the Explorer tool bar at the top to get back to the Record page.
8. If you want to calculate the Thermal Expansion Coefficient at a given temperature by interpolation using the curve, click on Parameters, select the Enter Value bullet and enter your temperature value. Once you click Save, the interpolated value will be displayed along with your entered temperature if your temperature value is within the data range of the plot. Otherwise, you will see Out Of Range being displayed.
9. Click on the icon to close the plot.
10. Click on Collapse All under View at the top of the right window pane, all Attributes will be hidden and only the headings are displayed. You may click on any of the headings to view Attributes under that heading.
11. You may also change the unit system by selecting from Units at the top of the right window pane.
12. You may notice the chemical composition values are given in ranges because this Record is for generic Inconel 617 and its chemistry specification covers a range for each element. To hide or display the chemical composition Attributes, click on the “Chemical Composition” heading.
Example
2
To find pedigree information on an annealed plate of Inconel 617 Heat XX01A3US stored in Record number B1-2-N06617-0001.
The pedigree Record name is composed of two major parts separated by an underscore sign “_”, the first part is Batch/Heat Number + Product Form + Treatment, and the second part is the Handbook Record number in the format of P-x-yyyyyy-zzzz. For details about the Handbook numbering and naming system, please refer to Appendices B and C.
There are two options to find Record B1-2-N06617-0001.
Option 1:
Under the Further Information heading at the bottom of the Inconel 617 Record found in Example 1, all the pedigree Records of Inconel 617 currently stored in the Handbook are listed under Pedigrees for this Material. Find the Record name XX01A3USPlateAnnealed_B1-2-N06617-0001 in the list (Looking for the Record ending with 0001 helps you find it quickly.) and click on it to display the pedigree Record. You may notice the chemical composition values are exact numbers for this particular heat, not ranges as shown in the previous generic Record.
Option 2:
Click the home icon in the database top toolbar to go back to the starting point. Open Chapter “B1-Pedigree/Metal” by clicking on the + beside the Chapter name and then follow the branches:

15
Austenitic Alloys > Inconel 617 > Plate, and click on XX01A3USPlateAnnealed_B1-2-N06617-0001.
If the Record name is not completely shown, the relative sizes of the left and right window panes can be adjusted by click and hold on the vertical demarcation between the two to drag it.
This pedigree information can also be accessed from links in “Chapter C1-Test Data/Creep” and “Chapter E-Microstructure,” where creep test data and microstructures, respectively, of this pedigree material are stored. This allows you to easily get pedigree information of the test data and microstructures you are viewing, and vice versa.
Example
3
To find microstructure data on Inconel 617 hot rolled plate from Heat XX01A3US, there are two options.
Option 1:
Under the Further Information heading at the bottom of the Inconel 617 Heat XX01A3US Record found in Example 2, lists the microstructure for this pedigree material under Microstructure for this Pedigree. Currently there is only one optical (OP) microscope Record. Click on the Record name OP-XX01A3USPlateAnnealed_B1-2-N06617-0001 to display the Record. You may download the micrograph by right click or print it by left click you mouse.
Option 2:
Click the home icon in the database top toolbar to return to the starting point. Open Chapter “E1-Microstructure” and then follow the branches:
Austenitic Alloys > Inconel 617 > Plate > Hot Rolled > Heat XX01A3US > OP Micrographs and click on OP-XX01A3USPlateAnnealed_B1-2-N06617-0001.
Example
4
To find creep test data generated from Inconel 617 Heat XX01A3US plate, there are three options.
Option 1:
Under the Further Information heading at the bottom of its pedigree Record XX01A3USPlateAnnealed_B1-2-N06617-0001 for Heat XX01A3US plate found in Example 2, all Records containing creep test data generated for the pedigree material are listed under Creep Test Data for this Pedigree. Click on Show All to display the list and select any of the test data Record to see the creep test result.
Option 2:
Under the Further Information heading at the bottom of the Inconel 617 “Materials” Record Inconel 617 found in Example 1, all Records containing creep test data generated for Inconel 617 are listed under Creep Test Data for this Material. Click on Show All to display the list. Select any of the test data Record to see the creep test result and find out whether it is for Heat XX01A3US. (This option is dumb but does demonstrate internal connections among relevant information within the Handbook)
Option 3:
Use this option when you want to review a Record of creep test data on Heat XX01A3US under a particular testing temperature and stress (e.g., 760ºC and 138 MPa) if it exists in the Handbook. Open Chapter “C1-Test Data/Creep” from the Handbook Tree structure in the left window pane and then follow the branches:

16
Austenitic Alloys > Inconel 617 > 760°C > 138 MPa > Heat XX01A3US Base Metal. There are two tests under the desired temperature and stress, one in air and the other in helium environment. Click on either of the Record names to view the test results.
Example
5
To find test information on a creep test specimen design there are two options.
Option 1:
Under the Further Information heading at the bottom of the creep test data Record found in Example 4, Specimen Design for this Test lists the Record name for the specimen design that was used to generate the creep test data if the Record is stored in the Handbook. Click on the specimen Record name, for example, Tensile&Creep C3-S-0001, to hop to the Record for the specimen design. You may notice that all the creep test data that were generated using this specimen design have their Record name listed under Test Data for this Specimen Design at the bottom of the specimen Record. To download the specimen drawing for machining a new specimen in that design, click on the ORNL Threadless Creep Specimen link in the “Specimen Drawing” Attribute to display and save the drawing.
Option 2:
Click the home icon in the database top toolbar to return to the starting point. Open Chapter “C3-Test Information/Specimen” and then open the Metal Specimens Folder. Currently there are two specimen Records. Click on Creep_C3-S-0002 to review the specimen design information. Click on the specimen drawing to display the drawing in full scale.
4.3.2 Using the “search” icon
The search icon is used to find Records containing given words and/or desired Attribute data, for example, to find all tensile data Records of Inconel 617 tested at 871ºC. By clicking on search, the search page will be displayed in the right window pane. You may type in your key words in the My search results must contain field and/or your desired Attributes in the Search the following attributes field to search for the Records that contain them. Names of your desired Attributes can be selected from the list of Handbook Attributes by clicking the Browse link on the search page.
When typing in your key words, there are several Search Operators that can be used:
• AND - finds both terms in a Record, for example: steel AND alloy will find Records containing both the words “steel” and “alloy”.
• OR - finds either term in a Record, for example: steel OR alloy will find Records containing either the word “steel”, the word “alloy”, or both.
• NOT - finds Records that contain the first term, but not the second, for example: steel NOT alloy will find Records containing the word “steel” but not the word “alloy”.
• Phrase - finds a phrase in a Record. The phrase must be enclosed in double quotes. For example: “steel alloy” will find Records with the words “steel” and “alloy” located next to each other.
• Wildcard operator * - The * wildcard operator cannot be used alone or as the first character of a word. It must be used following a test string to make a wildcard. The * operator represents any sequence of zero or more characters. For example: metal* will find Records containing the words “metal”, “metals”, “metallic”, and so on.
17
• Wildcard operator ? – The ? wildcard operator cannot be used alone or as the first character of a word. It must be used following a test string to make a wildcard. The ? operator represents zero or one single character. For example: metal? will find Records containing “metal” and “metals” but not “metallic”.
• Parentheses - groups terms. Parentheses cannot be empty. For example: iron AND (ore OR cast) will find Records with “iron” that also contain “ore” or “cast”.
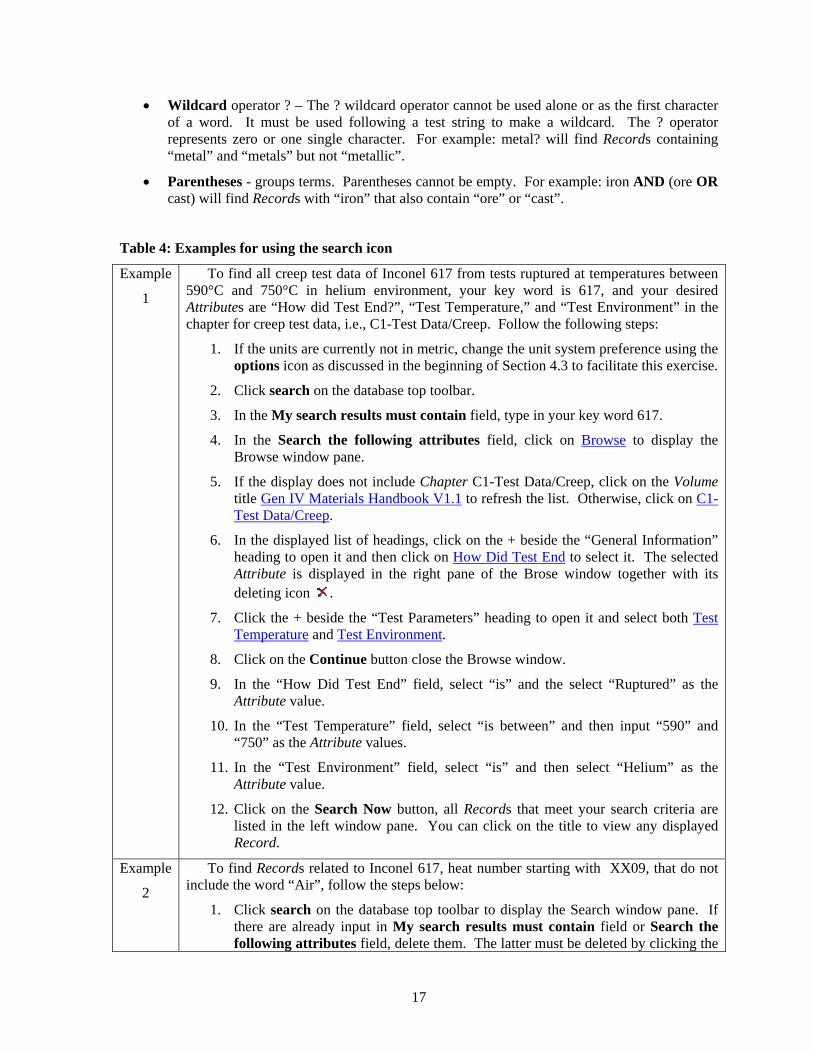
Table 4: Examples for using the search icon
Example
1
To find all creep test data of Inconel 617 from tests ruptured at temperatures between 590°C and 750°C in helium environment, your key word is 617, and your desired Attributes are “How did Test End?”, “Test Temperature,” and “Test Environment” in the chapter for creep test data, i.e., C1-Test Data/Creep. Follow the following steps:
1. If the units are currently not in metric, change the unit system preference using the options icon as discussed in the beginning of Section 4.3 to facilitate this exercise.
2. Click search on the database top toolbar.
3. In the My search results must contain field, type in your key word 617.
4. In the Search the following attributes field, click on Browse to display the Browse window pane.
5. If the display does not include Chapter C1-Test Data/Creep, click on the Volume title Gen IV Materials Handbook V1.1 to refresh the list. Otherwise, click on C1-Test Data/Creep.
6. In the displayed list of headings, click on the + beside the “General Information” heading to open it and then click on How Did Test End to select it. The selected Attribute is displayed in the right pane of the Brose window together with its deleting icon .
7. Click the + beside the “Test Parameters” heading to open it and select both Test Temperature and Test Environment.
8. Click on the Continue button close the Browse window.
9. In the “How Did Test End” field, select “is” and the select “Ruptured” as the Attribute value.
10. In the “Test Temperature” field, select “is between” and then input “590” and “750” as the Attribute values.
11. In the “Test Environment” field, select “is” and then select “Helium” as the Attribute value.
12. Click on the Search Now button, all Records that meet your search criteria are listed in the left window pane. You can click on the title to view any displayed Record.
Example
2
To find Records related to Inconel 617, heat number starting with XX09, that do not include the word “Air”, follow the steps below:
1. Click search on the database top toolbar to display the Search window pane. If there are already input in My search results must contain field or Search the following attributes field, delete them. The latter must be deleted by clicking the

18
deleting icon at the far right end of the Attribute.
2. Enter the text: XX09* NOT Air in the My search results must contain field in the right window pane.
3. Click on the Search Now button, all Records that might meet your search criteria are listed in the left window pane. You can use the matching confidence rate indicated on the left of the Record symbol to decide which Records to review.
4.3.3 Using the “report” icon
The report icon can be used to create a comparison table showing selected properties of multiple Records, make an X-Y chart showing the relationship between two Attributes for a set of Records, or to export data in a specified format.
To create a comparison table:
1. Use the home icon, or the search icon in the database top toolbar as described above to display a list of Records in the left window pane to choose from for creating your comparison table.
2. Click report on the toolbar to display the Report window pane on right.
3. If there are already Records in the large rectangular box in the right window pane, click on the Clear List tab found below the rectangular box to reset the Record list.
4. Add Records from the left window pane to the right window pane by clicking on the icon next to the Record name. If the icon beside a Folder is clicked, all the Records in the Folder and sub-Folders will be added to the right window pane.
5. Select Comparison Table found in the right window pane below the Records list.
6. Select Attributes to compare by either choosing a report template from the drop down menu in the right window pane, or by clicking on the + beside the headings and selecting the desired Attributes from the left window pane.
7. Click the Generate Report button.
Table 5: Examples for using the report icon to create a comparison table
Example
1
Compare the time to 1%, 2%, and 5% creep strain under various loads for Inconel 617 tested at 1050°C. Use the home icon to list the Records to choose from.
1. Click home on the database top toolbar to display the Chapters in the left window pane.
2. Open Chapter C1-Test Data/Creep and then open the following Folders:
Austenitic Alloys > Inconel 617
3. Click report on the database top toolbar.
4. If there are Records already in the large rectangular box in the right window pane, click on the Clear List tab found below the rectangular box to reset the Record list.
5. Click on the icon beside the 1050°C Folder to add all the Records at 1050ºC to
19
the right window pane.
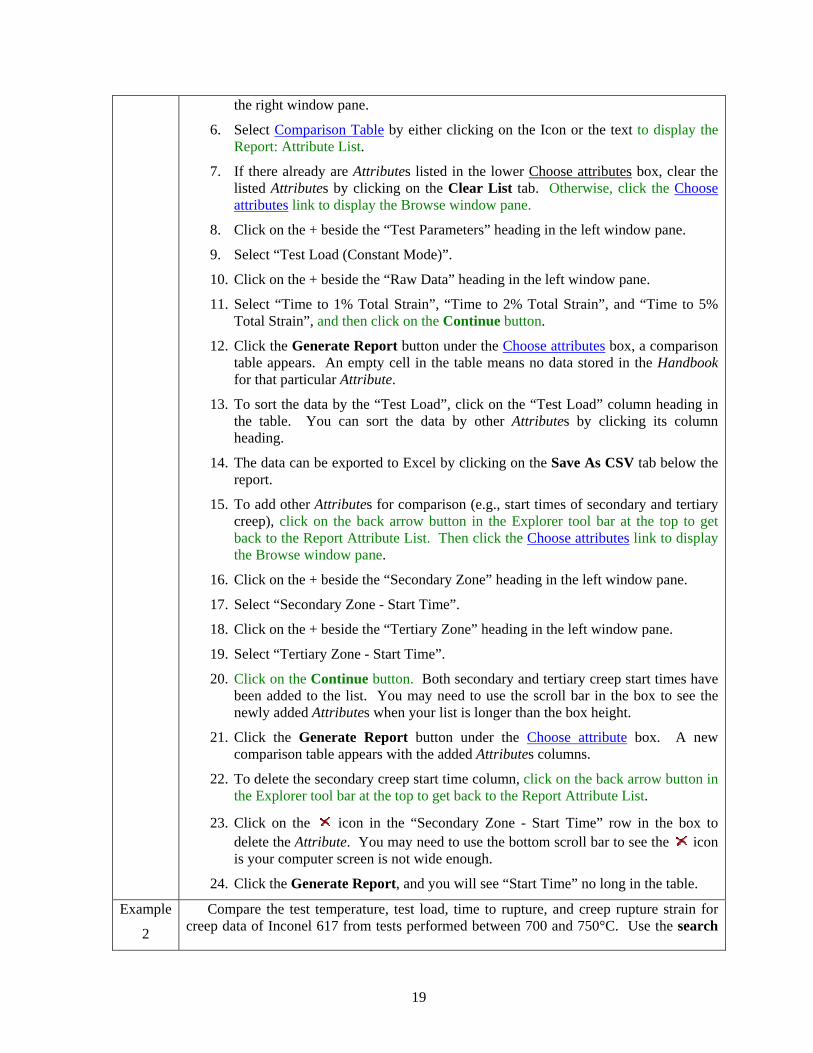
6. Select Comparison Table by either clicking on the Icon or the text to display the Report: Attribute List.
7. If there already are Attributes listed in the lower Choose attributes box, clear the listed Attributes by clicking on the Clear List tab. Otherwise, click the Choose attributes link to display the Browse window pane.
8. Click on the + beside the “Test Parameters” heading in the left window pane.
9. Select “Test Load (Constant Mode)”.
10. Click on the + beside the “Raw Data” heading in the left window pane.
11. Select “Time to 1% Total Strain”, “Time to 2% Total Strain”, and “Time to 5% Total Strain”, and then click on the Continue button.
12. Click the Generate Report button under the Choose attributes box, a comparison table appears. An empty cell in the table means no data stored in the Handbook for that particular Attribute.
13. To sort the data by the “Test Load”, click on the “Test Load” column heading in the table. You can sort the data by other Attributes by clicking its column heading.
14. The data can be exported to Excel by clicking on the Save As CSV tab below the report.
15. To add other Attributes for comparison (e.g., start times of secondary and tertiary creep), click on the back arrow button in the Explorer tool bar at the top to get back to the Report Attribute List. Then click the Choose attributes link to display the Browse window pane.
16. Click on the + beside the “Secondary Zone” heading in the left window pane.
17. Select “Secondary Zone - Start Time”.
18. Click on the + beside the “Tertiary Zone” heading in the left window pane.
19. Select “Tertiary Zone - Start Time”.
20. Click on the Continue button. Both secondary and tertiary creep start times have been added to the list. You may need to use the scroll bar in the box to see the newly added Attributes when your list is longer than the box height.
21. Click the Generate Report button under the Choose attribute box. A new comparison table appears with the added Attributes columns.
22. To delete the secondary creep start time column, click on the back arrow button in the Explorer tool bar at the top to get back to the Report Attribute List.
23. Click on the icon in the “Secondary Zone - Start Time” row in the box to delete the Attribute. You may need to use the bottom scroll bar to see the icon is your computer screen is not wide enough.
24. Click the Generate Report, and you will see “Start Time” no long in the table.
Example
2
Compare the test temperature, test load, time to rupture, and creep rupture strain for creep data of Inconel 617 from tests performed between 700 and 750°C. Use the search

20
icon to list Records for creep test data of Inconel 617 between 700 and 750°C.
1. Click search on the database top toolbar. If there are already input in My search results must contain field or Search the following attributes field, delete them. The latter must be deleted by clicking the deleting icon at the far right end of the Attribute.
2. In the Search the following attributes field, click on Browse to display the Browse window pane.
3. If the display does not include Chapter C1-Test Data/Creep, click on the Volume title Gen IV Materials Handbook V1.1 to refresh the list. Otherwise, click on C1-Test Data/Creep.
4. In the displayed list of headings, click on the + beside the “Specimen Information” heading to open it and then click on Material Trade Name to select it. The selected Attribute is displayed in the right pane of the Brose window together with its deleting icon .
5. Click the + beside the “Test Parameters” heading to open it and select Test Temperature. You may need to scroll down to see the “Test Parameters” heading.
6. Click on the Continue button close the Browse window.
7. In the “Material Trade Name” field, select “is” and then select “Inconel 617” as the Attribute value.
8. In the “Test Temperature” field, select “is between”, and then input “700” and “750” as the Attribute values.
9. Click on the Search Now button, all Records that meet your search criteria are listed in the left window pane, with the total number of Records under Records Found in the Result Summary field.
10. Click on the report icon on the database top toolbar.
11. If there are already Records in the large rectangular box in the right window pane, click on the Clear List tab found below the rectangular box to reset the Record list.
12. In the Results Summary field of the left window pane, click on the icon in the Record Found area to add all Records into the large rectangular box in the right window pane.
13. Select Comparison Table by either clicking on the Icon or the text.
14. In the Report Template field, select the template for reporting Temp, Load, Time to Rupture, Creep Rupture Strain.
15. Click the Generate Report button, and the comparison table appears.
16. To move Test Load to the first column, click on the back arrow button in the Explorer tool bar at the top to get back to the Report Attribute List.
17. Click on the icon in the “Test Load” row in the Choose attributes box to move the “Test Load” row to the top.
18. Click the Generate Report button.

21
In Step 14 of Example 2 presented above, the Report Template enables user to generate report efficiently. If you need to repeatedly create reports using a fixed combination of Attributes, you can contact the Handbook Manager of Operations ([email protected]) to have a template specifically developed for you.
To create an X-Y chart:
1. Use the home icon, or the search icon in the database top toolbar as described above to display a list of Records in the left window pane to choose from for creating your X-Y chart.
2. Click report on the toolbar to display the Report window pane on right.
3. If there are already Records in the large rectangular box in the right window pane, click on the Clear List tab found below the rectangular box to reset the Record list.
4. Add Records from the left window pane to the right window pane by clicking on the icon next to the Record name. If the icon beside a Folder is chosen, all the Records in the Folder and sub-Folders will be added to the right window pane.
5. Select X-Y Chart found in the right window pane below the Records list.
6. Select Attributes to plot by either choosing a report template from the drop down menu in the right window pane, or by first clicking the Select X-Axis Attribute button, clicking on the + beside the headings in the left window pane and selecting the desired Attribute for the X-Axis, and then clicking the Select Y-Axis Attribute button, clicking on the + beside the headings and selecting the desired Attribute for the Y-Axis.
7. Click the Plot Chart button.
Table 6: Examples for using the report icon to create an X-Y chart
Example
1
Plot a graph showing the “Time to 5% Total Strain” vs. “Test Load” for Inconel 617, Heat XX63A8UK. Use the search icon to list Records to choose from.
1. Click search on the top toolbar. If there are already input in My search results must contain field or Search the following attributes field, delete them. The latter must be deleted by clicking the deleting icon at the far right end of the Attribute.
2. Enter XX63A8UK in the My search results must contain field in the top of the left window pane, and click the Search Now button. All Records for Heat XX63A8UK appear in the left pane.
3. Click report on the top toolbar.
4. If Records already appear in the Record list in the right window pane, click Clear List tab found below the rectangular box to reset the Record list.
5. Click on the icon beside “C1-Test Data/Creep” in the Results Summary area of the left window pane to add the creep test data Records to the Record list in the right window pane.
6. Select X-Y Chart by either clicking on the Icon or the text.
7. Click on the Choose Now link under X-Axis.
8. Click on the + beside the “Test Parameters” heading.
9. Select the “Test Load (Constant Mode)” Attribute and click on the Continue

22
button. Under Axis Range, you may choose “Linear” for X-axis scale.
10. Click on the Choose Now link for under Y-Axis.
11. Click on the + beside the “Raw Data” heading in the left window pane.
12. Select the “Time to 5% Total Strain” Attribute and click on the Continue button. Under Axis Range, you may choose “Linear” for Y-axis scale.
13. Click the Plot Chart button and the plot is displayed. The legends are listed under the plot.
14. If you are interested in a particular data point in the plot, click on that data point, the data point will become solid and its legend will appear at the top of the legend list, and you can click on the legend name to view its Record.
15. Or if you are interested in all the data when viewing the plot, go to View in the top of the right window pane and click on the Data link. You can save the in Excel file for further processing.
4.3.4 Using other icons and buttons
In addition to the icons and buttons described above, there are many more that have been constructed in the Handbook to allow users to operate and enjoy powerful data processing and management functionalities of the system. You may use the help icon to explore the various possibilities. Because the Handbook system is still under development, some buttons may not fully functional in the current version. For example, to use the Export button in the report mode, the needed Exporter Templates are still to be developed; and to use the Data Comparison Chart to plot data points over a given curve for comparison, at least one Record with curve must be uploaded into the Handbook. As progress is made in the Handbook construction and data uploading, more and more highly desired functionalities will become available.
4.3.5 Access external Material Data Network
A link is provided in the Handbook to allow users to access an external Material Data Network, which includes the following databases of interest:
• ASM Handbook
• ASM Alloy Center
• ASM Micrograph Center
• ASM Failure Analysis Center
• ASM-Granta Medical Devices
• ASM MEMS Materials Database
• NIMS Materials Database
• The PGM Database
• Steelspec

23
When any one of the Handbook Records is display in the right window pane, a Tools menu will be shown in the narrow dark blue strip above the Record. Click on the Tools menu and select the Search Web commend, the matdata.net window will be displayed to show links to these databases.
5. REPORT AND DATA FILE UPLOADING
If you are a Data Upload Manager, your Handbook access privileges will allow you to follow the operational procedures described in this section to upload reports and data files.
5.1 Handbook Information Categorization
Based on relevant stipulations of GIF documents and extensive discussions among VHTR Materials PMB Signatories, information contained in the Handbook is divided into 5 Categories.
1. Background Public Information
2. Background Proprietary Information
3. Background Restricted Information
4. Generated Business Confidential Information
5. Generated Public Information
The three “Background” Categories are used for information that is acquired or developed by a Signatory before the signature of the VHTR Materials Project Agreement (PA) (before January 1, 2007), or outside the scope of the PA that is contributed (offered to and accepted by the other Signatories) by one or more PA Signatories.
Of these three, Category 1 is for the Background information that may be freely shared in the public domain, such as published literature. Category 2 is for the Background information that falls into the definition by VHTR Materials PA 10.3 as follows:
10.3.1 Scientific and technical information, such as design procedures and methodologies, product formulas, the chemical composition of materials, manufacturing methods, processes and treatments, computer programs, and data compilations, and employee know-how (including specialized skills and experience);
10.3.2 Business information such as strategic or marketing plans, financial information and credit or pricing policies; and
10.3.3 Client-related information such as customer lists, customer preferences or contacts.
Category 3 is for the Background information that is not related to VHTR Materials PA and has certain limits on its distribution, such as data from previous nuclear reactor programs of US DOE and other Signatories, or from a third party with permission for Handbook inclusion etc.
The two “Generated” Categories are for information resulting from the collaborative efforts of the PA Signatories. Of these two, Category 4 is for the Generated information that falls into the description by Article 2 of the Convention Establishing the World Intellectual Property Organization, done at Stockholm, July 14, 1967 as follows:
a. Is not generally known or publicly available;

24
b. Has not previously been made available by its owner without an obligation to keep such information confidential; and
c. Is not already in the possession of a receiving party without obligation to keep it confidential.
Category 5 is for the Generated information that may be freely shared in the public domain, such as published literature.
In preparation of information for Handbook uploading, Data Upload Managers must determine the Information Categories of the reports or data that are to be uploaded, and select the correct Category from the dropdown list for Attribute “Information Category”. It can be difficult to determine the Category for generated data because some of them may become publishable in the future. In such cases, please select Category 4 to have the information protected, and when it becomes clear that the information is publishable or published, inform Handbook Manager of Operations in writing to change the Category to Category 5.
5.2 Handbook Record Number and Handbook Record ID
In Section 2.1, all Handbook data containers were introduced in detail. When information is uploaded into these containers to build up Handbook contents, each container must have its unique ID to enable accurate traceability. Names for large containers of Parts and Divisions are their IDs specified in Section 2.1 and summarized in Appendix B for quick reference. Some containers, such as Folder and Record, can only be named when they are created for data uploading. The ID of a Record is very important for information traceability in the Handbook. The Record functions as the page of a regular book. When browsing through related data, the Handbook tracking function must often rely on the uniqueness of the Record IDs to correctly trace relations between the data, and guide the user to accurately hop between related Records. On the other hand, the Record ID must also provide succinct information that can tell the user at a glance what data are contained in the Record. To ensure that all Record IDs satisfy the needs of both the Handbook tracking function and the user, a system must be established for consistency, clarity, and uniqueness in Record ID creation. The Handbook Record Number Rules and Handbook Record ID Rules, as exhibited in Appendix C and Appendix D, are developed to provide such a system. Because Handbook Record IDs in Part I will be created directly by Data Upload Managers, it is mandatory for these managers to study and follow the rules for Part I in Appendices C and D. It is also noted that for regular users, familiarity with the rules in these two Appendices will certainly facilitate Handbook navigation.
5.3 Operational Procedure for Uploading Reports
All R&D reports from the Gen IV materials programs are kept in Handbook Part I - Reports. These reports should also be connected by hypertext links to their supporting data (the data that have been used to generate the reports) if the data are stored in Records of relevant Chapters. The connections would allow users to conveniently trace back to the original source information of a report whenever needed, and vice versa. The present section describes how to upload reports and create Records in Part I for Data Upload Managers.
In the present Handbook version, Part I contains 8 Folders, each for a Signatory, plus 1 Folder for the VHTR PMB. In addition, there is also a Report Uploading Folder in maroon color for Data Upload Managers. This Report Uploading Folder, which is invisible for regular users, also contains 8 Folders, each for a Signatory, plus 1 for the VHTR PMB, as shown in Figure 4. Inside the Report Uploading Folder, a Data Upload Manager can only see three Uploading Folders, one for his/her own

25
Signatory, one for the United States, and the other for the VHTR PMB. The United States Uploading Folder is provided as an example.
Figure 4: Report Uploading Folders of Handbook Part I – Reports
Each report in PDF is uploaded in its Handbook Record that contains relevant information such as author name, publication date etc. of the report to facilitate search and select operations. There are direct and indirect methods to create the Handbook Record. To create a batch of Handbook Records, the indirect method is more efficient and therefore highly recommended.
To create Handbook Records using the indirect method, follow the procedure in Table 7.
Table 7: Procedure for indirect Handbook Record creation and report uploading
Step Operation 1 In a Word file, create a Record Nickname for each of your reports. A Record Nickname
can be created by deleting less important words from the report full title, keeping only a few most important words, and formatting it in title case, i.e., each word has its first letter in capital (upper case) except prepositions. A Nickname must not start with a numerical number. For example: the Record Nickname for report “Gen IV Materials Handbook Implementation Plan,” is created as “Handbook Plan.”
2 Create a Handbook Record Number for each of your report in the Word file. The Handbook Record Number must consist of the following elements:
I-Acronym of your country-5 digit series number for your report
For example: Handbook Record Number I-US-00001, in which “I” stands for “Part I –

26
Step Operation Reports,” US is the acronym for the United States and it indicates the report is contributed by Signatory DOE United States, and 00001 means this is the first US report uploaded. Note there is no space between hyphens and letters.
The Signatory country acronym must be kept consistent throughout the Handbook as listed below. Note that the Signatory country refers to the country that is contributing the report, which may not necessarily be the country where you have citizenship. The 5 digit series number represents the sequence in which the report is uploaded from your Signatory country. If there are more than one Upload Managers for your Signatory, please coordinate to ensure no redundant sequence numbers are created.
Canada CA Japan JP Switzerland CH European Union EU Korea KR United States US
France FR South Africa ZA VHTR PMB MB 3 Create a Handbook Record ID for your report in the Word file. The Handbook Record ID
format is as follows:
Record Nickname_Record Number
For example: the Handbook Record ID for report “Gen IV Materials Handbook Implementation Plan” contributed by the United States is:
Handbook Plan_I-US-00001,
Note the Record Nick Name and Record Number is connected by an underscore sign, not a hyphen.
4 Name the PDF file of your report by its Nickname but remove symbols such as &, # etc. These symbols are not recognized by hypertext link.
5 Open the most updated Report Record Creation Spreadsheet distributed by Handbook Manager of Operations and follow the instructions on the first page and in each title cell of the RecordInfo page to complete information input.
6 Email your completed Spreadsheet to Handbook Manager of Operations, or upload it into Part K and send Handbook Manager of Operations a notification. Your Spreadsheet will be used for automated Record creation in the Handbook.
7 You will receive notification from Handbook Manager of Operations that the Records for your reports have been created.
8 After receiving the notification, log into the Handbook and locate Part I - Reports at the lower section of the Materials Tree in the left pane. Click on the + sign next to I-Reports to expand it. Keep in mind that the first maroon Folder named Report Uploading is not visible for regular Handbook users, and this is the Folder which you should upload your reports into.
9 Click on the + sign next to the maroon Report Uploading Folder to expand it. You will see the Folders for your own Signatory country, the United States, and the VHTR PMB.
10 Look at the database top toolbar, if the toolbar color is grey and the read mode link is selected by a rectangular box, you are currently in the READ Mode and you need to click on the edit mode link to enter the EDIT Mode. (Regular users can not see these two mode options.) If the color is yellow and the edit mode link is selected by a rectangular box, you are already in the EDIT Mode and can conduct the report uploading operation.
11 Click on the + icon on the right side of the Folder for your Signatory country to open it.

27
Step Operation You will see a branch of Records ID for your reports created from the Spreadsheet you sent in Step 6.
12 Click on a hypertext Record ID to open it. Scroll down to find Attribute “Full Report File” and click on its icon on the right end to display the File Upload window.
13 Use the Browse button to upload the PDF file of your report.
14 Check the “Allow file contents to be searched” box.
15 For Attribute “Description”, leave it blank.
16 For Attribute “Target”, use the dropdown menu to select “New window”. This will let your report be opened in a new window for convenient reading and download when its hypertext link is clicked on. (Mandatory Input)
17 Repeat Step 12 – 16 to upload the next report file.
18 Notify Manager of Operations the completion of you uploading operation.
To create Handbook Records using the direct method, follow the procedure in Table 8.
Table 8: Procedure for direct Handbook Record creation and report uploading
Step Operation 1 Log into the Handbook
2 Locate Part I - Reports at the lower section of the Materials Tree in the left pane. Click on the + sign next to I-Reports to expand it. Keep in mind that the first maroon Folder named Report Uploading is not visible for regular Handbook users, and this is the Folder which you should upload your reports into. Your uploaded reports will be temporarily stored in this Folder to be further processed for the next Handbook version release.
3 Click on the + sign next to the maroon Report Uploading Folder to expand it. You will see the Folders for your own Signatory country, the United States, and the VHTR PMB.
4 Look at the database top toolbar, if the toolbar color is grey and the read mode link is selected by a rectangular box, you are currently in the READ Mode and you need to click on the edit mode link to enter the EDIT Mode. (Regular users can not see these two mode options.) If the color is yellow and the edit mode link is selected by a rectangular box, you are already in the EDIT Mode and can conduct the report uploading operation.
5 Click on the icon on the right side of the Folder for your Signatory country to open the Reports Uploading window in the right pane.
6 In the middle “Record Tree” field of the right pane, click on Add new record (It is the first line.) to open the “Add a new record” pane.
7 In the “Full Name” box, type in the full title of your report in title case, i.e., each word has its first letter in capital (upper case) except prepositions. This full tile will be automatically displayed on the top of the Handbook Record for the report you are uploading. As you type, the same full title will automatically appear in the “Short Name” box.
8 To fill the “Short Name” box, you need first to read the rule under Report Record Number in Appendix C and rule under Report Record ID in Appendix D.
In the “Short Name” box, you need to fill in your Handbook Record ID for your report in

28
Step Operation the format of Record Nickname_Record Number. To proceed, delete some words from your report full title currently existing in the “Short Name” box and keep only the most important ones to make your Record Nickname in title case. Then type an immediate underscore sign “_” followed by your Record Number composed of the following elements:
I-Acronym of your country-5 digit series number for your report
Note there should be no space before and after the hyphens. For example:
Handbook Plan_I-US-00001,
where “Handbook Plan” is the Record Nickname for “Gen IV Materials Handbook Implementation Plan,” the “I” following the underscore sign “_” stands for “Part I - Reports,” the “US” following the first hyphen is the acronym of the United States indicating this is a US report, and the “00001” following the second hyphen is the 5 digit series number indicating this report is the first US report uploaded into the Handbook.
Note that the Handbook Record ID you have typed into the “Short Name” box is what you will see as a hypertext link for this report in the left pane of the Materials Tree. In the example above, you will see the hypertext link Handbook Plan_I-US-00001 displayed for the report in the United States Uploading Folder in left pane of the Materials Tree. So please make the Record Nickname a succinct summary of your report full title to ensure efficient display of the hypertext link. Nickname must not start with a numerical number.
Please give the 5 digit series number in the sequence you upload your reports. If there are more than one Data Upload Managers for your Signatory, coordination is needed to ensure consistency of the sequence. You also need to keep your country name acronym consistent throughout the Handbook by using the standard acronyms listed below. Note “your country” here refers to the Signatory country that is contributing the report, which may not necessarily be the country where you have your citizenship.
Canada CA Japan JP Switzerland CH European Union EU Korea KR United States US
France FR South Africa ZA VHTR PMB MB 9 You can skip the “Short Code” box.
In the “Color” dropdown menu, select the designated color code for your Signatory country listed as follows:
Canada Yellow Japan White Switzerland Silver European Union Blue Korea Aqua United States Navy
10
France Fuchsia South Africa Green VHTR PMB Lime 11 For “Record Type”, select Record (It should be the default selection).
12 You may write some notes for yourself about this report you are uploading in the “Enter some notes about the changes made (optional)” field. Regular users will not be able to see your notes even after this report is released. Only Data Upload Managers can see the notes. If you don’t need any notes, skip this field.
13 Click on the Next button on the lower right corner to move to the next page.
At this point, you have already created an empty Handbook Record for your report. You can see the Handbook Record ID of this report displayed as a hypertext link in the left pane. In the following steps you will fill in Attribute values to complete this Record.
14 For Attribute “Report Title”, type in the full title of your report in title case. (Mandatory

29
Step Operation Input)
15 For Attribute “Report Nickname”, type in the Record Nickname you have created in Step 8 for the report in title case. (Optional Input)
16 For Attribute “Principal Author Name”, type in the name of the first author of your report in the order of given name and family name. The family name should be all in capital (upper case) letters to help readers from different cultural traditions to understand the name correctly. If the author is an organization, type in the full name of the organization in title case. (Mandatory Input)
17 For Attribute “Co-Author Name(s)”, type in the name of the co-author(s) of your report in the order of given name and family name. The family name should be all in capital (upper case) letters. (Optional Input)
18
For Attribute “Publication Date”, type in the report publication date in Arabic number in the format of month/day/year completely. If you don’t know the day, make it the last day of that month, and if you don’t know the month, make it December. The input order must be month, day, and year. For example: the 16th of January 2009 must be input as 1/16/2009, or January 16, 2009. Despite various official orders for date around the world, this is the order the Handbook base software can recognize. An input such as 16/1/2009, although generally accepted in many regions of the world, will trigger an error message when processed by some Handbook software tools. (Mandatory Input)
Note 1: Some code development is underway to allow incomplete input of month, day, and year in the future.
19 For Attribute “Keywords”, type in a few key words separated by comma for your report to facilitate search. (Optional Input)
20 For Attribute “Report Project Name / ID”, type in the name and/or ID number of the project that generated the report. (Mandatory Input)
21 For Attribute “Reporting Organization”, type in the name of the organization that generated the report. (Mandatory Input)
22 For Attribute “Original Report Number”, type in the original report number or ID of the report (which is usually on the report cover page). If the report does not have an original report number, type in “None”. (Mandatory Input)
23 Based on what you have in your report, you can copy and paste to fill either the “Abstract” or the “Executive Summary” Attribute box. If the report has both, fill the “Abstract” box only. (Mandatory Input)
24 For Attribute “Report Notes”, type in any notes about the report you would like to have for the readers. (Optional Input)
25 Before filling the “Full Report File” Attribute field, name the PDF file of your report by its Nickname but remove symbols such as &, # etc. These symbols are not recognized by hypertext link. In the example we have, the PDF file of report Handbook Plan_I-US-00001 should be name I-US-00001. (Mandatory Input)
26 Use the Browse button to upload the PDF file of your report. (Mandatory Input)
27 Check the “Allow file contents to be searched” box. (Mandatory Input)

30
Step Operation 28 For Attribute “Description”, leave it blank.
29 For Attribute “Target”, use the dropdown menu to select “New window”. This will let your report be opened in a new window for convenient reading and download when its hypertext link is clicked on. (Mandatory Input)
30 The “Link to Related Documents” field allows you to provide a link to an external source on internet. If your report is closely related to an external website, you may choose to fill out this field. Select “New window” in the “Target” dropdown menu so the external source can be opened up in a new window. (Optional Input)
The Attributes under “Record Management Information” heading are shared with other Parts of the Handbook. Therefore you only need to fill those applicable to Part I.
31 For Attribute “Handbook Record Number”, type in the Record Number you generated in Step 8 for the report. In the example we have, the Handbook Record Number of report Handbook Plan_I-US-00001 is I-US-00001. (Mandatory Input)
32 For Attribute “Handbook Record ID”, type in the Handbook Record ID you generated in Step 8 for the report. In the example we have, the Handbook Record ID is Handbook Plan_I-US-00001. (Mandatory Input)
33 For Attribute “Record Contributing Signatory”, use the dropdown list to choice your Signatory. (Mandatory Input)
34 For Attribute “Information Category”, use the dropdown list to choose the correct Category for your report. Guidelines for determining the Category can be found in Section 5.1. (Mandatory Input)
35 For Attribute “Record Distribution Scope”, type in distribution scope for the report. Under the current agreement, the scope is either “Restricted” or “Unlimited”. Unlimited means the report can be downloaded and given to anyone, such as the Handbook Plan_I-US-00001 report. (Mandatory Input)
36 For Attribute “Applicable QA Requirements”, type in the ID of the Quality Assurance that was followed in generating your report. If the ID is unknown, type in “Unknown”. If no Quality Assurance was applied in generating the report, type in “None”. (Mandatory Input)
37 For Attribute “Record Edited by”, type in your name with the family name all in capital letters. (Mandatory Input)
38 For Attribute “Record Administrative Approval by”, type in name of the person who approved uploading the report into the Handbook, with the family name all in capital letters. (Mandatory Input)
39 After you are done, click on the blue Finish button on the upper or lower right corner to complete the operation for uploading this report.
40 To revise any Attribute in the Record for this report, click on the icon on the right side of row for that Attribute.
41 After you upload all your reports, send an email notification to Handbook Manager of Operations ([email protected]). The email must at least include 1) a list of the reports you have just uploaded, 2) the date you plan for releasing these reports.

31
5.4 Operational Procedure for Uploading Data Files
Because the Handbook is a digitized database, the majority of its contents are numerical and text data that can be conveniently further processed by users. Due to the significant volume of the materials data the Handbook is planned to contain and manage, it is practically time-prohibitive, if not completely impossible, to manually type in each number and letter. To facilitate the data input, a mechanism has been developed to minimize manual type-in and ensure data input accuracy.
As previously described, Part K - New Data Ports is designed for uploading files of numerical and text data to be used for creating Handbook Records in various Parts. For numerical and text data, Data Upload Managers only need to upload their adequately formatted Excel files that contain the data into Part K in a similar fashion for uploading PDF reports into Part I, and the Handbook management will then use customized software tools to conduct automated data import to create and fill their Handbook Records.
In the present version, Part K contains 8 Folders, each for a Signatory, as shown in Figure 5. A Data Upload Manager can only see the Uploading Folder for his/her own Signatory and the one for the United States with some loaded example files. Inside each Uploading Folder, there are 50 virtual cabinets for file storage, as shown in Figure 6. These cabinets can store not only the Excel files, but also other types of file such as PDF, DOC for Microsoft Word, JPG for photo, and TXT for plain text. More cabinets can be added at any time by contacting the Handbook Manager of Operations. Data Upload Managers can follow the procedure in Table 9 to upload their Excel data files, and other types of files as needed, into these cabinets for further processing by the Handbook management to create Handbook Records that contains the uploaded data and information.
It should be noted that for the Handbook management to develop customized software tools to accurately identify the data in your Excel files uploaded in the cabinets and relocate the data to correct Records in other Parts and Chapters, the format of the Excel files must remain consistent for one batch of your data files, and be coded into the software tools. If the format of your Excel files has to be changed for some reason, the customized software tools must also be revised accordingly. Because the software tools look for data in the Excel file by their locations, changing format without changing the software tools accordingly will cause the tools to extract wrong data from the Excel file and input the extracted data into wrong Attributes in the Record.
Figure 5: Excel data file uploading Folders of Handbook Part K – New Data Ports

32
Figure 6: New Data Cabinets of Handbook Part K - New Data Ports
Table 9: Data file uploading procedure
Step Operation 1 Contact the Handbook Manager of Operations ([email protected]) for a review and
discussion of your Excel data file format so that customized software tools can be developed for automated data extraction from your Excel files to create Handbook Records that contain your data.
2 Log into the Handbook
3 Locate Part K-New Data Ports at the lower section of the Materials Tree in the left pane. Keep in mind that the entire Part K is not visible for regular Handbook users, but Data Upload Managers can see it. Click on the + sign next to K - New Data Ports to expand it, you will see the Folders for your own Signatory country and the United States. Data uploaded by the other countries will become accessible only at the next Handbook version release. This allows time for the Handbook management to process your uploaded data for Handbook Record creation.
4 Check on the database top toolbar, if toolbar color is grey and the read mode link is selected by a rectangular box, you are currently in the READ Mode and you need to click on

33
Step Operation the edit mode link to enter the EDIT Mode. (Regular users can not see these two mode options.) If the color is yellow and the edit mode link is selected by a rectangular box, you are already in the EDIT Mode and can conduct the data uploading operation.
5 Click on the + sign next to the Folder for your Signatory country, you will see the blue hypertext title of the New Data Cabinets for your Signatory country.
6 Click on the blue hypertext title for the New Data Cabinets of your Signatory country, you will see 50 cabinets.
7 Go to “Edit” on top of the right pane and click on Edit Data from its dropdown list to open all cabinets.
8 Each cabinet is used for one file. Fill every field of each cabinet, use the Browse button to upload you file and make sure you select “New window” in the dropdown list next to “Target”. After you complete, click on the Save button on the upper or lower right corner to save all your uploaded information. Then send an email notification to Handbook Manager of Operations ([email protected]) so that your new data can be further processed for the next version of Handbook version release.
9 After your uploaded data are processed by the Handbook management, you will be given access to the next version of the Handbook before its release to check whether the Records are correctly created for your data. Carefully review the Records and notify the Handbook Manager of Operations if any error is identified.
6. REFERENCES
1. “Gen IV Materials Handbook GIF Release for Architecture and Functionality Demonstration”, ORNL/GEN4/LTR-08-002, U. S. Department of Energy Generation IV Nuclear Energy Systems Program, U. S. Department of Energy, March 7, 2008, Weiju Ren.
2. “Gen IV Materials Handbook Implementation Plan”, ORNL/TM-2005/77, U. S. Department of Energy Generation IV Nuclear Reactor Program, U. S. Department of Energy, March 29, 2005, Phil Rittenhouse and Weiju Ren.
3. “Assessment of Existing Alloy 617 Data for Gen IV Materials Handbook”, ORNL/TM-2005/510, U. S. Department of Energy Generation IV Nuclear Reactor Program, U. S. Department of Energy, June 30, 2005, Weiju Ren and R. W. Swindeman.
4. “Initial Development of the Gen IV Materials Handbook”, ORNL-GEN4/LTR-05/012, U. S. Department of Energy Generation IV Nuclear Reactor Program, U. S. Department of Energy, September 15, 2005, Weiju Ren and P. Rittenhouse.
5. “Purpose and Role of the Gen IV Materials Handbook Advisory Committee”, Gen IV Materials Handbook Task internal document, October 25, 2005, Phil Rittenhouse, William Corwin, and Weiju Ren.
6. “Gen IV Materials Handbook Architecture and System Design”, ORNL-GEN4/LTR-06-004, U. S. Department of Energy Generation IV Nuclear Reactor Program, U. S. Department of Energy, February 28, 2006, Weiju Ren.
7. “English Country Names and Code Elements,” ISO 3166-1/ ISO 3166-1-alpha-2 Code Elements, International Organization for Standardization.
34
APPENDIX A
PROCEDURES FOR ESTABLISHING ACCESS TO GEN IV MATERIALS HANDBOOK

35
Procedure for Establishing Access to Gen IV Materials Handbook
READ THIS SECTION FIRST This procedure is required to gain initial access to the Handbook. As a continued effort to improve clarity to help users with different language, culture, and expertise backgrounds, the present version is updated on April 22, 2009 based on new user feedback. If you still find any ambiguities, please email Dr. Weiju Ren ([email protected]). The Handbook security system configuration is schematically shown in Figure 1. The Handbook servers are electronically locked behind the RSA located inside the ORNL external computing system called the XCAMS. To initiate access to the Handbook, you must first register as an XCAMS user (Phase One of the procedure, conducted on-line). Then you should complete the required paperwork (Phase Two of the procedure, conducted off-line). Finally you will activate your RSA token and initiate your Handbook login (Phase Three of the procedure, conducted on-line). Steps in the three phases are summarized in Figure 2. We’ll guide you step by step through the entire process. Once you complete the three phases, you can unlock the RSA directly from the internet and log into the Handbook without consciously dealing with the ORNL XCAMS.

36
Figure 1: HANDBOOK SECURITY SYSTEM CONFIGURATION SCHEMATIC
Figure 2: HANDBOOK ACCESS INITIATION FLOWCHART To help yourself smoothly go through the three phases, we suggest that before you start, please follow the example of Table A1 to prepare an “Info Table” of the information you will need to complete the procedure. Because some private information will be included, you should keep your Info Table private, destroy it after you complete the entire procedure of the three phases, and keep your account access information in other safe places.

37
Table A1: INFORMATION FOR HANDBOOK ACCESS INITIATION (Info Table) Row Information Comments
1 your email address, e.g., [email protected]
This should be the email address we will use to communicate with you regarding your Handbook access.
2
your username, also called user identification (User ID, userid, or UID), e.g., jsmith
This should be the username you will use to 1) unlock the RSA and 2) log into the Handbook. Please choose a username with 4 ~ 8 characters. It cannot contain punctuation marks or special characters, such as “@ ! - * &”, etc.
3
your XCAMS PIN, also called personal identification number, e.g., 5375612
You need to prepare two PINs, and this is the first PIN. This PIN should be 4 ~ 8 numeric digits. No alphabetic or special characters can be used. Please keep a copy of this PIN in another safe place. You will need it in the future when you want to reset your Handbook password. For example, when you forget you Handbook password and need to have it reset.
4 your password, e.g., nw8b3jk
This will be the password you use every time you log into the Handbook. Do not lose or share this password with other people! We do not recommend you use zeros and the letter o, because they look too similar. This is a case sensitive password. Before you create this password, please turn to page 42 for “XCAMS New User Account Registration - Step 4 of 6” and review the Password Rules Policy because this is also the password for your XCAMS user account. If you do not want to create your own password, you can leave this row empty, and let the XCAMS create one for you during your registration at “XCAMS New User Account Registration - Step 4 of 6.” Your will need this password each time you log into the Handbook, please memorize this password.
5 your RSA PIN, e.g., 7692
This is the second PIN. This PIN must be different from the first PIN in Row 3. This PIN must be 4 digits long. You will need this PIN to unlock the RSA every time before you can log into the Handbook. You must memorize this PIN. So choose a number easy for yourself to remember but hard for others to guess.
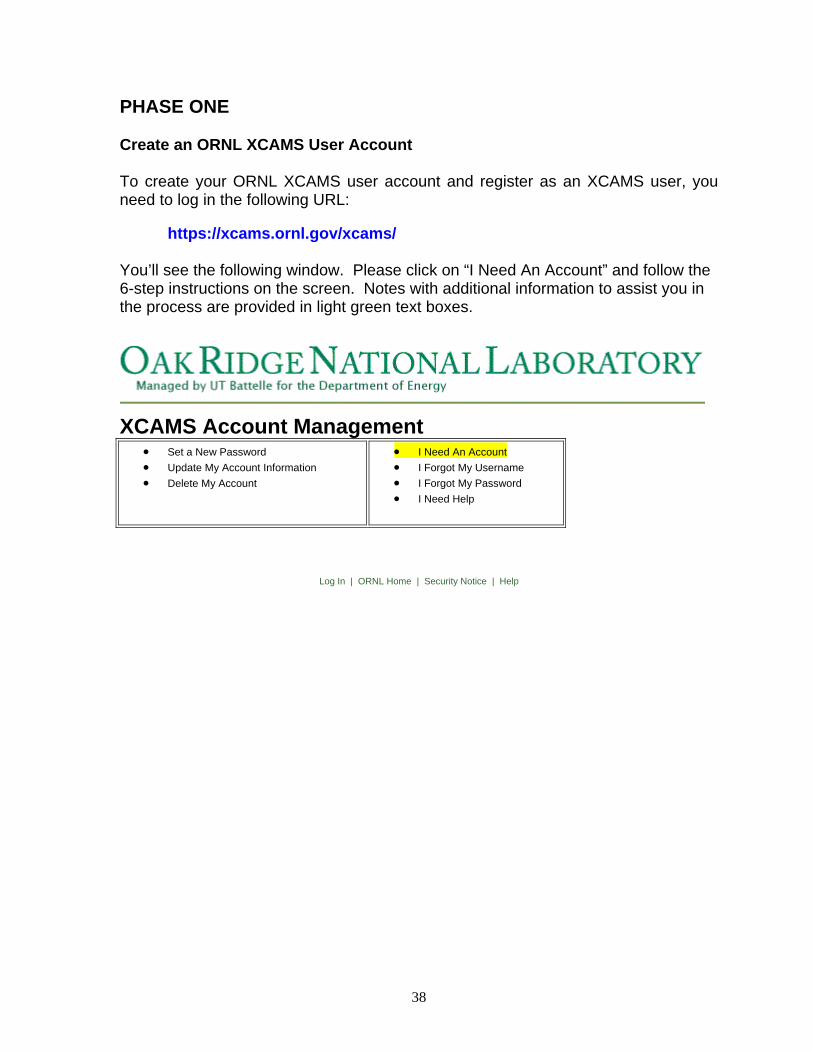
38
PHASE ONE Create an ORNL XCAMS User Account To create your ORNL XCAMS user account and register as an XCAMS user, you need to log in the following URL:
https://xcams.ornl.gov/xcams/ You’ll see the following window. Please click on “I Need An Account” and follow the 6-step instructions on the screen. Notes with additional information to assist you in the process are provided in light green text boxes.
XCAMS Account Management
• Set a New Password
• Update My Account Information
• Delete My Account
• I Need An Account • I Forgot My Username
• I Forgot My Password
• I Need Help
Log In | ORNL Home | Security Notice | Help
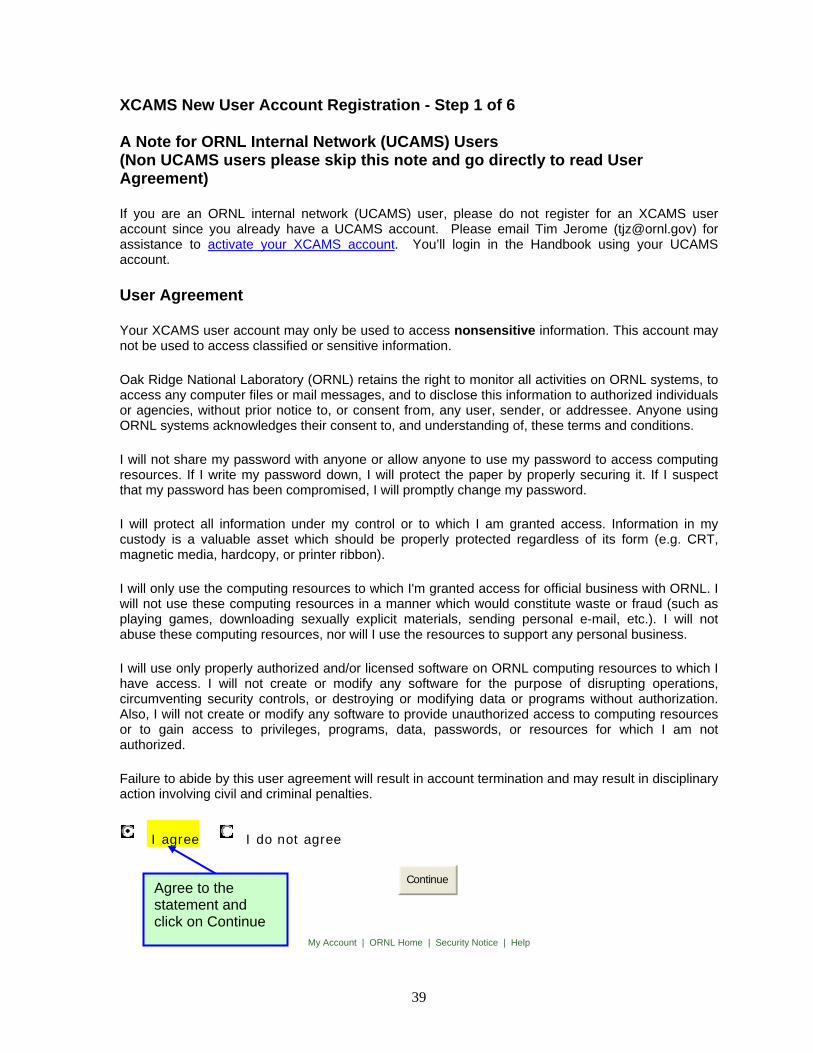
39
XCAMS New User Account Registration - Step 1 of 6 A Note for ORNL Internal Network (UCAMS) Users (Non UCAMS users please skip this note and go directly to read User Agreement)
If you are an ORNL internal network (UCAMS) user, please do not register for an XCAMS user account since you already have a UCAMS account. Please email Tim Jerome ([email protected]) for assistance to activate your XCAMS account. You’ll login in the Handbook using your UCAMS account.
User Agreement
Your XCAMS user account may only be used to access nonsensitive information. This account may not be used to access classified or sensitive information.
Oak Ridge National Laboratory (ORNL) retains the right to monitor all activities on ORNL systems, to access any computer files or mail messages, and to disclose this information to authorized individuals or agencies, without prior notice to, or consent from, any user, sender, or addressee. Anyone using ORNL systems acknowledges their consent to, and understanding of, these terms and conditions.
I will not share my password with anyone or allow anyone to use my password to access computing resources. If I write my password down, I will protect the paper by properly securing it. If I suspect that my password has been compromised, I will promptly change my password.
I will protect all information under my control or to which I am granted access. Information in my custody is a valuable asset which should be properly protected regardless of its form (e.g. CRT, magnetic media, hardcopy, or printer ribbon).
I will only use the computing resources to which I'm granted access for official business with ORNL. I will not use these computing resources in a manner which would constitute waste or fraud (such as playing games, downloading sexually explicit materials, sending personal e-mail, etc.). I will not abuse these computing resources, nor will I use the resources to support any personal business.
I will use only properly authorized and/or licensed software on ORNL computing resources to which I have access. I will not create or modify any software for the purpose of disrupting operations, circumventing security controls, or destroying or modifying data or programs without authorization. Also, I will not create or modify any software to provide unauthorized access to computing resources or to gain access to privileges, programs, data, passwords, or resources for which I am not authorized.
Failure to abide by this user agreement will result in account termination and may result in disciplinary action involving civil and criminal penalties.
I agree I do not agree
Continue
My Account | ORNL Home | Security Notice | Help
Agree to the statement and click on Continue
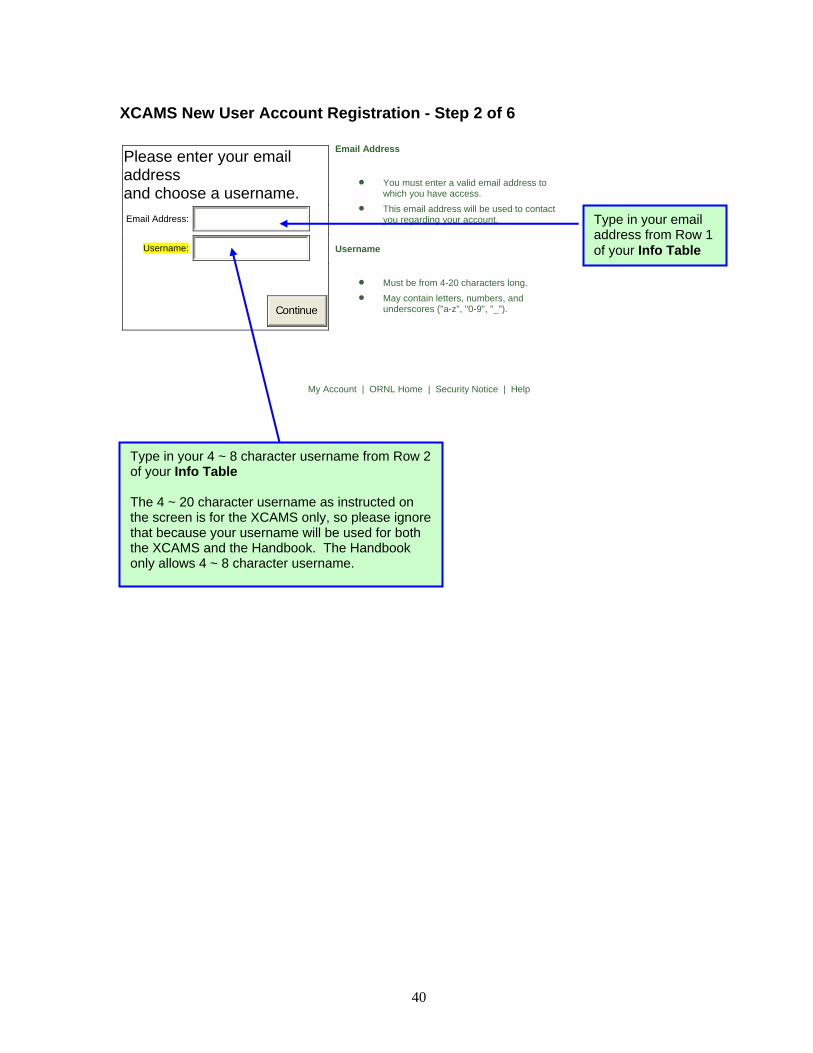
40
XCAMS New User Account Registration - Step 2 of 6
Please enter your email address and choose a username. Email Address:
Username:
Continue
Email Address
• You must enter a valid email address to which you have access.
• This email address will be used to contact you regarding your account.
Username
• Must be from 4-20 characters long. • May contain letters, numbers, and
underscores ("a-z", "0-9", "_").
My Account | ORNL Home | Security Notice | Help
Type in your 4 ~ 8 character username from Row 2 of your Info Table The 4 ~ 20 character username as instructed on the screen is for the XCAMS only, so please ignore that because your username will be used for both the XCAMS and the Handbook. The Handbook only allows 4 ~ 8 character username.
Type in your email address from Row 1 of your Info Table

41
XCAMS New User Account Registration - Step 3 of 6 Personal Information
Prefix: none
First Name:
Middle Name: optional
Last Name:
Suffix: none
Birth: Select Country
Citizenship: Select Country
Enter new PIN:
Confirm PIN:
Privacy Policy. Your personal, contact, and account information is used to establish your identity at ORNL. This information is also used to grant you access to applications, functions, and/or information at ORNL. ORNL does not rent or sell your information to others. However, ORNL retains the right to disclose your information to authorized individuals or agencies as noted in the User Agreement.
Required Fields. All fields are required unless otherwise noted.
Personal Identification Number. Your PIN will be used to verify your identity if you forget your username or password. Your PIN must be 4 to 8 digits (no alphabetic or special characters).
Contact Information
Email Address: [email protected]
Phone Number: optional
Fax Number: optional
Affiliation:
Address Line 1:
Address Line 2: optional
Address Line 3: optional
City:
State: Select State
Zip Code:
Country: Select Country
Phone and Fax Numbers. Entry of phone and fax numbers is optional. Provide these numbers only if you'd like to be contacted by phone or fax when interacting with ORNL (e.g., you might like us to be able to call you if there's a problem with a research proposal you've submitted). These numbers may be used to identify you to other XCAMS users. If you do not want your numbers available to other XCAMS users, do not enter them.
Affiliation. Please enter the name of the laboratory, university, or other organization with which you are affiliated.
Postal Mailing Address. Please enter the postal mail address where any written correspondence should be sent.
Continue
Type in your XCAMS PIN from Row 3 of your Info Table This XCAMS PIN will be needed in case you forget your Handbook password and need to have it reset. Do not type in your RSA PIN in Row 5 of your Info Table here. These two PINs should NOT be the same number! Please keep this XCAMS PIN in a safe place so you can use it if you forget you Handbook password!
Select N/A if in country outside of USA
Or Postal Code

42
XCAMS New User Account Registration - Step 4 of 6 ** WARNING ** Please ensure no one else can see your screen when you enter your password.
Username: username
Enter new password: Select new password:
Confirm new password: Confirm
Password Rules Policy
1. Must contain either 6 letters and 2 digits (6x2 format) or 5 letters and 3 digits (5x3 format) (e.g. no more than three letters in a row without a number).
2. Must contain a nonnumeric in the first and last position.
3. Must contain no more than three identical consecutive characters in any position from the previous password.
4. Must not be a string that is the same as the username or contains the username.
5. Must not contain any dictionary word in any language (except words of three or less characters).
6. Must not contain any proper noun or the name of any person, pet, child, or fictional character (except words of three or less characters).
7. Must not contain any employee serial number, Social Security number, birth date, phone number, or any information that could be readily guessed about the creator of the password.
8. Must not contain the string "ABC", "XYZ", "123" or any keyboard patterns of 3 characters or more.
9. Must not contain any consecutive characters that are the same (e.g. aa, bb, 11, etc.)
10. Must not repeat patterns of three characters (e.g. ab1+ab1, k9s+k9s, etc.).
11. Must not be any word, noun, or name spelled backwards (except words of three or less characters).
12. Must not be equal to the null string.
Select from a list of generated passwords.
New password is currently limited to letters and numbers. New password must contain a nonnumeric in
first position. New password must contain a nonnumeric in last position. New password must not
contain 3 consecutive characters from old. New password must be different from old password. New
password must not be a string that is part of the userid. New password must not be a string that
contains the userid. New password must not contain simple pairs of characters. New password must not
contain simple patterns of characters. New password must not repeat simple patterns of characters.
New password must be compliant with established policy. New password must be compliant with
established policy. New password must be compliant with established policy. New password must be
compliant with established policy. New password must not contain a word found in dictionary. New
password must not be similar to a word in dictionary.
This will be the password you use every time you log into the Handbook. Do not lose or share this password with others! If this password you create in Row 4 of your Info Table violates the Password Rules Policy, you’ll get a warning message, and you must create a better one and write it down in Row 4. If you don’t want to create your own password, please click on Select from a list of generated passwords, or check the box next to it to let the XCAMS suggest some passwords for you to choose one. Write down the password you choose into Row 4 of your Info Table.
You only need to use this if you want the XCAMS to suggest some passwords for you to choose. You can click on this box and choose from a list of randomly generated passwords in the Select new password: box above. Write your password down and keep in a safe place!

43
XCAMS New User Account Registration - Step 5 of 6
You are almost done! An email has been sent to you at [email protected]. You must follow the link in this email to complete the registration process. You must complete the registration process within 72 hours.
Upon completion of the registration process, your Password will be set to password. You are responsible for protecting your password according to the User Agreement.
o Do not share your password with anyone or allow anyone to use your password to access computing resources.
o Protect all information under your control or to which you are granted access. o Only use the computing resources to which you are granted access for official
business with ORNL. o Use only properly authorized and/or licensed software on ORNL computing
resources to which you have access.
Hello [email protected]: Thank you for registering for an XCAMS account. This message was sent to you on 05/22/2008 at 12:25:28 EDT to verify your email address and confirm registration of your email address for username "username" in XCAMS. To activate your new XCAMS account, please follow the link in this email to complete the registration process. You must complete the registration process within 72 hours. Your confirmation number is xxxxxxxxxxxxx. https://xcams.ornl.gov/sec-cgi-bin/cgiwrap/xcams/activate.cgi?username=username&confnumb=xxxxxxxxxxxx IF YOU DID NOT REGISTER your email address or you do not need an XCAMS account, please do not complete the registration process and the new account will automatically be deleted in 72 hours. If you suspect this registration is fraudulent, please report it to the ORNL Computer Helpline at 865-241-ORNL (865-241-6765) or via email to [email protected]. Thank you, XCAMS
Your will find an email like this one in your email account. Click on this link in your email and you’ll be automatically moved to Step 6 of 6 to complete your registration with the XCAMS.
Now, you can log out and go to the email account you listed in Row 1 of your Info Table to look for an email from the XCAMS.

44
XCAMS New User Account Registration - Step 6 of 6
When you see this “XCAMS New User Account Registration - Step 6 of 6” on your screen, you will also find your second email of confirmation like the one on the next page. Read the second email carefully and save it for future use.

45
The second email you will receive looks like this. Please save it for future use. Thank you for activating your XCAMS account. As of 05/22/2008 at 12:27:05 EDT, username "username" is activated in XCAMS and should be ready for you to use. If you have access problems with your new account, please wait a few minutes and try again. If you continue to have access problems or want to report other issues, please notify the ORNL Computer Helpline at 865-241-ORNL (865-241-6765) or via email to [email protected] IF YOU FORGET YOUR PASSWORD 1. Using your Web browser, access the following URL: https://xcams.ornl.gov/xcams/fpwStep1.shtml 2. Complete the steps for changing a forgotten password. IF YOU DID NOT REGISTER for this account or you suspect this XCAMS account activation is fraudulent, please report it to the ORNL Computer Helpline at 865-241-ORNL (865-241-6765) or via email to [email protected] Thank you, XCAMS Now you have created your ORNL XCAMS user account and registered as an XCAMS user. Please move to Phase Two on the next page.
If you forget your password you can go to this link and reset it, but you will need your XCAMS PIN as you prepared in Row 3 of your Info Table. Hopefully you remember where you have kept it safely!

46
PHASE TWO In this phase, you must provide the information for your Handbook access. The information includes the following three items:
1. The signed non-disclosure agreement (NDA) that all Handbook users sign to ensure their willingness to properly protect confidential information in the Handbook;
2. Handbook User Registration Information as required in Table A2; 3. A photo of you in JPG format.
As you review and sign the NDA, please make sure that you also enter the personalizing information indicated in red font in the text of the NDA, e.g. the effective date of the NDA, your name as the person to receive the information contained in the Handbook, and your address. You can make a copy of Table A2 from the next page and fill it out as instructed in its third column. Once your signed NDA, Table A2, and photo are ready, send them to William Corwin (Bill is his nickname) ([email protected]) and Weiju Ren ([email protected]) in email attachment. After the information has been received and processed, you will receive an email from the Handbook management letting you know you have been approved to start Phase Three and complete you access initiation.

47
Table A2: HANDBOOK USER REGISTRATION INFORMATION
Item Information Notes and Instruction
Family Name Also called surname, or last name.
Middle Name Asian users normally do not have a middle name. If you have no middle name, please type in NMN.
First Name For most Asian users, this is the name following your family name in your original name order.
Signatory the GIF signatory you belong to
Organization
your company or institute name
Email Address
This is the email address from Row 1 of your Info Table. You next email notification for Phase Three will be sent to this address.
Postal Address
Please avoid using P.O. Box number. If we need to send you items in registered mail, someone has to sign the delivery record. Normally a postal address should include the following elements:
1. Street Number 2. City 3. State or Province 4. Postal Code 5. Country
Citizenship as from your current passport
Phone Number
Please use (W), (H), and (M) to indicate whether the number is for your work, home, or mobile (cellular) phone, respectively.
Username This is the username from Row 2 of your Info Table. Please don’t mistakenly provide the username for your email account.
RSA Token Number the serial number on back of your RSA token

48
PHASE THREE As soon as we receive and process the information requested in Phase Two, you will receive an email telling you to start this phase. Once you receive the email, get your RSA token and your Info Table ready, and go to the Handbook website https://gen4www.ornl.gov, the following RSA SecurityID page will be displayed: Note: You need to type in the address https://gen4www.ornl.gov via Internet Explorer or Mozilla Firefox. You must have security cookies enabled and must be able to go to HTTPS or secured websites in your browser client. IE7 is preferred. You should also choose English from your Language Toolbar, if you have that enabled.
1. Input your User ID (This is the username in Row 2 of your Info Table). Now, look at your RSA token. There is a 6-digit passcode displayed, and the passcode will change every 60 seconds. The bar at the side shows you how much time you still have before the next change. When the bar is still high, type the current 6-digit passcode displayed into the Passcode box as shown above and click on the “Log In” button. Because you are initiating your login at this moment, you only need to type in the 6-digit passcode. The screen instruction “Your Passcode is your PIN + the number displayed on your token (the Tokencode) is for future login. Please ignore it at this time.

49
2. In the window shown as below, click on “I will create my PIN”, type your RSA
PIN from Row 5 of your Info Table in both the New PIN and Confirm New PIN boxes, and click on “OK”. This RSA PIN must be 4 digits long, and should be different number from your XCAMS PIN. Do not forget this PIN! Please memorize this PIN, write it down and keep in a safe place. You will need this PIN every time you use your RSA Token!

50
3. On this screen that appears, type in your User ID again (the username in Row
2 of your Info Table). This time, follow the screen instruction to type in your RSA PIN and the current 6-digit passcode displayed in your RSA token with no spaces between the PIN and passcode, and click on the “Log In” button.

51
4. The Gen IV Materials Handbook cover page appears and you need to click on “Click here to enter”. If your screen is small, you may need to scroll down to see the “Click here to enter” line.
Click here to enter

52
5. Once the Log in screen appears, type in extranet\ immediately followed by your User ID (the username in Row 2 of your Info Table). For example, if your User ID is “jsmith”, you type in extranet\jsmith. If you only type in jsmith, it will not be accepted. The “extranet\” must be included in front of your username because “extranet\” stands for XCAMS where the Handbook servers are located.
6. Type in your Handbook password (This is the password you inputted in
“XCAMS New User Account Registration - Step 4 of 6,” either from Row 4 of your Info Table or chosen from Select from a list of generated passwords in “XCAMS New User Account Registration - Step 4 of 6.”
7. Click on the “OK” button and you should be logged into the Handbook. 8. For future logins, just go to https://gen4www.ornl.gov in your browser and
repeat steps 3 through 7.
If you run into any problems, please call Gen IV Materials Handbook IT support, Tim Jerome, at 1+865-576-2568, or send email to Gen IV Materials Handbook Manager of Operations, Weiju Ren at [email protected].

53
APPENDIX B
GEN IV MATERIALS HANDBOOK PART AND DIVISION SYMBOLS

54
Gen IV Materials Handbook Construction Rules Part and Division Symbols - 9/23/2008 -11/1/2009 No. Name and Description 0025 Handbook Part and Division Symbols
The Part or Division symbols of the Handbook are defined in Section 2.1 A = Materials B1 = Base Material Pedigree B2 = Joining Pedigree C1 = Test Data C2 = Test Definition C3 = Test Information C4 = Data Requirements D = Statistical Data E = Microstructure F = Design Data G = Application H = Comments and Analyses I = Reports J = References K = New Data Ports

55
APPENDIX C
GEN IV MATERIALS HANDBOOK RECORD NUMBERING RULES

56
Gen IV Materials Handbook Construction Rules Record Number Rules - 9/23/2008 -11/1/2009 No. Name and Description 0030 Handbook Record Number Rules
Materials Record Number: Record number format: A-x-zzzz
A represents Part A for generic materials information. x represents a number for material type defined as follows:
1 = General Classification Steel 2 = Austenitic Alloys 3 = Refractory & Other Alloys 4 = Graphite 5 = C/C & Ceramic Composites 6 = Ceramics
zzzz represents a 4 digit Record serial number and can go on forever. Pedigree Record Number: Record number format for base materials pedigree: B1-x-MatID-zzzz Record number format for joints pedigree is to be developed: B2-x-MatID-zzzz
B1 represents Part B Division B1 for base materials pedigree. B2 represents Part B Division B2 for joints pedigree. x represents the number for material type as defined for Materials Records described above. MatID is the ID for a specific material grade. For steels, MatID is the UNS No. For dissimilar joints, x can be two digits and MatID can contain two material grades separated by & sign. zzzz is a 4 digit Record serial number and can go on forever, zzzz starts from 0 for each MatID.
Test Data Record Number: Record number format: C1-Lx-MatID-zzzz
C1 represents Division C1 for test data. L represents Chapter name symbol defined as follows:
C = Creep Test CCG = Creep Crack Growth Test CF = Creep-Fatigue Test CR = Corrosion Test FCG = Fatigue Crack Growth Test FL = Flexure Test H = Hardness Test HCF = High-Cycle Fatigue Test LCF = Low-Cycle Fatigue Test RX = Relaxation Test T = Tensile Test TN = Toughness Test
x-MatID-zzzz is same as for the Pedigree Record number.

57
No. Name and Description Test Definition Record Number: Record number format: C2-Lx-MatID-zzzz
C2 represents Division C2 for test definition. Lx-MatID-zzzz is same as for the Test Data Records number.
Specimen Record Number: Record number format: C3-S-zzzz (4 digits)
C3 represents Division C3 for test information. S represents Chapter symbol for specimen. zzzz is a 4 digit Record serial number and can go on forever.
Equipment Record Number: Record number format: C3-E-zzzz (4 digits)
C3 represents Division C3 for test information. E represents Chapter symbol for testing equipment. zzzz is a 4 digit Record serial number and can go on forever.
Microstructure Record Number: Record number format: Acronym for micrograph type-Object’s Record number
Acronyms for micrograph type are defined as follows: EDS = Energy Dispersive X-Ray Spectroscopy OP = Optical Microscopy SEM = Scanning Electron Microscopy TEM = Transmission Electron Microscopy XES = X-Ray Emission Spectroscopy
For example: SEM-C1-C2-N06617-0003 is the Record number for Scanning Electron Micrograph of test specimen for Record C1-C2-N06617-0003, which can be easily traced to Record He593C414MPa_C1-C2-N06617-0003 by using the search functionality. Users who have become familiarized with the Record number rules can also tell that C1-C2-N06617-0003 means test data (C1) for creep of austenitic alloy (-C2) Inconel 617 (-N06617) Record 3 (-0003). Report Record Number: Record number format: I-CA-xxxxx
I represents Part I for reports. CA represents Country Name Acronym defined as follows:
Canada = CA European Union = EU France = FR Japan = JP Korea = KR South Africa = ZA Switzerland = CH United States = US VHTR PMB = MB
xxxxx represents report uploading serial number.

58
APPENDIX D
GEN IV MATERIALS HANDBOOK RECORD ID RULES

59
Gen IV Materials Handbook Construction Rules Record ID Rules - 9/23/2008 -11/1/2009 No. Name and Description 0040 Handbook Record ID Rules
In most cases, Handbook Record ID follows the format: Record Nickname_Record Number Materials Record ID Record ID format: Record Nickname Because each type of material has only one Record for its generic information, the Record Number is not needed. For example: Inconel 617
Materials Record Nickname contains only one element 1. Common Material Name
Material Pedigree Record ID Record ID format: Record Nickname_Record Number
Record Nickname for base materials pedigree is composed of three elements. 1. Batch/Heat Number (XX14A6UK in the example) 2. Product Form (Plate in the example) 3. Treatment (Annealed in the example)
Treatment is only described by treatment method (annealed, quenched, normalized, tempered etc.) without treatment parameters. The three elements distinguished by the initial capital letter without space in between.
For example: XX14A6UKPlateAnnealed_B1-2-N06617-0003 Record Nickname for joints pedigree is composed of 3 elements. 1. Joining Processing (TIG in the example) 2. Base Materials Batch/Heat Number (304SS&316SS in the example) 3. Filler Materials ID (316SS in the example)
For dissimilar joints, & symbol is used between two base materials. For example: TIG304SS&316SS361SS_B2-2-S31600&S30400-0006 Test Data Record ID Creep Tests Record ID format: Record Nickname_Record Number
Creep Test Data Record Nickname is composed of three elements with words distinguished by the initial capital letter without space in between. 1. Test Environment (Air in the example) 2. Test Temperature (982C in the example) 3. Test Stress (48.26MPa in the example)
Creep Test temperature must be in integer in Celsius, and test stress can only have two digits after decimal point in MPa.
For example: Air982C48.26MPa_C1-C2-N06617-0258 Tensile Tests Record ID format: Record Nickname_Record Number
Tensile Test Data Record Nickname contains only one element. 1. Test Temperature (871C in the example)

60
No. Name and Description Test temperature must be in integer in Celsius.
For example: 871C_C1-T2-N06617-0034 Other Types of Tests To be developed Test Definition Record ID: To be developed Specimen Record ID Record ID format: Record Nickname_Record Number
Specimen Record Nickname contains only one element. 1. Applicable Test Types separated by the & sign (Tensile&Creep in the example)
For example: Tensile&Creep C3-S-0001 Microstructural Record ID Record ID format: Acronym for micrograph type-Object’s Record ID
Acronyms for micrograph type are defined as follows: EDS = Energy Dispersive X-Ray Spectroscopy OP = Optical Microscopy SEM = Scanning Electron Microscopy TEM = Transmission Electron Microscopy XES = X-Ray Emission Spectroscopy
For example: SEM-He593C414MPa_C1-C2-N06617-0003 is the Record ID for Scanning Electron Micrograph of test specimen for Record He593C414MPa_C1-C2-N06617-0003, which can be easily traced by using the search functionality. Users who have become familiarized with the Record ID rules can also tell that C1-C2-N06617-0003 means test data (C1) for creep of austenitic alloy (-C2) Inconel 617 (-N06617) Record 3 (-0003), which is tested in helium (-He) at 593C (-593˚C) at 414 MPa (-414 MPa). Report Record ID: Record ID format: Record Nickname_Record Number
Report Record Nickname consists of the key words of the report full title. For example: Handbook Plan_I-US-00001 is the Record for report “Gen IV Materials Handbook Implementation Plan”.

61
ORNL/TM-2009/285_1B
DISTRIBUTION LIST
INTERNAL DISTRIBUTION
1. T. D. Burchell 11. W. Ren 2. W. R. Corwin 12. P. L. Rittenhouse 3. S. R. Greene 13. T. L. Sham 4. D. T. Hoelzer 14. L. L. Snead 5. D. T. Ingersoll 15. R. E. Stoller 6. Y. Katoh 16. J. P. Strizak 7. J. W. Klett 17. R. W. Swindeman 8. E. Lara-Curzio 18. P. F. Tortorelli 9. L. K. Mansur 19. D. F. Wilson 10. R. K. Nanstad 20. S. J. Zinkle
EXTERNAL DISTRIBUTION 21. Cathy Barnard, Idaho National Laboratory, P.O. Box 1625, Idaho Falls, Idaho 83415-3750
22. Robert Bratton, Idaho National Laboratory, P.O. Box 1625, Idaho Falls, Idaho 83415-3750
23. Trevor Cook, NE-20/Germantown Building, Office of Advanced Nuclear Research, U.S. Department of Energy, 1000 Independence Avenue, S.W., Washington, DC 20585-1290
24. Thomas J. O’Conner, NE-20/Germantown Building, Office of Advanced Nuclear Research, U.S. Department of Energy, 1000 Independence Avenue, S.W., Washington, DC 20585-1290
25. Richard Petti, Idaho National Laboratory, P.O. Box 1625, Idaho Falls, Idaho 83415-3750
26. Carl Sink, NE-20/Germantown Building, Office of Advanced Nuclear Research, U.S. Department of Energy, 1000 Independence Avenue, S.W., Washington, DC 20585-1290
27. Rafael Soto, Idaho National Laboratory, P.O. Box 1625, Idaho Falls, Idaho 83415-3750
28. Robert Versluis, NE-20/Germantown Building, Office of Advanced Nuclear Research, U.S. Department of Energy, 1000 Independence Avenue, S.W., Washington, DC 20585-1290
29. Will Windes, Idaho National Laboratory, P.O. Box 1625, Idaho Falls, Idaho 83415-3750
30. Richard Wright, Idaho National Laboratory, MS 2218, STC 602-IRC 308, BEA, 1765 North Yellowstone Hwy., Idaho Falls, ID 83415
31. John A Yankeelov III, Idaho National Laboratory, P.O. Box 1625, Idaho Falls, Idaho 83415-3750.
31. Gen IV Materials Handbook users.