Embed Size (px)
Citation preview
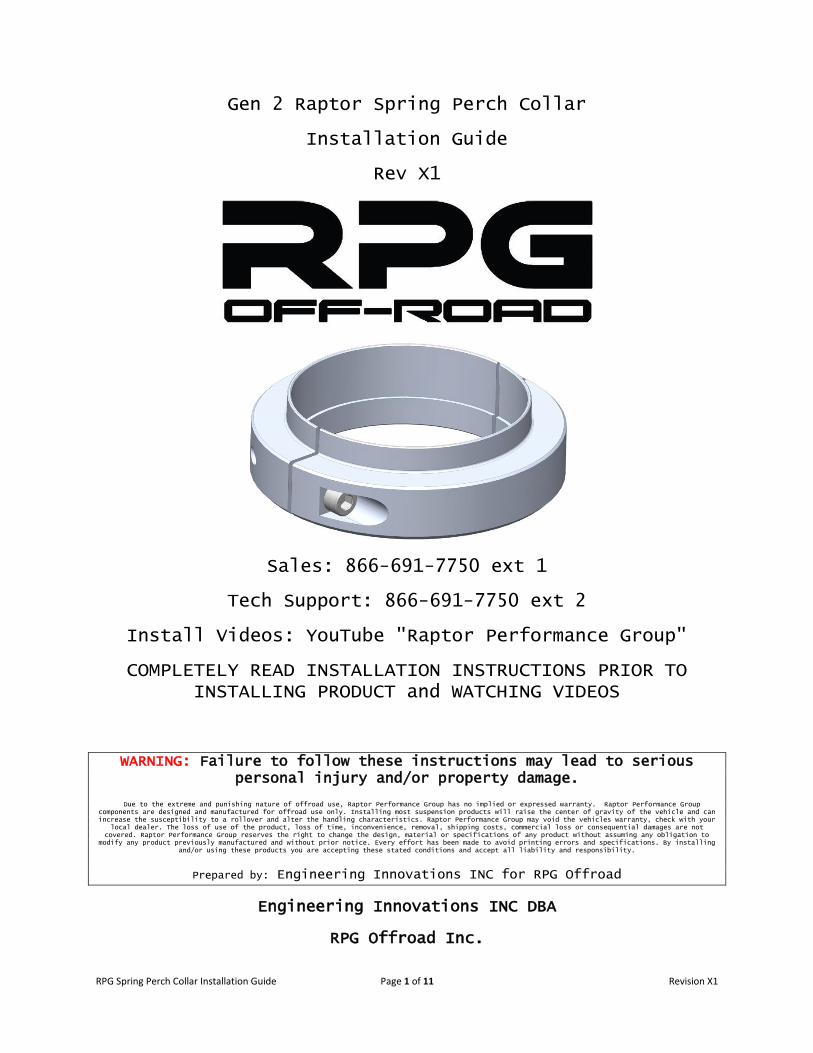
RPG Spring Perch Collar Installation Guide Page 1 of 11 Revision X1
Gen 2 Raptor Spring Perch Collar
Installation Guide
Rev X1
Sales: 866-691-7750 ext 1
Tech Support: 866-691-7750 ext 2
Install Videos: YouTube "Raptor Performance Group"
COMPLETELY READ INSTALLATION INSTRUCTIONS PRIOR TO INSTALLING PRODUCT and WATCHING VIDEOS
WARNING: Failure to follow these instructions may lead to serious personal injury and/or property damage.
Due to the extreme and punishing nature of offroad use, Raptor Performance Group has no implied or expressed warranty. Raptor Performance Group components are designed and manufactured for offroad use only. Installing most suspension products will raise the center of gravity of the vehicle and can increase the susceptibility to a rollover and alter the handling characteristics. Raptor Performance Group may void the vehicles warranty, check with your
local dealer. The loss of use of the product, loss of time, inconvenience, removal, shipping costs, commercial loss or consequential damages are not covered. Raptor Performance Group reserves the right to change the design, material or specifications of any product without assuming any obligation to
modify any product previously manufactured and without prior notice. Every effort has been made to avoid printing errors and specifications. By installing and/or using these products you are accepting these stated conditions and accept all liability and responsibility.
Prepared by: Engineering Innovations INC for RPG Offroad
Engineering Innovations INC DBA
RPG Offroad Inc.
RPG Spring Perch Collar Installation Guide Page 2 of 11 Revision X1
Table Of Contents
1. General Information
1.1 Installation Information
1.2 For your Safety
1.3 Important Safety Precautions
1.4 Type of Installation
2.0 Removal of Original Parts
3.0 Installation of Kit
3.1 Install Coil Spring Perch Collar
3.2 Install Shock
3.3 Attach Tie Rod
3.4 Attach UCA to Knuckle
3.5 Attach Brake, ABS and Vacuum Lines
3.6 Perform the same operation to the Passenger's Side
3.7 Install Wheels and Tires
4.0 Inspection
5.0 Maintenance
1. General Information The Kit is designed with the utmost consideration for safety, quality and ease of installation. The kit comes complete with all necessary hardware and fasteners. However, it is assumed that the installer has advanced/professional skills automotive vehicle servicing. It is recommended that installer obtain an OEM service manual for the vehicle.
1.1 Installation Information The information contained in this Installation Guide is intended for use by technicians of advanced to professional skill levels. Attempting installation without the proper training, tools and equipment could cause injury to you or others. It could also damage the vehicle or cause an unsafe condition.
1.2 For Your Safety Because this guide in intended for technicians of advanced to professional skill levels, we do not provide warnings about many basic shop safety practices. If you have not received shop safety training or do not feel
RPG Spring Perch Collar Installation Guide Page 3 of 11 Revision X1
confident about your knowledge of safety practices, we recommend that you do not attempt to perform the procedures described in this guide. Some of the most important general safety precautions are given below. Engineering Innovations cannot warn you of every conceivable hazard that can arise. Only you can decide whether or not you should perform a given task. 1.3 Important Safety Precautions Make sure you have a clear understanding of all basic shop safety practices and that you wear appropriate clothing and use safety equipment. Be especially careful of the following:
Read all directions before you begin, and make sure you have the tools, the parts and the skills required to perform the tasks safely and completely.
Protect your eyes by using proper safety glasses, goggles or face shields anytime you hammer, drill, grind, pry or work around pressurized air or liquids, and springs or other stored-energy components.
Use other protective wear when necessary, for example gloves or safety shoes. Handling hot or sharp parts can cause severe burns or cuts.
Protect yourself and others when you have a vehicle up in the air. Anytime you lift a vehicle, either by hoist or a jack, make sure that it is securely supported.
Make sure the engine is turned off and battery disconnected before you begin work.
Carbon Monoxide poisoning from exhaust gases: Be sure there is adequate ventilation whenever you run the engine.
Burns from hot parts: Let the engine and exhaust system cool before working on those areas.
Injury from moving parts: If running the engine, keep hands, fingers and clothing away from moving/rotating parts.
Gasoline vapor and hydrogen gases from batteries are explosive. To reduce the possibility of fire or explosion, be careful when working near gasoline and batteries. Use only nonflammable solvent, not gasoline, to clean parts. Never drain or store gasoline in an open container. Keep all cigarettes, sparks or flame away from the battery and all fuel related parts. 1.4 Type of Installation
If you have a set of hand held coil spring compressors, simply watch the Spring Perch Mod video that we have on our tech help page. Here is a link to the YouTube page https://youtu.be/aqJXF0KYp0I With the exception of Installing the Spring perch collar rather then moving up the snap ring groove. Please scroll down to 3.1 for illustrations on how the Spring Perch Collar is to be installed.
If you do not have a set of hand held coil spring compressors and or prefer to remove the shock absorber from the vehicle then please follow the remaining installation instructions.
2.0 Removal of Original Parts
See OEM manual for detailed instructions. Items to be retained for re-installation are noted.
Wheels and Tires (to be re-installed)
RPG Spring Perch Collar Installation Guide Page 4 of 11 Revision X1
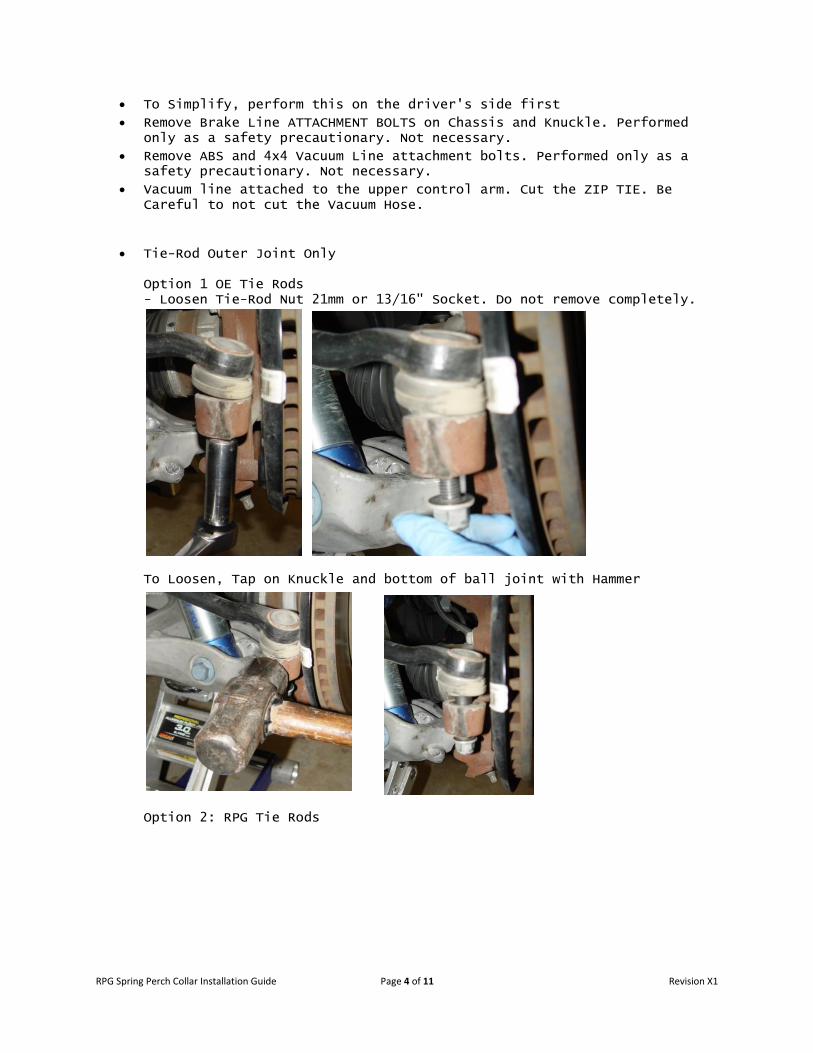
To Simplify, perform this on the driver's side first
Remove Brake Line ATTACHMENT BOLTS on Chassis and Knuckle. Performed only as a safety precautionary. Not necessary.
Remove ABS and 4x4 Vacuum Line attachment bolts. Performed only as a safety precautionary. Not necessary.
Vacuum line attached to the upper control arm. Cut the ZIP TIE. Be Careful to not cut the Vacuum Hose.
Tie-Rod Outer Joint Only Option 1 OE Tie Rods - Loosen Tie-Rod Nut 21mm or 13/16" Socket. Do not remove completely.
To Loosen, Tap on Knuckle and bottom of ball joint with Hammer
Option 2: RPG Tie Rods
RPG Spring Perch Collar Installation Guide Page 5 of 11 Revision X1
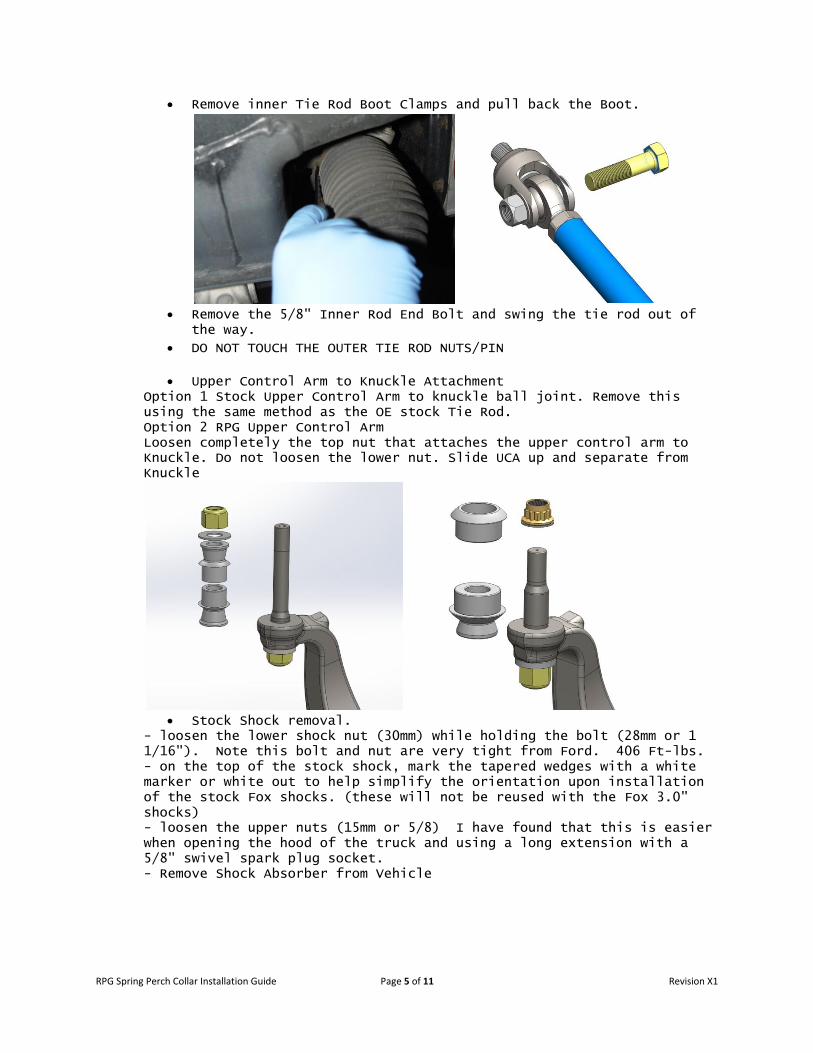
Remove inner Tie Rod Boot Clamps and pull back the Boot.
Remove the 5/8" Inner Rod End Bolt and swing the tie rod out of
the way.
DO NOT TOUCH THE OUTER TIE ROD NUTS/PIN
Upper Control Arm to Knuckle Attachment Option 1 Stock Upper Control Arm to knuckle ball joint. Remove this using the same method as the OE stock Tie Rod. Option 2 RPG Upper Control Arm Loosen completely the top nut that attaches the upper control arm to Knuckle. Do not loosen the lower nut. Slide UCA up and separate from Knuckle
Stock Shock removal.
- loosen the lower shock nut (30mm) while holding the bolt (28mm or 1 1/16"). Note this bolt and nut are very tight from Ford. 406 Ft-lbs. - on the top of the stock shock, mark the tapered wedges with a white marker or white out to help simplify the orientation upon installation of the stock Fox shocks. (these will not be reused with the Fox 3.0" shocks) - loosen the upper nuts (15mm or 5/8) I have found that this is easier when opening the hood of the truck and using a long extension with a 5/8" swivel spark plug socket. - Remove Shock Absorber from Vehicle

RPG Spring Perch Collar Installation Guide Page 6 of 11 Revision X1
3.0 Installation of Kit 3.1 Install Coil Spring Perch Collar
- Place Shock Absorber into Coil Spring Compressor
- Compress Coil Spring
- Slide up coil spring perch to expose retaining rings. This may require a soft hammer, be careful to not damage the aluminum.
- Remove retaining rings.
- Ensure that the snap ring groove is clean and free of debris.
RPG Spring Perch Collar Installation Guide Page 7 of 11 Revision X1
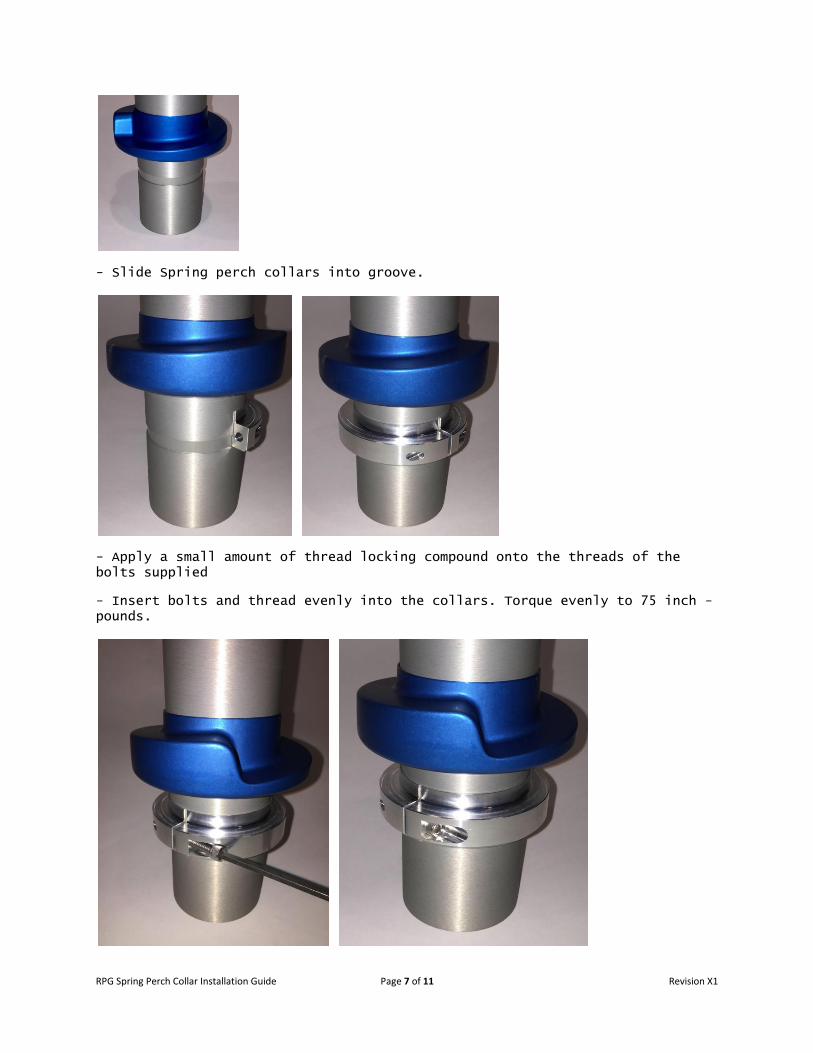
- Slide Spring perch collars into groove.
- Apply a small amount of thread locking compound onto the threads of the bolts supplied
- Insert bolts and thread evenly into the collars. Torque evenly to 75 inch - pounds.
RPG Spring Perch Collar Installation Guide Page 8 of 11 Revision X1
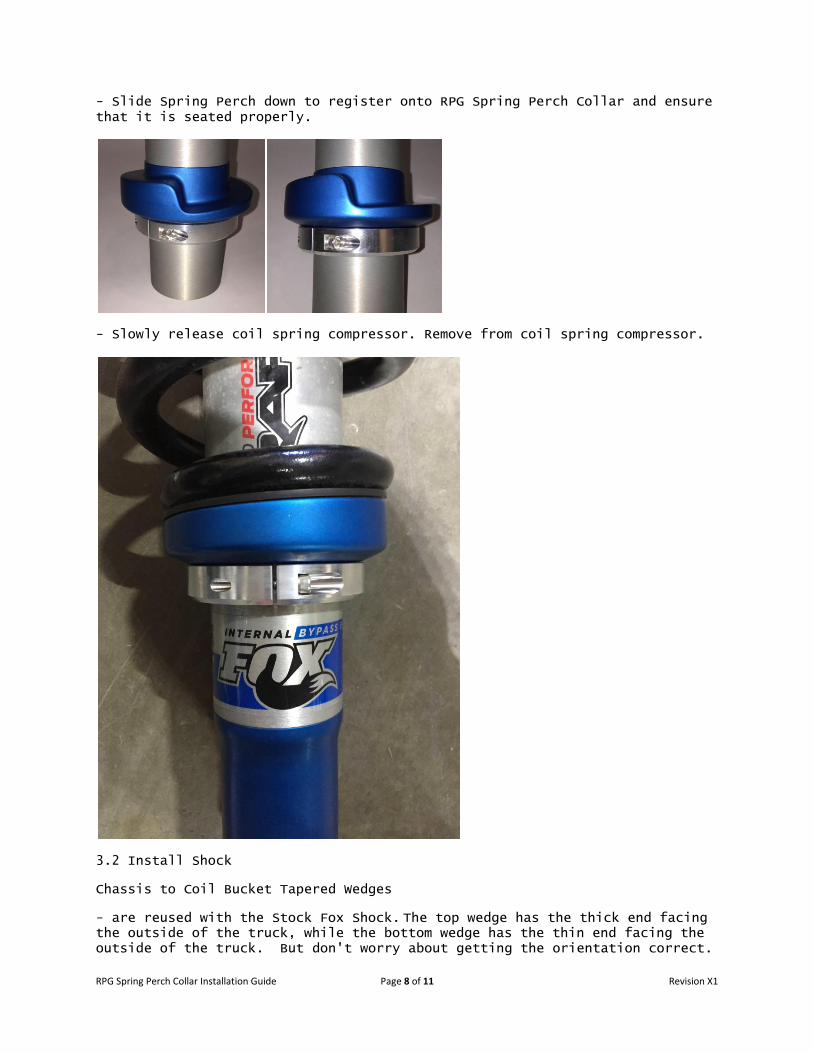
- Slide Spring Perch down to register onto RPG Spring Perch Collar and ensure that it is seated properly.
- Slowly release coil spring compressor. Remove from coil spring compressor.
3.2 Install Shock
Chassis to Coil Bucket Tapered Wedges
- are reused with the Stock Fox Shock. The top wedge has the thick end facing the outside of the truck, while the bottom wedge has the thin end facing the outside of the truck. But don't worry about getting the orientation correct.
RPG Spring Perch Collar Installation Guide Page 9 of 11 Revision X1
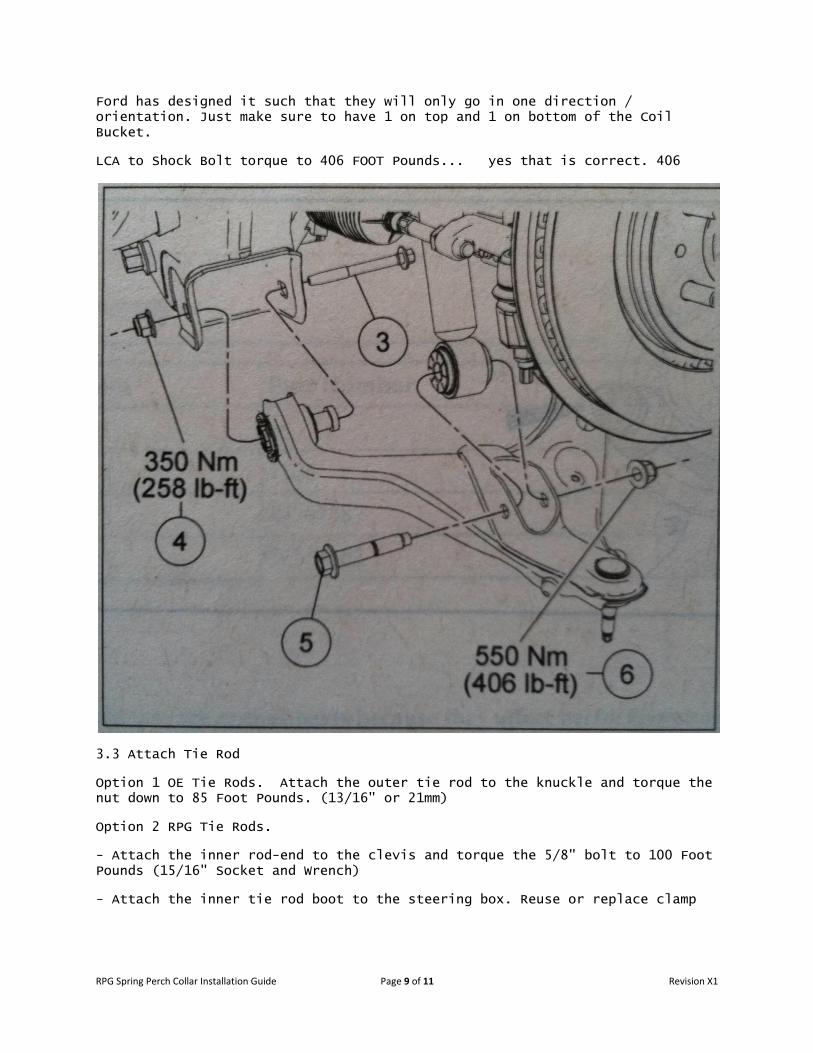
Ford has designed it such that they will only go in one direction / orientation. Just make sure to have 1 on top and 1 on bottom of the Coil Bucket.
LCA to Shock Bolt torque to 406 FOOT Pounds... yes that is correct. 406
3.3 Attach Tie Rod
Option 1 OE Tie Rods. Attach the outer tie rod to the knuckle and torque the nut down to 85 Foot Pounds. (13/16" or 21mm)
Option 2 RPG Tie Rods.
- Attach the inner rod-end to the clevis and torque the 5/8" bolt to 100 Foot Pounds (15/16" Socket and Wrench)
- Attach the inner tie rod boot to the steering box. Reuse or replace clamp
RPG Spring Perch Collar Installation Guide Page 10 of 11 Revision X1
3.4 Attach UCA to Knuckle
Option 1 OE Upper Control Arms. Attach the upper control arm to the knuckle and torque the nut down to 85 Foot Pounds. (13/16" or 21mm)
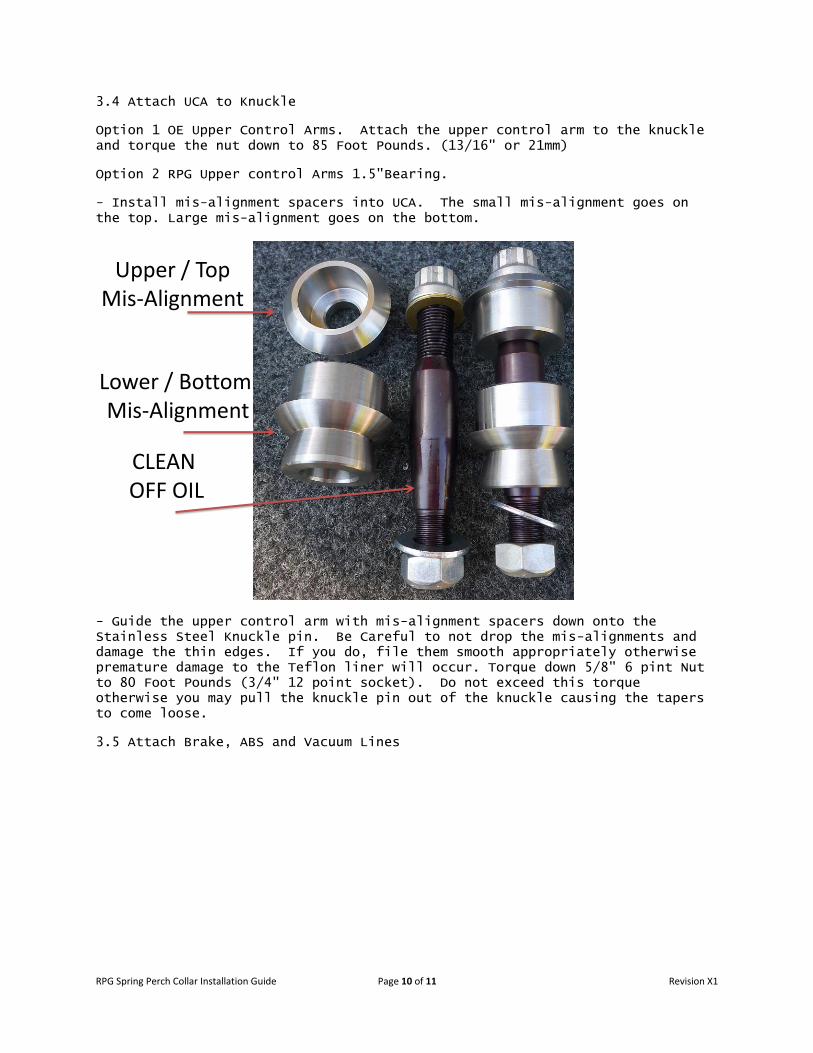
Option 2 RPG Upper control Arms 1.5"Bearing.
- Install mis-alignment spacers into UCA. The small mis-alignment goes on the top. Large mis-alignment goes on the bottom.
Upper / TopMis-Alignment
Lower / BottomMis-Alignment
CLEAN OFF OIL
- Guide the upper control arm with mis-alignment spacers down onto the Stainless Steel Knuckle pin. Be Careful to not drop the mis-alignments and damage the thin edges. If you do, file them smooth appropriately otherwise premature damage to the Teflon liner will occur. Torque down 5/8" 6 pint Nut to 80 Foot Pounds (3/4" 12 point socket). Do not exceed this torque otherwise you may pull the knuckle pin out of the knuckle causing the tapers to come loose.
3.5 Attach Brake, ABS and Vacuum Lines
RPG Spring Perch Collar Installation Guide Page 11 of 11 Revision X1
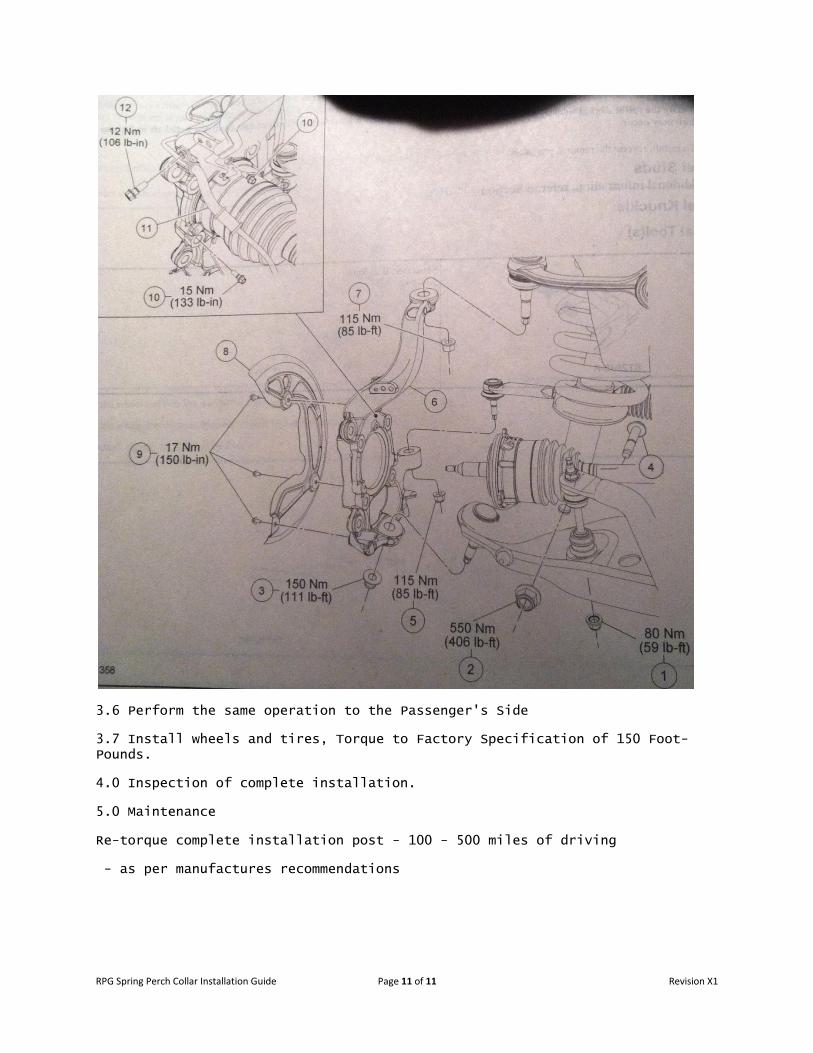
3.6 Perform the same operation to the Passenger's Side
3.7 Install wheels and tires, Torque to Factory Specification of 150 Foot-Pounds.
4.0 Inspection of complete installation.
5.0 Maintenance
Re-torque complete installation post - 100 - 500 miles of driving
- as per manufactures recommendations