Embed Size (px)
Citation preview
Framework Navigator User Guide
Author: Knowledge, Methods and Support
Deloitte Consulting–Chadds Ford, PA Revision Date: September 26, 2002 Print Date: December 19, 2016, 5:53 PM
Copyright WordPronk 2016. All Rights Reserved.
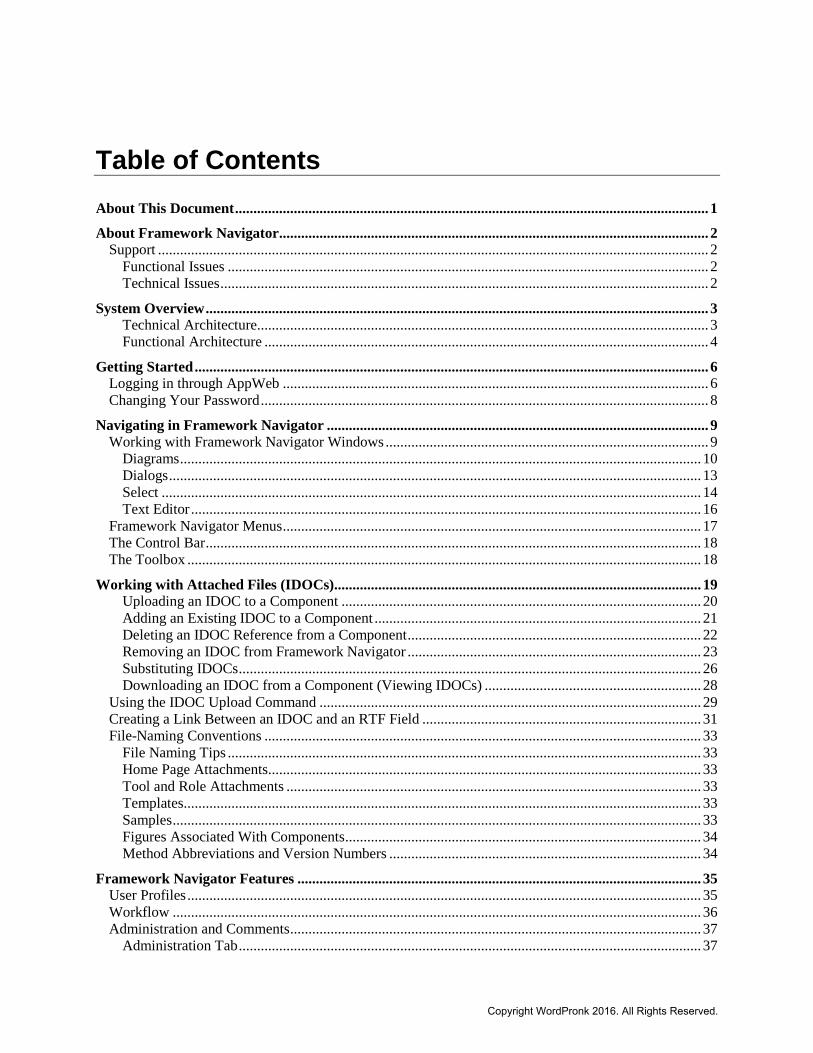
Table of Contents About This Document ................................................................................................................................. 1 About Framework Navigator ..................................................................................................................... 2
Support ...................................................................................................................................................... 2 Functional Issues ................................................................................................................................... 2 Technical Issues ..................................................................................................................................... 2
System Overview ......................................................................................................................................... 3 Technical Architecture ........................................................................................................................... 3 Functional Architecture ......................................................................................................................... 4
Getting Started ............................................................................................................................................ 6 Logging in through AppWeb .................................................................................................................... 6 Changing Your Password .......................................................................................................................... 8
Navigating in Framework Navigator ........................................................................................................ 9 Working with Framework Navigator Windows ........................................................................................ 9
Diagrams .............................................................................................................................................. 10 Dialogs ................................................................................................................................................. 13 Select ................................................................................................................................................... 14 Text Editor ........................................................................................................................................... 16
Framework Navigator Menus .................................................................................................................. 17 The Control Bar ....................................................................................................................................... 18 The Toolbox ............................................................................................................................................ 18
Working with Attached Files (IDOCs) .................................................................................................... 19 Uploading an IDOC to a Component .................................................................................................. 20 Adding an Existing IDOC to a Component ......................................................................................... 21 Deleting an IDOC Reference from a Component ................................................................................ 22 Removing an IDOC from Framework Navigator ................................................................................ 23 Substituting IDOCs .............................................................................................................................. 26 Downloading an IDOC from a Component (Viewing IDOCs) ........................................................... 28
Using the IDOC Upload Command ........................................................................................................ 29 Creating a Link Between an IDOC and an RTF Field ............................................................................ 31 File-Naming Conventions ....................................................................................................................... 33
File Naming Tips ................................................................................................................................. 33 Home Page Attachments ...................................................................................................................... 33 Tool and Role Attachments ................................................................................................................. 33 Templates ............................................................................................................................................. 33 Samples ................................................................................................................................................ 33 Figures Associated With Components ................................................................................................. 34 Method Abbreviations and Version Numbers ..................................................................................... 34
Framework Navigator Features .............................................................................................................. 35 User Profiles ............................................................................................................................................ 35 Workflow ................................................................................................................................................ 36 Administration and Comments ................................................................................................................ 37
Administration Tab .............................................................................................................................. 37
Copyright WordPronk 2016. All Rights Reserved.
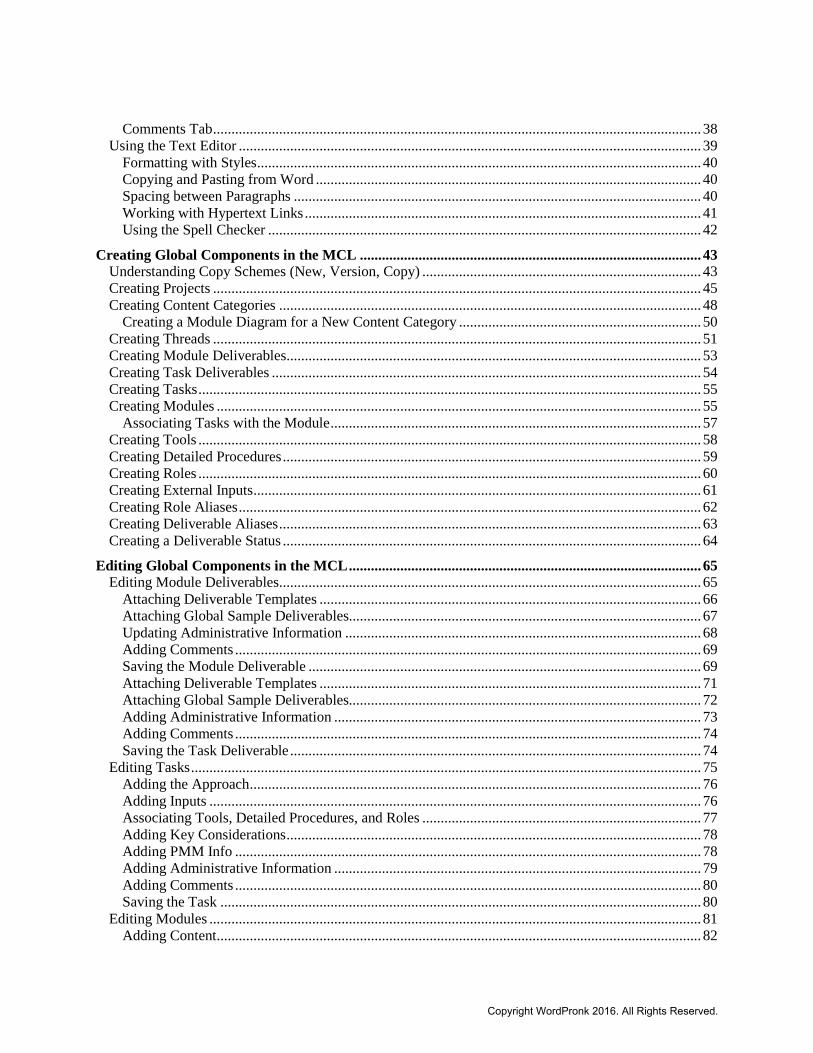
Comments Tab ..................................................................................................................................... 38 Using the Text Editor .............................................................................................................................. 39
Formatting with Styles ......................................................................................................................... 40 Copying and Pasting from Word ......................................................................................................... 40 Spacing between Paragraphs ............................................................................................................... 40 Working with Hypertext Links ............................................................................................................ 41 Using the Spell Checker ...................................................................................................................... 42
Creating Global Components in the MCL ............................................................................................. 43 Understanding Copy Schemes (New, Version, Copy) ............................................................................ 43 Creating Projects ..................................................................................................................................... 45 Creating Content Categories ................................................................................................................... 48
Creating a Module Diagram for a New Content Category .................................................................. 50 Creating Threads ..................................................................................................................................... 51 Creating Module Deliverables ................................................................................................................. 53 Creating Task Deliverables ..................................................................................................................... 54 Creating Tasks ......................................................................................................................................... 55 Creating Modules .................................................................................................................................... 55
Associating Tasks with the Module ..................................................................................................... 57 Creating Tools ......................................................................................................................................... 58 Creating Detailed Procedures .................................................................................................................. 59 Creating Roles ......................................................................................................................................... 60 Creating External Inputs .......................................................................................................................... 61 Creating Role Aliases .............................................................................................................................. 62 Creating Deliverable Aliases ................................................................................................................... 63 Creating a Deliverable Status .................................................................................................................. 64
Editing Global Components in the MCL ................................................................................................ 65 Editing Module Deliverables ................................................................................................................... 65
Attaching Deliverable Templates ........................................................................................................ 66 Attaching Global Sample Deliverables................................................................................................ 67 Updating Administrative Information ................................................................................................. 68 Adding Comments ............................................................................................................................... 69 Saving the Module Deliverable ........................................................................................................... 69 Attaching Deliverable Templates ........................................................................................................ 71 Attaching Global Sample Deliverables................................................................................................ 72 Adding Administrative Information .................................................................................................... 73 Adding Comments ............................................................................................................................... 74 Saving the Task Deliverable ................................................................................................................ 74
Editing Tasks ........................................................................................................................................... 75 Adding the Approach ........................................................................................................................... 76 Adding Inputs ...................................................................................................................................... 76 Associating Tools, Detailed Procedures, and Roles ............................................................................ 77 Adding Key Considerations ................................................................................................................. 78 Adding PMM Info ............................................................................................................................... 78 Adding Administrative Information .................................................................................................... 79 Adding Comments ............................................................................................................................... 80 Saving the Task ................................................................................................................................... 80
Editing Modules ...................................................................................................................................... 81 Adding Content .................................................................................................................................... 82
Copyright WordPronk 2016. All Rights Reserved.
Viewing the Task List .......................................................................................................................... 82 Updating Administrative Information ................................................................................................. 83 Adding Comments ............................................................................................................................... 83 Saving the Module ............................................................................................................................... 83
Editing Tools ........................................................................................................................................... 84 Attaching Tools ................................................................................................................................... 85 Viewing MCL References to the Tool ................................................................................................. 85 Adding Administrative Information .................................................................................................... 86 Adding Comments ............................................................................................................................... 86 Saving the Tool .................................................................................................................................... 86
Editing Detailed Procedures .................................................................................................................... 87 Viewing MCL References ................................................................................................................... 88 Updating Administrative Information ................................................................................................. 88 Adding Comments ............................................................................................................................... 88 Saving the Detailed Procedure ............................................................................................................. 88
Editing Roles ........................................................................................................................................... 89 Viewing MCL References ................................................................................................................... 90 Adding Administrative Information .................................................................................................... 90 Adding Comments ............................................................................................................................... 90 Saving the Role .................................................................................................................................... 90
Assembling Methods in the AA................................................................................................................ 91 Assembling a Method .............................................................................................................................. 92
Setting up a New Method .................................................................................................................... 92 Reusing Modules ................................................................................................................................. 95
Adding Local Content to Components in the AA .................................................................................. 98 Editing Phases and Threads ................................................................................................................. 98 Assembling the Method Home Page ................................................................................................. 101
Developing the Activities by Workflow ................................................................................................. 102 Adding Local Content to Modules ......................................................................................................... 104
Adding Local Content to Tasks ............................................................................................................. 106 Adding a Local Approach .................................................................................................................. 106 Adding Local Inputs .......................................................................................................................... 106 Adding Local References to Tools, Detailed Procedures, and Roles ................................................ 108 Adding Local Key Considerations ..................................................................................................... 109 Updating Administrative Information ............................................................................................... 109
Adding Local Content to Module Deliverables ..................................................................................... 110 Adding Local Templates .................................................................................................................... 110 Adding Local Samples ....................................................................................................................... 111 Updating Administrative Information ............................................................................................... 111
Adding Local Content to Task Deliverables ......................................................................................... 112 Adding Local Templates .................................................................................................................... 112 Adding Local Samples ....................................................................................................................... 113 Updating Administrative Information ............................................................................................... 114
Using Reports .......................................................................................................................................... 115 Reports Related to Activities ............................................................................................................. 115 Reports Related to Components ........................................................................................................ 115 Reports Related to Deliverables ........................................................................................................ 116
Copyright WordPronk 2016. All Rights Reserved.
Reports Related to Team Member Assignments ............................................................................... 116 Creating a Framework Navigator Report .............................................................................................. 116 Exporting a Report to HTML ................................................................................................................ 118
Options for Report Views .................................................................................................................. 118 Publishing Procedures ............................................................................................................................ 121
Framework Navigator Environment ...................................................................................................... 121 Publishing Method Content ................................................................................................................... 122
Prepare the Method for Publishing .................................................................................................... 122 Export the Method to XML ............................................................................................................... 123 Convert XML Files to HTML ........................................................................................................... 124 Run the alfabet Meta Tagging Software ............................................................................................ 126 Make Manual Changes to the Method ............................................................................................... 126 Move Files to Production................................................................................................................... 128 Extra Changes for CD Files ............................................................................................................... 128
Copyright WordPronk 2016. All Rights Reserved.

About This Document This is the first edition of this document. As such, it is not exhaustive. The content is limited to the functions, features, and procedures that method analysts and content developers need to master to enter, edit, and manipulate content in Framework Navigator.
Copyright WordPronk 2016. All Rights Reserved.
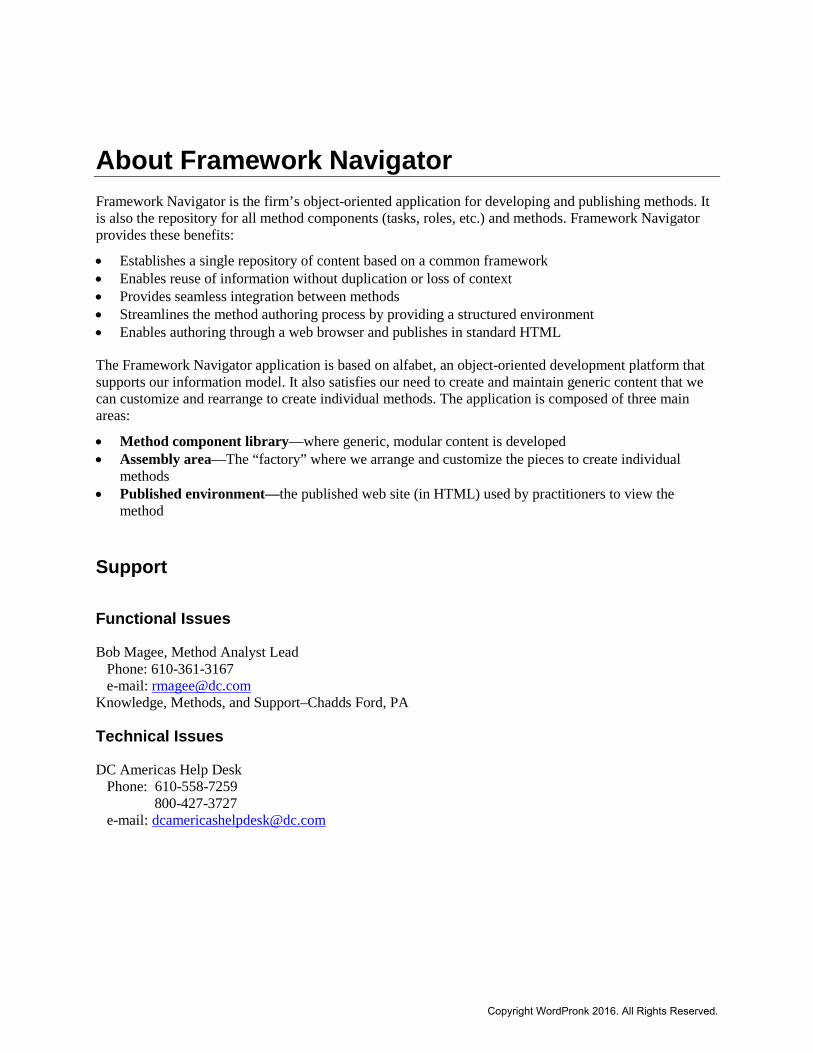
About Framework Navigator Framework Navigator is the firm’s object-oriented application for developing and publishing methods. It is also the repository for all method components (tasks, roles, etc.) and methods. Framework Navigator provides these benefits:
• Establishes a single repository of content based on a common framework • Enables reuse of information without duplication or loss of context • Provides seamless integration between methods • Streamlines the method authoring process by providing a structured environment • Enables authoring through a web browser and publishes in standard HTML
The Framework Navigator application is based on alfabet, an object-oriented development platform that supports our information model. It also satisfies our need to create and maintain generic content that we can customize and rearrange to create individual methods. The application is composed of three main areas:
• Method component library—where generic, modular content is developed • Assembly area—The “factory” where we arrange and customize the pieces to create individual
methods • Published environment—the published web site (in HTML) used by practitioners to view the
method
Support
Functional Issues
Bob Magee, Method Analyst Lead Phone: 610-361-3167 e-mail: [email protected] Knowledge, Methods, and Support–Chadds Ford, PA
Technical Issues
DC Americas Help Desk Phone: 610-558-7259 800-427-3727 e-mail: [email protected]
Copyright WordPronk 2016. All Rights Reserved.
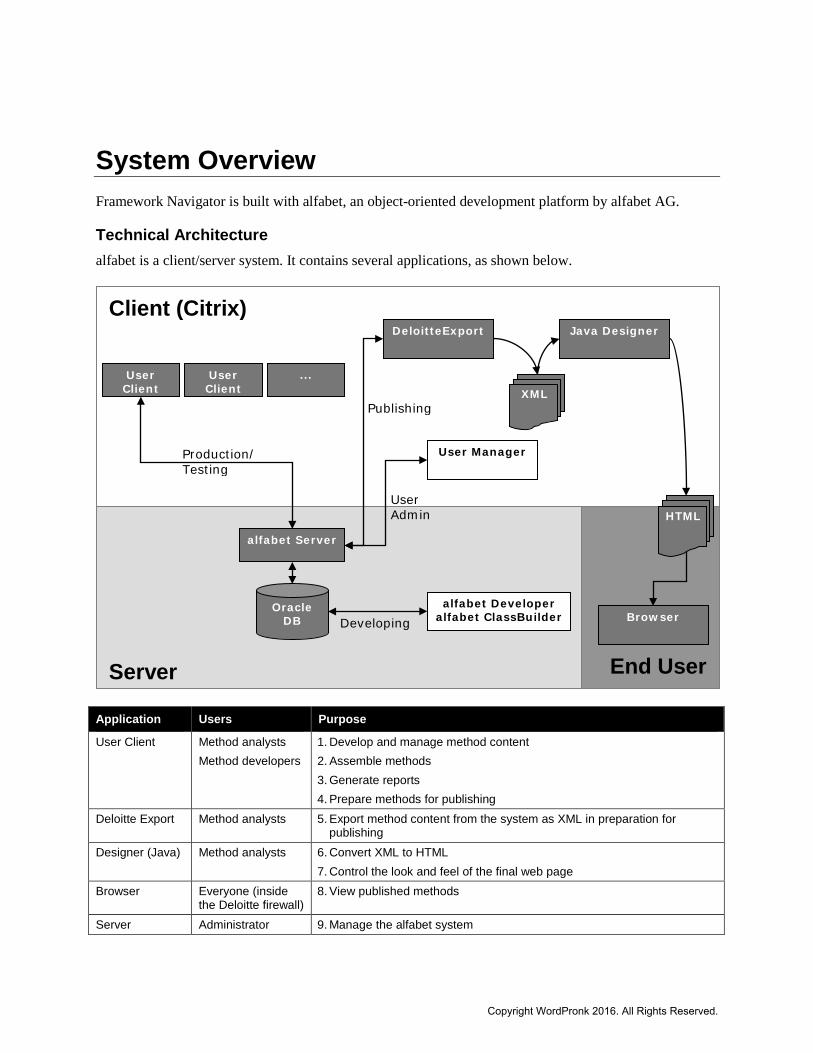
System Overview Framework Navigator is built with alfabet, an object-oriented development platform by alfabet AG.
Technical Architecture alfabet is a client/server system. It contains several applications, as shown below.
Application Users Purpose
User Client Method analysts Method developers
1. Develop and manage method content 2. Assemble methods 3. Generate reports 4. Prepare methods for publishing
Deloitte Export Method analysts 5. Export method content from the system as XML in preparation for publishing
Designer (Java) Method analysts 6. Convert XML to HTML 7. Control the look and feel of the final web page
Browser Everyone (inside the Deloitte firewall)
8. View published methods
Server Administrator 9. Manage the alfabet system
Oracle DB
alfabet Server
alfabet Developer alfabet ClassBuilder
User Client
User Client
DeloitteExport
User Manager
Java Designer
...
Browser
Client (Citrix)
Server End User
Production/ Testing
Developing
User Admin
Publishing XML
HTML
Copyright WordPronk 2016. All Rights Reserved.
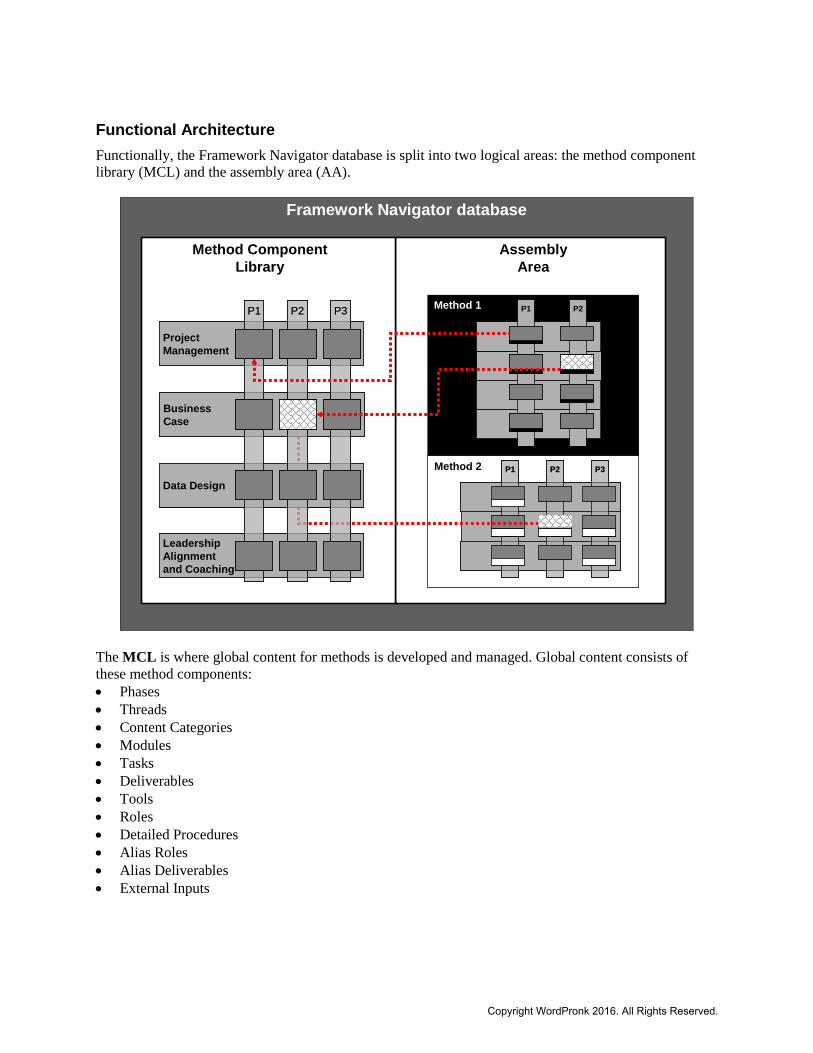
Functional Architecture Functionally, the Framework Navigator database is split into two logical areas: the method component library (MCL) and the assembly area (AA).
Framework Navigator database
Method 1 P2P1 P2P1P2 P3P1 P2 P3P1
Method ComponentLibrary
AssemblyArea
Method 2 P2P1 P3P2P1 P3
BusinessCase
Leadership Alignment and Coaching
Project Management
Data Design
BusinessCase
Leadership Alignment and Coaching
Project Management
Data Design
P1 P2 P3P1 P2 P3
The MCL is where global content for methods is developed and managed. Global content consists of these method components: • Phases • Threads • Content Categories • Modules • Tasks • Deliverables • Tools • Roles • Detailed Procedures • Alias Roles • Alias Deliverables • External Inputs
Copyright WordPronk 2016. All Rights Reserved.

In the AA, modules are reused (either from the MCL or from a method in the AA) to assemble new methods. In addition, the AA is where local content is added. Local content consists of the following:
• Phase – Name; Description • Module – Name*; Key Considerations • Task – Approach*; Key Considerations; references to Tools, Detailed Procedures, and Roles • Deliverables – Template, Samples *The local Module Name and Task Approach are used very seldom; it is only done with the express approval of the method manager.
Copyright WordPronk 2016. All Rights Reserved.
Getting Started Requesting Access The method manager initiates the user setup process. She also informs you when the process is complete.
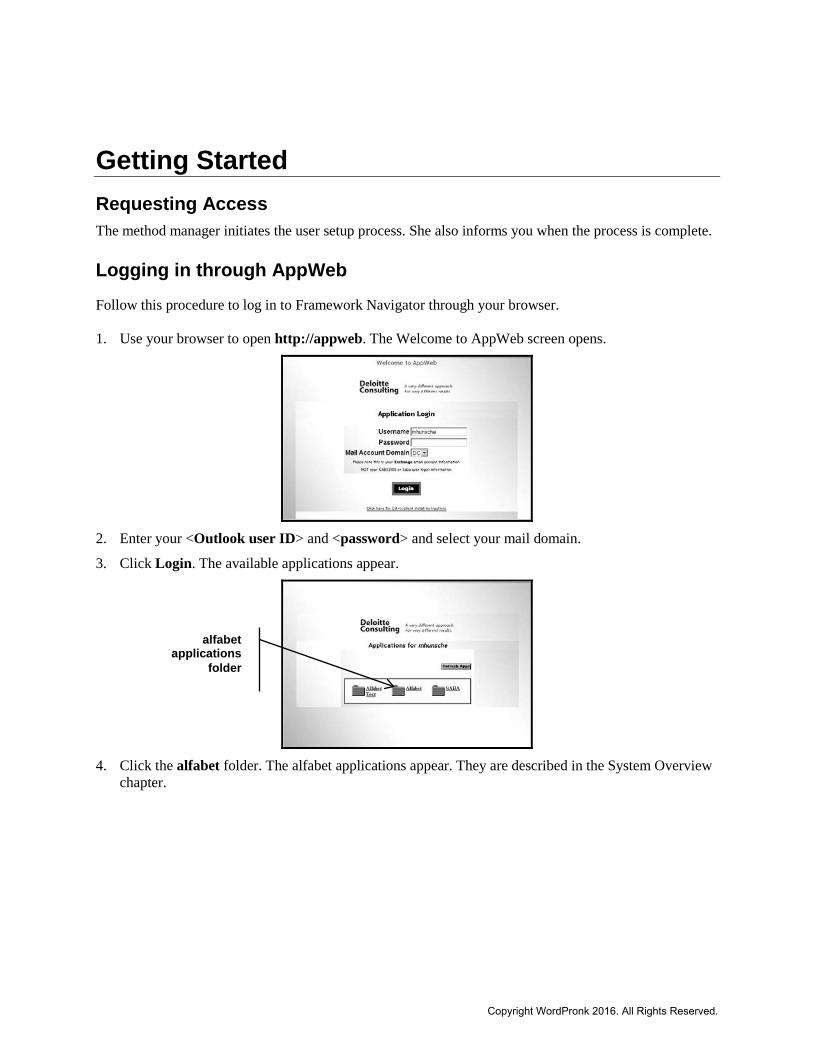
Logging in through AppWeb Follow this procedure to log in to Framework Navigator through your browser. 1. Use your browser to open http://appweb. The Welcome to AppWeb screen opens.
2. Enter your <Outlook user ID> and <password> and select your mail domain.
3. Click Login. The available applications appear.
4. Click the alfabet folder. The alfabet applications appear. They are described in the System Overview
chapter.
alfabet applications
folder
Copyright WordPronk 2016. All Rights Reserved.
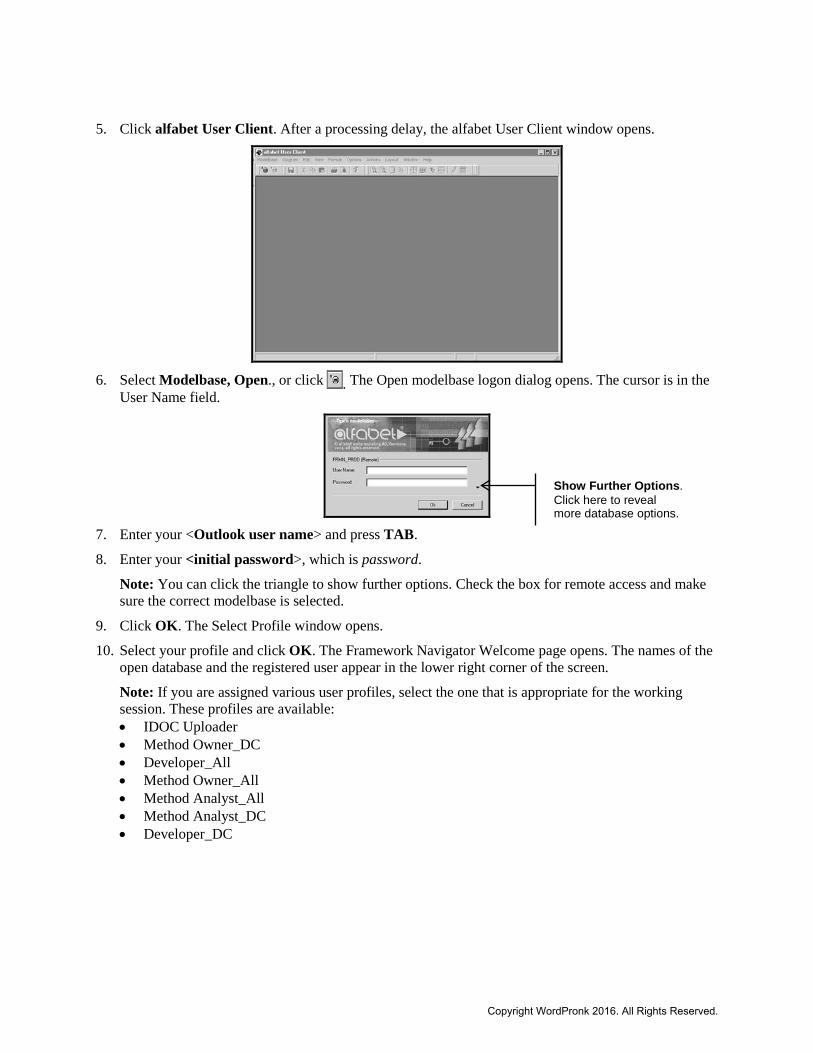
5. Click alfabet User Client. After a processing delay, the alfabet User Client window opens.
6. Select Modelbase, Open., or click . The Open modelbase logon dialog opens. The cursor is in the
User Name field.
7. Enter your <Outlook user name> and press TAB.
8. Enter your <initial password>, which is password.
Note: You can click the triangle to show further options. Check the box for remote access and make sure the correct modelbase is selected.
9. Click OK. The Select Profile window opens.
10. Select your profile and click OK. The Framework Navigator Welcome page opens. The names of the open database and the registered user appear in the lower right corner of the screen.
Note: If you are assigned various user profiles, select the one that is appropriate for the working session. These profiles are available: • IDOC Uploader • Method Owner_DC • Developer_All • Method Owner_All • Method Analyst_All • Method Analyst_DC • Developer_DC
Show Further Options. Click here to reveal more database options.
Copyright WordPronk 2016. All Rights Reserved.
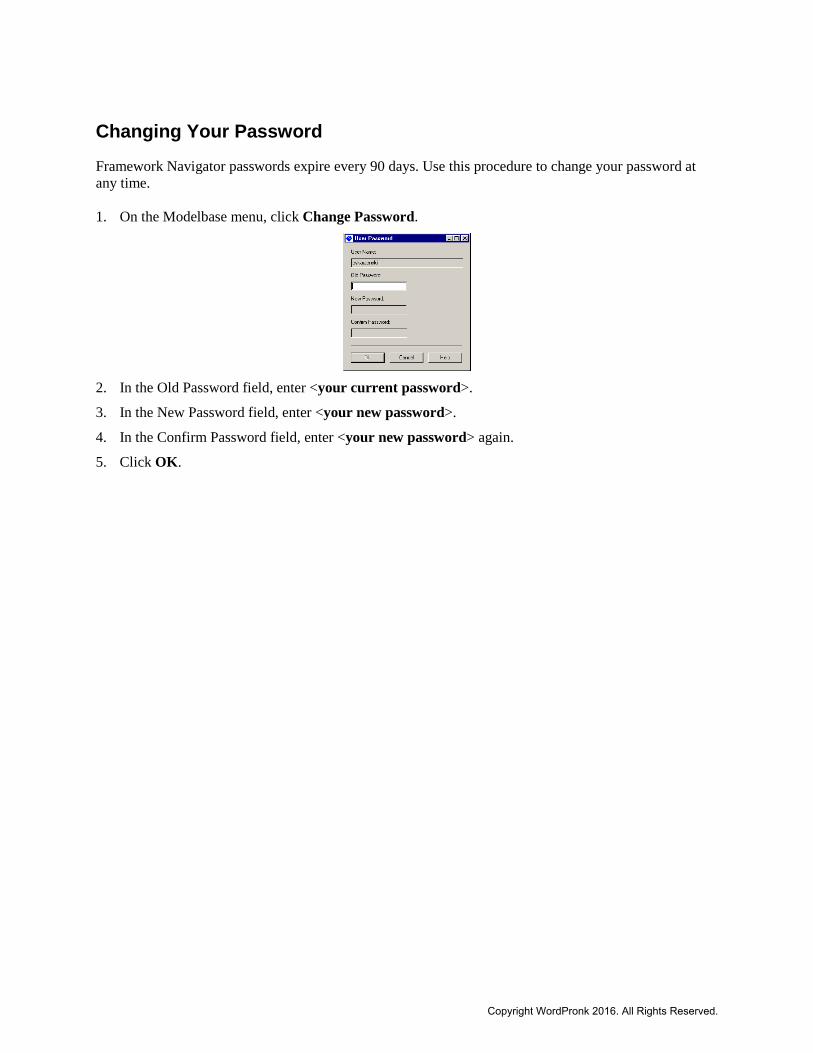
Changing Your Password Framework Navigator passwords expire every 90 days. Use this procedure to change your password at any time. 1. On the Modelbase menu, click Change Password.
2. In the Old Password field, enter <your current password>.
3. In the New Password field, enter <your new password>.
4. In the Confirm Password field, enter <your new password> again.
5. Click OK.
Copyright WordPronk 2016. All Rights Reserved.
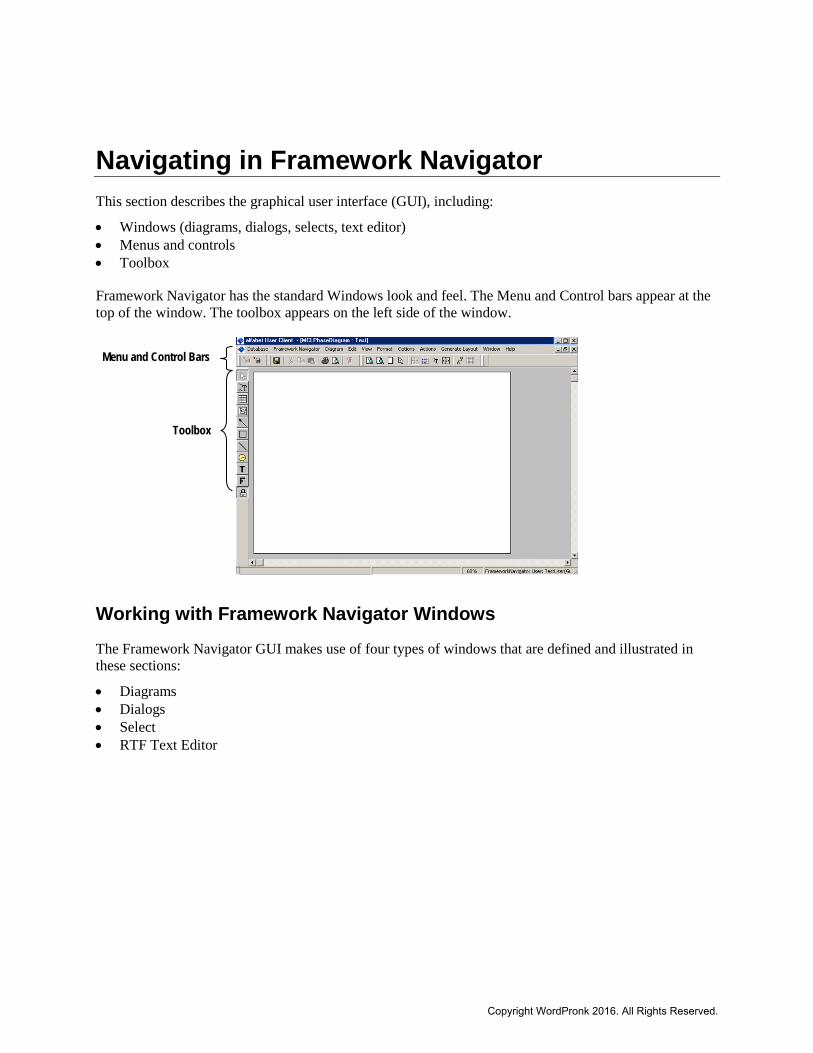
Navigating in Framework Navigator This section describes the graphical user interface (GUI), including:
• Windows (diagrams, dialogs, selects, text editor) • Menus and controls • Toolbox
Framework Navigator has the standard Windows look and feel. The Menu and Control bars appear at the top of the window. The toolbox appears on the left side of the window.
Working with Framework Navigator Windows
The Framework Navigator GUI makes use of four types of windows that are defined and illustrated in these sections:
• Diagrams • Dialogs • Select • RTF Text Editor
Menu and Control Bars
Toolbox
Copyright WordPronk 2016. All Rights Reserved.
Diagrams Method managers and analysts can use the diagrams to create modules and other objects in the MCL and AA. Method analysts and content developers can also use the diagrams to select and edit method components.
Follow this procedure to use Framework Navigator diagrams. 1. Display the FrameworkNavigator menu. It provides access to two diagram groups that are of interest
to method analysts and content developers:
− MCL diagrams—a visual depiction of the method component library − AA diagrams—a visual depiction of the assembly area
2. Follow these steps to view the various types of diagrams.
MCL Diagrams:
• Click MCL Diagrams. The MCL Diagram explorer opens. • Click Plus ( ) to expand the tree. MCL diagrams exist for content categories, modules, phases,
and threads. • Double-click the diagram of interest to open it. The following table includes screen captures of
the various diagrams and describes the purpose of each.
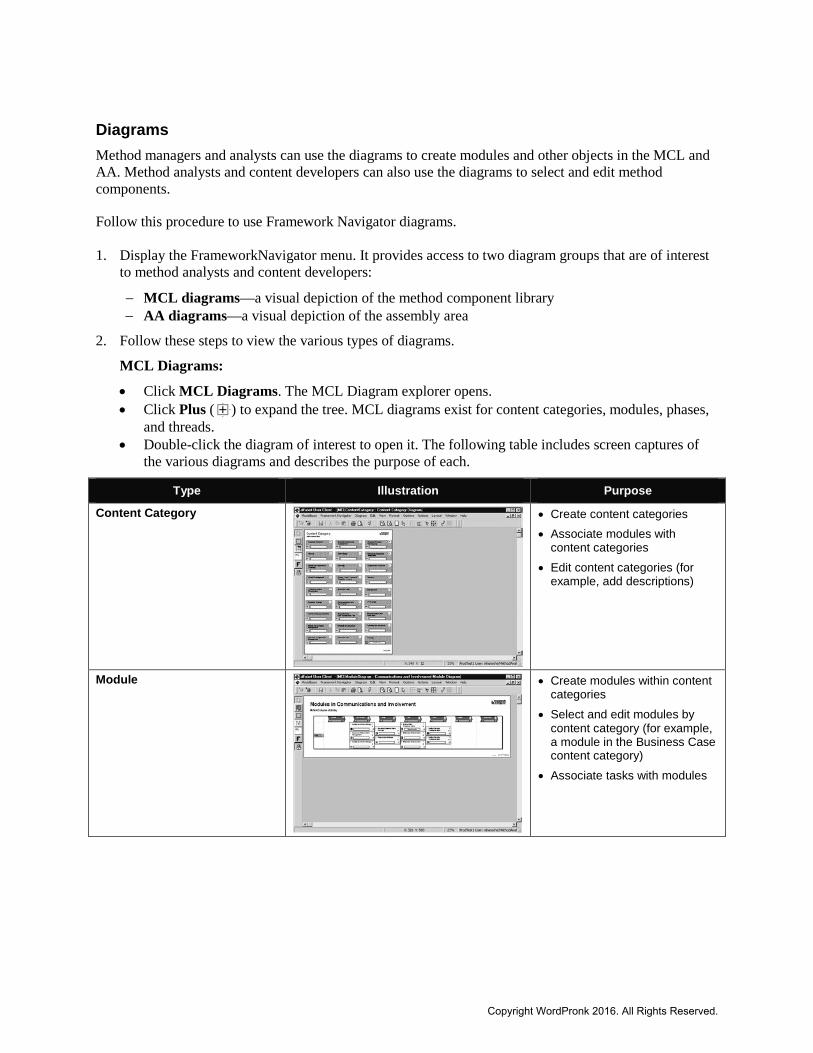
Type Illustration Purpose
Content Category
• Create content categories • Associate modules with
content categories • Edit content categories (for
example, add descriptions)
Module
• Create modules within content categories
• Select and edit modules by content category (for example, a module in the Business Case content category)
• Associate tasks with modules
Copyright WordPronk 2016. All Rights Reserved.
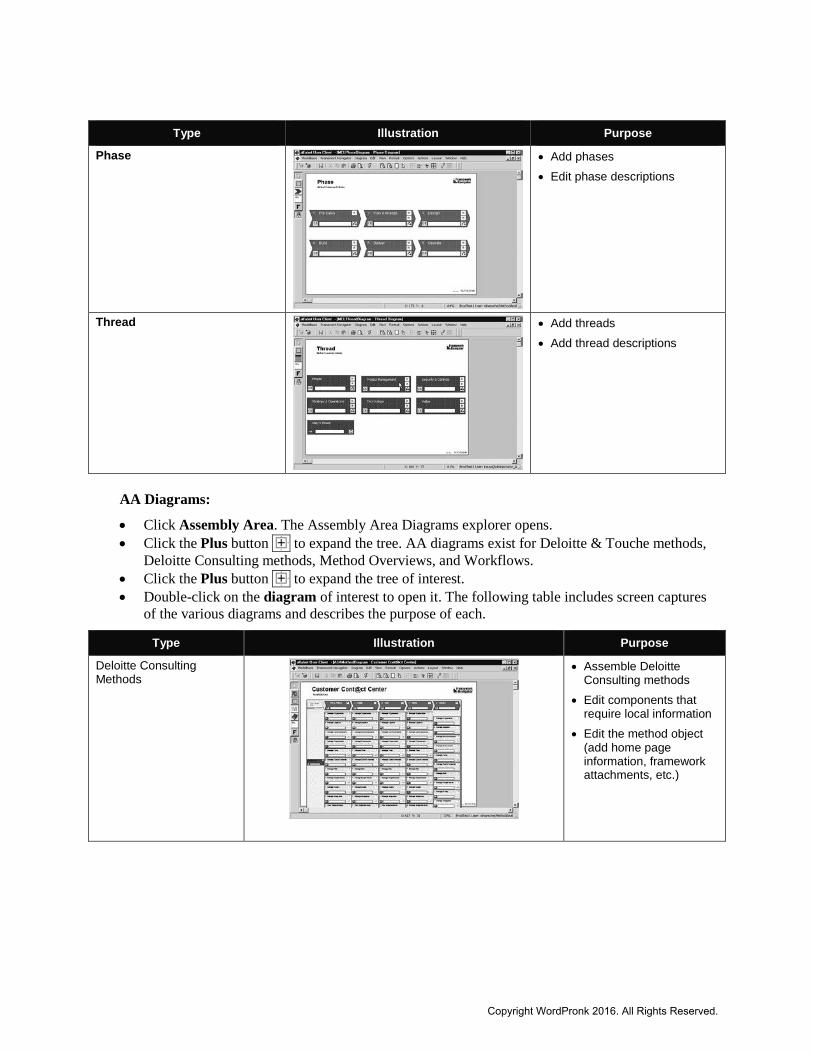
Type Illustration Purpose
Phase
• Add phases • Edit phase descriptions
Thread
• Add threads • Add thread descriptions
AA Diagrams:
• Click Assembly Area. The Assembly Area Diagrams explorer opens. • Click the Plus button to expand the tree. AA diagrams exist for Deloitte & Touche methods,
Deloitte Consulting methods, Method Overviews, and Workflows. • Click the Plus button to expand the tree of interest. • Double-click on the diagram of interest to open it. The following table includes screen captures
of the various diagrams and describes the purpose of each.
Type Illustration Purpose
Deloitte Consulting Methods
• Assemble Deloitte Consulting methods
• Edit components that require local information
• Edit the method object (add home page information, framework attachments, etc.)
Copyright WordPronk 2016. All Rights Reserved.
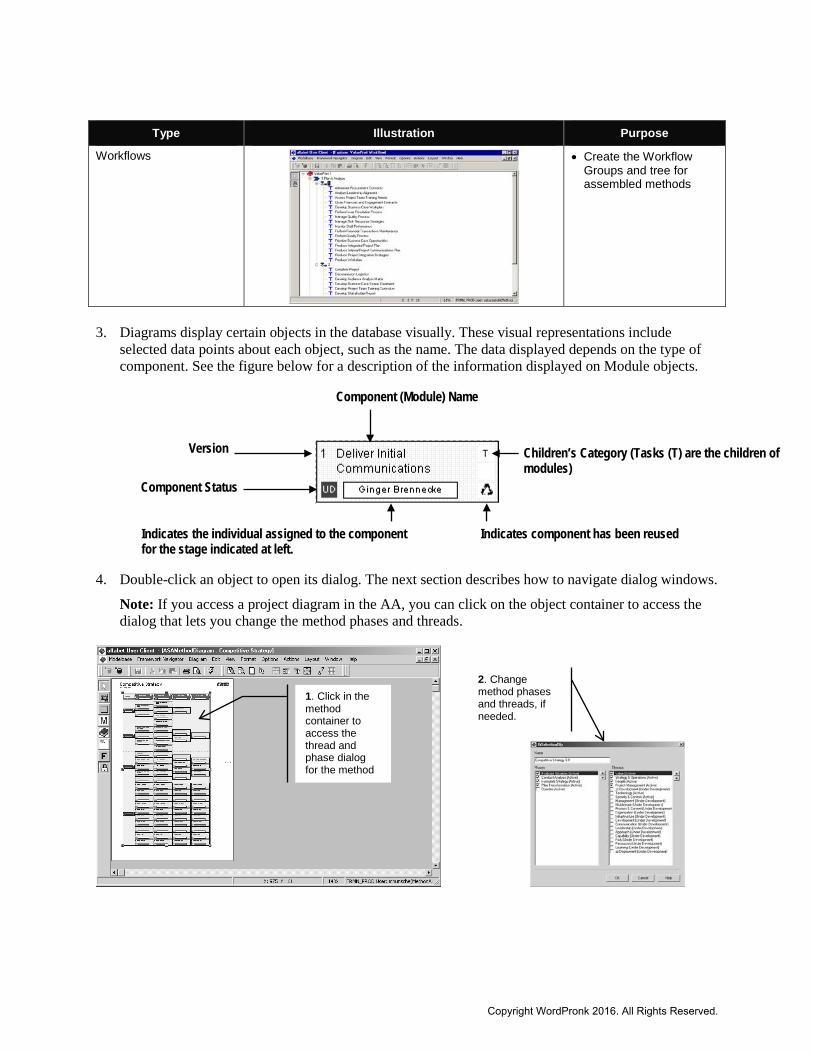
Type Illustration Purpose
Workflows
• Create the Workflow Groups and tree for assembled methods
3. Diagrams display certain objects in the database visually. These visual representations include
selected data points about each object, such as the name. The data displayed depends on the type of component. See the figure below for a description of the information displayed on Module objects.
4. Double-click an object to open its dialog. The next section describes how to navigate dialog windows.
Note: If you access a project diagram in the AA, you can click on the object container to access the dialog that lets you change the method phases and threads.
Component (Module) Name
Component Status
Version Children’s Category (Tasks (T) are the children of modules)
Indicates component has been reused
Indicates the individual assigned to the component for the stage indicated at left.
1. Click in the method container to access the thread and phase dialog for the method
2. Change method phases and threads, if needed.
Copyright WordPronk 2016. All Rights Reserved.
Dialogs
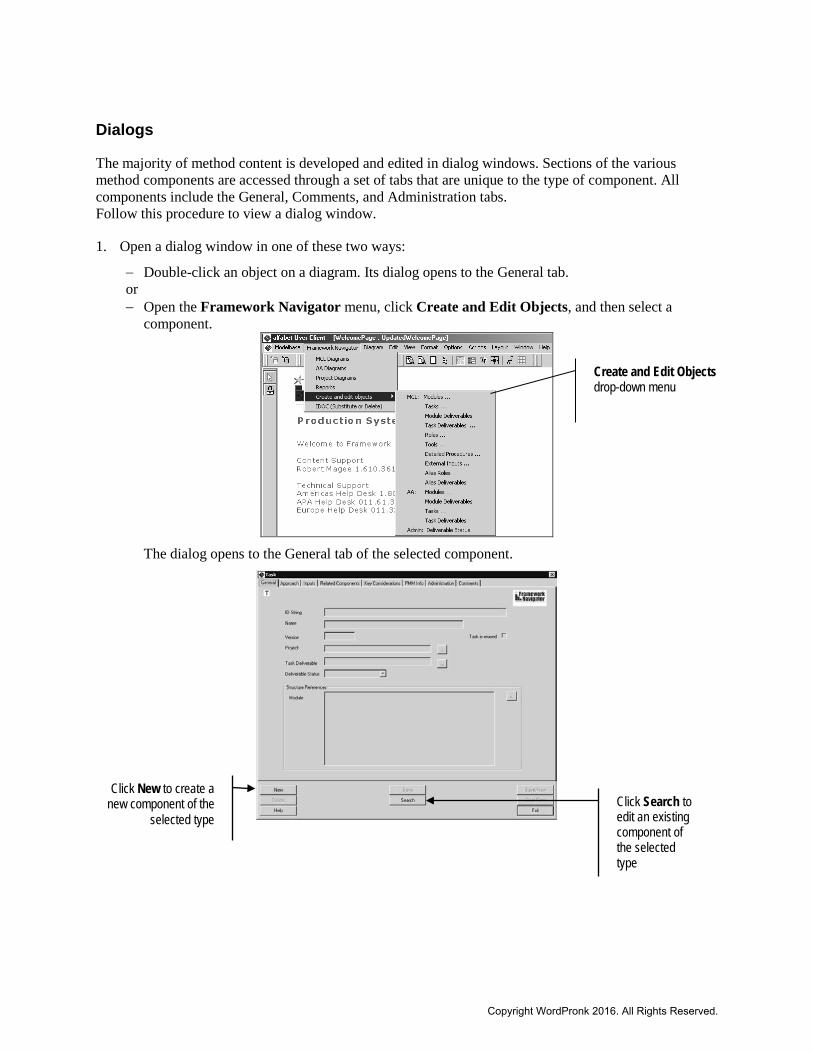
The majority of method content is developed and edited in dialog windows. Sections of the various method components are accessed through a set of tabs that are unique to the type of component. All components include the General, Comments, and Administration tabs. Follow this procedure to view a dialog window.
1. Open a dialog window in one of these two ways:
− Double-click an object on a diagram. Its dialog opens to the General tab. or − Open the Framework Navigator menu, click Create and Edit Objects, and then select a
component.
The dialog opens to the General tab of the selected component.
Click New to create a new component of the
selected type Click Search to edit an existing component of the selected type
Create and Edit Objects drop-down menu
Copyright WordPronk 2016. All Rights Reserved.
2. Take the appropriate action:
− To create a new document, click New. The Select Copy Scheme window opens. − Click Create, and then click OK. The document dialog opens to the General tab. Required fields
are highlighted in yellow. or − To edit an existing document, click Search. The Select Instance window opens. − Locate the document as described in the following section. The document dialog opens to the
General tab for that method component.
3. Click a tab to display it.
4. To enter data in a field, click on it. Or use the Tab and Arrow keys to move from field to field.
Note: When the Dot button ( ) appears next to a field, click it to take further action (for example, to make a selection or to access the Text Editor window.
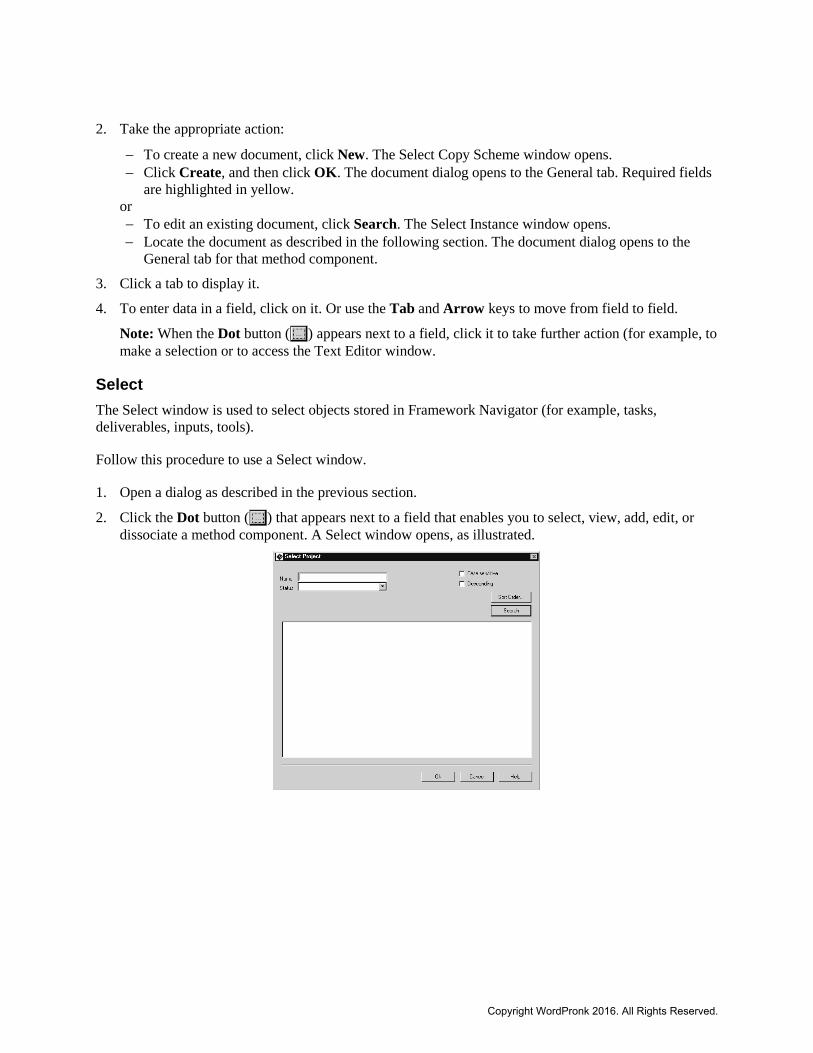
Select The Select window is used to select objects stored in Framework Navigator (for example, tasks, deliverables, inputs, tools).
Follow this procedure to use a Select window.
1. Open a dialog as described in the previous section.
2. Click the Dot button ( ) that appears next to a field that enables you to select, view, add, edit, or dissociate a method component. A Select window opens, as illustrated.
Copyright WordPronk 2016. All Rights Reserved.
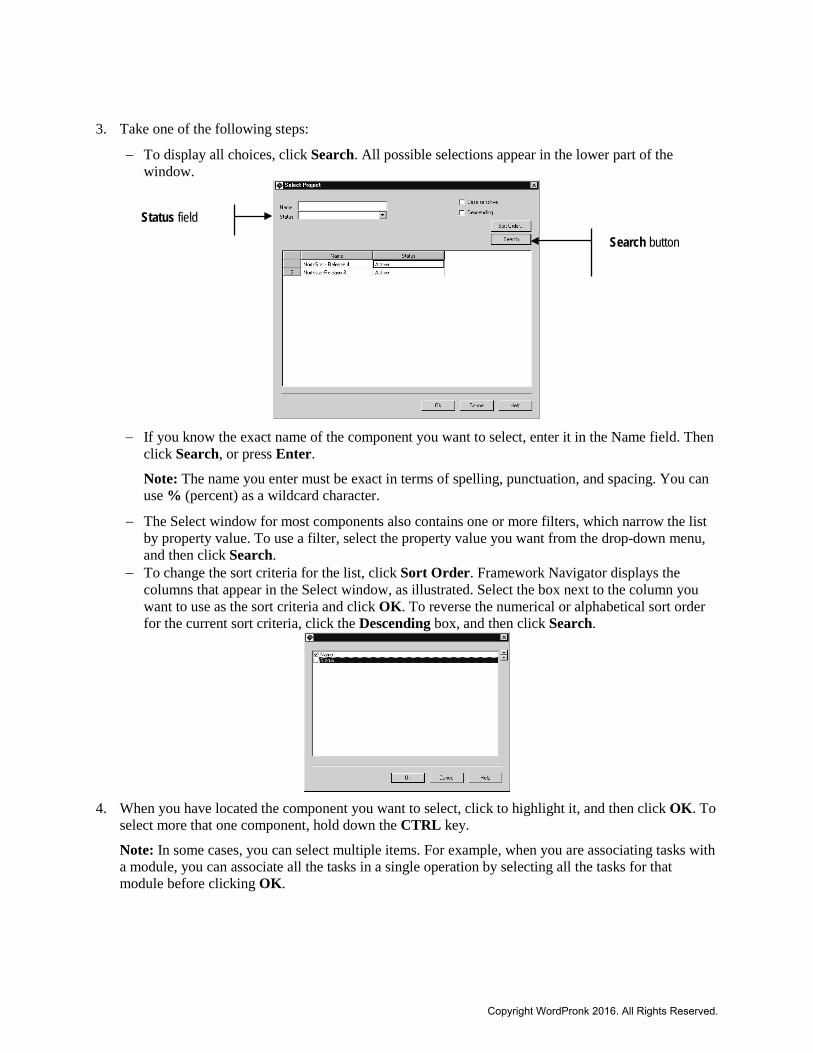
3. Take one of the following steps:
− To display all choices, click Search. All possible selections appear in the lower part of the window.
− If you know the exact name of the component you want to select, enter it in the Name field. Then
click Search, or press Enter.
Note: The name you enter must be exact in terms of spelling, punctuation, and spacing. You can use % (percent) as a wildcard character.
− The Select window for most components also contains one or more filters, which narrow the list by property value. To use a filter, select the property value you want from the drop-down menu, and then click Search.
− To change the sort criteria for the list, click Sort Order. Framework Navigator displays the columns that appear in the Select window, as illustrated. Select the box next to the column you want to use as the sort criteria and click OK. To reverse the numerical or alphabetical sort order for the current sort criteria, click the Descending box, and then click Search.
4. When you have located the component you want to select, click to highlight it, and then click OK. To
select more that one component, hold down the CTRL key.
Note: In some cases, you can select multiple items. For example, when you are associating tasks with a module, you can associate all the tasks in a single operation by selecting all the tasks for that module before clicking OK.
Search button
Status field
Copyright WordPronk 2016. All Rights Reserved.
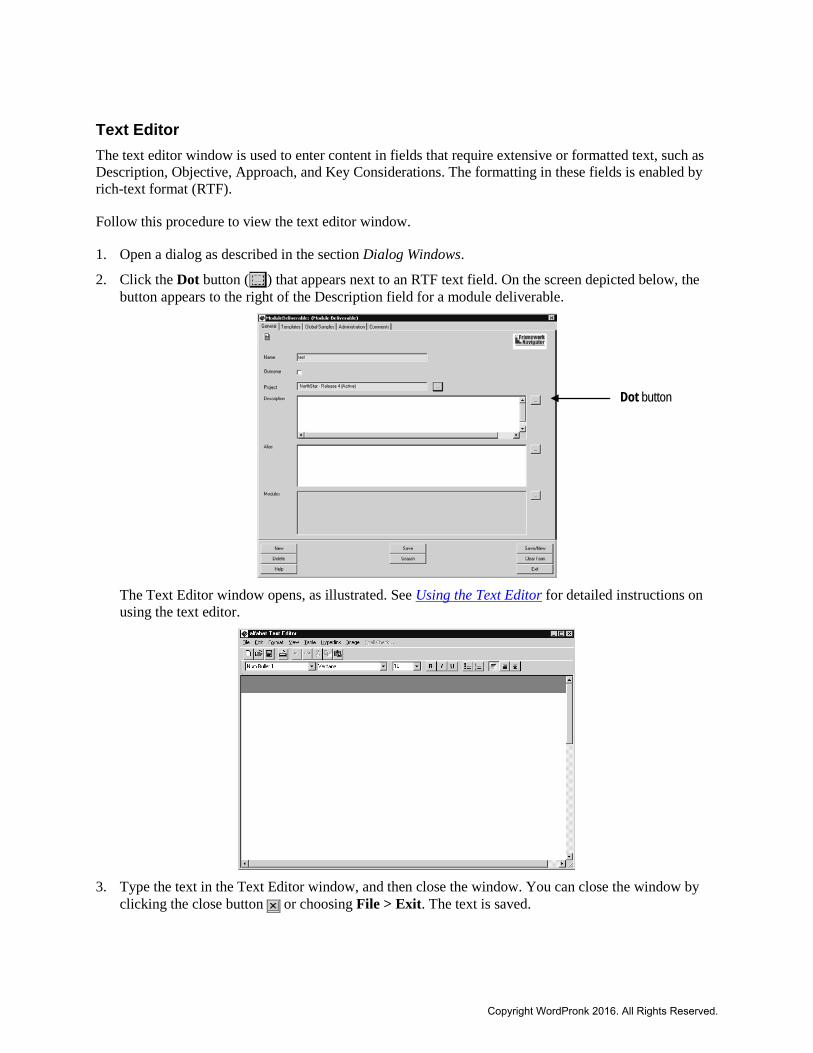
Text Editor The text editor window is used to enter content in fields that require extensive or formatted text, such as Description, Objective, Approach, and Key Considerations. The formatting in these fields is enabled by rich-text format (RTF).
Follow this procedure to view the text editor window.
1. Open a dialog as described in the section Dialog Windows.
2. Click the Dot button ( ) that appears next to an RTF text field. On the screen depicted below, the button appears to the right of the Description field for a module deliverable.
The Text Editor window opens, as illustrated. See Using the Text Editor for detailed instructions on using the text editor.
3. Type the text in the Text Editor window, and then close the window. You can close the window by
clicking the close button or choosing File > Exit. The text is saved.
Dot button
Copyright WordPronk 2016. All Rights Reserved.
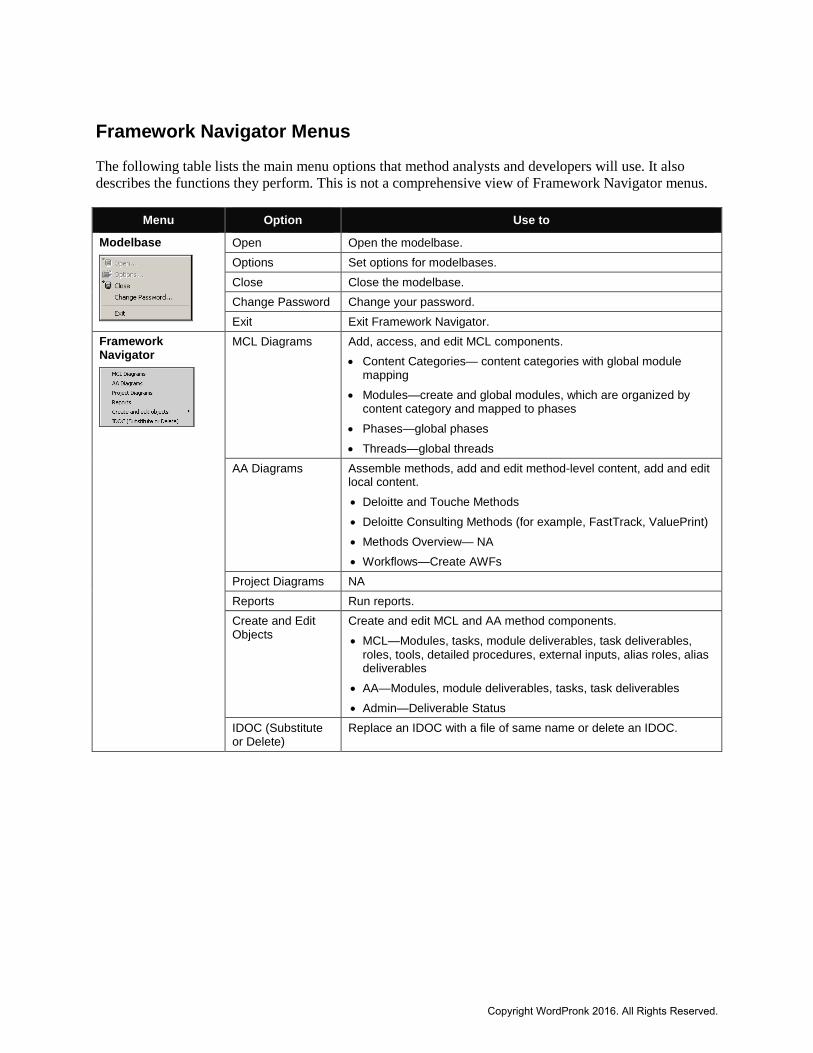
Framework Navigator Menus The following table lists the main menu options that method analysts and developers will use. It also describes the functions they perform. This is not a comprehensive view of Framework Navigator menus.
Menu Option Use to
Modelbase
Open Open the modelbase. Options Set options for modelbases. Close Close the modelbase. Change Password Change your password. Exit Exit Framework Navigator.
Framework Navigator
MCL Diagrams Add, access, and edit MCL components. • Content Categories— content categories with global module
mapping • Modules—create and global modules, which are organized by
content category and mapped to phases • Phases—global phases • Threads—global threads
AA Diagrams Assemble methods, add and edit method-level content, add and edit local content. • Deloitte and Touche Methods • Deloitte Consulting Methods (for example, FastTrack, ValuePrint) • Methods Overview— NA • Workflows—Create AWFs
Project Diagrams NA Reports Run reports. Create and Edit Objects
Create and edit MCL and AA method components. • MCL—Modules, tasks, module deliverables, task deliverables,
roles, tools, detailed procedures, external inputs, alias roles, alias deliverables
• AA—Modules, module deliverables, tasks, task deliverables • Admin—Deliverable Status
IDOC (Substitute or Delete)
Replace an IDOC with a file of same name or delete an IDOC.
Copyright WordPronk 2016. All Rights Reserved.

The Control Bar The illustration below defines the functions of the Framework Navigator control buttons. Method analysts and content developers primarily use the buttons on the left (captions shaded). The buttons to the right (captions patterned) are used when creating diagrams.
The Toolbox Toolbox features are used when working with Framework Navigator diagrams. The items that appear in the toolbox vary according to the functions available in a particular diagram. The list provided in the table below is not comprehensive; it shows the tools used to add a module to an MCL or AA diagram.
Button Use to
Select Select an object on a diagram.
Lock Lock a tool to eliminate the need to select it each time you want to use it.
Module Add a module to the diagram.
Method Add a method to the diagram.
Content Category Add a content category to the diagram.
Phase Add a phase to the diagram.
Thread Add a thread to a diagram.
Paste
Open Database
Close Database
Save Diagram
Cut
Copy
Preview
Run Events
Zoom In
Zoom Out
Fit to Window
Magnifier
Text Alignment
Colors
Font
Zoom Out
Straight Connections
Grid Mode
Copyright WordPronk 2016. All Rights Reserved.
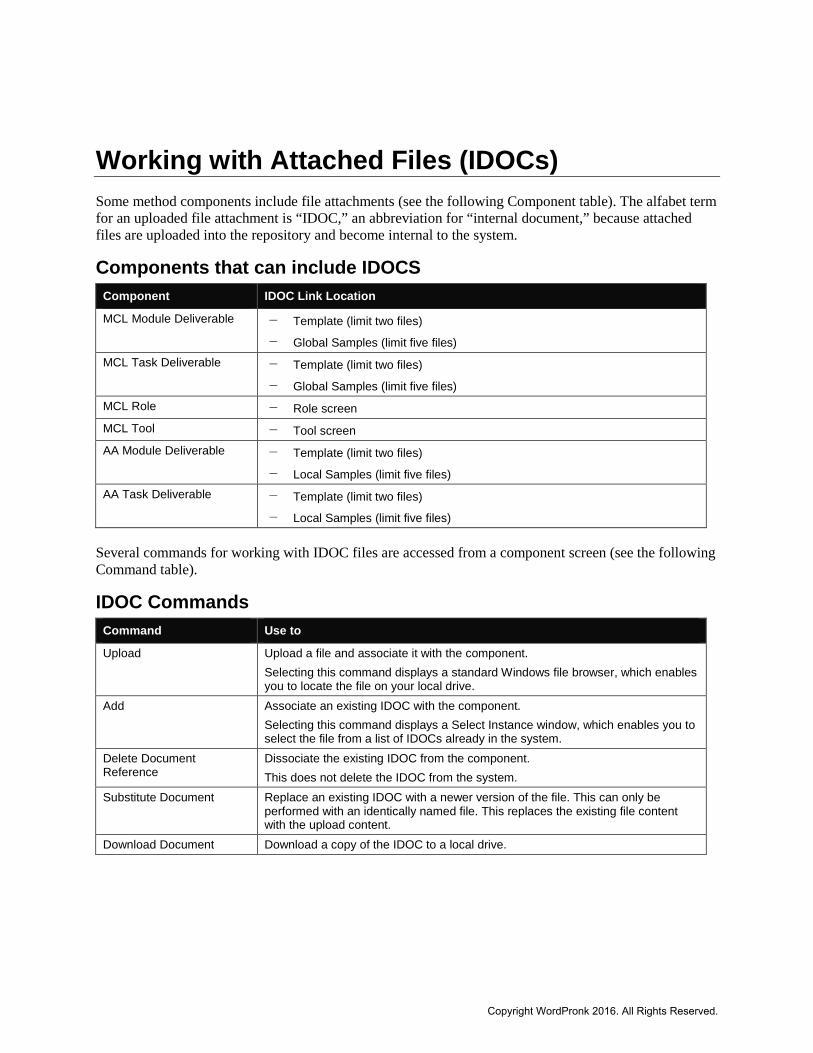
Working with Attached Files (IDOCs) Some method components include file attachments (see the following Component table). The alfabet term for an uploaded file attachment is “IDOC,” an abbreviation for “internal document,” because attached files are uploaded into the repository and become internal to the system.
Components that can include IDOCS Component IDOC Link Location
MCL Module Deliverable − Template (limit two files)
− Global Samples (limit five files) MCL Task Deliverable − Template (limit two files)
− Global Samples (limit five files) MCL Role − Role screen MCL Tool − Tool screen AA Module Deliverable − Template (limit two files)
− Local Samples (limit five files) AA Task Deliverable − Template (limit two files)
− Local Samples (limit five files)
Several commands for working with IDOC files are accessed from a component screen (see the following Command table).
IDOC Commands Command Use to
Upload Upload a file and associate it with the component. Selecting this command displays a standard Windows file browser, which enables you to locate the file on your local drive.
Add Associate an existing IDOC with the component. Selecting this command displays a Select Instance window, which enables you to select the file from a list of IDOCs already in the system.
Delete Document Reference
Dissociate the existing IDOC from the component. This does not delete the IDOC from the system.
Substitute Document Replace an existing IDOC with a newer version of the file. This can only be performed with an identically named file. This replaces the existing file content with the upload content.
Download Document Download a copy of the IDOC to a local drive.
Copyright WordPronk 2016. All Rights Reserved.
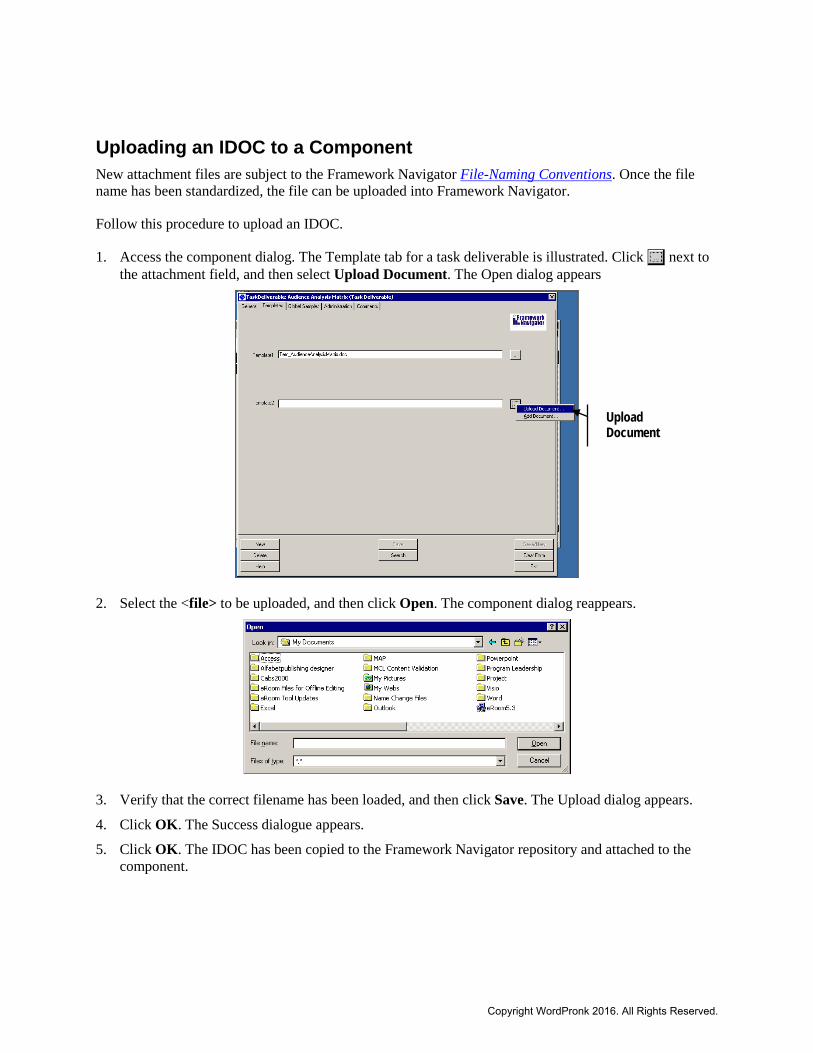
Uploading an IDOC to a Component New attachment files are subject to the Framework Navigator File-Naming Conventions. Once the file name has been standardized, the file can be uploaded into Framework Navigator.
Follow this procedure to upload an IDOC.
1. Access the component dialog. The Template tab for a task deliverable is illustrated. Click next to the attachment field, and then select Upload Document. The Open dialog appears
2. Select the <file> to be uploaded, and then click Open. The component dialog reappears.
3. Verify that the correct filename has been loaded, and then click Save. The Upload dialog appears.
4. Click OK. The Success dialogue appears.
5. Click OK. The IDOC has been copied to the Framework Navigator repository and attached to the component.
Upload Document
Copyright WordPronk 2016. All Rights Reserved.
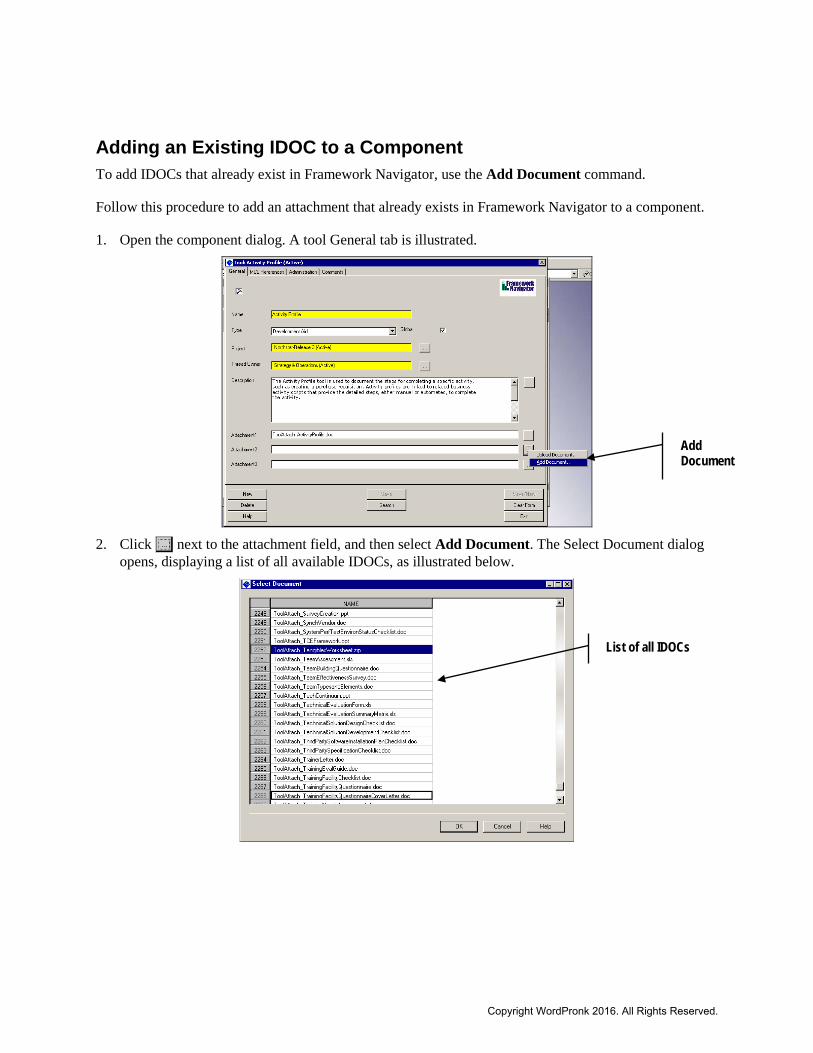
Adding an Existing IDOC to a Component To add IDOCs that already exist in Framework Navigator, use the Add Document command.
Follow this procedure to add an attachment that already exists in Framework Navigator to a component.
1. Open the component dialog. A tool General tab is illustrated.
2. Click next to the attachment field, and then select Add Document. The Select Document dialog
opens, displaying a list of all available IDOCs, as illustrated below.
Add Document
List of all IDOCs
Copyright WordPronk 2016. All Rights Reserved.
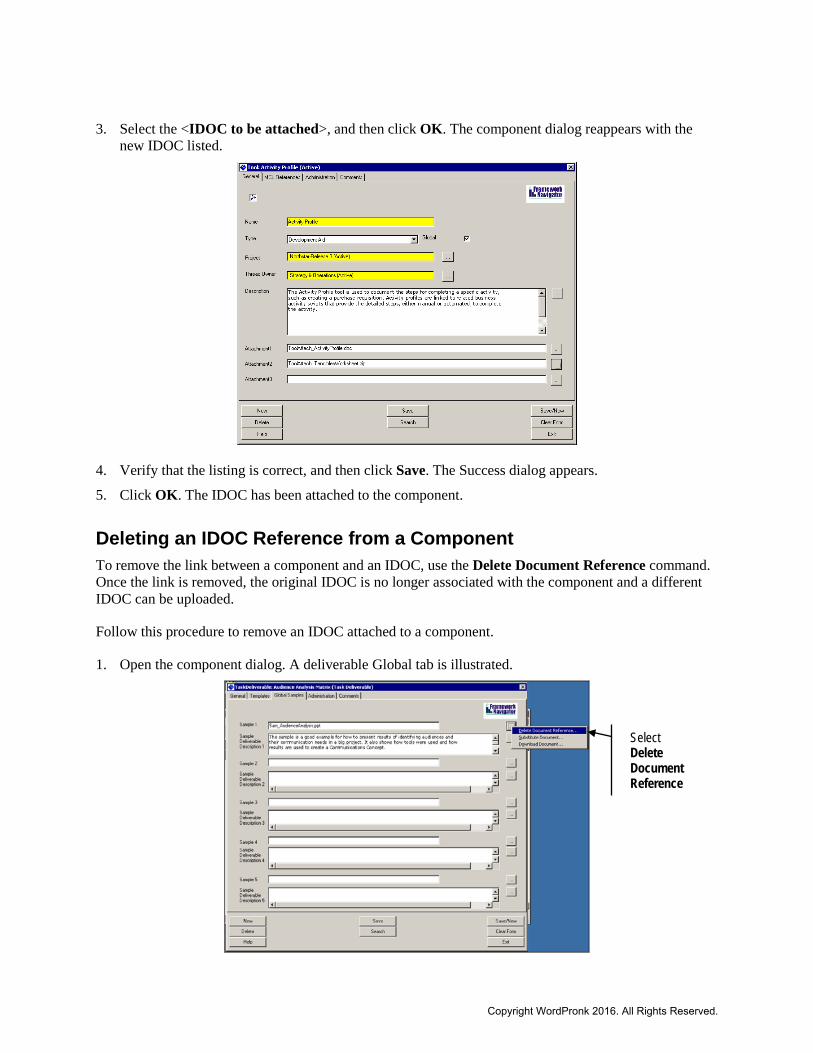
3. Select the <IDOC to be attached>, and then click OK. The component dialog reappears with the new IDOC listed.
4. Verify that the listing is correct, and then click Save. The Success dialog appears.
5. Click OK. The IDOC has been attached to the component.
Deleting an IDOC Reference from a Component To remove the link between a component and an IDOC, use the Delete Document Reference command. Once the link is removed, the original IDOC is no longer associated with the component and a different IDOC can be uploaded.
Follow this procedure to remove an IDOC attached to a component.
1. Open the component dialog. A deliverable Global tab is illustrated.
Select Delete Document Reference
Copyright WordPronk 2016. All Rights Reserved.
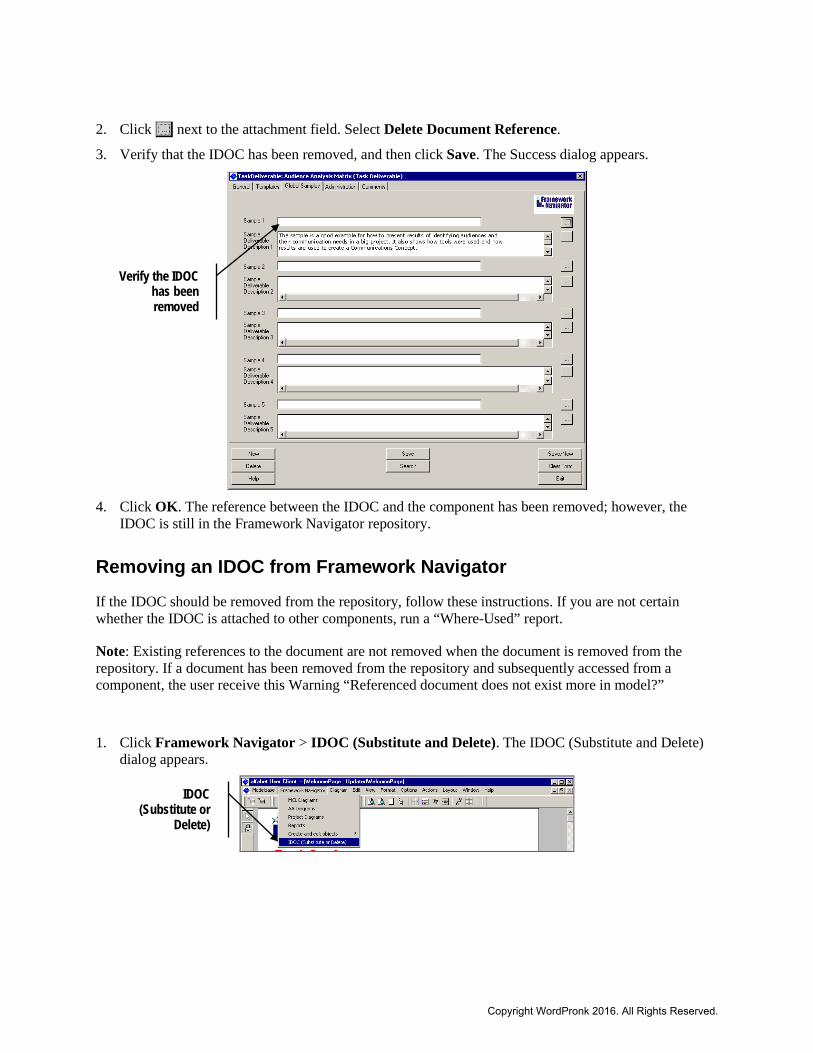
2. Click next to the attachment field. Select Delete Document Reference.
3. Verify that the IDOC has been removed, and then click Save. The Success dialog appears.
4. Click OK. The reference between the IDOC and the component has been removed; however, the
IDOC is still in the Framework Navigator repository.
Removing an IDOC from Framework Navigator If the IDOC should be removed from the repository, follow these instructions. If you are not certain whether the IDOC is attached to other components, run a “Where-Used” report.
Note: Existing references to the document are not removed when the document is removed from the repository. If a document has been removed from the repository and subsequently accessed from a component, the user receive this Warning “Referenced document does not exist more in model?”
1. Click Framework Navigator > IDOC (Substitute and Delete). The IDOC (Substitute and Delete) dialog appears.
Verify the IDOC has been removed
IDOC (Substitute or
Delete)
Copyright WordPronk 2016. All Rights Reserved.

2. Click Search. The Select Instance dialog appears, as illustrated.
3. Enter the <filename> of the IDOC and click Search.
4. Select the IDOC and then click Ok. The Upload dialog reappears.
IDOC (Substitute or Delete) Dialog
Search button
Copyright WordPronk 2016. All Rights Reserved.
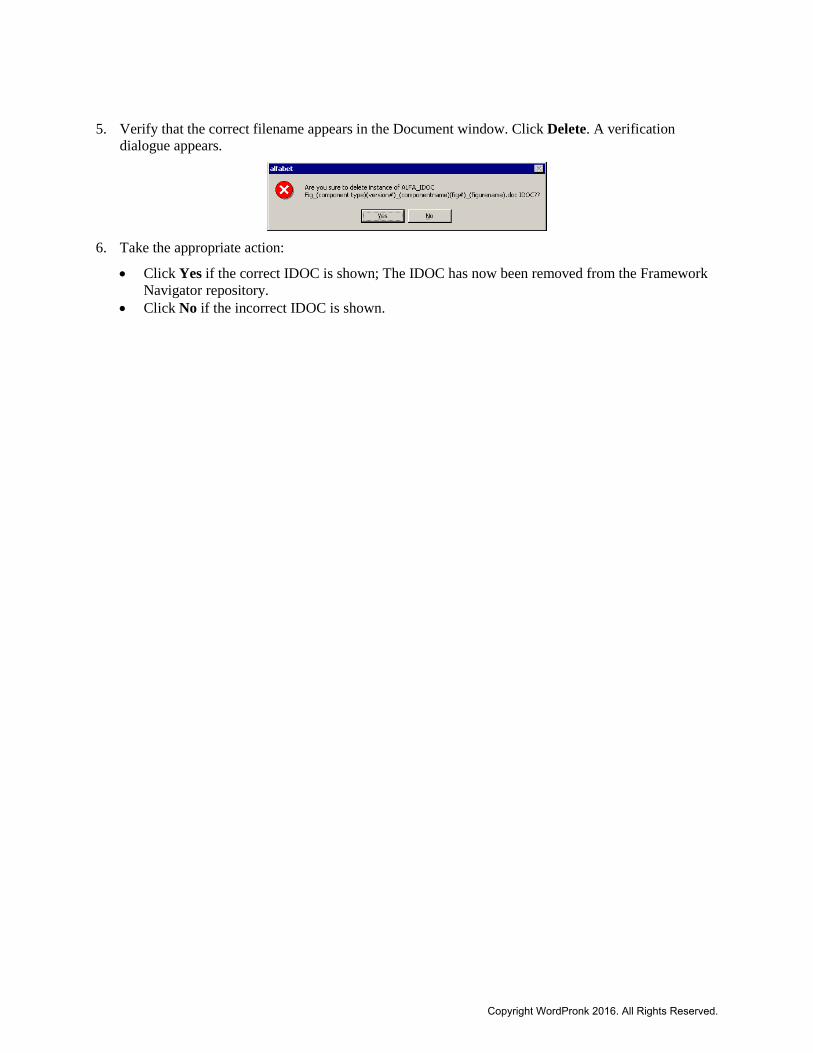
5. Verify that the correct filename appears in the Document window. Click Delete. A verification dialogue appears.
6. Take the appropriate action:
• Click Yes if the correct IDOC is shown; The IDOC has now been removed from the Framework Navigator repository.
• Click No if the incorrect IDOC is shown.
Copyright WordPronk 2016. All Rights Reserved.
Substituting IDOCs The procedure to follow for substituting an IDOC depends on whether the replacement file has the same file-name or is named differently.
Replacing an IDOC with a Differently Named File The Delete Document command must be used first when replacing an IDOC with a differently named file. This command removes the association between the IDOC and the component. After deleting the document reference, the original file must be deleted using the IDOC (Substitute or Delete) dialog. Next, the new file is uploaded and attached using the Upload Document command from the component dialog. The new file must follow Framework Navigator File-Naming Conventions.
Substituting an Identically Named File for an IDOC Updating the contents of an existing IDOC can be performed either from either the IDOC (Substitute or Delete) dialog or from a component’s Substitute Document command. An IDOC’s content can be updated by substituting a file with the same name for the existing IDOC file. This replaces the IDOC’s content with the new file everywhere that IDOC exists on Framework Navigator.
Follow either procedure to replace an existing IDOC with an identically named file.
Procedure A
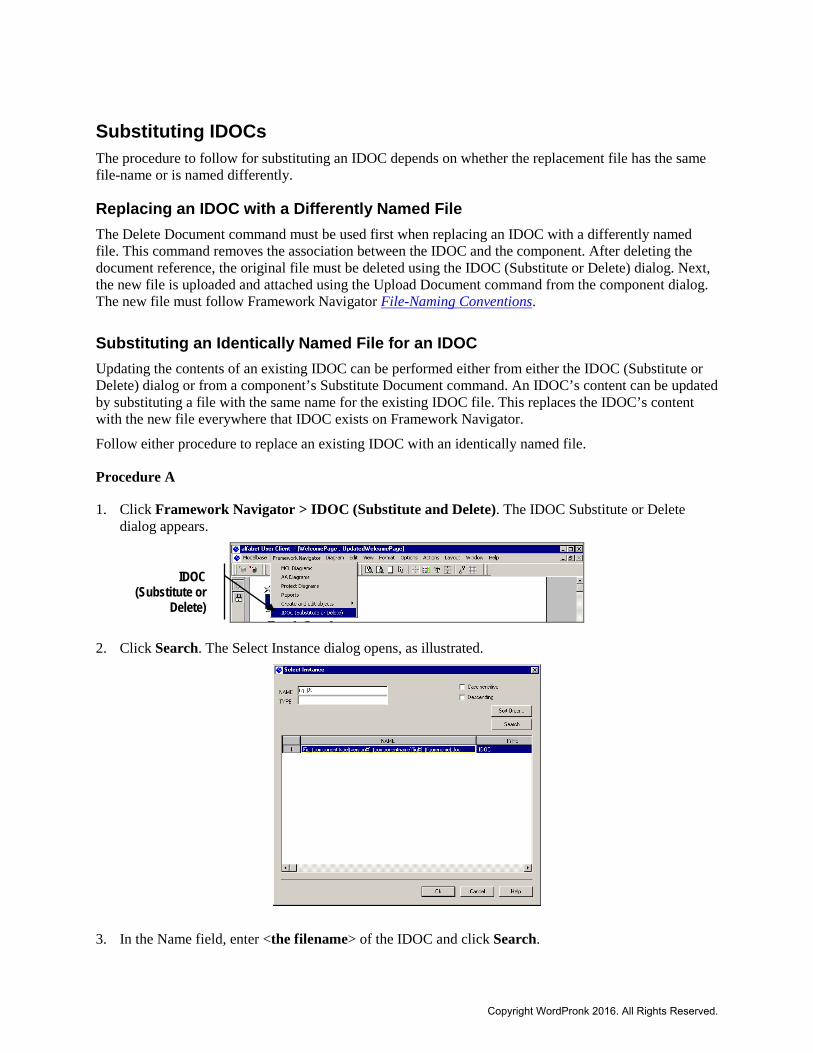
1. Click Framework Navigator > IDOC (Substitute and Delete). The IDOC Substitute or Delete dialog appears.
2. Click Search. The Select Instance dialog opens, as illustrated.
3. In the Name field, enter <the filename> of the IDOC and click Search.
IDOC (Substitute or
Delete)
Copyright WordPronk 2016. All Rights Reserved.
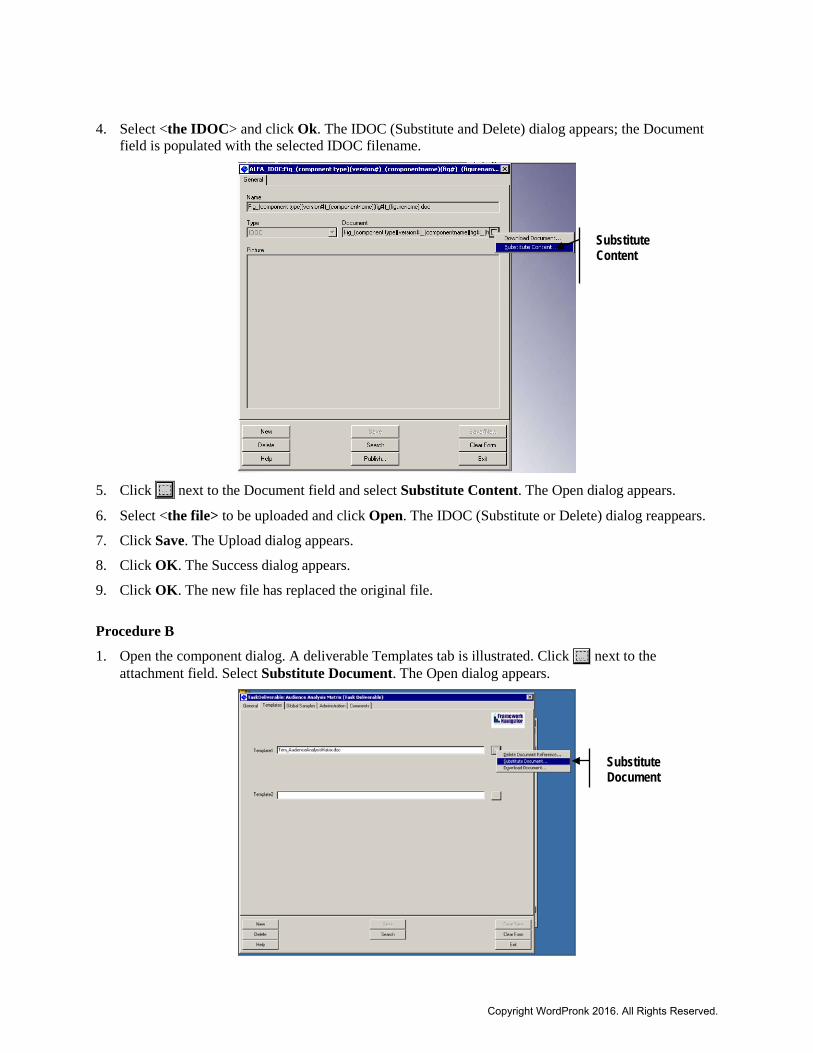
4. Select <the IDOC> and click Ok. The IDOC (Substitute and Delete) dialog appears; the Document field is populated with the selected IDOC filename.
5. Click next to the Document field and select Substitute Content. The Open dialog appears.
6. Select <the file> to be uploaded and click Open. The IDOC (Substitute or Delete) dialog reappears.
7. Click Save. The Upload dialog appears.
8. Click OK. The Success dialog appears.
9. Click OK. The new file has replaced the original file.
Procedure B
1. Open the component dialog. A deliverable Templates tab is illustrated. Click next to the attachment field. Select Substitute Document. The Open dialog appears.
Substitute Document
Substitute Content
Copyright WordPronk 2016. All Rights Reserved.
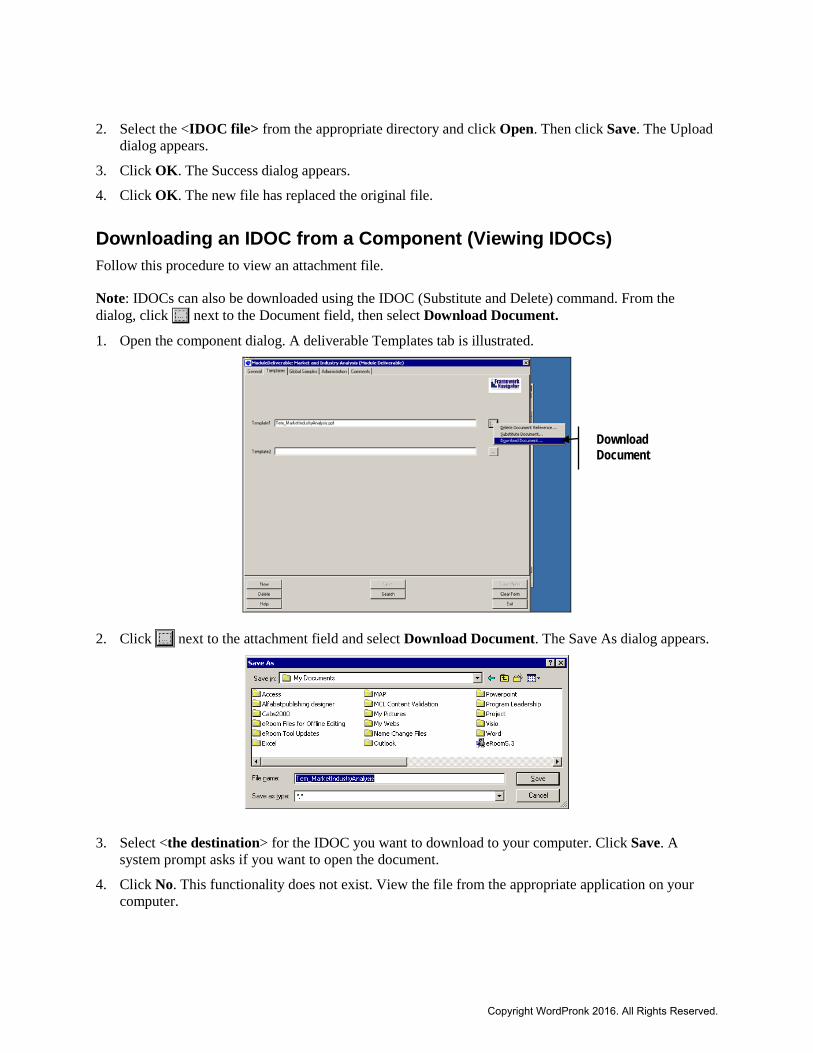
2. Select the <IDOC file> from the appropriate directory and click Open. Then click Save. The Upload dialog appears.
3. Click OK. The Success dialog appears.
4. Click OK. The new file has replaced the original file.
Downloading an IDOC from a Component (Viewing IDOCs) Follow this procedure to view an attachment file.
Note: IDOCs can also be downloaded using the IDOC (Substitute and Delete) command. From the dialog, click next to the Document field, then select Download Document.
1. Open the component dialog. A deliverable Templates tab is illustrated.
2. Click next to the attachment field and select Download Document. The Save As dialog appears.
3. Select <the destination> for the IDOC you want to download to your computer. Click Save. A system prompt asks if you want to open the document.
4. Click No. This functionality does not exist. View the file from the appropriate application on your computer.
Download Document
Copyright WordPronk 2016. All Rights Reserved.
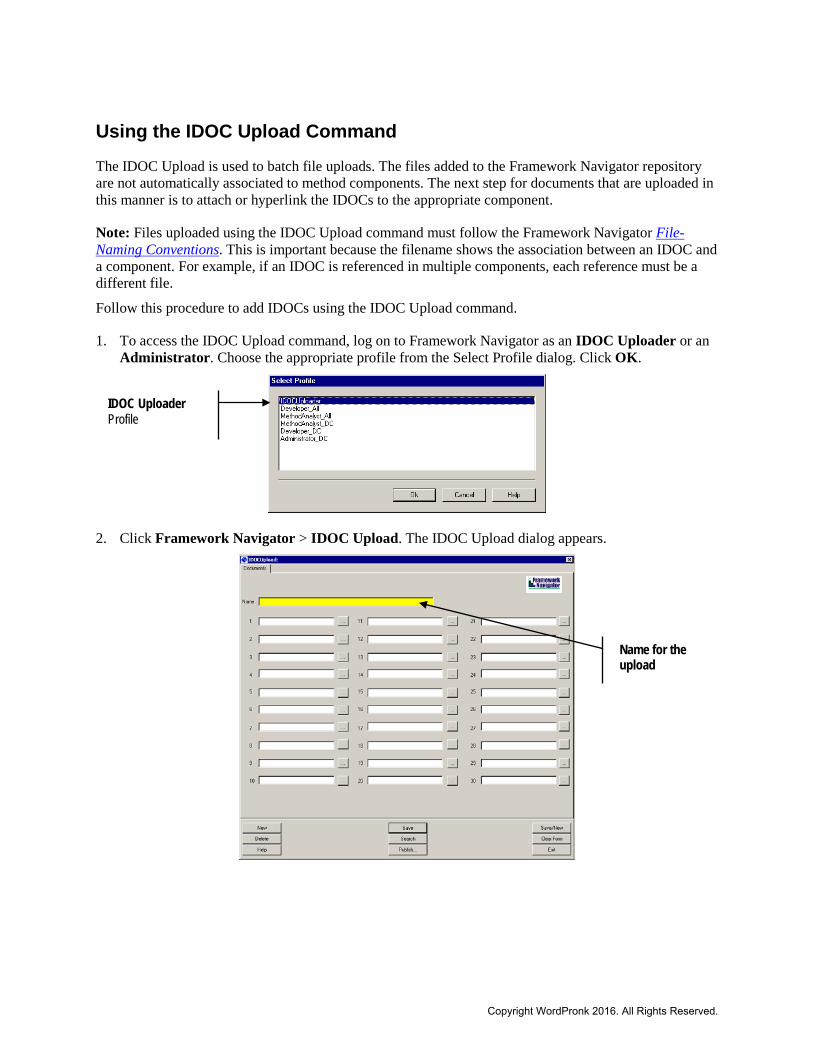
Using the IDOC Upload Command The IDOC Upload is used to batch file uploads. The files added to the Framework Navigator repository are not automatically associated to method components. The next step for documents that are uploaded in this manner is to attach or hyperlink the IDOCs to the appropriate component.
Note: Files uploaded using the IDOC Upload command must follow the Framework Navigator File-Naming Conventions. This is important because the filename shows the association between an IDOC and a component. For example, if an IDOC is referenced in multiple components, each reference must be a different file.
Follow this procedure to add IDOCs using the IDOC Upload command.
1. To access the IDOC Upload command, log on to Framework Navigator as an IDOC Uploader or an Administrator. Choose the appropriate profile from the Select Profile dialog. Click OK.
2. Click Framework Navigator > IDOC Upload. The IDOC Upload dialog appears.
IDOC Uploader Profile
Name for the upload
Copyright WordPronk 2016. All Rights Reserved.
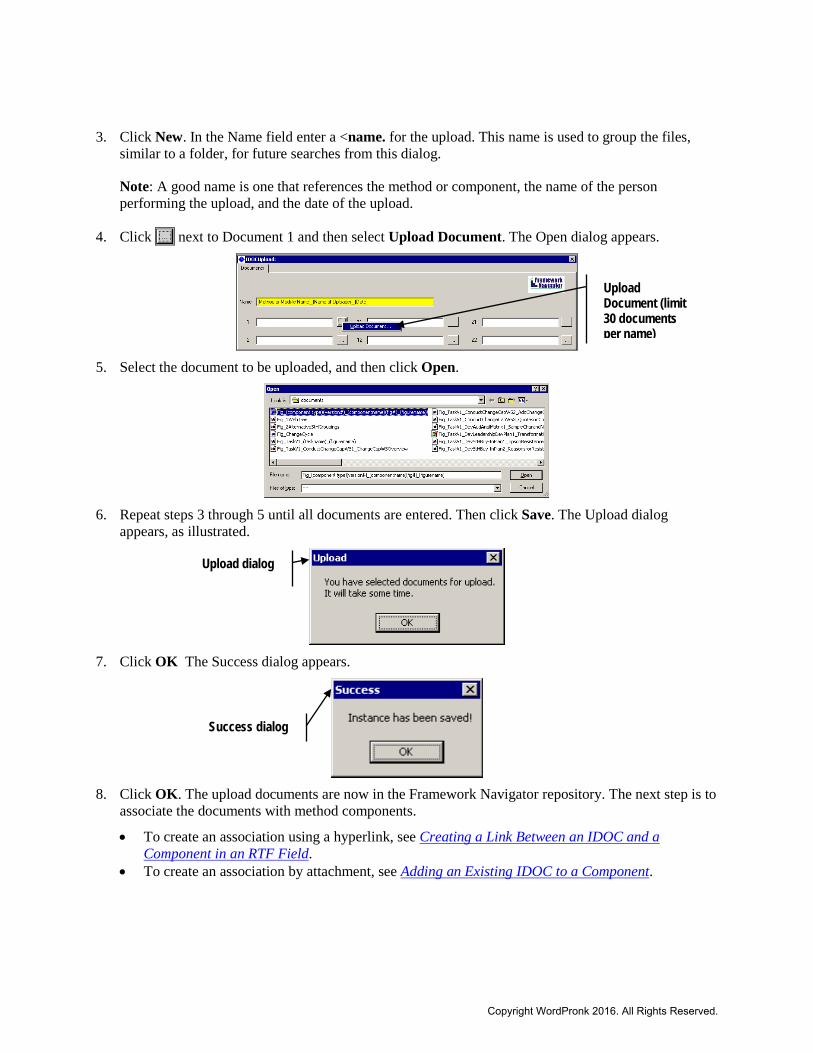
3. Click New. In the Name field enter a <name. for the upload. This name is used to group the files, similar to a folder, for future searches from this dialog.
Note: A good name is one that references the method or component, the name of the person performing the upload, and the date of the upload.
4. Click next to Document 1 and then select Upload Document. The Open dialog appears.
5. Select the document to be uploaded, and then click Open.
6. Repeat steps 3 through 5 until all documents are entered. Then click Save. The Upload dialog
appears, as illustrated.
7. Click OK The Success dialog appears.
8. Click OK. The upload documents are now in the Framework Navigator repository. The next step is to
associate the documents with method components.
• To create an association using a hyperlink, see Creating a Link Between an IDOC and a Component in an RTF Field.
• To create an association by attachment, see Adding an Existing IDOC to a Component.
Upload Document (limit 30 documents per name)
Upload dialog
Success dialog
Copyright WordPronk 2016. All Rights Reserved.
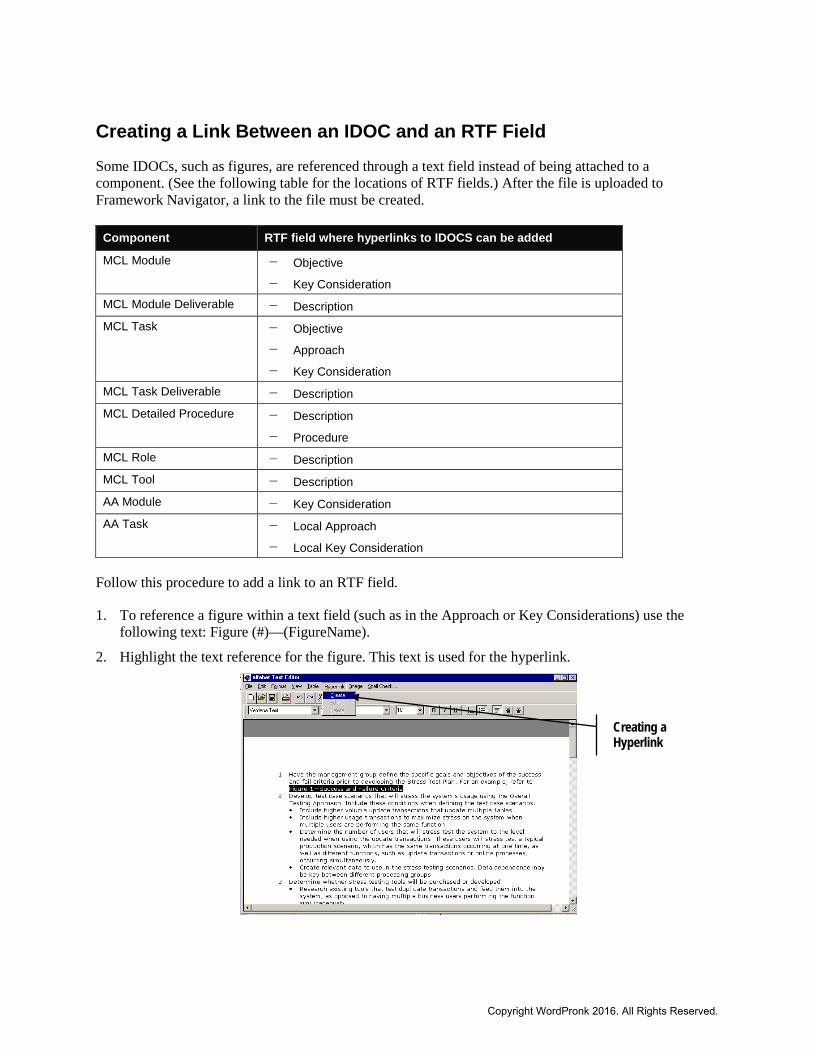
Creating a Link Between an IDOC and an RTF Field Some IDOCs, such as figures, are referenced through a text field instead of being attached to a component. (See the following table for the locations of RTF fields.) After the file is uploaded to Framework Navigator, a link to the file must be created.
Component RTF field where hyperlinks to IDOCS can be added
MCL Module − Objective
− Key Consideration MCL Module Deliverable − Description MCL Task − Objective
− Approach
− Key Consideration MCL Task Deliverable − Description MCL Detailed Procedure − Description
− Procedure MCL Role − Description MCL Tool − Description AA Module − Key Consideration AA Task − Local Approach
− Local Key Consideration
Follow this procedure to add a link to an RTF field.
1. To reference a figure within a text field (such as in the Approach or Key Considerations) use the following text: Figure (#)—(FigureName).
2. Highlight the text reference for the figure. This text is used for the hyperlink.
Creating a Hyperlink
Copyright WordPronk 2016. All Rights Reserved.
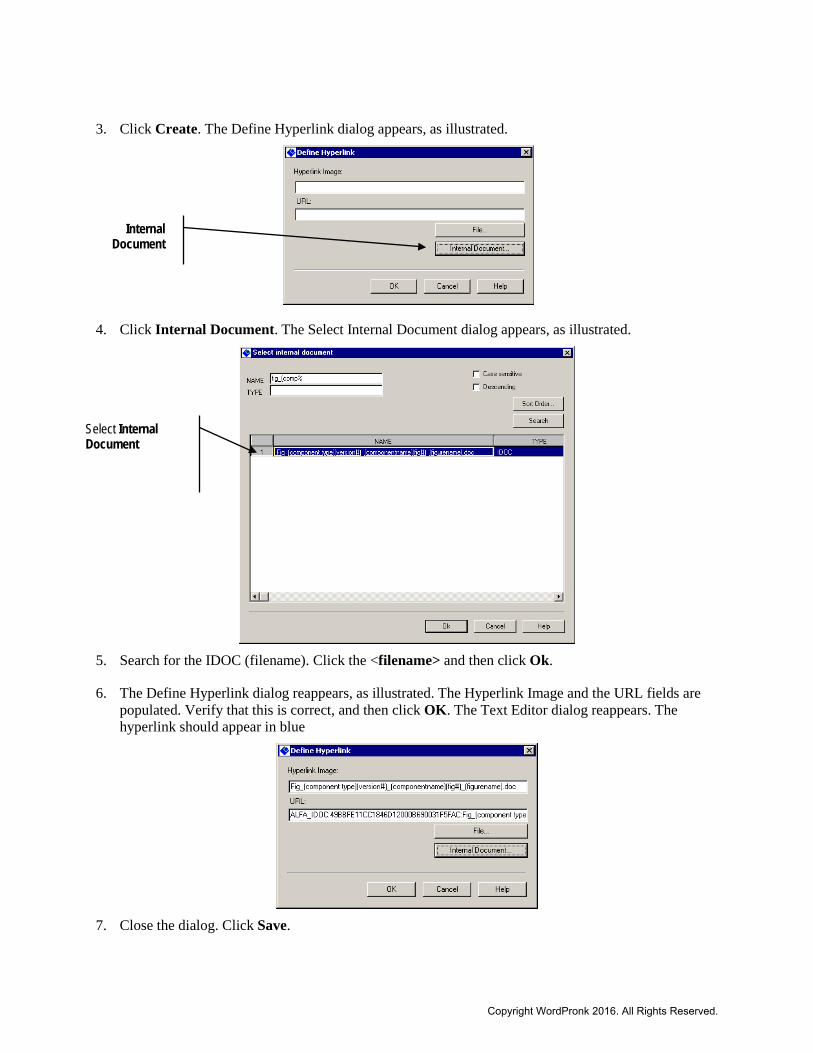
3. Click Create. The Define Hyperlink dialog appears, as illustrated.
4. Click Internal Document. The Select Internal Document dialog appears, as illustrated.
5. Search for the IDOC (filename). Click the <filename> and then click Ok.
6. The Define Hyperlink dialog reappears, as illustrated. The Hyperlink Image and the URL fields are populated. Verify that this is correct, and then click OK. The Text Editor dialog reappears. The hyperlink should appear in blue
7. Close the dialog. Click Save.
Internal Document
Select Internal Document
Copyright WordPronk 2016. All Rights Reserved.
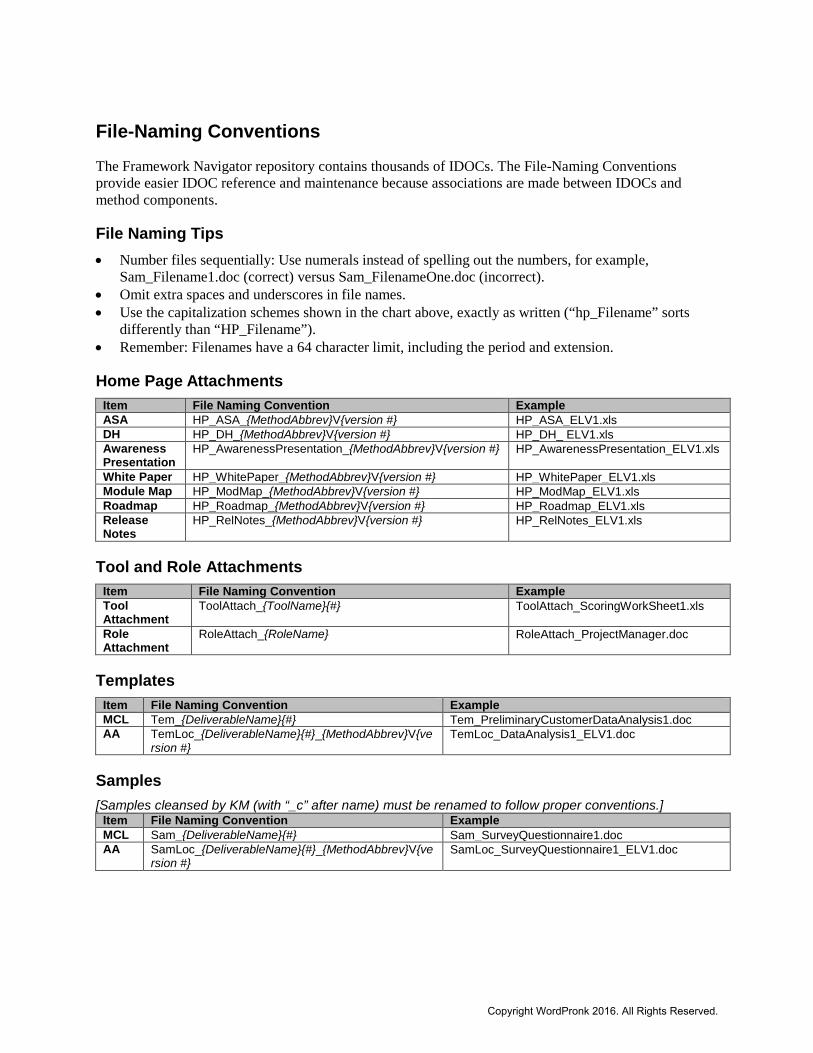
File-Naming Conventions The Framework Navigator repository contains thousands of IDOCs. The File-Naming Conventions provide easier IDOC reference and maintenance because associations are made between IDOCs and method components.
File Naming Tips • Number files sequentially: Use numerals instead of spelling out the numbers, for example,
Sam_Filename1.doc (correct) versus Sam_FilenameOne.doc (incorrect). • Omit extra spaces and underscores in file names. • Use the capitalization schemes shown in the chart above, exactly as written (“hp_Filename” sorts
differently than “HP_Filename”). • Remember: Filenames have a 64 character limit, including the period and extension.
Home Page Attachments Item File Naming Convention Example ASA HP_ASA_{MethodAbbrev}V{version #} HP_ASA_ELV1.xls DH HP_DH_{MethodAbbrev}V{version #} HP_DH_ ELV1.xls Awareness Presentation
HP_AwarenessPresentation_{MethodAbbrev}V{version #} HP_AwarenessPresentation_ELV1.xls
White Paper HP_WhitePaper_{MethodAbbrev}V{version #} HP_WhitePaper_ELV1.xls Module Map HP_ModMap_{MethodAbbrev}V{version #} HP_ModMap_ELV1.xls Roadmap HP_Roadmap_{MethodAbbrev}V{version #} HP_Roadmap_ELV1.xls Release Notes
HP_RelNotes_{MethodAbbrev}V{version #} HP_RelNotes_ELV1.xls
Tool and Role Attachments Item File Naming Convention Example Tool Attachment
ToolAttach_{ToolName}{#} ToolAttach_ScoringWorkSheet1.xls
Role Attachment
RoleAttach_{RoleName} RoleAttach_ProjectManager.doc
Templates Item File Naming Convention Example MCL Tem_{DeliverableName}{#} Tem_PreliminaryCustomerDataAnalysis1.doc AA TemLoc_{DeliverableName}{#}_{MethodAbbrev}V{ve
rsion #} TemLoc_DataAnalysis1_ELV1.doc
Samples
[Samples cleansed by KM (with “_c” after name) must be renamed to follow proper conventions.] Item File Naming Convention Example MCL Sam_{DeliverableName}{#} Sam_SurveyQuestionnaire1.doc AA SamLoc_{DeliverableName}{#}_{MethodAbbrev}V{ve
rsion #} SamLoc_SurveyQuestionnaire1_ELV1.doc
Copyright WordPronk 2016. All Rights Reserved.

Figures Associated With Components NOTE: Abbreviate as much as possible while being able to easily tell where the figure belongs. Use three to four underscores in names.
Figure Goes With:
File Naming Convention Examples
Role Fig_Role_{role abbrev+fig#}_{FigureName}
Fig_Role_ProjMgr1_MgrHats.ppt Fig_Role_ProjMgr2_MgrResp.xls
[in the Project Manager role] Detailed Procedures
Fig_DP{DP abbrev+fig#}_{FigureName} Fig_DP_EstRes1_OrgStruct.ppt Fig_DP_EstRes2_OrgPieChart.ppt
[two organization diagrams in the detailed procedure, Estimating Resources]
Tool Fig_Tool_{tool abbrev+fig#}_{FigureName}
Fig_Tool_IndustryPrint1_IndustryTypes.ppt Fig_Tool_IndustryPrint2_Industrial.ppt
[in the IndustryPrint tool] MCL Modules
Fig_ModV{module version #}_{module abbrev+fig#}_{FigureName}
Fig_ModV2_DevBusCase1_BCDiagram.ppt Fig_ModV2_DevBusCase2_BCFlow.ppt
[a business case diagram and a flow chart in the second version of the module, Develop Business Case]
AA Modules FigLoc_ModV{module version #}_{module abbrev+fig#}_{FigureName}_{MethodAbbrev}V{version #}
FigLoc_ModV1_DevBusCase1_BCDiagram_ELV1.ppt
FigLoc_ModV1_DevBusCase2_BCFlow_ELV1.ppt [a business case diagram and a flow chart in the first version of the local module, Develop Business Case]
MCL Tasks Fig_TaskV{task version #}_{task abbrev+fig#}_{FigureName}
Fig_TaskV2_CondELWorkshops1_ClassSetup.ppt Fig_TaskV2_CondELWorkshops2_AVEquip.ppt
[classroom setup information in the second version of the MCL task, Conduct Enterprise Learning Workshops]
AA Tasks FigLoc_TaskV_{task version #}_{task abbrev+fig#}_{FigureName}_{MethodAbbrev}V{version #}
FigLoc_TaskV1_CondELWkshps1_StadiumClassSetup_ELV1.ppt
FigLoc_TaskV1_CondELWkshps2_StadiumAVEquip_ELV1.ppt [Stadium classroom setup information in the first version of the local task, Conduct Enterprise Learning Workshops]
Method Abbreviations and Version Numbers
Method Method Abbreviation and Version Number
Competitive Strategy _CSV3 Customer Contact Center _CCCV1 Enterprise Learning _ELV1 FT for Oracle _FTOV4 FT for PeopleSoft _FTPV4 Middleware _MWV1 Program Leadership _PLV3 Project Management _PMMV3 ValuePrint _VPV4
Copyright WordPronk 2016. All Rights Reserved.
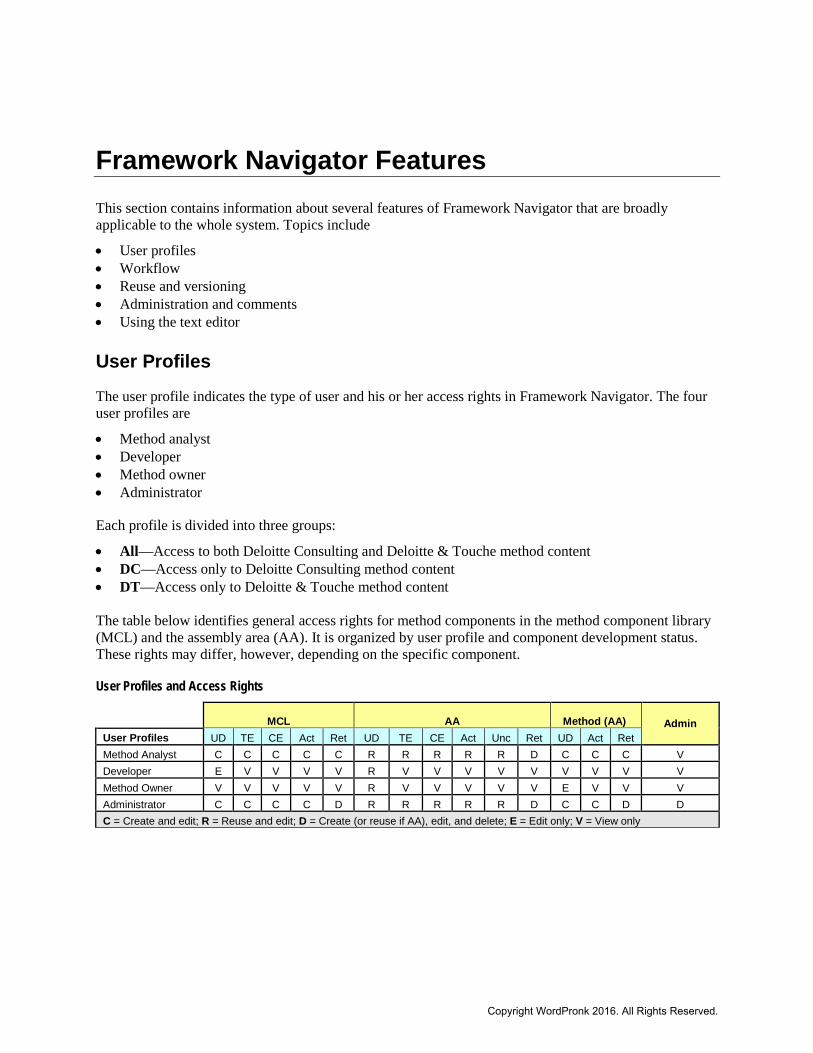
Framework Navigator Features This section contains information about several features of Framework Navigator that are broadly applicable to the whole system. Topics include
• User profiles • Workflow • Reuse and versioning • Administration and comments • Using the text editor
User Profiles
The user profile indicates the type of user and his or her access rights in Framework Navigator. The four user profiles are
• Method analyst • Developer • Method owner • Administrator
Each profile is divided into three groups:
• All—Access to both Deloitte Consulting and Deloitte & Touche method content • DC—Access only to Deloitte Consulting method content • DT—Access only to Deloitte & Touche method content The table below identifies general access rights for method components in the method component library (MCL) and the assembly area (AA). It is organized by user profile and component development status. These rights may differ, however, depending on the specific component.
User Profiles and Access Rights
MCL AA
Method (AA) Admin User Profiles UD TE CE Act Ret UD TE CE Act Unc Ret UD Act Ret Method Analyst C C C C C R R R R R D C C C V Developer E V V V V R V V V V V V V V V Method Owner V V V V V R V V V V V E V V V Administrator C C C C D R R R R R D C C D D C = Create and edit; R = Reuse and edit; D = Create (or reuse if AA), edit, and delete; E = Edit only; V = View only
Copyright WordPronk 2016. All Rights Reserved.
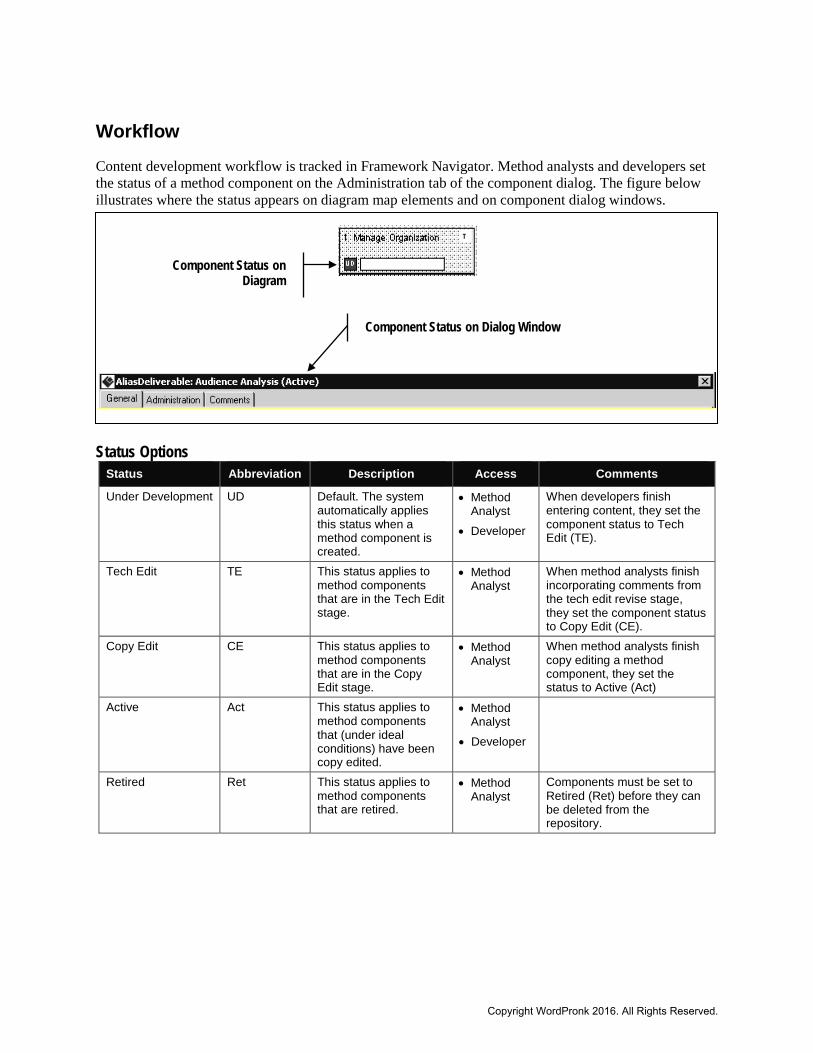
Workflow Content development workflow is tracked in Framework Navigator. Method analysts and developers set the status of a method component on the Administration tab of the component dialog. The figure below illustrates where the status appears on diagram map elements and on component dialog windows.
Status Options
Status Abbreviation Description Access Comments
Under Development UD Default. The system automatically applies this status when a method component is created.
• Method Analyst
• Developer
When developers finish entering content, they set the component status to Tech Edit (TE).
Tech Edit TE This status applies to method components that are in the Tech Edit stage.
• Method Analyst
When method analysts finish incorporating comments from the tech edit revise stage, they set the component status to Copy Edit (CE).
Copy Edit CE This status applies to method components that are in the Copy Edit stage.
• Method Analyst
When method analysts finish copy editing a method component, they set the status to Active (Act)
Active Act This status applies to method components that (under ideal conditions) have been copy edited.
• Method Analyst
• Developer
Retired Ret This status applies to method components that are retired.
• Method Analyst
Components must be set to Retired (Ret) before they can be deleted from the repository.
Component Status on Diagram
Component Status on Dialog Window
Copyright WordPronk 2016. All Rights Reserved.
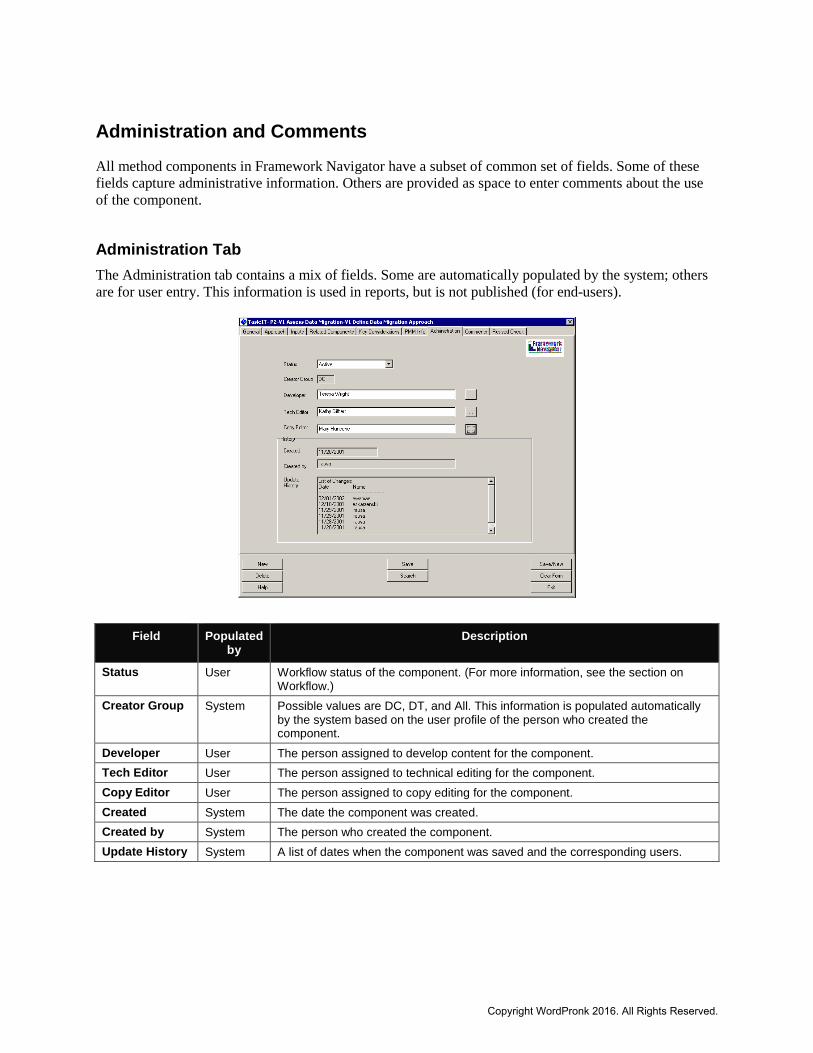
Administration and Comments All method components in Framework Navigator have a subset of common set of fields. Some of these fields capture administrative information. Others are provided as space to enter comments about the use of the component.
Administration Tab The Administration tab contains a mix of fields. Some are automatically populated by the system; others are for user entry. This information is used in reports, but is not published (for end-users).
Field Populated by
Description
Status User Workflow status of the component. (For more information, see the section on Workflow.)
Creator Group System Possible values are DC, DT, and All. This information is populated automatically by the system based on the user profile of the person who created the component.
Developer User The person assigned to develop content for the component. Tech Editor User The person assigned to technical editing for the component. Copy Editor User The person assigned to copy editing for the component. Created System The date the component was created. Created by System The person who created the component. Update History System A list of dates when the component was saved and the corresponding users.
Copyright WordPronk 2016. All Rights Reserved.
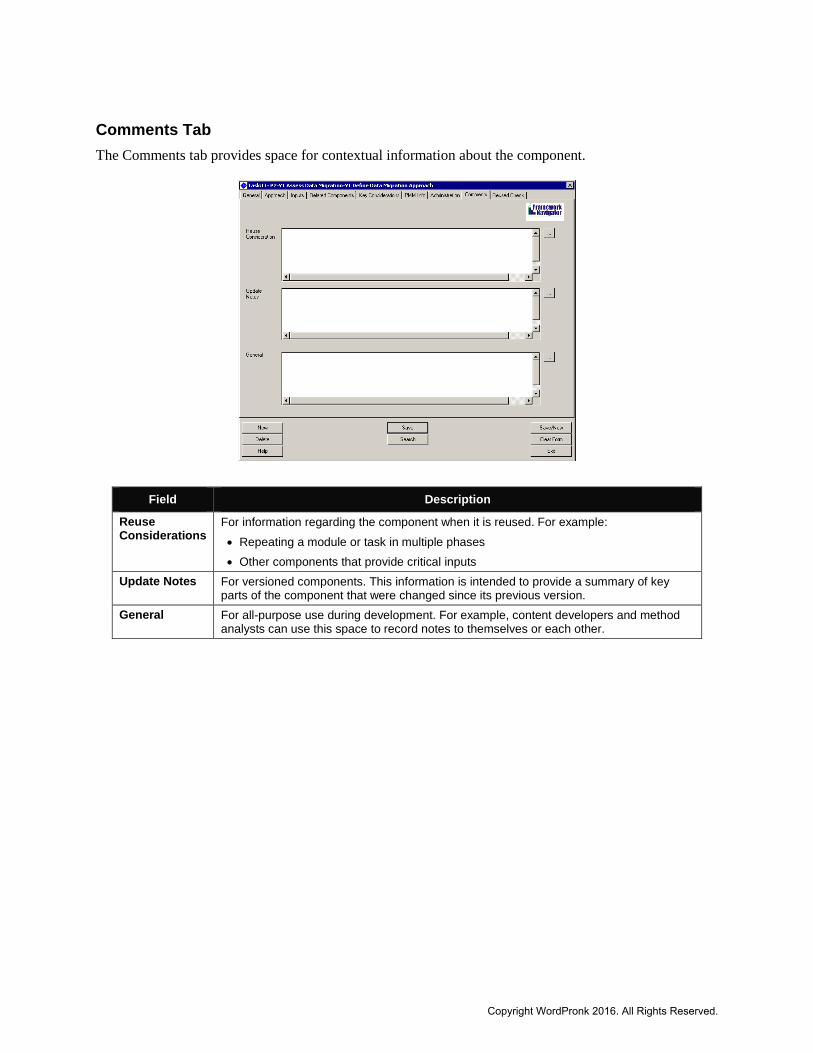
Comments Tab The Comments tab provides space for contextual information about the component.
Field Description
Reuse Considerations
For information regarding the component when it is reused. For example: • Repeating a module or task in multiple phases • Other components that provide critical inputs
Update Notes For versioned components. This information is intended to provide a summary of key parts of the component that were changed since its previous version.
General For all-purpose use during development. For example, content developers and method analysts can use this space to record notes to themselves or each other.
Copyright WordPronk 2016. All Rights Reserved.
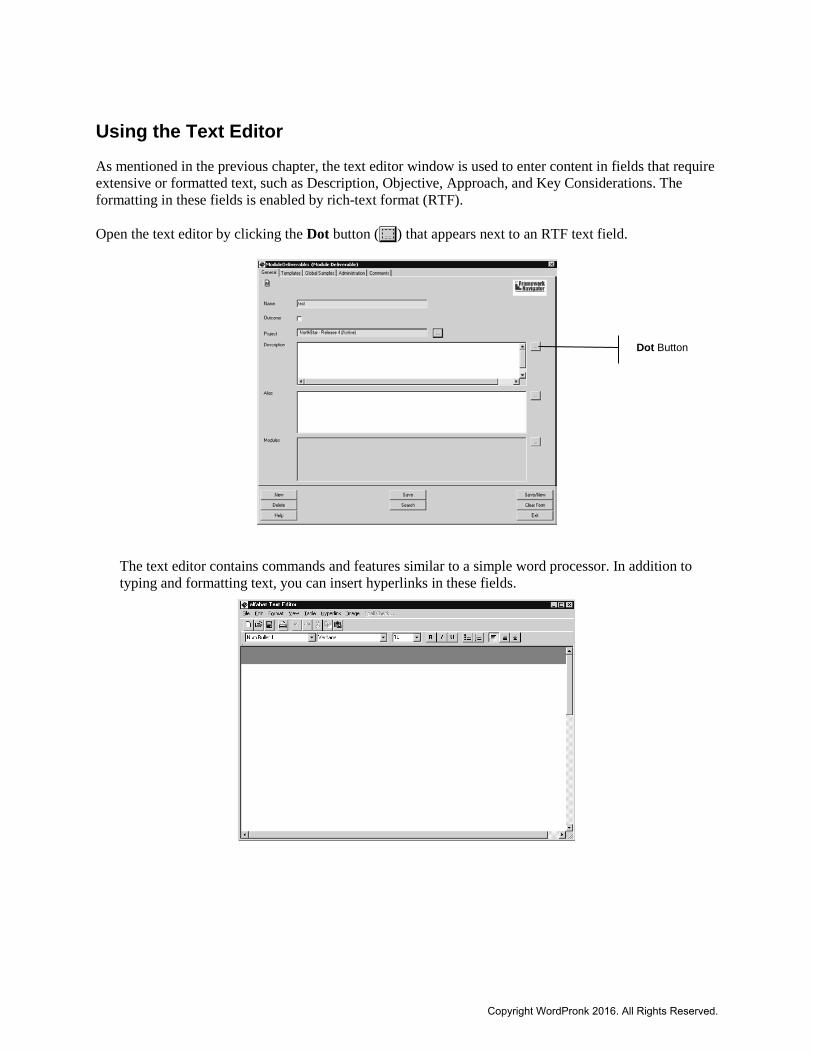
Using the Text Editor As mentioned in the previous chapter, the text editor window is used to enter content in fields that require extensive or formatted text, such as Description, Objective, Approach, and Key Considerations. The formatting in these fields is enabled by rich-text format (RTF). Open the text editor by clicking the Dot button ( ) that appears next to an RTF text field.
The text editor contains commands and features similar to a simple word processor. In addition to typing and formatting text, you can insert hyperlinks in these fields.
Dot Button
Copyright WordPronk 2016. All Rights Reserved.
Formatting with Styles Several default styles have been set up in Framework Navigator to provide a common format for published content. The following table lists the styles and when they are used. Style Usage
Verdana Text Base font and size (Verdana 10) Numbered Step Use for Approach steps Num Bullet 1 Use for 1st-level bullets under Approach steps Num Bullet 2 Use for 2nd-level bullets under Approach steps Bullet 1 Use for 1st-level bullets elsewhere (Key Considerations, Objective, etc.) Bullet 2 Use for 2nd-level bullets elsewhere (Key Considerations, Objective, etc.) Subhead Use for headings within text fields (if you group Key Considerations under a heading, for
example)
Copying and Pasting from Word This is the suggested procedure for copying content that has been developed in another application (such as Word). 1. Make sure you have a copy of the content for reference.
2. Highlight all the text in the field (the open window) and set it to Verdana Text. This overrides all formatting that may have come in from Word and replaces it with correct settings for the font, size, and spacing.
3. Recreate numbered/bulleted paragraphs and subheads using the appropriate styles (based on reference copy you have from step #1).
4. Reapply any other miscellaneous formatting (mostly italics, for things like IndustryPrint, etc.) using the toolbar buttons.
5. Save and close.
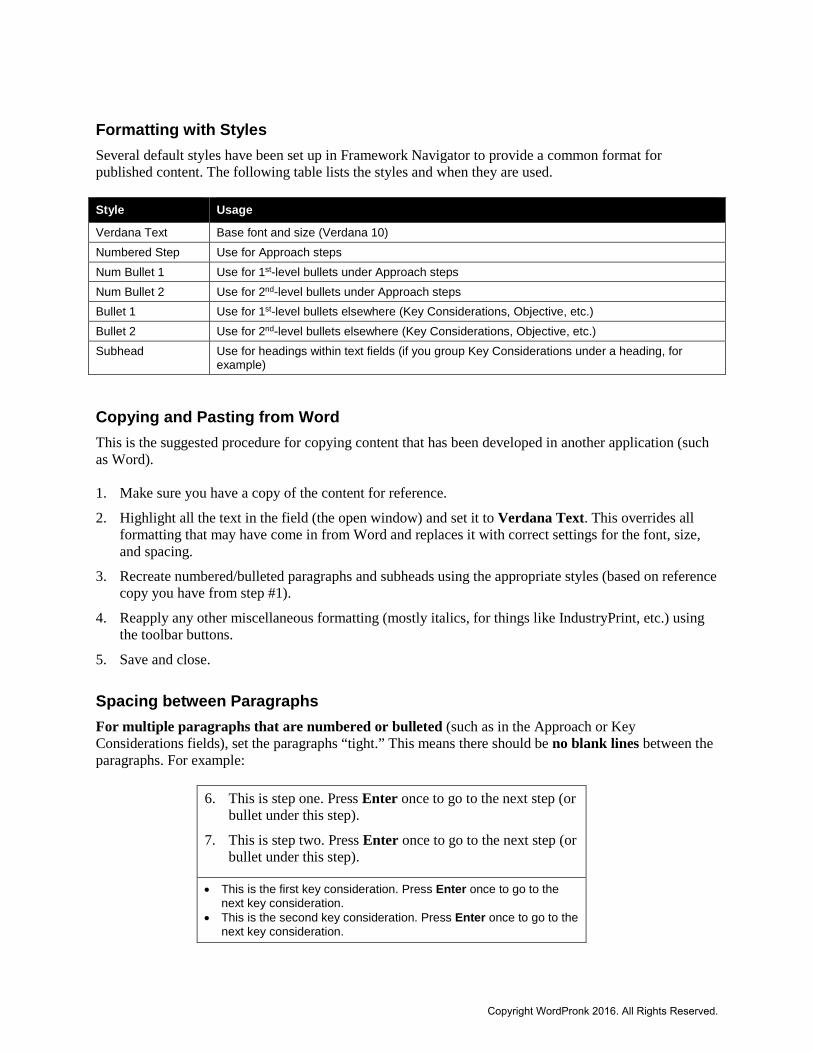
Spacing between Paragraphs For multiple paragraphs that are numbered or bulleted (such as in the Approach or Key Considerations fields), set the paragraphs “tight.” This means there should be no blank lines between the paragraphs. For example:
6. This is step one. Press Enter once to go to the next step (or bullet under this step).
7. This is step two. Press Enter once to go to the next step (or bullet under this step).
• This is the first key consideration. Press Enter once to go to the next key consideration.
• This is the second key consideration. Press Enter once to go to the next key consideration.
Copyright WordPronk 2016. All Rights Reserved.
For multiple paragraphs that are set flush left (such as Objective or Description fields), separate them with a blank line by pressing the Enter key twice. For example:
This is the first paragraph of a Role description. If there are bullets under it, press Enter only ONE time and begin the bullets on the next line. If there is another flush-left paragraph, however, press Enter TWO times to leave a blank line between the flush-left paragraphs. This is the second paragraph of a Role description.
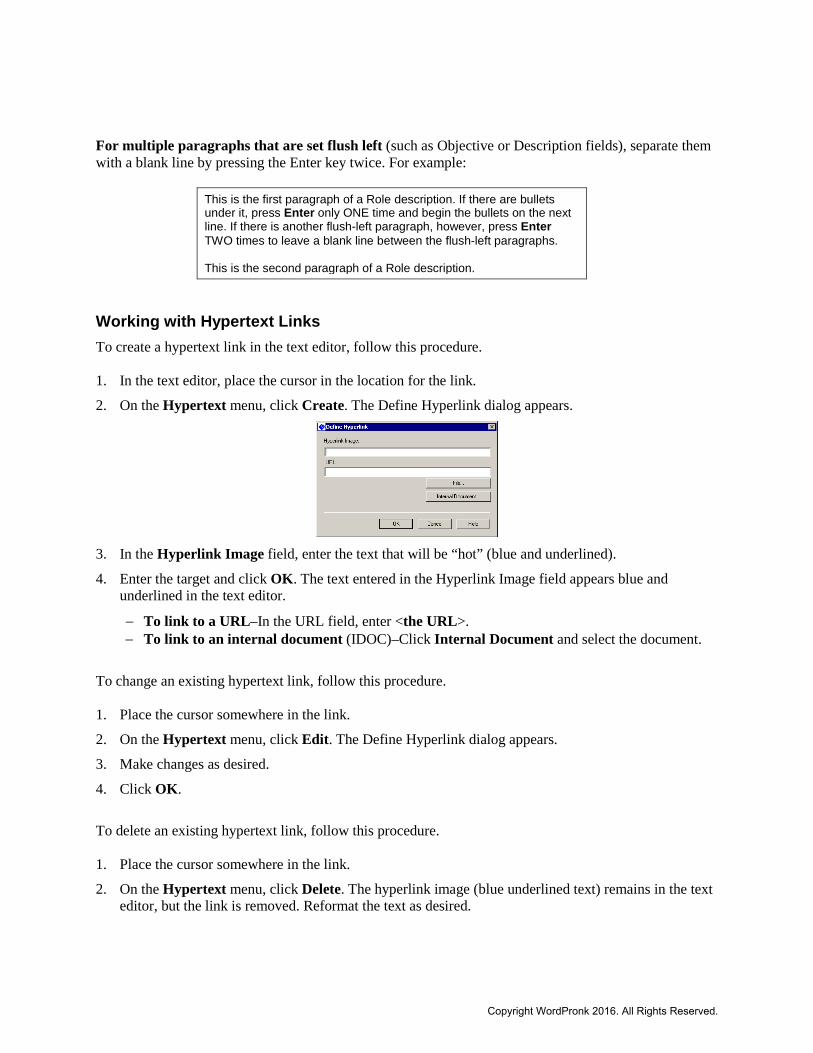
Working with Hypertext Links To create a hypertext link in the text editor, follow this procedure. 1. In the text editor, place the cursor in the location for the link.
2. On the Hypertext menu, click Create. The Define Hyperlink dialog appears.
3. In the Hyperlink Image field, enter the text that will be “hot” (blue and underlined).
4. Enter the target and click OK. The text entered in the Hyperlink Image field appears blue and underlined in the text editor.
− To link to a URL–In the URL field, enter <the URL>. − To link to an internal document (IDOC)–Click Internal Document and select the document.
To change an existing hypertext link, follow this procedure. 1. Place the cursor somewhere in the link.
2. On the Hypertext menu, click Edit. The Define Hyperlink dialog appears.
3. Make changes as desired.
4. Click OK.
To delete an existing hypertext link, follow this procedure. 1. Place the cursor somewhere in the link.
2. On the Hypertext menu, click Delete. The hyperlink image (blue underlined text) remains in the text editor, but the link is removed. Reformat the text as desired.
Copyright WordPronk 2016. All Rights Reserved.

Using the Spell Checker The text editor includes a simple spell checker. To use it, click Spell Check on the menu bar.
Copyright WordPronk 2016. All Rights Reserved.
Creating Global Components in the MCL Global method elements are created and edited in the method component library (MCL) of Framework Navigator. This section describes how method analysts create components in the MCL. The components are usually specified in method framework documents (module map, activities by subject area, and deliverables hierarchy). The following sections describe how to create the various types of method components. Certain components must be created before others in order to provide the appropriate data for required fields. The suggested order of completion follows:
1. Project
2. Content category
3. Thread
4. Phase
5. Module deliverable
6. Task deliverable
7. Task
8. Module
The remaining types of components can be created at any time, in any order:
• Tool • Detailed Procedure • Role • Deliverable alias • Role alias • State change
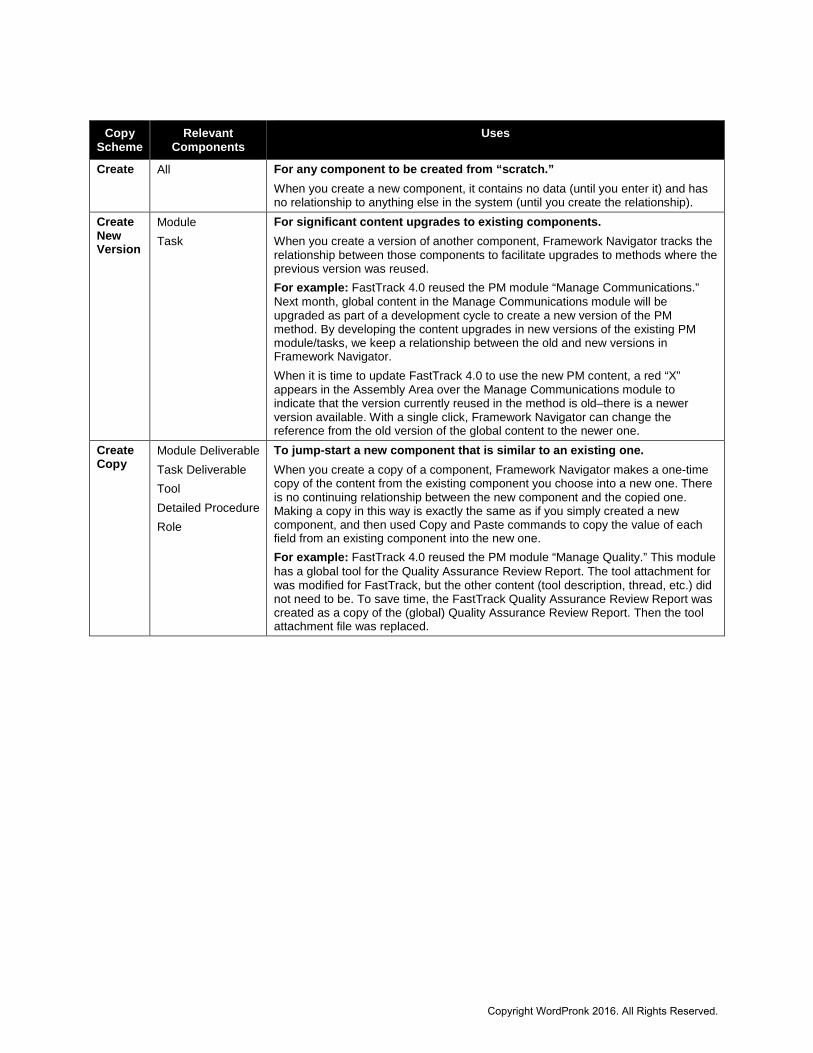
Understanding Copy Schemes (New, Version, Copy) Unless you are upgrading method content, you will usually create components in the MCL as new components. However, sometimes you will create a new component as a version or a copy of an existing component. These choices are called “copy schemes.” The following table describes copy schemes. Note: Not all components have a choice of copy schemes; and only modules and tasks have the option for versioning.
Copyright WordPronk 2016. All Rights Reserved.
Copy Scheme
Relevant Components
Uses
Create All For any component to be created from “scratch.” When you create a new component, it contains no data (until you enter it) and has no relationship to anything else in the system (until you create the relationship).
Create New Version
Module Task
For significant content upgrades to existing components. When you create a version of another component, Framework Navigator tracks the relationship between those components to facilitate upgrades to methods where the previous version was reused. For example: FastTrack 4.0 reused the PM module “Manage Communications.” Next month, global content in the Manage Communications module will be upgraded as part of a development cycle to create a new version of the PM method. By developing the content upgrades in new versions of the existing PM module/tasks, we keep a relationship between the old and new versions in Framework Navigator. When it is time to update FastTrack 4.0 to use the new PM content, a red “X” appears in the Assembly Area over the Manage Communications module to indicate that the version currently reused in the method is old–there is a newer version available. With a single click, Framework Navigator can change the reference from the old version of the global content to the newer one.
Create Copy
Module Deliverable Task Deliverable Tool Detailed Procedure Role
To jump-start a new component that is similar to an existing one. When you create a copy of a component, Framework Navigator makes a one-time copy of the content from the existing component you choose into a new one. There is no continuing relationship between the new component and the copied one. Making a copy in this way is exactly the same as if you simply created a new component, and then used Copy and Paste commands to copy the value of each field from an existing component into the new one. For example: FastTrack 4.0 reused the PM module “Manage Quality.” This module has a global tool for the Quality Assurance Review Report. The tool attachment for was modified for FastTrack, but the other content (tool description, thread, etc.) did not need to be. To save time, the FastTrack Quality Assurance Review Report was created as a copy of the (global) Quality Assurance Review Report. Then the tool attachment file was replaced.
Copyright WordPronk 2016. All Rights Reserved.
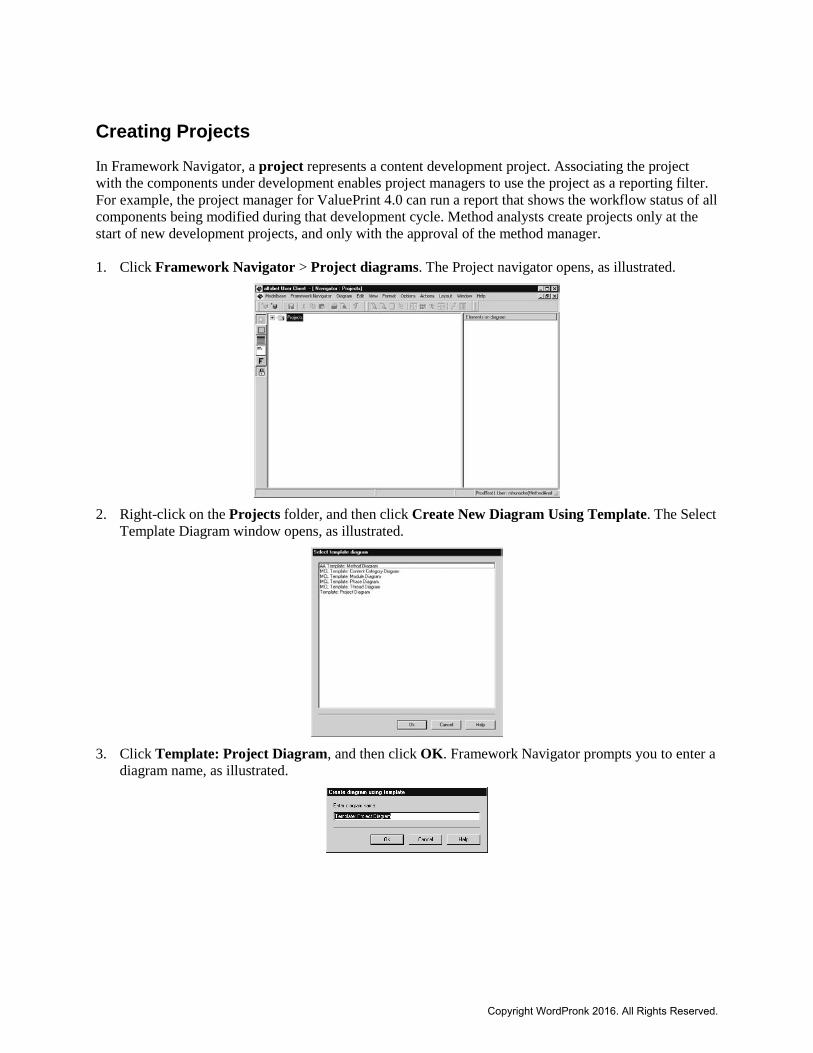
Creating Projects In Framework Navigator, a project represents a content development project. Associating the project with the components under development enables project managers to use the project as a reporting filter. For example, the project manager for ValuePrint 4.0 can run a report that shows the workflow status of all components being modified during that development cycle. Method analysts create projects only at the start of new development projects, and only with the approval of the method manager. 1. Click Framework Navigator > Project diagrams. The Project navigator opens, as illustrated.
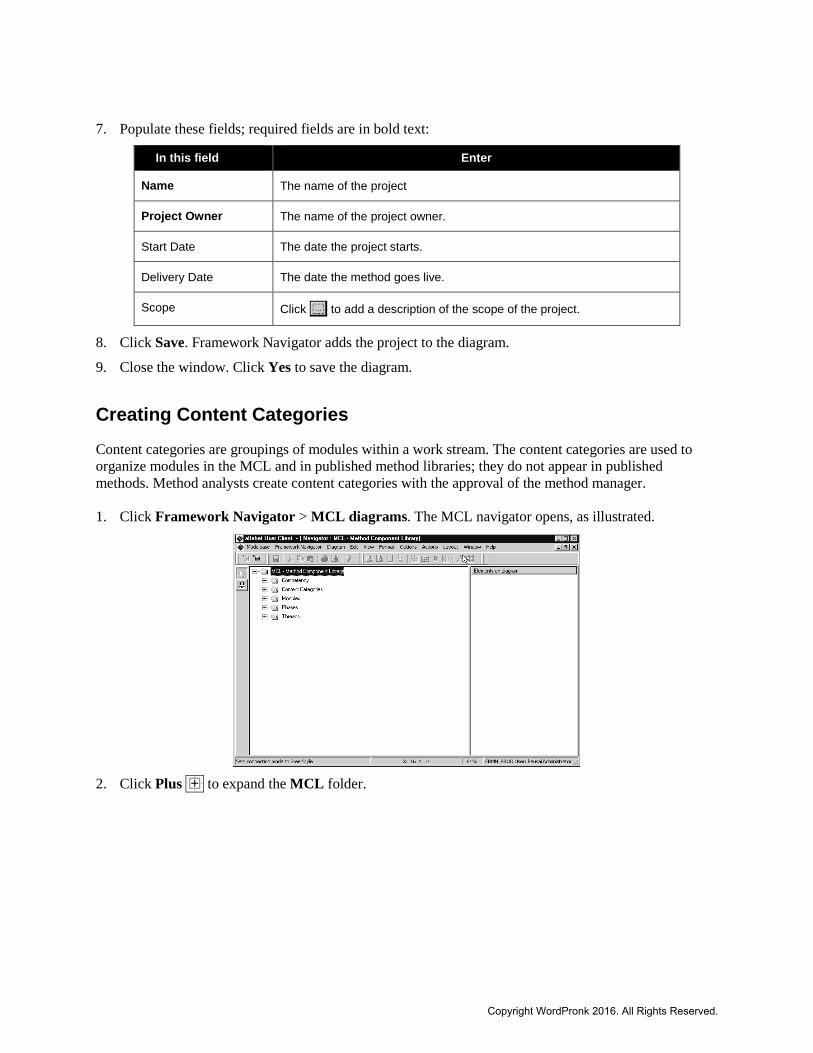
2. Right-click on the Projects folder, and then click Create New Diagram Using Template. The Select
Template Diagram window opens, as illustrated.
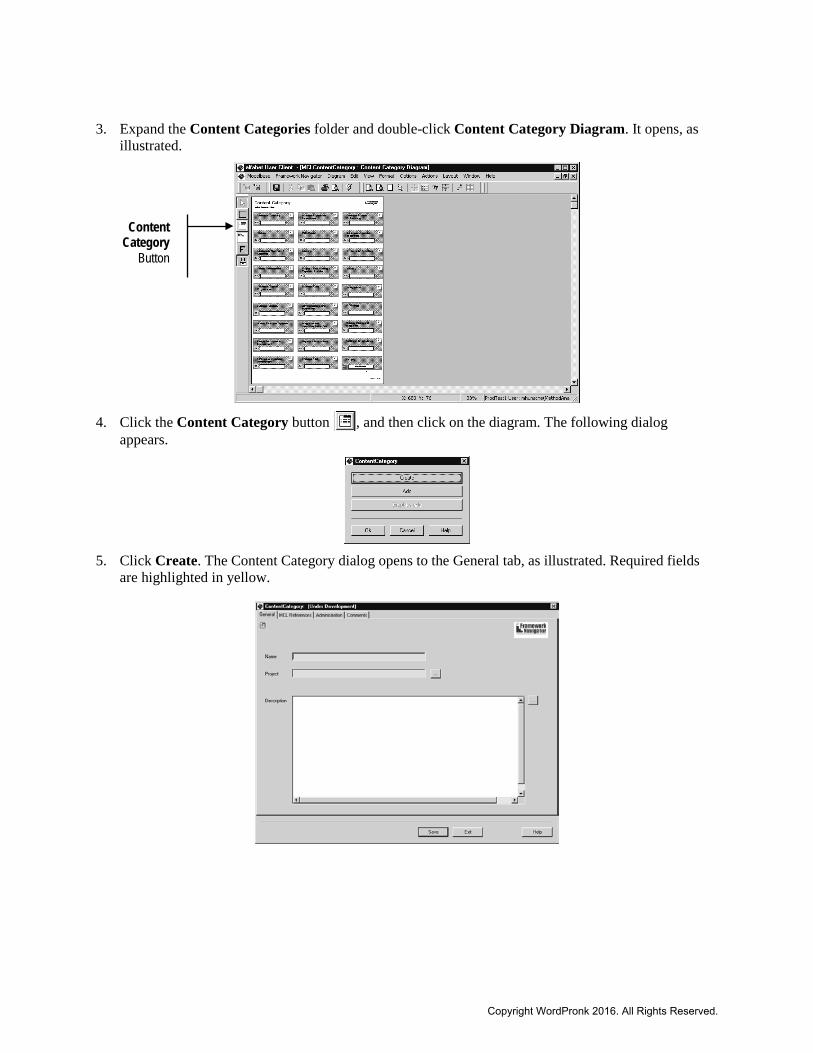
3. Click Template: Project Diagram, and then click OK. Framework Navigator prompts you to enter a
diagram name, as illustrated.
Copyright WordPronk 2016. All Rights Reserved.

Copyright WordPronk 2016. All Rights Reserved.

4. Enter the project name and click OK. The project diagram appears, as illustrated.
5. Click the Project button , and then click on the empty page. This window opens.
6. Click Create. The Project dialog opens to the General tab, as illustrated. Required fields are
highlighted in yellow.
Project button
Copyright WordPronk 2016. All Rights Reserved.
7. Populate these fields; required fields are in bold text:
In this field Enter
Name The name of the project
Project Owner The name of the project owner.
Start Date The date the project starts.
Delivery Date The date the method goes live.
Scope Click to add a description of the scope of the project.
8. Click Save. Framework Navigator adds the project to the diagram.
9. Close the window. Click Yes to save the diagram.
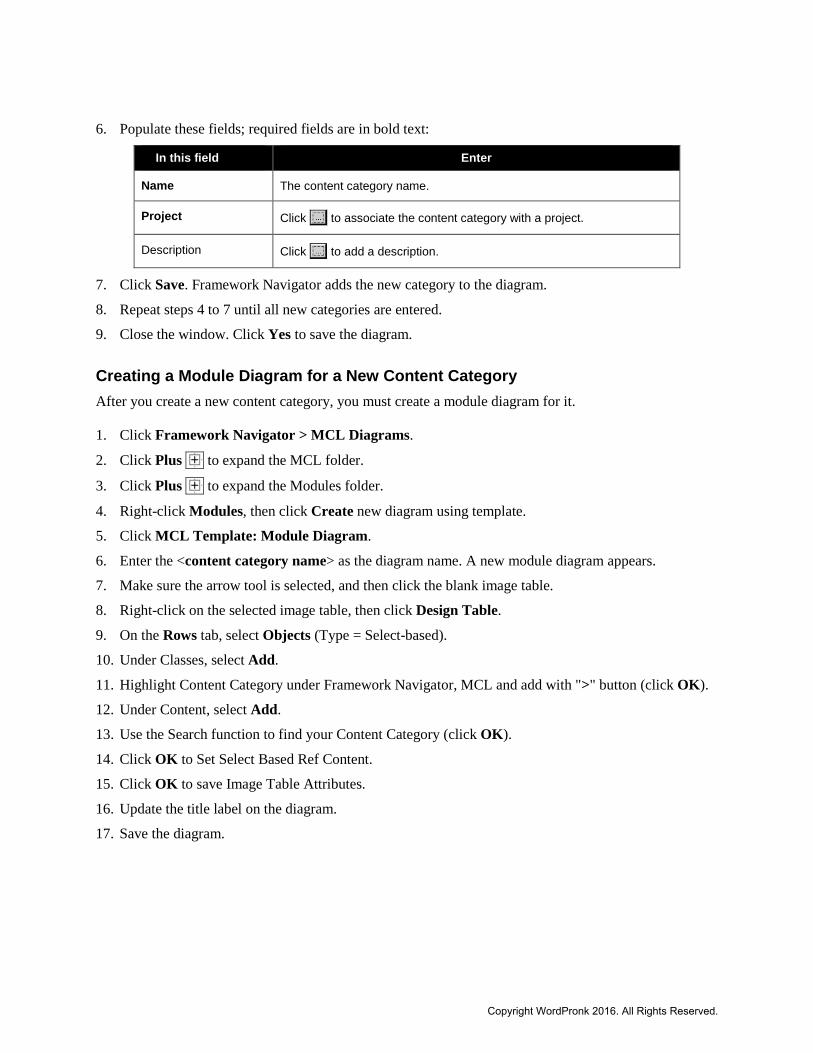
Creating Content Categories Content categories are groupings of modules within a work stream. The content categories are used to organize modules in the MCL and in published method libraries; they do not appear in published methods. Method analysts create content categories with the approval of the method manager. 1. Click Framework Navigator > MCL diagrams. The MCL navigator opens, as illustrated.
2. Click Plus to expand the MCL folder.
Copyright WordPronk 2016. All Rights Reserved.
3. Expand the Content Categories folder and double-click Content Category Diagram. It opens, as illustrated.
4. Click the Content Category button , and then click on the diagram. The following dialog
appears.
5. Click Create. The Content Category dialog opens to the General tab, as illustrated. Required fields
are highlighted in yellow.
Content Category
Button
Copyright WordPronk 2016. All Rights Reserved.
6. Populate these fields; required fields are in bold text:
In this field Enter
Name The content category name.
Project Click to associate the content category with a project.
Description Click to add a description.
7. Click Save. Framework Navigator adds the new category to the diagram.
8. Repeat steps 4 to 7 until all new categories are entered.
9. Close the window. Click Yes to save the diagram.
Creating a Module Diagram for a New Content Category After you create a new content category, you must create a module diagram for it. 1. Click Framework Navigator > MCL Diagrams.
2. Click Plus to expand the MCL folder.
3. Click Plus to expand the Modules folder.
4. Right-click Modules, then click Create new diagram using template.
5. Click MCL Template: Module Diagram.
6. Enter the <content category name> as the diagram name. A new module diagram appears.
7. Make sure the arrow tool is selected, and then click the blank image table.
8. Right-click on the selected image table, then click Design Table.
9. On the Rows tab, select Objects (Type = Select-based).
10. Under Classes, select Add.
11. Highlight Content Category under Framework Navigator, MCL and add with ">" button (click OK).
12. Under Content, select Add.
13. Use the Search function to find your Content Category (click OK).
14. Click OK to Set Select Based Ref Content.
15. Click OK to save Image Table Attributes.
16. Update the title label on the diagram.
17. Save the diagram.
Copyright WordPronk 2016. All Rights Reserved.
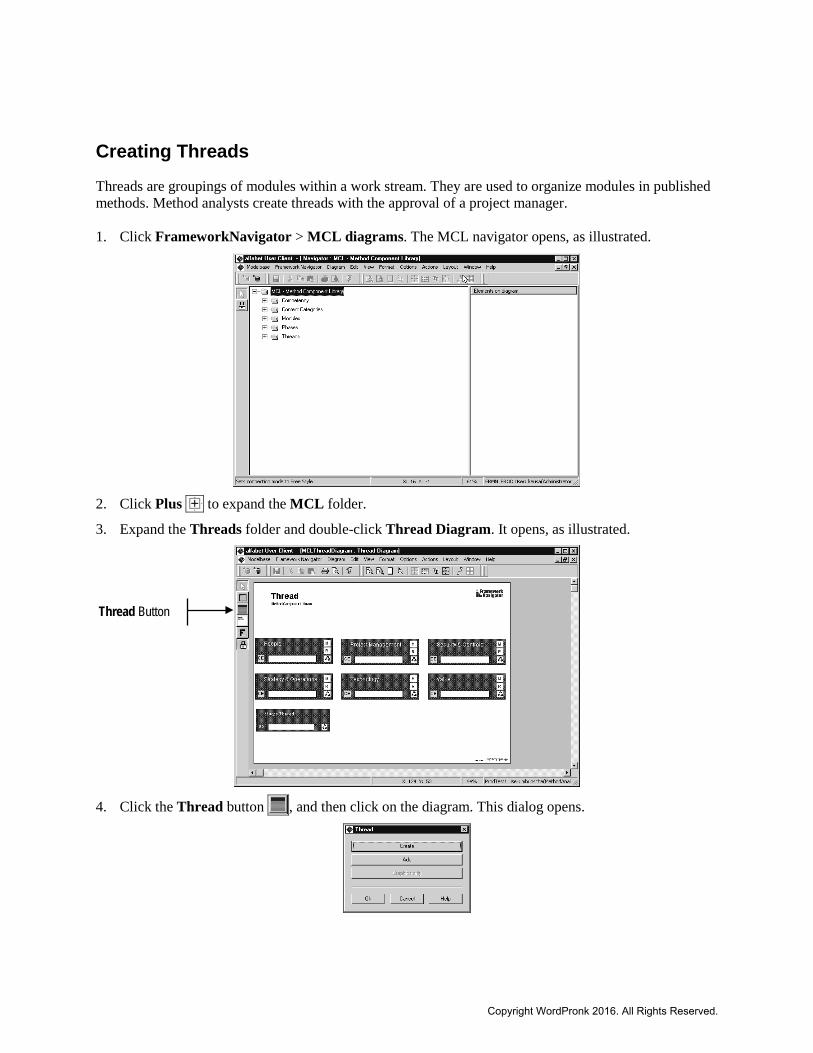
Creating Threads Threads are groupings of modules within a work stream. They are used to organize modules in published methods. Method analysts create threads with the approval of a project manager. 1. Click FrameworkNavigator > MCL diagrams. The MCL navigator opens, as illustrated.
2. Click Plus to expand the MCL folder.
3. Expand the Threads folder and double-click Thread Diagram. It opens, as illustrated.
4. Click the Thread button , and then click on the diagram. This dialog opens.
Thread Button
Copyright WordPronk 2016. All Rights Reserved.
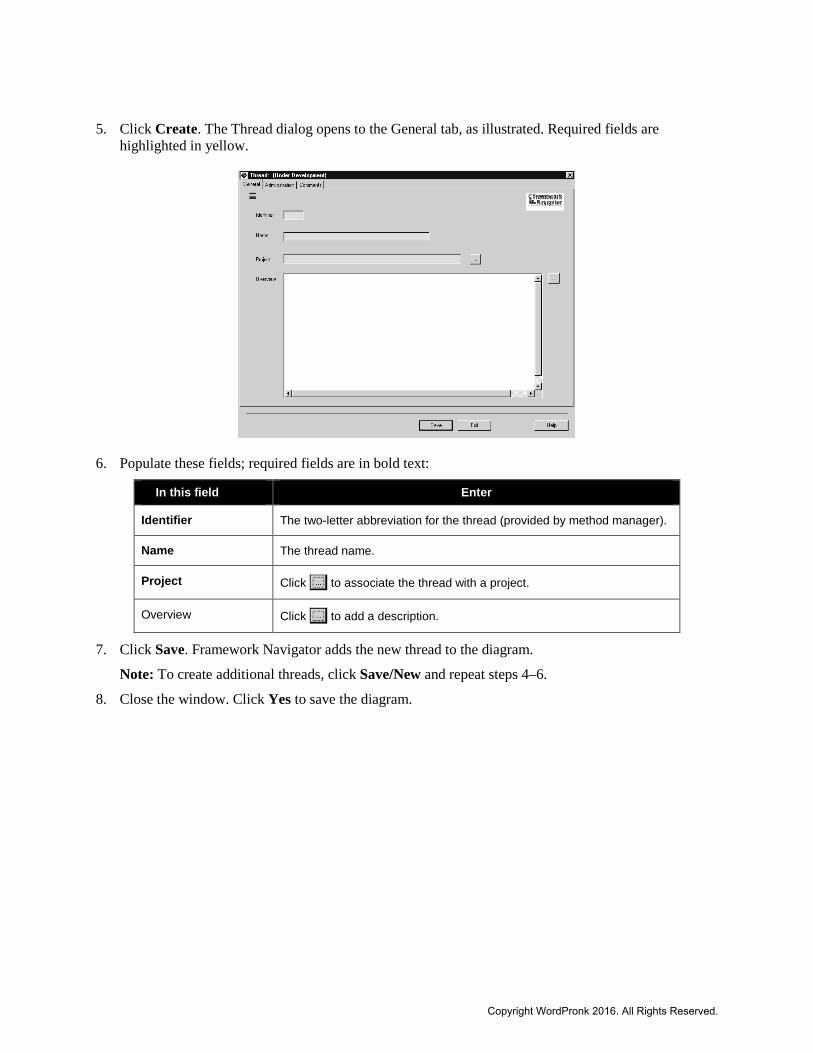
5. Click Create. The Thread dialog opens to the General tab, as illustrated. Required fields are highlighted in yellow.
6. Populate these fields; required fields are in bold text:
In this field Enter
Identifier The two-letter abbreviation for the thread (provided by method manager).
Name The thread name.
Project Click to associate the thread with a project.
Overview Click to add a description.
7. Click Save. Framework Navigator adds the new thread to the diagram.
Note: To create additional threads, click Save/New and repeat steps 4–6.
8. Close the window. Click Yes to save the diagram.
Copyright WordPronk 2016. All Rights Reserved.
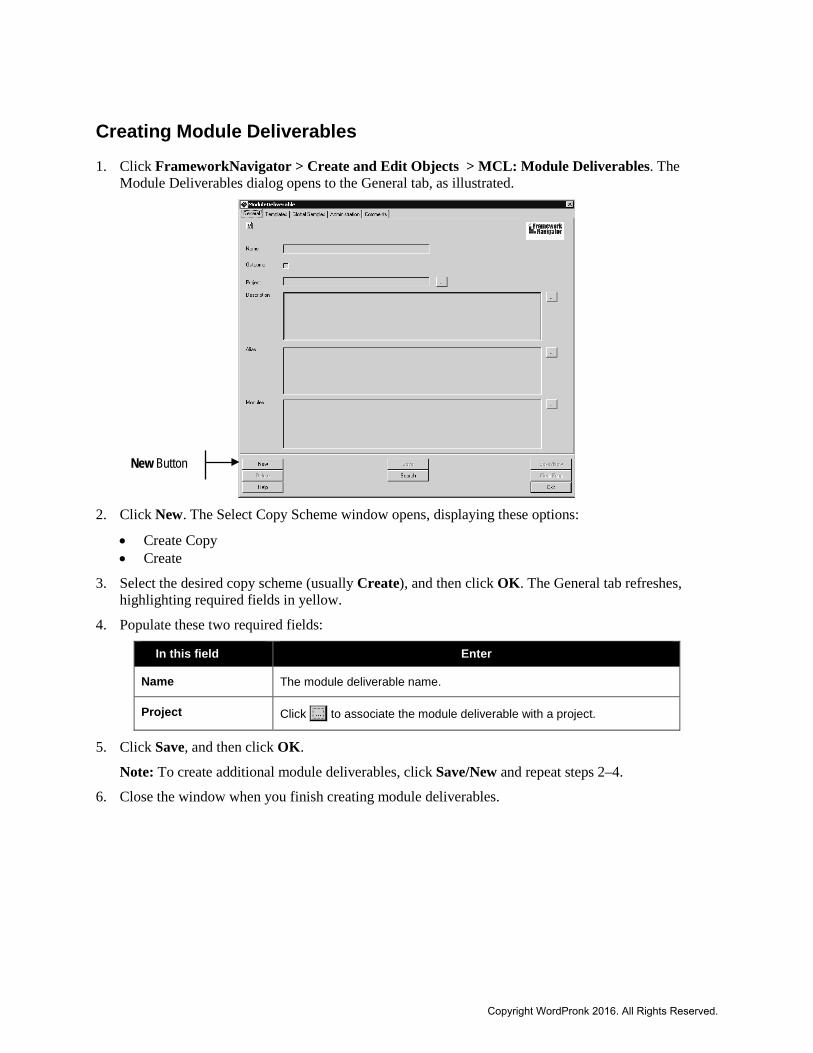
Creating Module Deliverables 1. Click FrameworkNavigator > Create and Edit Objects > MCL: Module Deliverables. The
Module Deliverables dialog opens to the General tab, as illustrated.
2. Click New. The Select Copy Scheme window opens, displaying these options:
• Create Copy • Create
3. Select the desired copy scheme (usually Create), and then click OK. The General tab refreshes, highlighting required fields in yellow.
4. Populate these two required fields:
In this field Enter
Name The module deliverable name.
Project Click to associate the module deliverable with a project.
5. Click Save, and then click OK.
Note: To create additional module deliverables, click Save/New and repeat steps 2–4.
6. Close the window when you finish creating module deliverables.
New Button
Copyright WordPronk 2016. All Rights Reserved.
Creating Task Deliverables Follow this procedure to add task deliverables to the MCL.
1. Click FrameworkNavigator > Create and Edit Objects > MCL: Task Deliverables. The Task Deliverable dialog opens to the General tab.
2. Click New. The Select Copy Scheme window opens, displaying these options:
• Create Copy • Create
3. Select the desired copy scheme (usually Create), and then click OK. The General tab refreshes, highlighting required fields in yellow.
4. Complete the two required fields:
In this field Enter
Name The task deliverable name.
Project Click to associate the task deliverable with a project.
5. Click Save, and then click OK.
Note: To create additional task deliverables, click Save/New and repeat steps 2–4.
6. Close the window when you finish creating task deliverables.
Copyright WordPronk 2016. All Rights Reserved.
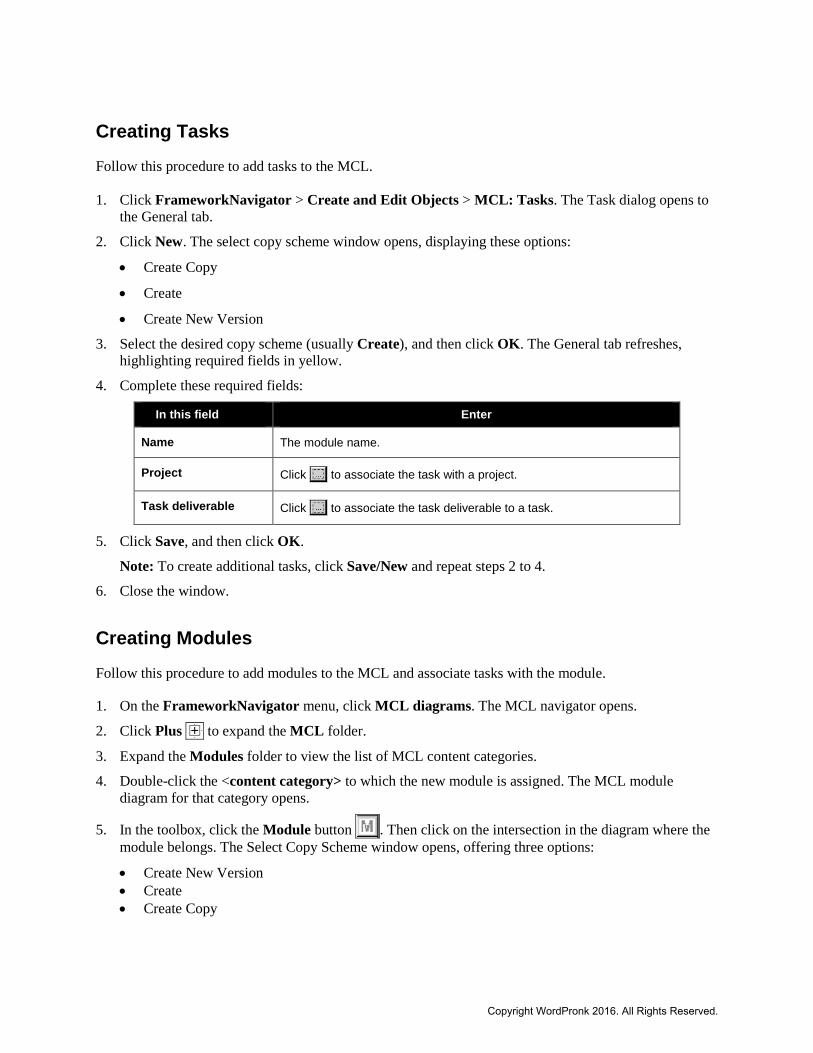
Creating Tasks Follow this procedure to add tasks to the MCL. 1. Click FrameworkNavigator > Create and Edit Objects > MCL: Tasks. The Task dialog opens to
the General tab.
2. Click New. The select copy scheme window opens, displaying these options:
• Create Copy
• Create
• Create New Version
3. Select the desired copy scheme (usually Create), and then click OK. The General tab refreshes, highlighting required fields in yellow.
4. Complete these required fields:
In this field Enter
Name The module name.
Project Click to associate the task with a project.
Task deliverable Click to associate the task deliverable to a task.
5. Click Save, and then click OK.
Note: To create additional tasks, click Save/New and repeat steps 2 to 4.
6. Close the window.
Creating Modules
Follow this procedure to add modules to the MCL and associate tasks with the module.
1. On the FrameworkNavigator menu, click MCL diagrams. The MCL navigator opens.
2. Click Plus to expand the MCL folder.
3. Expand the Modules folder to view the list of MCL content categories.
4. Double-click the <content category> to which the new module is assigned. The MCL module diagram for that category opens.
5. In the toolbox, click the Module button . Then click on the intersection in the diagram where the module belongs. The Select Copy Scheme window opens, offering three options:
• Create New Version • Create • Create Copy
Copyright WordPronk 2016. All Rights Reserved.
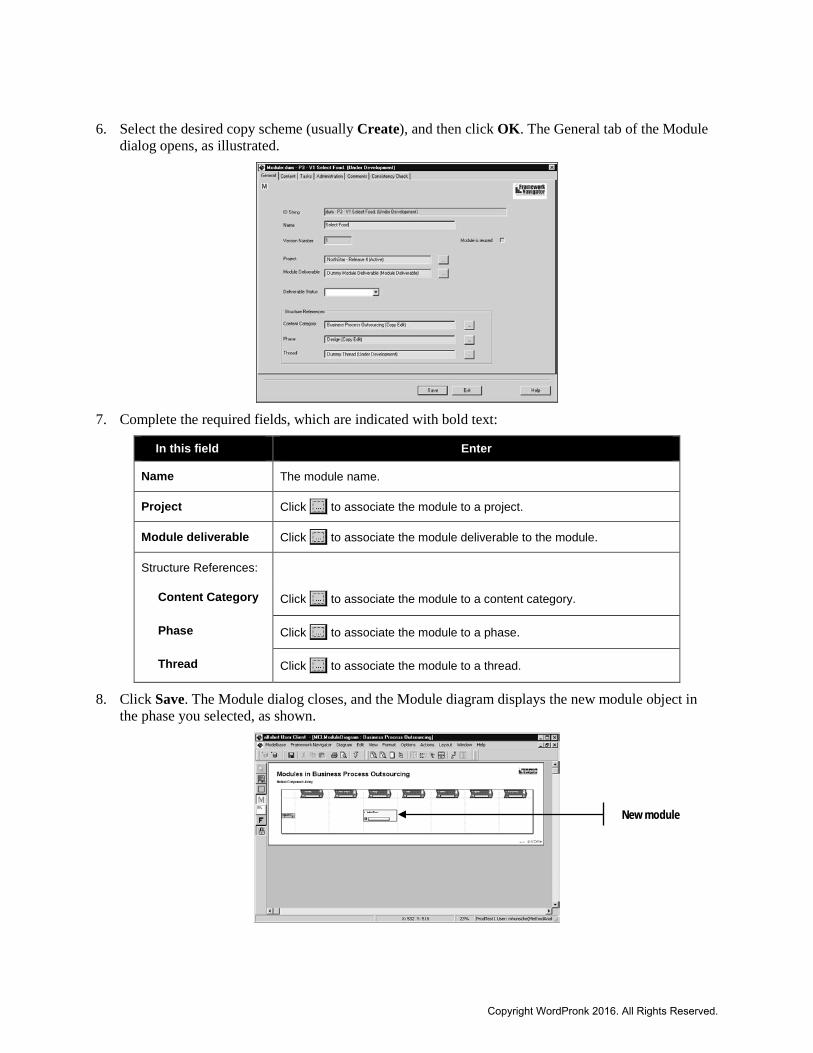
6. Select the desired copy scheme (usually Create), and then click OK. The General tab of the Module dialog opens, as illustrated.
7. Complete the required fields, which are indicated with bold text:
In this field Enter
Name The module name.
Project Click to associate the module to a project.
Module deliverable Click to associate the module deliverable to the module.
Structure References:
Content Category Click to associate the module to a content category.
Phase Click to associate the module to a phase.
Thread Click to associate the module to a thread.
8. Click Save. The Module dialog closes, and the Module diagram displays the new module object in the phase you selected, as shown.
New module
Copyright WordPronk 2016. All Rights Reserved.
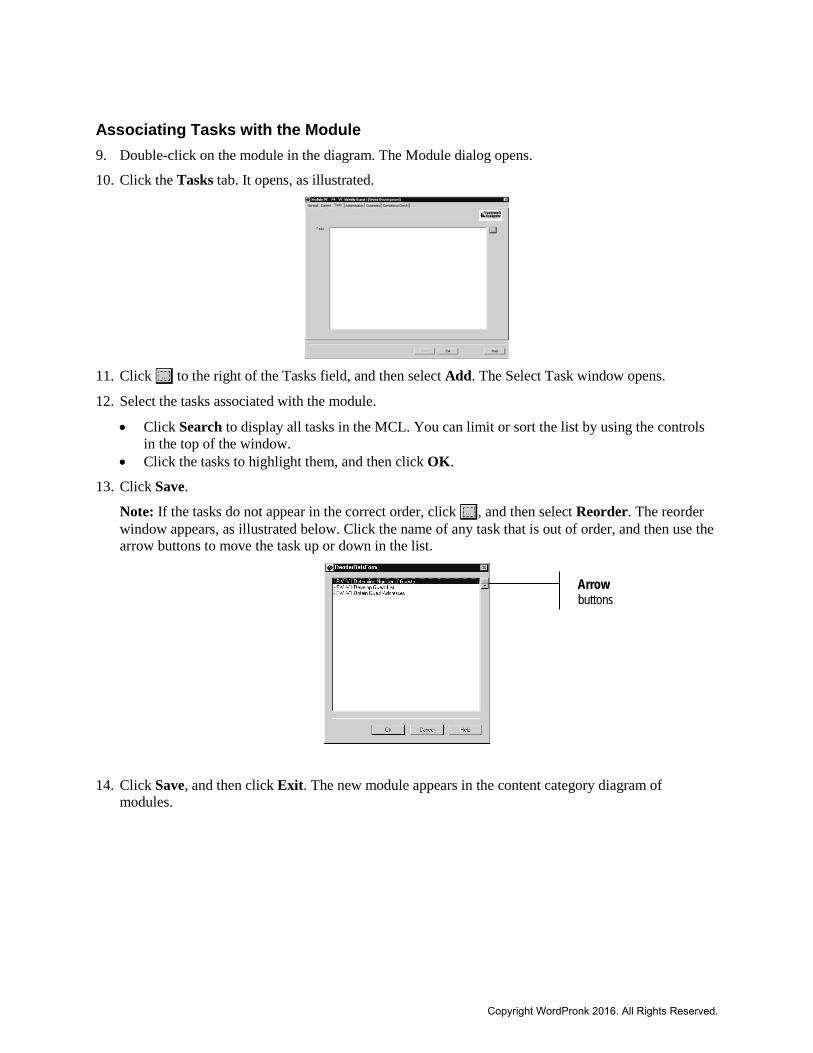
Associating Tasks with the Module 9. Double-click on the module in the diagram. The Module dialog opens.
10. Click the Tasks tab. It opens, as illustrated.
11. Click to the right of the Tasks field, and then select Add. The Select Task window opens.
12. Select the tasks associated with the module.
• Click Search to display all tasks in the MCL. You can limit or sort the list by using the controls in the top of the window.
• Click the tasks to highlight them, and then click OK.
13. Click Save.
Note: If the tasks do not appear in the correct order, click , and then select Reorder. The reorder window appears, as illustrated below. Click the name of any task that is out of order, and then use the arrow buttons to move the task up or down in the list.
14. Click Save, and then click Exit. The new module appears in the content category diagram of modules.
Arrow buttons
Copyright WordPronk 2016. All Rights Reserved.
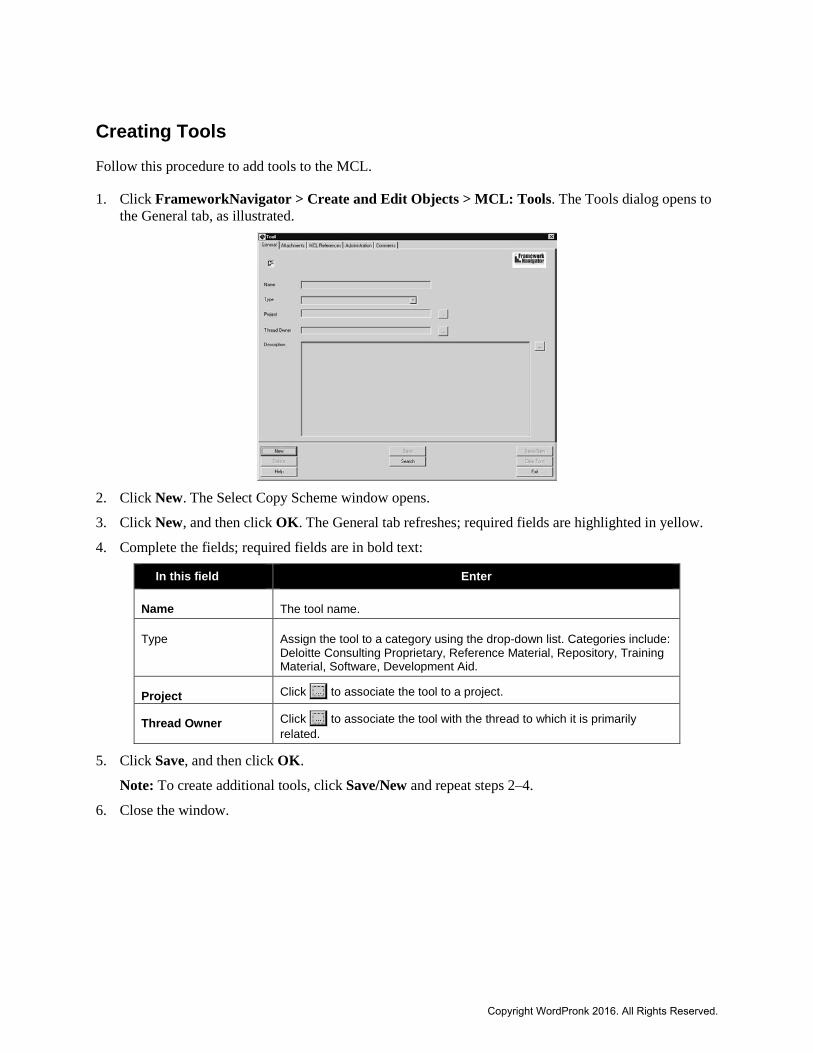
Creating Tools Follow this procedure to add tools to the MCL.
1. Click FrameworkNavigator > Create and Edit Objects > MCL: Tools. The Tools dialog opens to the General tab, as illustrated.
2. Click New. The Select Copy Scheme window opens.
3. Click New, and then click OK. The General tab refreshes; required fields are highlighted in yellow.
4. Complete the fields; required fields are in bold text:
In this field Enter
Name The tool name.
Type Assign the tool to a category using the drop-down list. Categories include: Deloitte Consulting Proprietary, Reference Material, Repository, Training Material, Software, Development Aid.
Project Click to associate the tool to a project.
Thread Owner Click to associate the tool with the thread to which it is primarily related.
5. Click Save, and then click OK.
Note: To create additional tools, click Save/New and repeat steps 2–4.
6. Close the window.
Copyright WordPronk 2016. All Rights Reserved.
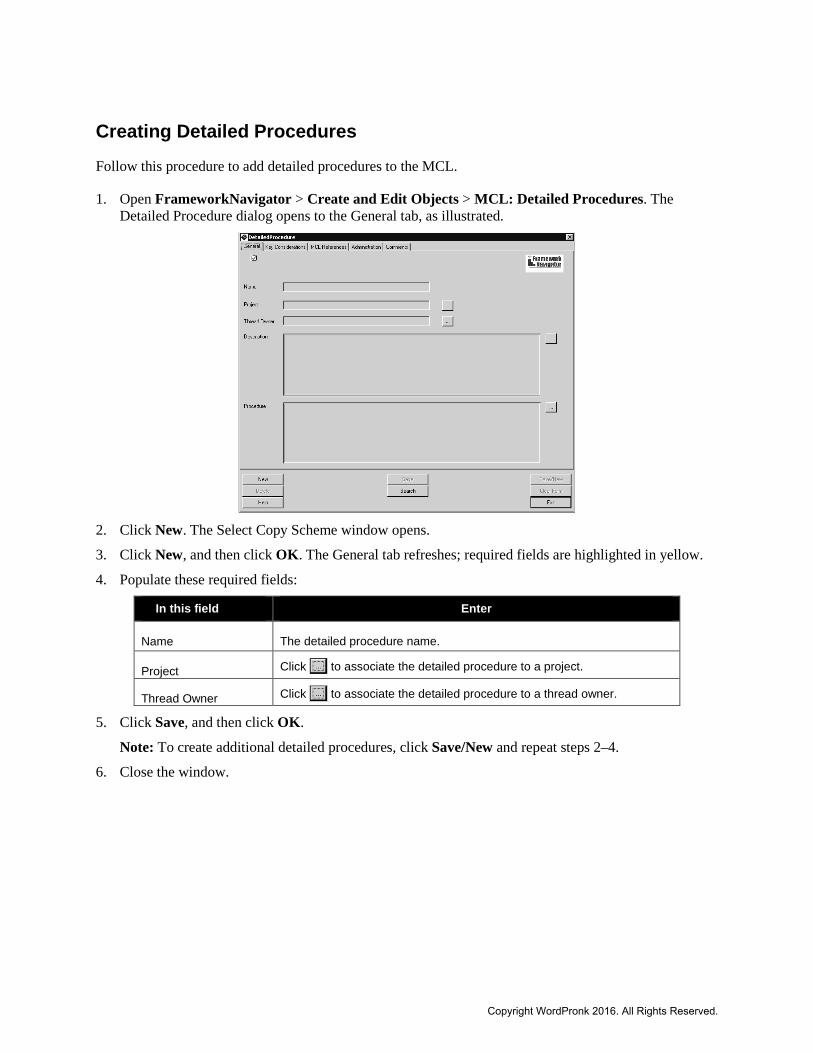
Creating Detailed Procedures Follow this procedure to add detailed procedures to the MCL.
1. Open FrameworkNavigator > Create and Edit Objects > MCL: Detailed Procedures. The Detailed Procedure dialog opens to the General tab, as illustrated.
2. Click New. The Select Copy Scheme window opens.
3. Click New, and then click OK. The General tab refreshes; required fields are highlighted in yellow.
4. Populate these required fields:
In this field Enter
Name The detailed procedure name.
Project Click to associate the detailed procedure to a project.
Thread Owner Click to associate the detailed procedure to a thread owner.
5. Click Save, and then click OK.
Note: To create additional detailed procedures, click Save/New and repeat steps 2–4.
6. Close the window.
Copyright WordPronk 2016. All Rights Reserved.
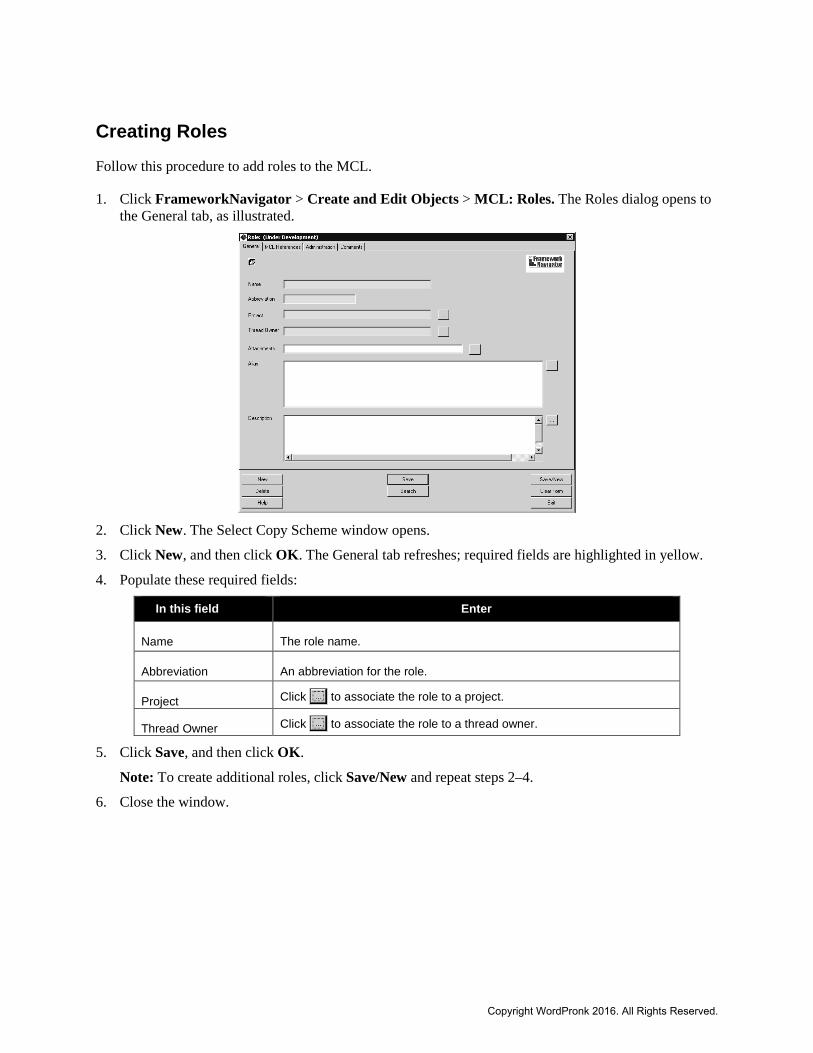
Creating Roles Follow this procedure to add roles to the MCL.
1. Click FrameworkNavigator > Create and Edit Objects > MCL: Roles. The Roles dialog opens to the General tab, as illustrated.
2. Click New. The Select Copy Scheme window opens.
3. Click New, and then click OK. The General tab refreshes; required fields are highlighted in yellow.
4. Populate these required fields:
In this field Enter
Name The role name.
Abbreviation An abbreviation for the role.
Project Click to associate the role to a project.
Thread Owner Click to associate the role to a thread owner.
5. Click Save, and then click OK.
Note: To create additional roles, click Save/New and repeat steps 2–4.
6. Close the window.
Copyright WordPronk 2016. All Rights Reserved.
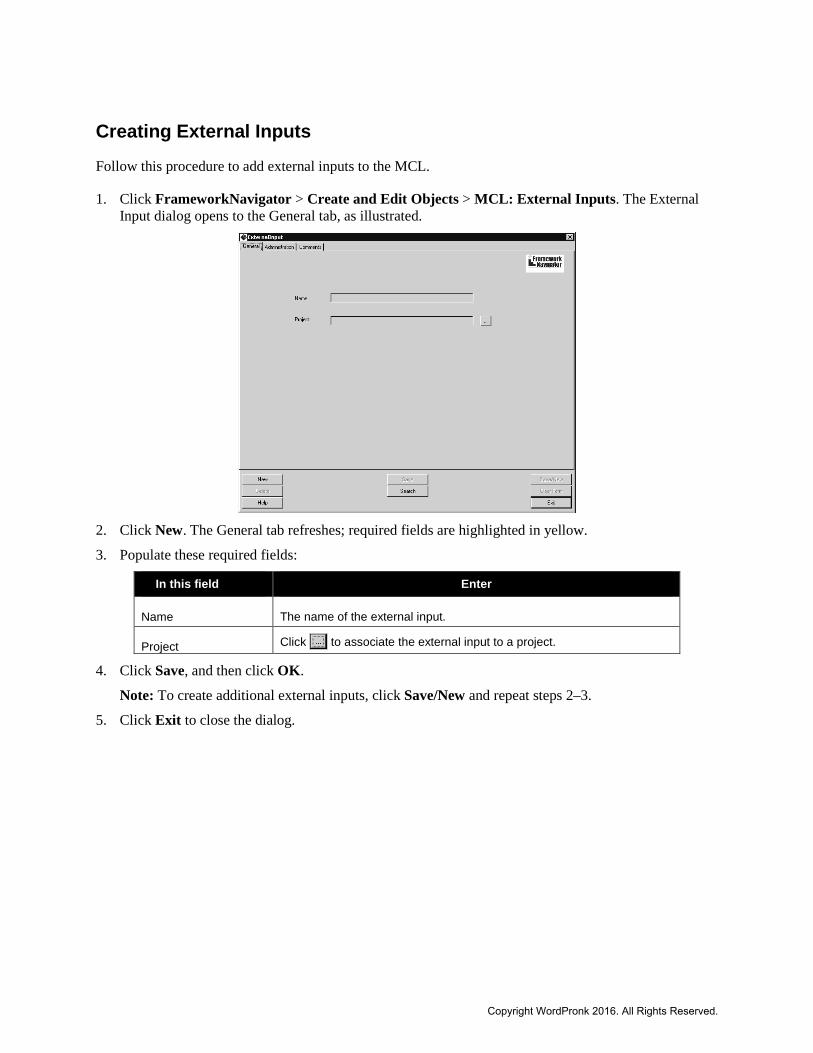
Creating External Inputs Follow this procedure to add external inputs to the MCL.
1. Click FrameworkNavigator > Create and Edit Objects > MCL: External Inputs. The External Input dialog opens to the General tab, as illustrated.
2. Click New. The General tab refreshes; required fields are highlighted in yellow.
3. Populate these required fields:
In this field Enter
Name The name of the external input.
Project Click to associate the external input to a project.
4. Click Save, and then click OK.
Note: To create additional external inputs, click Save/New and repeat steps 2–3.
5. Click Exit to close the dialog.
Copyright WordPronk 2016. All Rights Reserved.
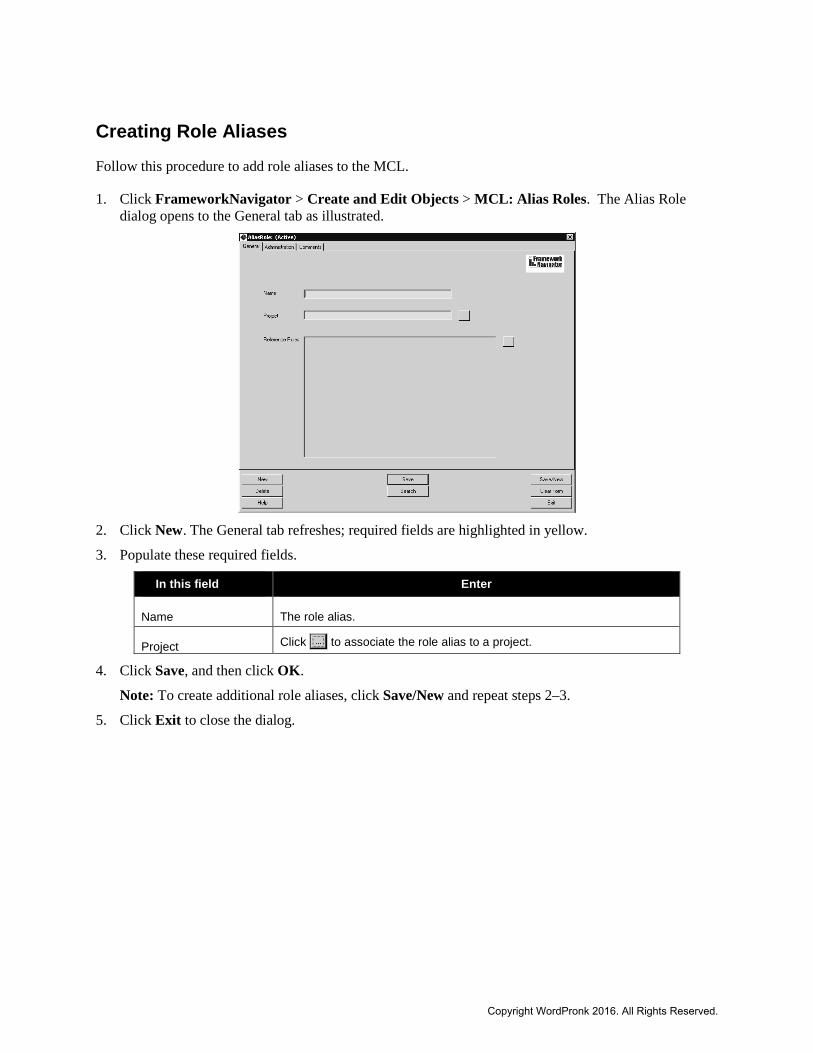
Creating Role Aliases Follow this procedure to add role aliases to the MCL.
1. Click FrameworkNavigator > Create and Edit Objects > MCL: Alias Roles. The Alias Role dialog opens to the General tab as illustrated.
2. Click New. The General tab refreshes; required fields are highlighted in yellow.
3. Populate these required fields.
In this field Enter
Name The role alias.
Project Click to associate the role alias to a project.
4. Click Save, and then click OK.
Note: To create additional role aliases, click Save/New and repeat steps 2–3.
5. Click Exit to close the dialog.
Copyright WordPronk 2016. All Rights Reserved.
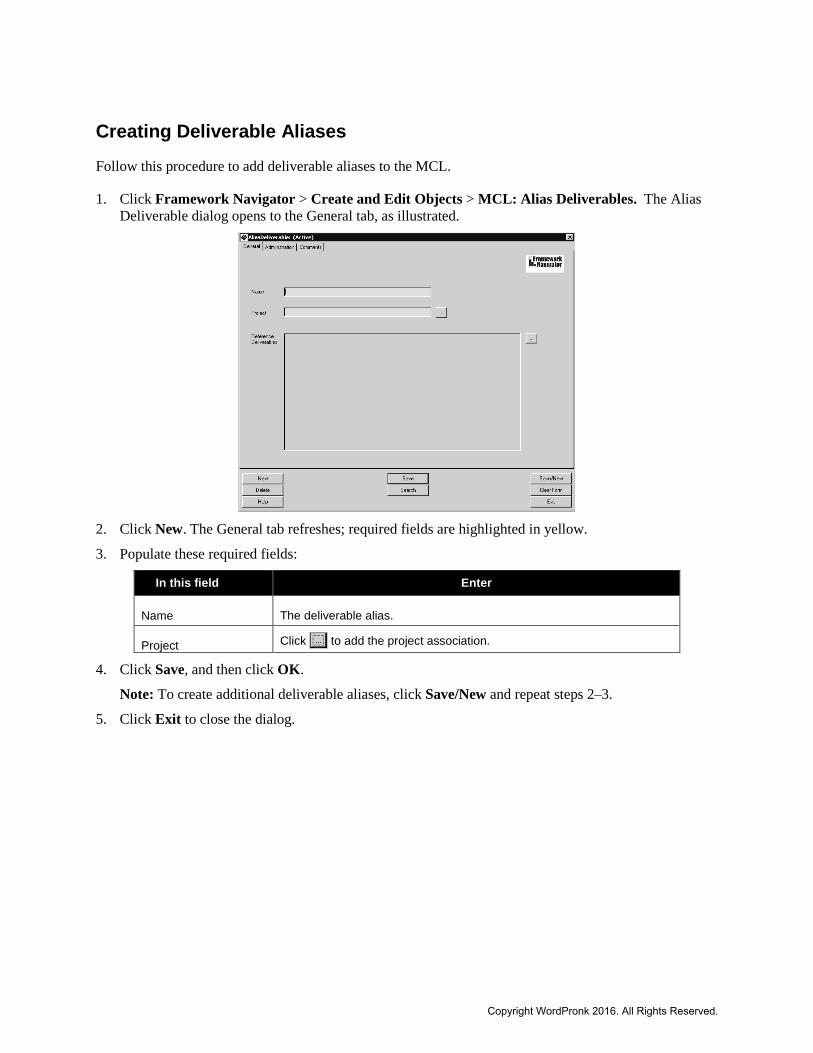
Creating Deliverable Aliases Follow this procedure to add deliverable aliases to the MCL.
1. Click Framework Navigator > Create and Edit Objects > MCL: Alias Deliverables. The Alias Deliverable dialog opens to the General tab, as illustrated.
2. Click New. The General tab refreshes; required fields are highlighted in yellow.
3. Populate these required fields:
In this field Enter
Name The deliverable alias.
Project Click to add the project association.
4. Click Save, and then click OK.
Note: To create additional deliverable aliases, click Save/New and repeat steps 2–3.
5. Click Exit to close the dialog.
Copyright WordPronk 2016. All Rights Reserved.

Creating a Deliverable Status Follow this procedure to add a deliverable status to the MCL.
1. Click Framework Navigator > Create and Edit Objects > Admin: Deliverable Status. The Deliverable dialog opens, as illustrated.
2. Click New. The cursor appears in the Name field.
3. Type the <state change>.
4. Click Save, and then click OK.
Note: To create additional deliverable aliases, click Save/New and repeat steps 2–3.
5. Click Exit to close the dialog.
Copyright WordPronk 2016. All Rights Reserved.

Editing Global Components in the MCL A method analyst must create all components in the MCL before content developers can add field-level content. Therefore, in this document, the term “editing” refers to developing and editing method components in the MCL.
The method components can be edited in any order, and you can access a component through various related component dialogs.
Editing Module Deliverables Follow this procedure to
• Add the description • Add deliverable templates • Add sample deliverables • Associate deliverable aliases to the module deliverable • Enter and update administrative information • Add comments
1. Click FrameworkNavigator > Create and Edit Objects > MCL: Module Deliverables. The Module Deliverable dialog opens to the General tab, as illustrated.
2. Click Search. The Select Instance window opens.
3. In the Name field, enter the module deliverable name, and then click Search. The deliverable appears in the selection window.
Copyright WordPronk 2016. All Rights Reserved.
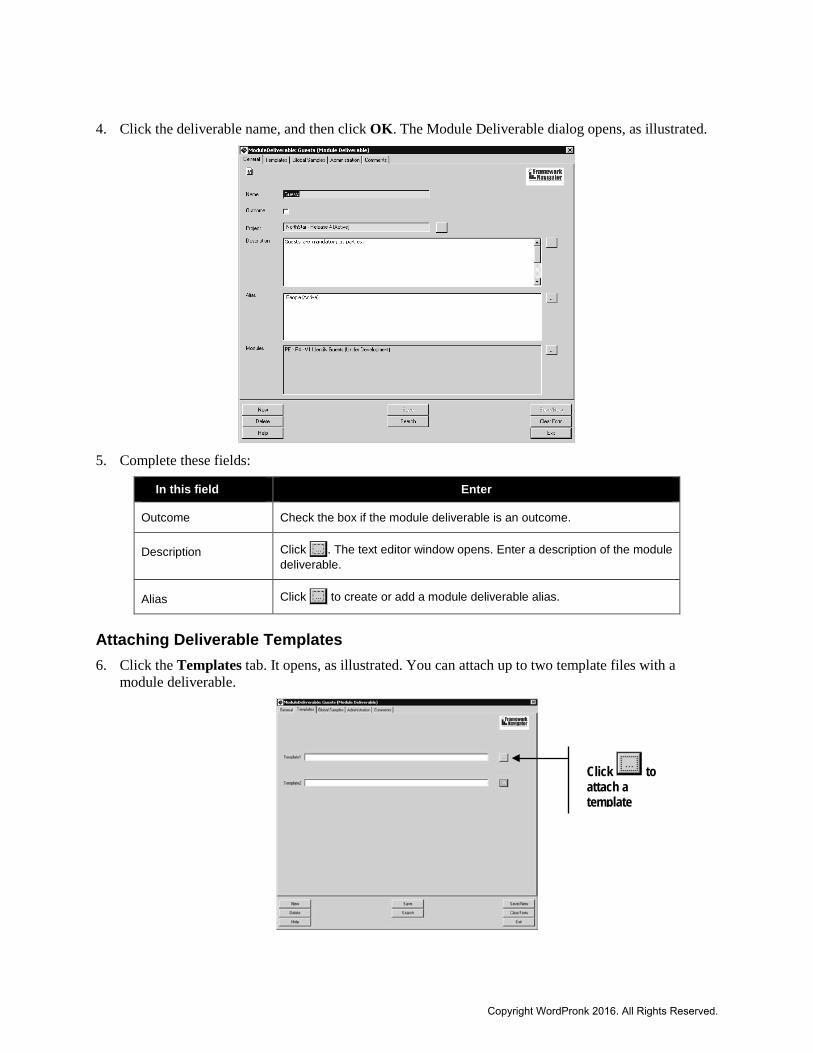
4. Click the deliverable name, and then click OK. The Module Deliverable dialog opens, as illustrated.
5. Complete these fields:
In this field Enter
Outcome Check the box if the module deliverable is an outcome.
Description Click . The text editor window opens. Enter a description of the module deliverable.
Alias Click to create or add a module deliverable alias.
Attaching Deliverable Templates 6. Click the Templates tab. It opens, as illustrated. You can attach up to two template files with a
module deliverable.
Click to attach a template
Copyright WordPronk 2016. All Rights Reserved.
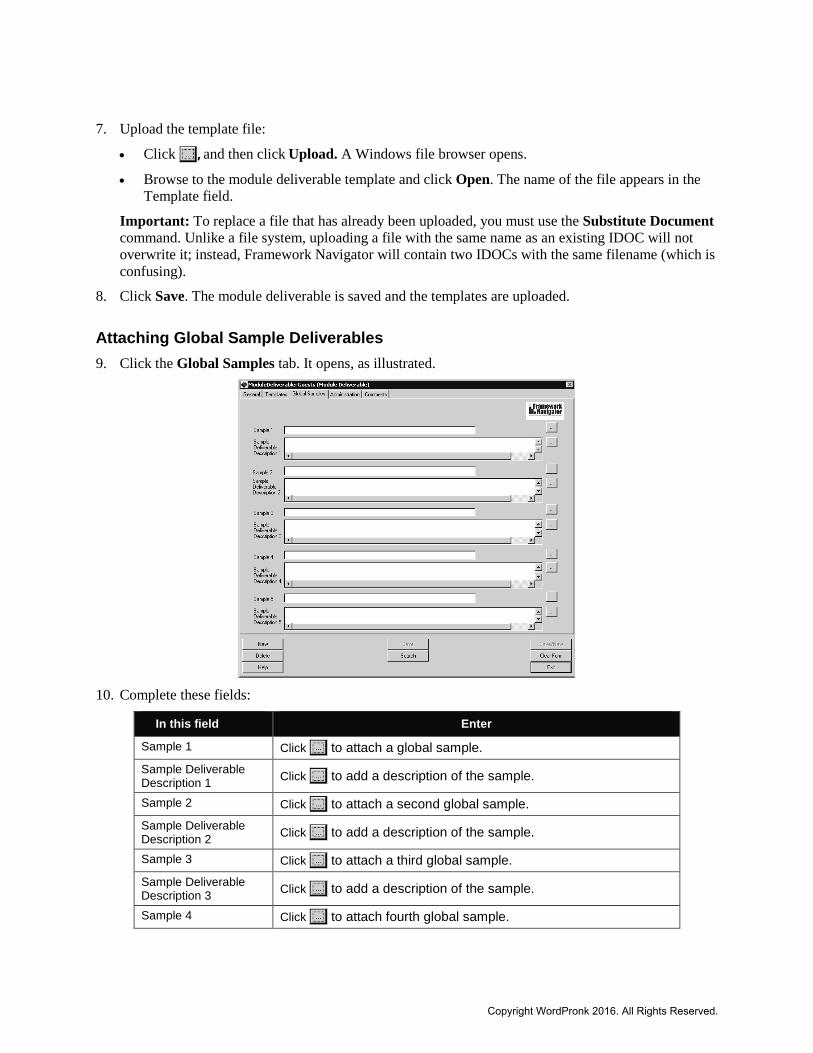
7. Upload the template file:
• Click , and then click Upload. A Windows file browser opens.
• Browse to the module deliverable template and click Open. The name of the file appears in the Template field.
Important: To replace a file that has already been uploaded, you must use the Substitute Document command. Unlike a file system, uploading a file with the same name as an existing IDOC will not overwrite it; instead, Framework Navigator will contain two IDOCs with the same filename (which is confusing).
8. Click Save. The module deliverable is saved and the templates are uploaded.
Attaching Global Sample Deliverables 9. Click the Global Samples tab. It opens, as illustrated.
10. Complete these fields:
In this field Enter
Sample 1 Click to attach a global sample. Sample Deliverable Description 1 Click to add a description of the sample.
Sample 2 Click to attach a second global sample. Sample Deliverable Description 2 Click to add a description of the sample.
Sample 3 Click to attach a third global sample. Sample Deliverable Description 3 Click to add a description of the sample.
Sample 4 Click to attach fourth global sample.
Copyright WordPronk 2016. All Rights Reserved.
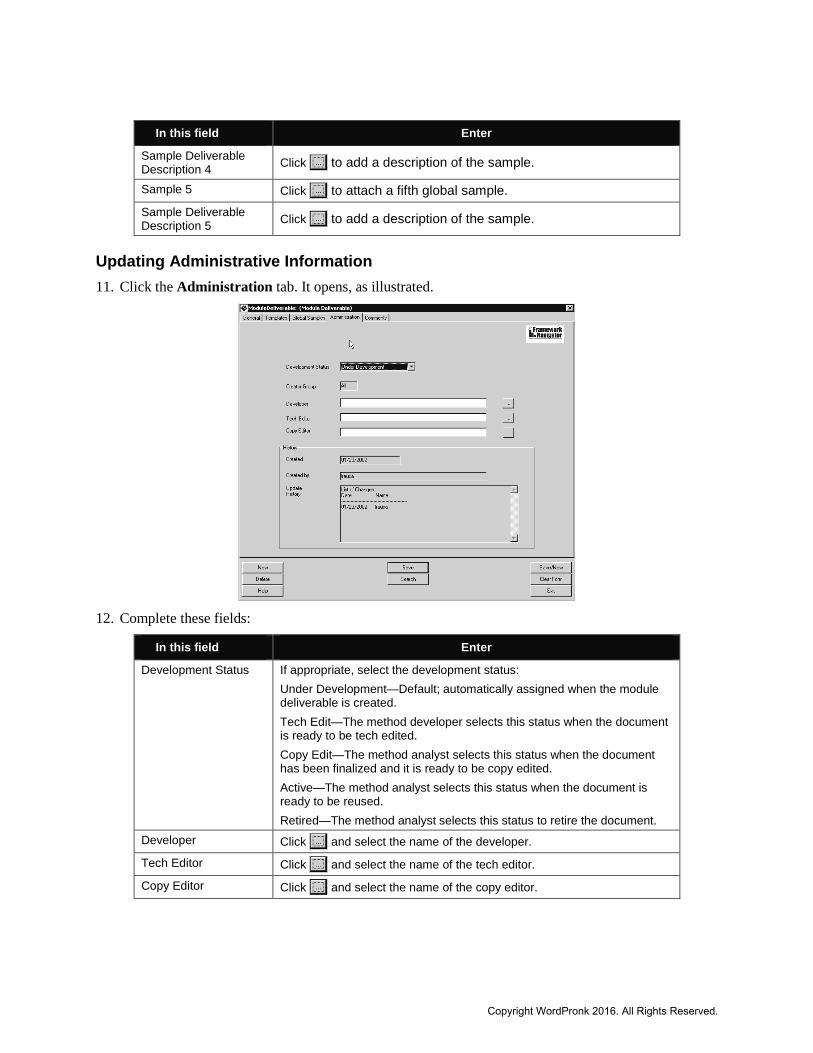
In this field Enter
Sample Deliverable Description 4 Click to add a description of the sample.
Sample 5 Click to attach a fifth global sample. Sample Deliverable Description 5 Click to add a description of the sample.
Updating Administrative Information 11. Click the Administration tab. It opens, as illustrated.
12. Complete these fields:
In this field Enter
Development Status If appropriate, select the development status: Under Development—Default; automatically assigned when the module deliverable is created. Tech Edit—The method developer selects this status when the document is ready to be tech edited. Copy Edit—The method analyst selects this status when the document has been finalized and it is ready to be copy edited. Active—The method analyst selects this status when the document is ready to be reused. Retired—The method analyst selects this status to retire the document.
Developer Click and select the name of the developer.
Tech Editor Click and select the name of the tech editor.
Copy Editor Click and select the name of the copy editor.
Copyright WordPronk 2016. All Rights Reserved.
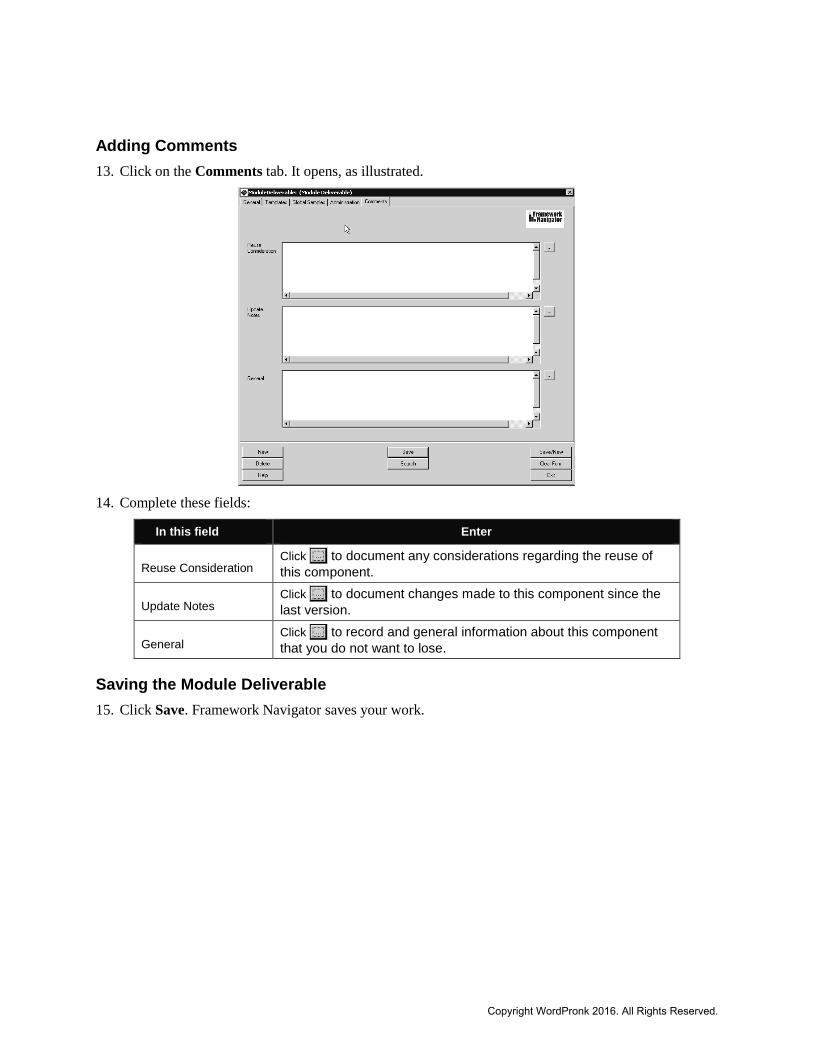
Adding Comments 13. Click on the Comments tab. It opens, as illustrated.
14. Complete these fields:
In this field Enter
Reuse Consideration
Click to document any considerations regarding the reuse of this component.
Update Notes
Click to document changes made to this component since the last version.
General
Click to record and general information about this component that you do not want to lose.
Saving the Module Deliverable 15. Click Save. Framework Navigator saves your work.
Copyright WordPronk 2016. All Rights Reserved.
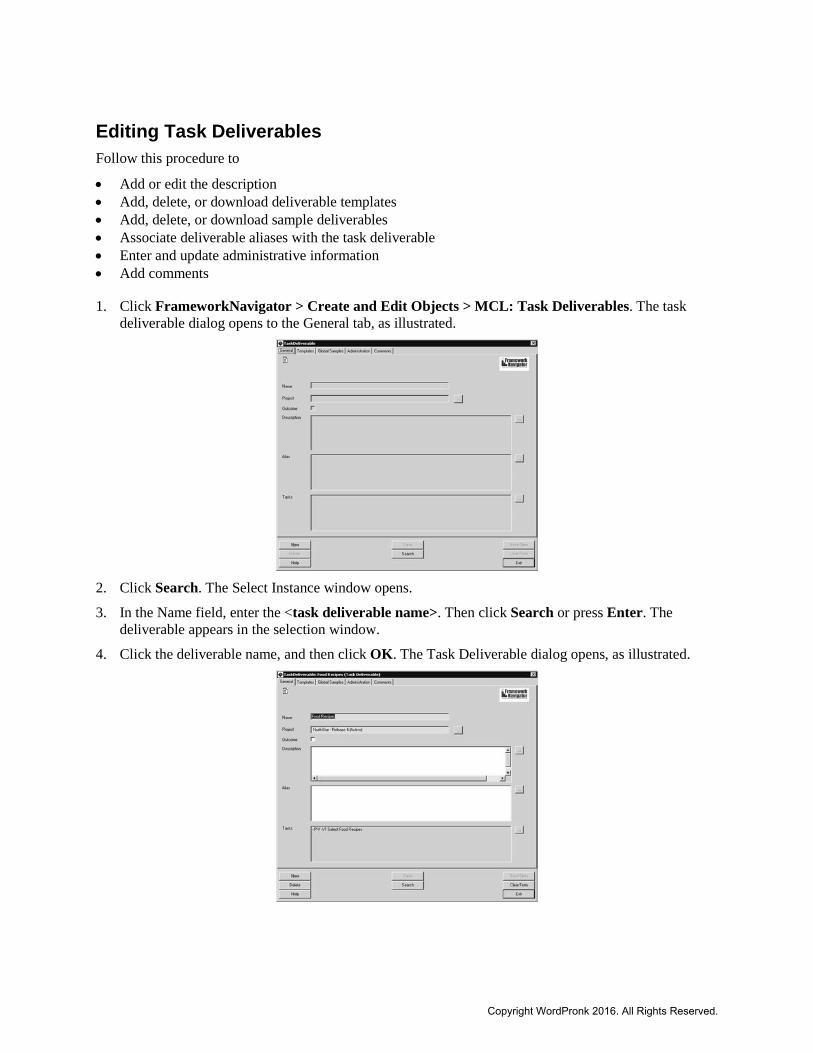
Editing Task Deliverables Follow this procedure to
• Add or edit the description • Add, delete, or download deliverable templates • Add, delete, or download sample deliverables • Associate deliverable aliases with the task deliverable • Enter and update administrative information • Add comments
1. Click FrameworkNavigator > Create and Edit Objects > MCL: Task Deliverables. The task deliverable dialog opens to the General tab, as illustrated.
2. Click Search. The Select Instance window opens.
3. In the Name field, enter the <task deliverable name>. Then click Search or press Enter. The deliverable appears in the selection window.
4. Click the deliverable name, and then click OK. The Task Deliverable dialog opens, as illustrated.
Copyright WordPronk 2016. All Rights Reserved.
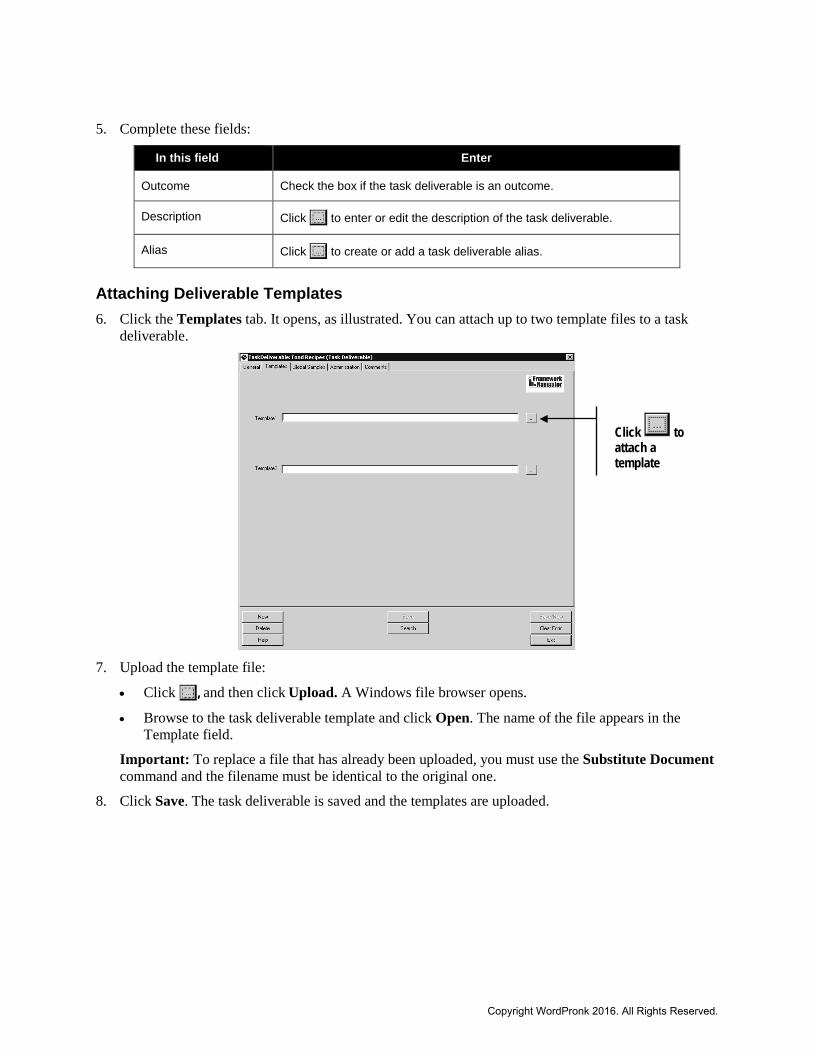
5. Complete these fields:
In this field Enter
Outcome Check the box if the task deliverable is an outcome.
Description Click to enter or edit the description of the task deliverable.
Alias Click to create or add a task deliverable alias.
Attaching Deliverable Templates 6. Click the Templates tab. It opens, as illustrated. You can attach up to two template files to a task
deliverable.
7. Upload the template file:
• Click , and then click Upload. A Windows file browser opens.
• Browse to the task deliverable template and click Open. The name of the file appears in the Template field.
Important: To replace a file that has already been uploaded, you must use the Substitute Document command and the filename must be identical to the original one.
8. Click Save. The task deliverable is saved and the templates are uploaded.
Click to attach a template
Copyright WordPronk 2016. All Rights Reserved.
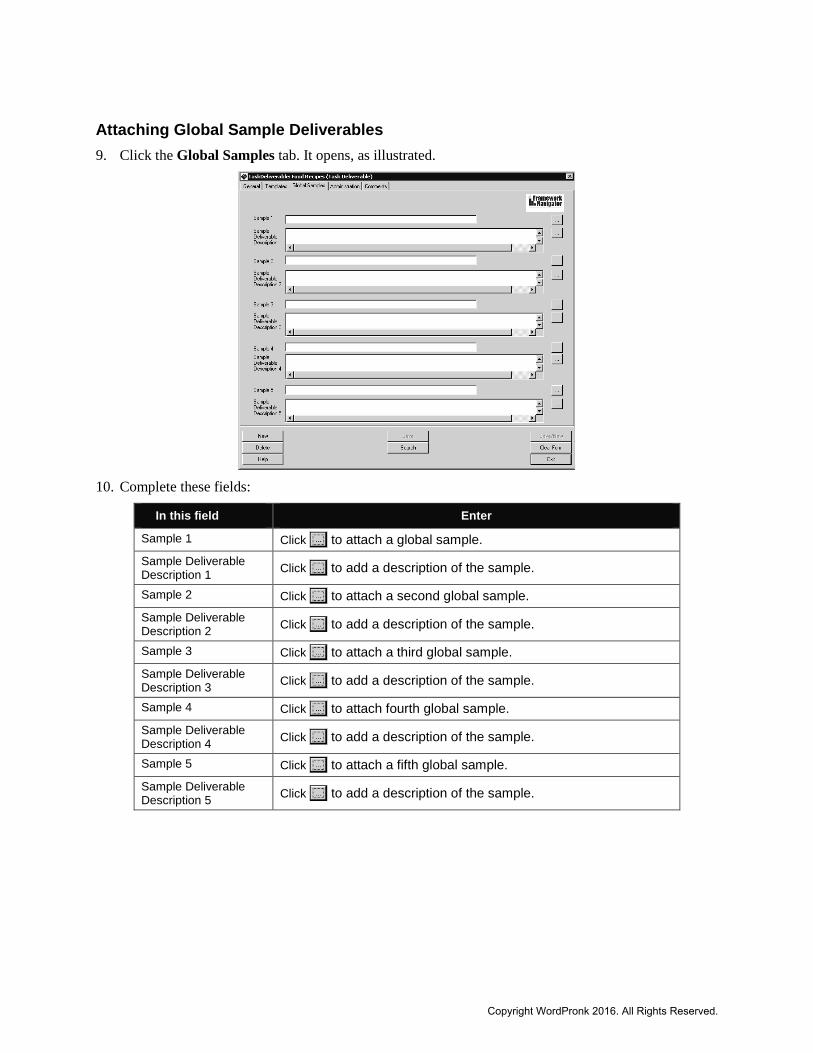
Attaching Global Sample Deliverables 9. Click the Global Samples tab. It opens, as illustrated.
10. Complete these fields:
In this field Enter
Sample 1 Click to attach a global sample. Sample Deliverable Description 1 Click to add a description of the sample.
Sample 2 Click to attach a second global sample. Sample Deliverable Description 2 Click to add a description of the sample.
Sample 3 Click to attach a third global sample. Sample Deliverable Description 3 Click to add a description of the sample.
Sample 4 Click to attach fourth global sample. Sample Deliverable Description 4 Click to add a description of the sample.
Sample 5 Click to attach a fifth global sample. Sample Deliverable Description 5 Click to add a description of the sample.
Copyright WordPronk 2016. All Rights Reserved.
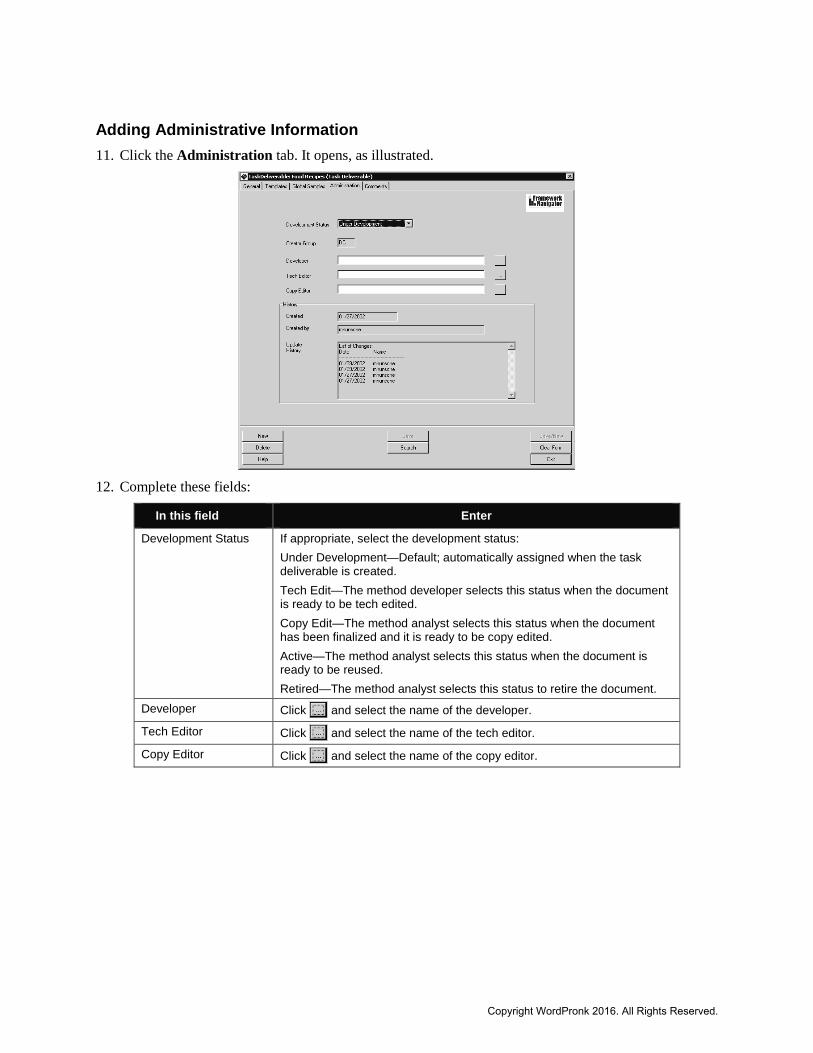
Adding Administrative Information 11. Click the Administration tab. It opens, as illustrated.
12. Complete these fields:
In this field Enter
Development Status If appropriate, select the development status: Under Development—Default; automatically assigned when the task deliverable is created. Tech Edit—The method developer selects this status when the document is ready to be tech edited. Copy Edit—The method analyst selects this status when the document has been finalized and it is ready to be copy edited. Active—The method analyst selects this status when the document is ready to be reused. Retired—The method analyst selects this status to retire the document.
Developer Click and select the name of the developer.
Tech Editor Click and select the name of the tech editor.
Copy Editor Click and select the name of the copy editor.
Copyright WordPronk 2016. All Rights Reserved.
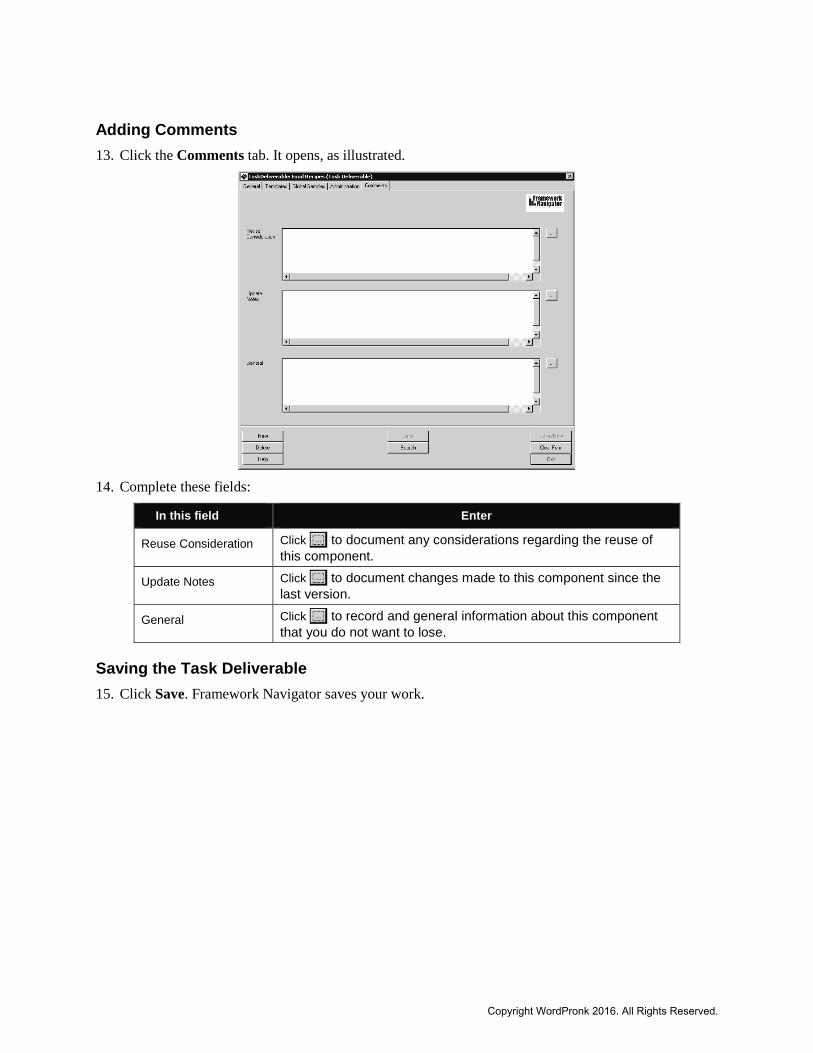
Adding Comments 13. Click the Comments tab. It opens, as illustrated.
14. Complete these fields:
In this field Enter
Reuse Consideration Click to document any considerations regarding the reuse of this component.
Update Notes Click to document changes made to this component since the last version.
General Click to record and general information about this component that you do not want to lose.
Saving the Task Deliverable 15. Click Save. Framework Navigator saves your work.
Copyright WordPronk 2016. All Rights Reserved.
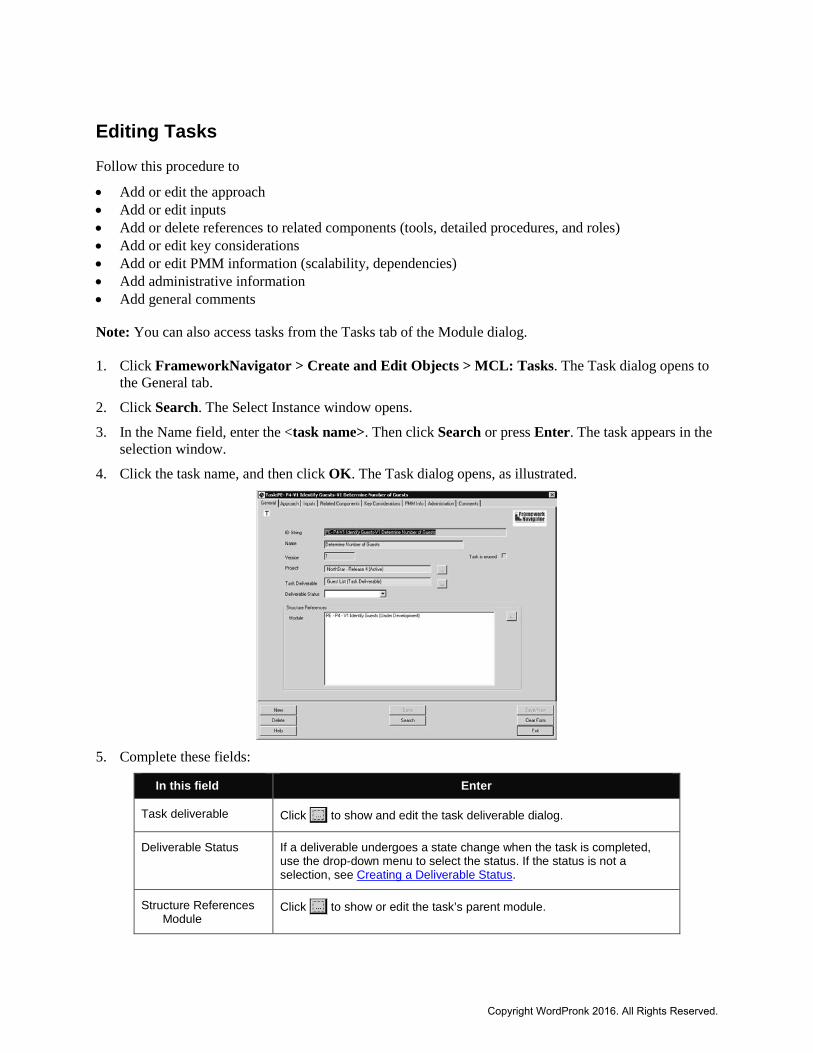
Editing Tasks Follow this procedure to
• Add or edit the approach • Add or edit inputs • Add or delete references to related components (tools, detailed procedures, and roles) • Add or edit key considerations • Add or edit PMM information (scalability, dependencies) • Add administrative information • Add general comments
Note: You can also access tasks from the Tasks tab of the Module dialog. 1. Click FrameworkNavigator > Create and Edit Objects > MCL: Tasks. The Task dialog opens to
the General tab.
2. Click Search. The Select Instance window opens.
3. In the Name field, enter the <task name>. Then click Search or press Enter. The task appears in the selection window.
4. Click the task name, and then click OK. The Task dialog opens, as illustrated.
5. Complete these fields:
In this field Enter
Task deliverable Click to show and edit the task deliverable dialog.
Deliverable Status If a deliverable undergoes a state change when the task is completed, use the drop-down menu to select the status. If the status is not a selection, see Creating a Deliverable Status.
Structure References Module
Click to show or edit the task’s parent module.
Copyright WordPronk 2016. All Rights Reserved.
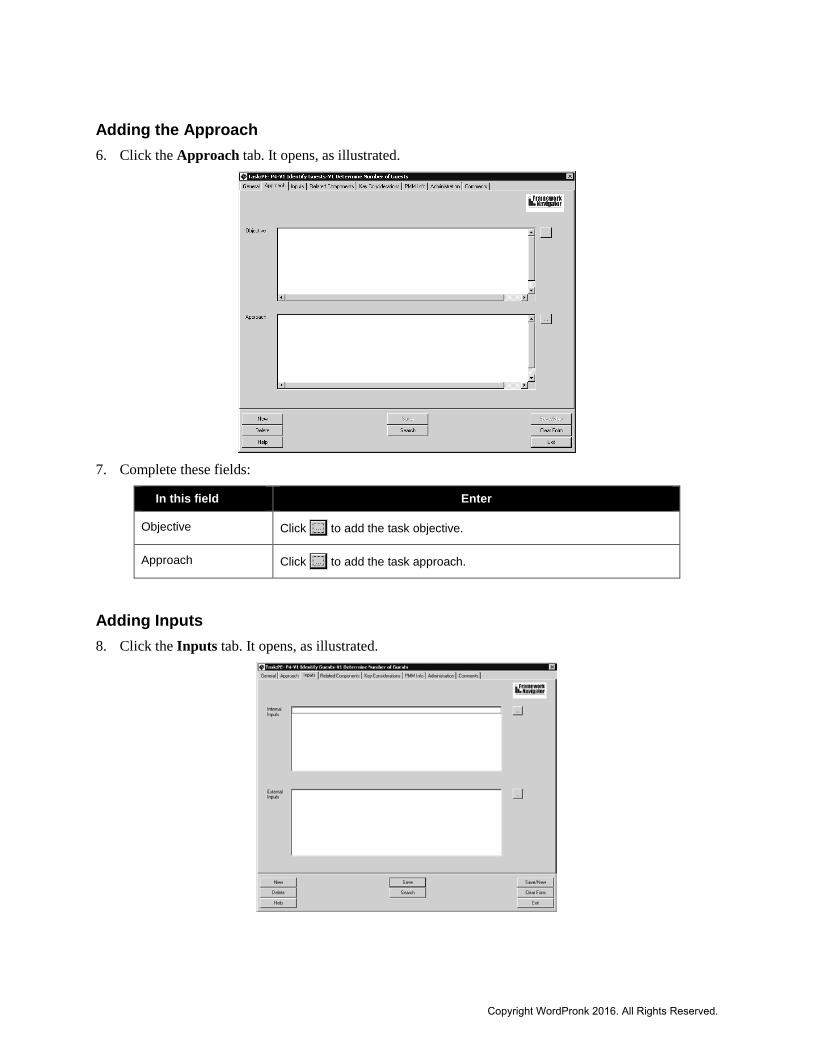
Adding the Approach 6. Click the Approach tab. It opens, as illustrated.
7. Complete these fields:
In this field Enter
Objective Click to add the task objective.
Approach Click to add the task approach.
Adding Inputs 8. Click the Inputs tab. It opens, as illustrated.
Copyright WordPronk 2016. All Rights Reserved.
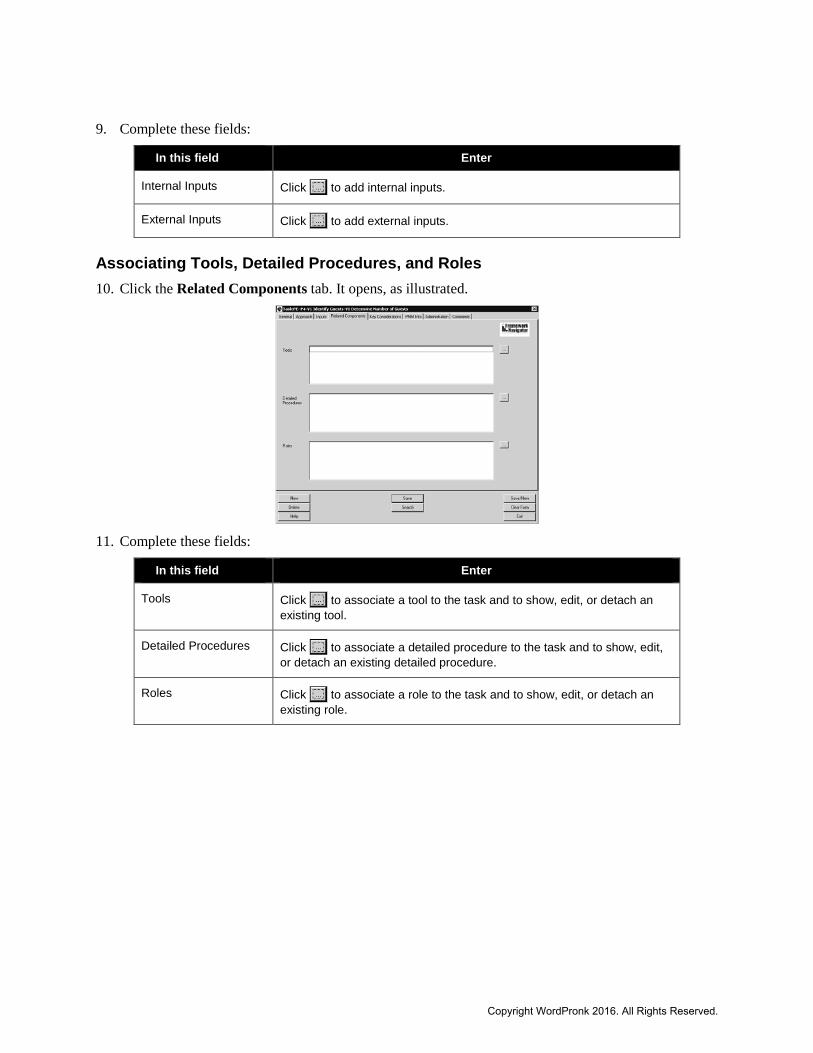
9. Complete these fields:
In this field Enter
Internal Inputs Click to add internal inputs.
External Inputs Click to add external inputs.
Associating Tools, Detailed Procedures, and Roles 10. Click the Related Components tab. It opens, as illustrated.
11. Complete these fields:
In this field Enter
Tools Click to associate a tool to the task and to show, edit, or detach an existing tool.
Detailed Procedures Click to associate a detailed procedure to the task and to show, edit, or detach an existing detailed procedure.
Roles Click to associate a role to the task and to show, edit, or detach an existing role.
Copyright WordPronk 2016. All Rights Reserved.
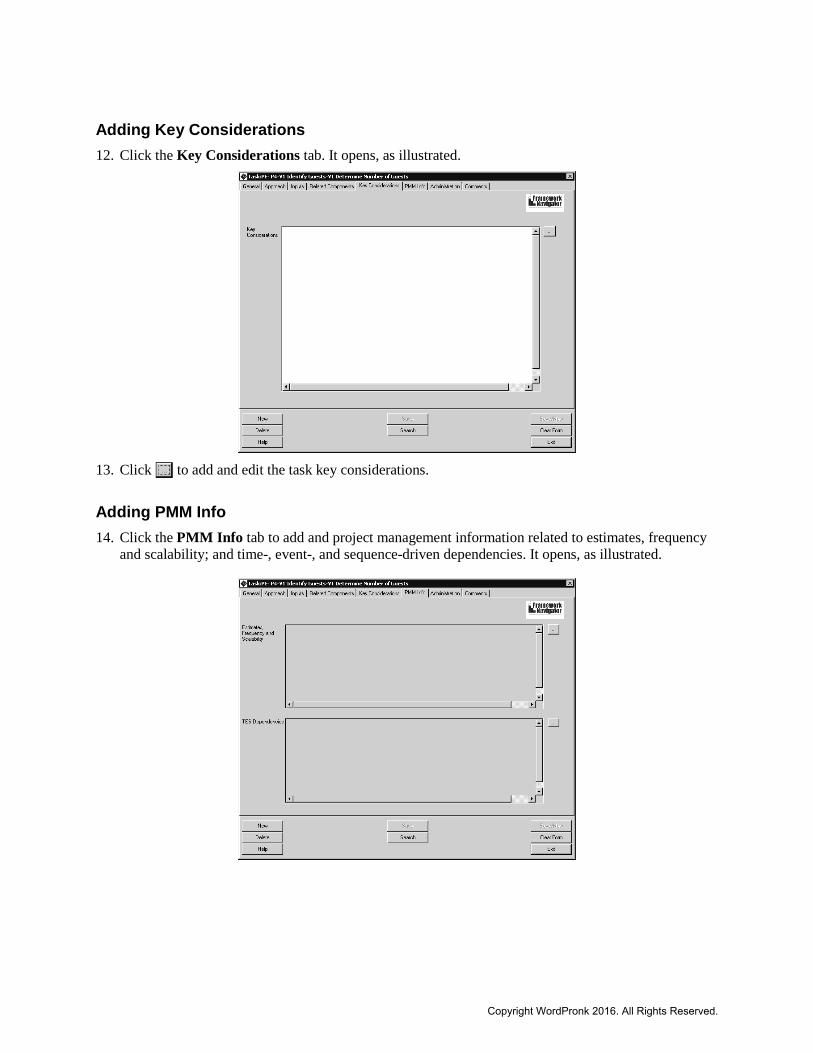
Adding Key Considerations 12. Click the Key Considerations tab. It opens, as illustrated.
13. Click to add and edit the task key considerations.
Adding PMM Info 14. Click the PMM Info tab to add and project management information related to estimates, frequency
and scalability; and time-, event-, and sequence-driven dependencies. It opens, as illustrated.
Copyright WordPronk 2016. All Rights Reserved.
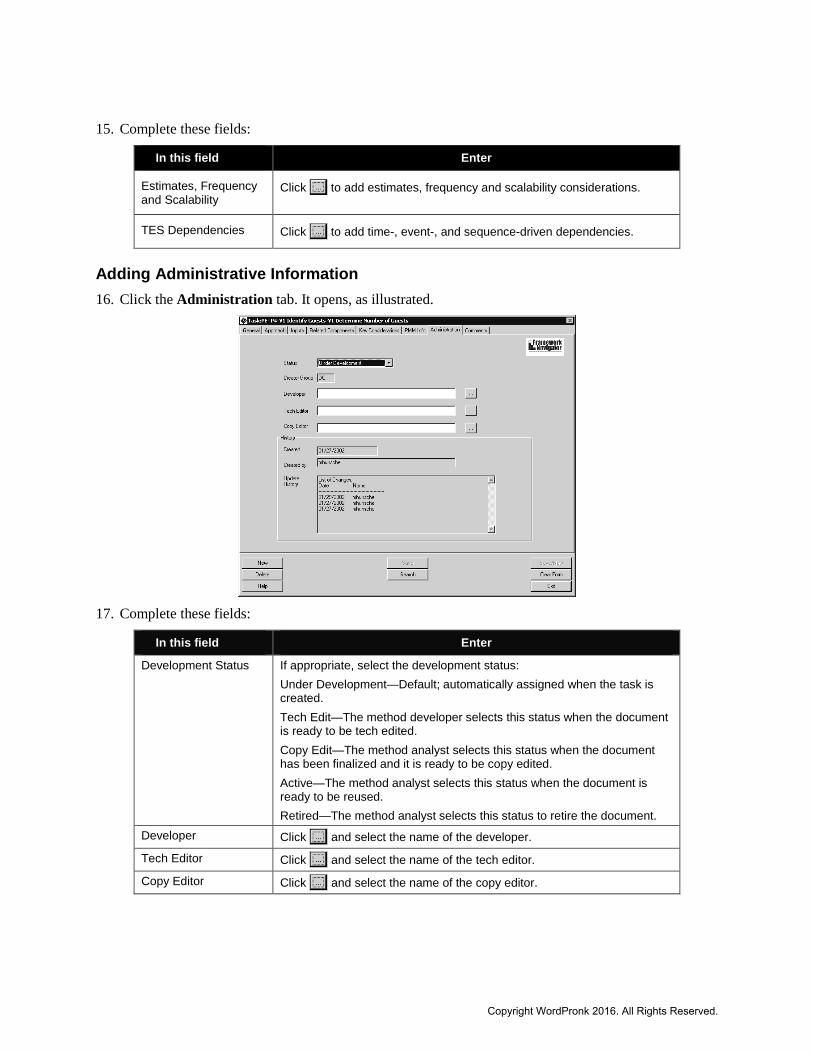
15. Complete these fields:
In this field Enter
Estimates, Frequency and Scalability
Click to add estimates, frequency and scalability considerations.
TES Dependencies Click to add time-, event-, and sequence-driven dependencies.
Adding Administrative Information 16. Click the Administration tab. It opens, as illustrated.
17. Complete these fields:
In this field Enter
Development Status If appropriate, select the development status: Under Development—Default; automatically assigned when the task is created. Tech Edit—The method developer selects this status when the document is ready to be tech edited. Copy Edit—The method analyst selects this status when the document has been finalized and it is ready to be copy edited. Active—The method analyst selects this status when the document is ready to be reused. Retired—The method analyst selects this status to retire the document.
Developer Click and select the name of the developer.
Tech Editor Click and select the name of the tech editor.
Copy Editor Click and select the name of the copy editor.
Copyright WordPronk 2016. All Rights Reserved.
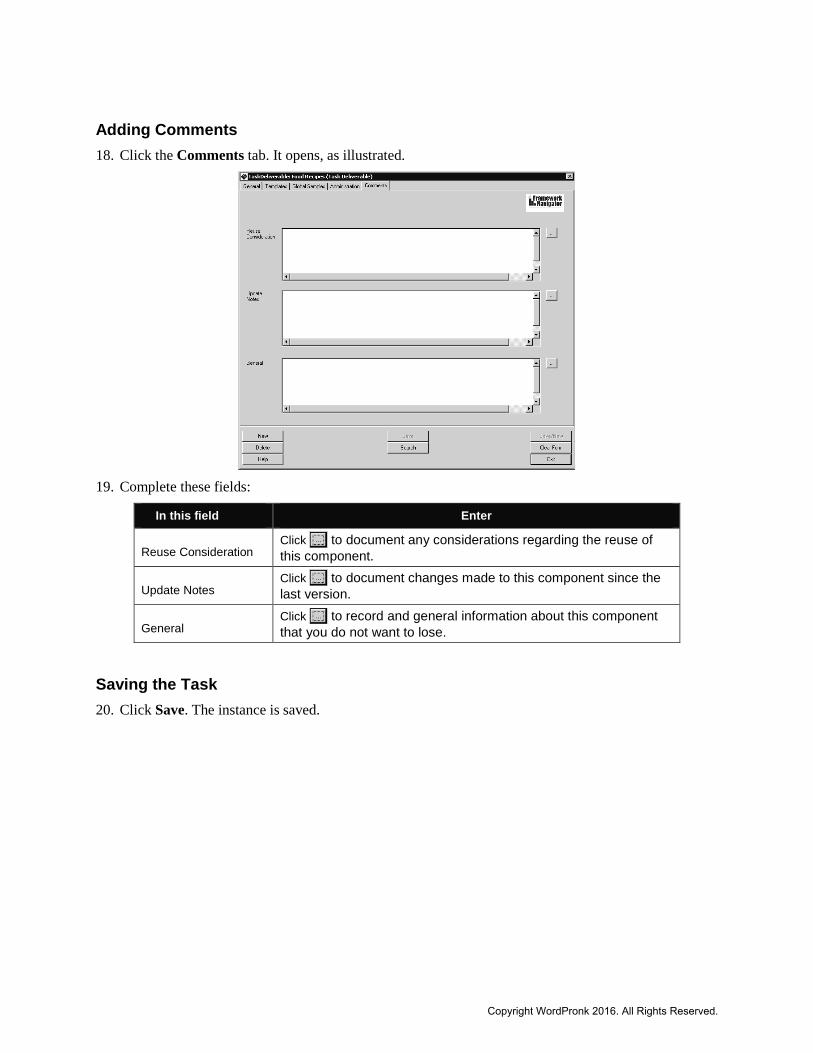
Adding Comments 18. Click the Comments tab. It opens, as illustrated.
19. Complete these fields:
In this field Enter
Reuse Consideration
Click to document any considerations regarding the reuse of this component.
Update Notes
Click to document changes made to this component since the last version.
General
Click to record and general information about this component that you do not want to lose.
Saving the Task 20. Click Save. The instance is saved.
Copyright WordPronk 2016. All Rights Reserved.
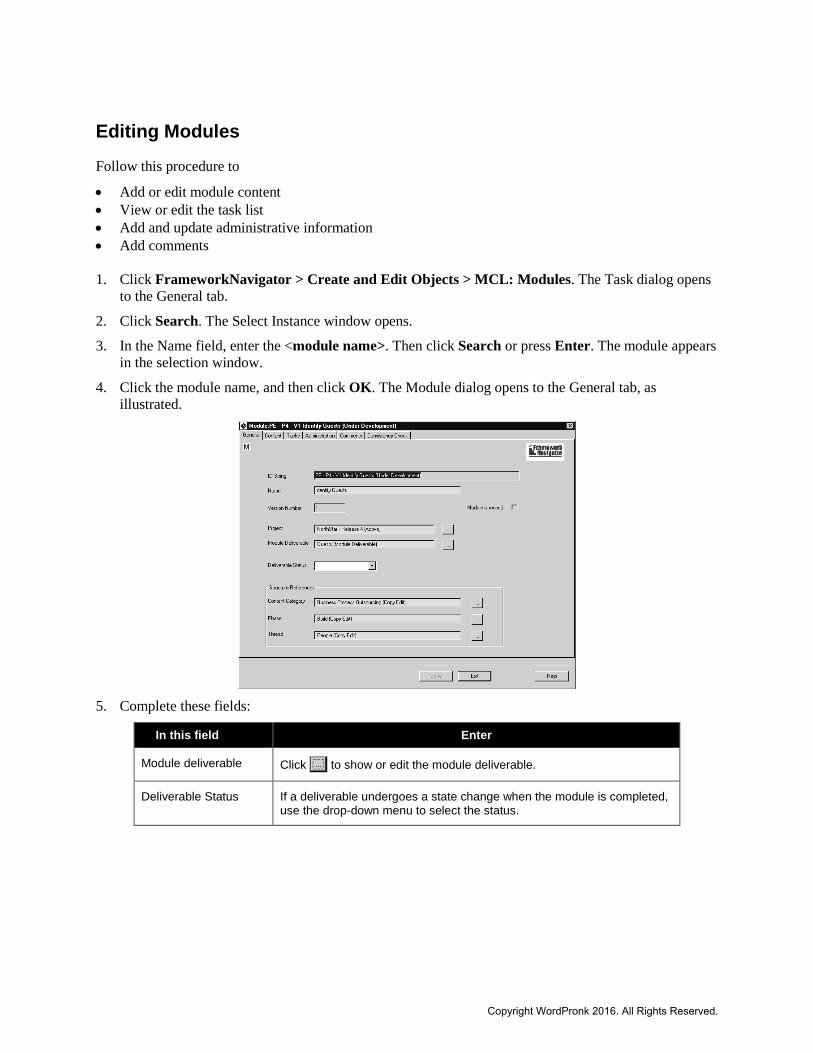
Editing Modules Follow this procedure to
• Add or edit module content • View or edit the task list • Add and update administrative information • Add comments 1. Click FrameworkNavigator > Create and Edit Objects > MCL: Modules. The Task dialog opens
to the General tab.
2. Click Search. The Select Instance window opens.
3. In the Name field, enter the <module name>. Then click Search or press Enter. The module appears in the selection window.
4. Click the module name, and then click OK. The Module dialog opens to the General tab, as illustrated.
5. Complete these fields:
In this field Enter
Module deliverable Click to show or edit the module deliverable.
Deliverable Status If a deliverable undergoes a state change when the module is completed, use the drop-down menu to select the status.
Copyright WordPronk 2016. All Rights Reserved.
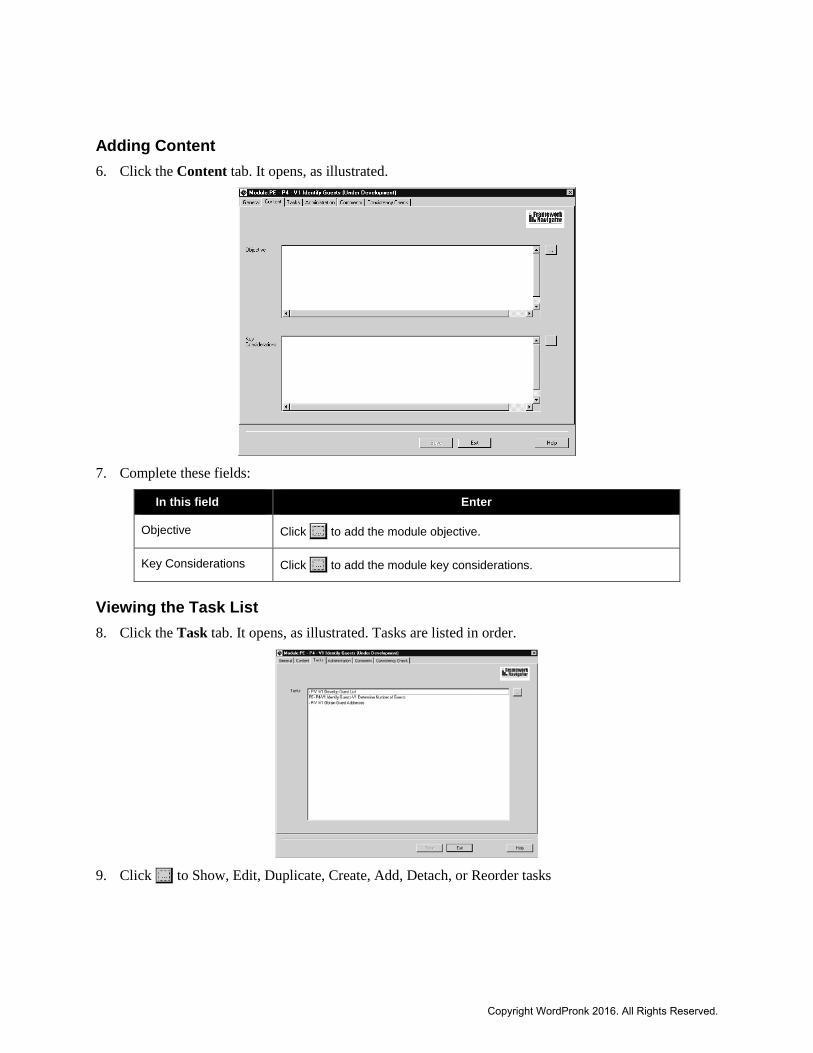
Adding Content 6. Click the Content tab. It opens, as illustrated.
7. Complete these fields:
In this field Enter
Objective Click to add the module objective.
Key Considerations Click to add the module key considerations.
Viewing the Task List 8. Click the Task tab. It opens, as illustrated. Tasks are listed in order.
9. Click to Show, Edit, Duplicate, Create, Add, Detach, or Reorder tasks
Copyright WordPronk 2016. All Rights Reserved.
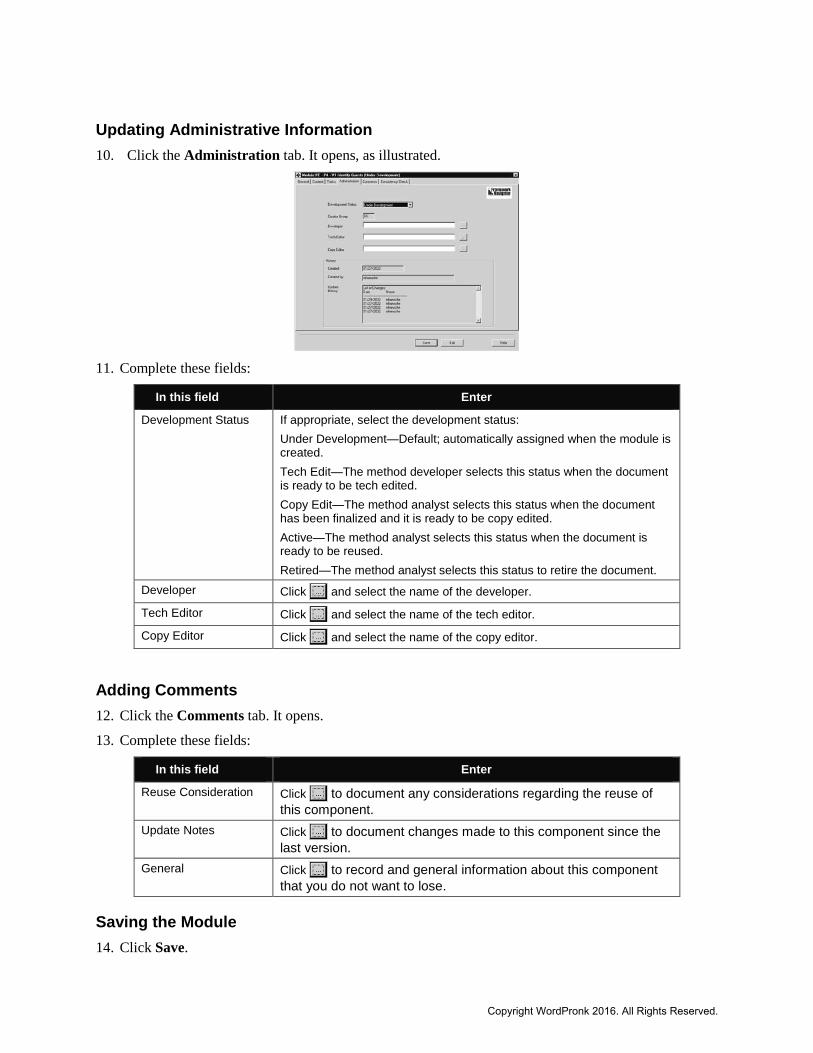
Updating Administrative Information 10. Click the Administration tab. It opens, as illustrated.
11. Complete these fields:
In this field Enter
Development Status If appropriate, select the development status: Under Development—Default; automatically assigned when the module is created. Tech Edit—The method developer selects this status when the document is ready to be tech edited. Copy Edit—The method analyst selects this status when the document has been finalized and it is ready to be copy edited. Active—The method analyst selects this status when the document is ready to be reused. Retired—The method analyst selects this status to retire the document.
Developer Click and select the name of the developer.
Tech Editor Click and select the name of the tech editor.
Copy Editor Click and select the name of the copy editor.
Adding Comments 12. Click the Comments tab. It opens.
13. Complete these fields:
In this field Enter
Reuse Consideration Click to document any considerations regarding the reuse of this component.
Update Notes Click to document changes made to this component since the last version.
General Click to record and general information about this component that you do not want to lose.
Saving the Module 14. Click Save.
Copyright WordPronk 2016. All Rights Reserved.
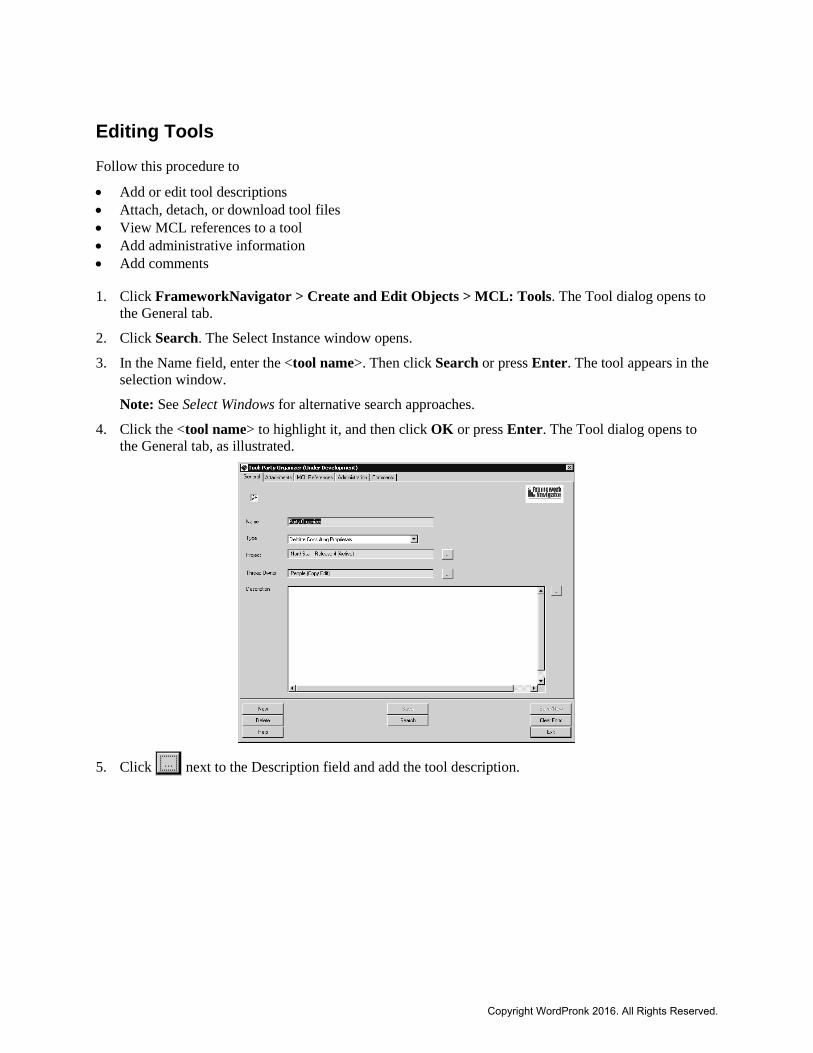
Editing Tools Follow this procedure to
• Add or edit tool descriptions • Attach, detach, or download tool files • View MCL references to a tool • Add administrative information • Add comments
1. Click FrameworkNavigator > Create and Edit Objects > MCL: Tools. The Tool dialog opens to the General tab.
2. Click Search. The Select Instance window opens.
3. In the Name field, enter the <tool name>. Then click Search or press Enter. The tool appears in the selection window.
Note: See Select Windows for alternative search approaches.
4. Click the <tool name> to highlight it, and then click OK or press Enter. The Tool dialog opens to the General tab, as illustrated.
5. Click next to the Description field and add the tool description.
Copyright WordPronk 2016. All Rights Reserved.

Attaching Tools 6. Click the Attachments tab. It opens, as illustrated. You can attach up to three files to a tool.
7. Upload the tool attachment file:
• Click , and then click Upload. A Windows file browser opens.
• Browse to the file and click Open.
Important: To replace a file that has already been uploaded, you must use the Substitute Document command and the filename must be identical to the original one.
8. Click Save.
Viewing MCL References to the Tool 9. Click the MCL References tab. It opens.
10. Highlight the task of interest and click to view the task dialog in which the tool is referenced.
Copyright WordPronk 2016. All Rights Reserved.
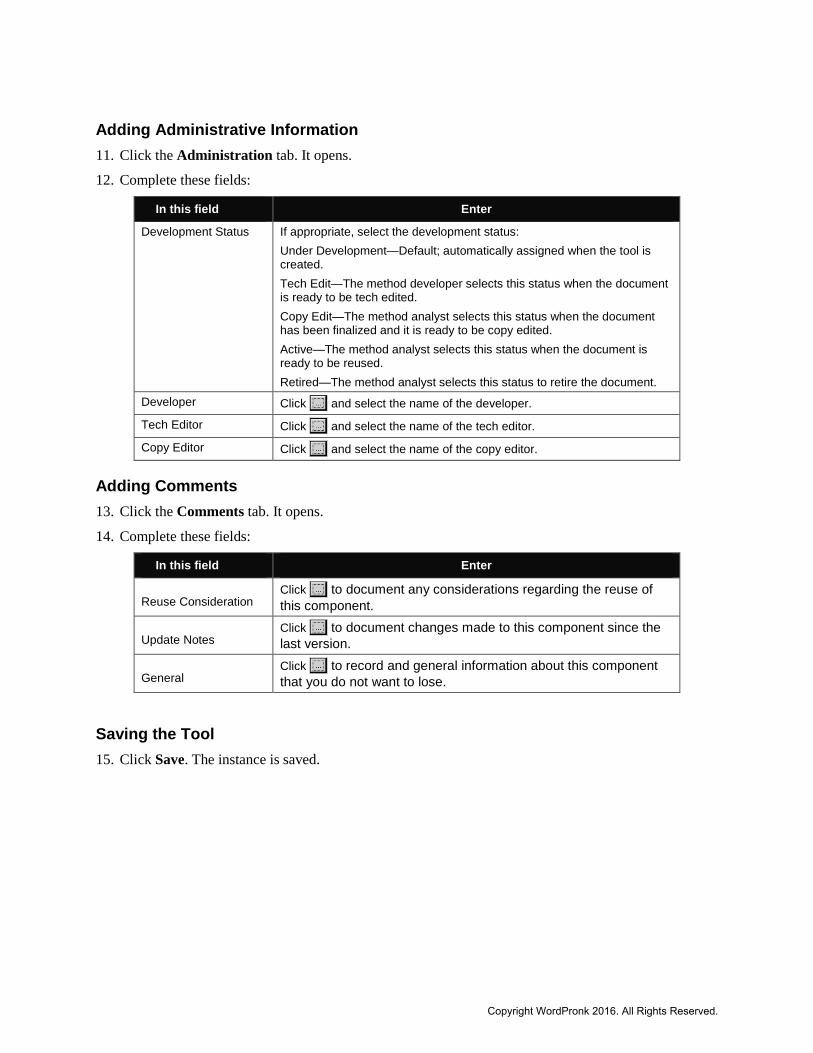
Adding Administrative Information 11. Click the Administration tab. It opens.
12. Complete these fields:
In this field Enter
Development Status If appropriate, select the development status: Under Development—Default; automatically assigned when the tool is created. Tech Edit—The method developer selects this status when the document is ready to be tech edited. Copy Edit—The method analyst selects this status when the document has been finalized and it is ready to be copy edited. Active—The method analyst selects this status when the document is ready to be reused. Retired—The method analyst selects this status to retire the document.
Developer Click and select the name of the developer.
Tech Editor Click and select the name of the tech editor.
Copy Editor Click and select the name of the copy editor.
Adding Comments 13. Click the Comments tab. It opens.
14. Complete these fields:
In this field Enter
Reuse Consideration
Click to document any considerations regarding the reuse of this component.
Update Notes
Click to document changes made to this component since the last version.
General
Click to record and general information about this component that you do not want to lose.
Saving the Tool 15. Click Save. The instance is saved.
Copyright WordPronk 2016. All Rights Reserved.
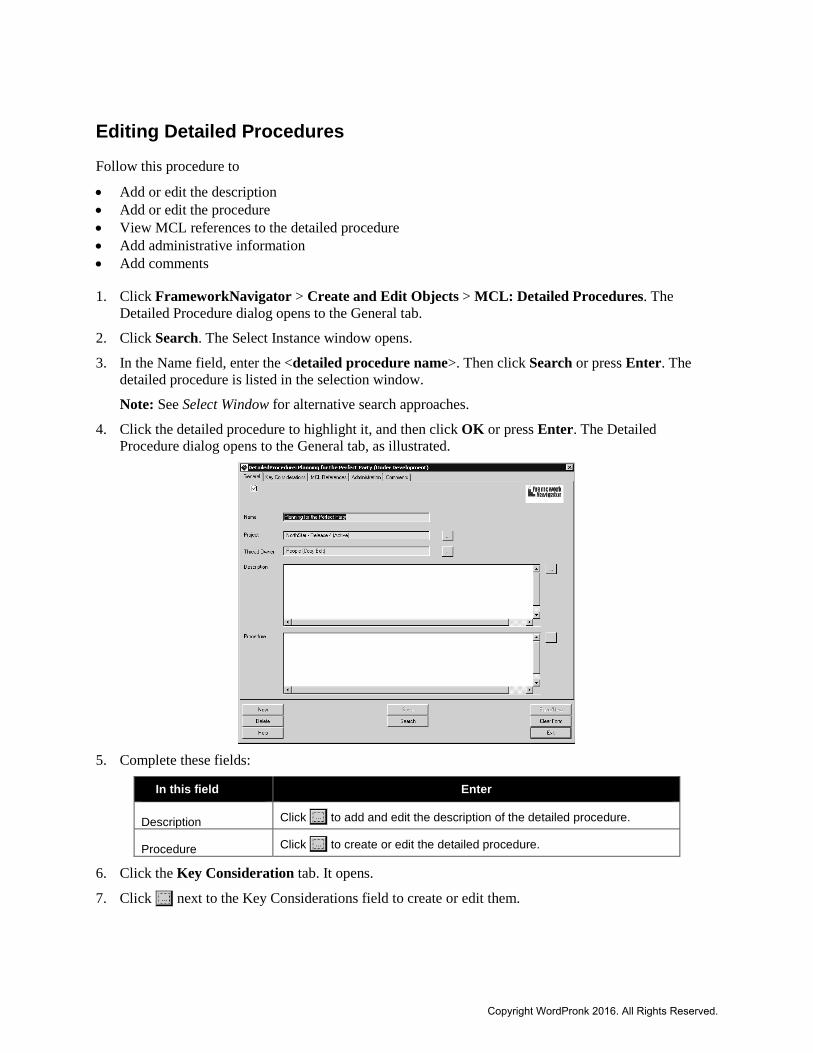
Editing Detailed Procedures Follow this procedure to
• Add or edit the description • Add or edit the procedure • View MCL references to the detailed procedure • Add administrative information • Add comments
1. Click FrameworkNavigator > Create and Edit Objects > MCL: Detailed Procedures. The Detailed Procedure dialog opens to the General tab.
2. Click Search. The Select Instance window opens.
3. In the Name field, enter the <detailed procedure name>. Then click Search or press Enter. The detailed procedure is listed in the selection window.
Note: See Select Window for alternative search approaches.
4. Click the detailed procedure to highlight it, and then click OK or press Enter. The Detailed Procedure dialog opens to the General tab, as illustrated.
5. Complete these fields:
In this field Enter
Description Click to add and edit the description of the detailed procedure.
Procedure Click to create or edit the detailed procedure.
6. Click the Key Consideration tab. It opens.
7. Click next to the Key Considerations field to create or edit them.
Copyright WordPronk 2016. All Rights Reserved.
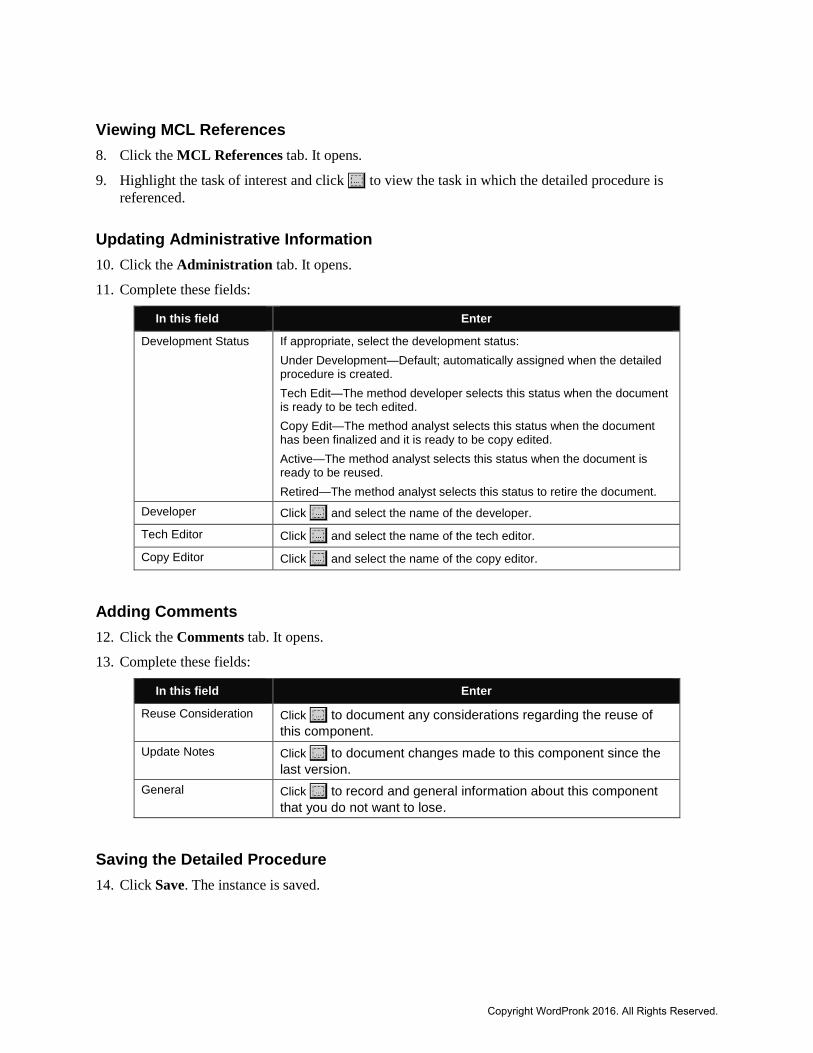
Viewing MCL References 8. Click the MCL References tab. It opens.
9. Highlight the task of interest and click to view the task in which the detailed procedure is referenced.
Updating Administrative Information 10. Click the Administration tab. It opens.
11. Complete these fields:
In this field Enter
Development Status If appropriate, select the development status: Under Development—Default; automatically assigned when the detailed procedure is created. Tech Edit—The method developer selects this status when the document is ready to be tech edited. Copy Edit—The method analyst selects this status when the document has been finalized and it is ready to be copy edited. Active—The method analyst selects this status when the document is ready to be reused. Retired—The method analyst selects this status to retire the document.
Developer Click and select the name of the developer.
Tech Editor Click and select the name of the tech editor.
Copy Editor Click and select the name of the copy editor.
Adding Comments 12. Click the Comments tab. It opens.
13. Complete these fields:
In this field Enter
Reuse Consideration Click to document any considerations regarding the reuse of this component.
Update Notes Click to document changes made to this component since the last version.
General Click to record and general information about this component that you do not want to lose.
Saving the Detailed Procedure 14. Click Save. The instance is saved.
Copyright WordPronk 2016. All Rights Reserved.
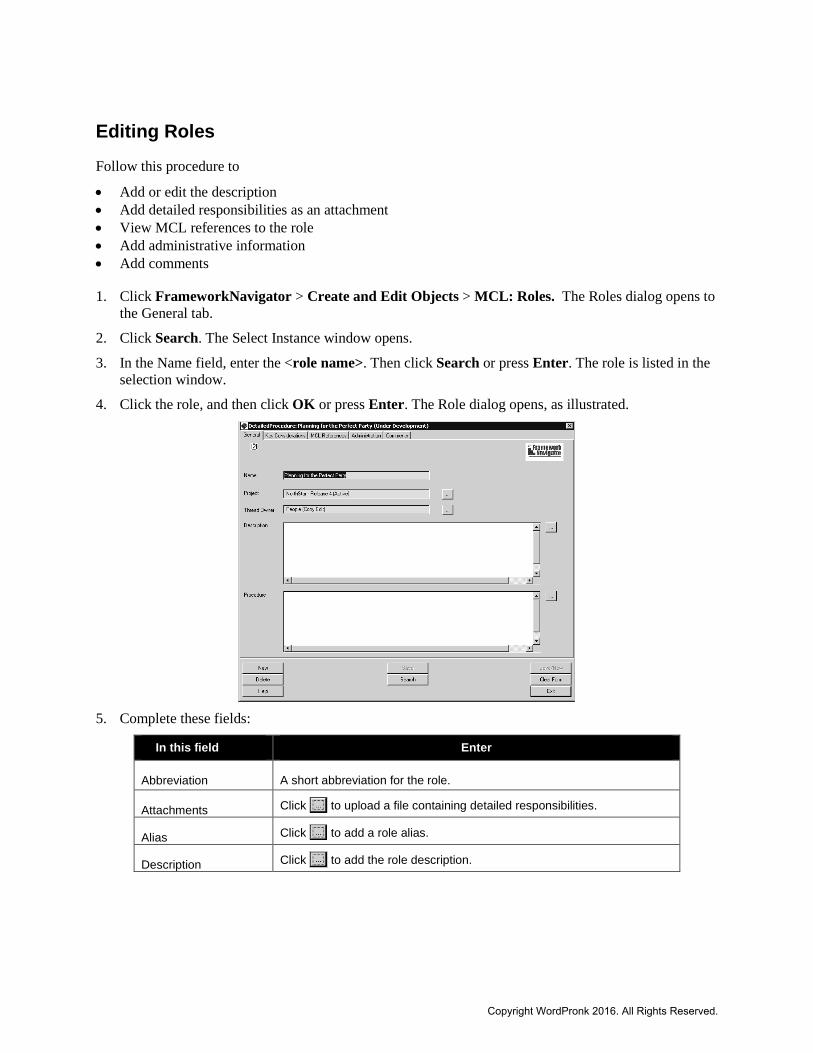
Editing Roles Follow this procedure to
• Add or edit the description • Add detailed responsibilities as an attachment • View MCL references to the role • Add administrative information • Add comments
1. Click FrameworkNavigator > Create and Edit Objects > MCL: Roles. The Roles dialog opens to the General tab.
2. Click Search. The Select Instance window opens.
3. In the Name field, enter the <role name>. Then click Search or press Enter. The role is listed in the selection window.
4. Click the role, and then click OK or press Enter. The Role dialog opens, as illustrated.
5. Complete these fields:
In this field Enter
Abbreviation A short abbreviation for the role.
Attachments Click to upload a file containing detailed responsibilities.
Alias Click to add a role alias.
Description Click to add the role description.
Copyright WordPronk 2016. All Rights Reserved.
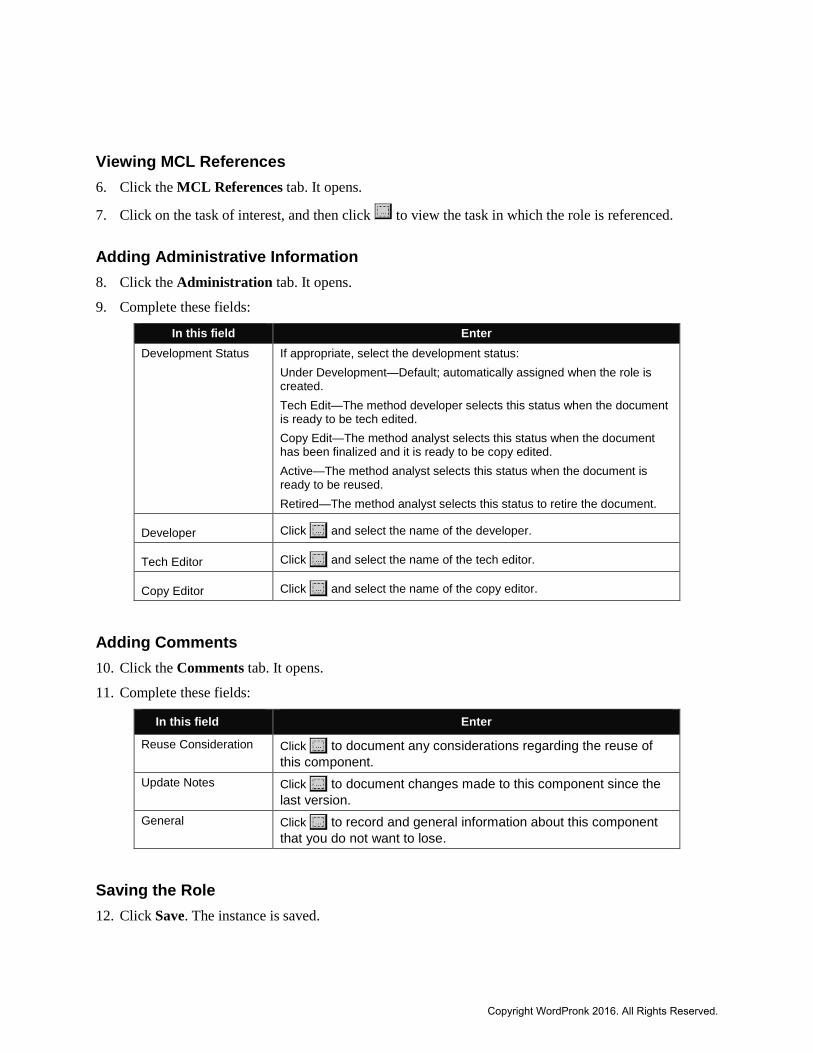
Viewing MCL References 6. Click the MCL References tab. It opens.
7. Click on the task of interest, and then click to view the task in which the role is referenced.
Adding Administrative Information 8. Click the Administration tab. It opens.
9. Complete these fields:
In this field Enter Development Status If appropriate, select the development status:
Under Development—Default; automatically assigned when the role is created. Tech Edit—The method developer selects this status when the document is ready to be tech edited. Copy Edit—The method analyst selects this status when the document has been finalized and it is ready to be copy edited. Active—The method analyst selects this status when the document is ready to be reused. Retired—The method analyst selects this status to retire the document.
Developer Click and select the name of the developer.
Tech Editor Click and select the name of the tech editor.
Copy Editor Click and select the name of the copy editor.
Adding Comments 10. Click the Comments tab. It opens.
11. Complete these fields:
In this field Enter
Reuse Consideration Click to document any considerations regarding the reuse of this component.
Update Notes Click to document changes made to this component since the last version.
General Click to record and general information about this component that you do not want to lose.
Saving the Role 12. Click Save. The instance is saved.
Copyright WordPronk 2016. All Rights Reserved.
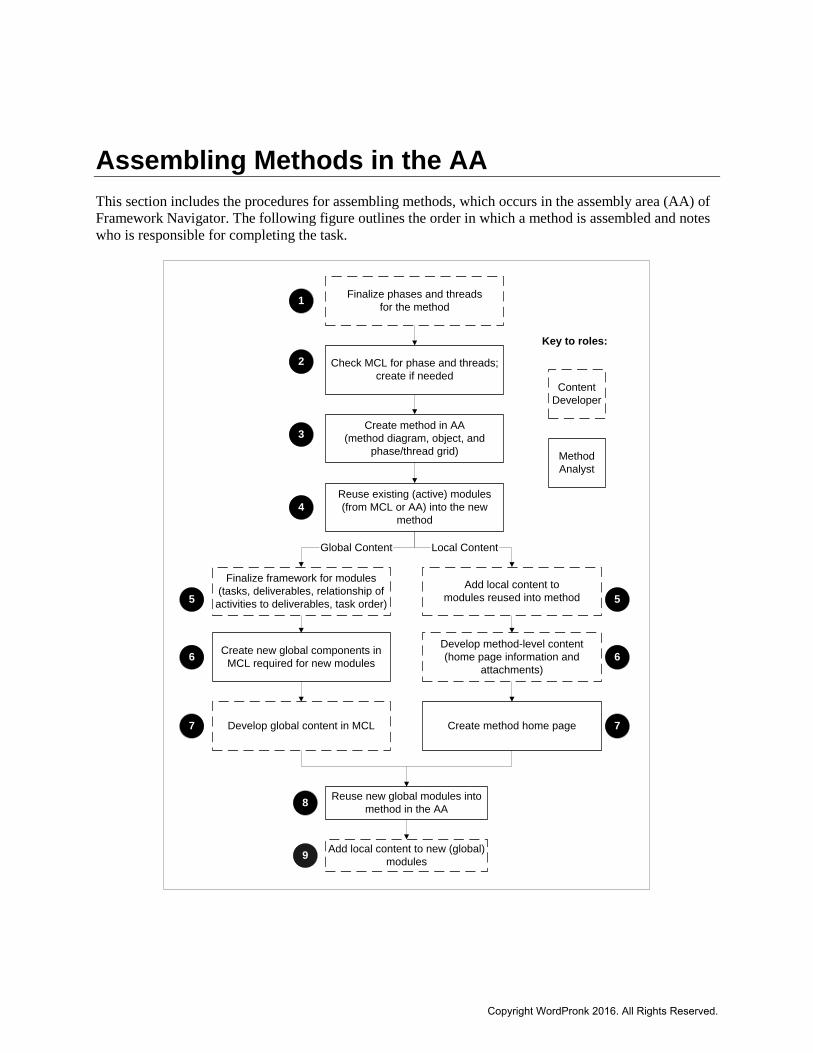
Assembling Methods in the AA This section includes the procedures for assembling methods, which occurs in the assembly area (AA) of Framework Navigator. The following figure outlines the order in which a method is assembled and notes who is responsible for completing the task.
Finalize phases and threadsfor the method
Check MCL for phase and threads;create if needed
Create method in AA(method diagram, object, and
phase/thread grid)
Reuse existing (active) modules(from MCL or AA) into the new
method
Finalize framework for modules(tasks, deliverables, relationship ofactivities to deliverables, task order)
Add local content tomodules reused into method
Create new global components inMCL required for new modules
Develop method-level content(home page information and
attachments)
Develop global content in MCL Create method home page
Reuse new global modules intomethod in the AA
Add local content to new (global)modules
1
2
3
4
5
6
7
5
6
7
8
9
Global Content Local Content
ContentDeveloper
MethodAnalyst
Key to roles:
Copyright WordPronk 2016. All Rights Reserved.
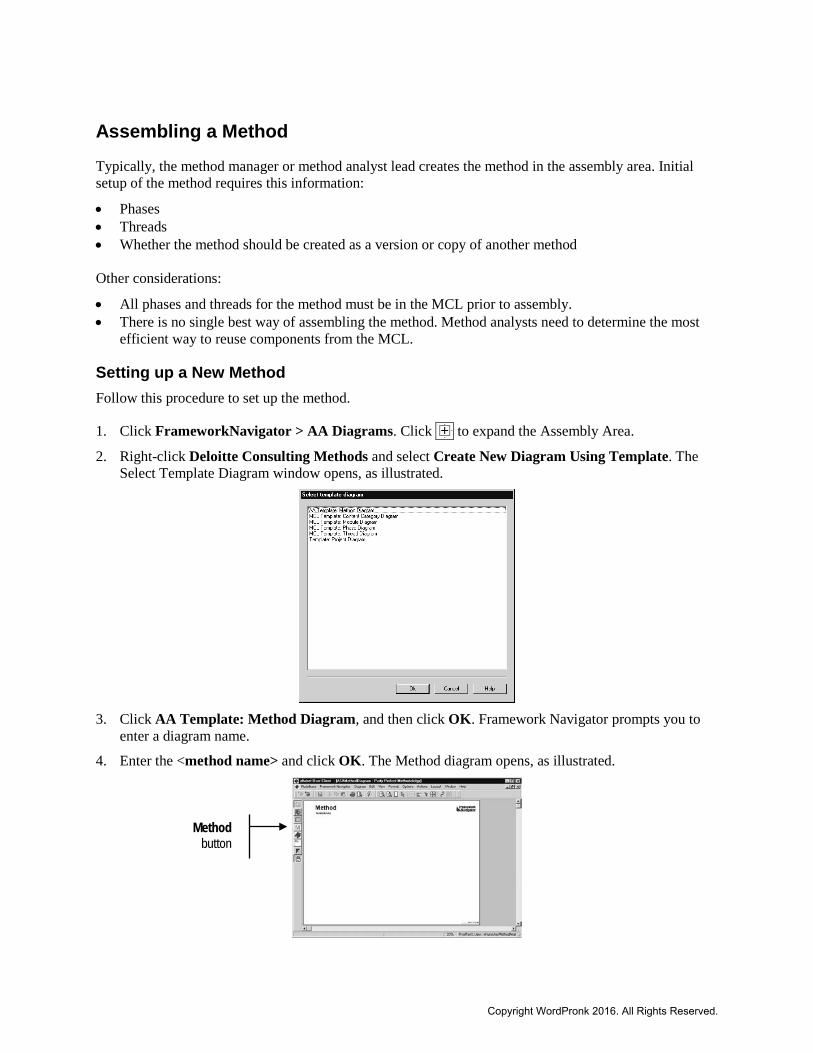
Assembling a Method Typically, the method manager or method analyst lead creates the method in the assembly area. Initial setup of the method requires this information:
• Phases • Threads • Whether the method should be created as a version or copy of another method Other considerations:
• All phases and threads for the method must be in the MCL prior to assembly. • There is no single best way of assembling the method. Method analysts need to determine the most
efficient way to reuse components from the MCL.
Setting up a New Method Follow this procedure to set up the method.
1. Click FrameworkNavigator > AA Diagrams. Click to expand the Assembly Area.
2. Right-click Deloitte Consulting Methods and select Create New Diagram Using Template. The Select Template Diagram window opens, as illustrated.
3. Click AA Template: Method Diagram, and then click OK. Framework Navigator prompts you to
enter a diagram name.
4. Enter the <method name> and click OK. The Method diagram opens, as illustrated.
Method button
Copyright WordPronk 2016. All Rights Reserved.

5. Click the Method button in the toolbox. Then click on the empty page. The Select Copy Scheme window opens, as illustrated.
6. Select Create New, and then click OK. The BiSelection dialog opens, as illustrated.
7. In the Name field, enter the <method name>.
8. In the Phases field, click the check boxes next to the phases included in the method. To specify a
different order, click on a phase and use the reorder button ( ) to move it up or down in the list.
9. In the Thread field, click the check boxes next to the threads included in the method. To specify a
different order, click on a thread and use the reorder button ( ) to move it up or down in the list.
10. Click OK. The Method dialog opens to the General tab, as illustrated. Required fields are highlighted in yellow.
Copyright WordPronk 2016. All Rights Reserved.
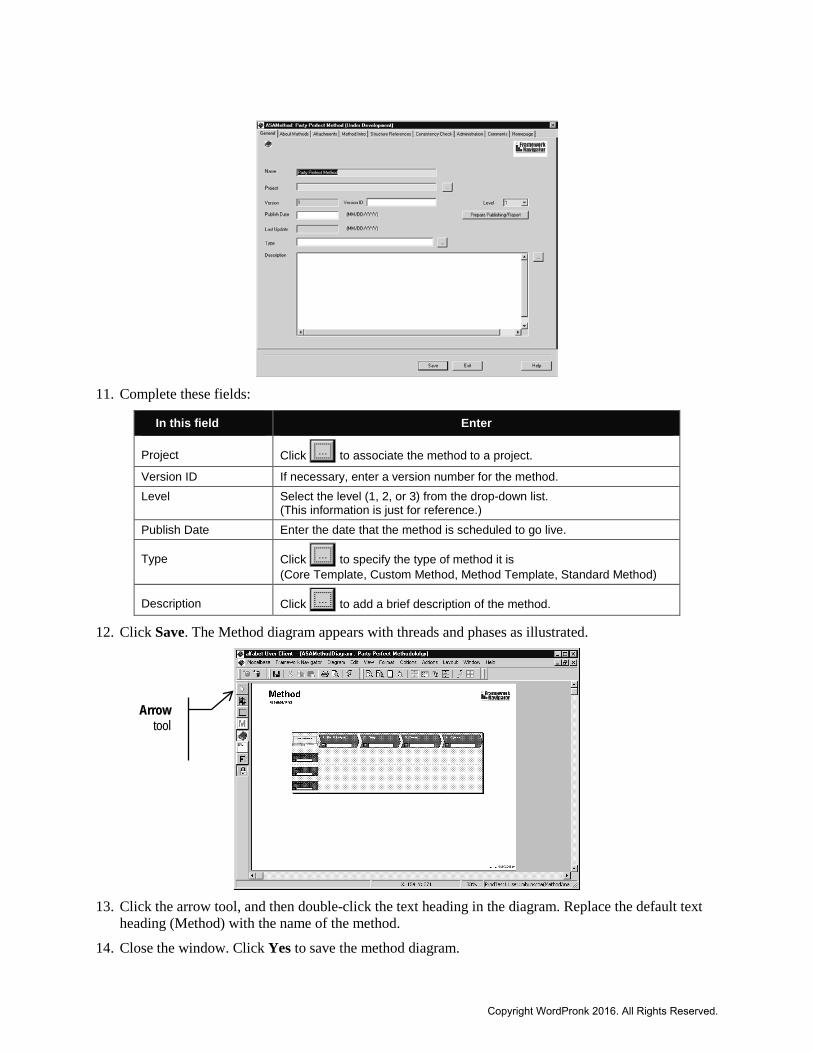
11. Complete these fields:
In this field Enter
Project Click to associate the method to a project.
Version ID If necessary, enter a version number for the method. Level Select the level (1, 2, or 3) from the drop-down list.
(This information is just for reference.) Publish Date Enter the date that the method is scheduled to go live.
Type Click to specify the type of method it is (Core Template, Custom Method, Method Template, Standard Method)
Description Click to add a brief description of the method.
12. Click Save. The Method diagram appears with threads and phases as illustrated.
13. Click the arrow tool, and then double-click the text heading in the diagram. Replace the default text
heading (Method) with the name of the method.
14. Close the window. Click Yes to save the method diagram.
Arrow tool
Copyright WordPronk 2016. All Rights Reserved.
Reusing Modules Before reusing modules, you must know where the modules will be reused from. There are two choices:
• From the MCL – brings the global content • From another method in the AA – brings the global content and any local content entered in the
other method
Reusing MCL modules If the method includes any “new” modules (modules that were not in the MCL before the project began), modules from the MCL should be reused in two stages: 1. First, reuse existing modules from the MCL. This can be done at any time, in any order, and in any
number of segments. Generally, existing modules have a status of Active, indicating they are complete and approved.
2. Later, reuse the new modules. New modules do not need to be fully populated before they are reused,
but the following statements should be true before reuse: • The tasks are identified, associated with the module, and ordered correctly. • The module deliverable is identified. • All task deliverables are identified.
If any of these conditions change after the module is reused, a new version of the module will have to be created in the MCL. Then the method must be updated with the new version of the module in the AA.
Reusing AA modules When an AA module is reused, any local content associated with the module is copied into the new method. However, unlike the relationship of global content in that module to the MCL, there is no continuing relationship of the local content with its source. The local content that is copied from one place in the AA to another is therefore only a “snapshot in time.”
Copyright WordPronk 2016. All Rights Reserved.
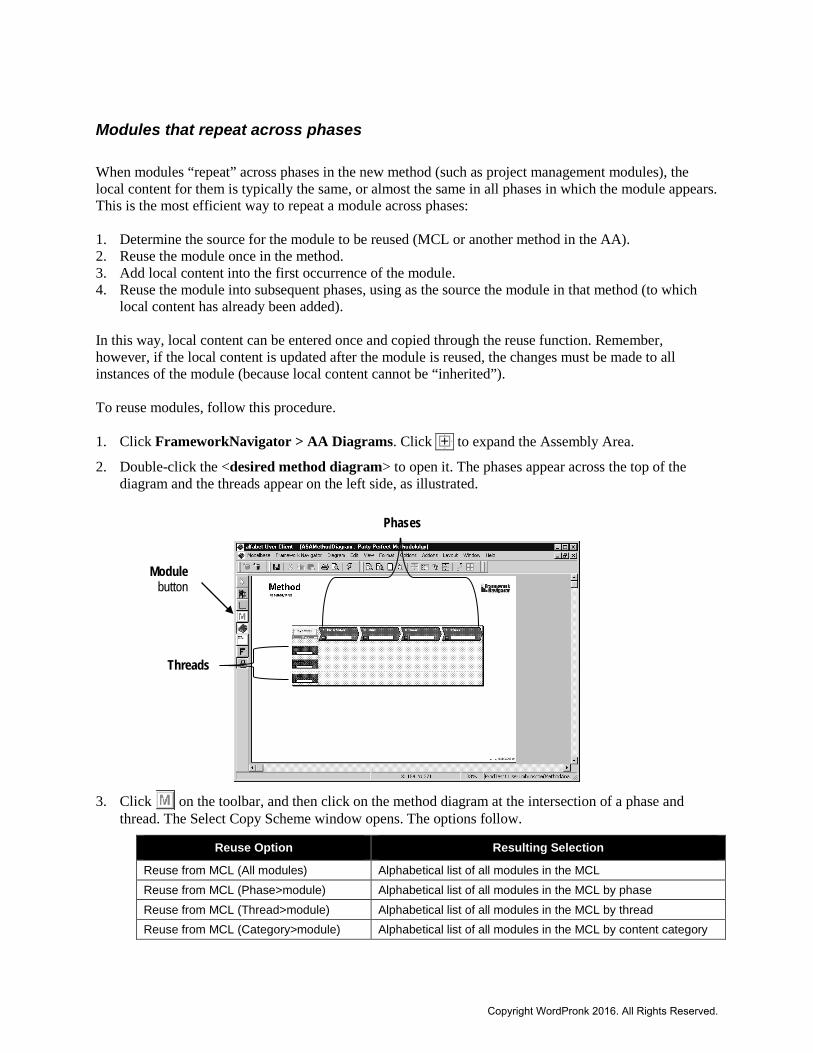
Modules that repeat across phases When modules “repeat” across phases in the new method (such as project management modules), the local content for them is typically the same, or almost the same in all phases in which the module appears. This is the most efficient way to repeat a module across phases: 1. Determine the source for the module to be reused (MCL or another method in the AA). 2. Reuse the module once in the method. 3. Add local content into the first occurrence of the module. 4. Reuse the module into subsequent phases, using as the source the module in that method (to which
local content has already been added). In this way, local content can be entered once and copied through the reuse function. Remember, however, if the local content is updated after the module is reused, the changes must be made to all instances of the module (because local content cannot be “inherited”). To reuse modules, follow this procedure. 1. Click FrameworkNavigator > AA Diagrams. Click to expand the Assembly Area.
2. Double-click the <desired method diagram> to open it. The phases appear across the top of the diagram and the threads appear on the left side, as illustrated.
3. Click on the toolbar, and then click on the method diagram at the intersection of a phase and
thread. The Select Copy Scheme window opens. The options follow.
Reuse Option Resulting Selection
Reuse from MCL (All modules) Alphabetical list of all modules in the MCL Reuse from MCL (Phase>module) Alphabetical list of all modules in the MCL by phase Reuse from MCL (Thread>module) Alphabetical list of all modules in the MCL by thread Reuse from MCL (Category>module) Alphabetical list of all modules in the MCL by content category
Phases
Threads
Module button
Copyright WordPronk 2016. All Rights Reserved.
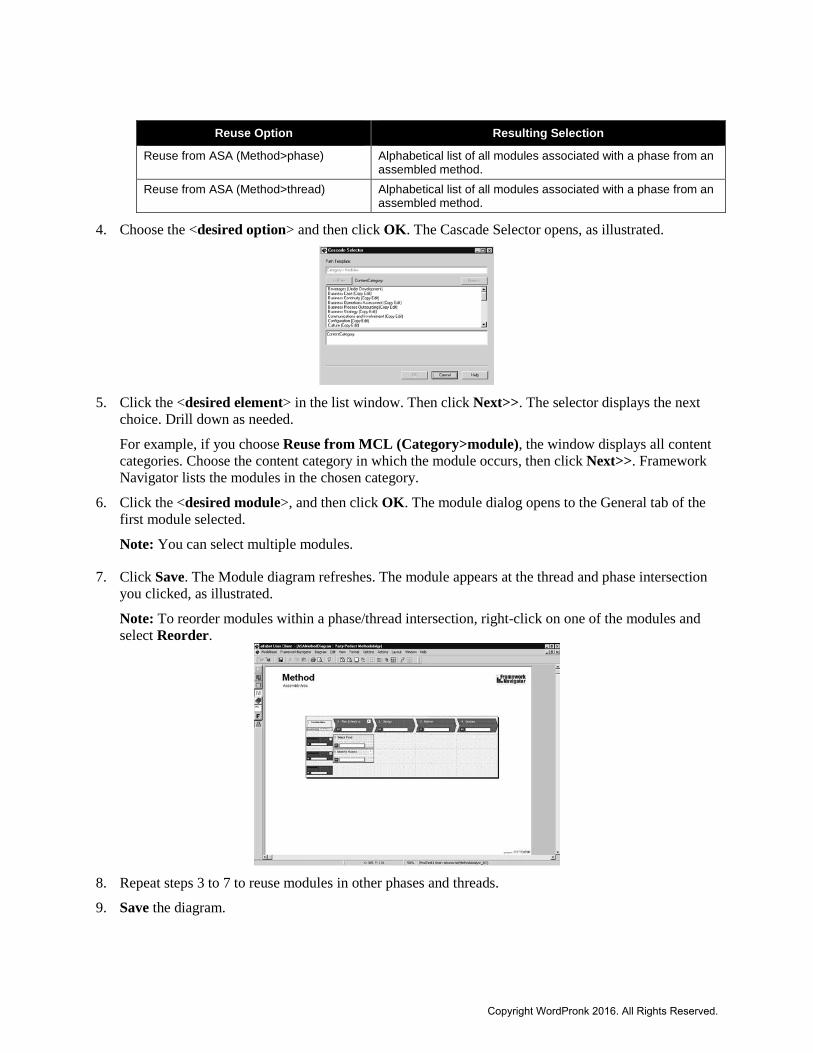
Reuse Option Resulting Selection
Reuse from ASA (Method>phase) Alphabetical list of all modules associated with a phase from an assembled method.
Reuse from ASA (Method>thread) Alphabetical list of all modules associated with a phase from an assembled method.
4. Choose the <desired option> and then click OK. The Cascade Selector opens, as illustrated.
5. Click the <desired element> in the list window. Then click Next>>. The selector displays the next
choice. Drill down as needed.
For example, if you choose Reuse from MCL (Category>module), the window displays all content categories. Choose the content category in which the module occurs, then click Next>>. Framework Navigator lists the modules in the chosen category.
6. Click the <desired module>, and then click OK. The module dialog opens to the General tab of the first module selected.
Note: You can select multiple modules.
7. Click Save. The Module diagram refreshes. The module appears at the thread and phase intersection you clicked, as illustrated.
Note: To reorder modules within a phase/thread intersection, right-click on one of the modules and select Reorder.
8. Repeat steps 3 to 7 to reuse modules in other phases and threads.
9. Save the diagram.
Copyright WordPronk 2016. All Rights Reserved.
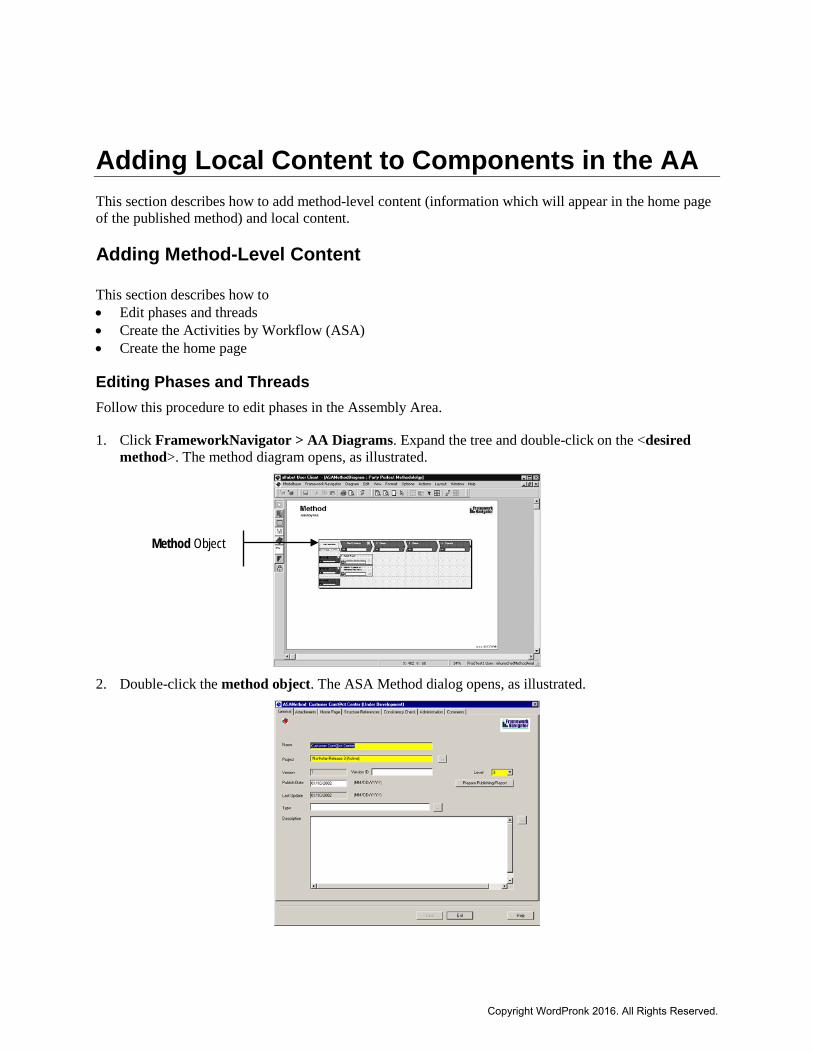
Adding Local Content to Components in the AA This section describes how to add method-level content (information which will appear in the home page of the published method) and local content. Adding Method-Level Content This section describes how to • Edit phases and threads • Create the Activities by Workflow (ASA) • Create the home page
Editing Phases and Threads Follow this procedure to edit phases in the Assembly Area.
1. Click FrameworkNavigator > AA Diagrams. Expand the tree and double-click on the <desired method>. The method diagram opens, as illustrated.
2. Double-click the method object. The ASA Method dialog opens, as illustrated.
Method Object
Copyright WordPronk 2016. All Rights Reserved.
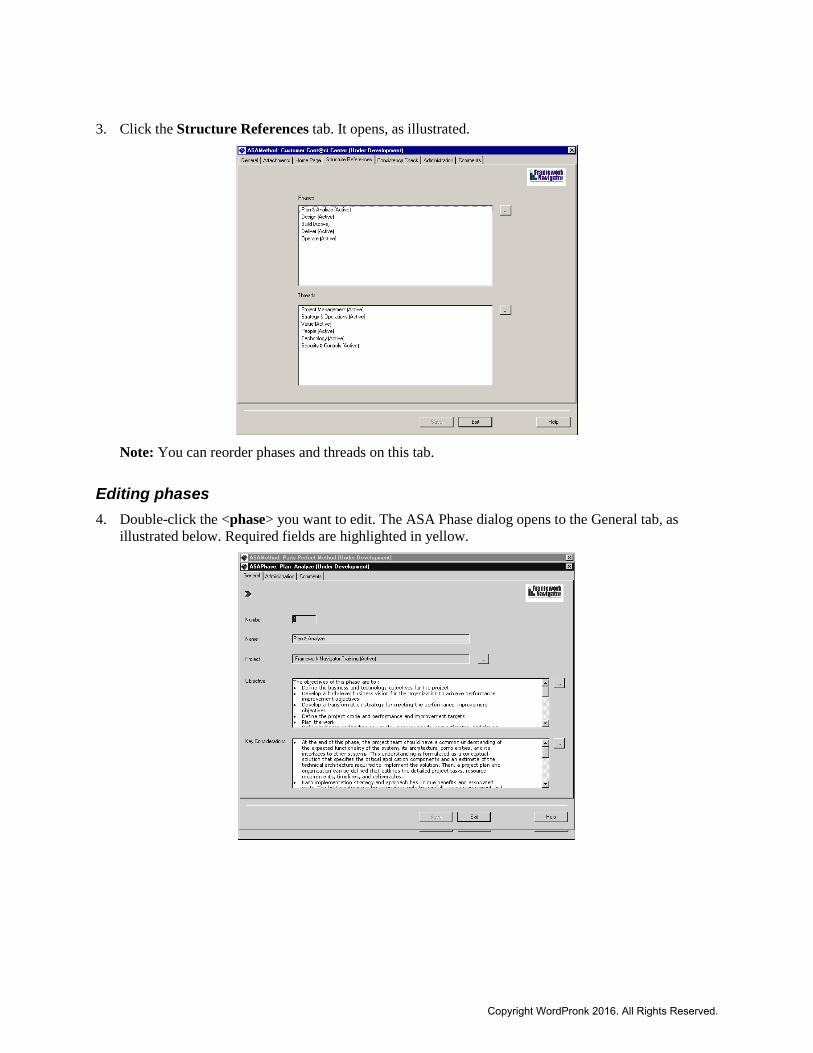
3. Click the Structure References tab. It opens, as illustrated.
Note: You can reorder phases and threads on this tab.
Editing phases 4. Double-click the <phase> you want to edit. The ASA Phase dialog opens to the General tab, as
illustrated below. Required fields are highlighted in yellow.
Copyright WordPronk 2016. All Rights Reserved.
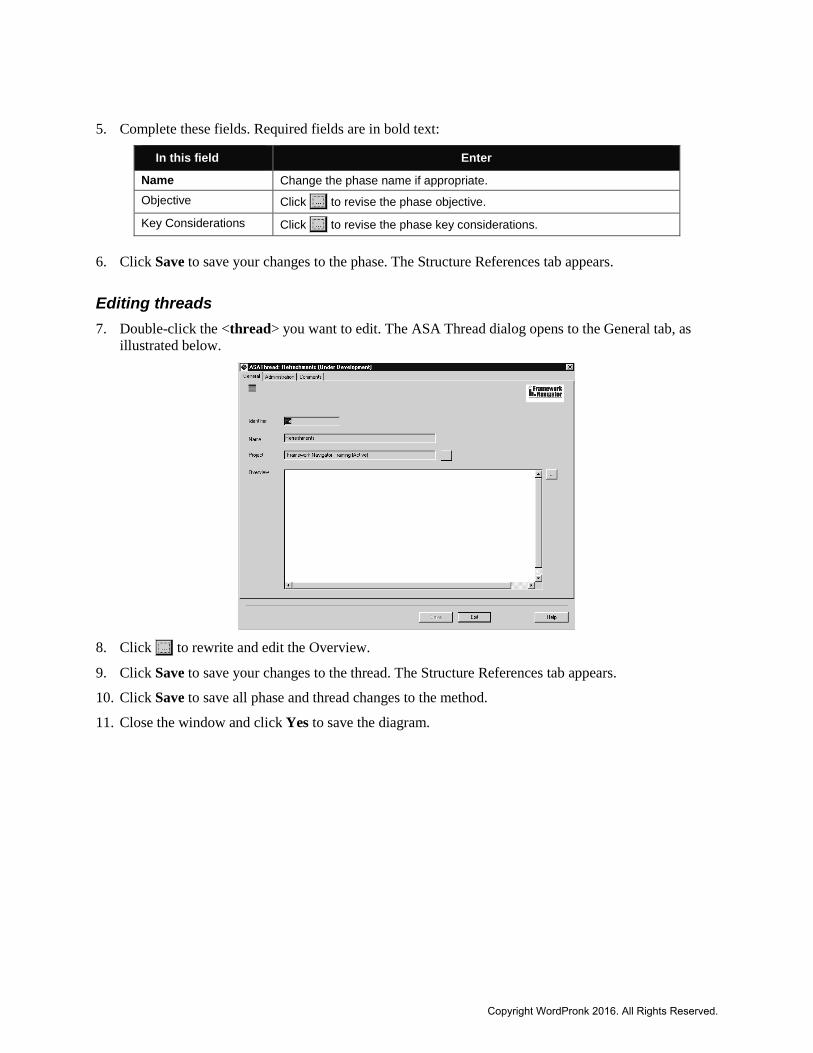
5. Complete these fields. Required fields are in bold text:
In this field Enter
Name Change the phase name if appropriate. Objective Click to revise the phase objective.
Key Considerations Click to revise the phase key considerations.
6. Click Save to save your changes to the phase. The Structure References tab appears.
Editing threads 7. Double-click the <thread> you want to edit. The ASA Thread dialog opens to the General tab, as
illustrated below.
8. Click to rewrite and edit the Overview.
9. Click Save to save your changes to the thread. The Structure References tab appears.
10. Click Save to save all phase and thread changes to the method.
11. Close the window and click Yes to save the diagram.
Copyright WordPronk 2016. All Rights Reserved.
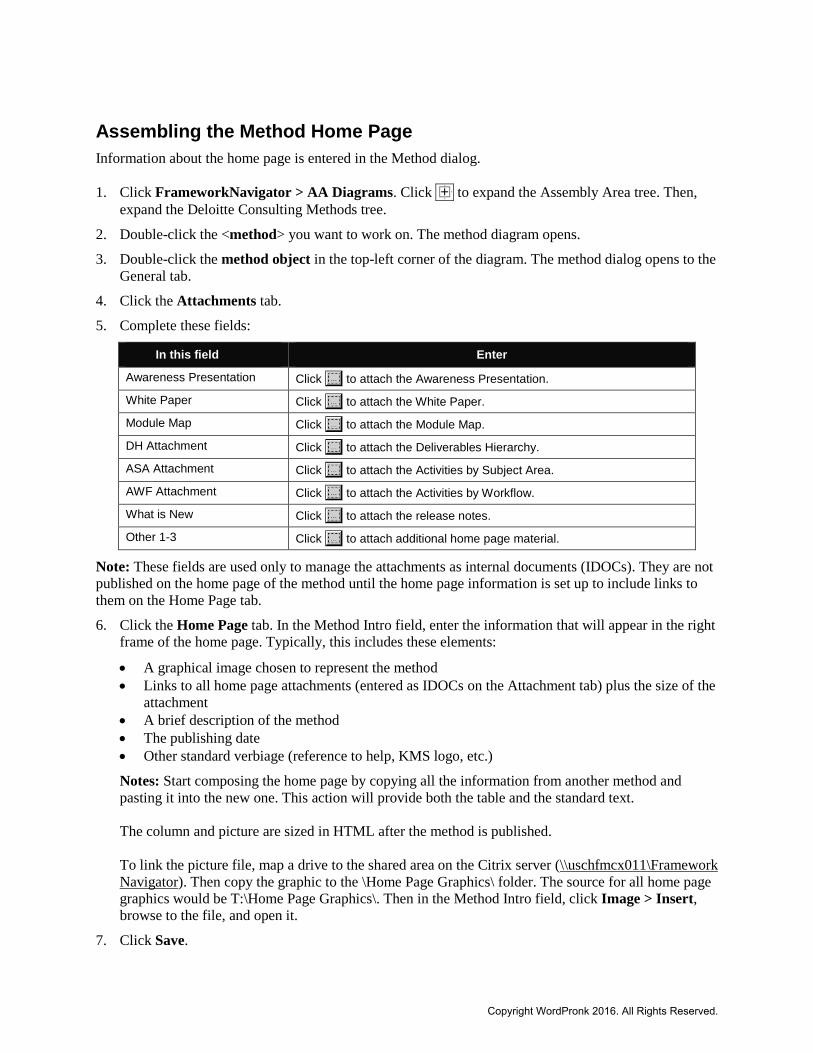
Assembling the Method Home Page Information about the home page is entered in the Method dialog. 1. Click FrameworkNavigator > AA Diagrams. Click to expand the Assembly Area tree. Then,
expand the Deloitte Consulting Methods tree.
2. Double-click the <method> you want to work on. The method diagram opens.
3. Double-click the method object in the top-left corner of the diagram. The method dialog opens to the General tab.
4. Click the Attachments tab.
5. Complete these fields:
In this field Enter
Awareness Presentation Click to attach the Awareness Presentation.
White Paper Click to attach the White Paper.
Module Map Click to attach the Module Map.
DH Attachment Click to attach the Deliverables Hierarchy.
ASA Attachment Click to attach the Activities by Subject Area.
AWF Attachment Click to attach the Activities by Workflow.
What is New Click to attach the release notes.
Other 1-3 Click to attach additional home page material.
Note: These fields are used only to manage the attachments as internal documents (IDOCs). They are not published on the home page of the method until the home page information is set up to include links to them on the Home Page tab.
6. Click the Home Page tab. In the Method Intro field, enter the information that will appear in the right frame of the home page. Typically, this includes these elements:
• A graphical image chosen to represent the method • Links to all home page attachments (entered as IDOCs on the Attachment tab) plus the size of the
attachment • A brief description of the method • The publishing date • Other standard verbiage (reference to help, KMS logo, etc.)
Notes: Start composing the home page by copying all the information from another method and pasting it into the new one. This action will provide both the table and the standard text. The column and picture are sized in HTML after the method is published. To link the picture file, map a drive to the shared area on the Citrix server (\\uschfmcx011\Framework Navigator). Then copy the graphic to the \Home Page Graphics\ folder. The source for all home page graphics would be T:\Home Page Graphics\. Then in the Method Intro field, click Image > Insert, browse to the file, and open it.
7. Click Save.
Copyright WordPronk 2016. All Rights Reserved.
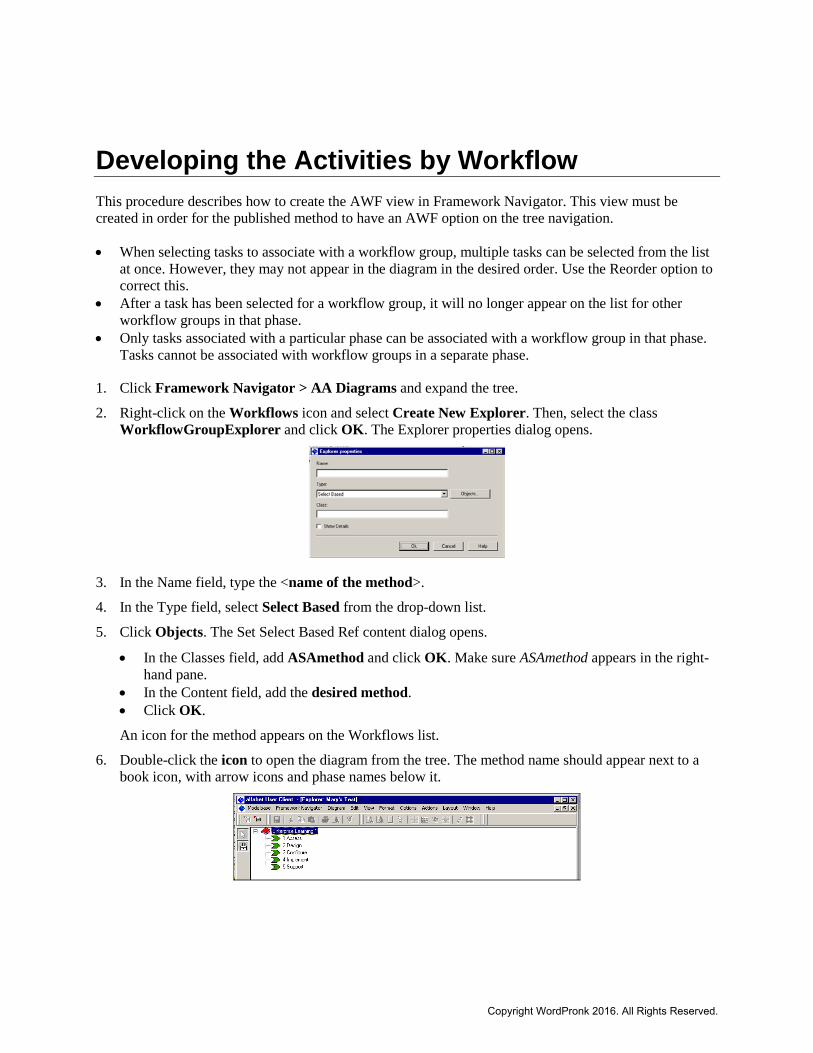
Developing the Activities by Workflow This procedure describes how to create the AWF view in Framework Navigator. This view must be created in order for the published method to have an AWF option on the tree navigation.
• When selecting tasks to associate with a workflow group, multiple tasks can be selected from the list at once. However, they may not appear in the diagram in the desired order. Use the Reorder option to correct this.
• After a task has been selected for a workflow group, it will no longer appear on the list for other workflow groups in that phase.
• Only tasks associated with a particular phase can be associated with a workflow group in that phase. Tasks cannot be associated with workflow groups in a separate phase.
1. Click Framework Navigator > AA Diagrams and expand the tree.
2. Right-click on the Workflows icon and select Create New Explorer. Then, select the class WorkflowGroupExplorer and click OK. The Explorer properties dialog opens.
3. In the Name field, type the <name of the method>.
4. In the Type field, select Select Based from the drop-down list.
5. Click Objects. The Set Select Based Ref content dialog opens.
• In the Classes field, add ASAmethod and click OK. Make sure ASAmethod appears in the right-hand pane.
• In the Content field, add the desired method. • Click OK.
An icon for the method appears on the Workflows list.
6. Double-click the icon to open the diagram from the tree. The method name should appear next to a book icon, with arrow icons and phase names below it.
Copyright WordPronk 2016. All Rights Reserved.
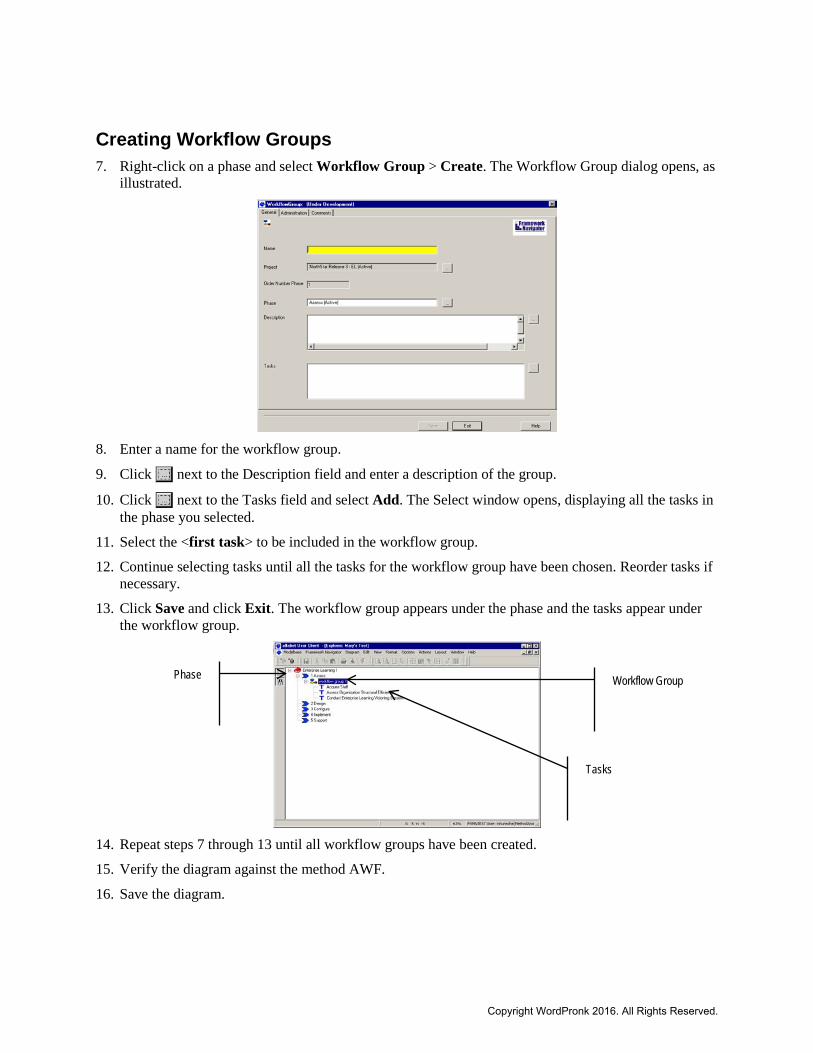
Creating Workflow Groups 7. Right-click on a phase and select Workflow Group > Create. The Workflow Group dialog opens, as
illustrated.
8. Enter a name for the workflow group.
9. Click next to the Description field and enter a description of the group.
10. Click next to the Tasks field and select Add. The Select window opens, displaying all the tasks in the phase you selected.
11. Select the <first task> to be included in the workflow group.
12. Continue selecting tasks until all the tasks for the workflow group have been chosen. Reorder tasks if necessary.
13. Click Save and click Exit. The workflow group appears under the phase and the tasks appear under the workflow group.
14. Repeat steps 7 through 13 until all workflow groups have been created.
15. Verify the diagram against the method AWF.
16. Save the diagram.
Phase Workflow Group
Tasks
Copyright WordPronk 2016. All Rights Reserved.
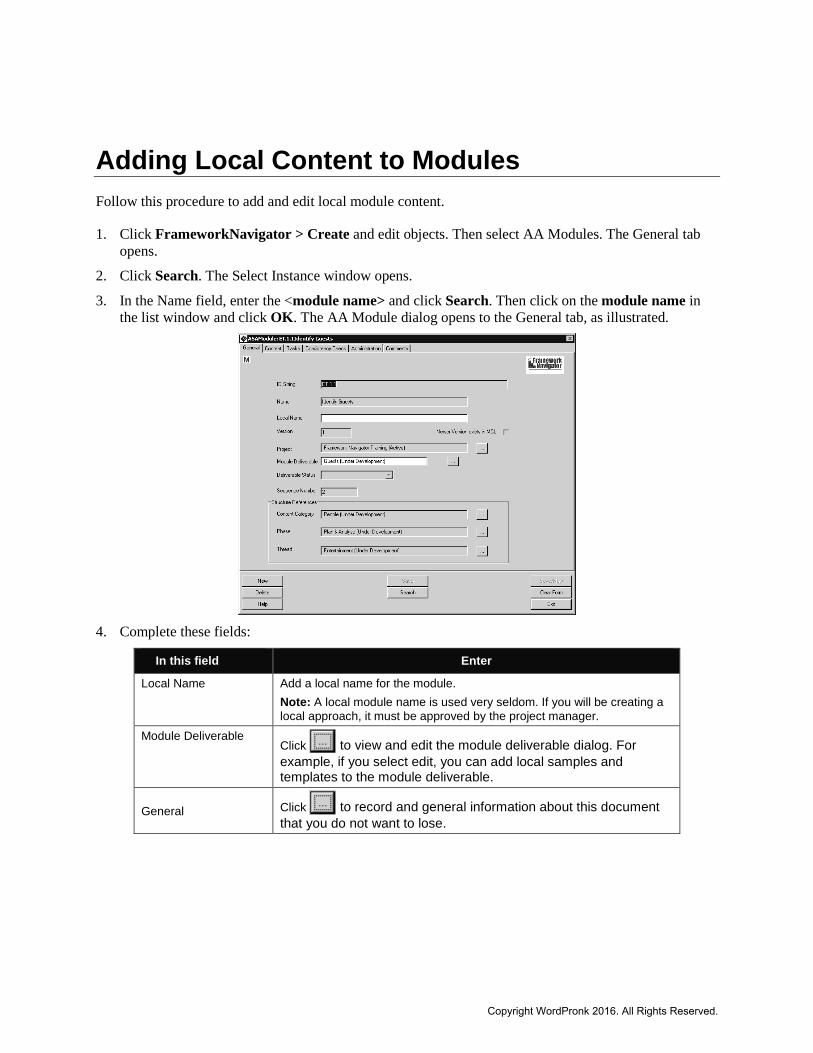
Adding Local Content to Modules Follow this procedure to add and edit local module content.
1. Click FrameworkNavigator > Create and edit objects. Then select AA Modules. The General tab opens.
2. Click Search. The Select Instance window opens.
3. In the Name field, enter the <module name> and click Search. Then click on the module name in the list window and click OK. The AA Module dialog opens to the General tab, as illustrated.
4. Complete these fields:
In this field Enter
Local Name Add a local name for the module. Note: A local module name is used very seldom. If you will be creating a local approach, it must be approved by the project manager.
Module Deliverable Click to view and edit the module deliverable dialog. For example, if you select edit, you can add local samples and templates to the module deliverable.
General Click to record and general information about this document
that you do not want to lose.
Copyright WordPronk 2016. All Rights Reserved.
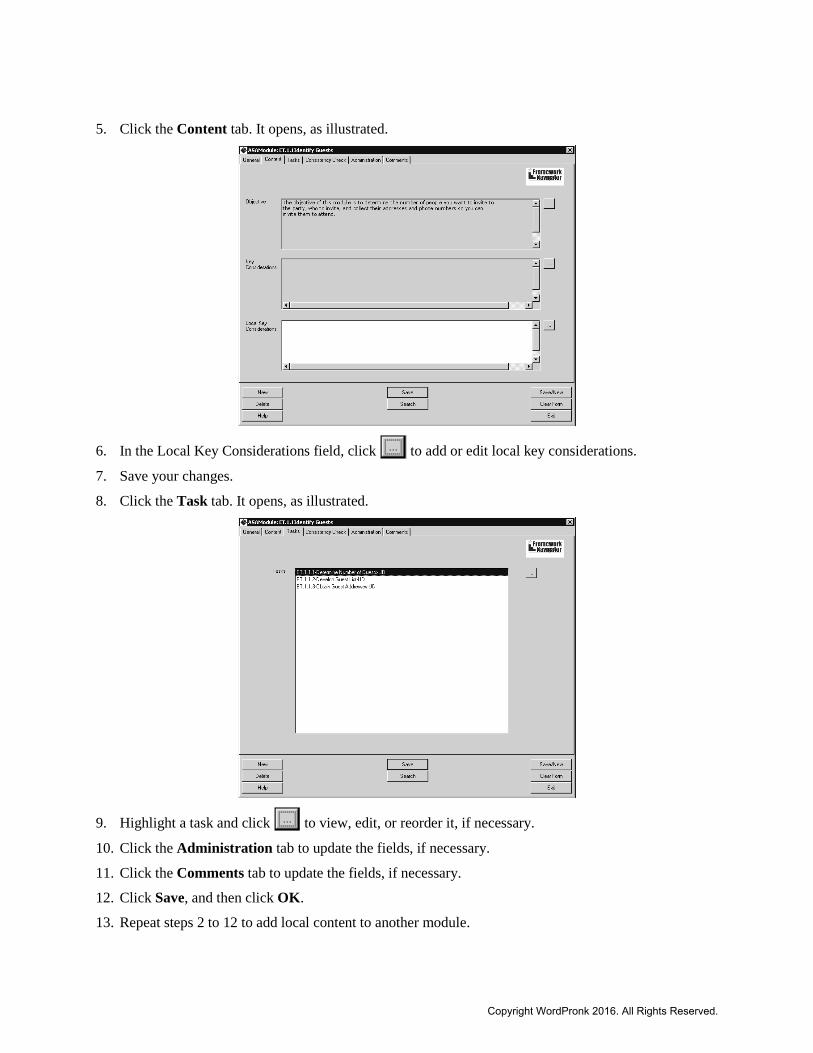
5. Click the Content tab. It opens, as illustrated.
6. In the Local Key Considerations field, click to add or edit local key considerations.
7. Save your changes.
8. Click the Task tab. It opens, as illustrated.
9. Highlight a task and click to view, edit, or reorder it, if necessary.
10. Click the Administration tab to update the fields, if necessary.
11. Click the Comments tab to update the fields, if necessary.
12. Click Save, and then click OK.
13. Repeat steps 2 to 12 to add local content to another module.
Copyright WordPronk 2016. All Rights Reserved.
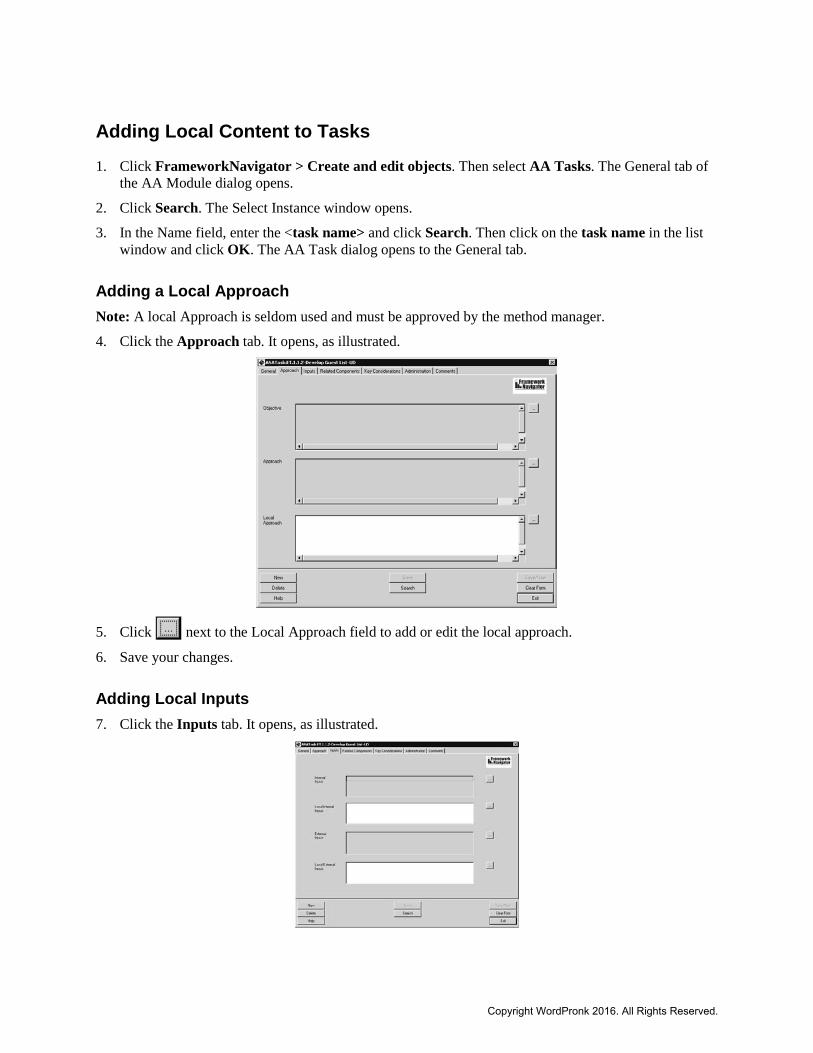
Adding Local Content to Tasks 1. Click FrameworkNavigator > Create and edit objects. Then select AA Tasks. The General tab of
the AA Module dialog opens.
2. Click Search. The Select Instance window opens.
3. In the Name field, enter the <task name> and click Search. Then click on the task name in the list window and click OK. The AA Task dialog opens to the General tab.
Adding a Local Approach Note: A local Approach is seldom used and must be approved by the method manager.
4. Click the Approach tab. It opens, as illustrated.
5. Click next to the Local Approach field to add or edit the local approach.
6. Save your changes.
Adding Local Inputs 7. Click the Inputs tab. It opens, as illustrated.
Copyright WordPronk 2016. All Rights Reserved.
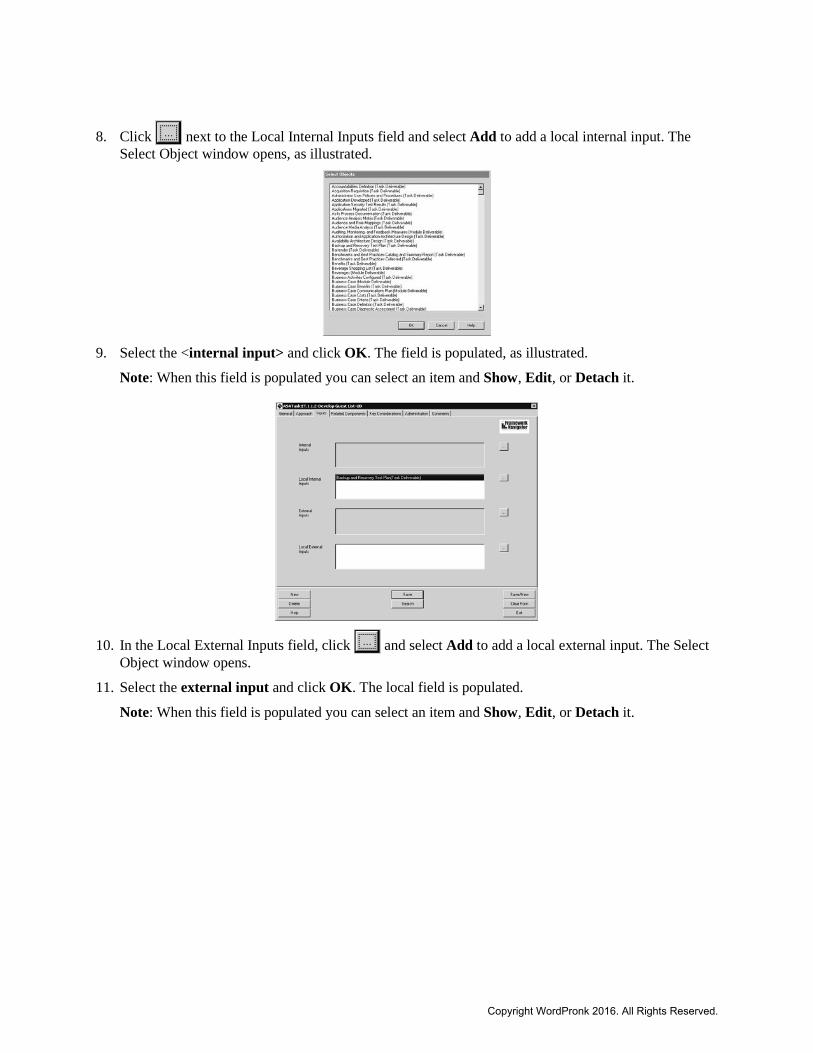
8. Click next to the Local Internal Inputs field and select Add to add a local internal input. The Select Object window opens, as illustrated.
9. Select the <internal input> and click OK. The field is populated, as illustrated.
Note: When this field is populated you can select an item and Show, Edit, or Detach it.
10. In the Local External Inputs field, click and select Add to add a local external input. The Select Object window opens.
11. Select the external input and click OK. The local field is populated.
Note: When this field is populated you can select an item and Show, Edit, or Detach it.
Copyright WordPronk 2016. All Rights Reserved.
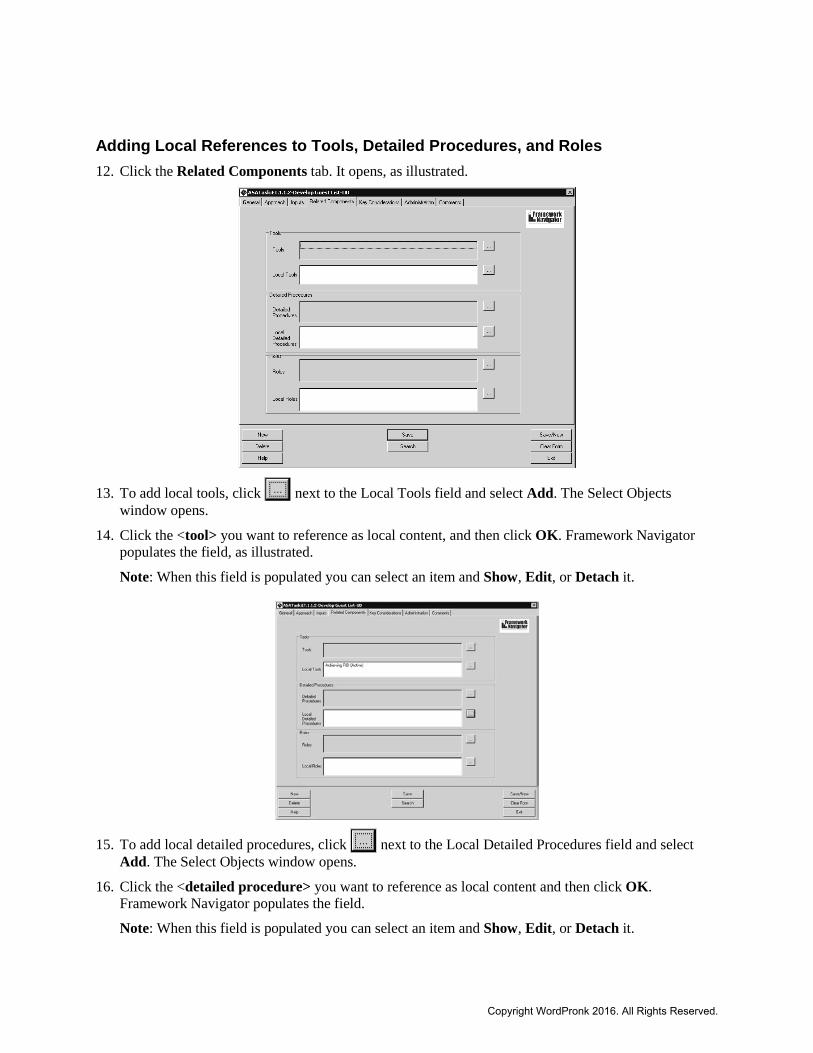
Adding Local References to Tools, Detailed Procedures, and Roles 12. Click the Related Components tab. It opens, as illustrated.
13. To add local tools, click next to the Local Tools field and select Add. The Select Objects window opens.
14. Click the <tool> you want to reference as local content, and then click OK. Framework Navigator populates the field, as illustrated.
Note: When this field is populated you can select an item and Show, Edit, or Detach it.
15. To add local detailed procedures, click next to the Local Detailed Procedures field and select Add. The Select Objects window opens.
16. Click the <detailed procedure> you want to reference as local content and then click OK. Framework Navigator populates the field.
Note: When this field is populated you can select an item and Show, Edit, or Detach it.
Copyright WordPronk 2016. All Rights Reserved.

17. To add local roles, click next to the Local Roles field, and select Add. The Select Objects window opens.
18. Click the <role> you want to reference as local content, and then click OK. Framework Navigator populates the field.
Note: When this field is populated you can select an item and Show, Edit, or Detach it.
Adding Local Key Considerations 19. Click the Key Considerations tab. It opens, as illustrated.
20. Click next to the Local Key Considerations field, and add or edit local key considerations.
Updating Administrative Information 21. Click the Administration tab to update the fields, if necessary.
22. Click the Comments tab to update the fields, if necessary.
23. Click Save, and then click OK.
24. Repeat steps 2 to 23 to add local content to other tasks.
Copyright WordPronk 2016. All Rights Reserved.
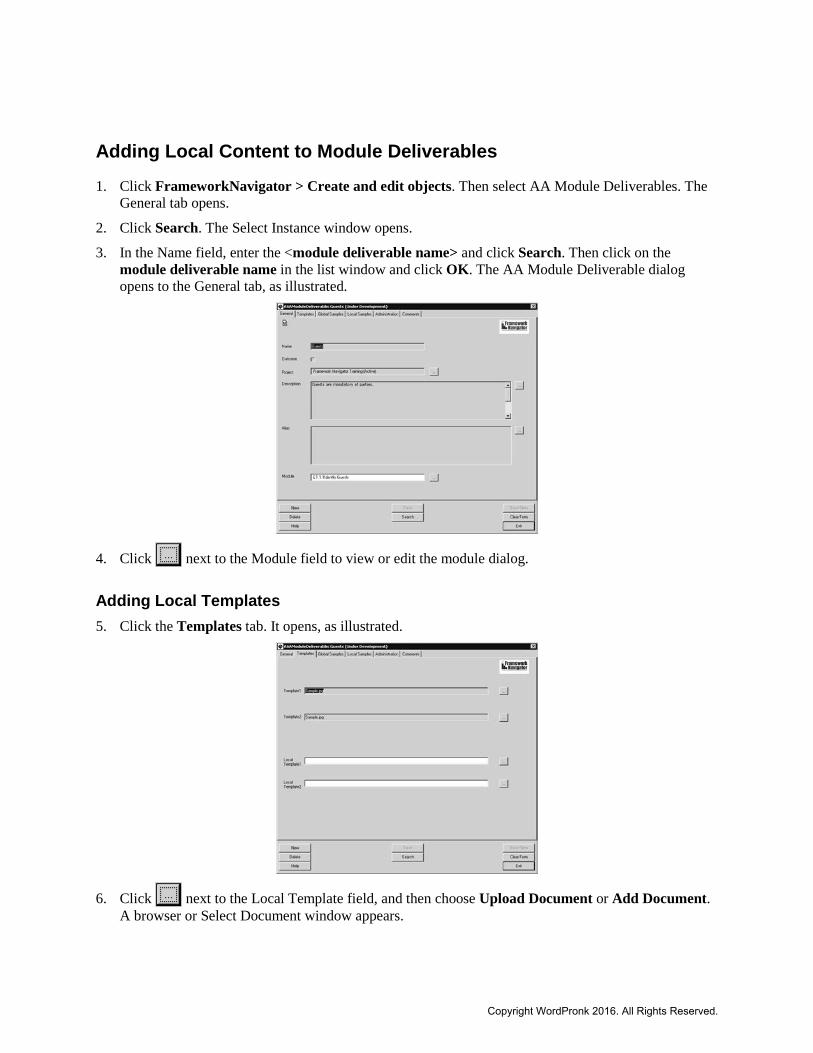
Adding Local Content to Module Deliverables 1. Click FrameworkNavigator > Create and edit objects. Then select AA Module Deliverables. The
General tab opens.
2. Click Search. The Select Instance window opens.
3. In the Name field, enter the <module deliverable name> and click Search. Then click on the module deliverable name in the list window and click OK. The AA Module Deliverable dialog opens to the General tab, as illustrated.
4. Click next to the Module field to view or edit the module dialog.
Adding Local Templates 5. Click the Templates tab. It opens, as illustrated.
6. Click next to the Local Template field, and then choose Upload Document or Add Document. A browser or Select Document window appears.
Copyright WordPronk 2016. All Rights Reserved.

7. Select the <file> and click OK. Framework Navigator takes the appropriate action and populates the field.
Note: When the field is populated, click to remove the document reference.
Adding Local Samples Framework Navigator can accommodate the addition of fives samples. Follow these steps for each addition.
8. Click the Local Samples tab. It opens, as illustrated.
9. Click next to the Local Sample # field, and then choose Upload Document or Add Document. A browser or select document window appears.
10. Select the <file> and click OK.
Note: When the field is populated, click to remove the document reference.
11. Click next to the Local Sample Deliverable Description # field and add or edit the sample deliverable description.
12. Click Save.
Updating Administrative Information 13. Click the Administration tab to update the fields, if necessary.
14. Click the Comments tab to update the fields, if necessary.
15. Click Save, and then click OK.
16. Repeat steps 2 to 15 to add local content to other module deliverables.
Copyright WordPronk 2016. All Rights Reserved.
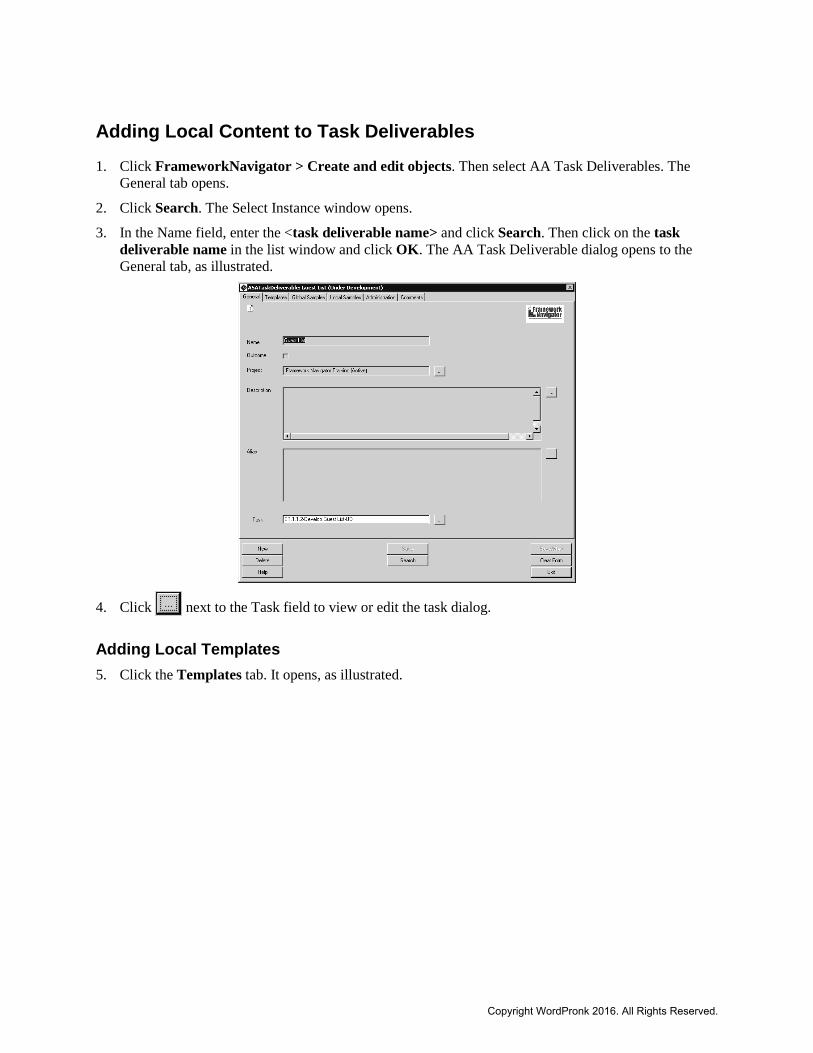
Adding Local Content to Task Deliverables 1. Click FrameworkNavigator > Create and edit objects. Then select AA Task Deliverables. The
General tab opens.
2. Click Search. The Select Instance window opens.
3. In the Name field, enter the <task deliverable name> and click Search. Then click on the task deliverable name in the list window and click OK. The AA Task Deliverable dialog opens to the General tab, as illustrated.
4. Click next to the Task field to view or edit the task dialog.
Adding Local Templates 5. Click the Templates tab. It opens, as illustrated.
Copyright WordPronk 2016. All Rights Reserved.
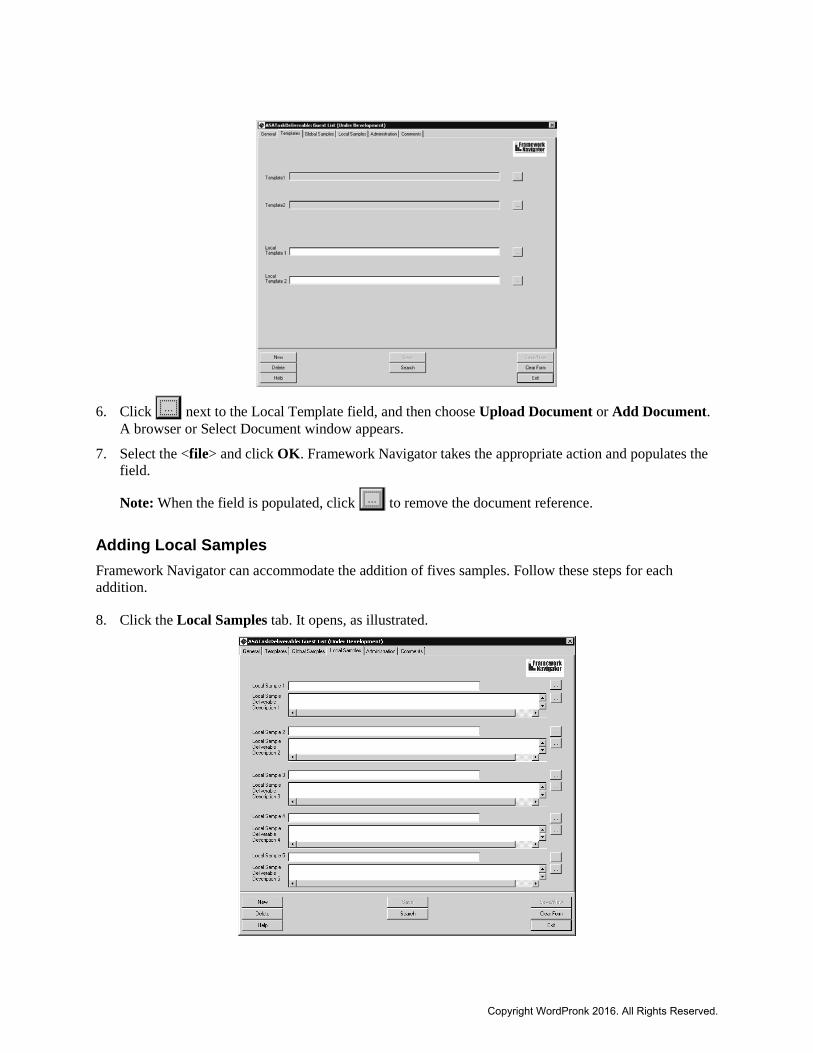
6. Click next to the Local Template field, and then choose Upload Document or Add Document. A browser or Select Document window appears.
7. Select the <file> and click OK. Framework Navigator takes the appropriate action and populates the field.
Note: When the field is populated, click to remove the document reference.
Adding Local Samples Framework Navigator can accommodate the addition of fives samples. Follow these steps for each addition.
8. Click the Local Samples tab. It opens, as illustrated.
Copyright WordPronk 2016. All Rights Reserved.
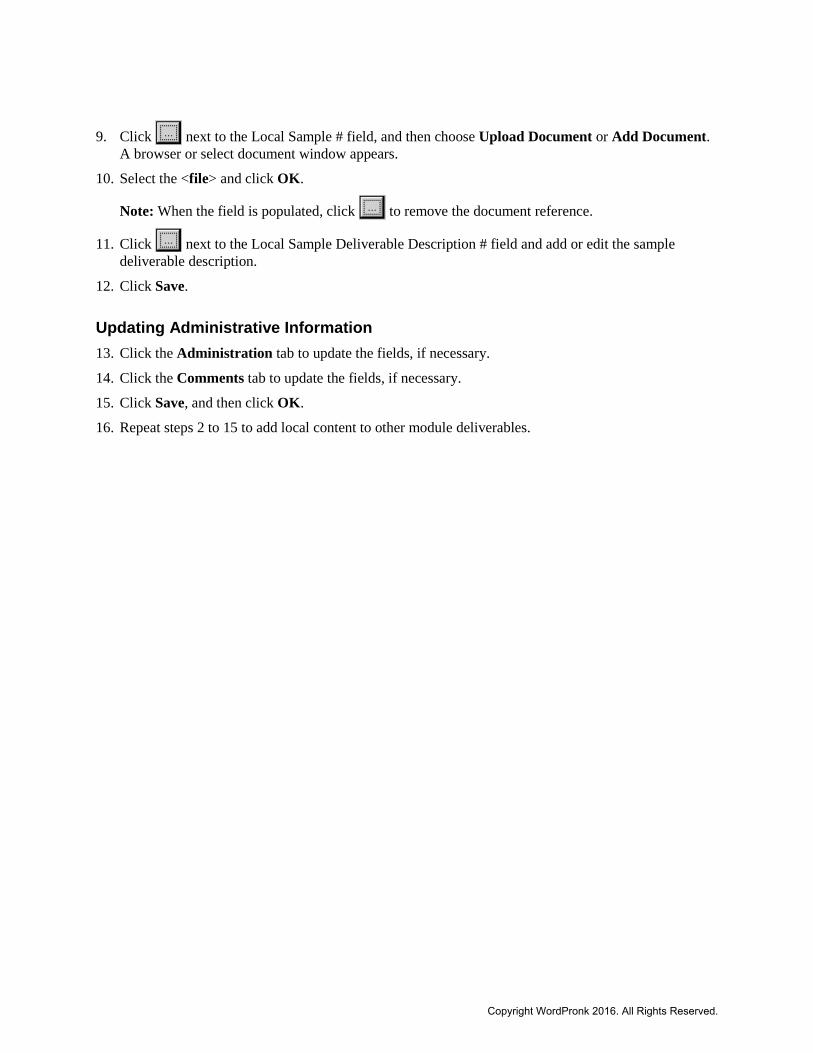
9. Click next to the Local Sample # field, and then choose Upload Document or Add Document. A browser or select document window appears.
10. Select the <file> and click OK.
Note: When the field is populated, click to remove the document reference.
11. Click next to the Local Sample Deliverable Description # field and add or edit the sample deliverable description.
12. Click Save.
Updating Administrative Information 13. Click the Administration tab to update the fields, if necessary.
14. Click the Comments tab to update the fields, if necessary.
15. Click Save, and then click OK.
16. Repeat steps 2 to 15 to add local content to other module deliverables.
Copyright WordPronk 2016. All Rights Reserved.
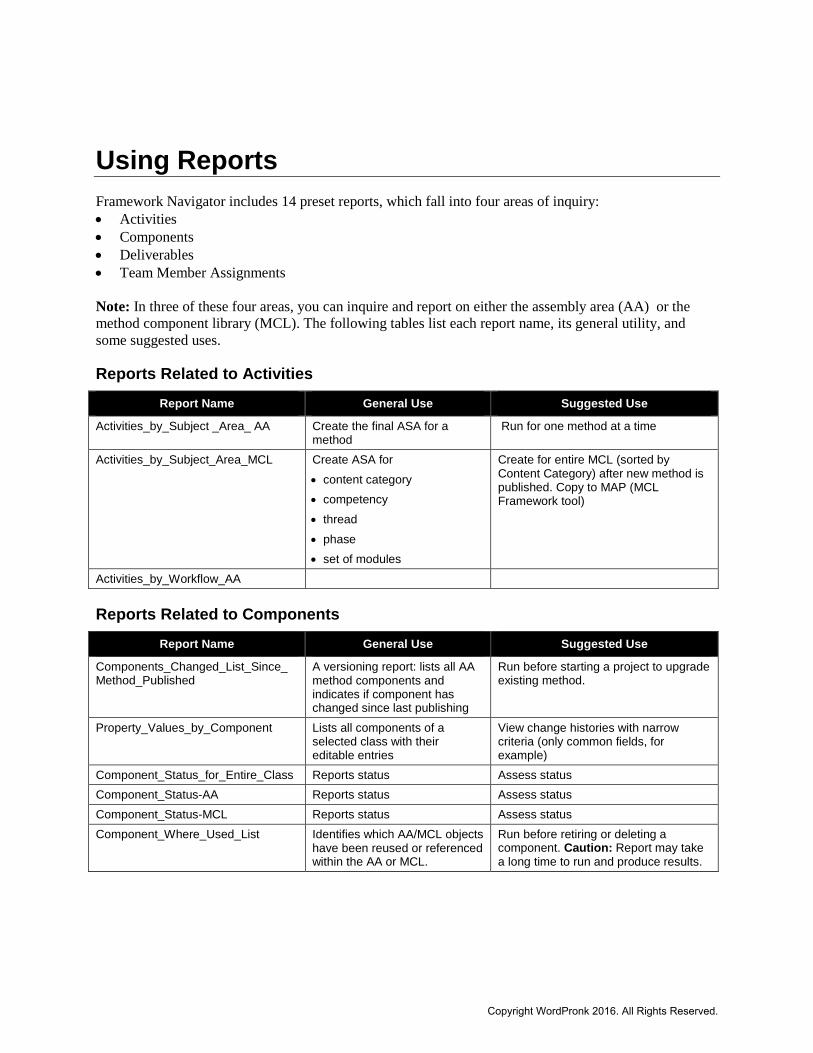
Using Reports Framework Navigator includes 14 preset reports, which fall into four areas of inquiry: • Activities • Components • Deliverables • Team Member Assignments Note: In three of these four areas, you can inquire and report on either the assembly area (AA) or the method component library (MCL). The following tables list each report name, its general utility, and some suggested uses.
Reports Related to Activities Report Name General Use Suggested Use
Activities_by_Subject _Area_ AA Create the final ASA for a method
Run for one method at a time
Activities_by_Subject_Area_MCL Create ASA for • content category • competency • thread • phase • set of modules
Create for entire MCL (sorted by Content Category) after new method is published. Copy to MAP (MCL Framework tool)
Activities_by_Workflow_AA
Reports Related to Components Report Name General Use Suggested Use
Components_Changed_List_Since_ Method_Published
A versioning report: lists all AA method components and indicates if component has changed since last publishing
Run before starting a project to upgrade existing method.
Property_Values_by_Component Lists all components of a selected class with their editable entries
View change histories with narrow criteria (only common fields, for example)
Component_Status_for_Entire_Class Reports status Assess status Component_Status-AA Reports status Assess status Component_Status-MCL Reports status Assess status Component_Where_Used_List Identifies which AA/MCL objects
have been reused or referenced within the AA or MCL.
Run before retiring or deleting a component. Caution: Report may take a long time to run and produce results.
Copyright WordPronk 2016. All Rights Reserved.
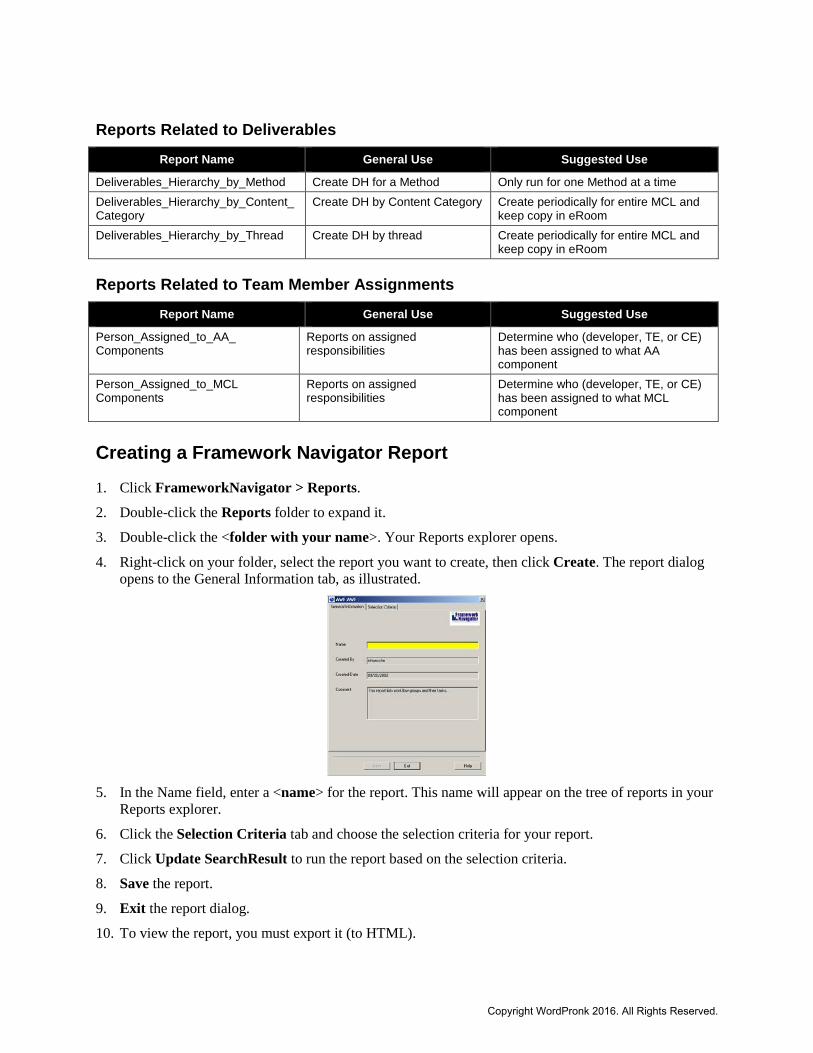
Reports Related to Deliverables Report Name General Use Suggested Use
Deliverables_Hierarchy_by_Method Create DH for a Method Only run for one Method at a time Deliverables_Hierarchy_by_Content_ Category
Create DH by Content Category Create periodically for entire MCL and keep copy in eRoom
Deliverables_Hierarchy_by_Thread Create DH by thread Create periodically for entire MCL and keep copy in eRoom
Reports Related to Team Member Assignments Report Name General Use Suggested Use
Person_Assigned_to_AA_ Components
Reports on assigned responsibilities
Determine who (developer, TE, or CE) has been assigned to what AA component
Person_Assigned_to_MCL Components
Reports on assigned responsibilities
Determine who (developer, TE, or CE) has been assigned to what MCL component
Creating a Framework Navigator Report
1. Click FrameworkNavigator > Reports.
2. Double-click the Reports folder to expand it.
3. Double-click the <folder with your name>. Your Reports explorer opens.
4. Right-click on your folder, select the report you want to create, then click Create. The report dialog opens to the General Information tab, as illustrated.
5. In the Name field, enter a <name> for the report. This name will appear on the tree of reports in your
Reports explorer.
6. Click the Selection Criteria tab and choose the selection criteria for your report.
7. Click Update SearchResult to run the report based on the selection criteria.
8. Save the report.
9. Exit the report dialog.
10. To view the report, you must export it (to HTML).
Copyright WordPronk 2016. All Rights Reserved.
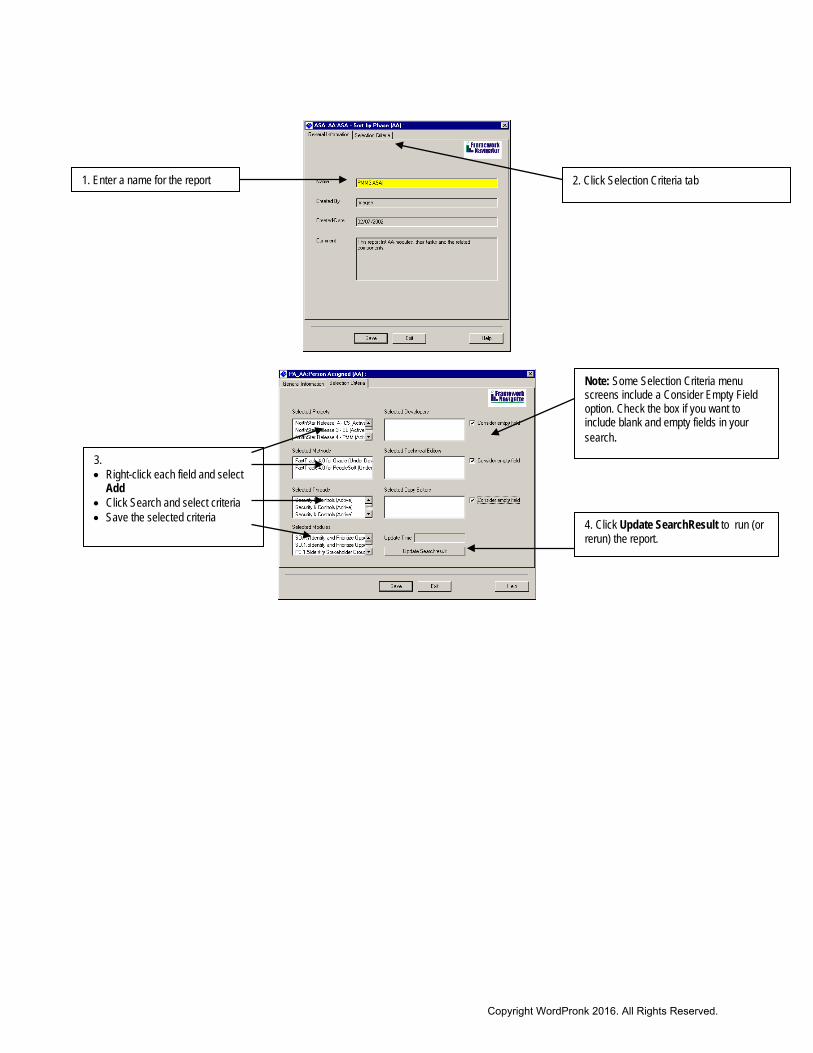
1. Enter a name for the report 2. Click Selection Criteria tab
3. • Right-click each field and select
Add • Click Search and select criteria • Save the selected criteria 4. Click Update SearchResult to run (or
rerun) the report.
Note: Some Selection Criteria menu screens include a Consider Empty Field option. Check the box if you want to include blank and empty fields in your search.
Copyright WordPronk 2016. All Rights Reserved.
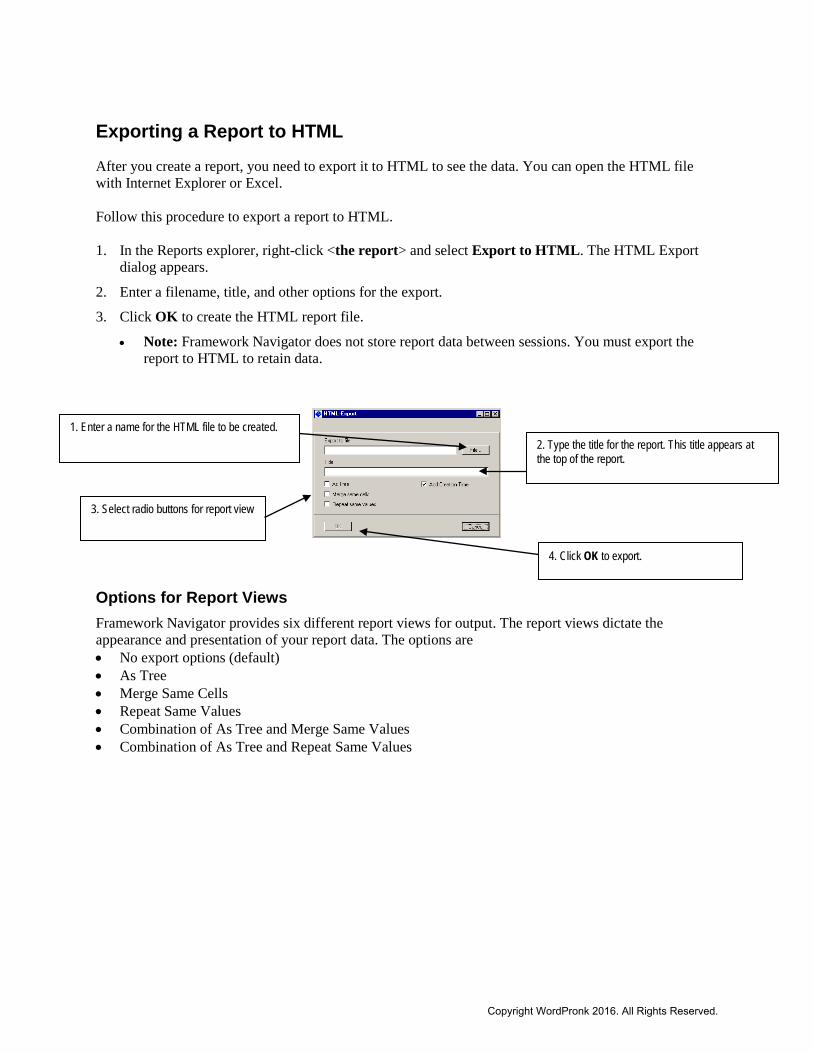
Exporting a Report to HTML After you create a report, you need to export it to HTML to see the data. You can open the HTML file with Internet Explorer or Excel. Follow this procedure to export a report to HTML. 1. In the Reports explorer, right-click <the report> and select Export to HTML. The HTML Export
dialog appears.
2. Enter a filename, title, and other options for the export.
3. Click OK to create the HTML report file.
• Note: Framework Navigator does not store report data between sessions. You must export the report to HTML to retain data.
Options for Report Views Framework Navigator provides six different report views for output. The report views dictate the appearance and presentation of your report data. The options are • No export options (default) • As Tree • Merge Same Cells • Repeat Same Values • Combination of As Tree and Merge Same Values • Combination of As Tree and Repeat Same Values
1. Enter a name for the HTML file to be created. 2. Type the title for the report. This title appears at the top of the report.
3. Select radio buttons for report view
4. Click OK to export.
Copyright WordPronk 2016. All Rights Reserved.
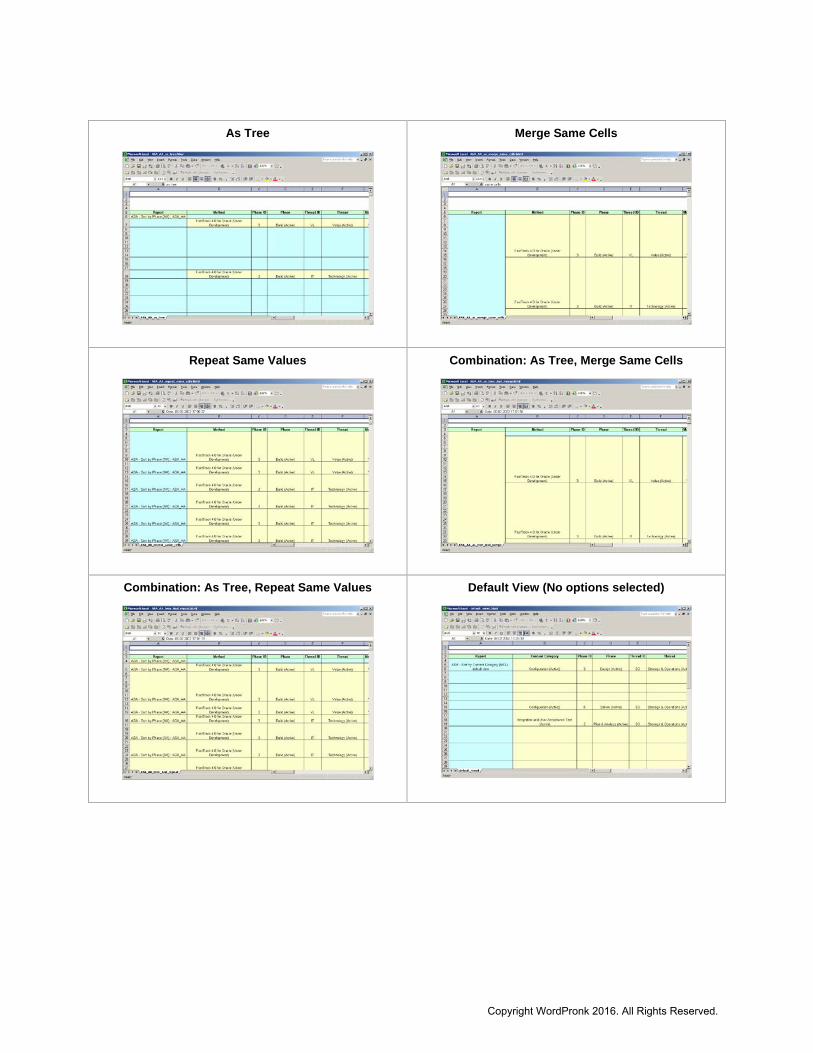
As Tree
Merge Same Cells
Repeat Same Values
Combination: As Tree, Merge Same Cells
Combination: As Tree, Repeat Same Values
Default View (No options selected)
Copyright WordPronk 2016. All Rights Reserved.

Copyright WordPronk 2016. All Rights Reserved.
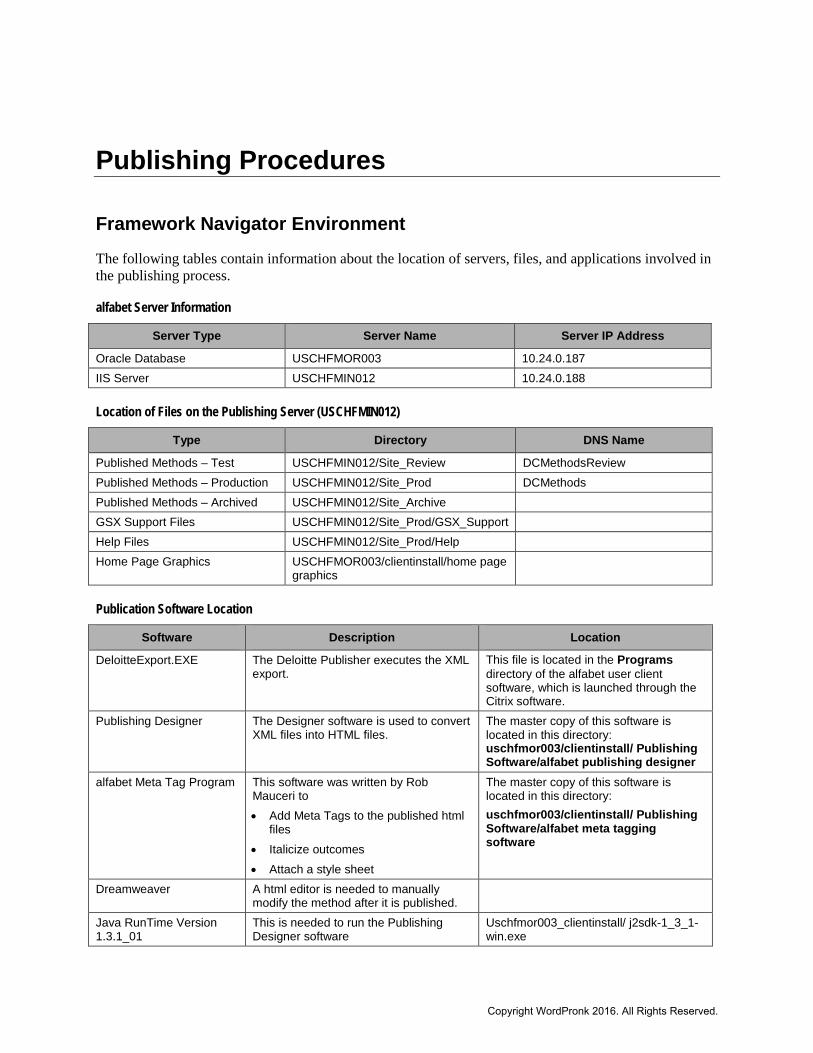
Publishing Procedures
Framework Navigator Environment The following tables contain information about the location of servers, files, and applications involved in the publishing process.
alfabet Server Information
Server Type Server Name Server IP Address
Oracle Database USCHFMOR003 10.24.0.187 IIS Server USCHFMIN012 10.24.0.188
Location of Files on the Publishing Server (USCHFMIN012)
Type Directory DNS Name
Published Methods – Test USCHFMIN012/Site_Review DCMethodsReview Published Methods – Production USCHFMIN012/Site_Prod DCMethods Published Methods – Archived USCHFMIN012/Site_Archive GSX Support Files USCHFMIN012/Site_Prod/GSX_Support Help Files USCHFMIN012/Site_Prod/Help Home Page Graphics USCHFMOR003/clientinstall/home page
graphics
Publication Software Location
Software Description Location
DeloitteExport.EXE The Deloitte Publisher executes the XML export.
This file is located in the Programs directory of the alfabet user client software, which is launched through the Citrix software.
Publishing Designer The Designer software is used to convert XML files into HTML files.
The master copy of this software is located in this directory: uschfmor003/clientinstall/ Publishing Software/alfabet publishing designer
alfabet Meta Tag Program This software was written by Rob Mauceri to • Add Meta Tags to the published html
files • Italicize outcomes • Attach a style sheet
The master copy of this software is located in this directory: uschfmor003/clientinstall/ Publishing Software/alfabet meta tagging software
Dreamweaver A html editor is needed to manually modify the method after it is published.
Java RunTime Version 1.3.1_01
This is needed to run the Publishing Designer software
Uschfmor003_clientinstall/ j2sdk-1_3_1-win.exe
Copyright WordPronk 2016. All Rights Reserved.
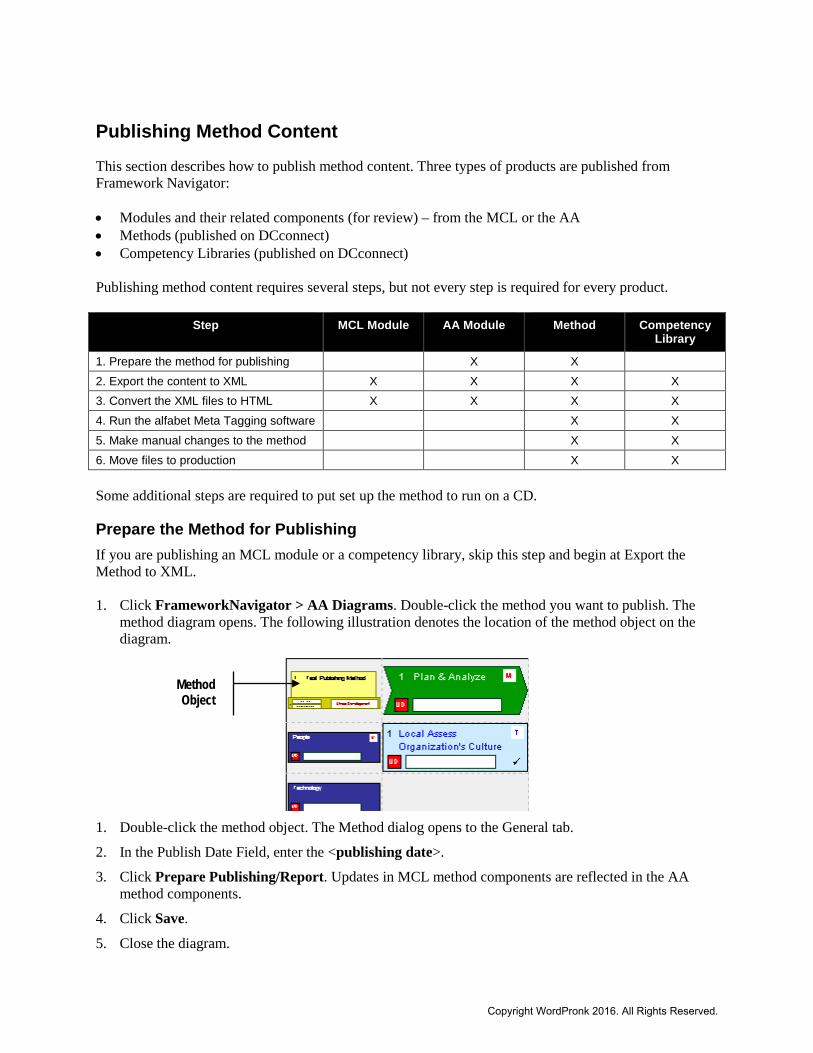
Publishing Method Content This section describes how to publish method content. Three types of products are published from Framework Navigator: • Modules and their related components (for review) – from the MCL or the AA • Methods (published on DCconnect) • Competency Libraries (published on DCconnect) Publishing method content requires several steps, but not every step is required for every product.
Step MCL Module AA Module Method Competency Library
1. Prepare the method for publishing X X 2. Export the content to XML X X X X 3. Convert the XML files to HTML X X X X 4. Run the alfabet Meta Tagging software X X 5. Make manual changes to the method X X 6. Move files to production X X Some additional steps are required to put set up the method to run on a CD.
Prepare the Method for Publishing If you are publishing an MCL module or a competency library, skip this step and begin at Export the Method to XML. 1. Click FrameworkNavigator > AA Diagrams. Double-click the method you want to publish. The
method diagram opens. The following illustration denotes the location of the method object on the diagram.
1. Double-click the method object. The Method dialog opens to the General tab.
2. In the Publish Date Field, enter the <publishing date>.
3. Click Prepare Publishing/Report. Updates in MCL method components are reflected in the AA method components.
4. Click Save.
5. Close the diagram.
Method Object
Copyright WordPronk 2016. All Rights Reserved.
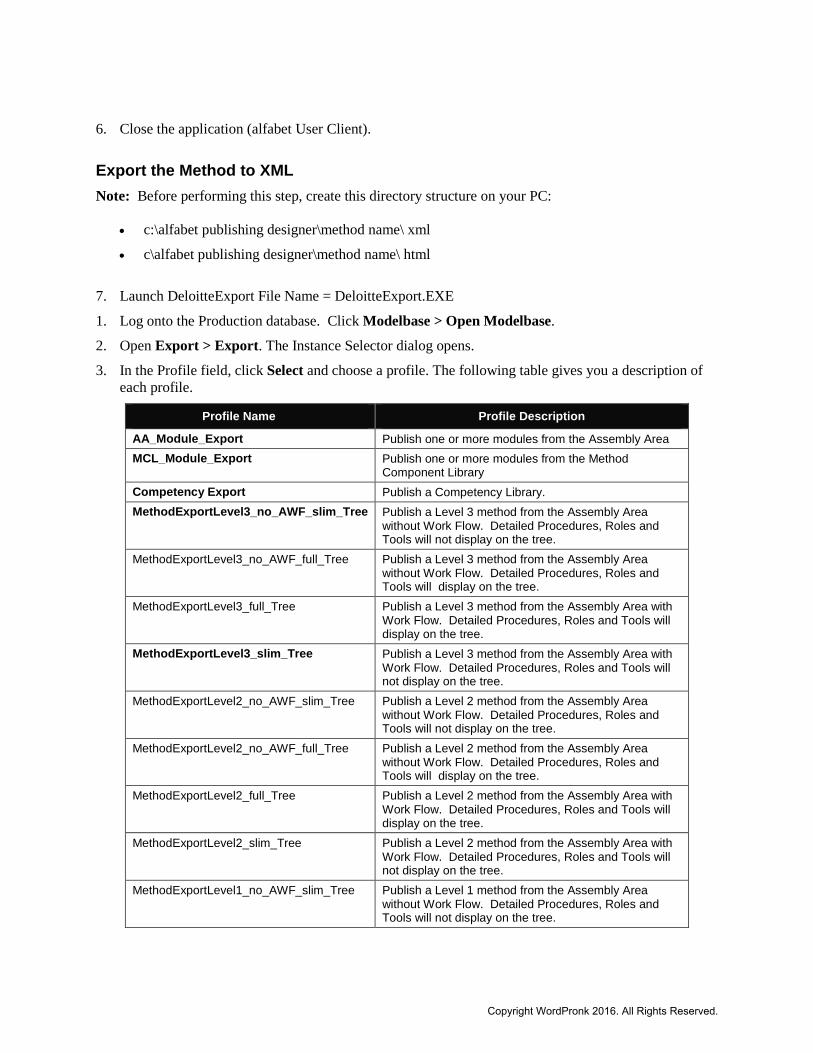
6. Close the application (alfabet User Client).
Export the Method to XML Note: Before performing this step, create this directory structure on your PC:
• c:\alfabet publishing designer\method name\ xml
• c\alfabet publishing designer\method name\ html
7. Launch DeloitteExport File Name = DeloitteExport.EXE
1. Log onto the Production database. Click Modelbase > Open Modelbase.
2. Open Export > Export. The Instance Selector dialog opens.
3. In the Profile field, click Select and choose a profile. The following table gives you a description of each profile.
Profile Name Profile Description
AA_Module_Export Publish one or more modules from the Assembly Area MCL_Module_Export Publish one or more modules from the Method
Component Library Competency Export Publish a Competency Library. MethodExportLevel3_no_AWF_slim_Tree Publish a Level 3 method from the Assembly Area
without Work Flow. Detailed Procedures, Roles and Tools will not display on the tree.
MethodExportLevel3_no_AWF_full_Tree Publish a Level 3 method from the Assembly Area without Work Flow. Detailed Procedures, Roles and Tools will display on the tree.
MethodExportLevel3_full_Tree Publish a Level 3 method from the Assembly Area with Work Flow. Detailed Procedures, Roles and Tools will display on the tree.
MethodExportLevel3_slim_Tree Publish a Level 3 method from the Assembly Area with Work Flow. Detailed Procedures, Roles and Tools will not display on the tree.
MethodExportLevel2_no_AWF_slim_Tree Publish a Level 2 method from the Assembly Area without Work Flow. Detailed Procedures, Roles and Tools will not display on the tree.
MethodExportLevel2_no_AWF_full_Tree Publish a Level 2 method from the Assembly Area without Work Flow. Detailed Procedures, Roles and Tools will display on the tree.
MethodExportLevel2_full_Tree Publish a Level 2 method from the Assembly Area with Work Flow. Detailed Procedures, Roles and Tools will display on the tree.
MethodExportLevel2_slim_Tree Publish a Level 2 method from the Assembly Area with Work Flow. Detailed Procedures, Roles and Tools will not display on the tree.
MethodExportLevel1_no_AWF_slim_Tree Publish a Level 1 method from the Assembly Area without Work Flow. Detailed Procedures, Roles and Tools will not display on the tree.
Copyright WordPronk 2016. All Rights Reserved.
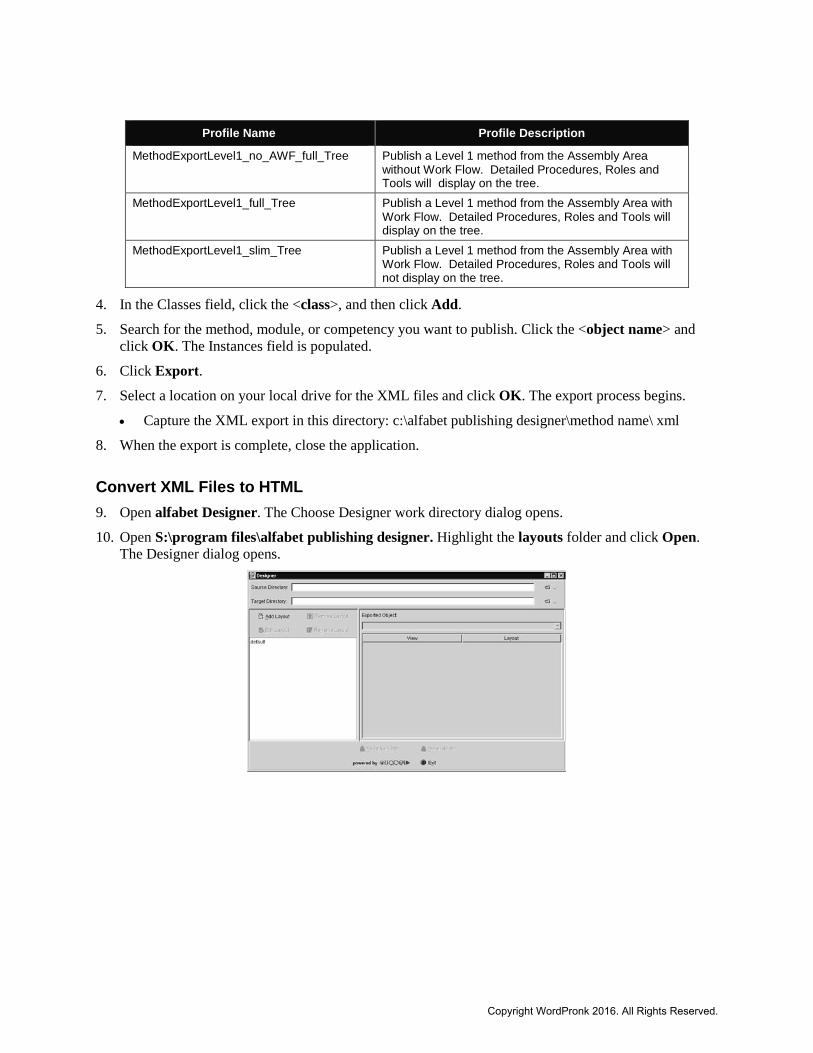
Profile Name Profile Description
MethodExportLevel1_no_AWF_full_Tree Publish a Level 1 method from the Assembly Area without Work Flow. Detailed Procedures, Roles and Tools will display on the tree.
MethodExportLevel1_full_Tree Publish a Level 1 method from the Assembly Area with Work Flow. Detailed Procedures, Roles and Tools will display on the tree.
MethodExportLevel1_slim_Tree Publish a Level 1 method from the Assembly Area with Work Flow. Detailed Procedures, Roles and Tools will not display on the tree.
4. In the Classes field, click the <class>, and then click Add.
5. Search for the method, module, or competency you want to publish. Click the <object name> and click OK. The Instances field is populated.
6. Click Export.
7. Select a location on your local drive for the XML files and click OK. The export process begins.
• Capture the XML export in this directory: c:\alfabet publishing designer\method name\ xml
8. When the export is complete, close the application.
Convert XML Files to HTML 9. Open alfabet Designer. The Choose Designer work directory dialog opens.
10. Open S:\program files\alfabet publishing designer. Highlight the layouts folder and click Open. The Designer dialog opens.
Copyright WordPronk 2016. All Rights Reserved.
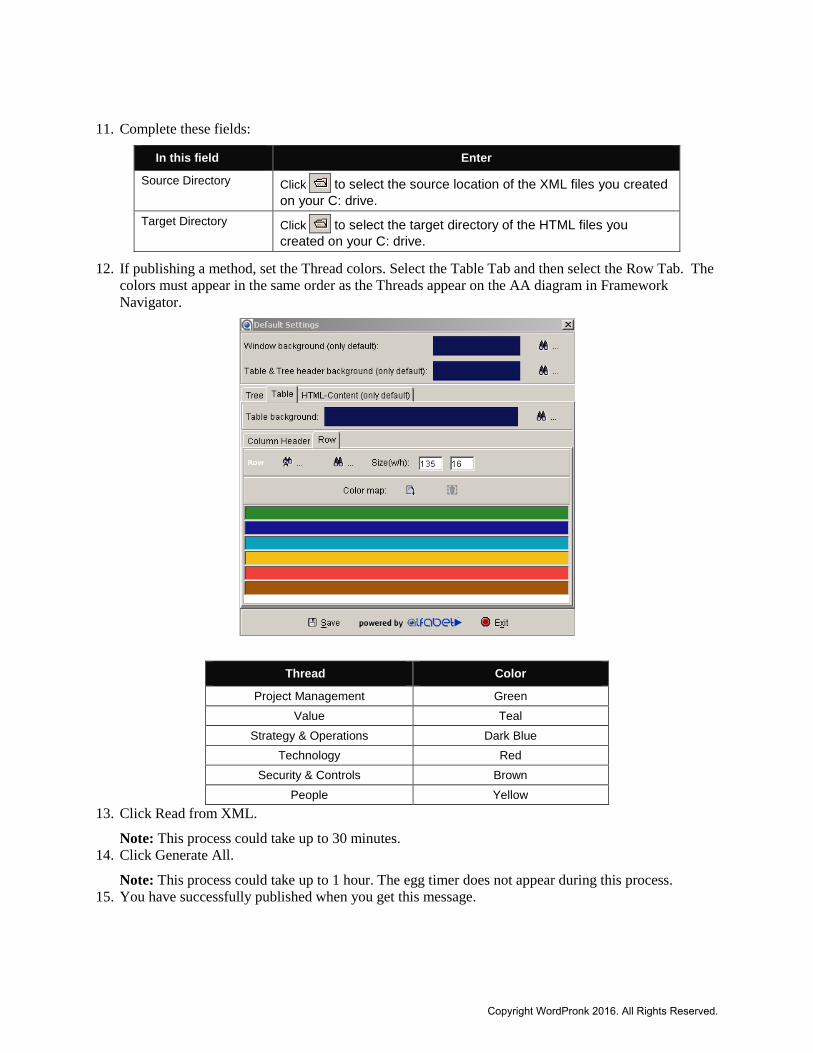
11. Complete these fields:
In this field Enter
Source Directory Click to select the source location of the XML files you created on your C: drive.
Target Directory Click to select the target directory of the HTML files you created on your C: drive.
12. If publishing a method, set the Thread colors. Select the Table Tab and then select the Row Tab. The colors must appear in the same order as the Threads appear on the AA diagram in Framework Navigator.
Thread Color
Project Management Green Value Teal
Strategy & Operations Dark Blue Technology Red
Security & Controls Brown People Yellow
13. Click Read from XML.
Note: This process could take up to 30 minutes. 14. Click Generate All.
Note: This process could take up to 1 hour. The egg timer does not appear during this process. 15. You have successfully published when you get this message.
Copyright WordPronk 2016. All Rights Reserved.
16. Click OK, and then click Exit.
Run the alfabet Meta Tagging Software If you are not publishing a method or competency, skip this step. 17. Launch AlfaMeta. The alfabet META Tag Generator dialog opens.
18. In the XML field, browse to the directory containing the XML files.
19. In the HTML field, browse to the directory containing the HTML files.
20. Click on the following options:
• Add META tag for verity search
• Italicize Outcome
21. Click Generate.
Make Manual Changes to the Method After method is published, make the following manual changes to the method.
Note: If you are not publishing a method or competency, skip this step. 22. Update the _combo…htm file to change the view names. The view names should be
• Activities by Subject Area by Phase
• Activities by Subject Area by Thread
• Deliverables Hierarchy by Phase
• Deliverables Hierarchy by Thread
• Tools by Phase
• Tools by Thread
• Detailed Procedures by Phase
• Detailed Procedures by Thread
• Roles by Phase
• Roles by Thread
Copyright WordPronk 2016. All Rights Reserved.
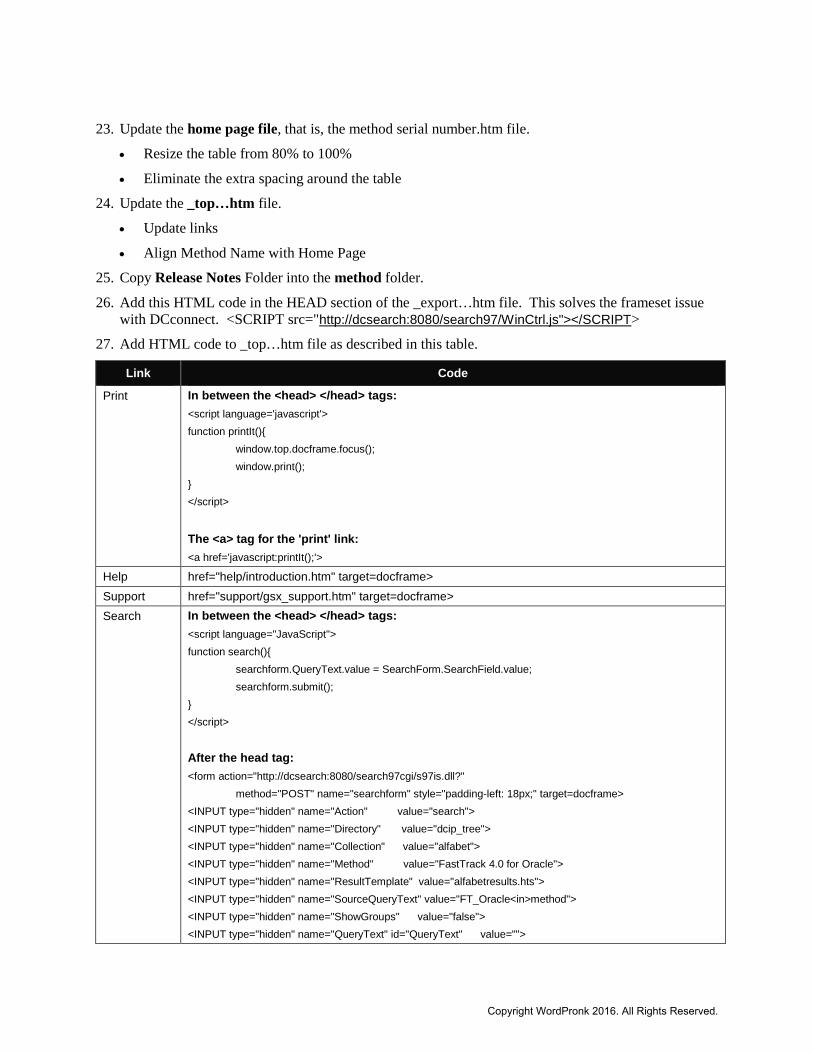
23. Update the home page file, that is, the method serial number.htm file.
• Resize the table from 80% to 100%
• Eliminate the extra spacing around the table
24. Update the _top…htm file.
• Update links
• Align Method Name with Home Page
25. Copy Release Notes Folder into the method folder.
26. Add this HTML code in the HEAD section of the _export…htm file. This solves the frameset issue with DCconnect. <SCRIPT src="http://dcsearch:8080/search97/WinCtrl.js"></SCRIPT>
27. Add HTML code to _top…htm file as described in this table.
Link Code
Print In between the <head> </head> tags: <script language='javascript'> function printIt(){ window.top.docframe.focus(); window.print(); } </script>
The <a> tag for the 'print' link: <a href='javascript:printIt();'>
Help href="help/introduction.htm" target=docframe> Support href="support/gsx_support.htm" target=docframe> Search In between the <head> </head> tags:
<script language="JavaScript"> function search(){ searchform.QueryText.value = SearchForm.SearchField.value; searchform.submit(); } </script>
After the head tag: <form action="http://dcsearch:8080/search97cgi/s97is.dll?" method="POST" name="searchform" style="padding-left: 18px;" target=docframe> <INPUT type="hidden" name="Action" value="search"> <INPUT type="hidden" name="Directory" value="dcip_tree"> <INPUT type="hidden" name="Collection" value="alfabet"> <INPUT type="hidden" name="Method" value="FastTrack 4.0 for Oracle"> <INPUT type="hidden" name="ResultTemplate" value="alfabetresults.hts"> <INPUT type="hidden" name="SourceQueryText" value="FT_Oracle<in>method"> <INPUT type="hidden" name="ShowGroups" value="false"> <INPUT type="hidden" name="QueryText" id="QueryText" value="">
Copyright WordPronk 2016. All Rights Reserved.
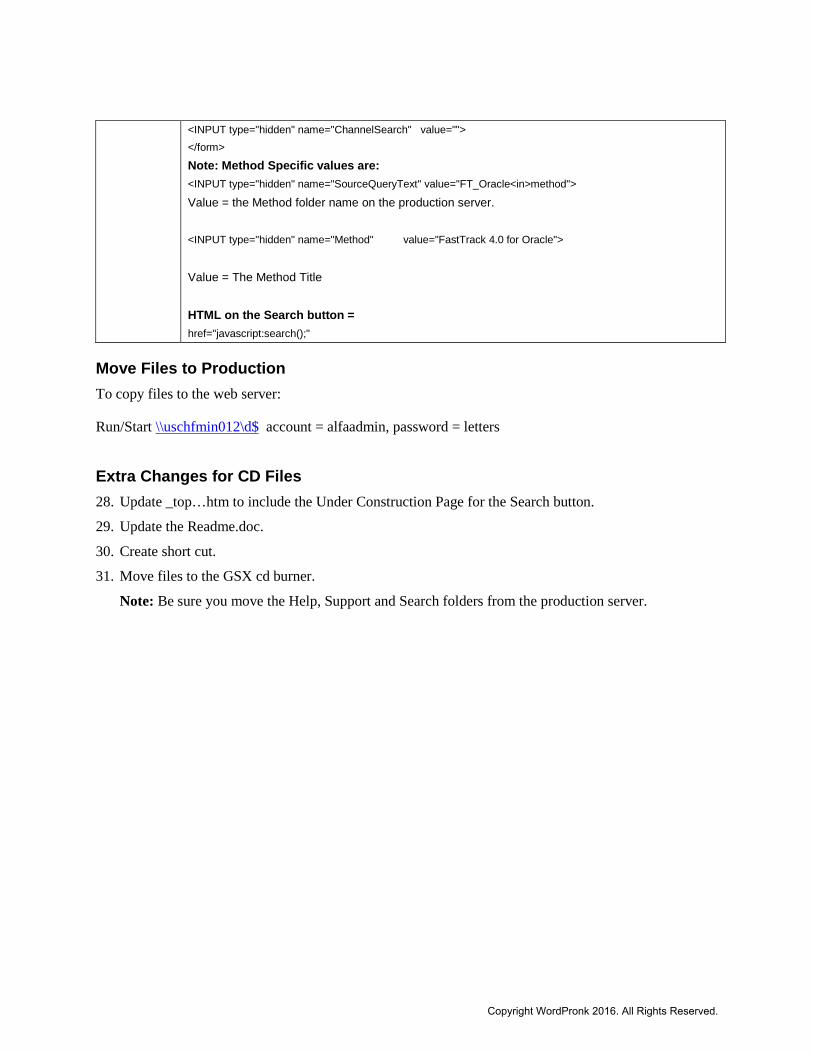
<INPUT type="hidden" name="ChannelSearch" value=""> </form>
Note: Method Specific values are: <INPUT type="hidden" name="SourceQueryText" value="FT_Oracle<in>method">
Value = the Method folder name on the production server. <INPUT type="hidden" name="Method" value="FastTrack 4.0 for Oracle">
Value = The Method Title HTML on the Search button = href="javascript:search();"
Move Files to Production To copy files to the web server:
Run/Start \\uschfmin012\d$ account = alfaadmin, password = letters
Extra Changes for CD Files 28. Update _top…htm to include the Under Construction Page for the Search button.
29. Update the Readme.doc.
30. Create short cut.
31. Move files to the GSX cd burner.
Note: Be sure you move the Help, Support and Search folders from the production server.
Copyright WordPronk 2016. All Rights Reserved.