Embed Size (px)
Citation preview

Four-Play
Artistic Licence (UK) Ltd Firmware Version V2.52 Manual Revision V4.0

Artistic Licence (UK) Ltd. Four-Play User Guide 2 / 67

Artistic Licence (UK) Ltd. Four-Play User Guide 3 / 67

Artistic Licence (UK) Ltd. Four-Play User Guide 4 / 67

Artistic Licence (UK) Ltd. Four-Play User Guide 5 / 67
A R T I S T I C L I C E N C E
P R O D U C T R E G I S T R A T I O N F O R M
Product: Four-Play
Version No.
Serial No.
Date Purchased:
Supplier: Name: Company Name: Address: Email: Post/Zip Code:
Phone No.
Comments: Please return to: Artistic Licence (UK) Ltd. B1 & B3 Livingstone Court, Peel Road, Harrow, Middlesex HA3 7QT. England.
Fax: +44 (0) 20 84 26 05 51

Artistic Licence (UK) Ltd. Four-Play User Guide 6 / 67

Artistic Licence (UK) Ltd. Four-Play User Guide 7 / 67
ARTISTIC LICENCE PRODUCT REGISTRATION FORM ..............................5
CONTENTS ...............................................................................7
INTRODUCTION .........................................................................9
QUICK START ....................................................................................................................................9 FEATURES...........................................................................................................................................9 WHAT’S NEW IN FOUR-PLAY ..........................................................................................................10 OPERATING MODES .......................................................................................................................... 11
PROTOCOL CONVERSION ............................................................................................................. 11 CONSOLE REPLACEMENT.............................................................................................................. 11 TRACKING BACKUP.......................................................................................................................12
THE CONTROL SURFACE.............................................................. 13
KEYBOARD ........................................................................................................................................13 CURSOR ............................................................................................................................................13 EDIT..................................................................................................................................................13 PLAYBACK..........................................................................................................................................14 RECORD.............................................................................................................................................14 DISPLAYS .........................................................................................................................................15
LCD ..............................................................................................................................................15 INPUTS.........................................................................................................................................15 RECORD.........................................................................................................................................15 ART-NET......................................................................................................................................15 MONITOR.....................................................................................................................................15
RX................................................................................................................................................................. 15 TX ................................................................................................................................................................ 16 STATUS........................................................................................................................................................ 17 TX – RX STATUS......................................................................................................................................... 18 REPLAY STATUS .......................................................................................................................................... 19 MACRO KEYS................................................................................................................................................ 19 REMOTE KEYS..............................................................................................................................................20 TRIGGERS.....................................................................................................................................................20 LCD..............................................................................................................................................................20
MENUS...........................................................................................................................................21 TRANSPORT MENU.........................................................................................................................21 SHOW MENU................................................................................................................................21
BACKUP......................................................................................................................................................... 21 PLAY .............................................................................................................................................................23 RECORD ........................................................................................................................................................24 RECORD EDIT...............................................................................................................................................25
SETUP MENU ............................................................................................................................ 30 LOOP.............................................................................................................................................................30 KEYS.............................................................................................................................................................30 CONFIG ........................................................................................................................................................32
C O N T E N T S

Artistic Licence (UK) Ltd. Four-Play User Guide 8 / 67
APPLICATIONS......................................................................... 36
OVERVIEW....................................................................................................................................... 36 EXAMPLE 1 POS/POI ................................................................................................................ 36 EXAMPLE 2 MUSEUM EXHIBIT .................................................................................................. 37 EXAMPLE 3 GAME SHOW ........................................................................................................... 38 EXAMPLE 4 CAR LAUNCH............................................................................................................ 39 EXAMPLE 5 THEATRE BACKUP .................................................................................................... 40 EXAMPLE 6 MULTIPLE UNIVERSE REAL TIME CONTROL...........................................................41
CONNECTIONS......................................................................... 43
OVERVIEW....................................................................................................................................... 43 DMX512 INPUTS....................................................................................................................... 43 DMX512 OUTPUTS.................................................................................................................... 43 REMOTE INPUT ........................................................................................................................... 44 RS232 ........................................................................................................................................ 44 ART-NET..................................................................................................................................... 45 MIDI .......................................................................................................................................... 45 VIDEO.......................................................................................................................................... 45 POWER ......................................................................................................................................... 45
NETWORK ADMIN ..................................................................... 46
OVERVIEW................................................................................................................................... 46 INSTALLATION........................................................................................................................... 46
WINDOWS 2000, NT & XP USERS.........................................................................................................47 ADMINISTRATOR RIGHTS ..........................................................................................................................48
SOFTWARE INSTALLATION....................................................................................................... 49 CONFIGURATION ........................................................................................................................ 49
ART-NET .....................................................................................................................................................50 OPERATION......................................................................................................................................51
CONTROL ......................................................................................................................................51 FILE TRANSFER ...........................................................................................................................................52 FIRMWARE UPLOAD.....................................................................................................................................53
STATUS ....................................................................................................................................... 54 DATA PATHS ............................................................................................................................... 55
PLAYBACK .....................................................................................................................................................55 LOOP THOUGH .............................................................................................................................................55 RECORD ........................................................................................................................................................56 TRIGGERED RECORD ....................................................................................................................................56 TRIGGERED PLAYBACK .................................................................................................................................57 AUTO BACKUP..............................................................................................................................................57
TROUBLE SHOOTING ................................................................. 58
OVERVIEW................................................................................................................................... 58 NETWORK.................................................................................................................................... 58 CLOCK .......................................................................................................................................... 59
CONVERSION TABLES ................................................................ 60
INDEX................................................................................... 64

Artistic Licence (UK) Ltd. Four-Play User Guide 9 / 67
QUICK START
Welcome to the Four-Play user guide. Four-Play is a hard disc based real time recorder for lighting control. It supports both DMX512 and Ethernet Art-net. It can also translate between these protocols. The product serves three key purposes:
• Tracking backup.
• Lighting console replacement.
• Protocol conversion. Please remember to return your product registration card, so that we can keep you informed of new developments.
FEATURES Four-Play has a rich feature set including: • Receives four universes or 2048 channels. • Input source of DMX512 or Art-Net. • Transmits four universes of DMX512 and Art-Net. • Records over twenty hours of real time data. • Remote control via keypad, MIDI or Ethernet. • Real time triggers. • MIDI time code tracking. • Received data analysis. • Remote monitoring via Ethernet. • File backup and restore via Ethernet • Multiple unit synchronisation. • Remote control via Internet (requires additional components). • DMX-Workshop compatible.
I N T R O D U C T I O N

Artistic Licence (UK) Ltd. Four-Play User Guide 10 / 67
WHAT’S NEW IN FOUR-
PLAY
For users familiar with the predecessor ‘No-Worries’, the following list details the key differences: 1. Addition of the 10BaseT Ethernet connection. 2. A mixture of DMX512 and Art-Net inputs can now be received and
transmitted. 3. Approximately double the recording time is now available. 4. The user interface has been streamlined and transport keys added
as standard. 5. Fast switching between display modes has been added. 6. Single press record mode has been added. 7. Multiple units can now be slaved via the network using the macro
keys. 8. All file backup and restore is now performed using the network.
This significantly improves backup and restore time. 9. The product firmware can be updated via the network. This
protects your investment and provides you with free of charge maintenance and feature updates.
10. Four-Play is fully integrated with DMX-Workshop which allows
network remote control, monitoring, show file backup and restore and firmware upload.
11. Real time clock synchronisation has been implemented. This allows
a single unit to be designated as master. The master then synchronises all other devices on the network.
12. The synchronisation feature can also be slaved to DMX-Workshop.
This allows all Four-Plays connected to a network to synchronise to Internet time. This feature can be used to provide automatic daylight saving correction.

Artistic Licence (UK) Ltd. Four-Play User Guide 11 / 67
OPERATING MODES
This section discusses the key operating modes and how they can be used.
PROTOCOL CONVERSION
Protocol Conversion mode is used to convert between DMX512 and Art-Net. The following combinations are supported:
• Any input universe can be attached to a physical DMX512 input.
• Any input universe can be attached to a virtual Art-Net Ethernet universe.
• All outputs provide DMX512 in all modes.
• Any or all outputs can output Art-Net Ethernet.
To summarise, any combination of four DMX512 inputs, four DMX outputs and four universes of Art-Net Ethernet can be converted. Whilst this mode of operation would not in itself justify purchase or the product, it does provide some useful opportunities:
• Using Four-Play as a ‘console replacement’: A console with either DMX512 or Art-Net output can be used for programming.
• Implementing a ‘wireless DMX’ link: The Ethernet output of
Four-Play can be connected directly to the Access Point, removing a second level of DMX to Ethernet conversion.
CONSOLE REPLACEMENT
Console Replacement mode is perhaps the key operating mode of Four-Play. This mode can be viewed as identical to the operation of a VCR: A lighting console is used to generate the lighting show. The show is then played back in real time whilst Four-Play records the entire show. At this point, the lighting console can be returned to the hire company and Four-Play used to play back the show. This is of significant cost and space benefit in fixed installation projects. Show playback can be triggered by numerous events including:
• Real time clock at specific time and or day.
Artistic Licence (UK) Ltd. Four-Play User Guide 12 / 67
• Front panel button press.
• Contact closure input.
• DMX512 level.
• MIDI note command.
• MIDI time code.
• Ethernet packet.
• Event from another Four-Play. The addition of an Artistic Licence ‘Common-Sense’ interface opens up an even greater range of triggering options.
TRACKING
BACKUP Tracking Backup uses the recording facility of Four-Play to operate in parallel with the lighting console. Four-Play then monitors the console and takes control of the show in the event of a failure. The entire show is recorded into Four-Play in real time. Four-Play connects between the lighting console and the lights. A trigger channel is allocated, such that Four-Play can detect when the lighting console starts playback. At this point, Four-Play starts playback internally, but the outputs stay in loop through mode. The console has total control of the lights. In the event of a console failure, Four-Play activates its outputs and disconnects the console. The changeover is seamless and occurs within a few frames of DMX. Four-Play locks into this mode until an operator intervenes. This guards against intermittent faults, or a console reboot.

Artistic Licence (UK) Ltd. Four-Play User Guide 13 / 67
KEYBOARD Four-Play operation is primarily controlled by the three soft keys and the MENU button. General key functions are discussed below:
CURSOR LEFT: The Left cursor key is used to toggle through the menu options and to select editing points for text editing of macro, file, and remote trigger names. RIGHT: The Right cursor key is used to toggle through the menu options and to select editing points for text editing of macro, file, and remote trigger names. UP: The Up cursor key is used to increment the number displayed at the cursor position for selecting files, macros and remote triggers. It is also used for incrementing the letter value in editing functions, along with the numeric keys. DOWN: The Down cursor key is used to decrement the number displayed at the cursor position for selecting files, macros and remote triggers. It is also used for decrementing the letter value in editing functions, along with the numeric keys.
EDIT MENU: In any mode of operation the Menu key is used to display or exit the menu. SOFT KEYS: The operation of the soft keys changes dependent upon the menu currently displayed. The function that will occur when the key is pressed is displayed in the LCD screen above each key, and also in the bottom right-hand corner of the optional VGA monitor. When a menu is not active, the Soft Keys operate as short cuts to the Status, Display and Transport menus respectively. Soft Key 1 is used as a BACK key in most menus. This allows the user to return to the previous menu level.
T H E C O N T R O L
S U R F A C E

Artistic Licence (UK) Ltd. Four-Play User Guide 14 / 67
PLAYBACK The bank of eight Playback Keys operate in numerous modes dependent upon the active menus. These keys are also used for text entry using the text message ‘multi-tap’ format of data entry. When there is no menu active, the eight keys operate as macro triggers. The macros are fully programmable and each is displayed in the status screen of the optional VGA monitor. By default, the macro settings are as follows:
1. Play File 1 2. Play File 2 3. Loop On (All outputs connect to input) 4. Loop Off (All outputs connect to playback) 5. Scan Rev 6. Scan Fwd 7. Play Current File. 8. Pause.
Please note that 1 to 4 are located on the bottom row of buttons. Keys 5 to 8 are located on the top row and have engraved key caps. The key caps are removable and can be engraved to customer specification as required. When any menu that requires numeric entry is active, the keys operate as numerals 1 to 8. When any menu that requires text entry is active, the keys operate as multi-tap text keys. These keys are echoed to the network connection. This means that all Four-Plays connected to the network will respond to the button press.
RECORD The Record key is used to start recording. If there is an existing file, the system will prompt to confirm an ‘overwrite’. If no file exists, recording is instantaneous.
Artistic Licence (UK) Ltd. Four-Play User Guide 15 / 67
DDDIIISSSPPPLLLAAAYYY MMMEEENNNUUU >>> RRRXXX TTTXXX SSSTTTAAATTT
<<< DDDIIISSSPPPLLLAAAYYY MMMEEENNNUUU BBBAAARRR FFFIIILLLEEESSS ---------
DISPLAYS Four-Play provides a number of status and feedback displays as detailed below. Whilst the VGA monitor is optional, it is highly recommended during programming.
LCD The LCD is used for both status monitoring and programming. When a menu is active, the lower line of the display is used to label the Soft Keys.
INPUTS The four Input LEDs indicate the state of each input. Static illumination indicates that the relevant input is good and active.
RECORD The Record LED indicates that recording is active. Static illumination indicates recording is in progress. A flashing indicator shows that Record Pause is activated.
ART-NET The Art-Net indicator illuminates when Art-Net traffic is active on the network.
MONITOR The optional monitor provides a wealth of system information. Whilst it is possible to program Four-Play without the monitor, we do not recommend this. There are five display modes. These are selected by the Display Menu. To activate this menu press Soft Key 2. The LCD will display the following: The chevron indicates that the menu is multi-page. Use the Left & Right cursor keys to select each page. The second page of the Display Menu is as follows: The section below describes each of the five display modes:
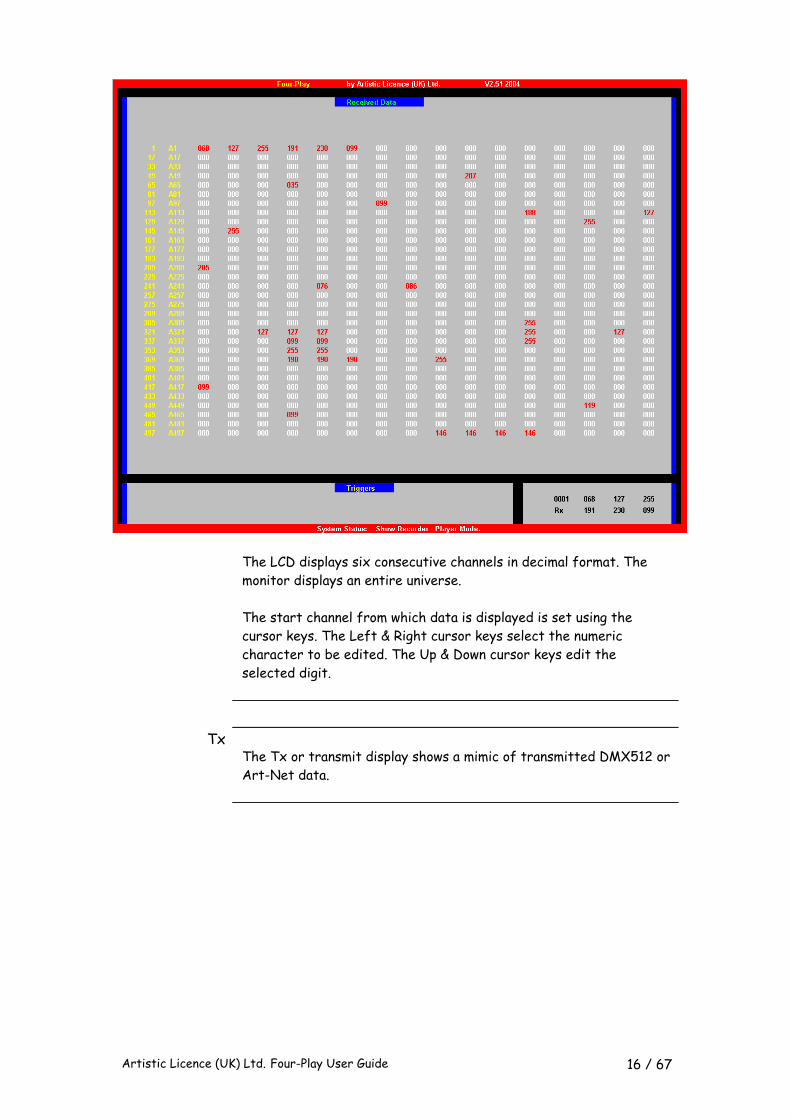
Rx
The Rx or receive display shows a mimic of received DMX512 or Art-Net data.
Artistic Licence (UK) Ltd. Four-Play User Guide 16 / 67
The LCD displays six consecutive channels in decimal format. The
monitor displays an entire universe. The start channel from which data is displayed is set using the cursor keys. The Left & Right cursor keys select the numeric character to be edited. The Up & Down cursor keys edit the selected digit.
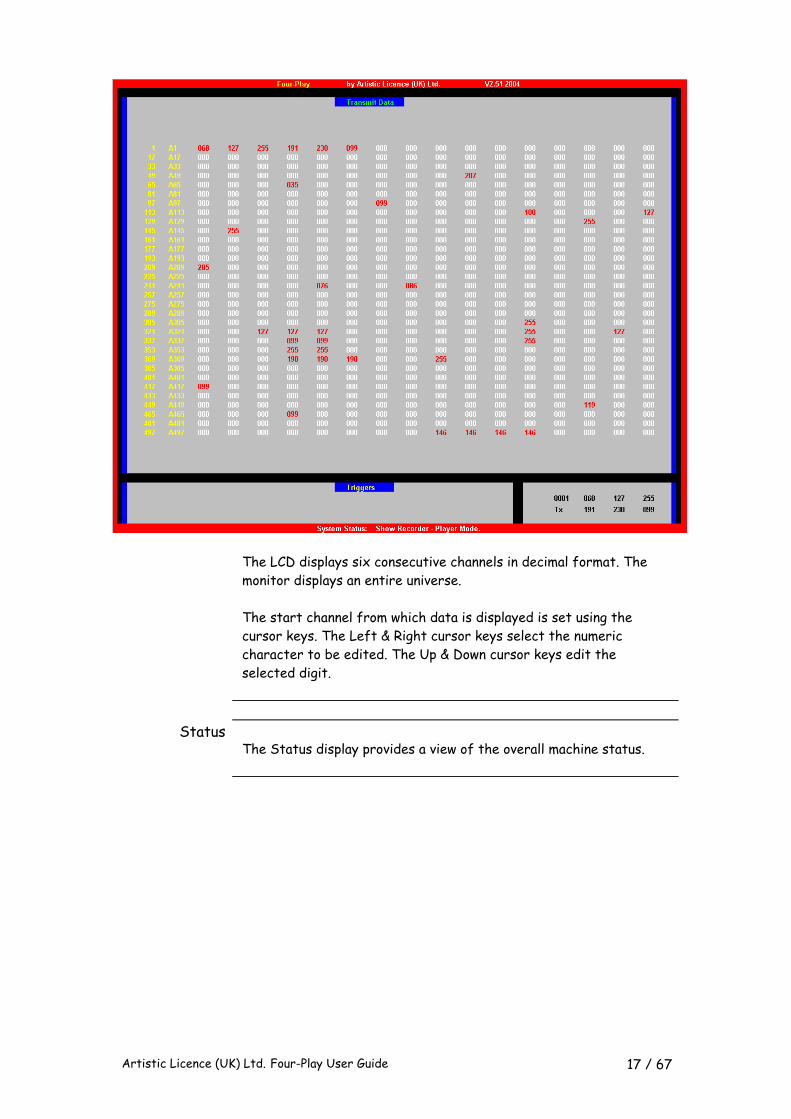
Tx
The Tx or transmit display shows a mimic of transmitted DMX512 or Art-Net data.
Artistic Licence (UK) Ltd. Four-Play User Guide 17 / 67
The LCD displays six consecutive channels in decimal format. The
monitor displays an entire universe. The start channel from which data is displayed is set using the cursor keys. The Left & Right cursor keys select the numeric character to be edited. The Up & Down cursor keys edit the selected digit.
Status
The Status display provides a view of the overall machine status.

Artistic Licence (UK) Ltd. Four-Play User Guide 18 / 67
Tx – Rx Status
The Tx – Rx Status display shows both the input diagnostics and the output connectivity. The four boxes to the left represent each of the four inputs. An input can be either a DMX512 input or an Art-Net input. The four boxes to the right represent each of the outputs. The DMX512 output is always active. Each output can also be assigned to transmit Art-Net data. The arrow lines that connect the input boxes to the output boxes indicate the playback status. A solid line connecting the two shows that the output is connected to the input.
The diagnostics data is as follows: Src: The input source data. This can be DMX512 or Art-Net. Frm: The number of data frames received. F-Err: The number of framing errors detected.
Artistic Licence (UK) Ltd. Four-Play User Guide 19 / 67
N-Strt: The number of non-zero start codes detected. Sips: The number of System Information Packets received. Len-Er: The number of frames detected that exceed 512 channels.
Replay Status The Replay Status display shows numerous file timing parameters as detailed below: Play File: The file number and name that will be played or recorded. Elapsed Time: The elapsed time from the beginning of the last play or record operation. File Time: The total time recorded in the current file. Remaining Time: The time remaining until the end of the current file playback. At End: The command that will be processed when playback reaches the end of the current file. Clock: The current time and date. Time Sync: The Time Sync mode is either Master or Slave. In Master mode, Four-Play transmits a network synchronisation signal at one minute past the hour. This synchronises the real time clocks of all other devices connected to the network. In Slave mode, Four-Play listens to the network for a synchronisation signal. Timecode: The current value of received MIDI time code. Base: The time base of the received MIDI time code.
Macro Keys The Macro Keys display shows the functions assigned to each of the eight front panel macro keys.

Artistic Licence (UK) Ltd. Four-Play User Guide 20 / 67
Remote Keys
The Remote Keys display shows the functions assigned to each of the eight remote contact closures.
Triggers The Triggers Keys display shows a text description of the last trigger event received and the action taken.
LCD The LCD display is echoed to the monitor display for ease of operation.

Artistic Licence (UK) Ltd. Four-Play User Guide 21 / 67
SSSHHHOOOWWW MMMEEENNNUUU >>> BBB---UUUPPP PPPLLLAAAYYY RRREEECCC
<<< TTTRRRAAANNNSSSPPPOOORRRTTT MMMEEENNNUUU >>> PPPAAAUUUSSSEEE CCCOOONNNTTT SSSTTTOOOPPP
<<< SSSEEETTTUUUPPP MMMEEENNNUUU >>> LLLOOOOOOPPP KKKEEEYYYSSS CCCOOONNNFFF
SSSHHHOOOWWW MMMEEENNNUUU >>> BBB---UUUPPP PPPLLLAAAYYY RRREEECCC
<<< TTTRRRAAANNNSSSPPPOOORRRTTT MMMEEENNNUUU >>> PPPAAAUUUSSSEEE CCCOOONNNTTT SSSTTTOOOPPP
MENUS The menu system is hierarchical. Pressing the Menu Key activates the main menu. The main menu consists of three pages. Each page is selected using the Left & Right keys. The main menu is displayed thus: The following section details each of the sub menus.
TRANSPORT MENU
The Transport Menu provides access to playback controls. It is used in conjunction with the macro keys to provide shortcuts for commonly used functions. Exit the Transport menu by pressing Menu. The available Transport functions are: Key Function Where Pause Pause playback or record. If already paused,
effect is the same as stop. Transport Menu, Macro.
Cont Continue playback or record if in pause. If stopped, effect is same as play.
Transport Menu, Macro.
Stop Stop playback or record. Transport Menu, Macro.
Scan Fwd
Scan forward in file by 10 seconds and starts playback.
Macro.
Scan Rev
Scan reverse in file by 10 seconds and starts playback.
Macro.
Play Start playback of current file. Macro. Record Start recording to current file. Macro, Rec
key.
SHOW MENU
The Show Menu provides access to primary record, playback and backup functions.
Backup The Backup function is used to provide automatic backup to a lighting console. Before this function can be used, the lighting console show must be recorded into Four-Play. To do this, see the Record section below.

Artistic Licence (UK) Ltd. Four-Play User Guide 22 / 67
FFFIIILLLEEE::: FFFIIILLLEEE 000000111 BBBAAACCCKKK NNNEEEXXXTTT
TTTRRRIIIGGG CCCHHHAAANNN::: 222000444888 BBBAAACCCKKK DDDOOONNNEEE
AAA---AAA BBB---BBB CCC---CCC DDD---DDD WWWAAAIIITTTIIINNNGGG---AAAUUUTTTOOO---TTTRRRIIIGGG
Backup operates as follows:
• The user defines a ‘Trigger Channel’ that will be used to synchronise Four-Play to the lighting console. Any unused channel can be used for this purpose.
• The lighting console show is authored such that the first playback event is a transition of the Trigger Channel from off to full. The Trigger Channel must not change at any other time in the show. This allows Four-Play to detect when the lighting console starts playback.
• The outputs of the lighting console are connected to the inputs of Four-Play. The outputs of Four-Play connect to the stage.
• When Four-Play enters Backup Mode, the inputs are connected to the outputs. This means that the lighting console has control of the stage.
• Four-Play monitors the Trigger Channel, watching for a change in level. When it sees the level change, it starts internal playback of the backup file. At this point, the lighting console still controls the stage, but Four-Play is now running in synchronism.
• Four-Play monitors the output of the lighting console. If it detects a DMX512 failure (or loss of Art-Net data) it shuts of the lighting console and connects its own playback to the stage.
The Backup menu operates as a selection wizard as shown below. Please note that Four-Play can be programmed to power on in Backup Mode. See the chapter on Configuration for details. The first menu allows the backup file to be selected. Use the cursor keys to select the file and press NEXT. The second menu is used to select the trigger channel. The final channel, 2048, is offered as a default. When complete, press the DONE key. The display reverts to status display. The top line indicates that each DMX input is connected to the respective DMX output, giving control to the external lighting console.
Artistic Licence (UK) Ltd. Four-Play User Guide 23 / 67
SSSHHHOOOWWW MMMEEENNNUUU >>> BBB---UUUPPP PPPLLLAAAYYY RRREEECCC
PPPLLLAAAYYY::: FFFIIILLLEEE 000000111 BBBAAACCCKKK PPPLLLAAAYYY TTTRRRIIIGGG
PPPLLLAAAYYY::: FFFIIILLLEEE 000000111 BBBAAACCCKKK GGGOOO ………
The bottom line shows the Backup status. The possible modes of Backup Status are detailed below:
• WAITING-AUTO-TRIG: Four-Play has not yet detected a transition of the Trigger Channel. The lighting console has control.
• CONSOLE IS GOOD: Four-Play has detected the Trigger Channel and is running in synchronism. The lighting console has control.
• CONSOLE FAILED: Four-Play detected a failure of the lighting console and has taken control of the show.
Play
The Play function is used to playback a file. Playback can be instantaneous or synchronised to a trigger channel. Before this function can be used, the lighting console show must be recorded into Four-Play. To do this, see the Record section below. When the Play button is pressed, the following menu is displayed. Three options are then available. The Back key returns to the previous menu. The Play key is used to select a file for instantaneous playback. The Trig key is used to select a file for triggered playback. The cursor keys are used to select the file required for playback.
Instant Playback
The cursor keys are used to select the file required for instantaneous playback. Once the file has been selected, press Go to start playback. The outputs instantly switch to playback mode.

Artistic Licence (UK) Ltd. Four-Play User Guide 24 / 67
SSSHHHOOOWWW MMMEEENNNUUU >>> BBB---UUUPPP PPPLLLAAAYYY RRREEECCC
RRREEECCC::: FFFIIILLLEEE 000000111 BBBAAACCCKKK EEEDDDIIITTT NNNEEEXXXTTT
AAARRREEE YYYOOOUUU SSSUUURRREEE ??? NNNOOO YYYEEESSS
RRREEECCC::: FFFIIILLLEEE000000111 BBBAAACCCKKK TTTRRRIIIGGG GGGOOO
Trigger Playback
Triggered playback operates as follows: A channel is defined for triggering purposes. This channel can be any unused channel. When Four-Play enters triggered playback mode, the outputs are not changed until the trigger is detected. This is the key difference between Backup mode of operation and Triggered Playback. When Four-Play detects a transition between zero and full on the trigger channel, the outputs switch to playback mode and playback commences. When Triggered Playback mode starts, the display shows: WAITING-PLAY-TRIG.
Record The Record function is used to record a file from the external lighting console. Record can be instantaneous or can be synchronised to a trigger channel. When the Rec button is pressed, the following menu is displayed. The cursor keys are used to select the file number to be recorded. The Edit key allows the file name and playback parameters to be changed. See below. Press Next to move on to the Record mode menu. Four-Play now asks for confirmation as you are about to overwrite the previously recorder file. Press Yes to continue with the recording process. Three options are then available. The Back key returns to the previous menu. The Go key is used to select a file for instantaneous record. The Trig key is used to select a file for triggered record. The cursor keys are used to select the file required for playback.

Artistic Licence (UK) Ltd. Four-Play User Guide 25 / 67
TTTRRRIIIGGG CCCHHHAAANNN 222000444888 BBBAAACCCKKK GGGOOO
RRREEECCC::: FFFIIILLLEEE 000000111 BBBAAACCCKKK EEEDDDIIITTT NNNEEEXXXTTT
Trigger Record
Triggered record is particularly useful for recording a file to be used in Backup mode. It allows the start of the recording to be perfectly synchronised to the lighting console show. Operation is as follows: A channel is defined for triggering purposes. This channel can be any unused channel. When Four-Play enters triggered record mode, record is started but paused. Four-Play monitors the Trigger Channel for a transition between zero and full. When the trigger is detected, recording starts. When Triggered Playback mode starts, the display shows: WAITING-REC-TRIG.
Record Edit
The Edit key is used to edit all of the file parameters including file name and playback mode. Use the cursor keys to select the file to be edited. Please note that this menu does not record the file contents.

Artistic Licence (UK) Ltd. Four-Play User Guide 26 / 67
EEEDDDIIITTT::: FFFIIILLLEEE 000000111 BBBAAACCCKKK NNNEEEXXXTTT
TTTIIIMMMEEE MMMOOODDDEEE::: NNNOOONNNEEE BBBAAACCCKKK NNNEEEXXXTTT
TTTIIIMMMEEE::: 111111:::111222:::555999...222000 BBBAAACCCKKK NNNEEEXXXTTT
File Name Pressing the Edit key displays the filename menu. Use the Left & Right cursors to select the character. Use the Up & Down cursors to change characters. The Macro keys can be used for multi-tap character entry in this mode. Press Next to move on to the Time Mode menu.
Time Mode
The Time Mode setting of a file defines the parameter that will start playback. Use the cursor keys to adjust the setting. The available options are:
• None • Clock • MTC • DMX
None
No specific triggering is associated with the file. This means that the file can be played back using manual start, triggered start, backup mode or macro key.
Clock The file will be automatically played back when a specific time and day occurs. If the trigger occurs when another file is being played, that file will stop and the new file will start. The cursor keys are used to edit the required trigger time. The time is entered using the 24 hour clock in the format HH:MM:SS.TT.
• HH: Hours 0-23 • MM: Minutes 0-59 • SS: Seconds 0-59 • TT: Decimal Seconds .00-.99

Artistic Licence (UK) Ltd. Four-Play User Guide 27 / 67
TTTIIIMMMEEE::: 111111:::111222:::555999...222000 BBBAAACCCKKK NNNEEEXXXTTT
MTC The file will playback locked to the received MIDI Time Code. If no time code input is detected, MTC triggers are ignored. When the MTC input is active, all other triggering modes are ignored. The cursor keys are used to edit the required trigger time. The time is entered using the 24 hour clock in the format HH:MM:SS.FF.
• HH: Hours 0-23 • MM: Minutes 0-59 • SS: Seconds 0-59 • FF: If MTC received is Film (24FPS) 00-23 • FF: If MTC received is EBU (25FPS) 00-24 • FF: If MTC received is DF (29.97FPS) 00-29 • FF: If MTC received is SMPTE (30FPS) 00-29
It is only necessary to set the start timecode number for any file. This is because Four-Play uses the duration of the file to calculate the end timecode value. Whenever timecode is active, Four-Play will shuttle playback in order to keep locked. This is true across multiple files that are configured to accept timecode. Files can be set to any timecode start times in any order. Timelock is best described by way of the following example. File001 is configured for MTC at time 01:00:00.00. Duration is 59 seconds. So this file has a timecode window from 01:00:00.00 to 01:00:59.00 File002 is configured for MTC at time 01:02:00.00. Duration is 59 seconds. So this file has a timecode window from 01:02:00.00 to 01:02:59.00 Let’s say that timecode starts at 00:59:00.00. The following table shows how file playback tracks time code: Timecode File
Active Time offset in File Outputs
00.59.00.00 None --.--.--.-- Undefined 01.00.00.00 File001 00.00.00.00 File playing. 01.00.30.00 File001 00.00.30.00 File playing. 01.00.59.00 File001 00.00.59.00 Holding last state. 01.01.00.00 None --.--.--.-- Holding last state. 01.01.30.00 None --.--.--.-- Holding last state. 01.02.00.00 File002 00.00.00.00 File playing. 01.02.30.00 File002 00.00.30.00 File playing. 01.02.59.00 File002 00.00.59.00 Holding last state.

Artistic Licence (UK) Ltd. Four-Play User Guide 28 / 67
TTTIIIMMMEEE MMMOOODDDEEE::: DDDMMMXXX BBBAAACCCKKK NNNEEEXXXTTT
DDDAAAYYY::: AAANNNYYY---DDDAAAYYY BBBAAACCCKKK NNNEEEXXXTTT
DMX
The file playback can be triggered by a DMX512 or Art-Net input. The source of data to be used for remote triggering must be connected to the A input. Two triggering formats are available for DMX mode. Both modes can be used simultaneously:
• Channel number mode: When a channel level transitions from zero to full, a file is started. The file is defined by the channel number. So channel 3 will start File 003 playback and channel 350 will start File 350 playback.
• Signature mode:
The first six channels are used to encode the file to be played back as defined in the following table: DMX512 Channel
Function Description
1 High Byte File Number First file is 0x0001 2 Low Byte File Number 3 0xaa (170) Signature 4 0x55 (85) Signature 5 0xff (255) Signature 6 0x00 (00) Signature
Example: To start playback of File 300 send: 0x01 0x2c 0xaa 0x55 0xff 0x00 or in decimal: 1 ,44, 170, 85, 255, 00 The file number in this encoding is in hexadecimal. 300 in decimal = 0x0144 in hexadecimal.
Day
Any file can be programmed to only playback on a specific day. This is most useful in combination with the Clock and MTC time modes as it allowed different files to be used on different days at the same time. The Day trigger can be set to any day of the week or all days. The cursor keys are used to adjust the setting.

Artistic Licence (UK) Ltd. Four-Play User Guide 29 / 67
DDDAAAYYY::: AAANNNYYY---DDDAAAYYY BBBAAACCCKKK NNNEEEXXXTTT
At End The At End field is used to define what should occur when the file playback reaches the end. The available options are:
• Nothing: The output freezes on the last frame of the file being played back.
• Loop: The file will playback continuously once triggered. • Lnk File: Another user defined file will start when this file finishes. • Go DMX: The DMX (or Art-Net) inputs will be connected to the outputs
when the file completes. When the MTC input is active, the At End setting is ignored. This is because Four-Play will always attempt to lock file playback to timecode when timecode is active.

Artistic Licence (UK) Ltd. Four-Play User Guide 30 / 67
<<< SSSEEETTTUUUPPP MMMEEENNNUUU ... LLLOOOOOOPPP KKKEEEYYYSSS CCCOOONNNFFF
SSSEEELLLEEECCCTTT III///PPP::: AAALLLLLL BBBAAACCCKKK NNNEEEXXXTTT
LLLOOOOOOPPP::: NNNOOORRRMMM BBBAAACCCKKK DDDOOONNNEEE
MMMAAACCCRRROOO /// RRREEEMMM MMMEEENNNUUU BBBAAACCCKKK MMMAAACCCRRROOO RRREEEMMM
MMMAAACCCRRROOO::: MMMAAACCCRRROOO 111 BBBAAACCCKKK NNNEEEXXXTTT
EEEDDDIIITTT::: MMMAAACCCRRROOO 111 BBBAAACCCKKK NNNEEEXXXTTT
SETUP MENU
The Setup Menu provides access to three sub menus that are used to adjust the overall operating modes of Four-Play. These are:
• Loop: Controls whether inputs are connected to outputs. • Keys: Sets the functions of Macro and Remote keys. • Conf: Global configuration.
The following section details the operation of each sub-menu.
Loop The Loop Menu is used to define the connection between the inputs and outputs. It should be noted that these functioned can be configured as macros for faster operation. The cursor keys are used to select any one of the inputs A to D or All inputs. Press Next to continue. The cursor keys are used to select one of two modes:
• Loop: The inputs are connected to the outputs, this gives the external lighting console control of the stage.
• Norm: The inputs are disconnected and the outputs are controlled by Four-Play.
Keys
The Keys menu is used to configure the remote inputs and the macro keys. Select the type you wish to configure by pressing the relevant button. The following menu will be displayed which allows the number of the remote or macro to be set using the cursor keys. Press next to continue. The name of the remote or macro can then be set. Use the Left & Right cursors to select the character and the Up & Down cursors to change the alphanumeric. You can also use the Macro Keypad in multitap mode to edit the name.

Artistic Licence (UK) Ltd. Four-Play User Guide 31 / 67
The next menu allows the function of the remote or macro to be set. The following table describes the available options: Name Function No Function Nothing. Status Display Status Screen. Transmit Display Transmit Mimic. Receive Display Receive Mimic. Bargraph Display Bargraph view of inputs and outputs. Scan Fwd Move forward by 10 seconds in current file then start
playback. Scan Rev Move in reverse by 10 seconds in current file then start
playback. Continue If stopped, starts playback of last file selected.
If in play pause, continues to play from current location. If in record pause, continues to record at end of file.
Pause If recording or playing, enter pause mode. If already paused, enter stop mode.
Trig Rec Record a specific file using Trigger Channel. Trig Play Play a specific file using Trigger Channel. Rec Current Record the current (last selected) file. Play Current
Play the current (last selected) file.
Record File Record a specific file number. Play File Play a specific file number. Loop Toggle Reverse the current state of all input to output connections. Loop Off Disconnect all inputs from outputs. (Loop Through Off). Loop On Connect all inputs to outputs. (Loop Through On). Show Menu Display the Show Menu.
Depending upon the selection, the wizard may display an additional menu to select a specific file number. When complete, the menu reverts to select remote or Macro so that the next value can be programmed. Press the Menu key to exit this mode.

Artistic Licence (UK) Ltd. Four-Play User Guide 32 / 67
<<< CCCOOONNNFFFIIIGGG MMMEEENNNUUU >>> BBBOOOOOOTTT MMMIIIDDDIII DDDOOONNNEEE
SSSEEELLLEEECCCTTT III///PPP::: AAA BBBAAACCCKKK NNNEEEXXXTTT
SSSOOOUUURRRCCCEEE::: AAARRRTTT---NNNEEETTT BBBAAACCCKKK NNNEEEXXXTTT
AAARRRTTT---NNNEEETTT UUUNNNIII::: 000---222 BBBAAACCCKKK DDDOOONNNEEE
CCCOOONNNFFFIIIGGG MMMEEENNNUUU >>> III///PPP OOO///PPP DDDOOONNNEEE
<<< CCCOOONNNFFFIIIGGG MMMEEENNNUUU SSSYYYNNNCCC DDDAAATTTEEE TTTIIIMMMEEE
Config
The configuration Menu comprises of three sub menu’s. The first is used to configure the inputs and outputs. The second is used to control the behaviour of Four-Play at power on plus the MIDI interface. The third is used to set time, date and automatic time synchronisation.
I/P The I/P option is used to configure Inputs. Use the Cursor keys to select the required logical input or all inputs. The cursor keys are used to select the source as either DMX512 or Art-Net. If DMX512 is selected, the relevant physical DMX512 input is connected to this logical input. If Art-Net is selected, the next menu allows the Art-Net Sub-Net and Universe to be selected. These numbers range from 0-0 to F-F. The first digit is the Sub-Net and the second the Universe.

Artistic Licence (UK) Ltd. Four-Play User Guide 33 / 67
SSSEEELLLEEECCCTTT III///PPP::: AAA BBBAAACCCKKK NNNEEEXXXTTT
EEENNNAAABBBLLLEEE::: OOONNN BBBAAACCCKKK NNNEEEXXXTTT
AAARRRTTT---NNNEEETTT UUUNNNIII::: 777---222 BBBAAACCCKKK DDDOOONNNEEE
BBBOOOOOOTTT MMMOOODDDEEE::: LLLOOOOOOPPP BBBAAACCCKKK NNNEEEXXXTTT
O/P The O/P option is used to control the output of Art-Net data for each of the four outputs. The Art-Net outputs are disabled by default, to avoid wasting bandwidth. The DMX512 outputs are always active. Use the Cursor keys to select the required logical output or all outputs. Press Next to continue. Use the Cursor keys to enable or disable the Art-Net output. If Art-Net is selected, the next menu allows the Art-Net Sub-Net and Universe to be selected. These numbers range from 0-0 to F-F. The first digit is the Sub-Net and the second the Universe. Avoid setting the addresses to values used by other Art-Net devices used on the network.
Boot The Boot Menu defines the action that Four-Play will take when it is powered on or ‘booted’. The options are:
• None: No action is performed after boot. • Loop: The DMX512 inputs are connected to the outputs. • Play File: A specific file is played back.

Artistic Licence (UK) Ltd. Four-Play User Guide 34 / 67
MMMIIIDDDIII CCCHHHAAANNN::: 111555 BBBAAACCCKKK NNNEEEXXXTTT
MMMIIIDDDIII CCCHHHAAANNN::: 111555 BBBAAACCCKKK NNNEEEXXXTTT
MIDI MIDI Note Commands can be used to simulate pressing the Macro and Remote keys. This menu is used to define the MIDI Channel and MIDI Note that is used for this purpose. The MIDI Channel can be set to any number in the range 00 to 15. The MIDI Note can be set to any value from 0 to 127. This is the offset that is subtracted from the received MIDI Note On command. For example: If Channel = 00 and Note = 000, a received Note On command for Channel 0 at Note 0 will trigger Macro 1. However: If Channel = 00 and Note = 100, a received Note On command for Channel 0 at Note 100 will trigger Macro 1. The following table describes the MIDI Trigger options:
EVENT CHANNEL NOTE EFFECT HEX CODE Note On 0 0 Trigger
Macro 1 90 00 7F
Note On 0 1 Trigger Macro 2
90 01 7F
Note On 0 2 Trigger Macro 3
90 02 7F
↓ ↓ ↓ ↓ ↓ Note On 0 8 Trigger
Remote 1 90 08 7F
↓ ↓ ↓ ↓ ↓ Note On 0 15 Trigger
Remote 8 90 0F 7F
The MIDI velocity value must exceed 75% to generate a trigger. Note Off is ignored. Running Status is not implemented.

Artistic Licence (UK) Ltd. Four-Play User Guide 35 / 67
TTTIIIMMMEEE SSSYYYNNNCCC::: MMMAAASSSTTTRRR BBBAAACCCKKK NNNEEEXXXTTT
DDDAAAYYY::: 333111 BBBAAACCCKKK NNNEEEXXXTTT
MMMOOONNNTTTHHH::: 111222 BBBAAACCCKKK NNNEEEXXXTTT
YYYEEEAAARRR::: 222000000999 BBBAAACCCKKK DDDOOONNNEEE
TTTIIIMMMEEE::: 111777:::333333:::333444...000111 BBBAAACCCKKK DDDOOONNNEEE
Sync Sync mode defines the method by which Four-Play synchronises the internal Real Time Clock. The menu allows one of two modes to be selected: Master or Slave.
• Master Mode: Four-Play transmits an Art-Net TimeSync packet over the network at one minute past the hour.
• Slave Mode: Four-Play listens for an Art-Net TimeSync packet and synchronises its internal real time clock.
Time Synchronisation can be used in the following four modes:
• Single Four-Play with no network connection. Setting is ignored. • Two or more Four-Play connected together. One Four-Flay is set to
Master. The others are set to Slave. All Four-Play will synchronise their clocks.
• One or more Four-Play connected to network running DMX-Workshop. All Four-Play set to Slave mode. DMX-Workshop transmits the TimeSync packet over the network. If DMX-Workshop has an Internet connection and is configured to automatically connect to a time server, all the Four-Play will synchronise to Internet time.
Please note the following: There can only be one Master. Setting multiple Masters or setting any Masters when connected to DMX-Worshop will cause eratic operation!
Date The Date does not need to be set when using Time Sync mode. To set the date manually, follow the wizard then press Done.
Time
The Time does not need to be set when using Time Sync mode. To set the time manually, use the cursor keys and press Done.
Artistic Licence (UK) Ltd. Four-Play User Guide 36 / 67
OVERVIEW Four-Play is a remarkably versatile product that can be used in a wide range of applications. This chapter details some possible applications and the key settings required.
EXAMPLE 1 POS/POI
In this example, Four-Play is used to control lighting for a Point of Sale or Point of Information. The requirement is simply that the lighting control starts running when the system is powered on. A Lighting console is used to author the show, which is then recorded to Four-Play. At that point, the lighting console is no longer required. Four-Play requires two configuration setting:
• Set the show to loop continuously. This is achieved with:
MENU SHOW REC FILE001 EDIT ATEND=Loop
• Set the show to start automatically. This is achieved with:
MENU SETUP CONF >> BOOT=Play FILE001
The above example assumes the file was recorded to File001.
A P P L I C A T I O N S

Artistic Licence (UK) Ltd. Four-Play User Guide 37 / 67
EXAMPLE 2 MUSEUM EXHIBIT
In this example, Four-Play is used to control lighting for a museum exhibit. The requirement is that the lights run a default show until a visitor walks through a beam break detector. The exhibit show then runs to completion and control returns to the default show. The beam break sensor is connected to the remote input contact closure 1. A Lighting console is used to record the two shows. The default show is recorded to File001 and the exhibit show to File002. Four-Play requires four configuration setting:
• Set the default show to loop continuously. This is achieved with:
MENU SHOW REC FILE001 EDIT ATEND=Loop
• Set the exhibit show to return to the default show when
complete. This is achieved with:
MENU SHOW REC FILE002 EDIT ATEND=Link File001
• Set the exhibit show to trigger from Remote Input 1. This is achieved with:
MENU SETUP KEYS REM REM 1 PLAY File001
• Set the default show to start automatically. This is achieved
with:
MENU SETUP CONF >> BOOT=Play FILE001

Artistic Licence (UK) Ltd. Four-Play User Guide 38 / 67
EXAMPLE 3 GAME SHOW
In this example, Four-Play is used to control lighting for a TV Game Show. Let’s say there are eight contestant positions each with an array of lights. The requirement is that the studio lighting console has default control of the lights. When a contestant presses a button, the lights at their position sequence for a few seconds then return control to the studio lighting console. The contestant buttons are connected to the remote input contact closure 1 - 8. The studio lighting console is used to record the eight shows into File001 to File008. Four-Play requires three configuration setting:
• Set each show to return control to the lighting console when complete. This is achieved with (repeat 8 times for each show):
MENU SHOW REC FILE001 EDIT ATEND=Go DMX
• Set each show to trigger from its respective Remote Input.
This is achieved with (repeat 8 times for each show):
MENU SETUP KEYS REM REM 1 PLAY File001
• Set the power on default to give control to the lighting console. This is achieved with:
MENU SETUP CONF >> BOOT=Loop

Artistic Licence (UK) Ltd. Four-Play User Guide 39 / 67
EXAMPLE 4 CAR LAUNCH
In this example, Four-Play is used to control lighting for a Car Launch. The lighting show is to be slaved to an AV control system that outputs timecode. The show requires two different main shows of 30 minute duration. The time code output of the AV system is connected to the MIDI input of Four-Play. As the show uses moving lights, it is necessary to ensure that all the lights see a reset-strike sequence when the system is first powered. A lighting console is used to record three shows. File001 is the Main 1 show. File002 is the Main 2 show. File003 is the reset sequence. Four-Play requires four configuration setting:
• Set the reset show to start automatically. This is achieved with:
MENU SETUP CONF >> BOOT=Play FILE003
• Set the reset show to stop when complete. This is achieved
with:
MENU SHOW REC FILE002 EDIT ATEND=None
• Set the Main 1 show to track timecode starting at hour 1. This is achieved with:
MENU SHOW REC FILE001 EDIT TIMEMODE=MTC TIME=01:00:00.00 DAY=ALL
• Set the Main 2 show to track timecode starting at hour 2. This is achieved with:
MENU SHOW REC FILE002 EDIT TIMEMODE=MTC TIME=02:00:00.00 DAY=ALL

Artistic Licence (UK) Ltd. Four-Play User Guide 40 / 67
EXAMPLE 5 THEATRE BACKUP
In this example, Four-Play is used to backup a lighting controller in a theatre show. The lighting controller is not using channel 2048, so that channel is chosen as the Trigger Channel. The lighting controller is programmed such that channel 2048 transitions from off to full at the very beginning of the show. It does not change for the remainder of the show. The DMX512 outputs of the lighting console are connected to the DMX512 inputs of Four-Play. The Loop outputs of Four-Play are terminated and the Main outputs of Four-Play connect to the Stage.
• The lighting console show is recorded to File001 in Four-Play using triggered record mode. This ensures that the start of the recorded file is exactly synchronised to the start of the lighting controller show. This is achieved as follows:
MENU SHOW REC File001 NEXT YES TRIG 2048 GO
Start playback of the lighting controller. Four-Play will change from Record-Pause to Record mode when the Trigger Channel fires. At the end of the show press the following to stop recording:
PAUSE PAUSE
• Now set Four-Play to operate in Backup mode. This is
achieved with:
MENU SHOW B-UP FILE001 TRIG 2048 GO Four-Play activates loop through so that the lighting controller has control of the stage. When the trigger channel is detected, it starts playing back the show in the background. If DMX512 from the lighting controller should fail, Four-Play takes control of the outputs.
Artistic Licence (UK) Ltd. Four-Play User Guide 41 / 67
EXAMPLE 6 MULTIPLE
UNIVERSE REAL TIME CONTROL
In this example, two Four-Play are used to control 8 universes of lighting via DMX512. The show requires that triggering occur at a specific time of day. There are two key considerations when preparing this type of show:
1. The show must be recorded accurately into both Four-Play. This is achieved using triggered record.
2. The real time clocks of each Four-Play must be synchronised.
The 8 DMX512 outputs of the lighting console are connected to the DMX512 inputs of each Four-Play. The Loop outputs of the Four-Plays are terminated and the Main outputs of the Four-Plays connect to the Stage. The network connections of the Four-Plays are connected using a cross over cable.
• The lighting console show is recorded to File001 in both Four-Plays using triggered record mode. This ensures that the start of the recorded file is exactly synchronised to the start of the lighting controller show. This is achieved as follows:
MENU SHOW REC File001 NEXT YES TRIG 2048 GO
Start playback of the lighting controller. Both Four-Play will change from Record-Pause to Record mode when the Trigger Channel fires. At the end of the show press the following to stop recording:
PAUSE PAUSE
The above assumes that channel 2048 and 4096 is not used by the lighting controller and are used to trigger Four-Play. The lighting controller is programmed such that channels 2048 & 4096 transition from off to full at the very beginning of the show. These channels do not change for the remainder of the show.

Artistic Licence (UK) Ltd. Four-Play User Guide 42 / 67
• On each Four-Play the show must be set to trigger at a
specific time. In this example we use 1.30pm every day. This is achieved with:
MENU SHOW REC FILE001 EDIT TIMEMODE=CLOCK TIME=13:30:00.00 DAY=ALL It is also possible to have different shows run on different days by adjusting the ‘Day’ setting.
• The final setting is to synchronise the real time clocks in the Four-Plays. This is necessary because all real time clocks have a drift rate. If not synchronised, the clocks in the two Four-Play would gradually drift apart. This is achieved with:
First Four-Play: MENU SETUP CONF >> >> SYNC=Master Second Four-Play: MENU SETUP CONF >> >> SYNC=Slave
Artistic Licence (UK) Ltd. Four-Play User Guide 43 / 67
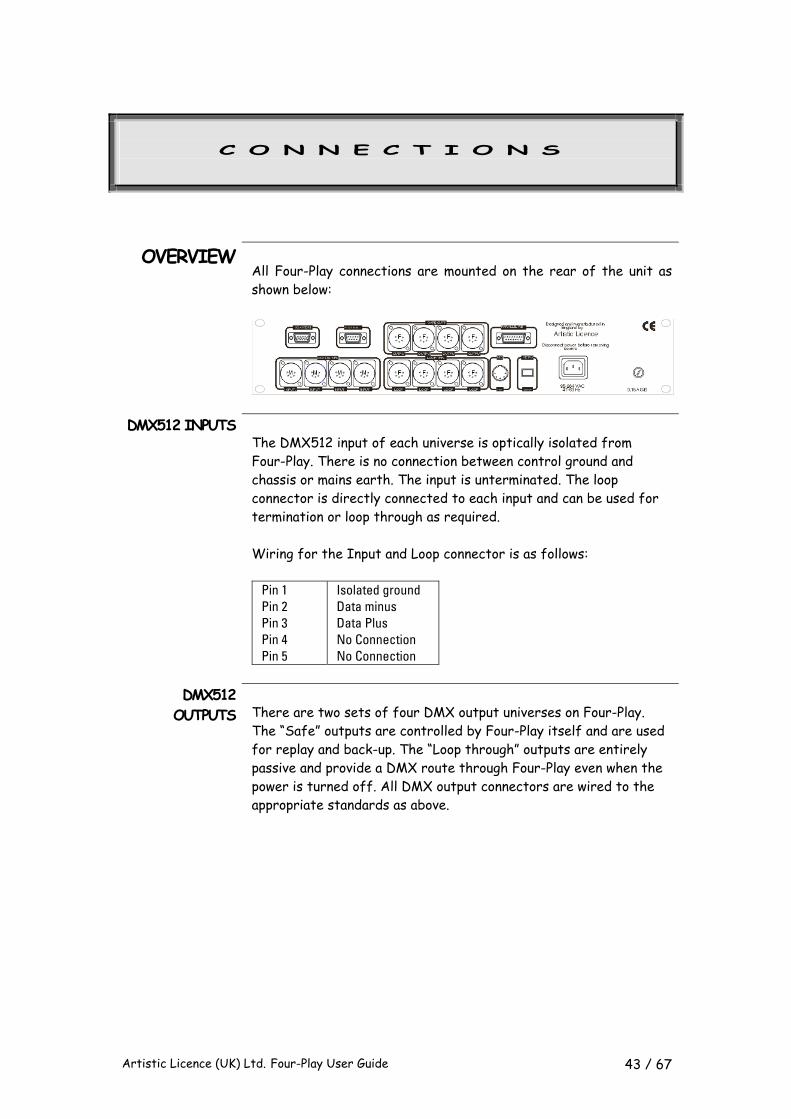
OVERVIEW All Four-Play connections are mounted on the rear of the unit as shown below:
DMX512 INPUTS
The DMX512 input of each universe is optically isolated from Four-Play. There is no connection between control ground and chassis or mains earth. The input is unterminated. The loop connector is directly connected to each input and can be used for termination or loop through as required. Wiring for the Input and Loop connector is as follows:
Pin 1 Pin 2 Pin 3 Pin 4 Pin 5
Isolated ground Data minus Data Plus No Connection No Connection
DMX512
OUTPUTS There are two sets of four DMX output universes on Four-Play. The “Safe” outputs are controlled by Four-Play itself and are used for replay and back-up. The “Loop through” outputs are entirely passive and provide a DMX route through Four-Play even when the power is turned off. All DMX output connectors are wired to the appropriate standards as above.
C O N N E C T I O N S

Artistic Licence (UK) Ltd. Four-Play User Guide 44 / 67
REMOTE INPUT The Remote interface provides 8 contact closure inputs for Remote triggering. A Remote is triggered by shorting together the ground and input pin. A Maximum cable length of 5m is advised and the cable should be screened. Do not make any connections to voltage sources or Mains Earth. Wiring is as follows:
Pin 1 Pin 2 Pin 3 Pin 4 Pin 5 Pin 6 Pin 7 Pin 8 Pin 15
Aux 8 Aux 7 Aux 6 Aux 5 Aux 4 Aux 3 Aux 2 Aux1 Ground
RS232
The RS232 port is not used by Four-Play.

Artistic Licence (UK) Ltd. Four-Play User Guide 45 / 67
ART-NET
The RJ45 is a 10BaseT ethernet link for use with Art-Net. Amongst many other facilities, this port allows the recording of shows from Art-Net compliant consoles such as Jands Vista and Zero-88 Frog, without converting to DMX512.
MIDI The MIDI port is used for receiving MIDI triggers and MIDI Time Code. The input is optically isolated and conforms to standard MIDI wiring.
VIDEO The video output is a high density 15 pin DB style connector. It conforms to the S/VGA wiring standard.
POWER The Power input is a universal voltage range mains connection. The product shall be connected to a suitable earthed outlet. The fuse must only be changed when the product is disconnected from the power. The fuse rating is printed on the rear panel.

Artistic Licence (UK) Ltd. Four-Play User Guide 46 / 67
OVERVIEW Four-Play can be administered via the network connection. To achieve this the software package ‘DMX-Workshop’ must be installed on a PC running Windows XP. DMX-Workshop offers the following functionality:
• Remote control of front panel switches. • Viewing of file parameters and other configuration. • Backup of show files. • Firmware upgrade. • Real time clock synchronisation. • Multiple Four-Play, synchronised record.
This chapter describes installation, configuration and use of the software.
INSTALLATION DMX-Workshop is a 32 bit application specifically designed to operate with Windows XP. Whilst it will operate on Windows 98, Windows ME, Windows NTv4 and Windows 2000, we advise Windows XP. The minimum specification PC is:
• Processor: Pentium • Speed: 133MHz • RAM: 512MB • Operating System : Windows 95 / 98 / ME / 2K / XP • Graphics: 800 x 600 8 bit Colour
N E T W O R K A D M I N
Artistic Licence (UK) Ltd. Four-Play User Guide 47 / 67
Windows 2000, NT & XP Users
The Windows 2000, Windows NT and Windows XP operating systems provide the concept of User Rights. This allows different users to be granted different access rights to the computer. The highest level of access rights is called ‘Administrator’. DMX-Workshop will NOT install correctly unless you are logged onto the computer with Administrator rights. If your computer is part of a network, you must ask your system administrator to set the computer for Administrator rights. If you are a single user, the following sequence shows how to change the settings:
Artistic Licence (UK) Ltd. Four-Play User Guide 48 / 67
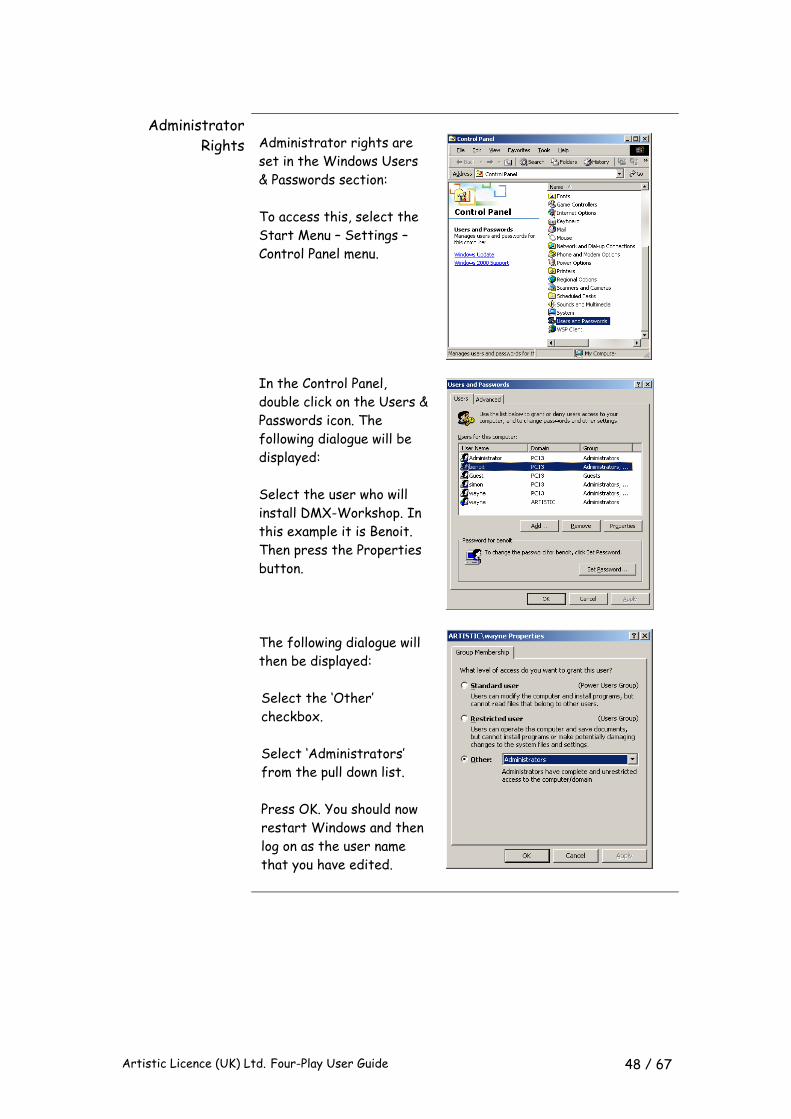
Administrator
Rights Administrator rights are set in the Windows Users & Passwords section: To access this, select the Start Menu – Settings – Control Panel menu. In the Control Panel, double click on the Users & Passwords icon. The following dialogue will be displayed: Select the user who will install DMX-Workshop. In this example it is Benoit. Then press the Properties button. The following dialogue will then be displayed: Select the ‘Other’ checkbox. Select ‘Administrators’ from the pull down list. Press OK. You should now restart Windows and then log on as the user name that you have edited.
Artistic Licence (UK) Ltd. Four-Play User Guide 49 / 67
SOFTWARE INSTALLATION
DMX-Workshop is supplied on CD. To install use the following procedure: If you are upgrading, first uninstall the existing copy DMX-Workshop. • Shutdown any applications running on your computer • Insert the CD in drive. • Wait for CD to start, then select ‘Enter CD’. • Select the ‘Software’ button. • Select the ‘DMX-Workshop’ button. • Install Shield will then guide you through the remainder of
the procedure.
CONFIGURATION Before starting to use the system you will need to configure your network interface. The process is very simple and is described below.

Artistic Licence (UK) Ltd. Four-Play User Guide 50 / 67
Art-Net
To communicate with Four-Play you must configure the PC Ethernet card. It is necessary to set two parameters, the IP address and the Subnet Mask. These settings are adjusted in the Windows Network Settings Dialogue. To access this, select the Start Menu – Settings – Control Panel menu. In the Control Panel, double click on the Network Icon. The following dialogue will be displayed: Select the TCP/IP protocol line and then press the properties button. The following dialogue will then be displayed: Select the radio button marked ‘Specify an IP Address’. Type the number 2.0.0.1 into the first box. Type the number 255.0.0.0 into the second box. The display should be as follows: Select the DNS Tab and click on disable DNS.
Press the OK button but do not restart the computer yet. When using the Art-Net output, ensure that your network is not connected to the Internet.
Artistic Licence (UK) Ltd. Four-Play User Guide 51 / 67
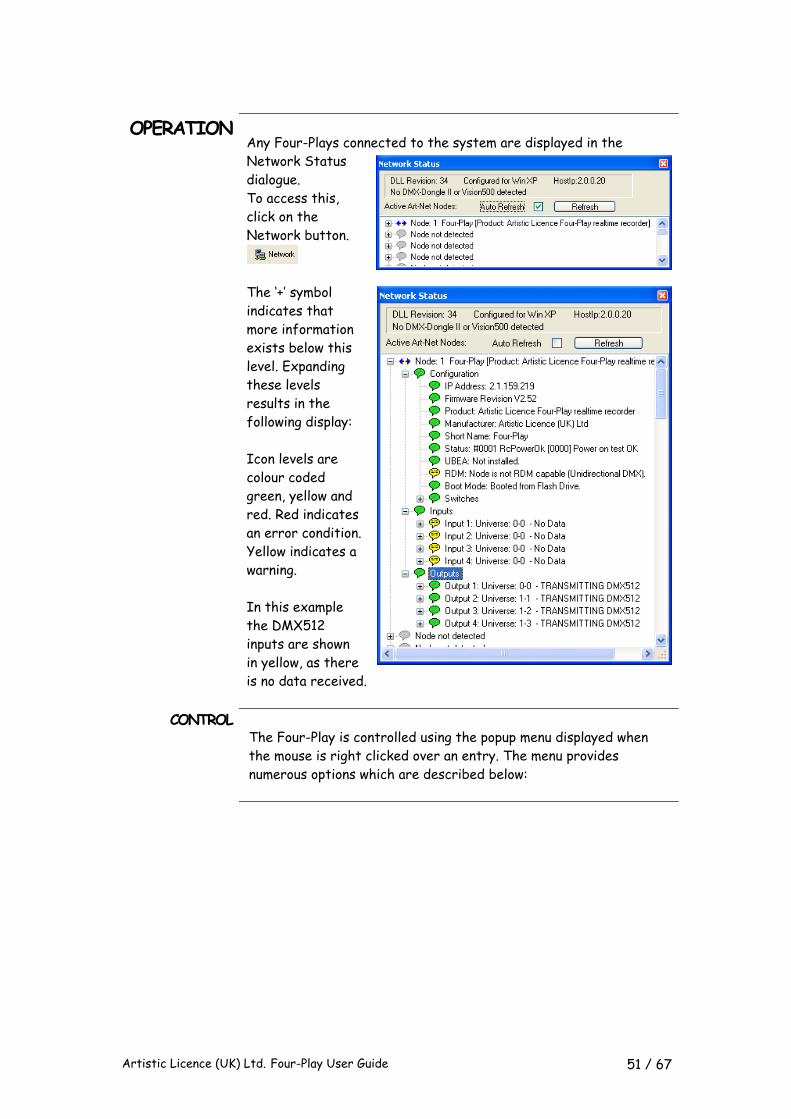
OPERATION Any Four-Plays connected to the system are displayed in the Network Status dialogue. To access this, click on the Network button.
The ‘+’ symbol indicates that more information exists below this level. Expanding these levels results in the following display: Icon levels are colour coded green, yellow and red. Red indicates an error condition. Yellow indicates a warning. In this example the DMX512 inputs are shown in yellow, as there is no data received.
CONTROL The Four-Play is controlled using the popup menu displayed when the mouse is right clicked over an entry. The menu provides numerous options which are described below:
Artistic Licence (UK) Ltd. Four-Play User Guide 52 / 67
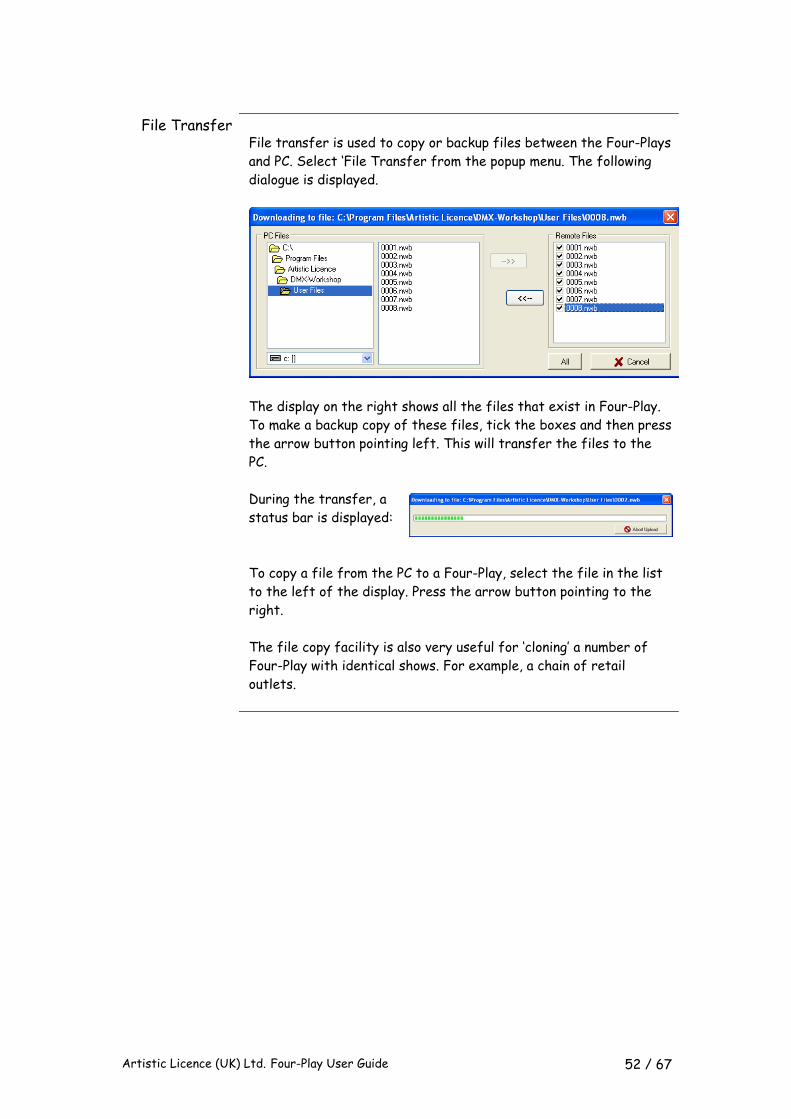
File Transfer
File transfer is used to copy or backup files between the Four-Plays and PC. Select ‘File Transfer from the popup menu. The following dialogue is displayed.
The display on the right shows all the files that exist in Four-Play. To make a backup copy of these files, tick the boxes and then press the arrow button pointing left. This will transfer the files to the PC. During the transfer, a status bar is displayed:
To copy a file from the PC to a Four-Play, select the file in the list to the left of the display. Press the arrow button pointing to the right. The file copy facility is also very useful for ‘cloning’ a number of Four-Play with identical shows. For example, a chain of retail outlets.
Artistic Licence (UK) Ltd. Four-Play User Guide 53 / 67
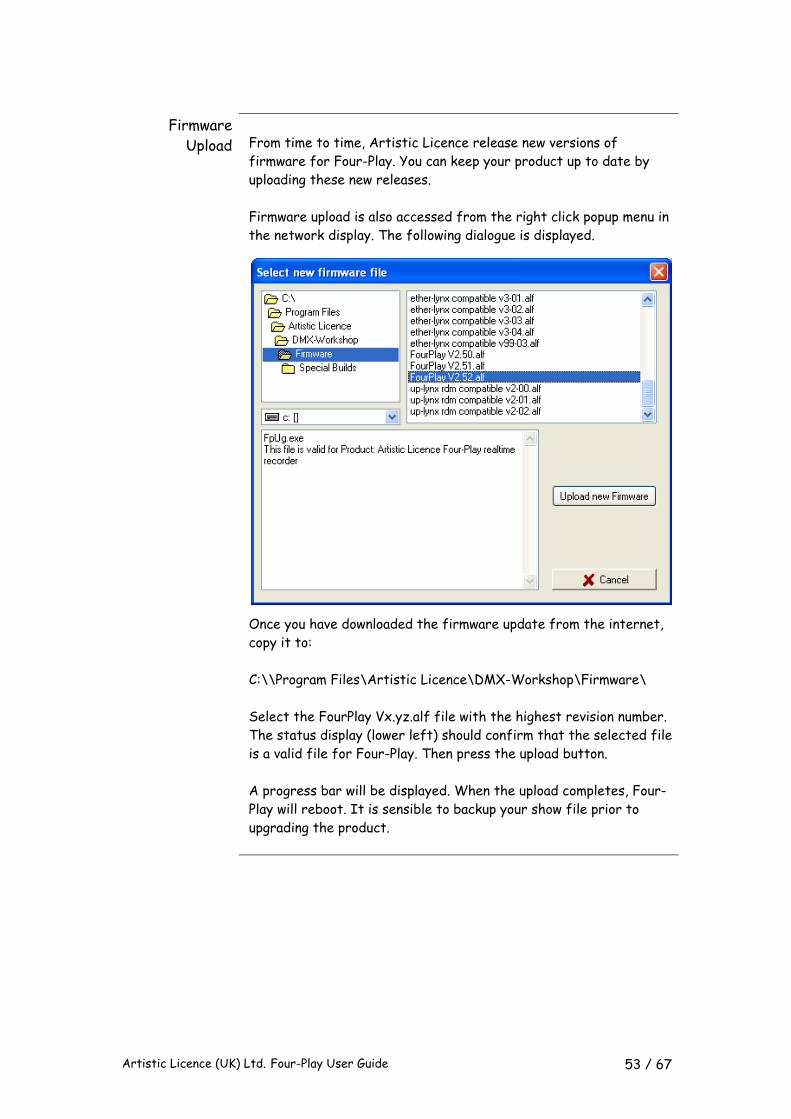
Firmware
Upload From time to time, Artistic Licence release new versions of firmware for Four-Play. You can keep your product up to date by uploading these new releases. Firmware upload is also accessed from the right click popup menu in the network display. The following dialogue is displayed.
Once you have downloaded the firmware update from the internet, copy it to: C:\\Program Files\Artistic Licence\DMX-Workshop\Firmware\ Select the FourPlay Vx.yz.alf file with the highest revision number. The status display (lower left) should confirm that the selected file is a valid file for Four-Play. Then press the upload button. A progress bar will be displayed. When the upload completes, Four-Play will reboot. It is sensible to backup your show file prior to upgrading the product.

Artistic Licence (UK) Ltd. Four-Play User Guide 54 / 67
STATUS
The operating status and file configuration of Four-Play can be displayed. Select the configuration option from within the popup menu. The information screen is shown below. The top section is controlled by the tab selects and allows all 4 data paths plus the file listing to be viewed.
The lower section provides remote control of the Four-Play. Note the tick box which allows this dialogue to control all Four-Play connected to the network. From left to right, the button functions are:
• Scan Reverse • Scan Forward • Pause • Stop • Continue • Play • Play Triggered • Play Auto-Backup • Loop On (Inputs connect to output) • Loop Off (Inputs not connected to output) • Record • Record Triggered

Artistic Licence (UK) Ltd. Four-Play User Guide 55 / 67
DATA PATHS
The following section shows each of the possible data path displays.
Playback
The yellow arrows show the active data path. In this example the Four-Play is playing a file and the output is both DMX512 and Art-Net.
Loop Though In this example, the DMX512 input is converted to Art-Net and also output as DMX512. This gives the external lighting controller control of the lights whilst also acting as a protocol convertor.

Artistic Licence (UK) Ltd. Four-Play User Guide 56 / 67
Record
The record data path is shown in red. In this example, the DMX512 input is being recorded to the hard disc. At the same time, that signal is converted to Art-Net and also output to DMX512.
Triggered
Record The record data path is shown in red. In this example, Four-Play is in record pause, awaiting a trigger from Channel 2048 of the input.
At the same time, that signal is converted to Art-Net and also output to DMX512.
Artistic Licence (UK) Ltd. Four-Play User Guide 57 / 67
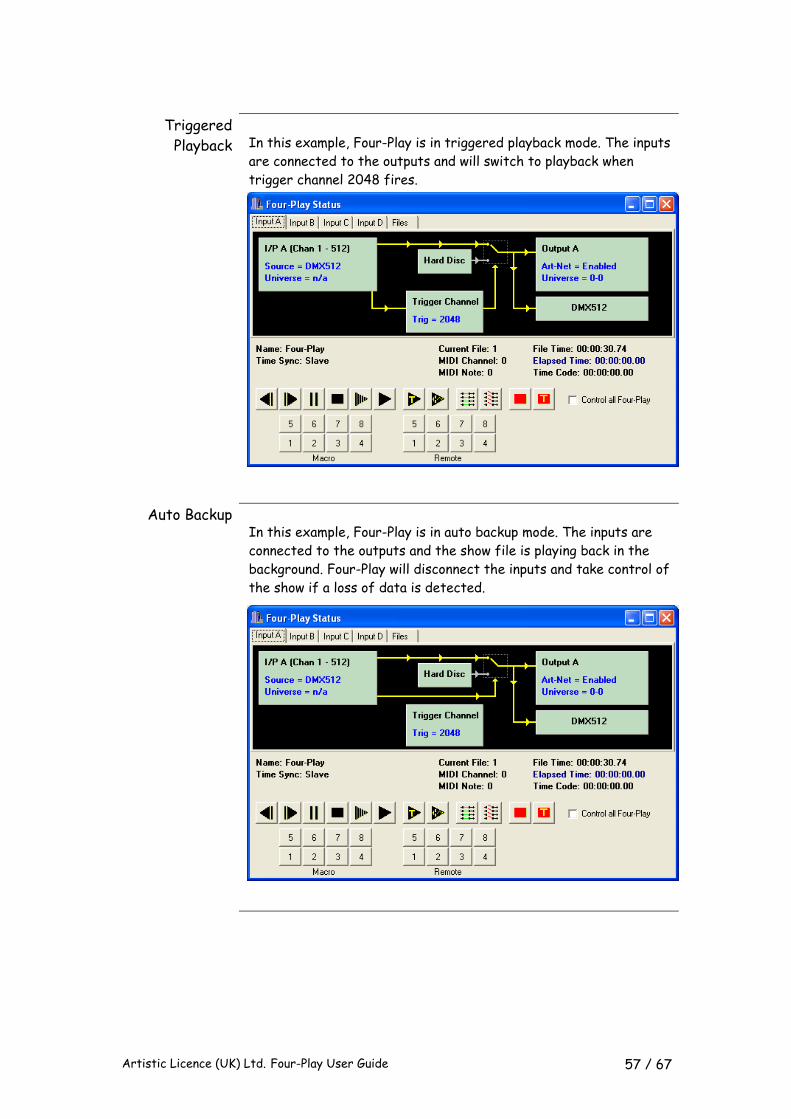
Triggered
Playback In this example, Four-Play is in triggered playback mode. The inputs are connected to the outputs and will switch to playback when trigger channel 2048 fires.
Auto Backup
In this example, Four-Play is in auto backup mode. The inputs are connected to the outputs and the show file is playing back in the background. Four-Play will disconnect the inputs and take control of the show if a loss of data is detected.
Artistic Licence (UK) Ltd. Four-Play User Guide 58 / 67
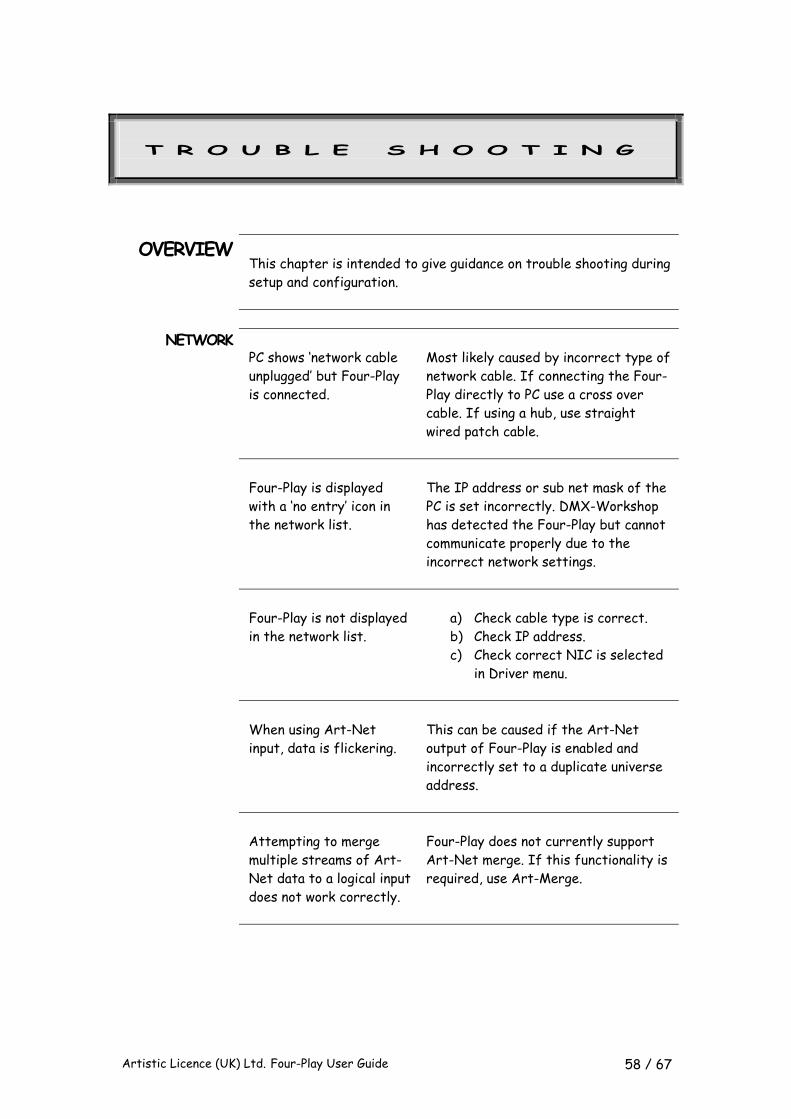
OVERVIEW This chapter is intended to give guidance on trouble shooting during setup and configuration.
NETWORK
PC shows ‘network cable unplugged’ but Four-Play is connected.
Most likely caused by incorrect type of network cable. If connecting the Four-Play directly to PC use a cross over cable. If using a hub, use straight wired patch cable.
Four-Play is displayed with a ‘no entry’ icon in the network list.
The IP address or sub net mask of the PC is set incorrectly. DMX-Workshop has detected the Four-Play but cannot communicate properly due to the incorrect network settings.
Four-Play is not displayed in the network list.
a) Check cable type is correct. b) Check IP address. c) Check correct NIC is selected
in Driver menu.
When using Art-Net input, data is flickering.
This can be caused if the Art-Net output of Four-Play is enabled and incorrectly set to a duplicate universe address.
Attempting to merge multiple streams of Art-Net data to a logical input does not work correctly.
Four-Play does not currently support Art-Net merge. If this functionality is required, use Art-Merge.
T R O U B L E S H O O T I N G

Artistic Licence (UK) Ltd. Four-Play User Guide 59 / 67
CLOCK
Four-Play real time clock is not synchronised to PC clock.
Ensure synchronisation is enabled in DMX-Workshop. Menu selection is: Art-Net Driver Time Synchronisation Automatic
Real time clock behaves erratically.
One or more Four-Play is set to Master Time Sync mode as well as the PC. There can only be one master time clock.
Real time clock is not synchronised to Internet Time.
Ensure the PC has a permanent Internet connection. Internet time is enabled by: Start Control Panel Date & Time Internet Time

Artistic Licence (UK) Ltd. Four-Play User Guide 60 / 67
C O N V E R S I O N T A B L E S
Dec Hex Binary Dec Hex Binary Dec Hex Binary 0 1 2 3 4 5 6 7 8 9 10 11 12 13 14 15 16 17 18 19 20 21 22 23 24 25 26 27 28 29 30 31
00 01 02 03 04 05 06 07 08 09 0A 0B 0C 0D 0E 0F 10 11 12 13 14 15 16 17 18 19 1A 1B 1C 1D 1E 1F
0000 0000 0000 0001 0000 0010 0000 0011 0000 0100 0000 0101 0000 0110 0000 0111 0000 1000 0000 1001 0000 1010 0000 1011 0000 1100 0000 1101 0000 1110 0000 1111 0001 0000 0001 0001 0001 0010 0001 0011 0001 0100 0001 0101 0001 0110 0001 0111 0001 1000 0001 1001 0001 1010 0001 1011 0001 1100 0001 1101 0001 1110 0001 1111
32 33 34 35 36 37 38 39 40 41 42 43 44 45 46 47 48 49 50 51 52 53 54 55 56 57 58 59 60 61 62 63
20 21 22 23 24 25 26 27 28 29 2A 2B 2C 2D 2E 2F 30 31 32 33 34 35 36 37 38 39 3A 3B 3C 3D 3E 3F
0010 0000 0010 0001 0010 0010 0010 0011 0010 0100 0010 0101 0010 0110 0010 0111 0010 1000 0010 1001 0010 1010 0010 1011 0010 1100 0010 1101 0010 1110 0010 1111 0011 0000 0011 0001 0011 0010 0011 0011 0011 0100 0011 0101 0011 0110 0011 0111 0011 1000 0011 1001 0011 1010 0011 1011 0011 1100 0011 1101 0011 1110 0011 1111
64 65 66 67 68 69 70 71 72 73 74 75 76 77 78 79 80 81 82 83 84 85 86 87 88 89 90 91 92 93 94 95
40 41 42 43 44 45 46 47 48 49 4A 4B 4C 4D 4E 4F 50 51 52 53 54 55 56 57 58 59 5A 5B 5C 5D 5E 5F
0100 0000 0100 0001 0100 0010 0100 0011 0100 0100 0100 0101 0100 0110 0100 0111 0100 1000 0100 1001 0100 1010 0100 1011 0100 1100 0100 1101 0100 1110 0100 1111 0101 0000 0101 0001 0101 0010 0101 0011 0101 0100 0101 0101 0101 0110 0101 0111 0101 1000 0101 1001 0101 1010 0101 1011 0101 1100 0101 1101 0101 1110 0101 1111

Artistic Licence (UK) Ltd. Four-Play User Guide 61 / 67
Dec Hex Binary Dec Hex Binary Dec Hex Binary 96 60 0110 0000 128 80 1000 0000 160 A0 1010 0000 97 61 0110 0001 129 81 1000 0001 161 A1 1010 0001 98 62 0110 0010 130 82 1000 0010 162 A2 1010 0010 99 63 0110 0011 131 83 1000 0011 163 A3 1010 0011 100 64 0110 0100 132 84 1000 0100 164 A4 1010 0100 101 65 0110 0101 133 85 1000 0101 165 A5 1010 0101 102 66 0110 0110 134 86 1000 0110 166 A6 1010 0110 103 67 0110 0111 135 87 1000 0111 167 A7 1010 0111 104 68 0110 1000 136 88 1000 1000 168 A8 1010 1000 105 69 0110 1001 137 89 1000 1001 169 A9 1010 1001 106 6A 0110 1010 138 8A 1000 1010 170 AA 1010 1010 107 6B 0110 1011 139 8B 1000 1011 171 AB 1010 1011 108 6C 0110 1100 140 8C 1000 1100 172 AC 1010 1100 109 6D 0110 1101 141 8D 1000 1101 173 AD 1010 1101 110 6E 0110 1110 142 8E 1000 1110 174 AE 1010 1110 111 6F 0110 1111 143 8F 1000 1111 175 AF 1010 1111 112 70 0111 0000 144 90 1001 0000 176 B0 1011 0000 113 71 0111 0001 145 91 1001 0001 177 B1 1011 0001 114 72 0111 0010 146 92 1001 0010 178 B2 1011 0010 115 73 0111 0011 147 93 1001 0011 179 B3 1011 0011 116 74 0111 0100 148 94 1001 0100 180 B4 1011 0100 117 75 0111 0101 149 95 1001 0101 181 B5 1011 0101 118 76 0111 0110 150 96 1001 0110 182 B6 1011 0110 118 77 0111 0111 151 97 1001 0111 183 B7 1011 0111 119 78 0111 1000 152 98 1001 1000 184 B8 1011 1000 120 79 0111 1001 153 99 1001 1001 185 B9 1011 1001 121 7A 0111 1010 154 9A 1001 1010 186 BA 1011 1010 122 7B 0111 1011 155 9B 1001 1011 187 BB 1011 1011 123 7C 0111 1100 156 9C 1001 1100 188 BC 1011 1100 124 7D 0111 1101 157 9D 1001 1101 189 BD 1011 1101 125 7E 0111 1110 158 9E 1001 1110 190 BE 1011 1110 126 7F 0111 1111 159 9F 1001 1111 191 BF 1011 1111
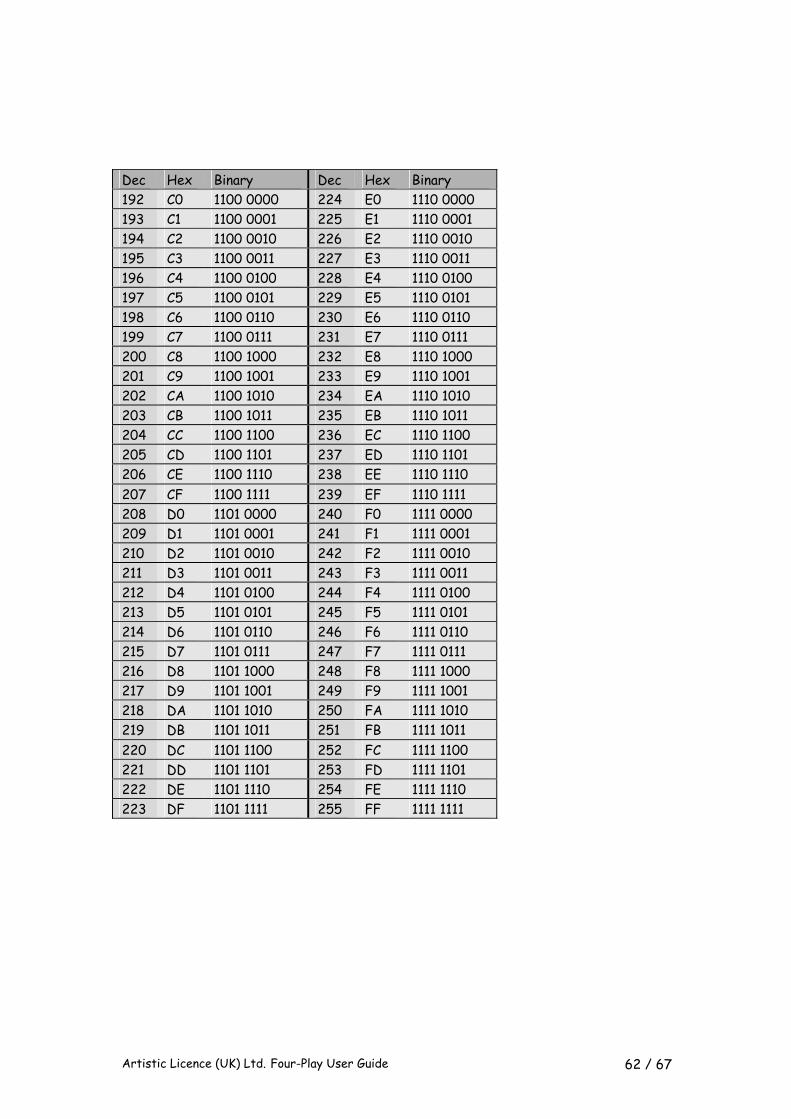
Artistic Licence (UK) Ltd. Four-Play User Guide 62 / 67
Dec Hex Binary Dec Hex Binary 192 C0 1100 0000 224 E0 1110 0000 193 C1 1100 0001 225 E1 1110 0001 194 C2 1100 0010 226 E2 1110 0010 195 C3 1100 0011 227 E3 1110 0011 196 C4 1100 0100 228 E4 1110 0100 197 C5 1100 0101 229 E5 1110 0101 198 C6 1100 0110 230 E6 1110 0110 199 C7 1100 0111 231 E7 1110 0111 200 C8 1100 1000 232 E8 1110 1000 201 C9 1100 1001 233 E9 1110 1001 202 CA 1100 1010 234 EA 1110 1010 203 CB 1100 1011 235 EB 1110 1011 204 CC 1100 1100 236 EC 1110 1100 205 CD 1100 1101 237 ED 1110 1101 206 CE 1100 1110 238 EE 1110 1110 207 CF 1100 1111 239 EF 1110 1111 208 D0 1101 0000 240 F0 1111 0000 209 D1 1101 0001 241 F1 1111 0001 210 D2 1101 0010 242 F2 1111 0010 211 D3 1101 0011 243 F3 1111 0011 212 D4 1101 0100 244 F4 1111 0100 213 D5 1101 0101 245 F5 1111 0101 214 D6 1101 0110 246 F6 1111 0110 215 D7 1101 0111 247 F7 1111 0111 216 D8 1101 1000 248 F8 1111 1000 217 D9 1101 1001 249 F9 1111 1001 218 DA 1101 1010 250 FA 1111 1010 219 DB 1101 1011 251 FB 1111 1011 220 DC 1101 1100 252 FC 1111 1100 221 DD 1101 1101 253 FD 1111 1101 222 DE 1101 1110 254 FE 1111 1110 223 DF 1101 1111 255 FF 1111 1111

Artistic Licence (UK) Ltd. Four-Play User Guide 63 / 67

Artistic Licence (UK) Ltd. Four-Play User Guide 64 / 67
1
10BaseT · 10, 45
2
2.0.0.1 · 50 2000 · 46, 47 2048 · 9, 21, 40, 41 24 hour clock · 26, 27 255.0.0.0 · 50
4
4096 · 41
A
Administrator · 47, 48 alf · 53 Artistic Licence · 1, 5, 67 Art-Net · 9, 10, 11, 15, 16, 18, 21, 28, 29, 32,
33, 35, 45, 50 At End · 19, 29 authored · 21 AV control system · 39
B
backup · 9, 10, 21, 26, 40, 52, 53, 57 Bargraph · 31 Base · 19 beam break · 37 Binary · 60, 61, 62 Boot · 33
C
Car Launch · 39 CD · 49 Channel number mode · 28
Clock · 19, 26, 28, 35 Colour · 46 Common-Sense · 11 configuration · 30, 32, 36, 37, 38, 39 Cont · 21 Contact closure · 11 Continue · 21, 31 Control · 48, 50 cross over · 41, 58
D
data path · 55, 56 daylight saving · 10 Display · 13, 15, 31 DMX · 50 DMX512 · 9, 10, 11, 15, 16, 18, 21, 28, 32, 33,
36, 40, 41, 43, 45 DMX-Workshop · 9, 10, 35, 46, 49, 53, 58,
59 DMX-Worshop · 35 DNS · 50 drift · 42
E
Elapsed Time · 19 engraved · 14 Ethernet · 9, 10, 11, 50 example · 48 exhibit · 37
F
failure · 12, 21, 23 Features · 9 feedback · 15 F-Err · 18 File Time · 19 File transfer · 52 firmware · 10, 53 Flash · 46, 47, 48, 49, 50 Frm · 18 fuse · 45
I N D E X

Artistic Licence (UK) Ltd. Four-Play User Guide 65 / 67
G
Game Show · 38 green · 51
H
Hex · 60, 61, 62 hierarchical · 21 High Byte · 28
I
In · 48, 50 Insert · 49 instantaneous playback · 23 Internet · 9, 10, 35 Internet time · 35, 59 IP · 50
L
LCD · 13, 15, 16, 17, 20 LED · 15 Len-Er · 18 lighting console · 11, 12, 21, 23, 24, 25, 30,
36, 38, 39, 40, 41 Lighting console · 9, 36, 37 Loop · 14, 29, 30, 31, 33, 36, 37, 38, 40, 41,
43 Low Byte · 28
M
Macro · 19, 21, 26, 30, 31, 34 main menu · 21 Mask · 50 MENU · 15, 16, 17, 18, 19, 20, 21, 30 merge · 58 MIDI · 9, 11, 19, 27, 32, 34, 39, 45 mimic · 15, 16 MTC · 26, 27, 28, 29, 39 multi-tap · 14, 26
N
network · 10, 14, 15, 19, 33, 35, 41, 46, 47, 49, 50, 53, 54, 58
Network · 50
NIC · 58 None · 26, 27, 33, 39 Note Off · 34 Note On · 34 N-Strt · 18
O
OVERVIEW · 46, 58
P
Pause · 14, 15, 21, 31, 40, 41 Pentium · 46
Play · 1, 9, 10, 11,
12, 13, 14, 15, 19, 21, 23, 24, 25, 27, 29, 30, 31, 32, 33, 35, 36, 37, 38, 39, 40, 41, 42, 43, 44
Point of Information · 36 Point of Sale · 36 Power · 45 Protocol · 9, 11
Q
Quick Start · 9
R
real time clock · 35, 59 Real time clock · 10, 11 real time clocks · 19, 41, 42 Receive · 31 Record · 14, 15, 21, 23, 24, 25, 31, 40, 41 recording · 10, 12, 14, 15, 21, 24, 25, 31, 40,
41, 45 Red · 51 registration · 9 Remaining Time · 19 Remote · 9, 20, 30, 34, 37, 38, 44 restart · 48 RS232 · 44
Artistic Licence (UK) Ltd. Four-Play User Guide 66 / 67
S
Scan · 14, 21, 31 Show-Control · 5, 9 Signature · 28 Signature mode · 28 Sips · 18 Soft Key · 13, 15 Src · 18 start · 49 Status · 13, 17, 18, 19, 23, 31, 34 Stop · 21 synchronisation · 9, 10, 19, 32
T
TCP/IP · 50 theatre show · 40 Time Sync · 19, 35 Time Synchronisation · 35 timecode · 27, 29, 39 Timecode · 19, 27 Timelock · 27 Tracking Backup · 12 transmit · 16, 18 Transmit · 31 Transport · 13, 21 Trigger · 21, 23, 24, 25, 31, 34, 40, 41 trigger channel · 12, 21, 23, 24, 40 Triggered Playback · 24, 25
triggered record · 24, 25, 40, 41 Triggered record · 25
U
upload · 10, 53 User Rights · 47
V
Version · 5 VGA · 13, 14, 15, 45
W
warning · 51 Windows · 46, 47, 48, 50 wireless · 11
X
XT · 47
Y
Yellow · 51

Artistic Licence (UK) Ltd. Four-Play User Guide 67 / 67
The information contained in this document is subject to change without notice. Artistic Licence (UK) Ltd. makes no warranty of any kind with regard to this material, including, but not limited to, the implied warranties of fitness for a particular purpose. Artistic Licence (UK) Ltd. shall not be liable for errors contained herein or for incidental or consequential damages in connection with the furnishing, performance or use of this material. As with all Artistic Licence products, Micro-Scope 3 is fully compliant with all EMC and LVD directives. All trademarks are acknowledged.
Artistic Licence © Artistic Licence (UK) Ltd. 1999-2005 B1 & B3 Livingstone Court Peel Road Harrow Middlesex England HA3 7QT Tel: +44 (0)20 88 63 45 15 Fax: +44 (0)20 84 26 05 51 Email: [email protected]


![A NEW PLAY DEVELOPMENT PROGRAM Supported by the …...InterAct Theatre Company] Maura Krause [Artistic Director of Orbiter 3] A NEW PLAY DEVELOPMENT PROGRAM 6 5 4 3 2 In this dark](https://img.pdfslide.us/doc/110x75/5fdcb5a1c2ff1d6b2e4c3f98/a-new-play-development-program-supported-by-the-interact-theatre-company-maura.jpg)