Embed Size (px)
Citation preview
Fortify® SCA User Guide
Fortify 360, Version 2.6May 2010

Copyright © 2010 Fortify® Software, Inc.RB_RB_May 4, 2010 3:48 pmAll Rights Reserved. Printed in the United States of America. Fortify Software, Inc.2215 Bridgepointe Pkwy.Suite 400San Mateo, CA 94404 Fortify Software, Inc. (“Fortify”) and its licensors retain all ownership rights to this document (the “Document”). Use of the Document is governed by applicable copyright law. Fortify may revise this Document from time to time without notice. THIS DOCUMENT IS PROVIDED “AS IS” WITHOUT WARRANTY OF ANY KIND. IN NO EVENT SHALL FORTIFY BE LIABLE FOR INDIRECT, SPECIAL, INCIDENTAL, OR CONSEQUENTIAL DAMAGES OF ANY KIND ARISING FROM ANY ERROR IN THIS DOCUMENT, INCLUDING WITHOUT LIMITATION ANY LOSS OR INTERRUPTION OF BUSINESS, PROFITS, USE OR DATA. FORTIFY RESERVES THE RIGHT TO MODIFY OR REMOVE ANY OF THE FEATURES OR COMPONENTS DESCRIBED IN THIS DOCUMENT FROM THE FINAL PRODUCT, WITHOUT NOTICE. Fortify is a registered trademark of Fortify Software, Inc.Brand and product names in this Document are trademarks of their respective owners.
Part Number: 1‐113‐2010‐05‐20‐26‐1
Fortify SCA User Guide i
Table of Contents
Preface . . . . . . . . . . . . . . . . . . . . . . . . . . . . . . . . . . . . . . . . . . . . . . . . . . . . . . . . . . . . . . . . . . . . . . . . . . . vii
Contacting Fortify Software. . . . . . . . . . . . . . . . . . . . . . . . . . . . . . . . . . . . . . . . . . . . . . . . . . . . . . . . . . . . . . . . . . . . . . . . . . . .vii
Technical Support . . . . . . . . . . . . . . . . . . . . . . . . . . . . . . . . . . . . . . . . . . . . . . . . . . . . . . . . . . . . . . . . . . . . . . . . . . . . . . . . .viiCorporate Headquarters. . . . . . . . . . . . . . . . . . . . . . . . . . . . . . . . . . . . . . . . . . . . . . . . . . . . . . . . . . . . . . . . . . . . . . . . . . .viiWeb Site . . . . . . . . . . . . . . . . . . . . . . . . . . . . . . . . . . . . . . . . . . . . . . . . . . . . . . . . . . . . . . . . . . . . . . . . . . . . . . . . . . . . . . . . . .vii
About the Fortify 360 Documentation Set . . . . . . . . . . . . . . . . . . . . . . . . . . . . . . . . . . . . . . . . . . . . . . . . . . . . . . . . . . . . . .vii
Introduction . . . . . . . . . . . . . . . . . . . . . . . . . . . . . . . . . . . . . . . . . . . . . . . . . . . . . . . . . . . . . . . . . . . . . . . . . . . . . . . . . . . . . 1
Overview of Fortify SCA . . . . . . . . . . . . . . . . . . . . . . . . . . . . . . . . . . . . . . . . . . . . . . . . . . . . . . . . . . . . . . . . . . . . . . . . . . . . . . . . 1
Overview of the Analyzers . . . . . . . . . . . . . . . . . . . . . . . . . . . . . . . . . . . . . . . . . . . . . . . . . . . . . . . . . . . . . . . . . . . . . . . . . . . . . . 1
Overview of the Analysis Phases . . . . . . . . . . . . . . . . . . . . . . . . . . . . . . . . . . . . . . . . . . . . . . . . . . . . . . . . . . . . . . . . . . . . . . . . 3
Example of Analysis Commands . . . . . . . . . . . . . . . . . . . . . . . . . . . . . . . . . . . . . . . . . . . . . . . . . . . . . . . . . . . . . . . . . . . . 3Memory Considerations . . . . . . . . . . . . . . . . . . . . . . . . . . . . . . . . . . . . . . . . . . . . . . . . . . . . . . . . . . . . . . . . . . . . . . . . . . . . 3Translation Phase . . . . . . . . . . . . . . . . . . . . . . . . . . . . . . . . . . . . . . . . . . . . . . . . . . . . . . . . . . . . . . . . . . . . . . . . . . . . . . . . . . 3Fortify SCA Per Use License Only, Verifying Available Lines . . . . . . . . . . . . . . . . . . . . . . . . . . . . . . . . . . . . . . . . . 4Analysis Phase . . . . . . . . . . . . . . . . . . . . . . . . . . . . . . . . . . . . . . . . . . . . . . . . . . . . . . . . . . . . . . . . . . . . . . . . . . . . . . . . . . . . . 4Verification of the Translation and Analysis Phase . . . . . . . . . . . . . . . . . . . . . . . . . . . . . . . . . . . . . . . . . . . . . . . . . . 5
Translating Java Code . . . . . . . . . . . . . . . . . . . . . . . . . . . . . . . . . . . . . . . . . . . . . . . . . . . . . . . . . . . . . . . . . . . . . . . . . . . . . . . 6
Java Command Line Syntax . . . . . . . . . . . . . . . . . . . . . . . . . . . . . . . . . . . . . . . . . . . . . . . . . . . . . . . . . . . . . . . . . . . . . . . . . . . . . 6
Java Command Line Examples . . . . . . . . . . . . . . . . . . . . . . . . . . . . . . . . . . . . . . . . . . . . . . . . . . . . . . . . . . . . . . . . . . . . . . . . . . 7
Integrating with Ant using the Fortify Ant Compiler Adapter . . . . . . . . . . . . . . . . . . . . . . . . . . . . . . . . . . . . . . . . . . . . 7
Translating J2EE Applications . . . . . . . . . . . . . . . . . . . . . . . . . . . . . . . . . . . . . . . . . . . . . . . . . . . . . . . . . . . . . . . . . . . . . . . . . . 8
Working with JSP Projects . . . . . . . . . . . . . . . . . . . . . . . . . . . . . . . . . . . . . . . . . . . . . . . . . . . . . . . . . . . . . . . . . . . . . . . . . . 8XML Configuration Files . . . . . . . . . . . . . . . . . . . . . . . . . . . . . . . . . . . . . . . . . . . . . . . . . . . . . . . . . . . . . . . . . . . . . . . . . . . . 8Call Graph. . . . . . . . . . . . . . . . . . . . . . . . . . . . . . . . . . . . . . . . . . . . . . . . . . . . . . . . . . . . . . . . . . . . . . . . . . . . . . . . . . . . . . . . . . 9
Handling Resolution Warnings. . . . . . . . . . . . . . . . . . . . . . . . . . . . . . . . . . . . . . . . . . . . . . . . . . . . . . . . . . . . . . . . . . . . . . . . . . 9
Java Warnings. . . . . . . . . . . . . . . . . . . . . . . . . . . . . . . . . . . . . . . . . . . . . . . . . . . . . . . . . . . . . . . . . . . . . . . . . . . . . . . . . . . . . . 9J2EE Warnings . . . . . . . . . . . . . . . . . . . . . . . . . . . . . . . . . . . . . . . . . . . . . . . . . . . . . . . . . . . . . . . . . . . . . . . . . . . . . . . . . . . . . 9
Using FindBugs. . . . . . . . . . . . . . . . . . . . . . . . . . . . . . . . . . . . . . . . . . . . . . . . . . . . . . . . . . . . . . . . . . . . . . . . . . . . . . . . . . . . . . . 10
Translating .NET Source Code . . . . . . . . . . . . . . . . . . . . . . . . . . . . . . . . . . . . . . . . . . . . . . . . . . . . . . . . . . . . . . . . . . . . . . 11
Visual Studio .NET . . . . . . . . . . . . . . . . . . . . . . . . . . . . . . . . . . . . . . . . . . . . . . . . . . . . . . . . . . . . . . . . . . . . . . . . . . . . . . . . . . . . 11
Translating Simple .NET Applications . . . . . . . . . . . . . . . . . . . . . . . . . . . . . . . . . . . . . . . . . . . . . . . . . . . . . . . . . . . . . . . . . 11
Translating ASP.NET 1.1 (Visual Studio Version 2003) Projects. . . . . . . . . . . . . . . . . . . . . . . . . . . . . . . . . . . . . . . . 12
Handling Resolution Warnings. . . . . . . . . . . . . . . . . . . . . . . . . . . . . . . . . . . . . . . . . . . . . . . . . . . . . . . . . . . . . . . . . . . . . . . . 13
.NET Warnings . . . . . . . . . . . . . . . . . . . . . . . . . . . . . . . . . . . . . . . . . . . . . . . . . . . . . . . . . . . . . . . . . . . . . . . . . . . . . . . . . . . 13ASP.NET Warnings . . . . . . . . . . . . . . . . . . . . . . . . . . . . . . . . . . . . . . . . . . . . . . . . . . . . . . . . . . . . . . . . . . . . . . . . . . . . . . . 14
Translating C/C++ Code . . . . . . . . . . . . . . . . . . . . . . . . . . . . . . . . . . . . . . . . . . . . . . . . . . . . . . . . . . . . . . . . . . . . . . . . . . . . 15
C and C++ Command Line Syntax . . . . . . . . . . . . . . . . . . . . . . . . . . . . . . . . . . . . . . . . . . . . . . . . . . . . . . . . . . . . . . . . . . . . . 15
Fortify SCA User Guide ii
C and C++ Command Line Examples . . . . . . . . . . . . . . . . . . . . . . . . . . . . . . . . . . . . . . . . . . . . . . . . . . . . . . . . . . . . . . . . . . 15
Integrating with Make . . . . . . . . . . . . . . . . . . . . . . . . . . . . . . . . . . . . . . . . . . . . . . . . . . . . . . . . . . . . . . . . . . . . . . . . . . . . . . . . 15
Using the Fortify Touchless Build Adapter . . . . . . . . . . . . . . . . . . . . . . . . . . . . . . . . . . . . . . . . . . . . . . . . . . . . . . . . 15Modifying a Makefile to Invoke Fortify SCA . . . . . . . . . . . . . . . . . . . . . . . . . . . . . . . . . . . . . . . . . . . . . . . . . . . . . . . 16
Using Fortify Build Monitor . . . . . . . . . . . . . . . . . . . . . . . . . . . . . . . . . . . . . . . . . . . . . . . . . . . . . . . . . . . . . . . . . . . . . . . . . . . 17
Fortify Build Monitor Overview. . . . . . . . . . . . . . . . . . . . . . . . . . . . . . . . . . . . . . . . . . . . . . . . . . . . . . . . . . . . . . . . . . . 17Configuring Fortify Build Monitor . . . . . . . . . . . . . . . . . . . . . . . . . . . . . . . . . . . . . . . . . . . . . . . . . . . . . . . . . . . . . . . . 18Monitoring Builds . . . . . . . . . . . . . . . . . . . . . . . . . . . . . . . . . . . . . . . . . . . . . . . . . . . . . . . . . . . . . . . . . . . . . . . . . . . . . . . . 19Example of Monitoring a Project . . . . . . . . . . . . . . . . . . . . . . . . . . . . . . . . . . . . . . . . . . . . . . . . . . . . . . . . . . . . . . . . . . 19
Visual Studio .NET . . . . . . . . . . . . . . . . . . . . . . . . . . . . . . . . . . . . . . . . . . . . . . . . . . . . . . . . . . . . . . . . . . . . . . . . . . . . . . . . . . . . 20
Visual Studio 6.0. . . . . . . . . . . . . . . . . . . . . . . . . . . . . . . . . . . . . . . . . . . . . . . . . . . . . . . . . . . . . . . . . . . . . . . . . . . . . . . . . . . . . . 20
Translating Other Languages . . . . . . . . . . . . . . . . . . . . . . . . . . . . . . . . . . . . . . . . . . . . . . . . . . . . . . . . . . . . . . . . . . . . . . 21
Command Line Syntax for Other Languages . . . . . . . . . . . . . . . . . . . . . . . . . . . . . . . . . . . . . . . . . . . . . . . . . . . . . . . . . . . 21
Configuration Considerations . . . . . . . . . . . . . . . . . . . . . . . . . . . . . . . . . . . . . . . . . . . . . . . . . . . . . . . . . . . . . . . . . . . . . . . . . 22
Configuring Python. . . . . . . . . . . . . . . . . . . . . . . . . . . . . . . . . . . . . . . . . . . . . . . . . . . . . . . . . . . . . . . . . . . . . . . . . . . . . . . 22Configuring ColdFusion . . . . . . . . . . . . . . . . . . . . . . . . . . . . . . . . . . . . . . . . . . . . . . . . . . . . . . . . . . . . . . . . . . . . . . . . . . 22Configuring the SQL Extension. . . . . . . . . . . . . . . . . . . . . . . . . . . . . . . . . . . . . . . . . . . . . . . . . . . . . . . . . . . . . . . . . . . . 22Configuring ASP/VBScript Virtual Roots . . . . . . . . . . . . . . . . . . . . . . . . . . . . . . . . . . . . . . . . . . . . . . . . . . . . . . . . . . 22Other Language Command Line Examples . . . . . . . . . . . . . . . . . . . . . . . . . . . . . . . . . . . . . . . . . . . . . . . . . . . . . . . . 24Example of Translating PL/SQL. . . . . . . . . . . . . . . . . . . . . . . . . . . . . . . . . . . . . . . . . . . . . . . . . . . . . . . . . . . . . . . . . . . 24Example of Translating T‐SQL . . . . . . . . . . . . . . . . . . . . . . . . . . . . . . . . . . . . . . . . . . . . . . . . . . . . . . . . . . . . . . . . . . . . 24Example of Translating PHP . . . . . . . . . . . . . . . . . . . . . . . . . . . . . . . . . . . . . . . . . . . . . . . . . . . . . . . . . . . . . . . . . . . . . . 24Example of Translating Classic ASP written with VBScript. . . . . . . . . . . . . . . . . . . . . . . . . . . . . . . . . . . . . . . . . 25Example of Translating JavaScript . . . . . . . . . . . . . . . . . . . . . . . . . . . . . . . . . . . . . . . . . . . . . . . . . . . . . . . . . . . . . . . . 25Example of Translating VB Script File . . . . . . . . . . . . . . . . . . . . . . . . . . . . . . . . . . . . . . . . . . . . . . . . . . . . . . . . . . . . . 25
Translating COBOL Code. . . . . . . . . . . . . . . . . . . . . . . . . . . . . . . . . . . . . . . . . . . . . . . . . . . . . . . . . . . . . . . . . . . . . . . . . . . . . . 25
Supported Technologies . . . . . . . . . . . . . . . . . . . . . . . . . . . . . . . . . . . . . . . . . . . . . . . . . . . . . . . . . . . . . . . . . . . . . . . . . . 25Preparing COBOL Source Files for Translation . . . . . . . . . . . . . . . . . . . . . . . . . . . . . . . . . . . . . . . . . . . . . . . . . . . . 25COBOL Command Line Syntax . . . . . . . . . . . . . . . . . . . . . . . . . . . . . . . . . . . . . . . . . . . . . . . . . . . . . . . . . . . . . . . . . . . . 26Auditing a COBOL Scan . . . . . . . . . . . . . . . . . . . . . . . . . . . . . . . . . . . . . . . . . . . . . . . . . . . . . . . . . . . . . . . . . . . . . . . . . . . 26
Troubleshooting and Support . . . . . . . . . . . . . . . . . . . . . . . . . . . . . . . . . . . . . . . . . . . . . . . . . . . . . . . . . . . . . . . . . . . . . . 27
Troubleshooting. . . . . . . . . . . . . . . . . . . . . . . . . . . . . . . . . . . . . . . . . . . . . . . . . . . . . . . . . . . . . . . . . . . . . . . . . . . . . . . . . . . . . . 27
Using the Log File to Debug Problems. . . . . . . . . . . . . . . . . . . . . . . . . . . . . . . . . . . . . . . . . . . . . . . . . . . . . . . . . . . . . 27Translation Failed Message. . . . . . . . . . . . . . . . . . . . . . . . . . . . . . . . . . . . . . . . . . . . . . . . . . . . . . . . . . . . . . . . . . . . . . . 27JSP Translation Problems. . . . . . . . . . . . . . . . . . . . . . . . . . . . . . . . . . . . . . . . . . . . . . . . . . . . . . . . . . . . . . . . . . . . . . . . . 27ASPX Translation Problems. . . . . . . . . . . . . . . . . . . . . . . . . . . . . . . . . . . . . . . . . . . . . . . . . . . . . . . . . . . . . . . . . . . . . . . 28C/C++ Precompiled Header Files . . . . . . . . . . . . . . . . . . . . . . . . . . . . . . . . . . . . . . . . . . . . . . . . . . . . . . . . . . . . . . . . . 29
Reporting Bugs and Requesting Enhancements . . . . . . . . . . . . . . . . . . . . . . . . . . . . . . . . . . . . . . . . . . . . . . . . . . . . . . . 29
Appendix: Managing Per Use Accounts . . . . . . . . . . . . . . . . . . . . . . . . . . . . . . . . . . . . . . . . . . . . . . . . . 30
About the Fortify SCA Per Use Edition. . . . . . . . . . . . . . . . . . . . . . . . . . . . . . . . . . . . . . . . . . . . . . . . . . . . . . . . . . . . . . . . . 30
Managing Your Portal User Account. . . . . . . . . . . . . . . . . . . . . . . . . . . . . . . . . . . . . . . . . . . . . . . . . . . . . . . . . . . . . . . . . . . 31
Fortify SCA User Guide iii
Changing your Password . . . . . . . . . . . . . . . . . . . . . . . . . . . . . . . . . . . . . . . . . . . . . . . . . . . . . . . . . . . . . . . . . . . . . . . . . 31
Purchasing Additional Lines . . . . . . . . . . . . . . . . . . . . . . . . . . . . . . . . . . . . . . . . . . . . . . . . . . . . . . . . . . . . . . . . . . . . . . . . . . 31
Transferring Lines. . . . . . . . . . . . . . . . . . . . . . . . . . . . . . . . . . . . . . . . . . . . . . . . . . . . . . . . . . . . . . . . . . . . . . . . . . . . . . . . . . . . 31
Transferring Lines to a Machine with Internet Access . . . . . . . . . . . . . . . . . . . . . . . . . . . . . . . . . . . . . . . . . . . . . 32Transferring Lines to a Machine without Internet Access . . . . . . . . . . . . . . . . . . . . . . . . . . . . . . . . . . . . . . . . . . 32
Appendix: Command Line Interface . . . . . . . . . . . . . . . . . . . . . . . . . . . . . . . . . . . . . . . . . . . . . . . . . . . . 34
Command Line Options . . . . . . . . . . . . . . . . . . . . . . . . . . . . . . . . . . . . . . . . . . . . . . . . . . . . . . . . . . . . . . . . . . . . . . . . . . . . . . . 34
Output Options. . . . . . . . . . . . . . . . . . . . . . . . . . . . . . . . . . . . . . . . . . . . . . . . . . . . . . . . . . . . . . . . . . . . . . . . . . . . . . . . . . . 34Analysis Options . . . . . . . . . . . . . . . . . . . . . . . . . . . . . . . . . . . . . . . . . . . . . . . . . . . . . . . . . . . . . . . . . . . . . . . . . . . . . . . . . 36Python Option. . . . . . . . . . . . . . . . . . . . . . . . . . . . . . . . . . . . . . . . . . . . . . . . . . . . . . . . . . . . . . . . . . . . . . . . . . . . . . . . . . . . 37ColdFusion Options . . . . . . . . . . . . . . . . . . . . . . . . . . . . . . . . . . . . . . . . . . . . . . . . . . . . . . . . . . . . . . . . . . . . . . . . . . . . . . 37Java/J2EE Options. . . . . . . . . . . . . . . . . . . . . . . . . . . . . . . . . . . . . . . . . . . . . . . . . . . . . . . . . . . . . . . . . . . . . . . . . . . . . . . . 37.NET Options . . . . . . . . . . . . . . . . . . . . . . . . . . . . . . . . . . . . . . . . . . . . . . . . . . . . . . . . . . . . . . . . . . . . . . . . . . . . . . . . . . . . . 38Build Integration Options. . . . . . . . . . . . . . . . . . . . . . . . . . . . . . . . . . . . . . . . . . . . . . . . . . . . . . . . . . . . . . . . . . . . . . . . . 38Directives . . . . . . . . . . . . . . . . . . . . . . . . . . . . . . . . . . . . . . . . . . . . . . . . . . . . . . . . . . . . . . . . . . . . . . . . . . . . . . . . . . . . . . . . 39Runtime Options . . . . . . . . . . . . . . . . . . . . . . . . . . . . . . . . . . . . . . . . . . . . . . . . . . . . . . . . . . . . . . . . . . . . . . . . . . . . . . . . . 40Line Transfer Options . . . . . . . . . . . . . . . . . . . . . . . . . . . . . . . . . . . . . . . . . . . . . . . . . . . . . . . . . . . . . . . . . . . . . . . . . . . . 40Other Options . . . . . . . . . . . . . . . . . . . . . . . . . . . . . . . . . . . . . . . . . . . . . . . . . . . . . . . . . . . . . . . . . . . . . . . . . . . . . . . . . . . . 41
Specifying Files . . . . . . . . . . . . . . . . . . . . . . . . . . . . . . . . . . . . . . . . . . . . . . . . . . . . . . . . . . . . . . . . . . . . . . . . . . . . . . . . . . . . . . . 41
Appendix: Using the sourceanalyzer Ant Task . . . . . . . . . . . . . . . . . . . . . . . . . . . . . . . . . . . . . . . . . . . 43
Using the Ant sourceanalyzer Task. . . . . . . . . . . . . . . . . . . . . . . . . . . . . . . . . . . . . . . . . . . . . . . . . . . . . . . . . . . . . . . . . . . . 43
Ant properties. . . . . . . . . . . . . . . . . . . . . . . . . . . . . . . . . . . . . . . . . . . . . . . . . . . . . . . . . . . . . . . . . . . . . . . . . . . . . . . . . . . . . . . . 44
sourceanalyzer Task Options . . . . . . . . . . . . . . . . . . . . . . . . . . . . . . . . . . . . . . . . . . . . . . . . . . . . . . . . . . . . . . . . . . . . . . . . . 45
Appendix: Advanced Options . . . . . . . . . . . . . . . . . . . . . . . . . . . . . . . . . . . . . . . . . . . . . . . . . . . . . . . . . 49
Creating a Filter File . . . . . . . . . . . . . . . . . . . . . . . . . . . . . . . . . . . . . . . . . . . . . . . . . . . . . . . . . . . . . . . . . . . . . . . . . . . . . . . . . . 49
EightBall.java(4) . . . . . . . . . . . . . . . . . . . . . . . . . . . . . . . . . . . . . . . . . . . . . . . . . . . . . . . . . . . . . . . . . . . . . . . . . . . . . . . . . 52
Using Properties to Control Runtime Options . . . . . . . . . . . . . . . . . . . . . . . . . . . . . . . . . . . . . . . . . . . . . . . . . . . . . . . . . 52
Specifying the Order of Properties . . . . . . . . . . . . . . . . . . . . . . . . . . . . . . . . . . . . . . . . . . . . . . . . . . . . . . . . . . . . . . . . 52
Appendix: Fortify SCA Memory Tuning . . . . . . . . . . . . . . . . . . . . . . . . . . . . . . . . . . . . . . . . . . . . . . . . . 59
Java Heap Exhaustion. . . . . . . . . . . . . . . . . . . . . . . . . . . . . . . . . . . . . . . . . . . . . . . . . . . . . . . . . . . . . . . . . . . . . . . . . . . . . . . . . 59
Error Message. . . . . . . . . . . . . . . . . . . . . . . . . . . . . . . . . . . . . . . . . . . . . . . . . . . . . . . . . . . . . . . . . . . . . . . . . . . . . . . . . . . . 59Resolution . . . . . . . . . . . . . . . . . . . . . . . . . . . . . . . . . . . . . . . . . . . . . . . . . . . . . . . . . . . . . . . . . . . . . . . . . . . . . . . . . . . . . . . 59
Java Permanent Generation Exhaustion . . . . . . . . . . . . . . . . . . . . . . . . . . . . . . . . . . . . . . . . . . . . . . . . . . . . . . . . . . . . . . . 61
Error Message. . . . . . . . . . . . . . . . . . . . . . . . . . . . . . . . . . . . . . . . . . . . . . . . . . . . . . . . . . . . . . . . . . . . . . . . . . . . . . . . . . . . 61Resolution . . . . . . . . . . . . . . . . . . . . . . . . . . . . . . . . . . . . . . . . . . . . . . . . . . . . . . . . . . . . . . . . . . . . . . . . . . . . . . . . . . . . . . . 61
Native Heap Exhaustion . . . . . . . . . . . . . . . . . . . . . . . . . . . . . . . . . . . . . . . . . . . . . . . . . . . . . . . . . . . . . . . . . . . . . . . . . . . . . . 62
Error Message. . . . . . . . . . . . . . . . . . . . . . . . . . . . . . . . . . . . . . . . . . . . . . . . . . . . . . . . . . . . . . . . . . . . . . . . . . . . . . . . . . . . 62Resolution . . . . . . . . . . . . . . . . . . . . . . . . . . . . . . . . . . . . . . . . . . . . . . . . . . . . . . . . . . . . . . . . . . . . . . . . . . . . . . . . . . . . . . . 62
Appendix: Acknowledgements . . . . . . . . . . . . . . . . . . . . . . . . . . . . . . . . . . . . . . . . . . . . . . . . . . . . . . . . 63

Fortify SCA User Guide iv
Java RunTime Environment. . . . . . . . . . . . . . . . . . . . . . . . . . . . . . . . . . . . . . . . . . . . . . . . . . . . . . . . . . . . . . . . . . . . . . . . . . . 63
Index . . . . . . . . . . . . . . . . . . . . . . . . . . . . . . . . . . . . . . . . . . . . . . . . . . . . . . . . . . . . . . . . . . . . . . . . . . . . . 64
Fortify SCA User Guide vii
Preface
This guide describes how to use Fortify® Source Code Analyzer.
Contacting Fortify SoftwareIf you have questions or comments about any part of this guide, contact Fortify Software at:
Technical Support650.358.5679
Corporate Headquarters2215 Bridgepointe Pkwy.
Suite 400
San Mateo, CA 94404
650.358.5600
Web Sitehttp://www.fortify.com
About the Fortify 360 Documentation SetThe Fortify 360 documentation set contains installation, user, and deployment guides for various 360 components, including Fortify 360 Server and analyzers, as well as other documentation pertaining to the use of Fortify 360.
Updated versions of the documentation and release notes that describe new features and known issues are also available on the Fortify Customer Portal.
Fortify SCA User Guide 1
IntroductionThis chapter contains the following sections:
• Overview of Fortify SCA
• Overview of the Analyzers
• Overview of the Analysis Phases
Overview of Fortify SCAFortify Source Code Analyzer (SCA) is a set of software security analyzers that search for violations of security‐specific coding rules and guidelines in a variety of languages. The rich data provided by Fortify SCA language technology enables the analyzers to pinpoint and prioritize violations so that fixes can be fast and accurate. The analysis information produced by SCA helps you deliver more secure software, as well as making security code reviews more efficient, consistent, and complete. This is especially advantageous when large code bases are involved. The modular architecture of SCA allows you to quickly upload new, third party, and customer‐specific security rules.
At the highest level, using Fortify SCA involves:
1. Choosing to run SCA as a stand‐alone process or integrating Fortify SCA as part of the build tool
2. Translating the source code into an intermediate translated format, preparing the code base for scanning by the different analyzers
3. Scanning the translated code, producing security vulnerability reports
4. Auditing the results of the scan, either by transferring the resulting FPR file to Audit Workbench or Fortify 360 Server for analysis, or directly with the results displayed onscreen
Note: For information on transferring results to Audit Workbench and creating customer‐specific security rules, see the Audit Workbench User’s Guide.
Overview of the AnalyzersFortify SCA comprises five distinct analyzers: data flow, control flow, semantic, structural, and configuration. Each analyzer accepts a different type of rule specifically tailored to provide the information necessary for the corresponding type of analysis performed. Rules are definitions that identify elements in the source code that may result in security vulnerabilities or are otherwise unsafe.
Rules are organized according to the analyzer that uses them, resulting in rules that are specific to the data flow, control flow, semantic, structural, and configuration analyzers. These rule categories are further divided to reflect the category of the issue or type of information represented by the rule.
The installation process downloads and updates the set of rules used by SCA on your system. Fortify updates the specific rules contained within the Fortify Secure Code Rulepack on a regular basis. The Fortify Customer Portal offers updated rulepacks.
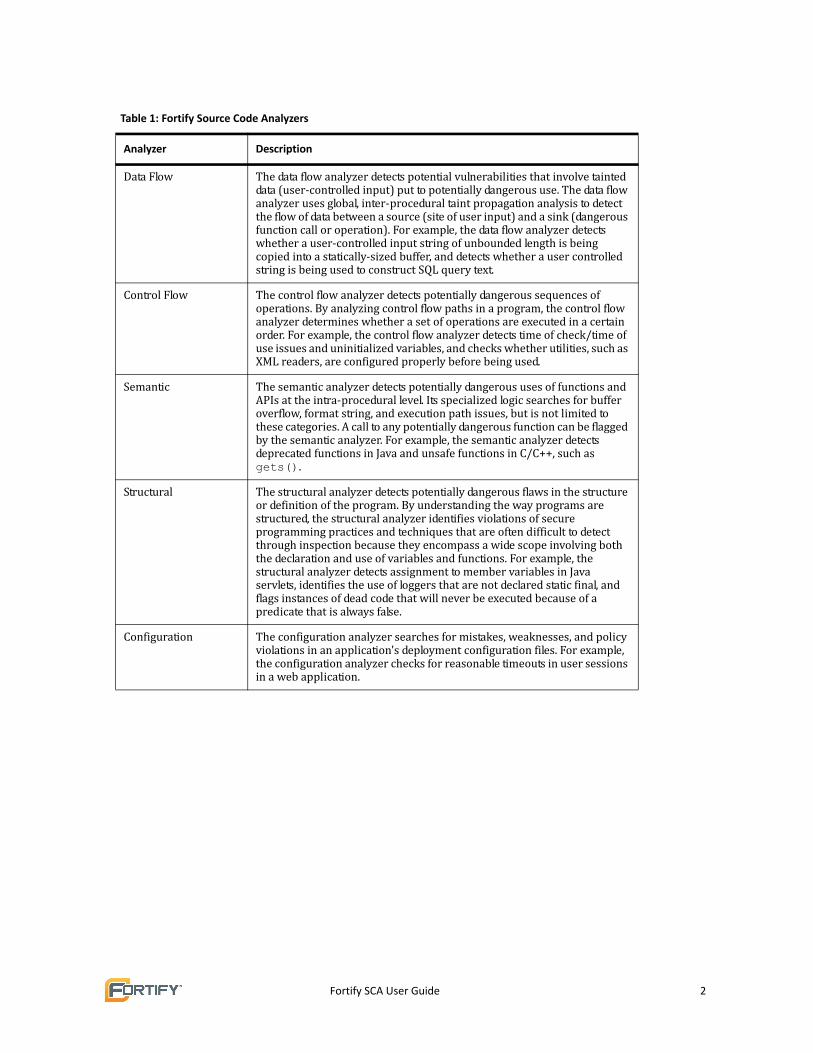
The following table lists and describes each Fortify source code analyzer.
Fortify SCA User Guide 2
Table 1: Fortify Source Code Analyzers
Analyzer Description
Data Flow The data flow analyzer detects potential vulnerabilities that involve tainted data (user‐controlled input) put to potentially dangerous use. The data flow analyzer uses global, inter‐procedural taint propagation analysis to detect the flow of data between a source (site of user input) and a sink (dangerous function call or operation). For example, the data flow analyzer detects whether a user‐controlled input string of unbounded length is being copied into a statically‐sized buffer, and detects whether a user controlled string is being used to construct SQL query text.
Control Flow The control flow analyzer detects potentially dangerous sequences of operations. By analyzing control flow paths in a program, the control flow analyzer determines whether a set of operations are executed in a certain order. For example, the control flow analyzer detects time of check/time of use issues and uninitialized variables, and checks whether utilities, such as XML readers, are configured properly before being used.
Semantic The semantic analyzer detects potentially dangerous uses of functions and APIs at the intra‐procedural level. Its specialized logic searches for buffer overflow, format string, and execution path issues, but is not limited to these categories. A call to any potentially dangerous function can be flagged by the semantic analyzer. For example, the semantic analyzer detects deprecated functions in Java and unsafe functions in C/C++, such as gets().
Structural The structural analyzer detects potentially dangerous flaws in the structure or definition of the program. By understanding the way programs are structured, the structural analyzer identifies violations of secure programming practices and techniques that are often difficult to detect through inspection because they encompass a wide scope involving both the declaration and use of variables and functions. For example, the structural analyzer detects assignment to member variables in Java servlets, identifies the use of loggers that are not declared static final, and flags instances of dead code that will never be executed because of a predicate that is always false.
Configuration The configuration analyzer searches for mistakes, weaknesses, and policy violations in an application's deployment configuration files. For example, the configuration analyzer checks for reasonable timeouts in user sessions in a web application.
Fortify SCA User Guide 3
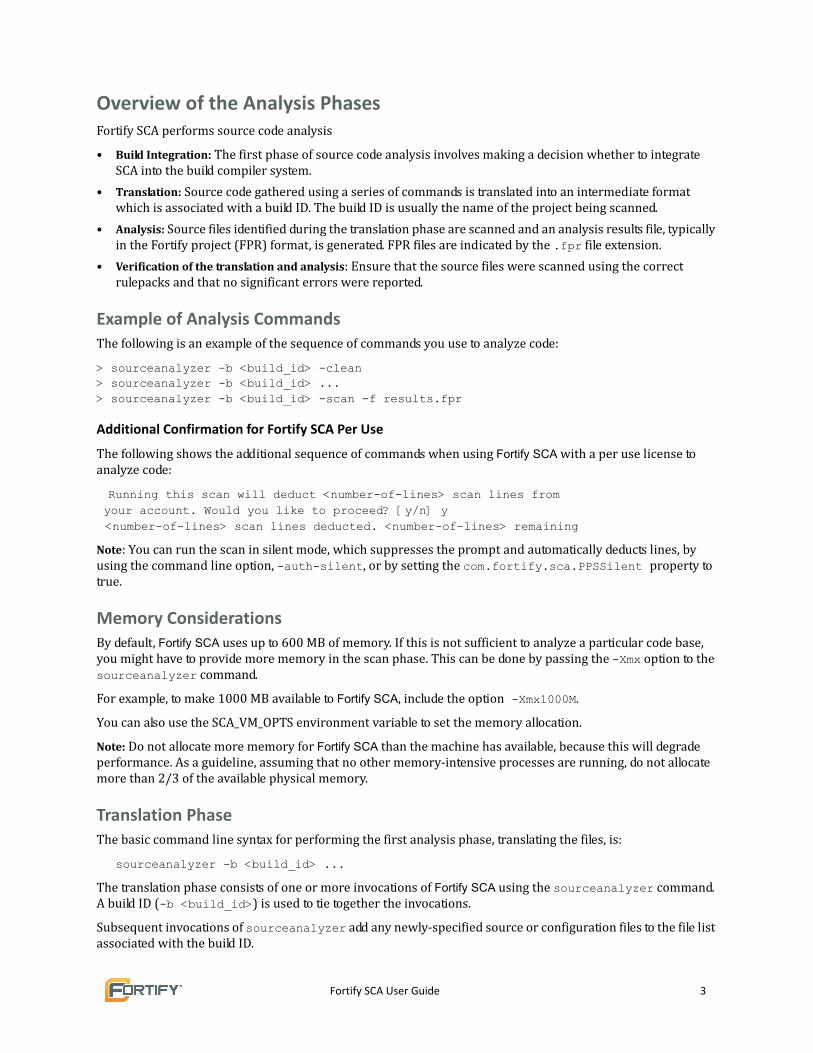
Overview of the Analysis PhasesFortify SCA performs source code analysis
• Build Integration: The first phase of source code analysis involves making a decision whether to integrate SCA into the build compiler system.
• Translation: Source code gathered using a series of commands is translated into an intermediate format which is associated with a build ID. The build ID is usually the name of the project being scanned.
• Analysis: Source files identified during the translation phase are scanned and an analysis results file, typically in the Fortify project (FPR) format, is generated. FPR files are indicated by the .fpr file extension.
• Verification of the translation and analysis: Ensure that the source files were scanned using the correct rulepacks and that no significant errors were reported.
Example of Analysis CommandsThe following is an example of the sequence of commands you use to analyze code:
> sourceanalyzer -b <build_id> -clean> sourceanalyzer -b <build_id> ...> sourceanalyzer -b <build_id> -scan -f results.fpr
Additional Confirmation for Fortify SCA Per Use
The following shows the additional sequence of commands when using Fortify SCA with a per use license to analyze code:
Running this scan will deduct <number-of-lines> scan lines from your account. Would you like to proceed? [y/n] y <number-of-lines> scan lines deducted. <number-of-lines> remaining
Note: You can run the scan in silent mode, which suppresses the prompt and automatically deducts lines, by using the command line option, -auth-silent, or by setting the com.fortify.sca.PPSSilent property to true.
Memory ConsiderationsBy default, Fortify SCA uses up to 600 MB of memory. If this is not sufficient to analyze a particular code base, you might have to provide more memory in the scan phase. This can be done by passing the -Xmx option to the sourceanalyzer command.
For example, to make 1000 MB available to Fortify SCA, include the option -Xmx1000M.
You can also use the SCA_VM_OPTS environment variable to set the memory allocation.
Note: Do not allocate more memory for Fortify SCA than the machine has available, because this will degrade performance. As a guideline, assuming that no other memory‐intensive processes are running, do not allocate more than 2/3 of the available physical memory.
Translation PhaseThe basic command line syntax for performing the first analysis phase, translating the files, is:
sourceanalyzer -b <build_id> ...
The translation phase consists of one or more invocations of Fortify SCA using the sourceanalyzer command. A build ID (-b <build_id>) is used to tie together the invocations.
Subsequent invocations of sourceanalyzer add any newly‐specified source or configuration files to the file list associated with the build ID.
Fortify SCA User Guide 4
At the end of translation, you can use -show-build-warnings to list all warnings and errors that were encountered during the translation process:
sourceanalyzer -b <build_id> -show-build-warnings
To view all of the files associated with a particular build ID, use the -show-files directive:
sourceanalyzer -b <build_id> -show-files
The following chapters describe how to translate different types of source code:
• Translating Java Code
• Translating .NET Source Code
• Translating C/C++ Code
• Translating Other Languages, such as ColdFusion, Classic ASP and JavaScript
Fortify SCA Per Use License Only, Verifying Available LinesWhen using Fortify SCA with a per use license, the basic command line syntax to display the number of available lines is:
sourceanalyzer -auth-query
For translated projects, display the total number of lines required to analyze the project using the -show-loc option. Fortify SCA counts lines of code (LOC) in a project that are executable, and excludes lines such as comments and blank lines. The command to display the number of lines is:
sourceanalyzer -b <build_id> -show-loc
If the number of available lines is less than the amount required to analyze the project, request lines from the Per Use Portal account before continuing with the analysis phase. See “Managing Per Use Accounts” on page 30 for details.
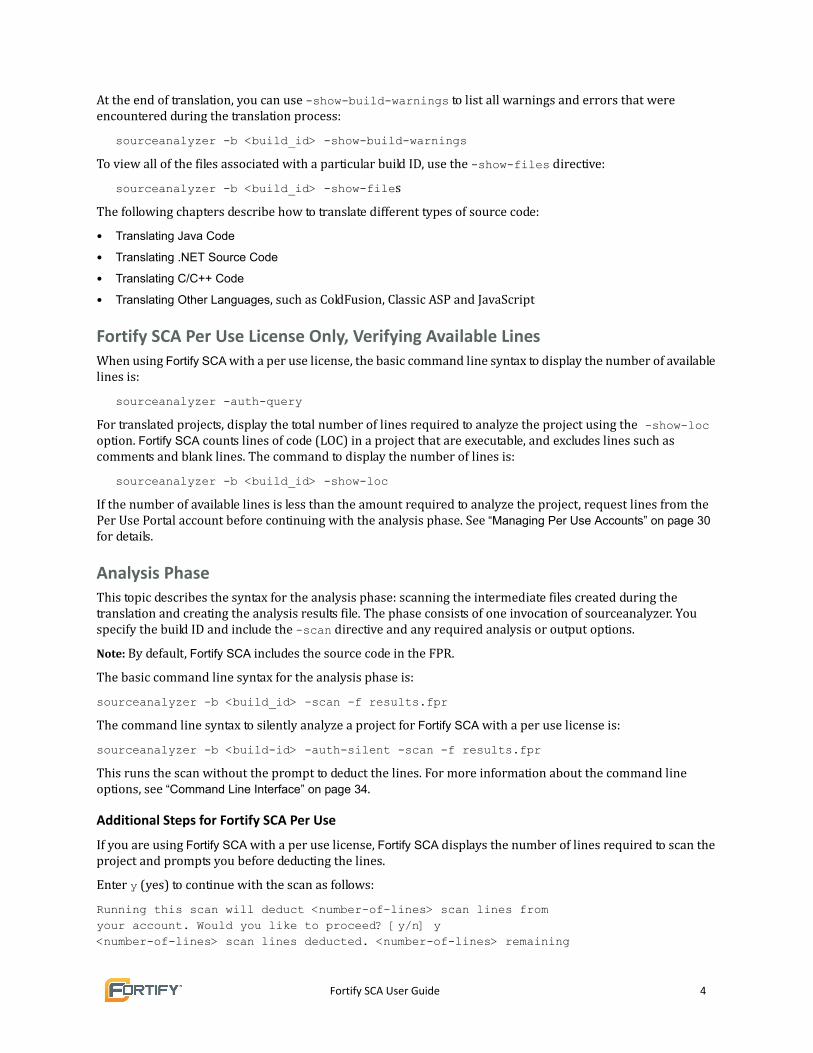
Analysis PhaseThis topic describes the syntax for the analysis phase: scanning the intermediate files created during the translation and creating the analysis results file. The phase consists of one invocation of sourceanalyzer. You specify the build ID and include the -scan directive and any required analysis or output options.
Note: By default, Fortify SCA includes the source code in the FPR.
The basic command line syntax for the analysis phase is:
sourceanalyzer -b <build_id> -scan -f results.fpr
The command line syntax to silently analyze a project for Fortify SCA with a per use license is:
sourceanalyzer -b <build-id> -auth-silent -scan -f results.fpr
This runs the scan without the prompt to deduct the lines. For more information about the command line options, see “Command Line Interface” on page 34.
Additional Steps for Fortify SCA Per Use
If you are using Fortify SCA with a per use license, Fortify SCA displays the number of lines required to scan the project and prompts you before deducting the lines.
Enter y (yes) to continue with the scan as follows:
Running this scan will deduct <number-of-lines> scan lines from your account. Would you like to proceed? [y/n] y<number-of-lines> scan lines deducted. <number-of-lines> remaining
Fortify SCA User Guide 5
Note: You can re‐scan a set of translated files. This allows you to scan the same project with different rules, updated rulepacks, and/or scan settings without using additional scan lines.
Verification of the Translation and Analysis PhaseThe Result Certification feature of Audit Workbench verifies that the analysis is complete. results certificationResult certification shows specific information about the code scanned by Fortify SCA, including:
• List of files scanned, with file sizes and timestamps
• Java classpath used for the translation
• List of rulepacks used for the analysis
• List of Fortify SCA runtime settings and command line arguments
• List of errors or warnings encountered during translation or analysis
• Machine/platform information
To view result certification information, open the FPR file in Audit Workbench and select Tools ‐ Project Summary Certification.
Fortify SCA User Guide 6
Translating Java CodeThis chapter describes how to translate Java source code for analysis with Fortify SCA.
The following topics are included:
• Java Command Line Syntax
• Java Command Line Examples
• Integrating with Ant using the Fortify Ant Compiler Adapter
• Translating J2EE Applications
• Using FindBugs
Java Command Line SyntaxThis topic describes the Fortify SCA command syntax for translating Java source code.
The basic command line syntax for Java is:
sourceanalyzer -b <build_id> -cp <classpath> <file_list>
With Java code, Fortify SCA can either emulate the compiler, which may be convenient for build integration, or accept source files directly, which is more convenient for command line scans.
Note: For a description of all the options you can use with the sourceanalyzer command, see “Command Line Interface” on page 34.
To have Fortify SCA emulate the compiler, enter:
sourceanalyzer -b <build_id> javac [<translation options>]
To pass files directly to Fortify SCA, enter:
sourceanalyzer -b <build_id> -cp <classpath> [<translation options>] <files>|<file specifiers>
where:
<translation options>
are options passed to the compiler.
-cp <classpath>
specifies the classpath to be used for the Java source code. A classpath is a list of build directories and jar files. The format is the same as expected by javac (colon or semicolon‐separated list of paths). You can use Fortify SCA file specifiers.
-cp "build/classes:lib/*.jar"
Note: If you do not specify the classpath with this option, the CLASSPATH environment variable is used.
For more information, see “Java/J2EE Options” on page 37. For information about file specifiers, see “Specifying Files” on page 41.
Fortify SCA User Guide 7
Java Command Line ExamplesTo translate a single file named MyServlet.java with j2ee.jar on the classpath, enter:
sourceanalyzer -b MyServlet -cp lib/j2ee.jar MyServlet.java
To translate all .java files in the src directory using all jar files in the lib directory as a classpath:
sourceanalyzer -b MyProject -cp "lib/*.jar" "src/**/*.java"
To translate and compile the MyCode.java file while using the javac compiler:
sourceanalyzer -b mybuild javac -classpath libs.jar MyCode.java
Integrating with Ant using the Fortify Ant Compiler AdapterFortify SCA provides an Ant Compiler Adapter that you can use as an easy way to translate Java source files if your project uses an Ant build file. This integration requires setting only two Ant properties, and can be done on the command line without modifying the Ant build.xml file. When the build runs, Fortify SCA intercepts all javac task invocations and translates the Java source files as they are compiled. Note that any JSP files, configuration files, or any other non‐Java source files that are part of the application need to be translated in a separate step.
The following steps must be taken to use the Compiler Adapter:
• The sourceanalyzer executable must be on the system PATH.
• sourceanalyzer.jar (located in Core/lib) must be on Ant's classpath.
• The build.compiler property must be set to com.fortify.dev.ant.SCACompiler.
• The sourceanalyzer.buildid property must be set to the build ID.
The following examples show how to run an Ant build using the Compiler Adapter without modifying the build file:
ant -Dbuild.compiler=com.fortify.dev.ant.SCACompiler
-Dsourceanalyzer.buildid=MyBuild -lib <install_dir>/Core/lib/sourceanalyzer.jar
The -lib option is only available in Ant version 1.6 or higher. In older versions you must set the CLASSPATH environment variable or copy sourceanalyzer.jar to Ant's lib directory.
Alternatively, with Ant 1.6 or newer, the following shorthand can be used to run Ant with the compiler adapter:
sourceanalyzer -b <build-id> ant [ant-options]
By default, 600 MB of memory is allocated to Fortify SCA for translation. Increase the memory allocation when using the Ant Compiler Adapter using the -Dsourceanalyzer.maxHeap option as follows:
ant -Dbuild.compiler=com.fortify.dev.ant.SCACompiler -Dsourceanalyzer.buildid=MyBuild -lib <install_directory>/Core/lib/sourceanalyzer.jar-Dsourceanalyzer.maxHeap=1000M
Fortify SCA User Guide 8
Translating J2EE ApplicationsTranslating J2EE applications involves processing Java source files, J2EE components such as JSP files, deployment descriptors such as web.xml, and configuration files such as struts-config.xml.
The steps include:
1. Translating the Java files.
Refer to the samples earlier in this chapter.
2. Translating the JSP files.
Refer to the sample below.
3. Processing the configuration files.
An example is:
sourceanalyzer -b my_buildid "mydirectory/myfile.xml"
Working with JSP ProjectsTo translate JSP files, Fortify SCA requires that the JSP files are in a standard Web Application Archive (WAR) layout. If your source directory is already organized in a WAR layout, you can translate JSP files directly from the source directory. If this is not the case, you may need to deploy your application and translate the JSP files from the deployment directory.
If your JSP files use any tag libraries, such as JSTL, ensure that the libraries’ jar files are in the WEB-INF/lib directory. Otherwise, the JSP compiler will not resolve the tag libraries and could produce incorrect results.
By default, Fortify SCA uses a version of the Jasper JSP compiler to compile JSP files into Java files during the translation phase. However, if your web application is developed specifically for an application server, you must use the JSP compiler for that application server when performing the translation.
To support this, Fortify SCA provides the following command line options:
• -appserver supported values: weblogic/websphere
• -appserver-home
For Weblogic, the path to the directory containing the server/lib directory
For WebSphere, the path to the directory containing the bin/JspBatchCompiler script
• -appserver-version supported values:
Weblogic versions 7, 8, 9, and 10
WebSphere version 6
If you are using an application server that is not listed, use the default internal Fortify JSP compiler.
For example:
sourceanalyzer -b my_buildid -cp "WEB-INF/lib/*.jar" "WEB-INF/**/*.jsp"
XML Configuration FilesFortify SCA uses the web.xml configuration file during the project scan for the following information:
• servlet tags
• servlet‐mapping tags
• filter tags
• filter‐mapping tags
• error‐page tags
Fortify SCA User Guide 9
These tags are used to determine how the servlets and filers defined in the .java and .jsp files are connected.
If a struts servlet is detected, Fortify SCA extracts the configuration file to process the following top‐level tags:
• form‐beans
• global forwards
• action mappings
This data connects struts actions to follow how taint may propagate through an application.
Call GraphUsing data from the XML and struts configuration files, Fortify SCA builds a call graph to track potential taint from servlet to servlet and to struts actions. For information about what is extracted from the configuration files, see XML Configuration Files.
Handling Resolution WarningsTo see all warnings that were generated during your build, enter the following command before you start the scan phase:
sourceanalyzer -b <build_id> -show-build-warnings
Java WarningsYou may see the following warnings for Java:
Unable to resolve type...
Unable to resolve function...
Unable to resolve field...
Unable to locate import...
Unable to resolve symbol...
Multiple definitions found for function...
Multiple definitions found for class...
These warnings are typically caused by missing resources. For example, some of the .jar and class files required to build the application have not been specified. To resolve the warnings, make sure that you have included all of the required files that your application uses.
J2EE WarningsYou may see the following warnings for J2EE applications:
Could not locate the root (WEB-INF) of the web application. Please build your web application and try again. Failed to parse the following jsp files:
<list of .jsp file names>
This warning displays because your Web application is not deployed in the standard WAR directory format or does not contain the full set of required libraries. To resolve the warning, ensure that your web application is in an exploded WAR directory format with the correct WEB-INF/lib and WEB-INF/classes directories containing all of the .jar and .class files required for your application. You should also verify that you have all of the TLD files for all of the tags that you have and the corresponding .jar files with their tag implementations.
Fortify SCA User Guide 10
Using FindBugsFindBugs (http://findbugs.sourceforge.net) is a static analysis tool that detects quality issues in Java code. You can run FindBugs with Fortify SCA and the results will be integrated into the analysis results file. Unlike Fortify SCA, which runs on Java source files, FindBugs runs on Java bytecode. Therefore, before running an analysis on your project, you should first compile the project and produce the class files.
To demonstrate how to run FindBugs automatically with Fortify SCA, compile the sample code, Warning.java, as follows:
1. Go to the following directory:
<install_directory>/Samples/advanced/findbugs
2. Enter the following command to compile the sample:
mkdir build
javac -d build Warning.java
3. Scan the sample with FindBugs and Fortify SCA as follows:
sourceanalyzer -b findbugs_sample -java-build-dir build Warning.java
sourceanalyzer -b findbugs_sample -scan -findbugs -f findbugs_sample.fpr
4. Examine the analysis results in Audit Workbench:
auditworkbench findbugs_sample.fpr
The output contains the following issue categories:
• Bad casts of Object References (1)
• Dead local store (2)
• Equal objects must have equal hashcodes (1)
• Object model violation (1)
• Unwritten field (2)
• Useless self‐assignment (2)
If you group by Analyzer, you can see that the Fortify SCA Structural analyzer produced one warning and FindBugs produced eight. The Object model violation warning produced by Fortify SCA on line 25 is similar to the Equal objects must have equal hash codes warning produced by FindBugs. In addition, FindBugs produces two sets of warnings (Useless self-assignment and Dead local store) about the same issues on lines 6 and 7. To avoid overlapping results, apply the filter.txt filter file by using the -filter option during the scan. Note that the filtering is not complete because each tool filters at a different level of granularity. To demonstrate how to avoid overlapping results, scan the sample code using filter.txt as follows:
sourceanalyzer -b findbugs_sample -scan -findbugs -filter filter.txt -f findbugs_sample.fpr
Fortify SCA User Guide 11
Translating .NET Source CodeThis chapter describes how to use Fortify SCA to translate Microsoft Visual Studio .NET and ASP.NET applications built with:
• .NET Versions 1.1 and 2.0
• Visual Studio .NET version 2003
• Visual Studio .NET version 2005
Fortify SCA works on the Common Intermediate Language (CIL), and therefore supports all of the .NET languages that compile to CIL, including C# and VB .NET.
The following topics are included:
• Visual Studio .NET
• Translating Simple .NET Applications
• Translating ASP.NET 1.1 (Visual Studio Version 2003) Projects
Note: The easiest way to analyze a .NET application is to use a Fortify Secure Coding Plug‐in for Visual Studio, which automates the process of gathering information about the project.
Visual Studio .NETIf you perform command line builds with Visual Studio .NET, you can easily integrate static analysis by wrapping the build command line with an invocation of sourceanalyzer. For this to work, you must have the Secure Coding Package for your version of Visual Studio installed.
The following example demonstrates the command line syntax for Visual Studio .NET:
sourceanalyzer -b my_buildid devenv Sample1.sln /REBUILD debug
This performs the translation phase on all files built by Visual Studio. Be sure to do a clean or a rebuild so that all files are included. You can then perform the analysis phase, as in the following example:
sourceanalyzer -b my_buildid -scan -f results.fpr
Note: If your classic ASP/VBScript application uses virtual includes, for example,
<!--include virtual=”/myweb/foo.inc”>
then you should specify the physical location of the myweb application by passing the following property value:
com.fortify.sca.ASPVirtualRoots=<semicoloon separated list of full paths to virtual roots used>
For example, if the IIS virtual root /myweb is located at C:\webapps\myweb-folder, then your property value should be:
-Dcom.fortify.sca.ASPVirtualRoots=c:\webapps\myweb-folder
If you add this line to the fortify‐sca.properties file, you must escape the \ character, as in the following:
com.fortify.sca.ASPVirtualRoots=c:\\webapps\\myweb-folder
Translating Simple .NET ApplicationsYou can also use Fortify SCA command line interface for processing .NET applications.
Prepare your application for analysis using one of the following methods:
Fortify SCA User Guide 12
• Perform a complete rebuild of your project with the "debug" configuration enabled. Compiling your project with debug enabled provides information that Fortify SCA uses for presenting the results.
• Obtain all of the third party .dll files, project output .dll files, and corresponding .pdb files for your projects. Note that Fortify SCA ignores any .dll file passed as an input argument if the corresponding .pdb file does not exist in the same folder. It is therefore imperative that you include all of the .pdb files for all your project .dll files.
Note: .pdb files are not required for third party libraries.
Run Fortify SCA to analyze the .NET application from the command line as follows:
• For Visual Studio .NET Version 2003, enter:
sourceanalyzer -vsversion 7.1 -b MyBuild -libdirs ProjOne/Lib;ProjTwo/Lib ProjOne/bin/Debug ProjTwo/bin/Debug
where:
• MyBuild is the build identifier
• ProjOne/Lib;ProjTwo/Lib is a semicolon‐separated list of paths to folders or DLLs with third party DLLs
• ProjOne/bin/Debug ProjTwo/bin/Debug are the output folders
• For Visual Studio .NET Version 2005, enter:
sourceanalyzer -vsversion 8.0 -b MyBuild -libdirs ProjOne/Lib;ProjTwo/Lib ProjOne/bin/Debug ProjTwo/bin/Debug
where:
• MyBuild is the build identifier
• ProjOne/Lib;ProjTwo/Lib is a semicolon‐separated list of paths to folders or DLLs with third party DLLs
• ProjOne/bin/Debug ProjTwo/bin/Debug are the output folders
Note: Standard .NET DLLs used in your project are automatically picked up by Fortify SCA, so you do not need to include them in the command line.
If your project is large, you can perform the translation phase separately for each output folder using the same build ID, as follows:
sourceanalyzer -vsversion <version_number> -b <build_id> -libdirs <paths> <folder_1> ...sourceanalyzer -vsversion <version_number> -b <build_id> -libdirs <paths> <folder_n>
where:
• <version_number> is either 7.1, 8.0, or 9.0
• <build_id> is the build ID
• <paths> is a semicolon‐separated list of paths to folders or DLLs with third party DLLs
• <folder_1> and <folder_n> are the output folders
Note: Fortify SCA requires the appropriate version of Visual Studio, even if you are using the command line
interface.
Translating ASP.NET 1.1 (Visual Studio Version 2003) ProjectsAs discussed previously, Fortify SCA works on CIL generated by the .NET compilers. For ASP.NET projects, web components such as .aspx files need to be compiled before they can be analyzed. However, there is no standard
Fortify SCA User Guide 13
compiler for .aspx files. The .NET 1.1 runtime automatically compiles them when they are accessed from a browser.
To facilitate the .aspx compilation phase, Fortify Software provides a simple tool that compiles all of the .aspx files in your project. The tool is located in the Fortify installation directory at:
\Tools\fortify_aspnet_compiler\fortify_aspnet_compiler.exe
To analyze ASP.NET 1.1 solutions:
1. Perform a complete rebuild of the solution.
2. For each of the web projects in the solution, delete the following folder:
%SYSTEMROOT%\Microsoft.NET\Framework\v1.1.4322\Temporary ASP.NET Files\<web_application_name>
3. For each of the web projects in the solution, run the following command:
fortify_aspnet_compiler <url_to_the_web_site> <source_root_of_the_web_project>
where:
<url_to_the_web_site> is the URL for your web site, such as http://localhost/WebApp
<source_root_of_the_web_project> is the source location of your web project, such as <VS_project_location>\WebApp
4. Perform the translation phase for the DLLs built in Step 1. Enter the following command using the same build ID as in the following steps:
sourceanalyzer -b <build_id> "<VS_project_location>\**\*.dll"
5. Perform the translation phase for the web components. For each of the web projects in the solution, enter the following when you invoke sourceanalyzer:
sourceanalyzer -b <build_id> %SYSTEMROOT%\Microsoft.NET\Framework\v1.1.4322\Temporary ASP.NET Files\<web_application_name>
6. Include the configuration files and any Microsoft T‐SQL source files that you have:
sourceanalyzer -b <build_id> "<solution_root>\**\*.config" <"t-sql_src>\**\*.sql">
Note: These steps are all automated if you use the Fortify 360 Package for Visual Studio.
Handling Resolution WarningsTo see all warnings that were generated during your build, enter the following command before you start the scan phase:
sourceanalyzer -b <build_id> -show-build-warnings
.NET WarningsYou may see the following warnings for .NET:
Cannot locate class... in the given search path and the Microsoft .NET Framework libraries.
These warnings are typically caused by missing resources. For example, some of the .DLL files required to build the application have not been specified. To resolve the warnings, make sure that you have included all of the required files that your application uses. If you still see a warning and the classes it lists are empty interfaces with no members, you can ignore the warning. If the interface is not empty, contact Technical Support.
Fortify SCA User Guide 14
ASP.NET WarningsYou may see the following warnings for ASP.NET applications:
Failed to parse the following aspx files:
<list of .aspx file names>
This warning displays because your Web application is not deployed correctly or does not contain the full set of required libraries, or it uses the Global Access Cache (GAC). If your application is a .NET version 1.1 application, you may also have access issues from Microsoft IIS. Verify that you can access the application from a browser without authentication or access errors. If your web application uses the GAC, you must add the .DLL files to the project separately to ensure a successful scan. Fortify SCA does not load .DLL files from the GAC.
Fortify SCA User Guide 15
Translating C/C++ CodeThis chapter describes how to translate C and C++ source code for analysis with Fortify SCA.
C and C++ Command Line SyntaxThe basic command line syntax for translating a single file is:
sourceanalyzer -b <build_id> <compiler> [<compiler options>]
where:
• <compiler> is the name of the compiler you want to use during a project build scan, such as gcc or cl.
• <compiler options> are options passed to the compiler that are typically used to compile the file.
C and C++ Command Line ExamplesThe following is a simple usage example:
To translate a file named helloworld.c using the gcc compiler, enter:
sourceanalyzer -b my_buildid gcc helloworld.c
Note: This also compiles the file.
Integrating with MakeYou can use either of the following methods to use Fortify SCA with Make:
• Using the Fortify Touchless Build Adapter
• Modifying a Makefile to Invoke Fortify SCA
Using the Fortify Touchless Build AdapterThe following section descibes the different methods for using the touchless build adaptor.
Using the sourceanalyzer Build Adaptor Command
To use the Fortify touchless build adapter to integrate with makefiles, run the following command:
sourceanalyzer -b <build_id> touchless make
Fortify SCA runs the make command. When make invokes any command that Fortify SCA determines is a compiler, the command is processed by Fortify SCA. Note that the makefile is not modified.
For information about informing Fortify SCA about specially‐named compilers, see the com.fortify.sca.compilers.* property in “Using Properties to Control Runtime Options” on page 52.
This method of build integration is not limited to make. Any build command that executes a compiler process can be used with this system; just replace the 'make' section of the above command with the command used to run a build.
Note: The Fortify touchless build adapter does not function correctly if:
• The build script invokes the compiler with an absolute path or if the build script overrides the executable search path.
• The build script does not create a new process to run the compiler. Many Java build tools, including Ant, operate this way.
Fortify SCA User Guide 16
Using the fortify Build Adaptor Command
Fortify 360 offers a convenient command that bundles together the translation and scan steps when you are using touchless integration to analyze a C/C++ project. The command is as follows:
fortify [-b my_build_id] [-noscan] [-f my_fpr_name.fpr] build_command
The command fortify build_command serves as an equivalent to running the following commands:
sourceanalyzer -b my_build_id -clean
sourceanalyzer -b my_build_id touchless build_command
sourceanalyzer -b my_build_id -scan -f cwd.fpr
If -f is not used, the name of the current working directory is used in naming the FPR, i.e. cwd.fpr.
If additional options are required for either the translation or analysis step (as described in Ch. 1), a couple of environment variables are available:
FORTIFY_BUILD_OPTS
FORTIFY_SCAN_OPTS
For example, in a Bash shell, you would set these to the following values in order to acquire the information needed byFortify Technical Support when they are helping you with an SCA‐related ticket.
export FORTIFY_BUILD_OPTS=-debug\ -logfile\ translation.log
export FORTIFY_SCAN_OPTS=-debug\ -logfile\ scan.log
This would cause two additional files to be created, translation.log and scan.log, after the following is run:
fortify make
Modifying a Makefile to Invoke Fortify SCATo modify a makefile to invoke Fortify SCA, replace any calls to the compiler, archiver, or linker in the makefile with calls to Fortify SCA. These tools are typically specified in a special variable in the makefile, as in the following example:
CC=gccCXX=g++AR=ar
The step can be as simple as prepending these tool references in the makefile with Fortify SCA and the appropriate options:
CC=sourceanalyzer -b mybuild gccCXX=sourceanalyzer -b mybuild g++AR=sourceanalyzer -b mybuild ar
Fortify SCA User Guide 17
Using Fortify Build MonitorThis section describes how to use Fortify Build Monitor to scan C/C++ projects automatically during a build on Windows and view the results. It includes examples that use sample projects provided with Fortify SCA.
This section covers the following topics:
• Fortify Build Monitor Overview
• Configuring Fortify Build Monitor
• Monitoring Builds
• Example of Monitoring a Project
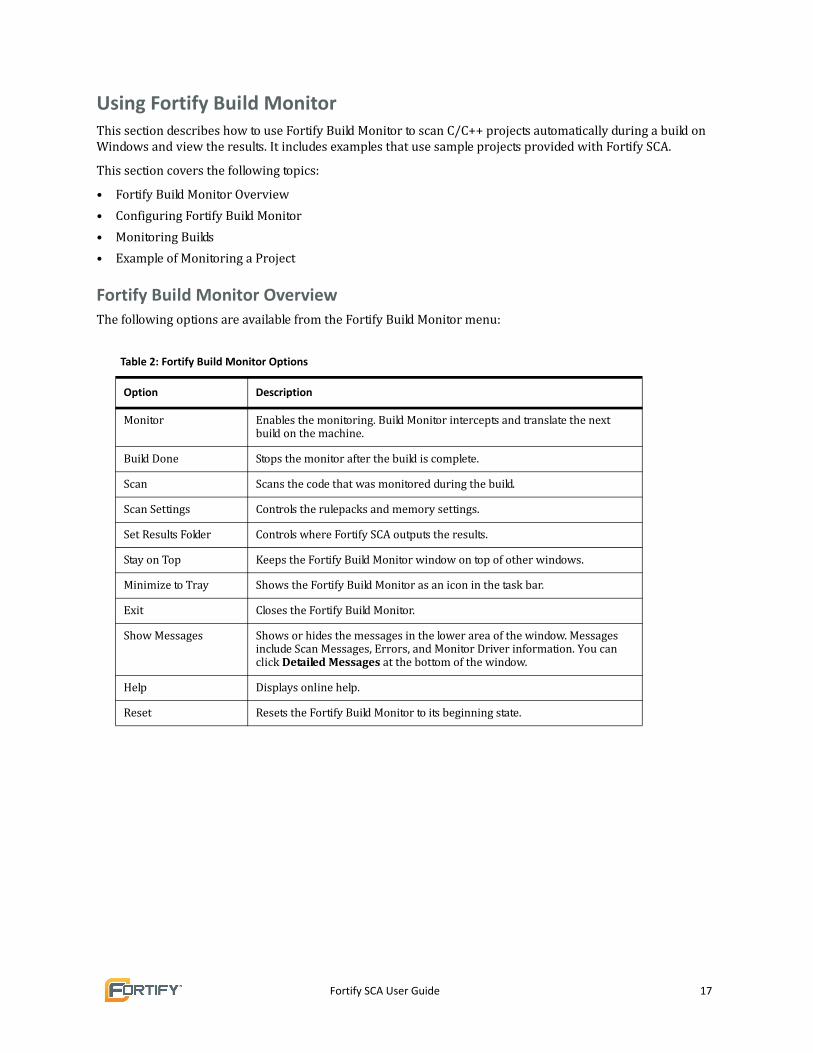
Fortify Build Monitor OverviewThe following options are available from the Fortify Build Monitor menu:
Table 2: Fortify Build Monitor Options
Option Description
Monitor Enables the monitoring. Build Monitor intercepts and translate the next build on the machine.
Build Done Stops the monitor after the build is complete.
Scan Scans the code that was monitored during the build.
Scan Settings Controls the rulepacks and memory settings.
Set Results Folder Controls where Fortify SCA outputs the results.
Stay on Top Keeps the Fortify Build Monitor window on top of other windows.
Minimize to Tray Shows the Fortify Build Monitor as an icon in the task bar.
Exit Closes the Fortify Build Monitor.
Show Messages Shows or hides the messages in the lower area of the window. Messages include Scan Messages, Errors, and Monitor Driver information. You can click Detailed Messages at the bottom of the window.
Help Displays online help.
Reset Resets the Fortify Build Monitor to its beginning state.
Fortify SCA User Guide 18
Configuring Fortify Build Monitor
This section covers the following topics:
• Setting Up the Results Folder
• Setting Fortify SCA Scan Options
Setting Up the Results Folder
Fortify Build Monitor outputs results in FPR format to a local folder. You can change the output folder. Fortify Build Monitor replaces the results each time a scan is performed. Results are not archived.
To change the results folder:
1. Select Action Set Results Folder.
The Browse for Folder dialog displays.
2. Select a folder and click OK.
Fortify Build Monitor will output the results to the selected folder.
Setting Fortify SCA Scan Options
Fortify Build Monitor scans the project using Fortify SCA. You can adjust the following scan settings:
• Allocate memory: Increase or decrease the amount of memory allocated to Fortify SCA
• Fortify Secure Coding Rulepacks and custom rulepacks: Change which rulepacks Fortify SCA uses to analyze the source code
• User: Only monitor builds run by the current user
To change the scan options:
1. Select Action Scan Settings.
The Fortify Build Monitor: Scan Settings dialog displays.
2. To change the memory allocation, select a value.
Note: Entering an invalid option sets the memory to unlimited.
3. To add or remove rulepacks, click Rulepacks.
4. To view the Fortify SCA command line options, click Preview.
5. Click Done.
The Fortify SCA scan options are changed.
Fortify SCA User Guide 19
Monitoring Builds
For C/C++ projects and solutions on Windows, Fortify SCA includes the Fortify Build Monitor, which is a graphical user interface tool that automates analysis during builds.
To analyze C/C++ source code builds on Windows:
1. Select Start Program Files Fortify Software Fortify SCA Build Monitor.
2. Click Monitor.
After the monitor initiates a green light icon displays.
3. Create a complete build of your project in your build environment.
4. Check that the build has finished successfully.
5. Return to the Fortify Build Monitor window and click Build Done.
6. Fortify SCA outputs the results to a subfolder, specify a name for the folder for the output. If the folder already exists, Fortify SCA cleans the folder before starting the scan.
7. Click Scan.
Fortify SCA displays the results and saves an FPR file in the folder you specified.
Note: To view the results, open the FPR file in Audit Workbench or using the Secure Coding Package for Microsoft Visual Studio.
Example of Monitoring a ProjectThis example for Windows users analyzes the sample C++ code project named qwik-smtpd. It uses Microsoft Visual Studio and the Fortify Build Monitor.
To analyze the qwik-smtpd project:
1. Using Microsoft Visual Studio, open and build the qwik-smtpd project located in the Tutorial/C/source directory.
2. Select Start Program Files Fortify Software Fortify SCA Build Monitor.
3. Click Monitor.
4. Minimize the window.
5. In Microsoft Visual Studio, rebuild the project.
Note: Since nothing in the project changed, you must use the rebuild option.
6. Check that build has finished successfully.
7. Return to the Fortify Build Monitor window and click Build Done.
8. Specify the location of the build output.
9. Click Scan.
Fortify SCA saves an FPR file in the folder you specified.
Note: To view the results, open the FPR file in Audit Workbench or using the Secure Coding Package for Microsoft
Visual Studio.
Fortify SCA User Guide 20
Visual Studio .NETIf you perform command line builds with Visual Studio .NET, you can easily integrate static analysis by simply wrapping the build command line with an invocation of sourceanalyzer. For this to work, you must have the Fortify Secure Coding Plug‐in for your version of Visual Studio installed.
Consider the following example
sourceanalyzer -b my_buildid devenv MyProject.sln /REBUILD
This performs the translation phase on all files built by Visual Studio. Be sure to do a clean or a rebuild so that all files are included.
Visual Studio 6.0If you perform command line builds with Visual Studio 6.0, you can integrate static analysis by wrapping the build command line with an invocation of sourceanalyzer.
Consider the following example:
sourceanalyzer -b my_buildid msdev MyProject.dsp /MAKE "MyProject DEBUG" /REBUILD
This performs the translation phase on all files built by the Visual Studio. Be sure to do a clean or a rebuild so that all files are included, as described in your Visual Studio documentation.
Fortify SCA User Guide 21
Translating Other LanguagesThis chapter describes how to translate other programming languages for analysis with Fortify SCA.
This section includes the following topics:
• Command Line Syntax for Other Languages
• Configuration Considerations
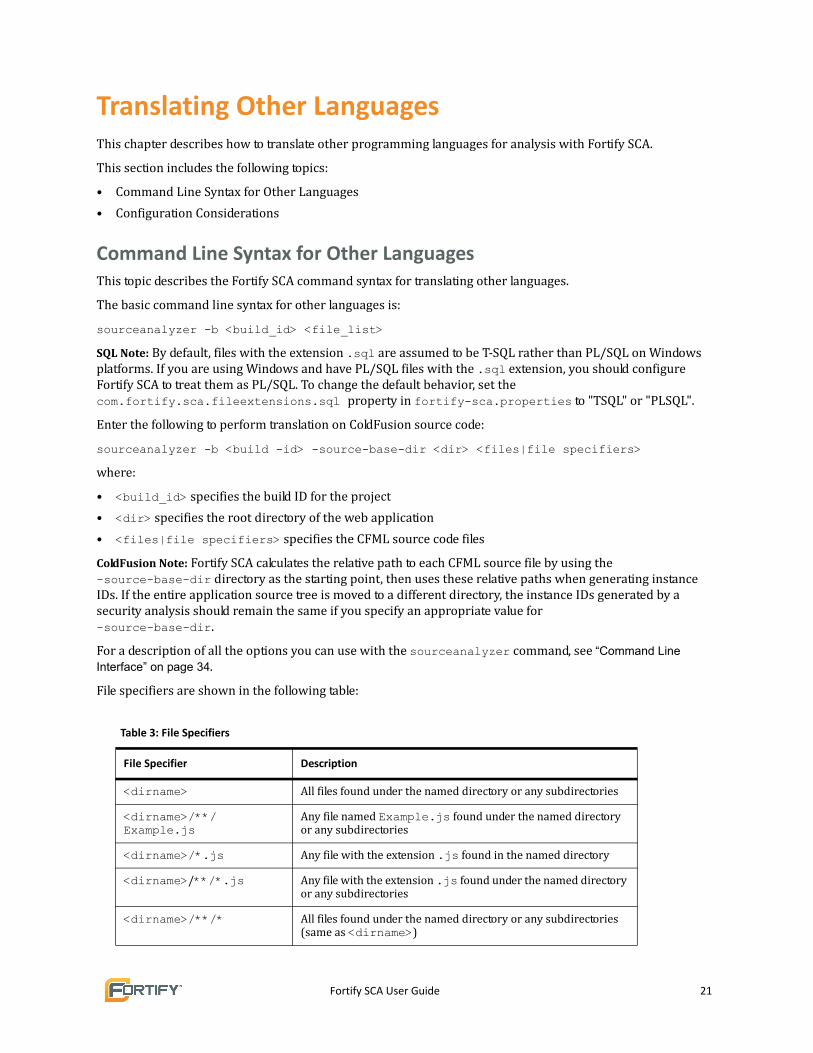
Command Line Syntax for Other LanguagesThis topic describes the Fortify SCA command syntax for translating other languages.
The basic command line syntax for other languages is:
sourceanalyzer -b <build_id> <file_list>
SQL Note: By default, files with the extension .sql are assumed to be T‐SQL rather than PL/SQL on Windows platforms. If you are using Windows and have PL/SQL files with the .sql extension, you should configure Fortify SCA to treat them as PL/SQL. To change the default behavior, set the com.fortify.sca.fileextensions.sql property in fortify-sca.properties to "TSQL" or "PLSQL".
Enter the following to perform translation on ColdFusion source code:
sourceanalyzer -b <build -id> -source-base-dir <dir> <files|file specifiers>
where:
• <build_id> specifies the build ID for the project
• <dir> specifies the root directory of the web application
• <files|file specifiers> specifies the CFML source code files
ColdFusion Note: Fortify SCA calculates the relative path to each CFML source file by using the -source-base-dir directory as the starting point, then uses these relative paths when generating instance IDs. If the entire application source tree is moved to a different directory, the instance IDs generated by a security analysis should remain the same if you specify an appropriate value for -source-base-dir.
For a description of all the options you can use with the sourceanalyzer command, see “Command Line Interface” on page 34.
File specifiers are shown in the following table:
Table 3: File Specifiers
File Specifier Description
<dirname> All files found under the named directory or any subdirectories
<dirname>/**/Example.js
Any file named Example.js found under the named directory or any subdirectories
<dirname>/*.js Any file with the extension .js found in the named directory
<dirname>/**/*.js Any file with the extension .js found under the named directory or any subdirectories
<dirname>/**/* All files found under the named directory or any subdirectories (same as <dirname>)
Fortify SCA User Guide 22
Note: Windows and many Unix shells automatically try to expand arguments containing the '*' character, so file‐specifier expressions should be quoted. Also, on Windows, enter the backslash (\) instead of the forward slash (/).
Configuration ConsiderationsThis section covers the following topics:
• Configuring Python
• Configuring ColdFusion
• Configuring the SQL Extension
• Configuring ASP/VBScript Virtual Roots
Configuring PythonFortify SCA translates Python applications, and treats files with the extension .py as Python source code. In order for SCA to translate Python applications and prepare the application for a scan, SCA searches any import files for the application. SCA does not respect the PYTHONPATH environment variable which the Python runtime system uses to find imported files, so this information should be given directly to SCA using the -python-path argument. In addition, some applications add additional import directories during runtime initialization.
To add paths for additional import directories, use the sourceanalyzer command line option:
-python-path pathname
Note: SCA translates Python applications using all import files located in the directory path defined by the -python-path pathname option. Subsequently, translation may take a significant amount of time to complete.
Configuring ColdFusionIn order to treat undefined variables in a CFML page as tainted, uncomment the following line in sca_install_dir\Core\config\fortify‐sca.properties:#com.fortify.sca.CfmlUndefinedVariablesAreTainted=true
Doing so serves as a hint to the data flow analyzer to watch out for register‐globals‐style vulnerabilities. However, enabling this property interferes with data flow findings in which a variable in an included page is initialized to a tainted value in an earlier‐occurring included page.
Configuring the SQL ExtensionBy default, files with the extension .sql are assumed to be T‐SQL rather than PL/SQL on Windows platforms. If you are using Windows and have PL/SQL files with the .sql extension, you should configure Fortify SCA to treat them as PL/SQL. To change the default behavior, set the com.fortify.sca.fileextensions.sql property in fortify-sca.properties to "TSQL" or "PLSQL".
Note: Fortify 360 v2.5 updates the PL/SQL parser to improve translation of PL/SQL source code. However, the existence of two different parsers can make merging results from pre‐v2.5 and post‐v2.5 difficult.
To revert to the older version of the PL/SQL parser, add the following property to the fortify-sca.properties file:
com.fortify.sca.UseOldPlsql=true
Configuring ASP/VBScript Virtual RootsFortify SCA allows you to handle ASP virtual roots. For web servers that use virtual directories as aliases that map to physical directories, SCA allows you to use alias.
Fortify SCA User Guide 23
For instance, you may have virtual directories named Include and Library which refer to the physical directories C:\WebServer\CustomerOne\inc and C:\WebServer\CustomerTwo\Stuff respectively.
As an example, the ASP/VBScript code for an application using virtual includes, as follows:
<!--#include virtual=”Include/Task1/foo.inc”-->
The above ASP code refers to the actual directory, as follows:
C:\Webserver\CustomerOne\inc\Task1\foo.inc
The real directory replaces the virtual directory name Include in that instance.
Accommodating Virtual Roots
In order to indicate to SCA what each virtual directory is an alias for, you must set a property of the form com.fortify.sca.ASPVirtualRoots.name_of_virtual_directory as part of your commandline invocation of SCA in the following manner:
sourceanalyzer -Dcom.fortify.sca.ASPVirtualRoots.name_of_virtual_directory=<full path to corresponding physical directory>
Note: On Windows, if the physical path has spaces in it, you must include the property setting in double‐quotes:
sourceanalyzer "-Dcom.fortify.sca.ASPVirtualRoots.name_of_virtual_directory=<full path to corresponding *physical* directory>"
To expand upon the example in the previous section, the property value that you must pass along should be:
-Dcom.fortify.sca.ASPVirtualRoots.Include=”C:\WebServer\CustomerOne\inc”
-Dcom.fortify.sca.ASPVirtualRoots.Library="C:\WebServer\CustomerTwo\Stuff
Doing so causes the mapping of Include to its directory and Library to its directory.
When SCA encounters the include directive:
<!-- #include virtual="Include/Task1/foo.inc" -->
SCA will first check to see if your project contains a physical directory named Include. If there is no such physical directory, SCA looks through its own run‐time properties and sees that:
-Dcom.fortify.sca.ASPVirtualRoots.Include="C:\WebServer\CustomerOne\inc"
This tells SCA that virtual directory Include is actually the directory:
C:\WebServer\CustomerOne\inc
This will cause SCA to look for the file:
C:\WebServer\CustomerOne\inc\Task1\foo.inc
Alternately, if you choose to set this property in the fortify-sca.properties file, which is located in <sca_install_dir>\Core\config, you must escape the \ character, as well as any spaces that appear in the path of the physical directory:
com.fortify.sca.ASPVirtualRoots.Library=c:\\WebServer\\CustomerTwo\Stuff
com.fortify.sca.ASPVirtualRoots.Include=c:\\WebServer\\CustomerOne\inc
Note: The previous version of the ASPVirtualRoot property is still valid, which you may use on the SCA commandline as follows:
-Dcom.fortify.sca.ASPVirtualRoots=C:\WebServer\CustomerTwo\Stuff;C:\WebServer\CustomerOne\inc
This prompts SCA to search through the listed directories in the order specified when it is resolving a virtual include directive.

Fortify SCA User Guide 24
Example: Using Virtual Roots
You have a file as follows:
C:\files\foo\bar.asp
You can specify this file by using the following include:
<!-- #include virtual="/foo/bar.asp">
Then you should set the virtual root as:
-Dcom.fortify.sca.ASPVirtualRoots=C:\files\foo
This will strip the /foo from the front of the virtual root. If you do not specify foo in the ASPVirtualRoots property, SCA will look in C:\files\bar.asp, and will fail.
The sequence for specifying virtual roots are as follows:
1. Remove the first part of the path in the source
2. Replace the first parth of the path with the virtual root as specified on the command line.
Other Language Command Line ExamplesThis section includes the following examples:
• Example of Translating PL/SQL
• Example of Translating T‐SQL
• Example of Translating PHP
• Example of Translating Classic ASP written with VBScript
• Example of Translating JavaScript
• Example of Translating VB Script File
Example of Translating PL/SQLThe following example demonstrates syntax for translating two PL/SQL files:
sourceanalyzer -b MyProject x.pks y.pks
The following example demonstrates how to translate all PL/SQL files under the sources directory:
sourceanalyzer -b MyProject "sources/**/*.pks"
Example of Translating T‐SQLThe following example demonstrates syntax for translating two T‐SQL files:
sourceanalyzer -b MyProject x.sql y.sql
The following example demonstrates how to translate all T‐SQL files under the sources directory:
sourceanalyzer -b MyProject "sources\**\*.sql"
Note: This example assumes the com.fortify.sca.fileextensions.sql property in fortify-sca.properties is set to "TSQL".
Example of Translating PHPTo translate a single file named MyPHP.php, enter:
sourceanalyzer -b mybuild "MyPHP.php"
Fortify SCA User Guide 25
Example of Translating Classic ASP written with VBScriptTo translate a single file named MyASP.asp, enter:
sourceanalyzer -b mybuild "MyASP.asp"
Example of Translating JavaScriptTo translate all JavaScript files under the scripts directory, enter:
sourceanalyzer -b mybuild "scripts/*.js"
Example of Translating VB Script FileTo translate a VB file named myApp.vb, enter:
sourceanalyzer -b mybuild "myApp.vb"
Translating COBOL CodeThis section contains the following topics:
• Supported Technologies
• Preparing COBOL Source Files for Translation
• COBOL Command Line Syntax
• Auditing a COBOL Scan
Note: In order to use SCA to scan COBOL, you must have a specialized Fortify License specific for COBOL scanning capabilities. Contact Fortify for more information about scanning COBOL and the necessary license required.
Supported TechnologiesFortify SCA supports IBM Enterprise COBOL for IBM z/OS and is compatible with the following systems:
• CICS
• IMS
• DB/2 embedded SQL
• IBM WebSphere MQ
Preparing COBOL Source Files for TranslationFortify SCA runs only on the supported systems listed in the Fortify System Requirements data sheet, not on mainframe computers. This means that before you can scan a COBOL program, you must copy the following program components to the system running Fortify SCA:
• The COBOL source code
• All copybook files used by the COBOL source code
• All SQL INCLUDE files referenced by the COBOL source code
Preparing COBOL Source Code Files
If you are retrieving COBOL source files from a mainframe without .COB or .CBL file extensions (which is usually the case for COBOL filenames), then you must use the following command line:
-noextension-type COBOL <directory-file-path>
Fortify SCA User Guide 26
Specify the directory and folder with all COBOL files as the argument to SCA, and SCA will process all the files in that directory and folder without any need for COBOL file extensions.
Preparing COBOL Copybook Files
Fortify SCA does not identify copybooks by extension. All copybook files should therefore retain the names used in the COBOL source code COPY statements.
COBOL Command Line SyntaxFree‐format COBOL is the default translation and scanning mode for Fortify SCA. The basic syntax for translating a single free‐format COBOL source code file is:
sourceanalyzer -b <build-id>
The basic syntax for scanning a translated free‐format COBOL program is:
sourceanalyzer -b <build-id> -scan -f <FPR file name>
Working with Fixed‐Format COBOL
Fortify SCA also supports fixed‐format COBOL. When translating and scanning fixed‐format COBOL, both the translation and scanning command lines must include the -fixed-format command line option. For example, the translation line syntax would look like:
sourceanalyzer -b <build-id> -fixed-format
And the scanning line syntax would look like:
sourceanalyzer -b <build-id> -scan -fixed-format -f <FPR file name>
If your COBOL code is IBM Enterprise COBOL, then it is most likely fixed format. If the COBOL translation command appears to hang indefinitely, terminate the translation by typing Ctrl‐C several times, and repeat the translation command with the "‐fixed‐format" parameter.
Searching for COBOL Copybooks
Use the copydirs command line option to direct Fortify SCA to search a list of paths for copybooks and SQL INCLUDE files. For example, the command line syntax would look like the following:
sourceanalyzer -b coboltest -copydirs c:\cobol\copybooks
Auditing a COBOL ScanAfter using the command line to scan the application, you can upload the resulting FPR file to Audit Workbench or Fortify 360 Server and audit the application’s issues.
Fortify SCA does not currently support custom rules for COBOL applications.

Fortify SCA User Guide 27
Troubleshooting and SupportThis chapter contains the following topics:
• Troubleshooting
• Reporting Bugs and Requesting Enhancements
TroubleshootingThis section contains the following troubleshooting topics:
• Using the Log File to Debug Problems
• Translation Failed Message
• JSP Translation Problems
• ASPX Translation Problems
• C/C++ Precompiled Header Files
Using the Log File to Debug ProblemsIf you encounter warnings and problems when you run Fortify SCA, re‐run Fortify SCA using the -debug option. This generates a file named sca.log in the following directory:
• On Windows: C:\Documents and Settings\<username>\Local Settings\Application Data\Fortify\sca5.0\log
• On other platforms: $HOME/.fortify/sca5.0/log
Email the sca.log file as a zip file to [email protected] for further investigation.
Translation Failed MessageIf your C/C++ application builds successfully but you see one or more “translation failed” messages when building with Fortify SCA, edit the <install_directory>/Core/config/fortify-sca.properties file to change the following line:
com.fortify.sca.cpfe.options= --remove_unneeded_entities --suppress_vtbl
to
com.fortify.sca.cpfe.options=-w --remove_unneeded_entities --suppress_vtbl
Re‐run the build to print the errors encountered by the translator. If the output indicates an incompatibility between your compiler and the Fortify translator, send your output to Fortify Technical Support for further investigation.
JSP Translation ProblemsFortify SCA uses either the built‐in or your specific application server's JSP compiler to translate JSP files into Java files for analysis.
If the JSP parser encounters problems when Fortify SCA is converting JSP files to Java files for analysis, you will see a message similar to the following:
Failed to translate the following jsps into analysis model. Please see the log file for any errors from the jsp parser and the user manual for hints on fixing those<List of JSP file names>
This typically happens due to one or more of the following reasons:

Fortify SCA User Guide 28
• The web application is not laid out in a proper deployable WAR directory format
• You are missing some JAR files or classes required for the application
• Some tag libraries or their definitions (TLD) are missing from your application
To obtain more information about the problem, perform the following steps:
1. Open the Fortify SCA log file in an editor.
2. Search for the strings Jsp parser stdout: and Jsp parser stderr:.
These errors are generated by the JSP parser that was used. Resolve the errors and rerun Fortify SCA.
For more information about scanning J2EE applications, see “Translating J2EE Applications” on page 8.
ASPX Translation ProblemsFortify SCA compiles ASPX files to DLLs for analysis as follows:
• If you are using .NET 2.0 or later and Visual Studio 2005, using the Microsoft aspnet_compile compiler
• If you are using .NET 1.1 and Visual Studio 2003, trying to fetch ASPX files one at a time from the web site
The compilation step can fail if:
• You have access or authentication problems with accessing the web application
• You are missing some required DLLs
In either case, you will see a message similar to the following:
Failed to translate the following aspx files into analysis model. Please see the log file for any errors from the aspx precompiler and the user manual for hints on fixing those.<List of ASPX file names>
If you are using the plug‐in, enable plug‐in debugging and examine the plug‐in log file for any errors generated by the ASPX precompiler.
If you are using the command line tool, fortify_aspnet_compiler, you should see the error messages on the console.
If you still cannot determine the cause of the problem, try to access some of the failed ASPX files from your browser and see what kind of errors display. If you see messages such as cannot locate assembly, ensure that you have the missing DLLs and rerun Fortify SCA.
If you can access the failed ASPX files from the browser, but Fortify SCA still fails to scan it, contact Fortify Technical Support for additional help.
For more information about scanning ASP.NET applications, see “Translating ASP.NET 1.1 (Visual Studio Version 2003) Projects” on page 12.
Fortify SCA User Guide 29
C/C++ Precompiled Header Files
Some C/C++ compilers support a feature termed “precompiled header files,” which can speed up compilation. Some compilers' implementations of this feature have subtle side‐effects. When the feature is enabled, the compiler may accept erroneous source code without warnings or errors. This can result in a discrepancy where Fortify SCA reports translation errors even when your compiler does not.
If you use the precompiled header feature of your compiler, make sure your source code compiles cleanly by disabling precompiled headers and doing a full build.
Reporting Bugs and Requesting EnhancementsFeedback is critical to the success of this product. To request enhancements or patches, or to report bugs, send an email to Technical Support at:
Be sure to include the following information in the email body:
• Product: Fortify SCA
• Version Number: To determine the version number, run the following:
sourceanalyzer -version
• Platform: (such as PC)
• OS: (such as Windows 2000)
When requesting enhancements, include a description of the feature enhancement.
When reporting bugs, provide enough details for the issue to be duplicated. The more descriptive you are, the faster we can analyze and fix the issue. Also include the log files, or the relevant portions of them, from when the issue occurred.
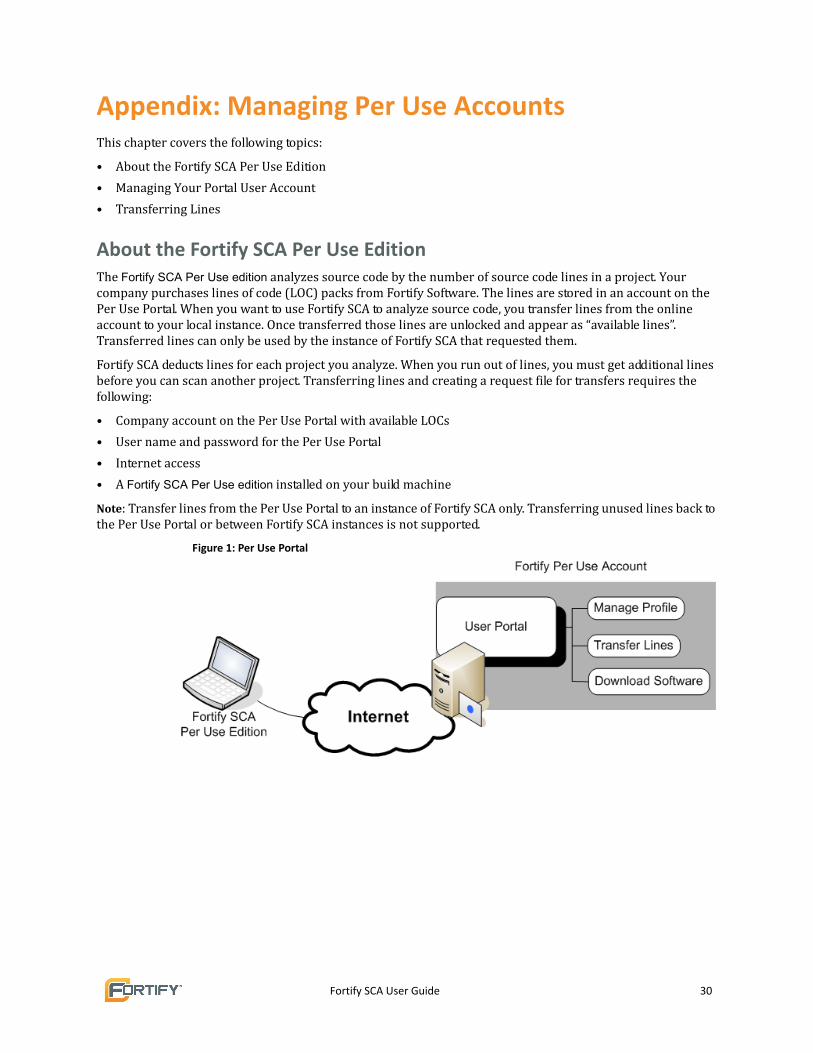
Fortify SCA User Guide 30
Appendix: Managing Per Use Accounts This chapter covers the following topics:
• About the Fortify SCA Per Use Edition
• Managing Your Portal User Account
• Transferring Lines
About the Fortify SCA Per Use EditionThe Fortify SCA Per Use edition analyzes source code by the number of source code lines in a project. Your company purchases lines of code (LOC) packs from Fortify Software. The lines are stored in an account on the Per Use Portal. When you want to use Fortify SCA to analyze source code, you transfer lines from the online account to your local instance. Once transferred those lines are unlocked and appear as “available lines”. Transferred lines can only be used by the instance of Fortify SCA that requested them.
Fortify SCA deducts lines for each project you analyze. When you run out of lines, you must get additional lines before you can scan another project. Transferring lines and creating a request file for transfers requires the following:
• Company account on the Per Use Portal with available LOCs
• User name and password for the Per Use Portal
• Internet access
• A Fortify SCA Per Use edition installed on your build machine
Note: Transfer lines from the Per Use Portal to an instance of Fortify SCA only. Transferring unused lines back to the Per Use Portal or between Fortify SCA instances is not supported.
Figure 1: Per Use Portal
Fortify SCA User Guide 31
Managing Your Portal User AccountTo use the Fortify SCA Per Use edition you must have a user account on the Fortify Per Use Portal. This account allows you to request lines.
The Per User Portal administrator configures the user accounts and provides the Fortify SCA Per Use edition license key. When the administrator sets up an account, the default password is automatically emailed to you.
Your user profile includes:
• Your username (email address) and password
• Contact information, such as your telephone number
• Record of lines allocated to your user account
Changing your PasswordWhen the administrator sets up your account, the Fortify Software portal sends you an email that contains a default password and a link to the Fortify Per Use Portal. This section explains how to log into the site and update your password.
To change your password:
1. Open the link in the email or enter the following URL:
https://per-use.fortify.com
2. Enter your username, which is your email address where you received a default password, and the password.
3. Click Customer Detail.
4. Enter a new password.
5. Confirm new password.
6. Click Save.
Purchasing Additional LinesFortify Software technical support representative can add lines to an existing account. Under some circumstances the technical support representative can also transfer lines back into the main account.
A technical support representative can only add lines if:
• You are a licensed user of Fortify SCA Per Use edition
• Your company has an account on the Fortify Per Use Portal
• You have a user account
• You are authorized to add lines to the account
Transferring LinesThis section explains how to transfer lines from the Per Use Portal account to Fortify SCA. The following is required to transfer lines:
• Fortify SCA Per Use edition is installed on a build machine
• You have an account on the Per Use Portal, http://per-use.fortify.com.
• Your company has scan lines available in the account
Note: To purchase lines, contact a Fortify Software technical support.
Transfer lines using one of the following methods:
Fortify SCA User Guide 32
• Transferring Lines to a Machine with Internet Access
• Transferring Lines to a Machine without Internet Access
Transferring Lines to a Machine with Internet AccessUsers with Fortify SCA Per Use edition clients that have internet access can send requests to transfer lines from the per use account to their local client. If the lines are available, the lines are deducted from the account and transferred directly to the client.
After the transfer, the per use account shows the lines allocated. The local client shows the lines as available.
To request lines:
1. Enter the sourceanalyzer command with the following option:
sourceanalyzer -auth-request
2. Enter the information, including the number of lines, per user account user name, and password.
If the lines you requested are available, they are automatically transferred to your client.
Transferring Lines to a Machine without Internet AccessUsers of offline Fortify SCA instances must manually generate a request file, transfer the file to a computer with Internet access, log into the portal, and upload the request file. They must then download and install the corresponding response file to transfer lines from the account to Fortify SCA.
After the response file is created, the account shows the lines as allocated. However the lines are not available on Fortify SCA until after the response file is downloaded and installed.
To transfer lines manually:
1. Generating a Request for Lines
2. Uploading the Request for Lines
3. Installing the Line Certificate
Generating a Request for Lines
For users of Fortify SCA that do not have internet access, generate a request file that contains the number of lines that you want to allocate.
To generate a request file:
1. Enter the sourceanalyzer command with the following option:
sourceanalyzer -auth-gen-request <request-file-name>
2. Follow the prompts to enter the request information.
A request file is created in the directory where you ran the command.
Uploading the Request for Lines
When you upload a request file and the account has the lines available, a certificate file is created. The requested number of lines are deducted from the account. To complete the transfer the user downloads the certificate and installs it.
To generate a line response file:
1. Copy the request file to a computer with internet access.
2. Log in to the Per Use Portal, http://per‐use.fortify.com.
Note: Your user name is your email address.
3. Click Request Lines.
Fortify SCA User Guide 33
4. Click Browse and locate the request file.
5. Click Upload.
After the request file is processed, a transaction ID (Txn ID) displays.
6. Click the transaction ID to download the certificate file to your local host.
Installing the Line Certificate
For offline Fortify SCA instances, manually install the certificate to add lines.
To transfer lines using the certificate file:
1. Copy the certificate to the machine where Fortify SCA is installed.
2. Enter the sourceanalyzer command with the following option:
sourceanalyzer -auth-import-response <response-file-name>
When the process completes a message displays the number of lines available.
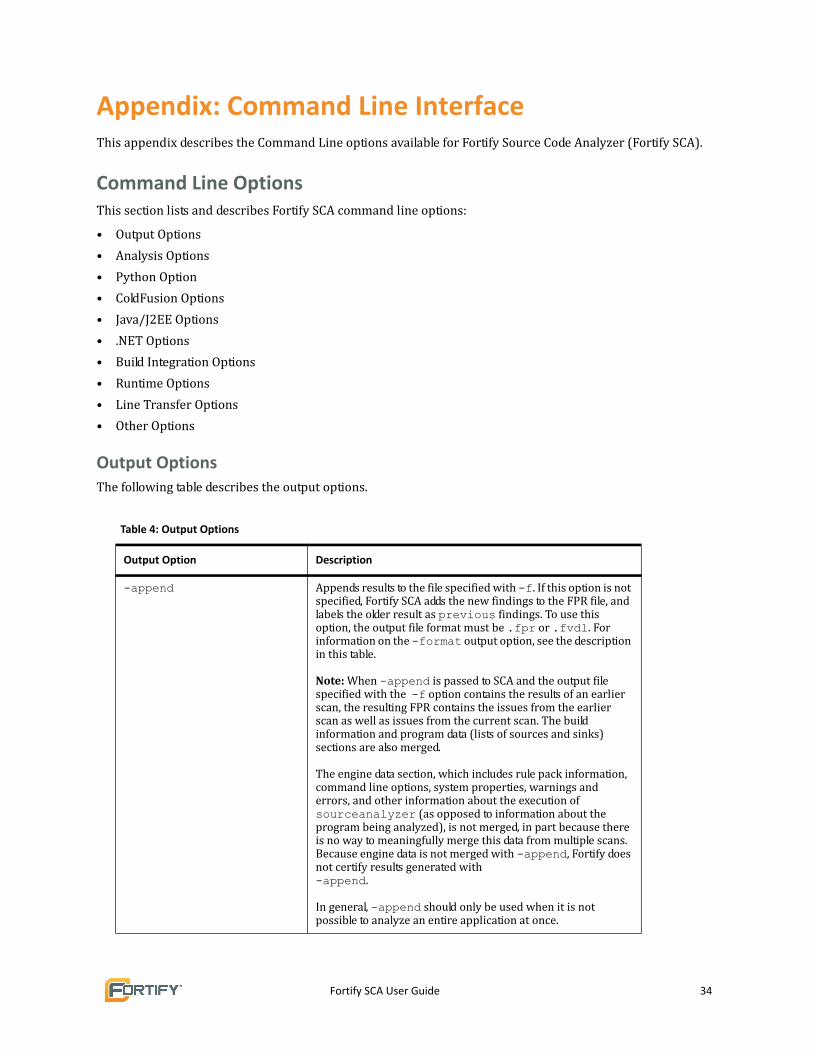
Fortify SCA User Guide 34
Appendix: Command Line InterfaceThis appendix describes the Command Line options available for Fortify Source Code Analyzer (Fortify SCA).
Command Line OptionsThis section lists and describes Fortify SCA command line options:
• Output Options
• Analysis Options
• Python Option
• ColdFusion Options
• Java/J2EE Options
• .NET Options
• Build Integration Options
• Runtime Options
• Line Transfer Options
• Other Options
Output OptionsThe following table describes the output options.
Table 4: Output Options
Output Option Description
-append Appends results to the file specified with -f. If this option is not specified, Fortify SCA adds the new findings to the FPR file, and labels the older result as previous findings. To use this option, the output file format must be .fpr or .fvdl. For information on the -format output option, see the description in this table.Note: When -append is passed to SCA and the output file specified with the -f option contains the results of an earlier scan, the resulting FPR contains the issues from the earlier scan as well as issues from the current scan. The build information and program data (lists of sources and sinks) sections are also merged.The engine data section, which includes rule pack information, command line options, system properties, warnings and errors, and other information about the execution of sourceanalyzer (as opposed to information about the program being analyzed), is not merged, in part because there is no way to meaningfully merge this data from multiple scans. Because engine data is not merged with -append, Fortify does not certify results generated with -append. In general, -append should only be used when it is not possible to analyze an entire application at once.
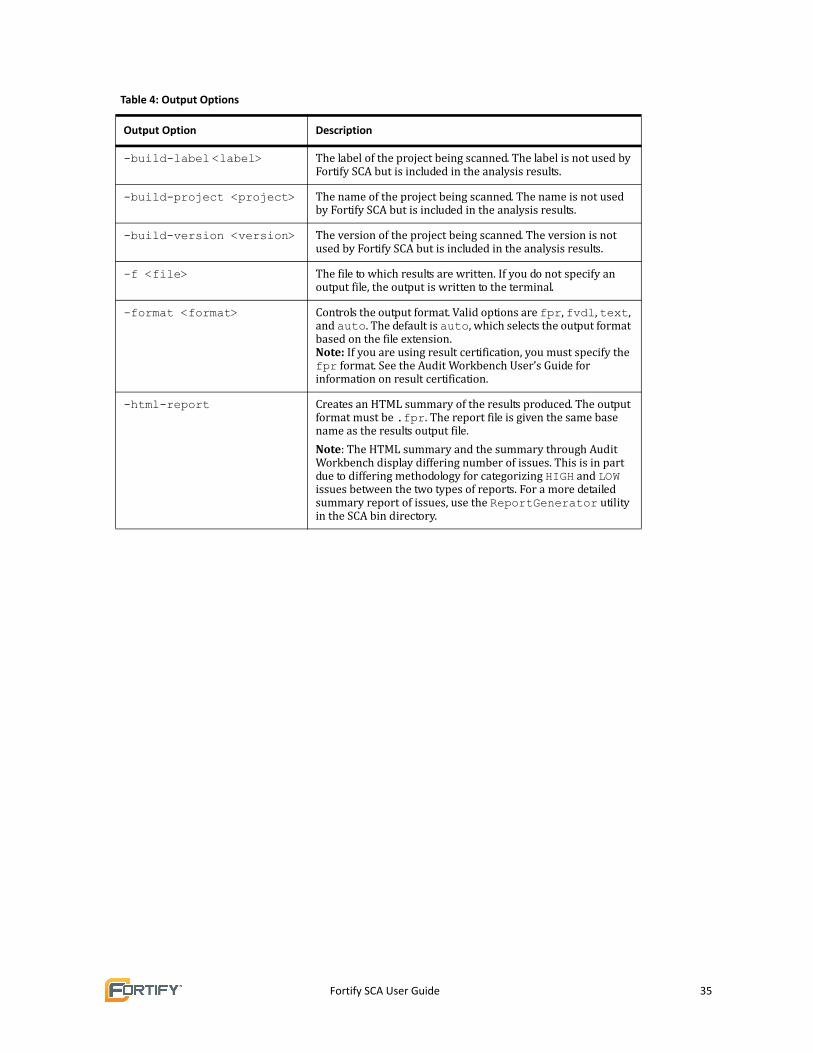
Fortify SCA User Guide 35
-build-label <label> The label of the project being scanned. The label is not used by Fortify SCA but is included in the analysis results.
-build-project <project> The name of the project being scanned. The name is not used by Fortify SCA but is included in the analysis results.
-build-version <version> The version of the project being scanned. The version is not used by Fortify SCA but is included in the analysis results.
-f <file> The file to which results are written. If you do not specify an output file, the output is written to the terminal.
-format <format> Controls the output format. Valid options are fpr, fvdl, text, and auto. The default is auto, which selects the output format based on the file extension.Note: If you are using result certification, you must specify the fpr format. See the Audit Workbench User’s Guide for information on result certification.
-html-report Creates an HTML summary of the results produced. The output format must be .fpr. The report file is given the same base name as the results output file.
Note: The HTML summary and the summary through Audit Workbench display differing number of issues. This is in part due to differing methodology for categorizing HIGH and LOW issues between the two types of reports. For a more detailed summary report of issues, use the ReportGenerator utility in the SCA bin directory.
Table 4: Output Options
Output Option Description
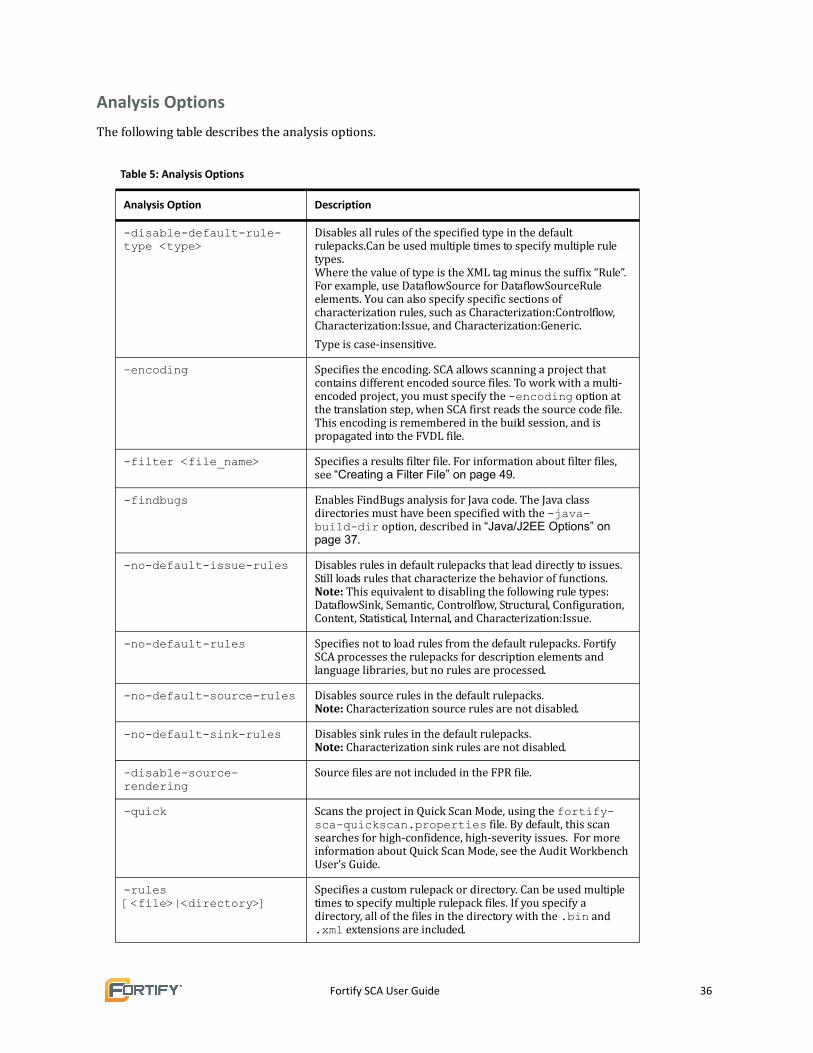
Fortify SCA User Guide 36
Analysis Options
The following table describes the analysis options.
Table 5: Analysis Options
Analysis Option Description
-disable-default-rule-type <type>
Disables all rules of the specified type in the default rulepacks.Can be used multiple times to specify multiple rule types.Where the value of type is the XML tag minus the suffix “Rule”. For example, use DataflowSource for DataflowSourceRule elements. You can also specify specific sections of characterization rules, such as Characterization:Controlflow, Characterization:Issue, and Characterization:Generic.
Type is case‐insensitive.
-encoding Specifies the encoding. SCA allows scanning a project that contains different encoded source files. To work with a multi‐encoded project, you must specify the -encoding option at the translation step, when SCA first reads the source code file. This encoding is remembered in the build session, and is propagated into the FVDL file.
-filter <file_name> Specifies a results filter file. For information about filter files, see “Creating a Filter File” on page 49.
-findbugs Enables FindBugs analysis for Java code. The Java class directories must have been specified with the -java-build-dir option, described in “Java/J2EE Options” on page 37.
-no-default-issue-rules Disables rules in default rulepacks that lead directly to issues. Still loads rules that characterize the behavior of functions. Note: This equivalent to disabling the following rule types: DataflowSink, Semantic, Controlflow, Structural, Configuration, Content, Statistical, Internal, and Characterization:Issue.
-no-default-rules Specifies not to load rules from the default rulepacks. Fortify SCA processes the rulepacks for description elements and language libraries, but no rules are processed.
-no-default-source-rules Disables source rules in the default rulepacks. Note: Characterization source rules are not disabled.
-no-default-sink-rules Disables sink rules in the default rulepacks. Note: Characterization sink rules are not disabled.
-disable-source-rendering
Source files are not included in the FPR file.
-quick Scans the project in Quick Scan Mode, using the fortify-sca-quickscan.properties file. By default, this scan searches for high‐confidence, high‐severity issues. For more information about Quick Scan Mode, see the Audit Workbench User’s Guide.
-rules [<file>|<directory>]
Specifies a custom rulepack or directory. Can be used multiple times to specify multiple rulepack files. If you specify a directory, all of the files in the directory with the .bin and .xml extensions are included.
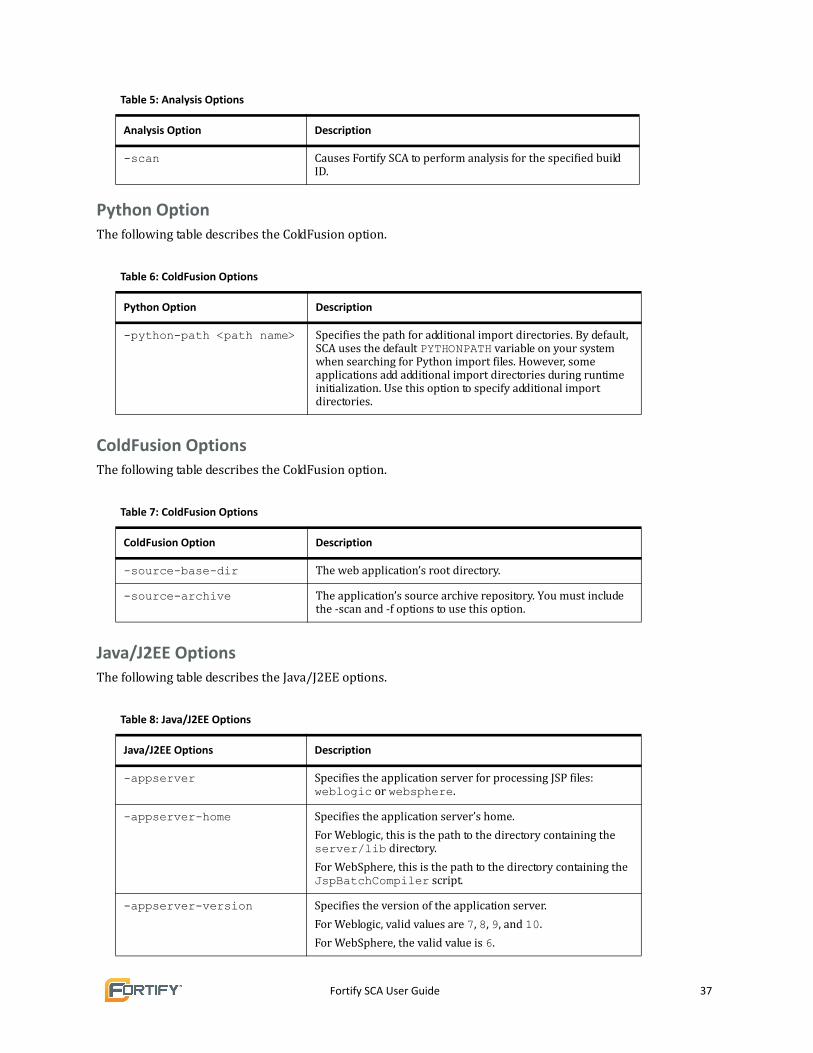
Fortify SCA User Guide 37
Python OptionThe following table describes the ColdFusion option.
ColdFusion OptionsThe following table describes the ColdFusion option.
Java/J2EE OptionsThe following table describes the Java/J2EE options.
-scan Causes Fortify SCA to perform analysis for the specified build ID.
Table 6: ColdFusion Options
Python Option Description
-python-path <path name> Specifies the path for additional import directories. By default, SCA uses the default PYTHONPATH variable on your system when searching for Python import files. However, some applications add additional import directories during runtime initialization. Use this option to specify additional import directories.
Table 7: ColdFusion Options
ColdFusion Option Description
-source-base-dir The web application’s root directory.
-source-archive The application’s source archive repository. You must include the ‐scan and ‐f options to use this option.
Table 8: Java/J2EE Options
Java/J2EE Options Description
-appserver Specifies the application server for processing JSP files: weblogic or websphere.
-appserver-home Specifies the application server’s home.
For Weblogic, this is the path to the directory containing the server/lib directory.
For WebSphere, this is the path to the directory containing the JspBatchCompiler script.
-appserver-version Specifies the version of the application server.
For Weblogic, valid values are 7, 8, 9, and 10.
For WebSphere, the valid value is 6.
Table 5: Analysis Options
Analysis Option Description
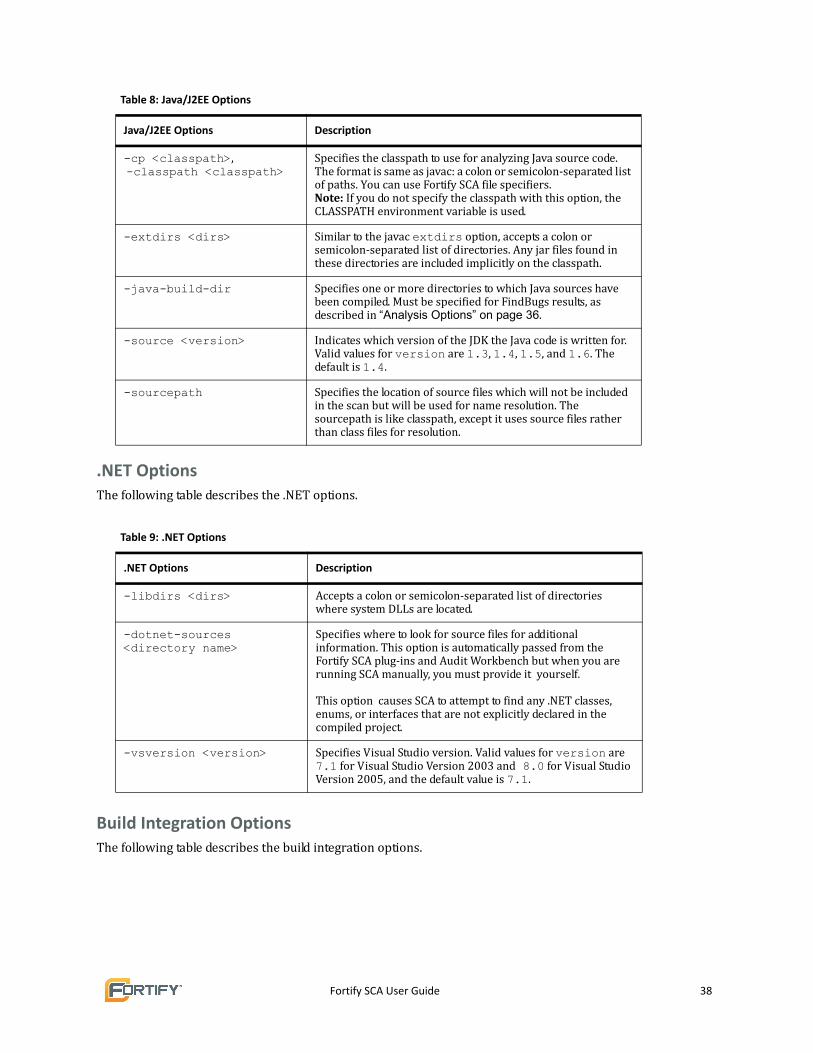
Fortify SCA User Guide 38
.NET OptionsThe following table describes the .NET options.
Build Integration OptionsThe following table describes the build integration options.
-cp <classpath>, -classpath <classpath>
Specifies the classpath to use for analyzing Java source code. The format is same as javac: a colon or semicolon‐separated list of paths. You can use Fortify SCA file specifiers.Note: If you do not specify the classpath with this option, the CLASSPATH environment variable is used.
-extdirs <dirs> Similar to the javac extdirs option, accepts a colon or semicolon‐separated list of directories. Any jar files found in these directories are included implicitly on the classpath.
-java-build-dir Specifies one or more directories to which Java sources have been compiled. Must be specified for FindBugs results, as described in “Analysis Options” on page 36.
-source <version> Indicates which version of the JDK the Java code is written for. Valid values for version are 1.3, 1.4, 1.5, and 1.6. The default is 1.4.
-sourcepath Specifies the location of source files which will not be included in the scan but will be used for name resolution. The sourcepath is like classpath, except it uses source files rather than class files for resolution.
Table 9: .NET Options
.NET Options Description
-libdirs <dirs> Accepts a colon or semicolon‐separated list of directories where system DLLs are located.
-dotnet-sources <directory name>
Specifies where to look for source files for additional information. This option is automatically passed from the Fortify SCA plug‐ins and Audit Workbench but when you are running SCA manually, you must provide it yourself. This option causes SCA to attempt to find any .NET classes, enums, or interfaces that are not explicitly declared in the compiled project.
-vsversion <version> Specifies Visual Studio version. Valid values for version are 7.1 for Visual Studio Version 2003 and 8.0 for Visual Studio Version 2005, and the default value is 7.1.
Table 8: Java/J2EE Options
Java/J2EE Options Description
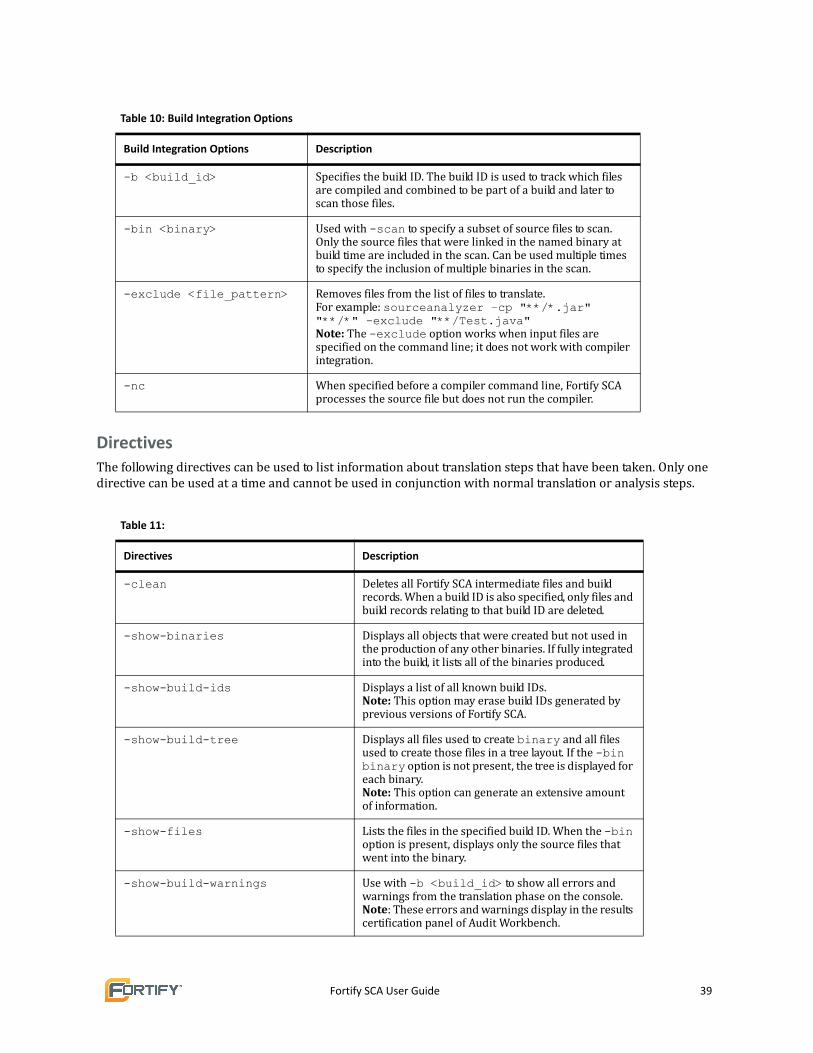
Fortify SCA User Guide 39
DirectivesThe following directives can be used to list information about translation steps that have been taken. Only one directive can be used at a time and cannot be used in conjunction with normal translation or analysis steps.
Table 10: Build Integration Options
Build Integration Options Description
-b <build_id> Specifies the build ID. The build ID is used to track which files are compiled and combined to be part of a build and later to scan those files.
-bin <binary> Used with -scan to specify a subset of source files to scan. Only the source files that were linked in the named binary at build time are included in the scan. Can be used multiple times to specify the inclusion of multiple binaries in the scan.
-exclude <file_pattern> Removes files from the list of files to translate. For example: sourceanalyzer –cp "**/*.jar" "**/*" -exclude "**/Test.java"Note: The -exclude option works when input files are specified on the command line; it does not work with compiler integration.
-nc When specified before a compiler command line, Fortify SCA processes the source file but does not run the compiler.
Table 11:
Directives Description
-clean Deletes all Fortify SCA intermediate files and build records. When a build ID is also specified, only files and build records relating to that build ID are deleted.
-show-binaries Displays all objects that were created but not used in the production of any other binaries. If fully integrated into the build, it lists all of the binaries produced.
-show-build-ids Displays a list of all known build IDs. Note: This option may erase build IDs generated by previous versions of Fortify SCA.
-show-build-tree Displays all files used to create binary and all files used to create those files in a tree layout. If the -bin binary option is not present, the tree is displayed for each binary. Note: This option can generate an extensive amount of information.
-show-files Lists the files in the specified build ID. When the -bin option is present, displays only the source files that went into the binary.
-show-build-warnings Use with -b <build_id> to show all errors and warnings from the translation phase on the console.Note: These errors and warnings display in the results certification panel of Audit Workbench.
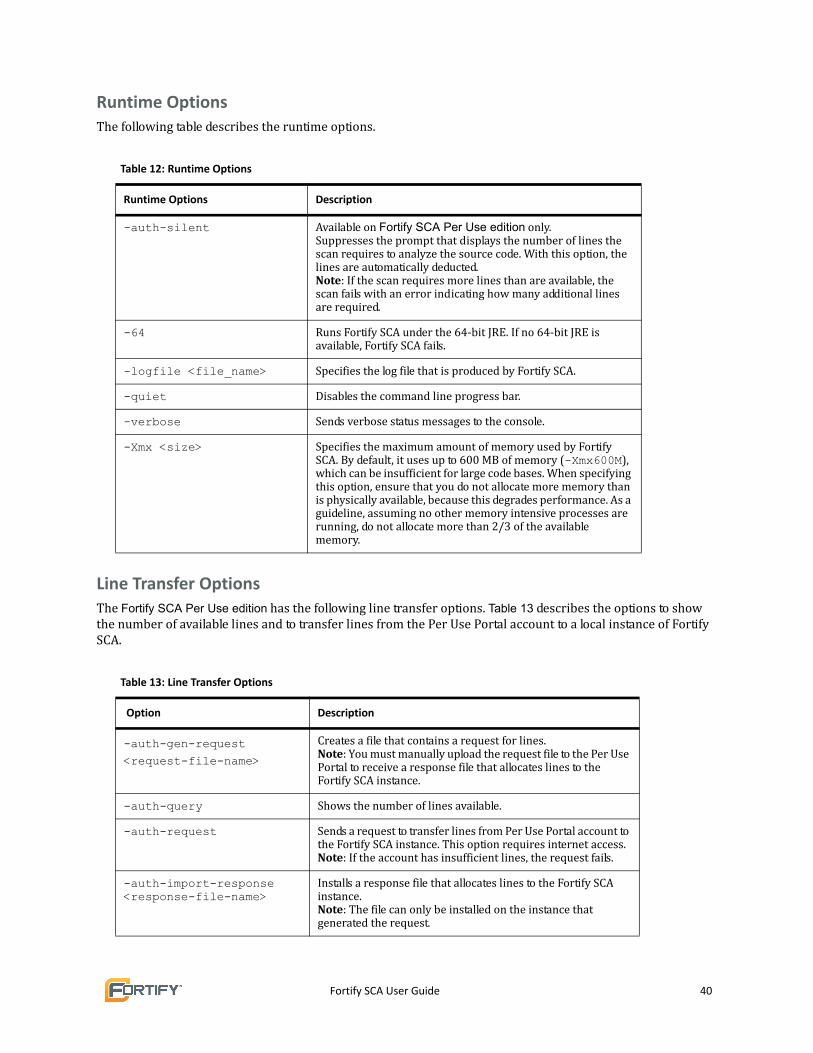
Fortify SCA User Guide 40
Runtime OptionsThe following table describes the runtime options.
Line Transfer OptionsThe Fortify SCA Per Use edition has the following line transfer options. Table 13 describes the options to show the number of available lines and to transfer lines from the Per Use Portal account to a local instance of Fortify SCA.
Table 12: Runtime Options
Runtime Options Description
-auth-silent Available on Fortify SCA Per Use edition only. Suppresses the prompt that displays the number of lines the scan requires to analyze the source code. With this option, the lines are automatically deducted. Note: If the scan requires more lines than are available, the scan fails with an error indicating how many additional lines are required.
-64 Runs Fortify SCA under the 64‐bit JRE. If no 64‐bit JRE is available, Fortify SCA fails.
-logfile <file_name> Specifies the log file that is produced by Fortify SCA.
-quiet Disables the command line progress bar.
-verbose Sends verbose status messages to the console.
-Xmx <size> Specifies the maximum amount of memory used by Fortify SCA. By default, it uses up to 600 MB of memory (-Xmx600M), which can be insufficient for large code bases. When specifying this option, ensure that you do not allocate more memory than is physically available, because this degrades performance. As a guideline, assuming no other memory intensive processes are running, do not allocate more than 2/3 of the available memory.
Table 13: Line Transfer Options
Option Description
-auth-gen-request
<request-file-name>
Creates a file that contains a request for lines. Note: You must manually upload the request file to the Per Use Portal to receive a response file that allocates lines to the Fortify SCA instance.
-auth-query Shows the number of lines available.
-auth-request Sends a request to transfer lines from Per Use Portal account to the Fortify SCA instance. This option requires internet access.Note: If the account has insufficient lines, the request fails.
-auth-import-response <response-file-name>
Installs a response file that allocates lines to the Fortify SCA instance. Note: The file can only be installed on the instance that generated the request.
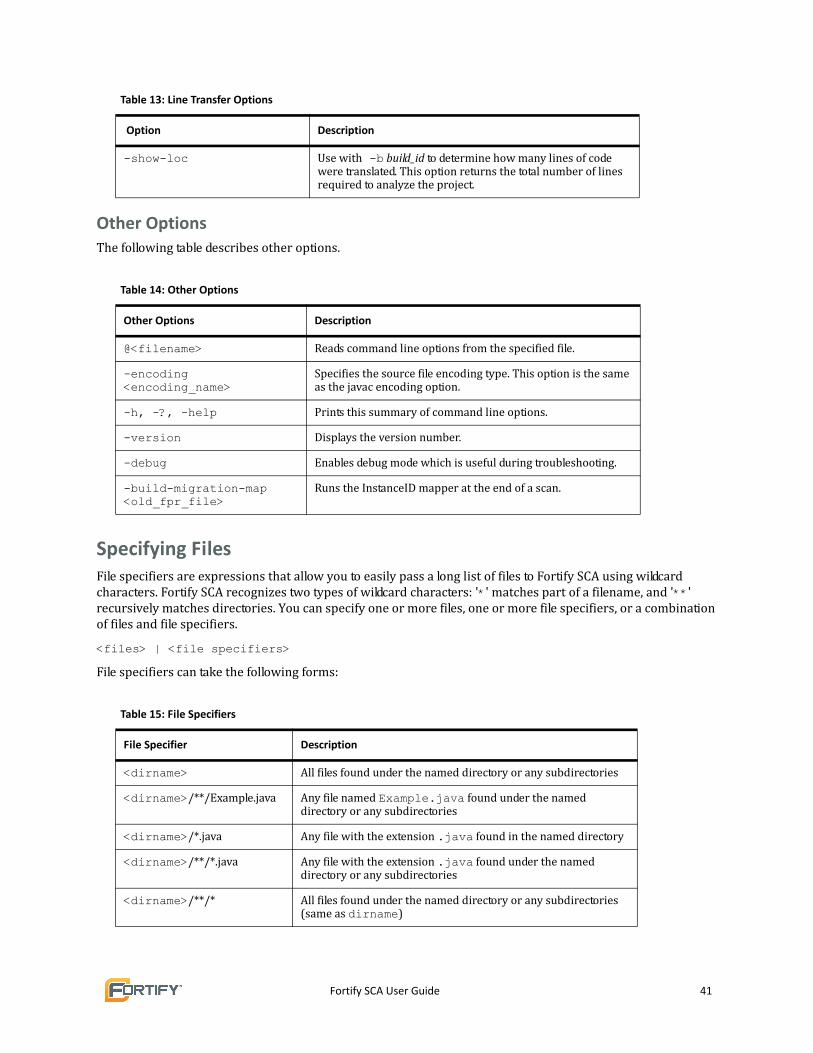
Fortify SCA User Guide 41
Other OptionsThe following table describes other options.
Specifying FilesFile specifiers are expressions that allow you to easily pass a long list of files to Fortify SCA using wildcard characters. Fortify SCA recognizes two types of wildcard characters: '*' matches part of a filename, and '**' recursively matches directories. You can specify one or more files, one or more file specifiers, or a combination of files and file specifiers.
<files> | <file specifiers>
File specifiers can take the following forms:
-show-loc Use with -b build_id to determine how many lines of code were translated. This option returns the total number of lines required to analyze the project.
Table 14: Other Options
Other Options Description
@<filename> Reads command line options from the specified file.
-encoding <encoding_name>
Specifies the source file encoding type. This option is the same as the javac encoding option.
-h, -?, -help Prints this summary of command line options.
-version Displays the version number.
-debug Enables debug mode which is useful during troubleshooting.
-build-migration-map <old_fpr_file>
Runs the InstanceID mapper at the end of a scan.
Table 15: File Specifiers
File Specifier Description
<dirname> All files found under the named directory or any subdirectories
<dirname>/**/Example.java Any file named Example.java found under the named directory or any subdirectories
<dirname>/*.java Any file with the extension .java found in the named directory
<dirname>/**/*.java Any file with the extension .java found under the named directory or any subdirectories
<dirname>/**/* All files found under the named directory or any subdirectories (same as dirname)
Table 13: Line Transfer Options
Option Description

Fortify SCA User Guide 42
Note: Windows and many Unix shells automatically try to expand arguments containing the '*' character, so file‐specifier expressions should be quoted. Also, on Windows, the backslash character (\) may be used as the directory separator instead of the forward slash (/).
File specifiers do not apply to C or C++ languages.
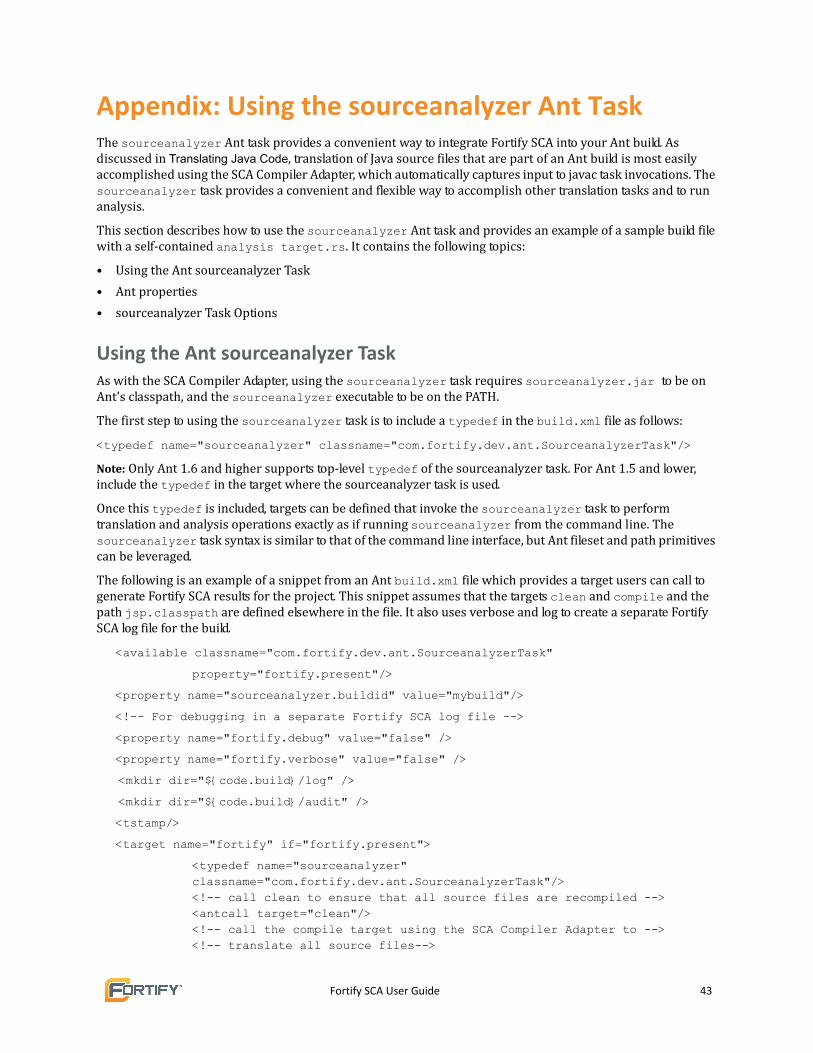
Fortify SCA User Guide 43
Appendix: Using the sourceanalyzer Ant TaskThe sourceanalyzer Ant task provides a convenient way to integrate Fortify SCA into your Ant build. As discussed in Translating Java Code, translation of Java source files that are part of an Ant build is most easily accomplished using the SCA Compiler Adapter, which automatically captures input to javac task invocations. The sourceanalyzer task provides a convenient and flexible way to accomplish other translation tasks and to run analysis.
This section describes how to use the sourceanalyzer Ant task and provides an example of a sample build file with a self‐contained analysis target.rs. It contains the following topics:
• Using the Ant sourceanalyzer Task
• Ant properties
• sourceanalyzer Task Options
Using the Ant sourceanalyzer TaskAs with the SCA Compiler Adapter, using the sourceanalyzer task requires sourceanalyzer.jar to be on Ant's classpath, and the sourceanalyzer executable to be on the PATH.
The first step to using the sourceanalyzer task is to include a typedef in the build.xml file as follows:
<typedef name="sourceanalyzer" classname="com.fortify.dev.ant.SourceanalyzerTask"/>
Note: Only Ant 1.6 and higher supports top‐level typedef of the sourceanalyzer task. For Ant 1.5 and lower, include the typedef in the target where the sourceanalyzer task is used.
Once this typedef is included, targets can be defined that invoke the sourceanalyzer task to perform translation and analysis operations exactly as if running sourceanalyzer from the command line. The sourceanalyzer task syntax is similar to that of the command line interface, but Ant fileset and path primitives can be leveraged.
The following is an example of a snippet from an Ant build.xml file which provides a target users can call to generate Fortify SCA results for the project. This snippet assumes that the targets clean and compile and the path jsp.classpath are defined elsewhere in the file. It also uses verbose and log to create a separate Fortify SCA log file for the build.
<available classname="com.fortify.dev.ant.SourceanalyzerTask"
property="fortify.present"/>
<property name="sourceanalyzer.buildid" value="mybuild"/>
<!-- For debugging in a separate Fortify SCA log file -->
<property name="fortify.debug" value="false" />
<property name="fortify.verbose" value="false" />
<mkdir dir="${code.build}/log" />
<mkdir dir="${code.build}/audit" />
<tstamp/>
<target name="fortify" if="fortify.present">
<typedef name="sourceanalyzer"classname="com.fortify.dev.ant.SourceanalyzerTask"/><!-- call clean to ensure that all source files are recompiled --><antcall target="clean"/><!-- call the compile target using the SCA Compiler Adapter to --><!-- translate all source files-->
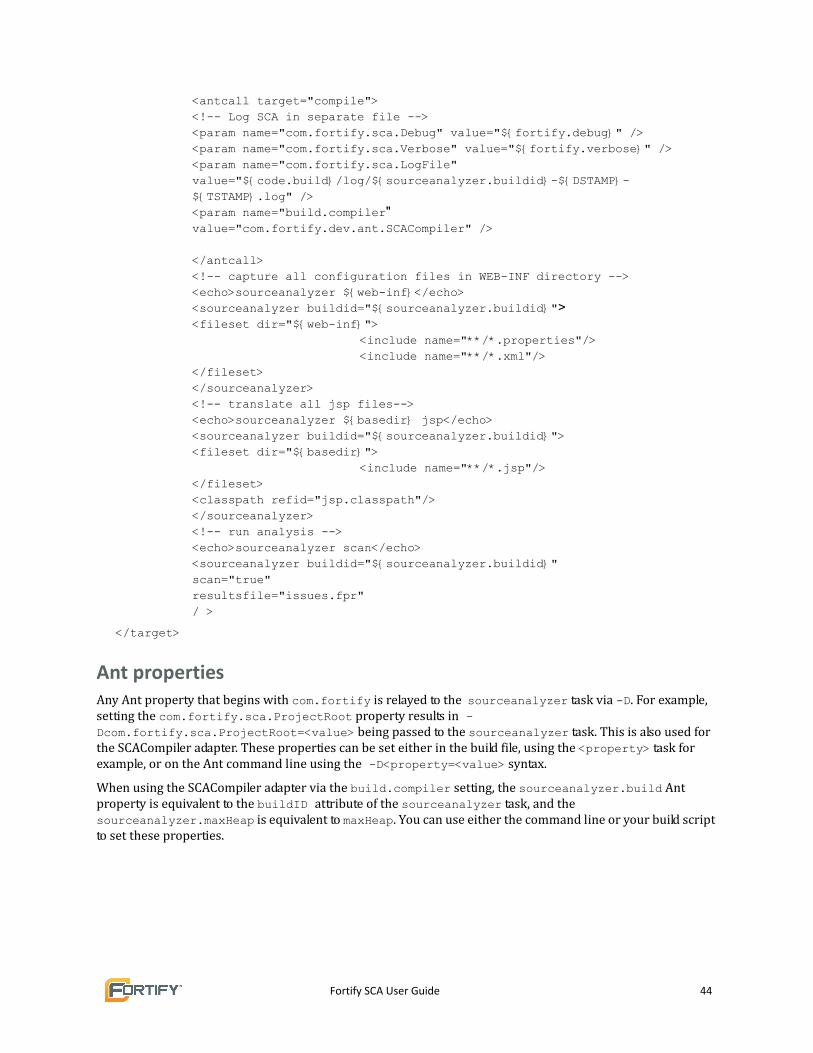
Fortify SCA User Guide 44
<antcall target="compile"><!-- Log SCA in separate file --><param name="com.fortify.sca.Debug" value="${fortify.debug}" /><param name="com.fortify.sca.Verbose" value="${fortify.verbose}" /><param name="com.fortify.sca.LogFile"value="${code.build}/log/${sourceanalyzer.buildid}-${DSTAMP}-${TSTAMP}.log" /><param name="build.compiler"value="com.fortify.dev.ant.SCACompiler" />
</antcall><!-- capture all configuration files in WEB-INF directory --><echo>sourceanalyzer ${web-inf}</echo><sourceanalyzer buildid="${sourceanalyzer.buildid}"><fileset dir="${web-inf}">
<include name="**/*.properties"/><include name="**/*.xml"/>
</fileset></sourceanalyzer><!-- translate all jsp files--><echo>sourceanalyzer ${basedir} jsp</echo><sourceanalyzer buildid="${sourceanalyzer.buildid}"><fileset dir="${basedir}">
<include name="**/*.jsp"/></fileset><classpath refid="jsp.classpath"/></sourceanalyzer><!-- run analysis --><echo>sourceanalyzer scan</echo><sourceanalyzer buildid="${sourceanalyzer.buildid}"scan="true"resultsfile="issues.fpr"/ >
</target>
Ant propertiesAny Ant property that begins with com.fortify is relayed to the sourceanalyzer task via -D. For example, setting the com.fortify.sca.ProjectRoot property results in -Dcom.fortify.sca.ProjectRoot=<value> being passed to the sourceanalyzer task. This is also used for the SCACompiler adapter. These properties can be set either in the build file, using the <property> task for example, or on the Ant command line using the -D<property=<value> syntax.
When using the SCACompiler adapter via the build.compiler setting, the sourceanalyzer.build Ant property is equivalent to the buildID attribute of the sourceanalyzer task, and the sourceanalyzer.maxHeap is equivalent to maxHeap. You can use either the command line or your build script to set these properties.
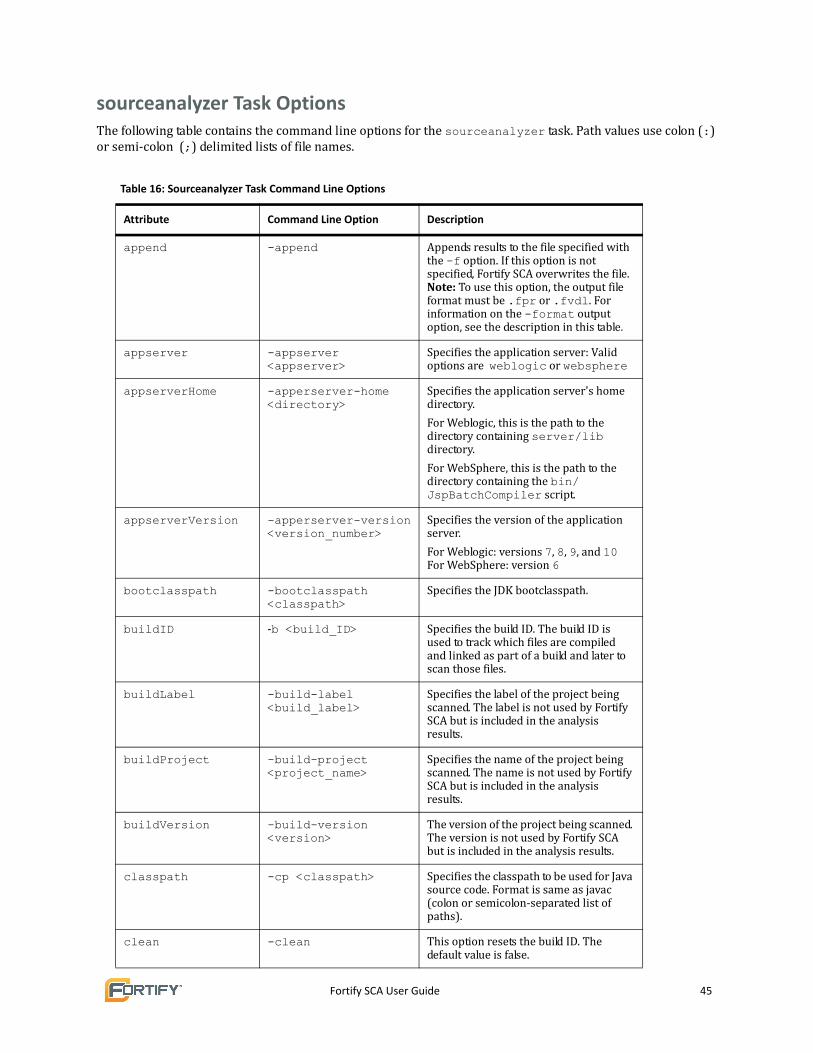
Fortify SCA User Guide 45
sourceanalyzer Task OptionsThe following table contains the command line options for the sourceanalyzer task. Path values use colon (:) or semi‐colon (;) delimited lists of file names.
Table 16: Sourceanalyzer Task Command Line Options
Attribute Command Line Option Description
append -append Appends results to the file specified with the -f option. If this option is not specified, Fortify SCA overwrites the file. Note: To use this option, the output file format must be .fpr or .fvdl. For information on the -format output option, see the description in this table.
appserver -appserver <appserver>
Specifies the application server: Valid options are weblogic or websphere
appserverHome -apperserver-home <directory>
Specifies the application server's home directory.
For Weblogic, this is the path to the directory containing server/lib directory.
For WebSphere, this is the path to the directory containing the bin/JspBatchCompiler script.
appserverVersion -apperserver-version <version_number>
Specifies the version of the application server.
For Weblogic: versions 7, 8, 9, and 10For WebSphere: version 6
bootclasspath -bootclasspath <classpath>
Specifies the JDK bootclasspath.
buildID ‐b <build_ID> Specifies the build ID. The build ID is used to track which files are compiled and linked as part of a build and later to scan those files.
buildLabel -build-label <build_label>
Specifies the label of the project being scanned. The label is not used by Fortify SCA but is included in the analysis results.
buildProject -build-project <project_name>
Specifies the name of the project being scanned. The name is not used by Fortify SCA but is included in the analysis results.
buildVersion -build-version <version>
The version of the project being scanned. The version is not used by Fortify SCA but is included in the analysis results.
classpath -cp <classpath> Specifies the classpath to be used for Java source code. Format is same as javac (colon or semicolon‐separated list of paths).
clean -clean This option resets the build ID. The default value is false.
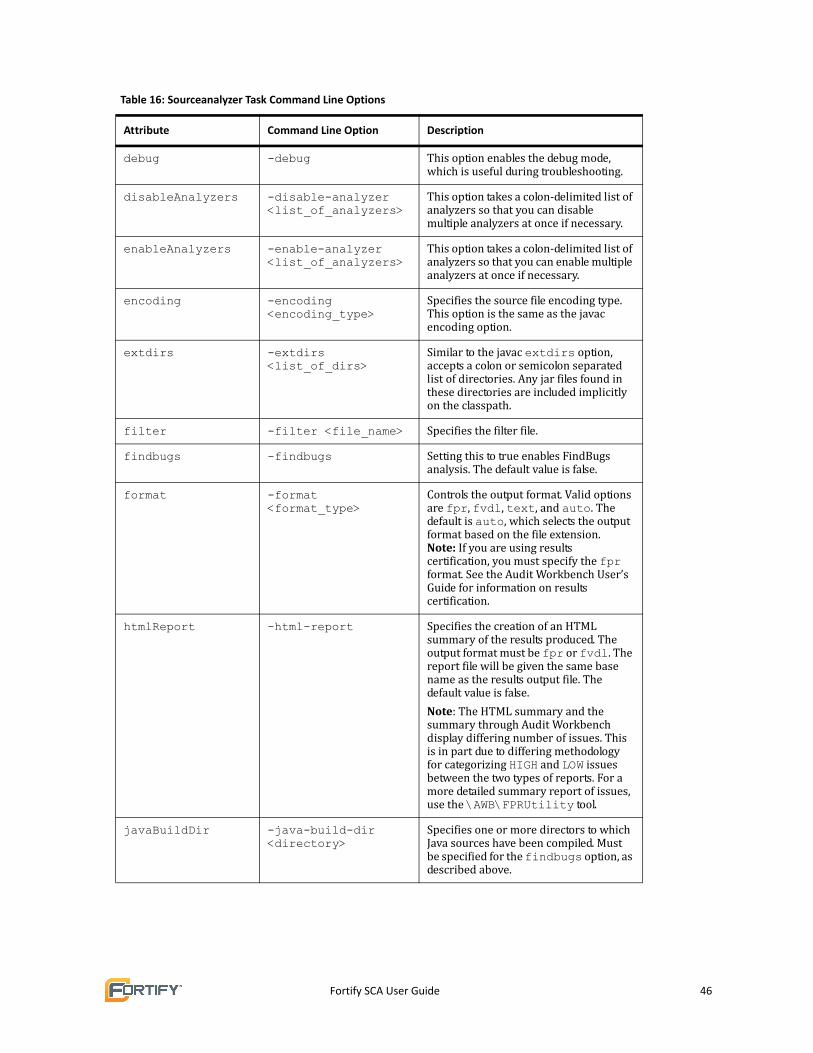
Fortify SCA User Guide 46
debug -debug This option enables the debug mode, which is useful during troubleshooting.
disableAnalyzers -disable-analyzer <list_of_analyzers>
This option takes a colon‐delimited list of analyzers so that you can disable multiple analyzers at once if necessary.
enableAnalyzers -enable-analyzer <list_of_analyzers>
This option takes a colon‐delimited list of analyzers so that you can enable multiple analyzers at once if necessary.
encoding -encoding <encoding_type>
Specifies the source file encoding type. This option is the same as the javac encoding option.
extdirs -extdirs <list_of_dirs>
Similar to the javac extdirs option, accepts a colon or semicolon separated list of directories. Any jar files found in these directories are included implicitly on the classpath.
filter -filter <file_name> Specifies the filter file.
findbugs -findbugs Setting this to true enables FindBugs analysis. The default value is false.
format -format <format_type>
Controls the output format. Valid options are fpr, fvdl, text, and auto. The default is auto, which selects the output format based on the file extension.Note: If you are using results certification, you must specify the fpr format. See the Audit Workbench User’s Guide for information on results certification.
htmlReport -html-report Specifies the creation of an HTML summary of the results produced. The output format must be fpr or fvdl. The report file will be given the same base name as the results output file. The default value is false.
Note: The HTML summary and the summary through Audit Workbench display differing number of issues. This is in part due to differing methodology for categorizing HIGH and LOW issues between the two types of reports. For a more detailed summary report of issues, use the \AWB\FPRUtility tool.
javaBuildDir -java-build-dir <directory>
Specifies one or more directors to which Java sources have been compiled. Must be specified for the findbugs option, as described above.
Table 16: Sourceanalyzer Task Command Line Options
Attribute Command Line Option Description
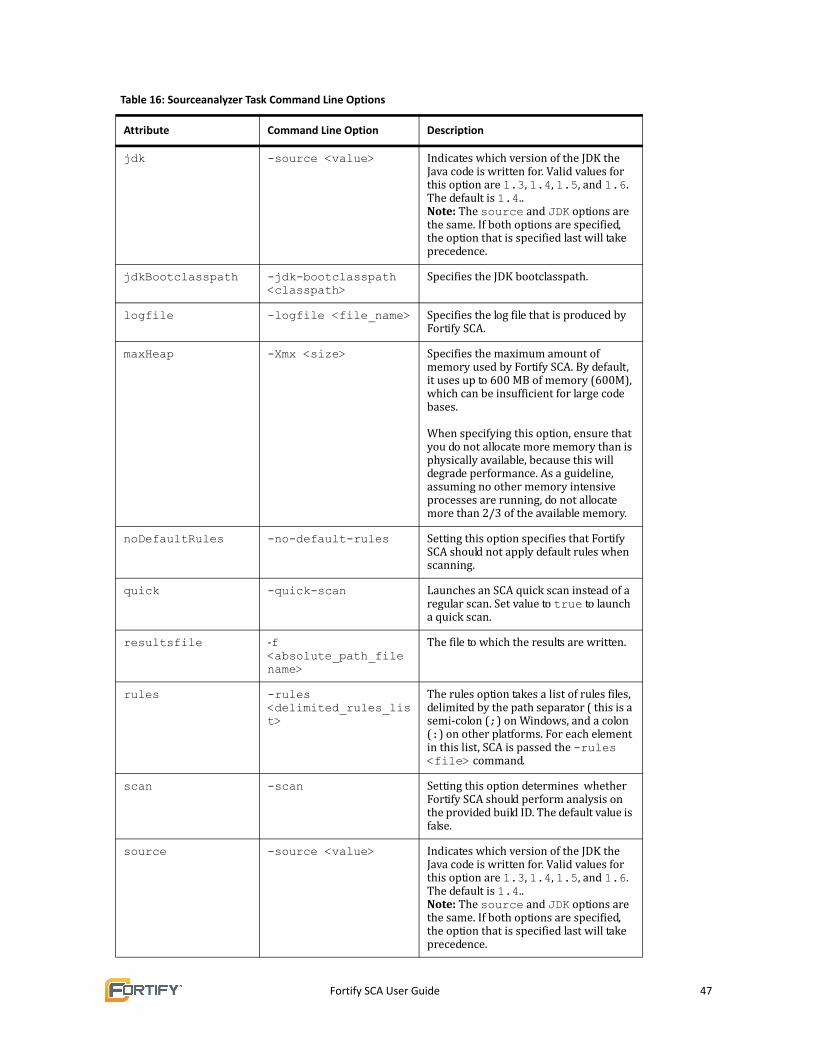
Fortify SCA User Guide 47
jdk -source <value> Indicates which version of the JDK the Java code is written for. Valid values for this option are 1.3, 1.4, 1.5, and 1.6. The default is 1.4..Note: The source and JDK options are the same. If both options are specified, the option that is specified last will take precedence.
jdkBootclasspath -jdk-bootclasspath <classpath>
Specifies the JDK bootclasspath.
logfile -logfile <file_name> Specifies the log file that is produced by Fortify SCA.
maxHeap -Xmx <size> Specifies the maximum amount of memory used by Fortify SCA. By default, it uses up to 600 MB of memory (600M), which can be insufficient for large code bases. When specifying this option, ensure that you do not allocate more memory than is physically available, because this will degrade performance. As a guideline, assuming no other memory intensive processes are running, do not allocate more than 2/3 of the available memory.
noDefaultRules -no-default-rules Setting this option specifies that Fortify SCA should not apply default rules when scanning.
quick -quick-scan Launches an SCA quick scan instead of a regular scan. Set value to true to launch a quick scan.
resultsfile ‐f <absolute_path_file name>
The file to which the results are written.
rules -rules <delimited_rules_list>
The rules option takes a list of rules files, delimited by the path separator ( this is a semi‐colon (;) on Windows, and a colon (:) on other platforms. For each element in this list, SCA is passed the -rules <file> command.
scan -scan Setting this option determines whether Fortify SCA should perform analysis on the provided build ID. The default value is false.
source -source <value> Indicates which version of the JDK the Java code is written for. Valid values for this option are 1.3, 1.4, 1.5, and 1.6. The default is 1.4..Note: The source and JDK options are the same. If both options are specified, the option that is specified last will take precedence.
Table 16: Sourceanalyzer Task Command Line Options
Attribute Command Line Option Description
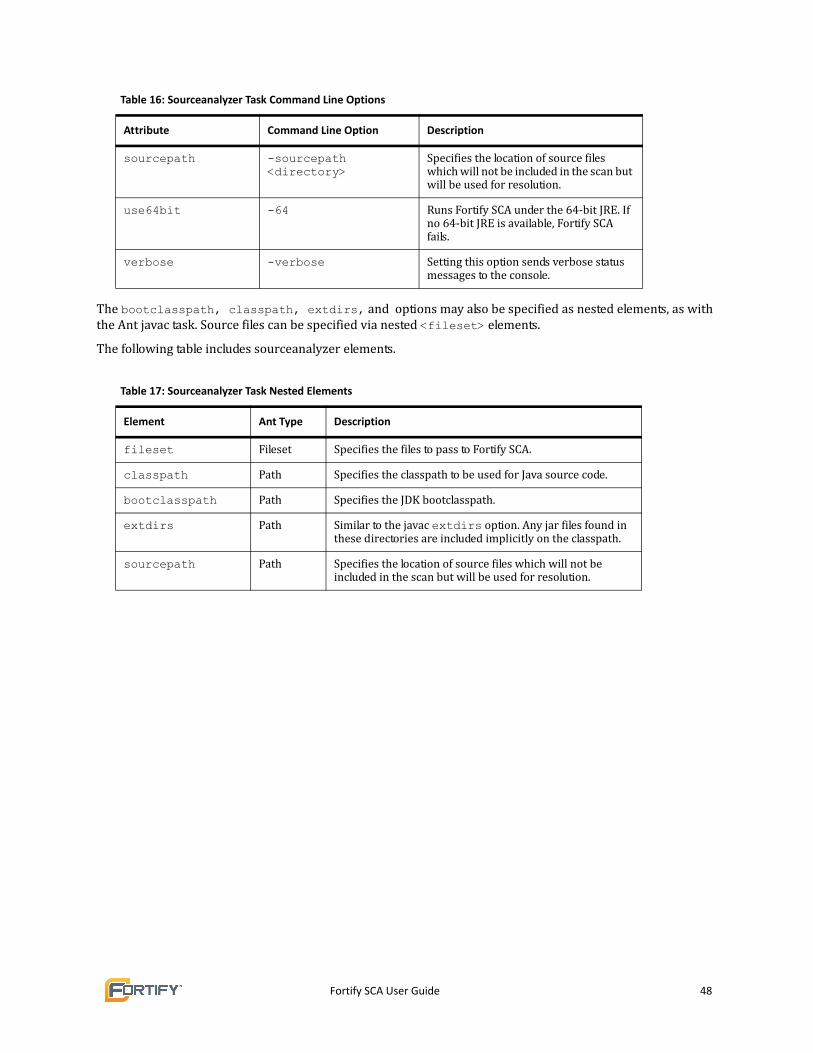
Fortify SCA User Guide 48
The bootclasspath, classpath, extdirs, and options may also be specified as nested elements, as with the Ant javac task. Source files can be specified via nested <fileset> elements.
The following table includes sourceanalyzer elements.
sourcepath -sourcepath <directory>
Specifies the location of source files which will not be included in the scan but will be used for resolution.
use64bit -64 Runs Fortify SCA under the 64‐bit JRE. If no 64‐bit JRE is available, Fortify SCA fails.
verbose -verbose Setting this option sends verbose status messages to the console.
Table 17: Sourceanalyzer Task Nested Elements
Element Ant Type Description
fileset Fileset Specifies the files to pass to Fortify SCA.
classpath Path Specifies the classpath to be used for Java source code.
bootclasspath Path Specifies the JDK bootclasspath.
extdirs Path Similar to the javac extdirs option. Any jar files found in these directories are included implicitly on the classpath.
sourcepath Path Specifies the location of source files which will not be included in the scan but will be used for resolution.
Table 16: Sourceanalyzer Task Command Line Options
Attribute Command Line Option Description
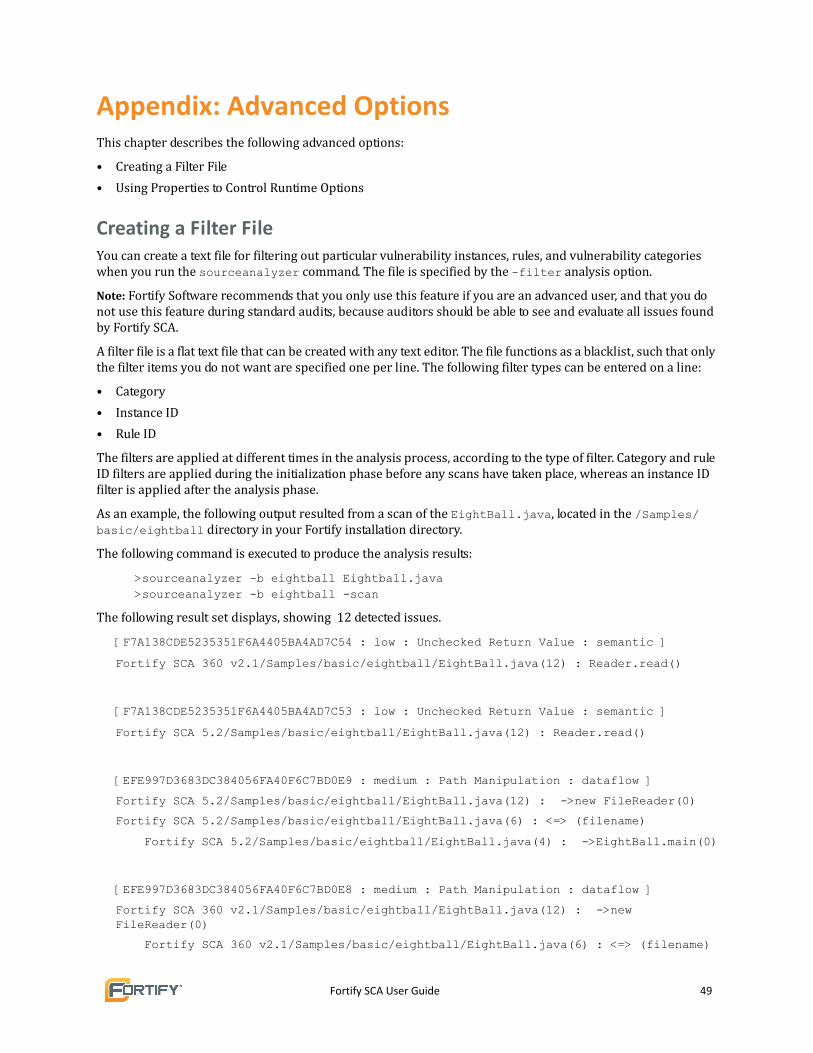
Fortify SCA User Guide 49
Appendix: Advanced OptionsThis chapter describes the following advanced options:
• Creating a Filter File
• Using Properties to Control Runtime Options
Creating a Filter FileYou can create a text file for filtering out particular vulnerability instances, rules, and vulnerability categories when you run the sourceanalyzer command. The file is specified by the -filter analysis option.
Note: Fortify Software recommends that you only use this feature if you are an advanced user, and that you do not use this feature during standard audits, because auditors should be able to see and evaluate all issues found by Fortify SCA.
A filter file is a flat text file that can be created with any text editor. The file functions as a blacklist, such that only the filter items you do not want are specified one per line. The following filter types can be entered on a line:
• Category
• Instance ID
• Rule ID
The filters are applied at different times in the analysis process, according to the type of filter. Category and rule ID filters are applied during the initialization phase before any scans have taken place, whereas an instance ID filter is applied after the analysis phase.
As an example, the following output resulted from a scan of the EightBall.java, located in the /Samples/basic/eightball directory in your Fortify installation directory.
The following command is executed to produce the analysis results:
>sourceanalyzer -b eightball Eightball.java>sourceanalyzer -b eightball -scan
The following result set displays, showing 12 detected issues.
[F7A138CDE5235351F6A4405BA4AD7C54 : low : Unchecked Return Value : semantic ]
Fortify SCA 360 v2.1/Samples/basic/eightball/EightBall.java(12) : Reader.read()
[F7A138CDE5235351F6A4405BA4AD7C53 : low : Unchecked Return Value : semantic ]
Fortify SCA 5.2/Samples/basic/eightball/EightBall.java(12) : Reader.read()
[EFE997D3683DC384056FA40F6C7BD0E9 : medium : Path Manipulation : dataflow ]
Fortify SCA 5.2/Samples/basic/eightball/EightBall.java(12) : ->new FileReader(0)
Fortify SCA 5.2/Samples/basic/eightball/EightBall.java(6) : <=> (filename)
Fortify SCA 5.2/Samples/basic/eightball/EightBall.java(4) : ->EightBall.main(0)
[EFE997D3683DC384056FA40F6C7BD0E8 : medium : Path Manipulation : dataflow ]
Fortify SCA 360 v2.1/Samples/basic/eightball/EightBall.java(12) : ->new FileReader(0)
Fortify SCA 360 v2.1/Samples/basic/eightball/EightBall.java(6) : <=> (filename)
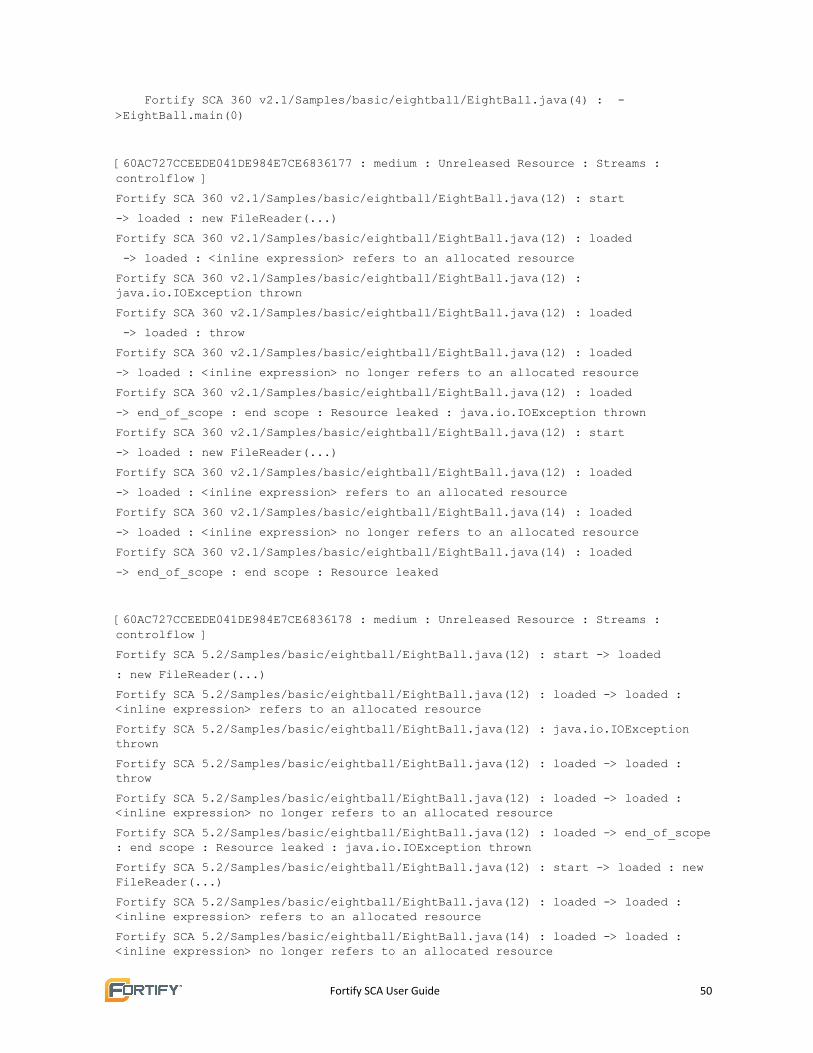
Fortify SCA User Guide 50
Fortify SCA 360 v2.1/Samples/basic/eightball/EightBall.java(4) : ->EightBall.main(0)
[60AC727CCEEDE041DE984E7CE6836177 : medium : Unreleased Resource : Streams : controlflow ]
Fortify SCA 360 v2.1/Samples/basic/eightball/EightBall.java(12) : start
-> loaded : new FileReader(...)
Fortify SCA 360 v2.1/Samples/basic/eightball/EightBall.java(12) : loaded
-> loaded : <inline expression> refers to an allocated resource
Fortify SCA 360 v2.1/Samples/basic/eightball/EightBall.java(12) : java.io.IOException thrown
Fortify SCA 360 v2.1/Samples/basic/eightball/EightBall.java(12) : loaded
-> loaded : throw
Fortify SCA 360 v2.1/Samples/basic/eightball/EightBall.java(12) : loaded
-> loaded : <inline expression> no longer refers to an allocated resource
Fortify SCA 360 v2.1/Samples/basic/eightball/EightBall.java(12) : loaded
-> end_of_scope : end scope : Resource leaked : java.io.IOException thrown
Fortify SCA 360 v2.1/Samples/basic/eightball/EightBall.java(12) : start
-> loaded : new FileReader(...)
Fortify SCA 360 v2.1/Samples/basic/eightball/EightBall.java(12) : loaded
-> loaded : <inline expression> refers to an allocated resource
Fortify SCA 360 v2.1/Samples/basic/eightball/EightBall.java(14) : loaded
-> loaded : <inline expression> no longer refers to an allocated resource
Fortify SCA 360 v2.1/Samples/basic/eightball/EightBall.java(14) : loaded
-> end_of_scope : end scope : Resource leaked
[60AC727CCEEDE041DE984E7CE6836178 : medium : Unreleased Resource : Streams : controlflow ]
Fortify SCA 5.2/Samples/basic/eightball/EightBall.java(12) : start -> loaded
: new FileReader(...)
Fortify SCA 5.2/Samples/basic/eightball/EightBall.java(12) : loaded -> loaded : <inline expression> refers to an allocated resource
Fortify SCA 5.2/Samples/basic/eightball/EightBall.java(12) : java.io.IOException thrown
Fortify SCA 5.2/Samples/basic/eightball/EightBall.java(12) : loaded -> loaded : throw
Fortify SCA 5.2/Samples/basic/eightball/EightBall.java(12) : loaded -> loaded : <inline expression> no longer refers to an allocated resource
Fortify SCA 5.2/Samples/basic/eightball/EightBall.java(12) : loaded -> end_of_scope : end scope : Resource leaked : java.io.IOException thrown
Fortify SCA 5.2/Samples/basic/eightball/EightBall.java(12) : start -> loaded : new FileReader(...)
Fortify SCA 5.2/Samples/basic/eightball/EightBall.java(12) : loaded -> loaded : <inline expression> refers to an allocated resource
Fortify SCA 5.2/Samples/basic/eightball/EightBall.java(14) : loaded -> loaded : <inline expression> no longer refers to an allocated resource
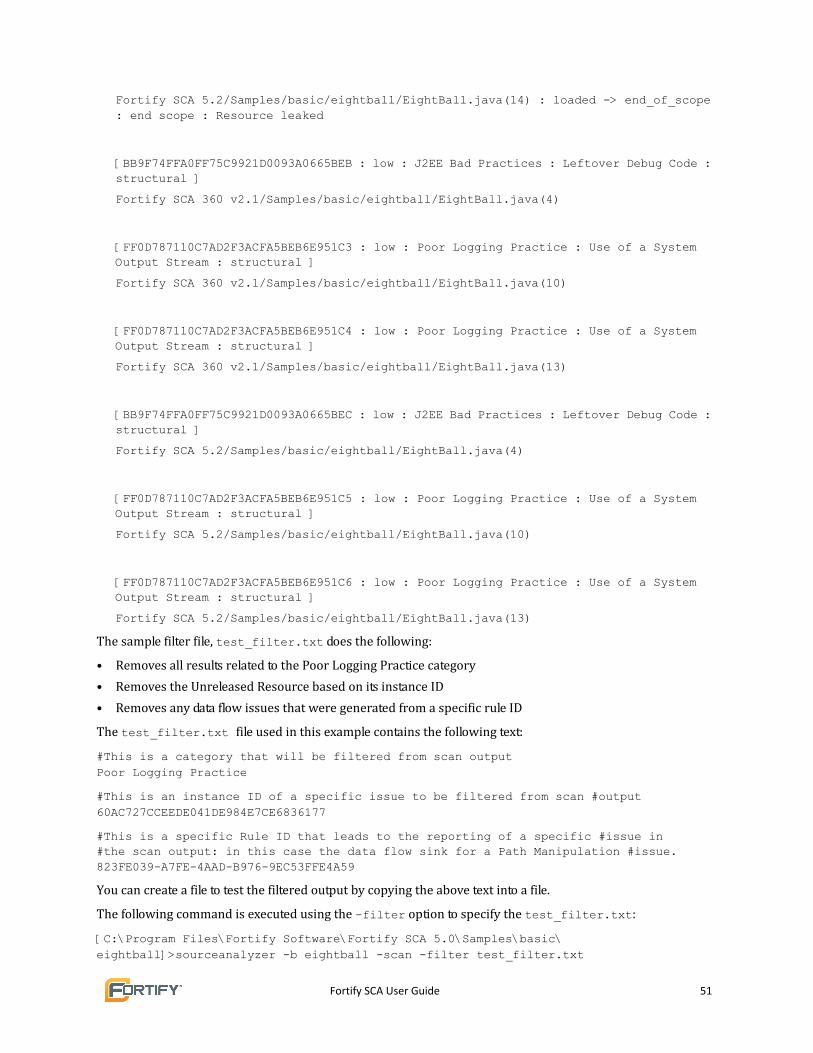
Fortify SCA User Guide 51
Fortify SCA 5.2/Samples/basic/eightball/EightBall.java(14) : loaded -> end_of_scope : end scope : Resource leaked
[BB9F74FFA0FF75C9921D0093A0665BEB : low : J2EE Bad Practices : Leftover Debug Code : structural ]
Fortify SCA 360 v2.1/Samples/basic/eightball/EightBall.java(4)
[FF0D787110C7AD2F3ACFA5BEB6E951C3 : low : Poor Logging Practice : Use of a System Output Stream : structural ]
Fortify SCA 360 v2.1/Samples/basic/eightball/EightBall.java(10)
[FF0D787110C7AD2F3ACFA5BEB6E951C4 : low : Poor Logging Practice : Use of a System Output Stream : structural ]
Fortify SCA 360 v2.1/Samples/basic/eightball/EightBall.java(13)
[BB9F74FFA0FF75C9921D0093A0665BEC : low : J2EE Bad Practices : Leftover Debug Code : structural ]
Fortify SCA 5.2/Samples/basic/eightball/EightBall.java(4)
[FF0D787110C7AD2F3ACFA5BEB6E951C5 : low : Poor Logging Practice : Use of a System Output Stream : structural ]
Fortify SCA 5.2/Samples/basic/eightball/EightBall.java(10)
[FF0D787110C7AD2F3ACFA5BEB6E951C6 : low : Poor Logging Practice : Use of a System Output Stream : structural ]
Fortify SCA 5.2/Samples/basic/eightball/EightBall.java(13)
The sample filter file, test_filter.txt does the following:
• Removes all results related to the Poor Logging Practice category
• Removes the Unreleased Resource based on its instance ID
• Removes any data flow issues that were generated from a specific rule ID
The test_filter.txt file used in this example contains the following text:
#This is a category that will be filtered from scan outputPoor Logging Practice
#This is an instance ID of a specific issue to be filtered from scan #output60AC727CCEEDE041DE984E7CE6836177
#This is a specific Rule ID that leads to the reporting of a specific #issue in #the scan output: in this case the data flow sink for a Path Manipulation #issue.823FE039-A7FE-4AAD-B976-9EC53FFE4A59
You can create a file to test the filtered output by copying the above text into a file.
The following command is executed using the -filter option to specify the test_filter.txt:
[C:\Program Files\Fortify Software\Fortify SCA 5.0\Samples\basic\eightball]>sourceanalyzer -b eightball -scan -filter test_filter.txt
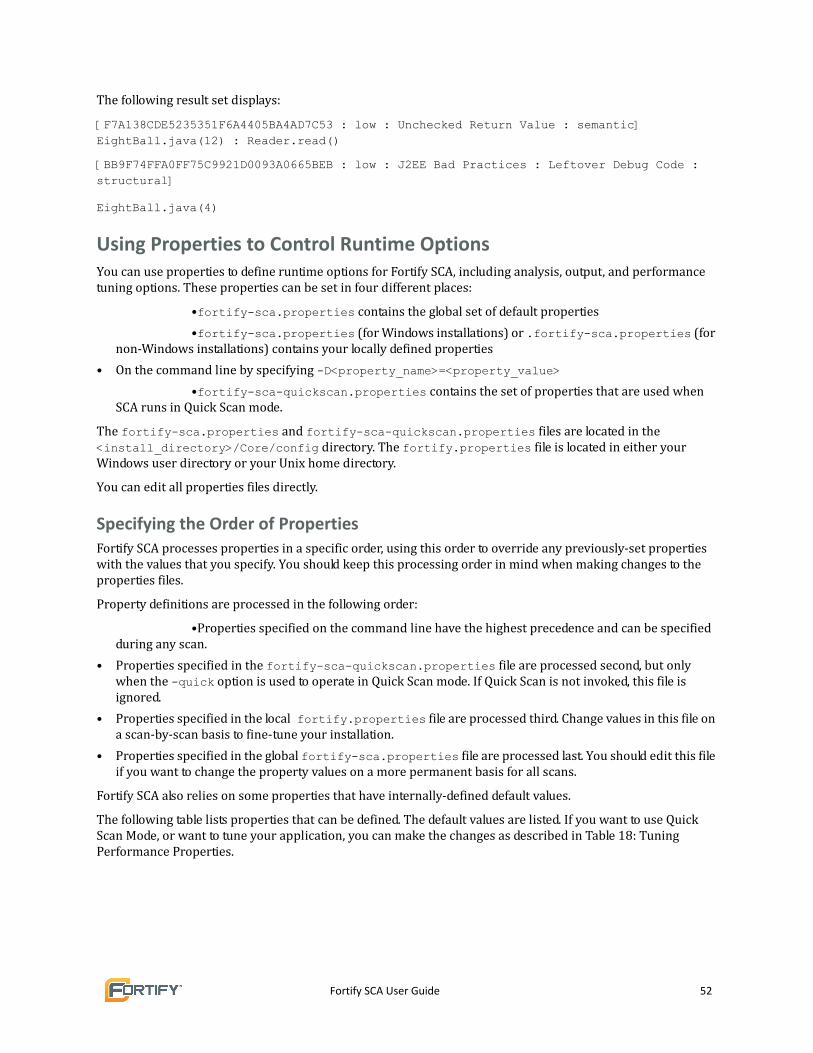
Fortify SCA User Guide 52
The following result set displays:
[F7A138CDE5235351F6A4405BA4AD7C53 : low : Unchecked Return Value : semantic]EightBall.java(12) : Reader.read()
[BB9F74FFA0FF75C9921D0093A0665BEB : low : J2EE Bad Practices : Leftover Debug Code : structural]
EightBall.java(4)
Using Properties to Control Runtime OptionsYou can use properties to define runtime options for Fortify SCA, including analysis, output, and performance tuning options. These properties can be set in four different places:
•fortify-sca.properties contains the global set of default properties
•fortify-sca.properties (for Windows installations) or .fortify-sca.properties (for non‐Windows installations) contains your locally defined properties
• On the command line by specifying -D<property_name>=<property_value>
•fortify-sca-quickscan.properties contains the set of properties that are used when SCA runs in Quick Scan mode.
The fortify-sca.properties and fortify-sca-quickscan.properties files are located in the <install_directory>/Core/config directory. The fortify.properties file is located in either your Windows user directory or your Unix home directory.
You can edit all properties files directly.
Specifying the Order of PropertiesFortify SCA processes properties in a specific order, using this order to override any previously‐set properties with the values that you specify. You should keep this processing order in mind when making changes to the properties files.
Property definitions are processed in the following order:
•Properties specified on the command line have the highest precedence and can be specified during any scan.
• Properties specified in the fortify-sca-quickscan.properties file are processed second, but only when the -quick option is used to operate in Quick Scan mode. If Quick Scan is not invoked, this file is ignored.
• Properties specified in the local fortify.properties file are processed third. Change values in this file on a scan‐by‐scan basis to fine‐tune your installation.
• Properties specified in the global fortify-sca.properties file are processed last. You should edit this file if you want to change the property values on a more permanent basis for all scans.
Fortify SCA also relies on some properties that have internally‐defined default values.
The following table lists properties that can be defined. The default values are listed. If you want to use Quick Scan Mode, or want to tune your application, you can make the changes as described in Table 18: Tuning Performance Properties.
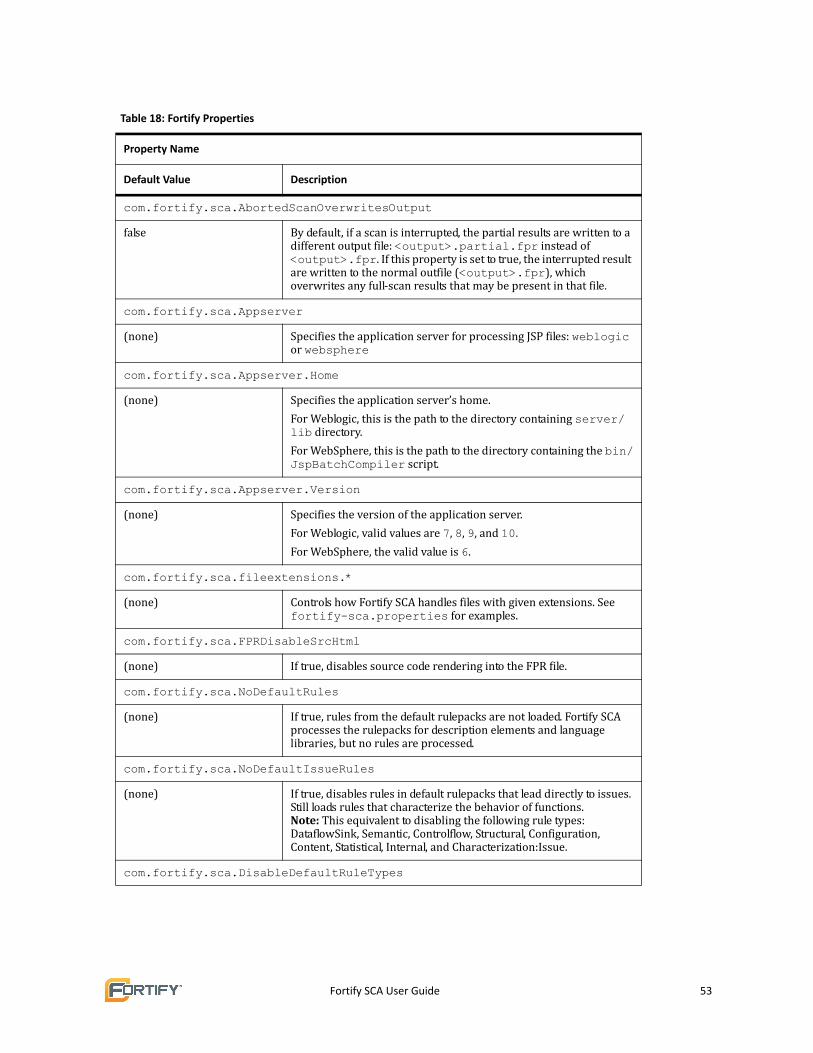
Fortify SCA User Guide 53
Table 18: Fortify Properties
Property Name
Default Value Description
com.fortify.sca.AbortedScanOverwritesOutput
false By default, if a scan is interrupted, the partial results are written to a different output file: <output>.partial.fpr instead of <output>.fpr. If this property is set to true, the interrupted result are written to the normal outfile (<output>.fpr), which overwrites any full‐scan results that may be present in that file.
com.fortify.sca.Appserver
(none) Specifies the application server for processing JSP files: weblogic or websphere
com.fortify.sca.Appserver.Home
(none) Specifies the application server’s home.
For Weblogic, this is the path to the directory containing server/lib directory.
For WebSphere, this is the path to the directory containing the bin/JspBatchCompiler script.
com.fortify.sca.Appserver.Version
(none) Specifies the version of the application server.
For Weblogic, valid values are 7, 8, 9, and 10.
For WebSphere, the valid value is 6.
com.fortify.sca.fileextensions.*
(none) Controls how Fortify SCA handles files with given extensions. See fortify-sca.properties for examples.
com.fortify.sca.FPRDisableSrcHtml
(none) If true, disables source code rendering into the FPR file.
com.fortify.sca.NoDefaultRules
(none) If true, rules from the default rulepacks are not loaded. Fortify SCA processes the rulepacks for description elements and language libraries, but no rules are processed.
com.fortify.sca.NoDefaultIssueRules
(none) If true, disables rules in default rulepacks that lead directly to issues. Still loads rules that characterize the behavior of functions. Note: This equivalent to disabling the following rule types: DataflowSink, Semantic, Controlflow, Structural, Configuration, Content, Statistical, Internal, and Characterization:Issue.
com.fortify.sca.DisableDefaultRuleTypes
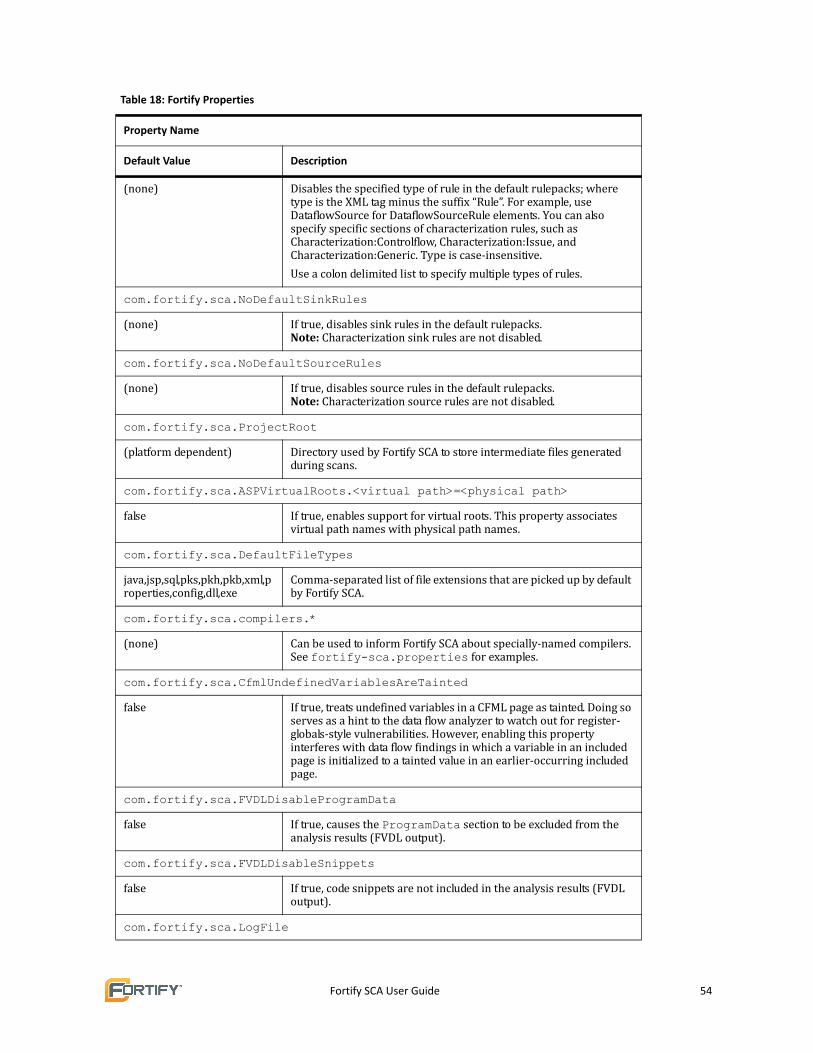
Fortify SCA User Guide 54
(none) Disables the specified type of rule in the default rulepacks; where type is the XML tag minus the suffix “Rule”. For example, use DataflowSource for DataflowSourceRule elements. You can also specify specific sections of characterization rules, such as Characterization:Controlflow, Characterization:Issue, and Characterization:Generic. Type is case‐insensitive.
Use a colon delimited list to specify multiple types of rules.
com.fortify.sca.NoDefaultSinkRules
(none) If true, disables sink rules in the default rulepacks. Note: Characterization sink rules are not disabled.
com.fortify.sca.NoDefaultSourceRules
(none) If true, disables source rules in the default rulepacks. Note: Characterization source rules are not disabled.
com.fortify.sca.ProjectRoot
(platform dependent) Directory used by Fortify SCA to store intermediate files generated during scans.
com.fortify.sca.ASPVirtualRoots.<virtual path>=<physical path>
false If true, enables support for virtual roots. This property associates virtual path names with physical path names.
com.fortify.sca.DefaultFileTypes
java,jsp,sql,pks,pkh,pkb,xml,properties,config,dll,exe
Comma‐separated list of file extensions that are picked up by default by Fortify SCA.
com.fortify.sca.compilers.*
(none) Can be used to inform Fortify SCA about specially‐named compilers. See fortify-sca.properties for examples.
com.fortify.sca.CfmlUndefinedVariablesAreTainted
false If true, treats undefined variables in a CFML page as tainted. Doing so serves as a hint to the data flow analyzer to watch out for register‐globals‐style vulnerabilities. However, enabling this property interferes with data flow findings in which a variable in an included page is initialized to a tainted value in an earlier‐occurring included page.
com.fortify.sca.FVDLDisableProgramData
false If true, causes the ProgramData section to be excluded from the analysis results (FVDL output).
com.fortify.sca.FVDLDisableSnippets
false If true, code snippets are not included in the analysis results (FVDL output).
com.fortify.sca.LogFile
Table 18: Fortify Properties
Property Name
Default Value Description
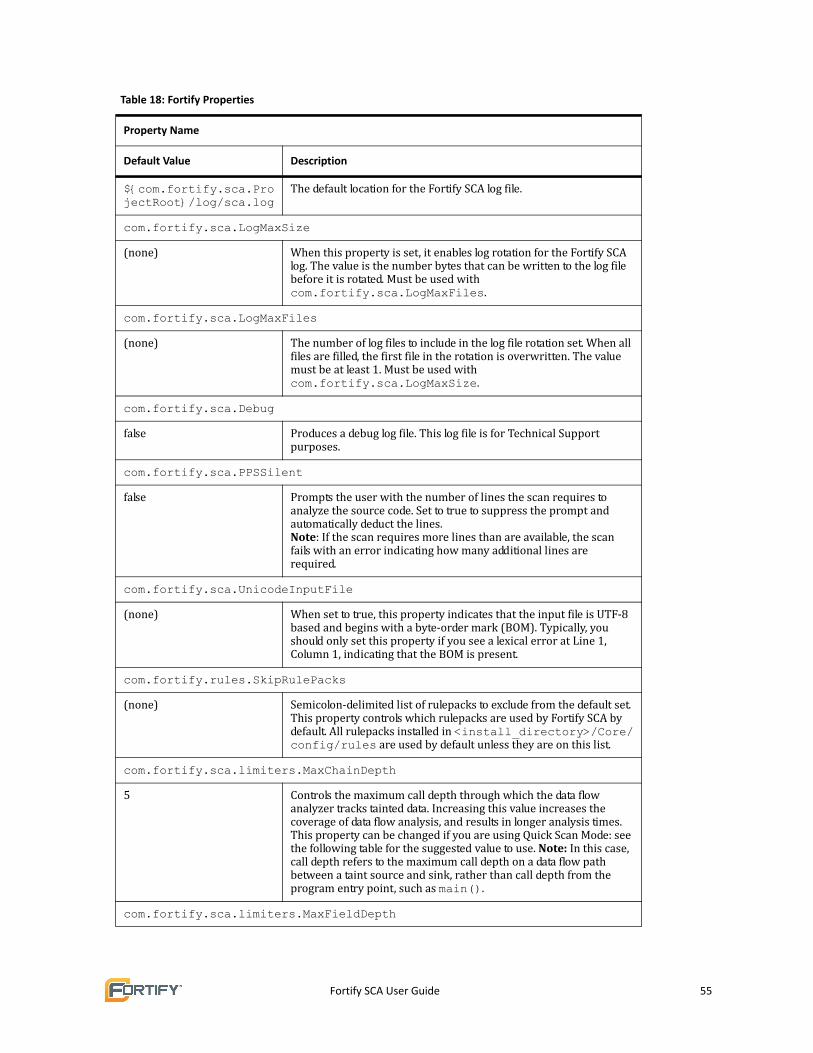
Fortify SCA User Guide 55
${com.fortify.sca.ProjectRoot}/log/sca.log
The default location for the Fortify SCA log file.
com.fortify.sca.LogMaxSize
(none) When this property is set, it enables log rotation for the Fortify SCA log. The value is the number bytes that can be written to the log file before it is rotated. Must be used with com.fortify.sca.LogMaxFiles.
com.fortify.sca.LogMaxFiles
(none) The number of log files to include in the log file rotation set. When all files are filled, the first file in the rotation is overwritten. The value must be at least 1. Must be used with com.fortify.sca.LogMaxSize.
com.fortify.sca.Debug
false Produces a debug log file. This log file is for Technical Support purposes.
com.fortify.sca.PPSSilent
false Prompts the user with the number of lines the scan requires to analyze the source code. Set to true to suppress the prompt and automatically deduct the lines. Note: If the scan requires more lines than are available, the scan fails with an error indicating how many additional lines are required.
com.fortify.sca.UnicodeInputFile
(none) When set to true, this property indicates that the input file is UTF‐8 based and begins with a byte‐order mark (BOM). Typically, you should only set this property if you see a lexical error at Line 1, Column 1, indicating that the BOM is present.
com.fortify.rules.SkipRulePacks
(none) Semicolon‐delimited list of rulepacks to exclude from the default set. This property controls which rulepacks are used by Fortify SCA by default. All rulepacks installed in <install_directory>/Core/config/rules are used by default unless they are on this list.
com.fortify.sca.limiters.MaxChainDepth
5 Controls the maximum call depth through which the data flow analyzer tracks tainted data. Increasing this value increases the coverage of data flow analysis, and results in longer analysis times. This property can be changed if you are using Quick Scan Mode: see the following table for the suggested value to use. Note: In this case, call depth refers to the maximum call depth on a data flow path between a taint source and sink, rather than call depth from the program entry point, such as main().
com.fortify.sca.limiters.MaxFieldDepth
Table 18: Fortify Properties
Property Name
Default Value Description
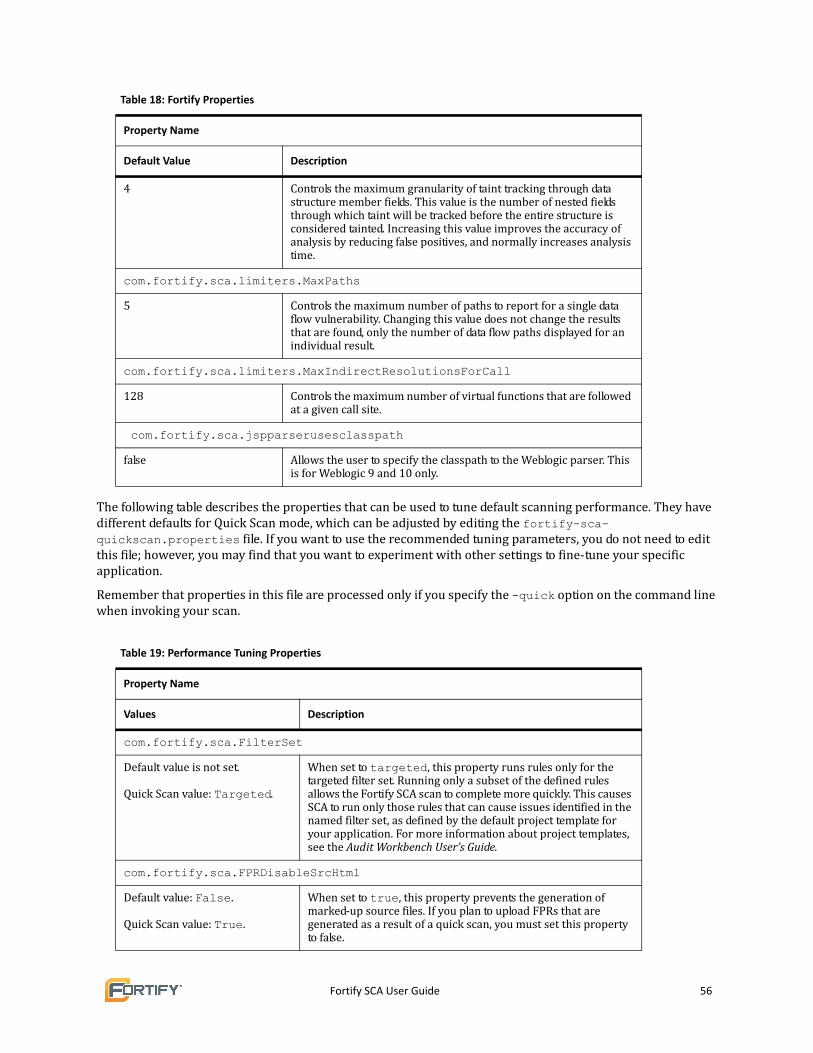
Fortify SCA User Guide 56
The following table describes the properties that can be used to tune default scanning performance. They have different defaults for Quick Scan mode, which can be adjusted by editing the fortify-sca-quickscan.properties file. If you want to use the recommended tuning parameters, you do not need to edit this file; however, you may find that you want to experiment with other settings to fine‐tune your specific application.
Remember that properties in this file are processed only if you specify the -quick option on the command line when invoking your scan.
4 Controls the maximum granularity of taint tracking through data structure member fields. This value is the number of nested fields through which taint will be tracked before the entire structure is considered tainted. Increasing this value improves the accuracy of analysis by reducing false positives, and normally increases analysis time.
com.fortify.sca.limiters.MaxPaths
5 Controls the maximum number of paths to report for a single data flow vulnerability. Changing this value does not change the results that are found, only the number of data flow paths displayed for an individual result.
com.fortify.sca.limiters.MaxIndirectResolutionsForCall
128 Controls the maximum number of virtual functions that are followed at a given call site.
com.fortify.sca.jspparserusesclasspath
false Allows the user to specify the classpath to the Weblogic parser. This is for Weblogic 9 and 10 only.
Table 19: Performance Tuning Properties
Property Name
Values Description
com.fortify.sca.FilterSet
Default value is not set. Quick Scan value: Targeted.
When set to targeted, this property runs rules only for the targeted filter set. Running only a subset of the defined rules allows the Fortify SCA scan to complete more quickly. This causes SCA to run only those rules that can cause issues identified in the named filter set, as defined by the default project template for your application. For more information about project templates, see the Audit Workbench User’s Guide.
com.fortify.sca.FPRDisableSrcHtml
Default value: False.Quick Scan value: True.
When set to true, this property prevents the generation of marked‐up source files. If you plan to upload FPRs that are generated as a result of a quick scan, you must set this property to false.
Table 18: Fortify Properties
Property Name
Default Value Description

Fortify SCA User Guide 57
com.fortify.sca.limiters.ConstraintPredicateSize
Default value: 50000.Quick Scan value: 10000.
Skips calculations defined as very complex in the buffer analyzer to improve scanning time.
com.fortify.sca.limiters.BufferConfidenceInconclusiveOnTimeout
Default value: true.Quick Scan value: false.
Skips calculations defined as very complex in the buffer analyzer to improve scanning time.
com.fortify.sca.limiters.MaxChainDepth
Default value: 5. Quick Scan value: 4.
Controls the maximum call depth through which the data flow analyzer tracks tainted data. Increasing this value increases the coverage of data flow analysis, and results in longer analysis times. Note: In this case, call depth refers to the maximum call depth on a data flow path between a taint source and sink, rather than call depth from the program entry point, such as main().
com.fortify.sca.limiters.MaxTaintDefForVar
Default value: 1000. Quick Scan value: 500.
This property sets the complexity limit for data flow precision backoff. Data flow incrementally decreases precision of analysis for functions that exceed this complexity metric for a given preci‐sion level.
com.fortify.sca.limiters.MaxTaintDefForVarAbort
Default value: 4000. Quick Scan value: 1000.
This property sets a hard limit for function complexity. If com‐plexity of a function exceeds this limit at the lowest precision level, the analyzer will not analyze that function.
com.fortify.sca.DisableGlobals
Default value: false. Quick Scan value: false.
This property prevents the tracking of tainted data through global variables to allow faster scanning.
com.fortify.sca.CtrlflowSkipJSPs
Default value: false. Quick Scan value: false.
This property skips control flow analysis of JSPs in your project.
com.fortify.sca.NullPtrMaxFunctionTime
Default value: 300000.Quick Scan value: 30000.
This property sets a time limit, in milliseconds, for Null Pointer analysis for a single function. The default is five minutes. Setting it to a shorter limit decreases overall scanning time.
com.fortify.sca.CtrlflowMaxFunctionTime
Default value: 600000.Quick Scan value: 30000.
This property sets a time limit, in milliseconds, for control flow analysis for a single function. The default is 10 minutes.
Table 19: Performance Tuning Properties
Property Name
Values Description
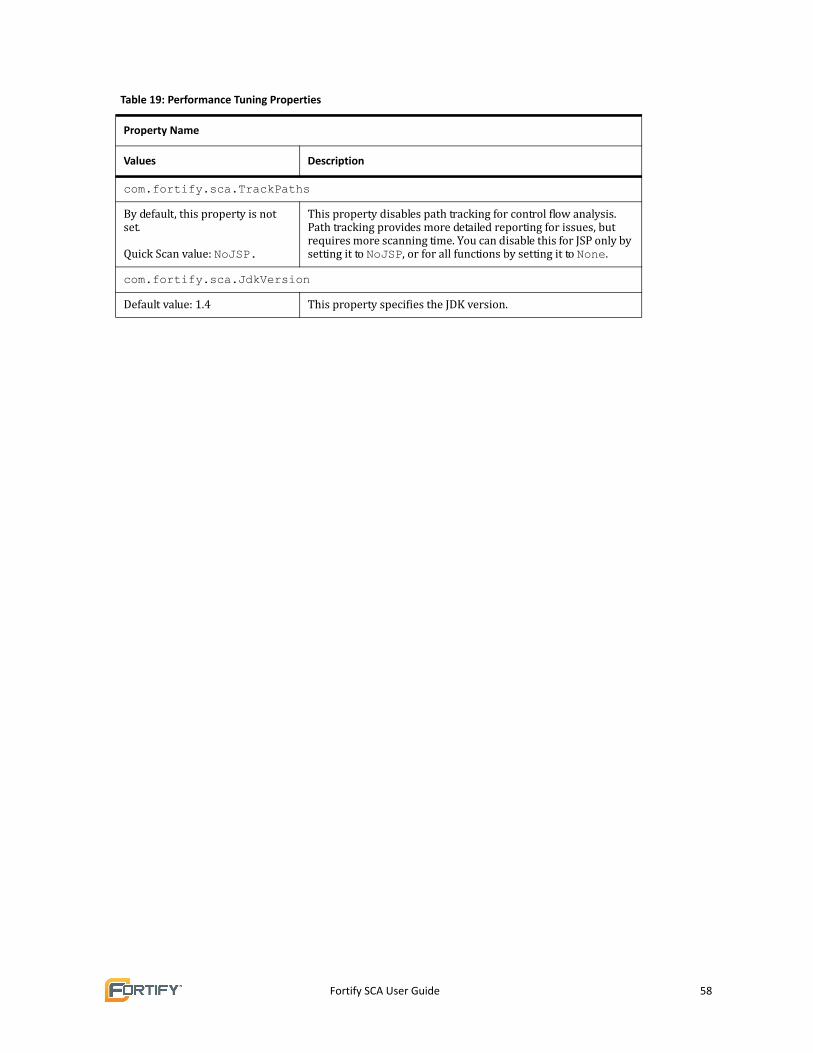
Fortify SCA User Guide 58
com.fortify.sca.TrackPaths
By default, this property is not set. Quick Scan value: NoJSP.
This property disables path tracking for control flow analysis. Path tracking provides more detailed reporting for issues, but requires more scanning time. You can disable this for JSP only by setting it to NoJSP, or for all functions by setting it to None.
com.fortify.sca.JdkVersion
Default value: 1.4 This property specifies the JDK version.
Table 19: Performance Tuning Properties
Property Name
Values Description
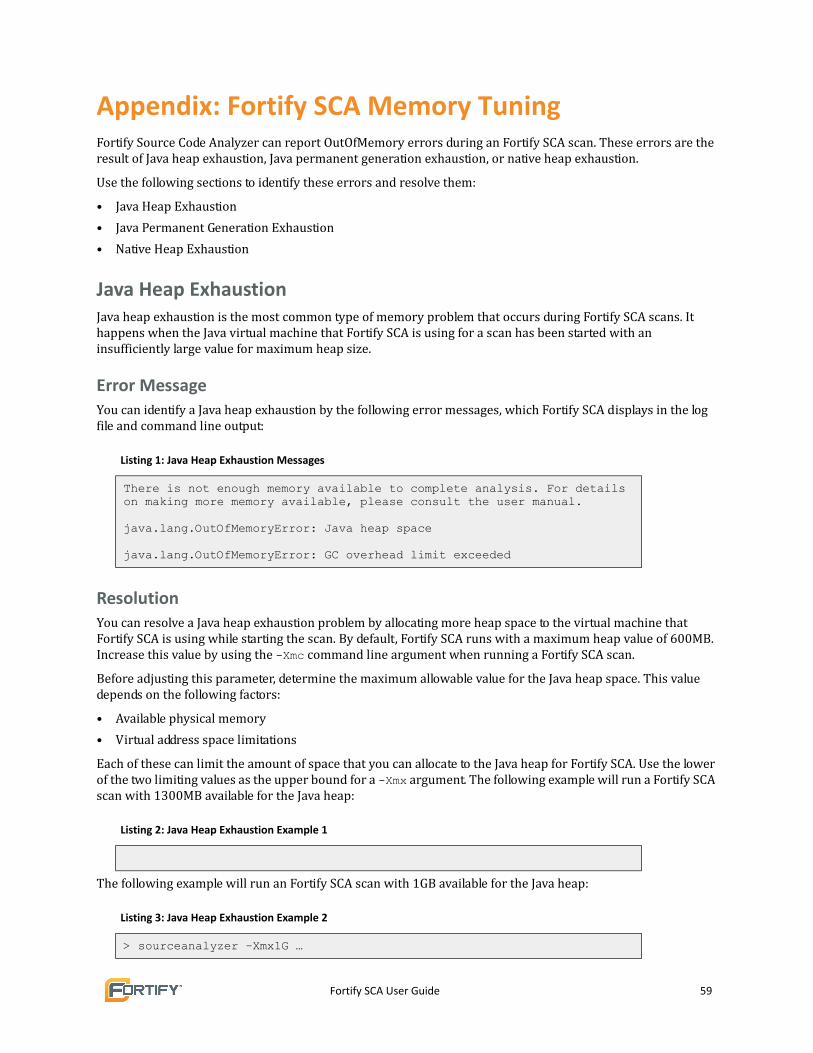
Fortify SCA User Guide 59
Appendix: Fortify SCA Memory TuningFortify Source Code Analyzer can report OutOfMemory errors during an Fortify SCA scan. These errors are the result of Java heap exhaustion, Java permanent generation exhaustion, or native heap exhaustion.
Use the following sections to identify these errors and resolve them:
• Java Heap Exhaustion
• Java Permanent Generation Exhaustion
• Native Heap Exhaustion
Java Heap ExhaustionJava heap exhaustion is the most common type of memory problem that occurs during Fortify SCA scans. It happens when the Java virtual machine that Fortify SCA is using for a scan has been started with an insufficiently large value for maximum heap size.
Error MessageYou can identify a Java heap exhaustion by the following error messages, which Fortify SCA displays in the log file and command line output:
ResolutionYou can resolve a Java heap exhaustion problem by allocating more heap space to the virtual machine that Fortify SCA is using while starting the scan. By default, Fortify SCA runs with a maximum heap value of 600MB. Increase this value by using the -Xmc command line argument when running a Fortify SCA scan.
Before adjusting this parameter, determine the maximum allowable value for the Java heap space. This value depends on the following factors:
• Available physical memory
• Virtual address space limitations
Each of these can limit the amount of space that you can allocate to the Java heap for Fortify SCA. Use the lower of the two limiting values as the upper bound for a -Xmx argument. The following example will run a Fortify SCA scan with 1300MB available for the Java heap:
> sourceanalyzer -Xmx1300M …
The following example will run an Fortify SCA scan with 1GB available for the Java heap:
Listing 1: Java Heap Exhaustion Messages
There is not enough memory available to complete analysis. For details on making more memory available, please consult the user manual.java.lang.OutOfMemoryError: Java heap spacejava.lang.OutOfMemoryError: GC overhead limit exceeded
Listing 2: Java Heap Exhaustion Example 1
Listing 3: Java Heap Exhaustion Example 2
> sourceanalyzer –Xmx1G …
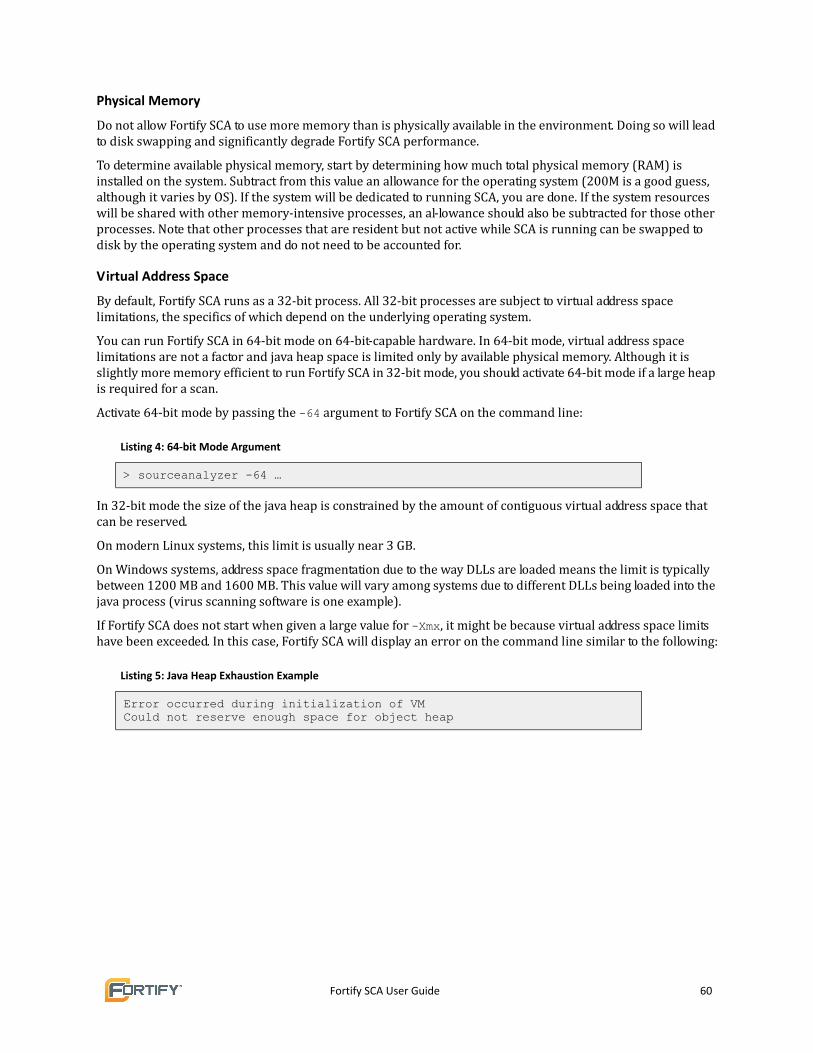
Fortify SCA User Guide 60
Physical Memory
Do not allow Fortify SCA to use more memory than is physically available in the environment. Doing so will lead to disk swapping and significantly degrade Fortify SCA performance.
To determine available physical memory, start by determining how much total physical memory (RAM) is installed on the system. Subtract from this value an allowance for the operating system (200M is a good guess, although it varies by OS). If the system will be dedicated to running SCA, you are done. If the system resources will be shared with other memory‐intensive processes, an al‐lowance should also be subtracted for those other processes. Note that other processes that are resident but not active while SCA is running can be swapped to disk by the operating system and do not need to be accounted for.
Virtual Address Space
By default, Fortify SCA runs as a 32‐bit process. All 32‐bit processes are subject to virtual address space limitations, the specifics of which depend on the underlying operating system.
You can run Fortify SCA in 64‐bit mode on 64‐bit‐capable hardware. In 64‐bit mode, virtual address space limitations are not a factor and java heap space is limited only by available physical memory. Although it is slightly more memory efficient to run Fortify SCA in 32‐bit mode, you should activate 64‐bit mode if a large heap is required for a scan.
Activate 64‐bit mode by passing the -64 argument to Fortify SCA on the command line:
In 32‐bit mode the size of the java heap is constrained by the amount of contiguous virtual address space that can be reserved.
On modern Linux systems, this limit is usually near 3 GB.
On Windows systems, address space fragmentation due to the way DLLs are loaded means the limit is typically between 1200 MB and 1600 MB. This value will vary among systems due to different DLLs being loaded into the java process (virus scanning software is one example).
If Fortify SCA does not start when given a large value for -Xmx, it might be because virtual address space limits have been exceeded. In this case, Fortify SCA will display an error on the command line similar to the following:
Listing 4: 64‐bit Mode Argument
> sourceanalyzer -64 …
Listing 5: Java Heap Exhaustion Example
Error occurred during initialization of VMCould not reserve enough space for object heap
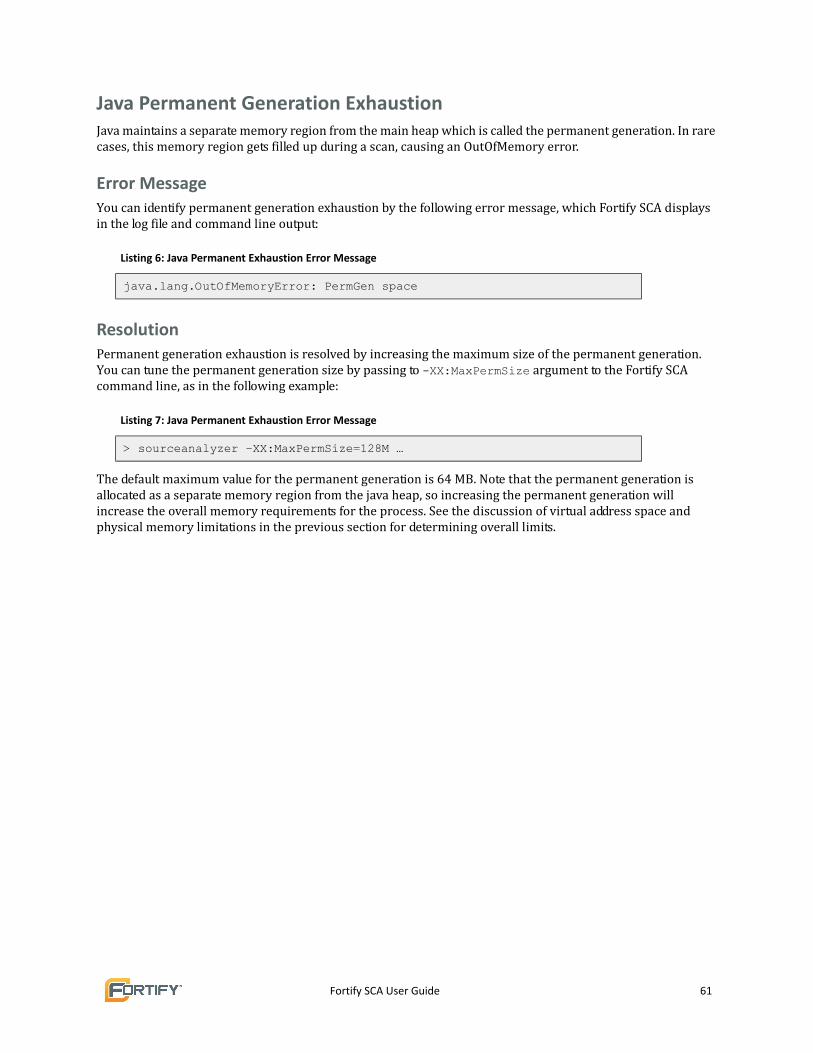
Fortify SCA User Guide 61
Java Permanent Generation ExhaustionJava maintains a separate memory region from the main heap which is called the permanent generation. In rare cases, this memory region gets filled up during a scan, causing an OutOfMemory error.
Error MessageYou can identify permanent generation exhaustion by the following error message, which Fortify SCA displays in the log file and command line output:
ResolutionPermanent generation exhaustion is resolved by increasing the maximum size of the permanent generation. You can tune the permanent generation size by passing to -XX:MaxPermSize argument to the Fortify SCA command line, as in the following example:
The default maximum value for the permanent generation is 64 MB. Note that the permanent generation is allocated as a separate memory region from the java heap, so increasing the permanent generation will increase the overall memory requirements for the process. See the discussion of virtual address space and physical memory limitations in the previous section for determining overall limits.
Listing 6: Java Permanent Exhaustion Error Message
java.lang.OutOfMemoryError: PermGen space
Listing 7: Java Permanent Exhaustion Error Message
> sourceanalyzer –XX:MaxPermSize=128M …
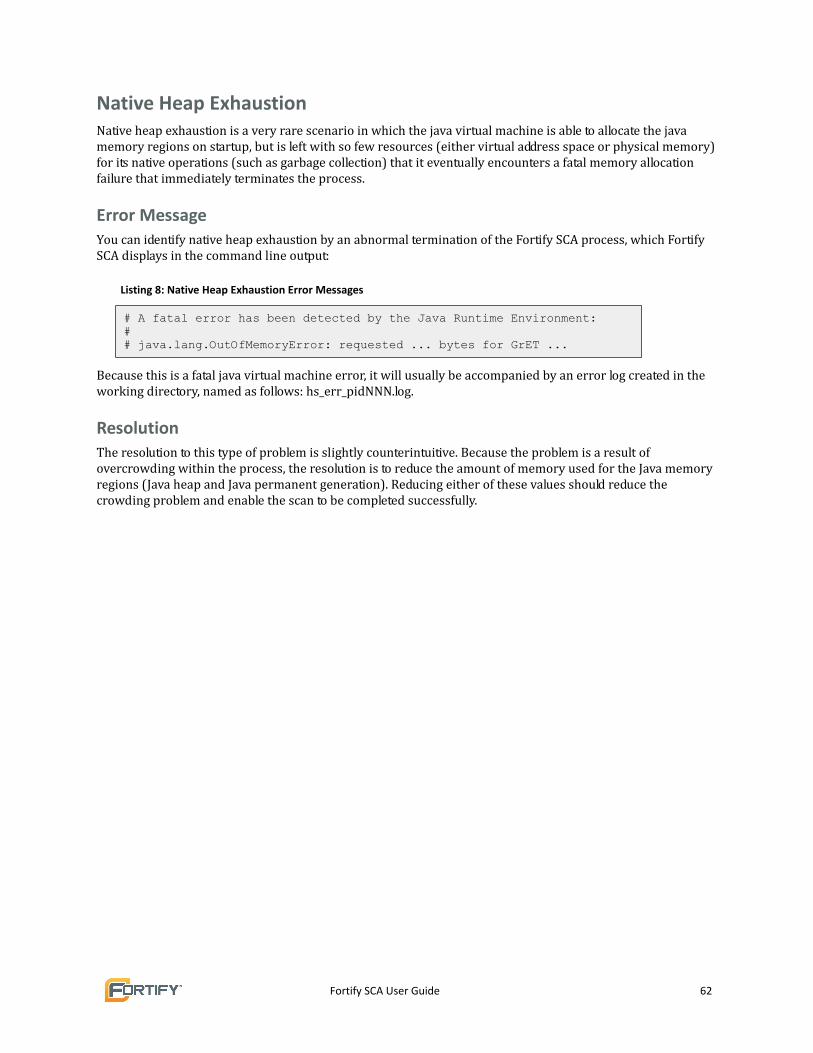
Fortify SCA User Guide 62
Native Heap ExhaustionNative heap exhaustion is a very rare scenario in which the java virtual machine is able to allocate the java memory regions on startup, but is left with so few resources (either virtual address space or physical memory) for its native operations (such as garbage collection) that it eventually encounters a fatal memory allocation failure that immediately terminates the process.
Error MessageYou can identify native heap exhaustion by an abnormal termination of the Fortify SCA process, which Fortify SCA displays in the command line output:
Because this is a fatal java virtual machine error, it will usually be accompanied by an error log created in the working directory, named as follows: hs_err_pidNNN.log.
ResolutionThe resolution to this type of problem is slightly counterintuitive. Because the problem is a result of overcrowding within the process, the resolution is to reduce the amount of memory used for the Java memory regions (Java heap and Java permanent generation). Reducing either of these values should reduce the crowding problem and enable the scan to be completed successfully.
Listing 8: Native Heap Exhaustion Error Messages
# A fatal error has been detected by the Java Runtime Environment:## java.lang.OutOfMemoryError: requested ... bytes for GrET ...

Fortify SCA User Guide 63
Appendix: AcknowledgementsFortify Software acknowledges the following:
• Java RunTime Environment
Java RunTime EnvironmentThe Fortify Source Code Analyzer distribution CD‐ROM media includes the Sun Java RunTime Environment (JRE). The following statements are included to comply with the terms of JRE distribution.
This product includes code licensed from RSA Security, Inc.
Some portions licensed from IBM are available at http://oss.software.ibm.com/icu4j/.
Fortify SCA User Guide 64
Index
Symbols.NET command line options 38@filename option 41
Aanalysis command line options 36analyzing
.NET 11
.NET 1.1 11
.NET 2.0 11ASP.NET 1.1 12ColdFusion 21J2EE 8JSP files 8Visual Studio .NET 2003 11Visual Studio 2005 11
Anttask parameters 43
ASP.NET 1.1analyzing 12
Bbuild
scan options 18build integration command line options 38Build Monitor
configuring 18example 19options 17overview 17results folder 18scan options 18starting 19
buildsmonitoring 19
CC and C++
command line examples 15ColdFusion
analyzing 21command line options 37command line syntax 21
command line examples.Net 11C and C++ 15
command line options.NET 38analysis 36build integration 38ColdFusion 37debug 41encoding 41help 41Java/J2EE 37other 41output 34
runtime 40version 41
command line syntaxColdFusion 21Java 6, 21
configuringBuild Monitor 18results folder 18
creatingfilter files 49
Ddebug option 41
Eencoding option 41example
Build Monitor 19
Ffile specifiers 21, 41filter files
creating 49FindBugs
integrating with 10Fortify SCA Properties 52
Hhelp option 41
Iintegrating
with FindBugs 10with Make 15
JJ2EE
analyzing 8command line options 37
Javacommand line options 37command line syntax 6, 21file specifiers 21, 41
JSP filesanalyzing 8
MMake
integrating with 15monitoring
builds 17, 19
Ooptions
Build Monitor 17output command line options 34overview
Build Monitor 17
Pproperties file 52
Rruntime command line options 40
Fortify SCA User Guide 65
runtime properties 52
Sscan
monitoring build 18SQL notes 21, 22
startingBuild Monitor 19
Ttask parameters 43touchless build adapter 15translating
Classic ASP 21JavaScript 21other languages 21PHP 21PLSQL 21SQL 21TSQL 21VB 6 21VBScript 21
Vversion option 41Visual Studio
Fortify plug-in 11