Embed Size (px)
Citation preview
HP Fortify CloudScan Software Version 4.40
Installation, Configuration, and Usage Guide
Document Release Date: November 2015
Software Release Date: November 2015

Legal Notices
Warranty
The only warranties for HP products and services are set forth in the express warranty statements accompanying such products and services. Nothing herein should be construed as constituting an additional warranty. HP shall not be liable for technical or editorial errors or omissions contained herein.
The information contained herein is subject to change without notice.
Restricted Rights Legend
Confidential computer software. Valid license from HP required for possession, use or copying. Consistent with FAR 12.211 and 12.212, Commercial Computer Software, Computer Software Documentation, and Technical Data for Commercial Items are licensed to the U.S. Government under vendor's standard commercial license.
The software is restricted to use solely for the purpose of scanning software for security vulnerabilities that is (i) owned by you; (ii) for which you have a valid license to use; or (iii) with the explicit consent of the owner of the software to be scanned, and may not be used for any other purpose.
You shall not install or use the software on any third party or shared (hosted) server without explicit consent
from the third party.
Copyright Notice
© Copyright 2011 - 2015 Hewlett Packard Enterprise Development LP
Documentation Updates
The title page of this document contains the following identifying information:
Software Version number
Document Release Date, which changes each time the document is updated
Software Release Date, which indicates the release date of this version of the software
To check for recent updates or to verify that you are using the most recent edition of a document, go to:
https://protect724.hp.com/welcome
You will receive updated or new editions if you subscribe to the appropriate product support service. Contact your
HP sales representative for details.
HP Fortify CloudScan Installation, Configuration, and Usage Guide iii
Contents
Contacting HP Fortify Support ................................................................................................................................................................. v
For More Information .................................................................................................................................................................................. v
About the HP Fortify Software Security Center Documentation Set ..................................................................................... v
Chapter 1: Introduction .................................................................................................................................................. 7
Intended Audience .........................................................................................................................................................................................7
Related Documents........................................................................................................................................................................................7
Chapter 2: How CloudScan Works ................................................................................................................................ 8
About the CloudScan Components .........................................................................................................................................................8
Chapter 3: Installing and Configuring the CloudScan Components ................................................................. 10
Securing Deployment of CloudScan.................................................................................................................................................... 10
Securing Access to Facilities .................................................................................................................................................................. 10
Installing and Configuring the CloudScan Controller ................................................................................................................ 10
Installing the CloudScan Controller on Windows ........................................................................................................................ 11
Installing the CloudScan Controller on Linux ................................................................................................................................ 11
Configuring the CloudScan Controller............................................................................................................................................... 12
Starting and Stopping the CloudScan Controller ......................................................................................................................... 12
Windows .......................................................................................................................................................................................................... 12
Linux .................................................................................................................................................................................................................. 12
Securing the CloudScan Controller ..................................................................................................................................................... 13
Self-Signed Certificates ............................................................................................................................................................................. 13
Certificates Signed by a Certificate Signing Authority ............................................................................................................... 15
Creating CloudScan Clients ..................................................................................................................................................................... 16
Creating a CloudScan Client Using HP Fortify Static Code Analyzer 4.20 or Later ...................................................... 17
Creating a CloudScan Client Using HP Fortify Static Code Analyzer 4.12 or Earlier .................................................. 17
Creating CloudScan Workers ................................................................................................................................................................. 17
Creating a CloudScan Worker Using HP Fortify Static Code Analyzer 4.20 or Later .................................................. 17
Creating a CloudScan Worker Using HP Fortify Static Code Analyzer 4.12 or Earlier .............................................. 18
Configuring Software Security Center (SSC) .................................................................................................................................. 18
Starting the CloudScan Components .................................................................................................................................................. 19
Starting the CloudScan Controller ....................................................................................................................................................... 19
Starting CloudScan Workers .................................................................................................................................................................. 19
Starting HP Fortify Software Security Center ................................................................................................................................ 20
Chapter 4: Submitting a Job ........................................................................................................................................ 21
HP Fortify CloudScan Installation, Configuration, and Usage Guide iv
Submitting a Job ........................................................................................................................................................................................... 21
Getting Job Status ........................................................................................................................................................................................ 21
Canceling a Job .............................................................................................................................................................................................. 21
Retrieving Job Results from the CloudScan Controller ............................................................................................................. 21
Submitting Jobs and Uploading to an SSC Project Version ...................................................................................................... 21
Support for Multiple SCA Versions ..................................................................................................................................................... 23
Viewing the CloudScan Client/Worker Log .................................................................................................................................... 23
Chapter 5: Monitoring CloudScan with HP Fortify Software Security Center ............................................... 25
SCA Mobile Build Format (MBS) Version Compatibility .......................................................................................................... 26
Enabling CloudScan Worker Auto-Start on Windows Using a Scheduled Task ............................................................ 27
Enabling CloudScan Worker Auto-Start on Linux ....................................................................................................................... 31
HP Fortify CloudScan Installation, Configuration, and Usage Guide v
Preface
Contacting HP Fortify Support If you have questions or comments about using this product, contact HP Fortify Technical Support using one of the following options.
To Manage Your Support Cases, Acquire Licenses, and Manage Your Account
https://support.fortify.com
To Email Support
To Call Support
650.735.2215
For More Information For more information on HP Enterprise Security Software products:
http://www.hpenterprisesecurity.com
About the HP Fortify Software Security Center Documentation Set The HP Fortify Software Security Center documentation set contains installation, user, and deployment guides for all HP Fortify Software Security Center products and components. In addition, you will find technical notes and release notes that describe new features, known issues, and last-minute updates. You can access the latest versions of these documents from the following HP ESP user community Protect724 website:
https://protect724.hp.com/welcome
You will need to register for an account.
HP Fortify CloudScan Installation, Configuration, and Usage Guide vi
Change Log
The following table tracks changes made to this guide.
Software release-version Change
4.40-01 Updated: Minor edits
Added: Appendix C: Optimizing Your Scans
4.30-01 Added: Updates in Chapter 3 for using new SSC CloudScan Administration interface rather than SSC Configuration tool.
Clarified: Procedures in Chapter 4 and Appendix B per customer input and internal review of 4.21 document.
4.21-02 Clarified: Need to escape the quotes around arguments when submitting a job.
Clarified: Need to use a fully privileged administrative account for auto-start setup.
HP Fortify CloudScan Installation, Configuration, and Usage Guide 7
Chapter 1: Introduction
With HP Fortify CloudScan (CloudScan), users of HP Fortify Static Code Analyzer (SCA) can better manage their resources by offloading the processor-intensive scanning phase of the analysis from their build machines to a cloud of machines provided for this purpose.
The translation phase, which is less processor- and time-intensive, is completed on the build machine. After translation is completed, a package is generated and moved to a distributed cloud of machines for scanning. In addition to freeing up the build machines, this process makes it easy to grow the system by adding more resources to the cloud as needed, without having to interrupt your build process.
In addition, HP Fortify Software Security Center (SSC) can direct CloudScan to output FPR files directly to the server.
This guide provides information on installing, configuring, and using CloudScan to streamline your static code analysis process.
Intended Audience Anyone who intends to install, configure, or use CloudScan for offloading the scanning phase of their SCA process.
Related Documents The following document provides additional information relevant to HP Fortify CloudScan:
HP Fortify Static Code Analyzer User Guide
HP Fortify Static Code Analyzer (SCA) is a set of software security analyzers that search for violations of security-specific coding rules and guidelines in a variety of languages. The rich data provided by SCA language technology enables the analyzers to pinpoint and prioritize violations so that fixes can be fast and accurate. The analysis information produced by SCA helps you deliver more secure software, as well as making security code reviews more efficient, consistent, and complete. This is especially advantageous when large code bases are involved. The modular architecture of SCA allows you to quickly upload new third-party and customer-specific security rules.
HP Fortify CloudScan Installation, Configuration, and Usage Guide 8
Chapter 2: How CloudScan Works
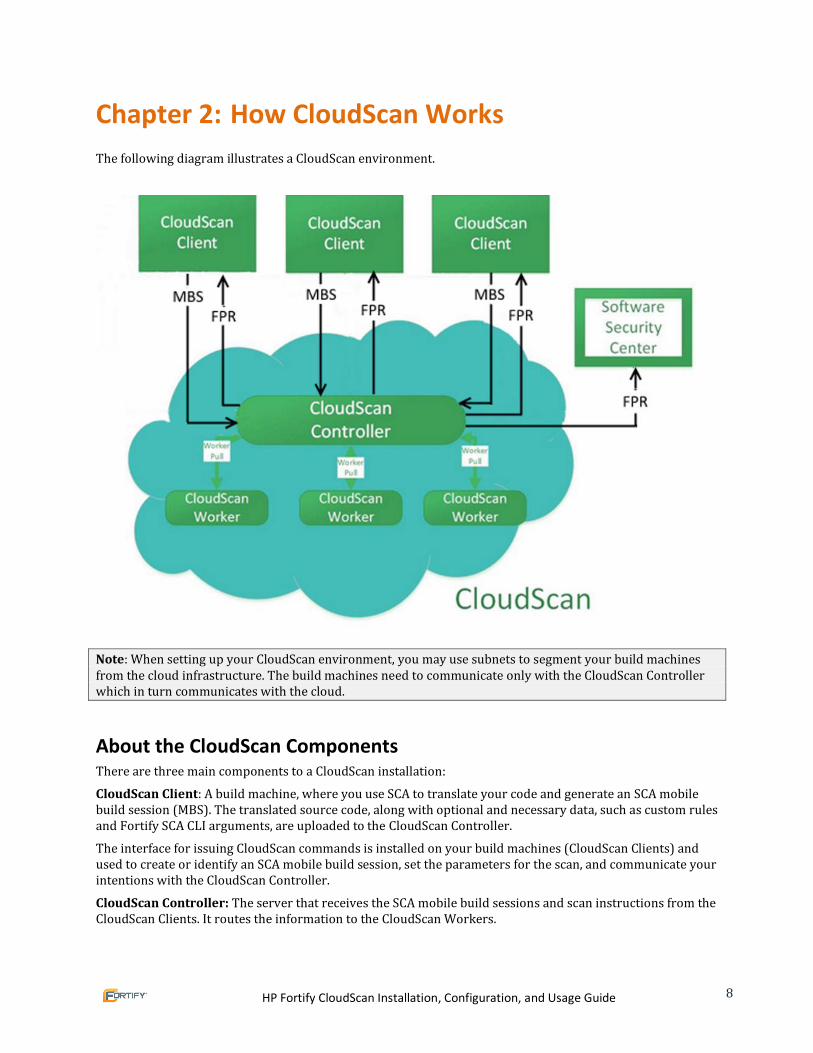
The following diagram illustrates a CloudScan environment.
Note: When setting up your CloudScan environment, you may use subnets to segment your build machines from the cloud infrastructure. The build machines need to communicate only with the CloudScan Controller which in turn communicates with the cloud.
About the CloudScan Components There are three main components to a CloudScan installation:
CloudScan Client: A build machine, where you use SCA to translate your code and generate an SCA mobile build session (MBS). The translated source code, along with optional and necessary data, such as custom rules and Fortify SCA CLI arguments, are uploaded to the CloudScan Controller.
The interface for issuing CloudScan commands is installed on your build machines (CloudScan Clients) and used to create or identify an SCA mobile build session, set the parameters for the scan, and communicate your intentions with the CloudScan Controller.
CloudScan Controller: The server that receives the SCA mobile build sessions and scan instructions from the CloudScan Clients. It routes the information to the CloudScan Workers.
HP Fortify CloudScan Installation, Configuration, and Usage Guide 9
CloudScan Workers: A distributed network of computers that have been set up to receive SCA mobile build sessions and scan the code using SCA analyzers. Results are output as FPR and/or log files that can be returned back to the command line of the initiating CloudScan Client or uploaded to HP Fortify Software Security Center.
Note: The minimum installation requires four physical or virtual machines: a CloudScan Client, a CloudScan
Worker, a CloudScan Controller, and an HP Fortify Software Security Center (SSC) server.
HP Fortify CloudScan Installation, Configuration, and Usage Guide 10
Chapter 3: Installing and Configuring the
CloudScan Components
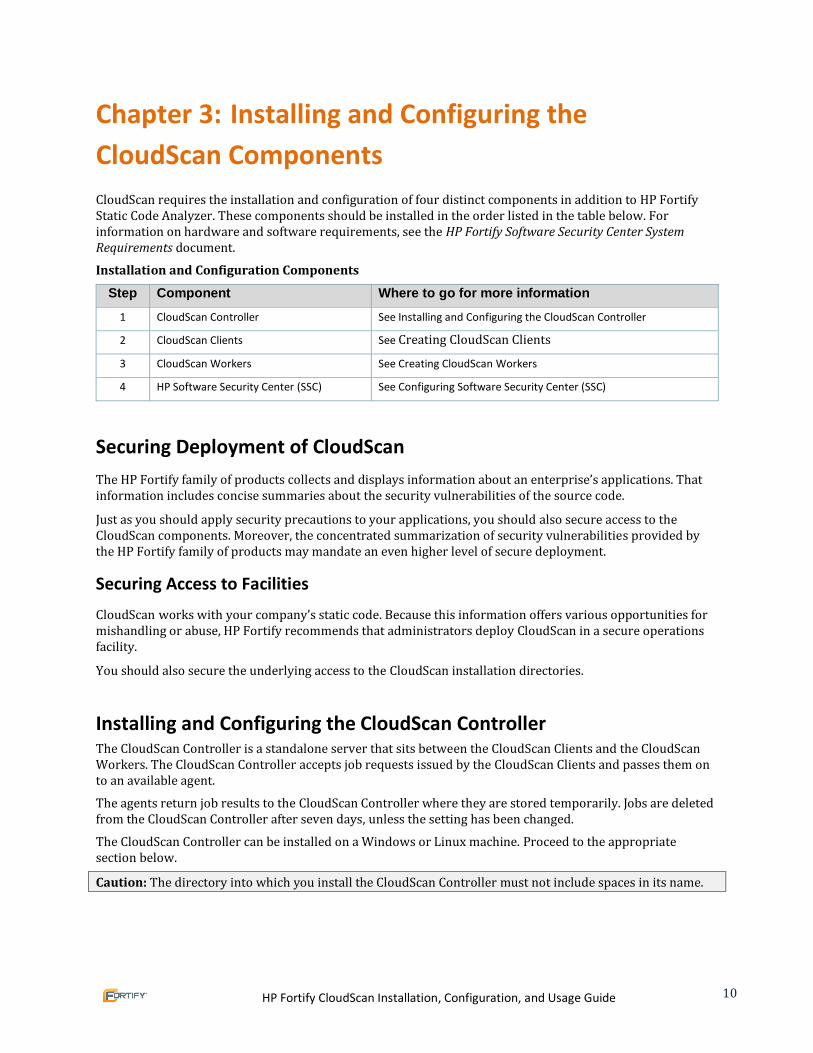
CloudScan requires the installation and configuration of four distinct components in addition to HP Fortify Static Code Analyzer. These components should be installed in the order listed in the table below. For information on hardware and software requirements, see the HP Fortify Software Security Center System Requirements document.
Installation and Configuration Components
Step Component Where to go for more information
1 CloudScan Controller See Installing and Configuring the CloudScan Controller
2 CloudScan Clients See Creating CloudScan Clients
3 CloudScan Workers See Creating CloudScan Workers
4 HP Software Security Center (SSC) See Configuring Software Security Center (SSC)
Securing Deployment of CloudScan
The HP Fortify family of products collects and displays information about an enterprise’s applications. That information includes concise summaries about the security vulnerabilities of the source code.
Just as you should apply security precautions to your applications, you should also secure access to the CloudScan components. Moreover, the concentrated summarization of security vulnerabilities provided by the HP Fortify family of products may mandate an even higher level of secure deployment.
Securing Access to Facilities
CloudScan works with your company’s static code. Because this information offers various opportunities for mishandling or abuse, HP Fortify recommends that administrators deploy CloudScan in a secure operations facility.
You should also secure the underlying access to the CloudScan installation directories.
Installing and Configuring the CloudScan Controller The CloudScan Controller is a standalone server that sits between the CloudScan Clients and the CloudScan Workers. The CloudScan Controller accepts job requests issued by the CloudScan Clients and passes them on to an available agent.
The agents return job results to the CloudScan Controller where they are stored temporarily. Jobs are deleted from the CloudScan Controller after seven days, unless the setting has been changed.
The CloudScan Controller can be installed on a Windows or Linux machine. Proceed to the appropriate section below.
Caution: The directory into which you install the CloudScan Controller must not include spaces in its name.
HP Fortify CloudScan Installation, Configuration, and Usage Guide 11
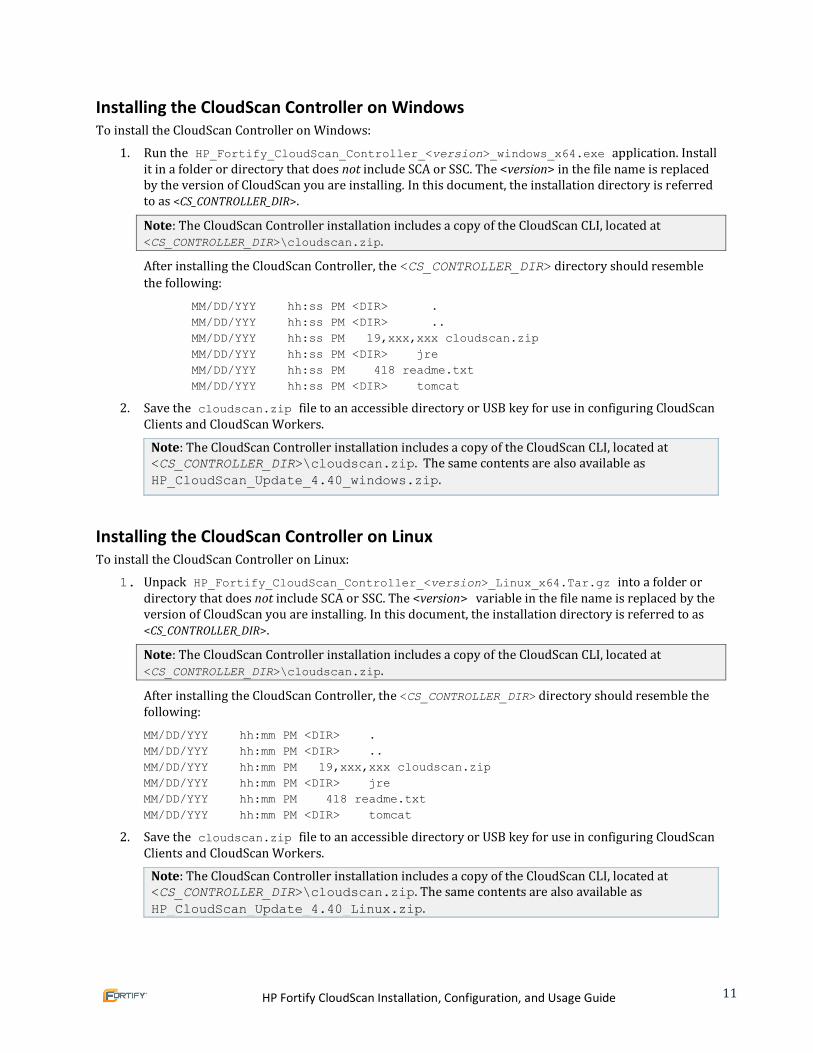
Installing the CloudScan Controller on Windows To install the CloudScan Controller on Windows:
1. Run the HP_Fortify_CloudScan_Controller_<version>_windows_x64.exe application. Install it in a folder or directory that does not include SCA or SSC. The <version> in the file name is replaced by the version of CloudScan you are installing. In this document, the installation directory is referred to as <CS_CONTROLLER_DIR>.
Note: The CloudScan Controller installation includes a copy of the CloudScan CLI, located at <CS_CONTROLLER_DIR>\cloudscan.zip.
After installing the CloudScan Controller, the <CS_CONTROLLER_DIR> directory should resemble
the following:
MM/DD/YYY hh:ss PM <DIR> .
MM/DD/YYY hh:ss PM <DIR> ..
MM/DD/YYY hh:ss PM 19,xxx,xxx cloudscan.zip
MM/DD/YYY hh:ss PM <DIR> jre
MM/DD/YYY hh:ss PM 418 readme.txt
MM/DD/YYY hh:ss PM <DIR> tomcat
2. Save the cloudscan.zip file to an accessible directory or USB key for use in configuring CloudScan Clients and CloudScan Workers.
Note: The CloudScan Controller installation includes a copy of the CloudScan CLI, located at <CS_CONTROLLER_DIR>\cloudscan.zip. The same contents are also available as
HP_CloudScan_Update_4.40_windows.zip.
Installing the CloudScan Controller on Linux To install the CloudScan Controller on Linux:
1. Unpack HP_Fortify_CloudScan_Controller_<version>_Linux_x64.Tar.gz into a folder or directory that does not include SCA or SSC. The <version> variable in the file name is replaced by the version of CloudScan you are installing. In this document, the installation directory is referred to as <CS_CONTROLLER_DIR>.
Note: The CloudScan Controller installation includes a copy of the CloudScan CLI, located at <CS_CONTROLLER_DIR>\cloudscan.zip.
After installing the CloudScan Controller, the <CS_CONTROLLER_DIR> directory should resemble the following:
MM/DD/YYY hh:mm PM <DIR> .
MM/DD/YYY hh:mm PM <DIR> ..
MM/DD/YYY hh:mm PM 19,xxx,xxx cloudscan.zip
MM/DD/YYY hh:mm PM <DIR> jre
MM/DD/YYY hh:mm PM 418 readme.txt
MM/DD/YYY hh:mm PM <DIR> tomcat
2. Save the cloudscan.zip file to an accessible directory or USB key for use in configuring CloudScan Clients and CloudScan Workers.
Note: The CloudScan Controller installation includes a copy of the CloudScan CLI, located at <CS_CONTROLLER_DIR>\cloudscan.zip. The same contents are also available as
HP_CloudScan_Update_4.40_Linux.zip.

HP Fortify CloudScan Installation, Configuration, and Usage Guide 12
Configuring the CloudScan Controller After installing the CloudScan Controller, you can edit global properties, such as the email address to be used, the polling period for status updates, and the HP Fortify Software Security Center Server URL (if you plan to upload your FPRs to it), as follows:
1. Navigate to <CS_CONTROLLER_DIR>/tomcat/webapps/cloud-ctrl/WEB-INF/classes.
2. Edit the following options in the config.properties file.
Option Value
worker_auth_token Set this value to a string. The string must not include spaces.
ssc_url URL for SSC server; all uploads will be sent to this server when using SSC Server Upload mode.
Example:
http://<host_for_ssc>:<port>/ssc
or
https://<host_for_ssc>:<port>/ssc
this_url URL for the CloudScan Controller; used in emails to refer to this server for manual job result downloads.
Example:
http://<host_for_controller>:8080/cloud-ctrl
or
https://<host_for_controller>:8443/cloud-ctrl
ssc_cloudctrl_secret A password that SSC uses when requesting data from the CloudScan Controller.
3. Restart the CloudScan Controller.
Starting and Stopping the CloudScan Controller The following sections provides instruction for stopping and starting the CloudScan Controller on Windows and Linux.
Windows To start the CloudScan Controller, navigate to <CS_CONTROLLER_DIR>\tomcat\bin and run
startup.bat.
To stop the CloudScan Controller, navigate to <CS_CONTROLLER_DIR>\tomcat\bin and run
shutdown.bat.
Linux To start the CloudScan Controller, navigate to <CS_CONTROLLER_DIR>/tomcat/bin and run
./startup.sh.
To stop the CloudScan Controller, navigate to <CS_CONTROLLER_DIR>/tomcat/bin and run
./shutdown.sh.
HP Fortify CloudScan Installation, Configuration, and Usage Guide 13
Securing the CloudScan Controller The following procedures provide the steps needed to create a secure connection (HTTPS) between the CloudScan Controller/Tomcat server and CloudScan CLI. Either a self-signed certificate or a certificate that has been signed by a certificate authority such as VeriSign is required—see the appropriate procedure below.
Self-Signed Certificates To enable SSL on Tomcat using a self-signed certificate:
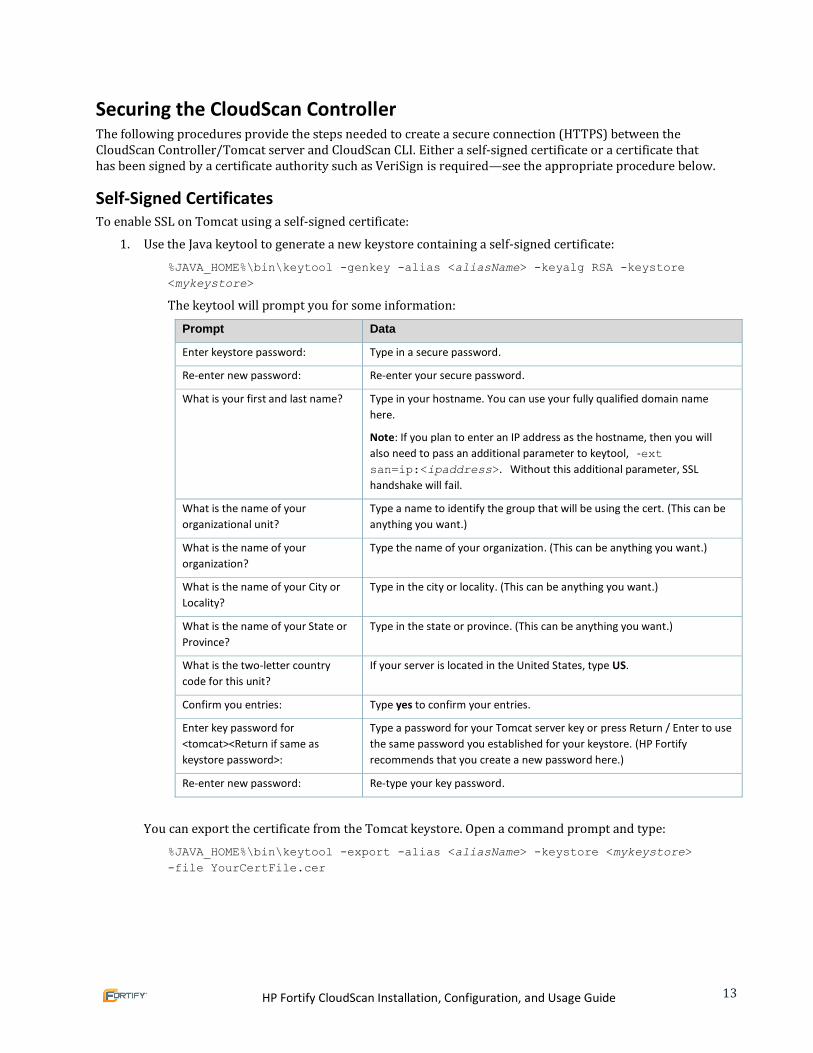
1. Use the Java keytool to generate a new keystore containing a self-signed certificate:
%JAVA_HOME%\bin\keytool -genkey -alias <aliasName> -keyalg RSA -keystore
<mykeystore>
The keytool will prompt you for some information:
Prompt Data
Enter keystore password: Type in a secure password.
Re-enter new password: Re-enter your secure password.
What is your first and last name? Type in your hostname. You can use your fully qualified domain name
here.
Note: If you plan to enter an IP address as the hostname, then you will
also need to pass an additional parameter to keytool, -ext
san=ip:<ipaddress>. Without this additional parameter, SSL
handshake will fail.
What is the name of your
organizational unit?
Type a name to identify the group that will be using the cert. (This can be
anything you want.)
What is the name of your
organization?
Type the name of your organization. (This can be anything you want.)
What is the name of your City or
Locality?
Type in the city or locality. (This can be anything you want.)
What is the name of your State or
Province?
Type in the state or province. (This can be anything you want.)
What is the two-letter country
code for this unit?
If your server is located in the United States, type US.
Confirm you entries: Type yes to confirm your entries.
Enter key password for
<tomcat><Return if same as
keystore password>:
Type a password for your Tomcat server key or press Return / Enter to use
the same password you established for your keystore. (HP Fortify
recommends that you create a new password here.)
Re-enter new password: Re-type your key password.
You can export the certificate from the Tomcat keystore. Open a command prompt and type:
%JAVA_HOME%\bin\keytool -export -alias <aliasName> -keystore <mykeystore>
-file YourCertFile.cer
HP Fortify CloudScan Installation, Configuration, and Usage Guide 14
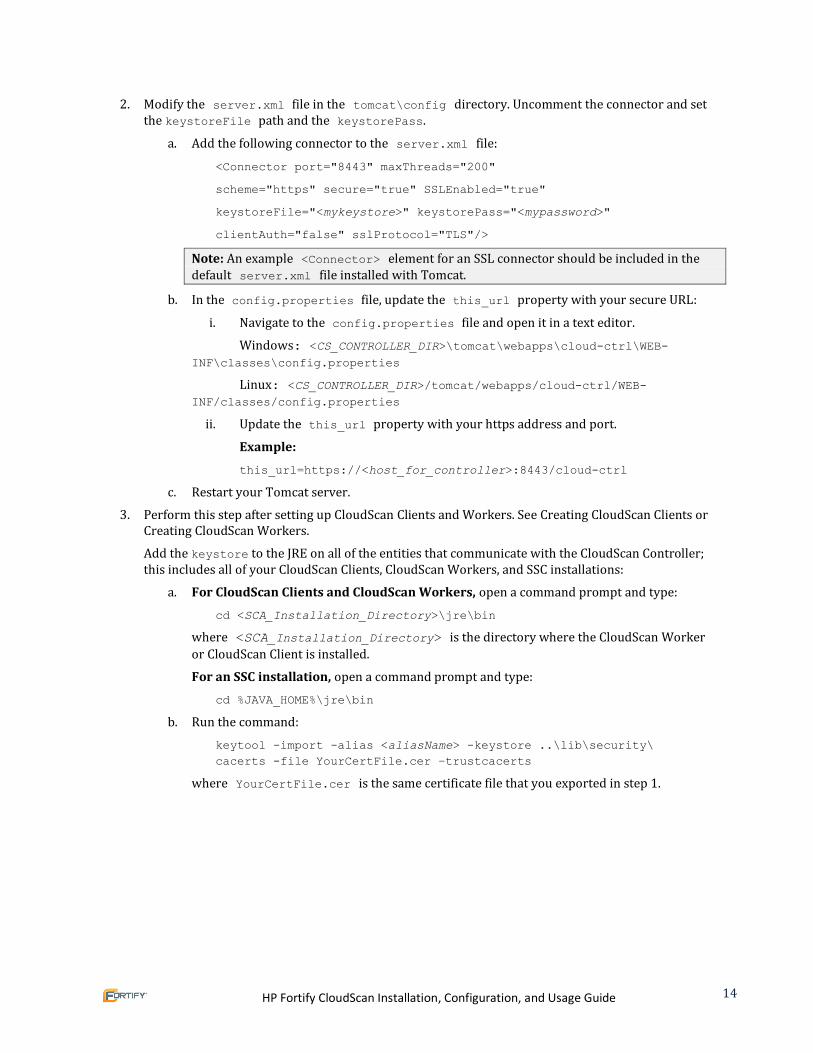
2. Modify the server.xml file in the tomcat\config directory. Uncomment the connector and set the keystoreFile path and the keystorePass.
a. Add the following connector to the server.xml file:
<Connector port="8443" maxThreads="200"
scheme="https" secure="true" SSLEnabled="true"
keystoreFile="<mykeystore>" keystorePass="<mypassword>"
clientAuth="false" sslProtocol="TLS"/>
Note: An example <Connector> element for an SSL connector should be included in the default server.xml file installed with Tomcat.
b. In the config.properties file, update the this_url property with your secure URL:
i. Navigate to the config.properties file and open it in a text editor.
Windows: <CS_CONTROLLER_DIR>\tomcat\webapps\cloud-ctrl\WEB-
INF\classes\config.properties
Linux: <CS_CONTROLLER_DIR>/tomcat/webapps/cloud-ctrl/WEB-INF/classes/config.properties
ii. Update the this_url property with your https address and port.
Example:
this_url=https://<host_for_controller>:8443/cloud-ctrl
c. Restart your Tomcat server.
3. Perform this step after setting up CloudScan Clients and Workers. See Creating CloudScan Clients or Creating CloudScan Workers.
Add the keystore to the JRE on all of the entities that communicate with the CloudScan Controller; this includes all of your CloudScan Clients, CloudScan Workers, and SSC installations:
a. For CloudScan Clients and CloudScan Workers, open a command prompt and type:
cd <SCA_Installation_Directory>\jre\bin
where <SCA_Installation_Directory> is the directory where the CloudScan Worker
or CloudScan Client is installed.
For an SSC installation, open a command prompt and type:
cd %JAVA_HOME%\jre\bin
b. Run the command:
keytool -import -alias <aliasName> -keystore ..\lib\security\
cacerts -file YourCertFile.cer –trustcacerts
where YourCertFile.cer is the same certificate file that you exported in step 1.
HP Fortify CloudScan Installation, Configuration, and Usage Guide 15
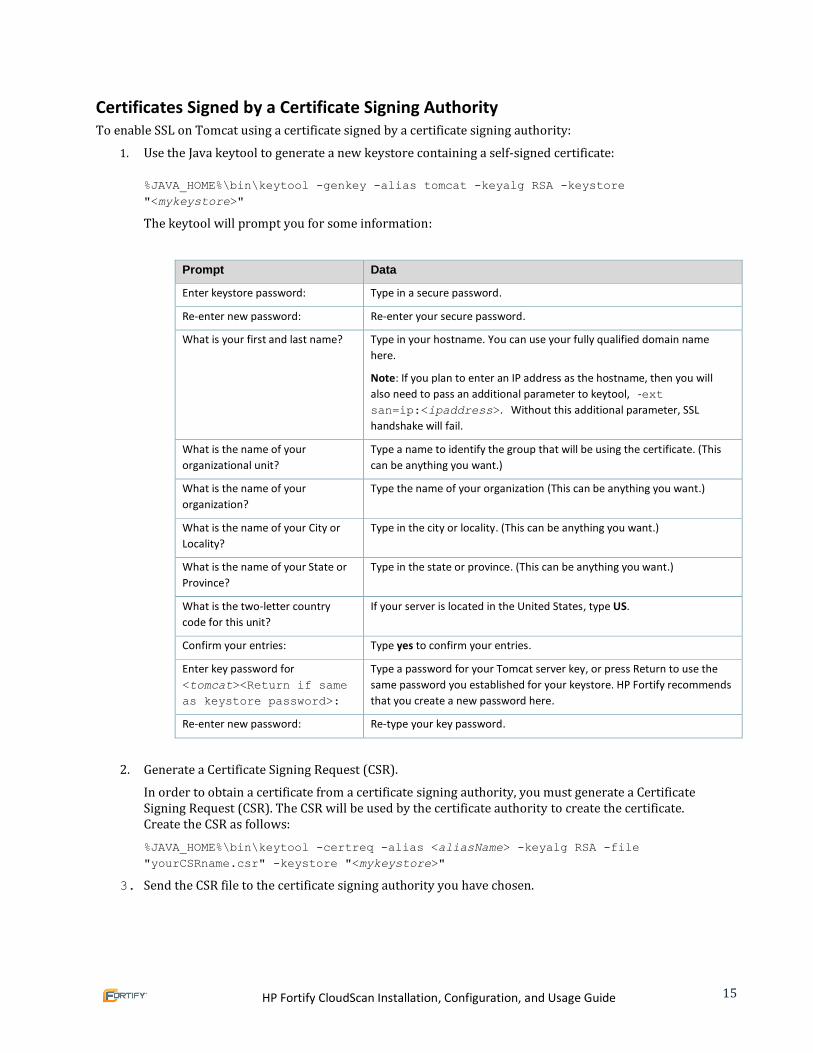
Certificates Signed by a Certificate Signing Authority To enable SSL on Tomcat using a certificate signed by a certificate signing authority:
1. Use the Java keytool to generate a new keystore containing a self-signed certificate: %JAVA_HOME%\bin\keytool -genkey -alias tomcat -keyalg RSA -keystore
"<mykeystore>"
The keytool will prompt you for some information:
Prompt Data
Enter keystore password: Type in a secure password.
Re-enter new password: Re-enter your secure password.
What is your first and last name? Type in your hostname. You can use your fully qualified domain name
here.
Note: If you plan to enter an IP address as the hostname, then you will
also need to pass an additional parameter to keytool, -ext
san=ip:<ipaddress>. Without this additional parameter, SSL
handshake will fail.
What is the name of your
organizational unit?
Type a name to identify the group that will be using the certificate. (This
can be anything you want.)
What is the name of your
organization?
Type the name of your organization (This can be anything you want.)
What is the name of your City or
Locality?
Type in the city or locality. (This can be anything you want.)
What is the name of your State or
Province?
Type in the state or province. (This can be anything you want.)
What is the two-letter country
code for this unit?
If your server is located in the United States, type US.
Confirm your entries: Type yes to confirm your entries.
Enter key password for
<tomcat><Return if same
as keystore password>:
Type a password for your Tomcat server key, or press Return to use the
same password you established for your keystore. HP Fortify recommends
that you create a new password here.
Re-enter new password: Re-type your key password.
2. Generate a Certificate Signing Request (CSR).
In order to obtain a certificate from a certificate signing authority, you must generate a Certificate Signing Request (CSR). The CSR will be used by the certificate authority to create the certificate. Create the CSR as follows:
%JAVA_HOME%\bin\keytool -certreq -alias <aliasName> -keyalg RSA -file
"yourCSRname.csr" -keystore "<mykeystore>"
3. Send the CSR file to the certificate signing authority you have chosen.
HP Fortify CloudScan Installation, Configuration, and Usage Guide 16
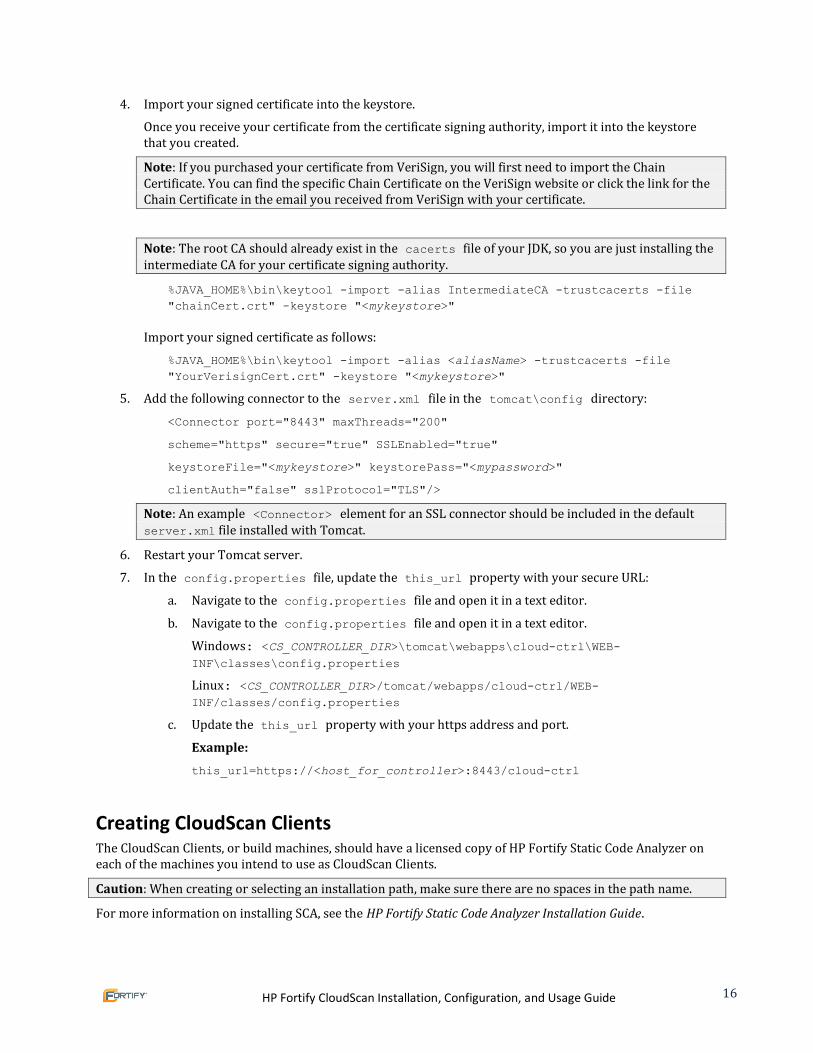
4. Import your signed certificate into the keystore.
Once you receive your certificate from the certificate signing authority, import it into the keystore that you created.
Note: If you purchased your certificate from VeriSign, you will first need to import the Chain Certificate. You can find the specific Chain Certificate on the VeriSign website or click the link for the Chain Certificate in the email you received from VeriSign with your certificate.
Note: The root CA should already exist in the cacerts file of your JDK, so you are just installing the intermediate CA for your certificate signing authority.
%JAVA_HOME%\bin\keytool -import -alias IntermediateCA -trustcacerts -file
"chainCert.crt" -keystore "<mykeystore>"
Import your signed certificate as follows:
%JAVA_HOME%\bin\keytool -import -alias <aliasName> -trustcacerts -file
"YourVerisignCert.crt" -keystore "<mykeystore>"
5. Add the following connector to the server.xml file in the tomcat\config directory:
<Connector port="8443" maxThreads="200"
scheme="https" secure="true" SSLEnabled="true"
keystoreFile="<mykeystore>" keystorePass="<mypassword>"
clientAuth="false" sslProtocol="TLS"/>
Note: An example <Connector> element for an SSL connector should be included in the default server.xml file installed with Tomcat.
6. Restart your Tomcat server.
7. In the config.properties file, update the this_url property with your secure URL:
a. Navigate to the config.properties file and open it in a text editor.
b. Navigate to the config.properties file and open it in a text editor.
Windows: <CS_CONTROLLER_DIR>\tomcat\webapps\cloud-ctrl\WEB-
INF\classes\config.properties
Linux: <CS_CONTROLLER_DIR>/tomcat/webapps/cloud-ctrl/WEB-INF/classes/config.properties
c. Update the this_url property with your https address and port.
Example:
this_url=https://<host_for_controller>:8443/cloud-ctrl
Creating CloudScan Clients The CloudScan Clients, or build machines, should have a licensed copy of HP Fortify Static Code Analyzer on each of the machines you intend to use as CloudScan Clients.
Caution: When creating or selecting an installation path, make sure there are no spaces in the path name.
For more information on installing SCA, see the HP Fortify Static Code Analyzer Installation Guide.
HP Fortify CloudScan Installation, Configuration, and Usage Guide 17
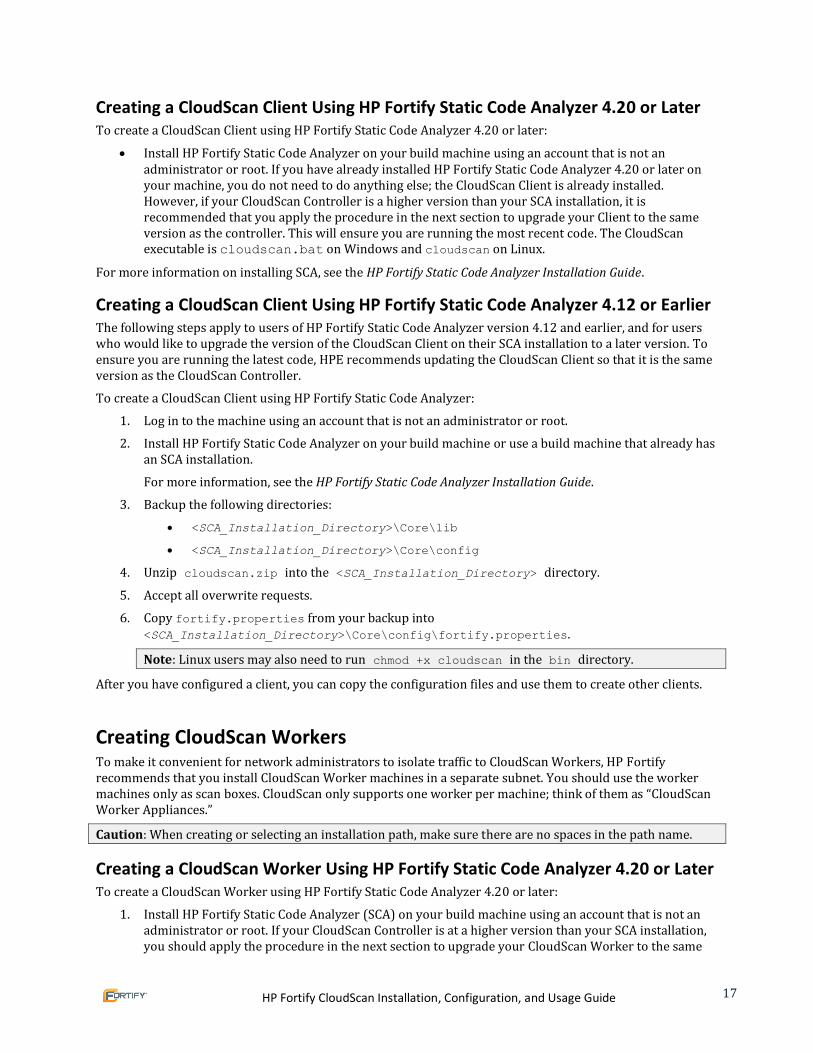
Creating a CloudScan Client Using HP Fortify Static Code Analyzer 4.20 or Later To create a CloudScan Client using HP Fortify Static Code Analyzer 4.20 or later:
Install HP Fortify Static Code Analyzer on your build machine using an account that is not an administrator or root. If you have already installed HP Fortify Static Code Analyzer 4.20 or later on your machine, you do not need to do anything else; the CloudScan Client is already installed. However, if your CloudScan Controller is a higher version than your SCA installation, it is recommended that you apply the procedure in the next section to upgrade your Client to the same version as the controller. This will ensure you are running the most recent code. The CloudScan executable is cloudscan.bat on Windows and cloudscan on Linux.
For more information on installing SCA, see the HP Fortify Static Code Analyzer Installation Guide.
Creating a CloudScan Client Using HP Fortify Static Code Analyzer 4.12 or Earlier The following steps apply to users of HP Fortify Static Code Analyzer version 4.12 and earlier, and for users who would like to upgrade the version of the CloudScan Client on their SCA installation to a later version. To ensure you are running the latest code, HPE recommends updating the CloudScan Client so that it is the same version as the CloudScan Controller.
To create a CloudScan Client using HP Fortify Static Code Analyzer:
1. Log in to the machine using an account that is not an administrator or root.
2. Install HP Fortify Static Code Analyzer on your build machine or use a build machine that already has an SCA installation.
For more information, see the HP Fortify Static Code Analyzer Installation Guide.
3. Backup the following directories:
<SCA_Installation_Directory>\Core\lib
<SCA_Installation_Directory>\Core\config
4. Unzip cloudscan.zip into the <SCA_Installation_Directory> directory.
5. Accept all overwrite requests.
6. Copy fortify.properties from your backup into <SCA_Installation_Directory>\Core\config\fortify.properties.
Note: Linux users may also need to run chmod +x cloudscan in the bin directory.
After you have configured a client, you can copy the configuration files and use them to create other clients.
Creating CloudScan Workers To make it convenient for network administrators to isolate traffic to CloudScan Workers, HP Fortify recommends that you install CloudScan Worker machines in a separate subnet. You should use the worker machines only as scan boxes. CloudScan only supports one worker per machine; think of them as “CloudScan Worker Appliances.”
Caution: When creating or selecting an installation path, make sure there are no spaces in the path name.
Creating a CloudScan Worker Using HP Fortify Static Code Analyzer 4.20 or Later To create a CloudScan Worker using HP Fortify Static Code Analyzer 4.20 or later:
1. Install HP Fortify Static Code Analyzer (SCA) on your build machine using an account that is not an administrator or root. If your CloudScan Controller is at a higher version than your SCA installation, you should apply the procedure in the next section to upgrade your CloudScan Worker to the same
HP Fortify CloudScan Installation, Configuration, and Usage Guide 18
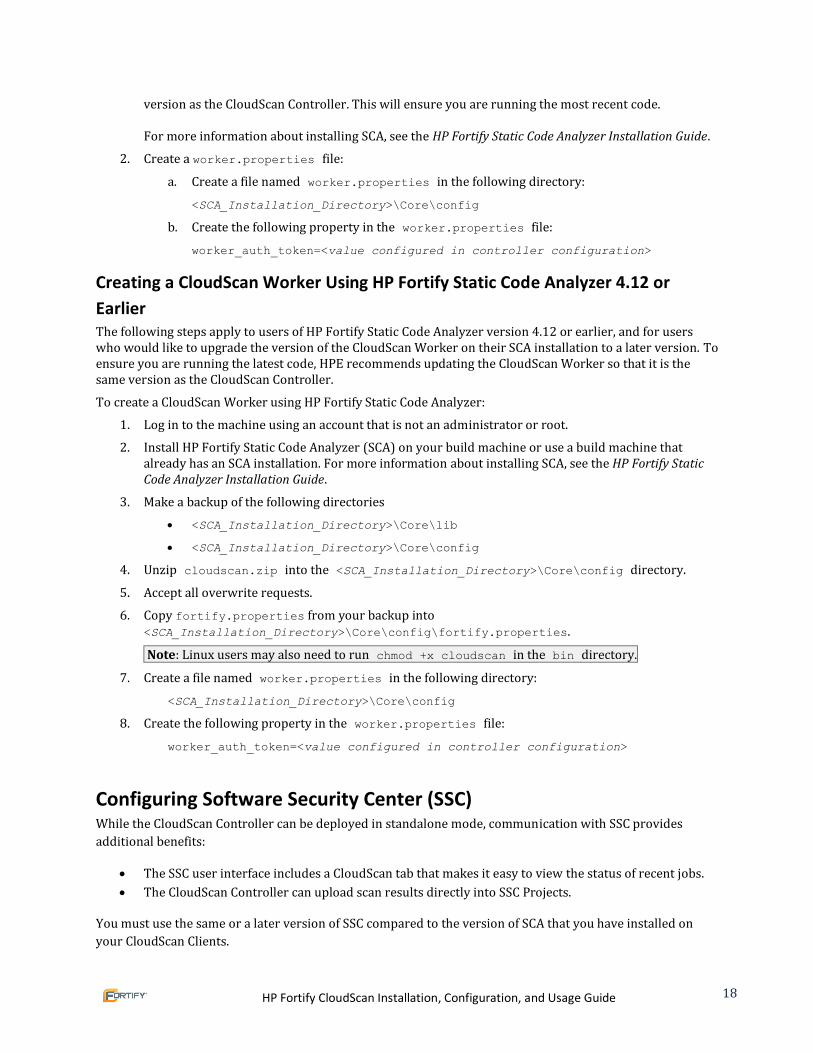
version as the CloudScan Controller. This will ensure you are running the most recent code. For more information about installing SCA, see the HP Fortify Static Code Analyzer Installation Guide.
2. Create a worker.properties file:
a. Create a file named worker.properties in the following directory:
<SCA_Installation_Directory>\Core\config
b. Create the following property in the worker.properties file:
worker_auth_token=<value configured in controller configuration>
Creating a CloudScan Worker Using HP Fortify Static Code Analyzer 4.12 or
Earlier The following steps apply to users of HP Fortify Static Code Analyzer version 4.12 or earlier, and for users who would like to upgrade the version of the CloudScan Worker on their SCA installation to a later version. To ensure you are running the latest code, HPE recommends updating the CloudScan Worker so that it is the same version as the CloudScan Controller.
To create a CloudScan Worker using HP Fortify Static Code Analyzer:
1. Log in to the machine using an account that is not an administrator or root.
2. Install HP Fortify Static Code Analyzer (SCA) on your build machine or use a build machine that already has an SCA installation. For more information about installing SCA, see the HP Fortify Static Code Analyzer Installation Guide.
3. Make a backup of the following directories
<SCA_Installation_Directory>\Core\lib
<SCA_Installation_Directory>\Core\config
4. Unzip cloudscan.zip into the <SCA_Installation_Directory>\Core\config directory.
5. Accept all overwrite requests.
6. Copy fortify.properties from your backup into <SCA_Installation_Directory>\Core\config\fortify.properties.
Note: Linux users may also need to run chmod +x cloudscan in the bin directory.
7. Create a file named worker.properties in the following directory:
<SCA_Installation_Directory>\Core\config
8. Create the following property in the worker.properties file:
worker_auth_token=<value configured in controller configuration>
Configuring Software Security Center (SSC) While the CloudScan Controller can be deployed in standalone mode, communication with SSC provides
additional benefits:
The SSC user interface includes a CloudScan tab that makes it easy to view the status of recent jobs.
The CloudScan Controller can upload scan results directly into SSC Projects.
You must use the same or a later version of SSC compared to the version of SCA that you have installed on
your CloudScan Clients.
HP Fortify CloudScan Installation, Configuration, and Usage Guide 19
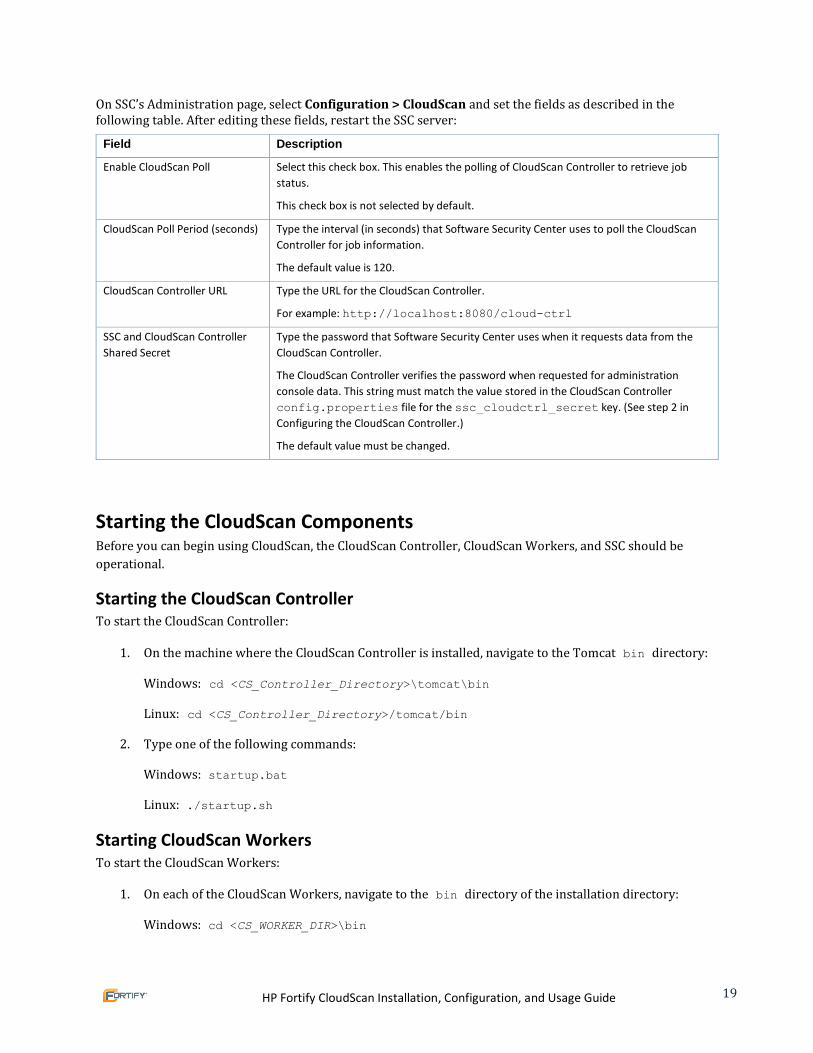
On SSC’s Administration page, select Configuration > CloudScan and set the fields as described in the following table. After editing these fields, restart the SSC server:
Field Description
Enable CloudScan Poll Select this check box. This enables the polling of CloudScan Controller to retrieve job
status.
This check box is not selected by default.
CloudScan Poll Period (seconds) Type the interval (in seconds) that Software Security Center uses to poll the CloudScan
Controller for job information.
The default value is 120.
CloudScan Controller URL Type the URL for the CloudScan Controller.
For example: http://localhost:8080/cloud-ctrl
SSC and CloudScan Controller
Shared Secret Type the password that Software Security Center uses when it requests data from the
CloudScan Controller.
The CloudScan Controller verifies the password when requested for administration
console data. This string must match the value stored in the CloudScan Controller
config.properties file for the ssc_cloudctrl_secret key. (See step 2 in
Configuring the CloudScan Controller.)
The default value must be changed.
Starting the CloudScan Components Before you can begin using CloudScan, the CloudScan Controller, CloudScan Workers, and SSC should be
operational.
Starting the CloudScan Controller To start the CloudScan Controller:
1. On the machine where the CloudScan Controller is installed, navigate to the Tomcat bin directory:
Windows: cd <CS_Controller_Directory>\tomcat\bin
Linux: cd <CS_Controller_Directory>/tomcat/bin
2. Type one of the following commands:
Windows: startup.bat
Linux: ./startup.sh
Starting CloudScan Workers To start the CloudScan Workers:
1. On each of the CloudScan Workers, navigate to the bin directory of the installation directory:
Windows: cd <CS_WORKER_DIR>\bin
HP Fortify CloudScan Installation, Configuration, and Usage Guide 20
Linux: cd <CS_WORKER_DIR>/bin
2. Type one of the following commands:
Windows: cloudscan.bat –url http://<Host_for_Controller>:8080/cloud-ctrl worker
Linux: ./cloudscan –url http://<Host_for_Controller>:8080/cloud-ctrl worker
If the CloudScan Worker startup is successful, it will start printing messages to the console indicating its
waiting status. After you have verified that the machine is working, you can create a Startup Task in Windows
Task Scheduler or add it to your Linux startup scripts. For more information, see Appendix B: Worker Auto-
Start Configuration.
Starting HP Fortify Software Security Center Start SSC in the normal manner. After you log in to SSC, you should notice that you now have a CloudScan tab.
If you do not see the tab, perform a logout and a fresh browser login.
HP Fortify CloudScan Installation, Configuration, and Usage Guide 21
Chapter 4: Submitting a Job
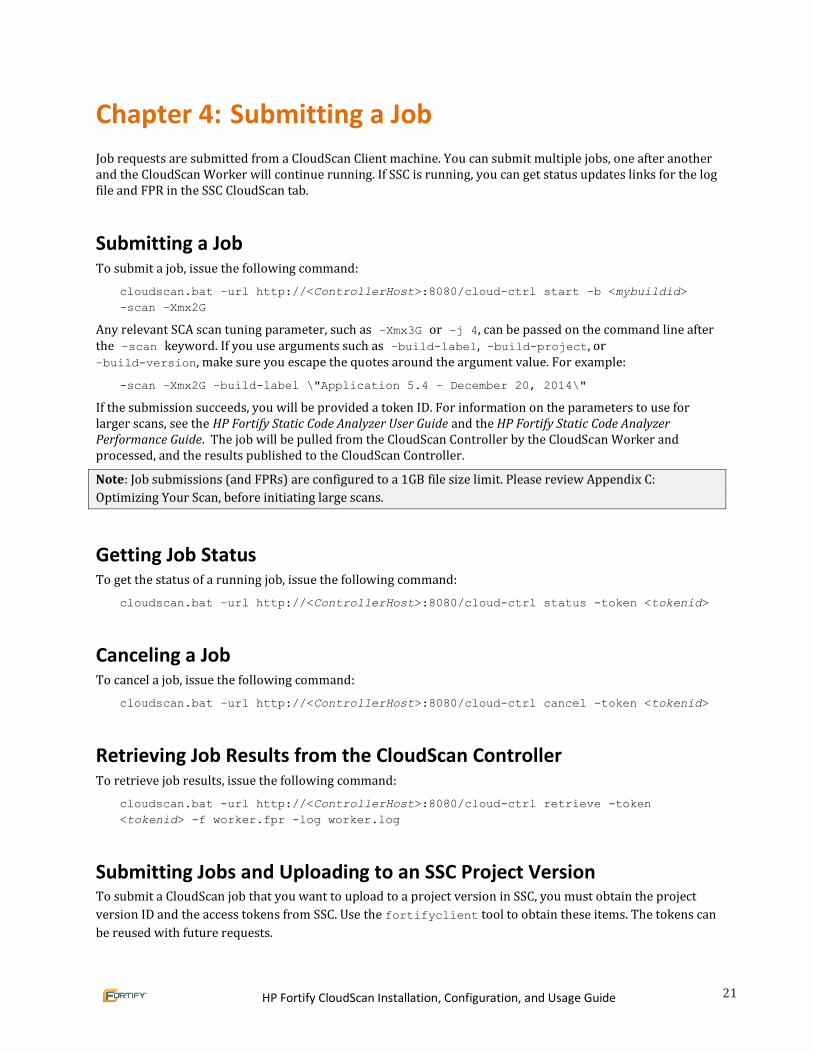
Job requests are submitted from a CloudScan Client machine. You can submit multiple jobs, one after another and the CloudScan Worker will continue running. If SSC is running, you can get status updates links for the log file and FPR in the SSC CloudScan tab.
Submitting a Job To submit a job, issue the following command:
cloudscan.bat –url http://<ControllerHost>:8080/cloud-ctrl start -b <mybuildid>
-scan –Xmx2G
Any relevant SCA scan tuning parameter, such as –Xmx3G or –j 4, can be passed on the command line after the –scan keyword. If you use arguments such as –build-label, -build-project, or –build-version, make sure you escape the quotes around the argument value. For example:
-scan –Xmx2G –build-label \"Application 5.4 – December 20, 2014\"
If the submission succeeds, you will be provided a token ID. For information on the parameters to use for larger scans, see the HP Fortify Static Code Analyzer User Guide and the HP Fortify Static Code Analyzer Performance Guide. The job will be pulled from the CloudScan Controller by the CloudScan Worker and processed, and the results published to the CloudScan Controller.
Note: Job submissions (and FPRs) are configured to a 1GB file size limit. Please review Appendix C:
Optimizing Your Scan, before initiating large scans.
Getting Job Status To get the status of a running job, issue the following command:
cloudscan.bat –url http://<ControllerHost>:8080/cloud-ctrl status -token <tokenid>
Canceling a Job To cancel a job, issue the following command:
cloudscan.bat –url http://<ControllerHost>:8080/cloud-ctrl cancel -token <tokenid>
Retrieving Job Results from the CloudScan Controller To retrieve job results, issue the following command:
cloudscan.bat -url http://<ControllerHost>:8080/cloud-ctrl retrieve -token
<tokenid> -f worker.fpr -log worker.log
Submitting Jobs and Uploading to an SSC Project Version To submit a CloudScan job that you want to upload to a project version in SSC, you must obtain the project
version ID and the access tokens from SSC. Use the fortifyclient tool to obtain these items. The tokens can
be reused with future requests.
HP Fortify CloudScan Installation, Configuration, and Usage Guide 22
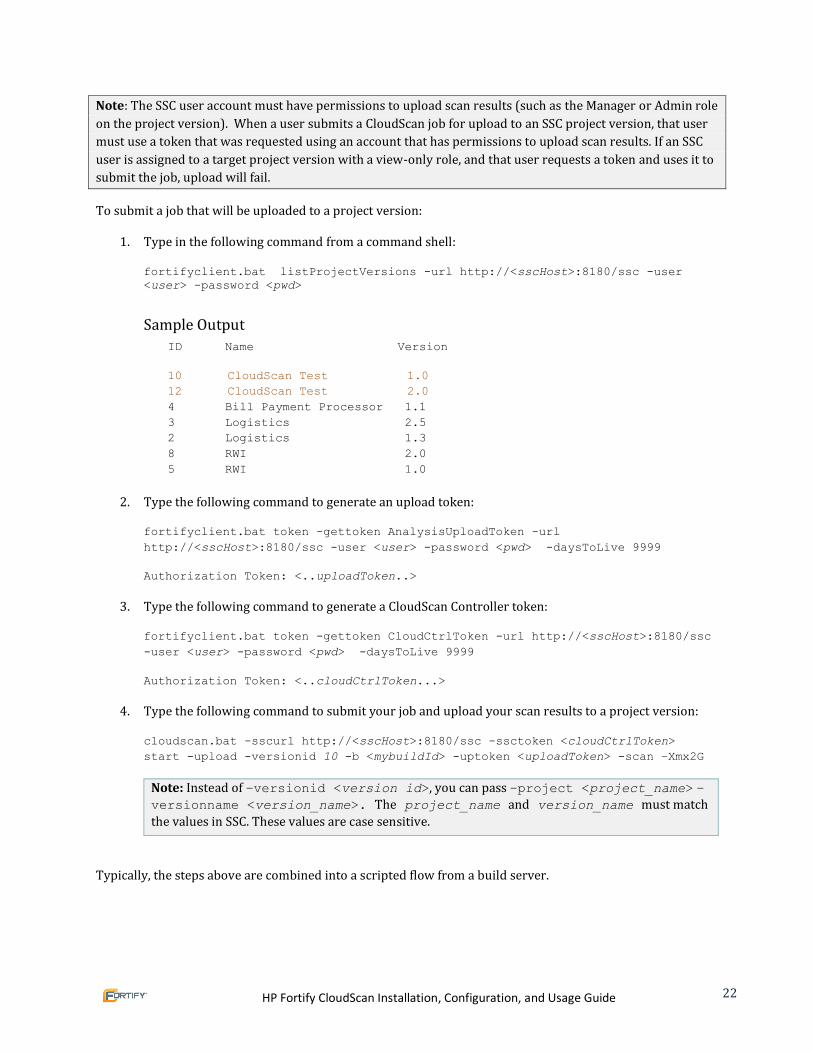
Note: The SSC user account must have permissions to upload scan results (such as the Manager or Admin role
on the project version). When a user submits a CloudScan job for upload to an SSC project version, that user
must use a token that was requested using an account that has permissions to upload scan results. If an SSC
user is assigned to a target project version with a view-only role, and that user requests a token and uses it to
submit the job, upload will fail.
To submit a job that will be uploaded to a project version:
1. Type in the following command from a command shell:
fortifyclient.bat listProjectVersions -url http://<sscHost>:8180/ssc -user
<user> -password <pwd>
Sample Output
ID Name Version
10 CloudScan Test 1.0
12 CloudScan Test 2.0
4 Bill Payment Processor 1.1
3 Logistics 2.5
2 Logistics 1.3
8 RWI 2.0
5 RWI 1.0
2. Type the following command to generate an upload token:
fortifyclient.bat token -gettoken AnalysisUploadToken -url
http://<sscHost>:8180/ssc -user <user> -password <pwd> -daysToLive 9999
Authorization Token: <..uploadToken..>
3. Type the following command to generate a CloudScan Controller token:
fortifyclient.bat token -gettoken CloudCtrlToken -url http://<sscHost>:8180/ssc
-user <user> -password <pwd> -daysToLive 9999
Authorization Token: <..cloudCtrlToken...>
4. Type the following command to submit your job and upload your scan results to a project version:
cloudscan.bat -sscurl http://<sscHost>:8180/ssc -ssctoken <cloudCtrlToken>
start -upload -versionid 10 -b <mybuildId> -uptoken <uploadToken> -scan –Xmx2G
Note: Instead of –versionid <version id>, you can pass –project <project_name> –
versionname <version_name>. The project_name and version_name must match
the values in SSC. These values are case sensitive.
Typically, the steps above are combined into a scripted flow from a build server.
HP Fortify CloudScan Installation, Configuration, and Usage Guide 23
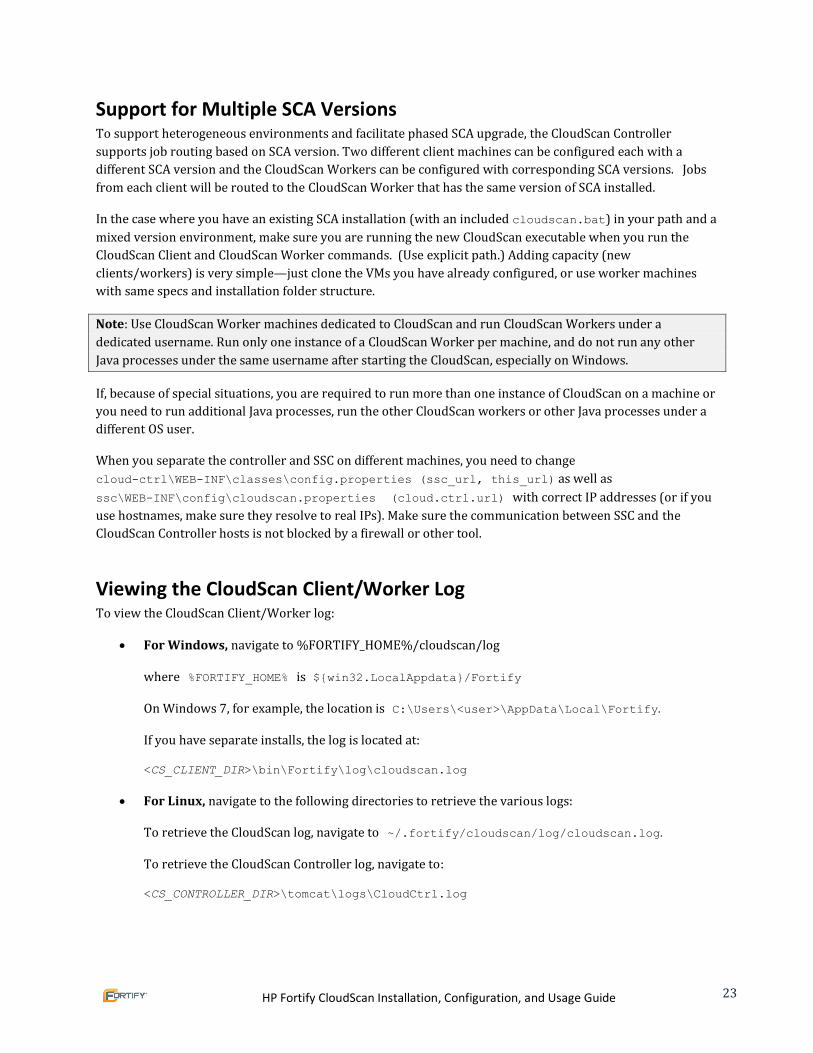
Support for Multiple SCA Versions To support heterogeneous environments and facilitate phased SCA upgrade, the CloudScan Controller
supports job routing based on SCA version. Two different client machines can be configured each with a
different SCA version and the CloudScan Workers can be configured with corresponding SCA versions. Jobs
from each client will be routed to the CloudScan Worker that has the same version of SCA installed.
In the case where you have an existing SCA installation (with an included cloudscan.bat) in your path and a
mixed version environment, make sure you are running the new CloudScan executable when you run the
CloudScan Client and CloudScan Worker commands. (Use explicit path.) Adding capacity (new
clients/workers) is very simple—just clone the VMs you have already configured, or use worker machines
with same specs and installation folder structure.
Note: Use CloudScan Worker machines dedicated to CloudScan and run CloudScan Workers under a
dedicated username. Run only one instance of a CloudScan Worker per machine, and do not run any other
Java processes under the same username after starting the CloudScan, especially on Windows.
If, because of special situations, you are required to run more than one instance of CloudScan on a machine or
you need to run additional Java processes, run the other CloudScan workers or other Java processes under a
different OS user.
When you separate the controller and SSC on different machines, you need to change
cloud-ctrl\WEB-INF\classes\config.properties (ssc_url, this_url) as well as
ssc\WEB-INF\config\cloudscan.properties (cloud.ctrl.url) with correct IP addresses (or if you
use hostnames, make sure they resolve to real IPs). Make sure the communication between SSC and the
CloudScan Controller hosts is not blocked by a firewall or other tool.
Viewing the CloudScan Client/Worker Log To view the CloudScan Client/Worker log:
For Windows, navigate to %FORTIFY_HOME%/cloudscan/log
where %FORTIFY_HOME% is ${win32.LocalAppdata}/Fortify
On Windows 7, for example, the location is C:\Users\<user>\AppData\Local\Fortify.
If you have separate installs, the log is located at:
<CS_CLIENT_DIR>\bin\Fortify\log\cloudscan.log
For Linux, navigate to the following directories to retrieve the various logs:
To retrieve the CloudScan log, navigate to ~/.fortify/cloudscan/log/cloudscan.log.
To retrieve the CloudScan Controller log, navigate to:
<CS_CONTROLLER_DIR>\tomcat\logs\CloudCtrl.log
HP Fortify CloudScan Installation, Configuration, and Usage Guide 24
To retrieve the SSC Log (if deployed on Tomcat), navigate to <path to tomcat>\logs\ssc.log.
If not deployed on Tomcat, consult the standard application logs for your SSC application server.
HP Fortify CloudScan Installation, Configuration, and Usage Guide 25
Chapter 5: Monitoring CloudScan with HP Fortify
Software Security Center
You can configure CloudScan and HP Fortify Software Security Center (SSC) so that you can monitor and troubleshoot CloudScan from within SSC.
From the CloudScan tab in SSC, you can:
View the results of a scan
Confirm connectivity to the CloudScan Controller and view CloudScan Controller properties
View status of running scans and scans completed within the last seven days
HP Fortify CloudScan Installation, Configuration, and Usage Guide 26
Appendix A: SCA Mobile Build Sessions
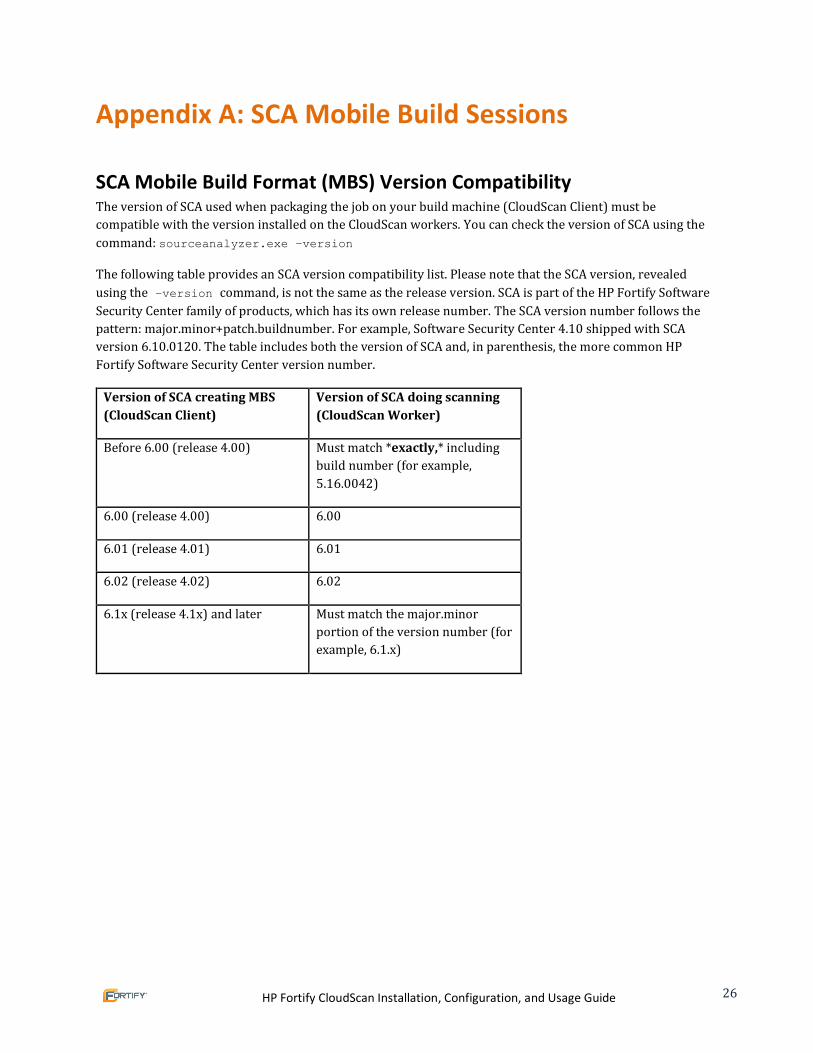
SCA Mobile Build Format (MBS) Version Compatibility The version of SCA used when packaging the job on your build machine (CloudScan Client) must be
compatible with the version installed on the CloudScan workers. You can check the version of SCA using the
command: sourceanalyzer.exe –version
The following table provides an SCA version compatibility list. Please note that the SCA version, revealed
using the –version command, is not the same as the release version. SCA is part of the HP Fortify Software
Security Center family of products, which has its own release number. The SCA version number follows the
pattern: major.minor+patch.buildnumber. For example, Software Security Center 4.10 shipped with SCA
version 6.10.0120. The table includes both the version of SCA and, in parenthesis, the more common HP
Fortify Software Security Center version number.
Version of SCA creating MBS
(CloudScan Client)
Version of SCA doing scanning
(CloudScan Worker)
Before 6.00 (release 4.00) Must match *exactly,* including
build number (for example,
5.16.0042)
6.00 (release 4.00) 6.00
6.01 (release 4.01) 6.01
6.02 (release 4.02) 6.02
6.1x (release 4.1x) and later Must match the major.minor
portion of the version number (for
example, 6.1.x)

HP Fortify CloudScan Installation, Configuration, and Usage Guide 27
Appendix B: Worker Auto-Start Configuration
Note: The instructions in this section are intended to provide general guidance to enable auto-start and may not be appropriate in all environments. HP Fortify strongly recommends that the user review it with their system administrator and make any changes that are appropriate to your environment.
Enabling CloudScan Worker Auto-Start on Windows Using a Scheduled
Task
1. Log in to Windows as the appropriate local admin user.
Note: The Workers are dedicated machines that are intended only for running Sourceanalyzer on behalf of CloudScan; they are not shared with any other service. Therefore, use a fully privileged administrative account for the subsequent auto-start setup to avoid issues with insufficient privileges.
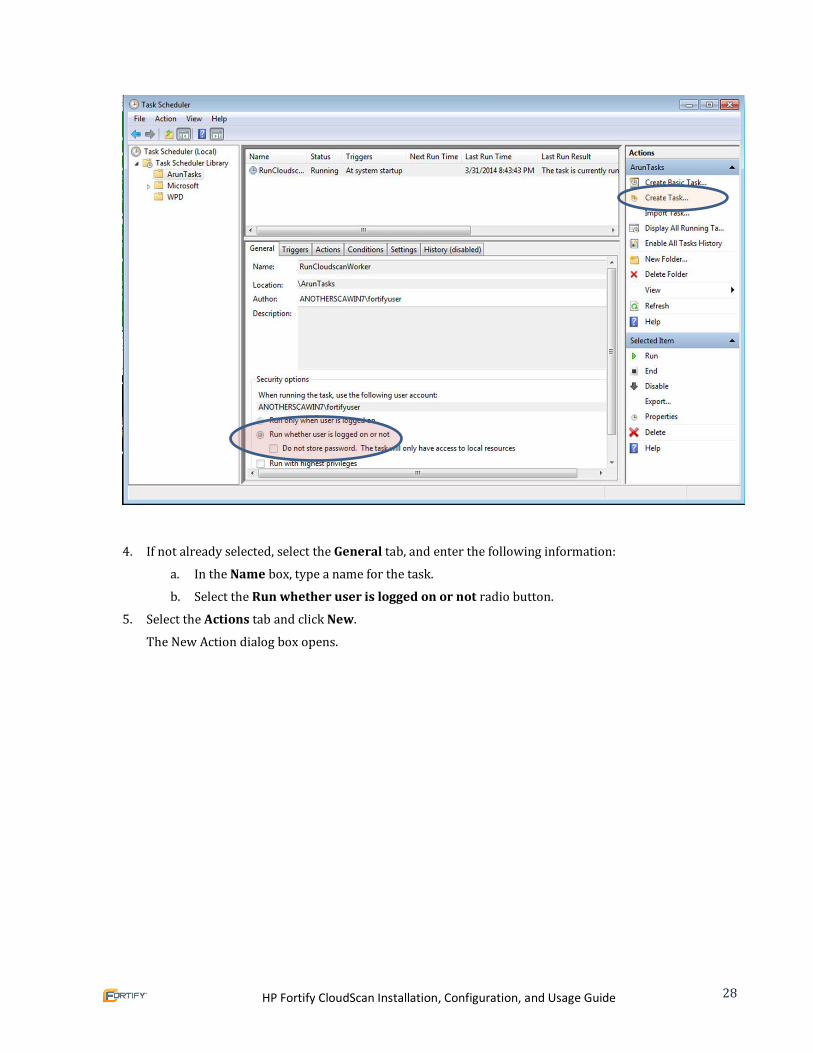
2. Launch Task Scheduler (or run taskschd.msc).
3. Click Create Task in the Actions pane, or select it from the Action menu.
The Create Task window opens.
HP Fortify CloudScan Installation, Configuration, and Usage Guide 28
4. If not already selected, select the General tab, and enter the following information:
a. In the Name box, type a name for the task.
b. Select the Run whether user is logged on or not radio button.
5. Select the Actions tab and click New.
The New Action dialog box opens.
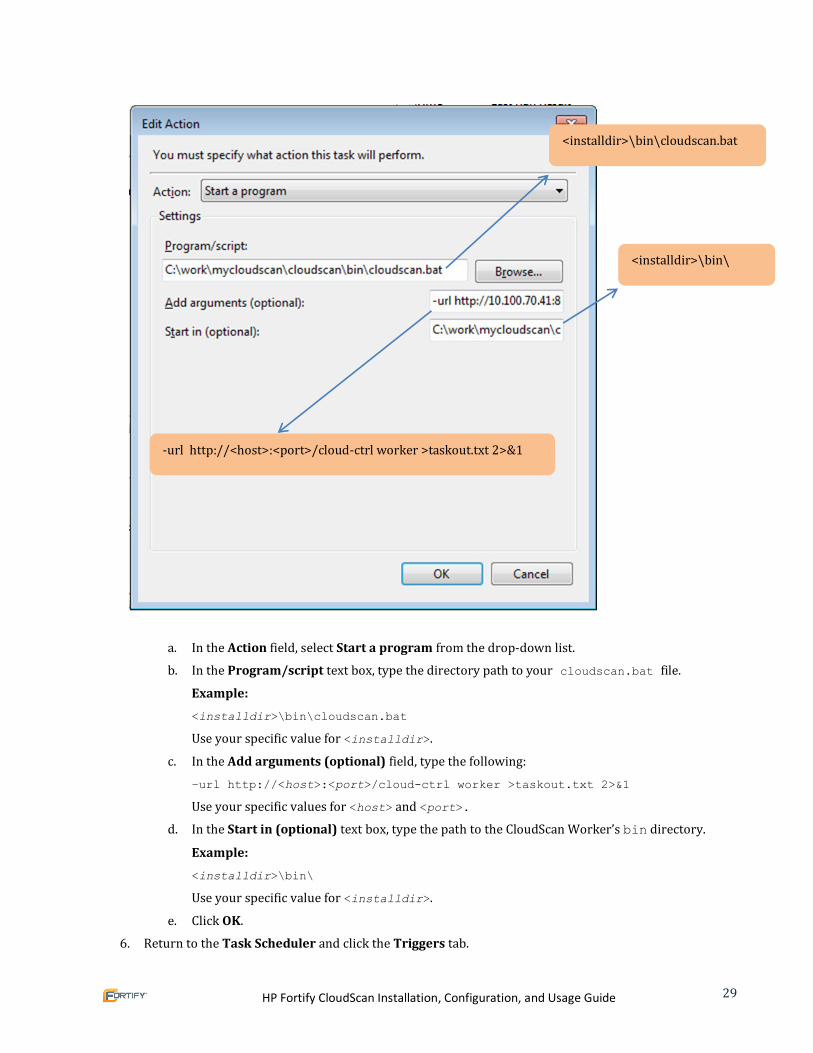
HP Fortify CloudScan Installation, Configuration, and Usage Guide 29
a. In the Action field, select Start a program from the drop-down list.
b. In the Program/script text box, type the directory path to your cloudscan.bat file.
Example:
<installdir>\bin\cloudscan.bat
Use your specific value for <installdir>.
c. In the Add arguments (optional) field, type the following:
–url http://<host>:<port>/cloud-ctrl worker >taskout.txt 2>&1
Use your specific values for <host> and <port>.
d. In the Start in (optional) text box, type the path to the CloudScan Worker’s bin directory.
Example:
<installdir>\bin\
Use your specific value for <installdir>.
e. Click OK.
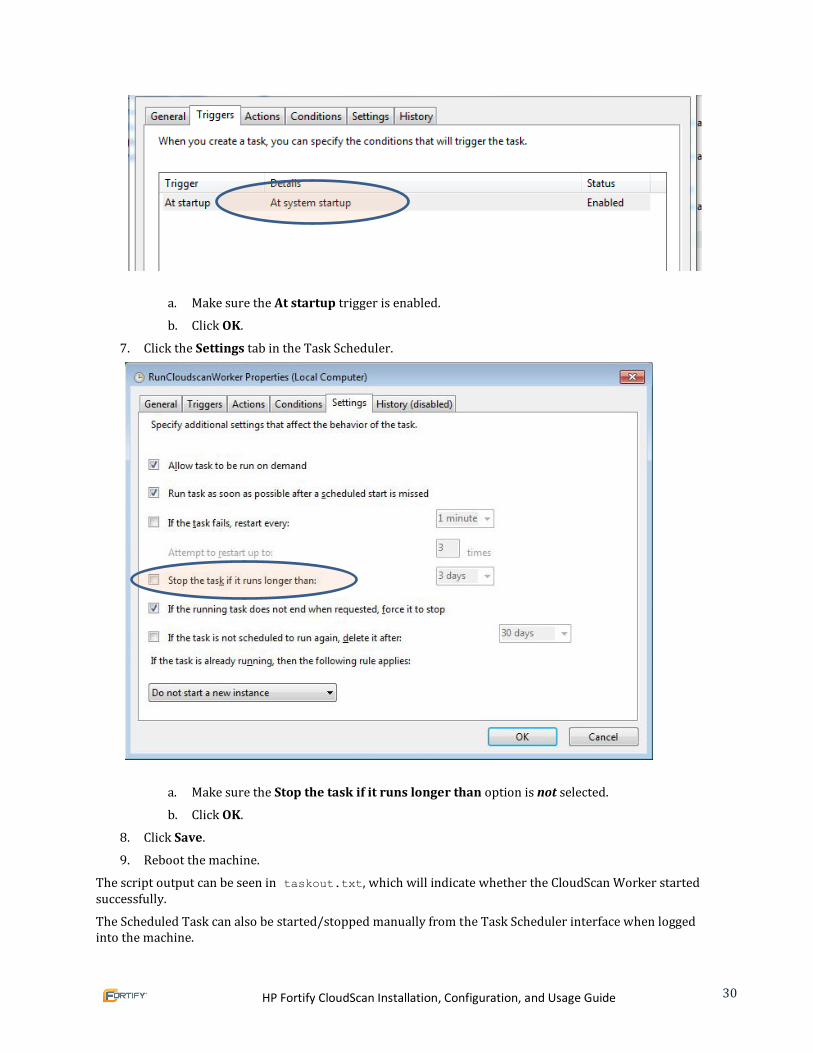
6. Return to the Task Scheduler and click the Triggers tab.
-url http://<host>:<port>/cloud-ctrl worker >taskout.txt 2>&1
<installdir>\bin\
<installdir>\bin\cloudscan.bat
HP Fortify CloudScan Installation, Configuration, and Usage Guide 30
a. Make sure the At startup trigger is enabled.
b. Click OK.
7. Click the Settings tab in the Task Scheduler.
a. Make sure the Stop the task if it runs longer than option is not selected.
b. Click OK.
8. Click Save.
9. Reboot the machine.
The script output can be seen in taskout.txt, which will indicate whether the CloudScan Worker started successfully.
The Scheduled Task can also be started/stopped manually from the Task Scheduler interface when logged into the machine.
HP Fortify CloudScan Installation, Configuration, and Usage Guide 31
Enabling CloudScan Worker Auto-Start on Linux Note: This has been tested with Red Hat; there may be some variation for other flavors of Linux. Please review with your system administrator before making any changes.
1. Log in to the machine as “root.”
2. Run the visudo command to edit the sudoers file and turn off "requiretty" (this can also be made specific to the <username>):
Defaults !requiretty
3. Set auto-start:
a. Verify the command invocation from the console (modify according to your install directory).
sudo -u <username> -- <installdir>/bin/cloudscan -url
http://<host>:8080/cloud-ctrl worker > <installdir>/bin/workerout.txt
2>&1 &
b. Make the change to the startup file.
Warning: Make sure you do not alter anything else in your bootup script.
vi /etc/rc.d/rc.local
Add the sudo command to the end of the file (add it before the line "exit 0" if it exists).
The ampersand (&) at the end allows the machine to boot up even if CloudScan Worker startup fails or hangs.
The double-dash (--) is important to separate the options to sudo from the options to your service.
4. Check the setup:
a. Reboot and log in to the machine as “root.”
b. Verify the processes under root. Enter:
ps -x | grep java=>
Verify that the output shows that the CloudScan Worker is not started under root.
c. Verify the processes under the user. Enter:
sudo -u <username> ps x | grep java=>
Verify that the output displays the Worker process.
d. Verify the existence and contents of the script output file. Enter:
tail -f/opt/<installdir>/bin/workerout.txt
For example:
tail -f/opt/HP_Fortify/HP_Fortify_SCA_and_Apps_4.40/bin/workerout.txt
HP Fortify CloudScan Installation, Configuration, and Usage Guide 32
Appendix C: Optimizing Your Scans
If you plan to regularly scan a large project, HPE recommends manually running a test scan on hardware that
is equivalent to the hardware where your CloudScan Worker is installed. This will ensure that the scan
parameters submitted to CloudScan are optimal.
To optimize your scan:
1. Set the HP Fortify SCA scan parameters for optimal performance by:
a. Adjusting the memory settings to align with your hardware
b. Turning on parallel processing
Note: For more information on tuning SCA, see the “HP Fortify Static Code Analyzer Performance
Guide”.
2. Run the scan.
3. Note the size of the resultant FPR file and scan log. For files greater than 1 GB in size, increase the
following file size thresholds to ensure the resultant files will be accept by the CloudScan Controller
and Software Security Center:
a. Controller threshold:
max_upload_size=<max_FPR_Or_logfile_size_in_MB> (default value is 1024,
located in “cloud-ctrl\WEB-INF\classes\config.properties”)
b. SSC threshold:
upload.mb.limit.analysis.result=<max_FPR_size_in_MB> (default is 1024,
located in “webapps\ssc\WEB-INF\config\ssc.properties”)
4. Ensure that your SSC hardware and application startup parameters are set to process a very large FPR. For more information, see the “HP Fortify Static Code Analyzer Performance Guide”.