Embed Size (px)
Citation preview

FOREWORD
i2001 MY RX300_U (OM48431U)
Welcome to the growing group of value–conscious people who drive Lexus vehicles. Weare proud of the advanced engineering and quality construction of each vehicle we build.
This Owner’s Manual explains the features of your new Lexus. Please read it and follow theinstructions carefully so that you can enjoy many years of safe motoring.
When it comes to service, remember that your Lexus dealer knows your vehicle best andis interested in your complete satisfaction. Your Lexus dealer will provide qualitymaintenance and any other assistance you may require.
If there is not a Lexus dealer near you, or you need emergency assistance for any reason,please call the following number:
U.S. OWNERS� When traveling in the U.S. mainland or Canada:
Lexus Roadside Assistance 1–800–25–LEXUS (Toll–Free)(1–800–255–3987)
� HAWAII:Lexus Customer Service Assistance 1–800–25–LEXUS (Toll–Free)
(1–800–255–3987)
CANADIAN OWNERS� When traveling in Canada or the U.S. mainland:
Lexus Roadside Assistance/Customer Service 1–800–26–LEXUS (Toll–Free)(1–800–265–3987)
Please leave this Owner’s Manual in this vehicle at the time of resale. The next ownerwill need this information also.
All information and specifications in this manual are current at the time of printing.However, because of the Lexus policy of continual product improvement, we reservethe right to make changes at any time without notice.
Please note that this manual applies to all models and explains all equipment,including options. Therefore, you may find some explanations for equipment notinstalled on your vehicle.

INTRODUCTION
ii 2001 MY RX300_U (OM48431U)
New vehicle warrantyYour new vehicle is covered by the following Lexus limitedwarranties:
� New vehicle warranty
� Emission control systems warranty
� Others
For further information, please refer to the “Owner’s Guide”,“Owner’s Manual Supplement” or “Warranty Booklet”.
Your responsibility for maintenanceIt is the owner’s responsibility to make sure the specifiedmaintenance is performed. Section 5 of this Owner’s Manualgives details of these maintenance requirements. Included inSection 6 is general maintenance. For scheduledmaintenance information, please refer to the “Owner’s ManualSupplement / Maintenance Schedule”.
Accessories, spare parts and modification ofyour LexusA wide variety of non–genuine spare parts and accessories forLexus vehicles are currently available in the market. Youshould know that Toyota does not warrant these products andis not responsible for their performance, repair or replacement,or for any damage they may cause to, or adverse effect theymay have on, your Lexus vehicle.
This vehicle should not be modified with non–genuine Lexusproducts. Modification with non–genuine Lexus productscould affect its performance, safety or durability, and may evenviolate governmental regulations. In addition, damage orperformance problems resulting from the modification may notbe covered under warranty.
Spark ignition system of your LexusThe spark ignition system in your Lexus meets allrequirements of the Canadian Interference–CausingEquipment Standard.
Installation of a mobile two–way radio systemAs the installation of a mobile two–way radio system in yourvehicle could affect electronic systems such as the multiportfuel injection system/sequential multiport fuel injection system,cruise control system, anti–lock brake system, SRS airbagsystem and seat belt pretensioner system, be sure to checkwith your Lexus dealer for precautionary measures or specialinstructions regarding installation.

INTRODUCTION
iii2001 MY RX300_U (OM48431U)
Scrapping of your LexusThe SRS airbag and seat belt pretensioner devices in yourLexus contain explosive chemicals. If the vehicle is scrappedwith the airbags and seat belt pretensioners left as they are,this may cause an accident such as fire. Be sure to have thesystem of the SRS airbag and seat belt pretensioner removedand disposed of by a qualified service shop or by your Lexusdealer before you scrap your vehicle.
On–pavement and off–road driving tipsThis vehicle belongs to the utility vehicle class. Utility vehicleshave a significantly higher rollover rate than other types ofvehicles. This vehicle will handle and maneuver differentlyfrom an ordinary passenger car because it is designed foroff–road use also. In addition, this vehicle has a higher groundclearance and center of gravity than that of an ordinarypassenger car. This vehicle design feature causes this type ofvehicle to be more likely to rollover. Failure to operate thisvehicle correctly may result in loss of control, accidents orvehicle rollover causing death or serious injury. Be sure to read“Off–road vehicle precautions” on page 204 and “Off–roaddriving precautions” on page 206.

HOW TO USE THIS MANUAL
iv 2001 MY RX300_U (OM48431U)
HOW TO USE THIS MANUALThe contents of this manual are explained briefly on thispage to help you make the best use of the manual. Pleaseread this page and the rest of the Owner’s Manualcarefully to make sure you fully understand the operationof your vehicle.
This will help you enjoy safe and comfortable driving.
TABLE OF CONTENTSThe table of contents and the pictorial index provide easyreference to the appropriate pages.
BASIC OPERATION – QUICK REFERENCEOperation of basic equipment is briefly explained in an easilyunderstandable way for quick reference.
SECTION 1 – INSTRUMENTS ANDCONTROLSThe vehicle’s equipment is divided into the 7 groups listedbelow. Use of the equipment is explained, including any pointsyou should pay particular attention to.
1. Keys and doors2. Switches3. Gauges, meters and service reminder indicators4. Interior equipment5. Exterior equipment6. Comfort adjustment7. Theft deterrent
SECTION 2 – AIR CONDITIONING AND AUDIOThe features of the vehicle’s air conditioning and audio areexplained in detail. Be sure to read this section so that you canmake full use of them.
SECTION 3 – STARTING AND DRIVINGStarting the engine, driving, stopping, operation of featuresaffecting vehicle handling, hints on vehicle safety and safedriving techniques are all explained. Please read everythingin this section, and remember – drive safely!
SECTION 4 – IN CASE OF AN EMERGENCYThis section explains what to do in the event of an urgentsituation such as the engine not starting or getting a flat tire,etc. If such a problem occurs, check the contents of thisOwner’s Manual and follow the instructions given.
SECTION 5 – MAINTENANCEThis section explains the importance of regular maintenance.Regular and periodic inspection and maintenance of yourLexus will help to keep your vehicle in its best condition.
SECTION 6 – SERVICE PROCEDURES ANDSPECIFICATIONSSimple maintenance procedure and service data are providedhere for your reference should you wish to perform inspectionand maintenance yourself.

HOW TO USE THIS MANUAL
v2001 MY RX300_U (OM48431U)
INDEXThe page number is listed for each item in the Owner’s Manualso that you can rapidly find the item and page you aresearching for.
GAS STATION INFORMATIONThe information you need to know for appropriate servicing atthe gas station is provided here.
QUICK INDEXThis is designed so that you can quickly find the neededinformation when an urgent situation arises.
Safety symbol
In this manual, you will also see a circle with a slash throughit. This means “Do not”, “Do not do this”, or “Do not let thishappen”.
Safety and vehicle damage warningsIn this manual you will see CAUTION and NOTICE warnings.These are used in the following ways:
CAUTION
This is a warning against something which may causeinjury to people if the warning is ignored. You areinformed what you must or must not do in order to avoidor reduce the risk to yourself and other people.
NOTICE
This is a warning against something which may causedamage to the vehicle or its equipment if the warning isignored. You are informed what you must or must notdo in order to avoid or reduce the risk of damage to yourLexus and its equipment.
Your Lexus Owner ’s Manual provides you with aconsiderable amount of information. To use thisinformation most effectively, please take the time tofamiliarize yourself with the contents and use of themanual.

HOW TO USE THIS MANUAL
vi 2001 MY RX300_U (OM48431U)

PICTORIAL INDEX
vii2001 MY RX300_U (OM48431U)
INSTRUMENT PANEL
PR078

For detailed information, refer to the description given in each section.
PICTORIAL INDEX
viii 2001 MY RX300_U (OM48431U)
Page
1 Door lock switch and power windowswitches 19, 31. . . . . . . . . . . . . . . . . . . . . . . . . . . . . . . . .
2 Side vent 150. . . . . . . . . . . . . . . . . . . . . . . . . . . . . . . . . . .
3 Instrument panel light control 50. . . . . . . . . . . . . . . . .
4 Headlight, turn signal and fog light switch 24, 26, 27. . . . . . . . . . . . . . . . . . . . . . . . . . . .
5 Wiper and washer switch 28, 29. . . . . . . . . . . . . . . . . .
6 Ignition switch 178. . . . . . . . . . . . . . . . . . . . . . . . . . . . . .
7 Emergency flasher switch 34. . . . . . . . . . . . . . . . . . . .
8 Automatic air conditioning controls 142. . . . . . . . . .
9 Multi–display
Cruise information display 48. . . . . . . . . . . . . . . . . . Outside temperature display 56. . . . . . . . . . . . . . . . . Clock 55. . . . . . . . . . . . . . . . . . . . . . . . . . . . . . . . . . . . . . Audio system 152. . . . . . . . . . . . . . . . . . . . . . . . . . . . . . Automatic air conditioning controls 142. . . . . . . . .
Page
10 Car audio 152. . . . . . . . . . . . . . . . . . . . . . . . . . . . . . . . . .
11 Front passenger’s seat belt reminder light 42. . . . .
12 Glove box/CD automatic changer 59/164. . . . . . . . . .
13 Seat heater switches 34. . . . . . . . . . . . . . . . . . . . . . . . .
14 Cigarette lighter 57. . . . . . . . . . . . . . . . . . . . . . . . . . . . .
15 Driving pattern selector switch 187. . . . . . . . . . . . . . .
16 Traction control system off switch 191. . . . . . . . . . .
17 Automatic transmission selector lever 180. . . . . . . .
18 Cruise control switch 188. . . . . . . . . . . . . . . . . . . . . . .
19 Driving position memory switch 134. . . . . . . . . . . . . .
20 Parking brake 179. . . . . . . . . . . . . . . . . . . . . . . . . . . . . .
21 Security indicator light 11,138. . . . . . . . . . . . . . . . . . . .
22 Hood lock release lever 72. . . . . . . . . . . . . . . . . . . . . .
23 Auxiliary box 66. . . . . . . . . . . . . . . . . . . . . . . . . . . . . . . .
24 Power rear view mirror control switches 88. . . . . . .

PICTORIAL INDEX
ix2001 MY RX300_U (OM48431U)
INSTRUMENT CLUSTER (Two–wheel drive models sold in U. S. A.)
PR067

For detailed information, refer to the description given in each section.
PICTORIAL INDEX
x 2001 MY RX300_U (OM48431U)
Page
1 Vehicle skid control system warning light 45. . . . . .
2 Traction control system OFFindicator/warning light 45. . . . . . . . . . . . . . . . . . . . . . .
3 Slip indicator light 191,194. . . . . . . . . . . . . . . . . . . . . .
4 Engine coolant temperature gauge 38. . . . . . . . . . . .
5 Turn signal indicator light 27. . . . . . . . . . . . . . . . . . . .
6 Headlight indicator light 24. . . . . . . . . . . . . . . . . . . . . .
7 Automatic transmission indicator lights 180. . . . . .
8 ODO/TRIP knob 40. . . . . . . . . . . . . . . . . . . . . . . . . . . . . .
9 Odometer and trip meter 40. . . . . . . . . . . . . . . . . . . . .
10 Headlight high beam indicator light 26. . . . . . . . . . .
11 Tachometer 39. . . . . . . . . . . . . . . . . . . . . . . . . . . . . . . . .
12 Cruise control indicator light 188. . . . . . . . . . . . . . . .
13 Rear light failure warning light 45. . . . . . . . . . . . . . . .
14 Anti–lock brake system warning light 45. . . . . . . . . .
Page
15 Malfunction indicator lamp 44. . . . . . . . . . . . . . . . . . .
16 Low washer fluid warning light 47. . . . . . . . . . . . . . . .
17 Automatic transmission fluid temperaturewarning light 46. . . . . . . . . . . . . . . . . . . . . . . . . . . . . . . .
18 Discharge warning light 43. . . . . . . . . . . . . . . . . . . . . .
19 Low engine oil pressure warning light 44. . . . . . . . .
20 SRS warning light 43. . . . . . . . . . . . . . . . . . . . . . . . . . . .
21 Brake system warning light 42. . . . . . . . . . . . . . . . . . .
22 Driver’s seat belt reminder light 42. . . . . . . . . . . . . . .
23 Open door warning light 45. . . . . . . . . . . . . . . . . . . . . .
24 Snow mode indicator light 187. . . . . . . . . . . . . . . . . . .
25 Automatic headlight leveling system warning light 47. . . . . . . . . . . . . . . . . . . . . . . . . . . . . . . .
26 Overdrive off indicator light 182. . . . . . . . . . . . . . . . . .
27 Low fuel level warning light 47. . . . . . . . . . . . . . . . . . .
28 Fuel gauge 38. . . . . . . . . . . . . . . . . . . . . . . . . . . . . . . . . .

PICTORIAL INDEX
xi2001 MY RX300_U (OM48431U)
INSTRUMENT CLUSTER (Four–wheel drive models sold in U. S. A.)
PR068

For detailed information, refer to the description given in each section.
PICTORIAL INDEX
xii 2001 MY RX300_U (OM48431U)
Page
1 Vehicle skid control system warning light 45. . . . . .
2 Slip indicator light 193,194. . . . . . . . . . . . . . . . . . . . . .
3 Engine coolant temperature gauge 38. . . . . . . . . . . .
4 Turn signal indicator light 27. . . . . . . . . . . . . . . . . . . .
5 Headlight indicator light 24. . . . . . . . . . . . . . . . . . . . . .
6 Automatic transmission indicator lights 180. . . . . .
7 ODO/TRIP knob 40. . . . . . . . . . . . . . . . . . . . . . . . . . . . . .
8 Odometer and trip meter 40. . . . . . . . . . . . . . . . . . . . .
9 Headlight high beam indicator light 26. . . . . . . . . . .
10 Tachometer 39. . . . . . . . . . . . . . . . . . . . . . . . . . . . . . . . .
11 Cruise control indicator light 188. . . . . . . . . . . . . . . .
12 Rear light failure warning light 45. . . . . . . . . . . . . . . .
13 Anti–lock brake system warning light 45. . . . . . . . . .
14 Malfunction indicator lamp 44. . . . . . . . . . . . . . . . . . .
Page
15 Low washer fluid warning light 47. . . . . . . . . . . . . . . .
16 Automatic transmission fluid temperaturewarning light 46. . . . . . . . . . . . . . . . . . . . . . . . . . . . . . . .
17 Discharge warning light 43. . . . . . . . . . . . . . . . . . . . . .
18 Low engine oil pressure warning light 44. . . . . . . . .
19 SRS warning light 43. . . . . . . . . . . . . . . . . . . . . . . . . . . .
20 Brake system warning light 42. . . . . . . . . . . . . . . . . . .
21 Driver’s seat belt reminder light 42. . . . . . . . . . . . . . .
22 Open door warning light 45. . . . . . . . . . . . . . . . . . . . . .
23 Snow mode indicator light 187. . . . . . . . . . . . . . . . . . .
24 Automatic headlight leveling system warning light 47. . . . . . . . . . . . . . . . . . . . . . . . . . . . . . . .
25 Overdrive off indicator light 182. . . . . . . . . . . . . . . . . .
26 Low fuel level warning light 47. . . . . . . . . . . . . . . . . . .
27 Fuel gauge 38. . . . . . . . . . . . . . . . . . . . . . . . . . . . . . . . . .

PICTORIAL INDEX
xiii2001 MY RX300_U (OM48431U)
INSTRUMENT CLUSTER (Two–wheel drive models sold in Canada)
PR069

For detailed information, refer to the description given in each section.
PICTORIAL INDEX
xiv 2001 MY RX300_U (OM48431U)
Page
1 Vehicle skid control system warning light 45. . . . . .
2 Traction control system OFFindicator/warning light 45. . . . . . . . . . . . . . . . . . . . . . .
3 Slip indicator light 191,194. . . . . . . . . . . . . . . . . . . . . .
4 Engine coolant temperature gauge 38. . . . . . . . . . . .
5 Turn signal indicator light 27. . . . . . . . . . . . . . . . . . . .
6 Tail light indicator light 24. . . . . . . . . . . . . . . . . . . . . . .
7 Automatic transmission indicator lights 180. . . . . .
8 ODO/TRIP knob 40. . . . . . . . . . . . . . . . . . . . . . . . . . . . . .
9 Odometer and trip meter 40. . . . . . . . . . . . . . . . . . . . .
10 Headlight high beam indicator light 26. . . . . . . . . . .
11 Tachometer 39. . . . . . . . . . . . . . . . . . . . . . . . . . . . . . . . .
12 Cruise control indicator light 188. . . . . . . . . . . . . . . .
13 Rear light failure warning light 45. . . . . . . . . . . . . . . .
14 Anti–lock brake system warning light 45. . . . . . . . . .
Page
15 Malfunction indicator lamp 44. . . . . . . . . . . . . . . . . . .
16 Low washer fluid warning light 47. . . . . . . . . . . . . . . .
17 Automatic transmission fluid temperaturewarning light 46. . . . . . . . . . . . . . . . . . . . . . . . . . . . . . . .
18 Discharge warning light 43. . . . . . . . . . . . . . . . . . . . . .
19 Low engine oil pressure warning light 44. . . . . . . . .
20 SRS warning light 43. . . . . . . . . . . . . . . . . . . . . . . . . . . .
21 Brake system warning light 42. . . . . . . . . . . . . . . . . . .
22 Driver’s seat belt reminder light 42. . . . . . . . . . . . . . .
23 Open door warning light 45. . . . . . . . . . . . . . . . . . . . . .
24 Snow mode indicator light 187. . . . . . . . . . . . . . . . . . .
25 Automatic headlight leveling system warning light 47. . . . . . . . . . . . . . . . . . . . . . . . . . . . . . . .
26 Overdrive off indicator light 182. . . . . . . . . . . . . . . . . .
27 Low fuel level warning light 47. . . . . . . . . . . . . . . . . . .
28 Fuel gauge 38. . . . . . . . . . . . . . . . . . . . . . . . . . . . . . . . . .

PICTORIAL INDEX
xv2001 MY RX300_U (OM48431U)
INSTRUMENT CLUSTER (Four–wheel drive models sold in Canada)
PR070

For detailed information, refer to the description given in each section.
PICTORIAL INDEX
xvi 2001 MY RX300_U (OM48431U)
Page
1 Vehicle skid control system warning light 45. . . . . .
2 Slip indicator light 193,194. . . . . . . . . . . . . . . . . . . . . .
3 Engine coolant temperature gauge 38. . . . . . . . . . . .
4 Turn signal indicator light 27. . . . . . . . . . . . . . . . . . . .
5 Tail light indicator light 24. . . . . . . . . . . . . . . . . . . . . . .
6 Automatic transmission indicator lights 180. . . . . .
7 ODO/TRIP knob 40. . . . . . . . . . . . . . . . . . . . . . . . . . . . . .
8 Odometer and trip meter 40. . . . . . . . . . . . . . . . . . . . .
9 Headlight high beam indicator light 26. . . . . . . . . . .
10 Tachometer 39. . . . . . . . . . . . . . . . . . . . . . . . . . . . . . . . .
11 Cruise control indicator light 188. . . . . . . . . . . . . . . .
12 Rear light failure warning light 45. . . . . . . . . . . . . . . .
13 Anti–lock brake system warning light 45. . . . . . . . . .
14 Malfunction indicator lamp 44. . . . . . . . . . . . . . . . . . .
Page
15 Low washer fluid warning light 47. . . . . . . . . . . . . . . .
16 Automatic transmission fluid temperaturewarning light 46. . . . . . . . . . . . . . . . . . . . . . . . . . . . . . . .
17 Discharge warning light 43. . . . . . . . . . . . . . . . . . . . . .
18 Low engine oil pressure warning light 44. . . . . . . . .
19 SRS warning light 43. . . . . . . . . . . . . . . . . . . . . . . . . . . .
20 Brake system warning light 42. . . . . . . . . . . . . . . . . . .
21 Driver’s seat belt reminder light 42. . . . . . . . . . . . . . .
22 Open door warning light 45. . . . . . . . . . . . . . . . . . . . . .
23 Snow mode indicator light 187. . . . . . . . . . . . . . . . . . .
24 Automatic headlight leveling system warning light 47. . . . . . . . . . . . . . . . . . . . . . . . . . . . . . . .
25 Overdrive off indicator light 182. . . . . . . . . . . . . . . . . .
26 Low fuel level warning light 47. . . . . . . . . . . . . . . . . . .
27 Fuel gauge 38. . . . . . . . . . . . . . . . . . . . . . . . . . . . . . . . . .

PR080
PICTORIAL INDEX
xvii2001 MY RX300_U (OM48431U)
SEAT AND STEERING WHEELPage
1 Tilt steering adjustment lever 87. . . . . . . . . . . . . . . . . . . . . . . . . .
2 Seat position, seat cushion angle and height control switch 79. . . . . . . . . . . . . . . . . . . . . . . . .
3 Seatback angle control switch 80. . .
4 Lumbar support control switch 81. .
For detailed information, refer to thedescription given in each section.

PR048
PICTORIAL INDEX
xviii 2001 MY RX300_U (OM48431U)
EXTERIOR VIEWPage
1 Rear window defogger 30. . . . . . . . . .
2 Back door 20. . . . . . . . . . . . . . . . . . . . .
3 Fuel filler door 73. . . . . . . . . . . . . . . . .
4 Moon roof 74. . . . . . . . . . . . . . . . . . . . .
5 Wiper and washer 28, 298. . . . . . . . . .
6 Outside rear view mirror 87. . . . . . . .
7 Side door 18. . . . . . . . . . . . . . . . . . . . . .
8 Tire and wheel 279. . . . . . . . . . . . . . . .
9 Headlights 24, 300. . . . . . . . . . . . . . . . .
10 Hood 72. . . . . . . . . . . . . . . . . . . . . . . . . .
For detailed information, refer to thedescription given in each section.

PICTORIAL INDEX
xix2001 MY RX300_U (OM48431U)

BASIC OPERATION
12001 MY RX300_U (OM48431U)
QUICK REFERENCEDriver’s seat 2. . . . . . . . . . . . . . . . . . . . . . . . . . . . . . . . . . . . . . . . . . . . . . Steering wheel 2. . . . . . . . . . . . . . . . . . . . . . . . . . . . . . . . . . . . . . . . . . . . Automatic transmission 3. . . . . . . . . . . . . . . . . . . . . . . . . . . . . . . . . . . . . Headlight and turn signal switch 4. . . . . . . . . . . . . . . . . . . . . . . . . . . . . Wiper switch 5. . . . . . . . . . . . . . . . . . . . . . . . . . . . . . . . . . . . . . . . . . . . . .

BR027
Seat position
Seat cushionangle
Seat cushionheight
Seatbackangle
Lumbarsupport
Head restraintheight
Head restraintangle
BASIC OPERATION – QUICK REFERENCE
2 2001 MY RX300_U (OM48431U)
1. DRIVER’S SEAT 2. STEERING WHEEL
� TILT STEERING WHEEL
BR030
To tilt the steering wheel up or down to the desired angle:
1. Pull the lever up while holding the steering wheel.
2. Push or pull the steering wheel to the desired angle.
3. Release the lever.

BR010
Note: When the cruise control is being used, even if you downshift the transmission by pushing and releasing the overdrive switch,engine braking will not be enabled because the cruise control is not cancelled. For ways to decrease the vehicle speed, see page190.
Parking, engine starting and keyremoval position
Reverse position
Neutral positionNormal driving position (with overdrive on)Stronger engine brakingMaximum engine braking
With the brake pedal depressed, shiftwhile holding the lock release buttonin. (The ignition switch must be in“ON” position.)
Shift while holding the lock releasebutton in.
Shift normally.
Overdrive switch
“O/D OFF” indicatorlight on the instrumentcluster
For selecting either a three–speed orfour–speed transmission
Lock release button (To prevent misshifting)
BASIC OPERATION – QUICK REFERENCE
32001 MY RX300_U (OM48431U)
3. AUTOMATIC TRANSMISSION

BE004
BE004
Parking, tail, license plate,side marker and instrumentpanel lights turn on.
Headlights turn on at fullintensity.
Automatic light control
Parking, tail, license plate,side marker and instrumentpanel lights turn on.
Headlights also turn on.
Automatic light control
BE005
BE006
High beam
Headlight flasher
Right or left turn
Lane change(Right or left)
BASIC OPERATION – QUICK REFERENCE
4 2001 MY RX300_U (OM48431U)
4. HEADLIGHT AND TURN SIGNAL SWITCH
� HEADLIGHT SWITCHWith the ignition OFF
With the engine started and parking brakereleased
� TURN SIGNAL SWITCH

BR008
BR007c
BASIC OPERATION – QUICK REFERENCE
52001 MY RX300_U (OM48431U)
5. WIPER SWITCH� Front
Intermittent operation
1 Low speed operation
2 High speed operation
Washer on
� Rear
3 Wiper on(Intermittent operation)
4 Wiper on(Normal operation)
5 Washer also on
6 Washer on

BASIC OPERATION – QUICK REFERENCE
6 2001 MY RX300_U (OM48431U)

SECTION 1 – 1
72001 MY RX300_U (OM48431U)
INSTRUMENTS AND CONTROLSKeys and doorsKeys 8. . . . . . . . . . . . . . . . . . . . . . . . . . . . . . . . . . . . . . . . . . . . . . . . . . . . . Engine immobiliser system 11. . . . . . . . . . . . . . . . . . . . . . . . . . . . . . . . . Wireless remote control 13. . . . . . . . . . . . . . . . . . . . . . . . . . . . . . . . . . . . Side doors 18. . . . . . . . . . . . . . . . . . . . . . . . . . . . . . . . . . . . . . . . . . . . . . . Back door 20. . . . . . . . . . . . . . . . . . . . . . . . . . . . . . . . . . . . . . . . . . . . . . . .

KEYS AND DOORS
8 2001 MY RX300_U (OM48431U)
KEYS
11L025a
1 Master key (black) – The master key works in everylock. For your Lexus dealer to make you a new keywith built–in transponder chip, your dealer will needit.
2 Sub key (gray) – The sub key will not open the glovebox.
3 Key number plate – Keep the plate in a safe placesuch as your wallet, not in the vehicle.
A transponder chip for engine immobiliser system has beenfilled in the head of the master and sub keys. These chips areneeded to enable the system to function correctly, so be carefulnot to lose these keys. If you make your own duplicate key, youwill not be able to cancel the system or start the engine.
To protect things locked in the glove box when you have yourvehicle parked, leave the sub key with the attendant.
Since the doors can be locked without a key, you shouldalways carry a spare master key in case you accidentally lockyour keys inside the vehicle.
If you should lose your keys or if you need additional keys,duplicates can be made by a Lexus dealer using the keynumber.
We recommend you to write down the key number and keepit in safe place.
Flat key
11R089
As a transponder chip is built in its key case, you can startthe engine with this key.
The flat key works in every lock.
A transponder chip for engine immobiliser system has beenfilled in the key case of the flat key. This chip is needed toenable the system to function correctly, so be careful not tolose this key. If you make your own duplicate key, you will notbe able to cancel the system or start the engine.

KEYS AND DOORS
92001 MY RX300_U (OM48431U)
Insert your flat key plate in its key case as shown. Werecommend that you always carry this with you for emergencyuse. Do not leave it in your vehicle.
Starting the engine using a flat key
11R090
1. Remove the key plate from the key case.
2. Insert the key plate into the ignition switch. The indicatorlight keeps flashing.
3. Bring the key case closer to the ignition switch within 10seconds as indicated by the arrow head. The indicator lightgoes out. This means the engine immobiliser system isautomatically canceled. (For details, see “Engine immobilisersystem” on page 11.) You can put the key case away then. Youcannot cancel the engine immobiliser system if 10 secondshave past after you inserted the key plate. You need to removethe key plate from the ignition switch and try it again from thestep 2.
4. Start the engine within 60 seconds after the securityindicator light goes out. You cannot start the engine if 60seconds have past after the security indicator went off. Youneed to remove the key plate from the ignition switch and tryit again from the step 2.
NOTICE
� Do not let the key case become bent as the key platemay fall out or become bent also.
� The flat key is designed for emergency use only. Sodo not use it regularly instead of other master keys.

KEYS AND DOORS
10 2001 MY RX300_U (OM48431U)
11L021-2
When using a key containing a transponder chip,observe the following precautions:
� When starting the engine, do not use the key with akey ring resting on the key grip and do not press thekey ring against the key grip. Otherwise the enginemay not start, or may stop soon after it starts.
11R055
� When starting the engine, do not use the key withother transponder keys around (including the flat keyand keys of other vehicles) and do not press otherkey plates against the key grip. Otherwise the enginemay not start, or may stop soon after it starts. If thishappens, remove the key once and then insert itagain after taking off other transponder keys(including the flat key and keys of other vehicles)from the ring or while gripping or covering them withyour hand to start the engine.

KEYS AND DOORS
112001 MY RX300_U (OM48431U)
11R091
� Do not bend the key grip or flat key.
� Do not cover the key grip or flat key with any materialthat cuts off electromagnetic waves.
� Do not knock the key or flat key hard against otherobjects.
� Do not leave the key or flat key exposed to hightemperatures for a long period, such as on thedashboard and hood under the direct sunlight.
� Do not put the key or flat key in water or wash it in anultrasonic washer.
� Do not use the key or flat key with electromagneticmaterials.
ENGINE IMMOBILISER SYSTEM
11R015
The engine immobiliser system is a theft preventionsystem. W hen you insert the key in the ignition switch, thetransponder chip in the key’s head transmits an electroniccode to the vehicle. The engine will start, only when theelectronic code in the chip corresponds to the registeredID code for the vehicle.
The system is automatically set when the key is removed fromthe ignition switch. At this time, the security indicator lightflashes. When you insert the key in the ignition switch, thesecurity indicator light goes out and the system is canceledautomatically, which enables the engine to start.
For your Lexus dealer to make you a new key with built–intransponder chip, your dealer will need your key number andmaster key or the flat key. However, there is a limit to thenumber of additional keys your Lexus dealer can make for you.

KEYS AND DOORS
12 2001 MY RX300_U (OM48431U)
The transponder chip of the flat key is in its key case. You cancancel the engine immobiliser system using the flat key. (Fordetails, see “Flat key” on page 8.)
If you make your own duplicate key, you will not be ableto cancel the system or start the engine.
For vehicles sold in U.S.A.
FCC ID: NI4TMIM–3MADE IN JAPAN
This device complies with Part 15 of the FCC Rules.Operation is subject to the following two conditions:(1) This device may not cause harmful interference,and (2) this device must accept any interferencereceived, including interference that may causeundesired operation.
CAUTION
Changes or modifications not expressly approved bythe party responsible for compliance could void theuser’s authority to operate the equipment.
For vehicles sold in Canada
This device complies with RSS–210 of IndustryCanada.Operation is subject to the following two conditions: (1)This device may not cause interference, and (2) thisdevice must accept any interference, includinginterference that may cause undesired operation of thedevice.

KEYS AND DOORS
132001 MY RX300_U (OM48431U)
WIRELESS REMOTE CONTROL*
11R007d
1 Locking the doors
2 Unlocking the doors
3 Indicator light
4 Sounding an alarm
NOTE: *This feature can be set inoperative as vehicle theftdeterrent measure in case of the loss of the wireless remotecontrol key. Ask your Lexus dealer for details.
When you operate any button on the key, push it slowly andsurely. At this time, the indicator light on the key grip flashesonce.
The operational range of the wireless remote control isapproximately 1 meter (3 ft.). The effective range may varywith different conditions. To activate the wireless remotecontrol without fail, do it approximately 1 meter (3 ft.) from yourLexus.
In the following cases, the battery in the key may bedischarged. If this is a case, replace it using a specialscrewdriver.
� The remote control does not work.
� The operational range of wireless remote control becomesextremely short.
� The indicator light on the key is dimmed or does not comeon.
For the replacement of the battery, see “Replacing the battery”on page 17. You can also have the battery of the key replacedby your Lexus dealer.
If you lose the wireless key, contact your Lexus dealer as soonas possible to avoid the possibility of theft, or an accident.
You can use up to 4 wireless remote control keys for the samevehicle. Contact your Lexus dealer for detailed information.
The wireless remote control key is an electroniccomponent. Observe the following instructions in ordernot to cause damage to the key.
� Do not leave the wireless remote control key on placeswhere the temperature becomes high such as on thedashboard.
� Do not disassemble it.
� Avoid knocking it hard against other objects or dropping it.
� Avoid putting it in water.

KEYS AND DOORS
14 2001 MY RX300_U (OM48431U)
Locking/Unlocking the doorsWhen you push the “LOCK” button on the key briefly, allthe side doors and back door can be locked from outsidethe vehicle.
At this time, you can hear one beep* and the turn signal lightsflash.** However, when you push the “LOCK” button with anydoor not closed securely, the buzzer sounds for 10 seconds.***To stop the buzzer, close all the side doors and back doorsecurely or push the “UNLOCK” button. If the key is in theignition switch, locking cannot be done.
Make sure all the doors are locked when you leave the vehicle.Push the “LOCK” button once again. If they were alreadylocked, the turn signal lights will flash.
NOTE: *The volume of beep sound can be changed. **Theturn signal lights can be set not to flash. ***The buzzer canbe set not to sound with any door not closed securely. Askyour Lexus dealer for details.
When you push the “UNLOCK” button, the driver’s dooris unlocked. Pushing that button once again within 3seconds from the first push, all other side doors and backdoor are also unlocked.*
NOTE: *Unlocking by a 2–time operation can be changed.Ask your Lexus dealer for details.
At this time, two beeps sound.* Together with the activation ofunlocking, the interior light comes on for 15 seconds if theinterior light switch is in “DOOR” position.** However, thisfunction does not work when the ignition key is in the “ON”position. For further information, see “Interior lights” on page53.
You have 30 seconds to open a door after using the wirelessremote unlock feature.*** If a door is not opened by then, allthe doors will be automatically locked again.
Even if the “LOCK” or “UNLOCK” button is kept pressed in, thelocking or unlocking operation is not repeated. Release thebutton and then push again.
NOTE: *The volume of beep sound can be changed. **Theinterior light can be set not to come on or the duration oflighting can be changed. ***The time before automaticre–locking can be changed. Ask your Lexus dealer fordetails.

KEYS AND DOORS
152001 MY RX300_U (OM48431U)
Sounding an alarm*
11R010e
When you push the “PANIC” button for about 1 second, analarm sounds to deter any person trying to break into ordamage your vehicle.
If you want to stop the alarm, push any button.
This function does not work when the ignition key is in the “ON”position.
NOTE: *The alarm can be set not to sound. Ask your Lexusdealer for details.
Operating the windows and moon roofThe windows and moon roof can be opened using awireless key from outside the vehicle.*
NOTE: *The windows can be set inoperative. The moonroof can be set to slide open, tilt up or inoperative. Ask yourLexus dealer for details.
11R077
Push the “UNLOCK” button until the windows and moon roofstart to move. A beep sounds just before opening. When yourelease the button, the windows and moon roof stop opening.

KEYS AND DOORS
16 2001 MY RX300_U (OM48431U)
For vehicles sold in U.S.A.
FCC ID: NI4TMRX–1MADE IN JAPAN
This equipment has been tested and found to complywith the limits for a Class B digital device, pursuant toPart 15 of the FCC Rules. These limits are designedto provide reasonable protection against harmfulinterference in a residential installation. Thisequipment generates, uses and can radiate radiofrequency energy and, if not installed and used inaccordance with the instructions, may cause harmfulinterference to radio communications. However, thereis no guarantee that interference will not occur in aparticular installation. If this equipment does causeharmful interference to radio or television reception,which can be determined by turning the equipment offand on, the user is encouraged to try to correct theinterference by one or more of the following measures:
� Reorient or relocate the receiving antenna.
� Increase the separation between the equipment andreceiver.
� Connect the equipment into an outlet on a circuit differentfrom that to which the receiver is connected.
� Consult the dealer or an experienced radio / TV technicianfor help.
FCC ID: NI4TMTX–1MADE IN JAPAN
FCC ID: NI4TMRX–1MADE IN JAPAN
This device complies with Part 15 of the FCC Rules.Operation is subject to the following two conditions:(1) This device may not cause harmful interference,and (2) this device must accept any interferencereceived, including interference that may causeundesired operation.
CAUTION
Changes or modifications not expressly approved bythe party responsible for compliance could void theuser’s authority to operate the equipment.
For vehicles sold in Canada
This device complies with RSS–210 of IndustryCanada.Operation is subject to the following two conditions: (1)This device may not cause interference, and (2) thisdevice must accept any interference, includinginterference that may cause undesired operation of thedevice.

KEYS AND DOORS
172001 MY RX300_U (OM48431U)
Replacing the batteryWhen you replace the battery, prepare a lithium batteryCR1616 and a special screwdriver.
CAUTION
Special care should be taken that small children do notswallow the removed battery or components.
NOTICE
When replacing the battery, be careful not lose thecomponents, screws and O–ring.
11L028–1
1. Remove the screw, and then the cover while pushing it in thearrow direction.
11R056
2. Remove the module from the key frame.
11R057
3. Remove the lid of the module.
4. Take out the discharged battery and put a new battery withthe positive side up.

KEYS AND DOORS
18 2001 MY RX300_U (OM48431U)
NOTICE
� Make sure the positive side and negative side of thebattery should be faced correctly.
� Do not replace the battery with wet hands. Water maycause unexpected rust.
� Do not touch or move any components inside of thetransmitter, or it may interfere with proper operation.
� Be careful not to bend the electrode of the batteryinsertion and that dust or oils do not adhere to theinside of the module.
� Take care not to lose the screws and O–ring.
5. Install the lid.
NOTICE
Take care not to damage or bend the O–ring wheninstalling.
6. Install the module into the key frame and secure the coverwith the screw.
7. When pushing any switch on the wireless key, make surethe indicator light comes on.
SIDE DOORS
Locking with key
11R011d
� 1 Lock 2 Unlock
Turn the key towards the front of the vehicle to lock andtowards the back to unlock.
All the side doors and back door lock and unlocksimultaneously with either front door. In the driver’s door lock,turning the key once will unlock the driver’s door and twice insuccession will unlock all the side doors and back doorsimultaneously.* In the passenger’s door lock, turning the keyonce will unlock all the side doors and back doorsimultaneously.
NOTE: *Unlocking by a 2–time operation can be changed.Ask your Lexus dealer for details.

KEYS AND DOORS
192001 MY RX300_U (OM48431U)
The windows and moon roof can be opened and closed fromoutside the vehicle using the key. For details, see “Powerwindow switches” on page 31 and “Moon roof” on page 74.
Locking with inside lock knob
11R012
� 1 Lock 2 Unlock
Push the knob forward to lock and pull the knob backwardto unlock.
When locked, the door cannot be opened with either theoutside or inside door handle.
Closing the door with the lock button pushed in will also lockthe door. Be careful not to lock your keys in the vehicle. Withthe key in the ignition switch and the door open, the lock knobcannot be moved in the lock position.
CAUTION
Before driving, make sure the doors are closed andlocked, especially when small children are in thevehicle. Along with the proper use of seat belts, lockingthe doors helps prevent the driver and passengers frombeing thrown out from the vehicle during an accident.It also helps prevent the doors from being openedunintentionally.
Locking with power door lock switch
11R013c
� 1 Lock 2 Unlock
To lock all the doors simultaneously, push the power doorlock switch on the front side. Pushing on the rear side willunlock them.
The same switch is also equipped on the front passenger’sside.

KEYS AND DOORS
20 2001 MY RX300_U (OM48431U)
Locking with rear door child–protector
11R014b
� 1 Lock 2 Unlock
Whenever small children are in the vehicle, lock the reardoor so that it does not open from the inside. To do this,turn the knob to the “LOCK” position as shown and thenclose the door.
BACK DOOR
Locking and unlocking with key
11R078
� 1 Lock 2 Unlock 3 Open
Insert the master key into the keyhole and turn it.
To lock: Turn the key clockwise.To unlock: Turn the key counterclockwise.
The back door can be locked and unlocked together with theside doors by means of the power door lock system. (Forinstructions, see “Locking with power door lock switch” onpage 19.)

KEYS AND DOORS
212001 MY RX300_U (OM48431U)
11R054
When closing the back door, use the inside handle foreasier reach to the back door.
To close the back door, lower it and press down on it. Afterclosing the back door, try pulling it up to make sure it is securelyclosed.
See “Luggage stowage precautions” on page 69 forprecautions to observe in loading luggage.
CAUTION
� Keep the back door closed while driving. This notonly keeps the luggage from being thrown out butalso prevents exhaust gases from entering thevehicle.
� If the open back door hides the rear stop and taillights or rear turn signal lights while you are parked,other road users must be warned of the presence ofyour vehicle by a warning triangle or other device.
NOTICE
To prevent damage to the back door dampers, do notapply any force, paint or let any other foreign matter onthem.

KEYS AND DOORS
22 2001 MY RX300_U (OM48431U)

SECTION 1 – 2
232001 MY RX300_U (OM48431U)
INSTRUMENTS AND CONTROLSSwitchesHeadlight switch 24. . . . . . . . . . . . . . . . . . . . . . . . . . . . . . . . . . . . . . . . . . Headlight dimmer and turn signal switch 26. . . . . . . . . . . . . . . . . . . . . Fog light switch 27. . . . . . . . . . . . . . . . . . . . . . . . . . . . . . . . . . . . . . . . . . . Windshield wiper and washer switch 28. . . . . . . . . . . . . . . . . . . . . . . . . Rear window wiper and washer switch 29. . . . . . . . . . . . . . . . . . . . . . . Rear window and outside rear view mirror defogger, and windshieldwiper deicer switch 30. . . . . . . . . . . . . . . . . . . . . . . . . . . . . . . . . . . . . . . . Power window switches 31. . . . . . . . . . . . . . . . . . . . . . . . . . . . . . . . . . . . Emergency flasher switch 34. . . . . . . . . . . . . . . . . . . . . . . . . . . . . . . . . . Seat heater switches 34. . . . . . . . . . . . . . . . . . . . . . . . . . . . . . . . . . . . . .

SWITCHES
24 2001 MY RX300_U (OM48431U)
HEADLIGHT SWITCH
12E001–1
To turn the lights on, twist the knob on the end of the lever.
FIRST CLICKSTOP: Only the parking, tail, license plate, sidemarker and instrument panel lights turn on.
SECOND CLICKSTOP: Headlights also turn on.
THIRD CLICKSTOP (“AUTO”): The headlights and all otherlights automatically turn on depending on the darkness of thesurroundings.*
Vehicles sold in U.S.A.: When the headlights are on, theheadlight indicator lights up in the instrument cluster.
Vehicles sold in Canada: When the tail lights are on, the taillight indicator lights up in the instrument cluster.
Manually twist the knob to the second clickstop to turn onthe headlights if they are needed immediately whenentering a dark tunnel, parking structure, etc.
When the headlight switch is turned to the first or secondclickstop, the brightness of the instrument cluster will bereduced slightly unless the instrument panel light control knobis turned fully on.
NOTE: *The operating condition or sensitivity can bechanged. Ask your Lexus dealer for details.
12R050a
The automatic light control sensor is on top of the driver’s sideinstrument panel.
Do not place anything on the instrument panel, and/or do notaffix anything on the windshield to block this sensor.

SWITCHES
252001 MY RX300_U (OM48431U)
When the headlights come on: The lights automatically turn offabout 30 seconds after any of the doors is opened and closedwith the ignition key turned to the “ACC” or “LOCK” position.*
When only the tail lights come on: The lights automatically turnoff with the driver’s door opened and the ignition key turned tothe “ACC” or “LOCK” position. To turn them on again, turn theignition key to the “ON” position, or turn the headlight switch offand then twist the knob until the first or second clickstop. If youare going to park for over one week, make sure the headlightswitch is off.
When the headlight switch is on with all the doors locked,pushing the “LOCK” button on the wireless remote control keyturns off the headlights.
NOTE: *The time before turning off the lights can bechanged. Ask your Lexus dealer for details.
Daytime Running Light System
The headlights turn on at reduced intensity when the parkingbrake is released with the engine started, even with the lightswitch in the “OFF” position. They will not go off until theignition switch is turned off.
To turn on the other exterior lights and instrument panel lights,twist the knob to the first clickstop.
Twist the knob to the second clickstop to turn on the headlightsto full intensity for driving at night.
When setting the knob to the third clickstop (“AUTO”), theheadlights will automatically adjust to full intensity and/or turnon the other lights depending on the darkness of thesurroundings. Likewise, as the surroundings become brighter,the headlights will turn to reduced intensity, ultimately turningoff the other lights.
NOTICE
To prevent the battery from being discharged, do notleave the lights on longer than necessary when theengine is not running.

SWITCHES
26 2001 MY RX300_U (OM48431U)
Automatic headlight leveling system(Vehicles with discharge headlight only)
12R053
As the headlight beam level is always maintainedautomatically at the proper level in all loading conditions, yourheadlights do not dazzle other road users.
If this system fails, warning light in the instrument clustercomes on. If this occurs, have your vehicle checked by Lexusdealer.
HEADLIGHT DIMMER AND TURNSIGNAL SWITCH
12E003–1
For high beam, push the lever forward. Pull it back for lowbeam. For the headlight flasher, pull it further back.
A blue light in the instrument cluster indicates high beam orheadlight flasher is on.
The headlight flasher works even when the headlight switch isoff.

SWITCHES
272001 MY RX300_U (OM48431U)
12E004–1
For signaling turns, move the lever up or down in theconventional manner.
The ignition key must be in the “ON” position.
The turn signal is self–cancelling after a turn, but after a lanechange, you may have to cancel it by hand. You can also signala lane change by moving the turn signal lever partway andholding it there.
If the green light in the instrument cluster flashes faster thannormal, it indicates that the front or rear turn signal bulb hasburned out. If this indicator light does not come on, the fuseor the indicator light itself has probably failed.
FOG LIGHT SWITCH
12E005–1
To turn on the fog lights, turn the switch to the “ON”position. The fog lights come on only when the headlightsare on low beam.

SWITCHES
28 2001 MY RX300_U (OM48431U)
WINDSHIELD WIPER AND WASHERSWITCH
12R006a
� 1 Interval adjuster 2 Washer on
To turn the wipers on, move the lever down until you reachthe desired speed setting.
The ignition key must be in the “ON” position.
There are 3 settings:“INT” position: Intermittent operation“LO” position: Low speed operation“HI” position: High speed operation
Twist the interval adjuster upward to increase the wipingtime interval between sweeps, and downward to decreaseit.
The wiper lever must be in the “INT” position.
To make the washer squirt, pull the lever toward you andrelease it.
Also, the wipers will automatically operate a couple of timesafter the washer squirts even with the lever in the “OFF”position.
The low washer fluid warning light in the instrument clustercomes on when the fluid level in the tank becomes nearlyempty. For information on adding washer fluid, see “Addingwasher fluid” on page 298.
In cold weather, warm the windshield with the defroster beforeusing the washer. This will help prevent icing, which couldblock your vision.
NOTICE
Do not operate the wipers if the windshield is dry. It mayscratch the glass.

SWITCHES
292001 MY RX300_U (OM48431U)
REAR WINDOW WIPER ANDWASHER SWITCH
12R051a
� 1 Washer on during wiping 2 Washer on
To turn the wipers on, twist the knob at the end of the lever.
The ignition key must be in the “ON” position.
There are 2 settings:“INT” position: Intermittent operation“ON” position: Low speed operation
To make the washer squirt, twist the knob downward toposition 2.
To make the washer squirt while operating in “ON”position, twist the knob upward to position 1.
The knob automatically returns from these positions after yourelease it.
The low washer fluid warning light in the instrument clustercomes on when the fluid level in the tank becomes nearlyempty. For information on adding washer fluid, see “Addingwasher fluid” on page 298.
NOTICE
Do not operate the rear window wiper if the rear windowis dry. It may scratch the glass.

SWITCHES
30 2001 MY RX300_U (OM48431U)
REAR WINDOW AND OUTSIDEREAR VIEW MIRROR DEFOGGER,AND WINDSHIELD WIPER DEICER
SWITCH
12R010b
To turn the electric rear window and outside rear viewmirror defogger on, push the switch.
The ignition key must be in the “ON” position.
The thin heater wires on the inside of the rear window and theheater panels in the outside rear view mirrors will quickly clearthe surface. An indicator light is on when the defogger isoperating.
Vehicles sold in Canada: The windshield wiper deicers areequipped to deice the windshield wiper blades by operatingsimultaneously with defogger.
The system will automatically shut off when the defogger hasoperated about 15 minutes.
CAUTION
Since the mirror surfaces can get hot, keep your handsoff them when the switch is on.
If further defrosting or defogging is desired, simply actuate theswitch again. When the surface has cleared, push the switchonce again to turn the defogger off. Continuous use may causethe battery to discharge, especially during stop–and–godriving. The rear window defogger is not designed to dry rainwater or to melt snow.
If the outside rear view mirrors are heavily coated with ice, usea spray de–icer before operating the switch.
NOTICE
� When cleaning the inside of the rear window, becareful not to scratch or damage the heater wires orconnectors.
� To prevent the battery from being discharged, do notoperate the defogger continuously longer thannecessary.

SWITCHES
312001 MY RX300_U (OM48431U)
POWER WINDOW SWITCHES
12R011e
� 1 For driver’s window 2 For front passenger’s window 3 For left rear window 4 For right rear window
To raise or lower the windows, use the switch on eachdoor. The passengers’ windows can also be controlled bythe switches on the driver’s door.
The power windows work when the ignition key is in the “ON”position.
Key off operation: Even if the ignition key is turned to the“ACC” or “LOCK” position, the window can be operated untilany of the doors is opened (or for about 45 seconds).
12L010
Operating the switchesTo raise or lower the window, pull the switch halfway upor push it halfway down.
Automatic operation: To fully raise or lower the windowautomatically, pull the switch fully up or push it fully down.
To stop the window partway, lightly push or pull the switch inthe opposite direction and then release it.

SWITCHES
32 2001 MY RX300_U (OM48431U)
Operating the window lock switch
12R012f
�Indicator light
With the window lock switch pressed in, only the driver’swindow can be raised or lowered.
The indicator lights on the switch tell you which of the switchescan be operated.
Operating the windows from outside thevehicle(a) The windows can be opened and closed using anignition key.*
NOTE: *This feature can be set inoperative. Ask yourLexus dealer for details.
12R052a
Insert the ignition key into the keyhole on the driver’s side.
To close the windows: Turn the key in the locking directionand hold it.
After the door is locked, the window begins to close. To stopin the middle, return the key.
To open the windows: Turn the key in the unlocking directionand hold it.
After the door is unlocked, the window begins to open. To stopin the middle, return the key.

SWITCHES
332001 MY RX300_U (OM48431U)
(b) The windows can be opened using a wireless remotecontrol key.
Push and hold the “UNLOCK” button. When you releasethe button, the windows stop opening.
Jam protection functionDuring automatic raising operation, key off raising operation orraising operation using the ignition key from the outside, thewindow stops and is lowered if something gets caught betweenthe window and window frame.
If the window receives a strong impact, this function may workeven if nothing is caught.
CAUTION
To avoid serious personal injury, you must do thefollowing.
� Always make sure the heads, hands and other partsof the bodies of all occupants are kept completelyinside the vehicle before you close the powerwindows. If someone’s neck, head or hands getscaught in a closing window, it could result in aserious injury. When anyone closes the powerwindows, make sure that he/she operates thewindows safely.
� When small children are in the vehicle, never let themuse the power window switches without supervision.Use the window lock switch to prevent them frommaking unexpected use of the switches.
� Never leave small children alone in the vehicle,especially with the ignition key still inserted. Theycould use the power window switches and gettrapped in a window. Unattended children can beinvolved in serious accidents.
� Never try jamming any part of your body to make thejam protection function work intentionally.
� The jam protection function may not work ifsomething gets caught just before the window fullyclosed.

SWITCHES
34 2001 MY RX300_U (OM48431U)
EMERGENCY FLASHER SWITCH
12R013b
To turn on the emergency flashers, push the switch. Pushthe switch again to turn them off.
All the turn signal lights will flash. The emergency flashers willwork with the engine running or off and with or without theignition key.
Turn on the emergency flashers to warn other drivers if youmust stop your vehicle where it might be a traffic hazard.
Always pull your vehicle as far off the road as possible.
The turn signal light switch will not work when the emergencyflashers are in operation.
NOTICE
To prevent the battery from being discharged, do notleave the switch on longer than necessary when theengine is not running.
SEAT HEATER SWITCHES
12R054
� 1 For driver’s seat 2 For front passenger’s seat 3 Low heating temperature 4 High heating temperature
To turn on the seat heater, push the switch to “LO” (lowtemperature) or “HI” (high temperature). Pushing lightlyon the opposite side will turn it off.
The ignition key must be in the “ON” position.

SWITCHES
352001 MY RX300_U (OM48431U)
CAUTION
Occupants must use caution when operating the seatheater because they may experience minor burns evenat low temperatures. Use extra caution for;
� Babies, small children, elderly persons, sick personsor handicapped persons
� Persons who have delicate skin
� Persons who are exhausted
� Persons who have taken alcohol or drugs whichinduce sleep (sleeping drug, cold remedy, etc.).
To prevent the seat from overheating, do not use theseat heater with a blanket, cushion, or other insulatingobjects which cover the seat.
NOTICE
� Do not put unevenly weighted objects on the seat anddo not stick sharp objects (needles, nails, etc.) intothe seat.
� When cleaning the seats, do not use organicsubstances (paint thinner, benzine, alcohol,gasoline, etc.). They may damage the heater and seatsurface.
� To prevent the battery from being discharged, turnthe switches on when the engine is running.

SWITCHES
36 2001 MY RX300_U (OM48431U)

SECTION 1 – 3
372001 MY RX300_U (OM48431U)
INSTRUMENTS AND CONTROLSGauges, meters and service reminder indicatorsFuel gauge 38. . . . . . . . . . . . . . . . . . . . . . . . . . . . . . . . . . . . . . . . . . . . . . . Engine coolant temperature gauge 38. . . . . . . . . . . . . . . . . . . . . . . . . . Tachometer 39. . . . . . . . . . . . . . . . . . . . . . . . . . . . . . . . . . . . . . . . . . . . . . Odometer and trip meter 40. . . . . . . . . . . . . . . . . . . . . . . . . . . . . . . . . . . Service reminder indicators and warning buzzers 40. . . . . . . . . . . . . . Cruise information display 48. . . . . . . . . . . . . . . . . . . . . . . . . . . . . . . . . . Instrument panel light control 50. . . . . . . . . . . . . . . . . . . . . . . . . . . . . . .

GAUGES, METERS AND SERVICE REMINDER INDICATORS
38 2001 MY RX300_U (OM48431U)
FUEL GAUGE
13R001b
�Low fuel level warning light
The gauge is displayed when the ignition switch is on andindicates the approximate quantity of fuel remaining in thetank.
It is a good idea to keep the tank over 1/4 full.
If the fuel level approaches “E” or the low fuel level warning lightcomes on, fill the fuel tank as soon as possible.
On inclines or curves, due to the movement of fuel in the tank,the fuel gauge needle may fluctuate or the low fuel levelwarning light may come on earlier than usual.
If the fuel tank is completely empty, the malfunction indicatorlamp comes on. Fill the fuel tank immediately.
The indicator lamp goes off after driving several times. If theindicator lamp does not go off, contact your Lexus dealer assoon as possible.
See the inner back cover for fuel capacity and recommendedfuel selection.
ENGINE COOLANTTEMPERATURE GAUGE
13R002
�Normal range
The gauge indicates the engine coolant temperature whenthe ignition switch is on. The engine operatingtemperature will vary with changes in weather and engineload.
If the needle points to the red zone or higher, stop your vehicleand allow the engine to cool.
Your vehicle may overheat during severe operating conditions,such as:
� Driving up a long hill on a hot day.
� Reducing speed or stopping after high speed driving.

GAUGES, METERS AND SERVICE REMINDER INDICATORS
392001 MY RX300_U (OM48431U)
� Idling for a long period with the air conditioning on instop–and–go traffic.
� Towing a trailer.
NOTICE
� Do not remove the thermostat in the engine coolingsystem as this may cause the engine to overheat. Thethermostat is designed to control the flow of coolantto keep the temperature of the engine within thespecified operating range.
� Do not continue driving with an overheated engine.See “If your vehicle overheats” on page 226.
TACHOMETER
13R071
The tachometer indicates engine speed in thousands ofrpm (revolutions per minute). Use it while driving toprevent engine over–revving.
Driving with the engine running too fast causes excessiveengine wear and poor fuel economy. Remember, in mostcases the slower the engine speed, the greater the fueleconomy.
NOTICE
Do not let the indicator needle get into the red zone. Thismay cause severe engine damage.

GAUGES, METERS AND SERVICE REMINDER INDICATORS
40 2001 MY RX300_U (OM48431U)
ODOMETER AND TRIP METER
13R004a
�“ODO/TRIP” knob
This m eter displays the odometer and two trip meters. Tochange the mode indication, push the “ODO/TRIP” knobbriefly. Each time you push the knob, the mode changesin order from the odometer to trip meter A to trip meter B,then back to the odometer, etc.
The odometer records the total distance the vehicle hasbeen driven. The twin trip meter records two differentdistances independently.
For example, you can use one meter to calculate the fueleconomy and the other to measure the distance on each trip.
To set the A trip meter to zero, display the A meter reading,push the knob and hold it. The same applies for the B tripmeter.
The data of trip meters will be cancelled if the electrical powersource is disconnected.
SERVICE REMINDER INDICATORSAND WARNING BUZZERS
IF THIS INDICATOR OR BUZZER COMESON ...
DO THIS.
(a) If parking brake is off,stop immediately andcontact Lexus dealer.
(b) Fasten driver’s seatbelt.
(Indicator and buzzer)
(c) Fasten frontpassenger’s seat belt.
(On the center console)
(d) Take vehicle to Lexusdealer immediately.
(e) Stop and check.
or
w061

GAUGES, METERS AND SERVICE REMINDER INDICATORS
412001 MY RX300_U (OM48431U)
(f) Stop and check.
(g) Take vehicle to Lexusdealer.
(h) Take vehicle to Lexusdealer.
(i) Close all doors.
(j) Replace bulb.
(k) Take vehicle to Lexusdealer.
(Two–wheel drive models)
(l) Take vehicle to Lexusdealer.
(Four–wheel drive models)
(m) Stop and check.
(n) Add washer fluid.
(o) Fill up tank.
(p) Take vehicle to Lexusdealer.
(q) Key reminder buzzer Remove key.
or w16
or
and w16
w59
w59

GAUGES, METERS AND SERVICE REMINDER INDICATORS
42 2001 MY RX300_U (OM48431U)
(a) Brake System Warning LightThis light comes on in the following cases when the ignition keyis in the “ON” position.
� When the parking brake is applied ...
� When the brake fluid level is low ...
CAUTION
It is dangerous to continue driving normally when thebrake fluid level is low.
Have your vehicle checked at your Lexus dealer in thefollowing case:
� The light does not come on even if the parking brake isapplied when the ignition key is in the “ON” position.
CAUTION
If the light does not turn off even after the parking brakeis released while the engine is running, immediatelystop your vehicle at a safe place and contact your Lexusdealer. In this case, the brakes may not work properlyand your stopping distance will become longer.Depress the brake pedal firmly and bring the vehicle toan immediate stop.
(b) Driver’s Seat Belt Reminder Light andBuzzer
This light and buzzer remind you to buckle up the driver’s seatbelt.
Once the ignition key is turned to the “ON” position, thereminder light flashes and buzzer sounds if the driver’s seatbelt is not fastened. Unless the driver fastens the belt, the lightkeeps flashing and the buzzer stops after about 4 to 8 seconds.
(c) Front Passenger’s Seat Belt ReminderLight
This light reminds you to buckle up the front passenger’s seatbelt.
Once the ignition key is turned to the “ON” position, thereminder light flashes if a front passenger sits in the frontpassenger seat and does not fasten the seat belt. Unless thefront passenger fastens the belt, the light keeps flashing.
If luggage load is placed on the front passenger seat,depending on its weight and how it is placed on the seat,built–in sensors in the seat cushion may detect the pressure,causing the reminder light to come on.

GAUGES, METERS AND SERVICE REMINDER INDICATORS
432001 MY RX300_U (OM48431U)
(d) SRS Warning LightThe indicator comes on when the ignition key is turned tothe “ON” position. It goes off after about 6 seconds. Thismeans the SRS airbags and front seat belt pretensionersare operating properly.
The SRS warning light system monitors the airbag sensorassembly, front airbag sensors, side airbag sensors, front seatbelt pretensioner assemblies, inflators, warning light,interconnecting wiring and power sources.
If either of the following conditions occurs, this indicates amalfunction somewhere in the parts monitored by the warninglight system. Contact your Lexus dealer as soon as possibleto service the vehicle.
� When the ignition key is turned to the “ON” position, the lightdoes not come on, remains or flashes.
� The light comes on or starts flashing while driving.
If the light stays on, it indicates that the driver and frontpassenger airbags fail. If the light flashes, the side airbagsand/or seat belt pretensioners fail.
(e) Discharge Warning LightThis light warns that the battery is being discharged.
If it comes on while you are driving, stop the vehicle, turn off theengine, and check for the cause. Look first at the engine drivebelt.
� If it is loose or broken, the generator will not charge thebattery properly.
� If the belt is O.K., there is a problem somewhere in thecharging system.
The engine ignition will continue to operate, however, until thebattery is discharged. Turn off the air conditioning, blower,radio, etc., and drive directly to the nearest Lexus dealer orrepair shop.
NOTICE
Do not continue driving if the engine drive belt is brokenor loose.

GAUGES, METERS AND SERVICE REMINDER INDICATORS
44 2001 MY RX300_U (OM48431U)
(f) Low Engine Oil Pressure Warning LightThis light warns that the engine oil pressure is too low.
If it flickers or stays on while you are driving, pull off the roadto a safe place and stop the engine immediately. Call a Lexusdealer or qualified repair shop for assistance.
The light may occasionally flicker when the engine is idling orit may come on briefly after a hard stop. There is no cause forconcern if it then goes out when the engine is acceleratedslightly.
The light may come on when the oil level is extremely low. Itis not designed to indicate low oil level, and the oil level mustbe checked using the oil level dipstick.
NOTICE
Do not drive the vehicle with the warning light on – evenfor one block. It may ruin the engine.
(g) Malfunction Indicator LampThis lamp comes on in the following cases.
a. The fuel tank is completely empty. (See “Fuel gauge” onpage 38 for instructions.)
b. The fuel tank cap is not tightened securely. (See “Fuel tankcap” on page 73 for instructions.)
c. There is a problem somewhere in your engine or automatictransmission electrical system.
If it comes on while you are driving in case “c.”, have yourvehicle checked/repaired by your Lexus dealer as soon aspossible.

GAUGES, METERS AND SERVICE REMINDER INDICATORS
452001 MY RX300_U (OM48431U)
(h) “ABS” Warning Light The light comes on when the ignition key is turned to the “ON”position. If the anti–lock brake system and the brake assistsystem work properly, the light turns off after a few seconds.Thereafter, if either of the systems malfunctions, the lightcomes on again.
When the “ABS” warning light is on (and the brake systemwarning light is off), the anti–lock brake system, the brakeassist system, the traction control system and the vehicle skidcontrol system do not operate, but the brake system stilloperates conventionally.
When the “ABS” warning light is on (and the brake systemwarning light is off), the anti–lock brake system does notoperate so that the wheels could lock up during a suddenbraking or braking on slippery road surfaces.
If either of the following conditions occurs, this indicatesa malfunction somewhere in the parts monitored by thewarning light system. Contact your Lexus dealer as soonas possible to service the vehicle.
� The light does not come on when the ignition key is turnedto the “ON” position, or remains on.
� The light comes on while you are driving.
A warning light turning on briefly during operation does notindicate a problem.
(i) Open Door Warning LightThis light remains on until all the doors are completely closed.
(j) Rear Light Failure Warning LightIf this light comes on when the headlight switch is turned on (atthe first or second clickstop), it indicates that one or more of thetail lights are burned out.
If it comes on when the brake pedal is depressed, one or morestop lights are burned out.
Have defective bulbs replaced as soon as possible.
(k) Vehicle Skid Control System and “TRACOFF” Indicator/Warning Lights(Two–wheel drive models)
These lights warn that there is a problem somewhere in thevehicle skid control system, traction control system or brakeassist system.
The lights will come on when the ignition key is turned to “ON”,and will go off after a few seconds.
If the “VSC” warning light and “TRAC OFF” indicator/warninglight come on, the vehicle skid control system, traction controlsystem and brake assist system do not work. However, asconventional braking operates when applied, there is noproblem to continue your driving.

GAUGES, METERS AND SERVICE REMINDER INDICATORS
46 2001 MY RX300_U (OM48431U)
If any of the following conditions occurs, this indicates amalfunction somewhere in the parts monitored by the warninglight system. Contact your Lexus dealer as soon as possibleto service the vehicle:
� The “VSC” warning light and “TRAC OFF” indicator/warninglight do not come on after the ignition is turned to on.
� The “VSC” warning light and “TRAC OFF” indicator/warninglight remain on after the ignition is turned to on.
� The “VSC” warning light and “TRAC OFF” indicator/warninglight come on while driving without pushing “TRAC OFF”switch.
(l) Vehicle Skid Control System WarningLight (Four–wheel drive models)
This light warns that there is a problem somewhere in thevehicle skid control system, traction control system or brakeassist system.
The light will come on when the ignition key is turned to “ON”,and will go off after a few seconds.
If the “VSC” warning light comes on, the vehicle skid controlsystem, traction control system and brake assist system do notwork. However, as conventional braking operates whenapplied, there is no problem to continue your driving.
If any of the following conditions occurs, this indicates amalfunction somewhere in the parts monitored by the warninglight system. Contact your Lexus dealer as soon as possibleto service the vehicle:
� The “VSC” warning light does not come on after the ignitionis turned to on.
� The “VSC” warning light remains on after the ignition isturned to on.
� The “VSC” warning light comes on while driving.
(m) Automatic Transmission FluidTemperature Warning Light
This light warns that the automatic transmission fluidtemperature is too high.
If this light comes on while you are driving, slow down and pulloff the road. Stop the vehicle at a safe place and put theselector lever in “P” and leave the engine idling until the lightgoes off. If the light goes off, you can start the vehicle again.If the light does not go off, call a Lexus dealer or qualified repairshop for assistance.
NOTICE
Continued driving with the warning light on maydamage the automatic transmission.

GAUGES, METERS AND SERVICE REMINDER INDICATORS
472001 MY RX300_U (OM48431U)
(n) Low Washer Fluid Warning LightThis light comes on when the fluid level in the tank becomesnearly empty. Fill the tank as soon as possible.
(o) Low Fuel Level Warning LightThis light comes on when the fuel level in the tank becomesnearly empty. Fill the tank as soon as possible.
On inclines or curves, due to the movement of fuel in the tank,the low fuel level warning light may come on earlier than usual.
(p) Automatic Headlight Leveling SystemWarning Light (Vehicles with dischargeheadlight only)
This light warns that when there is a problem somewhere in theautomatic headlight leveling system.
The light will come on when the ignition key is turned to “ON”,and will go off after a few seconds.
If it comes on, have your vehicle checked by your Lexus dealer.
(q) Key Reminder BuzzerThis buzzer reminds you to remove the key when you open thedriver’s door with the ignition key in the “ACC” or “LOCK”position.
How to check all the service reminderindicators(except the low fuel level warning light):
1. Apply the parking brake.
2. Open the door.
The following service reminder indicator should come on. Itgoes off when you close the door completely.
3. Turn the ignition key to “ON”.
The following service reminder indicators should come on.
or
or
w16 or

GAUGES, METERS AND SERVICE REMINDER INDICATORS
48 2001 MY RX300_U (OM48431U)
The following service reminder indicators go off after a fewseconds.
or
The following service reminder indicator should come on. Itgoes off after 6 seconds.
The anti–lock brake system warning light, automatic headlightleveling system warning light, vehicle skid control systemwaring light and traction control system off indicator/warninglight may stay on for about 60 seconds after the engine isstarted. It is normal if they go out after a while.
If any service reminder indicator or warning buzzer does notfunction as described above, have it checked by your Lexusdealer as soon as possible.
CRUISE INFORMATION DISPLAY
20R051
The following information is shown with the ignitionswitched “ON”.
(1) Driving time
(2) Average vehicle speed
(3) Average fuel consumption
(4) Momentary fuel consumption
The displayed values in the cruise information display indicatethe general driving condition, so those may not show preciseand actual condition.

GAUGES, METERS AND SERVICE REMINDER INDICATORS
492001 MY RX300_U (OM48431U)
13R050e
To change the mode, push the “INFO” button briefly on theaudio control panel.
When the ignition switch is turned to “ON”, the mode displayedjust before the ignition switch is turned off will appear.
(1) Driving time(Figures with “E/T”)
The elapsed time after the engine started is displayed.
When the engine is started again, the driving time is countedfrom 0. Up to 12 hours can be displayed. When the driving timeexceeds 12 hours, recounting starts.
(2) Average vehicle speed(Figures with “AVG MPH” or “AVG km/h”)
The average vehicle speed is calculated and displayedbased on the total driving distance and the total drivingtime with the engine running.
The displayed value is updated every 10 seconds.
To calculate from the beginning, push the “INFO” button formore than 1 second.
(3) Average fuel consumption(Figures with “AVG MPG” or “AVG L/100km”)
The average fuel consumption is calculated and displayedbased on the total driving distance and the total fuelconsumption with the engine running.
The value is updated every 10 seconds.
To calculate from the beginning, push the “INFO” button formore than 1 second.

GAUGES, METERS AND SERVICE REMINDER INDICATORS
50 2001 MY RX300_U (OM48431U)
(4) Momentary fuel consumption(Figures with “MPG” or “L/100 km”)
The momentary fuel consumption is calculated anddisplayed based on the driving distance and the fuelconsumption for 2 seconds with the engine running.
The value is updated every 2 seconds.
If you are driving at low speeds just before stopping, theaccurate figure may not be shown.
For the display (2), (3) or (4), “– –” will appear in case thedata for calculation is not appropriate.
INSTRUMENT PANEL LIGHTCONTROL
13R005c
To adjust the brightness of the instrument panel lights,turn the knob.

SECTION 1 – 4
512001 MY RX300_U (OM48431U)
INSTRUMENTS AND CONTROLSInterior equipmentVanity mirrors 52. . . . . . . . . . . . . . . . . . . . . . . . . . . . . . . . . . . . . . . . . . . . Interior lights 53. . . . . . . . . . . . . . . . . . . . . . . . . . . . . . . . . . . . . . . . . . . . . Personal light 54. . . . . . . . . . . . . . . . . . . . . . . . . . . . . . . . . . . . . . . . . . . . Ignition switch light 55. . . . . . . . . . . . . . . . . . . . . . . . . . . . . . . . . . . . . . . . Clock 55. . . . . . . . . . . . . . . . . . . . . . . . . . . . . . . . . . . . . . . . . . . . . . . . . . . Outside temperature display 56. . . . . . . . . . . . . . . . . . . . . . . . . . . . . . . . Cigarette lighter and ashtray 57. . . . . . . . . . . . . . . . . . . . . . . . . . . . . . . . Power outlets 58. . . . . . . . . . . . . . . . . . . . . . . . . . . . . . . . . . . . . . . . . . . . Rear console box 59. . . . . . . . . . . . . . . . . . . . . . . . . . . . . . . . . . . . . . . . . Glove box 59. . . . . . . . . . . . . . . . . . . . . . . . . . . . . . . . . . . . . . . . . . . . . . . . Garage door opener 60. . . . . . . . . . . . . . . . . . . . . . . . . . . . . . . . . . . . . . . Cup holders 63. . . . . . . . . . . . . . . . . . . . . . . . . . . . . . . . . . . . . . . . . . . . . . Overhead console box 65. . . . . . . . . . . . . . . . . . . . . . . . . . . . . . . . . . . . . Auxiliary boxes 66. . . . . . . . . . . . . . . . . . . . . . . . . . . . . . . . . . . . . . . . . . . Luggage cover 67. . . . . . . . . . . . . . . . . . . . . . . . . . . . . . . . . . . . . . . . . . . Floor mat 68. . . . . . . . . . . . . . . . . . . . . . . . . . . . . . . . . . . . . . . . . . . . . . . . Tie–down hookss 69. . . . . . . . . . . . . . . . . . . . . . . . . . . . . . . . . . . . . . . . . Luggage stowage precautions 69. . . . . . . . . . . . . . . . . . . . . . . . . . . . . .

INTERIOR EQUIPMENT
52 2001 MY RX300_U (OM48431U)
VANITY MIRRORS
14R001a
To use the vanity mirrors, swing the sun visor down andopen the cover.
The vanity light comes on when you open the cover.
Sun visors
14R097
1 To block out glare from the front , swing the sun visordown.
2 To block out glare from the side, remove the sun visorfrom the hook and swing it to the side.
3 To block out glare coming obliquely from behind you,slide the visor backwards.
At this position, the vanity light does not come on.

INTERIOR EQUIPMENT
532001 MY RX300_U (OM48431U)
INTERIOR LIGHTS
14R003a
To turn on the interior light, slide the switch.
Center light:
With the switch in the “DOOR” position, the light comes onwhen any of the side doors or back door are opened. After allthe doors are closed, the light remains on for about 15 secondsand then goes out.
However, in the following cases, the light goes outimmediately:
1. All the doors are closed when the ignition key is in “ACC” or“ON” position.
2. The ignition key is turned to “ACC” or “ON” when the lightis still on.
3. All the doors are locked when the light is still on.
4. One door is closed with the lock button pushed in while theother doors are locked.
Rear light:
With the switch in the “DOOR” position, the light comes onwhen the back door is opened. The light goes out immediatelywhen the back door is closed.

INTERIOR EQUIPMENT
54 2001 MY RX300_U (OM48431U)
PERSONAL LIGHT
Vehicles without moon roof
14R004c
To turn on the personal light, push the switch. To turn itoff, push the switch again.
Vehicles with moon roof
14R005b
To turn on the personal light, push the switch. To turn itoff, push the switch again.

INTERIOR EQUIPMENT
552001 MY RX300_U (OM48431U)
IGNITION SWITCH LIGHT
14R102
For easy access to the ignition switch, the ignition switchlight comes on when the driver’s door is unlocked.
The light remains on for about 15 seconds and goes out afterall the doors are closed. However, the light goes outimmediately when all the doors are locked or the ignition keyis in the “ACC” or “ON” position.
CLOCK
14R007c
� 1 12–hour display mode 2 24–hour display mode 3 Time setting mode (indication blinking) 4 Alarm setting mode (indication blinking)
The digital clock indicates the time with the ignition key atthe “ACC” or “ON” position. The mode can be changedby pushing the “CLOCK” button on the audio controlpanel.
With the tail lights on, the brightness of the time indication willbe reduced.
If the electrical power source has been disconnected from theclock, the time display will automatically be set to 1:00 (oneo’clock).

INTERIOR EQUIPMENT
56 2001 MY RX300_U (OM48431U)
14R043
Adjusting the time:
1. Push the “CLOCK” button to enter the time setting mode.
2. Push the “H” or “M” button to adjust the time.
3. Push the “CLOCK” button again.
To set the clock by the radio, adjust the minute to “00” at step2. and push the “CLOCK” button by the time signal from theradio.
Setting the alarm:
1. Push the “CLOCK” button to display the alarm setting mode.
2. Input the time you want to sound an alarm by pushing “H”or “M” button.
3. Push the button indicated by the “bell” mark. The bellindicator appears.
An alarm sounds for about 20 seconds at the set time everyday. To stop the alarm, push the “CLOCK” button.
To disable the alarm activation, push the button indicated bythe “bell” mark at step 3. and turns off the bell indicator on thedisplay.
OUTSIDE TEMPERATURE DISPLAY
14R050b
This display shows the outside temperature when theignition switch is on.
The displayed temperature ranges from –22�F (–30�C) up to122�F (50�C). If the temperature does not appear on thedisplay or it shows “– –”, take your vehicle to your Lexus dealer.

INTERIOR EQUIPMENT
572001 MY RX300_U (OM48431U)
CIGARETTE LIGHTER ANDASHTRAY
14R110
�Cigarette lighter
14R112
�Ashtray
To use the cigarette lighter, press it in. When it becomesheated, it automatically pops out ready for use. To use theashtray, push the ashtray cover.
Do not hold the cigarette lighter pressed in.
If the engine is not running, the ignition key must be in the“ACC” position.
When finished with your cigarette, thoroughly extinguish it inthe ashtray to prevent other cigarette butts from catching fire.After using the ashtray, push it back in completely.
To remove the ashtray, just pull it up.
Use a Lexus genuine cigarette lighter or equivalent forreplacement.
CAUTION
To reduce the chance of injury in case of an accident orsudden stop while driving, always completely close theashtray after using it.

INTERIOR EQUIPMENT
58 2001 MY RX300_U (OM48431U)
POWER OUTLETS
14R010b
�Rear end of the console box
14R051
�In the luggage compartment
The power outlets are designed for power supply for caraccessories.
The ignition key must be in the “ACC” or “ON” position for thepower outlets to be used.
NOTICE
� To prevent the fuse from being blown, do not use theelectricity over the total vehicle capacity of 12V/120W(front and rear outlets together).
� To prevent the battery from being discharged, do notuse the power outlet longer than necessary when theengine is not running.
� Close the power outlet lid when the power outlet isnot in use. Inserting a foreign object other than theappropriate plug that fits the outlet, or allowing anyliquid into the outlet may cause electrical failure orshort circuits.

INTERIOR EQUIPMENT
592001 MY RX300_U (OM48431U)
REAR CONSOLE BOX
14R118
� 1 For upper box 2 For lower box
To use the rear console box, open as shown in theillustration.
GLOVE BOX
14R044
� 1 Unlock 2 Open 3 Lock
To open the glove box door, pull the lever. To lock theglove box door, insert the master key and turn itclockwise.
With the tail lights on, the glove box light will come on when theglove box door is open.
For the CD automatic changer, see page 164.
CAUTION
To reduce the chance of injury in case of an accident ora sudden stop, always keep the glove box door closedwhile driving.

INTERIOR EQUIPMENT
60 2001 MY RX300_U (OM48431U)
GARAGE DOOR OPENERThe garage door opener ( HomeLink� UniversalTransceiver) is manufactured under license fromHomeLink� and can be programmed to operate garagedoors, gates, entry doors, door locks, home lightingsystems, and security systems, etc.
(a) Programming the HomeLink�
14R098
The HomeLink� in your vehicle has 3 buttons and you
can store one program for each button.
To ensure correct programming into the HomeLink�, install
a new battery in the hand–held transmitter prior toprogramming.
The battery side of the hand–held transmitter must be pointedaway from the HomeLink
� during the programmingprocess.
For Canadian users, follow the procedure in “Programming anentrance gate/Programming all devices in the Canadianmarket”.
1. Decide which of 3 HomeLink� buttons you want to
program.
2. Place your hand–held garage transmitter 25 to 75 mm (1 to3 in.) away from the surface of the HomeLink
�.
Keep the indicator light on the HomeLink� in view while
programming.
3. Simultaneously press and hold the hand–held garagetransmitter button along with the selected HomeLink
�
button.
4. When the indicator light on the HomeLink� changes from
a slow to a rapid flash after 20 seconds, you can release bothbuttons.
5. Test the operation of the HomeLink� by pressing the
newly programmed button. If programming a garage dooropener, check to see if the garage door opens and closes.
If the garage door does not operate, identify if your garagetransmitter is of the “Rolling Code” type. Press and hold theprogrammed HomeLink
� button. The garage door has therolling code feature if the indicator light (on the HomeLink
�)flashes rapidly and then remains lit after 2 seconds. If yourgarage transmitter is the “Rolling Code” type, proceed to theheading “Programming a rolling code system”.
6. Repeat steps 2 through 5 for each remaining HomeLink�
button to program another device.

INTERIOR EQUIPMENT
612001 MY RX300_U (OM48431U)
Programming a rolling code system
If your device is “Rolling Code” equipped, it is necessaryto follow steps 1 through 4 under the heading“Programming the HomeLink
�” before proceeding withthe steps listed below.
1. Locate the “training” button on the ceiling mounted garagedoor opener motor. The exact location and color of the buttonmay vary by brand of garage door opener. Refer to the owner’sguide supplied by the garage door opener manufacturer for thelocation of this “training” button.
2. Press the “training” button on the ceiling mounted garagedoor opener motor.
Following this step, you have 30 seconds in which to initiatestep 3 below.
3. Press and release the vehicle’s programmed HomeLink�
button twice. The garage door may open. If the door doesopen, the programming process is complete. If the door doesnot open, press and release the button a third time. This thirdpress and release will complete the programming process byopening the garage door.
The ceiling mounted garage door opener motor should nowrecognize the HomeLink
� unit and be able activate thegarage door up/down.
4. Repeat steps 1 through 3 for each remaining HomeLink�
button to program another rolling code system.
Programming an entrance gate/Programming all devicesin the Canadian market
1. Decide which of the 3 HomeLink� buttons you want to
program.
2. Place your hand–held gate/device transmitter 25 to 75 mm(1 to 3 in.) away from the surface of the HomeLink
�.
Keep the indicator light on the HomeLink� in view while
programming.
3. Press and hold the selected HomeLink� button.
4. Continuously press and release (cycle) the hand–heldgate/device transmitter button every two seconds until step 5is complete.
5. When the indicator light on the HomeLink� changes from
a slow to a rapid flash after 20 seconds, you can release bothbuttons.
6. Test the operation of the HomeLink� by pressing the
newly programmed button. Check to see if the gate/deviceoperates correctly.
7. Repeat steps 1 through 6 for each remaining HomeLink�
button to program another device.
Programming other devices
To program other devices such as home security systems,home door locks or lighting, contact your authorized Toyotadealer for assistance.

INTERIOR EQUIPMENT
62 2001 MY RX300_U (OM48431U)
Reprogramming a button
Individual HomeLink� buttons cannot be erased, however,
to reprogram a single button, follow the procedure“Programming the HomeLink
�”.
(b) Operating the HomeLink�
To operate the HomeLink�, press the appropriate
HomeLink� button to activate the programmed device. The
HomeLink� indicator light should come on. The
HomeLink� continues to send the signal for up to 20
seconds as long as the button is pressed.
(c) Erasing the entire HomeLink� memory
(all three programs)To erase all previously programmed codes at one time, pressand hold down the 2 outside buttons for 20 seconds until theindicator light flashes.
If you sell your vehicle, be sure to erase the programs storedin the HomeLink
� memory.
CAUTION
� When programming the HomeLink� Universal
Transceiver, you may be operating a garage door orother device. Make sure people and objects are outof the way of the garage door or other device toprevent potential harm or damage.
� Do not use this HomeLink� Universal Transceiver
with any garage door opener that lacks the safetystop and reverse feature as required by federal safetystandards. (This includes any garage door openermodel manufactured before April 1, 1982.) A garagedoor opener, which cannot detect an object,signaling the door to stop and reverse, does not meetcurrent federal safety standards. Using a garagedoor opener without these features increases risk ofserious injury or death.
FCC ID: CB2SAHL3CANADA: 279 102 1849A
This device complies with FCC Rules Part 15.Operation is subject to the following two conditions:(1) This device may not cause harmful interference,and (2) this device must accept any interference thatmay be received, including interference that maycause undesired operation. WARNING: Thistransmitter has been tested and complies withFCC and DOC/MDC rules. Changes ormodifications not expressly approved by the partyresponsible for compliance could void the user’sauthority to operate the device.

INTERIOR EQUIPMENT
632001 MY RX300_U (OM48431U)
CUP HOLDERS
14R012b
�Front cup holder
To use the cup holder, slide the rear console box.
The cup holder is designed for holding cups or drink–canssecurely. You can adjust the arms to 3 stages.
14R042b
� 1 Upper console position 2 Lower console position
The cup holder can be installed as you desired using theupper and lower rear console boxes.
When the upper console is used as a cup holder, the lowerconsole may not be used. This applies to the opposite casewhen the lower console is used.

INTERIOR EQUIPMENT
64 2001 MY RX300_U (OM48431U)
14R123
� 1 Removal 2 Installation
To remove: Pull out the cup holder from the rear console box.
To install: Insert the rear tabs into the cutouts of the rearconsole box.
CAUTION
� Do not place anything else other than cups ordrink–cans in the cup holder, as such items may bethrown about in the compartment and possibly injurepeople in the vehicle during sudden braking or in anaccident.
� To reduce the chance of injury in case of an accidentor sudden stop while driving, keep the cup holderclosed when not in use.
14R058b
�Rear cup holder (rear console box)
To use the cup holder, push the button of the rear consolebox.
The cup holder is designed for holding cups or drink–canssecurely. You can adjust the arms to 3 stages.
CAUTION
� Do not place anything else other than cups ordrink–cans on the cup holder, as such items may bethrown about in the compartment and possibly injurepeople in the vehicle during sudden braking or in anaccident.
� To reduce the chance of injury in case of an accidentor sudden stop while driving, keep the cup holderclosed when not in use.

INTERIOR EQUIPMENT
652001 MY RX300_U (OM48431U)
14R113
�Rear cup holder (rear seat cushion)
To use the rear cup holder, pull the cup holder portion ofthe rear seat cushion.
The cup holder is designed for holding cups or drink–canssecurely.
CAUTION
� Do not place anything else other than cups ordrink–cans on the cup holder, as such items may bethrown about in the compartment and possibly injurepeople in the vehicle during sudden braking or in anaccident.
� To reduce the chance of injury in case of an accidentor sudden stop while driving, keep the cup holderclosed when not in use.
OVERHEAD CONSOLE BOX
14R114
To use the overhead console box, open it as shown above.
CAUTION
� To reduce the chance of injury in case of an accidentor a sudden stop, always keep the overhead consolebox closed while driving.
� As this box is designed for holding eyeglasses, donot place any object heavier than approximately 60 g(0.13 lb.) in it. Heavier objects may cause the box toopen and contents to fly out resulting in injuries.

INTERIOR EQUIPMENT
66 2001 MY RX300_U (OM48431U)
NOTICE
During hot weather, the interior of the vehicle becomesvery hot. Do not leave anything flammable ordeformable such as a lighter, glasses, etc. inside.
AUXILIARY BOXESYour vehicle has several types of auxiliary box. To usethem, open as shown in the following illustrations.
14R023c
�On the instrument panel
14R127
�In the right side of luggage compartment
CAUTION
To reduce the chance of injury in case of an accident ora sudden stop, always keep the auxiliary box closedwhile driving.

INTERIOR EQUIPMENT
672001 MY RX300_U (OM48431U)
LUGGAGE COVER
Using luggage cover
14R124
To use the luggage cover:
1 Attach the front hooks of the luggage cover to the headrestraint.
2 Pull out the rear luggage cover and hook it on theanchors.
CAUTION
Do not place anything on the luggage cover. Such itemsmay be thrown about and possibly injure people in thevehicle during sudden braking or an accident.
Removing luggage cover
14R122
To remove the luggage cover, lift it up.
After you remove the luggage cover, place it somewhere otherthan the passenger compartment. This will preventpassengers from injury in the event of a sudden stop oraccident.

INTERIOR EQUIPMENT
68 2001 MY RX300_U (OM48431U)
FLOOR MAT
14R024
Use a floor mat of the correct size.
If the floor carpet and floor mat have a hole, then it is designedfor use with a locking clip. Fix the floor mat with locking clip intothe hole in the floor carpet.
14R025
CAUTION
Make sure the floor mat is properly placed on the floorcarpet. If the floor mat slips and interferes with themovement of the pedals during driving, it may cause anaccident.

INTERIOR EQUIPMENT
692001 MY RX300_U (OM48431U)
TIE–DOWN HOOKS
14R083
To secure your luggage, use the tie–down hooks asshown above.
See “Luggage stowage precautions” for precautions toobserve in loading luggage.
LUGGAGE STOWAGEPRECAUTIONS
When stowing luggage or cargo in the vehicle, observethe following:
� Put luggage or cargo in the luggage compartment when atall possible. Be sure all items are secured in place.
� Be careful to keep the vehicle level. Placing the weight asfar forward as possible helps maintain vehicle balance.
� For better fuel economy, do not carry unnecessary weight.
CAUTION
� To prevent luggage or packages from sliding forwardduring braking, do not stack anything in the luggagecompartment higher than the seatbacks. Keepluggage or packages low, as close to the floor aspossible.
� Never allow anyone to ride in the luggagecompartment. It is not designed for passengers.They should ride in their seats with their seat beltsproperly fastened. Otherwise, they are much morelikely to suffer serious bodily injury, in the event ofsudden braking or a collision.

INTERIOR EQUIPMENT
70 2001 MY RX300_U (OM48431U)
� Do not drive with objects left on top of the instrumentpanel. They may interfere with the driver’s field ofview. Or they may move during sharp vehicleacceleration or turning, and impair the driver’scontrol of the vehicle. In an accident they may injurethe vehicle occupants.
NOTICE
Do not load the vehicle beyond the vehicle capacityweight specified on the tire pressure label.

SECTION 1 – 5
712001 MY RX300_U (OM48431U)
INSTRUMENTS AND CONTROLSExterior equipmentHood 72. . . . . . . . . . . . . . . . . . . . . . . . . . . . . . . . . . . . . . . . . . . . . . . . . . . . Fuel tank cap 73. . . . . . . . . . . . . . . . . . . . . . . . . . . . . . . . . . . . . . . . . . . . . Moon roof 74. . . . . . . . . . . . . . . . . . . . . . . . . . . . . . . . . . . . . . . . . . . . . . . .

EXTERIOR EQUIPMENT
72 2001 MY RX300_U (OM48431U)
HOOD
15R001a
1. To open the hood, pull the hood lock release leverunder the instrument panel. The hood will spring upslightly.
15R037
2. Insert your fingers under the hood, push up theauxiliary catch lever and lift the hood.
Before closing the hood, check to see that you have notforgotten any tools, rags, etc. Then lower the hood and makesure it locks.
CAUTION
Before driving, be sure that the hood is securely locked.Otherwise, the hood may open unexpectedly whiledriving and an accident may occur.

EXTERIOR EQUIPMENT
732001 MY RX300_U (OM48431U)
FUEL TANK CAP
15R006a
1. To open the fuel filler door, pull the lever up.
When refueling, turn off the engine.
CAUTION
� Do not smoke, cause sparks or allow open flameswhen refuelling. The fumes are flammable.
� When opening the cap, do not remove the capquickly. In hot weather, fuel under pressure couldcause injury by spraying out of the filler neck if thecap is suddenly removed.
15R046
2. To remove the fuel tank cap, turn the cap slowlycounterclockwise, t hen pause slightly before removing it.The removed cap can be stored on the back side of the fuelfiller door.
It is not unusual to hear a slight swoosh when the cap isopened. When installing the cap, turn the cap clockwise untilyou hear a click.
If the cap is not tightened securely, the malfunction indicatorlamp comes on. Make sure the cap is tightened securely.
The indicator lamp goes off after driving several times. If theindicator lamp does not go off, contact your Lexus dealer assoon as possible.

EXTERIOR EQUIPMENT
74 2001 MY RX300_U (OM48431U)
CAUTION
� Make sure the cap is tightened securely to preventfuel spillage in case of an accident.
� Use only a genuine Lexus fuel tank cap forreplacement. It is designed to regulate fuel tankpressure.
MOON ROOF
15R009d
� 1 Open 2 Close
To slide open the moon roof, push the switch on the“SLIDE OPEN” side briefly. The moon roof will open andstop partway 50 mm (2.0 in.) from the fully openedposition. When you push the switch again, the moon roofwill open fully. To stop partway, push the same side or“TILT UP” side briefly.
As driving with the moon roof opened fully will cause windthrobs, we recommend you to drive with the moon roof partway50 mm (2.0 in.) from the fully opened position.
To operate the moon roof, the ignition key must be in the “ON”position.
The sun shade can be opened or closed manually. However,if you open the moon roof, the sun shade will be opened withthe moon roof.

EXTERIOR EQUIPMENT
752001 MY RX300_U (OM48431U)
To close the moon roof, push the switch on the “TILT UP”side. The moon roof will fully close. To stop partway, pushthe same side or “SLIDE OPEN” side briefly.
To slide open the tilted–up moon roof:
Push the switch on the “SLIDE OPEN” side to tilt down themoon roof. After releasing the switch, push the switch on thesame side again.
15R010b
� 1 Lower 2 Tilt up
To tilt up the rear end of the moon roof fully, push theswitch on the “TILT UP” side or on the “SLIDE OPEN” sideto lower it.
To tilt up the slide–opened moon roof:
Push the switch on the “TILT UP” side to close the moon rooffully. After releasing the switch, push the switch on the sameside again.
Key off operation: Even if the ignition key is turned to the“ACC” or “LOCK” position with all the door closed, the moonroof can be operated until any of the doors is opened (or forabout 45 seconds).
Operating the moon roof from outside thevehicle(a) The moon roof can be closed or opened using anignition key.*
Insert the ignition key into the key hole on the driver’sdoor.
To close the moon roof: Turn the key in the locking directionand hold it.
After the door is locked, the moon roof begins to close. To stopin the middle, return the key.
To open the moon roof: Turn the key in the unlockingdirection and hold it.
After the door is unlocked, the moon roof begins to open. Tostop in the middle, return the key.
NOTE: *This feature can be set inoperative, or sliding openor tilting up can be selected. Ask your Lexus dealer fordetails.
(b) The moon roof can be opened using a wireless remotecontrol key.
Push and hold the “UNLOCK” button. When you releasethe button, the moon roof stops opening.

EXTERIOR EQUIPMENT
76 2001 MY RX300_U (OM48431U)
Jam protection functionDuring closing operation, the moon roof stops and is open ifsomething gets caught into the roof opening.
If the moon roof receives a strong impact, this function maywork even if nothing is caught.
CAUTION
To avoid serious personal injury, you must do thefollowing.
� While the vehicle is moving, always keep the heads,hands and other parts of the bodies of all occupantsaway from the roof opening. Otherwise, they couldbe seriously injured if the vehicle stops suddenly orif the vehicle is involved in an accident.
� Always make sure nobody places his/her head,hands and other parts of the body in the roof openingbefore you close the roof. If someone’s neck, head orhands gets caught in the closing roof, it could resultin a serious injury. When anyone closes the roof, firstmake sure it is safe to do so.
� Never leave small children alone in the vehicle,especially with the ignition key still inserted. Theycould use the moon roof switches and get trapped inthe roof opening. Unattended children can beinvolved in serious accidents.
� Never sit on top of the vehicle around the roofopening.
� Never try jamming any part of your body to make thejam protection function work intentionally.
� The jam protection function may not work ifsomething gets caught just before the moon rooffully closed.

SECTION 1 – 6
772001 MY RX300_U (OM48431U)
INSTRUMENTS AND CONTROLSComfort adjustmentFront seats 78. . . . . . . . . . . . . . . . . . . . . . . . . . . . . . . . . . . . . . . . . . . . . . . Rear seats 83. . . . . . . . . . . . . . . . . . . . . . . . . . . . . . . . . . . . . . . . . . . . . . . Armrests 85. . . . . . . . . . . . . . . . . . . . . . . . . . . . . . . . . . . . . . . . . . . . . . . . . Head restraints 86. . . . . . . . . . . . . . . . . . . . . . . . . . . . . . . . . . . . . . . . . . . Tilt steering wheell 87. . . . . . . . . . . . . . . . . . . . . . . . . . . . . . . . . . . . . . . . Outside rear view mirrors 87. . . . . . . . . . . . . . . . . . . . . . . . . . . . . . . . . . Inside rear view mirror 89. . . . . . . . . . . . . . . . . . . . . . . . . . . . . . . . . . . . . Seat belts 95. . . . . . . . . . . . . . . . . . . . . . . . . . . . . . . . . . . . . . . . . . . . . . . . SRS airbags 103. . . . . . . . . . . . . . . . . . . . . . . . . . . . . . . . . . . . . . . . . . . . Child restraint 115. . . . . . . . . . . . . . . . . . . . . . . . . . . . . . . . . . . . . . . . . . . Driving position memory system 134. . . . . . . . . . . . . . . . . . . . . . . . . . .

COMFORT ADJUSTMENT
78 2001 MY RX300_U (OM48431U)
FRONT SEATS
Front seat precautions
CAUTION
The side airbags are installed in the driver and frontpassenger seats, observe the following precautions.
� Do not lean over the front door when the vehicle is inuse. The side airbag inflates with considerable speedand force; you may be killed or severely injured.
� Do not modify or replace the seats or upholstery ofthe seats with side airbags. Such changes maydisable the system, or cause the side airbags toinflate accidentally, resulting in death or seriousinjury. Consult your Lexus dealer if you insist onmodifications of this kind.
� Do not use accessories for the seats which cover theparts where the side airbags should inflate. Suchaccessories may prevent the side airbags fromactivating correctly, causing death or serious injury.
Seat adjustment precautionsAdjust the driver’s seat so that the foot pedals, steering wheeland instrument panel controls are within easy reach of thedriver.
CAUTION
� Do not adjust the seat while the vehicle is moving asthe seat may unexpectedly move and cause thedriver to lose control of the vehicle.
� Be careful not to hit the seat against a passenger,luggage or the rear seat.
NOTICE
Do not operate the control switch in more than onedimension at a time. It may cause electrical overload.

COMFORT ADJUSTMENT
792001 MY RX300_U (OM48431U)
Adjusting front seats
16R001c
� 1 Seat position control switch, seat cushion angle and height control switch
2 Seatback angle control switch 3 Lumbar support control switch
Adjusting seat position
16R002b
Move the control switch in the desired direction.
Releasing the switch will stop the seat in that position. Do notplace anything under the seat. It might interfere with the seatmovement.

COMFORT ADJUSTMENT
80 2001 MY RX300_U (OM48431U)
Adjusting seatback angle
16R003b
Move the control switch in the desired direction.
Releasing the switch will stop the seatback in that position.
CAUTION
To reduce the risk of sliding under the lap belt during acollision, avoid reclining the seatback any more thanneeded. The seat belts provide maximum protection ina frontal or rear collision when the driver is sitting upstraight and well back in the seats. If you are reclined,the lap belt may slide past your hips and apply restraintforces directly to the abdomen. Therefore, in the eventof a frontal collision, the risk of personal injury mayincrease with increasing recline of the seatback.
Adjusting seat cushion angle and height(driver’s seat only)
16R004b
Move the control switch in the desired direction.
Releasing the switch will stop the seat cushion in that position.

COMFORT ADJUSTMENT
812001 MY RX300_U (OM48431U)
Adjusting lumbar support (driver’s seat only)
16R005b
Push the control switch on either side.
The amount of lumbar support will change as long as theswitch is pushed.
Flattening seatbacks
16R100b
Before flattening seatbacks, slide the rear seats as farback as possible.
1 Push the seat position control switch forward to move theseat forward.
2 Push the seat position control switch upward to raise theseat (driver’s seat only).
3 Push the lock release button on the head restraint toremove it.
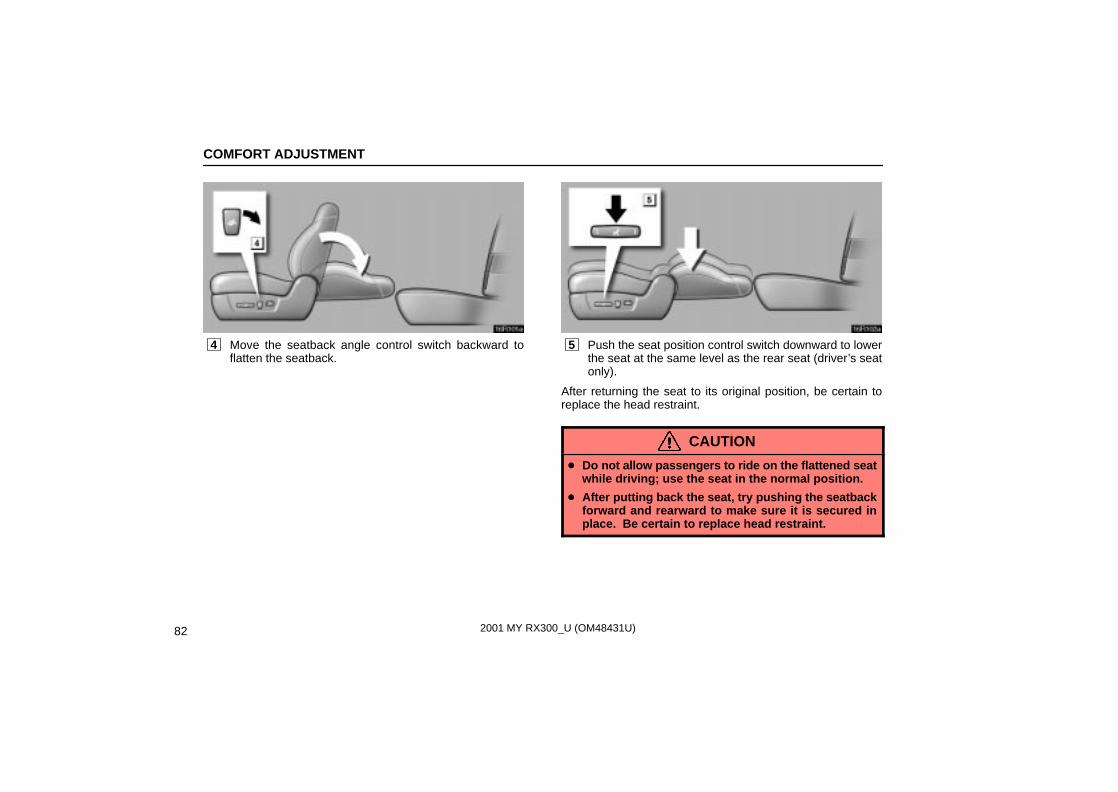
COMFORT ADJUSTMENT
82 2001 MY RX300_U (OM48431U)
16R101a
4 Move the seatback angle control switch backward toflatten the seatback.
16R102a
5 Push the seat position control switch downward to lowerthe seat at the same level as the rear seat (driver’s seatonly).
After returning the seat to its original position, be certain toreplace the head restraint.
CAUTION
� Do not allow passengers to ride on the flattened seatwhile driving; use the seat in the normal position.
� After putting back the seat, try pushing the seatbackforward and rearward to make sure it is secured inplace. Be certain to replace head restraint.

COMFORT ADJUSTMENT
832001 MY RX300_U (OM48431U)
REAR SEATS
Sliding and reclining rear seats
16R283
Hold the center of the lever and pull it up. Then slide theseat to the desired position with slight body pressure andrelease the lever.
When you move the seats forward and unlock the seatbacks,you can tilt the seatbacks a little rearward.
CAUTION
To reduce the risk of sliding under the lap belt during acollision, avoid reclining the seatback any more thanneeded. The seat belts provide maximum protectionwhen the passengers are sitting up straight and wellback in the seats. If you are reclined, the lap belt mayslide past your hips and apply restraint forces directlyto the abdomen. Therefore, in the event of a frontalcollision, the risk of personal injury may increase withincreasing recline of the seatback.

COMFORT ADJUSTMENT
84 2001 MY RX300_U (OM48431U)
Folding down rear seatbacks
16R309
�Before folding down rear seatbacks
Stow the rear seat belt buckles as shown in theillustration.
16R099
�Seat belt hanger
For the outer seat belts, use the seat belt hangers toprevent the belts from being tangled.
NOTICE
The seat belt buckles must be stowed before you folddown the rear seatbacks.

COMFORT ADJUSTMENT
852001 MY RX300_U (OM48431U)
16R271
�Folding down rear seatbacks
Lower the head restraints to the lowest position, unlockthe seatbacks and fold them down.
When returning the rear seats to their original position, liftup the seatbacks until they lock.
CAUTION
When returning the seatback to the upright position,observe the following in order to prevent personalinjury in a collision or sudden stop:
� Make sure the seat is securely locked by pushingforward and rearward on the top of the seatback.Failure to do so will prevent the seat belt fromoperating properly.
� Make sure the seat belts are not twisted or caughtunder the seat and are arranged in their properposition and are ready to use.
ARMRESTS
16R195
�Front �Rear
To use the armrests, pull them down as shown above.
NOTICE
To prevent damage to the armrests, avoid putting heavyloads on them.

COMFORT ADJUSTMENT
86 2001 MY RX300_U (OM48431U)
HEAD RESTRAINTS
Front seats
16R007
To raise the head restraint, pull it up. To lower it, press thelock release button and push the head restraint down. Tomove the head restraint forward or rearward, pull or pushon the top.
The head restraint is most effective when it is close to yourhead. Therefore, using a cushion on the seatback is notrecommended.
CAUTION
� Adjust the center of the head restraint so that it isclosest to the top of your ears.
� After adjusting the head restraint, make sure it islocked in position.
� Do not drive with the head restraints removed.
Rear seats
16R124
To raise the head restraint, pull it up. To lower it, press thelock release button and push the head restraint down.
The head restraint is most effective when it is close to yourhead. Therefore, using a cushion on the seatback is notrecommended.
CAUTION
� Adjust the center of the head restraint so that it isclosest to the top of your ears.
� After adjusting the head restraint, make sure it islocked in position.
� Do not drive with the head restraints removed.

COMFORT ADJUSTMENT
872001 MY RX300_U (OM48431U)
TILT STEERING WHEEL
16R300
To change the steering wheel angle, hold the steeringwheel, pull up the lock release lever, tilt the steering wheelto the desired angle and release the lever.
When the steering wheel is in a low position, it will spring up asyou release the lock release lever.
CAUTION
� Do not adjust the steering wheel while the vehicle ismoving. It may cause the driver to mishandle thevehicle and an accident may occur resulting in deathor serious injuries.
� After adjusting the steering wheel, try moving it upand down to make sure it is locked in position.
OUTSIDE REAR VIEW MIRRORS
16R010b
Adjust the mirror so that you can just see the side of yourvehicle in the mirror.
Be careful when judging the size or distance of any object seenin the outside rear view mirror on the passenger’s side. It is aconvex mirror with a curved surface. Any object seen in aconvex mirror will look smaller and farther away than if seen ina normal flat mirror.
When you push the rear window and outside rear view mirrordefogger switch, the heater panels in the outside rear viewmirrors will quickly clear the mirror surface.
Some models: When the inside rear view mirror darkens in“AUTO” mode, the outside rear view mirrors also darken toreduce the reflection of the headlights of the following vehicle.For details, see “Inside rear view mirror” on page 89.

COMFORT ADJUSTMENT
88 2001 MY RX300_U (OM48431U)
CAUTION
� Do not adjust the mirror while the vehicle is moving.It may cause the driver to mishandle the vehicle andan accident may occur, resulting in death or seriousinjuries.
� Since the mirror surfaces can get hot, keep yourhands off them when the rear window and outsiderear view mirror defogger switch is on.
Power rear view mirror control
16R011b
� 1 Master switch 2 Control switch
To adjust the power rear view mirror, first place the masterswitch at “L” (left) or “R” (right), and push the controlswitch on the desired side.
The power rear view mirror can be adjusted when the key is inthe “ACC” or “ON” position.
NOTICE
If ice should jam the mirror, do not operate the controlor scrape the mirror face. Use a spray de–icer to free themirror.

COMFORT ADJUSTMENT
892001 MY RX300_U (OM48431U)
Folding rear view mirrors
16R012
To fold the rear view mirror, push backward.
The rear view mirrors can be folded backward for parking inrestricted areas.
CAUTION
Do not drive with the mirrors folded backward. Both thedriver and passenger side rear view mirrors must beextended and properly adjusted before driving.
INSIDE REAR VIEW MIRROR
16R301
�Type A 1 Day 2 Night
Adjust the m irror so that you can just see the rear of yourvehicle in the mirror.
When driving at night, pull the lever toward you to reducethe glare from the headlights of vehicles behind you.
Before adjusting the mirror to the position with most clarity,push the day–night change lever forward (daylight drivingposition).
Remember that by reducing glare you also lose some rear viewclarity.

COMFORT ADJUSTMENT
90 2001 MY RX300_U (OM48431U)
CAUTION
Do not adjust the mirror while the vehicle is moving. Itmay cause the driver to mishandle the vehicle and anaccident may occur resulting in death or seriousinjuries. 16R295
�Type B
Adjust the m irror so that you can just see the rear of yourvehicle in the mirror.
Pushing the switch changes the mode between “AUTO”and “DAY”.
The indicator comes on when the “AUTO” mode is selected.
“DAY” mode: The mirror surface is normal.
“AUTO” mode: If the mirror detects light from theheadlights of the vehicle behind you, the mirror surfacedarkens slightly to reduce the reflected light.
When the inside rear view mirror surface changes, the outsiderear view mirror surfaces will also become darker.
When the ignition key is inserted and turned on, the inside rearview mirror always turns on in the “AUTO” mode.

COMFORT ADJUSTMENT
912001 MY RX300_U (OM48431U)
When the outside air temperature is low, it may take a littlelonger for the mirror to darken in response to the detection ofheadlights.
CAUTION
Do not adjust the mirror while the vehicle is moving. Itmay cause the driver to mishandle the vehicle and anaccident may occur resulting in death or seriousinjuries.
Compass (Some models)
16R296
The compass indicates the direction in which the vehicleis heading. The illustration shown above indicates thevehicle is heading north.
Pushing the button for longer 3 seconds turns on or off thecompass display.
Displays Directions
NNEE
SES
SWW
NW
NorthNortheast
EastSoutheast
SouthSouthwest
WestNorthwest
The compass may not show the correct direction in thefollowing conditions:
� The vehicle is stopped immediately after turning.
The compass does not adjust while the vehicle is stopped.
� The ignition switch is turned off immediately after turning.
� The vehicle is on an inclined surface.
� The vehicle is in a place where the earth’s magnetic field issubject to interference by artificial magnetic fields(underground parking, under a steel tower, betweenbuildings, roof parking, near a crossing, near a largevehicle, etc.).
� The vehicle is magnetized. (There is a magnet or a metalobject on or near the inside rear view mirror.)
� The battery has been disconnected.
The compass works to calibrate the direction automaticallywhile the vehicle is in motion, if deviation is small.

COMFORT ADJUSTMENT
92 2001 MY RX300_U (OM48431U)
For obtaining additional precision or for complete calibrating,see “CALIBRATING THE COMPASS” below.
If the direction is not indicated or the system does not operateproperly, contact your Lexus dealer.
16R297
�Compass sensor
NOTICE
Do not put magnets or a metal object on or near theinside rear view mirror of the vehicle. Doing this maycause malfunction of the compass sensor in the mirror.
Calibrating the compass (deviation calibration)
The direction display on the compass deviates from the truedirection determined by the earth’s magnetic field. The angleof deviation varies according to the geographic position of thevehicle.
To adjust for this deviation, stop the vehicle and push thebutton for longer than about 6 seconds until the number (1–15)appears on the display. Then push the button again, referringto the following map to select the number of the zone where thevehicle is.

COMFORT ADJUSTMENT
932001 MY RX300_U (OM48431U)
16R198
Hawaii: 5
�Zone number
Leaving the system after the calibration for several seconds,the direction will appear on the display. It shows the zonenumber is set.
CAUTION
Do not adjust the display while the vehicle is moving.Be sure to adjust the display only when the vehicle isstopped.
Calibrating the compass (circling calibration)
16R298
To rectify the compass, stop the vehicle and push the buttonfor longer than about 9 seconds until “C” appears on thedisplay.
There is also a case that “C” appears on the display in case ofthe drastic change of the magnetic field.

COMFORT ADJUSTMENT
94 2001 MY RX300_U (OM48431U)
16R200
Drive the vehicle slowly (at 8 km/h (5 mph) or lower) in a circleuntil the direction is displayed. If there is not enough space todrive in a circle, drive around the block until the direction isdisplayed.
After driving in 1 to 3 circles in the above method, calibrationis complete with the direction shown on the display.
If you want to cancel the calibration before it is complete, pushthe button again.
� Do not perform circling calibration of the compass in a placewhere the earth’s magnetic field is subject to interference byartificial magnetic fields (underground parking, under asteel tower, between buildings, roof parking, near acrossing, near a large vehicle, etc.).
� During calibration, do not operate electric systems (moonroof, power windows, etc.) as they may interfere with thecalibration.
CAUTION
� When doing the circling calibration, be sure to securea wide space, and pay attention to people andvehicles in the neighborhood. Do not violate anylocal traffic rules while performing circlingcalibration.
� Do not adjust the display while the vehicle is moving.Be sure to adjust the display only when the vehicle isstopped.

COMFORT ADJUSTMENT
952001 MY RX300_U (OM48431U)
SEAT BELTS
Seat belt precautionsLexus strongly urges that the driver and passengers in thevehicle be properly restrained at all times with the seat beltsprovided. Failure to do so could increase the chance of injuryand/or the severity of injury in accidents.
Child. Use a child restraint system appropriate for the childuntil the child becomes large enough to properly wear thevehicle’s seat belts. See “Child restraint” on page 115 fordetails.
If a child is too large for a child restraint system, the child shouldsit in the rear seat and must be restrained using the vehicle’sseat belt. According to accident statistics, the child is saferwhen properly restrained in the rear seat than in the front seat.
If a child must sit in the front seat, the seat belts should be wornproperly. Do not let the child sit on your lap. It does not providesufficient restraint. If an accident occurs and the seat belts arenot worn properly, the force of the rapid inflation of the airbagmay cause severe injury to the child.
Do not allow the child to stand up or kneel on either rear or frontseats. An unrestrained child could suffer serious injury ordeath during emergency braking or a collision.
Pregnant woman. Lexus recommends the use of a seat belt.Ask your doctor for specific recommendations. The lap beltshould be worn securely and as low as possible over the hipsand not on the waist.
Injured person. Lexus recommends the use of a seat belt.Depending on the injury, first check with your doctor for specificrecommendations.
CAUTION
Persons should ride in their seats properly wearingtheir seat belts whenever the vehicle is moving.Otherwise, they are much more likely to suffer seriousbodily injury or death in the event of sudden braking ora collision.
When using the seat belts, observe the following:
� Use the belt for only one person at a time. Do not usea single belt for two or more people – even children.
� Avoid reclining the seatbacks too much. The seatbelts provide maximum protection when theseatbacks are in the upright position. (See“Adjusting seatback angle” on page 80.)
� Be careful not to damage the belt webbing orhardware. Take care that they do not get caught orpinched in the seat or doors.
� Inspect the belt system periodically. Check for cuts,fraying, and loose parts. Damaged parts should bereplaced. Do not disassemble or modify the system.

COMFORT ADJUSTMENT
96 2001 MY RX300_U (OM48431U)
� Keep the belts clean and dry. If they need cleaning,use a mild soap solution or lukewarm water. Neveruse bleach, dye, or abrasive cleaners – they mayseverely weaken the belts. (See “Cleaning theinterior” on page 308 for instructions.)
� Replace the belt assembly (including bolts) if it hasbeen used in a severe impact. The entire assemblyshould be replaced even if damage is not obvious.
Fastening front and rear seat belts
16R014a
Adjust the seat as needed and sit up straight and well backin the seat. To fasten your belt, pull it out of the retractorand insert the tab into the buckle.
You will hear a click when the tab locks into the buckle.
The seat belt length automatically adjusts to your size and theseat position.
The retractor will lock the belt during a sudden stop or onimpact. It also may lock if you lean forward too quickly. A slow,easy motion will allow the belt to extend, and you can movearound freely.
When a passenger’s shoulder belt is completely extended andis then retracted even slightly, the belt is locked in that positionand cannot be extended. This feature is used to hold the childrestraint system securely. (For details, see “Child restraint” onpage 115.) To free the belt again, fully retract the belt and thenpull the belt out once more.

COMFORT ADJUSTMENT
972001 MY RX300_U (OM48431U)
If the seat belt cannot be pulled out of the retractor, firmly pullthe belt and release it. You will then be able to smoothly pullthe belt out of the retractor.
CAUTION
� After inserting the tab, make sure the tab and buckleare locked and that the belt is not twisted.
� Do not insert coins, clips, etc. in the buckle as thismay prevent you from properly latching the tab andbuckle.
� If the seat belt does not function normally,immediately contact your Lexus dealer. Do not usethe seat until the seat belt is fixed. It cannot protectan adult occupant or your child from injury.
16R107
Adjust the position of the lap and shoulder belts.
1 Position the lap belt as low as possible on your hips – noton your waist.
2 Adjust it to a snug fit by pulling the shoulder portionupward through the latch plate.
CAUTION
� Both high–positioned lap belts and loose–fittingbelts could cause serious injuries due to slidingunder the lap belt during a collision or otherunintended result. Keep the lap belt positioned aslow on hips as possible.
� For your safety, do not place the shoulder belt underyour arm.

COMFORT ADJUSTMENT
98 2001 MY RX300_U (OM48431U)
16R108
�Front seat belts only
Adjust the shoulder anchor position to your size.
To raise the anchor position, push the anchor up. To lower theanchor position, support the anchor while you push the lockrelease button then slide the anchor down. After theadjustment, make sure the anchor is locked in position.
CAUTION
Always make sure the shoulder belt is positionedacross the center of your shoulder. The belt should bekept away from your neck, but not falling off yourshoulder. Failure to do so could reduce the amount ofprotection in an accident and cause severe injuries in acollision.
16R017b
To release the belt, press the buckle release button andallow the belt to retract.
If the belt does not retract smoothly, pull it out and check forkinks or twists. Then make sure it remains untwisted as itretracts.

COMFORT ADJUSTMENT
992001 MY RX300_U (OM48431U)
Seat belt extenderIf your seat belts cannot be fastened securely because it is notlong enough, a personalized seat belt extender is availablefrom your Lexus dealer free of charge.
Please contact your local Lexus dealer to order the properrequired length for the extender. Bring the heaviest coat youexpect to wear for proper measurement and selection oflength. Additional ordering information is available at yourLexus dealer.
CAUTION
When using the seat belt extender, observe thefollowing. Failure to follow these instructions couldresult in less effectiveness of the seat belt restraintsystem in case of vehicle accident, increasing thechance of personal injury.
� Never use the seat belt extender if you can fasten theseat belt without it.
� Remember that the extender provided for you maynot be safe when used on a different vehicle, or foranother person or at a different seating position thanthe one originally intended for.
16R125
To connect the extender to the seat belt, insert the tab intothe seat belt buckle so that the “PRESS” signs on thebuckle release buttons of the extender and the seat beltare both facing outward as shown.
You will hear a click when the tab locks into the buckle.
When releasing the seat belt, press on the buckle releasebutton on the extender, not on the seat belt. This helps preventdamage to the vehicle interior and extender itself.
When not in use, remove the extender and store in the vehiclefor future use.

COMFORT ADJUSTMENT
100 2001 MY RX300_U (OM48431U)
CAUTION
� After inserting the tab, make sure the tab and buckleare locked and that the belt is not twisted.
� Do not insert coins, clips, etc. in the buckle as thismay prevent you from properly latching the tab andbuckle.
� If the seat belt does not function normally,immediately contact your Lexus dealer. Do not usethe seat until the seat belt is fixed. It cannot protectan adult occupant or your child from injury.
Front seat belt pretensioners
16R302
The driver and front passenger’s seat belt pretensionersare designed to be activated in response to a severefrontal impact.
When the airbag sensor detects the shock of a severe frontalimpact, the front seat belts are quickly drawn back in by theretractors so that the belts snugly restrain the front seatoccupants.
The front seat belt pretensioners are activated even with nopassenger in the front seat.
Collisions occurring at certain speeds and angles may causethe seat belt pretensioners and SRS airbags not to operate alltogether.

COMFORT ADJUSTMENT
1012001 MY RX300_U (OM48431U)
16R021a
This indicator comes on when the ignition key is turned tothe “ON” position. It goes off after about 6 seconds. Thismeans the front seat belt pretensioners are operatingproperly.
This warning light system monitors the airbag sensorassembly, front airbag sensors, side airbag sensors, front seatbelt pretensioner assemblies, inflators, warning light,interconnecting wiring and power sources. (For details, see“Service reminder indicators and warning buzzers” on page40.)
16R104a
� 1 Front airbag sensors 2 SRS warning light 3 Front seat belt pretensioner assemblies 4 Airbag sensor assembly
The front seat belt pretensioner system consists mainly of theabove components, and their locations are shown in theillustration.
The front seat belt pretensioners are controlled by the airbagsensor assembly. The airbag sensor assembly consists of asafing sensor and airbag sensor.
When the front seat belt pretensioners are activated, anoperating noise may be heard and a small amount ofsmoke–like gas may be released. This gas is harmless anddoes not indicate that a fire is occurring.
Once the front seat belt pretensioners have been activated, theseat belt retractors remain locked.

COMFORT ADJUSTMENT
102 2001 MY RX300_U (OM48431U)
CAUTION
Do not modify, remove, strike or open the front seat beltpretensioner assemblies, airbag sensor or surroundingarea or wiring. Doing any of these may cause suddenoperation of the front seat belt pretensioners or disablethe system, which could result in death or seriousinjury.
Failure to follow these instructions can result in deathor serious injuries.
NOTICE
Do not perform any of the following changes withoutconsulting your Lexus dealer. Such changes caninterfere with proper operation of the front seat beltpretensioners in some cases.
� Installation of electronic devices such as a mobiletwo–way radio, cassette tape player or compact discplayer.
� Repairs on or near the front seat belt retractorassemblies.
� Modification of the suspension system.
� Modification of the front end structure.
� Attachment of a grille guard (bull bar, kangaroo bar,etc.), snowplow, winches or any other equipment tothe front end.
� Repairs made on or near the front fenders, front endstructure or console.
16R021a
This front seat belt pretensioner system has a servicereminder indicator to inform the driver of operating problems.If any of the following conditions occurs, this indicates amalfunction of the pretensioners. Contact your Lexus dealeras soon as possible to service the vehicle.
� When the ignition key is turned to the “ON” position, the lightdoes not come on or flashes.
� The light flashes while driving.
� If either front seat belt does not retract or can not be pulledout due to a malfunction or activation of the relevant frontseat belt pretensioner.

COMFORT ADJUSTMENT
1032001 MY RX300_U (OM48431U)
16R106
In the following cases, contact your Lexus dealer as soon aspossible:
� The front part of the vehicle (shaded in the illustration) wasinvolved in an accident that was not severe enough to causethe front seat belt pretensioners to operate.
� Either front seat belt pretensioner assembly or surroundingarea is scratched, cracked, or otherwise damaged.
SRS AIRBAGSThe SRS (Supplemental Restraint System) airbags aredesigned to provide further protection for the driver andfront passenger in addition to the primary safetyprotection provided by the seat belts.
16R019b
�SRS front airbags
In response to a severe frontal impact, the SRS frontairbags work together with the seat belts to help reduceinjury by inflating. The SRS front airbags help to reduceinjuries mainly to the driver’s or front passenger’s head orchest caused by directly hitting the steering wheel ordashboard.
The front passenger airbag is activated even with nopassenger in the front seat.
Be sure to wear your seat belt properly.

COMFORT ADJUSTMENT
104 2001 MY RX300_U (OM48431U)
Your vehicle is equipped with a crash sensing and diagnosticmodule, which will record the use of the seat belt restraintsystem by the driver and front passenger when the SRSairbags are inflated.
CAUTION
The driver or front passenger too close to the steeringwheel or dashboard during airbag deployment can bekilled or seriously injured. Lexus strongly recommendsthat:
� The driver sit as far back as possible from thesteering wheel while still maintaining control of thevehicle.
� The front passenger sit as far back as possible fromthe dashboard.
� All vehicle occupants be properly restrained usingthe available seat belts.
16R020c
�SRS side airbags
In response to a severe side impact, the SRS side airbagswork together with the seat belts to help reduce injury byinflating. The SRS side airbags help to reduce injuriesmainly to the driver’s or front passenger’s chest.
The SRS side airbag on the passenger seat is activated evenwith no passenger in the front seat.
Be sure to wear your seat belt properly.
Your vehicle is equipped with a crash sensing and diagnosticmodule, which will record the use of the seat belt restraintsystem by the driver and front passenger when the SRS sideairbags are inflated.

COMFORT ADJUSTMENT
1052001 MY RX300_U (OM48431U)
CAUTION
SRS side airbags inflate with considerable force. Toavoid p otential death or serious injury when they inflate,the driver and front passenger must:
� Wear their seat belts properly.
� Remain properly seated with their back upright andagainst the seat at all times.
16R021a
The indicator comes on when the ignition key is turned tothe “ON” position. It goes off after about 6 seconds. Thismeans the SRS airbags are operating properly.
This warning light system monitors the airbag sensorassembly, front airbag sensors, side airbag sensors, front seatbelt pretensioner assemblies, inflators, warning light,interconnecting wiring and power sources. (For details, see“Service reminder indicators and warning buzzers” on page40.)
16R022
The SRS front airbag system is designed to activate inresponse to a severe frontal impact within the shaded areabetween the arrows in the illustration.
The SRS front airbags will deploy if the severity of the impactis above the designed threshold level, comparable to anapproximate 25 km/h (15 mph) collision when impactingstraight into a fixed barrier that does not move or deform.
If the severity of the impact is below the above threshold level,the SRS front airbags may not deploy.
However, this threshold velocity will be considerably higher ifthe vehicle strikes an object, such as a parked vehicle or signpole, which can move or deform on impact, or if it is involvedin an underride collision (e.g. a collision in which the nose ofthe vehicle “underrides”, or goes under, the bed of a truck,etc.).
It is possible that in some collisions at the lower zone of airbagsensor detection and activation the SRS airbags and seat beltpretensioners will not operate all together.

COMFORT ADJUSTMENT
106 2001 MY RX300_U (OM48431U)
For the safety of all occupants, always wear your seat beltsproperly.
16R023a
� 1 Collision from the rear 2 Vehicle rollover
The SRS front airbags are not designed to inflate if thevehicle is involved in a rear collision, if it rolls over, or ifit is involved in a low–speed frontal collision.
The SRS side airbags are designed to inflate when thepassenger compartment area suffers a severe impactfrom the side.
16R024
� 1 Collision from the side at an angle 2 Collision from the side to the vehicle body other
than the passenger compartment
The SRS side airbag system may not activate if the vehicleis subjected to a collision from the side at certain angles,or a collision to the side of the vehicle body other than thepassenger compartment as shown in the illustration.

COMFORT ADJUSTMENT
1072001 MY RX300_U (OM48431U)
16R103
� 1 Collision from the front 2 Collision from the rear 3 Vehicle rollover
The SRS side airbags are not designed to inflate if thevehicle is involved in a front or rear collision, if it rolls over,or if it is involved in a low–speed side collision.
16R087
� 1 Hitting a curb, edge of pavement or hard material 2 Falling into or jumping over a deep hole 3 Landing hard or vehicle falling
The SRS front airbags may deploy if a serious impactoccurs to the underside of your vehicle. Some examplesare shown in the illustration.

COMFORT ADJUSTMENT
108 2001 MY RX300_U (OM48431U)
16R026c
� 1 Side airbag modules (airbag and inflator) 2 Airbag module for front passenger
(airbag and inflator) 3 Side airbag sensors 4 Airbag sensor assembly 5 Airbag module for driver (airbag and inflator) 6 SRS warning light 7 Front airbag sensors
The SRS airbag system consists mainly of the abovecomponents, and their locations are shown in the illustration.
The airbag sensor assembly consists of a safing sensor andairbag sensor.
In a severe frontal impact, the sensors detect deceleration andthe system triggers the front airbag inflators. In a severe sideimpact, the side airbag sensor triggers the side airbag inflator.Then a chemical reaction in the inflators quickly fills the airbagswith non–toxic gas to help restrain the forward or lateral motionof the occupants.
When the SRS airbag operates, it produces a fairly loud noiseand release some smoke and residue along with non–toxicgas. This does not indicate a fire. This gas is normallyharmless; however, for those who have delicate skin, it maycause a minor skin irritation. Be sure to wash off any residueas soon as possible to prevent any potential skin irritation.
Deployment of the airbags happens in a fraction of a second,so the airbags must inflate with considerable force. While thesystem is designed to reduce serious injuries, it may alsocause minor burns or abrasions and swelling.
Parts of the airbag module (steering wheel hub, dashboard,front seats) may be hot for several minutes, but the airbagsthemselves will not be hot. The airbags are designed to inflateonly once.
A crash severe enough to inflate the driver and front passengerairbags may break the windshield as the vehicle buckles. Invehicles with a front passenger airbag, the windshield mayalso be damaged by absorbing some of the force of theinflating airbag.

COMFORT ADJUSTMENT
1092001 MY RX300_U (OM48431U)
CAUTION
� The SRS airbag system is designed only as asupplement to the primary protection of the driverside and front passenger side seat belt systems. Thefront seat occupants can be killed or seriouslyinjured by the inflating airbags if they do not wear theavailable seat belts properly. During sudden brakingjust bef ore a collision, an unrestrained driver or frontpassenger can move forward into direct contact withor close proximity to the airbag which may thendeploy during the collision. To ensure maximumprotection in an accident, the driver and allpassengers in the vehicle must wear their seat beltsproperly. Wearing a seat belt properly during anaccident reduces the chances of death or seriousinjury or being thrown out of the vehicle. Forinstructions and precautions concerning the seatbelt system, see “Seat belts” on page 95.
� Improperly seated and/or restrained infants andchildren can be killed or seriously injured by thedeploying front airbags. An infant or child who is toosmall to use a seat belt should be properly securedusing a child restraint system. Lexus stronglyrecommends that all infants and children be placedin the rear seat of the vehicle and properly restrained.The rear seat is the safest for infants and children.For instructions concerning the installation of a childrestraint system, see “Child restraint” on page 115 .
16R062a
� Never put a rear–facing child restraint system on thefront passenger seat because the force of the rapidinflation of the front passenger airbag can causedeath or serious injury to the child.

COMFORT ADJUSTMENT
110 2001 MY RX300_U (OM48431U)
16R046
�Move seat fully back
� A forward–facing child restraint system should beallowed to be put on the front passenger seat onlywhen it is unavoidable. Always move the seat as farback as possible, because the force of the deployingfront passenger airbag could cause death or seriousinjury to the child.
� Do not allow the child to lean against the front dooror around the front door even if the child is seated ina child restraint system. It is dangerous if the sideairbag inflates, and the impact could cause death orserious injury to the child.
� For instructions concerning the installation of a childrestraint system, see “Child restraint” on page 115.
16R029a
� Do not sit on the edge of the seat or lean over thedashboard when the vehicle is in use. The frontairbags inflate with considerable speed and force;you may be killed or seriously injured. Sit up straightand well back in the seat, and always use your seatbelt properly.

COMFORT ADJUSTMENT
1112001 MY RX300_U (OM48431U)
16R109
� Do not lean against the front door when the vehicleis in use. The side airbag inflates with considerablespeed and force; you may be killed or seriouslyinjured.
� Do not apply excessive weight to the outer side of thefront seats on vehicles with side airbags.
16R031a
� Do not allow a child to stand up, or to kneel on thefront passenger seat. The front airbag inflates withconsiderable speed and force; the child may be killedor seriously injured.
� Do not hold a child on your lap or in your arms. Usea child restraint system in the rear seat. Forinstructions concerning the installation of a childrestraint system, see “Child restraint” on page 115.

COMFORT ADJUSTMENT
112 2001 MY RX300_U (OM48431U)
16R032e
� Do not put objects or your pets on or in front of thedashboard or steering wheel pad that houses thefront airbag system. They might restrict inflation orcause death or serious injury as they are projectedrearward by the force of the deploying airbags.Likewise, the driver and front passenger should nothold things in their arms or on their knees.
16R303
� Do not attach a cup holder or any other device orobject on or around the door. When the side airbaginflates, the cup holder or any other device or objectwill be thrown with great force, or the side airbag maynot activate correctly, resulting in death or seriousinjury. Likewise, the driver and front passengershould not hold things in their arms or on their knees.

COMFORT ADJUSTMENT
1132001 MY RX300_U (OM48431U)
� Do not use accessories for the seats which cover theparts where the side airbags inflate. Suchaccessories may prevent the side airbags fromactivating correctly, causing death or serious injury.
� Do not modify or remove any wiring. Do not modify,remove, strike or open any components, such as thesteering wheel pad, steering wheel, column cover,front passenger airbag cover, front seats or airbagsensor assembly. Doing any of these may causesudden SRS airbag inflation or disable the system,which could result in death or serious injury.
� Do not modify or replace the seats or upholstery ofthe front seats with side airbags. Such changes maydisable the system or cause the side airbags to inflateaccidentally, resulting in death or serious injury.Consult your Lexus dealer if you insist onmodifications of this kind.
Failure to follow these instructions can result in deathor serious injury.
NOTICE
Do not perform any of the following changes withoutconsulting your Lexus dealer. Such changes caninterfere with proper operation of the SRS airbagsystem in some cases.
� Installation of electronic devices such as a mobiletwo–way radio, cassette tape player or compact discplayer.
� Modification of the suspension system.
� Modification of the front end structure and sidestructure of the passenger compartment.
� Attachment of a grille guard (bull bar, kangaroo bar,etc.), snowplow, winches or any other equipment tothe front end.
� Repairs made on or near the front fenders, front endstructure, console, steering column, steering wheel,dashboard near the front passenger airbag or frontseats.

COMFORT ADJUSTMENT
114 2001 MY RX300_U (OM48431U)
16R021a
The SRS airbag system has an indicator to inform the driver ofoperating problems. If either of the following conditionsoccurs, this indicates a malfunction of the airbags. Contactyour Lexus dealer as soon as possible to service the vehicle.
� When the ignition key is turned to the “ON” position, the lightdoes not come on, stays on or flashes.
� The light comes on or starts flashing while driving.
If the light stays on, it indicates that the driver and frontpassenger airbags fail. If the light flashes, the side airbags fail.
16R304
In the following cases, contact your Lexus dealer as soon aspossible:
� Any of the SRS airbags have been inflated.
� The front part of the vehicle and portion of the doors (shadedin the illustration) were involved in an accident that was notsevere enough to cause the SRS airbags to inflate.

COMFORT ADJUSTMENT
1152001 MY RX300_U (OM48431U)
� The surface of the seats with the side airbags or the padsection of the steering wheel or front passenger airbagcover (shaded in the illustration) is scratched, cracked, orotherwise damaged.
CHILD RESTRAINT
Child restraint precautionsLexus strongly urges the use of child restraint systems forchildren small enough to use them.
The laws of all fifty states in the U.S.A. and Canada nowrequire the use of a child restraint system.
Your vehicle conforms to SAE J1819.
If a child is too large for a child restraint system, the child shouldsit in the rear seat and must be restrained using the vehicle’sseat belt. See “Seat belts” on page 95 for details.
CAUTION
� For effective protection in automobile accidents andsudden stops, child must be properly restrainedusing a seat belt or child restraint depending on ageand size. Holding a child in your arms is not asubstitute for a child restraint system. In an accident,the child can be crushed against the windshield, orbetween you and the vehicle’s interior if you areunrestrained.
� Lexus strongly urges use of a proper child restraintwhich conforms to the size of the child, and is put onthe rear seat. According to accident statistics, thechild is safer when properly restrained in the rearseat than in the front seat.

COMFORT ADJUSTMENT
116 2001 MY RX300_U (OM48431U)
� Never put a rear–facing child restraint system on thefront seat. In the event of an accident, the force of therapid inflation of the airbag can cause death orserious injury if a rear–facing child restraint systemis put on the front seat.
� Unless it is unavoidable, do not put a forward–facingchild restraint system on the front seat.
� A forward–facing child restraint system should beallowed to be put on the front passenger seat onlywhen it is unavoidable. Always move the seat as farback as possible, because the force of the deployingfront passenger airbag could cause death or seriousinjury to the child.
� Do not allow the child to lean against the front dooror around the front door even if the child is seated inthe child restraint system. It is dangerous if the sideairbag inflates, and the impact could cause death orserious injury to the child.
� Make sure you have complied with all installationinstructions provided by the child restraintmanufacturer and that the system is properlysecured.
Child restraint systemA child restraint system for a small child or baby mustitself be properly restrained on the seat with the lapportion of the lap/shoulder belt. You must carefullyconsult the manufacturer ’s instructions whichaccompany the child restraint system.
To provide proper restraint, use a child restraint systemfollowing the manufacturer ’s instructions about theappropriate age and size of the child for the child restraintsystem.
Install the child restraint system correctly following theinstructions provided by its manufacturer. General directionsare also provided under the following illustrations.
The child restraint system should be installed on the rear seat.According to accident statistics, the child is safer whenproperly restrained in the rear seat than in the front seat.
CAUTION
� Never put a rear–facing child restraint system on thefront seat. In the event of an accident, the force of therapid inflation of the airbag can cause death orserious injury if a rear–facing child restraint systemis put on the front seat.
� Unless it is unavoidable, do not put a forward–facingchild restraint system on the front seat.

COMFORT ADJUSTMENT
1172001 MY RX300_U (OM48431U)
� A forward–facing child restraint system should beallowed to be put on the front passenger seat onlywhen it is unavoidable. Always move the seat as farback as possible, because the force of the deployingfront passenger airbag could cause death or seriousinjury to the child.
� Do not allow the child to lean over the front door oraround the front door even if the child is seated in achild restraint system. It is dangerous if the sideairbag inflates, and the impact could cause death orserious injury to the child.
� After installing the child restraint system, make sureit is secured in place according to the manufacturer’sinstructions. If it is not restrained securely, it maycause death or serious injury to the child in the eventof a sudden stop or accident.
When not using the child restraint system, keep it secured withthe seat belt or place it somewhere other than in the passengercompartment. This will prevent it from injuring passengers inthe event of a sudden stop or accident.
Types of child restraint system
Child restraint systems are classified into the following 3 typesdepending on the child’s age and size.
(A) Infant seat(B) Convertible seat(C) Booster seat
Install the child restraint system following the instructionsprovided by its manufacturer.
Your vehicle has anchor brackets for securing the top strap ofa child restraint system.
For instructions about how to use the anchor bracket, see“Using a top strap” on page 129.
The child restraint lower anchorages approved for your vehiclemay also be used. See “Installation with the child restraintlower anchorages” on page 132 for instructions.
(A) Infant seat
16R126

COMFORT ADJUSTMENT
118 2001 MY RX300_U (OM48431U)
(B) Convertible seat
16R310
(C) Booster seat
16R311
INSTALLATION WITH 3–POINT TYPE SEAT BELT
(A) Infant seat installation
16R126
An infant seat is used in rear–facing position only.

COMFORT ADJUSTMENT
1192001 MY RX300_U (OM48431U)
16R062a
CAUTION
� Never put a rear–facing child restraint system on thefront passenger seat because the force of the rapidinflation of the front passenger airbag can causedeath or serious injury to the child.
16R291
� If your driving seat position is not satisfactory, installthe child restraint system at another position.

COMFORT ADJUSTMENT
120 2001 MY RX300_U (OM48431U)
16R129
1. Run the lap and shoulder belt through or around the infantseat following the instructions provided by its manufacturerand inserting the tab into the buckle taking care not to twist thebelt. Keep the lap portion of the belt tight.
CAUTION
� After inserting the tab, make sure the tab and buckleare locked and that the lap and shoulder portions ofthe belt are not twisted.
� Do not insert coins, clips, etc. in the buckle as thismay prevent you from properly latching the tab andbuckle.
� If the seat belt does not function normally,immediately contact your Lexus dealer. Do not usethe seat until the seat belt is fixed. It cannot protectyour child from injury.
16R130
2. Fully extend the shoulder belt to put it in the lock mode.When the belt is then retracted even slightly, it cannot beextended.
To hold the infant seat securely, make sure the belt is in the lockmode before letting the belt retract.

COMFORT ADJUSTMENT
1212001 MY RX300_U (OM48431U)
16R131
3. While pressing the infant seat firmly against the seatcushion and seatback, let the shoulder belt retract as far as itwill go to hold the infant seat securely.
16R132
CAUTION
Push and pull the child restraint system in differentdirections to be sure it is secure. Follow all theinstallation instructions provided by its manufacturer.

COMFORT ADJUSTMENT
122 2001 MY RX300_U (OM48431U)
16R133
4. To remove the infant seat, press the buckle–release buttonand allow the belt to retract completely. The belt will movefreely again and be ready to work for an adult or older childpassenger.
(B) Convertible seat installation
16R310
A convertible seat is used in forward–facing or rear–facingposition depending on the child’s age and size. Wheninstalling, follow the manufacturer’s instruction about theapplicable child’s age and size as well as directions forinstalling the child restraint system.

COMFORT ADJUSTMENT
1232001 MY RX300_U (OM48431U)
16R069
CAUTION
� Never put a rear–facing child restraint system on thefront passenger seat because the force of the rapidinflation of the front passenger airbag can causedeath or serious injury to the child.
16R046
�Move seat fully back
� A forward–facing child restraint system should beallowed to be put on the front passenger seat onlywhen it is unavoidable. Always move the seat as farback as possible, because the force of the deployingfront passenger airbag could cause death or seriousinjury to the child.
� Do not allow the child to lean over the front door oraround the front door even if the child is seated in achild restraint system. It is dangerous if the sideairbag inflates, and the impact could cause death orserious injury to the child.

COMFORT ADJUSTMENT
124 2001 MY RX300_U (OM48431U)
16R292
� If your driving seat position is not satisfactory, installthe child restraint system at another position.
16R312
1. Run the lap and shoulder belt through or around theconvertible seat following the instructions provided by itsmanufacturer and inserting the tab into the buckle taking carenot to twist the belt. Keep the lap portion of the belt tight.
CAUTION
� After inserting the tab, make sure the tab and buckleare locked and that the lap and shoulder portions ofthe belt are not twisted.
� Do not insert coins, clips, etc. in the buckle as thismay prevent you from properly latching the tab andbuckle.
� If the seat belt does not function normally,immediately contact your Lexus dealer. Do not usethe seat until the seat belt is fixed. It cannot protectyour child from injury.

COMFORT ADJUSTMENT
1252001 MY RX300_U (OM48431U)
16R313
2. Fully extend the shoulder belt to put it in the lock mode.When the belt is then retracted slightly, it cannot be extended.
To hold the convertible seat securely, make sure the belt is inthe lock mode before letting the belt retract.
16R314
3. While pressing the convertible seat firmly against the seatcushion and seatback, let the shoulder belt retract as far as itwill go to hold the convertible seat securely.
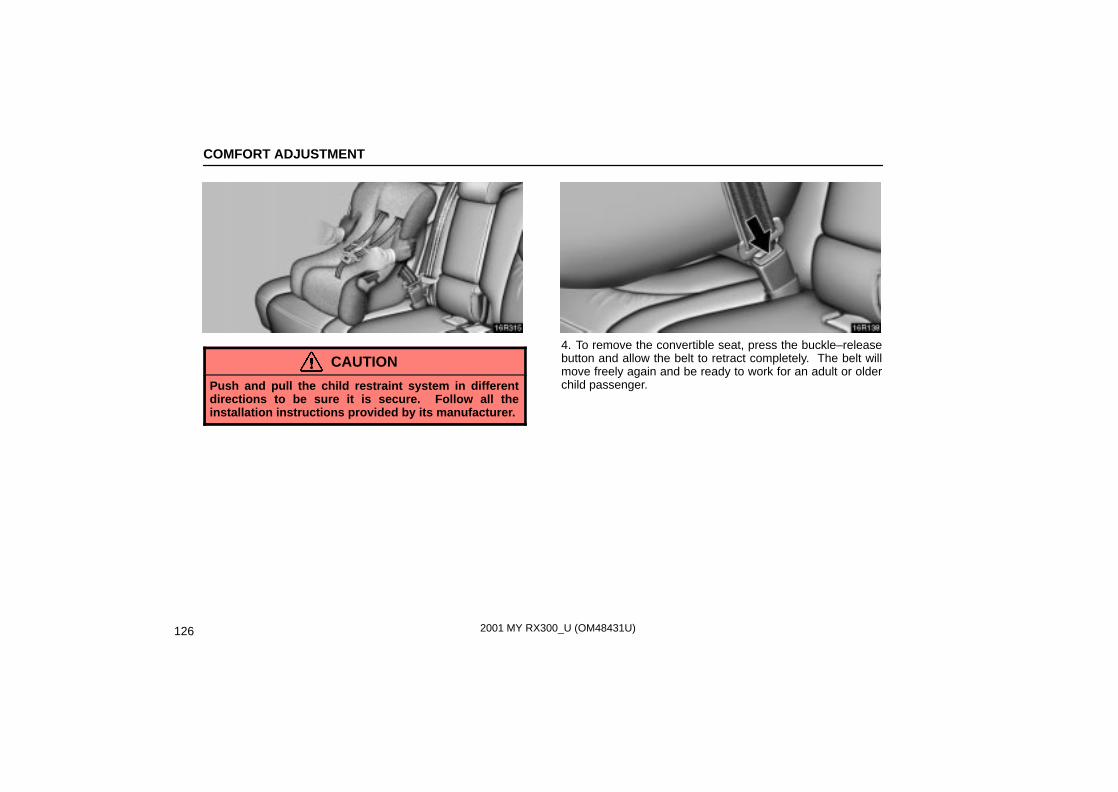
COMFORT ADJUSTMENT
126 2001 MY RX300_U (OM48431U)
16R315
CAUTION
Push and pull the child restraint system in differentdirections to be sure it is secure. Follow all theinstallation instructions provided by its manufacturer.
16R138
4. To remove the convertible seat, press the buckle–releasebutton and allow the belt to retract completely. The belt willmove freely again and be ready to work for an adult or olderchild passenger.

COMFORT ADJUSTMENT
1272001 MY RX300_U (OM48431U)
(C) Booster seat installation
16R139
A booster seat is used in forward–facing position only.
16R052
�Move seat fully back
CAUTION
� A forward–facing child restraint system should beallowed to be put on the front passenger seat onlywhen it is unavoidable. Always move the seat as farback as possible, because the force of the deployingfront passenger airbag could cause death or seriousinjury to the child.
� Do not allow the child to lean over the front door oraround the front door even if the child is seated in achild restraint system. It is dangerous if the sideairbag inflates, and the impact could cause death orserious injury to the child.

COMFORT ADJUSTMENT
128 2001 MY RX300_U (OM48431U)
16R140
1. Sit the child on a booster seat. Run the lap and shoulder beltthrough or around the booster seat and child following theinstructions provided by its manufacturer and insert the tab intothe buckle.
Make sure the shoulder belt is correctly across the child’sshoulder and that the lap belt is positioned as low as possibleon child’s hips. See “Seat belts” on page 95 for details.
CAUTION
� Always make sure the shoulder belt is positionedacross the center of child’s shoulder. The belt shouldbe kept away from child’s neck, but not falling offchild’s shoulder. Failure to do so could reduce theamount of protection in an accident and causeserious injuries in a collision.
� Both high–positioned lap belts and loose–fittingbelts could cause serious injuries due to slidingunder the lap belt during a collision or otherunintended result. Keep the lap belt positioned aslow on a child’s hips as possible.
� For child’s safety, do not place the shoulder beltunder child’s arm.
� After inserting the tab, make sure the tab and buckleare locked and that the lap and shoulder portions ofthe belt are not twisted.
� Do not insert coins, clips, etc. in the buckle as thismay prevent your child from properly latching the taband buckle.
� If the seat belt does not function normally,immediately contact your Lexus dealer. Do not usethe seat until the seat belt is fixed. It cannot protectyour child from injury.

COMFORT ADJUSTMENT
1292001 MY RX300_U (OM48431U)
16R141
2. To remove the child restraint system, press thebuckle–release button and allow the belt to retract.
Using a top strap
16R272
Follow the procedure below for a child restraint systemthat requires the use of a top strap.

COMFORT ADJUSTMENT
130 2001 MY RX300_U (OM48431U)
16R273
� 1 Symbol mark 2 Anchor brackets
Use the anchor bracket on the rear of the seatback to attachthe top strap.
Anchor brackets are installed for outside rear seatingpositions.
This symbol mark indicates the location of user ready anchorbrackets.
16R274
1. Remove the head restraint and open the anchor bracketcover.

COMFORT ADJUSTMENT
1312001 MY RX300_U (OM48431U)
16R275
2. Fix the child restraint system with the seat belt.
Latch the hook onto the anchor bracket and tighten the topstrap.
For instructions to install the child restraint system, see “Childrestraint system” on page 116.
CAUTION
Make sure the top strap is securely latched, and checkthat the child restraint system is securely by pushingand pulling it in different directions. Follow all theinstallation instructions provided by its manufacturer.
16R205
3. Replace the head restraint.
Be sure to close the cover when the anchor bracket is not inuse.

COMFORT ADJUSTMENT
132 2001 MY RX300_U (OM48431U)
Installation with child restraint loweranchorages
16R276
The lower anchorages for the child restraint systeminterfaced with the FMVSS225 specification are installedin the rear seat.
The anchorages are installed in the clearance between theseat cushion and seatback of both outside rear seats.
Child restraint system interfaced with the FMVSS225specification can be fixed with these anchorages. In this case,it is not necessary to fix the child restraint system with a seatbelt on the vehicle.
16R317
�Type A
1. Widen the clearance between the seat cushion andseatback a little and confirm the position of the loweranchorages below the tag in the seatback.
2. Latch the hooks of lower straps onto the anchoragesand tighten the lower straps.

COMFORT ADJUSTMENT
1332001 MY RX300_U (OM48431U)
If your child restraint system has a top strap, it should beanchored. (For the installation of the top strap, see “Using a topstrap” on page 129.)
For the installation details, refer to the instruction manualequipped with each product.
16R318
�Type B
1. Widen the clearance between the seat cushion andseatback a little and confirm the position of the loweranchorages below the tag in the seatback.
2. Latch the buckles onto the anchorages.

COMFORT ADJUSTMENT
134 2001 MY RX300_U (OM48431U)
If your child restraint system has a top strap, it should beanchored. (For the installation of the top strap, see “Using a topstrap” on page 129.)
For the installation details, refer to the instruction manualequipped with each product.
CAUTION
� When using the lower anchorages for the childrestraint system, be sure that there are no irregularobjects around the anchorages or that the seat belt isnot caught.
� Push and pull the child restraint system in differentdirections to be sure it is secure. Follow all theinstallation instructions provided by itsmanufacturer.
� Do not put a child restraint system on the rear seat ifit interferes with the lock mechanism of the frontseats. This can cause severe injury to the child andfront passenger in case of sudden braking or acollision.
DRIVING POSITION MEMORYSYSTEM
The micro computer can memorize the position of the driver’sseat. Two different driving position profiles can be entered intothe computer’s memory.
Recording a driving position in the computer’s memory canonly be done when the ignition key is in the “ON” position andthe selector lever is in the “P” position.
Setting a driving position
16R058a
1. Adjust the driver’s seat to the desired position.
2. While pushing the “SET” button, push button “1” or “2”until the signal beeps.
The beep sound means that the positions are recorded in thecomputer’s memory.

COMFORT ADJUSTMENT
1352001 MY RX300_U (OM48431U)
By repeating these two steps and pressing the remainingbutton, the driving position for another driver can be recorded.
To set a new memorized position, select the desired positionand perform step 2. The previous memory will be erased andthe new position will be set.
To make only slight changes to an already memorized position,the easiest way is to first activate the memorized position, thenmake the desired changes and perform step 2 above.
Activating a memorized position
16R059a
When you push button “1” or “2”, the driving position willbe automatically adjusted to the position recorded for thatbutton.
Conditions for memorized position activation
� Ignition key “ON” and selector lever in “P” position.All parts of the memorized positions can be activated.However, if the brake pedal is being depressed, the seatposition will not change.
� Key not in ignition switch and within 30 seconds of openingdriver’s door.The memorized position can be activated.
If any driving position memory switch is pushed while one ofthe memorized driving position profiles is being activated, theoperation will stop.
To activate the system, push the desired button (“1” or “2”)again.
The driving position memory control system cannot beoperated while the vehicle is moving.
If the vehicle’s battery is disconnected, the computer’smemory will be erased and the memorized positions will haveto be set again.

COMFORT ADJUSTMENT
136 2001 MY RX300_U (OM48431U)
CAUTION
� Do not start the vehicle while the adjustments arebeing made.
� Take care not to select the wrong button, or the seatcould strike the rear passenger or hit your bodyagainst the steering wheel. If this happens, you canstop the movement by pressing another drivingposition memory switch, or depressing the brakepedal.

SECTION 1 – 7
1372001 MY RX300_U (OM48431U)
INSTRUMENTS AND CONTROLSTheft deterrentTheft deterrent system 138. . . . . . . . . . . . . . . . . . . . . . . . . . . . . . . . . . . . Theft prevention labels 140. . . . . . . . . . . . . . . . . . . . . . . . . . . . . . . . . . .

THEFT DETERRENT
138 2001 MY RX300_U (OM48431U)
THEFT DETERRENT SYSTEMTo deter theft of the vehicle, this system is designed togive an alarm if any of the doors or hood is forciblyunlocked or the battery terminal is disconnected and thenreconnected while the vehicle is locked.
The alarm blows the horn intermittently and flashes theheadlights, tail lights and other exterior lights.
17R001a
Setting the system1. Turn the ignition key to the “LOCK” position andremove it.
The indicator light flashes by means of the engine immobilisersystem.
2. Close and lock all the doors and hood using an ignitionkey or wireless remote control.
If you lock them with wireless remote control, the turn signalsflash once.*
NOTE: *The turn signals can be set not to flash. Ask yourLexus dealer for details.
The flashing indicator light will change to stay on when all thedoors and hood are closed and locked.
3. After 30 seconds, the indicator starts flashing and thesystem is set.
Cancelling the systemWhen you unlock any door using an ignition key orwireless remote control, the system is cancelled.
If you unlock any door with wireless remote control, the turnsignals flash twice.*
NOTE: *The turn signals can be set not to flash. Ask yourLexus dealer for details.
Activating the systemThe alarm sounds for 60 seconds if any of the following areoperated:
� Unlocking any door without using an ignition key or wirelessremote control.
� Opening the hood forcibly.
� Reconnecting the battery.

THEFT DETERRENT
1392001 MY RX300_U (OM48431U)
If any door is unlocked and the ignition key is not in the ignitionswitch during the alarm sounding, its door is automaticallylocked.
To stop the alarm: Use either of the following methods.
� Unlock the door using an ignition key or wireless remotecontrol.
� Turn the ignition switch on.
Testing the system1. Open all the windows.
2. Set the system as described above.
The front doors should be locked with the ignition key orwireless remote control. Be sure to wait until the indicator lightstarts flashing.
3. Unlock one of the doors from the inside.
The system should activate the alarm.
4. Unlock any of the doors with a key or the wirelessremote control to cancel the system.
5. Repeat this operation for the other doors and hood.
When testing the hood, also check that the system is activatedwhen the battery terminal is disconnected and thenreconnected.
If the system does not work properly, have it checked by yourLexus dealer.
NOTICE
Disconnecting the battery may result in the erasure ofinformation you have set in the computer memory. Afterreconnecting the battery, check that the memorizeddata has been retained. If it has been erased, input it intothe computer once more.

THEFT DETERRENT
140 2001 MY RX300_U (OM48431U)
THEFT PREVENTION LABELS(U.S.A.ONLY)
17E002
Your new vehicle carries theft prevention labels which areapproximately 56 mm (2.20 in.) by 16 mm (0.63 in.).
The purpose of these labels is to reduce the incidence ofvehicle thefts by facilitating the tracing and recovery of partsfrom stolen vehicles. The label is designed so that once it isapplied to a surface, any attempt to remove it will result indestroying the integrity of the label. Transferring these labelsintact from one part to another will be impossible.
NOTICE
You should not attempt to remove the theft preventionlabels as it may violate certain state or federal laws.

SECTION 2 – 1
1412001 MY RX300_U (OM48431U)
AIR CONDITIONING AND AUDIOAir conditioningAutomatic air conditioning controls . . . . . . . . . . . . . . . . . . . . . . . . . 142
For vehicles equipped with Navigation System,please refer to the separate “Owner’s Manual forNavigation System”.

AIR CONDITIONING
142 2001 MY RX300_U (OM48431U)
AUTOMATIC AIR CONDITIONING CONTROLS
20R001d
�You can adjust the brightness of the display. See page156 for details.
The automatic air conditioning automatically maintainsthe set temperature.
This air conditioning features automatic fan speed and air flowcontrol which automatically selects the most suitable fanspeed and air flow to control the temperature. The ignition keymust be in the “ON” position.
NOTICE
To prevent the battery from being discharged, do notleave the air conditioning on longer than necessarywhen the engine is not running.

AIR CONDITIONING
1432001 MY RX300_U (OM48431U)
1 Temperature display (in degrees Fahrenheit orCentigrade)
2 Fan speed display
3 Air flow display
4 Automatic control button
5 Temperature control knob
6 OFF button
7 Front windshield button
8 Air intake control button
9 Air conditioning on–off button
10 Fan speed control knob
11 Air flow control button

AIR CONDITIONING
144 2001 MY RX300_U (OM48431U)
20R294
�Air flow selection

AIR CONDITIONING
1452001 MY RX300_U (OM48431U)
(a) Climate controlSETTING OPERATION – automatic control
20R003a
1. Push the “AUTO” button.
An indicator light will illuminate to show that the automaticoperation mode has been selected.
Air flow quantity, switching of the diffusers, on–off of the airconditioning and switching of the air intake betweenRECIRCULATED AIR and OUTSIDE AIR are automaticallyadjusted. The operation status is shown by each indicator.
When one of the manual control buttons is depressed whileoperating in automatic mode, the mode relevant to thedepressed button is set. Other conditions continue to beadjusted automatically.
Push the “OFF” button to turn the air conditioning system off.
20R004a
2. Turn the “TEMP” knob until the desired temperature isdisplayed.
The “TEMP” knob is used to set the desired passengercompartment temperature. The temperature of air deliveredto the passenger compartment will be controlled automaticallyaccording to the setting. The figures on the panel indicatedegrees Fahrenheit or Centigrade.
When you adjust the temperature selector knob to maximumcooling, a “MAX. COLD” message will appear on the displayand the air intake mode will be automatically changed toRECIRCULATE AIR mode.

AIR CONDITIONING
146 2001 MY RX300_U (OM48431U)
SETTING OPERATION – manual control
When one of the manual control buttons is depressedwhile operating in automatic mode, the mode relevant tothe depressed button is set. Other conditions continue tobe adjusted automatically.
If manual air flow selection is desired –
20R005b
The outlets from which air is delivered can be selectedmanually by pushing the button. The function of each mode isas follows:
1 Panel – Air flows mainly from the instrument panel vents.
2 Bi–level – Air flows from both the floor vents and theinstrument panel vents.
3 Floor – Air flows mainly from the floor vents. Unheatedair is also delivered through the side vents during heating.
4 Floor/Windshield – Air flows mainly from the floor ventsand windshield vents. Unheated air is also deliveredthrough the side vents during heating.
If quick heating or cooling is desired –
Turn the “TEMP” knob until “MAX. HOT” or “MAX. COLD”appears on the display.
When the “MAX. COLD” is selected, the air intake isautomatically set to RECIRCULATED AIR mode.
If manual fan speed control is desired –
20R006c
� 1 Toward low fan speed 2 Toward high fan speed
The fan speed can be set to your desired speed by turning thefan speed control button. The higher the fan speed is, the moreair is delivered. Pushing the “OFF” button turns off the fan.
To remove exterior windshield frost, use the high speedsetting.

AIR CONDITIONING
1472001 MY RX300_U (OM48431U)
If manual switching of air intake is desired –
20R007a
The air intake control button is used to switch the air intakebetween the OUTSIDE AIR mode and RECIRCULATED AIRmode. The indicator on the switch shows which mode isselected.
� With the indicator on – For RECIRCULATED AIR mode
� With the indicator off – For OUTSIDE AIR mode
For normal use, it is best to keep the setting to OUTSIDE AIRmode. If recirculated air is used during heating, the windowswill fog up more easily.
If the engine coolant temperature becomes extremely high, theRECIRCULATED AIR mode is automatically selected. This isnot a malfunction. When the engine coolant temperature islowered, the previous mode resumes.
To prevent fogging up of the windshield, the air intake modemay change automatically to OUTSIDE AIR mode dependingon the condition of the air conditioning system.
If manual on–off of the air conditioning is desired –
Push the “A/C” button to turn the air conditioning on and pushit again to turn the air conditioning off.
The air conditioning does not work if the outside temperatureis lowered down to around 0�C (32�F).
If the system is used for ventilation, heating in dry weather orremoving frost or exterior fog on the windshield, turn the airconditioning off once it is no longer required. This will improvefuel economy. The air conditioning can be used for year–roundautomatic temperature control including cooling anddehumidifying operation.
If the air conditioning compressor does not operate, theindicator of the “A/C” button will blink. If the indicator of the“A/C” button blinks even when the “A/C” button is pushedagain, have the compressor checked by your nearest Lexusdealer.

AIR CONDITIONING
148 2001 MY RX300_U (OM48431U)
(b) Windshield defogging and defrosting
20R008a
To remove interior fog on the windshield –
Push the “FRONT WINDSHIELD” button.
To remove frost or exterior fog on the windshield –
1. Turn the “TEMP” knob at the maximum temperature.
2. Push the “FRONT WINDSHIELD” button.
3. Turn the “FAN SPEED CONTROL” button to obtain amaximum air flow.
4. Leave the air conditioning on–off button off.
When the “FRONT WINDSHIELD” button is pushed, air flowsmainly from the windshield vents and the OUTSIDE AIR modeis automatically set. This setting clears the front view morequickly.
If you want to return the setting to RECIRCULATED AIR mode,push the air intake control button once again.
Pushing the “FRONT WINDSHIELD” button turns on thedefroster–linked air conditioning. This is to clean up the frontview more quickly.
Pushing the “FRONT WINDSHIELD” button once againreturns the air flow mode to the last one used.
CAUTION
Do not use the “FRONT WINDSHIELD” button duringcooled air operation in extremely humid weather. Thedifference between the temperature of the outside airand that of the windshield could cause the outer surfaceof the windshield to fog up blocking your vision.

AIR CONDITIONING
1492001 MY RX300_U (OM48431U)
(c) Air filterThe air filter may clog after long use and reduce air flow. Youcan inspect the filter easily.
When you inspect and replace the air filter, be sure to turn offthe fan.
20R040b
1. Open the glove box and remove the two covers.
20R041b
2. Take out the air filter.
3. Inspect the lower surface of the filter.
If it is just moderately dusty, it may be cleaned by blowingcompressed air from the lower surface. Do not wash or oil thefilter.
If it is dirty, it should be replaced. To maintain the airconditioning efficiency, replace the air filter according to themaintenance schedule. (For scheduled maintenanceinformation, please refer to the “Owner’s Manual Supplement/ Maintenance Schedule”.)
NOTICE
Do not drive with the air filter removed, or the ef ficiencyof air conditioning may be lost.

AIR CONDITIONING
150 2001 MY RX300_U (OM48431U)
(d) Operating tips� Make sure the air inlet grilles in front of the windshield are
not blocked by leaves or other obstructions.
� If air flow control is not satisfactory, check the dashboardvents. (See “Side vents” and “Rear vents”.)
� To help cool down the interior after parking in the hot sun,drive for the first few minutes with the windows open. Afterthe excess heat has blown away, close the windows.
� When driving on dusty roads, close all windows. If dustthrown up by the vehicle is still drawn into the vehicle afterclosing the windows, it is recommended that the air intakecontrol button be left to the OUTSIDE AIR mode and the fanspeed control button be pressed to anywhere except the“OFF” button.
� If following another vehicle on a dusty road, or driving inwindy and dusty conditions, it is recommended that the airintake control button be temporarily pressed in to theRECIRCULATED AIR mode, which will close off the outsidepassage and prevent outside air and dust from entering thevehicle interior.
Side vents
20R009e
The side vents may be opened or closed as shown.
Rear vents
20R042
The rear vents may be opened or closed as shown.

SECTION 2 – 2
1512001 MY RX300_U (OM48431U)
AIR CONDITIONING AND AUDIOAudioAudio system . . . . . . . . . . . . . . . . . . . . . . . . . . . . . . . . . . . . . . . . . . . . 152
For vehicles equipped with Navigation System,please refer to the separate “Owner’s Manual forNavigation System”.

AUDIO
152 2001 MY RX300_U (OM48431U)
AUDIO SYSTEMQuick reference for your audio system
20R010d
� The “CD” button works only when your Lexus is equipped with an automatic changer.Audio system made in Nakamichi has a “NAKAMICHI” logo on the panel.

AUDIO
1532001 MY RX300_U (OM48431U)
1 Function buttons
1 – 6: Station selector buttons(See page 159 for details.)
SCAN: Scan tuning(See page 160 for details.)
P·SCAN: Preset scan tuning(See page 160 for details.)
2 Display of functions in TAPE mode
� � : Side change(See page 162 for details.)
: DOLBY NR(See page 161 for details.)
��: Rewinding or Fast forwarding��: (See page 162 for details.)
RPT: Automatic repeat(See page 162 for details.)
SKIP: Automatic skip of blank portions of tape(See page 162 for details.)
2 Display of functions in CD mode
: Disc selection(See page 166 for details.)
��: Reversing or Fast forwarding��: (See page 168 for details.)
RPT: Automatic repeat(See page 168 for details.)
RAND: Random access(See page 169 for details.)
SCAN: Scan selection(See page 167 for details.)
D·SCAN: Disc scan selection(See page 167 for details.)
3 Turning the system on and adjusting volume (See page 154 for details.)
4 Stopping and ejecting a cassette tape(See page 161 for details.)
5 Radio mode: Frequency tuning(See page 158 or 160 for details.)
TAPE mode: Direct access to a desired program(See page 163 for details.)
CD mode: Direct access to a desired program(See page 168 for details.)
6 Mode selectors(See page 155 for details.)
7 Cassette tape slot(See page 161 for details.)
8 Brightness button:Adjusting brightness of display(See page 156 for details.)
9 Mute button(See page 154 for details.)
10 Sound control knob(See page 156 for details.)

AUDIO
154 2001 MY RX300_U (OM48431U)
Using your audio system: some basicsThis section describes some of the basic features of the Lexusaudio system. Some information may not pertain to yoursystem.
Your audio system works when the ignition key is in the “ACC”or “ON” position.
NOTICE
To prevent the battery from being discharged, do notleave the car audio on longer than necessary when theengine is not running.
(a) Turning the system on and off
20R011
Push this knob to turn the audio system on and off. Turnthis knob to adjust the volume.
The system turns on in the last mode used.
20R043a
Push the “MUTE” button to decrease the volumemomentarily.
To return to its original volume, push the same button again.
When the audio system is turned on, the mute is always offregardless of the previous mode.

AUDIO
1552001 MY RX300_U (OM48431U)
20R012b
Push “AM”, “FM1/2”, “TAPE” or “CD” to turn on thatmode. The selected mode turns on directly.
Push these buttons if you want to switch from one mode toanother.
If the tape or disc is not set, the cassette player or compact discplayer does not turn on.
You can turn off the cassette player by ejecting the cassettetape. If the audio system was previously off, then the entireaudio system will be turned off when you eject the cassettetape. If another function was previously playing, it will come onagain.
20R057
The applicable functions are shown in the lowest part ofthe display. Push the switch just below to turn on eachfunction.

AUDIO
156 2001 MY RX300_U (OM48431U)
(b) Brightness buttons
20R044
� 1 Darken 2 Brighten
The buttons adjust the brightness of the display. Eachtime you push the button on the “ ”side, the displaybecomes bright. Each time you push the button on the “ ”side, the display becomes dark.
(c) Tone and balance
How good an audio program sounds to you is largelydetermined by the mix of the treble, mid–range, and basslevels. In fact, different kinds of music and vocal programsusually sound better with different mixes of treble, mid–range,and bass.
A good balance of the left and right stereo channels and of thefront and rear sound levels is also important.
Keep in mind that if you are listening to a stereo recording orbroadcast, changing the right/left balance will increase thevolume of one group of sounds while decreasing the volumeof another.
20R014a
Each time you push the “SOUND CONTROL” knob, thedisplay changes as in the following. To adjust the toneand balance, turn the knob.
BAS: Adjusts low–pitched tones.
MId: Adjusts mid–pitched tones.
TRE: Adjusts high–pitched tones.
FAd: Adjusts the sound balance between the front and rearspeakers.
BAL: Adjusts the sound balance between the right and leftspeakers.

AUDIO
1572001 MY RX300_U (OM48431U)
(d) Your radio antenna
The antenna automatically extends when the radio and ignitionare turned on and retracts when either is turned off.
CAUTION
Before extending the antenna, confirm that no one isclose enough to get injured.
NOTICE
� To prevent damage to the antenna, make sure it isretracted before driving your vehicle through anautomatic car wash.
� When cleaning the inside of the left quarter window,be careful not to scratch or damage the wire antenna.
� Putting a window tint (especially, conductive ormetallic type) on the left quarter window may affectthe reception of radio or mobile telephone. For theinstallation of the window tint, consult with yourLexus dealer.
(e) Your cassette player
When you insert a cassette, the exposed tape should be to theright.
NOTICE
Do not oil any part of the cassette player, and do notinsert anything except a cassette tape into the slot.

AUDIO
158 2001 MY RX300_U (OM48431U)
(f) Your automatic changer
20R015b
If your Lexus is equipped with an automatic changer, it can playselected discs or continuously play all the discs set in themagazine.
NOTICE
Never try to disassemble or oil any part of the compactdisc player. Do not insert anything except a compactdisc into the magazine.
The player is intended for use with 12 cm (4.7 in.) discs only.
Radio operation
(a) Listening to the radio
20R016b
Push these buttons to choose either an AM or FM station.
“AM”, “FM1” or “FM2” appears on the display.

AUDIO
1592001 MY RX300_U (OM48431U)
20R017a
Push this button on the right side to step up the stationband or on the left side to step down.
Your radio automatically changes to stereo reception when astereo broadcast is received. “ST” appears on the display. Ifthe signal becomes weak, the radio reduces the amount ofchannel separation to prevent the weak signal from creatingnoise. If the signal becomes extremely weak, the radioswitches from stereo to mono reception. In this case, “ST”disappears from the display.
(b) Presetting a station
20R018a
1. Tune in the desired station.
2. Push one of the station selector buttons ( 1–6 ) and holdit until a beep is heard. This sets the station to the buttonand the button number ( 1–6 ) appears on the display.
Each button can store one AM station and two FM stations. Tochange the preset station to a different one, follow the sameprocedure.
The preset station memory is cancelled when the powersource is interrupted by battery disconnection or a blown fuse.

AUDIO
160 2001 MY RX300_U (OM48431U)
(c) Selecting a station
Your Lexus has an electronic tuning radio (ETR). Tune in thedesired station using one of the following methods.
20R019a
Preset tuning: Push the button ( 1–6 ) for the station you wantbriefly. The button number ( 1–6 ) and station frequencyappear on the display.
Manual tuning: Push the “TUNE SEEK” button briefly. Eachtime you push the button, the radio will step up or down toanother frequency.
Seek tuning: Push the “TUNE SEEK” button and hold it untilyou hear a beep. The radio will begin seeking up or down fora station of the nearest frequency and will stop on reception.Each time you push the button, the stations will be searchedout one after another.
20R020b
To scan all the frequencies: Push the “SCAN” button.“SCAN” appears on the display. The radio will find the nextstation up the band, stay there for a few seconds, and thenscan again. To select a station, push the “SCAN” button asecond time.
To scan the preset stations: Push the “P·SCAN” button.“P·SCAN” appears on the display. The radio will tune in thenext preset station up the band, stay there for a few seconds,and then move to the next preset station. To select a station,push the “P·SCAN” button a second time.

AUDIO
1612001 MY RX300_U (OM48431U)
Cassette tape player operation
(a) Playing a cassette tape
20R289
When you insert a cassette tape, the exposed tape shouldbe to the right.
The player will automatically start when you insert a cassettetape. At this time, “TAPE” appears on the display.
If a metal or chrome equivalent cassette tape is put in thecassette player, the player will automatically adapt to it and“METAL” appears on the display.
To stop or eject the cassette tape, push the “EJECT” button.
Auto–reverse feature: After the cassette player reaches theend of a tape, it automatically reverses and begins to play theother side, regardless of whether the cassette was playing orfast forwarding.
20R022a
If a cassette is already in the slot, push the “TAPE” button.
Dolby� Noise Reduction* feature: If you are listening to atape that was recorded with Dolby* B or C Noise Reduction,push the button by the double–D symbol until the appropriatesymbol appears on the display.
The Dolby B NR mode reduces tape noise by about 10 dB. TheDolby C NR mode reduces tape noise by another 10 dB orabout 20 dB total. For best sound reproduction, select thesame NR mode that was used to record the tape.
To play a tape recorded without Dolby NR, push the button untilthe symbol disappears from the display.
* Dolby noise reduction manufactured under license from DolbyLaboratories Licensing Corporation. “DOLBY” and the double–Dsymbol are trademarks of Dolby Laboratories Licensing
Corporation.

AUDIO
162 2001 MY RX300_U (OM48431U)
(b) Manual program selection
20R023a
“Program” button: Push the “ � � ” button to select theother side of a cassette tape. The display indicates which sideis currently selected (� indicates top side, � indicates bottomside).
“Rewind” button: Push the “�� ” button to rewind a tape.“REW” appears on the display.
To stop rewinding, push the same button or “TAPE” button.
“Fast forward” button: Push the “��” button to fast forwarda cassette tape. “FF” appears on the display.
To stop fast forwarding, push the same button or “TAPE”button.
(c) Automatic program selection
20R290
“RPT” button: The repeat feature automatically replays thecurrent program.
Push the “RPT” button while the program is playing. When theprogram ends, it will automatically be rewound and replayed.Push the button again to turn off the repeat feature.
There must be at least 4 seconds of blank space betweenprograms for the repeat feature to work correctly.
“SKIP” button: The skip feature allows you to fast forwardpast long stretches of blank tape. This is especially useful atthe end of cassettes.
Push the “SKIP” button. The player will automatically skip anyblank portions of 15 seconds or more and play the nextprogram. To cancel it, push the button once again.

AUDIO
1632001 MY RX300_U (OM48431U)
20R026a
“Automatic program selection” button: The automaticprogram selection feature allows you to program your cassetteplayer to skip forward or backward to locate the song you wantto hear. You can skip up to nine programs at a time.
Push this button on the right side to skip forward. “FF” and thenumber will appear on the display. Push the button until thenumber you want to skip appears on the display. After that, theplayer will automatically skip forward.
When the end of the tape is reached, the player automaticallyreverses sides and resumes normal play.
Push this button on the left side to skip backward. Push thebutton until “REW” and the number you want to skip appear onthe display.
� If you set “REW 1”, the player will rewind to the beginningof the current program.
� When counting the number of programs you want to rewind,remember to count the current program as well. Forexample, if you want to rewind to a song that is two beforethe song you are listening to, push this button until “REW3” appears on the display.
When the beginning of the tape is reached, the playerautomatically resumes normal play.
There must be at least 3 seconds of blank space betweenprograms for this feature to work correctly.
“RPT”, “SKIP” or “Automatic program selection”features: These features may not work well with some spokenword, live or classical recordings.

AUDIO
164 2001 MY RX300_U (OM48431U)
Compact disc player operationThe compact disc player is an optional accessory that yourvehicle is pre–wired to accept. Although your audio systemhas a “CD” button, your vehicle may or may not be equippedwith a CD player. Please contact your dealer for additionaldetails if you would like to have the optional CD playerinstalled.
(a) Inserting compact discs
20R027
1. Pull the lever and open the glove box door.
20R045
2. Push this button to eject the magazine.
20L021
3. Pull out the tray while pushing the lock release button.

AUDIO
1652001 MY RX300_U (OM48431U)
20L022
4. Put a disc on the tray with its label face down and pushthe tray back into the magazine.
20R031b
5. Insert the magazine into the player as indicated by thearrow head on the magazine and close the glove box door.
When the magazine is set completely, the system will be in a“Load” cycle for approximately 20 seconds while the systemsearches for discs in the magazine. Upon completion of thiscycle, the CD unit will be ready to play. If the “CD” button ispushed during the “Load” cycle, “LOAD” appears on thedisplay until the system has completed the load cycle, afterwhich the system will begin normal play.
CAUTION
To reduce the chance of injury in case of an accident ora sudden stop, always keep the glove box door closedwhile driving.

AUDIO
166 2001 MY RX300_U (OM48431U)
(b) Playing a compact disc
20R032b
Push the “CD” button if the magazine is already loaded inthe player.
“CD” appears on the display.
The discs set in the magazine are played continuously, startingwith disc number 1. The disc number of the disc currentlybeing played, the track number and the time from thebeginning of the program appear on the display.
When play of one disc ends, the first track of the following discstarts. When play of the final disc ends, play of the first discstarts again.
The player will skip any empty disc trays.
(c) Selecting a desired disc
20R033a
Push the “DISC” button to select the disc number.
Push the button several times until the desired disc numberappears on the display. When you release the button, theplayer will start playing the selected disc from the first track.

AUDIO
1672001 MY RX300_U (OM48431U)
(d) Searching for a desired track
20R034a
Push the “SCAN” button.
“SCAN” will appear on the display. The compact disc playerwill play the next track for 10 seconds, then scan again. Toselect a track, push the “SCAN” button a second time. If theplayer reaches the end of the disc, it will continue scanning attrack 1.
After all the tracks are scanned in one pass, normal playresumes.
(e) Searching for a desired disc
20R035a
Push the “D·SCAN” button.
With “D·SCAN” on the display, the program at the beginning ofeach disc will be played for 10 seconds. To continue listeningto the program of your choice, push the “D·SCAN” button asecond time.
After all the discs in the magazine are scanned in one pass, thescan function is cancelled.

AUDIO
168 2001 MY RX300_U (OM48431U)
(f) Selecting a desired track
20R036b
“TRACK” button: Use for direct access to a desired track.
Push either side of the “TRACK” button several times until thedesired track number appears on the display. As you releasethe button, the player will start playing the selected track fromthe beginning.
“Fast forward” button.
Push the “��” button and hold it to fast forward the disc.When you release the button, the compact disc player willresume playing from that position.
“Reverse” button.
Push the “��” button and hold it to reverse the disc. Whenyou release the button, the compact disc player will resumeplaying.
(g) Repeating a track or a disc
20R037a
“RPT” button: There are 2 repeat features — you can eitherreplay a disc track or a whole compact disc.
Repeating a track: Push the “RPT” button briefly while thetrack is playing. “RPT” will appear on the display. When thetrack ends, it will automatically be replayed. This process willbe continued until you push the button again to turn off therepeat feature.
Repeating a disc: Push the “RPT” button until you hear abeep. “D·RPT” will appear on the display. The player willrepeat all the tracks on the disc you are listening to. When thedisc ends, the player will automatically go back to the top trackof the disc and replay. This process will be continued until youpush the button again to turn off the repeat feature.

AUDIO
1692001 MY RX300_U (OM48431U)
(h) Random playing
20R038b
“RAND” button: There are 2 random features — you caneither listen to the tracks on all the compact discs in themagazine in random order, or only listen to the tracks on aspecific compact disc in random order.
Random playing for the tracks on a disc: Push the “RAND”button briefly. “RAND” will appear on the display and play thedisc you are listening to in random order.
Random playing for all the tacks in the magazine: Push the“RAND” button until you hear a beep. “D·RAND” will appearon the display and the player will perform all the tracks on allthe discs in the magazine in random order. To turn off therandom feature, push “RAND” a second time.
When a track is skipped or the system is inoperative, push thebutton to reset.
(i) If the player malfunctions
If “WAIT” appears on the display, audio signals of the disccannot be read or the system has trouble. Push the “CD”button once again.
If the player does not operate, check that the disc surface is notsoiled or damaged. If the disc is O.K., the following causes arepossible.
� Condensation may have occurred on the internalmechanism of the automatic changer. Open the cover to letthe air circulate.
� The temperature of the player’s internal mechanism israised because of high external temperature. Remove themagazine from the player to cool it.
If the player still does not operate, take it to your Lexus dealer.
Car audio system operating hints
NOTICE
To ensure the correct audio system operation:
� Be careful not to spill beverages over the audiosystem.
� Do not put anything other than a cassette tape or CDmagazine into the cassette tape slot or CD changer.
� The use of cellular phone inside or near the vehiclemay cause a noise from the speakers of the audiosystem which you are listening to. However, thisdoes not indicate a malfunction.

AUDIO
170 2001 MY RX300_U (OM48431U)
Radio reception
Usually, the problem with radio reception does not mean thereis a problem with your radio – it is just the normal result ofconditions outside the vehicle.
For example, nearby buildings and terrain can interfere withFM reception. Power lines or telephone wires can interferewith AM signals. And of course, radio signals have a limitedrange. The farther you are from a station, the weaker its signalwill be. In addition, reception conditions change constantly asyour vehicle moves.
Here are some common reception problems that probably donot indicate a problem with your radio:
FM
Fading and drifting stations – Generally, the effective rangeof FM is about 40 km (25 miles). Once outside this range, youmay notice fading and drifting, which increase with thedistance from the radio transmitter. They are oftenaccompanied by distortion.
Multi–path – FM signals are reflective, making it possible fortwo signals to reach your antenna at the same time. If thishappens, the signals will cancel each other out, causing amomentary flutter or loss of reception.
Static and fluttering – These occur when signals are blockedby buildings, trees, or other large objects. Increasing the basslevel may reduce static and fluttering.
Station swapping – If the FM signal you are listening to isinterrupted or weakened, and there is another strong stationnearby on the FM band, your radio may tune in the secondstation until the original signal can be picked up again.
AM
Fading – AM broadcasts are reflected by the upperatmosphere – especially at night. These reflected signals caninterfere with those received directly from the radio station,causing the radio station to sound alternately strong and weak.
Station interference – When a reflected signal and a signalreceived directly from a radio station are very nearly the samefrequency, they can interfere with each other, making it difficultto hear the broadcast.
Static – AM is easily affected by external sources of electricalnoise, such as high tension power lines, lightening, or electricalmotors. This results in static.
Caring for your cassette player and tapes
For the best performance for your cassette player and tapes:
Clean the tape head and other parts regularly.
� A dirty tape head or tape path can decrease sound qualityand tangle your cassette tapes. The easiest way to cleanthem is by using a cleaning tape. (A wet type isrecommended.)

AUDIO
1712001 MY RX300_U (OM48431U)
Use high–quality cassettes:
� Low–quality cassette tapes can cause many problems,including poor sound, inconsistent playing speed, andconstant auto–reversing. They can also get stuck ortangled in the cassette player.
� Do not use a cassette if it has been damaged or tangled orif its label is peeling off.
� Do not leave a cassette in the player if you are not listeningto it, especially if it is hot outside.
� Store cassettes in their cases and out of direct sunlight.
� Avoid using cassettes with a total playing time longer than100 minutes (50 minutes per side). The tape used in thesecassette is thin and could get stuck or tangled in thecassette player.
Caring for your compact disc player and discs
20L037
� Use only compact discs labeled as shown above. CD–R(CD–Recordable), CD–RW (CD–Re–writable) andpersonal computer use CD–ROMs may not be playable onyour compact disc player.
� Your compact disc player is intended for use with 12 cm (4.7in.) discs only.
� Extremely high temperature can keep your compact discplayer from working. On hot days, use air conditioning tocool the vehicle interior before you listen to a disc.
� Bumpy roads or other vibrations may make your compactdisc player skip.
� If moisture gets into your compact disc player, you may nothear any sound even though your compact disc playerappears to be working. Remove the magazine from theplayer and wait until it dries.

AUDIO
172 2001 MY RX300_U (OM48431U)
ss22072
Your automatic changer cannot play special shaped orlow–quality compact discs such as those shown here. Do notuse them as the changer could be damaged.
20L038
�Correct �Wrong
� Handle compact discs carefully, especially when you setthem into the magazine. Hold them on the edge and do notbend them. Avoid getting fingerprints on them, particularlyon the shiny side.
� Dirt, scrapes, warping, pin holes, or other disc damagecould cause the player to skip or to repeat a section of atrack. (To see a pin hole, hold the disc up to the light.)

AUDIO
1732001 MY RX300_U (OM48431U)
20L039
To clean a compact disc: Wipe it with a soft, lint–free cloththat has been dampened with water. Wipe in a straight linefrom the center to the edge of the disc (not in a circle). Do notuse a conventional record cleaner or anti–static device.
CAUTION
Compact disc players use an invisible laser beam whichcould cause hazardous radiation exposure if directedoutside the unit. Be sure to operate the player correctly.

AUDIO
174 2001 MY RX300_U (OM48431U)

SECTION 3 – 1
1752001 MY RX300_U (OM48431U)
STARTING AND DRIVINGStarting and drivingThree–way catalytic converter 176. . . . . . . . . . . . . . . . . . . . . . . . . . . . . Engine exhaust caution 177. . . . . . . . . . . . . . . . . . . . . . . . . . . . . . . . . . . Before starting the engine 177. . . . . . . . . . . . . . . . . . . . . . . . . . . . . . . . . Ignition switch with steering lock 178. . . . . . . . . . . . . . . . . . . . . . . . . . . Parking brake 179. . . . . . . . . . . . . . . . . . . . . . . . . . . . . . . . . . . . . . . . . . . How to start the engine 179. . . . . . . . . . . . . . . . . . . . . . . . . . . . . . . . . . . Automatic transmission 180. . . . . . . . . . . . . . . . . . . . . . . . . . . . . . . . . . . Cruise control 188. . . . . . . . . . . . . . . . . . . . . . . . . . . . . . . . . . . . . . . . . . . Traction control system . . . . . . . . . . . . . . . . . . . . . . . . . . . . . . . 191,193Vehicle skid control system 194. . . . . . . . . . . . . . . . . . . . . . . . . . . . . . . . Brake system 197. . . . . . . . . . . . . . . . . . . . . . . . . . . . . . . . . . . . . . . . . . . Brake pad wear limit indicators 201. . . . . . . . . . . . . . . . . . . . . . . . . . . . Limited–slip differentials 201. . . . . . . . . . . . . . . . . . . . . . . . . . . . . . . . . . Types of tires 202. . . . . . . . . . . . . . . . . . . . . . . . . . . . . . . . . . . . . . . . . . . .

STARTING AND DRIVING
176 2001 MY RX300_U (OM48431U)
THREE–WAY CATALYTICCONVERTER
31R077
Three–way catalytic converters are emission controldevices installed in the exhaust system.
It looks somewhat like a muffler, but its purpose is to reducepollutants in the exhaust gas.
CAUTION
� Keep people and combustible materials away fromthe exhaust pipe while the engine is running. Theexhaust gas is very hot.
� Do not drive, idle or park your vehicle over anythingthat might burn easily such as grass, leaves, paper orrags.
NOTICE
A large amount of unburned gases flowing into thethree–way catalytic converter may cause it to overheatand create a fire hazard. To prevent this and otherdamage, observe the following precautions:
� Use only unleaded gasoline.
� Do not drive with an extremely low fuel level; runningout of fuel could cause the engine to misfire, creatingan excessive load on the three–way catalyticconverter.
� Do not allow the engine to run at idle speed for morethan 20 minutes.
� Avoid racing the engine.
� Do not push–start or pull–start your vehicle.
� Do not turn off the ignition while the vehicle ismoving.
� Keep your engine in good running order.Malfunctions in the engine electrical system,electronic ignition system or fuel system could causean extremely high three–way catalytic convertertemperature.
� If the engine becomes difficult to start or stallsfrequently, take your vehicle in for a check–up assoon as possible. Remember, your Lexus dealerknows your vehicle and its three–way catalyticconverter system best.

STARTING AND DRIVING
1772001 MY RX300_U (OM48431U)
� To ensure that the three–way catalytic converter andthe entire emission control system operate properly,your vehicle must receive the periodic inspectionsrequired by the Lexus Maintenance Schedule. Forscheduled maintenance information, refer to the“Owner’s Manual Supplement / MaintenanceSchedule”.
ENGINE EXHAUST CAUTION
CAUTION
� Avoid inhaling the engine exhaust. It containscarbon monoxide, which is a colorless and odorlessgas. It can cause unconsciousness or even death.
� Make sure the exhaust system has no holes or looseconnections. The system should be checked fromtime to time. If you hit something, or notice a changein the sound of the exhaust, have the system checkedimmediately.
� Do not run the engine in a garage or enclosed areaexcept for the time needed to drive the vehicle in orout. The exhaust gases cannot escape, making thisa particularly dangerous situation.
� Do not remain for a long time in a parked vehicle withthe engine running. If it is unavoidable, however, doso only in an unconfined area and adjust the heatingor cooling system to force outside air into the vehicle.
� Keep the back door closed while driving. An open orunsealed back door may cause exhaust gases to bedrawn into the vehicle.
� To allow proper operation of your vehicle’sventilation system, keep the inlet grilles in front of thewindshield clear of snow, leaves, or otherobstructions.
� If you smell exhaust fumes in the vehicle, drive withthe windows open and the back door closed. Havethe cause immediately located and corrected.
BEFORE STARTING THE ENGINE1. Check the area around the vehicle before entering it.
2. Adjust seat position, seatback angle, head restraint heightand steering wheel angle.
3. Adjust the inside and outside rear view mirrors.
4. Lock all doors.
5. Fasten seat belts.
Remember to check that the service reminder indicatorsfunction when turning the key to “ON”, and check the fuelgauge to see that you have sufficient fuel.

STARTING AND DRIVING
178 2001 MY RX300_U (OM48431U)
IGNITION SWITCH WITH STEERINGLOCK
31R080
“START” – Starter motor on. The key will return to the“ON” position when released.
For starting tips, see page 179.
“ON” – Engine on and all accessories on.
This is the normal driving position.
NOTICE
Do not leave the key in the “ON” position if the engineis not running. The battery will discharge and theelectronic ignition system could be damaged.
“ACC” – Accessories such as the radio operate, but theengine is off.
If you leave the key in the “ACC” or “LOCK” position and openthe driver’s door, a buzzer will remind you to remove the key.*
NOTE: *The volume or interval of beep sound can bechanged. Ask your Lexus dealer for details.
31R081
“LOCK” – Engine is off and the steering wheel is locked.The ignition key can be removed only at this position.
You must push in the key to turn it from “ACC” to the “LOCK”position. The selector lever must be put in the “P” positionbefore turning the key to the “LOCK” position.
Once you remove the key, the engine immobiliser system isautomatically set. See “Engine immobiliser system” on page11.
When starting the engine, the key may seem stuck at the“LOCK” position. To free it, first be sure the key is pushed allthe way in, and then rock the steering wheel slightly whileturning the key gently.
If, in an emergency, you must turn the engine off while thevehicle is moving, turn the key only to “ACC”.

STARTING AND DRIVING
1792001 MY RX300_U (OM48431U)
PARKING BRAKE
31R004
To set: Hold the regular brake pedal down with your rightfoot. Push down the parking brake pedal with your leftfoot.
To release: Hold the regular brake pedal down with yourright foot and push the parking brake pedal with your leftfoot. When you lift your left foot, the parking brake pedalwill follow it to the released position.
Before leaving your vehicle, firmly apply the parking brake.
CAUTION
Before driving, make sure the parking brake is fullyreleased and that the parking brake reminder light is off.
HOW TO START THE ENGINE
Before cranking1. Apply the parking brake firmly.
2. Turn off unnecessary lights and accessories.
3. Put the selector lever in “P”. If you need to restart the enginewhile the vehicle is moving, put the selector lever in “N”. Astarter safety device will prevent the starter from operating ifthe selector lever is in any drive position.
4. Depress the brake pedal and hold it to the floor until drivingoff.
Starting the engineBefore starting the engine, be sure to follow the instructions in“Before cranking”.
Normal starting procedure
The multiport fuel injection system/sequential multiport fuelinjection system in your engine automatically controls theproper air–fuel mixture for starting. You can start a cold or hotengine as follows:
1. With your foot off the accelerator pedal, crank the engine byturning the key to “START”. Release it when the engine starts.
2. After the engine runs for about 10 seconds, you are readyto drive.

With the brake pedal depressed, shiftwhile holding the lock release buttonin. (The ignition switch must be in the“ON” position.)
Shift while holding the lock releasebutton in.
Shift normally.
STARTING AND DRIVING
180 2001 MY RX300_U (OM48431U)
If the weather is below freezing, let the engine warm up for afew minutes before driving. Do not leave the vehicle while theengine is warming up.
If the engine stalls ...
Simply restart it, using the correct procedure given in normalstarting.
If the engine will not start
See “If your vehicle will not start” on page 222.
NOTICE
� Do not crank for more than 30 seconds at a time. Thismay overheat the starter and wiring systems.
� Do not race a cold engine.
� If the engine becomes difficult to start or stallsfrequently, have the engine checked immediately.
AUTOMATIC TRANSMISSIONYour automatic transmission has a shift lock system tominimize the possibility of incorrect operation. Thismeans you can only shift out of “P” position when thebrake pedal is depressed (with the ignition switch in “ON”position and the lock release button pressed in). ( �)
30R041
1 Lock release button

STARTING AND DRIVING
1812001 MY RX300_U (OM48431U)
2 Overdrive switch
For selecting either a three–speed or four–speedtransmission.
When the cruise control is being used, even if youdownshift the transmission by pushing and releasing theoverdrive switch, engine braking will not be enabledbecause the cruise control is not cancelled. For ways todecrease the vehicle speed, see page 190.
3 Shift position indicator
The shift position is also displayed on the instrumentcluster.
P: Parking, engine starting and key removal position
R: Reverse position
N: Neutral position
D: Normal driving position (with overdrive on)
2: Stronger engine braking
L: Maximum engine braking
Correct use of the automatic transmission is explained inthe following parts.
(a) Overdrive switch(b) Normal driving(c) Using engine braking(d) Using the “2” and “L” positions(e) Backing up(f) Parking(g) Good driving practice
(h) Rocking your vehicle if stuck
(i) If you cannot shift the selector lever out of “P” position
(j) Driving in “Snow” mode

STARTING AND DRIVING
182 2001 MY RX300_U (OM48431U)
(a) Overdrive switch
31R042
You can select either a third gear (with overdrive off) or fourthgear (with overdrive on) by pushing this switch.
To turn the overdrive off, push the switch. The “O/D OFF”indicator light should come on. To turn the overdrive on again,push the switch again. The “O/D OFF” indicator light shouldgo off.
Always drive your vehicle with the overdrive on for better fueleconomy and quieter driving.
If the engine is turned off when the overdrive is off andrestarted, the overdrive will automatically be on.
When the cruise control is being used, even if you downshiftthe transmission by pushing and releasing the overdriveswitch, engine braking will not be enabled because the cruisecontrol is not cancelled.
For ways to decrease the vehicle speed, see page 190.
(b) Normal driving
31R043
� 1 “P” (Park) position 2 “N” (Neutral) position
1. Start the engine as instructed in “How to start theengine” on page 179.
The transmission must be in “P” or “N”. The engine will not startin “R”, “2”, “L” or “D” position even if the ignition key is turnedto “START”.
The driving pattern is automatically set to “Normal” mode whenthe engine is started. You can select the driving pattern either“Normal” or “Snow” mode to suit your driving condition.
2. For starting your vehicle in sand, mud, ice or snow, setthe “Snow” mode. For details, see “(j) Driving in “Snow”mode” on page 187.

STARTING AND DRIVING
1832001 MY RX300_U (OM48431U)
31R044
� 1 Brake pedal 2 “D” (Drive) position
3. With your foot holding down the brake pedal, shift theselector lever to “D”.
CAUTION
Never put your foot on the accelerator pedal whileshifting.
4. Release the parking brake and brake pedal. Depressthe accelerator pedal slowly for smooth starting.
The vehicle will start in the first gear and automatically shift tothe most suitable gear for the running conditions, such as thevehicle speed, hill climbing, hard towing, etc. However, whilethe engine coolant temperature is low and the vehicle istraveling at low speed, the transmission will not shift into theoverdrive gear even with the overdrive on.
When the lever is in the “D” position, the automatictransmission system will select the most suitable gear for therunning conditions such as hill climbing, hard towing, etc.
If you need to accelerate rapidly while driving, push theaccelerator pedal all the way to the floor. The transmission willautomatically downshift to third, second or first gear, accordingto the vehicle speed.
If engine braking is needed, such as in descending a long hill,see “(c) Using engine braking”.

STARTING AND DRIVING
184 2001 MY RX300_U (OM48431U)
(c) Using engine braking
31R045
To use the braking power of the engine, downshift thetransmission in the way described below:
1 Push the overdrive switch. (This is effective only whenyou are driving in the “D” position.) The “O/D OFF”indicator light in the instrument cluster will come on andthe transmission will downshift to third gear.
When the cruise control is being used, even if youdownshift the transmission by pushing and releasing theoverdrive switch, engine braking will not be enabledbecause the cruise control is not cancelled. If you needto decrease the vehicle speed, see page 190.
2 Shift into the “2” position. The transmission will downshiftto second gear when the vehicle speed drops down to orlower than the following speed, and stronger enginebraking will be enabled.
Two–wheel drive models 113 km/h (70 mph)
Four–wheel drive models 106 km/h (65 mph)
3 Shift into the “L” position. The transmission will downshiftto first gear when the vehicle speed drops down to orlower than the following speed, and maximum enginebraking will be enabled.
Two–wheel drive models 51 km/h (31 mph)
Four–wheel drive models 48 km/h (29 mph)
CAUTION
Be careful when downshifting on a slippery surface.The abrupt change in engine speed could cause thevehicle to spin or skid.

STARTING AND DRIVING
1852001 MY RX300_U (OM48431U)
(d) Using the “2” and “L” positionsThe “2” and “L” positions are used for strong engine braking asdescribed previously.
With the selector lever in “2” or “L”, you can start the vehicle inmotion as with the lever in “D”.
With the selector lever in “2”, the vehicle will start in first gearand automatically shift to second gear.
With the selector lever in “L”, the transmission is engaged infirst gear.
NOTICE
� Be careful not to over–rev the engine. Watch thetachometer to keep engine rpm from going into thered zone. The approximate maximum allowablespeed for each position is given below for yourreference.
Two–wheel drive models:“2” 125 km/h (78 mph). . . . . . . . . “L” 70 km/h (43 mph). . . . . . . . . .
Four–wheel drive models:“2” 117 km/h (73 mph). . . . . . . . . “L” 65 km/h (40 mph). . . . . . . . . .
� Do not continue hill climbing or hard towing for a longtime in the “2” or “L” position. This may cause severeautomatic transmission damage from overheating.To prevent such damage, “D” position should beused in hill climbing or hard towing.
(e) Backing up
31R046
� 1 Brake pedal 2 “R” (Reverse) position
1. Bring the vehicle to a complete stop.
2. With the brake pedal held down with your foot, shift theselector lever to the “R” position.
NOTICE
Never shift into reverse while the vehicle is moving.

STARTING AND DRIVING
186 2001 MY RX300_U (OM48431U)
(f) Parking
31R047
� 1 Brake pedal 2 Parking brake pedal 3 “P” (Park) position
1. Bring the vehicle to a complete stop.
2. Depress the parking brake fully to securely apply theparking brake.
3. With the brake pedal held down with your foot, shift theselector lever to the “P” position.
CAUTION
While the vehicle is moving, never attempt to move theselector lever into “P” under any circumstances.Serious mechanical damage and loss of vehicle controlmay result.
(g) Good driving practice� If the transmission repeatedly shifts up and down between
the third and overdrive gears when climbing a gentle slope,the overdrive should be turned off. Be sure to turn the switchon immediately after climbing the slope.
� When towing a trailer, in order to maintain efficient enginebraking and electrical charging performance, do not useoverdrive.
CAUTION
Always keep your foot on the brake pedal while stoppedwith the engine running. This prevents the vehicle fromcreeping.
NOTICE
Do not hold the vehicle on an upgrade with theaccelerator pedal. This can cause the transmission tooverheat. Alw ays use the brake pedal or parking brake.

STARTING AND DRIVING
1872001 MY RX300_U (OM48431U)
(h) Rocking your vehicle if stuck
CAUTION
If your vehicle becomes stuck in snow, mud, sand, etc.,then you may attempt to rock the vehicle free by movingit forward and backward. Do not attempt this procedureif people or objects are anywhere near the vehicle.During the rocking operation the vehicle may suddenlymove forward or backward as it becomes un–stuck,causing injury or damage to nearby people or objects.
NOTICE
If you rock your vehicle, observe the followingprecautions to prevent damage to the transmission andother parts.
� Do not depress the accelerator pedal while shiftingthe selector lever or before the transmission iscompletely shifted to forward or reverse gear.
� Do not race the engine and avoid spinning thewheels.
� If your vehicle remains stuck after rocking the vehicleseveral times, consider other ways such as towing.
(i) If you cannot shift the selector lever outof “P” position
If you cannot shift the selector lever from “P” position eventhough the brake pedal is depressed, use the shift lockoverride button. For instructions, see “If you cannot shiftautomatic transmission selector lever” on page 242.
(j) Driving in “Snow” mode
31R048
In the “Snow” mode, the transmission system shifts upfrom the second gear.
To set the driving pattern to the “Snow” mode, push the “Snow”switch. In the “ECT SNOW” indicator on the instrument clusteris on.
To cancel the “Snow” mode, push the “Snow” switch again.The “ECT SNOW” indicator light on the instrument cluster willgo off when the “Snow” mode is cancelled.
If the engine is turned off with the “Snow” mode is on, the“Snow” mode is cancelled when the engine is restarted.

STARTING AND DRIVING
188 2001 MY RX300_U (OM48431U)
CRUISE CONTROLThe cruise control allows you to cruise the vehicle at adesired s peed over 40 km/h (25 mph) with your foot off theaccelerator pedal.
Your cruising speed can be maintained although a slight speedchange may occur when driving up or down a gradient, withinthe limits of engine performance. On steeper hills, a greatspeed change will occur so it is better to drive without the cruisecontrol.
CAUTION
� To help maintain maximum control of your vehicle,do not use the cruise control when driving in heavyor varying traffic, or on slippery (rainy, icy orsnow–covered) or winding roads.
� Avoid vehicle speed increases when drivingdownhill. If the vehicle speed is too fast in relation tothe cruise control set speed, cancel the cruisecontrol then downshift the transmission to useengine braking to slow down.
Turning on the system
31R012b
To operate the cruise control, push the main switch. This turnsthe system on. The indicator light in the instrument clustershows that you can now set your desired cruising speed.Another push on the switch will turn the system completely off.
When the ignition key is turned off, the main switch is alsoautomatically turned off. To use the cruise control again, pushthe main switch again to turn it on.
CAUTION
To avoid accidental cruise control engagement, keepthe main switch off when not using the cruise control.

STARTING AND DRIVING
1892001 MY RX300_U (OM48431U)
Setting operation
31R013b
�Each function is described below.
1 Setting at a desired speed.
The transmission must be in “D” before you set the cruisecontrol speed.
Bring the vehicle to the desired speed, press the control leverdownward in the “SET/COAST” direction and release it. Thissets the vehicle at that speed. Now you may take your foot offthe accelerator pedal. If you need acceleration – for example,when passing – depress the accelerator pedal enough for thevehicle to exceed the set speed. When you release theaccelerator pedal, the vehicle will return to the speed set priorto the acceleration.
2 Cancelling the preset speed
You can cancel the preset speed by either of the following:
a. Pulling the control lever in the “CANCEL” direction.
b. Depressing the brake pedal.
If the vehicle speed falls below about 40 km/h (25 mph), thepreset speed will be automatically cancelled.
If the vehicle speed drops 16 km/h (10 mph) below the presetspeed, the preset speed will also automatically be cancelled.
If the preset speed automatically cancels out for other thanthese reasons, have your vehicle checked by your Lexusdealer at the earliest opportunity.
3 Resetting to a faster speed
Press the control lever upward in the “RES/ACC” direction andhold it. Release the lever when the desired speed is attained.While the lever is held upward, the vehicle will gradually gainspeed.
When the difference between the actual vehicle speed and theset speed is less than 5 km/h (3 mph), the set speed can beincreased 1.6 km/h (1 mph) each time by pressing the controllever upward in the “RES/ACC” direction quickly.
However, a quicker way to reset is to accelerate the vehicleand then press the control lever downward in the“SET/COAST” direction.

STARTING AND DRIVING
190 2001 MY RX300_U (OM48431U)
4 Resetting to a slower speed
Press the control lever downward in the “SET/COAST”direction and hold it. Release the lever when the desiredspeed is attained. While the lever is held downward, thevehicle speed will gradually decrease.
When the difference between the actual vehicle speed and theset speed is less than 5 km/h (3 mph), the set speed can belowered 1.6 km/h (1 mph) each time by pressing the controllever downward in the “SET/COAST” direction quickly.
However, a quicker way to reset is to depress the brake pedaland then press the control lever downward in the“SET/COAST” direction.
Even if you turn off the overdrive switch with the cruise controlon, engine braking will not be applied because the cruisecontrol is not cancelled. To decrease the vehicle speed, resetto a slower speed with the cruise control lever or depress thebrake pedal. If you use the brake pedal, cruise control iscancelled.
5 Resuming the preset speed
If the preset speed is cancelled by pulling the control lever orby depressing the brake pedal, pushing the lever up in the“RES/ACC” direction will restore the speed set prior tocancellation. However, once the vehicle speed falls belowabout 40 km/h (25 mph), the preset speed will not be resumed.
Cruise control failure warningIf the “CRUISE” indicator light in the instrument cluster flasheswhen using the cruise control, push the main switch to turn thesystem off and then push it again to turn it on.
If any of the following conditions then occurs, there is sometrouble in the cruise control system.
� The indicator light does not come on.
� The indicator light flashes again.
� The indicator light goes out after it comes on.
If this is the case, contact your Lexus dealer and have yourLexus inspected.

STARTING AND DRIVING
1912001 MY RX300_U (OM48431U)
TRACTION CONTROL SYSTEM(Two–wheel drive models)
The traction control system automatically helps controlthe spinning of the front wheels which may occur whenaccelerating on slippery road surfaces, thus assistingdriver to control the driving power of the front wheels.
31R015a
�Slip indicator light
When you turn the ignition switch on, this system alwaysturns on. Leave the system on during ordinary driving sothat it can operate when needed. When traction control isapplied, the slip indicator light blinks.
31R016d
You can turn off the traction control system by pushingthe “TRAC OFF” switch. The “TRAC OFF”indicator/warning light will then come on. Pushing the“TRAC OFF” switch a second time turns the system backon and extinguishes the “TRAC OFF” indicator/warninglight.
You may hear a sound in the engine compartment for a fewseconds when the engine is started or just after the vehicle isstarted. This means that the traction control system is in theself–check mode, and does not indicate malfunction.
When the traction control system is operating, you may feelvibration or noise of your vehicle, caused by operation of thebrakes. This indicates the system is functioning properly.
When getting the vehicle out of mud or new snow, etc., thetraction control system will help operate to prevent the wheelsfrom spinning.

STARTING AND DRIVING
192 2001 MY RX300_U (OM48431U)
Traction control system failure warning
31R054
These lights warn that there is a problem somewhere in thevehicle skid control system, traction control system or brakeassist system.
The lights will come on when the ignition key is turned to “ON”,and will go off after a few seconds.
If the “VSC” warning light and “TRAC OFF” indicator/warninglight come on, the vehicle skid control system, traction controlsystem and brake assist system do not work. However, asconventional braking operates when applied, there is noproblem to continue your driving.
If any of the following conditions occurs, this indicates amalfunction somewhere in the parts monitored by the warninglight system. Contact your Lexus dealer as soon as possibleto service the vehicle:
� The “VSC” warning light and “TRAC OFF” indicator/warninglight do not come on after the ignition is turned to on.
� The “VSC” warning light and “TRAC OFF” indicator/warninglight remain on after the ignition is turned to on.
� The “VSC” warning light and “TRAC OFF” indicator/warninglight come on while driving without pushing “TRAC OFF”switch.
CAUTION
Under certain slippery road conditions, full traction ofthe vehicle and power to the front wheels cannot bemaintained, even though the traction control system isin operation. Do not drive the vehicle under any speedor maneuvering conditions which will cause the vehicleto lose traction. In situations where the road surface iscovered with ice or snow, your vehicle should be fittedwith snow tires or tire chains. Always drive at anappropriate and cautious pace.

STARTING AND DRIVING
1932001 MY RX300_U (OM48431U)
TRACTION CONTROL SYSTEM(Four–wheel drive modes)
The traction control system automatically helps controlthe spinning of 4 wheels which may occur whenaccelerating on slippery road surfaces, thus assistingdriver to control the driving power of 4 wheels.
31R015a
�Slip indicator light
When you turn the ignition switch on, this system alwaysturns on. Leave the system on during ordinary driving sothat it can operate when needed. When traction control isapplied, the slip indicator light blinks.
You may hear a sound in the engine compartment for a fewseconds when the engine is started or just after the vehicle isstarted. This means that the traction control system is in theself–check mode, and does not indicate malfunction.
When the traction control system is operating, you may feelvibration or noise of your vehicle, caused by operation of thebrakes. This indicates the system is functioning properly.
When getting the vehicle out of mud or new snow, etc. thetraction control system will help operate to prevent the wheelsfrom spinning.
Traction control system failure warning
31R055
This light warns that there is a problem somewhere in thevehicle skid control system, traction control system or brakeassist system.
The light will come on when the ignition key is turned to “ON”,and will go off after a few seconds.
If the “VSC” warning light comes on, the vehicle skid controlsystem, traction control system and brake assist system do notwork. However, as conventional braking operates whenapplied, there is no problem to continue your driving.

STARTING AND DRIVING
194 2001 MY RX300_U (OM48431U)
If any of the following conditions occurs, this indicates amalfunction somewhere in the parts monitored by the warninglight system. Contact your Lexus dealer as soon as possibleto service the vehicle:
� The “VSC” warning light does not come on after the ignitionis turned to on.
� The “VSC” warning light remains on after the ignition isturned to on.
� The “VSC” warning light comes on while driving.
CAUTION
Under certain slippery road conditions, full traction ofthe vehicle and power to the 4 wheels cannot bemaintained, even though the traction control system isin operation. Do not drive the vehicle under any speedor maneuvering conditions which will cause the vehicleto lose traction. In situations where the road surface iscovered with ice or snow, your vehicle should be fittedwith snow tires or tire chains. Always drive at anappropriate and cautious pace.
VEHICLE SKID CONTROL SYSTEMThe vehicle skid control system provides comprehensivecontrol of the systems such as an anti–lock brake system,brake assist system, traction control, engine control, etc.This system automatically controls the output of thebrakes or engine to help prevent the vehicle from skiddingwhen cornering on a slippery road surface or abruptsteering wheel operation occurs.
31R015a
�Slip indicator light
If the vehicle is going to skid during driving, the slip indicatorlight flashes and an alarm sounds intermittently.
The vehicle skid control activates when the vehicle speed isabout more than 15 km/h (9 mph).

STARTING AND DRIVING
1952001 MY RX300_U (OM48431U)
You may hear a sound in the engine compartment for a fewseconds when the engine is started or just after the vehicle isstarted. This means that the vehicle skid control is in theself–check mode and does not indicate a malfunction.
When you turn the ignition switch on, this system always turnson.
Vehicle skid control system failure warning(Two–wheel drive models)
31R054
These lights warn that there is a problem somewhere in thevehicle skid control system, traction control system or brakeassist system.
The lights will come on when the ignition key is turned to “ON”,and will go off after a few seconds.
If the “VSC” warning light and “TRAC OFF” indicator/warninglight come on, the vehicle skid control system, traction controlsystem and brake assist system do not work. However, asconventional braking operates when applied, there is noproblem to continue your driving.

STARTING AND DRIVING
196 2001 MY RX300_U (OM48431U)
If any of the following conditions occurs, this indicates amalfunction somewhere in the parts monitored by the warninglight system. Contact your Lexus dealer as soon as possibleto service the vehicle:
� The “VSC” warning light and “TRAC OFF” indicator/warninglight do not come on after the ignition is turned to on.
� The “VSC” warning light and “TRAC OFF” indicator/warninglight remain on after the ignition is turned to on.
� The “VSC” warning light and “TRAC OFF” indicator/warninglight come on while driving.
CAUTION
� Do not rely excessively on the vehicle skid controlsystem. Even if the vehicle skid control system isoperating, it is not that your vehicle is absolutelysafe. Reckless driving will result in an unexpectedaccident. Always keep safety driving in mind. If theslip indicator light flashes, sounding an alarm,special care should be taken while driving.
� Only use tires of specified size. The size,manufacturer, brand and tread pattern for all 4 tiresshould be the same. If you use the tires other thanspecified, or different type or size, the vehicle skidcontrol system may not function correctly. Whenreplacing the tires or wheels, contact your Lexusdealer.
Vehicle skid control system failure warning(Four–wheel drive models)
31R055
This light warns that there is a problem somewhere in thevehicle skid control system, traction control system or brakeassist system.
The light will come on when the ignition key is turned to “ON”,and will go off after a few seconds.
If the “VSC” warning light comes on, the vehicle skid controlsystem, traction control system and brake assist system do notwork. However, as conventional braking operates whenapplied, there is no problem to continue your driving.
If any of the following conditions occurs, this indicates amalfunction somewhere in the parts monitored by the warninglight system. Contact your Lexus dealer as soon as possibleto service the vehicle:
� The “VSC” warning light does not come on after the ignitionis turned to on.

STARTING AND DRIVING
1972001 MY RX300_U (OM48431U)
� The “VSC” warning light remains on after the ignition isturned to on.
� The “VSC” warning light comes on while driving.
CAUTION
� Do not rely excessively on the vehicle skid controlsystem. Even if the vehicle skid control system isoperating, it is not that your vehicle is absolutelysafe. Reckless driving will result in an unexpectedaccident. Always keep safety driving in mind. If theslip indicator light flashes, sounding an alarm,special care should be taken while driving.
� Only use tires of specified size. The size,manufacturer, brand and tread pattern for all 4 tiresshould be the same. If you use the tires other thanspecified, or different type or size, the vehicle skidcontrol system may not function correctly. Whenreplacing the tires or wheels, contact your Lexusdealer.
BRAKE SYSTEMThe tandem master cylinder brake system is a hydraulicsystem with two separate sub–systems. If either sub–systemshould fail, the other will still work. However, the pedal will beharder to press, and your stopping distance will be longer.Also, the brake system warning light may come on.
CAUTION
Do not drive your vehicle with only a single brakesystem. Have your brakes fixed immediately.
Brake boosterThe brake booster uses engine vacuum to power–assist thebrakes. If the engine should quit while you are driving, you canbring the vehicle to a stop with normal pedal pressure. Thereis enough reserved vacuum for one or two stops but no more!
CAUTION
� Do not pump the brake pedal if the engine stalls.Each push on the pedal uses up your reservedvacuum.
� Even if the power assist is completely lost, the brakeswill still work. But you will have to push the pedalhard, much harder than normal. And your brakingdistance will be longer.

STARTING AND DRIVING
198 2001 MY RX300_U (OM48431U)
Anti–lock brake systemThe anti–lock brake system is designed to help preventlock–up of the wheels during a su dden braking or brakingon slippery road surfaces. This assists in providingdirectional stability and steering performance of thevehicle under these circumstances.
Effective way to press the ABS brake pedal: When theanti–lock brake system function is in action, you may feel thebrake pedal pulsating and hear a noise. In this situation, tolet the anti–lock brake system work for you, just hold thebrake pedal down more firmly. Do not pump the brake in apanic stop. This will result in reduced braking performance.
The anti–lock brake system becomes operative after thevehicle has accelerated to a speed in excess of approximately10 km/h (6 mph). It stops operating when the vehicledecelerates to a speed below approximately 5 km/h (3 mph).
Depressing the brake pedal on slippery road surfaces such ason the manhole cover, the steel plate under the construction,joints in the bridge, etc. on a rainy day tends to activate theanti–lock brake system.
You may hear a click or motor sound in the enginecompartment for a few seconds when the engine is started orjust after the vehicle is started. This means that the anti–lockbrake system is in the self–check mode, and does not indicatea malfunction.
When the anti–lock brake system is activated, thefollowing conditions may occur. They do not indicate amalfunction of the system:
� You may hear the anti–lock brake system operating and feelthe brake pedal pulsating and the vibrations of the vehiclebody and steering wheel. You may also hear the motorsound in the engine compartment even after the vehicle isstopped.
� At the end of the anti–lock brake system activation, thebrake pedal may move a little forward.
CAUTION
Do not overestimate the anti–lock brake system:Although the anti–lock brake system assists inproviding vehicle control, it is still important to drivewith all due care and maintain a moderate speed andsafe distance from the vehicle in front of you, becausethere are limits to the vehicle stability and effectivenessof steering wheel operation even with the anti–lockbrake system on.
If tires grip performance exceeds its capability, or ifhydroplaning occurs during high speed driving in therain, the anti–lock brake system does not providevehicle control.

STARTING AND DRIVING
1992001 MY RX300_U (OM48431U)
Anti–lock brake system is not designed to shorten thestopping distance: Always drive at the moderate speedand maintain a safe distance from the vehicle in front ofyou. Compared with vehicles without an anti–lockbrake system, your vehicle may require a longerstopping distance in the following cases:
� Driving on rough, gravel or snow–covered roads.
� Driving with tire chains installed.
� Driving over the steps such as the joints on the road.
� Driving on roads where the road surface is pitted orhas other differences in surface height.
Install all 4 tires of specified size at appropriatepressure: The anti–lock brake system detects vehiclespeeds using the speed sensors for respective wheels’turning speeds. The use of tires other than specifiedmay fail to detect the accurate turning speed resultingin a longer stopping distance.
“ABS” warning light
31R017a
The light comes on when the ignition key is turned to the “ON”position. If the anti–lock brake system and the brake assistsystem work properly, the light turns off after a few seconds.Thereafter, if either of the systems malfunctions, the lightcomes on again.
When the “ABS” warning light is on (and the brake systemwarning light is off), the anti–lock brake system, the brakeassist system, the traction control system and the vehicle skidcontrol system do not operate, but the brake system stilloperates conventionally.
When the “ABS” warning light is on (and the brake systemwarning light is off), the anti–lock brake system does notoperate so that the wheels could lock up during a suddenbraking or braking on slippery road surfaces.

STARTING AND DRIVING
200 2001 MY RX300_U (OM48431U)
If either of the following conditions occurs, this indicatesa malfunction somewhere in the parts monitored by thewarning light system. Contact your Lexus dealer as soonas possible to service the vehicle.
� The light does not come on when the ignition key is turnedto the “ON” position, or remains on.
� The light comes on while you are driving.
A warning light turning on briefly during operation does notindicate a problem.
Drum–in–disc type parking brake systemYour vehicle has a drum–in–disc type parking brake system.This type of brake system needs bedding–down of the brakeshoes periodically or whenever the parking brake shoesand/or drums are replaced.
Have your Lexus dealer perform the bedding–down.
Brake assist systemWhen you slam the brakes on, the brake assist systemjudges as an emergency stop and provides more powerfulbraking for a driver who cannot hold down the brake pedalfirmly.
When you slam the brakes on, more powerful braking will beapplied. At this time, you may hear a sound in the enginecompartment and feel the vibrations of the brake pedal. Thisdoes not indicate a malfunction.
The brake assist system becomes operative after the vehiclehas accelerated to a speed in excess of approximately 10 km/h(6 mph). It stops operating when the vehicle decelerates to aspeed below approximately 5 km/h (3 mph).
For an explanation of this system’s warning light, see “ABSwarning light” on page 45 and “Vehicle skid control systemfailure warning” on page 195,196.

STARTING AND DRIVING
2012001 MY RX300_U (OM48431U)
BRAKE PAD WEAR LIMITINDICATORS
31R018a
The brake pad wear limit indicators on your disc brakesgive a warning noise when the brake pads are worn to theextent that replacement is required.
If you hear a squealing or scraping noise while driving, havethe brake pads checked and replaced by your Lexus dealer assoon as possible. Expensive rotor damage can result if thepads are not replaced when needed.
LIMITED–SLIP DIFFERENTIALS(Four–wheel drive models only)
Your Lexus is equipped with a limited–slip center differential(transfer) and some models are equipped with a limited–sliprear differential as optional.
If one wheel – either front or rear – begins to spin, the transfer(limited–slip center differential) is designed to aid traction byautomatically transmitting driving force to the wheels on theother drive axle. It transmits driving force to the front wheelsif a rear wheel spins, and to the rear wheels if a front wheelspins.
Four–wheel drive models with limited–slip rear differential: Ifone rear wheel begins to spin, the limited–slip rear differentialis designed to aid traction by automatically transmitting drivingforce to the other rear wheel. If you are not sure whether yourvehicle is equipped with a limited–slip rear differential, you canask your Lexus dealer.
CAUTION
Do not start or run the engine while your vehicle issupported by a j ack. The vehicle could be driven off thejack and could pose a danger or result in serious injury.

STARTING AND DRIVING
202 2001 MY RX300_U (OM48431U)
NOTICE
Use only a spare tire of the same size, construction andload capacity as the original tires on your Lexusbecause damage to the limited–slip differential couldpossibly occur with another tire type.
TYPES OF TIRESDetermine what kind of tires your vehicle is originally equippedwith.
1. Summer tiresSummer tires are high–speed capability tires best suited tohighway driving under dry conditions.
Since summer tires do not have the same traction performanceas snow tires, summer tires are inadequate for driving onsnow–covered or icy roads. For driving on snow–covered oricy roads, we recommend using snow tires. If installing snowtires, be sure to replace all four tires.
2. All season tiresAll season tires are designed to provide better traction in snowand to be adequate for driving in most winter conditions, as wellas for use all year round.
All season tires, however, do not have adequate tractionperformance compared with snow tires in heavy or loose snow.Also, all season tires fall short in acceleration and handlingperformance compared with summer tires in highway driving.
CAUTION
� Do not mix summer and all season tires on yourvehicle as this can cause dangerous handlingcharacteristics, resulting in loss of control.
� Do not use tires other than the manufacturer’sdesignated tires, and never mix tires or wheels of thesizes different from the originals.

SECTION 3 – 2
2032001 MY RX300_U (OM48431U)
STARTING AND DRIVINGDriving tipsOff–road vehicle precautions 204. . . . . . . . . . . . . . . . . . . . . . . . . . . . . . Break–in period 205. . . . . . . . . . . . . . . . . . . . . . . . . . . . . . . . . . . . . . . . . . Operation in foreign countries 205. . . . . . . . . . . . . . . . . . . . . . . . . . . . . Tips for driving in various conditionss 205. . . . . . . . . . . . . . . . . . . . . . . Off–road driving precautions 206. . . . . . . . . . . . . . . . . . . . . . . . . . . . . . . Winter driving tips 208. . . . . . . . . . . . . . . . . . . . . . . . . . . . . . . . . . . . . . . . Dinghy towing 209. . . . . . . . . . . . . . . . . . . . . . . . . . . . . . . . . . . . . . . . . . . Trailer towing 211. . . . . . . . . . . . . . . . . . . . . . . . . . . . . . . . . . . . . . . . . . . . How to save fuel and make your vehicle last longer 219. . . . . . . . . .

DRIVING TIPS
204 2001 MY RX300_U (OM48431U)
OFF–ROAD VEHICLEPRECAUTIONS
32R001
This vehicle belongs to the utility vehicle class, which hashigher ground clearance and narrower tread in relation tothe height of its center of gravity to make it capable ofperforming in a wide variety of off–road applications.Specific design characteristics give it a higher center ofgravity than ordinary passenger cars. This vehicle designfeature causes this type of vehicle to be more likely torollover. And, utility vehicles have a significantly higherrollover rate than other types of vehicles. An advantageof the higher ground clearance is a better view of the roadallowing you to anticipate problems. It is not designed forcornering at the same speeds as ordinary passenger carsany more than low–slung sports cars designed to performsatisfactorily under off–road conditions. Therefore,sharp turns at excessive speeds may cause rollover.
CAUTION
Always observe the following precautions to minimizethe risk of serious personal injury or damage to yourvehicle:
� In a rollover crash, an unbelted person issignificantly more likely to die t han a person wearinga seat belt. Therefore, the driver and all passengersshould fasten their seat belts whenever the vehicle ismoving.
� Avoid sharp turns or abrupt maneuvers, if at allpossible. Failure to operate this vehicle correctlymay result in loss of control or vehicle rollovercausing death or serious injury.
� Avoid loading any items on the roof that will raise thevehicle’s center of gravity.
� Always slow down in gusty crosswinds. Because ofits profile and higher center of gravity, your vehicle ismore sensitive to side winds than an ordinarypassenger car. Slowing down will allow you to havebetter control.

DRIVING TIPS
2052001 MY RX300_U (OM48431U)
� When driving off–road or in rugged terrain, do notdrive at excessive speeds, jump, make sharp turns,strike objects, etc. This may cause loss of control orvehicle rollover causing death or serious injury. Youare also risking expensive damage to your vehicle’ssuspension and chassis.
� Do not drive horizontally across steep slopes.Driving straight up or straight down is preferred.Your vehicle (or any similar off–road vehicle) can tipover sideways much more easily than forward orbackward.
BREAK–IN PERIODDrive gently and avoid high speeds.
You need not follow a break–in schedule with your new Lexus.But following a few simple tips for the first 1600 km (1000 miles)can add to the future economy and long life of your vehicle:
� Do not drive over 88 km/h (55 mph).
� Avoid over–revving. Maintain engine speed between 2000and 4000 rpm.
� Avoid full–throttle starts.
� Try to avoid hard stops during the first 300 km (200 miles).
� Do not drive for a long time at any single speed, either fastor slow.
� Do not tow a trailer during the first 800 km (500 miles).
OPERATION IN FOREIGNCOUNTRIES
If you plan to drive your Lexus in another country ...
First, comply with the vehicle registration laws.
Second, confirm the availability of the correct fuel (unleadedand minimum octane rating).
TIPS FOR DRIVING IN VARIOUSCONDITIONS
� Always slow down in gusty crosswinds. This will allow youmuch better control.
� Drive slowly onto curbs and, if possible, at a right angle.Avoid driving onto high, sharp–edged objects and otherroad hazards. Failure to do so can lead to severe tiredamage resulting in tire bursts.
� When parking on a hill, turn the front wheels until they touchthe curb so that the vehicle will not roll. Apply the parkingbrake, and place the transmission in “P”. If necessary, blockthe wheels.
� Washing your vehicle or driving through deep water may getthe brakes wet. To see whether they are wet, check thatthere is no traffic near you and then press the pedal lightly.If you do not feel a normal braking force, the brakes areprobably wet. To dry them, drive the vehicle cautiously whilelightly pressing the brake pedal with the parking brakeapplied. If they still do not work safely, pull to the side of theroad and call a Lexus dealer for assistance.

DRIVING TIPS
206 2001 MY RX300_U (OM48431U)
CAUTION
� Before driving off, make sure the parking brake isfully released and that the parking brake reminderlight is off.
� Do not leave your vehicle unattended while theengine is running.
� Do not rest your foot on the brake pedal while driving.It can cause dangerous overheating, needless wear,and poor fuel economy.
� To drive down a long or steep hill, reduce your speedand downshift. Remember, if you ride the brakesexcessively, they may overheat and not workproperly. See page 184.
� Be careful when accelerating, upshifting,downshifting or braking on a slippery surface. Theabrupt change in engine speed, such as suddenacceleration or engine braking, could cause thevehicle to spin or skid.
� Do not drive in excess of the speed limit. Even if thelegal speed limit permits it, do not drive over 140 km/h(85 mph) unless your vehicle has high–speedcapability tires. Driving over 140 km/h (85 mph) mayresult in tire failure, loss of control and possibleinjury. Be sure to consult a tire dealer to determinewhether the tires on your vehicle are high–speedcapability tires or not before driving at such speeds.
� Do not continue normal driving when the brakes arewet. If they are wet, your vehicle will require a longerstopping distance, and it may pull to one side whenthe brakes are applied. Also, the parking brake willnot hold the vehicle securely.
OFF–ROAD DRIVINGPRECAUTIONS
When driving your vehicle off–road, please observe thefollowing precautions to ensure your driving enjoyment and tohelp prevent the closure of areas to off–road vehicles.
a. Drive your vehicle only in areas where off–road vehicles arepermitted to travel.
b. Respect private property. Get owner’s permission beforeentering private property.
c. Do not enter areas that are closed. Honor gates, barriersand signs that restrict travel.
d. Stay on established roads. When conditions are wet,driving techniques should be changed or travel delayed toprevent damage to roads.
For owners in U.S. mainland, Hawaii and Puerto Rico:
To obtain additional information pertaining to driving yourvehicle off–road, consult the following organizations.

DRIVING TIPS
2072001 MY RX300_U (OM48431U)
� State and Local Parks and Recreation Departments
� State Motor Vehicle Bureau
� Recreational Vehicle Clubs
� U.S. Forest Service and Bureau of Land Management
CAUTION
Always observe the following precautions to minimizethe risk of serious personal injury or damage to yourvehicle:
� Drive carefully when off the road. Do not takeunnecessary risks by driving in dangerous places.
� Do not grip the steering wheel spokes when drivingoff–road. A bad bump could jerk the wheel and injureyour hands. Keep both hands and especially yourthumbs on the outside of the rim.
� Always check your brakes for effectivenessimmediately after driving in sand, mud, water orsnow.
� After driving through tall grass, mud, rock, sand,rivers, etc., check that there is no grass, bush, paper,rags, stone, sand, etc. adhering or trapped on theunderbody. Clear off any such matter from theunderbody. If the vehicle is used with these materialstrapped or adhering to the underbody, a breakdownor fire could occur.
� In a rollover crash, an unbelted person issignificantly more likely to die than a person wearinga seat belt. Therefore, the driver and all passengersshould fasten their seat belts whenever the vehicle ismoving.
� When driving off–road or in rugged terrain, do notdrive at excessive speeds, jump, make sharp turns,strike objects, etc. This may cause loss of control orvehicle rollover causing death or serious injury. Youare also risking expensive damage to your vehicle’ssuspension and chassis.
NOTICE
� If driving through water, such as when crossingshallow streams, first check the depth of the waterand the bottom of the river bed for firmness. Driveslowly and avoid deep water.
� Take all necessary safety measures to ensure thatwater damage to the engine or other componentsdoes not occur.
Water entering the engine air intake will cause severeengine damage.
Water can wash the grease from wheel bearings,causing rusting and premature failure, and may alsoenter the differentials, transmission and transfercase, reducing the gear oil’s lubricating qualities.

DRIVING TIPS
208 2001 MY RX300_U (OM48431U)
� Sand and mud that has accumulated in brake drumsand around brake discs may affect braking ef ficiencyand may damage brake system components.
� Always perform a maintenance inspection after eachday of off–road driving that has taken you throughrough terrain, sand, mud, or water. For scheduledmaintenance information, refer to the “Owner’sManual Supplement / Maintenance Schedule”.
WINTER DRIVING TIPSMake sure you have a proper freeze protection of enginecoolant.
Your coolant must contain ethylene–glycol type coolant for aproper corrosion protection of aluminum components. Use“Toyota Long Life Coolant” or equivalent. See “Checking theengine coolant level” on page 270 for instructions.
NOTICE
Do not use alcohol type antifreeze or plain water alone.
When it is extremely cold, we recommend to use 60% solutionfor your Lexus, to provide protection down to about –50�C(–58�F). Do not use more than 70% solution for better coolantperformance.
Check the condition of the battery and cables.
Cold temperatures reduce the capacity of any battery, so itmust be in top shape to provide enough power for winterstarting. Page 291 tells you how to visually inspect the battery.Your Lexus dealer and most service stations will be pleased tocheck the battery charge level.
Make sure the engine oil viscosity is suitable for the coldweather.
See page 269 for recommended viscosity. Leaving a heavysummer oil in your vehicle during winter months may causeharder starting. If you are not sure about which oil to use, callyour Lexus dealer – they will be pleased to help.
Check the electronic ignition system for looseconnections or obvious damage.
Keep the door locks from freezing.
Squirt lock de–icer or glycerine into the locks to keep them fromfreezing.
Use a washer fluid containing an antifreeze solution.
This product is available at your Lexus dealer and most autoparts stores. Follow the manufacturer’s directions for howmuch to mix with water.
NOTICE
Do not use engine antifreeze or any other substitutebecause it may damage your vehicle’s paint.

DRIVING TIPS
2092001 MY RX300_U (OM48431U)
Do not use your parking brake when there is a possibilityit could freeze.
When parking, put the transmission into “P” and block the rearwheels. Do not use the parking brake, or snow or wateraccumulated in and around the parking brake mechanism mayfreeze the parking brake, making it hard to release.
Keep ice and snow from accumulating under the fenders.
Ice and snow built up under your fenders can make steeringdifficult. During bad winter driving, stop and check under thefenders occasionally.
Depending on where you are driving, we recommend youcarry some emergency equipment.
Some of the things you might put in the vehicle are tire chains,window scraper, bag of sand or salt, flares, small shovel,jumper cables, etc.
DINGHY TOWING
32R019
Your vehicle can be dinghy towed (with four wheels on theground) from the front behind a motorhome.
CAUTION
Dinghy towing requires special equipment andaccessories. Please refer to your service outlet of themotorhome manufacture for the recommendedequipment.
NOTICE
Dinghy towing does not eliminate the possibility ofdamage to your vehicle.

DRIVING TIPS
210 2001 MY RX300_U (OM48431U)
Dinghy towing tipsBefore dinghy towing, be sure to observe the following inorder to reduce the damage to your vehicle.
1. Turn the ignition switch to the “ON” position.
2. Shift the selector lever into the “N” position.
3. Turn the ignition switch to the “ACC” position. Make sure theaudio is turned off and any item is not plugged into the poweroutlet.
NOTICE
To avoid the locking of the steering wheel, turn theignition switch to the “ACC” position.
4. Release the parking brake.
NOTICE
To prevent the vehicle from being damaged, observefollowing.
� Do not tow the vehicle at the vehicle speed more than88 km/h (55 mph).
� Do not tow the vehicle for more than 320 km (200miles).
After dinghy towing or at the recommended distance limit, letthe engine idle for more than 3 minutes before driving thevehicle or resuming towing.
32R020
NOTICE
Do not tow your vehicle from the rear. This may causeserious damage to your vehicle.

DRIVING TIPS
2112001 MY RX300_U (OM48431U)
TRAILER TOWINGYour vehicle is designed primarily as a passenger–and–loadcarrying vehicle. Towing a trailer will have an adverse effecton handling, performance, braking, durability and drivingeconomy (fuel consumption, etc.). Your safety and satisfactiondepend on the proper use of correct equipment and cautiousdriving habits. For your safety and the safety of others, youmust not overload your vehicle or trailer. Lexus warranties donot apply to damage or malfunction caused by towing a trailerfor commercial purposes. Ask your local Lexus dealer forfurther details before towing.
NOTICE
When towing a trailer, be sure to consult your Lexusdealer for further information on additionalrequirements such as a towing kit, etc.
Weight limitsBefore towing, make sure the total trailer weight, grossvehicle weight, gross axle weight and trailer tongue loadare all within the limits.
The total trailer weight and tongue load can be measured withplatform scales found at a highway weighing station, buildingsupply company, trucking company, junk yard, etc.
63R004a
�Certification label
CAUTION
� The total trailer weight (trailer weight plus its cargoload) must not exceed 1588 kg (3500 lb.). Exceedingthis weight is dangerous.
� The gross combination weight (sum of your vehicleweight plus its load and the total trailer weight) mustnot exceed 3835 kg (8450 lb.).

Tongue load
Total trailer weightx 100 = 9 to 11%
DRIVING TIPS
212 2001 MY RX300_U (OM48431U)
� Trailer hitch assemblies have different weightcapacities established by the hitch manufacturer.Even though the vehicle may be physically capable oftowing a higher weight, the operator must determinethe maximum weight rating of the particular hitchassembly and never exceed the maximum weightrating specified for the trailer hitch. Exceeding themaximum weight rating set by the trailer hitchmanufacturer can cause an accident resulting inserious personal injuries.
� The gross vehicle weight must not exceed the GrossVehicle Weight Rating (GVWR) indicated on theCertification Label. The gross vehicle weight is thesum weight of the unloaded vehicle, driver,passengers, luggage, hitch and trailer tongue load.It also includes the weight of any special equipmentinstalled on your vehicle.
� The load on either the front or rear axle resulting fromdistribution of the gross vehicle weight on both axlesmust not exceed the Gross Axle Weight Rating(GAWR) listed on the Certification Label.
32L002
�Total trailer weight �Tongue load
� The trailer cargo load should be distributed so thatthe tongue load is 9 to 11 % of the total trailer weight,not exceeding the maximum of 158 kg (350 lb.).
� Never load the trailer with more weight in the backthan in the front. About 60 % of the trailer load shouldbe in the front half of the trailer and the remaining 40% in the rear.

DRIVING TIPS
2132001 MY RX300_U (OM48431U)
Hitches� If you wish to install a trailer hitch, your Lexus dealer should
be consulted.
� Use only a hitch which is recommended by Lexus dealerand conforms to the total trailer weight requirement.
� Follow the directions supplied by the hitch manufacturer.Lubricate the hitch ball with a light coat of grease.
� Lexus recommends removing the trailer hitch wheneveryou are not towing a trailer to reduce the possibility ofadditional damage caused by the hitch if your vehicle isstruck from behind. After removing the hitch, seal anymounting holes in the vehicle body to prevent entry ofpollutants such as exhaust fumes, dirt, water, etc.
NOTICE
� Install the trailer hitch using only the positionrecommended by your Lexus dealer. Do not installthe trailer hitch on the bumper; this may cause bodydamage.
� Do not use axle–mounted hitches as they can causedamage to the axle housing, wheel bearings, wheelsor tires.
Trailer ballFollow these easy steps to properly determine the correcttrailer ball for your application:
1. Determine the correct trailer ball size for the trailer coupler.Most couplers are stamped with the required trailer ball size.The sizes you will most likely find stamped on the coupler are:
Trailer class Typical Trailer Ball SizeIII 2– 5/16 in.II 2 in.I 1– 7/8 in.
2. Select the appropriate trailer ball to match or exceed thegross trailer weight rating of the trailer. The trailer ball loadrating should be printed on the top of the ball.

DRIVING TIPS
214 2001 MY RX300_U (OM48431U)
32R007
� 1 Trailer ball load rating 2 Ball diameter 3 Shank length 4 Shank diameter
3. When mounted in the ball mount, the threaded ball shankmust protrude beyond the bottom of the lock washer and nutat least 2 threads. The trailer ball shank must be matched tothe ball mount hole diameter size.
Matching trailer ball height to trailer couplerheightNo matter which class of tow hitch applies, for a safe trailerhookup, the trailer ball setup on must be the proper height forthe coupler on the trailer.
32R018
� 1 Coupler 2 Trailer ball

DRIVING TIPS
2152001 MY RX300_U (OM48431U)
Brakes and safety chains� Lexus recommends trailers with brakes that conform to
any applicable federal and state/provincial regulations.
� A safety chain must always be used between the towingvehicle and the trailer. Leave sufficient slack in thechain for turns. The chain should cross under thetrailer tongue to prevent the tongue from dropping tothe ground in case it becomes damaged or separated.For correct safety chain procedures, follow the hitch ortrailer manufacturer’s recommendations.
CAUTION
� If the total trailer weight exceeds 450 kg (1000 lb.),trailer brakes are required.
� Never tap into your vehicle’s hydraulic system as itwill lower its braking effectiveness.
� Never tow a trailer without using a safety chainsecurely attached to both the trailer and the vehicle.If damage occurs to the coupling unit or hitch ball,there is possible danger of the trailer wandering overinto another lane.
Tires� Ensure that your vehicle’s tires are properly inflated. Adjust
the tire pressure to the recommended cold tire pressureindicated below:
Tire pressure, kPa (kgf/cm2 or bar, psi) Front 210 (2.1, 30) Rear 210 (2.1, 30)
� The trailer tires should be inflated to the pressurerecommended by the trailer manufacturer in respect to thetotal trailer weight.

DRIVING TIPS
216 2001 MY RX300_U (OM48431U)
Trailer lights
32R014
� Your vehicle is equipped with a wire harness stored in therear end under body. Some models are fitted with a socketfor trailer lights under the rear bumper. Use either of themto connect and operate the trailer lights. However, the trailerlights must comply with federal, state/provincial and localregulations. See your local recreational vehicle dealer orrental agency for the correct type of wiring and relays foryour trailer. Check for correct operation of the turn signalsand stop lights each time you hitch up. Direct splicing maydamage your vehicle’s electrical system and cause amalfunction of your lights.
Break–in schedule� Lexus recommends that you do not tow a trailer with a new
vehicle or a vehicle with any new power train component(engine, transmission, differential, wheel bearing, etc.) forthe first 800 km (500 miles) of driving.
Maintenance� If you tow a trailer, your vehicle will require more frequent
maintenance due to the additional load. For thisinformation, please refer to the scheduled maintenanceinformation in the “Owner ’s Manual Supplement /Maintenance Schedule”.
� Retighten all fixing bolts of the towing ball and bracket afterapproximately 1000 km (600 miles) of trailer driving.
Pre–towing safety check� Check that your vehicle remains level when a loaded or
unloaded trailer is hitched. Do not drive if the vehicle hasan abnormal nose–up or nose–down condition, and checkfor improper tongue load, overload, worn suspension orother possible causes.
� Make sure the trailer cargo is securely loaded so that itcannot shift.
� Check that your rear view mirrors conform to any federal,state/provincial or local regulations. If they do not, installrequired rear view mirrors appropriate for towing purposes.

DRIVING TIPS
2172001 MY RX300_U (OM48431U)
Trailer towing tipsWhen towing a trailer, your vehicle will handle differentlythan when not towing. The three main causes ofvehicle–trailer accidents are driver error, excessive speedand improper trailer loading. Keep these in mind whentowing:
� Before starting out, check the operation of the lights and allvehicle–trailer connections. After driving a short distance,stop and recheck the lights and connections. Practiceturning, stopping and backing with a trailer in an area awayfrom traffic until you learn the feel.
� Backing with a trailer is difficult and requires practice. Gripthe bottom of the steering wheel and move your hand to theleft to move the trailer to the left. Move your hand to the rightto move the trailer to the right. (This procedure is generallyopposite to that when backing without a trailer.) Also, justturn the steering wheel a little at a time, avoiding sharp orprolonged turning. Have someone guide you when backingto reduce the risk of an accident.
� Because stopping distance may be increased,vehicle–to–vehicle distance should be increased whentowing a trailer. For each 16 km/h (10 mph) of speed, allowat least one vehicle and trailer length between you and thevehicle ahead. Avoid sudden braking as you may skid,resulting in jackknifing and loss of control. This is especiallytrue on wet or slippery surfaces.
� Avoid jerky starts or sudden acceleration.
� Avoid jerky steering and sharp turns. The trailer could hityour vehicle in a tight turn. Slow down before making a turnto avoid the need of sudden braking.
� Remember that when making a turn, the trailer wheels willbe closer than the vehicle wheels to the inside of the turn.Therefore, compensate for this by making a larger thannormal turning radius with your vehicle.
� Crosswinds and rough roads will adversely affect handlingof your vehicle and trailer, causing sway. Pay attention tothe rear from time to time to prepare yourself for beingpassed by large trucks or buses, which may cause yourvehicle and trailer to sway. If swaying happens, firmly gripthe steering wheel and reduce speed immediately butgradually. Never increase speed. If it is necessary toreduce speed, brake slowly. Steer straight ahead. If youmake no extreme correction with the steering or brakes,your vehicle and trailer will stabilize.
� Be careful when passing other vehicles. Passing requiresconsiderable distance. After passing a vehicle, do notforget the length of your trailer and be sure you have plentyof room before changing lanes.
� In order to maintain efficient engine braking and electricalcharging performance, do not use overdrive.
� Because of the added load of the trailer, your vehicle’sengine may overheat on hot days (at temperatures over30�C [85�F]) when going up a long or steep grade with atrailer. If the engine coolant temperature gauge indicatesoverheating, immediately turn off the air conditioning (if inuse), pull your vehicle off the road and stop in a safe spot.See “If your vehicle overheats” on page 226 of this manual.

DRIVING TIPS
218 2001 MY RX300_U (OM48431U)
� Always place wheel blocks under both the vehicle and trailerwheels when parking. Apply the parking brake firmly. Putthe transmission in “P”. Avoid parking on a slope with atrailer, but if it cannot be avoided, do so only after performingthe following:
1. Apply the brakes and keep them applied.
2. Have someone place wheel blocks under both the vehicleand trailer wheels.
3. When the wheel blocks are in place, release your brakesslowly until the blocks absorb the load.
4. Apply the parking brake firmly.
5. Shift into “P” and turn off the engine.
When restarting out after parking on a slope:
1. With the transmission in “P” position, start the engine. Besure to keep the brake pedal depressed.
2. Shift into the “2”, “L” or “R” position.
3. Release the parking brake and brake pedal and slowly pullor back away from the wheel blocks. Stop and apply yourbrakes.
4. Have someone retrieve the blocks.
CAUTION
� Do not exceed 72 km/h (45 mph) or the posted towingspeed limit, whichever is lower. Because instability(swaying) of a towing vehicle–trailer combinationusually increases as the speed increases, exceeding72 km/h (45 mph) may cause loss of control.
� Slow down and downshift before descending steepor long downhill grades. Do not make suddendownshifts.
� Avoid holding the brake pedal down too long or toofrequently. This could cause the brakes to overheatand result in reduced braking efficiency.

DRIVING TIPS
2192001 MY RX300_U (OM48431U)
HOW TO SAVE FUEL AND MAKEYOUR VEHICLE LAST LONGER
Improving fuel economy is easy – just take it easy. It will helpmake your vehicle last longer, too. Here are some specific tipson how to save money on both fuel and repairs:
� Keep your tires inflated at the correct pressure. Checkthe pressure every two weeks, or at least once a month.Underinflation causes tire wear and wastes fuel.
� Do not carry unneeded weight in your vehicle. Excessweight puts a heavier load on the engine, causing greaterfuel consumption.
� Avoid lengthy warm–up idling. Once the engine isrunning smoothly, begin driving – but gently. Remember,however, that on cold winter days this may take a littlelonger.
� Keep the automatic transmission overdrive turned onwhen engine braking is not required. Driving with theoverdrive off will reduce the fuel economy. (For details, see“Automatic transmission” on page 180.)
� Accelerate slowly and smoothly. Avoid jackrabbit starts.
� Avoid long engine idling. If you have a long wait and youare not in traffic, it is better to turn off the engine and startagain later.
� Avoid engine over–revving. Use a gear position suitablefor the road on which you are traveling.
� Avoid continuous speeding up and slowing down.Stop–and–go driving wastes fuel.
� Avoid unnecessary stopping and braking. Maintain asteady pace. Try to time the traffic signals so you only needto stop as little as possible or take advantage of throughstreets to avoid traffic lights. Keep a proper distance fromother vehicles to avoid sudden braking. This will alsoreduce wear on your brakes.
� Avoid heavy traffic or traffic jams whenever possible.
� Do not rest your foot on the brake pedal. This causespremature wear, overheating and poor fuel economy.
� Maintain a moderate speed on highways. The faster youdrive, the greater the fuel consumption. By reducing yourspeed, you will cut down on fuel consumption.
� Keep the front wheels in proper alignment. Avoid hittingthe curb and slow down on rough roads. Improperalignment not only causes faster tire wear but also puts anextra load on the engine, which, in turn, wastes fuel.
� Keep the bottom of your vehicle free from mud, etc.This not only lessens weight but also helps preventcorrosion.

DRIVING TIPS
220 2001 MY RX300_U (OM48431U)
� Keep your vehicle tuned–up and in top shape. A dirty aircleaner, improper valve clearance, dirty plugs, dirty oil andgrease, brakes not adjusted, etc. all lower engineperformance and contribute to poor fuel economy. Forlonger life of all parts and lower operating costs, keep allmaintenance work on schedule, and if you often drive undersevere conditions, see that your vehicle receives morefrequent maintenance. (For scheduled maintenanceinformation, please refer to the “Owner ’s ManualSupplement / Maintenance Schedule”.)
CAUTION
Never turn off the engine to coast down hills. Yourpower steering and brake booster will not functionwithout the engine running. Also, the emission controlsystem operates properly only when the engine isrunning.

SECTION 4
2212001 MY RX300_U (OM48431U)
IN CASE OF AN EMERGENCYIf your engine stalls while driving 222. . . . . . . . . . . . . . . . . . . . . . . . . . . If your vehicle will not start 222. . . . . . . . . . . . . . . . . . . . . . . . . . . . . . . . If your vehicle overheats 226. . . . . . . . . . . . . . . . . . . . . . . . . . . . . . . . . . If you have a flat tire 227. . . . . . . . . . . . . . . . . . . . . . . . . . . . . . . . . . . . . . If your vehicle needs to be towed 235. . . . . . . . . . . . . . . . . . . . . . . . . . If you cannot shift automatic transmission selector lever 242. . . . . . If you lose your keys or lock yourself out 243. . . . . . . . . . . . . . . . . . . .

IN CASE OF AN EMERGENCY
222 2001 MY RX300_U (OM48431U)
IF YOUR ENGINE STALLS WHILEDRIVING
If your engine stalls while driving . . . .
1. Reduce your speed gradually, keeping a straight line. Movecautiously off the road to a safe place.
2. Turn on your emergency flashers.
3. Turn the ignition key to “ACC” or “LOCK”, and try starting theengine again.
If the engine will not start, see “If your vehicle will not start”.
CAUTION
If the engine is not running, the power assist for thebrakes and steering will not work, so steering andbraking will be much harder than usual.
IF YOUR VEHICLE WILL NOTSTART
(a) Simple checksBefore making these checks, make sure you have followed thecorrect starting procedure instructions in “How to start theengine” on page 179 and that you have sufficient fuel. Sinceyour vehicle is equipped with the engine immobiliser system,also check whether the other keys will start the engine. If theywork, your key may be broken. Have the key checked at yourLexus dealer. If none of your keys work, the system is possiblybroken. Call your Lexus dealer. See “Keys” on page 8.
If the engine is not turning over or is turning over tooslowly –
1. Check that the battery terminals are tight and clean.
2. If the battery terminals are O.K., switch on the interior light.
3. If the light is out, dim or goes out when the starter is cranked,the battery is discharged. You may try jump starting. See “(c)Jump starting” for further instruction.
If the light is O.K., but the engine still will not start, it needsadjustment or repair. Call a Lexus dealer, RoadsideAssistance or Customer Service Assistance. (See“Foreword”.)

IN CASE OF AN EMERGENCY
2232001 MY RX300_U (OM48431U)
NOTICE
Do not pull– or push–start the vehicle. It may damagethe vehicle or cause a collision when the engine starts.Also the three–way catalytic converter may overheatand become a fire hazard.
If the engine turns over at its normal speed but will notstart –
1. Turn the ignition key to “ACC” or “LOCK” and try starting theengine again.
2. If the engine will not start, the engine may be floodedbecause of repeated cranking. See “(b) Starting a floodedengine” for further instructions.
3. If the engine still will not start, it needs adjustment or repair.Call a Lexus dealer or qualified repair shop.
(b) Starting a flooded engineIf the engine will not start, your engine may be floodedbecause of repeated cranking.
If this happens, turn the key to “START” with the acceleratorpedal held down. Continue this operation for 30 seconds andthen stop cranking. Then try starting the engine with your footoff the accelerator pedal.
If the engine does not start after 30 seconds of cranking,release the key, wait a few minutes and try again.
If the engine still will not start, it needs adjustment or repair.Call a Lexus dealer, Roadside Assistance or CustomerService Assistance. (See “Foreword”.)
NOTICE
Do not crank for more than 30 seconds at a time. Thismay overheat the starter and wiring systems.
(c) Jump startingTo avoid serious personal injury and damage to yourvehicle which might result from battery explosion, acidburns, electrical burns, or damaged electroniccomponents, these instructions must be followedprecisely.
If you are unsure about how to follow this procedure, westrongly recommend that you seek help from your Lexusdealer, Roadside Assistance or Customer Service Assistance.(See “Foreword”.)
CAUTION
� Batteries contain sulfuric acid which is poisonousand corrosive. Wear protective safety glasses whenjump starting, and avoid spilling acid on your skin,clothing, or vehicle.

IN CASE OF AN EMERGENCY
224 2001 MY RX300_U (OM48431U)
� If you should accidentally get acid on yourself or inyour eyes, remove any contaminated clothing andflush the affected area with water immediately. Thenget immediate medical attention. If possible,continue to apply water with a sponge or cloth whileen route to the medical office.
� The gas normally produced by a battery will explodeif a flame or spark is brought near. Use onlystandardized jumper cables and do not smoke orlight a match while jump starting.
� Warning: Battery posts, terminals and relatedaccessories contain lead and lead compounds,chemicals known to the State of California to causecancer and reproductive harm. Wash hands afterhandling.
NOTICE
The battery used for boosting must be 12 V. Do not jumpstart unless you are sure that the booster battery iscorrect.
40R094
� 5 Discharged battery 6 Booster battery

IN CASE OF AN EMERGENCY
2252001 MY RX300_U (OM48431U)
JUMP STARTING PROCEDURE
1. If the booster battery is installed in another vehicle, makesure the vehicles are not touching. Turn off all unnecessarylights and accessories.
2. If required, remove all the vent plugs from the boosterbattery. Lay a cloth over the open vents on the booster battery.(This helps reduce the explosion hazard, personal injuries andburns.)
3. If the engine in the vehicle with the booster battery is notrunning, start it and let it run for about 5 minutes. During jumpstarting, run the engine at about 2000 rpm with the acceleratorpedal lightly depressed.
4. Locate positive (+) and negative (–) terminals of eachbattery. Connect the jumper cables in the exact order ( 1 2 3 4 ) shown in the illustration.
1 Connect a positive (red) jumper cable clamp to thepositive (+) terminal of the discharged battery.
2 Connect the clamp at the other end of the positive (red)cable to the positive (+) terminal of the booster battery.
3 Connect a negative (black) cable clamp to the negative(–) terminal of the booster battery.
4 Connect the clamp at the other end of the negative (black)cable to a solid, stationary, unpainted metallic point (suchas shown in the illustration) away from the battery. Do notconnect it to or near any part that moves when the engineis cranked.
CAUTION
When making the connections, to avoid serious injury,do not lean over the battery or accidentally let thejumper cables or clamps touch anything except thecorrect battery terminals or the ground.
5. Start your engine in the normal way. After starting, run it atabout 2000 rpm for several minutes with the accelerator pedallightly depressed.
6. Carefully disconnect the cables in the exact reverse order:the negative cable and then the positive cable.
7. Carefully dispose of the battery cover cloths which may nowcontain sulfuric acid.
8. If removed, replace all the battery vent plugs.
If the cause of your battery discharging is not apparent (forexample, lights left on), you should have it checked.

IN CASE OF AN EMERGENCY
226 2001 MY RX300_U (OM48431U)
IF YOUR VEHICLE OVERHEATSIf your engine coolant temperature gauge indicatesoverheating, if you experience a loss of power, or if youhear a loud knocking or pinging noise, the engine hasprobably overheated.
When the engine overheatsPull safely off the road, stop the vehicle and turn on youremergency flashers. Put the transmission in “P” and apply theparking brake.
A: If steam is coming from your engine:
Turn off the engine. Leave the hood closed until there is no signof steam or coolant. Your engine could have been seriouslydamaged already. Call your Lexus dealer for assistance.
CAUTION
To help avoid personal injury, keep the hood closed untilthere is no steam. Escaping steam or coolant is sign ofvery high pressure.
B: If no steam is coming from your engine:
Leave the engine running and turn off the air conditioning.Check the following.
� Is the cooling fan operating?
� Is the coolant in the acceptable range?
� Is the engine drive belt O.K.?
CAUTION
� When the engine is running, keep hands and clothingaway from the moving fan and engine drive belt.
� Do not attempt to remove the radiator cap when theengine and radiator are hot. Serious injury couldresult from scalding hot fluid and steam blown outunder pressure.
If the cooling fan is not operating or the coolant is not in theacceptable range, turn off the engine and call your Lexusdealer.
If both conditions are O.K., after the engine coolanttemperature has cooled to normal, continue driving yourvehicle.
If the engine coolant temperature does not cool down, or yourvehicle overheats again, have it checked as soon as possibleby your Lexus dealer.

IN CASE OF AN EMERGENCY
2272001 MY RX300_U (OM48431U)
IF YOU HAVE A FLAT TIRE1. Reduce your speed gradually, keeping a straight line. Movecautiously off the road to a safe place – well away from thetraffic. Avoid stopping on the center divider of a highway. Parkon a level spot with firm ground.
2. Stop the engine and turn on your emergency flashers.
3. Firmly set the parking brake and put the transmission in “P”.
4. Have everyone get out of the vehicle on the side away fromtraffic.
5. Read the following instructions thoroughly.
CAUTION
When jacking, be sure to observe the following toreduce the possibility of personal injury:
� Follow jacking instructions.
� Do not put any part of your body under a vehiclesupported by a jack. Personal injury may occur.
� Do not start or run the engine while your vehicle issupported by the jack.
� Stop the vehicle on a level firm ground, firmly set theparking brake and put the transmission in “P”. Blockthe wheel diagonally opposite to the one beingchanged if necessary.
� Make sure to set the jack properly in the jack point.Raising the vehicle with jack improperly positionedwill damage the vehicle or may allow the vehicle to falloff the jack and cause personal injury.
� Never get under the vehicle when the vehicle issupported by the jack alone.
� Use the jack only for lifting your vehicle during wheelchanging.
� Do not raise the vehicle with someone in the vehicle.
� When raising the vehicle, do not put an object on orunder the jack.
� Raise the vehicle only high enough to remove andchange the tire.
NOTICE
Do not continue driving with a deflated tire. Drivingeven a short distance can damage a tire and wheelbeyond repair.

IN CASE OF AN EMERGENCY
228 2001 MY RX300_U (OM48431U)
Access to spare tire
40R053b
1. Pull up the deck board.
40R054a
2. Take off the hook at the rear of the deck board.
3. Lift up the back side of the board and secure the boardby hooking it at the top of the back door opening with thehook at the edge of the strap.
Make sure the board is secured and does not fall down.

IN CASE OF AN EMERGENCY
2292001 MY RX300_U (OM48431U)
40R055
When closing the board, replace the hook also in itsoriginal position as shown.
NOTICE
If you close the back door with the board hooked, thehook may be damaged.
Changing procedure
40R002b
� 1 Spare tire 2 Tool bag 3 Jack handle 4 Jack 5 Wrench
1. Get the jack, wrench and spare tire.
To prepare yourself for an emergency, you should familiarizeyourself with the use of the jack and each tool, and theirstorage locations. The jack is located under the tray for thejack handle and wrench.

IN CASE OF AN EMERGENCY
230 2001 MY RX300_U (OM48431U)
40R003a
� 1 Joint
2 When removing the jack, turn the joint by hand in the“contract” direction until the jack is free.
3 When storing, turn the joint by hand in the “expand”direction until the jack is firmly secured to prevent itfrom flying forward during a collision or suddenbraking.
40R004a
To remove the spare tire:
1 Remove the spare tire cover.
2 Loosen the bolt and remove it.
When storing the spare tire, place it with the inner side of thewheel facing up. Then bolt the tire in place and install the sparetire cover to prevent the tire from flying forward during acollision or sudden braking.

IN CASE OF AN EMERGENCY
2312001 MY RX300_U (OM48431U)
40R062
2. Block the wheel diagonally opposite the flat tire to keepthe vehicle from rolling when it is jacked up.
When blocking the wheel, place a wheel block in front of thefront wheels or behind the rear wheels.
40R006
3. Loosen all the wheel nuts.
Always loosen the wheel nuts before raising the vehicle.
Turn the wheel nuts counterclockwise to loosen them. To getmaximum leverage, fit the wrench to the nut so that the handleis on the right side, as shown above. Grab the wrench near theend of the handle and pull up on the handle. Be careful that thewrench does not slip off the nut.
Do not remove the nuts yet – just unscrew them about one–halfturn.

IN CASE OF AN EMERGENCY
232 2001 MY RX300_U (OM48431U)
40R007a
4. Position the jack at the jack points as shown.
Make sure the jack is positioned on a level and solid surface.
40R008a
5. After making sure no one is in the vehicle, raise it highenough so that the spare tire can be installed.
Allow for the fact that you need more ground clearance whenputting on the spare tire than when removing the flat tire.
To raise the vehicle, insert the jack handle into the jack (it is aloose fit) and turn it clockwise. As the jack touches the vehicleand begins to lift, double–check that it is properly positioned.
CAUTION
Never get under the vehicle when the vehicle issupported by the jack alone.

IN CASE OF AN EMERGENCY
2332001 MY RX300_U (OM48431U)
40R009
6. Remove the wheel nuts and remove the flat tire.
Lift the flat tire straight off and put it aside.
40R010
Before putting on the wheel, remove any corrosion on themounting surfaces with a wire brush or such. Installation ofwheels without good metal–to–metal contact at the mountingsurface can cause wheel nuts to loosen and eventually causea wheel to come off while driving.

IN CASE OF AN EMERGENCY
234 2001 MY RX300_U (OM48431U)
40R011
7. Reinstall all the wheel nuts finger tight.
Align the holes in the wheel with the bolts. Then lift up thewheel and get at least the top bolt started through its hole.Wiggle the tire and press it back over the other bolts.
Reinstall the wheel nuts and tighten them as much as you canby hand. Press the tire back and see if you can tighten themmore.
40R012
8. Lower the vehicle completely and tighten the wheelnuts.
Turn the jack handle counterclockwise to lower the vehicle.
Use only the wheel nut wrench to tighten the nuts. Do not useother tools or any additional leverage other than your hands,such as a hammer, pipe or your foot. Make sure the wrenchis securely engaged over the nut.
Tighten each nut a little at a time in the order shown. Repeatthe process until all the nuts are tight.
CAUTION
� When lowering the vehicle, make sure all portions ofyour body and all other persons around will not beinjured as the vehicle is lowered to the ground.
� As soon as possible after changing wheels, have thewheel nuts tightened by torque wrench at 103 N·m(10.5 kgf·m, 76 ft·lbf.).

IN CASE OF AN EMERGENCY
2352001 MY RX300_U (OM48431U)
9. After changing the wheel, check the air pressure of thereplaced tire. Stow all the tools, jack and flat tire securely.
If the pressure of the replaced tire is low, drive slowly to thenearest service station and fill to the correct pressure.
Do not forget to reinstall the tire valve cap as dirt and moisturecould get into the valve core and possible cause air leakage.If the cap is missing, put a new one on as soon as possible.
This is the same procedure for changing or rotating your tires.
CAUTION
Before driving, make sure all the tools, jack and flat tireare securely in place in their storage location to reducethe possibility of personal injury during a collision orsudden braking.
IF YOUR VEHICLE NEEDS TO BETOWED
If towing is necessary, we recommend you to have it doneby your Lexus dealer or a commercial tow truck service.In consultation with them, have your vehicle towed usingeither (a) or (b).
(a) Towing with a wheel lift type truck
(b) Using a flat bed truck
(c) Never tow with a sling type truck
Only when you cannot receive a towing service from aLexus dealer or commercial tow truck service, tow yourvehicle carefully in accordance with the instructionsgiven in “(d) Emergency towing” on page 240.
Proper equipment will help ensure that your vehicle is notdamaged while being towed. Commercial operators aregenerally aware of the state/provincial and local lawspertaining to towing.
Your vehicle can be damaged if it is towed incorrectly.Although most operators know the correct procedure, it ispossible to make a mistake. To avoid damage to your vehicle,make sure the following precautions are observed. Ifnecessary, show this page to the tow truck driver.
TOWING PRECAUTIONS:
Use a safety chain system for all towing, and abide by thestate/provincial and local laws. The wheels and axle on theground must be in good condition. If they are damaged, usea towing dolly.

IN CASE OF AN EMERGENCY
236 2001 MY RX300_U (OM48431U)
(a) Towing with a wheel lift type truck� From front
40R013
�Two–wheel drive models
Release the parking brake.
NOTICE
When lifting wheels, take care to ensure adequateground clearance for towing at the opposite end of theraised vehicle. Otherwise, the bumper and/orunderbody of the towed vehicle will be damaged duringtowing.
40R052
�Four–wheel drive models
Use a towing dolly under the rear wheels.
NOTICE
Never tow from the front with rear wheels on the ground,as this may cause serious damage to the transmission.

IN CASE OF AN EMERGENCY
2372001 MY RX300_U (OM48431U)
� From rear
40R014
Use a towing dolly under the front wheels.
NOTICE
Never tow from the rear with front wheels on the ground,as this may cause serious damage to the transmission.
(b) Using a flat bed truck
40R015
� Tie down points
40R016

IN CASE OF AN EMERGENCY
238 2001 MY RX300_U (OM48431U)
40R017a
� A Front B Rear
If your Lexus is transported by a flat bed, it should be tieddown at locations A and B as shown above.
40R063
�Rear emergency towing eyelets
NOTICE
Do not use the rear emergency towing eyelets.

IN CASE OF AN EMERGENCY
2392001 MY RX300_U (OM48431U)
� Tie down angle
40R019
If you use chains or wires to tie down your vehicle, theangles shaded black must be at 45�.
(c) Towing with a sling type truck
40R020a
NOTICE
Do not tow with a sling type truck, either from the frontor rear. This may cause body damage.

IN CASE OF AN EMERGENCY
240 2001 MY RX300_U (OM48431U)
(d) Emergency towing
40R064
If towing is necessary, we recommend you to have it doneby your Lexus dealer or a commercial tow truck service.
If towing service is not available in an emergency, yourvehicle may be temporarily towed by a cable or chainsecured to the emergency towing eyelet. Use extremecaution when towing the vehicle.
A driver must be in the vehicle to steer it and operate thebrakes.
Towing in this manner may be done only on hard–surfacedroads for a short distance and at low speeds. Also, the wheels,axles, drive train, steering and brakes must all be in goodcondition.
CAUTION
Use extreme caution when towing the vehicle. Avoidsudden starts or erratic driving maneuvers which wouldplace excessive stress on the emergency towing eyeletand towing cable or chain. The eyelet and towing cableor chain may break and cause serious injury or damage.
NOTICE
� Use only a cable or chain specifically intended foruse in towing vehicles. Securely fasten the cable orchain to the towing eyelet provided.
� Never use the eyelets under the front bumper. If youuse them for towing, it may damage the vehicle andcause an unexpected accident.
Before towing, release the parking brake and put thetransmission in “N”. The ignition key must be in “ACC” (engineoff) or “ON” (engine running).
CAUTION
If the engine is not running, the power assist for thebrakes and steering will not work so steering andbraking will be much harder than usual.

IN CASE OF AN EMERGENCY
2412001 MY RX300_U (OM48431U)
Emergency towing eyelet precautions:
� Before emergency towing, check that the eyelet is notbroken or damaged and that the installation bolts are notloose.
� Fasten the towing cable or chain securely to the eyelet.
� Do not jerk the eyelet. Apply steady and even force.
� To avoid damaging the eyelet, do not pull from the side orat a vertical angle. Always pull straight ahead.
CAUTION
If the emergency towing eyelet is used to get out whenyour vehicle becomes stuck in the mud, sand or othercondition from which the vehicle cannot be driven outunder its own power, make sure to observe theprecautions mentioned below. Otherwise, excessivestress will be put on the eyelet and the towing cable orchain may break, causing serious injury or damage.
� If the towing vehicle can hardly move, do not forciblycontinue the towing. Contact your Lexus dealer or acommercial tow truck service for assistance.
� Tow the vehicle as straight ahead as possible.
� Keep away from the vehicle during towing.
Tips for towing a stuck vehicle:
The following methods are effective to use when yourvehicle is stuck in the mud, sand or other condition fromwhich the vehicle cannot be driven out under its ownpower. Use extreme caution when towing the vehicle. Inaddition, keep away from the vehicles and towing cable orchain when towing.
� Remove the sand and soil in the front and the back of thetires.
� Place stones or wood under the tires.

IN CASE OF AN EMERGENCY
242 2001 MY RX300_U (OM48431U)
IF YOU CANNOT SHIFTAUTOMATIC TRANSMISSION
SELECTOR LEVER
40R095
If you cannot shift the selector lever out of “P” position toother positions even though the brake pedal is depressed,use the shift lock override button as follows:
1 Turn the ignition key to “LOCK”. Make sure the parkingbrake is applied.
2 Pry up the cover with a flat–bladed screwdriver orequivalent.
40R065
3 Push down the shift lock override button. You can shift outof “P” position only while pushing the button.
4 Shift into “N” position.
Insert the cover. Start the engine. For your safety, keepthe brake pedal depressed.
Be sure to have the system checked by your Lexus dealer assoon as possible.

IN CASE OF AN EMERGENCY
2432001 MY RX300_U (OM48431U)
IF YOU LOSE YOUR KEYS ORLOCK YOURSELF OUT
You can purchase a new key at your Lexus dealer if youcan give them the key number and master key.
Even if you lose only one key, contact your Lexus dealer tomake a new key. If you lose all your master keys, you cannotmake new keys; the whole engine immobiliser system must bereplaced.
See the suggestion given in “Keys” on page 8.
You can use the wireless remote control system with the newkey. Contact your Lexus dealer for detailed information.
If your keys are locked in the vehicle and you cannot get aduplicate, many Lexus dealers can still open the door for you,using their special tools. If you must break a window to get in,we suggest breaking the smallest side window because it is theleast expensive to replace. Be extremely cautious to avoidcuts from the glass.

IN CASE OF AN EMERGENCY
244 2001 MY RX300_U (OM48431U)

SECTION 5
2452001 MY RX300_U (OM48431U)
MAINTENANCEMaintenance requirements 246. . . . . . . . . . . . . . . . . . . . . . . . . . . . . . . . General maintenance 247. . . . . . . . . . . . . . . . . . . . . . . . . . . . . . . . . . . . . Does your vehicle need repairing? 250. . . . . . . . . . . . . . . . . . . . . . . . .
For scheduled maintenance information, please referto the “Owner’s Manual Supplement / MaintenanceSchedule”.

MAINTENANCE
246 2001 MY RX300_U (OM48431U)
MAINTENANCE REQUIREMENTSYour Lexus vehicle has been designed to have fewermaintenance requirements with longer service intervals tosave both your time and money. However, each regularmaintenance as well as day–to–day care is more importantthan ever before to ensure smooth, trouble–free, safe, andeconomical driving.
It is the owner’s responsibility to make sure the specifiedmaintenance, including general maintenance services, isperformed. Note that both the new vehicle and emissioncontrol system warranties specify that proper maintenanceand care must be performed. See “Owner’s Guide”, “Owner’sManual Supplement” or “Warranty Booklet” for completewarranty information.
General maintenanceGeneral maintenance items are those day–to–day carepractices that are important to your vehicle for properoperation. It is the owner’s responsibility to ensure that thegeneral maintenance items are performed regularly.
These checks or inspections can be done either by yourself oryour Lexus dealer.
Scheduled maintenanceThe scheduled maintenance items listed in the “Owner’sManual Supplement / Maintenance Schedule” are thoserequired to be serviced at regular intervals.
For details of your maintenance schedule, read the “Owner’sManual Supplement / Maintenance Schedule”.
It is recommended that any genuine Lexus parts be usedfor maintenance.
The owner may elect to use non–Lexus supplied parts forreplacement purposes without invalidating the emissioncontrol system warranty. However, use of replacementparts which are not of equivalent quality may impair theeffectiveness of the emission control systems.
You may also elect to have maintenance, replacement, orrepair of the emission control devices and systemperformed by any automotive repair establishment orindividual without invalidating this warranty. See“Owner’s Guide”, “Owner’s Manual Supplement” or“Warranty Booklet” for complete warranty information.
Where to go for service?Lexus technicians are well–trained specialists and are kept upto date with the latest service information through technicalbulletins, service tips, and in–dealership training programs.They are well informed about the operation of all the systemson your vehicle.
You can be confident that your Lexus dealer’s servicedepartment performs the best job to meet the maintenancerequirements of your vehicle.

MAINTENANCE
2472001 MY RX300_U (OM48431U)
Your copy of the repair order is proof that all requiredmaintenance has been performed for warranty coverage. Andif any problems should arise with your vehicle while underwarranty, your Lexus dealer will promptly take care of it. Again,be sure to keep a copy of the repair order for any serviceperformed on your Lexus.
What about do–it–yourself maintenance?Many of the maintenance items are easy to do yourself, if youhave a little mechanical ability and a few basic automotivetools. Simple instructions for how to perform them arepresented in Section 6.
If you are a skilled do–it–yourself mechanic, the Lexus servicemanuals are recommended. Please be aware thatdo–it–yourself maintenance can affect your warrantycoverage. See “Owner ’s Guide”, “Owner ’s ManualSupplement” or “Warranty Booklet” for the details.
GENERAL MAINTENANCEListed below are the general maintenance items that should beperformed at the intervals specified. It is recommended thatany problem you notice be brought to the attention of yourLexus dealer or qualified service shop for their advice.
CAUTION
Make these checks only where adequate ventilation canbe obtained if you run the engine.
Vehicle exteriorItems listed below should be performed from time to time,unless otherwise specified.
Tire pressure
Check the pressure with a gauge every two weeks, or at leastonce a month and adjust as shown on the tire pressure label.See page 279 for additional information.
Tire surface
Check the tires carefully for cuts, damage or excessive wear.See page 280 for additional information.
Wheel nuts
When checking the tires, make sure to check the nuts forlooseness. Tighten them if necessary.

MAINTENANCE
248 2001 MY RX300_U (OM48431U)
Tire rotation
Rotate the tires according to the maintenance schedule. (Forscheduled maintenance information, please refer to the“Owner’s Manual Supplement / Maintenance Schedule”.)See “Rotating tires” on page 280.
Fluid leaks
Check underneath for leaking fuel, oil, water or other fluid afterthe vehicle has been parked for a while. If you smell fuel fumesor notice any leak, have the cause found and correctedimmediately.
Doors and engine hood
Check that all doors and back door operate smoothly and alllatches lock securely. Make sure the engine hood secondarylatch secures the hood when the primary latch is released.
Vehicle interiorItems listed below should be checked regularly, e.g. whileperforming periodic services, cleaning the vehicle, etc.
Lights
Make sure the headlight, stop lights, tail lights, turn signallights, and other lights are working. Check headlight aim.
Service reminder indicators and warning buzzers
Check that all service reminder indicators and warningbuzzers function properly.
Steering wheel
Check that it has the specified free play. Be alert for changesin steering condition, such as hard steering, excessive freeplay or strange noise.
Seats
Check that all front seat controls such as seat adjusters,seatback recliner, etc., operate smoothly. Check that the headrestraints move up and down smoothly and that the locks holdsecurely in any latched position. For folding–down rearseatbacks, check that the latches lock securely.
Seat belts
Check that the seat belt system such as buckles, retractorsand anchors operate properly and smoothly. Make sure thebelt webbing is not cut, frayed, worn or damaged.

MAINTENANCE
2492001 MY RX300_U (OM48431U)
Accelerator pedal
Check the pedal for smooth operation and uneven pedal effortor catching.
Brake pedal
Check the pedal for smooth operation and the properclearance and free play. Check the brake booster function.
Brakes
At a safe place, check that the brakes do not pull to one sidewhen applied.
Parking brake
Check that the pedal has the proper travel and that, on a safeincline, your vehicle is held securely with only the parkingbrake applied.
Automatic transmission “Park” mechanism
Check the lock release button of the selector lever for properand smooth operation. On a safe incline, check that yourvehicle is held securely with the selector lever in “P” positionand all brakes released.
Engine compartmentItems listed below should be checked from time to time,e.g. each time when refueling.
Washer fluid
Make sure there is sufficient fluid in the tank. See page 298 foradditional information.
Engine coolant level
Make sure the coolant level is between the “F” and “L” lines onthe see–through reservoir when the engine is cold. See page270 for additional information.
Battery
Your Lexus has a maintenance free battery. You do not haveto add distilled water. For longer life of the battery, however,see page 291 for additional information.
Brake fluid level
Make sure the brake fluid level is correct. See page 277 foradditional information.
Engine oil level
Check the level on the dipstick with the engine turned off andthe vehicle parked on a level spot. See page 268 for additionalinformation.

MAINTENANCE
250 2001 MY RX300_U (OM48431U)
Power steering fluid level
Check the level through the reservoir. The level should be inthe “HOT” or “COLD” range depending on the fluidtemperature. See page 278 for additional information.
Exhaust system
If you notice any change in the sound of the exhaust or smellexhaust fumes, have the cause located and correctedimmediately. (See “Engine exhaust cautions” in Section 3–1.)
DOES YOUR VEHICLE NEEDREPAIRING?
Be on the alert for changes in performance and sounds, andvisual tip–offs that indicate service is needed. Some importantclues are:
� Engine missing, stumbling, or pinging
� Appreciable loss of power
� Strange engine noises
� A fluid leak under the vehicle (However, water dripping fromthe air conditioning after use is normal.)
� Change in exhaust sound (This may indicate a dangerouscarbon monoxide leak. Drive with the windows open andhave the exhaust system checked immediately.)
� Flat–looking tires, excessive tire squeal when cornering,uneven tire wear
� Vehicle pulls to one side when driving straight on a levelroad
� Strange noises related to suspension movement
� Loss of brake effectiveness, spongy feeling brake pedal,pedal almost touches floors, vehicle pulls to one side whenbraking
� Engine coolant temperature continually higher than normal

MAINTENANCE
2512001 MY RX300_U (OM48431U)
If you notice any of these clues, take your vehicle to your Lexusdealer as soon as possible. It probably needs adjustment orrepair.
CAUTION
Do not continue driving with the vehicle unchecked. Itcould result in serious vehicle damage and possiblypersonal injury.

MAINTENANCE
252 2001 MY RX300_U (OM48431U)

SECTION 6 – 1
2532001 MY RX300_U (OM48431U)
SERVICE PROCEDURES ANDSPECIFICATIONSIntroductionVehicle identification 254. . . . . . . . . . . . . . . . . . . . . . . . . . . . . . . . . . . . . . Engine compartment overview . . . . . . . . . . . . . . . . . . . . . . . . . . . . . 255Do–it–yourself service precautions 256. . . . . . . . . . . . . . . . . . . . . . . . . Parts and tools 257. . . . . . . . . . . . . . . . . . . . . . . . . . . . . . . . . . . . . . . . . . Positioning the jack 259. . . . . . . . . . . . . . . . . . . . . . . . . . . . . . . . . . . . . .

INTRODUCTION
254 2001 MY RX300_U (OM48431U)
VEHICLE IDENTIFICATION
61R001
The vehicle identification number (VIN) is the legalidentifier for your vehicle. This number is on the left topof the instrument panel and can be seen through thewindshield from outside.
This is the primary identification number for your Lexus. It isused in registering the ownership of your vehicle.
63R004a63R004a
The vehicle identification number (VIN) is also on theCertification Label.
61R006
The engine number is stamped on the engine block asshown.

61R028
INTRODUCTION
2552001 MY RX300_U (OM48431U)
ENGINE COMPARTMENT OVERVIEW
1 Engine oil filler cap
2 Brake fluid reservoir
3 Fuse box
4 Battery
5 Fuse box
6 Engine oil leveldipstick
7 Washer fluid tank
8 Engine coolantreservoir
9 Power steering fluidreservoir

INTRODUCTION
256 2001 MY RX300_U (OM48431U)
DO–IT–YOURSELF SERVICEPRECAUTIONS
If you perform maintenance yourself, be sure to follow thecorrect procedure given in this Section.
You should be aware that improper or incomplete servicingmay result in operating problems.
Performing do–it–yourself maintenance during the warrantyperiod may affect your warranty coverage. Read the separateLexus Warranty statement for details and suggestions.
This Section gives instructions only for those items that arerelatively easy for an owner to perform. As explained inSection 5, there are still a number of items that must beperformed by a qualified technician with special tools.
For information on tools and parts for do–it–yourselfmaintenance, see “Parts and tools” on page 257.
Utmost care should be taken when working on your vehicle toprevent accidental injury. Here are a few precautions that youshould be especially careful to observe:
CAUTION
� When the engine is running, keep hands, clothing,and tools away from the moving fan and engine drivebelt. (Removing rings, watches, and ties isadvisable.)
� Right after driving, the engine compartment – theengine, radiator, exhaust manifold and powersteering fluid reservoir, etc. – will be hot. So becareful not to touch them. Oil and other fluids mayalso be hot.
� Do not smoke, cause sparks or allow open flamesaround fuel or the battery. Their fumes areflammable.
� Do not get under your vehicle with just the body jacksupporting it. Always use automotive jack stands orother solid supports.
� Use eye protection whenever you work on or underyour vehicle where you may be exposed to flying orfalling material, fluid spray, etc.
� Be extremely cautious when working on the battery.It contains poisonous and corrosive sulfuric acid.
� Warning: Battery posts, terminals and relatedaccessories contain lead and lead compounds,chemicals known to the State of California to causecancer and reproductive harm. Wash hands afterhandling.

INTRODUCTION
2572001 MY RX300_U (OM48431U)
NOTICE
� Remember that battery and ignition cables carry highcurrents or voltages. Be careful of accidentallycausing a short circuit.
� Before closing the engine hood, check to see that youhave not forgotten any tools, rags, etc.
� Do not drive with the air cleaner removed, orexcessive engine wear could result. Also backfiringcould cause a fire in the engine compartment.
� Do not overfill automatic transmission fluid, or thetransmission could be damaged.
� Be careful not to scratch the glass surface with thewiper frame.
PARTS AND TOOLSHere is a list of parts and tools you will need to performdo–it–yourself maintenance. Remember all Lexus parts aredesigned in metric sizes, so your tools must be metric.
Checking the engine oil levelParts (if level is low):
� Use API SJ, “Energy–Conserving” multigrade engine oil orILSAC multigrade engine oil. For recommended oilviscosity, see page 269.
Tools:
� Rag or paper towel
� Funnel (only for adding oil)
Checking the engine coolant levelParts (if level is low):
� “Toyota Long Life Coolant” or equivalentSee “Checking the engine coolant level” on page 270 forinstructions.
� Demineralized or distilled water
Tools:
� Funnel (only for adding coolant)

INTRODUCTION
258 2001 MY RX300_U (OM48431U)
Checking brake fluidParts (if level is low):
� FMVSS No. 116 DOT 3 or SAE J1703 brake fluid
Tools:
� Funnel (only for adding fluid)
Checking power steering fluidParts (if level is low):
� Automatic transmission fluid DEXRON�II or III
Tools:
� Rag or paper towel
� Funnel (only for adding fluid)
Checking battery conditionTools:
� Warm water
� Baking soda
� Grease
� Conventional wrench (for terminal clamp bolts)
Checking and replacing the blade type fusesParts (if replacement is necessary):
� Fuse with same amperage rating as original
Checking the cartridge type fusesParts (if replacement is necessary):
� Genuine Lexus fuse or equivalent with same amperagerating as original
Adding washer fluidParts:
� Water
� Washer fluid containing antifreeze (for winter use)
Tools:
� Funnel

INTRODUCTION
2592001 MY RX300_U (OM48431U)
POSITIONING THE JACK
61R010
�Front
61R011
�Rear (two–wheel drive models)
61R018
�Rear (four–wheel drive models)
When jacking up your vehicle with the jack, position thejack correctly as shown in the illustrations.
CAUTION
When jacking, be sure to observe the following toreduce the possibility of personal injury:
� Follow jacking instructions.
� Do not put any part of your body under the vehiclesupported by the jack. Personal injury may occur.
� Do not start or run the engine while your vehicle issupported by the jack.
� Stop the vehicle on a level firm ground, firmly set theparking brake and put the transmission in “P”. Blockthe wheels on the opposite side of the jack up pointif necessary.

INTRODUCTION
260 2001 MY RX300_U (OM48431U)
� Make sure to set the jack properly in the jack point.Raising the vehicle with jack improperly positionedwill damage the vehicle or may allow the vehicle to falloff the jack and cause personal injury.
� Never get under the vehicle when the vehicle issupported by the jack alone; use vehicle supportstands.
� Do not raise the vehicle with someone in the vehicle.
� When raising the vehicle, do not put an object on orunder the jack.
NOTICE
Make sure to place the jack correctly, or your vehiclemay be damaged.

SECTION 6 – 2
2612001 MY RX300_U (OM48431U)
SERVICE PROCEDURES ANDSPECIFICATIONSEngineSpecifications 262. . . . . . . . . . . . . . . . . . . . . . . . . . . . . . . . . . . . . . . . . . . Fuel 264. . . . . . . . . . . . . . . . . . . . . . . . . . . . . . . . . . . . . . . . . . . . . . . . . . . . Fuel pump shut off system 266. . . . . . . . . . . . . . . . . . . . . . . . . . . . . . . . Facts about engine oil consumption 266. . . . . . . . . . . . . . . . . . . . . . . . Used engine oil 267. . . . . . . . . . . . . . . . . . . . . . . . . . . . . . . . . . . . . . . . . . Checking the engine oil level 268. . . . . . . . . . . . . . . . . . . . . . . . . . . . . . Checking the engine coolant level 270. . . . . . . . . . . . . . . . . . . . . . . . . . Spark plugs 272. . . . . . . . . . . . . . . . . . . . . . . . . . . . . . . . . . . . . . . . . . . . .

62L005–1
Temperature range anticipated before next oil change
ENGINE
262 2001 MY RX300_U (OM48431U)
SPECIFICATIONS– GENERAL
ModelTypeBore and strokeDisplacementValve clearance (engine cold)
IntakeExhaust
Drive belt tension (with Borroughs drive belt tension gaugeNo. BT–33–73F)
1MZ – FE6 cylinder V type, 4 cycle, gasoline87.5 � 83 mm (3.44 � 3.27 in.)2995 cm3 (182.7 cu.in.)
0.15 – 0.25 mm (0.006 – 0.010 in.)0.25 – 0.35 mm (0.010 – 0.014 in.)115 � 20 lb.
– LUBRICATION SYSTEM
Oil capacityDrain and refill
with filterwithout filter
Oil grade
Recommended oil viscosity (SAE):
4.7 L (5.0 qt., 4.1 lmp.qt.)4.5 L (4.8 qt., 4.0 lmp.qt.)API SJ, “Energy–Conserving” multigrade engine oil orILSAC multigrade engine oil

ENGINE
2632001 MY RX300_U (OM48431U)
– COOLING SYSTEM
CapacityCoolant type
9.0 L (9.5 qt., 7.9 lmp.qt.)“Toyota Long Life Coolant” or equivalentWith ethylene–glycol type coolant for a proper corrosionprotection of aluminum componentsDo not use alcohol type antifreeze or plain water alone.
– FUEL
Fuel typeOctane Rating
Only UNLEADED87 (Research Octane Number 91) or higher
– IGNITION SYSTEM
Spark plug – Make DENSONGK
– Gap
SK20R11IFR6A111.1 mm (0.043 in.)
– ELECTRICAL SYSTEM
Battery Open voltage at 20�C (68�F):
Charging rates
12.7V Fully charged12.3V Half charged11.9V Discharged[Voltage that is checked 20 minutes after the key is removedwith all the lights turned off]5A max.

ENGINE
264 2001 MY RX300_U (OM48431U)
FUEL
Fuel typeYour vehicle must use only unleaded gasoline.
To help prevent gas station mixups, your Lexus has a smallerfuel tank opening. The special nozzle on pumps with unleadedfuel will fit it, but the larger standard nozzle on pumps withleaded gas will not.
At a minimum, the gasoline you use should meet thespecifications of ASTM D4814 in the U.S.A. and CGSB3.5–M93 in Canada.
NOTICE
Do not use leaded gasoline. Use of leaded gasoline willcause the three–way catalytic converter to lose itseffectiveness and the emission control system tofunction improperly. Also, this can increasemaintenance costs.
Octane ratingSelect Octane Rating 87 (Research Octane Number 91) orhigher. For improved vehicle performance, the use ofpremium unleaded gasoline with an Octane Rating of 91(Research Octane Number 96) or higher is recommended.
Use of unleaded fuel with an Octane Rating or ResearchOctane Number lower than stated above will cause persistentheavy knocking. If it is severe, this will lead to engine damage.
If your engine knocks ...
If you detect heavy knocking even when using therecommended fuel, or if you hear steady knocking whileholding a steady speed on level roads, consult your Lexusdealer.
However, now and then, you may notice light knocking for ashort time while accelerating or driving up hills. This is nocause for concern.
Gasoline containing detergent additivesLexus recommends the use of gasoline that containsdetergent additives to avoid build–up of engine deposits.
However, all gasoline sold in the U.S. contains detergentadditives to keep clean and/or clean intake systems.
Quality gasolineAutomotive manufacturers in the U.S., Europe and Japanhave developed a specification for quality fuel namedWorld–Wide Fuel Charter (WWFC) that is expected to beapplied world wide. The WWFC consists of threecategories that depend on required emission levels. In theU.S., category 3 has been adopted. The WWFC improvesair quality by providing for better emissions in vehiclefleets, and customer satisfaction through better vehicleperformance.

ENGINE
2652001 MY RX300_U (OM48431U)
Cleaner burning gasoline Cleaner burning gasoline, including reformulatedgasoline that contains oxygenates such as ethanol orMTBE is available in many areas.
Lexus recommends the use of cleaner burning gasoline andappropriately blended reformulated gasoline. These types ofgasoline provide excellent vehicle performance, reducevehicle emissions, and improve air quality.
Oxygenates in gasolineLexus allows the use of oxygenate blended gasolinewhere the oxygenate content is up to 10% ethanol or 15%MTBE. If you use gasohol in your Lexus, be sure that it hasan octane rating no lower than 87.
Lexus does not recommend the use of gasoline containingmethanol.
Sulfur in gasolineIf your vehicle is certified to California EmissionRegulation, the vehicle is designed to operate onCalifornia cleaner burning gasoline (CBG) that containslower sulfur. If you cannot use California CBG, youremission control system may suffer damage and turn onthe Malfunction Indicator Lamp.
If the malfunction is caused by the type of fuel used, repairsmay not be covered by your warranty.
Gasoline containing MMTSome gasoline contain an octane enhancing additivecalled MMT (Methylcyclopentadienyl ManganeseTricarbonyl).
Lexus does not recommend the use of gasoline that containsMMT. If fuel containing MMT is used, your emission controlsystem may be adversely affected. The Malfunction IndicatorLamp on the instrument cluster may come on. If this happens,contact your Lexus dealer for service.
Gasoline qualityIn a very few cases, you may experience driveability problemscaused by the particular gasoline that you are using. If youcontinue to have unacceptable driveability, try changinggasoline brands. If this does not rectify your problem, thenconsult your Lexus dealer.
NOTICE
� Do not use gasohol other than stated above. It willcause fuel system damage or vehicle performanceproblems.
� If drivability problems are encountered (poor hotstarting, vaporizing, engine knock, etc.), discontinueits use.

ENGINE
266 2001 MY RX300_U (OM48431U)
� Take care not to spill gasohol during refueling.Gasohol may cause paint damage.
Fuel tank capacity75 L (19.8 gal., 16.5 lmp.gal.)
FUEL PUMP SHUT OFF SYSTEMThe fuel pump shut off system stops supplying fuel to theengine to minimize the risk of fuel leakage when the enginestalls or an airbag inflates upon collision. To restart the engineafter the fuel pump shut off system activates, turn the ignitionswitch to “ACC” or “LOCK” once and start it.
CAUTION
Inspect the ground under the vehicle before restartingthe engine. If you find that liquid has leaked onto theground, it is the fuel system has been damaged and it isin need of repair. In this case, do not restart the engine.
FACTS ABOUT ENGINE OILCONSUMPTION
Functions of engine oilEngine oil has the primary function of lubricating and coolingthe inside of the engine, and plays a major role in maintainingthe engine in proper working order.
Engine oil consumptionIt is normal that an engine should consume some engineoil during normal engine operation. The causes of oilconsumption in a normal engine are as follows.
� Oil is used to lubricate pistons, piston rings and cylinders.A thin film of oil is left on the cylinder wall when a pistonmoves downwards in the cylinder. High negative pressuregenerated when the vehicle is decelerating sucks some ofthis oil into the combustion chamber. This oil as well assome part of the oil film left on the cylinder wall is burned bythe high temperature combustion gases during thecombustion process.
� Oil is also used to lubricate the stems of the intake valves.Some of this oil is sucked into the combustion chambertogether with the intake air and is burned along with the fuel.High temperature exhaust gases also burn the oil used tolubricate the exhaust valve stems.

ENGINE
2672001 MY RX300_U (OM48431U)
The amount of engine oil consumed depends on theviscosity of the oil, the quality of the oil and the way thevehicle is driven.
More oil is consumed under driving conditions such as highspeeds and frequent acceleration and deceleration.
A new engine consumes more oil, since its pistons, piston ringsand cylinder walls have not become conditioned.
When judging the amount of oil consumption, keep inmind that the oil may have become diluted, making itdifficult to judge the true level accurately.
For example, if a vehicle is used for repeated short trips andconsumes a normal amount of oil, the dipstick may not showany drop in the oil level at all, even after 1000 km (600 miles)or more. This is because the oil is gradually becoming dilutedwith fuel or moisture, making it appear that the oil level has notchanged.
The diluting ingredients evaporate out when the vehicle is thendriven at high speeds, as on an expressway, making it appearthat oil is excessively consumed after driving at high speeds.
Importance of engine oil level checkOne of the most important points in proper vehiclemaintenance is to keep the engine oil at the optimum level sothat oil function will not be impaired. Therefore, it is essentialthat the oil level be checked regularly. Lexus recommends thatthe oil level be checked every time you refuel the vehicle.
NOTICE
Failure to check the oil level regularly could lead toserious engine trouble due to insufficient oil.
For detailed information on oil level check, see “Checking theengine oil level” on page 268.
USED ENGINE OIL
CAUTION
� Used engine oil contains potentially harmfulcontaminants which may cause skin disorders suchas inflammation or skin cancer, so care should betaken to avoid prolonged and repeated contact withit. To remove used engine oil from your skin, washthoroughly with soap and water.
� Do not leave used oil within the reach of children.
� Dispose of used oil and used oil filters only in a safeand acceptable manner. Do not dispose of used oiland used oil filters in household trash, in sewers oronto the ground. Call your Lexus dealer or a servicestation for information concerning recycling ordisposal.

ENGINE
268 2001 MY RX300_U (OM48431U)
CHECKING THE ENGINE OIL LEVEL
62R042
With the engine at operating temperature and turned off,check the oil level on the dipstick.
1. To get a true reading, the vehicle should be on a level spot.After turning off the engine, wait a few minutes for the oil todrain back into the bottom of the engine.
2. Pull out the dipstick, and wipe it clean with a rag.
3. Reinsert the dipstick and push it in as far as it will go, or thereading will not be correct.
62e002a
� 1 Add oil 2 O.K. 3 Too full
4. Pull the dipstick out and look at the oil level on the end. Ifit is between the low level mark ( 4 ) and the full level mark( 5 ), it is O.K.

ENGINE
2692001 MY RX300_U (OM48431U)
62R003b
If the oil level is below or only slightly above the low mark,add engine oil of the same type as already in the engine.
Remove the oil filler cap and add engine oil a little at a time,checking the dipstick. The approximate quantity of oil neededto fill between the low level mark and the full level mark on thedipstick is indicated below for reference.
When the level reaches within the correct range, return thefiller cap and turn the cap clockwise until you hear a click.
Oil quantity. L (qt., lmp. qt.) 1.5 (1.6, 1.3)
NOTICE
Avoid overfilling, or the engine could be damaged.Check the oil level on the dipstick once again afteradding the oil.
Engine oil selectionUse API SJ, “Energy–Conserving” multigrade engine oil orILSAC multigrade engine oil.
Recommended viscosity (SAE):
62L005
Temperature range anticipated before next oil change
SAE 5W–30 is the best choice for your vehicle, for goodfuel economy, and good starting in cold weather.
If you use SAE 10W–30 engine oil in extremely lowtemperatures, the engine may become difficult to start, soSAE 5W–30 engine oil is recommended.

ENGINE
270 2001 MY RX300_U (OM48431U)
Oil identification marks
62L006
�API Service Symbol �ILSAC Certification Mark
Either or both API registered marks are added to some oilcontainers to help you select the oil you should use.
� The API Service Symbol is located anywhere on the outsideof the container.
The top portion of the label shows the oil quality by API(American Petroleum Institute) designation such as SJ.The center portion of the label shows the SAE viscositygrade such as SAE 5W–30. “Energy–Conserving”, shownin the lower portion, indicates that the oil has fuel–savingcapabilities.
� The ILSAC (International Lubricant Standardization andApproval Committee) Certification Mark is displayed on thefront of the container.
CHECKING THE ENGINE COOLANTLEVEL
62R043
� 1 Reservoir cap 2 Upper line 3 Lower line
Look at the see–through coolant reservoir when theengine is cold. The coolant level is satisfactory if it isbetween the “F” and “L” lines on the reservoir. If the levelis low, add ethylene–glycol type coolant for a propercorrosion protection of aluminum components.
The coolant level in the reservoir will vary with enginetemperature. However, if the level is on or below the “L” line,add coolant. Bring the level up to the “F” line.
Always use ethylene–glycol type coolant for a proper corrosionprotection of aluminum components. See information in thenext column.

ENGINE
2712001 MY RX300_U (OM48431U)
If the coolant level drops within a short time after replenishing,there may be a leak in the system. Visually check the radiator,hoses, engine coolant filler cap, radiator cap and drain cockand water pump.
If you can find no leak, have your Lexus dealer test the radiatorcap pressure and check for leaks in the cooling system.
CAUTION
To prevent burning yourself, do not remove the radiatorcap when the engine is hot.
Coolant type selectionUse of improper coolants may damage your engine coolingsystem. Your coolant must contain ethylene–glycol typecoolant for a proper corrosion protection of your engine thatcontains aluminum components. Use “Toyota Long LifeCoolant” or equivalent.
In addition to preventing freezing and subsequent damage tothe engine, this type of coolant will also prevent corrosion.Further supplemental inhibitors or additives are neitherneeded nor recommended.
Read the coolant container for information on freezeprotection. Follow the manufacturer’s directions for how muchto mix with plain water (preferably demineralized water ordistilled water). The total capacity of the cooling system isgiven on page 263.
We recommend to use 50% solution for your Lexus, to provideprotection down to about –35�C (–31�F). When it is extremelycold, to provide protection down to about –50�C (–58�F), 60%solution is recommended. Do not use more than 70% solutionfor better coolant performance.
NOTICE
Do not use alcohol type antifreeze or plain water alone.

ENGINE
272 2001 MY RX300_U (OM48431U)
SPARK PLUGS
62R031c
Your engine is fitted with iridium–tipped spark plugs.
NOTICE
Use only iridium–tipped spark plugs and do not adjustgaps for your engine performance and smoothdrivability.

SECTION 6 – 3
2732001 MY RX300_U (OM48431U)
SERVICE PROCEDURES ANDSPECIFICATIONSChassisSpecifications 274. . . . . . . . . . . . . . . . . . . . . . . . . . . . . . . . . . . . . . . . . . . Checking brake fluid 277. . . . . . . . . . . . . . . . . . . . . . . . . . . . . . . . . . . . . . Checking power steering fluid 278. . . . . . . . . . . . . . . . . . . . . . . . . . . . . Checking tire pressure 279. . . . . . . . . . . . . . . . . . . . . . . . . . . . . . . . . . . . Rotating tires 280. . . . . . . . . . . . . . . . . . . . . . . . . . . . . . . . . . . . . . . . . . . . Checking and replacing tires 280. . . . . . . . . . . . . . . . . . . . . . . . . . . . . . Installing snow tires and chains 283. . . . . . . . . . . . . . . . . . . . . . . . . . . . Replacing wheels 285. . . . . . . . . . . . . . . . . . . . . . . . . . . . . . . . . . . . . . . . Aluminum wheel precautions 285. . . . . . . . . . . . . . . . . . . . . . . . . . . . . . Suspension and chassis 286. . . . . . . . . . . . . . . . . . . . . . . . . . . . . . . . . .

CHASSIS
274 2001 Y RX300_U (OM48431U)
SPECIFICATIONS– TRANSFER
Oil capacityOil typeRecommended oil viscosity
0.9 L (1.0 qt., 0.8 Imp.qt.)Hypoid gear oil API GL–5Above –18�C (0�F) SAE 90Below –18�C (0�F) SAE 80W or 80W–90
– AUTOMATIC TRANSAXLE
Fluid capacityDrain and refill
Two–wheel drive modelsFour–wheel drive models
Fluid type
3.1 L (3.3 qt., 2.7 lmp.qt.)3.9 L (4.1 qt., 3.4 lmp.qt.)Automatic transmission fluid Type T–IV*
*Change automatic transmission fluid only as necessary.Generally, it is necessary to change automatic transmissionfluid only if your vehicle is driven under one of the SpecialOperating Conditions listed in your “Owner ’s ManualSupplement / Maintenance Schedule”. When changing theautomatic transmission fluid, use only Toyota Genuine ATFType T–IV (ATF JWS3309 or NWS6500) to aid in assuringoptimum transaxle performance.
NOTICE
Using automatic transmission fluid other than ToyotaGenuine ATF T ype T–IV may cause deterioration in shiftquality, locking up of your transmission accompaniedby vibration, and ultimately damage the automatictransmission of your vehicle.

CHASSIS
2752001 MY RX300_U (OM48431U)
– DIFFERENTIAL
Oil capacityOil typeRecommended oil viscosity
0.9 L (1.0 qt., 0.8 Imp. qt.)Hypoid gear oil API GL–5Above –18�C (0�F) SAE 90Below –18�C (0�F) SAE 80W or 80W–90
– BRAKES
Pedal clearancePedal free playBrake pad wear limitParking brake lining wear limitParking brake adjustmentFluid type
122 mm (5.0 in.) Min. *1
1 – 6 mm (0.04 – 0.24 in.)1.0 mm (0.04 in.)1.0 mm (0.04 in.)5 – 7 clicks *2
SAE J1703 or FMVSS No. 116 DOT 3
*1: Minimum pedal clearance when depressed with the pressure of 490 N (50 kgf, 110 lbf.) with the engine running*2: Parking brake adjustment when depressed with the pressure of 294 N (30 kgf, 66 lbf.)
– STEERING
Wheel free playPower steering fluid type
Less than 30 mm (1.2 in.)Automatic transmission fluid DEXRON�II or III

CHASSIS
276 2001 Y RX300_U (OM48431U)
– TIRES AND WHEELS
Tire sizeRecommended cold tire inflation pressure
Vehicle loaded up to vehicle capacity weightSpare tireTrailer towing (conventional and snow tires)
Wheel sizeWheel nut torque
P225/70R16 101S
210 kPa (2.1 kgf/cm2 or bar, 30 psi) (Both front and rear)210 kPa (2.1 kgf/cm2 or bar, 30 psi)210 kPa (2.1 kgf/cm2 or bar, 30 psi) (Both front and rear)
For sustained high speeds above 160 km/h (100 mph), incountries where such speeds are permitted by law, add 30kPa (0.3 kgf/cm2 or bar, 5 psi) to the front tires and reartires, but never exceed the maximum cold tire pressuremolded on the tire sidewall.
16 � 6.5 JJ103 N·m (10.5 kgf·m, 76 ft·lbf.)
NOTE: For complete information on tires (e.g. replacing tires or replacing wheels), see “Checking tire pressure” through “Aluminumwheel precautions” on page 279 through 285.

CHASSIS
2772001 MY RX300_U (OM48431U)
CHECKING BRAKE FLUID
63R007
To check the fluid level, simply look at the see–throughreservoir. The level should be between the “MAX” and“MIN” lines on the tank.
It is normal for the brake fluid level to go down slightly as thebrake pads wear. So be sure to keep the reservoir filled.
If the reservoir needs frequent refilling, it may indicate aserious mechanical problem.
If the level is low, add FMVSS No.116 DOT 3 or SAE J1703brake fluid to the brake reservoir.
Remove and replace the reservoir cap by hand. Add brakefluid up to the “MAX” line.
Use only newly opened brake fluid. Once opened, brake fluidabsorbs moisture from the air, and excess moisture can causea dangerous loss of braking efficiency.
CAUTION
Take care when filling the reservoir because brake fluidcan harm your hands or eyes and damage paintedsurfaces. If fluid gets in your eyes, flush your eyes withclean water immediately. If you still feel uncomfortablewith your eyes, go to the doctor.
NOTICE
If you spill some of the fluid, be sure to wipe it off toprevent it from damaging the parts or paintwork.

CHASSIS
278 2001 Y RX300_U (OM48431U)
CHECKING POWER STEERINGFLUID
63R013
Check the fluid level through the reservoir. If necessary,add automatic transmission fluid DEXRON �II or III .
If the vehicle has been driven around 80 km/h (50 mph) for 20minutes (a little more in frigid temperatures), the fluid is hot(60�C – 80�C or 140�F – 175�F). You may also check the levelwhen the fluid is cold (about room temperature, 10�C – 30�Cor 50�F – 85�F) if the engine has not been run for about fivehours.
63R014
� 1 If hot O.K. 2 If hot add 3 If cold O.K. 4 If cold add
Clean all dirt off the reservoir and look at the fluid level. If thefluid is cold, the level should be in the “COLD” range. Similarly,if it is hot, the fluid level should be in the “HOT” range. If thelevel is at the low side of the appropriate range, add automatictransmission fluid DEXRON�II or III to bring the level withinthe range.
To remove the reservoir cap, turn it counterclockwise and liftup. To reinstall it, turn it clockwise. After replacing the reservoircap, visually check the steering box case, vane pump and hoseconnections for leaks or damage.
CAUTION
The reservoir may be hot so be careful not to burnyourself.

CHASSIS
2792001 MY RX300_U (OM48431U)
NOTICE
Avoid overfilling, or the power steering could bedamaged.
CHECKING TIRE PRESSURE
63R015
The recommended cold tire pressures, tire size and thevehicle capacity weight are given on the label.
You should check the tire pressures every two weeks, or atleast once a month. And don’t forget the spare! The airpressure for the spare tire should be 210 kPa (2.1 kgf/cm2 orbar, 30 psi). Incorrect tire pressure can reduce tire life andmake your vehicle less safe to drive.
Low tire pressure results in excessive wear, poor handling,reduced fuel economy, and the possibility of blowouts fromoverheated tires. Also, low tire pressure can cause poorsealing of the tire bead. If the tire pressure is excessively low,there is the possibility of wheel deformation and/or tireseparation. So keep your tire pressures at the proper level.If a tire needs frequent refilling, have it checked by your Lexusdealer.
High tire pressure produces a harsh ride, handling problems,excessive wear at the center of the tire tread, and a greaterpossibility of tire damage from road hazards.
The following instructions for checking tire pressure should beobserved:
� The pressure should be checked only when the tires arecold. If your vehicle has been parked for at least 3 hoursand has not been driven for more than 1.5 km or 1 milesince, you will get an accurate cold tire pressure reading.
� Always use a tire pressure gauge. The appearance of thetire can be misleading. Besides, tire pressures that areeven just a few pounds off can degrade ride and handling.
� Do not bleed or reduce tire pressure after driving. It isnormal for the tire pressure to be higher after driving.
� Never exceed the vehicle capacity weight. Thepassengers and luggage weight should be located so thatthe vehicle is balanced.
� Be sure to reinstall the tire valve caps. Without the valvecaps, dirt or moisture could get into the valve core andcause air leakage. If the caps have been lost, have newones put on as soon as possible.

CHASSIS
280 2001 Y RX300_U (OM48431U)
ROTATING TIRES
61R005
To equalize the wear and help extend tire life, Lexusrecommends that you rotate your tires according to themaintenance schedule. (For scheduled maintenanceinformation, please refer to the “Owner ’s ManualSupplement / Maintenance Schedule”.) However, themost appropriate timing for tire rotation may varyaccording to your driving habits and road surfaceconditions.
The wheel assemblies must be rotated as illustrated above.
When rotating tires, check for uneven wear and damage.Abnormal wear is usually caused by incorrect tire pressure,improper wheel alignment, out–of balance wheels, or severebraking.
Before storing radial, snow or studded tires, mark the directionof rotation and be sure to install them in the same directionwhen using them again. Tires should be stored in a cool dryplace.
CHECKING AND REPLACING TIRES
When to replace your tires
63R006
� 1 New tread 2 Tread wear indicator 3 Worn tread
Replace the tires when the tread wear indicators show.The location of the tread wear indicators is shown by themarks such as “TWI” or “ ∆” marks molded on the sidewallof each tire.
The tires on your Lexus have built–in tread wear indicators tohelp you know when the tires need replacement. When thetread depth wears to 1.6 mm (0.06 in.) or less, the indicatorswill appear. If you can see the indicators in two or moreadjacent grooves, the tire should be replaced.
The effectiveness of snow tires is lost if the tread wearsdown below 4 mm (0.16 in.).

CHASSIS
2812001 MY RX300_U (OM48431U)
If you have tire damage such as cuts, splits, cracks deepenough to expose the fabric, or bulges indicating internaldamage, the tire should be replaced.
If a tire often goes flat or cannot be properly repaired due to thesize or location of a cut or other damage, it should be replaced.If you are not sure, consult with your Lexus dealer.
If an air loss occurs while driving, do not continue driving witha deflated tire. Driving even a short distance can damage a tirebeyond repair.
Any tires which are over 6 years old must be checked bya qualified technician even if damage is not obvious.
Tires deteriorate with age even if they have never or seldombeen used.
This also applies to the spare tire and tires stored for futureuse.
Uniform tire quality gradingThis information has been prepared in accordance withregulations issued by the National Highway T raffic SafetyAdministration of the U.S. Department of Transportation.It provides the purchasers and/or prospective purchasersof Lexus vehicles with information on uniform tire qualitygrading.
Your Lexus dealer will help answer any questions you mayhave as you read this information.
DOT quality grades – All passenger vehicle tires mustconform to Federal Safety Requirements in addition tothese grades. Quality grades can be found whereapplicable on the tire sidewall between tread shoulder andmaximum section width. For example: Treadwear 200Traction AA Temperature A
Treadwear – The treadwear grade is a comparative ratingbased on the wear rate of the tire when tested under controlledconditions on a specified government test course. Forexample, a tire graded 150 would wear one and a half (1 – 1/2)times as well on the government course as a tire graded 100.The relative performance of tires depends upon the actualconditions of their use, however, and may depart significantlyfrom the norm due to variations in driving habits, servicepractices and differences in road characteristics and climate.
Traction AA, A, B, C – The traction grades, from highest tolowest, are AA, A, B and C, and they represent the tire’s abilityto stop on wet pavement as measured under controlledconditions on specified government test surfaces of asphaltand concrete. A tire marked C may have poor tractionperformance.

CHASSIS
282 2001 Y RX300_U (OM48431U)
Warning: The traction grade assigned to this tire is based onbraking (straight ahead) traction tests and does not includecornering (turning) traction.
Temperature A, B, C – The temperature grades are A (thehighest), B, and C, representing the tire’s resistance to thegeneration of heat and its ability to dissipate heat when testedunder controlled conditions on a specified indoor laboratorytest wheel. Sustained high temperature can cause thematerial of the tire to degenerate and reduce tire life, andexcessive temperature can lead to sudden tire failure. Thegrade C corresponds to a level of performance which allpassenger car tires must meet under the Federal MotorVehicle Safety Standard No. 109. Grades B and A representhigher levels of performance on the laboratory test wheel thanthe minimum required by law.
Warning: The temperature grades for this tire are establishedfor a tire that is properly inflated and not overloaded.Excessive speed, underinflation, or excessive loading, eitherseparately or in combination, can cause heat buildup andpossible tire failure.
Tire selectionTwo–wheel drive models – When replacing a tire, use onlythe same size and construction as originally installed andwith the same or greater load capacity.
Four–wheel drive models – When replacing tires, makesure all the tires are the same brand. Only use the samesize and construction as the originally installed tires, withthe same or greater load capacity.
Using any other size or type of tire may seriously affecthandling, ride, speedometer/odometer calibration, groundclearance, and clearance between the body and tires or snowchains.
Do not mix radial, belted, or conventional tires on yourvehicle.
Do not use tires or wheels other than the manufacturer’srecommended size.
It can cause dangerous handling characteristics, resulting inloss of control. If you need to change from conventional tiresto radial tires or vice versa, replace them as a set.
NOTICE
Four–wheel drive models:Do not use tires of different brands, sizes andconstructions. This may damage the drive system.

CHASSIS
2832001 MY RX300_U (OM48431U)
INSTALLING SNOW TIRES ANDCHAINS
When to use snow tires or chainsSnow tires or chains are recommended when driving onsnow or ice.
On wet or dry roads, conventional or radial tires provide bettertraction than snow or studded tires.
Snow tire selectionIf you need snow tires, select the same size, constructionand load capacity as the original tires on your Lexus.
Do not use tires other than stated above. Since your vehiclehas radial tires as original equipment, make sure your snowtires also have radial construction. Do not install studded tireswithout first checking local regulations for possible restrictions.
NOTICE
Four–wheel drive models:Do not use tires of different brands, sizes andconstructions. This may damage the drive system.
Snow tire installationSnow tires should be installed on all wheels.
Installing snow tires on the front wheels only can lead to anexcessive difference in road grip capability between the frontand rear tires which could cause loss of vehicle control.
CAUTION
� Snow tires should be inflated to the same pressure asthe original tires.
� Never drive over 120 km/h (75 mph) with any type ofsnow tires.

CHASSIS
284 2001 Y RX300_U (OM48431U)
Tire chain selection
63r007a
� 1 Side chain 2 Cross chain
Use the tire chains of correct size.
For P225/70R16 101S tires, use the following type chains.
mm (in.)
A: Diameter of side chain 3.0 (0.12)
B: Width of side chain 10.0 (0.39)
C: Length of side chain 30.0 (1.18)
D: Width of cross chain 14.0 (0.55)
E: Length of cross chain 25.0 (0.98)
F: Diameter of cross chain 4.0 (0.16)
Regulations regarding the use of tire chains varyaccording to location or type of road. Always check thelocal regulations before installing chains.
NOTICE
If the wrong combination of tire and chain is used, thechains could damage the vehicle body.
Chain installationInstall the chains on the front tires as tightly as possible.Do not use tire chains on the rear tires. Retighten chainsafter driving 0.5 – 1.0 km (1/4 – 1/2 mile).
When installing chains on your tires, carefully follow theinstructions of the chain manufacturer.
CAUTION
� Do not exceed 50 km/h (30 mph) or the chainmanufacturer’s recommended speed limit,whichever is lower.
� Drive carefully avoiding bumps, holes, and sharpturns, which may cause the vehicle to bounce.
� Avoid sharp turns or locked–wheel braking, as use ofchains may adversely affect vehicle handling.
� When driving with chains installed, be sure to drivecarefully. Slow down before entering the curves toavoid losing control of the vehicle. Otherwise anaccident may occur.

CHASSIS
2852001 MY RX300_U (OM48431U)
REPLACING WHEELS
When to replace your wheelsIf you have wheel damage such as bending, cracks orheavy corrosion, the wheel should be replaced.
If you fail to replace damaged wheels, the tire may slip off thewheel or cause loss of handling control.
Replacement with used wheels is not recommended as theymay have been subjected to rough treatment or high mileageand could fail without warning. Also, bent wheels which havebeen straightened may have hidden structural damage andtherefore should not be used. Never use an inner tube in aleaking wheel which is designed for a tubeless tire.
Wheel selectionWhen replacing wheels, care should be taken to ensurethat they are equivalent to those removed in load capacity,diameter, rim width, and offset.
Correct replacement wheels are available at your Lexusdealer.
A wheel of a different size or type may adversely affecthandling, wheel and bearing life, brake cooling,speedometer/odometer calibration, stopping ability, headlightaim, bumper height, vehicle ground clearance, and tire or snowchain clearance to the body and chassis.
NOTICE
Four–wheel drive models:Do not use wheels of different brands, sizes andconstructions. This may damage the drive system.
ALUMINUM WHEEL PRECAUTIONS� When installing aluminum wheels, check that the wheel
nuts are tight after driving your vehicle the first 1600 km(1000 miles).
� If you have rotated, repaired, or changed your tires, checkthat the wheel nuts are still tight after driving 1600 km (1000miles).
� When using tire chains, be careful not to damage thealuminum wheels.
� Use only the Lexus wheel nuts and wrench designed foryour aluminum wheels.
� When balancing your wheels, use only Lexus balanceweights or equivalent and a plastic or rubber hammer.
� As with any wheel, periodically check your aluminumwheels for damage. If damaged, replace immediately.

CHASSIS
286 2001 Y RX300_U (OM48431U)
SUSPENSION AND CHASSIS
CAUTION
Do not modify the suspension/chassis with lift kits,spacers, springs, etc. It can cause dangerous handlingcharacteristics, resulting in loss of control.

SECTION 6 – 4
2872001 MY RX300_U (OM48431U)
SERVICE PROCEDURES ANDSPECIFICATIONSElectrical componentsSpecifications 288. . . . . . . . . . . . . . . . . . . . . . . . . . . . . . . . . . . . . . . . . . . Checking battery condition 291. . . . . . . . . . . . . . . . . . . . . . . . . . . . . . . . Battery recharging precautions 294. . . . . . . . . . . . . . . . . . . . . . . . . . . . Checking and replacing the blade type fuses 294. . . . . . . . . . . . . . . . Checking the cartridge type fuses 297. . . . . . . . . . . . . . . . . . . . . . . . . . Adding washer fluid 298. . . . . . . . . . . . . . . . . . . . . . . . . . . . . . . . . . . . . . Checking the headlight aim 299. . . . . . . . . . . . . . . . . . . . . . . . . . . . . . . . Replacing light bulbs 300. . . . . . . . . . . . . . . . . . . . . . . . . . . . . . . . . . . . .

ELECTRICAL COMPONENTS
288 2001 MY RX300_U (OM48431U)
SPECIFICATIONS– FUSE LOCATIONS
64R032
� 1 2 Engine compartment 3 Driver’s side instrument panel
– FUSES
64R003
�Engine compartment
64R098
�Engine compartment

ELECTRICAL COMPONENTS
2892001 MY RX300_U (OM48431U)
64R099
�Driver’s side instrument panel
No. FUSE AMPERE CIRCUIT
1 DRL 7.5 Daytime Running Light System
2 TOWING 20 Trailer lights
3 H–LP R
LWR 15Right–hand headlight (Low beam)
4 H–LP L
LWR 15Left–hand headlight (Low beam)
5 HAZARD 15 Emergency flashers, Turnsignal lights
6 AM2 20 Starting system
7 TEL 15 Telephone
8 FL DOOR 20 Power door lock system
9 SPARE 7.5 Spare fuse
10 SPARE 15 Spare fuse
11 SPARE 25 Spare fuse
12 ALT–S 7.5 Charging system
13 HORN 10 Theft deterrent system, Horn
14 EFI 20Multiport fuel injectionsystem/Sequential multiport fuelinjection system
15 DOME 10Interior light, Vanity lights, Footlights, Rear personal light,Gauges and meters,Multi–display
16 ECU–B 7.5 Multiplex computer
17 RAD NO.1 25 Audio system

ELECTRICAL COMPONENTS
290 2001 MY RX300_U (OM48431U)
No. FUSE AMPERE CIRCUIT
18 ABS 3 7.5 Anti–lock brake system
19 H–LP R
UPR 15Right–hand headlight (high beam)
20 H–LP L
UPR 15Left–hand headlight (high beam)
21 A/F HTR 25 Air fuel ratio sensor
22 IGN 7.5SRS system, Multiport fuelinjection/Sequential multiportfuel injection system
23 RADIONO.2 7.5
Audio system, Multiplexcomputer
24 CIG 15Cigarette lighter, Outside rearview mirrors, Power door locksystem
25 D RR
DOOR 20Rear door lock, Rear powerwindow
26 PWR
OUTLET 15Power outlets
27 FR FOG 15 Fog lights
28 SRS–IG 15 SRS system
29 ECU–IG 15Telephone, Inside rear viewmirror, Anti–lock brake system,Traction control system,Multi–display
30 WIPER 25 Windshield wipers
No. FUSE AMPERE CIRCUIT
31 P RR
DOOR 20Rear door lock, Rear powerwindow
32 P FR
DOOR 20Front door lock, Front powerwindow
33 S/ROOF 20 Moon roof
34 HEATER 15 Air conditioning system
35 GAUGE 7.5 Multiplex computer, Servicereminder indicators
36 RR WIP 15 Rear window wiper
37 STOP 20Stop lights, High mountedstoplight, Anti–lock brakesystem, Traction control system
38 OBD 7.5 On–board diagnosis system
39 SEAT HTR 15 Seat heater system
40 STARTER 7.5 Starting system
41 WASHER 20 Washer
42 RR FOG 7.5 No circuit
43 FR DEF 20 Rear window and outside rearview mirror defogger
44 TAIL 10Tail lights, Side marker lights,License plate lights, Parkinglights
45 PANEL 7.5 Instrument panel lights
46 ABS 60 Anti–lock brake system
47 ALT 140 Charging system

ELECTRICAL COMPONENTS
2912001 MY RX300_U (OM48431U)
No. FUSE AMPERE CIRCUIT
48 RDI 40 Cooling fan system
49 CDS 40 Cooling fan system
50 RR DEF 30 Rear window and outside rearview mirror defogger
51 HEATER 50 Blower
52 MAIN 50 Starting system
53 AM1 40 Ignition system
54 POWER 30 Power seats
CHECKING BATTERY CONDITION
Precautions
CAUTION
BATTERY PRECAUTIONS
The battery produces flammable and explosivehydrogen gas.
� Do not cause a spark by contacting the batteryterminals with tools.
� Do not smoke or light a match near the battery.
The electrolyte contains poisonous and corrosivesulfuric acid.
� Avoid contact with eyes, skin or clothes.
� Never inhale or swallow electrolyte.
� Wear protective safety glasses when working nearthe battery.
� Keep children away from the battery.
EMERGENCY MEASURES
� If electrolyte gets in your eyes, flush your eyes withclean water for at least 15 minutes and get immediatemedical attention. If possible, continue to applywater with a sponge or cloth while traveling to themedical office.

ELECTRICAL COMPONENTS
292 2001 MY RX300_U (OM48431U)
� If electrolyte gets on your skin, thoroughly wash thecontacted area. If you feel a pain or burn, get medicalattention immediately.
� If electrolyte gets on your clothes, there is apossibility of its soaking through to your skin, soimmediately take off the exposed clothing and followthe procedure above, if necessary.
� If you accidentally swallow electrolyte, drink a largequantity of water or milk. Follow with milk ofmagnesia, beaten raw egg or vegetable oil. Then goimmediately for emergency help.
� Warning: Battery posts, terminals and relatedaccessories contain lead and lead compounds,chemicals known to the State of California to causecancer and reproductive harm. Wash hands afterhandling.
Checking battery exterior
64R104
� 1 Terminals 2 Hold–down clamp
Check the battery for corroded or loose connections,cracks, or loose hold–down clamps.
1. If the battery is corroded, wash it off with a solution of warmwater and baking soda. Coat the terminals with grease toprevent further corrosion.
2. If the connections are loose, tighten the clamp bolts – but donot overtighten.
3. Tighten the hold–down clamp only enough to keep thebattery firmly in place. Overtightening may damage the batterycase.

ELECTRICAL COMPONENTS
2932001 MY RX300_U (OM48431U)
NOTICE
� Make sure the engine and all accessories are turnedoff before performing maintenance.
� When checking the battery, remove the ground cablefirst and reinstall it last.
� Be careful not to cause a short circuit with tools.
� Take care no solution gets into the battery whenwashing it.
Checking battery fluidChecking by hydrometer
64R105
Check the battery condition by the hydrometer color.
1 RED – Have the battery checked by your Lexus dealer.
2 BLUE – Good condition.
3 WHITE – Charging necessary. Have the battery checkedby your Lexus dealer.
NOTICE
Do not refill the battery with water.

ELECTRICAL COMPONENTS
294 2001 MY RX300_U (OM48431U)
BATTERY RECHARGINGPRECAUTIONS
During recharging, the battery is producing hydrogengas.
Therefore, before recharging:
1. If recharging with the battery installed on the vehicle, besure to disconnect the ground cable.
2. Make sure the power switch on the recharger is off whenconnecting the charger cables to the battery and whendisconnecting them.
CAUTION
� Always charge the battery in an unconfined area. Donot charge the battery in a garage or closed roomwhere there is not sufficient ventilation.
� Only do a slow charge (5 A or less). Charging at aquicker rate is dangerous. The battery may explodecausing personal injuries.
NOTICE
Never recharge the battery while the engine is running.Also, be sure all accessories are turned off.
CHECKING AND REPLACING THEBLADE TYPE FUSES
64R053
�Engine compartment
64R010b
�Engine compartment 1 Pull–out tool 2 Spare fuses

ELECTRICAL COMPONENTS
2952001 MY RX300_U (OM48431U)
64R011b
�Driver’s side instrument panel
1. Turn the ignition switch off and remove the auxiliarybox.
Determine which fuse may be causing the problem. Theauxiliary box shows the name of the circuit for each fuse.
64L013
2. Make sure the i noperative component is turned off. Pullthe suspected fuse straight out with the pull–out tool andcheck it. If it has blown, push a new fuse into the clips.

ELECTRICAL COMPONENTS
296 2001 MY RX300_U (OM48431U)
64G008
�Good �Blown
a. Look carefully at the fuse. If the thin wire is broken, the fusehas blown. If you are not sure or if it is too dark to see, tryreplacing the suspected fuse with one of the same value thatyou know is good.
b. Only install a fuse with the amperage rating designated onthe fuse box lid.
If you do not have a spare fuse, in an emergency you can pullout the “RAD NO.1”, “RADIO NO.2” or “PWR OUTLET” fuse,which may be dispensable for normal driving, and use it if itsamperage rating is the same.
If you cannot use one of the same amperage, use one lowerthan, but as close as possible to, the amperage. If theamperage is lower than that specified, the fuse might blow outagain but this does not indicate anything wrong. Be sure to getthe correct fuse as soon as possible and return the substituteto its original clips.
It is a good idea to purchase a set of spare fuses and keep themin your vehicle for emergencies.
If the new fuse immediately blows out, there is a problem withthe electrical system. Have your Lexus dealer correct it assoon as possible.
CAUTION
Never use a fuse with a higher amperage rating, or anyother object, in place of a fuse. This may causeextensive damage and possibly a fire.

ELECTRICAL COMPONENTS
2972001 MY RX300_U (OM48431U)
CHECKING THE CARTRIDGE TYPEFUSES
64R013
�Engine compartment
64R014b
�Driver’s side instrument panel
If the headlights or other electrical components do notwork and the blade type fuses are O.K., check thecartridge type fuses. If any of the cartridge type fuses areblown, they must be replaced.

ELECTRICAL COMPONENTS
298 2001 MY RX300_U (OM48431U)
64R023
� 1 Type A 2 Type B 3 Good 4 Blown
If there is an overload in the circuits from the battery, the fusesare designed to blow before the entire wiring harness isdamaged.
CAUTION
Always use a genuine Lexus fuse or equivalent forreplacement. Never install an ordinary wire – even fora temporary fix. This may cause extensive damage andpossibly a fire.
NOTICE
Before replacing the fuses, have the cause of electricaloverload determined and repaired by your Lexus dealer.
ADDING WASHER FLUID
64R016b
If the washer tank becomes nearly empty, add washerfluid.
You may use plain water as washer fluid. However, in coldareas where temperatures range below the freezing point, usewasher fluid containing antifreeze. This product is available atyour Lexus dealer and most auto parts stores. Follow themanufacturer’s directions for how much to mix with water.
NOTICE
Do not use engine antifreeze or any other substitutebecause it may damage your vehicle’s paint.

ELECTRICAL COMPONENTS
2992001 MY RX300_U (OM48431U)
CHECKING THE HEADLIGHT AIM(Vehicles with discharge headlight only)
64R100
� 1 Vertical movement adjusting bolt 1 2 Vertical movement adjusting bolt 2
Before checking the headlight aim:
1. Be sure that the body around the headlight is not deformed.
2. Park the vehicle on a level spot.
3. The driver gets into the driver’s seat and puts the vehicle ina state readying for a driving (with a full tank).
4. Bounce the vehicle several times.
Adjusting the vertical aiming
64R101
1. Turn the vertical movement adjusting bolt 1 in eitherdirection. At this time, keep the turning direction and numberof turns in mind.
2. Turn the vertical movement adjusting bolt 2 the samenumber of turns and in the same direction at step 1.

ELECTRICAL COMPONENTS
300 2001 MY RX300_U (OM48431U)
REPLACING LIGHT BULBSThe illustration on the following pages show the locations oflight bulbs. If it is necessary to replace a bulb, take your vehicleto your Lexus dealer as soon as possible. Use bulbs with thebulb numbers and wattage ratings given in the table.
CAUTION
� To prevent yourself from burning, do not replace thelight bulbs while they are hot.
� Halogen bulbs have pressurized gas inside andrequire special handling. They can burst or shatter ifscratched or dropped. Hold a bulb only by its plasticor metal case. Do not touch the glass part of a bulbwith bare hands.
NOTICE
Only use a bulb of the listed type.
The inside of the lens of exterior lights such as headlights maytemporarily fog up when the lens becomes wet in the rain or ina car wash. This is not a problem because the fogging iscaused by the temperature difference between the outside andinside of the lens, just like the windshield fogged up in the rain.However, if there is a large drop of water on the inside of thelens, or if there is water pooled inside the light, contact yourLexus dealer.
LIGHT LOCATION
64R033
Light Bulbs Bulb No. W Type
1 Headlights (high beam) 9005 60 A
2 Headlights (low beam)Discharge bulb D2R 35 BHalogen bulb 9006 51 C
3 Parking lights 168 5 E
4 Front turn signal 7440 21 Elights
5 Fog lights 9006 51 C
6 Front side marker lights 194 3.8 E

ELECTRICAL COMPONENTS
3012001 MY RX300_U (OM48431U)
64R034
Light Bulbs Bulb No. W Type
7 High mounted stoplight 921 18 E
8 Rear turn signal lights 7440 21 E
9 Stop/tail lights 7443 21/5 E
10 Rear side marker lights 194 3.8 E
11 Back–up lights 7440 21 E
12 License plate lights 168 5 E
64R035
Light Bulbs Bulb No. W Type
13 Vanity lights ––– 1.5 F
14 Personal light ––– 10 D
15 Interior lights ––– 8 F
16 Door courtesy lights ––– 5 E
17 Glove box light ––– 1.2 E
A: HB3 halogen bulbs
B: D2R discharge bulbs
C: HB4 halogen bulbs
D: Single end bulbs
E: Wedge base bulbs
F: Double end bulbs

ELECTRICAL COMPONENTS
302 2001 MY RX300_U (OM48431U)

SECTION 6 – 5
3032001 MY RX300_U (OM48431U)
SERVICE PROCEDURES ANDSPECIFICATIONSBodySpecifications 304. . . . . . . . . . . . . . . . . . . . . . . . . . . . . . . . . . . . . . . . . . . Protecting your vehicle from corrosion 305. . . . . . . . . . . . . . . . . . . . . . Washing and waxing 306. . . . . . . . . . . . . . . . . . . . . . . . . . . . . . . . . . . . . Cleaning the interior 308. . . . . . . . . . . . . . . . . . . . . . . . . . . . . . . . . . . . . .

BODY
304 2001 MY RX300_U (OM48431U)
SPECIFICATIONS– DIMENSIONS AND WEIGHT
Overall lengthOverall widthOverall heightWheelbaseTread – Front
– RearVehicle capacity weight (occupants + luggage)
4580 mm (180.3 in.)1815 mm (71.5 in.)1670 mm (65.7 in.)*2615 mm (103 in.)1565 mm (61.6 in.)1550 mm (61.0 in.)380 kg (840 lb.)
*Unladen vehicle
– FUEL TANK
Capacity 75 L (19.8 gal., 16.5 lmp.gal.)

BODY
3052001 MY RX300_U (OM48431U)
PROTECTING YOUR VEHICLEFROM CORROSION
Proper care of your Lexus can help ensure long–termcorrosion prevention.
The most common causes of corrosion to your vehicleare:
� The accumulation of road salt, dirt and moisture inhard–to–reach areas under the vehicle.
� Chipping of paint or undercoating caused by minoraccidents or by stones and gravel.
The following conditions will cause or acceleratecorrosion of your vehicle, so it is important to keep yourvehicle, particularly the underside, as clean as possibleand to repair any damage to paint or protective coatingsas soon as possible.
� The presence of road salt or dust control chemicals, salt inthe air near the sea coast, industrial air pollution.
� High humidity, especially at temperatures just abovefreezing point.
� Certain parts of your vehicle are wet or damp for anextended period of time, even though other parts of thevehicle are dry.
� Components of the vehicle which are prevented fromquick–drying due to lack of proper ventilation are exposedto high ambient temperature.
To help prevent corrosion on your Lexus, follow theseguidelines:
Keep your vehicle clean by regular washing. In addition,observe the following points.
� If you drive on salted roads in the winter or if you live nearthe ocean, you should hose off the undercarriage at leastonce a month to minimize corrosion.
� High pressure water or steam is effective for cleaning thevehicle’s underside and wheel housings. Pay particularattention to these areas as it is difficult to see all the mud anddirt. It will do more harm than good to simply wet the mudand debris without removing them. The lower edge ofdoors, rocker panels and frame members have drain holeswhich should not be allowed to clog with dirt as trappedwater in these areas can cause corrosion.
� Wash the underside of the vehicle thoroughly when winteris over.
See “Washing and waxing” on page 306 for more tips.
Check the c ondition of your vehicle’s paint and trim. If youfind any chips or scratches in the paint, touch them upimmediately to prevent corrosion from starting. If the chips orscratches have gone through the bare metal, have a qualifiedbody shop make the repair.

BODY
306 2001 MY RX300_U (OM48431U)
Check the interior of your vehicle. Water and dirt canaccumulate under the floor mats and could cause corrosion.Occasionally check under the mats to make sure the area isdry. Be particularly careful when transporting chemicals,cleansers, fertilizers, salt, etc. These should be transported inproper containers. If a spill or leak should occur, immediatelyclean and dry the area.
Use mud shields on your wheels. If you drive on salted orgravel roads, mud shields help protect your vehicle. Full–sizeshields, which come as near to the ground as possible, are thebest. We recommend that the fittings and the area where theshields are installed be treated to resist corrosion. Your Lexusdealer will be happy to assist in supplying and installing theshields if they are recommended for your area.
Keep your vehicle in a well ventilated garage or a roofedplace. Do not park your vehicle in a damp, poorlyventilated garage. If you wash your vehicle in the garage, orif you drive it in covered with water or snow, your garage maybe so damp it will cause corrosion. Even if your garage isheated, a wet vehicle can corrode if the ventilation is poor.
WASHING AND WAXING
Washing your LexusKeep your vehicle clean by regular washing.
The following cases may cause weakness to the paint orcorrosion to the body and parts. Wash your vehicle as soonas possible.
� When driving in a coastal area
� When driving on a road sprinkled with antifreeze
� When having coal tar, tree sap, bird droppings and carcassof an insect
� When driving in the areas where there is a lot of smoke,soot, dust, iron dust and chemical substance
� When the vehicle becomes remarkably dirty with dust andmud
Hand–washing your LexusWork in the shade and wait until the vehicle body is not hotto the touch.
1. Rinse off loose dirt with a hose. Remove any mud or roadsalt from the underside of the vehicle or in the wheel wells.
2. Wash with a mild car–wash soap, mixed according to themanufacturer’s instructions. Use a soft cotton mitt and keepit wet by dipping it frequently into the wash water. Do not rubhard – let the soap and water remove the dirt.

BODY
3072001 MY RX300_U (OM48431U)
Plastic wheel ornaments: The plastic wheel ornaments aredamaged easily by organic substances. If any organicsubstance splashes an ornament, be sure to wash it off withwater and check if the ornament is damaged.
CAUTION
Do not attach the heavily damaged plastic wheelornament. It may fly off the wheel and cause accidentswhile the vehicle is moving.
Aluminum wheels: Use only a mild soap or neutral detergent.
Urethane bumpers and side moldings: Wash carefully. Donot scrub with abrasive cleaners. The bumper and sidemolding faces are soft.
Road tar: Remove with turpentine or cleaners that are markedsafe for painted surfaces.
NOTICE
Do not use organic substances (gasoline, kerosene,benzine or strong solvents), which may be toxic orcause damage.
3. Rinse thoroughly – dried soap can cause streaking. In hotweather you may need to rinse each section right after youwash it.
4. To prevent water spots, dry the vehicle using a clean softcotton towel. Do not rub or press hard – you might scratch thepaint.
Automatic car wash
NOTICE
To prevent damage to the antenna, make sure it isretracted before driving your vehicle through anautomatic car wash.
Your vehicle may be washed in an automatic car wash, butremember that the paint can be scratched by some type ofbrushes, unfiltered washing water, or the washing processitself. Scratching reduces paint durability and gloss, especiallyon darker colors. The manager of the car wash should be ableto advise you whether the process is safe for the paint on yourvehicle.
Waxing your LexusPolishing and waxing is recommended to maintain theoriginal beauty of your Lexus’ finish.
Once a month or if the vehicle surface does not repel waterwell, apply wax.
1. Always wash and dry the vehicle before you begin waxing,even if you are using a combined cleaner and wax.
2. Use a good quality polish and wax. If the finish has becomeextremely weathered, use a car–cleaning polish, followed bya separate wax. Carefully follow the manufacturer ’sinstructions and precautions. Be sure to polish and wax thechrome trim as well as the paint.

BODY
308 2001 MY RX300_U (OM48431U)
3. Wax the vehicle again when water does not bead butremains on the surface in large patches.
CLEANING THE INTERIOR
CAUTION
� Be careful not to splash water or spill liquid on thefloor. This may prevent the side airbags fromactivating correctly, resulting in serious injury.
� Do not wash the vehicle floor with water, or allowwater to get onto the floor when cleaning the vehicleinterior or exterior. Water may get into audiocomponents or other electrical components above orunder the floor carpet (or mat) and cause amalfunction; and it may cause body corrosion.
Leather InteriorThe selected leather is used in your Lexus. Due to a leatherproduct, some parts of leather may be rough, uneven orscratched originally.
To keep good appearance, we recommend you to clean itperiodically twice a year.
Remove dirt on the leather in the following ways:
1. Wipe it off lightly using a soft cloth (e.g. gauze) dampenedwith 5% solution of neutral detergent for wool.
2. Wring water from a clean cloth and thoroughly wipe off alltraces of detergent with it.
3. Wipe off the surface of the leather with a dry soft cloth. Allowthe leather to dry in a ventilated shaded area. Excess of wetmay cause the hardening or shrinking of the leather.
NOTICE
� Dirt or sand adhered to the leather may damage thetreated surface and cause it to wear earlier. Removedirt or sand using a vacuum cleaner.
� If a stain should fail to come out with a neutraldetergent, apply a cleaner that does not contain anorganic solvent.
� Never use organic substances such as benzine,alcohol or gasoline, or alkaline or acid solutions forcleaning the leather as these could causediscoloring.
� Use of a nylon brush or synthetic fiber cloth, etc. mayscratch the fine grained surface of the leather.
� Mildew may de velop on soiled leather upholstery. Beespecially careful to avoid oil spots. Try to keep yourupholstery always clean.
� Long exposure to direct sunlight may cause theleather surface to harden and shrink. Keep yourvehicle in a shaded area, especially in the summer.
� The interior of your vehicle is apt to heat up on hotsummer days, so avoid placing on the upholsteryitems made of vinyl or plastic or containing wax asthese tend to stick to leather when warm.
� Improper cleaning of the leather upholstery couldresult in discoloration or staining.

BODY
3092001 MY RX300_U (OM48431U)
Synthetic Leather Areas (Dash)The synthetic leather areas may be easily cleaned with amild soap or detergent and water.
First vacuum over the upholstery to remove loose dirt. Then,using a sponge or soft cloth, apply the soap solution to thesynthetic leather. After allowing it to soak in for a few minutesto loosen the dirt, remove the dirt and wipe off the soap with aclean damp cloth. If all the dirt does not come off, repeat theprocedure. Commercial foaming–type cleaners are alsoavailable which work well. Follow the manufacturer ’sinstructions.
NOTICE
Do not use solvent, thinner, gasoline or window cleaneron the interior.
Carpets, Windows and Seat BeltsBegin by vacuuming thoroughly to remove as much dirt aspossible. Several types of foam cleaners are available; someare in aerosol cans and others are powders or liquids whichyou mix with water to produce a foam. To shampoo thecarpets, use a sponge or brush to apply the foam. Rub inoverlapping circles. Do not apply water – the best results areobtained by keeping the carpet as dry as possible. Read theshampoo instructions and follow them closely.
The seat belts may be cleaned with mild soap and wateror with lukewarm water.
Use a cloth or sponge. As you are cleaning, check the beltsfor excessive wear, fraying or cuts.
NOTICE
� Use a good foam–type shampoo to clean the carpets.
� Do not use dye or bleach on the belts – it may weakenthem.
� Do not use the belts until they become dry.
� The windows may be cleaned with any householdwindow cleaner.
� When cleaning the inside of the rear window, becareful not to scratch or damage the heater wires orconnectors.

BODY
310 2001 MY RX300_U (OM48431U)
Air Conditioning Control Panel, Car Audio,Instrument Panel, Console Panel, andSwitchesUse a soft damp cloth for cleaning.
Soak a clean soft cloth in water or lukewarm water then lightlywipe off any dirt.
NOTICE
� Do not use organic substances (solvents, kerosene,alcohol, gasoline, etc.) or alkaline or acidic solutions.These chemicals can cause discoloring, staining orpeeling of the surface.
� If you use cleaners or polishing agents, make suretheir ingredients do not include the substancesmentioned above.
� If you use a liquid car freshener, do not spill the liquidonto the vehicle’s interior surfaces. It may containthe ingredients mentioned above. Immediately cleanany spill using the method mentioned above.
If you have any questions about the cleaning of yourLexus, your local Lexus dealer will be pleased to answerthem.

SECTION 7
3112001 MY RX300_U (OM48431U)
REPORTING SAFETY DEFECTS FOR U.S. OWNERSReporting safety defects for U.S. owners 312. . . . . . . . . . . . . . . . . . . .

REPORTING SAFETY DEFECTS
312 2001 MY RX300_U (OM48431U)
REPORTING SAFETY DEFECTSFOR U.S. OWNERS
If you believe that your vehicle has a defect whichcould cause a crash or could cause injury or death,you should immediately inform the NationalHighway Traffic Safety Administration (NHTSA) inaddition to notifying Toyota Motor Sales, U.S.A.,Inc. (Toll–free: 1–800–25–LEXUS).
If NHTSA receives similar complaints, it may openan investigation, and if it finds that a safety defectexists in a group of vehicles, it may order a recalland remedy campaign. However, NHTSA cannotbecome involved in individual problems betweenyou, your dealer, or Toyota Motor Sales, U.S.A.,Inc.
To contact NHTSA, you may either call the AutoSafety Hotline toll–free at 1–800–424–9393 (or366–0123 in Washington, D.C. area) or write to:NHTSA, U.S. Department of Transportation,Washington, D.C. 20590. You can also obtainother information about motor vehicle safety fromthe Hotline.

2001 MY RX300_U (OM48431U)
GAS STATION INFORMATION� Fuel selection:
Select Octane Rating 87 (Research Octane Number 91) orhigher. For improved vehicle performance, the use ofpremium unleaded gasoline with an Octane Rating 91(Research Octane Number 96) or higher is recommended.
� Fuel tank capacity:75 L (19.8 gal., 16.5 lmp. gal.)
� Engine oil:API SJ, “Energy–Conserving” multigrade engine oil orILSAC multigrade engine oil.
Recommended oil viscosity – SAE 5W–30 if normaltemperatures are below 38�C (100�F)
Oil capacity: L (qt., lmp.qt.) Drain and refill
with filter 4.7 (5.0, 4.1)without filter 4.5 (4.8, 4.0)
See page 268 for detailed information.
� Engine coolant:Capacity: 9.0 L (9.5 qt., 7.9 lmp. qt.)
Coolant type – “Toyota Long Life Coolant” or equivalent
With ethylene–glycol type coolant for a proper corrosionprotection of aluminum components
Do not use alcohol type antifreeze or plain water alone.
For checking the engine coolant, see page 270.
� Automatic transaxle:Fluid type – Automatic transmission fluid Type T–IV
See page 274 for detailed information.
� Tire information:See page 279 through 285 for detailed information.
� Tire pressure:Tire size: P225/70R16 101S
cold tireskPa (kgf/cm2 or bar, psi)
Vehicle loaded up Vehicle load up to vehicle capacityto 4 occupants weight
Front tires 210 (2.1, 30) 210 (2.1, 30). . . . . . . . . . . . Rear tires 210 (2.1, 30) 210 (2.1, 30). . . . . . . . . . .
For sustained high speeds above 160 km/h (100 mph), incountries where such speeds are permitted by law, add30 kPa (0.3 kgf/cm2 or bar, 5 psi) to the front tires andrear tires, but never exceed the maximum cold tirepressure molded on the tire sidewall.

WE REALLY CARE ABOUT YOU − PLEASE BUCKLE UP
Lexus has made a special effort to encourage use of seat belts.
Lexus belts are:
� Comfortable
� Easy to use
� Convenient
We encourage you to use your belts every time you drive.
2001 MY RX300_U (OM48431U)

cm–1
2001 MY RX300_U (OM48431U)
You should know as much about the quality andimportance of proper maintenance of your newvehicle as the people who built it.
The Lexus authorized Repair Manual tells youhow to maintain your vehicle and enables you tocorrectly perform your own maintenance.
The best way to keep your new vehicle in top runningorder is to maintain it properly from the moment youdrive it off the showroom floor.
The Lexus authorized Repair Manual is packed withliterally everything you need to know to perform yourown maintenance in virtually every area of your newvehicle.

cm–2
2001 MY RX300_U (OM48431U)
Maintenance procedures for the engine, chassis,body, electrical system, and more, are clearlyexplained and illustrated.
Periodic maintenance and tune–up
Periodic maintenance and tune–up helps to prevent smallproblems from growing into larger ones later on. The repairmanual outlines exactly what maintenance is required andclearly explains how to do the work yourself step–by–step.
Areas covered include such things as spark plug replacement,valve clearance adjustment and engine oil and filterreplacement.
Where to obtain theRepair Manual
The repair manual for RX300, written in English, may bepurchased as applicable from any Lexus dealer.Pub. Name: 2001 RX300 Repair ManualPub. No.: Vol. 1 RM784U1
Vol. 2 RM784U2


![[XLS] · Web viewPATEL SAURABH ARVINDBHAI WARRANT NO. :1033 SURESH A DALASANIA WARRANT NO. :1036 RAJESH PATEL WARRANT NO. :1037 RAKESH P PATEL WARRANT NO. :1038 ANILA P CHALLA WARRANT](https://img.pdfslide.us/doc/110x75/5aba371c7f8b9a321b8b6573/xls-viewpatel-saurabh-arvindbhai-warrant-no-1033-suresh-a-dalasania-warrant.jpg)