Embed Size (px)
Citation preview
Ford/Lincoln Remote Access Android User’s Guide
Rev. A 10/17/13P/N: 4280523
2 of 13
Warning:Do not remote start vehicle in an enclosed environment (i.e. closed garage). Prolonged operation of a motor vehicle in an enclosed environment can cause a harmful build-up of Carbon Monoxide. Carbon Monoxide is harmful to your health. Exposure to high levels of carbon monoxide can cause headaches, dizziness or in extreme cases unconsciousness and/or death.
Warning:Changes or modifications not expressly approved by the party responsible for compliance could void the user’s authority to operate the equipment and void warranty.
Congratulations on your purchase of a Remote Access System. This technology represents the latest in automotive convenience and protection systems. Your system, purchased today, is ready to accept tomorrow’s advancements in technology.
Table Of ContentsDownload the Remote Access Application...............................................................................3Launch the Remote Access Application....................................................................................3New Account Setup.....................................................................................................................3Adding a Vehicle to a New Account...........................................................................................3Account Settings.........................................................................................................................4Alert Recipients...........................................................................................................................4Enabling Sounds.......................................................................................................................5Enabling Vibration.........................................................................................................................5Enabling Haptics.........................................................................................................................5Account Time Zone.....................................................................................................................6Enabling Security Alerts..............................................................................................................6Adding Additional Vehicles to an Existing Account..................................................................7Using the Remote Access Application......................................................................................8Vehicle Access and Control........................................................................................................8Remote Starting the Vehicle........................................................................................................9Extending Vehicle Remote Start Run Time...............................................................................9Multiple Vehicle Access and Control........................................................................................10Changing Vehicle Name...............................................................................................................10Power Save Mode......................................................................................................................11Logging Out...............................................................................................................................12Password Recovery...................................................................................................................12Additional Questions and Support...........................................................................................12Warranty Information.................................................................................................................13
3 of 13
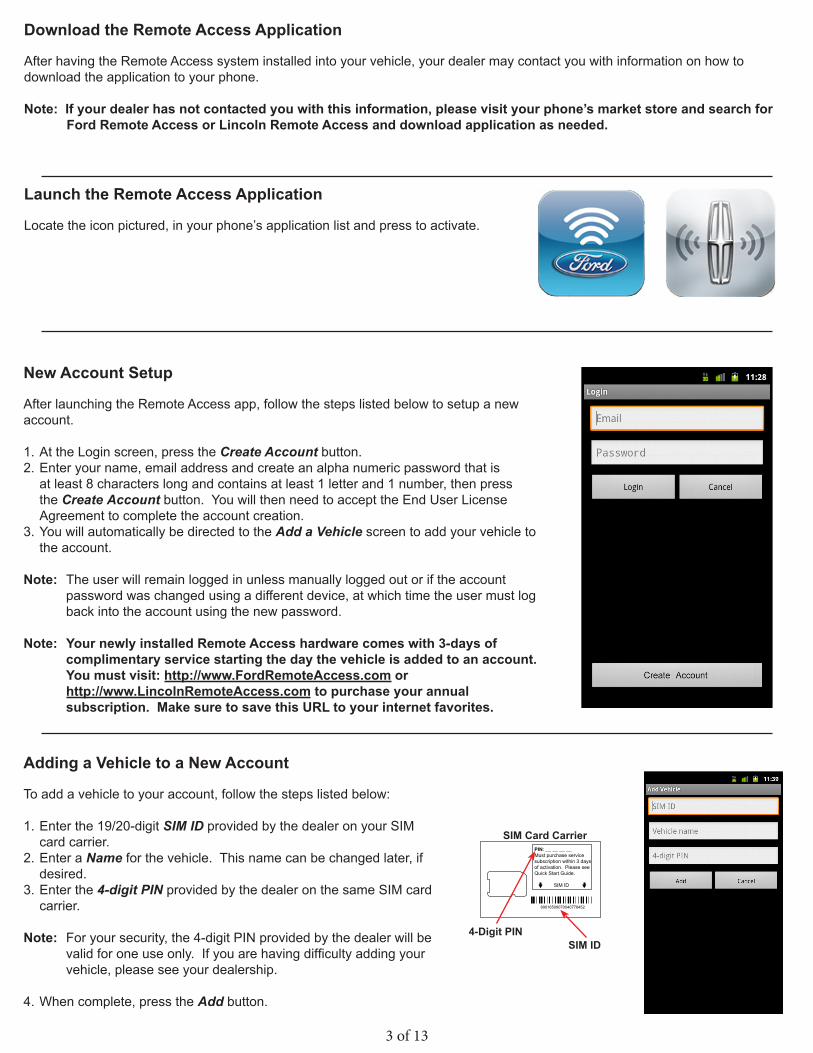
Launch the Remote Access Application Locate the icon pictured, in your phone’s application list and press to activate.
Download the Remote Access Application
After having the Remote Access system installed into your vehicle, your dealer may contact you with information on how to download the application to your phone.
Note: If your dealer has not contacted you with this information, please visit your phone’s market store and search for Ford Remote Access or Lincoln Remote Access and download application as needed.
New Account Setup
After launching the Remote Access app, follow the steps listed below to setup a new account.
1. At the Login screen, press the Create Account button. 2. Enter your name, email address and create an alpha numeric password that is
at least 8 characters long and contains at least 1 letter and 1 number, then press the Create Account button. You will then need to accept the End User License Agreement to complete the account creation.
3. You will automatically be directed to the Add a Vehicle screen to add your vehicle to the account.
Note: The user will remain logged in unless manually logged out or if the account password was changed using a different device, at which time the user must log back into the account using the new password.
Note: Your newly installed Remote Access hardware comes with 3-days of complimentary service starting the day the vehicle is added to an account. You must visit: http://www.FordRemoteAccess.com or
http://www.LincolnRemoteAccess.com to purchase your annual subscription. Make sure to save this URL to your internet favorites.
Adding a Vehicle to a New Account
To add a vehicle to your account, follow the steps listed below:
1. Enter the 19/20-digit SIM ID provided by the dealer on your SIM card carrier.
2. Enter a Name for the vehicle. This name can be changed later, if desired.
3. Enter the 4-digit PIN provided by the dealer on the same SIM card carrier.
Note: For your security, the 4-digit PIN provided by the dealer will be valid for one use only. If you are having difficulty adding your vehicle, please see your dealership.
4. When complete, press the Add button.
89016509070040778452
PIN: __ __ __ __Must purchase service subscription within 3 daysof activation. Please see Quick Start Guide.
SIM ID
SIM Card Carrier
SIM ID4-Digit PIN
4 of 13
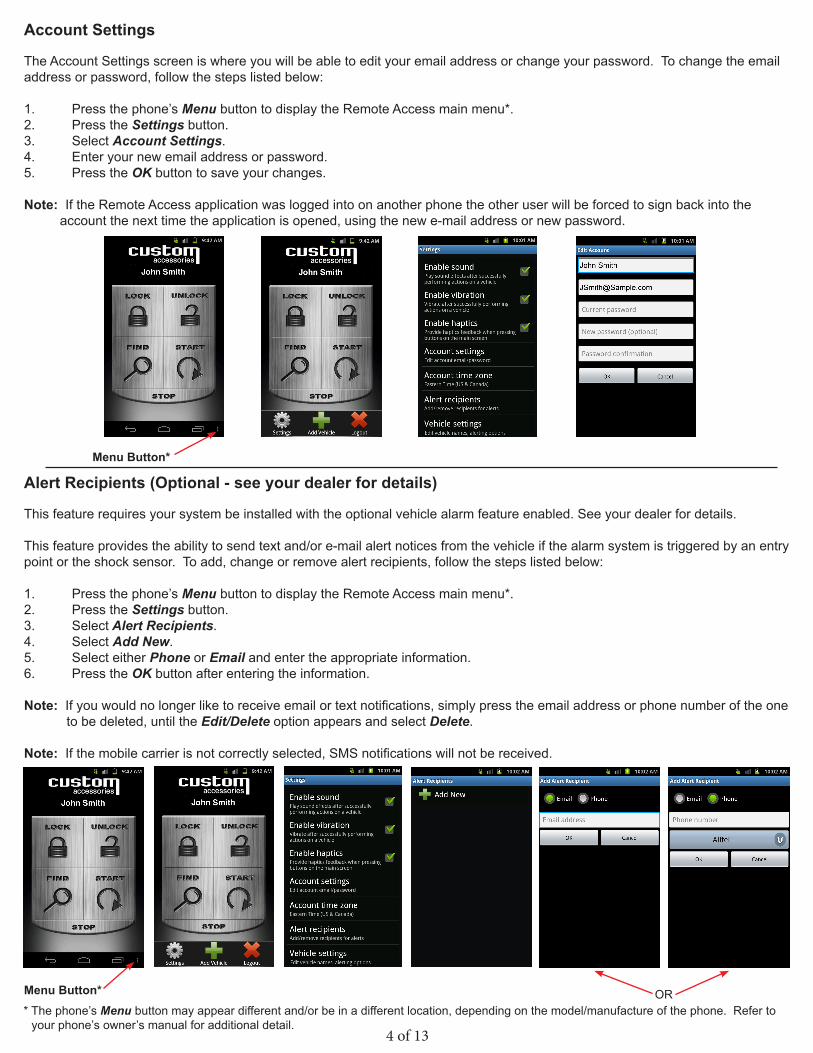
Account Settings
The Account Settings screen is where you will be able to edit your email address or change your password. To change the email address or password, follow the steps listed below:
1. Press the phone’s Menu button to display the Remote Access main menu*.2. Press the Settings button.3. Select Account Settings.4. Enter your new email address or password.5. Press the OK button to save your changes.
Note: If the Remote Access application was logged into on another phone the other user will be forced to sign back into the account the next time the application is opened, using the new e-mail address or new password.
Menu Button*
ORMenu Button*
Alert Recipients (Optional - see your dealer for details)
This feature requires your system be installed with the optional vehicle alarm feature enabled. See your dealer for details.
This feature provides the ability to send text and/or e-mail alert notices from the vehicle if the alarm system is triggered by an entry point or the shock sensor. To add, change or remove alert recipients, follow the steps listed below:
1. Press the phone’s Menu button to display the Remote Access main menu*.2. Press the Settings button.3. Select Alert Recipients.4. Select Add New.5. Select either Phone or Email and enter the appropriate information.6. Press the OK button after entering the information.
Note: If you would no longer like to receive email or text notifications, simply press the email address or phone number of the one to be deleted, until the Edit/Delete option appears and select Delete.
Note: If the mobile carrier is not correctly selected, SMS notifications will not be received.
* The phone’s Menu button may appear different and/or be in a different location, depending on the model/manufacture of the phone. Refer to your phone’s owner’s manual for additional detail.
5 of 13
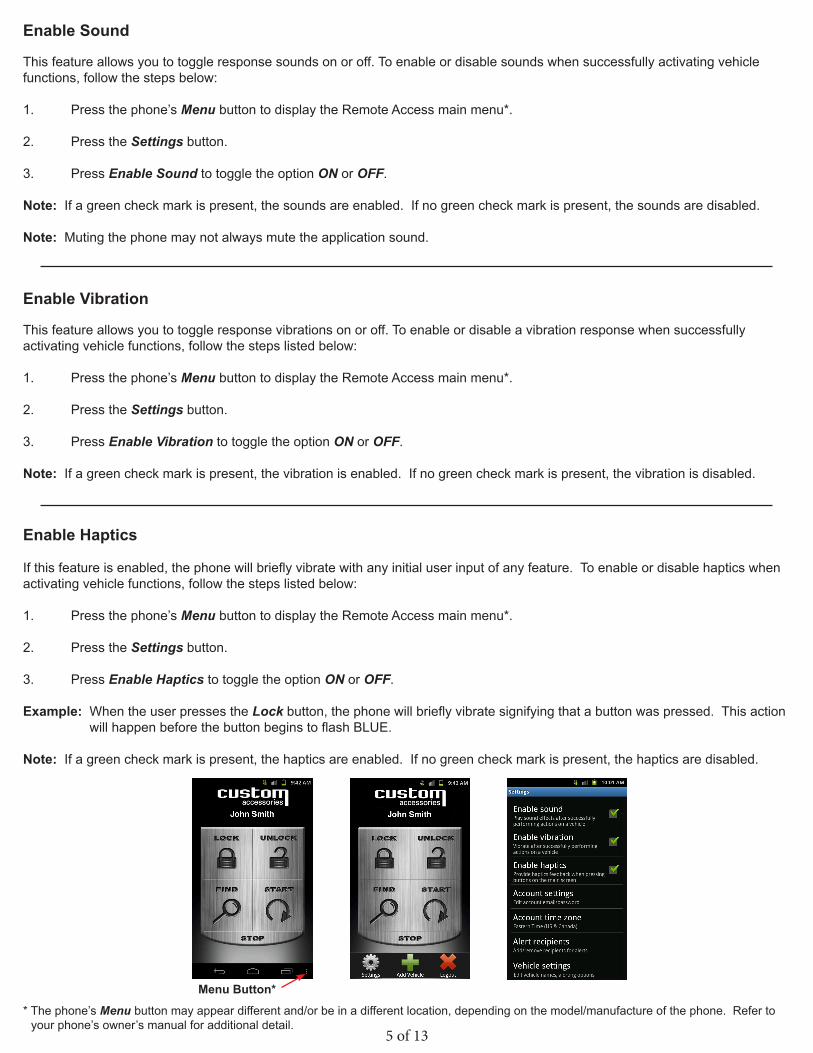
Enable Sound
This feature allows you to toggle response sounds on or off. To enable or disable sounds when successfully activating vehicle functions, follow the steps below:
1. Press the phone’s Menu button to display the Remote Access main menu*.
2. Press the Settings button.
3. Press Enable Sound to toggle the option ON or OFF.
Note: If a green check mark is present, the sounds are enabled. If no green check mark is present, the sounds are disabled.
Note: Muting the phone may not always mute the application sound.
Enable Vibration
This feature allows you to toggle response vibrations on or off. To enable or disable a vibration response when successfully activating vehicle functions, follow the steps listed below:
1. Press the phone’s Menu button to display the Remote Access main menu*.
2. Press the Settings button.
3. Press Enable Vibration to toggle the option ON or OFF.
Note: If a green check mark is present, the vibration is enabled. If no green check mark is present, the vibration is disabled.
Enable Haptics If this feature is enabled, the phone will briefly vibrate with any initial user input of any feature. To enable or disable haptics when activating vehicle functions, follow the steps listed below:
1. Press the phone’s Menu button to display the Remote Access main menu*.
2. Press the Settings button.
3. Press Enable Haptics to toggle the option ON or OFF.
Example: When the user presses the Lock button, the phone will briefly vibrate signifying that a button was pressed. This action will happen before the button begins to flash BLUE.
Note: If a green check mark is present, the haptics are enabled. If no green check mark is present, the haptics are disabled.
Menu Button*
* The phone’s Menu button may appear different and/or be in a different location, depending on the model/manufacture of the phone. Refer to your phone’s owner’s manual for additional detail.
6 of 13
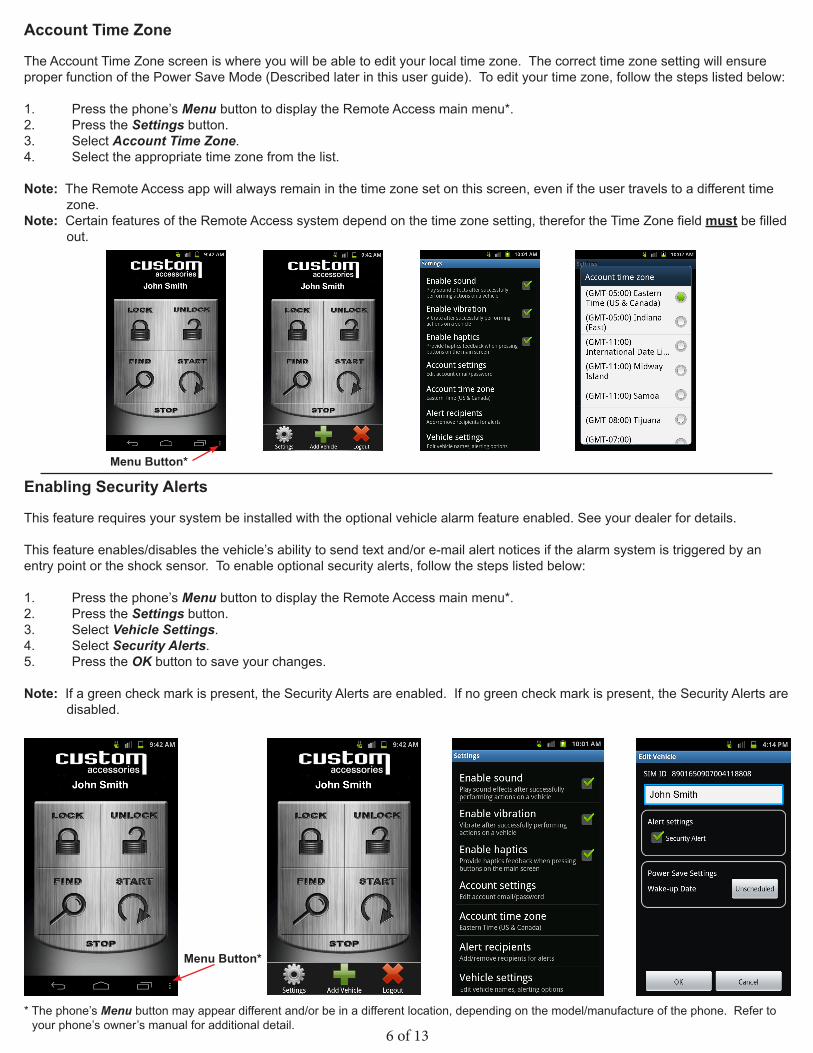
Account Time Zone
The Account Time Zone screen is where you will be able to edit your local time zone. The correct time zone setting will ensure proper function of the Power Save Mode (Described later in this user guide). To edit your time zone, follow the steps listed below:
1. Press the phone’s Menu button to display the Remote Access main menu*.2. Press the Settings button.3. Select Account Time Zone.4. Select the appropriate time zone from the list.
Note: The Remote Access app will always remain in the time zone set on this screen, even if the user travels to a different time zone.
Note: Certain features of the Remote Access system depend on the time zone setting, therefor the Time Zone field must be filled out.
Menu Button*
Enabling Security Alerts
This feature requires your system be installed with the optional vehicle alarm feature enabled. See your dealer for details.
This feature enables/disables the vehicle’s ability to send text and/or e-mail alert notices if the alarm system is triggered by an entry point or the shock sensor. To enable optional security alerts, follow the steps listed below:
1. Press the phone’s Menu button to display the Remote Access main menu*.2. Press the Settings button.3. Select Vehicle Settings.4. Select Security Alerts.5. Press the OK button to save your changes.
Note: If a green check mark is present, the Security Alerts are enabled. If no green check mark is present, the Security Alerts are disabled.
Menu Button*
* The phone’s Menu button may appear different and/or be in a different location, depending on the model/manufacture of the phone. Refer to your phone’s owner’s manual for additional detail.
7 of 13
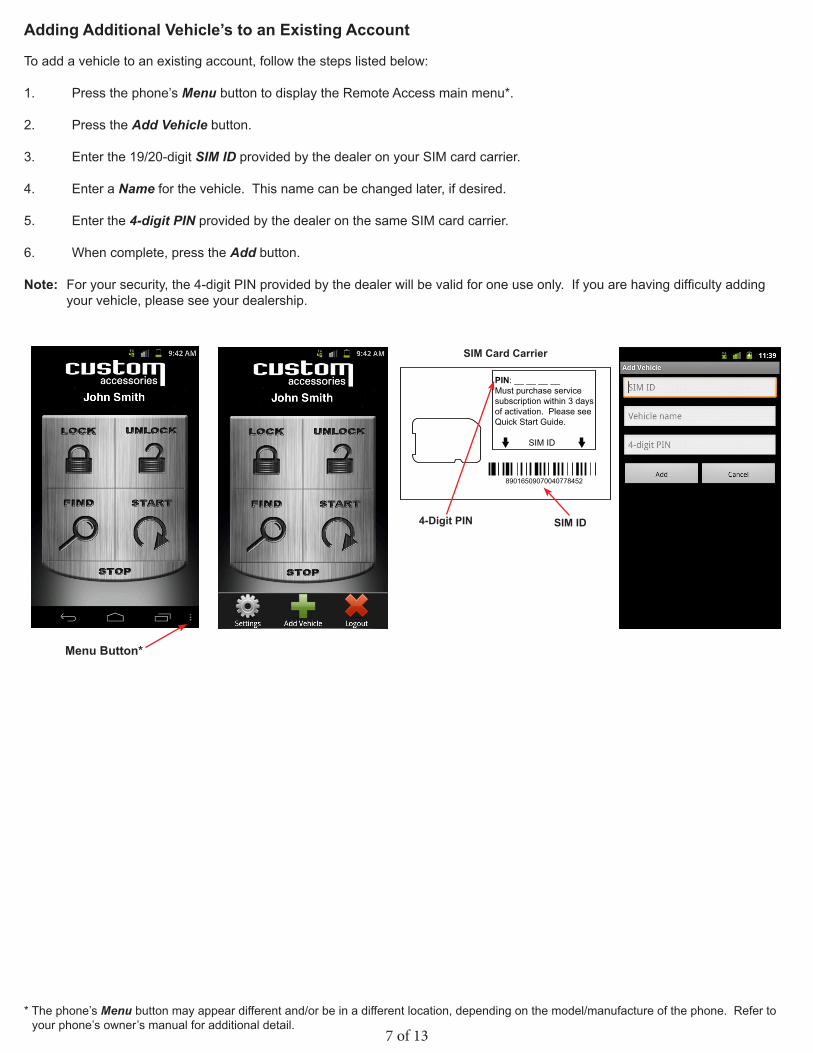
Adding Additional Vehicle’s to an Existing Account
To add a vehicle to an existing account, follow the steps listed below:
1. Press the phone’s Menu button to display the Remote Access main menu*.
2. Press the Add Vehicle button.
3. Enter the 19/20-digit SIM ID provided by the dealer on your SIM card carrier.
4. Enter a Name for the vehicle. This name can be changed later, if desired.
5. Enter the 4-digit PIN provided by the dealer on the same SIM card carrier.
6. When complete, press the Add button.
Note: For your security, the 4-digit PIN provided by the dealer will be valid for one use only. If you are having difficulty adding your vehicle, please see your dealership.
Menu Button*
89016509070040778452
PIN: __ __ __ __Must purchase service subscription within 3 daysof activation. Please see Quick Start Guide.
SIM ID
SIM Card Carrier
SIM ID 4-Digit PIN
* The phone’s Menu button may appear different and/or be in a different location, depending on the model/manufacture of the phone. Refer to your phone’s owner’s manual for additional detail.
8 of 13
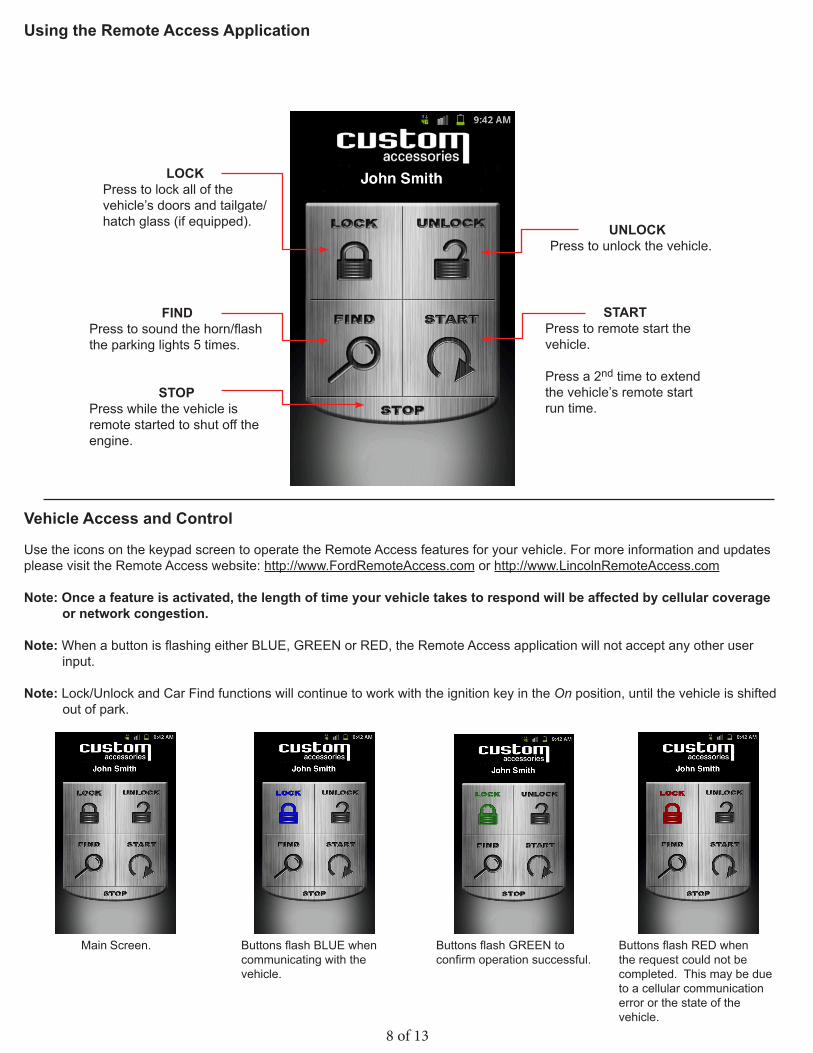
Buttons flash BLUE when communicating with the vehicle.
Buttons flash GREEN to confirm operation successful.
Buttons flash RED when the request could not be completed. This may be due to a cellular communication error or the state of the vehicle.
Main Screen.
Vehicle Access and Control
Use the icons on the keypad screen to operate the Remote Access features for your vehicle. For more information and updates please visit the Remote Access website: http://www.FordRemoteAccess.com or http://www.LincolnRemoteAccess.com Note: Once a feature is activated, the length of time your vehicle takes to respond will be affected by cellular coverage or network congestion.
Note: When a button is flashing either BLUE, GREEN or RED, the Remote Access application will not accept any other user input.
Note: Lock/Unlock and Car Find functions will continue to work with the ignition key in the On position, until the vehicle is shifted out of park.
Using the Remote Access Application
LOCKPress to lock all of the vehicle’s doors and tailgate/hatch glass (if equipped).
FIND Press to sound the horn/flash the parking lights 5 times.
STOPPress while the vehicle is remote started to shut off the engine.
START Press to remote start the vehicle.
Press a 2nd time to extend the vehicle’s remote start run time.
UNLOCK Press to unlock the vehicle.
9 of 13
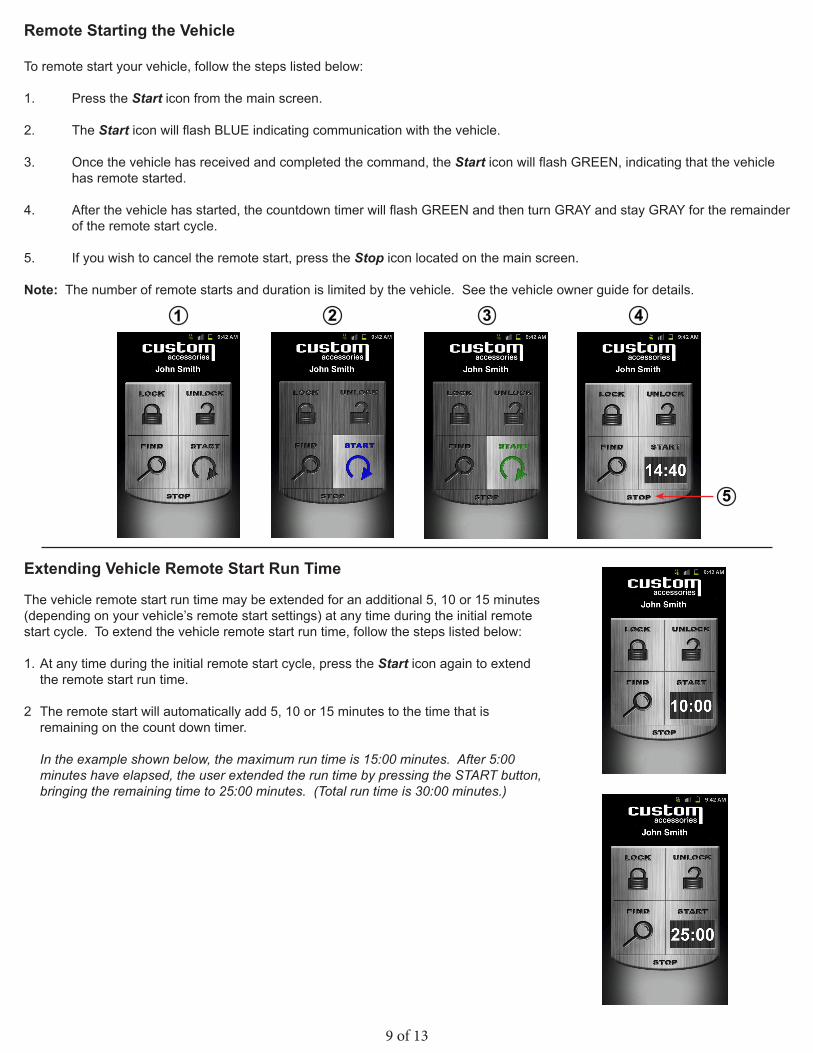
1 2 3 4
5
Extending Vehicle Remote Start Run Time
The vehicle remote start run time may be extended for an additional 5, 10 or 15 minutes (depending on your vehicle’s remote start settings) at any time during the initial remote start cycle. To extend the vehicle remote start run time, follow the steps listed below: 1. At any time during the initial remote start cycle, press the Start icon again to extend
the remote start run time. 2 The remote start will automatically add 5, 10 or 15 minutes to the time that is
remaining on the count down timer.
In the example shown below, the maximum run time is 15:00 minutes. After 5:00 minutes have elapsed, the user extended the run time by pressing the START button, bringing the remaining time to 25:00 minutes. (Total run time is 30:00 minutes.)
Remote Starting the Vehicle To remote start your vehicle, follow the steps listed below:
1. Press the Start icon from the main screen.
2. The Start icon will flash BLUE indicating communication with the vehicle.
3. Once the vehicle has received and completed the command, the Start icon will flash GREEN, indicating that the vehicle has remote started.
4. After the vehicle has started, the countdown timer will flash GREEN and then turn GRAY and stay GRAY for the remainder of the remote start cycle.
5. If you wish to cancel the remote start, press the Stop icon located on the main screen. Note: The number of remote starts and duration is limited by the vehicle. See the vehicle owner guide for details.
10 of 13
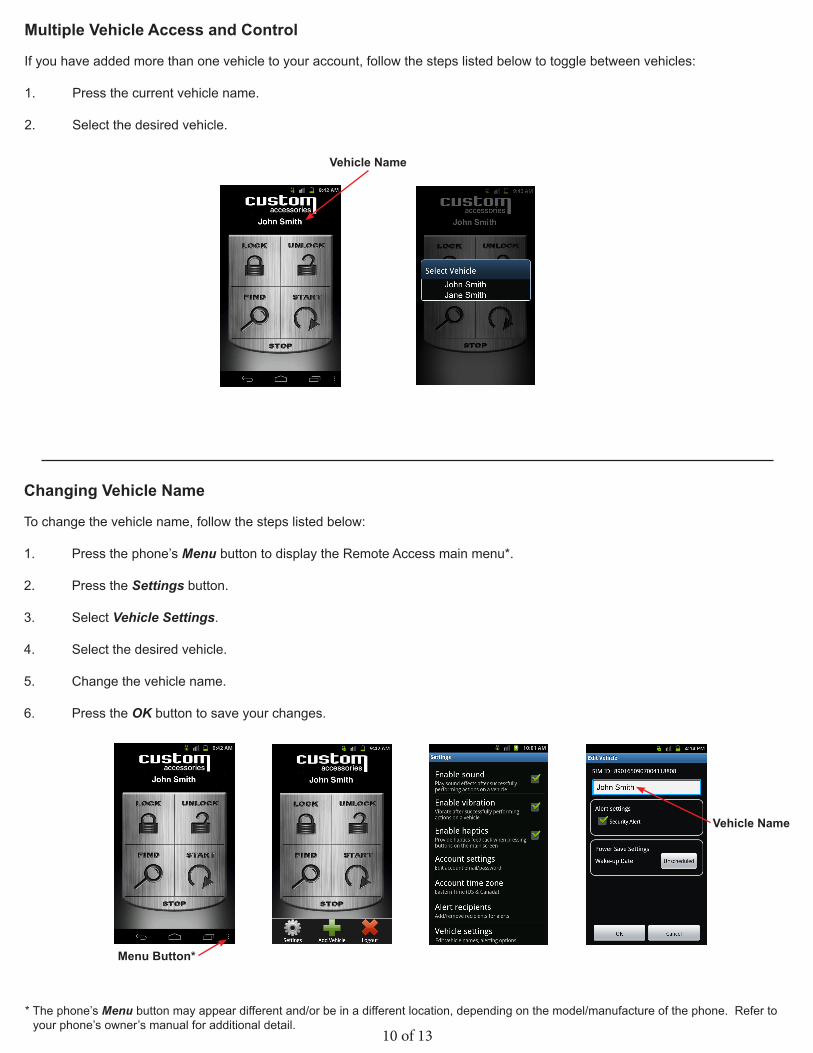
Multiple Vehicle Access and Control
If you have added more than one vehicle to your account, follow the steps listed below to toggle between vehicles:
1. Press the current vehicle name.
2. Select the desired vehicle.
Vehicle Name
Changing Vehicle Name
To change the vehicle name, follow the steps listed below:
1. Press the phone’s Menu button to display the Remote Access main menu*.
2. Press the Settings button.
3. Select Vehicle Settings.
4. Select the desired vehicle.
5. Change the vehicle name.
6. Press the OK button to save your changes.
* The phone’s Menu button may appear different and/or be in a different location, depending on the model/manufacture of the phone. Refer to your phone’s owner’s manual for additional detail.
Menu Button*
Vehicle Name
11 of 13
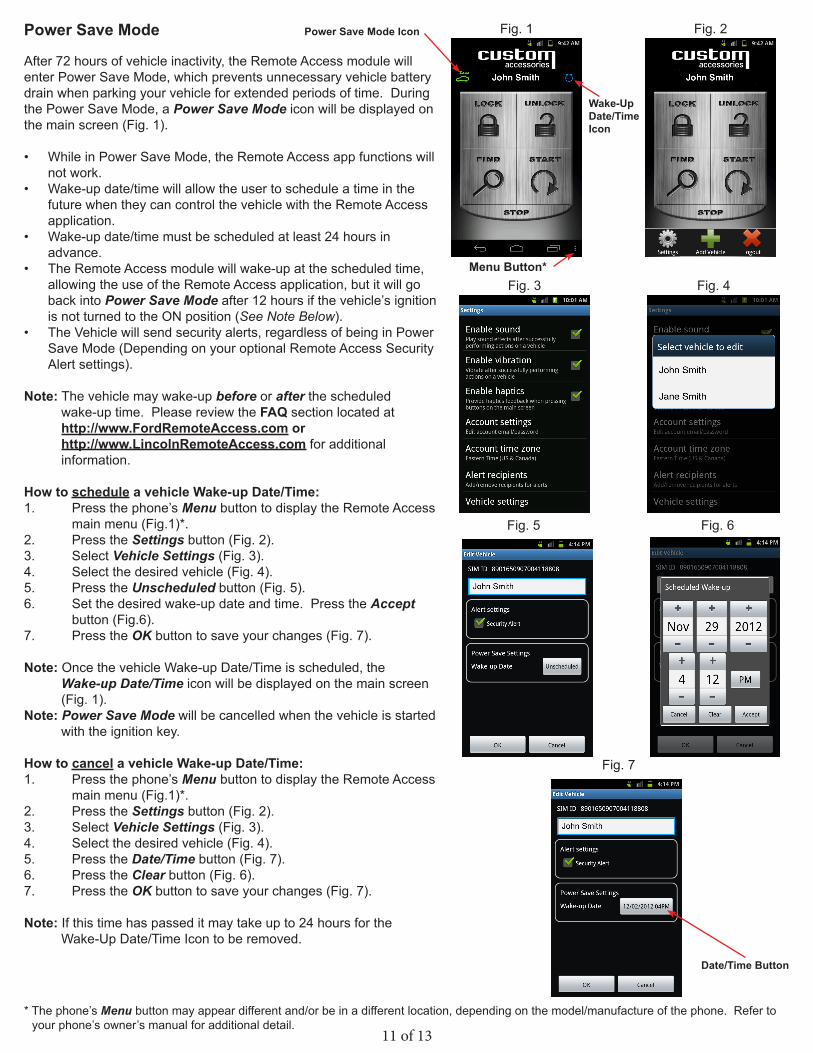
Power Save Mode
After 72 hours of vehicle inactivity, the Remote Access module will enter Power Save Mode, which prevents unnecessary vehicle battery drain when parking your vehicle for extended periods of time. During the Power Save Mode, a Power Save Mode icon will be displayed on the main screen (Fig. 1).
• While in Power Save Mode, the Remote Access app functions will not work.
• Wake-up date/time will allow the user to schedule a time in the future when they can control the vehicle with the Remote Access application.
• Wake-up date/time must be scheduled at least 24 hours in advance.
• The Remote Access module will wake-up at the scheduled time, allowing the use of the Remote Access application, but it will go back into Power Save Mode after 12 hours if the vehicle’s ignition is not turned to the ON position (See Note Below).
• The Vehicle will send security alerts, regardless of being in Power Save Mode (Depending on your optional Remote Access Security Alert settings).
Note: The vehicle may wake-up before or after the scheduled wake-up time. Please review the FAQ section located at
http://www.FordRemoteAccess.com or http://www.LincolnRemoteAccess.com for additional information.
How to schedule a vehicle Wake-up Date/Time:1. Press the phone’s Menu button to display the Remote Access main menu (Fig.1)*.2. Press the Settings button (Fig. 2).3. Select Vehicle Settings (Fig. 3).4. Select the desired vehicle (Fig. 4).5. Press the Unscheduled button (Fig. 5).6. Set the desired wake-up date and time. Press the Accept button (Fig.6).7. Press the OK button to save your changes (Fig. 7).
Note: Once the vehicle Wake-up Date/Time is scheduled, the Wake-up Date/Time icon will be displayed on the main screen
(Fig. 1).Note: Power Save Mode will be cancelled when the vehicle is started
with the ignition key. How to cancel a vehicle Wake-up Date/Time:1. Press the phone’s Menu button to display the Remote Access main menu (Fig.1)*.2. Press the Settings button (Fig. 2).3. Select Vehicle Settings (Fig. 3).4. Select the desired vehicle (Fig. 4).5. Press the Date/Time button (Fig. 7).6. Press the Clear button (Fig. 6).7. Press the OK button to save your changes (Fig. 7).
Note: If this time has passed it may take up to 24 hours for the Wake-Up Date/Time Icon to be removed.
Date/Time Button
Menu Button*
Fig. 2Fig. 1
Fig. 3 Fig. 4
Fig. 6Fig. 5
Fig. 7
* The phone’s Menu button may appear different and/or be in a different location, depending on the model/manufacture of the phone. Refer to your phone’s owner’s manual for additional detail.
Power Save Mode Icon
Wake-Up Date/Time Icon
12 of 13
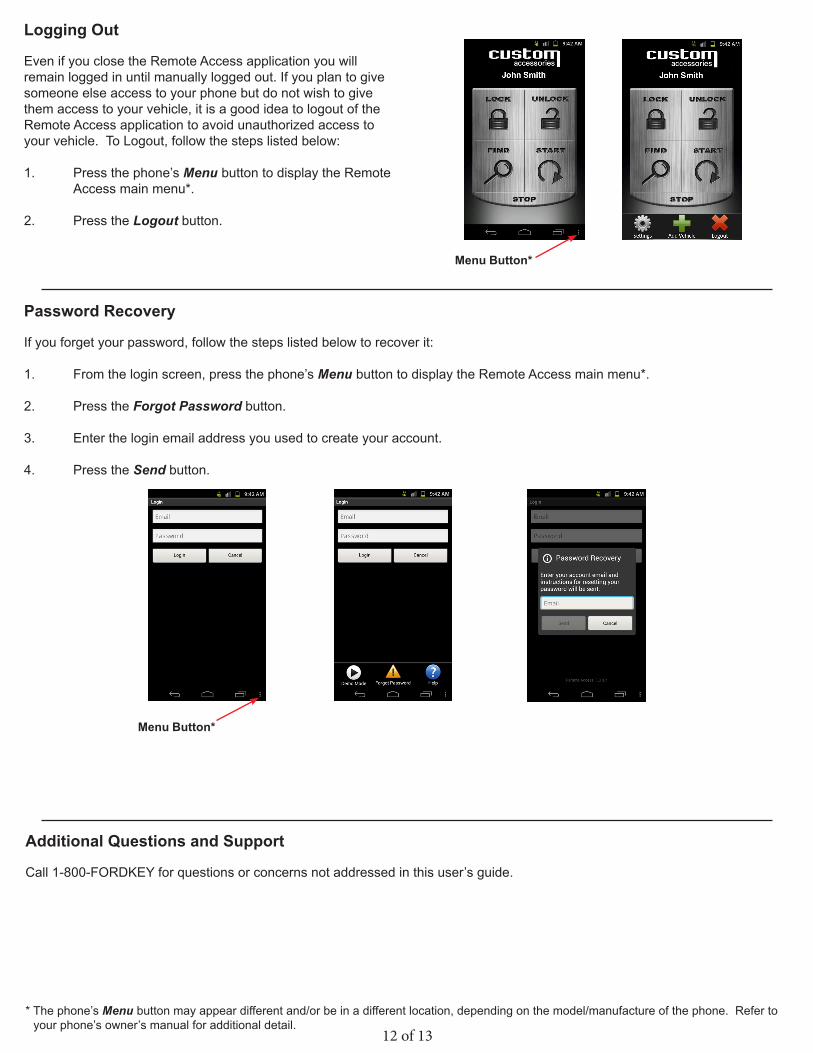
Logging Out
Even if you close the Remote Access application you will remain logged in until manually logged out. If you plan to give someone else access to your phone but do not wish to give them access to your vehicle, it is a good idea to logout of the Remote Access application to avoid unauthorized access to your vehicle. To Logout, follow the steps listed below:
1. Press the phone’s Menu button to display the Remote Access main menu*.
2. Press the Logout button.
Password Recovery
If you forget your password, follow the steps listed below to recover it:
1. From the login screen, press the phone’s Menu button to display the Remote Access main menu*.
2. Press the Forgot Password button.
3. Enter the login email address you used to create your account.
4. Press the Send button.
Menu Button*
* The phone’s Menu button may appear different and/or be in a different location, depending on the model/manufacture of the phone. Refer to your phone’s owner’s manual for additional detail.
Additional Questions and Support
Call 1-800-FORDKEY for questions or concerns not addressed in this user’s guide.
Menu Button*
13 of 13
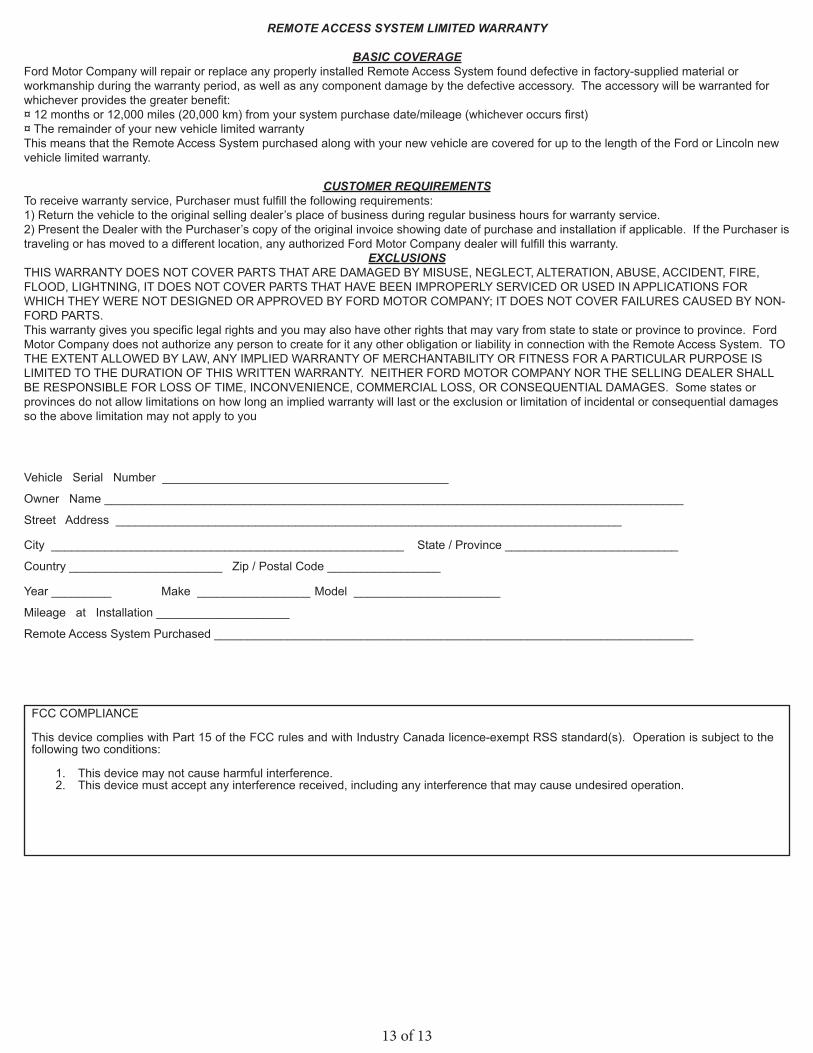
FCC COMPLIANCE
This device complies with Part 15 of the FCC rules and with Industry Canada licence-exempt RSS standard(s). Operation is subject to the following two conditions:
1. This device may not cause harmful interference. 2. This device must accept any interference received, including any interference that may cause undesired operation.
REMOTE ACCESS SYSTEM LIMITED WARRANTY
BASIC COVERAGE Ford Motor Company will repair or replace any properly installed Remote Access System found defective in factory-supplied material or workmanship during the warranty period, as well as any component damage by the defective accessory. The accessory will be warranted for whichever provides the greater benefit:¤ 12 months or 12,000 miles (20,000 km) from your system purchase date/mileage (whichever occurs first)¤ The remainder of your new vehicle limited warrantyThis means that the Remote Access System purchased along with your new vehicle are covered for up to the length of the Ford or Lincoln new vehicle limited warranty.
CUSTOMER REQUIREMENTS To receive warranty service, Purchaser must fulfill the following requirements:1) Return the vehicle to the original selling dealer’s place of business during regular business hours for warranty service.2) Present the Dealer with the Purchaser’s copy of the original invoice showing date of purchase and installation if applicable. If the Purchaser is traveling or has moved to a different location, any authorized Ford Motor Company dealer will fulfill this warranty.
EXCLUSIONSTHIS WARRANTY DOES NOT COVER PARTS THAT ARE DAMAGED BY MISUSE, NEGLECT, ALTERATION, ABUSE, ACCIDENT, FIRE, FLOOD, LIGHTNING, IT DOES NOT COVER PARTS THAT HAVE BEEN IMPROPERLY SERVICED OR USED IN APPLICATIONS FOR WHICH THEY WERE NOT DESIGNED OR APPROVED BY FORD MOTOR COMPANY; IT DOES NOT COVER FAILURES CAUSED BY NON-FORD PARTS.This warranty gives you specific legal rights and you may also have other rights that may vary from state to state or province to province. Ford Motor Company does not authorize any person to create for it any other obligation or liability in connection with the Remote Access System. TO THE EXTENT ALLOWED BY LAW, ANY IMPLIED WARRANTY OF MERCHANTABILITY OR FITNESS FOR A PARTICULAR PURPOSE IS LIMITED TO THE DURATION OF THIS WRITTEN WARRANTY. NEITHER FORD MOTOR COMPANY NOR THE SELLING DEALER SHALL BE RESPONSIBLE FOR LOSS OF TIME, INCONVENIENCE, COMMERCIAL LOSS, OR CONSEQUENTIAL DAMAGES. Some states or provinces do not allow limitations on how long an implied warranty will last or the exclusion or limitation of incidental or consequential damages so the above limitation may not apply to you
Vehicle Serial Number ___________________________________________
Owner Name _______________________________________________________________________________________
Street Address ____________________________________________________________________________
City _____________________________________________________ State / Province __________________________
Country _______________________ Zip / Postal Code _________________
Year _________ Make _________________ Model ______________________
Mileage at Installation ____________________
Remote Access System Purchased ________________________________________________________________________