Embed Size (px)
Citation preview
RIP Output Guidelines for the Process Metallic Color System™
Copyright © 2015. Color-Logic Inc | www.color-logic.com P1 of 2
®
NOTE: These instructions work for Flexi (and PhotoPRINT) Production Manager Version 10x, 11.x and 12.x.
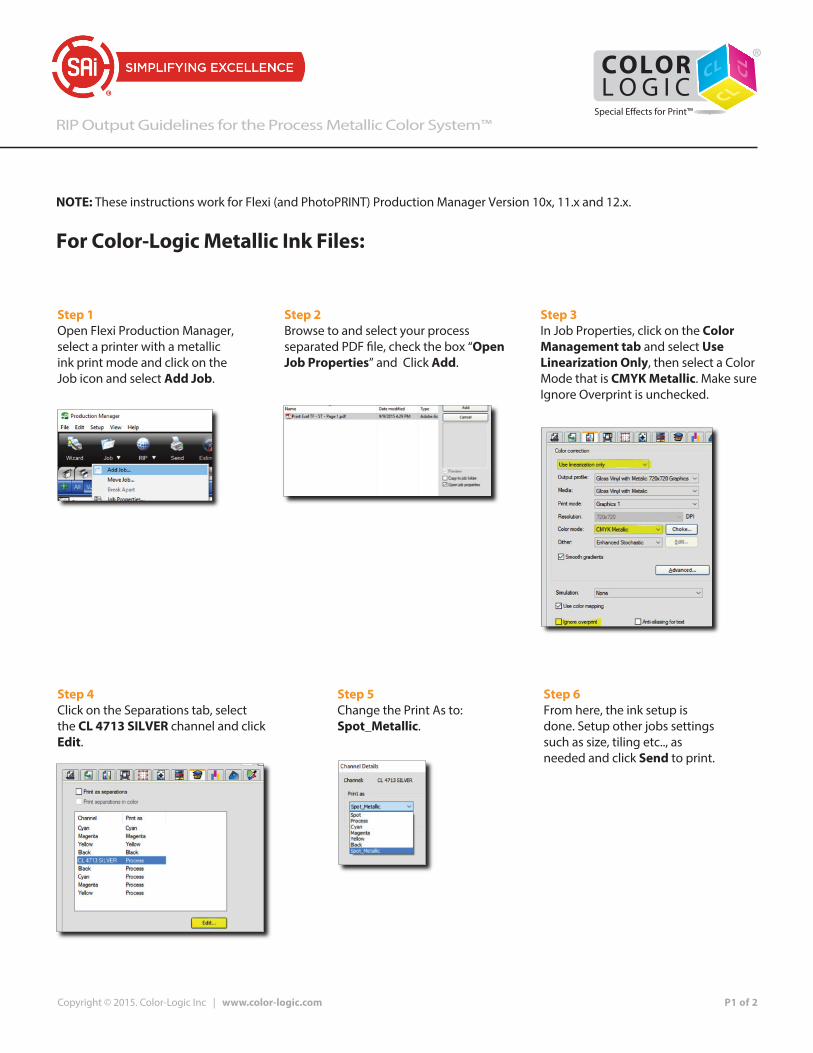
For Color-Logic Metallic Ink Files:
Step 1 Open Flexi Production Manager, select a printer with a metallic ink print mode and click on the Job icon and select Add Job.
Step 2 Browse to and select your process separated PDF �le, check the box “Open Job Properties” and Click Add.
Step 3 In Job Properties, click on the Color Management tab and select Use Linearization Only, then select a Color Mode that is CMYK Metallic. Make sure Ignore Overprint is unchecked.
Step 4 Click on the Separations tab, select the CL 4713 SILVER channel and click Edit.
Step 6 From here, the ink setup is done. Setup other jobs settings such as size, tiling etc.., as needed and click Send to print.
Step 5 Change the Print As to: Spot_Metallic.

Copyright © 2015. Color-Logic Inc | www.color-logic.com P2 of 2
For Color-Logic White Ink Files:
Step 1 Open Flexi Production Manager, select a printer with a white ink print mode and click the Job icon and select Add Job.
Step 2Browse to and select your process separated PDF �le, check the box “Open Job Properties” and Click Add.
Step 3In Job Properties, click on the Color Management tab and select Use Linearization Only, then select a Color Mode that is CMYK and WHITE. Make sure Ignore Overprint is unchecked.
Step 7Under the channel curve display, click on the 0 box, then enter 100 into the output box.
Step 7The Spot_White channel should now appear inverted in the curve display. From here, the ink setup is done. Setup other jobs settings such as size, tiling etc., as needed and click Send to print.
Step 4Click on the Separations tab, select the CL 4713 SILVER channel and click Edit.
Step 6Next, you need to invert the channel. Do this by �rst clicking on the Color Adjustments Tab and in the Channel section, selecting Spot_White
Step 5Change the Print As to: Spot_White.