Embed Size (px)
Citation preview
ADDENDUM
BIODEX SOFTWARE FOR BALANCE SYSTEM SD AND PORTABLE BIOSWAY
VERSION 2.0 950-440 950-441 950-444 950-460 950-461
FN: 11-350 11/11
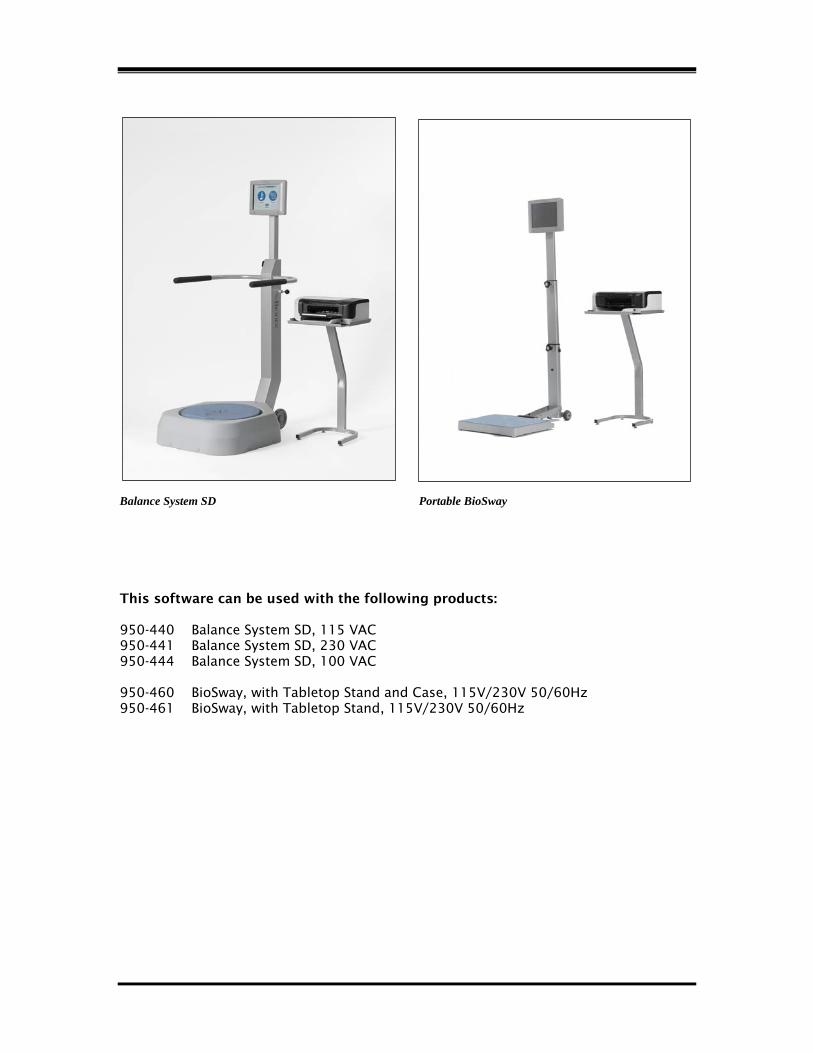
Balance System SD Portable BioSway This software can be used with the following products: 950-440 Balance System SD, 115 VAC 950-441 Balance System SD, 230 VAC 950-444 Balance System SD, 100 VAC 950-460 BioSway, with Tabletop Stand and Case, 115V/230V 50/60Hz 950-461 BioSway, with Tabletop Stand, 115V/230V 50/60Hz
- 3 -
Table of Contents v2.0 Software
1. CTSIB Progress Report ..............................................................................................5
Compares results over time to baseline or normative data with improved report format and result reporting.
2. Expanded Normative Data Values ...........................................................................11
Includes normative data for a population of student athletes, male and female. Data based on 20-second protocol, age 13-18 n=1440
3. Adding Comments ...................................................................................................12
Comments can be added to tests only.
4. Assign CPT Codes....................................................................................................15
Include CPT Codes to all training sessions and tests.
5. Ethernet
5.1 Setup Wireless Adapter ..................................................................................17
5.2 Setup Printer..................................................................................................17
5.3 Setup Balance System SD or BioSway for wireless printing ..............................18
6. USB Flash Drive capability
Note: USB keyboard support in all screens for entering text and numerics. Simply plug in any USB compatible keyboard and use it for data entry.
6.1 Export Data File Process.................................................................................21
6.2 Import Data File Process ...............................................................................23
3.2 Backup and Restore Data ...............................................................................25
7. Appendix
Rationale for 15% Baseline..............................................................................27
References .....................................................................................................27

sfgbsgs
- 5 -
1. CTSIB Progress Report Version 2.0 Software offers the ability to display and/or print a graph over time for each condition of a CTSIB test from multiple tests. Test results can be compared to previously recorded baseline test or to selected normative data ranges. CTSIB results can also be exported to Biodex Concussion Management software version 2.0, so that CTSIB test data does not have to be re-entered. Report Selection
1. Report is selected from Patient Management the same as current progress reports are selected.
• If a Patient has more than one CTSIB test in the patient record, the CTSIB <Progress Report> button is available.
2. Select specific conditions.
• For example: Progress Report for conditions #1 and #4 only.
3. Baseline values can be compared to either normative data values or to a previous baseline test if available.
• Different normative data values. The software includes normative data from two populations and protocols. Should additional normative values become available, either self generated or from another third party, these normative data values can be added to a table as they become available. E.g., Men’s Hockey, Women’s Soccer, etc.
• Baseline test value is a CTSIB test from an initial screening or previous test for the selected patient. The clinician can select a Baseline Upper Limit, which is a value for a “window” of how close to baseline a follow-up test is expected to be. A baseline upper limit is a value of 5, 10, 15, or 20%. 15% is the suggested upper limit. The rationale for 15% is explained in the appendix.
4. Only data from same conditions will be compared.
5. Report will be limited to display and print up to four conditions.
6. Comments cannot be entered to the Progress Report. Any comments will have to be hand written. This is explained in the Adding Comments section.
Note: It is very important to recognize that for a non-CTSIB progress report, when different normative data
groups are used, the normative data group should be selected as the default group in configuration for the target group being tested at that time. To ensure proper normative data comparisons, it will be necessary to make sure the appropriate default group is selected in configuration.
- 6 -
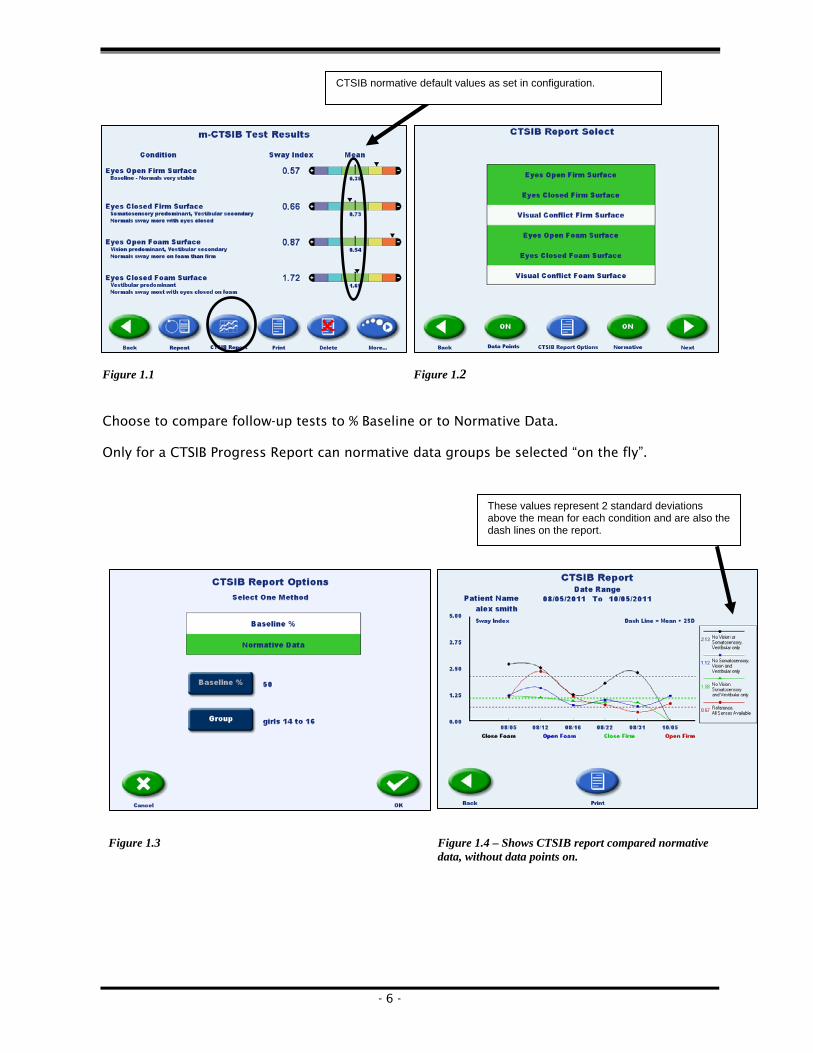
Figure 1.1 Figure 1.2 Choose to compare follow-up tests to % Baseline or to Normative Data. Only for a CTSIB Progress Report can normative data groups be selected “on the fly”.
Figure 1.3 Figure 1.4 – Shows CTSIB report compared normative data, without data points on.
CTSIB normative default values as set in configuration.
These values represent 2 standard deviations above the mean for each condition and are also the dash lines on the report.
- 7 -
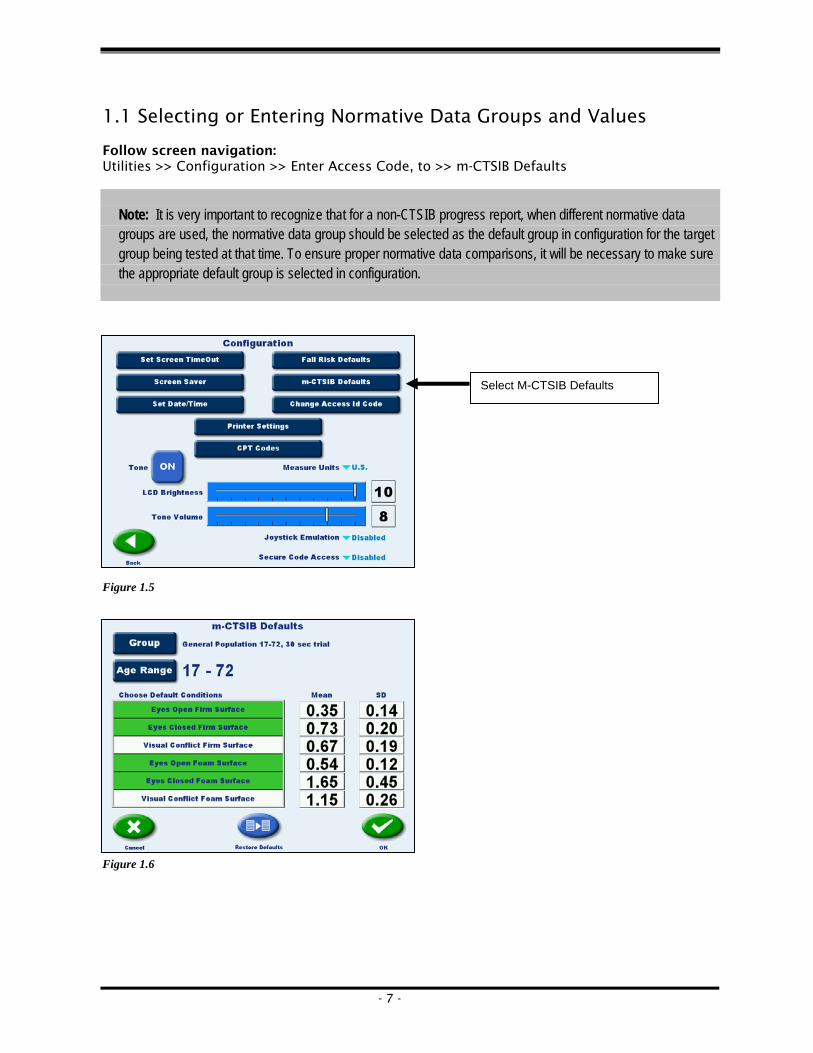
1.1 Selecting or Entering Normative Data Groups and Values Follow screen navigation: Utilities >> Configuration >> Enter Access Code, to >> m-CTSIB Defaults Note: It is very important to recognize that for a non-CTSIB progress report, when different normative data
groups are used, the normative data group should be selected as the default group in configuration for the target group being tested at that time. To ensure proper normative data comparisons, it will be necessary to make sure the appropriate default group is selected in configuration.
Figure 1.5
Figure 1.6
Select M-CTSIB Defaults
- 8 -
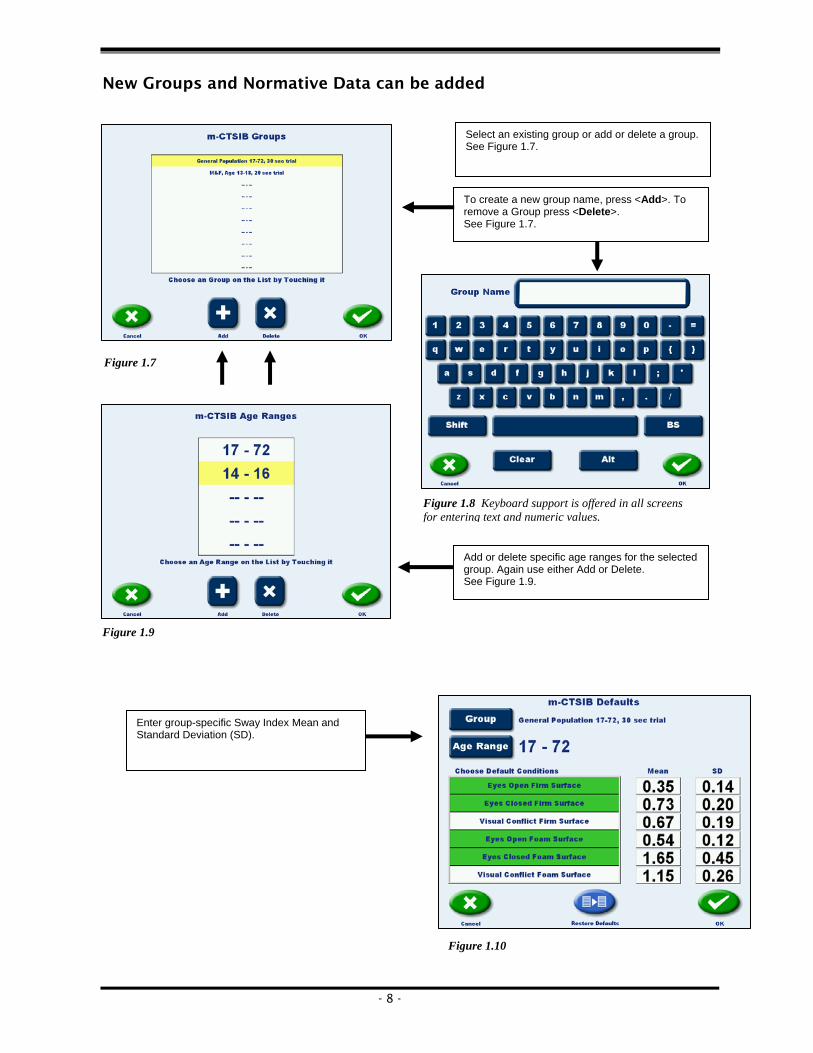
New Groups and Normative Data can be added
Figure 1.9
Select an existing group or add or delete a group. See Figure 1.7.
To create a new group name, press <Add>. To remove a Group press <Delete>. See Figure 1.7.
Add or delete specific age ranges for the selected group. Again use either Add or Delete. See Figure 1.9.
Enter group-specific Sway Index Mean and Standard Deviation (SD).
Figure 1.7
Figure 1.8 Keyboard support is offered in all screens for entering text and numeric values.
Figure 1.10
- 9 -
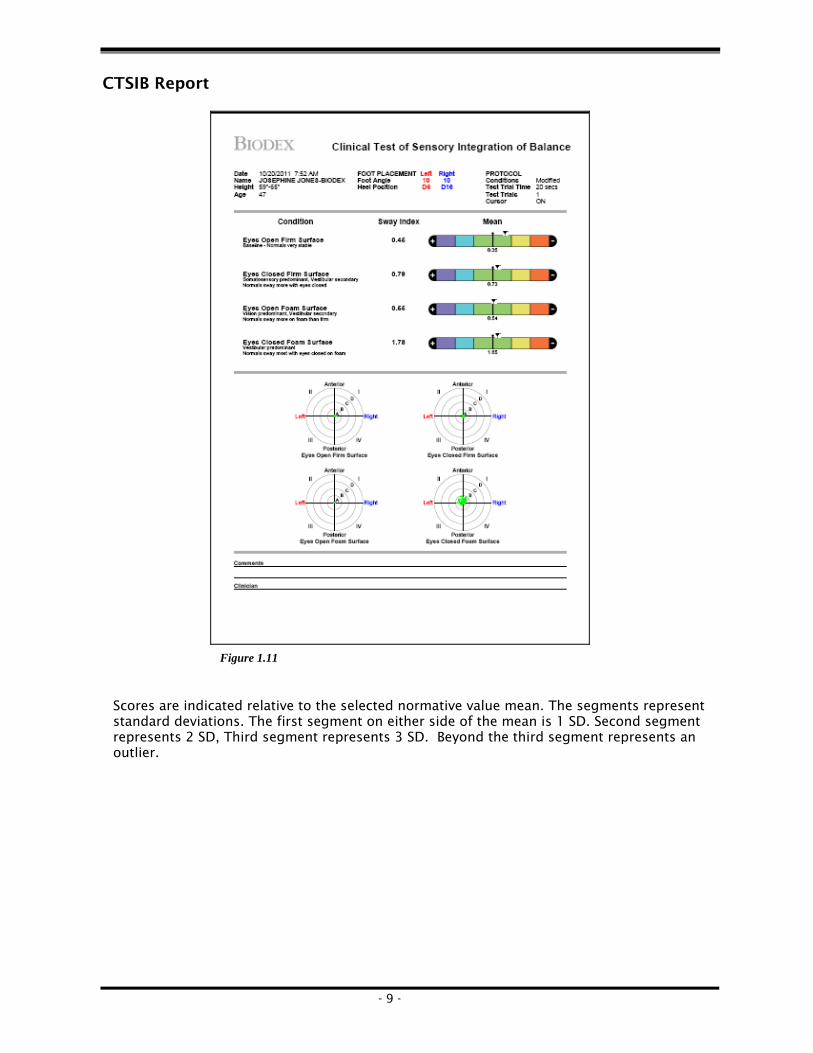
CTSIB Report
Scores are indicated relative to the selected normative value mean. The segments represent standard deviations. The first segment on either side of the mean is 1 SD. Second segment represents 2 SD, Third segment represents 3 SD. Beyond the third segment represents an outlier.
Figure 1.11

sfgbsgs
- 11 -
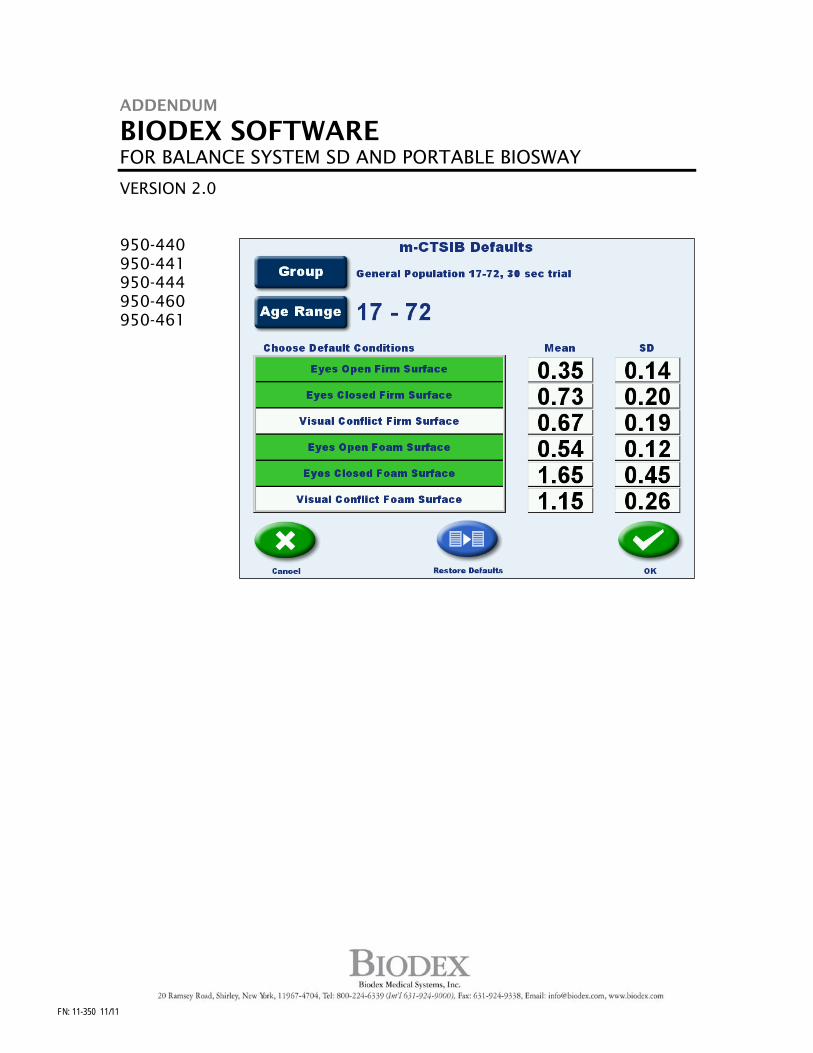
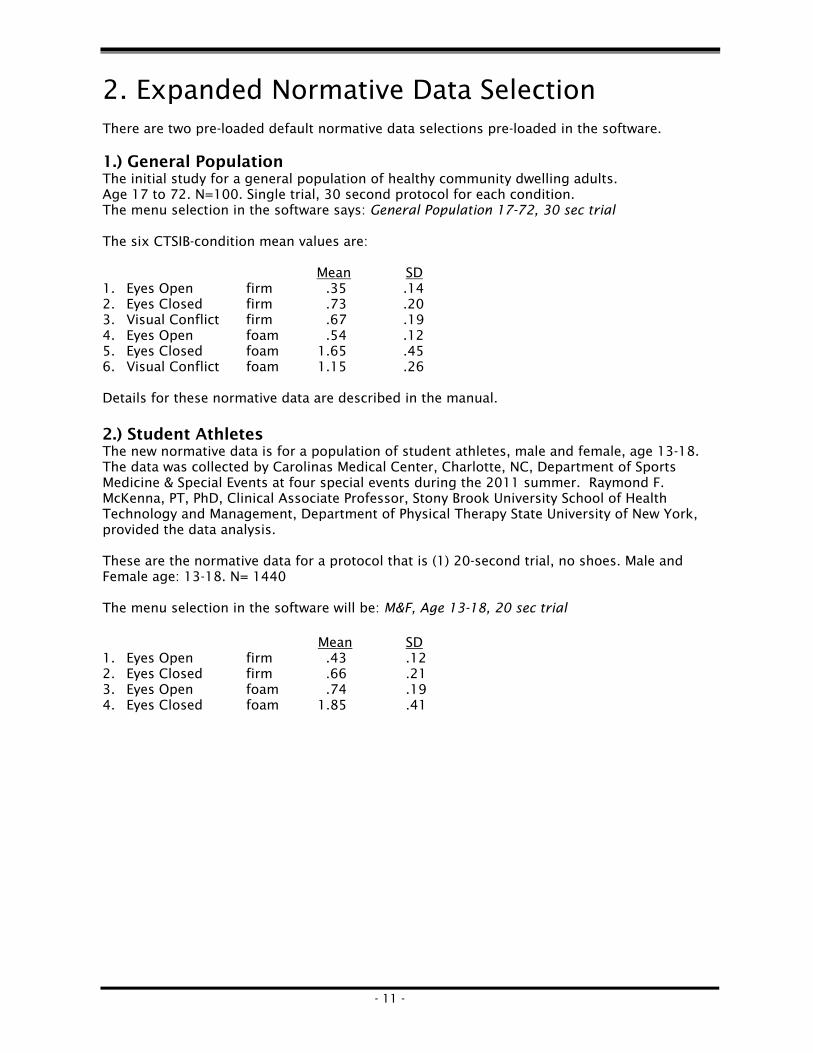
2. Expanded Normative Data Selection There are two pre-loaded default normative data selections pre-loaded in the software. 1.) General Population The initial study for a general population of healthy community dwelling adults. Age 17 to 72. N=100. Single trial, 30 second protocol for each condition. The menu selection in the software says: General Population 17-72, 30 sec trial The six CTSIB-condition mean values are: Mean SD 1. Eyes Open firm .35 .14 2. Eyes Closed firm .73 .20 3. Visual Conflict firm .67 .19 4. Eyes Open foam .54 .12 5. Eyes Closed foam 1.65 .45 6. Visual Conflict foam 1.15 .26 Details for these normative data are described in the manual. 2.) Student Athletes The new normative data is for a population of student athletes, male and female, age 13-18. The data was collected by Carolinas Medical Center, Charlotte, NC, Department of Sports Medicine & Special Events at four special events during the 2011 summer. Raymond F. McKenna, PT, PhD, Clinical Associate Professor, Stony Brook University School of Health Technology and Management, Department of Physical Therapy State University of New York, provided the data analysis. These are the normative data for a protocol that is (1) 20-second trial, no shoes. Male and Female age: 13-18. N= 1440 The menu selection in the software will be: M&F, Age 13-18, 20 sec trial Mean SD 1. Eyes Open firm .43 .12 2. Eyes Closed firm .66 .21 3. Eyes Open foam .74 .19 4. Eyes Closed foam 1.85 .41

sfgbsgs
- 13 -
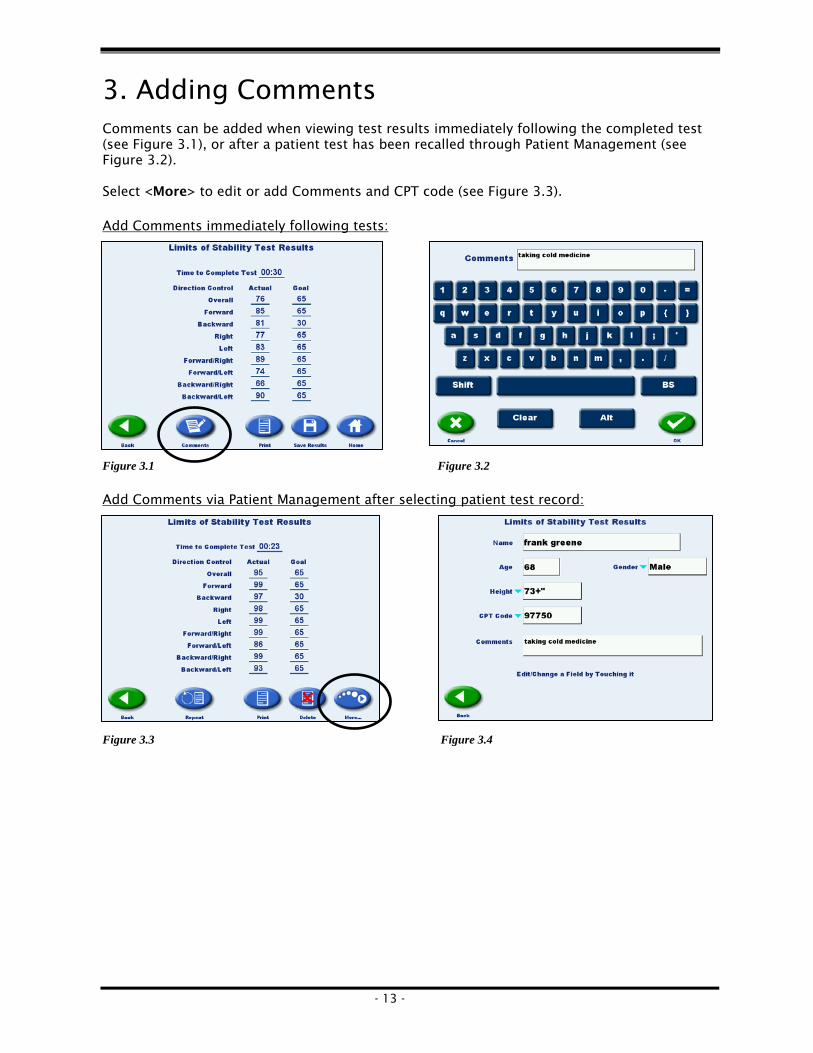
3. Adding Comments Comments can be added when viewing test results immediately following the completed test (see Figure 3.1), or after a patient test has been recalled through Patient Management (see Figure 3.2). Select <More> to edit or add Comments and CPT code (see Figure 3.3). Add Comments immediately following tests:
Figure 3.1 Figure 3.2 Add Comments via Patient Management after selecting patient test record:
Figure 3.3 Figure 3.4
- 14 -
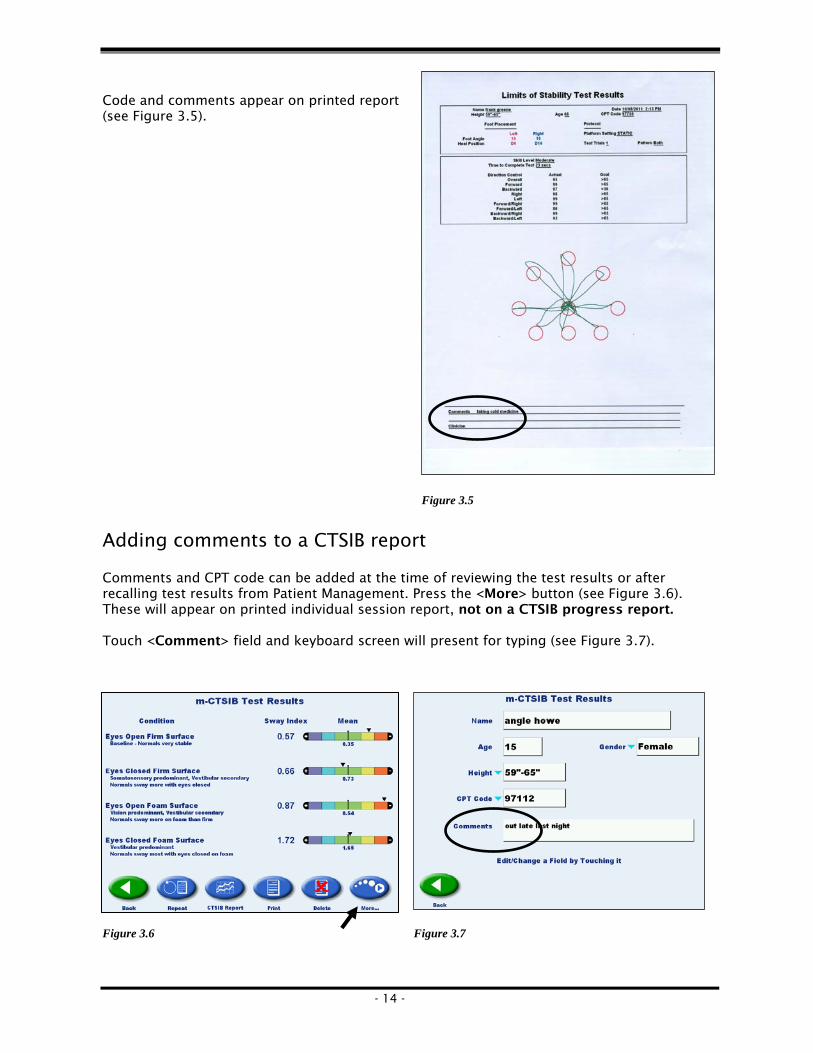
Code and comments appear on printed report (see Figure 3.5). Figure 3.5 Adding comments to a CTSIB report Comments and CPT code can be added at the time of reviewing the test results or after recalling test results from Patient Management. Press the <More> button (see Figure 3.6). These will appear on printed individual session report, not on a CTSIB progress report. Touch <Comment> field and keyboard screen will present for typing (see Figure 3.7).
Figure 3.6 Figure 3.7
- 15 -
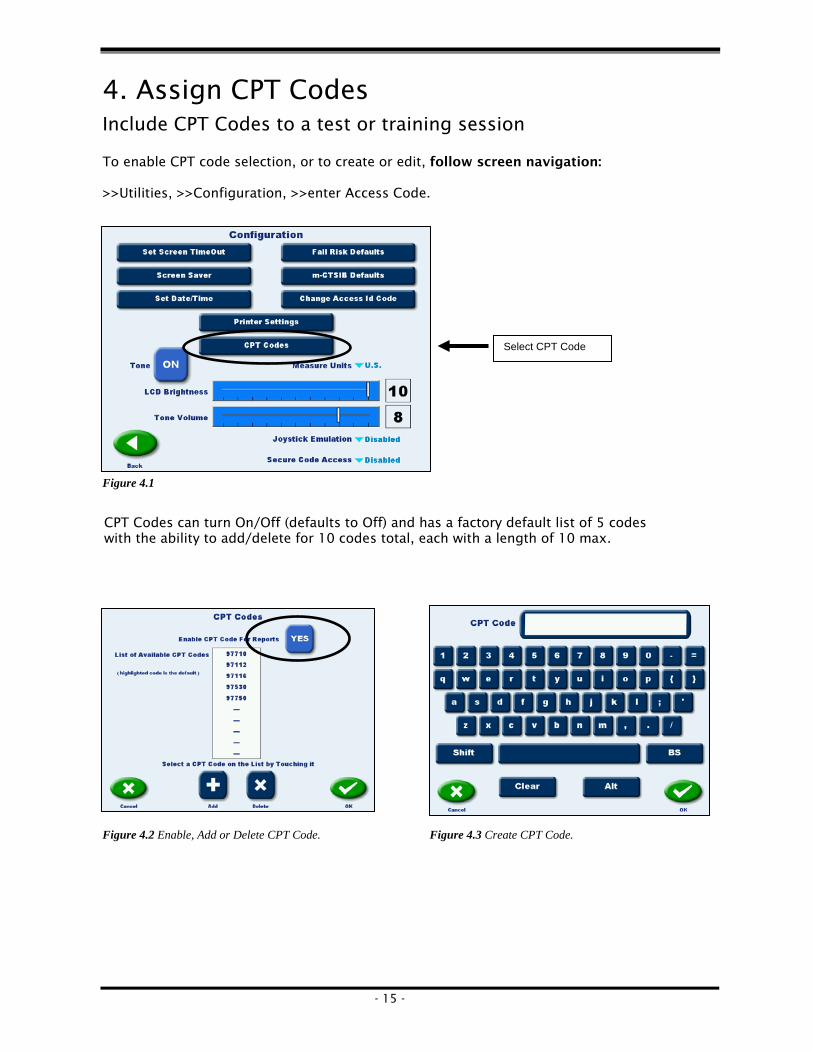
CPT Codes can turn On/Off (defaults to Off) and has a factory default list of 5 codes with the ability to add/delete for 10 codes total, each with a length of 10 max.
4. Assign CPT Codes Include CPT Codes to a test or training session To enable CPT code selection, or to create or edit, follow screen navigation: >>Utilities, >>Configuration, >>enter Access Code.
Figure 4.1
Figure 4.2 Enable, Add or Delete CPT Code. Figure 4.3 Create CPT Code.
Select CPT Code
- 16 -
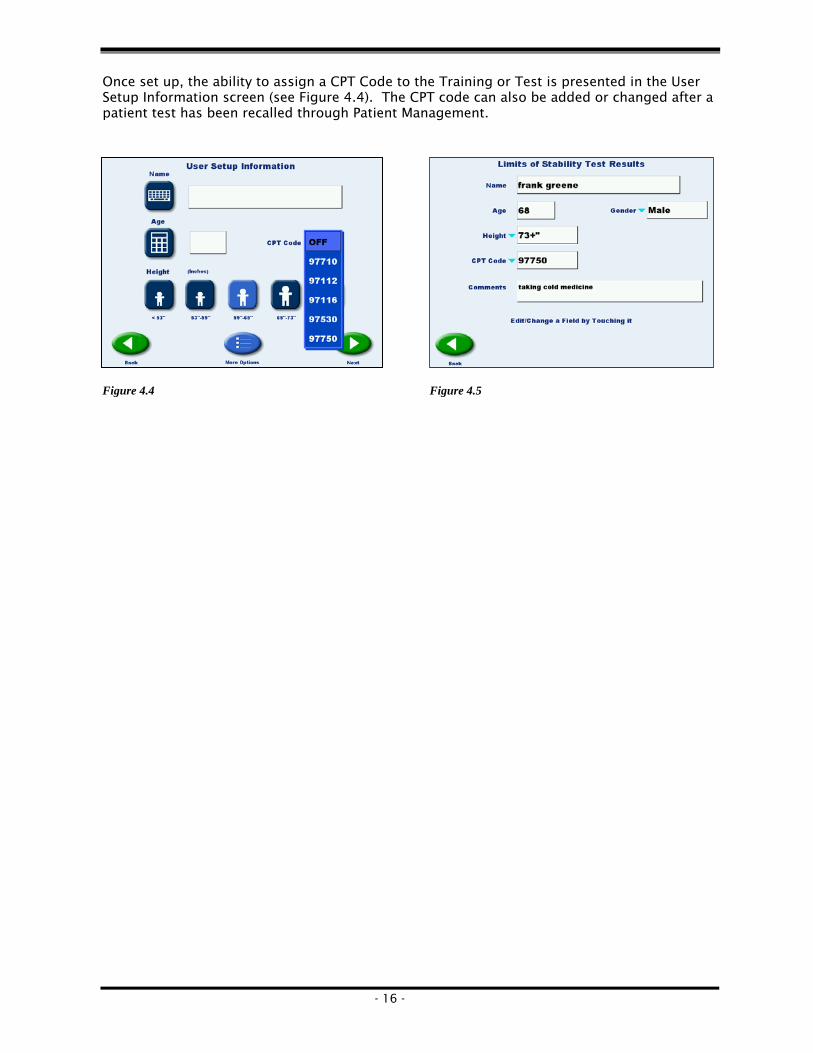
Once set up, the ability to assign a CPT Code to the Training or Test is presented in the User Setup Information screen (see Figure 4.4). The CPT code can also be added or changed after a patient test has been recalled through Patient Management.
Figure 4.4 Figure 4.5
- 17 -
5. Ethernet Printing: Wireless and Wired
Wireless printing feature will allow the Balance System SD or Portable BioSway to send all printed reports generated to a PCL compatible wireless printer.
Materials Needed In order to enable wireless printing, you will need the following: - Wireless printer that is PCL compatible - 802.11 b/g Wireless adapter. This can be purchased locally. - ClientVB program install in the ClientVB directory - Balance System SD or BioSway program version that supports wireless printing - A wireless network configured and active in close proximity to the Balance System SD or BioSway.
(This may require WPA or WEP password information for this network.)
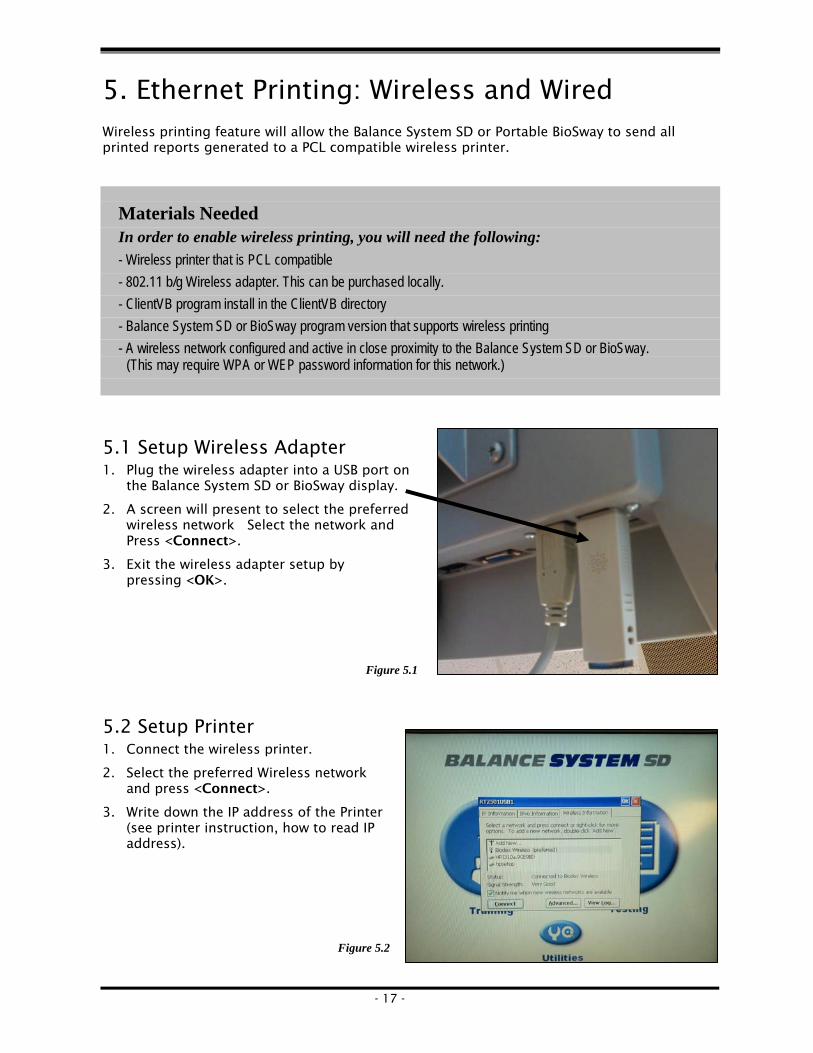
5.1 Setup Wireless Adapter 1. Plug the wireless adapter into a USB port on
the Balance System SD or BioSway display.
2. A screen will present to select the preferred wireless network Select the network and Press <Connect>.
3. Exit the wireless adapter setup by pressing <OK>.
Figure 5.1
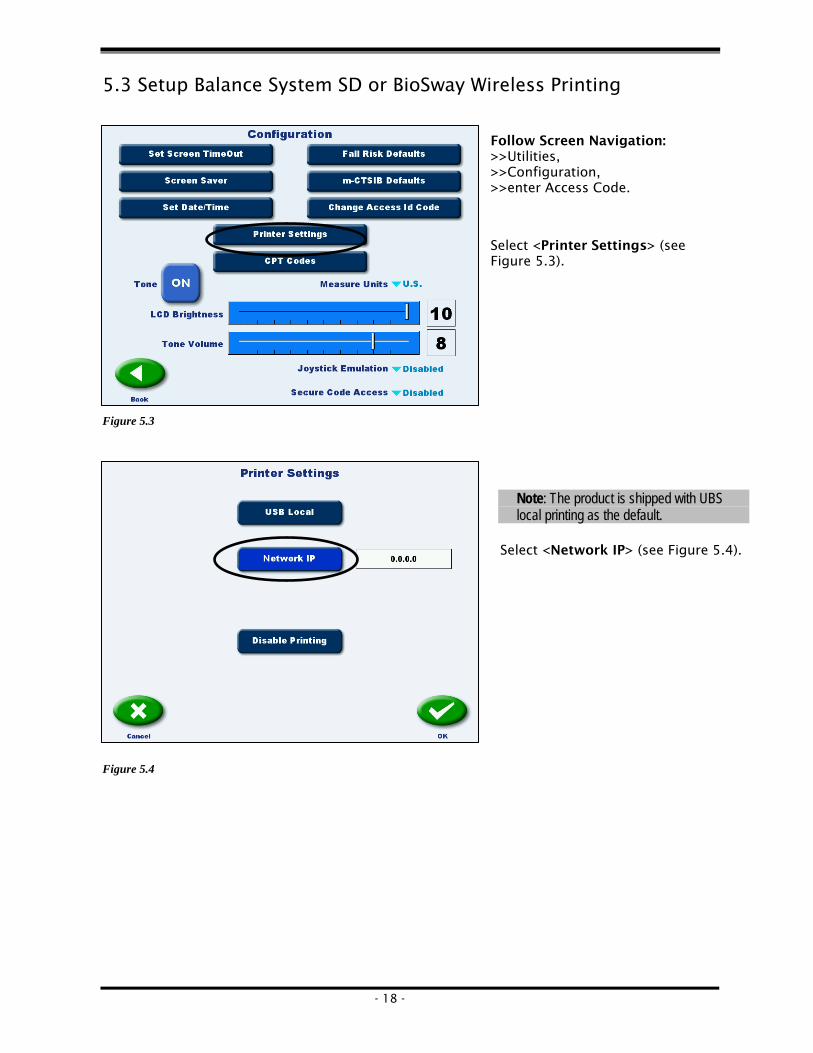
5.2 Setup Printer 1. Connect the wireless printer.
2. Select the preferred Wireless network and press <Connect>.
3. Write down the IP address of the Printer (see printer instruction, how to read IP address).
Figure 5.2
- 18 -
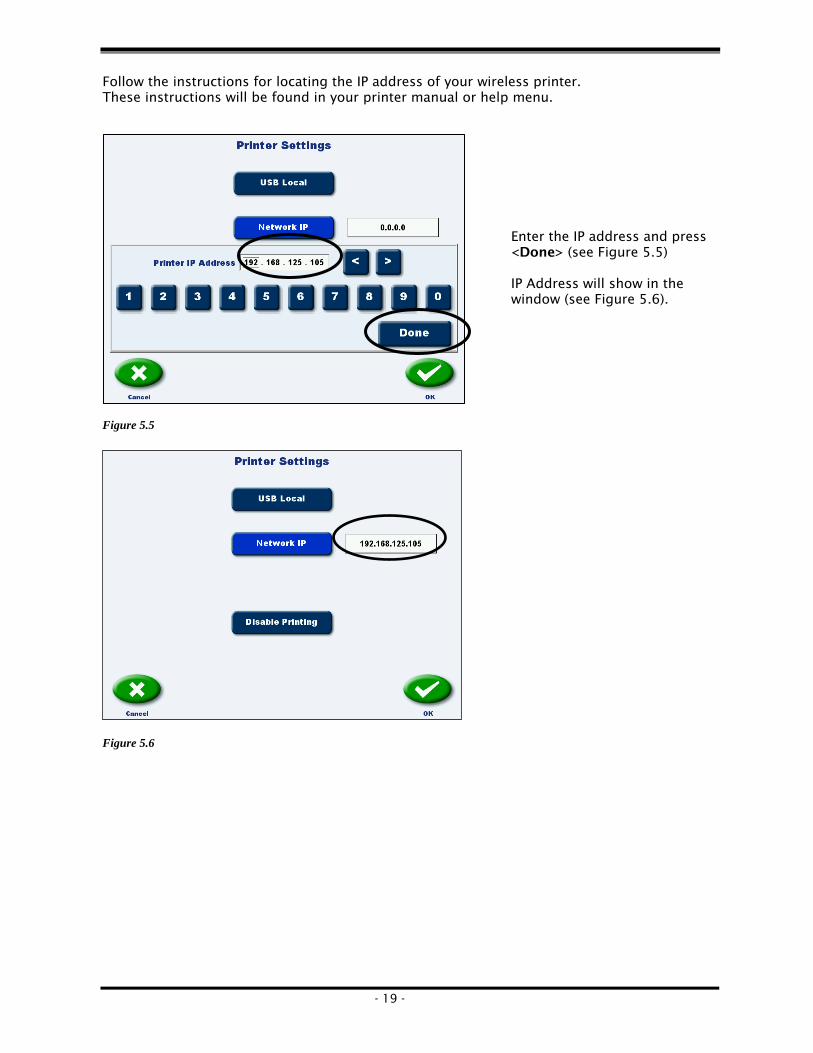
5.3 Setup Balance System SD or BioSway Wireless Printing
Follow Screen Navigation: >>Utilities, >>Configuration, >>enter Access Code.
Select <Printer Settings> (see Figure 5.3).
Figure 5.3
Figure 5.4
Note: The product is shipped with UBS local printing as the default.
Select <Network IP> (see Figure 5.4).
- 19 -
Follow the instructions for locating the IP address of your wireless printer. These instructions will be found in your printer manual or help menu.
Figure 5.5
Figure 5.6
Enter the IP address and press <Done> (see Figure 5.5) IP Address will show in the window (see Figure 5.6).
- 20 -
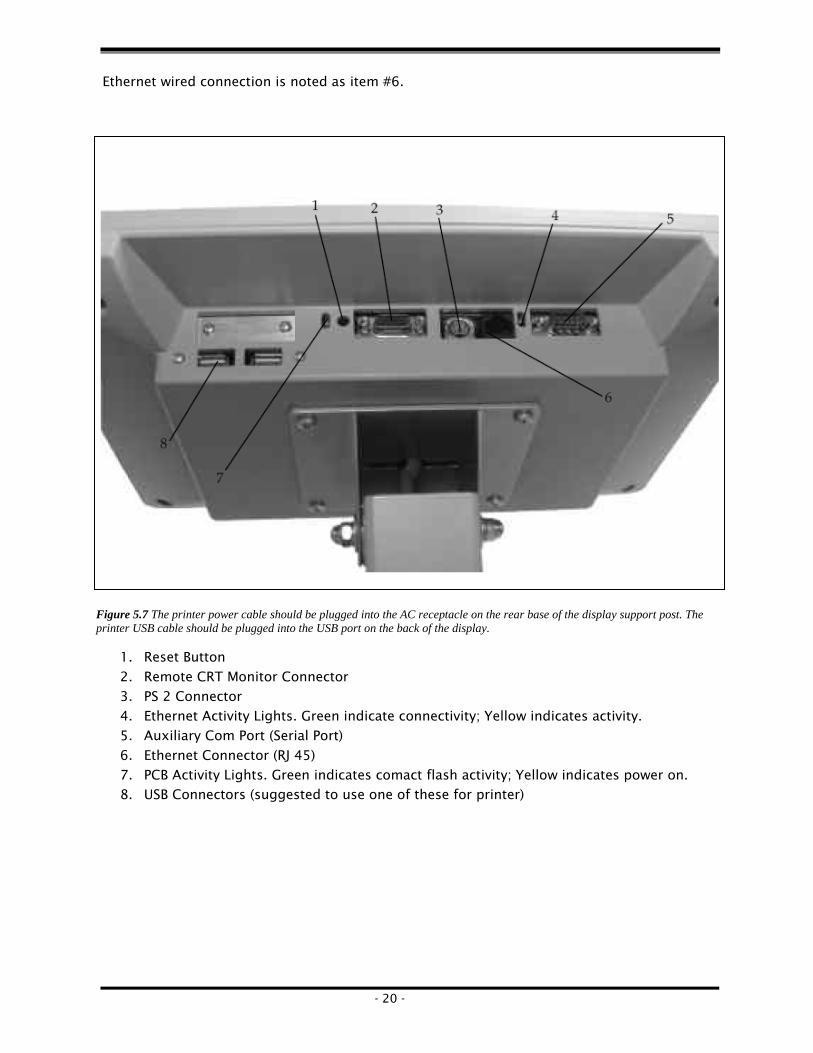
Ethernet wired connection is noted as item #6.
Figure 5.7 The printer power cable should be plugged into the AC receptacle on the rear base of the display support post. The printer USB cable should be plugged into the USB port on the back of the display.
1. Reset Button 2. Remote CRT Monitor Connector 3. PS 2 Connector 4. Ethernet Activity Lights. Green indicate connectivity; Yellow indicates activity. 5. Auxiliary Com Port (Serial Port) 6. Ethernet Connector (RJ 45) 7. PCB Activity Lights. Green indicates comact flash activity; Yellow indicates power on. 8. USB Connectors (suggested to use one of these for printer)
- 21 -
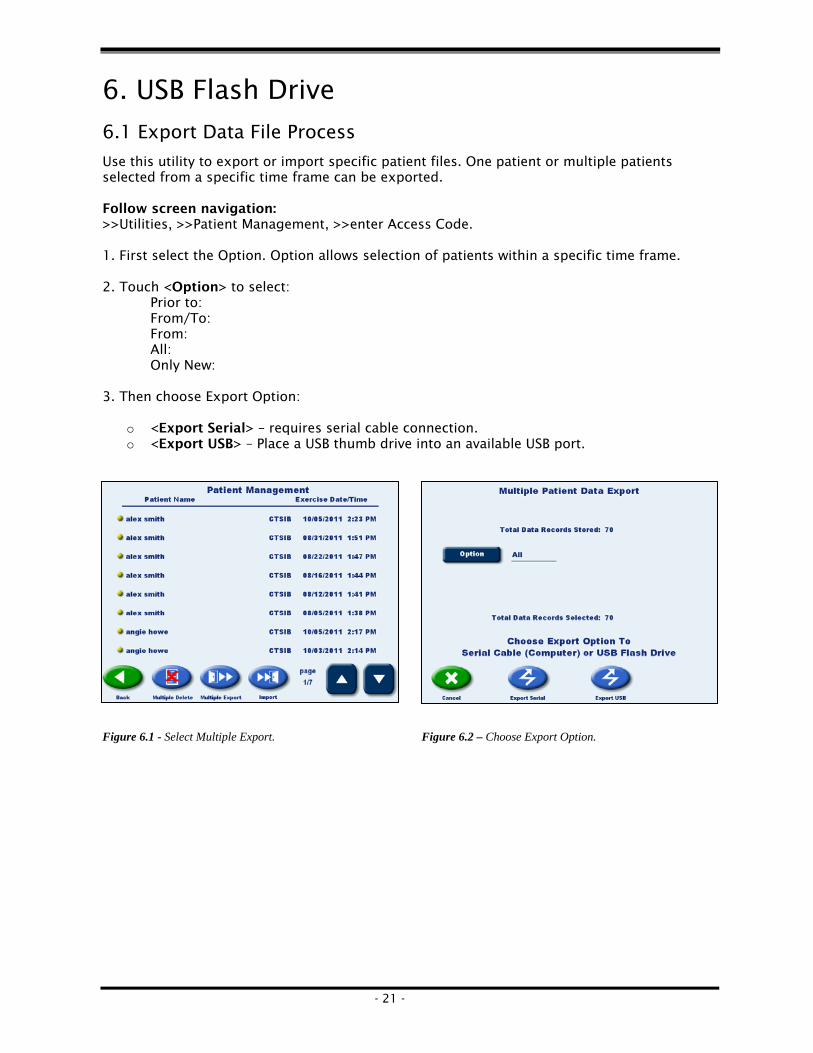
6. USB Flash Drive 6.1 Export Data File Process
Use this utility to export or import specific patient files. One patient or multiple patients selected from a specific time frame can be exported.
Follow screen navigation: >>Utilities, >>Patient Management, >>enter Access Code. 1. First select the Option. Option allows selection of patients within a specific time frame. 2. Touch <Option> to select:
Prior to: From/To: From: All: Only New:
3. Then choose Export Option:
o <Export Serial> – requires serial cable connection. o <Export USB> – Place a USB thumb drive into an available USB port.
Figure 6.1 - Select Multiple Export. Figure 6.2 – Choose Export Option.
- 22 -
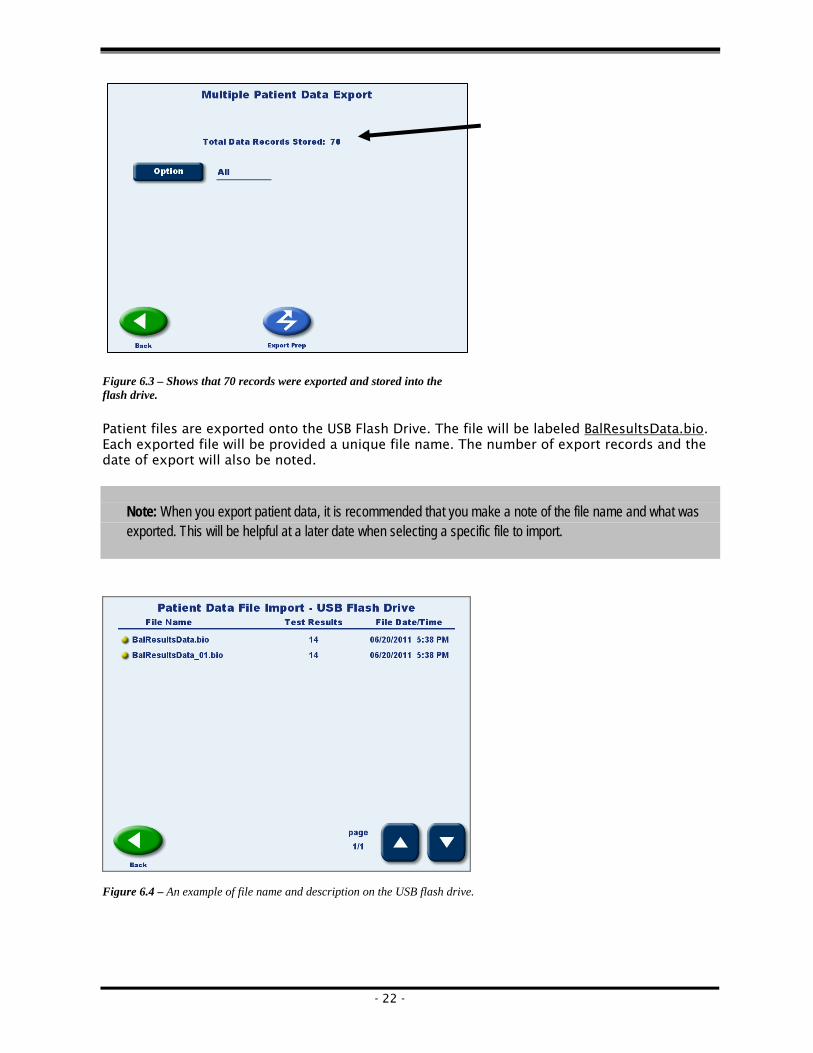
Figure 6.3 – Shows that 70 records were exported and stored into the flash drive. Patient files are exported onto the USB Flash Drive. The file will be labeled BalResultsData.bio. Each exported file will be provided a unique file name. The number of export records and the date of export will also be noted. Note: When you export patient data, it is recommended that you make a note of the file name and what was
exported. This will be helpful at a later date when selecting a specific file to import.
Figure 6.4 – An example of file name and description on the USB flash drive.
- 23 -
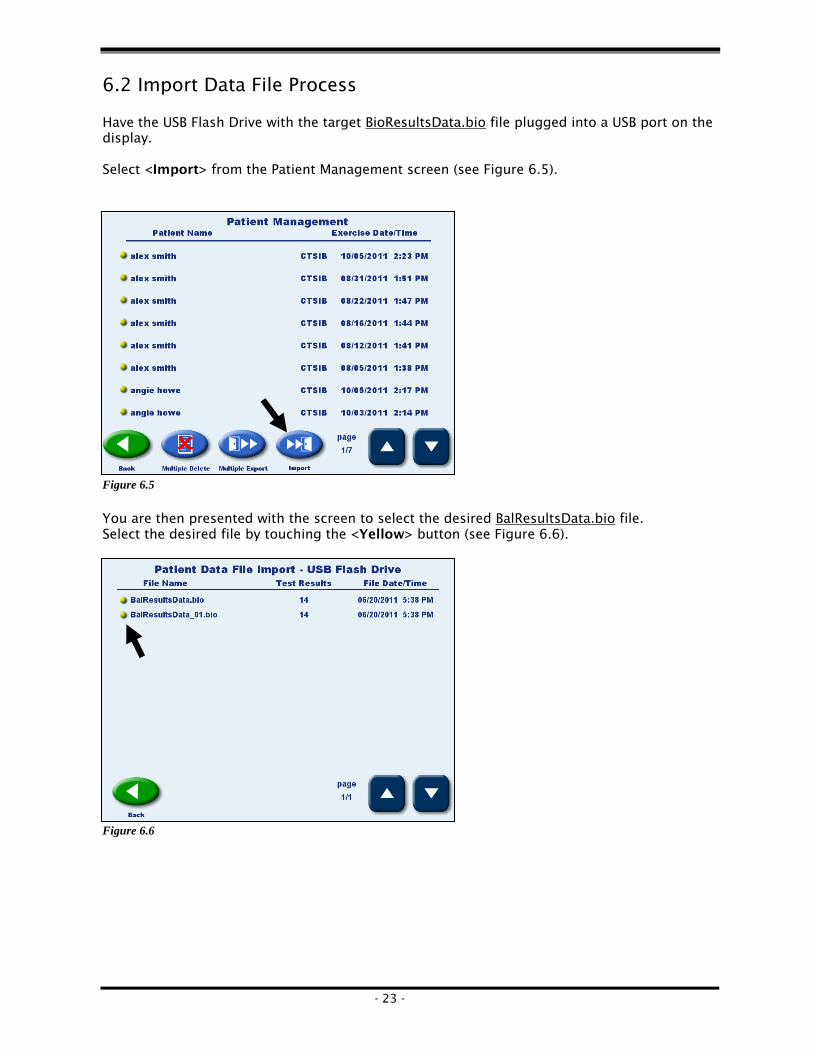
6.2 Import Data File Process Have the USB Flash Drive with the target BioResultsData.bio file plugged into a USB port on the display. Select <Import> from the Patient Management screen (see Figure 6.5).
Figure 6.5 You are then presented with the screen to select the desired BalResultsData.bio file. Select the desired file by touching the <Yellow> button (see Figure 6.6).
Figure 6.6
- 24 -
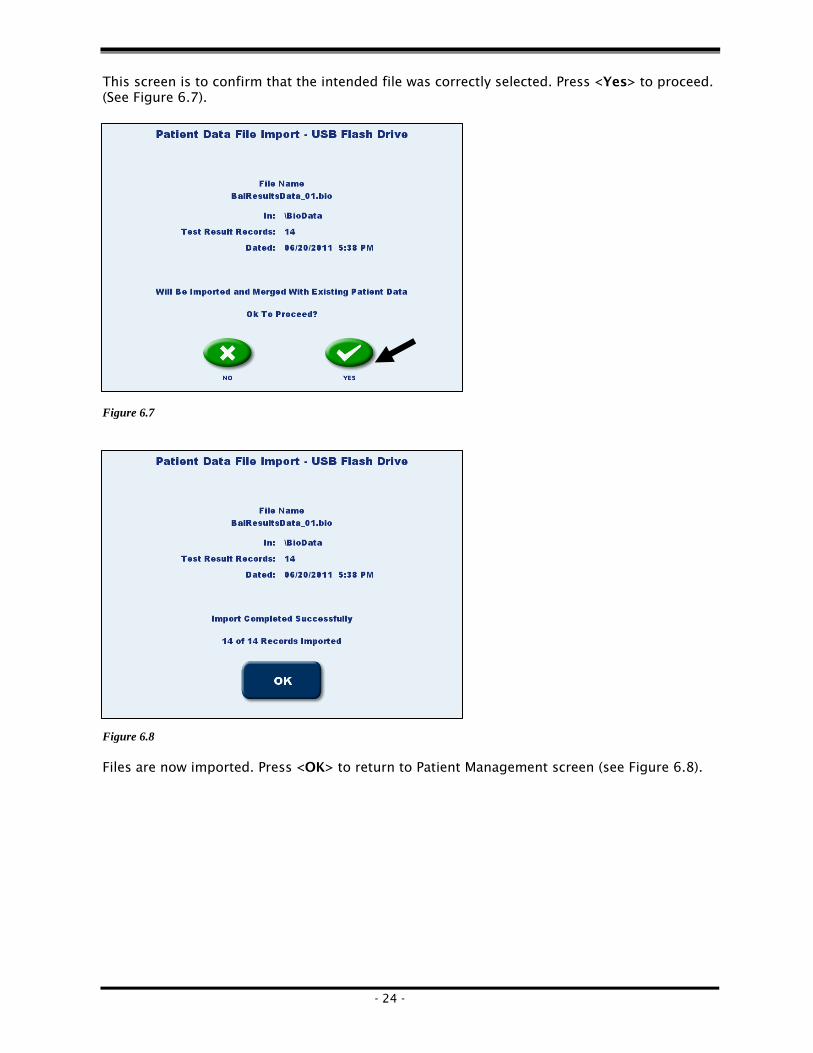
This screen is to confirm that the intended file was correctly selected. Press <Yes> to proceed. (See Figure 6.7).
Figure 6.7
Figure 6.8 Files are now imported. Press <OK> to return to Patient Management screen (see Figure 6.8).
- 25 -
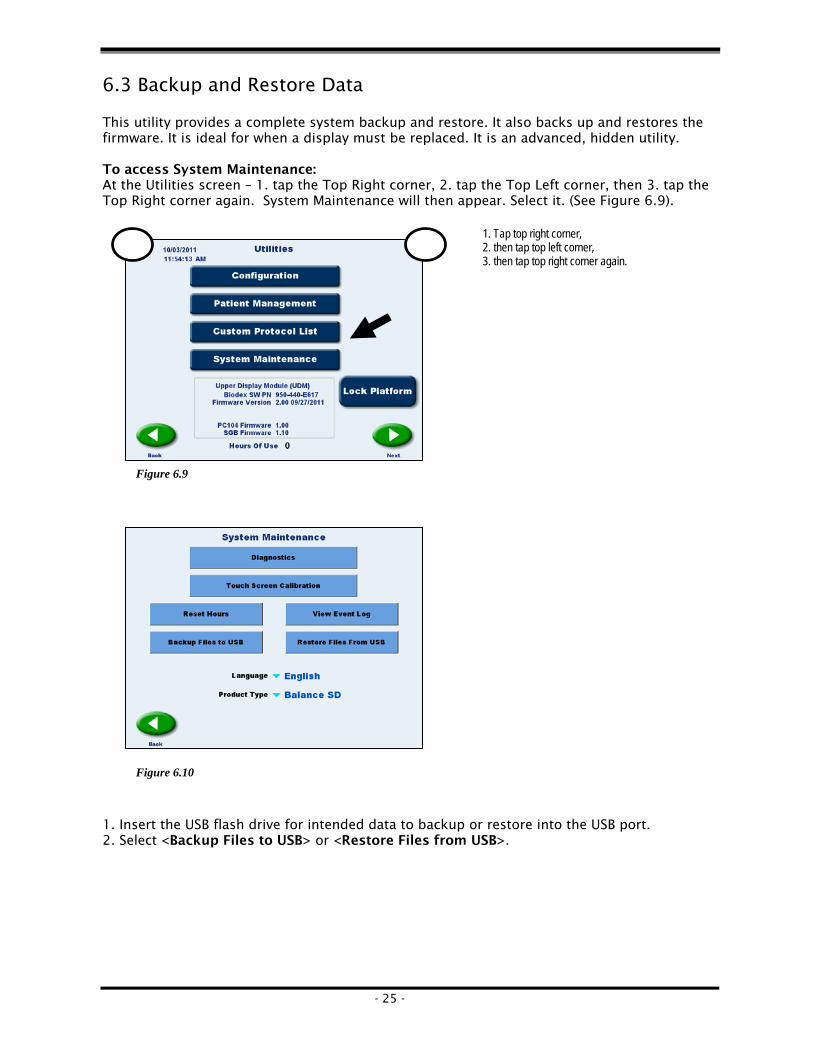
6.3 Backup and Restore Data This utility provides a complete system backup and restore. It also backs up and restores the firmware. It is ideal for when a display must be replaced. It is an advanced, hidden utility. To access System Maintenance: At the Utilities screen – 1. tap the Top Right corner, 2. tap the Top Left corner, then 3. tap the Top Right corner again. System Maintenance will then appear. Select it. (See Figure 6.9).
1. Tap top right corner, 2. then tap top left corner, 3. then tap top right corner again.
1. Insert the USB flash drive for intended data to backup or restore into the USB port. 2. Select <Backup Files to USB> or <Restore Files from USB>.
Figure 6.9
Figure 6.10
- 26 -
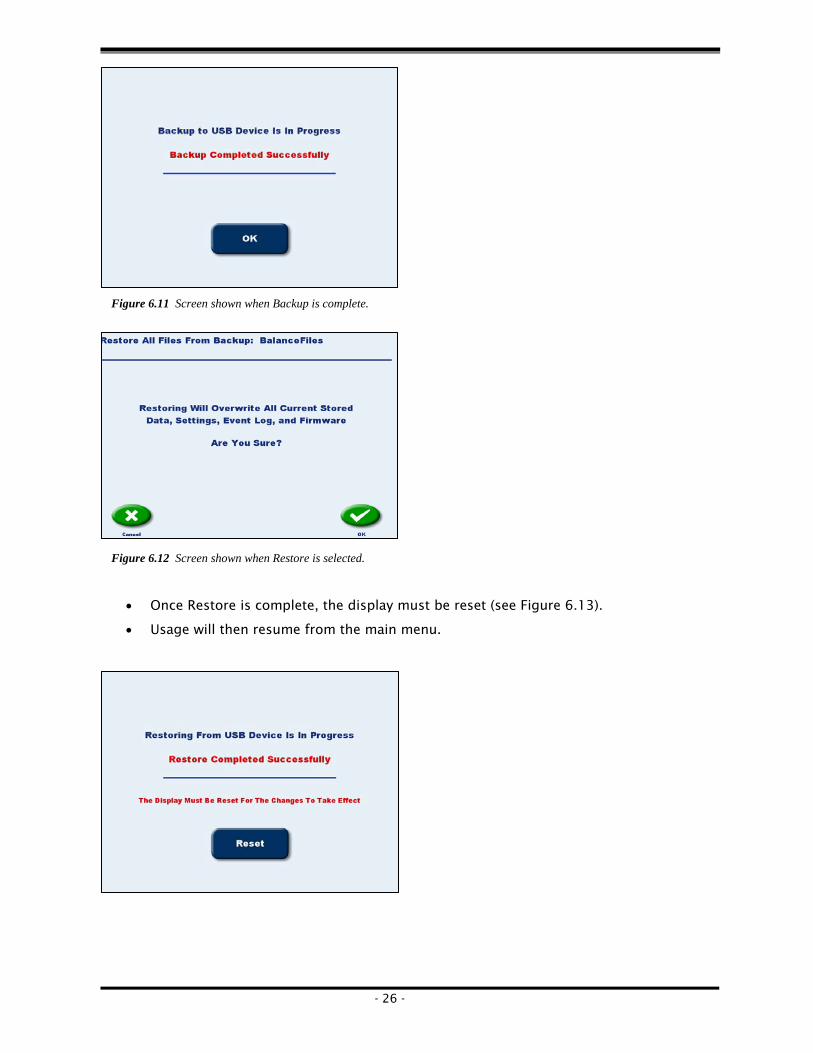
• Once Restore is complete, the display must be reset (see Figure 6.13).
• Usage will then resume from the main menu.
Figure 6.11 Screen shown when Backup is complete.
Figure 6.12 Screen shown when Restore is selected.
- 27 -
7. Appendix Rationale for 15% Baseline
• Geurts, et al, showed a test variability difference between controls and TBI patients of 18%.
• Guskiewicz, et al, noted an average difference of 6% between baseline variability and day 5 post injury.
• Lehman, et al, in the paper Quantitative Evaluation of Sway as an Indicator of Functional Balance in Post Traumatic Brain Injury noted a standard error of measure for normative values of 17%
Considering Guskiewicz was using values considerably larger than what are presented with CTSIB results, test variability between 6% and 18% appears reasonable. This is how we arrived at 15% as the default baseline limit.
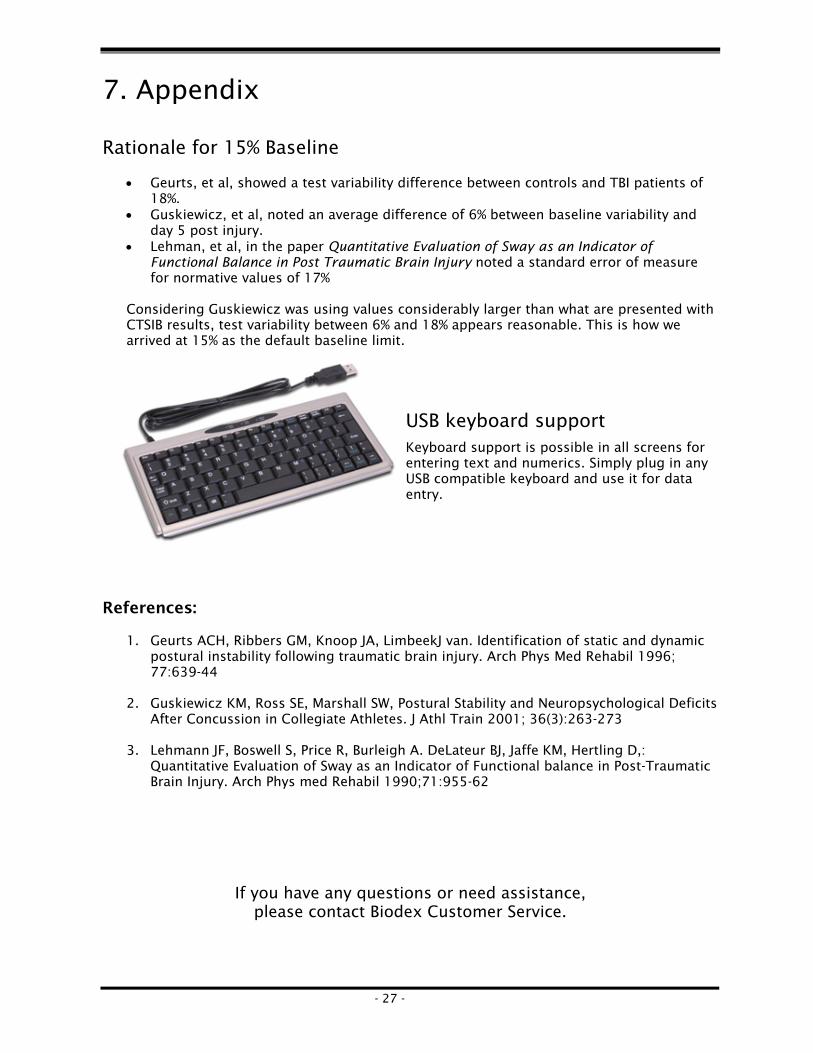
USB keyboard support Keyboard support is possible in all screens for entering text and numerics. Simply plug in any USB compatible keyboard and use it for data entry.
References:
1. Geurts ACH, Ribbers GM, Knoop JA, LimbeekJ van. Identification of static and dynamic postural instability following traumatic brain injury. Arch Phys Med Rehabil 1996; 77:639-44
2. Guskiewicz KM, Ross SE, Marshall SW, Postural Stability and Neuropsychological Deficits
After Concussion in Collegiate Athletes. J Athl Train 2001; 36(3):263-273
3. Lehmann JF, Boswell S, Price R, Burleigh A. DeLateur BJ, Jaffe KM, Hertling D,: Quantitative Evaluation of Sway as an Indicator of Functional balance in Post-Traumatic Brain Injury. Arch Phys med Rehabil 1990;71:955-62
If you have any questions or need assistance, please contact Biodex Customer Service.

BIODEXBiodex Medical Systems, Inc.
20 Ramsey Road, Shirley, New York, 11967-4704, Tel: 800-224-6339 (Int’l 631-924-9000), Fax: 631-924-9338, Email: [email protected], www.biodex.com
Certified Quality Management System