Embed Size (px)
Citation preview

Tenable.io for Amazon WebServices
Last Revised: April 16, 2018

Table of Contents
Tenable.io for Amazon Web Services 1
Introduction 3
Integration Requirements 4
Integration Configuration 5
About Tenable 26
Glossary 27
Copyright 2017-2018 Tenable, Inc. All rights reserved. Tenable Network Security, Nessus, SecurityCenter, SecurityCenter Continuous View and Log Correlation Engine are registered trademarks of Tenable, Inc. Tenable,
Tenable.io, Assure, and The Cyber Exposure Company are trademarks of Tenable, Inc. All other products or services are trademarks of their respective owners.

- 3 -
Introduction
This document describes how to deploy Tenable.io™ for integration with Amazon Web Services. Pleaseemail any comments and suggestions to [email protected].
With more than one million users, Nessus® is the world’s most widely deployed vulnerability, con-figuration, and compliance assessment product. Nessus prevents attacks by identifying the vul-nerabilities, configuration issues, and malware that hackers could use to penetrate your network. It is asimportant to run these assessments in AWS as it is in any other IT environment. Amazon recommendsthat all new and existing AWS customers scan their AWS instances while in development and operationsand before publishing to AWS users.
A pre-authorized Nessus scanner is available in the Amazon Marketplace. The Nessus scanner links toand is managed by Tenable.io, and allows pre-authorized scanning of AWS EC2 environments andinstances. Customers interested in leveraging the pre-authorized Nessus scanner to secure their AWSenvironments and instances must have active Tenable.io and Amazon Web Services accounts.
Copyright 2017-2018 Tenable, Inc. All rights reserved. Tenable Network Security, Nessus, SecurityCenter, SecurityCenter Continuous View and Log Correlation Engine are registered trademarks of Tenable,
Inc. Tenable, Tenable.io, Assure, and The Cyber Exposure Company are trademarks of Tenable, Inc. All other products or services are trademarks of their respective owners.

- 4 -
Integration Requirements
The following are required in order to integrate Tenable.io with AWS:
l Tenable.io account
To purchase a Tenable.io account or set up a free evaluation, visit http://www.ten-able.com/products/tenable-io
l AWS account
To create a free account, visit https://aws.amazon.com/start-now
Copyright 2017-2018 Tenable, Inc. All rights reserved. Tenable Network Security, Nessus, SecurityCenter, SecurityCenter Continuous View and Log Correlation Engine are registered trademarks of Tenable,
Inc. Tenable, Tenable.io, Assure, and The Cyber Exposure Company are trademarks of Tenable, Inc. All other products or services are trademarks of their respective owners.

- 5 -
Integration Configuration
1. Once you have created a Tenable.io account, navigate to https://cloud.tenable.com and log in.
2. In the top menu bar, click Scans.
3. In the left-hand menu, click Scanners.
4. Click the Linked Scanners tab.
5. Copy and save the Linking Key.
Tip: This key is needed during the AWS configuration steps.
AWS ConfigurationCopyright 2017-2018 Tenable, Inc. All rights reserved. Tenable Network Security, Nessus, SecurityCenter, SecurityCenter Continuous View and Log Correlation Engine are registered trademarks of Tenable,
Inc. Tenable, Tenable.io, Assure, and The Cyber Exposure Company are trademarks of Tenable, Inc. All other products or services are trademarks of their respective owners.
- 6 -
Create an IAM RoleTo begin the AWS configuration, you must first create an Identity and Access Management (IAM) role. Thisrole eliminates the need to store AWS access keys by providing the scanner instance with temporary AWScredentials. Once created, the IAM role will be assigned to the Nessus instance(s) as seen in the LaunchNessus Scanner Instance section below. Additionally, this role must also have the Describe VPC PeeringConnections role. The VPC peering relationship must be from the VPC containing the pre-authorized Nes-sus scanner (requestor) to the VPC(s) you want to scan.
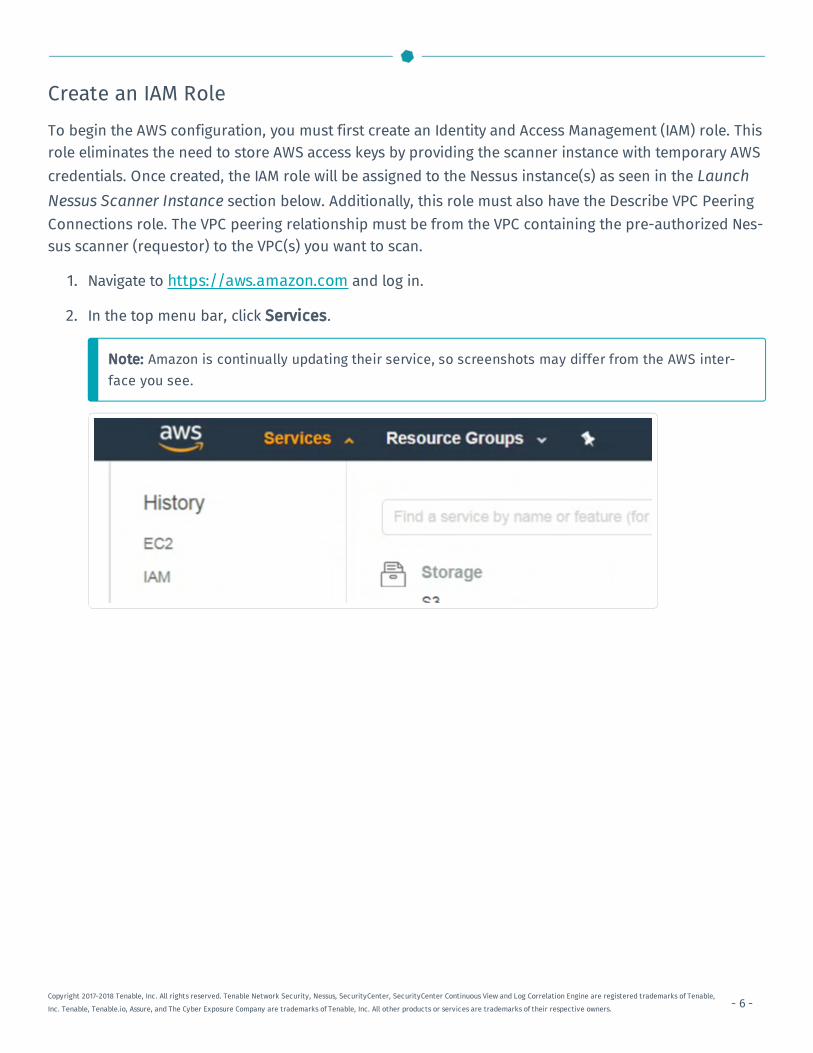
1. Navigate to https://aws.amazon.com and log in.
2. In the top menu bar, click Services.
Note: Amazon is continually updating their service, so screenshots may differ from the AWS inter-face you see.
Copyright 2017-2018 Tenable, Inc. All rights reserved. Tenable Network Security, Nessus, SecurityCenter, SecurityCenter Continuous View and Log Correlation Engine are registered trademarks of Tenable,
Inc. Tenable, Tenable.io, Assure, and The Cyber Exposure Company are trademarks of Tenable, Inc. All other products or services are trademarks of their respective owners.

- 7 -
3. In the Security, Identity, and Compliance section, click IAM.
4. In the left-hand menu, click Roles.
Copyright 2017-2018 Tenable, Inc. All rights reserved. Tenable Network Security, Nessus, SecurityCenter, SecurityCenter Continuous View and Log Correlation Engine are registered trademarks of Tenable,
Inc. Tenable, Tenable.io, Assure, and The Cyber Exposure Company are trademarks of Tenable, Inc. All other products or services are trademarks of their respective owners.

- 8 -
5. Click Create Role.
6. In the Select Type of Trusted Entity section, select AWS Service.
7. In the Choose the service that will use this role section, click EC2.
Note: EC2 assets must be activated for your AWS license in order to scan them. If you are going touse the Pre-authorized scanner in AWS, you are required to activate your assets.
The AWS acceptable scanning policy prevents scanning the m1.small, t1.micro or t2.nano instances.
Copyright 2017-2018 Tenable, Inc. All rights reserved. Tenable Network Security, Nessus, SecurityCenter, SecurityCenter Continuous View and Log Correlation Engine are registered trademarks of Tenable,
Inc. Tenable, Tenable.io, Assure, and The Cyber Exposure Company are trademarks of Tenable, Inc. All other products or services are trademarks of their respective owners.

- 9 -
8. In the Select your use case section, click EC2.
9. Click Next: Permissions.
10. Select the AmazonEC2ReadOnlyAccess check box.
Note: If a custom policy is created, “DescribeInstances” and “DescribeVpcPeeringConnections“ per-missions are required.
11. Click Next: Review.
12. In the Role Name field, enter a descriptive name for the role.
Note: The role name cannot be edited once it is created.
Copyright 2017-2018 Tenable, Inc. All rights reserved. Tenable Network Security, Nessus, SecurityCenter, SecurityCenter Continuous View and Log Correlation Engine are registered trademarks of Tenable,
Inc. Tenable, Tenable.io, Assure, and The Cyber Exposure Company are trademarks of Tenable, Inc. All other products or services are trademarks of their respective owners.

- 10 -
13. Once you have reviewed the the IAM information, click Create Role.
The newly created IAM role appears in the role list.
Launch Nessus Scanner Instance
Copyright 2017-2018 Tenable, Inc. All rights reserved. Tenable Network Security, Nessus, SecurityCenter, SecurityCenter Continuous View and Log Correlation Engine are registered trademarks of Tenable,
Inc. Tenable, Tenable.io, Assure, and The Cyber Exposure Company are trademarks of Tenable, Inc. All other products or services are trademarks of their respective owners.

- 11 -
1. In the top-menu bar, click Services.
2. In the Compute section, click EC2 to begin launching the pre-authorized scanner instance.
3. Click Launch Instance to create an Amazon EC2 instance (virtual server).
4. In Step 1: Choose an Amazon Machine Image (AMI), in the left-hand menu, click AWS Mar-ketplace.
Copyright 2017-2018 Tenable, Inc. All rights reserved. Tenable Network Security, Nessus, SecurityCenter, SecurityCenter Continuous View and Log Correlation Engine are registered trademarks of Tenable,
Inc. Tenable, Tenable.io, Assure, and The Cyber Exposure Company are trademarks of Tenable, Inc. All other products or services are trademarks of their respective owners.

- 12 -
5. In the Search box, type Tenable and on your keyboard, press Enter.
6. Select Nessus Scanner (Pre-Authorized).
7. Click Continue.
8. In Step 2: Choose an Instance Type, Tenable Network Security recommends selecting them4.large instance (or higher) for best performance.
Tip: The instances offer various combinations of CPU, memory, storage and network performance.Refer to Amazon EC2 Pricing for more details on Amazon’s pricing structure.
Copyright 2017-2018 Tenable, Inc. All rights reserved. Tenable Network Security, Nessus, SecurityCenter, SecurityCenter Continuous View and Log Correlation Engine are registered trademarks of Tenable,
Inc. Tenable, Tenable.io, Assure, and The Cyber Exposure Company are trademarks of Tenable, Inc. All other products or services are trademarks of their respective owners.

- 13 -
9. Click Next: Configure Instance Details.
10. In the Number of Instances field, enter the number of AMI instances to deploy. Multiple instancescan be deployed at a time.
11. In the Purchasing Option section, select the Request Spot Instances check box to launch aninstance at “Spot” prices rather than “On-demand” prices. Refer to Spot Instances for details.
Copyright 2017-2018 Tenable, Inc. All rights reserved. Tenable Network Security, Nessus, SecurityCenter, SecurityCenter Continuous View and Log Correlation Engine are registered trademarks of Tenable,
Inc. Tenable, Tenable.io, Assure, and The Cyber Exposure Company are trademarks of Tenable, Inc. All other products or services are trademarks of their respective owners.

- 14 -
12. From the Network drop-down menu, select the Amazon VPC in which to launch the instance.
Tip: To create a new VPC, click Create new VPC.
13. From the Subnet drop-down menu, select the subnet within the previously chosen VPC.
Tip: To create a new subnet, click Create new subnet.
14. Optionally, to request a public IP address from Amazon’s public pool and make the instance reach-able from the internet, enable the Auto-assign Public IP option.
15. From the IAM Role drop-down menu, select the required IAM role.
Tip: To create a new role, click the Create new IAM role. For more information on IAM roles, refer toIAM Roles for Amazon EC2.
16. From the Shutdown Behavior drop-down menu, select either Stop or Terminate to determine theinstance behavior when an OS-level shutdown is performed.
17. To prevent an instance from accidentally being terminated, select the Enable termination pro-tection check box.
18. To monitor, collect, and analyze metrics about the instances, select the Monitoring check box.
19. To allow for improved performance for Amazon EBS volumes through the use of dedicated through-put between Amazon EC2 and Amazon EBS, select the EBS-optimized instance check box.
20. From the Tenancy drop-down menu, select whether you want the instance to run on a dedicatedor shared host. For more information on dedicated hosts, refer to Amazon EC2 Dedicated Hosts.
Copyright 2017-2018 Tenable, Inc. All rights reserved. Tenable Network Security, Nessus, SecurityCenter, SecurityCenter Continuous View and Log Correlation Engine are registered trademarks of Tenable,
Inc. Tenable, Tenable.io, Assure, and The Cyber Exposure Company are trademarks of Tenable, Inc. All other products or services are trademarks of their respective owners.

- 15 -
21. Click Advanced Details.
22. In the User Data section, select the As Text radio button.
23. In the text field, enter the scanner name, the Linking Key previously copied from Tenable.io, andthe previously created IAM role in JSON format:
{"name": "AWS_Scanner","key": "d92a78e1177ff9ead79176b34c5de936ce00f0a7.......","iam_role": "TenableIO"}
Note: The Linking Key and IAM role are both required entries in the User Data field. Other accept-able entries include:
Copyright 2017-2018 Tenable, Inc. All rights reserved. Tenable Network Security, Nessus, SecurityCenter, SecurityCenter Continuous View and Log Correlation Engine are registered trademarks of Tenable,
Inc. Tenable, Tenable.io, Assure, and The Cyber Exposure Company are trademarks of Tenable, Inc. All other products or services are trademarks of their respective owners.

- 16 -
Parameter Description
name Name of the scanner shown in the Nessus UI (recommended). Ifa name is not specified, it defaults to the instance ID.
key Linking key used to register scanner with Tenable.io. Only usedduring initial registration (required).
iam_role Name of the IAM role assigned to the scanner instance(required).
proxy FQDN/IP address of proxy, if required.
proxy_port Port used to connect to proxy, if required.
24. Click Next: Add Storage.
25. In the Size field, enter a value of 30 or higher.
Note: Tenable Network Security requires the pre-authorized Nessus scanners to have a minimum of30GB of storage.
26. Click Next: Add Tags.
27. Click Add another tag for as many tags as you want to create to help manage and categorize yourAWS EC2 resources.
Copyright 2017-2018 Tenable, Inc. All rights reserved. Tenable Network Security, Nessus, SecurityCenter, SecurityCenter Continuous View and Log Correlation Engine are registered trademarks of Tenable,
Inc. Tenable, Tenable.io, Assure, and The Cyber Exposure Company are trademarks of Tenable, Inc. All other products or services are trademarks of their respective owners.

- 17 -
Note: Each tag requires both a Key and a Value, and each resource can have a maximum of 10 tags.For more information on tags, refer to Tagging Your Amazon EC2 Resources.
28. Click Next: Configure Security Group.
29. In the Assign a security group section, select the Create a new security group radio button.
30. In the Security group name field, enter a descriptive name for the security group.
31. In the Description field, enter a description of the security group.
32. In the Rules section below, click the X to the right of each rule to delete it.
Copyright 2017-2018 Tenable, Inc. All rights reserved. Tenable Network Security, Nessus, SecurityCenter, SecurityCenter Continuous View and Log Correlation Engine are registered trademarks of Tenable,
Inc. Tenable, Tenable.io, Assure, and The Cyber Exposure Company are trademarks of Tenable, Inc. All other products or services are trademarks of their respective owners.

- 18 -
Note: There is no way to directly access the AMI, so removing the rules prevents any inbound traffic,and is essentially a “deny all” firewall rule.
33. Click Review and Launch.
34. Once you have reviewed the instance, click Launch.
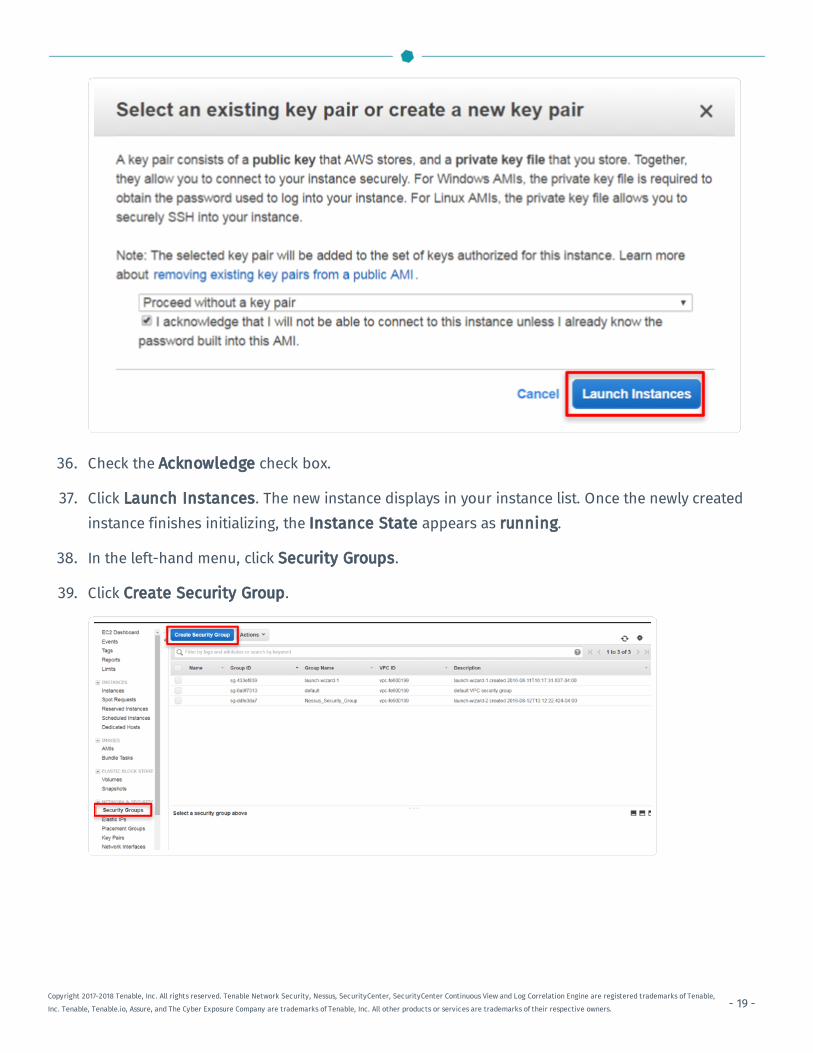
35. In the Select an existing key pair or create a new pair dialog box, from the drop-down menu,select Proceed without a key pair.
Tip: No key pair is needed since the instance is not listening on any ports and there are no avail-able connections to it.
Copyright 2017-2018 Tenable, Inc. All rights reserved. Tenable Network Security, Nessus, SecurityCenter, SecurityCenter Continuous View and Log Correlation Engine are registered trademarks of Tenable,
Inc. Tenable, Tenable.io, Assure, and The Cyber Exposure Company are trademarks of Tenable, Inc. All other products or services are trademarks of their respective owners.
- 19 -
36. Check the Acknowledge check box.
37. Click Launch Instances. The new instance displays in your instance list. Once the newly createdinstance finishes initializing, the Instance State appears as running.
38. In the left-hand menu, click Security Groups.
39. Click Create Security Group.
Copyright 2017-2018 Tenable, Inc. All rights reserved. Tenable Network Security, Nessus, SecurityCenter, SecurityCenter Continuous View and Log Correlation Engine are registered trademarks of Tenable,
Inc. Tenable, Tenable.io, Assure, and The Cyber Exposure Company are trademarks of Tenable, Inc. All other products or services are trademarks of their respective owners.

- 20 -
40. In the Security group name field, enter a name for the security group.
41. In the Description field, enter a description for the security group.
42. From the VPC drop-down menu, select the appropriate network for the security group.
43. Click Add Rule to create an inbound security group.
44. From the Type drop-down menu, select All TCP.
45. In the CIDR, IP or Security Group box, enter the name of the previously created security group.
46. Repeat steps 42-44 for All UDP and All ICMP types.
47. Click Create.
Tenable.io Configuration
1. Navigate to https://cloud.tenable.com and log in.
2. In the top menu bar, click Scans.
Copyright 2017-2018 Tenable, Inc. All rights reserved. Tenable Network Security, Nessus, SecurityCenter, SecurityCenter Continuous View and Log Correlation Engine are registered trademarks of Tenable,
Inc. Tenable, Tenable.io, Assure, and The Cyber Exposure Company are trademarks of Tenable, Inc. All other products or services are trademarks of their respective owners.

- 21 -
3. In the left-hand menu, click Scanners.
4. Click the Linked Scanners tab. The newly created AWS Scanner appears in the list.
Note: It may take a few minutes for the scanner status to appear as Online.
5. In the top menu bar, click Scans.
Copyright 2017-2018 Tenable, Inc. All rights reserved. Tenable Network Security, Nessus, SecurityCenter, SecurityCenter Continuous View and Log Correlation Engine are registered trademarks of Tenable,
Inc. Tenable, Tenable.io, Assure, and The Cyber Exposure Company are trademarks of Tenable, Inc. All other products or services are trademarks of their respective owners.

- 22 -
6. Click + New Scan.
7. Select the appropriate Scan Template for your scanning requirements.
8. In the Name field, enter a name for the scan.
9. In the Description field, enter a description for the scan.
10. From the Folder drop-down menu, select a folder in which to store the scan.
11. From the Scanner drop-down menu, select the previously created AWS Scanner. Once the AWSscanner is selected, in the left-hand menu the Target List option is replaced with a Targets option.
Copyright 2017-2018 Tenable, Inc. All rights reserved. Tenable Network Security, Nessus, SecurityCenter, SecurityCenter Continuous View and Log Correlation Engine are registered trademarks of Tenable,
Inc. Tenable, Tenable.io, Assure, and The Cyber Exposure Company are trademarks of Tenable, Inc. All other products or services are trademarks of their respective owners.

- 23 -
12. Click Targets to display a list of all AWS instances available for scanning.
13. Select the check box next to the instances to scan.
Copyright 2017-2018 Tenable, Inc. All rights reserved. Tenable Network Security, Nessus, SecurityCenter, SecurityCenter Continuous View and Log Correlation Engine are registered trademarks of Tenable,
Inc. Tenable, Tenable.io, Assure, and The Cyber Exposure Company are trademarks of Tenable, Inc. All other products or services are trademarks of their respective owners.

- 24 -
14. Click the Credentials tab.
15. Enter the appropriate credentials for the scan.
16. Click Save.
17. To launch a scan of the AWS instance, navigate to the folder in which you saved the scan.
Copyright 2017-2018 Tenable, Inc. All rights reserved. Tenable Network Security, Nessus, SecurityCenter, SecurityCenter Continuous View and Log Correlation Engine are registered trademarks of Tenable,
Inc. Tenable, Tenable.io, Assure, and The Cyber Exposure Company are trademarks of Tenable, Inc. All other products or services are trademarks of their respective owners.
- 25 -
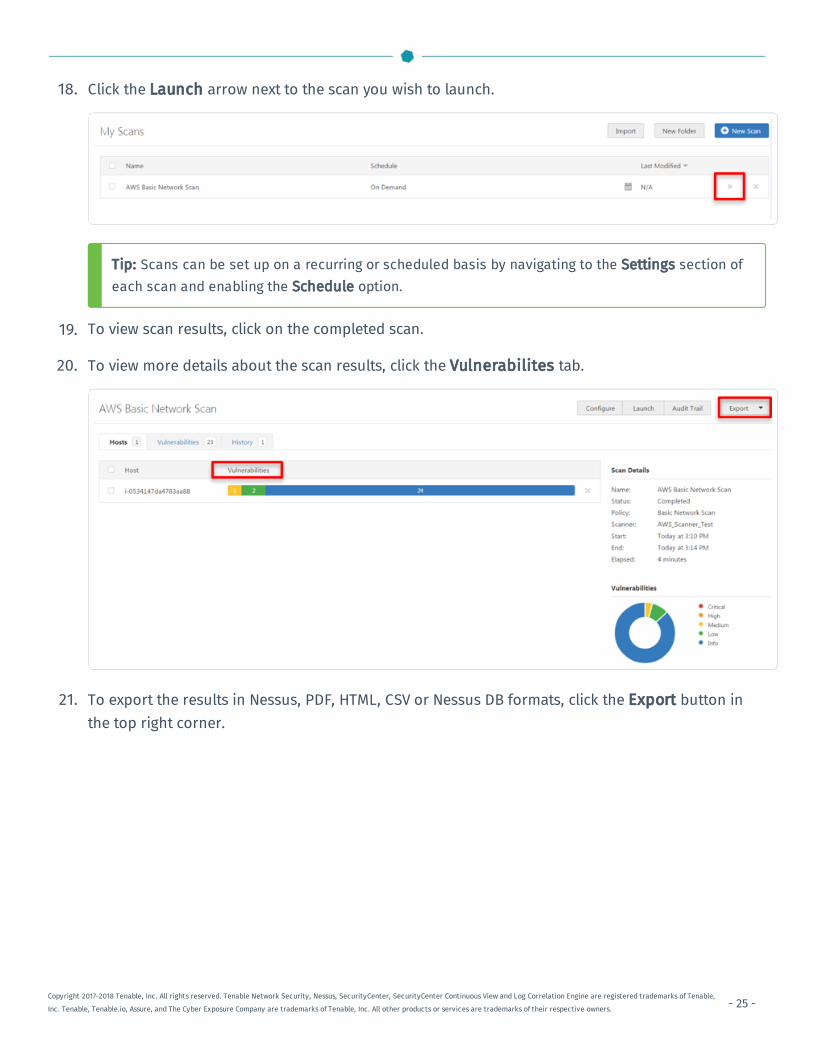
18. Click the Launch arrow next to the scan you wish to launch.
Tip: Scans can be set up on a recurring or scheduled basis by navigating to the Settings section ofeach scan and enabling the Schedule option.
19. To view scan results, click on the completed scan.
20. To view more details about the scan results, click the Vulnerabilites tab.
21. To export the results in Nessus, PDF, HTML, CSV or Nessus DB formats, click the Export button inthe top right corner.
Copyright 2017-2018 Tenable, Inc. All rights reserved. Tenable Network Security, Nessus, SecurityCenter, SecurityCenter Continuous View and Log Correlation Engine are registered trademarks of Tenable,
Inc. Tenable, Tenable.io, Assure, and The Cyber Exposure Company are trademarks of Tenable, Inc. All other products or services are trademarks of their respective owners.

- 26 -
About Tenable
Tenable Network Security provides continuous network monitoring to identify vulnerabilities, reduce risk,and ensure compliance. Our family of products includes SecurityCenter Continuous View™, whichprovides the most comprehensive and integrated view of network health, and Nessus®, the global stand-ard in detecting and assessing network data. Tenable is relied upon by many of the world’s largest cor-porations, not-for-profit organizations, and public sector agencies, including the entire U.S. Departmentof Defense. For more information, visit tenable.com.
Copyright 2017-2018 Tenable, Inc. All rights reserved. Tenable Network Security, Nessus, SecurityCenter, SecurityCenter Continuous View and Log Correlation Engine are registered trademarks of Tenable,
Inc. Tenable, Tenable.io, Assure, and The Cyber Exposure Company are trademarks of Tenable, Inc. All other products or services are trademarks of their respective owners.

- 27 -
Glossary
CCACertificate AuthorityCVContinuous ViewLLCELog Correlation EnginePPVSPassive Vulnerability Scanner
Copyright 2017-2018 Tenable, Inc. All rights reserved. Tenable Network Security, Nessus, SecurityCenter, SecurityCenter Continuous View and Log Correlation Engine are registered trademarks of Tenable,
Inc. Tenable, Tenable.io, Assure, and The Cyber Exposure Company are trademarks of Tenable, Inc. All other products or services are trademarks of their respective owners.