Embed Size (px)
Citation preview

igher
Performance Management
for ePerformance
Administrators
Job Aid
Performance Management for ePerformance Administrators 1
Table of Contents
Revision History 3
Introduction 4
Section 1: HR Administrative Tasks 4
Topic 1.1: Create New Documents 4
1.1.1 Create New Performance Documents 4
1.1.2 Clone a New Performance Document from an Existing Performance Document 6
Topic 1.2: Modify Dates 8
1.2.1 Modify Issue Date of Performance Document 8
1.2.2 Change Rating Period Dates 10
Topic 1.3: Change Document Reviewers 13
1.3.1 Transfer Document Supervisor 13
1.3.2 Change Document Approver 16
Topic 1.4: Change Document Status or Reopen a Document 20
1.4.1 Reopen Establish Performance Plan Step 20
1.4.2 Reopen Employee Self-Assessment 23
1.4.3 Reopen Mid-Year Review 25
1.4.4 Reopen Peer Review 28
1.4.5 Reopen Final Evaluation 30
1.4.6 Cancel a Document 33
Topic 1.5: Mass Actions 36
1.5.1 Classic Transfer Document 36
1.5.2 Classic Reopen Document 39
1.5.3 Classic Cancel Document 41
Topic 1.6: Other Actions 43
1.6.1 Modify Supervisor Level 43
1.6.2 Override Evaluation 46
Section 2: Create and Manage Business Objectives 49
Topic 2.1: Create Business Objectives 49
Performance Management for ePerformance Administrators 2
2.1.1 Identify Objective Nodes 50
2.1.2 Create Business Objectives 51
2.1.3 Assign/Transfer Business Objectives 53
Topic 2.2: Manage Business Objectives 55
2.2.1 Manage Business Objectives 55
2.2.2 Publish Business Objectives 58
Performance Management for ePerformance Administrators 3
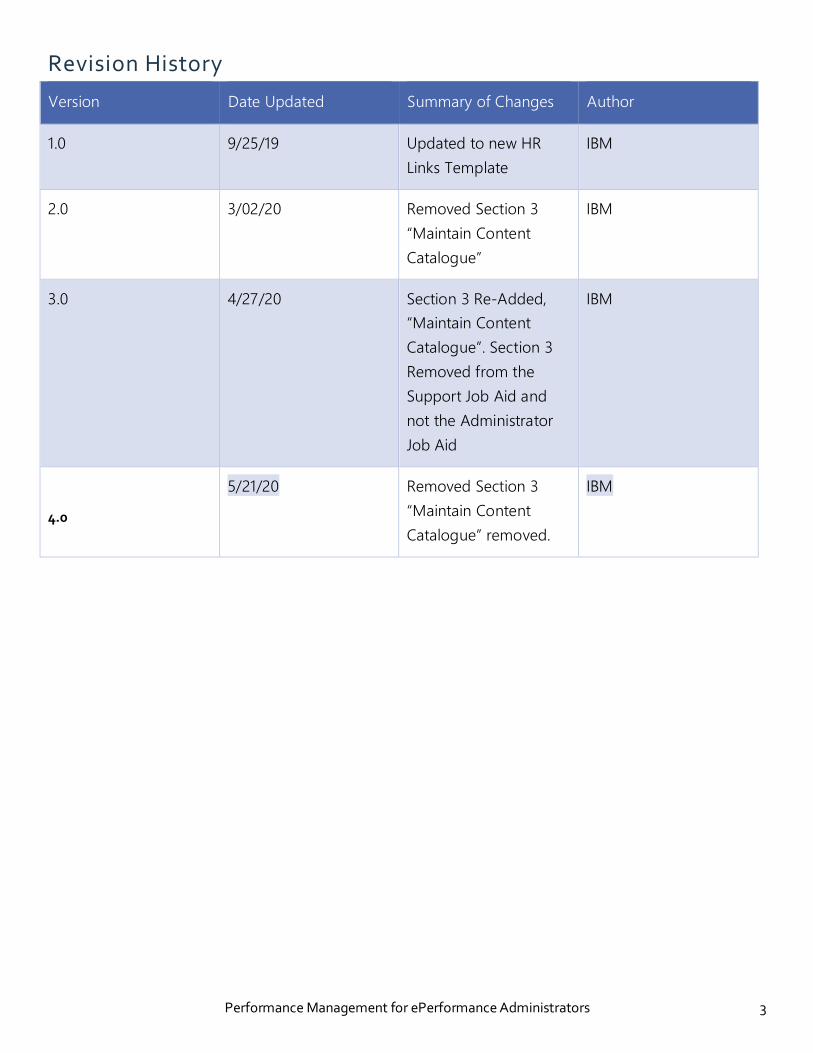
Revision History
Version Date Updated Summary of Changes Author
1.0 9/25/19 Updated to new HR
Links Template
IBM
2.0 3/02/20 Removed Section 3
“Maintain Content
Catalogue”
IBM
3.0 4/27/20 Section 3 Re-Added,
“Maintain Content
Catalogue”. Section 3
Removed from the
Support Job Aid and
not the Administrator
Job Aid
IBM
4.0
5/21/20 Removed Section 3
“Maintain Content
Catalogue” removed.
IBM

Performance Management for ePerformance Administrators 4
Introduction
Section 1: HR Administrative Tasks
This section provides ePerformance Administrators and Support with information about completing
administrative tasks in the ePerformance component of HR Links.
Topic 1.1: Create New Documents
1.1.1 Create New Performance Documents
1 Select the Create Documents [Admin] tile.
2 Enter the search criteria of the desired employee.
3 Select Search.
4 Select the employee from the search results.
5 Select Create Documents.

Performance Management for ePerformance Administrators 5
6 Select Period Begin Date and Period End Date.
7 Select Performance Document from the Document Type drop-down menu.
8 Be sure that the Clone from Prior Document switch is set to No.
Note: If you would like to clone a new performance document from an existing one, go to the Clone a
New Performance Document from Existing Performance Document section below.
9 Use the Template drop-down to select GSA Annual Performance Plan.
Note: Other options include Mass Approval and OIG Template. Do not use Mass Approval. The OIG
Template will be used for GSA OIG ePerformance.
10 Select Create.
11 The document will appear in the employee’s Current Documents.

Performance Management for ePerformance Administrators 6
1.1.2 Clone a New Performance Do cument fro m an Existing Performance Document
1 Select the Create Documents [Admin] tile.
2 Enter search criteria to find the correct manager.
3 Select Search.
4 Select the employees from the list of search results.
5 Select Create Documents.

Performance Management for ePerformance Administrators 7
6 Select Period Begin Date and Period End Date.
7 Select Performance Document from the Document Type drop-down menu.
8 Toggle the Clone from Prior Document switch to Yes.
9 Use the lookup icon to select the associated prior document.
10 Select Create.
11 The new document will appear in the employee’s Current Documents.

Performance Management for ePerformance Administrators 8
Topic 1.2: Modify Dates
1.2.1 Modify Issue Date of Performance Do cument
Note: Only Administrators can modify the issue date of a performance document.
1 Select the Performance Documents [Admin] tile.
2 Enter the search criteria of the desired employee.
3 Select Search.
4 Select the performance document you wish to modify.
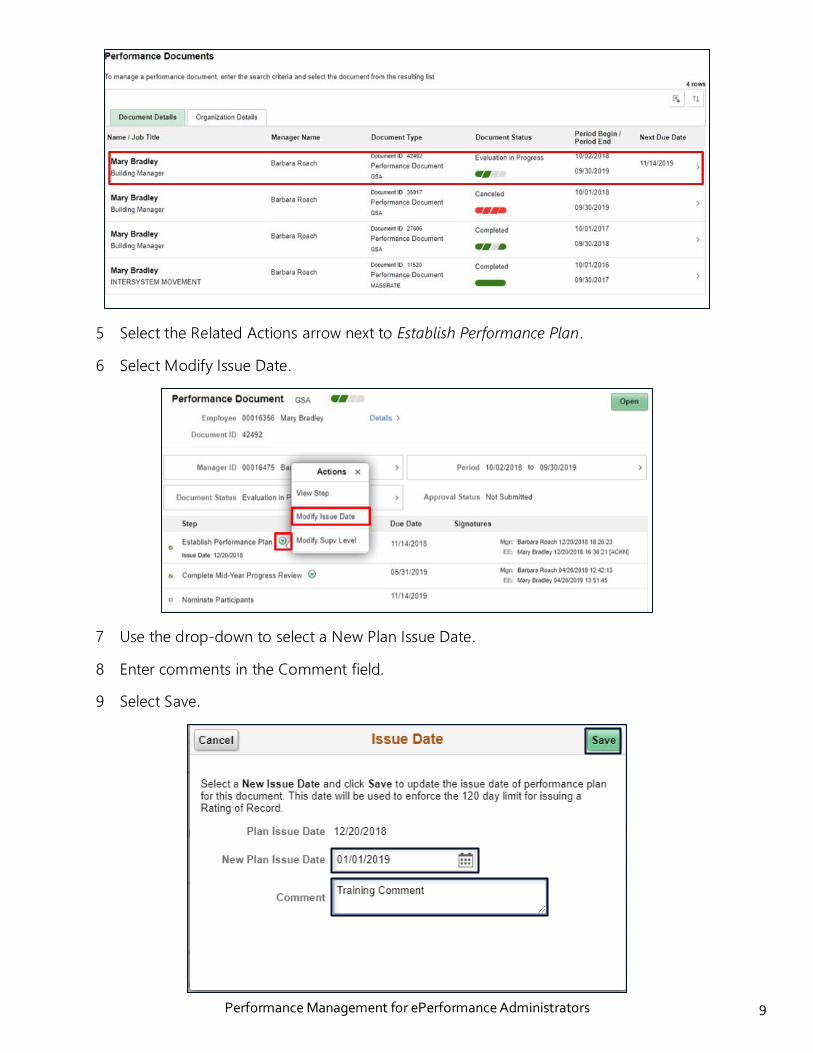
Performance Management for ePerformance Administrators 9
5 Select the Related Actions arrow next to Establish Performance Plan.
6 Select Modify Issue Date.
7 Use the drop-down to select a New Plan Issue Date.
8 Enter comments in the Comment field.
9 Select Save.
Performance Management for ePerformance Administrators 10
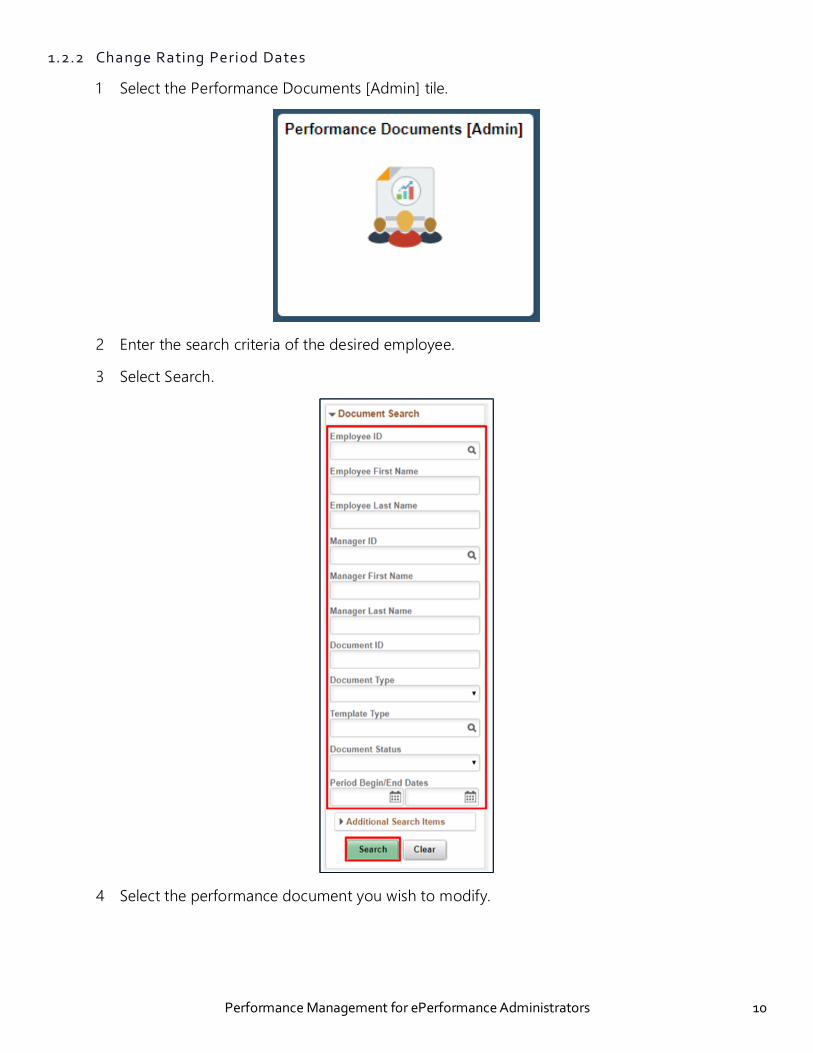
1.2.2 Change Rating Period Dates
1 Select the Performance Documents [Admin] tile.
2 Enter the search criteria of the desired employee.
3 Select Search.
4 Select the performance document you wish to modify.
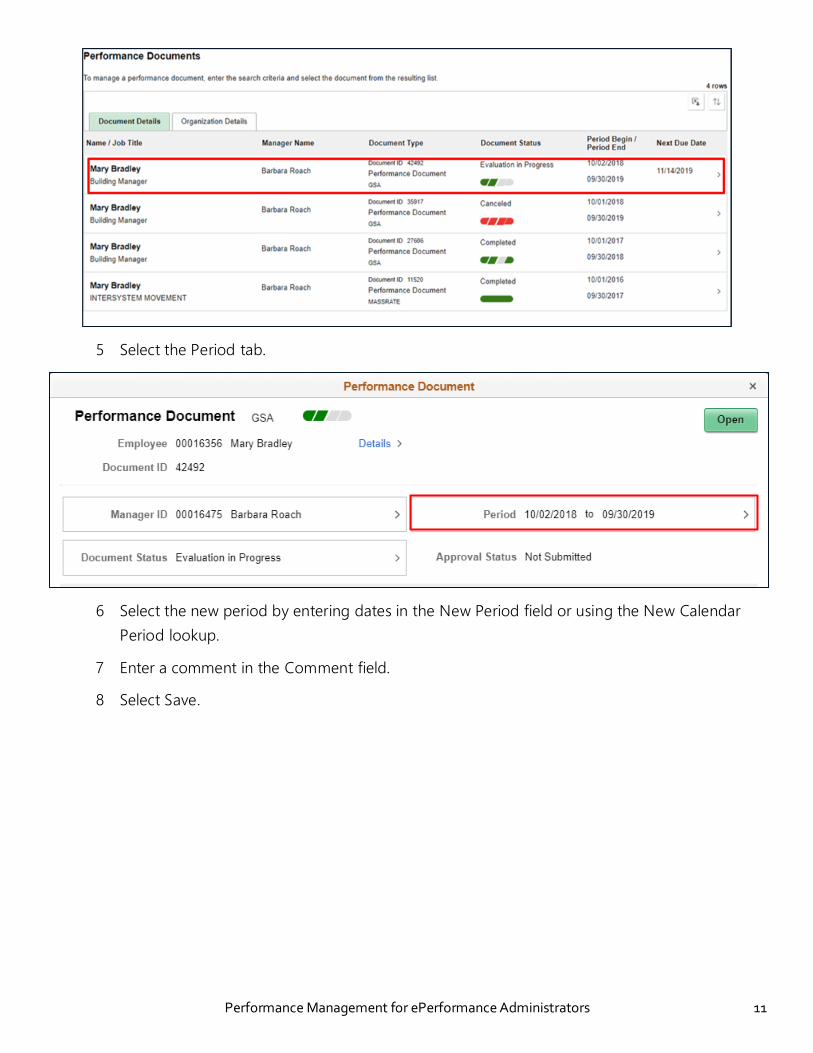
Performance Management for ePerformance Administrators 11
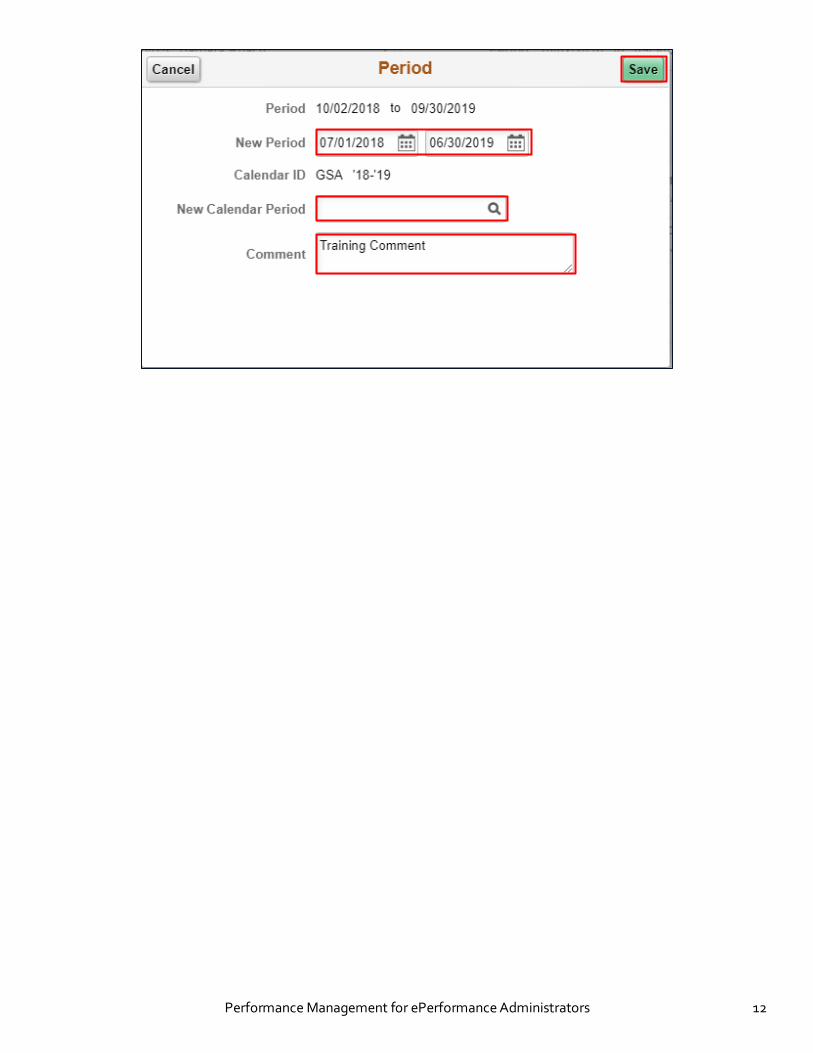
5 Select the Period tab.
6 Select the new period by entering dates in the New Period field or using the New Calendar
Period lookup.
7 Enter a comment in the Comment field.
8 Select Save.
Performance Management for ePerformance Administrators 12
Performance Management for ePerformance Administrators 13
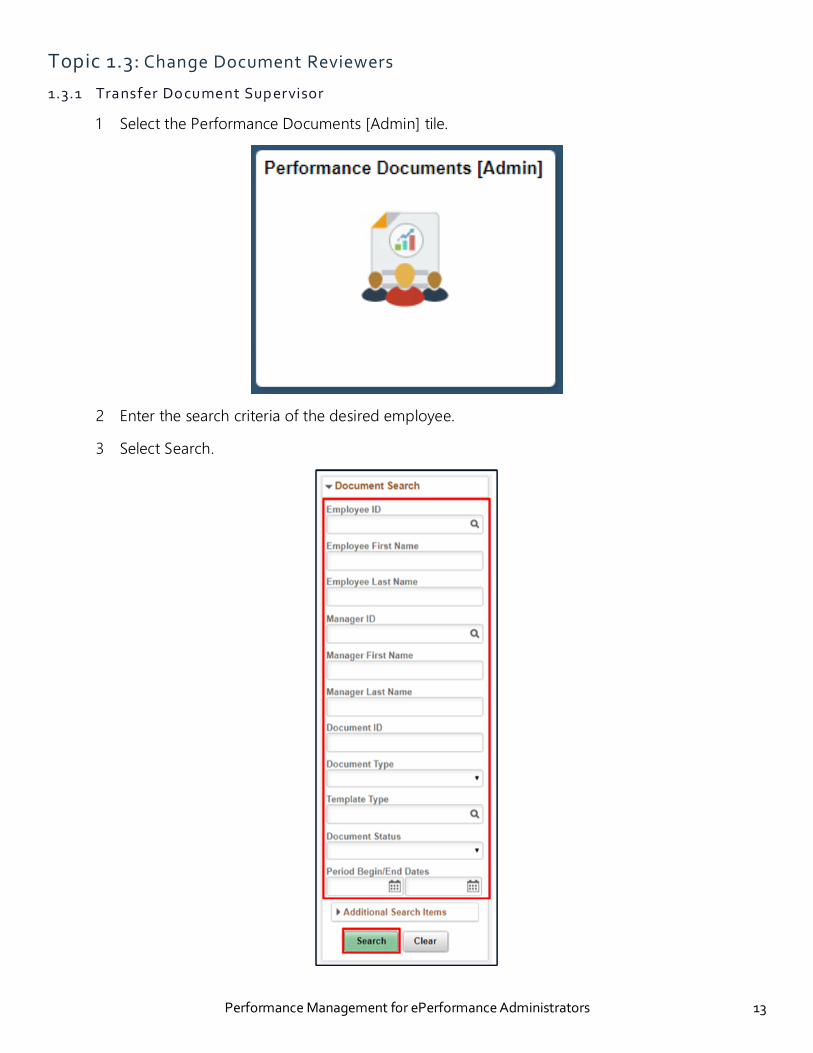
Topic 1.3: Change Document Reviewers
1.3.1 Transfer Do cument Sup ervisor
1 Select the Performance Documents [Admin] tile.
2 Enter the search criteria of the desired employee.
3 Select Search.

Performance Management for ePerformance Administrators 14
4 Select the employee’s performance document.
Note: This document must be in Approval – Submitted status.
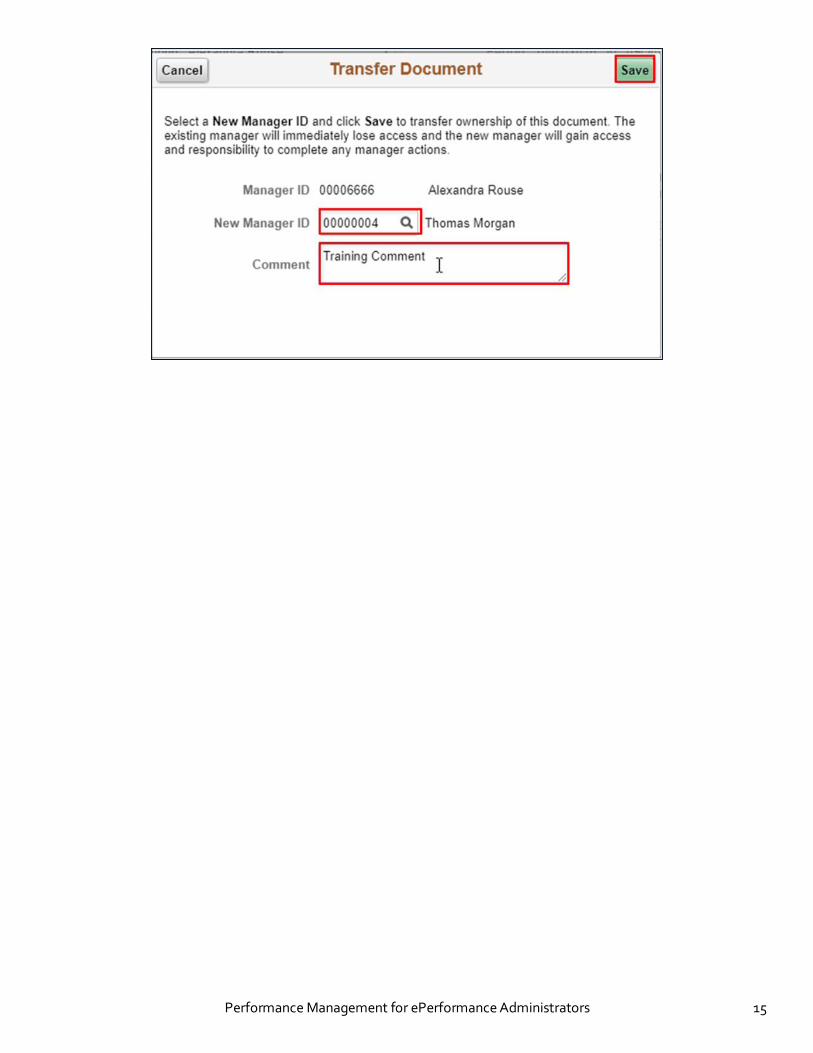
5 Select the Manager ID tab.
6 Use the lookup function in the New Manager ID field to enter a new reviewer.
7 Enter comments in the Comment field.
8 Select Save.
Performance Management for ePerformance Administrators 15

Performance Management for ePerformance Administrators 16
1.3.2 Change Do cument Approver
Administrators may change the designated approver of a performance document after the document
has been submitted for approval. To change a document reviewer, follow these steps:
1 Select the Performance Documents [Admin] tile.
2 Enter search criteria to find the correct employee.
3 Select Search.
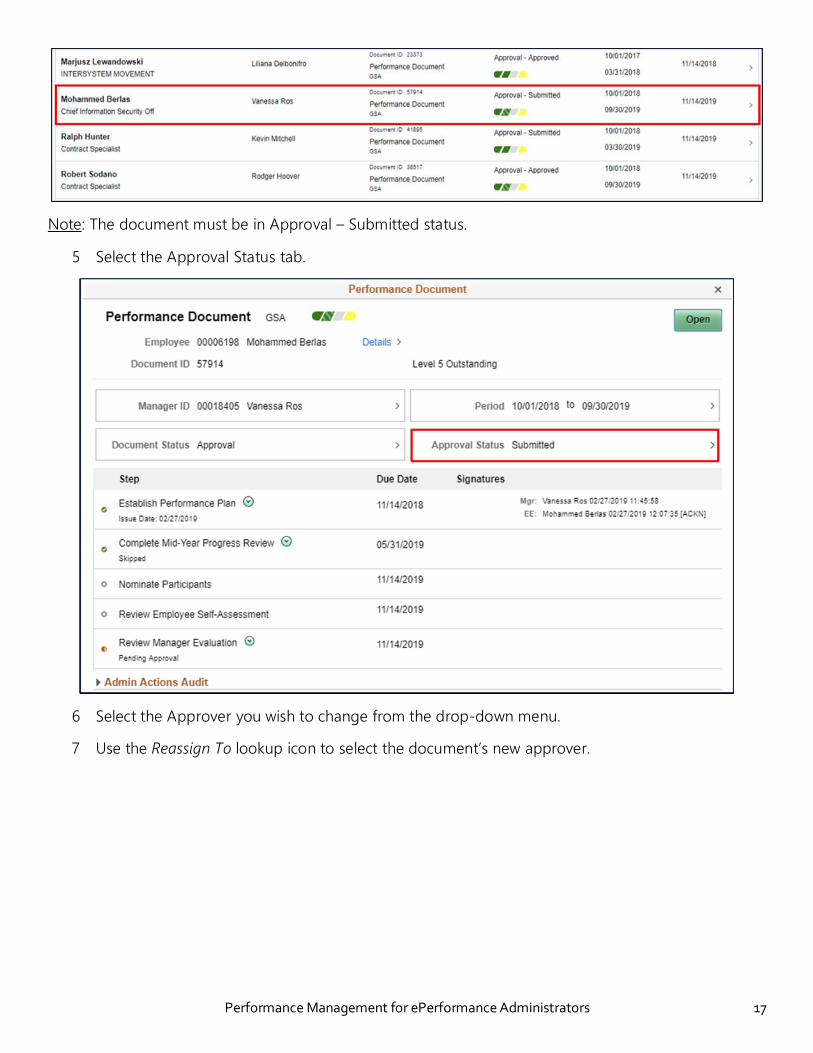
4 Select the performance document on which you want to change an approver.
Performance Management for ePerformance Administrators 17
Note: The document must be in Approval – Submitted status.
5 Select the Approval Status tab.
6 Select the Approver you wish to change from the drop-down menu.
7 Use the Reassign To lookup icon to select the document’s new approver.

Performance Management for ePerformance Administrators 18
8 Enter search criteria to find the new approver.
9 Select the new approver from the search results.
Note: The new Approver will be added at the same level as the previous reviewer.
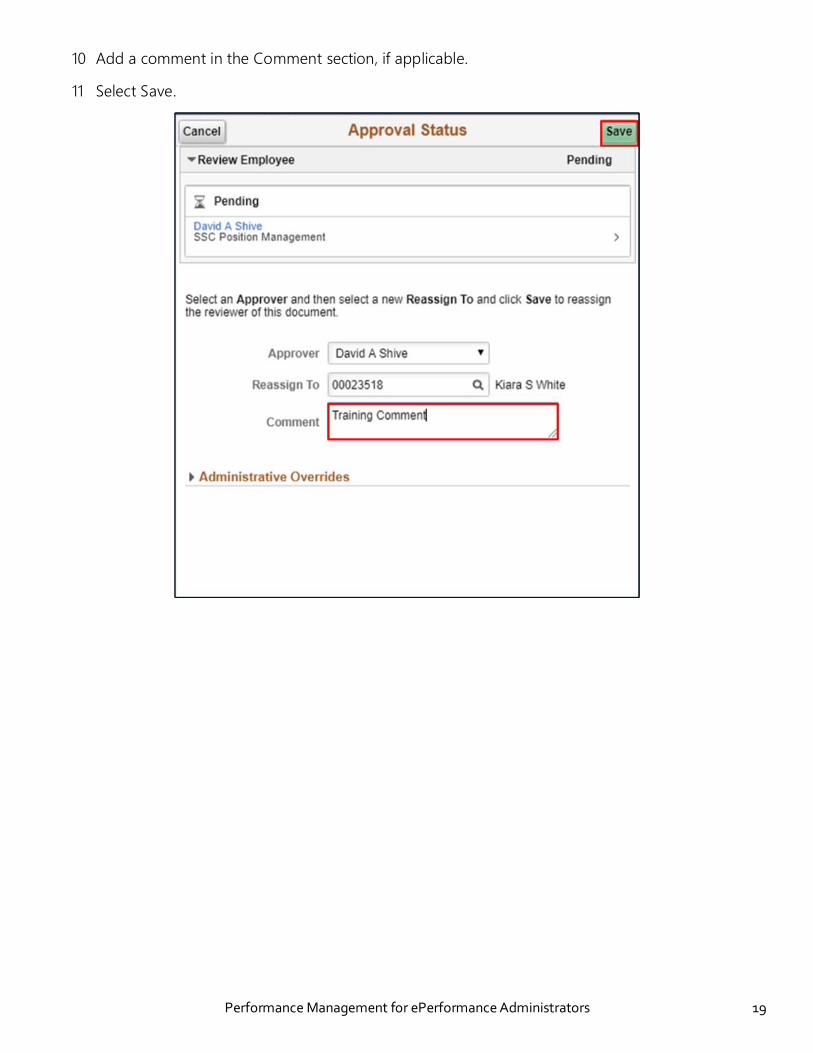
Performance Management for ePerformance Administrators 19
10 Add a comment in the Comment section, if applicable.
11 Select Save.
Performance Management for ePerformance Administrators 20
Topic 1.4: Change Document Status or Reopen a Document
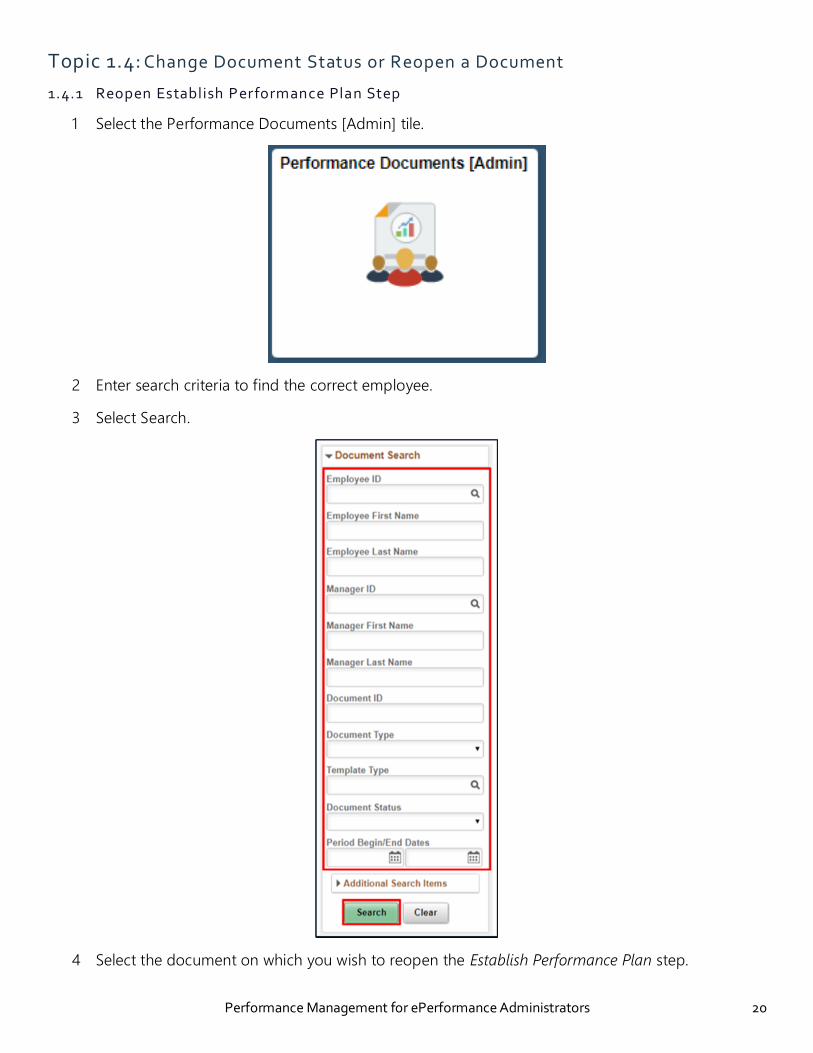
1.4.1 Reopen Establish Performance Plan Step
1 Select the Performance Documents [Admin] tile.
2 Enter search criteria to find the correct employee.
3 Select Search.
4 Select the document on which you wish to reopen the Establish Performance Plan step.

Performance Management for ePerformance Administrators 21
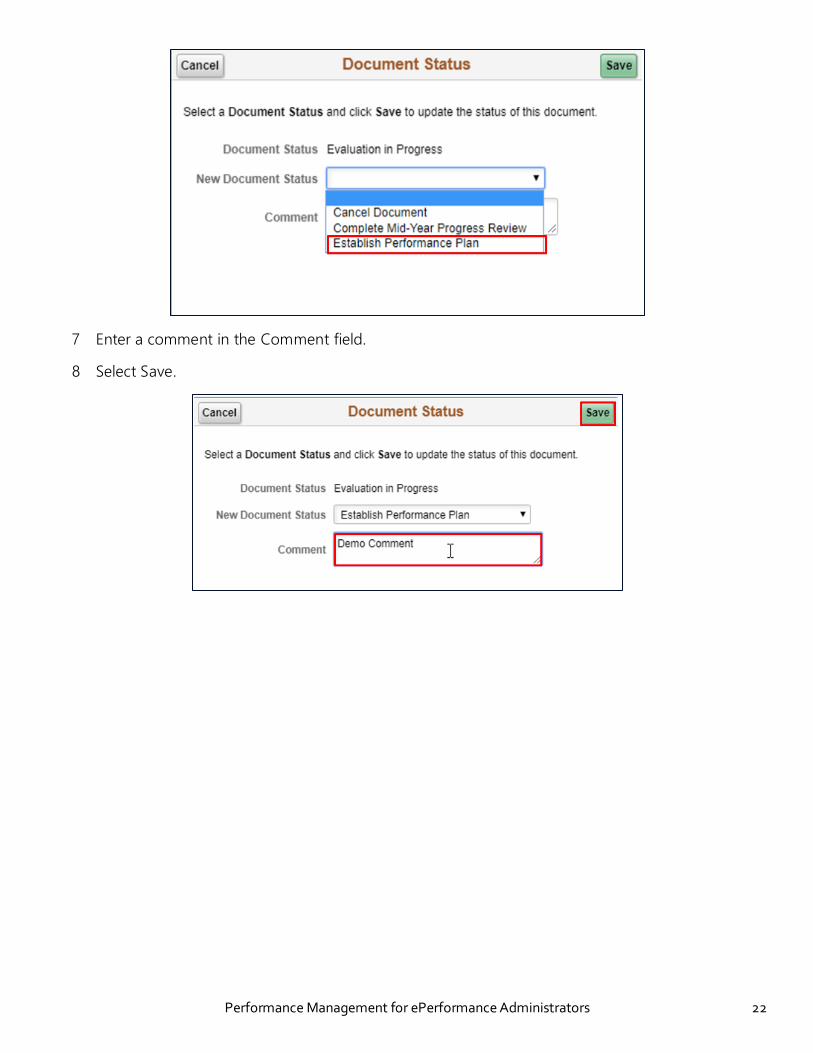
5 Select the Document Status tab.
6 Select Establish Performance Plan from the New Document Status drop-down.
Performance Management for ePerformance Administrators 22
7 Enter a comment in the Comment field.
8 Select Save.

Performance Management for ePerformance Administrators 23
1.4.2 Reopen Employee Self-Assessment
Roles: Administrator, Support
1 Select the Performance Documents [Admin] tile.
2 Enter search criteria to find the correct employee.
3 Select Search.
4 Select the document you wish to reopen for employee self-evaluation.

Performance Management for ePerformance Administrators 24
5 Select the Related Actions link.
6 Select Reopen Step.
7 Select OK.
Performance Management for ePerformance Administrators 25
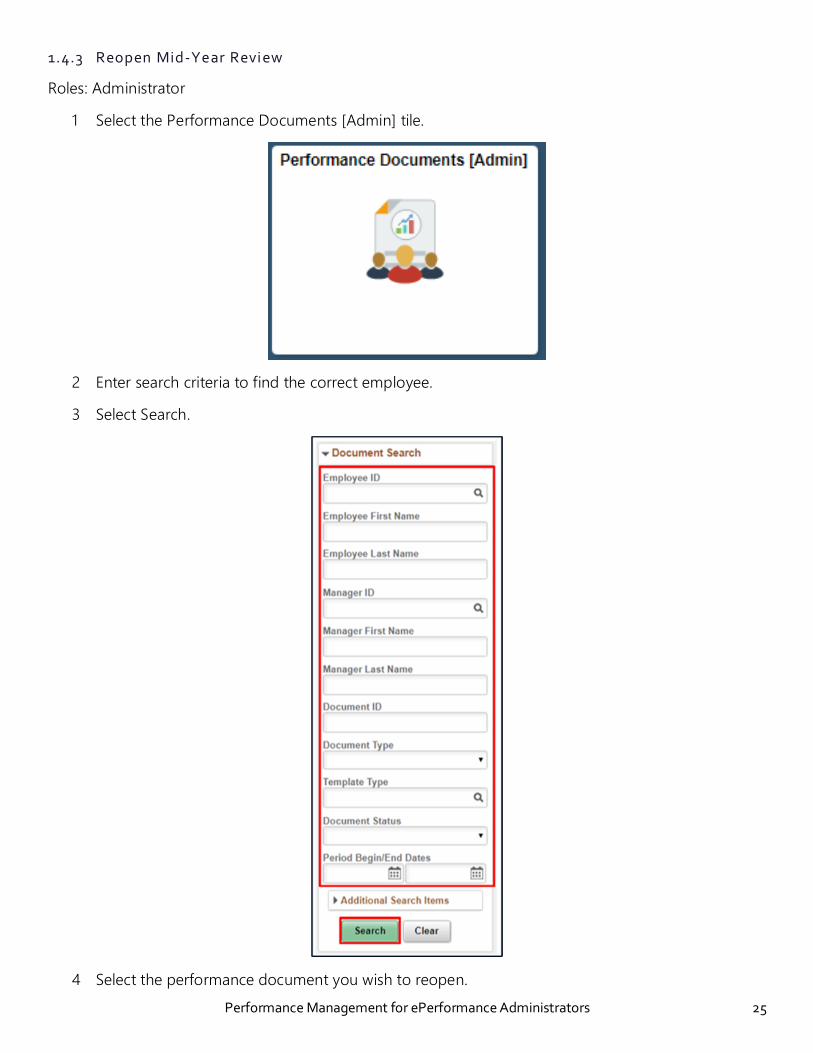
1.4.3 Reopen Mid-Year Review
Roles: Administrator
1 Select the Performance Documents [Admin] tile.
2 Enter search criteria to find the correct employee.
3 Select Search.
4 Select the performance document you wish to reopen.
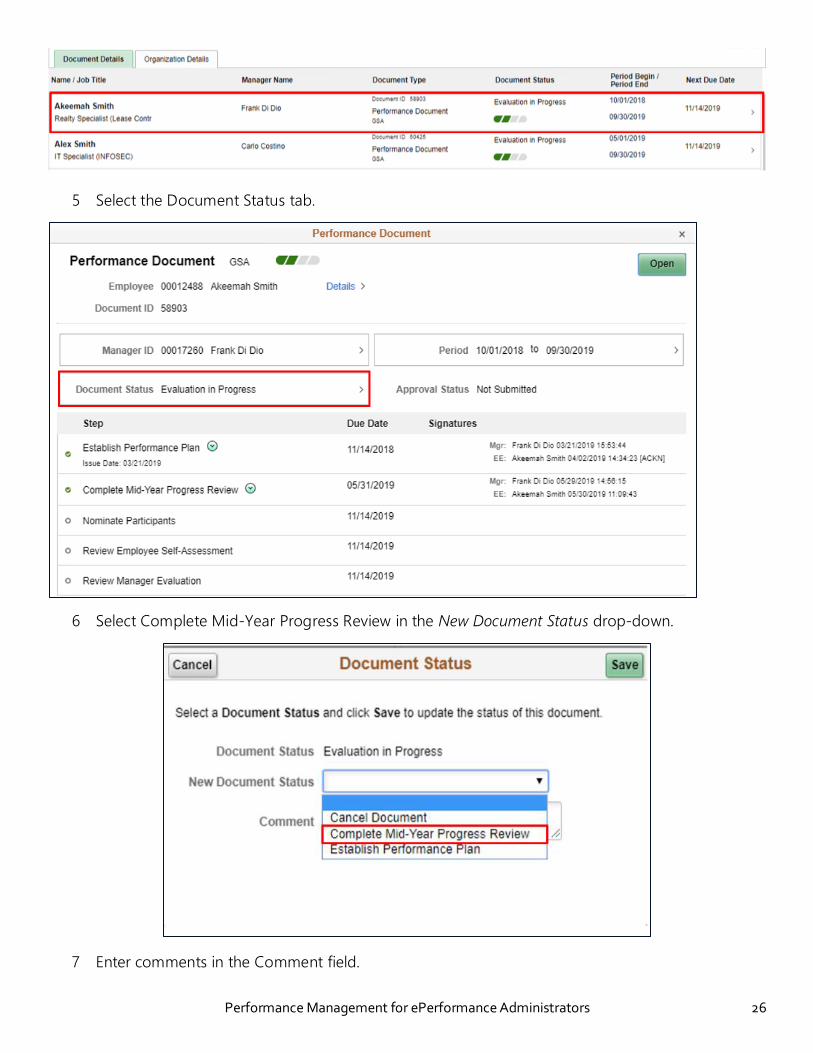
Performance Management for ePerformance Administrators 26
5 Select the Document Status tab.
6 Select Complete Mid-Year Progress Review in the New Document Status drop-down.
7 Enter comments in the Comment field.
Performance Management for ePerformance Administrators 27
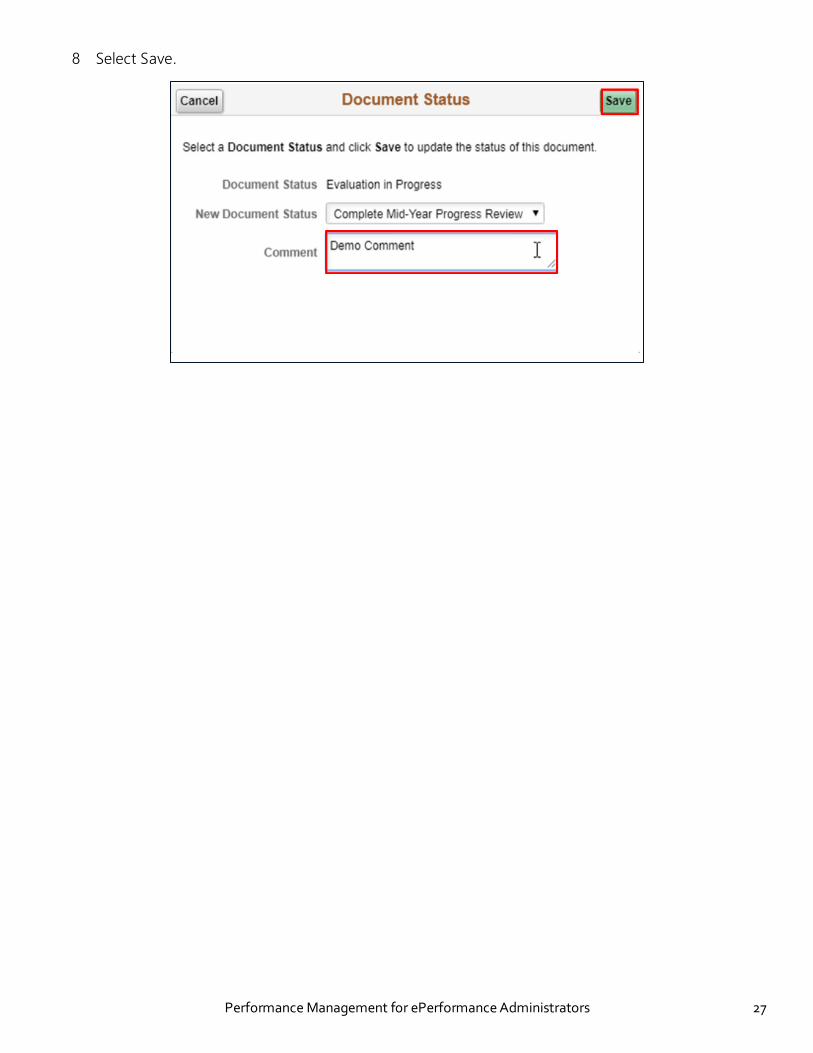
8 Select Save.
Performance Management for ePerformance Administrators 28
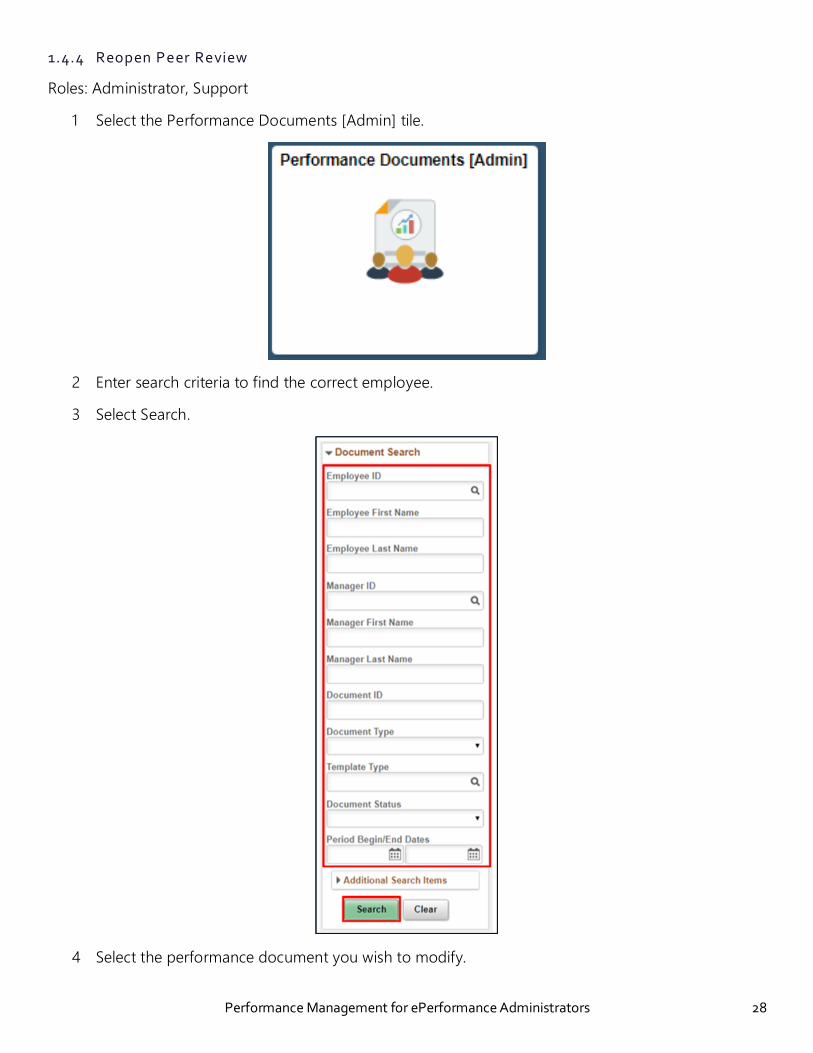
1.4.4 Reopen Peer Review
Roles: Administrator, Support
1 Select the Performance Documents [Admin] tile.
2 Enter search criteria to find the correct employee.
3 Select Search.
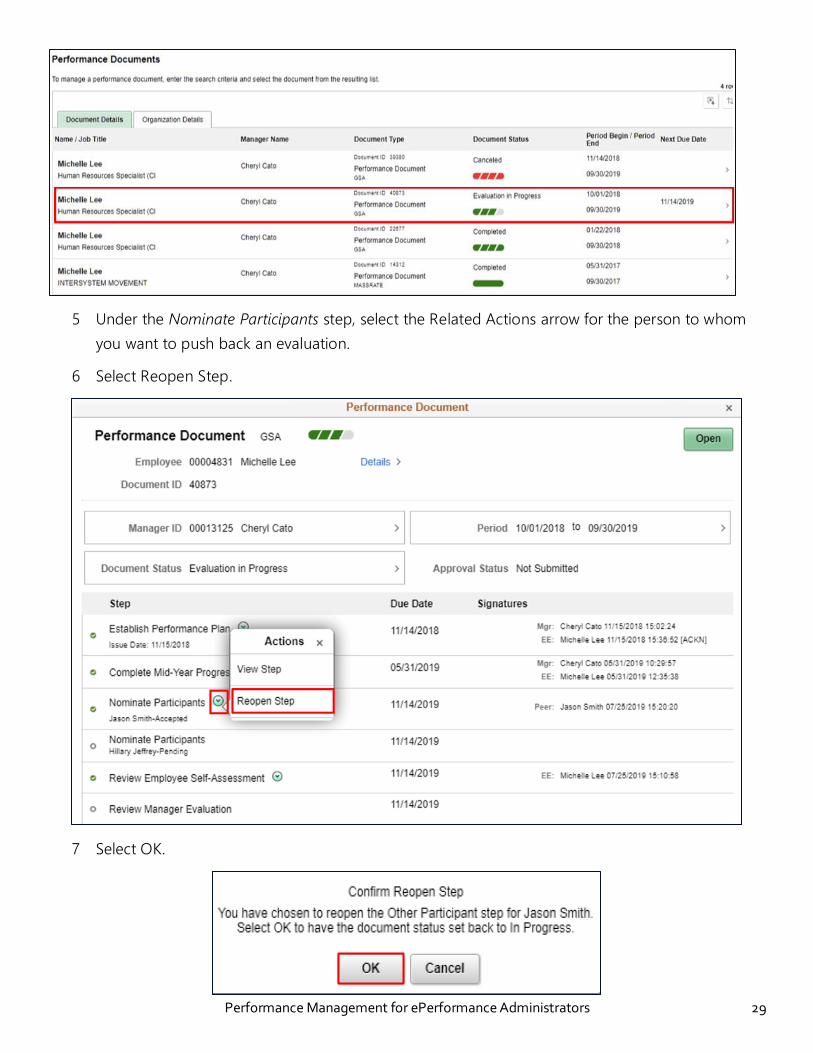
4 Select the performance document you wish to modify.
Performance Management for ePerformance Administrators 29
5 Under the Nominate Participants step, select the Related Actions arrow for the person to whom
you want to push back an evaluation.
6 Select Reopen Step.
7 Select OK.
Performance Management for ePerformance Administrators 30
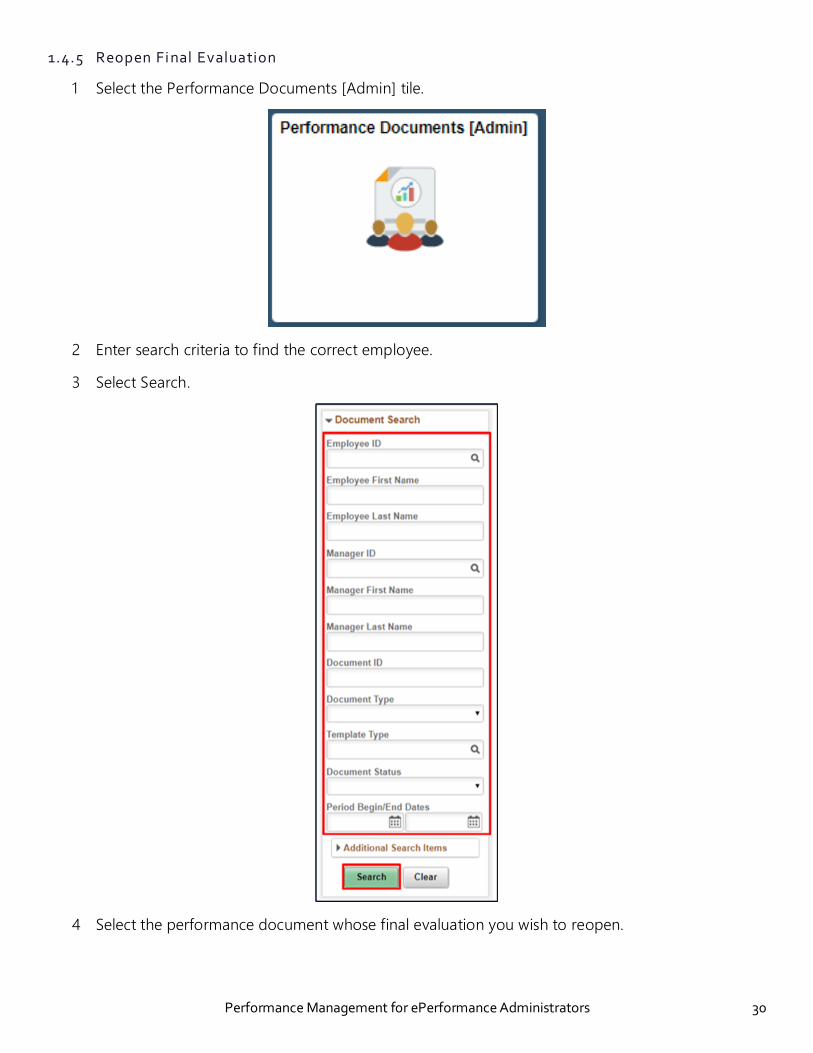
1.4.5 Reopen Final Evaluation
1 Select the Performance Documents [Admin] tile.
2 Enter search criteria to find the correct employee.
3 Select Search.
4 Select the performance document whose final evaluation you wish to reopen.
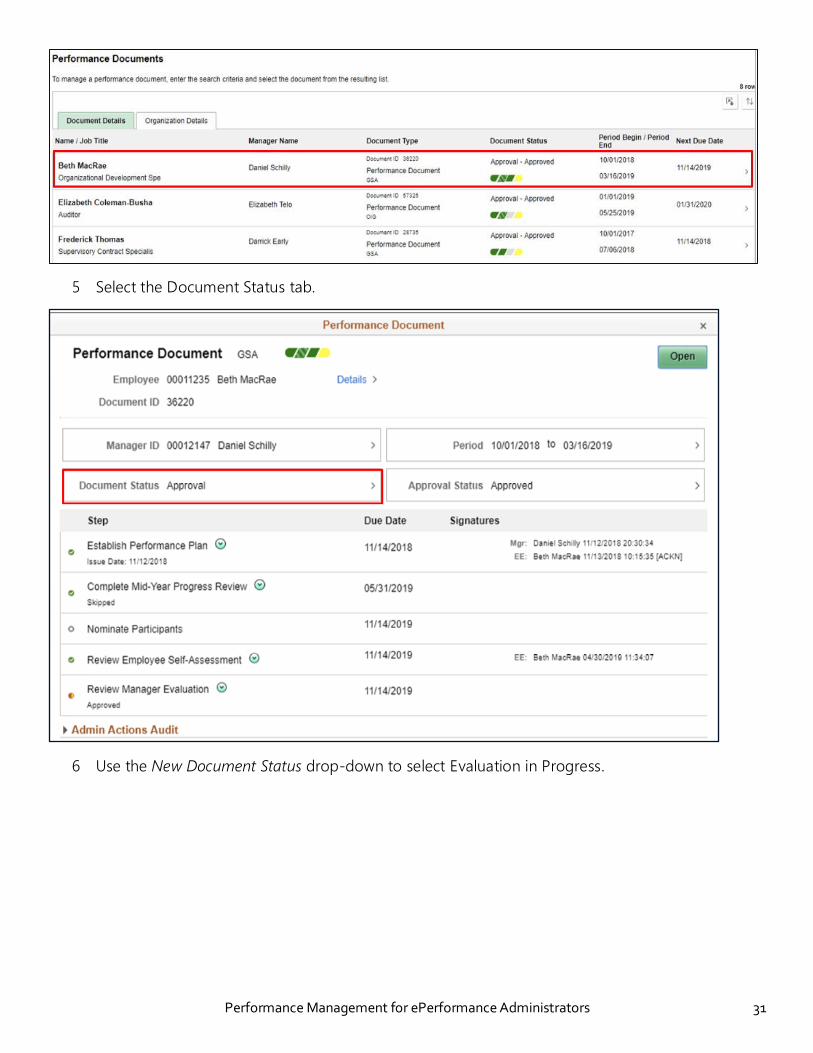
Performance Management for ePerformance Administrators 31
5 Select the Document Status tab.
6 Use the New Document Status drop-down to select Evaluation in Progress.
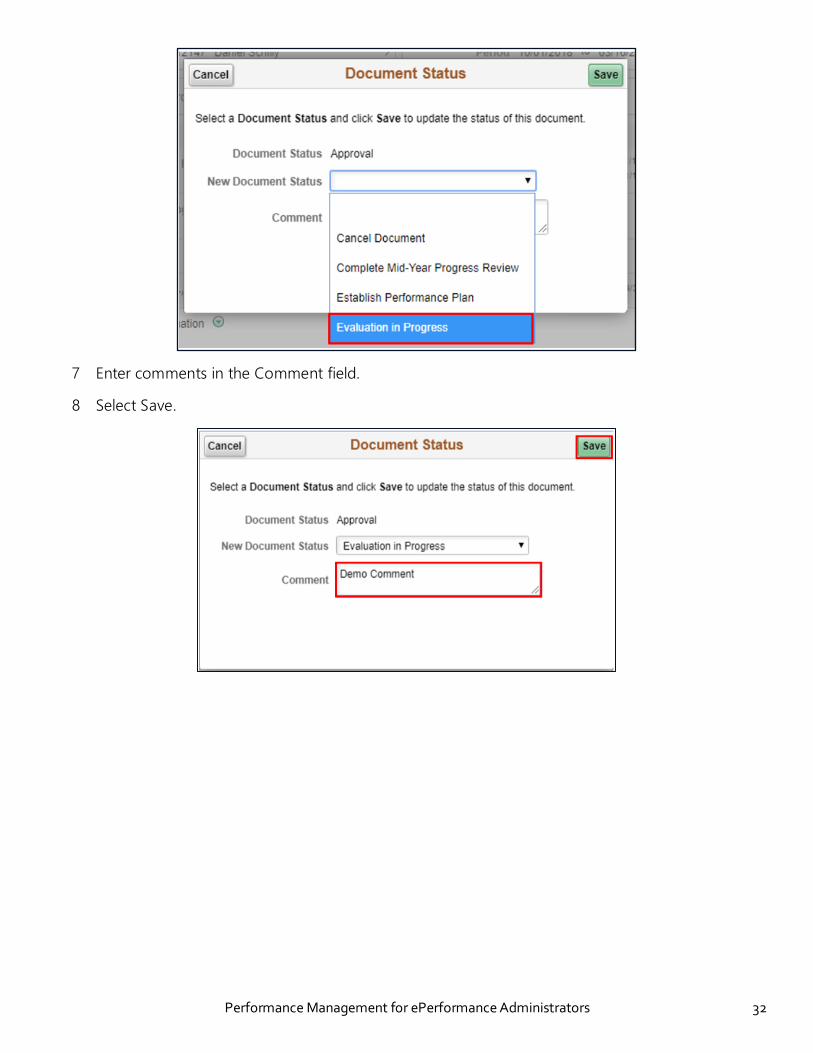
Performance Management for ePerformance Administrators 32
7 Enter comments in the Comment field.
8 Select Save.

Performance Management for ePerformance Administrators 33
1.4.6 Cancel a Do cument
1 Select the Performance Documents [Admin] tile.
2 Enter search criteria to find the correct employee.
3 Select Search.
4 Select the performance document you wish to cancel.

Performance Management for ePerformance Administrators 34
5 Select the Document Status tab.
6 Select Cancel Document from the New Document Status drop-down.
Performance Management for ePerformance Administrators 35
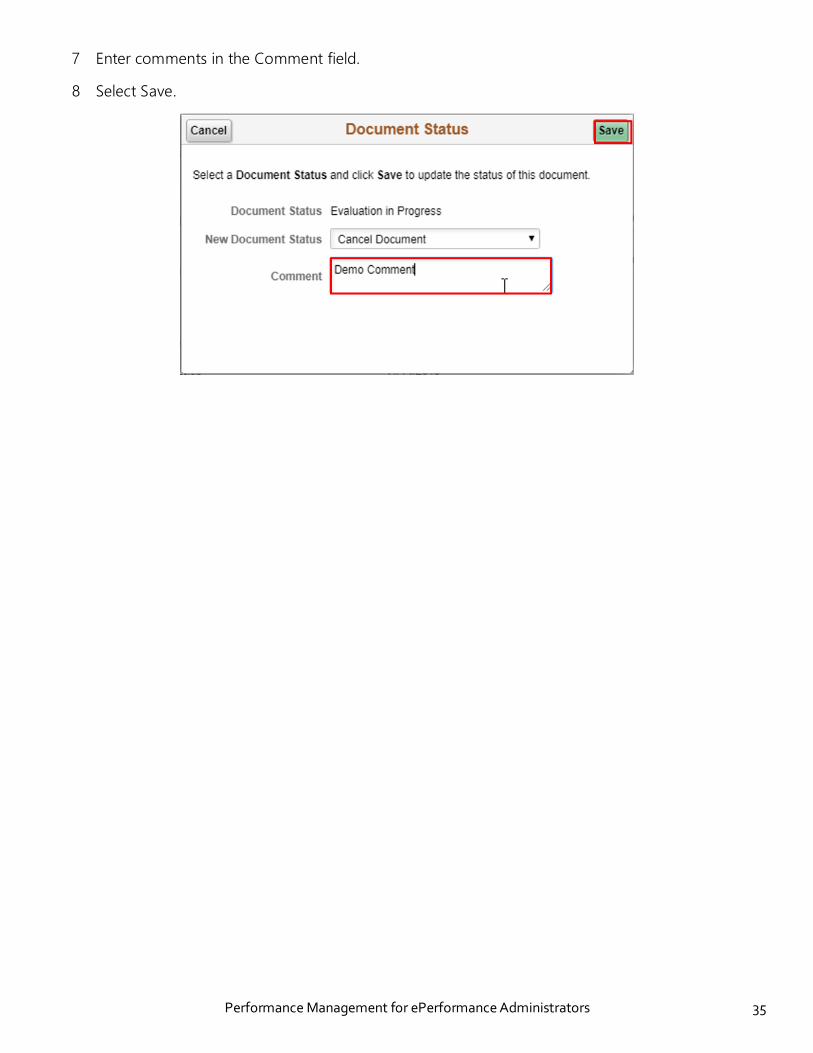
7 Enter comments in the Comment field.
8 Select Save.

Performance Management for ePerformance Administrators 36
Topic 1.5: Mass Actions
1.5.1 Classic Transfer Document
This topic will cover transferring a performance document in HR Links as an ePerformance Administrator.
1 To begin, navigate to the Talent Administrator homepage and select the Performance
Administration tile.
2 Select Transfer Documents on the left navigation menu.
3 Enter applicable data in the Search for Documents fields to locate the correct performance
document.
4 Select Search.
5 Select the correct performance document.

Performance Management for ePerformance Administrators 37
6 Select Continue.
7 Select the Select a Manager link.
8 On the Person Search pop-up, enter search criteria applicable to the manager/employee you are
transferring the document to.
9 Select Search.
10 Select the radio button next to the correct employee and select OK.

Performance Management for ePerformance Administrators 38
11 Confirm the correct employee was selected.
12 Select Save to confirm the transfer.
Performance Management for ePerformance Administrators 39
1.5.2 Classic Reopen Document
This topic will explain how to Reopen a document as an ePerformance Administrator. Throughout the
performance appraisal cycle, Supervisors have the ability to reopen the Establish Performance Plan step
in a performance document to make updates to the employee’s performance plan. Once the Supervisor
has signed the Manager Evaluation, the Supervisor can no longer Reopen, and only an ePerformance
Administrator can complete the Reopen Document process.
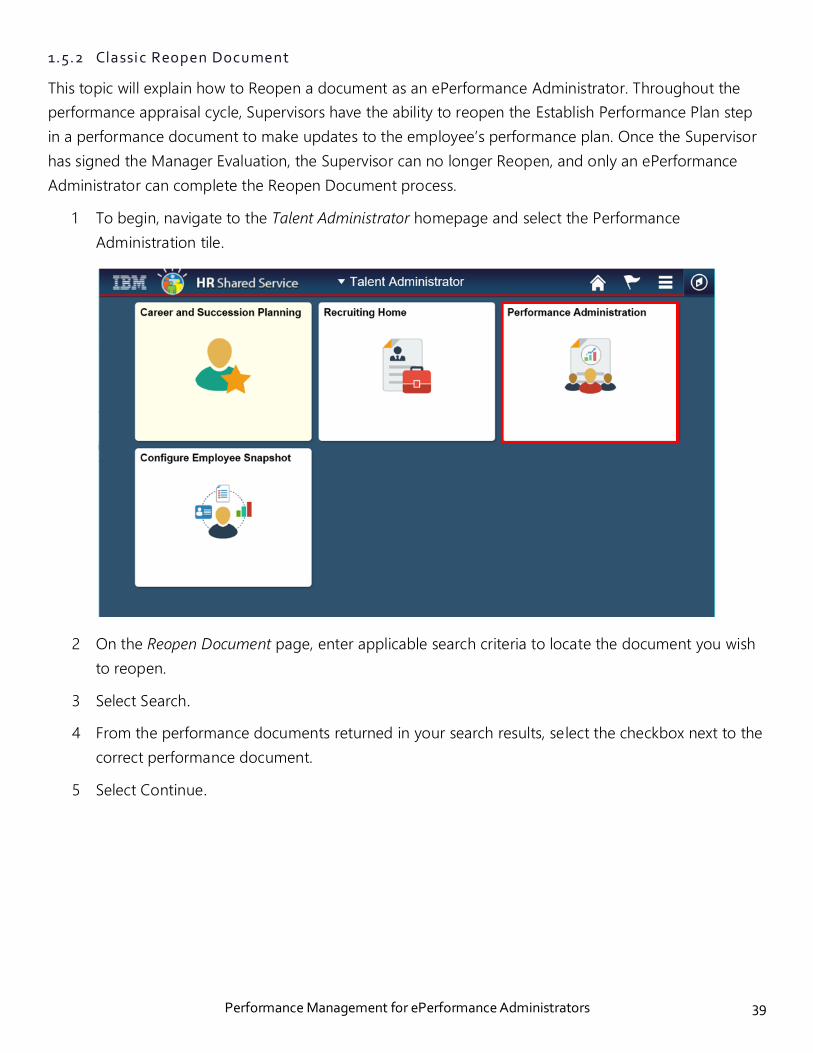
1 To begin, navigate to the Talent Administrator homepage and select the Performance
Administration tile.
2 On the Reopen Document page, enter applicable search criteria to locate the document you wish
to reopen.
3 Select Search.
4 From the performance documents returned in your search results, select the checkbox next to the
correct performance document.
5 Select Continue.

Performance Management for ePerformance Administrators 40
6 Select Save to confirm reopen.
Manager Evaluation status is now In Progress. The Supervisor can now edit the Manager Evaluation, and
can Reopen the Establish Performance Plan step, if necessary.

Performance Management for ePerformance Administrators 41
1.5.3 Classic Cancel Do cument
In this topic we will discuss the process of Cancelling a performance document as an ePerformance
Administrator.
1 To begin, navigate to the Talent Administrator homepage and select the Performance
Administration tile.
2 On the Cancel Document page, enter search criteria applicable to the document you wish to
cancel.
3 Select Search.
4 Select the checkbox next to the correct document.
5 Select Continue.
Performance Management for ePerformance Administrators 42
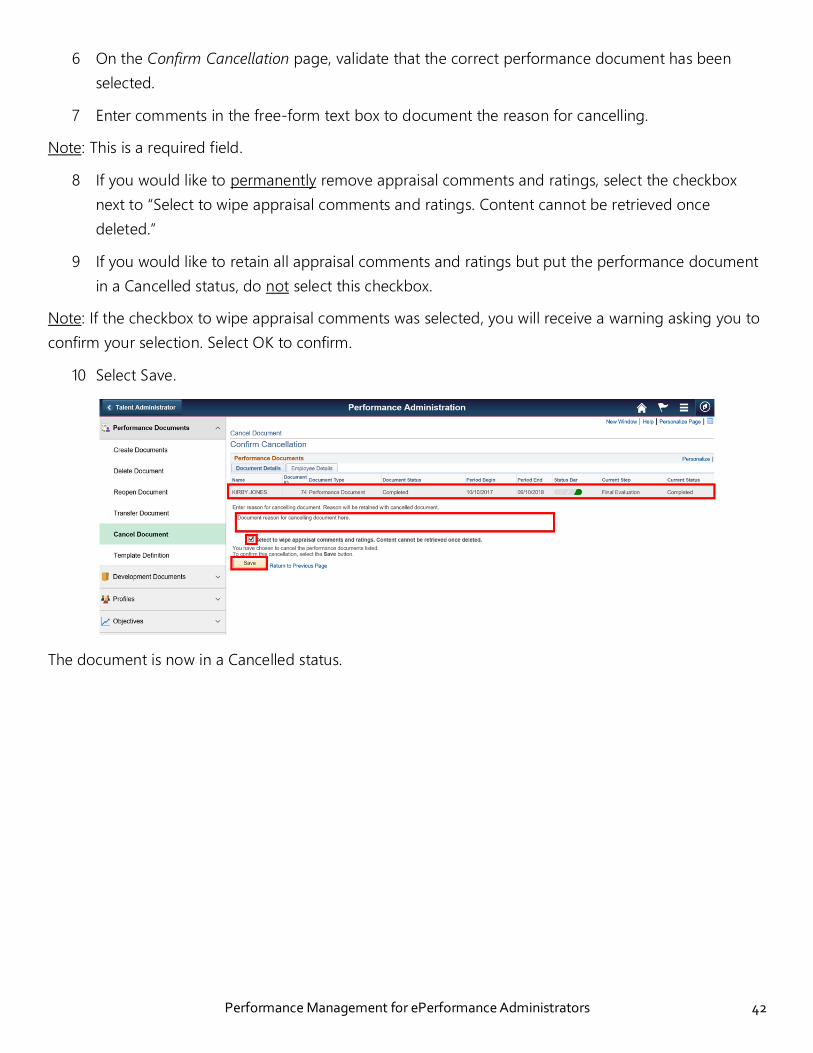
6 On the Confirm Cancellation page, validate that the correct performance document has been
selected.
7 Enter comments in the free-form text box to document the reason for cancelling.
Note: This is a required field.
8 If you would like to permanently remove appraisal comments and ratings, select the checkbox
next to “Select to wipe appraisal comments and ratings. Content cannot be retrieved once
deleted.”
9 If you would like to retain all appraisal comments and ratings but put the performance document
in a Cancelled status, do not select this checkbox.
Note: If the checkbox to wipe appraisal comments was selected, you will receive a warning asking you to
confirm your selection. Select OK to confirm.
10 Select Save.
The document is now in a Cancelled status.
Performance Management for ePerformance Administrators 43
Topic 1.6: Other Actions
1.6.1 Modify Sup ervisor Level
Roles: Administrator
Note: Changing the Supervisor Level as seen in this section will affect the 40% Leadership criteria for
some roles.
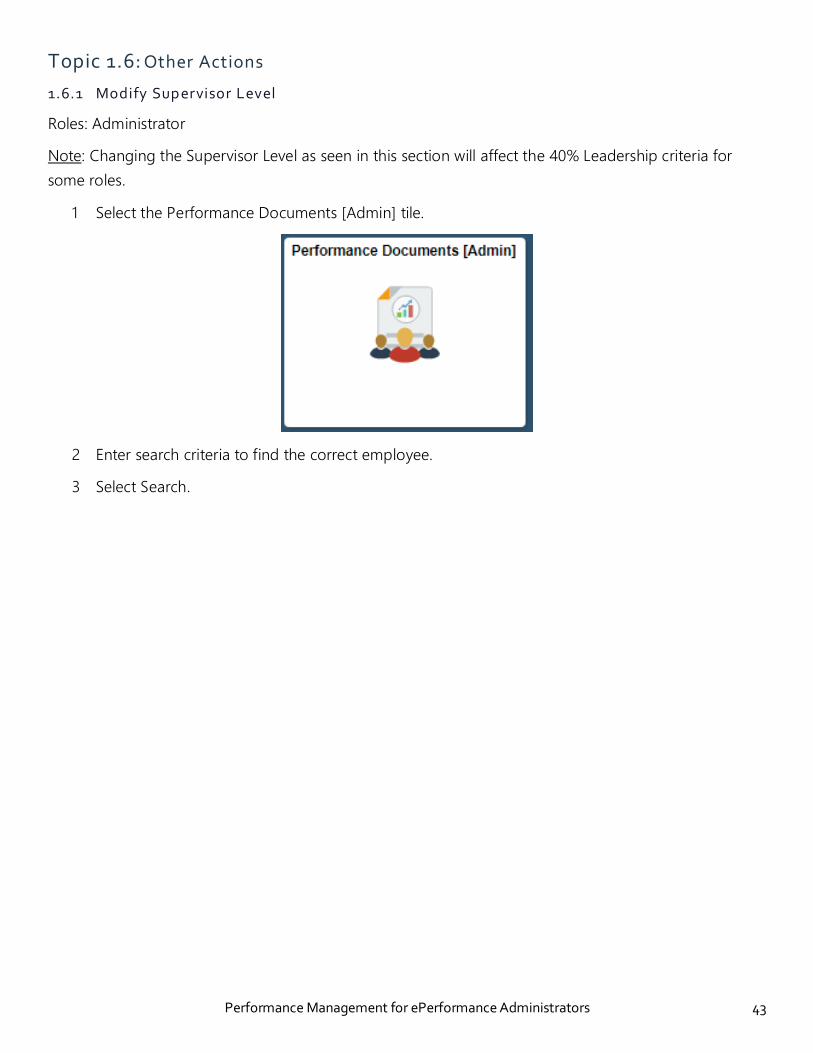
1 Select the Performance Documents [Admin] tile.
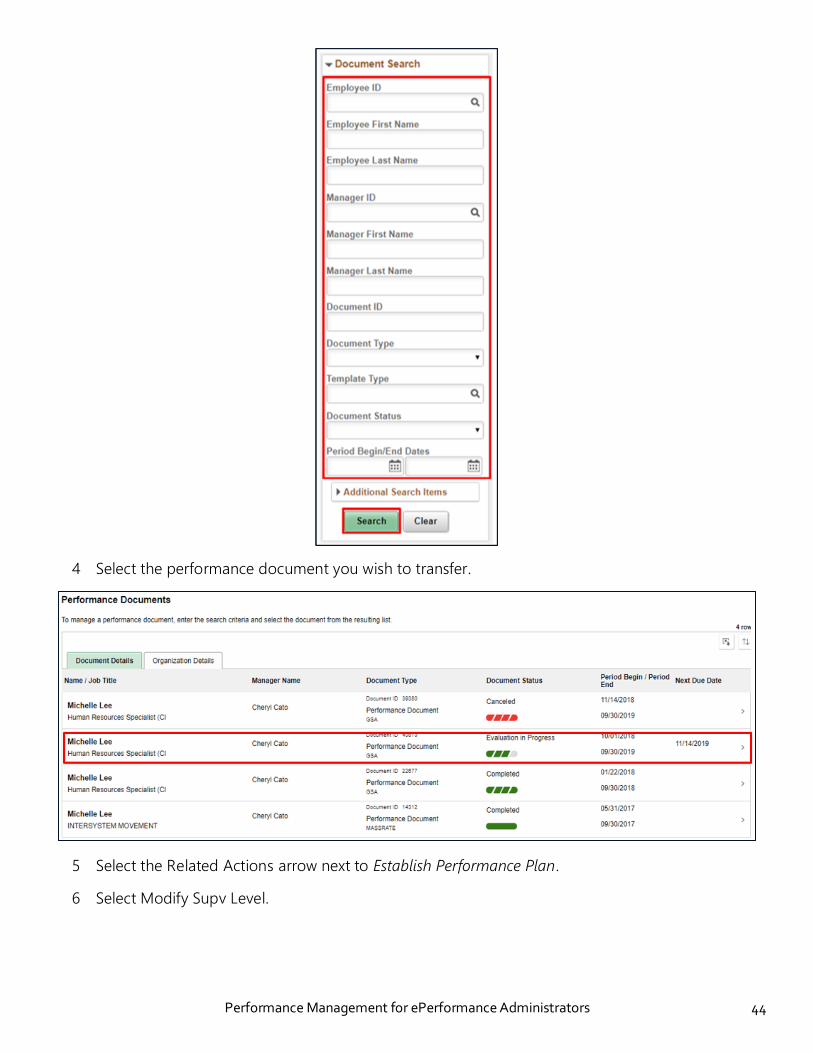
2 Enter search criteria to find the correct employee.
3 Select Search.
Performance Management for ePerformance Administrators 44
4 Select the performance document you wish to transfer.
5 Select the Related Actions arrow next to Establish Performance Plan.
6 Select Modify Supv Level.
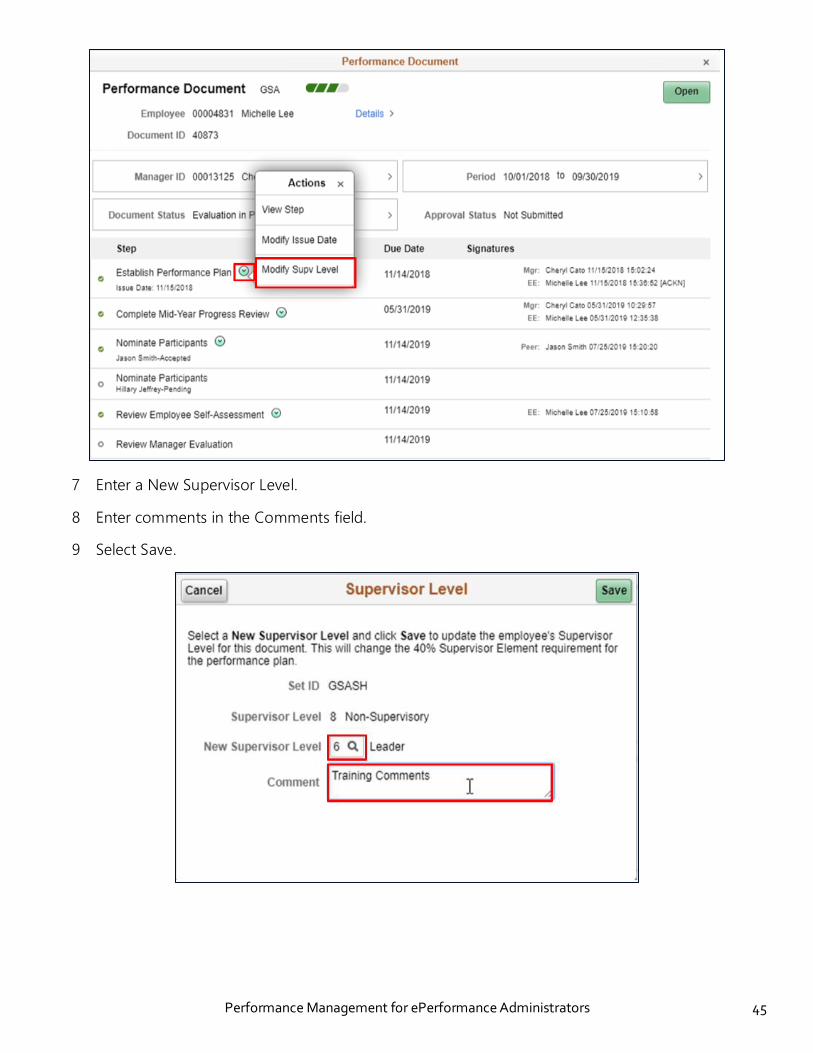
Performance Management for ePerformance Administrators 45
7 Enter a New Supervisor Level.
8 Enter comments in the Comments field.
9 Select Save.
Performance Management for ePerformance Administrators 46
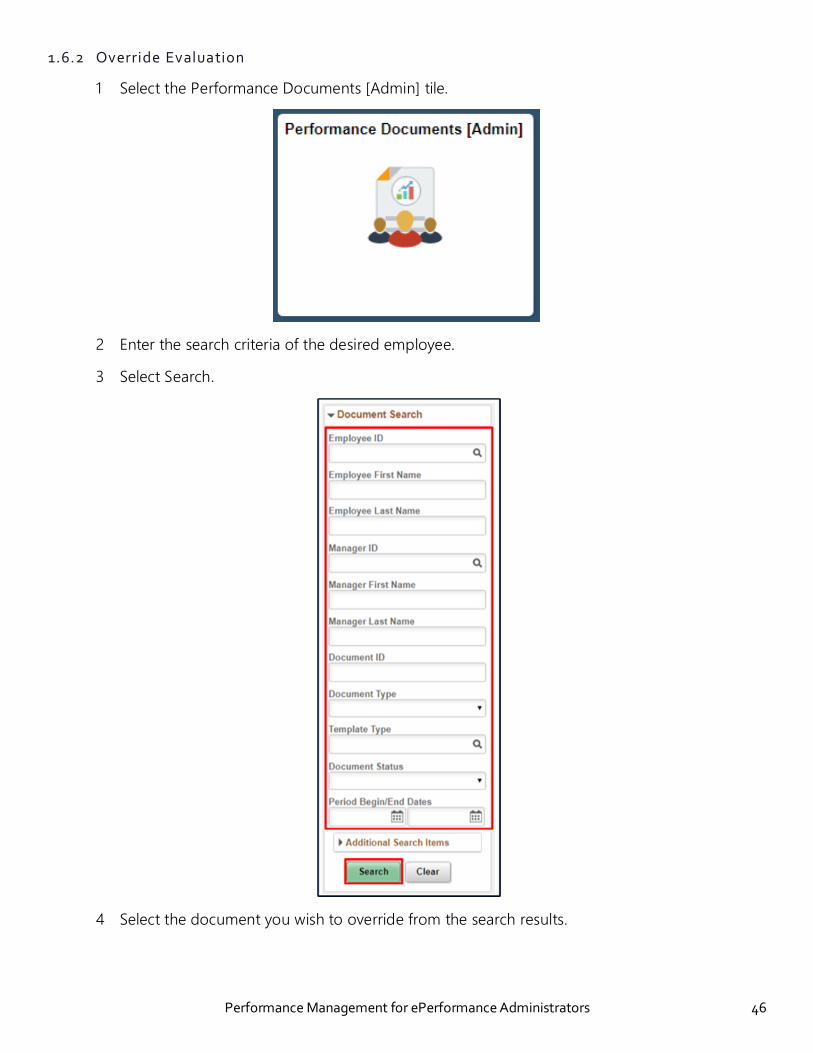
1.6.2 Override Evaluation
1 Select the Performance Documents [Admin] tile.
2 Enter the search criteria of the desired employee.
3 Select Search.
4 Select the document you wish to override from the search results.

Performance Management for ePerformance Administrators 47
5 Select the Approval Status tab.
6 Use the Approver drop-down to select the Approver whose tasks are being overridden.
7 Select the arrow to open the Administrative Overrides section.
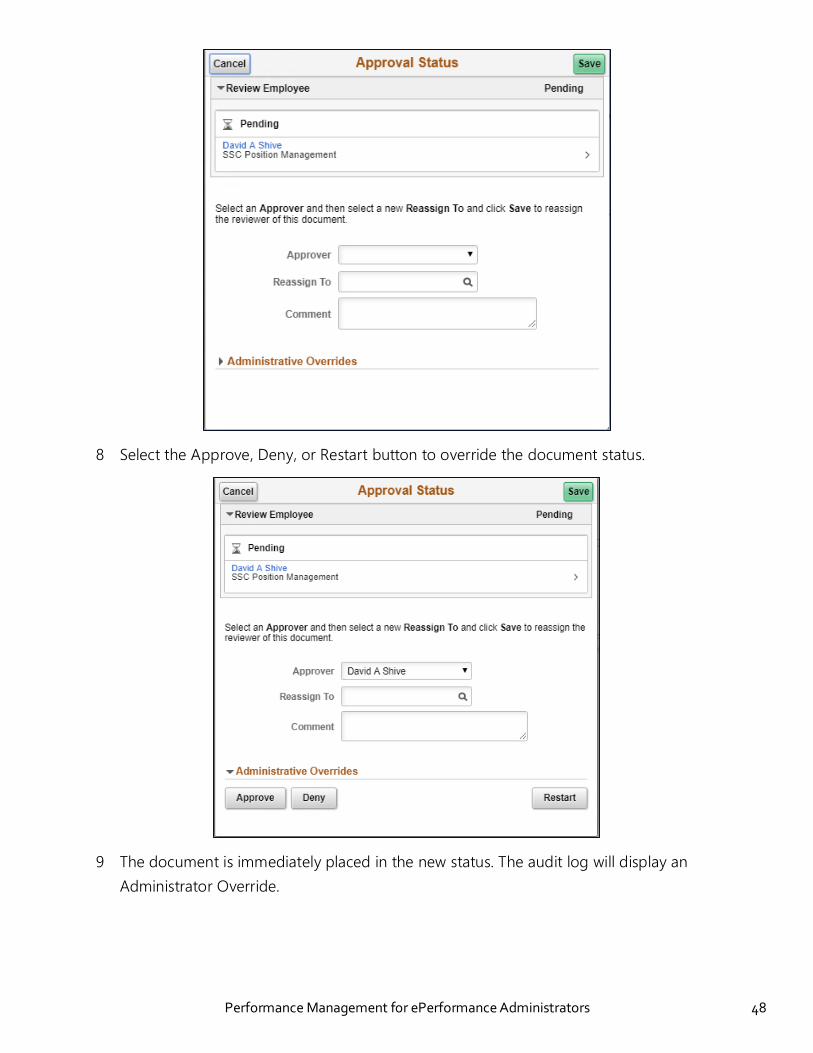
Performance Management for ePerformance Administrators 48
8 Select the Approve, Deny, or Restart button to override the document status.
9 The document is immediately placed in the new status. The audit log will display an
Administrator Override.
Performance Management for ePerformance Administrators 49
Section 2: Create and Manage Business Objectives
Topic 2.1: Create Business Objectives
This topic will cover creating business objectives. Business Objectives are organizational goals/objectives
that are cascaded down to employee performance plans, to align to performance elements.
As an ePerformance Administrator, you can complete every step in the process of creating and
cascading business objective, or you can assign another user as the business objective owner. While a
business objective owner can update and submit objectives for publication, only an ePerformance
Administrator can publish the objectives.
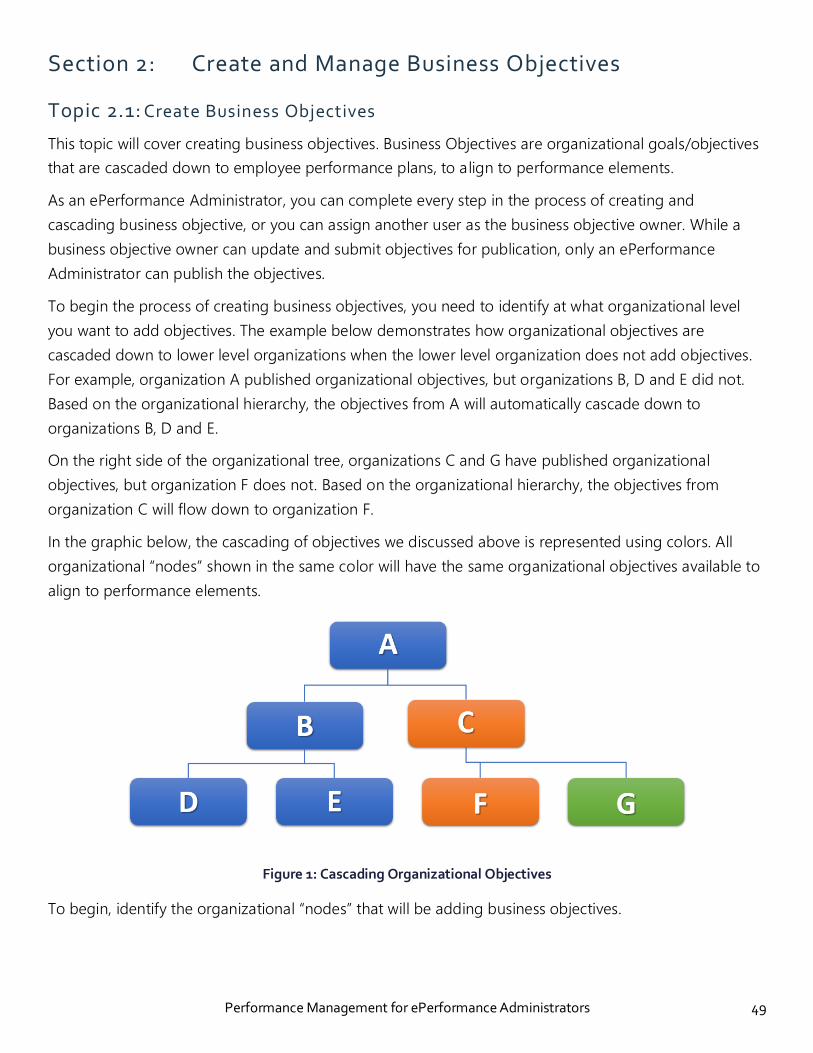
To begin the process of creating business objectives, you need to identify at what organizational level
you want to add objectives. The example below demonstrates how organizational objectives are
cascaded down to lower level organizations when the lower level organization does not add objectives.
For example, organization A published organizational objectives, but organizations B, D and E did not.
Based on the organizational hierarchy, the objectives from A will automatically cascade down to
organizations B, D and E.
On the right side of the organizational tree, organizations C and G have published organizational
objectives, but organization F does not. Based on the organizational hierarchy, the objectives from
organization C will flow down to organization F.
In the graphic below, the cascading of objectives we discussed above is represented using colors. All
organizational “nodes” shown in the same color will have the same organizational objectives available to
align to performance elements.
Figure 1: Cascading Organizational Objectives
To begin, identify the organizational “nodes” that will be adding business objectives.
Performance Management for ePerformance Administrators 50
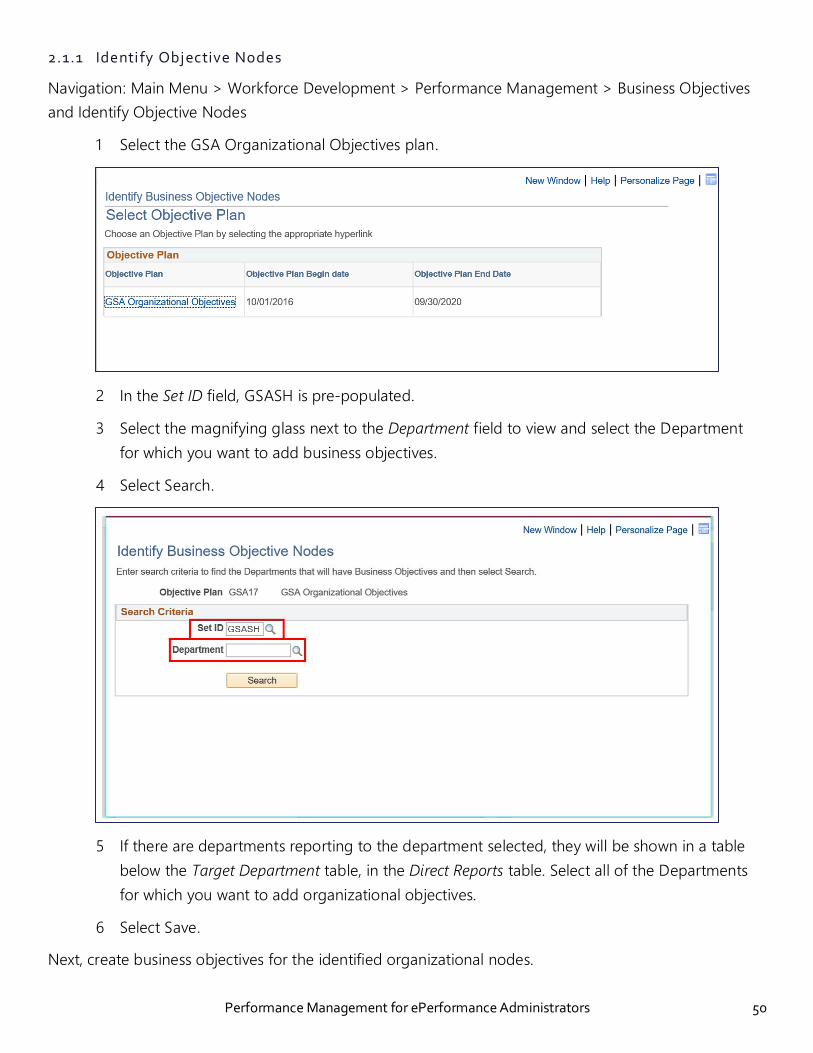
2.1.1 Identi fy Objective Nodes
Navigation: Main Menu > Workforce Development > Performance Management > Business Objectives
and Identify Objective Nodes
1 Select the GSA Organizational Objectives plan.
2 In the Set ID field, GSASH is pre-populated.
3 Select the magnifying glass next to the Department field to view and select the Department
for which you want to add business objectives.
4 Select Search.
5 If there are departments reporting to the department selected, they will be shown in a table
below the Target Department table, in the Direct Reports table. Select all of the Departments
for which you want to add organizational objectives.
6 Select Save.
Next, create business objectives for the identified organizational nodes.
Performance Management for ePerformance Administrators 51
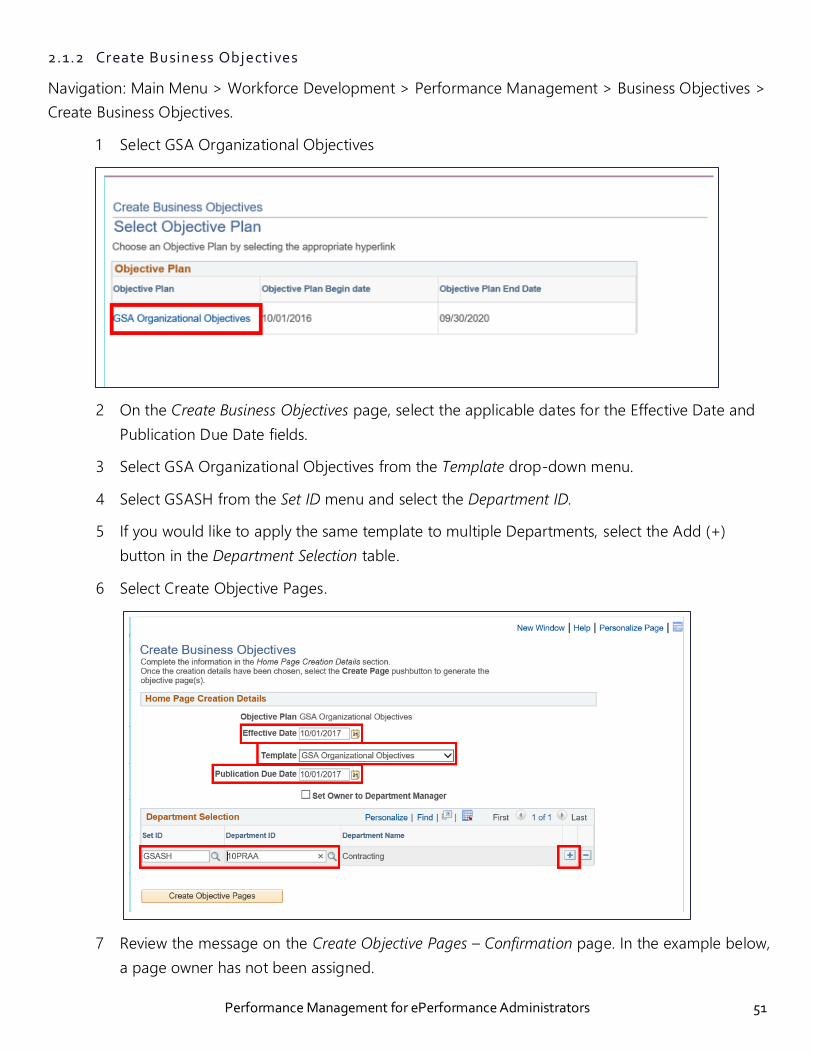
2.1.2 Create Business Objectives
Navigation: Main Menu > Workforce Development > Performance Management > Business Objectives >
Create Business Objectives.
1 Select GSA Organizational Objectives
2 On the Create Business Objectives page, select the applicable dates for the Effective Date and
Publication Due Date fields.
3 Select GSA Organizational Objectives from the Template drop-down menu.
4 Select GSASH from the Set ID menu and select the Department ID.
5 If you would like to apply the same template to multiple Departments, select the Add (+)
button in the Department Selection table.
6 Select Create Objective Pages.
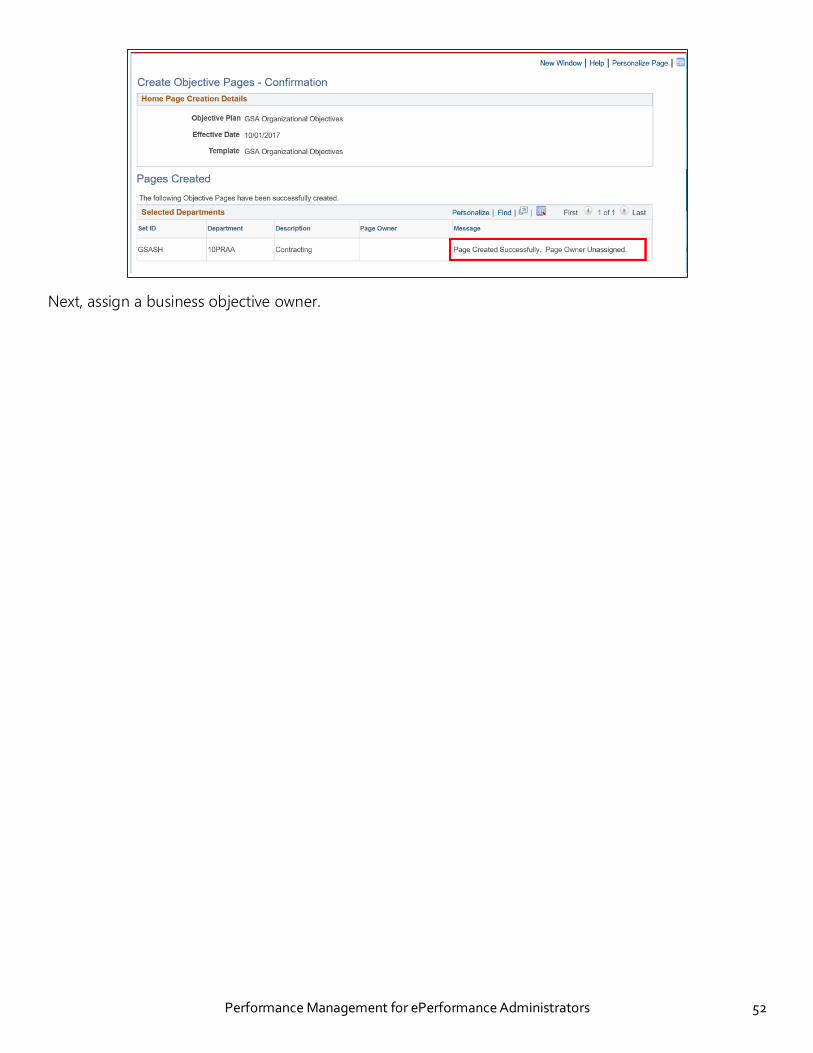
7 Review the message on the Create Objective Pages – Confirmation page. In the example below,
a page owner has not been assigned.
Performance Management for ePerformance Administrators 52
Next, assign a business objective owner.

Performance Management for ePerformance Administrators 53
2.1.3 Assig n/Transfer Business Objectives
This action is only to be completed when existing business objectives are present within the system. To
manage existing business objectives, perform the following steps:
Navigation: Main Menu > Workforce Development > Performance Management > Business Objectives >
Administer Business Objectives > Assign/Transfer Objectives.
1 Select GSA Organizational Objectives.
2 Select Assign Objectives Owner from the Action drop-down menu.
3 Select GSASH from the Set ID menu.
4 Select the appropriate Department.
5 Select Search.
6 Select the checkbox next to the applicable Departments and select Continue.
7 On the Assign Objectives Owner page, select Select a Page Owner.
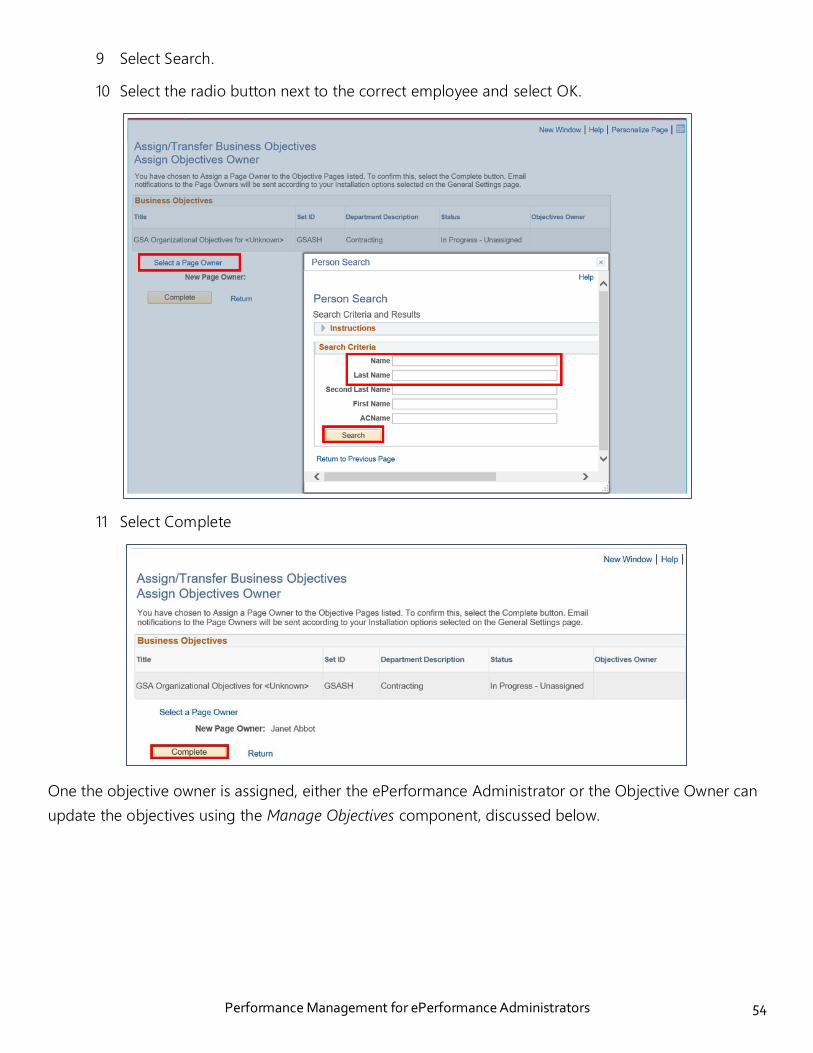
8 Search for the desired business objectives owner using the First Name and Last Name fields.
Performance Management for ePerformance Administrators 54
9 Select Search.
10 Select the radio button next to the correct employee and select OK.
11 Select Complete
One the objective owner is assigned, either the ePerformance Administrator or the Objective Owner can
update the objectives using the Manage Objectives component, discussed below.
Performance Management for ePerformance Administrators 55
Topic 2.2: Manage Business Objectives
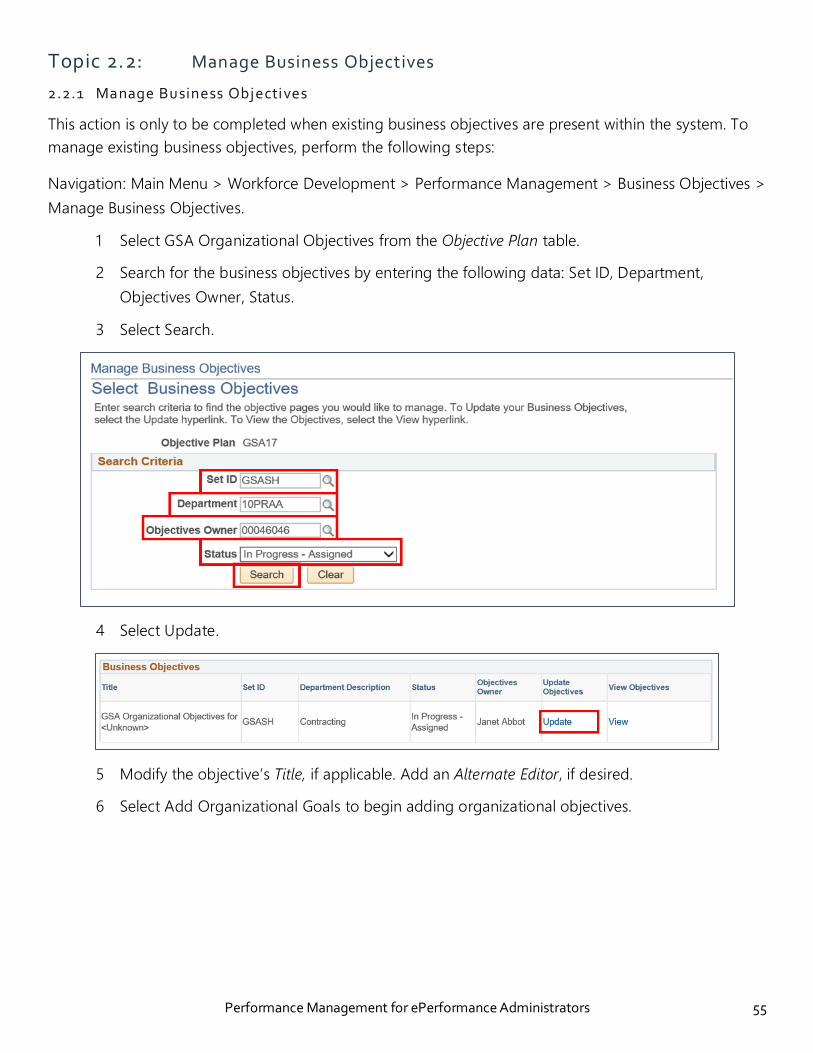
2.2.1 Manage Business Objectives
This action is only to be completed when existing business objectives are present within the system. To
manage existing business objectives, perform the following steps:
Navigation: Main Menu > Workforce Development > Performance Management > Business Objectives >
Manage Business Objectives.
1 Select GSA Organizational Objectives from the Objective Plan table.
2 Search for the business objectives by entering the following data: Set ID, Department,
Objectives Owner, Status.
3 Select Search.
4 Select Update.
5 Modify the objective’s Title, if applicable. Add an Alternate Editor, if desired.
6 Select Add Organizational Goals to begin adding organizational objectives.

Performance Management for ePerformance Administrators 56
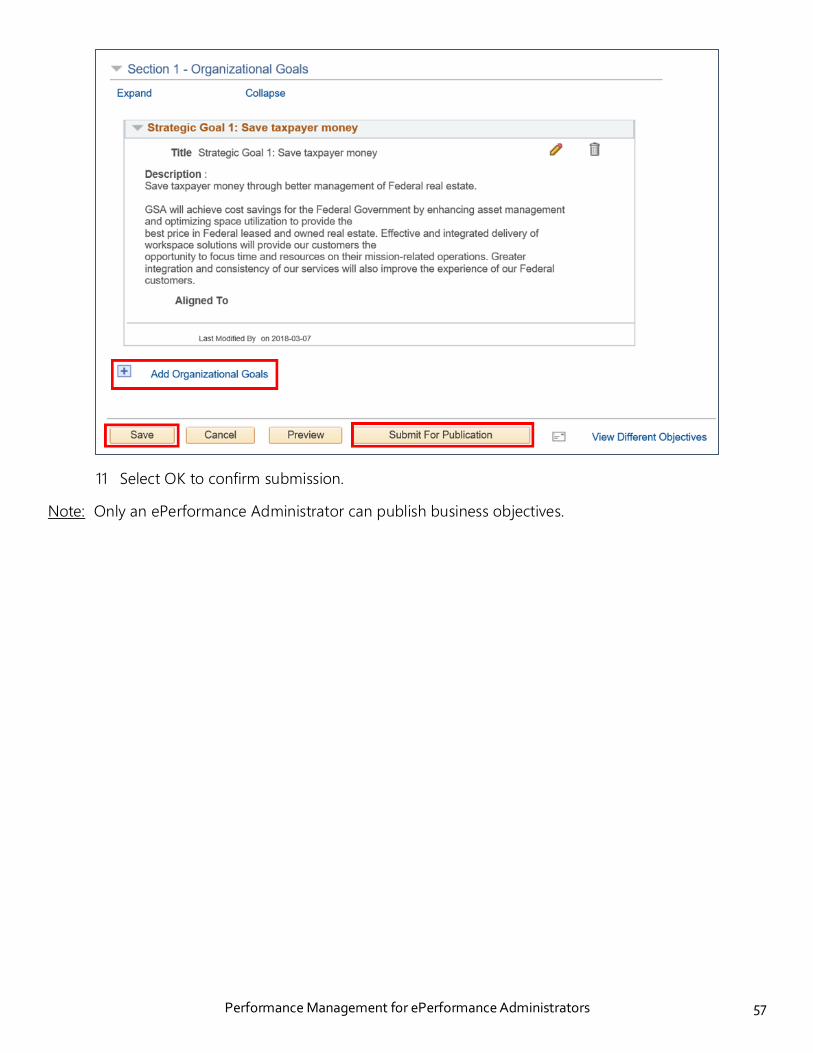
7 Enter the order you want the goal to display, the Title and the Description.
8 Select Add.
9 Continuing adding Organizational Goals following the same process until all goals have been
added.
10 Select Save to return to the Objectives at a later time or select Submit for Publication to begin
the process of publishing the objectives.
Performance Management for ePerformance Administrators 57
11 Select OK to confirm submission.
Note: Only an ePerformance Administrator can publish business objectives.

Performance Management for ePerformance Administrators 58
2.2.2 Publish Business Objectives
Navigation: Main Menu > Workforce Development > Performance Management > Business Objectives >
Publish Business Objectives.
1 Select GSA Organizational Objectives from the Objective Plan table on the Select Objective
Plan page.
2 Select Search to view all objectives that are ready for publication.
3 Select the checkbox next to the objectives you are ready to publish.
4 Select Continue.
5 Select Publish Pages to confirm publication of the listed objectives.
6 Select OK.