Embed Size (px)
DESCRIPTION
fmp_shop_qs
Citation preview
IContents
I
Table of Contents
..............................................................................................................................................................1Introduction 1
..............................................................................................................................................................1The Main Menu 2
..............................................................................................................................................................3The Equipment Manager 3
..............................................................................................................................................................6Step #1 - Establishing Locations/Categories 4
..............................................................................................................................................................6Step #2 - PM Schedule Setup 5
..............................................................................................................................................................9Step #3 - Adding vehicles/equipment 6
..............................................................................................................................................................10Scheduling and Tracking Repairs 7
..............................................................................................................................................................12Notification Popups 8
..............................................................................................................................................................13Service Calendar 9
..............................................................................................................................................................14Issuing/Updating a Work Order 10
..............................................................................................................................................................18Work Order Management 11
..............................................................................................................................................................19Viewing the Maintenance History 12
..............................................................................................................................................................21Generating Reports 13
1 Fleet Maintenance Pro Version 14
1 - Introduction
Welcome to Fleet Maintenance Pro! The tutorials in this guide provide a quick introductionto setting up and using Fleet Maintenance Pro. They are intentionally kept brief so that youcan start using the program quickly. The objective is not to review every single detail, but tofamiliarize you with the basic principles and most common features. For additional detail,please see the online help or full manual.
Fleet Maintenance Pro ships with a small amount of sample data which includes manydifferent types of equipment. We recommend using the sample data provided to try some ofthe popular features included with Fleet Maintenance Pro. After you have a goodunderstanding of the program, the sample data can be manually deleted.
The first sections will discuss the Main Menu and the Equipment Manager, which are theprimary screens of the program. Then we will step through the procedure for setting up theprogram and entering your equipment. Finally, we will cover some of the more commonfeatures of the program such as recording maintenance performed, work orders (ShopEdition), viewing maintenance history, and reporting.
Please note: there are also Help buttons located on nearly every screen within FleetMaintenance Pro. Clicking on the Help button will take you to the desired help topic thatdiscusses the screen in question. The full online help is also available in the Help-->Contents menu item.
2 - The Main Menu
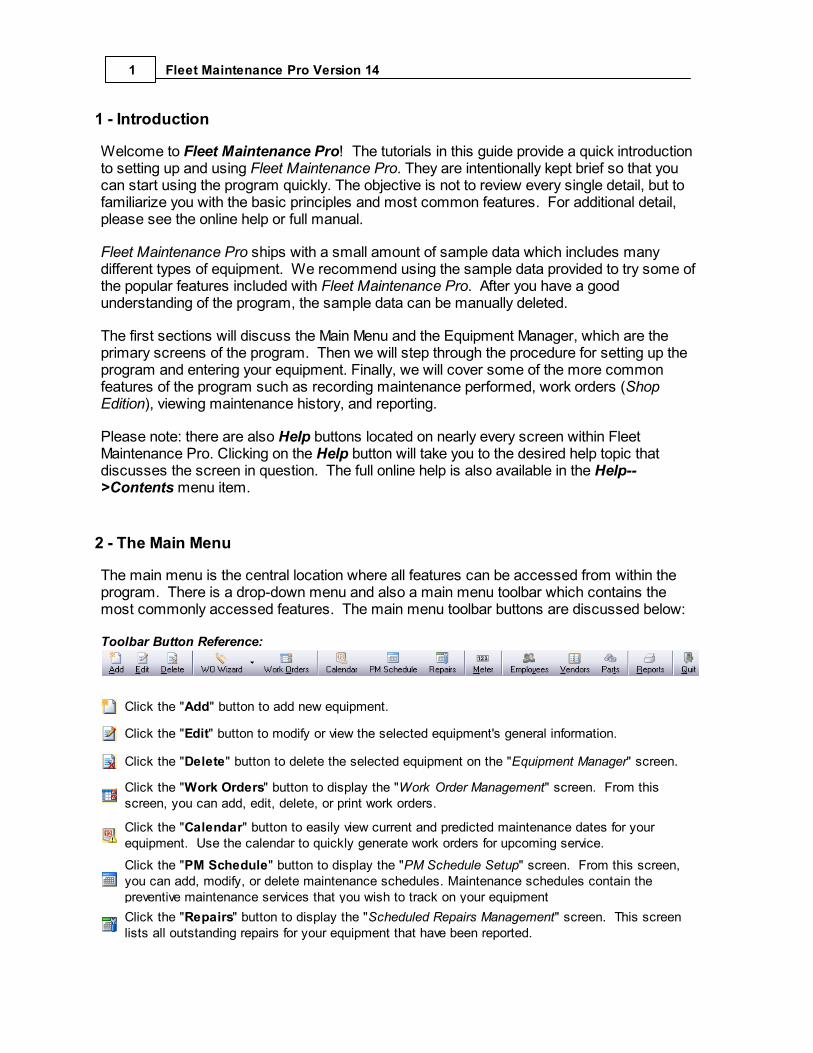
The main menu is the central location where all features can be accessed from within theprogram. There is a drop-down menu and also a main menu toolbar which contains themost commonly accessed features. The main menu toolbar buttons are discussed below:
Toolbar Button Reference:
Click the "Add" button to add new equipment.
Click the "Edit" button to modify or view the selected equipment's general information.
Click the "Delete" button to delete the selected equipment on the "Equipment Manager" screen.
Click the "Work Orders" button to display the "Work Order Management" screen. From thisscreen, you can add, edit, delete, or print work orders.
Click the "Calendar" button to easily view current and predicted maintenance dates for yourequipment. Use the calendar to quickly generate work orders for upcoming service.
Click the "PM Schedule" button to display the "PM Schedule Setup" screen. From this screen,you can add, modify, or delete maintenance schedules. Maintenance schedules contain thepreventive maintenance services that you wish to track on your equipment
Click the "Repairs" button to display the "Scheduled Repairs Management" screen. This screenlists all outstanding repairs for your equipment that have been reported.
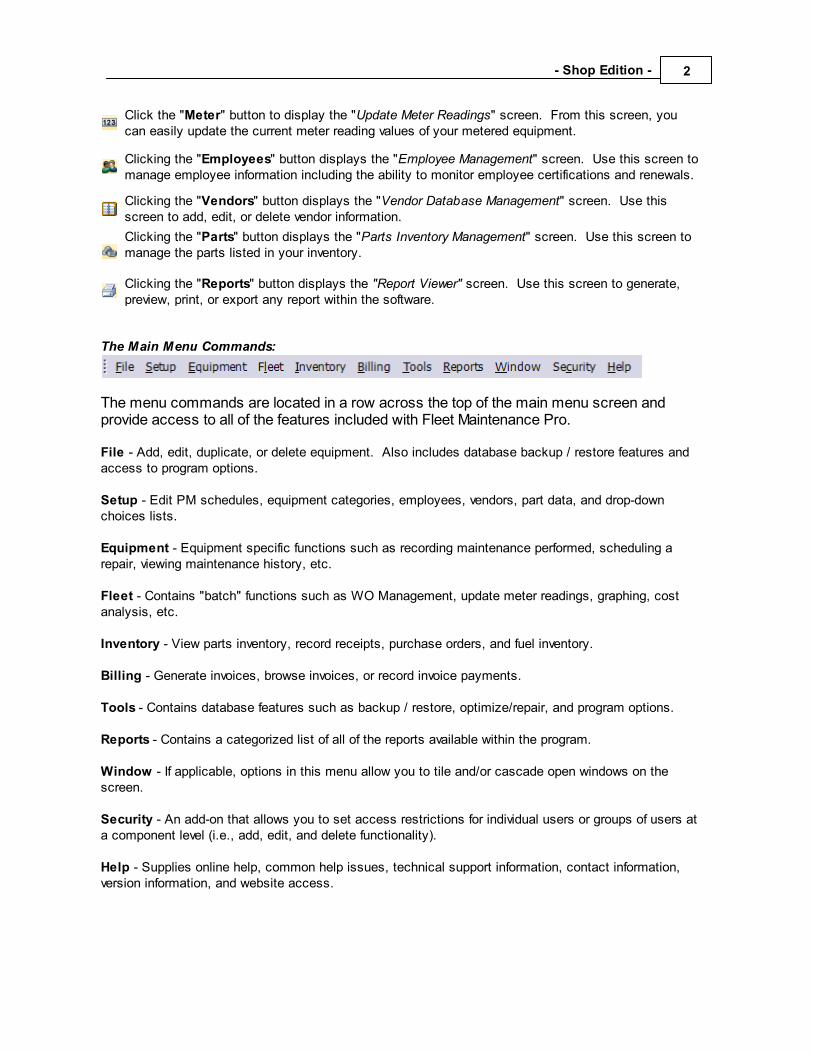
2- Shop Edition -
Click the "Meter" button to display the "Update Meter Readings" screen. From this screen, youcan easily update the current meter reading values of your metered equipment.
Clicking the "Employees" button displays the "Employee Management" screen. Use this screen tomanage employee information including the ability to monitor employee certifications and renewals.
Clicking the "Vendors" button displays the "Vendor Database Management" screen. Use thisscreen to add, edit, or delete vendor information.
Clicking the "Parts" button displays the "Parts Inventory Management" screen. Use this screen tomanage the parts listed in your inventory.
Clicking the "Reports" button displays the "Report Viewer" screen. Use this screen to generate,preview, print, or export any report within the software.
The Main Menu Commands:
The menu commands are located in a row across the top of the main menu screen andprovide access to all of the features included with Fleet Maintenance Pro.
File - Add, edit, duplicate, or delete equipment. Also includes database backup / restore features andaccess to program options.
Setup - Edit PM schedules, equipment categories, employees, vendors, part data, and drop-downchoices lists.
Equipment - Equipment specific functions such as recording maintenance performed, scheduling arepair, viewing maintenance history, etc.
Fleet - Contains "batch" functions such as WO Management, update meter readings, graphing, costanalysis, etc.
Inventory - View parts inventory, record receipts, purchase orders, and fuel inventory.
Billing - Generate invoices, browse invoices, or record invoice payments.
Tools - Contains database features such as backup / restore, optimize/repair, and program options.
Reports - Contains a categorized list of all of the reports available within the program.
Window - If applicable, options in this menu allow you to tile and/or cascade open windows on thescreen.
Security - An add-on that allows you to set access restrictions for individual users or groups of users ata component level (i.e., add, edit, and delete functionality).
Help - Supplies online help, common help issues, technical support information, contact information,version information, and website access.
3 Fleet Maintenance Pro Version 14
3 - The Equipment Manager
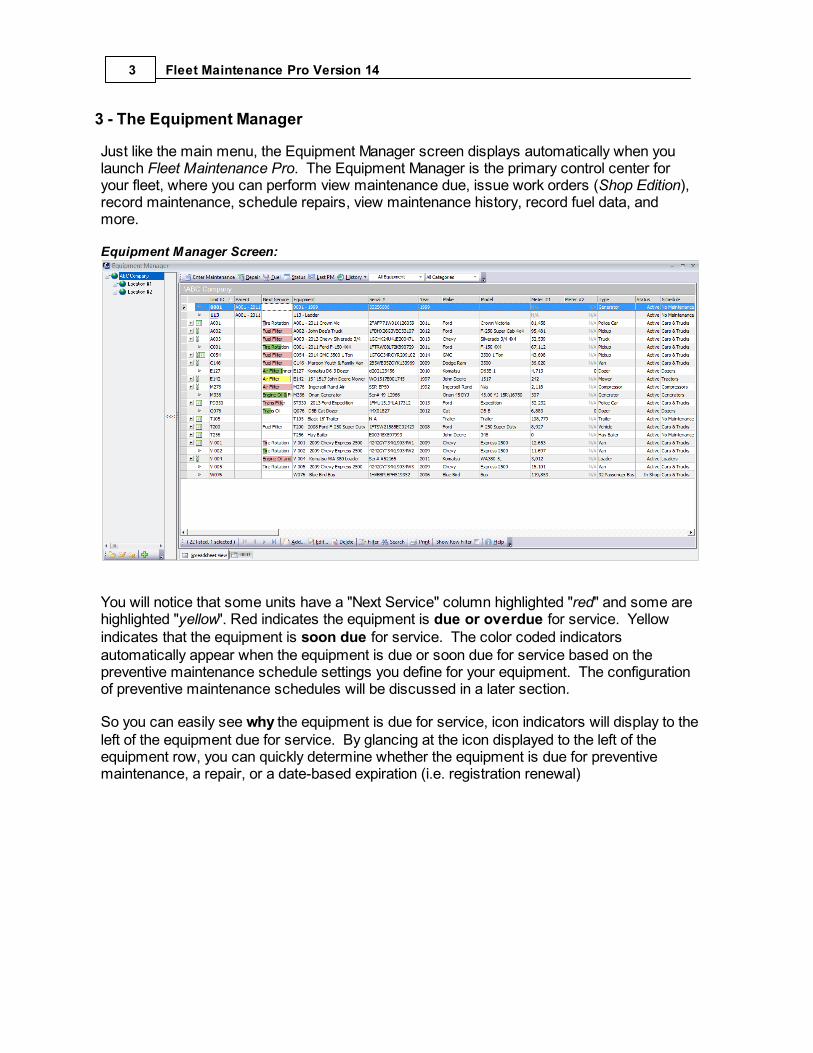
Just like the main menu, the Equipment Manager screen displays automatically when youlaunch Fleet Maintenance Pro. The Equipment Manager is the primary control center foryour fleet, where you can perform view maintenance due, issue work orders (Shop Edition),record maintenance, schedule repairs, view maintenance history, record fuel data, andmore.
Equipment Manager Screen:
You will notice that some units have a "Next Service" column highlighted "red" and some arehighlighted "yellow". Red indicates the equipment is due or overdue for service. Yellowindicates that the equipment is soon due for service. The color coded indicatorsautomatically appear when the equipment is due or soon due for service based on thepreventive maintenance schedule settings you define for your equipment. The configurationof preventive maintenance schedules will be discussed in a later section.
So you can easily see why the equipment is due for service, icon indicators will display to theleft of the equipment due for service. By glancing at the icon displayed to the left of theequipment row, you can quickly determine whether the equipment is due for preventivemaintenance, a repair, or a date-based expiration (i.e. registration renewal)
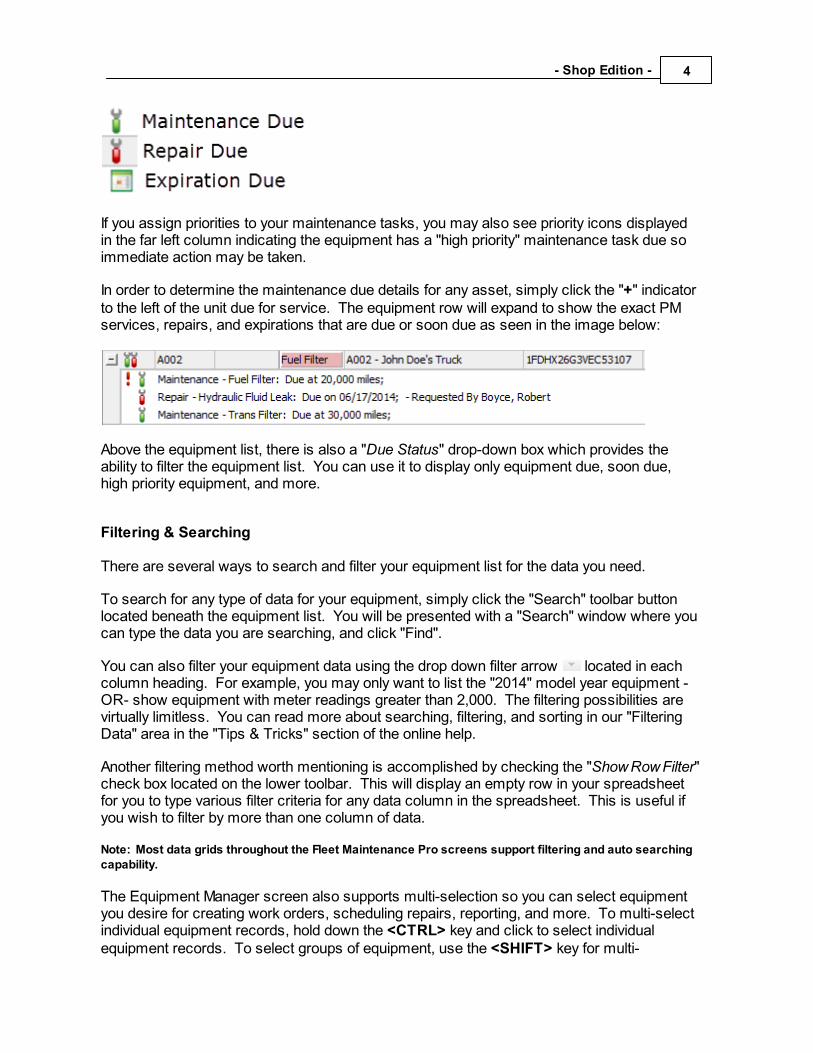
4- Shop Edition -
If you assign priorities to your maintenance tasks, you may also see priority icons displayedin the far left column indicating the equipment has a "high priority" maintenance task due soimmediate action may be taken.
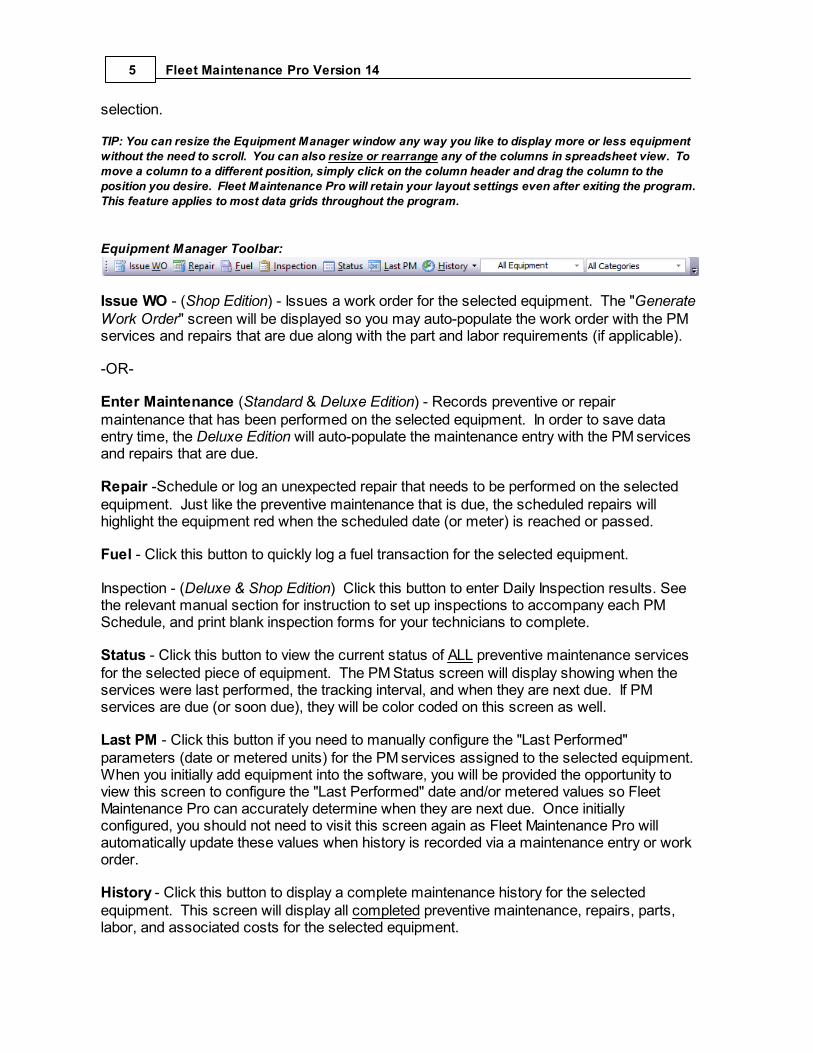
In order to determine the maintenance due details for any asset, simply click the "+" indicatorto the left of the unit due for service. The equipment row will expand to show the exact PMservices, repairs, and expirations that are due or soon due as seen in the image below:
Above the equipment list, there is also a "Due Status" drop-down box which provides theability to filter the equipment list. You can use it to display only equipment due, soon due,high priority equipment, and more.
Filtering & Searching
There are several ways to search and filter your equipment list for the data you need.
To search for any type of data for your equipment, simply click the "Search" toolbar buttonlocated beneath the equipment list. You will be presented with a "Search" window where youcan type the data you are searching, and click "Find".
You can also filter your equipment data using the drop down filter arrow located in eachcolumn heading. For example, you may only want to list the "2014" model year equipment -OR- show equipment with meter readings greater than 2,000. The filtering possibilities arevirtually limitless. You can read more about searching, filtering, and sorting in our "FilteringData" area in the "Tips & Tricks" section of the online help.
Another filtering method worth mentioning is accomplished by checking the "Show Row Filter"check box located on the lower toolbar. This will display an empty row in your spreadsheetfor you to type various filter criteria for any data column in the spreadsheet. This is useful ifyou wish to filter by more than one column of data.
Note: Most data grids throughout the Fleet Maintenance Pro screens support filtering and auto searchingcapability.
The Equipment Manager screen also supports multi-selection so you can select equipmentyou desire for creating work orders, scheduling repairs, reporting, and more. To multi-selectindividual equipment records, hold down the <CTRL> key and click to select individualequipment records. To select groups of equipment, use the <SHIFT> key for multi-
5 Fleet Maintenance Pro Version 14
selection.
TIP: You can resize the Equipment Manager window any way you like to display more or less equipmentwithout the need to scroll. You can also resize or rearrange any of the columns in spreadsheet view. Tomove a column to a different position, simply click on the column header and drag the column to theposition you desire. Fleet Maintenance Pro will retain your layout settings even after exiting the program.This feature applies to most data grids throughout the program.
Equipment Manager Toolbar:
Issue WO - (Shop Edition) - Issues a work order for the selected equipment. The "GenerateWork Order" screen will be displayed so you may auto-populate the work order with the PMservices and repairs that are due along with the part and labor requirements (if applicable).
-OR-
Enter Maintenance (Standard & Deluxe Edition) - Records preventive or repairmaintenance that has been performed on the selected equipment. In order to save dataentry time, the Deluxe Edition will auto-populate the maintenance entry with the PM servicesand repairs that are due.
Repair -Schedule or log an unexpected repair that needs to be performed on the selectedequipment. Just like the preventive maintenance that is due, the scheduled repairs willhighlight the equipment red when the scheduled date (or meter) is reached or passed.
Fuel - Click this button to quickly log a fuel transaction for the selected equipment.
Inspection - (Deluxe & Shop Edition) Click this button to enter Daily Inspection results. Seethe relevant manual section for instruction to set up inspections to accompany each PMSchedule, and print blank inspection forms for your technicians to complete.
Status - Click this button to view the current status of ALL preventive maintenance servicesfor the selected piece of equipment. The PM Status screen will display showing when theservices were last performed, the tracking interval, and when they are next due. If PMservices are due (or soon due), they will be color coded on this screen as well.
Last PM - Click this button if you need to manually configure the "Last Performed"parameters (date or metered units) for the PM services assigned to the selected equipment.When you initially add equipment into the software, you will be provided the opportunity toview this screen to configure the "Last Performed" date and/or metered values so FleetMaintenance Pro can accurately determine when they are next due. Once initiallyconfigured, you should not need to visit this screen again as Fleet Maintenance Pro willautomatically update these values when history is recorded via a maintenance entry or workorder.
History - Click this button to display a complete maintenance history for the selectedequipment. This screen will display all completed preventive maintenance, repairs, parts,labor, and associated costs for the selected equipment.
6- Shop Edition -
4 - Step #1 - EstablishingLocations/Categories
Fleet Maintenance Pro allows you to categorize your equipment in the form of a tree-likestructure. By organizing your equipment into categories, it is easier to locate equipment andgenerate reports by particular categories.
The left side of the "Equipment Manager" screen displays your category structure. From thisarea, you can add, edit, delete, or move categories. You can easily make alterations to thecategory structure at any time.
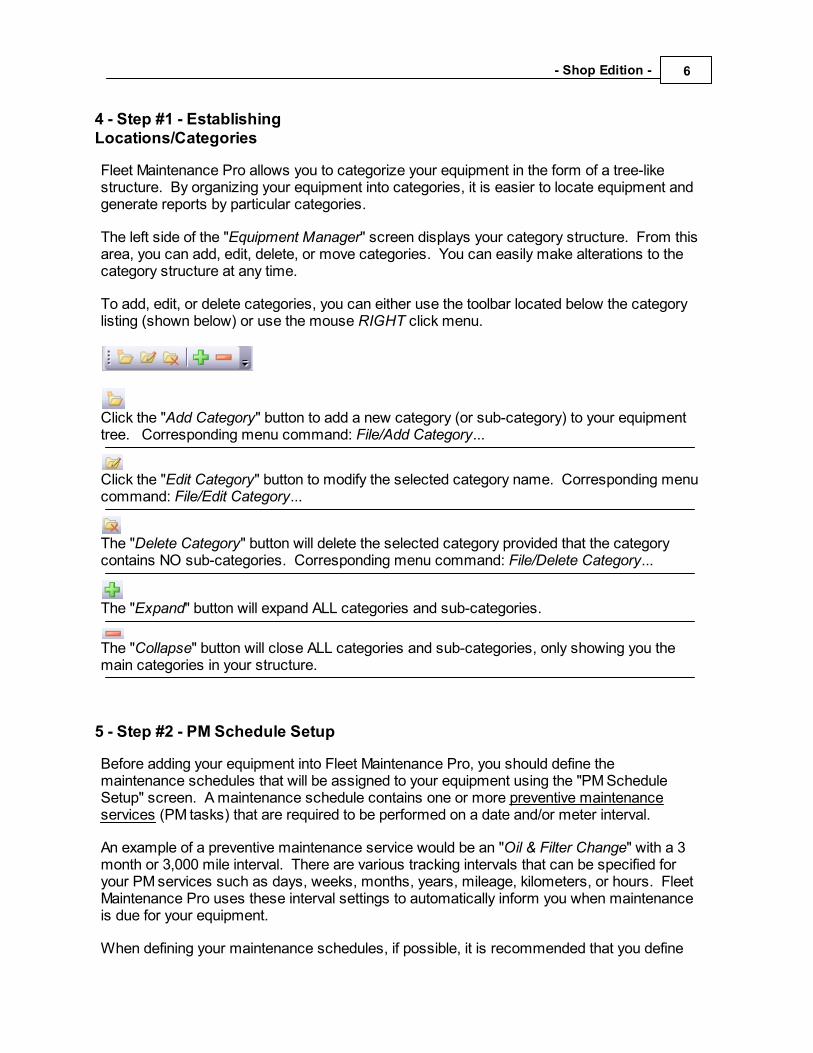
To add, edit, or delete categories, you can either use the toolbar located below the categorylisting (shown below) or use the mouse RIGHT click menu.
Click the "Add Category" button to add a new category (or sub-category) to your equipmenttree. Corresponding menu command: File/Add Category...
Click the "Edit Category" button to modify the selected category name. Corresponding menucommand: File/Edit Category...
The "Delete Category" button will delete the selected category provided that the categorycontains NO sub-categories. Corresponding menu command: File/Delete Category...
The "Expand" button will expand ALL categories and sub-categories.
The "Collapse" button will close ALL categories and sub-categories, only showing you themain categories in your structure.
5 - Step #2 - PM Schedule Setup
Before adding your equipment into Fleet Maintenance Pro, you should define themaintenance schedules that will be assigned to your equipment using the "PM ScheduleSetup" screen. A maintenance schedule contains one or more preventive maintenanceservices (PM tasks) that are required to be performed on a date and/or meter interval.
An example of a preventive maintenance service would be an "Oil & Filter Change" with a 3month or 3,000 mile interval. There are various tracking intervals that can be specified foryour PM services such as days, weeks, months, years, mileage, kilometers, or hours. FleetMaintenance Pro uses these interval settings to automatically inform you when maintenanceis due for your equipment.
When defining your maintenance schedules, if possible, it is recommended that you define
7 Fleet Maintenance Pro Version 14
them for the "groups" of similar equipment you will be tracking. For example, if you have 10fork lifts that all follow the same routine maintenance cycles, you can create onemaintenance schedule in Fleet Maintenance Pro for all 10 "Fork Lifts". That way, if changesare made to the schedule at a later time (i.e. you alter a maintenance interval, add a PMservice, etc), all equipment assigned to that schedule will inherit the change instead ofmaking the change in 10 individual maintenance schedules.
Once your maintenance schedules are defined, when adding equipment into FleetMaintenance Pro, you can choose a maintenance schedule for the equipment to follow. When you assign equipment to a schedule, the equipment inherits all the PM servicesdefined by the schedule you choose. As indicated above, you can assign the samemaintenance schedule to as many pieces of equipment as you like. Also, you can define asmany PM services within each schedule as you like.
TIP: Even though more than one piece of equipment can be assigned to a commonmaintenance schedule, each piece of equipment will still have its own unique last performeddate and/or meter for each PM service in the maintenance schedule. In other words,equipment assigned to the same maintenance schedule can still be due at different times.
To add a maintenance schedule:
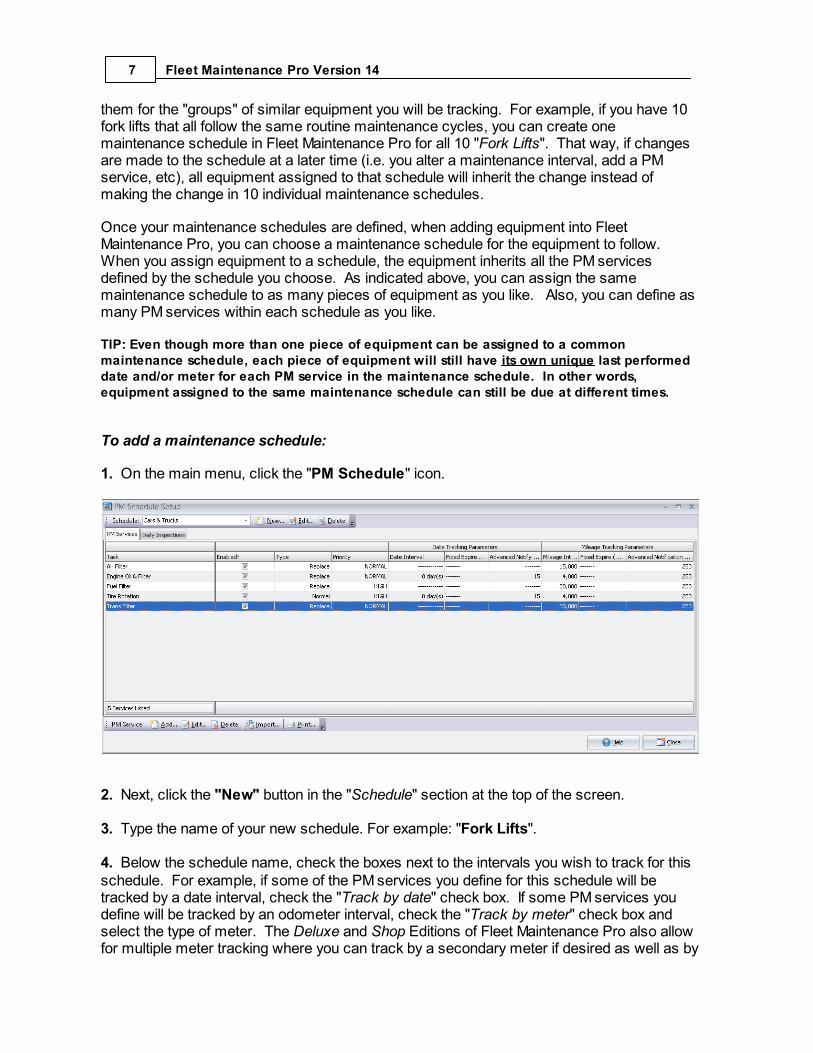
1. On the main menu, click the "PM Schedule" icon.
2. Next, click the "New" button in the "Schedule" section at the top of the screen.
3. Type the name of your new schedule. For example: "Fork Lifts".
4. Below the schedule name, check the boxes next to the intervals you wish to track for thisschedule. For example, if some of the PM services you define for this schedule will betracked by a date interval, check the "Track by date" check box. If some PM services youdefine will be tracked by an odometer interval, check the "Track by meter" check box andselect the type of meter. The Deluxe and Shop Editions of Fleet Maintenance Pro also allowfor multiple meter tracking where you can track by a secondary meter if desired as well as by
8- Shop Edition -
fuel consumption rates.
5. Finally, click the "Save" button.
You can now add PM services to this schedule.
To add a PM service to your schedule:
1. On the "PM Service" toolbar located at the bottom of the screen, click the "Add" button.
2. You can enter the Service Name and set your desired date and/or meter interval values.
3. Click the "Save" button.
TIP: In order to save time when setting up your maintenance schedules, you can import PM servicesfrom other schedules. Some of your schedules may differ only slightly from others and importing wouldeliminate re-typing the same PM services you have already entered in another schedule.
To import services from another schedule:
1. Click on the "Import" button to display the "Import Maintenance Services" screen.
2. Of the left side of the screen, choose the schedule you wish to import from using the "Import From Schedule" drop-down list. The PM services associated with the selectedschedule will be populated in the "Services Available" box.
3. In the "Services Available" box, click on the service(s) you wish to import. You canselect multiple services by using the Ctrl-Click or Shift-Click methods. If you wish to importALL services, click the "Select All" check box below the source list to highlight ALLmaintenance services in the source list.
4. Click the ">" button to add (import) the selected service(s) to the "Current Schedule" onthe right side of the screen.
5. Click "OK" to return to the "PM Schedule Setup" screen.
For additional information on the import screen, see Import Maintenance Services screenhelp topic.
9 Fleet Maintenance Pro Version 14
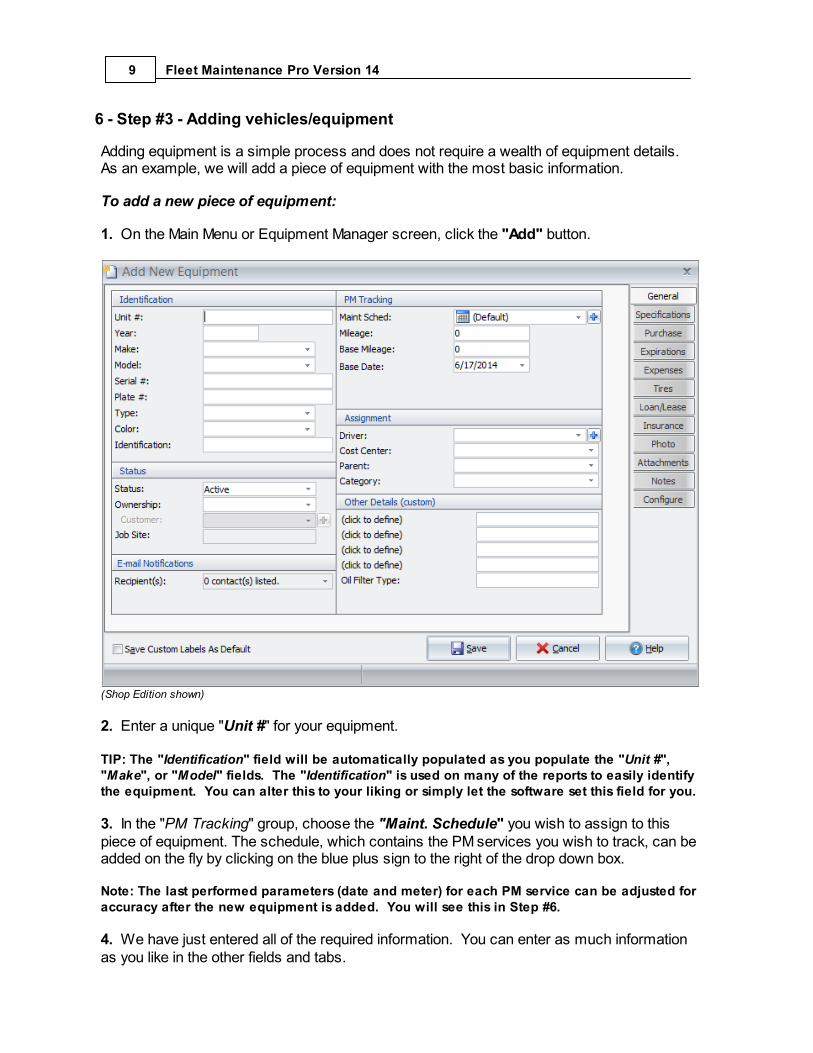
6 - Step #3 - Adding vehicles/equipment
Adding equipment is a simple process and does not require a wealth of equipment details. As an example, we will add a piece of equipment with the most basic information.
To add a new piece of equipment:
1. On the Main Menu or Equipment Manager screen, click the "Add" button.
(Shop Edition shown)
2. Enter a unique "Unit #" for your equipment.
TIP: The "Identification" field will be automatically populated as you populate the "Unit #","Make", or "Model" fields. The "Identification" is used on many of the reports to easily identifythe equipment. You can alter this to your liking or simply let the software set this field for you.
3. In the "PM Tracking" group, choose the "Maint. Schedule" you wish to assign to thispiece of equipment. The schedule, which contains the PM services you wish to track, can beadded on the fly by clicking on the blue plus sign to the right of the drop down box.
Note: The last performed parameters (date and meter) for each PM service can be adjusted foraccuracy after the new equipment is added. You will see this in Step #6.
4. We have just entered all of the required information. You can enter as much informationas you like in the other fields and tabs.
10- Shop Edition -
There are also 25+ custom fields you can define on the equipment information tabs. Tabsthat contain the custom labels are "General" (5), "Specifications" (18), "Purchase" (2),"Expirations" (2), and "Loan/Lease" (1).
By default, all custom fields read "(click to define)" when you are adding a new piece ofequipment. Simply click on the "(click to define)" text to define the label. A small screen willbe displayed showing the current label name. Alter the name to your liking and click "Ok". TIP: Once the custom labels are changed to your liking, to save data entry time, they can besaved as defaults for each subsequent equipment you enter by checking the "Save CustomLabels as Default" check box on the bottom of the screen. In addition, if you wish to alter dataor custom fields for multiple pieces of equipment that have already been added, you canmulti-select equipment on the "Equipment Manager" screen and then click "Edit".
5. Click the "Save" button to save your equipment.
6. Finally, you will be asked if you wish to configure the "Last Performed" data at this time.Again, the "Last Performed" data is used when calculating maintenance due. You should tellFleet Maintenance Pro when the PM services in the assigned schedule were last performed,or let Fleet Maintenance Pro assume the Base Date and Base Mileage figures for the lastperformed data as a starting point. Choose "Yes" or "No". You can always configure the"Last Performed" data at a later time by clicking the "Last PM" button on the EquipmentManager screen.
7 - Scheduling and Tracking Repairs
Fleet Maintenance Pro includes a repair scheduling utility which allows you to schedule orreport unexpected repairs. The software will keep a log of these repairs until they arecompleted. Scheduled repairs are also a factor when determining when the equipment isdue for service.
For example, let's say a driver notices that the right front parking light is out on theequipment. The operator (or anyone) can log this problem into Fleet Maintenance Pro so therepair can be flagged, tracked, and followed through completion.
To record an unexpected repair that needs to be performed:
1. Select the appropriate equipment on the "Equipment Manager" screen and click the "Repair" button.
11 Fleet Maintenance Pro Version 14
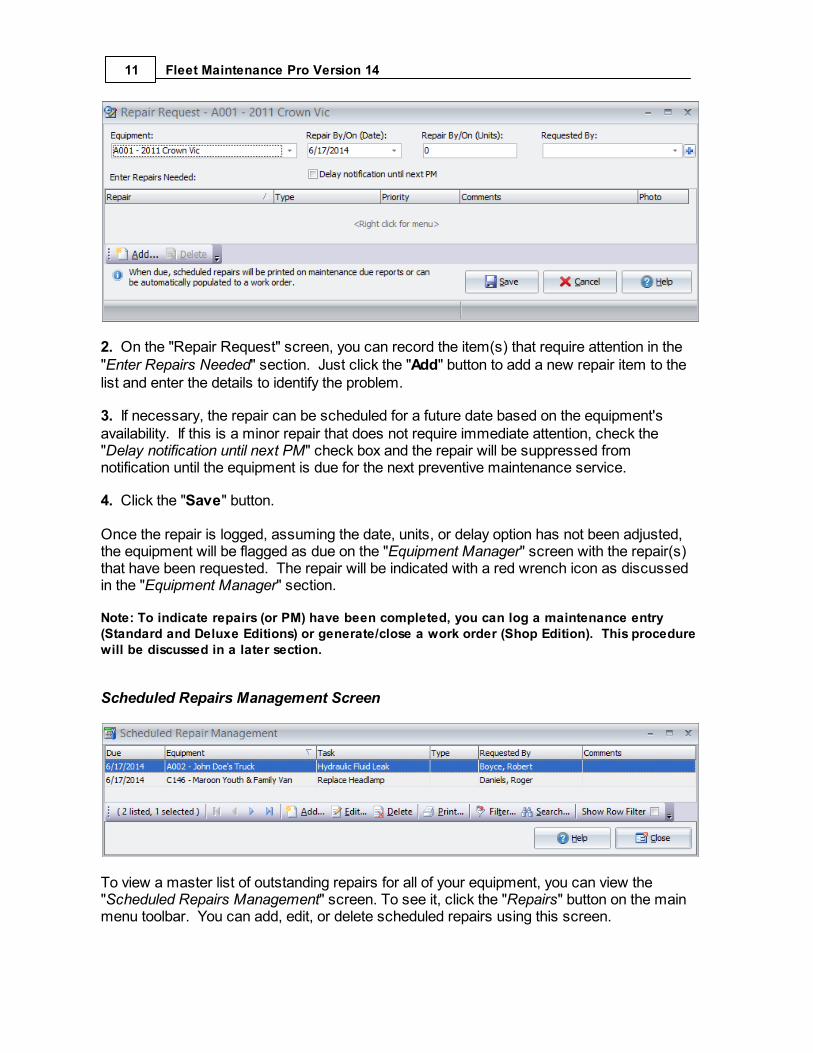
2. On the "Repair Request" screen, you can record the item(s) that require attention in the "Enter Repairs Needed" section. Just click the "Add" button to add a new repair item to thelist and enter the details to identify the problem.
3. If necessary, the repair can be scheduled for a future date based on the equipment'savailability. If this is a minor repair that does not require immediate attention, check the "Delay notification until next PM" check box and the repair will be suppressed fromnotification until the equipment is due for the next preventive maintenance service.
4. Click the "Save" button.
Once the repair is logged, assuming the date, units, or delay option has not been adjusted,the equipment will be flagged as due on the "Equipment Manager" screen with the repair(s)that have been requested. The repair will be indicated with a red wrench icon as discussedin the "Equipment Manager" section.
Note: To indicate repairs (or PM) have been completed, you can log a maintenance entry(Standard and Deluxe Editions) or generate/close a work order (Shop Edition). This procedurewill be discussed in a later section.
Scheduled Repairs Management Screen
To view a master list of outstanding repairs for all of your equipment, you can view the "Scheduled Repairs Management" screen. To see it, click the "Repairs" button on the mainmenu toolbar. You can add, edit, or delete scheduled repairs using this screen.
12- Shop Edition -
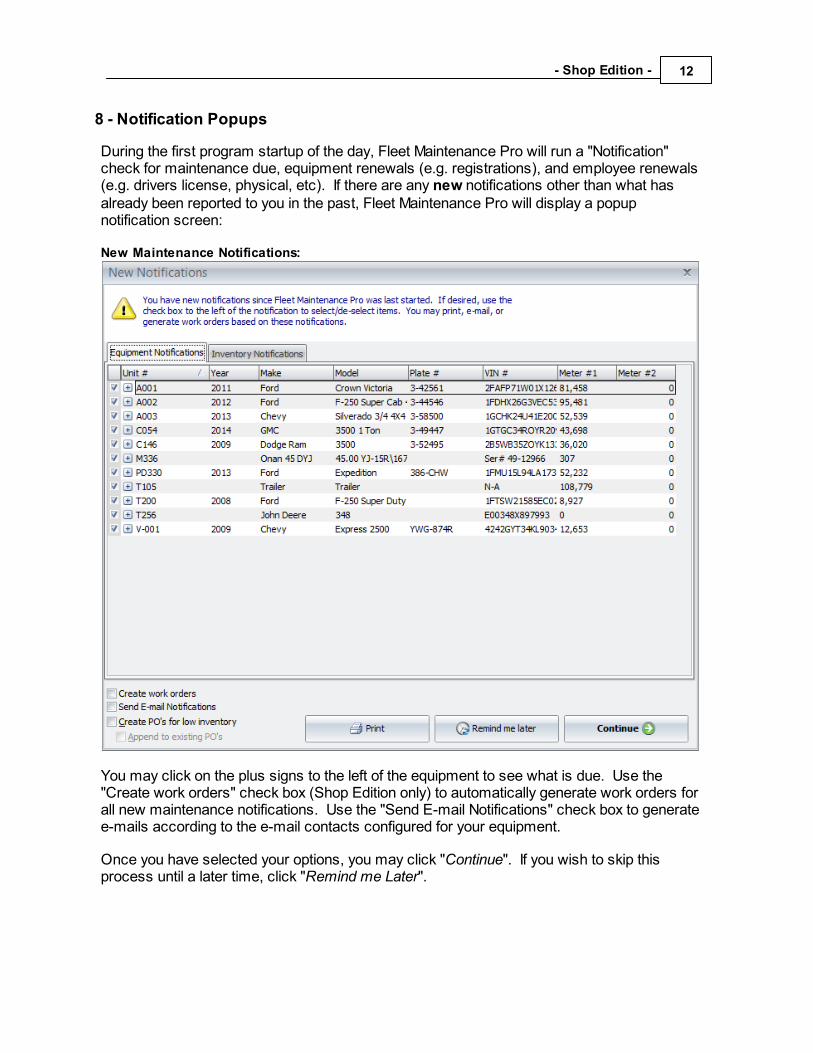
8 - Notification Popups
During the first program startup of the day, Fleet Maintenance Pro will run a "Notification"check for maintenance due, equipment renewals (e.g. registrations), and employee renewals(e.g. drivers license, physical, etc). If there are any new notifications other than what hasalready been reported to you in the past, Fleet Maintenance Pro will display a popupnotification screen:
New Maintenance Notifications:
You may click on the plus signs to the left of the equipment to see what is due. Use the"Create work orders" check box (Shop Edition only) to automatically generate work orders forall new maintenance notifications. Use the "Send E-mail Notifications" check box to generatee-mails according to the e-mail contacts configured for your equipment.
Once you have selected your options, you may click "Continue". If you wish to skip thisprocess until a later time, click "Remind me Later".
13 Fleet Maintenance Pro Version 14
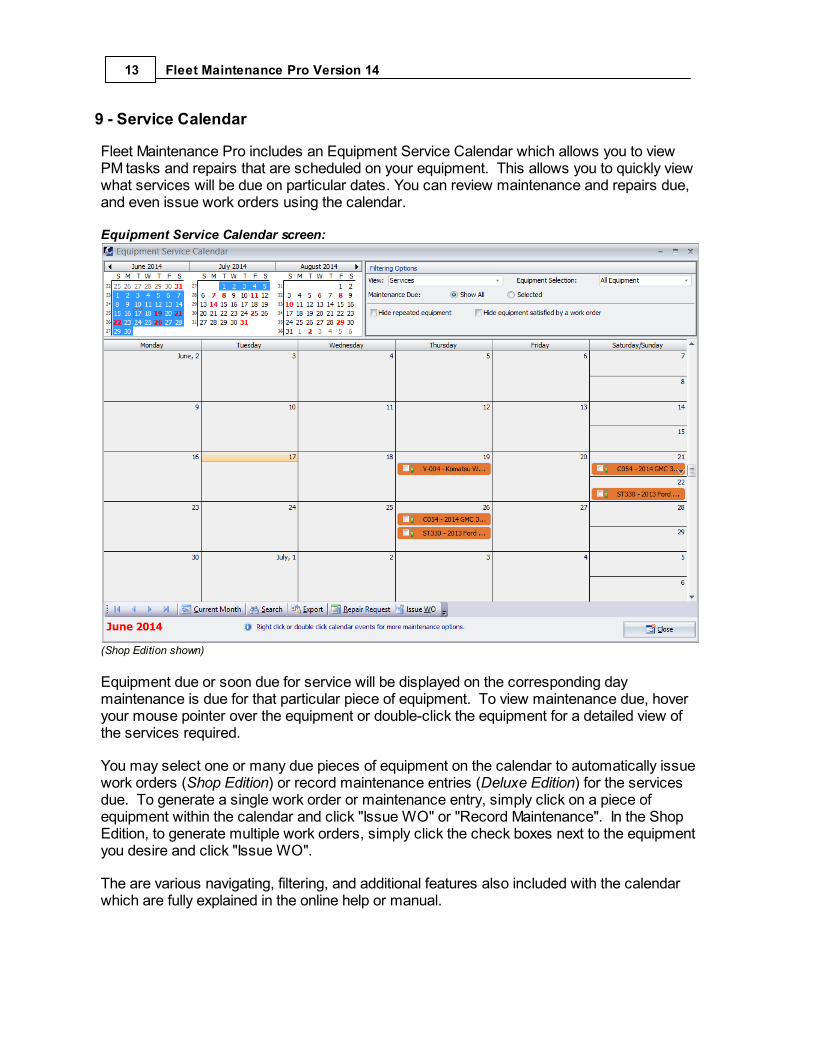
9 - Service Calendar
Fleet Maintenance Pro includes an Equipment Service Calendar which allows you to viewPM tasks and repairs that are scheduled on your equipment. This allows you to quickly viewwhat services will be due on particular dates. You can review maintenance and repairs due,and even issue work orders using the calendar.
Equipment Service Calendar screen:
(Shop Edition shown)
Equipment due or soon due for service will be displayed on the corresponding daymaintenance is due for that particular piece of equipment. To view maintenance due, hoveryour mouse pointer over the equipment or double-click the equipment for a detailed view ofthe services required.
You may select one or many due pieces of equipment on the calendar to automatically issuework orders (Shop Edition) or record maintenance entries (Deluxe Edition) for the servicesdue. To generate a single work order or maintenance entry, simply click on a piece ofequipment within the calendar and click "Issue WO" or "Record Maintenance". In the ShopEdition, to generate multiple work orders, simply click the check boxes next to the equipmentyou desire and click "Issue WO".
The are various navigating, filtering, and additional features also included with the calendarwhich are fully explained in the online help or manual.
14- Shop Edition -
10 - Issuing/Updating a Work Order
Fleet Maintenance Pro contains a built-in work order system that will create and keep track ofwork orders that you generate for your equipment. Work orders can contain preventivemaintenance, repairs, part details, labor details, and more.
You can issue work orders on your equipment individually or create a batch of work orders allat once. When work orders are created, they have a default status of "Open". When thework order maintenance is physically performed, the work order "Status" can be switched to "Closed". When a work order is closed, if applicable, Fleet Maintenance Pro will reset thepreventive maintenance service's "Last Performed" parameters and clear any outstandingrepairs that were indicated by your work order. In addition, a historical record will be writtenfor the equipment's maintenance history indicating the services performed, costs, and otherdetails.
15 Fleet Maintenance Pro Version 14
To issue a work order:
1. On the "Equipment Manager" screen, select a piece of equipment that is due for service.If you wish to create work orders for multiple equipment, use the <CTRL> or <SHIFT> keysto multi-select equipment.
2. Then, click the "Issue WO" button. If the chosen equipment is due for service, thefollowing screen will appear:
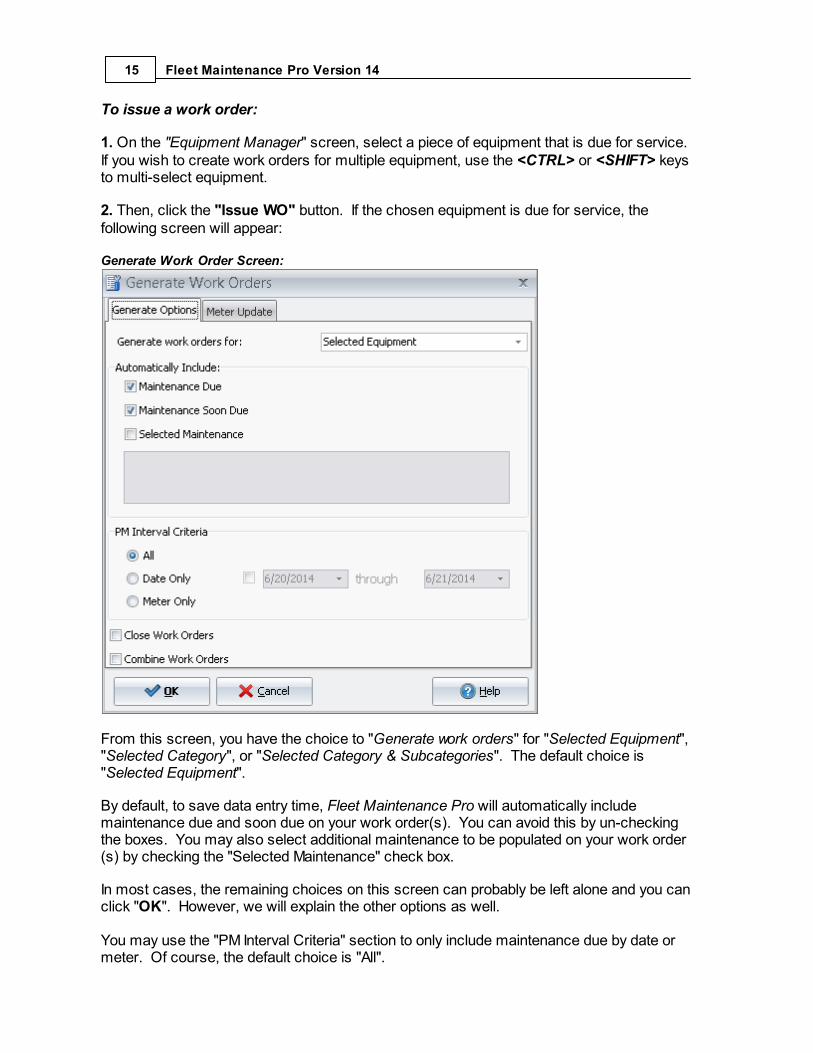
Generate Work Order Screen:
From this screen, you have the choice to "Generate work orders" for "Selected Equipment", "Selected Category", or "Selected Category & Subcategories". The default choice is"Selected Equipment".
By default, to save data entry time, Fleet Maintenance Pro will automatically includemaintenance due and soon due on your work order(s). You can avoid this by un-checkingthe boxes. You may also select additional maintenance to be populated on your work order(s) by checking the "Selected Maintenance" check box.
In most cases, the remaining choices on this screen can probably be left alone and you canclick "OK". However, we will explain the other options as well.
You may use the "PM Interval Criteria" section to only include maintenance due by date ormeter. Of course, the default choice is "All".
16- Shop Edition -
If desired, you may check the "Close work orders" check box to automatically close yourwork orders. This is useful if you are creating work orders for tasks that have already beencompleted. If using this option, you can click the "Meter Update" tab to key in your updatedmeter readings before the work orders are officially closed.
3. When you have made your choices click the "OK" button.
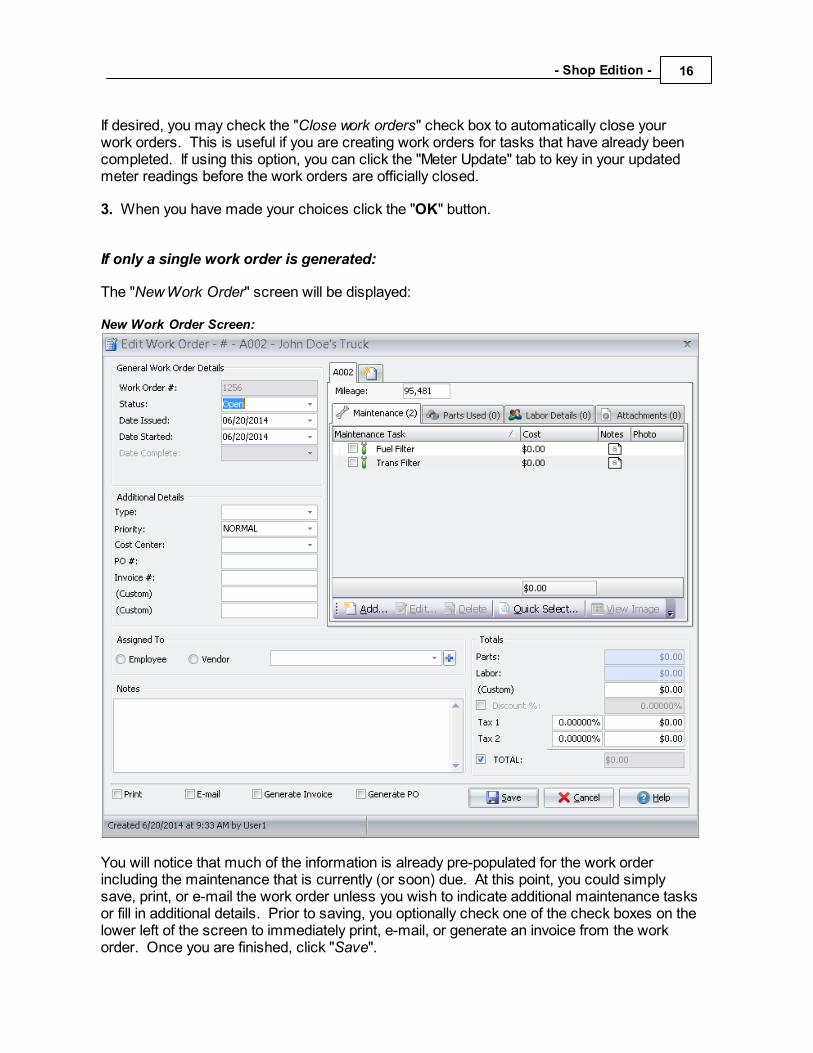
If only a single work order is generated:
The "New Work Order" screen will be displayed:
New Work Order Screen:
You will notice that much of the information is already pre-populated for the work orderincluding the maintenance that is currently (or soon) due. At this point, you could simplysave, print, or e-mail the work order unless you wish to indicate additional maintenance tasksor fill in additional details. Prior to saving, you optionally check one of the check boxes on thelower left of the screen to immediately print, e-mail, or generate an invoice from the workorder. Once you are finished, click "Save".
17 Fleet Maintenance Pro Version 14
TIP: Fleet Maintenance Pro also provides the ability for you to associate parts and labor withpreventive maintenance. Therefore, when preventive maintenance tasks are due and populatedon the work order, Fleet Maintenance Pro will also automatically indicate the parts and/or laborrequired to perform the PM or repair tasks. You can configure Service Associations via the"SETUP --> Service Associations" menu item on the main menu screen.
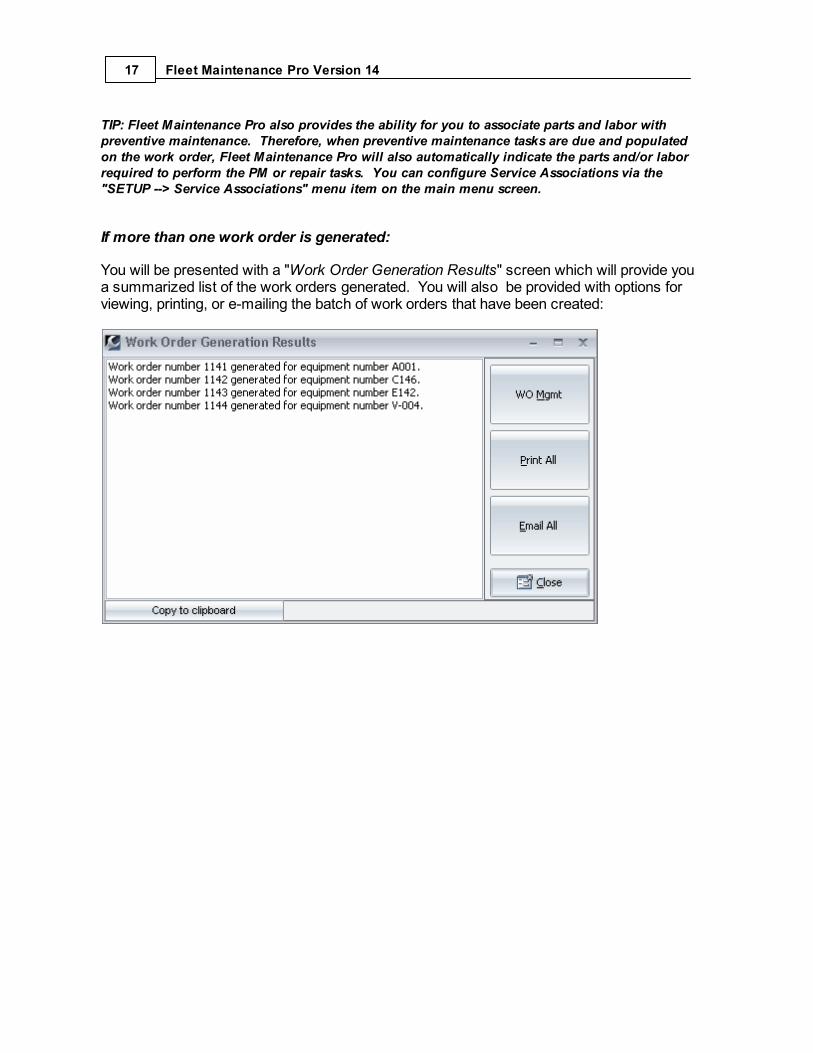
If more than one work order is generated:
You will be presented with a "Work Order Generation Results" screen which will provide youa summarized list of the work orders generated. You will also be provided with options forviewing, printing, or e-mailing the batch of work orders that have been created:
18- Shop Edition -
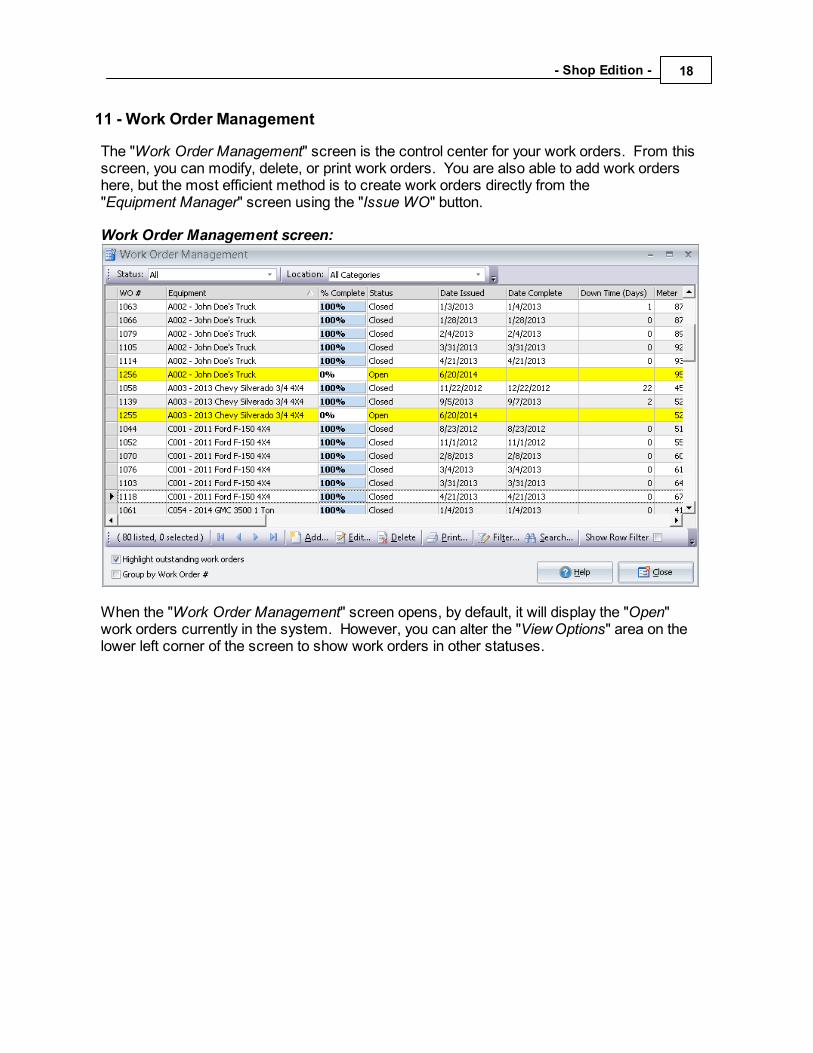
11 - Work Order Management
The "Work Order Management" screen is the control center for your work orders. From thisscreen, you can modify, delete, or print work orders. You are also able to add work ordershere, but the most efficient method is to create work orders directly from the "Equipment Manager" screen using the "Issue WO" button.
Work Order Management screen:
When the "Work Order Management" screen opens, by default, it will display the "Open"work orders currently in the system. However, you can alter the "View Options" area on thelower left corner of the screen to show work orders in other statuses.
19 Fleet Maintenance Pro Version 14
TIP: If desired, you can change the default view status of the "Work Order Management"screen in the program options.
Closing Work Orders
If you need to add or update information for the work order prior to closing, simply double-click on the work order you wish to edit, or select the work order and click the "Edit" button.The "Edit Work Order" screen will be displayed. Make any necessary adjustments (i.e. addparts, indicate labor details, additional maintenance, etc) and then set the "Status" of thework order to "Closed". Finally, set the "Date Complete" to the appropriate completion dateand click "Save".
If you simply want to close the work order without editing, use the "Toggle Status" button onthe lower right corner of the "Work Order Management" screen. Upon clicking the "Toggle"button on an "Open" work order, the status of the work order will be automatically set to "Closed" and the "Date Complete" will be set to the current date. Note that you can also usethe "Toggle Status" button to re-open a closed work order.
At the moment a work order is closed, provided all due (or soon due) maintenance has beensatisfied by the work order, the equipment will not longer be color shaded on the "EquipmentManager" screen. The maintenance data has been updated for the tasks performed, and thedate/meter values will be automatically advanced to the next respective due date/meter. Inaddition, the work order details will be automatically recorded in the maintenance history forthe equipment.
To leave this screen, click the "Close" button.
12 - Viewing the Maintenance History
When maintenance is performed or work orders are closed (Shop Edition), a record islogged to the maintenance history indicating the preventive maintenance, repairmaintenance, parts, labor, costs, and more. The maintenance history is useful for analyzingcosts and detecting trends in neglect, abuse, or aging equipment.
To view the maintenance history for your equipment:
1. Select a piece of equipment.
2. Click the "History" button.
20- Shop Edition -
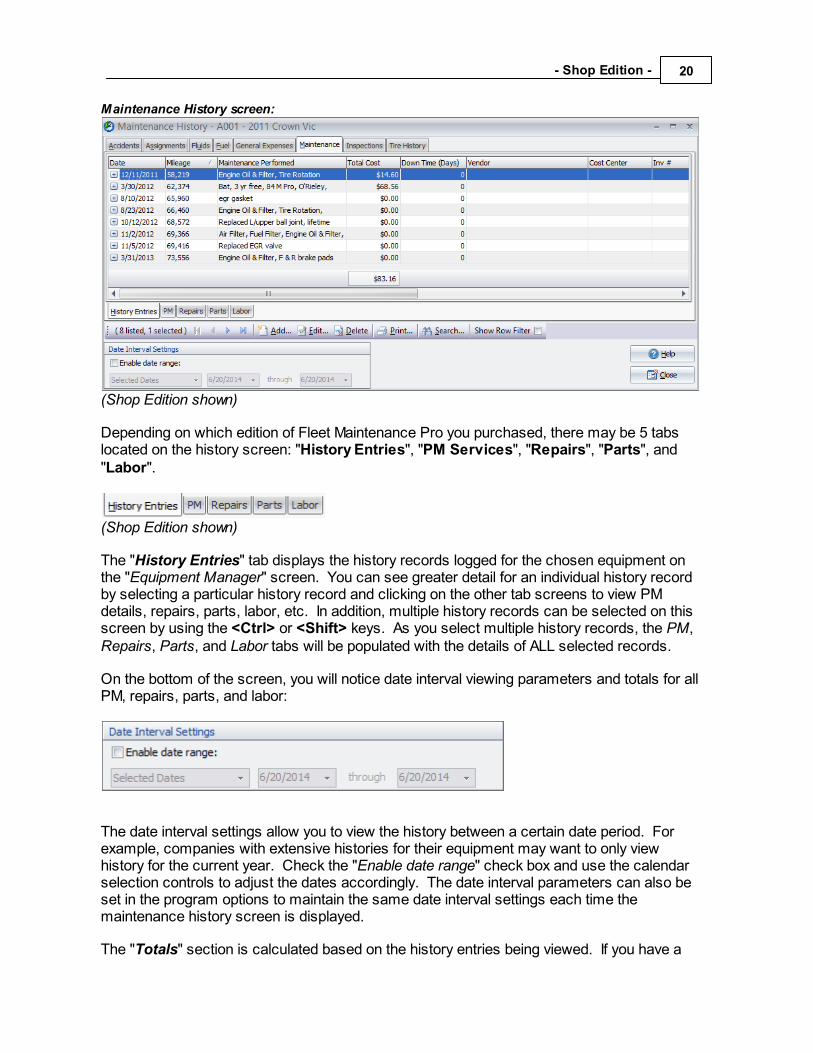
Maintenance History screen:
(Shop Edition shown)
Depending on which edition of Fleet Maintenance Pro you purchased, there may be 5 tabslocated on the history screen: "History Entries", "PM Services", "Repairs", "Parts", and "Labor".
(Shop Edition shown)
The "History Entries" tab displays the history records logged for the chosen equipment onthe "Equipment Manager" screen. You can see greater detail for an individual history recordby selecting a particular history record and clicking on the other tab screens to view PMdetails, repairs, parts, labor, etc. In addition, multiple history records can be selected on thisscreen by using the <Ctrl> or <Shift> keys. As you select multiple history records, the PM,Repairs, Parts, and Labor tabs will be populated with the details of ALL selected records.
On the bottom of the screen, you will notice date interval viewing parameters and totals for allPM, repairs, parts, and labor:
The date interval settings allow you to view the history between a certain date period. Forexample, companies with extensive histories for their equipment may want to only viewhistory for the current year. Check the "Enable date range" check box and use the calendarselection controls to adjust the dates accordingly. The date interval parameters can also beset in the program options to maintain the same date interval settings each time themaintenance history screen is displayed.
The "Totals" section is calculated based on the history entries being viewed. If you have a
21 Fleet Maintenance Pro Version 14
date interval set for the current year, the totals will only be calculated for the current year.
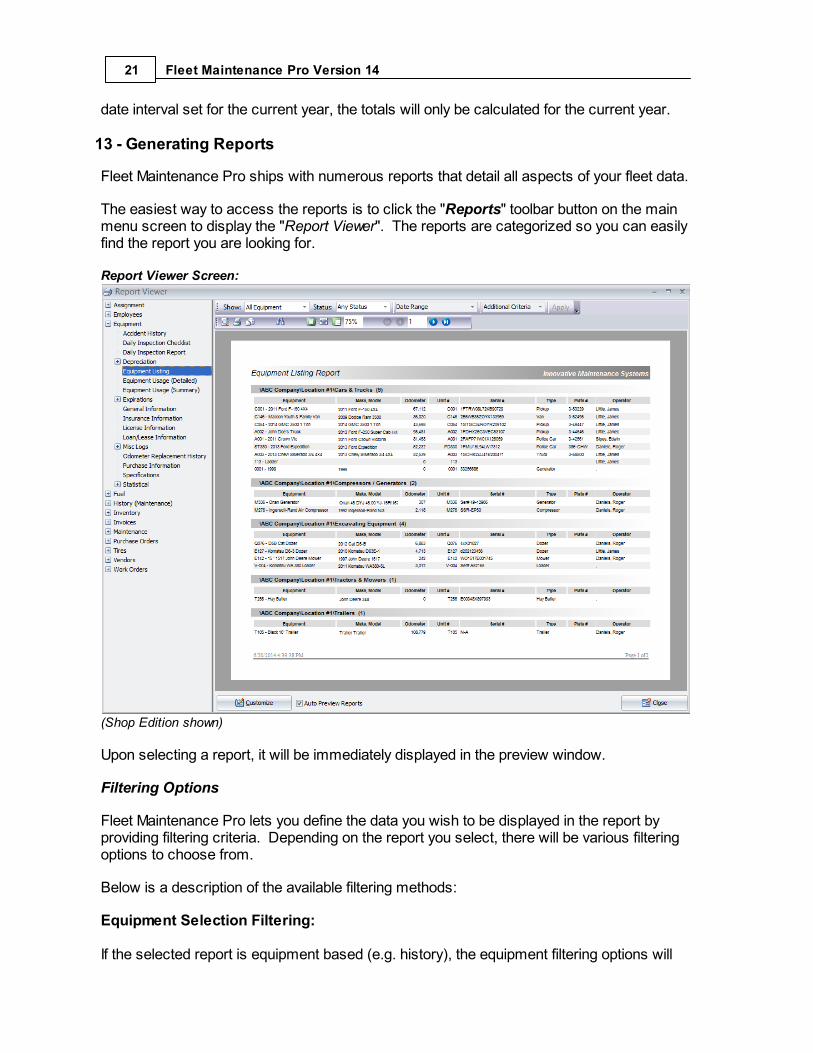
13 - Generating Reports
Fleet Maintenance Pro ships with numerous reports that detail all aspects of your fleet data.
The easiest way to access the reports is to click the "Reports" toolbar button on the mainmenu screen to display the "Report Viewer". The reports are categorized so you can easilyfind the report you are looking for.
Report Viewer Screen:
(Shop Edition shown)
Upon selecting a report, it will be immediately displayed in the preview window.
Filtering Options
Fleet Maintenance Pro lets you define the data you wish to be displayed in the report byproviding filtering criteria. Depending on the report you select, there will be various filteringoptions to choose from.
Below is a description of the available filtering methods:
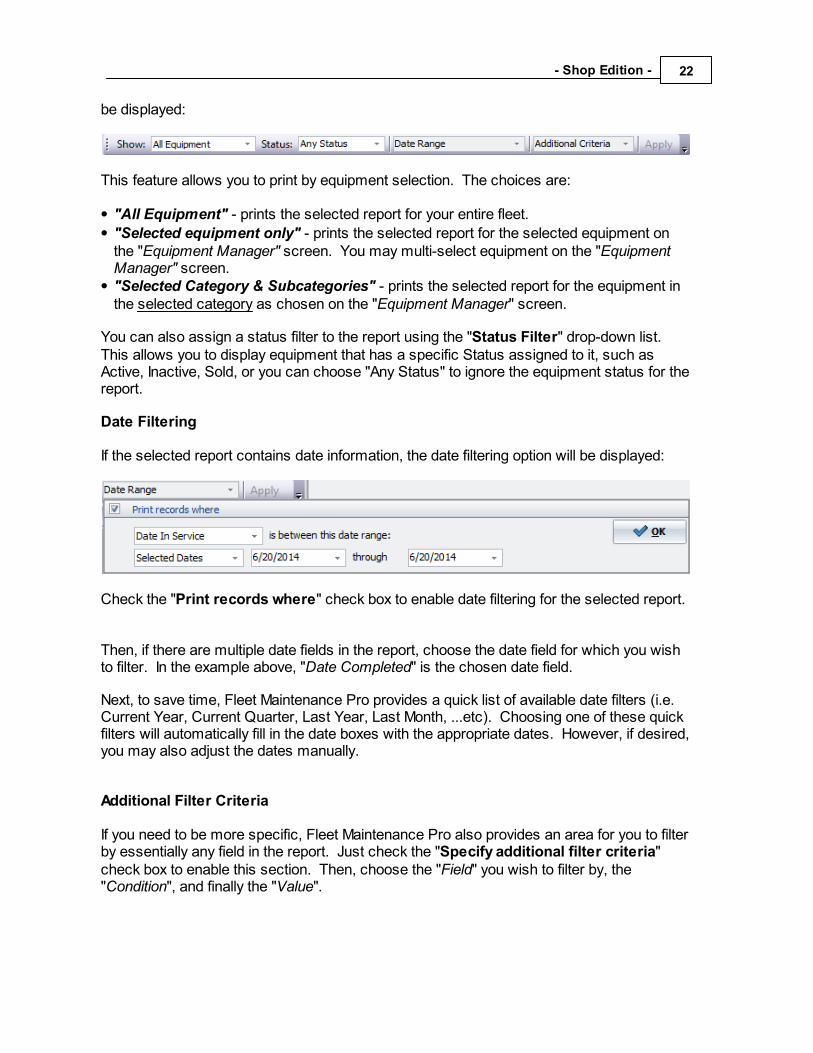
Equipment Selection Filtering:
If the selected report is equipment based (e.g. history), the equipment filtering options will
22- Shop Edition -
be displayed:
This feature allows you to print by equipment selection. The choices are:
"All Equipment" - prints the selected report for your entire fleet.
"Selected equipment only" - prints the selected report for the selected equipment onthe "Equipment Manager" screen. You may multi-select equipment on the "EquipmentManager" screen. "Selected Category & Subcategories" - prints the selected report for the equipment inthe selected category as chosen on the "Equipment Manager" screen.
You can also assign a status filter to the report using the "Status Filter" drop-down list.This allows you to display equipment that has a specific Status assigned to it, such asActive, Inactive, Sold, or you can choose "Any Status" to ignore the equipment status for thereport.
Date Filtering
If the selected report contains date information, the date filtering option will be displayed:
Check the "Print records where" check box to enable date filtering for the selected report.
Then, if there are multiple date fields in the report, choose the date field for which you wishto filter. In the example above, "Date Completed" is the chosen date field.
Next, to save time, Fleet Maintenance Pro provides a quick list of available date filters (i.e.Current Year, Current Quarter, Last Year, Last Month, ...etc). Choosing one of these quickfilters will automatically fill in the date boxes with the appropriate dates. However, if desired,you may also adjust the dates manually.
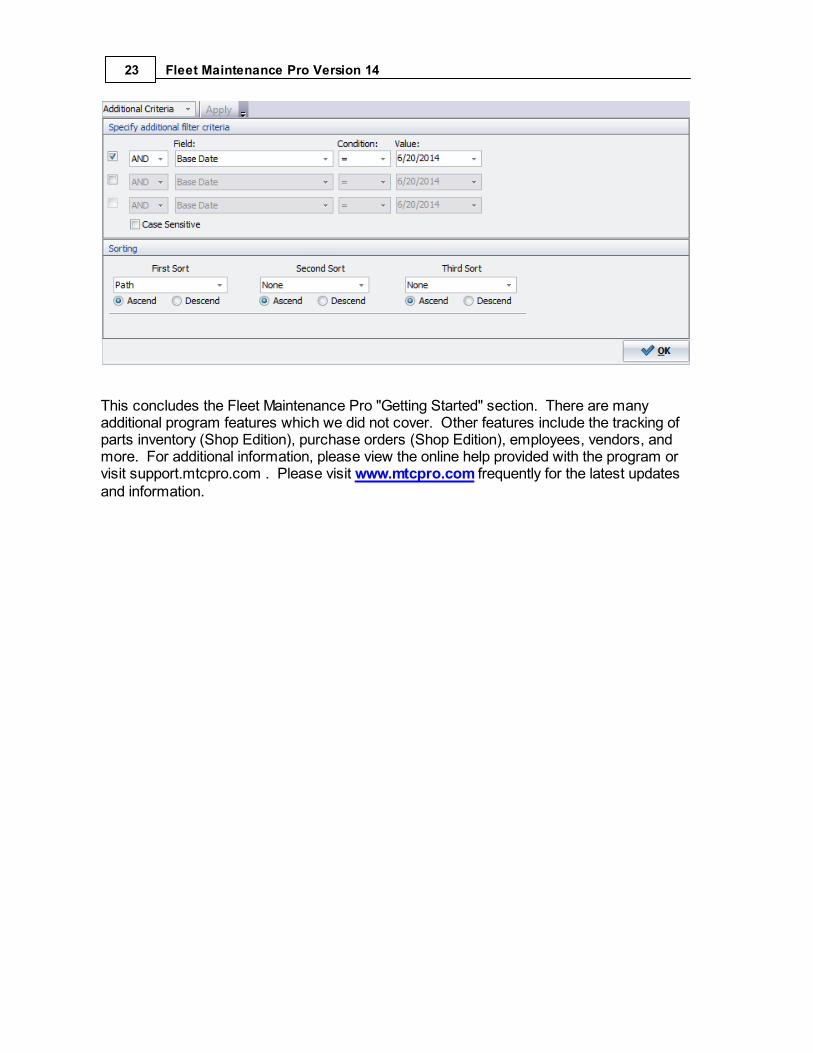
Additional Filter Criteria
If you need to be more specific, Fleet Maintenance Pro also provides an area for you to filterby essentially any field in the report. Just check the "Specify additional filter criteria"check box to enable this section. Then, choose the "Field" you wish to filter by, the "Condition", and finally the "Value".
23 Fleet Maintenance Pro Version 14
This concludes the Fleet Maintenance Pro "Getting Started" section. There are manyadditional program features which we did not cover. Other features include the tracking ofparts inventory (Shop Edition), purchase orders (Shop Edition), employees, vendors, andmore. For additional information, please view the online help provided with the program orvisit support.mtcpro.com . Please visit www.mtcpro.com frequently for the latest updatesand information.


