Embed Size (px)
Citation preview

Flying 20 Flying Club
S-TEC System 55
Autopilot Training Presented By: Brad Freeman

S-TEC System 55/ST-360 Training
• System 55 Overview
• Key Functions
• Heading Mode
• Altitude/VS Hold
• Control Wheel Steering
• VOR/GPS Tracking
• Refreshment Break!
• ST-360 Overview
• Key Functions
• Altitude Pre-select
• Altitude/DH Alerts
• Approach Coupling
• WX-500 Stormscope
• Q & A

System 55 Autopilot

S-TEC SYSTEM 55 OVERVIEW
• Rate-based autopilot – roll control is based on the turn coordinator.
• Two-axis – pitch and roll. Autotrim automatically adjusts pitch trim.
• Altitude and VS hold functions. Altitude pre-select with ST-360 altitude
selector/alerter.
• Intercepts and tracks NAV courses (GPS, VOR, LOC).
• Control Wheel Steering (CWS) will hold pilot determined attitude.
• Glide slope tracking – will fly an ILS to DA with precision.
• GPS Steering (GPSS) tracks any GPS-derived course with precision.

HDG – Heading
Hold
NAV – VOR/GPS
Course Tracking
APR –
Approach Mode
ALT – Altitude
Hold
VS – Vertical
Speed Hold
HDG + NAV – Pilot
Selectable Course Intercept
REV – Reverse
Sensing Mode
ALT + VS – Climb/Descend
to Selected Altitude
VS Selector
Knob
SYSTEM 55 “KNOBOLOGY”

POWER ON
• Switch the autopilot master switch ON.
• Unit will go through its power on self test.
• Observe that all autopilot display segments illuminate (5 sec).
• RDY annunciator will illuminate when done. Should a fault be detected
the FAIL annunciation will remain on and the autopilot can not be
engaged.
• Autopilot is ready for action! See System 55 POH for detailed pre-
flight procedures.

CONTROL WHEEL STEERING (CWS)
• Depress and HOLD the CWS switch located on the control yoke
• CWS and VS modes will annunciate and RDY will extinguish
• Position the aircraft in the desired roll and/or pitch attitude
• Allow aircraft to stabilize in desired attitude for 2 – 3 seconds
• Release the CWS switch.
• Aircraft will maintain roll and pitch attitude. VS will be displayed.
• From the CWS mode you may select other modes (HDG, NAV, ALT)
or may modify the vertical speed using the VS knob.

HEADING MODE (HDG)
• HDG mode may be selected initially from CWS mode or RDY mode
• Set the heading bug on the Directional Gyro (DG) to the desired
heading
• Press the HDG button. The HDG annunciator will illuminate.
• New headings can be selected by repositioning the heading bug

NAV INTERCEPT AND TRACKING (NAV)
• Select VOR or GPS course. Turn the OBS to the desired course.
• Set the DG heading bug to the OBS course.
• Engage the NAV mode by pressing the NAV button.
• If the CDI is at full scale deflection the autopilot will establish a 45°
intercept angle. Closure rate will decrease as course is captured.
• Aircraft will track selected course. Wind correction is automatic.
• When a course change of 10° or more is required at an enroute
waypoint select the new course and reset the NAV mode. Set the DG
heading bug to the new course.

• Press NAV twice to engage GPSS mode. All course guidance is
derived from the GPS.
• GPS determines turn initiation point to fly course centerline based on
aircraft ground speed.
• Fly a complete, pre-programmed flight plan hands off – including
coupled GPS approaches.
• WAAS extends this capability with full procedure coupling, including
procedure turns and holding patterns.
GPS STEERING (N8107B)

PILOT SELECTABLE COURSE INTERCEPT
• Select VOR or GPS course. Turn the OBS to the desired course.
• Set the DG heading bug to the desired INTERCEPT course.
• Press both the HDG and NAV buttons to engage course intercept.
• Aircraft will maintain the selected heading until course intercept.
Closure rate will decrease as course is captured.
• When HDG annunciator extinguishes, position the DG heading bug to
match the OBS course.
• NOTE: Intercept angles of greater than 45° will likely result in course
overshoot and are not recommended.

APPROACH MODE (APR)
• The APR mode provides increased sensitivity for VOR and GPS
approaches.
• APR mode selection is automatic when localizer is detected.
• APR mode may also be selected if desired for enroute NAV tracking
(i.e. GPS enroute +/- 5NM full scale CDI deflection)

VERTICAL SPEED HOLD (VS)
• In order to engage VS, the autopilot roll axis must be engaged.
Selecting any roll mode (CWS, HDG, NAV) will satisfy this
requirement.
• Select VS mode by pressing the VS button. Autopilot will synchronize
with the aircraft’s current vertical speed. VS will be indicated in the
autopilot display.
• VS may be modified in 100 foot increments by rotating the VS knob.
WARNING: Flashing VS means aircraft is unable to maintain selected
VS. Watch your airspeed! Adjust power or reduce VS as required.

ALTITUDE HOLD (ALT)
• In order to engage ALT, the autopilot roll axis must be engaged.
Selecting CWS or any roll mode (HDG, NAV) will satisfy this
requirement.
• Select ALT mode by pressing the ALT button. The aircraft will maintain
the pressure altitude present at the time of ALT mode selection.
• Altitude adjustments may be made by rotating the VS knob. Each click
will change the altitude by 20 ft (CW to increase, CCW to decrease).

MANUAL TRIM
• When a pitch mode is engaged the AP will annunciate TRIM ▲ or ▼
and an audible alert when manual trim is required.
• If no action is taken after four seconds the annunciation will flash and
the audible alert will be squelched.
• Once the aircraft has been sufficiently trimmed the TRIM annunciator
will extinguish.
• For best results make small trim adjustments using the manual trim
wheel.

AUTOTRIM
• When elevator trim is in motion, TRIM and the ▲ or ▼ annunciator
will indicate trim is in motion and direction of travel.
• Should the TRIM continue to run in excess of 7 seconds the TRIM
annunciator will flash.
• If the trim master switch is OFF or an autotrim failure has occurred the
system will revert to “Pitch Trim Indicator” mode.
• To use the manual electric trim, push the trim toggle switch on the
control yoke. FORWARD for nose down or AFT for nose up. TRIM will
flash while trim is in motion.
• NOTE: Using the trim switch on the control yoke while the pitch axis of
the autopilot is engaged will disconnect the autopilot.

LOCALIZER APPROACH
Intercepting and tracking the localizer:
1. Tune navigation radio to localizer
frequency
2. Set HDG bug to published
inbound course
3. Press NAV mode switch (or NAV
+ HDG).
4. Autopilot will intercept, capture
and track the localizer course.
Executing a missed approach:
1. Disconnect the autopilot and
stabilize the aircraft for the missed
approach.
2. Set the HDG bug to the published
missed approach heading.
3. Press the HDG mode button.
4. Press the VS button if desired.

LOCALIZER APPROACH WITH PROCEDURE TURN
1. Tune the navigation radio to the LOC frequency.
2. Push the REV mode button. Aircraft will intercept and track the
localizer outbound.
3. Set the HDG bug to the outbound procedure turn heading.
4. When ready to initiate the procedure turn, press the HDG button.
5. In 90° increments, set the HDG bug to the inbound procedure turn
heading.
6. Set heading bug to inbound LOC heading.
7. Press the NAV button. Autopilot will intercept and track the localizer
course inbound.

GLIDE SLOPE INTERCEPT AND TRACKING
To arm automatic GS capture, the following conditions must be met:
A. NAV receiver must be tuned to the appropriate frequency
B. Glideslope signal must be valid – no flag
C. Autopilot must be in NAV/APR/ALT mode
D. Aircraft must be at 60% or more below the GS and within 50% needle
deviation of the localizer
E. Glide slope capture is indicated by extinguishing the ALT annunciator
If above conditions are not met, GS capture can be manually armed:
A. Press the ALT switch ONCE if operating in altitude hold mode, or
B. TWICE if operating in VS mode.
C. Once capture is achieved, the GS annunciation will illuminate and the ALT
annunciation will extinguish

ILS APPROACH WITH GLIDE SLOPE
1. Tune navigation radio to ILS frequency.
2. Follow procedure for LOC course intercept and tracking.
3. Descend to final approach altitude. Press VS button or hand fly.
4. Upon reaching approach altitude press the ALT mode button.
5. If NAV mode is selected and aircraft is below the glide slope, APR,
ALT and GS will illuminate.
6. Upon GS capture, the ALT annunciation will extinguish.
7. Descend to DA or circling MDA. Disengage autopilot.
8. Land or execute missed approach

• If it becomes necessary to establish a holding pattern at the outer
marker, automatic glideslope arming can be disabled by pressing the
NAV button a second time while in NAV/APR mode.
• The GS annunciator will flash and the ALT will be annunciated.
• To re-establish GS arming, press the NAV button again.
• The GS annunciator will cease to flash and be steady. Rearming will
occur when all other required conditions have been met.
SUSPEND GLIDE SLOPE ARMING

SYSTEM FAILURE AND CAUTION ANNUNCIATIONS
Annunciation Condition Action
Flashing RDY for 5 sec with
audible tone
Autopilot disconnect. All annunciations
except RDY are cleared.
N/A
Flashing RDY with audible
tone then extinguished
Turn coordinator gyro rotor speed low.
Autopilot shutdown.
Check power to turn coordinator.
Flashing NAV, REV or APR Indicates off navigation course by 50%
needle deviation
Use HDG mode until problem is identified.
Flashing NAV, REV or APR.
Steady FAIL.
Indicates invalid radio nav signal. Check NAV radio for proper reception. Use
HDG mode until problem is identified.
Flashing VS Indicates excessive VS error (usually
climb)
Reduce VS and/or adjust power as
appropriate
Flashing GS Indicates off GS centerline by 50%
needle deviation or more
Check attitude and power. Add or reduce
power as appropriate.
Flashing GS, steady FAIL Indicates invalid GS radio navigation
signal
Disconnect autopilot and initiate go-around
or missed approach.
Flashing GS + ALT Indicates manual GS disable. Re-enable by pushing NAV mode switch
WARNING
If any failure annunciations occur at low altitude or during instrument approach,
disengage the autopilot and hand fly the airplane. Do not attempt to troubleshoot
the problem until at a safe altitude.

AUTOPILOT DISCONNECT
The autopilot can be disconnected by any of the following actions:
A. Turn the autopilot master switch OFF
B. Press the Autopilot Disconnect/Trim Interrupt switch on the control
yoke.
C. Press the electric trim switch on the control yoke (if autopilot pitch
axis is engaged).
D. Pull the AUTOPILOT circuit breaker
Autopilot Disconnect Autopilot and Electric Trim
Circuit Breakers
Electric Trim Switch
• HDG mode is your friend. When in doubt set the heading bug on the DG and
engage HDG mode while you sort things out.
• Disengage AP in moderate to severe turbulence. Roll control may be OK.
• Initiate course intercept within 45 degrees of desired course. Intercept angles
of greater than 45° will likely result in course overshoot.
• Altitude adjustment – when in ALT hold mode turn VS knob one click for each
20 feet (CW to increase, CCW to decrease).
• When reversing course using HDG mode adjust the HDG bug in 90°
increments. This will ensure turn in desired direction.
• Flashing VS means aircraft is unable to maintain selected VS. Adjust power
or reduce VS as required. Watch your airspeed!
• Be prepared for a possible out of trim condition when disengaging the
autopilot.
• Do not attempt to use the autopilot in IFR conditions unless you are
absolutely proficient in it’s operation!
AUTOPILOT TIPS & TRICKS

ST-360 Altitude
Selector/Alerter

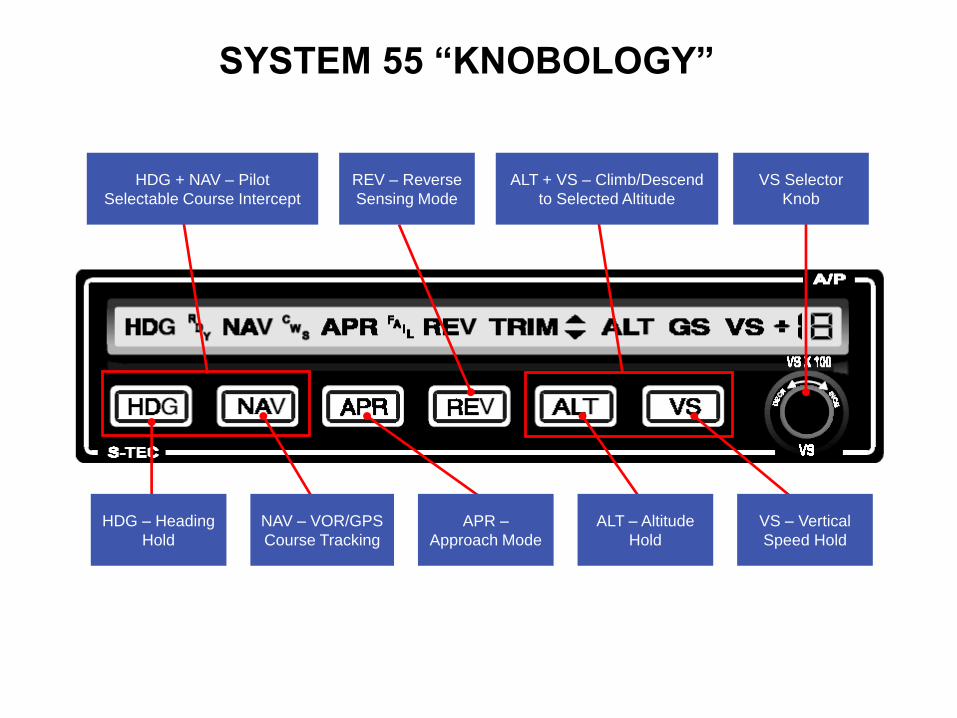
ST-360 OVERVIEW
The ST-360 Altitude Selector/Alerter provides:
• Vertical speed select for climb or descent.
• Pre-select altitude capture, with visual and audible alerts.
• Alerts if aircraft departs selected altitude.
• Selectable DH/MDA alerting.
• Monitor output of altitude encoder.
• Automatic vertical speed reduction prior to altitude capture for
smooth transition to level flight.

ST-360 SCHEMATIC
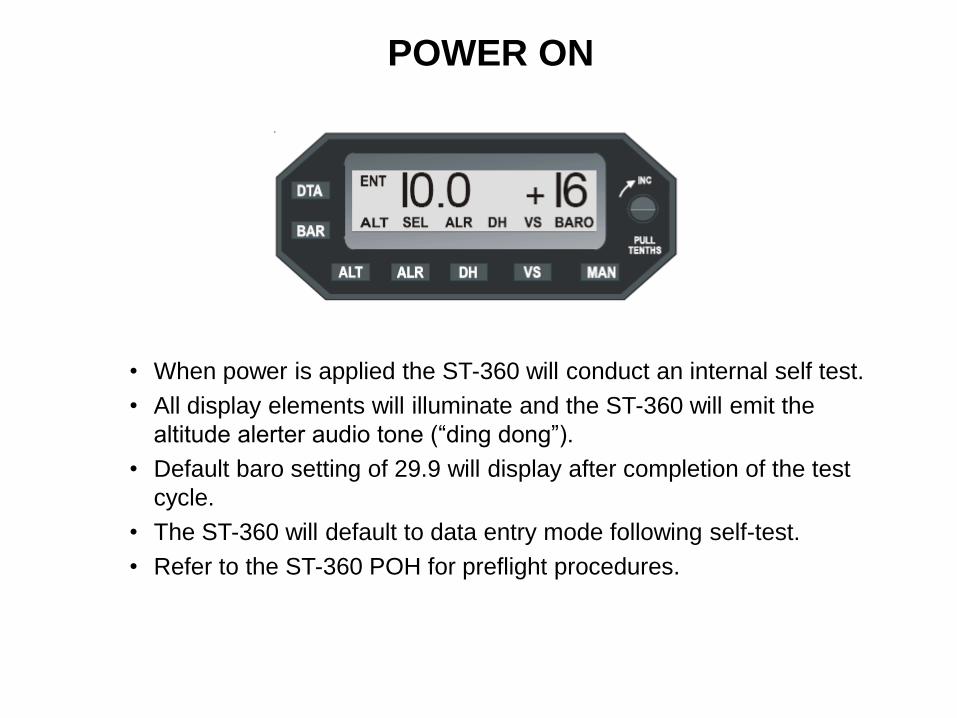
POWER ON
• When power is applied the ST-360 will conduct an internal self test.
• All display elements will illuminate and the ST-360 will emit the
altitude alerter audio tone (“ding dong”).
• Default baro setting of 29.9 will display after completion of the test
cycle.
• The ST-360 will default to data entry mode following self-test.
• Refer to the ST-360 POH for preflight procedures.

DATA ENTRY (DTA)
• The DTA (Data) button is used to select between data entry and
operate modes.
• When DTA is selected the display will show ENT to indicate entry
mode and the SEL annunciator will flash.
• To change BAR, ALT, DH or VS simply push the desired button and
rotate the selector knob to set value. Pull knob to set tenths.
• After the required values are selected, push DTA again to return
the system to operate mode.
• NOTE: it is not necessary to enter DTA mode to enter VS changes.
Simply rotate the selector knob to adjust VS.

BARO CALIBRATION (BAR)
• When the system is initially powered up, the baro ENT mode will be
displayed.
• Calibrate the ST-360 barometric pressure to match the current
altimeter setting by rotating the selector knob.
• Push DTA to return the ST-360 to operate mode.
• Repeated pushing of the BAR button (in data entry or operate
mode) will display the barometric setting in inches of Hg or
millibars.
• Once system is in operate mode it will be necessary to press the
DTA button again to select BAR.

ALTITUDE SELECT (ALT)
• The ALT mode has two functions – ALT selection and ALT read out.
• To select altitude press DTA and then ALT. Rotate the selector knob
to desired altitude (e.g. 5.5 = 5,500 feet).
• Press DTA again to enter ALT and return system to operate mode.
System will display current selected altitude.
• Press ALT button in operate mode to alternately display the
selected altitude or encoded altitude corrected by the baro
calibration.

VERTICAL SPEED SELECT (VS)
• Push the VS button to display the vertical speed and enable the VS
selector mode. Note that it is not necessary to be in ENT mode to
set VS.
• Rotate the selector knob to input the desired VS in 100 FPM
increments.
• Once engaged, the ST-360 will direct the autopilot to maintain the
selected VS (ST-360 will override VS selector on autopilot).
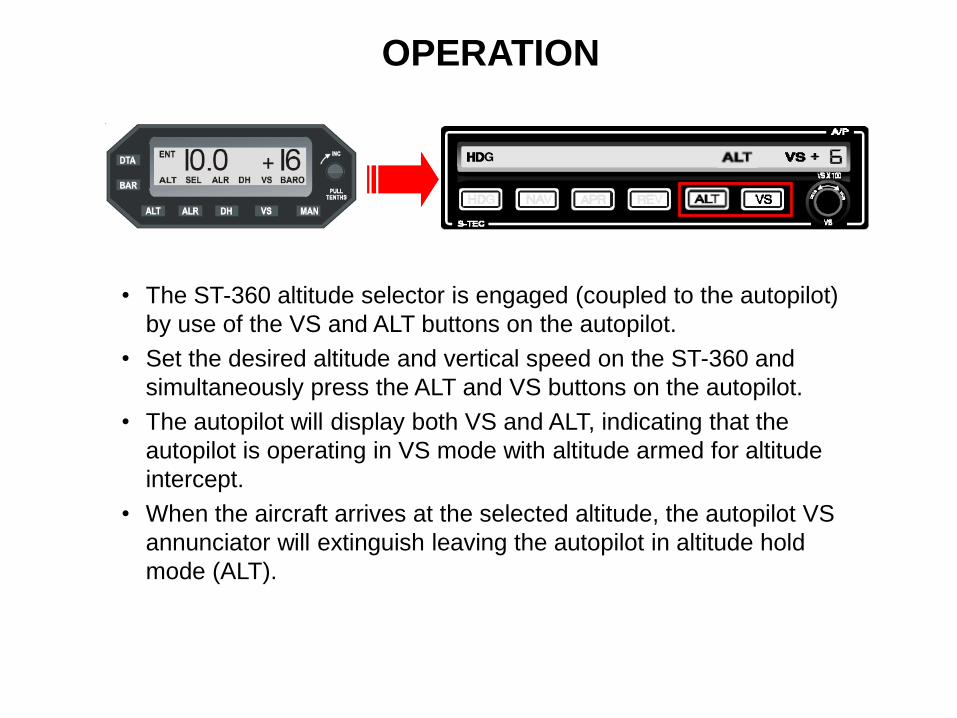
OPERATION
• The ST-360 altitude selector is engaged (coupled to the autopilot)
by use of the VS and ALT buttons on the autopilot.
• Set the desired altitude and vertical speed on the ST-360 and
simultaneously press the ALT and VS buttons on the autopilot.
• The autopilot will display both VS and ALT, indicating that the
autopilot is operating in VS mode with altitude armed for altitude
intercept.
• When the aircraft arrives at the selected altitude, the autopilot VS
annunciator will extinguish leaving the autopilot in altitude hold
mode (ALT).

ALTITUDE ALERT MODE (ALR)
• The Altitude Alert mode (ALR) works in conjunction with the
selected altitude (ALT)
• Pressing the ALR button will display the ALR annunciation
indicating arming of altitude alert mode.
• Alert mode will cause a chime through the cabin audio and flashing
ALR annunciation when the aircraft is 1000 ft. from the selected
altitude, and again at 300 ft. from the selected altitude.
• The alert will also activate if the aircraft deviates from the selected
altitude by more than 300 ft.
• The alert function can be alternately enabled and disabled by
pushing the ALR button.

DECISION HEIGHT ALERT MODE (DH)
• The Decision Height (DH) Alert mode will provide alerting at the set
DH or MDA altitude by activation of the chime and flashing the DH
annunciator.
• The chime will sound upon entering and leaving a 100 ft. window at
the DH.
• To set, push DTA for entry and press the DH button.
• Rotate the selector knob to obtain the desired DH to the nearest
100 ft. above the published DH or MDA (e.g. 1.2 = 1200 ft).
• Push DTA to enter the selected DH. The DH annunciator will
illuminate.
• The DH mode can be disabled at any time by pushing the DH
button.

MANUAL OVERRIDE (MAN)
• If for any reason the ST-360 does not function properly, push the
MAN button. This will completely remove the ST-360 from the
autopilot system.
• The autopilot altitude hold mode (ALT) will also disengage the ST-
360 when the ALT button is pressed on the autopilot.
• The VS selector function may also be disabled by pushing the
manual MAN button on the ST-360. The VS annunciator will
extinguish and the ST-360 will disengage from the autopilot.

• ST-360 will be in data entry mode following self-test.
• Set barometric calibration (BAR), altitude (ALT) and vertical speed
(VS) following initial self-test.
• Push DTA to enter or change any data EXCEPT vertical speed
(VS). Once entered, push DTA again to close the entry mode.
• To activate pre-selected altitude and vertical speed, push both the
ALT and VS buttons on the autopilot at the same time.
• Adjust the BAR for best accuracy relative to the target altitude. An
adjustment of 0.1” Hg will provide an altitude adjustment of 100 ft.
• Do not use the DH alert mode as the sole means of determining DH
or MDA!
• When in doubt, push the MAN button to disengage the ST-360 and
revert to normal autopilot operation.
IMPORTANT POINTS TO REMEMBER

Putting it all together
FLIGHT DEMOS