Embed Size (px)
Citation preview

FLY is FUN – User Guide – 2018-06-29 1 / 183
FLY is FUN
User Guide
www.flyisfun.com
FLY is FUN – User Guide – 2018-06-29 2 / 183
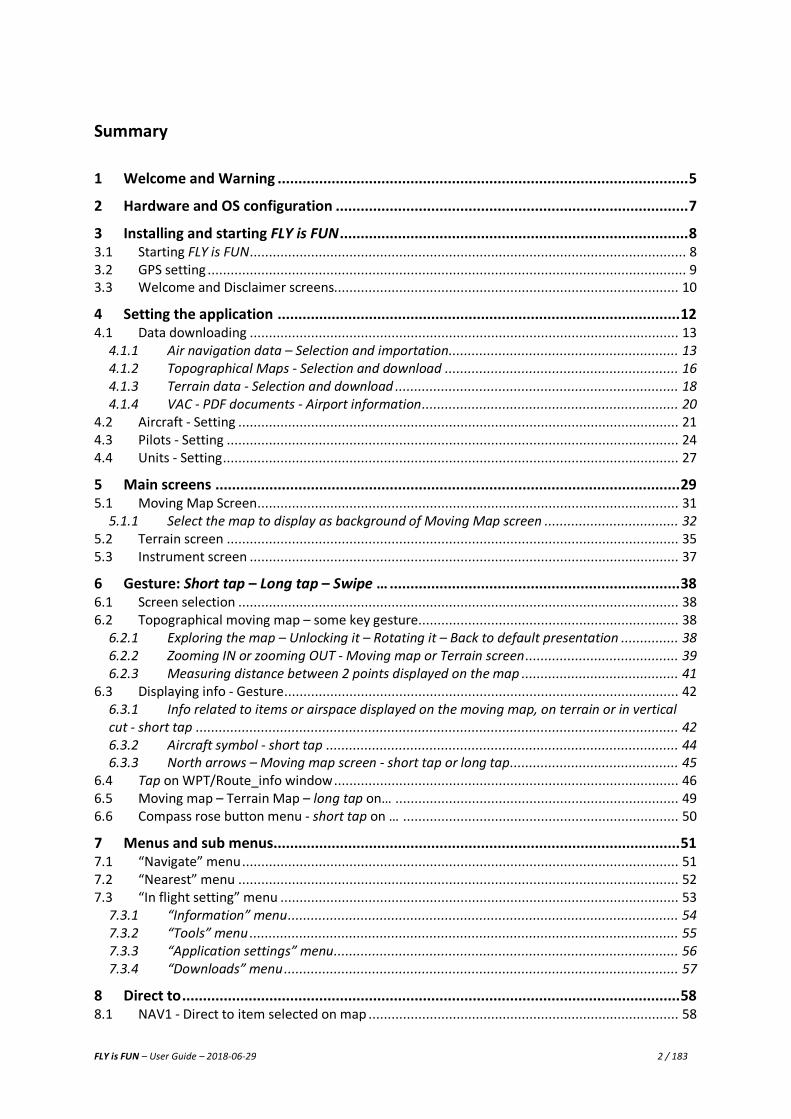
Summary
1 Welcome and Warning ................................................................................................... 5
2 Hardware and OS configuration ..................................................................................... 7
3 Installing and starting FLY is FUN .................................................................................... 8 3.1 Starting FLY is FUN .................................................................................................................. 8 3.2 GPS setting ............................................................................................................................. 9 3.3 Welcome and Disclaimer screens.......................................................................................... 10
4 Setting the application ................................................................................................. 12 4.1 Data downloading ................................................................................................................ 13
4.1.1 Air navigation data – Selection and importation ............................................................ 13 4.1.2 Topographical Maps - Selection and download ............................................................. 16 4.1.3 Terrain data - Selection and download .......................................................................... 18 4.1.4 VAC - PDF documents - Airport information ................................................................... 20
4.2 Aircraft - Setting ................................................................................................................... 21 4.3 Pilots - Setting ...................................................................................................................... 24 4.4 Units - Setting ....................................................................................................................... 27
5 Main screens ................................................................................................................ 29 5.1 Moving Map Screen .............................................................................................................. 31
5.1.1 Select the map to display as background of Moving Map screen ................................... 32 5.2 Terrain screen ...................................................................................................................... 35 5.3 Instrument screen ................................................................................................................ 37
6 Gesture: Short tap – Long tap – Swipe … ...................................................................... 38 6.1 Screen selection ................................................................................................................... 38 6.2 Topographical moving map – some key gesture .................................................................... 38
6.2.1 Exploring the map – Unlocking it – Rotating it – Back to default presentation ............... 38 6.2.2 Zooming IN or zooming OUT - Moving map or Terrain screen ........................................ 39 6.2.3 Measuring distance between 2 points displayed on the map ......................................... 41
6.3 Displaying info - Gesture ....................................................................................................... 42 6.3.1 Info related to items or airspace displayed on the moving map, on terrain or in vertical cut - short tap .............................................................................................................................. 42 6.3.2 Aircraft symbol - short tap ............................................................................................ 44 6.3.3 North arrows – Moving map screen - short tap or long tap ............................................ 45
6.4 Tap on WPT/Route_info window .......................................................................................... 46 6.5 Moving map – Terrain Map – long tap on… .......................................................................... 49 6.6 Compass rose button menu - short tap on … ........................................................................ 50
7 Menus and sub menus .................................................................................................. 51 7.1 “Navigate” menu .................................................................................................................. 51 7.2 “Nearest” menu ................................................................................................................... 52 7.3 “In flight setting” menu ........................................................................................................ 53
7.3.1 “Information” menu ...................................................................................................... 54 7.3.2 “Tools” menu ................................................................................................................ 55 7.3.3 “Application settings” menu .......................................................................................... 56 7.3.4 “Downloads” menu ....................................................................................................... 57
8 Direct to ........................................................................................................................ 58 8.1 NAV1 - Direct to item selected on map ................................................................................. 58
FLY is FUN – User Guide – 2018-06-29 3 / 183
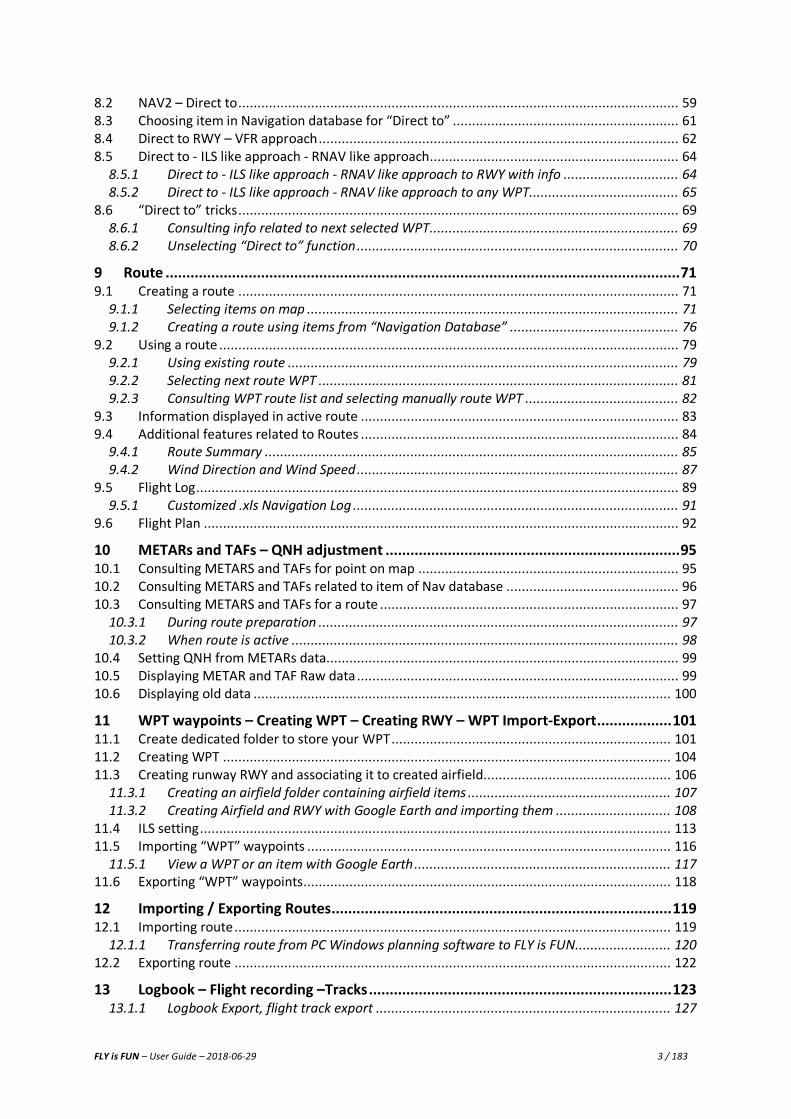
8.2 NAV2 – Direct to ................................................................................................................... 59 8.3 Choosing item in Navigation database for “Direct to” ........................................................... 61 8.4 Direct to RWY – VFR approach .............................................................................................. 62 8.5 Direct to - ILS like approach - RNAV like approach................................................................. 64
8.5.1 Direct to - ILS like approach - RNAV like approach to RWY with info .............................. 64 8.5.2 Direct to - ILS like approach - RNAV like approach to any WPT....................................... 65
8.6 “Direct to” tricks ................................................................................................................... 69 8.6.1 Consulting info related to next selected WPT ................................................................. 69 8.6.2 Unselecting “Direct to” function .................................................................................... 70
9 Route ............................................................................................................................ 71 9.1 Creating a route ................................................................................................................... 71
9.1.1 Selecting items on map ................................................................................................. 71 9.1.2 Creating a route using items from “Navigation Database” ............................................ 76
9.2 Using a route ........................................................................................................................ 79 9.2.1 Using existing route ...................................................................................................... 79 9.2.2 Selecting next route WPT .............................................................................................. 81 9.2.3 Consulting WPT route list and selecting manually route WPT ........................................ 82
9.3 Information displayed in active route ................................................................................... 83 9.4 Additional features related to Routes ................................................................................... 84
9.4.1 Route Summary ............................................................................................................ 85 9.4.2 Wind Direction and Wind Speed .................................................................................... 87
9.5 Flight Log .............................................................................................................................. 89 9.5.1 Customized .xls Navigation Log ..................................................................................... 91
9.6 Flight Plan ............................................................................................................................ 92
10 METARs and TAFs – QNH adjustment ....................................................................... 95 10.1 Consulting METARS and TAFs for point on map .................................................................... 95 10.2 Consulting METARS and TAFs related to item of Nav database ............................................. 96 10.3 Consulting METARS and TAFs for a route .............................................................................. 97
10.3.1 During route preparation .............................................................................................. 97 10.3.2 When route is active ..................................................................................................... 98
10.4 Setting QNH from METARs data ............................................................................................ 99 10.5 Displaying METAR and TAF Raw data .................................................................................... 99 10.6 Displaying old data ............................................................................................................. 100
11 WPT waypoints – Creating WPT – Creating RWY – WPT Import-Export .................. 101 11.1 Create dedicated folder to store your WPT ......................................................................... 101 11.2 Creating WPT ..................................................................................................................... 104 11.3 Creating runway RWY and associating it to created airfield ................................................. 106
11.3.1 Creating an airfield folder containing airfield items ..................................................... 107 11.3.2 Creating Airfield and RWY with Google Earth and importing them .............................. 108
11.4 ILS setting ........................................................................................................................... 113 11.5 Importing “WPT” waypoints ............................................................................................... 116
11.5.1 View a WPT or an item with Google Earth ................................................................... 117 11.6 Exporting “WPT” waypoints ................................................................................................ 118
12 Importing / Exporting Routes .................................................................................. 119 12.1 Importing route .................................................................................................................. 119
12.1.1 Transferring route from PC Windows planning software to FLY is FUN......................... 120 12.2 Exporting route .................................................................................................................. 122
13 Logbook – Flight recording –Tracks ......................................................................... 123 13.1.1 Logbook Export, flight track export ............................................................................. 127
FLY is FUN – User Guide – 2018-06-29 4 / 183
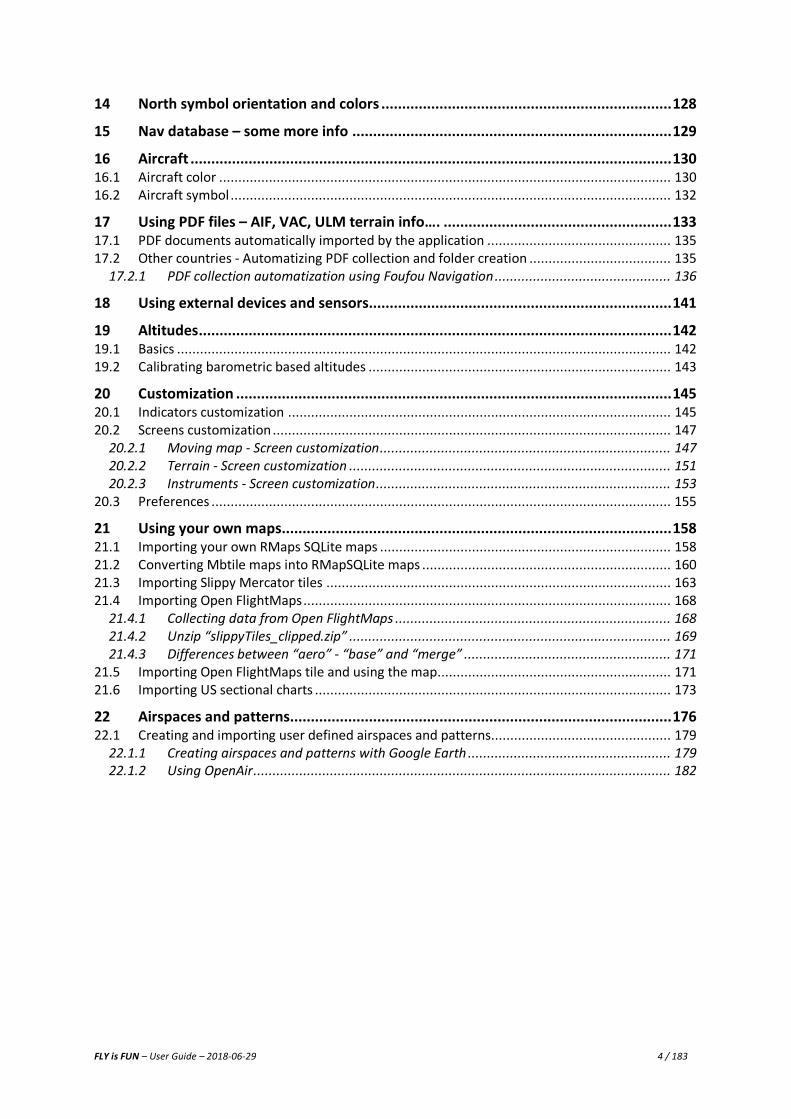
14 North symbol orientation and colors ...................................................................... 128
15 Nav database – some more info ............................................................................. 129
16 Aircraft .................................................................................................................... 130 16.1 Aircraft color ...................................................................................................................... 130 16.2 Aircraft symbol ................................................................................................................... 132
17 Using PDF files – AIF, VAC, ULM terrain info…. ....................................................... 133 17.1 PDF documents automatically imported by the application ................................................ 135 17.2 Other countries - Automatizing PDF collection and folder creation ..................................... 135
17.2.1 PDF collection automatization using Foufou Navigation .............................................. 136
18 Using external devices and sensors......................................................................... 141
19 Altitudes .................................................................................................................. 142 19.1 Basics ................................................................................................................................. 142 19.2 Calibrating barometric based altitudes ............................................................................... 143
20 Customization ......................................................................................................... 145 20.1 Indicators customization .................................................................................................... 145 20.2 Screens customization ........................................................................................................ 147
20.2.1 Moving map - Screen customization ............................................................................ 147 20.2.2 Terrain - Screen customization .................................................................................... 151 20.2.3 Instruments - Screen customization ............................................................................. 153
20.3 Preferences ........................................................................................................................ 155
21 Using your own maps .............................................................................................. 158 21.1 Importing your own RMaps SQLite maps ............................................................................ 158 21.2 Converting Mbtile maps into RMapSQLite maps ................................................................. 160 21.3 Importing Slippy Mercator tiles .......................................................................................... 163 21.4 Importing Open FlightMaps ................................................................................................ 168
21.4.1 Collecting data from Open FlightMaps ........................................................................ 168 21.4.2 Unzip “slippyTiles_clipped.zip” .................................................................................... 169 21.4.3 Differences between “aero” - “base” and “merge” ...................................................... 171
21.5 Importing Open FlightMaps tile and using the map ............................................................. 171 21.6 Importing US sectional charts ............................................................................................. 173
22 Airspaces and patterns............................................................................................ 176 22.1 Creating and importing user defined airspaces and patterns............................................... 179
22.1.1 Creating airspaces and patterns with Google Earth ..................................................... 179 22.1.2 Using OpenAir ............................................................................................................. 182
FLY is FUN – User Guide – 2018-06-29 5 / 183
1 Welcome and Warning Congratulation and thank you for your interest in FLY is FUN. With FLY is FUN you can prepare a flight, just in a few minutes (route, flight plan, terrain calculation, METARs and TAFs), flying direct to, ILS approach to any runway, vertical navigation, simulating VOR, NDB, DME, Marker beacons, RNAV navigation and Marker beacons warnings, without ILS/VOR/NDB/RNAV equipment on board. Exploring the application, you will discover that the application provides lot advanced functions as:
- ILS approach and GPS, VOR, NDB, DME, Marker beacons, RNAV navigation and Marker beacons warnings without ILS/VOR/NDB/RNAV equipment on board. This application is completely autonomous.
- Automatic and manual Logbook. The Logbook records: o flight track (can be exported as. KML (Google Earth) or. GPX file) o departure and arrive airport o departure and arrive time o aircraft o pilot(s)
- 4 portraits and 4 landscape screens (fully customized) - Warnings before entering to the controlled or special use airspaces - Virtual radar - users can see another aircraft in the air. - Dynamic terrain map (colors depend of height above ground level), obstacles - Free topographical map. Maps respecting RMaps SQLite format created by users and MTiles
could be imported - Free World navigation database - Airspaces warnings - Route planning, calculation of fuel consumption (depended on wind and of aircraft) - Flight Plan elaboration - METARs/TAFs consultation around WPT and routes - Barometric altitude and vertical speed indicators – (requires your device to have a
barometric sensor) - Sunset / Sunrise calculator - Export and import from/to third party’s devices and Google Earth via. GPX or. KML file.
Support for importing waypoints via txt file. - Organize your nav items to folders - Easy setup your nav items, RWY and airspaces via Google Earth - Support for external Bluetooth GPS, Bluetooth Barometric (pressure) sensor - NAV1 NAV2 support (switching them by one click) - VAC information in PDF format - Application can display:
o ACC GPS accuracy
o ACM Accelerometer
o AGL Height above ground level – GPS or barometric based
o AGS Average ground speed
o ALT Altitude – GPS or barometric based
o BRG Bearing to next WPT, RWY, etc.
o CAL Correct altitude (LS approach, vertical navigation)

FLY is FUN – User Guide – 2018-06-29 6 / 183
o CRS
Selected desired course to next WPT. It can be also runway direction when using RWY approach, ILS approach or vertical navigation
o DAL Density altitude
o DME Distance to next WPT or runway threshold
o DTA Desired time over WPT
o ELEV Ground elevation
o ET Estimated time to next WPT or to the end of route
o ETA Estimated time of arrival to next WPT or to the end of route
o FL Flight level
o GAL Geoid altitude
o GS Ground speed
o HDB Heading bug
o HDG Heading (compass)
o HUM Humidity of the air
o IAS Indicated air speed (external source)
o LOG Logbook recorded time
o LT Local time
o MGS Max ground speed
o PRE Current pressure (barometric sensor)
o QNH QNH
o RDL Radial from next WPT
o RRD Required rate of descent (ILS or vertical navigation)
o SR Sunrise
o SS Sunset
o SW Stop watch
o T Temperature
o TAS True airspeed (external source)
o TRK Current track
o UTC UTC time
o VAR Magnetic variation
o VS Vertical speed
o XAL Cross track altitude (= ALT - CAL)
o XTK Cross track distance
Use FLY is FUN application for VFR FLYING ONLY!
Using the application is at your own risk.
We are not responsible for any use of this application in any cases.
FLY is FUN does not substitute any aircraft gauge or device.
All data downloaded to this application can be incorrect and not valid.
Information displayed by this application are without any warranties.
Navigation data used in this application is not made from official sources!
Have fun and fly Safe!

FLY is FUN – User Guide – 2018-06-29 7 / 183
2 Hardware and OS configuration All Android devices are not equal! To use FLY is FUN it is highly recommended having a device (smartphone or tablet) with at least:
- Processor: Quad core;
- RAM: 3 GB or more;
- ROM: 32 GB SD or more and at least 4 Go for the application;
- Screen: As bright as possible, that you can read in sun day light, Full HD is the best;
- Satellite: Ability to receive satellite information from as many constellations as possible: § GPS: American satellite constellation; § GLONASS: Russian satellite constellation; § BEIDOU: Chinese satellite constellation;
and if possible signal of EGNOS, for Europe, and WASS, for America, terrestrial station allowing (sub)metric precision
Note 1: some devices claim to be GALILEO ready, GALILEO is the European satellite constellation; Note 2: More you get better is the precision.
- Sensors: Accelerometer, 3 axis gyros, compass, barometer;
- Android: 4.4 and above.
FLY is FUN – User Guide – 2018-06-29 8 / 183
3 Installing and starting FLY is FUN Install FLY is FUN from Google Play store: https://play.google.com/store/apps/details?id=gps.ils.vor.glasscockpit During installation process, you will be request to grant FLY is FUN access to:
- to device location: GPS; - to photos, medias and files: ability to read write and store file, waypoints, routes …
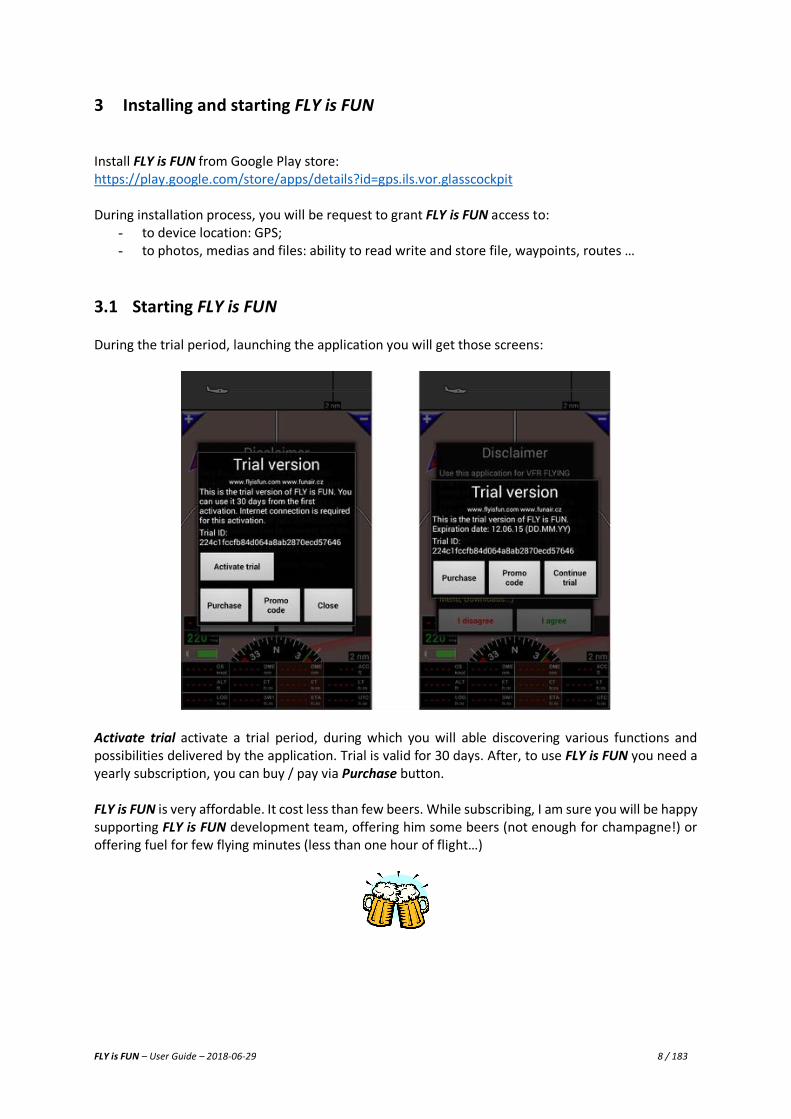
3.1 Starting FLY is FUN During the trial period, launching the application you will get those screens:
Activate trial activate a trial period, during which you will able discovering various functions and possibilities delivered by the application. Trial is valid for 30 days. After, to use FLY is FUN you need a yearly subscription, you can buy / pay via Purchase button. FLY is FUN is very affordable. It cost less than few beers. While subscribing, I am sure you will be happy supporting FLY is FUN development team, offering him some beers (not enough for champagne!) or offering fuel for few flying minutes (less than one hour of flight…)
FLY is FUN – User Guide – 2018-06-29 9 / 183
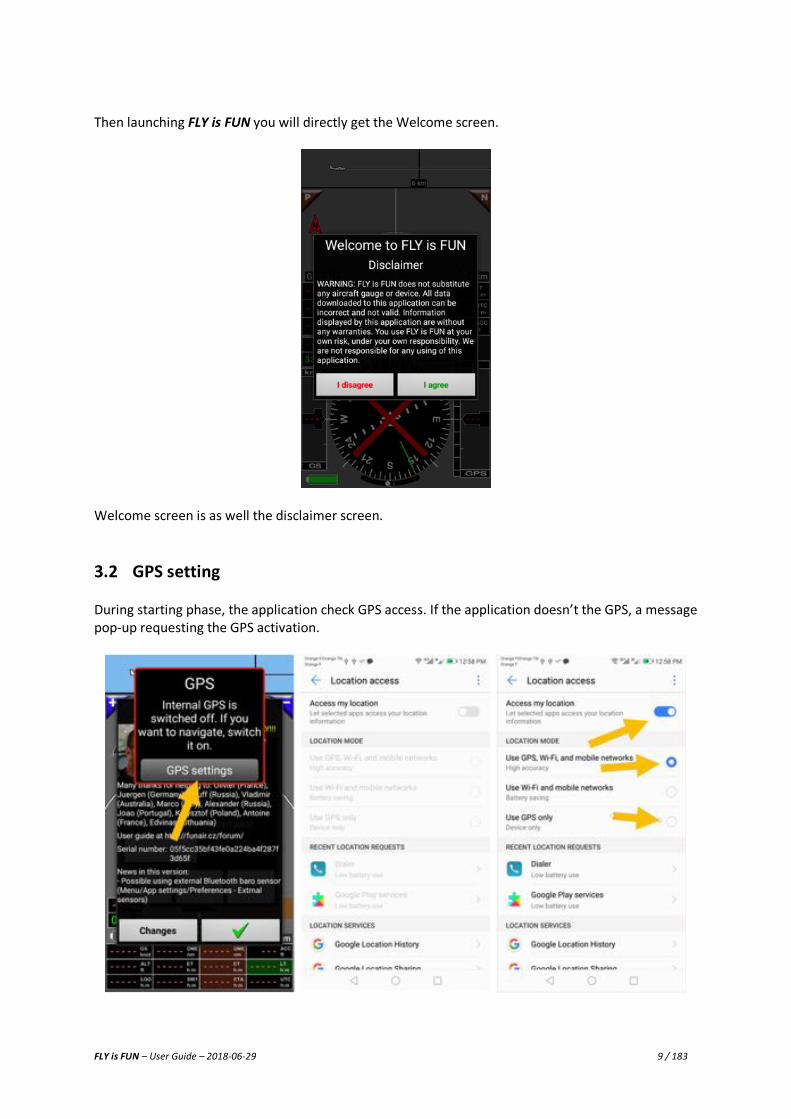
Then launching FLY is FUN you will directly get the Welcome screen.
Welcome screen is as well the disclaimer screen.
3.2 GPS setting During starting phase, the application check GPS access. If the application doesn’t the GPS, a message pop-up requesting the GPS activation.
FLY is FUN – User Guide – 2018-06-29 10 / 183
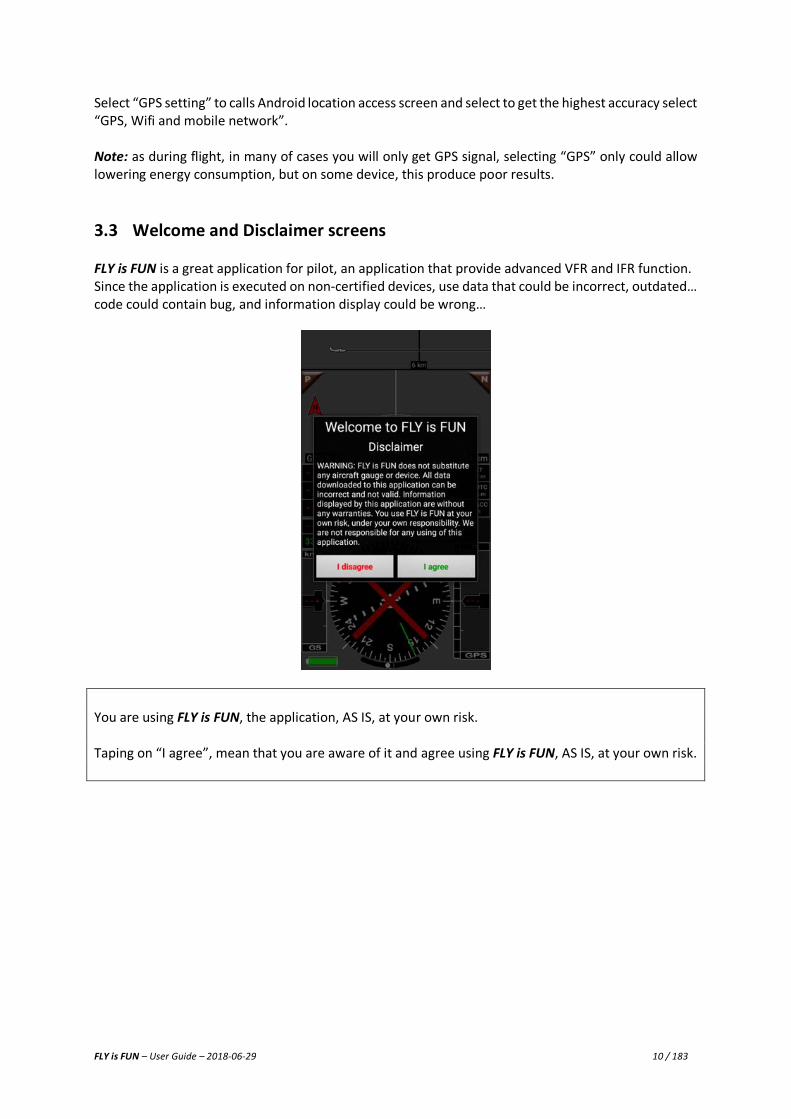
Select “GPS setting” to calls Android location access screen and select to get the highest accuracy select “GPS, Wifi and mobile network”. Note: as during flight, in many of cases you will only get GPS signal, selecting “GPS” only could allow lowering energy consumption, but on some device, this produce poor results.
3.3 Welcome and Disclaimer screens FLY is FUN is a great application for pilot, an application that provide advanced VFR and IFR function. Since the application is executed on non-certified devices, use data that could be incorrect, outdated… code could contain bug, and information display could be wrong…
You are using FLY is FUN, the application, AS IS, at your own risk. Taping on “I agree”, mean that you are aware of it and agree using FLY is FUN, AS IS, at your own risk.
FLY is FUN – User Guide – 2018-06-29 11 / 183
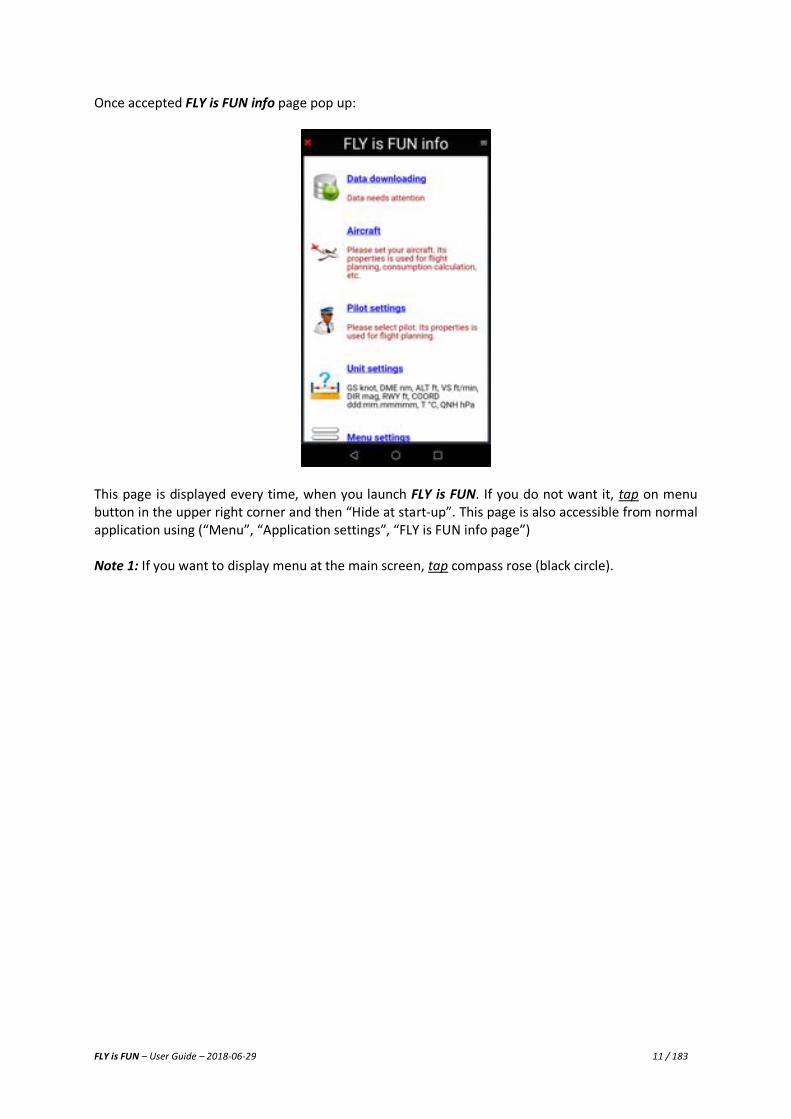
Once accepted FLY is FUN info page pop up:
This page is displayed every time, when you launch FLY is FUN. If you do not want it, tap on menu button in the upper right corner and then “Hide at start-up”. This page is also accessible from normal application using (“Menu”, “Application settings”, “FLY is FUN info page”) Note 1: If you want to display menu at the main screen, tap compass rose (black circle).

FLY is FUN – User Guide – 2018-06-29 12 / 183
4 Setting the application FLY is FUN info page allows fast configuration of the application and to check if imported data are up to date. Underlying text is:
- Red, if data are missing, out dated or not found; - Green if data are found and up to date.
From FLY is FUN info page, you can easily:
- Select and import data via Data downloading; o Air navigation data from the navigation data base;
Data are updated according to AIRAC cycle. o Maps to use as background of the moving map screen; o Terrain data: Elevation data.
- Set and select aircraft via Aircraft;
o Aircraft specification are used for flight preparation, flight plan and logbook, cabin pressure calibration.
- Set and select Pilots and copilots via Pilot:
o Pilot and copilot information are used for flight plan and logbook.
- Define favorite units via Unit setting: o Set favorites units for speed, distance, altitude, vertical speed, bearing …
FLY is FUN – User Guide – 2018-06-29 13 / 183
4.1 Data downloading
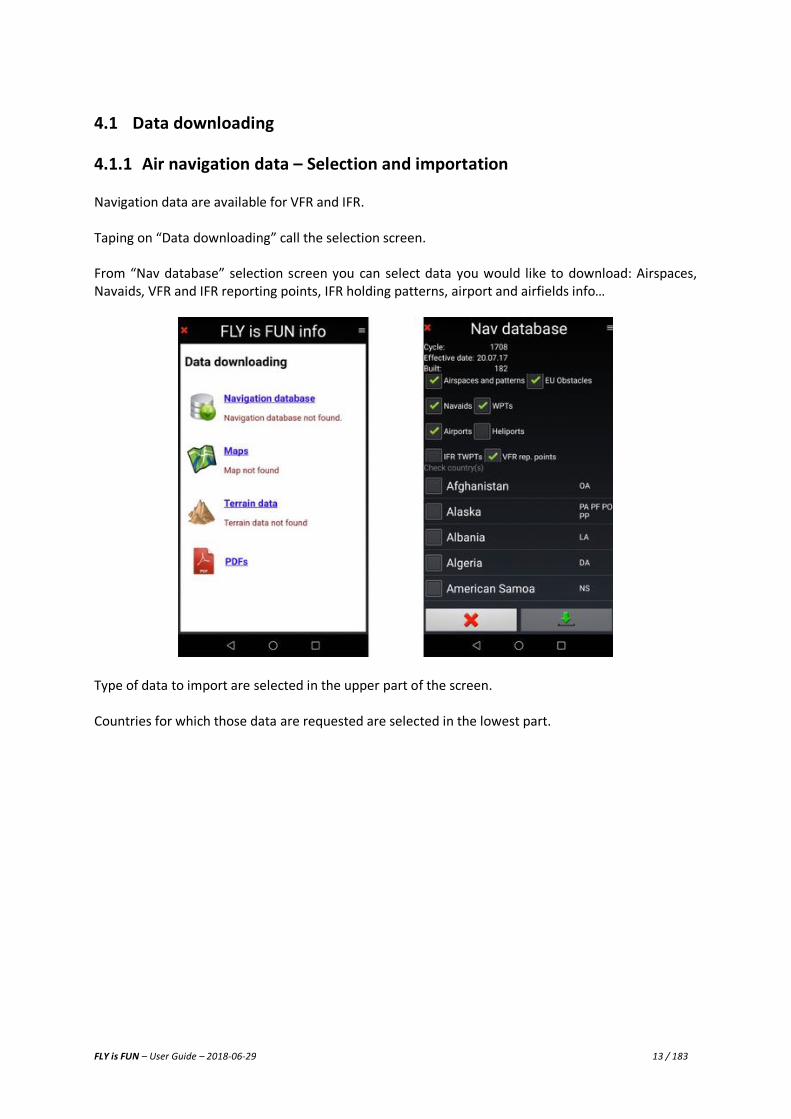
4.1.1 Air navigation data – Selection and importation Navigation data are available for VFR and IFR. Taping on “Data downloading” call the selection screen. From “Nav database” selection screen you can select data you would like to download: Airspaces, Navaids, VFR and IFR reporting points, IFR holding patterns, airport and airfields info…
Type of data to import are selected in the upper part of the screen. Countries for which those data are requested are selected in the lowest part.
FLY is FUN – User Guide – 2018-06-29 14 / 183
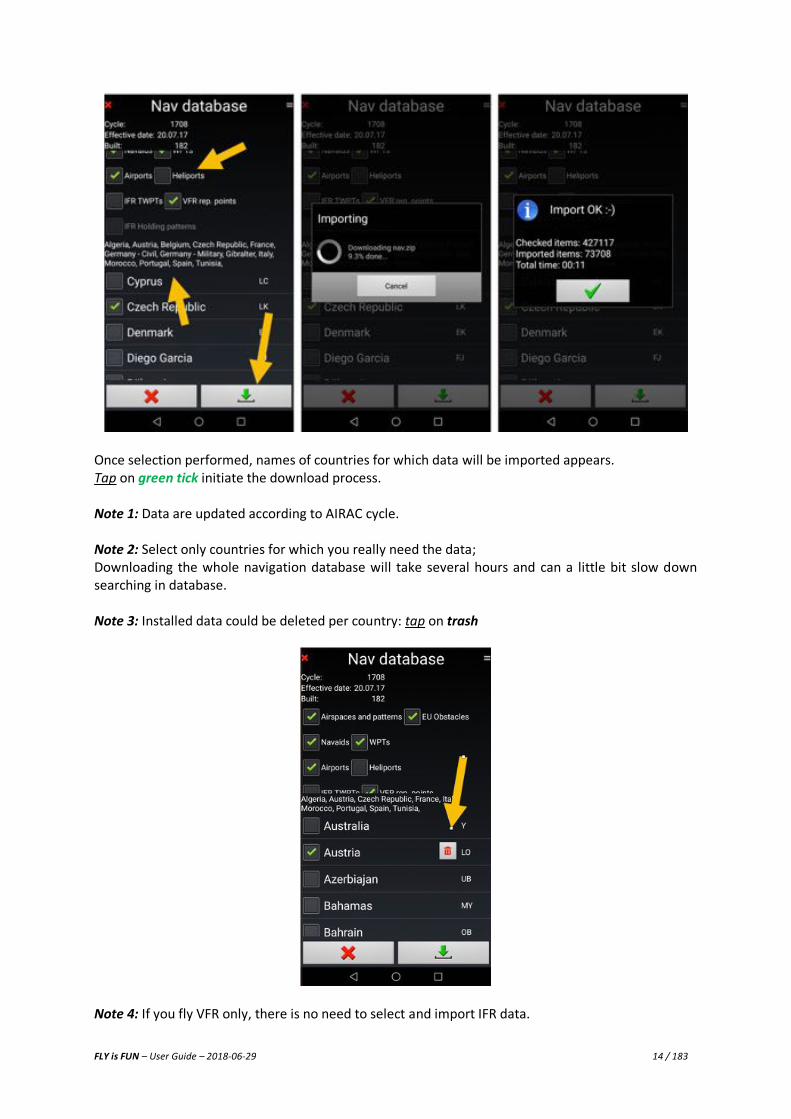
Once selection performed, names of countries for which data will be imported appears. Tap on green tick initiate the download process. Note 1: Data are updated according to AIRAC cycle. Note 2: Select only countries for which you really need the data; Downloading the whole navigation database will take several hours and can a little bit slow down searching in database. Note 3: Installed data could be deleted per country: tap on trash
Note 4: If you fly VFR only, there is no need to select and import IFR data.

FLY is FUN – User Guide – 2018-06-29 15 / 183
Once navigation have been downloaded, data fund and up to date, “Found” appears in green followed by countries names for which data are available on the device.
FLY is FUN – User Guide – 2018-06-29 16 / 183
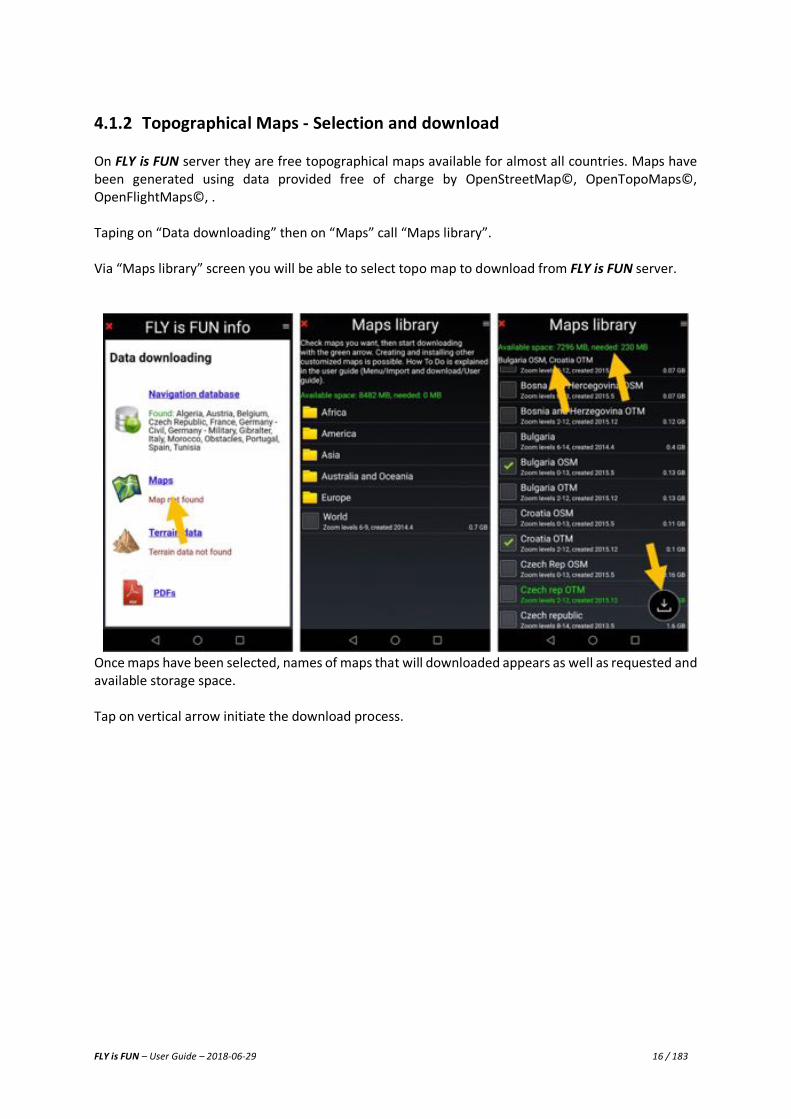
4.1.2 Topographical Maps - Selection and download On FLY is FUN server they are free topographical maps available for almost all countries. Maps have been generated using data provided free of charge by OpenStreetMap©, OpenTopoMaps©, OpenFlightMaps©, . Taping on “Data downloading” then on “Maps” call “Maps library”. Via “Maps library” screen you will be able to select topo map to download from FLY is FUN server.
Once maps have been selected, names of maps that will downloaded appears as well as requested and available storage space. Tap on vertical arrow initiate the download process.

FLY is FUN – User Guide – 2018-06-29 17 / 183
Once maps are installed and detected, “Found” appears in green followed by maps names. Note 1: It is advisable to download always the world map “World” Note 2: If for one country, you do not find a map, select the world map that covers the world and, please, drop a note on FLY is FUN forum http://funair.cz/forum/ . To suppress a map, freeing space:
- Long tap on map name, then tap on trash delete the map

FLY is FUN – User Guide – 2018-06-29 18 / 183
If you select Show source URL, you will see Map URL. It can be used to download maps on a PC and then copy them on the Android device via USB connection. Maps used by the application are stored in “RMapsSQLite” folder that is located in “Maps” folder. “Maps” folder is located in “GPS_ILS_VOR” folder Note 3: User cans import its own maps. Maps should respect RMaps SQLite format. Note 4: FLY is FUN allows to importing “Slippy Mercator tiles” (tiles are located in folders).
4.1.3 Terrain data - Selection and download Terrain data are used to know ground elevation, to display it and to calculate aircraft altitude above ground level. Data concerning artificial obstacles in Europe are downloaded via the “Nav database” as seen previously. Terrain data files are downloaded in 5x5 geographical degrees blocks. Each 5x5 degrees rectangle requires approximately 72MB of memory and 130 MB during installation phase. To download Terrain data from “Data downloading” screen select Terrain data.
Long tap on square select the area. Square becomes Yellow. Yellow indicate that terrain data for a specific area will be downloaded. Tap on green tick to initiate download process. When terrain data are fund and installed, “Fund” appears in green.
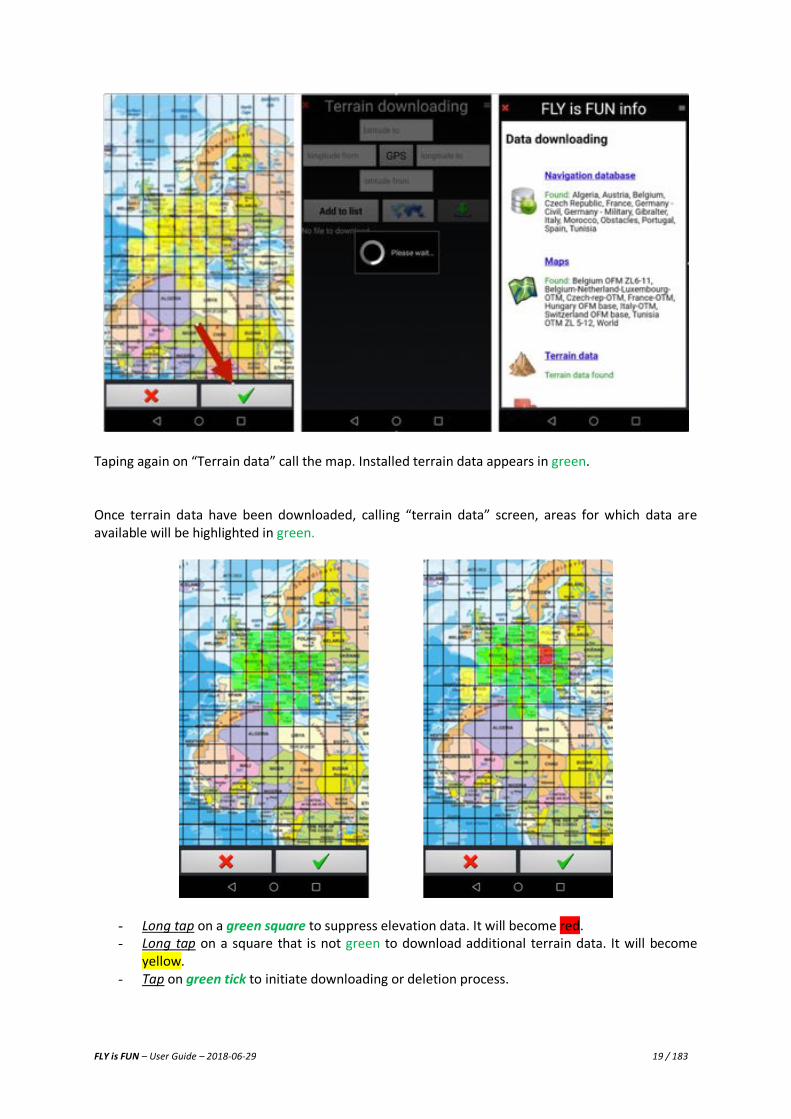
FLY is FUN – User Guide – 2018-06-29 19 / 183
Taping again on “Terrain data” call the map. Installed terrain data appears in green. Once terrain data have been downloaded, calling “terrain data” screen, areas for which data are available will be highlighted in green.
- Long tap on a green square to suppress elevation data. It will become red. - Long tap on a square that is not green to download additional terrain data. It will become
yellow. - Tap on green tick to initiate downloading or deletion process.

FLY is FUN – User Guide – 2018-06-29 20 / 183
4.1.4 VAC - PDF documents - Airport information Detail information concerning airfields approach, ground circulation, available services, are usually made available by Aviation Regulatory Authorities as PDF documents. For automatic download in “Data downloading” select “VAC and PDF documents”, then in “PDF Library” select the country for which you need PDF documents.
Once VAC and PDF documents have been selected, tap on download arrows initiate import process.
FLY is FUN – User Guide – 2018-06-29 21 / 183
For the time being, FLY is FUN provide PDF documents for more than 50 countries. This possibility depends a lot of Aviation Regulatory Authorities facilitating, or not, easy access to those data publishing APIs (Applications Programming Interface) allowing free and easy access of third parties’ applications as FLY is FUN. If, for some countries, you know how to access APIs that could facilitate data and PDF document access, please make FLY is FUN development team aware of it, email at [email protected]. Development team will then study the possibility of using those API’s to make AIP and VACs PDF documents accessible via FLY is FUN server. Manual importation or semi-automatized importation of VAC and PD documents is possible. That for refer to chapter “Using PDF files – AIF, VAC, ULM terrain info….”
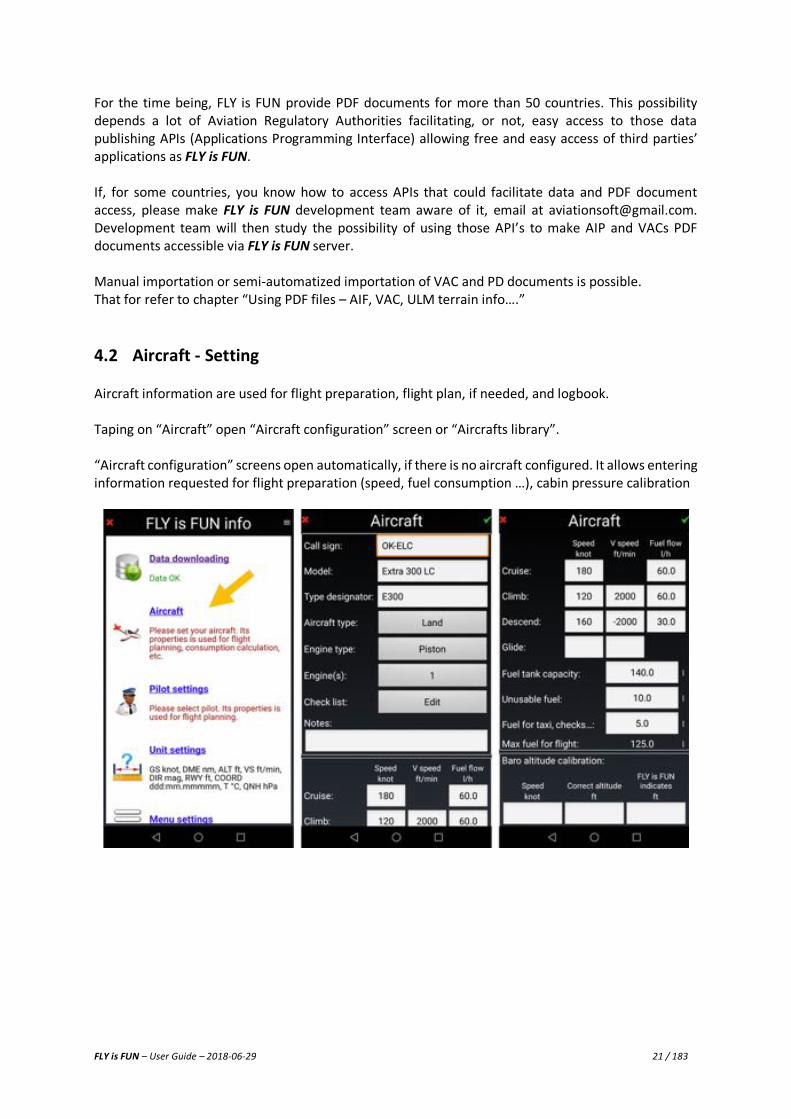
4.2 Aircraft - Setting Aircraft information are used for flight preparation, flight plan, if needed, and logbook. Taping on “Aircraft” open “Aircraft configuration” screen or “Aircrafts library”. “Aircraft configuration” screens open automatically, if there is no aircraft configured. It allows entering information requested for flight preparation (speed, fuel consumption …), cabin pressure calibration
FLY is FUN – User Guide – 2018-06-29 22 / 183
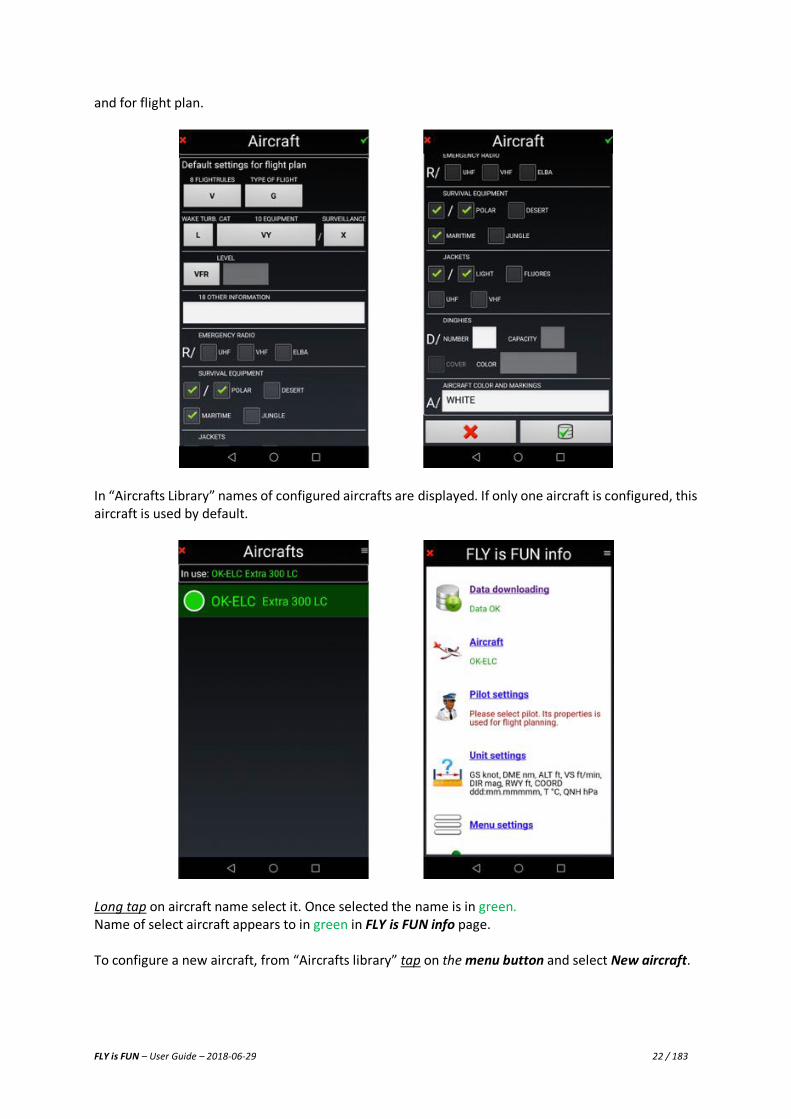
and for flight plan.
In “Aircrafts Library” names of configured aircrafts are displayed. If only one aircraft is configured, this aircraft is used by default.
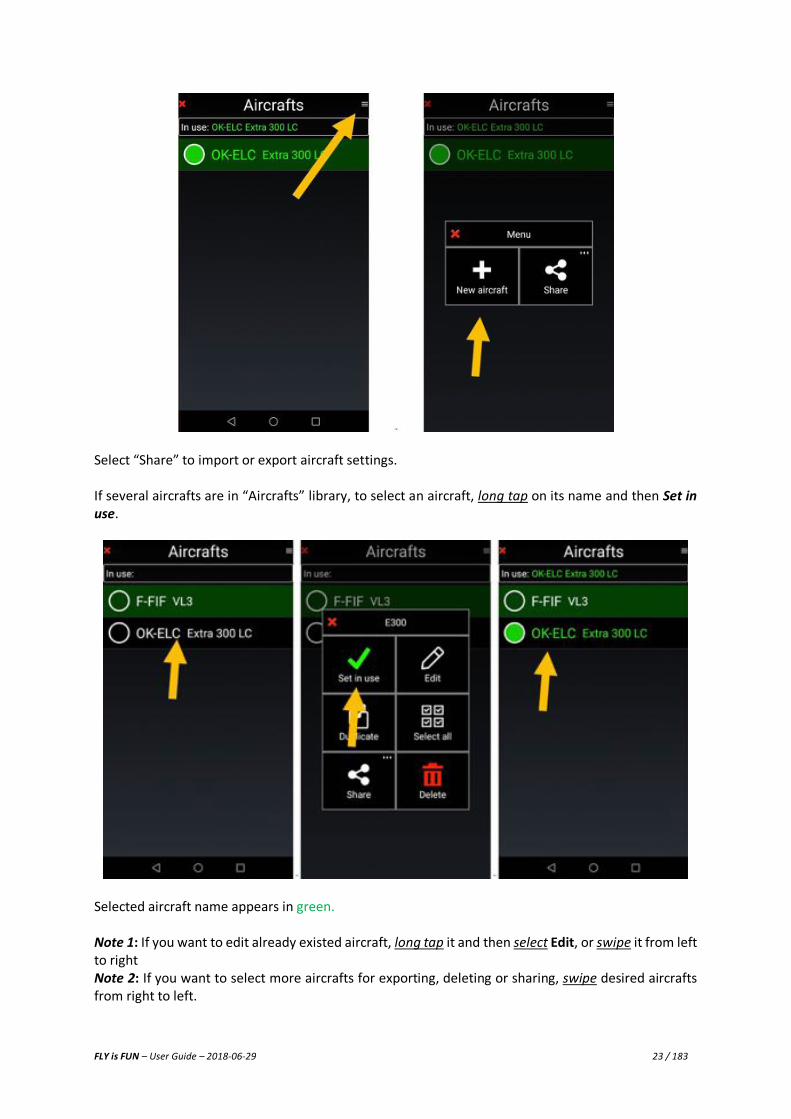
Long tap on aircraft name select it. Once selected the name is in green. Name of select aircraft appears to in green in FLY is FUN info page. To configure a new aircraft, from “Aircrafts library” tap on the menu button and select New aircraft.
FLY is FUN – User Guide – 2018-06-29 23 / 183
Select “Share” to import or export aircraft settings. If several aircrafts are in “Aircrafts” library, to select an aircraft, long tap on its name and then Set in
use.
Selected aircraft name appears in green. Note 1: If you want to edit already existed aircraft, long tap it and then select Edit, or swipe it from left to right Note 2: If you want to select more aircrafts for exporting, deleting or sharing, swipe desired aircrafts from right to left.
FLY is FUN – User Guide – 2018-06-29 24 / 183
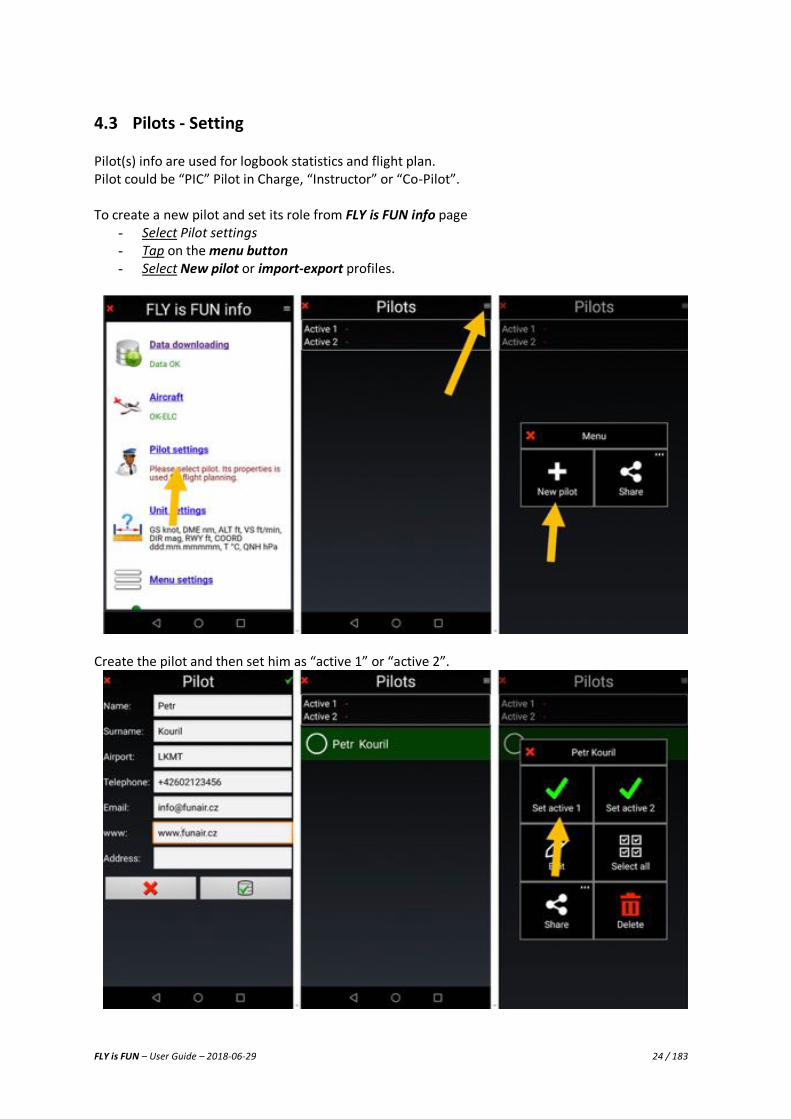
4.3 Pilots - Setting Pilot(s) info are used for logbook statistics and flight plan. Pilot could be “PIC” Pilot in Charge, “Instructor” or “Co-Pilot”. To create a new pilot and set its role from FLY is FUN info page
- Select Pilot settings - Tap on the menu button - Select New pilot or import-export profiles.
Create the pilot and then set him as “active 1” or “active 2”.
FLY is FUN – User Guide – 2018-06-29 25 / 183
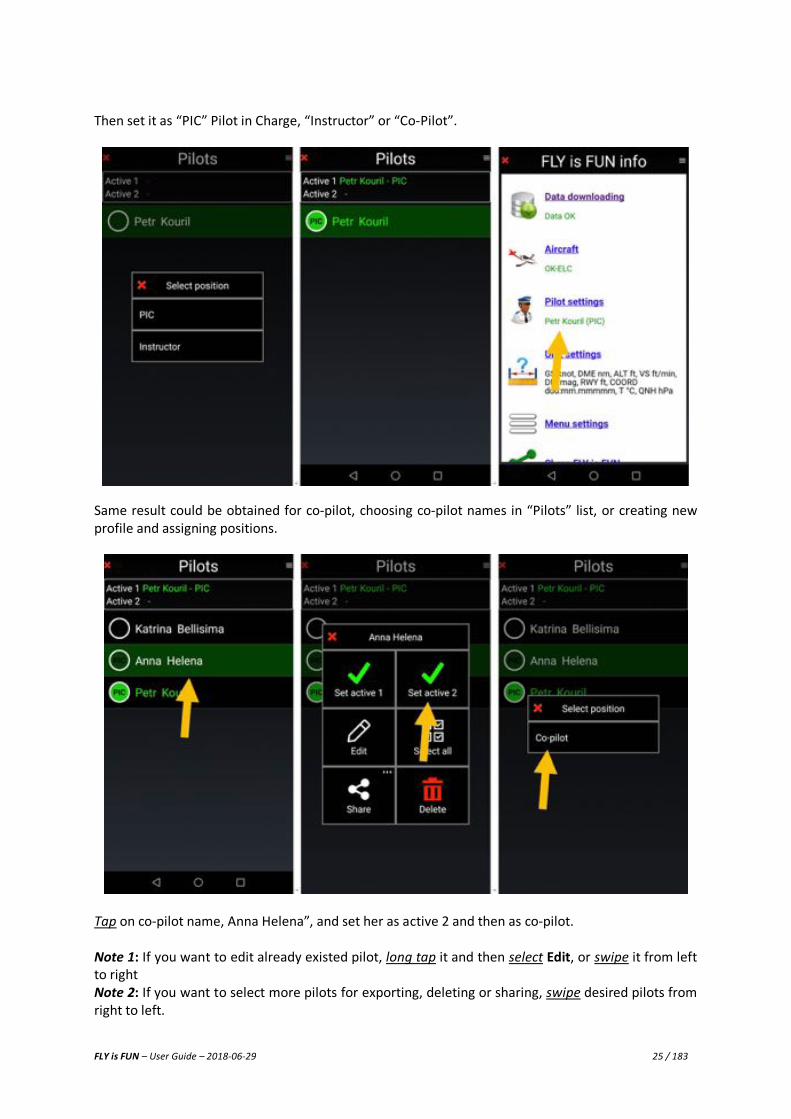
Then set it as “PIC” Pilot in Charge, “Instructor” or “Co-Pilot”.
Same result could be obtained for co-pilot, choosing co-pilot names in “Pilots” list, or creating new profile and assigning positions.
Tap on co-pilot name, Anna Helena”, and set her as active 2 and then as co-pilot. Note 1: If you want to edit already existed pilot, long tap it and then select Edit, or swipe it from left to right Note 2: If you want to select more pilots for exporting, deleting or sharing, swipe desired pilots from right to left.
FLY is FUN – User Guide – 2018-06-29 26 / 183
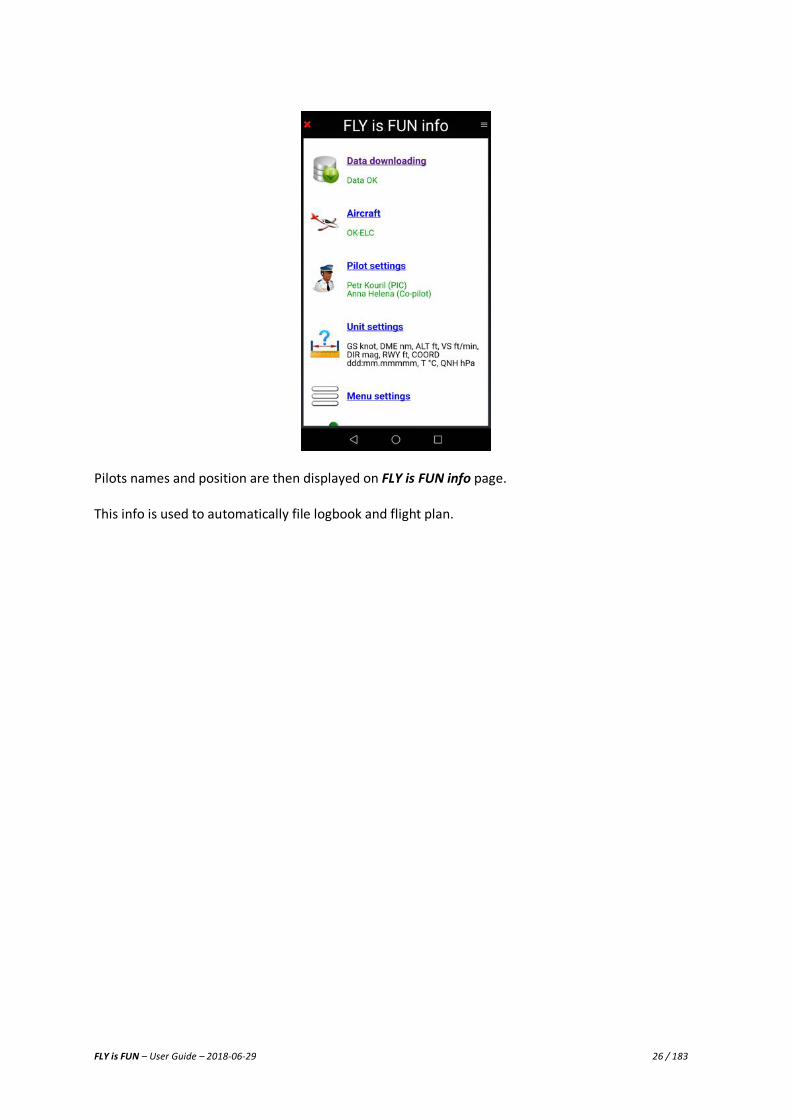
Pilots names and position are then displayed on FLY is FUN info page. This info is used to automatically file logbook and flight plan.
FLY is FUN – User Guide – 2018-06-29 27 / 183
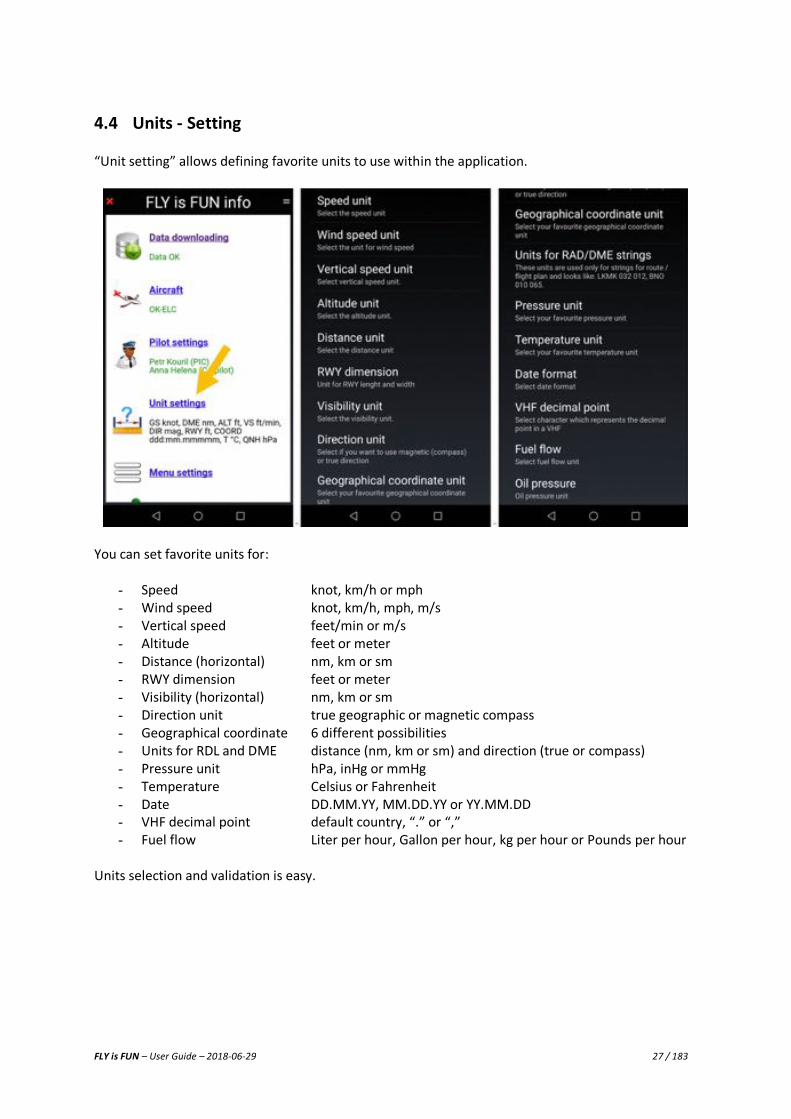
4.4 Units - Setting “Unit setting” allows defining favorite units to use within the application.
You can set favorite units for:
- Speed knot, km/h or mph - Wind speed knot, km/h, mph, m/s - Vertical speed feet/min or m/s - Altitude feet or meter - Distance (horizontal) nm, km or sm - RWY dimension feet or meter - Visibility (horizontal) nm, km or sm - Direction unit true geographic or magnetic compass - Geographical coordinate 6 different possibilities - Units for RDL and DME distance (nm, km or sm) and direction (true or compass) - Pressure unit hPa, inHg or mmHg - Temperature Celsius or Fahrenheit - Date DD.MM.YY, MM.DD.YY or YY.MM.DD - VHF decimal point default country, “.” or “,” - Fuel flow Liter per hour, Gallon per hour, kg per hour or Pounds per hour
Units selection and validation is easy.

FLY is FUN – User Guide – 2018-06-29 28 / 183
If you have completed all the step in all previous pages you will have:
- Data downloaded and up-to-date - Aircraft configured and selected - Pilot selected - Favorite unit set
All is in green. FLY is FUN configuration is achieved.
Bravo!!!
You achieved application basic setting
FLY is FUN is ready Tap on red X to close FLY is FUN info page.
FLY is FUN – User Guide – 2018-06-29 29 / 183
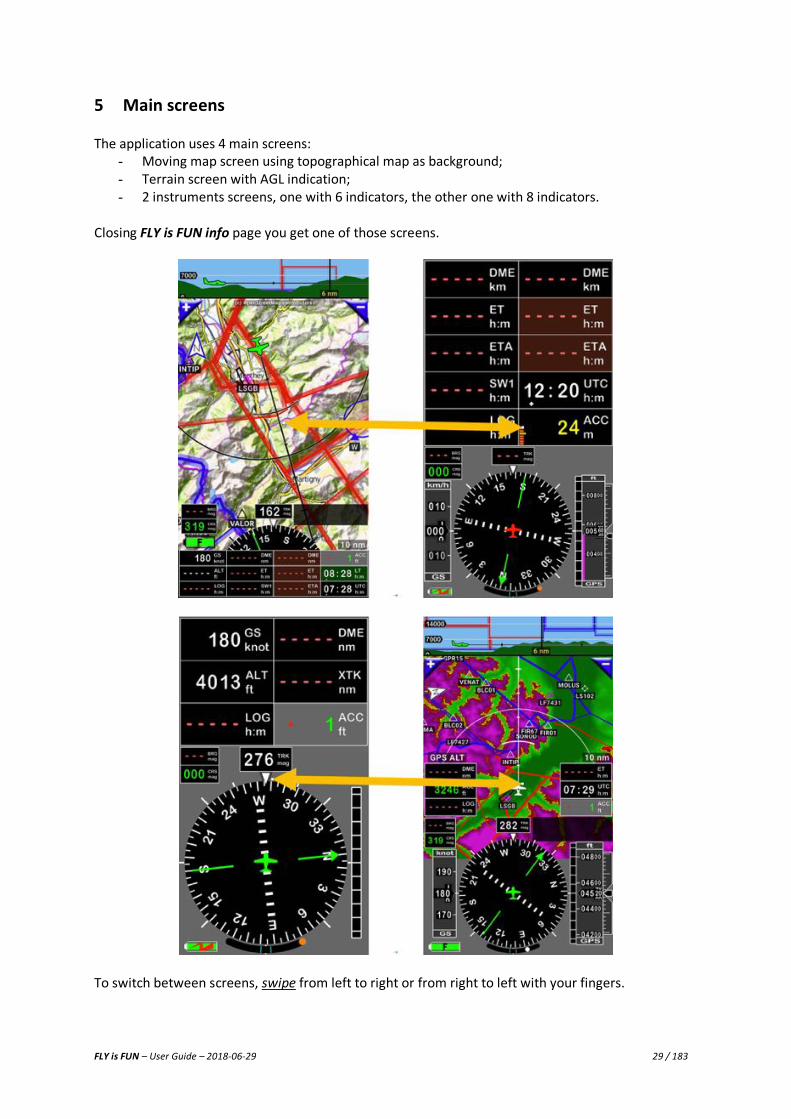
5 Main screens The application uses 4 main screens:
- Moving map screen using topographical map as background; - Terrain screen with AGL indication; - 2 instruments screens, one with 6 indicators, the other one with 8 indicators.
Closing FLY is FUN info page you get one of those screens.
To switch between screens, swipe from left to right or from right to left with your fingers.
FLY is FUN – User Guide – 2018-06-29 30 / 183
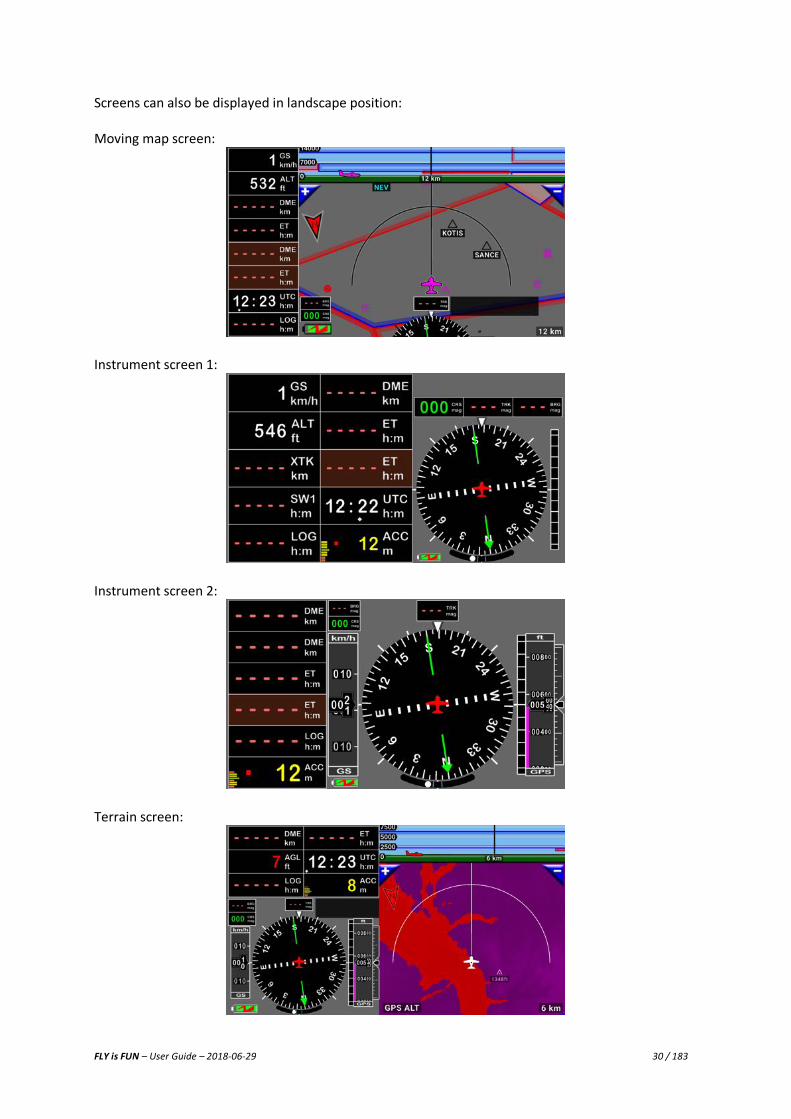
Screens can also be displayed in landscape position: Moving map screen:
Instrument screen 1:
Instrument screen 2:
Terrain screen:
FLY is FUN – User Guide – 2018-06-29 31 / 183
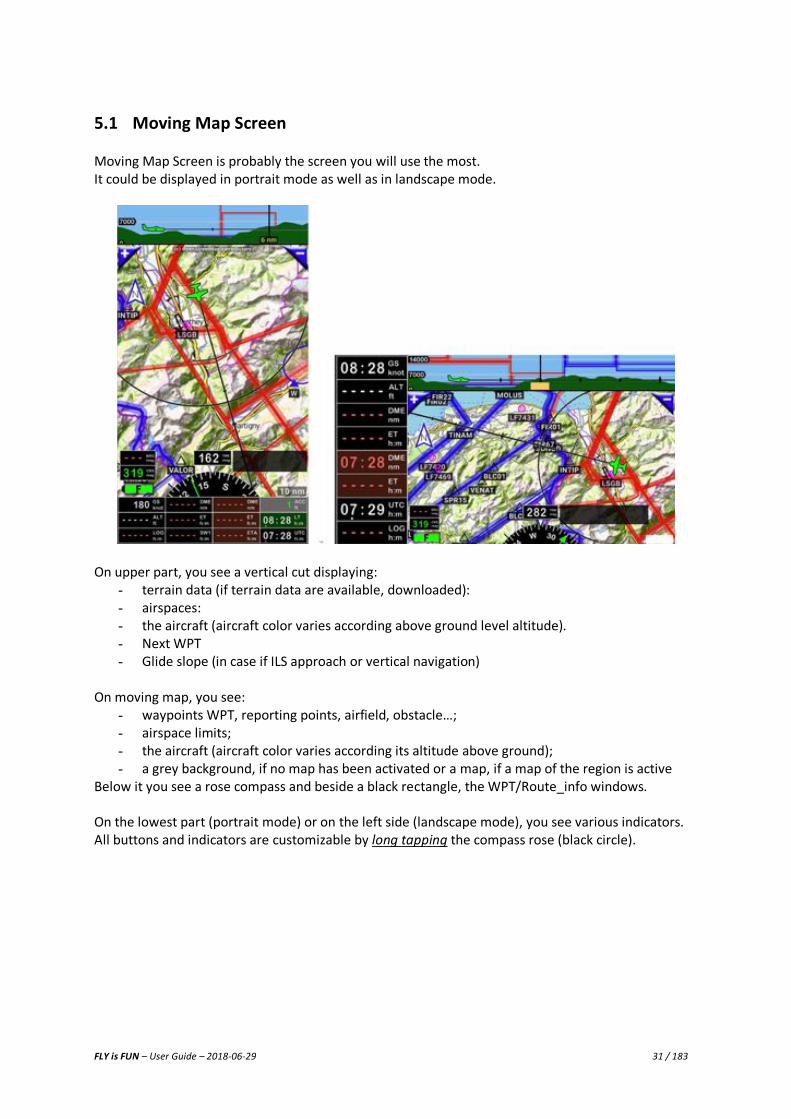
5.1 Moving Map Screen Moving Map Screen is probably the screen you will use the most. It could be displayed in portrait mode as well as in landscape mode.
On upper part, you see a vertical cut displaying:
- terrain data (if terrain data are available, downloaded): - airspaces: - the aircraft (aircraft color varies according above ground level altitude). - Next WPT - Glide slope (in case if ILS approach or vertical navigation)
On moving map, you see:
- waypoints WPT, reporting points, airfield, obstacle…; - airspace limits; - the aircraft (aircraft color varies according its altitude above ground); - a grey background, if no map has been activated or a map, if a map of the region is active
Below it you see a rose compass and beside a black rectangle, the WPT/Route_info windows. On the lowest part (portrait mode) or on the left side (landscape mode), you see various indicators. All buttons and indicators are customizable by long tapping the compass rose (black circle).
FLY is FUN – User Guide – 2018-06-29 32 / 183
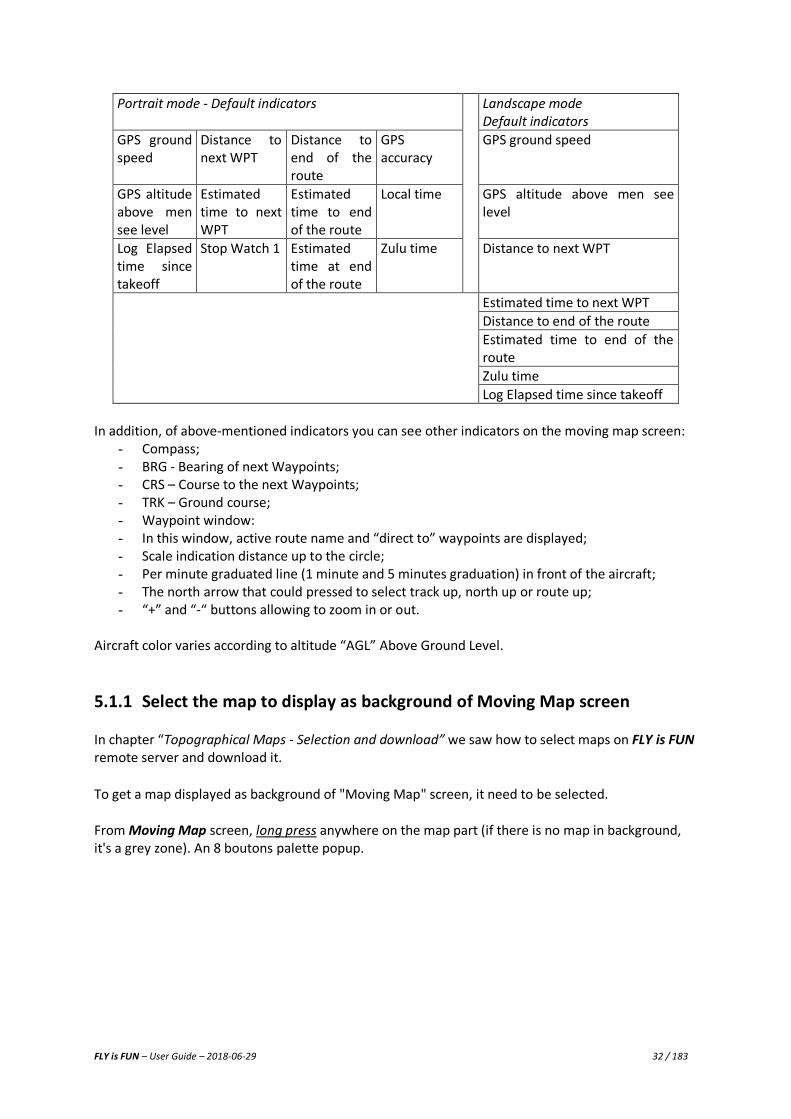
Portrait mode - Default indicators Landscape mode Default indicators
GPS ground speed
Distance to next WPT
Distance to end of the route
GPS accuracy
GPS ground speed
GPS altitude above men see level
Estimated time to next WPT
Estimated time to end of the route
Local time GPS altitude above men see level
Log Elapsed time since takeoff
Stop Watch 1 Estimated time at end of the route
Zulu time Distance to next WPT
Estimated time to next WPT Distance to end of the route Estimated time to end of the route Zulu time Log Elapsed time since takeoff
In addition, of above-mentioned indicators you can see other indicators on the moving map screen:
- Compass; - BRG - Bearing of next Waypoints; - CRS – Course to the next Waypoints; - TRK – Ground course; - Waypoint window: - In this window, active route name and “direct to” waypoints are displayed; - Scale indication distance up to the circle; - Per minute graduated line (1 minute and 5 minutes graduation) in front of the aircraft; - The north arrow that could pressed to select track up, north up or route up; - “+” and “-“ buttons allowing to zoom in or out.
Aircraft color varies according to altitude “AGL” Above Ground Level.
5.1.1 Select the map to display as background of Moving Map screen In chapter “Topographical Maps - Selection and download” we saw how to select maps on FLY is FUN remote server and download it.
To get a map displayed as background of "Moving Map" screen, it need to be selected.
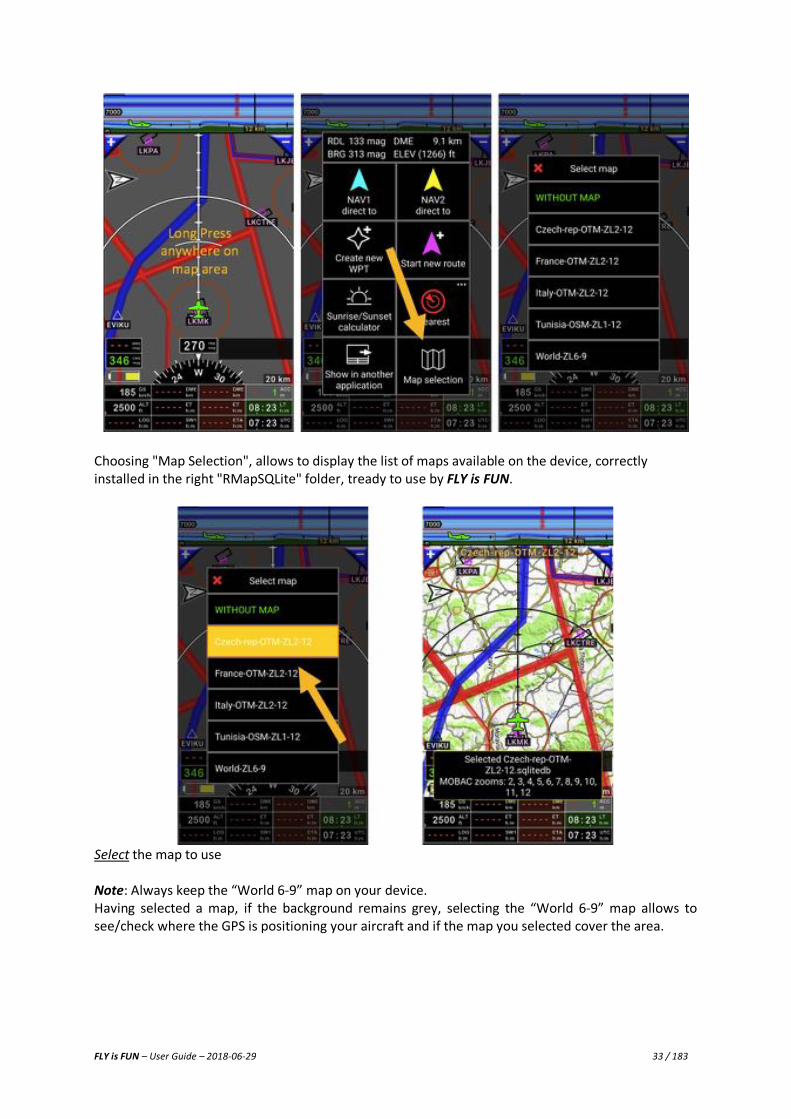
From Moving Map screen, long press anywhere on the map part (if there is no map in background, it's a grey zone). An 8 boutons palette popup.
FLY is FUN – User Guide – 2018-06-29 33 / 183
Choosing "Map Selection", allows to display the list of maps available on the device, correctly installed in the right "RMapSQLite" folder, tready to use by FLY is FUN.
Select the map to use
Note: Always keep the “World 6-9” map on your device. Having selected a map, if the background remains grey, selecting the “World 6-9” map allows to see/check where the GPS is positioning your aircraft and if the map you selected cover the area.

FLY is FUN – User Guide – 2018-06-29 34 / 183
FLY is FUN – User Guide – 2018-06-29 35 / 183
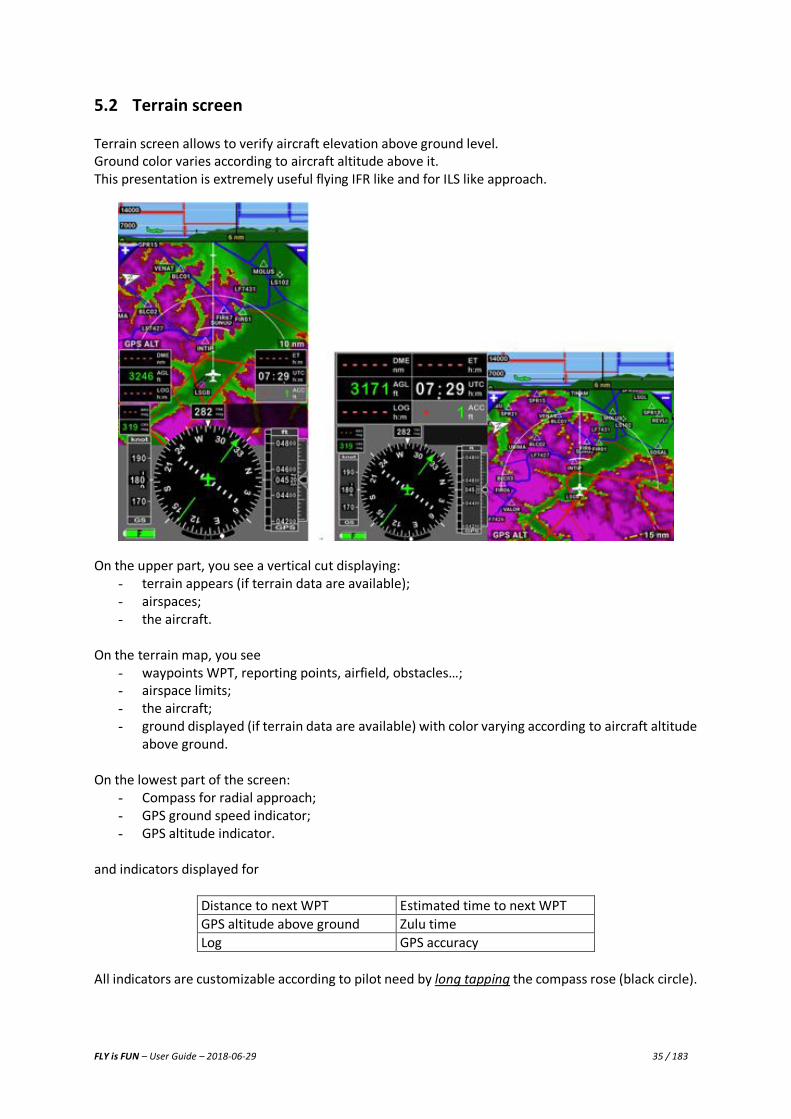
5.2 Terrain screen Terrain screen allows to verify aircraft elevation above ground level. Ground color varies according to aircraft altitude above it. This presentation is extremely useful flying IFR like and for ILS like approach.
On the upper part, you see a vertical cut displaying:
- terrain appears (if terrain data are available); - airspaces; - the aircraft.
On the terrain map, you see
- waypoints WPT, reporting points, airfield, obstacles…; - airspace limits; - the aircraft; - ground displayed (if terrain data are available) with color varying according to aircraft altitude
above ground. On the lowest part of the screen:
- Compass for radial approach; - GPS ground speed indicator; - GPS altitude indicator.
and indicators displayed for
Distance to next WPT Estimated time to next WPT GPS altitude above ground Zulu time Log GPS accuracy
All indicators are customizable according to pilot need by long tapping the compass rose (black circle).
FLY is FUN – User Guide – 2018-06-29 36 / 183
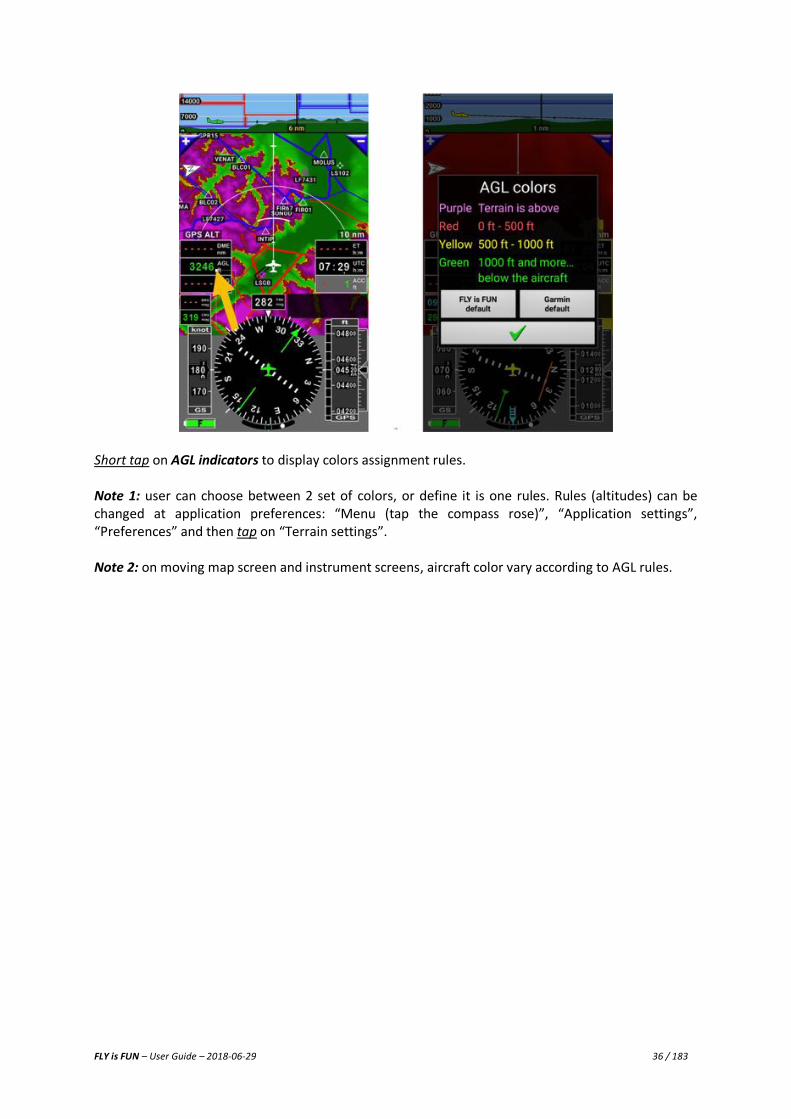
Short tap on AGL indicators to display colors assignment rules. Note 1: user can choose between 2 set of colors, or define it is one rules. Rules (altitudes) can be changed at application preferences: “Menu (tap the compass rose)”, “Application settings”, “Preferences” and then tap on “Terrain settings”. Note 2: on moving map screen and instrument screens, aircraft color vary according to AGL rules.
FLY is FUN – User Guide – 2018-06-29 37 / 183
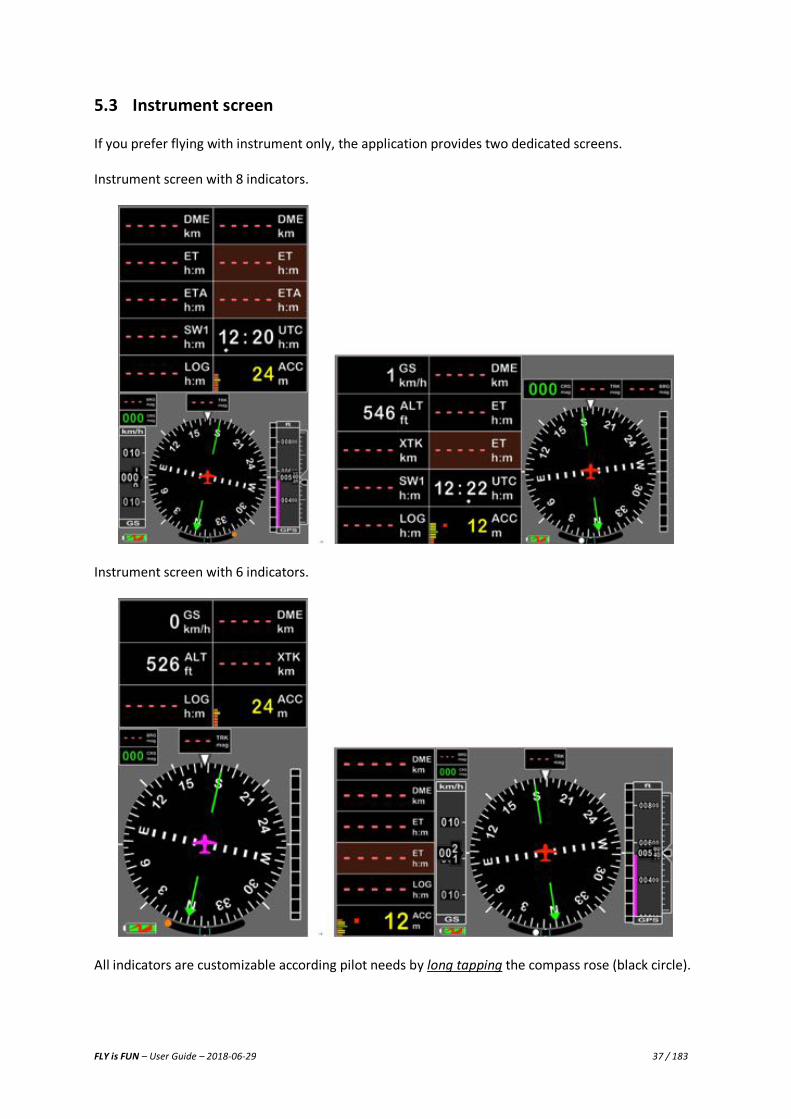
5.3 Instrument screen If you prefer flying with instrument only, the application provides two dedicated screens. Instrument screen with 8 indicators.
Instrument screen with 6 indicators.
All indicators are customizable according pilot needs by long tapping the compass rose (black circle).
FLY is FUN – User Guide – 2018-06-29 38 / 183
6 Gesture: Short tap – Long tap – Swipe … All functions and features provided by the application are accessible via menus and buttons. The application takes full advantage of multi touch screens and of Android capabilities, several of them are accessible via gesture, increasing the efficiency. You will see that usage of one finger, of two fingers, long tap, short tap… produce different results. To get the most of FLY is FUN, we suggest to train until getting comfortable with gesture results.
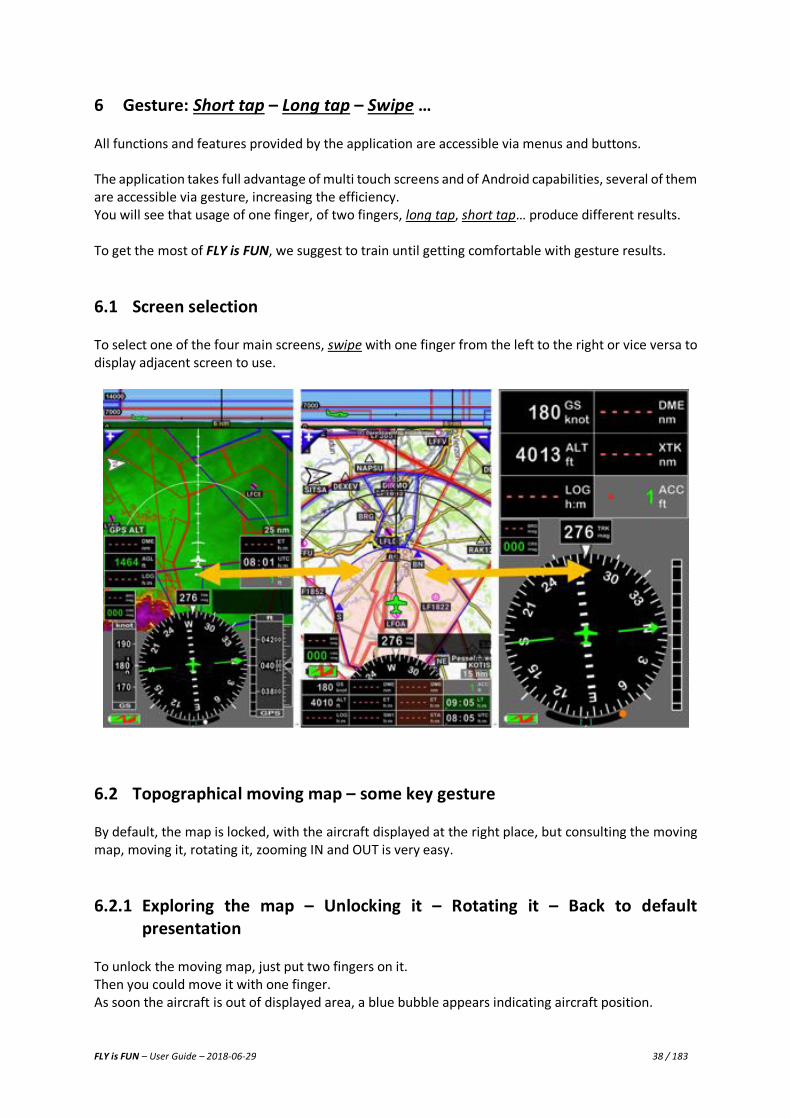
6.1 Screen selection To select one of the four main screens, swipe with one finger from the left to the right or vice versa to display adjacent screen to use.
6.2 Topographical moving map – some key gesture By default, the map is locked, with the aircraft displayed at the right place, but consulting the moving map, moving it, rotating it, zooming IN and OUT is very easy.
6.2.1 Exploring the map – Unlocking it – Rotating it – Back to default presentation
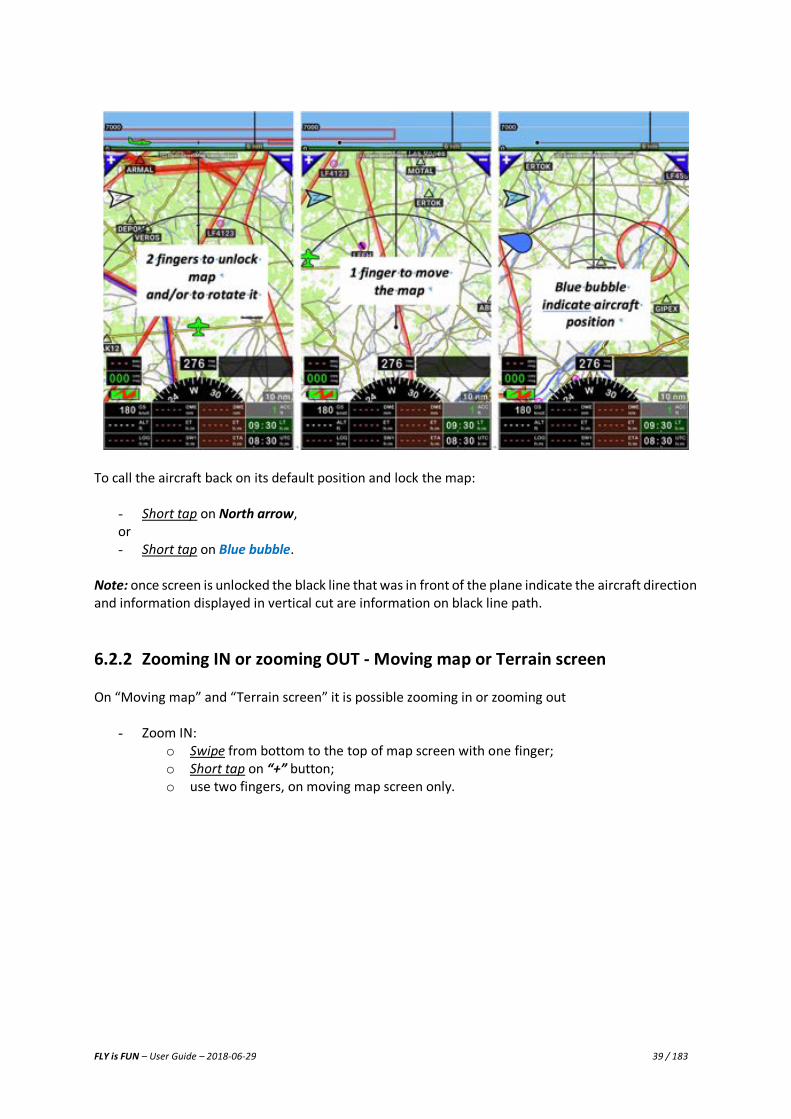
To unlock the moving map, just put two fingers on it. Then you could move it with one finger. As soon the aircraft is out of displayed area, a blue bubble appears indicating aircraft position.
FLY is FUN – User Guide – 2018-06-29 39 / 183
To call the aircraft back on its default position and lock the map:
- Short tap on North arrow, or - Short tap on Blue bubble.
Note: once screen is unlocked the black line that was in front of the plane indicate the aircraft direction and information displayed in vertical cut are information on black line path.
6.2.2 Zooming IN or zooming OUT - Moving map or Terrain screen On “Moving map” and “Terrain screen” it is possible zooming in or zooming out
- Zoom IN: o Swipe from bottom to the top of map screen with one finger; o Short tap on “+” button; o use two fingers, on moving map screen only.
FLY is FUN – User Guide – 2018-06-29 40 / 183
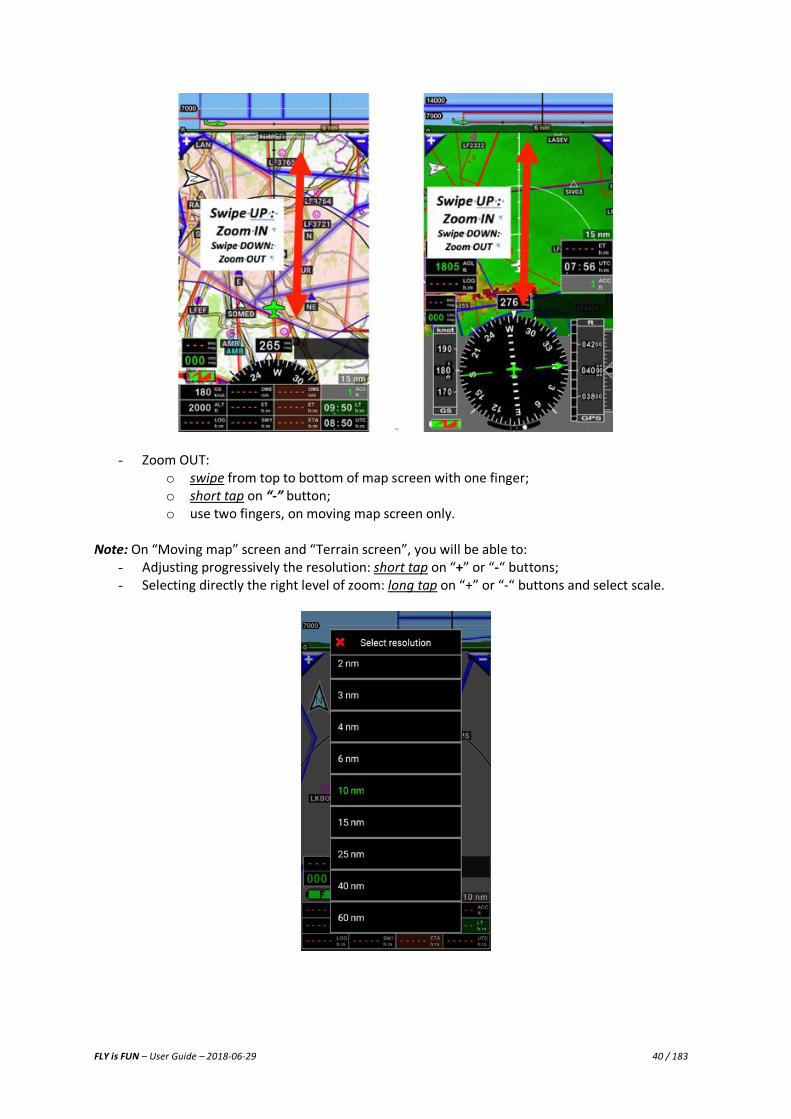
- Zoom OUT: o swipe from top to bottom of map screen with one finger; o short tap on “-” button; o use two fingers, on moving map screen only.
Note: On “Moving map” screen and “Terrain screen”, you will be able to:
- Adjusting progressively the resolution: short tap on “+” or “-“ buttons; - Selecting directly the right level of zoom: long tap on “+” or “-“ buttons and select scale.
FLY is FUN – User Guide – 2018-06-29 41 / 183
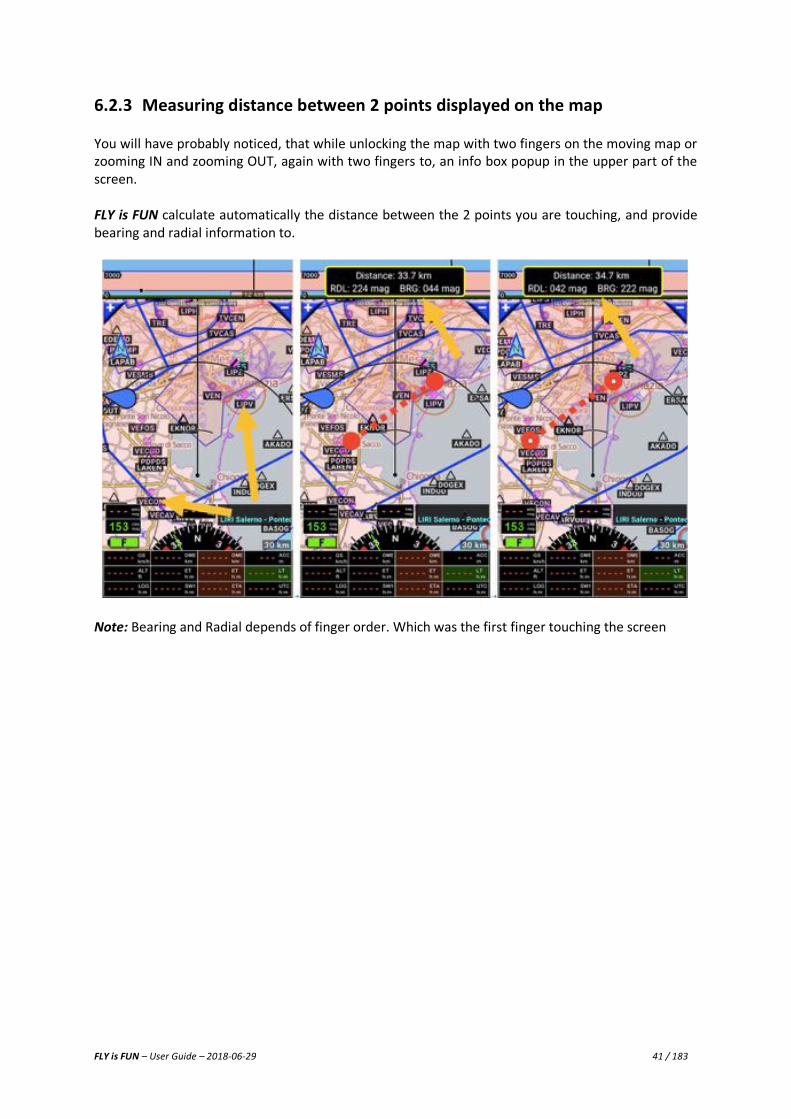
6.2.3 Measuring distance between 2 points displayed on the map You will have probably noticed, that while unlocking the map with two fingers on the moving map or zooming IN and zooming OUT, again with two fingers to, an info box popup in the upper part of the screen. FLY is FUN calculate automatically the distance between the 2 points you are touching, and provide bearing and radial information to.
Note: Bearing and Radial depends of finger order. Which was the first finger touching the screen
FLY is FUN – User Guide – 2018-06-29 42 / 183
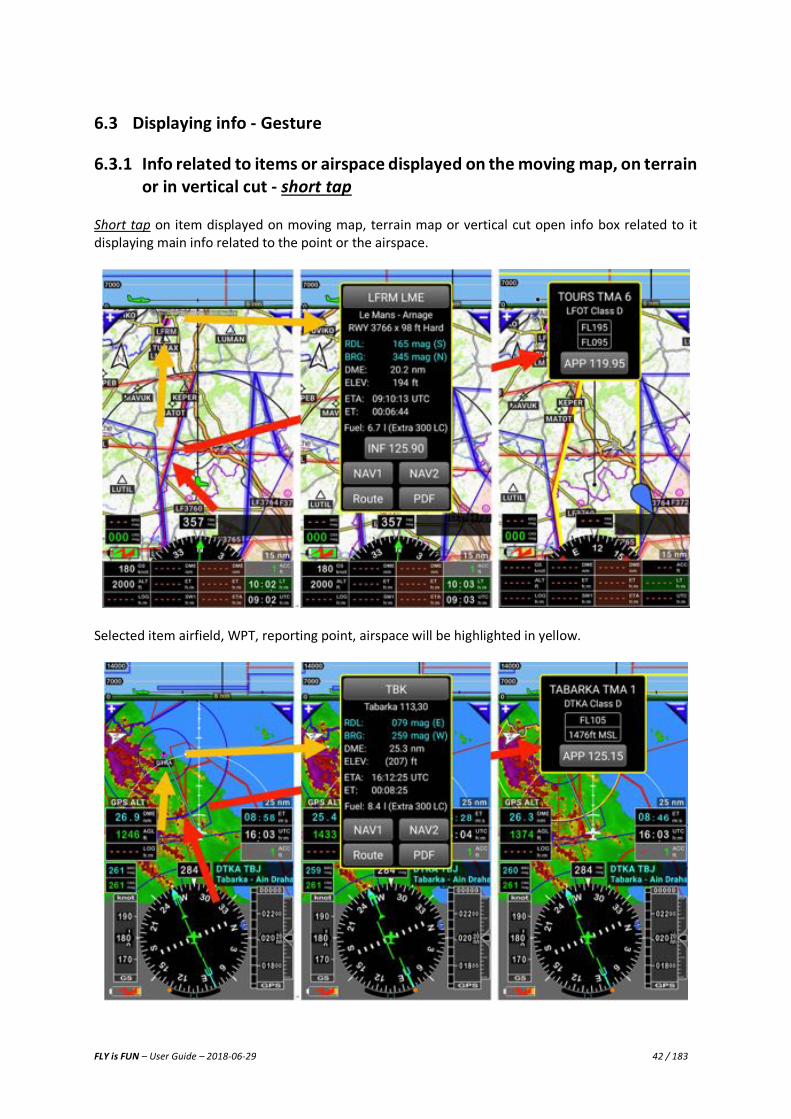
6.3 Displaying info - Gesture
6.3.1 Info related to items or airspace displayed on the moving map, on terrain or in vertical cut - short tap
Short tap on item displayed on moving map, terrain map or vertical cut open info box related to it displaying main info related to the point or the airspace.
Selected item airfield, WPT, reporting point, airspace will be highlighted in yellow.

FLY is FUN – User Guide – 2018-06-29 43 / 183
Short tap on info box to close it. If you do nothing info box close automatically after few seconds. Note 1: during a flight, approaching airspaces an info box automatically pops up displaying messages.
Note 2: Alerts could be customized in application preferences: “Menu (tap the compass rose)”, “Application settings”, “Preferences” and then tap on “Warning and info dialog box”.
FLY is FUN – User Guide – 2018-06-29 44 / 183
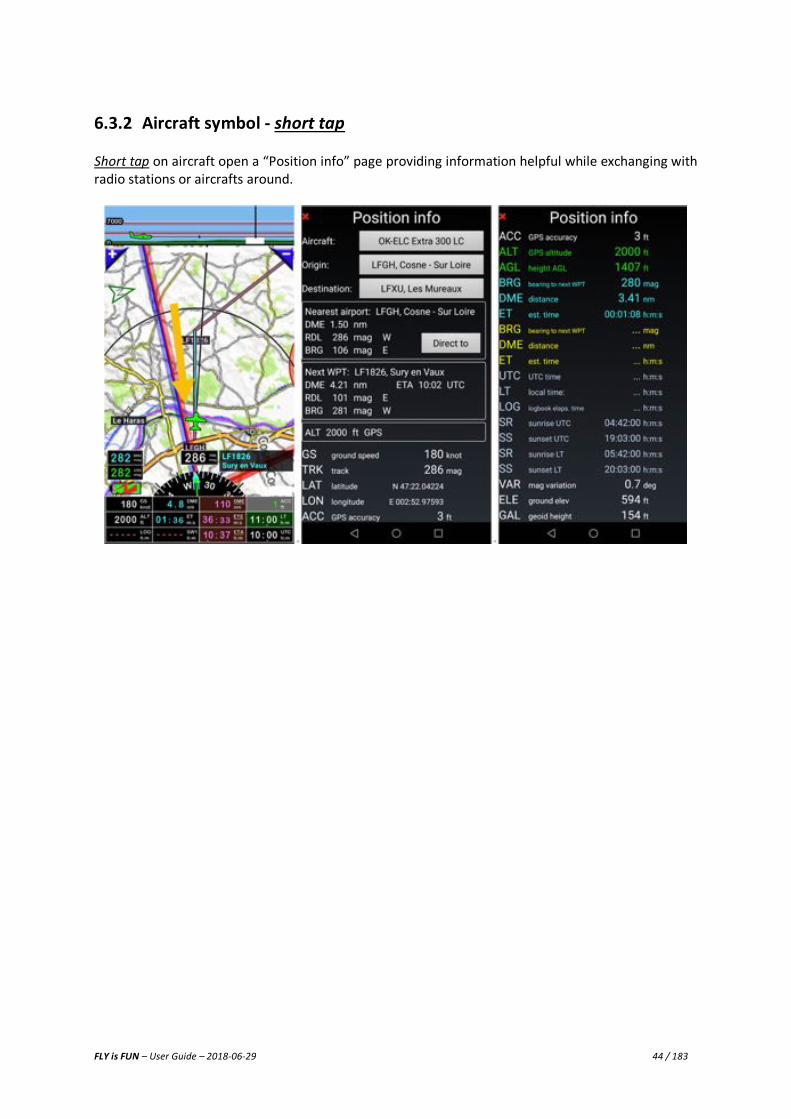
6.3.2 Aircraft symbol - short tap Short tap on aircraft open a “Position info” page providing information helpful while exchanging with radio stations or aircrafts around.
FLY is FUN – User Guide – 2018-06-29 45 / 183
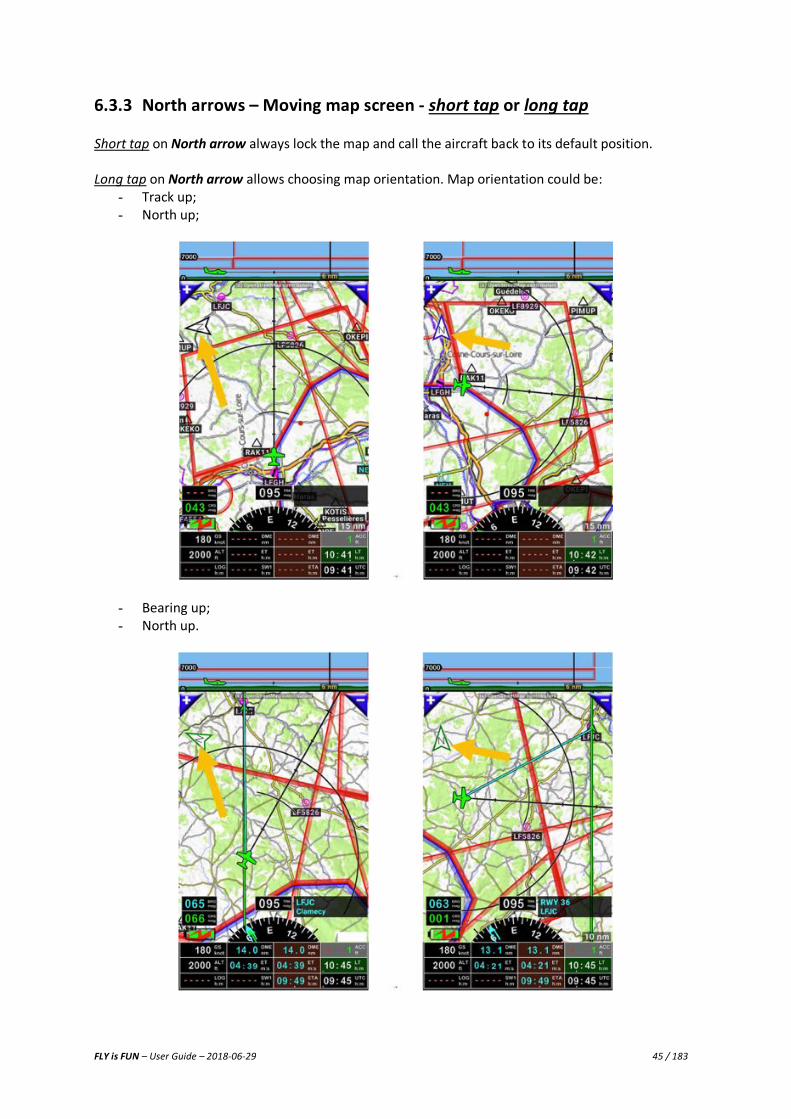
6.3.3 North arrows – Moving map screen - short tap or long tap Short tap on North arrow always lock the map and call the aircraft back to its default position. Long tap on North arrow allows choosing map orientation. Map orientation could be:
- Track up; - North up;
- Bearing up; - North up.
FLY is FUN – User Guide – 2018-06-29 46 / 183
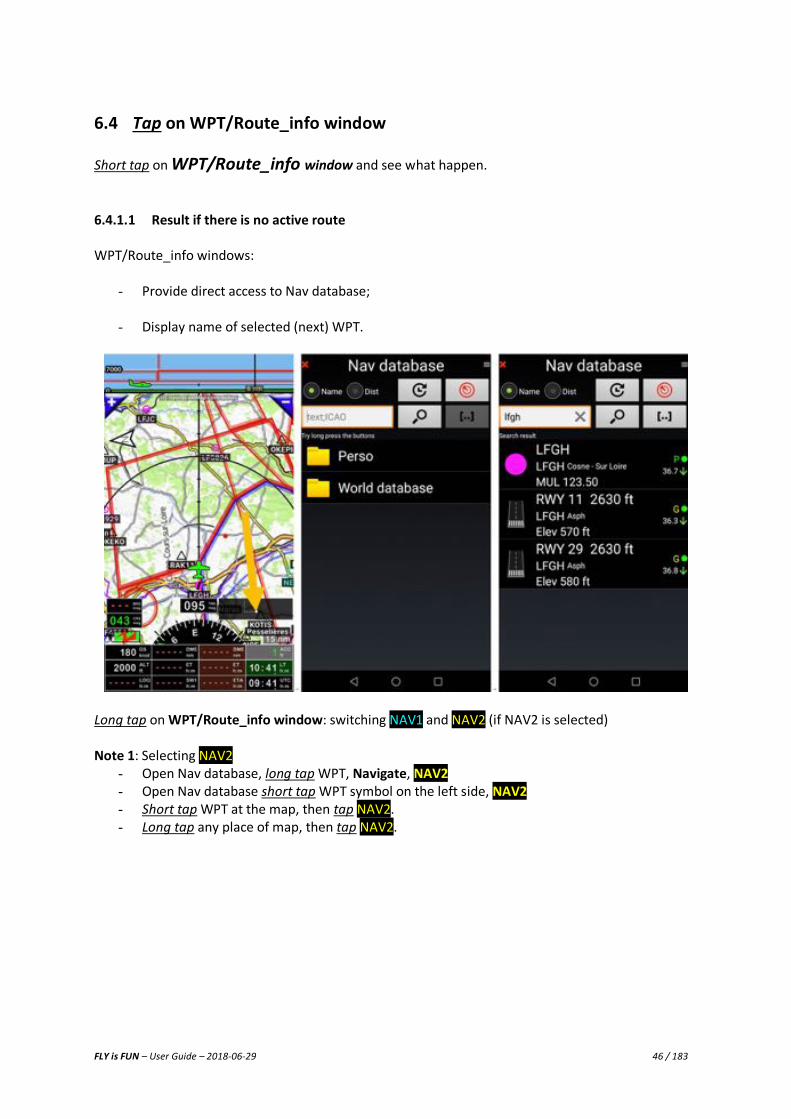
6.4 Tap on WPT/Route_info window
Short tap on WPT/Route_info window and see what happen. 6.4.1.1 Result if there is no active route WPT/Route_info windows:
- Provide direct access to Nav database;
- Display name of selected (next) WPT.
Long tap on WPT/Route_info window: switching NAV1 and NAV2 (if NAV2 is selected) Note 1: Selecting NAV2
- Open Nav database, long tap WPT, Navigate, NAV2 - Open Nav database short tap WPT symbol on the left side, NAV2 - Short tap WPT at the map, then tap NAV2. - Long tap any place of map, then tap NAV2.
FLY is FUN – User Guide – 2018-06-29 47 / 183
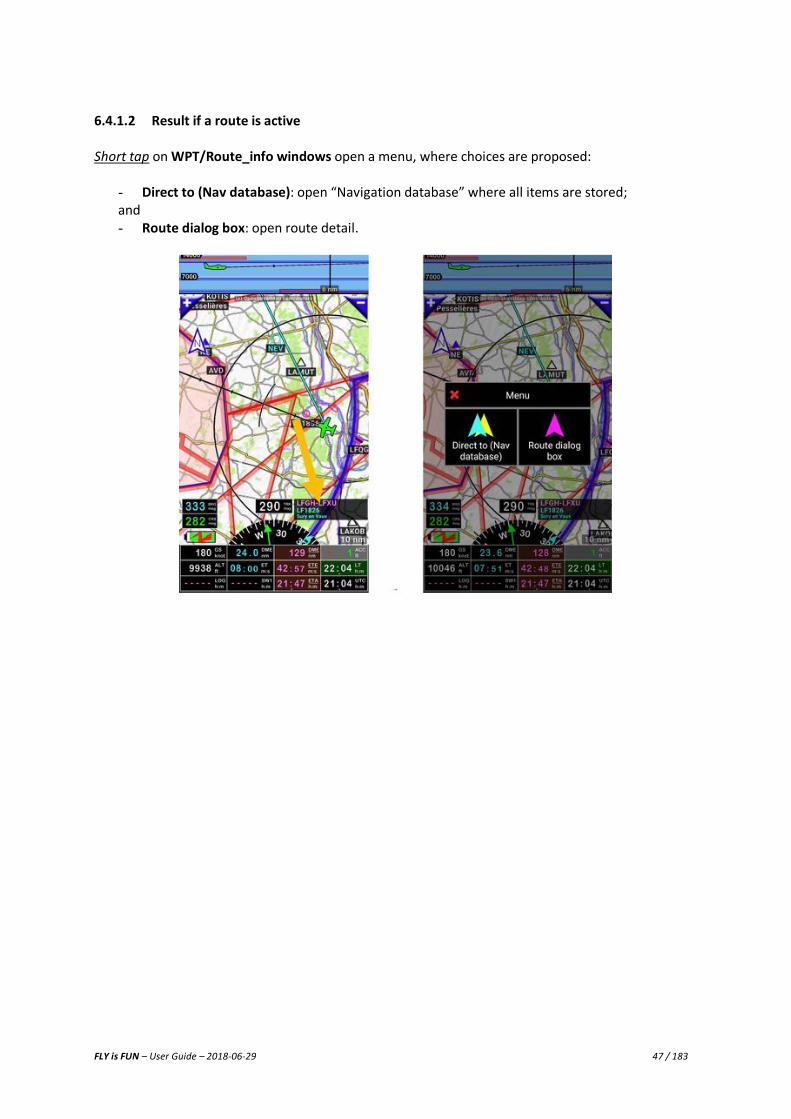
6.4.1.2 Result if a route is active Short tap on WPT/Route_info windows open a menu, where choices are proposed:
- Direct to (Nav database): open “Navigation database” where all items are stored; and - Route dialog box: open route detail.
FLY is FUN – User Guide – 2018-06-29 48 / 183
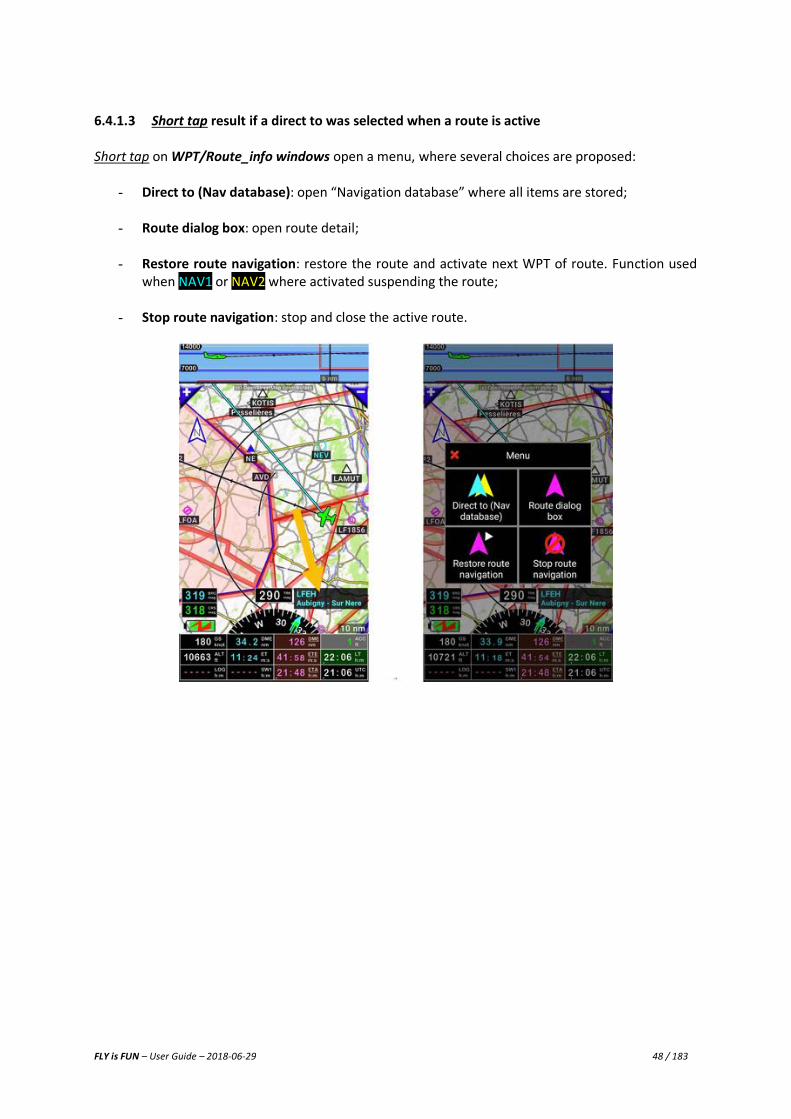
6.4.1.3 Short tap result if a direct to was selected when a route is active Short tap on WPT/Route_info windows open a menu, where several choices are proposed:
- Direct to (Nav database): open “Navigation database” where all items are stored;
- Route dialog box: open route detail;
- Restore route navigation: restore the route and activate next WPT of route. Function used when NAV1 or NAV2 where activated suspending the route;
- Stop route navigation: stop and close the active route.

FLY is FUN – User Guide – 2018-06-29 49 / 183
6.5 Moving map – Terrain Map – long tap on… Long tap anywhere on moving map or on terrain screen open a menu, proposing several choices:
Via this menu, it is possible:
- To get information on: o Distance from the aircraft to selected item / point; o Bearing from the aircraft the selected item / point; o Radial from selected item / point to the aircraft; o Elevation of selected item / point.
- To activate functions: - NAV1 direct to: Direct to selected item, only direction guidance (localizer approach); - NAV2 direct to: Direct to selected item, only direction guidance (localizer approach);
Note FLY is FUN allows selection of 2 different items / points to use for direct to purpose, with fast switching possibility between them;
- Create new WPT: Create new WPT in Nav database; - Start new route: Start route creation; - Sunrise / Sunset calculator: Calculate Sunrise and Sunset hours for any point of the world; - Nearest: Provide information of nearest Airports, Frequencies, METARs, airspaces …:
o Nearest airports: provide names of nearest airports sorted by distance; o Nearest with options: provide names of nearest nav items according to pilot choice (ILS,
LOC, RWY, VOR, NDB, APT, WPT, TWPT, FIX, HP, OBST, MB): o Nearest airports VHF: provide frequency info of nearest airport: o Nearest airports PDF: Displays PDF document attached to nearest airport:
(if files are on device) o METARs/TAFs around: Displays METARs and TAFs info for airports that are around. Active
Internet connection needed. o Nearest airspace: provide information on Airspace and patterns around the aircraft:
- Show in another application: Allows to see the selected point in other application (I.e. Google Earth or Google Map);
- Map selection: Allows to choose in “Maps library map to use in background”.
FLY is FUN – User Guide – 2018-06-29 50 / 183
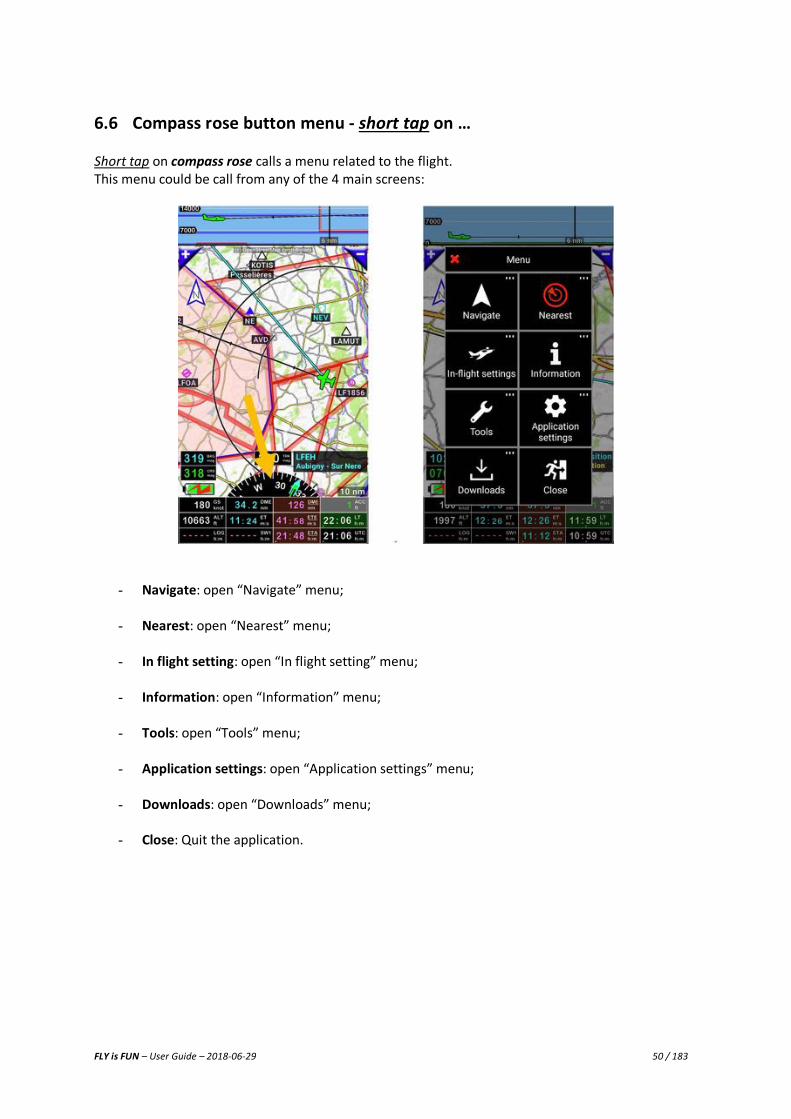
6.6 Compass rose button menu - short tap on … Short tap on compass rose calls a menu related to the flight. This menu could be call from any of the 4 main screens:
- Navigate: open “Navigate” menu;
- Nearest: open “Nearest” menu;
- In flight setting: open “In flight setting” menu;
- Information: open “Information” menu;
- Tools: open “Tools” menu;
- Application settings: open “Application settings” menu;
- Downloads: open “Downloads” menu;
- Close: Quit the application.
FLY is FUN – User Guide – 2018-06-29 51 / 183
7 Menus and sub menus
7.1 “Navigate” menu
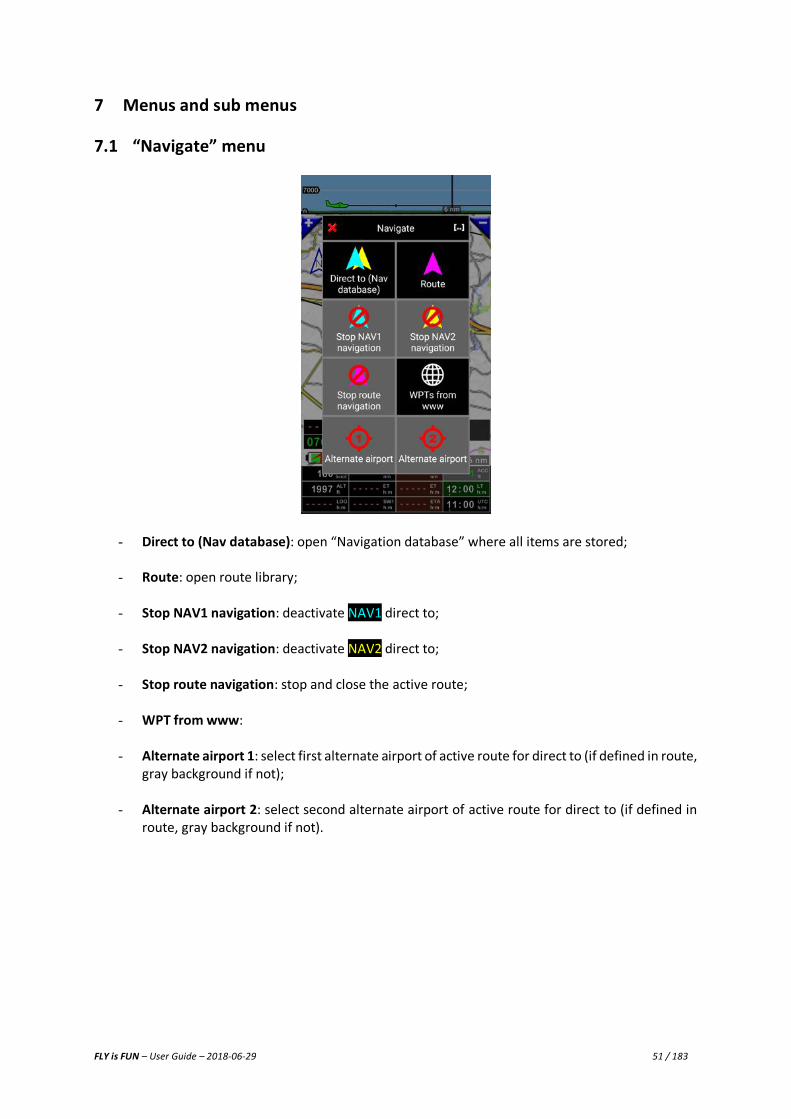
- Direct to (Nav database): open “Navigation database” where all items are stored;
- Route: open route library;
- Stop NAV1 navigation: deactivate NAV1 direct to;
- Stop NAV2 navigation: deactivate NAV2 direct to;
- Stop route navigation: stop and close the active route;
- WPT from www:
- Alternate airport 1: select first alternate airport of active route for direct to (if defined in route, gray background if not);
- Alternate airport 2: select second alternate airport of active route for direct to (if defined in route, gray background if not).
FLY is FUN – User Guide – 2018-06-29 52 / 183
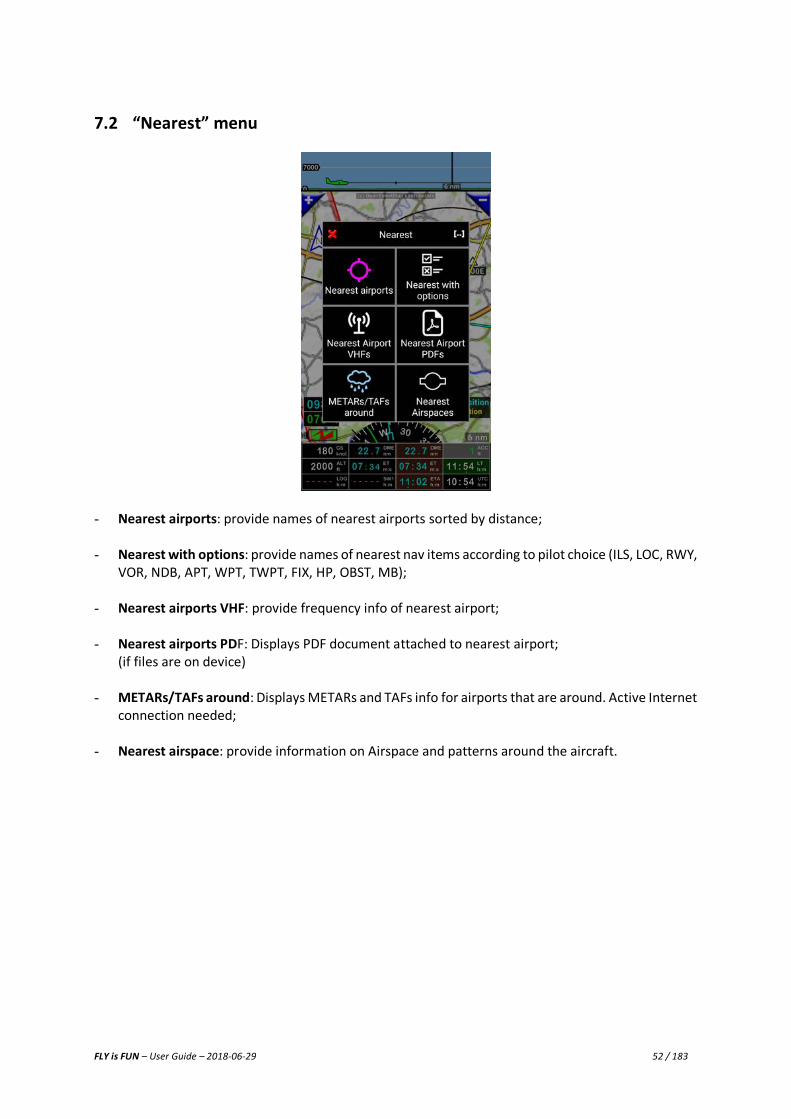
7.2 “Nearest” menu
- Nearest airports: provide names of nearest airports sorted by distance;
- Nearest with options: provide names of nearest nav items according to pilot choice (ILS, LOC, RWY,
VOR, NDB, APT, WPT, TWPT, FIX, HP, OBST, MB);
- Nearest airports VHF: provide frequency info of nearest airport;
- Nearest airports PDF: Displays PDF document attached to nearest airport; (if files are on device)
- METARs/TAFs around: Displays METARs and TAFs info for airports that are around. Active Internet connection needed;
- Nearest airspace: provide information on Airspace and patterns around the aircraft.

FLY is FUN – User Guide – 2018-06-29 53 / 183
7.3 “In flight setting” menu
- Course: allows to enter course information;
Note: Short tap on CRS indicator from any of the main screens allows to setting course information.
- Heading bug: allows to correct compass entering magnetic correction;
- Speed bug: allows to correct speed entering speed correction;
- Altitude correction: allows to correct altitude information entering altitude correction; Note: Short tap on ALT indicator allows to setting altitude correction.
- QNH: Allows to enter QNH info; Note: QNH information could be directly taken from METARs/TAFs info;
- Map selection: allows to choose a map to use in background in “Maps library”.
- Altitude data source: allows to choose altitude source, if FLY is FUN is connected to external data source
- GPS altitude correction.

FLY is FUN – User Guide – 2018-06-29 54 / 183
7.3.1 “Information” menu
- Position information: open “Aircraft position info” windows;
- VHF: display VHF frequency per country, sorted per airport;
- Pilots: open “Pilots” list;
- Aircrafts: open “Aircrafts library”;
- Airspaces and patterns: Displays Airspace and patterns per country;
- About: Display FLY is FUN version number and other information about the application.
FLY is FUN – User Guide – 2018-06-29 55 / 183
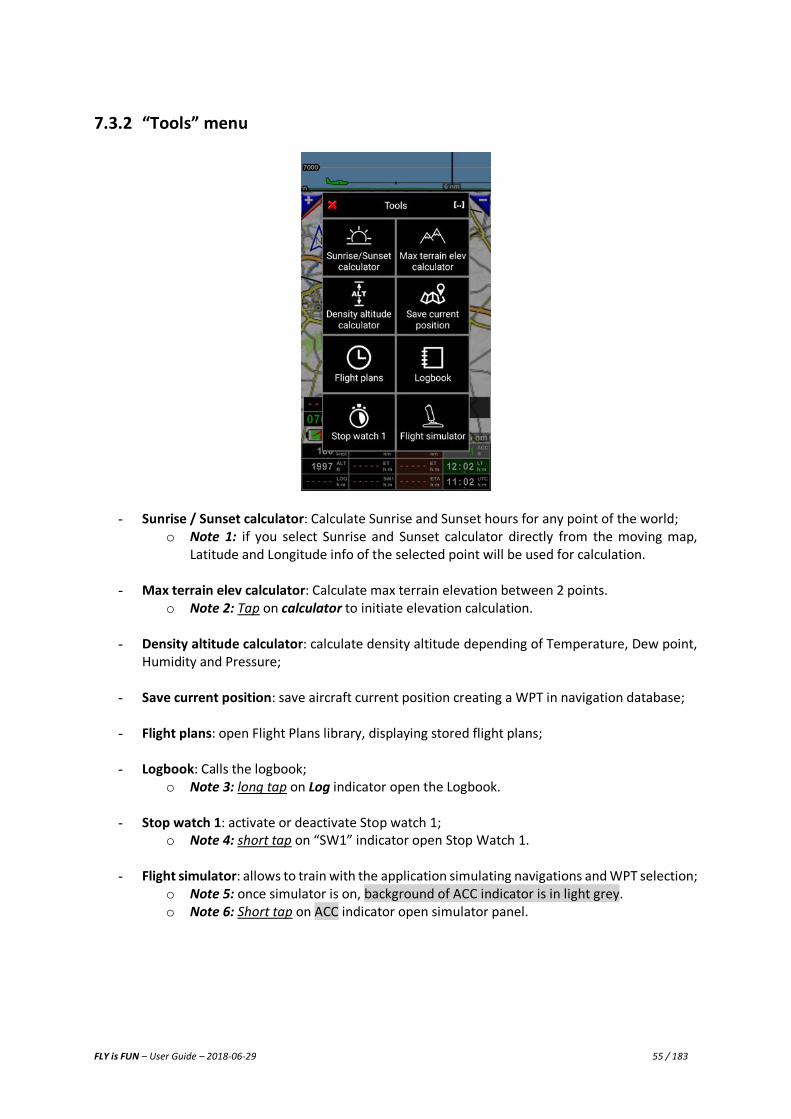
7.3.2 “Tools” menu
- Sunrise / Sunset calculator: Calculate Sunrise and Sunset hours for any point of the world; o Note 1: if you select Sunrise and Sunset calculator directly from the moving map,
Latitude and Longitude info of the selected point will be used for calculation.
- Max terrain elev calculator: Calculate max terrain elevation between 2 points. o Note 2: Tap on calculator to initiate elevation calculation.
- Density altitude calculator: calculate density altitude depending of Temperature, Dew point,
Humidity and Pressure;
- Save current position: save aircraft current position creating a WPT in navigation database;
- Flight plans: open Flight Plans library, displaying stored flight plans;
- Logbook: Calls the logbook; o Note 3: long tap on Log indicator open the Logbook.
- Stop watch 1: activate or deactivate Stop watch 1;
o Note 4: short tap on “SW1” indicator open Stop Watch 1.
- Flight simulator: allows to train with the application simulating navigations and WPT selection; o Note 5: once simulator is on, background of ACC indicator is in light grey. o Note 6: Short tap on ACC indicator open simulator panel.
FLY is FUN – User Guide – 2018-06-29 56 / 183
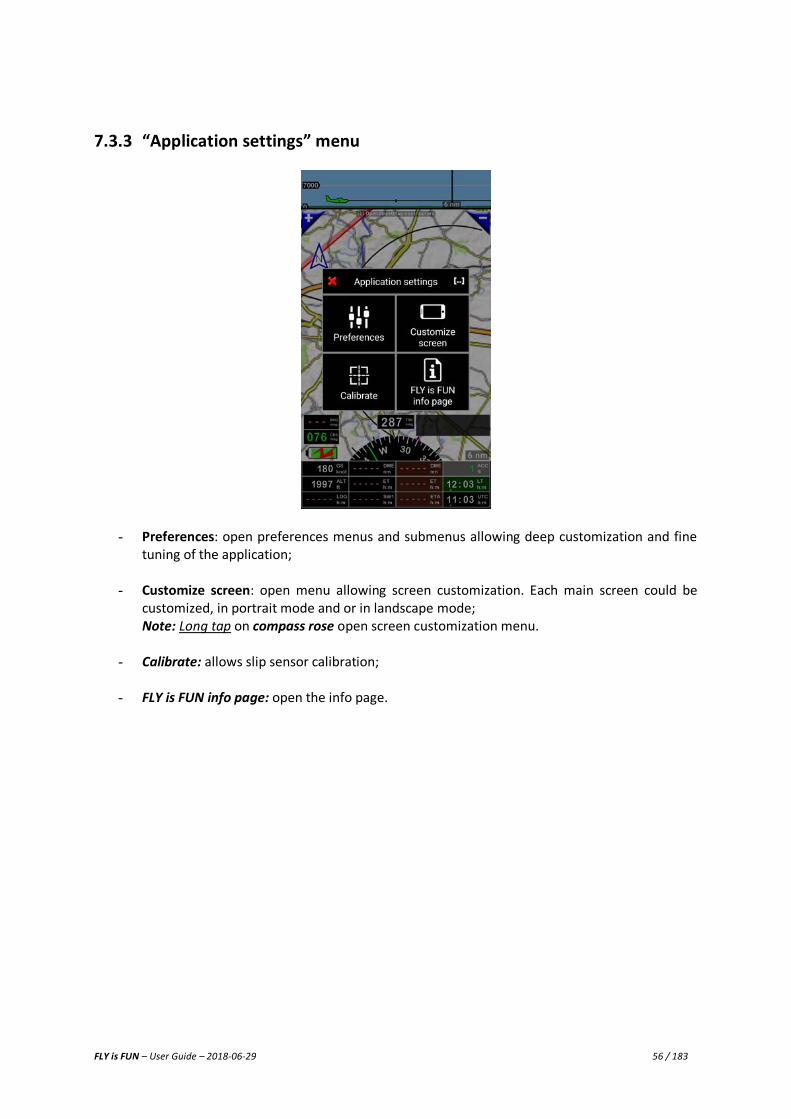
7.3.3 “Application settings” menu
- Preferences: open preferences menus and submenus allowing deep customization and fine tuning of the application;
- Customize screen: open menu allowing screen customization. Each main screen could be customized, in portrait mode and or in landscape mode; Note: Long tap on compass rose open screen customization menu.
- Calibrate: allows slip sensor calibration;
- FLY is FUN info page: open the info page.
FLY is FUN – User Guide – 2018-06-29 57 / 183
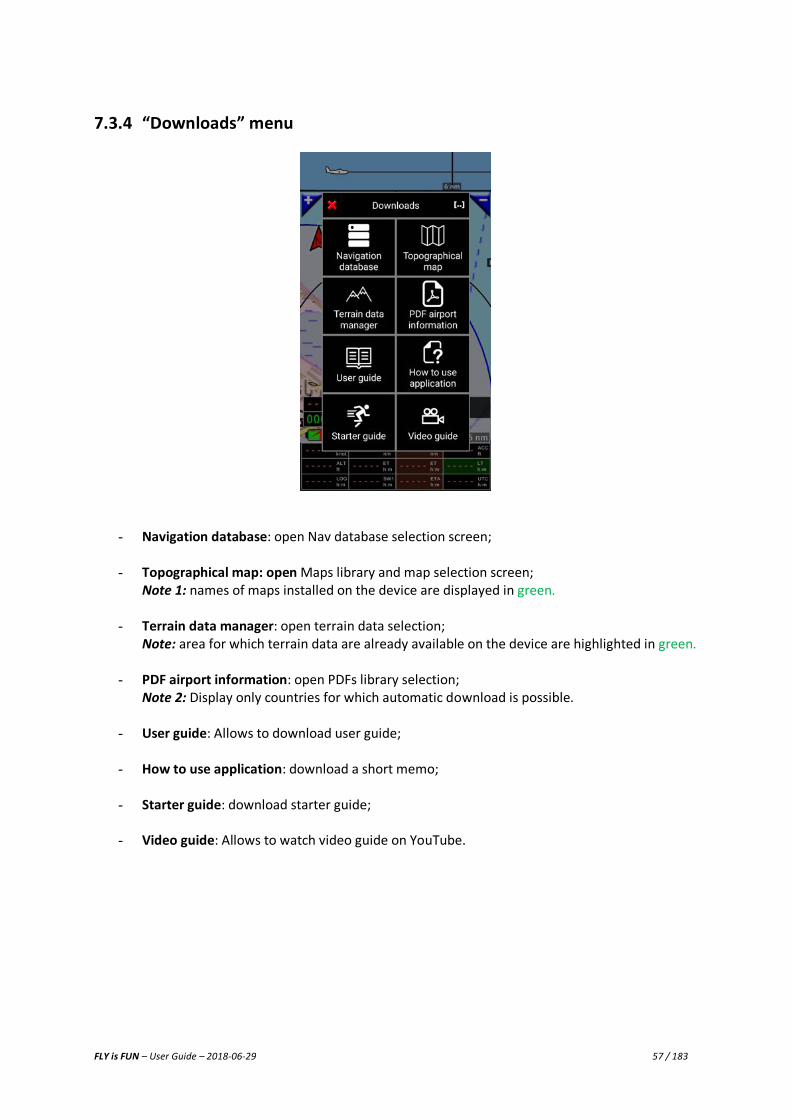
7.3.4 “Downloads” menu
- Navigation database: open Nav database selection screen;
- Topographical map: open Maps library and map selection screen; Note 1: names of maps installed on the device are displayed in green.
- Terrain data manager: open terrain data selection; Note: area for which terrain data are already available on the device are highlighted in green.
- PDF airport information: open PDFs library selection; Note 2: Display only countries for which automatic download is possible.
- User guide: Allows to download user guide;
- How to use application: download a short memo;
- Starter guide: download starter guide;
- Video guide: Allows to watch video guide on YouTube.
FLY is FUN – User Guide – 2018-06-29 58 / 183
8 Direct to
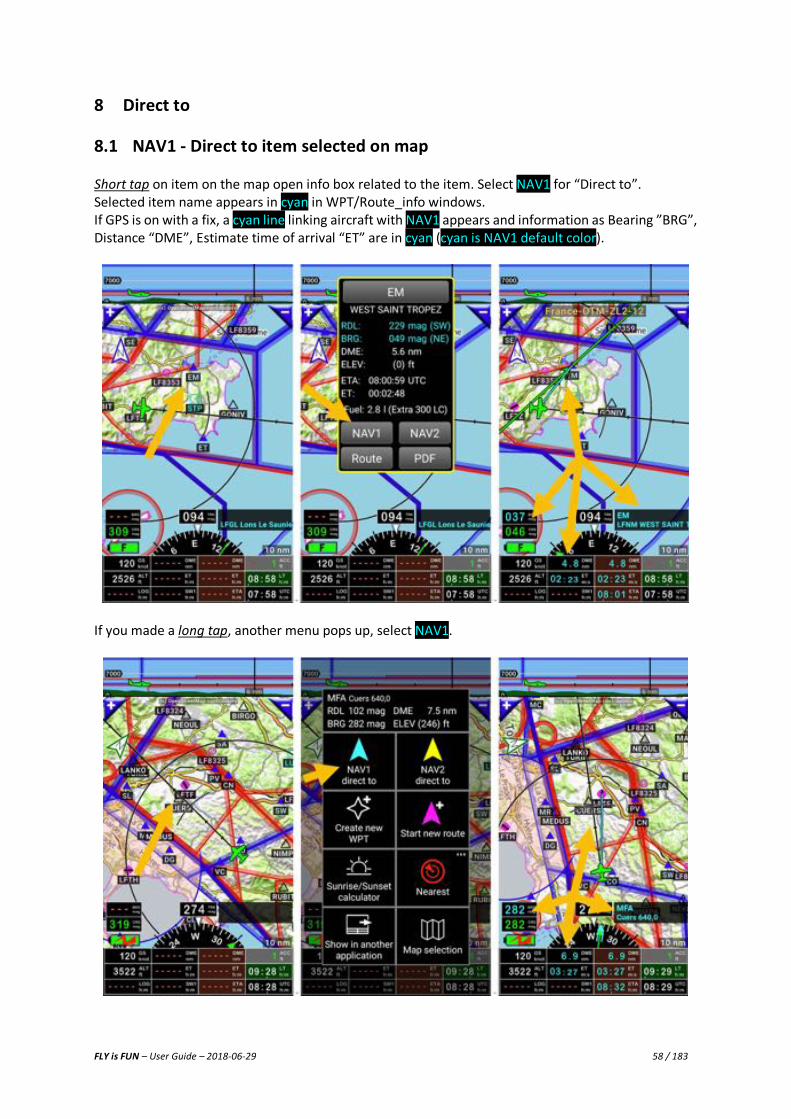
8.1 NAV1 - Direct to item selected on map Short tap on item on the map open info box related to the item. Select NAV1 for “Direct to”. Selected item name appears in cyan in WPT/Route_info windows. If GPS is on with a fix, a cyan line linking aircraft with NAV1 appears and information as Bearing ”BRG”, Distance “DME”, Estimate time of arrival “ET” are in cyan (cyan is NAV1 default color).
If you made a long tap, another menu pops up, select NAV1.
FLY is FUN – User Guide – 2018-06-29 59 / 183
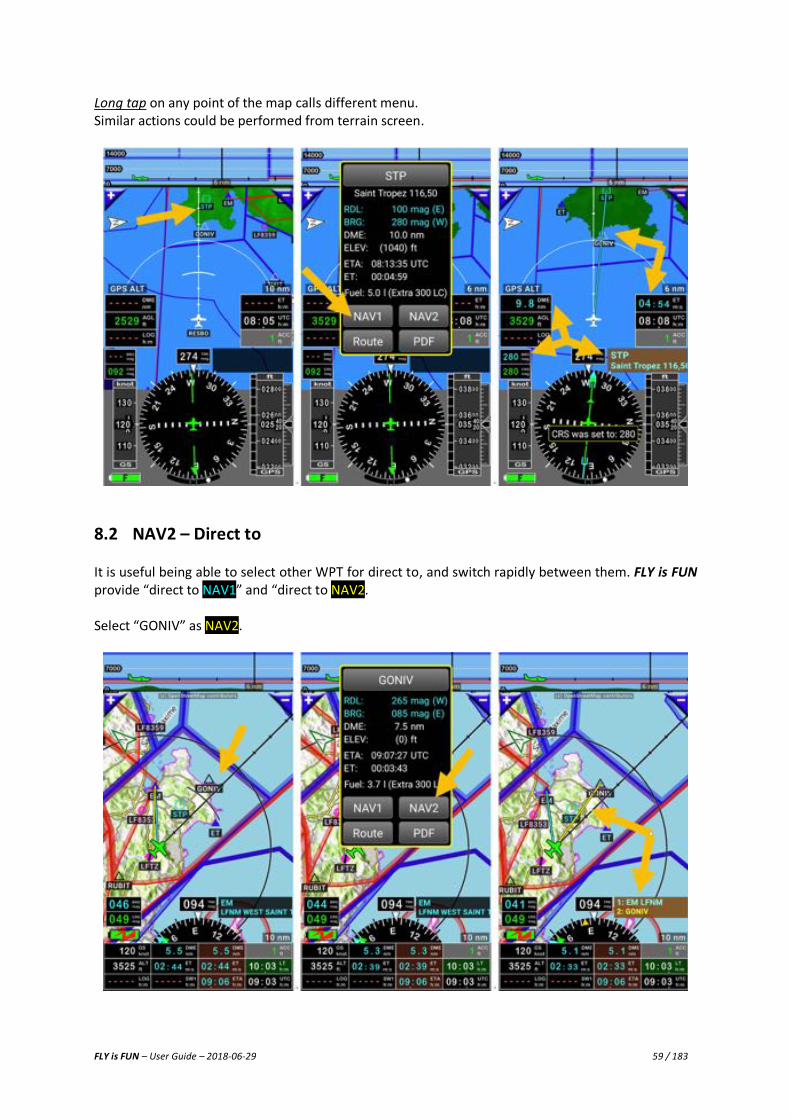
Long tap on any point of the map calls different menu. Similar actions could be performed from terrain screen.
8.2 NAV2 – Direct to It is useful being able to select other WPT for direct to, and switch rapidly between them. FLY is FUN provide “direct to NAV1” and “direct to NAV2. Select “GONIV” as NAV2.

FLY is FUN – User Guide – 2018-06-29 60 / 183
Indicators related to item selected as NAV1 or next active WPT are using cyan letters. Indicators related to item selected as NAV2 are using yellow letters. Indicators related to the route or to End of the route have brown background. You will see later, that if you like having more information related to NAV2, as bearing, distance… how to customize indicators. Switching NAV1 item and NAV2 item is easy and fast. Long tap on WPT/Route_info windows and see what is happen.
Previous NAV2 item is now NAV1 and previous NAV1 item is now NAV2. Note 1: Airspaces cannot be selected for direct to. Note 2: On the lower part of the screen, indicators that have brown background DME, ET, ETA are related to the end of the route, to the last point of the route, while the others with black background are related to the next selected point. In case of Direct to, values are the same.
FLY is FUN – User Guide – 2018-06-29 61 / 183
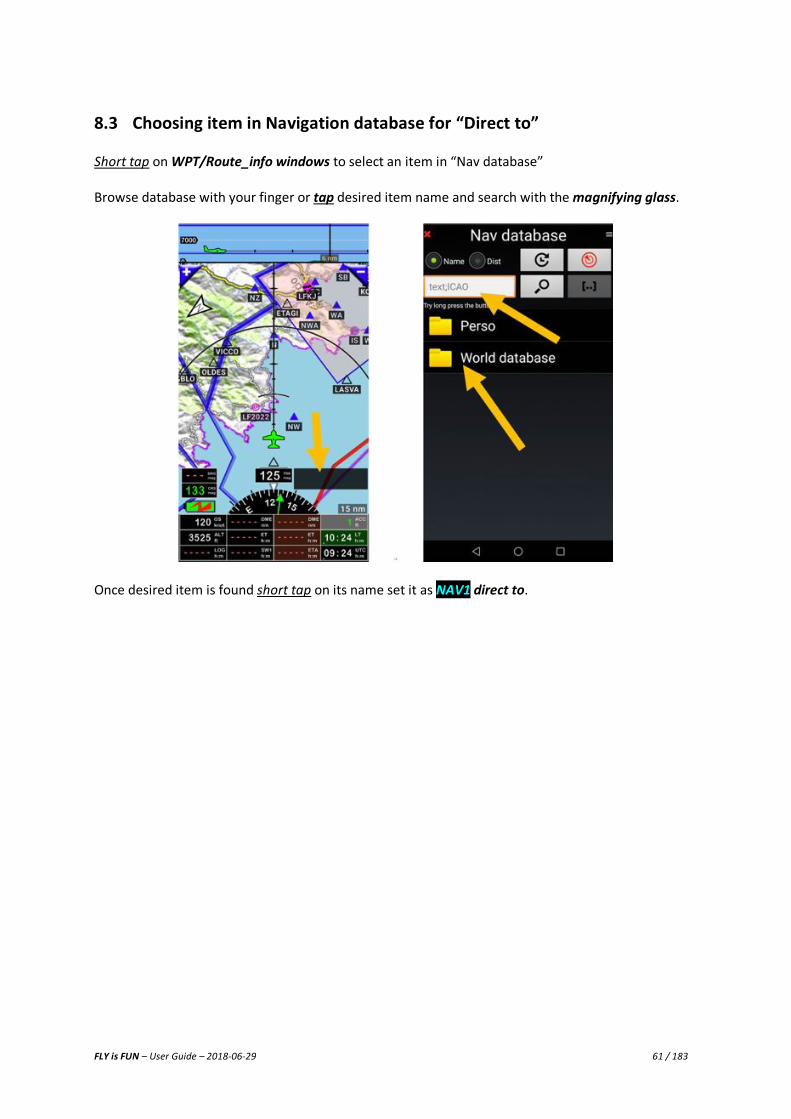
8.3 Choosing item in Navigation database for “Direct to” Short tap on WPT/Route_info windows to select an item in “Nav database” Browse database with your finger or tap desired item name and search with the magnifying glass.
Once desired item is found short tap on its name set it as NAV1 direct to.
FLY is FUN – User Guide – 2018-06-29 62 / 183
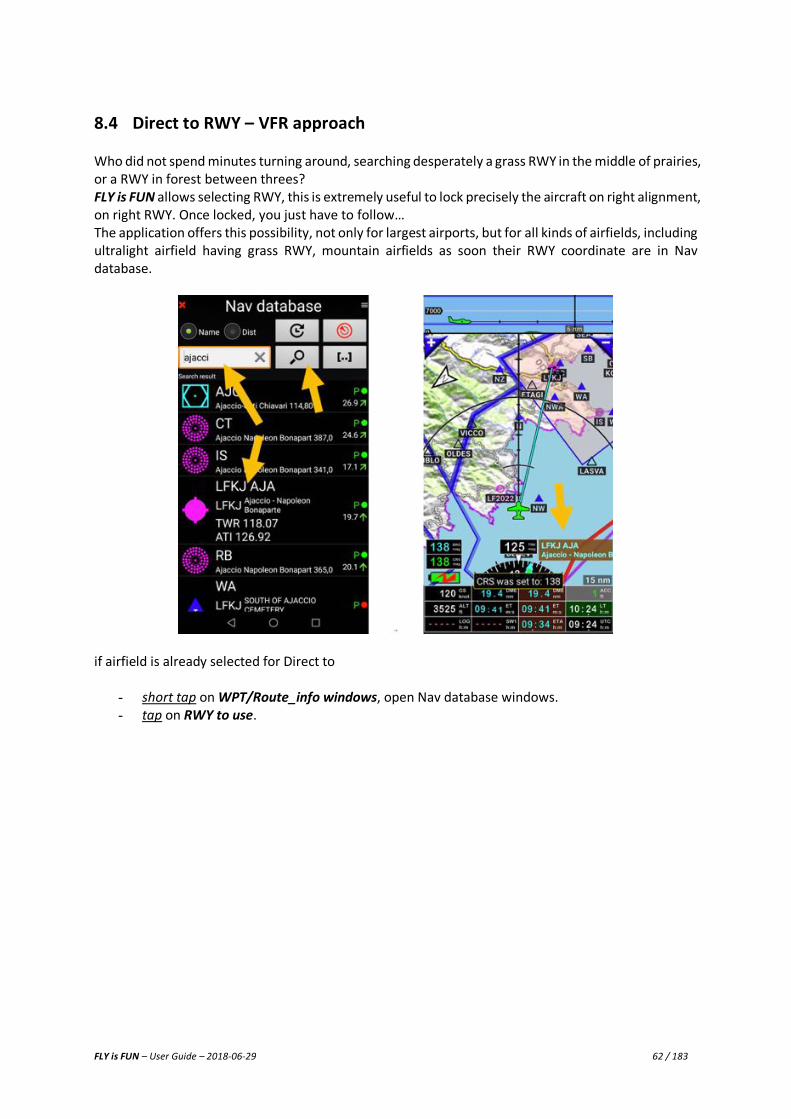
8.4 Direct to RWY – VFR approach Who did not spend minutes turning around, searching desperately a grass RWY in the middle of prairies, or a RWY in forest between threes? FLY is FUN allows selecting RWY, this is extremely useful to lock precisely the aircraft on right alignment, on right RWY. Once locked, you just have to follow… The application offers this possibility, not only for largest airports, but for all kinds of airfields, including ultralight airfield having grass RWY, mountain airfields as soon their RWY coordinate are in Nav database.
if airfield is already selected for Direct to
- short tap on WPT/Route_info windows, open Nav database windows. - tap on RWY to use.
FLY is FUN – User Guide – 2018-06-29 63 / 183
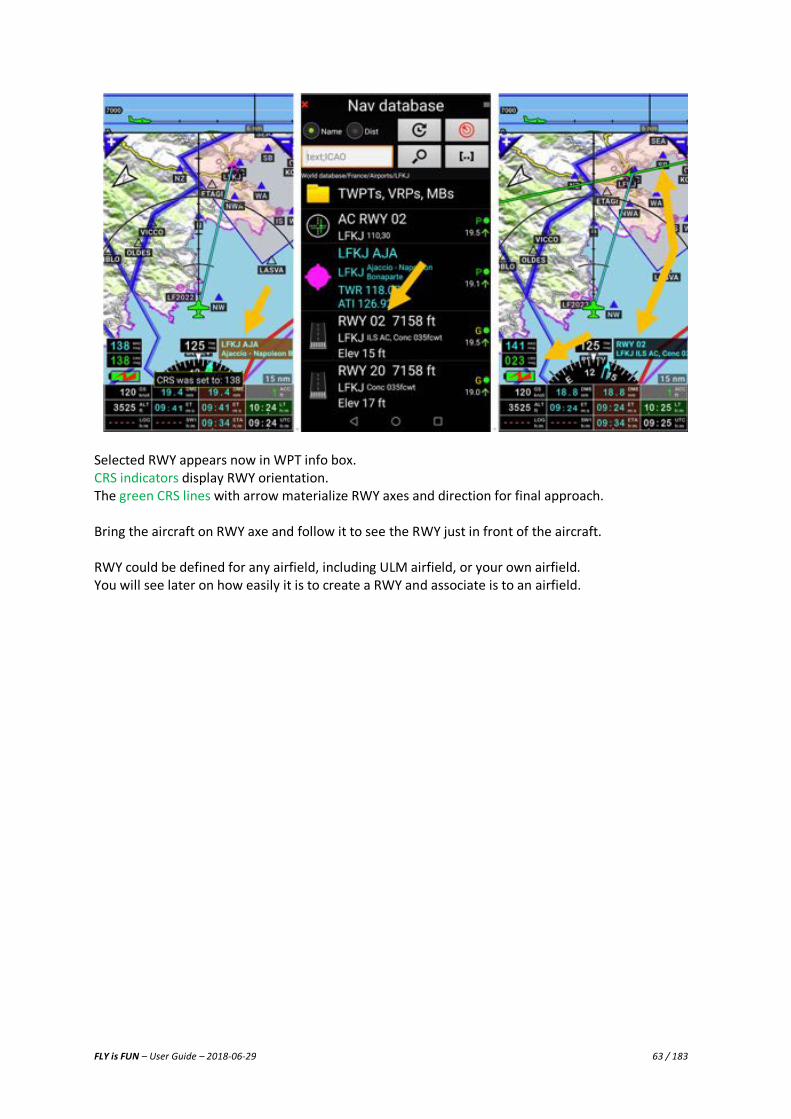
Selected RWY appears now in WPT info box. CRS indicators display RWY orientation. The green CRS lines with arrow materialize RWY axes and direction for final approach. Bring the aircraft on RWY axe and follow it to see the RWY just in front of the aircraft. RWY could be defined for any airfield, including ULM airfield, or your own airfield. You will see later on how easily it is to create a RWY and associate is to an airfield.
FLY is FUN – User Guide – 2018-06-29 64 / 183
8.5 Direct to - ILS like approach - RNAV like approach
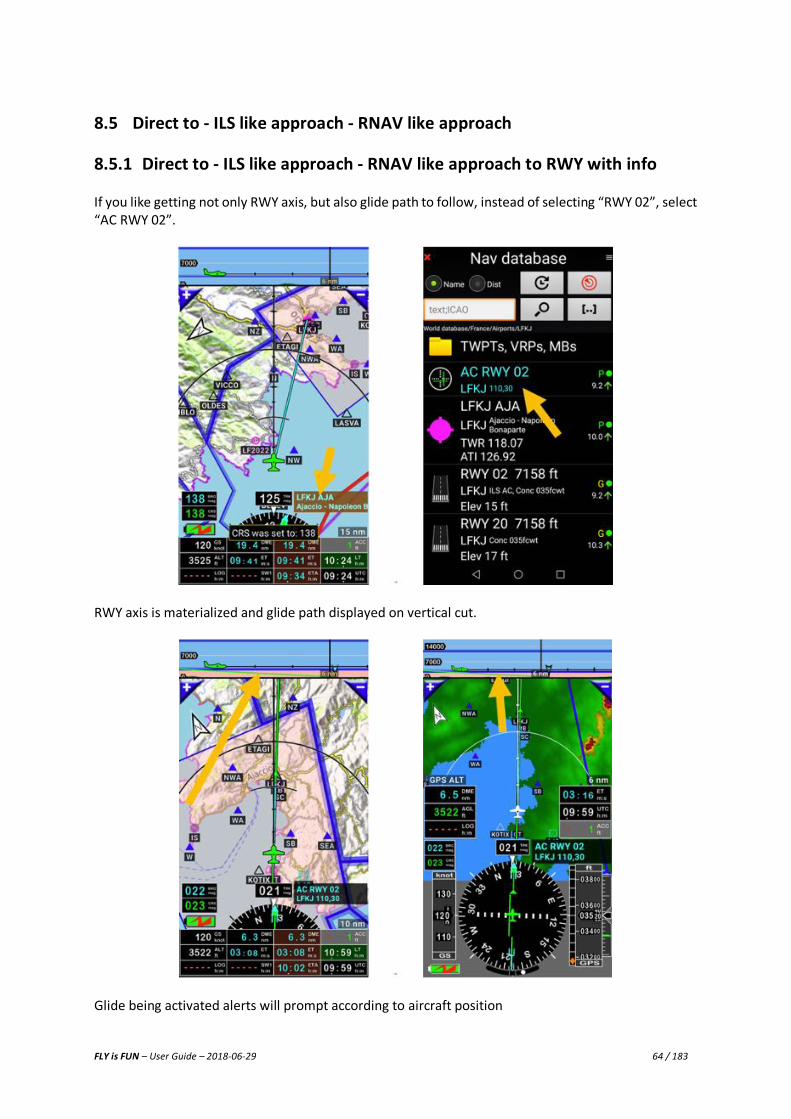
8.5.1 Direct to - ILS like approach - RNAV like approach to RWY with info If you like getting not only RWY axis, but also glide path to follow, instead of selecting “RWY 02”, select “AC RWY 02”.
RWY axis is materialized and glide path displayed on vertical cut.
Glide being activated alerts will prompt according to aircraft position

FLY is FUN – User Guide – 2018-06-29 65 / 183
8.5.2 Direct to - ILS like approach - RNAV like approach to any WPT The application allows to select any WPT or item and to fix CRS and glide path. 8.5.2.1 ILS like approach on RWY Approaching St Benoit sur Loire “LF4552” ultralight airfield, selecting final RWY, it is possible choosing an ILS like approach determining glide path and threshold crossing height. Open WPT/Route_info windows, the long tap on RWY name, then select Navigate… or short tap on the RWY symbol on the left side
There you can select:
- NAV1 direct to: Direct to selected item, only direction guidance (localizer approach);
- NAV2 direct to: Direct to selected item, only direction guidance (localizer approach);
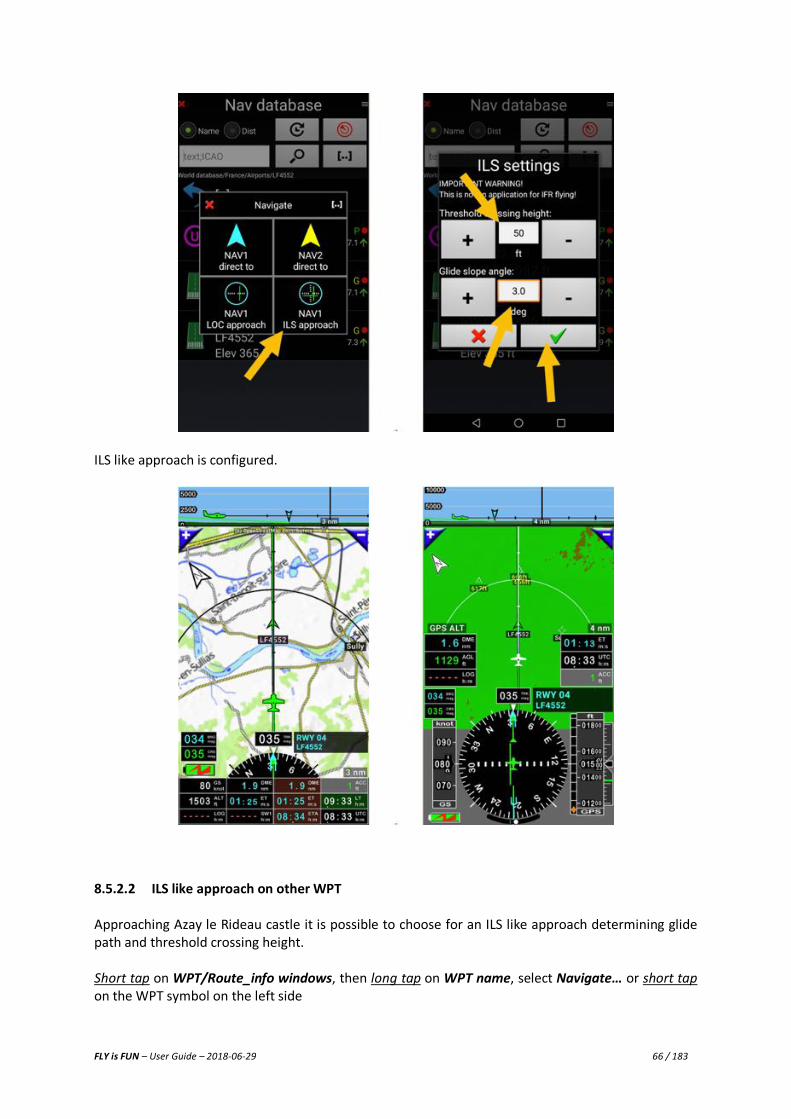
- NAV1 LOC approach:
- NAV1 ILS approach: You will be asked for glide slope and threshold crossing height.
FLY is FUN – User Guide – 2018-06-29 66 / 183
ILS like approach is configured.
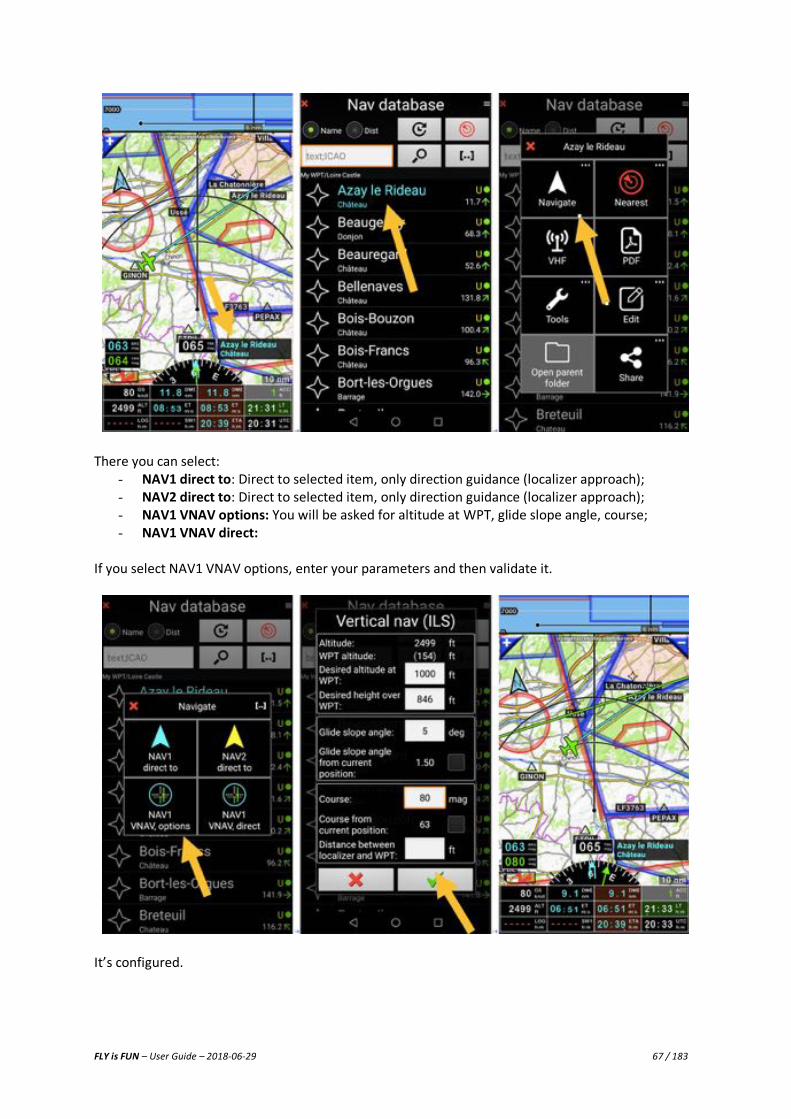
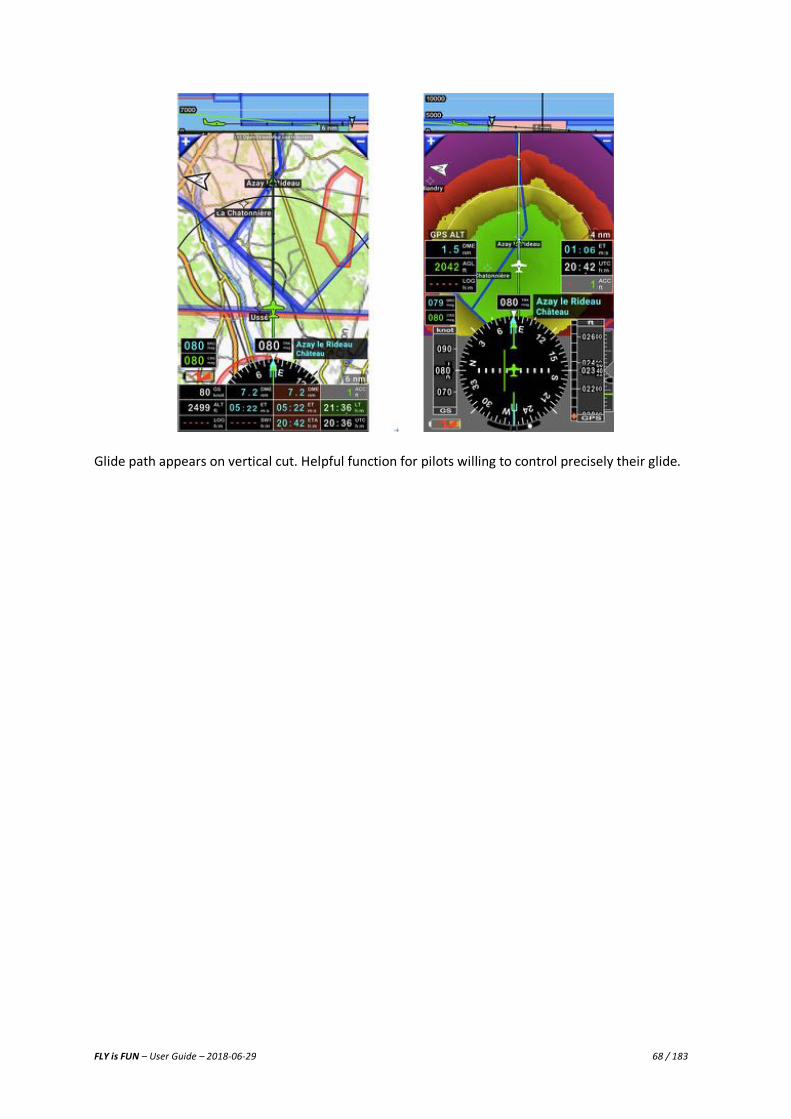
8.5.2.2 ILS like approach on other WPT Approaching Azay le Rideau castle it is possible to choose for an ILS like approach determining glide path and threshold crossing height. Short tap on WPT/Route_info windows, then long tap on WPT name, select Navigate… or short tap on the WPT symbol on the left side
FLY is FUN – User Guide – 2018-06-29 67 / 183
There you can select:
- NAV1 direct to: Direct to selected item, only direction guidance (localizer approach); - NAV2 direct to: Direct to selected item, only direction guidance (localizer approach); - NAV1 VNAV options: You will be asked for altitude at WPT, glide slope angle, course; - NAV1 VNAV direct:
If you select NAV1 VNAV options, enter your parameters and then validate it.
It’s configured.
FLY is FUN – User Guide – 2018-06-29 68 / 183
Glide path appears on vertical cut. Helpful function for pilots willing to control precisely their glide.
FLY is FUN – User Guide – 2018-06-29 69 / 183
8.6 “Direct to” tricks
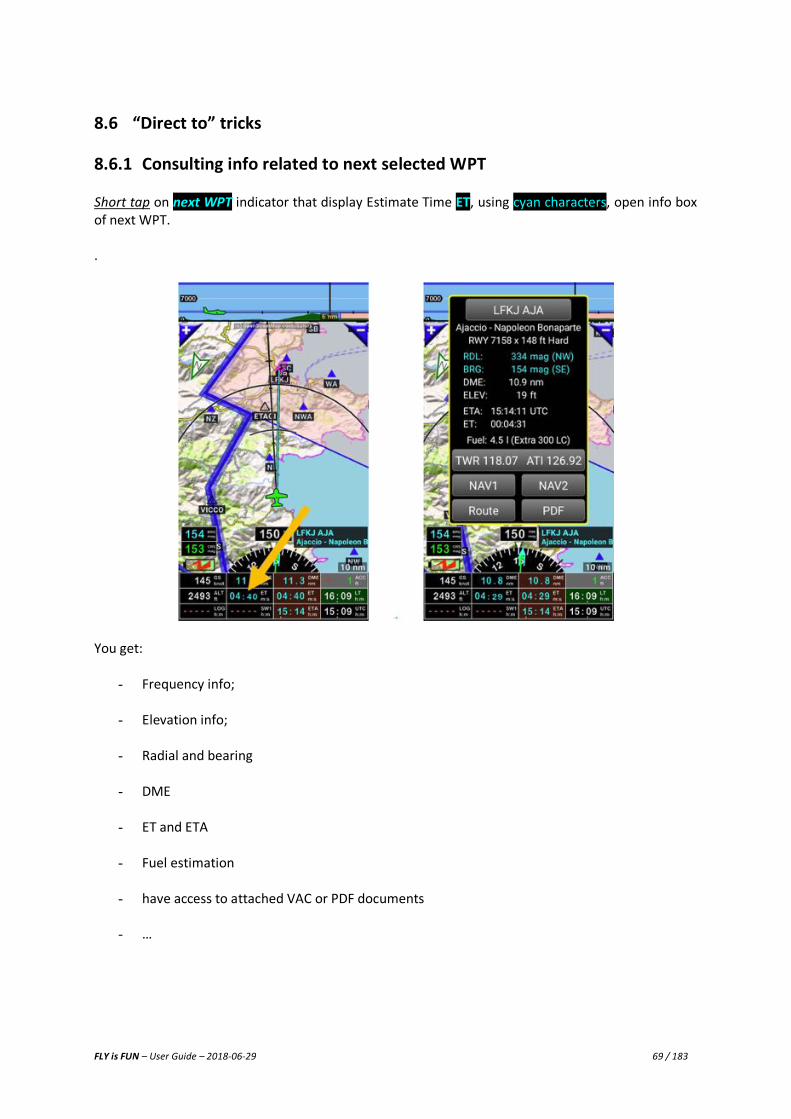
8.6.1 Consulting info related to next selected WPT Short tap on next WPT indicator that display Estimate Time ET, using cyan characters, open info box of next WPT. .
You get:
- Frequency info;
- Elevation info;
- Radial and bearing
- DME
- ET and ETA
- Fuel estimation
- have access to attached VAC or PDF documents
- …
FLY is FUN – User Guide – 2018-06-29 70 / 183
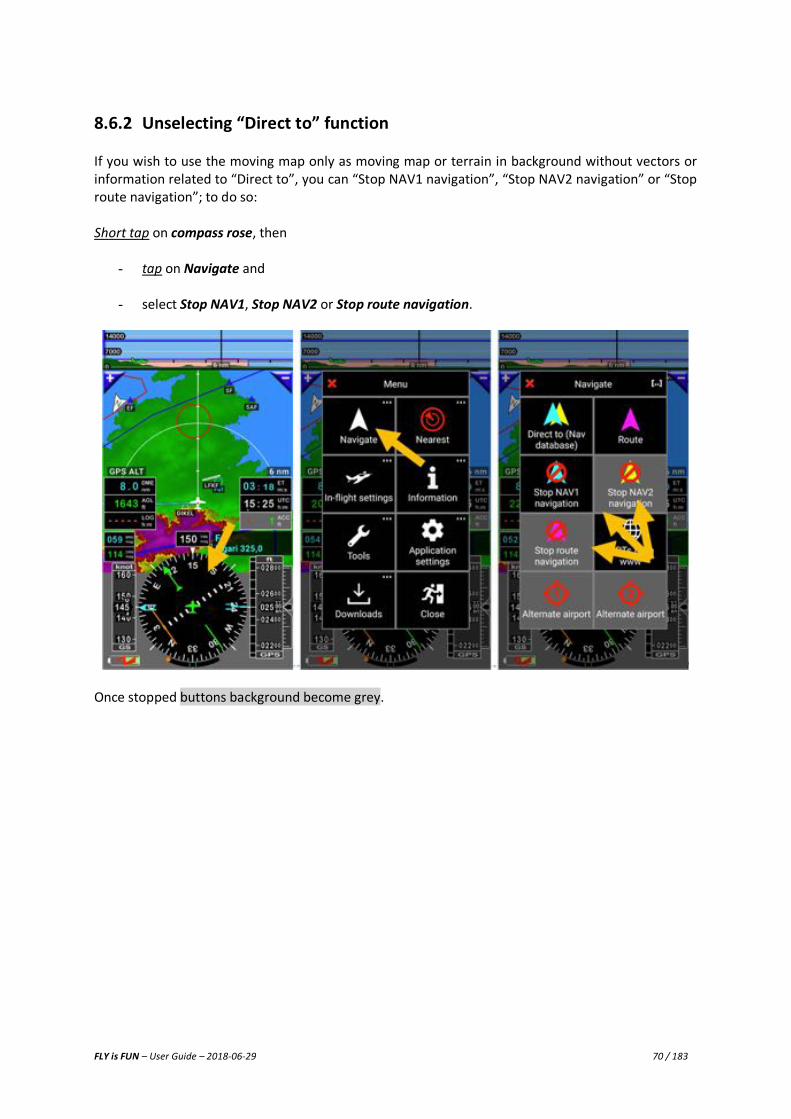
8.6.2 Unselecting “Direct to” function If you wish to use the moving map only as moving map or terrain in background without vectors or information related to “Direct to”, you can “Stop NAV1 navigation”, “Stop NAV2 navigation” or “Stop route navigation”; to do so: Short tap on compass rose, then
- tap on Navigate and
- select Stop NAV1, Stop NAV2 or Stop route navigation.
Once stopped buttons background become grey.
FLY is FUN – User Guide – 2018-06-29 71 / 183
9 Route A route should at least be composed of 2 points, one origin and one destination. If a route has only one point it’s not a route and you cannot save it.
9.1 Creating a route
9.1.1 Selecting items on map
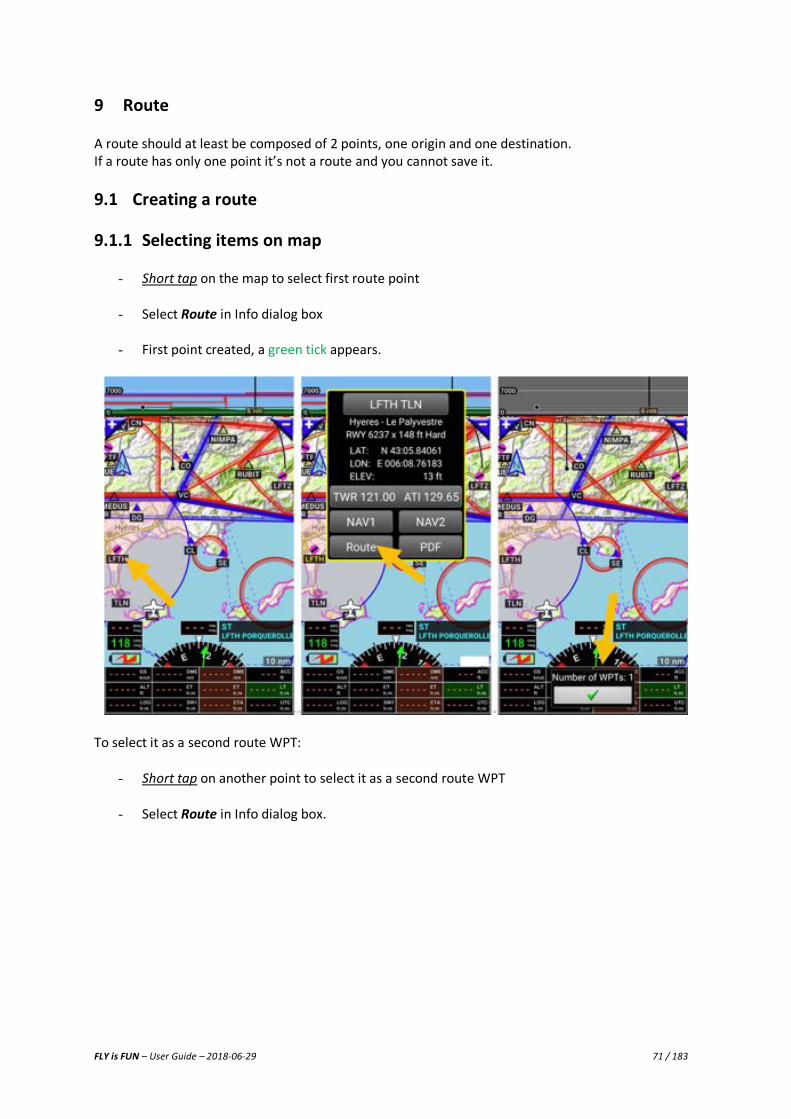
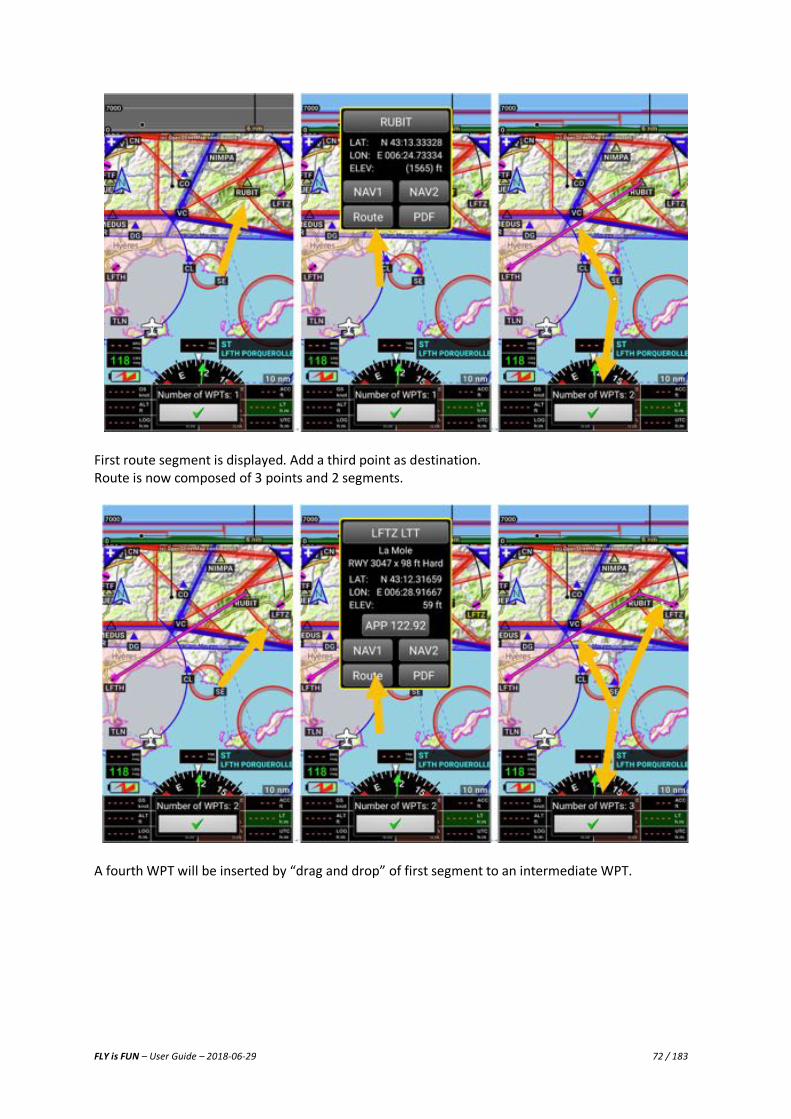
- Short tap on the map to select first route point
- Select Route in Info dialog box
- First point created, a green tick appears.
To select it as a second route WPT:
- Short tap on another point to select it as a second route WPT
- Select Route in Info dialog box.
FLY is FUN – User Guide – 2018-06-29 72 / 183
First route segment is displayed. Add a third point as destination. Route is now composed of 3 points and 2 segments.
A fourth WPT will be inserted by “drag and drop” of first segment to an intermediate WPT.

FLY is FUN – User Guide – 2018-06-29 73 / 183
A fifth WPT will be inserted by long tap on it on the map. Menu pop up proposing to add the nearest item or to create a new WPT, and then select its position in the route.
Tap on green tick to save the route. Route detail is then displayed.
FLY is FUN – User Guide – 2018-06-29 74 / 183
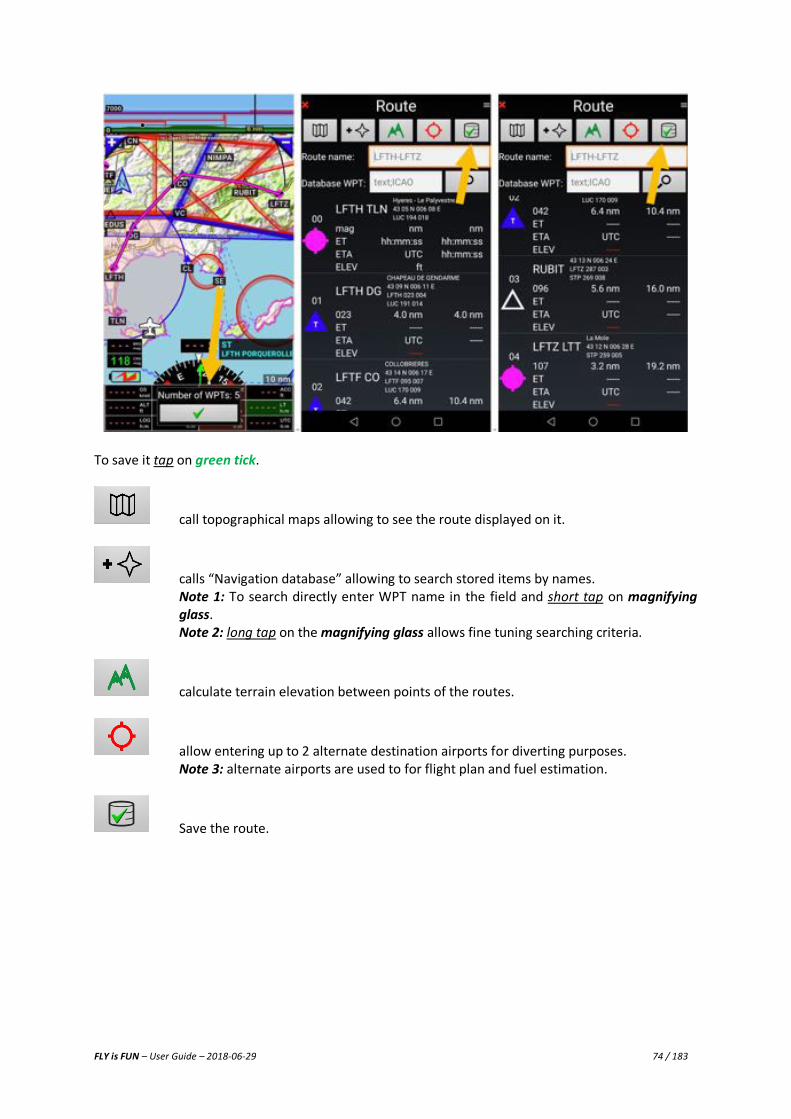
To save it tap on green tick.
call topographical maps allowing to see the route displayed on it.
calls “Navigation database” allowing to search stored items by names. Note 1: To search directly enter WPT name in the field and short tap on magnifying
glass. Note 2: long tap on the magnifying glass allows fine tuning searching criteria.
calculate terrain elevation between points of the routes.
allow entering up to 2 alternate destination airports for diverting purposes. Note 3: alternate airports are used to for flight plan and fuel estimation.
Save the route.
FLY is FUN – User Guide – 2018-06-29 75 / 183
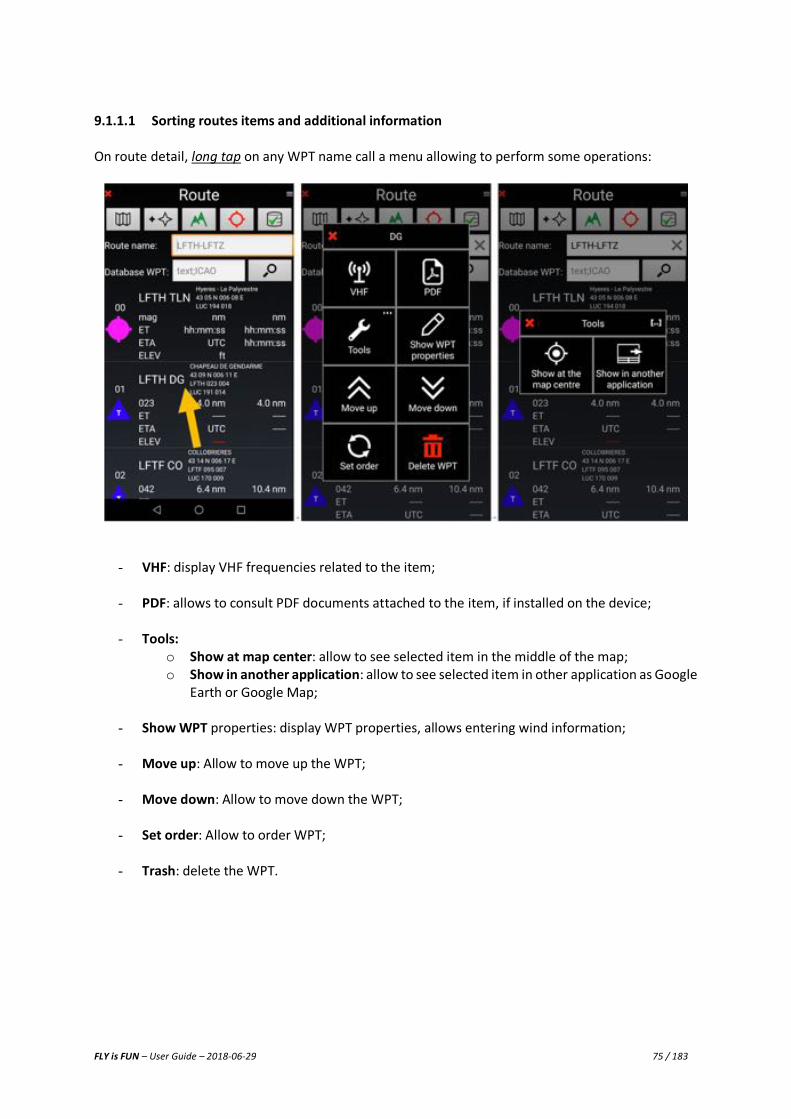
9.1.1.1 Sorting routes items and additional information On route detail, long tap on any WPT name call a menu allowing to perform some operations:
- VHF: display VHF frequencies related to the item;
- PDF: allows to consult PDF documents attached to the item, if installed on the device;
- Tools: o Show at map center: allow to see selected item in the middle of the map; o Show in another application: allow to see selected item in other application as Google
Earth or Google Map;
- Show WPT properties: display WPT properties, allows entering wind information;
- Move up: Allow to move up the WPT;
- Move down: Allow to move down the WPT;
- Set order: Allow to order WPT;
- Trash: delete the WPT.
FLY is FUN – User Guide – 2018-06-29 76 / 183
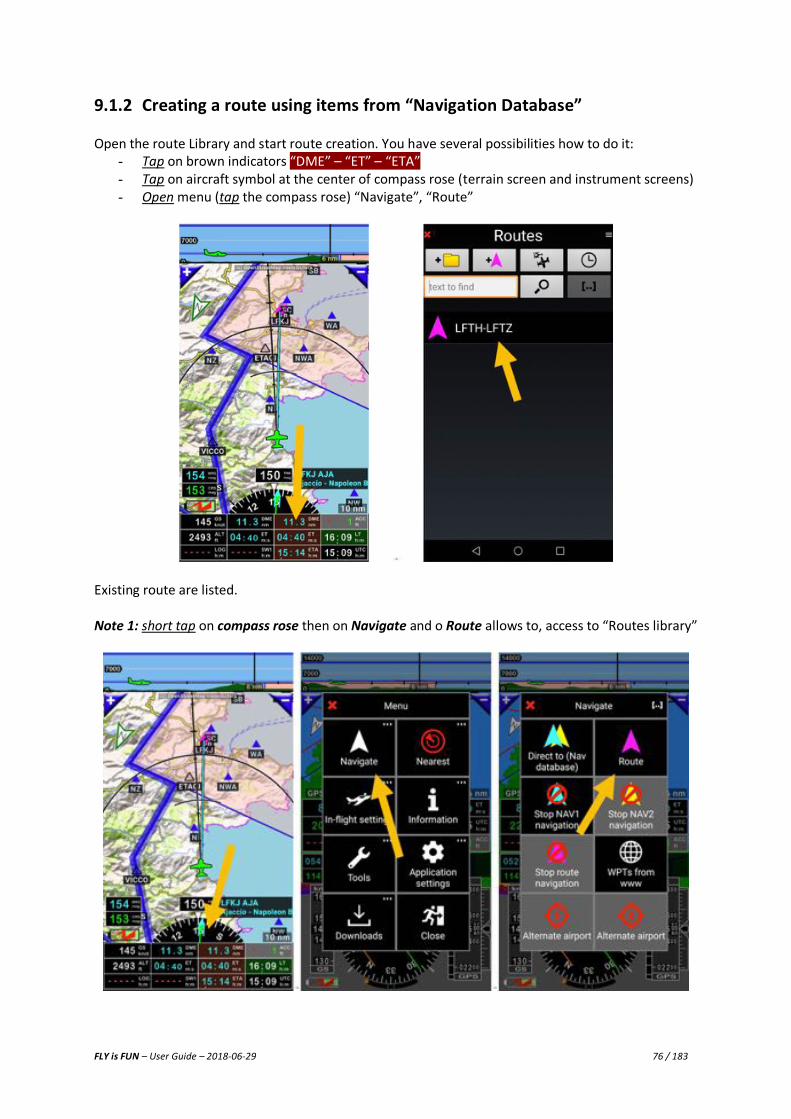
9.1.2 Creating a route using items from “Navigation Database” Open the route Library and start route creation. You have several possibilities how to do it:
- Tap on brown indicators “DME” – “ET” – “ETA” - Tap on aircraft symbol at the center of compass rose (terrain screen and instrument screens) - Open menu (tap the compass rose) “Navigate”, “Route”
Existing route are listed. Note 1: short tap on compass rose then on Navigate and o Route allows to, access to “Routes library”
FLY is FUN – User Guide – 2018-06-29 77 / 183
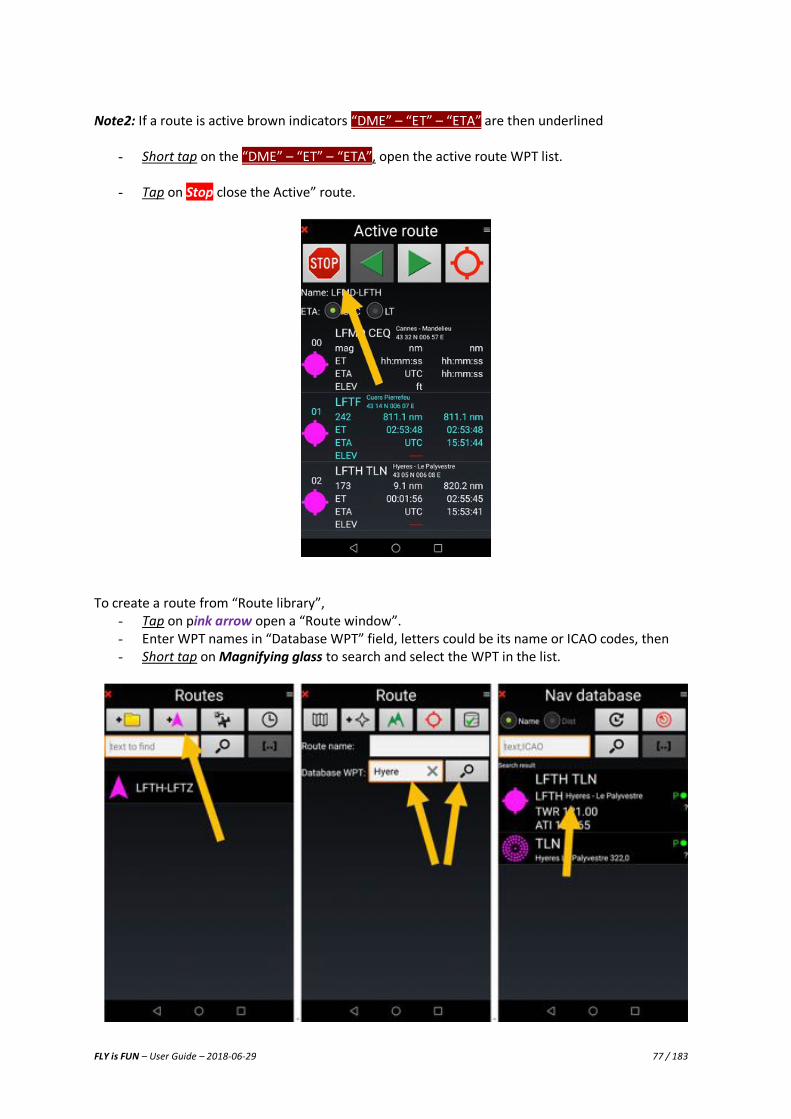
Note2: If a route is active brown indicators “DME” – “ET” – “ETA” are then underlined
- Short tap on the “DME” – “ET” – “ETA”, open the active route WPT list.
- Tap on Stop close the Active” route.
To create a route from “Route library”,
- Tap on pink arrow open a “Route window”. - Enter WPT names in “Database WPT” field, letters could be its name or ICAO codes, then - Short tap on Magnifying glass to search and select the WPT in the list.
FLY is FUN – User Guide – 2018-06-29 78 / 183
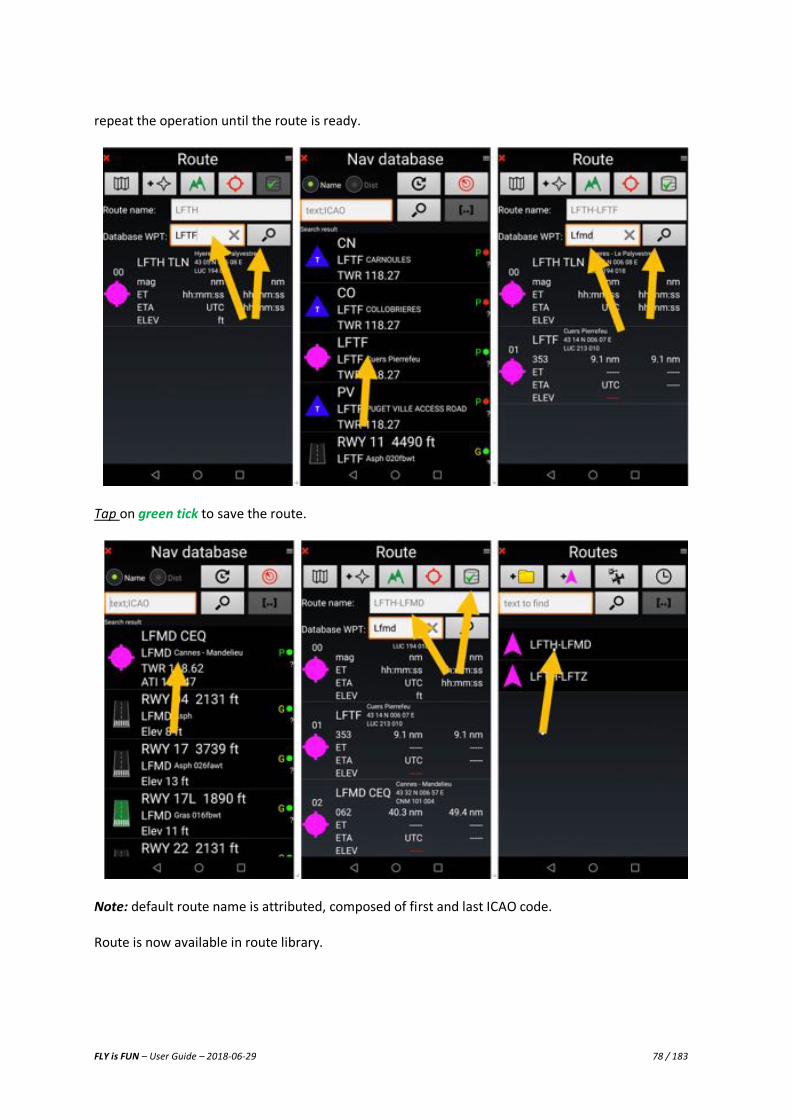
repeat the operation until the route is ready.
Tap on green tick to save the route.
Note: default route name is attributed, composed of first and last ICAO code. Route is now available in route library.
FLY is FUN – User Guide – 2018-06-29 79 / 183
9.2 Using a route
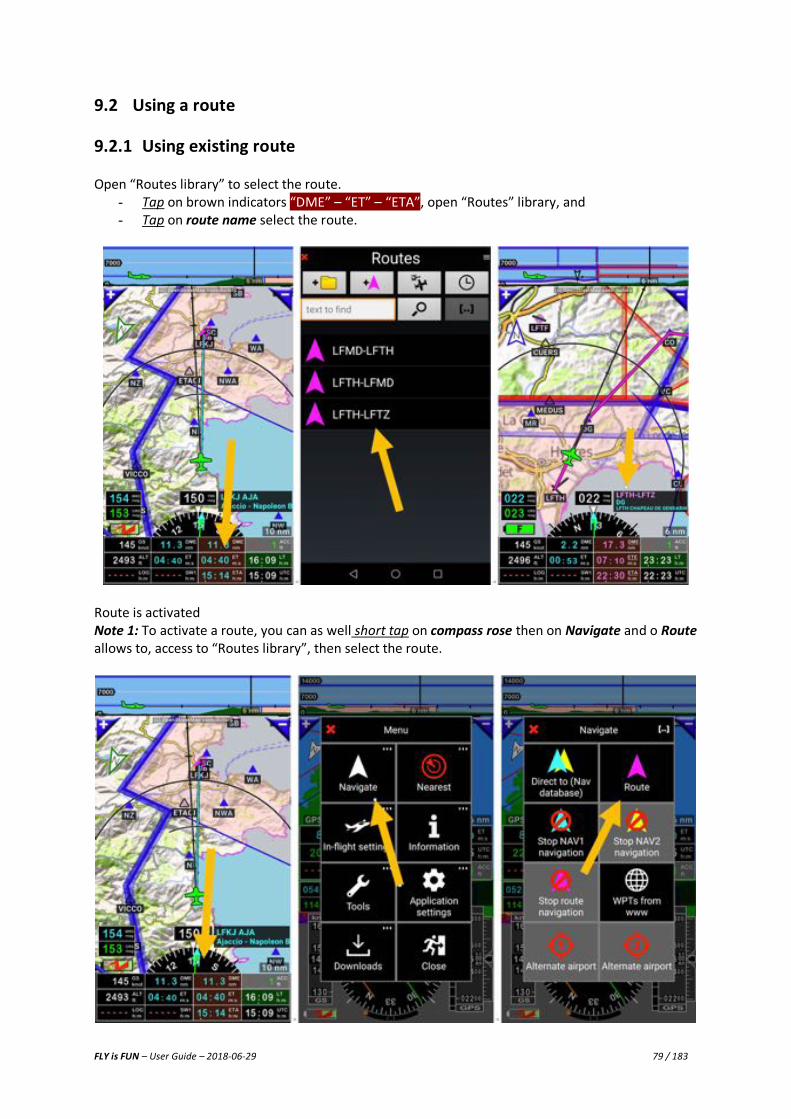
9.2.1 Using existing route Open “Routes library” to select the route.
- Tap on brown indicators “DME” – “ET” – “ETA”, open “Routes” library, and - Tap on route name select the route.
Route is activated Note 1: To activate a route, you can as well short tap on compass rose then on Navigate and o Route allows to, access to “Routes library”, then select the route.
FLY is FUN – User Guide – 2018-06-29 80 / 183
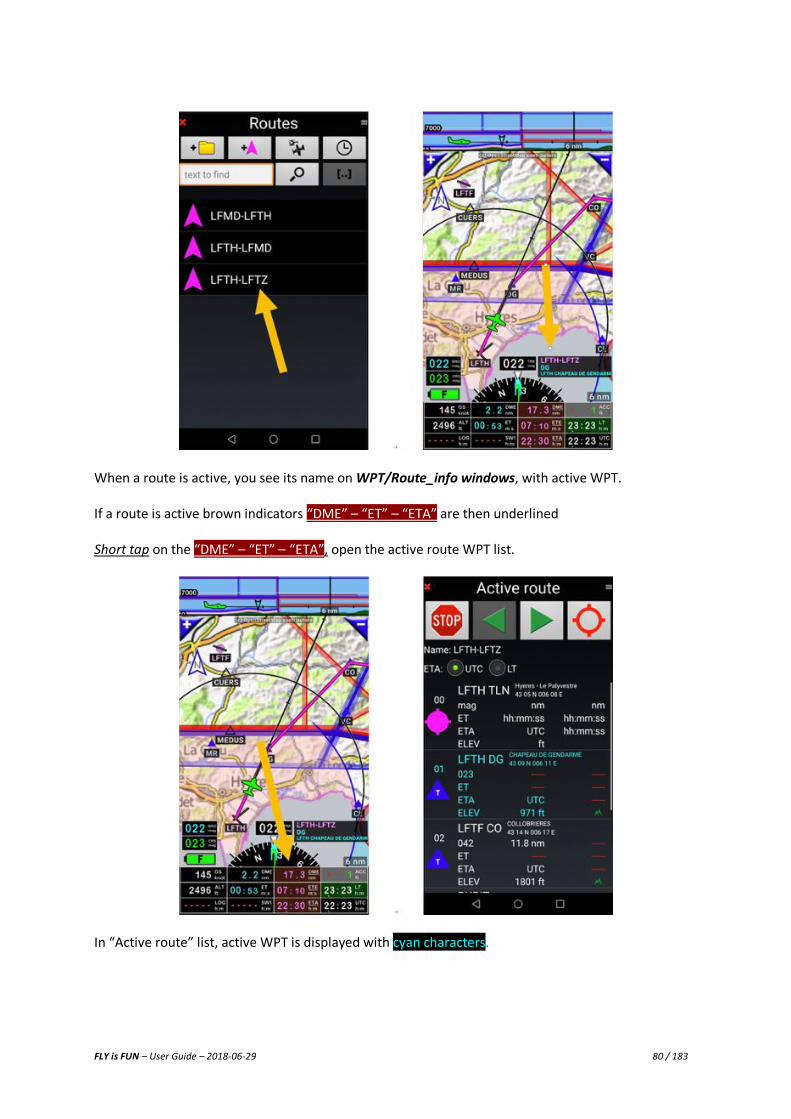
When a route is active, you see its name on WPT/Route_info windows, with active WPT. If a route is active brown indicators “DME” – “ET” – “ETA” are then underlined Short tap on the “DME” – “ET” – “ETA”, open the active route WPT list.
In “Active route” list, active WPT is displayed with cyan characters.
FLY is FUN – User Guide – 2018-06-29 81 / 183
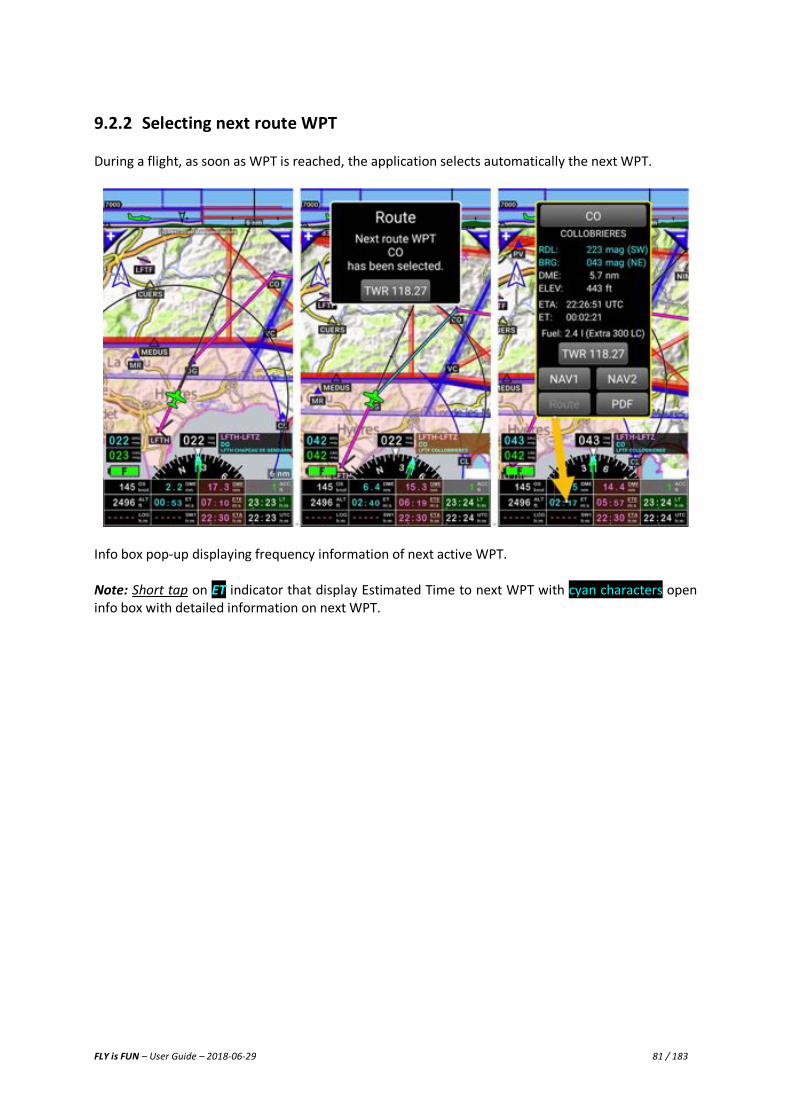
9.2.2 Selecting next route WPT During a flight, as soon as WPT is reached, the application selects automatically the next WPT.
Info box pop-up displaying frequency information of next active WPT. Note: Short tap on ET indicator that display Estimated Time to next WPT with cyan characters open info box with detailed information on next WPT.
FLY is FUN – User Guide – 2018-06-29 82 / 183
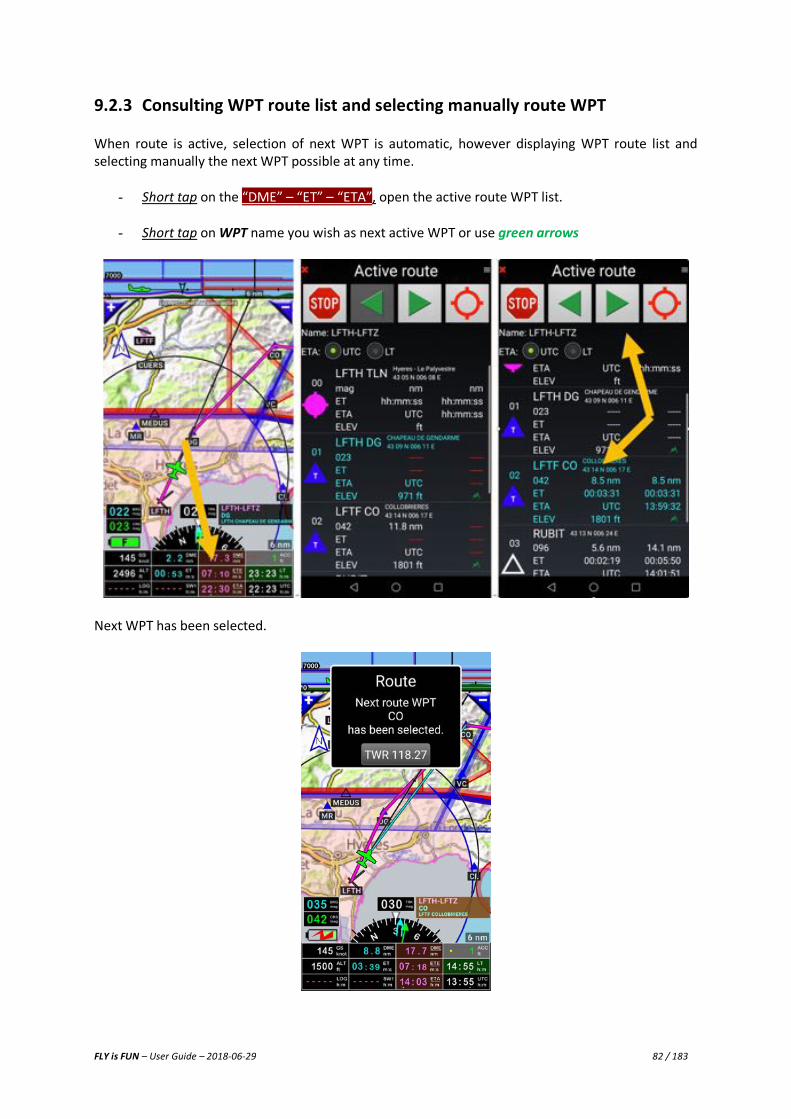
9.2.3 Consulting WPT route list and selecting manually route WPT When route is active, selection of next WPT is automatic, however displaying WPT route list and selecting manually the next WPT possible at any time.
- Short tap on the “DME” – “ET” – “ETA”, open the active route WPT list.
- Short tap on WPT name you wish as next active WPT or use green arrows
Next WPT has been selected.
FLY is FUN – User Guide – 2018-06-29 83 / 183
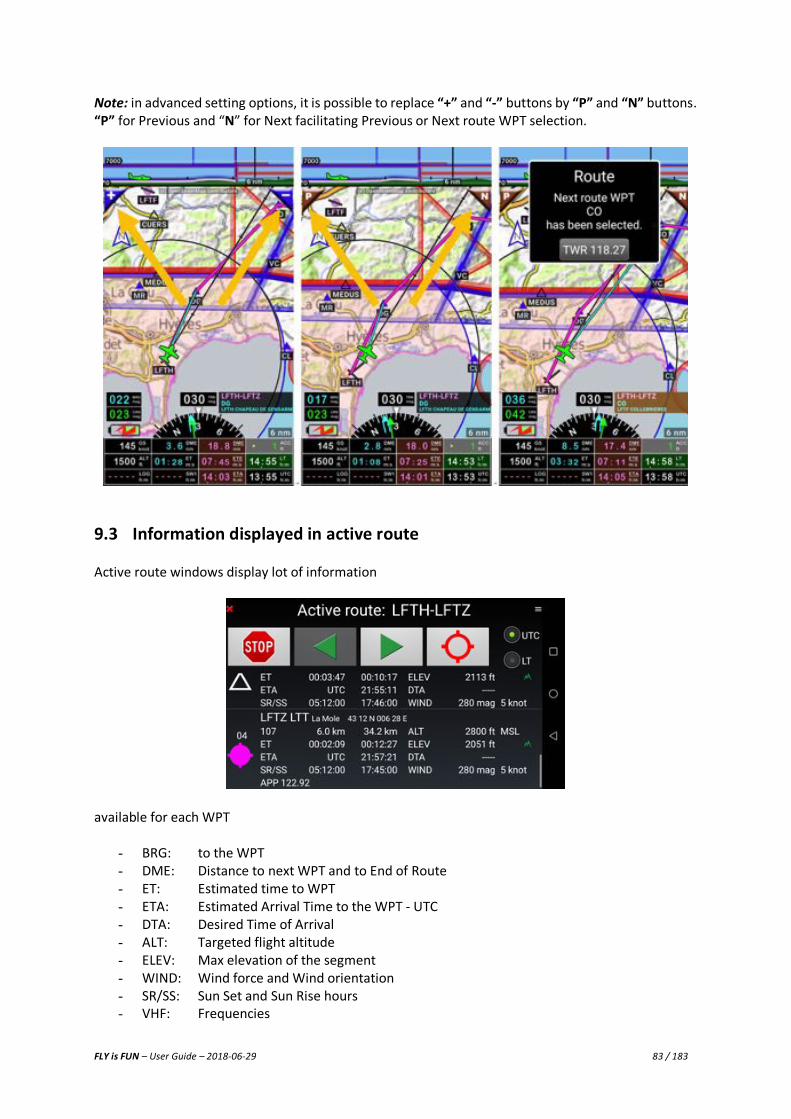
Note: in advanced setting options, it is possible to replace “+” and “-” buttons by “P” and “N” buttons. “P” for Previous and “N” for Next facilitating Previous or Next route WPT selection.
9.3 Information displayed in active route Active route windows display lot of information
available for each WPT
- BRG: to the WPT - DME: Distance to next WPT and to End of Route - ET: Estimated time to WPT - ETA: Estimated Arrival Time to the WPT - UTC - DTA: Desired Time of Arrival - ALT: Targeted flight altitude - ELEV: Max elevation of the segment - WIND: Wind force and Wind orientation - SR/SS: Sun Set and Sun Rise hours - VHF: Frequencies
FLY is FUN – User Guide – 2018-06-29 84 / 183
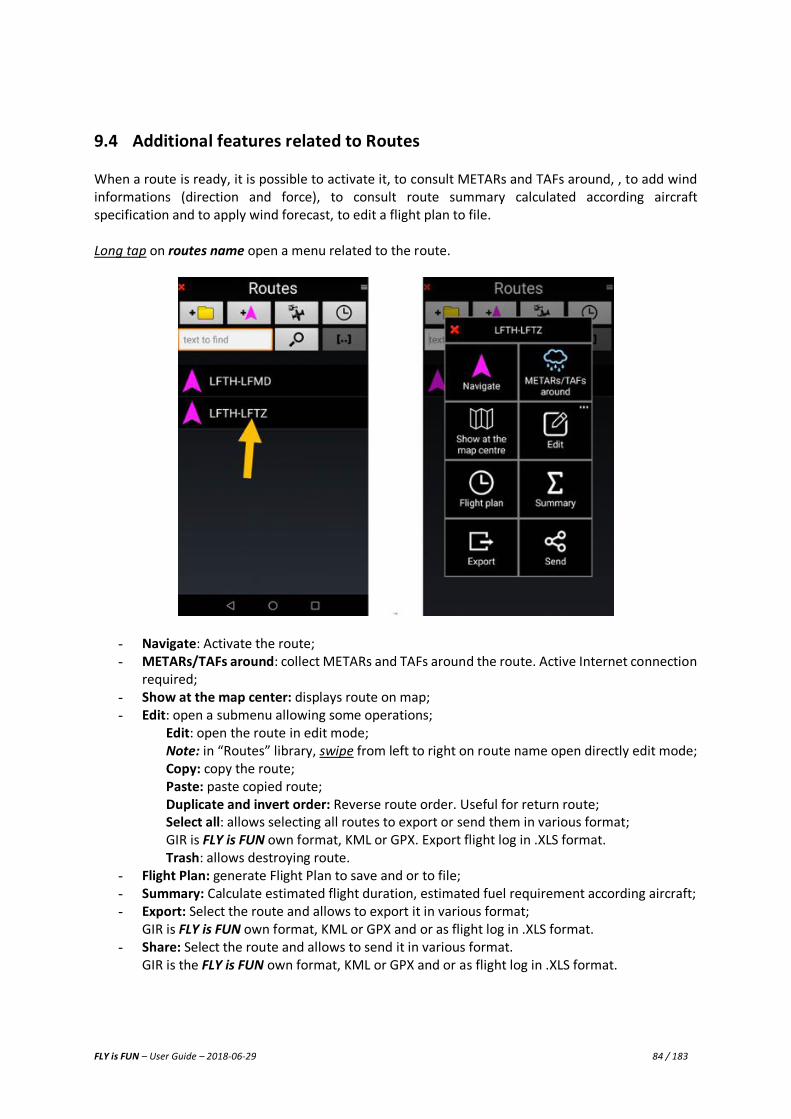
9.4 Additional features related to Routes When a route is ready, it is possible to activate it, to consult METARs and TAFs around, , to add wind informations (direction and force), to consult route summary calculated according aircraft specification and to apply wind forecast, to edit a flight plan to file. Long tap on routes name open a menu related to the route.
- Navigate: Activate the route; - METARs/TAFs around: collect METARs and TAFs around the route. Active Internet connection
required; - Show at the map center: displays route on map; - Edit: open a submenu allowing some operations;
Edit: open the route in edit mode; Note: in “Routes” library, swipe from left to right on route name open directly edit mode; Copy: copy the route; Paste: paste copied route; Duplicate and invert order: Reverse route order. Useful for return route; Select all: allows selecting all routes to export or send them in various format; GIR is FLY is FUN own format, KML or GPX. Export flight log in .XLS format. Trash: allows destroying route.
- Flight Plan: generate Flight Plan to save and or to file; - Summary: Calculate estimated flight duration, estimated fuel requirement according aircraft; - Export: Select the route and allows to export it in various format;
GIR is FLY is FUN own format, KML or GPX and or as flight log in .XLS format. - Share: Select the route and allows to send it in various format.
GIR is the FLY is FUN own format, KML or GPX and or as flight log in .XLS format.
FLY is FUN – User Guide – 2018-06-29 85 / 183
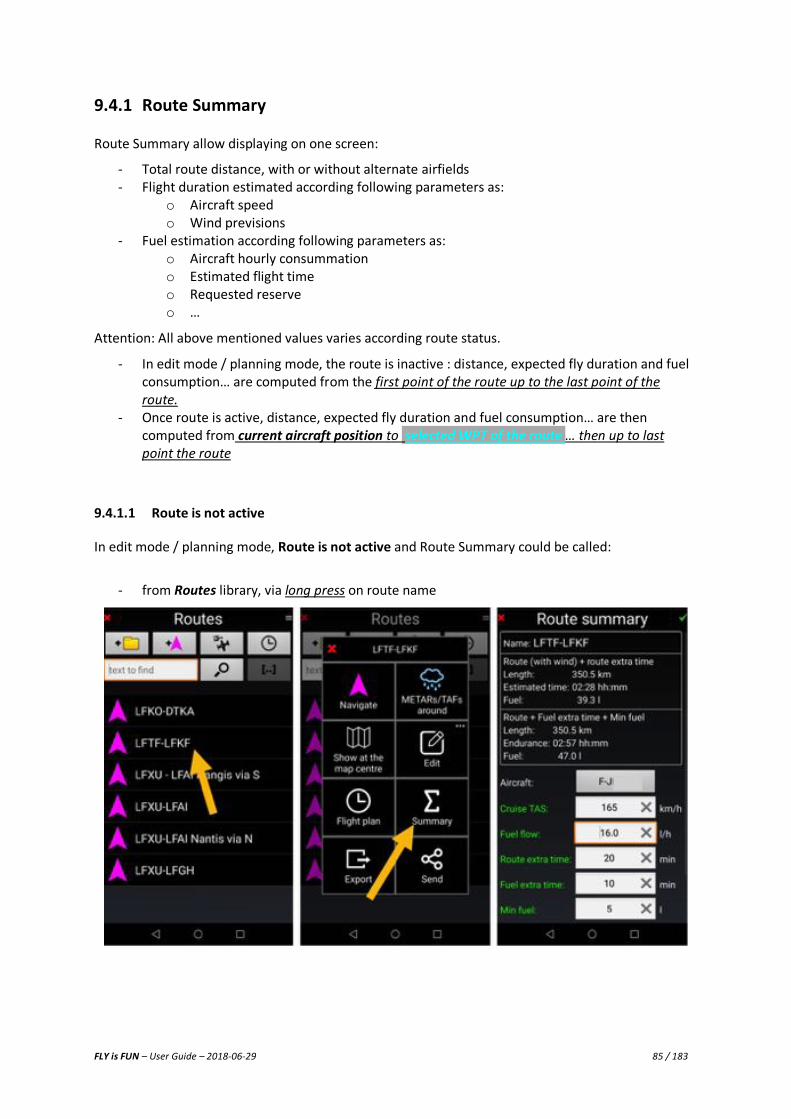
9.4.1 Route Summary Route Summary allow displaying on one screen:
- Total route distance, with or without alternate airfields - Flight duration estimated according following parameters as:
o Aircraft speed o Wind previsions
- Fuel estimation according following parameters as: o Aircraft hourly consummation o Estimated flight time o Requested reserve o …
Attention: All above mentioned values varies according route status.
- In edit mode / planning mode, the route is inactive : distance, expected fly duration and fuel consumption… are computed from the first point of the route up to the last point of the route.
- Once route is active, distance, expected fly duration and fuel consumption… are then computed from current aircraft position to selected WPT of the route … then up to last point the route
9.4.1.1 Route is not active
In edit mode / planning mode, Route is not active and Route Summary could be called:
- from Routes library, via long press on route name
FLY is FUN – User Guide – 2018-06-29 86 / 183
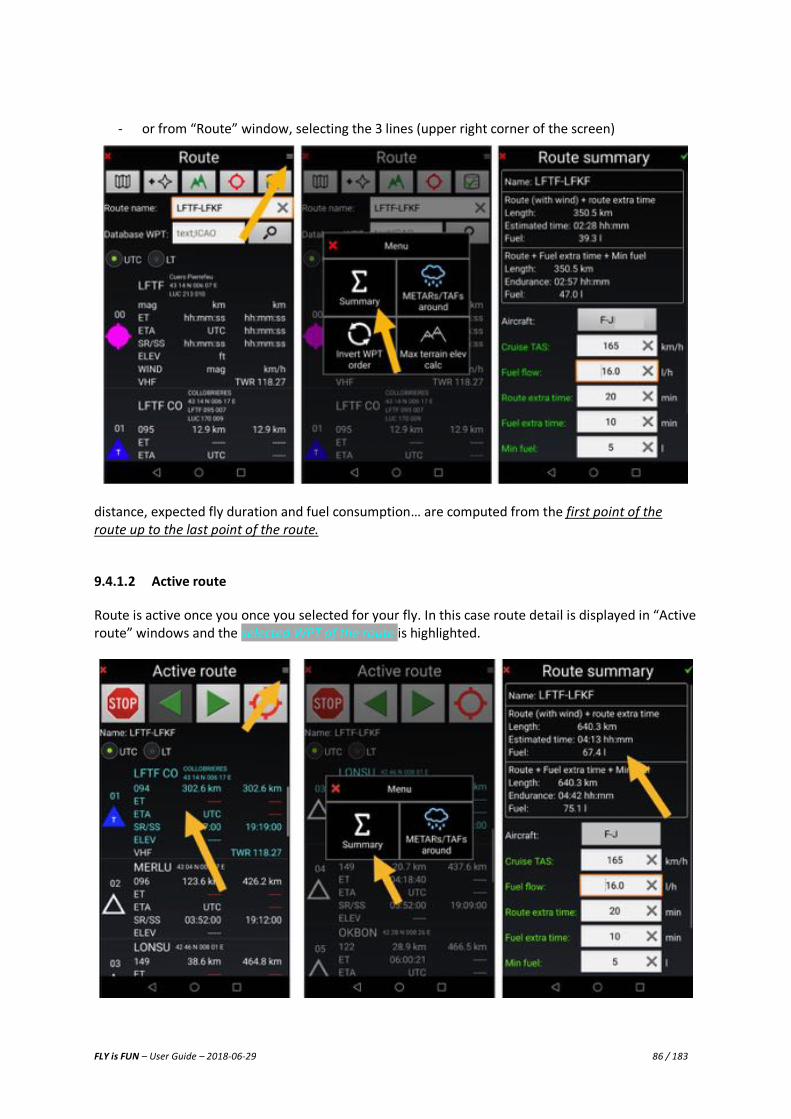
- or from “Route” window, selecting the 3 lines (upper right corner of the screen)
distance, expected fly duration and fuel consumption… are computed from the first point of the route up to the last point of the route.
9.4.1.2 Active route
Route is active once you once you selected for your fly. In this case route detail is displayed in “Active route” windows and the selected WPT of the route is highlighted.

FLY is FUN – User Guide – 2018-06-29 87 / 183
The route being active, information as distance, expected fly duration and fuel consumption… are computed from current aircraft position to selected WPT of the route … then up to last point the route, including eventually additional info as wind, alternates airports … That for, values displayed calling route summary when a route is active are not always the same. If route is active and there is no GPS fix, FLY is FUN cannot calculate the distance between aircraft position and the first active WPT won’t be displayed and route summary will not pop-up.
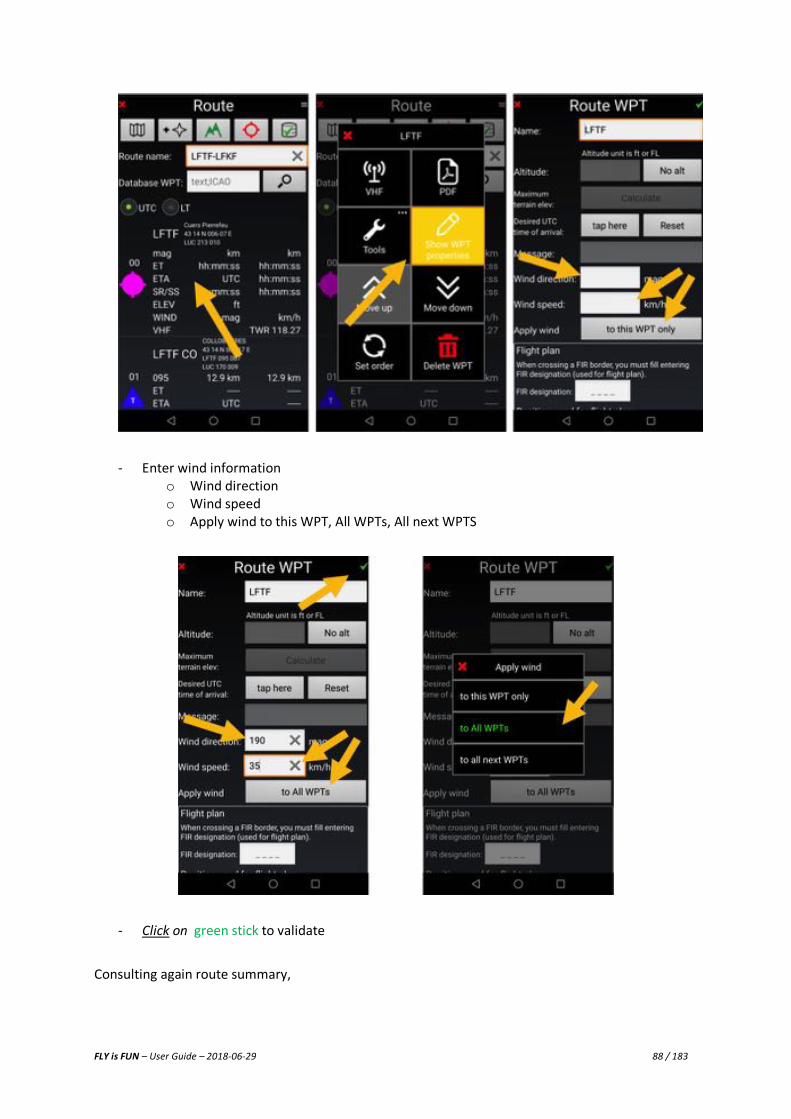
9.4.2 Wind Direction and Wind Speed Wind affects the time required to complete a route, the fuel consumption. FLYis FUN allows integrating wind direction and wind speed information while calculating a route, to estimate route duration, fuel consumption and the requested amount of fuel. To enter wind direction and wind speed information, from route detail:
- Long press on one of the WPT calls a 8 buttons palette - Select Show WPT Properties
FLY is FUN – User Guide – 2018-06-29 88 / 183
- Enter wind information o Wind direction o Wind speed o Apply wind to this WPT, All WPTs, All next WPTS
- Click on green stick to validate
Consulting again route summary,

FLY is FUN – User Guide – 2018-06-29 89 / 183
You get now results including wind informations
9.5 Flight Log Security impose to have a printed log of the route. Printed log will remain in case of device failure. To export Flight log, open the route Library and long tap on route for witch Flight Log is requested.

FLY is FUN – User Guide – 2018-06-29 90 / 183
Select “Export” or “Send”, then “Flight log”, Aircraft and templates, then validate.
Selecting “Send” allows to get Flight log in email. Selecting “Export”, file will be stored on the device.

FLY is FUN – User Guide – 2018-06-29 91 / 183
9.5.1 Customized .xls Navigation Log If you like to use your own .xls Navigation Log, it’s possible Download default Fly is Fun xls navigation log “route_template.xls” using this link http://www.funair.cz/downloads/templates/route_template.xls. In “route_template.xls” you will find the “raw_data” tab. Fly is Fun store in this tab, all data related to the route and the aircraft. The xls navigation log use data of the “raw_data” tab, to display them in other tabs. Your customized.xls navigation log will use to, those data. That for,
• the “raw_data” tab must be included as a tab in your customized .xls navigation log file. Doing it, make sure living it unchanged, this including its name.
• customized tabs should be linked with the “raw_data” tab and their data from it Once your customized.xls navigation log will be ready, you need to stored it in XLS format (not XLXS format doesn’t work) in “Route” folder, that is located in “Templates” folder of Fly is Fun application. “GPS_ILS_VOR -> Templates -> Routes” (GPS_ILS_VOR folder is Fly is Fun application folder). Then exporting a route from Fly is Fun via Long press on route name and selecting “Send” or “Export”, you can choose and select your own template. Some Fly is Fun user are sharing their customized xls.navigation log templates on the forum. You can find them there http://funair.cz/forum/viewforum.php?f=17 . Do not hesitate trying them and/or adding yours.

FLY is FUN – User Guide – 2018-06-29 92 / 183
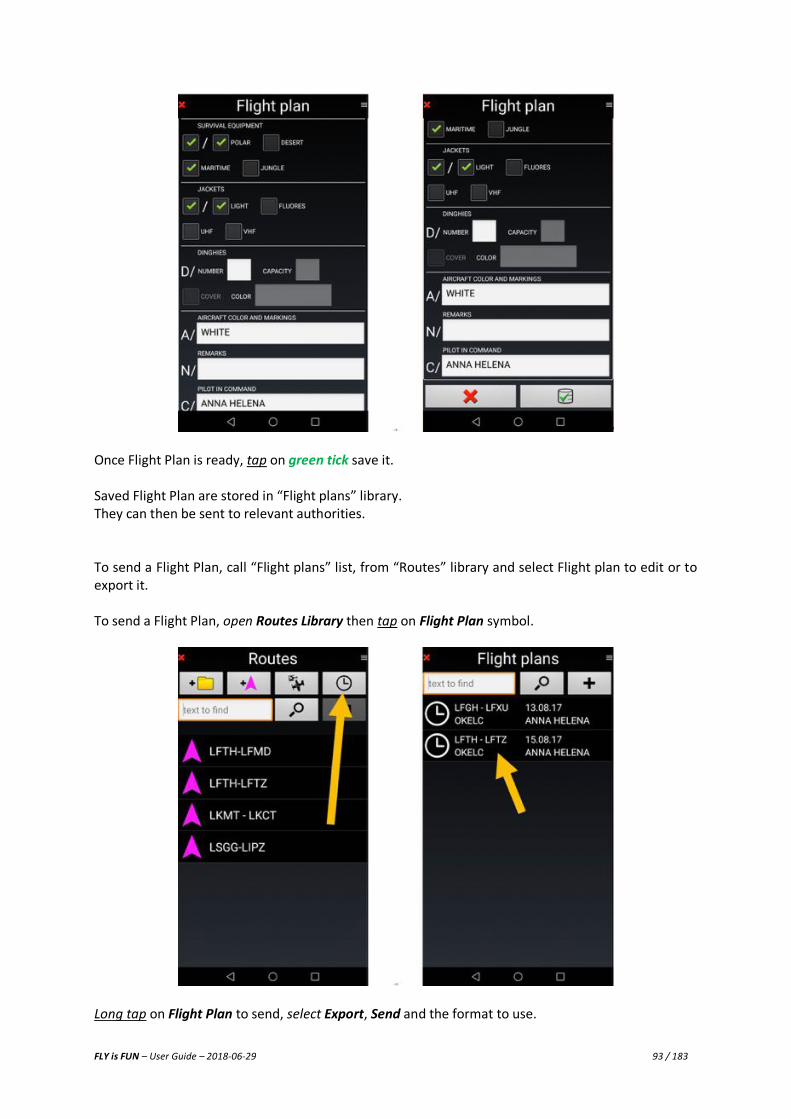
9.6 Flight Plan While editing a route Flight Plan to transmit to relevant authorities later on can be generated. In Route Library, long tap on route name and select Flight Plan.
Complete Flight Plan information
FLY is FUN – User Guide – 2018-06-29 93 / 183
Once Flight Plan is ready, tap on green tick save it. Saved Flight Plan are stored in “Flight plans” library. They can then be sent to relevant authorities. To send a Flight Plan, call “Flight plans” list, from “Routes” library and select Flight plan to edit or to export it. To send a Flight Plan, open Routes Library then tap on Flight Plan symbol.
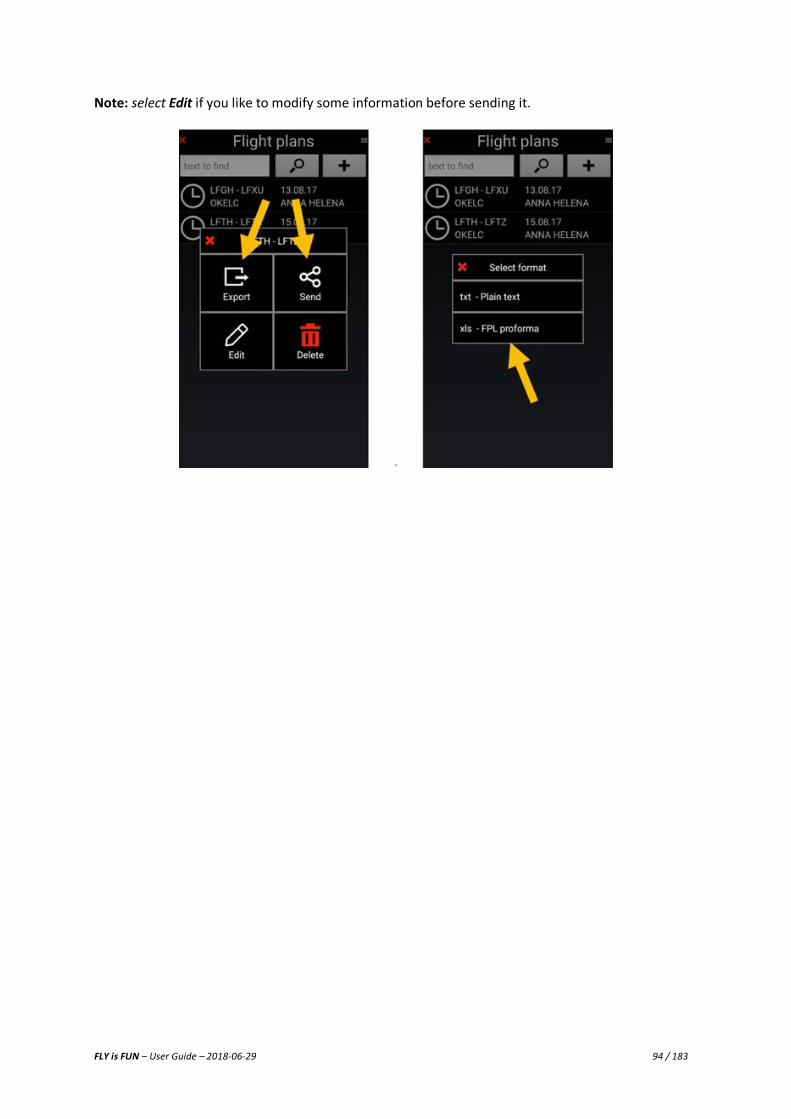
Long tap on Flight Plan to send, select Export, Send and the format to use.
FLY is FUN – User Guide – 2018-06-29 94 / 183
Note: select Edit if you like to modify some information before sending it.
FLY is FUN – User Guide – 2018-06-29 95 / 183
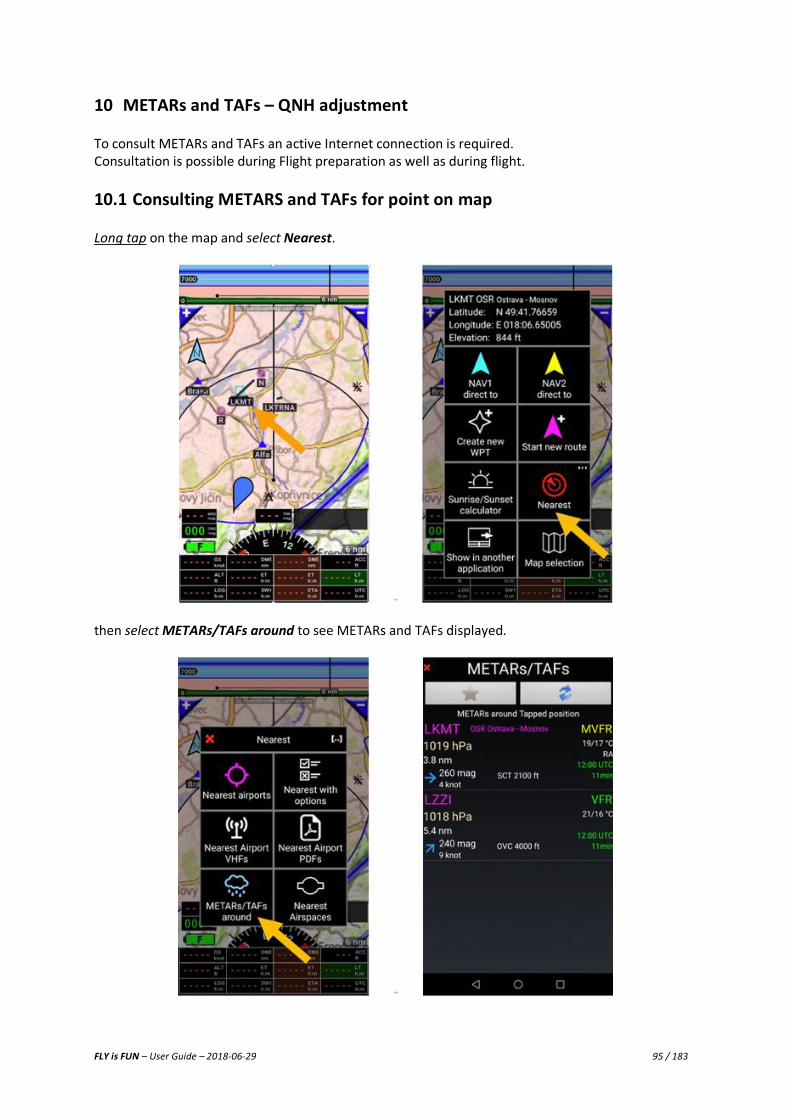
10 METARs and TAFs – QNH adjustment To consult METARs and TAFs an active Internet connection is required. Consultation is possible during Flight preparation as well as during flight.
10.1 Consulting METARS and TAFs for point on map Long tap on the map and select Nearest.
then select METARs/TAFs around to see METARs and TAFs displayed.
FLY is FUN – User Guide – 2018-06-29 96 / 183
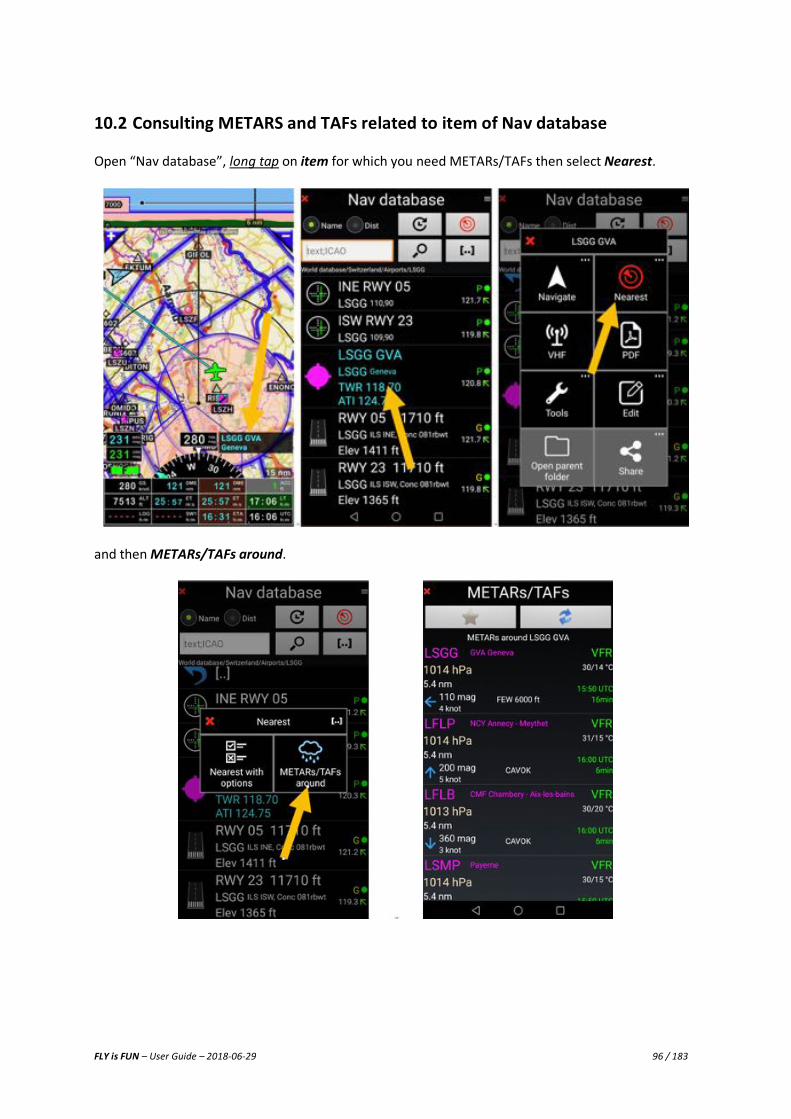
10.2 Consulting METARS and TAFs related to item of Nav database Open “Nav database”, long tap on item for which you need METARs/TAFs then select Nearest.
and then METARs/TAFs around.

FLY is FUN – User Guide – 2018-06-29 97 / 183
10.3 Consulting METARS and TAFs for a route
10.3.1 During route preparation During a flight preparation, to consult METARs and TAFs of the route, long tap on route name in “Routes” library and select METARs / TAFs around.
Note 1: Internet connection required. Note 2: short tap on route name activate the route.

FLY is FUN – User Guide – 2018-06-29 98 / 183
10.3.2 When route is active During Flight when route is active, to consult METARs and TAFs of the route, open “Active route” window, long tap on any WPT of the route and select METARs / TAFs around.
Note 1: Internet connection required. Note 2: short tap on WPT name select it as next route WPT.
FLY is FUN – User Guide – 2018-06-29 99 / 183
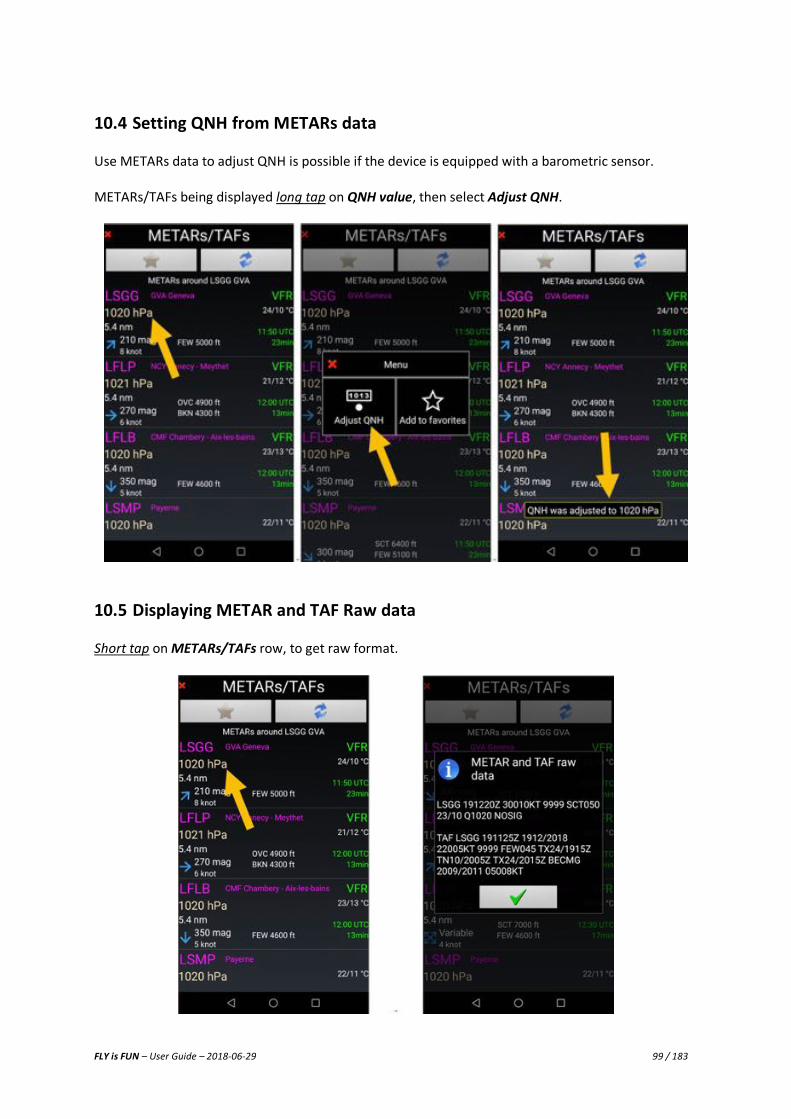
10.4 Setting QNH from METARs data Use METARs data to adjust QNH is possible if the device is equipped with a barometric sensor. METARs/TAFs being displayed long tap on QNH value, then select Adjust QNH.
10.5 Displaying METAR and TAF Raw data Short tap on METARs/TAFs row, to get raw format.
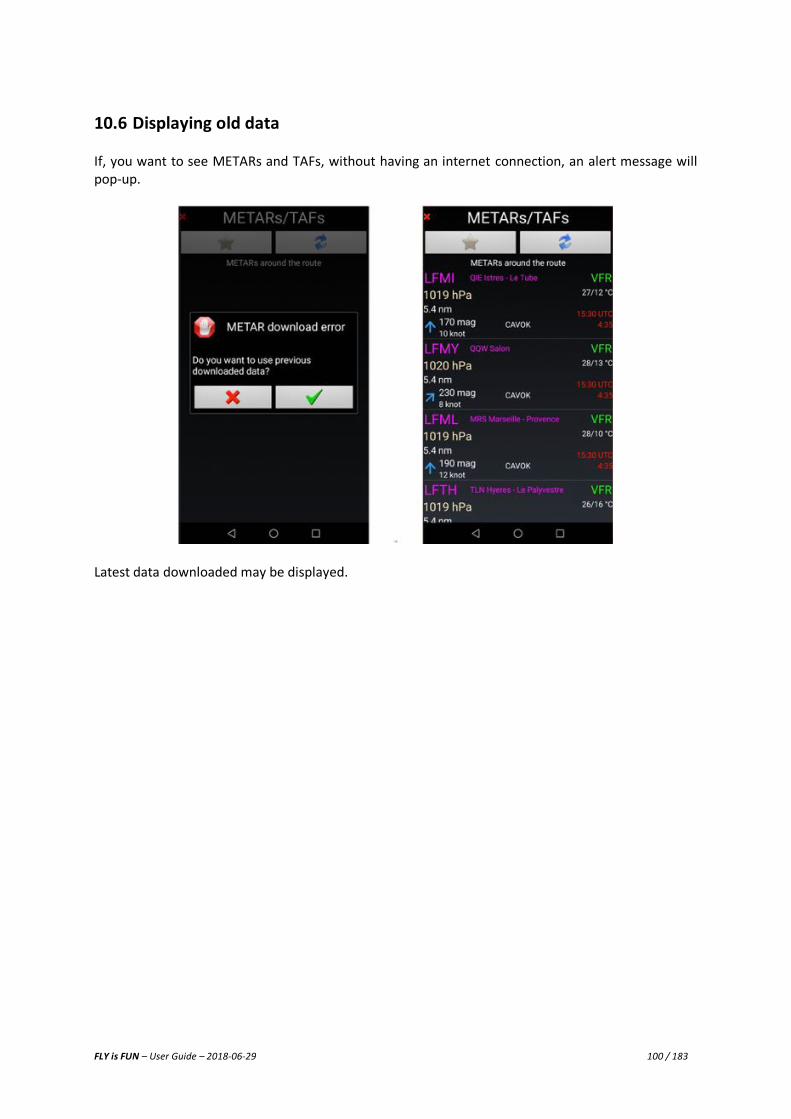
FLY is FUN – User Guide – 2018-06-29 100 / 183
10.6 Displaying old data If, you want to see METARs and TAFs, without having an internet connection, an alert message will pop-up.
Latest data downloaded may be displayed.
FLY is FUN – User Guide – 2018-06-29 101 / 183
11 WPT waypoints – Creating WPT – Creating RWY – WPT Import-Export FLY is FUN is widely open and support following WPT formats:
- .GPX standard format for most GPS - .KML Google Earth format - .GIW FLY is FUN own format
This facilitate importation of existing items, point of interest, waypoints.
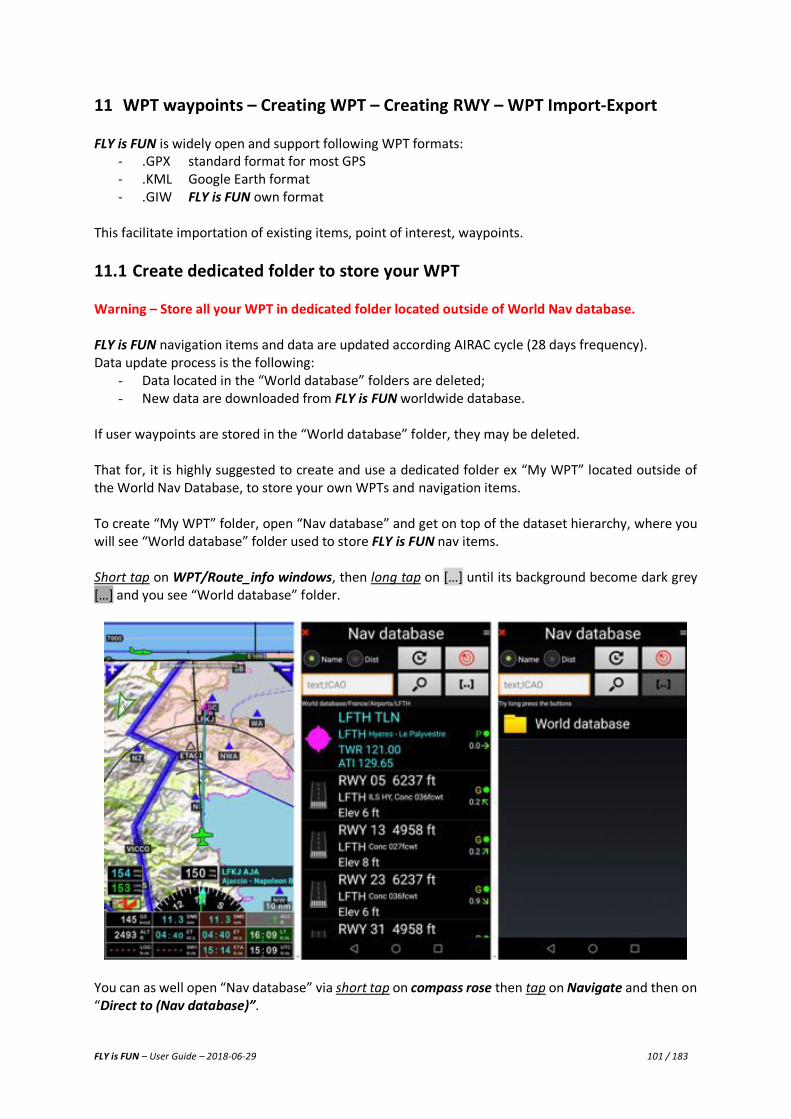
11.1 Create dedicated folder to store your WPT Warning – Store all your WPT in dedicated folder located outside of World Nav database. FLY is FUN navigation items and data are updated according AIRAC cycle (28 days frequency). Data update process is the following:
- Data located in the “World database” folders are deleted; - New data are downloaded from FLY is FUN worldwide database.
If user waypoints are stored in the “World database” folder, they may be deleted. That for, it is highly suggested to create and use a dedicated folder ex “My WPT” located outside of the World Nav Database, to store your own WPTs and navigation items. To create “My WPT” folder, open “Nav database” and get on top of the dataset hierarchy, where you will see “World database” folder used to store FLY is FUN nav items. Short tap on WPT/Route_info windows, then long tap on […] until its background become dark grey […] and you see “World database” folder.
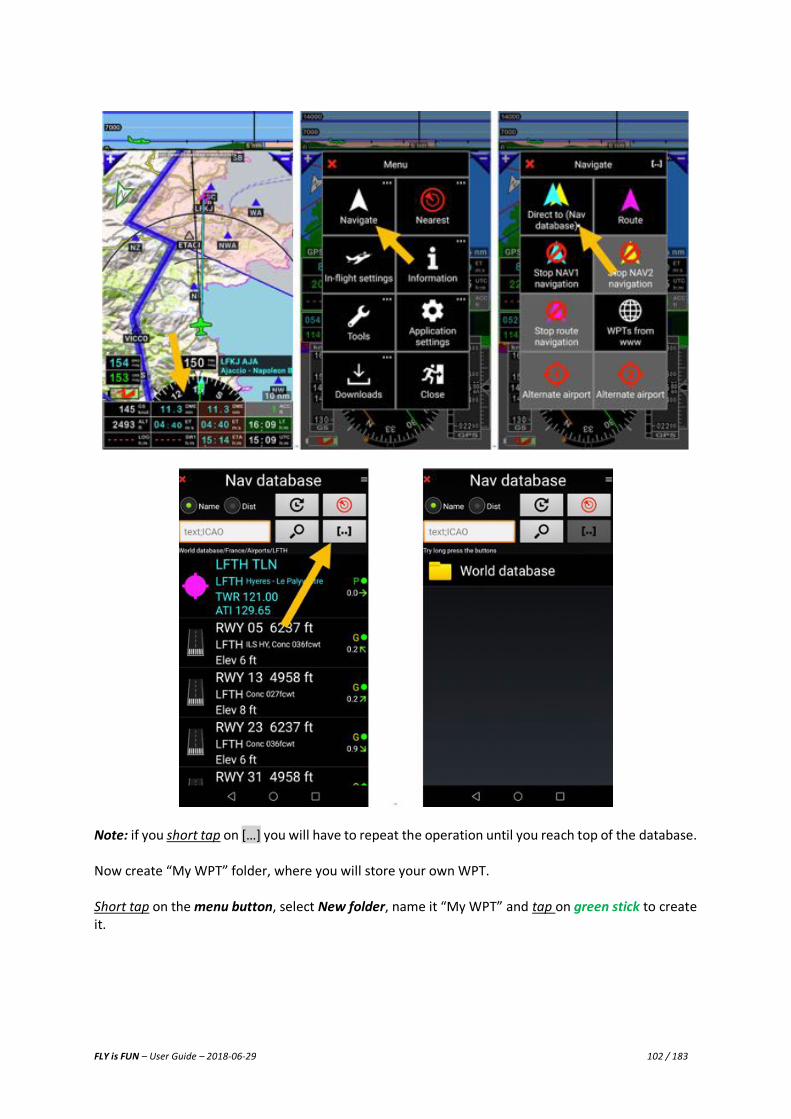
You can as well open “Nav database” via short tap on compass rose then tap on Navigate and then on “Direct to (Nav database)”.
FLY is FUN – User Guide – 2018-06-29 102 / 183
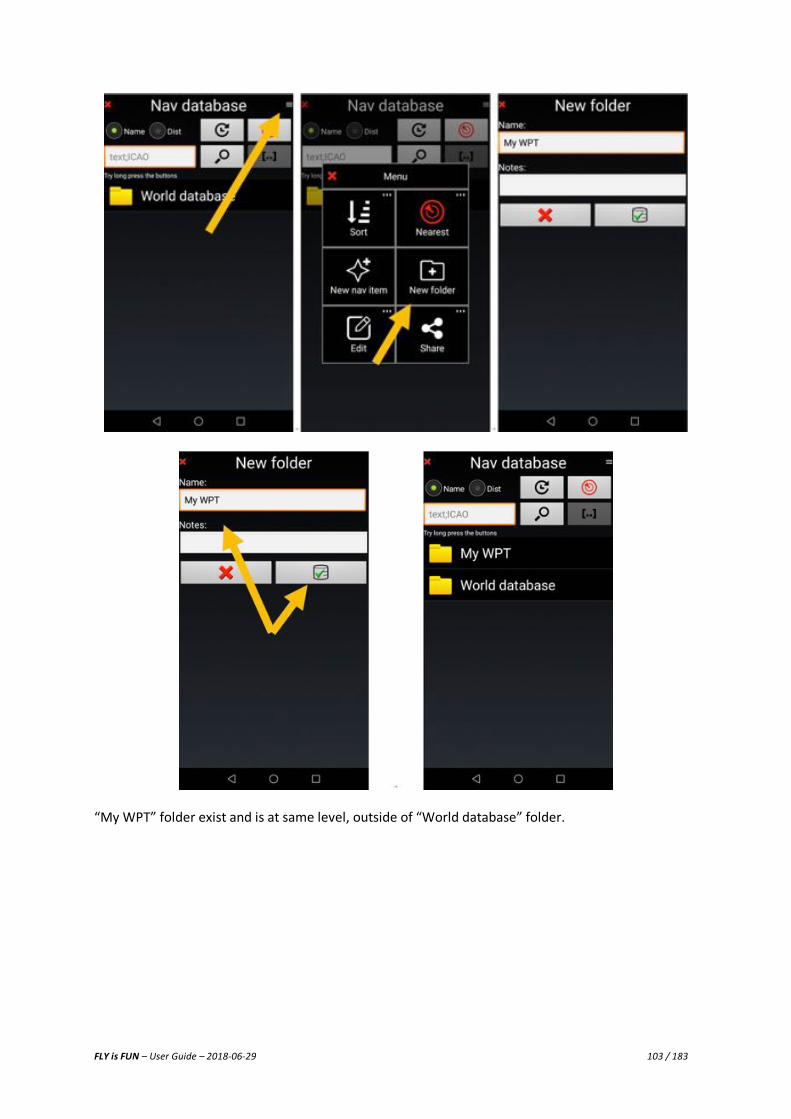
Note: if you short tap on […] you will have to repeat the operation until you reach top of the database. Now create “My WPT” folder, where you will store your own WPT. Short tap on the menu button, select New folder, name it “My WPT” and tap on green stick to create it.
FLY is FUN – User Guide – 2018-06-29 103 / 183
“My WPT” folder exist and is at same level, outside of “World database” folder.

FLY is FUN – User Guide – 2018-06-29 104 / 183
11.2 Creating WPT Long tap on a point of the map, then select Create new WPT.
Item / WPT screen pop up, where all data concerning the item should be completed.
Once completed
- Tap on green stick validate and save the point

FLY is FUN – User Guide – 2018-06-29 105 / 183
Item type:
ILS Approach NDB APT Airport
VOR WPT OBST Obstacle
FIX RWY Runway MDB Marker Beacon
LOC Localizer Approach If Airfield “APT” is selected Airfield type:
Not specified Military Glider
Service Ultralight Not registered
Non-serviced Helicopter Seaplane base
Restricted In this example, we created an ultralight airfield and saved it.
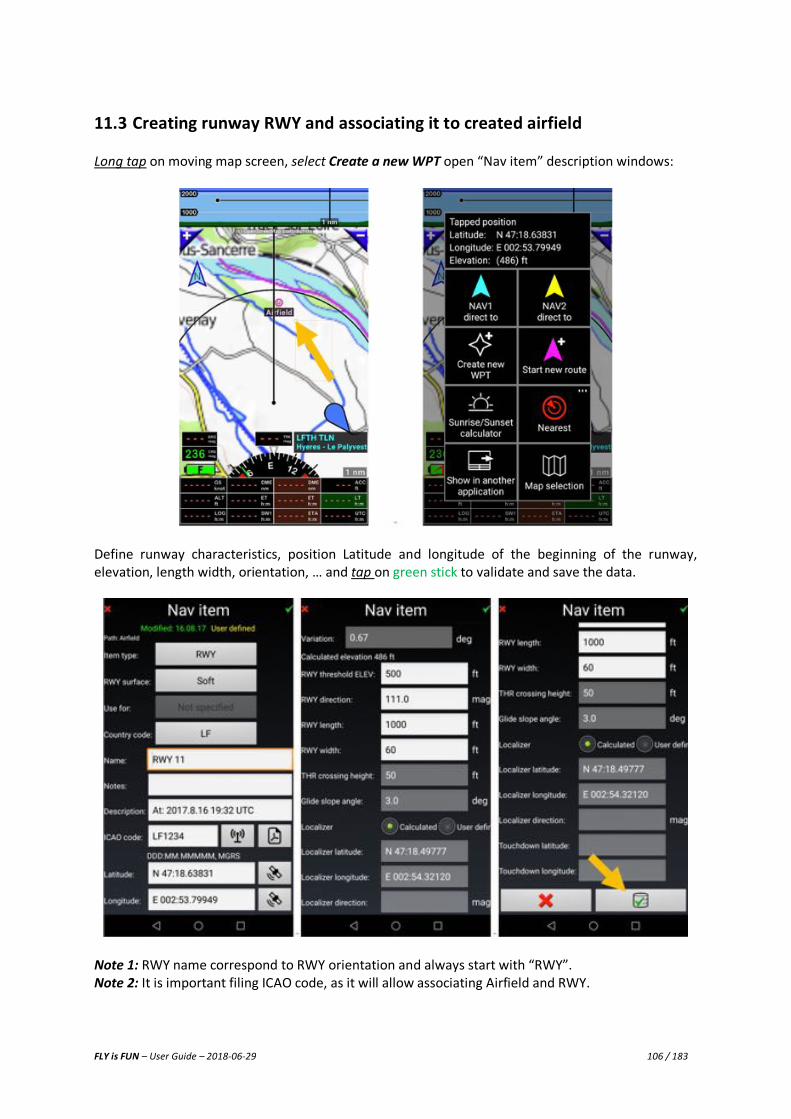
FLY is FUN – User Guide – 2018-06-29 106 / 183
11.3 Creating runway RWY and associating it to created airfield Long tap on moving map screen, select Create a new WPT open “Nav item” description windows:
Define runway characteristics, position Latitude and longitude of the beginning of the runway, elevation, length width, orientation, … and tap on green stick to validate and save the data.
Note 1: RWY name correspond to RWY orientation and always start with “RWY”. Note 2: It is important filing ICAO code, as it will allow associating Airfield and RWY.
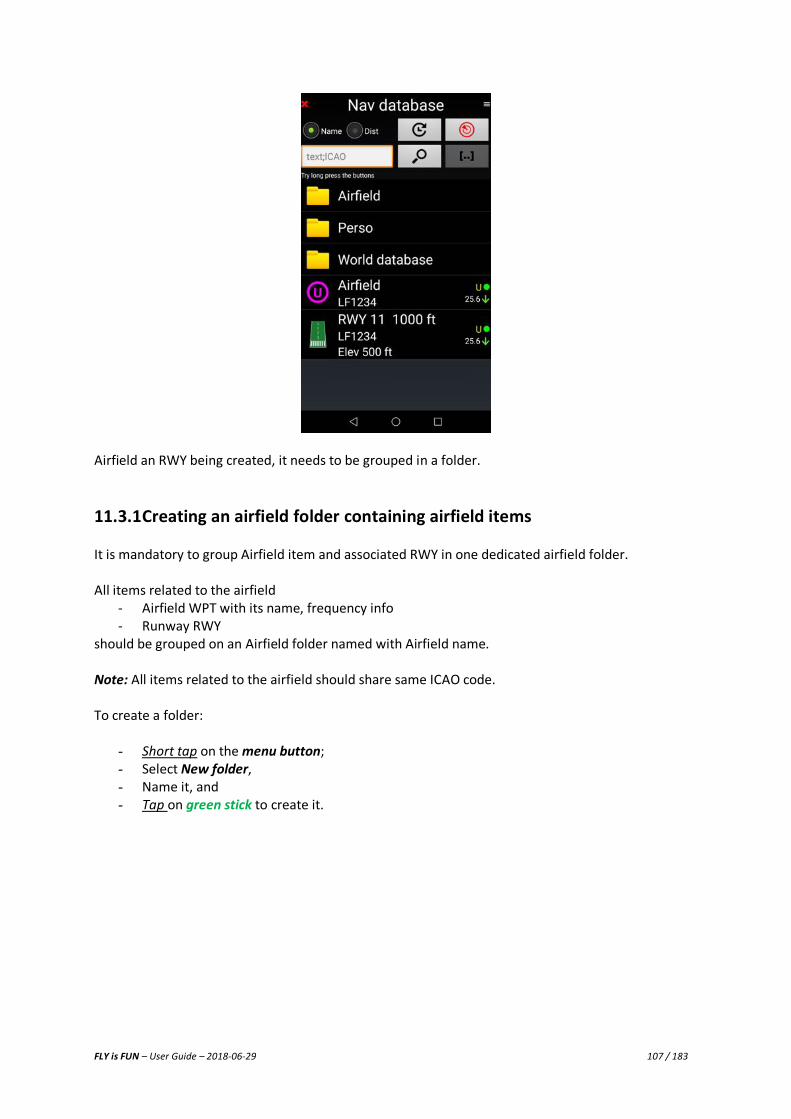
FLY is FUN – User Guide – 2018-06-29 107 / 183
Airfield an RWY being created, it needs to be grouped in a folder.
11.3.1 Creating an airfield folder containing airfield items It is mandatory to group Airfield item and associated RWY in one dedicated airfield folder. All items related to the airfield
- Airfield WPT with its name, frequency info - Runway RWY
should be grouped on an Airfield folder named with Airfield name. Note: All items related to the airfield should share same ICAO code. To create a folder:
- Short tap on the menu button; - Select New folder, - Name it, and - Tap on green stick to create it.
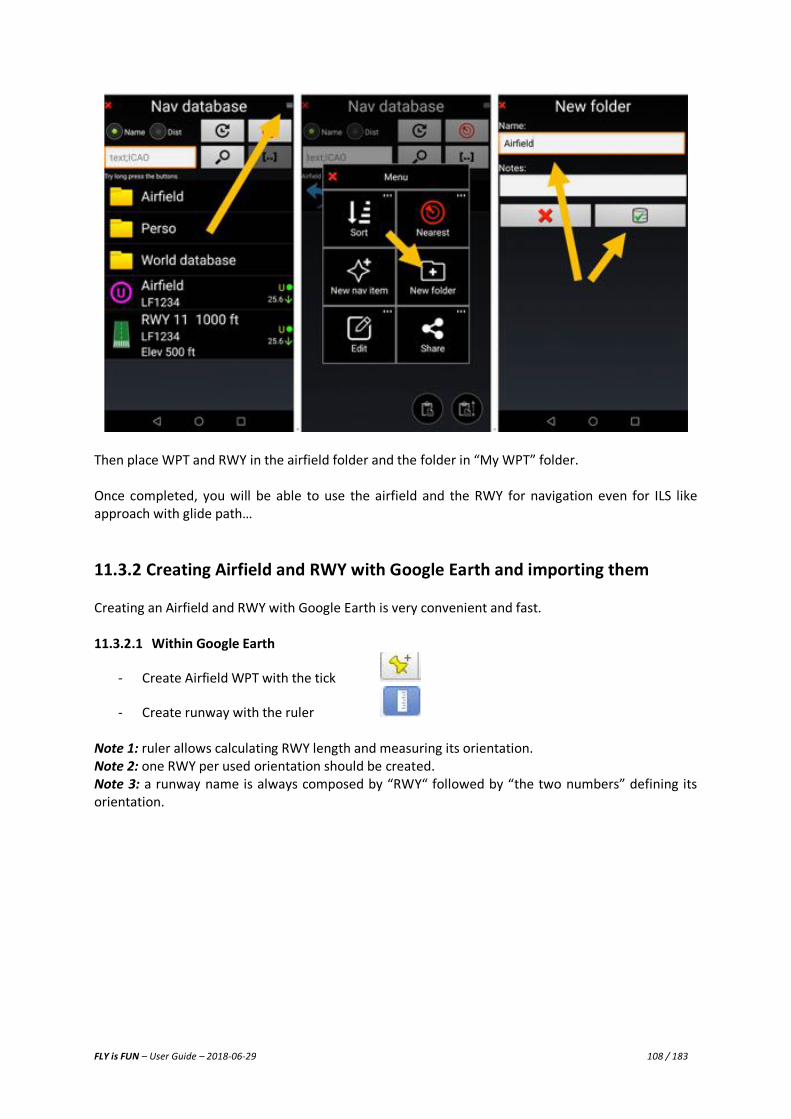
FLY is FUN – User Guide – 2018-06-29 108 / 183
Then place WPT and RWY in the airfield folder and the folder in “My WPT” folder. Once completed, you will be able to use the airfield and the RWY for navigation even for ILS like approach with glide path…
11.3.2 Creating Airfield and RWY with Google Earth and importing them Creating an Airfield and RWY with Google Earth is very convenient and fast. 11.3.2.1 Within Google Earth
- Create Airfield WPT with the tick
- Create runway with the ruler Note 1: ruler allows calculating RWY length and measuring its orientation. Note 2: one RWY per used orientation should be created. Note 3: a runway name is always composed by “RWY“ followed by “the two numbers” defining its orientation.
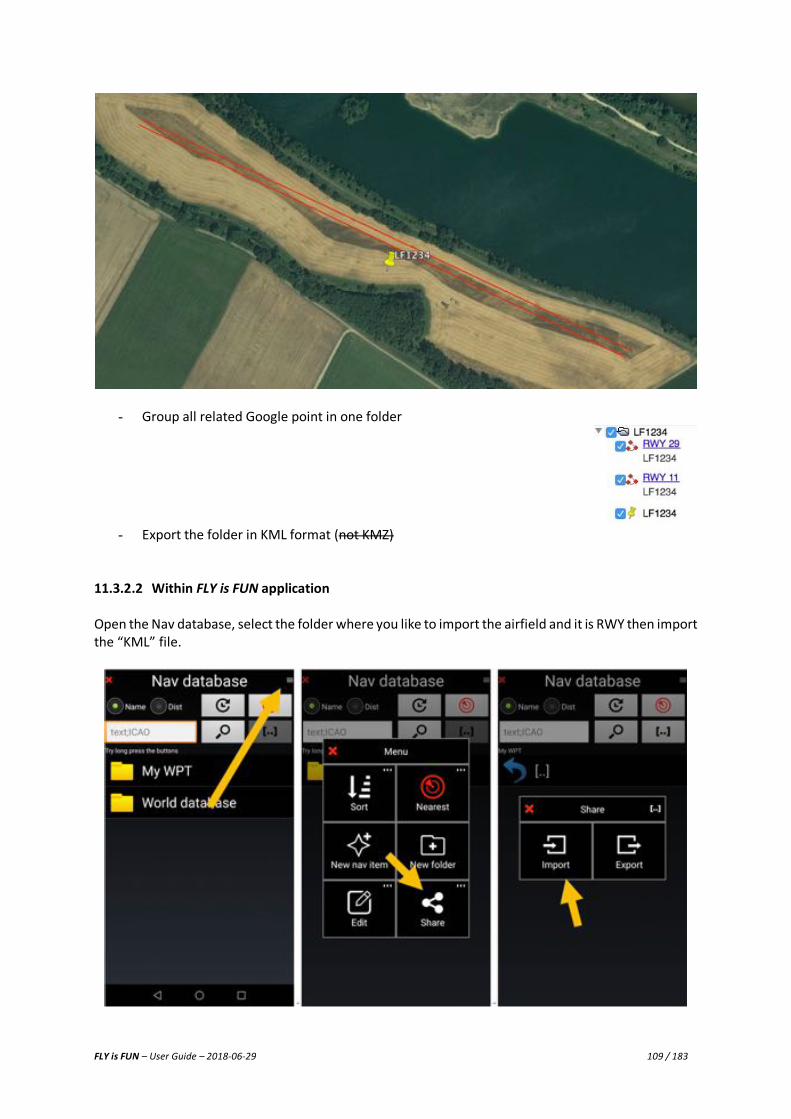
FLY is FUN – User Guide – 2018-06-29 109 / 183
- Group all related Google point in one folder
- Export the folder in KML format (not KMZ)
11.3.2.2 Within FLY is FUN application Open the Nav database, select the folder where you like to import the airfield and it is RWY then import the “KML” file.
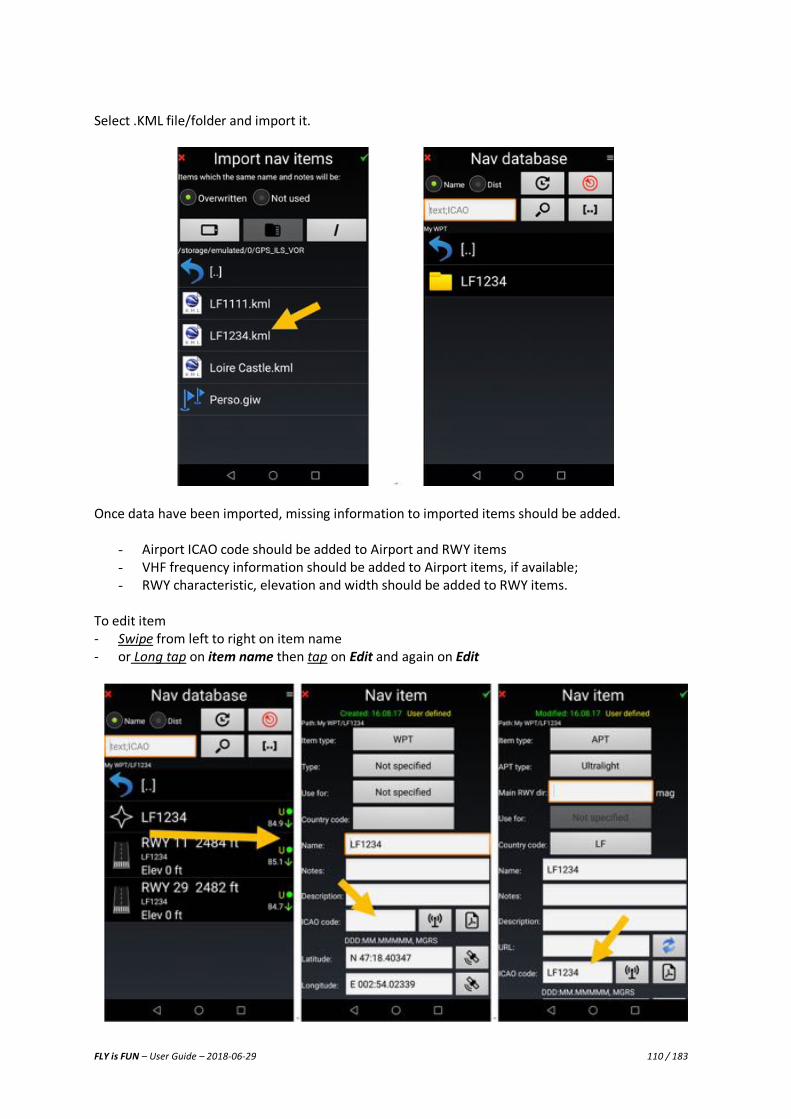
FLY is FUN – User Guide – 2018-06-29 110 / 183
Select .KML file/folder and import it.
Once data have been imported, missing information to imported items should be added.
- Airport ICAO code should be added to Airport and RWY items - VHF frequency information should be added to Airport items, if available; - RWY characteristic, elevation and width should be added to RWY items.
To edit item - Swipe from left to right on item name - or Long tap on item name then tap on Edit and again on Edit
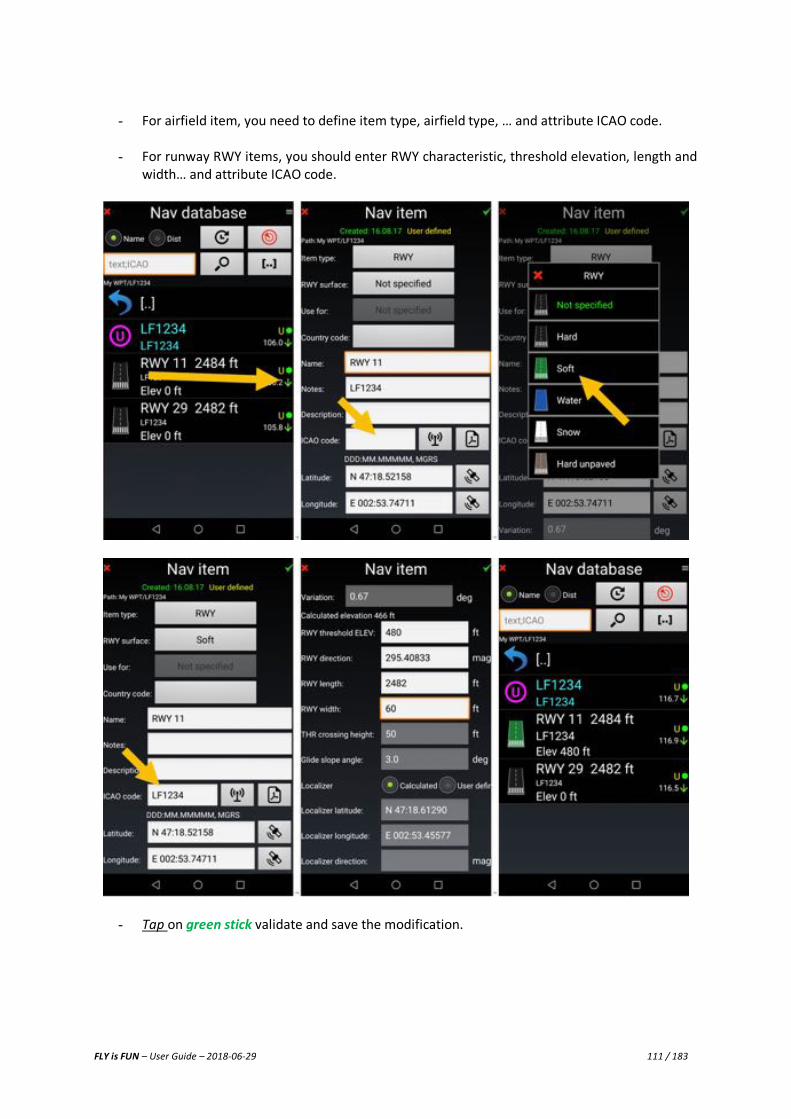
FLY is FUN – User Guide – 2018-06-29 111 / 183
- For airfield item, you need to define item type, airfield type, … and attribute ICAO code.
- For runway RWY items, you should enter RWY characteristic, threshold elevation, length and
width… and attribute ICAO code.
- Tap on green stick validate and save the modification.

FLY is FUN – User Guide – 2018-06-29 112 / 183
Information being added the new airfield and its RWY is ready to be used within the application
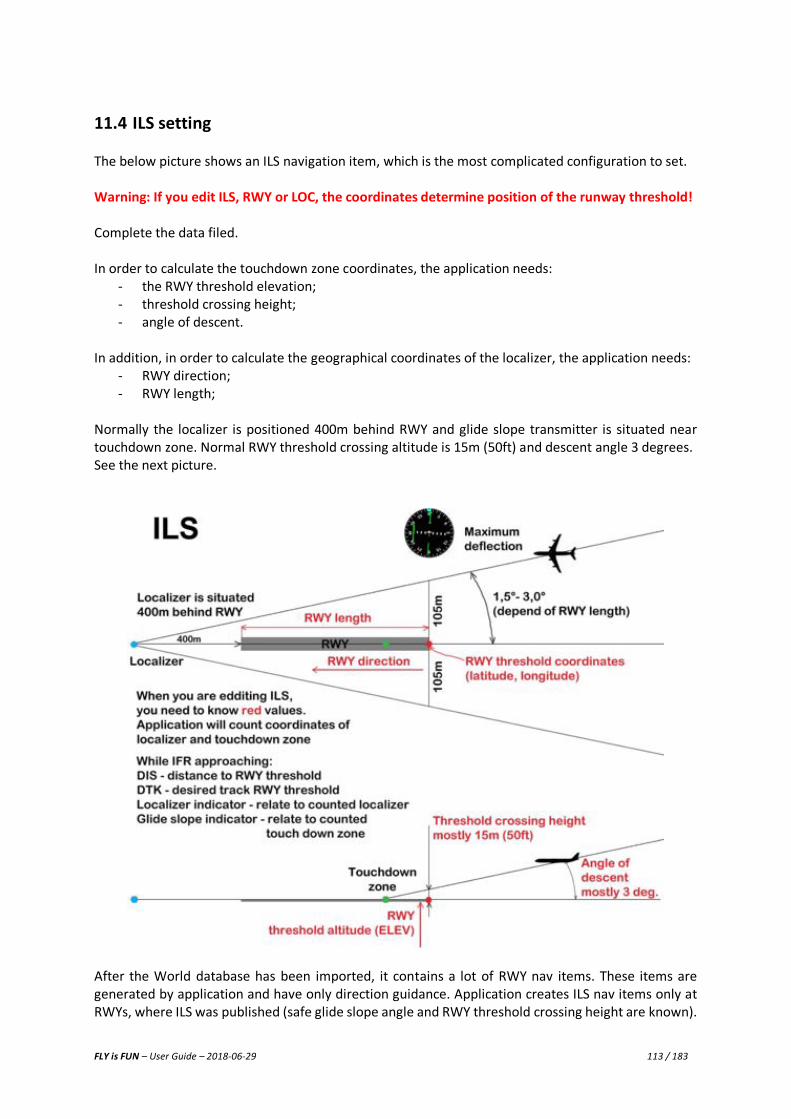
FLY is FUN – User Guide – 2018-06-29 113 / 183
11.4 ILS setting The below picture shows an ILS navigation item, which is the most complicated configuration to set. Warning: If you edit ILS, RWY or LOC, the coordinates determine position of the runway threshold! Complete the data filed. In order to calculate the touchdown zone coordinates, the application needs:
- the RWY threshold elevation; - threshold crossing height; - angle of descent.
In addition, in order to calculate the geographical coordinates of the localizer, the application needs:
- RWY direction; - RWY length;
Normally the localizer is positioned 400m behind RWY and glide slope transmitter is situated near touchdown zone. Normal RWY threshold crossing altitude is 15m (50ft) and descent angle 3 degrees. See the next picture.
After the World database has been imported, it contains a lot of RWY nav items. These items are generated by application and have only direction guidance. Application creates ILS nav items only at RWYs, where ILS was published (safe glide slope angle and RWY threshold crossing height are known).

FLY is FUN – User Guide – 2018-06-29 114 / 183
It is very easy to change RWY nav item to ILS, but you have to know safe glide slope angle and safe RWY threshold crossing height. First make a copy of RWY To copy the RWY long tap on RWY name, then select Edit, and then Copy
To paste the RWY, tap on Past. RWY is duplicated

FLY is FUN – User Guide – 2018-06-29 115 / 183
then swipe with one finger on RWY name to open it in Edit mode, select ILS in “Item type:” button.
- File requested information
o safe glide slope angle, and
o safe RWY threshold crossing height
- Tap on green stick to validate and save

FLY is FUN – User Guide – 2018-06-29 116 / 183
11.5 Importing “WPT” waypoints It is to import WPT. Example with WPT of Loire Castle position in France generated using Google Earth Note: Google Earth file should be KML, not kmz. Open Nav database and go to “My WPT” folder. Being in “My WPT” tap on menu button, select Share, then Import, then Loire Castle.kml
So easy.
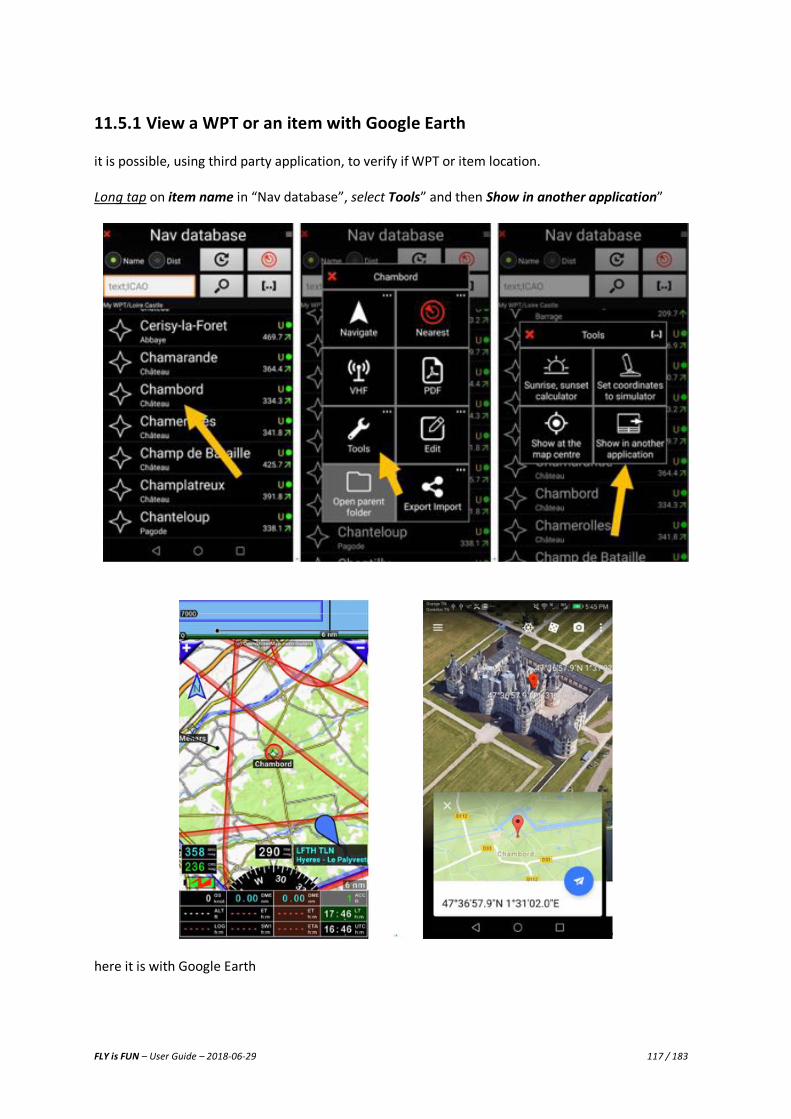
FLY is FUN – User Guide – 2018-06-29 117 / 183
11.5.1 View a WPT or an item with Google Earth it is possible, using third party application, to verify if WPT or item location. Long tap on item name in “Nav database”, select Tools” and then Show in another application”
here it is with Google Earth
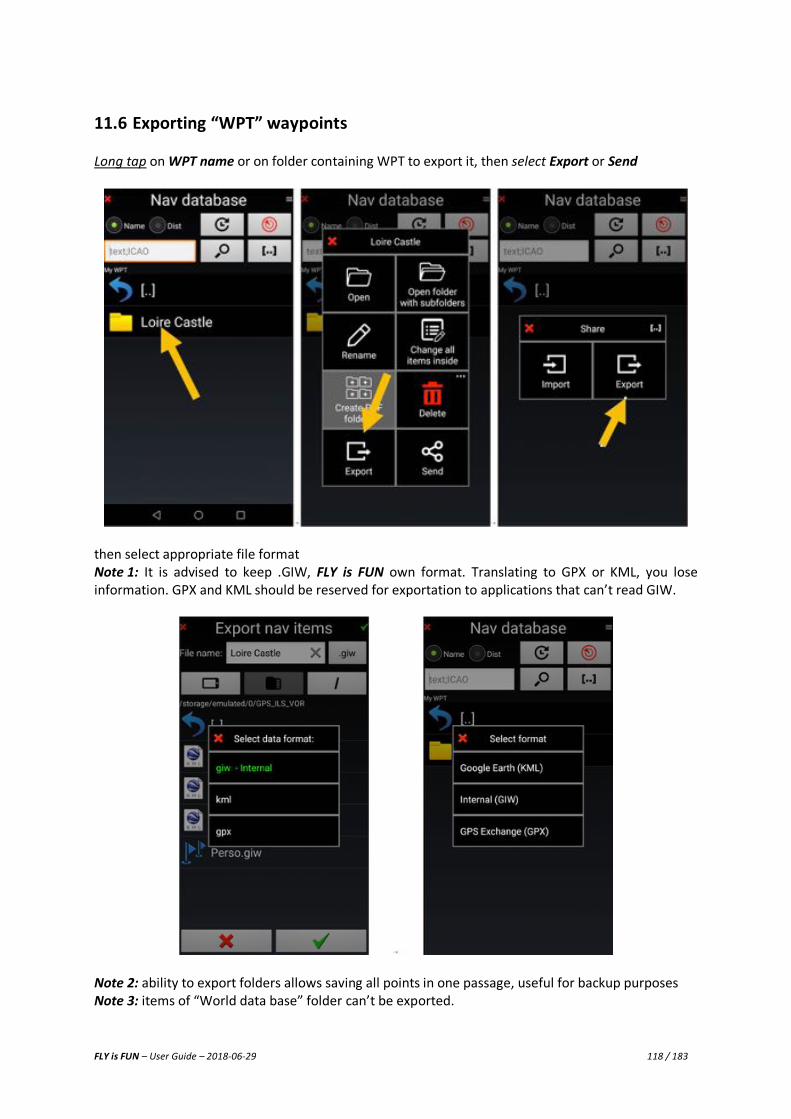
FLY is FUN – User Guide – 2018-06-29 118 / 183
11.6 Exporting “WPT” waypoints Long tap on WPT name or on folder containing WPT to export it, then select Export or Send
then select appropriate file format Note 1: It is advised to keep .GIW, FLY is FUN own format. Translating to GPX or KML, you lose information. GPX and KML should be reserved for exportation to applications that can’t read GIW.
Note 2: ability to export folders allows saving all points in one passage, useful for backup purposes Note 3: items of “World data base” folder can’t be exported.

FLY is FUN – User Guide – 2018-06-29 119 / 183
12 Importing / Exporting Routes
12.1 Importing route FLY is FUN allows you to import or export routes using the following formats
- .GPX standard format for most GPS - .KML Google Earth format - .GIR FLY is FUN own format
To import a route, open “Routes” library and select “Import”
select the route to import. The route appears now in “Routes library”
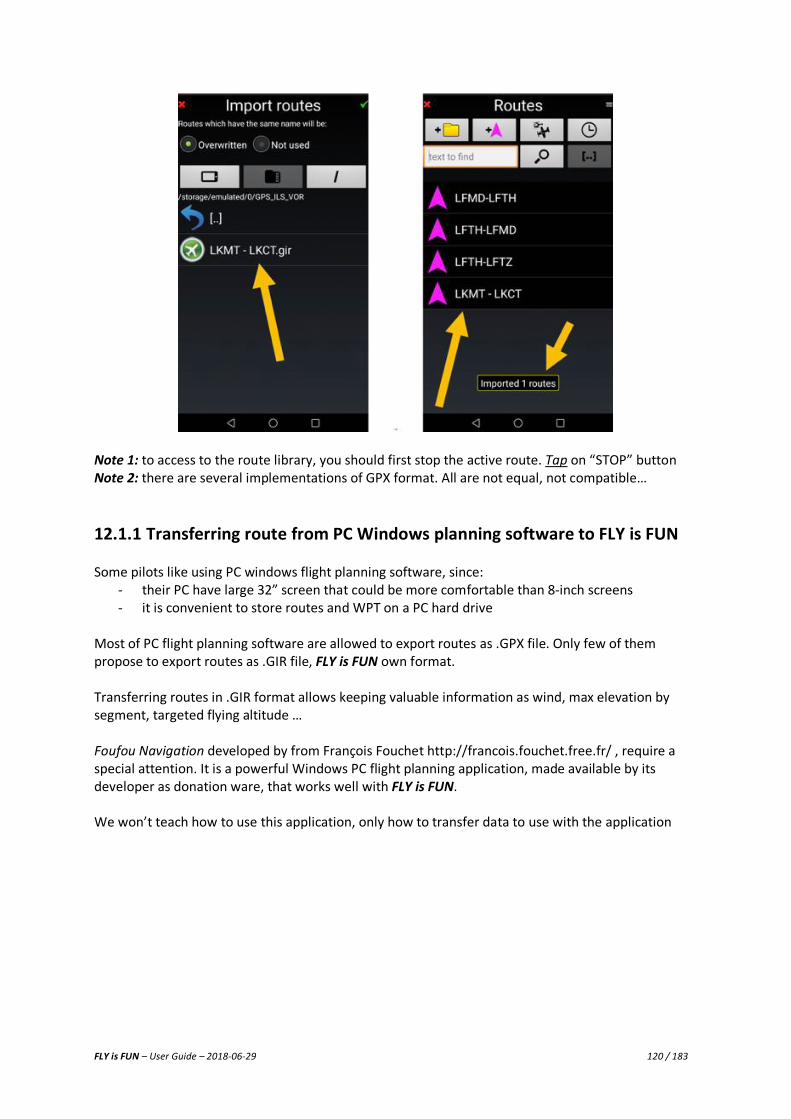
FLY is FUN – User Guide – 2018-06-29 120 / 183
Note 1: to access to the route library, you should first stop the active route. Tap on “STOP” button Note 2: there are several implementations of GPX format. All are not equal, not compatible…
12.1.1 Transferring route from PC Windows planning software to FLY is FUN Some pilots like using PC windows flight planning software, since:
- their PC have large 32” screen that could be more comfortable than 8-inch screens - it is convenient to store routes and WPT on a PC hard drive
Most of PC flight planning software are allowed to export routes as .GPX file. Only few of them propose to export routes as .GIR file, FLY is FUN own format. Transferring routes in .GIR format allows keeping valuable information as wind, max elevation by segment, targeted flying altitude … Foufou Navigation developed by from François Fouchet http://francois.fouchet.free.fr/ , require a special attention. It is a powerful Windows PC flight planning application, made available by its developer as donation ware, that works well with FLY is FUN. We won’t teach how to use this application, only how to transfer data to use with the application
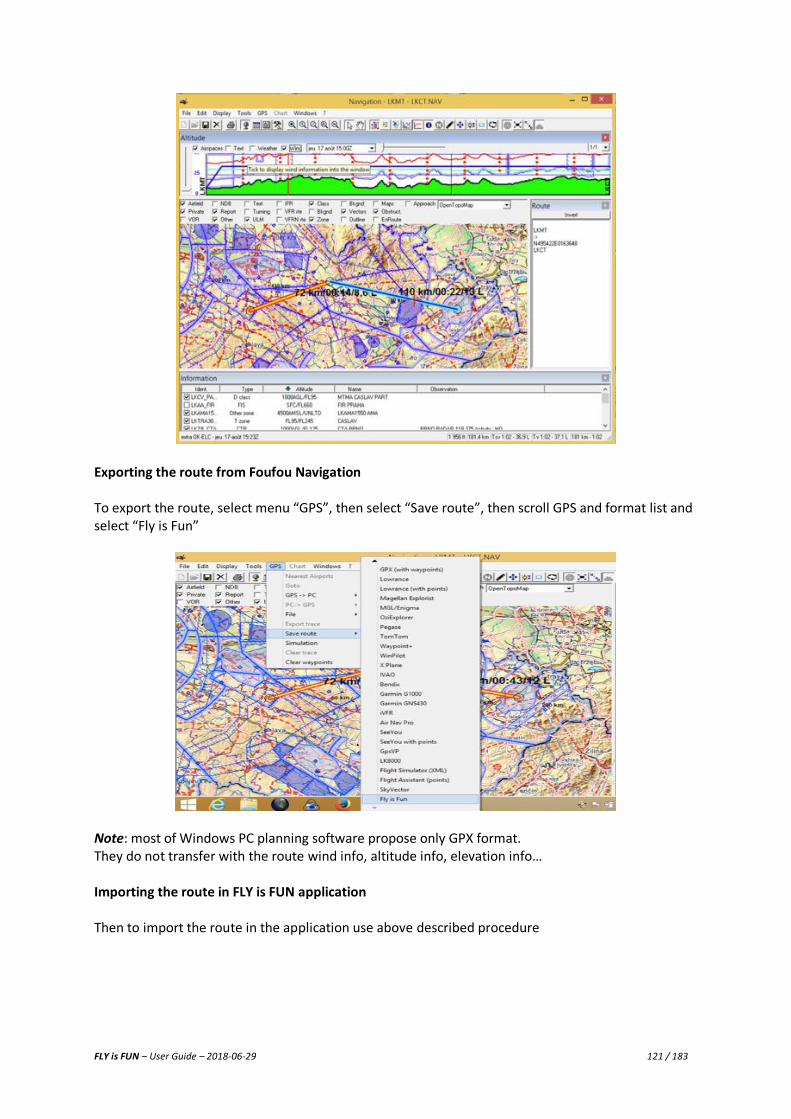
FLY is FUN – User Guide – 2018-06-29 121 / 183
Exporting the route from Foufou Navigation To export the route, select menu “GPS”, then select “Save route”, then scroll GPS and format list and select “Fly is Fun”
Note: most of Windows PC planning software propose only GPX format. They do not transfer with the route wind info, altitude info, elevation info… Importing the route in FLY is FUN application Then to import the route in the application use above described procedure
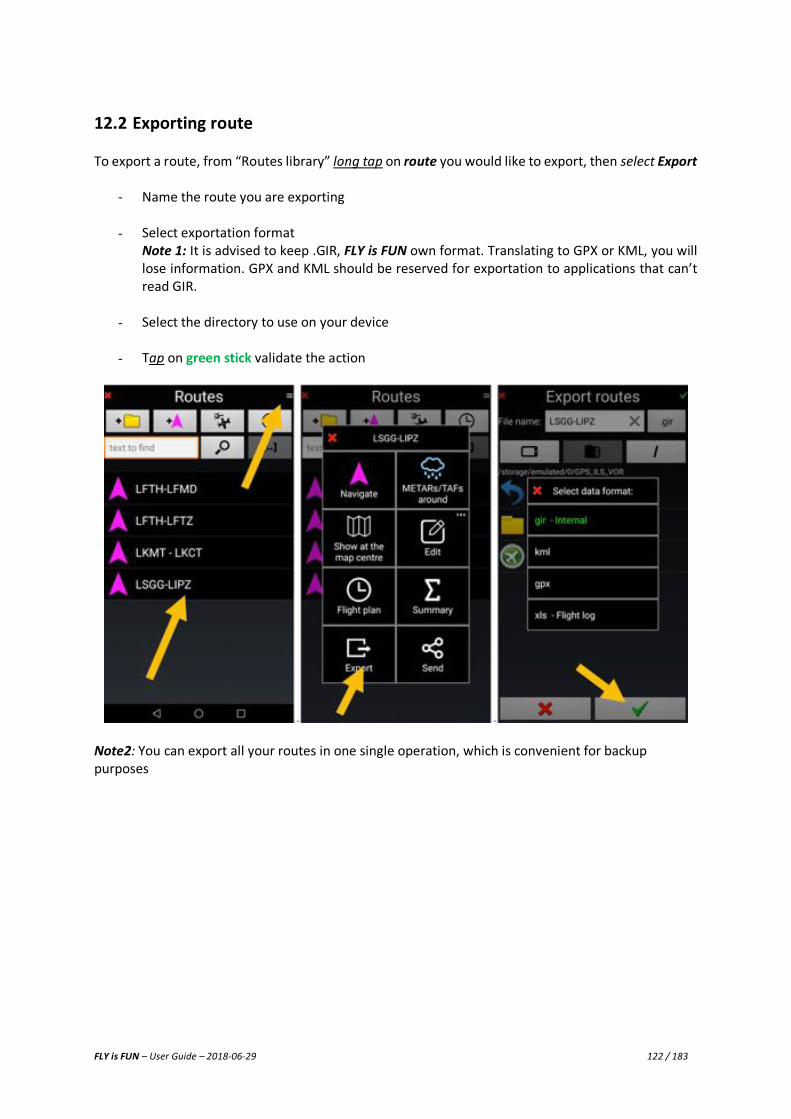
FLY is FUN – User Guide – 2018-06-29 122 / 183
12.2 Exporting route To export a route, from “Routes library” long tap on route you would like to export, then select Export
- Name the route you are exporting
- Select exportation format
Note 1: It is advised to keep .GIR, FLY is FUN own format. Translating to GPX or KML, you will lose information. GPX and KML should be reserved for exportation to applications that can’t read GIR.
- Select the directory to use on your device
- Tap on green stick validate the action
Note2: You can export all your routes in one single operation, which is convenient for backup purposes
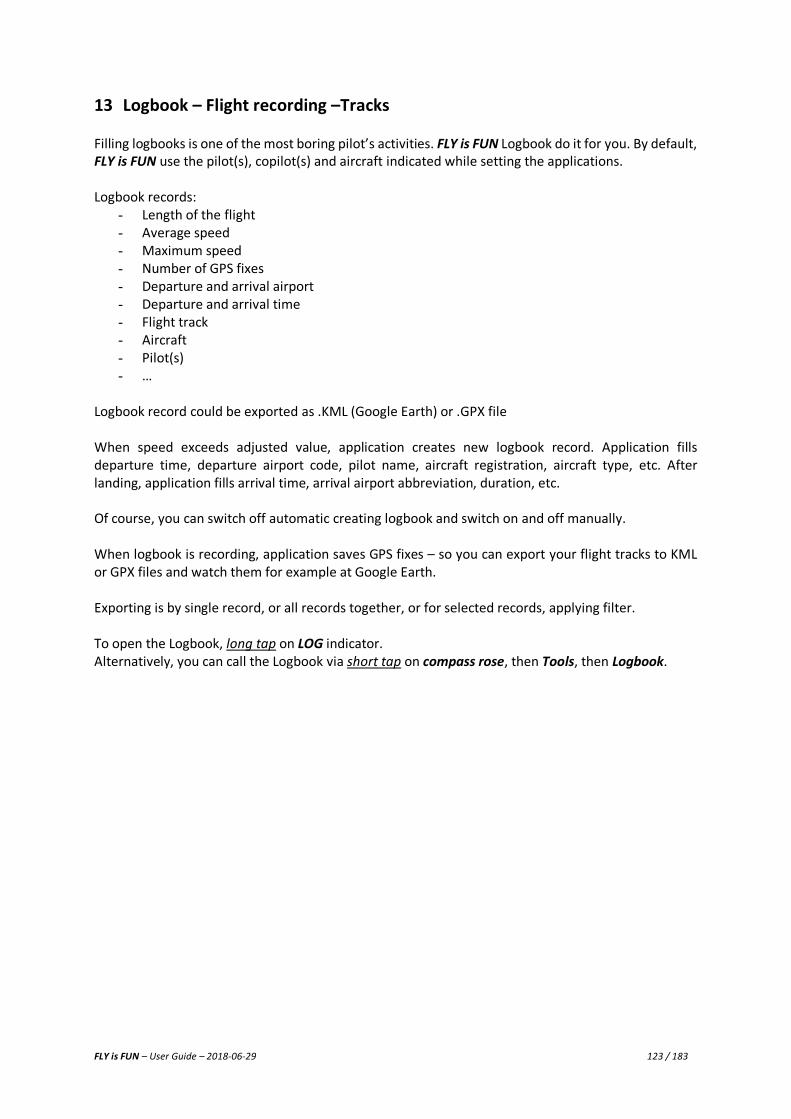
FLY is FUN – User Guide – 2018-06-29 123 / 183
13 Logbook – Flight recording –Tracks Filling logbooks is one of the most boring pilot’s activities. FLY is FUN Logbook do it for you. By default, FLY is FUN use the pilot(s), copilot(s) and aircraft indicated while setting the applications. Logbook records:
- Length of the flight - Average speed - Maximum speed - Number of GPS fixes - Departure and arrival airport - Departure and arrival time - Flight track - Aircraft - Pilot(s) - …
Logbook record could be exported as .KML (Google Earth) or .GPX file When speed exceeds adjusted value, application creates new logbook record. Application fills departure time, departure airport code, pilot name, aircraft registration, aircraft type, etc. After landing, application fills arrival time, arrival airport abbreviation, duration, etc. Of course, you can switch off automatic creating logbook and switch on and off manually. When logbook is recording, application saves GPS fixes – so you can export your flight tracks to KML or GPX files and watch them for example at Google Earth. Exporting is by single record, or all records together, or for selected records, applying filter. To open the Logbook, long tap on LOG indicator. Alternatively, you can call the Logbook via short tap on compass rose, then Tools, then Logbook.
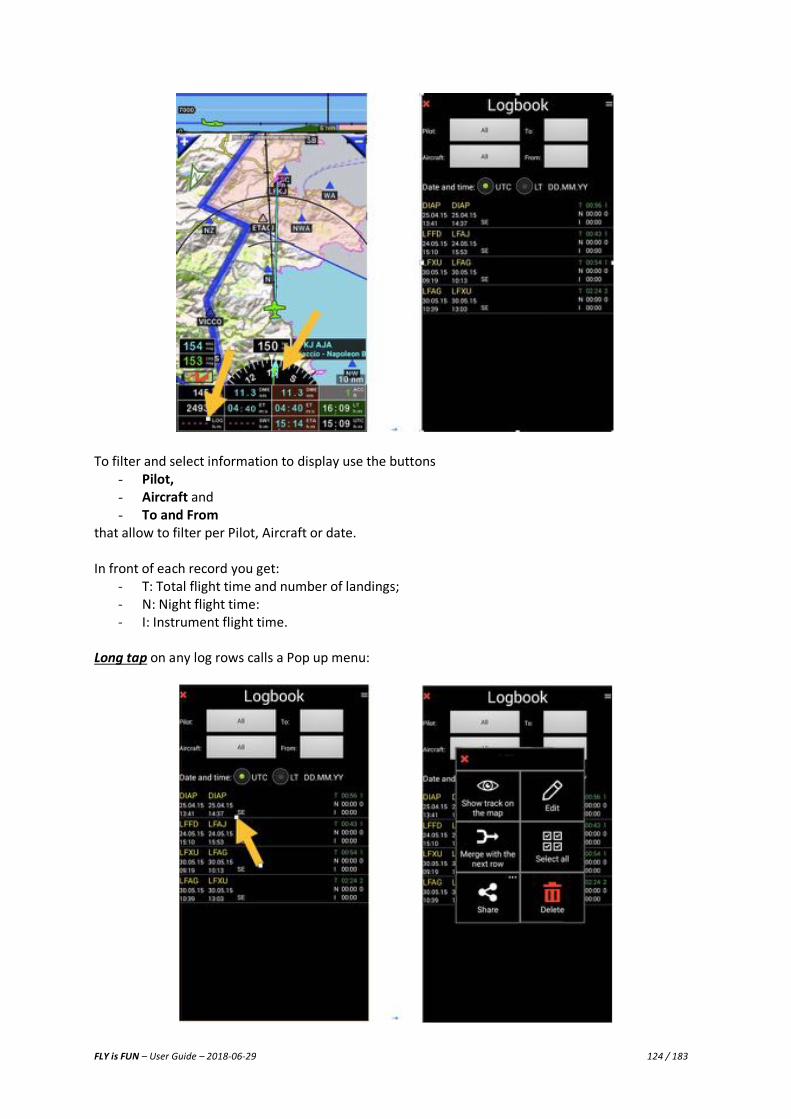
FLY is FUN – User Guide – 2018-06-29 124 / 183
To filter and select information to display use the buttons
- Pilot, - Aircraft and - To and From
that allow to filter per Pilot, Aircraft or date. In front of each record you get:
- T: Total flight time and number of landings; - N: Night flight time: - I: Instrument flight time.
Long tap on any log rows calls a Pop up menu:
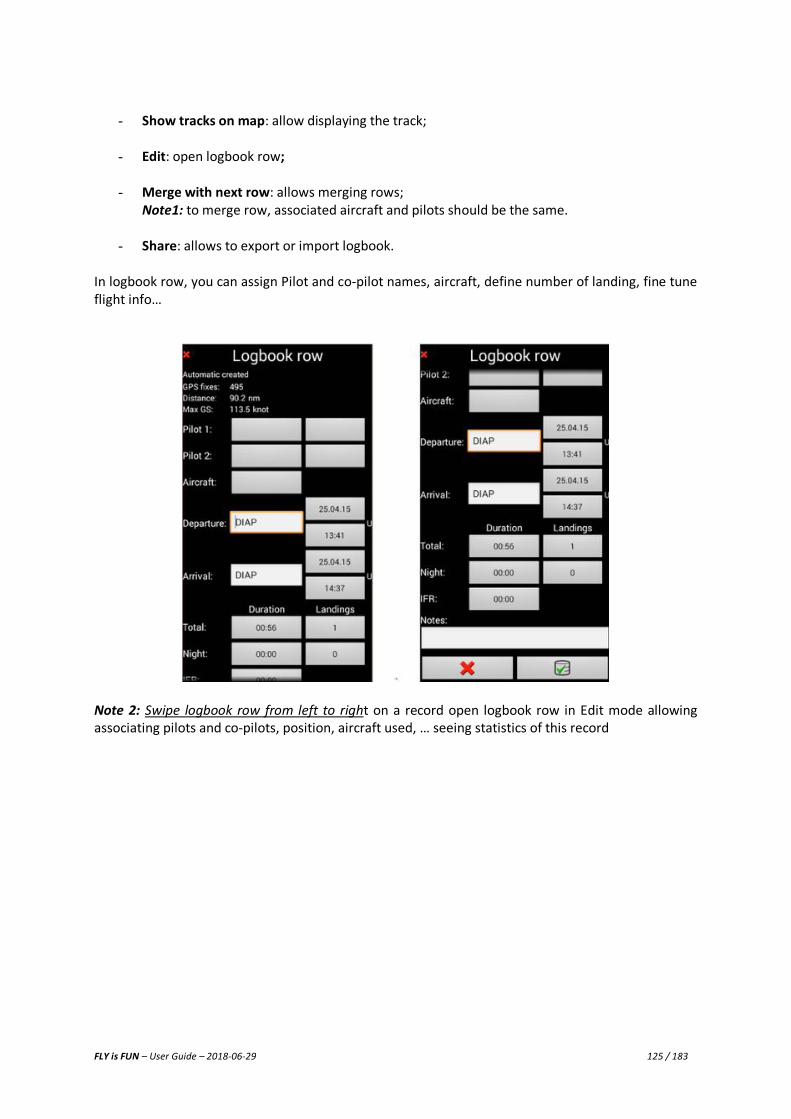
FLY is FUN – User Guide – 2018-06-29 125 / 183
- Show tracks on map: allow displaying the track;
- Edit: open logbook row;
- Merge with next row: allows merging rows;
Note1: to merge row, associated aircraft and pilots should be the same.
- Share: allows to export or import logbook. In logbook row, you can assign Pilot and co-pilot names, aircraft, define number of landing, fine tune flight info…
Note 2: Swipe logbook row from left to right on a record open logbook row in Edit mode allowing associating pilots and co-pilots, position, aircraft used, … seeing statistics of this record
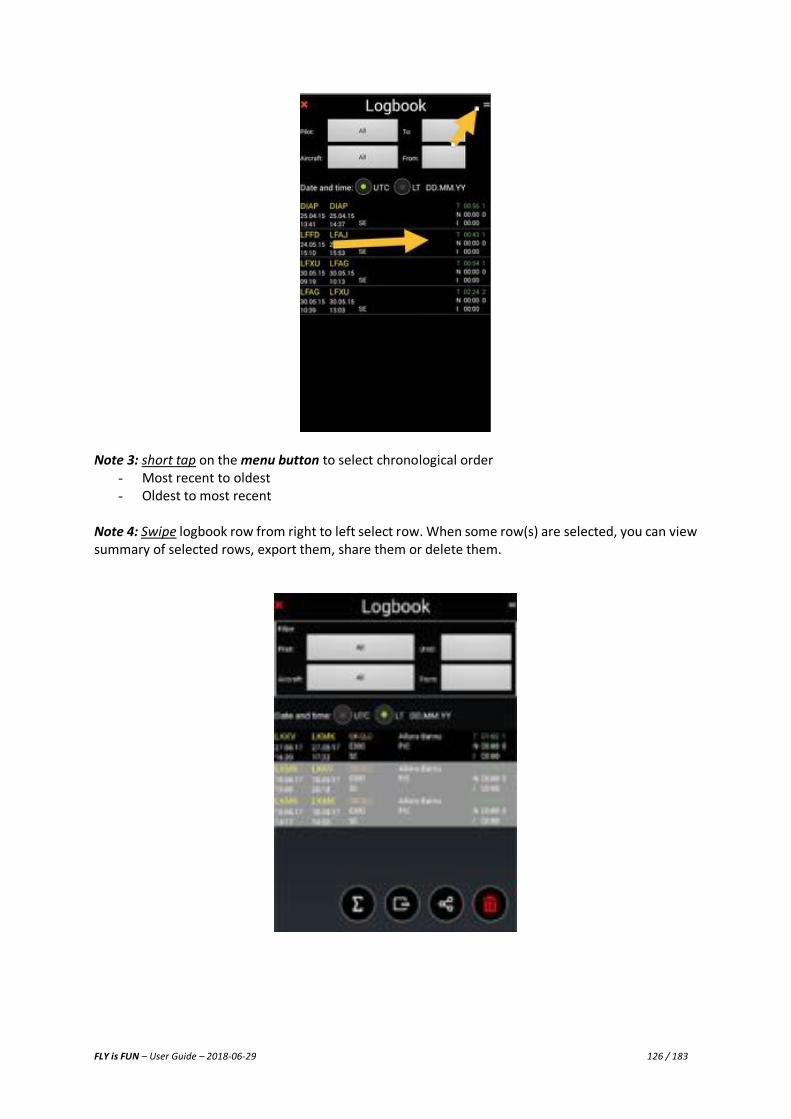
FLY is FUN – User Guide – 2018-06-29 126 / 183
Note 3: short tap on the menu button to select chronological order - Most recent to oldest - Oldest to most recent
Note 4: Swipe logbook row from right to left select row. When some row(s) are selected, you can view summary of selected rows, export them, share them or delete them.
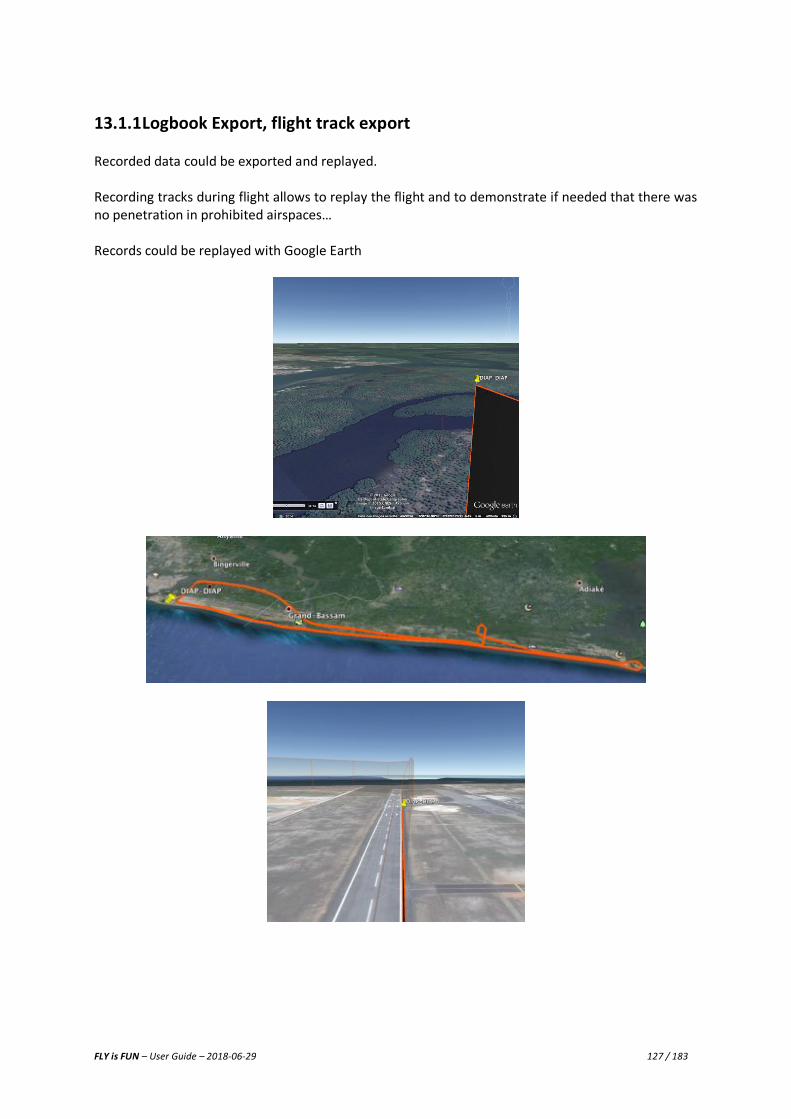
FLY is FUN – User Guide – 2018-06-29 127 / 183
13.1.1 Logbook Export, flight track export Recorded data could be exported and replayed. Recording tracks during flight allows to replay the flight and to demonstrate if needed that there was no penetration in prohibited airspaces… Records could be replayed with Google Earth
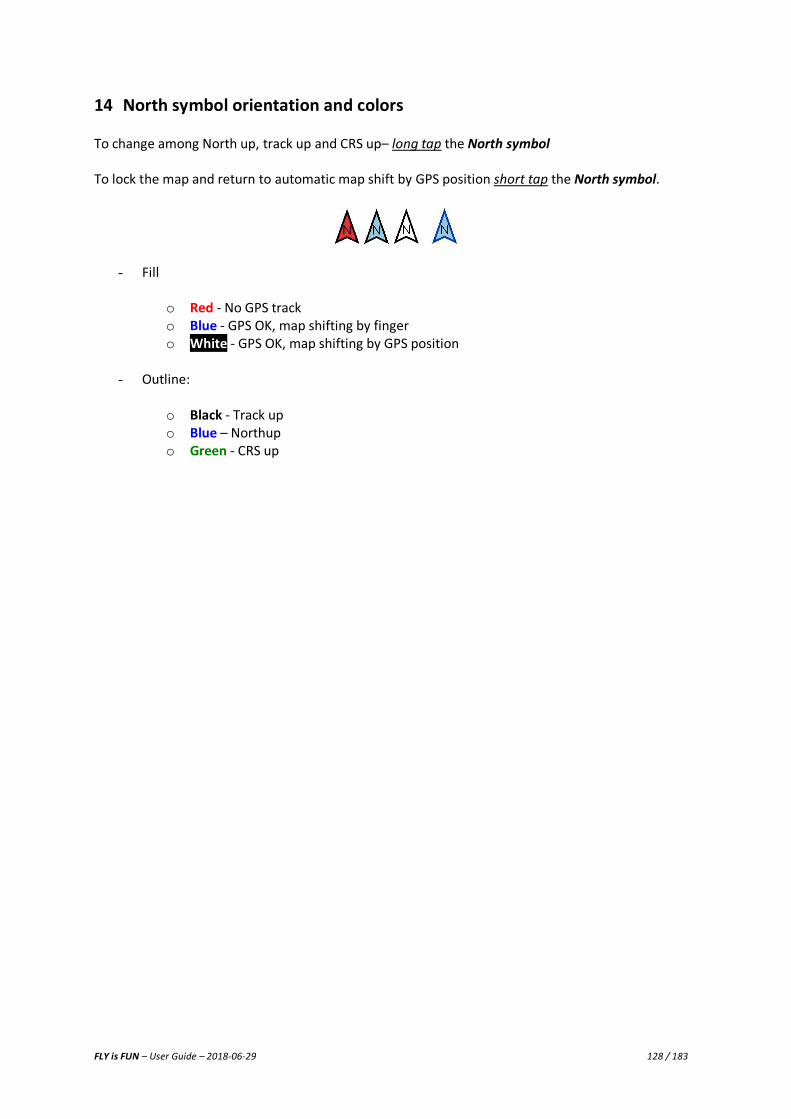
FLY is FUN – User Guide – 2018-06-29 128 / 183
14 North symbol orientation and colors To change among North up, track up and CRS up– long tap the North symbol To lock the map and return to automatic map shift by GPS position short tap the North symbol.
- Fill
o Red - No GPS track o Blue - GPS OK, map shifting by finger o White - GPS OK, map shifting by GPS position
- Outline:
o Black - Track up o Blue – Northup o Green - CRS up

FLY is FUN – User Guide – 2018-06-29 129 / 183
15 Nav database – some more info
Navigation items imported and updated from Fly is Fun server and items created or imported by the user are stored in Nav database. Only Airspaces and Patterns are not displayed via the Nav data base windows, but they can be consulted in the Airspace/Pattern windows that is accessible via short press on compass rose, then select Information and Airspaces and Patterns. In front each item names on the same line, at its right you can see some strange characters “P, G, U, C”, color points “green, yellow or red”, and just below a question marks or numbers
What mean those letters and colors?
- P : Published by FLY is FUN using data provided by external sources - G : Generated by FLY is FUN user community and inserted in FIF database. Update is not
granted, user need to check data validity - U : User created or imported item
- Green : update or user creation date within the last 28 days - Yellow : update or user creation date within 29 to 84 days - Red : update or user creation date is more than 84 days
- Number and arrow: the number indicate the distance (in km or nm according selected
distance units) and the arrow, the direction. To get distance and direction, you need a valid GPS signal with a fix
- ? : mean that distance can’t be calculated as GPS fix is missing
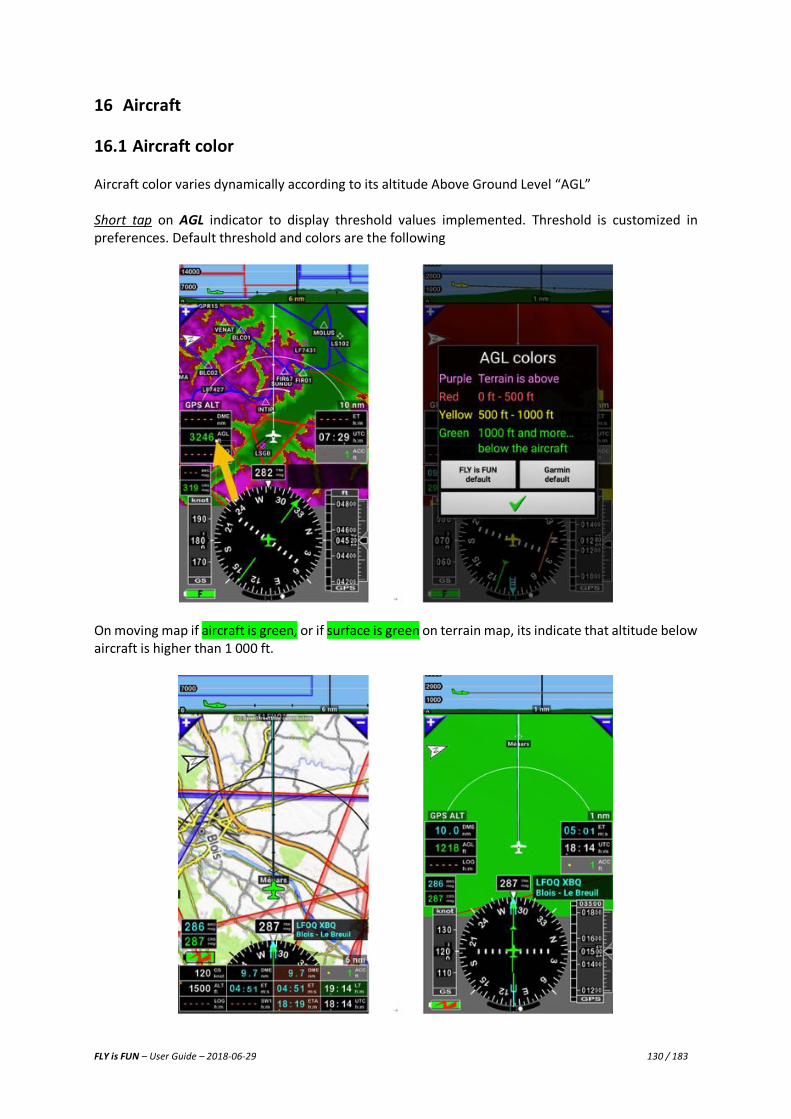
FLY is FUN – User Guide – 2018-06-29 130 / 183
16 Aircraft
16.1 Aircraft color Aircraft color varies dynamically according to its altitude Above Ground Level “AGL” Short tap on AGL indicator to display threshold values implemented. Threshold is customized in preferences. Default threshold and colors are the following
On moving map if aircraft is green, or if surface is green on terrain map, its indicate that altitude below aircraft is higher than 1 000 ft.
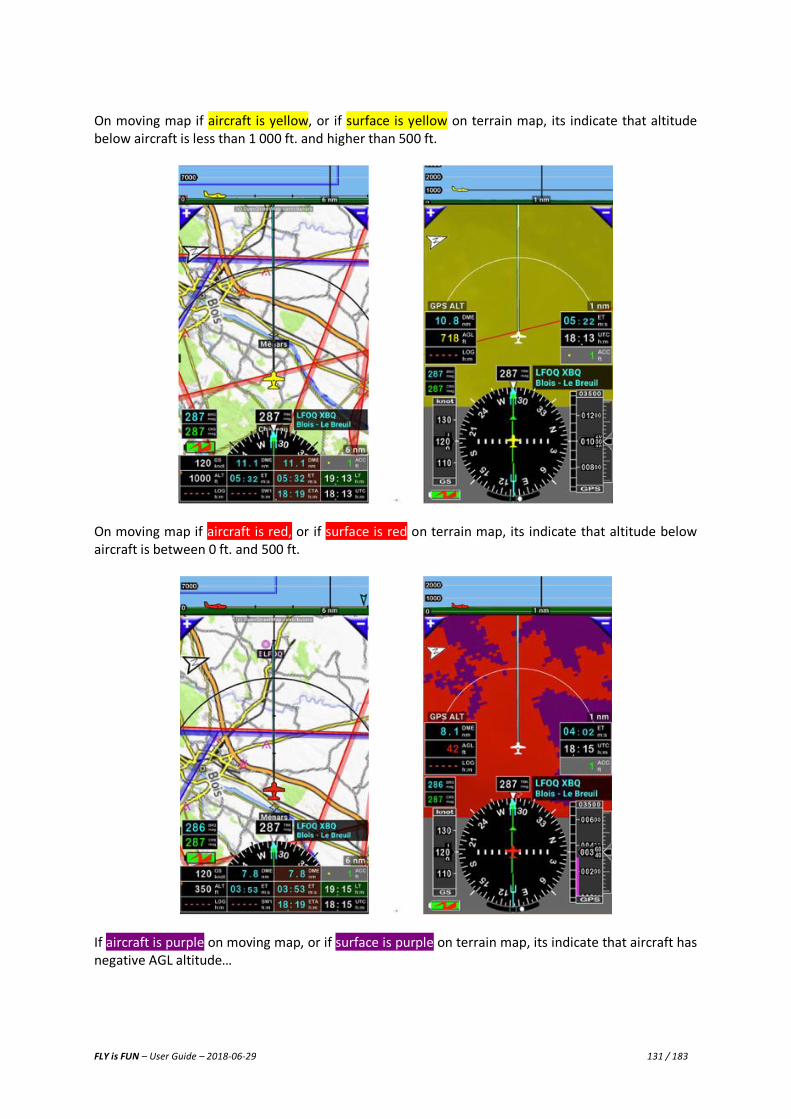
FLY is FUN – User Guide – 2018-06-29 131 / 183
On moving map if aircraft is yellow, or if surface is yellow on terrain map, its indicate that altitude below aircraft is less than 1 000 ft. and higher than 500 ft.
On moving map if aircraft is red, or if surface is red on terrain map, its indicate that altitude below aircraft is between 0 ft. and 500 ft.
If aircraft is purple on moving map, or if surface is purple on terrain map, its indicate that aircraft has negative AGL altitude…
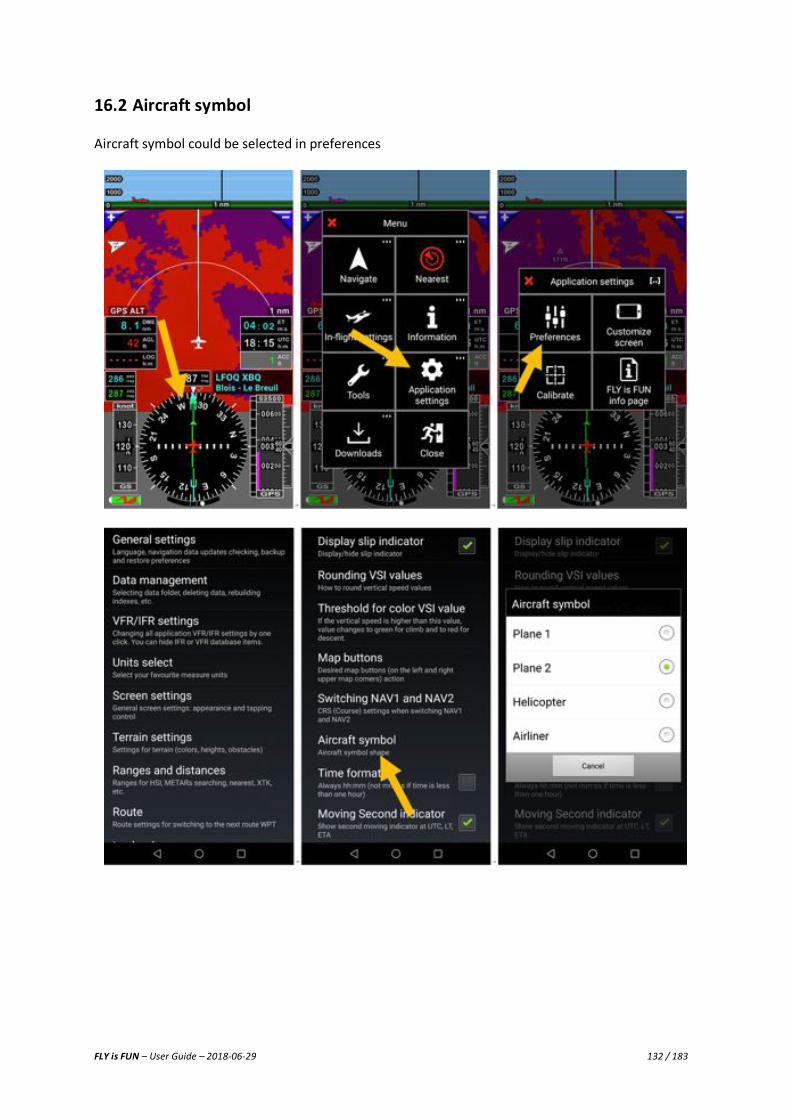
FLY is FUN – User Guide – 2018-06-29 132 / 183
16.2 Aircraft symbol Aircraft symbol could be selected in preferences
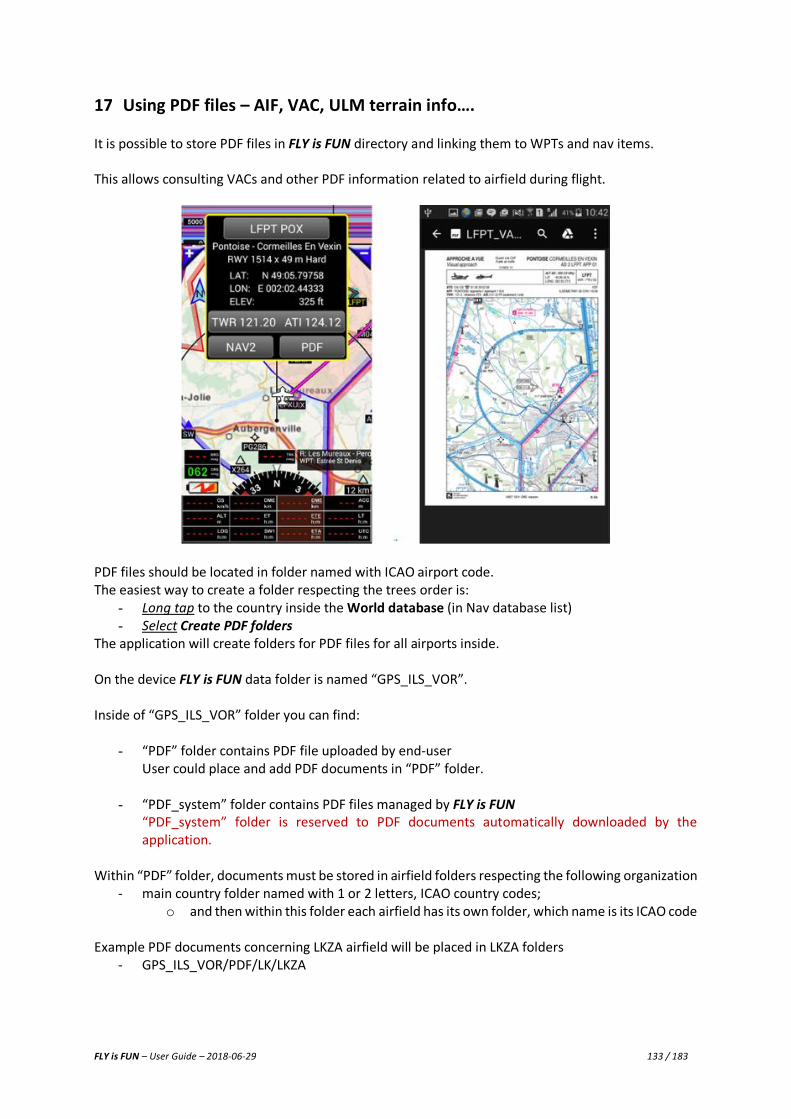
FLY is FUN – User Guide – 2018-06-29 133 / 183
17 Using PDF files – AIF, VAC, ULM terrain info…. It is possible to store PDF files in FLY is FUN directory and linking them to WPTs and nav items. This allows consulting VACs and other PDF information related to airfield during flight.
PDF files should be located in folder named with ICAO airport code. The easiest way to create a folder respecting the trees order is:
- Long tap to the country inside the World database (in Nav database list) - Select Create PDF folders
The application will create folders for PDF files for all airports inside. On the device FLY is FUN data folder is named “GPS_ILS_VOR”. Inside of “GPS_ILS_VOR” folder you can find:
- “PDF” folder contains PDF file uploaded by end-user
User could place and add PDF documents in “PDF” folder.
- “PDF_system” folder contains PDF files managed by FLY is FUN “PDF_system” folder is reserved to PDF documents automatically downloaded by the application.
Within “PDF” folder, documents must be stored in airfield folders respecting the following organization
- main country folder named with 1 or 2 letters, ICAO country codes; o and then within this folder each airfield has its own folder, which name is its ICAO code
Example PDF documents concerning LKZA airfield will be placed in LKZA folders
- GPS_ILS_VOR/PDF/LK/LKZA
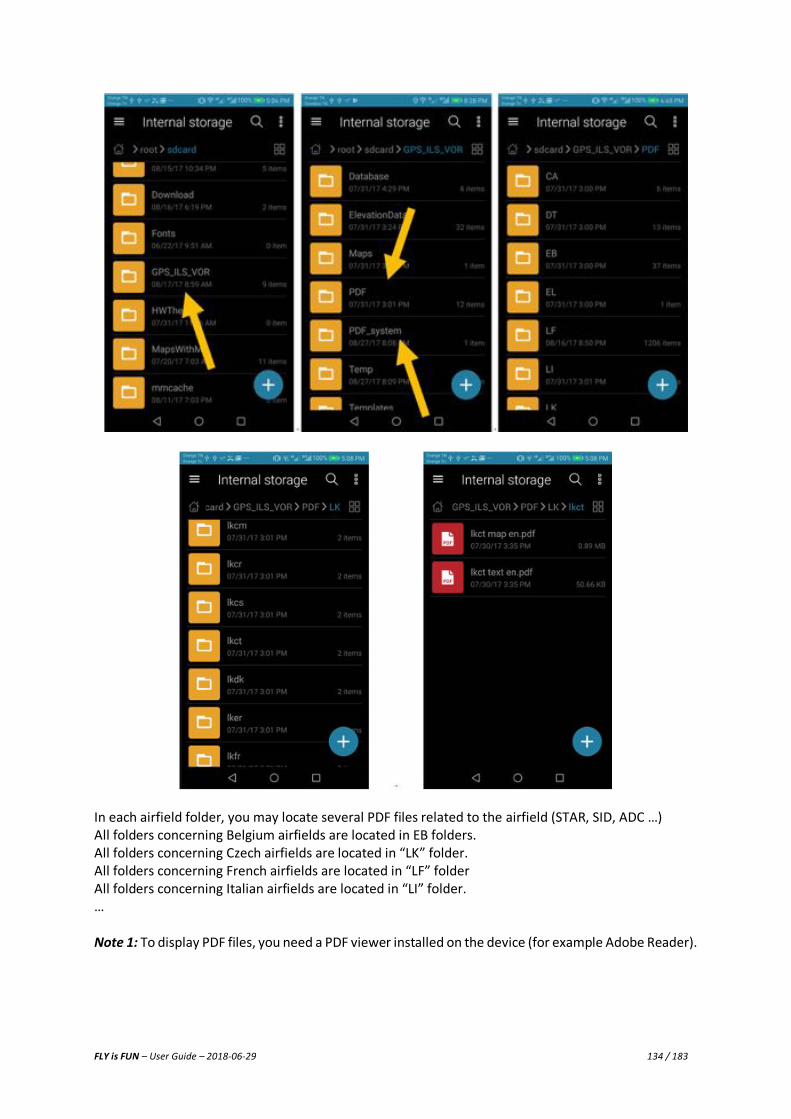
FLY is FUN – User Guide – 2018-06-29 134 / 183
In each airfield folder, you may locate several PDF files related to the airfield (STAR, SID, ADC …) All folders concerning Belgium airfields are located in EB folders. All folders concerning Czech airfields are located in “LK” folder. All folders concerning French airfields are located in “LF” folder All folders concerning Italian airfields are located in “LI” folder. … Note 1: To display PDF files, you need a PDF viewer installed on the device (for example Adobe Reader).
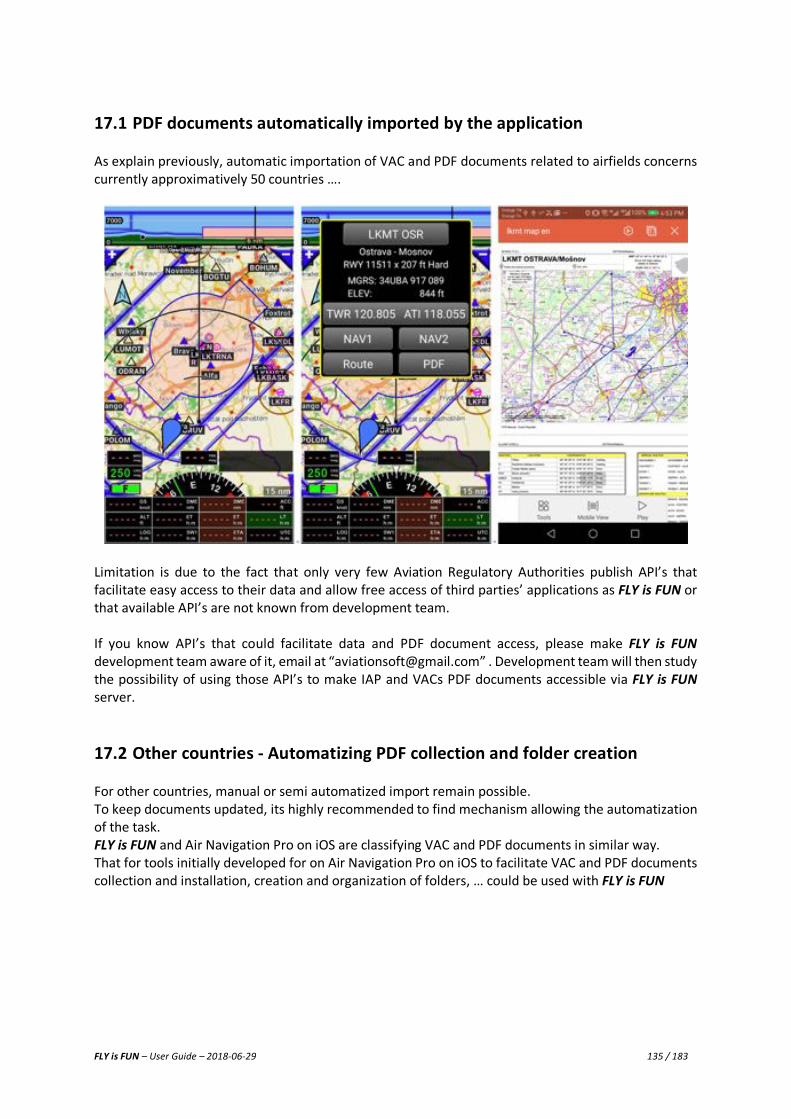
FLY is FUN – User Guide – 2018-06-29 135 / 183
17.1 PDF documents automatically imported by the application As explain previously, automatic importation of VAC and PDF documents related to airfields concerns currently approximatively 50 countries ….
Limitation is due to the fact that only very few Aviation Regulatory Authorities publish API’s that facilitate easy access to their data and allow free access of third parties’ applications as FLY is FUN or that available API’s are not known from development team. If you know API’s that could facilitate data and PDF document access, please make FLY is FUN development team aware of it, email at “[email protected]” . Development team will then study the possibility of using those API’s to make IAP and VACs PDF documents accessible via FLY is FUN server.
17.2 Other countries - Automatizing PDF collection and folder creation For other countries, manual or semi automatized import remain possible. To keep documents updated, its highly recommended to find mechanism allowing the automatization of the task. FLY is FUN and Air Navigation Pro on iOS are classifying VAC and PDF documents in similar way. That for tools initially developed for on Air Navigation Pro on iOS to facilitate VAC and PDF documents collection and installation, creation and organization of folders, … could be used with FLY is FUN
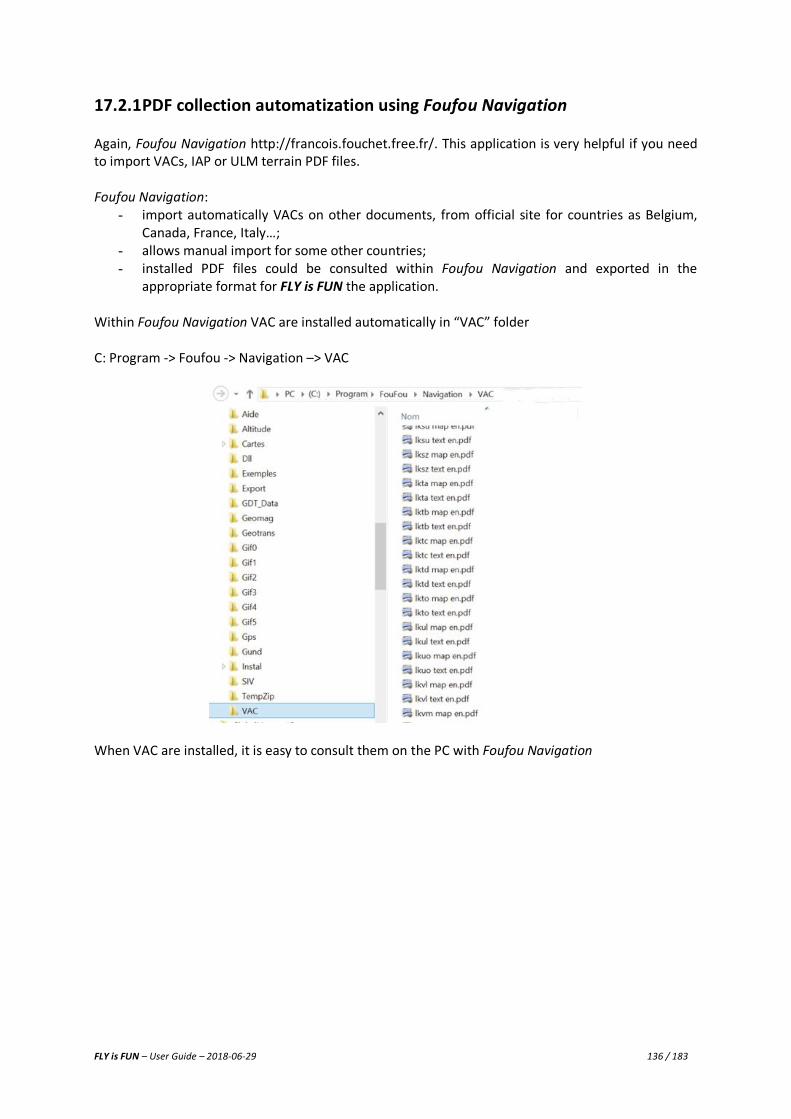
FLY is FUN – User Guide – 2018-06-29 136 / 183
17.2.1 PDF collection automatization using Foufou Navigation Again, Foufou Navigation http://francois.fouchet.free.fr/. This application is very helpful if you need to import VACs, IAP or ULM terrain PDF files. Foufou Navigation:
- import automatically VACs on other documents, from official site for countries as Belgium, Canada, France, Italy…;
- allows manual import for some other countries; - installed PDF files could be consulted within Foufou Navigation and exported in the
appropriate format for FLY is FUN the application. Within Foufou Navigation VAC are installed automatically in “VAC” folder C: Program -> Foufou -> Navigation –> VAC
When VAC are installed, it is easy to consult them on the PC with Foufou Navigation

FLY is FUN – User Guide – 2018-06-29 137 / 183
but this is not what we are looking for. To export documents to use with FLY is FUN from Foufou Navigation select
- -> Tools -> Export
-> Export VACs -> Air Nav Pro Format
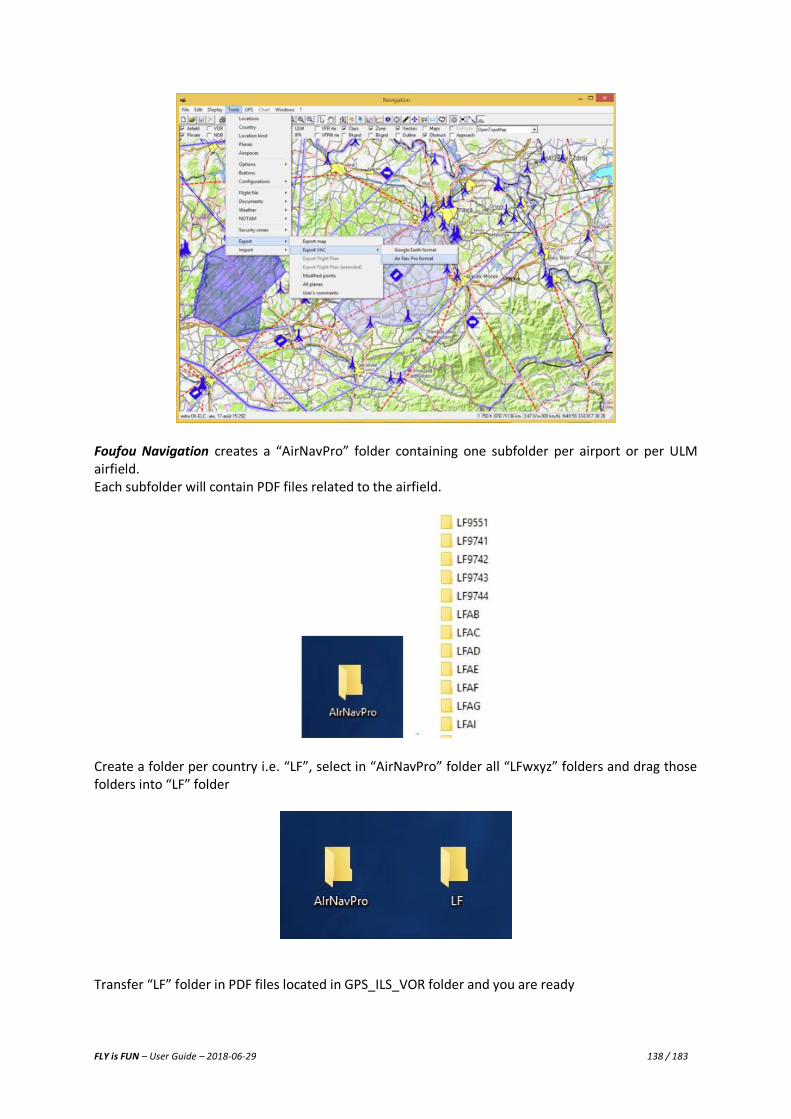
FLY is FUN – User Guide – 2018-06-29 138 / 183
Foufou Navigation creates a “AirNavPro” folder containing one subfolder per airport or per ULM airfield. Each subfolder will contain PDF files related to the airfield.
Create a folder per country i.e. “LF”, select in “AirNavPro” folder all “LFwxyz” folders and drag those folders into “LF” folder
Transfer “LF” folder in PDF files located in GPS_ILS_VOR folder and you are ready
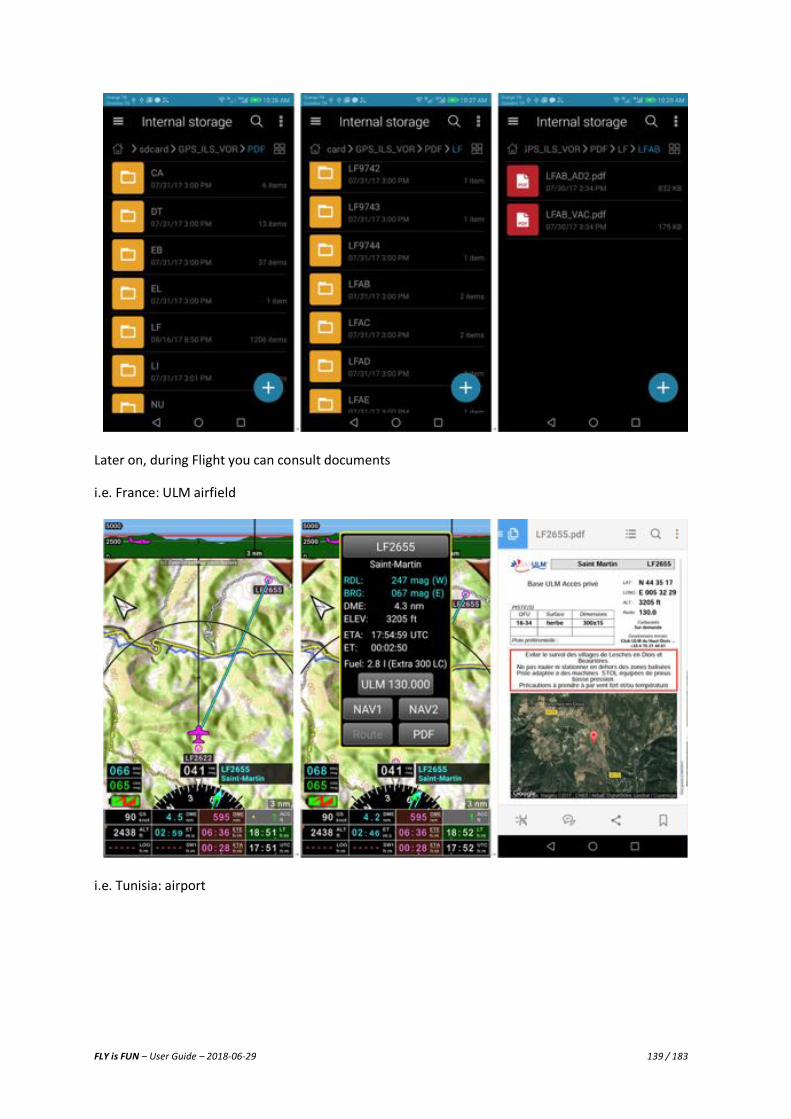
FLY is FUN – User Guide – 2018-06-29 139 / 183
Later on, during Flight you can consult documents i.e. France: ULM airfield
i.e. Tunisia: airport

FLY is FUN – User Guide – 2018-06-29 140 / 183
FLY is FUN – User Guide – 2018-06-29 141 / 183
18 Using external devices and sensors The application could easily be interfaced with external devices and sensors. Interfaces have developed with:
- External GPS, that are then connected via USB or Bluetooth;
- Experimental HSI devices using non-certified electronic components: o Talos Avionic Aeolus connected via WiFi.
- External Baro, that are then connected via USB or Bluetooth port.
Interface with Stratux ADSB-IN detector based on Raspberry is under development.
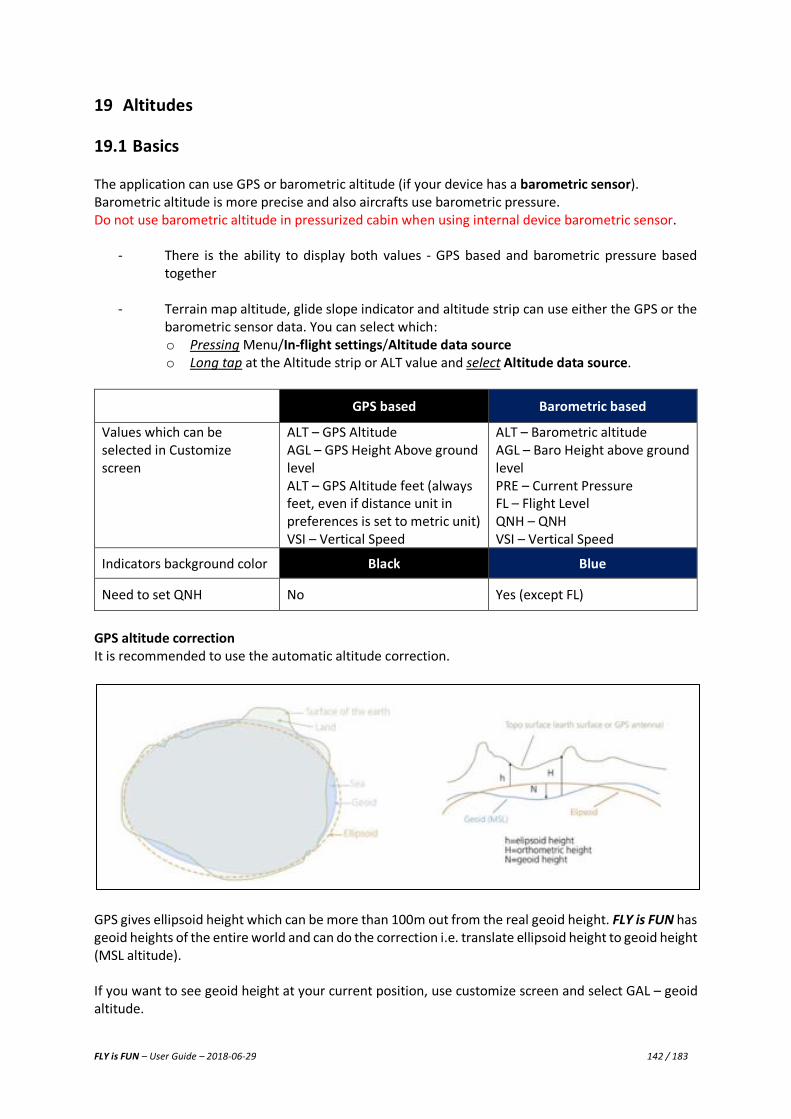
FLY is FUN – User Guide – 2018-06-29 142 / 183
19 Altitudes
19.1 Basics The application can use GPS or barometric altitude (if your device has a barometric sensor). Barometric altitude is more precise and also aircrafts use barometric pressure. Do not use barometric altitude in pressurized cabin when using internal device barometric sensor.
- There is the ability to display both values - GPS based and barometric pressure based together
- Terrain map altitude, glide slope indicator and altitude strip can use either the GPS or the barometric sensor data. You can select which: o Pressing Menu/In-flight settings/Altitude data source o Long tap at the Altitude strip or ALT value and select Altitude data source.
GPS based Barometric based
Values which can be selected in Customize screen
ALT – GPS Altitude AGL – GPS Height Above ground level ALT – GPS Altitude feet (always feet, even if distance unit in preferences is set to metric unit) VSI – Vertical Speed
ALT – Barometric altitude AGL – Baro Height above ground level PRE – Current Pressure FL – Flight Level QNH – QNH VSI – Vertical Speed
Indicators background color Black Blue
Need to set QNH No Yes (except FL)
GPS altitude correction It is recommended to use the automatic altitude correction.
GPS gives ellipsoid height which can be more than 100m out from the real geoid height. FLY is FUN has geoid heights of the entire world and can do the correction i.e. translate ellipsoid height to geoid height (MSL altitude). If you want to see geoid height at your current position, use customize screen and select GAL – geoid altitude.
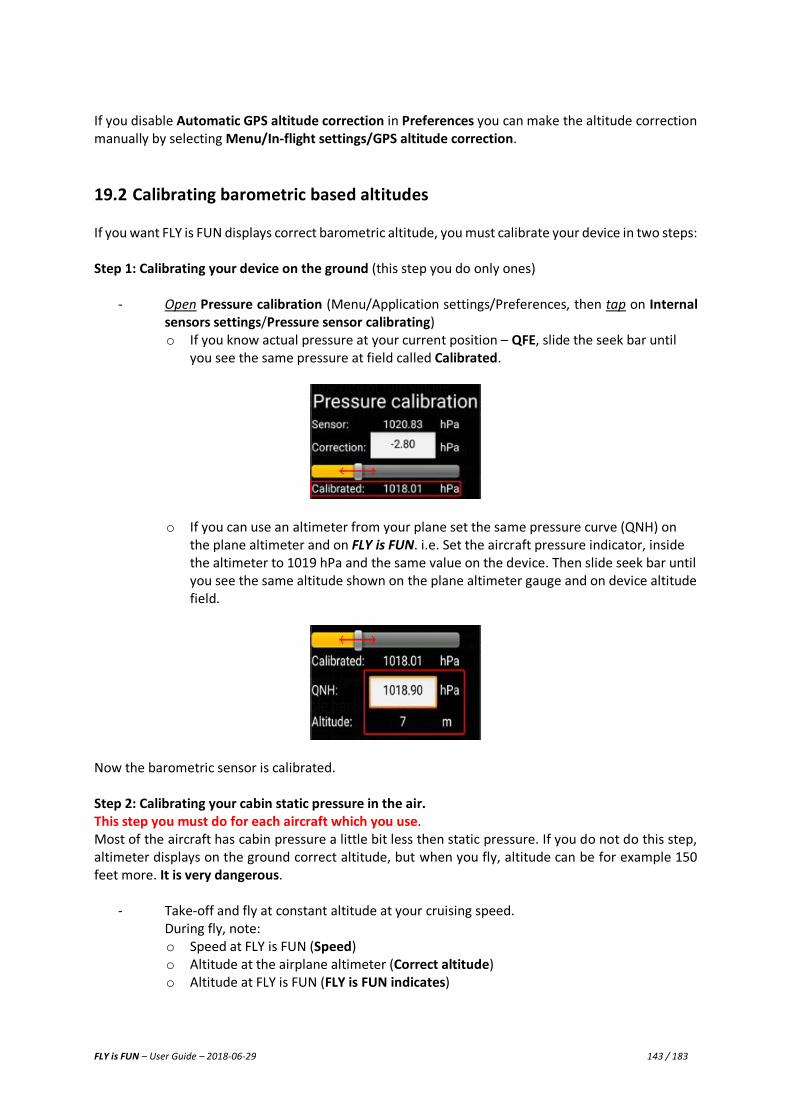
FLY is FUN – User Guide – 2018-06-29 143 / 183
If you disable Automatic GPS altitude correction in Preferences you can make the altitude correction manually by selecting Menu/In-flight settings/GPS altitude correction.
19.2 Calibrating barometric based altitudes If you want FLY is FUN displays correct barometric altitude, you must calibrate your device in two steps: Step 1: Calibrating your device on the ground (this step you do only ones)
- Open Pressure calibration (Menu/Application settings/Preferences, then tap on Internal sensors settings/Pressure sensor calibrating) o If you know actual pressure at your current position – QFE, slide the seek bar until
you see the same pressure at field called Calibrated.
o If you can use an altimeter from your plane set the same pressure curve (QNH) on the plane altimeter and on FLY is FUN. i.e. Set the aircraft pressure indicator, inside the altimeter to 1019 hPa and the same value on the device. Then slide seek bar until you see the same altitude shown on the plane altimeter gauge and on device altitude field.
Now the barometric sensor is calibrated. Step 2: Calibrating your cabin static pressure in the air. This step you must do for each aircraft which you use. Most of the aircraft has cabin pressure a little bit less then static pressure. If you do not do this step, altimeter displays on the ground correct altitude, but when you fly, altitude can be for example 150 feet more. It is very dangerous.
- Take-off and fly at constant altitude at your cruising speed. During fly, note: o Speed at FLY is FUN (Speed) o Altitude at the airplane altimeter (Correct altitude) o Altitude at FLY is FUN (FLY is FUN indicates)

FLY is FUN – User Guide – 2018-06-29 144 / 183
- Back on the ground, create the aircraft which you want to calibrate. If you do not know, how to do it, please visit chapter Aircraft settings (Menu / Information / Aircrafts).
o Open editing of the aircraft in which you flew before (swipe to the right on it) or create
new one. o Fill Baro Altitude calibration fields
When you fly, you must activate correct aircraft to see correct altitude! Selected aircraft has light green circle.
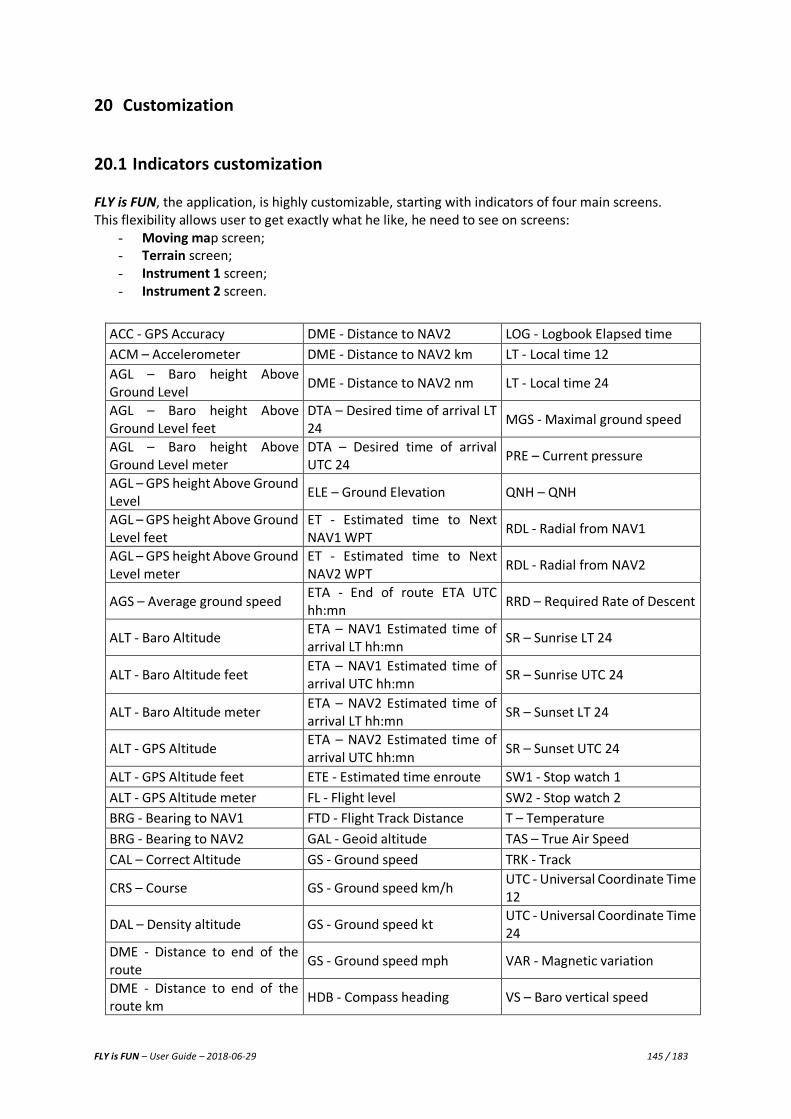
FLY is FUN – User Guide – 2018-06-29 145 / 183
20 Customization
20.1 Indicators customization FLY is FUN, the application, is highly customizable, starting with indicators of four main screens. This flexibility allows user to get exactly what he like, he need to see on screens:
- Moving map screen; - Terrain screen; - Instrument 1 screen; - Instrument 2 screen.
ACC - GPS Accuracy DME - Distance to NAV2 LOG - Logbook Elapsed time
ACM – Accelerometer DME - Distance to NAV2 km LT - Local time 12 AGL – Baro height Above Ground Level
DME - Distance to NAV2 nm LT - Local time 24
AGL – Baro height Above Ground Level feet
DTA – Desired time of arrival LT 24
MGS - Maximal ground speed
AGL – Baro height Above Ground Level meter
DTA – Desired time of arrival UTC 24
PRE – Current pressure
AGL – GPS height Above Ground Level
ELE – Ground Elevation QNH – QNH
AGL – GPS height Above Ground Level feet
ET - Estimated time to Next NAV1 WPT
RDL - Radial from NAV1
AGL – GPS height Above Ground Level meter
ET - Estimated time to Next NAV2 WPT
RDL - Radial from NAV2
AGS – Average ground speed ETA - End of route ETA UTC hh:mn
RRD – Required Rate of Descent
ALT - Baro Altitude ETA – NAV1 Estimated time of arrival LT hh:mn
SR – Sunrise LT 24
ALT - Baro Altitude feet ETA – NAV1 Estimated time of arrival UTC hh:mn
SR – Sunrise UTC 24
ALT - Baro Altitude meter ETA – NAV2 Estimated time of arrival LT hh:mn
SR – Sunset LT 24
ALT - GPS Altitude ETA – NAV2 Estimated time of arrival UTC hh:mn
SR – Sunset UTC 24
ALT - GPS Altitude feet ETE - Estimated time enroute SW1 - Stop watch 1
ALT - GPS Altitude meter FL - Flight level SW2 - Stop watch 2
BRG - Bearing to NAV1 FTD - Flight Track Distance T – Temperature
BRG - Bearing to NAV2 GAL - Geoid altitude TAS – True Air Speed
CAL – Correct Altitude GS - Ground speed TRK - Track
CRS – Course GS - Ground speed km/h UTC - Universal Coordinate Time 12
DAL – Density altitude GS - Ground speed kt UTC - Universal Coordinate Time 24
DME - Distance to end of the route
GS - Ground speed mph VAR - Magnetic variation
DME - Distance to end of the route km
HDB - Compass heading VS – Baro vertical speed
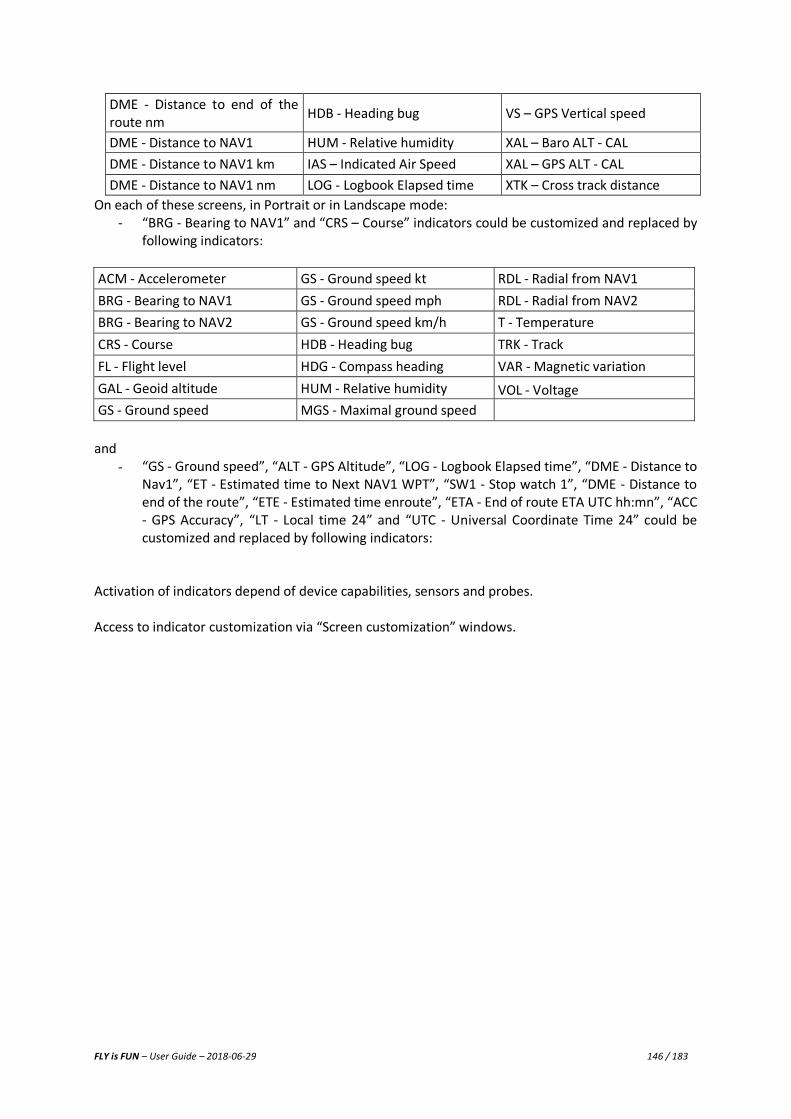
FLY is FUN – User Guide – 2018-06-29 146 / 183
On each of these screens, in Portrait or in Landscape mode: - “BRG - Bearing to NAV1” and “CRS – Course” indicators could be customized and replaced by
following indicators: ACM - Accelerometer GS - Ground speed kt RDL - Radial from NAV1
BRG - Bearing to NAV1 GS - Ground speed mph RDL - Radial from NAV2
BRG - Bearing to NAV2 GS - Ground speed km/h T - Temperature
CRS - Course HDB - Heading bug TRK - Track
FL - Flight level HDG - Compass heading VAR - Magnetic variation
GAL - Geoid altitude HUM - Relative humidity VOL - Voltage GS - Ground speed MGS - Maximal ground speed
and
- “GS - Ground speed”, “ALT - GPS Altitude”, “LOG - Logbook Elapsed time”, “DME - Distance to Nav1”, “ET - Estimated time to Next NAV1 WPT”, “SW1 - Stop watch 1”, “DME - Distance to end of the route”, “ETE - Estimated time enroute”, “ETA - End of route ETA UTC hh:mn”, “ACC - GPS Accuracy”, “LT - Local time 24” and “UTC - Universal Coordinate Time 24” could be customized and replaced by following indicators:
Activation of indicators depend of device capabilities, sensors and probes. Access to indicator customization via “Screen customization” windows.
DME - Distance to end of the route nm
HDB - Heading bug VS – GPS Vertical speed
DME - Distance to NAV1 HUM - Relative humidity XAL – Baro ALT - CAL
DME - Distance to NAV1 km IAS – Indicated Air Speed XAL – GPS ALT - CAL
DME - Distance to NAV1 nm LOG - Logbook Elapsed time XTK – Cross track distance
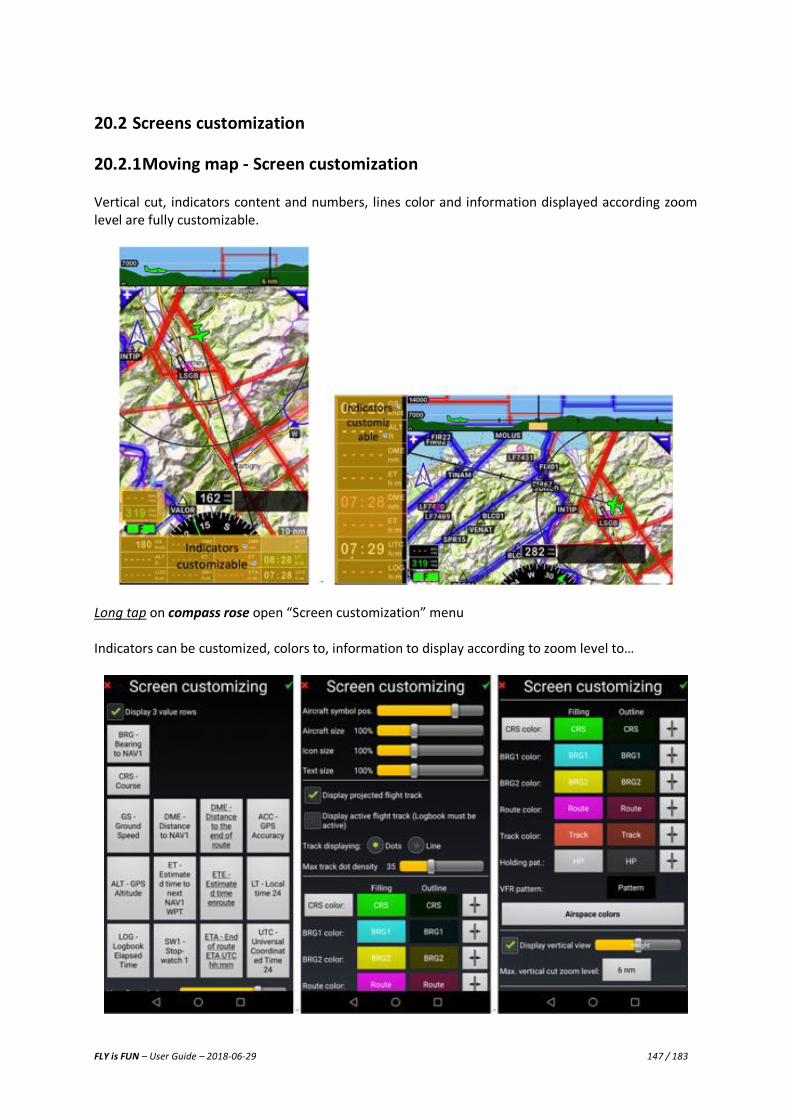
FLY is FUN – User Guide – 2018-06-29 147 / 183
20.2 Screens customization
20.2.1 Moving map - Screen customization Vertical cut, indicators content and numbers, lines color and information displayed according zoom level are fully customizable.
Long tap on compass rose open “Screen customization” menu Indicators can be customized, colors to, information to display according to zoom level to…
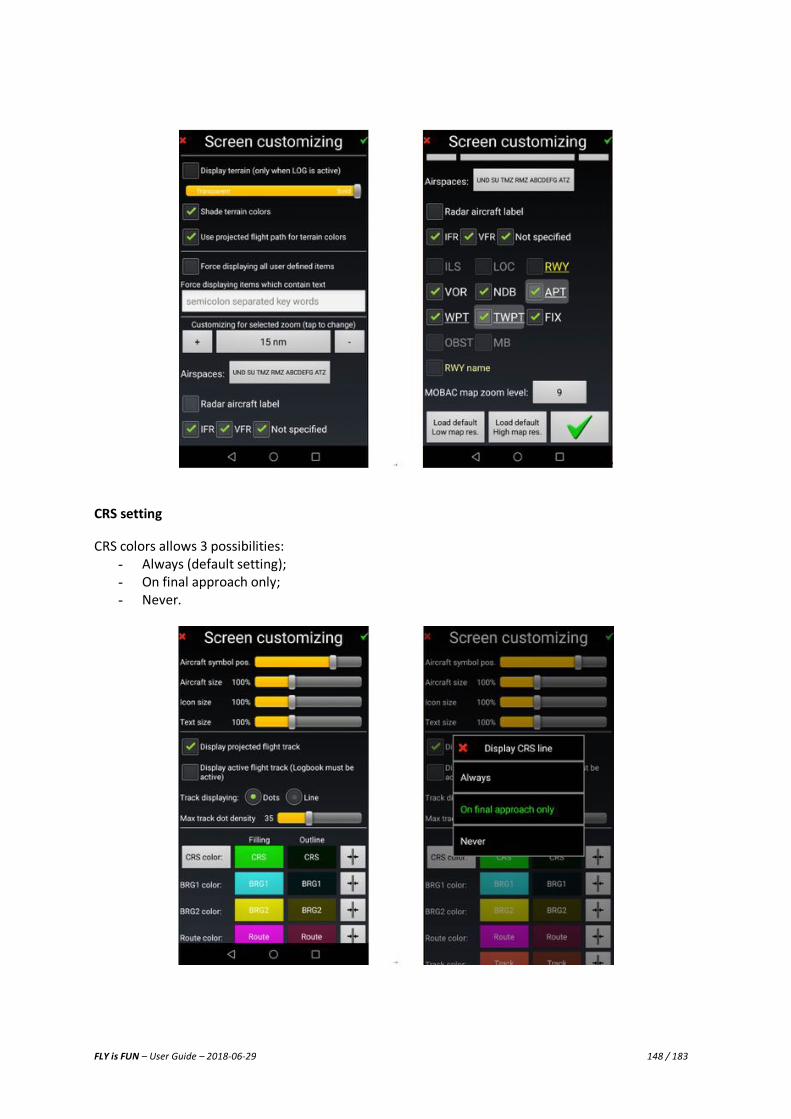
FLY is FUN – User Guide – 2018-06-29 148 / 183
CRS setting CRS colors allows 3 possibilities:
- Always (default setting); - On final approach only; - Never.
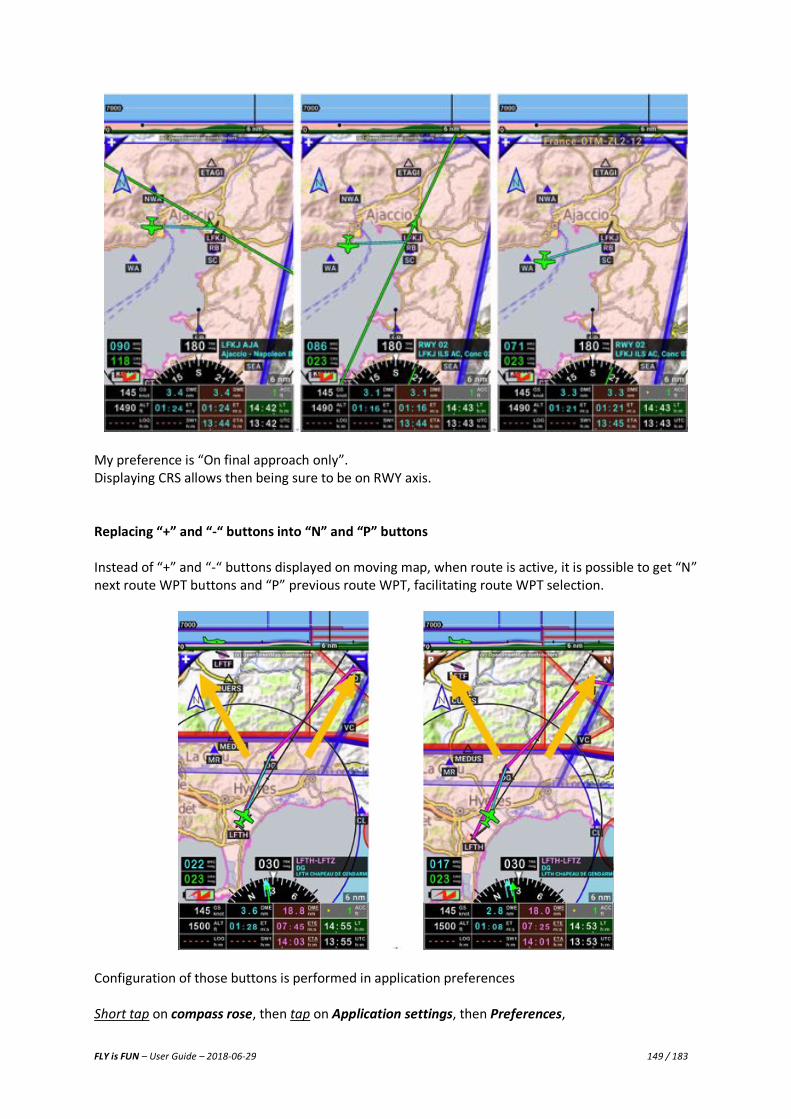
FLY is FUN – User Guide – 2018-06-29 149 / 183
My preference is “On final approach only”. Displaying CRS allows then being sure to be on RWY axis. Replacing “+” and “-“ buttons into “N” and “P” buttons Instead of “+” and “-“ buttons displayed on moving map, when route is active, it is possible to get “N” next route WPT buttons and “P” previous route WPT, facilitating route WPT selection.
Configuration of those buttons is performed in application preferences Short tap on compass rose, then tap on Application settings, then Preferences,
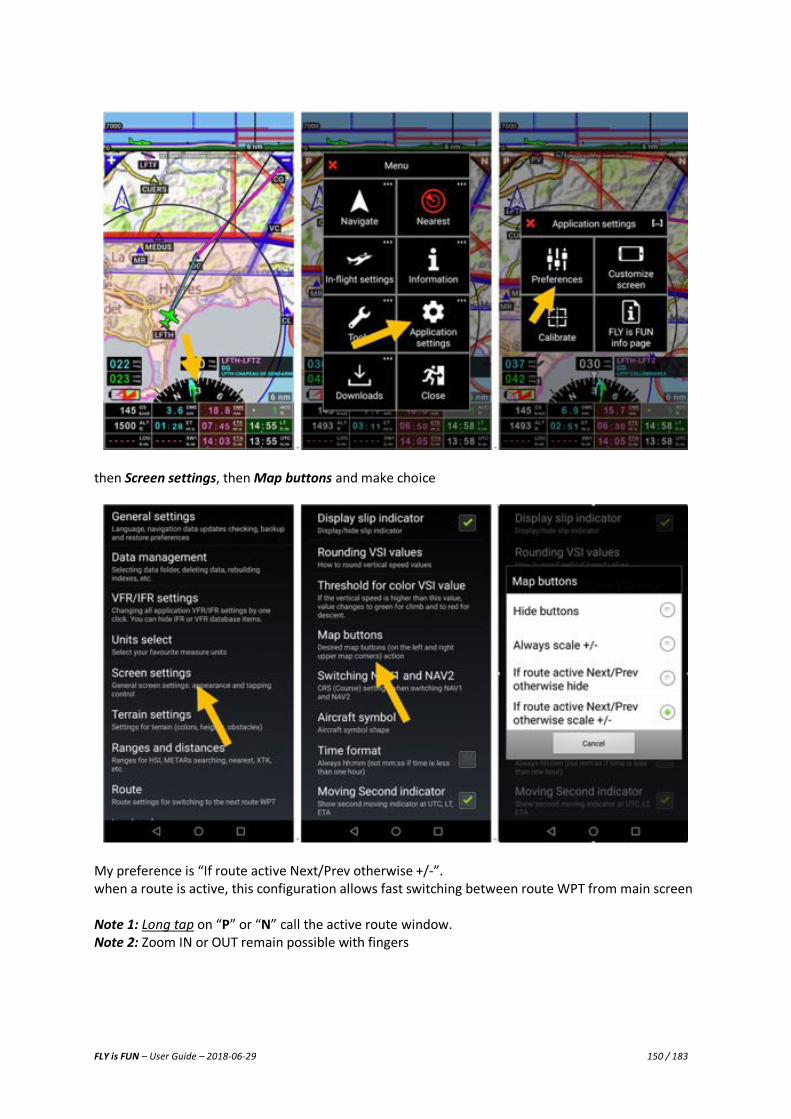
FLY is FUN – User Guide – 2018-06-29 150 / 183
then Screen settings, then Map buttons and make choice
My preference is “If route active Next/Prev otherwise +/-”. when a route is active, this configuration allows fast switching between route WPT from main screen Note 1: Long tap on “P” or “N” call the active route window. Note 2: Zoom IN or OUT remain possible with fingers
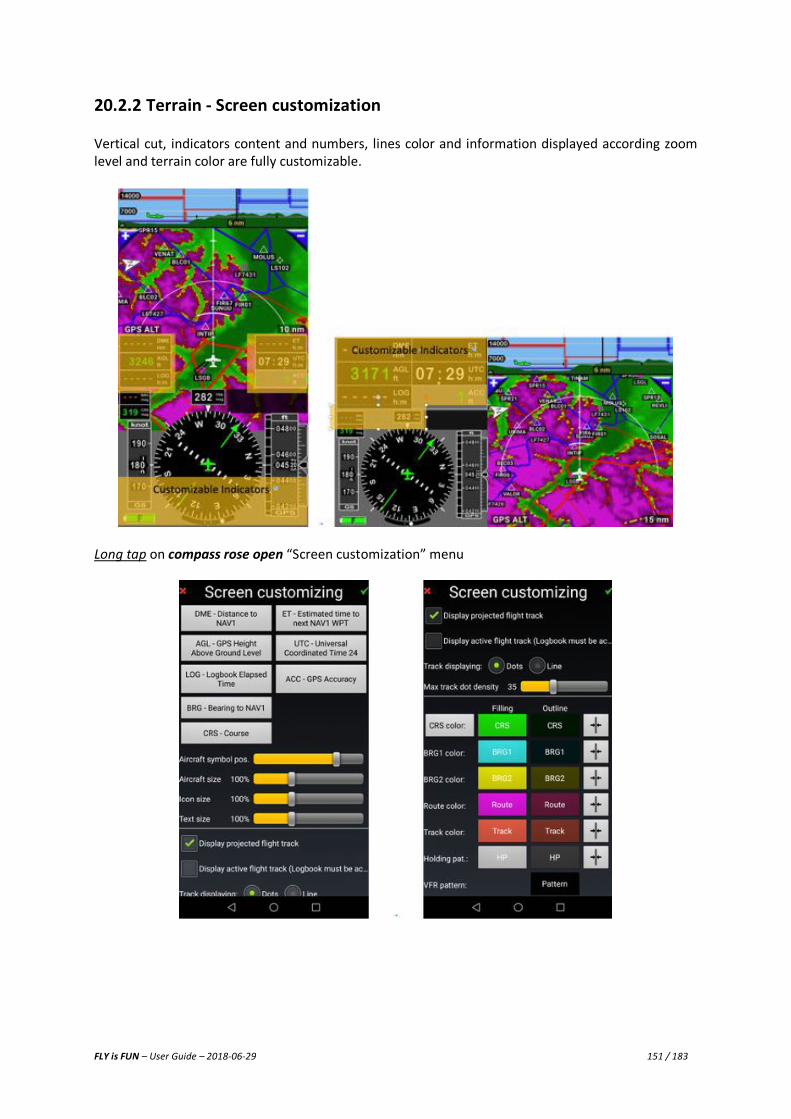
FLY is FUN – User Guide – 2018-06-29 151 / 183
20.2.2 Terrain - Screen customization Vertical cut, indicators content and numbers, lines color and information displayed according zoom level and terrain color are fully customizable.
Long tap on compass rose open “Screen customization” menu
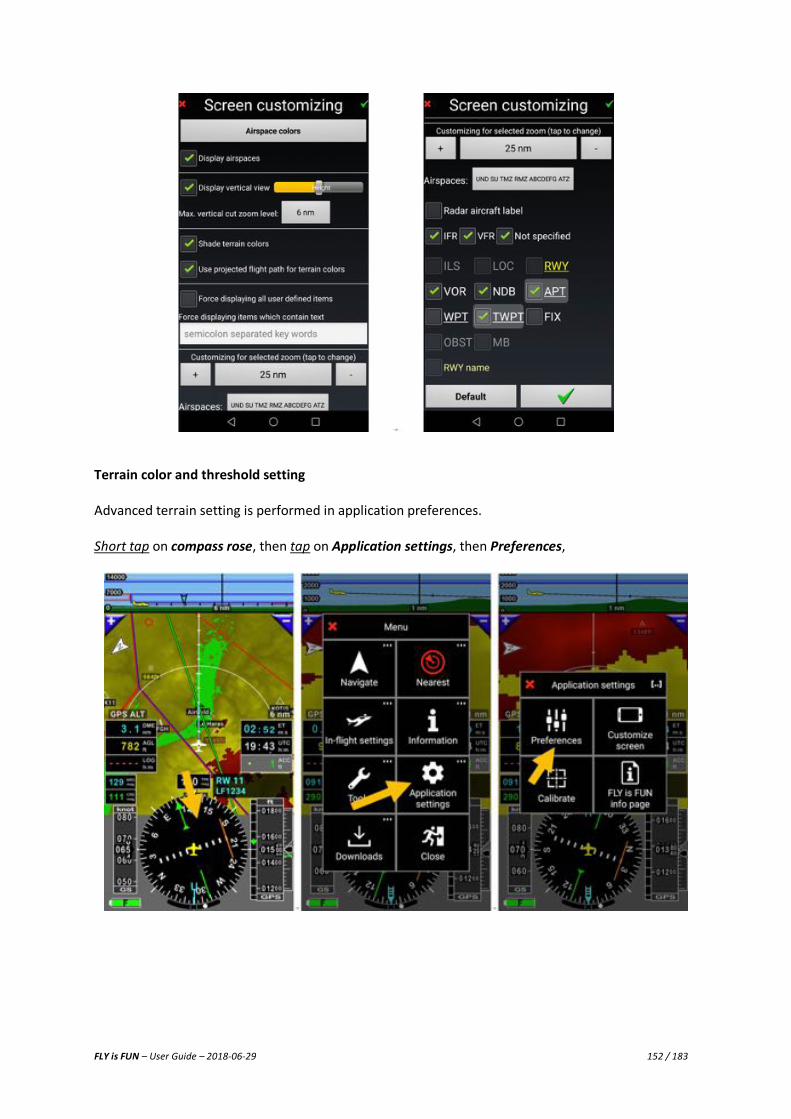
FLY is FUN – User Guide – 2018-06-29 152 / 183
Terrain color and threshold setting Advanced terrain setting is performed in application preferences. Short tap on compass rose, then tap on Application settings, then Preferences,

FLY is FUN – User Guide – 2018-06-29 153 / 183
then Terrain settings, and there you can customize
20.2.3 Instruments - Screen customization Indicators of instrument screens could as well be customized

FLY is FUN – User Guide – 2018-06-29 154 / 183
Long tap on compass rose open “Screen customization” menu

FLY is FUN – User Guide – 2018-06-29 155 / 183
20.3 Preferences If you need higher customization level, FLY is FUN allows it, then go to Preferences and feel free exploring the various options Short tap on compass rose, then tap on Application settings, then Preferences
There from explore various options made available by FLY is FUN development team Note: don’t be afraid you can always come back to factory default setting, without losing your data Short tap on compass rose, then tap on Application settings, then Preferences, then General settings, and Factory default.
General presentations of various options
General settings Language Backup settings Factory default
Check data upgrade Restore settings
Data management Data location Rebuild database indexes Delete data
VFR IFR Settings Use VFR and IFR Use only VFR Use only IFR
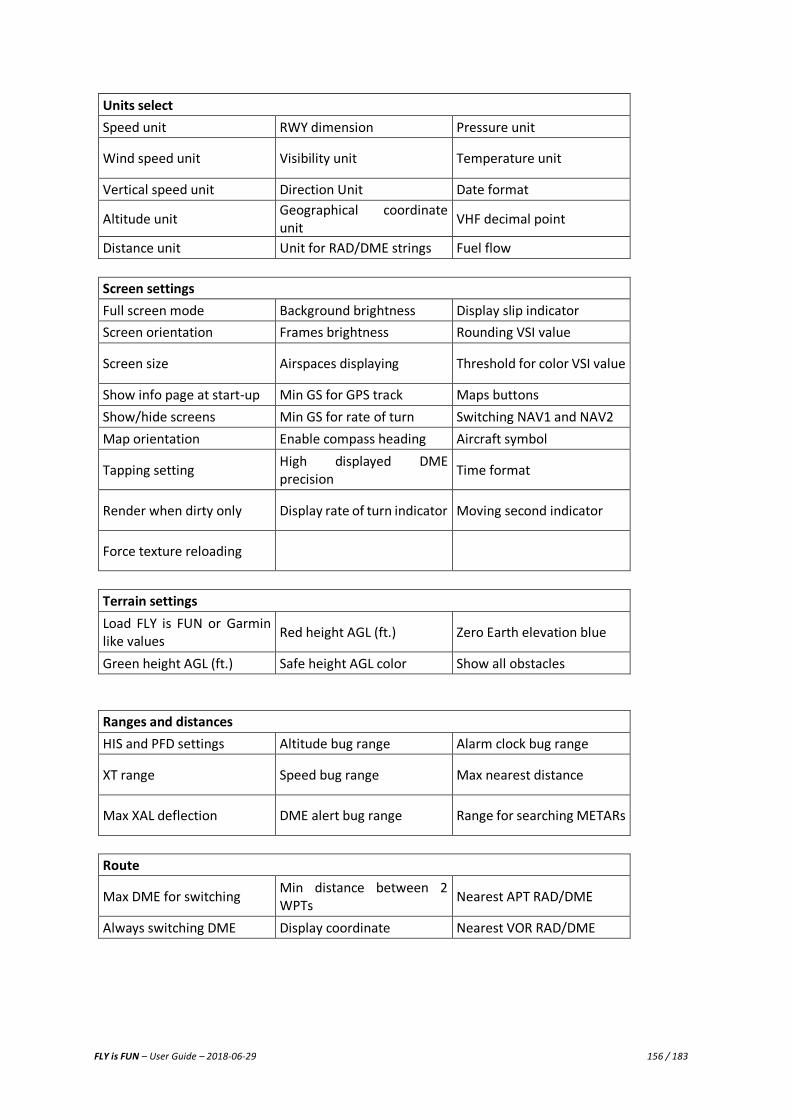
FLY is FUN – User Guide – 2018-06-29 156 / 183
Units select Speed unit RWY dimension Pressure unit
Wind speed unit Visibility unit Temperature unit
Vertical speed unit Direction Unit Date format
Altitude unit Geographical coordinate unit
VHF decimal point
Distance unit Unit for RAD/DME strings Fuel flow
Screen settings Full screen mode Background brightness Display slip indicator
Screen orientation Frames brightness Rounding VSI value
Screen size Airspaces displaying Threshold for color VSI value
Show info page at start-up Min GS for GPS track Maps buttons
Show/hide screens Min GS for rate of turn Switching NAV1 and NAV2
Map orientation Enable compass heading Aircraft symbol
Tapping setting High displayed DME precision
Time format
Render when dirty only Display rate of turn indicator Moving second indicator
Force texture reloading
Terrain settings Load FLY is FUN or Garmin like values
Red height AGL (ft.) Zero Earth elevation blue
Green height AGL (ft.) Safe height AGL color Show all obstacles
Ranges and distances HIS and PFD settings Altitude bug range Alarm clock bug range
XT range Speed bug range Max nearest distance
Max XAL deflection DME alert bug range Range for searching METARs
Route
Max DME for switching Min distance between 2 WPTs
Nearest APT RAD/DME
Always switching DME Display coordinate Nearest VOR RAD/DME
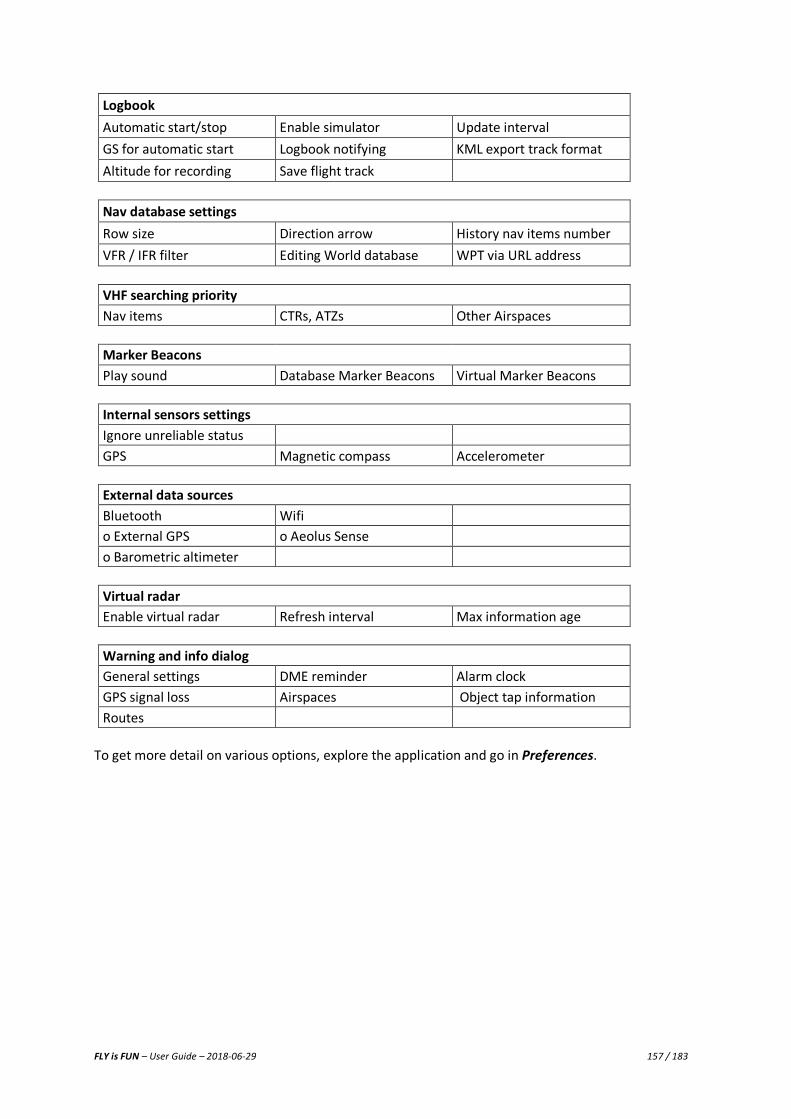
FLY is FUN – User Guide – 2018-06-29 157 / 183
Logbook Automatic start/stop Enable simulator Update interval
GS for automatic start Logbook notifying KML export track format
Altitude for recording Save flight track
Nav database settings Row size Direction arrow History nav items number
VFR / IFR filter Editing World database WPT via URL address
VHF searching priority Nav items CTRs, ATZs Other Airspaces
Marker Beacons
Play sound Database Marker Beacons Virtual Marker Beacons
Internal sensors settings Ignore unreliable status
GPS Magnetic compass Accelerometer
External data sources Bluetooth Wifi
o External GPS o Aeolus Sense
o Barometric altimeter
Virtual radar Enable virtual radar Refresh interval Max information age
Warning and info dialog General settings DME reminder Alarm clock
GPS signal loss Airspaces Object tap information
Routes To get more detail on various options, explore the application and go in Preferences.
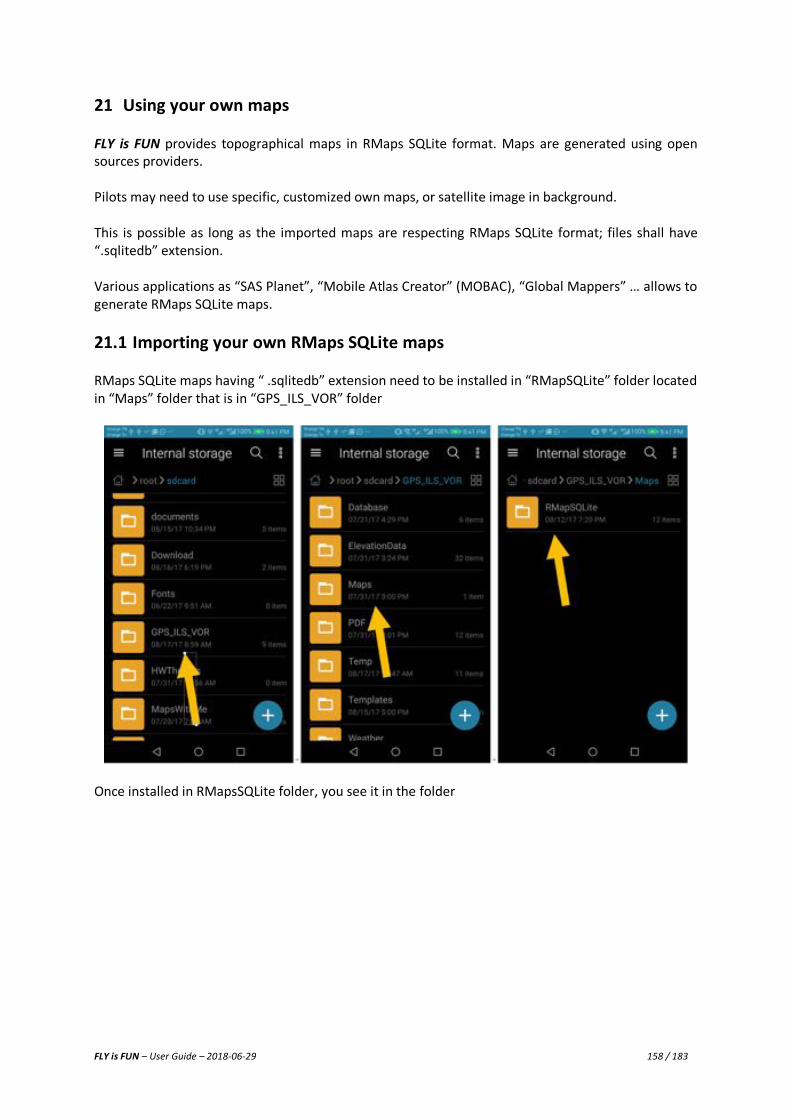
FLY is FUN – User Guide – 2018-06-29 158 / 183
21 Using your own maps FLY is FUN provides topographical maps in RMaps SQLite format. Maps are generated using open sources providers. Pilots may need to use specific, customized own maps, or satellite image in background. This is possible as long as the imported maps are respecting RMaps SQLite format; files shall have “.sqlitedb” extension. Various applications as “SAS Planet”, “Mobile Atlas Creator” (MOBAC), “Global Mappers” … allows to generate RMaps SQLite maps.
21.1 Importing your own RMaps SQLite maps RMaps SQLite maps having “ .sqlitedb” extension need to be installed in “RMapSQLite” folder located in “Maps” folder that is in “GPS_ILS_VOR” folder
Once installed in RMapsSQLite folder, you see it in the folder
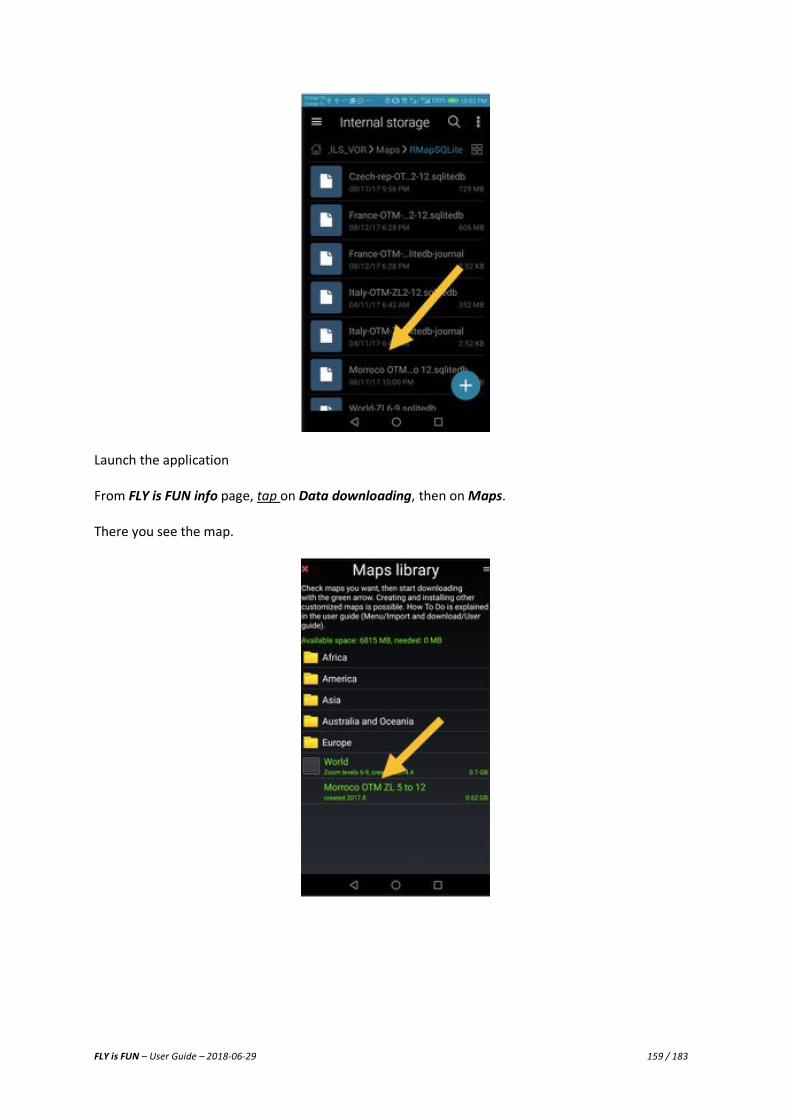
FLY is FUN – User Guide – 2018-06-29 159 / 183
Launch the application From FLY is FUN info page, tap on Data downloading, then on Maps. There you see the map.

FLY is FUN – User Guide – 2018-06-29 160 / 183
To use the map, just select it:
- Long tap on moving map screen, then
- Tap on Map selection and
- Select the map
21.2 Converting Mbtile maps into RMapSQLite maps Mbtile is another popular format used for maps on Android, that, as RMapSQLite, is based on SQLite database to. RogerF, FLY is FUN user, explained on the forum how to generate an RMapSQLite map to use with Fly Is Fun converting a “mbtile file” into a “RMapSQLite file”. Step 1: requested files and application on your PC or Mac you need
i) a copy of the Mbtile file to convert. ex: ICAO_copy.mbtiles and ii) DB Browser for SQLite application. You can download it at http://sqlitebrowser.org/
Step 2: change .mbtiles file extension into .sqlitedb In our example ICAO_copy.mbtiles is becoming ICAO_copy.sqlitedb Step 3: launch DB Browser for SQLite and upload the file to convert Upload is performed via the Open Database button. In our example upload ICAO_copy.sqlitedb file Step 4: cut and past the following script into the SQL 1 windows in DB Browser for SQLite application.
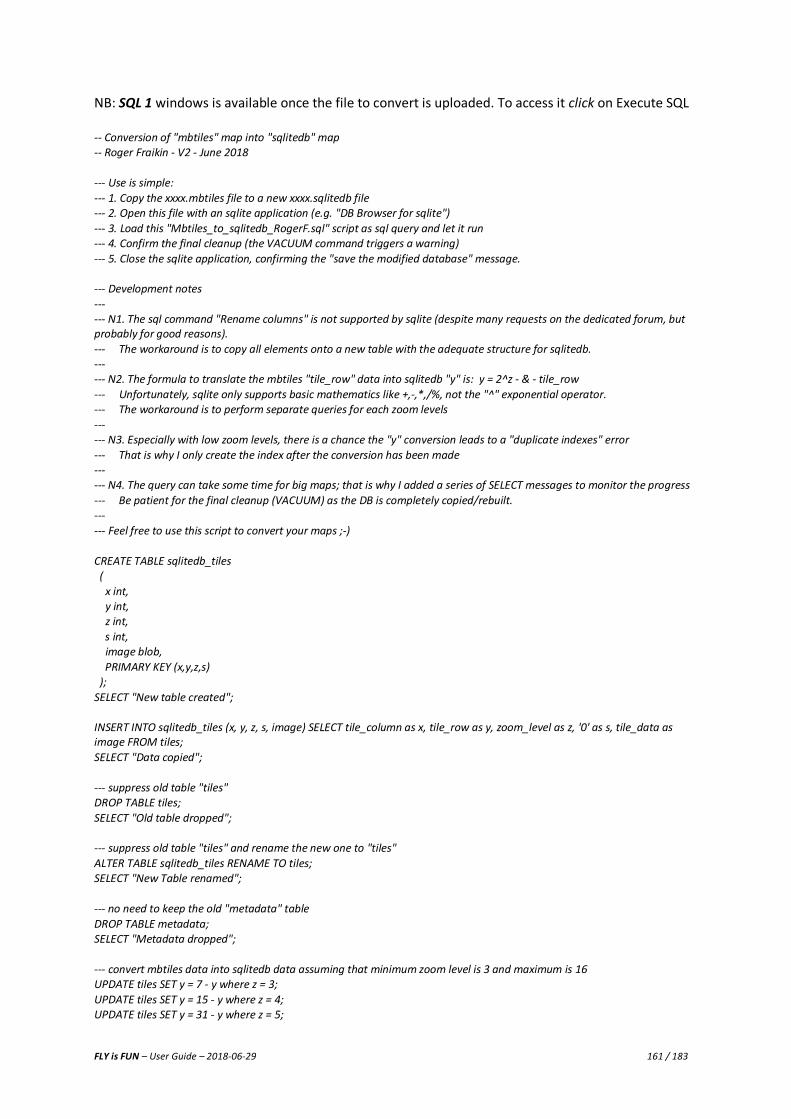
FLY is FUN – User Guide – 2018-06-29 161 / 183
NB: SQL 1 windows is available once the file to convert is uploaded. To access it click on Execute SQL -- Conversion of "mbtiles" map into "sqlitedb" map -- Roger Fraikin - V2 - June 2018 --- Use is simple: --- 1. Copy the xxxx.mbtiles file to a new xxxx.sqlitedb file --- 2. Open this file with an sqlite application (e.g. "DB Browser for sqlite") --- 3. Load this "Mbtiles_to_sqlitedb_RogerF.sql" script as sql query and let it run --- 4. Confirm the final cleanup (the VACUUM command triggers a warning) --- 5. Close the sqlite application, confirming the "save the modified database" message. --- Development notes --- --- N1. The sql command "Rename columns" is not supported by sqlite (despite many requests on the dedicated forum, but probably for good reasons). --- The workaround is to copy all elements onto a new table with the adequate structure for sqlitedb. --- --- N2. The formula to translate the mbtiles "tile_row" data into sqlitedb "y" is: y = 2^z - & - tile_row --- Unfortunately, sqlite only supports basic mathematics like +,-,*,/%, not the "^" exponential operator. --- The workaround is to perform separate queries for each zoom levels --- --- N3. Especially with low zoom levels, there is a chance the "y" conversion leads to a "duplicate indexes" error --- That is why I only create the index after the conversion has been made --- --- N4. The query can take some time for big maps; that is why I added a series of SELECT messages to monitor the progress --- Be patient for the final cleanup (VACUUM) as the DB is completely copied/rebuilt. --- --- Feel free to use this script to convert your maps ;-) CREATE TABLE sqlitedb_tiles ( x int, y int, z int, s int, image blob, PRIMARY KEY (x,y,z,s) ); SELECT "New table created"; INSERT INTO sqlitedb_tiles (x, y, z, s, image) SELECT tile_column as x, tile_row as y, zoom_level as z, '0' as s, tile_data as image FROM tiles; SELECT "Data copied"; --- suppress old table "tiles" DROP TABLE tiles; SELECT "Old table dropped"; --- suppress old table "tiles" and rename the new one to "tiles" ALTER TABLE sqlitedb_tiles RENAME TO tiles; SELECT "New Table renamed"; --- no need to keep the old "metadata" table DROP TABLE metadata; SELECT "Metadata dropped"; --- convert mbtiles data into sqlitedb data assuming that minimum zoom level is 3 and maximum is 16 UPDATE tiles SET y = 7 - y where z = 3; UPDATE tiles SET y = 15 - y where z = 4; UPDATE tiles SET y = 31 - y where z = 5;
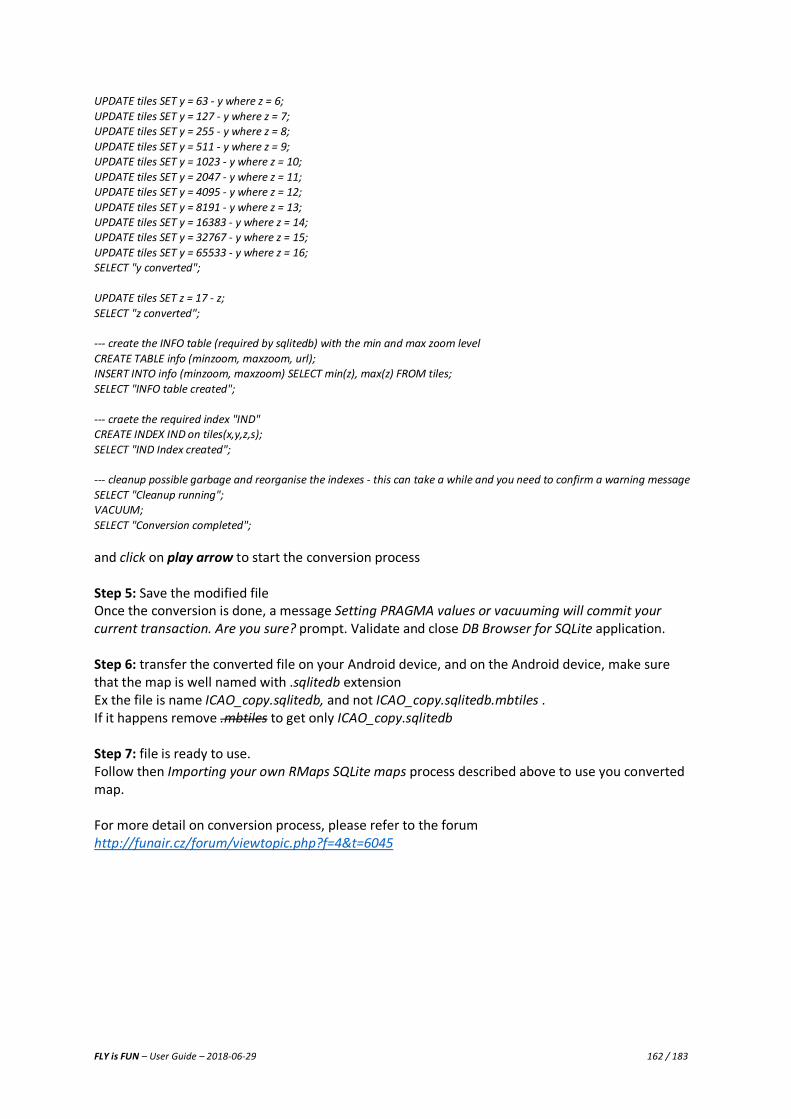
FLY is FUN – User Guide – 2018-06-29 162 / 183
UPDATE tiles SET y = 63 - y where z = 6; UPDATE tiles SET y = 127 - y where z = 7; UPDATE tiles SET y = 255 - y where z = 8; UPDATE tiles SET y = 511 - y where z = 9; UPDATE tiles SET y = 1023 - y where z = 10; UPDATE tiles SET y = 2047 - y where z = 11; UPDATE tiles SET y = 4095 - y where z = 12; UPDATE tiles SET y = 8191 - y where z = 13; UPDATE tiles SET y = 16383 - y where z = 14; UPDATE tiles SET y = 32767 - y where z = 15; UPDATE tiles SET y = 65533 - y where z = 16; SELECT "y converted"; UPDATE tiles SET z = 17 - z; SELECT "z converted"; --- create the INFO table (required by sqlitedb) with the min and max zoom level CREATE TABLE info (minzoom, maxzoom, url); INSERT INTO info (minzoom, maxzoom) SELECT min(z), max(z) FROM tiles; SELECT "INFO table created"; --- craete the required index "IND" CREATE INDEX IND on tiles(x,y,z,s); SELECT "IND Index created"; --- cleanup possible garbage and reorganise the indexes - this can take a while and you need to confirm a warning message SELECT "Cleanup running"; VACUUM; SELECT "Conversion completed"; and click on play arrow to start the conversion process Step 5: Save the modified file Once the conversion is done, a message Setting PRAGMA values or vacuuming will commit your current transaction. Are you sure? prompt. Validate and close DB Browser for SQLite application. Step 6: transfer the converted file on your Android device, and on the Android device, make sure that the map is well named with .sqlitedb extension Ex the file is name ICAO_copy.sqlitedb, and not ICAO_copy.sqlitedb.mbtiles . If it happens remove .mbtiles to get only ICAO_copy.sqlitedb Step 7: file is ready to use. Follow then Importing your own RMaps SQLite maps process described above to use you converted map. For more detail on conversion process, please refer to the forum http://funair.cz/forum/viewtopic.php?f=4&t=6045

FLY is FUN – User Guide – 2018-06-29 163 / 183
21.3 Importing Slippy Mercator tiles While consulting on-lines maps or satellite image services, some of them are saving, in temporary folders in the PC, tiles in Slippy Mercator format. FLY is FUN allows importing those tiles. Example with Foufou Navigation from François Fouchet: During flight preparation, maps and satellite image of online services were used.
- “OpenTopoMap” maps used as background:
- “Here” below satellite images used as background:
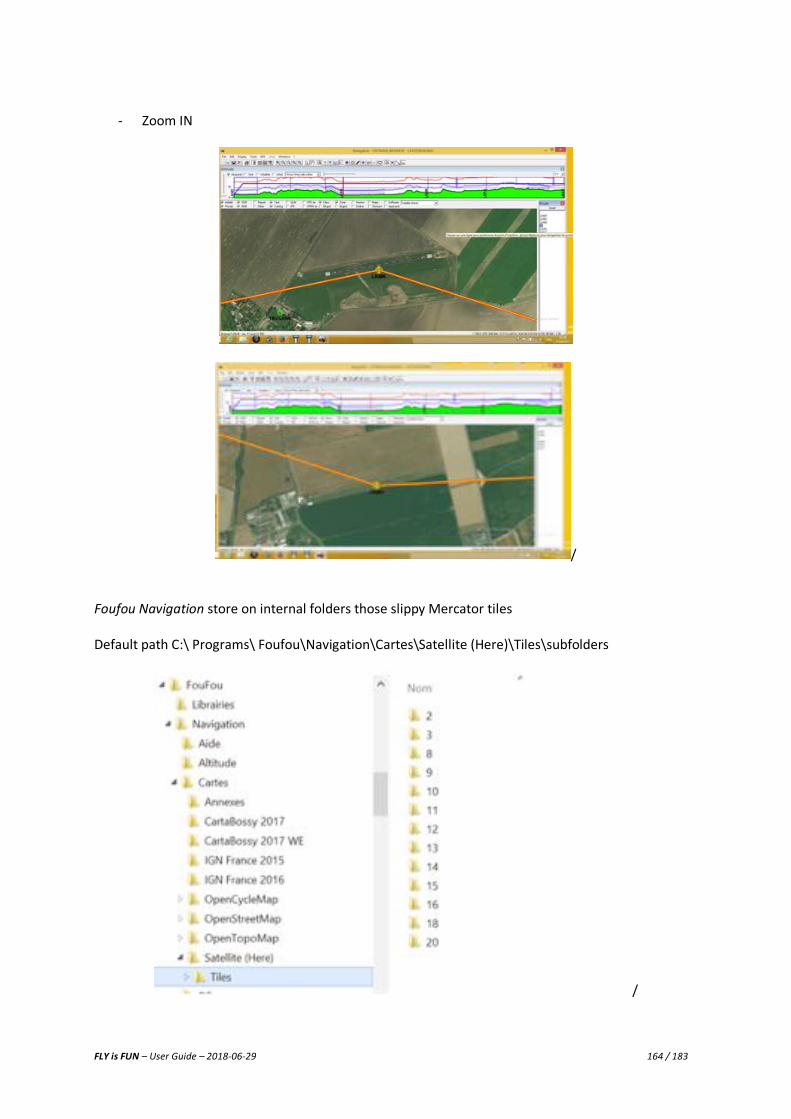
FLY is FUN – User Guide – 2018-06-29 164 / 183
- Zoom IN
/ Foufou Navigation store on internal folders those slippy Mercator tiles Default path C:\ Programs\ Foufou\Navigation\Cartes\Satellite (Here)\Tiles\subfolders
/
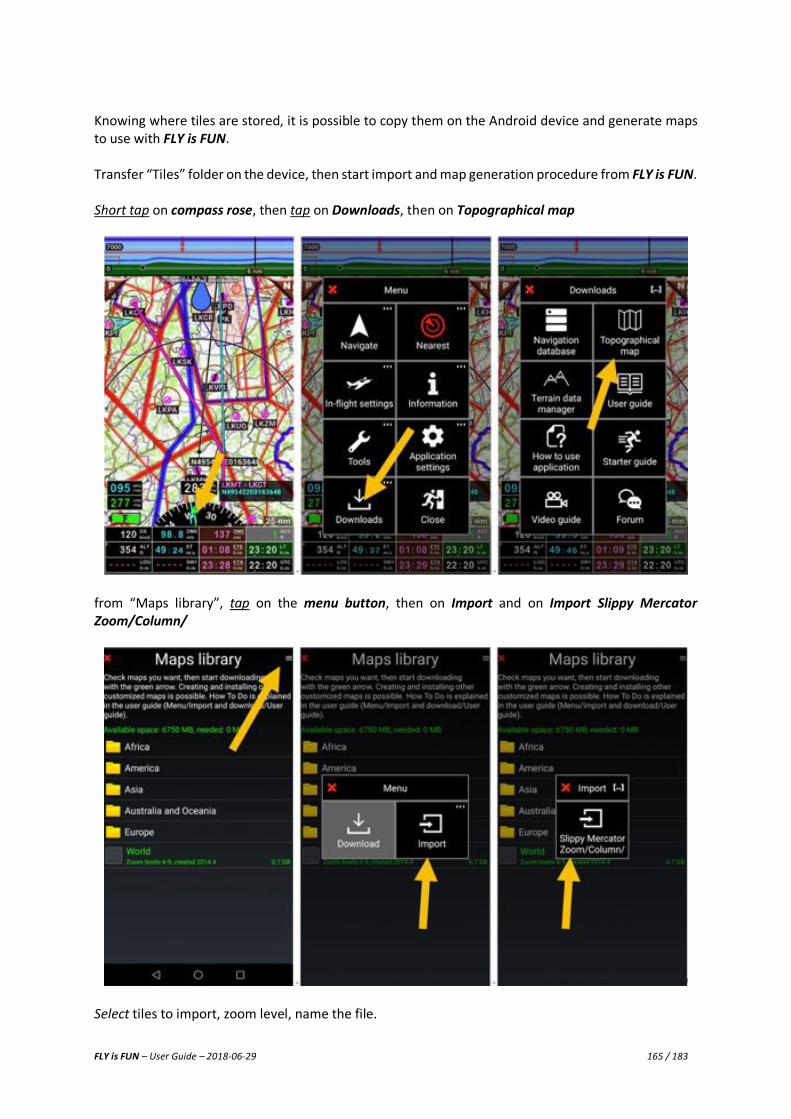
FLY is FUN – User Guide – 2018-06-29 165 / 183
Knowing where tiles are stored, it is possible to copy them on the Android device and generate maps to use with FLY is FUN. Transfer “Tiles” folder on the device, then start import and map generation procedure from FLY is FUN. Short tap on compass rose, then tap on Downloads, then on Topographical map
from “Maps library”, tap on the menu button, then on Import and on Import Slippy Mercator
Zoom/Column/
Select tiles to import, zoom level, name the file.

FLY is FUN – User Guide – 2018-06-29 166 / 183
Tap on green stick start importation process Once importation is successfully completed, the new map is in “Maps library”.
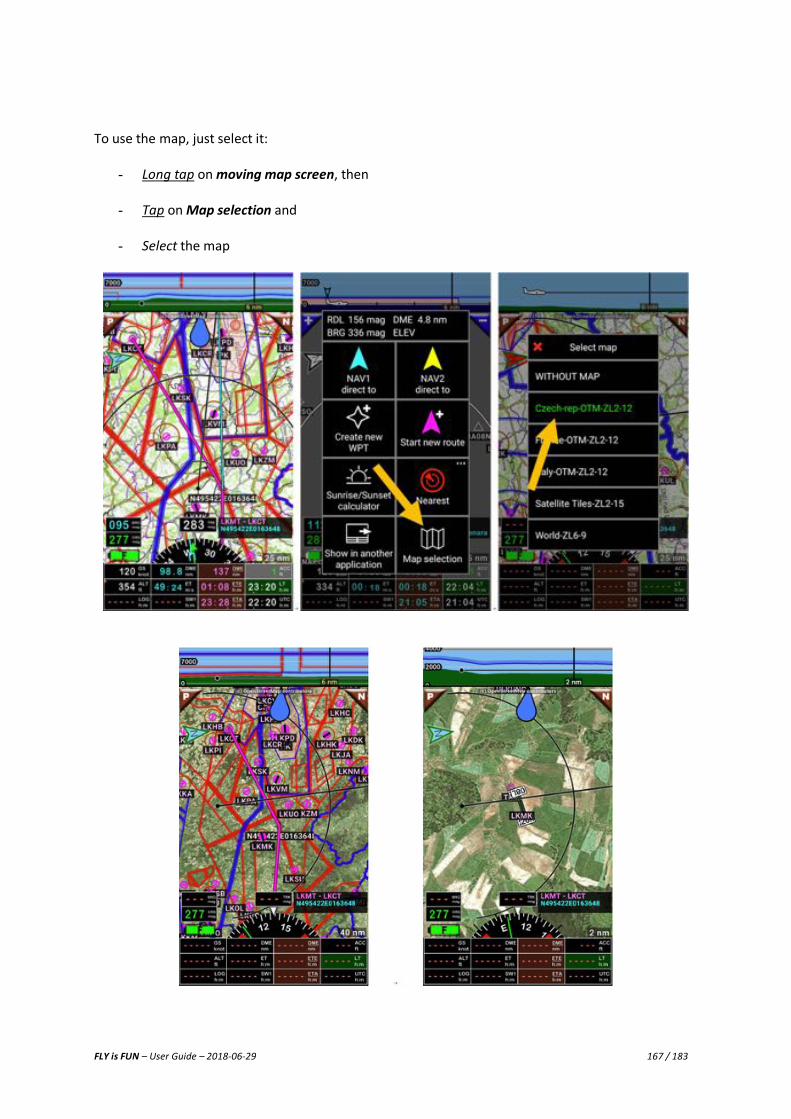
FLY is FUN – User Guide – 2018-06-29 167 / 183
To use the map, just select it:
- Long tap on moving map screen, then
- Tap on Map selection and
- Select the map
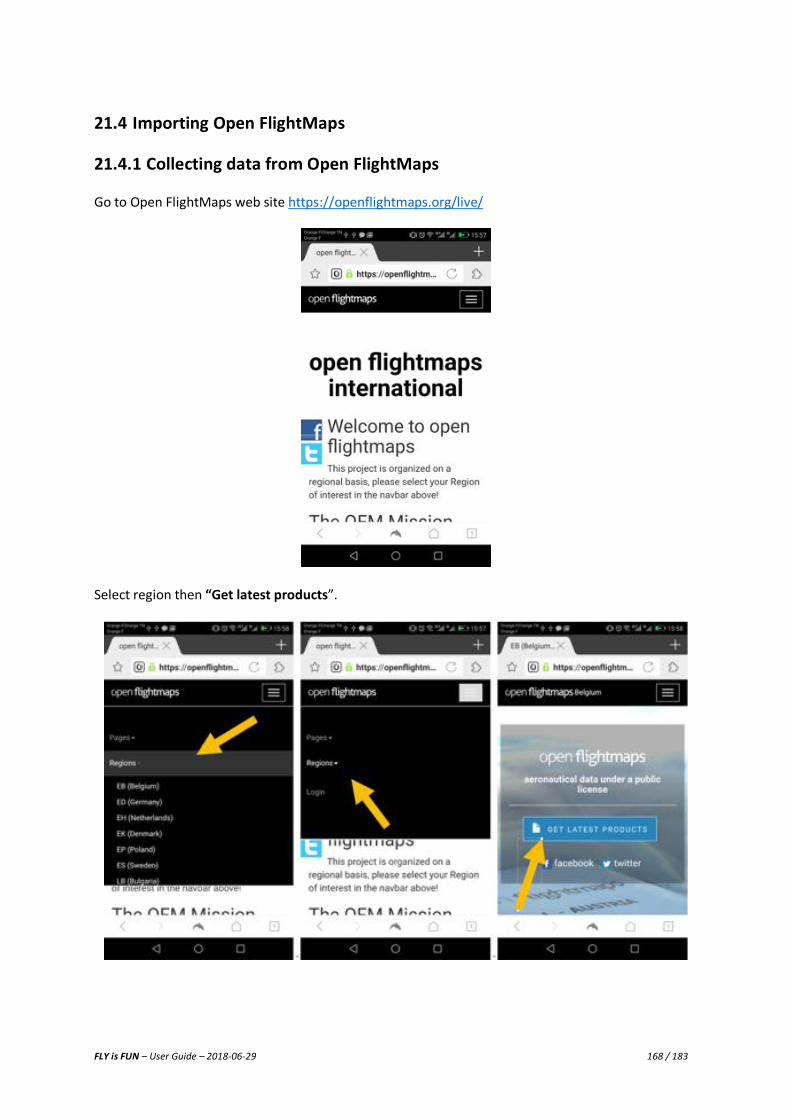
FLY is FUN – User Guide – 2018-06-29 168 / 183
21.4 Importing Open FlightMaps
21.4.1 Collecting data from Open FlightMaps Go to Open FlightMaps web site https://openflightmaps.org/live/
Select region then “Get latest products”.
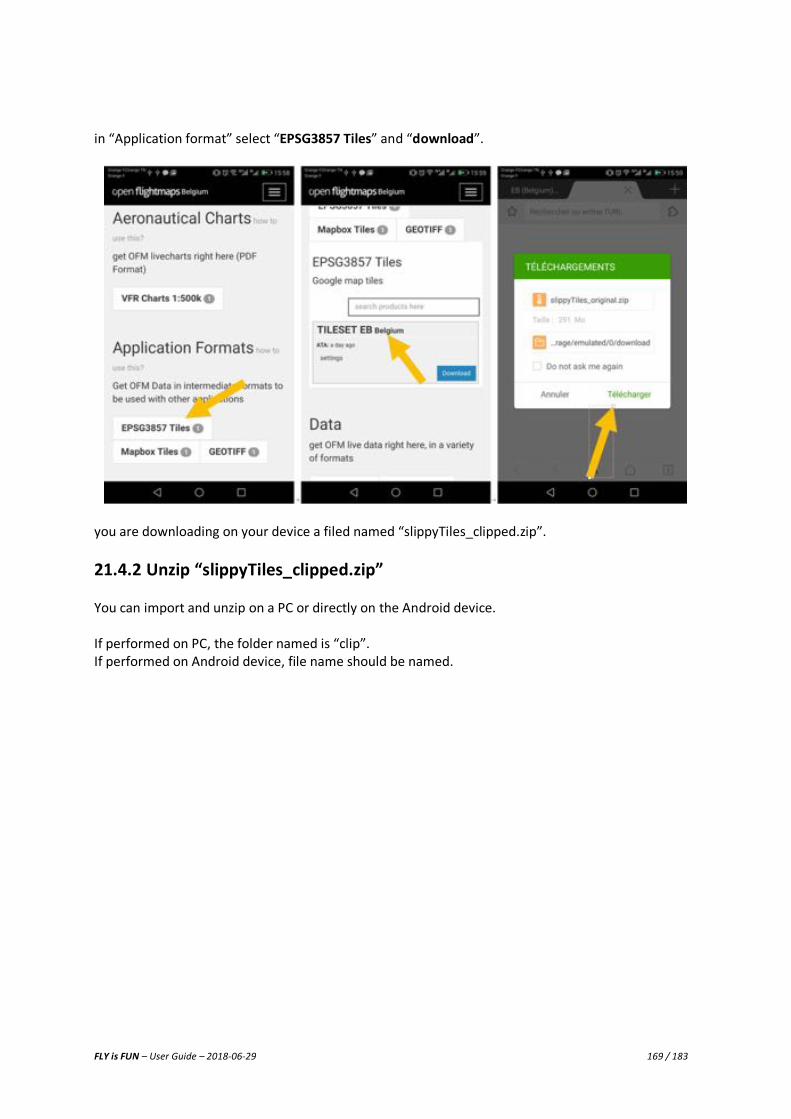
FLY is FUN – User Guide – 2018-06-29 169 / 183
in “Application format” select “EPSG3857 Tiles” and “download”.
you are downloading on your device a filed named “slippyTiles_clipped.zip”.
21.4.2 Unzip “slippyTiles_clipped.zip” You can import and unzip on a PC or directly on the Android device. If performed on PC, the folder named is “clip”. If performed on Android device, file name should be named.
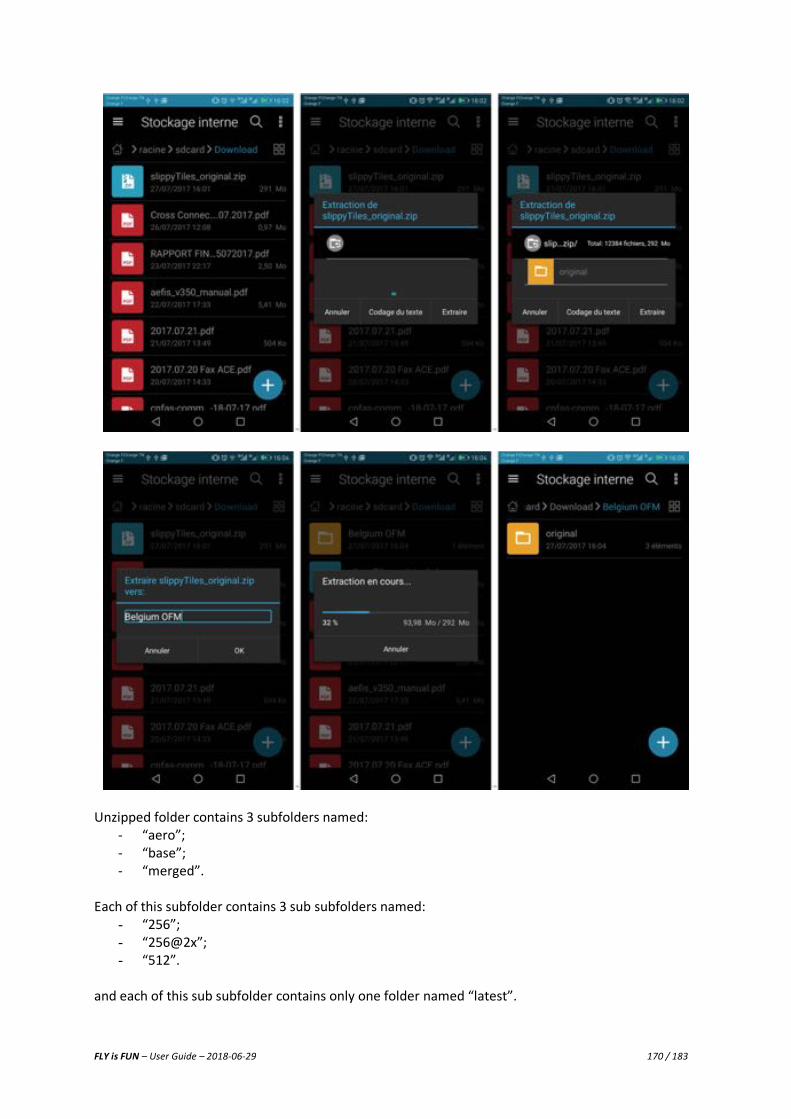
FLY is FUN – User Guide – 2018-06-29 170 / 183
Unzipped folder contains 3 subfolders named:
- “aero”; - “base”; - “merged”.
Each of this subfolder contains 3 sub subfolders named:
- “256”; - “256@2x”; - “512”.
and each of this sub subfolder contains only one folder named “latest”.

FLY is FUN – User Guide – 2018-06-29 171 / 183
FLY is FUN allows importing slippy mercator's tiles in 256x256 format, which mean we are interested only by data that are in “256” format, in “latest” folders. Folders “256@2x” and “512” could be deleted, we do not need them.
21.4.3 Differences between “aero” - “base” and “merge” “aero” folder contains aero data in tiles format without map in background It is not interesting for FLY is FUN You can delete it with its data. “base” folder contains only the base map used as background without aero data It is very convenient to use it with FLY is FUN own data on top “merge” folder contains aero data projected on the base map in tiles format this is perhaps what you are looking for.
21.5 Importing Open FlightMaps tile and using the map Follow process describe in chapter “Importing Slippy Mercator tiles” Tiles to import are in folder called “Latest” Open it, but don’t open its subfolders “10” – “11” – “6” – “7” – “8” – “9”
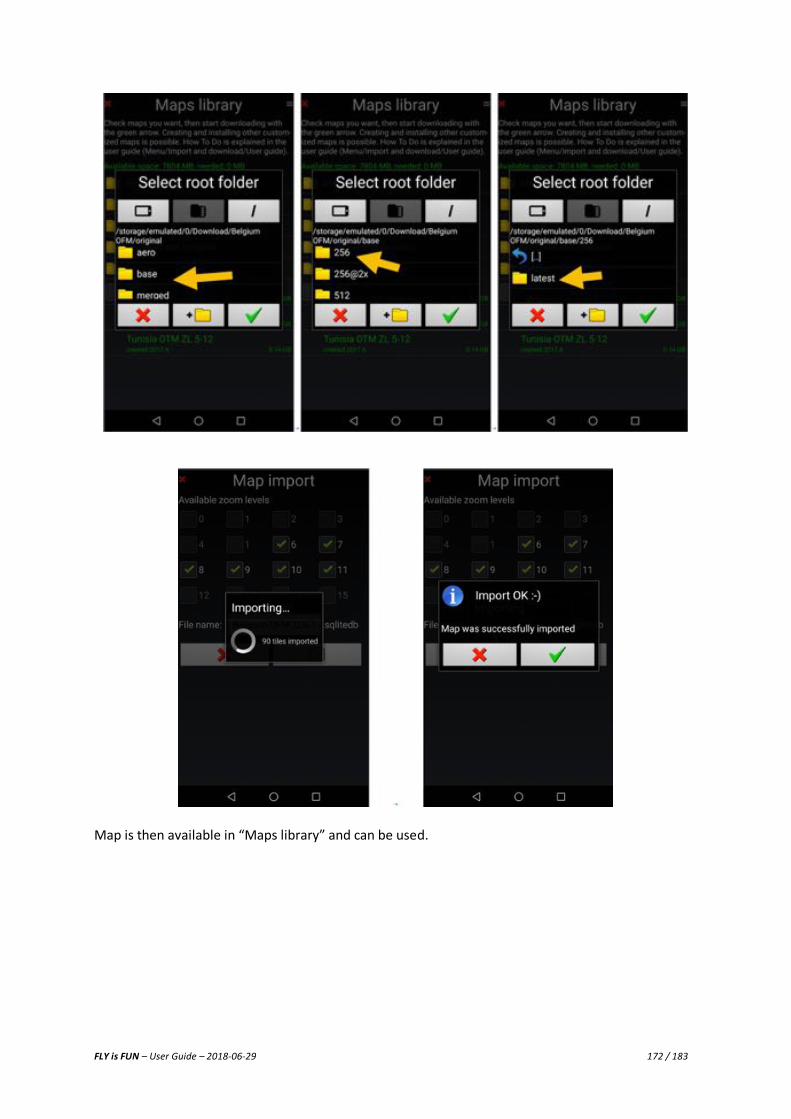
FLY is FUN – User Guide – 2018-06-29 172 / 183
Map is then available in “Maps library” and can be used.
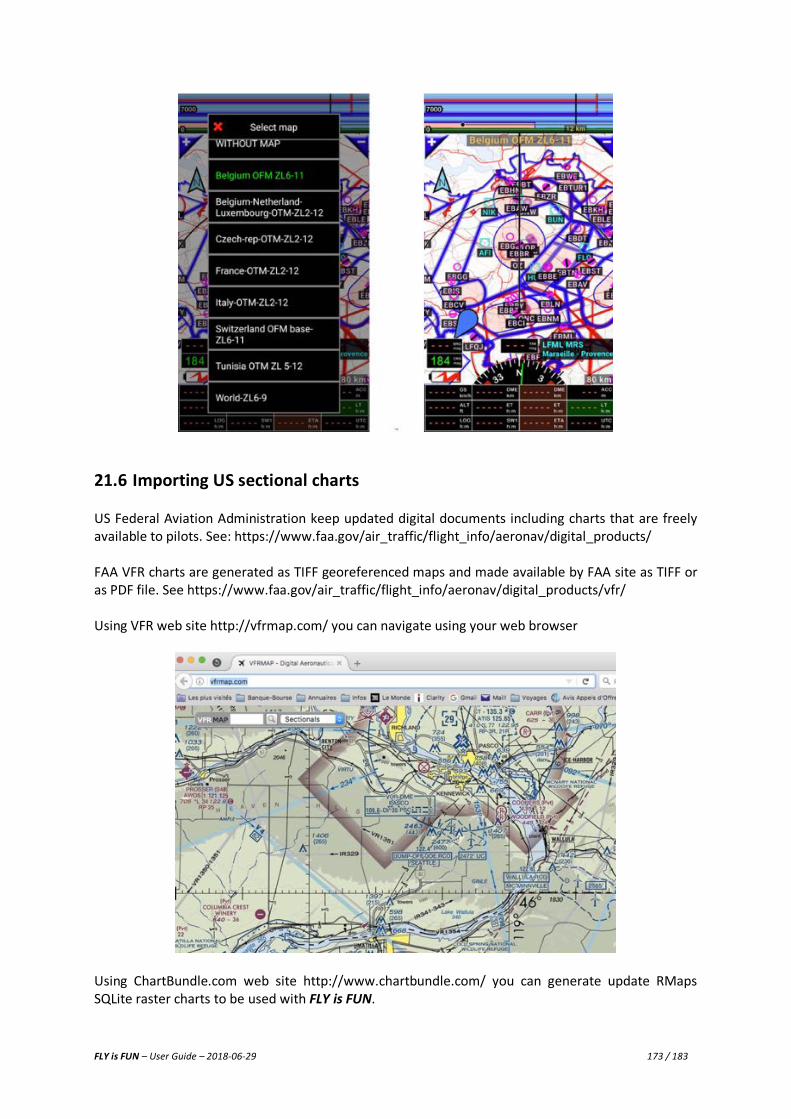
FLY is FUN – User Guide – 2018-06-29 173 / 183
21.6 Importing US sectional charts US Federal Aviation Administration keep updated digital documents including charts that are freely available to pilots. See: https://www.faa.gov/air_traffic/flight_info/aeronav/digital_products/ FAA VFR charts are generated as TIFF georeferenced maps and made available by FAA site as TIFF or as PDF file. See https://www.faa.gov/air_traffic/flight_info/aeronav/digital_products/vfr/ Using VFR web site http://vfrmap.com/ you can navigate using your web browser
Using ChartBundle.com web site http://www.chartbundle.com/ you can generate update RMaps SQLite raster charts to be used with FLY is FUN.

FLY is FUN – User Guide – 2018-06-29 174 / 183
Being on ChartBundle.com:
- select “Charts” http://www.chartbundle.com/charts/; - scroll down up to “Full Chart Download” - tap on “Download full chart here” http://www.chartbundle.com/v2/chart.cgi
- There you should select:
o Format: “RMapsSQLite” o Chart type
§ choose between “Sectional Charts”, “Terminal Area Charts”, “Helicopter Charts”, “Enroute Low Charts”, Area Charts”, “Enroute High Charts”, “Sectional Charts with SAR Grids”, “Terminal Area Charts with SAR Grids”, “Helicopter Charts with SAR Grids”
- then tap on “Show Charts” and select “chart to download”

FLY is FUN – User Guide – 2018-06-29 175 / 183
- … wait until Chart bundle generate the map - then download the RMaps SQLite chart
and install it . To do it refer above to chapter “Importing your own RMaps SQLite maps” section. Once installed, to use the map, just select it:
- Long tap on moving map screen, then
- Tap on Map selection and
- Select the map
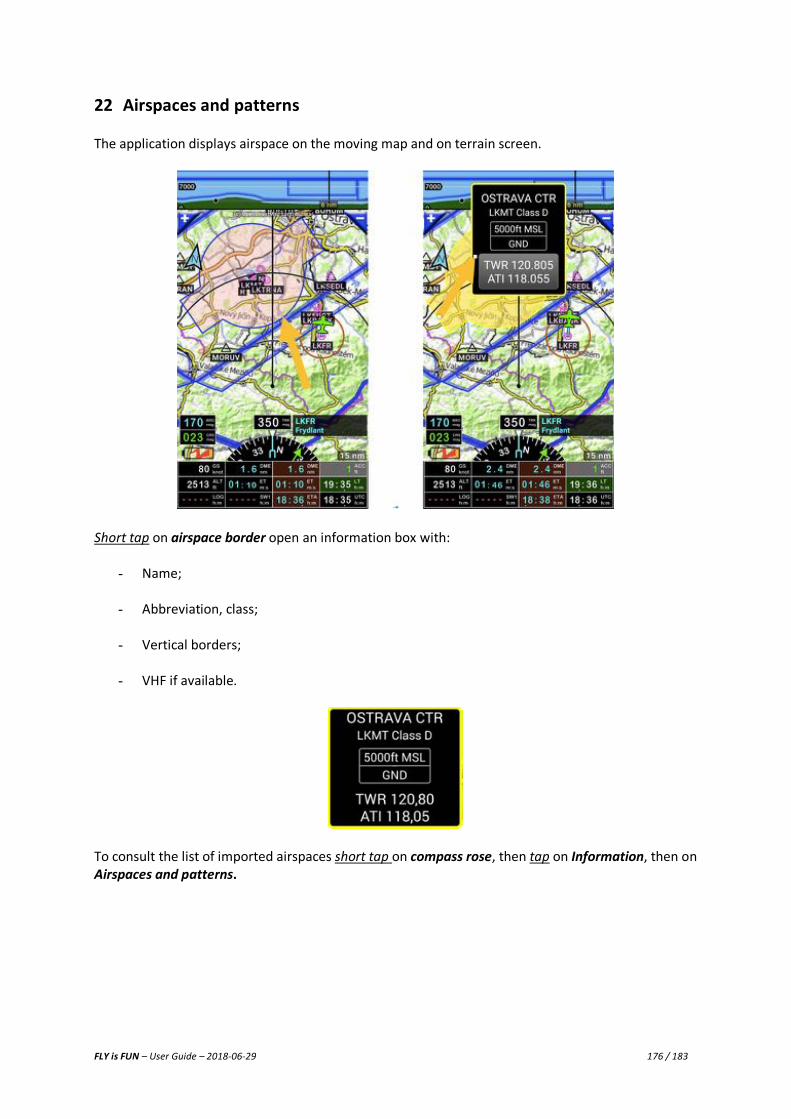
FLY is FUN – User Guide – 2018-06-29 176 / 183
22 Airspaces and patterns The application displays airspace on the moving map and on terrain screen.
Short tap on airspace border open an information box with:
- Name;
- Abbreviation, class;
- Vertical borders;
- VHF if available.
To consult the list of imported airspaces short tap on compass rose, then tap on Information, then on Airspaces and patterns.
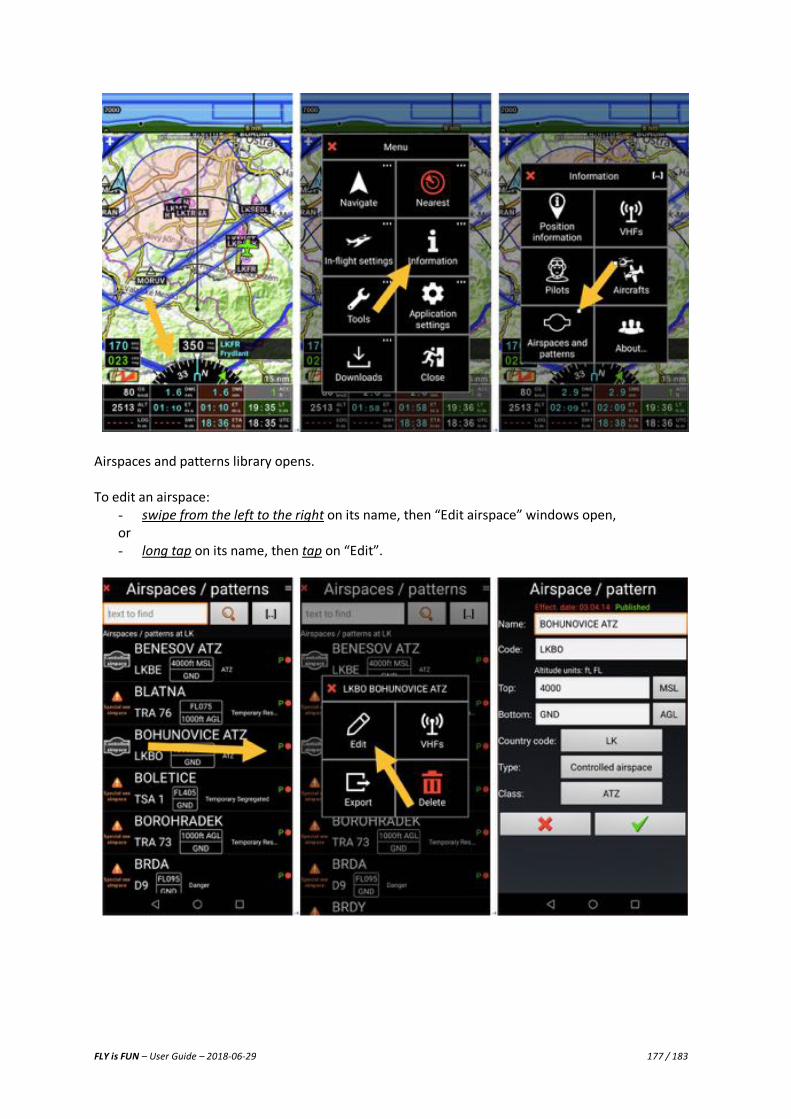
FLY is FUN – User Guide – 2018-06-29 177 / 183
Airspaces and patterns library opens. To edit an airspace:
- swipe from the left to the right on its name, then “Edit airspace” windows open, or - long tap on its name, then tap on “Edit”.
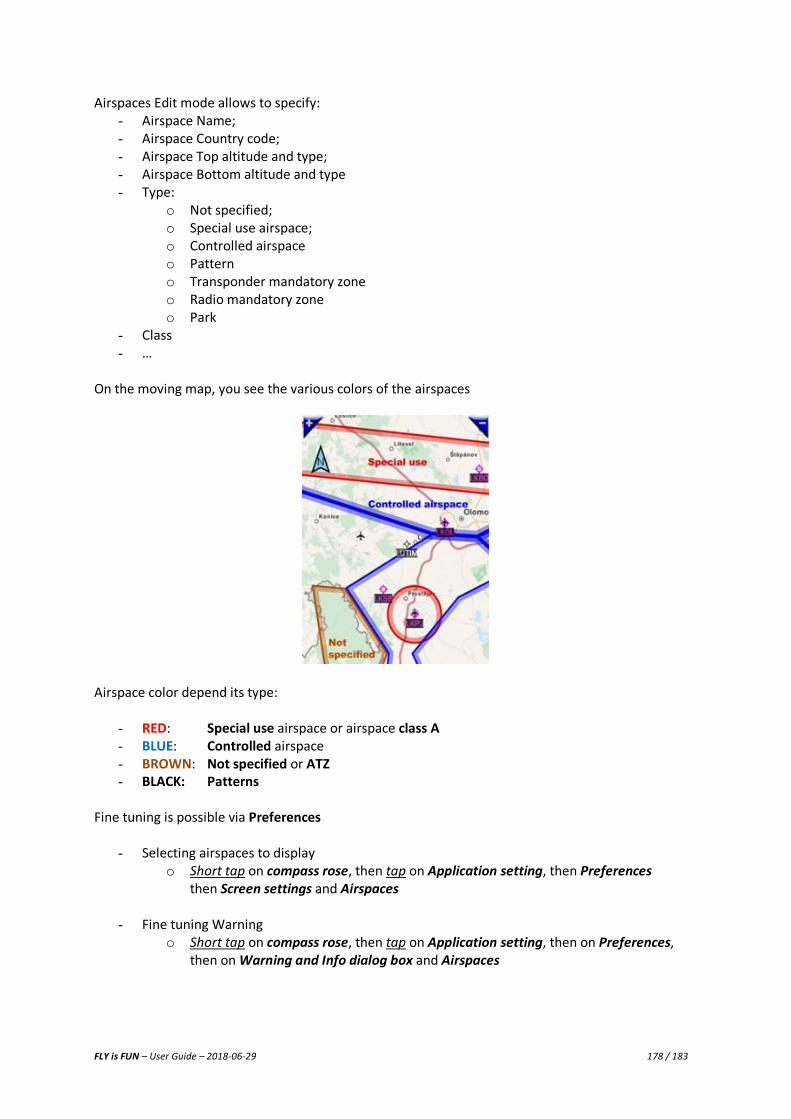
FLY is FUN – User Guide – 2018-06-29 178 / 183
Airspaces Edit mode allows to specify: - Airspace Name; - Airspace Country code; - Airspace Top altitude and type; - Airspace Bottom altitude and type - Type:
o Not specified; o Special use airspace; o Controlled airspace o Pattern o Transponder mandatory zone o Radio mandatory zone o Park
- Class - …
On the moving map, you see the various colors of the airspaces
Airspace color depend its type:
- RED: Special use airspace or airspace class A - BLUE: Controlled airspace - BROWN: Not specified or ATZ - BLACK: Patterns
Fine tuning is possible via Preferences
- Selecting airspaces to display o Short tap on compass rose, then tap on Application setting, then Preferences
then Screen settings and Airspaces
- Fine tuning Warning o Short tap on compass rose, then tap on Application setting, then on Preferences,
then on Warning and Info dialog box and Airspaces
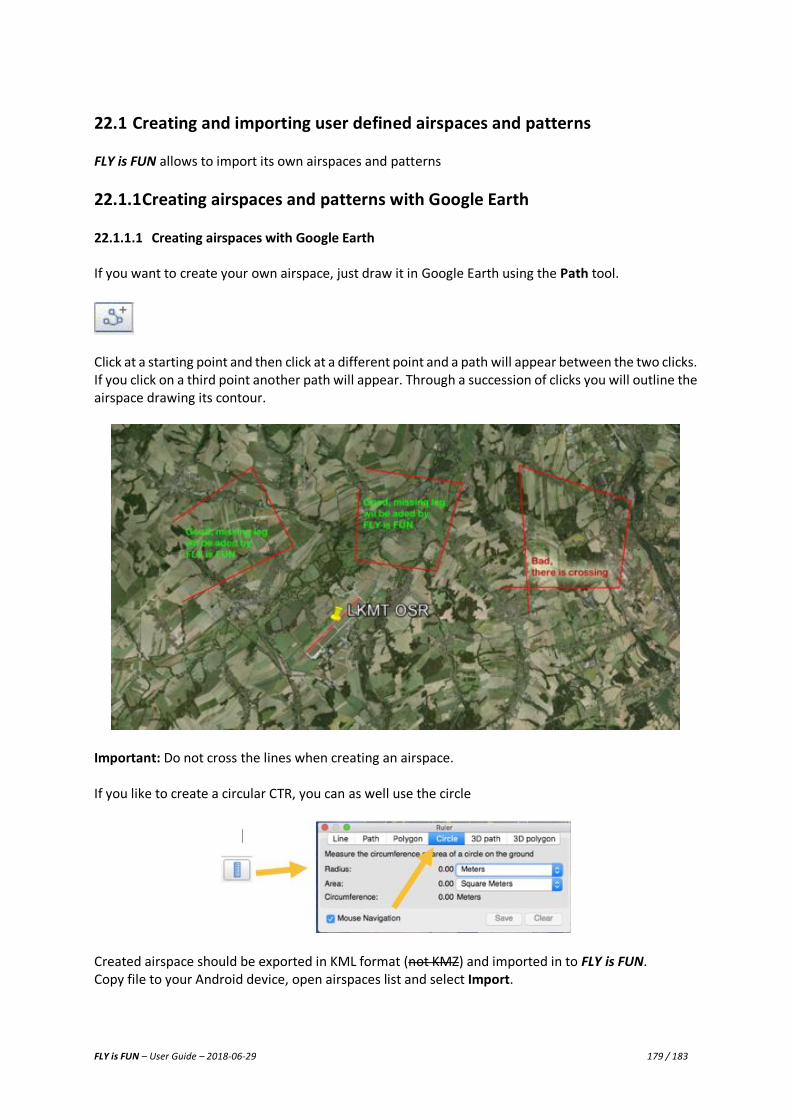
FLY is FUN – User Guide – 2018-06-29 179 / 183
22.1 Creating and importing user defined airspaces and patterns FLY is FUN allows to import its own airspaces and patterns
22.1.1 Creating airspaces and patterns with Google Earth 22.1.1.1 Creating airspaces with Google Earth If you want to create your own airspace, just draw it in Google Earth using the Path tool.
Click at a starting point and then click at a different point and a path will appear between the two clicks. If you click on a third point another path will appear. Through a succession of clicks you will outline the airspace drawing its contour.
Important: Do not cross the lines when creating an airspace. If you like to create a circular CTR, you can as well use the circle
Created airspace should be exported in KML format (not KMZ) and imported in to FLY is FUN. Copy file to your Android device, open airspaces list and select Import.

FLY is FUN – User Guide – 2018-06-29 180 / 183
22.1.1.2 Importing airspace in FLY is FUN Within the application open “Airspaces / patterns” library, import the airspace and add missing information: elevation, type…. Short tap on compass rose, then tap on Information, then Airspaces and patterns,
then on the menu button and then on Import Select the file to import
select the country, start the importation.

FLY is FUN – User Guide – 2018-06-29 181 / 183
Imported airspace is in airspace country list. Swipe from left to right on its name to open edit mode. Add missing information, elevation, class, type… and validate with tap on green stick.
Airspace is ready. Note: “U” mean crated by user. “P” mean FLY is FUN data

FLY is FUN – User Guide – 2018-06-29 182 / 183
22.1.2 Using OpenAir FLY is FUN also enables to import airspaces at OpenAir format, so airspaces could be created too using this format. Look here for more information: http://www.winpilot.com/UsersGuide/UserAirspace.asp.

FLY is FUN – User Guide – 2018-06-29 183 / 183
Have nice and safe flights
FLY
is
FUN
www.flyisfun.com