Embed Size (px)
Citation preview

FLM V2.0 USER GUIDE DOCUMENT
FPTU Learning Material
DECEMBER 10, 2020 FPT UNIVERSITY

FLM V2.0 - Guidelines
1
Table of Contents
I. Introduction .............................................................................................................................3
II. User Guide ..............................................................................................................................3
1. Login FLM ........................................................................................................................................ 3 1.1 Login with email @fpt.edu.vn ................................................................................................................... 3 1.2 Login with username and password for Syllabus reviewer and Syllabus designer ....................................... 3 1.3 Create and authorize users ....................................................................................................................... 4
2. Assessment type management ....................................................................................................... 4 2.1 Create new Assessment Type ................................................................................................................... 5 2.2 Edit, delete Assessment Type ................................................................................................................... 6
3. Subject management ...................................................................................................................... 7 3.1 Search subject .......................................................................................................................................... 7 3.2 Add multiple subjects by importing excel file ............................................................................................ 7 3.3 Add new subject by interface ................................................................................................................... 7 3.4 Edit, delete subject ................................................................................................................................... 8
4. Syllabus management ..................................................................................................................... 8 4.1 Search Syllabus (by a subject) ................................................................................................................... 8 4.2 Add Syllabus by importing excel file. ......................................................................................................... 8 4.3 Add new Syllabus by interface .................................................................................................................. 9 4.4 View syllabus detail. Edit, delete, clone, export syllabus............................................................................ 9
5. LO management .............................................................................................................................. 9 5.1 Search LO by LO details .......................................................................................................................... 10 5.2 Add multiple LO by importing excel file ................................................................................................... 10 5.3 Add new LO by interface ........................................................................................................................ 11 5.4 Edit, delete LO ........................................................................................................................................ 11
6. Material management .................................................................................................................. 11 6.1 Search material ...................................................................................................................................... 12 6.2 Add new material by interface ................................................................................................................ 12 6.3 Edit, delete material ............................................................................................................................... 12
7. Schedule management .................................................................................................................. 12 7.1 Search schedule by schedule topic .......................................................................................................... 13 7.2 Add new schedule by interface ............................................................................................................... 13 7.3 Upload Material file for multiple sessions ............................................................................................... 14 7.4 Edit, delete Schedule .............................................................................................................................. 17
8. Assessment management ............................................................................................................. 18 8.1 Add new Assessment by interface .......................................................................................................... 19 8.2 Edit, delete Assessment .......................................................................................................................... 19
9. Curriculum management............................................................................................................... 19 9.1 Search curriculum .................................................................................................................................. 20 9.2 Add new curriculum by interface ............................................................................................................ 20 9.3 Clone curriculum .................................................................................................................................... 20 9.4 Edit, delete, approved, disapprove, export Curriculum ............................................................................ 20

FLM V2.0 - Guidelines
2
10. Curriculum Subject management ................................................................................................ 21 10.1 View all subjects in curriculum .............................................................................................................. 22 10.2 Add multiple subjects into curriculum by importing excel file ................................................................ 22 10.3 Edit, delete subject ............................................................................................................................... 23
11. Curriculum Subject Grouping ..................................................................................................... 24 11.1 View list subjects in a curriculum belong to a group .............................................................................. 24 11.2 Display list subjects in a curriculum that belong to one group ............................................................... 25 11.3 View the group statistics list of curriculums .......................................................................................... 25 11.4 Add new subject group ......................................................................................................................... 25 11.5 View, edit, delete subject group ........................................................................................................... 26 11.6 Add new or delete subject in group of curriculums ............................................................................... 27
12. Report semester of subjects ........................................................................................................ 28 12.1 Upload report semester of subjects ...................................................................................................... 28 12.2 Download report semester of subjects ................................................................................................. 28
13. Tools ........................................................................................................................................... 28 13.1 Update curriculums with new syllabus version ...................................................................................... 28 13.2 Subject Reporting ................................................................................................................................. 28 13.3 Export Textbook to Order ..................................................................................................................... 28 13.4 Export Grading Structure ...................................................................................................................... 28 13.5 Export Materials of Curriculum ............................................................................................................. 28 13.6 Syllabus Reporting ................................................................................................................................ 28 13.7 Curriculum Reporting ........................................................................................................................... 28 13.8 Material Reporting ............................................................................................................................... 28 13.9 LO Reporting ........................................................................................................................................ 28 13.10 Final Check ......................................................................................................................................... 28
FLM V2.0 - Guidelines
3
I. Introduction
II. User Guide
1. Login FLM
1.1 Login with email @fpt.edu.vn
- Step 1: From login screen, click button google ‘Sign in “.
- Step 2: Login with username and password email @fpt.edu.vn
1.2 Login with username and password for Syllabus reviewer and Syllabus designer
- Step 1: From login screen click ‘ Sign in for Syllabus Reviewer/Designer’

FLM V2.0 - Guidelines
4
- Step 2: Login with the username and password provided.
1.3 Create and authorize users
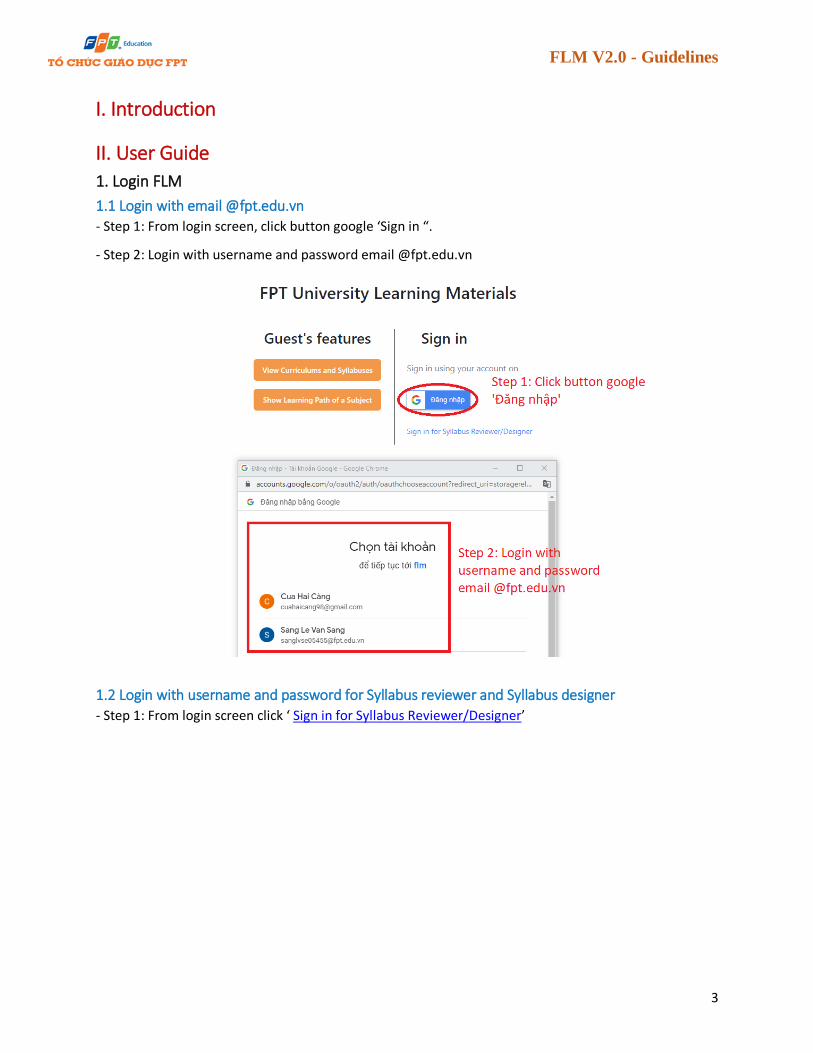
2. Assessment type management From main screen click ‘ Assessment Type’
FLM V2.0 - Guidelines
5
2.1 Create new Assessment Type
- Step 1: From screen ‘Assessment Type Management’, click ‘ Add New Assessment Type’
- Step 2: From screen ‘Add Assessment Type”, enter Assessment type name into text box, then click ‘Add’ to add new assessment type.

FLM V2.0 - Guidelines
6
2.2 Edit, delete Assessment Type

FLM V2.0 - Guidelines
7
3. Subject management From home screen click ‘ Subject’
3.1 Search subject - Step 1: Enter subject code or subject ID into text box and choose the search type in selector box. (If left text box blank, all available subjects will be displayed)
- Step 2: Click button search
3.2 Add multiple subjects by importing excel file - Step 1: From screen ‘Subject management’, click ‘ Import subject’
- Step 2: Click ‘Choose File’ then choose your excel file to upload.
- Step 3: Click ‘Import’ to import subject from the excel file.
3.3 Add new subject by interface
- Step 1: From screen ‘Subject management’, click ‘ Add New Subject’
- Step 2: Fill all information of subject into input field on screen, then click ‘Add’ to add new subject. Message ‘Added Successfully!’ will display if you add subject done.

FLM V2.0 - Guidelines
8
3.4 Edit, delete subject
- In the list subjects on ‘Subject management’ screen, click on one subject to go to edit/delete subject screen.
- You can’t delete a subject if this subject is in a curriculum.
4. Syllabus management - From home screen click ‘Syllabus’
- Teacher and student can view only active and approved syllabus
4.1 Search Syllabus (by a subject)
- Step 1: Enter exactly subject code into text box.
- Step 2: Click search button.
- Step 3: Click into ‘Add new syllabus’ to add new syllabus for this subject by interface
- Step 4: Click on a syllabus name to view syllabus detail, edit, delete, approval, disapproval
4.2 Add Syllabus by importing excel file.
- Step 1: From screen ‘Syllabus management” , click ‘Import syllabus from Excel file’
- Step 2: From screen ‘Import syllabus form Excel file’, click ‘Choose file’ to choose your excel file.
- Step 3: Click ‘Import’. If you import successfully, message ‘Syllabus successfully imported!’ will be display on screen
FLM V2.0 - Guidelines
9
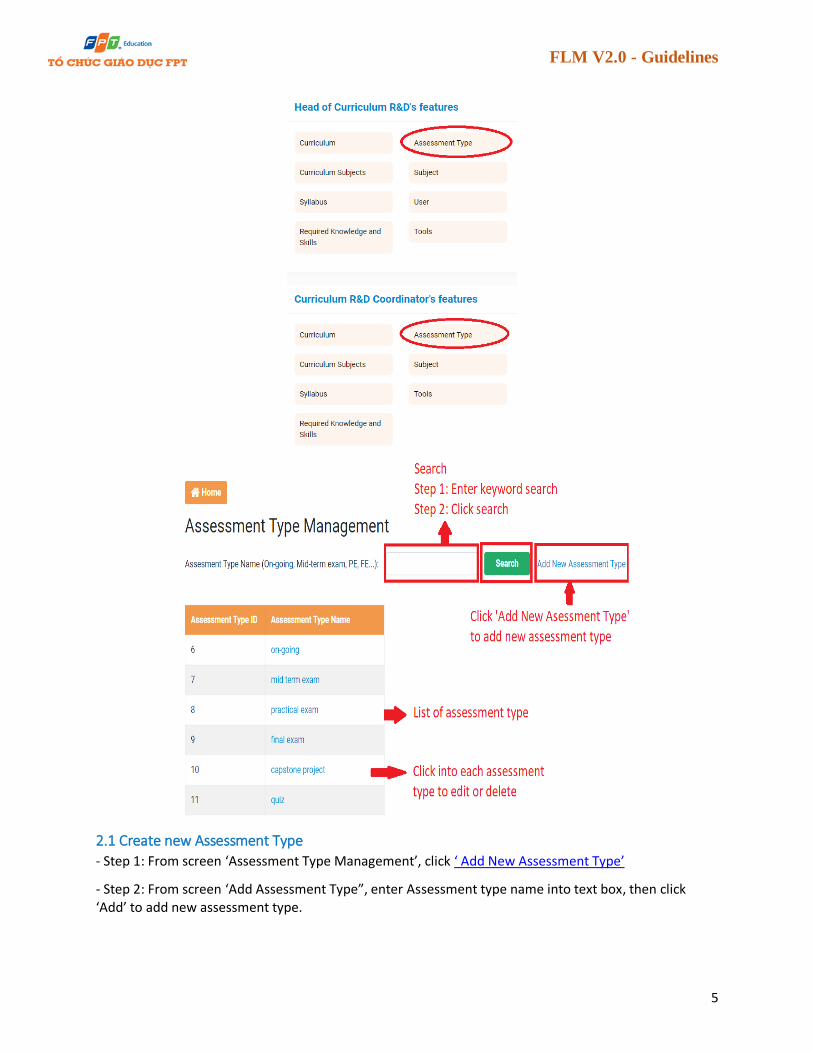
4.3 Add new Syllabus by interface
- Step 1: Follow the instructions for search syllabus above.
- Step 2: Click ‘Add new syllabus’.
- Step 3: From screen ‘Add Syllabus’, enter syllabus information into all input field on screen. Then click ‘Save’ button.
4.4 View syllabus detail. Edit, delete, clone, export syllabus - Step 1: From screen ‘Syllabus management”, click on one text link syllabus name.
- Step 2: From screen ‘Syllabus detail’, at the end of screen
o Click ‘Edit’ button to edit syllabus. o Click ‘Delete’ button to delete syllabus. o Click ‘Clone’ button to clone syllabus. o Click ‘Export’ button to export syllabus detail to a excel file. o Click ‘Approve/Disapprove’ button to approve/disapprove syllabus o Click ‘View All syllabus Parts’ to view all syllabus detail and assessment, LO, schedule, material of
this syllabus and export to pdf file.
5. LO management From screen ‘View Syllabus Details’ click ‘View LO’ button

FLM V2.0 - Guidelines
10
5.1 Search LO by LO details
- Step 1: Enter the keyword into text box
- Step 2: Click “Search” button
5.2 Add multiple LO by importing excel file
- Step 1: From screen ‘LO management’, click ‘Add new LO’ button.
- Step 2: Click ‘Choose file’ and choose your excel file.
- Step 3: Click ‘Import’ button
- Note: LO name must follow the rule:
o LO parent name pattern: LOxx o Sub LO name pattern: LOxx.xx o Example: LO1, LO01, LO2, LO02 ... LO01 has sub LO1.1, LO1.2, etc

FLM V2.0 - Guidelines
11
5.3 Add new LO by interface
- Step 1: From screen ‘LO management’, Click ‘Add new LO’ button.
- Step 2: Enter LO information into all input field on screen.
- Step 3: Click ‘Add’ button to add new LO or click ‘Reset’ button to cancel all input field on screen.
- Note: LO name must follow the rule above
5.4 Edit, delete LO
- Step 1: From screen ‘LO management’, click on a text link LO name.
- Step 2: From screen ‘View LO ‘, click ‘Edit’ button to edit, click ‘Delete’ button to delete LO.
6. Material management From screen ‘View Syllabus Details’ click ‘View Material’ button

FLM V2.0 - Guidelines
12
6.1 Search material
- Step 1: Enter the keyword into text box
- Step 2: Click ‘Search’ button
6.2 Add new material by interface
- Step 1: From screen ‘Material management’, click ‘Add material’
- Step 2: Enter material information into all input field on screen
- Step 3: Click ‘Add’ button to save or ‘Reset’ to cancel all input field on screen
6.3 Edit, delete material
- Step 1: From screen ‘Material management’, click a text link material name.
- Step 2: From screen ‘View Material‘, click ‘Edit’ button to edit, click ‘Delete’ button to delete material.
7. Schedule management From screen ‘View Syllabus Details’ click ‘View Schedule’ button
FLM V2.0 - Guidelines
13
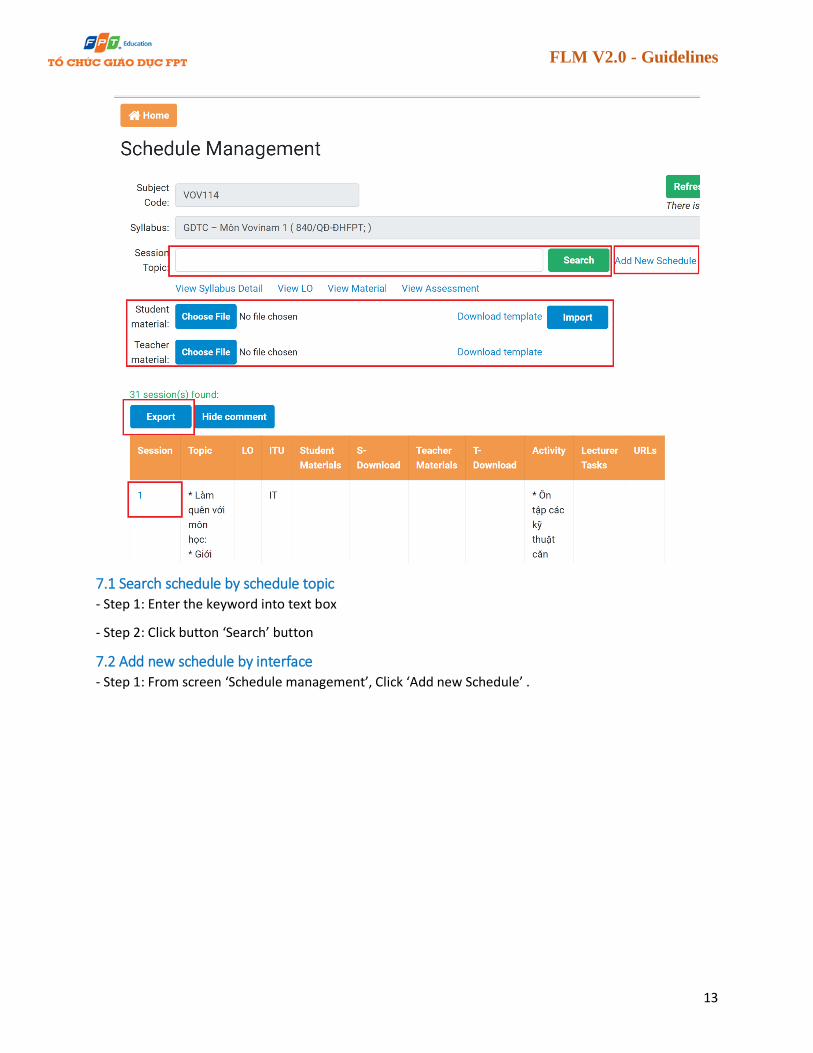
7.1 Search schedule by schedule topic
- Step 1: Enter the keyword into text box
- Step 2: Click button ‘Search’ button
7.2 Add new schedule by interface
- Step 1: From screen ‘Schedule management’, Click ‘Add new Schedule’ .

FLM V2.0 - Guidelines
14
- Step 2: Enter schedule information into all input field on screen
- Step 3: Click ‘Add’ button to save or ‘Reset’ to cancel all input field on screen.
- Note:
o If there are multiple Los, enter LO name separated by commas. Example: LO1, LO2, LO3 o When adding a material file, you need to add the material file name to ‘Material Name’ text box
7.3 Upload Material file for multiple sessions - Step 1: Material files should be compressed in a zip file and named with a prefix according to the format: [Order] [Material name]
o Example: 1_Baigiang1.zip
- Step 2: After creating the material file, you need to compress it into a total zip file and name it with prefix according to the format:
o For student: [Subject code] S_download Example: KRL101_S_download.zip
o For teacher: [Subject code]_T_download Example: KRL101_T_download.zip

FLM V2.0 - Guidelines
15
- Step 3: Upload material file
- Step 3.1: Choose the syllabus you want to add, then click “View Schedule”
FLM V2.0 - Guidelines
16
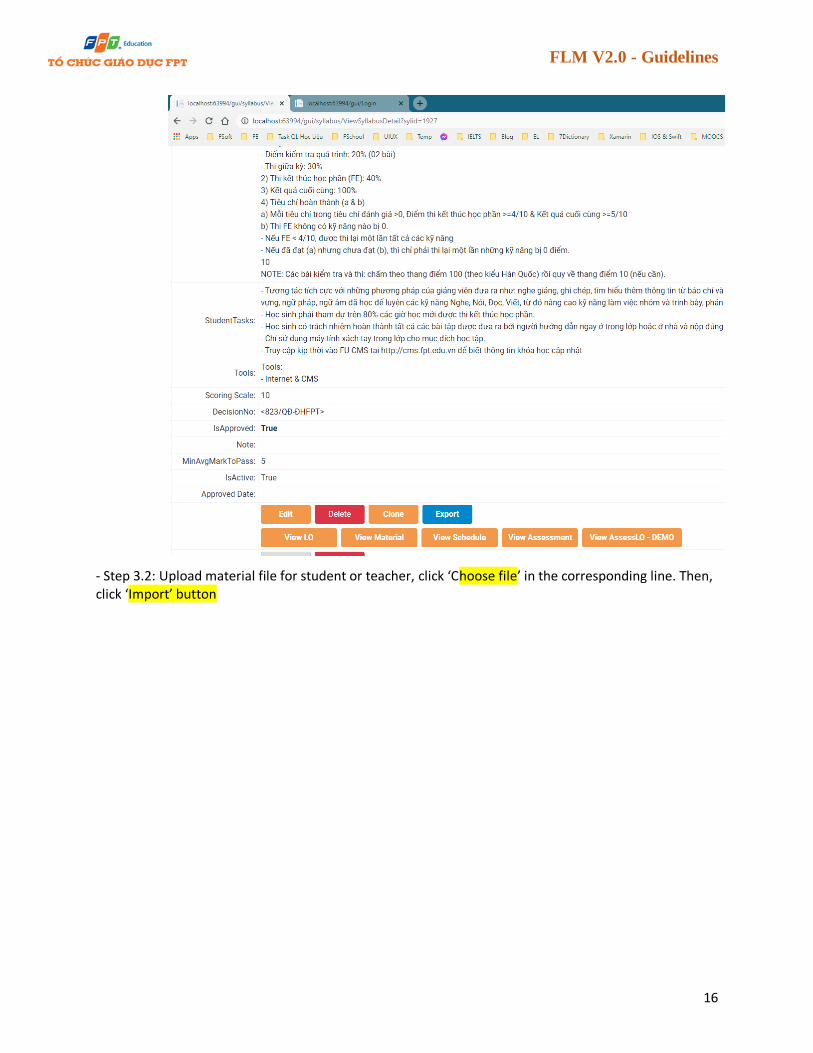
- Step 3.2: Upload material file for student or teacher, click ‘Choose file’ in the corresponding line. Then, click ‘Import’ button
FLM V2.0 - Guidelines
17
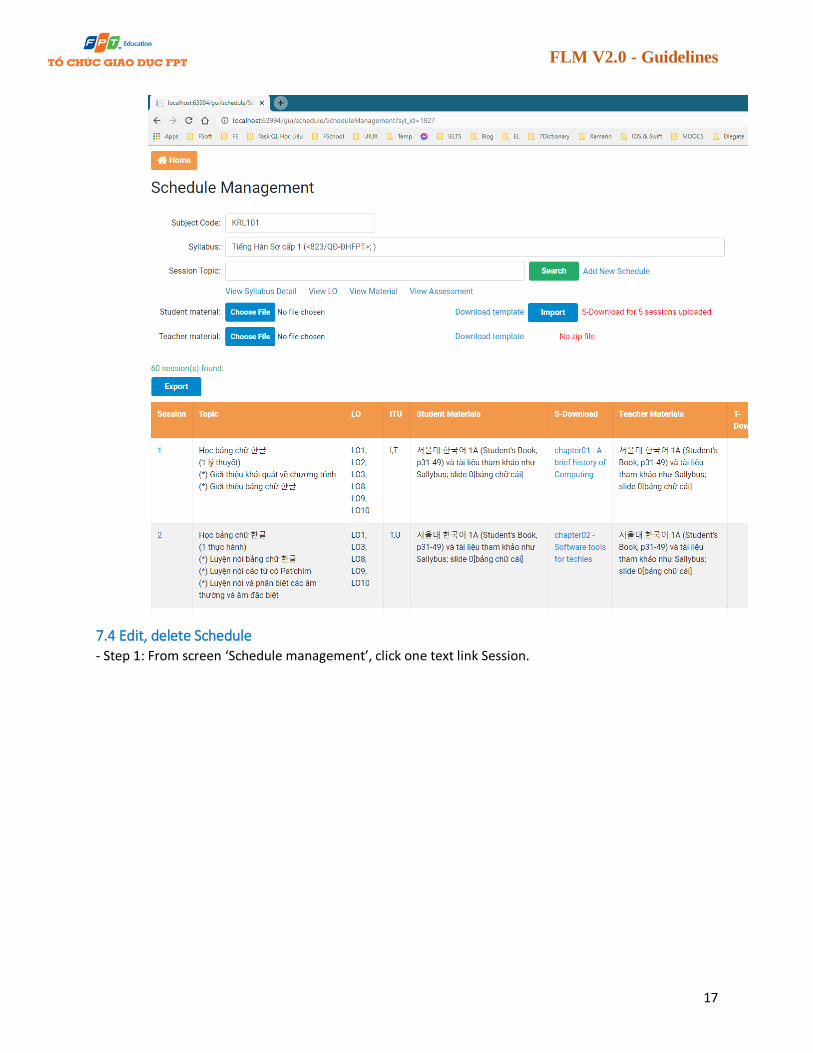
7.4 Edit, delete Schedule - Step 1: From screen ‘Schedule management’, click one text link Session.

FLM V2.0 - Guidelines
18
- Step 2: From screen ‘View Schedule‘, click ‘Edit’ button to edit, click ‘Delete’ button to delete.
- Note: LO name and material name must follow the rule above
8. Assessment management From screen ‘View Syllabus Details’ click ‘View Assessment’ button

FLM V2.0 - Guidelines
19
8.1 Add new Assessment by interface
- Step 1: From screen ‘Assessment Management’ click ‘Add new assessment’
- Step 2: Enter assessment information into all input field on screen. If assessment type is not defined, click ‘Add new Assessment Type’ to create new assessment type.
- Note: LO name must follow the rule above
8.2 Edit, delete Assessment
- Step 1: From screen ‘Assessment Management’, click text link Category
- Step 2: From screen ‘View Assessment‘, click Edit’ button to edit, click ‘Delete’ button to delete.
- Note: LO name must follow the rule above
9. Curriculum management - From home screen click ‘Curriculum’
- Teacher and student can only view active and approved curriculums
FLM V2.0 - Guidelines
20
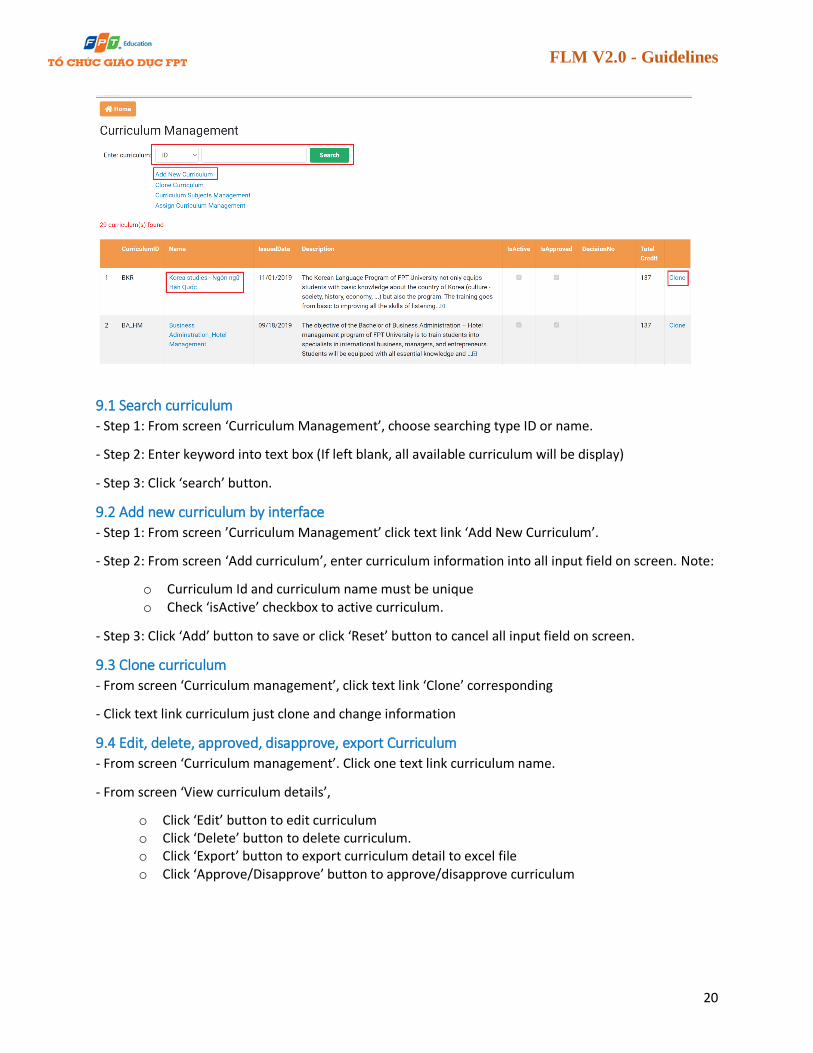
9.1 Search curriculum
- Step 1: From screen ‘Curriculum Management’, choose searching type ID or name.
- Step 2: Enter keyword into text box (If left blank, all available curriculum will be display)
- Step 3: Click ‘search’ button.
9.2 Add new curriculum by interface
- Step 1: From screen ’Curriculum Management’ click text link ‘Add New Curriculum’.
- Step 2: From screen ‘Add curriculum’, enter curriculum information into all input field on screen. Note:
o Curriculum Id and curriculum name must be unique o Check ‘isActive’ checkbox to active curriculum.
- Step 3: Click ‘Add’ button to save or click ‘Reset’ button to cancel all input field on screen.
9.3 Clone curriculum
- From screen ‘Curriculum management’, click text link ‘Clone’ corresponding
- Click text link curriculum just clone and change information
9.4 Edit, delete, approved, disapprove, export Curriculum
- From screen ‘Curriculum management’. Click one text link curriculum name.
- From screen ‘View curriculum details’,
o Click ‘Edit’ button to edit curriculum o Click ‘Delete’ button to delete curriculum. o Click ‘Export’ button to export curriculum detail to excel file o Click ‘Approve/Disapprove’ button to approve/disapprove curriculum

FLM V2.0 - Guidelines
21
10. Curriculum Subject management From home screen click ‘Curriculum Subjects’

FLM V2.0 - Guidelines
22
10.1 View all subjects in curriculum
- From screen ‘Curriculum details’, select curriculum, then click ‘Show’ button.
- The subjects belonging to the curriculum will be shown below
10.2 Add multiple subjects into curriculum by importing excel file
- Prerequisite: Curriculum excel file is required as the template. No ‘Curriculum template’ download yet for reference
- Step 1: From screen ‘Curriculum details’, select curriculum. If curriculum doesn’t exist, click text
link ‘Add Curriculum’ to add new curriculum.

FLM V2.0 - Guidelines
23
- Step 2: Click button ‘Choose File’ and choose your excel file
- Step 3: Click button ‘Import’ to import your excel file
10.3 Edit, delete subject
- Step 1: From the list of subjects belonging to curriculum. Click on the text link ‘Subject Name’ correspondingly
- Step 2: From screen ‘Edit curriculum subject’,
o Edit: Enter information need to change. Then click ‘Update’ button.
o Delete: Click ‘Delete’ button.

FLM V2.0 - Guidelines
24
11. Curriculum Subject Grouping From home screen click ‘Required knowledge and Skills’.
11.1 View list subjects in a curriculum belong to a group
- Step 1: From screen ‘Curriculum Subject Grouping’, choose curriculum.
- Step 2: Choose group. Then click ‘Show’ button.
FLM V2.0 - Guidelines
25
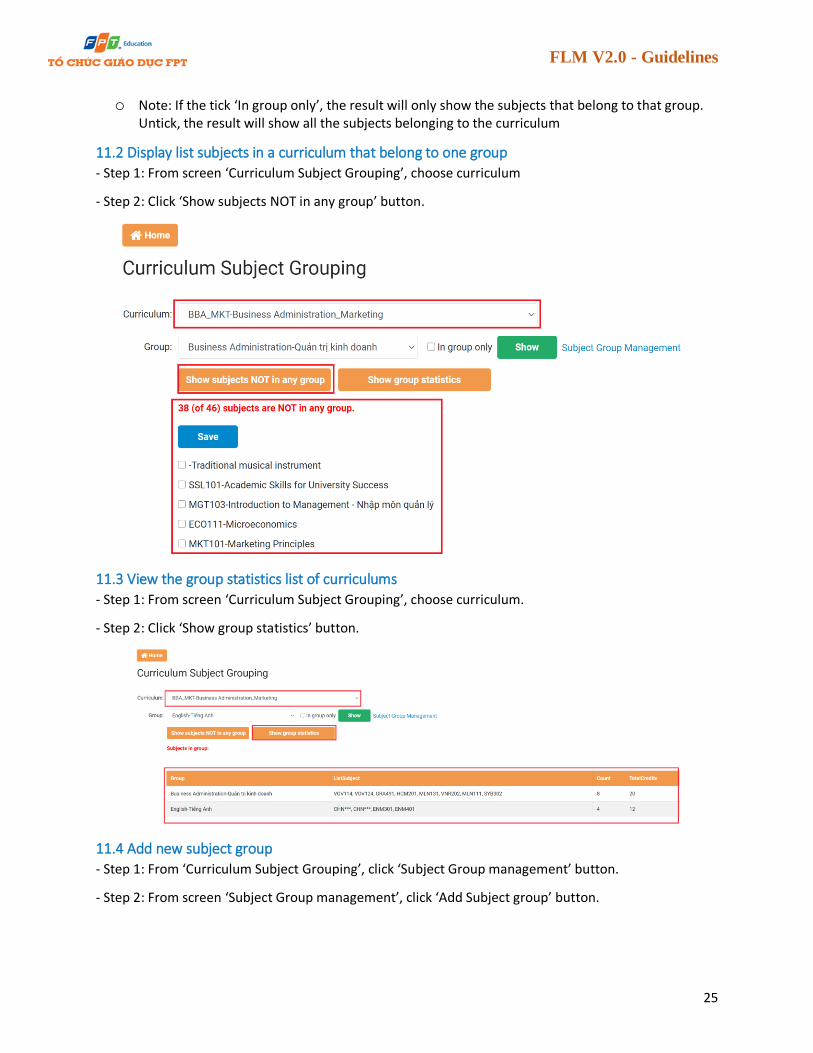
o Note: If the tick ‘In group only’, the result will only show the subjects that belong to that group. Untick, the result will show all the subjects belonging to the curriculum
11.2 Display list subjects in a curriculum that belong to one group
- Step 1: From screen ‘Curriculum Subject Grouping’, choose curriculum
- Step 2: Click ‘Show subjects NOT in any group’ button.
11.3 View the group statistics list of curriculums
- Step 1: From screen ‘Curriculum Subject Grouping’, choose curriculum.
- Step 2: Click ‘Show group statistics’ button.
11.4 Add new subject group
- Step 1: From ‘Curriculum Subject Grouping’, click ‘Subject Group management’ button.
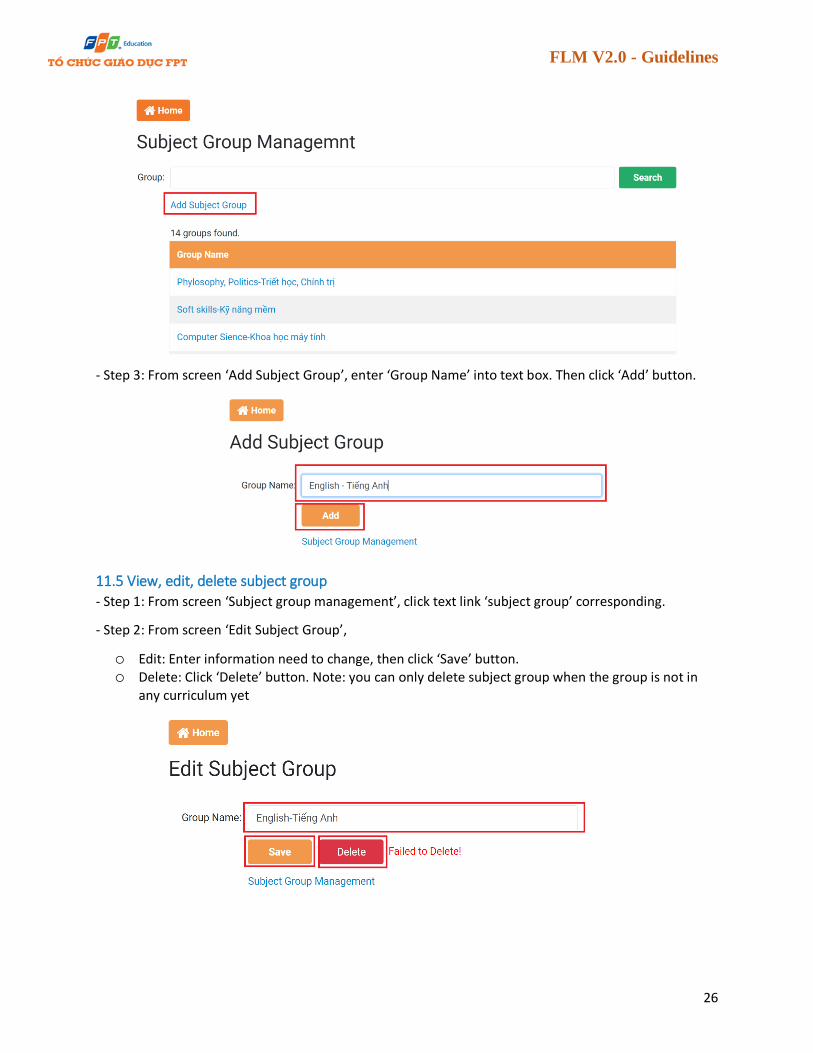
- Step 2: From screen ‘Subject Group management’, click ‘Add Subject group’ button.
FLM V2.0 - Guidelines
26
- Step 3: From screen ‘Add Subject Group’, enter ‘Group Name’ into text box. Then click ‘Add’ button.
11.5 View, edit, delete subject group
- Step 1: From screen ‘Subject group management’, click text link ‘subject group’ corresponding.
- Step 2: From screen ‘Edit Subject Group’,
o Edit: Enter information need to change, then click ‘Save’ button. o Delete: Click ‘Delete’ button. Note: you can only delete subject group when the group is not in
any curriculum yet

FLM V2.0 - Guidelines
27
11.6 Add new or delete subject in group of curriculums
- Step 1: From screen ‘Subject group management’, choose curriculum and group corresponding.
- Step 2: Display list groups. There are 2 way:
o 1: Untick ‘In Group Only’, then click ‘Show’ button. The result will be list of all available subject of curriculum. Subject belonging to the group will be ticked (Untick to remove this subject from the group).
o 2: Click ‘Show subjects NOT in any group’ button. Result is list subjects not in any group.

FLM V2.0 - Guidelines
28
- Step 3: Tick/Untick into subject need to add/delete from group, then click ‘Save’ button.
12. Report semester of subjects
12.1 Upload report semester of subjects
12.2 Download report semester of subjects
13. Tools
13.1 Update curriculums with new syllabus version
13.2 Subject Reporting
13.3 Export Textbook to Order
13.4 Export Grading Structure
13.5 Export Materials of Curriculum
13.6 Syllabus Reporting
13.7 Curriculum Reporting
13.8 Material Reporting
13.9 LO Reporting
13.10 Final Check


![flM£inelly and l]](https://img.pdfslide.us/doc/110x75/6115ed34669701400e7b8619/flminelly-and-l.jpg)