Embed Size (px)
Citation preview

8/7/2019 FlexCourse - Image gallery EN - v1.0
http://slidepdf.com/reader/full/flexcourse-image-gallery-en-v10 1/36
FlexCoursefor Adobe Flex Builder 3
Image gallery
Bas van Dijk
v1.0 – September 2008

8/7/2019 FlexCourse - Image gallery EN - v1.0
http://slidepdf.com/reader/full/flexcourse-image-gallery-en-v10 2/36
Copyright © 2008 - Bas van Dijk
You may redistribute and copy this document as long as it keeps unchanged and it is providedin its original format. No commercial printing of this e-book is allowed.

8/7/2019 FlexCourse - Image gallery EN - v1.0
http://slidepdf.com/reader/full/flexcourse-image-gallery-en-v10 3/36
Table of ContentsIntroduction..................................................................................................................4
About the technique.......................................................................................................5Adobe Flex.................................................................................................................5Microsoft Silverlight.....................................................................................................5
About this FlexCourse.....................................................................................................6
Installing the Adobe Flex Builder IDE................................................................................7
License.......................................................................................................................7Download...................................................................................................................7
Installing....................................................................................................................7For your information....................................................................................................7
Creating the Flex gallery.................................................................................................8Creating the project.....................................................................................................8The layout basics.......................................................................................................11
Importing images......................................................................................................18Working with arrays...................................................................................................18
The first click............................................................................................................24Adding the hand cursor..............................................................................................29
Adding fade effects....................................................................................................29
Appendix 1 – The source code........................................................................................31Gallery.xml...............................................................................................................31HorizontalListItemRenderer.mxml................................................................................35
Links...........................................................................................................................36

8/7/2019 FlexCourse - Image gallery EN - v1.0
http://slidepdf.com/reader/full/flexcourse-image-gallery-en-v10 4/36
Introduction
This document uses several symbols. Below is the explanation of these symbols:
An arrow () means instruction. This means you have to follow the step after it.
Example: Click on the object with the right mouse button.
A text between < and > refers to a key on the keyboard.
Example: Press <Enter> to confirm the operation.
A combination of more than one key will be written with the plus sign (+).
Example: Press <Alt> + <F4> to exit the program.
A button on the screen will be written between [ and ].
Example: Click at [OK] to close the window.
If there is an arrow () between two words, this means a click sequence in a menu.
Example: Choose File Save
A new technique or additional information will be written inside a grey box.
Example:
This is how this technique works.
Source code will be shown in a dark grey box. Please not that sometimes a single line of code will shown as two lines in the document because of the paper width.
Example:
<mx:Canvas xmlns:mx="http://www.adobe.com/2006/mxml" horizontalScrollPolicy="off"
verticalScrollPolicy="off">

8/7/2019 FlexCourse - Image gallery EN - v1.0
http://slidepdf.com/reader/full/flexcourse-image-gallery-en-v10 5/36
About the technique
Adobe Flex
With Adobe Flex it is possible to create Rich Internet Applications (RIA). These RIAs arerunning in a browser through the Adobe Flash plugin. This is great advantage since youdo not need any new plugin to run these applications. Almost everyone using the internet
has the Flash plugin installed.
Adobe Flex uses MXML files. These files contain the graphically formatting as well asAcrionScript code. Compiling the MXML files result in a SWF file which is a Flash file.These SWF files can, just as Flash files, be embedded in a HTML file.
Many examples of Adobe Flex can be found at:
http://flex.org/showcase/
Microsoft Silverlight Microsoft created another platform for RIAs called Silverlight. The advantages over AdobeFlex are performance and its integration within Visual Studio.
Some advantages are the cross platform usability. Linux is not (yet) supported. ForSilverlight one need to install a separate Silverlight plugin, while most computers alreadyhave the Adobe Flash plugin installed.
Examples of Silverlight can be found at (in order to view you need the Silverlight plugininstalled):
http://silverlight.net/Showcase/
FlexCourse – Image Gallery v1.0 5

8/7/2019 FlexCourse - Image gallery EN - v1.0
http://slidepdf.com/reader/full/flexcourse-image-gallery-en-v10 6/36
About this FlexCourseThis FlexCourse is teaching you how to create a image gallery such as the one on thescreenshot below.
On top, the gallery shows a gallery title. In the middle, there is a full size picture with adescription underneath. At the bottom, there is a thumbnail list. When a thumbnail is
clicked, the full size picture of this thumbnail is shown in the middle of the gallery. Inorder to navigate trough the thumbnails the little arrows at the end can be used. At the
bottom of the gallery is a small footer for copyright notices.
FlexCourse – Image Gallery v1.0 6

8/7/2019 FlexCourse - Image gallery EN - v1.0
http://slidepdf.com/reader/full/flexcourse-image-gallery-en-v10 7/36
Installing the Adobe Flex Builder IDE
In order to start with Adobe Flex, you need the Adobe Flex SDK, which is available forfree. This SDK comes without an IDE. The IDE created by Adobe is called “Flex Builder”.
Flex Builder is based on Eclipse and provides autocompletion and visual designing yourapplication. This tool costs about 210 Euro.
There are some free IDEs in the market like FlexDevelop (http://www.flashdevelop.org).In this tutorial we are going to use Adobe Flex Builder.
LicenseStudents can get a educational license from Adobe for free. In order to get one, you
should fill in the form at:
https://freeriatools.adobe.com/student.php
They ask for a scanned copy of your student card. If you send one you receive yourlicense within three days. In the meantime the 60 day trial version can be used.
Download You can download Adobe Flex Builder from:
http://www.adobe.com/cfusion/entitlement/index.cfm?e=flex3email
Flex Builder is available for both Mac and Windows.
Installing
The SDK is already in the package. There is no need to download and install itseparately!
Download and install Flex Builder on your machine so you can get started withAdobe Flex development!
For your informationThis tutorial has been tested on a MacBook Pro, 2.6Ghz with 4Gb RAM. It is not testedagainst Windows, but you should not have any difficulties following this tutorial.
On my machine the gallery runs very smoothly. If you experience problems with thesmoothness of your gallery please see if your system is fast enough to run the Flex
project.
FlexCourse – Image Gallery v1.0 7

8/7/2019 FlexCourse - Image gallery EN - v1.0
http://slidepdf.com/reader/full/flexcourse-image-gallery-en-v10 8/36
Creating the Flex gallery
Creating the project In order to create our gallery we need a project to work in. This is why we are going tocreate our first Adobe Flex project.
Start the Adobe Flex Builder.
Choose File New Flex Project
A window pops up.
figure 1
In this window you can define all project properties like the name of the project and thelocation on your filesystem.
Enter as project name “Gallery”
Click on the browse button to navigate to the location where you want the projectto be stored (I used /Users/bas/Development/Adobe Flex).
Make sure “Web application (runs in Flash Player)” is selected.
Click <Finish>
Your project will be created and your workspace should look like figure 2.
FlexCourse – Image Gallery v1.0 8

8/7/2019 FlexCourse - Image gallery EN - v1.0
http://slidepdf.com/reader/full/flexcourse-image-gallery-en-v10 9/36
figure 2
On the left you see the project navigator. This tree shows all your files related to yourFlex Project. Below is the project outline which shows the outline of your project. On theright you see the source code of your brand new project.
We are going to run our project for the first time.
On the toolbar, click on the green “play” icon (figure 3).
figure 3
Instead of clicking on this button, you can also use < > + <F11> or <Ctrl> + <F11> for Windows users.
Your browser should display a grey/blue gradient (figure 4).
figure 4
Congratulations! You just created your very first Adobe Flex application! In the nextsection we are going to create the graphical basics of our image gallery.
The gallery consists of a few rows: header, content, thumbnails, footer. The thumbnail
row consists of three columns, the others consists of one column.
FlexCourse – Image Gallery v1.0 9

8/7/2019 FlexCourse - Image gallery EN - v1.0
http://slidepdf.com/reader/full/flexcourse-image-gallery-en-v10 10/36
At the top of the screen are two buttons: source and design. The source button showsthe source code of our MXML file. The design button shows the MXML code graphically(figure 5).
figure 5
Click on [Design].
This shows our Gallery.mxml graphically. You see the same gradient (figure 6) that wesaw before when we ran our application. This area shows what our application will looklike when we run it.
figure 6
On the bottom left is a “components” panel. This panel shows several GUI objects whichwe can use like a label, button, datefield, checkbox, image etc. Adobe has a componentexplorer at:
http://examples.adobe.com/flex3/componentexplorer/explorer.html
Here you can view all the components in action.
At the centre bottom we can see debug output and possible problems found in our source
code.
The right part of our screen shows the several properties of our objects. Here you canadjust dimensions, colours and events. Adobe has an online tool called: Flex StyleExplorer. With this tool you can online see the effect of a property. The Flex StyleExplorer can be found at:
http://examples.adobe.com/flex3/consulting/styleexplorer/Flex3StyleExplorer.html
FlexCourse – Image Gallery v1.0 10

8/7/2019 FlexCourse - Image gallery EN - v1.0
http://slidepdf.com/reader/full/flexcourse-image-gallery-en-v10 11/36
The layout basics
We are going to change the background colour of our application into black. Abackground colour consists of two colours. These two colours create a gradient. Since wewant a solid black background we need to change both background colours into black.
Click the left colour picker under the fill section and select black (figure 7).
figure 7
Do the same for the right colour picker.
Our background colour is black, but we need some rows as well. The grid component can
help us with this. This component splits a certain area in multiple (or single) rows andcolumns.
In the component panel, navigate to the Layout section and drag the “grid” component into our application.
A menu appears:
figure 7
Set the rows to 4 and the columns to 3.
Press [OK].
We now have a 4x3 grid on our application. But it does not cover the entire application.This because the width and height of the grid are not set.
Under the layout properties, set the with and height to 100%. This cause our gridto cover the entire application.
figure 8
To place grid in the top left of our application set the X and Y to 0.
Your screen should look like figure 9.
FlexCourse – Image Gallery v1.0 11
8/7/2019 FlexCourse - Image gallery EN - v1.0
http://slidepdf.com/reader/full/flexcourse-image-gallery-en-v10 12/36
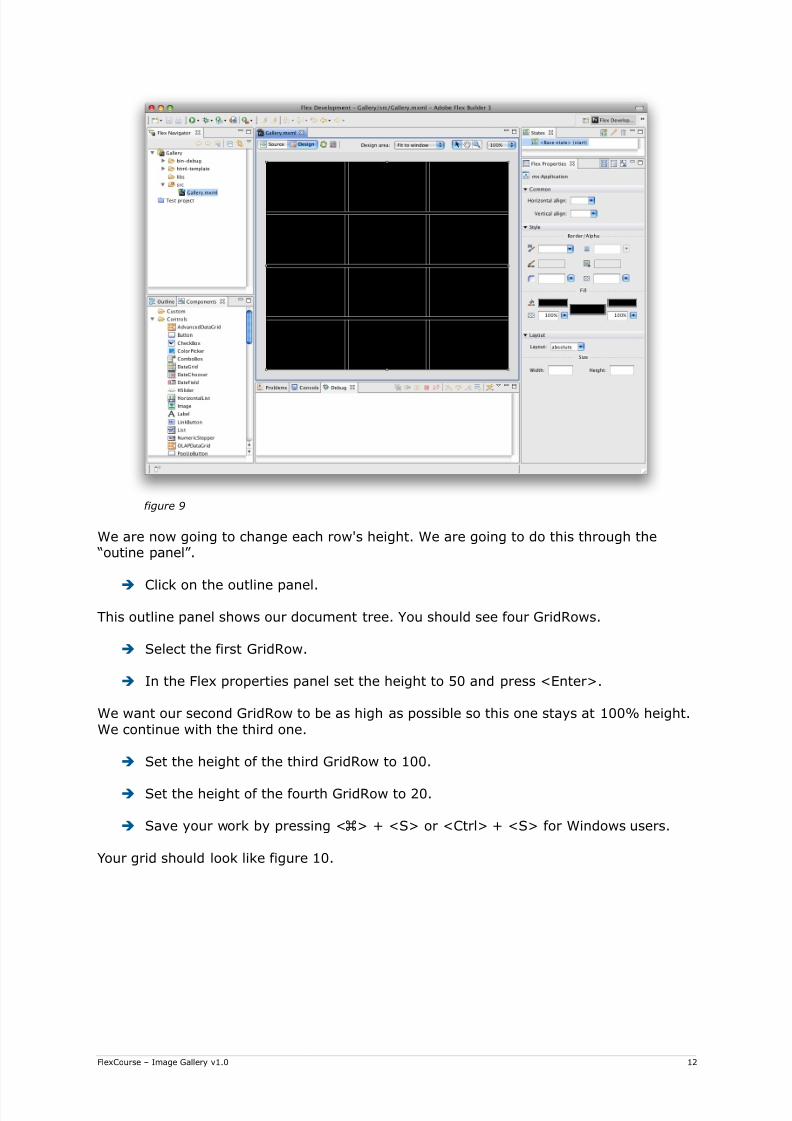
figure 9
We are now going to change each row's height. We are going to do this through the“outine panel”.
Click on the outline panel.
This outline panel shows our document tree. You should see four GridRows.
Select the first GridRow.
In the Flex properties panel set the height to 50 and press <Enter>.
We want our second GridRow to be as high as possible so this one stays at 100% height.
We continue with the third one.
Set the height of the third GridRow to 100.
Set the height of the fourth GridRow to 20.
Save your work by pressing < > + <S> or <Ctrl> + <S> for Windows users.
Your grid should look like figure 10.
FlexCourse – Image Gallery v1.0 12

8/7/2019 FlexCourse - Image gallery EN - v1.0
http://slidepdf.com/reader/full/flexcourse-image-gallery-en-v10 13/36
figure 10
All our rows consist of three columns. The only which needs three columns is the thirdone. We are going to merge the columns of the other rows by using the “colspan” property (you might recognise this property from HTML).
Click on [Source] to view the source code.
Here you can see all the MXML definitions for our Grid. One row consists of three
GridItems.
<mx:GridRow width="100%" height="50">
<mx:GridItem width="100%" height="100%">
</mx:GridItem>
<mx:GridItem width="100%" height="100%">
</mx:GridItem>
<mx:GridItem width="100%" height="100%">
</mx:GridItem>
</mx:GridRow>
Here you can see all the MXML definitions for our Grid. One row consists of three
GridItems.
For the top row, remove two GridItems and add colspan="3" to the GridItem left.
Your code should look like:
<mx:GridRow width="100%" height="50">
<mx:GridItem width="100%" height="100%" colspan="3">
</mx:GridItem>
</mx:GridRow>
FlexCourse – Image Gallery v1.0 13
8/7/2019 FlexCourse - Image gallery EN - v1.0
http://slidepdf.com/reader/full/flexcourse-image-gallery-en-v10 14/36
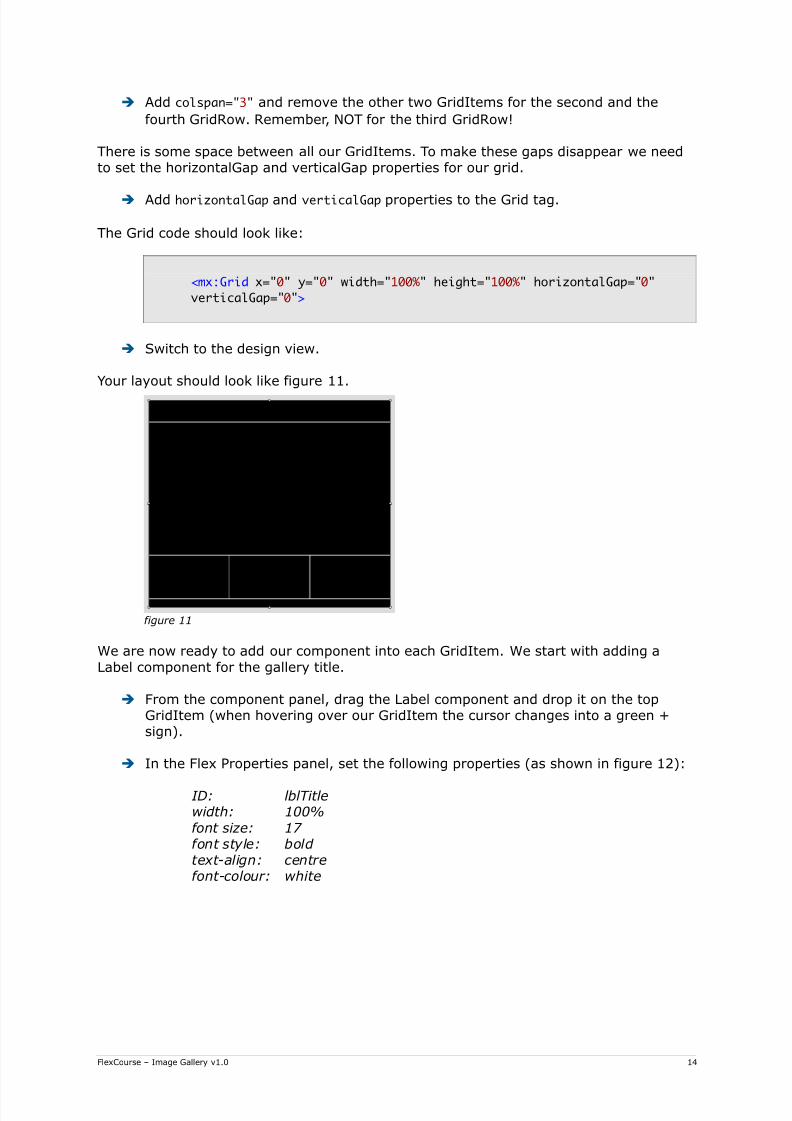
Add colspan="3" and remove the other two GridItems for the second and the
fourth GridRow. Remember, NOT for the third GridRow!
There is some space between all our GridItems. To make these gaps disappear we needto set the horizontalGap and verticalGap properties for our grid.
Add horizontalGap and verticalGap properties to the Grid tag.
The Grid code should look like:
<mx:Grid x="0" y="0" width="100%" height="100%" horizontalGap="0"
verticalGap="0">
Switch to the design view.
Your layout should look like figure 11.
figure 11
We are now ready to add our component into each GridItem. We start with adding a
Label component for the gallery title.
From the component panel, drag the Label component and drop it on the topGridItem (when hovering over our GridItem the cursor changes into a green +sign).
In the Flex Properties panel, set the following properties (as shown in figure 12):
ID: lblTitlewidth: 100%
font size: 17 font style: bold text-align: centrefont-colour: white
FlexCourse – Image Gallery v1.0 14

8/7/2019 FlexCourse - Image gallery EN - v1.0
http://slidepdf.com/reader/full/flexcourse-image-gallery-en-v10 15/36
figure 12
The label is really close to the top of our application and not in the vertical middle of ourGridItem.
Click below our Label in the top GridItem.
In the Flex Properties panel change the vertical align from “top” to “middle”.
Add to the bottom GridItem another Label in the same way as we did for the title.But now with the following properties:
ID: lblFooter width: 100%
text-align: centrefont-colour: white
In the Flex Properties panel change for the footer GridItem the vertical align from
“top” to “middle” as well.
Save your work by pressing < > + <S> or <Ctrl> + <S> for Windows users.
The easy part is done. Now we are going to fill the second GridRow where our enlargedimage will be displayed. This is a rather complicated construction.
Our enlarged image consists of an Image component and a Label component. We wantthese to be centred in the middle of the second GridRow. To accomplish this we need twonested Grid components; one to combine the Label and the Image, and one to centre it
in our second GridRow.
Image 13 shows a schematic view. The red lines are Grid components, the blue once areGridItems.
FlexCourse – Image Gallery v1.0 15

8/7/2019 FlexCourse - Image gallery EN - v1.0
http://slidepdf.com/reader/full/flexcourse-image-gallery-en-v10 16/36
figure 13
We start with creating the outer Grid component. This Grid component has one Griditeminside which is 100% width and 100% height.
Drag and drop a grid into the second GridRow of our application. Set as the
number of rows and columns: 1.
Make the grid 100% width and height.
Click inside the new Grid to select the new Grid.
Set in the Flex Properties panel the horizontal align to “center” and the verticalalign to “middle”.
Drag a new Grid component into our previously created Grid. Give this the size of
1 column and 2 rows.
Drag an Image component into the top part and give it the ID “imgMain”.
Drag a Label component into the bottom one and give it the ID “lblImageTitle”.
Change the Label text colour into white.
Your application should look like figure 14.
FlexCourse – Image Gallery v1.0 16

8/7/2019 FlexCourse - Image gallery EN - v1.0
http://slidepdf.com/reader/full/flexcourse-image-gallery-en-v10 17/36
figure 14
The only missing part is our thumbnail navigator and the scroll buttons. This navigatorhas three GridItems. We start with creating the scroll buttons.
Click inside the left GridItem and set the “Horizontal align” to “right”.
Set the “vertical align” to “middle”.
Drag an Image component into this GridItem and give it the ID “cmdScrollPrev”.
Drag a Spacer component between the Image and the right border of theGridItem so there is some space between the Image and the right border.
Click inside the right GridItem and set the “vertical align” to “middle”.
Drag an Image component into this GridItem and give it the ID “cmdScrollNext”.
Drag a Spacer component between the Image and the left border of the GridItemso there is some space between the Image and the left border.
Click inside the centre GridItem and set the “vertical align” to “middle”.
Drag a Horizontal List component into this GridItem and set the followingproperties:
ID: lstThumbnailswidth: 800
height: 80column width: 100
The buttons do not have a image yet. We are going to import existing images into ourproject.
FlexCourse – Image Gallery v1.0 17

8/7/2019 FlexCourse - Image gallery EN - v1.0
http://slidepdf.com/reader/full/flexcourse-image-gallery-en-v10 18/36
Importing images
Right click on the “src” folder in the Flex Navigator and choose New Folder.
Name the folder “img” and click [OK].
Right click on the “img” folder and choose Import.
Choose under “General” for “File System” and click [Next >].
Click on [Browse...] and navigate to the folder of this tutorial.
Click in the left part of your dialog on your tutorial folder.
On the right part of your dialog check “next.png” and “prev.png”.
Click [Finish].
Now you have imported two images from your file system.
Select the left image which we gave the ID “cmdScrollPrev”.
Type as the “Source” property img/prev.png and press [Enter].
Do the same with the “cmdScrollNext” image and set the source for this image toimg/next.png.
Save your work by pressing < > + <S> or <Ctrl> + <S> for Windows users.
It is time to define our images. Our images are stored in an array. This array contains thelocations and the descriptions of our images.
Create inside our img folder a folder called “photos”.
Inside this folder, import about 12 images. You can do this just the way as weimported the prev.png and next.png.
Instead of importing existing images into a folder you can also drag the filesfrom your Finder window (Explorer window for Windows users) into the projectfolder.
Working with arrays
Switch to the source view.
At the bottom of our source code, we are going to add some new code between</mx:Grid> and </mx:Application>. In this code we define our array of images.
FlexCourse – Image Gallery v1.0 18

8/7/2019 FlexCourse - Image gallery EN - v1.0
http://slidepdf.com/reader/full/flexcourse-image-gallery-en-v10 19/36
Type the following code at the position specified above:
<mx:Array id="arrImages">
<mx:Object lbl="Flower" src="img/flower.jpg" />
<mx:Object lbl="Sunset" src="img/sunset.jpg" /> </mx:Array>
This code defines an array which is identified by the name “arrImages”. The arraycontains items from the type Object. Each object has two properties: lbl and src. Lbl isused for the image description. Src is used for the location of the image.
Inside the array create an object for every image you imported.
Your code should look like:
</mx:GridRow>
</mx:Grid>
<mx:Array id="arrImages">
<mx:Object lbl="Flower" src="img/flower.jpg" />
<mx:Object lbl="Church" src="img/church.jpg" />
... <mx:Object lbl="Car" src="img/car.jpg" />
<mx:Object lbl="Flower macro" src="img/flower2.jpg" />
</mx:Array>
</mx:Application>
The “...” marks a cut in the source to save space. In the real code twelve images are
defined.
We would like to have our HorizontalList component to read this image information andcreate our thumbnails. Unfortunately our HorizontalList does not know how to rendereach item. Below I explain how this can be defined.
The HorizontalList uses a so called “ItemRenderer” for creating items. We define an itemtemplate. This is a separate MXML file in which we define how each item should look.
Right click on the src folder and choose New MXML component.
Specify as filename “HorizontalListItemRenderer.mxml” and click [Finish].
The source of HorizontalListItemRenderer.mxml will be opened automatically.
Switch to the design view.
You see a white rectangle, which is the Canvas on which we base our Item.
Drag a grid with one column and one row to the Canvas and set the following
properties width and height to 100%
Click inside the right GridItem and set the “vertical align” to “middle”.
FlexCourse – Image Gallery v1.0 19

8/7/2019 FlexCourse - Image gallery EN - v1.0
http://slidepdf.com/reader/full/flexcourse-image-gallery-en-v10 20/36
Drag a new image inside the Grid.
Set for the image in the Flex Properties panel the value “{data.src}”.
When the HorizontalList items are rendered, the {data.src} will be replaced with the data
for each specific item.
Save your work by pressing < > + <S> or <Ctrl> + <S> for Windows users.
We are going back to our created Gallery.mxml.
In the source view click in the Outline panel on the HorizontalList.
The source code line of our HorizontalList will be highlighted. This list does not yet know
what ItemRenderer to use and where it can fetch its data.
Add the property dataProvider="{arrImages}" ,
itemRenderer="HorizontalListItemRenderer" and rowHeight="80" to theHorizontalList so your code looks like:
<mx:HorizontalList height="80" width="800" columnWidth="100"
rowHeight="80" dataProvider="{arrImages}"
itemRenderer="HorizontalListItemRenderer"
horizontalScrollPolicy="off" verticalScrollPolicy="off"
borderStyle="none" id="lstThumbnails">
The dataprovider defines our Array with the images and descriptions. The itemRenderer
defines our created item template. The rowHeight is for later use to make the row exactlyfit the HorizontalList.
Press < > + <F11> or <Ctrl> + <F11> for Windows users to run our application.
Your application should look like figure 15.
figure 15
FlexCourse – Image Gallery v1.0 20

8/7/2019 FlexCourse - Image gallery EN - v1.0
http://slidepdf.com/reader/full/flexcourse-image-gallery-en-v10 21/36
This is not quite how we want the scrollbars to look. You also see our thumbnailsshowing the top left of our image. It would be nicer if we saw the centre of our pictures.In the next part we are going to fix these issues.
First we start with removing the scrollbars from our thumbnail images. Items which have
a scrollbar use the scrollbarpolicy property to define if a scrollbar is allowed. Since thereare horizontal and vertical scrollbars the properties are horizontalScrollPolicy and
verticalScrollPolicy.
Open HorizontalListItemRenderer.mxml in the source view.
Add the properties horizontalScrollPolicy="off" and verticalScrollPolicy="off"
to the Canvas component.
Your Canvas code should look like:
<mx:Canvas xmlns:mx="http://www.adobe.com/2006/mxml"horizontalScrollPolicy="off" verticalScrollPolicy="off">
Press < > + <F11> or <Ctrl> + <F11> for Windows users to run our application.
You should see no scrollbars anymore on the thumbnails.
Add both scroll properties to the HorizontalList of our Gallery.mxml file to removethe scrollbars from the HorizontalList component as well.
Switch to the design view and set the Border style to “none”.
Press < > + <F11> or <Ctrl> + <F11> for Windows users to run our application.
Your thumbnail HorizontalList should look like figure 16.
figure 16
The images are still not centred. We are going to change this by adding thehorizontalCenter and verticalCenter parameter. The horizontalCenter and
verticalCenter property specifies the distance between the component's centre point and
the container centre.
Open HorizontalListItemRenderer.mxml in the source view.
Add the properties horizontalCenter="0" and verticalCenter="0" to your Grid
Component.
FlexCourse – Image Gallery v1.0 21

8/7/2019 FlexCourse - Image gallery EN - v1.0
http://slidepdf.com/reader/full/flexcourse-image-gallery-en-v10 22/36
Your Grid code should look like:
<mx:Grid width="100%" height="100%" horizontalCenter="0"
verticalCenter="0">
Press < > + <F11> or <Ctrl> + <F11> for Windows users to run our application.
Your thumbnail HorizontalList should look like figure 17.
figure 17
When our application is loaded we want an initialisation function to be executed. In thisfunction we can set our gallery title and footer text. The code we used till now was justMXML which defined our Graphical User Interface (GUI) and our array.
The functional code which we for example going to the next slide, set the title, handleclick events etc. are using is called AcrionScript.
Open the Gallery.mxml in the source code view.
Add the creationComplete="initSlideshow()" property to our Application
component. This means we want initSlideshow() to be executed when the
application is created.
Some code lines are getting very large. Our application component for example consists
of a single line which is very large:
<mx:Application xmlns:mx="http://www.adobe.com/2006/mxml"
layout="absolute" backgroundGradientAlphas="[1.0, 1.0]"
backgroundGradientColors="[#000000, #000000]"
creationComplete="initSlideshow()">
Instead it is allowed to spread the code over multiple lines, like:
<mx:Application
xmlns:mx="http://www.adobe.com/2006/mxml"
layout="absolute"
backgroundGradientAlphas="[1.0, 1.0]"
backgroundGradientColors="[#000000, #000000]"
creationComplete="initSlideshow()"
>
This can improve the readability of your source code.
We have not yet defined the place to put our ActionScript code.
FlexCourse – Image Gallery v1.0 22

8/7/2019 FlexCourse - Image gallery EN - v1.0
http://slidepdf.com/reader/full/flexcourse-image-gallery-en-v10 23/36
Scroll to the bottom of Gallery.mxml.
Between </mx:Array> and </mx:Application> add the following code:
<mx:Script><![CDATA[
private function initSlideshow():void {
if (arrImages.length > 0) {
lblFooter.text = "© Bas van Dijk - 2008";
lblTitle.text = "Flex 3 gallery test";
}
}
]]>
</mx:Script>
On the first line we see function initSlideshow():void. ActionScript is a strongly typed
language so we need to define the datatype of our functions and variabled. In this caseour function is of the type void.
With if (arrImages.length > 0) we check if our array contains any images. If so we set
the text properties of both lblFooter and lblTitle.
Press < > + <F11> or <Ctrl> + <F11> for Windows users to run our application.
The title and footer should be set to the text you typed in your source. The next step ismaking the scrollbuttons work in our HorizontalList for the thumbnails. First we need toexplain the meaning of the horizontalScrollPosition.
Imagine we have five images and our list displays a maximum of three images. The
horizontalScrollPosition works as follows:
Displayed imagnumber on each position
thumbnail 1 thumbnail 2 thumbnail 3 horizontalScrollPosition
image 1 image 2 image 3 1
image 2 image 3 image 4 2image 3 image 4 image 5 3
FlexCourse – Image Gallery v1.0 23

8/7/2019 FlexCourse - Image gallery EN - v1.0
http://slidepdf.com/reader/full/flexcourse-image-gallery-en-v10 24/36
The first click
So every time we want to scroll our HorizontalList one position further we need toincrease the horizontalScrollPosition by one. If we want to scroll back we need to
decrease it with one.
After our initSlideshow function insert the following code:
private function cmdScrollNext_click():void {
var newPos:int = lstThumbnails.horizontalScrollPosition + 1;
if (newPos <= lstThumbnails.maxHorizontalScrollPosition) {
lstThumbnails.horizontalScrollPosition = newPos;
}
checkScroll();}
This function is the click function for cmdScrollNext therefore it is called cmdScrollNext.
First we define a new variable called newPos. This variable is of the type int. In this
variable we store our current horizontalScrollPosition + 1. If this position is greater
than or equal to the maximum possible scroll position we set the new scroll position. ThecheckScroll is a function which we will add later.
After our cmdScrollNext function add the following code:
private function cmdScrollPrev_click():void {
var newPos:int = lstThumbnails.horizontalScrollPosition - 1;
if (newPos >= 0) {
lstThumbnails.horizontalScrollPosition = newPos;
}
checkScroll();
}
This function does exactly the opposite of the cmdScrollNext_click function and is prettymuch self explaining.
We continue with a more complicated function: checkScroll. When we are in the first
scroll position, it is not possible to scroll back anymore. The same goes if we are at thelast scroll position, then we van not scroll any further.
What we want is to hide the next and previous scroll button if it is not possible to scroll inthat direction. Each component has the property visible. This property can be true or
false. We want to set these properties for our buttons according to the current scroll
position.
After our cmdScrollPrevious function add the following code:
FlexCourse – Image Gallery v1.0 24

8/7/2019 FlexCourse - Image gallery EN - v1.0
http://slidepdf.com/reader/full/flexcourse-image-gallery-en-v10 25/36
private function checkScroll():void {
if (lstThumbnails.horizontalScrollPosition == 0)
{
cmdScrollPrev.visible = false;
} else {cmdScrollPrev.visible = true;
}
if (lstThumbnails.horizontalScrollPosition ==
lstThumbnails.maxHorizontalScrollPosition)
{
cmdScrollNext.visible = false;
} else {
cmdScrollNext.visible = true;
}
}
This functions has two if statements. The first one is for the previous button the secondfor the next. For the previous button we check if the current horizontalScrollPosition is
equal to 0. Which means it is as far as possible to the left. If so we hide the button, if notwe show the button.
We do the same for the next button, but we check if the maxHorizontalScrollPosition is
reached.
We have our functions now, but they are not yet bound to the two buttons. We are now
going to make this connection.
Find in your source code the cmdScrollPrev Image component and add the
property click="cmdScrollPrev_click()".
Find the cmdScrollNext Image component as well and add the property
click="cmdScrollNext_click()".
Your code for cmdScrollPrev should look like:
<mx:Image id="cmdScrollPrev" source="img/prev.png"
click="cmdScrollPrev_click()" />
And for cmdScrollNext like:
<mx:Image id="cmdScrollNext" source="img/next.png"
click="cmdScrollNext_click()" />
The click events are bound now.
FlexCourse – Image Gallery v1.0 25
8/7/2019 FlexCourse - Image gallery EN - v1.0
http://slidepdf.com/reader/full/flexcourse-image-gallery-en-v10 26/36
Press < > + <F11> or <Ctrl> + <F11> for Windows users to run our application and try the scroll buttons.
When the application is started you will notice that the previous scroll button is stillvisible. We are going to fix this.
Add checkScroll(); outside the if statement of our initSlideshow function. Thiswill execute the checkScroll function when the application starts.
Now it is time to add the click functionality for our thumbnails so we can see the enlargedpicture with the correct label.
After our checkScroll function add the following code:
private function lstThumbnails_itemClick(evt:ListEvent):void {
imgMain.source = evt.itemRenderer.data.src;
lblImageTitle.text = evt.itemRenderer.data.lbl;
}
The first line asks the itemRenderer which item is clicked. From this item we ask the “src”
property so we can set this source as the imgMain source. We do the same for the label
but now with the label data from the itemRenderer.
The HorizontalList uses a special library for handling the events. We need to link to thislibrary.
Above our initSlideshow function add the code below to import the ListEvents.
This line goes right under the <
8/7/2019 FlexCourse - Image gallery EN - v1.0
http://slidepdf.com/reader/full/flexcourse-image-gallery-en-v10 27/36
Press < > + <F11> or <Ctrl> + <F11> for Windows users to run our application and try clicking on the thumbnails.
When clicked on a thumbnail your gallery should look like figure 18.
figure 18
You probably noticed that we first need to click on a thumbnail to make the first pictureshow up. In the next section we are going to fix this.
Add the following code after the lstThumbnails_itemClick function:
private function loadImage(imageNumber:int):void {
imgMain.source = arrImages[imageNumber].src;
lblImageTitle.text = arrImages[imageNumber].lbl;
}
This function loadImage has one parameter, imageNumber, of the type int. This is the
number of the image we want to load.
Add inside the if statement of our initSlideshow function the statement
“loadImage(0);” .
Press < > + <F11> or <Ctrl> + <F11> for Windows users to run our application.
Your first image should be loaded automatically.
For our gallery viewer it quite hard to walk through all pictures since he/she needs toclick on a thumbnail for every picture. It would be nicer if the viewer can click on theenlarged image for the next one.
FlexCourse – Image Gallery v1.0 27

8/7/2019 FlexCourse - Image gallery EN - v1.0
http://slidepdf.com/reader/full/flexcourse-image-gallery-en-v10 28/36
Insert the following code after our loadImage function:
private function imgMain_click():void {
if (lstThumbnails.selectedIndex < arrImages.length) {
lstThumbnails.selectedIndex += 1;lstThumbnails.scrollToIndex(lstThumbnails.selectedIndex);
loadImage(lstThumbnails.selectedIndex);
checkScroll();
}
}
The if statement is to check if an image before the last image is selected. If so weincrease the selected index with 1. Then we tell our list to scroll to the new selectedimage. This makes the thumbnails “follow” the currently selected image. After this weload the new image in our enlarged image. And finally we check if there are any scroll
buttons which need to hide.
Navigate to our image and add the following property: click="imgMain_click()"
Your image code should look like:
<mx:Image id="imgMain" click="imgMain_click()">
</mx:Image>
Press < > + <F11> or <Ctrl> + <F11> for Windows users to run our application
and test our new function to click on the enlarged image.
If you test very well you noticed something strange. When your first image is loaded you
need to click twice for the next image. This is because the selected index is -1 by default.We are going to solve this.
Add the lstThumbnails.selectedIndex = 0; statement to our initSlideshow
function.
Your initSlideshow function should look like:
private function initSlideshow():void { if (arrImages.length > 0) {
lblFooter.text = "© Bas van Dijk - 2008";
lblTitle.text = "Flex 3 gallery test";
loadImage(0);
lstThumbnails.selectedIndex = 0;
}
checkScroll();
}
Press < > + <F11> or <Ctrl> + <F11> for Windows users to run our application
and test if the next image appears after one click.
FlexCourse – Image Gallery v1.0 28

8/7/2019 FlexCourse - Image gallery EN - v1.0
http://slidepdf.com/reader/full/flexcourse-image-gallery-en-v10 29/36
Adding the hand cursor
We click on the thumbnails and buttons because we know it is possible. It is a lot userfriendlier when the user sees a hand cursor when he/she moves over a clickable item.
There is a property called useHandCursor. Only adding this property is not enough youshould tell the image is clickable by adding the property buttonMode as well.
Find the enlarged image definition and add the property useHandCursor="true" and
buttonMode="true".
Press < > + <F11> or <Ctrl> + <F11> for Windows users to run our application and hover over the enlarged image. It should show a hand cursor.
Add the same two tags for the Scroll next and Scroll previous button, and thethumbnail list.
Press < > + <F11> or <Ctrl> + <F11> for Windows users to run our application and hover over the items where you placed the new properties.
Adding fade effects
ActionScript has the ability to add smooth animations to objects like fading. To add a
little more smoothness to our application we are going to add the fade effect to someobjects.
Find the enlarged image definition and add the property completeEffect="Fade".
Press < > + <F11> or <Ctrl> + <F11> for Windows users to run our application and click through your images. The enlarged image fades when it appears.
We can do the same for our scroll next and scroll previous buttons.
Find the cmdScrollPrev definition and add the property hideEffect="Fade" and
showEffect="Fade".
Do the same for cmdScrollNext.
You can also add the completeEffect="Fade" property on the Image Component of
the HorizontalListItemRenderer.
Press < > + <F11> or <Ctrl> + <F11> for Windows users to run our application and scroll through the thumbnails. The scroll buttons should fade in and out when
they appear or disappear.
A Image Component cannot have a border. If we want our enlarged image to have aborder we need to place it on a canvas.
Find the imgMain image in the Gallery.mxml and add <mx:Canvas
borderStyle="solid" borderColor="#3F3F3F"> above it and </mx:Canvas>
underneath.
Your new imgMain code should look like:
FlexCourse – Image Gallery v1.0 29
8/7/2019 FlexCourse - Image gallery EN - v1.0
http://slidepdf.com/reader/full/flexcourse-image-gallery-en-v10 30/36
<mx:Canvas borderStyle="solid" borderColor="#3F3F3F">
<mx:Image id="imgMain" click="imgMain_click()"
useHandCursor="true" buttonMode="true" completeEffect="Fade">
</mx:Image>
</mx:Canvas>
We might also want to change the font of the label under the enlarged picture.
Add the properties fontFamily="Georgia" and fontSize="16" to the lblImageTitle
component.
The lblImageTitle code should look like:
<mx:Label text="Label" color="#FFFFFF" id="lblImageTitle"
fontFamily="Georgia" fontSize="16"/>
Press < > + <F11> or <Ctrl> + <F11> for Windows users to run our application and see the new changes.
You also see a small white border around the HorizontalList.
This can be solved by adding the backgroundAlpha="0" property to the
HorizontalList.
If you hover over the HorizontalList you see a light blue top and bottom border on the
thumbnail on which you hover. To change this:
Add the themeColor="#1E1E1E" property to the HorizontalList.
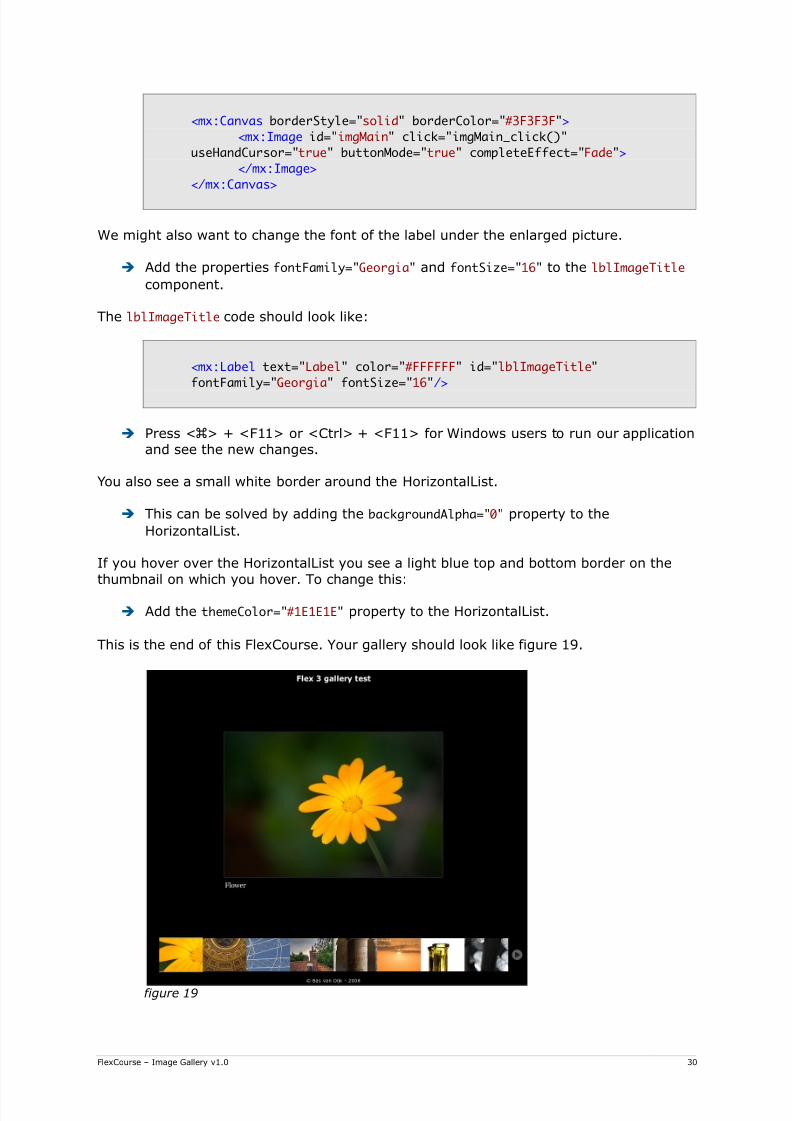
This is the end of this FlexCourse. Your gallery should look like figure 19.
figure 19
FlexCourse – Image Gallery v1.0 30

8/7/2019 FlexCourse - Image gallery EN - v1.0
http://slidepdf.com/reader/full/flexcourse-image-gallery-en-v10 31/36
Appendix 1 – The source code
Gallery.xml
<?xml version="1.0" encoding="utf-8"?>
<mx:Application
xmlns:mx="http://www.adobe.com/2006/mxml"
layout="absolute"
backgroundGradientAlphas="[1.0, 1.0]"
backgroundGradientColors="[#000000, #000000]"
creationComplete="initSlideshow()">
<mx:Grid x="0" y="0" width="100%" height="100%" horizontalGap="0" verticalGap="0">
<mx:GridRow width="100%" height="50">
<mx:GridItem width="100%" height="100%" colSpan="3" verticalAlign="middle">
<mx:Label text="Label" fontSize="17" width="100%" fontWeight="bold" color="#FFFFFF" textAlign="center"
id="lblTitle"/>
</mx:GridItem>
</mx:GridRow>
<mx:GridRow width="100%" height="100%">
<mx:GridItem width="100%" height="100%" colSpan="3">
<mx:Grid width="100%" height="100%">
<mx:GridRow width="100%" height="100%">
<mx:GridItem width="100%" height="100%" horizontalAlign="center" verticalAlign="middle">
<mx:Grid>
<mx:GridRow width="100%" height="100%">
<mx:GridItem width="100%" height="100%"><mx:Canvas borderStyle="solid" borderColor="#3F3F3F">
<mx:Image id="imgMain" click="imgMain_click()"
useHandCursor="true" buttonMode="true"
completeEffect="Fade">
</mx:Image>
</mx:Canvas>
</mx:GridItem>
</mx:GridRow>
<mx:GridRow width="100%" height="100%">

8/7/2019 FlexCourse - Image gallery EN - v1.0
http://slidepdf.com/reader/full/flexcourse-image-gallery-en-v10 32/36
<mx:GridItem width="100%" height="100%">
<mx:Label text="Label" color="#FFFFFF" id="lblImageTitle"
fontFamily="Georgia" fontSize="16"/>
</mx:GridItem>
</mx:GridRow>
</mx:Grid>
</mx:GridItem>
</mx:GridRow>
</mx:Grid>
</mx:GridItem>
</mx:GridRow>
<mx:GridRow width="100%" height="100">
<mx:GridItem width="100%" height="100%" horizontalAlign="right" verticalAlign="middle"><mx:Image id="cmdScrollPrev" source="img/prev.png" click="cmdScrollPrev_click()" useHandCursor="true"
buttonMode="true" hideEffect="Fade" showEffect="Fade" />
<mx:Spacer/>
</mx:GridItem>
<mx:GridItem width="100%" height="100%" verticalAlign="middle">
<mx:HorizontalList
height="80"
width="800"
columnWidth="100"
rowHeight="80"
dataProvider="{arrImages}"
itemRenderer="HorizontalListItemRenderer"
horizontalScrollPolicy="off"
verticalScrollPolicy="off"
borderStyle="none"
id="lstThumbnails"
itemClick="lstThumbnails_itemClick(event);"
useHandCursor="true"buttonMode="true"
backgroundAlpha="0"
themeColor="#1E1E1E"
>
</mx:HorizontalList>
</mx:GridItem>
<mx:GridItem width="100%" height="100%" verticalAlign="middle">
<mx:Spacer/>
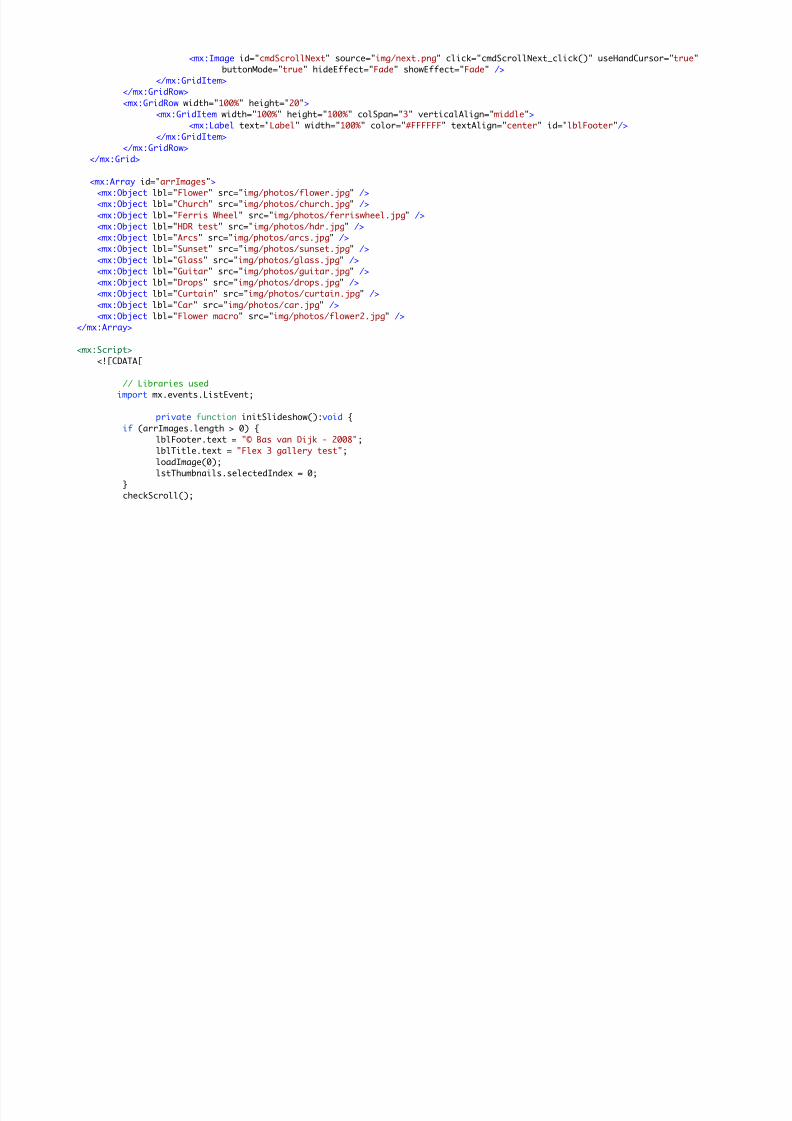
8/7/2019 FlexCourse - Image gallery EN - v1.0
http://slidepdf.com/reader/full/flexcourse-image-gallery-en-v10 33/36
<mx:Image id="cmdScrollNext" source="img/next.png" click="cmdScrollNext_click()" useHandCursor="true"
buttonMode="true" hideEffect="Fade" showEffect="Fade" />
</mx:GridItem>
</mx:GridRow>
<mx:GridRow width="100%" height="20">
<mx:GridItem width="100%" height="100%" colSpan="3" verticalAlign="middle">
<mx:Label text="Label" width="100%" color="#FFFFFF" textAlign="center" id="lblFooter"/>
</mx:GridItem>
</mx:GridRow>
</mx:Grid>
<mx:Array id="arrImages">
<mx:Object lbl="Flower" src="img/photos/flower.jpg" /> <mx:Object lbl="Church" src="img/photos/church.jpg" />
<mx:Object lbl="Ferris Wheel" src="img/photos/ferriswheel.jpg" />
<mx:Object lbl="HDR test" src="img/photos/hdr.jpg" />
<mx:Object lbl="Arcs" src="img/photos/arcs.jpg" />
<mx:Object lbl="Sunset" src="img/photos/sunset.jpg" />
<mx:Object lbl="Glass" src="img/photos/glass.jpg" />
<mx:Object lbl="Guitar" src="img/photos/guitar.jpg" />
<mx:Object lbl="Drops" src="img/photos/drops.jpg" />
<mx:Object lbl="Curtain" src="img/photos/curtain.jpg" />
<mx:Object lbl="Car" src="img/photos/car.jpg" />
<mx:Object lbl="Flower macro" src="img/photos/flower2.jpg" />
</mx:Array>
<mx:Script>
<
8/7/2019 FlexCourse - Image gallery EN - v1.0
http://slidepdf.com/reader/full/flexcourse-image-gallery-en-v10 34/36
}
private function cmdScrollNext_click():void {
var newPos:int = lstThumbnails.horizontalScrollPosition + 1;
if (newPos <= lstThumbnails.maxHorizontalScrollPosition) {
lstThumbnails.horizontalScrollPosition = newPos;
}
checkScroll();
}
private function cmdScrollPrev_click():void {
var newPos:int = lstThumbnails.horizontalScrollPosition - 1;
if (newPos >= 0) {
lstThumbnails.horizontalScrollPosition = newPos;
}
checkScroll();
}
private function checkScroll():void {
// Check if the scroll position is at the start position of the list
// if so hide the scroll previous button
if (lstThumbnails.horizontalScrollPosition == 0)
{
cmdScrollPrev.visible = false;
} else {
cmdScrollPrev.visible = true;}
// Check if the scroll position is at the max position of the list
// if so hide the scroll next button
if (lstThumbnails.horizontalScrollPosition == lstThumbnails.maxHorizontalScrollPosition) {
cmdScrollNext.visible = false;
} else {
cmdScrollNext.visible = true;

8/7/2019 FlexCourse - Image gallery EN - v1.0
http://slidepdf.com/reader/full/flexcourse-image-gallery-en-v10 35/36
}
}
private function lstThumbnails_itemClick(evt:ListEvent):void {
imgMain.source = evt.itemRenderer.data.src;
lblImageTitle.text = evt.itemRenderer.data.lbl;
}
private function loadImage(imageNumber:int):void {
imgMain.source = arrImages[imageNumber].src;
lblImageTitle.text = arrImages[imageNumber].lbl;
}
private function imgMain_click():void {
if (lstThumbnails.selectedIndex < arrImages.length) {
lstThumbnails.selectedIndex += 1;
lstThumbnails.scrollToIndex(lstThumbnails.selectedIndex);
loadImage(lstThumbnails.selectedIndex);
checkScroll();
}
}
]]>
</mx:Script>
</mx:Application>
HorizontalListItemRenderer.mxml
<?xml version="1.0" encoding="utf-8"?><mx:Canvas xmlns:mx="http://www.adobe.com/2006/mxml" horizontalScrollPolicy="off" verticalScrollPolicy="off">
<mx:Grid width="100%" height="100%" horizontalCenter="0" verticalCenter="0">
<mx:GridRow width="100%" height="100%">
<mx:GridItem width="100%" height="100%" horizontalAlign="center" verticalAlign="middle">
<mx:Image source="{data.src}" completeEffect="Fade" />
</mx:GridItem>
</mx:GridRow>
</mx:Grid>
</mx:Canvas>

8/7/2019 FlexCourse - Image gallery EN - v1.0
http://slidepdf.com/reader/full/flexcourse-image-gallery-en-v10 36/36
Links
Learn Adobe Flex in one week (video training)http://www.adobe.com/devnet/flex/videotraining/
Flex Examples Bloghttp://blog.flexexamples.com/
Flex Cookbook Betahttp://www.adobe.com/cfusion/communityengine/index.cfm?event=homepage&productId=2
Flex quickstarthttp://www.adobe.com/devnet/flex/?tab:quickstart=1
Flex showcasehttp://flex.org/showcase/
Flex 3 Getting startedhttp://learn.adobe.com/wiki/display/Flex/Getting+Started
Flex Style Explorerhttp://examples.adobe.com/flex3/consulting/styleexplorer/Flex3StyleExplorer.html
Flex Component Explorerhttp://examples.adobe.com/flex3/componentexplorer/explorer.html
Flex bloghttp://www.flexpasta.com/