Embed Size (px)
Citation preview
8/2/2019 Flash 5 User Guide
http://slidepdf.com/reader/full/flash-5-user-guide 1/16
Multimedia Module
FLASH 5 PART I
USER MANUAL
Flash5_I_User.pmd
Last modified: 04/30/02
8/2/2019 Flash 5 User Guide
http://slidepdf.com/reader/full/flash-5-user-guide 2/16
File name: Flash5_I_User.pmdLast modified: 04/30/02
Copyright Arizona Board of Regents, 2002University of Arizona
2FLASH 5 PART I: USER MANUAL
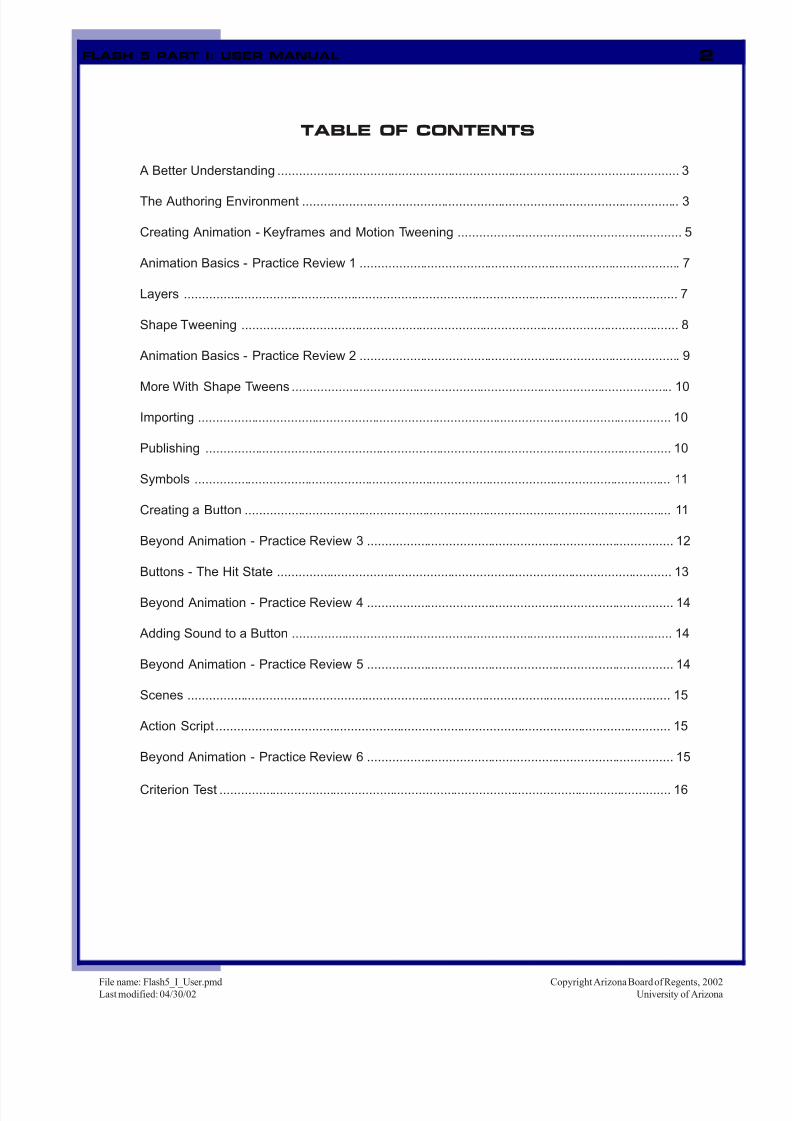
TABLE OF CONTENTS
A Better Understanding ................................................................................................................. 3
The Authoring Environment .......................................................................................................... 3
Creating Animation - Keyframes and Motion Tweening ............................................................... 5
Animation Basics - Practice Review 1 .......................................................................................... 7
Layers ........................................................................................................................................... 7
Shape Tweening ........................................................................................................................... 8
Animation Basics - Practice Review 2 .......................................................................................... 9
More With Shape Tweens ........................................................................................................... 10
Importing ..................................................................................................................................... 10
Publishing ................................................................................................................................... 10
Symbols ...................................................................................................................................... 11
Creating a Button ........................................................................................................................ 11
Beyond Animation - Practice Review 3 ...................................................................................... 12
Buttons - The Hit State ............................................................................................................... 13
Beyond Animation - Practice Review 4 ...................................................................................... 14
Adding Sound to a Button ........................................................................................................... 14
Beyond Animation - Practice Review 5 ...................................................................................... 14
Scenes ........................................................................................................................................ 15
Action Script ................................................................................................................................ 15
Beyond Animation - Practice Review 6 ...................................................................................... 15
Criterion Test ............................................................................................................................... 16

8/2/2019 Flash 5 User Guide
http://slidepdf.com/reader/full/flash-5-user-guide 3/16
File name: Flash5_I_User.pmdLast modified: 04/30/02
Copyright Arizona Board of Regents, 2002University of Arizona
3FLASH 5 PART I: USER MANUAL
Flash has been marketed lately as a Web Development tool, but it’s not easy to learn because of a
counter intuitive interface and may not be the right tool for the job. If you’re using any of these other
applications for Web Pages and you’re thinking about switching to Flash, there are some things to
consider.
♦ Flash requires a plug–in for the viewer to see your site. (These plug-ins now come withall new browsers)
♦ Accessibility is an issue. (Some progress has been made)
♦ For best results, you can always keep your pages in these other formats and simply
insert a Flash animation movie to make it more interesting.
It is important though that you understand that Flash is a Multimedia Authoring tool that can also be
used for web pages.
A BETTER UNDERSTANDING:
When you start the application, Flash opens a new movie by default. After that, you can create
more “new movies” by choosing File > New
Stage:
The stage displays what the end viewer will see, much like the canvas in PhotoShop. You
can open the Movie Properties window to modify the size, frames per second (fps) and
background color of the stage by choosing Modify > Movie.
THE AUTHORING ENVIRONMENT:
Stage

8/2/2019 Flash 5 User Guide
http://slidepdf.com/reader/full/flash-5-user-guide 4/16
File name: Flash5_I_User.pmdLast modified: 04/30/02
Copyright Arizona Board of Regents, 2002University of Arizona
4FLASH 5 PART I: USER MANUAL
Toolbar :
The toolbar contains tools for creating and changing artwork. The Line,
Rectangle and Oval tools function as you would expect from using other
graphic programs.
Steps:
1. Using the oval tool, create a circle
2. Click once using selection tool
3. Click once on shape to select the fill
4. Drag fill to the side to show that stroke has been left behind
5. To select both stroke and fill, double click, or drag the selection
tool around object
Timeline:
The left side of the timeline contains Layers used to organize movie content. Like the layers
in PhotoShop, they can be locked or hidden. The right side contains Frames and the play-
back head in the same way that you may have seen in other animation applications.
Different tools have different modifiers. Note: they are
called modifiers in all lessons, but on the toolbar they are
labeled as “Options”
8/2/2019 Flash 5 User Guide
http://slidepdf.com/reader/full/flash-5-user-guide 5/16
File name: Flash5_I_User.pmdLast modified: 04/30/02
Copyright Arizona Board of Regents, 2002University of Arizona
5FLASH 5 PART I: USER MANUAL
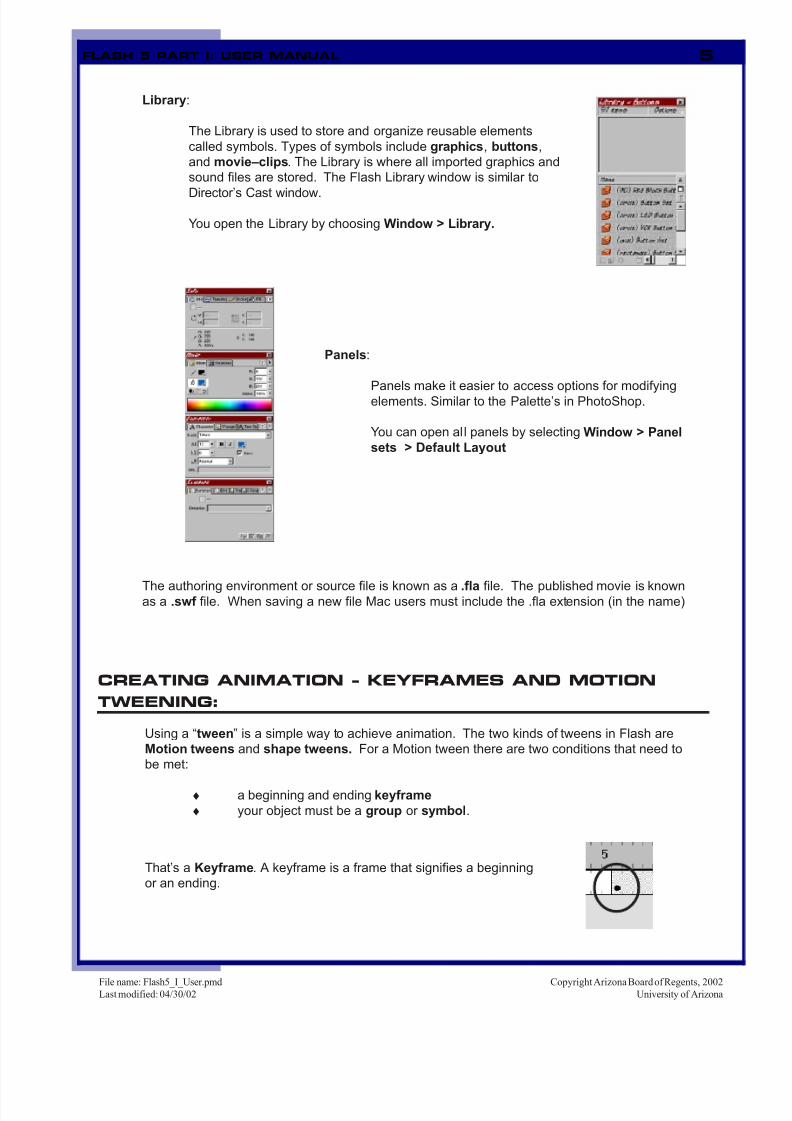
Library:
The Library is used to store and organize reusable elements
called symbols. Types of symbols include graphics, buttons,
and movie–clips. The Library is where all imported graphics and
sound files are stored. The Flash Library window is similar to
Director’s Cast window.
You open the Library by choosing Window > Library.
Panels:
Panels make it easier to access options for modifying
elements. Similar to the Palette’s in PhotoShop.
You can open all panels by selecting Window > Panel
sets > Default Layout
The authoring environment or source file is known as a .fla file. The published movie is knownas a .swf file. When saving a new file Mac users must include the .fla extension (in the name)
CREATING ANIMATION - KEYFRAMES AND MOTION
TWEENING:
Using a “tween” is a simple way to achieve animation. The two kinds of tweens in Flash are
Motion tweens and shape tweens. For a Motion tween there are two conditions that need to
be met:
♦ a beginning and ending keyframe
♦ your object must be a group or symbol.
That’s a Keyframe. A keyframe is a frame that signifies a beginning
or an ending.

8/2/2019 Flash 5 User Guide
http://slidepdf.com/reader/full/flash-5-user-guide 6/16
File name: Flash5_I_User.pmdLast modified: 04/30/02
Copyright Arizona Board of Regents, 2002University of Arizona
6FLASH 5 PART I: USER MANUAL
♦♦♦♦♦ Shapes
♦ Anything you draw with flash except text
♦ Visual cue – appearance of small white dots when selected
♦♦♦♦♦ Groups
♦ Any shape that has been grouped, or any imported graphic
♦ Visual cue – surrounded by blue bounding box when selected
♦♦♦♦♦ Symbols
♦ Any object can be converted into a symbol. All symbols are stored
in the Library.
♦ Visual cue – surrounded by a blue bounding box with a crosshair
in the center
Creating a Motion Tween:
Steps:
1. Draw a circle and make sure it is selected
2. Select Insert > Create Motion Tween.
It is now a symbol. Flash has changed the shape into a symbol. Remember,
the two conditions for a Motion Tween are: beginning and ending keyframes and
a group or a symbol.
Creating an Ending Keyframe:
Steps:
1. Select frame 20
2. Select Insert > Keyframe from top menu.
3. Click on the second keyframe
4. Move the circle with the move tool
5. Hit return to show the animation
Preview in Test Mode:
Steps:
1. Select Control > Test Movie

8/2/2019 Flash 5 User Guide
http://slidepdf.com/reader/full/flash-5-user-guide 7/16
File name: Flash5_I_User.pmdLast modified: 04/30/02
Copyright Arizona Board of Regents, 2002University of Arizona
7FLASH 5 PART I: USER MANUAL
ANIMATION BASICS - PRACTICE REVIEW 1:
Steps:
1. Open new document and save to desktop as “review.fla”
2. Draw your object
3. Create Motion Tween
♦ using Arrow tool select object
♦ choose Insert > Create Motion Tween. Hint: Flash turns your shape into a
symbol
4. Insert you second keyframe in frame 20. Hint: Your first keyframe is automati-
cally put in for you by default.
♦ click on frame 20
♦ choose Insert > Keyframe
♦ with second keyframe still selected, move object to different place on stage
Hint: you should see an arrow with a solid line in blue shaded area on timeline. If line is broken you may have completed steps in the wrong order. If you
add the second keyframe before adding the motion tween, your object will still
be a shape. Remember that motion tweens can only be done on a Group or
Symbol.
5. Alter position of object in 2nd keyframe. (Drag object to different place on stage)
6. Preview in Test Mode by selecting Control > Test Movie. Hint: Flash exports
the .fla as a .swf file and opens it in a new window.
When you create a new Flash movie, it contains one layer by default. You can add more layers
to organize the artwork. Layers do not add to your file size, and it is recommended that you put
all objects as well as sounds on separate layers. It is extremely important to label your layers!
Steps:
1. Double-click on the words “Layer 1”
2. Type the word “motion” to name this layer
3. Click on the Eye icon to hide this layer. Note:Clicking on the Eye icon hides all layers that
you have. If you had multiple layers and only
wanted to hide one of them, click on the bullet
of that layer that is in the Eye icon column.
4. Select Insert > Layer to add a new layer. You
may more quickly add a new layer by clicking
on the New Layer button.
5. Name the new layer “shape”
LAYERS:

8/2/2019 Flash 5 User Guide
http://slidepdf.com/reader/full/flash-5-user-guide 8/16
File name: Flash5_I_User.pmdLast modified: 04/30/02
Copyright Arizona Board of Regents, 2002University of Arizona
8FLASH 5 PART I: USER MANUAL
SHAPE TWEENING:
Remember that the two conditions for a motion tween are: a beginning and ending keyframe,
and a group or symbol.
The two conditions for a shape tween are: a beginning and ending keyframe, and a shape.
Steps:
1. Make object is selected.
2. Locate the Frames Panel (Window > Panels > Frame) and choose Tweening >
Shape
3. Select frame 20 in the timeline
4. Select Insert > Keyframe
Notice that the visual cue here is that the timeline turns green and there is an arrow with a
solid black line.

8/2/2019 Flash 5 User Guide
http://slidepdf.com/reader/full/flash-5-user-guide 9/16
File name: Flash5_I_User.pmdLast modified: 04/30/02
Copyright Arizona Board of Regents, 2002University of Arizona
9FLASH 5 PART I: USER MANUAL
ANIMATION BASICS - PRACTICE REVIEW 2:
Remember the conditions for a Shape tween:
♦ beginning and ending keyframes
♦ must be a shape
Hint: grouped objects have to be ungrouped and text and symbols must be broken apart
Steps:
1. Make a new layer and label it “review”.
2. Draw your object
3. Create shape tween:
♦ with shape selected, locate the Frames panel
♦ choose Tweening > Shape
Hint: if Frames panel cannot be seen choose Modify > Frame
4. Insert 2nd keyframe
♦ click in frame20
♦ choose Insert > Keyframe
5. Deselect shape by click anywhere other than the shape
6. Alter shape:
♦ click and drag at one of it’s sides
or
♦ with 2nd keyframe still selected, delete shape and replace with newshape
7. Save and test movie
8/2/2019 Flash 5 User Guide
http://slidepdf.com/reader/full/flash-5-user-guide 10/16
File name: Flash5_I_User.pmdLast modified: 04/30/02
Copyright Arizona Board of Regents, 2002University of Arizona
10FLASH 5 PART I: USER MANUAL
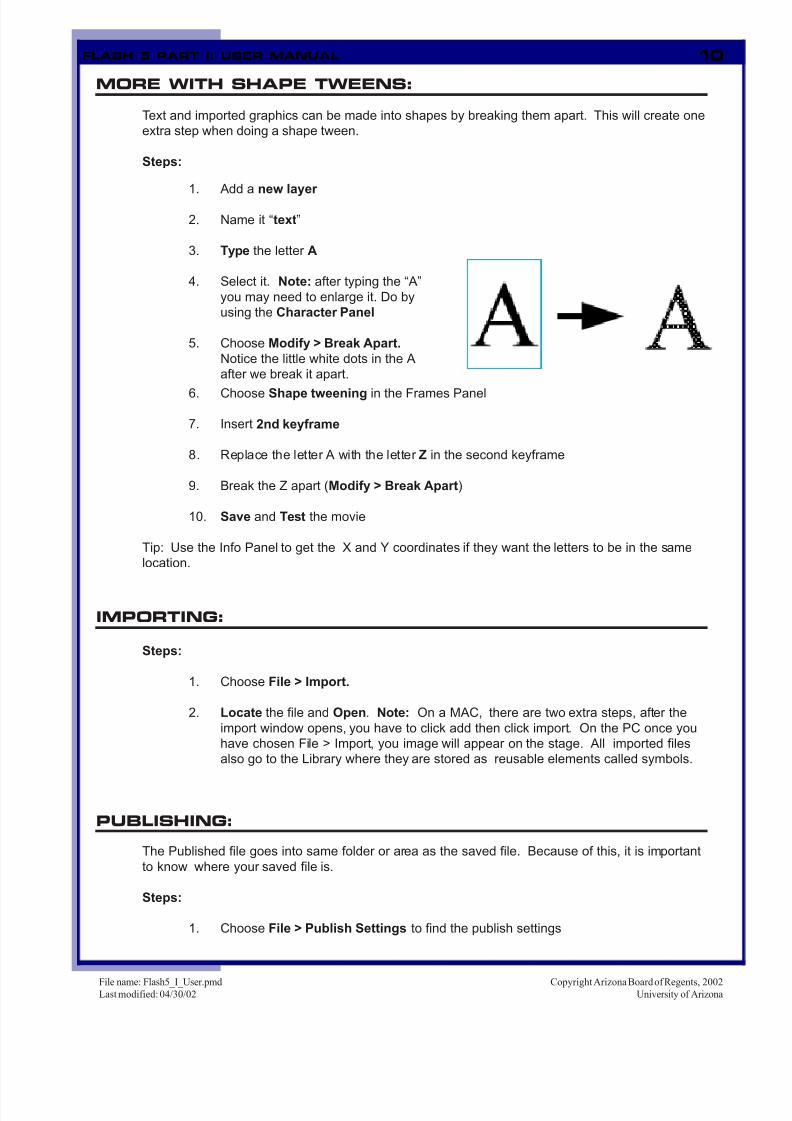
MORE WITH SHAPE TWEENS:
Text and imported graphics can be made into shapes by breaking them apart. This will create one
extra step when doing a shape tween.
Steps:
6. Choose Shape tweening in the Frames Panel
7. Insert 2nd keyframe
8. Replace the letter A with the letter Z in the second keyframe
9. Break the Z apart (Modify > Break Apart)
10. Save and Test the movie
Tip: Use the Info Panel to get the X and Y coordinates if they want the letters to be in the same
location.
1. Add a new layer
2. Name it “text”
3. Type the letter A
4. Select it. Note: after typing the “A”
you may need to enlarge it. Do by
using the Character Panel
5. Choose Modify > Break Apart.
Notice the little white dots in the A
after we break it apart.
IMPORTING:
Steps:
1. Choose File > Import.
2. Locate the file and Open. Note: On a MAC, there are two extra steps, after the
import window opens, you have to click add then click import. On the PC once you
have chosen File > Import, you image will appear on the stage. All imported files
also go to the Library where they are stored as reusable elements called symbols.
PUBLISHING:
The Published file goes into same folder or area as the saved file. Because of this, it is important
to know where your saved file is.
Steps:
1. Choose File > Publish Settings to find the publish settings

8/2/2019 Flash 5 User Guide
http://slidepdf.com/reader/full/flash-5-user-guide 11/16
File name: Flash5_I_User.pmdLast modified: 04/30/02
Copyright Arizona Board of Regents, 2002University of Arizona
11FLASH 5 PART I: USER MANUAL
SYMBOLS:
A symbol is a reusable image, animation, or button ( all stored in the Library).
The 3 kinds of symbols in Flash are:
♦ Buttons used to control interactivity, and navigation
♦ Movie Clips used for complex animations
♦ Graphics (when you import graphics, flash turns them into symbols)
Common Libraries:
Notice the difference of the screen, as we are in symbol editing mode as opposed to the
main timeline of a scene.
You can get back to the main timeline by choosing Edit > Edit Movie or you could simply
click on the Scene 1 icon as we only have one scene anyway.
CREATING A BUTTON:
When you select the button behavior for a symbol, Flash creates a Timeline with four frames.
These refer to the corresponding state of the user’s mouse.
Steps:
1. Choosing Insert > New Symbol
2. Choose Button behavior
3. Name it “Shape button” and click OK
4. Draw a button
5. Add keyframes to over and down states
8/2/2019 Flash 5 User Guide
http://slidepdf.com/reader/full/flash-5-user-guide 12/16
File name: Flash5_I_User.pmdLast modified: 04/30/02
Copyright Arizona Board of Regents, 2002University of Arizona
12FLASH 5 PART I: USER MANUAL
6. Change appearance in over and down states (color, size). To change the size of
the button choose Modify > Transform > Scale and Rotate and type in 80%.
7. Navigate back to the main timeline by choosing Edit > Edit Movie or clicking on
the Scene 1 icon
BEYOND ANIMATION - PRACTICE REVIEW 3:
Steps:
1. Create a new movie and save it as “buttons.fla” to the desktop
2. Create a button Symbol
♦ choose Insert > New Symbol
♦ choose button behavior
♦ name your button “shape button”♦ click OK
3. Draw a button
4. Add keyframes to over and down states
5. Change appearance in over and/or down state (color, size)
6. Place Instance of Button on Stage. Hint: to get back to the main timeline choose
Edit > Edit Movie
♦ select button in library
♦ drag button to Stage
6. Test button by choosing Control > Test Movie
8/2/2019 Flash 5 User Guide
http://slidepdf.com/reader/full/flash-5-user-guide 13/16
File name: Flash5_I_User.pmdLast modified: 04/30/02
Copyright Arizona Board of Regents, 2002University of Arizona
13FLASH 5 PART I: USER MANUAL
BUTTONS - THE HIT STATE:
Steps:
1. Make sure the first layer is labeled “shape”
2. Add a new layer and label it “text”
3. Type the word “Text” on the new layer
Now we will convert this text into a button:
4. Select text and choose Insert > Convert to Symbol
5. Choose button behavior
6. Name button “text button”
7. Click OK.
We must now get into symbol editing mode ourselves by:
8. Locate button in Library
9. Double click on button icon, (not name) to open into Symbol editing mode
10. Add keyframes to over and down states
11. Change appearance of button in over and down states (color, size)
12. Select Edit > Edit Movie to get back to the main timeline.
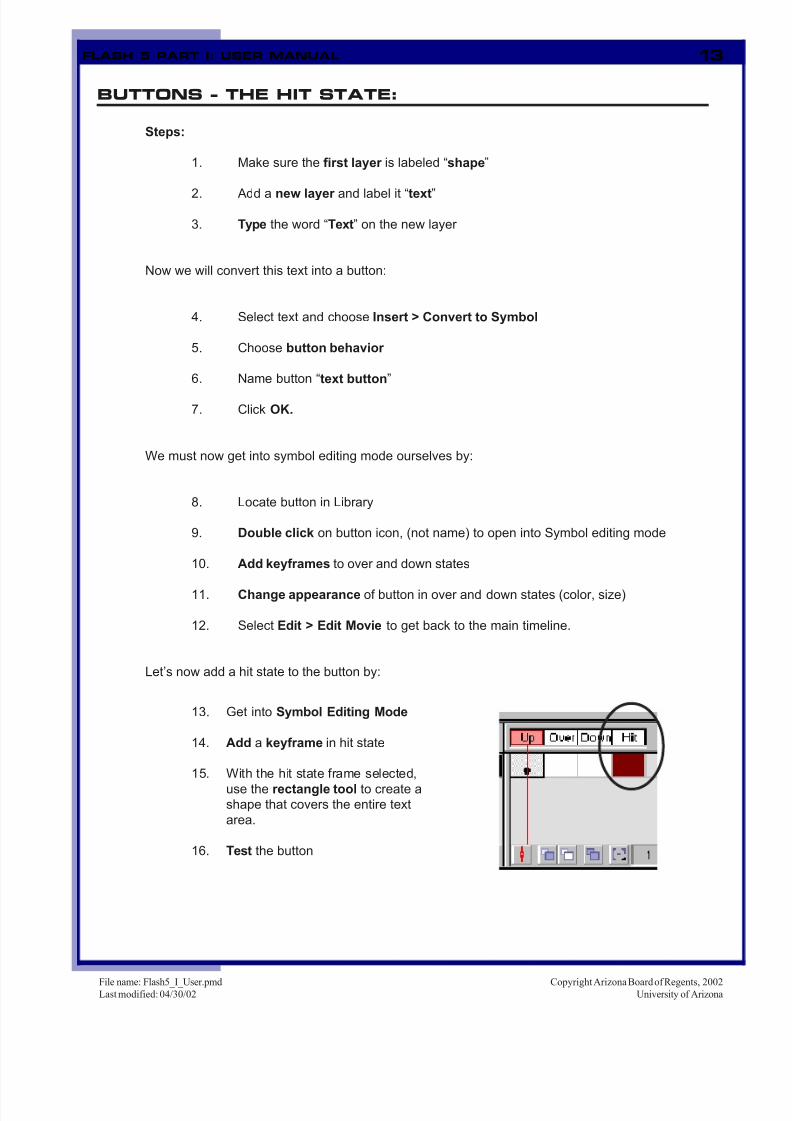
Let’s now add a hit state to the button by:
13. Get into Symbol Editing Mode
14. Add a keyframe in hit state
15. With the hit state frame selected,
use the rectangle tool to create ashape that covers the entire text
area.
16. Test the button
8/2/2019 Flash 5 User Guide
http://slidepdf.com/reader/full/flash-5-user-guide 14/16
File name: Flash5_I_User.pmdLast modified: 04/30/02
Copyright Arizona Board of Regents, 2002University of Arizona
14FLASH 5 PART I: USER MANUAL
BEYOND ANIMATION - PRACTICE REVIEW 4:
Steps:
1. Add a new layer and label it “text”
2. Type the word “Text” on the new layer
3. Convert the text to a symbol (Insert > Convert to Symbol)
4. Choose Button behavior and name the button “text button”. Click OK.
5. Double click button icon in Library to go to Symbol Editing Mode
6. Add keyframe in over, down and hit states
7. Change appearance in over and down states (color, size)
8. Use rectangle tool to create a shape that covers the entire text area. This creates
the Hit State.
10. Test the button
ADDING SOUND TO A BUTTON:
Sound can be added to the over or down state of a button. Keep in mind that sound must be in
its final form before importing it into Flash.
BEYOND ANIMATION - PRACTICE REVIEW 5:
Steps:
1. Double click instance of “shape” button on Stage (to open into Symbol Editing
Mode)
2. Select “Over ” State
3. Locate a sound file from the common Library (sound) and drag it onto the stage.
4. Test button

8/2/2019 Flash 5 User Guide
http://slidepdf.com/reader/full/flash-5-user-guide 15/16
File name: Flash5_I_User.pmdLast modified: 04/30/02
Copyright Arizona Board of Regents, 2002University of Arizona
15FLASH 5 PART I: USER MANUAL
SCENES:
Scenes are one way to organize your movie. You can add,
delete, duplicate, rename, and change the order of scenes.
You can quickly jump from scene to scene using the Edit
Scene icon above the timeline.
ACTION SCRIPT:
Flash has a scripting language called ActionScript. It’s used to add sophisticated interactivity.
Actions can be added to a frame, button or movie clip.
BEYOND ANIMATION - PRACTICE REVIEW 6:
Steps:
1. Add a new scene (Insert > Scene)
2. Place “shape” button instance on the stage in scene 2
3. In Actions Window, click and hold on the “+” sign to reveal the drop down menu
4. Choose Basic Actions > Go To
5. Choose Scene 1, Frame 1
6. In Scene 2, create a New layer and name it “stop action”
7. Select frame 1 in “stop action” layer
8. In Frame Actions window, click and hold on “+” sign
9. Choose Basic Actions > Stop
10. Navigate to Scene 1
11. Select “text button” instance on stage
12. In Object Actions window, click and hold on “+” sign
13. Choose Basic Actions > Go To
14. Choose Scene 2, Frame 1
15. Add Stop Action to Scene 1
16. Test Movie

8/2/2019 Flash 5 User Guide
http://slidepdf.com/reader/full/flash-5-user-guide 16/16
16FLASH 5 PART I: USER MANUAL
♦ Open a new document and save to the desktop as “(YourName).fla”
♦ Create a circle that moves from the left side of the stage to the right side
♦ On a second layer create a shape tween of a box that turns into a circle
♦ On a third layer create a button of out of your name, make it red and put a sound
on the over state. ( don’t forget to create the hit state)
♦ Publish for the web.
This is the criterion test for the Flash 5 Part I module. It is going to test your comprehension of the
workshop you just participated in or allow you to test out of the Flash 5 Part I module.
CRITERION TEST
20 min: