Embed Size (px)
Citation preview

PACK CONTENTS & FITTING INSTRUCTIONS
The bars you have will be specific to your vehicle, and the type of End Cap you have chosen.
Part Numbers / Description
VXB / Cross Bars (Black)
VXS / Cross Bars (Silver)
Cross Bars (VXB or VXS)
Please complete the Warranty form on the reverse side and post to:
PO BOX 4050Dandenong South
VIC 3164Australia
ABN 60 004 546 543
Cross Bars (VXB or VXS)
End Supports4x (27-0825, 27-0842, 27-0835, 27-0829/27-0830)
Cover Caps for End Supports2x 27-0831 2x 27-0832
There are two types of Vehicle Fitments.You will either have a Strap fitment or an Anchor Point fitment (not both).Please compare the part number on the packaging with the part numbers below to determine which one you have.
Part Numbers / DescriptionVFS / Vehicle Fitment StrapVFA / Vehicle Fitment Anchor Point
Vehicle Fitment Strap (VFS)
Strap Bolt4x (27-0819)
Anchor Point Platform4x (27-0823)
Straps 4x (Refer to Vehicle Compatability Guide for FRONT and REAR part numbers)
Anchor Point Locator4x (27-0824)
Strap Nuts4x (27-0839)
Please note that your Fit kit may also contain Pad Adaptors, and other parts depending on your vehicle. Please consult the Vehicle Compatability Guide.
Please note that your Fit kit may also contain Pad Adaptors, and other parts depending on your vehicle. Please consult the Vehicle Compatability Guide.
Anchor Point Locator
Anchor Point Platform
Vehicle Fitment Anchor Point (VFA)
Keys for lock system 2x (22-0601-4)
End cap for bars 4x (25-0258)
Keys for lock system 2x (22-0601-4)
End Supports4x (27-0825, 27-0842, 27-0835, 27-0827/27-0828)
Anchor Point Nuts4x (27-0839)-
Extended End Support System (VEA001)
Concealed End Support System (VCA001)
There are two types of End Supports. You will either have End Supports that accomodate Extended Cross Bars, or ones that accomodate Concealed Cross Bars. Please compare the part number on the packaging with the part numbers below to determine which type you have.
Part Numbers / DescriptionVCA / Concealed End SupportVEA / Extended End Support
End Supports
Fit Kit
Cross bars
care for your roof racks
Usage Instructions
When fitting the Roof Rack and transporting a load, ensure the vehicle’s functions are not impaired (eg. sunroof, aerials, windscreen wipers, mirrors). Rear doors on Hatch, and wagon-type vehicles should be inspected for adequate clearance for full opening operation of the boot/tailgate. Stop and check all screw connections, bolts and retaining straps after a short distance of travel. Repeat these checks at regular intervals. Immediately replace any worn or damaged components.
Warnings
Remember that the fitting of a Roof Rack and the transport of a load increases the overall height of the carrying vehicle.Where the Roof Rack is to be used in off-road conditions, a safety weight reduction of 1.5 should be observed from the total carrying capacity (eg. 60kg becomes 40kg). Cequent will not be liable to the purchaser or any other person for any concequential, direct or indirect loss, damage or costs incurred or suffered by the purchaser or any other person including but not limited to damage to persons or property, loss of turnover, loss of profits, loss of business or goodwill arising from or in relation to the assembly and use of the Roof Rack, or the non-observance of the fitting and care instructions.
•The Roof Rack and roof load must not project beyond the body of the carrying vehicle. The load must not extent beyond the sides of the Roof Bars. Long loads should be positioned centrally on the Roof Rack and securely fastened at the front and at the rear. Narrow and heavy loads should be carried as close to the end supports as possible. It is your responsibility to comply with statutory requirements regarding the projection of your load.
•Always secure the load with sufficiently strong synthetic or textile straps.
•Do not use elasticised or "Occy" straps.
•Do not use damaged or frayed straps and replace immediately before subsequent use.
IMPORTANT Please Read Thoroughly Before Use.Please ensure that Roof Racks are fitted in accordance with the Fitting Instructions.It is important that you observe all recommendations outlined below.
Safe usage •It is essential for the proper assembly, operation and use of the Roof Rack that the instructions and safety precautions supplied are strictly observed. Read any fitting, use and care instructions carefully.
•When loading, pay particular attention to weight distribution. Always ensure that the load has a low centre of gravity. Fasten the load securely against sliding and check regularly for correct positioning.
•When carrying heavy loads the addition of extra crossbars where possible have proven to be the most successful way to minimise vehicle roof deformation. However, increasing the number of crossbars does not increase the vehicle's maximum permissible roof loading.
•Check the security of your load and the tension of the bolts and fastenings of the Roof Rack before departing and at regular intervals during your journey.
•Specialised systems: where applicable, a specialised Roof Rack and accessories should be used to carry or secure your load (eg, Bike Carrier, Water Craft Carrier). The maximum permissible load for your Roof Bar is the lower of the maximum load capacity specified in your vehicle operation manual, or as specified for the roof rack. Do not exceed the maximum specified load capacity.
•Maximum permissible load = weight of the Roof Rack + weight of accessories + weight of load (cargo).
•Surfboards: surfboards should be loaded on top of each other rather than side by side.•Skis: skis should be loaded with the front tips facing towards the rear of the carrying vehicle.
•The mounted & loaded Roof Rack will affect your vehicle's handling characteristics, particularly relating to crosswind sensitivity, corners, and bends and braking behaviour. Exercise extreme care when driving and adjust for the change in vehicle handling and braking behaviour by always driving safely and at a speed appropriate to travel conditions and the load being carried.
•Wind resistance is the number one cause of Roof Rack failures. Prior to securing a load, consider the surface area of the load to determine the suitability of carrying the load on the Roof Racks. Extra caution should be taken when travelling in high winds, at high speed, or when carrying loads with large surface areas (eg tables, bed bases and mattresses, sheets of wood).
Maintenance:
•The Roof Rack should be removed regularly to clean adjoining vehicle surfaces, attaching locations and the Roof Rack itself. It is your responsibility to ensure that the Roof Rack is adequately maintained.•Remove Roof Rack before entering an automatic carwash.•To increase fuel efficiency, remove Roof Rack from carrying vehicle when not in use.•We recommend that you store the Roof Rack Security Key and Fitting Instructions in the glove compartment of your vehicle.
Rola Roof Racks 5 Year WarrantyRack System: (“Rola Roof Rack”). The Rola Roof Rack incorporates three components:
Cross Bars
End Supports
Fit Kit
Cequent warrants that, subject to the exclusions and limitations below, the Rola Roof Rack will be free from defects in materials and workmanship for a period of 5 years commencing on the date of sale by the
authorised Rola stockist to the original purchaser of the entire Rola Roof Rack, including the End Support, Fit Kit and Cross Bars.
If a defect appears in the Rola Roof Rack before the end of the warranty period and Cequent finds the Rola Roof Rack to be defective in materials or workmanship, Cequent will, in its sole discretion, either:
1. Repair the Rola Roof Rack or the defective component of the Rola Roof Rack free of charge;
2. Replace the Rola Roof Rack or the defective component of the Rola Roof Rack; or
3. Refund the purchase price of the Rola Roof Rack to the original purchaser.
Cequent reserves the right to change the design, specifications or composition of the Rola Roof Rack without notice and without liability.
Cequent reserves the right to replace defective products or components with products or components of similar quality, grade and composition, where an identical product or component is not available.
Goods presented for repair may be replaced by refurbished goods of the same type rather than being repaired. Refurbished parts may be used to repair the goods.
The 5 year warranty only applies where the entire Rola Roof Rack is purchased in one transaction and is installed and used together.
The 5 year warranty does not apply where:
1. The Rola Roof Rack is not installed in compliance with the fitting instructions provided;
2. The Rola Roof Rack is not used as intended or designed;
3. Any part of the Rola Roof Rack, such as the End Supports, Fit Kits, or Cross Bars, is used with
other products or components notintended to be used in conjunction with the modular Rola Roof Rack system;
4. The Rola Roof Rack has been on-sold or assigned by the original purchaser;
5. The Rola Roof Rack has been modified or repaired by someone other than Cequent or an authorised Rola stockist;
6. Cequent cannot establish any fault in the Rola Roof Rack after testing;
7. The Rola Roof Rack has been subject to abnormal conditions, including fire, water, humidity, pressure, stress or similar;
8. The defect in the Rola Roof Rack has arisen due to abuse, misuse, neglect or accident;
9. The defect in the Rola Roof Rack has arisen due to the unlawful or unusual operation of the vehicle to which it is fitted;
10. The defect in the Rola Roof Rack has arisen due to the purchaser’s failure to properly assemble,
install, fit, maintain or use the Rola Roof Rack in accordance with the specifications and instructions provided by Cequent.
For safety and use instructions, please refer to any General or Specific Fitting Instructions and Use & Care Instructions enclosed with the Rola Roof Rack or on our website at www.rola.com.au.
This warranty does not extend to fair wear and tear. Warranty claims can be made by contacting Cequent directly using the details below. A warranty claim must be accompanied by proof of purchase (such as
receipt) and details of the alleged defect. It is the purchaser’s responsibility to arrange and pay for any warranty claims, including the shipment of goods to Cequent for inspection. The purchaser may seek reimburse-
ment from Cequent for the costs of such activities, providing Cequent notifies the purchaser in writing that a warranty claim is justified. Any such claims must be made in writing via post or email. The benefits of
this warranty are in addition to any rights and remedies imposed by Australian State and Federal legislation that cannot be excluded. Nothing in this warranty is to be interpreted as excluding, restricting or modifying
any State or Federal legislation applicable to the supply of goods and services which cannot be so excluded, restricted or modified. Our goods come with guarantees that cannot be excluded under the Australian
Consumer Law. You are entitled to a replacement or refund for a major failure and for compensation for any other reasonably foreseeable loss or damage. You are also entitled to have the goods repaired or
replaced if the goods fail to be of acceptable quality and the failure does not amount to a major failure. Cequent makes no express warranties or representations other than set out in this warranty.
The repair or replacement of Rola Roof Racks or part there of, or a refund of the purchase price of the Rola Roof Rack, is the absolute limit of Cequent’s liability under this express warranty.
CROSS BARSVCA001VEA001Revision I
Pack Contents & Fitting Instructions
Cequent, a division of TriMas Corporation Pty Ltd49 Pacific Drive, Keysborough, VIC, 3173
Phone: 1800 812 017www.rola.com.au
For Vehicle Compatability Guide refer www.rola.com.auPlease refer to http://www.rola.com.au/fi/vca-vea.pdf for Fitting Instruction revision updates
End Support Feet4x (27-0844, 27-0845, 27-084, 27-0847)
End Support Feet4x (27-0848, 27-0849, 27-0850, 27-08451)
Anchor Point Bolt 4x
4
5
6
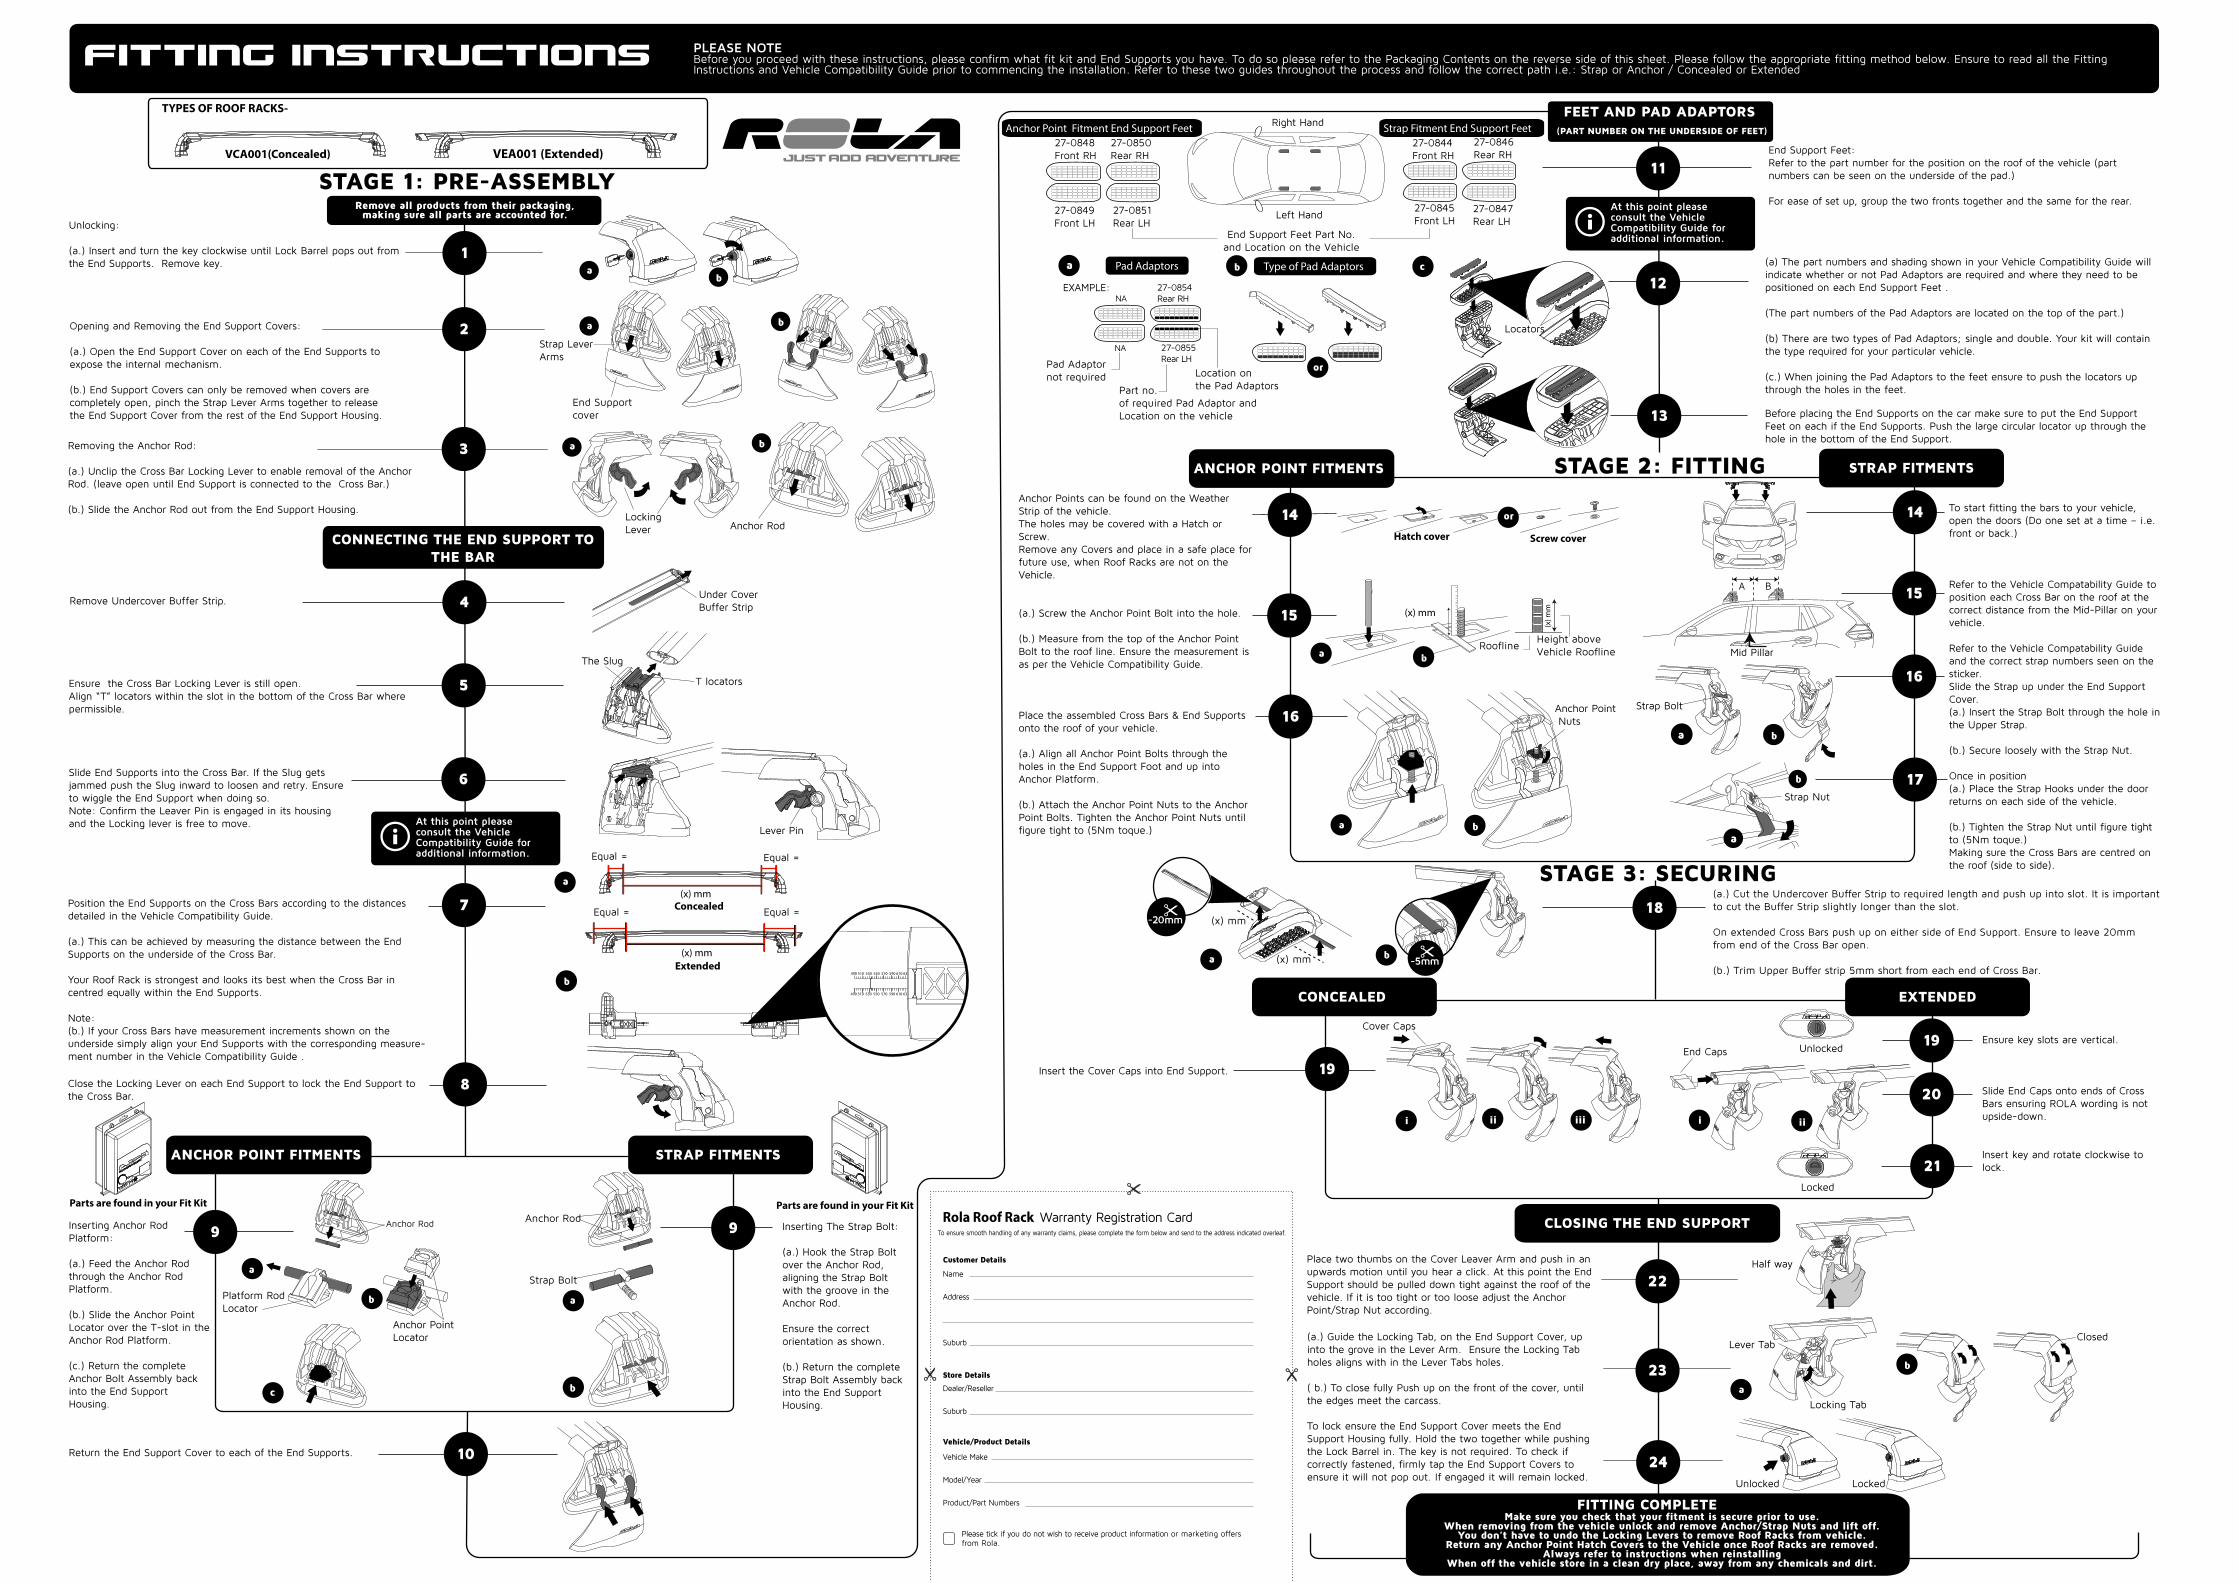
Remove Undercover Buffer Strip.
Ensure the Cross Bar Locking Lever is still open.Align “T” locators within the slot in the bottom of the Cross Bar where permissible.
STAGE 1: PRE-ASSEMBLY
STAGE 2: FITTING
STAGE 3: SECURING
PLEASE NOTEBefore you proceed with these instructions, please confirm what fit kit and End Supports you have. To do so please refer to the Packaging Contents on the reverse side of this sheet. Please follow the appropriate fitting method below. Ensure to read all the Fitting Instructions and Vehicle Compatibility Guide prior to commencing the installation. Refer to these two guides throughout the process and follow the correct path i.e.: Strap or Anchor / Concealed or Extended
Position the End Supports on the Cross Bars according to the distances detailed in the Vehicle Compatibility Guide.
(a.) This can be achieved by measuring the distance between the End Supports on the underside of the Cross Bar.
Your Roof Rack is strongest and looks its best when the Cross Bar in centred equally within the End Supports.
Note: (b.) If your Cross Bars have measurement increments shown on the underside simply align your End Supports with the corresponding measure-ment number in the Vehicle Compatibility Guide .
11
12
FITTING COMPLETEMake sure you check that your fitment is secure prior to use.
When removing from the vehicle unlock and remove Anchor/Strap Nuts and lift off. You don’t have to undo the Locking Levers to remove Roof Racks from vehicle.
Return any Anchor Point Hatch Covers to the Vehicle once Roof Racks are removed. Always refer to instructions when reinstalling
When off the vehicle store in a clean dry place, away from any chemicals and dirt.
CONNECTING THE END SUPPORT TO THE BAR
13
Remove all products from their packaging, making sure all parts are accounted for.
Unlocking:
(a.) Insert and turn the key clockwise until Lock Barrel pops out from the End Supports. Remove key.
Opening and Removing the End Support Covers: (a.) Open the End Support Cover on each of the End Supports to expose the internal mechanism.
(b.) End Support Covers can only be removed when covers are completely open, pinch the Strap Lever Arms together to release the End Support Cover from the rest of the End Support Housing.
(a) The part numbers and shading shown in your Vehicle Compatibility Guide will indicate whether or not Pad Adaptors are required and where they need to be positioned on each End Support Feet .
(The part numbers of the Pad Adaptors are located on the top of the part.)
(b) There are two types of Pad Adaptors; single and double. Your kit will contain the type required for your particular vehicle.
(c.) When joining the Pad Adaptors to the feet ensure to push the locators up through the holes in the feet.
7
Slide End Supports into the Cross Bar. If the Slug gets jammed push the Slug inward to loosen and retry. Ensure to wiggle the End Support when doing so. Note: Confirm the Leaver Pin is engaged in its housing and the Locking lever is free to move.
End Support Feet: Refer to the part number for the position on the roof of the vehicle (part numbers can be seen on the underside of the pad.)
For ease of set up, group the two fronts together and the same for the rear.
(a.) Cut the Undercover Buffer Strip to required length and push up into slot. It is important to cut the Buffer Strip slightly longer than the slot.
On extended Cross Bars push up on either side of End Support. Ensure to leave 20mm from end of the Cross Bar open.
(b.) Trim Upper Buffer strip 5mm short from each end of Cross Bar. -5mm
i ii iii
a b
a b
End Supportcover
Strap Lever Arms
9 9
a
b
c
Strap Bolt
Anchor Rod Anchor Rod
b
a
Inserting Anchor Rod Platform:
(a.) Feed the Anchor Rod through the Anchor Rod Platform.
(b.) Slide the Anchor Point Locator over the T-slot in the Anchor Rod Platform.
(c.) Return the complete Anchor Bolt Assembly back into the End Support Housing.
Inserting The Strap Bolt:
(a.) Hook the Strap Bolt over the Anchor Rod, aligning the Strap Bolt with the groove in the Anchor Rod.
Ensure the correct orientation as shown.
(b.) Return the complete Strap Bolt Assembly back into the End Support Housing.
Platform Rod Locator
STRAP FITMENTS ANCHOR POINT FITMENTS
10Return the End Support Cover to each of the End Supports.
a
a
b
(x) mm
Equal =
Equal =
Equal = Equal =
(x) mmConcealed
Extended
a
b
FEET AND PAD ADAPTORS (PART NUMBER ON THE UNDERSIDE OF FEET)
Before placing the End Supports on the car make sure to put the End Support Feet on each if the End Supports. Push the large circular locator up through the hole in the bottom of the End Support.
a b c
a b
or
a
b
Strap Bolt
or
a b
8Close the Locking Lever on each End Support to lock the End Support to the Cross Bar.
EXAMPLE:
490 510 530 550 570 590 610 63
490 510 530 550 570 590 610 63
Anchor Point Locator
3
2
1
a
b
a b
Locators
a b
i ii
fitting instructions
Parts are found in your Fit Kit
VCA001(Concealed) VEA001 (Extended)
TYPES OF ROOF RACKS-
Parts are found in your Fit Kit
22
23
24
CLOSING THE END SUPPORT
Place two thumbs on the Cover Leaver Arm and push in an upwards motion until you hear a click. At this point the End Support should be pulled down tight against the roof of the vehicle. If it is too tight or too loose adjust the Anchor Point/Strap Nut according.
(a.) Guide the Locking Tab, on the End Support Cover, up into the grove in the Lever Arm. Ensure the Locking Tab holes aligns with in the Lever Tabs holes.
( b.) To close fully Push up on the front of the cover, until the edges meet the carcass.
To lock ensure the End Support Cover meets the End Support Housing fully. Hold the two together while pushing the Lock Barrel in. The key is not required. To check if correctly fastened, firmly tap the End Support Covers to ensure it will not pop out. If engaged it will remain locked.
Unlocked
Locked
LockedUnlocked
(x)mm
(x) mm
(x) mm-20mm
Half way
Locking Tab
Lever Tab Closed
Removing the Anchor Rod: (a.) Unclip the Cross Bar Locking Lever to enable removal of the Anchor Rod. (leave open until End Support is connected to the Cross Bar.)
(b.) Slide the Anchor Rod out from the End Support Housing.
14
STRAP FITMENTS
14Anchor Points can be found on the Weather Strip of the vehicle.The holes may be covered with a Hatch or Screw.Remove any Covers and place in a safe place for future use, when Roof Racks are not on the Vehicle.
(a.) Screw the Anchor Point Bolt into the hole.
(b.) Measure from the top of the Anchor Point Bolt to the roof line. Ensure the measurement is as per the Vehicle Compatibility Guide.
Place the assembled Cross Bars & End Supports onto the roof of your vehicle.
(a.) Align all Anchor Point Bolts through the holes in the End Support Foot and up into Anchor Platform.
(b.) Attach the Anchor Point Nuts to the Anchor Point Bolts. Tighten the Anchor Point Nuts until figure tight to (5Nm toque.)
To start fitting the bars to your vehicle, open the doors (Do one set at a time – i.e. front or back.)
Refer to the Vehicle Compatability Guide to position each Cross Bar on the roof at the correct distance from the Mid-Pillar on your vehicle.
Refer to the Vehicle Compatability Guide and the correct strap numbers seen on the sticker.Slide the Strap up under the End Support Cover.(a.) Insert the Strap Bolt through the hole in the Upper Strap.
(b.) Secure loosely with the Strap Nut.
Once in position(a.) Place the Strap Hooks under the door returns on each side of the vehicle.
(b.) Tighten the Strap Nut until figure tight to (5Nm toque.) Making sure the Cross Bars are centred on the roof (side to side).
15
16
15
16
17
19
CONCEALED EXTENDED
19
Insert the Cover Caps into End Support.
Ensure key slots are vertical.
Slide End Caps onto ends of Cross Bars ensuring ROLA wording is not upside-down.
Insert key and rotate clockwise to lock.
20
21
18
Locking Lever
27-0846Rear RH
27-0844Front RH
27-0847Rear LH
27-0845Front LH
27-0855Rear LH
NA
27-0854Rear RH NA
Pad Adaptor not required
Part no. of required Pad Adaptor and Location on the vehicle
Location on the Pad Adaptors
Pad Adaptors Type of Pad Adaptors
End Support Feet Part No. and Location on the Vehicle
Screw cover Hatch cover
Anchor Point Nuts
Roofline Height above Vehicle Roofline
Cover Caps
End Caps
ANCHOR POINT FITMENTS
T locators
Anchor Rod
27-0850Rear RH
27-0848Front RH
27-0851Rear LH
27-0849Front LH
Anchor Point Fitment End Support Feet Strap Fitment End Support Feet Right Hand
Left Hand
Rola Roof Rack Warranty Registration CardTo ensure smooth handling of any warranty claims, please complete the form below and send to the address indicated overleaf.
Name
Address
Suburb
Dealer/Reseller
Suburb
Vehicle Make
Model/Year
Product/Part Numbers
Customer Details
Store Details
Vehicle/Product Details
Please tick if you do not wish to receive product information or marketing offersfrom Rola.
Under Cover Buffer Strip
(x) m
m
At this point please consult the VehicleCompatibility Guide for additional information.
The Slug
(x) mm
At this point please consult the VehicleCompatibility Guide for additional information.
Lever Pin
Mid Pillar
Strap Nut
A B